
ED65C01UHD-VE - TV EDENWOOD - Free user manual and instructions
Find the device manual for free ED65C01UHD-VE EDENWOOD in PDF.
| Product Type | LED TV 65 inches |
| Screen Size | 65 inches (165 cm) |
| Resolution | Ultra HD (3840 x 2160 pixels) |
| Dimensions with stand (W x H x D) | 1463 x 905 x 335 mm (estimated) |
| Dimensions without stand (W x H x D) | 1463 x 852 x 82 mm (estimated) |
| Weight with stand | Approximately 21 kg (estimated) |
| Weight without stand | Approximately 20.5 kg (estimated) |
| Power Supply | 220-240 V ~ 50/60 Hz |
| Power Consumption (max) | 150 W (estimated) |
| Standby Consumption | < 0.5 W |
| Main Features | DVB-T2/C/S2 tuner, HDR, Smart TV (proprietary operating system), built-in Wi-Fi, Bluetooth |
| Connectivity | 3x HDMI, 2x USB, 1x Ethernet (RJ45), optical audio output, headphone jack, antenna input, CI+ |
| Maintenance and Cleaning | Clean with a soft dry cloth, do not use abrasive products or solvents |
| Safety | Do not expose to moisture, do not block ventilation openings, use a stable support |
| Spare Parts and Repairability | Repairability index not provided, parts available through after-sales service |
| General Information | 2-year warranty (parts and labor). Customer support: 0809 10 20 20 (France) |
Frequently Asked Questions - ED65C01UHD-VE EDENWOOD
User questions about ED65C01UHD-VE EDENWOOD
0 question about this device. Answer the ones you know or ask your own.
Ask a new question about this device
Download the instructions for your TV in PDF format for free! Find your manual ED65C01UHD-VE - EDENWOOD and take your electronic device back in hand. On this page are published all the documents necessary for the use of your device. ED65C01UHD-VE by EDENWOOD.
USER MANUAL ED65C01UHD-VE EDENWOOD
natural_image
Simple diagram showing a door and a circular component, no text or symbols present| 56Hz | 60Hz | 66Hz | 70Hz | 72Hz | 75Hz | |
| 640x480 | X | X | ||||
| 800x600 | X | X | X | |||
| 1024x768 | X | X | X | |||
| 1280x768 | X | X | ||||
| 1280x960 | X | |||||
| 1360x768 | X | |||||
| 1366x768 | X | |||||
| 1280x1024 | X | X | X | |||
| 1400x1050 | X | |||||
| 1600x900 | X |
Safety Information....35
Introduction 37
Accessories Included 37
Features....37
Stand Installation & Wall Mounting 38
Antenna Connection....38
Other Connections 39
Turning On/Off the TV 40
TV Control & Operation....40
Initial Setup Wizard 42
Home Screen 43
Live TV Mode Menu Content 44
Channels 44
TV Options....44
Record 45
Settings 46
Network & Internet....46
Channel 46
Accounts & Sign In 48
Apps 48
Device Preferences....48
Remote & Accessories 51
Channel List 51
Programme Guide....51
Connecting to the Internet....52
Multi Media Player....53
From USB Connection....53
From a Mobile Device via DMR....53
USB Recording 53
Instant Recording 54
Watching Recorded Programmes 54
Timeshift Recording....54
Disk Format....54
Schedule List....54
CEC....54
Google Cast 55
HBBTV System 55
Quick Standby Search 56
Software Update 56
Troubleshooting & Tips 56
VGA Input Typical Display Modes....57
AV and HDMI Signal Compatibility....57
Supported File Formats for USB Mode....58
Video 58
Audio 58
Picture 60
Subtitle....61
Supported DVI Resolutions....61
Wireless LAN Transmitter Specifications 62
Licences 62
Disposal Information 63
Safety Information

In extreme weather (storms, lightning) and long inactivity periods (going on holiday) disconnect the TV set from the mains.
The mains plug is used to disconnect TV set from the mains and therefore it must remain readily operable. If the TV set is not disconnected electrically from the mains, the device will still draw power for all situations even if the TV is in standby mode or switched off.
Note: Follow the on screen instructions for operating the related features.
IMPORTANT - Please read these instructions fully before installing or operating
WARNING: This device is intended to be used by persons (including children) who are capable / experienced of operating such a device unsupervised, unless they have been given supervision or instruction concerning the use of the device by a person responsible for their safety.
- Use this TV set at an altitude of less than 2000 meters above the sea level, in dry locations and in regions with moderate or tropical climates.
- The TV set is intended for household and similar general use but may also be used in public places.
- For ventilation purposes, leave at least 5cm of free space around the TV.
- The ventilation should not be impeded by covering or blocking the ventilation openings with items, such as newspapers, table-cloths, curtains, etc.
- The power cord plug should be easily accessible. Do not place the TV, furniture, etc. on the power cord. A damaged power cord/plug can cause fire or give you an electric shock. Handle the power cord by the plug, do not unplug the TV by pulling the power cord. Never touch the power cord/plug with wet hands as this could cause a short circuit or electric shock. Never make a knot in the power cord or tie it with other cords. When damaged it must be replaced, this should only be done by qualified personnel.
-
Do not expose the TV to dripping or splashing of liquids and do not place objects filled with liquids, such as vases, cups, etc. on or over the TV (e.g., on shelves above the unit).
-
Do not expose the TV to direct sunlight or do not place open flames such as lit candles on the top of or near the TV.
- Do not place any heat sources such as electric heaters, radiators, etc. near the TV set.
- Do not place the TV on the floor and inclined surfaces.
- To avoid danger of suffocation, keep plastic bags out of the reach of the babies, children and domestic animals.
- Carefully attach the stand to the TV. If the stand is provided with screws, tighten the screws firmly to prevent the TV from tilting. Do not over-tighten the screws and mount the stand rubbers properly.
- Do not dispose of the batteries in fire or with hazardous or flammable materials.
WARNING
- Batteries must not be exposed to excessive heat such as sunshine, fire or the like.
- Excessive sound pressure from earphones or headphones can cause hearing loss.
ABOVE ALL - NEVER let anyone, especially children, push or hit the screen, push anything into holes, slots or any other openings in the case.
 | Caution | Serious injury or death risk |
 | Risk of electric shock | Dangerous voltage risk |
 | Maintenance | Important maintenance component |
Markings on the Product
The following symbols are used on the product as a marker for restrictions and precautions and safety instructions. Each explanation shall be considered where the product bears related marking only. Note such information for security reasons.

Class II Equipment: This appliance is designed in such a way that it does not require a safety connection to electrical earth.

Hazardous Live Terminal: The marked terminal(s) is/are hazardous live under normal operating conditions.

Caution, See Operating Instructions: The marked area(s) contain(s) user replaceable coin or button cell batteries.

Class 1 Laser Product: This product contains Class 1 laser source that is safe under reasonably foreseeable conditions of operation.
WARNING
Do not ingest the battery, Chemical Burn Hazard
This product or the accessories supplied with the product may contain a coin/button cell battery. If the coin/button cell battery is swallowed, it can cause severe internal burns in just 2 hours and can lead to death.
Keep new and used batteries away from children.
If the battery compartment does not close securely, stop using the product and keep it away from children.
If you think batteries might have been swallowed or placed inside any part of the body, seek immediate medical attention.
A television may fall, causing serious personal injury or death. Many injuries, particularly to children, can be avoided by taking simple precautions such as:
- ALWAYS use cabinets or stands or mounting methods recommended by the manufacturer of the television set.
- ALWAYS use furniture that can safely support the television set.
- ALWAYS ensure the television set is not overhanging the edge of the supporting furniture.
- ALWAYS educate children about the dangers of climbing on furniture to reach the television set or its controls.
- ALWAYS route cords and cables connected to your television so they cannot be tripped over, pulled or grabbed.
- NEVER place a television set in an unstable location.
- NEVER place the television set on tall furniture (for example, cupboards or bookcases) without anchoring both the furniture and the television set to a suitable support.
- NEVER place the television set on cloth or other materials that may be located between the television set and supporting furniture.
- NEVER place items that might tempt children to climb, such as toys and remote controls, on the top of the television or furniture on which the television is placed.
If the existing television set is going to be retained and relocated, the same considerations as above should be applied.
Apparatus connected to the protective earthing of the building installation through the MAINS connection or through other apparatus with a connection to protective earthing – and to a television distribution system using coaxial cable, may in some circumstances create a fire hazard. Connection to a television distribution system has therefore to be provided through a device providing electrical isolation below a certain frequency range (galvanic isolator)
WALL MOUNTING WARNINGS
- Read the instructions before mounting your TV on the wall.
- The wall mount kit is optional. You can obtain from your local dealer, if not supplied with your TV.
- Do not install the TV on a ceiling or on an inclined wall.
- Use the specified wall mounting screws and other accessories.
- Tighten the wall mounting screws firmly to prevent the TV from fall. Do not over-tighten the screws.
Figures and illustrations in this user manual are provided for reference only and may differ from the actual product appearance. Product design and specifications may be changed without notice.
Introduction
Thank you for choosing our product. You'll soon be enjoying your new TV. Please read these instructions carefully. They contain important information which will help you get the best from your TV and ensure safe and correct installation and operation.
Accessories Included
- Remote Control
- Batteries not included
- Instruction Book
Features
- Remote controlled colour TV
- Android™ operating system
- Google Cast (optional)
- Voice Search
- Fully integrated digital terrestrial/cable TV (DVB-T-T2/C)
- HDMI inputs to connect other devices with HDMI sockets (HDMI 2.0 support)
- USB input
- Composite inputs for external devices (such as DVD Players, PVR, video games, etc.)
- Stereo sound system
- Teletext
• Headphone connection
• Automatic programming system - Manual tuning
- Sleep timer
- On/Off timer
- Switch off timer
- Picture off function
- No signal auto power off function
- VGA input
- Ethernet (LAN) for Internet connectivity and service
• 802.11 a/b/g/n/ac built in WLAN Support
• HbbTV
Ultra HD (UHD)
TV supports Ultra HD (Ultra High Definition - also known as 4K) which provides resolution of 3840 x 2160 (4K:2K). It equals 4 times the resolution of Full HD TV by doubling the pixel count of the Full HD TV both horizontally and vertically. Ultra HD contents are supported from HDMI, USB inputs and over DVB-T2 and DVB-S2 broadcasts.
High Dynamic Range (HDR) / Hybrid Log-Gamma (HLG)
Using this feature the TV can reproduce greater dynamic range of luminosity by capturing and then combining several different exposures. HDR/HLG promises better picture quality thanks to brighter, more realistic highlights, more realistic colour and other improvements. It delivers the look that filmmakers intended to achieve, showing the hidden areas of dark shadows and sunlight with full clarity, colour and detail. HDR/HLG contents are supported via native and market applications, HDMI, USB inputs and over DVB-S broadcasts. Set the related HDMI source input as EDID 2.0 or Auto EDID from the HDMI EDID Version option in the Settings>Device Preferences>Inputs menu in order to watch HDR/HLG content, if the HDR/HLG content is received through an HDMI input. The source device should also be at least HDMI 2.0a compatible in this case.
Dolby Vision
Dolby Vision™ delivers a dramatic visual experience, astonishing brightness, exceptional contrast, and vivid colour, that brings entertainment to life. It achieves this stunning image quality by combining HDR and wide colour gamut imaging technologies. By increasing the brightness of the original signal and using a higher dynamic colour and contrast range, Dolby Vision presents amazing true-to-life images with stunning detail that other post-processing technologies in the TV aren't able to produce. Dolby Vision is supported via native and market applications, HDMI and USB inputs. Set the related HDMI source input as EDID 2.0 or Auto EDID from the HDMI EDID Version option in the Settings>Device Preferences>Inputs menu in order to watch Dolby Vision content, if the Dolby Vision content is received through an HDMI input. The source device should also be at least HDMI 2.0a compatible in this case. In the Settings>Device Preferences>Picture>Picture Mode menu two predefined picture modes will be available if Dolby Vision content is detected: Dolby Vision Bright and Dolby Vision Dark. Both allow the user to experience the content in the way the creator originally intended with different ambient lighting conditions. While watching Dolby Vision Content via an internet streaming application you will not be able to access the Picture menu and set the Picture Mode.
Stand Installation & Wall Mounting
Assembling / Removing the pedestal
Preparations
Take out the pedestal(s) and the TV from the packing case and put the TV onto a work table with the screen panel down on the clean and soft cloth (blanket, etc.)
- Use a flat and firm table bigger than the TV.
- Do not hold the screen panel part.
- Make sure not to scratch or break the TV.
Assembling the pedestal
- Place the stand(s) on the stand mounting pattern(s) on the rear side of the TV.
- Insert the screws provided and tighten them gently until the stand is properly fitted.
Removing the pedestal from the TV
Be sure to remove the pedestal in the following way when using the wall-hanging bracket or repacking the TV.
- Put the TV onto a work table with the screen panel down on the clean and soft cloth. Leave the stand(s) protruding over the edge of the surface.
- Unscrew the screws that fixing the stand(s).
- Remove the stand(s).
When using the wall mount bracket
Your TV is also prepared for a VESA-compliant wall mount bracket. If it is not supplied with your TV, contact your local dealer to purchase the recommended wall-hanging bracket.
Holes and measurements for wall mount bracket installation;
Antenna Connection
Connect the aerial or cable TV plug to the AERIAL INPUT (ANT-TV) socket located on the rear side of the TV.
Rear side of the TV


If you want to connect a device to the TV, make sure that both the TV and the device are turned off before making any connection. After the connection is done, you can turn on the units and use them.
Other Connections

If you want to connect a device to the TV, make sure that both the TV and the device are turned off before making any connection. After the connection is done, you can turn on the units and use them.
| Connector | Type | Cables (not supplied) | Device |
COMPONENT | Component Video Connection (back) |  VGA to Component Connection Cable VGA to Component Connection Cable |  |
| [87] | HDMI Connection (back&side) |  | |
 | VGA Connection (back) |  |  |
AUDIO IN | VGA/ Component Audio Connection (back) |  Component/VGA Audio Cable Component/VGA Audio Cable | |
SPDIF | SPDIF (Optical Out) Connection (back) |  |  |
COMPOSITE | Composite (Audio/Video) Connection (back) | [BY78]Audio Video Cable |  |
HEADPHONE | Headphone Connection (side) |  | |
| [0250] | USB Connection (side) |  |  |
| [84] | CI Connection (side) | [SYG7] | 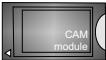 |
| [2732] | Ethernet Connection (back) |  LAN / Ethernet Cable LAN / Ethernet Cable | [329] |
To enable VGA/Component audio, you will need to use the back audio inputs with a VGA/Component audio cable for audio connection. When using the wall mounting kit (contact your dealer to purchase one, if not supplied), we recommend that you plug all your cables into the back of the TV before mounting on the wall. Insert or remove the CI module only when the TV is SWITCHED OFF. You should refer to the module instruction manual for details of the settings. The USB inputs on the TV support devices up to 500mA. Connecting devices that have current value above 500mA may damage your TV. When connecting equipment using a HDMI cable to your TV, to guarantee sufficient immunity against parasitic frequency radiation and trouble-free transmission of high definition signals, such as 4K content, you have to use a high speed shielded (high grade) HDMI cable with ferrites.
Turning On/Off the TV
Connect power
IMPORTANT: The TV set is designed to operate on 220-240V AC, 50 Hz socket.
After unpacking, allow the TV set to reach the ambient room temperature before you connect the set to the mains.
Plug the power cable to the mains socket outlet. The TV will switch on automatically.
To switch on the TV from standby
If the TV is in standby mode the standby LED lights up. To switch on the TV from standby mode either:
- Press the Standby button on the remote control.
- Press the control button on the TV.
The TV will then switch on.
To switch the TV into standby
The TV cannot be switched into standby mode via control button. Press and hold the Standby button on the remote control. Power off dialogue will appear on the screen. Highlight OK and press the OK button. The TV will switch into standby mode.
To switch off the TV
To power down the TV completely, unplug the power cord from the mains socket.
Quick Standby Mode
In order to switch the TV into quick standby mode either;
- Press the Standby button on the remote.
Press again to go back to operating mode.
- Press the control button on the TV.
Press the control button again to go back to operating mode.
TV Control & Operation
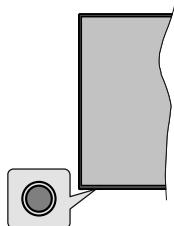
natural_image
Simple diagram showing a speaker icon next to a microphone (no text or symbols)The control button allows you to control the Quick Standby-On functions of the TV.
Note: The position of the control button may differ depending on the model.
To turn the TV off (Quick Standby): Press the control button to turn the TV into quick standby mode.
To turn the TV off (Standby): The TV cannot be switched into standby mode via control button.
To turn on the TV: Press the control button, the TV will turn on.
Note: Live TV settings menu OSD in Live TV mode cannot be displayed via the control button.
Operation with the Remote Control
Press the Menu button on your remote control to display Live TV settings menu when in Live TV mode. Press Home button to display or return to the Home Screen of the Android TV. Use the directional buttons to move the focus, proceed, adjust some settings and press OK to make selections in order to make changes, set your preferences, enter a sub-menu, launch an application etc. Press Return/Back to return to the previous menu screen.
Input Selection
Once you have connected external systems to your TV, you can switch to different input sources. Press the Source button on your remote control consecutively or use the directional buttons and then press the OK button to switch to different sources when in Live TV mode. Or enter the Inputs menu on the Home Screen, select the desired source from the list and press OK.
Changing Channels and Volume
You can adjust the volume by using the Volume +/- buttons and change the channel in Live TV mode by using the Programme +/- buttons on the remote.
Remote Control
Inserting the Batteries into the Remote
Remove the screw that secure the battery compartment cover on the back side of the remote control first. Lift the cover gently. Insert two 1.5V - size AAA batteries. Make sure the (+) and (-) signs match (observe correct polarity). Do not mix old and new batteries. Replace only with same or equivalent type. Place the cover back on. Then screw the cover back on again.
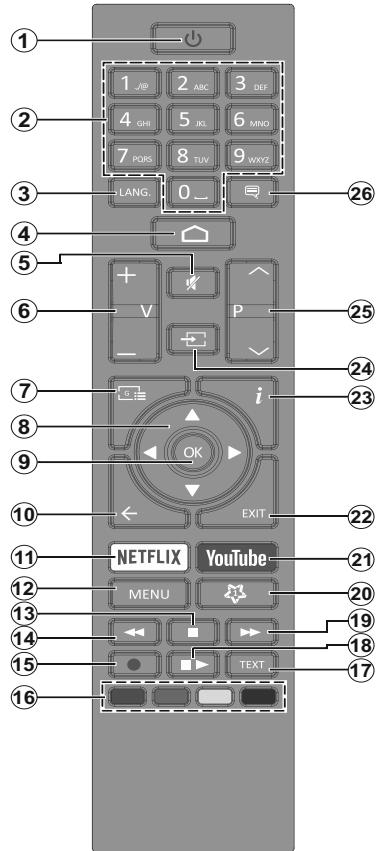
Standby Button
Press and hold the Standby button on the remote control. Power off dialogue will appear on the screen. Highlight OK and press the OK button. The TV will switch into standby mode. Press briefly and release to switch the TV into quick standby mode or to switch on the TV when in quick standby or standby mode.
- Standby: Quick Standby / Standby / On
- Numeric buttons: Switches the channel in Live TV mode, enters a number or a letter in the text box on the screen
- Language: Switches among sound modes (analogue TV), displays and changes audio language (digital TV, where available)
- Home: Opens the Home Screen
- Mute: Completely turns off the volume of the TV
- Volume +/-
- Guide: Displays the electronic programme guide in Live TV mode
- Directional buttons: Navigates menus, setting options, moves the focus or cursor etc., sets record time and displays the subpages in Live TV-Teletext mode when pressed Right or Left. Follow the on-screen instructions.
- OK: Confirms selections, enters sub-menus, views channel list (in Live TV mode)
- Back/Return: Returns to previous menu screen, goes one step back, closes open windows, closes teletext (in Live TV-Teletext mode)
- Netflix: Launches the Netflix application
- Menu: Displays Live TV Settings menu in Live TV mode, displays available setting options such as sound and picture
- Stop: Stops the media being played
- Rewind: Moves frames backwards in media such as movies
- Record: Records programmes in Live TV mode
- Coloured Buttons: Follow the on-screen instructions for coloured button functions
- Text: Opens and closes teletext (where available in Live TV mode)
- Pause: Pauses the media being played, starts timeshift recording in Live TV mode Play: Starts to play selected media
- Fast forward: Moves frames forward in media such as movies
- MyButton1: Opens the picture mode setting menu on available sources
- YouTube: Launches the YouTube application
- Exit: Closes and exits from displayed Live TV Settings menus, closes running applications and/or the Home Screen and switches to last set source
- Info: Displays information about on-screen content
- Source: Shows all available broadcast and content sources, closes the Home Screen and switches to last set source
- Programme +/-: Increases/Decreases channel number in Live TV mode
- Subtitles: Turns subtitles on and off (where available)
Standby Button
Press and hold the Standby button on the remote control. Power off dialogue will appear on the screen. Highlight OK and press the OK button. The TV will switch into standby mode. Press briefly and release to switch the TV into quick standby mode or to switch on the TV when in quick standby or standby mode.
Inserting the Batteries into the Remote
Remove the screw that secure the battery compartment cover on the back side of the remote control first. Lift the cover gently. Insert two 1.5V - size AAA batteries. Make sure the (+) and (-) signs match (observe correct polarity). Do not mix old and new batteries. Replace only with same or equivalent type. Place the cover back on. Then screw the cover back on again.
To pair remote with the TV
When TV is turned on for the first time, a search for accessories will be performed before the initial setup starts. You will need to pair your remote control with your TV at this point.
Press and hold the Source button on the remote for about 5 seconds, the LED on the remote will light up. Then release the Source button, the LED will start to blink. That means the remote is in pairing mode.
Now you will wait the TV to find your remote. Select the name of your remote and press OK when it appears on the TV screen.
When the paring process was successful, the LED on the remote will go off. If the pairing process fails the remote will enter to sleep mode after 30 seconds.
Initial Setup Wizard
Note: Follow the on-screen instructions to complete the initial setup process. Use the directional buttons and the OK button on the remote to select, set, confirm and proceed.
When turned on for the first time, a search for accessories will be performed before the initial setup starts. Follow the on-screen informations to pair your remote control and other wireless accessories with your TV. Press Exit to end adding accessories and start the setup.
1. Welcome Message and Language Selection
"Welcome" message will be displayed along with the language selection options listed on the screen. Select the desired language from the list and press OK to continue.
2. Quick Setup
If you didn't priorly connect your TV to the internet via Ethernet a screen will be displayed where you can transfer your Android phone's WLAN network and Google Account to your TV. Highlight Continue and press OK to proceed. Follow the on-screen instructions on your TV and your phone to complete the process. You can also skip this step by selecting Skip option. Some steps may be skipped depending on the settings made in this step.
If you did priorly connect your TV to the internet via Ethernet a message will be displayed stating that you are connected. You can choose to continue with wired connection or change the network. Highlight Change network and press OK if you want to use wireless connection instead of wired connection.
3. Network Connection
You will be directed to the next step automatically, if you connect your TV to internet via Ethernet at this point. If not, available wireless networks will be searched and listed on the next screen. Select your WLAN network from the list and press OK to connect. Enter the password using the virtual keyboard if the network is password protected. Select the Other network option from the list, if the network that you want to connect has hidden SSID.
If you prefer not to connect to the internet at this point you can skip this step by selecting Skip option. You can connect to internet later using the Network & Internet menu options in the Settings menu from the Home Screen or from the TV options menu in Live TV mode.
This step will be skipped if internet connection has been established in the previous step.
4. Sign in to your Google account
If connection succeeds, you can sign in to your Google account on the next screen. You need to be signed in to a Google account in order to use Google services. This step will be skipped if no internet connection has been established in the previous step or if you already signed in to your Google account in Quick Setup step.
By signing in, you will be able to discover new apps for videos, music and games on Google Play; get personalised recommendations from apps like YouTube; buy or rent the newest movies and shows on Google Play Movies & TV; access your entertainment, control your media and ask about anything with Google Assistant. Highlight Sign In and press OK to proceed. Sign-in options are as following:
- Use your phone or computer: You can use a browser on your phone or computer to sign in. Highlight this option and press OK button. A code will be displayed on the TV screen. Make sure your phone or computer is on the same network as your TV. Open the given website (androidtv.com/setup, follow on-screen instructions for the up-to-date website url) in your phone's or computer's browser and enter the code you see on your TV screen into the related entry field. Then follow the instructions on your device and complete the process.
- Use your remote: Using this option you can sign in to your Google account by entering your e-mail address or phone number and your password.
If you prefer not to sign in to your Google account at this point you can skip this step by selecting Skip option.
5. Terms of Service
Terms of Service screen will be displayed next. By continuing, you will agree to the Google Terms of Service, the Google Privacy Policy and the Google Play Terms of Service. Highlight Accept and press OK on the remote to confirm and proceed. You can also view Terms of Service, Privacy Policy and Play Terms of Service on this screen. To display the content an internet connection is needed. A message will be displayed mentioning the web site address on which these informations can also be viewed, in case internet access is not available.
6. Location
On the next screen, you can allow or disallow Google and third party apps to use your TV's location information. Select Yes to confirm and press OK. To skip this step without confirmation, select No and proceed by pressing the OK button. You can change this setting later using the Settings>Device Preferences>Location menu on the Home Screen.
7. Help improve Android
Automatically send diagnostic information to Google, like crash reports and usage data from your device and apps. This information won't be used to identify you. Select Yes to confirm and press OK. To skip this step without confirmation, select No and proceed by pressing the OK button. You can change this setting later using the Settings>Device Preferences>Usage & Diagnostics menu on the Home Screen.
Informations on Google services and some features of your TV will be displayed next. You can turn on personal results for Assistant by choosing the related option when prompted. Press OK consecutively to proceed.
8. Country
In the next step select your Country from the list and press OK to continue.
9. Password
Depending on the country selection you made in the previous step you may be asked to define a password (PIN) at this point. Press OK to proceed. The selected PIN cannot be 0000. This PIN will be required in order to access some menus, contents or to release locked channels, sources etc. You will have to enter it if you are asked to enter a PIN for any menu operation later.
10. Select TV Mode
In the following step of the initial setup, you can set the TV's operation mode either as Home or as Retail. Retail option will configure your TV's settings for store environment. This option is intended only for store use. It is recommended to select Home for home use.
11. Tuner Mode
Note: If you don't want to perform a tuner scan, select one of the available options anyway. You can skip the scan at some later stage of the installation wizard. If you skip this step you can perform a channel search later using the related Channels menu options.
The next step is the selection of the tuner mode. Select your tuner preference to install channels for Live TV function. Antenna and Cable options are available. Highlight the option that corresponds to your environment and press OK or Right directional button to proceed.
Antenna
If Antenna option is selected, the TV will search for digital terrestrial and analogue broadcasts. On the next screen highlight Scan option and press OK to start the search or select Skip Scan to continue without performing a search.
Cable
If Cable option is selected, the TV will search for digital cable and analogue broadcasts. If any, available operator options will be listed on the Select Operator screen. Otherwise this step will be skipped. You can select only one operator from the list. Highlight the desired operator and press OK or the Right directional button to proceed. On the next screen select Scan option to start a search or select Skip Scan to continue without performing a search. If Scan is selected a configuration screen will be displayed next. Scan Mode, Frequency(KHz), Modulation, Symbol Rate(Ksym/s), Network ID options may need to be set. To perform a full scan set the Scan Mode as Full/Advance if available. Depending on the selected operator and/or Scan Mode some options may not be available to be set.
Once you are done with setting available options, press the Right directional button to proceed. The TV will start to search available broadcasts.
When the initial setup is completed "Complete" message will be displayed. Press OK to finish the setup.
A disclaimer of liability will be displayed on the screen. You can use Up and Down directional buttons to scroll through and read the entire text. Highlight Accept and press OK to proceed.
Home Screen will be displayed. You can highlight Live TV app and press OK to switch to Live TV mode and watch TV channels.
Home Screen
To enjoy the benefits of your Android TV, your TV must be connected to the Internet. Connect the TV to a home network with a high-speed Internet connection. You can connect your TV wirelessly or wired to your modem/router. Refer to the Network & Internet
and Connecting to the Internet sections for further information on how to connect your TV to the internet.
The Home menu is the centre of your TV. Press the Home button to display Home Screen. From the Home menu you can start any application, switch to a TV channel, watch a movie or switch to a connected device. Depending on your TV setup and your country selection in the initial setup the Home menu may contain different items.
The available options of the Home Screen are positioned in rows. To navigate through the Home Screen options use the directional buttons on the remote. Apps, YouTube, Google Play Movies & TV, Google Play Music and Google Play related rows and rows of the applications you have installed might be available. Select a row then move the focus to the desired item in the row. Press OK button to make a selection or to enter a sub-menu.
On the upper left of the screen, search tools will be located. You can choose either to type a word to start a search via the virtual keyboard or try voice search option if your remote has a built-in microphone. Move the focus to the desired option and press OK to proceed.
On the upper right of the screen, Notifications, Inputs, Networks & Internet (will be named as Connected or Not Connected according to the current connection status) options and the current time will be displayed. You can configure your date and time preferences using the Date & time menu options from the Settings>Device Preferences menu.
First row will be the Apps row. Live TV and Multi Media Player apps will be available alongside with other apps. Highlight Live TV and press OK to switch to Live TV mode. If the source was set to an option other than TV previously, press the Source button and set as TV in order to watch live TV channels. Highlight Live TV and press OK to browse the connected USB devices or media servers and play/display the installed media content on the TV. The audio files can be played through the speakers of the TV or through the speaker systems connected to the TV. You can configure your sound output preference from the Speaker option in the Settings>Device Preferences>Sound menu.
Live TV Mode Menu Content
Switch the TV to Live TV mode first and then press the Menu button on the remote to see Live TV menu options. To switch to Live TV mode you can either press the Exit button or highlight the Live TV app from the Apps row and press OK on the Home Screen.
Channels
Add to My Favorites: Add the channel that is currently being watched to the previously selected favourite list. Program Guide: Open the electronic programme guide. Refer to the Programme Guide section for detailed information.
New Channels Available: Start a search for new channels. Select the channel source application or tuner. Then make the settings according to your environment and preferences if necessary. You can use the Channel menu options to search for broadcast channels. Refer to the Channel section for more information. When complete highlight Done and press OK.
TV Options
Source: Display the list of input sources. Select the desired one and press OK to switch to that source.
Picture Mode: Set the picture mode to suit your preference or requirements. Picture mode can be set to one of these options: User, Standard, Vivid, Sport, Movie and Game. You can use User mode to create customised settings. Go to Settings>Device Preferences>Picture for detailed setting options.
Display Mode: Set the aspect ratio of the screen. Select one of the predefined options according to your preference.
Speakers: To hear the TV audio from the connected compatible audio device set as External Audio System. Set as TV Speakers to use the speakers of your TV for sound output.
Power
Sleep Timer: Define an idle time after which you want your TV to enter sleep mode automatically.
Picture off: Select this option and press OK to turn the screen off. Press a button on the remote or on the TV to turn the screen on again. Note that you can not turn the screen on via the Volume +/-, Mute and Standby buttons. These buttons will function normally.
Switch off timer: Define a time after which you want your TV to switch off automatically. Set as Off to disable.
No Signal Auto Power Off: Set the behaviour of the TV, when no signal is detected from the currently set input source. Define a time after which you want your TV to turn itself off or set as Off to disable.
CI Card: Display available menu options of the CI card in use. This item may not be available depending on the input source setting.
Manual OAD Download: Search for firmware upgrade through the DTV signal manually. This item may not be available depending on the input source setting.
Advanced Options
Soundtracks: Set your language preference for soundtracks. This item may not be available depending on the input source setting.
Blue Mute: Turn this function on/off according to your preference. When turned on, blue background will be displayed on the screen when no signal is available.
Default Channel: Set your default startup channel preference. When the Select Mode is set as User Select, Show Channels option will become available. Highlight and press OK to see channel list. Highlight a channel and press OK to make a selection. Selected channel will be displayed, every time the TV is turned back on from quick standby mode. If the Select Mode is set as Last Status, the last watched channel will be displayed.
Interaction Channel: Turn the Interaction Channel function on or off.
MHEG PIN Protection: Turn the MHEG PIN protection function on or off. This setting enables or disables access some of the MHEG applications. Disabled applications can be released by entering the right PIN.
HBBTV Settings
HBBTV Support: Turn the HBBTV function on or off.
Do Not Track: Set your preference regarding the tracking behaviour for HBBTV services.
Cookie Settings: Set your cookie setting preference for HBBTV services.
Persistent Storage: Turn the Persistent Storage function on or off.
Block Tracking Sites: Turn the Block Tracking Sites function on or off.
Device ID: Turn the Device ID function on or off.
Reset Device ID: Reset the device ID for HBBTV services. Confirmation dialogue will be displayed. Press OK to proceed, Back to cancel.
Subtitle
Subtitle Tracks: Set your subtitle track preference, if any available.
Analog Subtitle: Set this option as Off, On or Mute. If Mute option is selected, the analogue subtitle will be displayed on the screen but the speakers will be muted simultaneously.
Digital Subtitle Language: Set one of the listed language options as first digital subtitle language preference.
2nd Digital Subtitle Language: Set one of the listed language options as second digital subtitle language preference. If the selected language in the Digital Subtitle Language option is not
available, the subtitles will be displayed in this language.
Subtitle Type: Set this option as Normal or Hearing Impaired. If Hearing Impaired option is selected, it provides subtitle services to deaf and hard of hearing viewers with additional descriptions.
Teletext
Digital Teletext Language: Set the teletext language for digital broadcasts.
Decoding Page Language: Set the decoding page language for teletext display.
OAD: Set the TV to auto detect the latest firmware through the DTV signal. Set the Auto Download option as Yes to enable the automatic firmware upgrade function.
Auto Sleep: Define an idle time after which you want your TV to enter sleep mode automatically. 4 Hours, 6 Hours and 8 Hours options are available. Set as Never to disable.
System Information: Display detailed system information on the current channel such as Signal Level, Signal Quality, Frequency etc.
Version Info: Display system information such as Model Name, Version and Serial Number.
Settings: Refer to Settings section for detailed information.
Record
Record List: The recordings will be displayed if any available. Highlight a recording of your choice and press the Yellow button to delete it or press the Blue button to view detailed information. You can use Red and Green buttons to scroll the page up and down.
Device Info: Connected USB storage devices will be displayed. Highlight the device of your choice and press OK to see available options.
Set TimeShift: Tag the selected USB storage device or a partition on it for time shift recording.
Set PVR: Tag the selected USB storage device or a partition on it for PVR.
Format: Format the selected USB storage device. Refer to USB Recording section for more information
Speed Test: Start a speed test for the selected USB storage device. The test result will be displayed when completed.
Schedule List: Add reminders or record timers using the Schedule List menu.
Time Shift Mode: Enable or disable timeshift recording feature. Refer to USB Recording section for more information.
Settings
You can access the Settings menu from the Home Screen or from the TV options menu in Live TV mode.
Network & Internet
You can configure your TV's network settings using the options of this menu. You can also highlight the Connected/Not Connected icon on the Home screen and press OK to access this menu.
Wi-Fi: Turn the wireless LAN (WLAN) function on and off.
Available networks
When the WLAN function is turned on, available wireless networks will be listed. Highlight See all and press OK to see all networks. Select one and press OK to connect. You may be asked to enter a password to connect to the selected network, in case the network is password protected. Additionally you can add new networks by using the related options.
Other options
Add new network: Add networks with hidden SSID's.
Scanning always available: You can let the location service and other apps scan for networks, even when WLAN function is turned off. Press OK to turn it on and off.
Wow: Turn the Wake-On-LAN function on and off. This function allows you to turn on or awaken your TV via network.
Wol: Turn the Wake On WLAN function on and off. This function allows you to turn on or awaken your TV via wireless network.
Ethernet
Connected/Not connected: Displays the status of the internet connection via Ethernet, IP and MAC addresses.
Proxy settings: Set a HTTP proxy for browser manually. This proxy may not be used by other apps.
IP settings: Configure your TV's IP settings.
Channel
Channels
Options of this menu may change or become inactive depending on the Channel Installation Mode selection.
Channel Installation Mode - Antenna
Channel Scan: Start a scan for analogue and digital channels. You can press the Back button to cancel the scan. The channels that have already been found will be stored in the channel list.
Update Scan: Search for updates. Previously added channels will not be deleted, but any newly found channels will be stored in the channel list.
Analog Manual Scan: Start a manual scan for analogue channels. Enter the Start Frequency and then select Scan Up or Scan Down. When a channel is found the scan will be completed and the found channel will be stored in the channel list.
Single RF Scan: Select the RF Channel by using the Right/Left directional buttons. Signal Level and Signal Quality of the selected channel will be shown. Press OK to start scan on the selected RF channel. The found channels will be stored in the channel list.
Manual Service Update: Start a service update manually.
LCN: Set your preference for LCN. LCN is the Logical Channel Number system that organizes available broadcasts in accordance with a recognizable channel number sequence (if available).
Channel Scan Type: Set your scan type preference.
Channel Store Type: Set your store type preference.
Favorite Network Select: Select your favourite network. This menu option will be active, if more than only one network is available.
Channel Skip: Set channels to be skipped when switching the channels via Programme +/- buttons on the remote. Highlight the desired channel/s on the list and press OK to select/unselect.
Channel Sort: Replace the positions of the two selected channels in the channel list. Highlight the desired channels on the list and press OK to select. When the second channel is selected, the position of this channel will be replaced with the position of the first selected channel.
Channel Move: Move a channel to the position of another channel. Highlight the channel you want to move and press OK to select. Then do the same for a second channel. When the second channel is selected, the first selected channel will be moved to the position of that channel.
Channel Edit: Edit channels in the channel list. Edit the name and channel number of the selected channel and display Network Name, Frequency, Color System and Sound System informations related to that channel if available. Depending on the channel other options may also be editable. You can press the Blue button to delete the highlighted channel.
Analog Channel Fine-tune: Fine-tune an analogue channel. A list of available analogue channels will be displayed. Select the desired one from the list and press OK button. Then change the frequency of the channel by pressing Left/Right directional buttons. Press OK to store the new frequency for that channel. Press Back to cancel. This item may not be visible,
depending on whether or not the last watched channel was analogue.
Clear Channel List: Delete all channels stored in the channel list of the selected channel installation mode. A dialogue will be displayed for confirmation. Highlight OK and press OK button to proceed. Highlight Cancel and press OK to cancel.
Channel Installation Mode - Cable
Channel Scan: Start a scan for analogue and digital cable channels. If available, operator options will be listed. Select the desired one and press OK. Scan Mode, Channel Scan Type, Frequency and Network ID options may be available. The options may vary depending on the operator and the Scan Mode selections. Set the Scan Mode as Full if you don't know how to set up other options. Highlight Scan and press OK to start the scan. You can press the Back button to cancel the scan. The channels that have already been found will be stored in the channel list.
Single RF Scan: Enter the Frequency value. Signal Level and Signal Quality of the selected Frequency will be shown. Highlight the Scan option and press OK to start scan. The found channels will be stored in the channel list.
LCN: Set your preference for LCN. LCN is the Logical Channel Number system that organizes available broadcasts in accordance with a recognizable channel number sequence (if available).
Channel Scan Type: Set your scan type preference.
Channel Store Type: Set your store type preference.
Favorite Network Select: Select your favourite network. This menu option will be active, if more than only one network is available.
Channel Skip: Set channels to be skipped when switching the channels via Programme +/- buttons on the remote. Highlight the desired channel/s on the list and press OK to select/unselect.
Channel Sort: Replace the positions of the two selected channels in the channel list. Highlight the desired channels on the list and press OK to select. When the second channel is selected, the position of this channel will be replaced with the position of the first selected channel.
Channel Move: Move a channel to the position of another channel. Highlight the channel you want to move and press OK to select. Then do the same for a second channel. When the second channel is selected, the first selected channel will be moved to the position of that channel.
Channel Edit: Edit channels in the channel list. Edit the name and channel number of the selected channel and display Network Name, Frequency, Color System, Sound System, Modulation and Symbol Rate informations related to that channel. Depending on the channel other options may also be editable. You can press the Blue button to delete the highlighted channel.
Analog Channel Fine-tune: Fine-tune an analogue channel. A list of available analogue channels will be displayed. Select the desired one from the list and press OK button. Then change the frequency of the channel by pressing Left/Right directional buttons. Press OK to store the new frequency for that channel. Press Back to cancel. This item may not be visible, depending on whether or not the last watched channel was analogue.
Clear Channel List: Delete all channels stored in the channel list of the selected channel installation mode. A dialogue will be displayed for confirmation. Highlight OK and press OK button to proceed. Highlight Cancel and press OK to cancel.
Note: Some options may not be available and appear as grayed out depending on the operator selection and operator related settings.
Channel Installation Mode
Set this option as Antenna or Cable.
Auto Channel Update
Turn the auto channel update function on or off.
Channel Update Message
Turn the channel update message function on or off. This item may not be visible, depending on the Channel Installation Mode selection.
Parental Controls
(*) To enter this menu PIN should be entered first. Default password is set to 1234. If you have defined a new password after the initial setup process use the password that you have defined. Some options may not be available or vary depending on the country selection during the initial setup.
Channels Blocked: Select channel/s to be blocked from the channel list. Highlight a channel and press OK to select/unselect. To watch a blocked channel password should be entered first.
Program Restrictions: Block programmes according to the age rating informations that are being broadcasted with them. You can turn on or off restrictions, set ratings systems, restriction levels and age limits using the options of this menu.
Inputs Blocked: Prevent access to the selected input source content. Highlight the desired input option and press OK to select/unselect. To switch to a blocked input source password should be entered first.
Change PIN: Change the default PIN. Highlight this option and press OK. You will need to enter the old PIN first. Then new password entry screen will be displayed. Enter the new password twice for confirmation.
Audio Channel
Set the audio channel preference, if available. This item may not be visible, depending on whether or not the last watched channel was analogue.
Audio Language
Set one of the listed language options as first audio language preference. This item may not be visible, depending on whether or not the last watched channel was digital.
2nd Audio Language
Set one of the listed language options as second audio language preference. If in the Audio Language setting selected language option is not supported, this language preference will be considered. This item may not be visible, depending on whether or not the last watched channel was digital.
Open Source Licenses
Display Open Source Software license information.
Version
Displays system version number.
Accounts & Sign In
Google: This option will be available if you have signed in to your Google account. You can configure your data syncing preferences or remove your registered account on the TV. Highlight a service listed in the Choose synced apps section and press OK to enable/disable data sync. Highlight Sync now and press OK to sync all enabled services at once.
Add account: Add a new one to available accounts by signing in to it.
Apps
Using the options of this menu, you can manage the apps on your TV.
Recently opened apps
You can display recently opened apps. Highlight See all apps and press OK to see all the apps installed on your TV. The amount of storage space that they needed will also be displayed. You can see the version of the app, open or force to stop the running of the app, uninstall a downloaded app, see the permissions and turn them on/off, turn on/off the notifications, clear the data and cache etc. Highlight an app and press OK to see available options.
Permissions
Manage the permissions and some other features of the apps.
App permissions: The apps will be sorted by permission type categories. You can enable disable permissions for the apps from within these categories.
Special app access: Configure some app features and special permissions.
Security & restrictions: Using the options of this menu;
- You can allow or restrict installation of apps from sources other than the Google Play Store.
- Set the TV to disallow or warn before installation of apps that may cause harm.
Device Preferences
About: Check for system updates, change the device name, restart the TV and display system informations such as network addresses, serial numbers, versions etc. You can also display legal information, manage advertisings, display your advertising ID, reset it and turn on/off the personalised advertisings based on your interests.
Netflix ESN: Display your ESN number. ESN number is an unique ID number for Netflix, created especially to identify your TV.
Date & time: Set the date and time options of your TV. You can set your TV to automatically update the time and date data over the network or over the broadcasts. Set corresponding to your environment and preference. Disable by setting as Off if you want to manually change the date or time. Then set date, time, time zone and hour format options.
Timer
Power On Time Type: Set your TV to turn on by itself. Set this option as On or Once to enable a power on timer to be set, set as Off to disable. If set as Once the TV will turn on only once at the defined time in Auto Power On Time option below.
Auto Power On Time: Available if the Power On Time Type is enabled. Set the desired time for your TV to come on from standby using the directional buttons and press OK to save the new set time.
Power Off Time Type: Set your TV to turn off by itself. Set this option as On or Once to enable a power off timer to be set, set as Off to disable. If set as Once the TV will turn off only once at the defined time in Auto Power Off Time option below.
Auto Power Off Time: Available if the Power Off Time Type is enabled. Set the desired time for your TV to go to standby using the directional buttons and press OK to save the new set time.
Language: Set your language preference.
Keyboard: Select your keyboard type and manage keyboard settings.
Inputs: Show or hide an input terminal, change the label for an input terminal, and configure the options for HDMI CEC(Consumer Electronic Control) function.
Power
Sleep Timer: Define an idle time after which you want your TV to enter sleep mode automatically.
Picture off: Select this option and press OK to turn the screen off. Press a button on the remote or on the TV to turn the screen on again. Note that you can not turn the screen on via the Volume +/-, Mute and Standby buttons. These buttons will function normally.
Switch off timer: Define a time after which you want your TV to switch off automatically. Set as Off to disable.
No Signal Auto Power Off: Set the behaviour of the TV, when no signal is detected from the currently set input source. Define a time after which you want your TV to turn itself off or set as Off to disable.
Picture
Picture Mode: Set the picture mode to suit your preference or requirements. Picture mode can be set to one of these options: User, Standard, Vivid, Sport, Movie and Game. You can use User mode to create customised settings.
Dolby Vision Modes: If Dolby Vision content is detected Dolby Vision Dark and Dolby Vision Bright picture mode options will be available instead of other picture modes.
Brightness, Contrast, Saturation, HUE, Sharpness settings will be adjusted according to the selected picture mode. If one of these settings is changed manually, Picture Mode option will be changed to User, if not already set as User.
Dolby Vision Notification: Set your notification appearance preference for Dolby Vision content. When turned on, Dolby Vision logo will be displayed on the lower right side of the screen when Dolby Vision content is detected.
Auto Backlight: Set your auto backlight preference. Off, Low, Middle and Eco options will be available. Set as Off to disable.
Backlight: Adjust the backlight level off the screen manually. This item will not be available if the Auto Backlight is not set as Off.
Brightness: Adjust the brightness value off the screen.
Contrast: Adjust the contrast value off the screen.
Saturation: Adjust the saturation value off the screen.
HUE: Adjust the hue value off the screen.
Sharpness: Adjust the sharpness value for the objects displayed on the screen.
Gamma: Set your gamma preference. Dark, Middle and Bright options will be available.
Color Temperature: Set your colour temperature preference. User, Cool, Standard and Warm options will be available. Set as User to adjust red, green and blue gain values manually. If one of these values is changed manually, Color Temperature option will be changed to User, if not already set as User.
Picture Format: Set the aspect ratio of the screen. Select one of the predefined options according to your preference.
HDR: Turn the HDR function on or off.
Advanced Video
DNR: Set your DNR preference as Low, Medium, Strong, Auto or turn it off by setting as Off.
MPEG NR: Set your MPEG NR preference as Low, Medium, Strong or turn it off by setting as Off.
Adaptive Luma Control: Set your Adaptive Luma Control preference as Low, Medium, Strong or turn it off by setting as Off.
Local Contrast Control: Set your Local Contrast Control preference as Low, Medium, High or turn it off by setting as Off.
DI Film Mode: Set your DI Film Mode preference as Auto or turn it off by setting as Off. This item will not be available if Game Mode or PC Mode is turned on.
Blue Stretch: Turn the Blue Stretch function on or off.
Game Mode: Turn the Game Mode function on or off.
PC Mode: Turn the PC Mode function on or off.
HDMI RGB Range: Set your HDMI RGB range preference. Auto, Full and Limit options will be available. This item will not be available, if the input source is not set as HDMI.
Color Tuner: Set the HUE, Saturation, Brightness, Offset and Gain values manually. Highlight Enable and press OK to turn this function on.
11 Point White Balance Correction: Adjust the strength of the Red, Green, Blue colours and Gain value manually. Highlight Enable and press OK to turn this function on.
Reset to Default: Reset the video settings to factory default settings.
Note: Depending on the currently set input source some menu options may not be available.
Sound
Sound Style: For easy sound adjustment, you can select a preset setting. User, Standard,
Vivid, Sports, Movie, Music or News options will be available. Sound settings will be adjusted according to the selected sound style. Some other sound options may become unavailable depending on the selection.
Balance: Adjust the left and right volume balance for speakers and headphones.
Sound Surround: With Sound Surround, you can enrich (expand and deepen) the sound quality of the TV speakers. Turn this option on/off by pressing OK.
Equalizer Detail: Adjust the equalizer values according to your preferences.
Speakers: To hear the TV audio from the connected compatible audio device set as External Audio System. Set as TV Speakers to use the speakers of your TV for sound output.
Digital Output: Set the digital sound output preference. Auto, Bypass, PCM, Dolby Digital Plus and Dolby Digital options will be available. Highlight the option you prefer and press OK to set.
SPDIF Delay: Adjust the SPDIF delay value.
Auto Volume Control: With Auto Volume Control, you can set the TV to automatically level out sudden volume differences. Typically at the beginning of adverts or when you are switching channels. Turn this option on/off by pressing OK.
Downmix Mode: Press OK to see the options and set. Stereo and Surround options will be available. Highlight the option you prefer and press OK to set.
Dolby Audio Processing: With Dolby Audio Processing, you can improve the sound quality of your TV. Press OK to see the options and set.
Dolby Audio Processing: Highlight this option and press OK to turn this function on/off.
Sound Mode: If the Dolby Audio Processing option is turned on Sound Mode option will be available to set. Highlight the Sound Mode option and press OK to see the preset sound modes.
Smart, Movie, Music and News options will be available. Highlight the option you prefer and press OK to set.
Reset to Default: Resets the sound settings to factory defaults.
Storage: View the total storage space status of the TV and connected devices if available or reset the TV to factory settings. To see detailed information on the usage details highlight and press OK. There will also be options for ejecting and formatting the connected storage devices.
Home screen: Customise your home screen. Select channels which will be displayed on the home screen. Organize apps and games, change their order or get more of them.
Retail mode: Highlight Retail mode and press OK. Read the description, highlight Continue and press OK if you want to proceed. Then highlight On to activate or Off to deactivate and press OK. In retail mode your TV's settings will be configured for store environment and the supported features will be displayed on the screen. Once activated, Retail messaging and PQ Demo settings will become available. Set according to your preferences. It is recommended not to activate retail mode for home use.
Google: Select your active account, view permissions, select which apps to include in search results, activate safe search filter, active offensive word blocking and view open source licenses.
Chromecast built-in: View the open source licenses and version number. By means of built-in chromecast feature, you can cast the content from your mobile device straight to your TV. Refer to the Google Cast section for further information.
Screen saver: Set screensaver and sleep mode options for your TV. You can choose a screensaver, set wait time for the screensaver, set when the TV goes into sleep mode or start the screensaver mode.
Location: You can allow the use of the wireless connection to estimate the location, see the recent location requests and allow or restrict the listed apps to use your location information.
Usage & Diagnostics: Automatically send usage data and diagnostic information to Google. Set according to your preference.
Accessibility: Configure Visually Impaired, AC4 Dialogue Enhancement, Captions, Text to speech, Accessibility shortcut settings and/or turn Audio Description, Hearing Impaired, High contrast text on/off. Some of the caption settings may not be applied.
Visually Impaired: Digital TV channels can broadcast special audio commentary describing on-screen action, body language, expressions and movements for people with visual disabilities.
Speaker: Turn this option on if you want to hear the audio commentary through the TV speakers.
Headphone: Turn this option on if you want to route the sound of the audio commentary to the TV's headphone output.
Volume: Adjust the volume level of the audio commentary.
Pan and Fade: Turn this option on if you want to hear the audio commentary more clearly, when it is available through broadcast.
Audio for the Visually Impaired: Set the audio type for visually impaired. Options will be available depending on the selected broadcast.
Fader Control: Adjust the volume balance between the main TV audio (Main) and audio commentary (AD).
Reset: Reset all TV settings to the factory default. Highlight Reset and press OK. A confirmation message will be displayed, select Erase everything to proceed with resetting. The TV will switch off/on first and the initial setup will start. Select Cancel to exit.
Remote & Accessories
You can use wireless accessories, such as your remote control, headphones, keyboards or game controllers with your Android TV. Add devices to use them with your TV. Select this option and press OK to start searching available devices in order to pair them with your TV. If available highlight Add accessory option and press OK to start the search. Set your device to pairing mode. Available devices will be recognized and listed or pairing request will be displayed. Select your device from the list and press OK or highlight OK and press OK to start pairing.
Connected devices will also be listed here. To unpair a device, highlight it and press OK. Then highlight Unpair option and press OK. Then select OK and press OK again to unpair the device from the TV. You can also change the name of an connected device. Highlight the device and press OK, then highlight Change name and press OK again. Press OK again use the virtual keyboard to change the name of the device.
Channel List
The TV sorts all stored channels in the Channel List. Press the OK button to open the Channel List in Live TV mode. You can press the Red button to scroll up the list page by page, or press the Green button to scroll down.
If desired, you can filter or sort the channels or find a channel in the channel list. Press the Yellow button to display the Select More options. Available options are Select Type, Sort and Find.
To filter the channels highlight Select Type and press the OK button. You can select among Digital, Radio, Free, Encrypted, Analogue and Network options to filter the channel list or select Broadcast option to see all installed channels in the channel list.
To sort the channels highlight Sort and press the OK button. Select one of the available options and press OK again. The channels will be sorted according to your selection.
To find a channel highlight Find and press the OK button. Virtual keyboard will be displayed. Enter all or a portion of the name or number of the channel you want to find, highlight the check mark symbol on the keyboard and press OK. Matching results will be listed. Note: If any option except Broadcast is selected in the Select Type menu, you can only scroll through the channels that are currently listed in the channel list using the Program +/- buttons on the remote.
Editing the Channels and the Channel List
You can edit the channels and the channel list using the Channel Skip, Channel Sort, Channel Move and Channel Edit options under the Settings>Channel>Channels menu. You can access the Settings menu from the Home Screen or from the TV options menu in Live TV mode.
Note: The options Channel Sort, Channel Move and Channel Edit may not be available and appear as grayed out depending on the operator selection and operator related settings.
Managing Favourite Channel Lists
You can create four different lists of your favourite channels. These lists include only the channels that are specified by you. Press the OK button to display the channel list. Then press Blue button to access favourite lists. If one of the lists is being displayed on the screen you can press the Yellow button to open the Favorite List Selection menu in order to switch from one list to another. Select the desired list and press the OK button. Highlight a channel in the list and press the OK button to watch.
To add the currently watched channel to one of your favourite lists select the desired favourite list as described above and press the Menu button on the remote. Then enter the Channels menu, highlight Add to My Favorites option and press OK. The channel will be added to the selected favourite list. To remove that channel from the list open the favourite list, highlight the channel and press Blue button. In this way only the currently watched channel can be added or removed.
Programme Guide
By means of Electronic Programme Guide (EPG) function of your TV you can browse the event schedule of the currently installed channels on your channel list. It depends on the related broadcast whether this feature is supported or not.
Electronic Programme Guide is available in Live TV mode. You can switch to Live TV mode by either launching the Live TV application on the Home Screen or selecting Channels input source from the Inputs menu on the Home Screen. To access the programme guide while in Live TV mode, press the EPG button on your remote. Use the directional buttons to navigate through the programme guide. You can use the Up/Down directional buttons or Programme +/- buttons to switch to previous/next channel on the list and Right/Left directional buttons to select a desired event of the currently highlighted channel. If available, the full name, start-end time and date, genre of the highlighted event and a brief information about it will be displayed on the bottom of the screen.
Press Blue button to filter the events. Due to the large variety of filter options you can find events of the desired type quicker. Press Yellow button to see detailed information on the highlighted event. You can also use Red and Green buttons to see events of previous day and next day. The functions will be assigned to the coloured buttons on the remote when they are available. Follow the on-screen informations for accurate button functions.
The guide can not be displayed if TV input source is blocked from the Settings>Channel>Parental Controls>Inputs Blocked menu in Live TV mode or on Home Screen.
Connecting to the Internet
You can access the Internet via your TV, by connecting it to a broadband system. It is necessary to configure the network settings in order to enjoy a variety of streaming content and internet applications. These settings can be configured from Settings>Network & Internet menu. You can also highlight the Connected/Not Connected icon on the Home screen and press OK to access this menu. For further information refer to Network & Internet section under the title of Home Screen.
Wired Connection
Connect your TV to your modem/router via an Ethernet cable. There is a LAN port on the rear side of your TV.
The status of the connection under the Ethernet section in the Network & Internet menu will changed from Not connected to Connected.
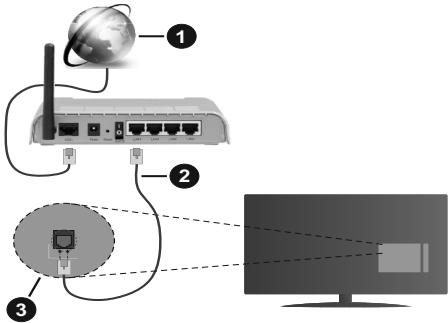
- Broadband ISP connection
- LAN (Ethernet) cable
- LAN input on the rear side of the TV
You might be able to connect your TV to a network wall socket depending on your network's configuration. In that case, you can connect your TV directly to the network using an Ethernet cable.
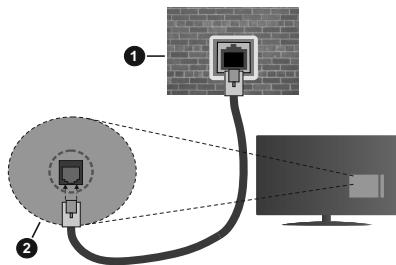
- Network wall socket
- LAN input on the rear side of the TV
Wireless Connection
A wireless LAN modem/router is required to connect the TV to the Internet via wireless LAN.
Highlight Wi-Fi option in the Network & Internet menu and press OK to enable wireless connection. Available networks will be listed. For more information refer to Network & Internet>Wi-Fi section under the title of Home Screen.
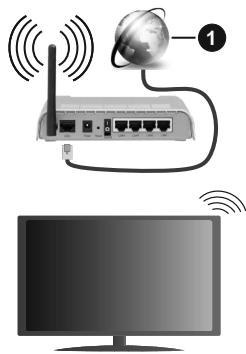
1. Broadband ISP connection
A network with hidden SSID can not be detected by other devices. If you want to connect to a network with hidden SSID, highlight the Add new network option under the Network & Internet menu on the Home Screen and press OK. Add the network by entering its name manually using the related option.
A Wireless-N router (IEEE 802.11a/b/g/n/ac) with simultaneous 2.4 and 5 GHz bands is designed to increase bandwidth. These are optimized for smoother and faster HD video streaming, file transfers and wireless gaming.
Use a LAN connection for quicker data transfer between other devices like computers.
The transmission speed differs depending on the distance and number of obstructions between the
transmission products, the configuration of these products, the radio wave conditions, the line traffic and the products that you use. The transmission may also be cut off or may get disconnected depending on the radio wave conditions, DECT phones or any other WLAN 11b appliances. The standard values of the transmission speed are the theoretical maximum values for the wireless standards. They are not the actual speeds of data transmission.
The location where the transmission is most effective differs depending on the usage environment.
The Wireless feature of the TV supports 802.11 a,b,g,n & ac type modems. It is highly recommended that you should use the IEEE 802.11n communication protocol in order to avoid any possible problems while watching videos.
You must change your modem's SSID when there are any other modems around with the same SSID. You can encounter connection problems otherwise. Use a wired connection if you experience problems with a wireless connection.
A stable connection speed is required to play back streaming content. Use an Ethernet connection if the wireless LAN speed is unstable.
Multi Media Player
On the Home Screen scroll to Apps row, select Multi Media Player (MMP) and press the OK button to launch.
Select the media type on the main media player screen. On the next screen, you can press the Menu button to access a list of menu options while the focus is on a folder or a media file. Using the options of this menu you can change the media type, sort the files, change the thumbnail size and turn your TV into a digital photo frame. You will also be able to copy, paste and delete the media files using the related options of this menu. Additionally you can switch the viewing style by selecting either Normal Parser or Recursive Parser. In Normal Parser mode the files will be displayed with folders if any available. So only the selected type of media files in the root folder or in the selected folder will be displayed. If there isn't any media files of the selected type, the folder will be assumed as empty. In Recursive Parser mode the source will be searched for all available media files of the selected type and the found files will be listed. Press the Back/Return button to close this menu.
While browsing for the video files a preview of the highlighted video will be displayed in a small window on the left side of the screen if the view style is set to List View. Press the Blue button to switch between the List View and Grid View.
From USB Connection
IMPORTANT! Back up the files on your USB storage devices before connecting them to the TV. Manufacturer will not be responsible for any file damage or data loss. Certain types of USB devices (e.g. MP3 Players) or USB hard disk drives/memory sticks may not be compatible with this TV. The TV supports FAT32 and NTFS disk formatting.
You can view your photos, text documents or play your music and video files installed on a connected USB storage device on the TV. Plug in the USB storage device to one of the USB inputs on the TV.
On the main media player screen select the desired media type. On the next screen, highlight a file name from the list of available media files and press the OK button. Follow the on-screen instructions for more information on other available button functions.
Note: Wait a little while before each plugging and unplugging as the player may still be reading files. Failure to do so may cause physical damage to the USB player and the USB device itself. Do not pull out your drive while playing a file.
From a Mobile Device via DMR
Make sure that your mobile device is connected to the same network as your TV. On the TV, scroll to Apps row on the Home Screen, select Multi Media Player (MMP) and press the OK button to launch. Select the media type on the main media player screen. On the next screen, press the Blue button to switch the List View layout. Then press the Back button. DMR (Digital Media Renderer) option will appear among the media type options. Highlight the DMR option and press the OK button. The TV is ready to receive the media file sent from your mobile device. On the mobile device, open the file you want to share and tap on the sharing icon or on the related option from the options menu of your mobile device. Available devices will be listed. Select your TV from the list. You can get the device name of your TV from the Settings>Device Preferences>About menu on the Home screen. If desired, the name of the TV can also be changed by either selecting one of the predefined names or entering a custom name using the options of the Device name menu. If the connection is successfully established the selected media file will be played/displayed on your TV.
USB Recording
To record a programme, you should first connect a USB disk to your TV while the TV is switched off. You should then switch on the TV to enable the recording feature. To record long duration programmes such as movies, it is recommended to use USB Hard disk drives (HDD's). Recorded programmes are saved into the connected USB disk. If desired, you can store/copy recordings onto a computer; however, these files will not be available to be played on a computer. You can play the recordings only via your TV.
Lip Sync delay may occur during the timeshifting. Radio record is supported.
If the writing speed of the connected USB disk is not sufficient, the recording may fail and the timeshifting feature may not be available.
It is recommended to use USB hard disk drives for recording HD programmes.
Do not pull out the USB/HDD during a recording. This may harm the connected USB/HDD.
Some stream packets may not be recorded because of signal problems, as a result sometimes videos may freeze during playback.
If a recording starts from timer when teletext is on, a dialogue will be displayed. If you highlight Yes and press OK teletext will be turned off and recording will start.
Instant Recording
Press Record button to start recording an event instantly while watching a programme. Press Stop button to cancel instant recording.
You can not switch broadcasts during the recording mode.
Watching Recorded Programmes
Select Record List from the Record menu in Live TV mode and press OK. Select a recorded item from the list (if previously recorded). Press the OK button to watch.
Press the Stop or Back/Return button to stop a playback.
The recordings will be named in the following format: Channel Name_Date(Year/Month/Day)_Duration(Hour/Minute/Second).
Timeshift Recording
In order to use timeshift recording feature Time Shift Mode option in the Record>Time Shift Mode menu should be enabled first.
In timeshifting mode, the programme is paused and simultaneously recorded to the connected USB disk. Press Pause/Play button while watching a broadcast to activate timeshifting mode. Press Pause/Play button again to resume the paused programme from where you stopped. Press the Stop button to stop timeshift recording and return to the live broadcast.
When this feature is used for the first time Disk Setup wizard will be displayed when the Pause/Play button is pressed. You can either choose Auto or Manual setup mode. In Manual mode, if you prefer, you can format your Disk and specify the storage space that will be used for timeshift function. When the setup is completed result will be displayed. Press Exit button.
Timeshift function will not be available for radio broadcasts.
Disk Format
When using a new USB storage device, it is recommended that you first format it using the Format option in the Record>Device Info menu in Live TV mode. Highlight the connected device on the Device Info screen and press OK or Right directional button to see the list of available options. Then highlight Format and press OK to proceed. A confirmation dialogue will be displayed. Highlight Yes and press OK to start formatting.
IMPORTANT: Formatting your USB storage device will erase ALL the data on it and it's file system will be converted to FAT32. In most cases operation errors will be fixed after a format but you will lose ALL your data.
Schedule List
You can add reminders or record timers using the Schedule List menu. You can access the Schedule List from the Record menu in Live TV mode. Highlight Schedule List and press OK. Previously set timers will be listed if any available.
Press Record button to add a timer while the Schedule List menu is displayed on the screen. You can define the type of the timer by setting the Schedule Type option as Reminder or Record. When other parameters are set highlight Add and press OK. The timer will be added to the list.
If any available, you can also edit or delete the timers on this list. Highlight the timer of your choice and press OK. Edit and Delete options will appear at the bottom of the screen. Highlight the desired option and press OK. After you edited a timer you can choose either to replace it or add it as a new timer. If you choose the Replace option, the timer will be saved with the new settings. If you choose the Add option, the timer will be added to the list as a new timer. Highlight Replace or Add according to your preference and press OK to proceed. When you choose to delete a timer a confirmation dialogue will be displayed on the screen. Highlight Yes and press OK to delete the selected timer.
A warning message will be displayed if the time intervals of two timers overlap. You can not set more than one timer for the same time interval.
Press EXIT button to close the Schedule List.
CEC
With CEC function of your TV you can operate a connected device with the TV remote control. This function uses HDMI CEC (Consumer Electronics Control) to communicate with the connected devices. Devices must support HDMI CEC and must be connected with an HDMI connection.
The TV comes CEC function switched on. Make sure that all CEC settings are properly set up on the
connected CEC device. The CEC functionality has different names on different brands. CEC function might not work with all devices. If you connect a device with HDMI CEC support to your TV, the related HDMI input source will be renamed with the connected device's name.
To operate the connected CEC device, select the related HDMI input source from the Inputs menu on the Home Screen. Or press the Source button if the TV is in Live TV mode and select the related HDMI input source from the list. To terminate this operation and control the TV via the remote again, press the Source button, which will still be functional, on the remote and switch to another source.
The TV remote is automatically able to control the device once the connected HDMI source has been selected. However not all buttons will be forwarded to the device. Only devices that support CEC Remote Control function will respond to the TV remote control.
The TV supports also ARC(Audio Return Channel) feature. This feature is an audio link meant to replace other cables between the TV and the audio system (A/V receiver or speaker system). Connect the audio system to the HDMI2 input on the TV to enable ARC feature.
In order to activate ARC feature the Speakers option should be set as External Audio System. You can access this option from the TV options or TV options>Settings>Device Preferences>Sound menu in Live TV mode or from Settings>Device Preferences>Sound menu on the Home Screen. When ARC is active, TV will mute its other audio outputs automatically. So you will hear audio from connected audio device only (same as other optical or co-axial digital audio outputs). The volume control buttons of the remote will be directed to connected audio device and you will be able to control the volume of the connected device with your TV remote.
Note: ARC is supported only via the HDMI2 input.
The CEC functions are set to On by default. To switch off completely do the following:
1 - Enter the Settings>Device Preferences>Inputs menu on the Home Screen or TV options>Settings>Device Preferences>Inputs menu in Live TV mode.
2 - Scroll down to Consumer Electronic Control (CEC) section. Highlight HDMI control option and press OK.
Google Cast
With the built-in Google Cast technology you can cast the content from your mobile device straight to your TV. If your mobile device has Google Cast feature, you can mirror your device's screen to your TV wirelessly. Select Cast screen option on your android device. Available devices will be detected and listed. Select your TV from the list and tap on it to start casting. You can get the network name of your TV from the Settings>Device Preferences>About menu on the Home screen. Device name will be one of the shown articles. You can also change the name of your TV. Highlight Device name and press OK. Then highlight Change and press OK again. You can either select one of the predefined names or enter a custom name.
To cast your device's screen to the TV screen...
- On your android device, go to 'Settings' from the notification panel or home screen
- Tap on 'Device Connectivity'
- Tap on the ‘Easy projection’ and enable ‘Wireless projection’. Available devices will be listed
-
Select the TV you would like to cast to or
-
Slide down the notification panel
-
Tap on 'Wireless projection'
-
Select the TV you would like to cast to
If the mobile app is Cast-enabled, such as YouTube, Dailymotion, Netflix, you can cast your app to your TV. On the mobile app, look for the Google Cast icon and tap on it. Available devices will be detected and listed. Select your TV from the list and tap on it to start casting.
To cast an app to the TV screen...
- On your smartphone or tablet, open an app that supports Google Cast
- Tap the Google Cast icon
- Select the TV you would like to cast to
- The app you selected should start playing on TV
Notes: Google Cast works on Android and iOS. Make sure that your mobile device is connected to the same network as your TV.
The menu options and namings for Google Cast function on your Android device can differ from brand to brand and can change with time. Refer to your device's manual for latest informations on Google Cast function.
HBBTV System
HbbTV (Hybrid Broadcast Broadband TV) is a standard that seamlessly combines TV services delivered via broadcast with services delivered via broadband and also enables access to Internet only services for consumers using connected TVs and set-top boxes. Services delivered through HbbTV include traditional broadcast TV channels, catch-up services, video-on-demand, electronic programme guide, interactive advertising, personalisation, voting, games, social networking and other multimedia applications.
HbbTV applications are available on channels where they are signalled by the broadcaster.
The HbbTV applications are generally launched with the press of a coloured button on the remote. Generally a small red button icon will appear on the screen in order to notify the user that there is an HbbTV application on that channel. Press the button indicated on the screen to launch the application.
HbbTV applications use the buttons on the remote control to interact with the user. When an HbbTV application is launched, the control of some buttons are owned by the application. For example, numeric channel selection may not work on a teletext application where the numbers indicate teletext pages.
HbbTV requires AV streaming capability for the platform. There are numerous applications providing VOD (video on demand) and catch-up TV services. The OK (play&pause), Stop, Fast forward, and Rewind buttons on the remote control can be used to interact with the AV content.
Note: You can enable or disable this feature from the HBBTV Settings>TV Options>Advanced Options> menu in Live TV mode.
Quick Standby Search
If earlier an automatic search is performed, your TV will search for new or missing digital channels at 05:00 am every morning while in quick standby mode. Any new found broadcasts will be added to the channel list and missing ones will be deleted if you confirm at the next power on. The search will be performed for the set Tuner Mode in the Channels>New Channels Available>Tuner menu in Live TV mode. This feature will not be functional if the TV is in standby mode.
Software Update
Your TV is capable of finding and updating the firmware automatically via the broadcast signal or via Internet.
To experience the best use of your TV and benefit from the latest improvements make sure your system is always up to date.
Software update via internet
On the Home Screen enter the Settings>Device Preferences>About menu in order to update your Android system version. Move the focus to the System update option and press OK. You will be informed about the system status and the time at which the device was last checked for an update will be displayed. The Check for update option will be highlighted, press OK if you want to check for an available update.
Over Air Download (OAD)
In Live TV mode enter the TV Options>Advanced Options>OAD menu. You can enable/disable Auto Download option for a firmware upgrade.
To start a manual download Highlight Manual OAD Download option in the TV Options menu and press the OK button to start a search for an available firmware upgrade through the DTV broadcast signals manually.
Note: Do not unplug the power cord during the reboot process. If the TV fails to come on after the upgrade, unplug, wait for two minutes then plug it back in.
Troubleshooting & Tips
TV does not switch on
- Make sure the power cord is plugged in securely to power outlet.
- Disconnect the power cable from the power outlet. Wait for one minute then reconnect it.
- Press the Standby/On button on the TV.
TV does not respond to the remote control
- The TV requires some time to start up. During this time, the TV does not respond to the remote control or TV controls. This is normal behaviour.
- Check if the remote control is working by means of a mobile phone camera. Put the phone in camera mode and point the remote control to the camera lens. If you press any key on the remote control and you notice the infra red LED flicker through the camera, the remote control is working. The TV needs to be checked.
If you do not notice the flickering, the batteries may be exhausted. Replace the batteries. If the remote is still not working, the remote control might be broken and needs to be checked.
This method of checking the remote control is not possible with remote controls which are wirelessly paired with the TV.
No Channels
- Make sure that all cables are properly connected and that the correct network is selected.
- Make sure that the correct channel list is selected.
- Make sure that you have entered the correct channel frequency if you have done manual tuning.
No picture / distorted picture
- Make sure that the antenna is properly connected to the TV.
- Make sure that the antenna cable is not damaged.
- Make sure that the correct device is selected as the input source.
- Make sure that the external device or source is properly connected.
- Make sure that the picture settings are set correctly.
- Loud speakers, unearthed audio devices, neon lights, high buildings and other large objects can
influence reception quality. If possible, try to improve the reception quality by changing the antenna direction or moving devices away from the TV.
- Change to a different picture format, if the picture does not fit the screen
- Make sure that your PC uses the supported resolution and refresh rate.
No sound / poor sound
- Make sure that the sound settings are correctly set.
- Make sure that all cables are properly connected.
- Make sure that the volume is not muted or set to zero, increase the volume to check.
- Make sure that the TV audio output is connected to the audio input on the external sound system.
- Sound may be coming from only one speaker. Check the balance settings from Sound menu.
Input sources - can not be selected
- Make sure that the device is connected to the TV.
- Make sure that all cables are properly connected.
- Make sure that you select the right input source which is dedicated to the connected device.
VGA Input Typical Display Modes
The following table is an illustration of some of the typical video display modes. Your TV may not support all resolutions.
| Index | Resolution | Frequency |
| 1 | 640x480 | 60Hz |
| 2 | 640x480 | 72Hz |
| 3 | 640x480 | 75Hz |
| 4 | 800x600 | 56Hz |
| 5 | 800x600 | 60Hz |
| 6 | 800x600 | 72Hz |
| 7 | 800x600 | 75Hz |
| 8 | 1024x768 | 60Hz |
| 9 | 1024x768 | 70Hz |
| 10 | 1024x768 | 75Hz |
| 11 | 1152x864 | 75Hz |
| 12 | 1280x768 | 60Hz |
| 13 | 1280x768 | 75Hz |
| 14 | 1280x960 | 60Hz |
| 15 | 1280x960 | 75Hz |
| 16 | 1280x1024 | 60Hz |
| 17 | 1280x1024 | 75Hz |
| Index | Resolution | Frequency |
| 18 | 1360x768 | 60Hz |
| 19 | 1366x768 | 60Hz |
| 20 | 1400x1050 | 59Hz |
| 21 | 1400x1050 | 60Hz |
| 22 | 1400x1050 | 75Hz |
| 23 | 1440x900 | 60Hz |
| 24 | 1440x900 | 75Hz |
| 25 | 1600x1200 | 60Hz |
| 26 | 1680x1050 | 59Hz |
| 27 | 1680x1050 | 60Hz |
| 28 | 1920x1080 | 60Hz |
AV and HDMI Signal Compatibility
| Source | Supported Signals | |
| Composite / Back AV | PAL | |
| SECAM | ||
| NTSC4.43 | ||
| NTSC3.58 | ||
| Component / YPbPr | 480i, 480p | 60Hz |
| 576i, 576p | 50Hz | |
| 720p | 50Hz,60Hz | |
| 1080i | 50Hz,60Hz | |
| HDMI | 480i | 60Hz |
| 480p | 60Hz | |
| 576i, 576p | 50Hz | |
| 720p | 50Hz,60Hz | |
| 1080i | 50Hz,60Hz | |
| 1080p | 24Hz, 25Hz, 30Hz, 50Hz, 60Hz | |
| 3840x2160p | 24Hz, 25Hz, 30Hz, 50Hz, 60Hz | |
| 4096x2160p | 24Hz, 25Hz, 30Hz, 50Hz, 60Hz | |
In some cases a signal on the TV may not be displayed properly. The problem may be an inconsistency with standards from the source equipment (DVD, Set-top box, etc.). If you do experience such a problem please contact your dealer and also the manufacturer of the source equipment.
Supported File Formats for USB Mode
Video
| Video Codec | Resolution | Bit Rate | Profile | Container |
| MPEG 1/2 | 1080P@ 60fps | 80Mbps | MP@HL | MPEG program stream (.DAT, .VOB, .MPG, .MPEG), MPEG transport stream (.ts, .trp, .tp), MP4 (.mp4, .mov), 3GPP (.3gpp, .3gp), AVI (.avi), MKV (.mkv), ASF (.asf) |
| MPEG4 | 1080P@60fps | 40Mbps | · Simple Profile · Advanced Simple Profile@Level 5 · GMC is not supported | MPEG program stream (.MPG, .MPEG), MP4 (.mp4, .mov), 3GPP (.3gpp, .3gp), AVI (.avi), MKV (.mkv), ASF (.asf) |
| Sorenson H.263 | 1080P@60fps | 40Mbps | FLV (.flv), AVI (.avi), SWF(.swf) | |
| H.263 | 1080P@60fps | 40Mbps | MP4 (.mp4, .mov), 3GPP (.3gpp, .3gp), AVI (.avi), MKV (.mkv) | |
| H.264 | 4096x2176@60fps 1080P@60fps | 135Mbps | · Main Profile · High Profile @Level 5.1 | FLV (.flv), MP4 (.mp4, .mov), 3GPP (.3gpp, .3gp), MPEG transport stream (.ts, .trp, .tp), ASF (.asf), WMV (.wmv), AVI (.avi), MKV (.mkv) |
| HEVC/H.265 | 4096x2176@60fps | 100Mbps | Main/Main10 Profile, High Tier @Level 5.1 | MP4 (.mp4, .mov), 3GPP (.3gpp, .3gp), MPEG transport stream (.ts, .trp, .tp), MKV (.mkv) |
| MVC | 1080P@30fps | 80Mbps | MPEG transport stream (.ts, .trp, .tp) | |
| AVS | 1080P@60fps | 40Mbps | Jizhun profile @ Level 6.0 | MPEG transport stream (.ts, .trp, .tp) |
| AVS+ | 1080P@60fps | 50Mbps | Broadcasting profile@ Level 6.0.1.08.60 | MPEG transport stream (.ts, .trp, .tp) |
| WMV3 | 1080P@60fps | 40Mbps | ASF (.asf), AVI (.avi), MKV (.mkv), WMV (.wmv) | |
| VC1 | 1080P@60fps | 40Mbps | · Advanced Profile @ Level 3 · Simple Profile · Main Profile | MPEG program stream (.MPG, .MPEG), MPEG transport stream (.ts, .trp, .tp), ASF (.asf), WMV (.wmv), AVI (.avi), MKV (.mkv) |
| Motion JPEG | 1080P@30fps | 10Mbps | AVI (.avi), 3GPP (.3gpp, .3gp), MP4 (.mp4, .mov), MKV (.mkv), ASF (.asf) | |
| VP8 | 1080P@60fps | 20Mbps | MKV (.mkv), WebM (.webm) | |
| VP9 | 4096x2176@60fps | 100Mbps | Profile0/2 | MKV (.mkv), WebM (.webm) |
| RV30/RV40 | 1080P@60fps | 40Mbps | RM (.rm, .rmvb) |
Audio
| Audio Codec | Sample rate | Channel | Bit Rate | Container | Note |
| MPEG1/2 Layer1 | 16KHz ~ 48KHz | Up to 2 | 32Kbps ~ 448Kbps | Movie: AVI (.avi), ASF (.asf), Matroska (.mkv), MPEG transport stream (.ts, .trp, .tp), MPEG program stream (.DAT, .VOB, .MPG, .MPEG)Music: MP3 (.mp3), WAV (.wav) | |
| MPEG1/2 Layer2 | 16KHz ~ 48KHz | Up to 2 | 8Kbps ~ 384Kbps | Movie: AVI (.avi), ASF (.asf), Matroska (.mkv), MPEG transport stream (.ts, .trp, .tp), MPEG program stream (.DAT, .VOB, .MPG, .MPEG)Music: MP3 (.mp3), WAV (.wav) | |
| MPEG1/2 Layer3 | 16KHz ~ 48KHz | Up to 2 | 8Kbps ~ 320Kbps | Movie: AVI (.avi), ASF (.asf), Matroska (.mkv), 3GPP (.3gpp, .3gp), MP4 (.mp4, .mov), MPEG transport stream (.ts, .trp, .tp), MPEG program stream (.DAT, .VOB, .MPG, .MPEG), FLV (.flv), SWF (.swf)Music: MP3 (.mp3), WAV (.wav), MP4 (.m4a) | |
| AC3 | 32KHz, 44.1KHz, 48KHz | Up to 5.1 | 32Kbps ~ 640 Kbps | Movie: AVI (.avi), Matroska (.mkv), 3GPP (.3gpp, .3gp), MP4 (.mp4, .mov), MPEG transport stream (.ts, .trp, .tp), MPEG program stream (.DAT, .VOB, .MPG, .MPEG)Music: AC3 (.ac3), MP4 (.m4a) | |
| EAC3 | 32KHz, 44.1KHz, 48KHz | Up to 5.1 | 32Kbps ~ 6 Mbps | Movie: 3GPP (.3gpp, .3gp), MP4 (.mp4, .mov), MPEG transport stream (.ts, .trp, .tp), MPEG program stream (.DAT, .VOB, .MPG, .MPEG)Music: EAC3 (.ec3), MP4 (.m4a) | |
| AAC-LC, HEAAC | 8KHz ~ 48KHz | Up to 5.1 | Movie: AVI (.avi), Matroska (.mkv), 3GPP (.3gpp, .3gp), MP4 (.mp4, .mov), MPEG transport stream (.ts, .trp, .tp), MPEG program stream (.DAT, .VOB, .MPG, .MPEG), FLV (.flv), RM (.rm, .rmvb)Music: AAC (.aac), MP4 (.m4a) | ||
| WMA | 8KHz ~ 48KHz | Up to 2 | 128bps ~ 320Kbps | Movie: ASF (.wmv, .asf), AVI (.avi), Matroska (.mkv)Music: ASF (.wma) | WMA 7, WMA 8, WMA 9, Standard |
| WMA 10 Pro M0 | 48KHz | Up to 2 | < 192kbps | Movie: ASF (.wmv, .asf), AVI (.avi), Matroska (.mkv)Music: ASF (.wma) | No LBR mode |
| WMA 10 Pro M1 | 48KHz | Up to 5.1 | < 384kbps | Movie: ASF (.wmv, .asf), AVI (.avi), Matroska (.mkv)Music: ASF (.wma) | |
| WMA 10 Pro M2 | 96KHz | Up to 5.1 | < 768kbps | Movie: ASF (.wmv, .asf), AVI (.avi), Matroska (.mkv)Music: ASF (.wma) | |
| VORBIS | Up to 48KHz | Up to 2 | Movie: Matroska (.mkv), WebM (.webm), 3GPP (.3gpp, .3gp), MP4 (.mp4, .mov)Music: MP4 (.m4a), OGG (.ogg) | Supports stereo decoding only | |
| DTS | Up to 48KHz | Up to 5.1 | < 1.5Mbps | Movie: MPEG transport stream (.ts, .trp, .tp), MPEG program stream (.DAT, .VOB, .MPG, .MPEG), MP4 (.mp4, .mov), Matroska (.mkv) | |
| LPCM | 8KHz ~ 48KHz | Up to 5.1 | 64Kbps ~ 1.5Mbps | Movie: AVI (.avi), Matroska (.mkv), 3GPP (.3gpp, .3gp), MP4 (.mp4, .mov), MPEG transport stream (.ts, .trp, .tp), MPEG program stream, (.DAT, .VOB, .MPG, .MPEG)Music: WAV (.wav), MP4 (.m4a) | |
| IMA-ADPCMMS-ADPCM | 8KHz ~ 48KHz | Up to 2 | 384Kbps | Movie: AVI (.avi), Matroska (.mkv), 3GPP (.3gpp, .3gp), MP4 (.mp4, .mov)Music: WAV (.wav), MP4 (.m4a) | |
| G711 A/mu-law | 8KHz | Up to 2 | 64Kbps ~ 128Kbps | Movie: AVI (.avi), Matroska (.mkv), 3GPP (.3gpp, .3gp), MP4 (.mp4, .mov)Music: WAV (.wav), MP4 (.m4a) | |
| LBR (cook) | 8KHz11.025KHz, 22.05KHz, 44.1KHz | Up to 5.1 | 6Kbps ~ 128Kbps | Movie: RM (.rm, .rmvb) | |
| FLAC | 8KHz~96KHz | Up to 5.1 | < 1.6Mbps | Movie: Matroska (.mkv, mka)Music: FLAC(.flac) | |
| DTS LBR | 12KHz, 22KHz, 24KHz, 44.1KHz, 48KHz | Up to 5.1 | up to 2Mbps | Movie: MP4 (.mp4, .mov) | |
| DTS XLL | Up to 96KHz | Up to 6 | Movie: MPEG transport stream (.ts, .trp, .tp), MP4 (.mp4, .mov) | ||
| DRA | 8KHZ~96KHz | Up to 7.1 | < 1533Kbps | Movie: MPEG transport stream (.ts, .trp) |
Picture
| Image | Photo | Resolution(width x height) |
| JPEG | Base-line | 15360x8640 (1920x8 x 1080x8) |
| Progressive | 1024x768 | |
| PNG | non-interlace | 9600x6400 |
| interlace | 1200x800 | |
| BMP | 9600x6400 | |
| MPO | Base-line | 15360x8640 (1920x8 x 1080x8) |
| Progressive | 1024x768 | |
| GIF | 6400x4800 (800x8 x 600x8) |
Subtitle
Internal
| File Extension | Container | Subtitle Codec |
| dat, mpg, mpeg, vob | MPG, MPEG | DVD Subtitle |
| ts, trp, tp | TS | DVB Subtitle |
| mp4 | MP4 | DVD SubtitleUTF-8 Plain Text |
| mkv | MKV | ASSSSAUTF-8 Plain TextVobSubDVD Subtitle |
| avi | AVI(1.0, 2.0),DMF0, 1, 2 | XSUBXSUB+ |
External
| File Extension | Subtitle Parser | Remark |
| .srt | SubRip | |
| .ssa/.ass | SubStation Alpha | |
| .smi | SAMI | |
| .sub | SubViewerMicroDVDDVDSubtitleSystemSubIdx (VobSub) | SubViewer 1.0 & 2.0 Only |
| .txt | TMPlayer |
Supported DVI Resolutions
When connecting devices to your TV's connectors by using DVI converter cable(DVI to HDMI cable - not supplied), you can refer to the following resolution information.
| 56Hz | 60Hz | 66Hz | 70Hz | 72Hz | 75Hz | |
| 640x480 | x | x | ||||
| 800x600 | x | x | x | |||
| 1024x768 | x | x | x | |||
| 1280x768 | x | x | ||||
| 1280x960 | x | |||||
| 1360x768 | x | |||||
| 1366x768 | x | |||||
| 1280x1024 | x | x | x | |||
| 1400x1050 | x | |||||
| 1600x900 | x |
Wireless LAN Transmitter Specifications
| Frequency Ranges | Max Output Power |
| 2400 - 2483,5 MHz (CH1-CH13) | < 100 mW |
| 5150 - 5250 MHz (CH36 - CH48) | < 200 mW |
| 5250 - 5350 MHz (CH52 - CH64) | < 200 mW |
| 5470 - 5725 MHz (CH100 - CH140) | < 200 mW |
Country Restrictions
This device is intended for home and office use in all EU countries (and other countries following the relevant EU directive) without any limitation except for the countries mentioned below.
| Country | Restriction |
| Bulgaria | General authorization required for outdoor use and public service |
| France | In-door use only for 2454-2483.5 MHz |
| Italy | If used outside of own premises, general authorization is required |
| Greece | In-door use only for 5470 MHz to 5725 MHz band |
| Luxembourg | General authorization required for network and service supply(not for spectrum) |
| Norway | Radio transmission is prohibited for the geographical area within a radius of 20 km from the centre of Ny-Ålesund |
| Russian Federation | In-door use only |
The requirements for any country may change at any time. It's recommended that user checks with local authorities for the current status of their national regulations for both 2.4 GHz and 5 GHz wireless LAN's.
Licences
The terms HDMI and HDMI High-Definition Multimedia Interface, and the HDMI Logo are trademarks or registered trademarks of HDMI Licensing Administrator, Inc. in the United States and other countries.

Manufactured under license from Dolby Laboratories. Dolby, Dolby Audio, Dolby Vision, and the double-D symbol are trademarks of Dolby Laboratories. Confidential unpublished works. Copyright ©1992-2019 Dolby Laboratories. All rights reserved.
Google, Android, Android TV, Chromecast, Google Play and YouTube are trademarks of Google LLC.
For DTS patents, see http://patents.dts.com. Manufactured under license from DTS Licensing Limited. DTS, the Symbol, DTS and the Symbol together, DTS-HD, and the DTS-HD logo are registered trademarks or trademarks of DTS, Inc. in the United States and/or other countries. © DTS, Inc. All Rights Reserved.

This product contains technology subject to certain intellectual property rights of Microsoft. Use or distribution of this technology outside of this product is prohibited without the appropriate license(s) from Microsoft.
Content owners use Microsoft PlayReady™ content access technology to protect their intellectual property, including copyrighted content. This device uses PlayReady technology to access PlayReady-protected content and/or WMDRM-protected content. If the device fails to properly enforce restrictions on content usage, content owners may require Microsoft to revoke the device's ability to consume PlayReady-protected content. Revocation should not affect unprotected content or content protected by other content access technologies. Content owners may require you to upgrade PlayReady to access their content. If you decline an upgrade, you will not be able to access content that requires the upgrade.
The "CI Plus" Logo is a trademark of CI Plus LLP.
This product is protected by certain intellectual property rights of Microsoft Corporation. Use or distribution of such technology outside of this product is prohibited without a license from Microsoft or an authorized Microsoft subsidiary.
Disposal Information
[European Union]
These symbols indicate that the electrical and electronic equipment and the battery with this symbol should not be disposed of as general household waste at its end-of-life. Instead, the products should be handed over to the applicable collection points for the recycling of electrical and electronic equipment as well as batteries for proper treatment, recovery and recycling in accordance with your national legislation and the Directive 2012/19/EU and 2013/56/EU.
By disposing of these products correctly, you will help to conserve natural resources and will help to prevent potential negative effects on the environment and human health which could otherwise be caused by inappropriate waste handling of these products.
For more information about collection points and recycling of these products, please contact your local municipal office, your household waste disposal service or the shop where you purchased the product.
Penalties may be applicable for incorrect disposal of this waste, in accordance with national legislation.
[Business users]
If you wish to dispose of this product, please contact your supplier and check the terms and conditions of the purchase contract.
[Other Countries outside the European Union]
These symbols are only valid in the European Union.
Contact your local authority to learn about disposal and recycling.
The product and packaging should be taken to your local collection point for recycling.
Some collection points accept products free of charge.
Note: The sign Pb below the symbol for batteries indicates that this battery contains lead.
- Products
- Battery
| Spécifications | Especificación | ||
| Télédiffusion | PAL BG/I/DK/SECAM BG/DK | Señal de Televisión | PAL BG/I/DK/SECAM BG/DK |
| Réception des chaînes | VHF (BAND I/III),UHF (BAND U),HYPERBAND | Canales de Recepción | VHF (BANDA I/III)UHF (BANDA U)HIPERBANDA |
| Réception numérique | Télévision numérique terrestre ou par câble entièrement intégrée (DVB-T2/C) | Recepción Digital | TV por cable-señal terrestre digital totalmente integrada (DVB-T2/C) |
| Nombre de chaînes prédéfinies | 2 200 | Número de Canales Predefinidos | 2 200 |
| Indicateur de chaîne | Affichage à l'écran | Indicador de Canal | Ayuda en pantalla |
| Entrée d'antenne RF | 75 Ohm (déséquilibrée) | Entrada de Antena RF | 75 Ohm (sin balance) |
| Tension de fonctionnement | 220-240 V CA, 50 Hz. | Tensión de Funcionamiento | 220-240V AC, 50Hz. |
| Audio | DTS-HD | Audio | DTS-HD |
| Puissance de sortie Audio (WRMS.) (10 % THD) | 2 x 12 | Potencia de salida del audio (WRMS.) (10% THD) | 2 x 12 |
| Consommation électrique (W) | 200 | Consumo Eléctrico (en W.) | 200 |
| Veille avec maintien de la connexion au réseau (W) | < 2 | Red en espera (en W) | < 2 |
| Dimensions TV DxLxH (avec pied) (mm) | 247 x 1462 x 843 | Dimensiones del TV AxAxF (con soporte) (en mm) | 247 x 1462 x 843 |
| Dimensions TV DxLxH (sans pied) (mm) | 48/81 x 1462 x 907 | Dimensiones del TV (sin soporte) AxAxF (en mm) | 48/81 x 1462 x 907 |
| Affichage | 65" | Pantalla | 65" |
| Température de fonctionnement et humidité | 0 °C à 40 °C, soit 85 % d'humidité maximale | Temperatura y humedad de funcionamiento | Desde 0°C hasta 40°C, 85% humedad máx. |
| Specificaties | Technische Daten | ||
| TV-Uitzending | PAL BG/I/DKSECAM BG/DK | TV-Übertragung | PAL BG/I/DKSECAM BG/DK |
| Kanalen ontvangen | VHF (BAND I/III)- UHF (BAND U) -HYPERBAND | Empfangskanäle | VHF (BAND I/III)- UHF (BAND U) -HYPERBAND |
| Digitale ontvangst | Volledig geintegreerdedigitale aardse/kabel-TV(DVB-T2-C) | Digitaler Empfang | Vollintegriertes digital-terrestrisches Kabel-TV(DVB-T2-C) |
| Aantal instelbarekanalen | 2 200 | Anzahl dervoreingestelltenKanäle | 2 200 |
| Kanaalindicator | Weergave op hetscherm | Kanalanzeige | Bildschirmanzeige |
| RF Antenne-Input | 75 Ohm (nietgebalanceerd) | RF-Antenneneingang | 75 Ohm (nichtgeregelt) |
| Werkingsspanning | 220-240V AC, 50Hz. | Betriebsspannung | 220-240V AC, 50Hz. |
| Geluid | DTS CD | Audio | DTS-HD |
| Geluidsuitgangstroom (WRMS.) (10%THD) | 2 x 12 | Audio-Ausgangsleistung(WRMS.) (10% THD) | 2 x 12 |
| Stroomverbruik (W) | 200 | Leistungsaufnahme(W) | 200 |
| Netwerk stand-by (W) | < 2 | Vernetzt Standby (W) | < 2 |
| TV afmetingen BxLxH(met voet) (mm) | 247 x 1462 x 843 | TV-AbmessungenTxBxH (Mit Standfuß)(mm) | 247 x 1462 x 843 |
| TV afmetingen BxLxH(zonder voet) (mm) | 48/81 x 1462 x 907 | TV-AbmessungenTxBxH (ohneStandfuß) (mm) | 48/81 x 1462 x 907 |
| Beeldscherm | 65" | Bildschirm | 65" |
| Operationeletemperatuur enoperationelevochtigheid | 0°C tot 40°C, 85%max. vochtigheid | BetriebstemperaturenundBetriebsfeuchtigkeit | 0°C bis 40°C, max.85% Feuchtigkeit |
| Specification | |
| TV Broadcasting | PAL BG/I/DKSECAM BG/DK |
| Receiving Channels | VHF (BAND I/III)- UHF (BAND U) -HYPERBAND |
| Digital Reception | Fully integrated digital terrestrial-cable TV (DVB-T2-C) |
| Number of Preset Channels | 2 200 |
| Channel Indicator | On Screen Display |
| RF Aerial Input | 75 Ohm (unbalanced) |
| Operating Voltage | 220-240V AC, 50Hz. |
| Audio | DTS HD |
| Audio Output Power (WRMS.) (10% THD) | 2 x 12 |
| Power Consumption (W) | 200 |
| Networked Standby Power Consumption (W) | < 2 |
| TV Dimensions DxLxH (with foot) (mm) | 247 x 1462 x 843 |
| TV Dimensions DxLxH (without foot) (mm) | 48/81 x 1462 x 907 |
| Display | 65" |
| Operation temperature and operation humidity | 0°C up to 40°C, 85% humidity max |
| A | Product Fiche | ||
| B | Commercial Brand:EDENWOOD | ||
| C | Product No. | 10129720 | |
| D | Model No. | ED65C01UHD-VE | |
| E | Energy efficiency class | A+ | |
| F | Visible screen size (diagonal,approx.) (inch/cm) | 65 inches | 164 cm |
| G | On mode average power consumption (Watt) | 118,0 | |
| H | Annual energy consumption (kWh/annum) (*) | 172 | |
| I | Standby power consumption (Watt) | 0,50 | |
| J | Off mode power consumption (Watt) | N/A | |
| K | Display resolution (px) | 3840x2160 | |
| A | B | C | D | E | F | |
| Français | Fiche du produit | Marque commerciale | Produit N° | Modèle N° | Classe d'efficacité énergétique | Taille d'écran visible (diagonale,approx.) (pouces/cm) |
| Nederlands | Productfiche | Commercieel merk. | Productnr. | Modelnr. | Energie efficiëntie klasse | Zichtbare schermgrootte (diagonaal,ca.) (inches/cm) |
| Deutsch | Produkt-Datenblatt | Markenzeichen | Produkt-Nr. | Modell-Nr. | Energieeffizienzklasse | Sichtbare Bildschirmgröße (diagonal,ca.) (Zoll /cm) |
| Español | Ficha del Producto | Marca Comercial | N° de Producto | N° de Modelo | Clasificación Energética | Tamaño de pantalla visible (diagonal,aprox.) (pulgadas/cm) |
| G | H | I | J | K | |
| Français | Consommation énergétique moyenne en mode "marche" (Watt) | Consommation énergétique annuelle (kWh/annuel) | Consommation d'énergie en veille (Watt) | Consommation d'énergie en mode "arrêt" (Watt) | Résolution de l'écran (px) |
| Nederlands | Aan-modus gemiddeld stroomverbruik (Watt) | Jaarlijks energieverbruik (kWh/Jaarlijks) | Stand-by stroomverbruik (Watt) | Uit-modus stroomverbruik (Watt) | Schermresolutie (px) |
| Deutsch | Durchschnittlicher Stromverbrauch im eingeschaltetem Zustand (Watt) | Jährlicher Energieverbrauch (kWh/Jahr) | Standby-Stromverbrauch (Watt) | Stromverbrauch im ausgeschaltetem Zustand (Watt) | Display-Auflösung (px) |
| Español | Consumo eléctrico medio, en funcionamiento (Vatio) | Consumo eléctrico anual (kWh/anual) | Consumo en modo en espera (Vatio) | Consumo eléctrico modo apagado (Vatio) | Resolución de pantalla (px) |
| A | VESA WALL MOUNT MEASUREMENTS | ||
| B | Hole Pattern Sizes (mm) | W | H |
| 400 | 200 | ||
| C | Screw Sizes | ||
| D | Length (X) | min. (mm) | 10 |
| max. (mm) | 13 | ||
| E | Thread (Y) | M6 | |

| A | B | C | D | E | |
| Français | DIMENSIONS DU SUPPORT DE FIXATION MURALE VESA | Dimensions des modèles de trous de montage (mm) | Dimensions des vis | Longueur (X) | Filetage (Y) |
| Nederlands | VESA WANDMONTAGE METINGEN | Grootte booropening (mm) | Schroefgroote | Lengte (X) | Draad (Y) |
| Deutsch | MASSANGABEN FÜR VESA-WANDMONTAGE | Lochmustergrößen (mm) | Schraubengrößen | Länge (X) | Gewinde (Y) |
| Español | MEDIDAS DEL MONTAJE DE PARED VESA | Tamaños de patrón para agujero (mm) | Tamaños de tornillo | Longitud (X) | Rosca (Y) |
CONDITION DE GARANTIE
FR


- Safety Information
- IMPORTANT - Please read these instructions fully before installing or operating
- WARNING
- Markings on the Product
- WALL MOUNTING WARNINGS
- Introduction
- Accessories Included
- Features
- Ultra HD (UHD)
- High Dynamic Range (HDR) / Hybrid Log-Gamma (HLG)
- Dolby Vision
- Stand Installation & Wall Mounting
- Assembling / Removing the pedestal
- Preparations
- Assembling the pedestal
- Removing the pedestal from the TV
- When using the wall mount bracket
- Antenna Connection
- Rear side of the TV
- Other Connections
- Turning On/Off the TV
- Connect power
- To switch on the TV from standby
- To switch the TV into standby
- To switch off the TV
- Quick Standby Mode
- TV Control & Operation
- Operation with the Remote Control
- Input Selection
- Changing Channels and Volume
- Remote Control
- Inserting the Batteries into the Remote
- Standby Button
- To pair remote with the TV
- Initial Setup Wizard
- Welcome Message and Language Selection
- Quick Setup
- Network Connection
- Sign in to your Google account
- Terms of Service
- Location
- Help improve Android
- Country
- Password
- Select TV Mode
- Tuner Mode
- Antenna
- Cable
- Home Screen
- Live TV Mode Menu Content
- Channels
- TV Options
- Power
- Advanced Options
- HBBTV Settings
- Teletext
- Record
- Settings
- Network & Internet
- Available networks
- Other options
- Ethernet
- Channel
- Channel Installation Mode - Antenna
- Channel Installation Mode - Cable
- Channel Installation Mode
- Auto Channel Update
- Channel Update Message
- Parental Controls
- Audio Channel
- Audio Language
- 2nd Audio Language
- Open Source Licenses
- Version
- Accounts & Sign In
- Apps
- Recently opened apps
- Permissions
- Device Preferences
- Timer
- Picture
- Advanced Video
- Sound
- Remote & Accessories
- Channel List
- Editing the Channels and the Channel List
- Managing Favourite Channel Lists
- Programme Guide
- Connecting to the Internet
- Wired Connection
- Wireless Connection
- Broadband ISP connection
- Multi Media Player
- From USB Connection
- From a Mobile Device via DMR
- USB Recording
- Instant Recording
- Watching Recorded Programmes
- Timeshift Recording
- Disk Format
- Schedule List
- CEC
- Google Cast
- To cast your device's screen to the TV screen...
- To cast an app to the TV screen...
- HBBTV System
- Quick Standby Search
- Software Update
- Software update via internet
- Over Air Download (OAD)
- Troubleshooting & Tips
- TV does not switch on
- TV does not respond to the remote control
- No Channels
- No picture / distorted picture
- No sound / poor sound
- Input sources - can not be selected
- VGA Input Typical Display Modes
- Supported File Formats for USB Mode
- Subtitle
- Supported DVI Resolutions
- Wireless LAN Transmitter Specifications
- Country Restrictions
- Licences
- Disposal Information
- [European Union]
- [Business users]
- [Other Countries outside the European Union]
- CONDITION DE GARANTIE
- FR
Brand : EDENWOOD
Model : ED65C01UHD-VE
Category : TV