MWO 20 GM S 343C - Microwaves VALBERG - Free user manual and instructions
Find the device manual for free MWO 20 GM S 343C VALBERG in PDF.
User questions about MWO 20 GM S 343C VALBERG
0 question about this device. Answer the ones you know or ask your own.
Ask a new question about this device
Download the instructions for your Microwaves in PDF format for free! Find your manual MWO 20 GM S 343C - VALBERG and take your electronic device back in hand. On this page are published all the documents necessary for the use of your device. MWO 20 GM S 343C by VALBERG.
USER MANUAL MWO 20 GM S 343C VALBERG
This product has a 2-year warranty as of the date of purchase*, covering any fault resulting from a manufacturing or material defect. This warranty does not cover defects or damage resulting from incorrect installation, improper use or abnormal wear of the appliance.
*upon presentation of the sales receipt.
CONDITION DE GARANTIE
FP
Thank you for choosing this VALBERG product. Selected, tested and recommended by ELECTRO DEPOT, VALBERG branded products are easy to use, reliable and of an impeccable standard. With every use of this appliance, you can be sure of complete satisfaction.
Welcome to ELECTRO DEPOT.
Visit our website: www.electrodepot.fr
Table of contents
| A Overview of the appliance | Appliance description |
| B Using the appliance | Installation Operation |
| C Practical information | Cleaning and maintenance Troubleshooting |
Appliance description
Names of microwave oven parts and accessories
Remove the microwave oven and all components from the box and microwave oven cavity. Your microwave oven is supplied with the following accessories:
- Glass tray: 1
- Turntable ring: 1
-User guide:1
Control panel
5 Observation window
2 Turntable shafts
Door assembly
3 Turntable ring
Safety interlock system
Glass tray
Oven rack cannot be used at the same time as the microwave function and must be placed on the glass tray
Installation
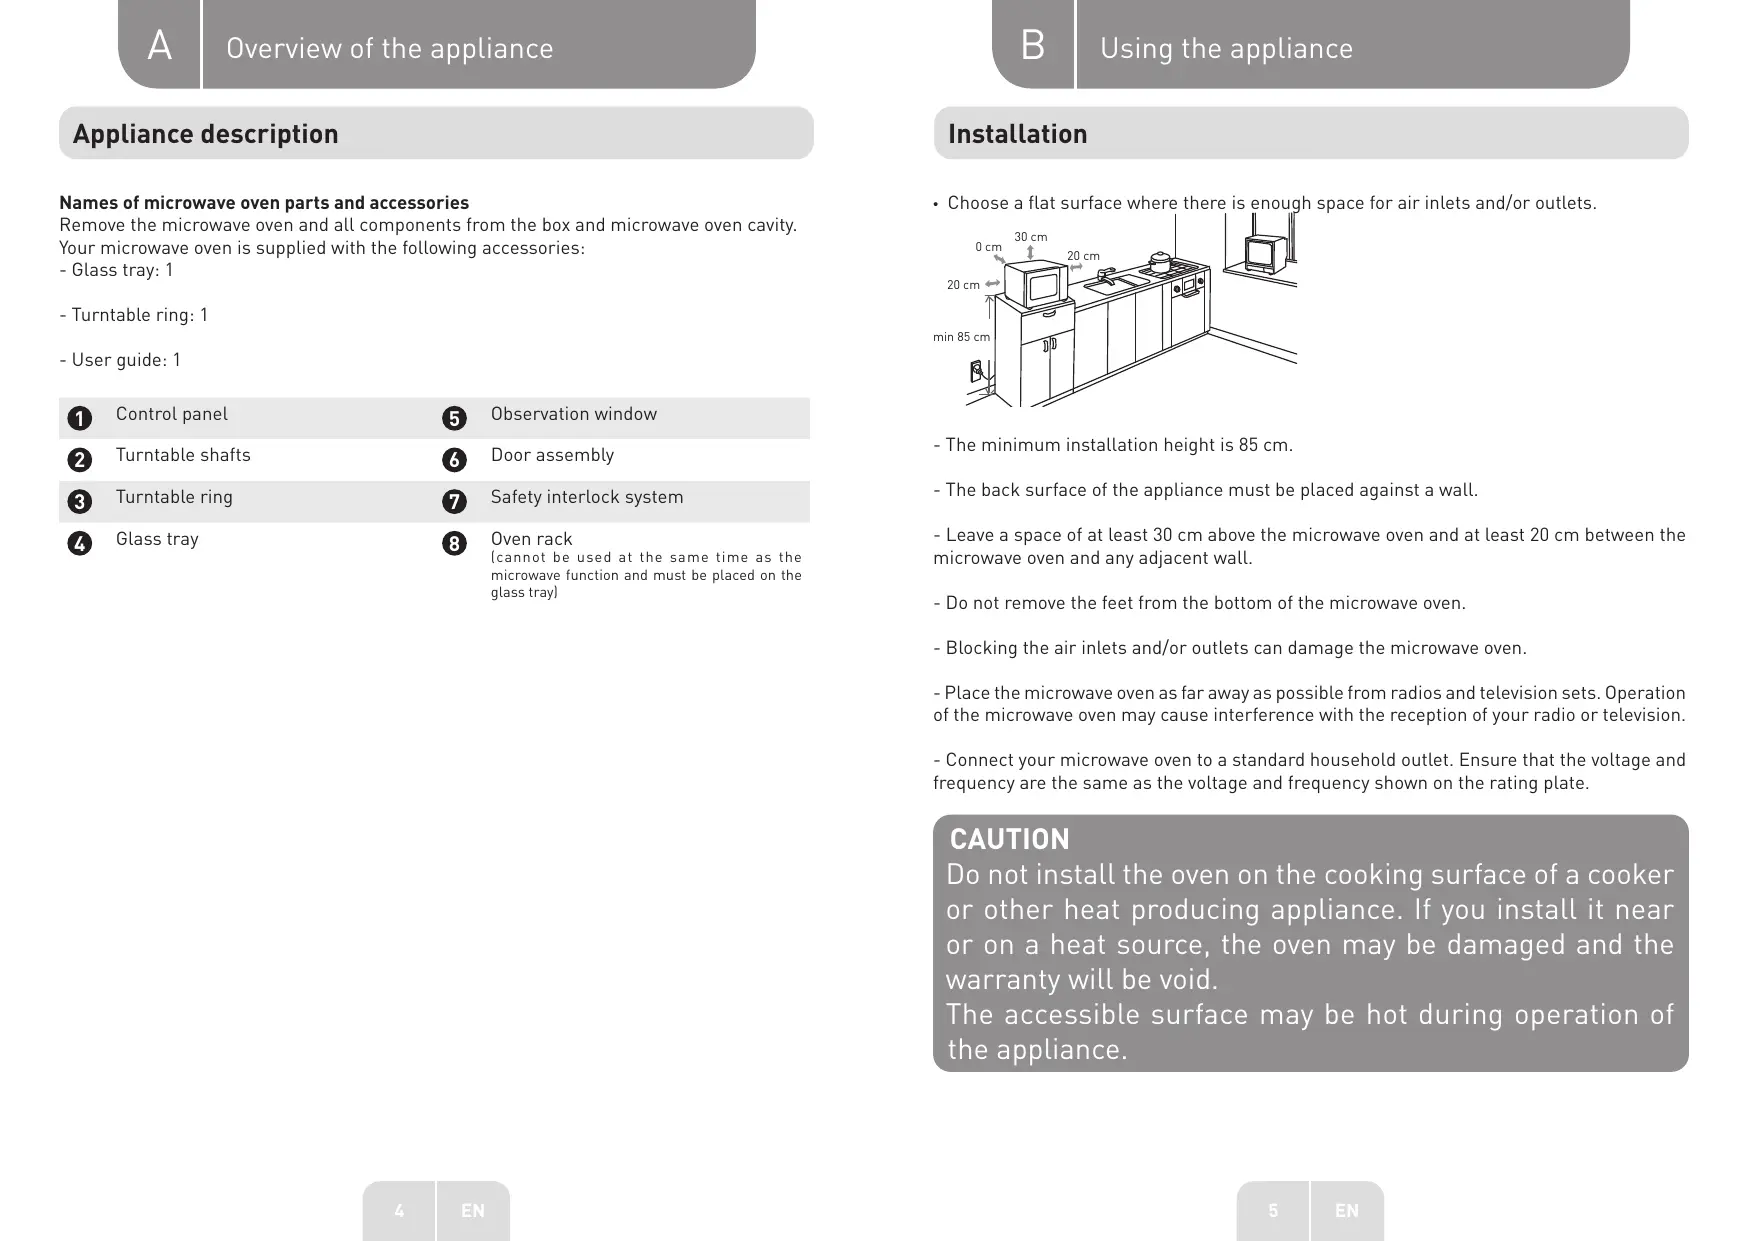
- Choose a flat surface where there is enough space for air inlets and/or outlets.
- The minimum installation height is 85~cm .
- The back surface of the appliance must be placed against a wall.
- Leave a space of at least 30~cm above the microwave oven and at least 20~cm between the microwave oven and any adjacent wall.
- Do not remove the feet from the bottom of the microwave oven.
- Blocking the air inlets and/or outlets can damage the microwave oven.
- Place the microwave oven as far away as possible from radios and television sets. Operation of the microwave oven may cause interference with the reception of your radio or television.
- Connect your microwave oven to a standard household outlet. Ensure that the voltage and frequency are the same as the voltage and frequency shown on the rating plate.
CAUTION
Do not install the oven on the cooking surface of a cooker or other heat producing appliance. If you install it near or on a heat source, the oven may be damaged and the warranty will be void.
The accessible surface may be hot during operation of the appliance.
Remove all packaging and accessories. Inspect the microwave oven for damage such as dents or a broken door. Do not install the microwave oven if it is damaged.
Cabinet: Remove any protective film from the surface of the cabinet where the microwave oven will be installed.
Do not remove the light brown mica plate attached to the oven cavity to protect the magnetron.
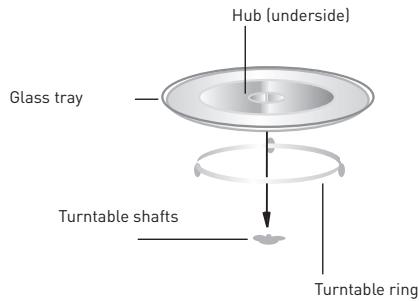
Installing the turntable ring
- Never place the glass tray upside down. The glass tray must never be restricted.
- Both the glass tray and turntable ring must always be used during cooking.
- All food and containers of food are always placed on the glass tray for cooking.
- If the glass tray or turntable ring cracks or breaks, contact your nearest authorised service centre.
Operation
Operating instructions for the control panel and features
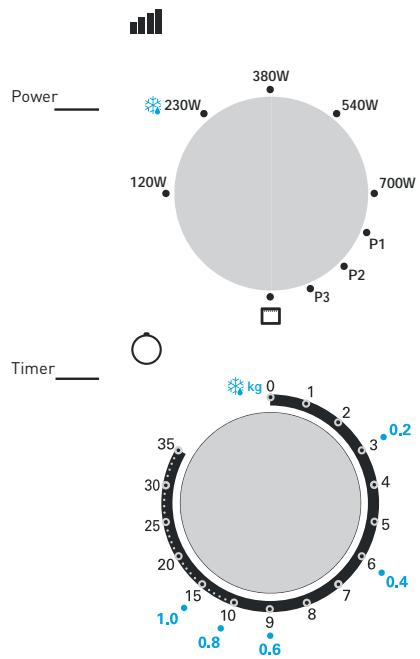
- To adjust the cooking power, turn the power knob to the desired level.
2.To set the cooking time, turn the timer knob to the desired time according to your food cooking guide. - The microwave oven automatically starts cooking once the power level and time are set.
- At the end of the cooking time, the appliance stops by sounding a bell.
5.If the device is not in use, always set the time to "0".
| Function/Power | Output | Use |
| Low power | 17% microwave power. | Softening ice cream |
| Low/medium power (defrosting) | 33% microwave power. | Soup, stew, soften butter or defrost |
| Medium power | 55% microwave power. | Stew, fish |
| Medium/high power | 77% microwave power. | Rice, fish, chicken, minced meat |
| High power | 100% microwave power. | Reheating, milk, boiling water, vegetables, drinks |
| Combination 1 | 80% grill and 20% microwave | Sausages, lamb, kebabs, seafood, steaks |
| Combination 2 | 70% grill and 30% microwave | Chicken pieces, chicken fillets, pork chops |
| Combination 3 | 60% grill and 40% microwave | Whole chicken |
| Grill | 100% grill | Baking bread, sliced meats |
CAUTION
When removing food from the oven, make sure to turn off the oven by setting the timer button to 0 (zero). If you do not do this and the microwave oven is operating without food inside, it may cause overheating and damage the magnetron.
| Microwave oven interfering with TV reception | The operation of the microwave oven may cause interference with radio or television reception. This interference is similar to that of small electrical appliances, such as blenders, hoovers and electric fans. This is completely normal. |
| Poor oven lighting | When cooking at low power, the oven lighting may be less intense. This is completely normal. |
| Steam build-up on the door, hot air coming out of the vents | During cooking, food may produce steam. Much of it escapes through the air vents. But it is possible that some of it will accumulate on a cool spot, such as the oven door. This is completely normal. |
Starting the microwave oven accidentally Do not operate the appliance without any without food inside. food inside. This is very dangerous.
Materials you can use in a microwave oven
| Utensils | Notes |
| Browning dish | Follow the manufacturer's instructions. The bottom of the browning dish should be at least 5 mm from the turntable. The turntable can break if not used properly. |
| Crockery | Microwave-safe only. Follow the manufacturer's instructions. Do not use cracked or chipped dishes. |
| Glass jars | Always remove lid. Use only to heat food until just warm. Most glass jars are not heat resistant and may break. |
| Glassware | Heat-resistant oven glassware only. Make sure there is no metallic trim. Do not use cracked or chipped dishes. |
| Oven cooking bags | Follow the manufacturer's instructions. Do not close with a metal tie. Make slits to allow steam to escape. |
| Paper plates and cups | Use for short term cooking/reheating only. Do not leave oven unattended while cooking. |
| Paper towels | Use to cover food for reheating and absorbing fat. Use with supervision for short-term cooking only. |
| Wax paper | Use it to cover food to prevent splattering or as a wrap for steaming. |
| Plastic | Microwave-safe only. Follow the manufacturer's instructions. Should be labelled “Microwave Safe”. Some plastic containers soften, as the food inside gets hot. “Cooking bags” and tightly closed plastic bags should be slit, pierced or vented according to the instructions on the packaging. |
| Plastic wrap | Microwave-safe only. Use to cover food during cooking to retain moisture. Do not allow plastic wrap to touch food. |
| Thermometers | Microwave-safe only (meat and candy thermometers). |
| Wax paper | Use as a cover to prevent splattering and retain moisture. |
Materials to be avoided in a microwave oven
| Utensils | Notes |
| Aluminium tray | May cause arcing. Transfer the food into a microwave-safe dish. |
| Food carton with metal handle | May cause arcing. Transfer the food into a microwave-safe dish. |
| Metal or metal-trimmed utensils | Metal shields the food from the microwave energy. Metal trim may cause arcing. |
| Metal twist ties | May cause arcing and could cause a fire in the microwave oven. |
| Paper bags | May cause a fire in the microwave oven. |
| Plastic foam | Plastic foam may melt or contaminate the liquid inside when exposed to high temperatures. |
| Wood | Wood will dry out when used in the microwave oven and may split or crack. |
Utensils
CAUTION
Risk of personal injury It is dangerous for any unqualified person to carry out repairs or maintenance that require the removal of the oven cover, which protects against exposure to microwave energy.
Please refer to the instructions under "Materials you can use in a microwave oven" and "Materials to be avoided in a microwave oven". There are some non-metallic utensils that cannot be safely used for cooking in a microwave oven. If in doubt, you can test the relevant utensil by following the procedure below.
Utensil test:
- Fill a microwave-safe container with 1 cup of cold water (250ml) along with the relevant utensil.
2.Cook on maximum power for 1 minute. - Carefully touch the utensil. If it is warm, do not use it for microwave cooking.
4.Do not exceed 1 minute of cooking time.
Cleaning and maintenance
Ensure to disconnect the appliance from the power source.
- Clean the oven cavity after use with a slightly damp cloth.
- Clean the accessories in the usual way in soapy water.
- The door frame, door seal and adjacent parts should be cleaned thoroughly with a damp cloth when dirty.
- Do not use abrasive cleaners or hard metal scrapers to clean the glass on the microwave oven door. These could scratch the surface and break the glass.
- Cleaning tips
To make it easier to clean the walls of the cavity with which food may come into contact: Place half a lemon in a bowl, add 300 ml of water and heat the microwave oven on full power for 10 minutes. Clean the microwave oven by wiping it with a soft, dry cloth.
Troubleshooting
| Problem | Possible cause | Remedy |
| Unable to start the oven. | (1) Power cord is not plugged in. | Unplug it. Then plug it back in after 10 seconds. |
| (2) Fuse blown or switching on circuit breaker. | Replace the fuse or reset the circuit breaker (repair to be carried out by a qualified member of our company) | |
| (3) Problem with the socket. | Test the socket with other electrical appliances. |
The oven does not heat (4) Door not properly closed. Close the door well. up.