
Pro 15 bars - Espresso Coffee Maker PICKYOO - Free user manual and instructions
Find the device manual for free Pro 15 bars PICKYOO in PDF.
| Product Type | Combined espresso machine with drip coffee function |
| Brand | PICKYOO |
| Model | Pro 15 bars |
| Pressure | 15 bars |
| Power supply | 230 V ~ 50 Hz |
| Rated power | 1850 W |
| Water tank capacity | 1.25 L |
| Main functions | Espresso, cappuccino, drip coffee, steam production, preheating, auto shut-off |
| Usable coffee type | Ground coffee (espresso and drip) |
| Included accessories | Metal filter holder, nylon filter, steam nozzle, carafe (drip), small carafe, drip tray, removable grid |
| Main materials | Plastic, stainless steel (grid, nozzle), glass (carafe) |
| Safety | Auto shut-off after 25 min (espresso) or 35 min (drip coffee), overheating protection, grounded plug |
| Maintenance and cleaning | Regularly clean removable parts with soapy water; descaling recommended every 2-3 months with citric acid |
| Dimensions (approx.) | Not specified (estimated: W 30 x D 25 x H 35 cm) |
| Weight (approx.) | Not specified (estimated: 4 kg) |
| Warranty | Standard manufacturer warranty (refer to seller) |
Frequently Asked Questions - Pro 15 bars PICKYOO
User questions about Pro 15 bars PICKYOO
0 question about this device. Answer the ones you know or ask your own.
Ask a new question about this device
Download the instructions for your Espresso Coffee Maker in PDF format for free! Find your manual Pro 15 bars - PICKYOO and take your electronic device back in hand. On this page are published all the documents necessary for the use of your device. Pro 15 bars by PICKYOO.
USER MANUAL Pro 15 bars PICKYOO
pickingo COMBINÉ EXPRESSO CAFETIÈRE
24 Product description
25 Introduction
26 For your safety
28 Operational use
29 Operating manual
29 Make coffee
30 Pre-heating
30 Make expresso
31 Make cappuccino
33 Producing steam
34 Automatic power off
34 Clean and maintenance
34 Clean and mineral deposits
35 Clean and mineral deposits
36 Trouble shooting
With this unit, you have purchased a quality item, benefiting from the experience of Yoo DigitalTM in the field of cooking. It meets the quality criteria Yoo DigitalTM : the best materials and components – have been used in its manufacture, and it has been subjected to strict controls.
We hope that its use gives you full satisfaction and ask you to read carefully the instructions given in this manual, as they provide, among other things, important information about the safe installation, use and maintenance.
Keep your record, you may need to refer to it in the future..
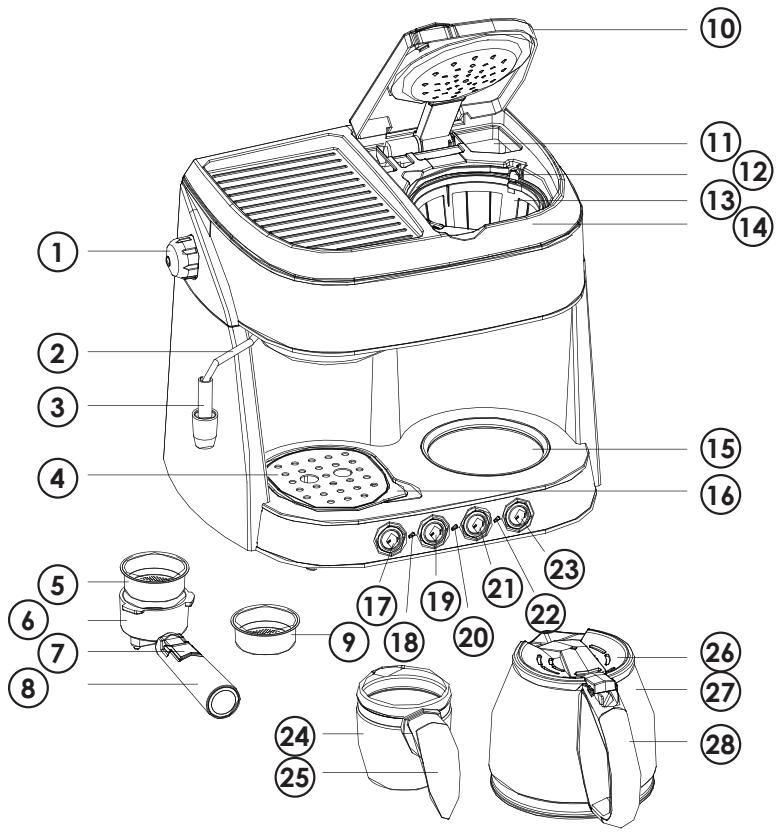
- Steam controller
- Steam tube
3.Frothing device - Removable shelf
5.Steel mesh (for ground coffee)
6.Metal funnel - Press bar (press steel mesh with it when for coffee residue to avoid it's slipping out)
8.Metal funnel handle - Support metal container (for pod coffee)
- Top cover
- Water tank
- Funnel (for drip coffee)
-
Nylon filter (for drip coffee)
-
Funnel support
- Keeping warm plate
- Drip tray
- On/Off 1 switch (for pre-heating)
- Indicator 1
- MODE switch (for steam or expresso)
- Indicator 2
- START/STOP switch
- Indicator 3
- On/Off 2 switch (for drip coffee)
- Small carafe
- Small carafe handle
- Carafe lid
- Carafe
- Carafe handle
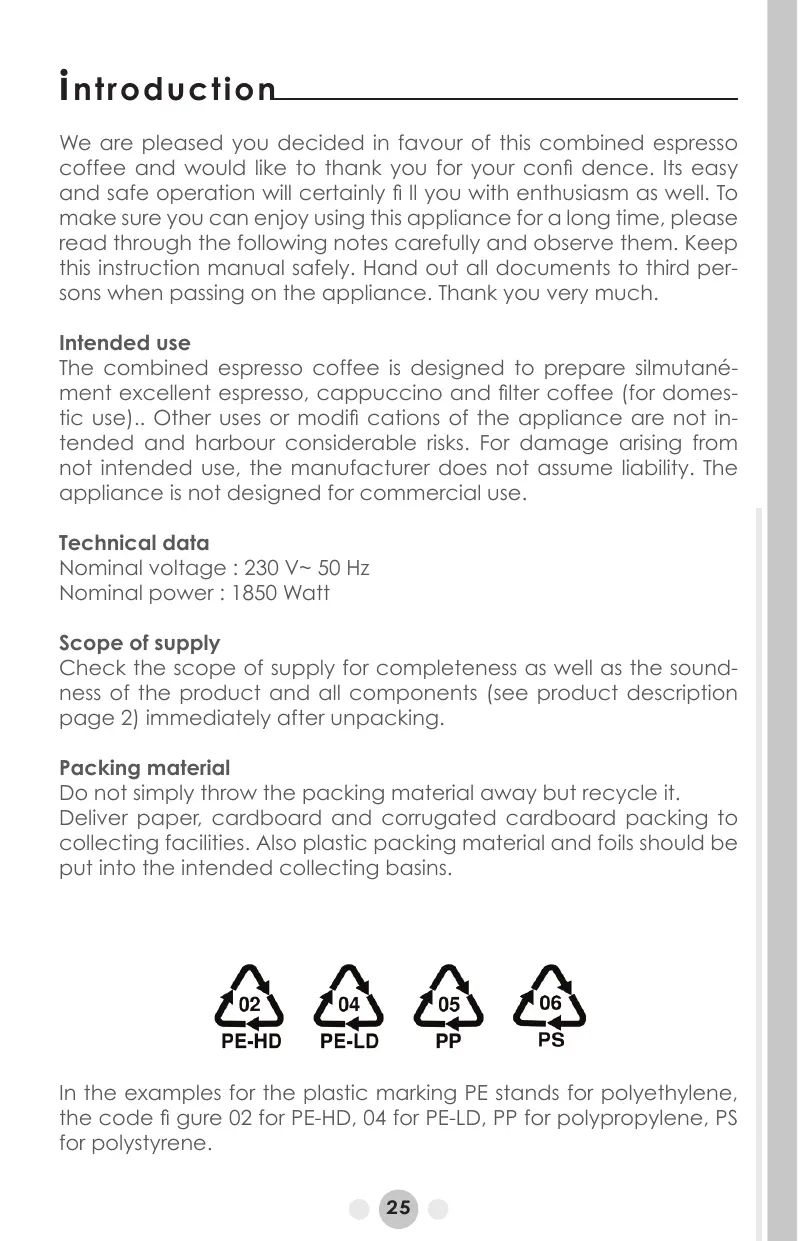
Introduction
We are pleased you decided in favour of this combined espresso coffee and would like to thank you for your confidence. Its easy and safe operation will certainly fit you with enthusiasm as well. To make sure you can enjoy using this appliance for a long time, please read through the following notes carefully and observe them. Keep this instruction manual safely. Hand out all documents to third persons when passing on the appliance. Thank you very much.
Intended use
The combined espresso coffee is designed to prepare siltutanément excellent espresso, cappuccino and filter coffee (for domestic use).. Other uses or modifi cations of the appliance are not intended and harbour considerable risks. For damage arising from not intended use, the manufacturer does not assume liability. The appliance is not designed for commercial use.
Technical data
Nominal voltage : 230 V~ 50 Hz
Nominal power : 1850 Watt
Scope of supply
Check the scope of supply for completeness as well as the soundness of the product and all components (see product description page 2) immediately after unpacking.
Packing material
Do not simply throw the packing material away but recycle it. Deliver paper, cardboard and corrugated cardboard packing to collecting facilities. Also plastic packing material and foils should be put into the intended collecting basins.

In the examples for the plastic marking PE stands for polyethylene, the code fi gure 02 for PE-HD, 04 for PE-LD, PP for polypropylene, PS for polystyrene.

Warning
Read all safety advices and instructions. Non-observance of the safety advices and instructions may cause electric shock, fire and/or bad injuries.
Before using the electrical appliance, the following basic precautions should always be followed including the following :
- Read all instructions.
- Before using check that the voltage of wall outlet corresponds to rated voltage marked on the rating plate.
- This appliance has been incorporated with a grounded plug. Please ensure the wall outlet in your house is well earthed.
- To protect against fire, electric shock and injury to persons do not immerse cord, plug, in water or other liquid.
- Remove plug from wall outlet before cleaning and when not in use. Allow appliance cool down completely before taking off, attaching components or before cleaning.
- Do not operate any appliance with a damaged cord or plug or after the appliance malfunctions, or is dropped or damaged in any manner, return appliance to the nearest authorized service facility for examination, repair or electrical or mechanical adjustment.
- The use of accessory attachments not recommended by the appliance manufacturer may result in fire, electric shock or injury to persons.
- Place appliance on flat surface or table, do not hang power cord over the edge of table or counter.
- Ensure the power cord do not touch hot surface of appliance.
-
Never use the coffee maker in the environment of high temperature, high magnetic field and humidity, do not place the coffee maker on or hot surface or beside fire or another electrical appliance, such as on the top of refrigerator, avoid to be damaged. And also never place another objects on the top of coffee maker.
-
To disconnect, remove plug from wall outlet. Always hold the plug. But never pull the cord.
- Do not use appliance for other than intended use and place it in a dry environment.
- This appliance can be used by children aged from 8 years and above and persons with reduced physical, sensory or mental capabilities or lack of experience and knowledge if they have been given supervision or instruction concerning use of the appliance in a safe way and understand the hazards involved. Children shall not play with the appliance. Cleaning and user maintenance shall not be made by children without supervision.
- Be careful not to get burned by the steam.
- Some parts of appliance are hot when operated (such as stainless decorated plate, drip tray shelf, top cover, steam tube and froth nozzle and so on), so do not touch with hand directly. Only use the handle or knob.
- Clean and maintain the coffee maker regularly according to the section of "Cleaning and maintenance" to ensure the quality of coffee and the using life of appliance. And add lubricant oil on the running parts regularly.
- If you do not want to use the appliance for a long time, firstly clean all the detachable components, and dry them for storage.
- During the coffee maker is on the states of making coffee, making hot water and making steam, never open the side door to remove the component and shut off the power. The detail operation refers to the operation manual.
- When the appliance prompts trouble, never operation the appliance, do not place the foreign object into the brewer.
- Never use the detergent or hot water for cleaning the brewing component, to avoid the running component is lack of lubricant oil and the component will be distortion as the high temperature.
- Do not let the coffee maker operate without water.
- Do not use outdoors.
- Save these instructions.
Operational use of the panel.
Espresso coffee ( ① switch I)
Push the button for espresso preparation
Indicator 1 will come on
When the indicator 2 comes on
Push the MODE Switch to "espresso" position and push the start/stop switch to "start" to make espresso coffee
MODE SWITCH and START/STOP SWITCH
1)Push the switch to make espresso coffee when the indicator 2 comes on
When desired coffee is obtained or the color of coffee changes weak obviously
Push the START/STOP switch to the “ STOP” position to stop making coffee
2)Push the switch to make froth from milk
Push the switch I and MODE Switch to "froth" position
Indicator 1 will come on
When the indicator 2 comes on, and keep START/STOP Switch at "stop" Position
Use the steam controller to release the steam to cup
When the required purpose is reached
Turn the steam controller to off position to stop generating the steam
Drip coffee ( ① switch II)
This is used to make drip coffee only
When selected the process of making coffee will start. Indicator 3 comes on
It is a assumed that the user has filled the reservoir with water and coffee powder in the machine
When finished, the indicator 3 stays on indicating, the plate is warming.
When warming is not needed, the user turns off the switch II by pressing for 3s manually. Indicator 3 is off
Operating manual
To ensure the first cup of coffee tastes excellent, you should rinse the coffee maker with warm water as follows:
- Open the top cover, and pour 1250ml water into water tank.
- Set nylon funnel in the funnel support (add no coffee powder). Place a paper filter in the funnel, and then replace the top cover.
- Set steel mesh into metal funnel (no coffee in steel mesh).
- Place carafe on keeping warm plate and put small carafe on removable shelf.
- Plug the power cord into the outlet. Press the ① switch II for drip coffee, the indicator 3 will be illuminated. The appliance will begin working. You may stop to brew by pressing the ① switch II for 3s at any time, the indicator 3 will be extinguished. The appliance will continue brewing once pressing the ① switch II again.
- Press ① switch I for espresso coffee, the indicator 1 is illuminated. The coffee maker begins to be preheated. When the indicator 2 is illuminated, the preheating is finished, pressing MODE SWITCH to “Espresso” position and press START/STOP SWITCH to “Start” position and water will flow out.
- After water not dropping out any more. You can pour the water in each container out then clean them thoroughly, now you can start brewing.
Note: There may be noise when pump the water on the first time, it is normal, the appliance is releasing the air in the appliance. After about 20s, the noise will disappear.
make coffee
- Open the top cover, and pour proper drinking water into water tank according to the gauge. Then close the tank cover.
- Place the funnel into the funnel support, and make sure it is assembled correctly. Put the filter correctly.
- Add coffee powder into filter with measuring spoon, a spoon coffee powder can make a cup of top-grade coffee, but you can adjust according to the taste yourself.
- Close the top cover, and then insert the carafe on keeping warm plate horizontally.
- Plug the power cord into the outlet, press the switch ① button, the indicator 3 will be illuminated. The appliance will begin working. You may stop to brew by pressing the switch ① button and holding for 3s at any time.
Note: at any time, you can take out carafe to serve but the time
cannot exceed 30 seconds.
- When the process is finished, if you do not want to serve immediately, keep the switch on, the coffee can be kept warm in the keeping warm plate until the power is cut off. For an optimum coffee taste, serve it just after brewing.

Be noted
1 After 35 minutes of turning on the power switch, the unit will power off automatically. 2 When you want to turn off the unit, you should press and hold the ① Switch II for 3S.
Pre-heating
To make a cup of good hot espresso coffee, we recommend you to preheat the appliance before making coffee, including the funnel, filter and cup, so that the coffee flavour can not be influenced by the cold parts.
- Open the top cover, and fill the tank with desired water according to the gauge. Replace the top cover.
- Set steel mesh into metal funnel, pull the press bar backward, make sure the tuber on the funnel aligns with groove in the appliance, then insert the funnel into the appliance from the "Insert" position and release the press bar, and you can fix them into coffee maker firmly by turning it anticlockwise until it is at the lock position.
- Place the small carafe on removable shelf.
-
Then connecting the appliance to power supply source. Make sure the steam controller is on the off position.
-
Press switch 1, the indicator 1 is illuminated. The coffee maker begins to be preheated.
- When the indicator 2 is illuminated, you should press MODE SWITCH on the "Espresso" position and turn "START/STOP SWITCH to "start" position, there will be hot water flowing out. When the indicator 2 is extinguished, turn "START/STOP SWITCH to "stop" position to stop. The preheating is finished.
Make expresso coffee
- Remove the metal funnel by turning it in clockwise. Add coffee powder to steel mesh with measuring spoon, a spoon coffee powder can make about a cup of top-grade coffee, then press the coffee powder lightly with the tamper and remove the redundant cof-
fee powder on the edge.
- Set steel mesh into metal funnel.
- Pour out the hot water in the small carafe. Then place the hot small carafe on removable shelf.
- At the time, indicator 2 is illuminated, if indicator 2 is extinguished, wait for a moment, once indicator 2 is illuminated, you should turn "START/STOP SWITCH to "start" position, and waiting for a moment, there will be coffee flowing out.

Be noted
During operation, if indicator 2 is extinguished, you should turn "START/STOP SWITCH to "stop" position to stop make espresso coffee. After a few seconds, if indicator 2 is illuminated again, you can make espresso coffee continued by turning "START/ STOP SWITCH to "start" position, the indicator 2 is cycle on and off to maintain the water temperature is hot enough.
- You should press the ① I switch and hold for 3s to turn off it manually when desired coffee is obtained or the colour of coffee changes weak obviously, the indicator go out and the coffee maker stops working, your coffee is ready now.

Warning
Do not leave the coffee maker unattended during making the coffee, as you need operate manually sometimes!
- After finishing making the coffee, you can take the metal funnel out through turn clockwise. Then pour the coffee residue out with the steel mesh pressed by press bar.
- Let them cool down completely, then rinse under running water.
Frothing milk/Make cappuccino
You get a cup of cappuccino when you top up a cup of espresso with frothing milk.

Be noted
during making steam, the metal steel must be assembled in position.
- Prepare espresso coffee first with container big enough according to the part "MAKE ESPRESSO COFFEE", make sure that the steam controller is at the off position.
- Press the switch I and turn MODE switch to "Froth" position and keep Start/stop switch on "stop" position, waiting for until the indicator 2 is illuminated.
- Fill a jug with about 100 grams of milk for each cappuccino to be prepared, you are recommended to use whole milk at refrigerator temperature (not hot!).

Be noted
During making steam, the metal steel must be assembled in position.
- Turn the steam controller in anti-clockwise slowly, steam will come out from the adjustable steam outlet

Be noted
Never turn the steam controller rapidly, as the steam will accumulate rapidly in short time which may increase the potential of the risk of explosion. During operation, if the indicator 2 is extinguished, you should turn the steam controller to off position and waiting for until the indicator 2 is illuminated again and turn the steam controller in anti-clockwise, the steam will come out again.
- Insert the frothing device into the milk about two centimetre, froth milk in the way moving vessel round from up to down.
- When the required purpose is reached, you can turn the steam controller to off position to stop generating the steam.
Note: Clean frothing device with wet sponge immediately after steam stops generating, but care not to hurt!
- Pour the frothed milk into the espresso prepared, now the capuccino is ready. Sweeten to taste and if desired, sprinkle the froth with a little cocoa powder.
we recommend you allow the maker to cool down at least for 5 min before making coffee again. Otherwise burnt odor may occurred in your Espresso coffee.
Producing steam to heat liquids.
The steam tube (without the frothing device) can be used to make hot beverages like drinking chocolate, water or tea.
Method:
- Open the top cover, add proper drinking water into water tank according to the gauge.
- Close the top cover, then connect the appliance to power supply source.
- Make sure that the steam controller is at the off position.
- Press the ① switch I, the indicator 1 is illuminated. The coffee maker begins to be preheated. At same time Turn MODE switch to “Froth” position and keep Start/stop switch on “stop” position.
- Waiting for until the indicator 2 is illuminated, it shows that the preheating is finished.
- Remove the frothing device from the steam tube.
- Dip the steam tube into the liquid to be heated. Turn the steam controller in anti-clockwise slowly to start making steam.

Be noted
During operation, if the indicator 2 is extinguished, you must turn the steam controller to off position (first make sure there is water in the tank), waiting for until the indicator 2 is illuminated again, turn the steam controller knob in anti-clockwise, the steam will come out again.
- When the required temperature is reached (the ideal is 60^ ), you can turn the steam controller to off position to stop generating steam.
Automatic power off function for expresso
- After pressing ① switch I, if there is no any operation within 25 minutes, the unit will power off automatically.
- After pressing ① switch I, turn START/STOP switch to ‘start’ position, after pump worked for 3 minutes, the unit will power off automatically.
- After pressing ① switch I, Turn MODE switch to “Froth” position and keep Start/stop switch on “stop” position, after indicator becomes green, turn on the steam controller to release steam, the unit will power off automatically within 25 minutes.
-
After pressing ① switch I, within 25 mins, if there is no any operation, then press MODE switch or START/STOP switch, the time to power-off time will be counted from new operation.
-
Press and hold the ① switch I for 3s to turn off unit.
Clean and maintenance
- Cut off power source and let the coffee maker cool down completely before cleaning.
- Clean housing of coffee maker with moisture-proof sponge often.

Be noted
Do not clean with alcohol or solvent cleanser. Never immerse the housing in water for cleaning.
- Detach the metal funnel through turn it clockwise, get rid of coffee residue inside, then you can clean it with cleanser, but at last you must rinse with clear water.
- Clean all the detachable attachments in the water and dry thoroughly.
Clean and mineral deposits for espresso coffe
- To make sure your coffee maker operating efficiently, internal piping is cleanly and the peak flavor of coffee, you should clean away the mineral deposits left every 2-3 months.
- Fill the tank with water and descaler to the MAX level (the scale of water and descaler is 4:1, the detail refers to the instruction of descaler. Please use "household descaler", you can use the citric acid (obtainable from chemist's or drug stores) instead of the descaler
(the one hundred parts of water and three parts of citric acid).
3. According to the program of preheating, put the metal funnel (no coffee powder in it) and carafe (jug) in place. Brewing water per "PRE-HEATING".
4. Turn on the ① switch 1, the indicator 1 is illuminated, the coffee maker begins to be heated.
5. When the indicator 2 is illuminated, it shows the heating is finish. Press MODE switch to "Espresso" position and turn START/STOP switch to "start" position to make two cups coffee (about 2Oz). Then turn START/STOP switch to "stop" position.
6. Then pressing ① switch I for 3s to stop the unit immediately, make the descalers deposit in the unit at least 15 minutes.
7. Restart the unit and repeat the steps of 4-6 at least 3 times.
8. When the indicator 2 is illuminated, Press MODE switch to "Espresso" position and turn START/STOP switch to "start" position to brew until no descaler is left.
9. Then brewing coffee (no coffee powder) with tap water in the MAX level, repeat the steps of 4-6 for 3 times (it is not necessary to wait for 15 minutes in step of 6), then brewing until no water is left in the tank.
10. Repeat the step of 9 at least 3 times to make sure the piping is cleanly.
Clean and mineral deposits for dip coffee
- Fill the tank with water and descaler to the MAX level (the scale of water and descaler is 4:1, the detail refers to the instruction of descaler. Please use "household descaler", you can use the citric acid instead of the descaler (the one hundred parts of water and three parts of citric acid).
- Push carafe on keeping warm plate, pay attention to let center line of carafe aligns with that of brew basket.
- Turn on ① switch II, the indicator 3 will be illuminated. After a while, water will drop out automatically.
- After percolate the equivalent of one cup and then press ① switch off for 3s to stop the appliance.
- Leave the solution work for 15 minutes, repeat the steps of 3-5 again.
- Turn the appliance on and run off the water until the water tank is completely empty.
- Rinse by operating the appliance with water at least 3 times.
| Symptom | Cause | Corrections |
| Carafe leakage water or water leaks out from lid of carafe. | The carafe is not located properly. | Let centreline of carafe aligns with leakage opening of brew basket well. |
| The level of water in the tank exceeds the scale of MAX. | The water level in the tank should be within the scale of MIN and MAX. | |
| The metal parts in the tank have rust. | The descaler is not re com mended type. It may corrode the metal parts in the tank. | Use the descaler recommended by manufacturer. |
| Water leaks from the bottom of coffee maker. | There is much water in the drip tray. | Please clean the drip tray. |
| The coffee maker is malfunction. | Please contact with the authorized service facility for repairing. | |
| Water leaks out of outer side of filter. | There is some cof-fee powder on filter edge. | Get rid of them. |
| Acid (vinegar) taste exists in Espresso cof-fee. | No clean correctly after cleaning mine-ral deposits. | Clean coffee maker per the content in “before the first use” for several times. |
| The coffee powder is stored in a hot, wet place for a long time. The coffee powder turns bad. | Please use fresh cof-fee powder, or store unused coffee pow-der in a cool, dry place. After opening a package of coffee powder,reseal it tightly and store it in a refrigerator to maintain its freshness. | |
| The coffee maker cannot work any more. | The power outlet is not plugged well. | Plug the power cord into a wall outlet correctly, if the appliance still does not work, please contact with the authorized service facility for repairing. |
| The steam cannot froth. | The steam ready indicator (green indicator) is not illuminated. | Only after the steam ready indicator (green indicator) is illuminated, the steam can be used to froth. |
| The container is too big or the shape is not fit. | Use high and narrow cup. | |
| You have used skimmed milk. | Use whole milk or half-skimmed milk. |

Be noted
During operation, if the indicator 2 is extinguished, you must turn the steam controller to off position and turn off the steam switch (first make sure there is water in the tank), waiting for until the indicator 2 is illuminated again, turn on the steam switch and turn the steam controller knob in anti-clockwise, the steam will come out again.
All information subject to change without notice!
Recycling
This symbol is a symbol of sorting garbage electrical and electronic equipment (WEEE). This means that this product should be treated in accordance with European Directive 2002/96/EC to be recycled or dismantled to minimize its impact on the environment.
For more information, contact your local or regional authorities.