
M5350 - Mobile Wi-Fi Router TP-LINK - Free user manual and instructions
Find the device manual for free M5350 TP-LINK in PDF.

| Product type | Mobile Wi-Fi router (3G/4G) |
| Brand | TP-LINK |
| Model | M5350 |
| Dimensions (L x W x H) | 94 mm x 56.8 mm x 14.7 mm |
| Weight | 105 g (with battery) |
| Power supply | Rechargeable lithium-ion battery 2000 mAh |
| Battery life | Up to 6 hours of continuous use |
| Charger | USB 5V/1A (micro-USB cable included) |
| Supported mobile network | 3G/4G LTE (depending on carrier) |
| Wi-Fi standard | 802.11 b/g/n, 2.4 GHz |
| Number of simultaneous users | Up to 10 |
| Wi-Fi security | WPA/WPA2-PSK, WEP |
| Main features | Mobile hotspot, LCD status screen, web-based management |
| Care and cleaning | Clean with a soft, dry cloth. Do not use chemical products. |
| Security | MAC filtering, NAT firewall, VPN pass-through support |
| Spare parts and repairability | Removable battery, replacement possible by a professional |
| Box contents | M5350 router, battery, USB cable, quick start guide |
| Operating temperature | 0°C to 40°C |
| Certifications | CE, FCC, IC |
Frequently Asked Questions - M5350 TP-LINK
User questions about M5350 TP-LINK
0 question about this device. Answer the ones you know or ask your own.
Ask a new question about this device
Download the instructions for your Mobile Wi-Fi Router in PDF format for free! Find your manual M5350 - TP-LINK and take your electronic device back in hand. On this page are published all the documents necessary for the use of your device. M5350 by TP-LINK.
USER MANUAL M5350 TP-LINK
Specifications are subject to change without notice. TP-LINK® is a registered trademark of TP-LINK TECHNOLOGIES CO., LTD. Other brands and product names are trademarks or registered trademarks of their respective holders.
No part of the specifications may be reproduced in any form or by any means or used to make any derivative such as translation, transformation, or adaptation without permission from TP-LINK TECHNOLOGIES CO., LTD. Copyright © 2013 TP-LINK TECHNOLOGIES CO., LTD. All rights reserved.
http://www.tp-link.com
FCC STATEMENT

This equipment has been tested and found to comply with the limits for a Class B digital device, pursuant to part 15 of the FCC Rules. These limits are designed to provide reasonable protection against harmful interference in a residential installation. This equipment generates, uses and can radiate radio frequency energy and, if not installed and used in accordance with the instructions, may cause harmful interference to radio communications. However, there is no guarantee that interference will not occur in a particular installation. If this equipment does cause harmful interference to radio or television reception, which can be determined by turning the equipment off and on, the user is encouraged to try to correct the interference by one or more of the following measures:
Reorient or relocate the receiving antenna.
- Increase the separation between the equipment and receiver.
- Connect the equipment into an outlet on a circuit different from that to which the receiver is connected.
- Consult the dealer or an experienced radio/ TV technician for help.
This device complies with part 15 of the FCC Rules. Operation is subject to the following two conditions:
This device may not cause harmful interference.
This device must accept any interference received, including interference that may cause undesired operation.
Any changes or modifications not expressly approved by the party responsible for compliance could void the user's authority to operate the equipment.
Note: The manufacturer is not responsible for any radio or TV interference caused by unauthorized modifications to this equipment. Such modifications could void the user's authority to operate the equipment.
FCC RF Radiation Exposure Statement:
This equipment complies with FCC RF radiation exposure limits set forth for an uncontrolled environment. This device and its antenna must not be co-located or operating in conjunction with any other antenna or transmitter.
"To comply with FCC RF exposure compliance requirements, this grant is applicable to only Mobile Configurations. The antennas used for this transmitter must be installed to provide a separation distance of at least 20 cm from all persons and must not be co-located or operating in conjunction with any other antenna or transmitter."
CE Mark Warning
€1588
This is a class B product. In a domestic environment, this product may cause radio interference, in which case the user may be required to take adequate measures.
This device has been designed to operate with the antennas listed below, and having a maximum gain of 5 dBi. Antennas not included in this list or having a gain greater than 5 dBi are strictly prohibited for use with this device. The required antenna impedance is 50 ohms.
To reduce potential radio interference to other users, the antenna type and its gain should be so chosen that the equivalent isotropically radiated power (e.i.r.p.) is not more than that permitted for successful communication."
Canadian Compliance Statement
This device complies with Industry Canada license-exempt RSS standard(s). Operation is subject to the following two conditions:
(1) This device may not cause interference, and
(2) This device must accept any interference, including interference that may cause undesired operation of the device.
Industry Canada Statement
Complies with the Canadian ICES-003 Class B specifications.
This device complies with RSS 210 of Industry Canada. This Class B device meets all the requirements of the Canadian interference-causing equipment regulations.
Korea Warning Statements:
当海末,自
NCC Notice & BSMI Notice
注意!
依據 低功率電波輻射性電機管理辦法
- When product has power button, the power button is one of the way to shut off the product; When there is no power button, the only way to completely shut off power is to disconnect the product or the power adapter from the power source.
- Don't disassemble the product, or make repairs yourself. You run the risk of electric shock and voiding the limited warranty. If you need service, please contact us.
- Avoid water and wet locations.
This product can be used in the following countries:
| AT | BG | BY | CA | CZ | DE | DK | EE |
| ES | FI | FR | GB | GR | HU | IE | IT |
| LT | LV | MT | NL | NO | PL | PT | RO |
| RU | SE | SK | TR | UA |
DECLARATION OF CONFORMITY
For the following equipment:
Product Description: 3G Mobile Wi-Fi
Model No.: M5350
Trademark: TP-LINK
We declare under our own responsibility that the above products satisfy all the technical regulations applicable to the product within the scope of Council Directives:
Directives 1999/5/EC, Directives 2004/108/EC, Directives 2006/95/EC, Directives 1999/519/EC,
Directives 2011/65/EU
The above product is in conformity with the following standards or other normative documents
ETSI EN 300 328 V1.7.1: 2006
ETSI EN 301 489-1 V1.9.2:2011& ETSI EN 301 489-17 V2.1.1:2009
EN 55022:2010
EN 55024:2010
EN 61000-3-2:2006+A1:2009+A2:2009
EN 61000-3-3:2008
EN 60950-1:2006+A11:2009+A1:2010+A12:2011
EN 62311:2008
The product carries the CE Mark:
C€1588
Person responsible for marking this declaration:

Yang Hongliang
Product Manager of International Business
Date of issue: 2013
CONTENTS
Package Contents 1
Chapter 1. Introduction 2
1.1 Product Overview 2
1.2 Main Features 2
1.3 Physical Description 2
Chapter 2. Hardware Installation 4
2.1 Environment Requirements 4
2.2 Hardware Installation 4
Chapter 3. Quick Installation Guide
3.1 System Requirements 7
3.2 TCP/IP Configuration 7
3.3 Wireless Connection 7
3.4 Wizard 8
Chapter 4. Device Configuration 12
4.1 Status 12
4.2 Wizard 13
4.3 SMS 13
4.3.1 New Message 13
4.3.2 Inbox 14
4.3.3 Outbox 15
4.3.4 Drafts 15
4.3.5 SMS Settings 17
4.4 Advanced 18
4.4.1 Dial-up 18
4.4.2 Wireless 24
4.4.3 DHCP Server 27
4.4.4 System Tools 29
Appendix A: FAQ 34
Appendix B: Configuring the PC 36
Appendix C: Specifications 39
Appendix D: Glossary 40
Package Contents
The following items should be found in your package:
3G Mobile Wi-Fi M5350
One power adapter
One USB cable
One battery
Quick Installation Guide
Note:
Make sure that the package contains the above items. If any of the listed items is damaged or missing, please contact with your distributor.
Conventions
The Device or M5350 mentioned in this guide stands for 3G Mobile Wi-Fi M5350 without any explanation.
Chapter 1. Introduction
1.1 Product Overview
TP-LINK's M5350 is at the forefront of wireless 3G sharing. Equipped with a built-in 3G modem, you can instantly establish your own Wi-Fi hotspot simply by inserting a 3G SIM card at the interior of the device. With up to 21.6Mbps download and 5.76Mbps upload speeds, M5350 is able to provide 3G wireless sharing to up to 10 users simultaneously. Its pocket-sized design and powerful 2000mAh internal battery make it an ideal travel companion, allowing users to work or play for hours on end. Besides, with its innovative OLED display, users can have a much more intuitive view of the device's working status, such as network type (3G/1x/R) and signal strength, network status, dial-up type, Wi-Fi status, message, battery meter, data statistics, download and upload speed, .
1.2 Main Features
Equipped with a built-in 3G modem - No other bulky devices required
HSPA+ supported with up to 21.6Mbps download and 5.76Mbps upload speeds
Supports up to 10 users simultaneously
2000mAh internal battery for extended hours of outdoor use
Portable and cobblestone design ideal for travel use
Micro USB port for versatile recharging
OLED display provides an intuitive view of the device's working status
Equipped with a micro SD card slot for up to 32GB of optional storage
1.3 Physical Description
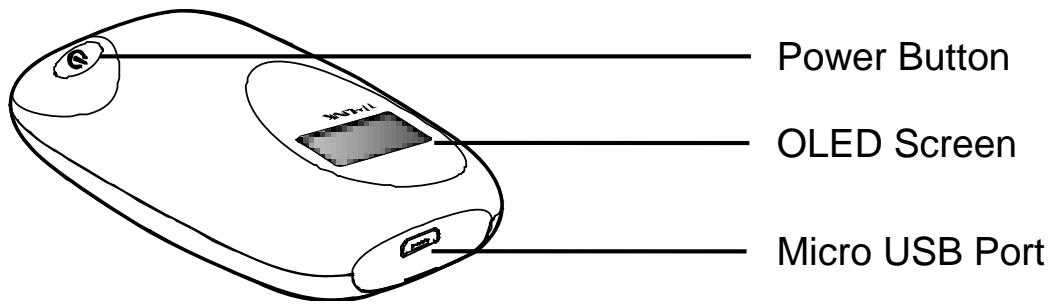
Figure 1-1 the Exterior
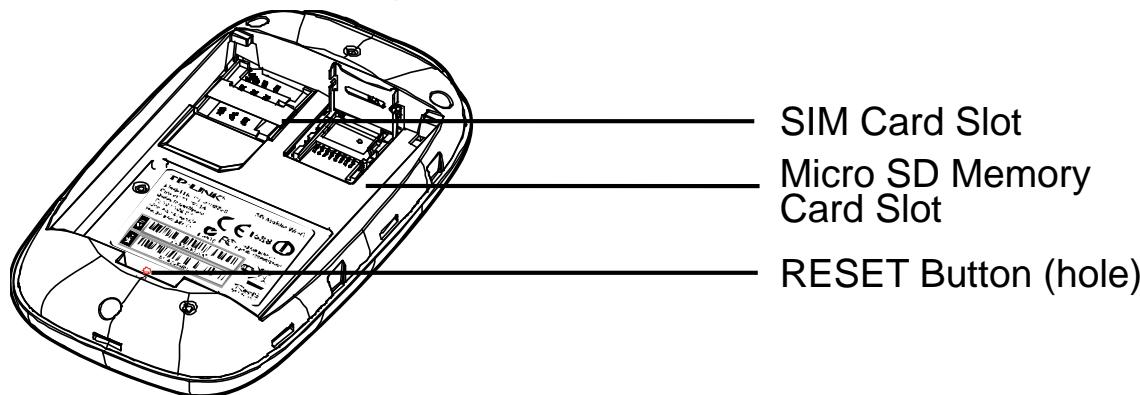
Figure 1-2 the Interior
The details about the Exterior and Interior are explained as below.
Power Button: When the Device is successfully installed, and it's powered (either by battery or electricity); press this button for about 5 seconds to turn on the Device, and if you want to turn it off, please press this button for another 3 seconds.
Micro USB Port: It's for you to connect the Device with the power adapter (attached in the package) via the USB cable.
SIM Card Slot: It's where to insert your SIM card.
Micro SD Memory Card Slot: It's where to insert your micro SD memory card.
RESET Button (hole): It's the button to restore the Device to its factory defaults. With the Device powered on, use a pin to press and hold the RESET button (hole) for about 5 seconds, until the OLED screen is off and later displays "TP-LINK"; then release the button and wait the Device to reboot and restore its factory default settings.
OLED Screen:
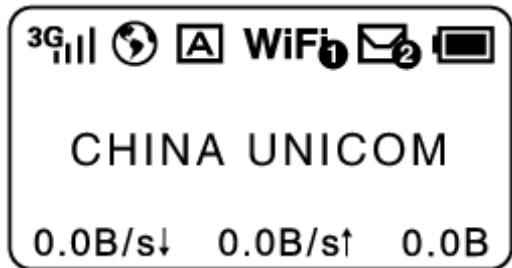
Figure 1-3 OLED Screen
The OLED Indication:
Table 1-1 The OLED Screen details
| Item | Description | Indication |
| 3G / 2G / 1G | Network type & Signal strength | Indicates the current network option: 2G or 3G, and signal strength of current network. |
| Network status | Indicates the successful network connection. | |
| M / A | Dial-up type | A Means the automatic mode of Internet connection; M Means the manual mode of Internet connection. |
| WiFi | Wi-Fi connection | Displays the Wi-Fi status and the amount of current wireless clients. |
| SMS | Indicates that there is un-read short message(s) and the amount of un-read messages. | |
| Battery | Displays the remaining battery power. | |
| 0.0B/s↓ | Download speed | Indicates the download speed of current data transmission. |
| 0.0B/s↑ | Upload speed | Indicates the upload speed of current data transmission. |
| 0.0B | Data statistics | Indicates the data used in total. The data statistics will be cleared after resetting the Device. |
Note:
Pressing the power button will light up or turn off the OLED screen. When you leave alone the buttons on the device, the OLED screen will light on for about 55 seconds and then turn off.
Chapter 2. Hardware Installation
2.1 Environment Requirements
Place the Device in a well-ventilated place far from any heater or heating vent
Avoid direct irradiation of any strong light (such as sunlight)
Keep at least 2 inches (5 cm) of clear space around the Device
Operating Temperature: 15^ 40^ (59°F ~ 104°F)
Operating Humidity: 0% 75% RH , Non-condensing
2.2 Hardware Installation
STEP 1: Install SIM card and memory card.
1) Open the cover upwards (as the arrow shows).
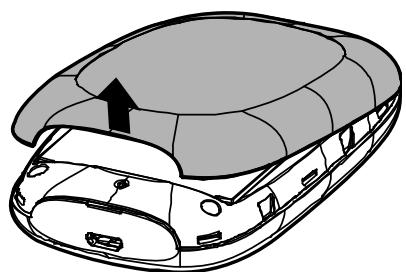
2) Make sure to have the SIM card's metal chip downwards and the triangle notch outwards, and then slide the card into its slot (in the direction as the arrow shows).

Note:
If you have a Micro-SIM or Nano-SIM, please use an adapter to convert it to a standard SIM card.
3) First, push and then lift the locker to open it. Second, have the memory card's metal chip downwards and inwards, and then fit it in its slot. Finally, put down and then pull the locker to lock it.
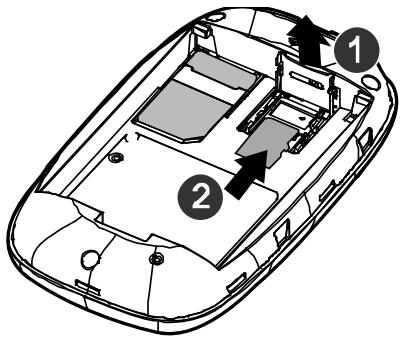

Note:
The micro SD memory card is optional. You can purchase it appropriate to your own need.
STEP 2: Install the battery.
1) Touch the metal contacts of the battery to the metal points of the Device, and then press to fit the battery body into the slot.
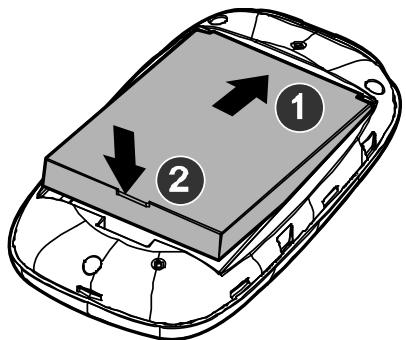
2) Before closing the cover, please note down the SSID and the wireless password on the label for later use.
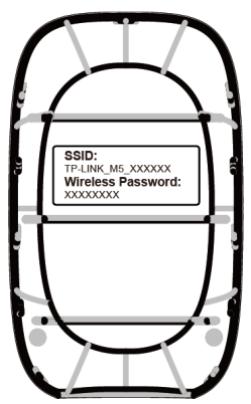
- SSD: The wireless network name of M5350
- Wireless Password: The pre-encryption of M5350
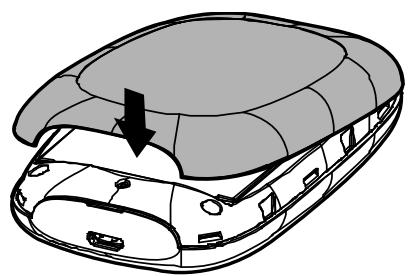
3) Close the cover by pressing it.

Note:
It's advised that you do not use M5350 until the battery has been installed.
When finishing the above two-step installation, you can press the power button

for about
5 seconds to turn on M5350.

Tips:
You are supported to charge the battery in two ways:
Method 1:
1) Connect one end of the USB cable to the micro USB port.
2) Connect the other end of the USB cable to the USB port of the power adapter.
3) Plug the power adapter to a standard wall socket.

Method 2:
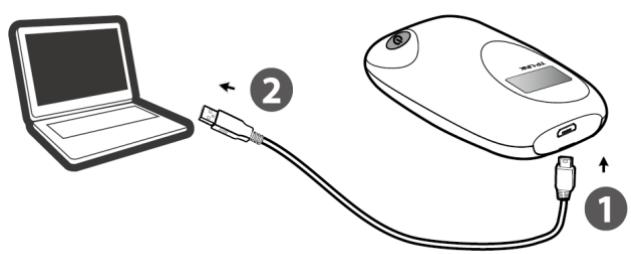
1) Connect one end of the USB cable to the micro USB port.
2) Connect the other end of the USB cable to the USB port of your PC.
Chapter 3. Quick Installation Guide
This chapter will guide you to quickly set up the basic functions for your M5350 3G Mobile Wi-Fi.
3.1 System Requirements
SIM card with Internet access enabled.
Computer with wireless network card.
Web browser, such as Mozilla Firefox, Internet Explorer, Google Chrome, Apple Safari, etc.
3.2 TCP/IP Configuration
The default IP address of the M5350 3G Mobile Wi-Fi is 192.168.0.1, and the default Subnet Mask is 255.255.255.0, which values can be changed as you desire. In this guide, we use all the default values for description, and take the configuration in Windows XP for example. While, Pads or Wi-Fi cellphones by default obtain IP address and DNS server address automatically, so you can just skip this step and continue with the 3.3 Wireless Connection.
Note:
Before configuration, please make sure your computer has been equipped with a wireless network adapter.
Obtain an IP address automatically
1) Set up the TCP/IP Protocol in "Obtain an IP address automatically" mode on your PC. Please refer to Appendix B: Configuring the PC for the detailed instructions.
2) Then the built-in DHCP server will assign an IP address for the PC.
Configure the IP address manually
Set up the TCP/IP Protocol manually for your PC. Please refer to Appendix B: Configuring the PC for the detailed instructions.
3.3 Wireless Connection
Note:
To log in the Device's web-based management page, you need to first connect to the wireless network of the Device.
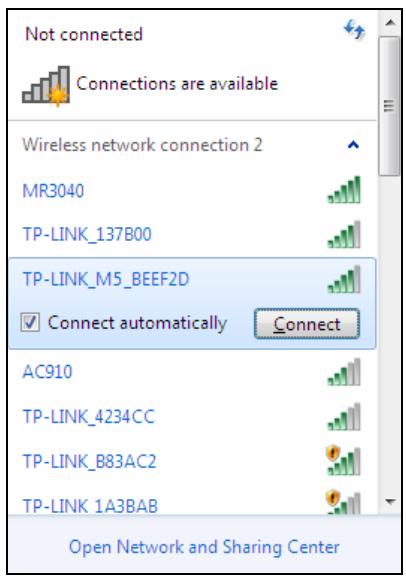
- Click the icon at the bottom of your desktop.
- Click the refresh button , and then select the SSID of M5350 and then click Connect.
Note:
The default SSID (also called Wireless Network Name) of the device is TP-LINK_M5_XXXXXXXX (XXXXXXXX is the last 6 characters of the device's MAC address).
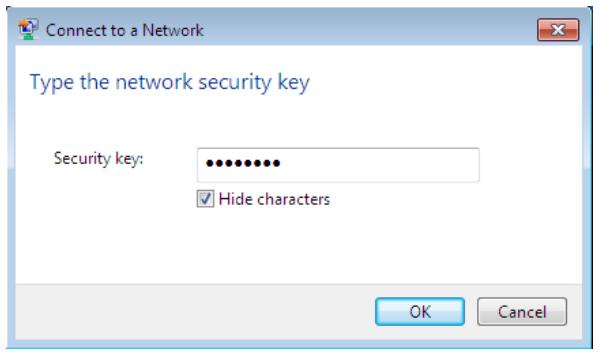
- Enter the wireless password you've noted down in the Security Key field, and then click OK.
Note:
You can refer to the label on the rear cover for the default SSD and wireless password of M5350.
- When Connected appears behind the SSID of M5350, you've successfully connected to its wireless network.
Note:
You can enjoy the 3G mobile connection instantaneously, after the device has successfully connected to M5350 (with a SIM card inserted) and M5350's OLED screen displays the network status icon. Otherwise, please continue with 3.4 Wizard to further configure your device.
3.4 Wizard
- Open a web-browser, enter the default address 192.168.0.1 in the address field and then press Enter. When the login window appears, enter admin (in lower case letters) for the Password, and then click the Log in button or press the Enter.
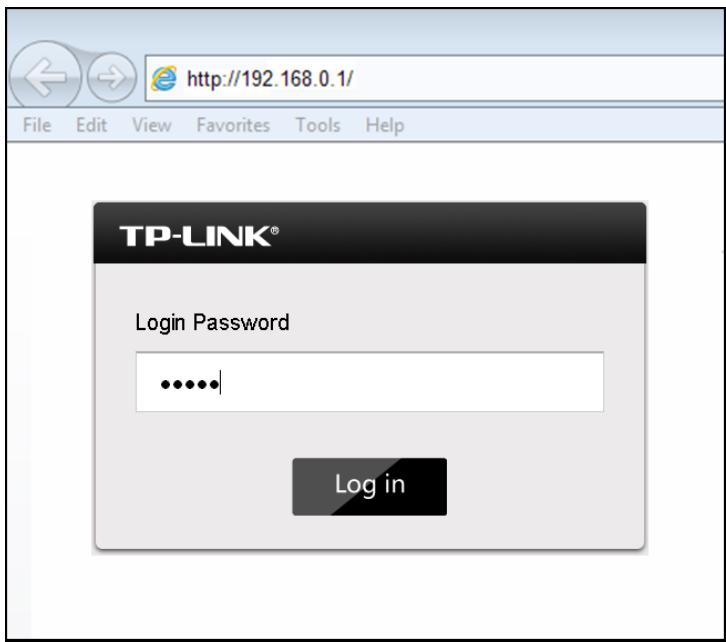
Figure 3-1 Login Window
Note:
If the above screen does not pop-up, it means that your Web-browser has been set to a proxy. Go to menu Tools > Internet Options > Connections > LAN Settings, in the screen that appears, cancel the Using Proxy checkbox, and click OK to finish it.
- After successful login, there will appear the Status page. Click Wizard to configure the basic network settings for accessing network. Click Next to continue.
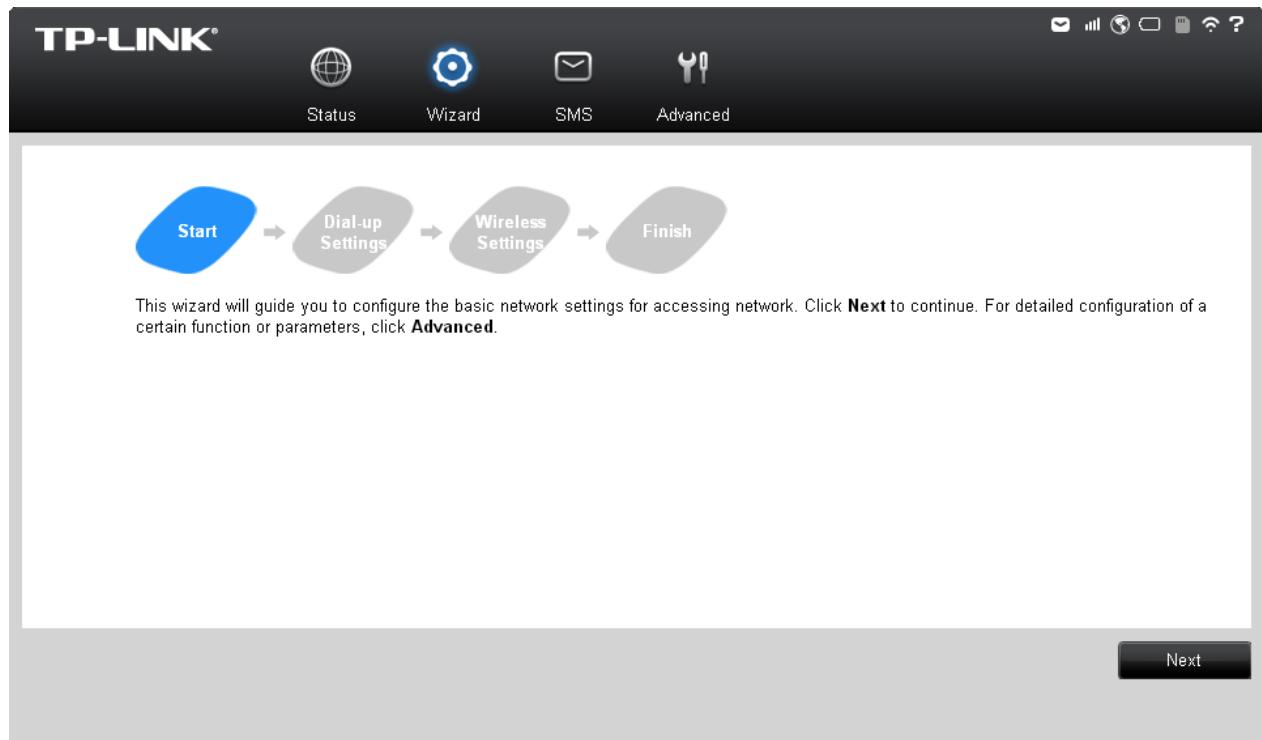
Figure 3-2 Wizard - Start
- On the Dial-up Settings page shows the ISP information of the SIM card inserted. Click Next to continue, if you are sure the information is correct. You can also click Create to create a new profile.
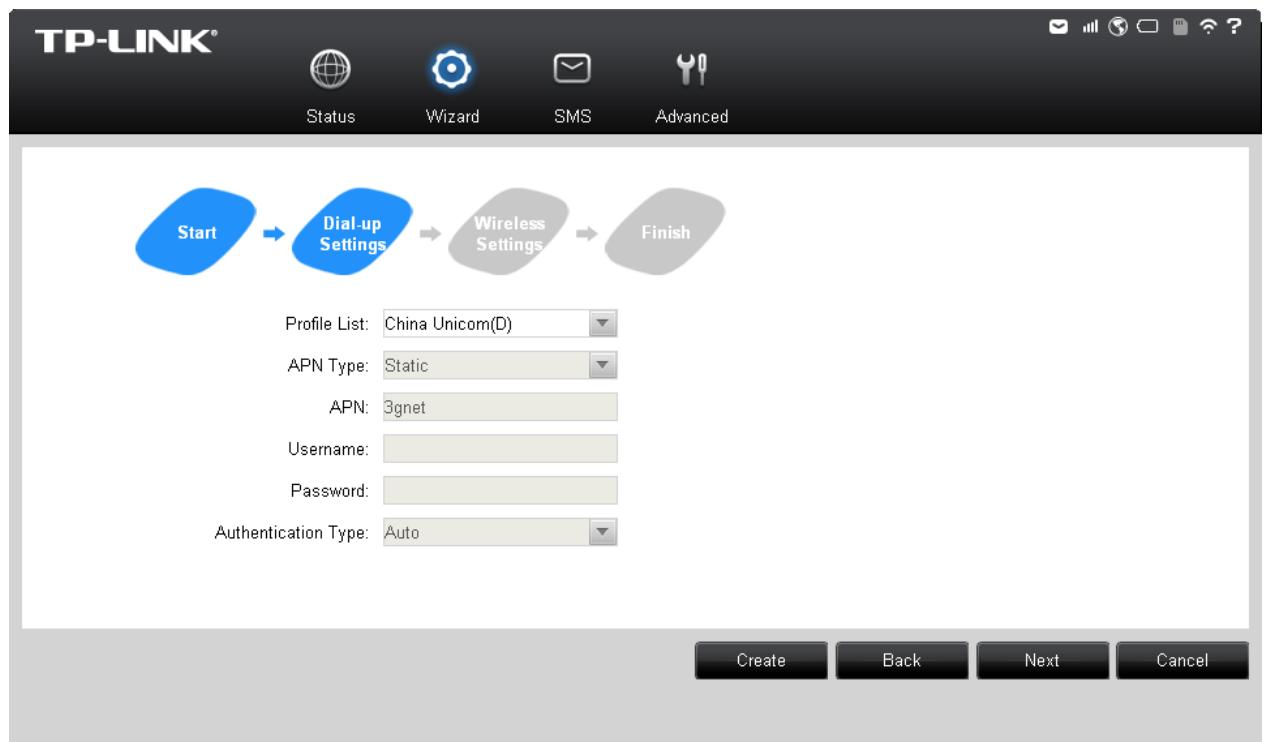
Figure 3-3 Wizard - Dial-up Settings
- On the Wireless Settings page, you can create a unique and easy-to-remember wireless network name (SSID) as well as Wireless Password, or you can keep it default. Then click Next to continue.
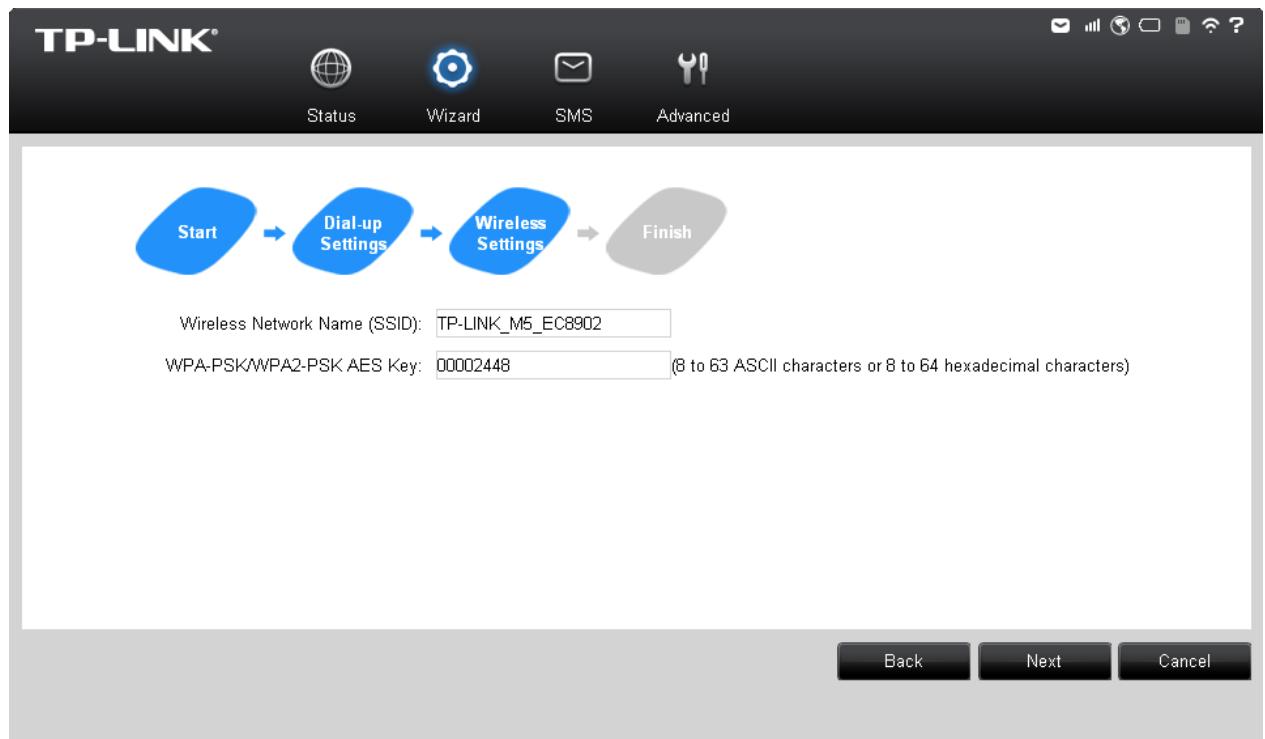
Figure 3-4 Wizard - Wireless Settings
- On the Finish page, please double-check your settings. If all the parameters are verified, click Finish to complete the Wizard; if there is anything wrong, you can click Back to re-configure it.
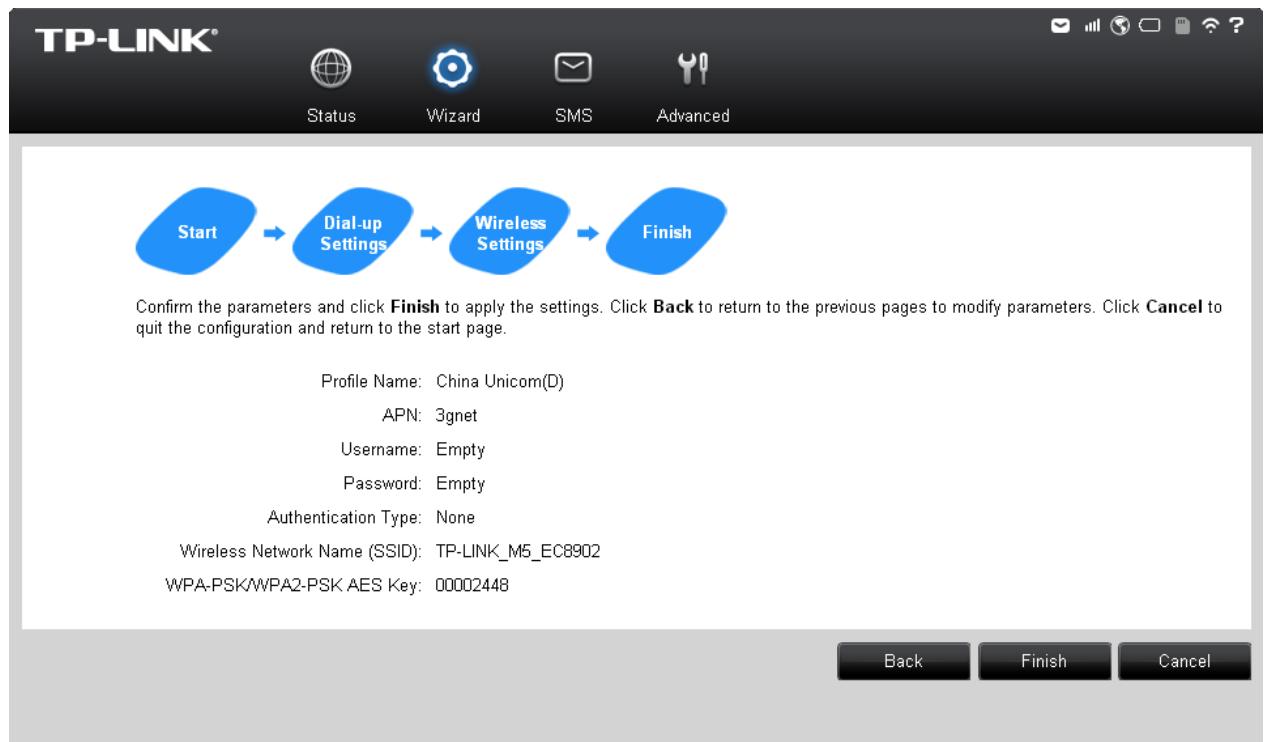
Figure 3-5 Wizard - Finish
Chapter 4. Device Configuration
After the successful login to the web-based management page of M5350, you will see the main menu listing Status, Wizard, SMS and Advanced on the top. In the following parts, these items will be explained in details, about their respective functions and configurations.

Figure 4-1 Main Menu
4.1 Status
The Status page displays the current status information about the device. All information is read-only.
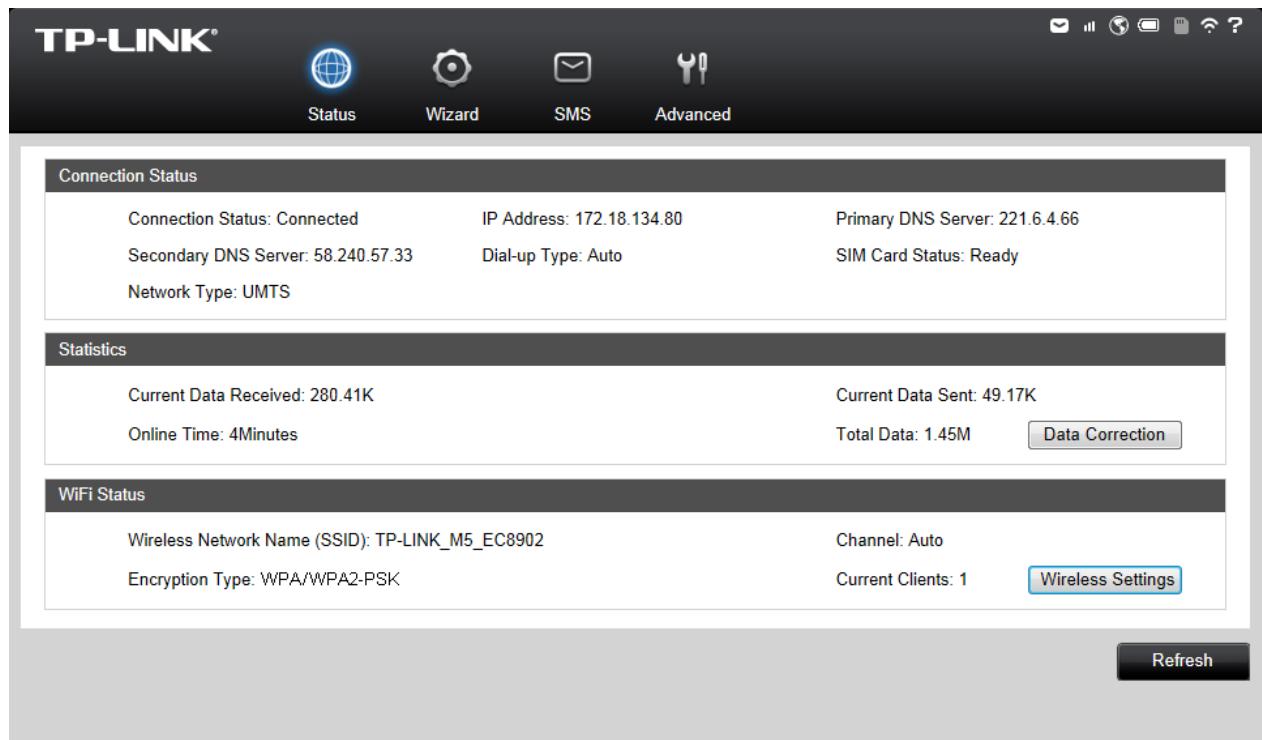
Figure 4-2 Status
Connection Status: Displays the device's current connection status, including the connection and SIM card status, Dial-up and network type, IP address, primary and secondary DNS server.
Statistic: Displays the device's statistics, including current received and sent data, online time and total data used.
WiFi Status: Displays the device's current wireless settings, including SSID, channel, encryption type and current Wireless clients.
Click Data Correction to correct the accumulate data used. If the data statistics is different from that your ISP provided, please click Data Correction button, and input the data statistics your ISP provided to correct the accumulate data used.
Click Wireless Settings to head for the Wireless Basic Settings page and configure it.
Click Refresh to get the status information updated.
4.2 Wizard
Please refer to 3.4 Wizard.
4.3 SMS
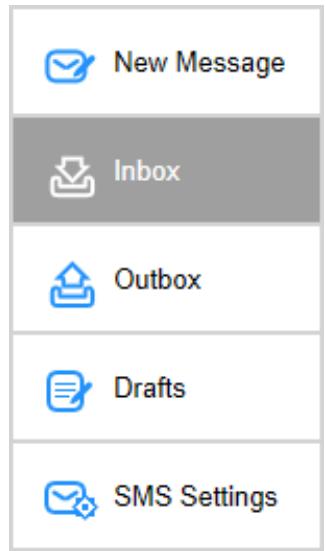
Figure 4-3 SMS Menu
There are five submenus under the SMS tab (as shown in Figure 4-3): New Message, Inbox, Outbox, Drafts and SMS Settings. Click any of them, and you will be able to configure the corresponding functions.
4.3.1 New Message
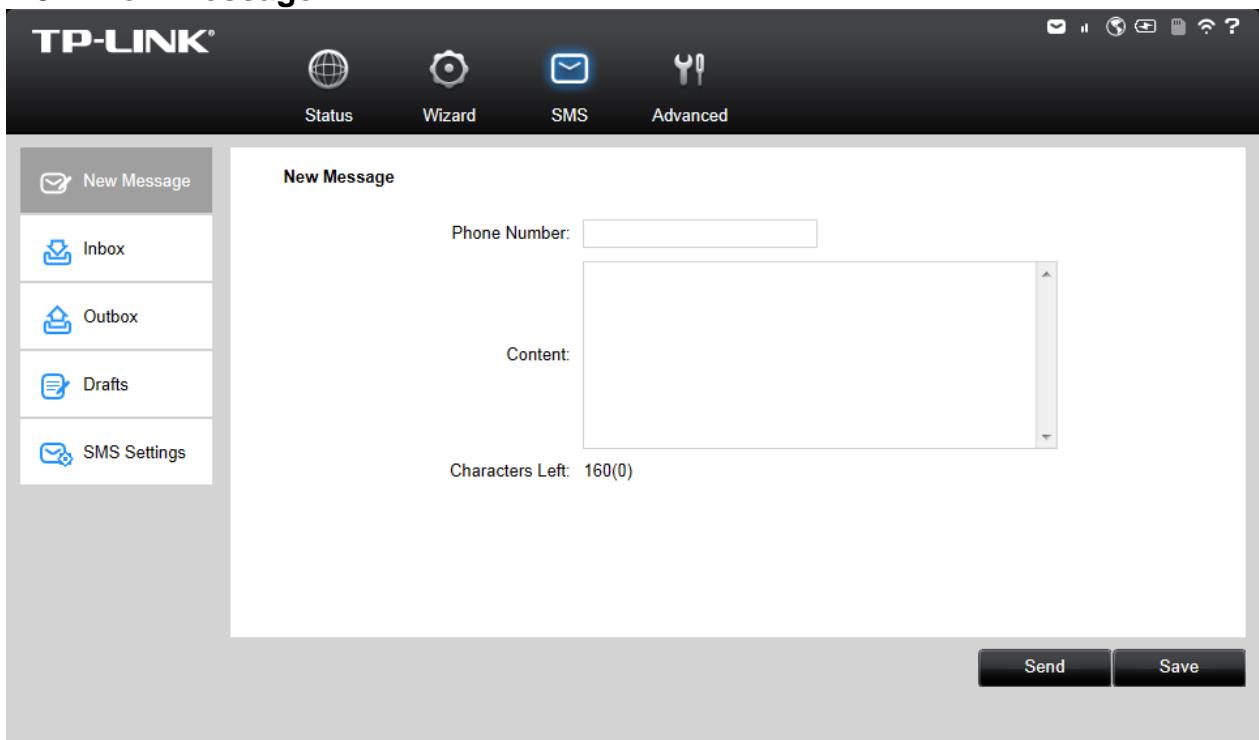
Figure 4-4 New Message
Phone Number: Enter the receiver's cellphone number.
Content:Text your message in this box.
Click Send to send the message.
Click Save to save the message in the Drafts box.
4.3.2 Inbox
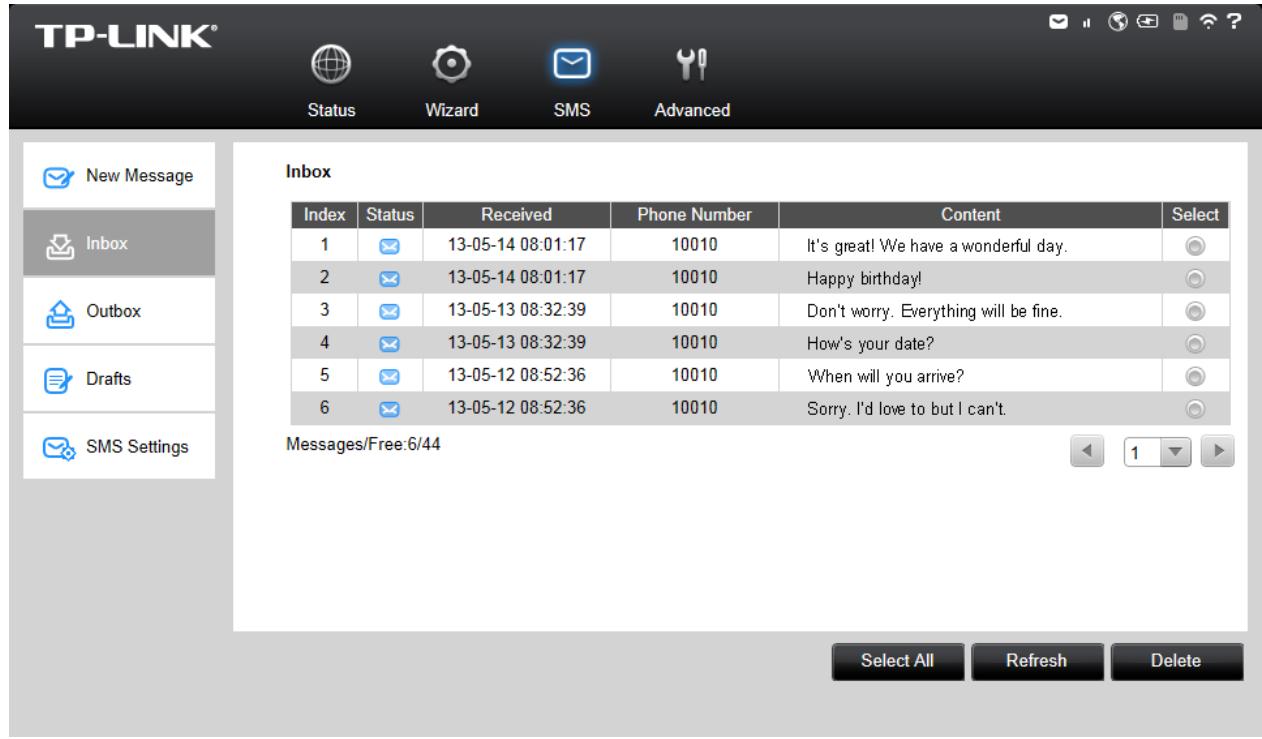
Figure 4-5 Inbox
Index: The index of the message.
Status: means the message has been read. means the message hasn't been read yet.
Received: Shows the date and time when the message was received.
Phone Number: Shows the cellphone number that sent this message.
Content: Click to unfold and read the detailed content of the message.
Select: Select the message(s) for deletion.
Click Select All to select all of the messages.
Click Refresh to refresh the inbox, and get any new message(s).
Click Delete to delete the message(s) selected.
4.3.3 Outbox
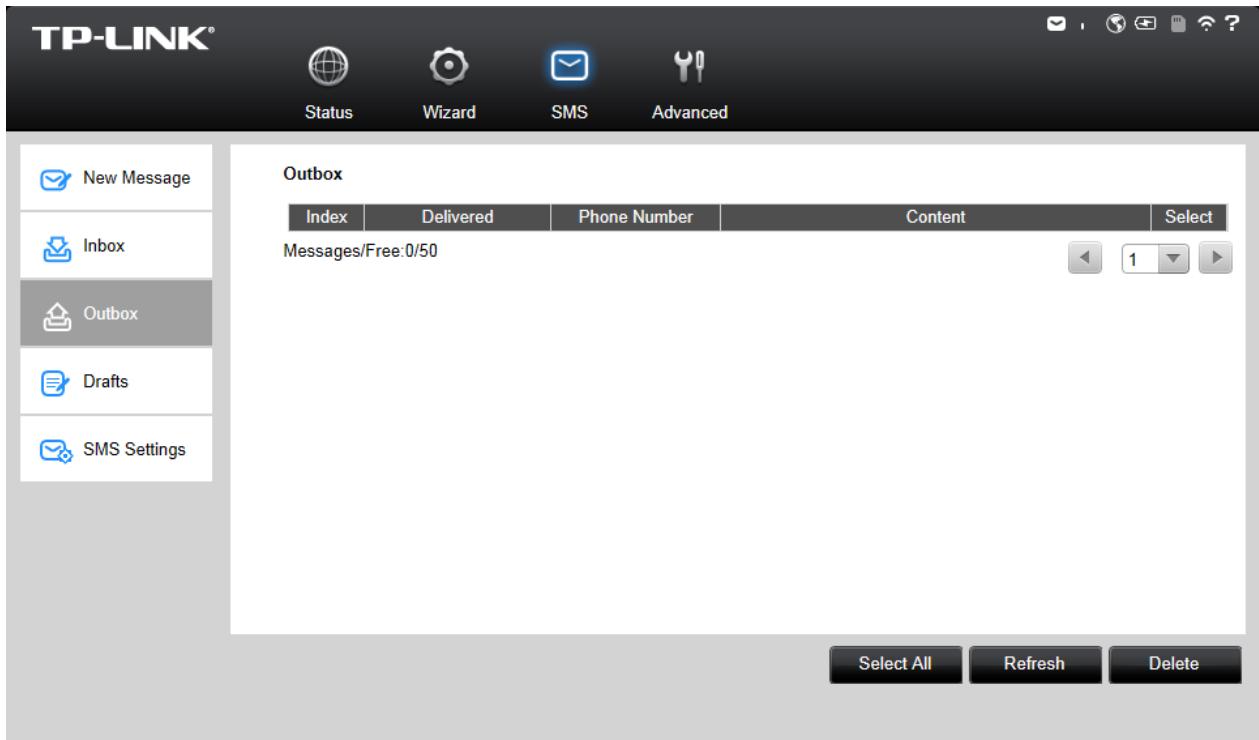
Figure 4-6 Outbox
Index: The index of the message.
Delivered: Shows the date and time when the message was sent.
Phone Number: Shows the cellphone number that the message was planned to be sent to.
Content: Click to unfold and read the detailed content of the message.
Select: Select the message(s) for deletion.
Click Select All to select all of the messages.
Click Refresh to refresh the inbox.
Click Delete to delete the message(s) selected.
4.3.4 Drafts
You can review the unsent saved message(s) on this page.

Figure 4-7 Drafts
Index: The index of the message.
Phone Number: Shows the cellphone number that this message was planned to be sent to.
Content: Click to unfold and read the detailed content of the message(s), or for further edition and delivery (as shown in Figure 4-8).
Select: Select the message(s) for deletion.
Click Select All to select all of the messages.
Click Refresh to refresh the drafts.
Click Delete to delete the message(s) selected.
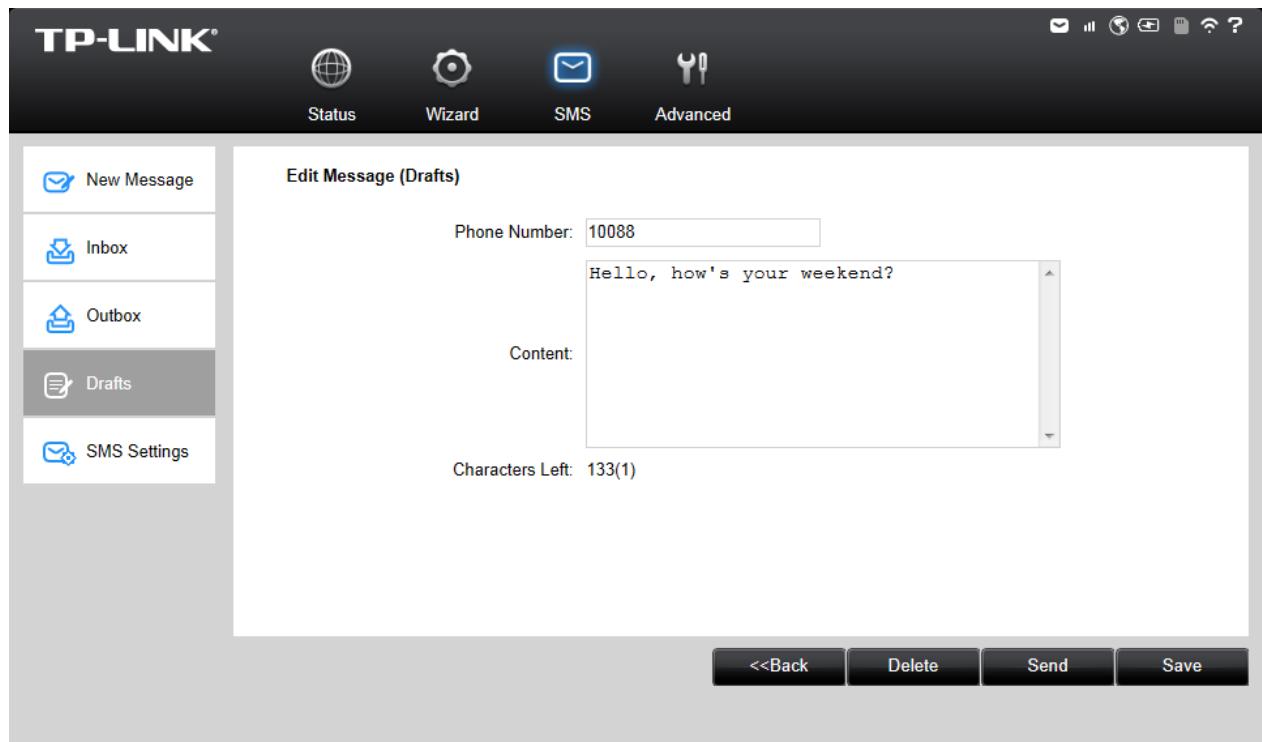
Figure 4-8 Edit Message (Drafts)
4.3.5 SMS Settings
On this page, you can do the following settings:
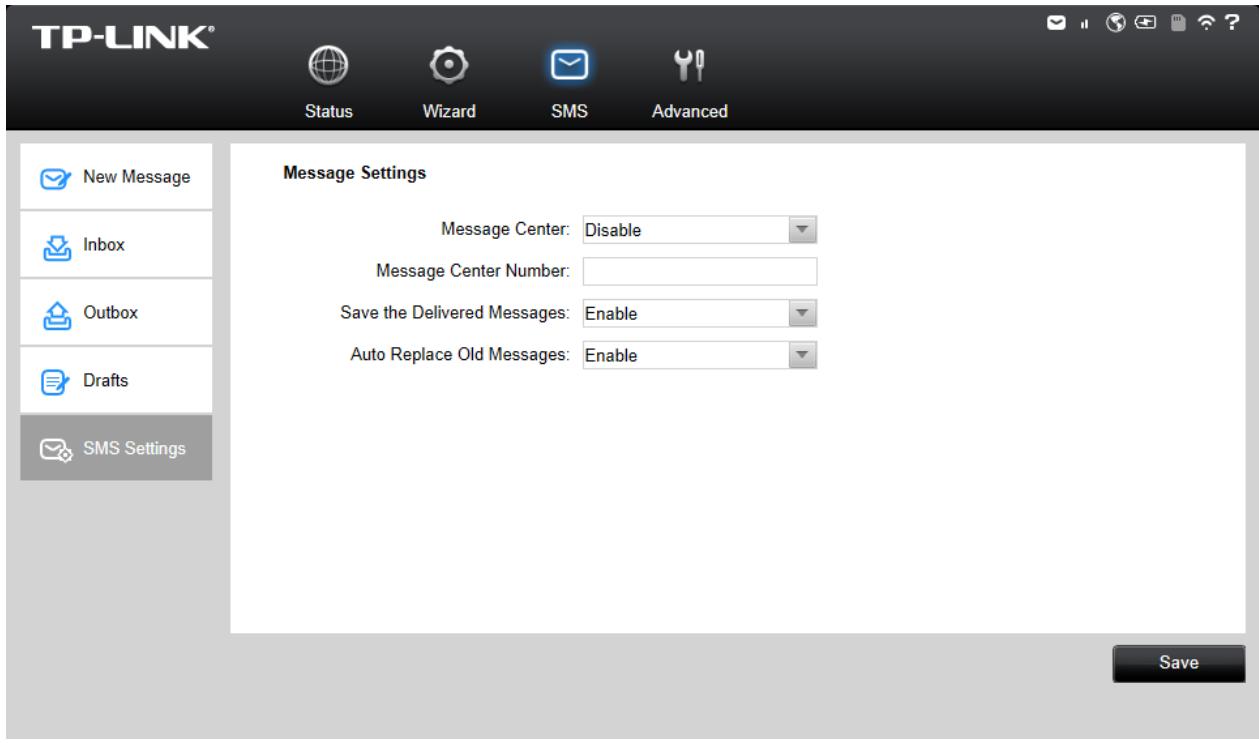
Figure 4-9 Settings
Message Center: Disabled by default. It's recommended to keep the default setting. If you want to manually set the Message Center Number, please select Enable.
Message Center Number: When the Message Center is enabled, you can enter the Message Center Number of the local ISP. If you enter a wrong number, the SMS would be affected and not properly used.
Save the Delivered Messages: Enable it to automatically save the delivered messages in the Outbox.
Auto Replace Old Messages: If enabled, it will automatically delete the oldest message and save the new one when the Outbox or Drafts box is full. If disabled, you need to manually delete the old messages to save the new ones when the Outbox or Drafts box is full.
Click Save to make your settings take effect.
4.4 Advanced

Dial-up

Wireless

DHCP Server

Figure 4-10 Advanced Menu
System Tools
There are four submenus under the Advanced tab (as shown in Figure 4-10): Dial-up, Wireless, DHCP Server and System Tools. Click any of them, and you will be able to configure the corresponding functions.
4.4.1 Dial-up

Figure 4-11 Dial-up Menu
Dial-up
Dial-up
Profile Management
Network Mode
PIN Management
Auto-unlock PIN
4.4.1.1. Dial-up
Dial-up Settings page allows you to do the following configurations.
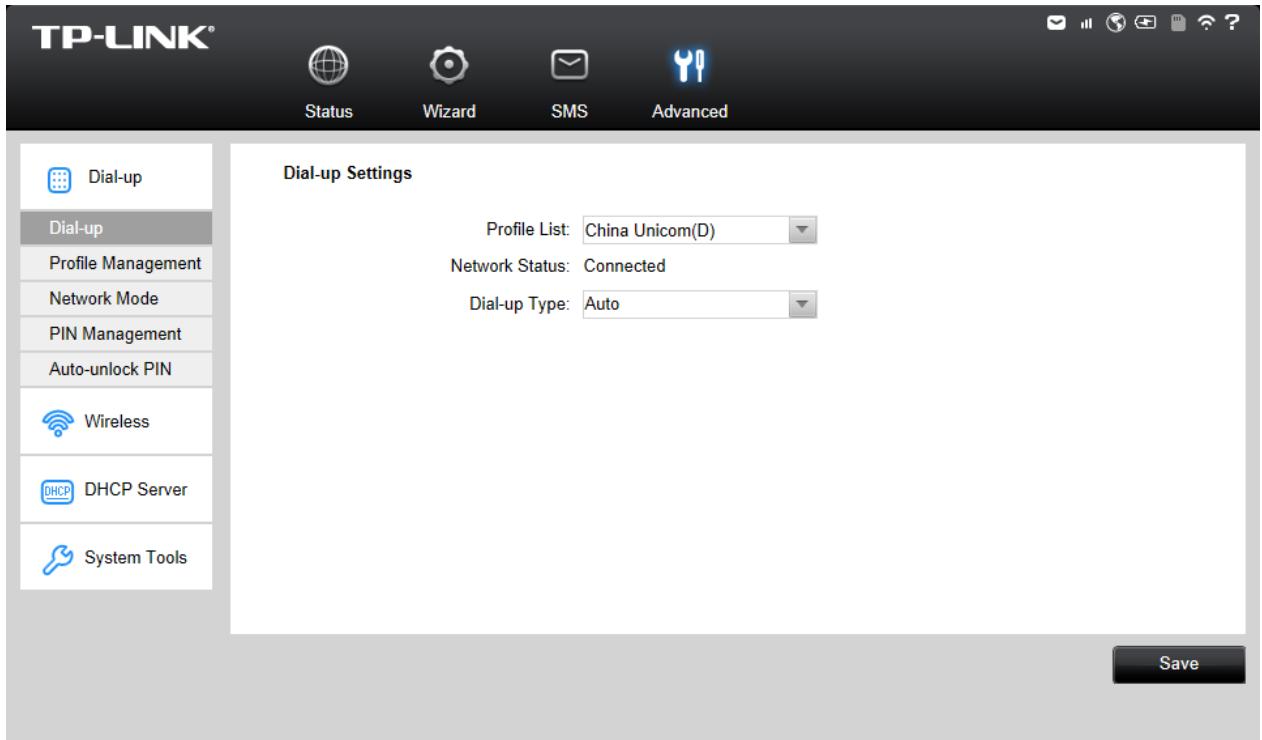
Figure 4-12 Dial-up Settings
Profile List: A list of profile(s). Select the profile of your SIM card currently inserted in the device.
Network Status: Shows whether the Internet is connected or disconnected at present.
Dial-up type: The device provides two types of dial-up - Auto and Manual. Please select the dial-up type as you need.
- Auto: The device will automatically establish connection once it's started. During the process, if your Internet connection is terminated due to some exterior reasons, the device would automatically attempt connection until it's successful. This option is suggested, if you have the network service paid by month.
- Manual: When you start the device and your computer, or when the connection is terminated during the process, you need to manually dial up for connection in here. When you select Manual as your dial-up type, you need to specify a MAX Idle Time (5 minutes by default), namely a period of inactivity, after which the device will disconnect your Internet connection, and not be able to re-establish your connection automatically as soon as you attempt to access the Internet again. If you have the network service paid by hour, this option is suggested.
Click Save to save the above settings and have them take effect.
4.4.1.2. Profile Management
You can manage your profile on this page.
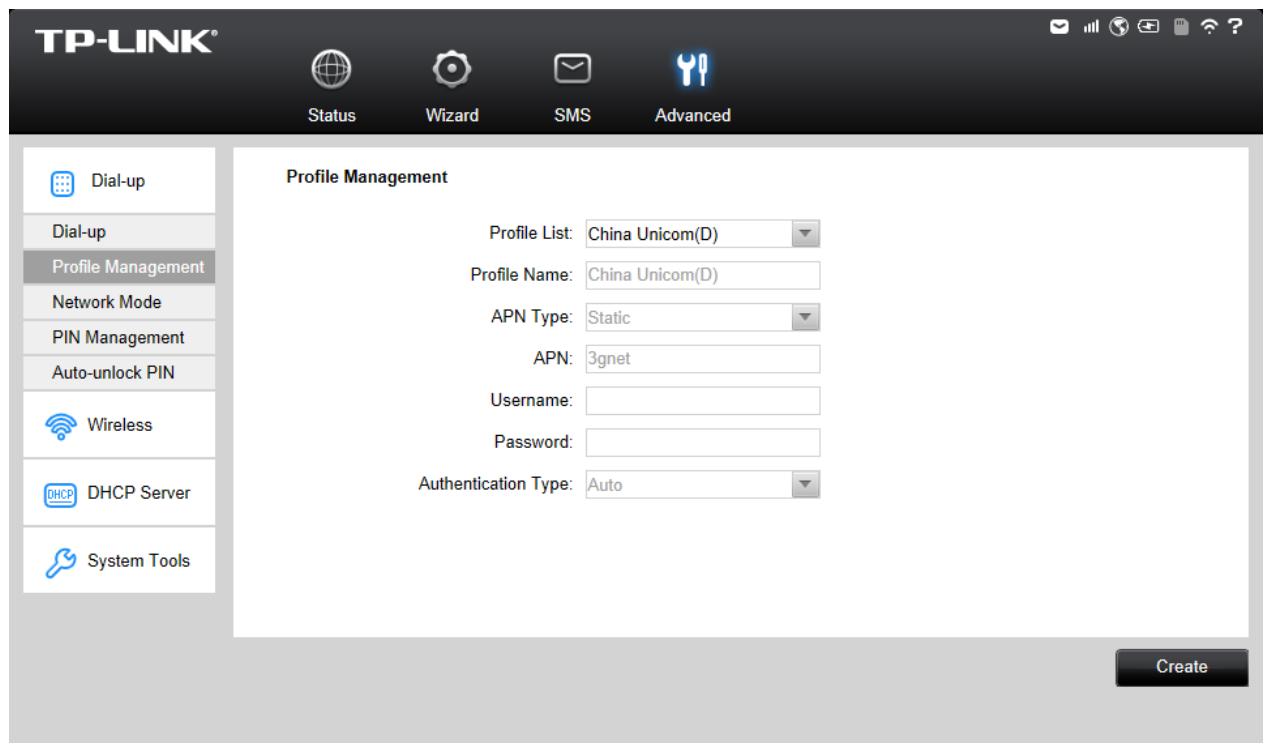
Figure 4-13 Profile Management
Profile List: A list of profile(s). Select the profile of your SIM card currently inserted in the device, and then you can view the related information of it. If you find any parameters wrong, you can click Create to create a new profile with the right settings (as shown in Figure 4-14).
Profile Name: Displays the name of the profile you've selected.
APN Type: Displays the type of your APN, either Dynamic or Static. Dynamic means the device have dynamic APN, which needs not to be specified. Static means you specify your APN manually.
APN: Displays the Access Point Name provided by your ISP.
Username/Password: Displays the User Name and Password provided by your ISP.
Authentication Type: Displays the specific authentication type your ISP required.
- None: Means no authentication is required.
- CHAP: Means your ISP required Challenge Handshake Authentication Protocol, which allows the device to establish authentication with the peer using three handshakes and checking the peer identity periodically.
- PAP: Means your ISP required Password Authentication Protocol, which allows the device to establish authentication with the peer using two handshakes.
- Auto: Means the device have dynamic negotiation with the dialing server and the Authentication Type needs not to be specified.
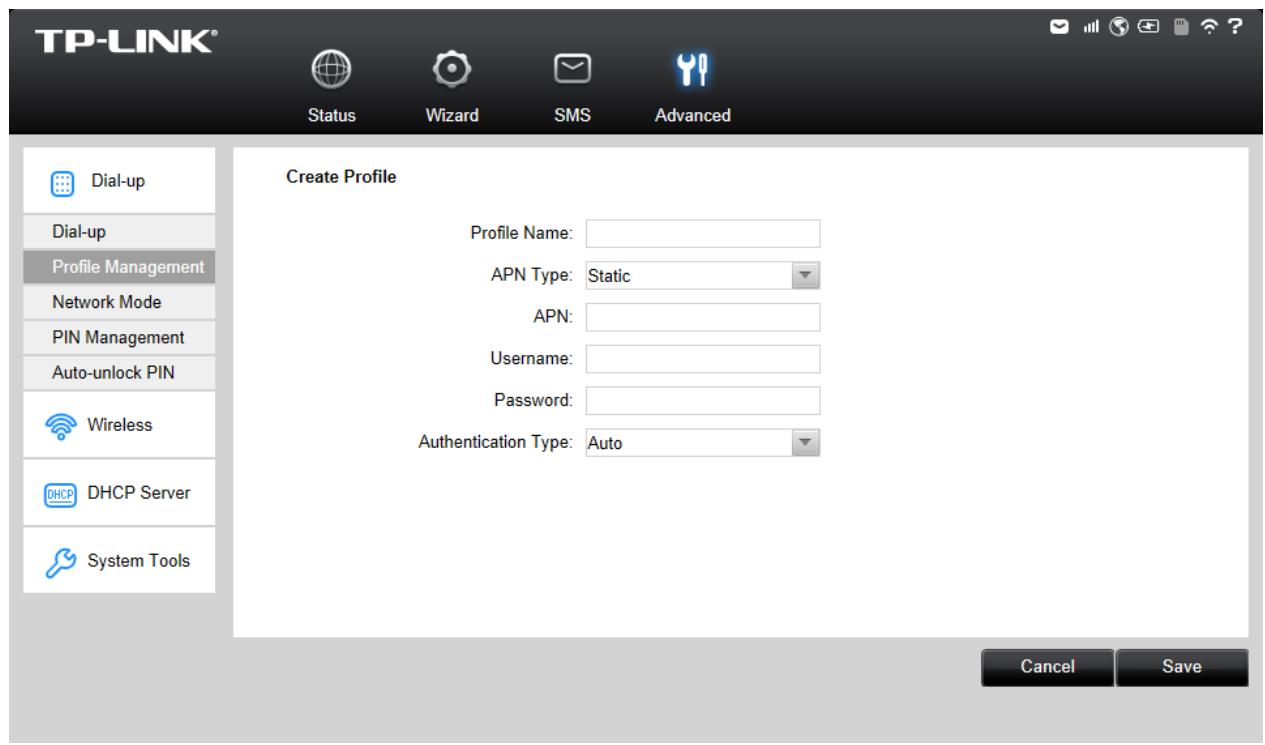
Figure 4-14 New Profile
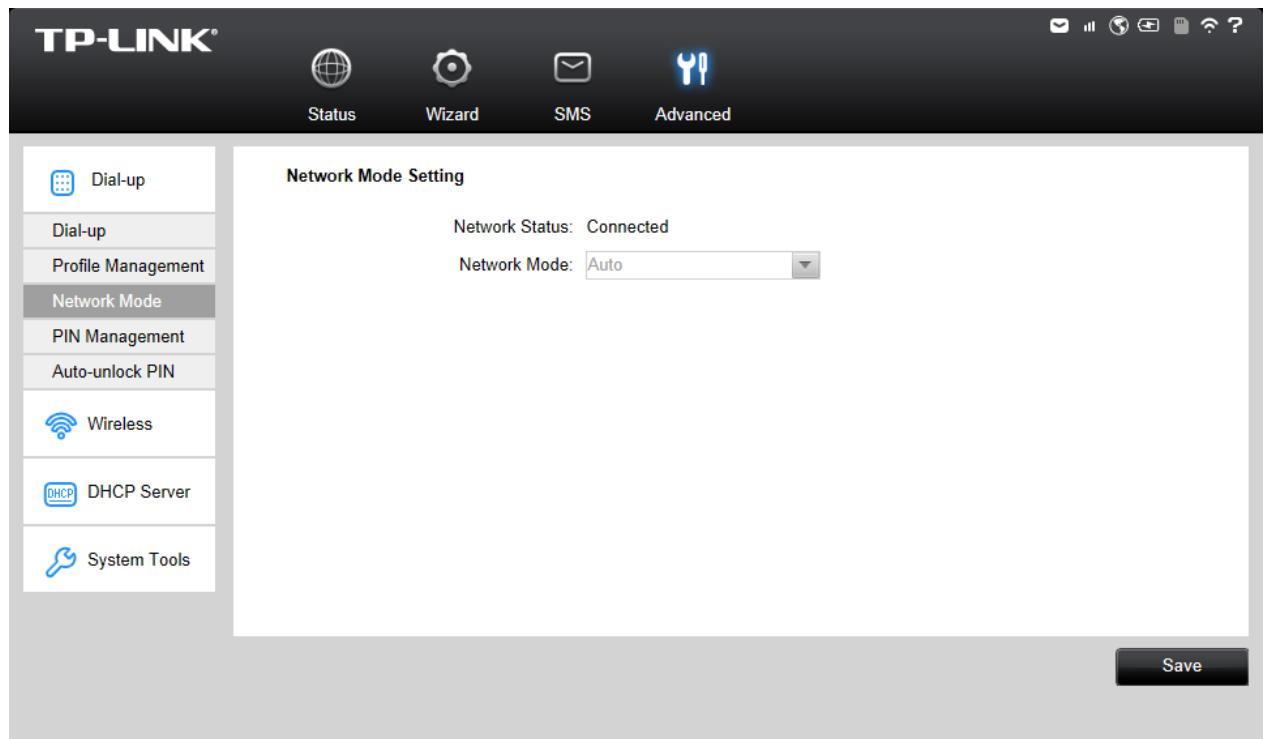
Figure 4-15 Network Mode Settings
Network Status: Shows whether the Internet is connected or disconnected at present.
Network Mode: The device supports three modes of network connection – Auto, 2G only and 3G only. You can choose the appropriate mode after disconnecting the network. If your SIM card supports GSM, please select 2G only; if your SIM card supports WCDMA, please select 3G only; if you are not very sure about it, please select Auto and then the device will detect it automatically.
Click Save to save your settings.
4.4.1.4. PIN Management
You can management your PIN code on this page.
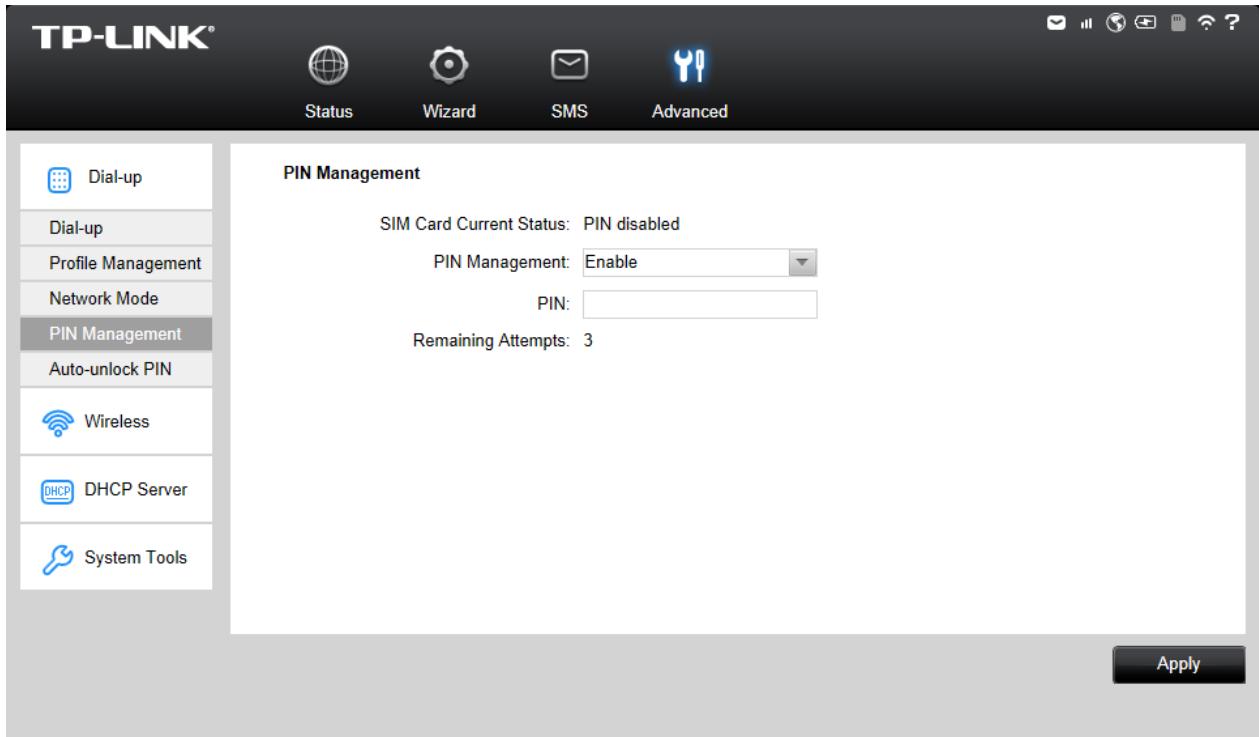
Figure 4-16 PIN Management
SIM Card Current Status: Shows whether your PIN function is enabled or disabled.
PIN Management: You can select whether to enable PIN function or not. Once the PIN function is enabled, every time you start the device with this SIM card inserted, you need to enter the PIN code; while if you go to enable the Auto-unlock PIN function, it could save you this trouble.
PIN: You can set a PIN code, which requires 4-8 digits.
Remaining Attempts: Shows how many attempts there are left for you to try entering the PIN code after you failed to enter the right one. You have 3 attempts at most. If you accidentally fail in three attempts, the PIN will be locked and you will be required to enter the PUK code that is written on your SIM card (as shown in Figure 4-17).
If the current status of PIN is disabled, you can select Enable and set a PIN code, and then click Apply to make your settings take effect. While, if the SIM card's current status is PIN enabled and verified, you can select Disable and enter the current PIN code, or select Modify and enter the required parameters to set a new PIN code, and then click Apply to make your settings take effect.
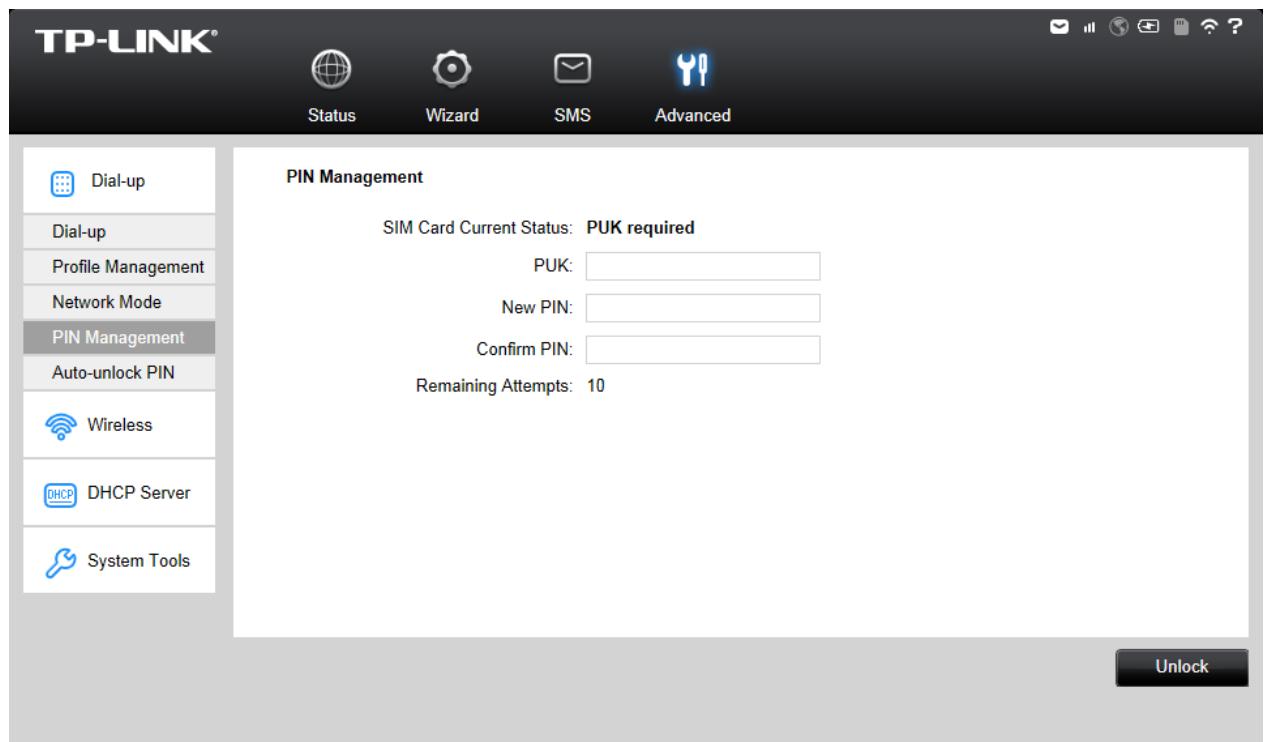
Figure 4-17 PIN Configuration - PUK Decode
A PUK (PIN Unlocked Key), also known as Personal Unlock Code (PUC), is used in 3GPP mobile phones to reset a personal identification number (PIN) that has been lost or forgotten. The PUK is a SIM-specific code assigned by the service provider. If a user does not know his or her PUK and is prompted for it, it should be obtained from the service provider.
On the page as shown in Figure 4-17, first enter the PUK code and then set a new PIN code to unlock your SIM card as well as any device with it inserted.
4.4.1.5. Auto-unlock PIN
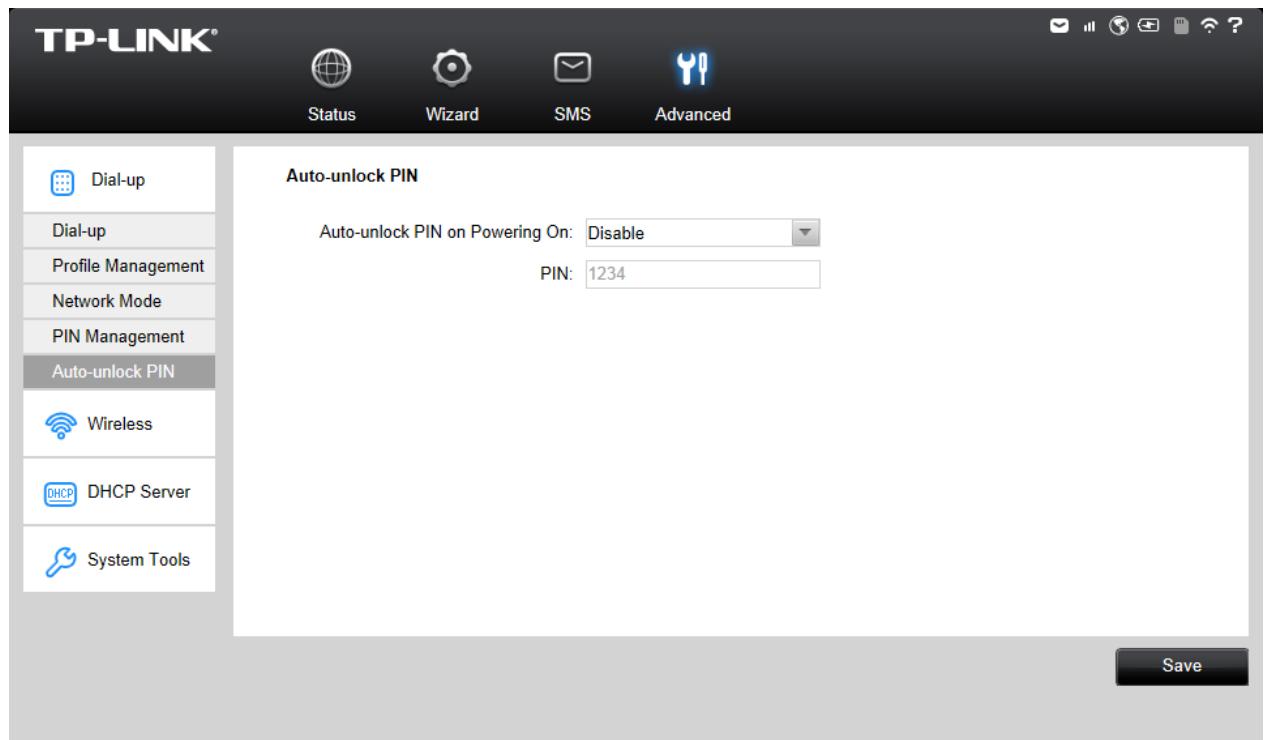
Figure 4-18 PIN Code Auto unlock
Auto-unlock PIN on Powering On: Select to enable or disable this function.
PIN: If you enable the Auto-unlock PIN on Powering ON function above, please enter the appropriate PIN code of your SIM card in this field. When the PIN code is required upon device restarting, it will be validated automatically once. If validation failed, please go to PIN Management page to input another PIN code.
Click Save to save your settings.
4.4.2 Wireless
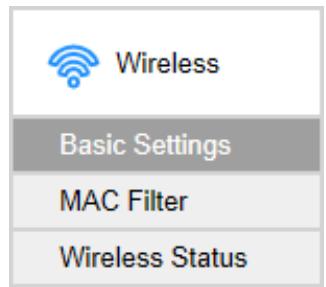
Figure 4-19 Wireless Menu
Wireless Settings can prevent any intruders from connecting your wireless network, occupying your network resources, hacker-overhearing and hacker-attacking, and thus enhance the security of your wireless network.
4.4.2.1. Basic Settings
Wireless basic settings enable you to configure your wireless parameters.
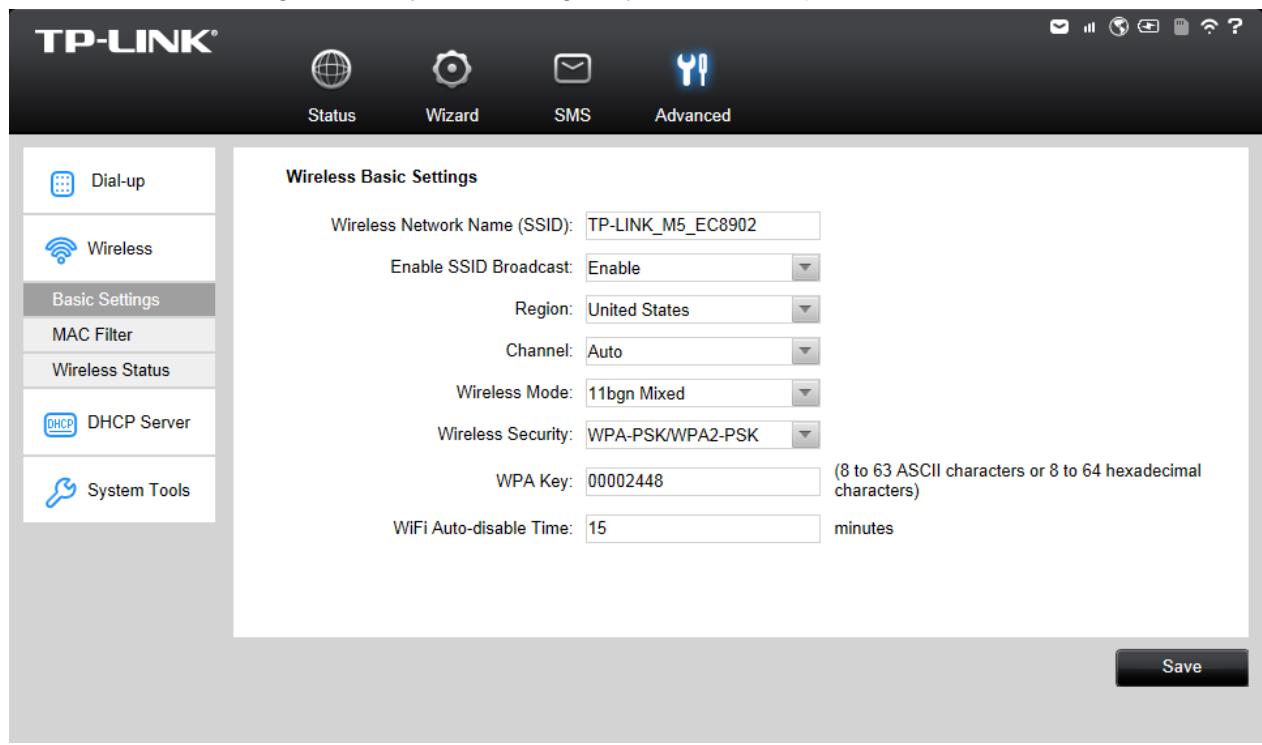
Figure 4-20 Wireless Basic Settings
Wireless Network Name (SSID):SSID is short for Service Set Identification, which is for you to distinguish the different wireless network. The defaultSSID of this device is TP-LINK_M5_XXXXXXXX (XXXXXXXX stand for the last 6 characters of the MAC address of the
device.) You can rename it as your preference, but the value is limited to 32 characters at most and also it is case-sensitive (For example, TEST is NOT the same as test.). Later on it will displays in the wireless network list searched by your devices.
Enable SSID Broadcast: Select to enable or disable this function. When wireless clients search the local area for wireless networks to associate with, they will detect the SSID broadcast by the device. If you Enable SSID Broadcast, the Wireless device will broadcast its name (SSID) on the air; otherwise, you have to manually type in the SSID and then you can join its network.
Region: Select your region from the drop-down list. This field specifies the region where the wireless function of the device can be used. It may be illegal to use the wireless function of the device in a region other than one of those specified in this field. If your country or region is not listed, please contact your local government agency for assistance.
Channel: This field determines which operating frequency ranging from 1~13 will be used. If you select Auto, then the device will choose the best channel automatically. It is not necessary to change the wireless channel unless you notice interference problems with another nearby access point.
Wireless Mode: You are provided with five wireless modes here: 11b Only, 11g Only, 11n Only, 11bg Mixed and 11bgn Mixed. The default wireless mode is 11bgn Mixed. If your wireless network card didn't work well in 11bgn Mixed mode, try 11bg Mixed mode.
Wireless Security: You are provided with two modes of wireless security here: Not Secured, WPA-PSK/WPA2-PSK.
- WPA-PSK/WPA2-PSK: It's the WPA/WPA2 authentication type based on pre-shared pass phrase. It's easy to set and secure to use. So it's perfect for SOHO users.
WPA Key: The default WPA key is the last 8 characters of IMEI. You can keep it default or enter 8~63 ASCII characters or 8~64 hexadecimal characters as your new WPA key.
WiFi Auto DISABLE Time: If no clients connect to the device's wireless network in a period of time (15 minutes by default), the Wi-Fi will be shut down. You can press the power button to resume the Wi-Fi.
Click Save to save your settings.
4.4.2.2. MAC Filter
The Wireless MAC Address Filtering feature allows you to control the wireless stations accessing the device, which depends on the station's MAC addresses. MAC Address is the physical address of the wireless stations, usually in the format of XX-XX-XX-XX-XX format (X is any hexadecimal digit).
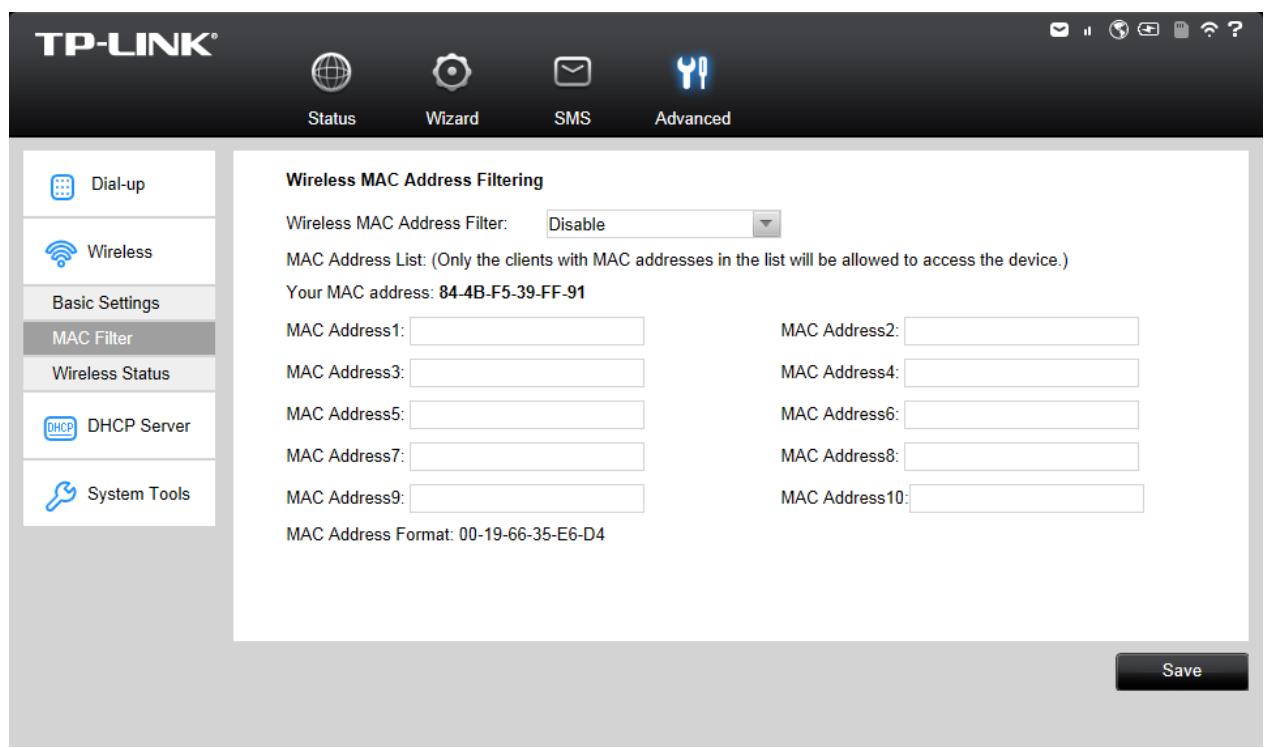
Figure 4-21 Wireless MAC Filter
Wireless MAC Address Filter: Select to Enable or Disable the MAC filter function of the device. The below settings will take effect only when you select Enable.
MAC Address List: A List of MAC addresses will be allowed to access the device.
Your MAC Address: Displays the MAC address of your client(s) currently wirelessly connected to the device.
Click Save to save your settings.
4.4.2.3. Wireless Status
The Wireless Status page displays the basic information about the Wireless client(s) that are currently connected to the device.
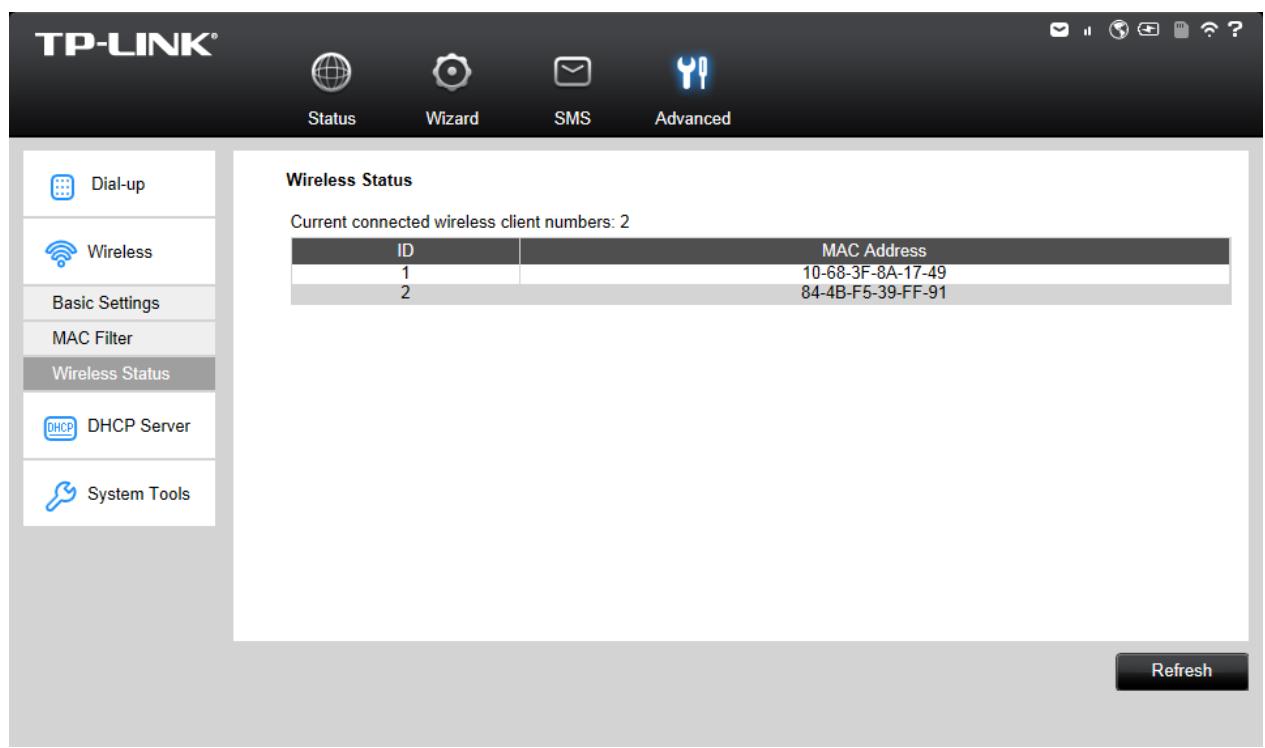
Figure 4-22 Wireless Status
ID: The index of the Wireless Client.
MAC Address: The MAC address of the Wireless client.
Click Refresh to update the amount of the Wireless clients and their information.
4.4.3 DHCP Server

Figure 4-23 DHCP menu
The Device is set up by default as a DHCP (Dynamic Host Configuration Protocol) server, which provides the TCP/IP configuration for all the wireless clients that are connected to the device in the LAN.
4.4.3.1. Basic Settings
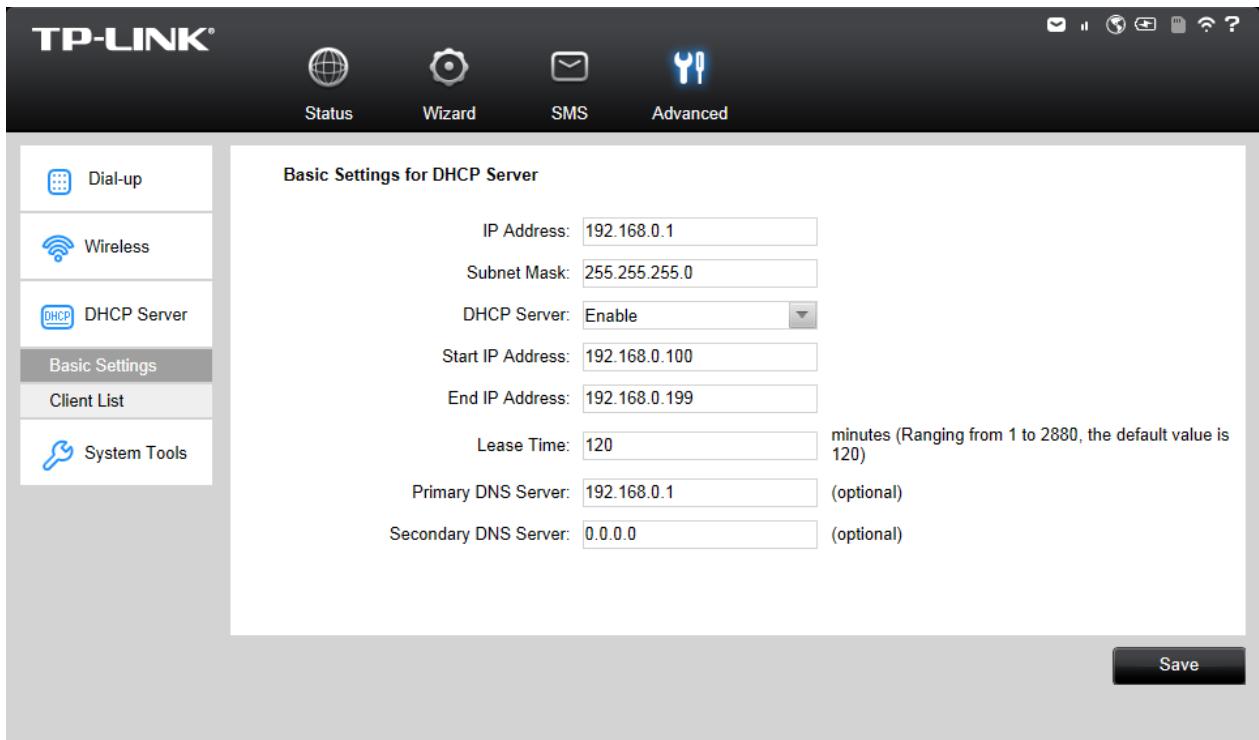
Figure 4-24 Basic Settings
IP Address: The IP address of the device, which is used to log in its web-based management page. The default value is 192.168.0.1.
Subnet Mask: An address code that determines the size of the network. Normally use 255.255.255.0 as the subnet mask.
DHCP Server: You can select to enable or disable the DHCP server. If you disable the server, you must have another DHCP server within your network, or else you must configure the IP address of the host(s) manually.
Start IP Address: This field specifies the first address in the IP address pool. 192.168.0.100 is the default start IP address.
End IP Address: This field specifies the last address in the IP Address pool. 192.168.0.199 is the default end IP address.
Lease Time: It is the length of time a network user will be allowed to keep connecting to the device with the current IP address (that is assigned by the DHCP server). Enter the amount of time, in minutes, that the IP address will be "leased". The time range is 1~2880 minutes. The default value is 120 minutes.
Primary DNS Server: Input the DNS IP address provided by your ISP. It is optional. The default primary DNS server IP is 192.168.0.100.
Secondary DNS Server: Input the IP address of another DNS server if your ISP provides two DNS servers. It is optional. The default secondary DNS server IP is 192.168.0.199.
Click Save to save the changes.
Note:
To use the DHCP server function of the Device, you should configure all the clients in the LAN as "Obtain an IP Address automatically" mode.
4.4.3.2. Client List
On this page, you can view the information about the clients attached to the device. All the information is read-only. You cannot change any of the values on this page.

Figure 4-25 Clients List
ID: The index of the DHCP Client.
Client Name: The name of the DHCP client.
MAC Address: The MAC address of the DHCP client.
IP Address: The IP address the device has assigned to the DHCP client.
Lease Residual Time: The rest lease time for the IP address assigned to the DHCP client. The DHCP client will automatically apply to lengthen the lease time before the dynamic IP address expires.
4.4.4 System Tools
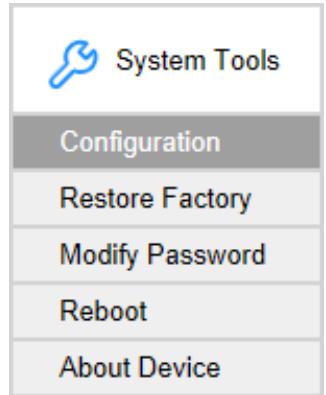
Figure 4-26 System Tools menu
Under System Tools menu, you can do such configurations as backing up or uploading a configuration file of the device, restoring all the settings of the device to its factory defaults, modifying the password for your login, rebooting the device, and checking some information
about the device. As follows, we will explain them in details.
4.4.4.1. Configuration
On this page, you can back up the configuration of the device to file, or upload a configuration file to the device.
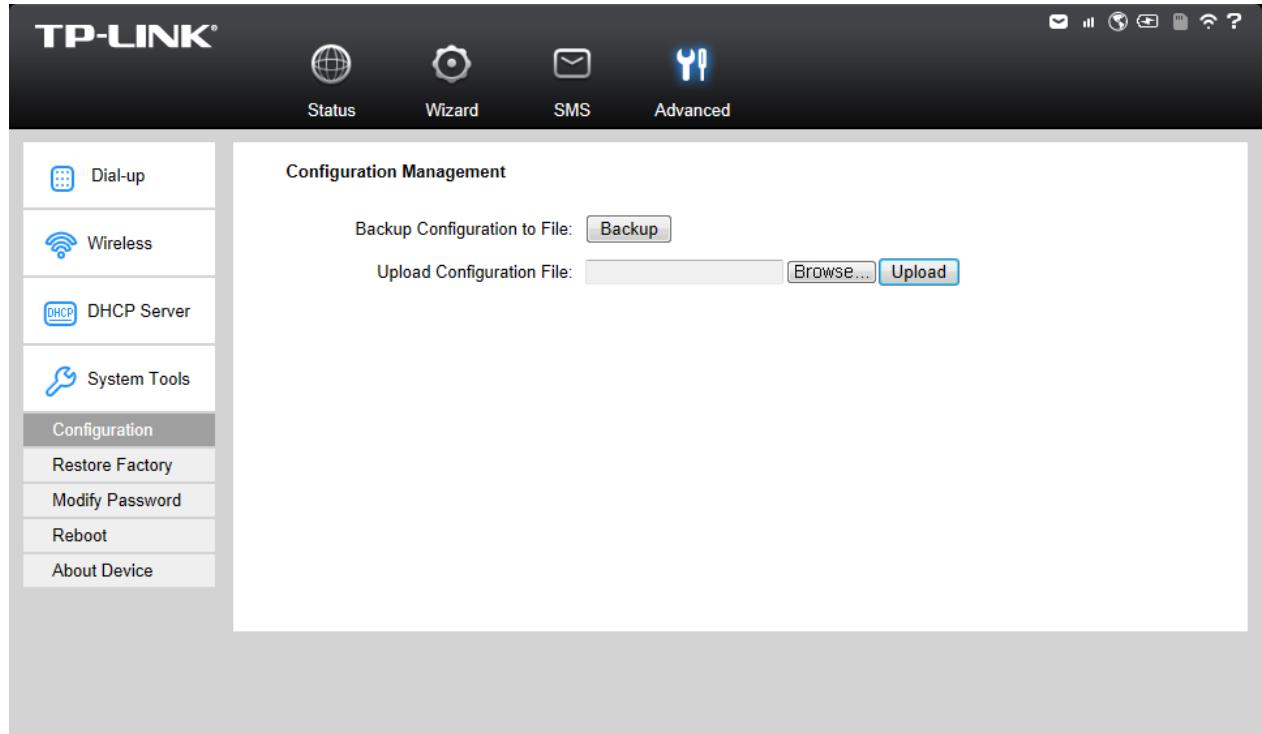
Figure 4-27 Configuration Management
Backup Configuration to File: Click Backup to save the configuration file in your computer, for later necessary use. It's strongly recommended to back up the old configuration file before firmware upgrade or new configuration file upload, in case that during those process it might get the original configuration lost.
Upload Configuration File: Click Browse... to locate the config.bin file or directly enter its location file, and then click Upload to upload the configuration file.
4.4.4.2. Restore Factory
You can restore the device to its factory default settings, when necessary.
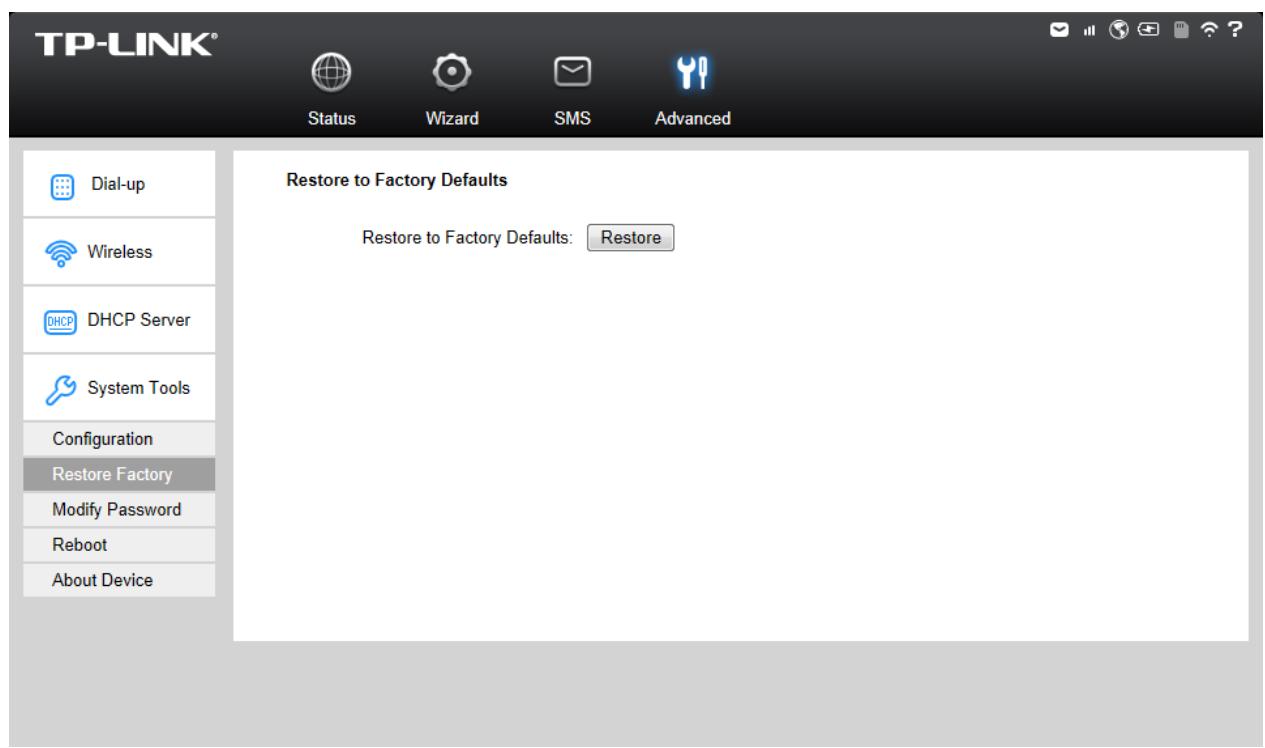
Figure 4-28 Restore to factory defaults
Restore to Factory Defaults: Click Restore to reset all configuration settings to their default values. All of the settings you have saved will be lost when the default settings are restored.
You can restore the following factory default values:
- The default login Password: admin
The default IP Address: 192.168.0.1
The default Subnet Mask: 255.255.255.0 - The default SSID: TP-LINK_M5_XXXXXXXX (XXXXXXXX is the last 6 characters of the device's MAC address). Please refer to the label on the rear cover of the device for the default SSID.
- The default Wireless Password: Please refer to the label on the rear cover of the device for the default wireless password.
4.4.4.3. Modify Password
It is strongly recommended that you change the factory default login password of the device.
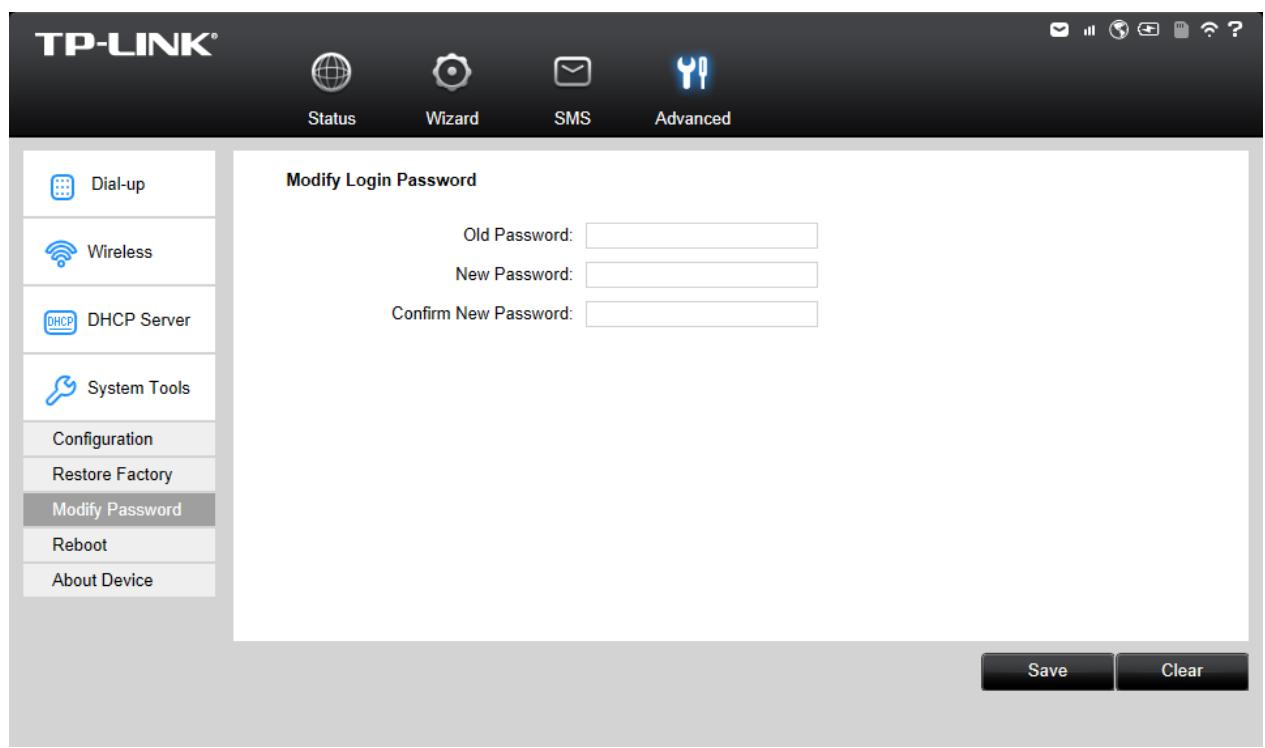
Figure 4-29 Modify Login Password
Old Password: The old password that is used to log in of the device.
New Password: The new password you want to set for the login of the device.
Confirm New Password: Enter the new password again for confirmation.
Click Save when you finish the setting.
Click Clear to clear all the values you have already set, and then you can reset it.
Note:
The new password must not exceed 14 characters in length and not include any spaces.
4.4.4.4. Reboot

Figure 4-30 Reboot the Device
Reboot the Device: Click Reboot to get the device rebooted and the saved settings to take effect.
4.4.4.5. About Device
This page displays the related information about this device, including Model, Firmware Version, Hardware Version, MAC Address, and IMEI.
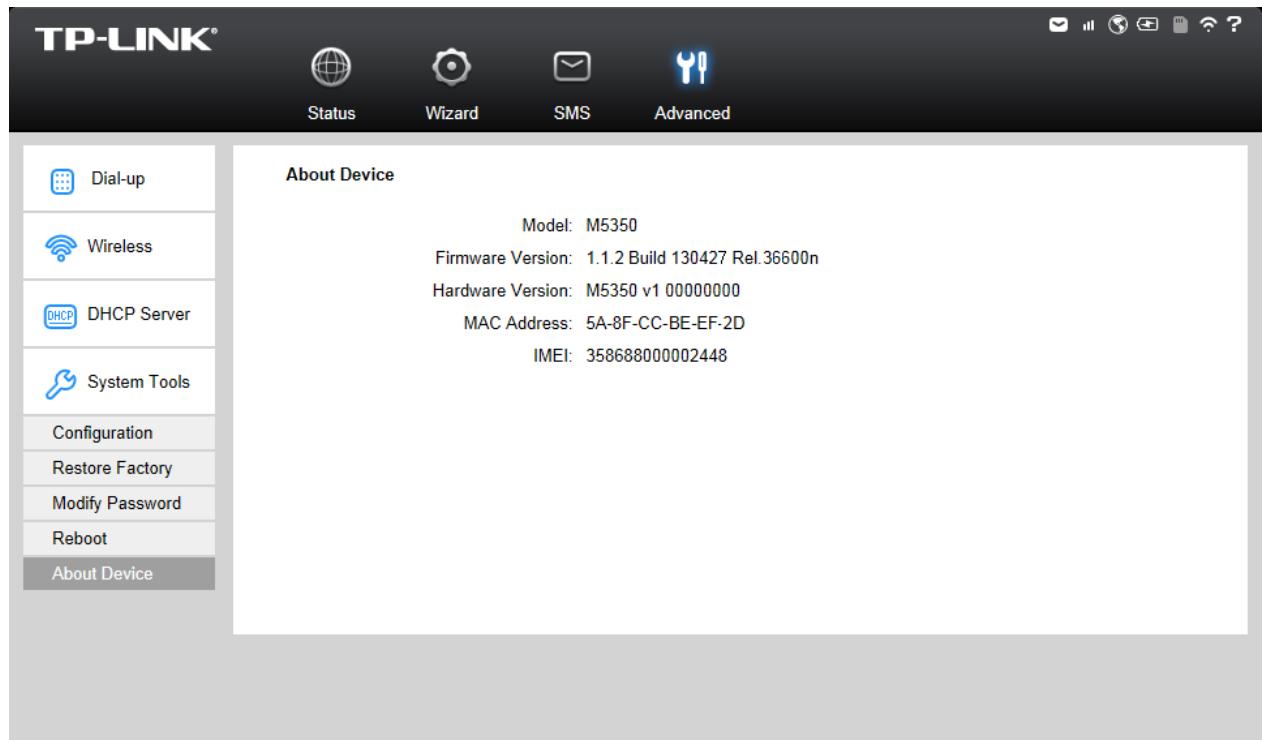
Figure 4-31 Device Information
Model: The Model of the device.
Firmware Version: The current firmware version
Hardware Version: The current hardware version.
MAC Address: The physical address of the device. The value is read-only thus could not be changed.
IMEI: International Mobile Equipment Identity. Composed of 15 digits, it is unique and thus used to identify individual mobile equipment.
Appendix A: FAQ
T1. What should I do if I cannot log in the web-based management page of M5350 after I have successfully connected to M5350?
1) Please verify your PC's IP address is on the same network segment with M5350. If not, please go to the next step.
2) Manually set an IP address for your PC, or configure your PC to "Obtain an IP address automatically" and "Obtain DNS server address automatically". Thus to make sure your PC's IP address on the same network segment with M5350.
3) If the above two steps failed, please feel free to contact our technical support.
T2. What should I do if I cannot access the Internet?
1) Please verify the card you inserted into M5350 is a valid WCDMA SIM card.
2) Please check if the PIN function is enabled. If enabled, please go to Advanced -> Dial-up -> PIN Management and enter the correct PIN code.
3) Please verify the current ISP parameters are correct. Otherwise, please go to Advanced -> Dial-up -> Profile Management and configure the correct parameters.
4) Please check if the dial-up type is auto or manual. If it is manual dial-up, please go to Advanced -> Dial-up -> Dial-up, and click Connect to manually get connected to the Internet.
5) If the above steps failed, please feel free to contact our technical support.
T3. What if I forget my login password?
1) Restore M5350 to its factory defaults;
2) Log into M5350 with the default password: admin. And then reconfigure M5350 following the QIG.
T4. How could I restore M5350 to its factory defaults?
Method 1:
With M5350 powered on, use a pin to press the RESET button in the interior panel.
Method 2:
Get logged in to the web-based management page of M5350, and then go to Advanced -> System Tools -> Restore Factory, and click Restore.
Note:
Once M5350 is reset, all the current configurations will be lost and you need to reconfigure it.
T5. How to access the micro SD memory card of M5350?
1) Connect one end of the USB cable to the micro USB port of M5350 and the other end to the USB port of your PC.
2) If there appears the Found New Hardware Wizard window, please click Cancel to ignore it.
Found New Hardware Wizard

Welcome to the Found New Hardware Wizard
This wizard helps you install software for:
TP-LINK M5 Series

If your hardware came with an installation CD or floppy disk, insert it now.
What do you want the wizard to do?
Install the software automatically (Recommended)
Install from a list or specific location (Advanced)
Click Next to continue.
<Back
Next>
Cancel
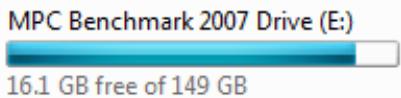
3) Double click Computer icon on your desktop. The inserted micro SD card is displayed as removable disk in file explorer (Here we take Removable Disk (F:) for example). Double click to access the micro SD card just as access a hard disk.
Hard Disk Drives (2)

Figure-A-0-1

Devices with Removable Storage (2)

CD Driver (D:) M5350
0 B free of 318KB
CDFS

Figure-A-0-2
Appendix B: Configuring the PC
In this section, we'll introduce how to install and configure the TCP/IP correctly in Windows XP. First make sure your Ethernet Adapter is working, refer to the adapter's manual if needed.
1. Install TCP/IP component
1) On the Windows taskbar, click the Start button, point to Settings, and then click Control Panel.
2) Click the Network and Internet Connections icon, and then click on the Network Connections tab in the appearing window.
3) Right click the icon that showed below, select Properties on the prompt page.
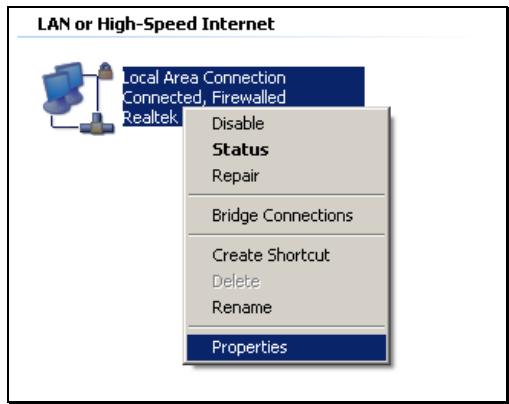
Figure B-0-1
4) In the prompt page that showed below, double click on the Internet Protocol (TCP/IP).
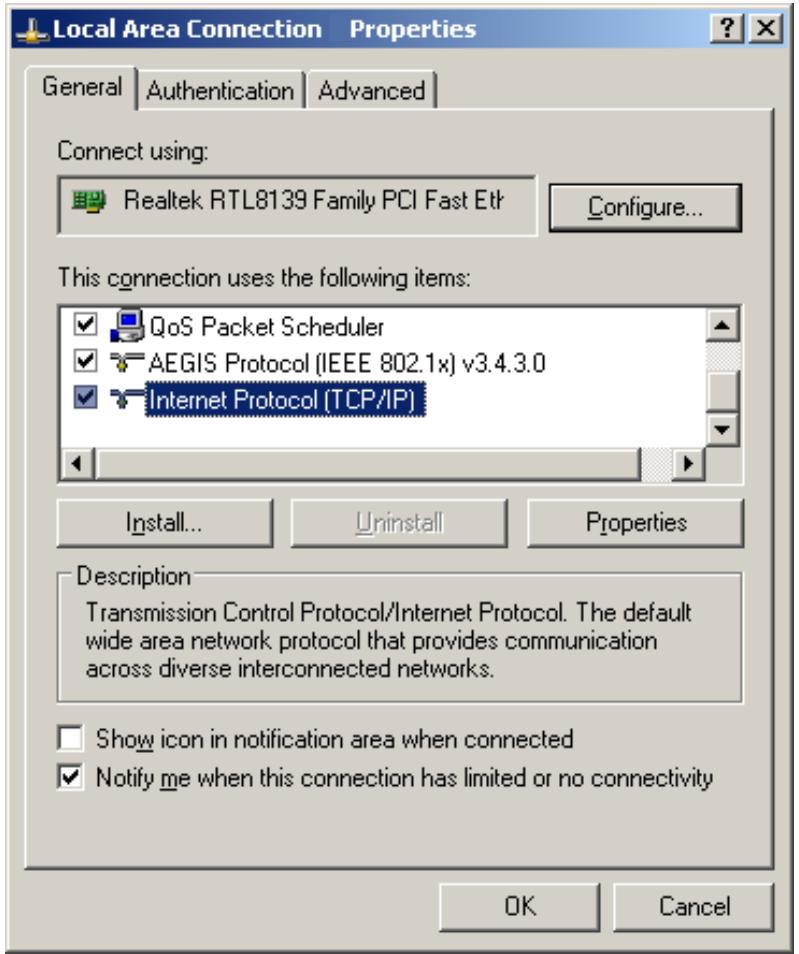
Figure B-0-2
5) The following Internet Protocol (TCP/IP) Properties window will display and the IP Address tab is open on this window by default.
You have two ways to configure the TCP/IP protocol below:
Setting IP address automatically
Select Obtain an IP address automatically, Choose Obtain DNS server address automatically, as shown in the Figure below:

Figure B-0-3
Setting IP address manually
a. Select Use the following IP address radio button. And the following items available
b. If the Device's LAN IP address is 192.168.0.1, type IP address is 192.168.0.x (x is from 2 to 254), and Subnet mask is 255.255.255.0.
c. Type the Device's LAN IP address (the default IP is 192.168.0.1) into the Default gateway field.
d. Select Use the following DNS server addresses radio button. In the Preferred DNS Server field you can type the DNS server IP address, which has been provided by your ISP.
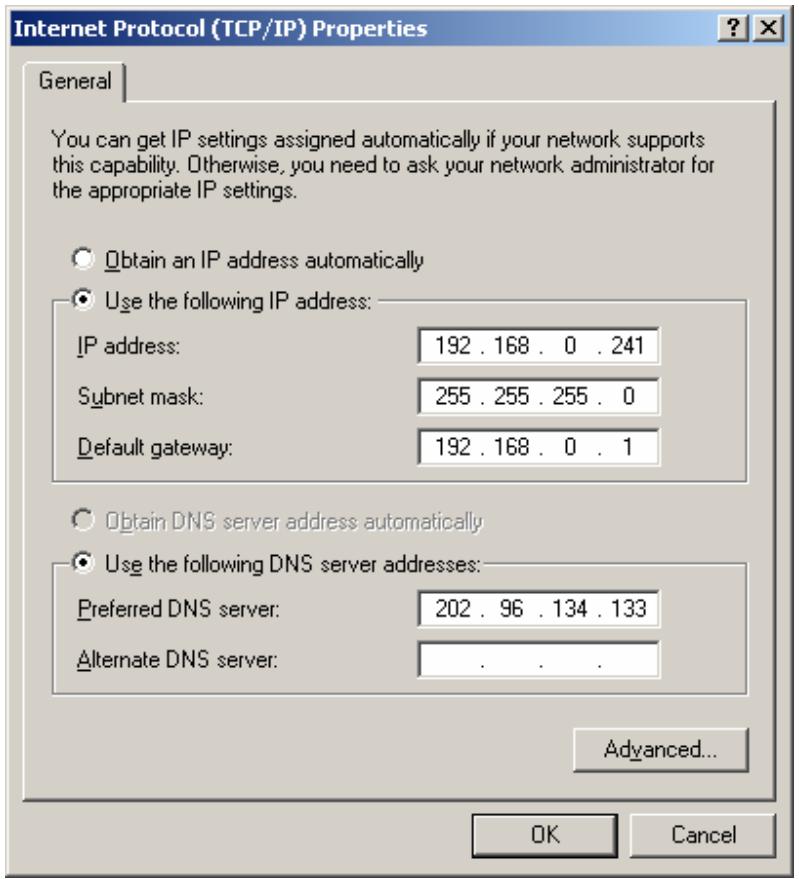
Figure B-0-4
6) Now click OK to keep your settings.
Appendix C: Specifications
| General | |
| Standards | IEEE 802.11n, IEEE 802.11b, IEEE 802.11g |
| Network Type | 3G: HSPA+ / HSUPA / HSDPA / UMTS 2G: GSM/GPRS/EDGE |
| Certification | CE, FCC, RoHS |
| Dimension | 94mm x 56.7mm x 19.8mm (W x D x H) |
| Interface | One Micro USB port One SIM card slot One Micro SD Memory card slot Power button RESET button |
| OLED Display | 3GIII / 2GIII Network type & Signal strength Network status M / A Dial-up type WiFi Wi-Fi connection SMS Battery 0.0B/s↓ Download speed 0.0B/s↑ Upload speed 0.0B Data statistics |
| Power Supply | 2000m Internal Ah Rechargeable Battery 5VDC/1.0A External Power Adapter |
| Wireless | |
| Band | WCDMA: 2100/900Mhz GSM: 850/900/1800/1900Mhz |
| Data Rate | Download: 21.6Mbps Upload: 5.76Mbps |
| Frequency | 2.4-2.4835GHz |
| EIRP | <20dBm |
| Security | WPA-PSK/WPA2-PSK |
| Antenna | Internal Antenna |
| Environment | |
| Temperature | Operating: 15℃~40℃ |
| Storage: -20℃~50℃ | |
| Humidity | Operating: 0% ~ 75% RH, Non-condensing |
| Storage: 0% ~ 75% RH, Non-condensing | |
Appendix D: Glossary
802.11n - 802.11n builds upon previous 802.11 standards by adding MIMO (multiple-input multiple-output). MIMO uses multiple transmitter and receiver antennas to allow for increased data throughput via spatial multiplexing and increased range by exploiting the spatial diversity, perhaps through coding schemes like Alamouti coding. The Enhanced Wireless Consortium (EWC) [3] was formed to help accelerate the IEEE 802.11n development process and promote a technology specification for interoperability of next-generation wireless local area networking (WLAN) products.
802.11b - The 802.11b standard specifies a wireless networking at 11 Mbps using direct-sequence spread-spectrum (DSSS) technology and operating in the unlicensed radio spectrum at 2.4GHz, and WEP encryption for security. 802.11b networks are also referred to as Wi-Fi networks.
802.11g - specification for wireless networking at 54 Mbps using direct-sequence spread-spectrum (DSSS) technology, using OFDM modulation and operating in the unlicensed radio spectrum at 2.4GHz, and backward compatibility with IEEE 802.11b devices, and WEP encryption for security.
DHCP (Dynamic Host Configuration Protocol) - A protocol that automatically configure the TCP/IP parameters for the all the PC(s) that are connected to a DHCP server.
ISP (Internet Service Provider) - A company that provides access to the Internet.
SSD - A Service Set Identification is a thirty-two character (maximum) alphanumeric key identifying a wireless local area network. For the wireless devices in a network to communicate with each other, all devices must be configured with the same SSD. This is typically the configuration parameter for a wireless PC card. It corresponds to the ESSID in the wireless Access Point and to the wireless network name.
WEP (Wired Equivalent Privacy) - A data privacy mechanism based on a 64-bit or 128-bit shared key algorithm, as described in the IEEE 802.11 standard.
Wi-Fi - A trade name for the 802.11b wireless networking standard, given by the Wireless Ethernet Compatibility Alliance (WECA, see http://www.wi-fi.net), an industry standards group promoting interoperability among 802.11b devices.
WLAN (Wireless Local Area Network) - A group of computers and associated devices communicate with each other wirelessly, which network serving users are limited in a local area.
- FCC STATEMENT
- FCC RF Radiation Exposure Statement:
- CE Mark Warning
- €1588
- Canadian Compliance Statement
- Industry Canada Statement
- Korea Warning Statements:
- NCC Notice & BSMI Notice
- DECLARATION OF CONFORMITY
- C€1588
- CONTENTS
- Package Contents 1
- Chapter 1. Introduction 2
- Chapter 2. Hardware Installation 4
- Chapter 3. Quick Installation Guide
- Chapter 4. Device Configuration 12
- Appendix A: FAQ 34
- Appendix B: Configuring the PC 36
- Appendix C: Specifications 39
- Appendix D: Glossary 40
- Package Contents
- Note:
- Conventions
- Chapter 1. Introduction
- Product Overview
- Main Features
- Physical Description
- Chapter 2. Hardware Installation
- Environment Requirements
- Hardware Installation
- STEP 1: Install SIM card and memory card.
- STEP 2: Install the battery.
- Tips:
- Method 1:
- Method 2:
- System Requirements
- TCP/IP Configuration
- Wireless Connection
- Wizard
- Chapter 4. Device Configuration
- Status
- Wizard
- SMS
- New Message
- Inbox
- Outbox
- Drafts
- SMS Settings
- Advanced
- Dial-up
- Dial-up
- Profile Management
- PIN Management
- Auto-unlock PIN
- Wireless
- Basic Settings
- MAC Filter
- Wireless Status
- DHCP Server
- Basic Settings
- Client List
- System Tools
- Configuration
- Restore Factory
- Modify Password
- Reboot
- About Device
- Appendix A: FAQ
- T1. What should I do if I cannot log in the web-based management page of M5350 after I have successfully connected to M5350?
- T2. What should I do if I cannot access the Internet?
- T3. What if I forget my login password?
- T4. How could I restore M5350 to its factory defaults?
- T5. How to access the micro SD memory card of M5350?
- Found New Hardware Wizard
- Welcome to the Found New Hardware Wizard
- Hard Disk Drives (2)
- Devices with Removable Storage (2)
- Appendix B: Configuring the PC
- Install TCP/IP component
- Appendix D: Glossary
Brand : TP-LINK
Model : M5350
Category : Mobile Wi-Fi Router