UO - Aspirateur ELECTROLUX - Free user manual and instructions
Find the device manual for free UO ELECTROLUX in PDF.
Download the instructions for your Aspirateur in PDF format for free! Find your manual UO - ELECTROLUX and take your electronic device back in hand. On this page are published all the documents necessary for the use of your device. UO by ELECTROLUX.
USER MANUAL UO ELECTROLUX
Thank you for choosing an Electrolux UltraOne vacuum cleaner. This instruction manual covers all UltraOne models. This means that with your specific model, some accessories/ features may not be included. In order to ensure the best results, always use original Electrolux accessories. They have been designed especially for your vacuum cleaner.
Before starting • Unpack your UltraOne model and the accessory system and check that all accessories are included.* • Read the instruction manual carefully. • Pay special attention to the Safety advice chapter.
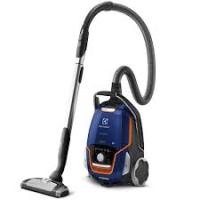
Description of your UltraOne 1 Display (see the specified versions later) 2 Exhaust filter lid 3 Exhaust filter 4 Parking slots 5 Power cord 6 Motor filter 7 Motor filter holder 8 S-bag® 9 S-bag® holder 10 Dust compartment cover 11 AeroPro 3in1 nozzle 12 AeroPro hose 13 AeroPro handle (see the specified versions later) 14 AeroPro telescopic tube 15 Parking clip 16 Display for models with rotary knob manual control* 17 Display for models with electronic + - manual control* 18 Display for models with remote control* 19 AeroPro Classic handle* 20 AeroPro Ergo handle* 21 AeroPro Remote Control handle* 22 AeroPro remote control handle for motorized nozzle* 23 AeroPro Extreme nozzle* 24 AeroPro Turbo nozzle* 25 AeroPro Mini Turbo nozzle* 26 AeroPro Parketto nozzle* 27 AeroPro Motorized nozzle*
Description de votre UltraOne 1 Tableau de commandes (voir les différentes versions spécifiées ci-dessous) 2 Grille du filtre de sortie d’air 3 Filtre de sortie d’air 4 Fentes pour le “Parking” horizontal et vertical 5 Cordon d’alimentation 6 Filtre moteur 7 Grille de filtre moteur 8 Sac à poussière S-bag® 9 Support du sac à poussière S-bag® 10 Couvercle du compartiment à poussière 11 Accessoire 3 en 1 AeroPro 12 Flexible AeroPro 13 Poignée du flexible AeroPro (voir les différentes versions spécifiées ci-après) 14 Tube télescopique AeroPro 15 Clip de rangement pour le parking horizontal ou vertical 16 Variateur rotatif *avec 5 positions pré-établies* 17 Variateur +/- * avec 5 positions pré-établies* 18 Tableau d’affichage du variateur télécommandé* 19 Poignée AeroPro classique* 20 Poignée AeroPro ergonomique* 21 Poignée télécommande AeroPro* 22 Poignée de felxible avec télécommande AeroPro pour la brosse électrique motorisée* 23 Brosse tous sols AeroPro Extreme* 24 Turbobrosse AeroPro* 25 Mini brosse turbo AeroPro* 26 Brosse spéciale sols durs/parquets AeroPro* 27 Brosse électrique motorisée Aeropro*
* Accessories may vary from model to model.
1. Open the dust compartment cover by pulling the s-bag button. Check that the s-bag® is in place.
2. Insert the hose into the cleaner (to remove it, press the lock buttons and pull the hose out). Insert the hose into the hose handle until the catches click to engage (press the catches to release the hose).
3. Attach the telescopic tube to the floor nozzle (to remove it, press the lock button and pull the nozzle off ).
2. Connectez le flexible au corps de l’appareil. Pour le retirer, pressez les deux boutons de verrouillage. Insérez le flexible dans la poignée jusqu’à entendre un «clic». Pour ôter le flexible appuyez sur le bouton de verrouillage.
3. Fixer le tube télescopique au suceur pour sols. (Pour le désassembler, appuyer sur le bouton de verrouillage et retirer le suceur).
4. Attach the telescopic tube to the hose handle (to remove it, press the lock button and pull the hose handle out).
5. Adjust the telescopic tube by holding the lock with one hand and pulling the handle with the other hand.
6. Pull out the power cord and plug it into the mains.
4. Fixer le tube télescopique à la poignée du flexible. (Pour le désassembler, appuyer sur le bouton de verrouillage et retirer la poignée du flexible).
7. Switch on/off the vacuum cleaner by pushing the ON/OFF button.
8. Models with remote control can also be operated by the ON/OFF button on the handle.*
9. Adjust suction power. Models with manual regulation. a) Use the suction control on the handle to quickly reduce the airflow b) Use the rotary knob on the cleaner to adjust suction power c) Use the + or - button on the cleaner to adjust suction power.*
7. Démarrer/arrêter l’aspirateur en appuyant sur le bouton marche /arrêt.
10. Adjust suction power. Models with remote control. The cleaner starts in auto-function (automatic power regulation). To regulate manually, press +/- button. To go back to auto-function, press AUTO button.*
11. Models with remote control and Aeropro motorized nozzle. To turn the motorized nozzle on and off, press BRUSH button on the handle.*
12. After vacuuming rewind the cable by pushing the REWIND button.
10. Réglage de la puissance pour les modèles à télécommande : l’aspirateur démarre dans la position AUTO. Pour un réglage manuel appuyez sur les touches+/-. Pour revenir à la position AUTO appuyez sur la touche AUTO.*
Tips on how to get the best results / Astuces pour un résultat impeccable Models with manual power regulation – follow graphics on cleaner for optimal performance. Models with AUTO-function automatically adjust the suction power in order to give an optimal cleaning performance and comfort on every surface. For manual regulation, follow graphics for optimal performance.
Brushes up. Brosses relevées.
Motorized nozzle gives the best dust pick-up and deep cleaning of carpets through the rotating brush roller agitating the carpet. Do not leave the motorized nozzle stationary with brush roller on.
Attention: on fur rugs, rugs with long fringes or deep pile exceeding 15 mm the motorized nozzle should have the brush roller off. Press BRUSH button to turn the brush roller off.
Le brosse électrique motorisée est plus adaptée pour aspirer la poussière et nettoyer en profondeur les tapis grâce à la brosse rotative. Ne pas garder cette brosse immobile pendant qu’elle tourne.
Parking positions / Positions de rangement 1. A practical parking position (and at the same time a backsaving feature) when you pause during cleaning. 2. A parking position which makes it easy to carry and store the vacuum cleaner.
On manually controlled models, the air valve can help to quickly reduce the suction power.
Press the 3in1 button to open the compartment. After usage, put the accessory back in its place.
Sur les modèles sans télécommande, le réglage de débit d’air* sur la poignée du flexible permet de régler mécaniquement la puissance d’aspiration.
Replacing the dustbag, s-bag® / Remplacer le sac à poussière, s-bag®
1. Models with digital display: Change the dust bag when the s-bag® indicator is illuminated. *
2. Models with mechanical indicator: The dust bag, s-bag®, must be replaced at the latest when the indicator window is completely red.
3. Open the dust compartment cover by pulling the S-BAG button.
1. Modèles avec témoins lumineux : Le sac à poussière doit être remplacé lorsque le témoin lumineux s-bag® est allumé. *
2. Modèles avec témoin mécanique: Le sac à poussière s-bag® doit être remplacé au plus tard lorsque la fenêtre témoin est rouge. La vérification doit toujours se faire le suceur soulevé du sol (20). *
NB: Always change the s-bag® when the indicator signal is illuminated even if the s-bag® is not full (it may be blocked) and after using carpet cleaning powder. For best performance use the Ultra Long Performance bag (E210B / E210) which has been developed specifically for your UltraOne or alternatively any Electrolux original synthetic s-bag®. Paper dust bags should not be used in your UltraOne! www.s-bag.com
4. Pull the cardboard handle to close and remove the s-bag®
5. Insert a new s-bag® by pushing the cardboard straight down in its tracks. Close the lid. If the s-bag® is not properly placed or is missing, the lid will not close.
4. Retirez le support du sac à poussière s-bag®.
de ned 1. Models with FILTER indicator (+/- display and remote control models). Replace/clean* the HEPA filter when the “filter” indicator is illuminated. *washable filter only
2. Models without FILTER indicator (rotary knob model). Replace/clean* the HEPA filter at every 5th replacement of the dust bag, s-bag. *washable filter only
3. Open the filter lid by pressing the FILTER button at the rear of the cleaner body. Use Electrolux original filters; EFH12, EFH12W, EFH13W.
1. Modèles avec voyant FILTER (modèles avec variateur +/ - ou modèles avec télécommande). Remplacez/ nettoyez* le filtre HEPA lorsque le voyant « filter » est allumé. *filtre lavable uniquement
ita 4. Lift out the filter and check the colour of the frame to determine type. Green colour: Must be replaced by a new filter. Blue colour: Replace by a new filter or clean it, see 5 (washable filter).
5. Cleaning the washable exhaust filter. Rinse the inside (dirty side) in lukewarm tap water. Tap the filter frame to remove the water. Repeat the process four times.
Note: Do not use cleaning agents and avoid touching the filter surface Let the filter dry completely (min.24 h In room temperature) before putting back! We recommend to change the washable filter also at least once in a year or when it is very dirty or damaged.
4. Vérifiez le type de filtre en vous référant à la couleur de son cadre. De couleur verte, le filtre doit être remplacé par un neuf. De couleur bleue, le filtre peut être lavé (voir «filtre lavable» paragraphe 5).
6. When the filter has been replaced, the filter lid can be pushed back until the filter lid is clicked back into place.
7. If the filter lid comes loose, restore by positioning the hinge part at the bottom and push the filter lid back until the filter lid is clicked back into place.
8. Replace the motor filter when dirty or after every 5th s-bag®. Push the filter holder down and pull it out. Exchange the filter and close the lid.
6. Une fois le filtre remplacé, remettre en place la grille du filtre en appuyant dessus jusqu’à entendre un clic.
de ned 1. Disconnect the nozzle from the tube. Use the hose handle to clean the nozzle.
2. If the wheels are stuck, clean them by removing the wheel cap with a small screwdriver.
3. Unscrew the wheel axis and clean all parts. Refit in reverse order.
1. Désassembler le suceur du tube. Utiliser la poignée du flexible pour nettoyer le suceur.
1. Open brush roll cover by pushing the latches. This will free the front wheels for cleaning.
2. Pull out the brush roll and remove entangled threads by snipping them away with scissors. Use the hose handle to clean the nozzle. Refit in reverse order.
3. If the wheels are stuck, remove them carefully by using a small screwdriver and clean the wheels.
1. Ouvrir le couvercle de la brosse rotative en poussant les loquets. Ceci libère les roues avant, qui peuvent être nettoyées.
Changing the battery in remote handle / Remplacement des piles de la poignée de flexible avec télécommande
1. Models with remote control: Change battery when light indicator on handle turns red or is not responding when pressing any button.*
2. Use only batteries type LITHIUM CR2032. Batteries must be removed from the appliance before it is scrapped and are to be disposed of safely.
The remote handle with motorized nozzle system DOES NOT have any batteries or light indicator. DO NOT try to open the motorized handle.
1. Modèles avec télécommande : Changer la pile lorsque le voyant sur la poignée devient rouge, ou lorsqu’il n’y a plus de réponse en pressant les touches.
The vacuum cleaner does not start • Check that the cable is connected to the mains. • Check that the plug and cable are not damaged. • Check for a blown fuse. • Check if the battery indicator lamp responds (certain models only).
L’aspirateur ne se met pas en marche • Vérifiez que le câble est branché au secteur. • Vérifiez que la prise et le câble ne sont pas endommagés. • Vérifiez qu’aucun fusible n’a sauté. • Vérifiez que le témoin des piles fonctionne (suivant les modèles).
The s-bag® indicator light is illuminated (only at specific models) • Check if the s-bag® is full or blocked. • If you have already changed the s-bag®, change the motor filter.
Le témoin lumineux du sac à poussière s-bag® est allumé (suivant les modèles) • Vérifiez si le sac à poussière s-bag® est plein ou colmaté. • Si vous avez déjà remplacé le sac à poussière s-bag®, remplacez le filtre moteur.
The filter indicator light is illuminated (only at specific models) • Change the exhaust filter
Le témoin lumineux du filtre est allumé (suivant les modèles) • Remplacez le filtre de sortie d’air
The cleaner stops The cleaner might be overheated: disconnect it from the mains; check if the nozzle, tube or hose are blocked. Let the cleaner cool down for 30 minutes before plugging it in again. If the cleaner still does not work, contact an authorized Electrolux service centre.
L’aspirateur s’arrête Surchauffe potentielle de l’appareil : débranchez-le du secteur ; vérifiez si le suceur, le tube ou le flexible sont obstrués. Laissez l’appareil refroidir pendant 30 minutes avant de le brancher à nouveau. Si l’appareil ne fonctionne toujours pas, contactez un Centre Service Agréé Electrolux.
Clearing the hose Clear the hose by “squeezing“ it. However, be careful in case the obstruction has been caused by glass or needles caught inside the hose. Note: The warranty does not cover any damage to the hose caused by cleaning it. Water has been sucked into the vacuum cleaner It will be necessary to replace the motor at an authorized Electrolux service centre. Damage to the motor caused by the penetration of water is not covered by the warranty. For any further problems, contact an authorized Electrolux service centre.
Recycle the materials with the symbol . Put the packaging in applicable containers to recycle it. Help protect the environment and human health and to recycle waste of electrical and electronic appliances. Do not dispose appliances marked with the symbol with the household waste. Return the product to your local recycling facility or contact your municipal office.
X U L O R T C E THE EL T S E U Q N E E GR Electrolux aims to raise awareness about the benefits of a green home. By selecting a product from the Electrolux Green range you join the quest for setting new, modern standards – for your home and our world. What makes Electrolux Green vacuum cleaners green? First of all, they are partially made from recycled plastic. What others see as waste, we see as valuable raw material. This approach saves resources, and puts plastic waste to good use again instead of having it end up in landfills. In our work, we scrutinise the proposed solutions of the day to evaluate where we should focus our efforts and energy. One of the sectors with the greatest potential for change is source reduction at the production level – simply put, using less new plastic. Electrolux strives to create and support source reduction, in part by using recycled plastic. When designing our vacuum cleaners we think about their entire lifecycle. So the packaging too is made from material that is recycled, and when the day comes to replace the vacuum cleaner, 92% of its materials are recyclable. We’re also reducing the use of PVC plastic as much as possible – one of our models is already completely PVC-free.
SOME OF OUR BEST VACUUM CLEANERS ARE ACTUALLY GARBAGE Plastic is of course a material with many advantages. It is used in an enormous range of products, from paper clips to spaceships, due to its relatively low cost, ease of manufacture and versatility. But when plastic ends up in the wrong place it becomes an environmental hazard. Plastic is durable and degrades very slowly. The best way to stop adding to this problem is to use less plastic and recycle as much we can.
UltraOne_EN-GR_130227.indd 89
RECYCLE THE PLASTIC YOU DIDN’T KNOW YOU COULD RECYCLE Making Electrolux Green vacuum cleaners from recycled plastic is a win-win situation. We get the raw material for our products while at the same time reducing the need for crude oil, and the world gets rid of some plastic garbage. You can win too – the type of plastic we need is the type that’s in old garden chairs, computers, big plastic toys, and machines like hairdryers, electric kettles and coffee machines. So we are interested in any of these things that you don’t use anymore. Get rid of them and give them a new life as vacuum cleaners by handing them in to your nearest recycling station.
Green fact: Every Electrolux Green vacuum cleaner saves about 2 litres of crude oil and 80 litres of water during the manufacturing process. 90% less energy is needed to produce the parts compared to making them from virgin plastic.
RADICALLY REDUCED ENERGY CONSUMPTION The lifecycle studies we’ve done show that a third of the environmental impact of a vacuum cleaner comes from the handling and manufacturing of the materials in it. Less than 3 percent is attributed to transportation. The rest is due to the energy that the vacuum cleaner consumes when in use. That’s why we’re constantly working to reduce the energy consumption of our vacuum cleaners. This is most evident when it comes to the Electrolux Green vacuum cleaners. Depending on the model, they can save up to 50% energy compared to an average 2,000 W vacuum cleaner – and get the job done at least as well.
GET A CLEANER HOME, AND GREENER WORLD Isn’t it nice to know that when you take the vacuum cleaner out of the closet you can be assured of an excellent result. Electrolux Green vacuum cleaners offer supreme performance. They are efficient, quiet, easy to handle and store – in short, everything you expect from the best of vacuum cleaners. And they are environmentally responsible. Our approach to making green vacuum cleaners is simple: you shouldn’t have to compromise on cleaning performance.
UltraOne_EN-GR_130227.indd 90
EVEN THE BAG IS GREEN If you have a model using bags, on most markets you can act green even when buying the bag. The s-bag® Green ensures an even level of high performance by the vacuum cleaner, while the environmental impact is radically reduced. The bag is made from corn and uses up to 65% less petroleum and contributes 68% less greenhouse gases to the atmosphere than traditional plastic materials.
Green fact: Some of our Green range models uses 50% less energy than an average 2,000 W vacuum cleaner. If you were to vacuum an hour a week for ten years, you would save enough energy to burn a 60 W lamp day and night for 234 days. To put it another way, you would reduce CO2 emissions by 294 kg.
YOU CAN DO MORE: Want a cleaner world? Start at home. To make a better world, what counts are all the “small” green steps we all can make in our everyday lives. Besides choosing a green vacuum cleaner, there are lots of things you can do to make your home greener. Here are some of the ways that can help make your life and your home a little more environmentally responsible.
• Water-saving taps work very well. You can also save water by not letting it run unnecessarily. • Choose eco-labelled laundry detergents and dishwasher
detergents. This helps reduce chemicals that are harmful to nature. Don’t throw chemicals into the toilet or the garbage bin – find out where to deposit them safely.
• Most of the time you don’t need to use appliances at the
maximum setting – a vacuum cleaner, for example, doesn’t necessarily clean better on certain surfaces when set to max compared to a medium setting.
• Switching off the TV and other appliances rather than leaving them in stand-by mode saves surprisingly much energy over time.
• If you live in a cold climate, reducing the indoor temperature by just 1 or 2°C drastically reduces energy consumption.
• Change to low-energy lamps, and don’t leave lights on when they’re not needed.
• Find out how the recycling systems work in your area.
Find a good solution with separate bins for different kinds of waste that’s easy to use and fits into your everyday life. Recycling saves energy and valuable resources.
UltraOne_EN-GR_130227.indd 91
OF COURSE WE ARE ALSO GREENWASHING – SWITCH UP TO OUR GREEN APPLIANCES True to our philosophy of making everyday appliances a little greener, it’s not only our vacuum cleaners that come in green versions. We also offer kitchen and laundry appliances that go a long way towards a greener world. In fact, studies show that if everyone in Europe would switch their 10-year-old household appliances to modern energy-saving models, the annual emissions of CO2 would be reduced by 22 million tons. That’s why we offer washing machines and dryers with settings that save energy and water. And the biggest energysaving effect is to replace old refrigerators and freezers with new ones, since these appliances run 24 hours a day, 365 days a year. To find out more about our green range, go to electrolux.com
Printed on recycled paper