
DSC 400 - Audio System JBL - Free user manual and instructions
Find the device manual for free DSC 400 JBL in PDF.

User questions about DSC 400 JBL
0 question about this device. Answer the ones you know or ask your own.
Ask a new question about this device
Download the instructions for your Audio System in PDF format for free! Find your manual DSC 400 - JBL and take your electronic device back in hand. On this page are published all the documents necessary for the use of your device. DSC 400 by JBL.
USER MANUAL DSC 400 JBL
And thank you for purchasing this JBL Digital Simply Cinema system. This state of the art system includes everything you need to experience movie theater quality digital video and audio in the comfort of your own living room. The only thing you need to add is your own TV. We have designed this system to be easy to set up, and even easier to use. But please review this manual before you operate your system. Have it handy while you are setting the system up and keep it available for future reference or in the unlikely event that you encounter any unexpected problems. We have tried to keep this manual as simple as possible. It begins with a description of the important controls on the main unit and the remote. It then explains how to connect the speakers, your TV, and optional external sources to the main unit, how to position the speakers for the most natural surround sound, and then how to operate the DVD/CD player and the AM/FM Stereo Receiver.
All of the optional system settings have been preset at our factory for correct operation of the system. All you have to do is insert a disc, sit back, and enjoy a great home theater experience.
You may want to change some of the optional settings. A description of all the optional settings and instructions for changing them are found in the second half of the manual.
This system was designed to provide you with many years of reliable operation with a minimum of care and maintenance. Every component in your system was in perfect working condition when it left our factory. If you experience any problems with the set-up or operation of this system, please review the Troubleshooting Guide at the end of this manual before you contact your authorized JBL dealer.
The serial number of your system can be found on a label on the back panel of the main unit, and also on the display carton. Please record the serial number in the space below. You may need to refer to this number if your system ever needs to be serviced or for insurance purposes.
Model no.: DSC400
Serial No.:
Model no.: DSC800
Serial No.:
Warning
To prevent fire or shock hazard, do not expose the unit to rain or moisture.
To avoid electrical shock, do not open the cabinet.
Refer servicing to qualified service personnel only.
The AC cord must only be changed at qualified service facility.
- This appliance is classified as a CLASS 1 LASER product.
- The CLASS 1 LASER PRODUCT MARKING is located on the rear panel.
- This product contains a low power laser device. To ensure continued safety, do not remove any cover or attempt to gain access to the inside of the product.
Caution
Refer servicing to qualified service personnel only.
The following marking is printed on the rear panel.

CAUTION
RISK OF ELECTRIC SHOCK DO NOT OPEN

CAUTION: TO REDUCE THE RISK OF ELECTRIC SHOCK, DO NOT REMOVE COVER (OR BACK). NO USERSERVICEABLE PARTS INSIDE. REFER SERVICING TO QUALIFIED SERVICE PERSONNEL.

The lightning flash with arrowhead symbol, within an equilateral triangle, is intended to alert the user to the presence of uninsulated "dangerous voltage" within the product's enclosure that may be of sufficient magnitude to constitute a risk of electric shock to persons.

The exclamation point within an equilateral triangle is intended to alert the user to the presence of important operating and maintenance (servicing) instructions in the literature accompanying the appliance.
WARNING: TO REDUCE THE RISK OF FIRE OR ELECTRIC SHOCK, DO NOT EXPOSE THIS APPLIANCE TO RAIN OR MOISTURE.
TABLE OF CONTENTS
| Introduction | Page |
| Important Safeguards and Precautions | 3 |
| Front Panel Controls | 5 |
| Front Panel Display | 6 |
| Rear Panel Connections | 7 |
| Remote Control | 8 |
| Basic Information | 10 |
| About This Manual | 10 |
| Notes On Discs | 10 |
| DVD Regional Coding | 10 |
| Inserting Batteries into the Remote Control | 10 |
| Installation | Page |
| Speaker Placement | 11 |
| System Connections | 13 |
| Antenna Connections | 14 |
| TV, Audio and Power Connections and Sub Auto On | 15 |
| TV and Aux Connections | 15 |
| Connecting AC Power | 15 |
| Subwoofer Auto-On | 15 |
| Adjusting Speaker Levels | 16 |
| Using Tuner Presets | 17 |
| Presetting Radio Stations | 17 |
| Recalling Preset Stations | 17 |
| Changing Preset Stations | 17 |
| Playing Disc | Page |
| Basic Playback | 18 |
| Slow Motion Play | 19 |
| Frame By Frame Advance | 19 |
| Locate a Point Quickly | 19 |
| Skip to Next or Previous Track/Chapter/Title | 19 |
| Using the Individual DVD Disc Menu | 20 |
| Repeat Playback | 21 |
| Program Play (Audio CD's and VCD's Only) | 22 |
| Selecting a Start Point | 23 |
| Selecting a Start Point by Chapter or Time Code | 23 |
| Selecting a Track Using Number Buttons | 23 |
| Checking Information Using Display Button | 24 |
| Settings And Adjustments | Page |
| Using the Set-Up Menu and Navigation Buttons | 25 |
| Set Up Menu Item List | 26 |
| General Setup | 27 |
| Selecting the On Screen Display (OSD) Language | 27 |
| Screen Saver Setting (SCR Saver) | 27 |
| TV Display Setting | 28 |
| TV Type Setting (Multi / NTSC / PAL) | 28 |
| Video Out Setting | 29 |
| Angle Mark Setting | 29 |
| Speaker Setup | 30 |
| Audio Mode Setting | 30 |
| Dolby Digital Setup | 31 |
| Dual Mono Setting | 31 |
| Dynamic Range Setting | 31 |
| Preferences Setup | 31 |
| Selecting the Language for Audio | 31 |
| Selecting the Language for Subtitles | 32 |
| Selecting the Language for Disc Menu | 32 |
| Setting the Parental Control Level | 32 |
| Changing the Password | 33 |
| Returning to the Original Factory Default Settings | 33 |
| Other Functions | Page |
| Angle Selection | 34 |
| Subtitle Language Selection | 34 |
| Audio Language/Format Selection | 34 |
| Listening To The Radio | 35 |
| RDS Operation | 35 |
| Listening To An External Source | 36 |
| Selecting Listening Modes | 36 |
| Surround Mode Chart | 37 |
| Using The Sleep Timer | 38 |
| MP3 Playback | 38 |
| Adjusting The Speaker Volume And Treble Controls | 40 |
| Picture Zooming | 41 |
| Additional Information | Page |
| Troubleshooting | 42 |
| Glossary | 44 |
| Specifications | 45 |
Declaration of Conformity

We, Harman Consumer International
2, route de Tours
72500 Château-du-Loir
France
declare in own responsibility, that the product described in this owner's manual is in compliance with technical standards:
EN 50081-1:1992
EN 50082-1:1992
EN 60065-1:1998
EN 50013/A14:1999
EN 50020/A14:1999
EN 55022:1998
EN 61000-3-2/A14:2000
EN 61000-3-3/1:1995

Luc Emmanuel Godard
JBL, Harman Consumer International
France, 09/01
IMPORTANT SAFEGUARDS AND PRECAUTIONS
Power Cord Protection
To avoid any malfunctions of the system controller or subwoofer, and to protect against electric shock, fire or personal injury, please observe the following:
- Hold the plug firmly when connecting or disconnecting the AC power cord.
- Keep the AC power cord away from heating appliances.
- Never put any heavy object on the AC power cord.
- Do not attempt to repair or modify the AC power cords in any way.
Location and Handling
- The apparatus shall not be exposed to dripping or splashing and no objects filled with liquids, such as vases, shall be placed on the apparatus.
Air vents are provided in the cabinet to prevent excessive temperatures inside the unit. Do not place this unit in closed spaces, cover it, or otherwise block the vents. - Do not place this unit in direct sunlight or near heat sources.
- Keep this unit away from strong magnetic objects.
- Do not insert or drop anything into this unit through the air vents as this could cause serious damage, possibly resulting in fire.
- Do not place any object containing water or other liquids near the controller. In the event that liquid should enter the cabinet, unplug the unit immediately and contact your authorized JBL dealer immediately.
- Do not remove the cabinet. Touching parts inside the cabinet could result in electric shock and / or damage to the unit.
- Do not use the unit in a car. The operation cannot be guaranteed.
Non-Use Periods
- When the controller is not being used, turn it off.
- When left unused for a long period of time, the controller and subwoofer should be unplugged from the household AC outlet.
Foreign Objects Inside
Do not put any foreign object on the disc tray.
Stacking
Place the controller in a horizontal position and do not place any object on it.
Condensation
Moisture may form on the pickup lens in the following conditions:
- Immediately after a heater has been turned on.
In a steamy or very humid room. - When the unit is suddenly moved from a cold environment to a warm one.
If moisture forms inside this unit, it may not operate properly. In this case, turn on the power and wait about one hour for the moisture to evaporate.
On Adjusting Volume
Do not turn up the volume while listening to a passage with very low level or no audio signals. If you do, the speakers may be damaged when a peak level portion is played.
IMPORTANT SAFEGUARDS AND PRECAUTIONS
If There is Noise Interference on the TV While a Broadcast is Being Received
Depending on the reception condition of the TV, interference may appear on the TV monitor while you watch a TV broadcast and the controller is left on. This is not a malfunction of the controller or the TV. To watch a TV broadcast, turn off the controller.
Service
- Do not attempt to service the controller or subwoofer yourself.
- Please contact your authorized JBL dealer.
Copyright
Audio-visual material may consist of copyrighted works which must not be recorded without the permission of the owner of the copyright.
Please refer to relevant laws covering copyright protection.
Copy protection
This DVD player supports Macro-vision copy protection. On DVD discs that include a copy protection code, if the contents of the DVD disc are copied using a VCR, the copy protection code prevents the videotape copy from playing normally.
For Optimum Performance
The controller is a precision device that is constructed using extremely accurate technology. Soiling or friction affecting the pickup lens or disc drive can impair the image quality. In the worst case, neither video nor audio will be played back. To obtain optimum picture quality, the player should be checked (cleaning and replacement of some parts) every 1,000 hours. Note that this period varies depending on the environment (temperature, humidity, dust) in which the player is used.
Do not attempt to clean the pickup lens yourself.
Unpacking
Check that you have the following items:
- DSC100DVD-RDS DVD player/controller/tuner (1)
- Subwoofer (1)
- Center speaker (1)
- Satellite speakers (4)
Remote control (1) - AAA batteries (2)
SCART A/V cable (1 meter) - Controller/subwoofer cable (3 meter)
- Left/Center/Right/Front speaker cables (3x3 meter)
- Surround speaker cables (2x12 meter)
AM loop antenna (1)
FM antenna (1) - Owner's Manual (1)
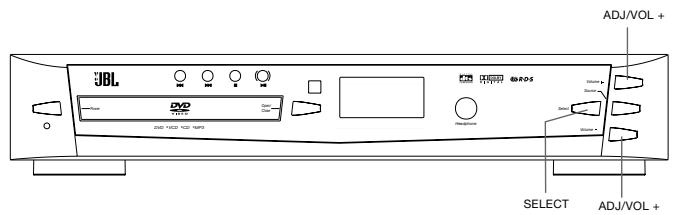
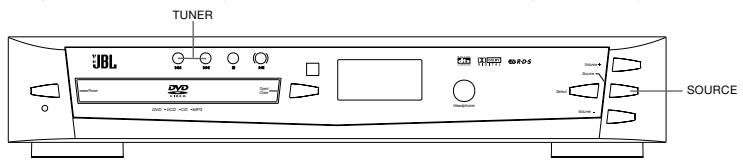
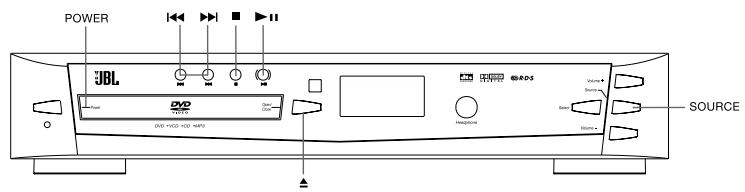
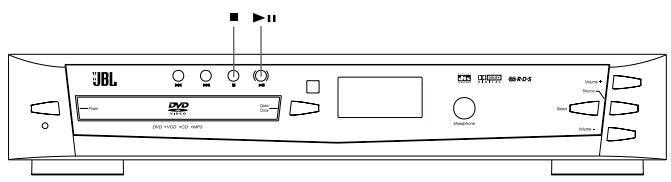
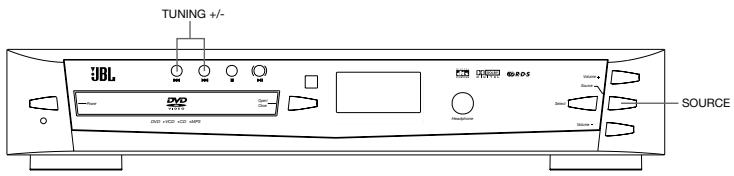
FRONT PANEL CONTROLS
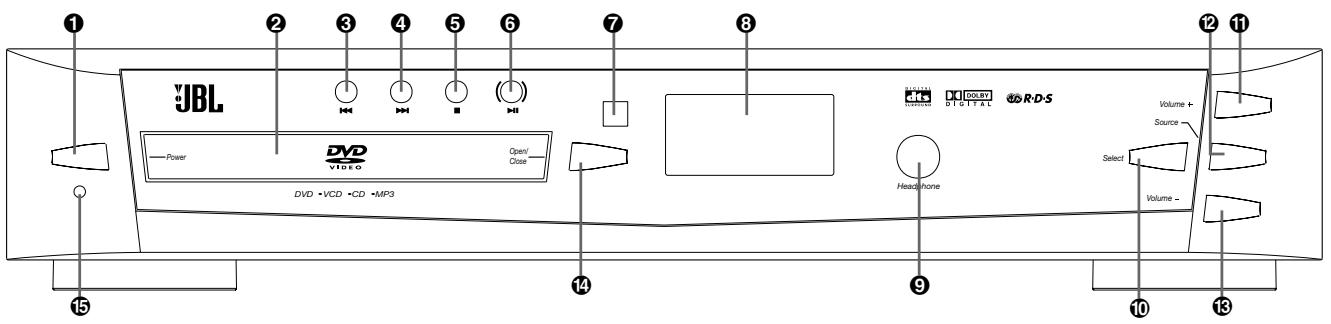
Refer to the pages indicated in parentheses for details.
1 POWER (page 15). Turn on and off the main power of the system. (Note: This switch must be "on" in order to operate the system with the remote control.)
2 Disc Tray (page 18). Place a disc on the tray.
REV. While playing a disc (page 19), press this button to select the previous title, chapter or track. While listening to the radio (page 35), press this button to tune to a lower frequency.
For automatic tuning, press and hold it for more than 1 second.
4 FWD. While playing a disc (page 19), press this button to select the next title, chapter or track. While listening to the radio (page 36), press this button to tune to a higher frequency. For automatic tuning, press and hold it for more than 1 second.
STOP (page 18). Stop playing a disc.
6 PLAY/PAUSE (page 18).Play or pause a disc.
7 REMOTE SENSOR. Receives the remote control signals.
3 Front Panel Display (page 6). Indicate the playing time, etc.
9 PHONES jack. Connect headphones to this jack. (Headphones not included.)
SELECT (page 40). Select an audio channel to check or adjust its level.
VOLUME + (page 16, 40). Increase the master volume level or the selected channel level.
SOURCE (page 17, 18, 35, 36). Select the component you want to use. In standby mode, press this button to turn on the power of this system.
VOLUME - (page 16, 40).
Decrease the master volume level or the selected channel level.
14 OPEN/CLOSE (page 18). Open or close the disc tray.
5 POWER LED (page 18).
Power On: LED lights Blue
Standby: LED lights Red
Mute: LED blinks Red
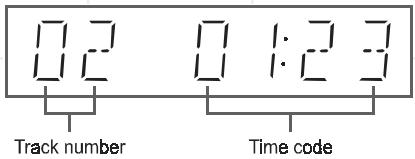
FRONT PANEL DISPLAY
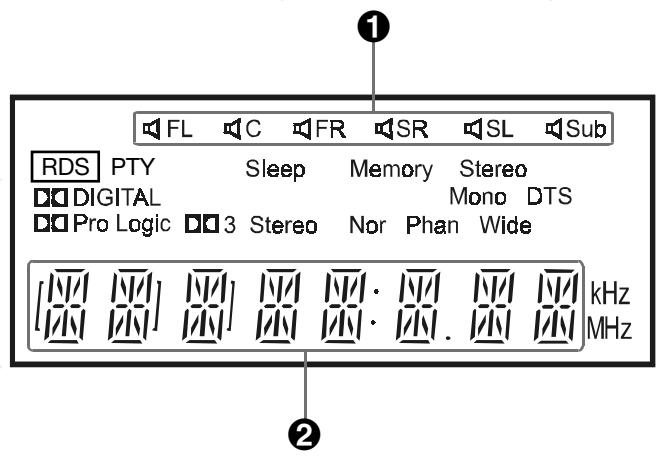
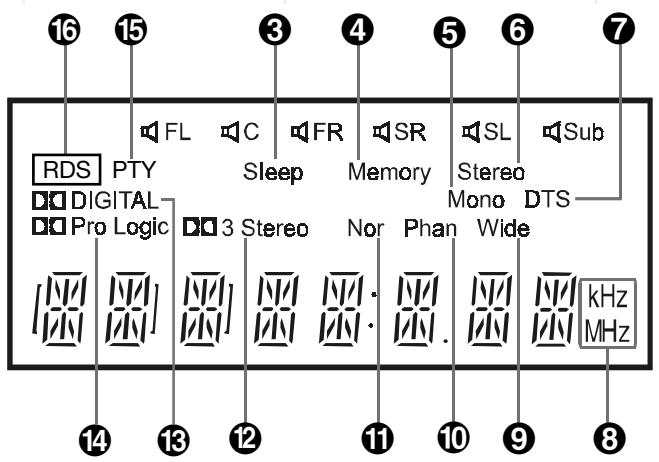
Refer to the pages indicated in parentheses for details.
1 Speakers Icon (page 16, 36). Indicates which of the six speak are operating.
Status Bar. Shows the operating information, such as "OPEN", "CLOSE" and "LOADING", etc. Shows the type of disc playing: DVD, CD and MP3, etc. Shows track and time information of the CD or MP3 disc. Shows the tuner band and frequency.
3 Sleep (page 38). Illuminates when the sleep timer is on.
Memory. Illuminates when the program play mode is set (page 22). Illuminates when presetting radio stations (page 17).
Mono (page 35). Illuminates when unit is set to MONO FM mode.
Stereo (page 35). Illuminates when a stereo FM station is received.
DTS. Illuminates when the disc playing outputs DTS audio.
FM/AM Frequency. In AM mode, "kHz" lights up. In FM mode, "MHz" lights up.
Wide (page 36). Illuminates when "Pro Logic Wide" or "3-Stereo Wide" mode is selected.
10 Phan (Phantom) (page 37). Illuminates when "Pro Logic Phantom" is selected.
1 Nor (Normal) (page 37).
Illuminates when "Pro Logic Normal" or "3-Stereo Normal" is selected.
Dolby 3-Stereo (page 37). Illuminates when "3-Stereo Normal" or "3-Stereo Wide" is selected.
Dolby Digital (page 37). Illuminates when the disc playing outputs Dolby Digital audio.
Dolby Pro Logic (page 37). Illuminates when the playing disc is recorded with Dolby Pro Logic format. Illuminates when "Pro Logic Normal", "Pro Logic Phantom" or "Pro Logic Wide" is selected.
15 PTY (page 35). Illuminates when an RDS station is received, transmitting any PTY (Program Type) code.
16 RDS (page 35). Illuminates when an RDS station is received.
REAR PANEL CONNECTIONS
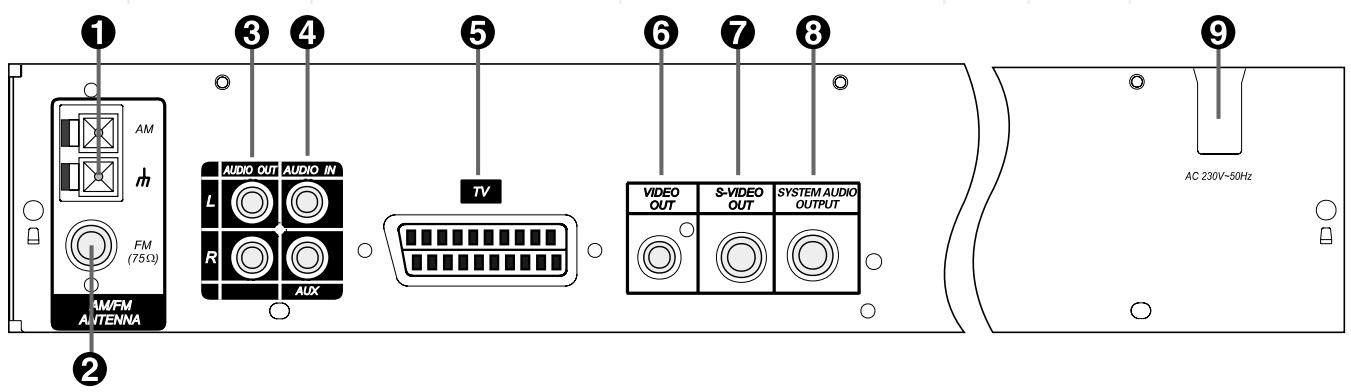
Refer to the pages indicated in parentheses for details.
AM Antenna (page 14). Connect to the supplied AM loop antenna.
FM Antenna (page 14). Connect to the supplied FM antenna.
3 Audio Out (page 15). Optional connection to a TV set or external audio system (also for recording devices). Not necessary when using DSC loudspeaker system and subwoofer connection.
AUX Audio In (page 15). Connect to a line-level analog audio source: TV, tape player, Minidisc, PC, etc.
SCART In/Out (page 15). Connect to a TV SCART input. (SCART cable included.)
Video Out (page 15). Connect to a TV video input. (Composite video cable not included).
S-Video Out (page 15). Connect to a TV S-Video input. (S-Video cable not included).
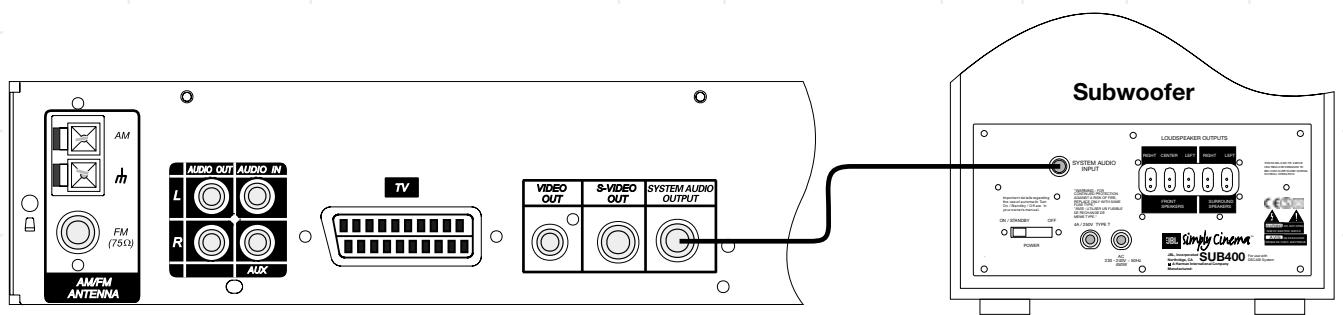
System Audio Output (page 13). Connect to "System Audio Input" on the DSC active subwoofer.
AC Power Cord (page 15). Connect to a 230V wall outlet.
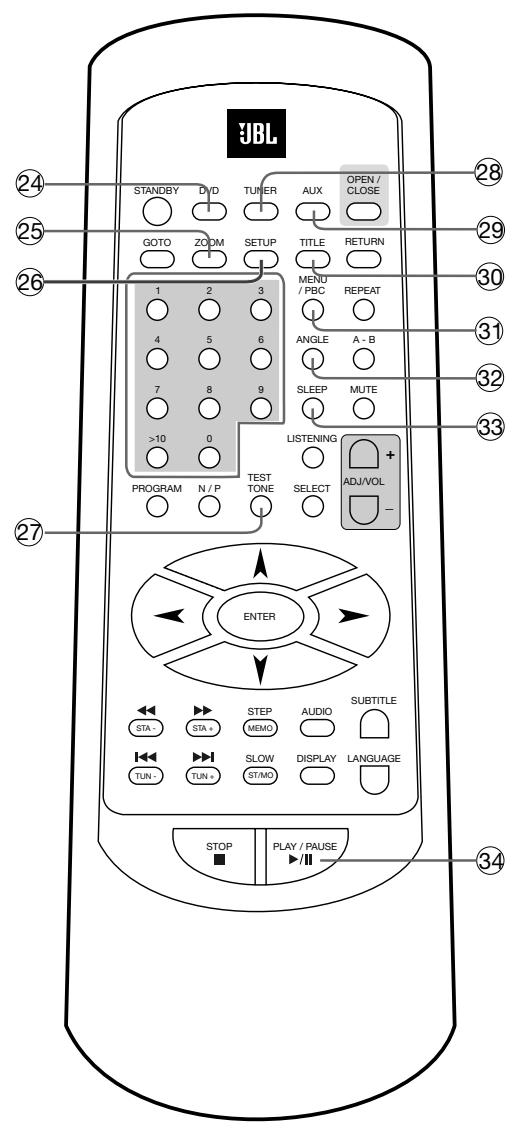
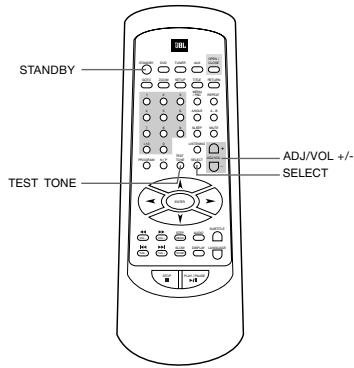
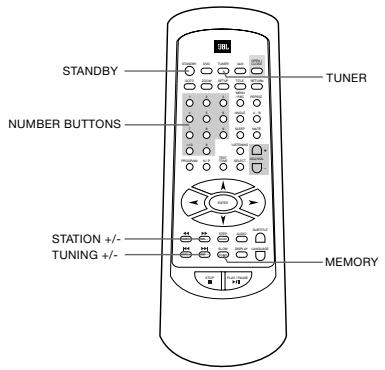
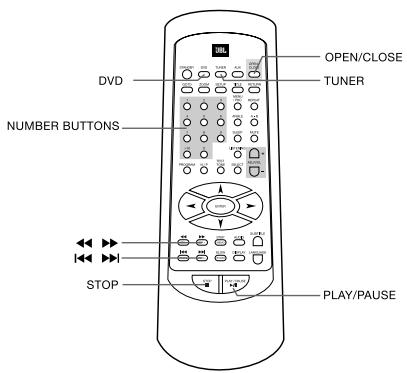
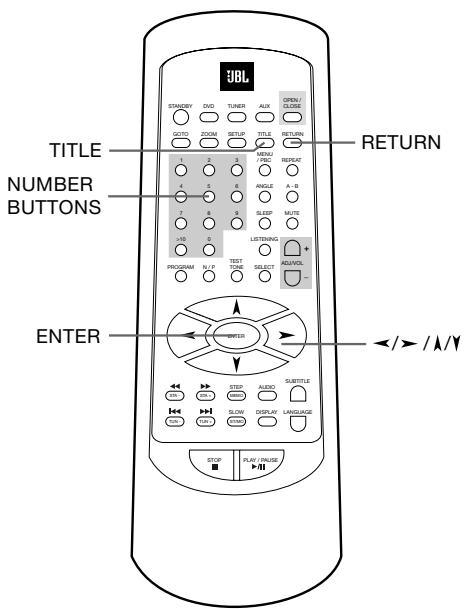
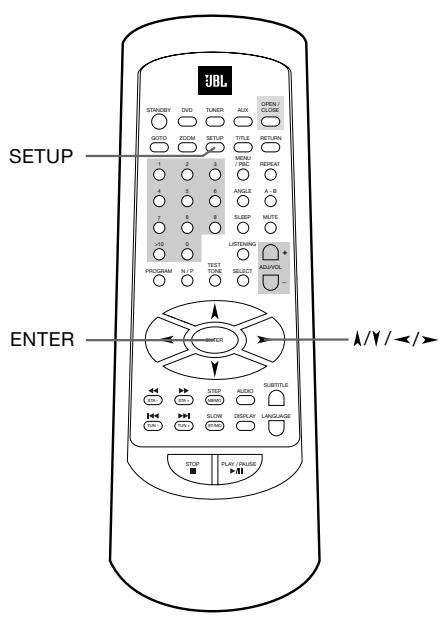
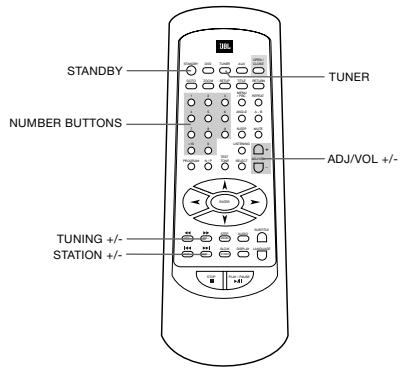
REMOTE CONTROL
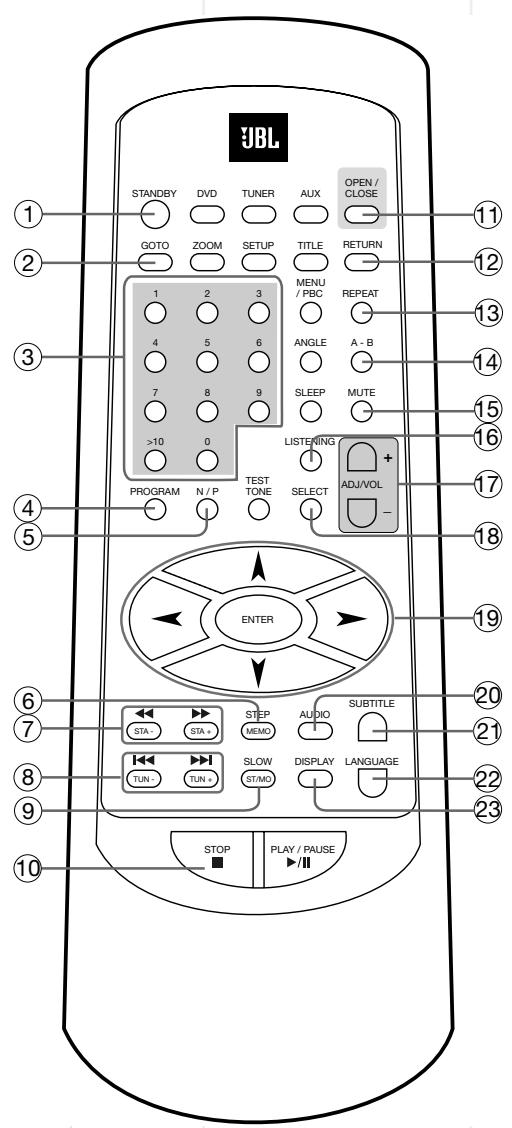
Refer to the pages indicated in parentheses for details.
STANDBY (page 16, 17).
Turns the system power on or off. (Note: Power switch on main unit must be "on").
2 GO TO (page 23). Selects a starting point to play.
3 Numbers (page 17, 20, 23).
Select the items or settings or tracks directly with discs or presets with tuner.
4 PROGRAM (page 22).Stores CD tracks for program play.
5 N/P (NTSC/PAL) (page 28).
Changes TV system temporarily without changing the default setting.
⑥ MEMO - STEP. Stores radio station in preset memory when tuner is selected (page 17). Activates frame by frame playback when playing DVD (page 19).
STA-/STA+. Press to play a disc in fast forward / reverse mode (page 19). In tuner mode, press to select previous/next preset station (page 17).
8 / (TUNING +/-). In DVD mode, press to select next/previous title chapter or track (page 19). In tuner mode, press to select next/previous frequency (page 17).
ST/MO (STEREO/MONO) - SLOW. Switches between mono and stereo during FM stereo reception (page 36). Activates slow-motion when playing DVD or VCD (page 19).
STOP. Stops disc playback (page 18). Also used to delete stored program (page 22).
OPEN / CLOSE (page 18). Opens or closes the disc tray.
RETURN (page 20). Displays root menu when playing a DVD.
REPEAT (page 21). Press to select Repeat 1 or Repeat All tracks (CDs) or titles/chapters (DVDs) playback.
A-B (page 21). Specifies a section and plays it repeatedly.
15 MUTE (page 18). Mutes the sound.
LISTENING (page 36). Selects desired listening (Surround/Audio) mode.
ADJUST/VOLUME (+or - ) (page 18,40).Increase/decrease the master volume level or the selected channel level.
18 SELECT (page 40). Selects audio channel to check or adjust its level.
19 / / / ENTER (Navigation) (page 20ff). Move the cursor to select and execute the items or settings.
AUDIO. Selects the audio channels for sound (Only with some DVDs, with others "LANGUAGE" must be used).
SUBTITLE (page 34). Selects desired language for subtitles when playing DVD.
LANGUAGE (page 34). Selects audio language and format when playing DVD.
DISPLAY (page 24). Switches item displayed on screen and/or on front panel display.
DVD (page 18). Selects the input from a DVD, or other disc format inserted in the disc tray.
ZOOM (page 41). Zoom in to enlarge picture area.
25 SETUP (page 25ff). Displays or exits the SETUP menu.
TEST TONE (page 16).Turns test tone on and off.
TUNER (page 17, 35). Press to select radio as source. If already selected, press to switch between FM and AM.
AUX (page 36). Selects the AUX or TV (SCART) audio input. (i.e. external source).
TITLE (page 20). Displays the title menu when playing DVD.
31 MENU/PBC (page 43). Changes to menu start function. With VCDs the control of all functions by the DVD itself can be turned off/on (PBC = Playback Contol).
2 ANGLE (page 34). Changes the angles while playing a DVD.
SLEEP (page 38). Activates sleep timer.
34 /II PLAY/PAUSE (page 18ff). Start or pause when playing a disc.
BASIC INFORMATION
About This Manual
- The types of functions and operations that can be used for a particular disc vary depending on the features of that disc. In some cases, these functions and operations may differ from the descriptions given in this manual. In this event, follow the instructions given on the screen. This manual only covers basic disc operations.
- For some operations, the icon may appear on the screen. This indicates that the operation described in this manual is not available on the disc in the player.
- On-screen and front panel display illustrations in this manual are purely for the purposes of explanation. The actual displays may differ slightly from these illustrations.
Notes on Discs
Disc formats supported by this player
The unit can play discs bearing any of the following logos:


DVD's
8-12cm disc
Video CD's
8-12cm disc
Supports
VCD 1.1
VCD2.0 and
SVCD
Audio CD's
8-12cm disc
Supports MP3,
CDR, CDR-W,
CD-DA
Note: Audio encoded in MPEG 2.0 may not play properly on some discs, although the picture will be shown.
Discs that Cannot be Played
- You cannot play CD-G, CD-EXTRA, PHOTO CD, CD-ROM and DVD-ROM discs.
- You may not play scratched discs.
- You may not play discs that are dusty, soiled or marked with fingerprints.
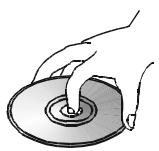
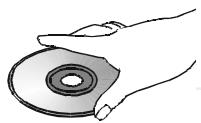
Disc handling precautions
- To keep the disc clean, handle the disc by its edge. Do not touch the surface.
- Do not stick paper or tape on the disc.
If there is glue (or a similar substance) on the disc, remove the glue completely before using the disc.
- Do not expose the disc to direct sunlight or sources such as hot air ducts, or leave it in a car parked in direct sunlight as there can be a considerable rise in temperature inside the car.
- After playing, store the disc in its case.
- Do not write on the label side with a ball-point pen or other writing utensils.
- Be careful not to drop or bend the disc.
Disc cleaning precautions
- Before playing, clean the disc with a cleaning cloth. Wipe the disc from the center out.
- Do not use solvents such as benzine, thinner, commercially available cleaners or anti-static spray intended for vinyl LPs.
Disc installing precautions
- Do not install more than 1 disc on disc tray.
-
Do not place the disc on the tray upside down.
-
Do not try to close the disc tray when the disc is not installed and centered properly.
Regional Coding
DVD players and discs are designed with regional restrictions which dictate the regions in which a disc can be played. If the region number on the disc you want to play does not match the region number of your DVD player, you will not be able to play the disc. The message "WRONG REGION" will appear in the on-screen display.
The region code of this player is indicated on the rear and on the external packaging.
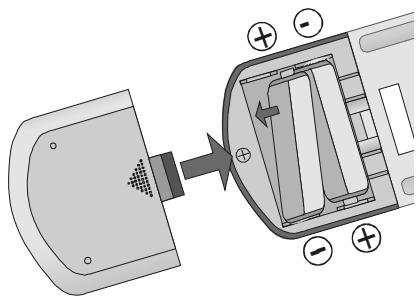
Remote Control
- Be sure to follow correct polarity when installing the batteries as indicated in the battery compartment. Reversed batteries may cause damage to the device.
- Use only the size and type of batteries specified.
- Do not mix different types of batteries (e.g. Alkaline and Carbon-zinc) or old batteries with new ones.
- If you will not use the remote for an extended period of time, remove the batteries to avoid possible damage from battery leakage and corrosion.
SPEAKER PLACEMENT
Front Speakers
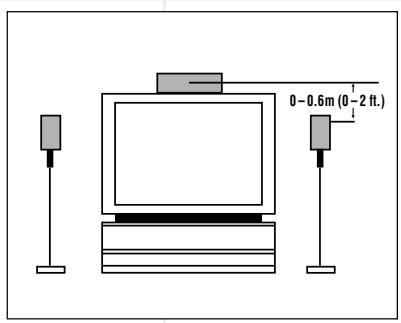
Center Channel Speaker
Subwoofer
Surround Speakers
The front speakers should be placed the same distance from each other as they are from the listening position. They should be placed at about the same height from the floor as the listeners' ears will be, or they may be angled toward the listeners.
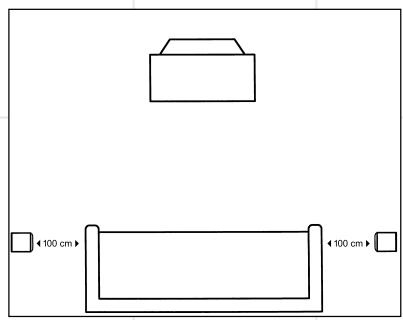
The center channel speaker should be placed slightly behind the front left and right speakers, and no more than 60 cm above or below the tweeters of the left and right speakers. It is often convenient to set the center speaker on top of the television set, as shown in the drawing. Use the supplied support leg to aim it toward the listener by screwing the leg in to angle the speaker up, or unscrewing the leg slightly to angle the speaker down (applies to the DSC400 only).
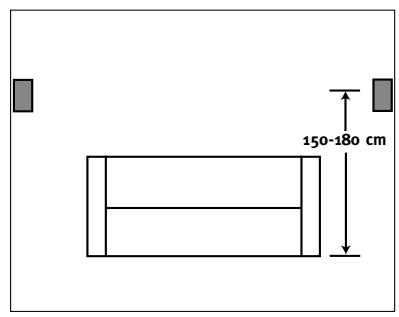
The rear delay settings in this system have been set so that the optimum position from the listener is 1m. The two surround speakers should be placed slightly behind the listening position and, ideally, should face each other and be at a level higher than the listeners' ears. If that is not possible, they may be placed on a wall behind the listening position, facing forward. The surround speakers should not call attention to themselves. Experiment with their placement until you hear a diffuse, ambient sound accompanying the main program material heard in the front speakers.
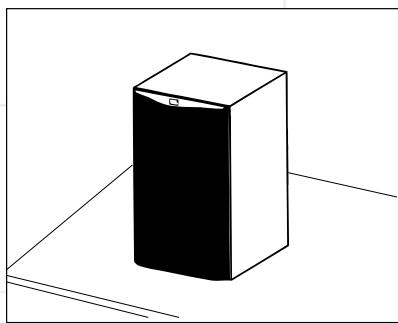
The low-frequency material reproduced by the subwoofer is mostly omnidirectional, and this speaker may be placed in a convenient location in the room. However, the best reproduction of bass will be heard when the subwoofer is placed in a corner along the same wall as the front speakers. Experiment with subwoofer placement by temporarily placing the subwoofer in the listening position and moving around the room until the bass reproduction is best. Place the subwoofer in that location.
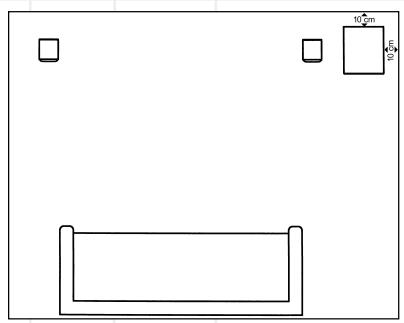
Note: To ensure adequate ventilation, allow a minimum distance of 10cm between the subwoofer and surrounding walls.
SPEAKER MOUNTING OPTIONS
DSC800 Satellites and Surrounds
On shelves.

On the wall. Wall brackets are included.
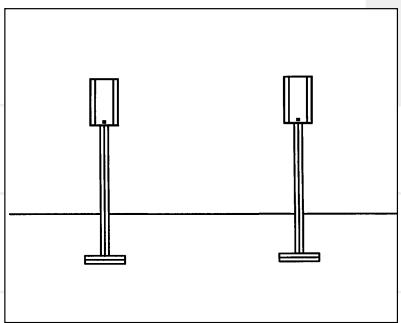
On optional stands.
Wall-Mounting
The customer is responsible for proper selection and use of mounting
hardware, available through hardware stores, to properly and safely wall-mount the speakers.
DSC400 Satellites and Surrounds
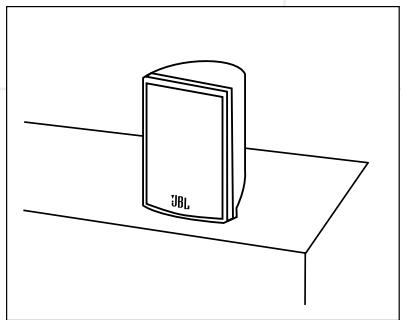
On shelves.
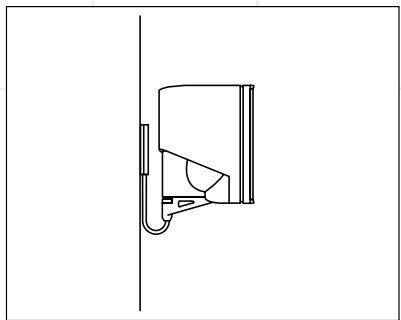
On the wall. Wall brackets are an optional extra (WB300S).
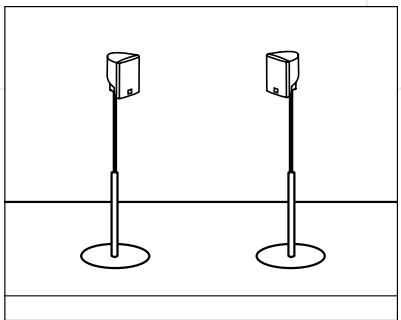
On optional stands (FS300S).
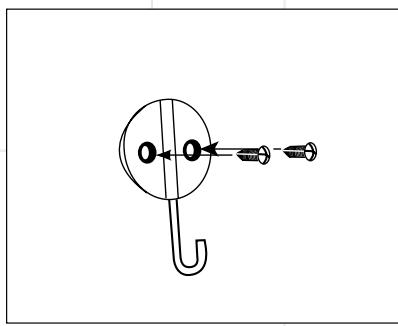
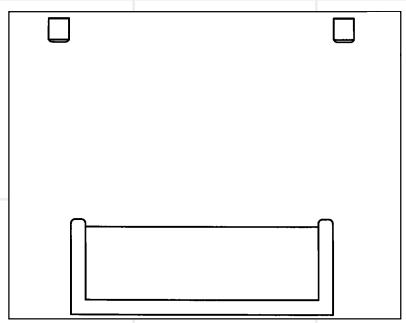
Attach plate to wall. The brackets should be placed, if possible, so that the screws will fasten into a wooden wall stud. If that is not possible, use properly selected wall anchors.
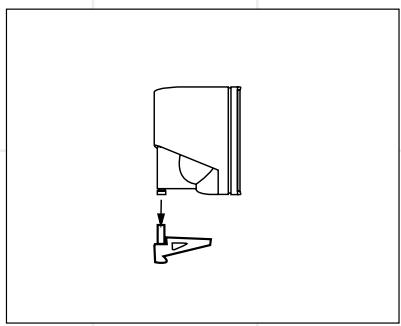
Slide speaker onto support.
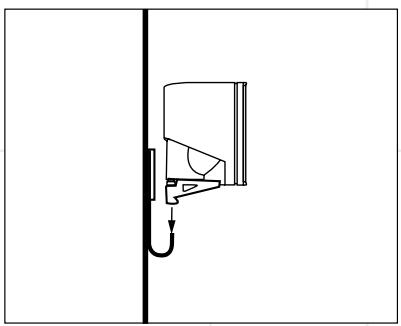
Place speaker and support on wall plate.
DSC SYSTEM CONNECTION
Caution: Always make certain that the controller and the subwoofer are turned off before connecting or disconnecting anything.
Connecting the Controller to the Subwoofer
Connect the special multi-pin cable (included) to the output marked "System Audio Output" on the controller and to the input marked
"System Audio Input" on the subwoofer. This sends the bass/Low Frequency Effects signal to the subwoofer's own 100 Watt amplifier and sends the three front and two rear channels to the five 35 Watt amplifiers
conveniently built into the subwoofer to power your DSC satellite speakers.
Connecting the Subwoofer to the Satellites
Your DSC system includes cables for connection of all five satellite speakers to the subwoofer. Connect the special error-proof connectors at the subwoofer end of each cable to the appropriately marked sockets on the rear of the subwoofer. Owners of the DSC400 system should follow the instructions in the section marked "DSC400 Only" for cable connection to the DSC400 satellites. Owners of the DSC800 system should follow the instructions in the section marked "DSC800 Only" for cable connection to the DSC800 satellites. To place the speakers in your room, see the recommendation on pages 11 and 30.
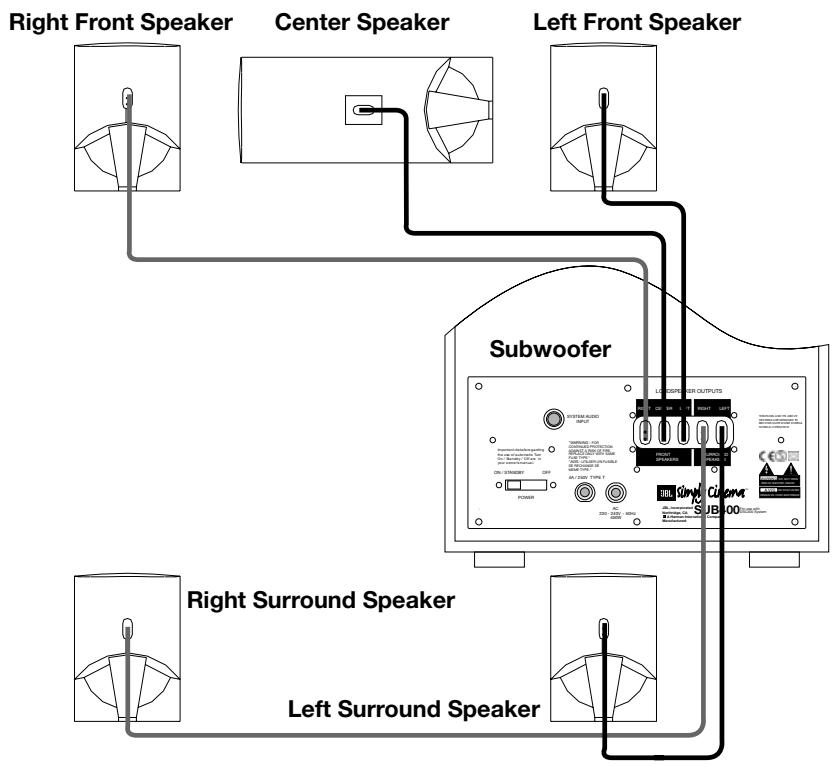
(DSC400 Only)
Connect the special error-proof connectors at the loudspeaker end of each cable to the correct loudspeaker. Make certain to connect the right front output on the subwoofer to the right front speaker, center output to center speaker, etc.
(DSC800 Only)
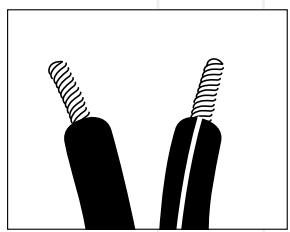
Remove 1 / 2 cm of insulation from the loudspeaker end of each cable. Connect the "+" conductor (marked with a stripe) to the red "+" terminal
of the appropriate loudspeaker and the "- " conductor to the black"-terminal of the loudspeaker. Make certain to connect the right front output on the subwoofer to the right front speaker, center output to center speaker, etc. It is important to connect all speakers correctly, with plus wire to plus terminal and minus wire to minus terminal. Incorrect "out of phase" wiring will result in thin sound, weak bass and a poor stereo image.
ANTENNA CONNECTIONS
Connect the supplied AM and FM antennas as shown for radio reception.
Connect the AM loop antenna to the AM screw terminals.
Connect the FM antenna to the 75 Ohm FM antenna socket.
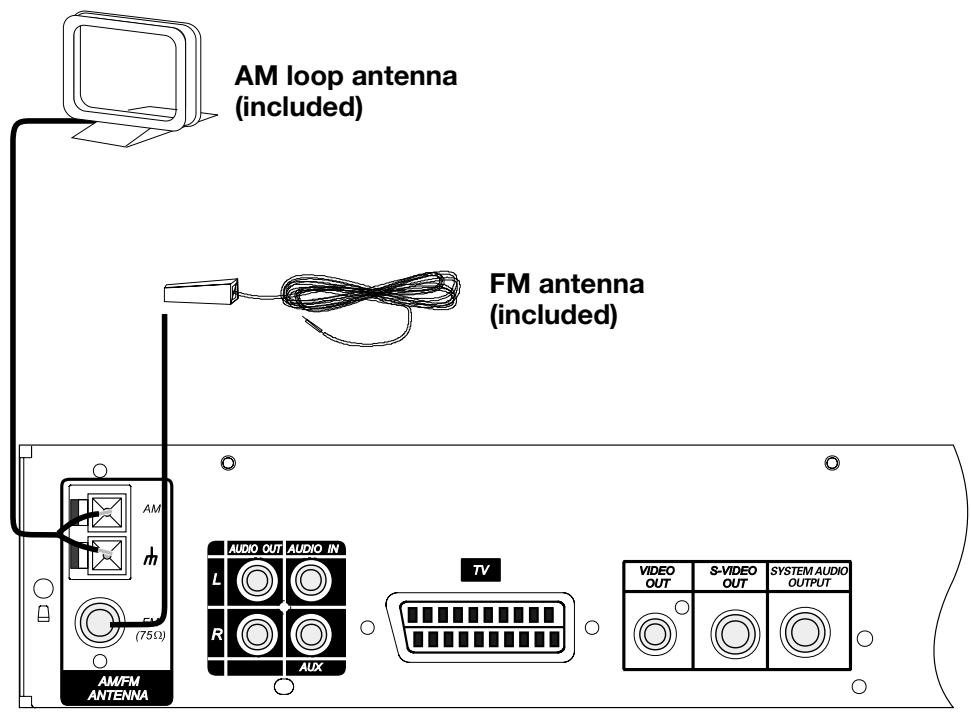
Notes:
- To prevent noise pickup, keep the AM loop antenna away from the system and other components.
- Be sure to fully extend the FM wire antenna.
After connecting the FM wire antenna, keep it as horizontal as possible. Move it until you receive the best reception.
If you have poor FM reception
Use a 75-ohm coaxial cable (not included) to connect the system to an outdoor FM antenna as shown below or to the radio antenna connector on the wall for the roof antenna on your house (if any).
Notes:
- If you connect the system to an outdoor antenna, ground it against lightning.
- To prevent a gas explosion, do not connect the ground wire to a gas pipe.

Outdoor FM antenna
TV, AUDIO AND POWER CONNECTIONS AND SUB AUTO ON
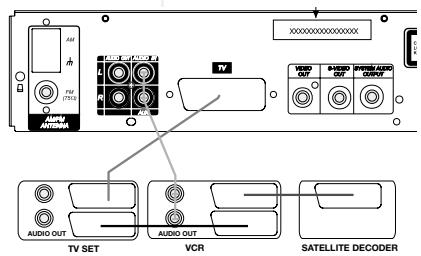
Connecting the TV and optional components
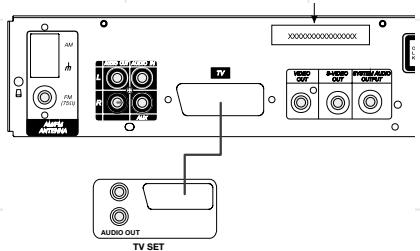
TV Connection (method 1)
- using SCART cable (cable included) To view the video from DVD discs on your TV set, connect the SCART TV Out jack of this system to the SCART In jack of your TV set. If this connection is made, the audio signal will also be routed to the TV, but as long as the speakers of your JBL DSC system are active, the volume on your TV should be turned down.
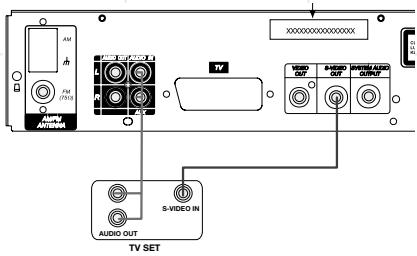
TV Connection (method 2)
- using S-Video cable
If your TV set has an S-Video Input Jack you can connect your TV to the S-Video Out Jack on the back of this system (the S-Video connection cable is not included). The S-Video connection will provide the best picture quality if your TV is equipped to handle S-Video signals. We recommend using the S-Video connection if your TV has an S-Video input jack. When connecting the DSC100DVD unit in this manner, use the AUX Audio Input to carry the audio signal from your TV. Connecting more than one video signal output from the DSC100DVD unit will result in degradation of the video signal.
TV Connection (method 2)
- using video cord:
If your TV set has neither S-Video nor SCART Input jacks, connect the Video Out jack of this system, to the Video In jack of your TV set (Composite video cable not included). When connecting
the DSC100DVD unit in this manner, use the AUX Audio Input to carry the audio signal from your TV. Connecting more than one video signal output from the DSC100DVD unit will result in degradation of the video signal.
Connecting VCR and Sat Decoder (method 3 and 4)
Diagrams 3 and 4 show possible connection methods for common system configurations. These are intended as guidelines only. Due to differences in equipment specifications, the method of connection of your equipment may be different to that shown. Please consult the Owner's Manual of your equipment for further guidance.

Aux Input for External Source
You may connect a line-level stereo analog audio source such as a Sat receiver, tape deck, phono preamp of a record player, etc. to the controller's rear panel AUX Input sockets to enjoy the benefits of your DSC system with other source components.
VCR Connection-Audio (Cables Not Included)
To listen to the sound from your stereo VCR through the speakers of this system, connect the Left/Right audio output jacks of your stereo VCR to the Left/Right audio input jacks (AUX) of this system.
Audio Out Connections
To record the sound of the DSC system with your VCR or any audio recording device (tape deck, MD,
CDR and some others.) the Audio Out jacks should be connected to the analog Record In jacks of the appropriate device. They can also be connected to any audio input on your TV, as shown in the diagrams, to listen to the sound of your DSC100DVD through the speakers of your TV only, when the amp in your subwoofer is turned off. As soon as the speakers of your JBL DSC system are active, the volume on your TV should be turned down.
Connecting the AC Power
Notes
The Power Requirement is: AC 230V, 50 Hz.
- Connecting to power other than the one listed above may damage the system or cause abnormal operation.
- Before connecting the AC power cord of this system to a wall outlet, connect the speakers and other component cables to the system.
- Connect the AC power cord of the active subwoofer.
- Connect the AC power cords of your TV and any optional components to a wall outlet.
Subwoofer Auto-On
Move the Power Switch on the rear panel of the subwoofer to the ON position to use the system. The subwoofer should normally be left on. When the controller is off, or is not sending a signal to the subwoofer, the subwoofer will be in standby. When the subwoofer senses an audio signal, it will automatically turn itself on. If the subwoofer does not sense a signal after approximately twenty minutes, it will automatically go into standby.
If you will be away from home for an extended period of time, or if the subwoofer will not be used, move the Power switch to the OFF position.
After you have connected the system and positioned the speakers, the next step is to adjust the level of each satellite, using the Test Tone, so that their levels at your normal listening position are identical. This adjustment should be made with the Test Tone only, not while you are watching a DVD movie.
Remember that the rear speakers are designed to operate only when there is action, ambience or effects behind you. If you adjust the level of the rear speakers incorrectly so that you constantly hear sound behind you, you will not get the proper surround effect.
selected, note that all six speaker icons in the display are on (see page 6), otherwise press LISTENING on the remote until this is the case.
- Stop any external source, when playing, and turn the volume until "VOL 20" is displayed.
- Press TEST TONE on the remote control. The test tone will start at the front left (FL) speaker. After 3 seconds the sound will move to the center (C) speaker, and then to the front right (FR), surround right (SR) and surround left (SL) speakers in succession. The main display and the TV screen will show the word "TEST" and will also indicate which
-
Turn your system on.
-
Press POWER on the front panel to turn the system ON.
- Sit in your normal listening position and press STANDBY on the remote control, if the system has not turned on already. The unit will go into the Active mode and the main display will come on and show "NO DISC", if the tray is empty still.
- Turn on your TV and select the input on the TV to which the controller is connected. The words "NO DISC" should appear on your TV, if the tray is empty.
- Insert a DVD disc.
- If a disc is loaded already or if a source different from DVD player is
speaker is operating. The test tone continues cycling among the 5 speakers indefinitely.
3. All 5 satellite speakers have been pre-set to the same level (00 dB). If the level of the tone from all 5 speakers is the same at your normal listening position, no further adjustment is necessary. Press TEST TONE again to cancel the test tone function. You can skip step 4 and go to the next section.
4. If the level of all 5 speakers does not sound the same at your normal listening position you can adjust each speaker up or down, 10 dB in 1 dB steps. For example, if the test tone from the surround speakers
sounds lower than the front speakers when the front panel display and the TV screen indicate that the tone is coming from the surround right (SR) speaker, press the VOL + button on the remote control to increase the level of that speaker. The front panel and TV screen will show the new level setting. After a few seconds the new setting will be memorized and the test tone will move to the surround left (SL) speaker. Adjust the surround left (SL) speaker in the same manner.
Then listen to the tone from all 5 speakers again to verify that the level sounds the same at your normal listening position. Re-adjust each speaker up or down as required and press TEST TONE once more to cancel the test tone function.
Note: When matching the level of each of the individual satellite speakers, it is preferable to match the levels to the quietest channel. This will give you more flexibility when adjusting the subwoofer level.
After this setting is made all speaker levels will be adjusted for any surround mode and any source selected.
Subwoofer Level Adjustment Once the level of the 5 satellite speakers has been set, you can adjust the level of the subwoofer to match. Insert a DVD disc and play a passage that you are familiar with. Using the SELECT button on the remote, select the subwoofer level adjustment. Increase or decrease the level of the subwoofer until you are satisfied with its level, relative to the 5 satellite speakers.
USING TUNER PRESETS
Presetting Radio Stations
You can preset up to 40 of your favorite AM and FM stations, in any combination, in the tuner memory for easy recall.
- Press STANDBY on the remote control to turn the system On.
- Press either TUNER on the remote control or SOURCE on the front panel, repeatedly to select the Tuner and the desired radio band, AM or FM.
- Tune to the first station you wish to preset.
- Manual Tuning - repeatedly press TUNING +/- on the front panel or the remote control until the desired frequency appears on the display. (Note: You must use manual tuning if your are trying to tune to a weak station.)
Automatic Tuning - press and hold TUNING +/- on the front panel or the remote control until the display begins to scan up or down, then release the button. The tuner will stop at the first strong station it finds. Repeat this process until it stops at your desired station.
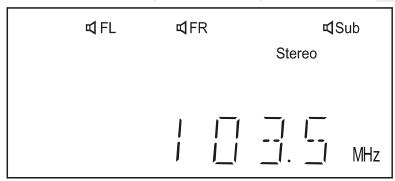
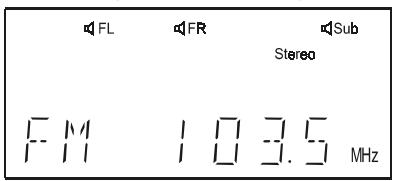
| FL | FR | Sub Stereo |
| MHz |
- When the desired station appears in the display (Example: FM 103.5 MHz) press MEMO on the remote control. The Memory indicator and "P01" appear in the display indicating that you are ready to enter that station in preset memory #1.
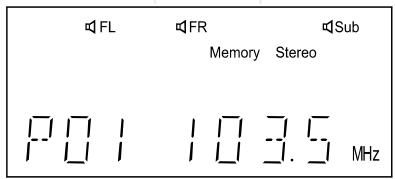
- Press MEMO on the remote control again to enter the station into memory. The Memory indicator and the preset station number disappear and the station is memorized.
- To enter the next station in memory follow steps 2 and 3 to tune the desired station and press MEMO on the remote control. Then press either STA + or STA - on the remote control or the desired NUMBER button (how to select see the note
on the right) to select another preset memory number, and press MEMO again to enter that station in the selected preset memory number.
Note:
You must press MEMO to memorize a station while the Memory indicator appears in the display (approximately 4 seconds), otherwise the station will not be memorized.
- Repeat steps 2 to 6 to enter up to 40 stations in the tuner memory.
Recalling Preset Stations
- Press STANDBY on the remote control to turn the system 'ON' and, if necessary, press TUNER to select the Tuner function.
- Press either STA + or STA - on the remote to select the desired preset memory number.
Note: You may also use the number keys on the remote control to go directly to one of the preset memory stations. To select preset stations 1 through 9, press the number key. To select preset station numbers higher than 9 press the >10 key one or more times followed by the appropriate number key, for example:
| To Select Station Number: | Press These Keys: | |
| 10 | >10 and 0 | |
| 15 | >10 and 5 | |
| 21 | >10 twice and then 1 | |
| 34 | >10 three times and then 4 | |
| 40 | >10 four times and then 0 | |
Changing Preset Stations
To change any of the preset stations simply tune to the new station you wish to memorize and enter it in the preset memory number you wish to change. The new station will be memorized and the previous station will be erased.
PLAYING DISC
Basic DISCPlayback
IMPORTANT:
Please note that some DVD movie discs may not have all the features described in this chapter. Refer to the instructions or notes included with each disc to determine what features and operations are available on that particular disc.
- Turn on the TV and select the video input so that you can view DVD video from this system.
- Press POWER on the front panel to turn on the system. The front panel display lights up.
- If the system is not in the DVD player mode, press DVD on the remote control to enter DVD player mode directly, or press SOURCE on the front panel to select it, the JBL logo screen appears on TV.
- Press the OPEN/CLOSE button, and place a disc on the tray.
Press OPEN/CLOSE again to close the tray. The player begins loading the disc. A message will appear on the TV screen and/or on the front panel display as follows.
On TV screen On front panel display WAITING
| DISC LOADING** | LOADING** |
| OPEN | OPEN |
| CLOSE | CLOSE |
| PLAY | PLAY |
| NO DISC | NO DISC |
| BAD DISC | BAD DISC |
| DVD/VCD |
WRONG REGION (See page 10)
PARENTAL VIOLATION (See page 33)
(**NOTE: While the disc is loading the player will not respond to any commands).
When a disc is inserted the following will occur depending on the type of disc inserted.
- When playing a DVD, a DVD menu or title menu may appear on the TV screen (see page 20).
- When playing a VCD, CD or MP3 disc the player will go to stop mode. With CDs and MP3 discs the number of all tracks on the disc will be displayed on the front panel display and with MP3 discs the main root directory will appear on the TV screen. With VCDs the message "VCD STOP" will appear on the front display.
Note
- While the disc is loading, the player will not respond to any commands.
- While in the stop mode, press /11 (PLAY/PAUSE) to begin playback. When playback begins, press ADJ/VOL +/- to adjust the volume to a comfortable listening level. To shut off the speakers temporarily without stopping playback, press MUTE on the remote control. Press MUTE again to cancel mute and restore the sound. During playback press PLAY/PAUSE ( /11) again to pause playback temporarily. Press once more to cancel pause mode and resume playback.
- Press STOP (■) to stop playback. The DVD disc will then cease playing. If the Play/Pause button is pressed, the DVD disc will continue to play from the point at which Stop was pressed. Pressing STOP a second time exits the DVD completely. In program playback mode, press STOP (■) one time to stop playback. Press it again to clear program memory. (See page 22).
- When the system is on, press STANDBY on the remote control to turn the system off. The LED on the front panel lights up red. In standby mode, press this button to turn ON the system. You can also turn the system on by pressing SOURCE on the main unit.
PLAYING DISC
Slow MotionPlayback
- Press SLOW on the remote control to play a disc in slow motion. If the disc is a DVD, press repeatedly to select the desired slow-motion speed: SF1 SF2 SF3 SR1 SR2 SR3→normal play.
Notes:
SF: Slow Forward SR: Slow Reverse
- The larger the number, the slower the speed.
This function is not available for CD and MP3.
- On some DVDs and on VCDs, the slow-motion playback function is not available. See the disc jacket for information.
Frame By Frame Advance
9 Press STEP repeatedly to advance the disc step by step (one frame at a time).
Note
This function is not available for CD and MP3.
10. Press / to resume normal playback.
Locate a Point Quickly
- Press or while playing a disc. The player will search the disc fast forward or reverse. When you find the point you want, press / to return to normal playback.
Change search speed
You can change search speed by pressing or repeatedly.
- If the playing disc is a DVD, you can select the following search speeds: FF1, FF2, FF3, FF4; or FR1, FR2, FR3, FR4.
- If the playing disc is a CD, you can select the following search speeds: FF1, FF2; or FR1, FR2.
- If the disc is a VCD, 3 speeds are available in both directions.
Notes
This function is not available for MP3.
- The larger the number is, the faster the searching speed.
- For CD, when the search reaches the end of one track, the player will begin to play the next track at normal speed.
Skip to Next/Previous Track or Chapter/Title
- Press or while playing a disc to go to the next or previous title, chapter or track in continuous play mode.
Notes:
- Press DISPLAY on the remote control to view the title, chapter, track and time on the front panel display and/or TV screen. See page 24 for more information about the DISPLAY.
- If the REPEAT-ONE function has been selected, pressing or will replay the same chapter (or track or title) from its beginning.
- If the REPEAT-ALL function has been selected, pressing or repeatedly will skip to select all the chapters (or tracks) in a title (or disc) cyclically.
USING THE INDIVIDUAL DVD DISC MENU
Using the title menu
A DVD is divided into sections called "titles". Normally, a title consists of several chapters. When you play a DVD which contains several titles, you can select the title (or chapter) you want using the title menu.
- Press TITLE while playing a DVD disc. "TITLE MENU" will be shown for a moment, then the title menu appears. The contents of the menu vary from disc to disc.
- While the title menu appears on the screen, press the / / / buttons to select the title (or chapter) you want to play. With DVDs and VCDs, when titles/chapters are numbered, you can use the number buttons (0~9/ >10) to select the title (or chapter).
- Press the ENTER button. The player starts playing the selected title or chapter (not needed when number button was pressed).
Notes:
Depending on the DVD disc, you may not be able to select titles or chapters.
Depending on the DVD disc, a "title menu" may simply be called a "menu" or "title" in the instructions supplied with the disc.
- For some DVD discs, when you press the TITLE button, the playback will restart from the beginning of the disc.
Using the root menu
A DVD may contain a "root menu". Some titles or chapters are recorded in the root menu.
- Press RETURN while playing a DVD disc. "ROOT MENU" will be shown for a moment, then the root menu appears. The contents of the root menu vary from disc to disc.
- While the root menu appears on the screen, press / / / to select the title (or chapter) you want to play. Depending on the disc, you can use the number buttons (0 9 / >10) to select the title (or chapter).
- Press ENTER. The player starts playing the selected title (or chapter).
Notes:
Depending on the DVD disc, you may not be able to enter the root menu.
- For some DVD discs, when you press RETURN, playback will restart from the beginning of the disc.
Important Note:
Many DVDs contain a Main Menu (rather than "Title Menu") and several Sub Menus (rather than "Root Menus"). With them, pressing TITLE will always call up the Main menu and pressing RETURN will call up the Sub Menu the currently playing track belongs to.
Using the DVD menu
Some DVDs allow you to select subtitle language, audio language, etc., using the DVD menu.
-
Press TITLE while playing a DVD disc. The DVD menu appears on the TV screen. The contents of the menu vary from disc to disc.
-
While the title menu appears on the screen, press / / / to select the item you want to change. Depending on the disc, you can use the number buttons (0~9/>10) to select the item.
-
Depending on the disc a new menu may appear. Repeat step 2 to select the option desired.
4. Press ENTER.
Note:
- You can set a preferred language for audio and subtitles in the SETUP menu. For details, see pages 31, 32.
REPEAT PLAYBACK
You can repeat all chapters in a title or on a disc. You can repeat all tracks on a disc. You can repeat a single title, chapter or track. In program play mode, the system repeats the chapters or tracks in the programmed order.
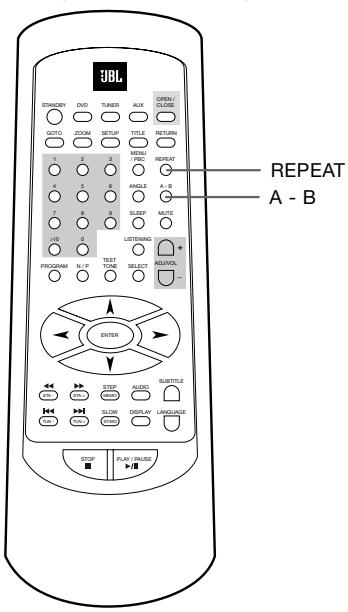
- Press REPEAT while playing a disc.
- If you are playing a DVD, continue pressing REPEAT to select one of the following repeat modes in sequence: Chapter Repeat On Title Repeat On Repeat Off.
- If you are playing a CD, VCD or MP3 disc, continue pressing REPEAT to select one of the following repeat modes in sequence: Repeat One (Track) Repeat All (Tracks) Repeat Off.
The front panel display will show the following message:
"RPT-ONE": means Chapter Repeat On or Repeat One Track.
"RPT-ALL": means Title Repeat On or Repeat All Tracks.
Notes:
- You cannot select repeat play while the disc is stopped.
- Some DVDs do not allow repeat playback function.
A-B Repeat Playback
You can play a specific portion in a chapter or track repeatedly. This is useful when you want to memorize lyrics or repeatedly watch a portion of the DVD.
- When playing a disc, press A-B one time to set the starting point "A" of the specific portion you want to play repeatedly. The "[A-]" indicator appears on the front panel display.
- When reaching the end point "B" you want, press A-B a second time. The "[A-B]" indicator appears on the front panel display. The player starts to play the specific portion from point "A", and will continue playing this portion repeatedly until you cancel the A-B repeat function.
- Press A-B again to cancel this setting and resume playback in normal order.
Notes:
- Point "A" and "B" can be set only in the same chapter or track.
- You can set A-B repeat on only one specific portion at a time.
- A-B repeat is canceled when: - you stop playback.
- you open the disc tray.
- you turn the power off.
- the A-B button is pressed again.
- Some DVD's do not allow A-B repeat playback.
PROGRAM PLAY
(AUDIO CD AND VCD ONLY)
Ensure that the disc tray is selected as the source by pressing DVD on the remote control.
You can arrange the order of the tracks on the disc to create your own program with up to 99 tracks.
Note
This function is not available for DVD and MP3 discs.
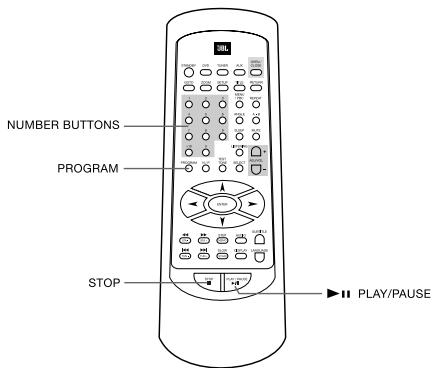
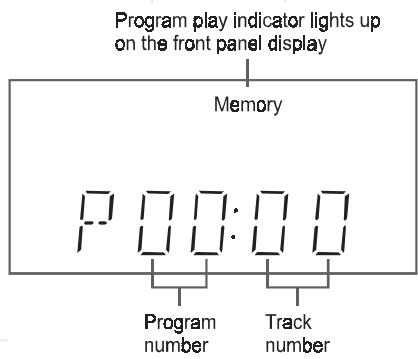
- In stop mode, press PROGRAM. The programming display appears on the TV screen and the front panel display.
- Use the number keys (0 9 / > 10) to select track numbers in the order you want. If the track number is more than 10, use >10 and the number button. Example: Press >10 and then 5 to select track 15.
-
With each program entered the program number will count up and the corresponding track number selected will appear in the display.
-
If you have programmed 99 tracks and try to add one more (P99:-), the "FULL" indicator will appear on the TV screen and the front panel display.
- After you have created a program, press to play the program.
Note:
- If you press STOP (■) twice or other buttons unrelated to the program mode, the system will interrupt and exit the program setting mode.
- In program play mode, press STOP (■) once to stop program play. The program sequence remains in memory.
Notes
- The program remains even after program play ends. When you press / , you can play the same program again.
-
You can repeat the programmed tracks by pressing the REPEAT button while in the program play mode.
-
To cancel program play, press STOP (■) a second time. The "Memory" indicator on the front panel display will disappear.
Notes
The program sequence is also canceled when:
- you open the disc tray.
- you turn the power off.
SELECTING A START POINT
Selecting a start point by chapter or time code
TO SELECT A STARTING TITLE/CHAPER (DVD ONLY)
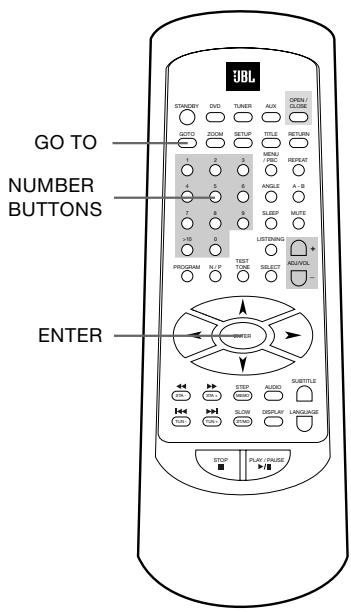
- Press GO TO. The following menu appears on the TV screen.

2.Use or to select title number or chapter number.
Use the number buttons (0 9 / > 10) to input the title or chapter number you want.
- Press ENTER to play your selection.
- Depending on the playback functions controlled by the disc (DVD), a disc menu may appear first, before any title/chapter is played. Then simply press ENTER (repeatedly) to exit all menus. The title/chapter selected will play.
TO SELECT A STARTING TIME (DVD AND VCD ONLY)
You can search by inputting the time code. Note that with VCD "Total Elapsed" or "Total Remain" time must be selected with the Display button on the remote (see page 24).
The time code corresponds to the approximate actual playing time. For example, to search for a scene 2 hours 30 minutes 20 seconds past the beginning, key in 02:30:20.
- Press GO TO twice (with DVD) or once (with VCD) to enter time menu as shown here (with VCD only time will be shown, no title).
| TITLE 02 / 05 | TIME ---:---:--- |
- Use the number buttons (0 9 / > 10) to input the desired time code. For example, key in 0, 1, 2, 3, 4, 5.
| TITLE 02 / 05 | TIME 01:23:45 |
- Press ENTER to start playing (from the point of 01:23:45). This is not needed with VCD's, the player will skip to the time selected at once.
- Press GO TO again to exit time menu screen.
Notes
- If the title number, chapter number or time code you input does not exist on the disc, the menu will disappear.
- The menu will disappear within a few seconds, if you do not input a valid number.
Selecting a Track Using Number Buttons
You can select a track directly using the number (0 9 / > 10) buttons
- In play or stop mode, press the number button to select the track you want. The system will go to the beginning of the selected track and start playing it.
- If the track number is more than 10, use the >10 button. The number will increase by 10 whenever you press >10 once. For example, you want to select the track number 25, press the >10 button twice, then press 5 button.
Note
This function is not available for DVD.
CHECKING DISC INFORMATION USING DISPLAY BUTTON
You can check information about the disc, such as the total number of titles or chapters, tracks or time, using the Display function. The information you want appears on the TV screen and/or on the front panel display.
When playing a DVD or VCD
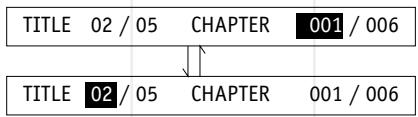
- Press DISPLAY once. Title number, chapter number and title elapsed time appear on-screen.
TITLE 02/05 CHAPTER 001/006 00:34:56 TI:02/05 CH:001/006
- Press DISPLAY again for title remaining time.
TITLE REMAIN 00:34:56 TI:02/05 CH:001/006
- Press DISPLAY again for chapter elapsed time.
CHAPTER ELAPSED 00:01:23 TI:02/05 CH:001/006
- Press DISPLAY again for chapter remaining time.
CHAPTER REMAIN 00:03:21 TI:02/05 CH:001/006
- Press DISPLAY again to exit information display.
Notes
- The above information does not appear on the front panel display.
- On certain DVDs, the title number, chapter number or time may not appear or you may not be able to change the display.
When playing a CD or VCD
- Press DISPLAY for track number selected / total track number on disc and the single track elapsed time.
SINGLE ELAPSED
00:01:23 TRACK 001/160
- Press Display repeatedly for single (track) remaining time, then total (disc) elapsed time and then total (disc) remaining time on-screen and on the front panel display (not with VCD).
- Press DISPLAY again to exit information display.
Note
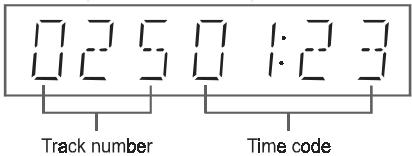
- For CD, the following information about track and time appears on the front panel display.
- For MP3 discs, the following track number and time appear on the front panel display.
- With VCD, track/time indication is not available on the front panel, only on-screen.
SETTINGS AND ADJUSTMENTS
Using the SETUP Menu and Navigation Buttons ( / / /)
- The SETUP Menu contains a listing of all of the optional settings that are included in this home theater system. They have all been preset to work properly with most systems and setups. The speaker setup cannot be altered, as it has been preset to the correct positions for using the system with the 6 speakers included when you purchased this system.
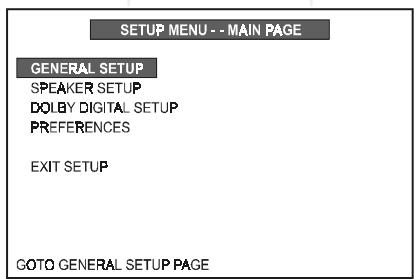
- To check or change any settings, go to the SETUP Menu Main Page and select one of the 4 pages on the main page. During Stop or Play mode (not Pause), press SETUP on the remote control for the SETUP Menu Main Page.
SETUP MENU--MAIN PAGE
GENERAL SETUP
SPEAKER SETUP
DOLBY DIGITAL SETUP
PREFERENCES
EXIT SETUP
GOTO GENERAL SETUP PAGE
- Press ( / ) to select one of the four pages on the Main Page, then press ENTER to go to the selected page.
GENERAL PAGE
TV DISPLAY
TV TYPE
VIDEO OUT
ANGLE MARK
QSD LANG
SCRSAVER
MAIN PAGE
SET TV DISPLAY MODE
Note:
The Preferences Page cannot be selected while a disc is playing. If a disc is playing, press SETUP again to exit the SETUP Menu page and press STOP to stop playback. Then press SETUP again to re-enter the Main Page. The Preferences Page can now be selected.
- Use ( / ) to select one of the settings on the page. The options for the setting will appear in the right column. One of those options will already be selected. This is the factory default setting. Use () to move to the right column, and then use ( / ) to scroll up or down to select a new setting.
- Press ENTER to make this the new default setting.
- If you want to change any other settings, use (▲) to move back to the left column and then use (▲/▼) to select the next item to be changed. If you are finished making changes, press SETUP again to exit the SETUP Menu. The menu page disappears.
SETUP MENU LISTING
Following is a listing of all of the possible options for each setting in this system as they appear on the menu pages. The factory default setting for each item is underlined.
Before you decide to change any of the factory default settings, please review the specific explanation of each setting on the following pages to be sure you understand how the change will affect the operation of your system.
SETUP MENU -- MAIN PAGE
GENERAL SETUP SPEAKER SETUP DOLBY DIGITAL SETUP PREFERENCES
GENERAL PAGE
-TV DISPLAY ...NORMAL/PS NORMAL/IB
...WIDE 16:9
-TV TYPE ...MULTI
...NTSC
...PAL
Selecting the On Screen Display (OSD) Language
The first step in making any settings is to select your preferred language for the On Screen Display menus.
We have preset the initial default On Screen Display (OSD) Language to English. If English is your preferred language, no adjustment is necessary and you can skip to the next section.
To change the On Screen Display (OSD) Language to German, Italian, French or Spanish, follow these three steps:
- Select OSD LANG using ( /) then press to go to the right option list. Select the desired language using ( /) , then press ENTER to confirm your selection.
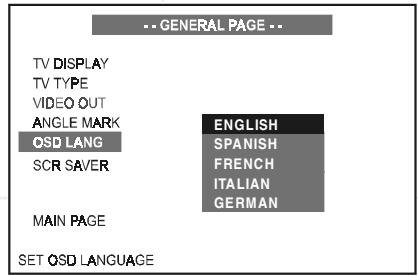
- Press SETUP again to exit SETUP MENU.
Notes:
- This setting will automatically select the languages for the audio track, subtitles and disc menus appropriately (see pages 31, 32), if available on the disc.
- If the disc you are viewing does not support the On Screen Display (OSD) language you selected, the player will automatically default to the language specified on the disc itself.
Screen Saver Setting (SCR Saver)
Path: Main Page General Page SCR Saver
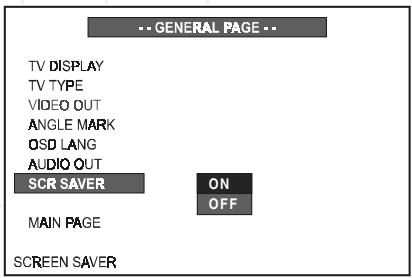
Turns the screen saver option on or off (default is on).
If you turn the screen saver on, the screen saver image appears when you leave the system in pause or stop mode for more than 1 minute. The screen saver is useful to prevent your display from becoming damaged.
- ON: Turns the screen saver on.
-
OFF: Turns the screen saver off.
-
Press SETUP to enter SETUP MENU. Use ( /) to select GENERAL SETUP, and then press ENTER.
GENERAL SETUP
TV Display Setting
Path: Main Page General Page TV Display
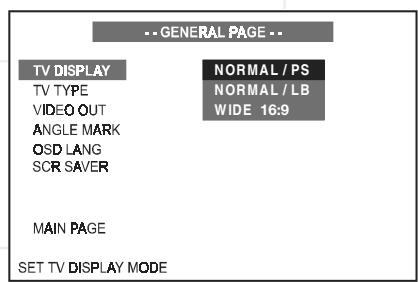
Selects the aspect ratio of the TV set to be connected.
- NORMAL/PS (4:3 Pan & Scan mode): Used when you connect a normal TV to the system. Displays a wide picture on the whole TV screen with a portion (right and left sides of the picture) automatically cut off.
- NORMAL/LB (4:3 Letterbox mode): Used when you connect a normal TV to the system. Displays a wide picture with bands displayed on the upper and lower portions of the screen.
- WIDE (16:9 Widescreen mode): Used when you connect a wide-screen TV to the system or a normal 4:3 TV, that can be turned to 16:9 mode.
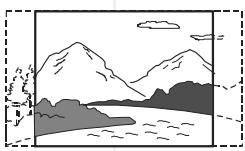
NORMAL/PS
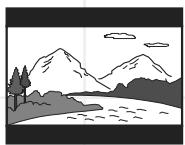
NORMAL/LB
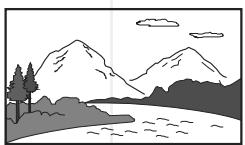
WIDE
Notes:
- Some widespread discs that do not permit Pan & Scan mode playback are automatically played in Letterbox mode.
Depending on the DVD, 4:3 Letterbox may be selected automatically instead of 4:3 Pan & Scan and vice versa.
- You must also set the screen mode on your widescreen TV to "FULL".
- If WIDE is selected and a normal TV is connected, 16:9 content will appear distorted during playback (objects look thin).
- If WIDE is selected and a normal 4:3 TV, switchable to 16:9 mode, is connected, to avoid vertically distorted videos the TV must be turned to 16:9 mode manually when 16:9 content is played. This is done automatically when the unit is connected to the TV via SCART, but then the TV must be turned to 4:3 mode manually when 4:3 content is played, otherwise it will be shown compressed vertically.
TV Type Setting (Multi/NTSC/PAL)
Your TV is either a PAL or multi-system TV.
The initial Default TV Type setting of this system is "PAL". This setting will allow PAL discs to play properly on both PAL TV's and multi-system TV's. And with this setting, NTSC discs will also be played properly, as the unit will convert NTSC signals to the PAL60 format which is compatible with most PAL TVs and all multi TV types. Only old PAL TVs are not compatible with PAL60 and cannot be used with NTSC discs (no matter which setting is made).
No further adjustment is necessary. You can skip to the next section.
If you use a multi-system TV and want to see NTSC discs in the original NTSC format (may improve the video performance with some NTSC discs), MULTI should be selected.
If you wish to change the TV Type setting, follow the 3 steps below.
- Press SETUP to enter SETUP MENU. Select GENERAL SETUP (see page 27), then press ENTER.
- Select TV TYPE using ( / ) , then press () to go to the right option list. Select MULTI, NTSC or PAL using ( / ) , then press ENTER to confirm your selection.
GENERAL PAGE
TV DISPLAY
TV TYPE VIDEO OUT ANGLE MARK OSD LANGUAGE SCR S/AVER
MAIN PAGE
SET TV STANDARD
MULTI
NTSC
PAL
- Press SETUP again to exit SETUP MENU. The TV type selected will be activated.
Note
- You can change TV system temporarily without changing the Default setting by pressing N/P (NTSC/PAL) on the remote control. However, when power is switched off or the disc drawer is opened, the TV type will automatically revert back to the initial Default setting.
GENERAL SETUP
Video Output Setting
The initial default Video Output Mode setting for this system is "S-VIDEO" which is the correct setting when you are connecting this system to your TV using either the Video Out jack, the S-Video output socket or the SCART connector. There is no need to change the video output mode setting.
A composite video signal is always available at the Video Out jack, should you wish to use this as your preferred connection method. If you wish to choose an RGB signal as your video output, this is available via the SCART socket only and is selected by accessing the VIDEO OUT options in the menu. If you choose this option you will not be able to see a video signal, or menus, when connecting to the S-Video output. The VIDEO OUT option must be reset to S-VIDEO, in the menu, using the SCART connection before this option becomes available.
The 3 steps below indicate how to select a different video output setting. They are for information only. Your system has been preset to the S-VIDEO setting and it must remain in the S-VIDEO setting in order to view the picture on your TV.
-
Press SETUP to enter SETUP MENU. Use ( /) to select GENERAL SETUP (see page 27), and then press ENTER.
-
Select VIDEO OUT using ( /) then press to go to the right option list. Select S-Video or RGB using ( /) , then press ENTER to confirm your selection.
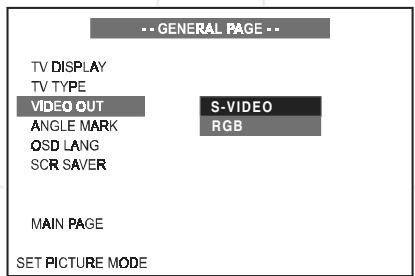
- Press SETUP again to exit SETUP MENU.
Angle Mark Setting
Path: Main Page General Page Angle Mark
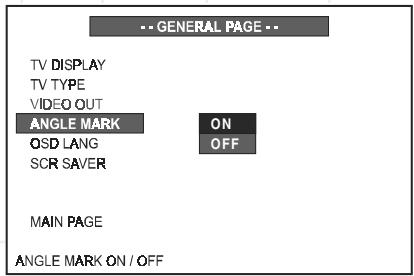
Some DVD movies contain scenes which were filmed from multiple angles simultaneously. If the scene you are watching was shot from multiple angles, the angle icon will appear on the screen.
You may then press the angle button on the remote to select the alternate angles. The default Angle Mark setting is 'On'. If you change the setting to 'Off' the angle icon will not appear, even if the scene was shot from multiple angles.
- ON: 1/4 appears on the TV screen.
- OFF: :1/4 does not appear.
Angle mark is on

Angle mark is off
Note:
- You can change the angles using ANGLE. For details, see page 34.
SPEAKER SETUP
Audio Mode Setting
Path: Main Page Speaker Set Up
Page Audio Mode
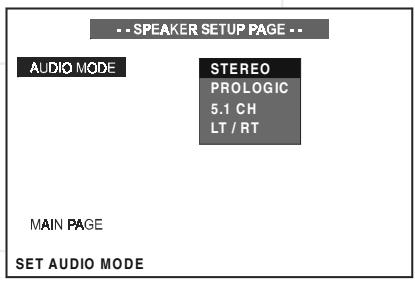
The Audio Mode switches automatically to the type of audio on the disc you are playing.
- If you play a DVD with either Dolby Digital or DTS audio, the "5.1" mode is selected automatically and sound is heard from all 5 satellites and the subwoofer.
- If you play a DVD with a stereo soundtrack (PCM only, not Dolby Digital 2.0), a VCD or an audio CD, the "Pro Logic" mode is selected automatically as default setting.
Notes:
- With all discs containing no Dolby Digital or DTS audio the default listening mode will be stereo, as indicated in the front display (no Pro Logic indicator is on), and the sound will only be heard from the left and right front speakers and the subwoooffer. The center and rear speakers will have output only when a Pro Logic listening mode is selected with the LISTENING button on the remote.
Important
This Audio Mode page is for indication of the audio mode switch only, no settings must be made manually, otherwise the sound from the speakers of the system may become distorted or the surround effect be destroyed.
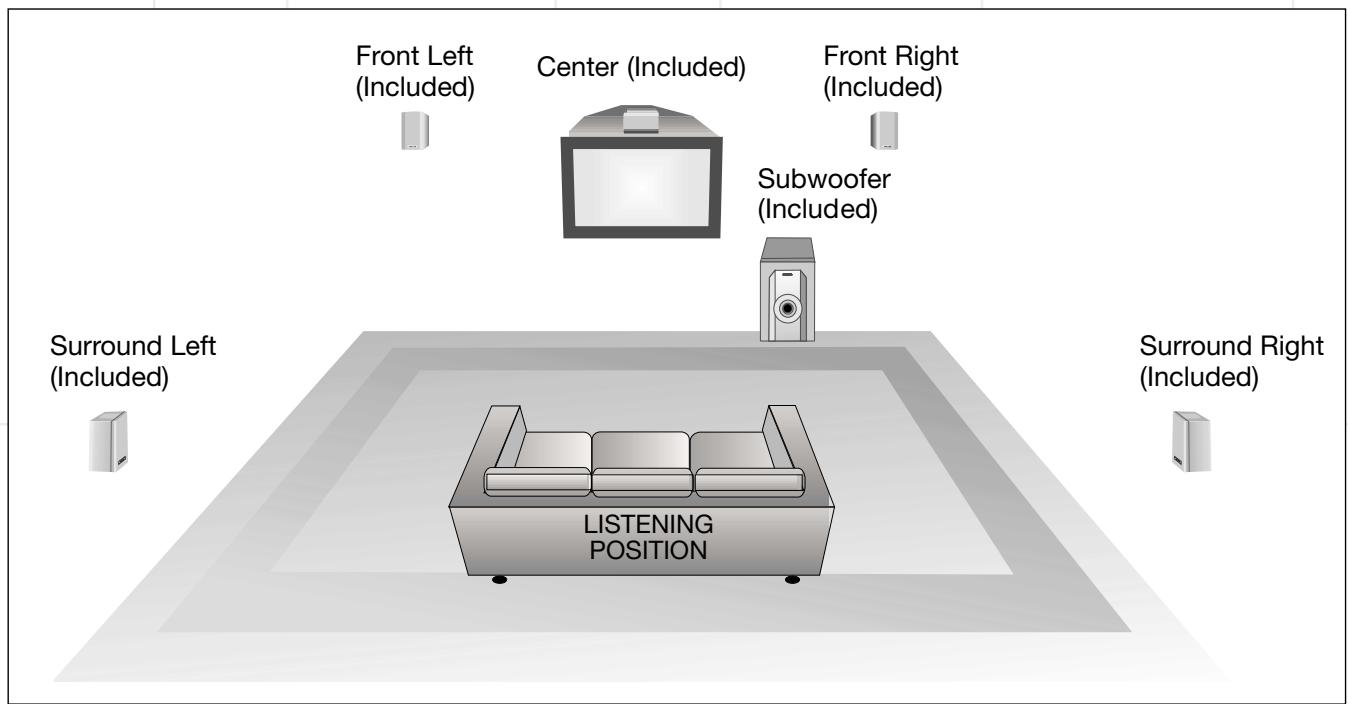
Recommended Speaker Placement
Speaker placement like above or similar is recommended when using the 5 satellites and subwoofer which were included with your system.
DOLBY DIGITAL AND PREFERENCES SETUP
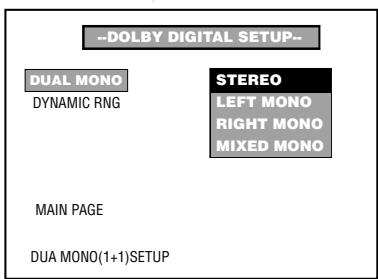
DOLBY DIGITAL SETUP
Dual Mono Setting
Path: Main Page Dolby Digital
Setup Dual Mono
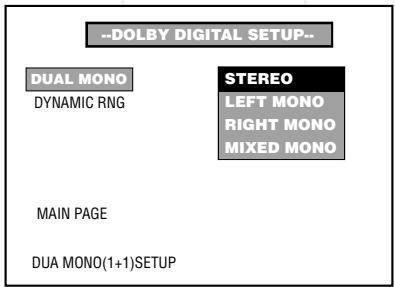
Default Setting: STEREO
Some (rare) Dolby Digital DVDs may be recorded with Dual Mono program, i.e. different programs on left and right front channels. With them the following options can be selected in the Dolby Digital Setup menu:
- STEREO: Reproduces both channels as stereo.
- LEFT MONO: Reproduces left channel in front left and right speakers.
- RIGHT MONO: Reproduces right channel in front left and right speakers.
- MIXED MONO: Reproduces both channels mixed together.
Dynamic Range Setting
Path: Main Page Dolby Digital Setup Dynamic
Default Setting: FULL
In some listening situations, it may be inconvenient to allow the sound to become very loud, such as late at night. The Dolby Digital Setup menu offers the facility to compress the dynamic range of the soundtrack so that the loudest sounds become quieter, while the low-level detail and content of quiet passages is retained.
Select dynamic range compression to fit your individual listening situation. The variable range is from FULL, 7/8 to 1/8, or OFF.
- OFF: Audio with uncompressed dynamic range.
- 7/8~1/8: Audio with partially compressed dynamic range.
- FULL: Audio with fully compressed dynamic range.
Note
- The Dual Mono and Dynamic Range settings can only be used with Dolby Digital programs.
PREFERENCES SETUP
Selecting the Language for Audio
Note
- You cannot enter the Preferences Page during playback. You must stop playback before setting the preferences.
Path: Main Page→Preferences
Page→Audio
Selects the preferred language for dialog as default.
- ENGLISH
- SPANISH
FRENCH
ITALIAN
GERMAN
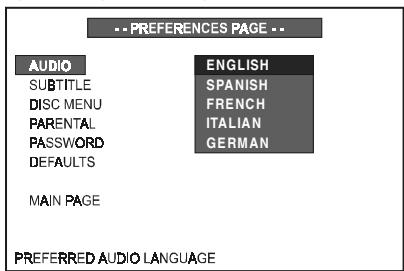
Notes:
- When you select a preferred language (English is the default) that is not recorded on the DVD, one of the recorded languages is automatically selected.
- You can select any language recorded on the disc by pressing LANGUAGE when playing a DVD (see page 34).
PREFERENCES SETUP
Selecting the Language for Subtitles
Path: Main Page→Preferences
Page Subtitle
Selects the preferred language for subtitles as default.
- ENGLISH
- SPANISH
FRENCH
ITALIAN
GERMAN
OFF

Notes:
- When you select a preferred language (English is the default) that is not recorded on the DVD, one of the recorded languages is automatically selected.
- You can select any subtitle language recorded on the disc by pressing SUBTITLE when playing a DVD. See page 34.
Selecting the Language for Disc Menu
Path: Main Page Preferences
Page Disc Menu
Selects the preferred language for Disc Menu as default.
- ENGLISH
- SPANISH
FRENCH
ITALIAN
GERMAN
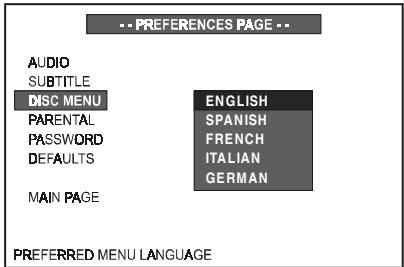
Notes:
- When you select a preferred language (English is the default) that is not recorded on the disc, one of the recorded languages is automatically selected.
- On many DVDs only one language for the disc menu is recorded.
Setting the Parental Control Level
Path: Main Page Preferences Page Parental
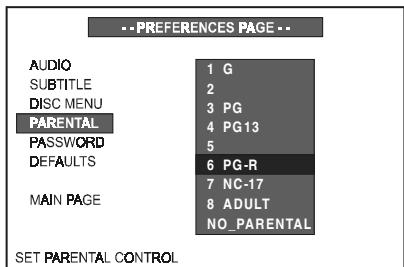
Playback of some DVD discs can be limited depending on the age of the users. The parental control function in this system allows restricted access to be set by the parent.
The default setting is "NO-PARENTAL".
Movie ratings, if any, are as follows (see also menu above):
G = General audiences, all ages admitted
PG = Parental Guidance suggested
PG13 = Parents strongly cautioned, inappropriate for children under 13
PG-R = Parental Guidance Restricted, under 17 requires accompanying parent
NC-17 = No one 17 and under admitted.
Notes:
- The lower the level is set, the stricter the limitation.
- If the parental control level of the DVD is higher than the setting level, the “PARENTAL VIOLATION” message will be shown on the TV screen, and the system will refuse to play the disc.
- To change the parental control level, a correct 4 digit password must be entered on the remote control. The original default password is "3308".
- Keep this owner's manual safe so children cannot change the parental control.
- Currently, European DVDs do not use the parental control function. They can be played, no matter what setting is selected.
PREFERENCES SETUP
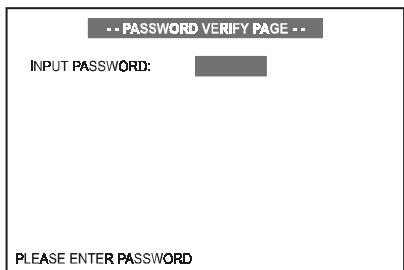
Changing the Password
Path: Main Page Preferences Password Change
To change the password from the original factory setting of "3308", follow the path shown above to select the "Change" heading. Press ENTER for the "Password Change Page".
Use the number keys on the remote to enter the old password "3308". Only "XXXX" will appear as you enter the numbers. If you enter an incorrect password, the "XXXX" will disappear from the "Input Password" box and you must enter the correct password.
Then enter a new 4-digit password in the "New Password" box. Enter it again in the "Confirm Pwd" box. Press ENTER once more to confirm your new password.
- To avoid locking forever, you must memorize and remember your password!
Please make a note of your new password:
Returning to the Original Factory Default Settings
Path: Main Page Preferences
Page Defaults
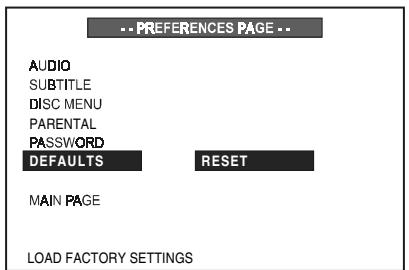
Select "RESET" and then press ENTER button.
All of the items in the SETUP menu will return to their original default settings. The default selections are shown and underlined on page 26.
Note:
The password will not be reset, that's why it is most important that you memorize and remember your password.
After the Default Reset has been made, all settings you have made and want to activate again must be re-entered.
OTHER FUNCTIONS
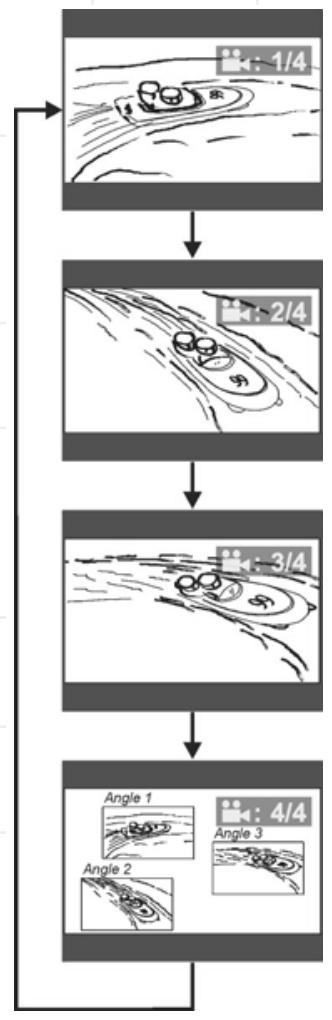
Angle Selection
Some DVD discs contain scenes which have been shot simultaneously from more than one camera angle to allow the user to select the preferred viewing angle. (The recorded angles differ from disc to disc.)
- While playing a title shot from different angles, the angle mark appears on the TV screen. This feature can be turned off, see page 29.
- Press ANGLE to change viewing angle.
Number changes to show the number of recorded angles (1 / 4 2 / 4 3 / 4 4 / 4, etc.)

Notes:
- The maximum number of angles allowed is 9.
- Most DVDs are recorded with only one angle.
Example: Sequence of angles shot.
Subtitle Language Selection
This function can only be used for DVD discs on which subtitles have been recorded in multiple languages.
While playing a DVD, press SUBTITLE repeatedly to select the desired language. An appropriate message will appear on-screen and subtitles are displayed in the new language immediately.
Notes:
- The first press shows the current selection. Continue pressing to select other subtitle languages or to turn all subtitles off.
-
Some DVD's display subtitles automatically that cannot be turned off, even if you set the subtitle function to off.
-
During some scenes, the subtitles may not appear immediately after you turn them on.
- Some DVD's allow you to make subtitle selections and turn subtitles on or off only via the disc menu. Use ▲/▼/▲/▷ and ENTER.
- The maximum number of subtitle languages on a DVD is 32.
- You can set a preferred language for subtitles in the SETUP menu, see page 32.
Audio Language/Format Selection
This function can only be used for DVD discs on which audio has been recorded in multiple languages or audio formats (PCM, Dolby Digital, DTS a.s.o.).
While playing a DVD disc with multiple languages, press LANGUAGE repeatedly to select the desired language. Playback will continue in the desired language.
While playing a DVD recorded in multiple audio formats (PCM, Dolby Digital, DTS a.s.o.), you may be able to change the audio format using the LANGUAGE button. The relevant message (including audio coding type, number of channels recorded and audio language) appears on the TV display:
AUDIO 2/8: AC-3 5.1CH ENGLISH
Notes:
- The first press shows the current selection. Continue pressing to select other languages/ audio formats.
- Some DVDs allow you to change audio format/language only via the disc menu. Use / / / and ENTER.
- The maximum number of audio languages/Formats on a DVD is 8.
- You can set a preferred audio language, see page 31.
OTHER FUNCTIONS
Listening To The Radio
To listen to preset radio stations
Store radio stations in the system's memory first (see “Presetting Radio Stations” on page 17).
- Press SOURCE on the controller repeatedly until "FM" or "AM" appears on the front panel display.
You can also press the TUNER/BAND button on the remote to select FM or AM directly.
The last received station is tuned in and its frequency will be displayed on the front panel.
- Press STA + or STA - repeatedly to select the preset station you want. With each press, the system tunes in the next or previous preset station.
You can also use the number buttons to select a preset station number directly.
- Adjust the volume level by pressing the ADJ/VOL + or - . This system's Dolby Pro Logic decoder may be used for enhanced FM stereo listening. For details, see "Selecting Listening Modes" on page 36.
- To turn off the radio, press the STANDBY button.
To listen to non-preset radio stations Use manual or automatic tuning in step 2.
For manual tuning, press TUN + or TUN - repeatedly.
For automatic tuning, press and hold TUN + or TUN - until the frequency indicator starts to change automatically, then release the button.
If an FM signal is noisy
Press MONO/STEREO on the remote control so that "MONO" appears on the front panel display. Reception will improve in mono. Press again to restore stereo.
To improve reception
Reorient the supplied antennas.
RDS Operation
The JBL DSC100DVD is equipped with RDS (Radio Data System), which brings a wide range of information to FM radio. Now in use in many countries, RDS is a system for transmitting e.g. station call signs or network information and a description of station program type (PTY).
As more FM stations become equipped with RDS capabilities, the JBL DSC100DVD will serve as an easy-to-use center for both information and entertainment. This section will help you take maximum advantage of the RDS system.
RDS Tuning
When an FM station is tuned in and it contains RDS data, the red RDS Indicator will illuminate and the JBL DSC100DVD will automatically display the station's call sign, e.g. "ANTENNE1" in the front panel display (up to 8 characters are possible). With some private stations, other information may alternate with the station's call sign.
RDS Display Options
In normal RDS operation, the display will indicate the station name, broadcast network or call letters. Pressing the DISPLAY button enables you to cycle through the following sequence:
- The station's call letters (with some private stations other information, too).
The Program Type (PTY) as shown in the list below.
The station's frequency.
Some RDS stations may not include the PTY feature. In this case, the PTY indicator in the display will not light and, if selected by the DISPLAY button, "NO PTY" will appear in the front display.
In any FM mode, the RDS function requires a strong enough signal for proper operation. If you receive a partial message, or the RDS Indicator goes on and off, try slowly adjusting the antenna or tune to another stronger RDS station.
OTHER FUNCTIONS (CONTINUED)
Program Types (PTY)
An important feature of RDS is its capability of encoding broadcasts with Program Type (PTY) codes that indicate the type of material being broadcast. The following list shows the abbreviations used to indicate each PTY, along with an explanation of the PTY:
NEWS:News
- A F F A I R S: Current Affairs
- I N F O: Infomation
- SPORT: Sports
EDUCATE: Educational
- Drama: Drama
CULTURE:Culture
SCIENCE:Science
VARIED:Varied Speech Programs
- P O P M: Popular Music
- R O C K M: Rock Music
- M - O - R - M : Middle-of-the-Road Music
- LIGHTM: Classical Music
CLASSICS: Serious Classical Music
OTHERM:Other Music
Listening To An External Source
If an external audio source is connected to this system (see page 15), you can listen to the external source through the system.
- Press SOURCE repeatedly until AUX appears on the front panel display. You can also press AUX on the remote once to select the desired external source directly.
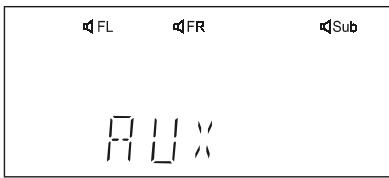
- Press SOURCE on the front or AUX on the remote repeatedly until TV appears on the front panel display. In that case, you can hear the sound of the station received by your TV's tuner with the JBL DSC system, if the system is connected to the TV using the SCART cable (see method 1, page 15).
- Operate the source connected to the system.
- Adjust the volume level by pressing ADJ/VOL + or -
- The system's Dolby Pro Logic decoder may be used for enhanced listening to a stereo source. For details, see "Selecting Listening Modes" below.

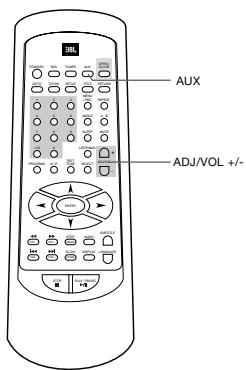
Selecting Listening Modes
This system has a built-in Dolby Pro Logic decoder. It can transform a stereo or PCM signal to Dolby Surround so that you can enjoy surround sound from nomal 2 channel stereo broadcasts and recordings. Moreover, with true (analog) surround recordings you will only hear the surround effect when one of the surround modes is selected.
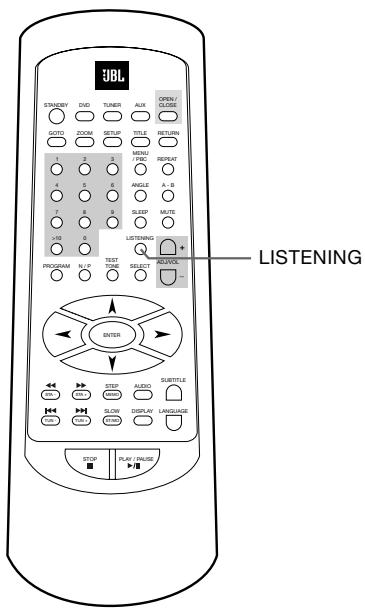
When listening to the source, press the LISTENING button repeatedly to select a listening mode. All modes are described in the Surround Mode Chart on the next page.
The relevant indicators appear on the front panel display. Additionally, speaker icons at the top of the display will light, indicating which of the six speakers is operating with the surround mode selected.
OTHER FUNCTIONS (CONTINUED)
Notes:
- Before you press the listening button, please lower the volume level to reduce the possibility of speaker damage.
-
If you are listening to a mono broadcast or recording, select the Stereo setting (all surround indicators disappear in the display) for best results. Do not select one of the surround sound settings.
-
When "Normal" is selected with "Pro Logic" all channels will be used, including the Center and the Rears (Rears not with "3 Stereo"). When "Phantom" is selected with "Pro Logic" the Center channel will not be used and its signal will be spread to both front speakers. This may be usefull with recordings where the Center sounds too dominant. When "Wide" is selected, depending on the recording, the front stage may sound somewhat wider, while the Center speaker still in use.
Surround Mode Chart
| MODE | FEATURES |
| DOLBY DIGITAL | Available only with digital input sources encoded with Dolby Digital data. It provides up to five separate main audio channels and a special dedicated Low Frequency Effects channel. |
| DTS | Available only with digital input sources encoded with DTS data. Available on special DVD, LD and audio-only discs, DTS provides up to five separate main audio channels and a special dedicated low frequency channel. |
| PRO LOGIC | The standard mode for analog surround sound decoding. It uses information encoded in a two channel stereo recording to produce four distinct outputs: Left, Center, Right and a Mono Surround channel. Use this mode for accurate reproduction of programs bearing the Dolby Surround, DTS Stereo, UltraStereo or other "Surround" logos. Surround-encoded programs include videocassette, DVD and LD movies, TV and cable programs, radio programs and audio CDs. Dolby Pro Logic processing may also be used to provide a pleasing surround effect with some stereophonic source material that does not carry surround encoding. |
| 3 STEREO | Uses the information contained in a surround encoded or two channel stereo program to create center channel information. In addition, the information that is normally sent to the rear channel surround speakers is carefully mixed in with the front left and front right channels for increased realism. Use this mode when you have a center channel speaker but no surround speakers. |
| SURROUND OFF (STEREO) | This mode turns off all surround processing and presents the pure left and right channel presentation of two channel stereo programs. |
Available Listening Modes and Defaults
| Source | Stereo | Dolby Pro Logic | 5.1 Ch | Stereo Downmixed |
| DVD/CD Dolby Digital | Option | Default | Option | |
| CD/MP3 | Default | Option | ||
| VCD | Option | Default | ||
| Tuner/AUX | Default | Option | ||
| TV | Option | Default |
OTHER FUNCTIONS (CONTINUED)
Using The Sleep Timer
You can set the system to turn off automatically at a specified time.
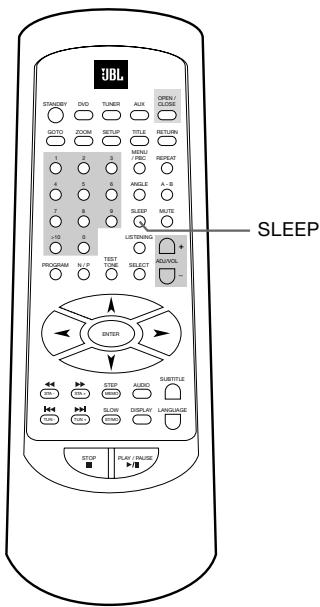
- Press SLEEP while the power is on. Each time you press SLEEP, the time changes as shown below.
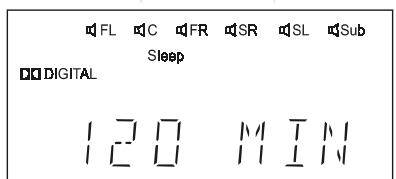
120 (minutes) 110 100 90 80 70 60 50 40 30 20 10 00 (OFF) 120
When you have specified the time, the "Sleep" indicator lights on the front panel display.
- If you want to reset the time, you can press SLEEP again to change it.
- You can check the time remaining before the system turns off. Press SLEEP, the remaining time appears on the front panel display for a few seconds.
MP3Playback
The JBL DSC100DVD is rare among DVD players in that it is able to playback discs recorded with MP3 files. This means that you may enjoy the latest music using discs created in your computer through the high quality audio components in your home theater system. As the way that MP3 files are recorded on discs differs from the way conventional CD audio discs are structured, MP3 playback is somewhat different from standard CDs.
Important Note on MP3 Playback
MP3 discs may contain 200 tracks or even more. For the best overview of all the titles on the disc and for convenient track selection, use the on-screen-display rather than the front panel display. The front panel display will only show the number and elapsed time of the track being played.
MP3 DiscPlayback
After an MP3 disc was entered and the tray closed, the JBL DSC100DVD will read the table of content (TOC) and then show the total number of titles on the disc and "STOP" on the front panel display. At the same time, a listing of all the directories appear on the screen (if the disc contains several directories), see figure 1 below. With discs without directories, a listing of up to 12 tracks on the disc will appear on the screen as shown in fig. 2 below, showing the names (ID tags) of all tracks currently listed.
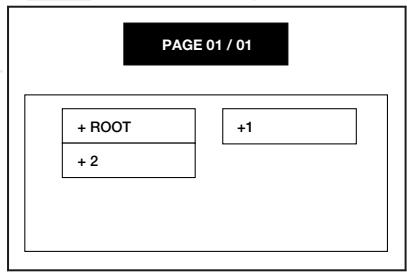
Figure 1.
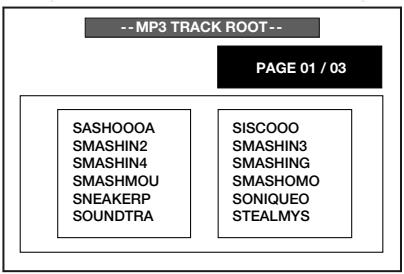
Figure 2.
To select a track, press the
/ / / arrow buttons until the desired track name is highlighted (possible in stop mode only). You must scroll through the list to see additional titles. If you know the number of the title you wish to play, you can select the title directly by entering its number with the numeric buttons on the remote (possible in play mode, too). With discs with several directories, first select the appropriate directory and then enter the corresponding title list by pressing ENTER (in stop mode only).
To start the track selected on the list press ENTER, in Stop mode you also can press PLAY.
During MP3 playback, some of the standard CD/DVD playback controls operate in their normal fashion:
- You may skip forward to the next track on the disc by pressing the button.
- You may skip back to the previous track on the disc by pressing the button.
- Press the PAUSE button to momentarily stop playback. Press PLAY to resume play.
Note that the Search Forward/ Reverse buttons / will have no function with MP3 playback.
OTHER FUNCTIONS (CONTINUED)
NOTES ON MP3 PLAYBACK
- During MP3 playback, the front panel display and the time indicator on the screen on top of the list will show the number and the elapsed time of the track being played (on the screen only when selected with the DISPLAY button). Other time display options are not available with MP3 playback.
- The JBL DSC100DVD is only compatible with standard MP3-encoded discs. Other compressed audio formats used for Internet audio downloads will not play on the JBL DSC100DVD.
-
Due to the differences in various versions of the MP3 format, and the many differences between the CD-R machines used to record MP3 discs on a computer, it is possible that some MP3 discs may not play on the JBL DSC100DVD, even though they will work on a computer. This is normal and does not indicate a fault in the unit.
-
When a multisession disc with both standard CD audio and MP3 content is in use, the JBL DSC100DVD will play only the CD audio sections of the disc.
- When an MP3 disc with multiple directories is played, you can select the desired directory and see its title list as described above. Return to the directory list menu from the title list by pressing RETURN (in stop mode only).
- Programming tracks is not possible with MP3 discs.
OTHER FUNCTIONS (CONTINUED)
Adjusting The Individual Speaker Volume (without Test Tone) And Treble Controls
Note:
All bass sounds are directed to the subwoofer only. You cannot adjust the bass level of the 5 compact satellite speakers, only that of the Subwoofer. These 5 satellite speakers are designed to reproduce the mid and high frequency (treble) sounds only.
- To increase or decrease the treble level of the satellite speakers, press the SELECT button on the remote control. "TRE : 00 db" will appear on the front panel display.
- Immediately press the VOL ADJ +/- buttons to increase or decrease the treble level of all 5 satellites simultaneously. The adjustment range is plus or minus 10db in 2db steps.
Note:
You must make the adjustment while the treble level appears in the display. If the treble level indicator disappears, the setting will not be changed. When you change the setting, the new setting becomes the default setting until you change it again.
- To raise or lower the master volume press the VOL ADJ +/- button on the remote control after the treble level indicator has disappeared. The level of all 6 speakers will be increased or decreased together.
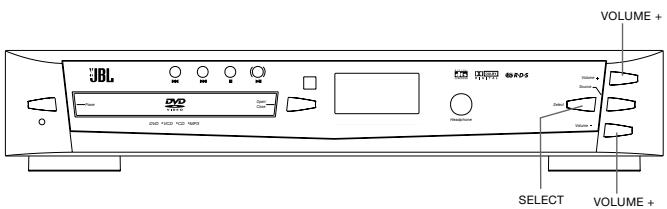
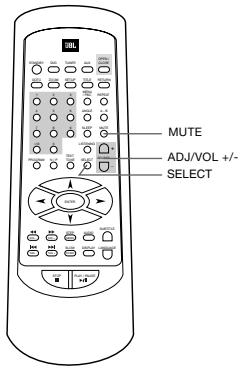
- To raise or lower the volume of one or more speakers individually, insert a DVD movie disc with a Dolby Digital or DTS 5.1 channel soundtrack and begin playback. Then press the SELECT button on the remote control to select the 6 speakers in the following sequence:
TREBLE LEVEL FRONT LEFT CENTER FRONT RIGHT SURROUND RIGHT SURROUND LEFT SUBWOOFER TREBLE LEVEL etc
- When the desired speaker level appears on the TV screen and front panel display, immediately press the VOL ADJ +/- buttons to raise or lower the level of that particular speaker. The adjustment range is plus or minus 10db in 1db steps. You must adjust the setting while the speaker level appears on the screen. If the speaker level indicator disappears, the setting will not be changed.
Note:
If the video disc you are playing has a stereo soundtrack or you are playing an audio CD, you will only see the level indicators for the left and right front speakers and the subwoofer. You will not be able to adjust the volume level of the center speaker or the two rear speakers.
SPECIAL FUNCTIONS (CONTINUED)
Picture Zooming (DVD and VCD)
-
Press the ZOOM button on the remote control during normal, slow or still (pause) playback.
-
Zooming does not work on subtitles or menu screens included on DVDs.
- The magnification level varies depending on the TV DISPLAY selection in the SETUP menu.
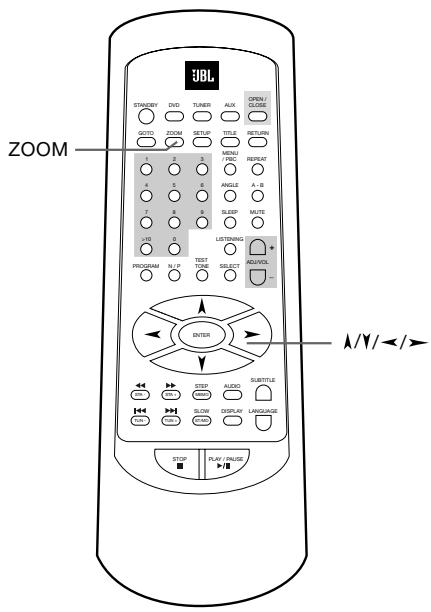
- If you press the ZOOM button repeatedly, the magnification level increases. Two magnification levels are available. On each press of ZOOM, the following message will appear on the TV screen.
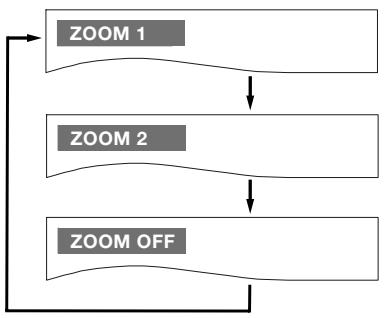
Notes:
- If you press the / / / buttons, the zoom point shifts, allowing you to pan the zoomed picture.
- Some discs may not respond to the zoom feature.
TROUBLESHOOTING
If you experience any of the following difficulties while using the system, use this troubleshooting guide to help you remedy the problem. Should any problem persist, consult your authorized JBL dealer.
No power.
- Is the power cord firmly plugged into the power outlet?
- One of the safety mechanisms may be operating. In this event, unplug the player from the power outlet briefly and then plug it in again.
No picture.
- Check that the system is connected correctly and securely.
- The video cable may be damaged. Replace it with a new one.
- Make sure the system is connected to a video input on the TV (see page 15).
- Make sure the TV is turned on.
Make sure the correct video input on the TV is selected for viewing with this system.
Noise (interference) appears in the picture.
Clean the disc.
- If video from this system has to go through your VCR to get to your TV, the copy-protection applied to some DVD programs could affect picture quality. If you still experience problems after checking your connections, please try connecting your DVD system directly to your TV's S-Video input, if your TV is equipped with this input (see page 15).
The aspect ratio of the screen is wrong (picture vertically expanded) when you play a wide picture even though you set "TV DISPLAY" in the SETUP menu to "WIDE 16:9".
- If you connect the system with the SCART cable, connect directly to the TV. Otherwise the autoswitch function of the aspect ratio for the TV may not work.
Depending on the TV, you may not be able to change the aspect ratio. In that case (TV not adjustable to 16:9) do not select "WIDE 16:9" in the TV Display. Then, no change of the aspect ratio is needed.
There is no sound or volume is very low
- Check that the speakers and components are connected correctly and securely.
Make sure that you have selected the correct source on the system. - Press MUTE on the remote control if the red MUTE LED on the front panel is blinking.
- The protective circuitry has been activated because of a short circuit. Turn off the system, eliminate the short circuit problem and turn on the power again.
- The audio interconnect is damaged. Replace it with a new one.
- The system is in pause mode or in slow-motion play mode, or fast forward or fast reverse. Press /II to return to normal play mode.
- Check the speaker settings (see page 30).
The left and right sounds are unbalanced or reversed.
- Check that the speakers and components are connected correctly and securely.
- Adjust front balance using SELECT and ADJ/VOL +/- (see page 41).
Severe hum or noise is heard.
- Check that the speakers and components are connected securely.
- Check that the connecting cords are away from a transformer or motor and at least 3 meters away from fluorescent light.
- Move your TV away from the audio components.
- The plugs and jacks are dirty. Wipe them with a cloth slightly moistened with alcohol.
Clean the disc.
The surround effect is difficult to hear when you are playing a Dolby Digital sound track.
- Check to see if the Dolby Digital mode is turned on properly (red "Dolby Digital" indicator lights in the front panel), otherwise unload and load the disc again.
- Check the speaker connections.
Depending on the DVD disc, the output signal may at times be mono or stereo even if the soundtrack is recorded in Dolby Digital format.
The sound comes from the center speaker only.
Depending on the disc, sound may sometimes come from the center speaker only. This also applies to mono recordings (from disc or any analog source), when Pro Logic or 3 Stereo mode is selected. This is normal.
No sound is heard from the center speaker.
- Do not set listening mode to Dolby Pro Logic Phantom (see page 36).
- Adjust center speaker volume (see pages 40).
No sound or only very low volume from the rear speakers.
- Do not set listening mode to 3-Stereo (see page 36).
- Adjust the rear speaker volume (see page 40).
Radio stations cannot be tuned in.
- Check that the antennas are connected correctly. Adjust the antennas and connect an external antenna if necessary.
- The signal strength of the stations is too weak for automatic tuning. Use manual tuning.
- No stations have been preset.
- The tuner mode is not selected, select the Tuner mode.
TROUBLESHOOTING (CONTINUED)
The remote does not function.
- Remove any obstacles between the remote control and the system.
- Move the remote control closer to the system.
- Point the remote control at the remote sensor on the front panel.
- Replace all the batteries in the remote control with new ones if they are weak.
- Check that the batteries are loaded correctly.
The disc does not play.
- There is no disc inside. ("NO DISC" appears on the front panel display and the TV screen.) Insert a disc.
- Insert the disc correctly with the playback side facing down on the disc tray.
Clean the disc. - The system cannot play CD-ROM's, etc. (see page 10).
DVD with wrong region code (see page 10).
The system starts playing the DVD automatically.
- The DVD features the auto playback function.
Playback stops automatically.
- Some disc include an auto pause signal. When playing such a disc, the system stops playback at the signal.
Track Skip or direct select with numeric buttons, Search, Slow-motion play, repeat play or Program play, etc., cannot be done.
Depending on the DVD, some of the above operations may not be available (Playback control with DVD).
- When VCD is played (in stop or play mode), turn the PBC (Playback Control) off by pressing MENU/PBC on the remote, an appropriate message will appear on the TV screen (not available with DVD).
Messages do not appear on the TV screen in the language you want.
- Select the language for OSD in the SETUP menu (see page 27). For all messages from the DVD (DVD menu, subtitles) in the proper language the disc must have the language you selected, if not, another language will be selected.
The audio language cannot be changed when you play a DVD.
- Multilingual sound is not recorded on the DVD.
- Changing the language for the sound is prohibited on the DVD.
The subtitle language cannot be changed when you play a DVD.
- Multilingual subtitles are not recorded on the DVD.
- Changing the language for the subtitles is prohibited on the DVD.
The subtitles cannot be turned off when you play a DVD.
Depending on the DVD, you may not be able to turn the subtitles off.
The angles cannot be changed when you play a DVD.
- Multi-angles are not recorded on most DVDs.
- Change the angles when the angle mark appears on the TV screen (see page 34).
- Changing the angles is prohibited on some DVDs.
The system does not operate properly.
- Static electricity, etc., may affect the system's operation. Disconnect the AC power cord, then connect it again.
GLOSSARY
Bit rate
Value indicating the amount of video data compressed in a DVD per second. The unit is Mbps (megabit per second). 1 Mbps indicates that the data per second is 1,000,000 bits. The higher the bit rate, the larger the amount of data. However, this does not always mean higher quality pictures.
Chapter
Sections of a picture or a music piece on a DVD that are smaller than titles. Many titles are composed of several chapters, but many others are not. Each chapter is assigned a chapter number enabling you to locate the chapter you want.
Dolby Digital ("5.1", "AC-3")
This sound format for movie theaters is more advanced than Dolby Pro Logic Surround. In this format, the rear speakers output stereo sound with an expanded frequency range and a subwoofer channel for deep bass is independently provided. This format is also called "5.1" because the subwoofer channel is counted as 0.1 channel (since it functions only when a deep bass effect is needed). All six channels in this format are recorded separately for superior channel separation. Furthermore, since all the signals are processed digitally, less signal degradation occurs. The name "AC-3" comes from the fact that it is the third audio coding method to be developed by the Dolby Laboratories Licensing Corporation.
Manufactured under license from Dolby Laboratories. "Dolby", "AC-3", "Pro Logic" and the Double-D symbol are trademarks of Dolby Laboratories. Confidential Unpublished Works. © 1992.1997 Dolby Laboratories, Inc. All rights reserved.
Dolby Pro Logic Surround
This is a method of decoding surround recordings that produces four channels from two-channel sound. Compared with the former Dolby Surround system, Dolby Pro
Logic Surround reproduces left-to-right panning more naturally and localizes sounds more precisely. To take full advantage of Dolby Pro Logic Surround, you should have a pair of rear speakers and a center speaker. The rear speakers output monaural sound.
DTS
Digital audio compression technology developed by Digital Theater Systems, Inc. This technology conforms to 5.1-channel surround. The rear channels are stereo and there is a discrete subwoofer channel in this format. DTS provides 5.1 discrete channels of high quality digital audio. Good channel separation is realized, because all channels are recorded discretely and processed digitally.
Manufactured under license from Digital Theater Systems, Inc. US Pat. No. 5,451,942 and other worldwide patents issued and pending. "DTS" and "DTS Digital Surround" are trademarks of Digital Theater Systems, Inc. © 1996 Digital Theater Systems, Inc. All rights reserved.
MPEG AUDIO
International standard coding system to compress audio digital signals authorized by ISO/IEC. MPEG 1 conforms to up to 2-channel stereo, used on some DVD's as alternate (other language) track.
DVD
A disc that contains up to 8 hours of moving pictures even though its diameter is the same as a CD. The data capacity of a single-layer and single-sided DVD, at 4.7 GB (Giga Byte), is 7 times that of a CD. Furthermore, the data capacity of a dual-layer and single-sided DVD is 8.5 GB, a single-layer and double-sided DVD 9.4 GB, and a dual-layer and double-sided DVD 17 GB. The picture data uses the MPEG 2 format, one of the worldwide standards of digital compression technology. The picture data is compressed to about 1/40 of its original size. The DVD also uses
the variable rate coding technology that changes the data to be allocated according to the status of the picture. The audio data is recorded in Dolby Digital, DTS and/or PCM, allowing you to enjoy more natural audio presence. Furthermore, various advanced functions such as multi-angle, multilingual, and subtitles may be provided with the DVD.
Multi-angle function
Various angles or viewpoints of the video camera for a scene are recorded on some DVDs.
Multilingual function
Several languages for the sound or subtitles in a picture are recorded on some DVDs.
Parental Control
A function of some (particular US) DVD's to limit playback of the disc by the age of the users. The limitation varies from disc to disc. When it is activated, playback is completely prohibited, violent scenes are skipped or replaced with other scenes and so on.
Title
The longest sections of a picture or a music piece on a DVD; a movie, etc., for a picture piece on video software; or an album, etc., for a music piece on an audio software. Each title is assigned a title number enabling you to locate the title you want.
Track
Sections of a music piece on a CD. Each track is assigned a track number enabling you to locate the track you want.
PCM
Pulse code modulation, an uncompressed data formation.
NTSC
National TV Systems Committee: a video standard used in USA.
PAL
Phase Alternation Line: a video standard used in many European countries.
DSC100 DVD-RDS SPECIFICATIONS
DVD player
| Pickup: | Semiconductor laser, wavelength 650nm |
| Signal system: | NTSC / PAL |
| Video signal horizontal resolution: | More than 480 lines (DVD) |
| Video signal-to-noise ratio: | More than 60 dB (DVD) |
| Audio frequency response: (Stereo) | DVD (PCM): 20Hz ~ 22kHz (+/- 1.0dB) CD (PCM): 20Hz ~ 20kHz (+/- 1.0dB) |
| Audio signal-to-noise ratio: | More than 80 dB (PCM) |
| Total harmonic distortion:: | Less than 0.01% (PCM) |
| Dynamic range: | DVD (PCM): More than 85 dB (EIAJ, 2kHz) CD: More than 85 dB (EIJA) |
FM Tuner
| System: | PLL quartz-locked digital synthesizer system |
| Tuning range: | 87.50 ~ 108.00 MHz |
| Antenna terminals: | 75 ohms, unbalanced |
| Intermediate frequency: | 10.7 MHz |
AM Tuner
| System: | PLL quartz-locked digital synthesizer system |
| Tuning range: | 522 ~ 1620 kHz (9 kHz interval) |
Video Outputs
| CVBS Video: | 1 Vp-p 75 ohms |
| S-video: | Y: 1 Vp-p 75 ohms C: PAL 0.3 Vp-p 75 ohms / NTSC 0.286 Vp-p 75 ohms |
Audio line Outputs
| Audio L/R: | 1 Vrms, 1 kilohms |
General
| Power requirements: | AC 230 V, 50 Hz |
| Power consumption: | 20 W |
| Dimensions (WxHxD): | 432 x 76 x 356 mm, 17" x 3" x 14" |
| Weight: | 8.5 kg, 18.7 lb. |
- Designs and specifications are subject to change without notice.
LOUDSPEAKER SPECIFICATIONS
| Satellite | DSC400 | DSC800 | |
| Frequency response (-6 dB) | 120 Hz - 20 kHz | 90 Hz - 22 kHz | |
| Sensitivity (2.83V/1M) | 86 dB | 86 dB | |
| Nominal impedance | 8 Ohm | 8 Ohm | |
| Amplifier power (in sub) | 5 x 35 Watts RMS | 5 x 35 Watts RMS | |
| Bass/midrange driver | 75 mm paper cone, magnetically shielded | 100 mm paper cone, magnetically shielded | |
| High frequency driver | 12 mm Titanium laminate dome, magnetically shielded | 12 mm Titanium laminate dome, magnetically shielded | |
| Dimensions (HxWxD) | 111 x 81 x 95 mm | 235 x 140 x 179 mm | |
| 4.4 x 3.2 x 3.7" | 9.3 x 5.5 x 7" | ||
| Weight | 0.5 kg, 1.1 lb | 2.8 kg, 6.2 lb | |
| Center | |||
| Frequency response (-6 dB) | 120 Hz - 20 kHz | 100 Hz - 22 kHz | |
| Sensitivity (2.83V/1M) | 88 dB | 88 dB | |
| Nominal impedance | 8 Ohm | 8 Ohm | |
| Amplifier power (in sub) | 35 Watts RMS | 35 Watts RMS | |
| Bass/midrange drivers | 2 x 75 mm paper cone, magnetically shielded | 2 x 100 mm paper cone, magnetically shielded | |
| High frequency driver | 12 mm Titanium laminate dome, magnetically shielded | 12 mm Titanium laminate dome, magnetically shielded | |
| Dimensions (HxWxD) | 83 x 194 x 95 mm | 145 x 402 x 155 mm | |
| 3.3 x 7.6 x 3.7" | 5.7 x 15.8 x 6.1" | ||
| Weight | 0.8 kg, 1.88 lb | 4.5 kg, 9.9 lb | |
| Active Subwoofer | |||
| Frequency response (-6 dB) | 35 - 160 Hz | ||
| Built-in amplifier power | 100 Watts RMS | ||
| Bass driver | 200 mm paper cone long-throw woofer | ||
| Design principle | Bass reflex with FreeFlow™ flared port | ||
| Dimensions (HxWxD) | 450 x 250 x 360 mm | ||
| 17.7 x 9.8 x 14.2" | |||
| Weight | 13.6 kg, 30 lb | ||
JBL continually strives to improve its products by introducing design refinements into existing models without notice. For this reason, the DSC 400 and DSC 800 systems may differ in some respects from the published specifications and descriptions, but will always equal or exceed the original specifications unless otherwise stated.

| OWNER'S GUIDE PRODUCT LINE: Digital simply Cinema | JBL | PRO SOUND COMES HOME™ |
| MODEL NUMBER: DSC 400 (230V)/DSC 800 (230V) | JBL Consumer Products 250 Crossways Park Drive, Woodbury, NY 11797 Europe: 2. Route de Tours, 72500 Château du Loir, France www.jbl.com | |
| DESIGN GOAL: Bring the thrill of live performance and movie sound to the home environment by calling on JBL's professional engineering leadership. | ||
| SATELLITE TYPE: Titanium-laminate-dome tweeter | ©2001 JBL, Incorporated. | |
| SUBWOOFER TYPE: Bass-reflex enclosure | JBL is a registered trademark of JBL, Incorporated. | |
| PORT DESIGN: FreeFlow™ flared | Part No.1111-DSC400/600 | |
| PROFESSIONAL REFERENCE: Cinema Systems | H A Harman International Company | |