USER MANUAL DVD-HR770 SAMSUNG
Thanks you for purchasing this Samsung product.
To receive more complete service, please register
your product at
www.samsung.com/global/register
WARNING
TO REDUCE THE RISK OF ELECTRIC SHOCK, DO NOT REMOVE THE COVER (OR BACK).
NO USER-SERVICEABLE PARTS ARE INSIDE. REFER SERVICING TO QUALIFIED SERVICE PERSONNEL.
| 3 | CAUTION
RISK OF ELECTRIC SHOCK
DO NOT OPEN | 1 |
| This symbol indicates “dangerous voltage” inside the product that presents a risk of electric shock or personal injury. | CAUTION: TO REDUCE THE RISK OF ELECTRIC SHOCK, DO NOT REMOVE COVER (OR BACK) NO USER SERVICEABLE PARTS INSIDE. REFER SERVICING TO QUALIFIED SERVICE PERSONNEL. | This symbol indicates important instructions accompanying the product. |
Do not install this equipment in a confined space such as a bookcase or similar unit.
WARNING : To prevent damage which may result in fire or electric shock hazard, do not expose this appliance to rain or moisture.
CAUTION : HDD & DVD REORDER USES AN INVISIBLE LASER BEAM WHICH CAN CAUSE HAZARDOUS RADIATION EXPOSURE IF DIRECTED. BE SURE TO OPERATE HDD & DVD REORDER CORRECTLY AS INSTRUCTED.
CAUTION
THIS PRODUCT UTILZES A LASER.
USE OF CONTROLS OR ADJUSTMENTS OR PERFORMANCE OF PROCEDURES OTHER THAN THOSE SPECIFIED HEREIN MAY RESULT IN HAZARDOUS RADIATION EXPOSURE.
DO NOT OPEN COVERS AND DO NOT REPAIR YOURSELF. REFER SERVICING TO QUALIFIED PERSONNEL.
This product satisfies CE regulations when shielded cables and connectors are used to connect the unit to other equipment. To prevent electromagnetic interference with electric appliances, such as radios and televisions, use shielded cables and connectors for connections.
IMPORTANT NOTE
The mains lead on this equipment is supplied with a moulded plug incorporating a fuse. The value of the fuse is indicated on the pin face of the plug. If it requires replacing, a fuse approved to BS1362 of the same rating must be used.
Never use the plug with the fuse cover omitted if the cover is detachable. If a replacement fuse cover is required, it must be of the same colour as the pin face of the plug. Replacement covers are available from your dealer.
If the fitted plug is not suitable for the power points in your house or the cable is not long enough to reach a power point, you should obtain a suitable safety approved extension lead or consult your dealer for assistance.
However, if there is no alternative to cutting off the plug, remove the fuse and then safely dispose of the plug. Do not connect the plug to a mains jack, as there is a risk of shock hazard from the bared flexible cord.
To disconnect the apparatus from the mains, the plug must be pulled out from the mains socket, therefore the mains plug shall be readily operable.
The product unit accompanying this user manual is licenced under certain intellectual property rights of certain third parties. This licence is limited to private non-commercial use by end-user consumers for licenced contents.
No rights are granted for commercial use.
The licence does not cover any product unit other than this product unit and the licence does not extend to any unlicensed product unit or process conforming to ISO/IEC 11172-3 or ISO/IEC 13818-3 used or sold in combination with this product unit. The licence only covers the use of this product unit to encode and/or decode audio files conforming to the ISO/IEC 11172-3 or ISO/IEC 13818-3. No rights are granted under this licence for product features or functions that do not conform to the ISO/IEC 11172-3 or ISO/IEC 13818-3.
Important Safety Instructions
Read these operating instructions carefully before using the unit. Follow all the safety instructions listed below. Keep these operating instructions handy for future reference.
1) Read these instructions.
2) Keep these instructions.
3) Heed all warnings.
4) Follow all instructions.
5) Do not use this apparatus near water.
6) Clean only with dry cloth.
7) Do not block any ventilation openings, Install in accordance with the manufacturer's instructions.
8) Do not install near any heat sources such as radiators, heat registers, stoves, or other apparatus (including amplifiers) that produce heat.
9) Do not defeat the safety purpose of the polarized or grounding- type plug. A polarized plug has two blades with one wider than the other. A grounding-type plug has two blades and a third grounding prong. The wide blade or the third prong are provided for your safety. If the provided plug does not fit into your outlet, consult an electrician for replacement of the obsolete outlet.
10) Protect the power cord from being walked on or pinched particularly at plugs, convenience receptacles, the point where they exit from the apparatus.
11) Only use attachments/accessories specified by the manufacturer.
12) Use only with the cart, stand, tripod, bracket, or table specified by the manufacturer, or sold with the apparatus. When a cart is used, use caution when moving the cart/apparatus combination to avoid injury from tip-over.
13) Unplug this apparatus during lightning storms or when unused for long periods of time.
14) Refer all servicing to qualified service personnel. Servicing is required when the apparatus has been damaged in any way, such as power-supply cord or plug is damaged, liquid has been spilled or objects have fallen into the apparatus, the apparatus has been exposed to rain or moisture, does not operate normally, or has been dropped.
Handling Cautions
- Before connecting other components to this HDD & DVD REORDER, be sure to turn them all off.
- Do not move the HDD & DVD REORDER while a disc is being played, or the disc may be scratched or broken, the HDD & DVD REORDER internal parts may be damaged.
- Do not put a flower vase filled with water or any small metal objects on the HDD & DVD REORDER.
- Be careful not to put your hand into the disc tray.
- Do not place anything other than the disc in the disc tray.
- Exterior interference such as lightning and static electricity can affect normal operation of this HDD & DVD REORDER. If this occurs, turn the HDD & DVD REORDER off and on again with the STANDBY/ON button, or disconnect and then reconnect the AC power cord to the AC power outlet. The HDD & DVD REORDER will operate normally.
- Be sure to remove the disc and turn off the HDD & DVD REORDER after use.
- Disconnect the AC power cord from the AC outlet when you don't intend to use the HDD & DVD REORDER for long periods of time.
- Clean the disc by wiping in a straight line from the inside to the outside of the disc.
- Apparatus shall not be exposed to dripping or splashing and no objects filled with liquids, such as vases, shall be placed on the apparatus.
- The Mains plug is used as a disconnect device and shall stay readily operable at any time.
Maintenance of Cabinet
For safety reasons, be sure to disconnect the AC power cord from the AC outlet.
- Do not use benzene, thinner, or other solvents for cleaning.
- Wipe the cabinet with a soft cloth.
HDD (Hard Disk Drive)
The hard disk has a high storage density, which enables long recording durations and quick access to written data. However, it can easily be damaged by shock, vibration or dust and should be kept away from magnets. To avoid losing important data, observe the following precautions.
- Do not use the HDD & DVD REORDER in a place subject to extreme changes in temperature.
- Do not apply a strong shock to the HDD & DVD REORDER.
- Do not place the HDD & DVD REORDER in a location subject to mechanical vibrations or in an unstable location.
- Do not place the HDD & DVD REORDER on top of a heat source.
- Do not disconnect the AC power cord while the power is on.
- Do not attempt to change the hard disk. This may result in a malfunction.
Should the hard disk be damaged, you cannot recover lost data. The hard disk is only a temporary storage space.
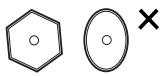
Disc Handling
- Use discs with regular shapes. If an irregular disc (a disc with a special shape) is used, this HDD & DVD REORDER may be damaged.

Holding discs
- Avoid touching the surface of a disc where recording is performed.
DVD-RAM, DVD-RW and DVD-R
- Clean with an optional DVD-RAM/PD disc cleaner (LF-K200DCA1 where available). Do not use cleaners or cloths for CDs to clean DVD-RAM/-RW/-R discs.

DVD-Video, Audio-CD
- Wipe off dirt or contamination on the disc with a soft cloth.
Cautions on handling discs
- Do not write on the printed side with a ball-point pen or pencil.
- Do not use record cleaning sprays or antistatic. Also, do not use volatile chemicals, such as benzene or thinner.
- Do not apply labels or stickers to discs. (Do not use discs fixed with exposed tape adhesive or leftover peeled-off stickers.)
- Do not use scratch-proof protectors or covers.
- Do not use discs printed with label printers available on the market.
- Do not load warped or cracked discs.
Disc Storage
Be careful not to harm the disc because the data on these discs is highly vulnerable to the environment.
- Do not keep under direct sunlight.
- Keep in a cool ventilated area.
- Store vertically.
-
Keep in a clean protection jacket.
-
If you move your HDD & DVD REORDER suddenly from a cold place to a warm place, condensation may generate on the operating parts and lens and cause abnormal disc playback. If this occurs, do not connect the plug to the power outlet and wait for two hours. Then insert the disc and try to play back again.
Disc Specifications
This unit allows you to record and playback high quality digital video on DVD-RAM/-RW/-R discs or on the HDD.
You can also edit digital images on DVD-RAM/-RW discs or HDD.
Disc Type
DVD-Video
- A digital versatile disc (DVD) can contain up to 135-minutes of images, 8 audio languages and 32 subtitle languages. It is equipped with MPEG-2 picture compression and Dolby digital surrounding, allowing you to enjoy vivid and clear theatre quality images in the comfort of your own home.
- When switching from the first layer to the second layer of a dual-layered DVD Video disc, there may be momentary distortion in the image and sound. This is not a malfunction of the unit.
- Once a DVD-RW/-R recorded in Video Mode is finalised, it becomes DVD-Video.
Audio CD
- An audio disc on which 44.1 kHz PCM Audio is recorded.
- Plays CD-DA format audio CD-R and CD-RW discs.
- The unit may not be able to play some CD-R or CD-RW discs due to the condition of the recording.
CD-R/-RW
- Use a 700MB (80 minutes) CD-R/-RW disc. If possible, do not use a 800MB (90 minutes) or above disc, as the disc may not play back.
- If the CD-R/-RW disc was not recorded as a closed session, you may experience a delay in the early playback time, all recorded files may not play.
- Some CD-R/-RW discs may not be playable with this unit, depending on the device which was used to burn them. For contents recorded on CD-R/-RW media from CDs for your personal use, playability may vary depending on contents and discs.
DVD-R Disc Playback and Recording
- Once a DVD-R recorded in Video Mode is finalised, it becomes DVD-Video.
- You can record onto the available space on the disc and perform editing functions such as giving titles to discs and programmes and erasing programmes before finalising.
- When programming is erased from a DVD-R, that space does not become available. Once an area on a DVD-R is recorded on, that area is no longer available for recording, whether the recording is erased or not.
- It takes about 30 seconds for the unit to complete recording management information after recording finishes.
- This product optimizes the DVD-R for each recording. Optimizing is carried out when you start recording after inserting the disc or turning on the unit. Recording onto the disc may become impossible if optimizing is carried out too many times.
- Playback may be impossible in some cases due to the condition of recording.
- This unit can play back DVD-R discs recorded and finalised with a Samsung DVD video recorder. It may not be able to play some DVD-R discs depending on the disc and the condition of the recording.
DVD-RW DiscPlayback and Recording
- Recording and playback can be performed on DVD-RW discs in both the Video and VR Modes.
- Once a DVD-RW recorded in both the Video and VR Modes is finalised, you cannot perform additional recording.
- Once a DVD-RW recorded in Video Mode is finalised, it becomes DVD-Video.
-
In both modes, playback can be performed before and after finalisation, but additional recording, deleting and editing can not be performed after finalisation.
-
If you want to record the disc in VR Mode and then record in V Mode, be sure to execute Format. Be careful when executing Format because all the recorded data may be lost.
- A DVD-RW blank disc is initialized to VR Mode when first initialized.
DVD-RAM Disc Playback and Recording
- Ensure that the recording mode is set to VR mode. Otherwise, this product will not be able to play the recording.
- You cannot play a DVD-RAM in most DVD components due to compatibility issues.
- Only DVD-RAM standard Version 2.0. discs can be played in this unit.
- DVD-RAM recorded on this unit may not work with other DVD components. To determine compatibility with these DVD-RAM discs, refer to the user's manual for the player.
- For cartridge type DVD-RAM discs, remove the cartridge and use the disc only.
Disc Copy
Contents Copy Specifications
| Contents | HDD → DVD | DVD → HDD |
| Recorded Video Title | Supported | Supported |
| Copy Protected Title | Not supported | Not supported |
| Copy Once Title | Move
(Deletes the Title in the HDD after copying) | Not supported |
Once "Copy Once programme" has been recorded on the DVD disc, this title cannot be copied to HDD anymore.
But "Copy Once programme" has been recorded on the HDD, this title can be copied to DVD-RW (VR mode) or DVD-RAM.
Contents Copy Specifications
| Contents | HDD → DVD | DVD → HDD |
| MP3 | Supported | Supported |
| JPEGphoto) | Supported | Supported |
| DivX | Supported | Supported |
| CD-DA | Not supported | Supported |
- Disc(CD-R/CD-DA/CD-RW/DVD-RAM, DVD-R(Finalise)/DVD-RW(Finalise)) HDD
- HDD DVD-R, DVD-RW(V)
- If the disc is finalised through Disc Manager, it can be compatible with PC as a disc with a UDF file system.
COPY PROTECTION
- Many DVD discs are encoded with copy protection. Because of this, you should only connect your HDD & DVD REORDER directly to your TV, not to a VCR. Connecting to a VCR results in a distorted picture from copy-protected DVD discs.
- This product incorporates copyright protection technology that is protected by methods claims of certain U.S. patents and other intellectual property rights owned by Macrovision Corporation and other rights owners. Use of this copyright protection technology must be authorised by Macrovision Corporation, is intended for home and other limited viewing uses only unless otherwise authorised by Macrovision Corporation. Reverse engineering or disassembly is prohibited.
Protection
This HDD & DVD REORDER can allow you to protect the contents of your discs, as described below.
Programme-protected: See page 74 "Locking (Protecting) a Title"
- Disc-protected: See page 88 "Disc Protection"
- DVD-RAM/-RW/-R discs that are incompatible with the DVD-VIDEO format cannot be played with this product.
- For more information on DVD recording compatibility, consult your DVD-RAM/-RW/-R manufacturer.
- Use of poor quality DVD-RAM/-RW/-R discs may cause following unexpected problems including, without limitation, recording failure, loss of recorded or edited materials or damage to the HDD & DVD REORDER.
Using MP3 disc
- CD-R/-RW, DVD-RAM/±RW/±R, HDD with MP3 files recorded with UDF, ISO9660 or JOLIET format can be playbacked.
- Only MP3 files with the ".mp3" or ".MP3" extension can be played.
- For MP3 files recorded with a VBR(Variable Bit Rates), from 32 Kbps to 320 Kbps, the sound may cut in and out.
- Playable bit-rate range is from 56 Kbps to 320 Kbps.
Each folder can have up to 500 items including files and sub folders.
Using JPEG disc
- CD-R/-RW, DVD-RAM/±RW/±R, HDD recorded with UDF, ISO9660 or JOLIET format can be playbacked.
- Only JPEG files with the“.jpg” or“.JPG” extension can be displayed.
Each folder can have up to 500 items including files and sub folders.
- MOTION JPEG and progressive JPEG are not supported.
Using DivX disc
CD-R/-RW, DVD-RAM/±RW/±R, HDD
- Video File with following extensions can be played. : .avi, .divx, .AVI, .DIVX
- DivX Video (Codec) Format : DivX 3.11 DivX 4.x
DivX 5.x (without QPEL and GMC)
- DivX Audio (Codec) Format: MP3, MPEG1 Audio Layer 2, LPCM, AC3, DTS
- Supported subtitle file formats: .smi, .srt, .sub, .psb, .txt, .ass
Each folder can have up to 500 items including files and sub folders.
- You cannot play back the disc that is larger than a 720 × 576 pixel resolution.
Do not use the following discs!
LD, CD-G, CD-I, CD-ROM and DVD-ROM discs should not be used in this product.
[Note]
Disc types that can be played : CD/CD-R/-RW/MP3/JPEG/DVD-Video/DVD-RAM/±RW/±R. For a DVD-RW/±R disc, which has been recorded in Video Mode on another component, it can play only when finalised.
- Some commercial discs and DVD discs purchased outside your region may not be playable with this product. When these discs are played, either "No disc." or "Please check the regional code of the disc." will be displayed.
- If your DVD-RAM/-RW/-R discs is an illegal copy or is not in DVD video format, it may also not be playable.
Disc compatibility
- Not all brands of discs will be compatible with this unit.
GETTING STARTED 2
2 Warning
3 Precaution
10 General Features
11 Before reading the user's manual
12 How to use the HDD & DVD REORDER
14 Unpacking
16 Description
19 Tour of the Remote Control
CONNECTING & SETTING UP
20
20 Connecting the HDD & DVD REORDER
21 Additional connections
22 Antenna + HDD & DVD REORDER + External decoder box + TV
23 Other type of connecting the Video output cable
25 Other type of connecting the Audio output cable
27 Connecting to AV 3 IN jackS
SYSTEM SETUP
28
28 On-Screen Menu Navigation
28 Plug & Play Setup
30 Setting the Clock
30 Channel Set
32 Setting up the Language Options
32 Setting up the System Options
34 Setting up the Audio Options
35 Setting up the Video Options
38 Setting up the Parental Lock
39 Setting up the Recording Options
PLAYBACK 41
41 Region code (DVD-Video only)
41 Logos of Discs that can be played
41 Disc types that can be played
43 Playing a Disc
44 Using the Disc Menu & Title Menu
44 Using the playback related buttons
46 Using the INFO button
46 Selecting the Subtitle Language
47 Selecting the Soundtracks & Audio Channels
47 Changing the Camera Angle
47 Repeat Play
48 Zooming-In
49 Using Markers
50 Using the Bookmarks
51 Playing an Audio CD/MP3
56 Viewing a Picture
58 Playing a DivX
RECORDING

60 Recordable Discs
61 Recording Formats
62 Recording Mode
63 Unrecordable pictures
64 Recording immediately
65 Making a One Touch Recording (OTR)
66 Simultaneous Recording and Playback
67 Time Shift function as a live signal
68 Making a Timer Recording
71 Using the ShowView Feature
72 ShowView Extended
72 Go To Recorded List
EDITING

74 Basic Editing (Title List)
78 Using the Sort function (Title List)
79 Navigation Menu
80 Select Contents
80 Advanced Editing ( Playlist)
85 Copying from HDD to DVD or vice-versa
86 Copying MP3, JPEG or DivX
88 Changing the name of Music/Photo/DivX file
89 Disc Manager
REFERENCE

93 Troubleshooting
APPENDIX

95 Specifications
GENERAL FEATURES
This unit allows you to record and playback high quality digital video on DVD-RAM/-RW/-R discs or on the HDD.
You can also edit digital images on DVD-RAM/-RW discs or HDD.
HDD Recording
DVD-HR770
You can record up to Approx. 264 hours of video (in EP mode (8 Hours)) on the internal 160GB (gigabyte) hard disk (HDD).
With both recordable DVD and a high-capacity HDD in the same recorder, you have the flexibility to keep recordings on the HDD for quick access anytime, or record to DVD for archiving or playing on other DVD players.
Copy between HDD and DVD
You can copy recordings from the HDD to recordable DVD, or from DVD to the HDD.
You can only copy in the same record mode as the source title.
Simultaneous Recording and Playback
Playback and recording for both the DVD and the built-in hard disk drive (HDD) are completely independent. For example you can record a broadcast programme to either a recordable DVD or the HDD, while watching another recording you already made on the same DVD or on the HDD.
Automated Quality Adjustment for Timer Recording
If FR mode is selected, the video quality is adjusted automatically so that all video for the scheduled time can be recorded onto the free disc space. (See page 67)
High quality progressive scan
Progressive scanning provides high resolution and flicker free video. The 10-bit 54-MHz DAC and 2D Y/C
Separating Circuitry provides the highest image playback and recording quality. (See page 36)
DivX Certification
DivX, DivX Certified, and associated logos are trademarks of DivX Networks, Inc and are used under licence.
- Official DivX® Certified product
- Plays all versions of DivX® video (including DivX® 6) with standard playback of DivX® media files

EZ Record Mode
This function allows you Initialise and Finalise a disc automatically. (See page 39)
Make sure to check the following terms before reading the user manual.
Icons that will be used in manual
| Icon | Term | Definition |
| HDD | HDD | This involves a function available on the HDD. |
| DVD-TED | DVD | This involves a function available on DVD or DVD±R/-RW(V) discs that have been finalised. |
| DVD-RAM | RAM | This involves a function available on DVD-RAM. |
| DVD-RW | -RW | This involves a function available on DVD-RW. |
| DVD-R | -R | This involves a function available on DVD-R. |
| DVD-RW | +RW | This involves a function available on DVD+RW. |
| DVD-R | +R | This involves a function available on DVD+R. |
| Audio CD | CD-DA | This involves a function available on a data CD (CD-R or CD-RW). |
| JPEG | JPEG | This involves a function available on CD-R/-RW, DVD±R/±RW/-RAM discs or HDD. |
| MP3 | MP3 | This involves a function available on CD-R/-RW, DVD±R/±RW/-RAM discs or HDD. |
| DivX | DivX | This involves a function available on CD-R/-RW, DVD±R/±RW/-RAM discs or HDD. |
| ! | Caution | This involves a case where a function does not operate or settings may be cancelled. |
| NOTE | This involves tips or instructions on the page that help each function operate. |
| One-Touch button | A function that can be operated by using only one button. |
About the use of this user's manual
1) Be sure to be familiar with Safety Instructions before using this product. (See pages 2~7)
2) If a problem occurs, check the Troubleshooting. (See pages 92~93)
Copyright
©2008 Samsung Electronics Co.
All rights reserved; No part or whole of this user's manual may be reproduced or copied without the prior written permission of Samsung Electronics Co.
Step 1: Select the disc type or HDD
Please check available disc type before recording.

If you want to repeatedly record on the same disc or you want to edit the disc after recording, select a rewritable DVD-RW or DVD-RAM type disc. If you want to save a recording without any changes, choose a non-rewritable DVD-R. You can record files directly to the built-in HDD or edit a recorded file.
Unlike a VCR, the HDD & DVD RECORDER automatically starts formatting when an unused disc is inserted. This is required for the preparation of recording on a disc.
Using the HDD
Formatting unnecessary.
Using a DVD-RAM
This type of disc can be formatted in DVD-Video Recording format (VR mode). You can edit recorded images and create a playlist in a specific sequence according to your requirements.
Using a DVD-RW
This type of disc can be formatted in either DVD-Video format (V mode) or DVD-Video Recording format (VR mode). For an unused disc, a message that asks whether to initialize a disc or not. If you select "DVD-VR" or "DVD-V", initialising will be started.
You can play a Video mode disc on various DVD components. A VR mode disc allows more varied editing.
Using a DVD-R
Formatting disc is unnecessary and only V Mode Recording is supported. You can play these types of discs on various DVD components only when they have been finalised.
Step 3: Recording
There are two different recording methods, Direct Recording and Timer Recording. Timer recording is classified as follows:
Recording mode : XP (high quality mode), SP (standard quality mode), LP (long recording mode), and EP (extended mode) according to the recording mode. When recording is set in the FR mode, the best quality picture is recorded with regards to the remaining time on the disc.
Step 4 : Playing
You can select the title you want to play in a displayed menu and then immediately start playback.
A DVD consists of sections, called titles, and sub- sections, called chapters.
Step 5: Editing a recorded disc
Editing on discs is easier than conventional video tapes. The HDD & DVD REORDER supports many different edit functions, possible only with DVDs and HDD.
With a simple and easy edit menu, you can operate various edit functions, such as delete, copy, rename, lock, etc., on a recorded title.
Creating a playlist (DVD-RAM/-RW in VR mode, HDD)
With this HDD & DVD REORDER, you can create a new playlist on a disc and edit it without the original, pre-existing recording.
Step 6 : Finalising & Playing on other DVD components
To play your DVD on other DVD components, finalising may be necessary. First, finish all editing and recording operations, then finalise the disc.
When using a DVD-RW disc in VR Mode
DVD discs recorded in VR mode can only be played back in DVD recorders, not players.
When using a DVD-RW disc in Video Mode
The disc should be finalised first to enable playback on anything other than this HDD & DVD REORDER. No more editing or recording can be made on the disc once it has been finalised.
To enable recording on the disc again, the disc must be unfinalised.
When using a DVD-R disc
You should finalise the disc to play it on a component other than this HDD & DVD REORDER. You cannot edit or record on the disc once it has been finalised.

- You can finalise the disc automatically using EZ Record function. (See page 39)
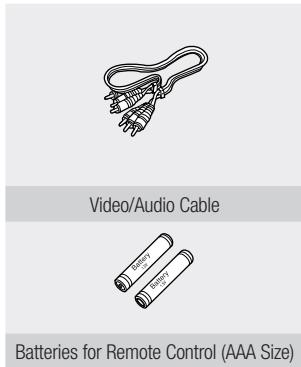
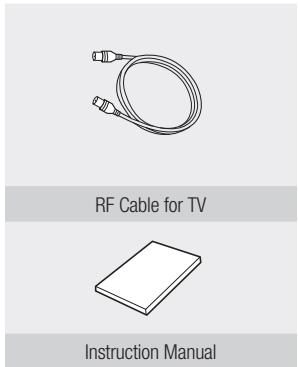
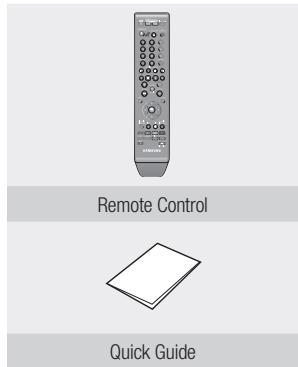
Accessories
Check for the supplied accessories below.
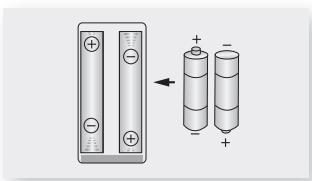
Preparing the Remote Control
Install Batteries in the Remote Control
- Open the battery cover on the back of the remote control.
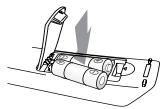
- Insert two AAA batteries. Make sure that the polarities (+ and -) are aligned correctly.
- Replace the battery cover.
If the remote does not operate properly:
- Check the polarity + / - of the batteries (Dry-Cell)
- Check if the batteries are drained.
- Check if remote sensor is blocked by obstacles.
- Check if there is any fluorescent lighting nearby.
Dispose of batteries according to local environmental regulations. Do not put them in the household trash.
To determine whether your television is compatible, follow the instructions below.
- Switch your television on.
- Point the remote control towards the television.
- Press and hold the TV STANDBY/ON button and enter the two-figure code corresponding to the brand of your television, by pressing the appropriate number buttons.
Controllable TV Codes
| BRAND | BUTTON |
| SAMSUNG | 01, 02, 03, 04, 05, 06, 07, 08, 09 |
| AIWA | 82 |
| ANAM | 10, 11, 12, 13, 14, 15, 16, 17, 18 |
| BANG & OLUFSEN | 57 |
| BLAUPUNKT | 71 |
| BRANDT | 73 |
| BRIONVEGA | 57 |
| CGE | 52 |
| CONTINENTAL EDISON | 75 |
| DAEWOO | 19, 20, 23, 24, 25, 26, 27, 28, 29, 30, 31, 32, 33, 34 |
| EMERSON | 64 |
| FERGUSON | 73 |
| FINLUX | 06, 49, 57 |
| FORMENTI | 57 |
| FUJITSU | 84 |
| GRADIENTE | 70 |
| GRUNDIG | 49, 52, 71 |
| HITACHI | 60, 72, 73, 75 |
| IMPERIAL | 52 |
| JVC | 61, 79 |
| LG | 06, 19, 20, 21, 22, 78 |
| LOEWE | 06, 69 |
| LOEWE OPTA | 06, 57 |
| MAGNAVOX | 40 |
| METZ | 57 |
| MITSUBISHI | 06, 48, 62, 65 |
| MIVAR | 52, 77 |
| NEC | 83 |
| NEWSAN | 68 |
| BRAND | BUTTON |
| NOBLEX | 66 |
| NOKIA | 74 |
| NORDMENDE | 72, 73, 75 |
| PANASONIC | 53, 54, 74, 75 |
| PHILIPS | 06, 55, 56, 57 |
| PHONOLA | 06, 56, 57 |
| PIONEER | 58, 59, 73, 74 |
| RADIOLA | 06, 56 |
| RADIOMARELLI | 57 |
| RCA | 45, 46 |
| REX | 74 |
| SABA | 57, 72, 73, 74, 75 |
| SALORA | 74 |
| SANYO | 41, 42, 43, 44, 48 |
| SCHNEIDER | 06 |
| SELECO | 74 |
| SHARP | 36, 37, 38, 39, 48 |
| SIEMENS | 71 |
| SINGER | 57 |
| SINUDYNE | 57 |
| SONY | 35, 48 |
| TELEAVA | 73 |
| TELEFUNKEN | 67, 73, 75, 76 |
| THOMSON | 72, 73, 75 |
| THOMSON ASIA | 80, 81 |
| TOSHIBA | 47, 48, 49, 50, 51, 52 |
| WEGA | 57 |
| YOKO | 06 |
| ZENITH | 63 |
Result: If your television is compatible with the remote control, it will switch off.
It is now programmed to operate with the remote control.

If several codes are indicated for your television brand, try each one in turn until you find one that works.
If you replace the remote control's batteries, you must set the brand code again.
Then you can control the television using the following buttons after pressing the TV button.
| Button | Function |
| TV STANDBY/ON | Used to switch the television on and off. |
| INPUT SEL. | Used to select an external source. |
| TV VOL (+/-) | Used to adjust the volume of the television. |
| PROG (▲ / √) | Used to select the desired channel. |
| TV MUTE | Used to toggle the sound on and off. |
| Number | Used to input number directly. |

The functions listed above does not necessarily work on all televisions. If you encounter problems, operate the television directly.
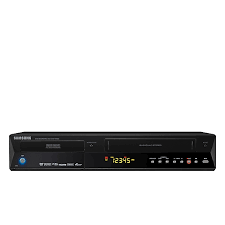
Front Panel
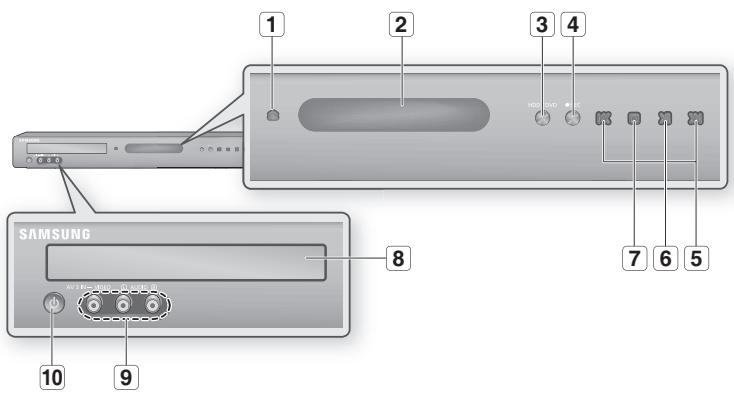
| 1 | OPEN/CLOSE button | Opens and closes the disc tray. |
| 2 | DISPLAY | Displays the playing status, time, etc. |
| 3 | HDD/DVD button | Selects HDD/DVD mode. |
| 4 | REC button | Starts recording. |
| 5 | SEARCH/SKIP buttons | Goes to the next title/chapter/track or goes back to the previous title/chapter/track.
(Playback mode)
Select TV preset Channels. (Stop mode) |
| 6 | PLAY/PAUSE button | Plays a disc or pauses playback. |
| 7 | STOP button | Stops disc playback. |
| 8 | DISC TRAY | Opens to accept a disc. |
| 9 | AV 3 INPUT | Connects to external equipment. |
| 10 | STANDBY/ON button | Turns the HDD & DVD Recorder on and off. |
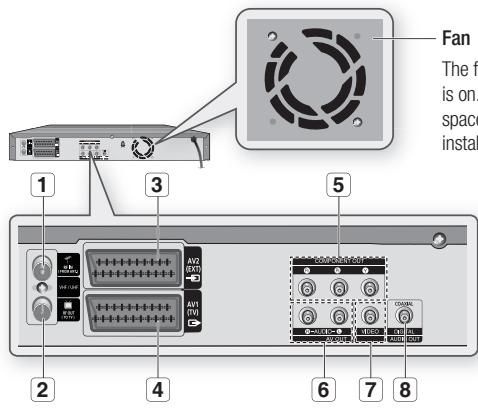
Fan
The fan always revolves when the power is on. Ensure a minimum of 10cm clear space on all sides of the fan when installing the product.
| 1 In from aerial connector | Connects RF cable from antenna. |
| 2 Out to TV connector | Connects RF cable to TV antenna input. |
| 3 AV2(EXT) INPUT SCART connector | Connects to equipment having SCART output jack. |
| 4 AV1(TV) OUTPUT SCART connector | Connects to equipment having SCART input jack. |
| 5 COMPONENT VIDEO OUT | Connects to equipment having Component video input. |
| 6 AUDIO OUT | Connects to the audio input of external equipment using audio cables. |
| 7 VIDEO OUT | Connects the input of external equipment using a Video cable. |
| 8 DIGITAL AUDIO OUT(COAXIAL) | Connects to an amplifier having a digital coaxial audio input jack. |
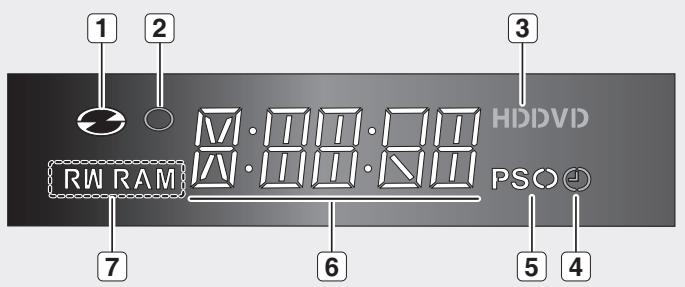
Front Panel Display
1 In Disc Indicator Lights status icon.
REC Indicator Lights in the record mode.
3 DVD VIEW Indicator Lights when DVD mode is selected.
4 TIMER Indicator Lights to indicate the timer record mode.
5 PS Indicator Lights in the progressive scan mode.
6 STATUS Indicator Playing time/clock/current status indicator.
7 Disc Media Indicator Lights when a DVD-RAM/-RW/-R disc is loaded.
Your HDD & DVD REORDER remote control will work with Samsung televisions and compatible brands.
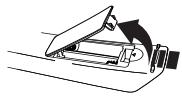
Installing batteries in the Remote Control


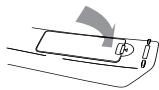
3. Replace the cover. Assuming typical TV usage, the batteries last for about one year.

1. Lift the cover at the back of the remote control upward as shown.
2. Install two AAA size batteries. Make sure to match the "+" and "-" ends of the batteries with the diagram inside the compartment.
connecting & setting up
CONNECTING THE HDD & DVD REORDER
This section involves various methods of connecting the HDD & DVD REORDER to other external components and required initial setting modes.
You can connect your HDD & DVD REORDER to the television using the SCART cable if the appropriate input is available on the television.
- Connect the RF cable as shown.
- Connect one end of the SCART cable to the AV1 socket on the rear of the HDD & DVD REORDER.
- Plug the other end into the appropriate connector on the television.
- Plug in the HDD & DVD REORDER and TV
- Turn on the HDD & DVD REORDER and TV.
- Press the INPUT SEL. button on your TV remote control until the Video signal from the HDD & DVD RECORDER appears on the TV screen.
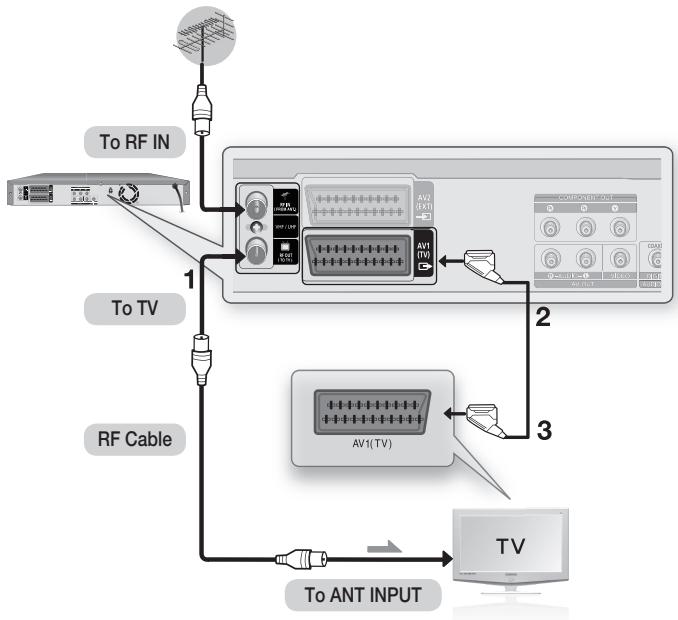

- The RF cable connection of this product sends only signals of TV. You must connect SCART cable or Audio/Video cables to watch a DVD from your HDD & DVD REORDER.
TV mode: Press the TV/DVD button on the remote control, then "TV" will appear on the Front display (or turn off HDD & DVD REORDER).
Then you can watch programmes received through TV.
You can connect your HDD & DVD REORDER to a satellite or digital tuner.
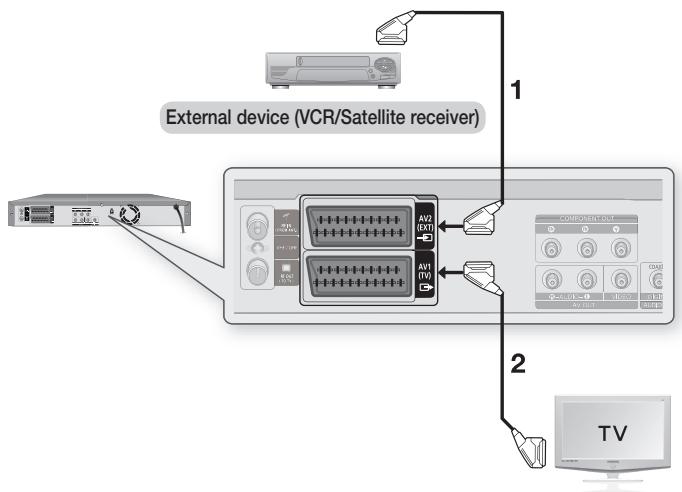
DVD mode
- Connect the AV2 connector of HDD & DVD REORDER and VCR/Satellite receiver or digital tuner using a SCART cable.
- Connect the AV1 connector to the SCART AV connector on TV.
- Turn on the HDD & DVD RECORDER, VCR/Satellite receiver or digital tuner and TV.
- Set Input mode on AV2.
- TV mode
- Press the TV/DVD button on the remote control, then "TV" will appear on Front display. (or turn off HDD & DVD REORDER.)
- You can watch programmes from a satellite or digital tuner connected to this HDD & DVD RECORDER, even when the HDD & DVD RECORDER is turned off.
connecting & setting up
ANTENNA + HDD & DVD REORDER + EXTERNAL DECODER BOX + TV
If you connect external decoder box to HDD & DVD REORDER, you can record scrambled channels (CANAL+ or Premiere broadcasts) received through the built-in TV tuner in HDD & DVD REORDER.
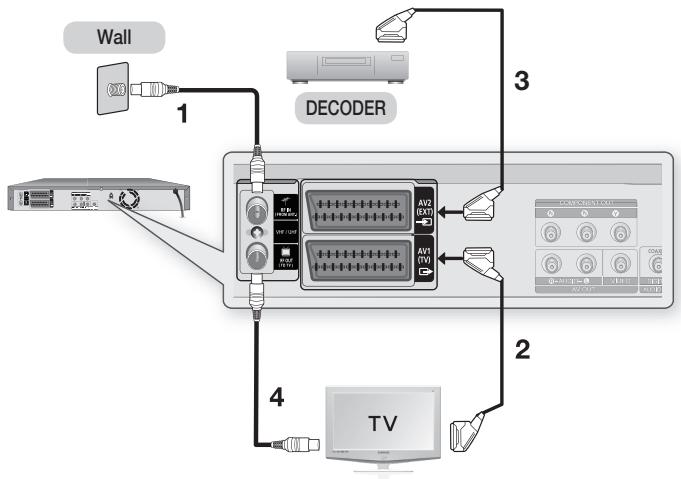
- Connect RF antenna cables as shown.
- Connect the AV1 connector on this recorder to the SCART AV connector on TV using a SCART cable.
- Connect the AV2 connector to a SCART AV connector on decoder box.
- To watch or record PAY-TV Canal Plus programmes, set your HDD & DVD RECORDER to receive the channels using the on-screen display. (Refer to pages 36~37)
There are several ways to output a video signal not using scart cables. Select one of the following video connections that best suits.
- Case 1: Connecting to a Video (Composite) output jack
- Case 2: Component Video output jacks
Component video and Progressive Output Modes
- Component video output is available only if your TV supports Component video input, respectively. If Component video output does not work, check the TV connections and the TV input selection settings.
- Compared to standard interlaced video, progressive scan doubles the amount of video lines fed to your TV, resulting in a more stable, flicker-free, clear image than interlaced video. This is only available with TVs that support progressive scan.
- Progressive Scan Output (576P) Consumers should note that not all high definition television sets are fully compatible with this product and may cause artifacts to be displayed in the picture, in case of 576 progressive scan picture problems. It is recommended that the user switch the connection to the 'standard definition' output. If there are questions regarding our TV set compatibility with this model 576P HDD & DVD REORDER, please contact our customer service centre.
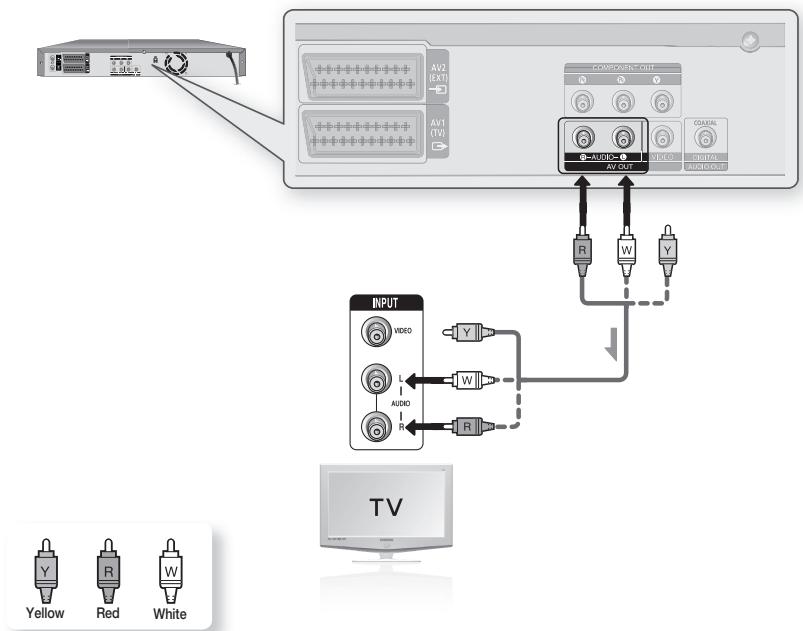
Case 1: Connecting to a Video (Composite) output jack
- Connect a video (Yellow) cable between the VIDEO (yellow) OUT jack on HDD & DVD REORDER and VIDEO (yellow) INPUT jack on your TV (or AV amplifier).
- You will enjoy regular quality images.
- Connect audio cables (white and red) between the AUDIO OUT jacks on the HDD & DVD RECORDER and AUDIO IN jacks on TV (or AV amplifier). (See pages 25~26)

connecting & setting up
Case 2 : Component Video output jacks
- Connect Component video cables(not supplied) between the COMPONENT OUT(Y, P_B , P_R ) jacks on HDD & DVD REORDER and COMPONENT IN(Y, P_B , P_R ) jacks on your TV.
- You will enjoy high quality and accurate colour reproduction images.
- Connect audio cables (white and red) between the AUDIO OUT jacks on the HDD & DVD RECORDER and AUDIO IN jacks on TV (or AV amplifier).
(See pages 25~26).
- After connecting, refer to the page 36.
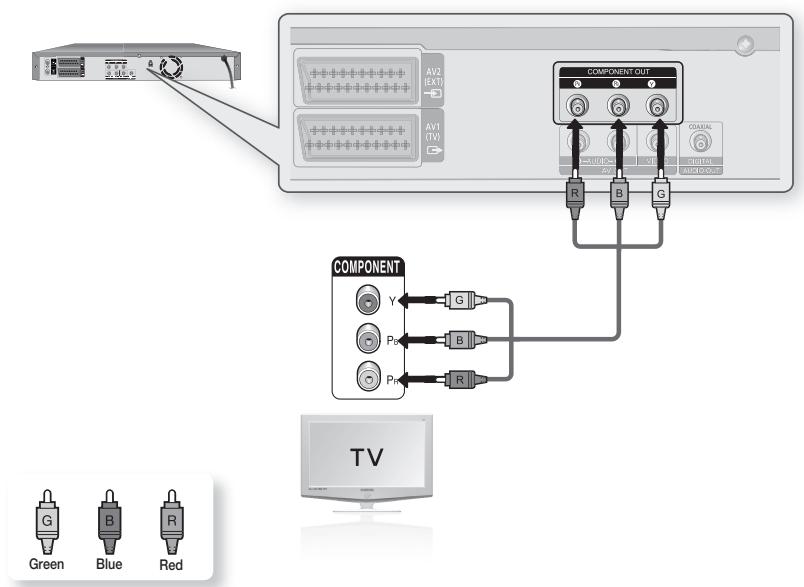

- Make sure that the colour coded connections match. The Y, PB, PR component output jacks of your HDD & DVD REORDER must be connected to the exact corresponding component input jacks on your TV.
- Progressive setting is only available when the Video Out is set to Component. (See page 36)
OTHER TYPE OF CONNECTING THE AUDIO OUTPUT CABLE
There are several ways to output audio signal not using scart cables. Select the audio connection that best suits you below.
- Case 1: Connecting to your TV
- Case 2: Connecting to a stereo amplifier with AV output jacks
- Case 3: Connecting to an AV amplifier with a digital output jack
Manufactured under license under U.S. Patent #: 5,451,942 & other U.S. and worldwide patents issued & pending. DTS and DTS Digital Out are registered trademarks and the DTS logos and Symbol are trademarks of DTS, Inc. © 1996-2007 DTS, Inc. All Rights Reserved.
Manufactured under licence from Dolby Laboratories. "Dolby" and the double-D symbol are trademarks of Dolby Laboratories.
Case 1: Connecting to your TV
If your TV has audio input jacks, use this connection.
connecting & setting up
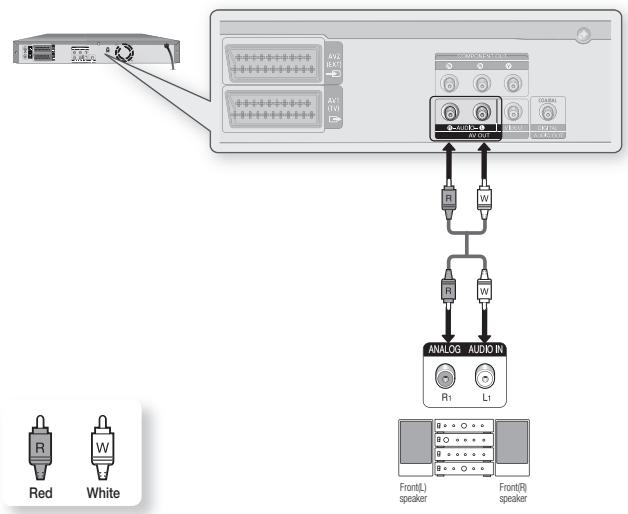
Case 2 : Connecting to a stereo amplifier with AV output jacks
If your stereo amplifier only has AUDIO INPUT jacks (L and R), use the AUDIO OUT jacks
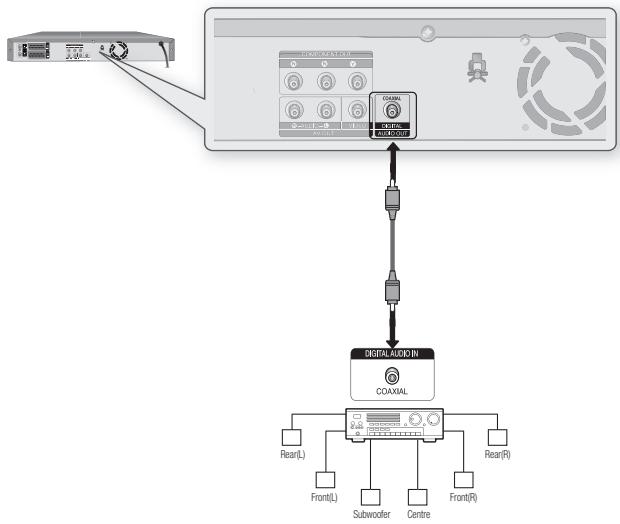
Case 3: Connecting to an AV amplifier with a digital output jack
If your AV amplifier has a Dolby Digital, MPEG2 or DTS decoder and a digital input jack, use this connection. To enjoy Dolby Digital, MPEG2 or DTS sound, you will need to set up the audio settings. According to your amplifier, connect to a coaxial cable. (See pages 34~35)
This allows you to connect your HDD & DVD REORDER to other external devices and view or record their outputs.
Connecting a VCR, Set-Top Box(STB), DVD player or Camcorder to the AV 3 IN jacks
Connecting a VCR or external device to AV 3 IN jacks of the HDD & DVD RECORDER. You can record from connected equipment (VCR, STB, DVD player or Camcorder).
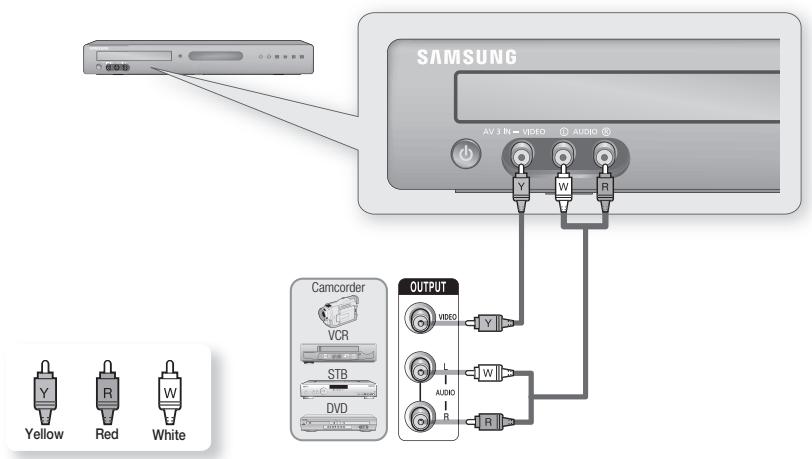

AV 3 in selection will be automatically done.
If the input is not selected automatically, use INPUT SEL. button to select proper input.
- Copy protected content cannot be recorded.
The on-screen menus allow you to enable or disable various functions on your HDD & DVD REORDER. Press the MENU button to open the on-screen menu and then use the following buttons to navigate through the on screen menus.
- ▲▼, △▶ buttons
Press these buttons on the remote control to move the selection bar , to cycle through the menu options.
- OK button
Press this button on the remote control to confirm any new settings.
- RETURN button
Press this button on the remote control to return to the Previous menu screen displayed or to exit the on-screen menu.
- EXIT button
Press this button to exit the on-screen MENU.

PLUG & PLAY SETUP
Your HDD & DVD REORDER will automatically set itself up when it is plugged in for the first time. TV stations and clock will be stored in memory. The process takes a few minutes. Your HDD & DVD REORDER will then be ready for use.
- Connect the RF cable as indicated on page 20.
(Connecting Your HDD & DVD REORDER to the TV Using the RF Cable and scart cable.)
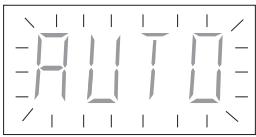
-
Plug the HDD & DVD REORDER into the mains. "AUTO" in the front panel display flickers.
-
Press a number button to select the language.
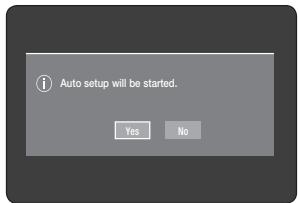
-
Press the OK button to start the auto setup.
-
Select "Country" using the , buttons to select your country.
Refer to following abbreviation table when selecting "Country".
| A(Austria) | NL(Netherlands) | S(Sweden) | PL(Poland) |
| B(Belgium) | I(Italy) | CH(Swiss) | CZ (Czech) |
| DK(Denmark) | N(Norway) | TR(Turkey) | Others |
| FIN(Finland) | P(Portugal) | GR(Greece) | |
| D(Deutschland) | E(Spain) | HU(Hungary) | |
- The HDD & DVD REORDER searches for the stations according to a preset preference list corresponding to the country that you have selected.


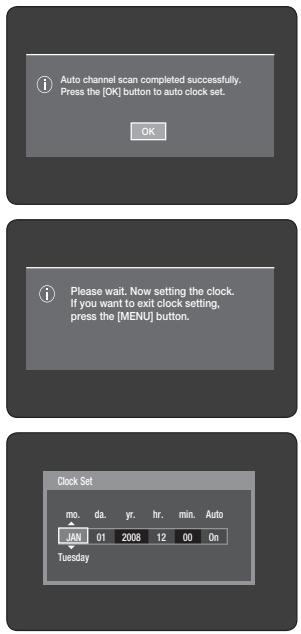
- Auto channel scan will be started.
- The number of stations automatically stored by the HDD & DVD RECORDER depends on the number of stations that it has found.
- After auto channel scan is completed, auto clock setting will be started automatically in 10 seconds. If you want to start auto clock setting immediately, press OK button.
- Wait until current date and time are displayed automatically. If you want to exit auto clock setting, press MENU button.

Now, your HDD & DVD REORDER is ready for use. "Plug & Play Setup" is complete. If you want to change it, you can by Presetting the Stations manually "Channel Set - Manual Setup" menu. (See page 31)
- Auto setup function can be performed by pressing STOP (⊙) on the unit continuously for 10 seconds or more during power off with no disc inserted.
-
Check the date and time.
-
If it is Correct, press OK button then the date and time will be saved. If you don't press the OK button, the date and time will be saved automatically after 5 seconds.
- If it is Incorrect, input correct Month, Day, Year, Hour or Minute using , buttons or number buttons. Press OK button then the date and time will be saved. When you need to change clock setting, you can set it up manually.
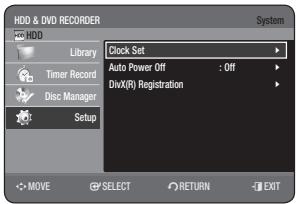
SETTING THE CLOCK
This menu is used to set the current time.
You need to set the time to use timer recording.
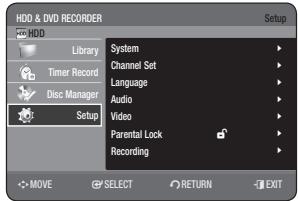
- With the unit in Stop mode, press the MENU button.
- Press the buttons to select Setup, then press the OK or button.
- Press the buttons to select System, then press the OK or button.
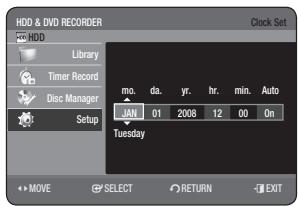
- Press the buttons to select Clock Set, then press the OK or button.
Press the buttons to input Month, Day, Year, Hour or Minute. Press the number buttons to input clock data directly. The day of the week is displayed automatically.
- Press the OK button, then the date and time will be saved. If you don't press the OK button, it will not be saved.

- You must have the RF cable connected to set the Auto Clock. (See page 20)
- The HDD & DVD REORDER automatically sets the clock according to the time signal broadcast between the channels PR1 to PR5. If you do not need the Auto Clock Set function, select Off.
CHANNEL SET
Auto Setup
This feature allows you to manually set the HDD & DVD REORDER tuner band to Antenna or Cable, whichever you connected to the Antenna In jack during initial setup.
- With the unit in Stop mode, press the MENU button.
- Press the buttons to select Setup, then press the OK or button.
- Press the buttons to select Channel Set, then press the OK or button.
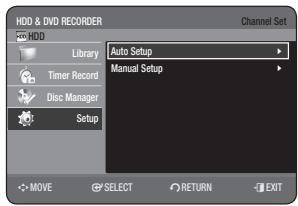
- Press the buttons to select Auto Setup, then press the OK or button.
The message "Your data will be lost. Press [OK] to continue, [RETURN] to exit." is displayed.
-
Press the OK button, then press the buttons to select your Country.
-
The HDD & DVD REORDER searches for the stations according to a preset preference list corresponding to the country that you have selected. (See page 28)
-
Press the OK button. Channel scan will be started.
-
The first frequency band is scanned and the first station found is displayed and stored. And the HDD & DVD REORDER searches for the second station and so on.
- The number of stations automatically stored by the HDD & DVD REORDER depends on the number of stations that it has found.

Press the OK button to stop the Auto Setup
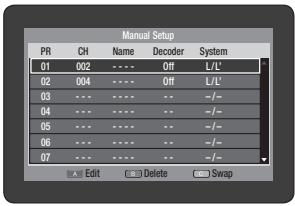
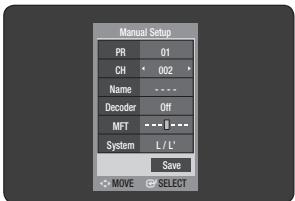
Manual Setup
You can add preset channel that Auto Channel Search missed. And you can delete a channel you wish to remove. You can programme the order of channels.
To setup, follow steps 1 to 3 in "Auto Setup" on page 30.
- Press the buttons to select Manual Setup, then press the OK or button.
-
Press the buttons to select a PR (programme) you wish to edit, delete, or swap, then press the COLOUR button. Select Edit, Delete or Swap.
-
In case of Edit (RED(A button): You can add or edit PR (programme) information. After change PR informations (CH., Name, Decoder, MFT, System), select Save, then press the OK button.
-
CH: Tune the channel using buttons.
- Name : Display station name automatically detected in broadcasting signal. If not detected, you can edit name by using buttons.
- Decoder : If you set on, you can record scrambled channels using external decoder box. Before setting on, refer to connecting external decoder box in the page 22.
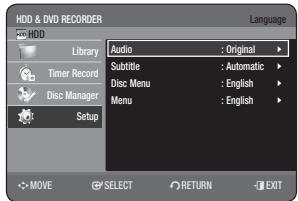
SETTING UP THE LANGUAGE OPTIONS
If you set the language options, in advance, they will come up automatically every time you watch a movie.
- With the unit in Stop mode, press the MENU button.
- Press the buttons to select Setup, then press the OK or button.
- Press the buttons to select Language, then press the OK or button.
Language setup menu will be displayed.
- Press the buttons to select the desired language option, press the OK or button.
Audio: For the disc audio language.
- Subtitle: For the disc subtitles.
- Disc Menu : For the disc menu contained on the disc
- Menu : For the on-screen menu of your HDD & DVD REORDER.
- Press the buttons to select the desired language, then press the OK or button.

If the selected language is not recorded on the disc, the original pre-recorded language is selected.
The selected language will only appear if it is supported on the disc.
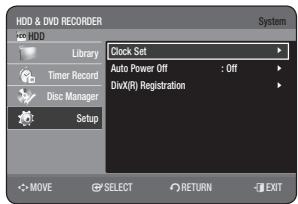
SETTING UP THE SYSTEM OPTIONS
This function allows you to setup the system setting.
- With the unit in Stop mode, press the MENU button.
- Press the buttons to select Setup, then press the OK or button.
- Press the buttons to select System, then press the OK or button.
- Press the buttons to select the desired system option, then press the OK or button.
- Press the buttons to select the desired item, then press the OK or button.
Auto Power Off Setting
This feature automatically turns off your HDD & DVD REORDER, if you do not press any button for the selected time.
-
Press the buttons to select Auto Power Off, then press the OK or button.
-
Press the buttons to select the desired item, then press the OK or button.
-
Off: Auto power off is disabled.
- 2 Hours : HDD & DVD REORDER will automatically turn off for 2 hours after the last button is pressed.
- 6 Hours : HDD & DVD REORDER will automatically turn off for 6 hours after the last button is pressed.
- If the turn off time set with the Auto Power off function is reached during playback or recording, the device will operate until the playback or recording is finished.
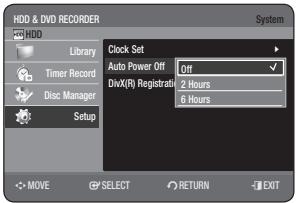
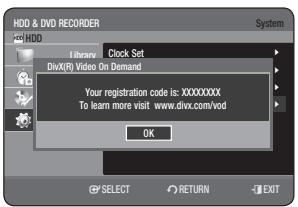
DivX(R) Registration
Please use the Registration code to register this HDD & DVD RECORDER with the DivX(R) Video On Demand format. For more information, visit www.divx.com/vod
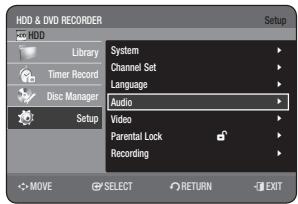
SETTING UP THE AUDIO OPTIONS
You can connect the HDD & DVD REORDER to an external amp or Home theatre.
Allows you to setup the Audio device and sound status depending on the audio system in use.
You can also set NICAM mode.
- With the unit in Stop mode, press the MENU button.
- Press the buttons to select Setup, then press the OK or button.
- Press the buttons to select Audio, then press the OK or button.
- Press the buttons to select the desired audio option, then press the OK or button.
- Press the buttons to select the desired item, then press the OK or button.
Digital Output
- PCM : Select this when your equipment does not decode Dolby Digital (or MPEG-2) compatible.
- Bitstream : Outputs Dolby Digital (or MPEG-2) audio as bitstream. Select this when your AV receiver or AV amplifier has a Dolby Digital (or MPEG-2) Decoder.
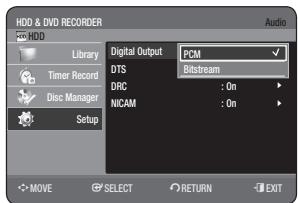

- Digital output setting is equally applied to both Dolby Digital and MPEG2 audio. LPCM sound track is always outputted as PCM. It has no relation with Digital Output setting.
- Be sure to select the correct Digital Output or you will hear no sound or a loud noise.
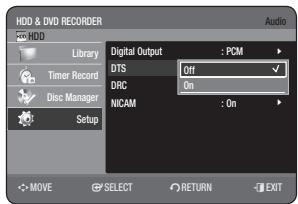
DTS
- Off : Doesn't output DTS signal. Select this when your AV receiver (or AV amplifier) does not have a DTS decoder.
- On : Outputs DTS Bitstream via digital output when you play DTS track. Select this only when your AV receiver (or AV amplifier) has a DTS decoder.

- When DTS soundtrack is played, sound does not output from AV Audio Output.
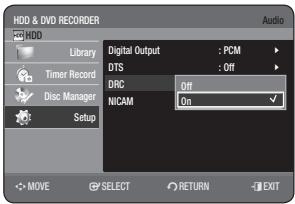
DRC
This is only active when a Dolby Digital signal is detected.
- On : When Movie soundtracks are played at low volume or from smaller speakers, the system can apply appropriate compression to make low-level content more intelligible and prevent dramatic passages from getting too loud.
- Off: You can enjoy the movie with the standard Dynamic Range.
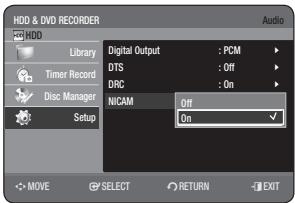
NICAM
NICAM programmes are divided into 3 types. NICAM Stereo, NICAM Mono and Bilingual (transmission in another language). NICAM programmes are always accompanied by a standard mono sound broadcast and you can select the desired sound by setting NICAM on or off.
- On: NICAM mode
- Off: Only set at this position to record the standard mono sound during a NICAM broadcast if the stereo sound is distorted due to inferior reception conditions.
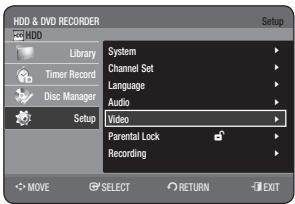
SETTING UP THE VIDEO OPTIONS
This function allows you to setup the video setting.
This function depends on disc type. It may not work for some disc types.
- With the unit in Stop mode, press the MENU button.
- Press the buttons to select Setup, then press the OK or button.
- Press the buttons to select Video, then press the OK or button. Video setup menu will be displayed.
- Press the buttons to select the desired video option, then press the OK or button.
- Press the buttons to select the desired item, then press the OK or button.
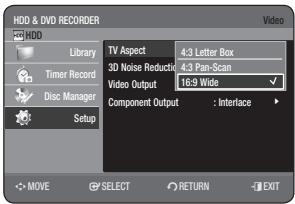
TV Aspect
Depending on the type of television you have, you may want to adjust the screen setting. (aspect ratio)
- 4:3 Letter Box : Select when you want to see the total 16:9 ratio screen DVD supplies, even though you have a TV with a 4:3 ratio screen. Black bars will appear at the top and bottom of the screen.
- 4:3 Pan-Scan : Select this for conventional size TV when you want to see the central portion of the 16:9 screen. (Extreme left and right side of movie picture will be cut off.)
16:9 Wide : You can view the full 16:9 picture on your wide screen TV.
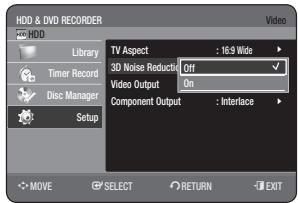
3D Noise Reduction (motion adaptive noise reduction)
- Off: Normal
- On : Provides a clear picture through noise reduction (for recording).
Video Output
You can enjoy high quality image through RGB or Component video connections. RGB video output is available connecting scart(AV1) and component video output is available connecting component(Y, P_B , P_R ) jack. Only one of these signals can be selected at one time.
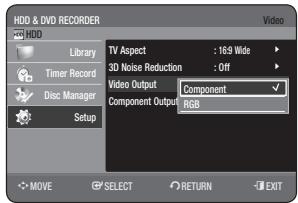
In Component mode, you can set video output to Progressive or Interlace.
Available video output jacks are as follow.
Available Video Output Jack
| Setting mode
Output jack | Component mode | RGB Mode |
| Component Output
(Y, PB, PR) | ○ | × |
| AV1 Scart | R, G, B | × | ○ |
| Composite | ○ | × |
| Composite Video out | ○ | ○ |
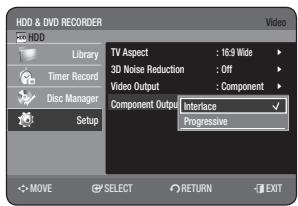
Component Output (Progressive Scan)
This function is available when video output is component. This setting enables you to select progressive mode. To view 'Progressive scan mode', first connect the component cable. (See page 24) Be sure the Component cables are connected properly.
- Progressive
The message "Do you want to maintain progressive mode? Reverting in 10 seconds." will be displayed. Select "Yes" to revert progressive mode.
- Interlace
The message "Do you want to maintain interlace mode? Reverting in 10 seconds." will be displayed. Select "Yes" to revert interlace mode.
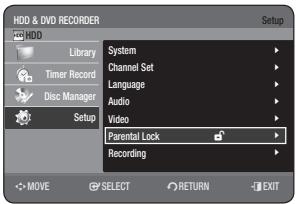
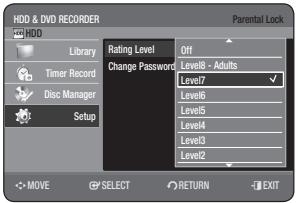
The Parental Lock function works in conjunction with DVDs that have been assigned a rating which helps you control the types of DVDs that your family watches. There are up to 8 rating levels on a disc.
- With the unit in Stop mode, press the MENU button.
- Press the buttons to select Setup, then press the OK or button.
- Press the buttons to select Parental Lock, then press the OK or button.
When you operate your HDD & DVD REORDER for the first time, the "Create the Password" message will be displayed.
- Enter the 4-digit password using the number buttons on the remote control.
The "Confirm the password" message will be displayed. Enter your password again.
If you forgot your password.
- Remove the disc.
- Press and hold the PLAY/PAUSE (▶II) button on the front panel for 10 seconds or more.
Setting the Rating Level
- Press the buttons to select Rating Level, then press the OK or button.
- Press the buttons to select the rating level you want, then press the OK or button.
For example, if you select up to Level 6, discs that contain Level 7, 8 will not play. A larger number indicates that the programme is intended for adult use only.
Changing the Password
- Press the buttons to select Change Password, then press the OK or button.
- Enter the 4-digit password using the number buttons on the remote control. The "Confirm the password" message will be displayed.
- Enter your password again using the number buttons on the remote control.

After Rating Level has been set, you can change the password.

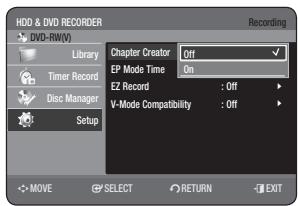
Automatic Chapter Creator

A DVD-Video consists of 'Titles' and 'Chapters'. When you record one programme, it makes one Title. If you use this function, the Title will be divided into Chapters.
- Press the buttons to select Setup, then press the OK or button.
- Press the buttons to select Recording, then press the OK or button.
- Press the buttons to select Chapter Creator, then press the OK or button.
-
Press the buttons to select Off or On, then press the OK or button.
-
Off: Select if you do not want use Automatic Chapter Creator.
- On: Select this option to use the Automatic Chapter Creator feature.
Press the EXIT (4) button exit the menu.
- Press the REC button to start recording.
(See page 63 about how to set recording speed)
The message "Do you want to create the chapter menu after this recording?" is displayed.
-
Press the buttons to select OK, then press the OK button.
-
A new chapter is created according to the selected recording mode. A chapter will be about 5 minutes long in XP and SP, and about 15 minutes long in LP and EP mode.
-
Press the STOP (●) button to stop recording.
- To display the created titles, finalise the disc (See page 90) and then press the TITLE MENU button. The title menu will be displayed.
- To display the created chapters, select the desired Title and then press the DISC MENU button. The chapter menu for the selected Title will be displayed.

The Automatic Chapter Creator function does not work during Timer Recording or when you turn the power off.
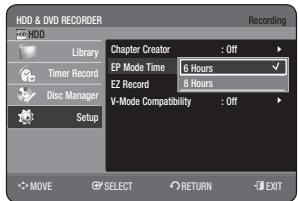
EP Mode Time Setting
You can select one of four recording modes by pressing the REC MODE button repeatedly.
In EP(Extended Play) mode, you can set recording time to 6 or 8 hours with this setting.
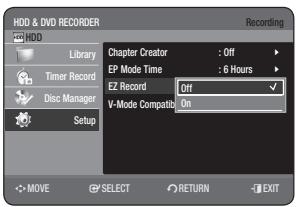
This function allows you to Initialise and Finalise a disc automatically.
- Press the buttons to select EZ Record, then press the OK or button.
- Press the buttons to select On, then press the OK or button.
Press the EXIT (4) button to exit the menu.
- Insert a disc.
If the disc is new, it will initialise automatically.
- Press the REC button.
-
EZ Record function will automatically Finalise the disc under the following conditions.
-
When you press the OPEN/CLOSE button on your HDD & DVD REORDER after recording on at least 70% of the disc. The tray will open after the disc has been finalised.
- The above feature is available only when a DVD-RW(V) or DVD-R disc is inserted.

If you insert a new DVD-RW disc, it will be formatted in V mode after auto initialising.
If you select off, you must initialise (See page 60) and finalise the disc manually in the Disc Manager menu. (See page 90)
The length of Recording is different according to recording mode. (See pages 40~41)
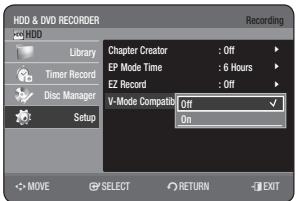
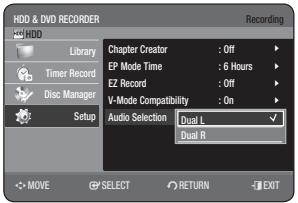
V-Mode Compatibility
This feature is about the setup for selecting audios when recording the NICAM STEREO (Multi-audio) broadcasting on HDD. It does not directly affect DVD recording of a programme.
- Off: Both "Dual L" and "Dual R" of the multi-audio broadcasting are recorded on HDD. Titles recorded on HDD under such setup status cannot be copied to DVD-R or DVD-RW (V mode).
- On : Either "Dual L" or "Dual R" of the multi-audio broadcasting is recorded on HDD. Titles recorded on HDD under such setup status can be copied to DVD-R or DVD-RW (V mode). "Dual L" and "Dual R" options can be selected from "Audio Selection."
This section introduces basic functions of playback and playback by disc type.
Read the following information before playing a disc.
Both the HDD & DVD REORDER and the discs are coded by region. These regional codes must match in order for the disc to play. If the codes do not match, the disc will not play. The Region Number for this HDD & DVD REORDER is described on the rear panel of the HDD & DVD REORDER.

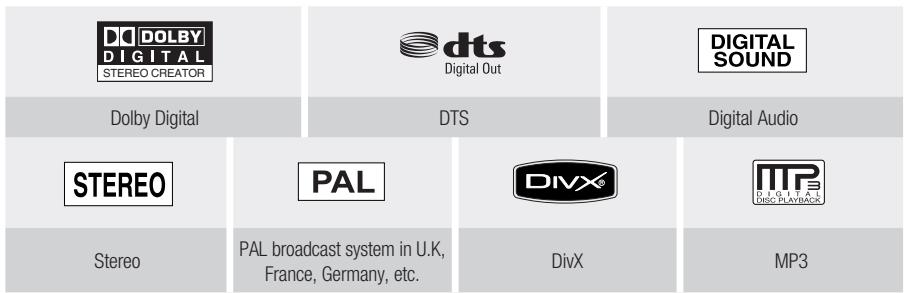
LOGOS OF DISCS THAT CAN BE PLAYED
DISC TYPES THAT CAN BE PLAYED
| Disc Types | Disc Logo content | Recorded content | Disc Shape | Max. Playing Time |
| DVD-VIDEO | VIDEO
VIDEO | VIDEO
AUDIO | Single sided(12cm) | 240 min. |
| Double sided(12cm) | 480 min. |
| Single sided(8cm) | 80 min. |
| Double sided(8cm) | 160 min. |
| AUDIO-CD | CONTRACT
DISC
DIGITAL AUDIO | AUDIO | Single sided(12cm) | 74 min. |
| Single sided(8cm) | 20 min. |
| JPEG | | JPEG Image | Single sided(12cm) | - |
| Single sided(8cm) | - |
| MP3 | | MP3 Audio | Single sided(12cm) | - |
| Single sided(8cm) | - |
| DivX | DIVX | DivX Movie | Single sided(12cm) | - |
| Single sided(8cm) | - |
| DVD-RAM | DVD RAM | AUDIOVIDEO | Single Layer(12cm)(4.7GB) | 1 hr. (XP: Excellent Quality) |
| 2 hrs. (SP: Standard Quality) |
| 4 hrs. (LP: Long Playback) |
| 6 or 8 hrs. (EP: Extended) |
| Dual Layer(12cm)(9.4GB) | 2 hr. (XP: Excellent Quality) |
| 4 hrs. (SP: Standard Quality) |
| 8 hrs. (LP: Long Playback) |
| 12 or 16 hrs. (EP: Extended) |
| DVD-RW | DVD RW | AUDIOVIDEO | 12cm (4.7GB) | 1 hr. (XP: Excellent Quality) |
| 2 hrs. (SP: Standard Quality) |
| 4 hrs. (LP: Long Playback) |
| 6 or 8 hrs. (EP: Extended) |
| DVD-R | DVD R | AUDIOVIDEO | Single Layer(12cm)(4.7GB) | 1 hr. (XP: Excellent Quality) |
| 2 hrs. (SP: Standard Quality) |
| 4 hrs. (LP: Long Playback) |
| 6 or 8 hrs. (EP: Extended) |
| Dual Layer(12cm)(8.5GB) | 1 hr. 50 min (XP: Excellent Quality) |
| 3 hrs. 40 min (SP: Standard Quality) |
| 7 hrs. 20 min (LP: Long Playback) |
| 11 or 14 hrs. 40 min (EP: Extended) |
| DVD+RW | RW DVD-RRR | AUDIOVIDEO | 12cm (4.7GB) | 1 hr. (XP: Excellent Quality) |
| 2 hrs. (SP: Standard Quality) |
| 4 hrs. (LP: Long Playback) |
| 6 or 8 hrs. (EP: Extended) |
| DVD+R | RW DVD-RH | AUDIOVIDEO | Single Layer(12cm)(4.7GB) | 1 hr. (XP: Excellent Quality) |
| 2 hrs. (SP: Standard Quality) |
| 4 hrs. (LP: Long Playback) |
| 6 or 8 hrs. (EP: Extended) |
| RW DVD-RDL | | Dual Layer(12cm)(8.5GB) | 1 hr. 50 min (XP: Excellent Quality) |
| 3 hrs. 40 min (SP: Standard Quality) |
| 7 hrs. 20 min (LP: Long Playback) |
| 11 or 14 hrs. 40 min (EP: Extended) |
| CD-R/-RWDVD-RAM/±RW/±R | | JPEGMP3DivX | - | - |
Discs that cannot be played
DVD-Video with a region number other than "2" or "ALL"
3.9 GB DVD-R Disc for Authoring.
DVD-RAM/-RW(VR mode) not recorded following the Video Recording Standard
- A DVD±R/DVD-RW(V) disc which has been recorded and not finalised in a different manufacturer's recorder.
DVD-ROM/PD/MV-Disc,etc
CVD/CD-ROM/CDV/CD-G/CD-I

This HDD & DVD REORDER can only operate with discs that are compatible with DVD-RAM Standard Version 2.0.
- Playback and/or recording may not work for some types of discs, or when specific operations, such as angle change and aspect ratio adjustment, are being performed. Information about the discs is written in detail on the box. Please refer to this if necessary.
- Do not allow the disc to become dirty or scratched, finger prints, dirt, dust, scratches or deposits of cigarette smoke on the recording surface may make it impossible to use the disc for recording.
DVD-RAM/±RW/±R discs may not be able to play on some DVD players, depending on the player, disc and the condition of the recording.
Discs with NTSC programmes recorded on them cannot be played and recorded using this product.
PLAYING A DISC
- Press the OPEN/CLOSE button.
-
Place a disc gently into the tray with the disc's label facing up.
-
Press the OPEN/CLOSE button to close the disc tray.
-
Your HDD & DVD REORDER closes the disc tray and plays the disc automatically.
- The HDD & DVD REORDER does not play discs automatically after being powered on initially.
- When the HDD & DVD REORDER is powered on and a disc is in the tray, the unit will be activated and wait in stop status.
- Press the PLAY (▶) button to start playback.
-
If you want the unit to play automatically when it is powered on with a disc in the unit, power on with the PLAY (▶) button.
-
Press the STOP (C) button to stop playback.

- When you stop playing back a disc, the HDD & DVD REORDER remembers where you stopped, so when you press PLAY (按钮 again, it will pick up where you left off. (Unless the disc is removed or the HDD & DVD REORDER is unplugged, or if you press the STOP (按钮 twice.)

- Do not move your HDD & DVD REORDER while playing, as this may cause damage to the disc.
Make sure to press the OPEN/CLOSE button to open or close the disc tray.
- Do not push the disc tray while it is being opened or closed, as this may cause a product malfunction.
Do not place foreign materials on or in the disc tray.
- Some functions may perform differently or be disabled depending on the disc type. If this occurs, refer to the instructions written on the disc case.
- Be especially careful that children's fingers are not caught between the disc tray and the tray chassis when it closes.
- You must only insert one DVD disc at a time. Inserting two or more discs will not allow playback and may cause damage to the HDD & DVD REORDER.
Some type of discs contain a dedicated menu system that allows you to select special functions for title, chapter, audio track, subtitle, film preview, information on characters, etc.
For DVD-VIDEO Disc

- Disc Menu : Press the DISC MENU button to enter the disc menu of the disc.
- Move to the setup menu related to playback operation.
- You can select audio language and subtitle etc. provided by the disc.
- Title Menu : Press the TITLE MENU button to move to the title menu of the disc.
- Press this button if the disc contains more than one title. Some discs may not support the title menu functionality.
For HDD/DVD-RAM/-RW/-R Disc

- Title List
Press the TITLE LIST button. Title List is a list of previously recorded programmes. If a title is deleted, that title cannot be played again.
- Play List (HDD/DVD-RAM/-RW(VR))
Press the PLAY LIST button. This refers to a list of user-selected titles. When one playlist is played, only the scene selected by the user will play and then stop. Since only the information necessary for playing a desired scene is included in a playlist, even if that playlist is deleted, the original recording will not be deleted. (only VR mode)
Searching through a Chapter or Track

During play, press the SEARCH (▶) buttons on the remote control.
| HDD/DVD-VIDEO/ | →X2→→X4→→X8→ |
| DVD-RAM/-RW/-R | →X16→→X32→→X128 |
| DivX | →X2→→X4→→X8 |
| AUDIO CD (CD-DA) | →X2→→X4→→X8 |
- You can scan the programme in reverse.
- When you press and hold the SEARCH (▶) buttons, playback is done at the default speed of X 4. If you release the SEARCH (▶) buttons, playback is performed at a normal speed.
- To return to normal speed playback, press the PLAY (▶) button.

- You can hear sound during forward search(X 2) in HDD/DVD-VIDEO/DVD-RAM/-RW/-R disc.
(No sound is heard during Scan(Search) mode in DivX disc.)
The speed marked in this function may be different from the actual playback speed.
Skipping Chapters, Titles or Markers


During play, press the SKIP (▶) buttons on the remote control.
- If you press the SKIP (▶) button,
it moves to the beginning of the chapter or Title or marker (HDD/DVD-RAM/-RW(VR mode)).
Pressing the button once again within 3 seconds returns to the beginning of the previous chapter or Title or marker (HDD/DVD-RAM/-RW(VR mode)).
- If you press the SKIP (▶) button,
it moves to the next chapter or track or marker (HDD/DVD-RAM/-RW(VR mode)).
Slow Motion Play


In pause mode, press the SEARCH (O) buttons on the remote control.
- If you press the SEARCH (O) button,
1/2→1/4→1/8
- If you press the SEARCH (O) button,
1/2→1/4→1/8
- To return to normal speed playback, press the PLAY (▶) button.
Press and hold the SEARCH (O) buttons during pause, the disc will play slowly at 1/4 speed.
If the button is released, the pause operation will resume.

The speed marked in this function may be different from the actual playback speed.
Slow motion operates only in the forward direction on DivX discs.
Step Motion Play


Press the SKIP(,) buttons on the remote control in the pause mode.
Each time the button is pressed, a new frame will appear.
When the SKIP() button is pressed, the previous frame will be activated.
When the SKIP() button is pressed, the next frame will be activated.
- To return to normal speed playback, press the PLAY (▶) button.

Step motion operates only in the forward direction on DivX discs.
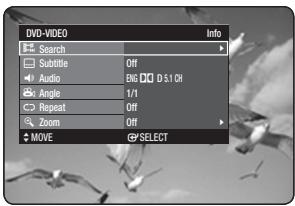
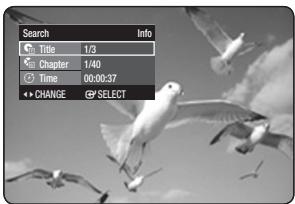
The INFO function allows you to easily search for a desired scene by accessing title, chapter, or time.
You can also change the subtitle and audio settings and set some features including Angle, Repeat, and Zoom.
Moving to a scene directly using the INFO


If you want to move to a certain title, chapter or time, use this function.
- Press the INFO button during playback.
- Press the buttons to select Search, then press the OK or button.
- Press the buttons to select Title, Chapter or Time.
- Press the buttons or number buttons to select the desired scene, then press the OK button. In case of searching a time, enter the time in the sequence of hours, minutes, and seconds using the number buttons. Then press the OK button.

This may not work for some discs.
When an audio CD(CD-DA) or an MP3/JPEG disc is inserted, depending on the disc type, the information display may not appear.
The Time Search function does not operate on some discs.
To make the screen disappear, press the RETURN button.
SELECTING THE SUBTITLE LANGUAGE


Selects one of the subtitle languages recorded on the disc.
You can also operate this function by pressing the SUBTITLE button on the remote control.
- Press the INFO button during playback.
- Press the buttons to select Subtitle.
- Press the buttons to select the desired subtitle language.

The subtitle display may be different depending on the disc type.
Some discs allow you to select the language from the disc menu only.
SELECTING THE SOUNDTRACKS & AUDIO CHANNELS


Selects one of the soundtracks recorded on the disc. Also selects the audio channels from recorded TV programmes.
You can also operate this function by pressing the AUDIO button on the remote control.
- Press the INFO button during playback.
- Press the buttons to select Audio.
- Press the buttons to select the desired soundtracks or audio channel.

Soundtracks or Audio channel may be different because they are disc-specific.
Some discs allow you to select the audio language from the disc menu only.
CHANGING THE CAMERA ANGLE

When a DVD VIDEO contains multiple angles of a particular scene, you can select the Angle function.
- Press the INFO button during playback.
- Press the buttons to select Angle.
- Press the buttons to select the desired angle.

This function is disc-dependent, and may not work on all DVDs.
This function does not work when a DVD has not been recorded with a multi-camera angle system.
- Displays the current angle and the total angle number.
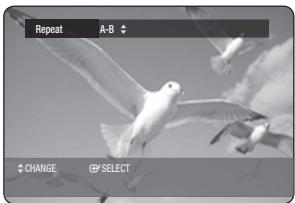
REPEAT PLAY
Playing Repeatedly (Repeat Playback)


You can also operate this function by pressing the REPEAT button on the remote control.
- Press the INFO button during playback.
- Press the buttons to select the Repeat.
- Press the buttons to select Off, A-B or Title or Chapter you want to play repeatedly, then press the OK button.


If you set point (B) before five seconds of playback has lapsed, the prohibition mark () will appear.
- You can also activate Normal Playback by pressing the EXIT (3) button.
Audio CDs(CD-DA), MP3 discs and DivX discs do not support the Repeat A-B function.
ZOOMING-IN


- Press the INFO button during playback.
- Press the buttons to select Zoom, then press the OK or button. (_·) will be displayed.
- Press buttons to move to the area you want to enlarge.
- Press the OK button. The screen will be enlarged to twice the normal size. Pressing the OK button again to enlarge the screen size to four times the normal size.
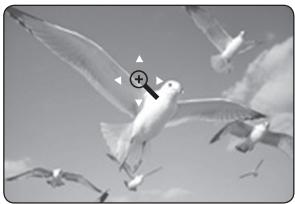
| HDD/DVD-VIDEO/DVD-RAM/-RW/-R | normal size → X2 → X4 → X2 → normal size |

- When the recording is done in EP mode, the zoom function is not supported except when the recording has been in V mode.
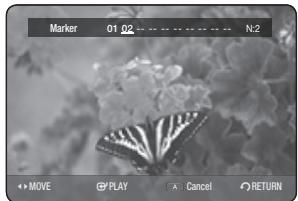
Set marks at scenes you want to see again so that you can start playback from the marked position.
Setting Markers
- Press the MARKER button during playback.
-
Press the OK button when the desired scene appears.
-
The number 01 is displayed and the scene is memorized.
-
Press the button to move to the next position.
-
Press the OK button again when the desired scene appears.
-
The number 02 is displayed and the scene is memorized.
- HDD, DVD-RAM or DVD-RW (VR Mode) discs have the Marker function instead of theBookmark function. Since the scenes may be displayed as many different pages, numbering is necessary.
If a disc in use is encoded with Disc Protection, Markers cannot be set or deleted, only playback is available.
Playing back a marker
- Press the MARKER button during playback.
-
Press the buttons to select a marked scene.
-
Press the OK or PLAY (▶) button to start playing from the selected scene.
-
If you press the SKIP (▶) button, it moves to the beginning of the marker. Pressing the button once again within 3 seconds returns to the beginning of the previous marker.
- If you press the SKIP (▶) button, it moves to the next marker.
Clearing a marker
- Press the MARKER button during playback.
-
Press the buttons to select a marked scene.
-
Press the RED(A) button to delete the selected mark.
-
When a marker is cleared while HDD/DVD-RAM/-RW (VR mode) is playing, marker numbers will change. For example, if the 7th marker is cleared after ten markers are registered, the marker numbers after the eighth will automatically move back by one and the 8th marker becomes the 7th.
Setting Bookmarks
- Press the MARKER button during playback.
-
Press the OK button when the desired scene appears.
-
The number 1 is displayed and the scene is memorized.
-
Press the button to move to the next position.
-
Press the OK button again when the desired scene appears. The number 2 is displayed and the scene is memorized.
-
Repeat above to bookmark other positions.
- You can bookmark up to 10 scenes.
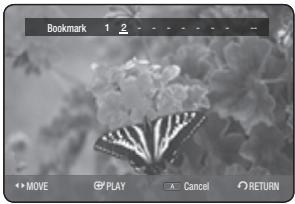

- When the disc tray is opened and then closed, bookmarks will disappear.
Playing back a bookmark
- Press the MARKER button during playback.
- Press the buttons to select a bookmarked scene.
- Press the OK or PLAY (▶) button to start playing from the selected scene.
Clearing a bookmark
- Press the MARKER button during playback.
- Press the buttons to select a bookmarked scene.
- Press the RED(A) button to delete the selected bookmark.
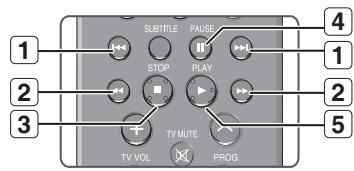
SKIP (一 ) button:Moves to the previous or next page.
Press the SEARCH ( ) buttons : Fast Play (X 2, X 4, X 8) (Audio CD only)
STOP () button: Stops a track(song).
4 PAUSE () button: Pauses playback.
5 PLAY ( ,) 0K button:Plays a track (song).
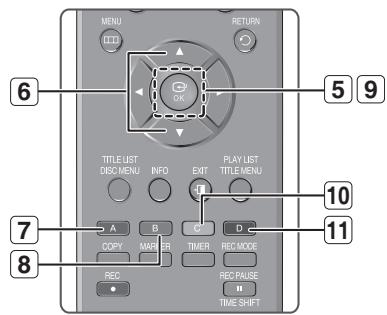
6 ▲▼: Selects a track (song).
- Creates a playlist or go to playlist.
7 -Select All:MP3,CD-DA
- Copy: MP3
- CD Import : Audio CD
GREEN(B) button : Selects the sort order. (MP3 disc only)
9 OK button : Plays the selected track (song).
10 YELLOW(C) button : Selects the play mode. (REPEAT)
11 BLUE(D) button : Selects a contents. (MP3 disc only)
Playing an Audio CD(CD-DA)
- Insert an audio CD (CD-DA) into the disc tray.
- The audio CD menu appears and the tracks (songs) are played automatically.
- Press the buttons to select the track (song) you want to hear, and then press the OK button.
Audio CD(CD-DA) Screen Elements
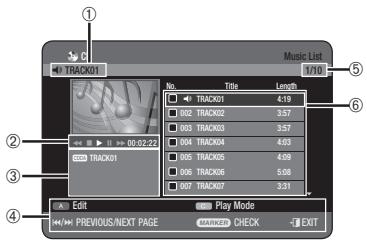
Current track (song) : Displays the number of the track currently being played.
2 Displays available buttons and a playback time corresponding to a portion that is currently played.
3 Displays the current file type and file name.
4 Display available buttons.
⑤ Displays the current play index, total track number.
6 Displays the track list (song list).
Playing an MP3 Disc
-
Insert an MP3 disc into the disc tray.
-
The menu is displayed
-
Press the buttons to select Library, then press the OK or button.
- Press the buttons to select Music, then press the OK or button.
- Press the buttons to select the track you want to hear, and then press the OK button.
MP3 Screen Elements
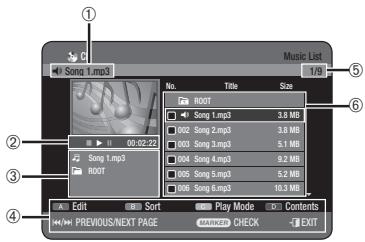
Current track (song) : Displays the name of the track being played.
2 Displays available buttons and a playback time corresponding to a portion that is currently played.
3 Displays the current file type, file name and folder name.
4 Displays available buttons.
5 Displays the current play index, total track number.
6 Displays the track list (song list).
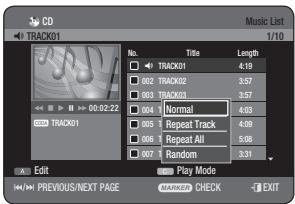
Repeat CD (CD-DA) & MP3
You can also operate this function by pressing the REPEAT button on the remote control. During playback, press the REPEAT button repeatedly to select the repeat mode you want.
-
Press the YELLOW(C) button during the Music List playback.
-
Press the buttons to select desired play mode, then press the OK or button.
-
Normal (CD (CD-DA)/MP3): Tracks on a disc are played in the order in which they were recorded on the disc.
Repeat Track (CD (CD-DA)/MP3)
Repeat Folder (MP3)
Repeat All (CD (CD-DA)/MP3)
- Random (CD (CD-DA)/MP3) : The random option plays a disc's tracks in random order.
CD Import
- Press the RED(A) button during the Music List playback.
- Press the buttons to select CD Import, then press the OK or button.
-
Press the buttons to select file you want to copy, then press the MARKER button until a checkmark appears.
-
If you don't want to copy a certain one of the checked entries, simply select that entry and press MARKER button to deselect it until a checkmark disappears.
-
Press the buttons to select the target media, then press the OK button.
- You can create a new folder by pressing the GREEN(B) button.
- Press the RED(A) button to select Start Copy. The message "Number of file : x" is displayed.
-
Press the buttons to select Start, then press the OK button. File copy begins.
-
To cancel the copying in progress, press the EXIT (①) button.

The format of a mp3 file after imported is as follows:
Bitrate 128kbps
Channel 2(stereo)
Sampling Rate 44KHz
- DTS CDDA and copy protected discs can not be imported.
New Playlist

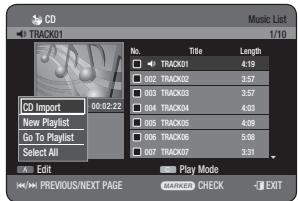
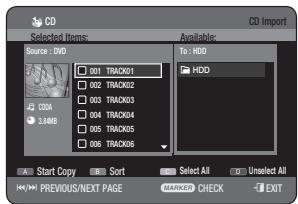
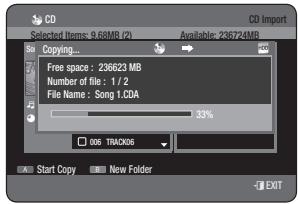
You can register a maximum 30 tracks in the playlist.
- Press the RED(A) button during the Music List playback.
- Press the buttons to select New Playlist, then press the OK or button.
-
Press the buttons to select tracks in the order in which you want them to play, then press the OK button.
-
If you playlisted a wrong track, press the buttons to select the wrong track, then press the OK button.
-
To store the Playlist, press the RED(A) button. A new Playlist will be created.

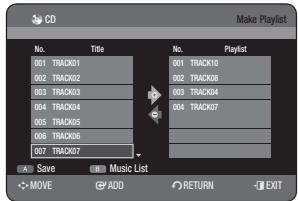
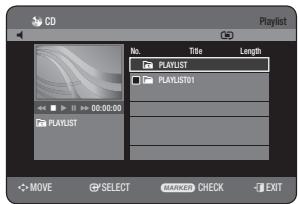


- Press the RED(A) button during the Music List playback.
- Press the buttons to select Go To Playlist, then press the OK or button.
- Press the buttons to select the desired playlist folder, then press the OK button.
The selected tracks are played automatically.
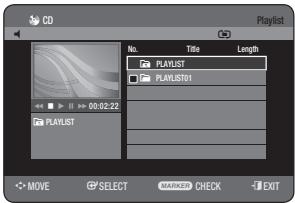
Delete the Playlist


- Press the RED(A) button during the Music List playback.
- Press the buttons to select Go To Playlist, then press the OK or button.
- Press the buttons to select the Playlist you want to delete.
- Press the RED(A) button.
- Press the buttons to select Yes, then press the OK button. The selected Playlist is deleted.
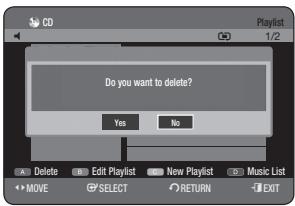

- When the player turns off or opens a file /disconnects, any playlists in the disc will be deleted.
Go To Edit Playlist


- Press the RED(A) button during the Music List playback.
- Press the buttons to select Go To Playlist, then press the OK or button.
- Press the buttons to select the Playlist you want to edit.
- Press the GREEN(B) button in playlist mode.
-
Press the buttons to select tracks in the order in which you want them to play, then press the OK button.
-
If you playlisted a wrong track, press the buttons to select the wrong track, then press the OK button.
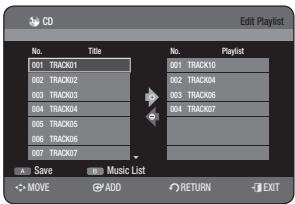
- To store the Playlist, press the RED(A) button. Playlist will be edited.
Go To Music List


- Press the BLUE(D) button during the Playlist playback. The Music List will be displayed.
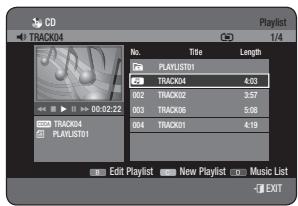
Using the Sort

When you need to change the Sort order of Music List, you can change it simply.
- While the list menu is displayed, press the GREEN(B) button to select Sort.
-
Press the buttons to select the desired item, then press the OK or button.
-
Name: In alphabetical order
- Size: In order of audio file size.
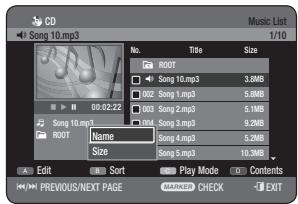

Audio CD(CD-DA) is not available.
- You can sort by Name, Length. Sorted list will be resorted in copied order upon reentering Music List.
Select Contents

- Press the BLUE(D) button to select Contents.
- Press the buttons to select the contents you want to move, then Press the OK or button.
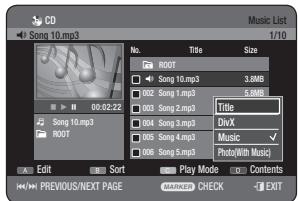

This function is possible only when the disc contains the selected contents.
Audio CD(CD-DA) is not available.
Music/Photo SimultaneousPlayback

You can listen to the music while watching the photo.
- Press the BLUE(D) button to select Contents.
- Press the buttons to select the Photo(With Music), then Press the OK or button. The photo List will be displayed. (See page 55)

To operate this function, you have to select the disc containing both music files and photo file.
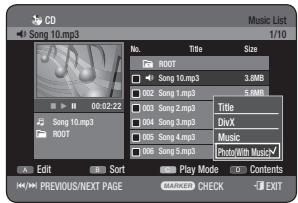
-
Insert a JPEG disc into the disc tray.
-
The menu is displayed
-
Press the buttons to select Library, then press the OK or button.
-
Press the buttons to select Photo, then press the OK or button.
-
To see the next 8 pictures, press the SKIP (→) button.
- To see the previous 8 pictures, press the SKIP(按钮。

- Press the buttons to select a desired picture, then press the OK button.
Slide Show
To setup, follow steps 1 and 4 above.
-
Press the PLAY (▶) button.
-
Once in the Photo List, you can also operate slideshow in by pressing the YELLOW(C) button.
-
Press the RED(A) button to select Speed.
-
Press the buttons to select the slideshow speed, then press the OK or button.
The slideshow starts and plays at the selected speed.
- You can go to Photo List by pressing YELLOW(C) button.
To stop the Slide Show
Press the GREEN(B), STOP (⊙) or RETURN button.
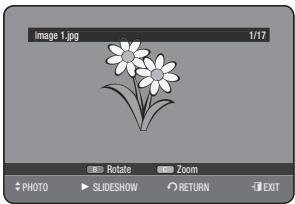
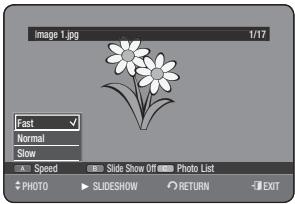
Rotate
To setup, follow steps 1 and 4 above.
5' Press the GREEN(B) button to select Rotate.
-
Press the buttons to select the rotate angle, then press the OK or button.
-
Once you select a rotate angle, you can change it by pressing the RED(A) button.
- You can go to Photo List by pressing YELLOW(C) button.
To stop the Rotate
Press the GREEN(B), STOP (⊙) or RETURN button.
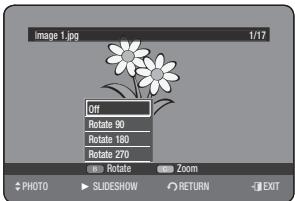
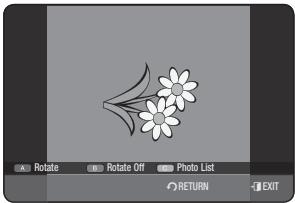
Zoom
To setup, follow steps 1 to 4 in page 55.
- Press the YELLOW(C) button to select Zoom.
- Each time the OK button is pressed, the picture is enlarged up to 4x (four times the normal size).

- You can go to Photo List by pressing YELLOW(C) button.
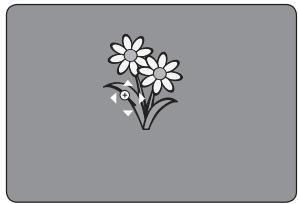
To stop the Zoom
Press the GREEN(B), STOP (⊙) or RETURN button.
Go To Photo List
To setup, follow steps 1 to 4 in page 55.
5-1. Press the RETURN button to go to Photo List.
Using the Sort
When you need to change the Sort order of Photo List, you can change it simply.
- While the list menu is displayed, press the GREEN(B) button to select Sort.
-
Press the buttons to select the desired item, then press the OK or button.
-
Name: In alphabetical order
- Size : In order of photo file size.
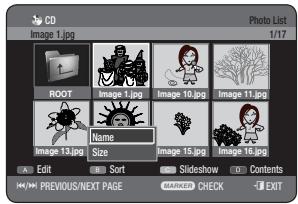

- You can sort by Name and Size. Sorted list will be resorted in copied order upon re-entering Photo List.
Select Contents
To setup, follow steps 1 to 3 in page 55.
- Press the BLUE(D) button to select Contents.
- Press the buttons to select the contents you want to move, then Press the OK or button.

This function is possible only when the disc contains the selected contents.
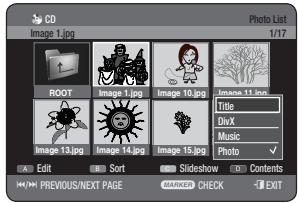

- Insert a DivX disc into the disc tray.
- The menu is displayed
- Press the buttons to select Library, then press the OK or button.
- Press the buttons to select DivX, then press the OK or button.
- Press the buttons to select the avi file (DivX), then press the OK or PLAY (▶) button.
- When DivX file is played, you can use following functions. Pressing the STOP (●) button once during playback will display the file list, pressing the button again will exit the menu screen.
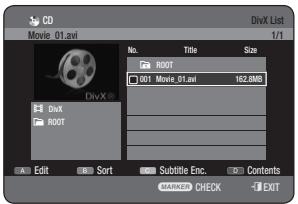
DivX Function Description
| Function | Description |
| Skip Scene | During play, press the SKIP (▶) buttons, it moves forward or backward 5 minutes. |
| Search | During play, press the SEARCH (▶) buttons and press again to search at a faster speed. (X 2, X 4, X 8) |
| Slow Motion Play | In pause mode(), press the SEARCH (▶) button on the remote control. (1/2, 1/4, 1/8)
Reverse Slow Motion Play is not available. |
| Step Motion Play | In pause mode(), press the SKIP (▶) button on the remote control in the still mode.
Reverse Step Motion Play is not available. |

- Some DivX files created on a personal computer may not be play back. That is why Codec Type, Version and Higher resolution over specification are not supported.
DivX Subtitle Encoding
- Press the YELLOW(C) button in the file list.
- Press the buttons to select a supported DivX subtitle language by region, then press the OK button.
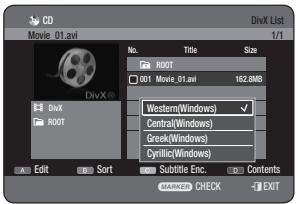
| Western | Afrikaans, Basque, Catalan, Danish, Dutch, English, Faeroese, Finnish, French, German, Icelandic, Indonesian, Italian, Malay, Norwegian, Portuguese, Spanish, Swahili, Swedish |
| Central | English, Albanian, Croatian, Czech, Hungarian, Polish, Romanian, Serbian(Latin), Slovak, Slovenian |
| Greek | English, Greek |
| Cyrillic | English, Azeri, Belarusian, Bulgarian, Kazakh, Macedonian, Russian, Serbian, Tatar, Ukrainian, Uzbek |

If the subtitle language is displayed in broken fonts, change DivX Subtitle to the appropriate region. If is still does not work, the format is not supported.
Using the Sort
When you need to change the Sort order of DivX List, you can change it simply.
- While the list menu is displayed, press the GREEN(B) button to select Sort.
-
Press the buttons to select the desired item, then press the OK or button.
-
Name: In alphabetical order
- Size : In order of DivX file size.
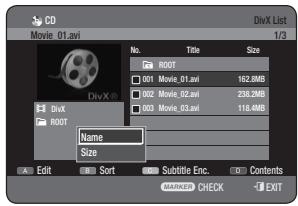

- You can sort by Name, Size. Sorted list will be resorted in copied order upon reentering DivX List.
Select Contents
- Press the BLUE(D) button to select Contents.
- Press the buttons to select the contents you want to move, then Press the OK or button.
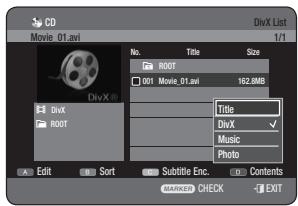

This function is possible only when the disc contains the selected contents.
This section shows various HDD & DVD Recording methods.
This unit can record on various types of discs. Before recording, read the following instructions and select the disc type according to your preference.
RECORDABLE DISCS
This HDD & DVD REORDER can record on the following discs.
| HDD | DVD-RAM | DVD-RW | DVD-R |
| HDD | DVD RAM | DVD R W | DVD R |
DVD-RAMs and DVD-RWs are rewritten.
DVD-Rs are non-rewritable.
Compatibility between Samsung and Other Company's Recorder
| Disc Types | Recording format | Recording Device | Finalising | Additional Recording in Samsung Recorder |
| DVD-RAM | VR Mode | Samsung | X | Recordable |
| Other Company | X | Recordable |
| DVD-RW | VR Mode | Samsung | finalised | Not recordable |
| not finalised | Recordable |
| Other Company | finalised | Not recordable |
| not finalised | Recordable |
| V Mode | Samsung | finalised | Not recordable |
| not finalised | Recordable |
| Other Company | finalised | Not recordable |
| not finalised | Not recordable |
| DVD-R | V Mode | Samsung | finalised | Not recordable |
| not finalised | Recordable |
| Other Company | finalised | Not recordable |
| not finalised | Not recordable |

Finalise
- This closes the DVD-RW/-R so no additional recording can be done.
Unfinalise
- This allows additional recording on a DVD-RW disc originally recorded on the HDD & DVD REORDER.
- A DVD-RW disc that has been recorded by DAO(Disc At Once) in a PC cannot be unfinalised.
- A DVD-RW disc that has been recorded in Video Mode of a different maker's recorder cannot be unfinalised.
- A DVD-R disc cannot be unfinalised.
When you insert an unused disc, the following message appears. Since available functions differ depending on the disc type, select a disc that best fits your preferences.
DVD-RAM : Formatting will be started automatically.
DVD-RW : Use after initializing the disc.
If you want to change the VR or V mode, refer to Formatting a Disc on page 90.
DVD-R : Formatting disc is unnecessary and only V Mode Recording is supported.
DVD-RAM/-RW(VR mode)
- This mode allows multiple editing functions (such as deletion of the whole title, partial deletion of a title, etc.).
- Various editing options using a created Playlist.
DVD-RW(V mode)/-R
- Chapters will be created automatically when you finalise recording on DVD-RW/-R discs in V mode. The chapter's length (interval between chapters) varies according to the recording mode.
- Simple editing (erasing titles/changing title name).
RECORDING MODE
Select one of four recording modes by pressing the REC MODE button repeatedly while the unit is in Stop mode for the desired recording time and picture quality. In general, picture quality improves as the recording time decreases. In FR mode, the most suitable record mode is adjusted automatically, according to remaining time on the disc and length of the timer recording. This function is selected only one mode in XP, SP, LP and EP modes and you can use this mode for timer recording.
DVD-HR770
| Recording Mode | Recording Times |
| HDD (160GB) | DVD-RAM/-RW/-R |
| XP
(high quality mode) | Approx. 33 hours | Approx. 1 hour about 8.5 Mbps |
| SP
(standard quality mode) | Approx. 67 hours | Approx. 2 hours about 4.5 Mbps |
| LP
(long recording mode) | Approx. 133 hours | Approx. 4 hours about 2 Mbps |
| EP
(extended mode) | Approx. 199 hours | Approx. 6 hours/ about 1.6 Mbps |
| Approx. 264 hours | Approx. 8 hours/ about 1.2 Mbps |
| FR
(Flexible Recording) | Approx. 33 hours ~ 264 hours | Approx. 1~8 hours |

- Recording time may vary according to specific conditions.
- 1GB = 1,000,000,000 bytes; actual formatted capacity may be less as the internal firmware uses a portion of the memory.
The dual layer DVD-Rs have approximately double the capacity of single layer DVD-Rs. (See page 41)
UNRECORDABLE PICTURES
Video with copy protection cannot be recorded on this HDD & DVD REORDER.
When the HDD & DVD REORDER receives a copy- guard signal while recording, recording stops and the following message appears on the screen.
Concerning Copy Control Signals
TV broadcasts that contain copy control signals may have one of the following three signal types, Copy-Free, Copy-Once and Copy-Never. If you want to record a copy-once type programme, use DVD-RW with CPRM in VR Mode, DVD-RAM, HDD.
| Media\Signal type | Copy-Free | Copy-Once | Copy-Never |
| DVD-RW (Ver.1.1) | 0 | - | - |
| DVD-RW(Ver.1.1) with CPRM | | | |
| VR mode | 0 | 0* | - |
| V mode | 0 | | - |
| DVD-R | 0 | - | - |
| DVD-RAM (Ver.2.0) | 0 | 0* | - |
| HDD | 0 | 0* | - |
Once "Copy Once" has been recorded, recording cannot be done anymore.
Content Protection for Recordable Media (CPRM)
CPRM is a mechanism that ties a recording to the media on which it is recorded. It is supported by some HDD & DVD RECORDERS, but not by many DVD players. Each blank recordable DVD has a unique 64-bit media ID etched in the BCA. When protected content is recorded onto the disc, it can be encrypted with a 56-bit C2 (Cryptomeria) cipher derived from the media ID.
During playback, the ID is read from the BCA and used to generate a key to decrypt the contents of the disc. If the contents of the disc are copied to other media, the ID will be absent or wrong and the data will not be decryptable.
Before you start
- Check that the disc has enough available space for the recording.
- Press the HDD or DVD button.
If you select DVD, Press the OPEN/CLOSE button and place a recordable disc on the disc tray.
Press the OPEN/CLOSE button to close the disc tray.
Wait until LOAD disappears from the front panel display.
Recording the current TV programme you are watching
- Press the PROG (O) or number buttons to select the current programme you want to record.
- Press the REC MODE button repeatedly, (or press the REC MODE button and then press the buttons) to select the recording speed(quality).

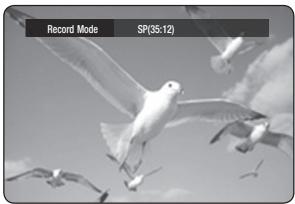
- Press the REC button.
Information concerning the channel is displayed on the screen, then recording begins.
Icon() is displayed on the front panel.
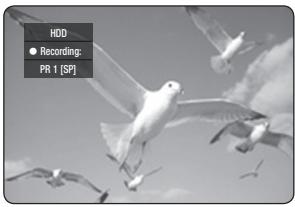
Recording from external equipment you are watching
- Press the INPUT SEL. button to select the input source according to the connection you made. The front panel display changes in the following sequence:

- Press the REC MODE button repeatedly, (or press the REC MODE button, then press the buttons) to select the recording speed (quality).
- Press the REC button. Information concerning the external input mode is displayed on the screen, then recording begins. Icon() is displayed on the front panel.
To pause recording
- Press the REC PAUSE button to pause a recording in progress.
- Press the REC PAUSE button again during pause to resume recording.
- You can switch channels by pressing the PROG (O) buttons while recording pauses.
To stop recording
Press the STOP ( ) button to stop or finish a recording in progress.
- When using DVD-RAM/-RW/-R discs, the message "Updating the information of disc. Please wait for a moment" is displayed.

- You can not change the recording mode while recording.
- Recording will stop automatically if there is no free space left for recording.
Up to 99 titles can be recorded onto a DVD- RAM/-RW/-R disc
Up to 999 titles can be registered on the HDD.
HDD recording is available for up to 24 hours, and when recording for 24 hours, 3 titles will be recorded with each being 8 hours in length.
- Recording will stop automatically if a copy protected image is selected.
DVD-RAM/-RW discs must be formatted before starting to record. Most new discs are sold unformatted.
- Do not use DVD-R authoring discs with this unit.
You can set the HDD & DVD REORDER to record in 30-minute increments up to 8 hours by pressing the REC button.
- Press the HDD or DVD button.
If you select DVD, press the OPEN/CLOSE button and place a recordable disc on the disc tray. Press the OPEN/CLOSE button to close the disc tray. Wait until LOAD disappears from the front panel display.
- Press the PROG (O) or number buttons to select the programme to record.
- Press the REC button to start recording.
- Press the REC button repeatedly to adjust the desired recording time.


The timer counter decreases by the minute from 8:00 to 0:00, then the HDD & DVD REORDER stops recording.
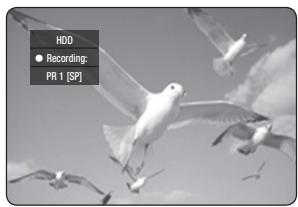
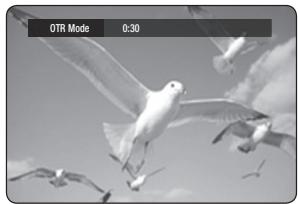
To stop recording
Press the STOP (●) button. The message "Do you want to stop recording?" is displayed.
- Press the buttons to select Yes, then press the OK button.
- Or press the STOP (●) button again.
You can play back from the beginning of the programme you are currently recording.
You can watch the previous title list while recording a programme.
- With the unit in recording mode, press the PLAY (▶) button. It plays back the title that you are currently recording from the beginning. Playback is not available for 10 seconds from the start of recording. You can use the SKIP (▶▶) and other playback-related buttons to view the previous recorded list.
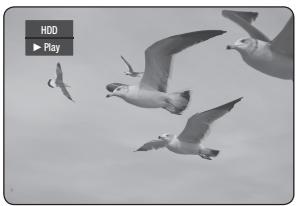
Stopping Playback / Recording
- Press the STOP (●) button. Playback screen disappears and the recording in progress screen appears.
- Pressing the STOP (●) button once more will stop the recording.

- With the unit in recording mode, press the TITLE LIST button. The above operation is possible from approx.10 seconds or more after recording starts. Press the / SKIP (O) buttons to select the recording title list.
- Press the OK or PLAY (C) button. It plays back the title that you are currently recording from the beginning.
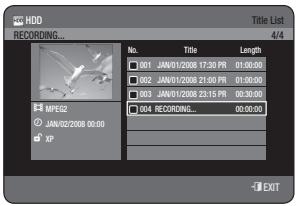

- With the unit in recording mode, press the MENU button.
- Press the buttons to select Title, then press the OK button. Title List screen is displayed.
- Press the / SKIP () buttons to select the recording title list, then press the OK or button. It plays back the title that you are currently recording from the beginning.
Stopping Playback / Recording
- Press the STOP (●) button once, playback screen disappears and the Title List screen appears.
- Pressing the MENU (按钮 again, the recording in progress screen appears.
- Pressing the STOP (●) button once more will stop the recording.

No sound is heard during search mode.
DVD disc or HDD playback is available during HDD recording. However, JPEG, MP3, and DivX files in the disc cannot be played back.
HDD playback is available during DVD recording. However, JPEG and MP3 files in the HDD cannot be played back.
TIME SHIFT FUNCTION AS A LIVE SIGNAL

This function replays recordings as a live signal.
If you are interrupted while watching a TV programme, simply press the TIME SHIFT button, and the HDD & DVD RECORDER immediately starts recording the programme.
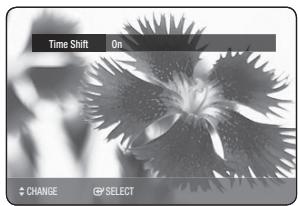
Using the Time Shift function
- Press the TIME SHIFT button on the remote control. The Time Shift menu is displayed.
- Press the button to select On, then press the OK button.
- While watching the currently broadcasting programme, press the PAUSE (u) button. The programme on TV is set in pause mode and the Time Shift Bar is displayed.
- Press the PLAY (▶) button to resume watching the programme.
Time Shift Screen Elements
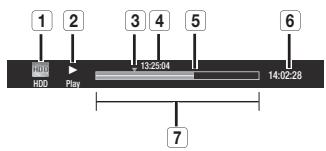
1 Displays the current media.
2 Displays the current status.
3 Watching Point.
4 Current play time.
Live Point.
6 Live Time.
Time Shift Time Bar
- PLAY (按钮) Playback.
- PAUSE (u) button : Pause live TV.
- SEARCH (⊙) buttons: Fast play (X 2, X 4, X 8, X 16, X 32, X 128)
- SKIP (按钮), STOP (按钮): Switches to live TV.
- SKIP ( ) button : Returns to the point where Time Shift begins.

The Time Shift is available only when HDD mode is selected.
- You can use this function for up to maximum two hours.
- You can only play the contents by using the menu when the Time Shift is set to On.
Press TIME SHIFT button to cancel the Time shift function.
- Check if the antenna cable is connected.
- Check the remaining time of the disc.
- Check if the date and time are correct.
Make sure the Clock (Setup-Clock Set) is set before you proceed with a timer recording. (See page 30)

- With the unit in Stop mode, press the TIMER button.
- Press the buttons to select the Scheduled List, then press the OK or button.
- Press the OK button to select Add a list.
-
Set timer recording option.
-
Fill the input items using the buttons and number buttons.
:Moves to the previous/next item.
To: Select the media to record HDD or DVD.
- Source : The video input source (AV1, AV2 or AV3), or the broadcasting channel you want to make a timer recording from.
- Date : Timer Recording allows setting the recording time within one month period. Set the recording day. (month/day)
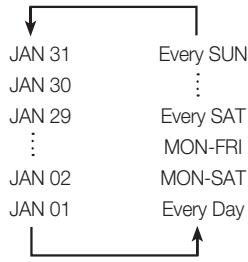
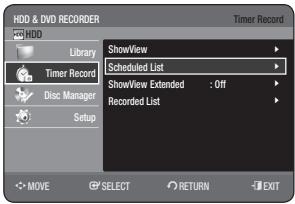
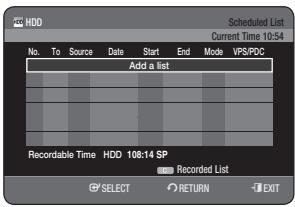
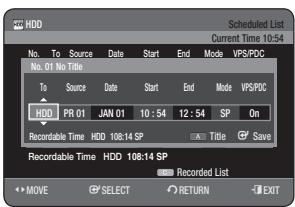
-
Start/End Time: Start and end time of the timer recording.
Mode (Recording Mode):
-
FR (Flexible Recording) : Select when you want to set video quality automatically. In FR mode, the most suitable record mode is adjusted automatically, according to remaining time on the disc and length of the timer recording. This function is selected only one mode in XP, SP, LP and EP modes.
- XP (high quality): Select when video quality is important.
- SP (standard quality): Select to record in standard quality.
- LP (low quality) : Select when a long recording time is required.
-
EP (extended) : Select when a longer recording time is required.
-
VPS/PDC: VPS(Video Programme System) or PDC(Programme Delivery Control) function.
-
If you set this function on, you can control the starting and ending time of recording by special signal included in the broadcasting signal. If a TV programme is shortened or starts earlier or later than scheduled, this function synchronizes the starting and ending time of recording with the actual broadcasting time automatically.
-
Set up the start-time EXACTLY according to the published TV schedule. Otherwise the timer recording will not operate.
-
Do not select PDC or VPS unless you are sure the programme you wish to record is broadcast with PDC or VPS.
-
TITLE: To label the title name, press the RED(A) button.
Title renaming screen appears.
Follow steps 4 and 5 of "Renaming (Labelling) a Title" on pages 73~74.
-
After selecting the set up value for each mode, press the OK button to select Save.
-
will appear on the front panel. It means that a timer recording is registered.
If the timer settings overlap;
The programmes are recorded in order of priority. After recording of the first programme is complete, the second programme starts being recorded.
To exit without saving the current setting
Press the EXIT (按钮。
Press the RETURN button if you don't want to set a timer recording.
- Turn the power off to finish the Timer Recording setting.
Timer Recording will not work when the power is on.

- The timer recording time may differ from the set time depending on disc status and overall timer recording status (for example, recording times overlapping, or when the previous recording ends within 2 minutes before the start time of the next recording.)
- You can make up to 12 Timer Recordings.
If HDD disk has no available recording space, blinks. It means that HDD disk has no space to record.
If you have set the Timer Recording using VPS/PDC, the fan can still operate and make a noise when the power is off.
Editing the Scheduled List
Follow these directions to edit the Scheduled List.
To setup, follow steps 1 to 2 in "Making a Timer Recording" on page 67.
- Press the buttons to select the number of the Scheduled List you want to edit, then press the OK button.
- Edit the items you want to modify. See the "Making a Timer Recording" section for more information on Timer Recording Input items. (See pages 67~68)
- Press the OK button to confirm the edited setting.
- Press the EXIT (1) button after finishing the operation. The Scheduled List screen will disappear.
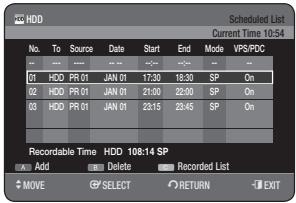
Adding a Scheduled List
Follow these directions to add an entry from the Scheduled List
To setup, follow steps 1 to 2 in "Making a Timer Recording" on page 67.
- Press the buttons to select the number of the Scheduled List, then press the RED(A) button.
- Set the items you want to add. See the "Making a Timer Recording" section for more information on Timer Recording Input items.(See pages 67~68)
- Press the OK button to confirm the added setting.
- Press the EXIT (1) button after finishing the operation. The Scheduled List screen will disappear.
Deleting a Scheduled List

Follow these directions to delete an entry from the Scheduled List.
To setup, follow steps 1 to 2 in "Making a Timer Recording" on page 67.
- Press the buttons to select the number of the Scheduled List you want to delete, and then press the GREEN(B) button.
- You will be prompted with the delete confirm message such as "Do you want to delete?"
- Press the buttons to select Yes, then press the OK button.
- The selected entry will be deleted from the list.
- Press the EXIT (9) button after finishing the operation. The Scheduled List screen will disappear.
Before setting your HDD & DVD Recorder to record.
- Switch on both the television and your HDD & DVD RECORDER.
- Check that the date and time are correct.
Up to twelve programmes can be set to record.
- With the unit in Stop mode, press the TIMER button.
-
Press the buttons to select ShowView, then press the OK or button.
-
A message is displayed to allow you to enter the ShowView code.
-
Press the number buttons to enter the code of the programme that you want to record in your television magazine.
-
If you want to correct the ShowView code that you are entering:
-
Press the button until the digit to be corrected is cleared.
-
Enter the correct digit.
-
Press the OK button.
-
The information concerning the programme is displayed.
-
When using the ShowView function for the first time with stored stations, the programme number flashes. This one time, you must enter the PR number manually by pressing the buttons.
-
Press the RED(A) button if you do not want to use the default title name.
The rename screen is displayed.
Follow steps 4 and 5 of "Renaming (Labelling) a Title" on pages 73~74.
- If the programme and times are correct, press the OK button.
- Turn the power off by pressing the STANDBY/ON button to activate the timer recording setting.
Refer to pages 69 and 71 if you want to
- Check whether the timer Recording has set correctly or not.
- Cancel a preset recording.
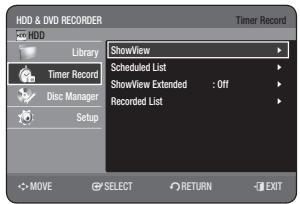
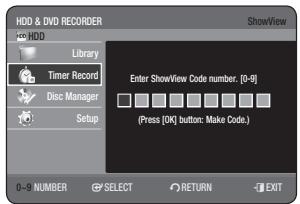
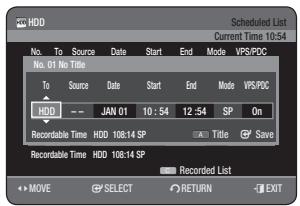

The numbers next to each TV programme listing in the magazines or newspapers are ShowView code numbers, which allow you to programme your HDD & DVD RECORDER. instantly with the remote control. Enter the ShowView code for the programme you wish to record.
ShowView is a trademark of Gemstar Development Corporation. The ShowView system is manufactured under licence from Gemstar Development Corporation.
SHOWVIEW EXTENDED
To prevent delays or overruns, the HDD & DVD Recorder has a function called ShowView Extended allowing you to extend the recording time by up to 60 minutes.
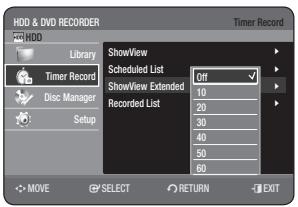
GO TO RECORDED LIST


You can view a list of the programmes that have been recorded.

- With the unit in Stop mode, press the TIMER button.
- Press the buttons to select Recorded List, then press the OK or button.
- Press the EXIT (B) button after finishing the operation. The Recorded List screen will disappear.
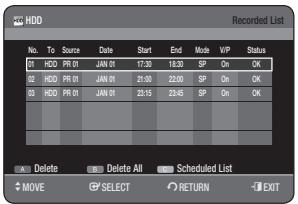
Informs whether the selected Recorded List performed a Timer Recording successfully.
3-1. Press the buttons to select the number of the Recorded List, then press the OK button.
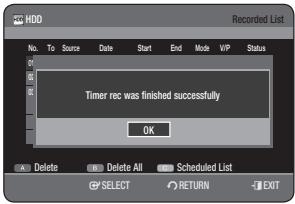
Delete Recorded List
Deletes a Recorded List individually.
3-1. Press the buttons to select the number of the Recorded List you want to delete, and then press the RED(A) button.
4. Press the buttons to select Yes, then press the OK button.
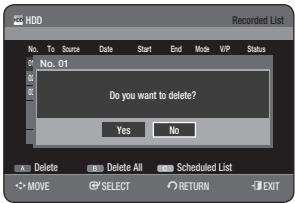
Clear Recorded List
Clearly all Recorded List at once.
3-1. Press the GREEN(B) button.
4. Press the buttons to select Yes, then press the OK button.
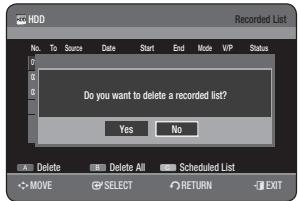
Go to Scheduled List
Switches directly from the Recorded List to the Scheduled List.
3-1. Press the YELLOW(C) button.

This section introduces basic functions of editing and explains both edit functions for the recording on a disc and edit functions for the entire disc.
Recording or editing might not be completed if an error, such as a sudden power failure occurs.
Please be aware that material that has been damaged is unable to be reverted back to its original state.
BASIC EDITING (TITLE LIST)
Playing the Title

Follow these instructions to play back a scene from the Title List.

- With the unit in Stop mode/Playback mode, press the TITLE LIST button.
- Press the buttons to select an entry you want to play from Title List, then press the OK or PLAY (O) button. The selected entry (title) will be played back.
- To stop title play, press the STOP (●) button. The screen returns to the Title List screen.
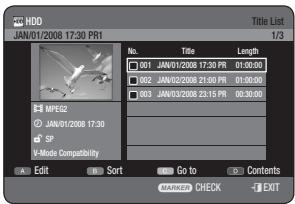
Renaming (Labelling) a Title

Follow these instructions to rename a title list entry, i.e., to edit the title of a recorded programme.

- With the unit in Stop mode/Playback mode, press the TITLE LIST button.
- Press the buttons to select an entry you want to rename from the Title List, then press the RED(A) button.
- Press the buttons to select Rename, then press the OK or button. The Rename screen is displayed.
-
Select the desired characters using the buttons, press the OK button.
-
Back Space (RED(A) button): Deletes and moves the cursor backwards by one position.
- Space (GREEN(B) button): Enters a blank and moves the cursor one forward (to the right).
- Clear (YELLOW(C) button): Deletes all the character inputs.
- Save (BLUE(D) button): Registers the character inputs.

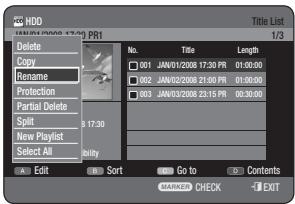
- Press the BLUE(D) button to select Save.
The changed title name is displayed on the title item of the selected entry.
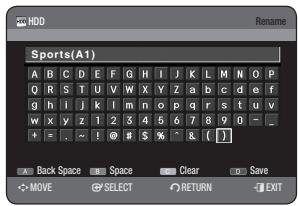
Locking (Protecting) a Title


Follow these instructions to lock an entry to protect it from accidental editing.

- With the unit in Stop mode/Playback mode, press the TITLE LIST button.
-
Press the buttons to select an entry you want to protect from the Title List, then press the MARKER button until a checkmark appears. Repeat this step to select an additional title you want to protect.
-
If you don't want to protect a certain one of the checked entries, simply select that entry and press MARKER to deselect it until the checkmark disappears.
- Press the RED(A) button to select Edit.
Edit menu is displayed.
- Press the buttons to select Protection, then press the OK or button.
- Press the buttons to select On, then press the OK button. The key icon on the information window for the selected entry changes to the locked status. (A→B)
- If you want to cancel the Protection, select Off in step 5 and press the OK button. The key icon changes to the unlocked status.

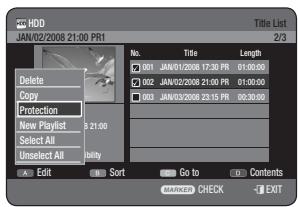
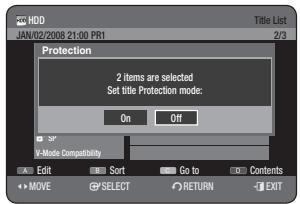

If you select "Select All" in the Edit menu, all title will be checked.
Follow these instructions to delete an entry from the Title List.

- With the unit in Stop mode/Playback mode, press the TITLE LIST button.
-
Press the buttons to select an entry you want to delete in the Title List, then press the MARKER button until a checkmark appears. Repeat this step to select an additional title you want to delete.
-
If you don't want to delete a certain one of the checked entries, simply select that entry and press MARKER to deselect it until the checkmark disappears.
-
Press the RED(A) button to select Edit.
Edit menu is displayed.
-
Press the buttons to select Delete, then press the OK or button.
-
The message may be different depending on the type of disc. You will be prompted with the confirmation message.
HDD, DVD-RAM(VR mode), DVD-RW(VR mode): If a Playlist is present, the message "Do you want to delete? (Related playlists may be deleted.)" is displayed.
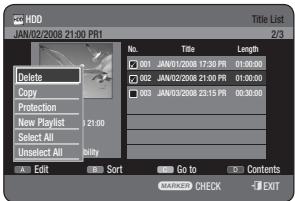
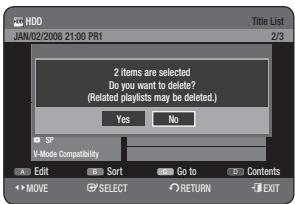
DVD-RW(V mode)/-R: If a Playlist is not present, the message "Do you want to delete?" is displayed.
- Press the buttons to select Yes, then press the OK button.

- You cannot delete a protected entry. If you want to delete a protected entry, select "Off" in the Title Protection menu. (See page 74)
- When the Disc Protection has been set to Protected, you cannot delete titles. (See page 88)
Once an entry is deleted from the Title List it cannot be recovered.
Once DVD-RW/-R is finalised, it cannot be deleted.
- With DVD-R, titles are only deleted from the menu, however, the Title remains physically on the disc.
If you select "Select All" in the Edit menu, all title will be checked.
Splitting a Section of a Title (Split)

Follow these instructions to split a section of a Title List entry into two titles.

- With the unit in Stop mode/Playback mode, press the TITLE LIST button.
- Press the buttons to select an entry you want to Split from the Title List, then press the RED(A) button. The Edit menu is displayed.
- Press the buttons to select Split, then press the OK or button.
- Using the playback-related buttons (PLAY () , SEARCH () , move to a point for splitting and press the OK button. If it is not the point where you want to split, press the RETURN button to cancel the selection. Using the playback-related buttons, move to a point to split and press the OK button.
- Press the OK button to select Split.
- Press the buttons to select Yes, then press the OK button. The split title is divided into two, and the following titles will be shifted down by one.
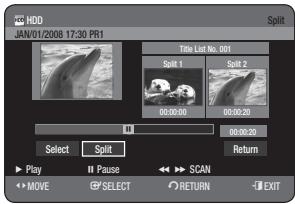
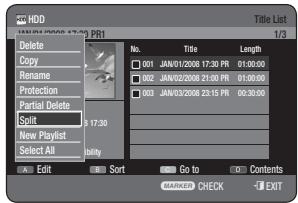
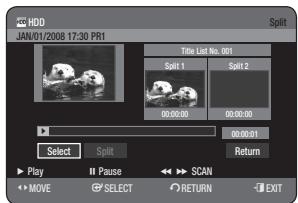
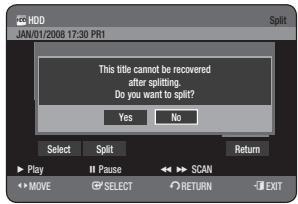
Deleting a Section of a Title (Partial Delete)


(VR mode)
Follow these instructions to delete a section of a Title List entry.

- With the unit in Stop mode/Playback mode, press the TITLE LIST button.
- Press the buttons to select an entry you want to edit from the Title List, then press the RED(A) button. The Edit menu is displayed.
- Press the buttons to select Partial Delete, then press the OK or button.

- Press the OK button at the starting point.
The image and starting point time is displayed in the section deletion starting point window.
- Select the start and end points of the section you want to delete using the playback related buttons.
-
Playback related buttons: (PLAY () ), PAUSE () , SEARCH ( ) ).
-
Press the OK button at the end point.
The image and end point time is displayed in the Section deletion ending point window.
- Press the buttons to select Delete, then Press the OK button.
- Press the buttons to select Yes, then press the OK button. The selected section has been deleted.
- Press the buttons to select Return, then press the OK button to finish the operation.

The length of the section to be deleted must be at least 5 seconds long.
End point cannot be marked earlier than start point
The section cannot be deleted when it includes a still picture.
- Press the EXIT (1) button after the operation has finished. The Title List screen will disappear.
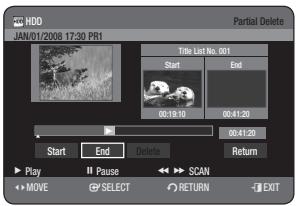
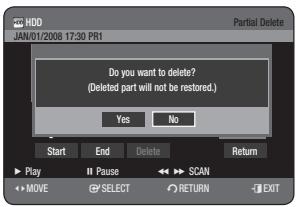
USING THE SORT FUNCTION (TITLE LIST)


When you need to change the Sort order of Title List.
- While the list menu is displayed, press the GREEN(B) button to select Sort.
-
Press the buttons to select the desired item, then press the OK or button.
-
Date : In order of when the titles were recorded
- Name: In alphabetical order
Length : In order of recorded title length.
- Channel Info : In order of Channel information.
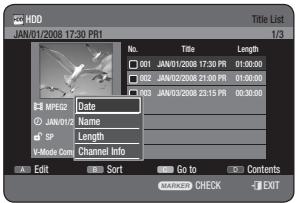

- You can sort by Date, Name, Length, Channel info. Sorted list will be resorted in copied order upon reentering Title List.
Time Navigation
Using this function, you can search scene minute-by-minute from the recorded title list.

- With the unit in Stop mode/Playback mode, press the TITLE LIST button.
- Press the buttons to select an entry you want to play from Title List, then press the YELLOW(C) button.
- Press the buttons to select Time Navigation, then press the OK or button.
- Press the buttons to skip one minute at a time and search the desired scene, then press the OK or PLAY (▶) button.
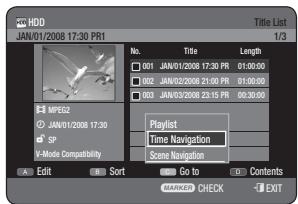

- Cursor does not move if the selected recorded title is shorter than 1 minute.
The Navigation function may not work on a disc that has not been recorded by this device.
An edited title may not display the exact search time.
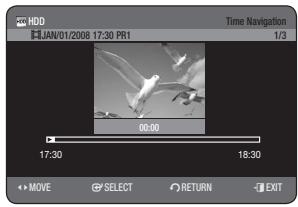
Scene Navigation
If there is a title composed of markers (See page 58), you can search the desired scene using the Scene Navigation.

- With the unit in Stop mode/Playback mode, press the TITLE LIST button.
- Press the buttons to select an entry you want to play from Title List, then press the YELLOW(C) button.
- Press the buttons to select Scene Navigation, then press the OK or button.
- Press the buttons to select desired scene, then press the OK or PLAY (O) button.

- Scene Navigation will not operate if a selected title does not have Markers.
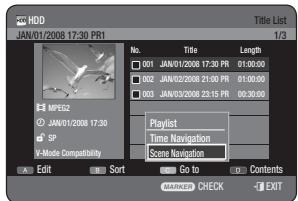
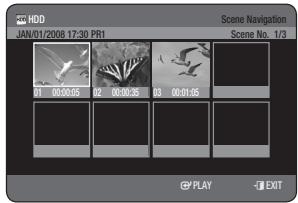
- Press the BLUE(D) button to select Contents.
- Press the buttons to select the contents you want to move, then Press the OK or button.

This function is possible only when the disc contains the selected contents.
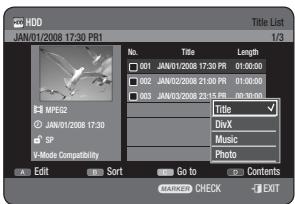
ADVANCED EDITING (PLAYLIST)
Creating a Playlist


(VR mode)
Follow these instructions to create a new playlist entry from a recorded title.

- With the unit in Stop mode/Playback mode, press the TITLE LIST button.
- Press the RED(A) button. The Edit menu is displayed.
- Press the buttons to select New Playlist, then press the OK or button. The Make Playlist screen is displayed.
-
Press the OK button at the start point.
-
The image and time at the start point is displayed on the Start window.
- The yellow-coloured selection bar moves to the End item.
-
Select the starting point of the section from which you want to create a new scene using the playback related buttons (PLAY (⊙), SEARCH (⊙), SKIP (⊙)).
-
Press the OK button at the end point.
-
The image and end point time is displayed in the End window.
-
The yellow-coloured selection bar moves to the Make item.
-
Press the buttons to select Make, then press the OK button.
-
To make a scene for the playlist.
A new Make scene screen is displayed. Repeat steps 4~6 to make a new scene for the playlist.
A new scene will be added to the current playlist.
You can check and see all the scenes on the Edit playlist screen. (See page 81)
Repeat steps 1~6 if you want to make a new playlist.
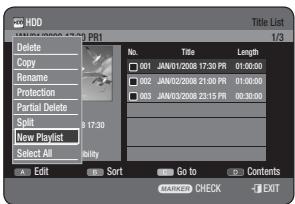
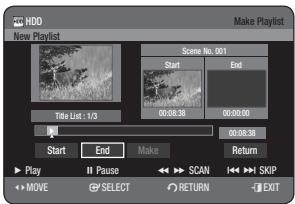
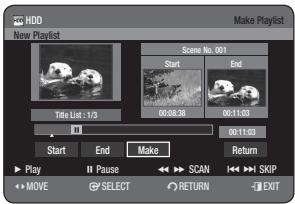
- Press the buttons to select Return, then press the OK button to finish the operation.

- You can create up to 99 playlist entries.
Depending on the kind of disc, the displayed screen may have a slight difference.
Playing Entries in the Playlist


(VR mode)
Follow these instructions to play the playlist entries.

- With the unit in Stop mode/Playback mode, press the PLAY LIST button.
- Press the buttons to select the playlist you want to play, then press the OK or PLAY (▶) button.
- Press the STOP (●) button to stop playing. The screen returns to the Playlist screen.
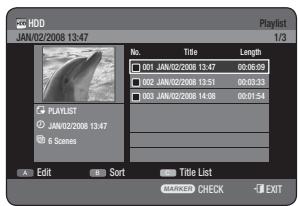
Renaming a Playlist Entry


(VR mode)
Follow these instructions to rename a playlist entry, i.e. to edit the title of a playlist entry.

- With the unit in Stop mode/Playback mode, press the PLAY LIST button.
- Press the buttons to select the title you want to Rename from the Playlist, then press the RED(A) button. The Edit menu is displayed.
- Press the buttons to select Rename, then press the OK or button. The Rename screen is displayed.
-
Select the desired characters using the buttons, then press the OK button.
-
Back Space (RED(A) button): Deletes and moves the cursor backwards by one position.
- Space (GREEN(B) button): Enters a blank and moves the cursor one forward (to the right).
- Clear (YELLOW(C) button): Deletes all the character inputs.
-
Save (BLUE(D) button): Registers the character inputs.
-
Press the BLUE(D) button to select Save.
The changed title is displayed in the title field of the selected playlist entry.
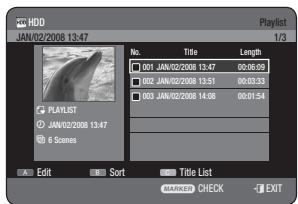
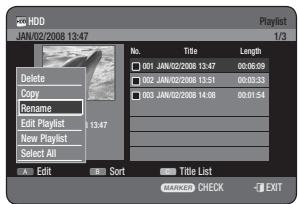
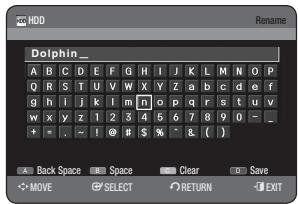
Follow these instructions to edit scenes for a playlist.

- With the unit in Stop mode/Playback mode, press the PLAY LIST button.
- Press the buttons to select the title you want to edit from the Playlist, then press the RED(A) button.
The Edit menu is displayed.
- Press the buttons to select Edit Playlist, then press the OK or button.
The Edit Playlist screen is displayed.
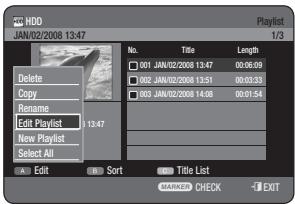
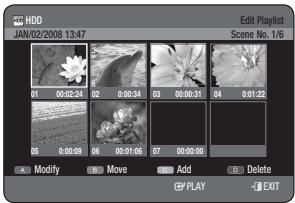
Playing a Selected Scene
-
Press the buttons to select the scene you want to play, then press the OK or PLAY (▶) button. The selected scene is played.
-
To stop scene play, press the STOP (●) button.
Modifying a Scene (Replacing a Scene)
To setup, follow steps 1 to 3.
4-1. Press the buttons to select the scene you want to Modify, then press the RED(A) button.
The Modify Scene screen is displayed.
-
Press the OK button at the start point of the scene.
-
The image and starting point time is displayed on the Start window.
- Select the starting or ending point of the section you want to modify using the playback related buttons (PLAY (P))
SEARCH ( ) ,SKIP ( )
-
Press the OK button at the end point of the scene.
-
The image and ending point time is displayed in the End window.
-
Press the buttons to select Change, then press the OK button.
-
The scene you want to modify is changed with the selected section.
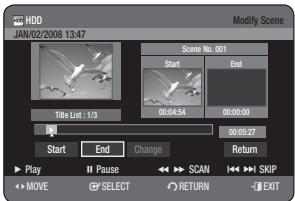
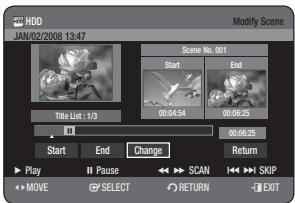
Moving a Scene (Changing the Position of a Scene)
To setup, follow steps 1 to 3 on page 81.
4-1. Press the buttons to select the scene you want to move (change the position), then press the GREEN(B) button.
-
A yellow selection window is displayed on the scene to be moved.
-
Press the buttons to select the position to which you want to move the selected scene, then select the OK button.

- You cannot move the selected scene to the position of the next scene, because the selected scene should be inserted before that position, which requires no action.
Depending on the kind of disc, the displayed screen may have a slight difference.
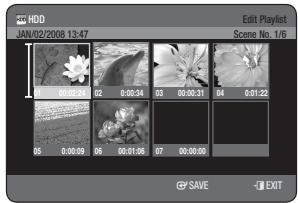
Adding a Scene
To setup, follow steps 1 to 3 on page 81.
4-1. Press the buttons to select the scene that will have a new scene inserted before it, then press the YELLOW(C) button. The Add Scene screen is displayed.
5. Press the OK button at the starting point of the scene.
- The image and starting point time is displayed on the Start window.
-
Select the starting or ending point of the section you want to modify using the playback related buttons (PLAY () , SEARCH ( ) , SKIP ( ) ).
-
Press the OK button at the end point of the scene.
-
The image and end point time are displayed in the End window.
-
To cancel, press the buttons to select Return, then press the OK button.
-
Press the buttons to select Add, then press the OK button.
-
The section you want to add is inserted prior to the scene selected in step 4^-1 of Adding a Scene.
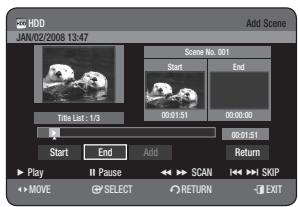
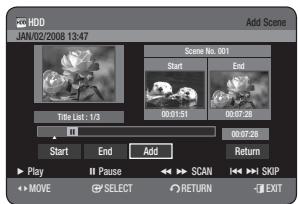
Deleting a Scene
To setup, follow steps 1 to 3 on page 81.
4-1. Press the buttons to select the scene you want to delete, then press the BLUE(D) button.
- The message "Do you want to delete the scene?" is displayed.
5. Press the buttons to select Yes, then press the OK to delete the selected scene.
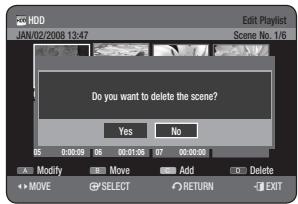

- With the unit in Stop mode/Playback mode, press the PLAY LIST button.
-
Press the buttons to select an entry you want to delete in the Playlist, then press the MARKER button until a checkmark appears. Repeat this step to select an additional title you want to delete.
-
If you don't want to delete a certain one of the checked entries, simply select that entry and press the MARKER button to deselect it until a checkmark disappears.
-
Press the RED(A) button to select Edit.
Edit menu is displayed.
-
Press the buttons to select Delete, then press the OK or button.
-
You will be prompted with the delete confirmation message "Do you want to delete?".
-
Press the buttons to select Yes, then press the OK button.
You will be automatically returned to the Playlist screen after the delete operation has finished.

If you select "Select All" in the Edit menu, all title will be checked.
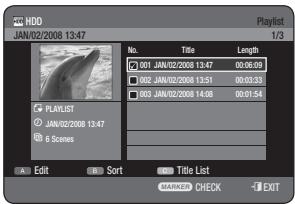

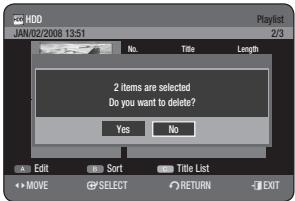
Using the Sort ( Playlist)
When you need to change the Sort order of Playlist, you can change it simply.
- While the list menu is displayed, press the GREEN(B) button to select Sort.
-
Press the buttons to select the desired item, then press the OK or button.
-
Date : In order of when the playlists were created
- Name: In alphabetical order

- You can sort by Date, Name. Sorted list will be resorted in copied order upon reentering Playlist.
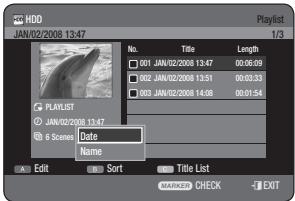
About the Copy Screen
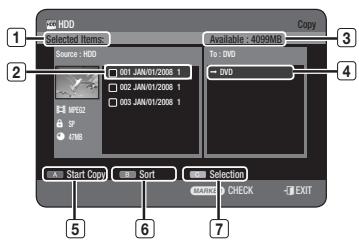
1 Total size and number of selected titles for copying
2 Title to be copied
This shows available disc space
4 The location where the copied files are stored
5 Copy start button
6 Sort button (Date, Name, Length, Channel Info)
Selection button
7 -Select All : All entries in the current folder will be checked.
- Unselect All : All checked entries will be unchecked.
Contents Copy Specifications
| Contents | HDD → DVD | DVD → HDD |
| Recorded Video Title | Supported | Supported |
| Copy Protected Title | Not supported | Not supported |
| Copy Once Title | Move
(Deletes the Title in the HDD after copying) | Not supported |
The Copy is possible only with CPRM-Compatible disc.
Once "Copy Once programme" has been recorded on the DVD disc, this title cannot be copied to HDD anymore.
But "Copy Once programme" has been recorded on the HDD, this title can be copied to DVD-RW(VR mode) or DVD-RAM.

- Press the OPEN/CLOSE button and place a recordable disc on the disc tray.
- Press the OPEN/CLOSE button to close the disc tray. Wait until LOAD disappears from the front panel display. Check that the disc has enough available space for the recording.
- Select a desired mode by pressing the HDD or DVD button on the remote control.
You can also select a desired mode by pressing the HDD/DVD button on the front panel.
- With the unit in Stop mode/Playback mode, press the TITLE LIST button.
-
Press the COPY button. Copy screen is displayed.
-
During Playback, you can also copy the title by pressing the COPY button.
-
Press the buttons to select the title you want to copy, then press the MARKER button until a checkmark appears. Repeat this step to select an additional title you want to copy.
-
If you don't want to copy a certain one of the checked entries, simply select that entry and press MARKER button to deselect it until the checkmark disappears.
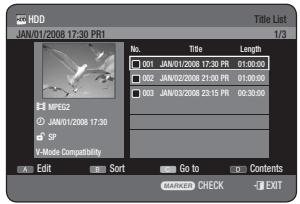
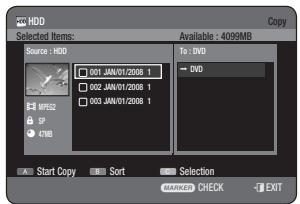
-
Press the RED(A) button to select Start Copy.
-
The title to be copied is not displayed on the screen, and copying begins while the currently broadcasting programme is displayed on the screen.
- Press the INFO button to view the copy processing bar. If you press INFO button again, copy processing bar will disappear.
-
To cancel the copying in progress, press the RED(A) button.
-
After a successful copy, "The title is successfully copied" message is displayed.
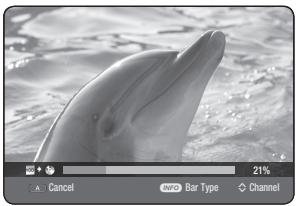
DVD-Video Copy
- Press the OPEN/CLOSE button and place a DVD-Video disc on the disc tray.
- Press the OPEN/CLOSE button to close the disc tray.
- During the playback, press the COPY button. Copy will be started.

The Copy function will be disabled in the following cases :
- If you try to copy in the section of a menu.
- NTSC disc or copy-protected disc
- Titles that are different in the broadcasting system.
- The audio title that is copied to the HDD will be recorded in the 2ch AC3 format.
- For the audio output in DTS mode, the audio source will not be copied.
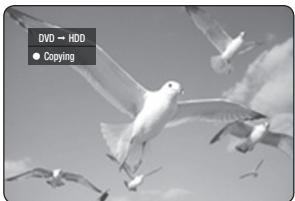
COPYING MP3, JPEG OR DIVX
Contents Copy Specifications
| Contents | HDD → DVD | DVD → HDD |
| MP3 | Supported | Supported |
| JPEGphoto) | Supported | Supported |
| DivX | Supported | Supported |
| CD-DA | Not supported | Supported |
- Disc(CD-R/ CD-DA/ CD-RW/ DVD-RAM/ DVD-R(Finalise)/ DVD-RW(Finalise)) HDD
HDD DVD-R, DVD-RW(V)
- If the disc is finalised through Disc Manager, it can be compatible with PC as a disc with a UDF file system.
File Copy
- Insert a JPEG disc, MP3 disc or DivX disc into the disc tray.
- Press the OPEN/CLOSE button to close the disc tray. Wait until LOAD disappears from the front panel display. Check that the disc has enough available space for the recording.
- Press the buttons to select Library, then press the OK or button.
- Press the buttons to select Music, Photo or DivX, then press the OK or button.
- Press the COPY button. Copy screen is displayed.
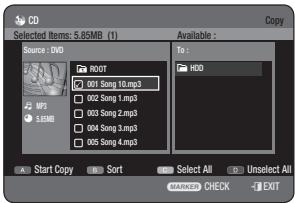
- Press the buttons to select the MP3, Photo or DivX file you want to copy, then press the MARKER button until a checkmark appears.
- If you don't want to copy a certain one of the checked entries, simply select that entry and press the MARKER button to deselect it until the checkmark disappears.
- Press the buttons to select the target media, then press the OK button.
- You can create a new folder by pressing the GREEN(B) button.
- Press the RED(A) button to select Start Copy. The message "Number of file : x" is displayed.
- Press the buttons to select Start, then press the OK button. File copy begins.
- To cancel the copying in progress, press the EXIT (④) button.
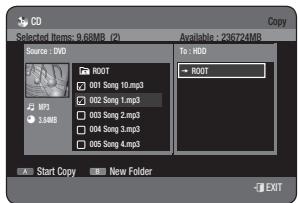
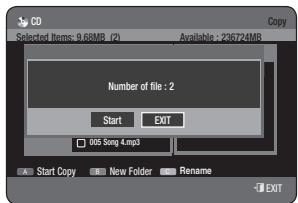
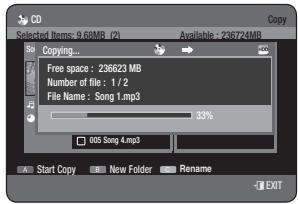
Folder Copy
- Insert a Disc (JPEG, MP3 or DivX) into the tray.
- Press the buttons to select Library, then press the OK or button.
- Press the buttons to select Music, Photo or DivX then press the OK or button. MP3, JPEG or DivX folder is displayed.
- Press the COPY button. Copy screen is displayed.
-
Press the buttons to select the folder you want to copy, then press MARKER button until a checkmark appears.
-
If you don't want to copy a certain one of the checked folders, simply select that entry and press MARKER button to deselect it until the checkmark disappears.
-
Press the buttons to select the target media, then press the OK button.
- You can create a new folder by pressing the GREEN(B) button.
- Press the RED(A) button to select Start Copy.
The message "Number of file : x" is displayed.
- Press the buttons to select Start, then press the OK button. Folder copy begins.
Sub folders and files in the selected folder are copied.
- To cancel the copying in progress, press the EXIT (4) button.
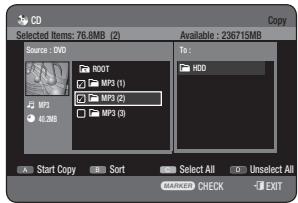

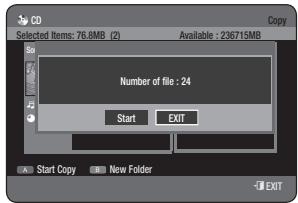

- Pressing the EXIT (▶) button during folder copying will cancel the folder copying after the current file is copied.
- You can copy up to 500 files or 500 sub folders to one folder. [MP3, JPEG, DivX]
- If you want to copy a file, you should create a new folder before starting a copy.
You cannot copy to top-level(ROOT) folder directly without creating a new folder.
If the top-level (ROOT) folder has had already 500 folders, you should delete one or more items before you can create a new folder.
File size on a disc and the copied file in the HDD may be slightly different due to the file system.
If you check some entries in the current folder and move to open a different folder, those entries are automatically unchecked and excluded from the selection list.

CHANGING THE NAME OF MUSIC/PHOTO/DIVX FILE

You can rename a Music, Photo or DivX file copied to HDD.
- Press the buttons to select the entry you want to rename, then press the RED(A) button.
- Press the buttons to select Rename, then press the OK or button.
Rename Screen is displayed.
-
Select the desired characters using the buttons, then press the OK button.
-
Back Space (RED(A) button): Deletes and moves the cursor backwards by one position.
- Space (GREEN(B) button): Enters a blank and moves the cursor one forward (to the right).
- Clear (YELLOW(C) button): Deletes all the character inputs.
-
Save (BLUE(D) button): Registers the character inputs.
-
Press the BLUE(D) button to select Save.
The changed file name is displayed on the selected entry.
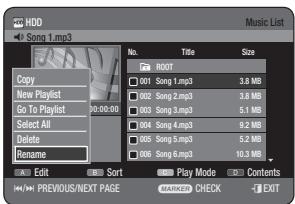

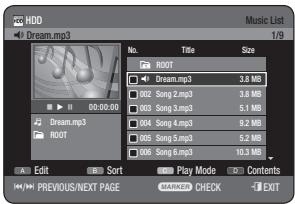
Editing the Disc Name


Follow these instructions to give a name to a disc.
- With the unit in Stop mode, press the MENU button.
- Press the buttons to select Disc Manager, then press the OK or button.
- Press the buttons to select Rename, then press the OK button.
The Rename screen is displayed.
- Select the desired characters using the buttons, then press the OK button.
- Press the BLUE(D) button to select Save.
A disc name is given to the disc.

You may need to clear Disc Protection beginning editing.
Depending on the kind of disc, the displayed screen may be different.
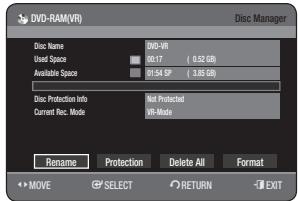
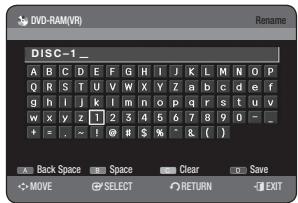
Disc Protection


Disc Protection allows you to protect your discs from being formatted or deleted due to unintended operations.
- With the unit in Stop mode, press the MENU button.
- Press the buttons to select Disc Manager, then press the OK or button.
- Press the buttons to select Protection, then press the OK button.
- Press the buttons to select On, then press the OK button.
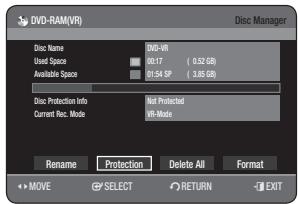

- With the unit in Stop mode, press the MENU button.
- Press the buttons to select Disc Manager, then press the OK or button.
-
Press the buttons to select Delete All, then press the OK button.
-
You will be prompted with the confirmation message "Do you want to delete all title lists?"
- When Protected Entry exists: The Delete All Title List function will not operate. If there is a title containing a still picture, however, that function will not operate.
- If you want to delete a protected entry, disable Protect for it on the Lock item.
- When protected a DVD-RAM/-RW is used, data cannot be deleted from a disc.
-
If you select Yes, you will be prompted with the confirmation message "All playlists will also be deleted. Do you want to continue?"
-
Press the buttons to select Yes, then press the OK button. All title lists are deleted.


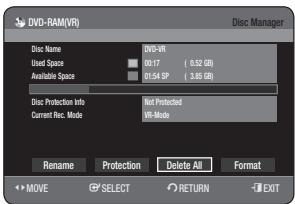
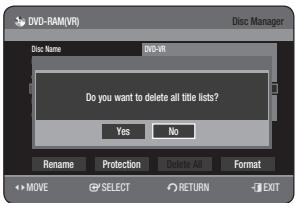
Delete All Title Lists/DivX Lists /Music Lists/Photo Lists
- With the unit in Stop mode, press the MENU button.
- Press the buttons to select Disc Manager, then press the OK or button.
-
Press the buttons to select Delete, then press the OK button.
-
When Protected Entry exists: The Delete All Title List function will not operate. If there is a title containing a still picture, however, that function will not operate. If you want to delete a protected entry, disable Protect for it on the Lock item.
-
Press the buttons to select the Title, DivX, Music or Photo, then press the OK button.
- Press the buttons to select Yes, then press the OK button. All title lists, DivX lists, music lists or photo lists are deleted.

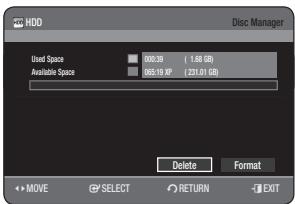
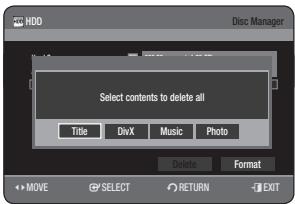
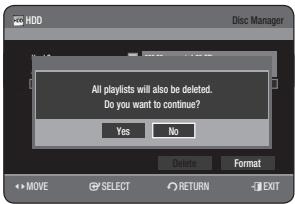
</p>
<h1 id="formatting-a-disc">Formatting a Disc</h1>
<p><img alt="" src="images/5c5f27c6dc3ff6770ad8429822523d05404f4a0d36cc531699db466bca183053.jpg" /></p>
<p><img alt="" src="images/b3f90cf8d01c54e47db5b0a81de709dacd69f02942e4e21f19d5fe42f780f7cc.jpg" /></p>
<p><img alt="" src="images/399e77e84d18e6d2156eb86e0d44a949736329611ac6a07c62fd164aa844878e.jpg" /></p>
<p>Use these instructions to format a disc.</p>
<p>The disc protect should also be cleared.</p>
<ol>
<li>With the unit in Stop mode, press the MENU button. </li>
<li>Press the buttons to select Disc Manager, then press the OK or button. </li>
<li>Press the buttons to select Format, then press the OK button.</li>
</ol>
<h1 id="hdddvd-ram">HDD/DVD-RAM</h1>
<ul>
<li>You will be prompted with the confirmation message "Current media: *** Do you want to format?" </li>
<li>If you select Yes, you will be prompted with the confirmation message "All data will be deleted. Do you want to continue?"</li>
</ul>
<h1 id="dvd-rw">DVD-RW</h1>
<ul>
<li>You will be prompted with the confirmation message "Choose the recording format for DVD-RW." </li>
<li>
<p>If you select the desired format type, you will be prompted with the confirmation message "All data will be deleted. Do you want to continue?"</p>
</li>
<li>
<p>Press the buttons to select Yes, then press the OK button. The disc is formatted.</p>
</li>
</ul>
<p>DVD-VR and DVD-V are defined according to their recording format. </p>
<table><tr><td></td><td>DVD-VR</td><td>DVD-V</td></tr><tr><td>DISC</td><td>DVD-RAM/-RW</td><td>DVD-RW/DVD-R</td></tr></table>
<h1 id="finalising-a-disc">Finalising a Disc</h1>
<p><img alt="" src="images/225c50b1638e96cabbe0c4c977714131cf60f3d692432262af6bed8310537530.jpg" /></p>
<p><img alt="" src="images/fd032dfc052c797d02d22adc95a03792e35e47cd6f3939ec2ee078f58c630dd1.jpg" /></p>
<p>After you record titles onto a DVD-RW/-R disc with your HDD & DVD REORDER, it needs to be finalised before it can be played back on external devices.</p>
<ol>
<li>With the unit in Stop mode, press the MENU button. </li>
<li>Press the buttons to select Disc Manager, then press the OK or button. </li>
<li>Press the buttons to select Finalise, then press the OK button.</li>
</ol>
<p>You will be prompted with the message "Do you want to finalise disc?"</p>
<p><img alt="" src="images/8290b4659d2e0ae4a96ee06d8516396d3fbb68c821c0956d54b32ed1cfaab572.jpg" /></p>
<ol>
<li>Press the buttons to select Yes, then press the OK button. You will be prompted again with the message "Disc will be finalised. Do you want to continue?" </li>
<li>Press the buttons to select Yes, then press the OK button. The disc is finalised.</li>
</ol>
<p><img alt="" src="images/96ba4e8e02e23f3ddfccda7259cd1ec9d6b083d3746c0edabd817943c96281c5.jpg" /></p>
<p>Once a disc is finalised, you cannot delete entries from the record list. <br />
After being finalised, the DVD-R/-RW(video mode) operates in the same manner as a DVD-Video. <br />
Depending on the disc type, the displayed screen may be different. <br />
Finalising time may be different depending on the amount of data recorded on the disc. <br />
Data on the disc will be damaged if the recorder is powered off during finalisation process. <br />
- You can finalise the disc automatically using EZ Record. (See page 39)</p>
<h1 id="unfinalising-a-disc-vvr-mode">Unfinalising a Disc (V/VR mode)</h1>
<ol>
<li>With the unit in Stop mode, press the MENU button. </li>
<li>Press the buttons to select Disc Manager, then press the OK or button. </li>
<li>Press the buttons to select Unfinalise, then press the OK button. You will be prompted with the message "Do you want to unfinalise disc?" </li>
<li>Press the buttons to select Yes, then press the OK button. You will be prompted again with the message "Disc will be unfinalised. Do you want to continue?" </li>
<li>Press the buttons to select Yes, then press the OK button. The disc is unfinalised.</li>
</ol>
<p><img alt="" src="images/eec50f75c46f33264e9f72c919d2bee4303756f8edc0c5b89abb5dad23c151b8.jpg" /></p>
<p>A DVD-RW can be finalised or unfinalised in Video mode.</p>
<table><tr><td></td><td>Finalise</td><td>Unfinalise</td></tr><tr><td>Mark</td><td>DVD-Video(RW)</td><td>DVD-RW(V)</td></tr><tr><td>Operation</td><td>Same as DVD-Video</td><td>Additional recording, protection and deletion are possible.</td></tr></table>
<p>A DVD-RW can be finalised or unfinalised in VR mode.</p>
<table><tr><td></td><td>Finalise</td><td>Unfinalise</td></tr><tr><td>Mark</td><td>DVD-RW(VR:F)</td><td>DVD-RW(VR)</td></tr><tr><td>Operation</td><td>Additional recording, deletion, editing, and protection are impossible.</td><td>Additional recording, deletion, editing, and protection are possible.</td></tr></table>
<p><img alt="" src="images/47ea52decaebc22ee3b15c622ef5270576af2abae4bfc26e1292bff619ae7dc2.jpg" /></p>
<p><img alt="" src="images/45ed8ad1f2f8dab583432c24d50843b5c407400b373bac4571684e7ba1262892.jpg" /></p>
<h1 id="troubleshooting">TROUBLESHOOTING</h1>
<p>If your product malfunctions, go through the checkpoints below before contacting a Samsung authorised service centre.</p>
<table><tr><td>PROBLEM</td><td>EXPLANATION/SOLUTION</td></tr><tr><td>The input is displayed for a while when the power is turned on.</td><td>The HDD & DVD REORDER requires some time to initialize and the input will be displayed for approx. 10 seconds after it is turned on.</td></tr><tr><td>Cannot record TV programmes.</td><td>Check whether the power cord is securely plugged into the power outlet.
Did you set the HDD & DVD REORDER channel settings correctly?
Check the free space on your HDD/DVD-RAM/-RW/-R discs.</td></tr><tr><td>I pressed the REC button but there is no response.</td><td>Check available disc type. (See page 59)
If a programme is copy protected, it cannot be recorded.</td></tr><tr><td>Cannot play the disc.</td><td>Check whether the disc is inserted correctly with the label facing up.
Check the regional code of the DVD disc.
This HDD & DVD REORDER cannot play some types of discs.
(See pages 7, 40)</td></tr><tr><td>© icon appears on the screen.</td><td>You cannot use this operation or function due to one of the following reasons:
(1) Your DVD disc restricts it.
(2) Your DVD disc does not support this feature (for example: angles)
(3) The feature is not available at the moment.
(4) You've requested a title, chapter, or scan time that is out of range.</td></tr><tr><td>Play mode settings are different from the settings configured in the Settings menu.</td><td>The disc does not support all selected functions. In this case, some settings configured in the settings menu may not work properly.</td></tr><tr><td>Cannot change the aspect ratio.</td><td>The aspect ratio is fixed for DVD discs. (See page 35)</td></tr><tr><td>The angle operation does not work while playing a DVD disc.</td><td>The angle operation is available only when the disc contains images captured from different angles.</td></tr><tr><td>The selected audio and/or subtitle language is not played.</td><td>Audio and subtitle languages are disc-specific. Only the sound and subtitle languages contained on the DVD disc are available and displayed in the disc menu.</td></tr><tr><td>Cannot copy title or file to the other mode.</td><td>DVD discs encoded with copy protection can not be copied to HDD.
Refer to "Contents Copy Specifications" on page 6 to check if copying is supported.
Refer to "V-Mode Compatibility" on page 39 to check if copying is support.</td></tr><tr><td>The disc revolves, but no image or bad quality images is displayed</td><td>Be sure that the Video Setting is properly set. (See pages 35~36)
Check whether there is damage to or any foreign material on your disc.
Some low quality discs may not play properly.
If scenes change from dark to bright suddenly, the screen may shake vertically temporarily, but this is not a fault.</td></tr><tr><td>No sound.</td><td>Are you watching a programme in slow or skip mode?
If you are playing a programme at a speed other than normal speed, sound will not be heard. (Except for forward search (X 2) in disc.)
Check the connections and settings. (See pages 25~26, 34~35)
Check whether the disc is damaged. Clean the disc, if necessary.
Check whether the disc is inserted correctly with the label facing up.</td></tr><tr><td>No audio output.</td><td>Check whether you have selected the correct digital output options in the Audio Output Options menu. (See pages 34~35)</td></tr><tr><td>Timer lamp flickers</td><td>·Check there is enough space in the disc or HDD for recording.
·Check whether the current disc is recordable or not.
Make sure to check before the start time of recording.</td></tr><tr><td>Timer recording does not work properly.</td><td>·Re-check the recording time and the end time settings again.
·Recording will be cancelled if the power is interrupted due to a power failure or another similar reason while recording.</td></tr><tr><td>The remote control doesn't work.</td><td>·Point the remote control at the remote control sensor on your HDD & DVD RECORDER. Allow for proper distance. Remove obstacles between your HDD & DVD RECORDER and the remote control.
·Check whether the batteries are drained.
·Check the TV/DVD selection button setting.
·Check whether TV control button is selected or not.</td></tr><tr><td>I forgot my password for parental supervision</td><td>Press and hold the PLAY/PAUSE (►II) buttons on the front panel for more than 10 seconds with no disc in the unit.
All settings including the password will revert to the factory settings. Do not use this unless absolutely necessary.</td></tr><tr><td>Is it possible to change a subtitle and an audio signal on a recorded disc?</td><td>A recorded disc is played with only the subtitle and the audio signal which were selected during recording</td></tr><tr><td>Other problems</td><td>·Read the table of contents and then find and read the section describing your problem, follow the instructions given.
·Plug your HDD & DVD RECORDER off and on.
·If the problem still persists, contact a nearby Samsung service centre.</td></tr></table>
<h1 id="specifications">SPECIFICATIONS</h1>
<table><tr><td rowspan="6">General</td><td colspan="2">Power requirements</td><td>AC 220~240 V, 50 Hz</td></tr><tr><td colspan="2">Power consumption</td><td>30 Watts / 2.2 Watts (Power off)</td></tr><tr><td colspan="2">Weight</td><td>3.8 Kg</td></tr><tr><td colspan="2">Dimensions</td><td>430 mm(W) x 300 mm(D) x 55 mm(H)</td></tr><tr><td colspan="2">Operating temp.</td><td>+5 °C to +35 °C</td></tr><tr><td colspan="2">Other conditions</td><td>Keep level when operating. Less than 75% operating humidity</td></tr><tr><td rowspan="4">Input</td><td colspan="2">Video</td><td>Composite Video: 1.0 V p-p at 75Ω load, sync negative</td></tr><tr><td colspan="2">Audio</td><td>Max.Audio Input Level: 2 Vrms</td></tr><tr><td colspan="2">Receivable Channels</td><td>PAL-B/G, SECAM-L/L'</td></tr><tr><td>Scart Jack</td><td>AV2 (Scart Ext)</td><td>Video: Composite, RGB Audio: analogue</td></tr><tr><td rowspan="5">Output</td><td rowspan="2" colspan="2">Audio</td><td>Analogue output jacks x 1</td></tr><tr><td>Coaxial digital audio output</td></tr><tr><td rowspan="2" colspan="2">Video</td><td>Composite Video: Video output jack x 1</td></tr><tr><td>Component output x 1 (Y: 1,0Vp-p, Pb: 0,70Vp-p, Pr: 0,70Vp-p at 75Ω load)</td></tr><tr><td>Scart Jack</td><td>AV1 (Scart TV)</td><td>Video: Composite, RGB Audio: analogue</td></tr><tr><td rowspan="4">Recording</td><td colspan="2">Picture Compression format</td><td>MPEG-II</td></tr><tr><td colspan="2">Audio Compression format</td><td>Dolby Digital 2ch/256Kbps, MPEG-II</td></tr><tr><td colspan="2">Recording Quality</td><td>XP (about 8,5 Mbps), SP (about 4,5 Mbps), LP (about 2,5 Mbps), EP (about 1,6 Mbps or about 1,2 Mbps)</td></tr><tr><td colspan="2">Audio Frequency Response</td><td>20 Hz~20 kHz</td></tr><tr><td>HDD Capacity</td><td colspan="2">DVD-HR770</td><td>160 GB</td></tr></table>
<h1 id="audio-output">Audio Output</h1>
<p>For DVD discs, audio signals recorded at 96 kHz sampling frequency are converted into and output at 48 kHz.</p>
<table><tr><td>Disc Type</td><td>DVD</td><td>AUDIO CD (CD-DA)</td></tr><tr><td>Analogue Audio Output</td><td>48 / 96 kHz</td><td>44,1 kHz</td></tr><tr><td>Digital Audio Output</td><td>48 kHz</td><td>44,1 kHz</td></tr></table>
<p>This Samsung product is warranted for the period of twelve (12) months from the original date of purchase, against defective materials and workmanship. In the event that warranty service is required, you should return the product to the retailer from whom it was purchased.</p>
<p>However, Samsung Authorised Dealers and Authorised Service Centres in other EC Countries will comply with the warranty on the terms issued to purchasers in the country concerned. In case of difficulty, details of our Authorised Service Centres are available from:</p>
<p>Samsung Electronics U.K. Ltd.</p>
<p>Customer Care Centre</p>
<p>PO Box 17243</p>
<p>Edinburgh, EH11 4YB</p>
<p>United Kingdom</p>
<p>Tel: 0845 SAMSUNG (7267864),</p>
<p>Fax:08456508080 (United Kingdom)</p>
<p>Tel:0818717100,</p>
<p>Fax: +44 (0)131 202 0630 (Republic of Ireland)</p>
<p>Web: www.samsung.com</p>
<p>WARRANTY CONDITIONS</p>
<ol>
<li>The warranty is only valid if, when warranty service is required, the warranty card is fully and properly completed and is presented with the original invoice or sales slip or confirmation, and the serial number on the product has not been defaced. </li>
<li>Samsung's obligations are limited to the repair or, at its discretion, replacement of the product or the defective part. </li>
<li>
<p>Warranty repairs must be carried out by Authorised Samsung Dealers or Authorised Service Centres. No re-imbursement will be made for repairs carried out by non Samsung Dealers and, any such repair work and damage to the products caused by such repair work will not be covered by this warranty.</p>
</li>
<li>
<p>This product is not considered to be defective in materials nor workmanship by reason that it requires adaptation in order to conform to national or local technical or safety standards in force in any Country other than the one for which the product was originally designed and manufactured. This warranty will not cover, and no re-imbursement will be made for such adaptation nor any damage which may result. </p>
</li>
<li>This warranty covers none of the following:</li>
</ol>
<p>a) Periodic check ups, maintenance and repair or replacement of parts due to normal wear and tear. <br />
b) Cost relating to transport,removal or installation of the product. <br />
c) Misuse, including the failure to use this product for its normal purposes or incorrect installation. <br />
d) Damage caused by Lightning,Water,Fire,Acts of God,Wa ,Public Disturbances,incorrect mains voltage,improper ventilation or any other cause beyond the control of Samsung.</p>
<ol>
<li>This warranty is valid for any person who legally acquired possession of the product during the warranty period. </li>
<li>The consumers statutory rights in any applicable national legislation whether against the retailer arising from the purchase contract or otherwise are not affected by this warranty.Unless there is national legislation to the contrary,the rights under this warranty are the consumers sole rights and Samsung,its subsidiaries and distributors shall not be liable for indirect or consequential loss or any damage to records,compact discs,videos or audio taper or any other related equipment or material.</li>
</ol>
<p>SAMSUNG ELECTRONICS (U.K.) LTD.</p>
<p>If you have any questions or comments relating to Samsung products, please contact the SAMSUNG customer care center.</p>
<p>Contact SAMSUNG WORLD WIDE </p>
<table><tr><td>Region</td><td>Country</td><td>Customer Care Center</td><td>Web Site</td></tr><tr><td rowspan="3">North America</td><td>CANADA</td><td>1-800-SAMSUNG(726-7864)</td><td>www.samsung.com/ca</td></tr><tr><td>MEXICO</td><td>01-800-SAMSUNG(726-7864)</td><td>www.samsung.com</td></tr><tr><td>U.S.A</td><td>1-800-SAMSUNG(726-7864)</td><td>www.samsung.com</td></tr><tr><td rowspan="16">Latin America</td><td>ARGENTINE</td><td>0800-333-3733</td><td>www.samsung.com/ar</td></tr><tr><td>BRAZIL</td><td>0800-124-421 , 4004-0000</td><td>www.samsung.com</td></tr><tr><td>CHILE</td><td>800-SAMSUNG(726-7864)</td><td>www.samsung.com/cl</td></tr><tr><td>NICARAGUA</td><td>00-1800-5077267</td><td></td></tr><tr><td>HONDURAS</td><td>800-7919267</td><td></td></tr><tr><td>COSTA RICA</td><td>0-800-507-7267</td><td>www.samsung.com/latin</td></tr><tr><td>ECUADOR</td><td>1-800-10-7267</td><td>www.samsung.com/latin</td></tr><tr><td>EL SALVADOR</td><td>800-6225</td><td>www.samsung.com/latin</td></tr><tr><td>GUATEMALA</td><td>1-800-299-0013</td><td>www.samsung.com/latin</td></tr><tr><td>JAMAICA</td><td>1-800-234-7267</td><td>www.samsung.com/latin</td></tr><tr><td>PANAMA</td><td>800-7267</td><td>www.samsung.com/latin</td></tr><tr><td>PUERTO RICO</td><td>1-800-682-3180</td><td>www.samsung.com/latin</td></tr><tr><td>REP. DOMINICA</td><td>1-800-751-2676</td><td>www.samsung.com/latin</td></tr><tr><td>TRINIDAD & TOBAGO</td><td>1-800-SAMSUNG(726-7864)</td><td>www.samsung.com/latin</td></tr><tr><td>VENEZUELA</td><td>0-800-100-5303</td><td>www.samsung.com/latin</td></tr><tr><td>COLOMBIA</td><td>01-8000112112</td><td>www.samsung.com.co</td></tr><tr><td rowspan="20">Europe</td><td>BELGIUM</td><td>0032 (0)2 201 24 18</td><td>www.samsung.com/be</td></tr><tr><td>CZECH REPUBLIC</td><td>844 000 844 Distributör pro Českou republik: Samsung Zrt., Česka organizačni složka Vyskočilova 4, 14000 Praha 4</td><td>www.samsung.com/cz</td></tr><tr><td>DENMARK</td><td>70 70 19 70</td><td>www.samsung.com.dk</td></tr><tr><td>FINLAND</td><td>030-6227 515</td><td>www.samsung.com/fi</td></tr><tr><td>FRANCE</td><td>3260 SAMSUNG (€ 0,15/Min), 08 25 08 65 65 (€ 0,15/Min)</td><td>www.samsung.com</td></tr><tr><td>GERMANY</td><td>01805 - SAMSUNG(726-7864) (€ 0,14/Min)</td><td>www.samsung.com</td></tr><tr><td>HUNGARY</td><td>06-80-SAMSUNG(726-7864)</td><td>www.samsung.com</td></tr><tr><td>ITALIA</td><td>800-SAMSUNG(726-7864)</td><td>www.samsung.com</td></tr><tr><td>LUXEMBURG</td><td>0035 (0)2 261 03 710</td><td>www.samsung.com/be</td></tr><tr><td>NETHERLANDS</td><td>0900-SAMSUNG(726-7864) (€ 0,10/Min)</td><td>www.samsung.com/nl</td></tr><tr><td>NORWAY</td><td>815-56 480</td><td>www.samsung.com/no</td></tr><tr><td>POLAND</td><td>0 801 801 881 , 022-607-93-33</td><td>www.samsung.com/pl</td></tr><tr><td>PORTUGAL</td><td>80820-SAMSUNG(726-7864)</td><td>www.samsung.com/pt</td></tr><tr><td>SLOVAKIA</td><td>0800-SAMSUNG(726-7864)</td><td>www.samsung.com/sk</td></tr><tr><td>SPAIN</td><td>902 10 11 30</td><td>www.samsung.com</td></tr><tr><td>SWEDEN</td><td>0771-400 200</td><td>www.samsung.com/se</td></tr><tr><td>U.K.</td><td>0845 SAMSUNG (7267864)</td><td>www.samsung.com</td></tr><tr><td>EIRE</td><td>0818 717 100</td><td>www.samsung.com/e</td></tr><tr><td>AUSTRIA</td><td>0800-SAMSUNG(726-7864)</td><td>www.samsung.com/at</td></tr><tr><td>SWITZERLAND</td><td>0800-SAMSUNG(726-7864)</td><td>www.samsung.com/ch</td></tr><tr><td rowspan="9">CIS</td><td>RUSSIA</td><td>8-800-555-55-55</td><td>www.samsung.com</td></tr><tr><td>KAZAHSTAN</td><td>8-10-800-500-55-500</td><td>www.samsung.kz</td></tr><tr><td>UZBEKISTAN</td><td>8-10-800-500-55-500</td><td>www.samsung.uz</td></tr><tr><td>KYRGYZSTAN</td><td>00-800-500-55-500</td><td></td></tr><tr><td>TADJIKISTAN</td><td>8-10-800-500-55-500</td><td></td></tr><tr><td>UKRAINE</td><td>8-800-502-0000</td><td>www.samsung.com</td></tr><tr><td>LITHUANIA</td><td>8-800-77777</td><td>www.samsung.it</td></tr><tr><td>LATvia</td><td>800-7267</td><td>www.samsung.com/lv</td></tr><tr><td>ESTONIA</td><td>800-7267</td><td>www.samsung.ee</td></tr><tr><td rowspan="13">Asia Pacific</td><td>AUSTRALIA</td><td>1300 362 603</td><td>www.samsung.com</td></tr><tr><td>NEW ZEALAND</td><td>0800SAMSUNG(726-7864)</td><td>www.samsung.com/nz</td></tr><tr><td>CHINA</td><td>800-810-5858 , 010-6475 1880</td><td>www.samsung.com</td></tr><tr><td>HONG KONG</td><td>3698-4698</td><td>www.samsung.com/hk</td></tr><tr><td>INDIA</td><td>3030 8282 , 1800 110011</td><td>www.samsung.com</td></tr><tr><td>INDONESIA</td><td>0800-112-8888</td><td>www.samsung.com</td></tr><tr><td>JAPAN</td><td>0120-327-527</td><td>www.samsung.com/jp</td></tr><tr><td>MALAYSIA</td><td>1800-88-9999</td><td>www.samsung.com/my</td></tr><tr><td>PHILIPPINES</td><td>1800-10-SAMSUNG(726-7864)</td><td>www.samsung.com/ph</td></tr><tr><td>SINGAPORE</td><td>1800-SAMSUNG(726-7864)</td><td>www.samsung.com</td></tr><tr><td>THAILAND</td><td>1800-29-3232 , 02-689-3232</td><td>www.samsung.com</td></tr><tr><td>TAIWAN</td><td>0800-329-999</td><td>www.samsung.com/tw</td></tr><tr><td>VIETNAM</td><td>1 800 588 889</td><td>www.samsung.com</td></tr><tr><td rowspan="3">Middle East & Africa</td><td>TURKEY</td><td>444 77 11</td><td>www.samsung.com</td></tr><tr><td>SOUTH AFRICA</td><td>0860-SAMSUNG(726-7864)</td><td>www.samsung.com</td></tr><tr><td>U.A.E</td><td>800-SAMSUNG (726-7864), 8000-4726</td><td>www.samsung.com</td></tr></table>
<p>SAMSUNG</p>
<p><img alt="" src="images/c776beba089d894be9cfa76e8c8b1688bf585d4c5cb0ea210d5f20d46741afa9.jpg" /></p>
<h1 id="correct-disposal-of-this-product-waste-electrical-electronic-equipment">Correct Disposal of This Product (Waste Electrical & Electronic Equipment)</h1>
<p>(Applicable in the European Union and other European countries with separate collection systems)</p>
<p>This marking shown on the product or its literature, indicates that it should not be disposed with other household wastes at the end of its working life. To prevent possible harm to the environment or human health from uncontrolled waste disposal, please separate this from other types of wastes and recycle it responsibly to promote the sustainable reuse of material resources.</p>
<p>Household users should contact either the retailer where they purchased this product, or their local government office, for details of where and how they can take this item for environmentally safe recycling.</p>
<p>Business users should contact their supplier and check the terms and conditions of the purchase contract. This product should not be mixed with other commercial wastes for disposal.</p>
<h1 id="dvd-2">DVD</h1>
<h1 id="manuel-dutilisation">Manuel d'utilisation</h1>
<h1 id="imaginez-les-possibités">imaginez les possibités</h1>
<p>Merci d'avoir besoin cet apparéil Samsung. Pour receivevoir une assistance plus complète, veuillez enregistrer votre produit sur www.samsung.com/global/register</p>
<h1 id="avertissement">AVERTISSEMENT</h1>
<p>POUR REDUIRE LES RISQUES D' ELECTROCUTION, NE RETIREZ PAS LE COUVERCLE (NI LE PANNEAU ARRIERE). AUCUNE PIECE SITUEE A L'INTERIEUR NE POT ETRE REPAREE PAR L'UTILISATEUR. POUR TOUTE REVISION, S'ADRESSER A UN TECHNICIEN SPECIALISE.</p>
<table><tr><td>3</td><td>ATTENTION
RISQUE D'ÉLECTROCUTION
NE PAS OUVIR</td><td>1</td></tr><tr><td>Ce symbole indique une "tension électrique dangereuse" à l'intérieur de l'appareil susceptible de provquer une décharge électrique ou un dommage corporel.</td><td>ATTENTION: POUR DIMINUER LES RISQUES
D'éLECTROCUTION, NE RETIREZ PAS LE Cache (OU LE CACHE ARRÊRIE). AUCUN DES ÉLÉMENTS INTERNES N'EST RÉPARABLE PAR L'UTILISEUR. CONFIEZ L'ENTRETIEN DE CET APPAREL À UNE PERSONNE QUALIFIÉE.</td><td>Ce symbole indique les instructions importantes accompagnant l'appareil.</td></tr></table>
<p>Ne placez pas cet apparéil dans un environnement clos tel qu'une bibliothèque ou un élément similaire.</p>
<p>AVERTISSEMENT : Pour éviter tout dommage pouvant provoquer un incendie ou une décharge électrique, n'expose pas cet apparéil à la pluie ou à l'humidité.</p>
<p>DANGER: LE GRAVEUR DE DVD AVEC DISQUE DUR UTILISE UN FAISCEAU LASER INVISIBLE SUSCEPTIBLE DE PROVOUER DES RADIATIONS DANGEREUSES EN CAS D'EXPOSITION DIRECTE. ASSUREZ-VOUS D'UTILISER LE GRAVEUR CORRECTEMENT EN VOUS REPORTANT A CE MANUEL.</p>
<h1 id="attention">ATTENTION</h1>
<p>CE PRODUIT FAIT APPEL A LA TECHNOLOGIE DU LASER. SI LES CONSIGNES RELATIVES A L'UTILISATION DES COMMANDES, AUX REGLAGES OU A L'APPLICATION DES PROCEDES, SPECIFIÉES DANS LE PRESENT MANUEL NE SONT PAS RESPECTEES, VOUS RISQUÉZ D'ETRE EXPOSE A UNE SOURCE DE RAYONNEMENT NOCIF POUR LA SANTE. NE TENTEZ PAS D'OUVRIR LES COUVERCES OU DE REPARER VOUS-MEME L'APPAREIL. POUR TOUTE REVISION, S'ADRESSER A UN TECHNIÇIEN SPECIALISE.</p>
<p>Ce produit est conforme aux reglementations CE lorsque les cables blindés et les connecteurs sont utilisés pour relier l'apparéil à un autre équipement. Pour évier les interférences electromagnétiques avec des appareils ELECTriques, tels que des radios et des téléviseurs, utilisez des cables blindés et des connecteurs pour les branchements.</p>
<h1 id="remarque-importante">REMARQUE IMPORTANTE</h1>
<p>Le cable relié au secteur de cet apparéil est fourni avec une prise summoulée incorporent un fusible. La valeur du fusible est indiquée sur la face de la fiche représentant les broches. S'il doit être remplaced, il convient d'utiliser un fusible de la même valeur nominale et conforme à BS1362.</p>
<p>N'utilise jamais la fiche sans le couvercle du fusible si ce couvercle est detachable. Si le couvercle de fusible doit être remplaced, il doit être de la même valeur que la face de la fiche représentant les broches. Les couvercles de remplacement sont disponibles auprès de votre revendeur.</p>
<p>Si la prise foumie ne s'adapte pas aux prises électriques de votre domicile ou si le cable n'est pas suffisamment long pour atteindre une prise électricque, vous nevez utiliser un cordon d'extension adapté et sécurisé ou consulter libre revendeur qui pourrait vous assister.</p>
<p>Cependant, dans le cas où il n'y aurait pas d'autre solution que de couper la prise, retirez le fusible et jetez la prise pour votre sécurité. Ne la branchez pas à une prise murale d'alimentation secteur. En effet, il y a un risque de décharge du au cordon flexible dénudé. Pour débrancher l'appareil, il convient desterolir la fiche de la prise murale afin que celle-ci soit facilement accessible.</p>
<p>Ce manuel d'utilisation accompagne un produit protégé par une licence que régissant des droits de propriété intellectuelle détenus par certains tiers. Cette licence confère à l'utilateur final un droit d'usage à but non lucratif dans le domaine privé, et ce, uniquement au titre du contenu sous licence. Toutée exploitation à but commercial est prohibée. En outre, cette licence couvreeteillement ce produit, à l'exclusion de tout autre. Aucune extension ne saureit exister pour unquelconque produit ou procédéquien, qui,bien que conforme aux normes ISO/IEC 11172-3 ou ISO/IEC 13818-3 et utilisé ou vendu avec le présence produit,ne fait pasl'objet d'une licence. La licence s'applique uniquement au codage et/ou au décodage de fichiers audio a l'aide de ce produit, conformément aux normes ISO/IEC 11172-3 ou ISO/IEC 13818-3. Cette licence n'implique aucun droit afferent a des caractéristiques ou fonctions du produit ne satisfaisant pas aux normes ISO/IEC 11172-3 ou ISO/IEC 13818-3.</p>
<h1 id="consignes-de-sécurité-importantes">Consignes de sécurité importantes</h1>
<p>Lisez attentivement ces instructions d'utilisation avant d'utiliser l'appareil. Conformez-vous à toutes les consignes de sécurité listedes ci-dessous. Conservez ces instructions d'utilisation en vue d'une consultation ultérieure.</p>
<p>1) Lisez les instructions. <br />
2) Conserve les instructions. <br />
3) Tenez compte de tous les averissements. <br />
4) Suívez toutes les instructions. <br />
5) N'utilisez jamais cet apparéil à proximé de l'eau. <br />
6) Nettoyez uniquement avec un chiffon sec. <br />
7) N'obstruez aucun orifice de ventilation, installez l'appareil conformément aux instructions du fabricant. <br />
8) Ne l'installé pas à proximé d'une source de chaleur telle que des radiateurs, des registres de chaleur, des jours ou d'autres apparèels (y compris des amplificateurs) produit an de la chaleur. <br />
9) Ne démonze pas le dispositif de sécurité de la prise de terre ou de la prise polarisée. Les fiches polarisées disposent de deux broches, dont l'une est plus large que l'autre. En revanche,les prises de terre comportent deux fiches ainsi qu'une broche de mise à la terre.Dans les deux cas,la broche largere et la troisième broche garantissant toute sécurité. Si la fiche fournie ne s'adapte pas sur votre prise murale, renseignez-vous auprès d'un électricien pour replacer cette dernière. <br />
10) Protégéz le cordon d'alimentation afin d'éviter qu'il ne soit piétiné ou pince, tout particulièrement au niveau des fiches, des prises et au point où il sort de l'appareil. <br />
11) Utilisez uniquement des accessoires spécifiés par le fabricant. <br />
12) Utilisez uniquement un chariot, un socle, un trépied, une console ou une table spécifique par le fabricant ou vendue avec l'appareil. En cas d'utilisation d'un chariot, déplacez l'ensemble chariot/appareil avec précaution afin d'éviter toute blessure due à un basculement de cet ensemble. <br />
13) Débranchez cet apparéil en cas d'orage ou de non utilisation prolongée. <br />
14) Confiez l'ensemble des réparations au personnel qualifié. Une réparation est nécessaire en cas de dommage subi par l'objet,quel qu'il soit : cordon d'alimentation ou fiche endommagée,projection deliquide ou chute d'objets sur l'objet, exposition à la pluie ou à l'humidité, dysfonctionnement, chute.</p>
<h1 id="précautions-de-manipulation">Précautions de manipulation</h1>
<ul>
<li>Avant de raccorder d'autres composants à votregraveur,veillez a tous les eteindre. </li>
<li>Ne déplacez pas legraveur alors qu'un disque est en cours de lecture carle disque risque d'être rayé ou cassé,les parties internes dugraveur endommagées. </li>
<li>Ne posez jamais de vase à fleurs contenant de l'eau ou de petits objets métalliques sur le graveur. <br />
Veillez à ne pas mettre votre main dans le tiroir disque. </li>
<li>Ne mettez rien d'autre que le disque dans le tiroir disque. </li>
<li>Des phénomènes extérieurs comme la foudre et l'électricité statique peuvent affecter le fonctionnement normal du graveur. Si cela se produit, éteignez puis rallumez le graveur à l'aide du bouton STANDBY/ON ou débranchez puis rebranchez le cordon d'alimentation CA sur la prise CA. Le graveur fonctionnera alors normalement. <br />
Assurez-vous de retirer le disque et d'etreindre le graveur après usage. </li>
<li>Débranche le cordon d'alimentation CA de la prise CA lorsque vous n'avez pas l'intention d'utiliser legraveur pendant des périodes longues. </li>
<li>Nettoyez le disque en l'essuyant en ligne droite de l'intérieur vers l'extérieur du disque. </li>
<li>Veiliez à éviter toute projection sur l'appareil et ne place jamais de récipients contenant un liquide (ex.: vase) dessus. </li>
<li>La prise d'alimentation fait office de système de déconnexion ; elle doit donc rester disponible en permanence.</li>
</ul>
<h1 id="entretien-du-chassin">Entretien du chassin</h1>
<p>Pour des raisons de sécurité, assurez-vous de débrancher le cordon d'alimentation CA de la prise CA.</p>
<ul>
<li>N'utilise pas de benzène, de diluant ou d'autres solvants pour le nettoyage. </li>
<li>Nettoyez le chassis avec un chiffon doux.</li>
</ul>
<h1 id="hdd-disque-dur">HDD (disque dur)</h1>
<p>Le disque dur dispose d'une grande capacité de stockage qui permet un enregistrement de longue durée et un accès rapide aux données écrites. Cependant, il peut être endommagé facilement par des chocs, des vibrations ou de la poussière et doit être éloigné des aimants. Pour éviter de perdre des données importantes, respectez les précautions suivantes.</p>
<ul>
<li>N'utilise pas le GRAVEUR DE DVD AVEC DISQUE DUR dans un endroit sujet à des changements extrêmes de température. </li>
<li>Ne soumettez pas le GRAVEUR DE DVD AVEC DISQUE DUR à des chocs violents. </li>
<li>Ne placez pas le GRAVEUR DE DVD AVEC DISQUE DUR dans un endroit sujet à des vibrations mécaniques ou dans un endroit instable. </li>
<li>Ne placez pas le GRAVEUR DE DVD AVEC DISQUE DUR sur une source de chaleur. </li>
<li>Ne débranchez pas le cordon d'alimentation CA lorsque l'appareil est sous tension. </li>
<li>N'essayez pas de changer le disque dur. Cela risque de provoquer un dysfonctionnement de l'appareil. Si le disque dur est endommagé, vous ne pouvez pas récapérer les données perdues. Le disque dur sert uniquement d'espace de stockage-temporaire.</li>
</ul>
<h1 id="manipulation-des-disques">Manipulation des disques</h1>
<ul>
<li>Utilisez des disques représentant des formes régulières. Si vous utilisez un disque aux formes irrégulières (un disque avec une forme spéciale), vous risquez d'endommager le GRAVEUR DE DVD AVEC DISQUE DUR.</li>
</ul>
<p><img alt="" src="images/9e09580d3ffbf2d4fe895d81a4be65dacd7a88ed5e5b56528c0385360e274e5d.jpg" /></p>
<h1 id="tenue-des-disques">Tenue des disques</h1>
<ul>
<li>Evitez de toucher la surface du disque sur laquelle vous allez effectuer un enregistrement.</li>
</ul>
<p><img alt="" src="images/0f8d2ef13722a75a2cfb2b2557e3b06f14b8a029962993673c00f0941af46d05.jpg" /></p>
<h1 id="dvd-ram-dvd-rw-et-dvd-r">DVD-RAM, DVD-RW et DVD-R</h1>
<ul>
<li>Procédez au nettoyage avec un nettoyant pour disque DVD-RAM/ PD en option (LF-K200DCA1 si disponible). N'utilisez pas des nettoyants ou des chiffons pour CD pour nettoyer des disques DVD-RAM/-RW/-R.</li>
</ul>
<p><img alt="" src="images/1a12535a9310fe8e8037b8fba1639bc66988c28f19c6722e38902ef58945fc17.jpg" /></p>
<h1 id="dvd-video-audio-cd-2">DVD-Video, Audio-CD</h1>
<ul>
<li>Eliminez la poussière ou la contamination sur le disque avec un chiffon doux.</li>
</ul>
<h1 id="précautions-lors-de-la-manipulation-des-disques">Précautions lors de la manipulation des disques</h1>
<p>N'ecrivez pas sur la face imprimée avec un stylo à bille ou un crayon. <br />
- N'utilisez pas de liquides de nettoyage pour disques vinys en aérosol ou d'antistatiques. Evitez également d'utiliser des produits chimiques volatiles, tels que le benzène ou un solvant. <br />
- N'apposez pas d'étiquettes ou d'autocollants sur les disques. (N'utilisez pas des disques avec du ruban adhésié ou des restes d'autocollants décollés.) <br />
- N'utilise pas de couvercles ou de protections contre les rayures. <br />
- N'utilise pas des disques imprimés avec les imprimantes d'étiquettes disponibles sur le marché. <br />
- Ne chargez pas des disques gauchis ou craquelés.</p>
<h1 id="stockage-des-disques">Stockage des disques</h1>
<p>Assurez-vous de ne pas endommager le disque car les données contenues sur ces disques sont très sensibles à l'environnement.</p>
<ul>
<li>Ne les conservez pas sous la luzière directe du soleil. </li>
<li>
<p>Maintenez-les dans un endroit frais et ventilé. <br />
Rangez-les verticalement.</p>
</li>
<li>
<p>Gardez-les dans une chemise de protection propre. </p>
</li>
<li>Si vous déplacezrapidementvoretGRAVEURDEDVDAVECDISQUEDURd'unendroitfroida un endroit chaud,les parties en fonctionnement et les lentilles peuvent generations de la condensation et entrainer une lecture anomale du disque.Danspareilcas,attendez deux heures avant de brancher l'appareil.INSEREZ ensuitele disqueetessayeza nouveau de le litre.</li>
</ul>
<h1 id="spécifications-des-disques">Spécifications des disques</h1>
<p>Cet apparéil vous permet d'enregistrer et de dire des videos numériques de haute qualité sur des disques DVD-RAM/-RW/-R ou sur le disque dur.</p>
<p>Vou puez egalment modifier des images numériques sur des disques DVD-RAM/-RW/ ou sur le disque dur.</p>
<h1 id="type-de-disque">Type de disque</h1>
<h1 id="dvd-video-2">DVD-Video</h1>
<ul>
<li>Un disque numérique polyvalent (DVD) peutContainir jusqu'à 135 minutes d'images, 8 langues audio et 32 langues de sous-titrage. Il dispose de la compression d'image MPEG-2 et de l'environnement Dolby digital, vous permettant de bénéficier d'images de qualite cinema claires et vives chez vous. </li>
<li>Lors du passage de la première à la seconde couche d'un video disque DVD bi couche, une distorsion-temporaire de l'image et du son est possible. Il ne s'agit pas d'un dysfonctionnement de l'appareil. </li>
<li>Une fois l'enregistrement d'un DVD-RW/-R en mode Video finalisé, il devient un DVD video.</li>
</ul>
<h1 id="cd-audio">CD audio</h1>
<ul>
<li>Un disque audio sur lequel un son 44,1kHz PCM est enregistré. </li>
<li>Lit les disques CD-DA format audio, CD-R et les disques CD-RW. </li>
<li>L'appareil peut ne pas dire certains disques CD-R ou CDRW du fait des conditions d'enregistrement.</li>
</ul>
<h1 id="cd-r-rw-2">CD-R/-RW</h1>
<ul>
<li>Utilisez des disques CD-R/-RW de 700 Mo (80 minutes). <br />
Evitez dans la mesure du possible d'utiliser des disques de 800 Mo (90 minutes) ou d'une capacité supérieure car le lecteur pourrait ne pas les dire. </li>
<li>Si les disques CD-R/RW n'ont pas ete enregistrres dans une session fermee, vous risquez d'avoir un retard en debut de lecture, de ne pas pouvoir dire tous les fichiers enregistrres. </li>
<li>Certains disques CD-R/-RW ne peuvent pas etre lus par cet apparéil, en fonction du dispositif utilisé pour le gravage. Concernant les contenus enregistrés sur support CD-R/-RW à partir de CD pour votre usage personnel, la lisibilité peut varier en fonction du contenu et des disques.</li>
</ul>
<h1 id="diamond-lecture-et-enregistrement-de-disque-dvd-r"> Lecture et enregistrement de disque DVD-R</h1>
<ul>
<li>Une fois l'enregistrement d'un DVD-R en mode Video finalisé, il devient un DVD video. </li>
<li>Vous pouvez enregistrer sur l'espace disponible du disque et utiliser les fonctions de modification telles que donner un titre aux disques et aux programmes et effacer les programmes avant de finaliser. </li>
<li>Lorsqu'une programmation est effacée d'un disque DVD-R, cet espace ne devient pas pour autant disponible. Une fois qu'une zone sur un disque DVD-R est enregistrée, cette zone n'est plus disponible pour enregistrement, que l'enregistrement soit effacé ou non. </li>
<li>Cela prend environ 30 secondes à l'appareil pour finir de Traits les informations de gestion d'enregistrement après la fin de celui-ci. </li>
<li>Ce produit optimise le disque DVD-R à chaque enregistrement. L'optimisation est réalisée lorsque vous démarrez l'enregistrement après avoir insérer le disque ou mis l'appareil sous tension. L'enregistrement sur le disque devient impossible en cas de trop nombreuses optimisations. </li>
<li>La lecture peut s'avérer impossibly dans certains cas du fait de la qualité de l'enregistrement. </li>
<li>Cet apparéil peut dire des disques DVD-R enregistrés et finalisés avec ungraveur videoDVD Samsung. Il peut ne pas dire certains disques DVD-R en fonction du disque et de la qualité de l'enregistrement.</li>
</ul>
<h1 id="lecture-et-enregistrement-de-disque-dvd-rw">Lecture et enregistrement de disque DVD-RW</h1>
<ul>
<li>Les disques DVD-RW peuvent être lus et enregistrés aussi bien en mode Video qu'en mode VR. </li>
<li>Une fois l'enregistrement sur un DVD-RW finalisé que ce soit en mode Video ou en mode VR, vous ne pouvez pas réaliser d'enregistrement supplémentaire. </li>
<li>Une fois que l'enregistrement d'un DVD-RW est finalisé en mode Video, il devient un DVD video. </li>
<li>
<p>Dans les deux modes, la lecture est possible avant et après finalisation mais il n'est plus possible d'enregistrer, d'effacer et de modifier après finalisation.</p>
</li>
<li>
<p>Si vous souhaitez enregistrer le disque en mode VR, puis enregistrer en mode V, assurez-vous d'executer le Format. Soyez attentif à l'opération du Format car vous risquez de perdre l'ensemble des données enregistrées. </p>
</li>
<li>Un disque DVD-RW vierge est initialisé en mode VR lors de sa première initiaisation.</li>
</ul>
<h1 id="diamond-lecture-et-enregistrement-de-disque-dvd-ram"> Lecture et enregistrement de disque DVD-RAM</h1>
<ul>
<li>Assurez-vous que le mode d'enregistrement est le mode VR. Dans le cas contraire, cet apparéil ne pourrait pas dire l'enregistrement. </li>
<li>Vous ne pouvez pas dire un DVD-RAM sur la plupart des composants DVD du fait des problèmes de compatibilité. </li>
<li>Seuls les disques DVD-RAM standard version 2.0. peuvent être lus sur cet apparéil. </li>
<li>Les DVD-RAM enregistrés sur cet apparéil risquènt de ne pas fonctionner avec d'autres composants DVD. Pour déterminer la compatibilité avec ces disques DVD-RAM, reportez-vous au manuel d'utilisation du lecteur. </li>
<li>Pour les disques DVD-RAM à cartouche, retirez la cartouche et utilisez seulement le disque.</li>
</ul>
<h1 id="copie-de-disque">Copie de disque</h1>
<p>Spécifications de copie du contenu </p>
<table><tr><td>Contenu</td><td>HDD → DVD</td><td>DVD → HDD</td></tr><tr><td>Titre matériel enregistré</td><td>Pris en charge</td><td>Pris en charge</td></tr><tr><td>Titre protégé contre la copie</td><td>Arrêt pris en charge</td><td>Arrêt pris en charge</td></tr><tr><td>Titre calculable pour une copie</td><td>Déplacer
(Efface le titre sur le disque dur après l'avoir copié)</td><td>Arrêt pris en charge</td></tr></table>
<p>Une fois le "programme variable pour une seule copie" enregistré sur le DVD, il ne pourrait plus être enregistré sur le disque dur. Par contre, si le "programme variable pour une seule copie" a été enregistré sur le disque dur, il pourrait être enregistré sur un DVD-RW (mode VR) ou un DVD-RAM.</p>
<p>Spécifications de copie du contenu </p>
<table><tr><td>Contenu</td><td>HDD → DVD</td><td>DVD → HDD</td></tr><tr><td>MP3</td><td>Pris en charge</td><td>Pris en charge</td></tr><tr><td>JPEGphoto)</td><td>Pris en charge</td><td>Pris en charge</td></tr><tr><td>DivX</td><td>Pris en charge</td><td>Pris en charge</td></tr><tr><td>CD-DA</td><td>Arrêt pris en charge</td><td>Pris en charge</td></tr></table>
<ul>
<li>Disque (CD-R/CD-DA/CD-RW/DVD-RAM, DVD-R(Finaliser)/DVD-RW(Finaliser)) HDD </li>
<li>HDD DVD-R, DVD-RW(V) </li>
<li>Si le disque est finalisé via Gestionnaire Disque, il est compatible avec un ordinateur en tant que disque au format standard.</li>
</ul>
<h1 id="protection-contre-la-copie">PROTECTION CONTRE LA COPIE</h1>
<ul>
<li>De nombreux DVD sont protégés contre la copie. C'est pourquoi vous veez raccarder directement votre GRAVEUR DE DVD AVEC DISQUE DUR à votre téléviseur et non à un magnétoscope. Le branchement à un magnétoscope entraine une déformation de l'image lorsque vous tentez de dire des DVD protégés contre la copie. </li>
<li>Cet apparéil bénéficiaie d'une protection des droits d'auteur faisant l'objet de brevets aux Etats-Unis et de droits de propriété intellectuelle détenus par Macrovision Corporation ainsi que par d'autres titulaires. L'utilisation de ce système de protection des droits d'auteur est suymse à l'approbation de Macrovision Corporation. Elle est destinée à un usage juste ainsi qu'à autres utilisations restreintes, sauf si une autorisation a été délivrée par Macrovision Corporation. Tout opération de décompilation ou de désassemblage est interdite.</li>
</ul>
<h1 id="protection-2">Protection</h1>
<p>Ce GRAVEUR DE DVD AVEC DISQUE DUR vous permet de protégger le contenu de vos disques comme précisé ci-dessous.</p>
<ul>
<li>Protégé par programme : Reportez-vous à la page 74 “Verrouillage(protection) d'un titre” </li>
<li>
<p>Disque protégé: Reportez-vous à la page 88 "Protection du disque"</p>
</li>
<li>
<p>Les DVD-RAM/-RW/-R incompatibles avec le format DVDVIDEO ne peuvent pas être lus sur ce produit. </p>
</li>
<li>Pour de plus amples informations concernant la compatibilité en matière d'enregistrement de DVD, consultez le fabricant du DVD-RAM/-RW/-R. </li>
<li>L'utilisation de DVD-RAM/-RW/-R de mauvaise qualité est susceptible de provoquer, entre autres, les problèmes inattendus suivants :échéç de l'enregistrement, perte de données enregistrées ou modifiées, dommages à l'enregistreur de DVD avec DISQUE DUR.</li>
</ul>
<h1 id="format-du-disque">Format du disque</h1>
<h1 id="utilisation-de-disque-mp3">Utilisation de disque MP3</h1>
<ul>
<li>Les CD-R/-RW, DVD-RAM/±RW/±R et disques durs, contenant des fichiers MP3 enregistrés au format UDF, ISO9660 ou JOLIET peuvent être lus. </li>
<li>Vous pouvez dire uniquement les fichiers MP3 générant une extension ".mp3" ou ".MP3". </li>
<li>Pour les fichiers MP3 enregistrés avec un VBR (débit binaire variable), de 32 Kbps à 320 Kbps, le son peut être coupé. </li>
<li>La plage de lecture de débit binaire est comprise entre 56 Kbps et 320 Kbps. </li>
<li>Chaque dossier peut composer un maximum de 500 éléments, fichiers et sous-dossiers compris.</li>
</ul>
<h1 id="utilisation-de-disque-jpeg">Utilisation de disque JPEG</h1>
<ul>
<li>Les CD-R/-RW, DVD-RAM/±RW/±R et disques durs, enregistrés au format UDF, ISO9660 ou JOLIET peuvent être lus. </li>
<li>OVous pouvez tire uniquement les fichiers JPEGprésentant une extension“.jpg” ou“.JPG”. </li>
<li>Chaque dossier peut composer un maximum de 500 éléments, fichiers et sous-dossiers compris </li>
<li>MOTION JPEG et JPEG progressif ne sont pas pris en charge.</li>
</ul>
<h1 id="utilisation-de-disque-divx">Utilisation de disque DivX</h1>
<ul>
<li>CD-RW/-R, DVD-RAM/±RW/±R et disques durs, </li>
<li>Les fichiers video possessant des extensions suivantes peuvent êtrelus:.avi, .divx, .AVI, .DIVX </li>
<li>Format DivX Video (Codec) : DivX 3.11 DivX 4.x DivX 5.x (sans QPEL et GMC) </li>
<li>Format DivX Audio (Codec) : MP3, MPEG1 Audio Layer 2, LPCM, AC3, DTS </li>
<li>Formats de fichier sous titre pris en charge : .smi, .srt, .sub, .psb, .txt, .ass </li>
<li>Chaque dossier peut composer un maximum de 500 éléments, fichiers et sous-dossiers compris </li>
<li>Les disques d'une résolution supérieure à 720 x 576 pixels ne peuvent être lus.</li>
</ul>
<h1 id="nutilisez-pas-les-disques-suivants">N'utilisez pas les disques suivants!</h1>
<ul>
<li>Les disques LD, CD-G, CD-I, CD-ROM, DVD-ROM ne doivent pas etre utilisés avec cet apparéil.</li>
</ul>
<p>[Remarque]</p>
<p>Types de disque qui ne peuvent pas etre lus : CD/ CD-R/-RW/MP3/JPEG/DVD-Video/DVD-RAM/ ± RW/ ± R. La lecture d'un disque DVD-RW/ ± R enregistré en Mode Video sur un autre composant n'est possible qu'une fois celui-ci finalisé.</p>
<ul>
<li>Cet apparéil risque de ne pas dire certains disques commerciaux ou certains disques DVD achétés hors zone. Lorsque ces disques sont lus, "Pas de disque" ou "Merci de vérifier le code régional du disque." s'affiche. </li>
<li>De même, si vous disque DVD-RAM/-RW/-R est une copie illégale ou n'est pas au format DVD matériel, il risque de ne pas être lisible.</li>
</ul>
<h1 id="diamond-compatibilité-des-disques"> Compatibilité des disques</h1>
<ul>
<li>Certainly marques de disques ne sont pas compatibles avec cet apparéil.</li>
</ul>
<h1 id="premiers-pas-2">PREMIERS PAS 2</h1>
<p>2 Avertissement <br />
3 Précautions <br />
10 Fonctions generales <br />
11 Avant de dire le manuel d'utilisation <br />
12 Utilisation du GRAVEUR DE DVD AVEC DISQUE DUR <br />
14 Déballage <br />
16 Description <br />
19 Aperçu de la télécommande</p>
<h1 id="raccordement-configuration">RACCORDEMENT & CONFIGURATION</h1>
<h1 id="20-2">20</h1>
<p>20 Raccordement du GRAVEUR DE DVD AVEC DISQUE DUR <br />
21 Raccordements supplémentaires <br />
22 Antenne + GRAVEUR DE DVD AVEC DISQUE DUR + Decodeur externe + Télèveur <br />
23 Autre type de raccordement du cable desorting Video <br />
25 Autre type de raccordement du cable de sortie Audio <br />
27 Branchement sur des prises d'entrée AV 3</p>
<h1 id="configuration-du-systéme">CONFIGURATION DU SYSTÉME</h1>
<h1 id="28-2">28</h1>
<p>28 Navigation dans les menus à l'écran <br />
28 Configuration PLUG & PLAY <br />
30 Réglage de l'horloge <br />
30 Paramétr un canal <br />
32 Configuration des options de langue <br />
32 Configuration des options du Systeme <br />
34 Configuration des options audio <br />
35 Configuration des options video <br />
37 Configuration du verrouillage parental <br />
38 Configuration des options d'enregistrement</p>
<h1 id="lecture">LECTURE</h1>
<h1 id="40">40</h1>
<p>40 Code régional (DVD Video uniquement) <br />
40 Logos des disques compatibles <br />
40 Types de disque qui peuvent etre lus <br />
42 Lecture d'un disque <br />
43 Utilisation du Menu du Disque & du Menu des Titres <br />
43 Utilisation des boutons de lecture <br />
45 Utilisation du bouton INFO <br />
45 Sélection de la langue des sous-titres <br />
46 Sélection des canaux de piste son & audio <br />
46 Changement de l'angle de prise de vue <br />
46 Lecture repétée <br />
47 Zoom avant <br />
48 Utilisation des marqueurs <br />
49 Utilisation des signets <br />
50 Lecture d'un fichier CD/MP3 audio <br />
55 Lecture d'une Image <br />
57 Lecture d'un DivX</p>
<h1 id="enregistrement">ENREGISTREMENT</h1>
<p>59</p>
<p>59 Disques enregistrables <br />
60 Formats d'enregistrement <br />
61 Mode d'enregistremente <br />
62 Images non enregistrables <br />
63 Enregistrement immédiat <br />
64 RÉalisation d'un enregistrement immédiat (OTR) <br />
65 Enregistrement et lecture simultanés <br />
66 Fonction de programmation en tant que signal direct <br />
67 RÉalisation d'un enregistrement programme <br />
70 Utilisation de la fonction ShowView <br />
71 ShowView Allongé <br />
71 Accès à la liste d'enregistements programmés</p>
<h1 id="modification">MODIFICATION</h1>
<p>73</p>
<p>73 Modification de base (liste de titres) <br />
77 Utilisation de la fonction Trier (liste de titres) <br />
78 Menu Navigation <br />
79 Sélection du Contenu <br />
79 Modification avancée (Liste de lecture) <br />
84 Effectuer des copies du disque dur vers un DVD et Inversement <br />
85 Copier un MP3, JPEG ou DivX <br />
87 Modification du nom du fichier Musical/ Photo/DivX <br />
88 Gestionnaire de disque</p>
<h1 id="fiche-technique">FICHE TECHNIQUE</h1>
<p>92</p>
<p>92 Dépannage</p>
<h1 id="annexe">ANNEXE</h1>
<p>94</p>
<p>94 Caracteristiques</p>
<h1 id="fonctions-générales">FONCTIONS GÉNÉRALES</h1>
<p>Cet apparéil vous permet d'enregistrer et de dire des videos numériques de haute qualité sur des disques DVD- RAM/-RW/-R ou sur le disque dur.</p>
<p>Voupez également modifier des images numériques sur des disques DVD-RAM/-RW/ ou sur le disque dur.</p>
<h1 id="enregistrement-sur-le-disque-dur">Enregistrement sur le disque dur</h1>
<p>DVD-HR770</p>
<p>Vouss pouvez effectuer un enregistrement video d'une durée maximale d'environ 264 heures (8 heures en mode EP) sur le disque dur interne de 160 Go (gigaoctet).</p>
<p>Grac aux DVD enregistrables et au disque dur de grande capacité sur le même graveur, vous pouvez aussi bien conserver des enregistements sur le disque dur pour un accès rapide à tout moment qu'enregistrer sur un DVD pour archivage ou lecture sur un autre lecteur DVD.</p>
<h1 id="copie-entre-le-disque-dur-et-le-dvd">Copie entre le disque dur et le DVD</h1>
<p>Voupe copier des enregistrements du disque dur sur un DVD enregistrable ou du DVD sur le disque dur. Toute copie ne peut etre effectue que dans le meme mode d'enregistrement que le titre source.</p>
<h1 id="enregistrement-et-lecture-simultanés">Enregistrement et lecture simultanés</h1>
<p>La lecture et l'enregistrement que ce soit pour les DVD ou pour le disque dur interne sont complètement indépendants.</p>
<p>Par exemple, vous pouvez enregistrer un programme en cours de diffusion soit sur un DVD enregistrable soit sur le disque dur tout en regardant un autre enregistrement déjà réalisé sur le même DVD ou sur le disque dur.</p>
<h1 id="réglage-automatisé-de-la-qualité-pour-lenregistrement-programme">Réglage automatisé de la qualité pour l'enregistrement programme</h1>
<p>Si le mode FR est sélectionné, la qualité video est régée automatiquement de sorte que toutes les videos programmes quisient être enregistrées sur l'espace disque restant. (Reportez-vous à la page 67)</p>
<h1 id="balayage-progressif-de-haute-qualité">Balayage progressif de haute qualité</h1>
<p>Le balayage progressif donne une video à haute résolution et sans scintillage. Le convertisseur numérique-analogique de 10 bits à 54 MHz et le circuit séparé 2D Y/C fournissent la qualité d'enregistrement et de lecture d'image optime. (Reportez-vous aux page 36)</p>
<h1 id="certification-divx">Certification DivX</h1>
<p>DivX, DivX Certified et les logos qui leur sont associés sont des marques déposées de</p>
<p>DivXNetworks, Inc et font l'objet d'une licence.</p>
<p><img alt="" src="images/f8af84fde6833c51260d7517cd1da7377c8e5ff4010e3362cbebec593ca5b978.jpg" /></p>
<ul>
<li>Produit certifié officiel DivX® </li>
<li>Permet une lecture de toutes les videos DivX® (y compris DivX® 6) avec lecture standard des fichiers multimédia DivX®</li>
</ul>
<h1 id="mode-enregistrement-ez">Mode Enregistrement EZ</h1>
<p>Cette fonction vous permet d'initialiser et de finaliser automatiquement un disque (reportez-vous à la page 39)</p>
<p>Prenez reconnaissance des points suivants avant de procéder à la lecture du manuel d'utilisation.</p>
<h1 id="le-tableau-ci-dessous-répertorie-les-iconônes-que-vous-rencontres-dans-le-manuel">Le tableau ci-dessous répertorie les iconônes que vous rencontres dans le manuel</h1>
<table><tr><td>Icône</td><td>Terme</td><td>Définition</td></tr><tr><td>HDD</td><td>HDD</td><td>Désigne une fonction disponible sur le disque dur.</td></tr><tr><td>DVDiges</td><td>DVD</td><td>Indique une fonction disponible sur les DVD ou DVD±R/-RW(V) enregistrées et finalisés.</td></tr><tr><td>DVD-RAM</td><td>RAM</td><td>Désigne une fonction disponible sur un DVD-RAM.</td></tr><tr><td>DVD-RW</td><td>-RW</td><td>Désigne une fonction disponible sur DVD-RW.</td></tr><tr><td>DVD-R</td><td>-R</td><td>Désigne une fonction disponible sur DVD-R.</td></tr><tr><td>DVD-RW</td><td>+RW</td><td>Désigne une fonction disponible sur DVD+RW.</td></tr><tr><td>DVD-R</td><td>+R</td><td>Désigne une fonction disponible sur DVD+R.</td></tr><tr><td>Audio CD</td><td>CD-DA</td><td>Désigne une fonction disponible sur un CD de données (CD-R ou CD-RW).</td></tr><tr><td>JPEG</td><td>JPEG</td><td>Indique une fonction disponible sur les CD-R/-RW, les DVD±R/±RW/-RAM ou sur le disque dur.</td></tr><tr><td>MP3</td><td>MP3</td><td>Indique une fonction disponible sur les CD-R/-RW, les DVD±R/±RW/-RAM ou sur le disque dur.</td></tr><tr><td>DivX</td><td>DivX</td><td>Indique une fonction disponible sur les CD-R/-RW, les DVD±R/±RW/-RAM ou sur le disque dur.</td></tr><tr><td>!</td><td>Attention</td><td>Désigne une situation dans laquelle un dysfonctionnement est survenu ou des paramètres ont été annulés.</td></tr><tr><td>REMARQUE</td><td colspan="2">Conseils ou consignes permettant à chaque option de fonctionner correctement.</td></tr><tr><td>Bouton d'accès direct</td><td colspan="2">Désigne une fonction qui peut être activée à l'aide d'un seul bouton.</td></tr></table>
<h1 id="a-propos-du-manuel-dutilisation">A propos du manuel d'utilisation</h1>
<p>1) Assurez-vous de dire attentivement le chapitre Consignes de sécurité avant d'utiliser ce produit. (reportez-vous aux pages 2 à 7) <br />
2) Si un problème survient, consultez le chapitre Dépannage. (reportez-vous aux pages 92 à 93)</p>
<h1 id="copyright-2">Copyright</h1>
<p>©2008 Samsung Electronics Co.</p>
<p>Tous droits réservés. Leprésent manuel d'utilisation ne peut être produit ou copie, partiellement ou dans son intégralité, sans le consentement écrit et préalable de Samsung Electronics Co.</p>
<h1 id="utilisation-du-graveur-de-dvd-avec-disque-dur">UTILISATION DU GRAVEUR DE DVD AVEC DISQUE DUR</h1>
<h1 id="etape-1-sélectionner-le-type-de-disque-ou-le-disque-dur">Etape 1: Sélectionner le type de disque ou le disque dur</h1>
<p>Veuillez vérifier le type de disque disponible avant de démarrer l'enregistrement.</p>
<p><img alt="" src="images/e2a1ff55e96fb95b5e24817958746c3d31d7bcf9b45aebd8368f785bdf4cb6b0.jpg" /></p>
<p>Si vous souhaitez enregistrer de manière repétée sur le même disque ou modifier le disque après l'enregistrement, Sélectionnez un disque réinscribable du type DVD-RW ou DVD-RAM. Si vous souhaitez sauvégarder un enregistrement sans faire de modifications, optez pour un disque non réinscribable DVD-R. Vous pouvez enregistrer des fichiers directement sur le disque dur intégré ou modifier un filchier enregistré.</p>
<h1 id="etape-2-formater-le-disque-pour-démarrer-lenregistrement">Etape 2: Formater le disque pour démarrer l'enregistrement</h1>
<p>Contrairement à un magnétoscope, legraveur lance automatiquement le processus de formatage dés qu'un disque vierge est inséré. Cette opération est nécessaire avant tout enregistrement sur un disque.</p>
<h1 id="utilisation-du-disque-dur">Utilisation du disque dur</h1>
<p>Le disque dur ne nécessite aucun formatage.</p>
<h1 id="utilisation-dun-dvd-ram">Utilisation d'un DVD-RAM</h1>
<p>Ce type de disque peut être formaté au format Enregistrement DVD-Video (mode VR). Vous pouvez, selon vos besoin, modifier une image enregistrée, créé une liste de lecture et modifier des images selon une série spécifique.</p>
<h1 id="utilisation-dun-dvd-rw">Utilisation d'un DVD-RW</h1>
<p>Ce type de disque peut être formé au format DVD Video (mode V) ou au format Enregistrement DVDVideo (mode VR). Pour un disque vierge, un message vous demande si vous souhaitez initiailler le disque ou non. L'initialisation démarre lorsqu vous sélectionnez « DVD-VR » ou « DVD-V » . Vous pouze dire un disque en mode Video sur différents composants DVD. Un disque en mode VR vous permet de proceder à un plus grand nombre de modifications.</p>
<h1 id="utilisation-dun-dvd-r">Utilisation d'un DVD-R</h1>
<p>Le formatage d'un disque n'est pas nécessaire et seul l'enregistrement en mode Video est pris en charge.Ce type de disques peut etre lu sur differents composants DVD une fois celui-ci finalise.</p>
<h1 id="etape-3-enregistrement">Etape 3: Enregistrement</h1>
<p>Il existe deux méthodes d'enregistrement :</p>
<p>I'enregistrement direct et I'enregistrement programme. L'enregistrement programme comprend quatre modes.</p>
<p>Mode d'enregistrement : XP (mode Haute qualité), SP (mode Qualité standard), LP (mode Enregistrement long) et EP (mode Etendu) en fonction du mode d'enregistrement. Lorsque l'enregistrement est en mode FR, laffective qualite d'image est enregistrree en fonction du temps restant sur le disque.</p>
<h1 id="etape-4-lecture">Etape 4 : Lecture</h1>
<p>Yououpouzeselectionnerletitrequeyoussoushaitez dansle menuaffichéa l'écranetlancerimmédiatement lalecture.</p>
<p>Un DVD est divisé en sections, appelées titres, et en sous-sections, appelées chaprites.</p>
<h1 id="etape-5-modification-dun-disque-enregistré">Etape 5: Modification d'un disque enregistré</h1>
<p>Modifier les données d'un disque est plus facile que de modifier les données d'une cassette video traditionnelle. Legraveur propose un plus grand nombre de fonctions de modification (pourDVD et disque dur uniquement).</p>
<p>Par l'intermédiaire d'un menu de modification convivial, vous pouvez activer différentes fonctions de modification vous permettant entre autre de supprimer, copier, renomer ou verrouiller un titre enregistré.</p>
<p>Creation d'une liste de lecture (DVD-RAM/-RW en mode VR, disque dur)</p>
<p>Cegraveurvoupermet decrier une nouvellelistediscution surunmeme disque etde la modifier sans touchera l'enregistrement original.</p>
<h1 id="etape-6-finalisation-et-lecture-sur-dautres-composants-dvd">Etape 6 : Finalisation et lecture sur d'autres composants DVD</h1>
<p>Afin de pouvoir lire votre DVD sur d'autres composants DVD, une opération de finalisation peut s'avérer nécessaire. Terminatez d'abord toutes les procédures de modification et d'enregistrement en cours, puis finalisez le disque.</p>
<h1 id="lorsque-vous-utilisez-un-disque-dvd-rw-en-mode-vr">Lorsque vous utilisez un disque DVD-RW en mode VR</h1>
<p>Bien qu'une procédure de finalisation ne soit en général pas nécessaire lorsque vous lisez le disque sur un composant compatible avec le mode VR, il est conseilé d'utiliser un disque finalisé pour lire le disque sur ce type de composant.</p>
<h1 id="lorsque-you-utilisez-un-disque-dvd-rw-en-mode-video">Lorsque you utilisez un disque DVD-RW en mode Video</h1>
<p>Le disque doit d'abord être finalisé avant de lancer la lecture sur un apparéil autre que cegraveur. Une fois le disque finalisé, vous ne pouvez plus ni modifier, ni enregistrer des données sur celui-ci.</p>
<p>Pour pouvoir proceeder à nouveau à des enregistements sur le disque, celui-ci doit être nonfinalisé.</p>
<h1 id="lorsque-vous-utilisez-un-disque-dvd-r">Lorsque vous utilisez un disque DVD-R</h1>
<p>Finalisez le disque afin de pouvoir le litre sur un composant autre que cegraveur. Vous ne pouvez ni modifier ni enregistrer de données sur le disque une fois celui-ci finalisé.</p>
<p><img alt="" src="images/557a24bc009138b3523a8d1e47f60f89fb81c442cfc640f05c83bf7544900b7b.jpg" /></p>
<ul>
<li>Vous pouvez finaliser le disque automatiquement à l'aide de la fonction Enregistrement EZ.</li>
</ul>
<p>(reports-à la page 39)</p>
<h1 id="accessoires">Accessoires</h1>
<p>Assurez-vous que tous les accessoires ci-dessous se trouvent bien dans l'emballage.</p>
<p><img alt="" src="images/af7c80e09023b5c30131dba14d5c7e94644d8e046eaa5a081fbf3f8415cef13c.jpg" /></p>
<p><img alt="" src="images/493db1a7c5d5bb60d93526edb09c4f02288e7254c3e3856fa2172c1c3ff955e1.jpg" /></p>
<p><img alt="" src="images/62c116f5b921480d858b83d68ec9e3ebff816ce915515a0ba856555f95ad2853.jpg" /></p>
<h1 id="préparation-de-la-télécommande">Préparation de la télécommande</h1>
<h1 id="insertion-des-piles-dans-la-télécommande">Insertion des piles dans la télécommande</h1>
<ul>
<li>Retirez le couvercle du compartment réservé aux piles situé à l'arrière de la télécommande. </li>
<li>Placez-y deux piles AAA. Assurez-vous que les polarités (+ et -) sont bien alignées. </li>
<li>Remettez en place le couvercle du compartment réservé aux piles.</li>
</ul>
<h1 id="si-la-télécommande-ne-fonctionne-pas-correctement">Si la télécommande ne fonctionne pas correctement :</h1>
<ul>
<li>Vérifiez la polarité +/- des piles (pile sèche) </li>
<li>Vérifiez que les piles ne sont pas déchargeées. </li>
<li>Vérifie que des obstacles n'entravent pas la course du faisceau provenant du capteur de la télécommande. </li>
<li>Vérifiez qu'aucun éclairage fluorescent ne se trouve à proximité.</li>
</ul>
<p>Débarrasssez-vous des piles conformément à la réglementation environnementale en vigueur dans votre région. Ne les jetez pas avec les ordures menagères.</p>
<p><img alt="" src="images/1e1db8266f5b2a745435f7b90becd4dac0f64cd3f4fc8e1fdd11f6a59dc567a9.jpg" /></p>
<h1 id="afin-de-savoir-si-votre-téléviseur-est-compatible-suivez-les-instructions-ci-dessous">Afin de savoir si votre téléviseur est compatible, suivez les instructions ci-dessous :</h1>
<ol>
<li>Allumez votre téléviseur. </li>
<li>Pointez la télécommande vers le recepteur du télévisuer. </li>
<li>Restez appuyer sur le bouton TV STANDBY/ON puis, à l'aide des touches numériques, saisissez le code à deux chiffres correspondant à la marque de votre téléviseur.</li>
</ol>
<p>Codes des téléviseurs pouvant etre entres a distance </p>
<table><tr><td>MARQUE</td><td>BOUTON</td></tr><tr><td>SAMSUNG</td><td>01, 02, 03, 04, 05, 06, 07, 08, 09</td></tr><tr><td>AIWA</td><td>82</td></tr><tr><td>ANAM</td><td>10, 11, 12, 13, 14, 15, 16, 17, 18</td></tr><tr><td>BANG & OLUFSEN</td><td>57</td></tr><tr><td>BLAUPUNKT</td><td>71</td></tr><tr><td>BRANDT</td><td>73</td></tr><tr><td>BRIONVEGA</td><td>57</td></tr><tr><td>CGE</td><td>52</td></tr><tr><td>CONTINENTAL EDISON</td><td>75</td></tr><tr><td>DAEWOO</td><td>19, 20, 23, 24, 25, 26, 27, 28, 29, 30, 31, 32, 33, 34</td></tr><tr><td>EMERSON</td><td>64</td></tr><tr><td>FERGUSON</td><td>73</td></tr><tr><td>FINLUX</td><td>06, 49, 57</td></tr><tr><td>FORMENTI</td><td>57</td></tr><tr><td>FUJITSU</td><td>84</td></tr><tr><td>GRADIENTE</td><td>70</td></tr><tr><td>GRUNDIG</td><td>49, 52, 71</td></tr><tr><td>HITACHI</td><td>60, 72, 73, 75</td></tr><tr><td>IMPERIAL</td><td>52</td></tr><tr><td>JVC</td><td>61, 79</td></tr><tr><td>LG</td><td>06, 19, 20, 21, 22, 78</td></tr><tr><td>LOEWE</td><td>06, 69</td></tr><tr><td>LOEWE OPTA</td><td>06, 57</td></tr><tr><td>MAGNAVOX</td><td>40</td></tr><tr><td>METZ</td><td>57</td></tr><tr><td>MITSUBISHI</td><td>06, 48, 62, 65</td></tr><tr><td>MIVAR</td><td>52, 77</td></tr><tr><td>NEC</td><td>83</td></tr><tr><td>NEWSAN</td><td>68</td></tr></table>
<table><tr><td>MARQUE</td><td>BOUTON</td></tr><tr><td>NOBLEX</td><td>66</td></tr><tr><td>NOKIA</td><td>74</td></tr><tr><td>NORDMENDE</td><td>72, 73, 75</td></tr><tr><td>PANASONIC</td><td>53, 54, 74, 75</td></tr><tr><td>PHILIPS</td><td>06, 55, 56, 57</td></tr><tr><td>PHONOLA</td><td>06, 56, 57</td></tr><tr><td>PIONEER</td><td>58, 59, 73, 74</td></tr><tr><td>RADIOLA</td><td>06, 56</td></tr><tr><td>RADIOMARELLI</td><td>57</td></tr><tr><td>RCA</td><td>45, 46</td></tr><tr><td>REX</td><td>74</td></tr><tr><td>SABA</td><td>57, 72, 73, 74, 75</td></tr><tr><td>SALORA</td><td>74</td></tr><tr><td>SANYO</td><td>41, 42, 43, 44, 48</td></tr><tr><td>SCHNEIDER</td><td>06</td></tr><tr><td>SELECO</td><td>74</td></tr><tr><td>SHARP</td><td>36, 37, 38, 39, 48</td></tr><tr><td>SIEMENS</td><td>71</td></tr><tr><td>SINGER</td><td>57</td></tr><tr><td>SINUDYNE</td><td>57</td></tr><tr><td>SONY</td><td>35, 48</td></tr><tr><td>TELEAVA</td><td>73</td></tr><tr><td>TELEFUNKEN</td><td>67, 73, 75, 76</td></tr><tr><td>THOMSON</td><td>72, 73, 75</td></tr><tr><td>THOMSON ASIA</td><td>80, 81</td></tr><tr><td>TOSHIBA</td><td>47, 48, 49, 50, 51, 52</td></tr><tr><td>WEGA</td><td>57</td></tr><tr><td>YOKO</td><td>06</td></tr><tr><td>ZENITH</td><td>63</td></tr></table>
<p>Résultat: Si vous telèviseur est compatible avec la télécommande, il s'est. Il est à présent configuré pour fonctionner avec cette télécommande.</p>
<p><img alt="" src="images/209662afbb9b62dc251880ec702dc129b21000575082ca8399fc0c98c38dc7bf.jpg" /></p>
<p>Si plusieurs codes correspondant à la marque de votre téléviseur, essayez-les un par un jusqu'à ce que vous trouviez celui qui convient. <br />
Si vous changez les piles de la télécommande, il vous faut regler a nouveau le code de la marque.</p>
<p>Vou pouvez désormais commander le téléviseur à l'aide des boutons situés après le bouton TV. </p>
<table><tr><td>Bouton</td><td>Fonction</td></tr><tr><td>TV STANDBY/ON</td><td>Permet d'allumer et d'éteindre le téléviseur.</td></tr><tr><td>INPUT SEL.</td><td>Permet de sélectionner une source externe.</td></tr><tr><td>TV VOL (+ / -)</td><td>Permet de régler le volume sonore du téléviseur.</td></tr><tr><td>PROG (▲ / √)</td><td>Permet de sélectionner le canal souhaïte.</td></tr><tr><td>TV MUTE</td><td>Permet de couper et de remettre le son.</td></tr><tr><td>Numéro</td><td>Permet d'entrez directement le numéro.</td></tr></table>
<p><img alt="" src="images/99aa3bd6f1cfdfcca928ee83aed57a361dd4bba7d05cf035d59032f043ad5515.jpg" /></p>
<p>Il est possible que les fonctions mentionnées ci-dessus ne poussent pas ete activees sur tous les televiseurs. Si vous rencontres des problemes, faites fonctionner le televiseur directement</p>
<h1 id="description">DESCRIPTION</h1>
<h1 id="façade">Façade</h1>
<p><img alt="" src="images/7fa5b2209423bea23225492ea21dd640aba80d22fbe2e86ae5e8c8edd2694bc0.jpg" /></p>
<table><tr><td>1</td><td>BOUTON OPEN/CLOSE</td><td>Permet d'ouvir et de fermer le tiroir disque.</td></tr><tr><td>2</td><td>AFFICHAGE</td><td>Affiche l'état de la lecture, l'houre, etc.</td></tr><tr><td>3</td><td>BOUTON HDD/DVD</td><td>Sélectionnez le mode HDD/DVD.</td></tr><tr><td>4</td><td>BOUTON REC</td><td>Pour démarrer l'enregistrement.</td></tr><tr><td>5</td><td>BOUTON RECHERCHE/SAUT</td><td>Pour aller aux titre/chapitre/piste suivants ou revenir aux titre/chapitre/pistepréciédents. (Mode Playback (Lecture))Permet de sélectionner les chaînes pré régliées de votre téléviseur.(Mode Stop (Arrêt))</td></tr><tr><td>6</td><td>BOUTON PLAY/PAUSE</td><td>Permet de dire un disque ou demettre en pause la lecture.</td></tr><tr><td>7</td><td>BOUTON STOP</td><td>Permet d'arrêter la lecture du disque.</td></tr><tr><td>8</td><td>TIROIR DISQUE</td><td>S'ouvre pour insérer le disque.</td></tr><tr><td>9</td><td>3 ENTRES AV</td><td>Pour raccarder des apparils externes.</td></tr><tr><td>10</td><td>BOUTON VEILLE/MARCHE</td><td>Pour allumer et étéindre legraveur.</td></tr></table>
<p><img alt="" src="images/0dc27ef5f6f842eecf45ddcce3322f0563e380aa6610e3ff4b3de05ae49865ff.jpg" /></p>
<h1 id="ventilateur">Ventilateur</h1>
<p>Le ventilateur fonctionné lorsque l'appareil est sous tension.<br />
Lorsque vous installez l'appareil, menagez un espace libre d'environ 10 cm tout autour du ventilateur.</p>
<table><tr><td>1</td><td>Entrée en provenance de la prise d'antenne</td><td>Permet de connecter le cable RF de l'antenne.</td></tr><tr><td>2</td><td>Sortie vers le connecteur du télévisuer</td><td>Permet de connecter un cable RF à l'entrée de l'antenne du téléviseur.</td></tr><tr><td>3</td><td>Connecteur ENTREE PERITEL AV2 (EXT)</td><td>Permet de connecter un apparéil muni d'une sortie Péritel.</td></tr><tr><td>4</td><td>Connecteur SORTIE PERITEL AV1 (TV)</td><td>Permet de connecter un apparéil muni d'une entrée Péritel.</td></tr><tr><td>5</td><td>COMPONENT VIDEO OUT</td><td>Permet de connecter un apparéil muni d'une entrée video composant.</td></tr><tr><td>6</td><td>SORTIE AUDIO</td><td>Pour raccarder l'entrée audio de l' apparéil externe à l'aide de cables audio.</td></tr><tr><td>7</td><td>SORTIE VIDEO</td><td>Pour raccarder l'entrée d'un apparéil externe à l'aide d'un cable video.</td></tr><tr><td>8</td><td>DIGITAL AUDIO OUT (COAXIAL)</td><td>Pour raccarder un amplificateur muni d'une prise d'entrée audio numérique coaxiale.</td></tr></table>
<p><img alt="" src="images/ea16d05354b6531c65c12f0ad94d7e425a1d8c8671a8447be338fd230e7592b8.jpg" /><br />
Affichage en façade</p>
<p>1 Boutons du mode Disque</p>
<p>Affiche I'etat.</p>
<p>2 Témoin REC (ENR.)</p>
<p>S'allume en mode enregistrement.</p>
<p>3 Témoin AFFICHAGE DVD</p>
<p>S'allume lorsque le mode DVD est selectionné.</p>
<p>4 Témoin TIMER (MINUTERIE)</p>
<p>S'allume pour indiquer le mode enregistrement programme.</p>
<p>5 Temoin PS</p>
<p>S'allume en mode balayage progressif.</p>
<p>6 Témoin ETAT</p>
<p>Témoin de durée de lecture/heure/état actuel.</p>
<p>7 Témoin du type de disque</p>
<p>S'allume lorsqu'un DVD-RW/-R est charge.</p>
<p>La télécommande de votre ENREGISTREUR DE DVD AVEC DISQUE DUR fonctionne avec les téléviseurs Samsung et les marques compatibles.</p>
<p><img alt="" src="images/bad8e12b0e63352147319cab8fd99dd1d7991e7442d75d0eda1c3923b8791476.jpg" /><br />
Insertion des piles dans la télécommande</p>
<p><img alt="" src="images/03b5d97d55ada6d23ec6e4e818c97f3e5d43295fcae746feaa17f9e9f4ca97a8.jpg" /></p>
<p><img alt="" src="images/04f31a0497944f2bb451d1025ce8f56369b34cc33051255e35c13fb77a1edf8e.jpg" /></p>
<p><img alt="" src="images/3e8105716f996cc1f92f761779d0c9fc80148982f8cdf51dea4d9afe58fb77ff.jpg" /></p>
<p><img alt="" src="images/a29a0ac9b87e96a043479df61a2827b10abe34b2d93281eb4066f39d0324dcb0.jpg" /><br />
3. Remettez le capot en place.</p>
<ol>
<li>
<p>Soulevez le capot arrêté de la télécommande comme indiqued dans l'illustration..</p>
</li>
<li>
<p>Installez deux piles AAA.</p>
</li>
</ol>
<p>Veillez à installer les piles en respectant le sens de polarité (+/−) indiqué dans le compartment.</p>
<p>La durée de vie des piles est d'environ un an si le téléviser est utilisé normalement.</p>
<p><img alt="" src="images/72575450fd4ffc08f49e45ef3639cd490d4ba3f1c8adf58726b22787acf0a9b5.jpg" /></p>
<h1 id="raccordement-configuration-2">raccordement & configuration</h1>
<h1 id="raccordement-du-graveur-de-dvd-avec-disque-dur">RACCORDEMENT DU GRAVEUR DE DVD AVEC DISQUE DUR</h1>
<p>Cette partie traite des différentes méthodes de raccordement du GRAVEUR DE DVD AVEC DISQUE DUR aux autres composants externes et des modes de réglage initial requis.</p>
<p>Vou puez connecter votre GRAVEUR DE DVD AVEC DISQUE DUR au teteviseur a I'aide du cable Peritel si l'entree appropriee est disponible sur le teteviseur.</p>
<ol>
<li>Connectez le cable RF comme indiqué. </li>
<li>Reliez l'une des extrémites du cable Péritel à la prise AV1 située à l'arrête du GRAVEUR DE DVD AVEC DISQUE DUR. </li>
<li>Branchez l'autre extrémité sur la fiche correspondante du téléviseur. </li>
<li>Reliez le GRAVEUR DE DVD AVEC DISQUE DUR et le téléviseur. </li>
<li>Allumez le GRAVEUR DE DVD AVEC DISQUE DUR et le téléviseur. </li>
<li>Appuyez sur le bouton INPUT SEL. de votre télécommande jusqu'à ce que le signal video du GRAVEUR DE DVD AVEC DISQUE DUR s'affiche à l'écran.</li>
</ol>
<p><img alt="" src="images/e865f00eeddf6a940c4a9f79ad69ecc98dd972b535d5c0482006ef27a553ac31.jpg" /></p>
<p><img alt="" src="images/7a19f81e3e1ef8b874c09f39562e88dce5086a62d2989dd5392a63d6a7bea8cf.jpg" /></p>
<p>Le cable RF de cet apparéil ne transmet que des signaux TV. Vous doivent connecter le cable Péritel ou les cables audio/vidente pour visionner un DVD à partir de votre GRAVEUR DE DVD AVEC DISQUE DUR. <br />
- En mode TV, Appuyez sur le bouton TV/DVD de la télécommande ; les lettres « TV » s'affichent à l'écran. (ou éteignez le GRAVEUR DE DVD AVEC DISQUE DUR) Vous pouze alors visionner des programmes reçus par le TV.</p>
<p>Vou pouve connecter votre GRAVEUR DE DVD AVEC DISQUE DUR à un satellite ou à un symtoniseur numérique.</p>
<p><img alt="" src="images/257f8ba7d009b5920fdd36ca36e3c78cd4f2ce18dd7d04f78febc0857c48fd25.jpg" /></p>
<h1 id="mode-dvd">- Mode DVD</h1>
<ol>
<li>Reliez le connecteur AV2 du GRAVEUR DE DVD AVEC DISQUE DUR et le récepteur satellite/magnétoscope ou le symtoniseur numérique à l'aide d'un cable Péritel. </li>
<li>Reliez le connecteur AV1 au connecteur Péritel AV du téléviseur. </li>
<li>Allumez le GRAVEUR DE DVD AVEC DISQUE DUR, le récepteur satellite/magnétoscope ou le symtoniseur numérique et le téléviseur. </li>
<li>Reglez le mode Entrée sur AV2.</li>
</ol>
<h1 id="mode-tv">-Mode TV</h1>
<ol>
<li>Appuyez sur le bouton TV/DVD de la télécommande ; les lettres « TV » s'affichent à l'écran. (ou éteignez le GRAVEUR DE DVD AVEC DISQUE DUR). </li>
<li>Vous pouvez visionner les programmes à partir d'un satellite ou du symponiseur numérique connecté à votre GRAVEUR DE DVD AVEC DISQUE DUR même si ce dernier est eteint.</li>
</ol>
<h1 id="raccordement-configuration-3">raccordement & configuration</h1>
<h1 id="antenne-graveur-de-dvd-avec-disque-dur-décodeur-externe-téléviseur">ANTENNE + GRAVEUR DE DVD AVEC DISQUE DUR + DÉCODEUR EXTERNE + TÉLÉVISEUR</h1>
<p>Si vous connectez un Décodeur externe au GRAVEUR DE DVD AVEC DISQUE DUR, vous pouvez enregistrer les chaînes cryptés (CANAL+ ou Première) reçues via le symponiseur TV intégré sur legraveur.</p>
<p><img alt="" src="images/8c3a2032dd70f91dd99c8a437f43294c90cd78ab203553ca579727aa84c84f5d.jpg" /></p>
<ol>
<li>Connectez les cables d'antenna RF comme indiqué. </li>
<li>Reliez le connecteur AV1 du graveur au connecteur Péritel AV du téléviseur à l'aide d'un cable Péritel. </li>
<li>Reliez le connecteur AV2 au connecteur Péritel AV du Décodeur. </li>
<li>Pour regarder ou enregistrer les programmes payants de CANAL+, réglez votre GRAVEUR DE DVD AVEC DISQUE DUR de manière à receivevoir les canaux en utilisant l'affichage à l'écran. (reportez-vous aux pages 30~31)</li>
</ol>
<p>Il existe plusieurs façon de transmettre le signal video sans utiliser de cables Péritel. Sélectionnez ci-dessus le raccordement video qui vous convient le mieux.</p>
<ul>
<li>Cas 1: Raccordement à une prise de sortie Video (composite) <br />
Cas 2: Prises de sortie Video composant</li>
</ul>
<h1 id="védo-composant-et-sortie-progressive">Védo composant et Sortie progressive</h1>
<ul>
<li>La sortie Video composant est disponible uniquement si le téléviseur est équipé d'une entrée Video composant. Si la sortie Video composant ne fonctionne pas, vérifie les connexions du téléviseur et les réglages de selection de l'entrée du téléviseur. </li>
<li>Par rapport à la vente entrelacée standard, le balayage progressif double le nombre de lignes video reliées à votre téléviseur, produitant ainsi des images plus stables, plus claires et sans scintillagement. Cette fonction n'est utilisable que sur les téléviseurs prénant le balayage progressif en charge. </li>
<li>Sortie de balayage progressif (modèle 576p)<br />
Notez que tous les téléviseurs haute définition ne sont pas entièrement compatibles avec cet apparéil et que des parasites peuvent apparátre à l'écran lors de la lecture. En cas de problèmes d'image lors du balayage progressif 576, il est conseilé de raccorder l' apparéil à la sortie "définition standard". Si des questions subsistant quant à la compatibilité de votre téléviseur avec ce GRAVEUR DE DVD AVEC DISQUE DUR 576p, veuillez contacter notre service technique clientèle.</li>
</ul>
<h1 id="cas-1-raccordement-à-une-prise-de-sortie-video-composite">Cas 1: Raccordement à une prise de sortie Video (composite)</h1>
<ol>
<li>Connectez un cable video (jaune) entre la prise VIDEO (jaune) OUT sur le GRAVEUR DE DVD AVEC DISQUE DUR et la prise VIDEO (jaune) INPUT sur votre téléviseur (ou sur l' amplificateur AV). <br />
Profitez d'images de qualite normale. </li>
<li>Connectez les cables audio (blanc et rouge) entre les prises de sortie AUDIO OUT du GRAVEUR DE DVD AVEC DISQUE DUR et les prises d'entrée AUDIO IN du téléviseur (ou de l'amplificateur AV). (Reportez-vous aux pages 25 et 26)</li>
</ol>
<p><img alt="" src="images/9e6bc3aefc17cc0ca7615c3d83b41a97abf2f9a7c2fb9112f8712cc17bee187e.jpg" /></p>
<h1 id="raccordement-configuration-4">raccordement & configuration</h1>
<h1 id="cas-2prises-de-sortie-video-composant">Cas 2:Prises de sortie Video composant</h1>
<ol>
<li>Connectez les cables video composant (non fournis) entre les prises COMPONENT OUT (Y, PB, PR) sur le GRAVEUR DE DVD AVEC DISQUE DUR et les prises COMPONENT IN (Y, PB, PR) sur votre téléviseur. </li>
<li>Profitez d'images de haute qualité dotées d'un rendu des couleurs parfait. </li>
<li>Connectez les cables audio (blanc et rouge) entre les prises de sortie AUDIO OUT du GRAVEUR DE DVD AVEC DISQUE DUR et les prises d'entrée AUDIO IN du téléviseur (ou de l' amplificateur AV). (Reportez-vous aux pages 25 et 26). </li>
<li>ÀpRES le raccordement, reportez-vous aux page 36.</li>
</ol>
<p><img alt="" src="images/0d2b9ed917644d58e3d45721c83ef68848a69505c9bf4dbf55b10de6fb2b8c6f.jpg" /></p>
<p><img alt="" src="images/32ef5cbed4d0dfc12ff148e3aaa9248bef25cb7cd2c64087bf9fce6cf2e09275.jpg" /></p>
<p>Assurez-vous que les connexions codées couleur correspondant. Les prises de sortie composant Y, P<em>B et P</em>R de la GRAVEUR DE DVD AVEC DISQUE DUR doivent être connectees aux prises d'entrée composant correspondantes de la vente télésieur. <br />
- Le réglage progressif n'est disponible que lorsque la sortie video est réglée sur Composant. (Reportez-vous aux page 36)</p>
<h1 id="autre-type-de-raccordement-du-câble-de-sortie-audio">AUTRE TYPE DE RACCORDEMENT DU CÂBLE DE SORTIE AUDIO</h1>
<p>Il existe plusieurs façon de transmettre le signal audio sans utiliser de cables Péritel. Sélectionnez le raccordement audio qui vous correspond le moins.</p>
<p>Cas 1: Raccordement au téléviseur <br />
- Cas 2: Raccordement à un amplificateur stéreo avec prises de sortie AV <br />
Cas 3: Raccordement à un amplificateur AV avec prise de sortie numérique</p>
<p>Manufactured under license under U.S. Patent #: 5,451,942 & other U.S. and worldwide patents issued & pending. DTS and DTS Digital Out are registered trademarks and the DTS logos and Symbol are trademarks of DTS, Inc. © 1996-2007 DTS, Inc. All Rights Reserved.</p>
<p>Fabriqué sous licence de Dolby Laboratories. "Dolby" et le symbole du double D sont des marques déposées des laboratoires Dolby.</p>
<h1 id="cas-1-raccordement-au-téléviseur">Cas 1: Raccordement au téléviseur</h1>
<p>Si vous telévisueur est muni de prises d'entrée audio, utilisez ce raccordement.</p>
<p><img alt="" src="images/0960eb69166cce3e5c9ccaaa59ba633b5d43247a5e4a6d143b9e57a639b73c02.jpg" /></p>
<h1 id="raccordement-configuration-5">raccordement & configuration</h1>
<h1 id="cas-2-raccordement-à-un-amplificateur-stéréo-avec-prises-de-sortie-av">Cas 2 : Raccordement à un amplificateur stéréo avec prises de sortie AV</h1>
<p>Si vous amplifieur stéreo possède uniquement des prises d'entrée AUDIO INPUT (L et R), utilisez les prises de sortie AUDIO OUT.</p>
<p><img alt="" src="images/bf42d7130dd2e4621381fdcd98022c09bd0a2e72279146a55a1073ede7a7bdd8.jpg" /></p>
<h1 id="cas-3-raccordement-à-un-amplificateur-av-avec-prise-de-sortie-numérique">Cas 3: Raccordement à un amplificateur AV avec prise de sortie numérique</h1>
<p>Si vous amplificateur AV est équipé d'un Décodeur numérique Dolby Digital, MPEG2 ou DTS et d'une prise d'entrée numérique, utilisez ce raccordement. Pour profiter du son Dolby Digital, MPEG2 ou DTS, vous devrez configurer les paramètres audio.</p>
<p>En fonction de votre amplificateur, branchez un cable coaxial.</p>
<p>(Reportez-vous aux pages 34~35)</p>
<p><img alt="" src="images/449b7cc2a0312a4fd889ed935146e1f8abcfcd9f64f14cbafa0a5d8d8bad065a.jpg" /></p>
<h1 id="branchement-sur-des-prises-dentrée-av-3">BRANCHEMENT SUR DES PRISES D'ENTRÉE AV 3</h1>
<p>Cette fonction vous permet de raccorder votre GRAVEUR DE DVD AVEC DISQUE DUR à d'autres péripériques et de visualiser ou d'enregistrer leur sortie.</p>
<h1 id="raccordement-dun-magnétoscope-dun-boîtier-décodeur-dun-lecteur-dvd-ou-dun-caméscope-aux-prises-av-3-in">Raccordement d'un magnétoscope, d'un boîtier Décodeur, d'un lecteur DVD ou d'un caméscope aux prises AV 3 IN</h1>
<p>Connexion d'un magnétoscope ou d'un périhérique aux prises AV 3 IN du GRAVEUR DE DVD AVEC DISQUE DUR. Vous pouvez enregistrer à partir d'un apparéil connecté (magnétoscope, boîtier Décodeur, lecteur DVD ou caméscope).</p>
<p><img alt="" src="images/b70285683b4d8a2cfb08c6d8434abaeb5ba1fe70c261349e7c00c0e17b4d9983.jpg" /></p>
<p><img alt="" src="images/0332fe94f4f8183b2a166b044e969f11a7132c84a1b4848c005f624a1be92e24.jpg" /></p>
<p>La selection de la prise AV 3 IN s'effectue automatique. Si I'entrée n'est pas selectionnee automatique, utilisez le bouton INPUT SEL. pour selectionner I'entrée appropriee. <br />
- Les contenus protégés contre la copie ne peuvent pas été enregistrés.</p>
<h1 id="navigation-dans-les-menus-à-lécran">NAVIGATION DANS LES MENUS À L'ÉCRAN</h1>
<p>Les menus à l'écran vous permettent d'activer ou de désactiver différentes fonctions de votre GRAVEUR DE DVD AVEC DISQUE DUR. Appuyez sur le bouton MENU pour ouvrir le menu à l'écran, puis utilisez les boutons suivants pour naviguer dans les menus à l'écran.</p>
<ol>
<li>Boutons ▲▼, △</li>
</ol>
<p>Appuyez sur ces boutons de la télécommande afin de déplacer la barre de selection ▲▼, ▲▷ pour naviguer entre les options du menu.</p>
<ol>
<li>Bouton OK</li>
</ol>
<p>Appuyez sur ce bouton de la télécommande pour confirmer vos réglages.</p>
<ol>
<li>Bouton RETURN</li>
</ol>
<p>Appuyez sur ce bouton de votre télécommande pour revenir à l'écran MENU précédent affché ou pour quitter le MENU d'affichage à l'écran.</p>
<ol>
<li>Bouton EXIT</li>
</ol>
<p>Appuyez sur ce bouton pour quitter le MENU à l'écran.</p>
<p><img alt="" src="images/03c263716bc5e9ff7a97dfcce883ee08ae45a9f8e5b3743fd7c78260dabf7f96.jpg" /></p>
<h1 id="configuration-plug-play">CONFIGURATION PLUG & PLAY</h1>
<p>Lorsque vous mettez votre GRAVEUR DE DVD AVEC DISQUE DUR sous tension pour la première fois, celui-ci se regle automatiquement. Les chaînes de télévision et l'horloge sont enregistrées dans la mémoire. Cette opération prend quelques minutes. À l'issue de la configuration, votre GRAVEUR DE DVD AVEC DISQUE DUR est pré à fonctionner.</p>
<ol>
<li>Branchez le cable RF comme indiqué page 20. <br />
(Connexion de votre GRAVEUR DE DVD AVEC DISQUE DUR au téléviseur à l'aide du cable RF et du cable Peritel). </li>
<li>Raccordez le GRAVEUR DE DVD AVEC DISQUE DUR à la prise murale. "AUTO" clignote dans l'affichage en façade. </li>
<li>Appuyez sur une touche numérique poursélectionner la langue. </li>
<li>Appuyez sur le bouton OK pour lancer la configuration automatique. </li>
<li>
<p>Select "Country" using the , buttons to select your country.</p>
</li>
<li>
<p>Reportez-vous au tableau d'abréviations suivant lorsque vous sélectionnez "Pays".</p>
</li>
</ol>
<table><tr><td>A(Austria)</td><td>NL(Netherlands)</td><td>S(Sweden)</td><td>PL(Poland)</td></tr><tr><td>B(Belgium)</td><td>I(Italy)</td><td>CH(Swiss)</td><td>CZ (Czech)</td></tr><tr><td>DK(Denmark)</td><td>N(Norway)</td><td>TR(Turkey)</td><td>Autres</td></tr><tr><td>FIN(Finland)</td><td>P(Portugal)</td><td>GR(Greece)</td><td></td></tr><tr><td>D(Deutschland)</td><td>E(Spain)</td><td>HU(Hungary)</td><td></td></tr></table>
<ul>
<li>Le GRAVEUR DE DVD AVEC DISQUE DUR recherche les chaînes selon une liste de préférences préréglées correspondant au pays que vous avez sélectionné.</li>
</ul>
<p><img alt="" src="images/bf7f2d60b9d7c09a62705459b85ac33d2f16c76ef47ff1be91e3d9bb2c8cc2f2.jpg" /></p>
<p><img alt="" src="images/23c6dcce0da3587b88090fc5fd3b64a030ce29741260561ed1ab6a9ea7521648.jpg" /></p>
<p><img alt="" src="images/ea5636fcc282f32a7a261e7cd6764690e77566066dad4f9a58e7e05cf17cf60f.jpg" /></p>
<p><img alt="" src="images/db6eeba194a934a53a2505a3ce918af25c3b9571c09596b36964d6b366b84054.jpg" /></p>
<ol>
<li>
<p>Le balayage automatique des chaînes est lancé.</p>
</li>
<li>
<p>Le nombre de chaînes enregistrées automatiquement par le GRAVEUR DE DVD AVEC DISQUE DUR dépend du nombre de canaux trouvés. </p>
</li>
<li>Lorsque le balayage automatique des chaînes est terminé, le réglage automatique de l'horloge est démarré dans les 10 secondes. Pour démarrer immédiatement le réglage automatique de l'horloge, appuyez sur le bouton OK. </li>
<li>Attende que la date et l'heure exactes s'affichent automatiquement. Si vous souhaitez quitter le réglage automatique de l'horloge, appuyez sur le bouton MENU.</li>
</ol>
<p><img alt="" src="images/f5269dba5b96ca9489a170b4ebc41d32d4d6a2f19e9015eb87f22189feb27a19.jpg" /></p>
<ul>
<li>Voiture ENREGISTREUR DVD AVEC DISQUE DUR est maintainant prét à être utilisé. La « Configuration Plug & Play » est terminée.</li>
</ul>
<p>Si vous souhaitez la modifier, vous pouvez le faire en préreglant manuellement les stations dans le menu « Paramétrer un canal – Installation Manuelle ». (voir page 31) <br />
- La fonction de configuration automatique peut être activée en appuyant sur le bouton STOP (©) de l'appareil d'une manière continue durant 10 secondes au minimum lorsqu'il est hors tension et qu'aucun disque n'est inséré.</p>
<ol>
<li>
<p>Vérifiez la date et l'heure.</p>
</li>
<li>
<p>Si elles sont : exactes, appuyez sur le bouton OK, la date et l'heure sont alors sauvegardées. Si vous n'appuyez pas sur le bouton OK, la date et l'heure seront sauvegardées automatiquement après 5 secondes. </p>
</li>
<li>Si elles sont : le mois, le jour, l'année, l'h ou la min. exactes à l'aide des boutons ▲▼◁▷ ou des touches numériques. Appuyez sur le bouton OK, la date et l'heure sont alors sauvégardées. Lorsque vous doivent changer le réglage de l'horloge, vous pouvez procéder manuellement.</li>
</ol>
<p><img alt="" src="images/f09be6f6d4e7b35902644036ebcd2d2d6e97f0b879988d5fe888fb4dca47d384.jpg" /></p>
<p><img alt="" src="images/e59ec886d8b04ebbb145b0304f1de0abc164307f3a78a2604db1815aa22ad2e0.jpg" /></p>
<p><img alt="" src="images/a56112a8b1b8ca0cd3ab28638e00afb505724946335c36edf6c77432212e01e9.jpg" /></p>
<h1 id="configuration-du-système">configuration du système</h1>
<h1 id="réglage-de-lhorloge">RéGLAGE DE L'HORLOGE</h1>
<p>Ce menu est utilisé pour régler l'heure exacte.</p>
<p>Voudevezregler l'heure pourutiliser l'enregistrementprogramme.</p>
<ol>
<li>Appuyez sur le bouton MENU, appareil en mode Arrêt. </li>
<li>Appuyez sur les boutons ▲▼ pour sélectionner Paramétrer, puis appuyez sur le bouton OK ou ▷. </li>
<li>Appuyez sur les boutons ▲▼ pour sélectionner Systeme, puis appuyez sur le bouton OK ou ▷. </li>
<li>Appuyez sur les boutons ▲▼ pour sélectionnier Paramétrrer horloge, puis appuyez sur le bouton OK ou ▷.</li>
</ol>
<p>Saisissez le mois, le jour, l'année, l'houre ou la minute à l'aide des boutons ▲▼ ▲► Appuyez sur les touches numéroétées pour saisir l'heure directement.</p>
<p>Le jour de la période s'affiche automatiquement.</p>
<ol>
<li>Appuyez sur le bouton OK, la date et l'heure sont alors sauvegardees. Si vous n'appuyez pas sur le bouton OK, celles-ci ne sont pas sauvegardees.</li>
</ol>
<p><img alt="" src="images/a45f96fb9cc129ceee98756d6bea1beef62004e18b529af1570cfcefa1c30983.jpg" /></p>
<p>Le cable RF doit être branché pour pouvoir régler l'horloge automatique. (Reportez-vous à la page 20) <br />
Le GRAVEUR DE DVD AVEC DISQUE DUR rgle automatiquement l'horloge en fonction du signal hora émis entre les canaux PR1 à PR5. Si vous n'avez pas besoin de la fonction Paramétrer horloge, sélectionnez Arrêt.</p>
<p><img alt="" src="images/abd2db0d2dbebbe6fd38ff242858e892292e41eee48f4612b7327a51e6244930.jpg" /></p>
<p><img alt="" src="images/5b5720a4c19ee6b4786a6d547423e5a10ae64662279863ebc0f64daf6b9f6d35.jpg" /></p>
<p><img alt="" src="images/ac112d3eb0f593029c97f7010244ac5c161bc9ee14df17eb40495eefdbe449dd.jpg" /></p>
<h1 id="paramétrer-un-canal">PARAMÉTRER UN CANAL</h1>
<h1 id="installation-auto">Installation Auto</h1>
<p>Cette fonction vous permet de régler manuellement le tuner à bande du GRAVEUR DE DVD AVEC DISQUE DUR sur l'antenne ou le cable,quel que soit le dispositif que vous avez branché sur la prise d'entrée de I'antenne lors de la configuration initiale.</p>
<ol>
<li>Appuyez sur le bouton MENU, apparéil en mode Arrêt. </li>
<li>Appuyez sur les boutons ▲▼ pour sélectionner Paramétrer, puis appuyez sur le bouton OK ou ▷. </li>
<li>Sélectionnéz Paramétrer un canal à l'aide des boutons ▲▼, puis appuyez sur le bouton OK ou ▷.</li>
</ol>
<p><img alt="" src="images/f03598289e1dbc2fb03c1c701b8cff996ce6138f872d6f590715bfda4a14a520.jpg" /></p>
<ol>
<li>Appuyez sur les boutons ▲▼ pour sélectionn Installation Auto, puis appuyez sur le bouton OK ou ▷. Le message "Vos données seront perdues. [OK] : POURSUIVRE ou [RETURN] : QUITTER." s'affiche. </li>
<li>
<p>Appuyez sur le bouton OK, puis sur les boutons ▲▼ ▲▷ pour sélectionner votre pays.</p>
</li>
<li>
<p>Le GRAVEUR DE DVD AVEC DISQUE DUR recherche les chaînes selon une liste de préférences prêrgéées correspondant au pays que vous avez sélectionné. (Reportez-vous à la page 28)</p>
</li>
<li>
<p>Appuyez sur le bouton OK. La recherche de canaux démarre.</p>
</li>
<li>
<p>Le balayage de la première bande de fréquence est lancé et la première chaîne trouvée est affichée puis enregistrée.<br />
Le GRAVEUR DE DVD AVEC DISQUE DUR recherche alors une deuxième chaîne et ainsi de suite. </p>
</li>
<li>Le nombre de chaînes enregistrées automatiquement par le GRAVEUR DE DVD AVEC DISQUE DUR dépend du nombre de canaux trouvés.</li>
</ol>
<p><img alt="" src="images/91b3db4f3eac1679239e6e691b3a470b7eb29fda77b463497ca902b827959c6c.jpg" /></p>
<ul>
<li>Appuyez sur le bouton OK pour arrêté la fonction Installation auto.</li>
</ul>
<h1 id="installation-manuelle">Installation Manuelle</h1>
<p>Voupez ajouter un canal prerégé que la recherche automatique de canal aurait manqué. Vous avez également la possibilité de supprimer un canal qui ne vous intéresse plus. Vous pouze programmer l'ordre des canaux.</p>
<p>Pour la configuration, suive les étapes 1 à 3 de la section « Installation Auto » en page 30.</p>
<ol>
<li>Appuyez sur les boutons ▲▼ pour sélectionner Installation Manuelle, puis sur le bouton OK ou ▷. </li>
<li>
<p>Appuyez sur les boutons ▲▼ pour Sélectionner un PR (programme) que vous souhaitez modifier, supprimer ou changer, puis appuyez sur le bouton de couleur. Sélectionnez Edit, Supprimer ou Swap.</p>
</li>
<li>
<p>Si vous désisissesé Édit (Bouton ROUGE (A)): vous pouvez ajouter ou écrire les informations relatives au PR (programme). Àpèrès avoir modifiées ces informations (CH, Nom, Décodeur, MFT, Système), sélectionnez Enreg., puis appuyez sur le bouton OK.</p>
</li>
<li>
<p>CH: Effectuez une syntonisation du canal à l'aide des boutons </p>
</li>
<li>Nom : vous permet d'afficher le nom du canal détecté automatiquement au cours de l'émission du signal. Si celui-ci n'a pas été détecté, vous pouvez modifier le nom à l'aide des boutons ▲▼▲▶.</li>
</ol>
<p><img alt="" src="images/0e367a95a08fcd03c2ca59fcc8f16f1c268b98a51b007b8bc2e82304e8a59728.jpg" /></p>
<p><img alt="" src="images/132bfcabe3449fd181a327224de4a6e9ad81c5ca59ba93c747cf26f80686c7b9.jpg" /></p>
<ul>
<li>Décoder : Si vous activez cette fonction, vous pouvez enregistrer les canaux cryptés à l'aide du Décoder externe. Avant de l'activer, reportez-vous à la section décrivant le branchement du Décoder externe en page 22. </li>
<li>MFT(Syntonisation manuelle de la fréquence): pour une(Meilleure syntonisation de la fréquence des canaux,utilisez les boutons </li>
<li>
<p>Système : Vous pouvez sélectionner le système de diffusion du canal reçu (B/G ou L/L')</p>
</li>
<li>
<p>Si vous choisissez Supprimer (Bouton VERT (B)): les informations relatives au PR (programme) sclectionné sont suprimées. </p>
</li>
<li>Si vous choisissez Swap (Bouton JAUNE (C)): vous pouvez alterner les informations relatives à deux PR (programme) différents. Par exemple, si vous souhaitez alterner les programmes PR2 et PR5, Sélectionnez Swap (Alterer) sur le programme PR2, puis appuyez sur le bouton OK sur le programme PR5.</li>
</ul>
<h1 id="configuration-du-système-2">configuration du système</h1>
<h1 id="configuration-des-options-de-language">CONFIGURATION DES OPTIONS DE LANGUAGE</h1>
<p>Si vous configUREZ les options de langue à l'avance, elles s'afficheront automatiquement chaque fois que vous visionnerez un film.</p>
<ol>
<li>Appuyez sur le bouton MENU, appareil en mode Arêt. </li>
<li>Appuyez sur les boutons ▲▼ pour sélectionner Paramétrer, puis appuyez sur le bouton OK ou ▷. </li>
<li>Appuyez sur les boutons pour selectionner Langue, puis appuyez sur le bouton OK ou . Le menu Configuration de la langue s'affiche. </li>
<li>
<p>Appuyez sur les boutons ▲▼ pour sélectionner la langue souhaitée, puis appuyez sur le bouton OK ou ▷.</p>
</li>
<li>
<p>Audio: permet de sélectionner la langue audio du disque. </p>
</li>
<li>Sous-titre : permet de selectionner les sous-titres du disque. </li>
<li>Menu du Disque : permet de sélectionner les menus contenus sur le disque </li>
<li>Menu : permet de sélectionner le menu à l'écran de votre GRAVEUR DE DVD AVEC DISQUE DUR.</li>
</ol>
<p><img alt="" src="images/d7e949c2d20f99c61d6c8ead92ab2566972e97abbc56cff2814a4608621a1a70.jpg" /></p>
<ol>
<li>Appuyez sur les boutons ▲▼ pour sélectionner la langue souhaïée, puis appuyez sur le bouton OK ou ▷.</li>
</ol>
<p><img alt="" src="images/4326cbd7e626c870e78cc746cc2658ff63b385c5fa15f86f786776c2d57c7ea3.jpg" /></p>
<p>Si la langue seLECTIONnée n'est pas enregistrée sur le disque, c'est la langue originale préenregistrée qui est seLECTIONnée. <br />
La langue selectionnee ne s'affiche que si elle est prise en charge par le disque.</p>
<h1 id="configuration-des-options-du-systeme">CONFIGURATION DES OPTIONS DU SYSTEME</h1>
<p>Cette fonction vous permet de configurer le système.</p>
<ol>
<li>Appuyez sur le bouton MENU, apparéil en mode Arrêt. </li>
<li>Appuyez sur les boutons ▲▼ pour sélectionnner Paramétrer, puis appuyez sur le bouton OK ou ▷. </li>
<li>Sélectionnez Systeme à l'aide des boutons ▲▼, puis appuyez sur OK ou le bouton ▷. </li>
<li>Appuyez sur les boutons ▲▼ pour sélectionner l'options du système souhaitée, puis appuyez sur le bouton OK ou ▷. </li>
<li>Appuyez sur les boutons ▲▼ pour sélectionner l'élement souhaité, puis appuyez sur le bouton OK ou ▷.</li>
</ol>
<p><img alt="" src="images/233634cf72e8f9a159c944ff7dfa6533aa38729ecd664ae19af811c3b696be61.jpg" /></p>
<p>Cette fonction permet d'éteindre automatiquement votre GRAVEUR DE DVD AVEC DISQUE DUR si aucun bouton n'est activé pendant une période déterminée.</p>
<ol>
<li>Appuyez sur les boutons ▲▼ pour sélectionner Extinct. auto, puis appuyez sur le bouton OK ou ▷. </li>
<li>
<p>Appuyez sur les boutons ▲▼ pour sélectionner l'élement souhaité, puis appuyez sur le bouton OK ou ▷.</p>
</li>
<li>
<p>Arrêt: L'extinction automatique est désactivée. </p>
</li>
<li>2 heures : Le récepteur du GRAVEUR DE DVD AVEC DISQUE DUR s'éteint automatiquement 2 heures après que le dernier bouton a été actionné. </li>
<li>6 heures : Le récepteur du GRAVEUR DE DVD AVEC DISQUE DUR s'éteint automatiquement 6 heures après que le dernier bouton a été actionné. </li>
<li>Si l'heure d'arrêt régée grâce à la fonction de mise hors tension automatique est atteinte en cours de lecture ou d'enregistrement, l'appareil fonctionne jusqu'à la fin de la lecture ou de l'enregistrement.</li>
</ol>
<p><img alt="" src="images/23dc25f2f54020ed47f94d72ad5ede50ff88467b3df907558b1e9aa12a95c8c4.jpg" /></p>
<h1 id="enregistrement-divxr">Enregistrement DivX(R)</h1>
<p>Veuillez enregistrer votre GRAVEUR DE DVD AVEC DISQUE DUR auprès du service Video à la demande DivX(R) à l'aide de votre code d'enregistrement. Pour plus d'informations, visitez le site www.divx.com/vod</p>
<p><img alt="" src="images/858d22f049211a8719b8d0710b4f22ba19e9ee9ca2bad5ceb6ff66aaa41dc46d.jpg" /></p>
<h1 id="configuration-du-système-3">configuration du système</h1>
<h1 id="configuration-des-options-audio">CONFIGURATION DES OPTIONS AUDIO</h1>
<p>Voues pouvez brancher votre GRAVEUR DE DVD AVEC DISQUE DUR sur un amplificateur exter ou un ensemble Home cinema.</p>
<p>Cela vous permet de configurer le dispositif audio et l'etat du son en fonction du système audio en cours d'utilisation.</p>
<p>Yououpezegalementreglerle modeNICAM.</p>
<ol>
<li>Appuyez sur le bouton MENU, appareil en mode Arrêt. </li>
<li>Appuyez sur les boutons ▲▼ pour sélectionner Paramétrer, puis appuyez sur le bouton OK ou ▷. </li>
<li>Appuyez sur les boutons ▲▼ pour sélectionner Audio, puis appuyez sur le bouton OK ou ▷. </li>
<li>Appuyez sur les boutons ▲▼ pour sélectionner l'option audio souhaïtée, puis appuyez sur le bouton OK ou ▷. </li>
<li>Appuyez sur les boutons ▲▼ pour sélectionner l'élement souhaité, puis appuyez sur le bouton OK ou ▷.</li>
</ol>
<p><img alt="" src="images/1936746ac5422fff79973e086cdc6e8a6ce66ecf52c9cacef8cb91bd8dc87dcd.jpg" /></p>
<h1 id="sortie-numérique">Sortie numérique</h1>
<ul>
<li>PCM : Sélectionné cette option si votre apparéil ne décode pas le format Dolby Digital (ou MPEG-2). Lorsque vous lisze une piste son Dolby Digital (ou MPEG-2), la sortie numérique est convertie en Sté reproduction PCM. </li>
<li>Bitstream : Sortie audio Dolby Digital (ou MPEG-2) en flot binaire. Sélectionnez cette option lorsque vous récepteur AV ou votre amplificateur AV possède un Décodeur Dolby Digital (ou MPEG-2).</li>
</ul>
<p><img alt="" src="images/9adb302aeb7d6a06e9958e663f4b2d1c7920bff2e454c29b97d8c26e2aeabb6e.jpg" /></p>
<p><img alt="" src="images/eb0be9455d23630436285e89f1b9340302ef3acb2971e2aac923dea5b373cc5f.jpg" /></p>
<ul>
<li>Le réglage de la sortie numérique s'applique de manière égale aux deux systèmes audio Dolby Digital et MPEG-2. La piste son LPCM est toujours émise en mode PCM. Elle n'est liée au réglage de la sortie numérique. <br />
Assurez-vous de selectionner la sortie numérique correcte ou le son ne sera pas perceptible ou sera au contraire très fort.</li>
</ul>
<h1 id="dts-2">DTS</h1>
<ul>
<li>Arret : N'émet aucun signal DTS. Sélectionné cette option lorsque votre récepteur AV (ou votre amplificateur AV) ne possède pas de Décodeur DTS. </li>
<li>Marche : Emet un flot binaire DTS via la sortie numérique lorsqu'you lisez une piste DTS. Sélectionnez cette option lorsqu'vrécepteur AV (ou votre amplificateur AV) possède un Décodeur DTS.</li>
</ul>
<p><img alt="" src="images/63e241864ad31289df1aaad179f6aacc582759bf5b42b0967e1d2784af51c5e5.jpg" /></p>
<p>Lorsque la piste son DTS est lue, le son n'est pas émis par la sortie audio AV.</p>
<p><img alt="" src="images/caab0b1e5da9b2ed73368f40ecb185cee318d467c05e55b1756c35eee94f6b9f.jpg" /></p>
<h1 id="drc-2">DRC</h1>
<p>Elle est activée uniquement lorsqu'un signal DolbyDigital est détecté.</p>
<ul>
<li>Arrêt : vous pouvez profiter du film avec la plage dynamique standard. </li>
<li>Marche : lorsque les pistes son d'un film sont lues à faible volume ou via des petits haut-parleurs, le système peut appliquer la compression appropriée afin de rendre le contenu d'un faible niveau plus compréhensible et éviter que les passages d'action violente ne soient trop forts.</li>
</ul>
<p><img alt="" src="images/0132ce672e3eb49cdeadd281df63dfd009ff3d809fb3f66fab1805f065b55e4f.jpg" /></p>
<h1 id="nicam-2">NICAM</h1>
<p>Les programmes NICAM sont divisés en 3 types. NICAM StéRéo, NICAM Mono et Bilingue (transmission dans une autre langue). Les programmes NICAM sont toujours accompagnés d'un son mono standard et vous pouvez selectionner le son désiré en réglant NICAM Marche ou Arrêt.</p>
<p>Marche : mode NICAM <br />
- Arrêt : réglez uniquement sur cette position pour enregistrer le son mono standard durant un programme NICAM si le son stéreo est déformé en raison de conditions de réception médiocres.</p>
<p><img alt="" src="images/8f7f78b7d5b02cc290d7507a663e72bde8b47dcb0fa885325c10cfdbf4cd8de9.jpg" /></p>
<h1 id="configuration-des-options-video">CONFIGURATION DES OPTIONS VIDEO</h1>
<p>Cette fonction vous permet de configurer le réglage video.</p>
<p>Cette fonction dépend du type de disque. Il est possible qu'elle ne fonctionne pas pour certains types de disques.</p>
<ol>
<li>Appuyez sur le bouton MENU, appareil en mode Arret. </li>
<li>Appuyez sur les boutons ▲▼ pour sélectionner Paramétrer, puis appuyez sur le bouton OK ou ▷. </li>
<li>Appuyez sur les boutons ▲▼ pour sélectionner Video, puis appuyez sur le bouton OK ou ▷. Le menu Configuration de la video s'affiche. </li>
<li>Appuyez sur les boutons ▲▼ pour sélectionner l'option videoe souhaïtée, puis appuyez sur le bouton OK ou >. </li>
<li>Appuyez sur les boutons ▲▼ pour sélectionner l'élement souhaité, puis appuyez sur le bouton OK ou ></li>
</ol>
<p><img alt="" src="images/ef7c69efde2ec2b5c34db947f0ab34a90fc31561073c6b73d1a185b7f584dc96.jpg" /></p>
<h1 id="format-écran">Format écran</h1>
<p>Selon le type de téléviseur, il se peut que vous soyez obligé d'ajuster le réglage de l'écran. (format)</p>
<p>4:3 Letter Box : Sélectionnez cette option pour voir l'ensemble de l'écran au format 16/9 que propose le DVD, même si l'écran de votre téléviseur est au format 4/3. Des barres noires apparaissent en haut et en bas de l'écran. <br />
- 4:3 Panoramaque : Sélectionnez cette option pour les téléviseurs deaille classique lorsque vous souhaitez voir la partie centrale de l'image au format 16/9. (les côtes gauche et droit de l'image sont coupés) <br />
16:9 Large : Vous pouvez voir l'image 16/9 en entier sur votre téléviseur à écran large.</p>
<p><img alt="" src="images/242abdeec2f32484bf6ebb47823eff1888cf7014e30f618bfad16ad9712a985f.jpg" /></p>
<h1 id="configuration-du-système-4">configuration du système</h1>
<h1 id="réduction-bruit-3d-réduction-du-bruit-adaptable-au-déplacement">Réduction bruit 3D (réduction du bruit adaptable au déplacement)</h1>
<ul>
<li>Arret: Normal </li>
<li>Marche: Procure une image plus nette grâce à la réduction du bruit (pour l'enregistrement).</li>
</ul>
<p><img alt="" src="images/b62b0aed2c8ad9335fb5c7cf3381597663658219375324ee65a8b8355fffb991.jpg" /></p>
<h1 id="sortie-video">Sortie Video</h1>
<p>Vouspouvez profiter d'une image deicieille qualite grace aux connexions RVB ou Video composant. La sortie videoe RVB est disponible en connectant la prise Peritel (AV1) et la sortie videoe composant est elle disponible en connectant la prise composant (Y, P_B P_ ).Seul l'un de ces signaux peutetre selectionné à la fois.</p>
<ul>
<li>Composant <br />
RVB</li>
</ul>
<p><img alt="" src="images/0c61555da5e1c6f792b038f96ea48a52512373d58f6af116d5952a06790e3dbb.jpg" /></p>
<p>En mode composant, vous pouvez régler la sortie video sur balayage progressif ou Balayage entrelacé.</p>
<p>les prises de sortie video disposibles sont les suivantes.</p>
<h1 id="sortie-video-disponible">Sortie video disponible</h1>
<table><tr><td colspan="2">Mode Réglage
Prise de sortie</td><td>Mode Composant</td><td>Mode RVB</td></tr><tr><td colspan="2">Sortie Composant
(Y, Pb, Pr)</td><td>○</td><td>×</td></tr><tr><td rowspan="2">Péritel AV1</td><td>R, V, B</td><td>×</td><td>○</td></tr><tr><td>Composite</td><td>○</td><td>×</td></tr><tr><td colspan="2">Sortie Video composite</td><td>○</td><td>○</td></tr></table>
<h1 id="sortie-component-balayage-progressif">Sortie component (balayage progressif)</h1>
<p>Cette fonction est disponible lorsque la sortie video est composante.<br />
Ce réglage vous permet de sélectionner le mode progressif. Pour afficher le mode de balayage progressif, commencez par connecter le cable composant. (Reportez-vous en page 24.) Assurez-vous que les cables Composant sont branchés correctement.</p>
<h1 id="progressif">Progressif</h1>
<p>Le message « Voulez-vous rester en mode progressif ? Reverting in 10 seconds. » s'affiche. Sélectionnez « Oui » pour réinitialiser le mode Progressif.</p>
<p><img alt="" src="images/b254505dc259bdf28bc5ea5ecc028daa982b687abab455ba9761d5e81189c0aa.jpg" /></p>
<h1 id="entrelacé">- Entrelacé</h1>
<p>Le message « Voulez-vous rester en mode Entrelacé ? Reverting in 10 seconds. » s'affiche. Sélectionnez « Oui » pour réinitialiser le mode Entrelacé.</p>
<p>La fonction verrouillage parental peut être utilisée avec des DVD ayant reçu un niveau de censure, ce qui permet de contrôler le type de DVD qui peuvent être regardés en famille. Un disque compte 8 niveaux d'évaluation.</p>
<ol>
<li>Appuyez sur le bouton MENU, appareil en mode Arrêt. </li>
<li>Appuyez sur les boutons ▲▼ pour sélectionner Paramétrer, puis appuyez sur le bouton OK ou ▷. </li>
<li>Appuyez sur les boutons ▲▼ pour sélectionner le Verrouillage parental, puis sur le bouton OK ou > Lors de la première utilisation de votre GRAVEUR DE DVD AVEC DISQUE DUR, le message “Créer le code” s'affiche. </li>
<li>Entrez les 4 chiffres du code secret à l'aide des boutons (de 0 à 9) de la télécommande.</li>
</ol>
<p><img alt="" src="images/4cb58df10626c33be4b718af88f3c059948d08660d99de90708df5b4a2a8d640.jpg" /></p>
<p>Le message "Confirmer le mot de passer." s'affiche. Veuille ressaisir votre code secret.</p>
<h1 id="si-vous-avez-oublié-votre-code-secret">Si vous avez oublié votre code secret</h1>
<ol>
<li>Retirez le disque. </li>
<li>Appuyez longuement sur le bouton PLAY/PAUSE (▶II) situé sur la façon pendant au moins 10 secondes.</li>
</ol>
<h1 id="a-propos-du-niveau-de-contrôle">A propos du Niveau de contrôle</h1>
<ol>
<li>Appuyez sur les boutons ▲▼ pour Sélectionner Niv. Contrôle, puis appuyez sur le bouton OK ou ▷. </li>
<li>Appuyez sur les boutons ▲▼ pour sélectionner le niveau de contrôle souhaité puis appuyez sur le bouton OK ou ▲. Si vous sélectionnez les niveaux 1 à 6 par exemple, les disques comptant un niveau 7 et 8 ne seront pas lus. Un nombre plus élevé indique que le programme est réservé à un public adulte.</li>
</ol>
<p><img alt="" src="images/69726493d6afea66f4eaabc51dd9dc52db96cbae1bbd422e6c49dde58fd175ff.jpg" /></p>
<h1 id="a-propos-du-changement-du-code-secret">A propos du changement du code secret</h1>
<ol>
<li>Appuyez sur les boutons ▲▼ pour sélectionnier Modif. Code Secret, puis appuyez sur OK ou ▷. </li>
<li>Entrez les 4 chiffres du code secret à l'aide des touches numériques de la télécommande. Le message “Confirmer le mot de passer.” s'affiche. </li>
<li>Ressaisissez votre code secret à l'aide des touches numériques de la télécommande.</li>
</ol>
<p><img alt="" src="images/a3878674c459b6fc3d7c778234e94f02b1c39e0eda3228eb3ea4593d231c092f.jpg" /></p>
<p><img alt="" src="images/4e57ef5df919d506f48f50c8d4211b19cf9c78f56d75597607538a69f42fc662.jpg" /></p>
<p>Une fois Niv. Contrôle régèle, vous pouvez modifier le mot de passer.</p>
<h1 id="création-automatique-des-chapîtres">Création automatique des chapîtres</h1>
<p><img alt="" src="images/7aab4a808ad6091c69da1a8f2b886c673e5106376033c2c226444e0920257f14.jpg" /></p>
<p>DVB-RW</p>
<p><img alt="" src="images/7900e08fa1b0c6e8788dcf5ddf89c4da4ebfd85b44e86e1681b2c1fa12470284.jpg" /></p>
<p>Mode V)</p>
<p>Un DVD video est divisé en « Titles » et en « Chapters ». Lorsque vous enregistrez un programme, un titre est alors créé. Si vous utilisez cette fonction, le titre se divise en chapitres.</p>
<ol>
<li>Appuyez sur les boutons ▲▼ pour SéLECTIONNER Paramétrer, puis appuyez sur le bouton OK ou ▷. </li>
<li>Appuyez sur les boutons ▲▼ pour sélectionner enregistrement, puis appuyez sur le bouton OK ou ▷.</li>
</ol>
<p><img alt="" src="images/4b04e3f1a0a8e5086509d7a20cfd1caef826fbc5c1d3c833d4343a4d293db602.jpg" /></p>
<ol>
<li>Appuyez sur les boutons ▲▼ pour sélectionner Créateur de chapitre, puis appuyez sur le bouton OK ou ▷. </li>
<li>
<p>Appuyez sur les boutons ▲▼ pour sélectionner Arrêt ou Marche, puis sur le bouton OK ou ▷.</p>
</li>
<li>
<p>Arrêt : Sélectionnez cette option si vous ne souhaitez pas utiliser cette fonction Création automatique de chapitres. </p>
</li>
<li>Marche : Sélectionnez cette option si vous souhaitez utiliser cette fonction Création automatique de chapitres.</li>
</ol>
<p>Appuyez sur le bouton EXIT (4) pour quitter le menu.</p>
<ol>
<li>Appuyez sur le bouton REC pour lancer l'enregistrement. (Reportez-vous à la page 63 pour régler la vitesse d'enregistrement). Le message "Souhaitez-vous créé le menu du chapitre après cet envr.?" s'affiche. </li>
<li>
<p>Appuyez sur les boutons pour selectionner OK, puis appuyez sur le bouton OK.</p>
</li>
<li>
<p>Un nouveau chapitre est créé selon le mode d'enregistrement sélection. Un chapitre sera d'une durée d'environ 5 minutes en modes XP et SP et d'environ 15 minutes en modes LP et EP.</p>
</li>
<li>
<p>Appuyez sur le bouton STOP pour arrêté l'enregistrement. </p>
</li>
<li>Pour afficher les titres créés, finalisez le disque (voir page 90) puis appuyez sur le bouton TITLE MENU. Le menu des titres s'affiche. </li>
<li>Pour afficher les chapitres créés, Sélectionné que le titre désiré puis appuyez sur le bouton DISC MENU. Le menu du chapitre correspondant au titre sélectionné s'affiche.</li>
</ol>
<p><img alt="" src="images/3971e459399d66fe064c5b8c4420ce13b3f0b4e9a545cffa75b126f129bc399f.jpg" /></p>
<ul>
<li>La fonction Création automatique de chapitres ne fonctionne pas durant l'enregistrementprogramme ou lorsque vous mettez l'appareil hors tension.</li>
</ul>
<h1 id="réglage-de-lheure-du-mode-ep">Réglage de l'Heure du mode EP</h1>
<p>Vou puezsez electionner I'un des quatre modes d'enregistrement en appuyant sur le bouton REC MODE plusieurs fois de suite.</p>
<p>En mode EP (Lecture prolongée), vous pouvez définir un temps d'enregistrement de 6 ou 8 heures.</p>
<p>6 heures <br />
8 heures</p>
<p><img alt="" src="images/34385b373b87d8e1bdf3a5cc7be2fd5f083956c03c9436edd0cd92244dd3ff15.jpg" /></p>
<p>Cette fonction vous permet d'initialiser et de finaliser automatiquement un disque.</p>
<ol>
<li>
<p>Appuyez sur les boutons ▲▼ pour SéLECTIONNER Enregistrement EZ, puis appuyez sur le bouton OK ou ▷.</p>
</li>
<li>
<p>Appuyez sur les boutons ▲▼ pour sélectionner Marche, puis sur le bouton OK ou ▷. Appuyez sur le bouton EXIT (◇) pour sortir du menu.</p>
</li>
<li>
<p>Insérez un disque.<br />
S'il s'agit d'un nouveau disque, il sera automatiquement initiaisé.</p>
</li>
<li>
<p>Appuyez sur le bouton REC.</p>
</li>
<li>
<p>Le mode Enregistrement EZ permet de finaliser automatiquement le disque dans les conditions suivantes.</p>
</li>
</ol>
<p>Lorsque you appuyez sur le bouton OPEN/CLOSE de votre ENREGISTREUR DE DVD AVEC DISQUE DUR alors que l'enregistrement du disque est effectue a 70% , le tiroir disque s'ouvre une fois le disque finalisé. <br />
- La fonction ci-dessus n'est disponible que lorsqu'un disque DVD-RW(V), DVD-R est inséré.</p>
<p><img alt="" src="images/64ff5476200ab8a185864d0b43d87308296a5690e8d6f5434fb45509ba3a38c1.jpg" /></p>
<p><img alt="" src="images/ccf46f4211d36ef1c84cd98e47997c089391822bd7cc7e3f8e6d7c893b0bbfe3.jpg" /></p>
<p>Si vous insérez un nouveau disque DVD-RW, il sera formé en mode V (V) après l'initialisation automatique. <br />
Si vous selectionnez Arrêt, vous doivent initiailler et finaliser le disque manuellement (reportez-vous à la page 60) à l'aide du Gestionnaire de disque (reportez-vous à la page 90). <br />
La durée de l'enregistrement différent selon le mode d'enregistrementChoisi (reportez-vous à la pages 40~41).</p>
<h1 id="compatibilité-v-mode">Compatibilité V-mode</h1>
<p>Cette caractéristique concerne la configuration des sélections audio lors d'enregistrement d'émission NICAM STEREO (Multi-audio) sur le disque dur. Elle n'attécate pas l'enregistrement DVD direct d'un programme.</p>
<ul>
<li>Arrêt : "Double G" et "Double D" de l'émission multi-audio sont enregistrées sur le disque dur. Les titres enregistrés sur le disque dur avec cet état d'installation ne peuvent être copiés sur un DVD-R ou DVD-RW (mode V). </li>
<li>Marche : "Double G" ou "Double D" de l'émission multi-audio est enregistré sur le disque dur. Les titres enregistrés sur le disque dur sous cette configuration peuvent être copiés sur un DVD-R ou un DVD-RW (mode V). Les options "Double G" et "Double D" peuvent être sélectionnées à partir de " Sélection audio".</li>
</ul>
<p><img alt="" src="images/c03f61f415ce6253230c24e9d971d97acc3409a77e34500f35404e14de8b079a.jpg" /></p>
<p><img alt="" src="images/6fb8ff4d0b1a25a3875440c91a92abdb5ae44d3ea619f17f7b09329f4666f9be.jpg" /></p>
<p>Cette section présente le fonctionnement de base de la lecture et de la lecture par type de disque.</p>
<p>Veuillez litre les informations suivantes avant de dire un disque.</p>
<h1 id="code-régional-dvd-video-uniquement">CODE RÉGIONAL (DVD VIDEO UNIQUEMENT)</h1>
<p>Le GRAVEUR DE DVD AVEC DISQUE DUR et les disques sont codés par zone. Ces codes de zone doivent correspondre pour que le disque puisse être lu. Si les codes ne correspondent pas, le disque ne peut pas être lu. Le numéro de zone de ce GRAVEUR DE DVD AVEC DISQUE DUR est indiqué sur le panneau arrêté de l'appareil.</p>
<p><img alt="" src="images/77166d8652ffbaae479a2cd699278a367ba0ef4f4e90b825a7a1750a8c6bac22.jpg" /></p>
<p><img alt="" src="images/233003c1a7bcf72f75b8992b69fef82046047a1b9dbba3f3c1efd76609ca5b90.jpg" /></p>
<h1 id="logos-des-disques-compatibles">LOGOS DES DISQUES COMPATIBLES</h1>
<p><img alt="" src="images/1cdaf5826061758d8e6caaa5b3b1d989de2a6d4cc5e0829f73ae462f4bbbdcbf.jpg" /></p>
<h1 id="types-de-disque-qui-peuvent-étre-lus">TYPES DE DISQUE QUI PEUVENT ÉTRE LUS</h1>
<table><tr><td>Types de disque</td><td>Contenu du logo du disque</td><td>Contenu enregistré</td><td>Forme du disque</td><td>Durée de lecture maximale ou minute</td></tr><tr><td rowspan="4">DVD-VIDEO</td><td rowspan="4">VIDEO
VIDEO</td><td rowspan="4">VIDEO
AUDIO</td><td>Monoface (12cm)</td><td>240 min.</td></tr><tr><td>Double face (12cm)</td><td>480 min.</td></tr><tr><td>Monoface (8cm)</td><td>80 min.</td></tr><tr><td>Double face (8cm)</td><td>160 min.</td></tr><tr><td rowspan="2">AUDIO-CD</td><td rowspan="2">COMPACT
DISC
DIGITAL AUDIO</td><td rowspan="2">AUDIO</td><td>Monoface (12cm)</td><td>74 min.</td></tr><tr><td>Monoface (8cm)</td><td>20 min.</td></tr><tr><td rowspan="2">JPEG</td><td rowspan="2"></td><td rowspan="2">Image JPEG</td><td>Monoface (12cm)</td><td>-</td></tr><tr><td>Monoface (8cm)</td><td>-</td></tr><tr><td rowspan="2">MP3</td><td rowspan="2"></td><td rowspan="2">Audio MP3</td><td>Monoface (12cm)</td><td>-</td></tr><tr><td>Monoface (8cm)</td><td>-</td></tr><tr><td rowspan="2">DivX</td><td rowspan="2">DIVX</td><td rowspan="2">Film DivX</td><td>Monoface (12cm)</td><td>-</td></tr><tr><td>Monoface (8cm)</td><td>-</td></tr><tr><td rowspan="8">DVD-RAM</td><td rowspan="8">DVD-RAM</td><td rowspan="8">AUDIOVIDEO</td><td rowspan="4">Monoface (12cm) (4,7Go)</td><td>1 (XP: Excellente qualité)</td></tr><tr><td>2 (SP: Qualité standard)</td></tr><tr><td>4 (LP: Lecture longue)</td></tr><tr><td>6 ou 8 (EP: Etendu)</td></tr><tr><td rowspan="4">Double face (12cm) (9,4Go)</td><td>2 (XP: Excellente qualité)</td></tr><tr><td>4 (SP: Qualité standard)</td></tr><tr><td>8 (LP: Lecture longue)</td></tr><tr><td>12 ou 16 (EP: Etendu)</td></tr><tr><td rowspan="4">DVD-RW</td><td rowspan="4">DVD-RW</td><td rowspan="4">AUDIOVIDEO</td><td rowspan="4">12cm (4,7Go)</td><td>1 (XP: Excellente qualité)</td></tr><tr><td>2 (SP: Qualité standard)</td></tr><tr><td>4 (LP: Lecture longue)</td></tr><tr><td>6 ou 8 (EP: Etendu)</td></tr><tr><td rowspan="8">DVD-R</td><td rowspan="8">DVD-R</td><td rowspan="8">AUDIOVIDEO</td><td rowspan="4">Monoface (12cm) (4,7Go)</td><td>1 (XP: Excellente qualité)</td></tr><tr><td>2 (SP: Qualité standard)</td></tr><tr><td>4 (LP: Lecture longue)</td></tr><tr><td>6 ou 8 (EP: Etendu)</td></tr><tr><td rowspan="4">Double face (12cm) (8,5Go)</td><td>1 h 50 (XP: Excellente qualité)</td></tr><tr><td>3 h 40 (SP: Qualité standard)</td></tr><tr><td>7 h 20 (LP: Lecture longue)</td></tr><tr><td>11 ou 14 h 40 (EP: Etendu)</td></tr><tr><td rowspan="4">DVD+RW</td><td rowspan="4">RW DVD-RRR</td><td rowspan="4">AUDIOVIDEO</td><td rowspan="4">12cm (4,7Go)</td><td>1 (XP: Excellente qualité)</td></tr><tr><td>2 (SP: Qualité standard)</td></tr><tr><td>4 (LP: Lecture longue)</td></tr><tr><td>6 ou 8 (EP: Etendu)</td></tr><tr><td rowspan="8">DVD+R</td><td rowspan="4">RW DVD-RR</td><td rowspan="4">AUDIOVIDEO</td><td rowspan="4">Monoface (12cm) (4,7Go)</td><td>1 (XP: Excellente qualité)</td></tr><tr><td>2 (SP: Qualité standard)</td></tr><tr><td>4 (LP: Lecture longue)</td></tr><tr><td>6 ou 8 (EP: Etendu)</td></tr><tr><td rowspan="4">RW DVD-RDL</td><td rowspan="4"></td><td rowspan="4">Double face (12cm) (8,5Go)</td><td>1 h 50 (XP: Excellente qualité)</td></tr><tr><td>3 h 40 (SP: Qualité standard)</td></tr><tr><td>7 h 20 (LP: Lecture longue)</td></tr><tr><td>11 ou 14 h 40 (EP: Etendu)</td></tr><tr><td>CD-R/-RW DVD-RAM/±RW/±R</td><td></td><td>JPEG MP3 DivX</td><td>-</td><td>-</td></tr></table>
<h1 id="disques-qui-ne-peuvent-pas-etre-lus">Disques qui ne peuvent pas etre lus</h1>
<p>DVD Video contaminant un code régional autre que "2" ou "ALL" <br />
DVD-R d'auteur 3,9 Go <br />
DVD-RAM/-RW (mode VR) enregistré sans tenir compte des normes d'enregistrement video <br />
- Un DVD±R/DVD-RW(V) enregistré et non finalisé sur un enregistrur d'une marque différente. <br />
DVD-ROM/PD/Disque MV, etc <br />
CVD/CD-ROM/CDV/CD-G/CD-I</p>
<p><img alt="" src="images/afde375987c693803b87b4ecfcd303405ad2c3ed5fbde8ef8f730f6075aece16.jpg" /></p>
<p>Le GRAVEUR DE DVD AVEC DISQUE DUR ne peut dire que les disques compatibles avec DVD-RAM Standard Version 2.0. <br />
Il se peut que certains disques ne puissant pas et/ou enregistrés. Cela peut se produit lorsque des fonctions spécifiques, comme le changement d'angle et le réglage du format d'image, sont actives. Des informations détaillées concernant les disques sont mentionnées sur l'emballage. Veuillez vous y reporter ci nécessaire. <br />
Evitez que le disque ne soit sale ou rayé. Les traces de doigts, la saleté, la poussière, les rayures et les dépôts de fumée de cigarette sur la face enregistrable peuvent empêcher l'enregistrement du disque. <br />
- Certains disques DVD-RAM/±RW/±R peuvent ne pas etre lus par certains lecteurs de DVD. Cela depend du lecteur, du disque et des conditions d'enregistrement. <br />
- Les disques contenant des programmes NTSC ne peuvent pas'être enregistrés à l'aide de cet apparéil.</p>
<h1 id="lecture-dun-disque">LECTURE D'UN DISQUE</h1>
<ol>
<li>Appuyez sur le bouton OPEN/CLOSE. </li>
<li>
<p>Placez delicatement un disque dans le tiroir, face etiquette vers le haut.</p>
</li>
<li>
<p>Appuyez sur le bouton OPEN/CLOSE pour fermer le tiroir disque.</p>
</li>
<li>
<p>Le tiroir disque du GRAVEUR DE DVD AVEC DISQUE DUR se ferme et la lecture du disque se lance automatiquement. </p>
</li>
<li>L'enregistreur de DVD avec DISQUE DUR ne lit pas les disques automatiquement après sa mise en marche initiale. </li>
<li>Lorsque legraveur est mis sous tension alors qu'un disque se trouve dans le tiroir, l'appareil est activé et en attente. </li>
<li>Appuyez sur PLAY (▶) pour lancer la lecture. </li>
<li>
<p>Pour lancer la lecture automatique lorsqu'un disque se trouve dans le tiroir, mettez l'appareil sous tension en appuyant sur le bouton PLAY (®).</p>
</li>
<li>
<p>Appuyez sur le bouton STOP (⊙) pour arreter la lecture.</p>
</li>
</ol>
<p><img alt="" src="images/a72aa2c4b7a71ef63f5501fdb954030d573822563b5d3908f2d5ce53c341c41f.jpg" /></p>
<p>Lorsque vous arrêtez la lecture d'un disque, le GRAVEUR DE DVD AVEC DISQUE DUR garde en mémoire l'emplacement de l'arrêt. Si vous appuyez à nouveau sur le bouton PLAY (⊙) la lecture reprend à l'endroit où vous étes arrêté. (sauf dans les cas où vous retirez le disque, débranchez le GRAVEUR DE DVD AVEC DISQUE DUR ou appuyez deux fois sur le bouton STOP (⊙).)</p>
<p><img alt="" src="images/b0d113df8250ffb9bdb766bd320d34460fe4db7ace0afaee6d0cd4d0182237e1.jpg" /></p>
<ul>
<li>Ne déplacez pas votre GRAVEUR DE DVD AVEC DISQUE DUR pendant la lecture ; cela risquerait d'endommager le disque. </li>
<li>Veiliez à utiliser le bouton OPEN/CLOSE pour ouvrir ou fermer le tiroir disque. </li>
<li>Ne pousse pas le tiroir disque lors de son ouverture ou de sa fermeture ; cela risquerait de provoquer un dysfonctionnement de l'appareil. </li>
<li>Ne placez pas de corps étrangers sur ou dans le tiroir disque. </li>
<li>Selon le type de disque, certaines fonctions peuvent fonctionner différemment ou etre désactivées. Si cela se produit, veuillez vous reporter aux instructions mentionnées sur la pochette du disque. <br />
Veilz a ce que les enfants ne se coincep pas les doigs entre le tiroir disque et le chassis lors de la fermetre du tiroir. <br />
N'insérez qu'un DVD à la fois. Si vous insérez plusieurs disques, ils ne pourront pas être lus et risqueront d'endommager l'ENREGISTREUR DE DVD AVEC DISQUE DUR.</li>
</ul>
<h1 id="utilisation-du-menu-du-disque-du-menu-des-titres">UTILISATION DU MENU DU DISQUE & DU MENU DES TITRES</h1>
<p>Certsains disques comportant un systeme de menus permettant de selectionner des fonctions speciales comme titre, chapitre, bande son, bande annonce, informations sur les acteurs, etc.</p>
<h1 id="pour-un-dvd-video">Pour un DVD-VIDEO</h1>
<p><img alt="" src="images/d33ae21c5b185e6f8dbcda0b28af98b8c6ca9e3c94507138b3cbbe5245c6f4ac.jpg" /></p>
<ul>
<li>
<p>Menu du Disque : Appuyez sur le bouton DISC MENU pour acceder au menu disque.</p>
</li>
<li>
<p>Accédez au menu de configuration de la lecture. </p>
</li>
<li>
<p>Vous pouze selectionner la langue audio et la langue de sous-titrage disponibles sur le disque.</p>
</li>
<li>
<p>Menu des Titres : Appuyez sur le bouton TITLE MENU pour acceder au menu des titres du disque. </p>
</li>
<li>Appuyez sur ce bouton si le disque compte plusieurs titres. Certains disques ne prennant pas en charge la fonction menu des titres.</li>
</ul>
<h1 id="pour-un-disque-durun-disque-hdddvd-ram-rw-r">Pour un disque dur/un disque HDD/DVD-RAM/-RW/-R</h1>
<p><img alt="" src="images/5e38c540f85c308a88c40fcf126faaebf7e29a9f3185c50bc61f6800eacb2b09.jpg" /></p>
<h1 id="list-des-titres">- List des titres</h1>
<p>Appuyez sur le bouton TLTLE LIST. La liste de titres vous permet de sélectionner un titre. La liste de titres se compose des informations concernant le flux video en cours d'enregistrement. Si un titre est supprimé, il ne pourrait plus être lu.</p>
<h1 id="iste-de-lecture-hdddvd-ram-rwvr">-iste de lecture (HDD/DVD-RAM/-RW(VR))</h1>
<p>Appuyez sur le bouton PLAYLIST. Cette liste correspond à une plage de lecture, créée en sélectionnant une scene dans la liste des titres. Lors de la lecture de la liste, seule la scene selektionnelle est mise, puis la lecture s'arrête. Seules les informations nécessaires à la lecture d'une scene particulière sont comprises dans une liste de lecture. Ainsi, même si cette liste est supprimée, l'enregistrement original ne l'est pas. (mode VR uniquement)</p>
<h1 id="utilisation-des-boutons-de-lecture">UTILISATION DES BOUTONS DE LECTURE</h1>
<h1 id="recherche-dans-un-chapitre-ou-sur-une-piste">Recherche dans un chapitre ou sur une piste</h1>
<p><img alt="" src="images/d5453e6e5b1e426fc57dd1e263e740273e9685da97207c9557964684af6c82de.jpg" /></p>
<p>Appuyez sur les boutons RECHERCHE (O) de votre télécommande pendant la lecture.</p>
<table><tr><td>HDD/DVD-VIDEO/</td><td>→X2→→X4→→X8→</td></tr><tr><td>DVD-RAM/-RW/-R</td><td>→X16→→X32→→X128</td></tr><tr><td>DivX</td><td>→X2→→X4→→X8</td></tr><tr><td>AUDIO CD (CD-DA)</td><td>→X2→→X4→→X8</td></tr></table>
<ul>
<li>Vous pouvez parcourir le programme dans le sens inverse. <br />
Lorsque you appuyez longuement sur les boutons SEARCH (C) la lecture se fait a la vitesse par défaut, c'est-à-dire X4.</li>
</ul>
<p>Lorsque you relâchez les boutons SEARCH (⊙) la lecture se fait en vitesse normale.</p>
<ul>
<li>Pour repasser en lecture à vitesse normale, appuyez sur le bouton PLAY (®).</li>
</ul>
<p><img alt="" src="images/1ccc9540fc978503fe3bc5180631a088192405391700ed9b06f0c120de9dea21.jpg" /></p>
<ul>
<li>En mode avance rapide (X 2), un son est émis sur le disque HDD/DVD-VIDEO/DVD-RAM/-RW/-R. (Aucun son n'est émis en mode Scan (Search) (Balayage (Recherche)) pour les disques DivX.) <br />
La vitesse de lecture réelle peut être différente de la vitesse indiquée pour cette fonction.</li>
</ul>
<h1 id="saut-de-chapitures-de-titres-ou-de-repères">Saut de chapitures, de titres ou de repères</h1>
<p><img alt="" src="images/842801a734225e0449d2aff7c48e3b3a4d4cdf6c7710f1603e2f3b35f93a0478.jpg" /></p>
<p>Appuyez sur les boutons SAUT ( ) de votre télécommande pendant la lecture.</p>
<ul>
<li>Si vous appuyez sur le bouton SAUT (心) :</li>
</ul>
<p>Permet d'acceder au début du chapitre, du titre ou du repere (HDD/DVD-RAM/-RW (mode VR)).</p>
<p>Appuyer à nouveau sur le bouton au cours des 3 premières secondes permet de revenir au début du chapitre, titre ou repère précédent. (HDD/DVD-RAM/RW (mode VR)).</p>
<ul>
<li>Si vous appuyez sur le bouton SAUT () :</li>
</ul>
<p>La lecture avance au chapitre, à la piste ou au marqueur suivant (HDD/DVD-RAM/-RW (mode VR)).</p>
<h1 id="lecture-lente">Lecture lente</h1>
<p><img alt="" src="images/17c6828d5c865ce3c5be5297a3c2e1f3400372dbda63ad13574c6a03d06fcfe1.jpg" /></p>
<p>En mode Pause, appuyez sur les boutons RECHERCHE ( ) de la télécommande.</p>
<ul>
<li>Si vous appuyez sur le bouton RECHERCHE () :</li>
</ul>
<p>1/2→1/4→1/8</p>
<ul>
<li>Si vous appuyez sur le bouton RECHERCHE () :</li>
</ul>
<p>1/2 1/4 1/8</p>
<ul>
<li>Pour repasser en lecture à vitesse normale, appuyez sur le bouton PLAY (①).</li>
</ul>
<p>La lecture du disque se fait à vitesse lente (1/4) lorsque vous appuyez longuement sur les boutons RECHERCHE (心) en mode pause. Si le bouton est relachué, l'appareil se remet en mode pause.</p>
<p><img alt="" src="images/7882a152c8e1c46cda0e214ac63c41cc27c8608c544c905f198d392d65814e71.jpg" /></p>
<p>La vitesse de lecture reelle peut etre differente de la vitesse indiquee pour cette fonction. <br />
La vitesse lente ne fonctionne qu'en avance sur les disques DivX.</p>
<h1 id="lecture-par-étape">Lecture par étape</h1>
<p><img alt="" src="images/ef40ccdd132db0e8b23e33bb10f66f8f33b6426e68115e5386178e0caaa9f70f.jpg" /></p>
<p>Appuyez sur les boutons SAUT(,) de votre télécommande en mode pause.</p>
<ul>
<li>A chaque pression sur le bouton, une nouvelle image apparait. <br />
Lorsque you appuyez sur le bouton SAUT(®) l'image precedente est activée. <br />
Lorsque you appuyez sur le bouton SAUT(>) l'image suivante est activée. </li>
<li>Pour repasser en lecture à vitesse normale, appuyez sur le bouton PLAY (⊙).</li>
</ul>
<p><img alt="" src="images/75f82aded507e52f2ccbde9967a49d8ea0d036415954856cbe5e11f1e87365aa.jpg" /></p>
<p>La lecture au ralenti n'est possible que vers l'avant sur les disques DivX.</p>
<h1 id="utilisation-du-bouton-info">UTILISATION DU BOUTON INFO</h1>
<p>La fonction INFO permet de rechercher rapidement une scene en accédant au titre, au chapitre, à la piste ou à l'heure. Elle permet également de modifier les sous-titres et les paramètres audio et de régler certaines fonctions comme la fonction Angle, Zoom, Répartition.</p>
<h1 id="passage-direct-à-une-scène-grâce-à-la-fonction-info">Passage direct à une scène grâce à la fonction INFO</h1>
<p><img alt="" src="images/815433f29c47e80aeac7de1ac437bb15e6ee24b53512a8fcb08d87064ed32d8b.jpg" /></p>
<p><img alt="" src="images/d8d6ea239d28bffd7e35ed02490e04a4b905f48ab4daaa0a46538d615aead604.jpg" /></p>
<p><img alt="" src="images/760a144e05648f5f67ef9c20dd40259f20920b3db5b2480a4e6f5fc4732875be.jpg" /></p>
<p><img alt="" src="images/a06aa7770ede2c27d792c226f9ab2abe290de218305ee94b9b66a31ff4fc9404.jpg" /></p>
<p>Utilisez cette fonction pour acceder à un titre, un chapitre ou une heures spécifique.</p>
<ol>
<li>Appuyez sur le bouton INFO au cours de la lecture. </li>
<li>Appuyez sur les boutons ▲▼ pour SéLECTIONNER Recherche, puis sur le bouton OK ou ▷. </li>
<li>Appuyez sur les boutons ▲▼ pour sélectionner Titre, Chapitre ou Temps. </li>
<li>Appuyez sur les boutons « ou les touches 0 à 9 pour sélectionner la scene souhaitee, puis appuyez sur le bouton OK. En cas de recherche d'heure, saisissez dans l'ordre les heures, les minutes et les secondes à I'aide des touches numériques. Puis appuyez sur le bouton OK.</li>
</ol>
<p><img alt="" src="images/1c16bb12f2428c511c12980c583b91e6e5bcf654cd1273e12171c70e49353e8e.jpg" /></p>
<p><img alt="" src="images/8eff06ff7f385b3f8dfb7860c94c80928463f9b16f9dcd4de7b311253b2e2053.jpg" /></p>
<ul>
<li>Il est possible que cette fonction ne soit pas compatible avec certains disques. Lorsqu'un CD (CD-DA) audio ou un disque MP3/JPEG est inséré, l'affichage des informations peut ne pas s'effectuer selon le type de disque. </li>
<li>La fonction de recherche temporelle n'est pas compatible avec certains disques.. <br />
Pour que l'écran disparaissée, appuyez sur le bouton RETURN.</li>
</ul>
<p><img alt="" src="images/5c7086db6b14c4246dcd366ee5aeaabefe73c612debfdb6ea69114476ba79f22.jpg" /></p>
<h1 id="selection-de-la-language-des-sous-titres">SELECTION DE LA LANGUAGE DES SOUS-TITRES</h1>
<p><img alt="" src="images/f1a76496c30cbac1d36eb5b5bf045f9a0b0f6275356b26e8893ddebc83b13928.jpg" /></p>
<p><img alt="" src="images/68aa420ea9d1fe204609715a90f7cce924beba24b477c5feeca5e60edc6b6bab.jpg" /></p>
<p>Sélectionne l'une des langues de sous-titre enregistrées sur le disque.</p>
<p>Voupez egalement activer cette fonction en appuyant sur le bouton SUBTITLE de la telecommande.</p>
<ol>
<li>Appuyez sur le bouton INFO au cours de la lecture. </li>
<li>Appuyez sur les boutons pour selectionner Sous-titre. </li>
<li>Appuyez sur les boutons pour selectionner la langue des sous-titres de votrechoix.</li>
</ol>
<p><img alt="" src="images/5ff4119e00c04206e3b409bcdb33f6121b8f913699a4420adfadfda82f301c1c.jpg" /></p>
<p>L'affichage des sous-titres peut varier en fonction du type de disque. <br />
Sur certains disques, seule la langue du menu disque peut etre selectionnee.</p>
<h1 id="selection-des-canaux-de-piste-son-audio">SELECTION DES CANAUX DE PISTE SON & AUDIO</h1>
<p><img alt="" src="images/af1742aeebce3f09fbe4572c831c66c1fff50c79330d3fc1c1573a87c1c34a0f.jpg" /></p>
<p><img alt="" src="images/e68c0755b28a74ca88b8cd208fb50337eeff305e94e182c7977dcd5f7fa23569.jpg" /></p>
<p><img alt="" src="images/5dec3b7acd7826adc23afc53462bd2155ca49876c2971eebda1113d1905c3163.jpg" /></p>
<p><img alt="" src="images/ce3632d6a5e9a749c7dd2e2fd2f39eae0bd7f058e02c1fde6b17e5c3a94b12bb.jpg" /></p>
<p><img alt="" src="images/ca8d50b289750dfc5843f710ba6fd086a643373586585f5dcae6591b68124ff7.jpg" /></p>
<p>Sélectionne l'une des pistes son enregistrées sur le disque. Sélectionne également les canaux audio.</p>
<p>Yououpoezegalementactiverccttefonctionenappuyant surleboutAUDIOde la telecommande.</p>
<ol>
<li>Appuyez sur le bouton INFO au cours de la lecture. </li>
<li>Appuyez sur les boutons pour selectionner Audio. </li>
<li>Appuyez sur les boutons ↓▶ pour sélectionner les bandes son ou le canal audio de votrechoix.</li>
</ol>
<p><img alt="" src="images/48231ddc2bef58eb2fbbcb2959c077fe373b0e183dff4fd6b5f3b52d214ea1fe.jpg" /></p>
<ul>
<li>Les canaux de pistes son ou audio peuvent varier car ils sont propres au disque. <br />
Sur certains disques, seule la langue audio du menu disque peut etre selectionnee.</li>
</ul>
<h1 id="changement-de-langle-de-prese-de-vue">CHANGEMENT DE L'ANGLE DE PRESE DE VUE</h1>
<p><img alt="" src="images/f4de32b39402df989407c752b93ad830bf68352df2a6ec62213ebeac01e89c8d.jpg" /></p>
<p>Lorsqu'un DVD VIDÉO contient plusieurs angles pour une scène donnée, vous pouvez selectionner la fonction Angle.</p>
<ol>
<li>Appuyez sur le bouton INFO au cours de la lecture. </li>
<li>Appuyez sur les boutons pour selectionner Angle. </li>
<li>Appuyez sur les boutons pour sélectionner l'angle souhaïde de votrechoix.</li>
</ol>
<p><img alt="" src="images/7c86b29b48c1febd8fb71a88bd75af2a0695c7b5ecf69bd4c8c46d919079bb5e.jpg" /></p>
<ul>
<li>Cette fonction dépend du disque et n'est pas disponible avec tous les DVD. </li>
<li>Cette fonction n'est pas disponible lorsqu'un DVD a ete enregistré à l'aide d'un apparéil ne disposant pas d'un système a angles de prise de vue multiples. <br />
Permet d'afficher l'angle actuel, le nombre d'angles total.</li>
</ul>
<h1 id="lecture-répétée">LECTURE RÉPÉTÉE</h1>
<h1 id="lecture-repétée-répéter-la-lecture">Lecture repétée (Répéter la lecture)</h1>
<p><img alt="" src="images/1a2016aed2bc986160f09cd1d34b171dd8185fa650b508d6004cffe84cebbfba.jpg" /></p>
<p><img alt="" src="images/427634a692386db0b589fdeda1252f1203e55f3c5464851c26fbe7b30d7a72c7.jpg" /></p>
<p><img alt="" src="images/798616cc2e4fc2e989bb0bf988295460bb645172cf05d9cf34bbeed0841e245e.jpg" /></p>
<p><img alt="" src="images/ab81b3900ffe45c40d19b01c1983921c7ab9eb6ed9270233357ba4826cecc29f.jpg" /></p>
<p><img alt="" src="images/7b5e8ddc7d5ca4c3011cdaa14afb71e1a98148d3398737d7ab32a0766290ef9f.jpg" /></p>
<p><img alt="" src="images/fea557327f4873cd0ffa3065567763a0d2b5b56c1a1d5236dbe684552a010782.jpg" /></p>
<p>Yououpvezegalementactivercttefonctionenappuyant surleboutonREPEATdeleteltelecommande.</p>
<ol>
<li>Appuyez sur le bouton INFO au cours de la lecture. </li>
<li>Appuyez sur les boutons pour selectionner Repétition. </li>
<li>Appuyez sur les boutons pour selectionner Arrêt, A-B ou Titre ou Chapitre que vous souhaitez lire de manière répétée, puis appuyez sur le bouton OK.</li>
</ol>
<p><img alt="" src="images/eeabf346394aed2accee4d4a1379dafe943ec1452cca50b2b234f88b04ecd410.jpg" /></p>
<ul>
<li>Les chaprites ne peuvent pas etre repétés sur les HDD/DVD-RAM/-RW (mode VR), les DVD-R non-finalisés et les DVD-RW non-finalisés (mode V). </li>
<li>
<p>Vous poubez également activer Lecture normale en appuyant sur le bouton EXIT (3).</p>
</li>
<li>
<p>Appuyez sur le bouton INFO au cours de la lecture. </p>
</li>
<li>Appuyez sur les boutons pour selectionner Repétition. </li>
<li>Appuyez sur les boutons pour Sélectionner A-B, puis sur le bouton OK. </li>
<li>Appuyez sur le bouton OK à l'instant (A) où vous souhaitez faire demarrer la lecture repétée et appuyez à nouveau à l'instant (B) où vous souhaitez arrêté la lecture repétée. La lecture de la section A-B démarre.</li>
</ul>
<p><img alt="" src="images/2490b70cb8364832d4cb62864378acc17706ca2096ad9a898def122712fafc43.jpg" /></p>
<p><img alt="" src="images/aa2157f30badb000ff33fcacfb63713ddf41659abc0bbb1357553fa768eafe76.jpg" /></p>
<p>Si you reglez l'instant (B) avant que cinq secondes ne se soient ecoulées, la marque d'interdiction () apparait. <br />
- Vous pouvez également activer la fonction Lecture normale en appuyant sur le bouton EXIT (③). <br />
- Les CD Audio (CD-DA), les disques MP3 et DivX ne prennt pas en charge la fonction de réédition A-B.</p>
<h1 id="zoom-avant">ZOOM AVANT</h1>
<p><img alt="" src="images/52b6ae504da5492440ddda63ffd3ad85d1fd6406246050d41bead8bc2ac04c76.jpg" /></p>
<p><img alt="" src="images/e79b6d16a78101a090ed1910fb45328e33ff06d8bdee336c9508a3c39018f38e.jpg" /></p>
<p><img alt="" src="images/f31f115fe8ff1fdec91034a7347054c7bc17d3f88f2e7687f77ba0396e96cec6.jpg" /></p>
<p><img alt="" src="images/7fa4c6d358d6140c014072e56c9c07ed0728fbd8f1db04b9fc2b34b26ca60b09.jpg" /></p>
<p><img alt="" src="images/c5499d3b1fb24f5b2b5460dabb39aa9963a93846d1f00e03bbb89087f2d31b3c.jpg" /></p>
<ol>
<li>Appuyez sur le bouton INFO au cours de la lecture. </li>
<li>Appuyez sur les boutons ▲▼ pour SéLECTIONNER Zoom, puis sur le bouton OK ou ▷. (♂) s'affiche. </li>
<li>Appuyez sur les boutons ▲▼▲▶ pour atteindre la zone que vous souhaitez agrandir. </li>
<li>Appuyez sur le bouton OK. La taille de l'écran devient deux fois plus grande. Appuyez à nouveau sur le bouton OK pour agrandir la taille de l'écran à quatre fois la taille nomale.</li>
</ol>
<p><img alt="" src="images/f5b95d8aa410d7d387add03f78cc320b29ca4ec3e5bb3b29597d45c287397b52.jpg" /></p>
<table><tr><td>HDD/DVD-VIDEO/DVD-RAM/-RW/-R</td><td>Taille normale → X2 → X4 → X2 → Taille normale</td></tr></table>
<p><img alt="" src="images/80da2841359ae97dacc25234e7d0d4d4071e8c352dfd4d4a487c082e4134de3e.jpg" /></p>
<ul>
<li>Lorsque l'enregistrement est réalisé en mode EP, la fonction Zoom n'est pas prise en charge, sauf dans le cas où l'enregistrement a été réalisé en mode V.</li>
</ul>
<h1 id="utilisation-des-marqueurs">UTILISATION DES MARQUEURS</h1>
<p><img alt="" src="images/61836e53e3c3288fe0be0d773b861c4d481e9f11cfb5796a0ca4d8a73160773e.jpg" /></p>
<p><img alt="" src="images/70809576d4b9b094d4a4d2f7a18091e9f591d675367110428d1bb3a11dad1116.jpg" /></p>
<p><img alt="" src="images/2d38a5cb268d9874df90e87bc21125e69841bc1aa5cc239f5e8265c5189a1e14.jpg" /></p>
<p>Mode VR)</p>
<p>Posez des repêres aux scènes que vous désirez revoir afin de commencer la lecture à partir de la position repérée.</p>
<h1 id="réglage-de-repères">Réglage de repères</h1>
<ol>
<li>Appuyez sur le bouton MARKER au cours de la lecture. </li>
<li>Appuyez sur le bouton OK lorsque la scene souhaïée apparait.</li>
</ol>
<p>Le numero 01 s'affiche et la scene est mémorisée.</p>
<ol>
<li>Appuyez sur les boutons pour passer à la position suivante. </li>
<li>
<p>Appuyez de nouveau sur le bouton OK lorsque la scene souhaitationappeaït.</p>
</li>
<li>
<p>Le numéro 02 s'affiche et la scène est méorisée. </p>
</li>
<li>Les disque HDD (Disque dur), DVD-RAM ou DVD-RW (mode VR) sont dotés de la fonction Marqueur et non de la fonction Signet.</li>
</ol>
<p>Les scènes pouvant être affichées comme de nombreuses pages différentes, il s'avère nécessaire de les numéroter.</p>
<p>Si un disque en cours d'utilisation est protégé, les marqueurs ne peuvent être ni régés ni supprimés. Seule la lecture est possible.</p>
<p><img alt="" src="images/d760b837a81d7f72b59e99e2149c8b37b1d9baa014ba6f9d949ef91d2db8ce9f.jpg" /></p>
<h1 id="lecture-dun-marqueur">Lecture d'un marqueur</h1>
<ol>
<li>Appuyez sur le bouton MARKER au cours de la lecture. </li>
<li>Appuyez sur les boutons pour selectionner une scene marquee. </li>
<li>
<p>Appuyez sur le bouton OK ou PLAY (C) pour dire la scène sélectionnée.</p>
</li>
<li>
<p>Pour returner au début du marqueur, appuyez sur le bouton SAUT (S). Appuyez à nouveau sur le bouton au bout de 3 secondes pour revenir au début du marqueur précédent. </p>
</li>
<li>Pour aller au marqueeur suivant, appuyez sur le bouton SAUT (→).</li>
</ol>
<h1 id="effacement-dun-marqueur">Effacement d'un marqueur</h1>
<ol>
<li>Appuyez sur le bouton MARKER au cours de la lecture. </li>
<li>
<p>Appuyez sur les boutons pour seLECTIONner une scene marquee.</p>
</li>
<li>
<p>Appuyez sur le bouton ROUGE (A) pour effacer le repere sélectionné.</p>
</li>
<li>
<p>Lorsqu'un marqueur est effacé alors que le disque HDD (Disque dur)/DVD-RAM/-RW (mode VR) est en cours de lecture, les numéro des marqueurs changent. Ainsi, si le 7ème marqueur est effacé après l'enregistrement de dix marqueurs, les numéro après le 8ème marqueur se déplacent d'un numéro et le 8ème marqueur devient alors le 7ème.</p>
</li>
</ol>
<h1 id="réglage-de-signets">Réglage de signets</h1>
<ol>
<li>Appuyez sur le bouton MARKER au cours de la lecture. </li>
<li>
<p>Appuyez sur le bouton OK lorsque la scène souhaïée apparait.</p>
</li>
<li>
<p>Le numéro 1 s'affiche et la scene est mémorisée.</p>
</li>
<li>
<p>Appuyez sur les boutons pour passer à la position suivante. </p>
</li>
<li>ppuyez de nouveau sur le bouton OK lorsque la scene souhaitee apparait.</li>
</ol>
<p>Le numero 2 s'affiche et la scene est mémorisée.</p>
<ul>
<li>Répétez ces étapes pour repérer d'autres positions. </li>
<li>Vous pouvez repérer jusqu'à 10 scènes.</li>
</ul>
<p><img alt="" src="images/3f36b986113671736c10adf184d1e6adf1191876550fb2175e19bbae23d01518.jpg" /></p>
<p><img alt="" src="images/ad726a97aaeaca5bda9bee8c340d9eab7e12600136f384d50d63b9bd038c5735.jpg" /></p>
<ul>
<li>Les signets disparaissent lorsque le tiroir disque est ouvert puis reféré.</li>
</ul>
<h1 id="lecture-dun-signet">Lecture d'un signet</h1>
<ol>
<li>Appuyez sur le bouton MARKER au cours de la lecture. </li>
<li>Appuyez sur les boutons pour selectionner une scene mise en signet. </li>
<li>Appuyez sur le bouton OK ou PLAY (O) pour lire la scène seLECTIONnee.</li>
</ol>
<h1 id="effacement-dun-signet">Effacement d'un signet</h1>
<ol>
<li>Appuyez sur le bouton MARKER au cours de la lecture. </li>
<li>Appuyez sur les boutons pour selectionner une scene mise en signet. </li>
<li>Appuyez sur le bouton ROUGE (A) pour effacer le signet sélectionné.</li>
</ol>
<h1 id="lecture-dun-fichier-cdmp3-audio">LECTURE D'UN FICHIER CD/MP3 AUDIO</h1>
<h1 id="boutons-de-la-télécommande-servant-à-la-lecture-de-cd-audio-cd-damp3">Boutons de la télécommande servant à la lecture de CD audio (CD-DA)/MP3</h1>
<p><img alt="" src="images/2975c7a099d38e2c059ac533f1086d89a63d062c41ac61f3be53b8f9df916634.jpg" /></p>
<p><img alt="" src="images/cdaba37e2631f8f398beee22153024c06e5a55c6564e87b852f4ebc99be539f0.jpg" /></p>
<p>Bouton SAUT (心 心) :permet de passer à la page precedente ou la page suivante. <br />
Boutons RECHERCHE ( ) :permet d'accelerer la lecture (X2,X4,X8) (CD audio uniquement) <br />
3 Bouton STOP () :permet d'arreter la lecture d'une piste (chanson). <br />
4 Bouton PAUSE (u):permet d'interr compromise la lecture.. <br />
5 Bouton PLAY (O), OK: permet de dire une piste (chanson). <br />
6 :permet de selectionner une piste (chanson).</p>
<h1 id="bouton-rougea">Bouton ROUGE(A)</h1>
<ul>
<li>
<p>permet de creer une liste de lecture ou d'acceder à une liste de lecture. <br />
Sélectionner tout : MP3, CD-DA</p>
</li>
<li>
<p>Copier : MP3 </p>
</li>
<li>Import. CD : CD audio</li>
</ul>
<h1 id="bouton-vertb-permet-de-sélectionner-lordre-de-classement-disque-mp3-uniquement">Bouton VERT(B): permet de sélectionner l'ordre de classement (disque MP3 uniquement)</h1>
<p>9 Bouton OK:permet de litre la piste selectionnee (chanson). <br />
10 Bouton JAUNE(C):permet de selectionner le mode de lecture.(REPEAT (REPETER)) <br />
11 Bouton BLEU(D):permet de selectionner un contenu (disque MP3 uniquement)</p>
<h1 id="lecture-dun-cd-audio-cd-da">Lecture d'un CD audio (CD-DA)</h1>
<ol>
<li>
<p>Insérez un CD audio (CD-DA) dans le tiroir disque.</p>
</li>
<li>
<p>Le menu CD audio s'affiche et la lecture chansons démarre automatiquement.</p>
</li>
<li>
<p>Appuyez sur les boutons ▲▼ pour Sélectionner chanson que vous souhaitez dire, puis appuyez sur le bouton OK.</p>
</li>
</ol>
<h1 id="eléments-affichés-à-lécran-cd-audio-cd-da">Eléments affichés à l'écran CD Audio (CD-DA)</h1>
<p><img alt="" src="images/2f26b8eefe55fb4b4f4812f2a9e4566cf5c2aeda452baa90ea11c69a60188be4.jpg" /></p>
<p>Piste actuelle (titre) : affiche le nombre de la piste actuellement en cours de lecture. <br />
2 Permet d'afficher les boutons disponibles et le temps de lecture correspondant à la section en cours de lecture. <br />
Permet d'afficher le type et le nom du fisier actuel. <br />
4 Affiche les boutons pouvant etre utilisés. <br />
5 Affiche I'index de lecture actuelle, le nombre total de pistes. <br />
6 Affiche la liste des pistes (liste des chansons).</p>
<h1 id="lecture-dun-disque-mp3">Lecture d'un disque MP3</h1>
<ol>
<li>
<p>Insérez le disque MP3 dans le tiroir disque.</p>
</li>
<li>
<p>Le menu s'affiche</p>
</li>
<li>
<p>Appuyez sur les boutons ▲▼ pour sélectionner Bibliothèque, puis sur le bouton OK ou ▷. </p>
</li>
<li>Appuyez sur les boutons ▲▼ pour sélectionner Musique, puis sur le bouton OK ou ▷. </li>
<li>Appuyez sur les boutons ▲▼ pour sélectionner la piste que vous souhaitez dire, puis appuyez sur le bouton OK.</li>
</ol>
<h1 id="mp3-screen-elements-2">MP3 Screen Elements</h1>
<p><img alt="" src="images/f35e1afa23e35c2574acbe4fc8d72214cb20d9f9b1f56b756782526eba0f8ce5.jpg" /></p>
<p>Piste actuelle (chanson) : affiche le nom de la piste en cours de lecture. <br />
Permet d'afficher les boutons disponibles et le temps de lecture correspondant à la section en cours de lecture. <br />
3 Permet d'afficher le type et le nom du fichier ainsi que le nom du dossier actuel. <br />
4 Affiche les boutons pouvant etre utilisés. <br />
5 Permet d'afficher l'index de lecture actuel et le nombre total de plages. <br />
6 d'afficher la liste des plages (liste des chansons).</p>
<h1 id="répéter-la-lecture-dun-cd-cd-da-et-dun-fichier-mp3">Répéter la lecture d'un CD (CD-DA) et d'un fichier MP3</h1>
<p>Vou puez également activer cette fonction en appuyant sur le bouton REPEAT de la télécommande.</p>
<p>Pendant la lecture, appuyez de façon repétée sur le bouton REPEAT pour sélectionner le mode de répétition que vous souhaitez.</p>
<ol>
<li>Appuyez sur le bouton JAUNE (C) au cours de la lecture de la Liste musicale. </li>
<li>
<p>Appuyez sur les boutons ▲▼ pour sélectionner le mode de lecture souhaïté, puis appuyez sur OK ou le bouton ▷.</p>
</li>
<li>
<p>Normal (CD (CD-DA) et fichier MP3): les pistes du disque sont lues dans l'ordre de leur enregistrement. </p>
</li>
<li>Répéter la piste (CD (CD-DA) et fichier MP3) </li>
<li>Répéter dossier (MP3) </li>
<li>Répéter tout (CD (CD-DA) et fichier MP3) </li>
<li>Aléatoire (CD (CD-DA) et filchier MP3): l'option Aléatoire vous permet de dire les pistes d'un disque dans un ordre aléatoire.</li>
</ol>
<p><img alt="" src="images/f96afa1e02a1b5ae640db3def797f2f4faabae6fca6051ef5c3c22669dcacfb6.jpg" /></p>
<h1 id="import-cd">Import. CD</h1>
<p><img alt="" src="images/ef85774fc1e63d1141e5a03aac9bdb4be7b384409423484a5d06aacf55890d8e.jpg" /></p>
<ol>
<li>Appuyez sur le bouton ROUGE (A) au cours de la lecture de la liste musicale. </li>
<li>Appuyez sur les boutons ▲▼ pour SéLECTIONNER Import. CD, puis sur le bouton OK ou ▷. </li>
<li>
<p>À l'aide des boutons ▲▼, sélectionné le fidchier que vous souhaitez copier, puis appuyez sur le bouton MARKER jusqu'à ce que le fidchier soit coché.</p>
</li>
<li>
<p>Si vous souhaitez ne pas copier l'une des entrées cochées, il vous suffit de sélectionner l'entrée en question et d'appuyer sur le bouton MARKER jusqu'à ce qui elle ne soit plus cochée.</p>
</li>
<li>
<p>Appuyez sur les boutons ▲▼ pour sélectionner le support cible, puis sur le bouton OK.</p>
</li>
<li>
<p>Vous pouvez creer un nouveau dossier en appuyant sur le bouton VERT (B).</p>
</li>
<li>
<p>Appuyez sur le bouton ROUGE (A) pour sélectionner l'options Démarrage la copie.</p>
</li>
</ol>
<p>Le message « Nombre d' éléments : x » s'affiche.</p>
<ol>
<li>Appuyez sur les boutons pour sélectionner Démarrage, puis sur le bouton OK.</li>
</ol>
<p>La copie des fichiers commence.</p>
<ul>
<li>Appuyez sur le bouton EXIT (①) (QUITTER) pour annuler la copie en cours.</li>
</ul>
<p><img alt="" src="images/405e7e016e2afdf6d501ebd53184705e428c54395a77a126cc73e1315d660cc2.jpg" /></p>
<p><img alt="" src="images/b3c0e50ba96da9a6ce307b6fd548400b9121b8b3a66b5de06248c2428e2fad49.jpg" /></p>
<p><img alt="" src="images/16acae23271814720235925c8134800a6b9a780623e2096026f38fd6f3d860fe.jpg" /></p>
<p><img alt="" src="images/46b7bb0769643a7f2f701711d335b0d6c53b6c9b5ef7957b92698e065f5c93a6.jpg" /></p>
<p>Le format d'un fisier mp3 après importation est le suivant :</p>
<p>Débit binaire 128 kbps</p>
<p>Canal 2 (stereo)</p>
<p>Fréquence d'échantillonnage 44 KHz</p>
<ul>
<li>Les CD audio DTS et les disques protégés contre la copie ne peuvent pas'être importés.</li>
</ul>
<h1 id="nouvelle-liste-de-lecture">Nouvelle liste de lecture</h1>
<p><img alt="" src="images/b2b43d39dae166ee2ec6b8b3dbd637bed8937a1af678c4f1071b5e0528439f99.jpg" /></p>
<p><img alt="" src="images/4444d8615e105159cbfbb3ecea168255da35227de5b6db27728a8727d3e7f3e4.jpg" /></p>
<p>You pouez enregistrer jusqu'à 30 pistes dans la liste de lecture.</p>
<ol>
<li>Appuyez sur le bouton ROUGE (A) au cours de la lecture de la Liste musicale. </li>
<li>Appuyez sur les boutons ▲▼ pour Sélectionner Nouv. I. lect., puis appuyez sur le bouton OK ou ▷. </li>
<li>
<p>Appuyez sur les boutons ▲▼ pour sélectionner les pistes dans l'ordre où vous souhaitez les dire, puis appuyez sur le bouton OK.</p>
</li>
<li>
<p>Si vous sélectionnéz par erreur une piste qui ne vous intérésse pas, appuyez sur les boutons pour sélectionner la piste à supprimer, puis sur le bouton OK.</p>
</li>
<li>
<p>Pour enregistrer la liste de lecture, appuyez à nouveau sur le bouton ROUGE (A).</p>
</li>
</ol>
<p>Une nouvelle liste de lecture s'affiche.</p>
<p><img alt="" src="images/5de34e656e7af4229aa1db98dc0ef62716372066329c34721c2fe5933645055c.jpg" /></p>
<p><img alt="" src="images/131fe2a211bc18889ed28276a87779480fe01b04feac8d9fab37493a8add6a7d.jpg" /></p>
<p><img alt="" src="images/eb34352643523de727ca37221336fb8cdb388153461a84783a4a479197317d26.jpg" /></p>
<p><img alt="" src="images/5cfd708467a3059476ec8e0af968e9ab668ef404a551735d0e73c51b4bcd13bf.jpg" /></p>
<ol>
<li>Appuyez sur le bouton ROUGE (A) au cours de la lecture de la Liste musicale. </li>
<li>Appuyez sur les boutons ▲▼ pour sélectionner Ensemble de lecture, puis appuyez sur le bouton OK ou ▷. </li>
<li>Appuyez sur les boutons pour selectionner le dossier de la liste de lecture souhaitee, puis appuyez sur le bouton OK. La lecture des pistes selectionnées demarre automatiquement.</li>
</ol>
<p><img alt="" src="images/8e9e9259aaf35d584be94d5d611e5d667b56aeb609504685bcc6ef13eb53ee88.jpg" /></p>
<h1 id="supprimer-la-liste-de-lecture">Supprimer la liste de lecture</h1>
<p><img alt="" src="images/6010514ac43299b635e42b12e915776d058f2dc515592643c206d01bcac3ff1a.jpg" /></p>
<p><img alt="" src="images/386a909e0712fa5eea65b5426814d64c2875017079f3c82c0b5647334ebbcae5.jpg" /></p>
<ol>
<li>Appuyez sur le bouton ROUGE (A) au cours de la lecture de la Liste musicale. </li>
<li>Appuyez sur les boutons ▲▼ pour sélectionner Ensemble de lecture, puis appuyez sur le bouton OK ou ▷. </li>
<li>Appuyez sur les boutons pour selectionner la liste de lecture que vous souhaitez supprimer. </li>
<li>Appuyez sur le bouton ROUGE (A). </li>
<li>Appuyez sur les boutons pour sélectionner Oui, puis appuyez sur le bouton OK. La liste de lecture sélectionnée est supprimée.</li>
</ol>
<p><img alt="" src="images/d7489707b99bf622bc25bc2d1b2694981e037c8f75d0344b457abccdcd9feb43.jpg" /></p>
<p><img alt="" src="images/552220997d3c0a76d42d5e1a314ea209fda0f1f6837e53ef6d4b764265e662eb.jpg" /></p>
<p>Lorsque le lecteur s'eteint ou ouvre un fichier/se déconnecte, toutes les listes de lecture figurant sur le disque sont supprimées.</p>
<h1 id="aller-dans-modifieriste-de-lecture">Aller dans Modifieriste de lecture</h1>
<p><img alt="" src="images/03870ee6ba1745c53233fe189a889443e7c05eb72a46889d553e455a73dcf1a9.jpg" /></p>
<p><img alt="" src="images/156589a3fd7e0cbddda3e39534b62f35e2a09729903c558132beaf521f193f9e.jpg" /></p>
<ol>
<li>Appuyez sur le bouton ROUGE (A) au cours de la lecture de la Liste musicale. </li>
<li>Appuyez sur les boutons ▲▼ pour sélectionner Ensemble de lecture, puis appuyez sur le bouton OK ou ▷. </li>
<li>Appuyez sur les boutons pour selectionner la liste de lecture que vous souhaitez modifier. </li>
<li>Appuyez sur le bouton VERT (B) en mode Playlist (liste de lecture). </li>
<li>
<p>Appuyez sur les boutons ▲▼ pour sélectionner les pistes dans l'ordre où vous souhaitez les dire, puis appuyez sur le bouton OK.</p>
</li>
<li>
<p>Si vous sélectionné par erreur une piste qui ne vous intérésse pas, appuyez sur les boutons pour désigné onner la piste à supprimer, puis sur le bouton OK.</p>
</li>
<li>
<p>Pour enregistrer la liste de lecture, appuyez à nouveau sur le bouton ROUGE (A). La liste de lecture sera modifiée.</p>
</li>
</ol>
<p><img alt="" src="images/51a92a1617b1e0a39b75b0b078203c27195829b011c8341e5b2331976552e613.jpg" /></p>
<h1 id="aller-dans-liste-de-fichiers-musicaux">Aller dans liste de fichiers musicaux</h1>
<p><img alt="" src="images/d11fe5a9ec1018b4e4ab2941ba71fa415a658f4ff3e4b47ca44500cf22c6026c.jpg" /></p>
<p><img alt="" src="images/4f1bbed5ba96ec9371efc8240975a774218af3ffd58311d1b8b6e3ae42ae5507.jpg" /></p>
<ol>
<li>Appuyez sur le bouton BLEU (D) au cours de la lecture de la Liste de lecture. La Liste de lecture s'affiche.</li>
</ol>
<p><img alt="" src="images/a0c9d26ccac91d989bd1e57079d201d22caccc3d77be7638b87e6b7e9fa7ac82.jpg" /></p>
<h1 id="utilisation-de-la-fonction-trier">Utilisation de la fonction Trier</h1>
<p><img alt="" src="images/b28955c8e0c0c148c060f1da8ceca101e47f5d3a1aa14b38ab6cbedafd4f33fb.jpg" /></p>
<p>Yououpouzchanger l'ordre de tri de laListe musicale trèsfacilitémentdesqueyoulesouhaitez.</p>
<ol>
<li>Lorsque la liste des menus est affichée, appuyez sur le bouton VERT (B) pour selectionner Trier. </li>
<li>
<p>Appuyez sur les boutons ▲▼ pour sélectionner l'élement souhaité, puis appuyez sur le bouton OK ou ▷.</p>
</li>
<li>
<p>Nom : suivant l'ordre alphabetique </p>
</li>
<li>Taille : en fonction de la taille des fichiers audio.</li>
</ol>
<p><img alt="" src="images/391f8d59c798543cea2c6640ea06e397779dd5b0042082d88b4b353f26ae2a79.jpg" /></p>
<p><img alt="" src="images/79034a6b0f2f849b973bbad40183c77af97166bb073b0f479ae1421eba17228f.jpg" /></p>
<p>Le CD audio (CD-DA) n'est pas disponible. <br />
- Vous pouvez proceder au tri en fonction du nom et de la longueur. La liste est à nouveau triée selon l'ordre de copie en accédant à nouveau à la Liste musicale.</p>
<h1 id="sélection-du-contenu">Sélection du Contenu</h1>
<p><img alt="" src="images/da58583d5b0d41dea57311d8b914fa7d556dd9933d6b8beb5ad53d1d28f475f9.jpg" /></p>
<ol>
<li>Appuyez sur le bouton BLEU (D) pour selectionner Contenu. </li>
<li>Appuyez sur les boutons ▲▼ pour sélectionner le contenu que vous souhaïze déplacer, puis appuyez sur le bouton OK ou ▷.</li>
</ol>
<p><img alt="" src="images/cca2f5587eaefa3923f9c3a71e413bd9d739048392ca50ea2839375f364f5f61.jpg" /></p>
<p><img alt="" src="images/c16cb0ee61cb113343e3e9033bdc2c1be6b87f7e1c0c6a92fe769909c7f2cfc0.jpg" /></p>
<ul>
<li>Cette fonction n'est disponible que lorsque le disque contient le containu sélectionné. <br />
Le CD audio (CD-DA) n'est pas disponible.</li>
</ul>
<h1 id="lecture-simultanée-de-fichiers-musicauxphotos">Lecture simultanée de fichiers musicaux/photos</h1>
<p><img alt="" src="images/1f6ba9639fd5ef0ca54abe7ce506eba6b6c50c697636dc75c9def244732e30d9.jpg" /></p>
<p>Cette fonction vous permet d'écouter de la musique tout en regardant défiler un diaporama.</p>
<ol>
<li>Appuyez sur le bouton BLEU (D) pour selectionner Contenu. </li>
<li>Appuyez sur les boutons ▲▼ pour Sélectionner Photo(avec Mus)), puis sur le bouton OK ou ▷. La liste des photos s'affiche (voir page 55).</li>
</ol>
<p><img alt="" src="images/cc94701d886dfce9ffd5b37ee286036845333e254357b112b9ab5bcbe9a5ae5c.jpg" /></p>
<p>Pour activer cette fonction, selectionnez le disque contenant à la fois des fichiers musicaux et des fichiers photo.</p>
<p><img alt="" src="images/5f988a2f5d9a40d1613a3bc07b51522dd1c88bad0658b83868977008fba92eab.jpg" /></p>
<ol>
<li>
<p>Insérez le disque JPEG dans le tiroir disque.</p>
</li>
<li>
<p>Le menu s'affiche</p>
</li>
<li>
<p>Appuyez sur les boutons ▲▼ pour sélectionner Bibliothèque, puis sur le bouton OK ou ▷.</p>
</li>
<li>
<p>Appuyez sur les boutons ▲▼ pour Sélectionner Photo, puis appuyez sur le bouton OK ou ▷.</p>
</li>
<li>
<p>Appuyez sur le bouton SAUT (●) pour visualiser les huit images suivantes. </p>
</li>
<li>Appuyez sur le bouton SAUT (®) pour visualiser les huit images précédentes.</li>
</ol>
<p><img alt="" src="images/0796a2b3bfe18a43bf7b124f6e78619b268800eeb0dcdc9078943f34e6874ad7.jpg" /></p>
<ol>
<li>Pour sélectionner une image souhaité, appuyez sur les boutons ▲▼◁▶, puis sur le bouton OK.</li>
</ol>
<h1 id="diaporama">Diaporama</h1>
<p>Pour la configuration, suivez les étapes 1 et 4 ci-dessus. <br />
5. Appuyez sur le bouton PLAY (C)</p>
<p>Une fois dans Listé de photos, vous pouvez également démarrer un diaporama en appuyant sur le bouton JAUNE (C).</p>
<ol>
<li>Appuyez sur le bouton ROUGE (A) pour sélectionner Vitesse. </li>
<li>
<p>Appuyez sur les boutons ▲▼ pour sélectionner la vitesse du diaporama, puis appuyez sur le bouton OK ou ▷. Le diaporama est lancé et les photos défilent à la vitesse sélectionnée.</p>
</li>
<li>
<p>Vous pouvez acceder à la Liste de photos en appuyant sur le bouton JAUNE (C).</p>
</li>
</ol>
<h1 id="pourmettre-fin-au-diaporama">Pourmettre fin au diaporama</h1>
<p>Appuyez sur le bouton VERT (B), STOP () ou RETURN.</p>
<p><img alt="" src="images/e4a0ade04fb1566fa280e4ad22073a13542fc4bf78bd8e54d35aca422c8a99fb.jpg" /></p>
<p><img alt="" src="images/91fecf1c3a70a63aa94388805ec12816e4f79ab20e8a3686130455de391699db.jpg" /></p>
<h1 id="tourner">Tourner</h1>
<p>Pour la configuration, suivez les étapes 1 et 4 ci-dessus.</p>
<p>5-1. Appuyez sur le bouton VERT (B) pour selectionner Tourner.</p>
<ol>
<li>
<p>Appuyez sur les boutons pour sélectionner l'angle de rotation, puis appuyez sur le bouton OK ou .</p>
</li>
<li>
<p>Une fois l'angle de rotation sélectionné, vous pouvez le modifier en appuyant sur le bouton ROUGE (A). </p>
</li>
<li>Vous pouvez acceder à la Liste de photos en appuyant sur le bouton JAUNE (C).</li>
</ol>
<h1 id="pour-arreter-la-rotation">Pour arreter la rotation</h1>
<p>Appuyez sur le bouton VERT (B), STOP () ou RETURN.</p>
<p><img alt="" src="images/d49abb7c3ca1132f582025a15219e42755a7e8388e0e02b4bec1d1ff6b31f7b4.jpg" /></p>
<p><img alt="" src="images/8a49485de59ebc70496c71d984e2f527f6c14f2d482ed54e4114ff981533418d.jpg" /></p>
<h1 id="zoom-2">Zoom</h1>
<p>Pour la configuration, suivez les étapes 1 à 4 de la page 55.</p>
<p>5-1. Appuyez sur le bouton JAUNE (C) pour Sélectionner Zoom. <br />
6. Pour changer la taille de l'image, appuyez sur le bouton OK. L'agrandissement maximal est de quatre fois la taille normale (4x).</p>
<p><img alt="" src="images/0261b79a2a3b8afaee6a893d322b1b9b7928629d528ce43cb256fb72f47e08a7.jpg" /></p>
<ul>
<li>Vous pouvez acceder à la Liste de photos en appuyant sur le bouton JAUNE (C).</li>
</ul>
<h1 id="pour-arreter-le-zoom">Pour arreter le zoom</h1>
<p>Appuyez sur le bouton VERT (B), STOP () ou RETURN.</p>
<p><img alt="" src="images/f5f12355982c8cc86fe0fda061c40a9fbb66481ffcd505e03b52791e0b1c0cb2.jpg" /></p>
<h1 id="aller-dans-liste-de-photos">Aller dans liste de photos</h1>
<p>Pour la configuration, suivez les étapes 1 à 4 de la page 55.</p>
<p>5-1. Appuyez sur le bouton RETURN pour acceder à la liste de photos.</p>
<h1 id="utilisation-de-la-fonction-trier-2">Utilisation de la fonction Trier</h1>
<p>Vou puez Change I'ordre de tri de la Liste de photos tres facilement des que you le souhaitez.</p>
<ol>
<li>Lorsque la liste des menus est affichée, appuyez sur le bouton VERT (B) pour selectionner Trier. </li>
<li>
<p>Appuyez sur les boutons ▲▼ pour sélectionner l'élement souhaité, puis appuyez sur le bouton OK ou ▷.</p>
</li>
<li>
<p>Nom : suivant l'ordre alphabetique. </p>
</li>
<li>Taille : en fonction de la taille des fichiers photo.</li>
</ol>
<p><img alt="" src="images/2a71753f956afb71bde73eb2799cc700fd74fad3af8ba00e587b3ab0b1db03df.jpg" /></p>
<p><img alt="" src="images/1d98f260e4cc8e2173ec4f7aef8d427ace6818f8fc6dc8cac76f85064421ff59.jpg" /></p>
<ul>
<li>Vous pouze proceder au tri en fonction du nom et de la taille. La liste est à nouveau triée selon l'ordre de copie en accédant à nouveau à la Liste de photos.</li>
</ul>
<h1 id="sélection-du-contenu-2">Sélection du Contenu</h1>
<p>Pour la configuration, suivez les étapes 1 à 3 de la page 55.</p>
<ol>
<li>Appuyez sur le bouton BLEU (D) pour selectionner Contenu. </li>
<li>Appuyez sur les boutons ▲▼ pour sélectionner le contenu que vous souhaitez déplacer, puis appuyez sur le bouton OK ou ▷.</li>
</ol>
<p><img alt="" src="images/17e6f76d2f24e7cf73727c4fc750a4efc00e690e9c5171024f4dc7a8c38962b0.jpg" /></p>
<ul>
<li>Cette fonction n'est disponible que lorsque le disque contient le contentu sélectionné.</li>
</ul>
<p><img alt="" src="images/622b32c05edacc3c130a54a5ffe215f593fe0d647dc198243ea8b01518c2b98f.jpg" /></p>
<p><img alt="" src="images/0a19ad12ee0d54219ac2e6e1fa9da15c91b49946ec7bd367278677ae90327202.jpg" /></p>
<h1 id="utilisation-du-bouton-menu">Utilisation du bouton MENU</h1>
<ol>
<li>Insérez un DivX dans le tiroir disque. </li>
<li>Le menu s'affiche </li>
<li>Appuyez sur les boutons ▲▼ pour sélectionner Bibliothèque, puis sur le bouton OK ou ▷. </li>
<li>Appuyez sur les boutons ▲▼ pour sélectionner DivX, puis sur le bouton OK ou ▷. </li>
<li>Appuyez sur les boutons ▲▼ pour sélectionner le fichier avi (DivX), puis appuyez sur le bouton OK ou PLAY (▶). </li>
<li>Lors de la lecture d'un fisier DivX, vous pouvez utiliser les fonctions suivantes. Appuyez une fois sur le bouton STOP (⊙) au cours de la lecture pour afficher la liste des fichiers, appuyez une nouvelle fois sur le bouton pour quitter l'écran du menu.</li>
</ol>
<p><img alt="" src="images/22b998c2b9dbd9b4f97ffbf7e8184c40909e5fc365aaf87d08bd237dc8b35850.jpg" /></p>
<p>Description de la fonction DivX </p>
<table><tr><td>Fonction</td><td>Description</td></tr><tr><td>Sauter une scène</td><td>Pour avancer ou reculer de 5 minutes, appuyez sur les boutons SAUT (←) au cours de la lecture.</td></tr><tr><td>Rechercheer</td><td>Appuyez sur les boutons RECHERCHE (←) au cours de la lecture, puis appuyez à nouveau dessus pour accélérer la vitesse de recherche. (X 2, X 4, X 8)</td></tr><tr><td>Lecture lente</td><td>En mode Pause (↑), appuyez sur le bouton RECHERCHE (←) de la télécommande. (1/2, 1/4, 1/8) La lecture arrête en vitesse lente n'est pas disponible.</td></tr><tr><td>Lecture par étape</td><td>En mode Pause (↑), appuyez sur le bouton SAUT (←) de la télécommande. La lecture arrête en mode pas à pas n'est pas disponible.</td></tr></table>
<p><img alt="" src="images/9fa7ea179e5f554021ca7234b48a74245c0c0537635c4025abb926edad8e030d.jpg" /></p>
<p>Cercains fichiers DivX crees sur ordinateur peuvent ne pas etre lus.</p>
<p>C'est pourquoi un type de Codec, une Version et une Résolution plus élevé, au-delà de la Specification, ne sont pas pris en charge.</p>
<h1 id="codage-des-sous-titres-divx">Codage des sous-titres DivX</h1>
<ol>
<li>Appuyez sur le bouton JAUNE (C) dans la liste des fichiers. </li>
<li>Appuyez sur les boutons pour selectionner une langue de sous-titrage DivX prise en charge en fonction de la région, puis appuyez sur le bouton OK.</li>
</ol>
<p><img alt="" src="images/14ecd870cf8a11dbb505dd34138365c26e80ff1702c4302d95d3ca68f9f654cd.jpg" /></p>
<table><tr><td>Occid.</td><td>Afrikaans, Basque, Catalan, Danois, Néerlandais, Anglais, Féroïen, Finnois, Français, Allemand, Islandais, Indonésien, Italien, Malais, Norvégien, Portugais, Espagnol, Swahili, Suédois</td></tr><tr><td>Central</td><td>Anglais, Albanians, Croatia, Tchéque, Hongrois, Polonais, Roumain, Serbe(Latin), Slovaque, Slowène</td></tr><tr><td>Grec</td><td>Anglais, grec</td></tr><tr><td>Cyrillien</td><td>Anglais, Azéri, Biélorusse, Bulgare, Kazakh, Macédonien, Russe, Serbe, Tatar, Ukrainien, Ouzbek</td></tr></table>
<p><img alt="" src="images/c77f27de241f43d798e3fd7032bf0f911e2c56d7dad96912548db0625446b5e7.jpg" /></p>
<p>Si la langue des sous-titres s'affiche avec des caractères corrompus, faites correspondre les sous-titres DivX à la zone correspondante. Si cela ne fonctionne pas, le format n'est pas pris en charge.</p>
<h1 id="utilisation-de-la-fonction-trier-3">Utilisation de la fonction Trier</h1>
<p>Voussoupiezchangere l'ordre de tri de laListedeDivXtrésfacilitationdes queyoulseouhaitez.</p>
<ol>
<li>Lorsque la liste des menus est affichée, appuyez sur le bouton VERT (B) pour sélectionner Trier. </li>
<li>
<p>Appuyez sur les boutons ▲▼ pour sélectionner l'élement souhaité, puis appuyez sur le bouton OK ou ▷.</p>
</li>
<li>
<p>Nom : suivant l'ordre alphabetique. </p>
</li>
<li>Taille : en fonction de la taille des fichiers DivX.</li>
</ol>
<p><img alt="" src="images/601e5b1972d6d645653b2995fd14393aa135e13fbd8cef1b845b241b4ff765c6.jpg" /></p>
<p><img alt="" src="images/ea57e0073311c158213c34fea233f5586d7a6d5725ff1b627253b2aac08e8bb2.jpg" /></p>
<ul>
<li>Vous pouze proceder au tri en fonction du nom et de la taille. La liste est à nouveau triée selon l'ordre de copie en accédant à nouveau à la liste DivX.</li>
</ul>
<h1 id="sélection-du-contenu-3">Sélection du Contenu</h1>
<ol>
<li>Appuyez sur le bouton BLEU (D) pour selectionner Contenu. </li>
<li>Appuyez sur les boutons ▲▼ pour sélectionner le contenu que vous souhaitez déplacer, puis appuyez sur le bouton OK ou ▷.</li>
</ol>
<p><img alt="" src="images/7198eecf55144f3bc147d99b9547080d9c5d6ca374f557b53f9fb4e3745fa603.jpg" /></p>
<p><img alt="" src="images/b2b65421c9f5ce78ed35e6f7a7343f8b9fad85362602bf95489145b44e38d9ca.jpg" /></p>
<ul>
<li>Cette fonction n'est disponible que lorsque le disque contient le contentu sélectionné.</li>
</ul>
<h1 id="enregistrement-2">enregistrement</h1>
<p>Cette section présente diverses méthodes d'enregistrement sur disque dur et disque DVD.</p>
<p>TCet apparéil peut effectuer des enregistrements sur divers types de disques. Avant l'enregistrement, lisez les instructions suivantes et Sélectionnez le type de disque en fonction de vos préférences.</p>
<h1 id="disques-enregistrables">DISQUES ENREGISTRABLES</h1>
<p>Cet enregistrure est en mesure d'enregistrer sur les disques suivants.</p>
<table><tr><td>HDD</td><td>DVD-RAM</td><td>DVD-RW</td><td>DVD-R</td></tr><tr><td>HD</td><td>DVD
RAM</td><td>DVD
R W</td><td>DVD
R</td></tr></table>
<ul>
<li>Les DVD-RW et les DVD-RAM sont réinscriptibles. </li>
<li>Les DVD-R ne sont pas réinscriptibles.</li>
</ul>
<p>Compatibilité entre l'enregistreur Samsung et ceux d'autres compagnies </p>
<table><tr><td>Types de disque</td><td>Format d'enregistrement</td><td>Appareil d'enregistrement</td><td>Finalisation</td><td>Enregistrement complémentaire dans l'enregistreur Samsung</td></tr><tr><td rowspan="2">DVD-RAM</td><td rowspan="2">Mode VR</td><td>Samsung</td><td>X</td><td>Enregistrable</td></tr><tr><td>Autre compétie</td><td>X</td><td>Enregistrable</td></tr><tr><td rowspan="8">DVD-RW</td><td rowspan="4">Mode VR</td><td rowspan="2">Samsung</td><td>finalisé</td><td>Arrêt enregistrable</td></tr><tr><td>non finalisé</td><td>Enregistrable</td></tr><tr><td rowspan="2">Autre compétie</td><td>finalisé</td><td>Arrêt enregistrable</td></tr><tr><td>non finalisé</td><td>Enregistrable</td></tr><tr><td rowspan="4">Mode V</td><td rowspan="2">Samsung</td><td>finalisé</td><td>Arrêt enregistrable</td></tr><tr><td>non finalisé</td><td>Enregistrable</td></tr><tr><td rowspan="2">Autre compétie</td><td>finalisé</td><td>Arrêt enregistrable</td></tr><tr><td>non finalisé</td><td>Arrêt enregistrable</td></tr><tr><td rowspan="4">DVD-R</td><td rowspan="4">Mode V</td><td rowspan="2">Samsung</td><td>finalisé</td><td>Arrêt enregistrable</td></tr><tr><td>non finalisé</td><td>Enregistrable</td></tr><tr><td rowspan="2">Autre compétie</td><td>finalisé</td><td>Arrêt enregistrable</td></tr><tr><td>non finalisé</td><td>Arrêt enregistrable</td></tr></table>
<p><img alt="" src="images/b36c675b802a5560a515c07cecf62c4520ff41691af42f747c644d4ed5a35862.jpg" /></p>
<p>Finaliser</p>
<ul>
<li>Cette fonction ferme le DVD-RW/-R et:aucun enregistrement complémentaire ne peut etre effectue. <br />
Ne pas finaliser </li>
<li>Cela permet un enregistrement complémentaire sur un disque DVD-RW enregistré à l'origine sur le GRAVEUR DE DVD AVEC DISQUE DUR. </li>
<li>Un disque DVD-RW déjà enregistré en DAO (Disc At Once) sur un PC ne peut pas être non finalisé. </li>
<li>Un disque DVD-RW qui a été déjà enregistré en mode Video sur un enregistrur d'une autre marque ne peut pas être non finalisé. </li>
<li>Un disque DVD-R ne peut pas être non finalisé.</li>
</ul>
<h1 id="formatsdenregistrement">FORMATSD'ENREGISTREMENT</h1>
<p>Le message suivant s'affiche lorsque vous insérez un disque vierge. Les fonctions disponibles variant selon le type de disque, Sélectionné chez qui vous convient le moins.</p>
<p>DVD-RAM : le formatage démarre automatiquement.</p>
<p>DVD-RW: initializez le disque avant utilisation. Si vous souhaitez changer le mode VR ou V, reportez-vous à la rubrique « Formatage d'un disque», page 90.</p>
<p>DVD-R : Le formatage d'un disque n'est pas nécessaire et seul l'enregistrement en mode Video est pris en charge.</p>
<h1 id="dvd-ramdvd-rwmode-vr">DVD-RAM/DVD-RW(mode VR)</h1>
<ul>
<li>Ce mode permet des fonctions de modification multiples (telles que la suppression totale du titre, l'effacement partiel d'un titre, etc.) </li>
<li>Options de modifications diverses en utilisant une liste de lecture créé.</li>
</ul>
<h1 id="dvd-rwmode-v-r">DVD-RW(mode V)/-R</h1>
<ul>
<li>Les chapitres sont créés automatiquement lorsque vous finalisez l'enregistrement sur des disques DVD-RW/R en mode video.</li>
</ul>
<p>La longueur du chapitre (intervalle entre deux chaprites) varie selon le mode d'enregistrement.</p>
<ul>
<li>Modification simple (effacement de titres/changement du nom des titres).</li>
</ul>
<h1 id="mode-denregistremente">MODE D'ENREGISTREMENTE</h1>
<p>Sélectionnez l'un des quatre modes d'enregistrement en appuyant sur le bouton REC MODE à plusieurs reprises lorsqu'ell'appareil est en mode Stop pour la durée d'enregistrement souhaitée et la qualité de l'image.</p>
<p>Généralement, la qualité de l'image s'améliore lorsque la durée d'enregistrement diminue. En mode FR, le mode d'enregistrement le plus ajusté est régèle automatiquement, en fonction du temps restant sur le disque et de la durée de l'enregistrementprogramme. Cette fonction est sélectionnée uniquement pour un mode choisi parmi les modes XP, SP, LP et EP et vous pouvez utiliser ce mode pour l'enregistrementprogramme.</p>
<p>DVD-HR770 </p>
<table><tr><td rowspan="2">Recording Mode
(Mode d'enregistrement)</td><td colspan="2">Durées d'enregistrement</td></tr><tr><td>DD (Disque dur (160Go))</td><td>DVD-RAM/-RW/-R</td></tr><tr><td>XP
(mode Haute qualité)</td><td>Env. 33 heures</td><td>Env. 1 heures environ 8,5 Mbps</td></tr><tr><td>SP
(mode Qualité standard)</td><td>Env. 67 heures</td><td>Env. 2 heures environ 4,5 Mbps</td></tr><tr><td>LP
(mode Enregistrement long)</td><td>Env. 133 heures</td><td>Env. 4 heures environ 2 Mbps</td></tr><tr><td rowspan="2">EP (mode Etendu)</td><td>Env. 199 heures</td><td>Env. 6 heures/ environ 1,6 Mbps</td></tr><tr><td>Env. 264 heures</td><td>Env. 8 heures/ environ 1,2 Mbps</td></tr><tr><td>FR (Enregistrement variable)</td><td>Env. 33 heures ~ 264 heures</td><td>Env. 1~8 heures</td></tr></table>
<p><img alt="" src="images/029ab8c8e3859c69c447e5594d2064bc676f6531407d6c6a7781c940c102a3d0.jpg" /></p>
<ul>
<li>La durée d'enregistrement peut varier en fonction des conditions spécifiées. <br />
1 Go = 1,000,000,000 octets; l'espace formaté réel peut être inférieur car le micrologiciel interne utilise une partie de la mémoire. <br />
La capacité des DVD-R à double couche est environ deux fois plus importante que celle des DVD-R à simple couche. (reportez-vous à la page 41)</li>
</ul>
<h1 id="images-non-enregistrables">IMAGES NON ENREGISTRABLES</h1>
<p>Les videotos protégées contre la copie ne peuvent pas'être enregistrées sur ce GRAVEUR DE DVD AVEC DISQUE DUR. Lorsque le GRAVEUR DE DVD AVEC DISQUE DUR reçoit un signal de protection contre la copie en cours d'enregistrement, cet enregistrement s'interrrompt et le message suivant s'affiche à l'écran.</p>
<h1 id="a-propos-des-signaux-de-contrôle-de-copie">A propos des signaux de contrôle de copie</h1>
<p>Les émissions de télévision contenant des signaux de contrôle de copie peuvent partager l'un des trois types de signaux suivants, Copie libre, Une seule copie et Aucune copie. Si vous souhaitez enregistrer un programme du type Une seule copie, utilisez un disque DVD-RW avec CPRM en mode VR et un DVD-RAM, HDD.</p>
<table><tr><td>Type de signal Support</td><td>Copy-Free (Copie libre)</td><td>Copy- Once (Une seule copie)</td><td>Copy-Never (Aucune copie)</td></tr><tr><td>DVD-RW (Ver.1.1)</td><td>0</td><td>-</td><td>-</td></tr><tr><td>DVD-RW(Ver.1.1)avec CPRM</td><td></td><td></td><td></td></tr><tr><td>Mode VR</td><td>0</td><td>0*</td><td>-</td></tr><tr><td>Mode V</td><td>0</td><td></td><td>-</td></tr><tr><td>DVD-R</td><td>0</td><td>-</td><td>-</td></tr><tr><td>DVD-RAM (Ver.2.0)</td><td>0</td><td>0*</td><td>-</td></tr><tr><td>HDD</td><td>0</td><td>0*</td><td>-</td></tr></table>
<p>Lorsque "Une seule copie" a été enregistrée, un autre enregistrement ne peut plus jamais être réalisé.</p>
<h1 id="content-protection-for-recordable-media-cprm-2">Content Protection for Recordable Media (CPRM)</h1>
<h1 id="protection-du-contenu-pour-support-enregistrable">(Protection du contenu pour support enregistrable) :</h1>
<p>le CPRM est un mécanisme qui verrouille un enregistrement sur le support qui le contient. Il est pris en charge par certains GRAVEURS DE DVD AVEC DISQUE DUR, mais par très peu de lecteurs de DVD. Chaque DVD enregistrable vierge possède une ID (identification) de support 64 bits unique gravée dans le BCA. Lorsqu'un contentu protégé est enregistré sur le disque, il ne peut pas être cryptés avec un chiffre 56 bits C2 (Cryptométrie) dérivé de l'identification du support.</p>
<p>Au cours de la lecture, l'identification est lue à partir du BCA et utilisée pour générer une clé qui décrypte le contenu du disque. Si le contenu du disque est copé sur d'autres supports, l'identification sera absente ou erronée et les données ne seront alors pas décryptables.</p>
<h1 id="avant-de-commencer">Avant de commencer</h1>
<ol>
<li>Vérifiez que le disque dispose de suffisamment d'espace pour l'enregistrement. </li>
<li>Appuyez sur le bouton DD ou DVD. Si vous selectionnez DVD, appuyez sur le bouton OPEN/CLOSE et placez Appuyez sur le bouton OPEN/ CLOSE pour fermer le tiroir disque.</li>
</ol>
<p>Attendez la disparition de LOAD sur l'affichage en façade.</p>
<h1 id="enregistrement-du-programme-de-télévision-en-cours-de-visionnage">Enregistrement du programme de télévision en cours de visionnage</h1>
<ol>
<li>Appuyez sur le bouton PROG (O O) ou sur les touches numériques pour selectionner le programme actuel que vous souhaitez enregistrer. </li>
<li>Appuyez sur le bouton REC MODE à plusieurs reprises, (ou appuyez sur le bouton REC MODE puis sur les boutons ) pour sélectionner la vitesse d'enregistrement (qualité).</li>
</ol>
<p><img alt="" src="images/4f0c8ef76259c8822d5b3c81a340b3f2322992c8b8820d4d08116883ced6691c.jpg" /></p>
<ol>
<li>Appuyez sur le bouton REC. Les informations concernant la chaîne s'affichent à l'écran et l'enregistrement est lancé.</li>
</ol>
<p>L'icone () apparait sur la faconde.</p>
<p><img alt="" src="images/c4391810792dc2c123f5fd067503c2a6243882b361e078d3abe697d7181a56e8.jpg" /></p>
<p><img alt="" src="images/4832dad7eb9afbb5376c69147c9e24a0d2a1b197da9bb396070e1dc006073708.jpg" /></p>
<h1 id="enregistrement-à-partir-dun-apparéil-externe-en-cours-de-visionnage">Enregistrement à partir d'un apparéil externe en cours de visionnage</h1>
<ol>
<li>Appuyez sur le bouton INPUT SEL, pour selectionner la source d'entrée en fonction du branchement effectué.L'affichage en façade change dans l'ordre suivant :</li>
</ol>
<p><img alt="" src="images/d56f81c9d11f897d734dd5f2eb207c62a49ed3fcc69167baf1c06811c9a5151b.jpg" /></p>
<ol>
<li>Appuyez sur le bouton REC MODE de manière répétée, (ou appuyez sur le bouton REC MODE, puis sur les boutons ) pour sélectionner la vitesse d'enregistrement (qualité). </li>
<li>Appuyez sur le bouton REC. Les informations concernant le mode d'entrée externe s'affichent à l'écran et l'enregistrement est lancé. L'icône () apparait sur la façade.</li>
</ol>
<h1 id="pour-suspendre-lenregistrement">Pour suspendre l'enregistrement</h1>
<ul>
<li>Appuyez sur le bouton REC PAUSE pour suspendre l'enregistrement en cours. </li>
<li>Appuyez sur le bouton REC PAUSE à nouveau pendant la pause pour reprendre l'enregistrement en cours. </li>
<li>Vous pouvez changer de chaine en actionnant les boutons PROG (⊙) lors des pauses d'enregistrement.</li>
</ul>
<h1 id="pour-arrêté-lenregistrement">Pour arrêté l'enregistrement</h1>
<p>Appuyez sur le bouton STOP (⊙) pour arreter ou terminer l'enregistrement en cours.</p>
<ul>
<li>Lors de l'utilisation de disques DVD-RAM/-RW/-R, le message "Mise à jour des informations du disque. Veuillez patienter un instant." s'affiche.</li>
</ul>
<p><img alt="" src="images/5e4fdd226f0a10f1a52e1fac7e6e4f60e1ff62be94ebd2b87430a5411ab3ae02.jpg" /></p>
<ul>
<li>Vous ne pouvez changer de mode d'enregistrement lors d'un enregistrement. <br />
Celui-ci arrertera automatiquement en l'absence d'un espace suffisant pour enregistrer. <br />
Il est possible d'enregistrer jusqu'à 99 titres sur un DVD-RAM/-RW/-R. <br />
Il est possible d'enregistrer jusqu'à 999 titres sur le disque dur. <br />
L'enregistrement sur le disque dur est disponible jusqu'à 24 heures et lorsque vous enregistrez 24 heures, 3 titres seront enregistrés, chaque titre ayant une durée de 8 heures. <br />
L'enregistrement s'arrête automatique si une image protégée contre la copie est selectionnée. </li>
<li>Les disques DVD-RAM/RW peuvent être formatisés avant de lancer l'enregistrement. La plupart des nouveaux disques sont vendus non formatisés. <br />
N'utilisze pas de disques DVD-R d'auteur avec cet apparéil.</li>
</ul>
<h1 id="réalisation-dun-enregistrement-immédiat-otr">RÉALISATION D'UN ENREGISTREMENT IMMÉDIAT (OTR)</h1>
<p><img alt="" src="images/3f06ee3c902cb88b9fea63300e99dfc401d55c7388a69e3202f1cbe823d99fc1.jpg" /></p>
<p><img alt="" src="images/ee17eccf106f3055992ac736252e8c66681fd60cd35c59513b1bc90b86c37c4b.jpg" /></p>
<p><img alt="" src="images/c741a59779b0ac5f36ad81a4cc07085bb3575275a0d4cc37b8f26bf4c081ae48.jpg" /></p>
<p><img alt="" src="images/fb325f86fc19564e35c55f96f620954575ef14cf183ac0a70b49402f510ec43b.jpg" /></p>
<p>Vou puez regler le GRAVEUR DE DVD AVEC DISQUE DUR pour un enregistrement par tranche de 30 minutes et ce jusqu'à 8 heures en appuyant sur le bouton REC.</p>
<ol>
<li>Appuyez sur le bouton DD ou DVD. <br />
Si vous sélectionnez DVD, appuyez sur le bouton OPEN/CLOSE et placez un disque enregistrable sur le tiroir disque. Appuyez sur le bouton OPEN/CLOSE pour fermer le tiroir disque. Attendeze la disparition de LOAD sur l'affichage en façade. </li>
<li>Actionnez les boutons PROG (O) ou les touches numériques pour selectionner le programme que vous souhaitez enregistrer. </li>
<li>Appuyez sur le bouton REC pour lancer l'enregistrement. </li>
<li>Appuyez sur le bouton REC de façon repétée pour régler la durée d'enregistrement souhaitée.</li>
</ol>
<p><img alt="" src="images/d14c743b468ce3f4c06d4054b27913df7a234a9b626dc64b52993602c235093c.jpg" /></p>
<p><img alt="" src="images/756abb4719503e04cc0269aa31f461e69c9c7ce41b8f89ecdf69c8e62e1a1d3d.jpg" /></p>
<p>L'indication du compteur de la minuterie baisse de minute en minute de 8:00 à 0:00, puis le GRAVEUR DVD AVEC DISQUE DUR arrêté l'enregistrement.</p>
<p><img alt="" src="images/bad2629140995cfc936727b4d0436e8f172f780d7522c0f403db54a5ea221748.jpg" /></p>
<p><img alt="" src="images/ac1fdf47832dee7c8b7413ea85f7fce02635d3198577642807a9227ae668d69a.jpg" /></p>
<h1 id="pour-arrêté-lenregistrement-2">Pour arrêté l'enregistrement</h1>
<p>Appuyez sur le bouton STOP (⊙) Le message "Souhaitez-vous arrêté l'enregistrement?" s'affiche.</p>
<ul>
<li>Appuyez sur les boutons pour Sélectionner Oui, puis appuyez sur le bouton OK. </li>
<li>Ou, appuyez de nouveau sur le bouton STOP (⊙).</li>
</ul>
<p>Vous pouvez dire a partir du début le programme en cours d'enregistrement.<br />
Vous pouvez consulter la liste precedente tout enregistrant un programme.</p>
<h1 id="utilisation-du-bouton-play">Utilisation du bouton PLAY (</h1>
<ol>
<li>Appuyez sur le bouton PLAY (▶) pendant que l'appareil est en mode enregistrement.</li>
</ol>
<p>La lecture s'effectue à partir du début du titre en cours d'enregistrement.</p>
<p>La lecture n'est disponible que 10 secondes après le début de l'enregistrement.</p>
<p>Voussouspoucezutilser lebouton SAUT (一 + 一) etlesautresboutons de lecture pour afficher la liste préalablement enregistrree.</p>
<p><img alt="" src="images/b71d5ea2e888d86f72ae88f6270a27889437b45749ef269ca3ec2c7f5dd3d4b1.jpg" /></p>
<h1 id="arrêt-de-la-lecture-de-lenregistrement">Arrêt de la lecture / de l'enregistrement</h1>
<ol>
<li>Appuyez sur le bouton STOP (●). L'écran de lecture disparaît et l'écran de l'enregistrement en cours apparait. </li>
<li>Si vous appuyez une nouvelle fois sur le bouton STOP (⊙), l'enregistrement s'arrête.</li>
</ol>
<p><img alt="" src="images/2df30c05aed39600dd6ff65680d1c1555064fa0f519b4f8e8da3d354cc024498.jpg" /></p>
<h1 id="utilisation-du-bouton-title-list">Utilisation du bouton TITLE LIST</h1>
<ol>
<li>Appuyez sur le bouton TITLE LIST, appareil en mode enregistrement.</li>
</ol>
<p>L'opération précédente n'est possible qu'environ 10 secondes minimum après le début de l'enregistrement.</p>
<p>Appuyez sur les boutons ▲▼/SAUT (⊗) pour sélectionner la liste des titres à enregistrer.</p>
<ol>
<li>Appuyez sur le bouton OK ou PLAY (</li>
</ol>
<p>La lecture s'effectue à partir du début du titre en cours d'enregistrement.</p>
<p><img alt="" src="images/e34b32dfecf9a27aef5b87476fcca21091d008f7a3b517175db496601b652a21.jpg" /></p>
<p><img alt="" src="images/605fa5239f21a5f36232f2abe20d5ba716b0f0b1f622435b2453b0fd685271fd.jpg" /></p>
<h1 id="utilisation-du-bouton-menu-2">Utilisation du bouton MENU</h1>
<ol>
<li>Appuyez sur le bouton MENU pendant que l'appareil est en mode enregistrement. </li>
<li>Sélectionnez le Titre à l'aide des boutons ▲▼ et appuyez sur le bouton OK. </li>
<li>Appuyez sur les boutons ▲▼/SAUT (⊗⊗) pour sélectionner la liste de titres en cours d'enregistrement, puis sur le bouton OK ou ▷.</li>
</ol>
<p>Ainsi, le titre que vous estes en train d'enregistrer est lu depuis le début.</p>
<h1 id="arrêt-de-la-lecture-de-lenregistrement-2">Arrêt de la lecture / de l'enregistrement</h1>
<ol>
<li>Si vous appuyez une fois sur le bouton STOP (●) l'écran de lecture disparait et l'écran Liste de titres apparait. </li>
<li>Lorsque vous appuyez à nouveau sur le bouton MENU (®, l'écran de l'enregistrement en cours apparait. </li>
<li>Appuyer à nouveau sur le bouton STOP (⊙) met fin à l'enregistrement.</li>
</ol>
<p><img alt="" src="images/12c6038008fb95306805249edf15b8694320d1912a4275df7596af42b7eb9861.jpg" /></p>
<p>Aucun son n'est perceptible en mode de recherche. <br />
La lecture de disque DVD ou DD(DISQUE DUR) est possible durant l'enregistrement sur le disque dur. Cependant les fichiers JPEG, MP3 et DivX sur le disque ne peuvent ete Ius. <br />
- La lecture du disque dur est possible durant l'enregistrement sur DVD. Cependant les fichiers JPEG et MP3 sur le disque dur ne peuvent etre lus.</p>
<h1 id="fonction-de-programmation-en-tant-que-signal-direct">FONCTION DE PROGRAMMATION EN TANT QUE SIGNAL DIRECT</h1>
<p><img alt="" src="images/5b9c111e8e3beca66874e70154be911d0e4424360d74ae460387dc0ea9aa461f.jpg" /></p>
<p>Cette fonction permet de dire à nouveau les enregistements comme un signal direct.</p>
<p>Si vous étés interrompu pendant que vous regardez un programme télévisé, appuyez simplement sur le bouton TIME SHIFT et l'ENREGISTREUR DE DVD AVEC DISQUE DUR démarre immédiatement l'enregistrement du programme en question.</p>
<p><img alt="" src="images/5df23a29cc467199925ac4b143901cf2f1a548772e58d1bd6f11dea94f40a479.jpg" /></p>
<h1 id="utilisation-de-la-fonction-programmation">Utilisation de la fonction Programmation</h1>
<ol>
<li>Appuyez sur le bouton TIME SHIFT de la télécommande. Le menu Programmation s'affi che. </li>
<li>Appuyez sur les boutons ▲▼ pour sélectionner Marche, puis sur le bouton OK. </li>
<li>Lorsque vous regardez le programme en cours de diffusion, appuyez sur le bouton PAUSE (1). Le programme télévisé est régèle en mode pause et la barre Programmation est affichée. </li>
<li>Appuyez à nouveau sur le bouton PLAY (C) pour continuer à regarder le programme.</li>
</ol>
<h1 id="eléments-de-lécran-programmation">Eléments de l'écran Programmation</h1>
<p><img alt="" src="images/c0ac1cb5a74a2108a037502159d7b933e0ae4f1d71c856aa222bfdc6eaa421c7.jpg" /></p>
<p>1 Permet d'afficher le support actuel. <br />
Permet d'afficher I'etat actuel. <br />
3 Point de visionnage. <br />
4 Durée de lecture actuelle. <br />
5 Point direct. <br />
6 Temps direct. <br />
7 Barre Programmation.</p>
<h1 id="boutons-de-la-télécommande-servant-à-la-fonction-programmation">Boutons de la télécommande servant à la fonction Programmation</h1>
<ol>
<li>Bouton PLAY () : lecture. </li>
<li>Bouton PAUSE (n) : interrompt le programme télévisé en cours. </li>
<li>Boutons RECHERCHE ( ) : Fast play (X 2, X 4, X 8, X 16, X 32, X 128) </li>
<li>Bouton SAUT () , bouton STOP () : permet de passer au mode direct TV. </li>
<li>Bouton SAUT () : permet de revenir au point de départ de la Programmation.</li>
</ol>
<p><img alt="" src="images/26dbcff1f07106c24e7504718e53692e8fdaa1b3db49655d998f0e14a4d5e684.jpg" /></p>
<p>La Programmation est disponible uniquement lorsque le mode DISQUE DUR est selectionné. <br />
- Cette fonction est disponible pour une durée maximale de deux heures. <br />
-若您 pouvez dire le contentu à l'aide du menu uniquement si la Programmation est régée sur Marche. <br />
Appuyez sur le bouton TIME SHIFT pour annuler la fonction de programmation.</p>
<h1 id="réalisation-dun-enregistrement-programmé">RÉALISATION D'UN ENREGISTREMENT PROGRAMMÉ</h1>
<p><img alt="" src="images/dacc7245e52c0776976c9c43f74ea4ed7a7f079df7bdfcead1e72edc2a030444.jpg" /></p>
<p><img alt="" src="images/019d56a5357fb88aad358a2b5bc415895279e436ed1d8be30996b038c5271d46.jpg" /></p>
<p><img alt="" src="images/59c2964f0ede53c17c1077c4dfe79f17d2f85d7d0fc1dffa0f9f39f36fefeb2c.jpg" /></p>
<p><img alt="" src="images/a9d998ed2e4c4504cc9189d54031f2be88b842eaac27753753fe1696b0ec6157.jpg" /></p>
<ol>
<li>Vérifiez que le cable d'antenne est bien connecté. </li>
<li>Verifie qu'il reste suffisamment d'espace disponible sur le disque. </li>
<li>Vérifiez que la date et l'heure sont exactes.</li>
</ol>
<p>Assurez-vous que l'horloge est régée (Paramétrer - Réglage de l'horloge) avant d'effectuer un enregistrementprogrammé. (Reportez-vous à la page 30)</p>
<p><img alt="" src="images/f66a9f5f5c9629cfe5db248f6981479be7a93cd995c4aefb2e1ec7245a4c78d6.jpg" /></p>
<h1 id="utilisation-du-bouton-timer">Utilisation du bouton TIMER</h1>
<ol>
<li>Appuyez sur le bouton TIMER pendant que l'appareil est en mode Arrêt. </li>
<li>Appuyez sur les boutons ▲▼ pour sélectionner Liste programmée, puis appuyez sur le bouton OK ou ▷. </li>
<li>Appuyez sur le bouton OK pour selectionner Ajouter une liste. </li>
<li>
<p>Reglez l'option d'enregistrementprogrammé.</p>
</li>
<li>
<p>Remplissez les éléments d'entrée à l'aide des boutons et des touches numériques.</p>
</li>
</ol>
<p> : Déplace vers l'élément précédent suivant.</p>
<p> ,0\~9:Regleunevalueur.</p>
<ul>
<li>Vers : Sélectionne le support d'enregistrement : DD (Disque dur) ou DVD. </li>
<li>Source: La source d'entrée video (AV1, AV2 ou AV3) ou le canal émetteur à partir duquel vous souhaitez fais un enregistrementprogrammé. </li>
<li>Date: L'enregistrementprogrammepermét de régler la durée del'enregistrement sur une période d'un mois. Règle le jourd'enregistrement.(mois/jour)</li>
</ul>
<p><img alt="" src="images/07f03185adb9dbf2e6af02595b2f9f3b8f4c4d72a618e5e61993bd7777e31c5e.jpg" /></p>
<p><img alt="" src="images/35867d0c8b4d1cb7c977dd01aa9093870b26785b9f3f2ad0193456c00048136e.jpg" /></p>
<p><img alt="" src="images/a98e42bf56acdaf7d0480809c9fc66fa98542a6436967e092f6f97a514de96de.jpg" /></p>
<p><img alt="" src="images/fb7c934d1ca9d5a74f3921308b1aa6b3bcfd3f228934448ef0b904c91b026f3e.jpg" /></p>
<ul>
<li>
<p>Heure Démar./Fin : Heure de début et de fin de l'enregistrement programme. <br />
Mode (mode d'enregistrement) :</p>
</li>
<li>
<p>FR (Enregistrement variable) : Sélectionnez cette option lorsque vous voulez régler automatiquement la qualité video. En mode FR, le mode d'enregistrement le plus adapté est régé automatiquement, en fonction du temps restant sur le disque et de la durée de l'enregistrementprogramme. Cette fonction est sélectionnée uniquement dans un mode parmi les modes XP, SP, LP et EP. </p>
</li>
<li>XP (haute qualité) : Sélectionnez cette option lorsque la qualité video est importante. </li>
<li>SP (qualité standard) : Sélectionné cette option pour enregistrer en qualité standard. </li>
<li>LP (faible qualité) : Sélectionnéz cette option lorsque une longue durée d'enregistrement est requise. </li>
<li>
<p>EP (étendu) : Sélectionnez cette option lorsque une durée d'enregistrement plus longue est requise.</p>
</li>
<li>
<p>VPS/PDC : Fonction VPS (Système programme video) ou PDC (Commande échéance programme).</p>
</li>
<li>
<p>Si vous activez cette fonction, vous pouvez commander l'heure de début et de fin d'enregistrement à l'aide d'un signal spécial inclus dans le signal de radiodiffusion. Si le programme télévisé est raccourci ou commence plus tout que prévu, cette fonction synchronise automatiquement l'heure de début et de fin d'enregistrement avec la durée d'émission réelle. </p>
</li>
<li>Configurez l'heure de départ EXACTEMENT en fonction du programme télévisé publié. Sinon, l'enregistrementprogramme ne fonctionnera pas. </li>
<li>Ne sélectionnez pas VPS ou PDC avant d'être certain que le programme que vous souhaitez enregistrer est émis par VPS ou PDC. </li>
<li>
<p>TITLE: Pour désigner le titre, appuyez à nouveau sur le bouton ROUGE (A). L'écran de changement du nom du titre apparait. Suivez les étapes 4 à 5 de la rubrique « Changement du nom (étiquetage) d'un titre », pages 73~74.</p>
</li>
<li>
<p>Àpès avoir séLECTIONné la valeur de réglage pour chaque mode, appuyez sur le bouton OK pour sélectionner « Enreg. »</p>
</li>
<li>
<p>apparait sur la façade. Cela signifie qu'un enregistrement programme est enregistré.</p>
</li>
</ul>
<h1 id="si-les-réglages-de-la-minutesie-se-chevauchent">Si les réglages de la minutesie se chevauchent :</h1>
<p>les programmes sont enregistrés par ordre de priorité. A la fin de l'enregistrement du premier programme, l'enregistrement du second programme démarre.</p>
<h1 id="quitter-sans-sauvegarder-le-réglage-actuel">Quitter sans sauvegarder le réglage actuel</h1>
<p>Appuyez sur le bouton EXIT (④).</p>
<h1 id="retour-au-menu-précédent">Retour au menu précédent</h1>
<p>Appuyez sur le bouton RETURN si vous ne souhaitez pas régler un enregistrement programme.</p>
<ol>
<li>Coupe l'alimentation pour terminer le réglage de l'enregistrementprogrammé.L'enregistrementprogrammé ne fonctionne pas lorsqu'ell'article est sous tension.</li>
</ol>
<p><img alt="" src="images/5607646ded9447fc674c844fbb11e40b82866f87f86bad0a614835dc50f3c4da.jpg" /></p>
<p>La durée d'un enregistrementprogramme peut différer du temps régé selon l'état du disque et l'état global de l'enregistrementprogramme (par exemple, le chevauchement des durées d'enregistrement ou lorsque l'enregistrement précédent se termine avec deux minutes d'avance sur l'heure de départ de l'enregistrement suivant.) <br />
- Vous pouvez effectuer jusqu'à 12 enregistements programmés. <br />
Si le disque dur ne dispose plus d'espace disponible pour I'enregistrement, clignote. Cela signifie que le disque dur ne dispose plus d'espace libre pour effectuer I'enregistrement. <br />
Si vous avezprogramme I'enregistrement a I'aide du VPS/PDC, il est possible que le ventilateur continue a fonctionner et a faire du bruit lorsque I'appareil est mis hors tension.</p>
<h1 id="modification-de-la-liste-denregistrements-programmés">Modification de la liste d'enregistrements programmés</h1>
<p>Suivez les consignes suivantes pour modifier la Liste d'Enregistements Programmée.</p>
<p>Pour la configuration, suivez les étapes 1 à 2 de la section « RÉalisation d'un enregistrementprogramme » en page 67.</p>
<ol>
<li>
<p>Appuyez sur les boutons pour selectionner le numero de la Scheduled Record List que vous souhaitez modifier, puis appuyez sur le bouton OK.</p>
</li>
<li>
<p>Changez les éléments que vous souhaitez modifier. Reportez-vous au chapitre "Réalisation d'un enregistrement programme" pour de plus amples informations sur les éléments d'entrée d'enregistrementprogramme. (reportez-vous à la 67 et 68). </p>
</li>
<li>Appuyez sur le bouton OK pour confirmer le réglage modifié. </li>
<li>Appuyez sur le bouton EXIT (①) après avoir terminé l'opération.</li>
</ol>
<p>L'écran Liste d'Enregistrements Programmée disparait.</p>
<p><img alt="" src="images/802abebf18214269478628805c0ab89d18131ea615bc3a28fe284901cefa11a2.jpg" /></p>
<h1 id="ajout-dune-liste-programmée">Ajout d'une liste programmée</h1>
<p>Suívez les consignes suivantes pour ajouter une entrée de la liste programmée.</p>
<p>Pour la configuration, suive les étapes 1 à 2 de la section « RÉalisation d'un enregistrementprogramme » en page 67.</p>
<ol>
<li>Appuyez sur les boutons ▲▼ pour sélectionner le numéro de la liste programmée, puis appuyez sur le bouton ROUGE (A). </li>
<li>Définissez les éléments que vous souhaitez ajouter. Reportez-vous à la rubrique « Résilisation d'un enregistrementprogramme » pour plus d'informations sur les éléments d'entrée de l'enregistrementprogramme (reportez-vous aux pages 67 à 68). </li>
<li>Appuyez sur le bouton OK pour confirmer le réglage ajouté. </li>
<li>Appuyez sur le bouton EXIT (①) pour terminer l'opération.</li>
</ol>
<p>L'écran Liste programmée disparait.</p>
<h1 id="suppression-dune-liste-denregistrements-programmés">Suppression d'une liste d'enregistrements programmés</h1>
<p><img alt="" src="images/d1357c63e3faac201bce544da1d786c97e7196959ef3c82342a30cc835198a85.jpg" /></p>
<p><img alt="" src="images/dc5ae09778a67d2258552f7e97bc7cb51200cf5823c82aef4c3743298c981139.jpg" /></p>
<p><img alt="" src="images/2a8e7c31aca98d4b5f6f4fade8e7c2b108b3e9ca96ad5d1206724c4c4c7da9cc.jpg" /></p>
<p><img alt="" src="images/a0b04f1a4af8738d4c64d5b0e62c59f3905ef59a7477b8388a40bbdb753f5204.jpg" /></p>
<p>Suivez les consignes suivantes pour supprimer une entree de la Liste d'Enregistrements Programmée.</p>
<p>Pour la configuration, suivez les étapes 1 à 2 de la section « RÉalisation d'un enregistrementprogramme » en page 67.</p>
<ol>
<li>Appuyez sur les boutons pour selectionner le numero de la Liste programmée que vous souhaitez supprimer, puis appuyez sur le bouton VERT (B). </li>
<li>Vous serez sollicité par le message de confirmation de suppression "Souhaitez-vous supprimer?" </li>
<li>Appuyez sur les boutons pour selectionner Oui, puis appuyez sur le bouton OK. <br />
L'entrée selectionnee est supprimee de la liste. </li>
<li>Appuyez sur le bouton EXIT (①) pour terminer l'opération.</li>
</ol>
<p>L'écran Listed enregistrements Programmée disparait.</p>
<h1 id="utilisation-de-la-fonction-showview">UTILISATION DE LA FONCTION SHOWVIEW</h1>
<p><img alt="" src="images/175161ca8dd79c48ae8099560ff53d420e5a25c31b29096f33fd7712d3f3973b.jpg" /></p>
<p><img alt="" src="images/723c2ba9d613eb818af98ae11111aaef89610f4726e389e55ebddc6113fd2312.jpg" /></p>
<p><img alt="" src="images/69ce98e96a6023e80846fe20e206fb2dc51503160929fc433b39cb3cde3e7e7c.jpg" /></p>
<p><img alt="" src="images/f46477d62ae88a066a03b65076f38d33a901474501ad2a1708070c5e844f6ae5.jpg" /></p>
<p>Avant de programmer un enregistrement sur votre ENREGISTREUR DVD AVEC DISQUE DUR :</p>
<ul>
<li>Allumez le téléviseur et l'ENREGISTREUR DE DVD AVEC DISQUE DUR. </li>
<li>
<p>Vérifiez que la date et l'heure sont exactes. jusqu'à douze programmes peuvent être définis pour l'enregistrement.</p>
</li>
<li>
<p>Appuyez sur le bouton TIMER pendant que l'appareil est en mode Arrêt. </p>
</li>
<li>
<p>Appuyez sur les boutons ▲▼ pour sélectionnner ShowView, puis sur le bouton OK ou ▷.</p>
</li>
<li>
<p>Un message s'affiche vous permettant de saisir le code ShowView.</p>
</li>
<li>
<p>Appuyez sur les touches numériques pour saisir le code du programme que vous souhaitez enregistrer tel qu'il figure dans votre magazine télé.</p>
</li>
<li>
<p>Si vous souhaitez corriger le code ShowView que vous étes en train de saisir : </p>
</li>
<li>Appuyez sur le bouton jusqu'à ce que le chiffre que vous souhaitez corriger soit effacé. </li>
<li>
<p>Saisissez le chiffre correct.</p>
</li>
<li>
<p>Appuyez sur le bouton OK</p>
</li>
<li>
<p>Les informations concernant le programme s'affichent. </p>
</li>
<li>
<p>Lorsque vous utilisez la fonction ShowView pour la première fois avec les chaînes enregistrées, le numéro de programme clignote. Cette fois, vous nevez saisir manuelle le numéro PR en appuyant sur les boutons ▲▼.</p>
</li>
<li>
<p>Appuyez sur le bouton ROUGE (A) si vous ne souhaitez pas utiliser le nom de titre par défaut. L'écran Renommer s'affiche.</p>
</li>
</ul>
<p>Suívez les étapes 4 à 5 de la rubrique « Changement du nom (étiquetage) d'un titre», pages 73~74.</p>
<ol>
<li>Si le programme et l'heure sont corrects, appuyez sur le bouton OK.</li>
</ol>
<p><img alt="" src="images/44734a3684f9cbe29fddc0fbbeb43e15c4a79da2babffa5cee40e1e9d9924ae4.jpg" /></p>
<p><img alt="" src="images/5bb5ef0a68469a8c393a3983c61e4150fa797077d6bfa08f79b0b019bfa040e0.jpg" /></p>
<p><img alt="" src="images/3973e68f2d41a05019c61474da8c4ee4751d26c7f45b01fe0ccac762ba4e9206.jpg" /></p>
<ol>
<li>Eteignez l'appareil en appuyant sur le bouton STANDBY/ON afin d'activer le réglage de l'enregistrementprogrammé.</li>
</ol>
<p>Au besoin, reportez-vous aux pages 69 à 71 <br />
- Verifiez que l'enregistrement programme est correctement régle. <br />
- Annulez l'enregistrement préréglé.</p>
<p><img alt="" src="images/fc071b9365190adc0c4f3b4ff478091df1b71103b9550691c21b79d6f416cccb.jpg" /></p>
<ul>
<li>Les numéro des programmes télévisés figurant dans les magazines ou journaux sont des codes ShowView vous permettant de programmer instantanément votre ENREGISTREUR DE DVD AVEC DISQUE DUR à l'aide de la télécommande. Saisissez le code ShowView du programme que vous souhaitez enregistrer. <br />
ShowView est une marque déposée de Gemstar Development Corporation. Le système ShowView est fabriqué sous licence par Gemstar Development Corporation.</li>
</ul>
<p>Afin d'éviter les retards ou les dépassements, l'ENREGISTREUR DE DVD AVEC DISQUE DUR dispose de la fonction ShowView Allongé permettant d'all longer la durée d'enregistrement de 60 minutes.</p>
<p>Utilisez-la uniquement si la fonction PDC n'est pas disponible ou si elle est reglee sur ARRET.</p>
<ol>
<li>Appuyez sur le bouton TIMER pendant que l'appareil est en mode Arrêt. </li>
<li>Appuyez sur les boutons ▲▼ pour sélectionner ShowView Allongé, puis sur le bouton OK ou ▷. </li>
<li>Appuyez sur les boutons ▲▼ pour sélectionner la durée de la fonction ShowView Allongé, puis sur le bouton OK ou ▷. </li>
<li>Appuyez sur le bouton EXIT (@) pour sortir du menu.</li>
</ol>
<p><img alt="" src="images/4e5e3170b2ca5daf69a54a89794e7d8310bc62b8a0a9fd75abb5b6b3b144ba0f.jpg" /></p>
<h1 id="accés-à-la-liste-denregistrements-programmés">ACCÉS À LA LISTE D'ENREGISTREMENTS PROGRAMMÉS</h1>
<p><img alt="" src="images/cbf7daa53e029257069b305b917a8b76a4c91580204fae1e0b5361b5b1f00787.jpg" /></p>
<p>Yououpouzeafficherlaistedesprogrammesquicontéenregistrés.</p>
<p><img alt="" src="images/f9b7de098d088aecf20cf7be3167ffd295c01cc1d8cf892f7a9e6a5ad31a7f06.jpg" /></p>
<h1 id="utilisation-du-bouton-timer-2">Utilisation du bouton TIMER</h1>
<ol>
<li>Appuyez sur le bouton TIMER pendant que l'appareil est en mode Arrêt. </li>
<li>Appuyez sur le bouton ▲▼ pour SéLECTIONNER Liste enregistrée, puis appuyez sur le bouton OK ou ▲. </li>
<li>Appuyez sur le bouton EXIT (4) pour terminer l'opération.<br />
Liste enregistrée disparait</li>
</ol>
<p><img alt="" src="images/80783403e253396f5816b707747adcb502eebe8d1dc6ae2c3366a516cde88783.jpg" /></p>
<h1 id="informations-relatives-à-liste-enregistrée">Informations relatives à Liste enregistrée</h1>
<p>Cet écran vous informe si la Liste enregistrée sélectionnée contient un enregistrement programme terminé avec succès.</p>
<p>3-1. Appuyez sur les boutons ▲▼ pour sélectionner le numéro de la Liste enregistrée, puis appuyez sur le bouton OK.</p>
<p><img alt="" src="images/656090900f8672c71ab577b90ca4dd430b905fd4c378b70f853b8840d7313777.jpg" /></p>
<h1 id="supprimer-la-liste-enregistrée">Supprimer la Liste enregistrée</h1>
<p>Permet de supprimer individuellement une Liste enregistrée.</p>
<p>3-1. Appuyez sur les boutons ▲▼ pour sélectionner le numéro de la Liste enregistrée que vous souhaitez supprimer, puis appuyez sur le bouton ROUGE (A). <br />
4. Appuyez sur les boutons pour selectionner Oui, puis appuyez sur le bouton OK ou .</p>
<p><img alt="" src="images/3b8f4a37371155d3602087b76275f66065e5f2ba4efcfc5ca87e61c63c89c93e.jpg" /></p>
<h1 id="effacer-la-liste-enregistrée">Effacer la Liste enregistrée</h1>
<p>Efface toutes les Liste enregistrée en une fois.</p>
<p>3-1. Appuyez sur le bouton VERT (B). <br />
4. Appuyez sur les boutons pour Sélectionner Oui, puis appuyez sur le bouton OK ou .</p>
<p><img alt="" src="images/07ba92d232c64e6b99bb9f6aa77fa6af6e5fc812e984c2e4555caaffcdf44edb.jpg" /></p>
<h1 id="aller-sur-la-liste-denregistrements-programmée">Aller sur la Liste d'Enregistrements Programmée</h1>
<p>Permet de passer directement de l'option Liste enregistrée à l'option Liste programmée.</p>
<p>3-1. Appuyez sur le bouton JAUNE (C).</p>
<p><img alt="" src="images/8f7ba934300ca4a542fb8f5225221b4f875be17aff71e1a8e0479f0f3c1bc993.jpg" /></p>
<p>Cette section présente les fonctions de base de modification et explique les fonctions de modification pour un enregistrement sur un disque et les fonctions de modification pour la totalité du disque.</p>
<p>Un enregistrement ou une modification peut ne pas etre achievee si une erreur, une coupure soudaine de l'alimentation par exemple, est survenue.</p>
<p>Notez qu'un produit qui a eté endommagé ne retrouvera plus son contenu original.</p>
<h1 id="modification-de-base-liste-de-titres">MODIFICATION DE BASE (LISTE DE TITRES)</h1>
<h1 id="lecture-du-titre">Lecture du titre</h1>
<p><img alt="" src="images/820c84dfe8009c2695acea8bcfa5d641b43d8f364a23818ae6c2358fc9504b4e.jpg" /></p>
<p><img alt="" src="images/49f489ac9d8b7595adbc84db651439a43d6443f16f2668d5b96d785b930504e8.jpg" /></p>
<p><img alt="" src="images/0ce518c6d363b430d4f4ee8d8d3ed8db81aa2d4e4902b6d196488b076e352c13.jpg" /></p>
<p><img alt="" src="images/ef2f5dae99b7a76bdcadc17e7bc845cf00cca05c853216e086aa52f45df7f1a7.jpg" /></p>
<p>Respectez les consignes suivantes pour dire une scene à partir de la liste de titres.</p>
<p><img alt="" src="images/7800271c833b5735f3c14eee796bfc01713a8a18ab2cc86b3c2db75b3545a8d2.jpg" /></p>
<h1 id="utilisation-du-bouton-title-list-2">Utilisation du bouton TITLE LIST</h1>
<ol>
<li>Appuyez sur le bouton TITLE LIST, appareil en mode Stop ou Lecture. </li>
<li>A l'aide des boutons , sélectionné z'entrée que vous souhaitez renomer parmi la liste des titres, puis appuyez sur le bouton OK ou PLAY (➀). Le titre sélectionné est lu. </li>
<li>Pour arrêté la lecture du titre, appuyez sur le bouton STOP (⊙). L'affichage revient à l'écran Liste de titres.</li>
</ol>
<p><img alt="" src="images/d41bd1dbbd1445870b5b632b8aa3f0469cf27ef48b8a88422175d75f0618691c.jpg" /></p>
<h1 id="changement-du-nom-étiquetage-dun-titre">Changement du nom (étiquetage) d'un titre</h1>
<p><img alt="" src="images/d2a01a79041c315b24e07014c76195a62b466514c5c10ba88ccf8caa9d28bab9.jpg" /></p>
<p><img alt="" src="images/4f932ba7aae652e729b87d8bfd5b67683474f227afab65f630a56be9eff41af8.jpg" /></p>
<p><img alt="" src="images/a37618610d35a8b78b14b1e8c99ec799cb350589e5c967a7a4dc607481e4ece8.jpg" /></p>
<p><img alt="" src="images/be48799b89a17f20189bbb3f783dcf0ee30439186076d29411e18c36a21c2b3a.jpg" /></p>
<p>Suivez ces instructions pour renomer une entrée dans la liste de titres, c'est-à-dire pour modifier le titre d'un programme enregistré.</p>
<p><img alt="" src="images/a3e95551b09fe37d55f128a5cc894e5c6c95075b1b12c486dab2e3a4a93f84e5.jpg" /></p>
<h1 id="utilisation-du-bouton-title-list-3">Utilisation du bouton TITLE LIST</h1>
<ol>
<li>Appuyez sur le bouton TITLE LIST, apparéil en mode Stop ou Lecture. </li>
<li>Appuyez sur les boutons ▲▼ pour SéLECTIONNER une entrée que vous souhaitez renomer dans la Liste de titres, puis appuyez sur le bouton ROUGE (A). </li>
<li>Appuyez sur les boutons pour selectionner Renommer, puis appuyez sur le bouton OK ou . L'écran Renommer s'affiche.</li>
</ol>
<p><img alt="" src="images/d94482971f5ade6942f690e0d6d7e3f3c5d48a6bfaabea047db091c38c0efb6e.jpg" /></p>
<ol>
<li>
<p>Sélectionné les caractères nécessaires à l'aide des boutons ▲▼▲▶ puis appuyez sur le bouton OK.</p>
</li>
<li>
<p>Espace Libre (bouton ROUGE (A)): Supprime le caractère precedent et fait reculer le curseur d'une position. </p>
</li>
<li>Espace (bouton VERT (B)): Entre un espace et fait avancer le curseur d'une position (vers la droite). </li>
<li>Effacer (bouton JAUNE (C)): supprime tous les caractères saisis. </li>
<li>Enreg. (bouton bleu (D)): Enregistre les caractères saisis.</li>
</ol>
<p><img alt="" src="images/fd94b100cabb7d38583a5d466d0e703765f6322bbc2023144e94c525937b3dbd.jpg" /></p>
<ol>
<li>Appuyez sur le bouton BLEU (D) pour sélectionner Enreg.<br />
Le nom du titre changé s'affiche sur l'objet du titre de l'entrée选拔ctionnee.</li>
</ol>
<p><img alt="" src="images/bc63aad47028f80db02b21828251860eba96a2e09a77f9782ecb8ef11ef4db89.jpg" /></p>
<h1 id="verrouillage-protection-dun-titre">Verrouillage (protection) d'un titre</h1>
<p><img alt="" src="images/c9f7e67c4d63d24551b3d7986cfcbe6566e2c81da4c18a6792eef4f9ec369952.jpg" /></p>
<p><img alt="" src="images/5fd730c0e962d97442fba82f4709b6eeda588a374435e60dd329ac38b8d531c2.jpg" /></p>
<p><img alt="" src="images/26c4c8640457c104acae93f9f499814db8609470ed33eb66efe0ff873d4aa869.jpg" /></p>
<p><img alt="" src="images/75ce744d5bf3e7e92ddc31bbccc4a7267a724830f84a4c115476c8ac9c984759.jpg" /></p>
<p>Suivez ces instructions pour verrouiller une entree afin de la proteger contre toute modification accidentelle</p>
<p><img alt="" src="images/c639471f32e20af19a5a8520420262cea63fb2c0c012ec43c9c158fa8de35b00.jpg" /></p>
<h1 id="utilisation-du-bouton-title-list-4">Utilisation du bouton TITLE LIST</h1>
<ol>
<li>Appuyez sur le bouton TITLE LIST, apparéil en mode Stop ou Lecture. </li>
<li>
<p>Sélectionnez une entrée que vous souhaitez protégger dans la Liste de titres à l'aide des boutons ▲▼, puis appuyez sur le bouton MARKER jusqu'à ce que l'entrée soit cochée. Répêze cette étape pour sélectionner un titre supplémentaire que vous souhaitez protégier.</p>
</li>
<li>
<p>Si vous souhaitez ne pas protégier l'une des entrées cochées, il vous suffit de sélectionner l'entrée en question et d'appuyer sur le bouton MARKER jusqu'à ce qui ne soit plus cochée.</p>
</li>
<li>
<p>Appuyez sur le bouton ROUGE (A) pour selectionner Edit. Le menu Edit s'affiche. </p>
</li>
<li>Appuyez sur les boutons ▲▼ pour sélectionner Protection, puis appuyez sur le bouton OK ou ▷. </li>
<li>Appuyez sur les boutons pour sélectionner Marche, puis appuyez sur le bouton OK. L'icone de verrouillage sur la fenêtre d'information de l'entrée sélectionnée passée à l'état verrouillé.</li>
</ol>
<p><img alt="" src="images/7076e7ef5f8a7e3298b26c6157ed1067c5fb16f4ee45ee6e8e9e33eacf65e0ec.jpg" /></p>
<p><img alt="" src="images/1cbb0d8f3a7052e533e452cbadb6b1ba25035c0b239e05a2a4fdb0ab62e44134.jpg" /></p>
<p>(a→a)</p>
<ol>
<li>Si vous souhaitez annuler la protection, Sélectionnez Arrêt de l' étape 5 et appuyez sur le bouton OK. Le symbole du cadenas passée à l'état déverrouillé.</li>
</ol>
<p>(→)</p>
<p><img alt="" src="images/de831334f8478bd77d649460a5779b1a7c1db476c9c35fefaa5416aa793bd4c4.jpg" /></p>
<ul>
<li>Sélectionner « Sélect. tout » dans le menu Edit vous permet de cocher tous les titres.</li>
</ul>
<p>Suivez ces instructions pour supprimer une entrée de la liste des titres.</p>
<p><img alt="" src="images/e56729f1512d603bf195f42e83b2bf34d9ff068659f753473e6204a4b70128ec.jpg" /></p>
<h1 id="utilisation-du-bouton-title-list-5">Utilisation du bouton TITLE LIST</h1>
<ol>
<li>
<p>Appuyez sur le bouton TITLE LIST, apparéil en mode Stop ou Lecture.</p>
</li>
<li>
<p>Sélectionnez une entrée que vous souhaitez supprimer de la Liste de titres à l'aide des boutons ▲▼, puis appuyez sur le bouton MARKER jusqu'à ce que l'entrée soit cochée. Répéteze cette étape pour sélectionner un titre supplémentaire que vous souhaitez suprimer.</p>
</li>
<li>
<p>Si vous souhaitez ne pas supprimer l'une des entrées cochées, il vous suffit de sélectionner l'entrée en question et d'appuyer sur le bouton MARKER jusqu'à ce qui elle ne soit plus cochée.</p>
</li>
<li>
<p>Appuyez sur le bouton ROUGE (A) pour selectionner Edit. Le menu Edit s'affiche.</p>
</li>
<li>
<p>Appuyez sur les boutons ▲▼ pour sélectionn Supprimer, puis appuyez sur le bouton OK ou ▷.</p>
</li>
<li>
<p>Le message peut etre differenl selon le type de disque. Le <br />
message de confirmation s'affiche. Disque dur, DVD-RAM <br />
(mode VR),DVD-RW(mode VR):La liste de lecture etant <br />
presente,le message "Souhaitez-vous supprimer? (Les listes I. associées peuvent etre suprimedes.)" <br />
s'affiche. <br />
DVD-RW(mode V) : La liste de lecture etant presente, <br />
le message "Souhaitez-vous supprimer?" s'affiche.</p>
</li>
</ol>
<p><img alt="" src="images/e16da10d206aaab81d538a95a1cc3c6fc7de96b5a4e3d643cf45be05b031cff3.jpg" /></p>
<p><img alt="" src="images/6be35b57f846a542ec6e6e26eed13bd8933743d0db93bec5da9ccad17c23d9f3.jpg" /></p>
<ol>
<li>Appuyez sur les boutons pour selectionner Oui, puis appuyez sur le bouton OK.</li>
</ol>
<p><img alt="" src="images/f6caaa32fb3fef1861878597eb6168fd2ea3ef9e782d6c9094cb24f9ca05fff7.jpg" /></p>
<ul>
<li>Vous pouze supprimer une entree protégée. Si vous souhaitez supprimer une entree protégée, selectionnez "Arrêt" dans le menu Protection titre. (Reportez-vous à la page 74) <br />
Lorsque la protection du disque est reglee sur Protégé, vous ne pouvez pas supprimer des titres. (Reportez-vous à la page 88) </li>
<li>Une fois une entree supprimee de la listedes titres, elle ne peut plus etre recuperee. <br />
Une fois le DVD-RW/-R finalisé, il ne peut plus être effacé. <br />
Sur les DVD-R, les titres sont uniquement supprimés du menu, mais ils restent physique sur le disque. </li>
<li>Sélectionner « Sélect. tout » dans le menu Édition vous permet de cocher tous les titres.</li>
</ul>
<h1 id="partition-dune-section-dun-titre-partage">Partition d'une section d'un titre (partage)</h1>
<p><img alt="" src="images/b051969f020f7e666a41875481b42328950bdaca96fae5ff23b6cae692157c42.jpg" /></p>
<p>Suivez ces instructions pour séparer une section d'une entrée de liste de titres.</p>
<p><img alt="" src="images/5858374c58c27cdf0c8fc537d7b6e1b81681f38a5c290019c85f91873c9c72c0.jpg" /></p>
<h1 id="utilisation-du-bouton-title-list-6">Utilisation du bouton TITLE LIST</h1>
<ol>
<li>Appuyez sur le bouton TITLE LIST, apparéil en mode Stop ou Lecture. </li>
<li>Appuyez sur les boutons ▲▼ pour sélectionner une entrée que vous souhaitez séparer de la Liste de titres, puis appuyez sur le bouton ROUGE (A)<br />
Le menu Edit s'affiche. </li>
<li>Appuyez sur les boutons ▲▼ pour sélectionner Séparer, puis appuyez sur le bouton OK ou ▷. </li>
<li>En utilisant les boutons liés à la lecture, (PLAY () ), RECHERCHE ( ) , placez-vous sur un point de séparation puis appuyez sur le bouton OK.</li>
</ol>
<p>S'il ne s'agit pas du point auquel vous souhaitez effectuer la séparation, appuyez sur le bouton RETURN pour annuler la seLECTION. En utilisant les boutons liés à la lecture, placez-vous sur un point de séparation puis appuyez sur le bouton OK.</p>
<ol>
<li>Appuyez sur le bouton OK pour selectionner Séparer. </li>
<li>Appuyez sur les boutons pour selectionner Oui, puis appuyez sur le bouton OK.</li>
</ol>
<p>Le titre partagé est divisé en deux et les titres suivants seront reculés un par un</p>
<p><img alt="" src="images/66816c6d7217d6862949775a8b42d3cfde6fcf957791f3562938e45740205fc3.jpg" /></p>
<p><img alt="" src="images/ccb7c9ac67b480c948e2d2cfc727b1cf0fb6666aadaf9e2c85de2b7428481a5d.jpg" /></p>
<p><img alt="" src="images/b8114db7f44778638c90d020dcc5f5cc6ba7580aa31ad95597354fc6fd947870.jpg" /></p>
<p><img alt="" src="images/ec43b3e83d779fd43e1615b1a446d980ea6fd7c8733c6f703a75859fda192810.jpg" /></p>
<h1 id="suppression-dune-section-dun-titre-suppression-partielle">Suppression d'une section d'un titre (suppression partielle)</h1>
<p><img alt="" src="images/50b8d46b77d76174cbf411cd3b6055b85a475203eeed6df58da6e414f976e3f1.jpg" /></p>
<p><img alt="" src="images/96ba9ab166d72f6fd7a4a73142e4dfc07ecc481f0eaac16c050dd8f465ac4b9b.jpg" /></p>
<p><img alt="" src="images/f6452639cfcc84ba855c4ed7e5d9c2a4eb524440566a1983d4bb18a8ad2006e4.jpg" /><br />
Mode VR</p>
<p>Suivez ces instructions pour supprimer une section d'une entrée de liste de titres.</p>
<p><img alt="" src="images/80ea738deb058e909d6593ef1fde5d527bf48ec291381856ecbfc878e2c3a584.jpg" /></p>
<h1 id="utilisation-du-bouton-title-list-7">Utilisation du bouton TITLE LIST</h1>
<ol>
<li>Appuyez sur le bouton TITLE LIST, apparéil en mode Stop ou Lecture. </li>
<li>Appuyez sur les boutons pour selectionner une entrée que vous souhaitez modifier dans la Liste de titres, puis appuyez sur le bouton ROUGE (A).</li>
</ol>
<p>Le point de fin ne peut pas preceder le point de début.</p>
<ol>
<li>Appuyez sur les boutons ▲▼ pour sélectionnner Suppression partielle, puis appuyez sur le bouton OK ou ▷.</li>
</ol>
<p><img alt="" src="images/6b2258765fc1207e49c67b030fe5025dd74bd9d6ff40f2b25155ba38b47f1445.jpg" /></p>
<ol>
<li>
<p>Appuyez sur le bouton OK au point de départ. L'image ainsi que l'heure du point de départ s'affichent dans la fenetre du point de départ de la suppression de section.</p>
</li>
<li>
<p>Sélectionnéz les points de départ et de fin de la section que vous souhaitez supprimer à l'aide des boutons liés à la lecture. </p>
</li>
<li>
<p>Boutons liés à la lecture : (PLAY (⊙), PAUSE (U), RECHERCHE (⊙))</p>
</li>
<li>
<p>Appuyez sur le bouton OK au point de fin. L'image ainsi que l'heure du point de fin s'affichent dans la fenêtre du point de fin de la suppression de section. </p>
</li>
<li>Appuyez sur les boutons pour selectionner Supprimer, puis appuyez sur le bouton OK. </li>
<li>Appuyez sur les boutons pour selectionner Oui, puis appuyez sur le bouton OK. La section selectionnée a ete supprimee. </li>
<li>Appuyez sur les boutons pour sélectionner Termi., puis appuyez sur le bouton OK pour terminer l'opération.</li>
</ol>
<p><img alt="" src="images/9d6d98b256400fdb085d7644a089a990bf6681d757ba8b47325abd9e3837baa3.jpg" /></p>
<p><img alt="" src="images/895307624d817564276bd7fbb0966098df61cec1ceb552a290f1fed40a3597e6.jpg" /></p>
<p>La durée de la section à supprimer doit être au moins égale à 5 secondes.</p>
<p>Le point de fin ne peut etre defini avant le point de depart. <br />
La section ne peut pas etre suprimée lorsqu'elle comprend une image fixe. <br />
Appuyez sur le bouton EXIT (4) après avoir terminé l'opération. L'écran Nombre de Titres disparait.</p>
<h1 id="utilisation-de-la-fonction-trier-liste-de-titres">UTILISATION DE LA FONCTION TRIER (LISTE DE TITRES)</h1>
<p><img alt="" src="images/afec17e3a9420da9a7b0a150a1ed8fd8c641b7433529e850ab868ac8e6e251c6.jpg" /></p>
<p><img alt="" src="images/f30dd3022520ee11aa90fd8d586959ee78fd92ba89dd0ab07786f7e9239f6ee3.jpg" /></p>
<p><img alt="" src="images/9e930e64d7aecd21566e58df2989c4515bf2c4fe23392f6dc8ea4873ea0cd2b4.jpg" /></p>
<p><img alt="" src="images/a0aa806c6fb5b1d6bf07335aa95425bc5d5f0051f13db4d2baec69a7e6f8cf4f.jpg" /></p>
<p>Si vous souhaitez changer l'ordre de tri de la liste de titres :</p>
<ol>
<li>Lorsque la liste des menus est affichée, appuyez sur le bouton VERT (B) pour selectionner Trier. </li>
<li>
<p>Appuyez sur les boutons ▲▼ pour sélectionner l'élement souhaité, puis appuyez sur le bouton OK ou ▷.</p>
</li>
<li>
<p>Date : en fonction de la date d'enregistrement des titres. </p>
</li>
<li>Name : suivant l'ordre alphabetique </li>
<li>Longueur : en fonction de la longueur des titres enregistrés. </li>
<li>Info du canal : en fonction des informations du canal.</li>
</ol>
<p><img alt="" src="images/0a9873f3cb77ddb16b932e459f6667da77f13774fc097e4838a1e57b8101a437.jpg" /></p>
<p><img alt="" src="images/94dc857accfda0e4cb61bd07e509641df753ab797b826d3f4aac960385586832.jpg" /></p>
<ul>
<li>Vous pouvez procéder au tri en fonction de la date, du nom, de la longueur et desinfos du canal. La liste est à nouveau triée selon l'ordre de copie en accédant à nouveau à la Liste de titres.</li>
</ul>
<h1 id="navigation-par-durée">Navigation par Durée</h1>
<p><img alt="" src="images/567a7c176f917c3ec1a9e5dfe5c3030bdea866d6ed6b4a08a87a1836db48f88a.jpg" /></p>
<p><img alt="" src="images/a5dbd7d89bd70392e3230e10aacc0c4d14db9f996ebd53a642767d0454401505.jpg" /></p>
<p><img alt="" src="images/608352adba50157e17f6511208433d4003d2d4cab07de140ffd96c1282f48f8a.jpg" /><br />
Mode VR</p>
<p>Cette fonction vous permet de rechercher une scène minute par minute dans la liste de titres enregistrée.</p>
<p><img alt="" src="images/7a90bcd8633fc6b8712e3131354abfa9b191c7a999c1b1fc2f924f9cca5a3d55.jpg" /></p>
<h1 id="utilisation-du-bouton-title-list-8">Utilisation du bouton TITLE LIST</h1>
<ol>
<li>Appuyez sur le bouton TITLE LIST, apparéil en mode Stop ou Lecture. </li>
<li>Appuyez sur les boutons ▲▼ pour sélectionner une entrée à dire dans la Liste de titres, puis appuyez sur le bouton JAUNE (C). </li>
<li>Appuyez sur les boutons ▲▼ pour sélectionner Navigation par Durée, puis appuyez sur le bouton OK ou ▷. </li>
<li>Appuyez sur les boutons pour faire des sauts d'une minute et rechercher la scène souhaitée, puis appuyez sur le bouton OK ou PLAY (®).</li>
</ol>
<p><img alt="" src="images/1e4e9e0b804a31e8a115e2aa1004c27705bb23bc8efafd2897d4ddec74862a79.jpg" /></p>
<p><img alt="" src="images/7cc7d1d8b28dd6217dca6f9d79ed5d8391aadb87d0d24b446cf9bb855e6f675d.jpg" /></p>
<p>Leurrene se déplace pas si le titre enregistré et sélectionné est inférieur à 1 minute. <br />
La fonction Navigation n'est pas compatible avec les disques enregistrés à l'aide d'autres appareils. <br />
- Un titre modifié ne peut pas afficher l'heure exacte de la recherche.</p>
<p><img alt="" src="images/e6e46b6fa833ac15af63d78ecf378c5ba29dbefeab066f1003e450af1917726d.jpg" /></p>
<h1 id="navigation-par-scène">Navigation par Scène</h1>
<p><img alt="" src="images/f1a422e530cd9577a7808758ef1d1d56be2916a9ffe44b58a8922ea3f8bf5f4a.jpg" /></p>
<p><img alt="" src="images/dd18b86d8e7e0d655988aacf57aaccfd106acf89c85f22d8246432a014f5cabc.jpg" /></p>
<p><img alt="" src="images/e4d2f085fa451d205ed2017adf978358f967ceaf062ddeed948bbcf8cddfe1e4.jpg" /><br />
Mode VR</p>
<p>La Navigation par Scène vous permet de rechercher une scène si vous avez doté un titre de marqueurs (voir page 48).</p>
<p><img alt="" src="images/81720c58c54bf37e0854168448f50ea7df2dae942f7fadbb39540c8194a21203.jpg" /></p>
<h1 id="utilisation-du-bouton-title-list-9">Utilisation du bouton TITLE LIST</h1>
<ol>
<li>Appuyez sur le bouton TITLE LIST, appareil en mode Stop ou Lecture. </li>
<li>Appuyez sur les boutons ▲▼ pour sélectionner une entrée à dire dans la Liste de titres, puis appuyez sur le bouton JAUNE (C). </li>
<li>Appuyez sur les boutons ▲▼ pour sélectionner Navigation par Scène, puis appuyez sur le bouton OK ou ▷. </li>
<li>Appuyez sur les boutons ▲▼▶ pour sélectionner la scene souhaitée, puis appuyez sur le bouton OK ou PLAY (⊙).</li>
</ol>
<p><img alt="" src="images/5ea4e30971545b41aeec0196e53b7b3c9ecf898fcdcd7ef48edc3e1610bb970e.jpg" /></p>
<p><img alt="" src="images/77547471b6026acf43889a55fae49d2aac5fdc5994ee4cb13bbb4b1de38c47d6.jpg" /></p>
<p>La Navigation par Scène ne fonctionne pas si un titre sélectionné n'est pas doté de marqueurs.</p>
<p><img alt="" src="images/d872b38ffc6501644f07706eb0f0c3f43c7b83f06990e9937c702247b3cb969f.jpg" /></p>
<ol>
<li>Appuyez sur le bouton BLEU (D) pour selectionner Contenu. </li>
<li>Appuyez sur les boutons ▲▼ pour sélectionner le contenu que vous souhaitez déplacer, puis appuyez sur le bouton OK ou ▷.</li>
</ol>
<p><img alt="" src="images/8373a9647b60532e94e6550d25074fadcb8cdd7febbb029152efc9417db47fa9.jpg" /></p>
<ul>
<li>Cette fonction n'est disponible que lorsque le disque contient le containu sélectionné.</li>
</ul>
<p><img alt="" src="images/df94a49ca662532149e448f2279f9add7efdcb9de2359c794ca01441cb6e52b0.jpg" /></p>
<h1 id="modification-avancée-liste-de-lecture">MODIFICATION AVANCÉE (LISTE DE LECTURE)</h1>
<h1 id="création-dune-liste-de-lecture">Création d'une liste de lecture</h1>
<p><img alt="" src="images/f49cd6feca95f5378c0bdf7ecea9bb57803f58e6666a19ad8249a84155fecd6f.jpg" /></p>
<p><img alt="" src="images/47205b286b261807382b2f49f3e327060411eef3ce0c5540986a8fd967aab071.jpg" /></p>
<p><img alt="" src="images/9980150b5b6af3f02660ed6e9f30eccd726a3e6263a37ebf8b0d47ee371675d0.jpg" /><br />
Mode VR</p>
<p>Suivez ces instructions pour creer une nouvelle entrée de liste de lecture à partir d'un titre enregistré.</p>
<p><img alt="" src="images/346f7b63a71097edb05dd8a3efa1e2fb14f55711a3fa65ba9767cffe80fcc144.jpg" /></p>
<h1 id="utilisation-du-bouton-title-list-10">Utilisation du bouton TITLE LIST</h1>
<ol>
<li>Appuyez sur le bouton TITLE LIST, appeareil en mode Stop ou Lecture. </li>
<li>Appuyez sur le bouton ROUGE (A). Le menu Edit s'affiche. </li>
<li>Appuyez sur les boutons pour Sélectionner Nouv. I. lect., puis appuyez sur le bouton OK ou . L'écran Creer Une Liste De Lecture s'affiche. </li>
<li>
<p>Appuyez sur le bouton OK au point de départ.</p>
</li>
<li>
<p>L'image ainsi que l'heure du point de départ s'affichent dans la fenetre de démarrage. </p>
</li>
<li>La barre de selection de couleur jaune se déplace sur l'élément Fin. </li>
<li>
<p>Sélectionnez le point de départ de la section à partir duquel vous souhaitez créé une nouvelle-scène à l'aide des boutons liés à la lecture (PLAY (心) ), RECHERCHE (心) , SAUT (心) ).</p>
</li>
<li>
<p>Appuyez sur le bouton OK au point de fin.</p>
</li>
<li>
<p>L'image ainsi que l'heure du point de fin s'affichent dans la fenetre Fin. </p>
</li>
<li>
<p>La barre de sélection de couleur jaune se déplace sur l'élement faire.</p>
</li>
<li>
<p>Appuyez sur les boutons pour selectionner Faire, puis appuyez sur le bouton OK.</p>
</li>
<li>
<p>Création d'une scène pour la liste de lecture.</p>
</li>
</ol>
<p>Un nouvel écran de création de scene s'affiche.</p>
<p>Répétez les étapes 4 à 6 pour réaliser une scène pour la liste de lecture. La nouvelle scène est ajoutée à la liste de lecture actuelle. Vous pouvez vérifier et visualiser l'ensemble des scènes sur l'écran Edit la liste de lecture. (Reportez-vous à la page 81).</p>
<ul>
<li>Création d'une nouvelle liste de lecture.</li>
</ul>
<p>Répétez les étapes 1 à 6 si vous souhaitez étabir une nouvelle liste de lecture.</p>
<p><img alt="" src="images/1a1869549a5ec3444ee46d9209963b2b004ae395b6f07b5f7caf5dd288aaf884.jpg" /></p>
<p><img alt="" src="images/5be2b066a25a57777022d05572dd81f17efbd889b4b2d2fd393d471dd3d96fb8.jpg" /></p>
<p><img alt="" src="images/4f6c895ae355620048195857ad036e890f5e7d9bf4578bc6cbdcbc90e4697841.jpg" /></p>
<ol>
<li>Appuyez sur les boutons pour selectionner Termi., puis appuyez sur le bouton OK pour terminer l'opération.</li>
</ol>
<p><img alt="" src="images/c0781071621a6f73c39ef62e7a045ec63edbb27fd753f118a9eeee3968401385.jpg" /></p>
<ul>
<li>Vous pouvez创建工作 jusqu'à 99 entretes de liste de lecture. <br />
En fonction du type de disque, l'écran affché peut présenter une légère différence.</li>
</ul>
<h1 id="lecture-des-entrées-dans-la-liste-de-lecture">Lecture des entrées dans la liste de lecture</h1>
<p><img alt="" src="images/459655523f7677e59788fe26e244fbdf54322715b4f2b337b60c971864fd6e27.jpg" /></p>
<p>Suivez ces instructions pour dire les entrées de liste de lecture.</p>
<p><img alt="" src="images/ed3997b19eea1869ef0ffa264b2047bf12d33f11ea2b48a77ebe7ff76ddc3526.jpg" /></p>
<h1 id="utilisation-du-bouton-play-list">Utilisation du bouton PLAY LIST</h1>
<ol>
<li>Appuyez sur le bouton PLAY LIST, appareil en mode Stop ou Lecture. </li>
<li>Appuyez sur les boutons ▲▼ pour sélectionner la liste de lecture que vous souhaitez dire puis appuyez sur le bouton OK ou PLAY (⊙). </li>
<li>Appuyez sur la bouton STOP (⊙) pour arreter la lecture. L'affchage revient à l'écran Liste de lecture.</li>
</ol>
<p><img alt="" src="images/e9a496ac36c9e719fdb46899c75cc46c5d2659a5ca59c194d179d97ea2626d00.jpg" /></p>
<h1 id="changement-du-nom-dune-entrée-dans-la-liste-de-lecture">Changement du nom d'une entrée dans la liste de lecture</h1>
<p><img alt="" src="images/f3d3a30123fa60360b635eb320909705ae473978842dc4246359d3c1d1839e13.jpg" /></p>
<p>Suivez ces instructions pour renomer une entrée dans la liste de lecture, c'est-à-dire pour modifier le titre d'une entrée dans la liste de lecture.</p>
<p><img alt="" src="images/a6d0dc29906be30e142ff906ec5911c8613c07aa8d019d0daf85e61d27bdca99.jpg" /></p>
<h1 id="utilisation-du-bouton-play-list-2">Utilisation du bouton PLAY LIST</h1>
<ol>
<li>Appuyez sur le bouton PLAY LIST, appareil en mode Stop ou Lecture. </li>
<li>Sélectionnez le titre que vous souhaitez renomer dans la Liste de lecture à l'aide des boutons ▲▼, puis appuyez sur le bouton ROUGE (A).</li>
</ol>
<p>Le menu Édit s'affiche.</p>
<ol>
<li>Appuyez sur les boutons ▲▼ pour sélectionner Renommer, puis appuyez sur le bouton OK ou ▷.</li>
</ol>
<p>L'écran Renommer s'affiche.</p>
<ol>
<li>
<p>Sélectionné les caractères nécessaires à l'aide des boutons ▲▼▲▶, puis appuyez sur le bouton OK.</p>
</li>
<li>
<p>Espace Libre (bouton ROUGE (A)): Supprime le caractère précédent et fait reculer le curseur d'une position. </p>
</li>
<li>Espace (bouton VERT (B)): Entre un espace et fait avancer le curseur d'une position (vers la droite). </li>
<li>Effacer (bouton JAUNE (C)): Supprime tous les caractères saisis. </li>
<li>
<p>Enreg. (bouton BLEU (D)): Enregistre les caractères saisis.</p>
</li>
<li>
<p>Appuyez sur le bouton BLEU (D) pour sélectionner Enreg.</p>
</li>
</ol>
<p>Le titre changé s'affiche dans le champ du titre de l'entrée de la liste de lecture sélectionnée.</p>
<p><img alt="" src="images/2974e33558540115e7dc27a35301e99e39fa12328eaee082a99992b50ac01f1b.jpg" /></p>
<p><img alt="" src="images/fbf2088c3b556125bdb8793be490ea02449b0540270a8b26b1bbd94052aa1c15.jpg" /></p>
<p><img alt="" src="images/761549f0907bf42b8ef18053bd4b9e7db143d80a458fabd89bc44ef628b93e2c.jpg" /></p>
<p>Suivez ces instructions pour modifier les scènes d'une liste de lecture.</p>
<p><img alt="" src="images/57b3573f71647ba662aae7776d4cf78c5c73ce3972cab21b9ca0a848c9670aa3.jpg" /></p>
<h1 id="utilisation-du-bouton-play-list-3">Utilisation du bouton PLAY LIST</h1>
<ol>
<li>Appuyez sur le bouton PLAY LIST, appareil en mode Stop ou Lecture. </li>
<li>Appuyez sur les boutons ▲▼ pour sélectionner le titre que vous souhaitez modifier dans la Liste de lecture, puis appuyez sur le bouton ROUGE (A). Le menu Édit s'affiche. </li>
<li>Appuyez sur les boutons pour sélectionner Edit. I. lect., puis appuyez sur le bouton OK ou . L'écran Editor la liste de lecture s'affiche.</li>
</ol>
<p><img alt="" src="images/30b5c1e031ef7ac729590befb4acbaf06462aa23a0827d3a5861963dd5a7fa85.jpg" /></p>
<p><img alt="" src="images/343647d9dc03405e2c866e90087aab0bd20cdfa1dbddc5fea2aaf5130dceb24c.jpg" /></p>
<h1 id="lecture-dune-scène-selectionnée">Lecture d'une scène seLECTIONnée</h1>
<ol>
<li>
<p>Appuyez sur les boutons ▲▼▲▶ pour sélectionner la scène que vous souhaitez lire, puis appuyez sur le bouton OK ou PLAY (⊙). La-scène SéLECTIONNée est lue.</p>
</li>
<li>
<p>Pour arrêté la lecture de la scène, appuyez sur le bouton STOP (⊙).</p>
</li>
</ol>
<h1 id="modification-dune-scène-replacement-dune-scène">Modification d'une scène (replacement d'une scène)</h1>
<p>Pour la configuration, suive les étapes 1 à 3</p>
<p>4-1. Appuyez sur les boutons ▲▼ ▲▶ pour sélectionner la scène que vous souhaitez modifier, puis appuyez sur le bouton ROUGE (A). L'écran Modifier une Scène s'affiche.</p>
<ol>
<li>
<p>Appuyez sur le bouton OK au point de départ de la scene.</p>
</li>
<li>
<p>L'image ainsi que l'heure du point de départ s'affichent dans la fenetre de démarrage. </p>
</li>
<li>
<p>Sélectionnez le point de début ou de fin de la section que vous souhaitez modifier à l'aide des boutons liés à la lecture (PLAY () ), RECHERCHE ( ) , SAUT ( ) ).</p>
</li>
<li>
<p>Appuyez sur le bouton OK au point final de la scène.</p>
</li>
</ol>
<p>L'image ainsi que l'heure du point final s'affichent dans la fenetre Fin.</p>
<ol>
<li>Appuyez sur les boutons pour selectionner Changer, puis appuyez sur le bouton OK. </li>
<li>La scène que vous souhaitez modifier est changée avec la section sélectionnée.</li>
</ol>
<p><img alt="" src="images/158b4f9b6dff81bfd8f3a9313833eef295d80f8feb22454ce3140e425ee794a8.jpg" /></p>
<p><img alt="" src="images/9606a93c03cc5ef765411ad7ebb9946b2c077506c8e9ad79994b9075996e1958.jpg" /></p>
<h1 id="déplacement-dune-scène-changement-de-la-position-dune-scène">Déplacement d'une scène (changement de la position d'une scène)</h1>
<p>Pour la configuration, suivez les étapes 1 à 3 de la page 81.</p>
<p>4-1. A l'aide des boutons , Sélectionnez la scène que vous souhaitez déplacer (changer la position), puis appuyez sur le bouton VERT (B).</p>
<ul>
<li>
<p>Une fenêtre de sélection jaune s'affiche sur la scene à déplacer.</p>
</li>
<li>
<p>Appuyez sur les boutons ▲▼ ▲▷ pour sélectionner la position à laquelle vous souhaitez déplacer la scene selectionnée, puis appuyez sur le bouton OK.</p>
</li>
</ul>
<p><img alt="" src="images/eec33cca58f05c6f16bea35aa12f6cd9829961b3b48d54cbd28e3ab878fcb0e8.jpg" /></p>
<p><img alt="" src="images/020183ea7373249ad6b7e6fc90359be0f8f965df04488d050aa721a352ead0d5.jpg" /></p>
<ul>
<li>Vous ne pouvez pas déplacer la scène sélectionnée à la position de la scène suivante, car la scène sélectionnée doit être insérée avant cette position, ce qui n'entraine dans ce cas aucune action. <br />
En fonction du type de disque, l'écran affiché peut présenter une légère différence.</li>
</ul>
<h1 id="ajout-dune-scene">Ajout d'une scene</h1>
<p>Pour la configuration, suivez les étapes 1 à 3 de la page 81.</p>
<p>4-1. A l'aide des boutons ▲▼▲▶ pour sélectionner la scène avant laquelle sera insérée une nouvelle scène, puis appuyez sur le bouton JAUNE (C).</p>
<p>L'écran Ajouter la Scène s'affiche.</p>
<ol>
<li>
<p>Appuyez sur le bouton OK au point de départ de la scene.</p>
</li>
<li>
<p>TL'image ainsi que l'heure du point de départ s'affichent dans la fenêtre de démarrage. </p>
</li>
<li>
<p>Sélectionné le point de départ ou de fin de la section que vous souhaïez modifier à l'aide des boutons liés à la lecture (PLAY (©) ), RECHERCHE (©) , SAUT (©) ).</p>
</li>
<li>
<p>Appuyez sur le bouton OK au point final de la scene.</p>
</li>
</ol>
<p>L'image ainsi que l'heure du point final s'affichent dans la fenetre Fin. <br />
- Pour annuler, appuyez sur les boutons pour Sélectionner Termi., puis appuyez sur le bouton OK.</p>
<ol>
<li>
<p>Appuyez sur les boutons pour selectionner Ajout., puis appuyez sur le bouton OK.</p>
</li>
<li>
<p>La partie que vous souhaitez ajouter est insérée avant la scène sélectionnée lors de l' étape 4^-1 d'ajout d'une scène.</p>
</li>
</ol>
<p><img alt="" src="images/06bd277a7cd068015dce8a3ba1276c1c7c2dbd3a2723391f02604545651ffc20.jpg" /></p>
<p><img alt="" src="images/9ec62285cfbdc9b74b17999368fc7c70f30f38dd3e3cbf0262914475c180e088.jpg" /></p>
<h1 id="suppression-dune-scène">Suppression d'une scène</h1>
<p>Pour la configuration, suivez les étapes 1 à 3 de la page 81.</p>
<p>4-1. Appuyez sur les boutons ▲▼ ▲▶ pour sélectionner la scène que vous souhaitez supprimer, puis appuyez sur le bouton BLEU (D).</p>
<ul>
<li>
<p>Le message "Souhaitez-vous supprimer la scène?" apparait.</p>
</li>
<li>
<p>Appuyez sur les boutons pour sélectionner Oui, puis appuyez sur le bouton OK pour supprimer la scene sélectionnée.</p>
</li>
</ul>
<p><img alt="" src="images/b0e9835a360b7853a69a50af17a35672c78b26c617bd718088ed5e8a76e0357d.jpg" /></p>
<h1 id="suppression-dune-entrée-dans-la-liste-de-lecture-à-partir-de-la-liste-de-lecture">Suppression d'une entrée dans la liste de lecture à partir de la liste de lecture</h1>
<p><img alt="" src="images/2678375fd185c9735c79b9b14410702a13897f4ff0cc0c2bb0e0ae41c36e3e34.jpg" /></p>
<h1 id="utilisation-du-bouton-play-list-4">Utilisation du bouton PLAY LIST</h1>
<ol>
<li>Appuyez sur le bouton PLAY LIST, apparéil en mode Stop ou Lecture. </li>
<li>
<p>Appuyez sur les boutons ▲▼ pour sélectionner une entrée que vous souhaitez supprimer de la Liste de lecture, puis appuyez sur le bouton MARKER jusqu'à ce que l'entrée soit cochée.</p>
</li>
<li>
<p>Si vous souhaitez ne pas supprimer l'une des entrées cochées, il vous suffit de sélectionner l'entrée en question et d'appuyer sur le bouton MARKER jusqu'à ce qui elle ne soit plus cochée.</p>
</li>
<li>
<p>Appuyez sur le bouton ROUGE (A) pour selectionner Edit. Le menu Edit s'affiche. </p>
</li>
<li>
<p>Appuyez sur les boutons ▲▼ pour sélectionn Supprimer, puis appuyez sur le bouton OK ou ▷.</p>
</li>
<li>
<p>Vous serez sollicité par le message de confirmation de suppression "Souhaitez-vous supprimer?".</p>
</li>
<li>
<p>Appuyez sur les boutons pour selectionner Oui, puis appuyez sur le bouton OK.</p>
</li>
</ol>
<p>Vous revenez automatiquement à l'écran Liste de lecture une fois la suppression terminée.</p>
<p><img alt="" src="images/5b5de81f05fb2dc0534e175447f169b3b837c8b974b74524e33659ed4775528f.jpg" /></p>
<ul>
<li>Sélectionner « Sélect. tout » dans le menu Edit vous permet de cocher tous les titres.</li>
</ul>
<p><img alt="" src="images/13e5d642f7480b4114d14fb5284c953362d19cda225cb0796adf6edc7c8c5801.jpg" /></p>
<p><img alt="" src="images/59a0555789bde13710245ffcdce4c17d45a1af687e97f26890951d289506f028.jpg" /></p>
<p><img alt="" src="images/6036f6d127ce41a88048c576c35e9fc3667683fae76adad02cf16ae9bfd27b5c.jpg" /></p>
<h1 id="utilisation-de-la-fonction-trier-liste-de-lecture">Utilisation de la fonction Trier (Liste de lecture)</h1>
<p>Yououpouzchanger l'ordre de tri de laListedeclecture trésfaclementdés queyoulesouhaitez.</p>
<ol>
<li>Lorsque la liste des menus est affichée, appuyez sur le bouton VERT (B) pour selectionner Trier. </li>
<li>
<p>Appuyez sur les boutons ▲▼ pour sélectionner l'objet souhaite, puis appuyez sur le bouton OK ou ▷.</p>
</li>
<li>
<p>Date : en fonction de la date de création des listes de lecture. <br />
Nom : suivant l'ordre alphabetique</p>
</li>
</ol>
<p><img alt="" src="images/30fec46ca8eda85a90eae186c1b944c98728767af541fbc01457abfc48cb268e.jpg" /></p>
<p><img alt="" src="images/de1cfdfd01c49d068e6034b46ed138bc171f83d3b427ea0ce4815d313109a310.jpg" /></p>
<ul>
<li>Vous pouvez procéder au tri en fonction de la date et du nom. La liste est à nouveau triée selon l'ordre de copie en accédant à nouveau à la Liste de lecture.</li>
</ul>
<h1 id="effectuer-des-copies-du-disque-dur-vers-un-dvd-et-inversement">EFFECTUER DES COPIES DU DISQUE DUR VERS UN DVD ET INVERSEMENT</h1>
<h1 id="a-propos-de-iecran-de-copie">A propos de I'ecran de copie</h1>
<p><img alt="" src="images/893683014414b376ecf8fa36805954b5bdb221cefe19138528199bcacbab9b78.jpg" /></p>
<p>1 Taille totale et numero des titres selectionnés pour la copie <br />
2 Titre a copier <br />
3 Indique l'espace disponible sur le disque <br />
4 L'emplacement ou sont enregistrés les fichiers copies <br />
5 Bouton de départ de copie <br />
6 Bouton de tri (Date, Nom, Longueur, Info canal)</p>
<p>Bouton de sélection <br />
7 - Select. tout : toutes les entrées du dossier actuel sont cochées. <br />
- Dessélect. Tt : toutes les entrées cochées sont découvertes.</p>
<p>Spécifications de copie du contenu </p>
<table><tr><td>Contenu</td><td>HDD → DVD</td><td>DVD → HDD</td></tr><tr><td>Titre matériel enregistré</td><td>Pris en charge</td><td>Pris en charge</td></tr><tr><td>Titre protégé contre la copie</td><td>Arrêt pris en charge</td><td>Arrêt pris en charge</td></tr><tr><td>Titre calculable pour une copie</td><td>Déplacer (Efface le titre sur le disque dur après l'avoir copié)</td><td>Arrêt pris en charge</td></tr></table>
<p>La copie est possible uniquement avec un disque compatible CPRM.</p>
<p>Une fois le "programme valable pour une seule copie" enregistré sur le DVD, il ne pourrait plus être enregistré sur le disque dur.</p>
<p>Par contre, si le "programme valable pour une seule copie" a été enregistré sur le disque dur, il pourrait être enregistré sur un DVD-RW (mode VR) ou un DVD-RAM.</p>
<p><img alt="" src="images/aee0f1baf0e52d9b3402190226d29630744362bb6ff14d8c11b80657a9d38794.jpg" /></p>
<h1 id="utilisation-du-bouton-title-list-11">Utilisation du bouton TITLE LIST</h1>
<ol>
<li>Appuyez sur le bouton OPEN/CLOSE et placez un disque enregistrable sur le tiroir disque. </li>
<li>Appuyez sur le bouton OPEN/CLOSE pour fermer le tiroir disque. Attende la disparition de LOAD sur l'affichage en façade. Vérifie que le disque dispose de suffisamment d'espace pour l'enregistrement. </li>
<li>Sélectionnez le mode souhaité en appuyant sur le bouton HDD ou DVD de la télécommande.</li>
</ol>
<p>Vous pouvez également sélectionner le mode souhaité en appuyant sur le bouton HDD/DVD situé en façade de l'appareil.</p>
<ol>
<li>Appuyez sur le bouton TITLE LIST, appareil en mode Stop ou Lecture. </li>
<li>
<p>Appuyez sur le bouton COPY. L'écran Copier s'affiche.</p>
</li>
<li>
<p>Vous pouvez également copier le titre pendant la lecture en appuyant sur le bouton COPY.</p>
</li>
</ol>
<p><img alt="" src="images/dc1c813192e9c5485d0aeaf522017f7860af5f3f8511653ed254451d92ed4a89.jpg" /></p>
<p><img alt="" src="images/19e71c0349e536988d0d3a007e600aae959c17a1387a3a2940ba5be1ed30511f.jpg" /></p>
<ol>
<li>
<p>Appuyez sur les boutons ▲▼ pour sélectionner le titre que vous souhaitez copier, puis appuyez sur le bouton MARKER jusqu'à ce que le titre soit coché. Répétez cette étape pour sélectionner un titre supplémentaire que vous souhaitez copier.</p>
</li>
<li>
<p>Si vous souhaitez ne pas copier l'une des entrées cochées, il vous suffit de Sélectionner l'entrée en question et d'appuyer sur le bouton MARKER jusqu'à ce qu'elle ne soit plus cochée.</p>
</li>
<li>
<p>Appuyez sur le bouton ROUGE (A) pour selectionner Démarrer copie.</p>
</li>
<li>
<p>Le titre à copier ne s'affiche pas à l'écran et la copie démarre alors que le programme en cours de diffusion est affché à l'écran. </p>
</li>
<li>Appuyez sur le bouton INFO pour afficher la barre de traitement des copies.</li>
</ol>
<p>Si vous appuyez à nouveau sur le bouton INFO, la barre de traitement des copies disparait.</p>
<ul>
<li>
<p>Appuyez sur le bouton ROUGE (A) pour annuler la copie en cours.</p>
</li>
<li>
<p>Lorsque la copie a ete realisee avec succes, le message "Le titre a ete copie avec succes." s'affiche.</p>
</li>
</ul>
<p><img alt="" src="images/f3a0eadddb44ca886b61f066c935235c0259d1b999732c0bd900edba02aac94b.jpg" /></p>
<h1 id="copie-dvd-video">Copie DVD video</h1>
<ol>
<li>Appuyez sur le bouton OPEN/CLOSE et placez un disque DVD video dans le tiroir disque. </li>
<li>Appuyez sur le bouton OPEN/CLOSE pour fermer le tiroir disque. </li>
<li>Pendant la lecture, appuyez sur le bouton COPY. La copie démarre.</li>
</ol>
<p><img alt="" src="images/7ae06210fac2d430f716c938214b2f50873ca7677b062a1cdd4d170e917783d5.jpg" /></p>
<p><img alt="" src="images/5eeedb396ecafbad5a079e310b1a98ec70f42e01f5534bdd28256c739a191bbd.jpg" /></p>
<p>La fonction Copy (Copier) n'est pas disponible dans les cas suivants :</p>
<ul>
<li>Si vous tentez de copier dans une section d'un menu. </li>
<li>Si vous utilisez un disque NTSC ou un disque protégé contre la copie. </li>
<li>Si les titres sont différents dans le système de diffusion. </li>
<li>Le titre audio copié sur le disque dur sera enregistré au format AC3 2 canaux. </li>
<li>Concernant la sortie audio en mode DTS, la source audio ne sera pas copiee.</li>
</ul>
<h1 id="copier-un-mp3-jpeg-ou-divx">COPIER UN MP3, JPEG OU DIVX</h1>
<p>Spécifications de copie du contenu </p>
<table><tr><td>Contenu</td><td>HDD → DVD</td><td>DVD → HDD</td></tr><tr><td>MP3</td><td>Pris en charge</td><td>Pris en charge</td></tr><tr><td>JPEGphoto)</td><td>Pris en charge</td><td>Pris en charge</td></tr><tr><td>DivX</td><td>Pris en charge</td><td>Pris en charge</td></tr><tr><td>CD-DA</td><td>Arrêt pris en charge</td><td>Pris en charge</td></tr></table>
<ul>
<li>Disque(CD-R/ CD-DA/ CD-RW/ DVD-RAM/ DVD-R(Finaliser)/ DVD-RW(Finaliser)) HDD </li>
<li>HDD DVD-R, DVD-RW(V) </li>
<li>Si le disque est finalisé via Gestionnaire Disque, il est compatible avec un ordinateur en tant que disque au format standard.</li>
</ul>
<h1 id="copie-de-fichiers">Copie de fichiers</h1>
<ol>
<li>Insérez le disque au format JPEG, MP3 ou DivX dans le tiroir disque. </li>
<li>Appuyez sur le bouton OPEN/CLOSE pour fermer le tiroir disque. Attendez la disparition de LOAD sur l'affichage en façade. Vérifie que le disque dispose de suffisamment d'espace pour l'enregistrement. </li>
<li>Appuyez sur les boutons ▲▼ pour sélectionner Bibliothèque, puis sur le bouton OK ou ▷. </li>
<li>Appuyez sur les boutons ▲▼ pour sélectionner Musique, Photo ou DivX, puis appuyez sur le bouton OK ou ▷.</li>
</ol>
<p><img alt="" src="images/8b2fb40fd4b5e554d6e973577322a55d289b4e8b55608a5c59d0ce723555b35e.jpg" /></p>
<ol>
<li>Appuyez sur le bouton COPY. L'écran Copier s'affiche. </li>
<li>
<p>A l'aide des boutons ▲▼, sélectionné le fjichier MP3, Photo ou DivX que vous souhaitez copier, puis appuyez sur le bouton MARKER jusqu'à ce que le fjichier soit coché.</p>
</li>
<li>
<p>Si vous souhaitez ne pas copier l'une des entrées cochées, il vous suffit de selectionner l'entrée en question et d'appuyer sur le bouton MARKER jusqu'à ce qui elle ne soit plus cochée.</p>
</li>
<li>
<p>Appuyez sur les boutons pour selectionner le support cible; puis sur le bouton OK. </p>
</li>
<li>
<p>Vous pouvez creer un nouveau dossier en appuyant sur le bouton VERT (B).</p>
</li>
<li>
<p>Appuyez sur le bouton ROUGE (A) pour sélectionner Démarrer copie.</p>
</li>
</ol>
<p>Le message « Nombre d' éléments : x » s'affiche.</p>
<ol>
<li>Appuyez sur les boutons pour sélectionner Demarrage, puis sur le bouton OK.</li>
</ol>
<p>La copie des fichiers démarre.</p>
<ul>
<li>Pour annuler la copie en cours, appuyez sur le bouton EXIT (④).</li>
</ul>
<p><img alt="" src="images/ab71081692076866111bfd799fea6644c0c0695b2d8428e5c9b2029de1fa5760.jpg" /></p>
<p><img alt="" src="images/49d2ea33ce551388ab0b47113f245bd90b825051c47166c34df51375025c06d8.jpg" /></p>
<p><img alt="" src="images/75f22cea10d3152e901a1d0662840743b89c0834d53ccb7fb8dd47181f0d51eb.jpg" /></p>
<h1 id="copie-de-dossiers">Copie de dossiers</h1>
<ol>
<li>Insérez un disque (JPEG, MP3 ou DivX) dans le tiroir disque. </li>
<li>Appuyez sur les boutons ▲▼ pour sélectionner Bibliothèque, puis sur le bouton OK ou ▷. </li>
<li>Appuyez sur les boutons ▲▼ pour sélectionner Musique, Photo ou DivX, puis appuyez sur le bouton OK ou ▷. Les dossiers MP3, JPEG ou DivX s'afficht. </li>
<li>Appuyez sur le bouton COPY. L'écran Copier s'affiche. </li>
<li>
<p>A l'aide des boutons , sélectionné le dossier que vous souhaitez copier, puis appuyez sur le bouton MARKER jusqu'à ce que le dossier soit coché.</p>
</li>
<li>
<p>Si vous souhaitez ne pas copier l'un des dossiers cochés, il vous suffit de sélectionner le dossier en question et d'appuyer sur le bouton MARKER jusqu'à ce qu'il ne soit plus coché.</p>
</li>
<li>
<p>Appuyez sur les boutons pour selectionner le support cible; puis sur le bouton OK.</p>
</li>
<li>
<p>Vous pouvez creer un nouveau dossier en appuyant sur le bouton VERT (B).</p>
</li>
<li>
<p>Appuyez sur le bouton ROUGE (A) pour sélectionner Démarrer copie.<br />
Le message « Nombre d' éléments : x » s'affiche.</p>
</li>
<li>
<p>Appuyez sur les boutons pour sélectionner Démarriage, puis sur le bouton OK. La copie des fichiers démarre. Les sous-dossiers ainsi que les fichiers du dossier sélectionné sont copiés.</p>
</li>
<li>
<p>Pour annuler la copie en cours, appuyez sur le bouton EXIT (④).</p>
</li>
</ol>
<p><img alt="" src="images/c7a535aa3d7788561f5e675a5f109ffda7b8ffe98080d4e8b051d67f2f782317.jpg" /></p>
<p><img alt="" src="images/b73a6e2262f40c784c3f8a878d295201010c1a4a1779f45d3fcac93fd51dc8dd.jpg" /></p>
<p><img alt="" src="images/04065a2597f0ecb0209f1cee07f6ac6ff6a80618778d09a8a4bf9c958ed58734.jpg" /></p>
<p><img alt="" src="images/a748ab7629405944df68799dae4db5593384d25ac334da3611cea66398198621.jpg" /></p>
<ul>
<li>Si vous appuyez sur le bouton EXIT (①) durant la copie de dossiers, cette procédure sera annulée lorsque la copie du fidchier en cours sera terminée. </li>
<li>Vous pouvez procéder à la copie de 500 fischiers ou de 500 sous-dossiers dans un seul dossier. [MP3, JPEG, DivX] </li>
<li>Si vous souhaïze copier des fichiers, vous doivent creer un nouveau dossier avant de lancer la procédure de copie. </li>
<li>Vous ne pouv pas effectuer de copie dans le dossier racine sans creer de nouveau dossier. </li>
<li>Si le dossier racine compte déjà 500 dossiers, vous devez supprimer un ou plusieurs éléments avant de pouvoir creer un nouveau dossier. </li>
<li>Les taillés du fichier original sur le disque et de sa copie sur le disque dur peuvent varier légarement en raison du système de fichiers. </li>
<li>Si vous ave coché des entrées dans le dossier actuel et que vous ouvrez un autre dossier, ces entrées sont automatiquement découvertes et supprimées de la liste de sélection.</li>
</ul>
<p><img alt="" src="images/7b60f31569eda420656e267b3a708093b8a87265673e4ac4863187e994293ea7.jpg" /></p>
<h1 id="modification-du-nom-du-fichier-musicalphotodivx">MODIFICATION DU NOM DU FICHIER MUSICAL/PHOTO/DIVX</h1>
<p><img alt="" src="images/b33f85963ab9276286f7704d3abb9e4d40118765f6f8ac2d2658a62fe8ae612c.jpg" /></p>
<p>Vou pouvez renommer un fichier musical, photo ou DivX copie sur le disque dur.</p>
<ol>
<li>Appuyez sur les boutons ▲▼ pour sélectionner l'entrée que vous souhaitez renomer, puis appuyez sur le bouton ROUGE (A). </li>
<li>
<p>Appuyez sur les boutons ▲▼ pour sélectionner Renommer puis sur le bouton OK ou ▷. L'écran Renommer s'affiche.</p>
</li>
<li>
<p>Sélectionnez les caractères de votre besoin à l'aide des boutons ▲▼▲▶, puis appuyez sur le bouton OK.</p>
</li>
<li>
<p>Espace Libre (bouton ROUGE (A)): supprime le caractère précédent et fait reculer le curseur d'une position. </p>
</li>
<li>Espace (bouton VERT (B)): ajoute un espace et déplace le curseur vers l'avant (vers la droite). </li>
<li>Effacer (bouton JAUNE (C)): supprime tous les caractères saisis. </li>
<li>
<p>Enreg. (bouton bleu (D)): enregistrre les caractères saisis.</p>
</li>
<li>
<p>Appuyez sur le bouton BLEU (D) pour sélectionner Enreg.<br />
Le nouveau nom de filchier s'affiche sur l'entrée sélectionnée.</p>
</li>
</ol>
<p><img alt="" src="images/5bdb76e7af04a3ee3c18baa61a578da17f1d3cb1942bdc43c402d76333c6c59d.jpg" /></p>
<p><img alt="" src="images/2cd73c153dcffbe2bb05da4cf3e4e384fd5f9084e3e073d9f8ae3e2ea101504d.jpg" /></p>
<p><img alt="" src="images/b2adee573bdfc9aa596ae859f4bd832e0aef493a2adbe916efd6d086a03d9f5f.jpg" /></p>
<h1 id="modification-du-nom-du-disque">Modification du nom du disque</h1>
<p><img alt="" src="images/f7b29474ae4bfc29fbe2ef5150062b7bac29bed87f781d6c3a76981c455c0286.jpg" /></p>
<p><img alt="" src="images/9d0b7f6fa12a64ec75c37a249b7309caf214c54d4426cd6ffb2a8ace6a97e0a0.jpg" /></p>
<p><img alt="" src="images/d937ee6a5b5ecf97ed157f2ac419ed833026f0ebe1378ff3dd0008941149b086.jpg" /></p>
<p>Procedez comme suit pour donner un nom à un disque.</p>
<ol>
<li>Appuyez sur le bouton MENU, appareil en mode Arrêt. </li>
<li>Appuyez sur les boutons ▲▼ pour sélectionnner Gestionnaire de Disque, puis appuyez sur le bouton OK ou ▷. </li>
<li>Appuyez sur les boutons pour sélectionner Renommer, puis appuyez sur le bouton OK.</li>
</ol>
<p>L'écran Renommer s'affiche.</p>
<ol>
<li>Sélectionnez les caractères nécessaires à l'aide des boutons <br />
0K. </li>
<li>Appuyez sur le bouton BLEU (D) pour selectionner Enreg.</li>
</ol>
<p>Un nom est donné au disque.</p>
<p><img alt="" src="images/a55124ea22f4d31eb38dfd1d70cfc435aeb25f8ba4547f9fecd68c8f971f6a3f.jpg" /></p>
<p>Il est possible que vous deviez effacer la protection du disque avant de commencer l'edition. <br />
En fonction du type de disque, I'écran affiché peut différer.</p>
<p><img alt="" src="images/37ba5c72d43dd14fcd4d10720aa1c33516045787cbeb572792ac437f12c63417.jpg" /></p>
<p><img alt="" src="images/04b57fdf1061711556153975153db508f3ac9e9523c739922160f783f92d0411.jpg" /></p>
<h1 id="protection-dun-disque">Protection d'un disque</h1>
<p><img alt="" src="images/9968c715bfc721881e2f01a5f8c3a7e83130332000066c8d2d4a320213ed5ed7.jpg" /></p>
<p><img alt="" src="images/4ace917aa1af5f3b3f62b7746a7bffc261ed03738004448ba14113db16d8d65c.jpg" /></p>
<p><img alt="" src="images/6043f8923a09c73b485246544d8a5dd292eaa2e3b4577c5d1927e1710c841923.jpg" /></p>
<p>Cette protection vous permet de protégger vos disques contre le formatage ou la suppression suite à des opérations involontaires.</p>
<ol>
<li>Appuyez sur le bouton MENU, appareil en mode Arrêt. </li>
<li>Appuyez sur les boutons ▲▼ pour sélectionner Gestionnaire de Disque, puis appuyez sur le bouton OK ou ▷. </li>
<li>Appuyez sur les boutons pour Sélectionner Protection, puis appuyez sur le bouton OK. </li>
<li>Appuyez sur les boutons pour Sélectionner Marche, puis appuyez sur le bouton OK.</li>
</ol>
<p><img alt="" src="images/f45bf4ec1d4605fe8a00c585c7aa47e1fe58f7ad2fed5c43a5c0e7d13f59fa60.jpg" /></p>
<p><img alt="" src="images/15ba694618ebb4d6cc395e9ec47de3cc46933604c9488859eb4db292ff6c7292.jpg" /></p>
<ol>
<li>Appuyez sur le bouton MENU, appareil en mode Arrêt. </li>
<li>Appuyez sur les boutons ▲▼ pour sélectionnner Gestionnaire de Disque, puis appuyez sur le bouton OK ou ▷. </li>
<li>
<p>Appuyez sur les boutons ↓▶ pour Sélectionner Supprimer tout, puis appuyez sur le bouton OK.</p>
</li>
<li>
<p>Vous serez sollicité par le message de confirmation "Souhaitez-vous supprimer toutes les listes de titres?". </p>
</li>
<li>En présence d'une entrée protégée : La fonction Supprimer toutes les listes de titres ne fonctionne pas. Néanmoins, s'il y a un titre contenant une image fixe, cette fonction ne sera pas opérationnelle. Si vous souhaitez supprimer une entrée protégée, désactive sa protection dans l'élement Verrouiller. </li>
<li>Lorsque la protection d'un DVD-RAM/-RW est utilisée, les données ne peuvent pas etre suprimées du disque. </li>
<li>Si vous sélectionnez Oui, vous serez sollicité par le message de confirmation "Toutes les listes de lecture vont être supprimées. Souhaitez-vous continuer?"</li>
</ol>
<p><img alt="" src="images/b78556a537f999cc43850f55ab03d5b2e844eca5c26bb76046352a8652d41908.jpg" /></p>
<p><img alt="" src="images/31dd3227b66b7adc8fc31d7034360fc0f8d75a30b11b002d9a0ebaa29c5ffafe.jpg" /></p>
<ol>
<li>Appuyez sur les boutons pour sélectionner Oui, puis appuyez sur le bouton OK. Toutes les listes de titres sont supprimées.</li>
</ol>
<h1 id="suppression-de-tous-les-titresdes-fichiers-de-divxdes-fichiers-de-musiquedes-fichiers-de-photos">Suppression de tous les titres/des fichiers de DivX/des fichiers de musique/des fichiers de photos</h1>
<ol>
<li>Appuyez sur le bouton MENU, appareil en mode Arret. </li>
<li>Appuyez sur les boutons ▲▼ pour sélectionner Gestionnaire de Disque, puis appuyez sur le bouton OK ou ▷. </li>
<li>
<p>Appuyez sur les boutons pour selectionner Supprimer, puis appuyez sur le bouton OK.</p>
</li>
<li>
<p>En présence d'une entrée protégée : La fonction Supprimer toutes les listes de titres ne fonctionne pas. Néanmoins, s'il y a un titre contenant une image fixe, cette fonction ne sera pas opérationnelle. Si vous souhaitez supprimer une entrée protégée, désactive sa protection dans l'élement Verrouiller.</p>
</li>
<li>
<p>Appuyez sur les boutons pour selectionner Titre, DivX, Musique ou Photo, puis sur le bouton OK. </p>
</li>
<li>Appuyez sur les boutons pour sélectionner Oui, puis appuyez sur le bouton OK.</li>
</ol>
<p>Toutes les listes de titres, de fichiers DivX, de musique ou de photos sont supprimées.</p>
<p><img alt="" src="images/1d4c43cc4a1916d7ee21c5334f6a82f9ed8ae664303a0845a04089ca04890647.jpg" /></p>
<p><img alt="" src="images/5e378126ca15c2352e8a7b59e36f6caf2283c99356180f624bd890d3a5fb4572.jpg" /></p>
<p><img alt="" src="images/69b4ef8828ba0518bf7fc0f3ff7d4b878e0e0184d83e8c039d1a4fb9e95b5a0d.jpg" /></p>
<h1 id="formatage-dun-disque">Formatage d'un disque</h1>
<p><img alt="" src="images/cbd845db5a9469c660b5ddad32b9a75953fb603ebe48bad1491f038d4364f762.jpg" /></p>
<p><img alt="" src="images/b02e0b91402340e2f70bddeb86b5151414703d8f12de1a966c18c037aa776345.jpg" /></p>
<p><img alt="" src="images/a7c587d69c452ead38c2738ffffff5d88529c8f615d43d1d154cb4f325b0176d.jpg" /></p>
<p>Pour formater un disque, respectez ces instructions.</p>
<p>La protection du disque doit également être supprimée.</p>
<ol>
<li>Appuyez sur le bouton MENU, appareil en mode Arrêt. </li>
<li>Appuyez sur les boutons ▲▼ pour sélectionner Gestionnaire de Disque, puis appuyez sur le bouton OK ou ▷. </li>
<li>Appuyez sur les boutons pour selectionner Format, puis appuyez sur le bouton OK.</li>
</ol>
<h1 id="disque-dur-dvd-ram">Disque dur / DVD-RAM</h1>
<ul>
<li>Vous serez sollicité par le message de confirmation « Média actuel : *** Souhaitez-vous formater? » </li>
<li>Si vous sélectionné Oui, vous serez sollicité par le message de confirmation « Toutes les données sont doivent suprimées. Souhaitez-vous continuer? »</li>
</ul>
<h1 id="dvd-rw-2">DVD-RW</h1>
<ul>
<li>Vous serez sollicité par le message de confirmation "Choisissez le format d'enregistrement du DVD-RW." </li>
<li>
<p>Si vous sélectionné le type de format souhaité, le message de confirmation « Toutes les données seront intétre suprimées. Souhaitez-vous continuer ? » s'affiche.</p>
</li>
<li>
<p>Appuyez sur les boutons pour selectionner Oui, puis appuyez sur le bouton OK. Le disque est formaté.</p>
</li>
</ul>
<p><img alt="" src="images/04478963f688c23ffd79b60c208ddc082b5f3bba47b85af79a145770febe9f4f.jpg" /></p>
<p>Les DVD-VR et les DVD-V sont définis en fonction de leur format d'enregistrement.</p>
<table><tr><td></td><td>DVD-VR</td><td>DVD-V</td></tr><tr><td>DISQUE</td><td>DVD-RAM/-RW</td><td>DVD-RW/DVD-R</td></tr></table>
<h1 id="finalisation-dun-disque">Finalisation d'un disque</h1>
<p><img alt="" src="images/caa5e2f08f2b128f2b80f394582004db785344a09a4e04ba1e5977bbe15ae8f1.jpg" /></p>
<p><img alt="" src="images/b002d167e83ba56b0b5223bd33cff1ed7c4d21edaeb08f80520e3e5c8fec156e.jpg" /></p>
<p><img alt="" src="images/32375ba0d6fc89875e9f5d2bfcc6399710bbbe40e7f072ddd6a09486b5b7bd06.jpg" /></p>
<p><img alt="" src="images/f848242ea8b0b29f91280a2344532dfd5294396fec68d7dfc1d037f7c522a059.jpg" /></p>
<p><img alt="" src="images/dcc9f1ff565f9b86c30f18e9239ca06ea662445750bcda97a95721f69dd71513.jpg" /></p>
<p><img alt="" src="images/ef0aba9978c3faacd0b7990dce9b6a8f509db2e6aeb5dbfe8ad44825926dd16f.jpg" /></p>
<p><img alt="" src="images/badffd49a9fb32d2459f84413421113723f281449b7a84207fe27fb03c38acdd.jpg" /></p>
<p>Après avoir enregistré les titres sur un disque DVD-RW/DVD-R avec votre GRAVEUR DE DVD AVEC DISQUE DUR, vous doivent finaliser le disque avant de pouvoir le dire sur d'autres appareils.</p>
<ol>
<li>Appuyez sur le bouton MENU, appareil en mode Arrêt. </li>
<li>Appuyez sur les boutons ▲▼ pour sélectionner Gestionnaire de Disque, puis appuyez sur le bouton OK ou ▷. </li>
<li>Appuyez sur les boutons ▲▼▲▶ pour Sélectionner Finaliser, puis appuyez sur le bouton OK.</li>
</ol>
<p>Vou serez sollicité par le message de confirmation « Souhaitez-vous finaliser le disque? »</p>
<ol>
<li>Appuyez sur les boutons pour sélectionner Oui, puis appuyez sur le bouton OK.</li>
</ol>
<p>Le message « Le disque va être finalisé. Souhaitez-vous continuer? » s'affiche.</p>
<p><img alt="" src="images/2f620b40f3a9a1e343eef96979baf1a975be4040fb0d74ad40df6cd177a1f101.jpg" /></p>
<ol>
<li>Appuyez sur les boutons pour selectionner Oui, puis appuyez sur le bouton OK.</li>
</ol>
<p>Le disque est finalisé.</p>
<p><img alt="" src="images/ae8e178929291b3e0834df19bf54b8e426f5e1f970b6a7b6f753fd226a75c17d.jpg" /></p>
<ul>
<li>Une fois le disque finalisé, vous ne pouvez plus supprimer des entrées dans la liste d'enregistrements. <br />
Une fois finalise, le DVD-R/RW (mode V) fonctionne de la meme maniere qu'un DVD-Video. <br />
En fonction du type de disque, l'écran affché peut différer. <br />
La durée de finalisation peut différer en fonction du volume de données enregistré sur le disque. </li>
<li>Les données du disque seront endommagées si legraveur est eteint pendant le processus de finalisation. </li>
<li>Vous pouvez finaliser le disque automatiquement à l'aide de la fonction Enregistrement EZ. (reportez-vous à la page 39)</li>
</ul>
<h1 id="arrêt-finalisation-dun-disque-mode-vvr">Arrêt finalisation d'un disque (mode V/VR)</h1>
<p><img alt="" src="images/204ef5152aa49ad83b2f726d95cc9b0f09cd23ea2fc76beb74ff6dc03d4ac910.jpg" /></p>
<ol>
<li>Appuyez sur le bouton MENU, apparéil en mode Arêt. </li>
<li>Appuyez sur les boutons ▲▼ pour sélectionnner Gestionnaire de Disque, puis appuyez sur le bouton OK ou ▷. </li>
<li>Appuyez sur les boutons pour selectionner N. finaliser, puis appuyez sur le bouton OK.<br />
Vous serez sollicité par le message de confirmation "Souhaitez-vous ne pas finaliser le disque?" </li>
<li>Appuyez sur les boutons pour selectionner Oui, puis appuyez sur le bouton OK.</li>
</ol>
<p><img alt="" src="images/68c5a513667be6b325adadf40934643133078778adf41771b2a9b1217fa6a469.jpg" /></p>
<p>Le message « Le disque ne sera pas finalisé. Souhaitez-vous continuer? » s'affiche.</p>
<ol>
<li>Appuyez sur les boutons pour selectionner Oui, puis appuyez sur le bouton OK. Le disque n'est pas finalisé.</li>
</ol>
<p><img alt="" src="images/f94c48e1e34cce5d543c9f3b0a21f70be871010d795c660479c377dd233a6ccc.jpg" /></p>
<ul>
<li>Un DVD-RW peut être finalisé ou non finalisé en mode video.</li>
</ul>
<table><tr><td></td><td>Finalisé</td><td>Arrêt finalisé</td></tr><tr><td>Marque</td><td>DVD-Video(RW)</td><td>DVD-RW(V)</td></tr><tr><td>Fonctionnement</td><td>Identique à celui d'un DVD-Viséo</td><td>Des enregistrements, une protection et une suppression complémentaires sont possibles.</td></tr></table>
<ul>
<li>Un DVD-RW peut être finalisé ou non finalisé en mode VR.</li>
</ul>
<table><tr><td></td><td>Finalisé</td><td>Arrêt finalisé</td></tr><tr><td>Marque</td><td>DVD-RW(VR:F)</td><td>DVD-RW(VR)</td></tr><tr><td>Fonctionnement</td><td>Des enregistements une suppression, une modification et une protection complémentaires sont possibles.</td><td>Des enregistements, unesuppression une modification et une protection complémentaires sont impossibles.</td></tr></table>
<h1 id="depannage">DEPANNAGE</h1>
<p>Si vous appeareil connait des dysfonctionnements, passez en revue les points de contrôle avant de contacter un centre de service après-vente agree Samsung.</p>
<table><tr><td>PROBLÈME</td><td>EXPLICATION/SOLUTION</td></tr><tr><td>L'entrée s'affiche pendant un instant à la mise sous tension.</td><td>Le GRAVEUR DE DVD AVEC DISQUE DUR nécessite quelques minutes pour s'initialiser et l'entrée s'affiche durant environ 10 secondes après la mise sous tension.</td></tr><tr><td>Impossible d'enregistrer des programmes télévisés.</td><td>Vérifiez si le cordon d'alimentation est correctement branché dans la prise d'alimentation.Avez-vous correctement régle les paramètres des chaînes sur votre GRAVEUR DE DVD AVEC DISQUE DUR?Vérifiez l'espace libre sur votre Disque dur/DVD-RAM/-RW/-R.</td></tr><tr><td>J'accue sur le bouton REC mais je n'obtiens rien en réponse.</td><td>Vérifiez les types de disques disponibles. (reportez-vous à la page 60)Si un programme est protégé contre la copie, il ne peut pas être enregistré.</td></tr><tr><td>Impossible de dire le disque.</td><td>Vérifiez si le disque est inséré correctement face étiquétée vers le haut.Vérifiez le code régional du disque DVD.Ce GRAVEUR DE DVD AVEC DISQUE DUR ne lit pas certains types de disques.(Reportez-vous aux pages 7, 40)</td></tr><tr><td>L'icône ⊙ apparait à l'écran.</td><td>You ne pouze pas utiliser cette opération ou cette fonction du fait de l'une des raisons suivantes:(1) Notre disque DVD la restreint.(2) Notre disque DVD ne prend pas en charge cette fonction (par exemple : les angles)(3) La fonction n'est pas disponible pour le moment.(4) Vous avez demandé un titre, un chapitre ou une heures de balayage hors limites.</td></tr><tr><td>Les paramètres du mode lecture sont différents des paramètres configurés dans le menu Paramètres.</td><td>Le disque ne prend pas en charge toutes les fonctions sélectionnées.Dans ce cas, certains paramètres configurés dans le menu des paramètres peuvent ne pas fonctionner correctement.</td></tr><tr><td>Impossible de changer le format d'image.</td><td>Le format d'image est fixe pour les disques DVD. (Reportez-vous aux page 35)</td></tr><tr><td>La fonction d'angle ne fonctionne pas en cours de lecture d'un disque DVD.</td><td>La fonction angle est disponible uniquement lorsque le disque contient des images prises selon différents angles de vue.</td></tr><tr><td>La langue audio et/ou les sous-titres ne sont pas activés selon ma sélection</td><td>La langue audio et la langue de sous-titrage sont propres au disque.Seules les langues audio et de sous-titrage containes dans le disque DVD sont disponibles et affichées dans le menu du disque.</td></tr><tr><td>Impossible de copier le titre ou le fjichier dans un autre mode.</td><td>Reportez-vous au "Sφécifications de copie du contenu" page 6 pour vérifier si la copie est prise en charge.Reportez-vous à la section "Compatibilité du mode V" en page 39 pour vérifier si la copie est prise en charge.</td></tr><tr><td>Le disque tourne, mais aucune image ou des images de mauvaise qualité s'affichient.</td><td>Assurez-vous que les paramètres Video sont régliés correctement. (Reportez-vous aux pages 35 et 36)Vérifiez si le disque est endommagé ou si des corps étrangers se sont déposés sur le disque.Certains disques d'une qualité médiocre peuvent ne pas être lus correctement.Si la scène passé de l'ombre à la lumière rapidement, l'écran peut temporairement trembler verticalément, mais il ne s'agit pas d'un défaut.</td></tr><tr><td>Absence de son.</td><td>• Etes-vous en train de visualiser un programme en mode lent ou saut?
Si vous lisez un programme à une vitesse autre que la vitesse normale, vous n'entendrez aucun son. (hormis pour la recherche vers l'avant (X 2) du disque).
• Vérifiez les branchements et les paramètres. (Reportez-vous aux pages 25 et 26, 34 et 35)
• Vérifiez si le disque est endommagé. Nettoyez le disque, si nécessaire.
• Vérifiez si le disque est inséré correctement face étiquétée vers le haut.</td></tr><tr><td>Aucune sortie audio.</td><td>Vérifiez si vous avez sélectionné les options de sortie numérique correctes dans le menu Options de sortie audio. (Reportez-vous à la page 34 et 35)</td></tr><tr><td>Le voirant de la miniterie clignote</td><td>• Vérifiez qu'il y a suffisamment d'espace sur le disque ou le disque dur pour effectuer l'enregistrement.
• Vérifiez si le disque actuel peut être enregistré ou non.
Assurez-vous de vérifier cela avant l'heure de départ de l'enregistrement.</td></tr><tr><td>L'enregistrementprogrammé ne fonctionne pas correctement.</td><td>• Vérifiez à nouveau les paramètres d'houre d'enregistrement et d'houre de fin.
• L'enregistrement sera annulé en cas de coupure de courant ou autre cause d'arrêt similaire durant l'enregistrement.</td></tr><tr><td>La télécommande ne fonctionne pas.</td><td>• Dirigez la télécommande vers le capteur de télécommande sur votre GRAVEUR DE DVD AVEC DISQUE DUR. Choisissez une distance correcte. Eliminez les obstacles entre votre GRAVEUR DE DVD AVEC DISQUE DUR et la télécommande.
• Vérifiez si les piles sont usées.
• Vérifiez le bouton de sélection TV/DVD.
• Vérifiez si le bouton de commande du téléviseur est sélectionné ou non.</td></tr><tr><td>J'ai oublé mon mot de passer pour le contrôle parental.</td><td>Maintenez les boutons PLAY/PAUSE (►II) situés en façade enforcés pendant plus de 10 secondes, sans disque dans l'apparil. Tous les paramètres y compris le mot de passer sont réinitialisés sur les réglages d'usine. Ne l'utilise qu'en cas d'absolu nécessité. (Notez que cette fonction n'est possible que lorsqu'aucun disque n'est inséré.)</td></tr><tr><td>Est-il possible de changer un signal de sous-titrage et un signal audio sur un disque enregistré?</td><td>Un disque enregistré est lu uniquement avec le signal de sous-titrage et le signal audio sélectionnés lors de l'enregistrement.</td></tr><tr><td>Autres problèmes.</td><td>• Lisez la table des matérières, puis localisez et lisze le chapitre correspondant à votre problème, respectez les instructions fournies.
• Débranchez et branchez votre GRAVEUR DE DVD AVEC DISQUE DUR.
• Si le problème persististe, contactez le centre de service après-vente Samsung le plus proche.</td></tr></table>
<h1 id="caracteristiques">CARACTERISTIQUES</h1>
<table><tr><td rowspan="6">Généralités</td><td colspan="2">Alimentation</td><td>AC 220~240 V, 50 Hz</td></tr><tr><td colspan="2">Consommation d'énergie</td><td>30 Watts / 2,2 Watts (en veille)</td></tr><tr><td colspan="2">Poids</td><td>3,8 Kg</td></tr><tr><td colspan="2">Dimensions</td><td>430 mm(W) x 300 mm(D) x 55 mm(H)</td></tr><tr><td colspan="2">Température d'exploitation</td><td>+5 °C à +35 °C</td></tr><tr><td colspan="2">Autres exigences</td><td>Maintenez l'apparéil de niveau lors du fonctionnement. Humidité de fonctionnement inférieure à 75%</td></tr><tr><td rowspan="4">Entrée</td><td colspan="2">Vidéo</td><td>Vidéo composite: 1,0 V p-p avec une charge de 75Ω sync. négative</td></tr><tr><td colspan="2">Audio</td><td>Niveau d'entrée audio maxi.: 2 Vrms</td></tr><tr><td colspan="2">Canaux recevables</td><td>PAL-B/G, SECAM-L/L'</td></tr><tr><td>Prise Périitel</td><td>AV2 (Périitel Ext)</td><td>Vidéo: Composite, RVB Audio: analogue</td></tr><tr><td rowspan="5">Sortie</td><td rowspan="2" colspan="2">Audio</td><td>1 prises de sortie analogue</td></tr><tr><td>Sortie audio numérique coaxiale</td></tr><tr><td rowspan="2" colspan="2">Vidéo</td><td>Vidéo composite: 1 prise de sortie vidéo</td></tr><tr><td>1 sortie composant (Y: 1,0Vp-p, Pb: 0,70Vp-p, Pr: 0,70Vp-p at 75Ω load)</td></tr><tr><td>Prise Périitel</td><td>AV1 (Périitel TV)</td><td>Vidéo: Composite, RVB Audio: analogue</td></tr><tr><td rowspan="4">Enregistrement</td><td colspan="2">Format de compression d'image</td><td>MPEG-II</td></tr><tr><td colspan="2">Format de compression audio</td><td>Dolby Digital 2 canaux/256Kbps, MPEG II</td></tr><tr><td colspan="2">Qualité d'enregistrement</td><td>XP (environ 8,5Mbps), SP (environ 4,5 Mbps), LP (environ 2,5 Mbps), EP (environ 1,6Mbps ou environ 1,2Mbps)</td></tr><tr><td colspan="2">Réponse de la fréquence audio</td><td>20 Hz~20 kHz</td></tr><tr><td>Capacité du disque dur</td><td colspan="2">DVD-HR770</td><td>160 Go</td></tr></table>
<h1 id="sortie-audio">Sortie audio</h1>
<p>Pour les disques DVD, des signaux audio enregistrés à une fréquence d'échantillonnage de 96 kHz sont convertis et transmis vers une sortie numérique à 48 kHz.</p>
<table><tr><td>Type de disque</td><td>DVD</td><td>AUDIO CD (CD-DA)</td></tr><tr><td>Sortie audio analogique</td><td>48 / 96 kHz</td><td>44,1 kHz</td></tr><tr><td>Sortie audio numérique</td><td>48 kHz</td><td>44,1 kHz</td></tr></table>
<p>Chers clients, nous vous remercions d'avoir acheté un produit SAMSUNG.</p>
<p>La presente carte à pour objet de préciser les modalités de la garantie que la société Samsung Electronics France vous offèrment des garanties qui vous sont déjà offertes par le revendeur à qui vous aze acheté votre produit, et des garanties prévues par la loi (notamment la garantie des vices cachés prévue aux articles 1641 et suivants du Code civil, et la garantie légale de conformité prévue aux articles L.211-1 et suivants du Code de la consommation).</p>
<p>Aussi, si vous rencontres un problème avec votre produit SAMSUNG, nous vous invitons :</p>
<ul>
<li>soit à contacter directement notre service consommateur :</li>
</ul>
<p>Samsung Service Consommateurs</p>
<p>66 rue des Vanesses</p>
<p>BP 50116 - Villepinte - 95950 ROISSY cedex</p>
<p>France</p>
<p>TEL: 08 25 08 65 65 ou 32 60 dites SAMSUNG (€ 0,15/min),</p>
<p>Fax:0148630638</p>
<p>ou encore sur notre site Internet à l'adresse suivante :</p>
<p>www.samsung.com/fr rubrique Support SAV;</p>
<ul>
<li>soit à vous adresser au revendeur à qui vous l'avez acheté.</li>
</ul>
<p>ETENDUE DE LA GARANTIE DE SAMSUNG ELECTRONICS FRANCE</p>
<p>Samsung Electronics France garantit le produit contre tout défaut de matière ou de fabrication (pièces et main d'oeuvre) pendant le déali de 1 (un) an pour les caméscopes et de 1(an) pour les MP3.</p>
<p>La période de garantie commence le jour ou vous avez acheté l'appareil au revendeur.</p>
<p>En cas de défaut de matière ou de fabrication, et à condition de respecter les modalités indiquées ci-dessous, Samsung Electronics France s'engage à réparer ou faire réparer le produit sous garantie, ou à le remplaçer si la réparation n'est pas possible ou apparait disproportionnée.</p>
<p>Les réparations ou les échanges de produits sous garantie n'ont pas pour effet de prolonger la durée initiale de la garantie.</p>
<ul>
<li>MODALITES</li>
</ul>
<p>Si le produit que vous ave achetié s'avéré défecteurs pendant la période de garantie du fait d'un défaut visé ci-dessus, adressez vous à notre service consommateurs à l'adresse indiquée ci-dessus.</p>
<p>Celui-ci vous expliquera les démarches à effectuer ; étant d'ores et déjà précisé que vous aurez besoin de toute facture d'achat, et de la présente carte de garantie dument remplie.</p>
<p>Le produit qui nous sera returné fera alors l'objet d'un contrôle par notre centre de réparation/agree et sera alors soit réparé gratuitemment, soit échangé si la réparation n'est pas possible, et vous sera returné sans frais.</p>
<p>(Vous conservez bien sur la possibilité de vous adresser au revendeur à qui vous avez acheté votre produit.)</p>
<p>EXCLUSIONS</p>
<p>La presente garantie ne couvre pas les produits consommables tels que les piles, les ampoules, les cartouches d'encre, etc.</p>
<p>Par ailleurs, la garantie ne pourrait pas jouer :</p>
<ul>
<li>en cas de casse du produit par l'utilisateur ; </li>
<li>si le défaut est causé par une utilisation du produit non conforme à la notice d'utilisation ; </li>
<li>dans le cas ou le produit aurait eté modifié, démoné ou réparé par une personne autre que Samsung Electronics France ou ses centres de service agrées, </li>
<li>pour les produits dont le nombre de série a été retire; </li>
<li>lorsqu'un équipement auxiliaire non fourni ou non commande par Samsung est fixé sur le produit ou utilisé en conjunction avec celui-ci ; </li>
<li>au cas où la facture d'achat et/ou la carte de garantie ne seraient pas returnées ; </li>
<li>au cas où la carte de garantie ne serait pas dument remplie".</li>
</ul>
<h1 id="comment-contacter-samsung-dans-le-monde">Comment contacter Samsung dans le monde</h1>
<p>Si vous avez des suggestions ou des questions concernant les produits Samsung, veuillez contacter le Service Consommateurs Samsung.</p>
<table><tr><td>Region</td><td>Country</td><td>Customer Care Center</td><td>Web Site</td></tr><tr><td rowspan="3">North America</td><td>CANADA</td><td>1-800-SAMSUNG(726-7864)</td><td>www.samsung.com/ca</td></tr><tr><td>MEXICO</td><td>01-800-SAMSUNG(726-7864)</td><td>www.samsung.com</td></tr><tr><td>U.S.A</td><td>1-800-SAMSUNG(726-7864)</td><td>www.samsung.com</td></tr><tr><td rowspan="16">Latin America</td><td>ARGENTINE</td><td>0800-333-3733</td><td>www.samsung.com/ar</td></tr><tr><td>BRAZIL</td><td>0800-124-421, 4004-0000</td><td>www.samsung.com</td></tr><tr><td>CHILE</td><td>800-SAMSUNG(726-7864)</td><td>www.samsung.com/cl</td></tr><tr><td>NICARAGUA</td><td>00-1800-5077267</td><td></td></tr><tr><td>HONDURAS</td><td>800-7919267</td><td></td></tr><tr><td>COSTA RICA</td><td>0-800-507-7267</td><td>www.samsung.com/latin</td></tr><tr><td>ECUADOR</td><td>1-800-10-7267</td><td>www.samsung.com/latin</td></tr><tr><td>EL SALVADOR</td><td>800-6225</td><td>www.samsung.com/latin</td></tr><tr><td>GUATEMALA</td><td>1-800-299-0013</td><td>www.samsung.com/latin</td></tr><tr><td>JAMAICA</td><td>1-800-234-7267</td><td>www.samsung.com/latin</td></tr><tr><td>PANAMA</td><td>800-7267</td><td>www.samsung.com/latin</td></tr><tr><td>PUERTO RICO</td><td>1-800-682-3180</td><td>www.samsung.com/latin</td></tr><tr><td>REP. DOMINICA</td><td>1-800-751-2676</td><td>www.samsung.com/latin</td></tr><tr><td>TRINIDAD & TOBAGO</td><td>1-800-SAMSUNG(726-7864)</td><td>www.samsung.com/latin</td></tr><tr><td>VENEZUELA</td><td>0-800-100-5303</td><td>www.samsung.com/latin</td></tr><tr><td>COLOMBIA</td><td>01-8000112112</td><td>www.samsung.com.co</td></tr><tr><td rowspan="20">Europe</td><td>BELGIUM</td><td>0032 (0)2 201 24 18</td><td>www.samsung.com/be</td></tr><tr><td>CZECH REPUBLIC</td><td>844 000 844 Distributor pro Českou republika: Samsung Zrt., Česka organizačné složka Vyskočilova 4, 14000 Praha 4</td><td>www.samsung.com/cz</td></tr><tr><td>DENMARK</td><td>70 70 19 70</td><td>www.samsung.com/dk</td></tr><tr><td>FINLAND</td><td>030-6227 515</td><td>www.samsung.com/fi</td></tr><tr><td>FRANCE</td><td>3260 SAMSUNG (€ 0,15/Min), 08 25 08 65 65 (€ 0,15/Min)</td><td>www.samsung.com</td></tr><tr><td>GERMANY</td><td>01805 - SAMSUNG(726-7864) (€ 0,14/Min)</td><td>www.samsung.com</td></tr><tr><td>HUNGARY</td><td>06-80-SAMSUNG(726-7864)</td><td>www.samsung.com</td></tr><tr><td>ITALIA</td><td>800-SAMSUNG(726-7864)</td><td>www.samsung.com</td></tr><tr><td>LUXEMBURG</td><td>0035 (0)2 261 03 710</td><td>www.samsung.com/be</td></tr><tr><td>NETHERLANDS</td><td>0900-SAMSUNG(726-7864) (€ 0,10/Min)</td><td>www.samsung.com/nl</td></tr><tr><td>NORWAY</td><td>815-56 480</td><td>www.samsung.com/no</td></tr><tr><td>POLAND</td><td>0 801 801 881 , 022-607-93-33</td><td>www.samsung.com/pl</td></tr><tr><td>PORTUGAL</td><td>80820-SAMSUNG(726-7864)</td><td>www.samsung.com/pt</td></tr><tr><td>SLOVAKIA</td><td>0800-SAMSUNG(726-7864)</td><td>www.samsung.com/sk</td></tr><tr><td>SPAIN</td><td>902 10 11 30</td><td>www.samsung.com</td></tr><tr><td>SWEDEN</td><td>0771-400 200</td><td>www.samsung.com/se</td></tr><tr><td>U.K</td><td>0845 SAMSUNG (7267864)</td><td>www.samsung.com</td></tr><tr><td>EIRE</td><td>0818 717 100</td><td>www.samsung.com/e</td></tr><tr><td>AUSTRIA</td><td>0800-SAMSUNG(726-7864)</td><td>www.samsung.com/at</td></tr><tr><td>SWITZERLAND</td><td>0800-SAMSUNG(726-7864)</td><td>www.samsung.com/ch</td></tr><tr><td rowspan="9">CIS</td><td>RUSSIA</td><td>8-800-555-55-55</td><td>www.samsung.com</td></tr><tr><td>KAZAHSTAN</td><td>8-10-800-500-55-500</td><td>www.samsung.kz</td></tr><tr><td>UZBEKISTAN</td><td>8-10-800-500-55-500</td><td>www.samsung.uz</td></tr><tr><td>KYRGYZSTAN</td><td>00-800-500-55-500</td><td></td></tr><tr><td>TADJIKISTAN</td><td>8-10-800-500-55-500</td><td></td></tr><tr><td>UKRAINE</td><td>8-800-502-0000</td><td>www.samsung.com</td></tr><tr><td>LITHUANIA</td><td>8-800-77777</td><td>www.samsung.li</td></tr><tr><td>LATvia</td><td>800-7267</td><td>www.samsung.com/lv</td></tr><tr><td>ESTONIA</td><td>800-7267</td><td>www.samsung.ee</td></tr><tr><td rowspan="13">Asia Pacific</td><td>AUSTRALIA</td><td>1300 362 603</td><td>www.samsung.com</td></tr><tr><td>NEW ZEALAND</td><td>0800SAMSUNG(726-7864)</td><td>www.samsung.com/nz</td></tr><tr><td>CHINA</td><td>800-810-5858, 010-6475 1880</td><td>www.samsung.com</td></tr><tr><td>HONG KONG</td><td>3698-4698</td><td>www.samsung.com/hk</td></tr><tr><td>INDIA</td><td>3030 8282, 1800 110011</td><td>www.samsung.com</td></tr><tr><td>INDONESIA</td><td>0800-112-8888</td><td>www.samsung.com</td></tr><tr><td>JAPAN</td><td>0120-327-527</td><td>www.samsung.com/jp</td></tr><tr><td>MALAYSIA</td><td>1800-88-9999</td><td>www.samsung.com/my</td></tr><tr><td>PHILIPPINES</td><td>1800-10-SAMSUNG(726-7864)</td><td>www.samsung.com/ph</td></tr><tr><td>SINGAPORE</td><td>1800-SAMSUNG(726-7864)</td><td>www.samsung.com</td></tr><tr><td>THAILAND</td><td>1800-29-3232, 02-689-3232</td><td>www.samsung.com</td></tr><tr><td>TAIWAN</td><td>0800-329-999</td><td>www.samsung.com/tw</td></tr><tr><td>VIETNAM</td><td>1 800 588 889</td><td>www.samsung.com</td></tr><tr><td rowspan="3">Middle East & Africa</td><td>TURKEY</td><td>444 77 11</td><td>www.samsung.com</td></tr><tr><td>SOUTH AFRICA</td><td>0860-SAMSUNG(726-7864)</td><td>www.samsung.com</td></tr><tr><td>U.A.E</td><td>800-SAMSUNG (726-7864), 8000-4726</td><td>www.samsung.com</td></tr></table>
<h1 id="samsung">SAMSUNG</h1>
<h1 id="comment-éliminer-ce-produit-déchets-déquipements-électriques-et-électroniques">Comment éliminer ce produit (déchets d'équipements électriques et électroniques)</h1>
<p><img alt="" src="images/e9449f9dd5322205e870a1276638d34ff4d6cd5f078bfc32d55483c2ab610555.jpg" /></p>
<p>(Applicable dans les pays de l'Union Européen et aux autres pays européens disposant de systèmes de collecte sélective)</p>
<p>Ce symbole sur le produit ou sa documentation indique qu'il ne doit pas être éliminé en fin de vie avec les autres déchets menagers. L'élimination incontrolée des déchets pouvant porter préjudice à l'environnement ou à la santé humaine, veuilliez le séparer des autres types de déchets et le recycler de façon responsable.</p>
<p>Vous favoriserez ainsi la réutilisation durable des ressources matérielles.</p>
<p>Les particuliers sont invités à contacter le distributeur leur ayant vendu le produit ou à se renseigner auprès de leur mairie pour savoir où et comment ils peuvent se débarrasser de ce produit afin qu'il soit recyclé en respectant l'environnement.</p>
<p>Les entreprises sont invitees à contacter leurs fournisseurs et à consulter les conditions de leur contrat de vente. Ce produit ne doit pas être éliminé avec les autres déchets commerciaux.</p>
<h1 id="dvd-3">DVD</h1>
<h1 id="gebruiksaanwijzing">gebruiksaanwijzing</h1>
<h1 id="ongekende-möglichkheden">ongekende möglichkheden</h1>
<p>Bedankt voor het aanschaffen van dit Samsung-product.</p>
<p>Registerer uw product op</p>
<p>www.samsung.com/global/register</p>
<p>vooreenzocompleteetmogelijkke service.</p>
<h1 id="waarschuwing">WAARSCHUWING</h1>
<p>OM HET RISICO OPELEKTRISCHE SCHOKKEN TE BEPERKEN, DIENT U DE BEHUIZING (OF DE ACHTERZIJDE) NIET TE VERWIJDEREN. DIT APPARAAT BEVAT GEEN ONDERDELEN DIE DOOR DE GEBRUIKER KUNNEN WORDEN ONDERHOUDEN OF GEREPAEREED. LAAT ONDERHOUD EN REPARATIONS OVER AAN EEN GEKWALIFICEERDE MONTEUR.</p>
<table><tr><td>LET OP
GEVAAR VOOR
ELEKTRISCHE SCHOKKEN
NET OPENEN</td><td>!</td></tr><tr><td>Dit symbol duidt op gevaarlijke spanning binnen het product. Deze spanning bredgt het risico van elektrische schokken of personlijke verwonding met zich mee.</td><td>LET OP: OM HET RISICO OP ELEKTRISCHE SCHOKKEN TE BEPERKEN, DIENT U DE BEHUIZING (OF DE ACHTERZJDE) NET TE VERWULDEREN. DIT APPARAAT BEVAT GEEN OnderDELEN DIE DE GEBRIKER ZELF KAN REPAREREN. LAAT ONDERHOUD EN REPARATIONS OVER AAN EEN GEKwalificIERDE MONTEUR.</td></tr></table>
<p>Plaats deze apparatuur Niet in een besloten ruimte zoals een boekenkast of een vergelijkbare plaats.</p>
<p>WAARSCHUWING : om schade te voorkomen die tot brand of elektrische schokken kan leiden, mag dit apparaat nicht worden blootgesteld aan regen of vocht.</p>
<p>LET OP : VOOR DE HDD & DVD-RECORDER WORDT EEN ONZICTBARE LASERBUNDEL GEBRUKT DIE TOT EEN GEVAARLUKE BLOOSTELLING AAN STRALING KAN LEIDEN WANNEE DEZE OP IETS OF IEMAND WORDT GERICT. ZORG ERVOOR DAT DE RECORDER OP DE JUISTE MANIER EN IN OVEREENSTEMMING MET DEZE AANWUZIGEN WORDT GEBRUKT.</p>
<h1 id="let-op">LET OP</h1>
<p>IN DIT PRODUCT WORDT GEBRUIKGEMAAKT VAN EEN LASERSTRAAL.</p>
<p>GEBRUK VAN MECHANISMEN, AANPASSINGEN OF UITVOEREN VAN PROCEDURES ANDERS DAN ZOAALS IN DEZE GEBRUKSAANWIJZING VERMELD, KUNNEN BLOODSTELLING AAN SCHADELIKE STRALING TOT GEVOLG HEBBEN. MAAK DE DVD-RECORDER NOOIT OPEN EN VOER ZELF GEEN REPARATIONS UIT. LAAT ONDERHOLD EN REPARATIONS OVER AAN EEN GEKWALIFICIERDE MONTEUR.</p>
<p>Als afgeschermde kabels en stekkers worden gebruikt om het apparaat op andere apparaten aan te sluiten, voldoet dit product aan de CE-voorschriften. Gebruik afgeschermde kabels en stekkers voor aansluiting op andere elektrische apparaten, zoals radio's en televisies, om elektromagnetische storingen te voorkomen.</p>
<h1 id="belangrijke-opmerking">BELANGRIJKE OPMERKING</h1>
<p>De voedingskabel van deze apparatuur worden geleverd met een gegoten stekker die een zekering bevat. De waarde van de gezekering vindt u aan de kant van de polen van de stekker.</p>
<p>Als u de zekering van de stekker要去 verrangen, gebruik dan een zekering met bezelfde waarde die voldoet aan de vereisten van BS1362.</p>
<p>Gebruik de stekker nooit zonder het kleje van de zekering als dit kleje afneembaar is. Als het kleje van de zekering moet worden verrangen,要去 dit kleje bezelfde kleur als de Kant van de polen van de stekker hebben. Vervangingsklepjes zijn beschikkaar bij de leverancier.</p>
<p>Als de standaardstekker nicht geschikt is voor de stopcontacten in uw woning of de kabel Niet lang genoeg is om een stopcontact te bereiken,要去 een geschicht goedgekeurd verlengsnoer gebruiken of contact opnemen met de leverancier voor hulp.</p>
<p>Als er darüber geen andere möglichkheid is dan het afsnijden van de stekker, verwijdert u de zekering en gooit u de stekker op de juiste wijze weg. Sluit de stekker Niet aan op de contrastekker van een stroomsoer omdat de blanke flexibile draad tot elektrische schokken kan leiden.</p>
<p>Om het apparaat los te koppelen van elektriciteit, neemt u de stekker uit het stopcontact. Het stopcontact blijdt dan direct beschikkaar.</p>
<p>De producteenheid die bij deze gebruiksaanwijzing hoort, valt onder licentie van bepaalde intellectuele eigendomsrechten van bepaalde derde partijen.</p>
<p>Deze licentie is beperkt tot nicht-commercialeel gebruik in de privé-sfeer door eindgebruikers voor de inhoud van de licentie. Er worden geen rechten verleend voor commercieloe doeleinden. De licentie dekt geen andere producteheid dan deze producteheid. De licentie geldt nicht voor andere producte heden of -procesen zonder licentie conform ISO/IEC 11172-3 of ISO/IEC 13818-3, die gebruikt of verkocht worden in combinatie met deze producteheid. De licentie dekt alleen het gebruik van deze producteheid voor het codereren en/of decoderen van geluidsbestanden conform ISO/OUR 11172-3 of ISO/OUR 13818-3. Er worden onder deze licentie geen rechten verleend voor productekenmerken of -functies die nicht conform ISO/OUR 11172-3 of ISO/OUR 13818-3 zichn.</p>
<h1 id="belangrijke-veilgheidsinstrcties">Belangrijke veilgheidsinstrcties</h1>
<p>Lees deze bedieningsinstrumentes zorgvuldig door voordat u het apparaat gebruikt. Volg alle onderstaande veiligheidsinstrumentes op. Houd deze instructies bij de hand voor tokomstig gebruik.</p>
<p>1) Lees deze instructies. <br />
2) Bewaar deze instructies. <br />
3) Let op alle waarschuwingen. <br />
4) Volg alle instructies op. <br />
5) Gebruik dit apparaat Niet in de buurt van water. <br />
6) Reinig het apparaat alleen met een droge doeck. <br />
7) Blokker geen ventilatieopeningen. Installer het apparaat in overeenstemming met de instructies van de fabrikant. <br />
8) Plaat het apparaat Niet in de buurt van warmtebronnen zoals radiatoren, verwarmingsroosters of andere apparaten die warmte afgeven (met inbegrip van versterkers). <br />
9) Vergeet het verilgheidsdoel van de gepolariserde stekker of aardlestkeker Niet. Een gepolariserde stekker bevat twee pennen waar bij de een pen iota breder is dan de andere. Een aardlestkeker bevat twee pennen en een aardklem. De brede pen van de gepolariserde stekker en de aardklem van de aardlestkeker zich bedoeld voor uw verilghed. Als een stekker Niet in het stopcontact past, kutn u het Beste een elektricien raadplegen voor verranging van het verouderde stopcontact. <br />
10) Zorg ervoor dat niemand op het stroomsoer kan staan of dat stroomsoer beklemd kan raken, in het bijzonder bij stekkers, adapters en op het punt waar het snoer het apparaat verlaat. <br />
11) Gebruik alleen accessoires die door de fabrikant zijn opgegeven. <br />
12) Gebruik het apparaat alleen op een karretje, standaard, driepoot, steun of tafel die door de fabrikant is opgegeven of die bij het apparaat worden verkocht. Wees voorzichtig wanner u een karretje gebruikt om het apparaat te verplaatsen om te voorkomen dat het toestel of het karretje Kantelt en eventuele tot verwondingen leidt. <br />
13) Haal de stekker van het apparaat uit het stopcontactijdens onweer met bliksem of wonneer het apparaat langerearend Niet worden gebruikt. <br />
14) Laat onderhoud en reparations over aan een gekwalificeerde monteur. Reparations zijn nodig als het apparaat is beschadigd, bijvoorbeeld als het stroomsnoer of de stekker is beschadigd, vloeistof op het apparaat is gemorst of voorwerpen in het apparaat�ijn gevallen, het apparaat is blootgesteld aan regen of vocht, het apparaat Niet normal Werkt of het apparaat is gevallen.</p>
<h1 id="waarschuwingen-voor-gebruik">Waarschuwingen voor gebruik</h1>
<ul>
<li>Schakel andere installmentcomponenten erst ut voordat u deze op de recorder aansluit. </li>
<li>Verplaats de recorder Niet toenwijl een schijf worden afgespeeld, waar dat de schijf kan worden bekrast of kan breken en de interne onderdelen van de recorder konnen worden beschadigd. </li>
<li>Plaats geen bloemenvaas bevuld met water, ofkleine metalen voorwerpen op de recorder. </li>
<li>Steek uw hand Niet in de schijflade. </li>
<li>Plaats geen andere voorwerpen dan de schijf in de schijflade. </li>
<li>Externe storingen, zoals bliksem of statische elektricitieit, kuren de normale werking van de recorder beinvloeden. Schakel in dat geval de speler uit en weer in met de STANDBY/ON -toets, of haal de stekker uit het stopcontact en steek hem erervolgens wee in. De recorder werkt daarna weeer normala. </li>
<li>Verwijder de schijf en schakel de recorderuit na gebruik. </li>
<li>Haal de stekker uit het stopcontact wanneer u de recorder langere vrij nicht gezult gebruiken. </li>
<li>Reinig de schijf doorrecht vanaf het midden waar de buitenzijde van de schijf te vegen. </li>
<li>Het apparaat moet Niet worden blootgesteld aan druppels of spatten, en er要去en geen objcten bevuid met vloeistoffen, zoals vazen, op het apparaat geplaatst worden. </li>
<li>Met de hoofdstekker kan het apparaat volledig worden uitgeschakeld. Zorg ervoor dat deze goed bereikbaar is.</li>
</ul>
<h1 id="onderhoud-van-behuizing">Onderhoud van behuizing</h1>
<p>Zorg er om veiligheidsreden voor dat u de stekker uit het stopcontact haalt.</p>
<ul>
<li>Gebruik geen benzine, thinner of andere oplosmiddelen. <br />
Veeg de behuizing met een zachte doeck schoon.</li>
</ul>
<h1 id="hdd-hard-disk-drive-2">HDD (Hard Disk Drive)</h1>
<p>De vaste schijf beschikt over een hove opslagdichtheid, waardoor er langdurige opnamenuron worden gemaakt en er snelle toegang is tot opgenomen gegevens. De vaste schijf kanECHTER gemakkelijk worden beschadigdo door schokken, trillingen of stof en moet uit de buurt van magneten worden gehonden. Neem de volgende voorzorgsmaatregelen in ache om verlies van gegevens te vermijden.</p>
<ul>
<li>Gebruik de HDD & DVD-RECORDER Niet in een ruimte die bloatstaat aan extreme temperatuerschommelingen. </li>
<li>Stel de recorder Niet bloat aan sterke schokken. </li>
<li>Zet de HDD & DVD-RECORDER Niet op een plek die blotgesteld is aan mechanische trillingen of die onstabel is. </li>
<li>Plaats de HDD & DVD-RECORDER Niet boven op een warmtebron. </li>
<li>Haal de stekker Niet uit het stopcontact terwijl het apparaat staat ingeschakeld. </li>
<li>Probeer Niet de vaste schijf op enigerlei wijze zich te veranderen. Hierdoor kan het product defect raken.</li>
</ul>
<p>Als de vaste schijf worden beschadigd, können de verloren gegane gegevens nicht worden hersteld. De vaste schijf dient slechts voorijdelijkke opslag.</p>
<h1 id="gebruik-van-schijven">Gebruik van schijven</h1>
<ul>
<li>Gebruik alleen schijven met een normale vom. Als een schijf (met een speciale vom worden) Gebruikt, kan deze HDD & DVD-RECORDER beschadigd raken.</li>
</ul>
<p><img alt="" src="images/6879013571d357f70d78b731f64e1098775a69ff1a09ba78049232df78385f70.jpg" /></p>
<p><img alt="" src="images/f2e9f768e246e3c819226ff04ebc244ed89def25d3e49a7d58091c5bfcb4be1d.jpg" /></p>
<h1 id="schijven-vasthouden">Schijven vasthouden</h1>
<ul>
<li>Raak het oppervlak van de schijf Niet aan op deplaats waar de opname isuitgevoerd.</li>
</ul>
<p><img alt="" src="images/8086f09ad7dd244ca0a5ffdf4a5a2068f14177971f70df0d847e35a0825c78d6.jpg" /></p>
<h1 id="dvd-ram-dvd-rw-en-dvd-r">DVD-RAM, DVD-RW en DVD-R</h1>
<ul>
<li>Reinig deze schijven met een als optie verkrijgbaar DVD-RAM/PD-reinigungsmiddel (LF-K200DCA1 indien beschikbaar). Gebruik geen reinigungsmiddelen of doeken voor cd's om DVD-RAM/-RW/-R-schijven te reinigen.</li>
</ul>
<h1 id="dvd-video-audio-cd-3">DVD-Video, Audio-CD</h1>
<ul>
<li>Gebruik een zachte doek om vuil van de schijf te vegen.</li>
</ul>
<h1 id="waarschuwingen-voor-het-gebruik-van-schijven">Waarschuwingen voor het gebruik van schijven</h1>
<ul>
<li>Gebruik geen ballpoint of potlood om op de bedrukte zijde te schrijven. </li>
<li>Gebruik geen reinigingssprays voor langspeelplaten of antistatische middelen. Gebruik geen vluchtige middelen zoals benzine of thinner. </li>
<li>Plak geen etiketten of stickers op schijven. (Gebruik geen gerepareerde schijven met een blootligende kleefstof van plakband of verwijdderde stickers.) </li>
<li>Gebruik geen krasbestendige beschemhoezen of doosjes. </li>
<li>Gebruik geen schijven die met de verkruijbare etiketprinters zijn bedrukt. </li>
<li>Gebruik geen kromgetrokken of gebarsten schijven.</li>
</ul>
<h1 id="schijven-opslaan">Schijven opslaan</h1>
<p>Zorg ervoor dat u de schijf Niet beschadigt, want de gegevens op deze schijven zichkwetsbaar.</p>
<ul>
<li>Bewaar de schijf Niet in direct zonlicht. </li>
<li>
<p>Bewaar de schijf in een koele, geventileerde omgeving.</p>
</li>
<li>
<p>Bewaar de schijf verticaal. </p>
</li>
<li>Bewaar de schijf in een schone beschemhoes. </li>
<li>Als u de HDD & DVD-RECORDER plotseling van een koude maar een warme plek verplaatst, kan condensatie op de werkende onderdelen en lens ontstaan, waardoor de schijf möglichk op een abnormale manier worden afgespeeld. Als dit gebeurt, stek dan de stekker Niet in een stopcontact en wacht twee uur. Plaats verwolgens de schijf en probeer die opnieuw af te spelien.</li>
</ul>
<h1 id="specifications-van-schijven">Specifications van schijven</h1>
<p>Met dit apparaat Aunt u hoogwaardige digitale films afspelen of opnemen op een DVD-RAM/-RW/-R-schijf of op de HDD. Ook aunt u digitale beelden op DVD-RAM/-RW-schijven of op de vaste schijf bewerken.</p>
<h1 id="schijftype">Schijftype</h1>
<h1 id="dvd-video-3">DVD-Video</h1>
<ul>
<li>Een DVD (Digital Versatile Disc) kan maximaal 135 minuten aan beelden, 8 geluidstalen en 32 ondtitelingstalen bevatten. Een DVD is voorzien van mpeg-2-beeldcompressie en Dolby digital surround waarmee u in uw eigen huis van levendige en heldere beelden van bioscoopwaliteit kut genieten. </li>
<li>Wanner van de eerste laag worden overgeschakeldaar de tweede laag van een DVD-videoischij met twee lagen, kan een korte storing van het beeld en geluid optreden. Dit is geen storing van het apparaat zichl. </li>
<li>Wanneren een DVD-RW/-R die in videomodus is opgenomen, is afgesloten, worden dit een DVD-Video.</li>
</ul>
<h1 id="audio-cd-2">Audio CD</h1>
<ul>
<li>Een geluidsschijf waarop 44,1 kHz PCM-geluid is opgenomen. </li>
<li>Hiermee worden audio-CD-R's en -CD-RW's met de indeling CD-DA afgespeeld. </li>
<li>Het apparaat kan bepaalde CD-R's en CD-RW's möglichniet afspelen vanwege de opnamecondities.</li>
</ul>
<h1 id="cd-r-rw-3">CD-R/-RW</h1>
<ul>
<li>Gebruik een CD-R/RW van 700 MB (80 minutes). Probeer geen schijf van 800 MB (90 minutes) ofmeer te gebruiken,onthat deze schijf möglichniet worden afgespeeld. </li>
<li>Als de CD-R/RW Niet in een afgesloten sessie is opgenomen, kan een vertraging optredenijdens de eerste afspeeltijd en worden möglichk Niet alle opgenomen bestanden afgespeeld. </li>
<li>Sommige CD-R/-RW's können möglich nicht met dit apparaat worden afgespeeld. Dit hangt af van het apparaat dat is gebruikt om deze CD-R/-RW's te branden. Voor de inhoud van cd's die voor personlijk gebruik op CD-R/-RW's zijn opgenomen, kan de afspeelhaarheid affankelijk zichen van de inhoud en de schijf.</li>
</ul>
<h1 id="dvd-rs-afspelen-en-opnemen">DVD-R's afspelen en opnemen</h1>
<ul>
<li>Wanner een DVD-R die in videomodus is opgenomen, is afgesloten, worden dit een DVD-Video. </li>
<li>U kurz op de beschikkbare ruimte van de schijf opnemen en u kurz bewerkingsfuncties uitvoeren, zaals schijven en programma's namen geven en programma's verwijderen voordat u de schijf afluit. </li>
<li>Wanner een opname van een DVD-R worden verwijderd, komt deze ruimte nicht beschikkaar. Wanner eenmaal op een deel van een DVD-R is opgenomen, is deze ruimte nicht langer beschikkaar voor opnamen, of de opname nu gewist is of nicht. </li>
<li>Nadat de opname is beeindigd, duurt het ongeveer 30 seconden voordat de beheergegevens van de opname zich voltood. </li>
<li>Dit apparaat optimiseert de DVD-R voor elk opname. De optimalisatie worden UITgevoerd wanneer u met opnemen begint nadat u de schijf hebt geplaatst of het apparaat hebt ingeschakeld. Als de optimalisatie te vaak worden UITgevoerd, kan möglichnestiet longer op de schijf worden opgenomen. </li>
<li>Vanwege de opnamecondities kan afspelen in bepaalde geallen Niet möglichk zich. </li>
<li>Met dit apparaat kutn u DVD-R's afspelen die juices opgenomen en afgesloten met een Samsung DVD- en videorecorder. Mogelijk kutn u bepaalde DVD-R's nicht afspelen. Dit is afhankelijk van de schijf en de opnamecondities.</li>
</ul>
<h1 id="dvd-rws-afspelen-en-opnemen">DVD-RW's afspelen en opnemen</h1>
<ul>
<li>U kurz op DVD-RW-schijven opnemen en deze afspelen in zowel de modus Video als VR. </li>
<li>Als een DVD-RW die in de Video of VR modus is opgenomen, is afgesloten,kest u geen extra opnameneer opslaan. </li>
<li>Wanner een DVD-RW die in videomodus is opgenomen, is afgesloten, worden dit DVD-Video. </li>
<li>
<p>In beiden modi kurz u aspfelen voordat en nadat de DVD is afgesloten, maar nadat de DVD is afgesloten, kurz u zicheer opnemen, verwilderen of bewerken.</p>
</li>
<li>
<p>Als u in VR-modus en verrolgens in V-modus op de schijf wilt opnemen,要去 u Format (Formatteren) uitvoeren. Wees voorzichtig wanner u Format (Formatteren) uitvoert waar dat alle opgenomen gegevens verloren kan den gaan. </p>
</li>
<li>Wonneer een lege DVD-RW voor het eerst worden geinitialiseerd, worden de schijf in VR-modus geinitialiseerd.</li>
</ul>
<h1 id="dvd-rams-afspelen-en-opnemen">DVD-RAM's afspelen en opnemen</h1>
<ul>
<li>Zorg ervoor dat de opnamemodus is ingesteld op VRmodus. Als dit Niet het geval is, kan de opname möglich nicht op dit apparaat worden afgespeeld. </li>
<li>Op de meeste DVD-spelers=kunt u geen DVD-RAM's afspelen wegens compatibiliteitisproblemen. </li>
<li>Op dit apparaat kurz u alleen DVD-RAM's van standardversie 2.0 afsplen. </li>
<li>Een DVD-RAM opgenomen op deze recorder kan nicht altijd op andere DVD-spelers afgespeeld worden. Zie de gebruiksaanwijzing voor de speler om de compatibiliteit met deze DVD-RAM-schijven te bepalen. </li>
<li>Verwijder bij DVD-RAM-schijven in cartridges de cartridge en gebruik alleen de schijf.</li>
</ul>
<h1 id="schijfkopiernen">Schijfkopiernen</h1>
<p>Inhoud kopieerspecificities </p>
<table><tr><td>Inhoud</td><td>HDD → DVD</td><td>DVD → HDD</td></tr><tr><td>Titel opgenomen video</td><td>Ondersteund</td><td>Ondersteund</td></tr><tr><td>Titel met kopierbeveiliging</td><td>Niet ondersteund</td><td>Niet ondersteund</td></tr><tr><td>Titel eenmaal kopiën</td><td>Verplaatsen
(verbijdert de titel van de vaste schijf na kopiën)</td><td>Niet ondersteund</td></tr></table>
<p>Nadat een programme van het type "Titel eenmaal kopiernen" is opgenomen op DVD, kan deze titel Niet meer maar de vaste schijf (HDD) worden gekopieerd.</p>
<p>Maar als een programme van het type "Titel eenmaal kopieren" op de vaste schijf is vastgelegd, kan deze titel wel aan DVD-RW (VR-modus) of DVD-RAM worden gekopieerd.</p>
<p>Inhoud kopierspecificities </p>
<table><tr><td>Inhoud</td><td>HDD → DVD</td><td>DVD → HDD</td></tr><tr><td>MP3</td><td>Ondersteund</td><td>Ondersteund</td></tr><tr><td>JPEG (photo)</td><td>Ondersteund</td><td>Ondersteund</td></tr><tr><td>DivX</td><td>Ondersteund</td><td>Ondersteund</td></tr><tr><td>CD-DA</td><td>Niet ondersteund</td><td>Ondersteund</td></tr></table>
<ul>
<li>Schijf (CD-R/CD-DA/CD-RW/DVD-RAM, DVD-R(Afsluiten)/DVD-RW(Afsluiten)) HDD <br />
HDD DVD-R, DVD-RW(V) </li>
<li>Als de schijf is voltoid met Schijffbeheer, kan hij compatibel zichn met een PC als een schijf met een UDFbestandssystem.</li>
</ul>
<h1 id="kopierbeveiliging">KOPIERBEVEILIGING</h1>
<ul>
<li>Veel DVD's bevatten een kopieerbeveiliging. Sluit uw HDD & DVD-RECORDER.daaromrechtstreeks aan op uw tv en Niet op een videorecorder. Aansluiting via een videorecorder kan leiden tot verrormde weergave van DVD's met kopieerbeveiliging. </li>
<li>Dit product bevat copyrightbeschermingstechnologie die beschermd wird door methodeclaims van bepaalde patenten in de Verenigde Staten en andere intellectuelle eigendomsrechtten die in het bezit zichn van Macrovision Corporation en andere rechtmatige eigendenaren. Het grabuik van deze copyrightbeschermingstechnologie要去发展格局d Door Macrovision Corporation en is uitsluitend bedoeld voor privé-gebruik en weergave voor een bepertk publiek, tenzij Macrovision Corporation een andere goedkeuring haelt verleend. Reverse engineering of demonteren is Niet teogestaan.</li>
</ul>
<h1 id="beveiling">Beveiling</h1>
<p>Met deze HDD & DVD-RECORDER kurz u de inhoud van uw schijven beveiliggen, zoals hieronder worden beschreiben.</p>
<ul>
<li>Programmabveeiligung: zie pagna 74, "Een titel vergrendelen (beveiligen)". </li>
<li>
<p>Schijfbeveliging: zie pagina 88, "Schijfbeveliging".</p>
</li>
<li>
<p>DVD-RAM/-RW/-R-schijven die nicht compatibel zijn met de DVD-VIDEO-indeling, kurz u nicht afspelen met dit apparaat. </p>
</li>
<li>
<p>Raadpleeg uw DVD-RAM/-RW/-R-fabrikant voor meer informatie over de compatibiliteit van DVD-opnames.</p>
</li>
<li>
<p>Bij het gebruik van DVD-RAM/-RW/-R-schijven van slechte kwaliteit hunne onverwachtte problemen ontstaan, met inbegrip van opnamefouten, het verlies van opgenomen of bewerkt materiaal of beschadiging van de HDD & DVD-RECORDER.</p>
</li>
</ul>
<h1 id="schijfindelingen">Schijfindelingen</h1>
<h1 id="mp3-schijven">MP3-schijven</h1>
<ul>
<li>Cd-r/-rw-,DVD-ram/±rw/±r-,hdd-schijven waarop mp3-bestanden zich opgeslagen die zich opgenommen in de indeling UDF, ISO9660 of JOLIET, hunnen worden afgespeeld. </li>
<li>U kunt alleen mp3-bestanden met de extensie ".mp3" of "MP3" gebruiken. </li>
<li>Bij MP3-bestanden die met een VBR (Variable Bit Rates) van 32 Kbps tot 320 Kbps zijn opgenomen, kan het geluid worden onderbroken. </li>
<li>Afspeelbaar bitsnelheidsbereik ligtussen 56 en 320 kbps. </li>
<li>Ledere map kan tot 500 items bevatten, waaronder bestanden en submappen.</li>
</ul>
<h1 id="jpeg-schijven">JPEG-schijven</h1>
<ul>
<li>Cd-r/-rw-,DVD-ram/±rw/±r-,hdd-schijven die zich opgenomen in de indeling UDF,ISO9660 of JOLIET, können worden afgespeeld. </li>
<li>U kunt alleen bestanden met de extensie“.jpg” of“.JPG” gebruiken. </li>
<li>Ledere map kan tot 500 items bevatten, waaronder bestanden en submappen. </li>
<li>MOTION JPEG en progressief JPEG worden nicht ondersteund.</li>
</ul>
<h1 id="divx-schijven">DivX-schijven</h1>
<p>CD-RW/-R, DVD-RAM/±RW/±R, HDD <br />
- U kurz videobestanden met de volgende extensies afspelen : .avi, .divx, .AVI, .DIVX <br />
- DivX Video (Codec)-indeling : DivX 3.11 DivX 4.x DivX 5.x (zonder QPEL en GMC) <br />
- DivX Audio (Codec)-indeling : MP3, MPEG 1 Audio Layer 2, LPCM, AC3, DTS <br />
- Ondersteunde bestandsindelingen voor ondertiteling : .smi , .srt , .sub , .psb , .txt , .ass <br />
- Ledere map kan tot 500 items bevatten, waaronder bestanden en submappen. <br />
- U kunt geen schijven aftspelen met een resolutie van meer dan 720 × 576 pixels.</p>
<h1 id="gebruik-de-volgende-schijven-nicht">Gebruik de volgende schijven nicht!</h1>
<ul>
<li>Gebruik in dit apparaat geen schijven van het type LD, CD-G, CD-I, CD-ROM of DVD-ROM.</li>
</ul>
<p>[Opmerking]</p>
<p>U kunt de volgende typen schijven afspelen : CD/CD-R/-RW/MP3/JPEG/DVD-VIDEO/DVD-RAM/±RW/±R.</p>
<p>Een DVD-RW/±R-schijf die in videomodus op een ander apparaat is opgenomen, kan alleen worden afgespeeld als de schijf is voltoid.</p>
<ul>
<li>Mogelijk Aunt u bepaalde commerciele schijven en DVD-schijven die u buiten uw regio hebt aangeschäft, nicht afspelen op dit apparaat. Wanner deze schijven worden afgespeeld, worden "Geen schijf" of "Controller de regiocode" weergegeven. </li>
<li>Als de DVD-RAM-/RW-/R een illegale kopie is of een andere indeling dan DVD-videoindeling heeft, kurz udezeschij mogelijk ook nicht afspelen.</li>
</ul>
<h1 id="diamond-compatibleilitieit-schijf"> Compatibleilitieit schijf</h1>
<ul>
<li>Niet alle merken schijven konnen in dit apparaat gebruikt worden.</li>
</ul>
<h1 id="aan-de-slag">AAN DE SLAG</h1>
<p>2</p>
<p>2 Waarschuwing <br />
3 Voorzorgsmaatregelen <br />
10 Algemene kenmerken <br />
11 Voordat u de gebruiksaanwijzing leest <br />
12 De HDD & DVD-RECORDER gebruiken <br />
14 Uitpakken <br />
16 Beschrijving <br />
19 De toetsen van de afstandsbediening</p>
<h1 id="aansluiteen-instellen">AANSLUITEEN INSTELLEN</h1>
<p>20</p>
<p>20 De HDD & DVD-RECORDER aansluiten <br />
21 Extra aansluitingen <br />
22 Antenne + HDD & DVD-RECORDER + externe decoderbox + TV <br />
23 Andere manier voor het aansluien van de video-uitgangskabel <br />
25 Andere manier voor het aansluien van de audio-uitgangskabel <br />
27 Aansluiten op av 3 in-aansluitingen</p>
<h1 id="systemeem-installatie">SYSTEMEEM-INSTALLATIE</h1>
<p>28</p>
<p>28 Menunavigatie op het TV-schem <br />
28 PLUG & PLAY instellen <br />
30 De klok instellen <br />
30 Zenderinstelling <br />
32 De taalopties instellen <br />
32 De systeemopties instellen <br />
34 De geluidsopties instellen <br />
35 De video-opties instellen <br />
38 Het kinderslot instellen <br />
39 De opnameopties instellen</p>
<h1 id="afspelen">AFSPELEN</h1>
<p>41</p>
<p>41 Regiocode (alleen DVD-Video) <br />
41 Logo's van schijven die kuren worden afgespeeld <br />
41 U kunt de volgende typen schijven afspelen <br />
43 Een schijf afspelen <br />
44 Het schijfmenu en het titelmenu gebruiken <br />
44 De afspeelknoppen gebruiken <br />
46 De toets INFO gebruiken <br />
46 Taalkeuze ondtertiteling <br />
47 De geluidssporen en audiokanalen selectoren <br />
47 De camerahoek wijzigen <br />
47 Afspelen herhalen <br />
48 Inzoomen <br />
49 Markeringen gebruiken <br />
50 Favorieten gebruiken <br />
51 Een Audio-CD/MP3 afspelen <br />
56 Foto-CD's afspelen <br />
58 Een DivX afspelen</p>
<h1 id="opnemen">OPNEMEN</h1>
<p>60 Opneembare DVD's <br />
61 Opname-indelingen <br />
62 Opnamemodus <br />
63 Beelden die gegen opnemen beseiligd zijn <br />
64 Direct opnemen <br />
65 Een OTR (One Touch Recording) make <br />
66 Gelijktijdig opnemen en afspelen <br />
67 De functie Time Shift als live signal <br />
68 Een timer-opname make <br />
71 De functie ShowView gebruiken <br />
72 ShowView Extended <br />
72 Gaaar de Opnamelijst</p>
<h1 id="bewerken">BEWERKEN</h1>
<h1 id="74">74</h1>
<p>74 Basisbewerking (Titellijst) <br />
78 De functie Sorteren gebruiken (Titëllijst) <br />
79 Navigatiemenu <br />
80 Inhoud selecteren <br />
80 Geavanceerd bewerken (Afspeellijst) <br />
85 Kopieren van HDDaar DVD of vice versa <br />
86 Het kopiernen van MP3, JPEG of Divx <br />
88 De naam van een muziek-, Foto- of DivXbestand wijzigen <br />
89 Schijven beheren</p>
<h1 id="naslag">NASLAG</h1>
<h1 id="93">93</h1>
<p>93 Problemen oplossen</p>
<h1 id="bijlage">BIJLAGE</h1>
<h1 id="95">95</h1>
<p>95 Specifications</p>
<h1 id="algemene-kenmerken">ALGEMENE KENMERKEN</h1>
<p>Met dit apparaat kutn u hoogwaardige digitale films afspelen of opnemen op een DVD-RAM/-RW/-R-schijf of op de HDD. Ook kut u digitale beelden op DVD-RAM/-RW-schijven of op de vaste schijf bewerken.</p>
<h1 id="op-vaste-schijf-hdd-opnemen">Op vaste schijf (HDD) opnemen</h1>
<p>DVD-HR770</p>
<p>U kurz maximaal 264 uur (in EP-modus (8 uur)) aan video-opnamen opstaan op de interne vaste schijf (HDD) van 160 GB (gigabyte).</p>
<p>Met zowel de mogelijkheid van opname op DVD als opname op een grote, interne vaste schijfkest u met deze recorder de opnamen voor snelle toegang op de vaste schijf opslaan of ze opslaan op DVD, ter archivering of om op andere DVD-spelers af te spelen.</p>
<h1 id="kopieren-van-vaste-schijf-hdd-maar-dvd-en-vice-versa">Kopieren van vaste schijf (HDD) maar DVD en vice versa</h1>
<p>U kunt opnamen van de vaste schijf maar een opneembare DVD kopiernen en vice versa.</p>
<p>U kunt alleen indezelfde opnamemodus kopieren als die van de brontitel.</p>
<h1 id="gelijkrijkig-opnemen-en-aftspelen">Gelijkrijkig opnemen en aftspelen</h1>
<p>Weergave en opname verlopen zowel bij DVD's als bij de interne vaste schijf (HDD) volledig onafhankelijk van elkaar. U kurz bijvoorbeeld een tv-programma op een opneembare DVD of op de vaste schijf opnemen terwijl u een andere opname bekijdt die u al erder op DVD of op 17 de vaste schijf hebt opgenomen.</p>
<h1 id="automatische-kwaliteitsinstalling-bij-timer-opnamen">Automatische kwaliteitsinstalling bij timer-opnamen</h1>
<p>Als de modus FR (Flexible opname) is geseleed, wordt de beeldkwaliteit automatisch zodanig aangepast dat al het op te nemen beeldmaterialaal op de vrij schijfruimte past. (zie pagina 67)</p>
<h1 id="progressief-scanners-met-hoge-kwaliteit">Progressief scanners met hoge kwaliteit</h1>
<p>Met progressief scannen krijt u flikkervrie video van hoge resolutie. Het 10 bit 54-MHz DAC en 2D Y/C scheidingscircuit biedt de hoogste kwaliteit beeldweergave en -opname. (zie pagina 36)</p>
<h1 id="divx-certificatie">DivX-certificatie</h1>
<p>DivX, DivX Certified en de bijbehorende logo's zijn handelsmerken van DivXNetworks, Inc en worden gebruikt onder licentie.</p>
<p><img alt="" src="images/2935c13ac893b93996047a4e2098d23af435d8e643ff98690fadc35c46e1f79e.jpg" /></p>
<ul>
<li>Officeriel DivX® Certified-product </li>
<li>Hiermee speelt u alle versies van DivX®-video (inclusief DivX® 6) af door middel van standardaard afspelen van DivX®-mediabestanden.</li>
</ul>
<h1 id="modus-ez-bestand">Modus EZ bestand</h1>
<p>Met behulp van deze functie(Int) u een schijf automatisch initiaiteren en afsluiten. (zie pagina 39)</p>
<p>Raadpleeg de volgende begrippen voordat u de gebruiksaanwijzing leest.</p>
<p>Pictogrammen die in de gebruiksaanwijzing worden gebruikt </p>
<table><tr><td>Pictogram</td><td>Woord</td><td>Definitie</td></tr><tr><td>HDD</td><td>HDD</td><td>Een beschikbare functie voor de vaste schijf. (HDD).</td></tr><tr><td>DVD-VIDEO</td><td>DVD</td><td>Een beschikbare functie voor DVD of DVD±R/-RW(V)-schijven die zijn afgesloten.</td></tr><tr><td>DVD-RAM</td><td>RAM</td><td>Een beschikbare functie voor DVD-RAM's.</td></tr><tr><td>DVD-RW</td><td>-RW</td><td>Een beschikbare functie voor DVD-RW's</td></tr><tr><td>DVD-R</td><td>-R</td><td>Een beschikbare functie voor DVD-R's</td></tr><tr><td>DVD-RW</td><td>+RW</td><td>Een beschikbare functie voor DVD+RW's.</td></tr><tr><td>DVD-R</td><td>+R</td><td>Een beschikbare functie voor DVD+R's.</td></tr><tr><td>Audio CD</td><td>CD-DA</td><td>Een beschikbare functie voor gegevens-CD's (CD-R of CD-RW).</td></tr><tr><td>JPEG</td><td>JPEG</td><td>Een beschikbare functie voor CD-R/-RW, DVD±R/±RW/-RAM-schijven of HDD</td></tr><tr><td>MP3</td><td>MP3</td><td>Een beschikbare functie voor CD-R/-RW, DVD±R/±RW/-RAM-schijven of HDD</td></tr><tr><td>DivX</td><td>DivX</td><td>Een beschikbare functie voor CD-R/-RW, DVD±R/±RW/-RAM-schijven of HDD.</td></tr><tr><td>!</td><td>Let op</td><td>Een situation waarin een functie Niet werkt of installingen möglich worden geannuleerd.</td></tr><tr><td>OPMERKING</td><td colspan="2">Tips of aanwijzingen die de werkung van elke functie bevorderen.</td></tr><tr><td>Eenmaal drukken</td><td colspan="2">Een functie die kan worden gezruikt via=eén toets.</td></tr></table>
<h1 id="deze-gebruiksaaanwijzing-gebruiken">Deze gebruiksaaanwijzing gebruiken</h1>
<p>1) Zorg ervoor dat u de veiligheidsinstrumenties leest voordat u dit apparaat gebruikt. (zie pagina 2~7) <br />
2) Lees Problemen oplossen als sprake is van een probleem. (zie paginga 92~93)</p>
<h1 id="copyright-3">Copyright</h1>
<p>©2008 Samsung Electronics Co.</p>
<p>Alle rechten voorbehonden. Niets van deze gebruiksaanwijzing mag worden gereproduederd of gekopieerd zonder voorafgaande schriftelijke toestemming van Samsung Electronics Co.</p>
<h1 id="stap-1-selecteer-het-schijftype-of-de-vaste-schijf-hdd">Stap 1: Selecteer het schijftype of de vaste schijf (HDD)</h1>
<p>Controller voordat u gaat opnemen de schijftypen die beschikkaar zich.</p>
<p><img alt="" src="images/6a6937a271a7116845816dfe3b69eb13a074dd99be28bf4acaa2518e33c78f3a.jpg" /></p>
<p><img alt="" src="images/50eb0ccb6519c6a3246b4acaf9cb5bd7dbc2e57c9bdba10897233ad1bd6c1b97.jpg" /></p>
<p><img alt="" src="images/8dbd3434fe1c1cffde653d29d58dacae825c390145325697b3da3965140668cd.jpg" /></p>
<p><img alt="" src="images/05e6ac9850d2290a4c9639afa6bca4b64a5a20d55309c36a30047033fac6cf1e.jpg" /></p>
<p>Als u herhaaldelijk op bezelfde schijf wilt opnemen of als u de schijf na de opname wilt bewerken, kiest u een herschrijfbare DVD-RW- of DVD-RAM-schijf.</p>
<p>Als u een opname zonder wijzigingen wilt opstaan, kiest u een Niet-herschrijfbare DVD-R. Het is möglichst bestanden direct op te slaan op de interne vaste schij (HDD) of een opgeslagen bestand te bewerken.</p>
<h1 id="stap-2-de-schijf-formatteren-om-de-opname-te-starten">Stap 2: De schijf formatteren om de opname te starten</h1>
<p>In gegenstelling tot bij een videorecorder, worden een ongebruekte schijf die in de recorder worden geplaatst, automatisch geformatteerd. Dit is nodig om de opname op een schijf voor te bereiden.</p>
<h1 id="bij-gebruik-van-een-vaste-schijf">Bij gebruik van een vaste schijf</h1>
<p>Formatteren nicht nodig.</p>
<h1 id="bij-gebruik-van-een-dvd-ram">Bij gebruik van een DVD-RAM</h1>
<p>Dit schijftype kan in de DVD-video-opnameindeling (VR-modus) worden geformatteerd. U kurz opgenomen beelden bewerken en een aftseelligt in de gewenste volgorde make.</p>
<h1 id="bij-gebruik-van-dvd-rw">Bij gebruik van DVD-RW</h1>
<p>Dit schijftype kan in de DVD-video-indeling (V-modus) of de DVD-Video-opnameindeling (VR-modus) worden geformatteerd. Wanner u een lege schijf plaatst, worden u gevraagd od u deze wilt initiaiseren od nicht. Als uDVD-VR'ofDVD-V'selecteert, worden de initiaisatie gestart. U kunt een videomodusschijf op verschillende DVD-apparaten afspelen. Een VR-modusschijf kunt u utgebreider bewerken.</p>
<h1 id="bij-gebruik-van-een-dvd-r">Bij gebruik van een DVD-R</h1>
<p>Een DVD-R hoeft nicht te worden geformatteerd en alle en opnemen in videomodus worden ondersteund. U kurz dit type schijf pas op andere DVD-apparaten afspelen nadat deze is voltooid.</p>
<h1 id="stap-3-opnemen">Stap 3: Opnemen</h1>
<p>Er bestaan twee verschillende opnamemethoden, Direte opname en Timer-opname. Bij een timer-opname kan en van de vier</p>
<p>beschikbare opnamestanden worden gebruikt: XP (hoogste kwaliteit), SP (standaard kwaliteit), LP (lagere kwaliteit) en EP (minste kwaliteit). Hoe lager de kwaliteit, des te longer u kurz opnemen. Wanner het opnemen in de FR-modus (Flexibele opname) is ingesteld, worden met de Beste kwaliteit opgenomen rekening houdend met de resterende tijd op de schijf.</p>
<h1 id="stap-4-afspelen">Stap 4: Afspelen</h1>
<p>U kunt de titel die u wilt afspelen selecteren in een weergegeven menu en verrolgens direct afspelen.</p>
<p>Een DVD bestaat uit secties die titels genoemd worden, en subsectionies die hoofstukken genoemd worden.</p>
<h1 id="stap-5-een-opgenomen-schijf-bewerken">Stap 5: Een opgenomen schijf bewerken</h1>
<p>Het is eenvoudiger om schijven te bewerken dan conventionele videobanden. De recorder ondersteunt veel verschillende bewerkingsfuncties, die alleen möglichlijk zijn met DVD's en een vaste schijf (HDD).</p>
<p>Met een eenvoudig bewerkingsmenu=kunt u diverse bewerkingsfuncties op een opgenomen titel uitvoeren, zoals verwijderen, kopieren, hemoemen, vergrendelen</p>
<p>Een afspeelljst make (DVD-RAM/-RW in VR-modus, vaste schijf)</p>
<p>Met deze recorder=kunt u een neue afspeellijst opdezelfde schijf maken en bewerken zonder dat de originele opname worden gewijzigd.</p>
<h1 id="stap-6-afsluiten-en-op-andere-dvd-apparaten-afspelen">Stap 6: Afsluiten en op andere DVD-apparaten afspelen</h1>
<p>Wanner u de DVD op andere DVD-apparaten wilt afspelen, is het soms nodig deze af te sluiten. Zorg dat u klaar bent met alle bewerkingen en opnamen en sluit de schijf af.</p>
<p>Een DVD-RW-schijf in de VR-modus gebruiken</p>
<p>Hoewel het over het algemeen Niet nodig is de schijf af te sluiten om deze op een apparaat af te spelten dat geschikt is voor de VR-modus, dient u een voltoide schijf te gebruiken voor het afspelen op een dergelijk apparaat.</p>
<p>Een DVD-RW-schijf in de videomodus gebruiken</p>
<p>De schijf moet eerst worden afgesloten om op een ander apparaat dan op deze recorder te+kunnen worden afgespeeld.</p>
<p>Als u de schijf hebt afgesloten, kurz u deleze nicht更是 bewerken of ieets erop opnemen. Als u weer op de schijf wilt opnemen, moet u het aflsuielen van de schijf eerst ongedaan maken.</p>
<p>Een DVD-R-schijf gebruiken</p>
<p>De schijf要去erst worden afgesloten om deze op een ander apparaat dan op deze recorder te konnen afspelen. Als de schijf is afgesloten, kan deze Niet meer worden bewerkt of iets erop worden opgenomen.</p>
<p><img alt="" src="images/5f577cf283e6eaa9799df1985bcef4ccfe794308b8f447ee4abd9d591fdbf094.jpg" /></p>
<p>U kurz de schijf automatisch afsluiten met de functie EZ bestand. (zie pagina 39)</p>
<h1 id="accessoires-2">Accessoires</h1>
<p>Controleer of de onderstaande accessoires zijn meegeleverd.</p>
<p><img alt="" src="images/a2a9de11540b6e92be1e6559eef6d6e64852eec0c08907241f3df55789bff65b.jpg" /></p>
<p><img alt="" src="images/7abe2d8f079cec4c92f045080f80341119b270cc26f0b2e1589046a5b225754b.jpg" /></p>
<p><img alt="" src="images/df09f8ad53b6451b161e9c5a1122ebdd93141e9c176f93bd9a20016b4be73757.jpg" /></p>
<h1 id="de-afstandsbediening-voorbereiden">De afstandsbediening voorbereiden</h1>
<h1 id="batterijen-plaatsen-in-de-afstandsbediening">Batterijen plaatsen in de afstandsbediening</h1>
<ul>
<li>Open het batterijklepje aan de achterkant van de afstandsbediening. </li>
<li>Plaatswnee AAA-batterijen. Let bij hetplaatsen op de correcte polariteit (+ en -). </li>
<li>Schuif het batterijklepje weeper op de afstandsbediening.</li>
</ul>
<h1 id="als-de-afstandsbediening-niet-correct-werkt">Als de afstandsbediening Niet correct werkt:</h1>
<ul>
<li>Controller de polariteit (+/−) van de batterijen (Dry-Cell) </li>
<li>Controller of de batterijen leeg zich. </li>
<li>Controller of de sensor van de afstandsbediening Niet door voorwerpen worden geblokkeerd. </li>
<li>Controller of er tl-verlichting in de directe omgeving is.</li>
</ul>
<p>Gooi de batterijen weg volgens de milieuuwetten in uw land. Gooi ze Niet bij het huishoudelijk afval.</p>
<p><img alt="" src="images/85883e1300d2a45f4ccd899573007ad68c3601c1566d85ea18556020dc7d19cd.jpg" /></p>
<h1 id="u-bepaalt-of-uw-tevisie-geschikt-is-door-de-onderstaande-instructies-te-volgen">U bepaalt of uw tevisie geschikt is, door de onderstaande instructies te volgen.</h1>
<ol>
<li>Zet de tevisie aan. </li>
<li>Richt de afstandsbediening op de tevisie. </li>
<li>Houd de toets TV STANDBY/ON ingedrukt en voer met de cijfertoetsen de twecijferige code in voor het merk van de televisionie.</li>
</ol>
<p>Instelbare TV-codes </p>
<table><tr><td>MERK</td><td>TOETS</td></tr><tr><td>SAMSUNG</td><td>01, 02, 03, 04, 05, 06, 07, 08, 09</td></tr><tr><td>AIWA</td><td>82</td></tr><tr><td>ANAM</td><td>10, 11, 12, 13, 14, 15, 16, 17, 18</td></tr><tr><td>BANG & OLUFSEN</td><td>57</td></tr><tr><td>BLAUPUNKT</td><td>71</td></tr><tr><td>BRANDT</td><td>73</td></tr><tr><td>BRIONVEGA</td><td>57</td></tr><tr><td>CGE</td><td>52</td></tr><tr><td>CONTINENTAL EDISON</td><td>75</td></tr><tr><td>DAEWOO</td><td>19, 20, 23, 24, 25, 26, 27, 28, 29, 30, 31, 32, 33, 34</td></tr><tr><td>EMERSON</td><td>64</td></tr><tr><td>FERGUSON</td><td>73</td></tr><tr><td>FINLUX</td><td>06, 49, 57</td></tr><tr><td>FORMENTI</td><td>57</td></tr><tr><td>FUJITSU</td><td>84</td></tr><tr><td>GRADIENTE</td><td>70</td></tr><tr><td>GRUNDIG</td><td>49, 52, 71</td></tr><tr><td>HITACHI</td><td>60, 72, 73, 75</td></tr><tr><td>IMPERIAL</td><td>52</td></tr><tr><td>JVC</td><td>61, 79</td></tr><tr><td>LG</td><td>06, 19, 20, 21, 22, 78</td></tr><tr><td>LOEWE</td><td>06, 69</td></tr><tr><td>LOEWE OPTA</td><td>06, 57</td></tr><tr><td>MAGNAVOX</td><td>40</td></tr><tr><td>METZ</td><td>57</td></tr><tr><td>MITSUBISHI</td><td>06, 48, 62, 65</td></tr><tr><td>MIVAR</td><td>52, 77</td></tr><tr><td>NEC</td><td>83</td></tr><tr><td>NEWSAN</td><td>68</td></tr></table>
<table><tr><td>MERK</td><td>TOETS</td></tr><tr><td>NOBLEX</td><td>66</td></tr><tr><td>NOKIA</td><td>74</td></tr><tr><td>NORDMENDE</td><td>72, 73, 75</td></tr><tr><td>PANASONIC</td><td>53, 54, 74, 75</td></tr><tr><td>PHILIPS</td><td>06, 55, 56, 57</td></tr><tr><td>PHONOLA</td><td>06, 56, 57</td></tr><tr><td>PIONEER</td><td>58, 59, 73, 74</td></tr><tr><td>RADIOLA</td><td>06, 56</td></tr><tr><td>RADIOMARELLI</td><td>57</td></tr><tr><td>RCA</td><td>45, 46</td></tr><tr><td>REX</td><td>74</td></tr><tr><td>SABA</td><td>57, 72, 73, 74, 75</td></tr><tr><td>SALORA</td><td>74</td></tr><tr><td>SANYO</td><td>41, 42, 43, 44, 48</td></tr><tr><td>SCHNEIDER</td><td>06</td></tr><tr><td>SELECO</td><td>74</td></tr><tr><td>SHARP</td><td>36, 37, 38, 39, 48</td></tr><tr><td>SIEMENS</td><td>71</td></tr><tr><td>SINGER</td><td>57</td></tr><tr><td>SINUDYNE</td><td>57</td></tr><tr><td>SONY</td><td>35, 48</td></tr><tr><td>TELEAVA</td><td>73</td></tr><tr><td>TELEFUNKEN</td><td>67, 73, 75, 76</td></tr><tr><td>THOMSON</td><td>72, 73, 75</td></tr><tr><td>THOMSON ASIA</td><td>80, 81</td></tr><tr><td>TOSHIBA</td><td>47, 48, 49, 50, 51, 52</td></tr><tr><td>WEGA</td><td>57</td></tr><tr><td>YOKO</td><td>06</td></tr><tr><td>ZENITH</td><td>63</td></tr></table>
<p>Resultaat : als de televisie geschikt is voor de afstandsbediening, worden deze uitgeschakeld. De tv is nu geprogrammeerd om met de afstandsbediening bediend te worden.</p>
<p><img alt="" src="images/921ff2398acae7b193c151bfef928c56ffc6062dc3a848e518c6425ad0925bb6.jpg" /></p>
<ul>
<li>Als er meertere codes staan voor het merk van uw TV, probeer dan elke code uit totat u de code vindt die werkt. </li>
<li>Als u de batterijen van de afstandsbediening verramt, moet u opnieuw de merkcode instellen.</li>
</ul>
<p>Vervolgens sunt u na de TV-toets te hebben ingedrukt de television bedieren met de volgende toetsen. </p>
<table><tr><td>Toets</td><td>Functie</td></tr><tr><td>TV STANDBY/ON</td><td>Hiermee zet u de televisionaan en uit.</td></tr><tr><td>INPUT SEL.</td><td>Hiermee selecteert u een externe bron.</td></tr><tr><td>TV VOL (+/-)</td><td>Hiermee past u het volume van de televisionaan.</td></tr><tr><td>PROG (▲ / √)</td><td>Hiermee selecteert u het gewenste kanaal.</td></tr><tr><td>TV MUTE</td><td>Hiermee zet u het geluid aan en uit.</td></tr><tr><td>Cijfer</td><td>Hiermee voert u cijfersrechtstreeks in.</td></tr></table>
<p><img alt="" src="images/47d70155ddbbb171e61752e34cfb5b6af58936aa1a868f350c044b6788d40d4b.jpg" /></p>
<ul>
<li>De bovenstaande functies werken nicht altijd bij alle televisies. Als u problemen ondvindt, gebrukt u de toetsen op de tevisie zich.</li>
</ul>
<h1 id="beschrijving">BESCHRIJVING</h1>
<h1 id="voorpaneel">Voorpaneel</h1>
<p><img alt="" src="images/268bf31e9c2a90eb67d59c64c762b3ef894cc4a79bc00e8df4fc3a620ac59af3.jpg" /></p>
<table><tr><td>1</td><td>TOETS OPEN/CLOSE</td><td>Hiermee opent en sluit u de schijflade.</td></tr><tr><td>2</td><td>DISPLAY</td><td>Geeft o.a. de afspeelstatus,ijd weir.</td></tr><tr><td>3</td><td>TOETS HDD/DVD</td><td>Hiermee selecteert u de HDD/DVD-modus.</td></tr><tr><td>4</td><td>TOETS REC</td><td>Hiermee start u de opname.</td></tr><tr><td>5</td><td>TOETSEN ZOKEN/OVERSILAAN</td><td>Hiermee.gaat u maar de volgende/vorigite titel, het volgende/vorigige hoofdstuk of de volgende/vorigite track. (Afspeelmodus)
Hiermee selecteert u voorgedefinierde tv-kanalen. (Stopmodus)</td></tr><tr><td>6</td><td>TOETS PLAY/PAUSE</td><td>Hiermee speelt u een schijf af of onderbreekt u het afspelen.</td></tr><tr><td>7</td><td>TOETS STOP</td><td>Hiermee stopt u het afspelen van de schijf.</td></tr><tr><td>8</td><td>SCHIJFLADE</td><td>Deze kan worden geopend om een schijf teplaatsen.</td></tr><tr><td>9</td><td>AV 3 INPUT</td><td>Hierop sluit u externe apparatuur aan.</td></tr><tr><td>10</td><td>TOETS STANDBY/ON</td><td>Hiermeezet u de recorder aan of uit.</td></tr></table>
<p><img alt="" src="images/71dec695633d6efffadba72fd79c91fa3693625bded99c44d03a881f54fc4967.jpg" /></p>
<h1 id="ventilator">Ventilator</h1>
<p>De ventilator draait altid jld als het apparaat is ingeschakeld. Zorg dat er minimaal 10 cm ruimte is aan alle kanten van de ventilator wonneer het product worden geinstalleerd.</p>
<table><tr><td>1</td><td>Ingang voor antennestekker</td><td>Aansluiten RF-kabel vanaf de Antenne.</td></tr><tr><td>2</td><td>Uitgang voor TV-aansluiting</td><td>Aansluiten RF-kabel op ingang tv-antenne.</td></tr><tr><td>3</td><td>Aansluiting voor AV2(EXT) INPUT SCART-stekker</td><td>Aansluiten op apparatuur met een SCART-uitgang.</td></tr><tr><td>4</td><td>Aansluiting voor AV1(TV) OUTPUT SCART-stekker</td><td>Aansluiten op apparatuur met een SCART-ingang.</td></tr><tr><td>5</td><td>COMPONENT VIDEO UIT</td><td>Hierop sluit u apparatuur met een componentvideo-ingang aan.</td></tr><tr><td>6</td><td>AV AUDIO UIT</td><td>Hierop sluit u de audio-ingang van externe apparatuur met audiokabels aan.</td></tr><tr><td>7</td><td>AVVIDEO UIT</td><td>Hierop sluit u de ingang van externe apparatuur met een videokabel aan.</td></tr><tr><td>8</td><td>DIGITAALAUDIO UIT(COAXIAL)</td><td>Hierop sluit u een versteker met een digitale coaxiale audio-ingang aan.</td></tr></table>
<p><img alt="" src="images/b3486205a39e75399e82233a2cba2fc00f2d19f4f5f8ddd69f33a81c38e44a3c.jpg" /><br />
Display voorpaneel</p>
<p>1 Aanduiding van de schijf statuspictogram brandt. <br />
REC-aanduiding Gaat branden in de opnamemodus. <br />
3 DVD VIEW-aanduiding brandt wanneer de DVD-modus is geselecterd. <br />
4 TIMER-aanduiding Gaat branden bij timer-opnamen. <br />
5 PS-indicator Gaat branden in de progressieve-scanmodus. <br />
6 STATUS-aanduiding Afspeeltijd/klok/indicator huidige status. <br />
7 Aanduiding schijfmedia brandt wanner er een DVD-RW-/R-schij wordt geladen.</p>
<p>De afstandsbediening van uw HDD- & DVD-RECORDER werkkt ook met Samsung-televisiones en compatibile merken.</p>
<p><img alt="" src="images/a847d6ea824804e9e8494c2da0b05b97ea4d4165178b7bf2cbdd644cb6d0d8c0.jpg" /><br />
Batterijenplaatsen in de afstandsbediening</p>
<p><img alt="" src="images/dbd1ef61c37485222619179709b4b37f0df502f72991eb5307785e1c0d9345c1.jpg" /></p>
<p><img alt="" src="images/dd5059273a3c60b2bc15a9cd77a830021a085ece432ed71bc5a8c0f6b5f6ec21.jpg" /></p>
<p><img alt="" src="images/f29877c92c5b69f562d3ee80adeada73404b736061d001f0db35304baab4e6e3.jpg" /></p>
<p><img alt="" src="images/65f8d129defc204bc50fc01290ca2bdf19ee601a28c26f3bf88e6c4fb61f6d95.jpg" /><br />
3. Sluit het batterijklepje.</p>
<ol>
<li>
<p>Open het Klepje aan deijkenkant van de afstandsbediening zoals in de afbeeling worden weergegeven.</p>
</li>
<li>
<p>Plaats twee AAA-batterijen.</p>
</li>
</ol>
<p>Zorg voor dat de ^+ + en - van de batterijen overeenkomen met de afbeelding in het compartment.</p>
<p>Bij normala gebruik van deDTVie is de levensduur van de batterijen ongeveer eenaar.</p>
<p><img alt="" src="images/bc246524dda9848851928a44fde986fbcc983cca57a7f207c709b2c480db9e94.jpg" /></p>
<h1 id="de-hdd-dvd-recorder-aansluiten">DE HDD & DVD-RECORDER AANSLUITEN</h1>
<p>Deze paragraaf beschrijft diverse methoden om de HDD & DVD-RECORDER aan te sluiten op andere externe onderdelen en de vereiste Basisinstellungen.</p>
<p>Als de télévisie over de juiste ingang beschikt, kurz u met de scartkabel de HDD & DVD-RECORDER op de télévisie aansluiten.</p>
<ol>
<li>Sluit de RF-antennekabel aan zoals weergegeven. </li>
<li>Sluit een uiteinde van de SCART-kabel aan op de AV1-aansluiting op de achterkant van de HDD & DVD-RECORDER. </li>
<li>Sluit het andere uiteinde op de juiste aansluiting van de television aan. </li>
<li>Steek de stekkers van de HDD & DVD-RECORDER en de TV in het stopcontact. </li>
<li>Schakel de HDD & DVD-RECORDER en de TV in. </li>
<li>Druk op de toets INPUT SEL. op uw afstandbediening totdat op het scherm van uw tv het videosignaal van de HDD & DVD-RECORDER worden weergegeven.</li>
</ol>
<p><img alt="" src="images/f9a4fcd4407d5c382253f28dcaddc46821bd7c0423e04a1a9b660353818c7043.jpg" /></p>
<p><img alt="" src="images/aa9a9d13b515c0e0b186af41ddf16f5e17d1d86f695cd654a5b6ffeaa11de85f.jpg" /></p>
<ul>
<li>De RF-kabelverbinding van dit product verzendt alleen tv-signalen. U moet audio-/videokabels aansluten om een DVD-schijf vanaf uw HDD &DVD-RECORDER te konnen bekijken. Als u de HDD & DVD-RECORDER uitzet,kest u programmaa's bekijnen die via de RF-kabel ontvangen worden. <br />
TV-modus : druk op de knop TV/DVD op de afstandsbediening zDat "TV" worden weergegeven op de voorste display (of zet de HDD- & DVD-RECORDER uit). Dan kutu programma's bekijken die op TV worden ontvangen.</li>
</ul>
<p>U kunt uw HDD & DVD-RECORDER aansluiten op een satelliet of digitale tuner.</p>
<p><img alt="" src="images/21850b4c0d616681e260884375410843033b12b2916850b437c704f3c8d15c9f.jpg" /></p>
<h1 id="dvd-modus">DVD-modus</h1>
<ol>
<li>Sluit de AV2-aansluiting van de HDD & DVD-RECORDER en video aan op de aansluiting van de satellontvanger of digitale tuner met een SCART-kabel. </li>
<li>Sluit de AV1-aansluiting aan op op de SCART AV-aansluiting op de tv </li>
<li>Zet de HDD & DVD-RECORDER, video/satellitontvanger of digitale ontvanger en tv aan. </li>
<li>Stel de ingangsmodus in op AV2.</li>
</ol>
<h1 id="tv-modus">- TV-modus</h1>
<ol>
<li>Druk op de knop TV/DVD op de afstandsbediening zodate "TV" wordt weergegeven op het voorpaneel (of zet de HDD- & DVD-RECORDER ut). </li>
<li>U kurz programmá's bekijken van een satelliet of digitale tuner die is aangesloten op deze HDD & DVD RECORDER, zichs als de HDD & DVD-RECORDER uit staat.</li>
</ol>
<h1 id="antenne-hdd-dvd-recorder-externe-decoderbox-tv">ANTENNE + HDD & DVD-RECORDER + EXTERNE DECODERBOX + TV</h1>
<p>Als u de exter decoderbox op de HDD & DVD-RECORDER aansluit, kurz u gecodeerde kanalen (uitzendingen van CANAL+ of Premiere) opnemen die worden ontvangen via de ingebouwde tv-tuner in de HDD & DVD-RECORDER.</p>
<p><img alt="" src="images/2ca08ff314d302ec6e45889846fce17592058746fc969ec638d51173dd6d48cd.jpg" /></p>
<ol>
<li>Sluit de RF-antennekabels aan zoals is weergegeven. </li>
<li>Gebruik een SCART-kabel om de AV1-aansluiting op deze recorder aan te sluiten op de AV SCART-aansluiting op de tv. </li>
<li>Sluit de AV2-aansluting aan op een AV SCART-aansluting op de decoderbox. </li>
<li>Als u waar betaaltevisie kijkt, zoals Canal+-programma's, of deze opneemt, moet u de HDD & DVD-RECORDER zodanig instellen dat deze de kanalen ontvangt met het display op het scherm. (Zie pagina 30~31)</li>
</ol>
<h1 id="andere-manier-voor-het-aansluiteen-van-de-video-uitgangskabel">ANDERE MANIER VOOR HET AANSLUITEEN VAN DE VIDEO-UITGANGSKABEL</h1>
<p>Er zijn verschillende manieren om videosignalen te verzenden zonder scartkabels te gebruiken. Selecteer uit de onderstaande lijst met video-aansluitingen de aansluiting die voor u het meest geschikt is.</p>
<ul>
<li>Situation 1: Aansluiten op een (Composite) video-uitgang </li>
<li>Situation 2: Component video-uitgangen</li>
</ul>
<h1 id="componentvideo-en-progressieve-uitvoermodi">Componentvideo en progressieve uitvoermodi</h1>
<ul>
<li>Componentvideo-uitgangen zijn alleen beschikbaar als de tv componentvideo-invoer ondersteunt. Als componentvideo-uitvoer Niet werkt, contrôleert u de tv-aansluitingen en de instellenen voor het selecteren van de tv-invoer. </li>
<li>Vergeleken met standard interlaced video worden bij progressief scannen het aantal videolijnen verdubeld dat waar de TV worden verzonden, wat resulteert in een stabieler, flikkervrijer, duidelijk beeld dan interlaced video. Dit is alleen möglich bij TV's die progressief scannen ondersteunen. </li>
<li>Progressieve scanuitgang (576p): nicht jegere hoge-definitie TV-set is volledig compatibel met dit product. Dit kan ervoor zorgen dat Niet alle beelden just worden weergegeven. Als u problemen ondvindt met 576 progressive scan, wird u aangeraden over te schakenen maar de "standaarddefinitie"-uitvoer. Als u vragen heb't over de compatibilitit van de tv-set met de HDD &DVD-RECORDER model 576p, kutn u contact opnemen met once klantenservice.</li>
</ul>
<h1 id="situation-1-aansluiten-op-een-composite-video-uitgang">Situation 1: Aansluiten op een (Composite) video-uitgang</h1>
<ol>
<li>Gebruik een videokabel (geel) om de video-uitgang (geel) op de HDD & DVD-RECORDER aan te sluiten op de video-ingang (geel) op de tv (of AV-versterker). </li>
<li>Hiermee krijgt u een normale weergavekwaliteit. </li>
<li>Gebruik audiokabels (wit en rood) om de audio-uitgangen op de HDD & DVD-RECORDER aan te sluiten op de audio-ingangen op de TV (of AV-versterker).</li>
</ol>
<p>(zie pagina 25~26)</p>
<p><img alt="" src="images/0db3519ed4e74afeeb8dc77ed9cd4961a1cf800e3c07778abc3182218453ce76.jpg" /></p>
<h1 id="situation-2-componentvideo-uitgangen">Situation 2 : Componentvideo-uitgangen</h1>
<ol>
<li>Gebruik componentvideokabels (niet bijgeleverd) om de COMPONENT OUT-aansluitingen (Y, PB, PR) op de HDD & DVD-RECORDER te verbinden met de COMPONENT IN-aansluitingen (Y, PB, PR) op de tv. </li>
<li>Voor een hoge beeldkwaliteit en nauwgezette kleurweergave. </li>
<li>Gebruik audiokabels (wit en rood) om de audio-uitgangen op de HDD & DVD-RECORDER aan te sluiten op de audio-ingangen op de TV (of AV-versterker). <br />
(zie pagina 25~26). </li>
<li>Raadpleeg na het aansluiten pagina 36.</li>
</ol>
<p><img alt="" src="images/b686fef5923d922a2f4a946f59e61413b7660d542a88b1ac3c65c6518e72332f.jpg" /></p>
<p><img alt="" src="images/e832f8f14eef2ed8a031ae3adb808b732aeb712a91f1cf9f002713c30fe82918.jpg" /></p>
<p>Zorg ervoor dat de kleurgecodeerde aansluitingen overeenkomen. De Y, PB, PR-componentuitgangen van de HDD & DVD-RECORDER要去en worden aangesloten op de exact overeenkomende componentingangen van de TV. <br />
- De instelling voor progressief scannen is alleen beschikbaar wanner de video-uitgang op Component is ingesteld. (zie pagina 36)</p>
<h1 id="andere-manier-voor-het-aansluiteen-van-de-audio-uitgangskabel">ANDERE MANIER VOOR HET AANSLUITEEN VAN DE AUDIO-UITGANGSKABEL</h1>
<p>Er zijn verschillende manieren om geluidssignalen te verzenden zonder scartkabels te gebruiken. Selecteer uit de onderstaande lijst met audio-aansluitingen de aansluiting die voor u het meest geschikt is.</p>
<ul>
<li>Situation 1: Aansluiten op de TV </li>
<li>Situation 2: Aansluiten op een stereoversterker met AV-uitgangen </li>
<li>Situation 3: Aansluiten op een AV-versterker met een digitale uitgang.</li>
</ul>
<p>Gefabricieerd onder licentie van het Amerikaanse patentnummer 5,451,942 en andere Amerikaanse en elders in de wereld verstekte en aangevraagde patenten. DTS en DTS Digital Out waar gereistree handelsmerken en het DTS logo en symbolelijk handelsmerken van DTS, Inc. ©1996-2007 DTS, Inc. Alle rechten voorbehonden.</p>
<p>Geproduedeerd onder licentie van Dolby Laboratories. "Dolby" en het symbol met de dubbele D zich handelsmerken van Dolby Laboratories.</p>
<h1 id="situation-1-aansluiten-op-de-tv">Situation 1: Aansluiten op de TV</h1>
<p>Als uw TV audio-aansluitingen—heeft, gebruikt u deze verbinding.</p>
<p><img alt="" src="images/5053bc78721e2c38dc4f9875a720a48cd650f4fae26031e328df2f068efacca1.jpg" /></p>
<h1 id="situation-2-aansluiten-op-een-stereoversterker-met-av-uitgangen">Situation 2 : Aansluiten op een stereoversterker met AV-uitgangen</h1>
<p>Gebruik de audio-uitgangen als uw stereoversterker alleen audio-ingangen (L en R) hebft.</p>
<p><img alt="" src="images/4a98ee71599f744756d0621f8c137db6610b14229d8a0366f1df07b282de34d8.jpg" /></p>
<h1 id="situation-3-aansluiten-op-een-av-versterker-met-een-digitale-uitgang">Situation 3: Aansluiten op een AV-versterker met een digitale uitgang</h1>
<p>Gebruik deze aansluiting als uw versterker een Dolby Digital, MPEG2- of DTS-decoder en een digitale ingang heeft. Voor Dolby Digital-, MPEG2- of DTS-geluid要去 u de geluidsinstellungen instellen.</p>
<p>Aansluiten op een coaxkabel, afhankelijk van uw versterker. (zie pagina 34~35)</p>
<p><img alt="" src="images/70a8efd342db8057091b111fe35b8ed8b93c1b776b69616e0755235a341b992d.jpg" /></p>
<p>Hiermee(Int) de HDD & DVD-RECORDER op andere externe apparaten aansluiten en hun uitvoer weergeven of opnemen.</p>
<h1 id="een-videorecorder-set-top-box-stb-dvd-speler-of-camcorder-op-de-av3-in-aansluitingen-aansluiten">Een videorecorder, set-top box (STB), DVD-speler of camcorder op de AV3 IN-aansluitingen aansluiten</h1>
<p>Een videorecorder of extern apparatus op AV3 IN-aansluitingen van de HDD & DVD-RECORDER aansluiten. Het is möglich om van aangesloten apparatus op te nemen (videorecorder, STB, DVD-speler of camcorder.)</p>
<p><img alt="" src="images/7fb7533d4c95ae0f1fb3c6c45b5a146651e7267a38d53fad7733c518d069899d.jpg" /></p>
<p><img alt="" src="images/b1487be4940aaea67ca231cbea25e639e1afb04c71c4771c4ac2fdc4377fada4.jpg" /></p>
<ul>
<li>De selectie voor AV3 IN gebeurt automatisch. Als de ingang Niet automatisch worden geselecteerd, gebruikt u de toets INPUT SEL. om de juiste ingang te selecteren. </li>
<li>Tegen kopierten beveiligde inhoud kan nicht worden opgenomen.</li>
</ul>
<h1 id="menunavigatie-op-het-tv-scherm">MENUNAVIGATIE OP HET TV-SCHERM</h1>
<p>Met de menu's op het scherm Aunt u diverse functies op de HDD & DVD-RECORDER in- of uitschakelen. Druk op de toets MENU om het schermmenu te openen en gebruik verwolgens de volgende toetsen om door de schermmenu's te navigeren.</p>
<ol>
<li>▲▼, △toetsen</li>
</ol>
<p>Druk op deze toetsen op de afstandsbediening om de selectiebalk te verplaatsen en door de menuopties te bladeren.</p>
<ol>
<li>Toets OK</li>
</ol>
<p>Druk op deze toets op de afstandsbediening om alle{nieuwe instellen- te bevestigen.</p>
<ol>
<li>Toets RETURN</li>
</ol>
<p>Druk op deze toets op de afstandsbediening om terug te keren maar het eerder weergegeven schermmenu of om het menu op het scherm af te sluiten.</p>
<ol>
<li>Toets EXIT</li>
</ol>
<p>Druk op deze knop om het schermmenu ate sluiten.</p>
<p><img alt="" src="images/65cbc084c6873ea38abc97d8ceba98066f1eaf12b715cfadbdc17974f610d3d8.jpg" /></p>
<h1 id="plug-play-instellen">PLUG & PLAY INSTELLEN</h1>
<p>De HDD & DVD-RECORDER worden automatisch ingesteld als deze voor het eerst worden ingeschakeld. TV-stations en de klok worden in het geheugen opgeslagen. Dit proces duurt enkele minutes. De HDD & DVD-RECORDER is dan�koor gebruik.</p>
<ol>
<li>Sluit de RF-kabel aan zoals op pagina 20 is aangegeven. <br />
(Uw HDD & DVD-RECORDER op de TV aansluiten met de RF-kabel en scartkabel) </li>
<li>Steek de stekker van de HDD & DVD-RECORDER in het stopcontact. <br />
Op het display van het voorpaneel knippert "AUTO". </li>
<li>Kies de gewenste taal met behulp van de cijfertoetsen. </li>
<li>Druk op OK om het automatisch instellen te starten. </li>
<li>
<p>Gebruik de toetsen om uw land te selecteren.</p>
</li>
<li>
<p>Zie de onderstaande tabel met afkortingen bij het selecteren van uw land.</p>
</li>
</ol>
<table><tr><td>A(Oostenrijk)</td><td>NL(Nederland)</td><td>S(Zweden)</td><td>PL(Polen)</td></tr><tr><td>B(België)</td><td>I(italië)</td><td>CH(Zwiserland)</td><td>CZ(Tsjechë)</td></tr><tr><td>DK(Denemarken)</td><td>N(NOorwegen)</td><td>TR(Turkije)</td><td>Ander</td></tr><tr><td>FIN(Finland)</td><td>P(Portugal)</td><td>GR(Griekenland)</td><td></td></tr><tr><td>D(Duitsland)</td><td>E(Spanje)</td><td>HU(Hongarije)</td><td></td></tr></table>
<ul>
<li>De HDD & DVD-RECORDER gezakt de stations volgens een voorgedefinieerde voorkeurslijst die overeenkomt met het land dat u heb geselecteer.</li>
</ul>
<p><img alt="" src="images/4e438bd1e740749986f1097a2fa9959f32c580d3f74f9b7a3f05bb723dc1a15b.jpg" /></p>
<p><img alt="" src="images/9f5a39d3ab875cdae69a5d37c817daf6105a1060dc487c98aab138ca575d06a0.jpg" /></p>
<p><img alt="" src="images/97911cda05bee5823f16658e9422716b81ca33e542ae2f6a13c7b099e607e555.jpg" /></p>
<p><img alt="" src="images/40c1d1bd15b0408ebcef11333da33c25da75f5e0db53f2ddc37580ad4cb3f71c.jpg" /></p>
<ol>
<li>
<p>Het automatisch scannen van de zenders worden gestart.</p>
</li>
<li>
<p>Het aantal stations dat automatisch door de HDD & DVD-RECORDER worden opgeslagen, hangt af van het aantal gezonden stations. </p>
</li>
<li>Nadat het automatisch Scannen van zenders is voltooid, worden de functie voor het automatisch instellen van de klok binnen 10 seconden gestart. Wilt u de klokfunctie direct starten, dan drukt u op OK. </li>
<li>Wacht totdat de huidige datum enijd automatisch worden weergegeven. Als u de klokfunctie wilt sluiten, drukt u op MENU.</li>
</ol>
<p><img alt="" src="images/9f6b8ed4aea2623bfcc8e7bdf55fe17c922a03b9b96d7b996d422991904dba54.jpg" /></p>
<ul>
<li>Nu is uw HDD & DVD-RECORDER maar voor gelebruik. "Plug & Play instellen" is voltooid. U(Int) deinstallingen wijzigen door de stations handmatig in te stellen via het menu "Zenderinstelling - Handmatig installment". (zie pagina 31) </li>
<li>
<p>De functie Automatisch instellen kan worden uitgevoerd door 10 seconden of langer op de recorder op STOP (⊙) te drukken toenwijl het apparatusaat is uitgeschakeld en er geen schijf is geplaatst.</p>
</li>
<li>
<p>Controller de datum en de tijd.</p>
</li>
<li>
<p>Als deutsche just is, drukt u op de toets OK om de datum enijd op te slaan. Als u Niet op OK drukt, worden de datum enijd na 5 seconden automatisch opgeslagen. </p>
</li>
<li>Als deze nicht jeust is, voert u de mnd, dg, jr, u of de min in met de toetsen ▲▼ ▲▶ of de cijfertoetsen. Druk op de toets OK om de datum enijd op te sloan. Wanner u de kloinstelling wilt veranderen, stelt u deze handmatig in.</li>
</ul>
<p><img alt="" src="images/67ed0cd58f676ad11fbcb3863d19712b59b569d6dfecd313bb44a6446d8973dc.jpg" /></p>
<h1 id="de-klok-instelllen">DE KLOK INSTELLLEN</h1>
<p>Met dit menu kurz u de huidige tijd instellen.</p>
<p>Om een timer-opname te konnen make, moet u eerst deijd instellen.</p>
<ol>
<li>Druk in de stopstand op de toets MENU. </li>
<li>Druk op de toetsen om Installen te selecteren en druk cervolgens op de toets OK of . </li>
<li>Druk op de toetsen om Systeem te selecteren en druk op OK of op de toets . </li>
<li>Druk op de toetsen om Klok instellen te selecteren en druk op OK of op de toets .</li>
</ol>
<p>Gebruik de toetsen ▲▼ △▶ om de Maand, Dag, het Uur of de Minuten in te voeren. Gebruik de cijfertoetsen om de klokgegevens direct in te voeren.</p>
<p>De dag van de week worden automatisch weergegeven.</p>
<ol>
<li>Druk op de toets OK om de datum enijd op te slaan. Indien u Niet op OK drukt, worden deze gegevens nicht opgeslagen.</li>
</ol>
<p><img alt="" src="images/9362440664e80fa6a0fb936203eef39004ee29ccdd6068e70dcd14c0d946a50b.jpg" /></p>
<ul>
<li>De RF-kabel要去নী aangesloten om de klok automatisch in te stellen. (zie pagina 20) </li>
<li>De HDD & DVD-RECORDER stelt automatisch de klok in, in overeenstemming met het tijsdsignal dat worden doorgegeven:tussen de kanalen PR1 t/m PR5. Als u de functie Klok instellen nicht nodig hebt, selecteert u Uit.</li>
</ul>
<p><img alt="" src="images/b102e7866e49a87cbd8e0a77701e199c9f26e1847029137c34138e403e98ee42.jpg" /></p>
<p><img alt="" src="images/7965443344d62ebee73e18ee5d60649f85e8ee55734eb53143024fedaa08a22e.jpg" /></p>
<p><img alt="" src="images/3edc833fc48d0321ffb7b54d090393445bb16fa9543fab6872d2456e1fb6a5db.jpg" /></p>
<h1 id="zenderinstelling">ZENDERINSTELLING</h1>
<h1 id="automatische-installmentie">Automatische installmentie</h1>
<p>Met deze functie kurz u de tunerband van de HDD & DVD-RECORDER automatisch maar de beschikkbare zenders latent Zoeken en deze opslaan.</p>
<ol>
<li>Druk in de stopstand op de toets MENU. </li>
<li>Druk op de toetsen om Installen te selecteren en druk cervolgens op de toets OK of . </li>
<li>Druk op de toetsen om Zenderinstelling te selecteren en druk op OK of op de toets .</li>
</ol>
<p><img alt="" src="images/d1e57972ea4b18a3dd358db9a2754d91a7cd49a3b362df4aa551b8c607006cf9.jpg" /></p>
<ol>
<li>Druk op de toetsen om Automatische installmente te selecteren en verrolgens op OK of op de toets . De volgende melding verschijnt: "Uw gegevens gaan verloren. Druk op [OK] om door te gaan, op [RETURN] om af te sluiten". </li>
<li>
<p>Druk op OK en druk verwolgens op de toetsen om uw land te kiezen.</p>
</li>
<li>
<p>De HDD & DVD-RECORDER gezakt de zenders volgens een voorgedefinierde voorkeurslijst die overeenkomt met het land dat u heb geselecteerd. (zie pagina 28)</p>
</li>
<li>
<p>Druk op de toets OK. Het scannen van kanalen worden gestart.</p>
</li>
<li>
<p>De eerste frequentieband worden gescand en de eerstgevonden zender worden weergegeven en opgeslagen. Er worden naar de tweede zender gezocht, enzovoort. </p>
</li>
<li>Het aantal zenders dat automatisch door de HDD &DVD-RECORDER worden opgeslagen, hangt af van het aantal gezonden zenders.</li>
</ol>
<p><img alt="" src="images/4a8b08d098bc6c59decc02f0d73e6c704997d06762486fd1be09f01869d2b983.jpg" /></p>
<ul>
<li>Druk op de toets OK om het automatisch instellen te stoppen.</li>
</ul>
<h1 id="handmatig-installment">Handmatig installment</h1>
<p>U kunt een zender die de functie voor automatisch zender zoeken heeft gemist, handmatig toevoegen. Bovendien kunt u zenders verwijderen en de volgorde van de zenders wijzigen.</p>
<p>Volg voor deze instelling stap 1 t/m 3 bij "Automatische installmente" op pagina 30.</p>
<ol>
<li>Druk op de toetsen om Handmatig installmente te selecteren en druk op OK of op de toets . </li>
<li>Druk op de toetsen om een PR (programma) te selecteren dat u wilt bewerken, verwijderen of wisselen en drukervolgens op de toets Kleur.</li>
</ol>
<p>Selecteer Wijzigen, Verw. of Wissel.</p>
<ul>
<li>
<p>In het geval van Wijzigen (RODE toets (A)): u kurz PR (programma)-informatie teveogeen of bewerken. Na de programma-informatie te hebben gewijzigd (CH (Kanaal), Naam, Decoder, MFT, Systeem), selecteert u Opslaan en drukt u verwolgens op OK.</p>
</li>
<li>
<p>CH: Stel het kanaal af met de toetsen of met de cijfertoetsen. </p>
</li>
<li>
<p>Naam : Geeft de zendernaam automatisch wee in het zendsignaal is gezonden. Als deze nicht worden gezonden, kurz u de naam bewerken met de toetsen ▲▼▲▶.</p>
</li>
<li>
<p>Decoder : Als u deutsche inschakelt, kurz u gecodeerde kanalen opnemen met de externe decoderbox. Zie de instructies voor het aansluiten van de externe decoderbox op pagina 22 voordat u deutsche inschakelt.</p>
</li>
<li>
<p>MFT (Manual Frequency Tuning): Met de toetsen kunt u de kanaalfrequentie better afstellen. </p>
</li>
<li>
<p>Systeem : U kunt het uitzendsystemeer selecteren van het te ontvangen kanaal (B/G of L/L').</p>
</li>
<li>
<p>Verw(ijder) (GROENE toets (B)): de kanaalgeevens van het geselecteerde PR (programma) worden verwijderd. </p>
</li>
<li>Wissel (GELE toets (C)): Het is möglichk de kanaalgegevens van twee PR's (programma's) te wisselen. Als u bijvoordel PR2 en PR5 wilt wisselen, selecetert u Wisselen bij PR2 en drukt u bij PR5 op OK.</li>
</ul>
<p><img alt="" src="images/982e3ab9d20e80ab4dbd93ef1abc62e8449df121b2a15e423e3d7fd9e04e493c.jpg" /></p>
<p><img alt="" src="images/9940c0b8605f40dedb3f690b9f340194b14a2389c99fe729212bfe667c247a24.jpg" /></p>
<h1 id="de-taalopties-instellen">DE TAALOPTIES INSTELLEN</h1>
<p>Als u de taalopties van tevoren instelt, worden deze standard gebruikt wanner u een film kijkt.</p>
<ol>
<li>Druk in de stopstand op de toets MENU. </li>
<li>Druk op de toetsen om Installen te selecteren en druk cervolgens op de toets OK of . </li>
<li>Druk op de toetsen om Taal te selecteren en druk op OK of op de toets . Het menu met taalinstellungen verschijt. </li>
<li>
<p>Druk op de toetsen om de gewennen taaloptie te selecteren en druk op OK of op de toets .</p>
</li>
<li>
<p>Geluid : voor de taal van het geluidsspoor van de schijf. </p>
</li>
<li>Ondertitelis : voor de ondertitelis van de schijf. </li>
<li>Disc menu : Voor het schijfmenu op de schijf. </li>
<li>
<p>Menu : voor het tv-schemmenu van de HDD & DVD-RECORDER.</p>
</li>
<li>
<p>Druk op de toetsen om de gewonnenste taal te selecteren en druk op OK of op de toets .</p>
</li>
</ol>
<p><img alt="" src="images/10cb8d02725a3e2a492a573a128f6bfacfa55a09457211e1508c4279aa7f4aed.jpg" /></p>
<p><img alt="" src="images/79a7f268c9606403e2eb1173f90f5d42322b8c0b9f19ce5a3fd60e1c7711a0df.jpg" /></p>
<ul>
<li>Indien de geselecteerde taal Niet op de schijf is opgenomen, worden de taal geselecteerd waarin de schijf werd opgenomen. </li>
<li>De geselecteerde taal verschijnt alleen als deze op de schijf worden ondersteund.</li>
</ul>
<h1 id="de-systeemopties-instellen">DE SYSTEEMOPTIES INSTellen</h1>
<p>Met deze functie kurz u de systeinstellungen invoeren.</p>
<ol>
<li>Druk in de stopstand op de toets MENU. </li>
<li>Druk op de toetsen om Installen te selecteren en druk cervolgens op de toets OK of . </li>
<li>Druk op de toetsen om Systeem te selecteren en druk op OK of op de toets . </li>
<li>Druk op de toetsen om de gewenste systeemoptie te selecteren en druk op de toets OK of . </li>
<li>Druk op de toetsen om het gewenste item te selecteren en druk op de toets OK of .</li>
</ol>
<p><img alt="" src="images/2b026c1bc31b3dd0735d0f966aed0de2e2393bff55527604a307e6e6bc3c74b2.jpg" /></p>
<h1 id="instelling-voor-automatisch-uitschakelen">Instelling voor automatisch uitschakelen</h1>
<p>Met deze functie worden de HDD & DVD-RECORDER automatisch uitgeschakeld als u gedurende de geselecteerde hijd geen toets indrukt.</p>
<ol>
<li>
<p>Druk op de toetsen ▲▼ om Automatisch uit te selecteren en druk op OK of op de toets ▷.</p>
</li>
<li>
<p>Druk op de toetsen om het gewenste item te selecteren en druk verwolgens op OK of op de toets .</p>
</li>
<li>
<p>Uit: De functie Automatische uitschakeling isuitgeschakeld. </p>
</li>
<li>2 Uur : De recorder worden automatisch uitgeschakeld als u twee uurtiet op een toets hebt gedrukt. </li>
<li>6 Uur : De recorder wirdt automatisch uitgeschakeld als uzes uur nicht op een toets hebt gedrukt. </li>
<li>Alsijdens het afspelen of opnemen de tijd worden bereikt die was ingesteld met de functie Automatisch uitschaken, za het apparaat functioneren totdat het afspelen of opnemen klaar is.</li>
</ol>
<p><img alt="" src="images/f69509894636d2b21bca220615f1184d4c1157422cca545aa94f6409ba67c2b3.jpg" /></p>
<h1 id="divxr-registratie">DivX(R) registratie</h1>
<p>Voor het aanmelden van dele Ze HDD & DVD-RECORDER voor het DivX(R) Video On Demand-formaat heb u uw registratiecode nodig. Raadpleeg vooreer informatie www.divx.com/vod</p>
<p><img alt="" src="images/b313414ab25b26709d63256b2a87eb52e30e91e244ee28a4c604aa8bbbe20464.jpg" /></p>
<h1 id="de-geluidsopties-instellen">DE GELUIDSOPTIES INSTellen</h1>
<p>U kurz de HDD & DVD-RECORDER op een externte versterker of thuisbioscoop aansluten</p>
<p>Hiermee(Int) de instellingen van geluidsapparatuur en de geluidsstatus regelen afhankelijk van het gebruekte geluidssystem.</p>
<p>U kunt ook de modus NICAM instellen.</p>
<ol>
<li>Druk in de stopstand op de toets MENU. </li>
<li>Druk op de toetsen om Installen te selecteren en druk cervolgens op de toets OK of . </li>
<li>Druk op de toetsen om Geluid te selecteren en druk op OK of op de toets . </li>
<li>Druk op de toetsen om de gewennen gestulidsoptie te selecteren en druk verrolgens op OK of op de toets . </li>
<li>Druk op de toetsen om het gewenste item te selecteren en druk verwolgens op OK of op de toets .</li>
</ol>
<p><img alt="" src="images/b0e17849ba38b0b09968e599e7fbd99250a4277fb7cbef71960c2adbcb59562e.jpg" /></p>
<h1 id="digitale-output">Digitale output</h1>
<ul>
<li>PCM : selecteer deze optie wanneser uw apparaat geen Dolby Digital (of MPEG-2) kan decoderen. </li>
<li>Bitstream : voert Dolby Digital-geluid (of MPEG-2)uit als bitstream. Selecteer deze optiek wanner uw AV-ontvanger of AV-versterker over een Dolby Digital-(of MPEG-2-) decoder beschikt.</li>
</ul>
<p><img alt="" src="images/484573fbeaa04a727009d5e91851c1edc278ab0731472e0862292b6b0f97406a.jpg" /></p>
<ul>
<li>De instelling voor digitale uitvoer geldt zowel voor Dolby Digital- als MPEG-2-geluid. De LPCM-audiotrack worden aftijd als PCM uitgevoerd. </li>
<li>Selecteer de juiste digitale uitvoer, anders hoor u geen geluid of hard geluid.</li>
</ul>
<p><img alt="" src="images/7ae1a7dcbfef42988b523adfbfe1a587fb3bb93c4c62d0624f90ba47e2fdede7.jpg" /></p>
<h1 id="dts-3">DTS</h1>
<ul>
<li>Uit: Verzendt geen DTS-signaal. Selecteer deze optie wanneer uw AVontvanger (of AV-versterker) Niet voorzien is van een DTS-decoder. </li>
<li>Aan: Verzendt DTS-bitstream via digitale uitvoer wanner u een DTS-track afspeelt. Selecteer deze optie wanner uw AV-ontvanger (of AV-versterker) Niet voorzien is van een DTS-decoder.</li>
</ul>
<p><img alt="" src="images/5c5fe374dfe4b8948efb08897d8d1f357ac2a90daaf1c0c82da075b7a43fd232.jpg" /></p>
<p>Bij het afspelen van de DTS-audiotrack worden het geluid Niet via de AVaudio-uitgang uitgevoerd.</p>
<p><img alt="" src="images/e8761185a2f7509a5900cfc176129287b33e01675196f15c11f1e93421845181.jpg" /></p>
<h1 id="drc-3">DRC</h1>
<p>Deze is alleen actief wanner er een Dolby Digital-signaal is gedetecteerd.</p>
<p>Aan: Wanneru filmmuziek zachtjes afspeelt of met Kleinere speakers, kan het systeem de juiste compressie toepassen om de zachte inhoud verstaanbaarder te makeen en om te voorkommen dat dramatische passages te hard klinken. <br />
- Uit: U kurz de film bekijken met het standard dynamisch bereik.</p>
<p><img alt="" src="images/7b094bbd09b62354d0dae548f04f3fa2450c6e08d8fdaf50e587c40a573e0f4a.jpg" /></p>
<h1 id="nicam-3">NICAM</h1>
<p>NICAM-programma's worden verdeld in 3 typen. NICAM stereo, NICAM mono en tweetalig (transmissie in andere taal). NICAM-programma's—hebben alkijd een standard monogeluid en u kunt het gewenste geluid selectoreren door NICAM in ofuit te schaken.</p>
<p>Aan: NICAM-modus <br />
- Uit: schakel deze optie alleen in bij het opnemen van het standardaard monogeluidijdens een NICAM-uitzending, als het stereogeluid worden verstoord door slechte ontvangstomstandigheden.</p>
<p><img alt="" src="images/42acb18a5d542c8553cfe5c61872b4c9845bc96b00c112d5a522fa692ba160cf.jpg" /></p>
<h1 id="devideo-opties-instellen">DEVIDEO-OPTIES INSTELLEN</h1>
<p>Met deze functie kurz u de video-installingen invoeren.</p>
<p>Deze functie hangt af van het schijftype. Bij sommige schijven werkdt deze namelijk Niet.</p>
<ol>
<li>Druk in de stopstand op de toets MENU. </li>
<li>Druk op de toetsen om Installen te selecteren en druk cervolgens op de toets OK of . </li>
<li>Druk op de toetsen om Video te selecteren en druk op OK of op de toets . Het menu met beeldinstellungen verschijnt. </li>
<li>Druk op de toetsen om de gewenste beeldoptie te selecteren en druk verwolgens op OK of op de toets . </li>
<li>Druk op de toetsen om het gewenste item te selecteren en druk verzolgens op OK of op de toets .</li>
</ol>
<p><img alt="" src="images/9891db4607e6ca84dcaf0151e2b1ed0916af72d9f4ae1425e2dffa838ba12033.jpg" /></p>
<h1 id="normaalbreedbeeld">Normaal/Breedbeeld</h1>
<p>Afhankelijk van het type televisie(Int)kunt u de instellenen voor het beeld aanpassen (beeldformaat).</p>
<ul>
<li>4:3 Letter Box: Selecteer deze optie als u het gehele 16:9-schem wilt zich dat DVD bjedt, ook al heeft uw TV een beeldformaat van 4:3. Aan de boven- en onderkant van het scherm ziet u Zwarte balken. </li>
<li>4:3 Pan-Scan : Selecteer deze optie voor conventionele tv's als u het centrale deel van het 16:9-schem wilt zien. (De uiterste rechtter- en linkerkant van het beeld worden afgesneden). <br />
16:9 Wide : U ziet het volledige 16:9-beeld op uw breedbeeldtelevisie.</li>
</ul>
<p><img alt="" src="images/6ab0ccaa71c080228e857e73841be960c66224a78e6f5ee630ab26e45aad87d0.jpg" /></p>
<h1 id="3d-ruisonderdrukking-motion-adaptive-ruisonderdrukking">3D-ruisonderdrukking (motion adaptive ruisonderdrukking)</h1>
<ul>
<li>Uit: Normaal <br />
Aan: Biedt een helderde beeld via risonderdrukking (voor opnames).</li>
</ul>
<p><img alt="" src="images/2c905153ec549ebfb42e667db38674ad4b9edea2b13d10db6c49bf7fbb56f8aa.jpg" /></p>
<h1 id="video-uitvoer">Video-uitvoer</h1>
<p>U krijt een hogere weergavekwaliteit wanneer u gebruik maakt van de RGB- of componentvideoaansluiting. RGB-video-uitvoer is beschikbaar als u de scart-stekker (AV1) aansluit, componentvideo-uitvoer is beschikbaar als u de componentstekker (Y, P_B, P_R) aansluit. Slechts eén van deze signalen kan per keer geselecteerd worden.</p>
<ul>
<li>Component <br />
RGB</li>
</ul>
<p><img alt="" src="images/292aa1915c71091e998ad241a02c9855d65e188916f5293dd08601cd1ca061da.jpg" /></p>
<p>In de modus Componentkest u de video-uitgang instellen op Progressief of Interlace. Zullen de video-uitgangen als volgt beschikkaar zich.</p>
<h1 id="beschikbare-video-uitgangen">Beschikbare video-uitgangen</h1>
<table><tr><td colspan="2">Instellingsmodus
Uitgang</td><td>Modus Component</td><td>De modus RGB instellen</td></tr><tr><td colspan="2">Componentuitgang
(Y, Pb, Pr)</td><td>○</td><td>×</td></tr><tr><td rowspan="2">AV1 Scart</td><td>R, G, B</td><td>×</td><td>○</td></tr><tr><td>Composite</td><td>○</td><td>×</td></tr><tr><td colspan="2">Composite Video-uitgang</td><td>○</td><td>○</td></tr></table>
<h1 id="component-uitvoer-progressieve-scan">Component uitvoer (Progressieve scan)</h1>
<p>Deze functie is beschikbaar in het geval van componentvideo-uitvoer. Met deze instelling kut u de progressieve modus selecteren. Als u de 'Progressieve-scanmodus' wilt weergeven,要去 erst de componentkabel worden aangesloten. (Zie pagina 24) Controller of de componentkabels juist+zijn aangesloten.</p>
<h1 id="progressieve">Progressieve</h1>
<p>De melding "Wit u de modus Progressieve handhaven? Terug over 10 sec." worden weergegeven. Selecteer Ja om terug te keren maar de progressieve modus.</p>
<h1 id="interlace-2">- Interlace</h1>
<p>De melding "Wilt u de modus Interlace handhaven? Terug over 10 sec."\
wordt weergegeven. Selecteer Ja om terug te keren maar de interlaced modus.</p>
<p><img alt="" src="images/af5b2ec1869eed3848b3cd645418a2e03149a68f049e86ebb3304a3509e83d2b.jpg" /></p>
<p>De functie Kinderslot werkbt bij DVD's die voorzien zijn van een classificatie. Zo kurz u controle houden over het type films waarnaar uw gezin kikt. Een schijf bevat maximaal acht classificatie niveaus.</p>
<ol>
<li>Druk in de stopstand op de toets MENU. </li>
<li>Druk op de toetsen om Installen te selecteren en druk vervolgens op de toets OK of . </li>
<li>Druk op de toetsen om Kinderslot te selecteren en druk op OK of op de toets .</li>
</ol>
<p>De eerste keer dat u de HDD & DVD-RECORDER gebruikt, verschijnt de melding "Toegangscode Instellen".</p>
<ol>
<li>Voer de vierciferinge toegangscode in met de cijfertoetsen op de afstandsbediening.</li>
</ol>
<p>De melding "Geef de toegangscode nogmaals in" verschijt. Voer de toegangscode nogmaals in.</p>
<p><img alt="" src="images/cff5a3620791e501d0890685282d53d25197e4a38e26454ba9ff5f9d2b1fca1d.jpg" /></p>
<h1 id="als-u-uw-toegangscode-bent-vergeten">Als u uw toegangscode bent vergeten</h1>
<ol>
<li>Verwijder des schijf. </li>
<li>Houd de toets PLAY/PAUSE (▶II) op het voorpaneel minstens tien seconden ingedrukt.</li>
</ol>
<h1 id="het-classificationiveau">Het classificationiveau</h1>
<ol>
<li>Druk op de toetsen om Niveau te selecteren en druk op OK of op de toets . </li>
<li>Druk op de toetsen om het gewenste classificatieniveau te selecteren en druk op OK of op de toets . Als u bijvoorbeeld niveau 6 kiest, worden schijven van niveau 7 of 8 nicht afgeseeeld. Een hoger cijfer geeft aan dat het programme alleen voor volwassenen is bestemd.</li>
</ol>
<p><img alt="" src="images/568638e74533c8c702a414bfabc0b0139d836a5ff9aee08efdb54e70a0be67bb.jpg" /></p>
<h1 id="de-toegangscode-wijzigen">De toegangscode wijzigen</h1>
<ol>
<li>Druk op de toetsen om Toegangscode wijzigen te selecteren en druk op OK of op de toets . </li>
<li>Voer de viercijferige toegangscode in met de cijfertoetsen op de afstandsbediening. De melding "Geef de toegangscode nogmaals in" verschijnt. </li>
<li>Voer de toegangscode nogmaals in met de cijfertoetsen op de afstandsbediening.</li>
</ol>
<p><img alt="" src="images/66b5844c3b6cba5892fff3d0c38343b842d7b3f2a415c9b98e06d27193ee002e.jpg" /></p>
<p>U kunt het wachtwoord wijzigen zodia het Niveau (Classificatieniveau) is ingesteld.</p>
<p><img alt="" src="images/2e23cf876201622371e37124be72aacf3276f74efdba4b513e670ccc9774130a.jpg" /></p>
<h1 id="hoofdstuk-maken">Hoofdstuk maken</h1>
<p><img alt="" src="images/3fbfd101eef2cb49a944480f6299427fea76abe26a38a23a76cc989529f492ff.jpg" /></p>
<p>DVD-RW</p>
<p><img alt="" src="images/ace07ec64c0b6d901b9ee5fd488b9f6e66eb9a04ba074e0bfe0c60908cce944d.jpg" /></p>
<p>(V-modus)</p>
<p>Een DVD-video bestaat uit 'titels' en 'hoofdstukken'. Als u eenPROGRAMMA opneemt, worden een titel gemaakt.</p>
<p>Als u deze functie gebruikt, worden de titel verdeild in hoofdstubken.</p>
<ol>
<li>Druk op de toetsen om Installen, te selecteren en druk cervolgens op OK of op de toets . </li>
<li>Druk op de toetsen om Opname, te selecteren en druk op OK of op de toets . </li>
<li>Druk op de toetsen om Hoofdstuk maken te selecteren en druk op OK of op de toets . </li>
<li>
<p>Druk op de toetsen om Uit of Aan te selecteren en druk op OK of op de toets .</p>
</li>
<li>
<p>Uit: SelecteerDEXe optie wanner u de functie Automatisch hoofdstuk maken nicht wilt gebruiken. </p>
</li>
<li>Aan : Selecteer们都 optie wanneer u de functie Automatisch hoofdstuk maken wel wilt gebruiken.</li>
</ol>
<p>Druk op de toets EXIT (①) om het menu af te sluiten.</p>
<p><img alt="" src="images/0647d8fb2000de6f44c5f9f095860ae3436daa4b4e5d3d86c167d29d839b3c46.jpg" /></p>
<ol>
<li>Druk op de toets REC om het opnemen te starten. <br />
(Raadpleeg pagina 63 over het instellen van de Opnamesnelheid). De volgende melding verschijnt : "Wilt u het hoofdstukmenu make na deze opname?" </li>
<li>Druk op de toetsen om OK te selecteren en druk cervolgens op OK. </li>
<li>Elk/Newhoofdstuk worden gemaatk op basis van de geselecteerde opnamemodus. Een hoofdstuk duurt ongeveer 5 minuten in XP en SP en in de modi LP en EP 15 minutes. </li>
<li>Druk op de toets STOP (O) om het opnemen te stoppen. </li>
<li>U geeft de gemaaakte titels weeer door de schijf af te sluiten (zie pagina 90) en op de toets TITLE MENU te drukken. Het titelmenu verschijnt. </li>
<li>U geeft de gemaaakte hoofdstubken weeer door op de gewenste titel te klikken en vervolgens op de toets DISC MENU te drukkken. Het hoofdstubmenu voor de geselecteerde titel verschijnt.</li>
</ol>
<p><img alt="" src="images/392089fb76363d161ec8db91b9804312cdb47906291345dd9895b2c4acf2d70f.jpg" /></p>
<ul>
<li>De functie Automatisch hoofdstuk makew erkt nicht tijdens een Timer-opname of wanner u het apparaat uitschakelt.</li>
</ul>
<h1 id="tijdinstelling-ep-modus">Tijdinstelling EP-modus</h1>
<p>U kunt een van de vier opnamemodi selecteren door herhaaldelijk op de toets REC MODE te drukken.</p>
<p>In de EP-modus (Extended Play)kest u een opnametijd van 6 of 8 uer instellen.</p>
<p>6 Uur <br />
8Uur</p>
<p><img alt="" src="images/1f8e9586068b5b8640ab23dd5aa8b51f01282f8f466f4c455d85248edec894c5.jpg" /></p>
<p>Met behulp van deze functie kunt u een schijf automatisch initialiseren en afsluiten.</p>
<ol>
<li>Druk op de toetsen om EZ bestand te selecteren en druk verwolgens op de toets OK of . </li>
<li>Druk op de toetsen om Aan te selecteren en druk vervogens op de toets OK of .</li>
</ol>
<p>Druk op de toets EXIT (④) om het menu af te sluiten.</p>
<ol>
<li>Plaats een schijf.</li>
</ol>
<p>Als de schijf zich is, worden deze automatisch geinitialiseerd.</p>
<ol>
<li>Druk op de toets REC. </li>
<li>
<p>In de opnamestand EZ bestand worden de schijf automatisch afgesloten onder de volgende voorwaarden.</p>
</li>
<li>
<p>Als u op de toets OPEN/CLOSE van uw HDD- & DVD-RECORDER drukt nadat de opname voor 70% is voltooid, worden de lade geopend nadat de schijf volledig is afgesloten. </p>
</li>
<li>De bovenstaande functie is alleen beschikbaar als er een DVD-RW(V), DVD-R-schijf is geplaatst.</li>
</ol>
<p><img alt="" src="images/9f5ce705aaa006e684fc74bf0723e73f31fdec7fcbb61333921ddcdcb1280ab9.jpg" /></p>
<ul>
<li>Als u een neue DVD-RW-schijf staat, worden deze na automatische initialisatie in V-modus geformatteerd. </li>
<li>Als uuit selecteert, moet u de schijf handmatig initiaiseren (zie pagina 60) en afsluiten in het menu Schijfbeheer (zie pagina 90). <br />
Opnamelengthe kan varieren, afhankelijk van de opnamestand. (zie pagina 40~41)</li>
</ul>
<h1 id="compatible-met-v-modus">Compatible met V-modus</h1>
<p>Deze functie regelt de instelling voor de selectie van audio bij het opnemen van een NICAM STEREO (Multi-audio)-programma op de vaste schijf (HDD). De functie is nicht van invloed op de directe opname van een programma op DVD.</p>
<ul>
<li>Uit: Zowel "Dual L" en "Dual R" van het multi-audioprogramma worden op de vaste schijf (HDD) opgenomen. Titels die op basis van een dergelijkste instelling op de vaste schijf (HDD) zijn opgenomen, können nicht worden gekopieerdaar DVD-R of DVD-RW (V-modus). </li>
<li>Aan: Of "Dual L" of "Dual R" van het multi-audioprogramma worden op de vaste schijf (HDD) opgenomen. Titels die op basis van een dergelijkte instelling op de veste schijf (HDD) zijn opgenomen, können worden gekopieerd maar DVD-R of DVD-RW (V-modus). De opties "Dual L" en "Dual R" können onder "Audioselectie" worden geselecteerd.</li>
</ul>
<p><img alt="" src="images/1a5189890144a459059b5f058c4cb7ca1166911b030bfeae856ea1975a801bc2.jpg" /></p>
<p><img alt="" src="images/71631a3aabc78eb75326c1f3ee4277d49a85da3a7af9a764426edf09c9cb90b6.jpg" /></p>
<p>In dit hoofdstuk worden de basisfuncties voor het afspelen per schijftype beschreven.</p>
<p>Lees de volgende informatie voordat u een schijf aftspeelt.</p>
<h1 id="regiocode-alleen-dvd-video">REGIOCODE (ALLEEN DVD-VIDEO)</h1>
<p>Zowel de HDD & DVD-RECORDER als de DVD's zijn per regio gecodeerd. De regiocodes要去en overeenkomen om de DVD te konnen afspelen. Als de codes nicht overeenkomen, kurz u de DVD nicht afspelen. De regiocode voor deze HDD & DVD-RECORDER staat op dechterzijde van de recorder.</p>
<p><img alt="" src="images/eaaadf25275edff02efd37495cc672c234ce681639e858b7113815efc1be7cdf.jpg" /></p>
<h1 id="logos-van-schijven-die-kunnen-worden-afgespeeld">LOGO'S VAN SCHIJVEN DIE KUNNEN WORDEN AFGESPEELD</h1>
<p><img alt="" src="images/c7b2968e95e7b4f642d474a3418de9f00338b8e493343b5f4a1d32de45f270b0.jpg" /></p>
<h1 id="u-kunt-de-volgende-typeschijven-afspelen">U KUNT DE VOLGENDE TYPESCHIJVEN AFSPELEN</h1>
<table><tr><td>Typen schijven</td><td>Inhoud schijfflogo</td><td>Opgenomen inhoud</td><td>Vorm van schijf</td><td>Maximale speléduur</td></tr><tr><td rowspan="4">DVD-VIDEO</td><td rowspan="4">VIDEO
VIDEO</td><td rowspan="4">AUDIO
VIDEO</td><td>Enkelzijdig (12cm)</td><td>240 min.</td></tr><tr><td>Dubbelzijdig (12cm)</td><td>480 min.</td></tr><tr><td>Enkelzijdig (8cm)</td><td>80 min.</td></tr><tr><td>Dubbelzijdig (8cm)</td><td>160 min.</td></tr><tr><td rowspan="2">AUDIO-CD</td><td rowspan="2">CONTRACT
DISC
DIGITAL AUDIO</td><td rowspan="2">AUDIO</td><td>Enkelzijdig (12cm)</td><td>74 min.</td></tr><tr><td>Enkelzijdig (8cm)</td><td>20 min.</td></tr><tr><td rowspan="2">JPEG</td><td rowspan="2"></td><td rowspan="2">JPEG-afbeeling</td><td>Enkelzijdig (12cm)</td><td>-</td></tr><tr><td>Enkelzijdig (8cm)</td><td>-</td></tr><tr><td rowspan="2">MP3</td><td rowspan="2"></td><td rowspan="2">MP3 Audio</td><td>Enkelzijdig (12cm)</td><td>-</td></tr><tr><td>Enkelzijdig (8cm)</td><td>-</td></tr><tr><td rowspan="2">DivX</td><td rowspan="2">DIVX</td><td rowspan="2">DivX-film</td><td>Enkelzijdig (12cm)</td><td>-</td></tr><tr><td>Enkelzijdig (8cm)</td><td>-</td></tr><tr><td>Typen schijven</td><td>Inhoud schijflogo</td><td>Opgenomen inhoud</td><td>Vorm van schijf</td><td>Maximale speelduur</td></tr><tr><td rowspan="8">DVD-RAM</td><td rowspan="8">RAM</td><td rowspan="8">AUDIOVIDEO</td><td rowspan="4">Enkelzijdig (12cm)(4,7GB)</td><td>1 uur (XP: Uitstekende kwaliteit)</td></tr><tr><td>2 uur (SP: Standaardkwaliteit)</td></tr><tr><td>4 uur (LP: Langdurig afspelen)</td></tr><tr><td>6 of 8 uur (EP: Verlengd)</td></tr><tr><td rowspan="4">Dubblezijdig (12cm)(9,4GB)</td><td>2 uur (XP: Uitstekende kwaliteit)</td></tr><tr><td>4 uur (SP: Standaardkwaliteit)</td></tr><tr><td>8 uur (LP: Langdurig afspelen)</td></tr><tr><td>12 of 16 uur (EP: Verlengd)</td></tr><tr><td rowspan="4">DVD-RW</td><td rowspan="4">RW</td><td rowspan="4">AUDIOVIDEO</td><td rowspan="4">12cm (4,7GB)</td><td>1 uur (XP: Uitstekende kwaliteit)</td></tr><tr><td>2 uur (SP: Standaardkwaliteit)</td></tr><tr><td>4 uur (LP: Langdurig afspelen)</td></tr><tr><td>6 of 8 uur (EP: Verlengd)</td></tr><tr><td rowspan="8">DVD-R</td><td rowspan="4">R</td><td rowspan="4">AUDIOVIDEO</td><td rowspan="4">Enkelzijdig (12cm)(4,7GB)</td><td>1 uur (XP: Uitstekende kwaliteit)</td></tr><tr><td>2 uur (SP: Standaardkwaliteit)</td></tr><tr><td>4 uur (LP: Langdurig afspelen)</td></tr><tr><td>6 of 8 uur (EP: Verlengd)</td></tr><tr><td rowspan="4">R</td><td rowspan="4">AUDIOVIDEO</td><td rowspan="4">Dubblezijdig (12cm)(8,5GB)</td><td>1 uur 50 min(XP: Uitstekende kwaliteit)</td></tr><tr><td>3 uur 40 min(SP: Standaardkwaliteit)</td></tr><tr><td>7 uur 20 min(LP: Langdurig afspelen)</td></tr><tr><td>11 of 14 uur 40 min (EP: Verlengd)</td></tr><tr><td rowspan="4">DVD+RW</td><td rowspan="4">RW DVD-RR</td><td rowspan="4">AUDIOVIDEO</td><td rowspan="4">12cm (4,7GB)</td><td>1 uur (XP: Uitstekende kwaliteit)</td></tr><tr><td>2 uur (SP: Standaardkwaliteit)</td></tr><tr><td>4 uur (LP: Langdurig afspelen)</td></tr><tr><td>6 of 8 uur (EP: Verlengd)</td></tr><tr><td rowspan="8">DVD+R</td><td rowspan="4">RW DVD-R</td><td rowspan="4">AUDIOVIDEO</td><td rowspan="4">Enkelzijdig (12cm)(4,7GB)</td><td>1 uur (XP: Uitstekende kwaliteit)</td></tr><tr><td>2 uur (SP: Standaardkwaliteit)</td></tr><tr><td>4 uur (LP: Langdurig afspelen)</td></tr><tr><td>6 of 8 uur (EP: Verlengd)</td></tr><tr><td></td><td></td><td rowspan="4">Dubblezijdig (12cm)(8,5GB)</td><td>1 uur 50 min(XP: Uitstekende kwaliteit)</td></tr><tr><td></td><td></td><td>3 uur 40 min(SP: Standaardkwaliteit)</td></tr><tr><td></td><td></td><td>7 uur 20 min(LP: Langdurig afspelen)</td></tr><tr><td></td><td></td><td>11 of 14 uur 40 min (EP: Verlengd)</td></tr><tr><td>CD-R/-RWDVD-RAM/±RW/±R</td><td></td><td>JPEGMP3DivX</td><td>-</td><td>-</td></tr></table>
<h1 id="schijven-die-nichturonwen-aufgespeeld">Schijven die nichturonwen aufgespeeld</h1>
<p>DVD-Video met een andere regiocode dan "2" of "ALL" <br />
- 3,9 GB DVD-R-schijf voor authoring <br />
DVD-RAM/-RW(VR-modus) nicht opgenommen overeenkomstig de Video Recording Standard <br />
- Een DVD±R/DVD-RW (V)-schijf die is opgenomen en Niet is afgesloten op een recorder van een andere fabrikant. <br />
DVD-ROM/PD/MV-schijf,etc <br />
CVD/CD-ROM/CDV/CD-G/CD-I</p>
<p><img alt="" src="images/d4897c3f2beedf62c3dc1906cbd82a3a1fcd07e2c05966e1bb72bbff9be72a24.jpg" /></p>
<ul>
<li>Deze HDD & DVD-RECORDER kan alleen worden gebruikt met schijven die compatibel zichen met de DVD-RAM-standard, versie 2.0. <br />
Mogelijk werkkt het opnemen en/of aspelen Niet bij bepaalde typen schijven of wanner bepaalde bewerkingen,zoals een wijdiging van het camerastandpunt en het beeldformaat, worden uitgevoerd. </li>
<li>De verpakking bevat uitgebreide informatie over de schijf. Raadpleeg indien nodig deze informatie. Zorg ervoor dat de schijf geen vuil of krassen bevat. Als het opnameoppervlak vingerafrdukken, vuil, stof, krassen of restanten van sigarettenrook bevat, kan de schijf möglichk Niet meer voor opname worden gebruikt. </li>
<li>Mogelijk Aunt u op bepaalde DVD-spelers geen DVD-RAM/±RW/±R-schijven afspelen. Dit is afhankelijk van de speler, de schijf en de opnameconditions. <br />
Op schijven waarop NTSC-programma's zich opgenomen, kan Niet met deze recorder worden opgenomen.</li>
</ul>
<h1 id="een-schijf-afspelen">EEN SCHIJF AFSPELEN</h1>
<ol>
<li>Druk op de toets OPEN/CLOSE. </li>
<li>
<p>Plaats voorzichtig een schijf in de lade, met het etiket maar boven.</p>
</li>
<li>
<p>Druk op de toets OPEN/CLOSE om de schijflade te sluiten.</p>
</li>
<li>
<p>De schijflade worden gesloten en de schijf worden automatisch afgespeeld. </p>
</li>
<li>De HDD & DVD REORDER speelt de schijven Niet automatisch af nadat het apparaat worden ingeschakeld. </li>
<li>Wonneer de recorder is ingeschakeld en de lade een schijf bevat, worden het apparaat gestart en ingesteld op de stopstatus. </li>
<li>Druk op PLAY () om het afspelen te starten. </li>
<li>
<p>Als u wilt dat het apparaat automatisch afspeelt zodia u het aanzet en het reeds een schijf bevat, schakelt u het in met de toets PLAY (C).</p>
</li>
<li>
<p>Druk op STOP (⊙) om het afspelen te stoppen.</p>
</li>
</ol>
<p><img alt="" src="images/a5ff49cf8a02304547f14532881f9a5a6b96d80fe9eee294fb4087d8a5fbec9c.jpg" /></p>
<ul>
<li>Wanneer het afspelen worden gestopt, onthoudt de HDD & DVD-RECORDER de plaats waar op stop is gedrukt.<br />
Wanneer u meer op PLAY (©) drukt, worden het afspelen voortgezet vanaf de plaatssaar u bent gestopt (behavel<br />
wanneer de schijf intussen is verwijderd, de stekker van de spelereuit het stopcontact is gehald of twee koer op<br />
STOP (©) is gedrukt).</li>
</ul>
<p><img alt="" src="images/26fbd8741f63ff0d72420fe6100c3fd28dce9ce307c736485cce3a29ac08569b.jpg" /></p>
<ul>
<li>Verplaats de recorder Nietijdens het afspelen. Hierdoor kan de schijf beschadigd rakek. </li>
<li>Gebruik de toets OPEN/CLOSE om de schijflade te openen of te sluiten. </li>
<li>Druk niq op de schijflade verwil de lade wordt geopend of gesloten. Dit kan een defect van het product voroorzaken. </li>
<li>Plaats geen vreemde materialen op of in de schijflade. </li>
<li>Afhankelijk van het schijftype,{kunnen sommige functies anders worden uitgevoerd of zich uitgeschakeld. Raadpleeg de instructies op het DVD-doosje als dit het geval is. </li>
<li>Let goed op dat de vingers van kinderen Niet beklemd rakenussen de schijflade en het frame van de lade wanneer de lade worden gesloten. </li>
<li>Plaatse slechts een DVD-schijf per keer in de speler. Wanner u twee of meer schijven staat, is afspelen nicht meer möglichk en kan de DVD-speler worden beschadigd.</li>
</ul>
<h1 id="het-schijfmenu-en-het-titelmenu-gebruiken">HET SCHIJFMENU EN HET TITELMENU GEBRUIKEN</h1>
<p>Sommige schijven bevatten een specifiek menusysteme waarme u speciale functies kunt selecteren voor de titel, hoofdstukken, onterteling, voorvertoningen van films, informatie over personages, enzovoort.</p>
<h1 id="voor-dvd-video">Voor DVD-Video</h1>
<p><img alt="" src="images/478de4fdf149100bfddec240ba7227bdbaf20536fc8ad41db753f9eb5b0020d3.jpg" /></p>
<ul>
<li>Schijfmenu : Druk op de toets DISC MENU om het schijfmenu van de schijf te openen. </li>
<li>Gaaar het instellingenmenu voor het afsplen. </li>
<li>U kunt de taal van het geluidsspoor, die ondtertiteling, enzovoort, die op de schijf staan, selecteren </li>
<li>Titelmenu : Druk op de toets TITLE MENU om het titelmenu van de schijf te openen. </li>
<li>Druk op deze toets als de schijf meerere titels bevat. Niet alle schijven ondersteunen de titelmenufunctie.</li>
</ul>
<h1 id="voor-hdddvd-ram-rw-r-schijven">Voor HDD/DVD-RAM/-RW/-R-schijven</h1>
<p><img alt="" src="images/194e39e8c3130637c1ff53a81c0d3ee4dcde5178869fbdaf813d9d9e9e4978c4.jpg" /></p>
<h1 id="titelijst">- Titelijst</h1>
<p>Druk op de toets TLTLE LIST. De titelltijst is een lijst waar u een titel kut selecteren. Omdat de titelltijst uit informatie uit de opgenomen videostroom bestaat, kan een verwijderde titel nicht meer worden afgespeeld.</p>
<h1 id="afspeellijst-hdddvd-ram-rwvr">Afspeellijst (HDD/DVD-RAM/-RW(VR))</h1>
<p>Druk op de toets PLAYLIST. Een afspeellijst (ook wel playlist genoemd) bestaatuit scenes dieuit een titellijst zich geseleeteerd. Wanner een afspeellijst worden afgeseeeld, worden alleen de scene die door de gebruiker is geseleeteerd, afgespeeld en verrolgens beindigd. Omdat de afspeellijst alleen informatie bevat die nodig is voor het afselen van een gewenste scene, worden de oorspronkelijke opname Niet verwijderd als de afspeellijst worden verwijderd. (alleen VR-modus)</p>
<h1 id="de-afspeelknoppen-gebruiken">DE AFSPEELKNOPPEN GEBRUIKEN</h1>
<h1 id="zoeken-in-een-hoofdstuk-of-track">Zoeken in een hoofdstuk of track</h1>
<p><img alt="" src="images/fe849c848e7ae2fae390ea6fcbb2bad759752708c82d7866c9091f5a877851d0.jpg" /></p>
<p>Druktijdens het afspelen op de toetsen SEARCH () van de afstandsbediening.</p>
<table><tr><td>HDD/DVD-VIDEO/</td><td>→X2→→X4→→X8→</td></tr><tr><td>DVD-RAM/-RW/-R</td><td>→X16→→X32→→X128</td></tr><tr><td>DivX</td><td>→X2→→X4→→X8</td></tr><tr><td>AUDIO CD (CD-DA)</td><td>→X2→→X4→→X8</td></tr></table>
<ul>
<li>U kurz het programme in omgeekerde volgorde scannen. </li>
<li>Als u SEARCH (⊗) ingedrukt houdt, worden in de standardarsnelheid van X4 afgespeeld.</li>
</ul>
<p>Zodra u de toetsen SEARCH (⊙) loslaat, worden op normale snugheid afgespeeld.</p>
<ul>
<li>Als u de normale afspeelsnelheid wilt hervatten, drukt u op de toets PLAY () .</li>
</ul>
<p><img alt="" src="images/a22ee845c1c75fd5077e9e14a4e3d059bc3ea9536413497e2ea091ae31dd9680.jpg" /></p>
<ul>
<li>In HDD/DVD-VIDEO/DVD-RAM/-RW/-R-schijf worden er geluid weergeven wanner er vooruit worden gezocht (X 2). (In de scanmodus (zoeken) in DivX-schijf worden er geen geluid weergegeven). </li>
<li>De opgegeven snelheden in deze functie{kunnen afwijken van de feitelijke aftspeensnelheid.</li>
</ul>
<h1 id="hoofdstukken-titels-of-markeringen-overslaan">Hoofdstukken, titels of markeringen overslaan</h1>
<p><img alt="" src="images/29f34fbec4669a629d4c7b3c8802b21837a80955950b821bdb1808dc2dbf0f1b.jpg" /></p>
<p><img alt="" src="images/efdab11d9a7e91e79ae993f6d12fff153751de75b2902c5c8fb5c2d90a650627.jpg" /></p>
<p><img alt="" src="images/02fcc0c07032d8a21a599ffbec85f3fb155e80f03f1566766193fd94426da9f7.jpg" /></p>
<p><img alt="" src="images/721a48bc467c4fd4108d6fdec7389b15b65c46e8101a78211e68119dcdb7a957.jpg" /></p>
<p>Druktijdens het afspelen op de toetsen SKIP ( ) van de afstandsbediening.</p>
<ul>
<li>Als u op de toets SKIP ( ) drukt:</li>
</ul>
<p>gaat u waar het begin van het hoofdstuk, de titel of de markering (HDD/DVD-RAM/-RW (VR-modus)).</p>
<p>Als u binnen drie seconden nogmaals op de toets drukt, keert u terug hier het begin van het vorige hoofdstuk, de titel of de vorige marking (HDD/DVD-RAM/-RW (VR-modus)).</p>
<ul>
<li>Als u op de toets SKIP () drukt:</li>
</ul>
<p>gaat u maar het volgende hoofdstuk, de volgende track of de volgende marketing (DVD-RAM/-RW (VR-modus)).</p>
<h1 id="vertraagd-aftspelen">Vertraagd aftspelen</h1>
<p><img alt="" src="images/37a434a51685680818983af7cf27f83452a3f0f067a6cebc7daa03500c7ce4d8.jpg" /></p>
<p><img alt="" src="images/537b0697f7cd8699a7592881b7bed0172debfcec4e1146d853c048338a1e7c4c.jpg" /></p>
<p><img alt="" src="images/e2a72f8ea3e64df0d9a2dfa5653714a456188f73cd6a50bb411fb261b923e9d2.jpg" /></p>
<p><img alt="" src="images/9e734dcceab82f4aa8a879a11502d9705bee0dc472c2f051396d16f87c622316.jpg" /></p>
<p><img alt="" src="images/b19ba40a8e7a67cd714a50510f91fd1dd7a1316d9f36749c58f194e865177504.jpg" /></p>
<p><img alt="" src="images/42bfc055d66d24689a640a25b6ea35b881b4f60f9350bfb41d741f5eec1892f2.jpg" /></p>
<p>Druktijdens pauze op de toets SEARCH (Zoeken) () van de afstandsbediening.</p>
<ul>
<li>Als u op de toets SEARCH (⊙) drukt,</li>
</ul>
<p>1/2→1/4→1/8</p>
<ul>
<li>Als u op de toets SEARCH (⊙) drukt,</li>
</ul>
<p>1/2→1/4→1/8</p>
<ul>
<li>Als u de normale afspeelsnelheid wilt hervatten, drukt u op de toets PLAY (>)</li>
</ul>
<p>Als u in de pauzestand SEARCH (⊙) ingedrukt houdt, worden de schijf op een kwart van de normale spelheid afgespeeld. Zodra u de toets loslaat, worden de pauzestand hervat.</p>
<p><img alt="" src="images/bdd5df1777a9e24d7cb1f2243441ff35a8d4ecf0aa8541be02cc982e38b08564.jpg" /></p>
<ul>
<li>De opgegeven snelheden in deze functie{kunnen afwijken van de feitelijke aftspeelsnelheid. </li>
<li>Vertraagd aftspelen werkct op DivX-schijven alleen in voorwaartse richting.</li>
</ul>
<h1 id="beeld-voor-beeld-afspelen">Beeld voor beeld afspelen</h1>
<p><img alt="" src="images/bff86fcea438870ec3b4231e575d6c7f7233c2e9e2b9ef6180032dc47cfc40ec.jpg" /></p>
<p><img alt="" src="images/a398050555be04fd20e01154076a3aeda7f3760b0eec1a15280ae0264d21f048.jpg" /></p>
<p><img alt="" src="images/4debbaacc7cf5604548c0eae696bbbb4ecd2b96583aa71c569f1f23b3039327a.jpg" /></p>
<p><img alt="" src="images/181f56410d1dafd40e29ff7efa00bec7018e5021b6668af5cb708c0eb5bdf078.jpg" /></p>
<p><img alt="" src="images/a01b47bc89580cbf27060cf5e7f5a46c987de84ca292cc05d474257a5e3c12c6.jpg" /></p>
<p><img alt="" src="images/0395326b7d4d05169a976335d5e2394f96f46344b08c16448fcff6e337411f5a.jpg" /></p>
<p>Druk in de pauzestand op SKIP(, ) op de afstandsbediening.</p>
<ul>
<li>ledere keer dat de toets worden ingedrukt, verschijt er een/Newu beeld.</li>
</ul>
<p>Als u op de toets SKIP() drukt, worden het vorige frame weergegeven.</p>
<p>Als u op de toets SKIP(⊙) drukt, worden het volgende frame weergegeven.</p>
<ul>
<li>Als u de normale afspeelsnelheid wilt hervatten, drukt u op de toets PLAY () .</li>
</ul>
<p><img alt="" src="images/a684fdc1fbfefd976f8de54df348eaf4d6b3b28a8daf32beb31e2ba58e953494.jpg" /></p>
<p>Beeld voor beeld afspelen op DivX-schijven alleen in voorwaartse richting.</p>
<h1 id="de-toets-info-gebruiken">DE TOETS INFO GEBRUIKEN</h1>
<p>Met de INFO-functies kurz u gemakkelijk maar een gewenste scene zoeken via de titel, het hoofdstuk, de track en het tijdstip. Bovendien kurz u de ontertitelings- en geluidsinstellungen wijzigen en bepaalde functies instellen, waaronder Beeldhoek, Herhalen en Zoomen.</p>
<h1 id="rechtstreeks-maar-een-scene-gaan-met-info">Rechtstreeks maar een scene gaan met INFO</h1>
<p>Gebruik deze functie als u maar een bepaalde titel, hoofdstuk ofijd wilt gaan.</p>
<ol>
<li>Drukijdens het afspelen op de toets INFO. </li>
<li>Druk op de toetsen om Zoeken te selecteren en druk op OK of op de toets . </li>
<li>Druk op de toetsen om Titel, Hoofdstuk of Tijd te selecteren. </li>
<li>Druk op de toetsen of op de cijfertoetsen om de gewenste scenete selectoren en druk cervolgens op OK.</li>
</ol>
<p>Als u waar een bepaaldeincident wilt gaan,voert u met de cijferknoppen de gewensteincident in volgorde van uren,minuten en seconden in. Druk verwolgens op OK.</p>
<p><img alt="" src="images/903fc3128ac751e38458acec4ac4ca0e19a47ef0528a19fdb109cb499238ec3e.jpg" /></p>
<ul>
<li>Bij sommige schijven werkkt dit Niet. Wanner een audio-CD (CD-DA) of een mp3/JPEG-schijf in de recorder is geplaatst, worden de informatatie afhankelijk van het schijftype möglichk Niet weergegeven. <br />
Op sommige schijven werkdtijdzoekfunctie Niet. </li>
<li>Het scherm verdwijnt als u op de toets RETURN drukt.</li>
</ul>
<p><img alt="" src="images/5b9b971b58de29b271e8abefd5c128d5e99c3c8d5bb828a337cc2455aefb8067.jpg" /></p>
<p><img alt="" src="images/054811736d370f58e812d089ce63d91953d745fd82bcc99b443654f2253feccc.jpg" /></p>
<p><img alt="" src="images/b15b01a1d62d9a1ea7b9d33c76b39abc14dab0939d2e2075993f67a53a2f64ad.jpg" /></p>
<h1 id="taalkeuze-ondertiteling">TAALKEUZE ONDERTITELING</h1>
<p>Hiermee selecteert u een van de talen waarin ondtertiteling op de schijf is opgenomen.</p>
<p>U kunt deze functie ook uitvoeren via de toets SUBTITLE op de afstandsbediening.</p>
<ol>
<li>Druktijdens het afspelen op de toets INFO. </li>
<li>Druk op de toetsen om Ondertitelts te selecteren. </li>
<li>Druk op de toetsen om de gewenste taal voor de ondtiteling te selecteren.</li>
</ol>
<p><img alt="" src="images/4a0628e6c784482c6881ccc28d3475477b90e3258f757a88ba4aa34f61da5859.jpg" /></p>
<ul>
<li>De weergave van de ondterteling is afhankelijk van het schijftype. <br />
Bij sommige schijven Aunt u alleen de taal van het schijfmenu kiezen.</li>
</ul>
<h1 id="de-geluidssporen-en-audiookanalen-selecteren">DE GELUIDSSPOREN EN AUDIOOKANALEN SELECTEREN</h1>
<p><img alt="" src="images/8e3b7c3be3806744dca241ca7d1019ad0dad59cebfc5b8fe0bf60d0c1eadf907.jpg" /></p>
<p><img alt="" src="images/1e2d65bb54f871a7fba12a1fd17aee0c968b7e05ea8de9cc92b13e01bcc9fb8a.jpg" /></p>
<p><img alt="" src="images/7636ffc5be4bafca70a428ece30523feb44b4c70c14599d618bbb4fcf66c4b5a.jpg" /></p>
<p><img alt="" src="images/7683709f85d47ccd9fadf1a99dd61fb191535a2fe0d68dd333ccc297ed9fd19a.jpg" /></p>
<p><img alt="" src="images/7d67e055524c0088764dfa231e68d49f3e9dc8151beb196ecb8643c0dd95ef47.jpg" /></p>
<p>Hiermee selecteert u een van de geluidssporen die op de schijf zich opgenomen. U kurz er ook de audiokanalen mee selectoreren.</p>
<p>U kunt deze functie ook uitvoeren via de toets AUDIO op de afstandsbediening.</p>
<ol>
<li>Druktijdens het afspelen op de toets INFO. </li>
<li>Druk op de toetsen om Geluid te selecteren. </li>
<li>Druk op de toetsen om het gewenste geluidsspoor of audiokanaal te selecteren.</li>
</ol>
<p><img alt="" src="images/2380089e06eb2d19c89384d1487e4e95149497e9fd6cd9ebf3fa500c55b7f6a5.jpg" /></p>
<p>Geluidssporen en audiokanalen können verschillen odomat ze afhankelijk zijn van de schijf. <br />
Bij sommige schijven Aunt u alleen de taal voor het geluidsspoor van het schijfmenu kiezen.</p>
<h1 id="de-camerahoek-wijzigen">DE CAMERAHOEK WIJZIGEN</h1>
<p><img alt="" src="images/bab18c71370cc8013f99c4fc70799a93e64f02ba4ce4395b75db0df2a42fe816.jpg" /></p>
<p>Wonneer een DVD-video meertere camerastandpunten van een bepaalde scene bevat, kut u de functie Beeldhoek selecteren.</p>
<ol>
<li>Druktijdens het afspelen op de toets INFO. </li>
<li>Druk op de toetsen om Beeldhoek te selecteren. </li>
<li>Druk op de toetsen om de gewenste beeldhoek te selecteren.</li>
</ol>
<p><img alt="" src="images/ff6959401ddc9db7bffc1a8f69300fed2cc899747df78a409264b9f573da72b2.jpg" /></p>
<ul>
<li>Deze functie hangt af van de schijf en werkst möglichk Niet bij alle DVD's. </li>
<li>Deze functie werkst nicht als een DVD nicht vanuit verschillende camerastandpunten is opgenomen. </li>
<li>Het huidige cameraststandpunt en het totaal aantal cameraststandpunten worden weergegeven.</li>
</ul>
<h1 id="afspelen-herhalen">AFSPELEN HERHALEN</h1>
<h1 id="herhaaldelijk-afspelen-herhalen">Herhaaldelijk afspelen (Herhalen)</h1>
<p><img alt="" src="images/abcd09c550c07da8bdba229283d49a43b18925835dfa770aeb0cd25c97bd0394.jpg" /></p>
<p><img alt="" src="images/c1d06045c5e7597859b9c939b47285d2dc482243c9c5ec46b4ce0ddd0ff35a91.jpg" /></p>
<p><img alt="" src="images/15decd039819a5a8bfc9645c1e941a1e2ec60aee3cba9c76382bc596a640447c.jpg" /></p>
<p><img alt="" src="images/0fd14085967cc888d91a404be508a11541bcba8eb31a2ec717e85aeea4fdb088.jpg" /></p>
<p><img alt="" src="images/77726d8ff96e5692f5ac086ac06ee4893cde33f9214156917a7be48a90bf92b3.jpg" /></p>
<p><img alt="" src="images/47e4274ce653836bf9f2f176a13bc99c9abfd0c7102e31b0820781c3647c1e09.jpg" /></p>
<p>U kurz deze functie ook uitvoeren via de toets REPEAT op de afstandsbediening.</p>
<ol>
<li>Druktijdens het afspelen op de toets INFO. </li>
<li>Druk op de toetsen om Herhalen te selecteren. </li>
<li>Druk op de toetsen om Uit, A-B, Titel of Hoofdstuk te selecteren, afhankelijk van wat u herhaald wit afspelen, en druk op de toets OK.</li>
</ol>
<p><img alt="" src="images/67d86b186e72ce2f792c5ab3889bbb8677e86524717dfd920faa03fd765852a0.jpg" /></p>
<p>Bij HDD/DVD-RAM/-RW-schijven (VR-modus), nicht afgesloten DVD-R's en nicht afgesloten DVD-RW's (V-modus) worden geen hoofdstukken herhaald. <br />
U kunt ook terug maar normala afspelen door op de toets EXIT(9) te drukken.</p>
<ol>
<li>Druktijdens het afspelen op de toets INFO. </li>
<li>Druk op de toetsen om Herhalen te selecteren. </li>
<li>Druk op de toetsen om A-B te selecteren en druk op OK. </li>
<li>Druk op OK waar u het herhaaldelijk afspelen wilt lately beginnen (A) en druk nogmaals op OK waar u het herhaaldelijk afspelen wilt stoppen (B). Het herhaaldelijk afspelen van het gedeelte A-B begint.</li>
</ol>
<p><img alt="" src="images/262f7b39ef828cc9dfbbb2ab58a5e40cf02dd722fee22cef2ca05208048efd50.jpg" /></p>
<p><img alt="" src="images/e99e60f1ac2d8a00dedb4a28d4c7b7c7743b1a0a6e73baea396089595684e53d.jpg" /></p>
<ul>
<li>Als u punt (B) instelt voordat vrij seconden voor bij,zijn, worden het verbodsteken (Ø) weergegeven. <br />
U kunt het normale afspelen ook activeren door op de toets EXIT(9) te drukken. <br />
Muziek-CD's (CD-DA), mp3-schijven en DivX ondersteunen de functie Herhalen A-B Niet.</li>
</ul>
<h1 id="inzoomen">INZOOMEN</h1>
<p><img alt="" src="images/0194ccfedb8b1c342e839921da44781604f39c15b5bf7d78b7582e70602a66cd.jpg" /></p>
<p><img alt="" src="images/c2db787cdd03029c8ebbf10cdf6e0ad2fc728082e04567ff456e3d070d4ff3d4.jpg" /></p>
<p><img alt="" src="images/1a9a21caa1ac647c17347d5add24c1d019aba0aadb9fe25b1cb95a9d33fb126d.jpg" /></p>
<p><img alt="" src="images/fc91ef48c9948b77b70248666aabc46c736990c2c60196197f654eb3ce5270ae.jpg" /></p>
<p><img alt="" src="images/1d95f608de76b173904fbe7df461a5181d00e0cf48af0ce169e6327a9d6e8f2a.jpg" /></p>
<ol>
<li>Drukijdens het afspelen op de toets INFO. </li>
<li>Druk op de toetsen om Zoom te selecteren en druk op OK of op de toets . (^) worden weergegeven. </li>
<li>Druk op de toetsen om maar het gedeelte te gaan dat u wilt vergroten. </li>
<li>Druk op OK. Het scherm worden tweemaal zo groot weergegeven. Druk nogmaals op de knop OK om het beeld te vergroten tot vier keer de normale grotte.</li>
</ol>
<p><img alt="" src="images/bce0ac49fcde81a8ba5fcb0f81723448f5679eabf747536d76de1aec828b025e.jpg" /></p>
<table><tr><td>HDD/DVD-VIDEO/DVD-RAM/-RW/-R</td><td>normale grotte → X2 → X4 → X2 → normale grotte</td></tr></table>
<p><img alt="" src="images/74e5f522f4289e30e5f5be6f93968eaa72d0789c9203edb453040cbabb6aad62.jpg" /></p>
<ul>
<li>Wanner de opname in de EP-modus worden UITgevoerd, worden de zoomfunctie alleen ondersteund als de opname in de V-modus is UITgevoerd.</li>
</ul>
<h1 id="markeringen-gebruiken">MARKERINGEN GEBRUIKEN</h1>
<p><img alt="" src="images/fb241053057ca447106e92477687057bf08dba258fb9828461db9fcdfe5ae0d8.jpg" /></p>
<p>U kurz markeringen plaatsen bij scènes die u nogmaals wilt zien zodat u vanaf de gemarkeerde positie kurz afsplen.</p>
<h1 id="markeringen-instellen">Markeringen instellen</h1>
<ol>
<li>Druktijdens het afspelen op de toets MARKER. </li>
<li>
<p>Druk op OK wonneer de gewenste scene worden weergegeven.</p>
</li>
<li>
<p>Het getal 01 worden weergegeven en de scene worden in het geheugen opgeslagen.</p>
</li>
<li>
<p>Druk op de toetsen om maar de volgende positie te gaan. </p>
</li>
<li>
<p>Druk weeop OK wonneer de gewenste scene wordt weergegeven.</p>
</li>
<li>
<p>Het getal 02 worden weergegeven en de scene worden in het geheugen opgeslagen. </p>
</li>
<li>Voor HDD, DVD-RAM's of DVD-RW's (VR-modus) geldt de markingsfungte in plaats van de favorietfungte. Omdat de scènes als een groot+aantal pagina's+kennen worden weergegeven, is het nodig dat de scènes worden genummerd. Als de gebruekte schijf is gecodeerd met Schijfbveeligijing,+kennen er geen markeringen worden ingesteld of worden verwijderd. Het is alleen maybeijk om af te spelien.</li>
</ol>
<p><img alt="" src="images/d0414dc2cd06bc315f817d3e054e735d7fb90c7fae70fc6a7a0fa74857dbc6d0.jpg" /></p>
<h1 id="een-marking-afspelen">Een marking afspelen</h1>
<ol>
<li>Druktijdens het afspelen op de toets MARKER. </li>
<li>Druk op de toetsen om een gemarkeerde scene te selecteren. </li>
<li>
<p>Druk op OK of op PLAY (C) om af te spelen vanaf de geselecteerde scene.</p>
</li>
<li>
<p>Wonneer u op de toets SKIP (▶) drukt, gaat de recorder terug maar het begin van de markings. Door binnen 3 seconden nogmaals op de toets te drukken keert u terug maar het begin van de vorige markings. </p>
</li>
<li>Wanner u op de toets SKIP (◇) drukt, gaat de spelier maar de volgende markings.</li>
</ol>
<h1 id="een-marking-wissen">Een marking wissen</h1>
<ol>
<li>Druk tijdens het afspelen op de toets MARKER. </li>
<li>
<p>Druk op de toetsen om een gemarkeerde scene te selecteren.</p>
</li>
<li>
<p>Druk op de RODE toets (A) om de geselecteerde marking te verwijderen.</p>
</li>
<li>
<p>Als een marketing worden gewist terwijl de HDD/DVD-RAM/-RW (VR-modus) worden afgespeeld, worden de nummers van de markeringen gewijzigd. Als u bijoorbeeld de zevende marketing wist nadat er tien markeringen zijn geregisteerd, worden de markeringen na de achtste automatisch eén vooruit geschoven en worden de achtste marketing de zevende.</p>
</li>
</ol>
<h1 id="favorieten-instellen">Favorieten instellen</h1>
<ol>
<li>Drukijdens het afspelen op de toets MARKER. </li>
<li>
<p>Druk op OK wonneer de gewenste scene worden weergegeven.</p>
</li>
<li>
<p>Het getal 1 worden weergegeven en de scene worden in het geheugen opgeslagen.</p>
</li>
<li>
<p>Druk op de toetsen om waar de volgende positie te gaan. </p>
</li>
<li>
<p>Druk weeop OK wanneer de gewenste scene wordt weergegeven. Het getal 2 wordt weergegeven en de scene wordt in het geheugen opgeslagen.</p>
</li>
<li>
<p>Herhaal bovenstaande procedure om andere posities te markeren. </p>
</li>
<li>U kunt maximaal 10 scènes markeren.</li>
</ol>
<p><img alt="" src="images/bec1f924bd770e08a822317606320fad5d23425ee2baa241185ec3ce892fe976.jpg" /></p>
<p><img alt="" src="images/58e15783d323cfe069960cb54e15cceb694080901f64a0f6e0f742da3fd38320.jpg" /></p>
<ul>
<li>Als de schijflade worden geopend en cervolgens gesloten, verdwijnen de favorieten.</li>
</ul>
<h1 id="een-favoriet-aftspelen">Een favoriet aftspelen</h1>
<ol>
<li>Druktijdens het afspelen op de toets MARKER. </li>
<li>Druk op de toetsen om een gemarkeerde scène te selecteren. </li>
<li>Druk op OK of op PLAY (一) om af te spelen vanaf de geselecteerde scene.</li>
</ol>
<h1 id="een-favoriet-wissen">Een favoriet wissen</h1>
<ol>
<li>Druktijdens het afspelen op de toets MARKER. </li>
<li>Druk op de toetsen om een gemarkeerde scène te selecteren. </li>
<li>Druk op de RODE toets (A) om de geselecteerde favoriet te verwijderen.</li>
</ol>
<h1 id="toetsen-op-de-afstandsbediening-voor-het-afspelen-van-muziek-cds-cd-damp3">Toetsen op de afstandsbediening voor het afspelen van muziek-CD's (CD-DA)/MP3</h1>
<p><img alt="" src="images/ec5359736d38dbb1b0010ff63cdc2be31b232ce97c24ae7d5170fed929565239.jpg" /></p>
<p><img alt="" src="images/da748c672d85e429a5640a368b202d21cc68495c4b7e6f4d825afc74a2f0795b.jpg" /></p>
<p><img alt="" src="images/e1258264ae457ec0bcf944b863c81c2a121442021b42a027bce4a887a5323eea.jpg" /></p>
<p>De toets SKIP () : waar de volgende of vorige pagina.</p>
<p><img alt="" src="images/0b62944ce34317df2e90b76fbc19c633c80757e3e945f90e24766e02baa4f1a5.jpg" /></p>
<p>De toetsen SEARCH (C) : snel afspelen (X2, X4, X8) (Alleen muziek-CD's)</p>
<p><img alt="" src="images/fb221f71d9b0c36b5f6be3399733f26d594aaba46c6ca14fd48445f1141e315a.jpg" /></p>
<p>De toets STOP () : het aftspelen van een track stoppen.</p>
<p><img alt="" src="images/7c9413c809434bfa36512c5da86b6110377e4d482c3e1bae0aab71e154ce2fb7.jpg" /></p>
<p>De toets PAUSE () : afspelen onderbreken.</p>
<p><img alt="" src="images/d54d757567c961915843dc9027cd47be5f989bf7a947d5f63bd41d43d5a5dc4c.jpg" /></p>
<p>De toetsen PLAY (⊙) en OK : een track afspelen.</p>
<p><img alt="" src="images/9f2084452f5bc799154e07167c30df79367fe204670e096e8e95886d30c7dc5e.jpg" /></p>
<p> :een track selectoren.</p>
<p><img alt="" src="images/d35c30010b2b30143fba534f5c3a4ee6727ee16a1fa2698c64f0331c1a07ad41.jpg" /></p>
<p>RODE toets (A):</p>
<ul>
<li>Hiermee maakt u een afspeellijst of gaat u maar een afspeellijst. </li>
<li>Alles selecteren : MP3, CD-DA <br />
Kopiernen:MP3 </li>
<li>CD import : Audio-CD</li>
</ul>
<p><img alt="" src="images/2cc471e568d8ec2cbecd7bead99ccbc2aaa015df2c3cdfddfbdfb41370540db1.jpg" /></p>
<p>GROENE toets (B): hiermee selecteert u de volgorde. (alleen MP3-schijven)</p>
<p><img alt="" src="images/a83421866d4135b403b4c5e92e79953dad4af0f6186a300c1b298f663c7c5847.jpg" /></p>
<p>De toets OK: de geselecteerde track afspelen.</p>
<p><img alt="" src="images/5d4c4edaf459c9fa1df8c892cdac94be8f29599a5e6566a8ef161d50f412778e.jpg" /></p>
<p>GELE toets (C): hiermee selecteert u de afspeelmodus. (Herhalen)</p>
<p><img alt="" src="images/504bfac34d7b7a2871aeb58266309ff866a414a4d3806cf4f9dea54b3720234c.jpg" /></p>
<p>BLAUWE toets (D): hiermee selecteert u inhoud. (alleen MP3-schijven)</p>
<h1 id="een-audio-cd-cd-da-aufspelen">Een Audio-CD (CD-DA) aufspelen</h1>
<ol>
<li>Plaats een audio-CD (CD-DA) in de schijflade. </li>
<li>Het audio-CD-menu worden waergegeven en de tracks (nummers) worden automatisch afgespeeld. </li>
<li>Druk op de toetsen om de gewenste track (nummer) te selecteren en druk verwolgens op OK.</li>
</ol>
<h1 id="onderdelen-van-het-audio-cd-schem-cd-da">Onderdelen van het audio-CD-schem (CD-DA)</h1>
<p><img alt="" src="images/efec43e32624c654c97c4c8c271eab8cbe1e17132e5cec63cd76cf886872489e.jpg" /></p>
<p><img alt="" src="images/79d66ce18ea0edb9830120c123d64d0e33cedb93288c8356aa67850e30a09d4c.jpg" /></p>
<p>Huidige track : het nummer van de track die op het moment worden afgespeeld.</p>
<p><img alt="" src="images/e5303bfe2ae8601770a41cecbabecc8b72b8eaf229c59eff7c3f18a244d43f49.jpg" /></p>
<p>De beschikbare toetsen en de bij het momenteel afgeseelede deel behorende afspeeltijd worden weergegeven.</p>
<p><img alt="" src="images/4300009ec71e877adb329b3042872b402e9766fdd334d732aca249c5acbb7384.jpg" /></p>
<p>Het huidige bestandstype en de bestandsnaam.</p>
<p><img alt="" src="images/bc2354342b9f9fa41a5e525d4e3dd5fba578c2024ee28c5c4f159dc79c25156d.jpg" /></p>
<p>De beschikbare toetsen.</p>
<p><img alt="" src="images/46b5b4f5d48a82c9875bd6d6bc575f17d3d5a39e002696072640c38587aca5c1.jpg" /></p>
<p>De huidige afgespeelde track en het totale aantal tracks.</p>
<p><img alt="" src="images/30d81440ac2b3e9d2ae34289834c3232f208fdee9abd18ba68d3bcbb6b4cb4f6.jpg" /></p>
<p>De lijst met tracks.</p>
<h1 id="een-mp3-schijf-afspelen">Een MP3-schijf afspelen</h1>
<ol>
<li>
<p>Plaats een MP3-cd in de schijflade.</p>
</li>
<li>
<p>Het menu worden weergegeven.</p>
</li>
<li>
<p>Druk op de toetsen om Bibliothek te selecteren en druk verwolgens op OK of op de toets . </p>
</li>
<li>Druk op de toetsen om Muziek te selecteren en druk cervolgens op OK of op de toets . </li>
<li>Druk op de toetsen om de gewenste track te selecteren en druk cervolgens op OK.</li>
</ol>
<h1 id="onderdelen-van-het-mp3-schem">Onderdelen van het MP3-schem</h1>
<p><img alt="" src="images/b52df7c5c056f1664799f0629841f53bf48f4fc08d28ab84f50cbacc98f310da.jpg" /></p>
<p>Huidige track: de nom van de track die op het moment worden afgespeeld. <br />
2 De beschikbare toetsen en de bij het momenteel afgespeelde deel behorende afspeeltijd worden weergegeven. <br />
3 Het huidige bestandtype, de bestandsnaam en de mapnaam. <br />
4 De beschikbare toetsen. <br />
5 De huidige afgeseelde track en het totale aantal tracks. <br />
6 De afspeellijl (lijst met tracks).</p>
<h1 id="cd-cd-da-mp3-herhalen">CD (CD-DA) & MP3 herhalen</h1>
<p>U kunt deze functie ook uitvoeren via de toets REPEAT op de afstandsbediening.</p>
<p>Druktijdens het afspelen herhaaldelijk op de toets REPEAT om de gewenste herhaalmodus te selecteren.</p>
<ol>
<li>Druktijdens het afspelen van de muzieklijst op de GELE toets (C). </li>
<li>
<p>Druk op de toetsen om de gewenste afspeelmodus te selecteren en druk cervolgens op OK of op de toets .</p>
</li>
<li>
<p>Normaal (CD (CD-DA)/MP3) : de tracks op de schijf worden afgespeeld in de volgorde waarin ze op de schijf zijn opgenomen. </p>
</li>
<li>Nummer herhalen (CD (CD-DA)/MP3) </li>
<li>页 Map herhalen (MP3) </li>
<li>Alles herhalen (CD (CD-DA)/MP3) </li>
<li>CD Willekeurig (CD (CD-DA)/MP3): Met Willekeurig (Random) kurz u de tracks op een schijf in willekeurige volgorde afspelen.</li>
</ol>
<p><img alt="" src="images/43be8d6e48abb4fd520c0a188bcf4a6e1813e32ae29bc01c4e13163d4a068840.jpg" /></p>
<h1 id="cd-import-2">CD import</h1>
<ol>
<li>Druktijdens het afspelen van de muzieklijst op de RODE toets (A). </li>
<li>Druk op de knoppen om CD import te selecteren, en druk verwolgens op OK of op de knop . </li>
<li>
<p>Druk op de toetsen om het bestand te selecteren dat u wilt kopieren en houdervolgens de toets MARKER ingedrukt totdat er een vinkje worden weergegeven.</p>
</li>
<li>
<p>Als u een bepaald gemarkeerd item Niet wilt kopiieren, selecteert u dit item en houdt u de toets MARKER ingedrukt totdat het vinkje verdwijnt.</p>
</li>
<li>
<p>Druk op de toetsen om de doelmedia te selecteren en druk verwolgens op de toets OK. </p>
</li>
<li>
<p>Om een neue map te make, drukt u op de GROENE toets (B).</p>
</li>
<li>
<p>Druk op de RODE toets (A) om Start kopie te selecteren.</p>
</li>
</ol>
<p>De melding "Itemnummer: x"wortd weergegeven.</p>
<ol>
<li>Druk op de toetsen om Start te selecteren en druk op de toets OK.</li>
</ol>
<p>Het kopieren van de bestanden worden gestart.</p>
<ul>
<li>Als u het kopiernen wilt annuleren, drukt u op de toets EXIT (19).</li>
</ul>
<p><img alt="" src="images/2731d3f9c74f44e15779d0b5a80367ffecd8bbbfb8b31742d5f5c7afe9aa9f27.jpg" /></p>
<ul>
<li>Het formaat van een MP3-bestand is na het importereren volgt:</li>
</ul>
<p>Bitrate 128 kbps</p>
<p>Kanaal 2 (stereo)</p>
<p>Samplingfrequentie 44 KHz</p>
<ul>
<li>DTS CDDA-schijven en schijven met een kopierbeveiliging hunen nicht</li>
</ul>
<p>worden geimporteerd.</p>
<h1 id="nieuwe-afspeell">Nieuwe afspeell.</h1>
<p><img alt="" src="images/86c27293efcbb1f49e5758b8d7b2aac82be7cbd7173537b45924d154bd8d09e5.jpg" /></p>
<p><img alt="" src="images/37cf02e8f1362a5d6d26c92f75fe355f31c091f860823dbb7bc892d55948d086.jpg" /></p>
<p><img alt="" src="images/129142b8db3c8d94b370747abfa486575a1b4839b08ec37cfb35f5f9eef9bb09.jpg" /></p>
<p><img alt="" src="images/c4f0bfe72037dd60a46c5210c1de7603ee17c81e5b353ab24ca47b965134fb45.jpg" /></p>
<p><img alt="" src="images/175a58da6c9e6fba1fe914eaeb6fa431e728d2f4749676d5ac9f90a5963dda4c.jpg" /></p>
<p><img alt="" src="images/541ab81995969194d56a45f8d4a96010b1fb71619a3c9260de20a8dce2777610.jpg" /></p>
<p>U kunt maximaal 30 tracks in de afspeelijst plaatsen.</p>
<ol>
<li>Druktijdens het afspelen van de muzieklijst op de RODE toets (A). </li>
<li>Druk op de toetsen om Nieuwe aftspeell. te selecteren en druk verwolgens op OK of op de toets . </li>
<li>
<p>Druk op de toetsen om tracks te selecteren in de volgorde waarin u ze wilt afspelen en druk op OK.</p>
</li>
<li>
<p>Als u een verkeerde track in de aftspeellijst hebt opgenomen, drukt u op de toetsen om de verkeerde track te selecteren en vervolgens op OK.</p>
</li>
<li>
<p>Druk op de RODE toets (A) om de afspeellijst op te slaan.</p>
</li>
</ol>
<p>Er wordt een neue Afspeelljst gemaakt.</p>
<p><img alt="" src="images/92c9c4f564a1e404ca4e1747b52974058af95da42fb6a850cbad77708ba46bb2.jpg" /></p>
<p><img alt="" src="images/09fd24816e422e4c27c0ef104eea03e86e6f8c6c275126e749d91b715cddfb3b.jpg" /></p>
<ol>
<li>Druktijdens het afspelen van de muzieklijst op de RODE toets (A). </li>
<li>Druk op de toetsen om Afspeelijst te selecteren en druk verwolgens op OK of op de toets . </li>
<li>Druk op de toetsen om de gewenste afspeelijst te selecteren en druk verwolgens op OK.</li>
</ol>
<p>De geseleteerde tracks worden automatisch afgespeeld.</p>
<p><img alt="" src="images/9670492575faed9491e9b7d81cca8f020ab79816bbb484b8f0be200f7d2d03fa.jpg" /></p>
<p><img alt="" src="images/c0a34a75fc8c449f98eae35544f21d87e7067639ee302367f1d4e4eaea7d089e.jpg" /></p>
<p><img alt="" src="images/0854577c8e038403e9bf5d1bc2ee099135cee04e52e5d1082f36cde44cc54ffb.jpg" /></p>
<h1 id="deafspeellijst-verwijderen">Deafspeellijst verwijderen</h1>
<ol>
<li>Druktijdens het afspelen van de muzieklijst op de RODE toets (A). </li>
<li>Druk op de toetsen om Afspeelijst te selecteren en druk verwolgens op OK of op de toets . </li>
<li>Druk op de toetsen om de afspeelljst te selecteren die u wilt verwijderen. </li>
<li>Druk op de RODE toets (A). </li>
<li>Druk op om Ja, te selecteren en druk cervolgens op OK. De geselecteerde afspeellijst worden verwijderd.</li>
</ol>
<p><img alt="" src="images/5e0cbfcea3a77600ff16c43a04a11af9ef6a1408c506d1adda8b7919e6dcbe9f.jpg" /></p>
<p><img alt="" src="images/6df5740fd677c1fa50236882bc19a51af60fe29083bd55e42c22af354a69be61.jpg" /></p>
<p><img alt="" src="images/e67b97e04ba4ef9eadc51abd18a1c2529e33346586f3cc0cb6c25fe9e6c155f8.jpg" /></p>
<p><img alt="" src="images/4011d92794eca120ae1ca78da35d74801a902c32acca239ca5b05c62d1fbc65f.jpg" /></p>
<ul>
<li>Wanner de speler wordenuitgeschakeld, een bestand worden geopend of wanner de speler worden losgekoppeld, worden de afspeellijsten van de schijf verwijderd.</li>
</ul>
<h1 id="naar-afspeellijst-bewerken">Naar Afspeellijst bewerken</h1>
<p><img alt="" src="images/175c148d60afe29862b7798ea36e14c6e12ebcf099c80ab63351e2b90da41f1c.jpg" /></p>
<p><img alt="" src="images/838b99794058241691a8d71b2d80462a1da949557a6a42cf52d29f09e7f61e27.jpg" /></p>
<ol>
<li>Druktijdens het afspelen van de muzieklijst op de RODE toets (A). </li>
<li>Druk op de toetsen om Afspeelijst te selecteren en druk verwolgens op OK of op de toets . </li>
<li>Druk op de toetsen om de afspeellijst te selecteren die u wilt bewerken. </li>
<li>Druk in de afspeellijst-modus op de GROENE toets (B). </li>
<li>
<p>Druk op de toetsen om tracks te selecteren in de volgorde waarin u ze wilt afspelen en druk op OK.</p>
</li>
<li>
<p>Als u een verkeerde track in de afspeelijst hebt opgenomen, drukt u op de toetsen ▲▼ om de verkeerde track te selecteren enervoigens op OK.</p>
</li>
<li>
<p>Druk op de RODE toets (A) om de afspeelliest op te slaan.</p>
</li>
</ol>
<p>DeASFpeellijstwordtbewerkt.</p>
<p><img alt="" src="images/411e7867bddc7dcd82ef23e0b9a30e60d37edd9f9798ee3d96c0906f838dddda.jpg" /></p>
<h1 id="naar-muzieklijst">Naar muzieklijst</h1>
<ol>
<li>Druktijdens het afspelen van de afspeelijst op de BLAUWE toets (D). De muzieklijst worden nu weergegeven.</li>
</ol>
<p><img alt="" src="images/983666a9e9137e62d4b86ec75d7fb9647dbf4952f45d0f8e92479a25e28a32cd.jpg" /></p>
<p><img alt="" src="images/dc2214cbf087dd7588e3f4fd690c331814a659fd72768ce92969c301e70b18f9.jpg" /></p>
<p><img alt="" src="images/2db24371bbb41771fc4e89b57c6e9c320792a58e30998b61bc5e545dd389fe78.jpg" /></p>
<h1 id="sorteren-gebruiken">Sorteren gebruiken</h1>
<p><img alt="" src="images/33f285119ec41177b5ac097504e96a62b11056b997755583d0434da915c40f60.jpg" /></p>
<p>U kunt de volgorde van de muziekliest heel eenvoudig wijzigen.</p>
<ol>
<li>Drukt verwijl het lijstmenu worden weergegeven op de GROENE toets (B) om Sorteren te selecteren. </li>
<li>
<p>Druk op de toetsen om het gewenste item te selecteren en druk op de toets OK of op de toets .</p>
</li>
<li>
<p>Naam : In alfabetische volgorde. </p>
</li>
<li>Omvang: In volgorde van het formaat van de audiobestanden.</li>
</ol>
<p><img alt="" src="images/a1af77b7795c8917f2cf79e843cad0328268a8652e30d135a80d1d94b1a0e1b0.jpg" /></p>
<p><img alt="" src="images/3433ee9ffc66c07dc05c3a4d0cab9b2a159b2af87c135de54624c74201cb6e75.jpg" /></p>
<p>Audio CD(CD-DA) is nicht beschikbaar. <br />
U kunt sorteren op Naam en Lenghte. Gesorteerde lijsten zullen worden weergegeven in gekopieerde volgorde wanneer deze in de Muzieklijst worden geplaatst.</p>
<h1 id="inhoud-selecteren">Inhoud selecteren</h1>
<p><img alt="" src="images/f5a553f80a98b1df5a86b0bdb1f85cf7be0b5882288b241b0f178ec084badb67.jpg" /></p>
<ol>
<li>Druk op de BLAUWE toets (D) om Inhoud te selecteren. </li>
<li>Druk op de toetsen om de inhoud te selectoren die u wilt verplaatsen en druk vervolgens op de toets OK of .</li>
</ol>
<p><img alt="" src="images/b036d15ca6256053beb063a5d3359b131dcfba8423660218f7d35d163f9201f2.jpg" /></p>
<p><img alt="" src="images/cf9780c79587b676d79f97d2f8801a2b8f9503609212049b0679c7e96cf4a11b.jpg" /></p>
<ul>
<li>Deze functie is alleen beschikbaar als de schijf de geselecteerde inhoud bevat. <br />
Audio CD(CD-DA) is nicht beschikbaar.</li>
</ul>
<h1 id="muziek-en-fotos-geleiktijdig-afspelen">Muziek en Foto's geleiktijdig afspelen</h1>
<p><img alt="" src="images/ce67a7ca3cbe1f3713189b8157950043c500692f4e2b08949b166a7d2129b3d1.jpg" /></p>
<p>U kunt maar muziek luisteren terwij u fotu's bekijkt.</p>
<ol>
<li>Druk op de BLAUWE toets (D) om Inhoud te selecteren. </li>
<li>Druk op de knoppen om Foto (met muziek) te selecteren en druk op OK of op de knop .</li>
</ol>
<p>De fotolijst worden weergegeven. (Zie pagina 55)</p>
<p><img alt="" src="images/9c2e84b29ad6d4bfe11c4648b61386542b0bd1e478210c1cfd279977cbd1c290.jpg" /></p>
<p>Voor deze functie moet u een schijf selecteren die zowel muziekbestanden als afbeeldingsbestanden bevat.</p>
<p><img alt="" src="images/9567ff47ab4d6671c42e87f3fbfb6530cc0b7f462ce496a2be724c230dd2c130.jpg" /></p>
<ol>
<li>
<p>Plaats een JPEG-schijf in de schijflade.</p>
</li>
<li>
<p>Het menu worden teergegeven</p>
</li>
<li>
<p>Druk op de toetsen om Bibliotheek te selecteren en druk op OK of op de toets .</p>
</li>
<li>
<p>Druk op de toetsen om Foto te selecteren en druk cervolgens op OK of op de toets .</p>
</li>
<li>
<p>Druk op de toets SKIP () om de volgende 8 Foto's te bekijken. </p>
</li>
<li>Druk op de toets SKIP() om de vorige 8 Foto's te bekijken.</li>
</ol>
<p><img alt="" src="images/de21efa55ca9cebde4480e4250cfd6495f34ff5d937249c11270f6ba1a225639.jpg" /></p>
<ol>
<li>Druk op de toetsen om de gewenste afbeeling te selecteren. Druk vervolgens op de toets OK.</li>
</ol>
<h1 id="diashow">Diashow</h1>
<p>Volg stappen 1 en 4 hierboven om de betreffende instellenen wee ter geven.</p>
<p>5.Druk op de toets PLAY <br />
- Vanuit de FotolijstkestuntumetdeGELEtoets(C)deoto'sals Diashowweergeven. <br />
6. Druk op de RODE toets (A) om Snelheid te selecteren. <br />
7. Druk op de toetsen om de snelheid van de Diashow in te stellen en druk cervolgens op OK of op de toets .</p>
<p>De diashow begun en wordt met de geseleerde snelheid afgespeeld.</p>
<ul>
<li>U opent de Fotolijst met de GELE toets (C).</li>
</ul>
<p>De diashow stoppen</p>
<p>Druk op de GROENE toets (B) of op de toets STOP(⊙) of RETURN.</p>
<p><img alt="" src="images/8facd59001cfa570ac649a6b27b48ea15a7d8d2e0050c25409680898d397fc6e.jpg" /></p>
<p><img alt="" src="images/f15c838ed8c812ecaf34535f7a3278a195a7055345271a229d006d32245d1df9.jpg" /></p>
<h1 id="draaien">Draaien</h1>
<p>Volg stappen 1 en 4 hierboven om de betreffende instelleningen wee ter geven.</p>
<p>5-1. Druk op de GROENE toets (B) om Draaien te selecteren.</p>
<ol>
<li>
<p>Druk op de toetsen om de gewenste rotatiehoek te selecteren en druk op OK of op de toets .</p>
</li>
<li>
<p>U kunt de roeterhoek wijzigen door op de RODE toets (A) te drukken. </p>
</li>
<li>U opent de Fotolijst met de GELE toets (C).</li>
</ol>
<p> Het roteren stoppen</p>
<p>Druk op de GROENE toets (B) of op de toets STOP () of RETURN.</p>
<p><img alt="" src="images/63634cec4b902cd433e0f1a9293f7e3cdab3f543f922cc98179e0eddfbbbf1cb.jpg" /></p>
<p><img alt="" src="images/88fd5419d9c831f1d19f5ac9a10a65ad7815d9a44474fe1c5edd4d6db925a7a4.jpg" /></p>
<h1 id="zoom-3">Zoom</h1>
<p>U voert instellingen in door stap 1 t/m 4 op pagina 55 te volgen.</p>
<p>5' Druk op de GELE toets (C) om Zoom te selecteren. <br />
6. Telkens wanner u op de toets OK drukt, worden de Foto tot 4x uitvergroot (vier koer de normale grotte).</p>
<p><img alt="" src="images/b93f2a1c8c2adf7c74da65662c724df3dbfc165abbc0f7bfe32cdf4a69899427.jpg" /></p>
<ul>
<li>U opent de Fotolijst met de GELE toets (C).</li>
</ul>
<p><img alt="" src="images/b8f4fbf290ba83fb916ad67c0f2f7045f00a32487db6628947c038856a495f1b.jpg" /></p>
<h1 id="diamond-het-zoomen-stoppen"> Het zoomen stoppen</h1>
<p>Druk op de GROENE toets (B) of op de toets STOP () )of RETURN.</p>
<h1 id="naar-fotolijst">Naar fotolijst</h1>
<p>U voert instellen in door stap 1 t/m 4 op vagina 55 te volgen.</p>
<p>5-1. Druk op de toets RETURN om maar Fotolijst te gaan.</p>
<h1 id="sorteren-gebruiken-2">Sorteren gebruiken</h1>
<p>U kunt de volgorde van de fotolijst heel eenvoudig wijzigen.</p>
<ol>
<li>Drukt verwijl het lijstmenu worden weergegeven op de GROENE toets (B) om Sorteren te selecteren. </li>
<li>
<p>Druk op de toetsen om het gewenste item te selecteren en druk op de toets OK of .</p>
</li>
<li>
<p>Naam : In alfabetische volgorde. </p>
</li>
<li>Omvang : In volgorde van het formaat van de fot's.</li>
</ol>
<p><img alt="" src="images/4c1e11edff699589689358e6d3dc047c508f5216d0a8e735f65ef58c8b378358.jpg" /></p>
<p><img alt="" src="images/84aec09f055be59aa3f6f92b25349a9c9de2fe2643be5167ed539fe90b0efabf.jpg" /></p>
<p>U kunt sorteren op Naam en Grootte. Gesorteerde lijsten zullen worden weergegeven in gekopieerde volgorde wanneer deze in de Fotolijst worden geplaatst.</p>
<h1 id="inhoud-selecteren-2">Inhoud selecteren</h1>
<p>U voert instellingen in door stap 1 t/m 3 op pagina 55 te volgen.</p>
<ol>
<li>Druk op de BLAUWE toets (D) om Inhoud te selecteren. </li>
<li>Druk op de toetsen om de inhoud te selecteren die u wilt verplaatsen en druk verwolgens op de toets OK of .</li>
</ol>
<p><img alt="" src="images/22b712b305d234b3c0f2407e4acf91f945c3f5bae449a054e9be145a08f40e72.jpg" /></p>
<ul>
<li>Deze functie is alleen beschikbaar als de schijf de geselecteerde inhoud bevat.</li>
</ul>
<p><img alt="" src="images/3b82692e6fbf4d5e8a250aeb0639cc25b9f3e09c9d4813ba76116eba9db10acb.jpg" /></p>
<p><img alt="" src="images/bb93acb1e049263bdb7db883301f0a33cd62cc2530378a89ca9b096c77e13ddc.jpg" /></p>
<h1 id="de-toets-menu-gebruiken">De toets MENU gebruiken</h1>
<ol>
<li>Plaats een DivX-schijf in de schijflade. </li>
<li>Het menu wordenweergegeven </li>
<li>Druk op de toetsen om Bibliothek te selecteren en druk verwolgens op OK of op de toets . </li>
<li>Druk op de toetsen om DivX te selecteren en druk vervolgens op OK of op de toets . </li>
<li>Druk op de toetsen om het avi-bestand (DivX) te selecteren en druk verwolgens op OK of de toets PLAY (C). </li>
<li>Tijdens het afspelen van een DivX-bestand(Int)(Int) dukt tijdens het afspelen, worden de bestandenlijst weergegeven; als u nogmaals op de stoptoets drukt, worden het menuschem afgesloten.</li>
</ol>
<p><img alt="" src="images/23d87ef0ce721d0a39d9f702376d4c0ba0e59f1b2b472c7a52291ba23c2d9ca4.jpg" /></p>
<p>DivX Functiebeschrijving </p>
<table><tr><td>Functie</td><td>Beschrijving</td></tr><tr><td>Scène overslaan</td><td>Drukijdens het afspelen op de toetsen SKIP (⊙⊙) om 5 minuten vooruit of terug te springsen.</td></tr><tr><td>Zoeken</td><td>Drukijdens het afspelen op de toetsen SEARCH (⊙⊙) en druk nogmaals voor een hogere zoeksnelheid. (X 2, X 4, X 8)</td></tr><tr><td>Vertraagd afspelen</td><td>Drukijdens pauze (⊙) op de toets SEARCH (Zoeken) (⊙) van de afstandsbediening. (1/2, 1/4, 1/8)De functiechyteruivertraagd afspelen is Niet beschikbaar.</td></tr><tr><td>Beeld voor beeld afspelen</td><td>Drukijdens pauze (⊙) op de toets SKIP (Overslaan) (⊙) van de afstandsbediening.De functiechyteruibeeld voor beeld afspelen is Niet beschikbaar.</td></tr></table>
<p><img alt="" src="images/4ae55161c05f727066c9244ee7e82af8d750060e9ce8b14eee001607b9aa6b49.jpg" /></p>
<p>Sommige DivX-bestanden die op een pc werden aangemaaakt, worden möglichniet afgespeeld. Daarom worden codectypes, versies en resoluties die hoger zich dan de vermelde, Niet ondersteund.</p>
<h1 id="divx-ondertitelingscodering">DivX-ondertitelingscodering</h1>
<ol>
<li>Druk in de bestandenlijst op de GELE toets (C). </li>
<li>Druk op de toetsen om een regionalaal ondersteunde DivXondertitelingstaal te selecteren en druk cervolgens op OK.</li>
</ol>
<p><img alt="" src="images/9c1899b86f5728fbf0333e1023a67fc9dcf42d928b59505beb82bbf4ebcd438c.jpg" /></p>
<table><tr><td>Westen</td><td>Afrikaans, Baskisch, Catalaans, Deens, Netherlands, Engels, Faerørs, Fins, Frans, Duits, IJ Islands, Indonesisch, Italiaans, Maleisisch, Noors, Portugees, Spaans, Swahili, Zweeds</td></tr><tr><td>Centraal</td><td>Engels, Albaans, Kroatisch, Tsjechisch, Hongaars, Pools, Roemeens, Servisch(Latin), Slowaaks, Sloeens</td></tr><tr><td>Grieks</td><td>Engels, Grieks</td></tr><tr><td>Cyrillisch</td><td>Engels, Azerbeidzjaans, Wit-Russisch, Bulgaars, Kazaks, Macedonisch, Russisch, Servisch, Tataars, Oekraiens, Oezbeeks</td></tr></table>
<p><img alt="" src="images/31fe1e54557d22997b32c809c0930b5d03682b4e8ae4d54b5710b290072544b5.jpg" /></p>
<ul>
<li>Als de taal van de ondtiteling in verkeerde letters wordt weergegeven, wijzigt u de DivX-ondertiteling in de juiste regio. Als dit nicht werkkt, worden de opmaak Niet ondersteund.</li>
</ul>
<h1 id="sorteren-gebruiken-3">Sorteren gebruiken</h1>
<p>U kunt de volgorde van de DivX-lijst heel eenvoudig wijzigen.</p>
<ol>
<li>
<p>Drukt verwijl het lijstmenu worden weergegeven op de GROENE toets (B) om Sorteren te selecteren.</p>
</li>
<li>
<p>Druk op de toetsen om het gewennen item te selecteren en druk op de toets OK of .</p>
</li>
<li>
<p>Naam : In alfabetische volgorde. </p>
</li>
<li>Omvang: In volgorde van het formaat van de DivX-bestanden.</li>
</ol>
<p><img alt="" src="images/8e015e34afd115713ce227a75c260e5350b4447a99b6c57e0e0007d0fcd37a50.jpg" /></p>
<p><img alt="" src="images/3466856983ae6a2523c2ab1f3b4073c78bea21bce8948ba3ce4623e71c2ffe4b.jpg" /></p>
<p>U kunt sorteren op Naam en Grootte. Gesorteerde lijsten zullen worden weergegeven in gekopierde volgorde wanneer deze in de DivX-lijst worden geplaatst.</p>
<h1 id="inhoud-selecteren-3">Inhoud selecteren</h1>
<ol>
<li>Druk op de BLAUWE toets (D) om Inhoud te selecteren. </li>
<li>Druk op de toetsen om de inhoud te selecteren die u wilt verplaatsen en druk verwolgens op de toets OK of .</li>
</ol>
<p><img alt="" src="images/a0cac65204c4e8c2085cae5f0ab0efb17ff2f399a18fb1adab4324f483659011.jpg" /></p>
<p><img alt="" src="images/b08c4e663b8fe4696bf3d8de7f76de9a41840c5bff5e6e48c6536c85e40ec728.jpg" /></p>
<ul>
<li>Deze functie is alleen beschikbaar als de schijf de geselecteerde inhoud bevat.</li>
</ul>
<p>In dit hoofdstuk worden verschillende HDD & DVD-opnamemethoden besproken. Met dit apparaat=kunt u op verschillende schijftypen opnemen. Lees voordat u begint de volgende instructies en kies het schijftype op basis van uw voorkeur.</p>
<h1 id="opneembare-dvds">OPNEEMBARE DVD'S</h1>
<p>Met deze recorder kurz u op de volgende schijven opnemen.</p>
<table><tr><td>HDD</td><td>DVD-RAM</td><td>DVD-RW</td><td>DVD-R</td></tr><tr><td>HDD</td><td>DVD
RAM</td><td>DVD
R W</td><td>DVD
R</td></tr></table>
<p>DVD-RW's en DVD-RAM's zichhersrijfbaar. <br />
DVD-R's zich nicht herschrijfbaar.</p>
<p>Compatibilitéit van Samsung-recorders en recorders van andere bedrijven </p>
<table><tr><td>Typen schijven</td><td>Opname - indeling</td><td>Recorder</td><td>Sluiten</td><td>Aanvullende opnamen via Samsung-recorder</td></tr><tr><td rowspan="2">DVD-RAM</td><td rowspan="2">VR modus</td><td>Samsung</td><td>X</td><td>Opneembaar</td></tr><tr><td>Andere fabrikant</td><td>X</td><td>Opneembaar</td></tr><tr><td rowspan="8">DVD-RW</td><td rowspan="4">VR modus</td><td rowspan="2">Samsung</td><td>Afgesloten</td><td>Niet opneembaar</td></tr><tr><td>Niet afgesloten</td><td>Opneembaar</td></tr><tr><td rowspan="2">Andere fabrikant</td><td>Afgesloten</td><td>Niet opneembaar</td></tr><tr><td>Niet afgesloten</td><td>Opneembaar</td></tr><tr><td rowspan="4">V modus</td><td rowspan="2">Samsung</td><td>Afgesloten</td><td>Niet opneembaar</td></tr><tr><td>Niet afgesloten</td><td>Opneembaar</td></tr><tr><td rowspan="2">Andere fabrikant</td><td>Afgesloten</td><td>Niet opneembaar</td></tr><tr><td>Niet afgesloten</td><td>Niet opneembaar</td></tr><tr><td rowspan="4">DVD-R</td><td rowspan="4">V modus</td><td rowspan="2">Samsung</td><td>Afgesloten</td><td>Niet opneembaar</td></tr><tr><td>Niet afgesloten</td><td>Opneembaar</td></tr><tr><td rowspan="2">Andere fabrikant</td><td>Afgesloten</td><td>Niet opneembaar</td></tr><tr><td>Niet afgesloten</td><td>Niet opneembaar</td></tr></table>
<p><img alt="" src="images/abee3628a5ba34cd6c157810773eb41c4b15ec4d3a800e9bb29d29254678065f.jpg" /></p>
<p>Sluiten</p>
<ul>
<li>Hiermee worden de DVD-RW/-R gesloten zodategen extra opnamen konnen worden toegevoegd.</li>
</ul>
<p>Afsluiten ongedaan maken</p>
<ul>
<li>Hiermee(Int) op extra opnamen opslaan op een DVD-RW-schijf die oorspronkelijk op de HDD & DVD-RECORDER zijn opgenomen. </li>
<li>Het afsluiten van een DVD-RW die met DAO (Disc At Once) is opgenomen op een pc, kan nicht ongedaan worden gemaakt. </li>
<li>Het afsluiten van een DVD-RW die in de videomodus van een recorder van een ander merk is opgenomen, kan nicht ongete aan worden gemaakt. </li>
<li>Het aflsuiten van een DVD-R kan nicht ongedaan worden gemaakt.</li>
</ul>
<h1 id="opname-indelingen">OPNAME-INDELINGEN</h1>
<p>Wonneer u een ongebruekte schijf in de recorder plaatst, worden het volgende bericht weergegeven. Omdat de beschikbare functies affankelijk zijn van het schijftype, kutu d schijf kiezen die het Beste aan uw voorwaarden voldoet.</p>
<p>DVD-RAM/+R: Het formatteren worden automatisch gestart.</p>
<p>DVD-RW: Gebruiken nadat de schijf is geinitialiseerd.</p>
<p>Raadpleeg "Een schijf formatteren" op pagina 90 als u de modus VR of V wilt wijzigen.</p>
<p>DVD-R : een DVD-R hoeft Niet te worden geformatteerd en alle en opnemen in videomodus worden ondersteund.</p>
<h1 id="dvd-ram-rwvr-modus">DVD-RAM/-RW(VR-modus)</h1>
<ul>
<li>Deze modus bildet verschlende bewerkingsfuncties (zoals het verwijderen van de volledige titel, het gedeeltelijk verwijderen van een titel, enzovoort.) </li>
<li>Verschillende bewerkingsopties met behulp van een gemaaakte afspeellijst.</li>
</ul>
<h1 id="dvd-rwv-modus-r">DVD-RW(V-modus)/-R</h1>
<ul>
<li>Hoofdstukken worden automatisch gemaakt wannier u de opname op DVD-RW/-R-schijven in videomodus voltooit. De lengte van het hoofdstuk (intervalussenhoofdstukken)hangt af van de opnamemodus. <br />
Eenvoudige bewerkingen (titels wissen/naam van titels wijzigen)</li>
</ul>
<p>Kies een van de vier opnamemodi voor de gewenste opnametijd en beeldkwaliteit door de toets REC MODE meerder malen in te drukken vanuit de stopstand. Over het algemeen neemt de beeldkwaliteit toe naarmate de duur van de opname afneamt. In de modus FR wordt de meest geschikte opnamemodus automatisch aangepast op basis van de overgeblevenijd op de schijf en de lenghte van de timer-opname. Met这点 functie worden slechts een opnamemodus geselecteerd (XP, SP, LP of EP) en u kunt这点 modus voor timer-opnamen gebruiken.</p>
<p>DVD-HR770 </p>
<table><tr><td rowspan="2">Opnamemodus</td><td colspan="2">Duur van opname</td></tr><tr><td>HDD (160GB)</td><td>DVD-RAM/-RW/-R</td></tr><tr><td>XP(Hoge-kwaliteitsmodus)</td><td>Ong. 33 ur</td><td>Ong. 1 uur ong. 8,5 Mbps</td></tr><tr><td>SP(Standaardkwaliteitsmodus)</td><td>Ong. 67 ur</td><td>Ong. 2 uur ong. 4,5 Mbps</td></tr><tr><td>LP(Lange-opnamemodus)</td><td>Ong. 133 ur</td><td>Ong. 4 uur ong. 2 Mbps</td></tr><tr><td rowspan="2">EP(Verlengde modus)</td><td>Ong. 199 ur</td><td>Ong. 6 uur/ ong. 1,6 Mbps</td></tr><tr><td>Ong. 264 ur</td><td>Ong. 8 uur/ ong. 1,2 Mbps</td></tr><tr><td>FR(flexible opnamemodus)</td><td>Ong. 33 ur ~ 264 ur</td><td>Ong. 1~8 ur</td></tr></table>
<p><img alt="" src="images/a553c3df6e6aa6bd8334bfac516c7e0a9c2af4524b530b6884b7cd053bb98cdd.jpg" /></p>
<ul>
<li>De opnametijd kan verschillen, afhankelijk van de specifieke opnamecondities. <br />
1GB = 1.000.000.000 bytes. De daadwerkelijke capacititeit na het formatteren kan minder+zijn aangezien de internet firmware een gedeelte van het geheugen gezrukt. </li>
<li>De DVD-R's met dubbele laag hebben ongeveer de dubbele capacititeit van DVD-R's met een laag. (zie pagina 41)</li>
</ul>
<h1 id="beelden-die-tegen-opnemen-beveiligd-zijn">BEELDEN DIE TEGEN OPNEMEN BEVEILIGD ZIJN</h1>
<p>Met deze HDD & DVD- RECORDER kurz u geen beelden met kopieerbeveiliging opnemen.</p>
<p>Als de HDD &DVD-RECORDER een kopierbeveiligingssigmaal ontvangtijdens de opname, worden de opname gestopt en verschijnt het volgende bericht op het scherm.</p>
<h1 id="kopieerbeveiligingssignalen">Kopieerbeveiligingssignalen</h1>
<p>Tv-uitzendingen met kopierbeveiligingssignalen können een van de volgende drie typen signalen bevatten: vrij kopiieren,ënmaal kopieren en nooit kopieren. Als u een programme van het type vrij kopieren wilt opnemen, gebruikt u een DVD-RW met CPRM in VR-modus, DVD-RAM, HDD.</p>
<table><tr><td>Type signal Vrij kopiën</td><td>Eenmaal kopiën</td><td>Nooit kopiën</td><td>Medium</td></tr><tr><td>DVD-RW (Ver.1.1)</td><td>0</td><td>-</td><td>-</td></tr><tr><td>DVD-RW(Ver.1.1) met CPRM</td><td></td><td></td><td></td></tr><tr><td>VR modus</td><td>0</td><td>0*</td><td>-</td></tr><tr><td>V modus</td><td>0</td><td></td><td>-</td></tr><tr><td>DVD-R</td><td>0</td><td>-</td><td>-</td></tr><tr><td>DVD-RAM (Ver.2.0)</td><td>0</td><td>0*</td><td>-</td></tr><tr><td>HDD</td><td>0</td><td>0*</td><td>-</td></tr></table>
<p>Wonneer een programme van het type Eenmaal kopiernen is opgenomen, hunnen geen opnamen更是 worden uitgevoerd.</p>
<h1 id="diamond-inhoudbeveiliging-voor-opneembare-media-cprm"> Inhoudbeveiliging voor opneembare media (CPRM)</h1>
<p>CPRM is een mechanisme dat een opname aan de media koppelt waarop deze is opgenomen. Het worden ondersteund door sommige HDD & DVD-recorders, maar door weinig DVD-spellers. Elke lege opneembare DVD hebt een unk 64-bits medium-id geegt in de BCA. Wonneer de beveiligde inhoud op de schijf is opgenomen, kan deze worden gecodeerd met een 56 bits C2 (cryptomeria) sleutel afgeleid van de medium-id. Tijdens het afspelen worden de id gelezen vanaf de BCA en gebrukt om een sleutel te genereren om de inhoud van de schijf te ontcijferen.</p>
<p>Als de inhoud van de schijf waar andere media wordt gekopieerd, ontbreekt de id of is deze verkeerd en+kunnen de gegevens Niet worden ontcijferd.</p>
<h1 id="voordat-u-begint">Voordat u begint</h1>
<ol>
<li>Controller of de schijf over voldoende beschikbare opnameruihte beschikt. </li>
<li>Druk op de toets HDD of DVD.</li>
</ol>
<p>Als u DVD heeft geseleeteerd, drukt u op de toets OPEN/CLOSE en staat u een opneembare schijf in de schijflade.</p>
<p>Druk op de toets OPEN/CLOSE om de schijflade te sluiten. Wacht tot LOAD Nieteer op het display van het voorpaneel worden weergegeven.</p>
<h1 id="het-tv-programma-opnemen-waarnaar-u-kijkt">Het tv-programma opnemen waarnaar u kijkt</h1>
<ol>
<li>Ga met de PROG (O) of de cijfertoetsen maar de zender van het tv-programma dat u wilt opnemen. </li>
<li>Druk enkele malen op de toets REC MODE (of druk op de toets REC MODE en vervolgens op de toetsen om de opnamesnelheid (kwaliteit) in te stellen).</li>
</ol>
<p><img alt="" src="images/8872c4f787a9099ee780a056cdcd2b2ea0560661936774db0a95d75605c7b90b.jpg" /></p>
<p><img alt="" src="images/7a5e2a25bfa8579a738ccd0cf865764420002ebbc6d11c43221527a3d2276409.jpg" /></p>
<ol>
<li>Druk op de toets REC.</li>
</ol>
<p>Op het scherm worden informatie over de gekozen zender weergegeven, waarna de opname worden gestart.</p>
<p>Het pictogram (O) worden op het voorpaneel weergegeven.</p>
<p><img alt="" src="images/48b49c8897dee7bc04b2c13f8af6ec88be433392a728d158ec8b72b5df074a74.jpg" /></p>
<h1 id="opnemen-van-externe-apparaten-waarnaar-u-kijk">Opnemen van externe apparaten waarnaar u kijk</h1>
<ol>
<li>Druk op de toets INPUT SEL. om de invoerbron te selecteren waarmee u de recorder hebt verbonden. Het display van het voorpaneel worden in de volgende volgorde gewijzigd:</li>
</ol>
<p><img alt="" src="images/d98d446b33fef432b25f41ae1a3005ae45446375e91be771f44a6cbdf56cbac2.jpg" /></p>
<ol>
<li>Druk enkele malen op de toets REC MODE (of druk op de toets REC MODE en verrolgens op de toetsen om de opnamesnelheid (kwaliteit) in te stellen). </li>
<li>Druk op de toets REC.</li>
</ol>
<p>Op het scherm worden informatie over de externe-invoermodus weergegeven, waarna de opname worden gestart. Het pictogram (C) worden op het voorpaneel weergegeven.</p>
<h1 id="de-opname-tijdelijk-onderbreken">De opname tijdelijk onderbreken</h1>
<ul>
<li>Druk op de toets REC PAUSE om een opname te onderbreken. </li>
<li>Drukijdens de onderbreking nogmaals op de toets REC PAUSE om de opname te hervatten. </li>
<li>U=kntijdens de onderbreking van een opname tussen kanalen schakelen door op PROG ( ) te drukken.</li>
</ul>
<h1 id="de-opname-beeindigen">De opname beeindigen</h1>
<p>Druk op de toets STOP () om een opname te beeindigen.</p>
<ul>
<li>Wanner u DVD-RAM/-RW/-R-schijven gezrukt, verschijnt de melding "Schifinformatie worden bijgewerkt. Wacht een moment."</li>
</ul>
<p><img alt="" src="images/ebd6b4ace147e4fa84e65eec1b46f45ce0c1d542cb9a79952628be731ed75bdb.jpg" /></p>
<p>Tijdens een opname=kunt u de opnamemodus nicht wijzigen. <br />
■ Als er onvoldoende ruimte over is, worden een opname automatisch beeindigd. <br />
U kunt maximaal 99 titels opnemen op eenDVD-ram/-rw/-r-schijf. <br />
Maximaal 999 titels konnen op de vaste schijf (HDD) worden opgeslagen. <br />
Er kan maximaal 24 eer op de vaste schijf worden opgenomen, waarin 3 titels worden opgenomen, die elk een lengte van 8 eer hebben. <br />
- De opname worden automatisch beeindigd als gegen kopiernen beweignde beelden zijn geselecteerd. <br />
DVD-RAM/RW-schijven要去 voor de opname eerst worden geformatteerd. De meeste neue schijven worden Niet-geformatteerd verkocht. <br />
- Gebruik geen DVD-R-authoringschijven voor dit apparaat.</p>
<h1 id="een-otr-one-touch-recording-maken">EEN OTR (ONE TOUCH RECORDING) MAKEN</h1>
<p><img alt="" src="images/635f10384f2ac082d8d75b814013649aa68263b688afc55e6f5c2aaf0e7dae84.jpg" /></p>
<p><img alt="" src="images/25aa0d09490f296e770df03360650581a5300b224b7307f3c18df45433cbf69c.jpg" /></p>
<p><img alt="" src="images/0c256683437424e84b188e1e2bcbe019d65e5132c7c377b31e65c9a1e2096848.jpg" /></p>
<p><img alt="" src="images/ae532d25d7894549875288a1ddee4aa92880028ef836776c4e0f90660362fbb4.jpg" /></p>
<p>U kurz de HDD & DVD-RECORDER in stappen van 30 minutes maximaal 8 eer laten opnemen door op de toets REC te drukken.</p>
<ol>
<li>Druk op de toets HDD of DVD.</li>
</ol>
<p>Als u DVD heeft geseleedr, drukt u op de toets OPEN/CLOSE en plaatst u een opneembare schijf in de schijflade. Druk op de toets OPEN/CLOSE om de schijflade te sluiten.</p>
<p>Wacht tot LOAD nicht meer op het display van het voorpaneel worden weergegeven.</p>
<ol>
<li>Ga met de PROG (O) of de cijfertoetsen maar de zender van het tv-programma dat u wilt opnemen. </li>
<li>Druk op de toets REC om het opnemen te starten. </li>
<li>Druk herhaaldelijk op REC om de gewenste opnametijd in te stellen.</li>
</ol>
<p><img alt="" src="images/50faf93bd2f84b48de575e052982f4910c5ec0a0933322a5f8bb61ebe08aa337.jpg" /></p>
<p><img alt="" src="images/8cdc463ce4f950a8cd458aa2a3e76a77889ee80617eeeb222f9d77ac290e8427.jpg" /></p>
<ul>
<li>De teller van de timer loopt minuutsgewijs terug van 8:00 maar 0:00. Op dat moment worden de opname.beindigd.</li>
</ul>
<p><img alt="" src="images/a09ab581d0805f16b34f37c9427438e5fd63f9c039eeca930ae1b1ccca67d99e.jpg" /></p>
<p><img alt="" src="images/7b6ed7b7f1c403901d602587846bde451654c27d0c565f8f82b707b47cd3a202.jpg" /></p>
<h1 id="de-opname-beeindigen-2">De opname beeindigen</h1>
<p>Druk op de toets STOP () . De melding "Wilt u stoppen met opnemen?" worden weergegeven.</p>
<ul>
<li>Druk op om Ja te selectoren en druk cervolgens op OK. </li>
<li>Druk nogmaals op de toets STOP (⊙).</li>
</ul>
<p>U kunt afspelen vanaf het begin van het programma dat u aan het opnemen bent.</p>
<p>U(Int) de eerder opgenomen titels bekijnen terwijl een programma wordt opgenomen.</p>
<h1 id="de-toets-play-afspelen-odot-gelebruiken">De toets PLAY (Afspelen) () gelebruiken</h1>
<ol>
<li>Druk in de opnamemodus op de toets PLAY (▶).</li>
</ol>
<p>De titel die u momenteel aan het opnemen bent, worden afgespeeld.</p>
<p>Het afspelen kan pas tien seconden nadat het opnemen is gestart, beginnen.</p>
<p>U kunt met behulp van SKIP (⊗) en andere afspeeltoetsen de lijst met eerdere opnamen bekijken.</p>
<p><img alt="" src="images/0bb62bee04796fd116da004c5d7494fd3e4dbd17b0c82c7782ffa399f39a5297.jpg" /></p>
<h1 id="afspelenopnemen-beeindigen">Afspelen/Opnemen beeindigen</h1>
<ol>
<li>Druk op de toets STOP (⊙). Het aftspeelschem verdwijnt en het opnameschem worden weergegeven. </li>
<li>Stop het opnemen door nogmaals op de toets STOP (⊙) te drukken.</li>
</ol>
<p><img alt="" src="images/9f75d41a591d31ac4f7b96cbe6a3f519582e5c2b905230b75de56fb23841a377.jpg" /></p>
<h1 id="de-toets-title-list-gebruiken">De toets TITLE LIST gebruiken</h1>
<ol>
<li>Druk in de opnamemodus op de toets TITLE LIST.</li>
</ol>
<p>Deze handling kun t u itvoeren vanaf ongeveer 10 seconden of meer na het begin van de opname.</p>
<p>Selecteer met de toetsen / SKIP ( ) de titel die momenteel wordt opgenomen.</p>
<ol>
<li>Druk op OK of PLAY (▶).</li>
</ol>
<p>De titel die u momenteel aan het opnemen bent, worden afgespeeld.</p>
<p><img alt="" src="images/2dcb60b220db5b55ce3289225fb0d3d0858beac7f898be164d16b290a59b707b.jpg" /></p>
<p><img alt="" src="images/b0468a5e029fb855024952270cccc2f54cd9ec8c1ce0427e0943f1b87a2e126e.jpg" /></p>
<h1 id="de-toets-menu-gebruiken-2">De toets MENU gebruiken</h1>
<ol>
<li>Druk in de opnamestand op de toets MENU. </li>
<li>Druk op de toetsen om Titel te selecteren en druk vervolgens op OK. Het scherm Title List (Titellijst) verschijnt. </li>
<li>Druk op de toetsen / SKIP (Overslaan) (Ov) om de titel te selecteren die momenteel worden opgenomen en druk cervolgens op de toets OK of .</li>
</ol>
<p>De titel die umomenteel aan het opnemen bent, worden afgespeeld.</p>
<h1 id="afspelenopnemen-beeindigen-2">Afspelen/Opnemen beeindigen</h1>
<ol>
<li>Druk eenmaal op de toets STOP (⊙). Het afspeelschemr verschijnt en de Title List (Titelijst) worden weergegeven. </li>
<li>Druk nogmaals op de toets MENU (O) om het opnameschem weer te geben. </li>
<li>U stopt het opnemen door nogmaals op de toets STOP () te drukken.</li>
</ol>
<p><img alt="" src="images/57afc8d2d44a50e9e2157f061693090c2eea166f24e37a9d6e2c6c7eeff79205.jpg" /></p>
<p>U hoor geen geluidijdens het zoeken. <br />
- U kurz DVD's of HDD afsplen terwijl op de vaste schijf (HDD) worden opgenomen. Jpeg, mp3 en DivX-bestanden op de schijf können darüber nicht worden afgespeeld. <br />
- U kunt vanaf de vaste schijf (HDD) afspelen terwijl op DVD worden opgenomen. Jpeg en MP3-bestanden op de vaste schijf können darüber nicht worden afgespeeld.</p>
<h1 id="de-func-tie-time-shift-als-live-signala">DE FUNC TIE TIME SHIFT ALS LIVE SIGNALA</h1>
<p><img alt="" src="images/3966554e72b87560a314a537955a520c1bf56cf33cf7b823d631cc2ee915fecc.jpg" /></p>
<p>Met deleze functie worden opnames als een live signala afgespeeld.</p>
<p>Als uijdens het tv-kijken worden gestoord, drukt u op de toets TIME SHIFT. De HDD & DVD RECORDER begint nu direct met het opnemen van het programme.</p>
<p><img alt="" src="images/58fd858cb55ebcbec6bb64b5a2548f9594ecadcc8ce3fd9e620eb4996510e02e.jpg" /></p>
<h1 id="de-functie-time-shift-gebruiken">De functie Time Shift gebruiken.</h1>
<ol>
<li>Druk op de afstandsbedieling op de knop TIME SHIFT. Het menu Time Shift worden weergegeven. </li>
<li>Druk op de toetsen om Aan te selecteren, en druk cervolgens op OK. </li>
<li>Druk verwij u waar het huidige programma kijk op de toets PAUSE (u). Het tv-programma worden nu in de pauzestand gezet en de balk Time Shift worden weergegeven. </li>
<li>Druk nogmaals op de toets PLAY () om verdier te gaan met het programme.</li>
</ol>
<h1 id="onderdelen-van-het-scherm-time-shift">Onderdelen van het scherm Time Shift</h1>
<p><img alt="" src="images/430df329525974ec8defc7694ef0124b28d653696c888956cb5ba0be51a2f5ec.jpg" /></p>
<p>1 Geeft de huidige media weer <br />
2 Geeft de huidige status wee <br />
3 Kijkpunt <br />
4 Huidige afspeeltijd <br />
Livepunt <br />
6 Live tijd <br />
TijdBalk Time Shift</p>
<h1 id="knuppen-op-de-afstandsbediening-voor-de-functie-time-shift">Knuppen op de afstandsbediening voor de functie Time Shift</h1>
<ol>
<li>Toets PLAY (一) : afspelen </li>
<li>Toets PAUSE () : tv-uitzending onderbreken. </li>
<li>De toetsen SEARCH ( ) : Versneld afspelen (X 2, X 4, X 8, X 16, X 32, X 128) </li>
<li>De toetsen SKIP () , en STOP () : Hiermee schakelt u overaar de live tv-uitzending. </li>
<li>De toetsen SKIP ( ) : Hiermee keert u terug hier het beginnPunt van Time Shift.</li>
</ol>
<p><img alt="" src="images/97c82462a16f916c44795f41c79f2cce4da7445e12e0440c5f3ec0e27281dd8c.jpg" /></p>
<ul>
<li>De functie Time Shift is alleen beschikbaar in de modus HDD. <br />
U kunt deze functie maximaal twee urr gebruiken. <br />
U kunt alleen met behulp van het menu de inhoud afspelen als Time Shift op Aan staat. </li>
<li>
<p>Druk op de toets TIME SHIFT om de functie Time shift te annuleren.</p>
</li>
<li>
<p>Controller of de antennekabel is aangesloten. </p>
</li>
<li>Controller de resterendeijd op de schijf. </li>
<li>Controller de datum en de hijd.</li>
</ul>
<p>De klok要去 ingesteld voordat u een timer-opname kutn make. (zie pagina 30)</p>
<p><img alt="" src="images/36256cb3a2c7a72b3af28d515c3792f8270b36a039b21cb159f07dda84a167a1.jpg" /></p>
<h1 id="de-toets-timer-gebruiken">De toets TIMER gebruiken</h1>
<ol>
<li>Druk in de stopstand op de toets TIMER. </li>
<li>
<p>Druk op de knoppen om Geplande lijst te selecteren en druk verwolgens op OK of op de knop .</p>
</li>
<li>
<p>Druk op OK om Een lijst toevoegen te selecteren. </p>
</li>
<li>Timer-opnameopties instellen</li>
</ol>
<p>Vul de items in met de toetsen en de cijfertoetsen. <br />
: hiermee gaat u maar het vorige/volgendeit tem. <br />
0-9 : hiermee stelt u een waarde in.</p>
<ul>
<li>Naar : kies of u op HDD of op DVD wilt opnemen. </li>
<li>Bron : de video-ingangsbron (AV1, AV2 of AV3) of het uitzendkanaal waarvan u een timer-opname wilt makeen. </li>
<li>Datum : u kurz timer-opnamen maximaal eén maand vooruit plannen. Stel de opnamedag in. (maand/dag)</li>
</ul>
<table><tr><td>Jan 31</td><td>Elke ZO</td></tr><tr><td>Jan 30</td><td>⋮</td></tr><tr><td>Jan 29</td><td>Elke ZA</td></tr><tr><td>⋮</td><td>MA - VR</td></tr><tr><td>Jan 02</td><td>MA - ZA</td></tr><tr><td>Jan 01</td><td>Elke Dag</td></tr></table>
<p><img alt="" src="images/91d12cce08c7705c59c38830573604d4667aa1e429259e13441b8ea50e5ea6e1.jpg" /></p>
<p><img alt="" src="images/60b9a45aefcc66fee2e0ef71f484569fe3a67d7eb2ebf567c23e88a8a5d338ce.jpg" /></p>
<p><img alt="" src="images/168c21c9fa73fea660c8215d0bab51f6e3d5c2947d3ef15b6bcb6aa503c8e815.jpg" /></p>
<ul>
<li>
<p>Begin-/Einde: begin- en eindhoven van de timer-opname. <br />
Modus (Opnamemodus) :</p>
</li>
<li>
<p>FR (flexibel opnemen) : selecteer deze optie wanner u de videokwaliteit automatisch wilt instellen. In de modus FR (Flexible opname) worden de meest geschikte opnamemodus automatisch aangepast op basis van de overgebleven tijd op de schijf en de lenghte van de timer-opname. Met deze functie worden slechts een modus geseleeteerd in de modi XP, SP, LP en EP. </p>
</li>
<li>XP (hoge kwaliteit) : selecteer deze optie wanneer de videokwaliteit belangrijk is. </li>
<li>SP (standaardkwaliteit) : selecteer deze optie om met standaardkwaliteit op te nemen. </li>
<li>LP (lage kwaliteit) :selecteer deze optie wanner er een lange opnametijd nodig is. </li>
<li>
<p>EP (verlengd) : selecteer deze optie wanner er een langere opnametijd nodig is.</p>
</li>
<li>
<p>VPS/PDC: functie VPS(Video Programme System) of PDC(Programme Delivery Control).</p>
</li>
<li>
<p>Met deutsche functie kurz u de begin- en eindtijd van een opname regelen door middel van een speciaal signaal dat met het zendsignaal worden meegezonden. Als een tv-programma korter is of eerder of later dan gepland begint, worden met deutsche functie de begin- en eindtijd van de opname automatisch dienovereenkomstig aangepast.</p>
</li>
<li>
<p>Stel EXACT de begintijd in die is aangekondigd in de TV-gids. Anders werkt de timer-opname nicht. </p>
</li>
<li>
<p>Kies nicht PDC of VPS als u nicht zeker weet of het programme dat u wilt opnemen met VPS/PDC wordenuit gezonden.</p>
</li>
<li>
<p>TITEL: Druk op de RODE toets (A) om de titel een naam te gehen.</p>
</li>
</ul>
<p>Het scherm voor het wijzigen van de titel verschijnt.</p>
<p>Volg stap 4 en 5 van 'De naam van een titel wijzigen' op pagina 73~74.</p>
<ol>
<li>
<p>Nadat u de waarden voor elke modus hebt ingesteld, drukt u op de toets OK om Opslaan te selecteren.</p>
</li>
<li>
<p>[1] wordt op het voorpaneel weergegeven. Dit betekent dat een timer-opname is geregistreeid.</p>
</li>
</ol>
<h1 id="als-de-timer-installingen-elkaar-overlappen">Als de timer-installingen elkaar overlappen;</h1>
<p>De programme's worden in de volgorde van prioriteit opgenomen. Nadat de opname van het eerste programme is voltooid, worden het tweede programme opgenomen.</p>
<h1 id="afsluiten-zonder-de-huidige-instelling-op-te-slaan">Afsluiten zonder de huidige instelling op te slaan</h1>
<p>Druk op de toets EXIT (④).</p>
<h1 id="terugkeren-hier-het-vorige-menu">Terugkeren hier het vorige menu</h1>
<p>Druk op de toets RETURN als u geen timer-opname wilt instellen.</p>
<ol>
<li>Schakel het apparaat uit om de instellingen voor de timer-opname te voltooien.</li>
</ol>
<p>Als de recorder is ingeschakeld, is een timer-opname nicht möglich.</p>
<p><img alt="" src="images/3135c5202cbe24a1a03c586c118347d6b2f7b3fdb61808bd1aae897f7f1388bd.jpg" /></p>
<ul>
<li>Deijd van de timer-opname kan verschellen van de ingesteldeijd. Dit hangt af van de schijfstatus en de algehele status van de timer-opnamen (bijvoorbeeld wanner opnametijden elkaar overlappen of wanner de vorige opname 2 minuteu voor de begintijd van de volgende opname eindigt). <br />
U kunt voor maximaal 12 programme's timer-opnamen instellen. </li>
<li>Als er op de vaste schijf onvoldoende schijfruimte aanwezig is, knippert . Dit betekent dat de vaste schijf geen opslagruimte heeft om op te nemen. </li>
<li>Als u de timer-opname heeft ingesteld door middel van VPS/PDC, kan de ventilator nog altijd aanstaan en wat geluid makeen, ook als de recorder is uitgeschakeld.</li>
</ul>
<h1 id="de-geplande-lijst-bewerken">De geplande lijst bewerken</h1>
<p>Volg deze aanwijzingen om de lijst met geplande timer-opnamen te bewerken.</p>
<p>Volg voor deze instelling stap 1 en 2 bij "Een timer-opname maken" op pagina 67.</p>
<ol>
<li>Selecteer met de toetsen het nummer van de geplande lijst die u wilt bewerken en druk verwolgens op de toets OK. </li>
<li>Bewerk de items die u wilt aanpassen. Raadpleeg het hoofdstuk over het makev van timer-opnamen vooreer informatie over invoerItems voor timer-opnamen. (zie pagina's 67~68) </li>
<li>Druk op OK om de bewerkte instelling te bevestigen. </li>
<li>Druk op de toets EXIT (③) nadat de bewerking is voltooid. Het scherm Geplande lijst verdwijnt.</li>
</ol>
<p><img alt="" src="images/0c1d337fd5d7c91bd047d2f0ac2f93aff9cacab45c720ca2ad6dc2ce75613d0b.jpg" /></p>
<h1 id="een-geplande-lijst-toevoegen">Een geplande lijst toevoegen</h1>
<p>Volg de volgende aanwijzingen om een item aan de geplande lijst toe te voegen.</p>
<p>Volg voor deze instelling stap 1 en 2 bij "Een timer-opname maken" op pagina 67.</p>
<ol>
<li>Druk op de toetsen om het nummer van de Geplande lijst te selecteren en druk verwolgens op de RODE toets (A). </li>
<li>Stel de items in die u wilt toevoegen. Raadpleeg het gedeelte 'Een timer-opname make'n voor meer informatie over invoer-items voor timer-opnamen. (Zie pagina's 67~68) </li>
<li>Druk op OK om de toegevoegde instelling te bevestigen </li>
<li>Druk op de toets EXIT (nadat de bewerking is voltooid. Het scherm Geplande lij Verdwijnt.</li>
</ol>
<h1 id="de-geplande-lijst-verwijderen">De geplande lijst verwijderen</h1>
<p><img alt="" src="images/c79b20151e34db04d1d742c7767ae742383b55f2aa81351d8cdb4e7691c3dd88.jpg" /></p>
<p><img alt="" src="images/8cddf6f7bf2fc50ca9e8d0ce905ab39ba88634549b3944afd64d9e3055a211f5.jpg" /></p>
<p><img alt="" src="images/33a99af3a02590d5b513facf21d3e73fcfd35e1e20563712312db868c32be28f.jpg" /></p>
<p><img alt="" src="images/ffc7fb2db8541af05547804236ce594b55b640b752d645a912dec7d82b1b085b.jpg" /></p>
<p>Volg de volgende aanwijzingen om een item uit de lijst met geplande timer-opnamen te verwijderen.</p>
<p>Volg voor deze instelling stap 1 en 2 bij "Een timer-opname maken" op pagina 67.</p>
<ol>
<li>Selecteer met de toetsen het nummer van de Geplande Lijst dat u wilt verwijdenen en druk verrolgens op de GROENE toets (B). </li>
<li>Er verschijnt een melding als "Wilt u verwijderen?", waarmee u worden gezraagd het verwijderen te bevestigen. </li>
<li>Druk op de toetsen om Ja te selecteren en druk cervolgens op OK. </li>
<li>Het geseleeteerde item wordenuit de lijst verwijderd. </li>
<li>Druk op de toets EXIT (④) nadat de bewerking is voltooid. Het scherm Geplande lijst verdwijnt.</li>
</ol>
<h1 id="de-func-tie-showview-gebruiken">DE FUNC TIE SHOWVIEW GEBRUIKEN</h1>
<p><img alt="" src="images/62061eac311b355b6aea2070b522b2dc965b802572a6c444e4967c4d831a7dd7.jpg" /></p>
<p><img alt="" src="images/6cf973fcfdb2958d295d2d159ff09a4af6b14eb6a9fb8a7126b561d63dd62edb.jpg" /></p>
<p><img alt="" src="images/7ca7d0ee6eb25797c45cdfe07c8a0a15e67611a63a446b61f7559a3b566856ae.jpg" /></p>
<p><img alt="" src="images/a24e335e698b421a1c0bf6b34b9662050384d77e26ef6430c3bdb4cd4608c074.jpg" /></p>
<p>Voor het instellen van uw HDD- & DVD-recorder.</p>
<ul>
<li>Schakel zowel de tevisie als de HDD & DVD-RECORDER in. </li>
<li>Controller de datum en de hijd.</li>
</ul>
<p>Er kuren maximaal twaalf programma's worden ingesteld.</p>
<ol>
<li>Druk in de stopstand op de toets TIMER. </li>
<li>
<p>Druk op de toetsen om ShowView te selecteren en druk op OK of op de toets .</p>
</li>
<li>
<p>Er verschijnt een melding waarmee u de ShowView-code kurz invoeren.</p>
</li>
<li>
<p>Voer met de cijfertoetsen de code in voor het programme dat u wilt opnemen. Deze code vindt u in uw tv-gids naast het programme.</p>
</li>
<li>
<p>Ga als volgt te werk als u de ingevoerde ShowView-code wilt verbeteren: </p>
</li>
<li>Druk op de toets tot het cijfer dat u wilt corrigeren, is gewist. </li>
<li>
<p>Voer het juiste cijfer in.</p>
</li>
<li>
<p>Druk op de toets OK.</p>
</li>
<li>
<p>De informatie over het programme worden weergegeven. </p>
</li>
<li>
<p>De eerste keer dat u de functie ShowView gebruikt met opgeslagen stations, knippert het programmanummer. Nu moet u eenmalig het PR-nummer handmatig invoeren met de toetsen .</p>
</li>
<li>
<p>Druk op de RODE toets (A) als u de standard titelnaam nicht wit gebruiken.</p>
</li>
</ol>
<p>Het scherm Hernoemen verschijnt.</p>
<p>Volg stap 4 en 5 van 'De naam van een titel wijzigen' op pagina 73~74.</p>
<ol>
<li>Als het programme en deijd correct zijn, drukt u op OK. </li>
<li>
<p>Schakel de recorder ut door op de toets STANDBY/ON te drukken, waardoor de timer-opnamefunctie worden geactveerd.</p>
</li>
<li>
<p>Raadpleeg pagina 69, 71 als u: </p>
</li>
<li>Wilt controlleren of de timer-opname correct is ingesteld. </li>
<li>Een vooraf ingestelde opname wilt annuleren.</li>
</ol>
<p><img alt="" src="images/a3e7057f2cadfb55f40346ebe1f2d1a9fd559273e8b99396932c1a543a947bcc.jpg" /></p>
<p><img alt="" src="images/3200ccdd838cdb56370bc8197747d3139672bbe95c3e8a48719cae5d5a65b456.jpg" /></p>
<p><img alt="" src="images/b0bcd3c6824edb06e47575d28d3d4db5a4e9cc9237f8252105f953ea4fcd3f9e.jpg" /></p>
<p><img alt="" src="images/867340621ab80891573fabb059503bd133ab1e65b7d8d17706b48e4841479920.jpg" /></p>
<ul>
<li>De nummers die naast elk tv-programma staan in tjidschriften of kranten zichn ShowView-nummers, waarkee u de recorder direct met de afstandsbediening kurz programmeren. Voer de ShowView-code in voor het programme dat u wilt opnemen. <br />
ShowView is een handelsmerk van Gemstar Development Corporation. Het ShowView-system wordt onder licentie van Gemstar Development Corporation geproduerd.</li>
</ul>
<h1 id="showview-extended-2">SHOWVIEW EXTENDED</h1>
<p>Om vertragingen of overschrijdingen van de maximumtijd te voorkomen, beschikt de HDD & DVD-RECORDER over de functie ShowView Extended (ShowView Verlengd). Met deze functie kut u de opnametijd maximaal 60 minutes verlungen.</p>
<ul>
<li>
<p>Gebruik deze functie alleen als PDC nicht beschikbaar is of is uitgeschakeld.</p>
</li>
<li>
<p>Druk in de stopstand op de toets TIMER. </p>
</li>
<li>Druk op de toetsen om ShowView Verlngd te selecteren en druk op OK of op de toets . </li>
<li>Druk op de toetsen om deijd voor ShowView Verlngd te selectoren en druk op de toets OK of . </li>
<li>Druk op de toets EXIT (①) om het menu af te sluiten.</li>
</ul>
<p><img alt="" src="images/feaf94f85cff7cb52160800f5d5795d4610db009dede4341c74f12012cfc57a4.jpg" /></p>
<h1 id="ga-naar-de-opnamelijst">GA NAAR DE OPNAMELIJST</h1>
<p><img alt="" src="images/fa31bfe4a4578704cee1be9ce9a352428e504200b307452bbc0b4e3dcf5acee3.jpg" /></p>
<p><img alt="" src="images/f119207e1a048c2971270a2ea48c4d81e356a0ba69ac0b69785362ab907e5f4a.jpg" /></p>
<p><img alt="" src="images/ce473bf95bdd372ed4d43993b331224f113671ce891848f73858ac174f991847.jpg" /></p>
<p><img alt="" src="images/a4faf14b11da379f989dc88f587bd5b44484874162941df628d49a129fa8213e.jpg" /></p>
<p><img alt="" src="images/0c565c7ecd3ad1d3860123bca15bdd2142812728178372abc0c4ecfe3de811a9.jpg" /></p>
<p>U kunt een lijst bekijken met de opgenomen programma's.</p>
<p><img alt="" src="images/67f2a17677ff959d1c2052ebf06f0808f2f27bcc7e4e3b0cbcba3dc7c219e1f0.jpg" /></p>
<h1 id="de-toets-timer-gebruiken-2">De toets TIMER gebruiken</h1>
<ol>
<li>Druk in de stopstand op de toets TIMER. </li>
<li>Druk op de toetsen om Opnamelijst te selecteren en druk op OK of op de toets . </li>
<li>Druk op de toets EXIT (nadat de bewerking is voltooid. Het scherm Onpamelijst verdwijnt.</li>
</ol>
<p><img alt="" src="images/1d96e8eebec149920b3aeb9000d8c701333f6a3353cc9a41627a4be3a2ec5215.jpg" /></p>
<h1 id="informatie-over-de-opnamelijst">Informatie over de Opnamelijst</h1>
<p>Hiermee kunt u nagaan of een timer-opname al dan Niet is geslaagd.</p>
<p>3-1. Selecteer met de toetsen het gewenste nummer in de Opnamelijst en druk verwolgens op de toets OK.</p>
<p><img alt="" src="images/dc5e733e461a8c0b5bfcbed36299bffde931addec544205aece4f5766fb2972f.jpg" /></p>
<h1 id="opnamelijst-verwijderen">Opnamelijst verwijderen</h1>
<p>Hiermee kurz u item voor item uit de Opnamelijst verwijderen.</p>
<p>3-1. Selecteer met de toetsen het nummer in de Opnamelijst dat u wilt verwijderen en drukervolgens op de RODE toets (A). <br />
4. Druk op de toetsen om Ja te selecteren en druk vervolgens op de toets OK.</p>
<p><img alt="" src="images/0468781f1cb05eb577450f3e05c5401a4d04d22e25777522f64a42838dbfa665.jpg" /></p>
<h1 id="opnamelijst-wissen">Opnamelijst wissen</h1>
<p>Hiermee sunt u de hele Opnamelijst in eén keer verwijderen.</p>
<p>3-1. Druk op de GROENE toets (B). <br />
4. Druk op de toetsen om Ja te selecteren en druk verwolgens op de toets OK.</p>
<p><img alt="" src="images/ef8829132f0a7e184baa299549c4f31564121bcde7d3d1acfa5a9e590563375d.jpg" /></p>
<h1 id="naar-de-geplande-lijst-gaan">Naar de geplande lijst gaan</h1>
<p>Hiermee schakelt u direct over van de Opnamelijst waar de Geplande lijst.</p>
<p>3'. Druk op de GELE toets (C).</p>
<p><img alt="" src="images/1783f72db18063c7bad024104c31c98eb262500ef71a1d2035162b65d33d9ffa.jpg" /></p>
<p>In dit hoofdstuk komen de basisbewerkingsfuncties aan de orde en worden zowel bewerkingsfuncties uitgelegd voor het opnemen op een schijf als bewerkingsfuncties voor de hele schijf.</p>
<p>Het opnemen of bewerken worden mogelijk Niet voltooid als er een fouit optreedt, zoals een plotselinge stroomstoring. Materialial dat eenmaal is beschadigd, kan nicht worden hersteld.</p>
<h1 id="basisbewerking-titellijst">BASISBEWERKING (TITELLIJST)</h1>
<h1 id="de-titel-afspelen">De titel afspelen</h1>
<p><img alt="" src="images/5d89325ad84672ee4cb3101d93aa2f7b5d144993577f6c11c0ec0467d41ea5ab.jpg" /></p>
<p><img alt="" src="images/63f2dff1837b0eb3b76811f9d9b304011f55673b97fe15bbbfe0df3309beec72.jpg" /></p>
<p><img alt="" src="images/baaa2c2afdcffefd2742c317044f9b165389fcccfa205ba4bd5d2d3e39858075.jpg" /></p>
<p><img alt="" src="images/272363ca76b6788f9d88be6f0ec7f4a988ce3d57b8d609e9e7a7b93a063829bb.jpg" /></p>
<p>Volg deze instructies om een scene uit de titellijst af te spelien.</p>
<p><img alt="" src="images/bd268232950bc00469416ad26932bf8830204fe9f2d64e2fe4860abbc12aa814.jpg" /></p>
<h1 id="de-toets-title-list-gebruiken-2">De toets TITLE LIST gebruiken</h1>
<ol>
<li>Druk in de stopstand/afspeelstand op de toets TITLE LIST. </li>
<li>Druk op de toetsen om in de titellijst de titel te selecteren die u wilt afspelen en druk verzolgens op OK of PLAY (O). De geselecteerde titel worden afgespeeld. </li>
<li>U stopt het afspelen van de titel door op STOP (⊙) te drukken. Het scherm keert terug maar het scherm Titellijst.</li>
</ol>
<p><img alt="" src="images/f870c8accba327343d96c3b49bfa7482fe866fdec0f724e7de3a71b1108bddb5.jpg" /></p>
<h1 id="de-naam-van-een-titel-wijzigen">De naam van een titel wijzigen</h1>
<p><img alt="" src="images/1c8e8559fb4f6782af2d18bb5129b3829c826b2dc13979a7f981d954aa2f1c95.jpg" /></p>
<p><img alt="" src="images/3f7cb8ad85f9301e4acddf087768765249ec22ca1d4f30f4b9d727b1b9967ae6.jpg" /></p>
<p><img alt="" src="images/7f58d27f12f91d9f617c2054043167f8cad26d4407d47437d95eac0cea75fddc.jpg" /></p>
<p><img alt="" src="images/ef5491d00b0847b795938bd3405d76e6dd2d7b64cdddb533cd733a11c7ae8d3e.jpg" /></p>
<p>Volg de onderstaande instructies om de nom van een item in de titellijst te wijzigen, d.w.z. de titel van een opgenomen programma te bewerken.</p>
<p><img alt="" src="images/5ba3dd990704f8d77f47085a58b476f4b02003a03ee000b8716ff105dbefc8b1.jpg" /></p>
<h1 id="de-toets-title-list-gekruiken">De toets TITLE LIST gekruiken</h1>
<ol>
<li>Druk in de stopstand/afspeelstand op de toets TITLE LIST. </li>
<li>Druk op de toetsen om in de titellijst de titel te selecteren waarvan u de naam wilt wijzigen en drukervolgens op RODE toets (A). </li>
<li>Druk op de toetsen om Hemoemen te selecteren en druk verzolgens op OK of op de toets . Het scherm Hemoemen verschijnt. </li>
<li>
<p>Selecteer de gewenste tekens met de toetsen en druk verzolgens op de toets OK.</p>
</li>
<li>
<p>Backspace (RODE toets (A)): Verwijdt het teken links naast de cursor en zet de cursor een positie terug. </p>
</li>
<li>Spatie (GROENE toets (B)): Voegt een spatie in en zet de cursor een positie verder (naar rechts). </li>
<li>Verwijdere (GELE toets (C)): Verwijdt alle ingevoerde tekens. </li>
<li>Opslaan (BLAUWE toets (D)): Slaat de invoor op.</li>
</ol>
<p><img alt="" src="images/e8724492f0a1243d7e873ce4f796ab1cb36f526d209eedbe6053a13993400c62.jpg" /></p>
<p><img alt="" src="images/78b59a3b999523bf008627e9e6913fba6129a6e3c50d2d6e7780d603c9b02880.jpg" /></p>
<ol>
<li>Druk op de BLAUWE toets (D) om Opslaan te selecteren. De gewijzigde titel worden weergegeven in het titelveld van het geselecteerde aftseellijst-item.</li>
</ol>
<p><img alt="" src="images/7a6418c04642d4612c954e449a7d4e3ff32217aacf8284addd20d24b2441c599.jpg" /></p>
<h1 id="een-titel-vergrendelen-beveiliging">Een titel vergrendelen (Beveiliging)</h1>
<p><img alt="" src="images/37ee6c0833903ecaba96c29cdcb5cf112b853e490b6ccc0939633e68c2130766.jpg" /></p>
<p><img alt="" src="images/aa8d2ecb5b4bac26362d25b6f70c7a2074515fe98a13caea008a245f99cb1fed.jpg" /></p>
<p><img alt="" src="images/8653f4c5bf3aff4c232ca99af97424fac06f1f0eb9cb23a9e119d17e148402e6.jpg" /></p>
<p><img alt="" src="images/9728726fd0d4a56692c51a51e8574b2d61e74e1ba43b07ded10a07eca6a6d7a2.jpg" /></p>
<p>Volg onderstaande instructies om een titel te vergrendelen en zo te voorkomen dat deze per ongeluk worden verwijderd.</p>
<p><img alt="" src="images/36552431a73b03f254ebc923af32ae21d00e7cbb8cc6acb7adf0182fc6f97af8.jpg" /></p>
<h1 id="de-toets-title-list-gebruiken-3">De toets TITLE LIST gebruiken</h1>
<ol>
<li>Druk in de stopstand/afspeelstand op de toets TITLE LIST. </li>
<li>
<p>Druk op de toetsen om in de Titelijst de titel te selecteren die u wilt vergrendelen en houdervolgens de toets MARKER ingedrukt totdat er een vinkje worden waergevegen. Herhaal deze stap als u nog meer titels wilt selecteren om te vergrendelen.</p>
</li>
<li>
<p>Als u een bepaald gemarkeerd item Niet wilt vergrendelen, selecteert u dit item en houdt u de toets MARKER ingedrukt totdat het vinkje verdwijnt.</p>
</li>
<li>
<p>Druk op de RODE toets (A) om Wijzigen te selecteren. Het menu Wijzigen worden weergegeven. </p>
</li>
<li>Druk op de toetsen om Beveiliging te selecteren en druk verwolgens op OK of op de toets . </li>
<li>Druk op ⊥ ⋅ om Aan te selecteren en druk verzolgens op OK. Het sleutelpictogram op het informatievenster voor de geselecteerde titel verandert in de vergrendelde status. (♂ → ♀) </li>
<li>Om de vergrendeling uit te schakenen selecteert u in stap 5 Uit en drukt u op de toets OK. Het pictogram met de sleutel worden gewijzigd maar de status ontgrendeld. (B → B)</li>
</ol>
<p><img alt="" src="images/2947ff539f7736b65e614fcd0cc352cd70a253391e126ddbe91f13c7dd95b2be.jpg" /></p>
<p><img alt="" src="images/1153eae1b4d41930542cf671d2e7e149d5846c03dab1384aeaf9a7d90a0ac400.jpg" /></p>
<p><img alt="" src="images/8d0d95d6146a029ba36ff9aa160f4c03c4e4aa58ffab84f6c5576fe130d02414.jpg" /></p>
<p>U markeert alle titels door in het menu Wijzigen Alles selecteren te kiezen.</p>
<p>Volg onderstaande instructies om een titel uit de titelijst te verwijderen.</p>
<p><img alt="" src="images/e98f110992b1c3b300b1eda8dda001f8fe1551045cbc14152454946ba0ccd6c4.jpg" /></p>
<h1 id="de-toets-title-list-gebruiken-4">De toets TITLE LIST gebruiken</h1>
<ol>
<li>Druk in de stopstand/afspeelstand op de toets TITLE LIST. </li>
<li>
<p>Druk op de toetsen om in de Titelijst de titel te selecteren die u wilt verwijderen en houdervolgens de toets MARKER ingedrukt totdat er een vinkje worden weergegeven. Herhaal deze stap als u nogmeer titels wilt selecteren om te verwijderen.</p>
</li>
<li>
<p>Als u een bepaald gemarkeerd item Niet wilt verwijdenen, selecteert u dit item en houdt u de toets MARKER ingedrukt totdat het vinkje verdwijnt.</p>
</li>
<li>
<p>Druk op de RODE toets (A) om Wijzigen te selecteren.</p>
</li>
</ol>
<p>Het menu Wijzigen worden weergegeven.</p>
<ol>
<li>
<p>Druk op de toetsen om Verw. te selecteren en druk vervolgens op OK of op de toets .</p>
</li>
<li>
<p>De melding kan variieren, afthankelijk van het schijftype. Er verschijnt een melding waart u worden gevaagd de bewerking te bevestigen. HDD, DVD-RAM(VR-modus), DVD-RW(VR-modus): Aangezien de aftseelijst aanwezig is, verschijnt de melding "Wit: u verwijderen? (Verwante speellijsten können worden verwijderd)</p>
</li>
</ol>
<p><img alt="" src="images/e87d8038f1c66ef07061ec5aa028e4adb5e52ac7db058164a4403afb4e00e77d.jpg" /></p>
<p><img alt="" src="images/61acaec7bdbb77f196d0e2f0bf9ad061b3e7d7c18364db743b33e977bdd6f603.jpg" /></p>
<p>DVD-RW(V-modus)/-R : Aangezien de aftspeelliest Niet aanwezig is, verschijnt de melding 'Wilt u verwijderen?'</p>
<ol>
<li>Druk op om Ja te selecteren en druk cervolgens op OK.</li>
</ol>
<p><img alt="" src="images/a4bb6b5fb225bb9b3ca28914beb66e470ce41efc8b5200c17a1837a99acf9290.jpg" /></p>
<ul>
<li>Het is nicht möglich een beveiligde titel te verwijderen. Als u een beveiligde titel wilt verwijderen, selekteert u Uit in het menu Titelbeveiliging (zie pagina 74) </li>
<li>Als de schijf beveiligd is, können er geen titels worden verwijderd (zie paginga 88) </li>
<li>Wanner een titel eenmaal uit de titillijst is verwijderd, kan deze nicht meer worden hersteld. </li>
<li>Wanner een DVD-RW/-R is voltooid, kan deze nicht worden verwijderd. <br />
Bij DVD-R worden titels alleen uit het menu verwijderd, hoewel de titel fysiek op de schijf blijft staan. <br />
U markeert alle titels door in het menu Wijzigen Alles selecteren te kiezen.</li>
</ul>
<h1 id="een-deel-van-een-titel-aftplitsen-opsplitsen">Een deel van een titel aftplitsen (Opsplitsen)</h1>
<p><img alt="" src="images/67a817aff62976d73b331e8e39e7c79f3aabb1a231fd27876b53e2d6d6f08054.jpg" /></p>
<p>Volg onderstaande instructies om een gedeelte van een titel uit de titellijst af te splitsen</p>
<p><img alt="" src="images/4e5375babbece2985d602cbdcca5e6f4d47cfe593e487c1c2d058b8b0907902c.jpg" /></p>
<h1 id="de-toets-title-list-gebruiken-5">De toets TITLE LIST gebruiken</h1>
<ol>
<li>Druk in de stopstand/afspeelstand op de toets TITLE LIST. </li>
<li>Druk op de toetsen om in de titellijst de titel te selecteren waarvan u een deel wilt afsplitsen en druk verwolgens op RODE toets (A). Het menu Wijzigen verschijnt. </li>
<li>Druk op de toetsen om Opsplitsen te selecteren en druk verwolgens op OK of op de toets . </li>
<li>Ga met behulp van de afspeeltoetsen (PLAY () , SEARCH () ), maar de positie waar u wilt splitsen en druk verrolgens op OK. Als dit Niet de juiste positie blijkt te zichon om te splitsen, drukt u op RETURN om de keuze te annuleren. Ga met de afspeeltoetsen maar het punt waar u wilt splitsen en druk verrolgens op OK. </li>
<li>Druk op OK om Opsplitsen te selecteren. </li>
<li>Druk op om Ja te selecteren en druk vervolgens op OK. De gesplitste titel worden in tweeken gedeel en de volgende titels schuiven een plaatnsaar beneden op.</li>
</ol>
<p><img alt="" src="images/221891b249366f1b636d71bb4c742015138dd0eee3604dbbfeb05ad735aab7ba.jpg" /></p>
<p><img alt="" src="images/db8f27de48c2fc87010b58eb377a4e88e20e8de2d3bb6fbc1bd0bf7d379ba82c.jpg" /></p>
<p><img alt="" src="images/fba86a09fe853630de72296d2658cd81b8218fde38914b0c8817943b21466c35.jpg" /></p>
<p><img alt="" src="images/2dc4e41b212d0b274699a836902a498af397f541e84348a8fe39b3ed22ef5361.jpg" /></p>
<h1 id="een-deel-van-een-titel-verwijderen-gedeeltelijk-verwijderen">Een deel van een titel verwijderen (Gedeeltelijk verwijderen)</h1>
<p><img alt="" src="images/8a5f3bbe45b51ff2893fc2b8e69953c59b2d8a1a03f37c3913915059886f3bde.jpg" /></p>
<p><img alt="" src="images/a086c80631a8f5d51138330f193d840d0fd78e8a1bcffd7b117b54a2f854a531.jpg" /></p>
<p><img alt="" src="images/79e8c7a5b1b40b95bb093549b6fe3a21d2504c1d959d89a5b5eb6af628ec987f.jpg" /><br />
(VR-modus)</p>
<p>Volg onderstaande instructies om een gedeelte van een titel uit de titelligt te verwijdenen.</p>
<p><img alt="" src="images/0c02b592318cd11ce3adac89ad3a83c5de4173f89c3484112db9925ca5bdc92e.jpg" /></p>
<h1 id="de-toets-title-list-gebruiken-6">De toets TITLE LIST gebruiken</h1>
<ol>
<li>Druk in de stopstand/afspeelstand op de toets TITLE LIST. </li>
<li>Druk op de toetsen om in de titellijst de titel te selecteren die u wilt bewerken en druk verrolgens op RODE toets (A). Het menu Wijzigen worden weergegeven. </li>
<li>Druk op de toetsen om Gedeeltelijk verwijderen te selecteren en druk op OK of op de toets .</li>
</ol>
<p><img alt="" src="images/fe1c127fd0a84f2d4edc40b26a6398c7fa5bc288ed1fcf01618e10abb9e30104.jpg" /></p>
<ol>
<li>Druk bij het startpunt op OK.</li>
</ol>
<p>Het beeld en deijd van het startpunt worden weergegeven in het startpuntvenster voor sectieverwijdering.</p>
<ul>
<li>Gebruik de afspeeltoetsen om de start- en eindpunten te selecteren van de sectie die u wilt verwijden. </li>
<li>
<p>Afspeeltoetsen: (PLAY () , PAUSE () , SEARCH () ).</p>
</li>
<li>
<p>Druk bij het eindpunt op OK.</p>
</li>
</ul>
<p>Het beeld en deijd van het eindpunt worden weergegeven in het eindpuntvenster voor sectieverwijdering.</p>
<ol>
<li>Druk op om Verw. te selecteren en druk cervolgens op OK. </li>
<li>Druk op om Ja te selecteren en druk verwolgens op OK. De geselecteerde sectie is verwijderd. </li>
<li>Druk op ⊥ ⋅ om Terug te selecteren en druk cervolgens op OK om de bewerking te voltooien.</li>
</ol>
<p><img alt="" src="images/b83bdcee5b30cb91916e4bc9b006b1ffe46a6cff5cadcf97f5aa7f252675862c.jpg" /></p>
<ul>
<li>De te verwijderen sectie moet longer duren dan 5 seconden. <br />
Eindpunt kan nicht eerder vallen dan startpunkt </li>
<li>De sectie kan nicht worden verwijderd als deze een stilstaand beeld bevat. </li>
<li>Druk op de toets EXIT (19) nadat de bewerking is voltooid. Het scherm Titellijst verdwijnt.</li>
</ul>
<p><img alt="" src="images/b18332c5aac91b7cdd54ce003ca38568441fcfcf9f30bc18c2ac6dd702b0e5cc.jpg" /></p>
<p><img alt="" src="images/b7e4e41866f2de14b846a63557ebf4fb06940669b7ffe481e82a0e9cbc30e11d.jpg" /></p>
<h1 id="de-funcie-sorteren-gebruiken-titellijst">DE FUNCIE SORTEREN GEBRUIKEN (TITELLIJST)</h1>
<p><img alt="" src="images/8888139e70b71c14f38c90df8f7446546f508f85f34a235042e58f6d17a103c6.jpg" /></p>
<p><img alt="" src="images/1a0d6d97a992542e61581fc85d6649b60f945e772471fd9b1b9bfeaf584f7814.jpg" /></p>
<p><img alt="" src="images/f7ed777a2bacc259261d8ff7f0898f47ad6c6853fff8bbb485b8b54c847d82c7.jpg" /></p>
<p><img alt="" src="images/15ec49ebc24b50a241808afbae6879dc133fe1677e7e2fb48f0f01939d0e6fd2.jpg" /></p>
<p>Voor het wijdigen van de volgorde van de titellijst.</p>
<ol>
<li>Druk verwijt het lijstmenu worden weergegeven op de GROENE toets (B) om Sorteren te selecteren. </li>
<li>
<p>Druk op de toetsen om het gewenste item te selecteren en druk op de toets OK of .</p>
</li>
<li>
<p>Datum : In volgorde van wanner de titels zijn opgenomen. </p>
</li>
<li>Naam : In alfabetische volgorde </li>
<li>Lenght: In volgorde van lengte van de opgenomen titels. </li>
<li>Kanaalinformatie: In volgorde van kanaalinformatie.</li>
</ol>
<p><img alt="" src="images/3a7199e5a284ab71fce0a8ddd2980b041c067aa08db1d6a26320ef7b60ae8feb.jpg" /></p>
<p><img alt="" src="images/d9767e8a0f849d1123f12eb7a1a27f99a546d88921a5cac92908319c9320aeff.jpg" /></p>
<p>U kunt sorteren op Datum, Naam, Lengte, Kanaalinfo. Gesorteerde lijsten zullen worden weergegeven in gekopieerde volgorde wanneer.Deze in de Titelijst worden geplaatst.</p>
<h1 id="tijndavigatie">Tijndavigatie</h1>
<p><img alt="" src="images/427c0f701f5aaba70b7cd7b09e8f6bc24627923eb6c745a78aefe1d5a5c4893c.jpg" /></p>
<p>Met deze functie kurz u minuutsgewijs zoekenaar een scèneuit de lijst met opgenomen titels.</p>
<p><img alt="" src="images/e0866265c20bc40f45e964cf3eb7f12bda3d3a530a8cabac39d39ef183d3f1fd.jpg" /></p>
<h1 id="de-toets-title-list-gebruiken-7">De toets TITLE LIST gebruiken</h1>
<ol>
<li>Druk in de stopstand/afspeelstand op de toets TITLE LIST. </li>
<li>Druk op de toetsen om in de titellijst de titel te selectoren die u wilt afspelen en druk verrolgens op de GELE toets (C). </li>
<li>Druk op de toetsen om Tijndavigatie te selecteren en druk verwolgens op OK of op de toets . </li>
<li>Druk op de toetsen om de gewenste scene te selecteren en druk verwolgens op OK of op PLAY (C).</li>
</ol>
<p><img alt="" src="images/1c9c8a16fac2f28b2d6810f6cf93e8c77c72cf032ea2af2a877aadf699bb7d18.jpg" /></p>
<p><img alt="" src="images/889a8b10f76f52cf8fd88bd430d04afade74e586bef17d100adf9b7d3e79a1f0.jpg" /></p>
<ul>
<li>De cursor worden nicht verplaatst als de geselecteerde opgenomen titel korter dan een minuit is. </li>
<li>Mogelijk werkdt de navigatiefunctie Niet op een schijf die Niet door deze recorder is opgenomen. <br />
Een bewerkte titel geeft möglichnest Niet de exacte zoektijd weeR.</li>
</ul>
<p><img alt="" src="images/2dbe908b4d1e09f76678a358bff3e449c9ff9fb4b0db076e421cc86fcf641ec1.jpg" /></p>
<h1 id="scenenavigatie">Scenenavigatie</h1>
<p><img alt="" src="images/492b8cf9796eebfbc0534968d4f09f85cfda86189f7aa9149a35ef106ce2ba77.jpg" /></p>
<p>Als een titel markeringen bevat (zie pagina 48), kurz u met scenenavigatie aan een gewenste scene gaan.</p>
<p><img alt="" src="images/4c72d7b47eabd1a4d083f6c8fdc4b3dbb613a6bb381dace0d018e7d8698f48f5.jpg" /></p>
<h1 id="de-toets-title-list-gekruiken-2">De toets TITLE LIST gekruiken</h1>
<ol>
<li>Druk in de stopstand/afspeelstand op de toets TITLE LIST. </li>
<li>Druk op de toetsen om in de titellijst de titel te selecteren die u wilt afspelen en druk verrolgens op de GELE toets (C). </li>
<li>Druk op de toetsen om Scelenavigatie te selecteren en druk verwolgens op OK of op de toets . </li>
<li>Druk op de toetsen om de gewenste scène te selecteren en druk verwolgens op OK of op PLAY (C).</li>
</ol>
<p><img alt="" src="images/7f5bbdb18665de48a89ba7cb50226d9ef34a344ef4e21c535ae7122259310998.jpg" /></p>
<p><img alt="" src="images/02f28cc9decb0acb7a0d8a679fd2a3504fce8959bfe991edced2f76dd1bd1955.jpg" /></p>
<ul>
<li>De functie Scénavigatie werkkt nicht wanner de geselecteerde titel geen markeringen bevat.</li>
</ul>
<p><img alt="" src="images/b88ca190791256446268db87839351cfb7766b59cc076e3ce2e2e7493a49ab12.jpg" /></p>
<ol>
<li>Druk op de BLAUWE toets (D) om Inhoud te selecteren. </li>
<li>Druk op de toetsen om de inhoud te selectoren die u wilt verplaatsen en druk cervolgens op de toets OK of .</li>
</ol>
<p><img alt="" src="images/0b5b23dd93a6925e3742b303c3e871d410367ccb248bf4c8018c4de89756c99c.jpg" /></p>
<ul>
<li>Deze functie is alleen beschikbaar als de schijf de geselecteerde inhoud bevat.</li>
</ul>
<p><img alt="" src="images/1c61944ea2a9c28cd6079bcc1a6f54305b0d59241edb9dddd55694f8ec9eea44.jpg" /></p>
<h1 id="geavanceerd-bewerken-afspeelljst">GEAVANCEERD BEWERKEN (AFSPEELLJST)</h1>
<h1 id="een-afspeellijst-make">Een Afspeellijst make</h1>
<p><img alt="" src="images/7f5469166415d8fd4f970f6a12ecf13efa89f2896be0fb2166bc1408555bd30e.jpg" /></p>
<p><img alt="" src="images/f92eaee635fe6917365ee214b1b911b1a43722b03e3d6318c75c55b2ea695c8b.jpg" /></p>
<p><img alt="" src="images/7237e76011b4056eb432bacc0d372b23de432277a284b59b327a242bc6bbe21b.jpg" /><br />
(VR-modus)</p>
<p>Volg onderstaande instructies om een neue afspeellijstitel van een opgenomen titel te make.</p>
<p><img alt="" src="images/305f779d200bdb88840035abf29aa423fe0a4ed5b7f73d865b98089fd9987d1b.jpg" /></p>
<h1 id="de-toets-title-list-gekruiken-3">De toets TITLE LIST gekruiken</h1>
<ol>
<li>Druk in de stopstand/afspeelstand op de toets TITLE LIST. </li>
<li>Druk op de RODE toets (A). Het menu Wijzigen worden dit weergegeven. </li>
<li>
<p>Druk op de toetsen om Nieuweafspeell. te selecteren en druk op OK of op de toets . Het schermafspeellist makesverschijt.</p>
</li>
<li>
<p>Druk bij het startpunt op OK.</p>
</li>
<li>
<p>Het beeld en de tijd van het startpunt worden weergegeven in het startvenster. </p>
</li>
<li>De geelgekleurde selectiebalk gaat hier het eindhoven. </li>
<li>
<p>Selecteer het startpunt van de sectie waarvan u een neue scène wilt makeen met de afspeeltoetsen (PLAY () ), SEARCH ( ) , SKIP ( ) ).</p>
</li>
<li>
<p>Druk bij het eindhoven op OK.</p>
</li>
<li>
<p>Het beeld en de tijd van het eindpunt worden weergegeven in het eindvenster. </p>
</li>
<li>
<p>De geelgeleurde selectiebalk gaat hier het item Make.</p>
</li>
<li>
<p>Druk op om Make to selecteren en druk verwolgens op OK.</p>
</li>
<li>
<p>Om een-scène voor eenafspeelijst te make.</p>
</li>
</ol>
<p>Er verschijt een/New scherm Scène make. Herhaal stap 4-6 om een scène voor een aftspiegelst te make.</p>
<p>Er worden zu een neue scene aan de huidige afspeelijst toegevoegd.</p>
<p>U kurz de aftspeellijst controeren door alle scenes op het scherm (Afspeellijst bewerken) wee ter te geven. (zie pagina 81)</p>
<ul>
<li>En Nieuwe afspeel make. Herhaal stap 1-6 als u een Nieuwe afspeel wilt make.</li>
</ul>
<p><img alt="" src="images/67270405c4b86a5b8734ca0e4d7fe7ca23bc33ff4d140bf1386aa265f7699415.jpg" /></p>
<p><img alt="" src="images/f0bb46cbcff53e5fbf4749b1ecce5155ce7d12e8db623336b899f8585e6e8fd0.jpg" /></p>
<p><img alt="" src="images/0e65effae22f8302faeaa858284b5b8e9a2e5735dd78cdad6f0df747048bb37f.jpg" /></p>
<ol>
<li>Druk op om Terug te selecteren en druk vervolgens op OK om de bewerking te voitooien.</li>
</ol>
<p><img alt="" src="images/b6c583546ecdb0049da3f1bb37cc82b1ab5318919973fde971810c3ec8d10b59.jpg" /></p>
<p>U kunt maximaal 99 afspeellijsttitels makn. <br />
- Afhankelijk van het type schijf kan het weergegeven scherm iets verschillen.</p>
<h1 id="titels-in-de-afspeellijst-afspelen">Titels in de afspeellijst afspelen</h1>
<p><img alt="" src="images/9e59f4039557b01447317f625af6c19d86c7c3d0c1913fc79d7accfe8c280019.jpg" /></p>
<p><img alt="" src="images/4f9ebcb45604be304c0762a62dfdd8412c59f2fd14cb7e0f11fffd97ce4bc7e8.jpg" /></p>
<p><img alt="" src="images/b180d87fe5b4e9b65a98f81b97a82f91f29ed7144481fdf184341d56bd81e139.jpg" /><br />
(VR-modus)</p>
<p>Volg onderstaande instructies om de afspeellijsttitels at te spelien.</p>
<p><img alt="" src="images/9c128018fb1f87f53f375d52ceaa55468f5d373874a120d0d4eb083a4bd7ead2.jpg" /></p>
<h1 id="de-toets-play-list-gebruiken">De toets PLAY LIST gebruiken</h1>
<ol>
<li>Druk in de stopstand/afspeelstand op de toets PLAY LIST. </li>
<li>Druk op de toetsen om de afspeellijst te selecteren die u wilt afspelen en druk op OK of de toets PLAY (C). </li>
<li>Druk op STOP (⊙) om het afspelen te stoppen. Het scherm keert terug maar het scherm Afspeellijst.</li>
</ol>
<p><img alt="" src="images/933a4c65a8124cfbcd758cbd787db9a45734c4f7ed09aa73de1d9ce53b6a7449.jpg" /></p>
<h1 id="de-naam-van-een-afspeellijst-item-wijzigen">De naam van een afspeellijst-item wijzigen</h1>
<p><img alt="" src="images/a277298d40dabc4c49005798f1ffbeda775d5f5e0997fcdd3db440ed45f6471e.jpg" /></p>
<p><img alt="" src="images/6ae52a8d7a8752cf3b62106fa44bac944cb0fe057af9dd3f49ed6887de4e4c00.jpg" /></p>
<p><img alt="" src="images/b1e78df2bbf6eb9f7b8bdef9bab704a9b7eb189ee7a714599d14a733916fda1e.jpg" /><br />
(VR-modus)</p>
<p>Volg de onderstaande instructies om de naam van een afspeellijst-item te wijdigen, d.w.z. de titel van een afspeellijst-item te bewerken.</p>
<p><img alt="" src="images/c10524ab96d14e3d63c60c7737c7c42b0aaf33672c58b7b96e010dc0c5fc1715.jpg" /></p>
<h1 id="de-toets-play-list-gebruiken-2">De toets PLAY LIST gebruiken</h1>
<ol>
<li>Druk in de stopstand/afspeelstand op de toets PLAY LIST. </li>
<li>
<p>Druk op de toetsen om in de afspeellijst de titel te selecteren die u wilt hernoemen en druk op verevolgens op de RODE toets (A). Het menu Wijzigen worden weergegeven.</p>
</li>
<li>
<p>Druk op de toetsen om Hemoemen te selecteren en druk verzolgens op OK of op de toets . Het scherm Hemoemen verschijnt. </p>
</li>
<li>
<p>Selecteer de gewenste tekens met de toetsen en druk verzolgens op de toets OK.</p>
</li>
<li>
<p>Backspace (RODE toets (A)): Verwijdt het teken links naast de cursor en zet de cursor een positie terug. </p>
</li>
<li>Spatie (GROENE toets (B)): Voegt een spatie in en zet de cursor een positie verder (aar rechts). </li>
<li>Verwijdere (GELE toets (C)): Verwijdt alle ingevoerde tekens. </li>
<li>
<p>Opslaan (BLAUWE toets (D)): Slaat de invoor op.</p>
</li>
<li>
<p>Druk op de BLAUWE toets (D) om Opslaan te selecteren. De gewijzigde titel worden weergegeven in het titelveld van het geselecteerde aftseellijst-item.</p>
</li>
</ol>
<p><img alt="" src="images/5b4f0eea55439ef45dee35107027450d3fd74555e03e345247a13d3f881305b3.jpg" /></p>
<p><img alt="" src="images/07d06e7d93876a9d27d2e7cbcd6b32cd7cd25c0fe49eab3501f1f4a566449ab4.jpg" /></p>
<p><img alt="" src="images/c2e98f78ea2e4c9d41afa2c7bc976ee3fcfa72d72b346b9cae6f8a1000870029.jpg" /></p>
<p>Volg onderstaande instructies om scènes voor een afspeellijst te bewerken.</p>
<p><img alt="" src="images/4f07068e73488cc4f16f652caef1dbe35ac1b88769d4429ffb82df73b2dad924.jpg" /></p>
<h1 id="de-toets-play-list-gebruiken-3">De toets PLAY LIST gebruiken</h1>
<ol>
<li>Druk in de stopstand/afspeelstand op de toets PLAY LIST. </li>
<li>Druk op de toetsen om in de afspeellijst de titel te selecteren die u wilt bewerken en druk op verwolgensop de RODE toets (A). Het menu Wijzigen worden weergegeven. </li>
<li>Druk op de toetsen om Afspeell. Bew. te selecteren en druk op OK of op de toets . Het scherm Afspeellijst bewerken worden weergegeven.</li>
</ol>
<p><img alt="" src="images/b4d40d906ab278c98ce463659167c0069300c3dde8b6b335dd768e09565ebff9.jpg" /></p>
<p><img alt="" src="images/ac257248fa82f8d7f3e93d468ca52d7242898ed12ec0413a0b0f0ae4b35cc215.jpg" /></p>
<h1 id="een-geselecteerde-scene-afspelen">Een geselecteerde scene afspelen</h1>
<ol>
<li>Druk op de toetsen om de scène te selectoren die u wilt afspelen en druk nervolgens op de toets OK of PLAY (C).</li>
</ol>
<p>De geselecteerde scene worden afgespeeld.</p>
<ul>
<li>U stoot het afspelen van de scène door op STOP (⊙) te drukken.</li>
</ul>
<h1 id="een-scène-wijzigden-een-scene-verrangen">Een scène wijzigden (een scene verrangen)</h1>
<p>Volg stap 1 tot en met 3 hierboven om de betreffende instelleningen wee te gehen.</p>
<p>4-1. Druk op de toetsen om de scène te selectoren die u wilt wijzigen en druk vervolgens op de RODE toets (A). <br />
5. Druk bij het startpunt van de scene op OK.</p>
<ul>
<li>Het beeld en deijd van het startpunt worden weergegeven in het startvenster. </li>
<li>
<p>Selecteer de start- of het eindpunt van de sectie die u wilt wijzigem met deafspeeltoetsen (PLAY () , SEARCH ( ) , SKIP ( ) ).</p>
</li>
<li>
<p>Druk bij het eindpunt van de scene op OK. </p>
</li>
<li>Het beeld en deijd van het eindpunt worden weergegeven in het eindvenster. </li>
<li>Druk op de toetsen om Wijzigen te selecteren en druk cervolgens op OK. </li>
<li>De scène die u wilt wijdigen, is verrangen door de geselecteerde sectie.</li>
</ul>
<p><img alt="" src="images/806f054a0aa1f977e1587377654f0cde4a044b701b38b66a957986328658f49d.jpg" /></p>
<p><img alt="" src="images/5d577363644ad41235216ed10332213a9ff47062fe42aa1f1b1161673e47e1ea.jpg" /></p>
<h1 id="een-scène-verplaatsen-de-positie-van-een-scene-wijzigen">Een scène verplaatsen (de positie van een scene wijzigen)</h1>
<p>U voert instellen in door stap 1 t/m 3 op vagina 81 te volgen.</p>
<p>4-1. Druk op de toetsen om de scène te selectoren die u wilt verplaatsen (van positie wilt veranderen) en druk verwolgens op de GROENE toets (B).</p>
<ul>
<li>
<p>Er verschijnt een geel selectievenster op de te verplaatsen scene.</p>
</li>
<li>
<p>Druk op de toetsen om de positie te selectoreren waarnaar u de geselecteerde scene wilt verplaatsen en druk vervolgens op OK.</p>
</li>
</ul>
<p><img alt="" src="images/e146e4af7f2587c360b1dfb6a50cf31690f1f4b402bab1522a9e1e01212a54c4.jpg" /></p>
<ul>
<li>Het is nicht möglich de geselechterde scène waar de positie van de volgende scène te verplaatsen, omdat de geselechterde scène dan ervoor worden geplaatst en er niets verandert. </li>
<li>Afhankelijk van het type schijf kan het weergegeven schermiets verschillen.</li>
</ul>
<p><img alt="" src="images/dbb9956132ce81a24394a529ccf5493d5603e84c32a337adab85dfcde0a263cc.jpg" /></p>
<h1 id="een-scene-toevoegen">Een scene toevoegen</h1>
<p>U voert instellingen in door stap 1 t/m 3 op pagina 81 te volgen.</p>
<p>4-1. Druk op de toetsen om de scène te selecteren waar u een neue scène voor wilt plaatsen en druk verwolgens op de GELE toets (C).</p>
<p>Het scherm Scène Toevoegen worden weergegeven.</p>
<ol>
<li>
<p>Druk bij het startpunt van de scene op OK.</p>
</li>
<li>
<p>Het beeld en deijd van het startpunt worden weergegeven in het startvenster. </p>
</li>
<li>
<p>Selecteer de start- of het eindpunt van de sectie die u wilt wijzigem met de afspeeltoeisen (PLAY () , SEARCH ( ) , SKIP ( ) ).</p>
</li>
<li>
<p>Druk bij het eindpunt van de scene op OK.</p>
</li>
<li>
<p>Het beeld en de tijd van het eindpunt worden weergegeven in het eindventer. </p>
</li>
<li>
<p>Druk op om Terug te selectoren en druk cervolgens op OK.</p>
</li>
<li>
<p>Druk op de toetsen om Toevoegen te selecteren en druk verwolgens op OK.</p>
</li>
<li>
<p>De sectie die u wilt toevoegen, worden voor de scene ingevoed die in stap 4^-1 van Een scene toevoegen op de vorige pagina is geselecteerd.</p>
</li>
</ol>
<p><img alt="" src="images/7e9b2339cc8e614c72301b83184b46afa33a99cb8d1b794cee8dc28d343fe3ca.jpg" /></p>
<p><img alt="" src="images/8ed3dc153cb20d747713597c85efe4a1db7b0e1936828d9ef0e1c1bef2416cb2.jpg" /></p>
<h1 id="een-scene-verwijderen">Een scene verwijderen</h1>
<p>U voert instellingen in door stap 1 t/m 3 op pagina 81 te volgen.</p>
<p>4-1. Druk op de toetsen om de scène te selectoren die u wilt verwijderen en druk verrolgens op de BLAUWE toets (D).</p>
<ul>
<li>
<p>De melding "Wilt u de scene verwijderen?" worden weergegeben.</p>
</li>
<li>
<p>Druk op om Ja te selecteren en druk verwolgens op OK om de geselecteerde scene te verwijdenen.</p>
</li>
</ul>
<p><img alt="" src="images/dcadedd8b9c841e45a3ee782e348d32422337204bc188f7a2721edf7a523af44.jpg" /></p>
<p><img alt="" src="images/aa12c0c8722cfa7a5e2f8a909ff161725a49a3e80b9bd2a73e191df124ddaba2.jpg" /></p>
<h1 id="de-toets-play-list-gebruiken-4">De toets PLAY LIST gebruiken</h1>
<ol>
<li>Druk in de stopstand/afspeelstand op de toets PLAY LIST. </li>
<li>Druk op de toetsen om in de Afspeellijst de titel te selecteren die u wilt verwijderen en houdervolgens de toets MARKER ingedrukt totdat er een vinkje worden weergegeben.</li>
</ol>
<p>Herhaal deze stap als u nog meer titels wilt selecteren om te verwijderen.</p>
<ul>
<li>
<p>Als u een bepaald gemarkeerd item Niet wilt verwijdenen, selecteert u dit item en houdt u de toets MARKER ingedrukt totdat het vinkje verdwijnt.</p>
</li>
<li>
<p>Druk op de RODE toets (A) om Wijzigen te selecteren Het menu Wijzigen worden weergegeven. </p>
</li>
<li>Druk op de toetsen om Verw. te selecteren en druk op OK of op de toets . </li>
<li>De melding bij verwijderen "Wilt u verwijderen?" verschijnt. </li>
<li>Druk op om Ja te selecteren en druk cervolgens op OK.</li>
</ul>
<p>U gaat automatisch terug maar het scherm Afspeellijst als verwijderingsbewerking is voltooid.</p>
<p><img alt="" src="images/175125eda17beb39441ddb556678207c590b6b2362ebc503d27e3be77cf74ea4.jpg" /></p>
<p>U markeert alle titels door in het menu Wijzigen Alles selecteren te kiezen.</p>
<p><img alt="" src="images/1cd6d0caa3cd9ec3a7d568b9564843db436048e92a9c36171c97507d0fceb428.jpg" /></p>
<p><img alt="" src="images/fcf824295bbe60bfe69a489acba0cce44885bdcf706aaa2d0f1550da72509923.jpg" /></p>
<p><img alt="" src="images/89302bdd06246247e1b49ac2db500ea5eab1a4b46347feedf8a44b1aea412bf4.jpg" /></p>
<h1 id="sorteren-gebruiken-afspeellijst">Sorteren gebruiken (Afspeellijst)</h1>
<p>U kunt de volgorde van de Afspeellijst heel eenvoudig wijzigen.</p>
<ol>
<li>Drukt verwijl het lijstmenu worden weergegeven op de GROENE toets (B) om Sorteren te selecteren. </li>
<li>
<p>Druk op de toetsen om het gewenste item te selecteren en druk op de toets OK of .</p>
</li>
<li>
<p>Datum : In volgorde van wanner deafspeelijsten zijn gemaakt. </p>
</li>
<li>Naam : In alfabetische volgorde.</li>
</ol>
<p><img alt="" src="images/84b7de480295b44f07447c6408b7656567ece758479a2cf8f342743be92bc19c.jpg" /></p>
<p><img alt="" src="images/e2035b831bbc26425b06bf63a69dcb72c6579b95aa89fbb375b4de5565cc94f1.jpg" /></p>
<p>U kunt sorteren op Datum en Naam. Gesorteerde lijsten zullen worden weergegeven in gekopierde volgorde wonneer deze in de Afspeelijst worden geplaatst.</p>
<h1 id="kopieren-van-hdd-naar-dvd-of-vice-versa">KOPIEREN VAN HDD NAAR DVD OF VICE VERSA</h1>
<h1 id="het-kopieerschem">Het kopieerschem</h1>
<p><img alt="" src="images/fede49611a781bd648bb41b106b14857525e0526e17bb272a33c5c41d086f8ca.jpg" /></p>
<p>1 Totale grotte en aantal geselecteerde titels om te kapierten <br />
2 Te kopiernen titel <br />
3 Hiermee wordt de beschikbare schijfruimte weergegeven <br />
4 Hier worden de gekopieerde bestanden bewaard <br />
5 Toets voor starten van kopiernen <br />
6 Sorteertoets (Datum, Naam, Lenght, Kanaalinfo)</p>
<p>Selectietoets <br />
7 - Alles selectoren : Alle titels in de huidige map worden aangevinkt. <br />
- Alles deselecteren : Alle aangevinkte titels worden gedeselecteerd.</p>
<p>Inhoud kopierspecificities </p>
<table><tr><td>Inhoud</td><td>HDD → DVD</td><td>DVD → HDD</td></tr><tr><td>Titel opgenomen video</td><td>Ondersteund</td><td>Ondersteund</td></tr><tr><td>Kopieerbeveiligde titel</td><td>Niet ondersteund</td><td>Niet ondersteund</td></tr><tr><td>Eenmaal-kopiëren-titel</td><td>Verplaatsen (Verwijdt de titel van de vaste schijf na kopiëren)</td><td>Niet ondersteund</td></tr></table>
<p>Kopieren is alleen möglichk met CPRM-compatible schijven.</p>
<p>Nadat een programme van het type "Eenmaal kopiernen" is opgenomen op DVD, kan deze titel Niet meer maar de vaste schijf (HDD) worden gekopieerd. Maar als een programme van het type "Eenmaal kopiernen" op de vaste schijf (HDD) is vastgelegd, kan deze titelWel waar DVD-RW (VR-modus) of DVD-RAM worden gekopieerd.</p>
<p><img alt="" src="images/219ef2e447e687e423df325492e70a3258ffd48bfc3ed7c285a230340a9698df.jpg" /></p>
<h1 id="de-toets-title-list-gebruiken-8">De toets TITLE LIST gebruiken</h1>
<ol>
<li>Druk op de toets OPEN/CLOSE en planta een opneembare schijf in de schijflade. </li>
<li>Druk op de toets OPEN/CLOSE om de schijflade te sluiten. Wacht tot LOAD Niet meer op het display van het voorpaneel worden weergegeven. Controller of de schijf over voldoende beschikbare opnameruihte beschikt. </li>
<li>Selecteer de gewenste modus door op de afstandsbediening op de toetsen HDD of DVD te drukken.<br />
U=kunt de gewenste modus ook selecteren door op de HDD/DVD-toets op het voorpaneel te drukken. </li>
<li>Druk in de stopstand/afspeelstand op de toets TITLE LIST. </li>
<li>Druk op de toets COPY. Het scherm Kojieren worden weergegeven.</li>
</ol>
<p>Tijdens het afspelen kutn u de titel eveneens kopieren door op de toets COPY te drukken.</p>
<ol>
<li>Druk op de toetsen om de titel te selectoren die u wilt kopiernen en houd verwolgens de toets MARKER ingedrukt totdat er een vinkje worden weergegeben.</li>
</ol>
<p>Herhaal deze stap als u nog meer titels wilt selecteren om te kopieren.</p>
<ul>
<li>Als u een bepaald gemarkeerd item Niet wilt kopiieren, selecteert u dit item en houdt u de toets MARKER ingedrukt totdat het vinkje verdwijnt.</li>
</ul>
<p><img alt="" src="images/e3a6487d34e039f7da5931fc1e37c5296fe638a37b5da8ce5e96a95c1991c5a8.jpg" /></p>
<p><img alt="" src="images/06825afe57d4286c33040892ea80cac34231297f462f1a9c211b13b1b29f52f3.jpg" /></p>
<ol>
<li>
<p>Druk op de RODE toets (A) om Start kopie te selecteren.</p>
</li>
<li>
<p>De titel die wordt gekopieerd wordt nicht op het scherm weergegeven en het kopiernen begint terwijl het huidige programma op het scherm worden weergegeven. </p>
</li>
<li>Druk op de knop INFO om de voortgangsbalk van kopiaren waar te geven. Als u nogmaals op de knop INFO drukt, worden de voortgangsbalk van kopiaren Niet meer weergegeven. </li>
<li>
<p>Als u het kopiernen wilt annuleren, drukt u op de RODE toets (A).</p>
</li>
<li>
<p>Nadat het kopiaren is voltooid, worden de melding "De titel is met succes gekopieerd." weergegeven.</p>
</li>
</ol>
<p><img alt="" src="images/d75ed6c2a1e959aba135084dfe5f2e7d350325af0a464a2b8b28f075f2a9c2f3.jpg" /></p>
<h1 id="dvd-video-kopierten">DVD-video kopierten</h1>
<ol>
<li>Druk op de toets OPEN/CLOSE en plaats een opneembare schijf in de schijflade. </li>
<li>Druk op de knop OPEN/CLOSE om de schijflade te sluiten. </li>
<li>Drukijdens het afspelen op de toets COPY. Het kopiernen worden gestart.</li>
</ol>
<p><img alt="" src="images/04644766430a7e230c0daf285a3cac5555ad0e603b55ec773ff48566fb79f34f.jpg" /></p>
<p><img alt="" src="images/66e56c2f0d858fd6c2f753014e728bec58ccf90be3ce887e238d5675a0f9ff7f.jpg" /></p>
<ul>
<li>
<p>De kopiererfunctie worden in de volgend gevallen uitgeschakeld:</p>
</li>
<li>
<p>Als u probeert een gedeelte in het menu te kopieren </p>
</li>
<li>NTSC-schijven of schijven met een kopieerbeveiliging </li>
<li>Titels met een ander uitzendsystem </li>
<li>De audiotitel die is gekopieerd maar de HDD worden opgenomen in de indeling 2ch AC3. </li>
<li>In de DTS-modus worden de audiobron nicht gekopieerd.</li>
</ul>
<h1 id="het-kopieren-van-mp3-jpeg-of-divx">HET KOPIEREN VAN MP3, JPEG OF DIVX</h1>
<p>Inhoud kopieerspecificities</p>
<table><tr><td>Inhoud</td><td>HDD → DVD</td><td>DVD → HDD</td></tr><tr><td>MP3</td><td>Ondersteund</td><td>Ondersteund</td></tr><tr><td>JPEG(foto)</td><td>Ondersteund</td><td>Ondersteund</td></tr><tr><td>DivX</td><td>Ondersteund</td><td>Ondersteund</td></tr><tr><td>CD-DA</td><td>Niet ondersteund</td><td>Ondersteund</td></tr></table>
<ul>
<li>Schijf (CD-R/ CD-DA/ CD-RW/ DVD-RAM/ DVD-R(Afsluiten)/ DVD-RW(Afsluiten)) HDD </li>
<li>HDD DVD-R, DVD-RW(V) </li>
<li>Als de schijf is voltooid met Schijfbheer, kan hij compatibel zichn met een PC als een schijf met een UDFbestandssystem.</li>
</ul>
<h1 id="bestand-kopierten">Bestand kopierten</h1>
<ol>
<li>Plaats een JPEG- of een MP3-schijf of DivX-schijf in de schijflade. </li>
<li>Druk op de toets OPEN/CLOSE om de schijflade te sluiten. Wacht tot LOAD Nieteerop het display van het voorpaneel worden weergegeven. Controller of de schijf over voldoende beschikbare opnameruihte beschikt. </li>
<li>Druk op de toetsen om Bibliotheek te selecteren en druk op OK of op de toets . </li>
<li>Druk op de toetsen om Muziek, Foto of DivX te selecteren en druk verwolgens op OK of op de toets . </li>
<li>Druk op de toets COPY. Het scherm Kopiernen worden weergegeven.</li>
</ol>
<p><img alt="" src="images/19deeefad07c135c588d3f29d4f7e77ec5197d5defd0f766054faa4b0f448dbf.jpg" /></p>
<ol>
<li>Druk op de toetsen om het MP3-, Foto- of DivX-bestand te selectoren dat u wilt kopiën en houd verwolgens de toets MARKER ingedrukt totdat er een vinkje worden weergegeven. </li>
<li>Als u een bepaald gemarkeerd item Niet wilt kopiieren, selecteert u dit item en houdt u de toets MARKER ingedrukt totdat het vinkje verdwijnt. </li>
<li>Selecteer met een doelmedia en druk cervolgens op OK. </li>
<li>Om een neue map te makes, drukt u op de GROENE toets (B). </li>
<li>Druk op de RODE toets (A) om Start kopie te selecteren. <br />
De melding 'Itemnummer : x' worden weergegeven. </li>
<li>Druk op de toetsen om Begin te selecteren en druk op de toets OK. Het kopieren van de bestanden worden gestart. </li>
<li>Als u het kopiieren wilt annuleren, drukt op de toets EXIT (④).</li>
</ol>
<p><img alt="" src="images/8eab2aafb7ef966e191e56c795e56cbbb0c831f50fbbc471361d43a78a10c405.jpg" /></p>
<p><img alt="" src="images/86299c5d8614209c88ba32dfc7d2f47d7ce964a4a0b68f965a6027402c7e56ff.jpg" /></p>
<p><img alt="" src="images/321eea5681a2c22611714053ef7f5ab10ac9d77e463a31a391233a70141d4374.jpg" /></p>
<h1 id="map-kopierten">Map kopierten</h1>
<ol>
<li>Plaats een schijf (JPEG, MP3 of DivX) in de schijflade. </li>
<li>Druk op de toetsen om Bibliotheek te selecteren en druk op OK of op de toets . </li>
<li>Druk op de toetsen om Muziek, Foto of DivX te selecteren en druk op OK of op de toets .</li>
</ol>
<p>De MP3-, JPEG- of DivX-map wordt weergegeven.</p>
<ol>
<li>Druk op de toets COPY. Het scherm Kopiernen worden weergegeven. </li>
<li>
<p>Druk op de toetsen om de map te selecteren die u wilt kopiieren en houd verwolgens de toets MARKER ingedrukt totdat er een vinkje worden weergegeven.</p>
</li>
<li>
<p>Als u een bepaalde gemarkeerde map Niet wilt kopiieren, selecteert u deze en houdt u de toets MARKER ingedrukt totdat het vinkje verdwijnt.</p>
</li>
<li>
<p>Selecteer met een doelmedia en drukervoigens op OK. </p>
</li>
<li>Om een neue map te make, drukt u op de GROENE toets (B). </li>
<li>Druk op de RODE toets (A) om Start kopie te selecteren.</li>
</ol>
<p>De melding 'Itemnummer : x' worden weergegeven.</p>
<ol>
<li>Druk op de toetsen om Begin te selecteren en druk op de toets OK.</li>
</ol>
<p>Het kopiernen van de mappen worden gestart.</p>
<p>Submappen en bestanden in de geselecteerde map worden gekopieerd.</p>
<ul>
<li>Als u het kopieren wilt annuleren, drukt op de toets EXIT (9).</li>
</ul>
<p><img alt="" src="images/5546f3637b98f4867aa60d790800cdf58ca8557fa2950952f64844d324ee6f78.jpg" /></p>
<p><img alt="" src="images/2fa4507ec0d5dea24f7607e5e9601a708b679fca9fce8d5940f0f60ccd54ab24.jpg" /></p>
<p><img alt="" src="images/33dceb6a78dc368601d02fca367562cc367a5e2d45de5e205b5836255077e290.jpg" /></p>
<p><img alt="" src="images/e4977f2838bc0517bcd6243405e8316f88ed77ba7e239a49f5b41640fffbbdad.jpg" /></p>
<ul>
<li>Wanner u op de toets EXIT (①) druktijdens het kopiernen van een map, worden het kopiernen geannuleerd nadat het huidige bestand is gekopieerd. <br />
U kunt tot 500 bestanden of 500 submappen maar een map kopieren. [MP3, JPEG, DivX] </li>
<li>Als u het bestand wilt kopiieren, moet u een neue map makeen voordat u begint met kopiieren.<br />
U kunt Niet rechtsstreeks kopiierenaar de map in het hoogste niveau (ROOT) zonder een neue map te makeen. </li>
<li>Als de map op het hoogste niveau (ROOT) al 500 bestanden en mappings bevat,要去 een ofmeer items verwijdersen voordat u een neue map kunt maken. </li>
<li>De grotte van een bestand op een schijf en die van de kopie op de vaste schijf kan enigszins afwijken, afhankelijk van het bestandssystem. </li>
<li>Als u bepaalde items in de huidige map hebt aangevinkt en u wilt verwolgens een andere map openen, worden deze items automatischuitgeschakeld en Niet in de selectieltij opgenomen.</li>
</ul>
<p><img alt="" src="images/47ad853d8dc02afeaa8195092169b4da5f8699563161a7e42030eea27072cd7d.jpg" /></p>
<h1 id="de-naam-van-een-muziek-foto-of-divx-bestand-wijzigen">DE NAAM VAN EEN MUZIEK-, FOTO- OF DIVX-BESTAND WIJZIGEN</h1>
<p><img alt="" src="images/1245dd87b311919f578dbcff84f3a5c1040165b97f128164f740f7ea654ba743.jpg" /></p>
<p>U kunt de naam wijzigen van een muziek-, Foto- of DivX-bestand dat u waar de HDD hebt gekopieerd.</p>
<ol>
<li>Druk op de toetsen om de titel te selecteren die u wilt hemoemen en druk op cervolgens op de RODE toets (A). </li>
<li>
<p>Druk op de toetsen om Hemoemen te selecteren en druk verwolgens op de toets OK of . Het scherm Hemoemen worden weergegeven.</p>
</li>
<li>
<p>Selecteer de gewenste tekens met de toetsen en druk verwolgens op de toets OK.</p>
</li>
<li>
<p>Backspace (RODE toets (A)): Verwijdt het teken links naast de cursor en zet de cursor een positie terug. </p>
</li>
<li>Spatie (GROENE toets (B)): Voegt een spatie in en zet de cursor een positie verder (haar rechts). </li>
<li>Verwijdere (GELE toets (C)): Verwijdt alle ingevoerde tekens. </li>
<li>
<p>Opslaan (BLAUWE toets (D)): Slaat de invoor op.</p>
</li>
<li>
<p>Druk op de BLAUWE toets (D) om Opslaan te selectoren. De gewijzigde bestandsnaam worden weergegeven voor de geselecteerde titel.</p>
</li>
</ol>
<p><img alt="" src="images/13cc907b6391cbcfa7a1d19321884c481c348aeda3366abf6d301379790be77e.jpg" /></p>
<p><img alt="" src="images/32ce7fa14ecc84978156618ad6894e114002788fb6ef62a10792bd340ca54d25.jpg" /></p>
<p><img alt="" src="images/5f22fc6e613ba1692a70b4f46a8be274b48b27f5ee61c761e881a129977347ab.jpg" /></p>
<h1 id="de-naam-van-de-schijf-bewerken">De naam van de schijf bewerken</h1>
<p><img alt="" src="images/3e31c548963324835d98fed6d43678eb69e845f85cb77beede56cbcdb07e298a.jpg" /></p>
<p><img alt="" src="images/d4a5e49df16560dec706717d30120785da43761e14f4e9ddc903b6227c11ecb6.jpg" /></p>
<p><img alt="" src="images/79d25c6ea0074e69d518633a53f7e45e9db6a1d78d717aeafe542a62a2b44f18.jpg" /></p>
<p>Gebruik onderstaande instructies om een schijf een naam te gehen.</p>
<ol>
<li>Druk in de stopstand op de toets MENU. </li>
<li>Druk op de toetsen om Schijffbeheer te selecteren en druk verwolgens op OK of op de toets . </li>
<li>Druk op om Hemoemen te selecteren en druk vervolgens op OK. Het scherm Hemoemen verschijnt. </li>
<li>Selecteer de gewenste tekens met de toetsen en druk verwolgens op de toets OK. </li>
<li>Druk op de BLAUWE toets (D) om Opslaan te selecteren. De schij krijt een schijfnaam.</li>
</ol>
<p><img alt="" src="images/c3eece90cbb41edc7abbbd6be20f91a832f88b81c264cc7367f07ab4dd80d96f.jpg" /></p>
<p><img alt="" src="images/848083b8c229c167d156a7c22ecac7eb3b119e7be2f291482ac8a3be47a4892a.jpg" /></p>
<p>Soms is hetoodzakelijk om de schijfbbeveiliging te verwijderen voordat u gaat bewerken. <br />
- Afhankelijk van het type schijf kan het weergegeven scherm verschillen.</p>
<p><img alt="" src="images/460a343f3298121111ecc41a0b69e770b55dd35d2d82e0792679bdf6838548ca.jpg" /></p>
<h1 id="schijfbveiliging">Schijfbveiliging</h1>
<p><img alt="" src="images/5cf2e629e0b50eb65d28dda99db33569e2e3b819802c16593aa25a910a15b951.jpg" /></p>
<p><img alt="" src="images/4e67c02ee9bc50e1de57b1db4f674b15b7e9e1a68b926738905f21025b344ab1.jpg" /></p>
<p><img alt="" src="images/cc79aa27d5e96e56c48a1c43787b374c6bdc22a7affab00942c15f2c618edd58.jpg" /></p>
<p>Schijbfbeveiliging zorgtervoordat de schijven Niet per ongeluk kuren worden geformatteerd of verwijderd.</p>
<ol>
<li>Druk in de stopstand op de toets MENU. </li>
<li>Druk op de toetsen om Schijfbeheer te selecteren en druk verwolgens op OK of op de toets . </li>
<li>Druk op de toetsen om Beveiliging te selecteren en druk verwolgens op OK. </li>
<li>Druk op om Aan te selecteren en druk verwolgens op OK.</li>
</ol>
<p><img alt="" src="images/711b9708e5fc2cd906ece394fbdfacb066d67376382633c8667b42b8e0231e3e.jpg" /></p>
<p><img alt="" src="images/891a9a45c7b0d442cc2c2b9f30010dc96419b940b52ed49df7ccf1439aa4d0a9.jpg" /></p>
<ol>
<li>Druk in de stopstand op de toets MENU. </li>
<li>Druk op de toetsen om Schijfbeheer te selecteren en druk verwolgens op OK of op de toets . </li>
<li>
<p>Druk op om Alles verw. te selecteren en druk vervogens op OK.</p>
</li>
<li>
<p>De melding "Wilt u alle titellijsten verwijderen?" verschijnt. </p>
</li>
<li>Bij een beveiligde titel werkdt de functie Alle titellijsten verwijderen nicht. Ook als de lijst een titel bevat met een stilstaand beeld, za die functie Niet werken. Als u een beveiligde titel wilt verwijderen, schakelt u de beveiliging ervooruit om het item te ontgrendelen. </li>
<li>Als Beveiligid is ingeschakeld wonneer er een DVD-RAM-/RW worden gebruikt, können er geen gevevens van een schijf worden verwijderd. </li>
<li>
<p>Als u Ja selekteert, verschijnt de melding "Alle afspeellijsten worden ook verwijderd Wilt u doorgaan?".</p>
</li>
<li>
<p>Druk op om Ja te selectoren en druk cervolgens op OK. Alle titellijsten worden verwijderd.</p>
</li>
</ol>
<p><img alt="" src="images/d0f60a0d3df3172036383e812bcef85c11ef9c965d744e8eae7345a76d6f87b1.jpg" /></p>
<p><img alt="" src="images/c6b2303bfe5b6f22926d564a9946da04c8a73e809e4be2a2f92b2cf46d05d4a8.jpg" /></p>
<p><img alt="" src="images/e386996f13c55338e5d513794993be297e524fedc515f27cf04ec82b7537c250.jpg" /></p>
<p><img alt="" src="images/6e44ff577022fc4edf6ddc730cb0cd1498ff1b24020a44babb8bff31a867a86f.jpg" /></p>
<p><img alt="" src="images/34c8f8ad173f819f9993a5c4c5fec6cda44343e8e47c3b0e3986c5692937d665.jpg" /></p>
<h1 id="alle-titellijstendivx-lijstenmuzieklijstenfotolijsten-verwijderen">Alle titellijsten/DivX-lijsten/muzieklijsten/fotolijsten verwijderen</h1>
<p><img alt="" src="images/c99a8a26417f57e99e81f3db6e61f767583d331cb36701faf782e80b6562de92.jpg" /></p>
<ol>
<li>Druk in de stopstand op de toets MENU. </li>
<li>Druk op de toetsen om Schijfbeheer te selecteren en druk verwolgens op OK of op de toets . </li>
<li>
<p>Druk op om Verw. te selecteren en druk cervolgens op OK.</p>
</li>
<li>
<p>Bij een beveiligde titel werkdt de functie Alle titellijsten verwijderen nicht. Ook als de lijst een titel bevat met een stilstaand beeld, za die functie Niet werken. Als u een beveiligde titel wilt verwijderen, schakelt u de beveiliging ervooruit om het item te ontrendelen.</p>
</li>
<li>
<p>Druk op de toetsen om Titel, DivX, Muziek of Foto te selecteren en druk verzolgens op OK. </p>
</li>
<li>Druk op om Ja te selecteren en druk cervolgens op OK. Alle titellijsten, DivX-lijsten, muziekijsten of fotolijsten worden verwijderd.</li>
</ol>
<p><img alt="" src="images/b0c9e4208bc62d068ec6490ad5cd4e24edfb4c9268563e733800cd929f3ff012.jpg" /></p>
<p><img alt="" src="images/d65f35c0a8b1f14c525a57ceb280c2b5a8edce05215324eab099ae89cecbb662.jpg" /></p>
<p><img alt="" src="images/140009b2ce31088282fc6c48a7d69a73034aa5cc646afaff0400b26302b555da.jpg" /></p>
<h1 id="eenschijf-formatteren">Eenschijf formatteren</h1>
<p><img alt="" src="images/78d18753981d67d9eac5c83e74354b065664ada049ea93785aea7e88fc247780.jpg" /></p>
<p><img alt="" src="images/50a5e9ed64915b0ecbb9f51b0b49273641937903bfc35d24543f760010f1a8d7.jpg" /></p>
<p><img alt="" src="images/63ed2abd79ef1b84573d00f69b9923aaf5affdc53352382a40e0b94213cb7d7d.jpg" /></p>
<p>Gebruik deze instructies om een schijf te formatteren.</p>
<p>De schijfbveiliging moet ook worden gewist.</p>
<ol>
<li>Druk in de stopstand op de toets MENU. </li>
<li>Druk op de toetsen om Schijffbeheer te selecteren en druk verwolgens op OK of op de toets . </li>
<li>Druk op de toetsen om Formatteren te selecteren en druk verwolgens op OK.</li>
</ol>
<h1 id="hdddvd-ram-2">HDD/DVD-RAM</h1>
<ul>
<li>De melding "Huidige media: *** Wilt u formatteren?" verschijnt. </li>
<li>Als u Ja selecteert, verschijt de melding "Alle gegevens worden verwijderd. Wilt u doorgaan?".</li>
</ul>
<p><img alt="" src="images/b6ce1967c045fea75273e03abc1beb0a3042457fe6030565c0675de68e50a21c.jpg" /></p>
<h1 id="dvd-rw-3">DVD-RW</h1>
<ul>
<li>De melding "Kies opname-indeling voor DVD-RW." verschijnt. </li>
<li>
<p>Als u het gewenste formatteringstype selecteert, worden de melding 'Alle gegevens worden verwijderd. Wilt u doorgaan?' weergegeven.</p>
</li>
<li>
<p>Druk op om Ja te selectoren en druk verwolgens op OK.</p>
</li>
</ul>
<p>De schijf worden geformatteerd.</p>
<p>DVD-VR en DVD-V worden gedefiniereeid op basis van hun opname-indeling. </p>
<table><tr><td></td><td>DVD-VR</td><td>DVD-V</td></tr><tr><td>SCHIJF</td><td>DVD-RAM/-RW</td><td>DVD-RW/DVD-R</td></tr></table>
<h1 id="eenschijfafsluiten">Eenschijfafsluiten</h1>
<p><img alt="" src="images/bdf0294c61a77c1ebd36cf55014e6011d926e493288269ad092e7e4e8c3ce9c5.jpg" /></p>
<p>Nadat u titels op een DVD-RW/-R-schijf hebt opgenomen met uw HDD & DVD-RECORDER, dient deze te worden afgesloten voordat deze kan worden afgespeeld op externe apparaten.</p>
<ol>
<li>Druk in de stopstand op de toets MENU. </li>
<li>Druk op de toetsen om Schijffbeheer te selecteren en druk verwolgens op OK of op de toets . </li>
<li>Druk op de toetsen om Afsluiten te selecteren en druk verwolgens op OK.</li>
</ol>
<p>De melding "Wit u de schijf aflsliuten?" verschijnt.</p>
<ol>
<li>Druk op om Ja te selectoren en druk verwolgens op OK.</li>
</ol>
<p>Ook wordt de melding 'Schijf wordt afgesloten.</p>
<p>Wilt u doorgaan?' getoond.</p>
<ol>
<li>Druk op om Ja te selectoren en druk cervolgens op OK.</li>
</ol>
<p>De schijf worden afgesloten.</p>
<p><img alt="" src="images/f2303061f23d6e2b138fff4f865547890664f12926aa8071a2dc212b08227bd1.jpg" /></p>
<p><img alt="" src="images/4d9f2d83f3c3f3a63a9249a68c34bdec7b00502e642c899e73e66050fa8d4589.jpg" /></p>
<ul>
<li>Wanner een schijf eenmaal is afgesloten, kut u geen itemsuit de lijst van opnamen verwijderen. <br />
Nadat de schijf is afgesloten, werkdt DVD-R/RW (videomodus) op bezelfde manier als een DVD-videospeler. </li>
<li>Afhankelijk van het type schijf kan het weergegeven scherm verschillen. </li>
<li>De aflsuttiid kan verschillen, afhankelijk van de hoeveelheid gegevens die op de schijf zich opgenomen. </li>
<li>De gegevens op een schijf raken beschadigd, als de recorder wordenuitgeschakeldijdens het aflsluiten. <br />
U kunt de schijf automatisch afsluiten met de functie EZ bestand. (zie pagina 39)</li>
</ul>
<h1 id="afsluiten-van-een-schijf-ongedaan-make-vvr-modus">Afsluiten van een schijf ongedaan make (V/VR-modus)</h1>
<ol>
<li>Druk in de stopstand op de toets MENU. </li>
<li>Druk op de toetsen om Schijffbeheer te selectoren en druk verwolgens op OK of op de toets . </li>
<li>Druk op de toetsen om Afsl.annuleren te selecteren en druk verwolgens op OK. De melding "Wit u afsluiten schijf ongedaan make?" verschijt. </li>
<li>Druk op om Ja te selecteren en druk cervolgens op OK. Ook worden de melding 'Afsluiten schijf worden ontedaan gemaakt. Wilt u doorgaan?' getoond. </li>
<li>Druk op om Ja te selecteren en druk cervolgens op OK. Het afsluiten van de schijf worden ongedaan gemaakt.</li>
</ol>
<p><img alt="" src="images/55036e9b1e13a70aa50ae916b4592b133efcb4ba011e049a4f12b3229f71e72e.jpg" /></p>
<p><img alt="" src="images/78758e2b13832bcddf194eba4813ac503112f6eb787aa9cf96a2e326ecc7dd24.jpg" /></p>
<p><img alt="" src="images/ff3b5b554483a048ad89948d2ba0e45e4bbab76e01c23647e079633cb8d80d29.jpg" /></p>
<ul>
<li>En DVD-RW kan worden afgesloten of het afsluiten kan ongedaan worden gemaakt in de videomodus.</li>
</ul>
<table><tr><td></td><td>Afsluiten</td><td>Afsluiten ongedaan make</td></tr><tr><td>Markeren</td><td>DVD-Video(RW)</td><td>DVD-RW(V)</td></tr><tr><td>Bewerking</td><td>Dezelfde als DVD-Video</td><td>Extra opname, beveiliging en verwijdering is möglich</td></tr></table>
<ul>
<li>Een DVD-RW kan worden afgesloten of het afsluiten kan ongedaan worden gemaatk in de VR-modus.</li>
</ul>
<table><tr><td></td><td>Afsluiten</td><td>Afsluiten ongedaan make</td></tr><tr><td>Markeren</td><td>DVD-RW(VR:A)</td><td>DVD-RW(VR)</td></tr><tr><td>Bewerking</td><td>Extra opname, verwijdering, bewerkung en beveiliging is nicht möglich.</td><td>Extra opname, verwijdering, bewerkung en beveiliging is möglich.</td></tr></table>
<h1 id="problem-oplossen">PROBLEM OPLOSSEN</h1>
<p>Als het product Niet goed werkt, gaat u de onderstaande contropunten na voordat u contact opneemt met een erkend servicecentrum van Samsung.</p>
<table><tr><td>PROBLEEM</td><td>VERKLARING/OPLOSSING</td></tr><tr><td>De invoor wordt even weergeveen
wonneer het apparaat wordt
ingschakeld.</td><td>Nadat de HDD & DVD-RECORDER is ingeschakeld, duurt het even voordat deze
geinitialiseerd is en de invoor wordt ongeveer tien seconden nadat het apparaat is
ingschakeld, weergeveen.</td></tr><tr><td>Ik kan geen TV-programma's opnemen.</td><td>• Controller of de stekker stevig in het stopcontact zit.
• Hebt u de kanaalinstellenen van de HDD & DVD-RECORDER correct ingesteld?
• Ga na hoeveel vrij ruimte de HDD/DVD-RAM/-RW/-R-schijf bevat.</td></tr><tr><td>Er gebeurnt niets als ik op de toets REC
druk.</td><td>Controller de beschikbare schijftypen. (zie pagina 59)
Als een programme gegen kopiën is beveiligd, kurz u dit nicht kopiën.</td></tr><tr><td>Ik kan de schijf Niet afspelen.</td><td>• Controller of de schijf is geplaatst met het etiket aan de bovenzijde.
• Controller de regiocode van de DVD-schijf.
• Deze HDD & DVD-RECORDER kan sommige schijftypen net afspelen
(zie pagina 7, 40)</td></tr><tr><td>Het pictogram ◎ wordt op het scherm
weergeveen.</td><td>De bewerking of functie is nicht möglich om een van de onderstaande redenen:
(1) De DVD-schijf staat dit nicht toe.
(2) De DVD-schijf ondersteunt de functie Niet (bijvoorbeeld:beeldhoeken)
(3) De functie is momenteel nicht beschikbaar.
(4) U hebt een titel, hoofdstuknummer of zoektijd gewraagd buiten het toegestane
bereik.</td></tr><tr><td>De instellenen van de afspeelmodus+zijn
anders dan de instellenen die met het
instillingenmenu Installen+zijn
geconfigureerd.</td><td>De schijf ondersteunt nicht alle geselecteerde functies. In dit geval werkden
sommige functies Niet goed die u met het instillingenmenu Installen hebts
geconfigureerd.</td></tr><tr><td>Ik kan de beeldverhouding Niet wijzigen.</td><td>De beeldverhouding voor DVD-schijven staat vast. (zie pagina 35)</td></tr><tr><td>De beeldhoekfunctie werkt netijdens
het afspelen van de DVD.</td><td>De functie Beeldhoek is alleen beschikbaar wanneer de schijf beelden bevat die
met verschillende beeldhoeken zijn vastgelegd.</td></tr><tr><td>De geselecteerde audio- en/of
ondertitelingstaal wordt net afgespeeld.</td><td>Audio- en ondtitelingstalen,zijn schijf-specifiek. Alleen het geluid en de
ondertitelingstalen op een DVD-schijf zichbenschikbaar en worden op het
schijfmenu weergeveen.</td></tr><tr><td>Ik kan geen titel of bestand maar een
andere modus kopiën.</td><td>• Dvd-schijven met kopierbeveiliging hunnen Nietaar hdd (vaste schijf) worden
gekopieerd.
• Raadpleeg "Inhoud kopierspecificaties" op pagina 6 om na te gaan of kopiën
wordt ondersteund.
Zie "Compatible met V-modus" op pagina 39 om te controleren of kopiën
wordt ondersteund.</td></tr><tr><td>De schijf draaït, maar er worden allen
beelden van slechte kwaliteit of helmaal
geen beelden weergeveen.</td><td>• Ga na of de beeldinstelleningen correct+zijn (zie pagina 35~36)
• Controller of de schijf beschadigd is of dat er vreme de stoffen op zitten.
• De schijf is mogelijk van slechte kwaliteit.
• Als een donkere scène plotseling helder wordt, kan het scherm tijdelijk trillen.
Dit isECHTER geen mankement.</td></tr><tr><td>PROBLEM</td><td>VERKLARING/OPLOSSING</td></tr><tr><td>Geen geluid.</td><td>• Speelt u een programme vertraagd af of slaat u scènes over?
Als u een programme met een andere snelheid dan de normale snelheid afspeelt, hoog u geen geluid. (behalte voor vooruit Zoeken (X 2) op de schijf.)
• Controller de aansluitingen en de instellingen. (Zie pagina's 25~26, 34~35)
• Controller de de schijf is beschadigd. Maak de schijf schoon, indien nodig.
• Controller de de schijf is geplaatst met het etiket aan de bo benzijde.</td></tr><tr><td>Er is geen audio-uitvoer.</td><td>Controller of u de juiste opties voor digitale utvoer hebts geselecteerd in het menu Opties voor audio-uitvoer. (zie pagina's 34~35)</td></tr><tr><td>Timer-lampje knippert.</td><td>• Controller of de schijf of vaste schijf voldoende opslagruimte bevat voor de opname.
• Controller of de huidige schijf opneembaar is. Controller dit vóor de startijd van de timer-opname.</td></tr><tr><td>De timer-opname werkt Niet goed.</td><td>• Controller de instellenen voor opnametijd en eindijd.
• Het opnemen worden geannuleerd als de stroomvoorziening worden onderbroken vanwege een stroomstoring of een andere vergelijkbare reden.</td></tr><tr><td>Het met Timer-opname ingestelde programa is Niet opgenomen</td><td>• Controller of de recorder is uitgeschakeld na het instellenen van de timer-opname. Als de recorder is ingeschakeld, is een timer-opname net möglich.</td></tr><tr><td>De afstandsbediening werkt Niet.</td><td>• Wijs de afstandsbedieningaar de sensor van de afstandsbediening op de HDD & DVD-RECORDER. Zorg voor voldoende afstand. Verwijder obstakelsussen de recorder en de afstandsbediening.
• Controller of de batterijen leeg�.
• Controller de selectietoets TV/DVD.
• Ga na of de toets TV is geselecteerd.</td></tr><tr><td>Ik ben de toegangscode voor het kinderslot vergeten.</td><td>Houd de toetsEN PLAY/PAUSE (▶II) op het Voorpaneel van de recorder meer dan 10 seconden ingedrukt zonder een schijf in de lade.
Alle instellenen, inclusief de toegangscode, worden teruggezet in de fabrieksinstellenen. Gebruik deze optieuitsluitend in moodgevallen.</td></tr><tr><td>Is het möglich een ondTitel of audiosignal op een opgenomen schijf te wijzigen?</td><td>Een opgenomen schijf kan slechts worden afgespeeld met de ondterteling en het audio-signaal die bij de opname+zijn geselecteerd.</td></tr><tr><td>Overige problemen</td><td>• Lees de inhoudsopgave en zoek en lees de paragrafen die het probleem omschrijven en volg de gevegen instructies.
• Schakel de HDD &DVD-RECORDER uit en in.
• Neem contact op met hetplaatselijke Samsung-servicecentrum als het probleem aanhoudt.</td></tr></table>
<h1 id="specifications-2">SPECIFICATIONS</h1>
<table><tr><td rowspan="6">Algemeen</td><td colspan="2">Stroomvereisten</td><td>AC 220~240 V, 50 Hz</td></tr><tr><td colspan="2">Energieverbruik</td><td>30 Watts / 2,2 Watts (Uitgeschakeld)</td></tr><tr><td colspan="2">Gewicht</td><td>3,8 Kg</td></tr><tr><td colspan="2">Afmetingen</td><td>430 mm(W) x 300 mm(D) x 55 mm(H)</td></tr><tr><td colspan="2">Gebruikstemperatuur</td><td>+5 °C tot +35 °C</td></tr><tr><td colspan="2">Overige condites</td><td>Houd het apparaat horizontal als dit is ingeschakeld. Zorg voor minder dan 75% bedrijtsvochtigheid</td></tr><tr><td rowspan="4">Ingang</td><td colspan="2">Video</td><td>Compositiet Video : 1.0 V p-p bij 75Ω belasting, sync negatif</td></tr><tr><td colspan="2">Audio</td><td>Max. audio-invoerniveau : 2 Vrms</td></tr><tr><td colspan="2">Ontvangstkanalen</td><td>PAL-B/G, SECAM-L/L'</td></tr><tr><td>Scart aansluiting</td><td>AV2 (Scart Ext)</td><td>Video : Compositiet, RGB Audio: Analoog</td></tr><tr><td rowspan="5">Uitgang</td><td rowspan="2" colspan="2">Audio</td><td>Analoge uitvoeraansluitingen x 1</td></tr><tr><td>Coaxiale digitale audio-uitvoer</td></tr><tr><td rowspan="2" colspan="2">Video</td><td>Compositiet video : Video-uitvoeraansluiting x 1</td></tr><tr><td>Componentuitgang x 1 (Y: 1,0Vp-p, Pb: 0,70Vp-p, Pr: 0,70Vp-p at 75Ω belasting)</td></tr><tr><td>Scart aansluiting</td><td>AV1 (Scart TV)</td><td>Video : Compositiet, RGB Audio: Analoog</td></tr><tr><td rowspan="4">Opnemen</td><td colspan="2">Indeling beeldcompressie</td><td>MPEG-II</td></tr><tr><td colspan="2">Indeling audiocompressie</td><td>Dolby Digital 2ch/256Kbps, MPEG-II</td></tr><tr><td colspan="2">Opnamekwaliteit</td><td>XP (circa 8,5 Mbps), SP (circa 4,5 Mbps), LP (circa 2,5 Mbps), EP (circa 1,6 Mbps of circa 1,2 Mbps)</td></tr><tr><td colspan="2">Audiofrequentie-response</td><td>20 Hz~20 kHz</td></tr><tr><td>HDD- capacitit</td><td colspan="2">DVD-HR770</td><td>160 GB</td></tr></table>
<h1 id="audio-uitgang">Audio-uitgang</h1>
<p>Bij DVD-schijven worden audiosignalen die met een samplingfrequentie van 96kHz zijn opgenomen, geconverteerdaar enuitgevoerd met 48kHz</p>
<table><tr><td>Schijftype</td><td>DVD</td><td>AUDIO CD (CD-DA)</td></tr><tr><td>Analoge audio-uitgang</td><td>48 / 96 kHz</td><td>44,1 kHz</td></tr><tr><td>Digitale audio-uitgang</td><td>48 kHz</td><td>44,1 kHz</td></tr></table>
<p>Dit Samsung-product is gegandeerd gegen fabricage- en/of materiaialfouten voor eenperiode van twaalf (12) maanden gerekend van af de oorspronkelijke aankoopdatum, tenzij in de nationale of Europese wet-of regelgeving een andere garantiepieme is vastgesteld.</p>
<p>Indien aanssprak worden gemaakt op een reparatie onder garantie, dient u het product te returneren aan de winkelier waar u het product gekocht heeft.</p>
<p>Erkende dealers van Samsung danwel door Samsung erkende servicecentra in West-Europese landen zullen eveneens garantie verlenen,ECHTER op de voorwaarden die van toepassing+zijn in het betreffende land. Ingeval van problemen Aunt u nadere informatie verzrijgen via de Samsung service- en informatielijn:</p>
<h1 id="voor-nederland-0900-samsung-726-7864-0-10min">Voor Nederland: 0900-SAMSUNG (726-7864 € 0, 10/Min)</h1>
<h1 id="voor-belgie-02-201-24-18">Voor Belgie: 02-201 24 18</h1>
<h1 id="garantieconditions">GARANTIECONDITIONS</h1>
<ol>
<li>De garantie is alleen geldig wanner de garantiekaart volledig is ingevuld en samen met de originele aankoopbon of -bevestiging waarop duidelijk het serienummer vermeld staat, worden overlegd. </li>
<li>Samsungs verplichtingen beperken zich tot reparatie of, indien nodig en na haar beordeling, tot het verwangen van het product of het defecte onderdeel. </li>
<li>Reparations onder garantie moeten door Samsung erkende service-centra worden uitgevoerd. Er zal geen vergoeding plaatsvinden voor reparations uitgevoerd door nicht erkende Samsung dealers of nied erkende servicecentra. Alle waaruit voortvloeijeende schades vallen Niet onder deze garantie. </li>
<li>Aanpassingen aan het product die niedzakelijk zijn om te voldoen aan landelijkke ofplaatselijkte technische of veilgheidsvoerschriften die gelden in enig land anders dan dat waaroor het product oorspronkelijk is ontworpen en gefabricieerd, worden Niet beschouwd als voortvloeije uit materiaal- of fabricagefouten. </li>
<li>Deze garantie dekt geen van de volgende zaken:</li>
</ol>
<p>a) Periodieke controls, onderhoud en reparatie of verwangting van onderdelen veroorzaakt door normala gebruik en slijtage. Hierbij dient vermeld te worden dat bij alle beeldbuizen, ongeacht het fabrikaat, de helderheid met het verstreijken van deijd afneamt. <br />
b) Kosten verbonden aan transport, verwijdering of installment van het product. <br />
c) Misbruik, inclusief het gebruik voor andere doeleinden dan waarvoort het product bestemd is, of onjuiste installmentie. <br />
d) Schadeverooraakt door bliksem, water, vuur, overmacht, oorlog, rellen, aansluiting op onjuist voltage, onvoldoende ventilatie, vallen, stoten, onoordeelkundig gebruik of enige andere ororzaak die buiten de controle van Samsung valt.</p>
<ol>
<li>Deze garantie geldt voor iedereen die gedurende de garantieperiode legaal in het bezit is gekommen van het product. </li>
<li>De wettelijk rechten van de koper krachtens enigerlei van toepassing,zijnde nationale wetgeving, hetzij jegens de verkoper en voortvloeieend het koopcontract, hetzij anderszins, worden door deze garantie Niet beinvloed. Tenzij de nationale wetgeving anders bepaalt, zich de rechten voortvloeieend uit deze garantie de enige rechten van de koper, en(AP) Samsung,haar dochtermaatschappijen en vertegenvoordigingen Niet aansprakelijk worden gesteld voor indirect of voortvloeieend verlies.</li>
</ol>
<p>Cet apparéil Samsung est couvert par une garantie de douze (12) mois - à moins qu'une autre période de garantie ne soit fixée dans la législation ou règlementation nationale ou européenne - à partir de la date d'achat, pour des défauts de fabrication et/ou matérielles utilisés. Pour revendiquer le droit de réparation sous garantie, vous devez returner l' apparéil chez le revendeur où vous l'avez achetié. Les revendeurs officiels de la marque Samsung, ainsi que les centres de services reconnus par Samsung en Europe de l'Ouest reconnaissent également votre droit de garantie, mais uniquement aux conditions valables dans le pays en question. En cas de problèmes vous pouvez contacter le numéro de service de Samsung suivant :</p>
<p>Pour la Belgique : tel. 02 201 2418 www.samsung.com/be</p>
<p>Pour le Luxembourg : tel. 02 261 03 710 www.samsung.com/be</p>
<h1 id="conditions-de-garantie">CONDITIONS DE GARANTIE</h1>
<ol>
<li>La garantie est uniquement valable quand la carte de garantie - dûment remplie - est remise avec le bon d'achat officiel, mentionnant le numéro de série de l'appareil. </li>
<li>Les obligations de Samsung sont limitées à la réparation ou à son approbation, le remplacement de l' apparéil ou de la pièce en panne. </li>
<li>Les réparations sous garantie doivent être exécutées dans les centres de service reconnus par Samsung. Aucune indemnité ne sera allouée pour des réparations exécutées par des revendeurs ou centres de service non reconnus par Samsung. Chaque endommagement qui en résultat n'est pas couvert par cette garantie. </li>
<li>Les adaptations nécessaires pour répondre aux normes techniques ou aux normes de sécurité locales ou nationales, autres que pour le pays pour lequel l'appareil a été originally développé, ne sont pas considérés comme des défauts de fabrication ou de matériel. </li>
<li>La garantie ne couvre pas les points suivants :</li>
</ol>
<p>a) Les contrôles périodiques, l'entretien et la réparation ou le remplacement des pieces causés par une utilisation normale et par l'usure normale. <br />
b) Tous les frais de transport, l'enlèvement ou l'installation du produit. <br />
c) La mauvaise utilisation, y compris l'utilisation du produit pour des buts, autres que pour lequel il a été concu, et la mauvaise installation. <br />
d) Tous les endommagements causés par éclair, eau, feu, force majeure, guerre, émeutes, connexion au mauvais voltage, insuffisamment de ventilation, chute, coups, utilisation non judicieuse, ou toute autre cause imprévisible par Samsung.</p>
<ol>
<li>Cette garantie est valable pour l'acheteur qui a obtenu l'appareil d'une façon légale pendant la période de garantie. </li>
<li>Les droits légitimes de l'acheteur, en vertu d'une législation nationale, soit à l'égard du vendeur et resultant du contrat de vente, soit autrement, ne sont pas influencés par cette garantie. À moins que la législation nationale le prescrit différemment, les droits obtenus par cette garantie sont les seuls droits de l'acheteur: ni Samsung, ni ses filiales et ni ses distributeurs exclusifs peuvent être rendus responsables pour des pertes indirectes ou pour des endommagements de disques, disques compactes (CD), cassettes video ou audio, ou tout autre apparéil ou matériel s'y relatant.</li>
</ol>
<h1 id="samsung-klantenservice">SAMSUNG KLANTENSERVICE</h1>
<p>Mocht u vragen of opmerkingen met betrekking tot Samsung producten hebben, neem dan a.u.b. contact op met de SAMSUNG klantenservice.</p>
<table><tr><td>Regio</td><td>Land</td><td>Klantenservice</td><td>Website</td></tr><tr><td rowspan="3">North America</td><td>CANADA</td><td>1-800-SAMSUNG(726-7864)</td><td>www.samsung.com/ca</td></tr><tr><td>MEXICO</td><td>01-800-SAMSUNG(726-7864)</td><td>www.samsung.com</td></tr><tr><td>U.S.A</td><td>1-800-SAMSUNG(726-7864)</td><td>www.samsung.com</td></tr><tr><td rowspan="16">Latin America</td><td>ARGENTINE</td><td>0800-333-3733</td><td>www.samsung.com/ar</td></tr><tr><td>BRAZIL</td><td>0800-124-421 , 4004-0000</td><td>www.samsung.com</td></tr><tr><td>CHILE</td><td>800-SAMSUNG(726-7864)</td><td>www.samsung.com/cl</td></tr><tr><td>NICARAGUA</td><td>00-1800-5077267</td><td></td></tr><tr><td>HONDURAS</td><td>800-7919267</td><td></td></tr><tr><td>COSTA RICA</td><td>0-800-507-7267</td><td>www.samsung.com/latin</td></tr><tr><td>ECUADOR</td><td>1-800-10-7267</td><td>www.samsung.com/latin</td></tr><tr><td>EL SALVADOR</td><td>800-6225</td><td>www.samsung.com/latin</td></tr><tr><td>GUATEMALA</td><td>1-800-299-0013</td><td>www.samsung.com/latin</td></tr><tr><td>JAMAICA</td><td>1-800-234-7267</td><td>www.samsung.com/latin</td></tr><tr><td>PANAMA</td><td>800-7267</td><td>www.samsung.com/latin</td></tr><tr><td>PUERTO RICO</td><td>1-800-682-3180</td><td>www.samsung.com/latin</td></tr><tr><td>REP. DOMINICA</td><td>1-800-751-2676</td><td>www.samsung.com/latin</td></tr><tr><td>TRINIDAD & TOBAGO</td><td>1-800-SAMSUNG(726-7864)</td><td>www.samsung.com/latin</td></tr><tr><td>VENEZUELA</td><td>0-800-100-5303</td><td>www.samsung.com/latin</td></tr><tr><td>COLOMBIA</td><td>01-8000112112</td><td>www.samsung.com.co</td></tr><tr><td rowspan="20">Europe</td><td>BELGIUM</td><td>0032 (0)2 201 24 18</td><td>www.samsung.com/be</td></tr><tr><td>CZECH REPUBLIC</td><td>844 000 844 Distributör pro Českou republik: Samsung Zrt., Česka organizačni složka Vyskočilova 4, 14000 Praha 4</td><td>www.samsung.com/cz</td></tr><tr><td>DENMARK</td><td>70 70 19 70</td><td>www.samsung.com.dk</td></tr><tr><td>FINLAND</td><td>030-6227 515</td><td>www.samsung.com/fi</td></tr><tr><td>FRANCE</td><td>3260 SAMSUNG (€ 0,15/Min), 08 25 08 65 65 (€ 0,15/Min)</td><td>www.samsung.com</td></tr><tr><td>GERMANY</td><td>01805 - SAMSUNG(726-7864) (€ 0,14/Min)</td><td>www.samsung.com</td></tr><tr><td>HUNGARY</td><td>06-80-SAMSUNG(726-7864)</td><td>www.samsung.com</td></tr><tr><td>ITALIA</td><td>800-SAMSUNG(726-7864)</td><td>www.samsung.com</td></tr><tr><td>LUXEMBURG</td><td>0035 (0)2 261 03 710</td><td>www.samsung.com/be</td></tr><tr><td>NETHERLANDS</td><td>0900-SAMSUNG(726-7864) (€ 0,10/Min)</td><td>www.samsung.com/nl</td></tr><tr><td>NORWAY</td><td>815-56 480</td><td>www.samsung.com/no</td></tr><tr><td>POLAND</td><td>0 801 801 881 , 022-607-93-33</td><td>www.samsung.com/pl</td></tr><tr><td>PORTUGAL</td><td>80820-SAMSUNG(726-7864)</td><td>www.samsung.com/pt</td></tr><tr><td>SLOVAKIA</td><td>0800-SAMSUNG(726-7864)</td><td>www.samsung.com/sk</td></tr><tr><td>SPAIN</td><td>902 10 11 30</td><td>www.samsung.com</td></tr><tr><td>SWEDEN</td><td>0771-400 200</td><td>www.samsung.com/se</td></tr><tr><td>U.K</td><td>0845 SAMSUNG (7267864)</td><td>www.samsung.com</td></tr><tr><td>EIRE</td><td>0818 717 100</td><td>www.samsung.com/e</td></tr><tr><td>AUSTRIA</td><td>0800-SAMSUNG(726-7864)</td><td>www.samsung.com/at</td></tr><tr><td>SWITZERLAND</td><td>0800-SAMSUNG(726-7864)</td><td>www.samsung.com/ch</td></tr><tr><td rowspan="9">CIS</td><td>RUSSIA</td><td>8-800-555-55-55</td><td>www.samsung.com</td></tr><tr><td>KAZAHSTAN</td><td>8-10-800-500-55-500</td><td>www.samsung.kz</td></tr><tr><td>UZBEKISTAN</td><td>8-10-800-500-55-500</td><td>www.samsung.uz</td></tr><tr><td>KYRGYZSTAN</td><td>00-800-500-55-500</td><td></td></tr><tr><td>TADJIKISTAN</td><td>8-10-800-500-55-500</td><td></td></tr><tr><td>UKRAINE</td><td>8-800-502-0000</td><td>www.samsung.com</td></tr><tr><td>LITHUANIA</td><td>8-800-77777</td><td>www.samsung.it</td></tr><tr><td>LATvia</td><td>800-7267</td><td>www.samsung.com.lv</td></tr><tr><td>ESTONIA</td><td>800-7267</td><td>www.samsung.ee</td></tr><tr><td rowspan="13">Asia Pacific</td><td>AUSTRALIA</td><td>1300 362 603</td><td>www.samsung.com</td></tr><tr><td>NEW ZEALAND</td><td>0800SAMSUNG(726-7864)</td><td>www.samsung.com/nz</td></tr><tr><td>CHINA</td><td>800-810-5858 , 010-6475 1880</td><td>www.samsung.com</td></tr><tr><td>HONG KONG</td><td>3698-4698</td><td>www.samsung.com/hk</td></tr><tr><td>INDIA</td><td>3030 8282 , 1800 110011</td><td>www.samsung.com</td></tr><tr><td>INDONESIA</td><td>0800-112-8888</td><td>www.samsung.com</td></tr><tr><td>JAPAN</td><td>0120-327-527</td><td>www.samsung.com/jp</td></tr><tr><td>MALAYSIA</td><td>1800-88-9999</td><td>www.samsung.com/my</td></tr><tr><td>PHILIPPINES</td><td>1800-10-SAMSUNG(726-7864)</td><td>www.samsung.com/ph</td></tr><tr><td>SINGAPORE</td><td>1800-SAMSUNG(726-7864)</td><td>www.samsung.com</td></tr><tr><td>THAILAND</td><td>1800-29-3232 , 02-689-3232</td><td>www.samsung.com</td></tr><tr><td>TAIWAN</td><td>0800-329-999</td><td>www.samsung.com/tw</td></tr><tr><td>VIETNAM</td><td>1 800 588 889</td><td>www.samsung.com</td></tr><tr><td rowspan="3">Middle East & Africa</td><td>TURKEY</td><td>444 77 11</td><td>www.samsung.com</td></tr><tr><td>SOUTH AFRICA</td><td>0860-SAMSUNG(726-7864)</td><td>www.samsung.com</td></tr><tr><td>U.A.E</td><td>800-SAMSUNG (726-7864), 8000-4726</td><td>www.samsung.com</td></tr></table>
<h1 id="samsung-2">SAMSUNG</h1>
<h1 id="correcte-verwijdering-van-dit-product-elektrische-elektronische-afvalapparatuur">Correcte verwijdering van dit product (elektrische & elektronische afvalapparatuur)</h1>
<p><img alt="" src="images/a13620708073ce1147131528cb9bb3f590af7d6fe7aa5a3c2ed688abe8d253b7.jpg" /></p>
<p>Dit merkteken op het product of het bijbehorende informatiematerialiaal duidt erop dat het Niet met ander huishoudelijk afval verwijdert mag worden aan het einde van zich gebruilsduur. Om möglichke schade aan het milieu of de menselijke gezondheid door oncegcontrolerde afvalverwijdering te voorkomen, moet u dit product van andere soorten afval schieden en op een verantwoorde manier recyclen, zatat het duurzame hergebruik van materiaalbronnen worden bevorderd.</p>
<p>Huishoudelijke gebruikers要去en contact opnemen met de winkkel waar ze dit product hebben gekocht of met de gemeente waar ze wonden om te vernemen waar en hoe ze dit product milieuvriendelijk kuttenlaten recyclen.</p>
<p>Zakelijke gebruikers要去en contact opnemen met hun leverancier en de algemene voorwaarden van de koopovereenkomsten nalezen. Dit product mag Niet worden gemengd met andere bedrijfsafval voor verwijdering.</p>