LE32N73BD - TV SAMSUNG - Free user manual and instructions
Find the device manual for free LE32N73BD SAMSUNG in PDF.
| Product type | LCD TV |
| Brand | Samsung |
| Model | LE32N73BD |
| Screen size (diagonal) | 32 inches |
| Dimensions with stand (W x D x H) | 803 x 244 x 578 mm |
| Weight with stand | 15.5 kg |
| Power supply | AC 220-240 V, 50 Hz |
| Power consumption | 150 W |
| PC optimal resolution | 1360 x 768 @ 60 Hz |
| Audio power output | 10 W x 2 |
| Main features | WISELINK (JPEG, MP3), PIP, DNle (Digital Natural Image engine), TruSurround XT, Game Mode, Parental Lock, Teletext, Clock/timer |
| Connectivity | HDMI/DVI (x2), Component, PC (D-Sub), SCART (Ext.1, Ext.2), S-Video, AV, Optical audio output, Headphone, CI slot, Antenna |
| Cleaning and maintenance | Use the supplied soft cleaning cloth. Avoid chemical products. Clean the screen with a damp cloth. |
| Safety | Kensington lock (optional), precautions against image retention (burn-in), do not expose to humidity. |
| Spare parts and repairability | Stand, remote control, batteries (AAA x2), power cord, cleaning cloth. Screws for base. Wall mount kit sold separately. |
| General information | Manual available in PDF. Contact support by country. Warranty included. |
Frequently Asked Questions - LE32N73BD SAMSUNG
User questions about LE32N73BD SAMSUNG
0 question about this device. Answer the ones you know or ask your own.
Ask a new question about this device
Download the instructions for your TV in PDF format for free! Find your manual LE32N73BD - SAMSUNG and take your electronic device back in hand. On this page are published all the documents necessary for the use of your device. LE32N73BD by SAMSUNG.
USER MANUAL LE32N73BD SAMSUNG
If you have any questions or comments relating to Samsung products, please contact the SAMSUNG customer care centre.
Owner's Instructions
Before operating the unit, please read this manual thoroughly, and retain it for future reference.
ON-SCREEN MENUS
PC DISPLAY
PICTURE IN PICTURE (PIP)
TELETEXT
Register your product at www.samsung.com/global/register
Precautions When Displaying a Still Image
A still image may cause permanent damage to the TV screen.
- Do not display a still image on the LCD panel for more than 2 hours as it can cause screen image retention. This image retention is also known as "screen burn".
To avoid such image retention, reduce the degree of brightness and contrast of the screen when displaying a still image.
- Watching the LCD TV in 4:3 format for a long period of time may leave traces of borders displayed on the left, right and center of the screen caused by the difference of light emission on the screen. Playing a DVD or a game console may cause a similar effect to the screen. Damages caused by the above effect are not covered by the Warranty.
- Displaying still images from Video games and PC for longer than a certain period of time may produce partial after-images. To prevent this effect, reduce the 'brightness' and 'contrast' when displaying still images.
CONNECTING AND PREPARING YOUR TV
■ List of Parts.... 3
■ Installing the Stand 3
■ Installing the Wall Mount Kit 3
■ Viewing the Control Panel.... 4
■ Viewing the Connection Panel 5
■ Viewing the Remote Control 7
■ Installing Batteries in the Remote Control 7
■ Switching On and Off.... 8
■ Placing Your Television in Standby Mode 8
Plug & Play.... 8
SETTING THE CHANNELS
■ Storing Channels Automatically.... 9
■ Storing Channels Manually 9
■ Setting the Channel Manager.... 10
■ Activating the Child Lock....11
■ Sorting the Stored Channels 11
- Assigning Channels Names...... 12
■ Fine Tuning Channel Reception 12
SETTING THE PICTURE
■ Changing the Picture Standard 13
■ Adjusting the Custom Picture 13
■ Changing the Colour Tone .... 14
■ Adjusting the Color Tone with the Preferred Color Component....14
■ Resetting the Picture Settings to the Factory Defaults.... 15
■ Changing the Picture Size.... 15
■ Changing the Auto Wide (4:3).... 15
■ Digital Noise Reduction.... 16
■ DNle Demo (Digital Natural Image engine).... 16
■ Changing the Colour Space.... 16
■ Freezing the Current Picture.... 16
■ Viewing the Picture In Picture (PIP)...... 17
SETTING THE SOUND
■ Changing the Sound Standard....18
■ Adjusting the Sound Settings....18
■ Setting the TruSurround XT (SRS TSXT)....18
■ Adjusting the Volume Automatically .... 19
■ Selecting the Internal Mute....19
■ Listening to the Sound of the Sub Picture...... 19
■ Resetting the Sound Settings to the Factory Defaults ....20
■ Connecting Headphones....20
■ Selecting the Sound Mode ....20
SETTING THE TIME
■ Setting and Displaying the Current Time 20
■ Setting the Sleep Timer 21
■ Switching the Television
On and Off Automatically....21
SETTING THE OTHERS
■ Choosing Your Language......22
■ Using Game Mode......22
■ Setting the Blue Screen Mode / Selecting the Melody 23
■ Using the Energy Saving Feature......23
■ Setting the Blue Eye....23
■ Selecting the Source....24
■ Editing the Input Source Names....24
WISELINK
■ Using the WISELINK Function......25
■ Using the WISELINK Menu....26
■ Using the PHOTO (JPEG) List 26
■ Viewing Photo File Information......28
■ Selecting a Photo and Slide Show....28
■ Rotating....29
■ Zooming-in .... 30
■ Copying Image Files ....31
■ Deleting Image Files....31
■ Printing a Photo 32
■ Using the MP3 List.... 32
■ Copying Music Files 33
■ Deleting Music Files....33
■ Using the Setup Menu....34
USING THE DTV FEATURE
■ Previewing the DTV Menu System......35
■ Updating the Channel List Automatically .... 35
■ Updating the Channel List Manually....36
■ Editing Your Favourite Channels 36
■ Selecting Channel Manager 37
■ Displaying Programme Information....38
■ Viewing the EPG (Electronic Programme Guide)
Information 38
■ Using the Scheduled List....39
■ Setting the Default Guide....39
■ Viewing All Channels and Favourite Channels ..... 40
■ Choosing Your Language......40
■ Adjusting the Translucency Level 41
■ Setting up the Parental Lock....41
■ Setting the Subtitle......42
■ Selecting the Preferred Language
(Subtitle or Audio)....42
■ Viewing Product Information......42
- Checking the Signal Information......43
■ Upgrading the Software (Option)......43
■ Viewing Common Interface....44
■ Selecting the CI (Common Interface) Menu......44
■ Resetting 44
USING THE TELETEXT FEATURE
■ Teletext Decoder....45
■ Displaying the Teletext Information....45
■ Selecting a Specific Teletext Page 46
■ Using Fastext to Select a Teletext Page 46
■ Setting Up Your Remote Control....47
■ Remote Control Codes......49
SETTING THE PC
■ Setting up Your PC Software
(Based on Windows XP)....52
■ Display Modes....52
■ Setting the PC....53
RECOMMENDATIONS FOR USE
■ Using the Anti-Theft Kensington Lock....54
■ Troubleshooting:
Before Contacting Service Personnel....54
■ Technical and Environmental Specifications ....55

Symbol
Press

Important

Note

One-Touch Button
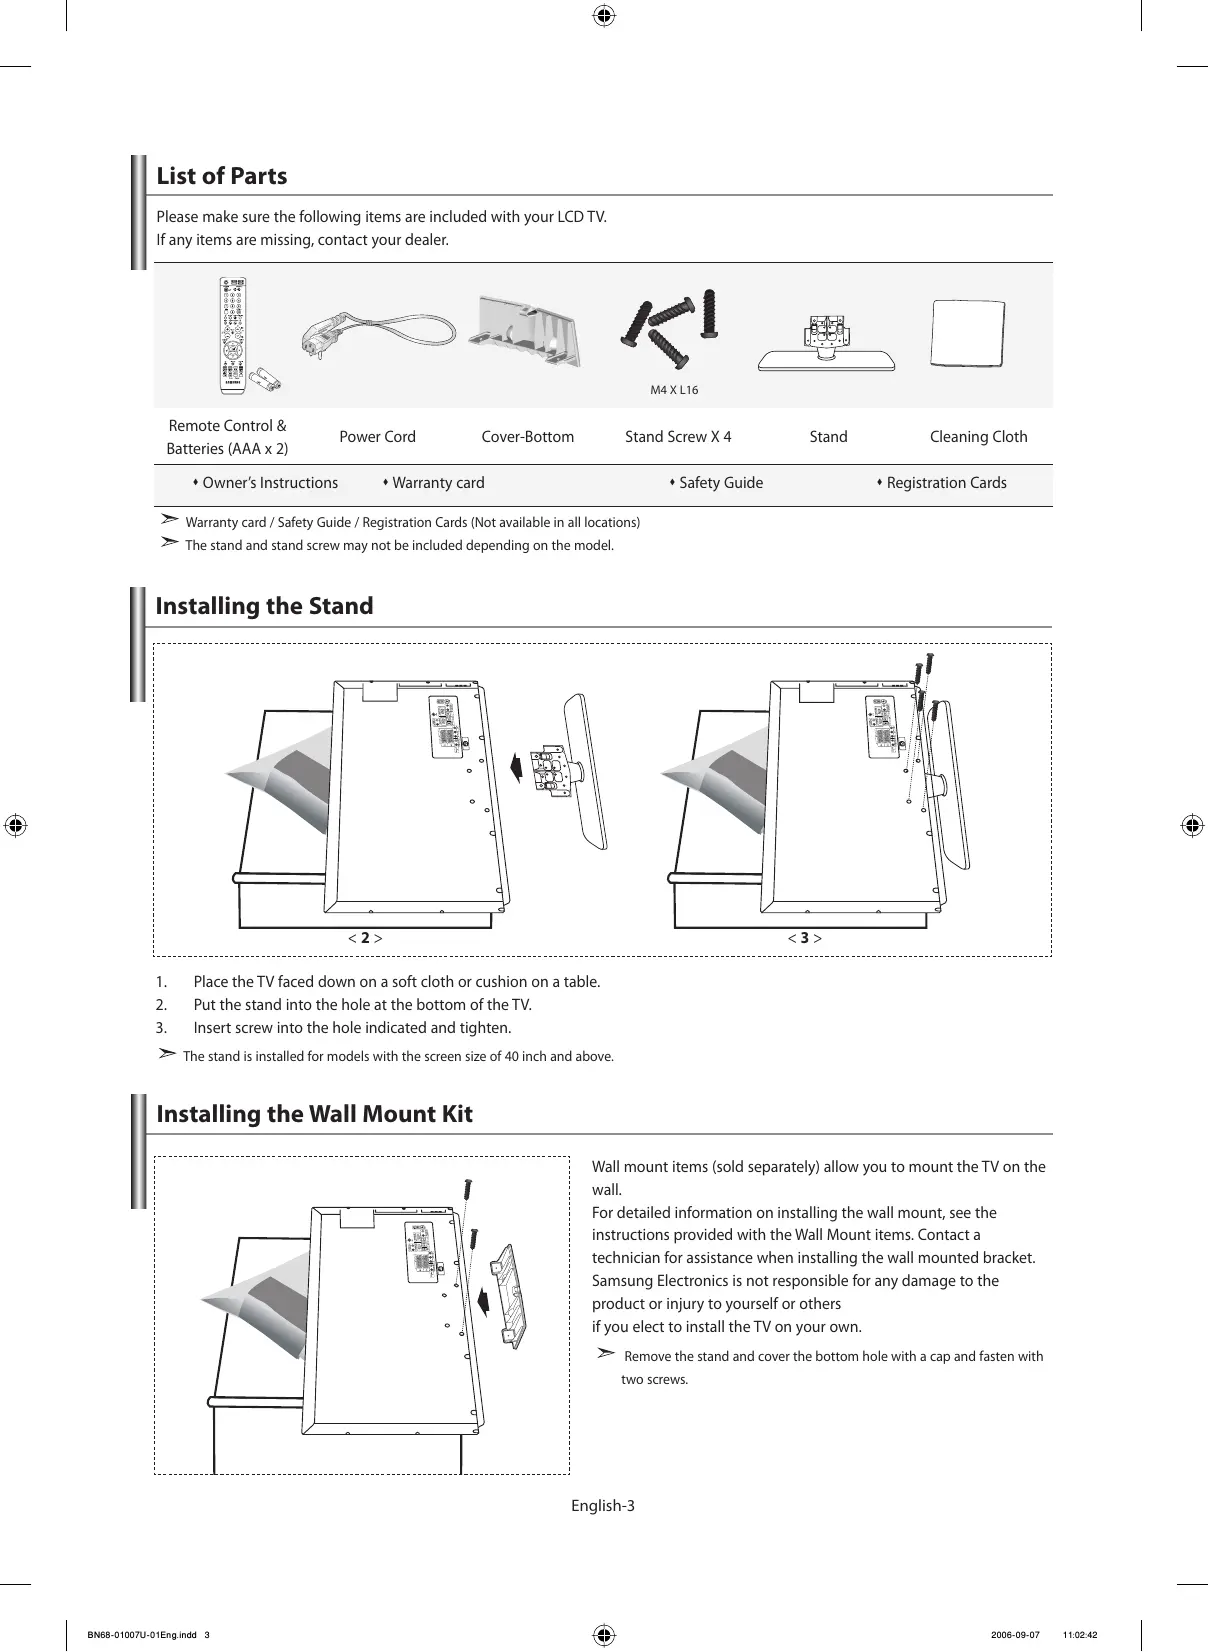
List of Parts
Please make sure the following items are included with your LCD TV. If any items are missing, contact your dealer.
Remote Control & Batteries (AAA x 2)

Power Cord
Cover-Bottom

M4 X L16
Stand

Cleaning Cloth
♦ Owner's Instructions
♦ Warranty card
♦ Safety Guide
♦ Registration Cards
Warranty card / Safety Guide / Registration Cards (Not available in all locations)
The stand and stand screw may not be included depending on the model.
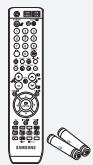
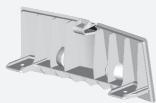
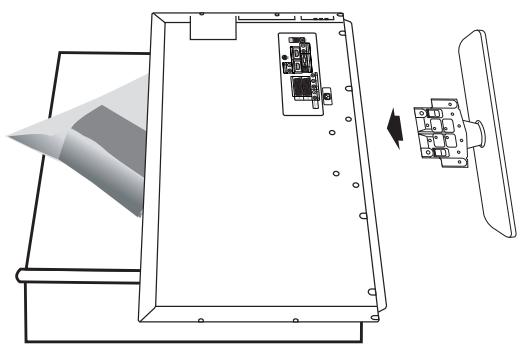
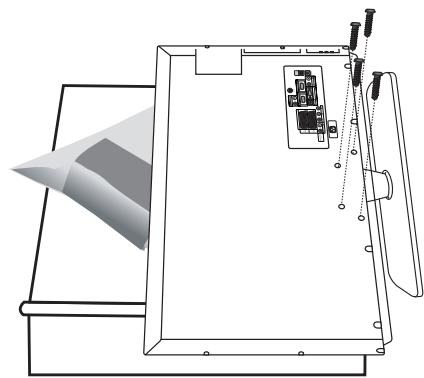
Installing the Stand
natural_image
Diagram of a device with an open panel and internal components, showing a conical light source and a separate close-up view (no text or symbols)< 2 >
natural_image
Technical line drawing of a mechanical assembly with no visible text or symbols<3>
- Place the TV faced down on a soft cloth or cushion on a table.
- Put the stand into the hole at the bottom of the TV.
- Insert screw into the hole indicated and tighten.
The stand is installed for models with the screen size of 40 inch and above.
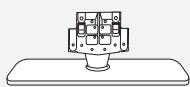
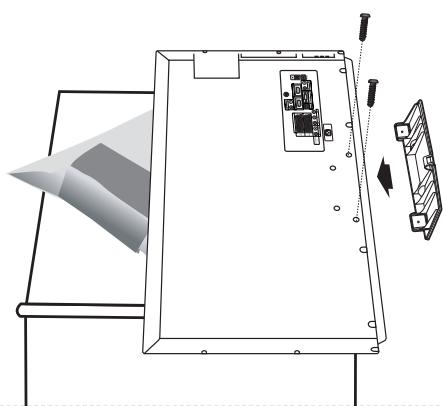
Installing the Wall Mount Kit
natural_image
Diagram of a device with a screen and internal components, showing alignment and disassembly (no text or symbols)Wall mount items (sold separately) allow you to mount the TV on the wall.
For detailed information on installing the wall mount, see the instructions provided with the Wall Mount items. Contact a technician for assistance when installing the wall mounted bracket.
Samsung Electronics is not responsible for any damage to the product or injury to yourself or others if you elect to install the TV on your own.
Remove the stand and cover the bottom hole with a cap and fasten with two screws.
The product colour and shape may vary depending on the model.
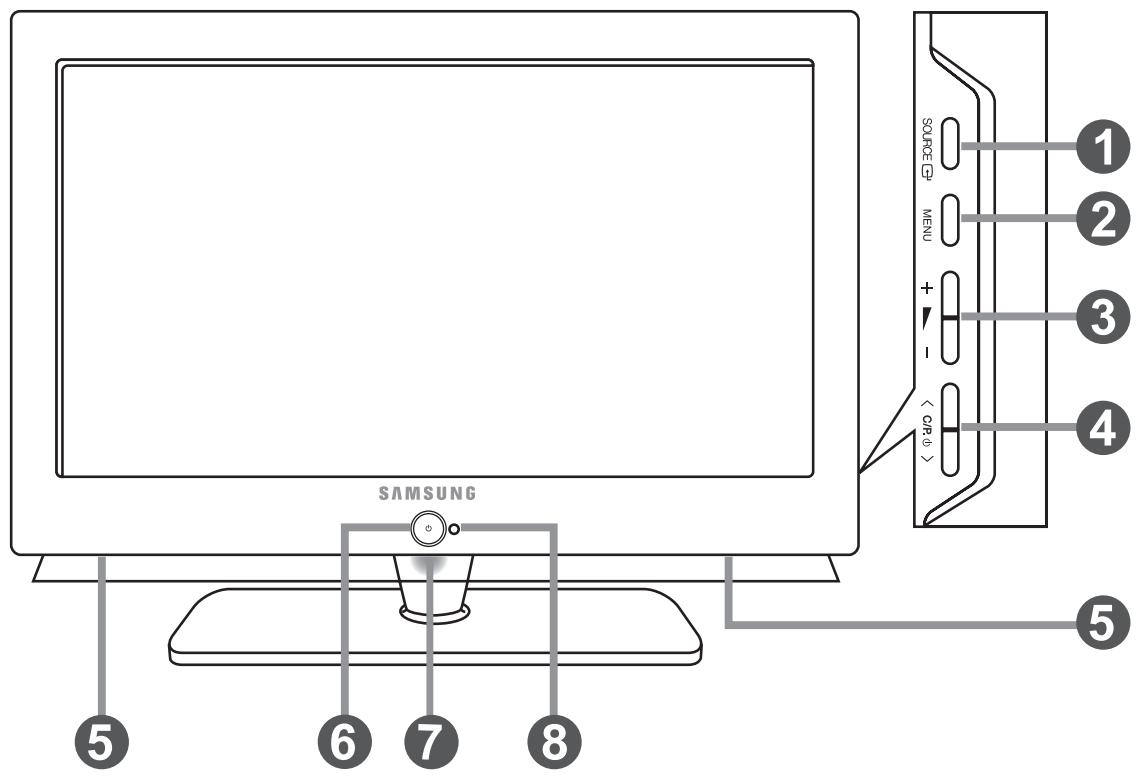
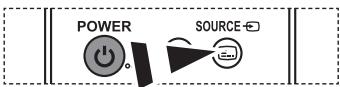
1 SOURCE
Toggles between all the available input sources (TV, Ext.1, Ext.2, AV, S-Video, Component, PC, HDMI1, HDMI2, DTV). In the on-screen menu, use this button as you use the ENTER button on the remote control.
2 MENU
Press to see an on-screen menu of your TV's features.
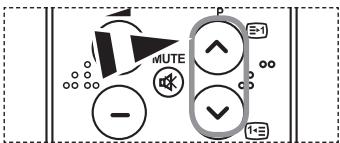
③ + ▲ -
Press to decrease or increase the volume. In the on-screen menu, use the + ▶ - buttons as you use the ◀ and ▶ buttons on the remote control.
4 < C/P. ⏻ >
Press to change channels. In the on-screen menu, use the < C/P. ⊙> buttons as you use the ▼ and ▲ buttons on the remote control. (Without the Remote Control, you can turn on the TV by using the Channel buttons.)
5 Speakers
6 (Power)
Press to turn the TV on and off.
7 Power Indicator
Blinks and turns off when the power is on and lights up in stand-by mode.
8 Remote Control Sensor
Aim the remote control towards this spot on the TV.
![[Rear Panel Jacks] [Side Panel Jacks] 3 2 1 11 EXT 2 (AV) 1 (RGB) COMPONENT IN R-AUDIO-1 P P Y DVI IN R-AUDIO-1 ANT IN HDMI/DVI IN 1 HDMI/DVI IN 2 AUDIO PC PC IN R-AUDIO-1 AUDIO OUT DIGITAL AUDIO OUT (OPTICAL) SERVICE AV IN S-VIDEO VIDEO AUDIO Power Input 9 8 7 6 5 4](/content/2020/05/25034/images/f782ea1d68a5301461d16a18d77366a8865442aac167f839d3e8e6b5b0becc66.jpg)
Whenever you connect an external device to your TV, make sure that power on the unit is turned off.
When connecting an external device, match the colour of the connection terminal to the cable.
1 Connecting an Aerial or Cable Television Network
To view television channels correctly, a signal must be received by the set from one of the following sources:
- An outdoor aerial / A cable television network / A satellite network
2 Connecting HDMI/DVI
- Supports connections between HDMI-connection-enabled AV devices (Set-Top Boxes, DVD players, AV receivers and digital TVs).
- No additional Audio connection is needed for an HDMI to HDMI connection.
What is HDMI?
- "High Definition Multimedia Interface" allows the transmission of high definition digital video data and multiple channels of digital audio (5.1 channels).
- The HDMI/DVI terminal supports DVI connection to an extended device with the appropriate cable (not supplied). The difference between HDMI and DVI is that the HDMI device is smaller in size, has the HDCP (High Bandwidth Digital Copy Protection) coding feature installed, and supports multi - channel digital audio.
➢ You should use the DVI-to-HDMI cable or DVI-HDMI Adapter for the connection, and the "R - AUDIO - L" terminal on DVI for sound output.
- When connecting this product via HDMI or DVI to a Set Top Box, DVD Player or Games Console etc, make sure that it has been set to a compatible video output mode as shown in the table below. Failure to observe this may result in picture distortion, image breakup or no picture.
▶ Supported modes for DVI or HDMI
- Do not attempt to connect the HDMI/DVI connector to a PC or Laptop Graphics Card. (This will result in a blank screen being displayed)
3 Connecting Set-Top Box, VCR or DVD
- Connect the VCR or DVD SCART cable to the SCART connector of the VCR or DVD.
- If you wish to connect both the Set-Top Box and VCR (or DVD), you should connect the Set-Top Box to the VCR (or DVD) and connect the VCR (or DVD) to your set.
5 Connecting External A/V Devices
- Connect RCA or S-VIDEO cable to an appropriate external A/V device such as VCR, DVD or Camcorder.
- Connect RCA audio cables to "R - AUDIO - L" on the rear of your set and the other ends to corresponding audio out connectors on the A/V device.
- Headphone may be connected to the headphone output (4) on the rear of your set. While the headphone is connected, the sound from the built-in speakers will be disabled.
6 SERVICE
- Service connection for qualified service engineer.
7 Connecting AUDIO
- Connect RCA audio cables to "R - AUDIO - L" on the rear of your set and the other ends to corresponding audio in connectors on the Amplifier or DVD Home Theater.
8 Connecting Computer
- Connect the D- Sub cable (optional) to "PC (PC IN)" on the rear of your set and the other end to the Video Card of your computer.
- Connect the stereo audio cable (optional) to "AUDIO (PC IN)" on the rear of your set and the other end to "Audio Out" of the sound card on your computer.
9 Connecting Component Devices (DTV/DVD)
- Connect component video cables (optional) to component connector ("PR", "PB", "Y") on the rear of your set and the other ends to corresponding component video out connectors on the DTV or DVD.
- If you wish to connect both the Set-Top Box and DTV (or DVD), you should connect the Set-Top Box to the DTV (or DVD) and connect the DTV (or DVD) to component connector ("PR", "PB", "Y") on your set.
- The PR, PB and Y connectors on your component devices (DTV or DVD) are sometimes labeled Y, B-Y and R-Y or Y, Cb and Cr.
- Connect RCA audio cables (optional) to "R - AUDIO - L" on the rear of your set and the other ends to corresponding audio out connectors on the DTV or DVD.
- This LCD TV displays its optimum picture resolution in 720p mode.
- This LCD TV displays its maximum picture resolution in 1080i mode.
10 Kensington Lock
- The Kensington lock (optional) is a device used to physically fix the system when used in a public place.
- If you want to use a locking device, contact the dealer where you purchased the TV.
- The place of the Kensington Lock may be different depending on its model.
11 DIGITAL AUDIO OUT (OPTICAL)
- Connect to a Digital Audio Component.
12 Connecting CI (Common Interface) CARD
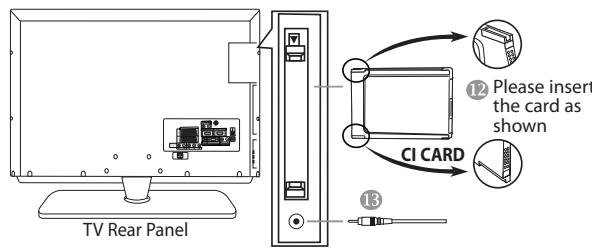
- When not inserting "CI CARD" in some channels, "Scrambled Signal" is displayed on the screen.
- The pairing information containing a telephone number, CI CARD ID, Host ID, and other information will be displayed
in about 2\~3 minutes. If an error message is displayed, please contact your service provider. - When the channel information configuration has finished, the message "Updating Completed" is displayed, indicating that the channel list is now updated.
You must obtain a CI CARD from a local cable service provider. Remove the CI CARD by carefully pulling it out with your hands since dropping the CI CARD may cause damage to it.
13 Service Port
- Service connection for qualified service engineer.
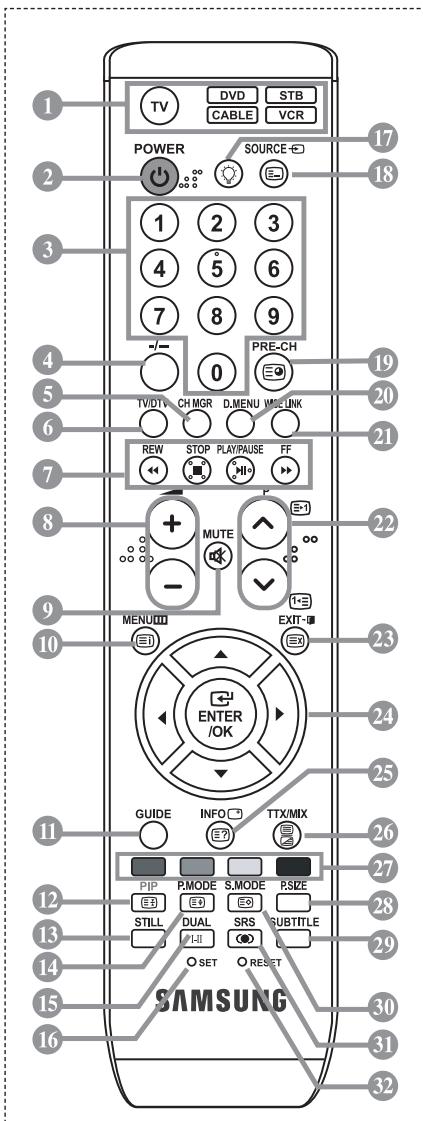
1 Selects a target device to be controlled by the Samsung remote control (TV, DVD, STB, CABLE, VCR) (Refer to page 48\~52)
② Television Standby button
3 Number buttons for direct channel access
4 One/Two-digit channel selection
⑤ It displays "Channel Manager" on the screen.
6 Selects the TV and DTV mode directly
7 VCR/DVD Functions
Rewind, Stop, Play/Pause,
Fast/Forward
8 + Volume increase
- Volume decrease
⑨ Temporary sound switch-off
10 Menu display and change confirmation
11 Electronic Program Guide (EPG) display
12 Picture-In-Picture On / Off
13 Picture freeze
14 Picture effect selection
15 Sound effect selection
16 Adjusts 5 separate devices - TV, DVD, STB, CABLE, or VCR.
17 When pressing this button, a number of buttons on the remote control (e.g. Selects a target device, volume, channel and MUTE buttons) light up for a few seconds and then turn off to save power. This function is to conveniently use the remote control at night or when dark.
18 Available source selection
20 Previous channel DTV menu display
21 This function enables you to load saved photo (JPEG) and audio files (MP3) and to view or play them on the TV.
22 P ⬇: Next channel
P ⬇: Previous channel
The performance of the remote control may be affected by bright light.
This is a special remote control for the visually impaired, and has Braille points on the Power, Channel and Volume buttons.
23 Exit the OSD
24 Control the cursor in the menu
27 Use to see information on the current broadcast
28 Picture size selection
29 Digital subtitle display
30 Sound mode selection
31 SRS TSXT selection
32 When your remote does not work, change the batteries and press the "RESET" button for 2-3 seconds before use.
Teletext Functions
6 Exit from the Teletext display
10 Teletext index
12 Teletext hold
14 Teletext size selection
18 Teletext mode selection (LIST/FLOF)
19 Teletext sub page
22 P ⬇: Teletext next page
P ⬇: Teletext previous page
23 Teletext cancel
25 Teletext reveal
26 Alternately select Teletext, Double, or Mix.
27 Fastext topic selection
30 Teletext store
Installing Batteries in the Remote Control
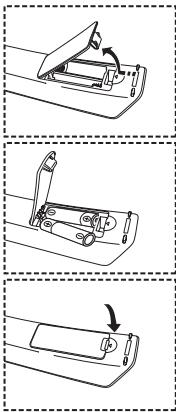
natural_image
Three-step diagram showing a mechanical assembly with a lever and handle, no text or symbols present.- Lift the cover at the back of the remote control upward as shown in the figure.
- Install two AAA size batteries.
Make sure to match the "+" and "-" ends of the batteries with the diagram inside the compartment.
- Replace the cover.
Remove the batteries and store them in a cool, dry place if you won't be using the remote control for a long time. The remote control can be used up to about 23 feet from the TV. (Assuming typical TV usage, the batteries last for about one year.)
If the remote control doesn't work, check the following:
- Is the TV power on?
- Are the plus and minus ends of the batteries reversed?
- Are the batteries drained?
- Is there a power outage, or is the power cord unplugged?
- Is there a special fluorescent light or neon sign nearby?
Switching On and Off
The mains lead is attached to the rear of your set.
- Plug the mains lead into an appropriate socket.
The standby indicator lights up on the front of the set.
- Press the ⏻ button on the front of the set.
You also can press the POWER button or the TV/DTV button on the remote control to turn the TV on.
The programme that you were watching last is reselected automatically.
- Press the numeric button (0\~9) or channel up/down (♂/▽) button on the remote control or
< C/P. ⏻ > button on the right side of the set.
When you switch the set on for the very first time, you will be asked to choose language in which the menus are to be displayed.
- To switch your set off, press the POWER ⏻ button again.
Placing Your Television in Standby Mode
Your set can be placed in standby mode in order to reduce the power consumption. The standby mode can be useful when you wish to interrupt viewing temporarily (during a meal, for example).
- Press the POWER ⏻ button on the remote control.
The screen is turned off and a blue standby indicator appears on the front of your set.
- To switch your set back on, simply press the POWER ⏻, numeric buttons (0\~9) or channel up/down (♡/♡) button again.
Do not leave your set in standby mode for long periods of time (when you are away on holiday, for example).
It is best to unplug the set from the mains and aerial.
Plug & Play
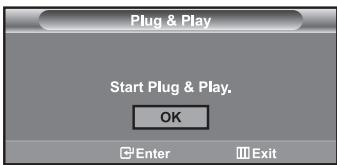
When the TV is initially powered on, several basic settings proceed automatically and subsequently. The following settings are available.
- Press the POWER ⏻ button on the remote control.
The message "Start Plug & Play" is displayed with "OK" selected.
- Select the appropriate language by pressing the ▲ or ▼ button.
Press the ENTER button to confirm your choice.
- The message "Check antenna input." is displayed with "OK" selected.
Press the ENTER button.
➢ Please check that the antenna cable is connected correctly.
- Select the appropriate country by pressing the ▲ or ▼ button.
Press the ENTER button to confirm your choice.
- The "Auto Store" menu is displayed with the "Start" selected.
Press the ENTER button.
The channel search will start and end automatically.
After all the available channels are stored, the "Clock Set" menu appears.
➢ Press the ENTER button at any time to interrupt the memorization process.
- Press the ENTER button.
Select the "Hour" or "Minute" by pressing the ◀ or ▶ button.
Set the "Hour" or "Minute" by pressing the ▲ or ▼ button.
➢ You can also set the hour and minute by pressing the number buttons on the remote control.
- Press the ENTER button to confirm your setting.
The DTV channel scan menu appears and the DTV channel is automatically updated.
If the DTV channel is updated, the Source in the source list of the Input menu is automatically changed to DTV.
For detailed descriptions about DTV channel update, refer to page 35 of this manual.
♦ Language: Select your language.
♦ Country: Select your country.
- Auto Store: Automatically scans for and stores channels available in the local area.
♦ Clock Set: Sets the current time for the TV clock.
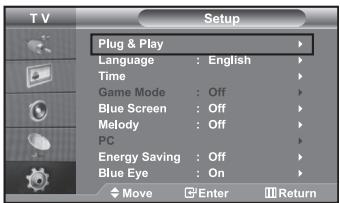
If you want to reset this feature...
- Press the MENU button to display the menu.
Press the ▲ or ▼ button to select "Setup", then press the ENTER button. - Press the ENTER button again, to select "Plug & Play".
- The message "Start Plug & Play" is displayed.
- Storing Channels Automatically
- Storing Channels Manually
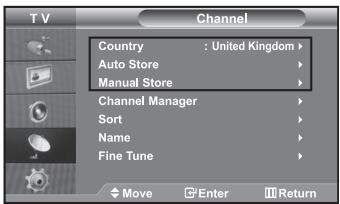
Storing Channels Automatically
You can scan for the frequency ranges available to you (and availability depends on your country). Automatically allocated programme numbers may not correspond to actual or desired programme numbers. However, you can sort numbers manually and clear any channels you do not wish to watch.
-
Press the MENU button to display the menu.
Press the ▲ or ▼ button to select "Channel", then press the ENTER button. -
Press the ENTER button to select "Country".
-
Select the appropriate country by pressing the ▲ or ▼ button.
Press the ENTER button to confirm your choice.
-
Press the ▲ or ▼ button to select "Auto Store", then press the ENTER button.
-
Press the ENTER button.
The TV will begin memorizing all of the available channels.
➢ Press the ENTER button at any time to interrupt the memorization process and return to the "Channel" menu.
- After all the available channels are stored, the "Sort" menu appears.
Storing Channels Manually
You can store up to 100 channels, including those received via cable networks.
When storing channels manually, you can choose:
◆ Whether or not to store each of the channels found.
◆ The programme number of each stored channel which you wish to identify.
-
Press the MENU button to display the menu. Press the ▲ or ▼ button to select "Channel", then press the ENTER button.
-
Press the ▲ or ▼ button to select "Manual Store", then press the ENTER button.
-
Press the ENTER button to select "Programme".
-
To assign a programme number to a channel, find the correct number by pressing the ▲ or ▼ button and then press the ENTER button.
➢ You can also set a programme number by pressing number buttons on the remote control.
- Press the ▲ or ▼ button to select "Colour System", then press the ENTER button.
- Select the colour standard required by pressing the ▲ or ▼ button then, press the ENTER button.
- Press the ▲ or ▼ button to select "Sound System", then press the ENTER button.
- Select the sound standard required by pressing the ▲ or ▼ button, then press the ENTER button. ➢ If there is an abnormal sound or no sound, re-select the sound system required.
- If you know the number of the channel to be stored, press the ▲ or ▼ button to select "Channel". Press the ENTER button.
Select C (Air channel) or S (Cable channel) by pressing the ▲ or ▼ button. Press the ▶ button to select channel. Select the required number by pressing the ▲ or ▼ button and then press the ENTER button.
➢ Channel mode: P (Programme mode), C (Air channel mode), S (Cable channel mode) ➢ You can also set a channel number by pressing number buttons on the remote control.
- If you do not know the channel numbers, press the ▲ or ▼ button to select "Search".
Press the ENTER button. Search by pressing the ▲ or ▼ button and then press the ENTER button. - Press the ▲ or ▼ button to select "Store". Press the ENTER button to select "OK".
- Repeat steps 3 to 11 for each channel to be stored.
♦ Programme: Selects a program number for the channel.
♦ Colour System: Sets the colour supporting system.
♦ Sound System: Sets the sound supporting system.
- Channel: Selects a channel.
♦ Search: Scans for the frequency value for the channel.
♦ Store: Saves your settings.
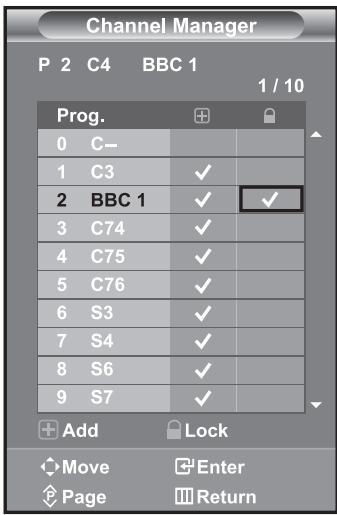
Setting the Channel Manager
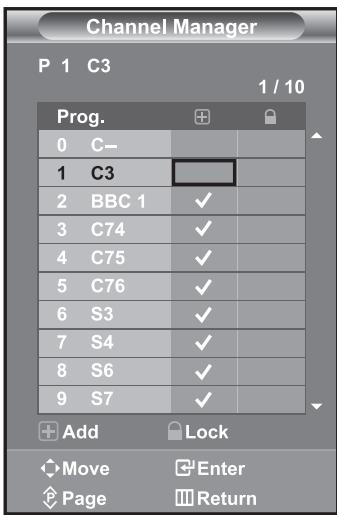
Set the channels according to your preference.
You can easily delete, add, or lock the channel you want.
- Press the MENU button to display the menu.
Press the ▲ or ▼ button to select "Channel", then press the ENTER button. - Press the ▲ or ▼ button to select "Channel Manager", then press the ENTER button.
- Press the ENTER button again, to select "Channel Manager".
- Press the ▶ button to select "⊕" line.
- Press the ▲ or ▼ button to select the undesired channel, then press the ENTER button to cancel.
- Repeat steps 5 for each channel to be selected or canceled
- Press the EXIT button to exit.
“ 🔒 ” is active when “Child Lock” is selected to “On”.
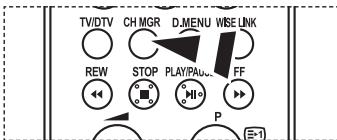
You can select these options by simply pressing the CH MGR button on the remote control.
Activating the Child Lock
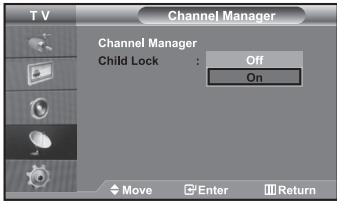
This feature allows you to prevent unauthorized users, such as children, from watching unsuitable programmes by muting out video and audio. Child Lock cannot be released using the buttons on the side.
Only the remote control can release the Child Lock setting, so keep the remote control away from children.
- Press the MENU button to display the menu.
Press the ▲ or ▼ button to select "Channel", then press the ENTER button. - Press the ▲ or ▼ button to select "Channel Manager", then press the ENTER button.
- Press the ▲ or ▼ button to select "Child Lock", then press the ENTER button.
-
Press the ▲ or ▼ button to select "On".
Press the ENTER button. -
Press the ▲ or ▼ button to select "Channel Manager", then press the ENTER button.
-
Press the ▶ button to select " 🔊" line.
-
Press the ▲ or ▼ button to select the channels you want to lock, then press the ENTER button.
-
Repeat steps 7 for each channel to be locked or unlocked.
-
Press the EXIT button to exit.
Select "On" or "Off" in "Child Lock" to easily turn the channels which selected on "☐" to be active or inactive.
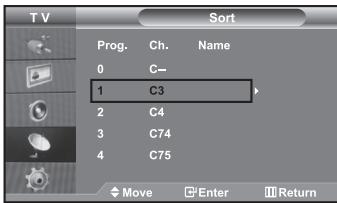
Sorting the Stored Channels
You can exchange the numbers of two channels, in order to:
Modify the numeric order in which the channels have been automatically stored.
◆ Give easily remembered numbers to the channels that you watch most often.
- Press the MENU button to display the menu.
Press the ▲ or ▼ button to select "Channel", then press the ENTER button.
-
Press the ▲ or ▼ button to select "Sort", then press the ENTER button.
-
Select channel number that you wish to change by pressing the ▲ or ▼ button repeatedly. Press the ENTER button.
The selected channel number and name are moved to right side.
- Press the ▲ or ▼ button to move to the position in which you would like to change and then press the ENTER button.
The selected channel is exchanged with the one previously stored to the chosen number.
-
Repeat steps 3 to 4 for another channel to be sorted.
-
Press the EXIT button to exit.
Assigning Channels Names
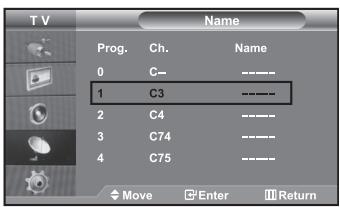
Channel names will be assigned automatically when channel information is broadcast. These names can be changed, allowing you to assign new names.
-
Press the MENU button to display the menu. Press the ▲ or ▼ button to select "Channel", then press the ENTER button.
-
Press the ▲ or ▼ button to select "Name", then press the ENTER button.
-
If necessary, select the channel to be assigned to a new name by pressing the ▲ or ▼ button. Press the ENTER button.
The selection bar is displayed around the name box.
| To... | Then... |
| Select a letter, number or symbol | Press the ▲ or ▼ button |
| Move on the next letter | Press the ▶ button |
| Move back the previous letter | Press the ◀ button |
| Confirm the name | Press the ENTER button |
The characters available are: Letters of the alphabet (A\~Z) / Numbers (0\~9) / Special characters (-, space)
-
Repeat steps 3 to 4 for each channel to be assigned to a new name.
-
Press the EXIT button to exit.
Fine Tuning Channel Reception
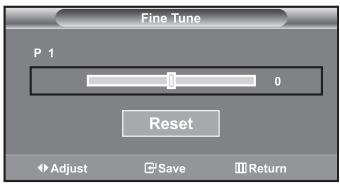
Use fine tuning to manually adjust a particular channel for optimal reception.
- Use the number buttons to directly select the channel that you want to fine tune.
- Press the MENU button to display the menu. Press the ▲ or ▼ button to select "Channel", then press the ENTER button.
- Press the ▲ or ▼ button to select "Fine Tune", then press the ENTER button.
- Press the ◀ or ▶ button to adjust the fine tuning. Press the ENTER button.
- Press the EXIT button to exit.
Fine tuned channels that have been saved are marked with an asterisk “*” on the right-hand side of the channel number in the channel banner. And the channel number turns red.
To reset the fine-tuning, select "Reset" by pressing the ▲ or ▼ button and then press the ENTER button.
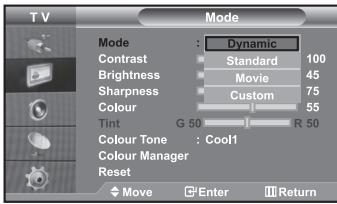
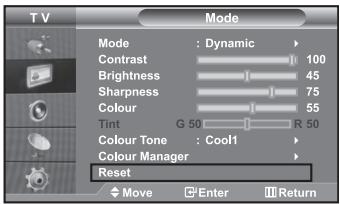
Changing the Picture Standard
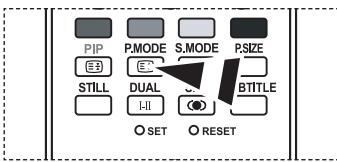

You can also press the P.MODE button on the remote control to select one of the picture settings.
You can select the type of picture which best corresponds to your viewing requirements.
- Press the MENU button to display the menu. Press the ▲ or ▼ button to select "Picture", then press the ENTER button.
- Press the ENTER button again, to select "Mode". Press the ENTER button again.
- Press the ▲ or ▼ button to select the desired picture effect. Press the ENTER button.
- Press the EXIT button to exit.
♦ Dynamic: Selects the picture for high-definition in a bright room.
Standard: Selects the picture for optimum display in a normal environment.
♦ Movie: Selects the picture for comfortable display in a dark room.
- Custom: Select to view your favorite display settings. (Refer to "Adjusting the Custom Picture")
The Picture mode must be adjusted separately for each input source.
You can return to the factory defaults picture settings by selecting the "Reset". (Refer to "Resetting the Picture Settings to the Factory Defaults" on page 15)
Adjusting the Custom Picture

Your set has several settings which allow you to control picture quality.
- To select the desired picture effect, follow the "Changing the Picture Standard" instructions number 1 to 3.
- Press the ▲ or ▼ button to select a particular item. Press the ENTER button.
- Press the ◀ or ▶ button to decrease or increase the value of a particular item. Press the ENTER button.
-
Press the EXIT button to exit.
-
Contrast: Adjusts the lightness and darkness between objects and the background.
♦ Brightness: Adjusts the brightness of the whole screen. - Sharpness: Adjusts the outline of objects to either sharpen them or make them more dull.
♦ Colour: Adjusts the colours, making them lighter or darker.
♦ Tint (NTSC only): Adjusts the colour of objects, making them more red or green for a more natural look.
The adjusted values are stored according to the selected Picture mode.
In PC Mode, Only "Contrast", "Brightness" and "Colour" can be adjusted
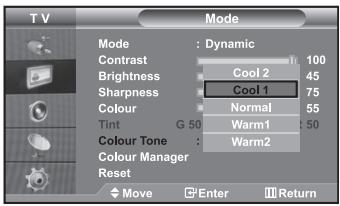
You can select the most comfortable colour tone to your eyes.
- To select the desired picture effect, follow the "Changing the Picture Standard" instructions number 1 to 3 on page 13.
- Press the ▲ or ▼ button to select "Colour Tone", then press the ENTER button.
-
Press the ▲ or ▼ button to select the desired colour tone setting. Press the ENTER button.
-
Press the EXIT button to exit.
♦ Cool2: Makes the colour temperature bluer than "Cool1" menu.
♦ Cool1: Makes whites bluish.
♦ Normal: Keeps whites white.
♦ Warm1: Makes whites reddish.
♦ Warm2: Makes the colour temperature redder than "Warm1" menu.
The adjusted values are stored according to the selected Picture mode.
Adjusting the Color Tone with the Preferred Color Component
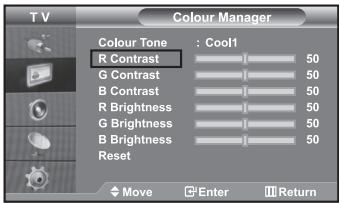
You can adjust a picture's color tone with your preferred color component.
- To select the desired picture effect, follow the "Changing the Picture Standard" instructions number 1 to 3 on page 13.
- Press the ▲ or ▼ button to select "Colour Manager", then press the ENTER button.
- Press the ▲ or ▼ button to select a particular item. Press the ENTER button.
-
Press the ◀ or ▶ button to decrease or increase the value of a particular item. Press the ENTER button.
-
Press the EXIT button to exit.
♦ R Contrast:
Lightens or intensifies the red component of the border between objects and the background.
♦ G Contrast:
Lightens or intensifies the green component of the border between objects and the background.
♦ B Contrast:
Lightens or intensifies the blue component of the border between objects and the background.
♦ R Brightness:
Adjusts the brightness of the red component for the entire screen.
♦ G Brightness:
Adjusts the brightness of the green component for the entire screen.
♦ B Brightness:
Adjusts the brightness of the blue component for the entire screen.
♦ Reset:
Resets all settings to the defaults.
You cannot select a "Colour Tone" in the "Colour Manager".
Resetting the Picture Settings to the Factory Defaults
You can return to the factory defaults picture settings.
- To select the desired picture effect, follow the "Changing the Picture Standard" instructions number 1 to 3 on page 13.
- Press the ▲ or ▼ button to select "Reset", then press the ENTER button.
- Press the EXIT button to exit.
The "Reset" will be set for each picture mode.
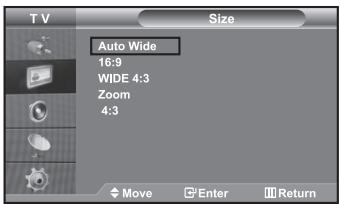
Changing the Picture Size
You can select the picture size which best corresponds to your viewing requirements.
- Press the MENU button to display the menu. Press the ▲ or ▼ button to select "Picture", then press the ENTER button.
- Press the ▲ or ▼ button to select "Size", then press the ENTER button.
- Select the required option by pressing the ▲ or ▼ button. Press the ENTER button.
- Press the EXIT button to exit.
- Auto Wide: Automatically adjusts the picture size to the "16:9" aspect ratio.
♦ 16:9: Adjusts the picture size to 16:9 appropriate for DVDs or wide broadcasting.
♦ WIDE 4:3 : Magnify the size of the picture more than 4:3.
♦ Zoom: Magnifies the 16:9 wide picture (in the vertical direction) to fit the screen size.
♦ 4:3: This is the default setting for a video movie or normal broadcasting.
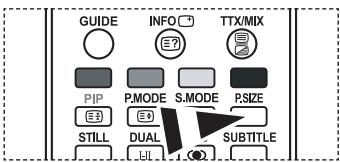
You can select these options by simply pressing the P.SIZE button on the remote control.
"Auto Wide" function is available only in "TV", "Ext.1", "Ext.2", "AV", "S-Video" and "DTV" mode.
In PC Mode, only "16:9" and "4:3" mode can be adjusted.
Zoom : Select □ by pressing the ◀ or ▶ buttons. Use the ▲ or ▼ button to move the picture up and down. After selecting □, use the ▲ or ▼ button to magnify or reduce the picture size in the vertical direction.
WIDE 4:3: Move the screen up/down using the ▲ or ▼ button after selecting the by pressing the ▶ or ENTER button.
Changing the Auto Wide (4:3)
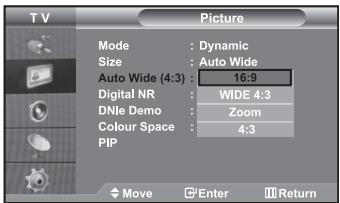
Ajusts the display picture size to 4:3 appropriate for input signal
- Press the MENU button to display the menu. Press the ▲ or ▼ button to select "Picture", then press the ENTER button.
- Press the ▲ or ▼ button to select "Auto Wide (4:3)", then press the ENTER button.
- Select the required option by pressing the ▲ or ▼ button. Press the ENTER button.
- Press the EXIT button to exit.
These functions don't work in "Component", "HDMI1", "HDMI2" and "PC" mode.
♦ 16:9: Adjusts the picture size to 16:9 appropriate for DVDs or wide broadcasting.
♦ WIDE 4:3 : Magnify the size of the picture more than 4:3.
♦ Zoom: Magnifies the 16:9 wide picture (in the vertical direction) to fit the screen size.
♦ 4:3: This is the default setting for a video movie or normal broadcasting.
Digital Noise Reduction
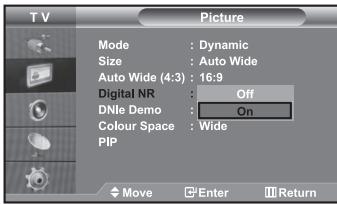
If the broadcast signal received by your TV is weak, you can activate the Digital Noise Reduction feature to help reduce any static and ghosting that may appear on the screen.
- Press the MENU button to display the menu.
Press the ▲ or ▼ button to select "Picture", then press the ENTER button. - Press the ▲ or ▼ button to select "Digital NR", then press the ENTER button.
- Press the ▲ or ▼ button to select "On" or "Off".
Press the ENTER button. - Press the EXIT button to exit.
DNle Demo (Digital Natural Image engine)
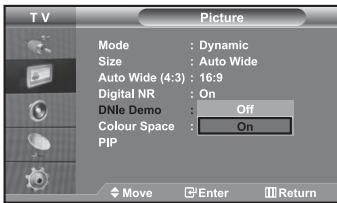
Samsung's new technology brings you more detailed images with contrast and white enhancement. A new image compensation algorithm gives viewers brighter and clearer images. DNle technology will match every signal to your eyes. You can see how DNle improves the picture by setting DNle Demo mode to On.
- Press the MENU button to display the menu.
Press the ▲ or ▼ button to select "Picture", then press the ENTER button. - Press the ▲ or ▼ button to select "DNle Demo", then press the ENTER button.
- Press the ▲ or ▼ button to select "On" or "Off".
Press the ENTER button. - Press the EXIT button to exit.
These functions don't work in PC mode.
The DNle Demo is designed to show the difference between the regular and DNle pictures.
By default, the product displays the picture with DNle applied.
Changing the Colour Space
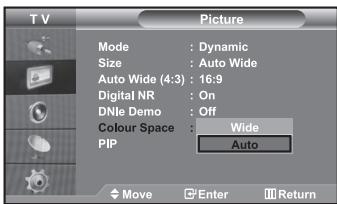
Colour space is a colour matrix composed of red, green, and blue colours. Select your favorite colour space and experience the world of natural colour.
- Press the MENU button to display the menu.
Press the ▲ or ▼ button to select "Picture", then press the ENTER button. - Press the ▲ or ▼ button to select "Colour Space", then press the ENTER button.
- Press the ▲ or ▼ button to select "Wide" or "Auto".
Press the ENTER button. - Press the EXIT button to exit.
♦ Wide : Wide Colour Space offers deep and rich colour tone.
- Auto: Auto Colour Space automatically adjusts to natural colour tone based on program sources.
Freezing the Current Picture
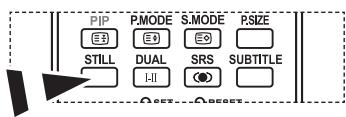
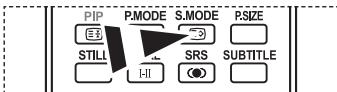
Press the STILL button to freeze a moving picture into a still one.
Press again to cancel.
Viewing the Picture In Picture (PIP)
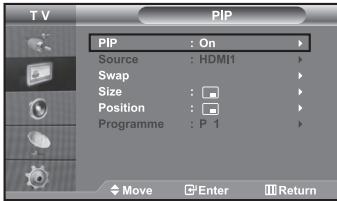

Press the PIP button on the remote control repeatedly to activate or deactivate the "PIP".
You can display a sub picture within the main picture of set programme or video input. In this way, you can watch the picture of set programme or video input from any connected equipment while watching the main picture.
- Press the MENU button to display the menu.
Press the ▲ or ▼ button to select "Picture", then press the ENTER button.
-
Press the ▲ or ▼ button to select "PIP", then press the ENTER button.
-
Press the ENTER button again.
Press the ▲ or ▼ button to select "On", then press ENTER button.
If the PIP is activated, the size of the main picture turns to "16:9".
- Press the ▲ or ▼ button to select "Source", then press ENTER button.
Select a source of the sub picture by pressing the ▲ or ▼ button and press the ENTER button.
The sub picture can serve different source selections based on what the main picture is set to.
- Press the ▲ or ▼ button to select "Swap".
To interchange the main picture and the sub picture, select "Swap" option and press the ENTER button.
The main picture and the sub picture are interchanged.
If main picture is in "PC" mode, "Swap" is not available.
- Press the ▲ or ▼ button to select "Size" of the sub picture and then press the
ENTER button. Select a size of the sub picture by pressing the ▲ or ▼ button and then press the ENTER button.
If main picture is in "PC" mode, "Size" is not available.
- Press the ▲ or ▼ button to select "Position", then press the ENTER button.
Select the position of the sub picture by pressing the ▲ or ▼ button and then press the ENTER button.
- Press the ▲ or ▼ button to select "Programme" and then press the ENTER button.
You can select the channel that you want to view through sub picture by pressing the ▲ or ▼ button. Press the ENTER button.
The "Programme" can be active when the sub picture is set to TV.
- Press the EXIT button to exit.
You may notice that the picture in the PIP window becomes slightly unnatural when you use the main screen to view a game or karaoke.
- Source: Used to select a source of the sub picture.
♦ Swap: Used to interchange the main picture and the sub picture.
♦ Size: Used to select a size of the sub picture.
♦ Position: Used to move the sub picture.
♦ Programme: Used to Change the sub picture.
PIP Settings (O: PIP operates, X: PIP doesn't operate)
| Main\Sub | TV | Ext.1 | Ext.2 | AV | S-Video | Component | PC | HDMI1 | HDMI2 | DTV |
| TV | X | X | X | X | X | X | X | O | O | X |
| Ext.1 | X | X | X | X | X | X | X | O | O | X |
| Ext.2 | X | X | X | X | X | X | X | O | O | X |
| AV | X | X | X | X | X | X | X | O | O | X |
| S-Video | X | X | X | X | X | X | X | O | O | X |
| Component | X | X | X | X | X | X | X | O | O | X |
| PC | O | O | O | O | X | X | X | X | X | X |
| HDMI1 | O | O | O | O | O | O | X | X | X | X |
| HDMI2 | O | O | O | O | O | O | X | X | X | X |
| DTV | X | X | X | X | X | X | X | X | X | X |
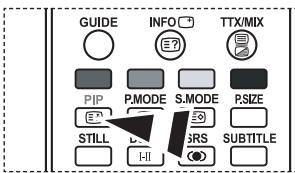
Changing the Sound Standard
flowchart
graph TD
    A["PIP"] --> B["P.MODE"]
    B --> C["S.MODE"]
    C --> D["PSIZE"]
    A --> E["STILL"]
    E --> F["I-II"]
    F --> G["SRS"]
    G --> H["SUBTITLE"]

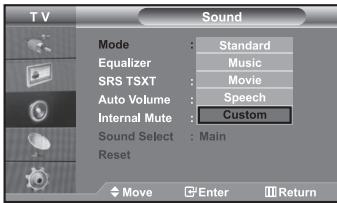
You can also select these options by simply pressing the S.MODE button on the remote control.
You can select the type of the special sound effect to be used when watching a given broadcast.
- Press the MENU button to display the menu. Press the ▲ or ▼ button to select "Sound", then press the ENTER button.
- Press the ENTER button again, to select "Mode".
- Select the required sound effect by pressing the ▲ or ▼ button repeatedly and then press the ENTER button.
-
Press the EXIT button to exit.
-
Standard: Selects the normal sound mode.
♦ Music: Emphasizes music over voices.
♦ Movie: Provides live and full sound for movies.
♦ Speech: Emphasizes voices over other sounds.
- Custom: Selects your custom sound settings. (Refer to "Adjusting the Sound Settings")
Adjusting the Sound Settings
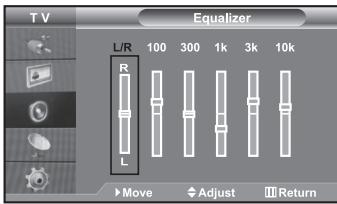
The sound settings can be adjusted to suit your personal preferences.
- Press the MENU button to display the menu.
Press the ▲ or ▼ button to select "Sound", then press the ENTER button. - Press the ▲ or ▼ button to select "Equalizer", then press the ENTER button.
- Press the ◀ or ▶ button to select a particular item.
Press the ENTER button. - Press the ▲ or ▼ button to reach the required setting. Press the ENTER button.
- Press the EXIT button to exit.
If you make any changes to these settings, the Sound Mode is automatically switched to "Custom".
Setting the TruSurround XT (SRS TSXT)
TruSurround XT is a patented SRS technology that solves the problem of playing 5.1 multichannel content over two speakers.
TruSurround delivers a compelling, virtual surround sound experience through any two-speaker playback systems, including internal television speakers. It is fully compatible with all multichannel formats.
- Press the MENU button to display the menu.
Press the ▲ or ▼ button to select "Sound", then press the ENTERbutton. - Press the ▲ or ▼ button to select "SRS TSXT", then press the ENTER button.
- Press the ▲ or ▼ button to select "On" or "Off". Press the ENTER button.
- Press the EXIT button to exit.
SRS (●)
TruSurround XT, SRS and ● symbol are trademarks of SRS Labs, Inc. TruSurround XT technology is incorporated under license from SRS Labs, Inc.

You can also set these options simply by pressing the SRS button on remote control.
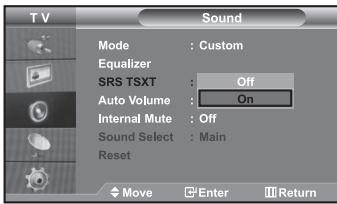
Adjusting the Volume Automatically
Each broadcasting station has its own signal conditions, and so it is not easy for you to adjust the volume every time the channel is changed.
This feature allows you to automatically adjust the volume of the desired channel by lowering the sound output when the modulation signal is high or by raising the sound output when the modulation signal is low.
- Press the MENU button to display the menu.
Press the ▲ or ▼ button to select "Sound", then press the ENTER button.
-
Press the ▲ or ▼ button to select "Auto Volume", then press the ENTER button.
-
Press the ▲ or ▼ button to select "On" or "Off".
Press the ENTER button.
- Press the EXIT button to exit.
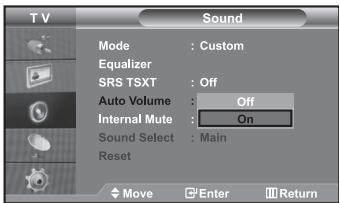
Selecting the Internal Mute
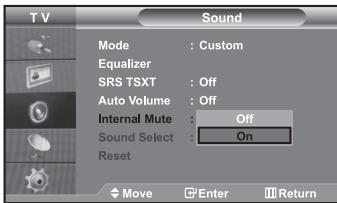
If you want to hear the sound through separate speakers, cancel the internal amplifier.
- Press the MENU button to display the menu.
Press the ▲ or ▼ button to select "Sound", then press the ENTER button.
-
Press the ▲ or ▼ button to select "Internal Mute", then press the ENTER button.
-
Press the ▲ or ▼ button to select "On" or "Off".
Press the ENTER button.
- Press the EXIT button to exit.
When "Internal Mute" is set to "On", the Sound menus except for "Sound Select" (in PIP mode) cannot be adjusted.
Listening to the Sound of the Sub Picture
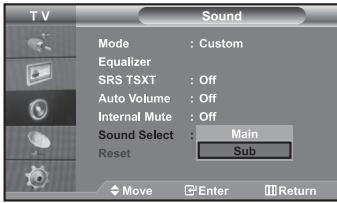
During the PIP features activation, you can listen to the sound of the sub picture.
- Press the MENU button to display the menu.
Press the ▲ or ▼ button to select "Sound", then press the ENTER button.
-
Press the ▲ or ▼ button to select "Sound Select", then press the ENTER button.
-
Press the ▲ or ▼ button to select "Sub".
Press the ENTER button.
- Press the EXIT button to exit.
- Main: Used to listen to the sound of the main picture.
Sub: Used to listen to the sound of the sub picture.
You can select this option when the "PIP" is set to "On".
Resetting the Sound Settings to the Factory Defaults
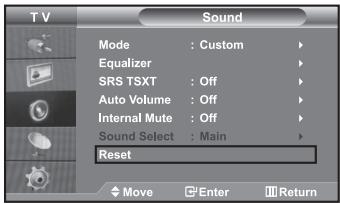
If Game Mode is On, the Reset Sound function is activated. Selecting the Reset function after setting the equalizer resets the equalizer setting to the factory defaults.
- Press the MENU button to display the menu. Press the ▲ or ▼ button to select "Sound", then press the ENTER button.
- Press the ▲ or ▼ button to select "Reset", then press the ENTER button.
- Press the EXIT button to exit.
You can select this option when the "Game Mode" is set to "On".
Connecting Headphones

You can connect a set of headphones to your set if you wish to watch a TV programme without disturbing the other people in the room.
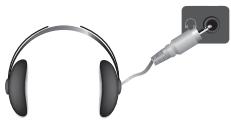
When you insert the head set jack into the corresponding port, you can operate only "Internal Mute" and "Sound Select" (in PIP mode) in Sound menu. (Refer to "Selecting the Internal Mute" on page 19) Prolonged use of headphones at a high volume may damage your hearing. You will not receive sound from the speakers when you connect headphones to the system.
Selecting the Sound Mode
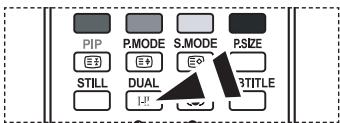
You can set the sound mode by pressing the "DUAL" button. When you press it, the current sound mode is displayed on the screen.
| Audio Type | DUAL 1/2 | Default | |
| FM Stereo | Mono | MONO | Automatic change |
| Stereo | STEREO ↔ MONO | ||
| Dual | DUAL 1 ↔ DUAL 2 | DUAL 1 | |
| NICAM Stereo | Mono | MONO | Automatic change |
| Stereo | MONO ↔ STEREO | ||
| Dual | MONO ↔ DUAL 1 ——DUAL 2 ← | DUAL 1 |

You can also set these options simply by pressing the DUAL button on remote control.
Setting and Displaying the Current Time
You can set the TV's clock so that the current time is displayed when you press the INFO button. You must also set the time if you wish to use the automatic On/Off timers.
-
Press the MENU button to display the menu. Press the ▲ or ▼ button to select "Setup", then press the ENTER button.
-
Press the ▲ or ▼ button to select "Time", then press the ENTER button.
-
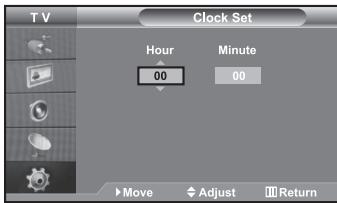
Press the ENTER button to select "Clock Set".
| To... | Press the... |
| Move to “Hour” or “Minute” | ◀ or ▶ button. |
| Set the “Hour” or “Minute” | ▲ or ▼ button. |
| Press the ENTER button. |
- Press the EXIT button to exit. ➢ If you disconnect the power cord, you have to set the clock again. ➢ You can also set hour and minute by pressing the number buttons on the remote control.
Setting the Sleep Timer
You can select a time period of between 30 and 180 minutes after which the television automatically switches to standby mode.
- Press the MENU button to display the menu.
Press the ▲ or ▼ button to select "Setup", then press the ENTER button. - Press the ▲ or ▼ button to select "Time", then press the ENTER button.
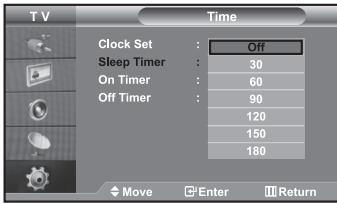
- Press the ▲ or ▼ button to select "Sleep Timer", then press the ENTER button.
- Press the ▲ or ▼ button repeatedly until the desired time appears (Off, 30, 60, 90, 120, 150, 180). Press the ENTER button.
- Press the EXIT button to exit.
The TV automatically switches to standby mode when the timer reaches 0.
Switching the Television On and Off Automatically
You can set the On/Off timers so that the set will:
◆ Switch on automatically and tune to the channel of your choice at the time you select.
◆ Switch off automatically at the time you select.
The first step is to set the television's clock.

- Press the MENU button to display the menu.
Press the ▲ or ▼ button to select "Setup", then press the ENTER button. - Press the ▲ or ▼ button to select "Time", then press the ENTER button.
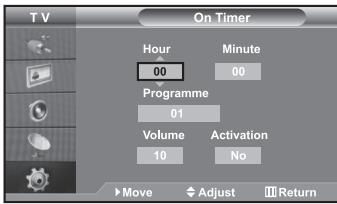
- Press the ▲ or ▼ button to select "On Timer", then press the ENTER button.
- Press the ▲ or ▼ button to adjust "Hour", then press the ▶ button to move to the next step. Set other items using the same method as above. When finished, press the ENTER button to return.
- Press the ▲ or ▼ button to select "Off Timer", then press the ENTER button.
- Press the ▲ or ▼ button to adjust "Hour", then press the ▶ button to move to the next step. Set other items using the same method as above. When finished, press the ENTER button to return.
- Press the EXIT button to exit.
You can also set hour and minute by pressing the number buttons on the remote control.
The "Activation" setting must be set to "Yes" in order for the timers to work.
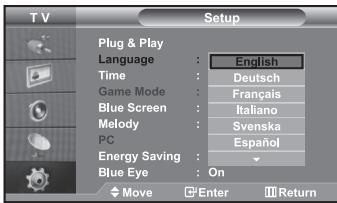
When you start using your set for the first time, you must select the language which will be used for displaying menus and indications.
- Press the MENU button to display the on-screen menu.
Press the ▲ or ▼ button to select "Setup", then press the ENTER button. - Press the ▲ or ▼ button to select "Language", then press the ENTER button.
-
Select a particular language by pressing the ▲ or ▼ button repeatedly. Press the ENTER button.
You can choose one of 7 languages. -
Press the EXIT button to exit.
Using Game Mode

When connecting to a game console such as PlayStation™ or Xbox™, you can enjoy a more realistic gaming experience by selecting game menu.
- Press the MENU button to display the menu.
Press the ▲ or ▼ button to select "Setup", then press the ENTER button. - Press the ▲ or ▼ button to select "Game Mode", then press the ENTER button.
-
Press the ▲ or ▼ button to select "On" or "Off".
Press the ENTER button. -
Press the EXIT button to exit.
To disconnect the game console and connect another external device, set Game to Off in the setup menu.
If you display the TV menu in Game mode, the screen shakes slightly.
Game Mode is not available in TV mode.
If Game Mode is On:
- Picture Mode and Sound Mode are automatically changed to Custom and users can not change the mode.
- Adjust the sound using the equalizer.
- The Reset Sound function is activated. Selecting the Reset function after setting the equalizer resets the equalizer setting to the factory defaults.
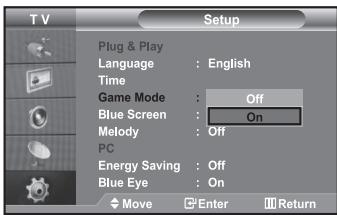
Setting the Blue Screen Mode / Selecting the Melody
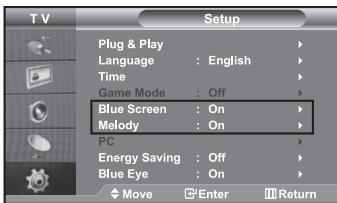
Blue Screen:
If no signal is being received or the signal is very weak, a blue screen automatically replaces the noisy picture background. If you wish to continue viewing the poor picture, you must set the "Blue Screen" mode to "Off".
Melody:
You can hear melody sound when the television is powered on or off.
- Press the MENU button to display the menu.
Press the ▲ or ▼ button to select "Setup", then press the ENTER button. - Press the ▲ or ▼ button to select "Blue Screen" or "Melody". Press the ENTER button.
- Press the ▲ or ▼ button to select "On" or "Off". Press the ENTER button.
- Press the EXIT button to exit.
Using the Energy Saving Feature
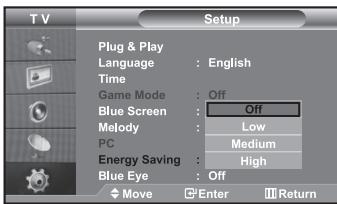
This function adjusts the brightness of the TV so as to reduce power consumption. When you watching TV at night, set the "Energy Saving" mode option to "High" so as to reduce the dazzling of your eyes as well as the power consumption.
- Press the MENU button to display the on-screen menu.
Press the ▲ or ▼ button to select "Setup", then press the ENTER button. - Press the ▲ or ▼ button to select "Energy Saving", then press the ENTER button.
- Select the required option (Off, Low, Medium, High) by pressing the ▲ or ▼ button. Press the ENTER button.
- Press the EXIT button to exit.
Setting the Blue Eye
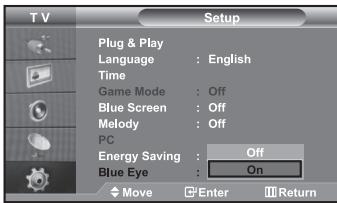
You can set the power of Blue LED to be on. If the power is off when Blue Eye TV is off, the Blue LED goes off. This will save power and reduce eye fatigue.
- Press the MENU button to display the on-screen menu.
Press the ▲ or ▼ button to select "Setup", then press the ENTER button. -
Press the ▲ or ▼ button to select "Blue Eye", then press the ENTER button.
-
Press the ▲ or ▼ button to select "On" or "Off". Press the ENTER button.
➢ Off: LED(Blue) will not come on. On: LED(Blue) will come on after you turn the TV off.
- Press the EXIT button to exit.
Selecting the Source
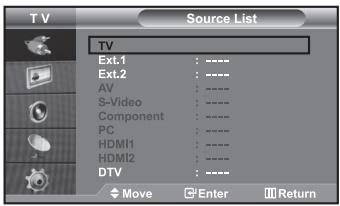

You can select among external sources connected to your TV's input jacks.
- Press the MENU button to display the menu. Press the ENTER button, to select "Input".
- Press the ENTER button again, to select "Source List".
When no external device is connected to your set, only "TV", "Ext.1", "Ext.2", "DTV" are activated in the "Source List". "AV", "S-Video", "Component", "PC", "HDMI1", "HDMI2", are activated only when they are connected to your set.
- Select the required device by pressing the ▲ or ▼ button. Press the ENTER button.
Press the SOURCE button on the remote control to toggle between all the available source. TV mode can be selected by pressing the TV/DTV button, number buttons(0\~9), and the P/√ button on the remote control. But it cannot be selected using the SOURCE button.
Editing the Input Source Names
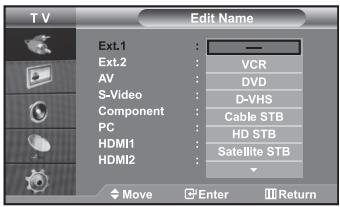
Name the device connected to the input jacks to make your input source selection easier.
- Press the MENU button to display the menu. Press the ENTER button, to select "Input".
- Press the ▲ or ▼ button to select "Edit Name", then press the ENTER button.
- Press the ▲ or ▼ button to select the device that you wish to edit. Press the ENTER button.
- Press the ▲ or ▼ button to select the required device. Press the ENTER button.
- Press the EXIT button to exit.
You can view stored photos (JPEG files) or play music files (MP3) using a memory card or USB storage media.
The "Photo" menu supports image files in the JPEG format only.
The "Music" menu supports sound files in the MP3 format only.
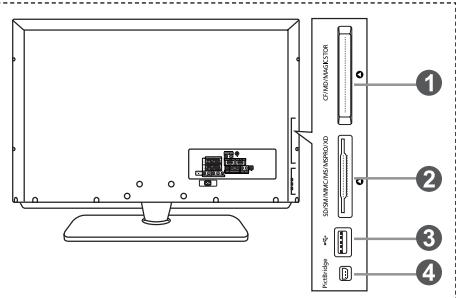
1 Compact Flash (CF) / Micro Driver (MD) / MAGICSTOR
2 Secure Digital Card (SD Card) / Smart Media Card (SM) / Multimedia Card (MMC) / Memory Stick / MSPRO / XD
3 USB Mass Storage Class
The USB hub type is not available because using the Half-Speed USB can cause the hardware limitation. (Only the Full-Speed USB is available.)
4 Photo Printer
- First, connect the memory card or USB storage media containing your files to the WISELINK terminal on the side of the TV.
Supported Memory Cards
 |  |  |  |  |
| Compact Flash (CF) | Micro Driver (MD) | MAGICSTOR | Secure Digital Card (SD Card) | Smart Media Card |
 | [xx56] | [xxw0] |  | |
| Multimedia Card (MMC) | Memory Stick | MSPRO | XD |
Some types of Memory Cards or USB hosts, depending on the manufacturer, may not be supported.
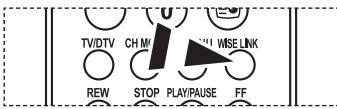
- Using the Remote Control Button in WISELINK Menu
| Button | Operations |
 | Move the cursor and select an item. |
 | Select the currently selected item. |
PLAY/PAUSE | Play or pause the Slide Show or MP3 file. |
 | Stop the current function and return to the previous high-level menu. |
INFO  | Run various functions from the Photo and Music menus. |
STOP | Stop the current slide show or MP3 file. |
 | Page Up or Down (file list item) |
MENU  | Return to the previous menu |
Using the WISELINK Menu
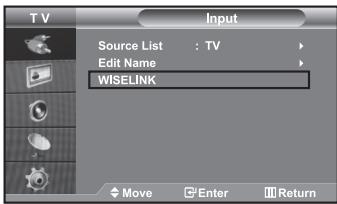

This menu shows JPEG and MP3 files and folders saved on a memory card.
- Press the MENU button to display the menu. Press the ENTER button, to select "Input".
- Press the ▲ or ▼ button to select "WISELINK", then press the ENTER button.
If the "Insert memory cards." message is displayed, check whether the memory card is correctly inserted into the WISELINK terminal on the side of the TV.
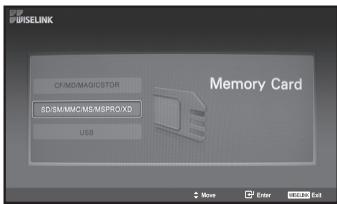
- Press the ▲ or ▼ button to select the corresponding Memory Card, then press the ENTER button.
A menu for selecting the format of the files saved on the selected Memory Card will be displayed.
- Press the ◀ or ▶ button to move to an item, then press the ENTER button.
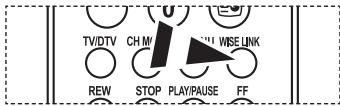
- To exit WISELINK, press the WISELINK button on the remote control.
You can select these options by simply pressing the WISELINK button on the remote control.
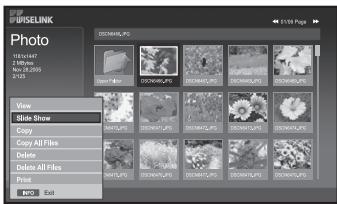
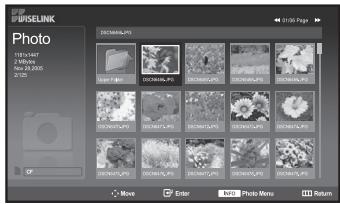
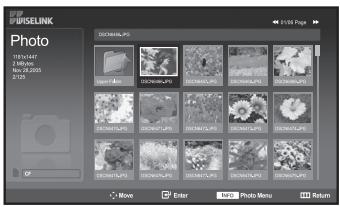
Using the PHOTO (JPEG) List

folder icon

photo icon

Move to the previous folder stage icon
This menu shows JPEG files and folders saved on a memory card.
- Complete Steps 1 to 4 of "Using the WISELINK Menu".
- Press the ◀ or ▶ button to select "Photo", then press the ENTER button.
The saved file information is displayed as a folder or file.
- Press the ▲,▼,◀ and ▶ buttons to select a file, then press the ENTER button.
➢ Pressing the button over a photo icon shows the currently selected photo in full screen.
➢ Pressing the button over a folder icon shows the JPEG files included in the folder.
The Menu is displayed. Select the View option to display a photo in the aspect ratio.
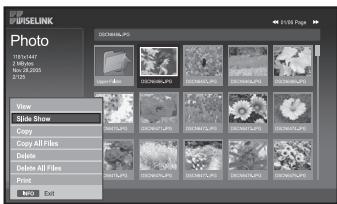
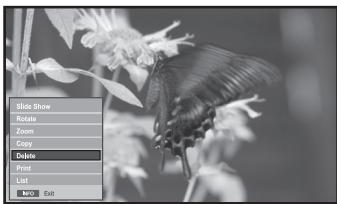
- Press the INFO button to configure the options.
When the Photo List screen is displayed:
"View", "Slide Show", "Copy", "Copy All files", "Delete", "Delete All Files", "Print"
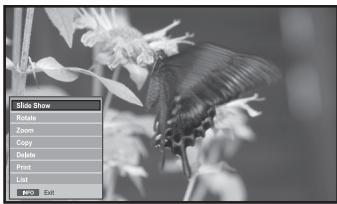
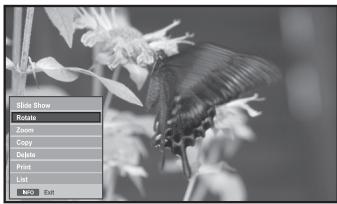
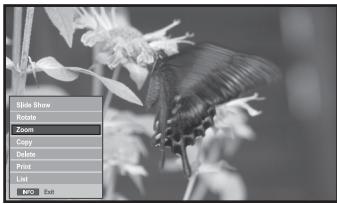
When a full screen is displayed:
"Slide Show", "Rotate", "Zoom", "Copy", "Delete", "Print", "List"
- To exit WISELINK, press the WISELINK button on the remote control.
- Moving to another photo may take a few seconds to load the file.
At this point, the 📁 icon will appear at the top left of the screen.
- This menu only shows files whose file extension is JPEG.
Files of other formats such as bmp or tiff will not be displayed.
- The files are displayed on a page. 15 thumbnail photos are displayed per page.
- The thumbnails are numbered from left to right and from top to bottom, from 1 to 15.
- Folders are displayed first and they are followed by all JPEG files in the current folder.
The folders and JPEG files are sorted in alphabetical order.
You can select these options by simply pressing the WISELINK button on the remote control.

natural_image
Black-and-white photo of a butterfly perched on a flowering plant (no text or symbols visible)"Slide Show":
Starts a slide show.
(Refer to "Selecting a Photo and Slide Show" on page 28)

natural_image
Black-and-white photo of a butterfly perched on a branch with flowers (no text or symbols visible)"Rotate":
You can rotate images in full screen mode.
Images are rotated in the order of 90^ , 180^ , 270^ and 0^ (original state).
(Refer to "Rotating" on page 29)
You cannot save a rotated image.
natural_image
Black-and-white close-up of a butterfly perched on a flower (no text or symbols visible)"Zoom":
You can zoom into images in full screen mode.
Images are zoomed in on in the order of X2, X3, X4 and X1 (original size).
(Refer to "Zooming-in" on page 30)
You cannot save a zoomed-in on image.
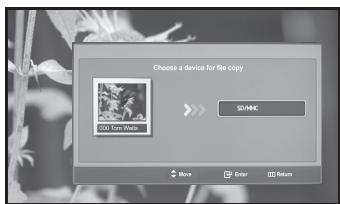
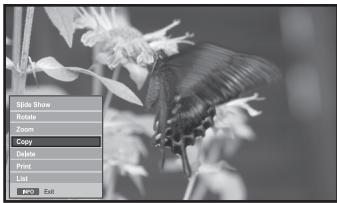
"Copy", "Copy All files":
You can copy image files to a different memory card.
(Refer to "Copying Image Files" on page 31)
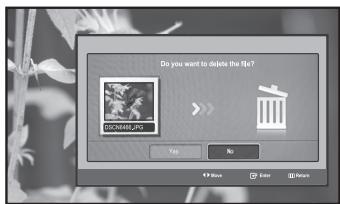
"Delete", " Delete All Files":
You can delete selected image files.
(Refer to "Deleting Image Files" on page 31)
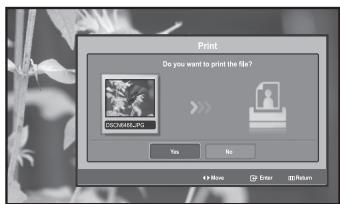
"Print":
You can print image files directly with your printer.
(Refer to "Printing a Photo" on page 32)
"List":
Displays the stored files and folders and file info.
The "File Error" message appears on the screen in the following situations:
- When the file actually has an error
• If the target memory cannot be written to when copying files
• If the target memory has not enough space when copying files
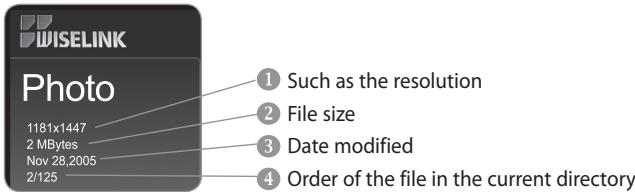
Viewing Photo File Information
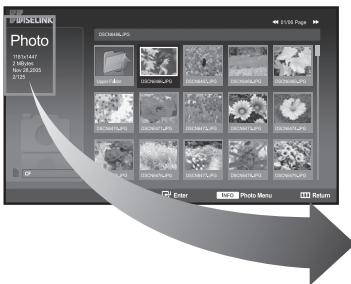
When selecting a photo file, the photo file information is displayed on the left in the TV screen, such as the resolution, the date modified and the order of the file in the current directory.
Selecting a Photo and Slide Show
This menu shows JPEG files and folders saved on a memory card.
- Complete Steps 1 to 4 of "Using the WISELINK Menu". (Refer to page 26)
-
Press the ◀ or ▶ button to select "Photo", then press the ENTER button. ▶ The saved file information is displayed as a folder or file.
-
Press the INFO button.
-
Press the ▲ or ▼ button to select "Slide Show", then press the ENTER button.
The Menu is displayed. Select the View option to display a photo in the aspect ratio. - Slide Show all files in the selected folder at a predetermined interval.
- During the Slide Show, files are displayed in order from the currently shown file.
-
Press the INFO button during "Slide Show" to set the option ("Speed", "Background Music, "Background Music Setting", "List"). Press the ▲ or ▼ button to select the option, then press the ENTER button.
-
To change the sub option, press the INFO button again to open the options window and select option you want to change, then press the ENTER button. Whenever you do this, the sub option on the screen is changed.
-
To exit WISELINK, press the WISELINK button on the remote control.
If the Slide Show feature is selected when a photo is displayed in full screen, other photos are also in the full screen size during the Slide Show.

You can select these options by simply pressing the WISELINK button on the remote control.
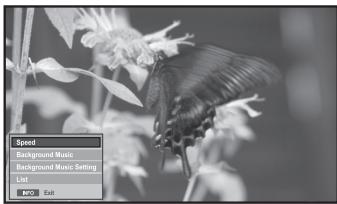
Using the Menu during a Slide Show

natural_image
Black-and-white close-up of a butterfly perched on a flower (no text or symbols visible)"Speed":
Select to control the slide show speed.
Press the ENTER button to select the option "Normal", "Slow", or "Fast".
When the Speed feature is set to the Fast option, usually it takes about 7 seconds to slide to the next photo. The loading time may be longer depends on the size of the file.
natural_image
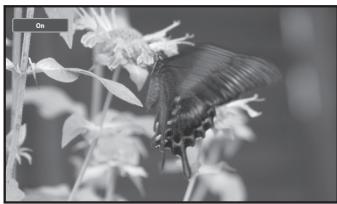
Black and white photo of a butterfly perched on flower petals (no text or symbols visible)"Background Music":
Select to determine whether to play an MP3 file during a slide show.
Press the ENTER button to select the option "On" or "Off".
Set the Background Music Settings first to use the "On" or "Off" function in this menu.
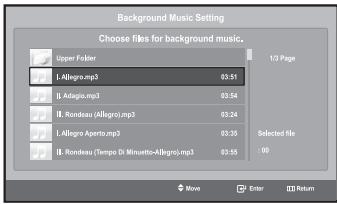
"Background Music Setting":
The saved file information is displayed as folder or MP3 file.
- Select the "Background Music Settings" and press the ENTER button.
Navigate to the folder that contains the MP3 files to use as the background music. Select an MP3 file and press ENTER button.
The selected file is displayed in yellow.
- MENU button again to return to the Slide Show screen.
The selected background music is played.
- If you turn Off the Background Music, even if the Background Music Settings have been set up, the background music will not be played.
- MP3 files can be automatically played during the Slide Show if the Default Background Music is set to On. To enable this function, MP3 files and other photo files must be located in the same folder.
"List":
Displays the stored files and folders and file info.
Rotating
Displays a 90^ , 180^ , or 270^ rotated image in full screen mode.
-
Complete Steps 1 to 4 of "Using the WISELINK Menu". (Refer to page 26)
-
Press the ◀ or ▶ button to select "Photo", then press the ENTER button.
The saved file information is displayed as a folder or file.
- Press the ▲,▼,◀ and ▶ buttons to select a file, then press the ENTER button.
➢ Pressing the button over a photo thumbnail displays the photo in full screen.
The Menu is displayed. Select the View option to display a photo in the aspect ratio.
- Press the INFO button to display the option
("Slide Show", "Rotate", "Zoom", "Copy", "Delete", "Print", "List").
Press the ▲ or ▼ button to select "Rotate", then press the ENTER button.
Press the ENTER button to select the option (90°, 180°, 270°, 0°(Original))
To rotate a photo, press the INFO button to open the options window, select the "Rotate" option and press the ENTER button.
Whenever you do this, the photo on the screen is gradually rotated.
- To exit WISELINK, press the WISELINK button on the remote control.
The rotated file is not saved.
This feature is also available for the photo in the aspect ratio.
The Rotating function information
| Current OSD | Function | |
| To rotate a photo by 90 degrees | ||
| To rotate a photo by 180 degrees | ||
| To rotate a photo by 270 degrees | ||
| To rotate a photo by original | ||

You can select these options by simply pressing the WISELINK button on the remote control.

natural_image
Black-and-white photo of a butterfly perched on flower petals (no text or symbols visible)

You can select these options by simply pressing the WISELINK button on the remote control.
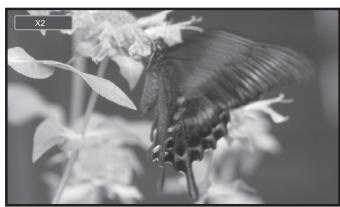
Displays a 2x, 3x or 4x zoomed-in image in full screen mode.
-
Complete Steps 1 to 4 of "Using the WISELINK Menu". (Refer to page 26)
-
Press the ◀ or ▶ button to select "Photo", then press the ENTER button.
The saved file information is displayed as a folder or file.
- Press the ▲,▼,◀ and ▶ buttons to select a file, then press the ENTER button.
➢ Pressing the button over a photo thumbnail displays the photo in full screen.
The Menu is displayed. Select the View option to display a photo in the aspect ratio.
- Press the INFO button to display the option
("Slide Show", "Rotate", "Zoom", "Copy", "Delete", "Print", "List").
Press the ▲ or ▼ button to select "Zoom", then press the ENTER button.
Press the ENTER button to select the option ("X2", "X3", "X4", "X1").
To zoom into a photo, press the INFO button to open the Options window, select the "Zoom" option and press the ENTER button.
Whenever you do this, the following zoom options are applied in sequence.
• X2: Zoom-in to the photo X2.
• X3: Zoom-in to the photo X3.
• X4: Zoom-in to the photo X4.
• X1: Restore the photo to its original size.
To move to pan up/down/left/right, press the ▲,▼,◀ and ▶ buttons.
- To exit WISELINK, press the WISELINK button on the remote control.
Zoom function information
| Current OSD | Function | |
 | Zoom-in to a photo X2. | |
| X3 | Zoom-in to a photo X3. | |
 | Zoom-in to a photo X4. | |
 | Restore a photo to its original size. | |
| Button | Function | |
 | Pan Down | Pan down to view the lower part of a zoomed-in photo. |
 | Pan Up | Pan up to view the upper part of a zoomed-in photo. |
 | Pan Right | Pan right to view the right side of a zoomed-in photo. |
 | Pan Left | Pan left to view the left side of a zoomed-in photo. |
This feature is also available for the photo in the aspect ratio.

You can select these options by simply pressing the WISELINK button on the remote control.
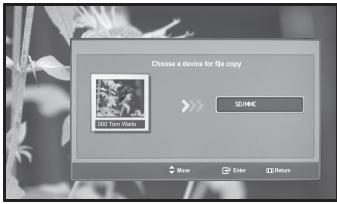
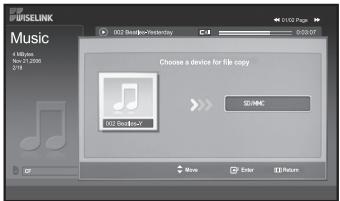
You can copy image files to a different memory card.
-
Complete Steps 1 to 4 of "Using the WISELINK Menu". (Refer to page 26)
-
Press the ◀ or ▶ button to select "Photo", then press the ENTER button.
The saved file information is displayed as a folder or file.
- Press the ▲,▼,◀ and ▶ buttons to select a file, then press the ENTER button.
➢ Pressing the button over a photo thumbnail displays the photo in full screen.
The Menu is displayed. Select the View option to display a photo in the aspect ratio.
- Press the INFO button to display the option
("Slide Show", "Rotate", "Zoom", "Copy", "Delete", "Print", "List").
Press the ▲ or ▼ button to select "Copy", then press the ENTER button.
To copy all photos, select the INFO button in the Photo List screen and then select the "Copy All Files" menu.
If there is no target memory card inserted, the "There is no device connected." message is displayed and no operation follows.
- To exit WISELINK, press the WISELINK button on the remote control.
Deleting Image Files

You can select these options by simply pressing the WISELINK button on the remote control.
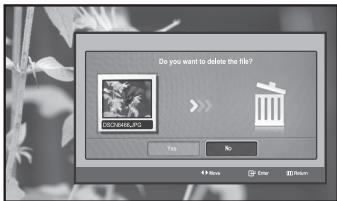
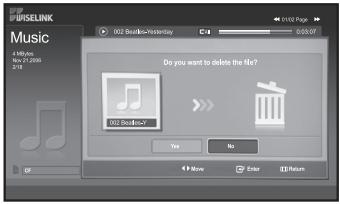
You can delete selected image files.
- Complete Steps 1 to 4 of "Using the WISELINK Menu". (Refer to page 26)
- Press the ◀ or ▶ button to select "Photo", then press the ENTER button.
The saved file information is displayed as a folder or file.
- Press the ▲,▼,◀ and ▶ buttons to select a file, then press the ENTER button.
➢ Pressing the button over a photo thumbnail displays the photo in full screen.
The Menu is displayed. Select the View option to display a photo in the aspect ratio.
- Press the INFO button to display the option
("Slide Show", "Rotate", "Zoom", "Copy", "Delete", "Print", "List").
Press the ▲ or ▼ button to select "Delete", then press the ENTER button.
To delete all photos, select the INFO button in the Photo List screen and then select the "Delete All Files" menu.
When selecting the "Delete" or "Delete All Files" menu, an OSD screen is displayed to confirm the deletion. To cancel the deletion, select "No."
- To exit WISELINK, press the WISELINK button on the remote control.

You can select these options by simply pressing the WISELINK button on the remote control.
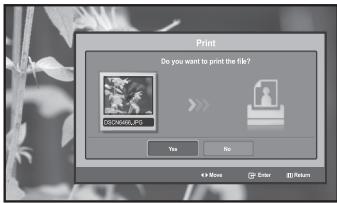
You can print image files directly with your printer.
-
Complete Steps 1 to 4 of "Using the WISELINK Menu". (Refer to page 26)
-
Press the ◀ or ▶ button to select "Photo", then press the ENTER button.
The saved file information is displayed as a folder or file.
- Press the ▲,▼,◀ and ▶ buttons to select a file, then press the ENTER button.
➢ Pressing the button over a photo thumbnail displays the photo in full screen.
The Menu is displayed. Select the View option to display a photo in the aspect ratio.
- Press the INFO button to display the option
("Slide Show", "Rotate", "Zoom", "Copy", "Delete", "Print", "List").
Press the ▲ or ▼ button to select "Print", then press the ENTER button.
If no printer is connected, the "Check the printer" message is displayed and no operation follows.
- To exit WISELINK, press the WISELINK button on the remote control.
Connect to the photo printer with the PictBridge feature to print pictures.
Using the MP3 List


folder icon

musical note icon

Move to the previous folder stage icon
You can select these options by simply pressing the WISELINK button on the remote control.
This menu shows MP3 files from among the files saved on the memory card.
-
Complete Steps 1 to 4 of "Using the WISELINK Menu". (Refer to page 26)
-
Press the ◀ or ▶ button to select "Music", then press the ENTER button.
The saved file information is displayed as a folder or file.
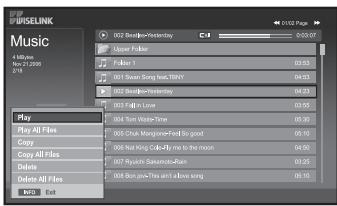
- Press the ▲ or ▼ button to select a file, then press the ENTER button.
To select all files or a file, press the INFO button to display the Music menus.
("Play", "Play All Files", "Copy", "Copy All Files", "Delete", "Delete All Files")
Press the ENTER button to select "Play All Files" or "Play".
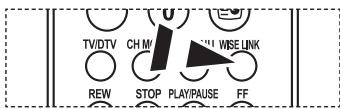
- Pressing the ENTER button over a musical note icon immediately plays the music file.
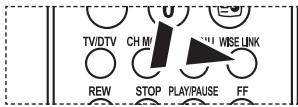
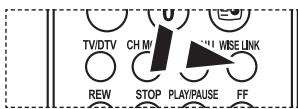
- Pressing the ENTER button over a folder icon shows the music files included in the folder. To select a file on the next page, press the REW ⚙ or FF ⚙ button to move to the next page.
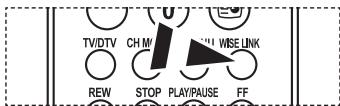
- Press the PLAY/PAUSE 🎨 button while playing an MP3 file to pause the file.
Press the STOP ☐ button to exit Play mode.
- To exit WISELINK, press the WISELINK button on the remote control.
- This menu only shows files with the MP3 file extension. Files with other file extensions are not displayed, even if they are saved on the same memory card.
- The selected file is displayed on the top with its playing time.
- To adjust the music volume, press the ⭕ or ⬄ button on the remote control.
To mute the sound, press the MUTE 🎧 button on the remote control.
Music function information
| Current OSD | Function | |
 | (Music) Play/Pause | When pressing the PLAY/PAUSE Ⓧ button on the remote control while music is playing. |
 | (Music) Stop | When pressing the STOP Ⓧ button on the remote control when music is stopped. |
Copying Music Files
You can copy music files to a different memory card.
- Complete Steps 1 to 4 of "Using the WISELINK Menu". (Refer to page 26)
- Press the ◀ or ▶ button to select "Music", then press the ENTER button.
The saved file information is displayed as a folder or file.
- Press the ▲ or ▼ button to select a file, then press the ENTER button.
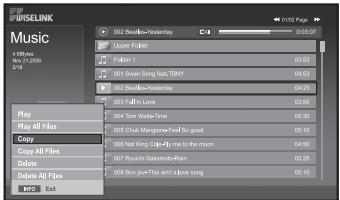
To select all files or a file, press the INFO button to display the Music menus.
("Play", "Play All Files", "Copy", "Copy All Files", "Delete", "Delete All Files")
Press the ENTER button to select "Copy" or "Copy All Files".
If no target memory card is inserted, the "There is no device connected." message is displayed and no operation follows.
- To exit WISELINK, press the WISELINK button on the remote control.
You can select these options by simply pressing the WISELINK button on the remote control.
Deleting Music Files


You can delete selected music files.
- Complete Steps 1 to 4 of "Using the WISELINK Menu". (Refer to page 26)
- Press the ◀ or ▶ button to select "Music", then press the ENTER button.
The saved file information is displayed as a folder or file.
- Press the ▲ or ▼ button to select a file, then press the ENTER button.
To select all files or a file, press the INFO button to display the Music menus. ("Play", "Play All Files", "Copy", "Copy All Files", "Delete", "Delete All Files")
Press the ENTER button to select "Delete" or "Delete All Files".
When selecting the "Delete" or "Delete All Files" menu, an OSD screen is displayed to confirm the deletion. To cancel the deletion, select "No."
- To exit WISELINK, press the WISELINK button on the remote control.
You can select these options by simply pressing the WISELINK button on the remote control.
Using the Setup Menu
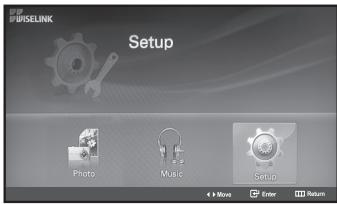
Setup displays the user settings of the WISELINK menu.
- Complete Steps 1 to 4 of "Using the WISELINK Menu". (Refer to page 26)
- Press the ◀ or ▶ button to select "Setup", then press the ENTER button.
The saved file information is displayed as a folder or file. - Press the ▲ or ▼ button to select an item you want, then press the ENTER button.
- Press the ▲ or ▼ button to select the option, then press the ENTER button.
- To exit WISELINK, press the WISELINK button on the remote control.
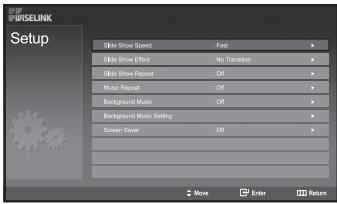
"Slide Show Speed":
Select to control the slide show speed.
"Slide Show Effect":
You can select effects to use with the slide show.
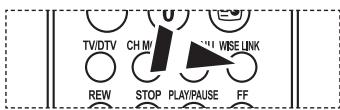
"Slide Show Repeat":
- On: Repeats the slide show from the beginning when all the files in the folder have been displayed.
- Off: Exit a slide show.
To return to the Photo menu when all the files in the folder have been displayed.
"Music Repeat":
Select to determine whether to repeat playing the music when all MP3 files in the current folder have been played.
"Background Music":
Select to determine whether to play an MP3 file during a slide show.
"Background Music Setting":
You can select the background music to play during a slide show.
You can also select the background music while a slide show is in process by pressing the INFO button and selecting the "Background Music Setting" menu.
"Screen Saver":
Select to set the waiting time before the screen saver is run when no button is pressed.

You can select these options by simply pressing the WISELINK button on the remote control.
Previewing the DTV Menu System

To help you navigate around the on-screen menu system and adjust the various settings available, refer to the following illustration.
Available in the Digital TV mode.
Press the D.MENU button.
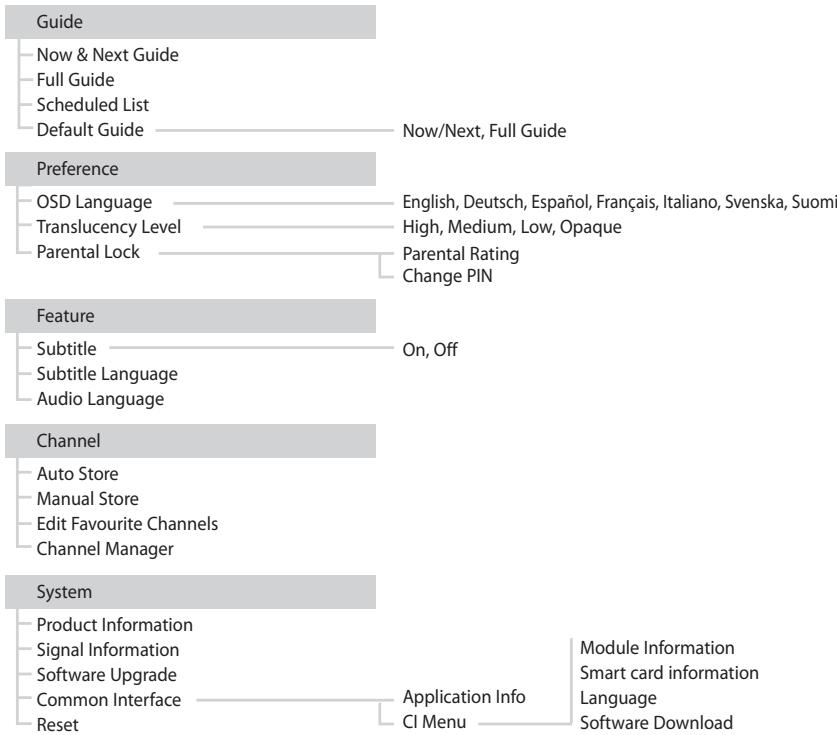
flowchart
graph TD
    A["Guide"] --> B["Now & Next Guide"]
    A --> C["Full Guide"]
    A --> D["Scheduled List"]
    A --> E["Default Guide"]
    E --> F["Now/Next, Full Guide"]
    G["Preference"] --> H["OSD Language"]
    G --> I["Translucency Level"]
    G --> J["Parental Lock"]
    G --> K["Feature"]
    K --> L["Subtitle"]
    K --> M["Subtitle Language"]
    K --> N["Audio Language"]
    K --> O["Channel"]
    O --> P["Auto Store"]
    O --> Q["Manual Store"]
    O --> R["Edit Favourite Channels"]
    O --> S["Channel Manager"]
    T["System"] --> U["Product Information"]
    T --> V["Signal Information"]
    T --> W["Software Upgrade"]
    T --> X["Common Interface"]
    T --> Y["Reset"]
    T --> Z["Application Info"]
    T --> AA["CI Menu"]
    T --> AB["Module Information"]
    T --> AC["Smart card information"]
    T --> AD["Language"]
    T --> AE["Software Download"]
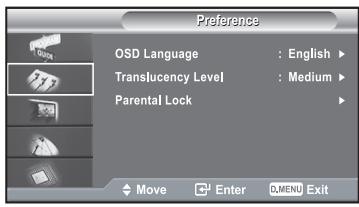
The sub-items of the CI Menu may vary depending on the CAM model.
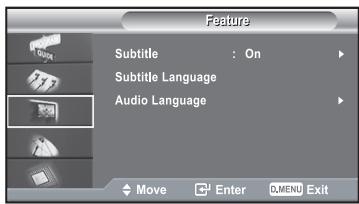
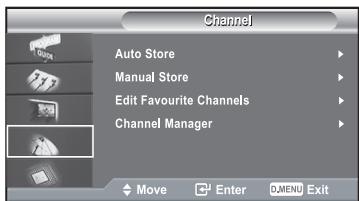
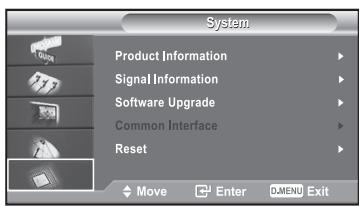


You can select these options by simply pressing the D.MENU button on the remote control.
Updating the Channel List Automatically
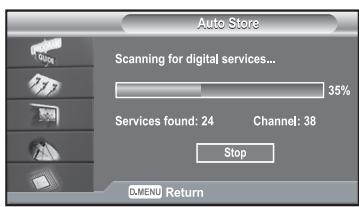
You can update the channel list when the broadcaster adds new Services or if you move the TV to a new location.
- Press the D.MENU button to display the DTV menu.
- Press the ▲ or ▼ button to select "Channel", then press the ENTER button.
- Press the ENTER button again, to select "Auto Store".
-
When it has finished, the number of scanned services will be displayed.
The existing favourite channel list will not be deleted when the channel list is updated.
To stop the scan before it has finished, press the ENTER button with "STOP" selected. -
Press the EXIT button to exit.
If the signal status is poor, the "No Service found! Check the aerial connection" message is displayed.
Updating the Channel List Manually
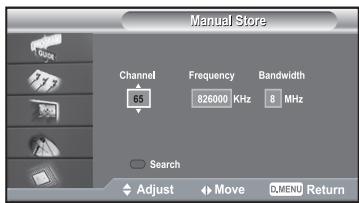
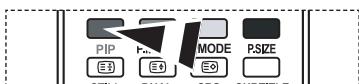
You can specify the channel or frequency for a fast channel search.
-
Press the D.MENU button to display the DTV menu.
-
Press the ▲ or ▼ button to select "Channel", then press the ENTER button.
-
Press the ▲ or ▼ button to select "Manual Store", then press the ENTER button.
4.
| To... | Then... |
| Move to "Channel", "Frequency", or "Bandwidth" | ◀ or ▶ button |
| Set the "Channel", or "Bandwidth" | ▲ or ▼ button |
| Set the "Frequency" | Numeric button (0~9) |
- Channel: Channel "21" to "68" in sequence are displayed in UK.
• Frequency: The frequency available in the Channel group is displayed.
• Bandwidth: The available bandwidths are 7 and 8 MHz.
- Press the red button to start the scan for digital services.
When it has finished, channels are updated in the channel list.
- Press the EXIT button to exit.
You can input by pressing the button on the remote control.
You can not change only Frequency and when changing a channel, the Frequency will be automatically changed.
Editing Your Favourite Channels
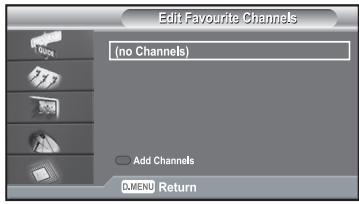
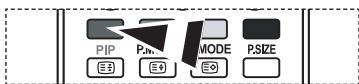
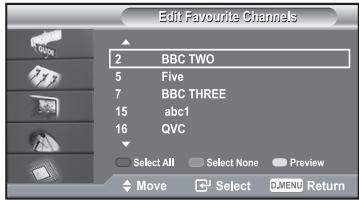
You can edit your favourite channels using the four colour buttons.
- Press the D.MENU button to display the DTV menu.
- Press the ▲ or ▼ button to select "Channel", then press the ENTER button.
- Press the ▲ or ▼ button to select "Edit Favourite Channels", then press the ENTER button.
- Press the red button to display all currently stored channels.
- Press the ▲ or ▼ button to select a channel you want. Press the ENTER button.
A "★" icon is shown next to the selected channel and the channel will be added to the favourite channel list.
• To undo, press the ENTER button again.
- Select All: Select all channels currently displayed.
- Select None: Deselect all selected channels.
- Preview: Displays (a) currently selected channel(s).
The Favorite Channels settings have been completed.
- Press the EXIT button to exit.
Add
You can use this function when one or more favourite channels have been selected.
- Press the D.MENU button to display the DTV menu.
- Press the ▲ or ▼ button to select "Channel", then press the ENTER button.
- Press the ▲ or ▼ button to select "Edit Favourite Channels", then press the ENTER button.
- Press the red button in the "Edit Favourite Channels" menu. To add more channels, refer to the step 5 on the previous description.
- If you want to check the channel to be stored, press D.MENU button. Press the EXIT button to exit.
• To add all channels to the favourite channel list, press the red button.
- To remove all channels, press the green button.
- Preview : Displays (a) currently selected channel(s).
- Press the CH MGR button to display the favourite channel manager.
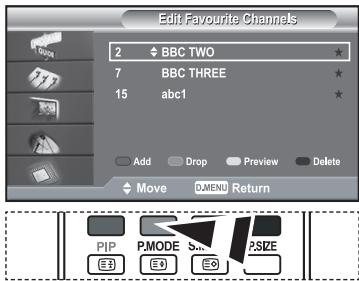
Move
- Press the D.MENU button to display the DTV menu.
- Press the ▲ or ▼ button to select "Channel", then press the ENTER button.
- Press the ▲ or ▼ button to select "Edit Favourite Channels", then press the ENTER button.
- Select the required channel using the ▲ or ▼ button.
- Press the green button.
A "◆" icon is displayed on the left side of the channel name.
-
Press the ▲ or ▼ button to select the channel that you want to move, and press the green or ENTER button.
-
Press the EXIT button to exit.
Preview
- In the "Edit Favourite Channels" menu, select the channel to be previewed by pressing the ▲ or ▼ button.
- Press the yellow button. ➢ The selected channel is displayed on the screen.
Delete
- In the "Edit Favourite Channels" menu, select the channel to be deleted from the favourite channels list by pressing the ▲ or ▼ button.
- Press the blue button.
The selected channel and number will be deleted.
To add a deleted channel back in to the favourite channel list, see "Add" on page 36.
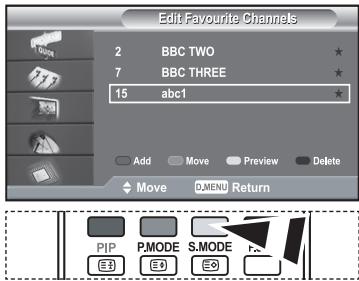
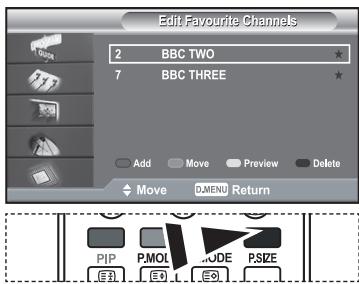
Selecting Channel Manager
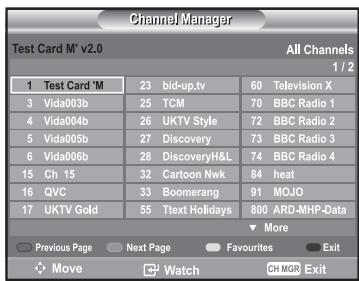

You can select these options by simply pressing the CH MGR button on the remote control.
You can exclude the channels you have chosen from the channels you have scanned. When you scan through the stored channels, those you have chosen to skip are not displayed. All channels that you do not specifically choose to skip are displayed during scanning.
- Press the D.MENU button to display the DTV menu.
- Press the ▲ or ▼ button to select "Channel", then press the ENTER button.
- Press the ▲ or ▼ button to select "Channel Manager". Press the ENTER button.
- Press the yellow button to toggle between your favourite channels and all channels. ➢ Your favourite channels are only displayed if they were previously set in the "Editing Your Favourite Channels" menu (refer to page 36\~37).
- Press the red or green button to display the previous or next channel manager page.
- Press the ▲ or ▼ button to select a channel to be tuned. Press the ENTER button.
The channel number, name and an icon are displayed in the top left corner while changing the channel. The channel number and name are displayed if the channel is one of the all channels, and a icon if the channel is one of the favourite channels.
- Press the blue or CH MGR button to exit from the channel manager.
Displaying Programme Information
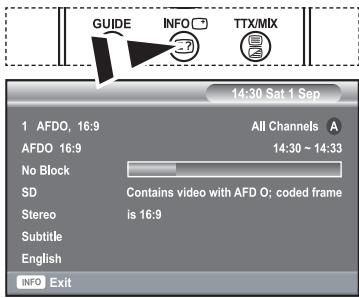
While viewing a channel, additional information about the current programme may be displayed.
- While viewing a programme, press the INFO button.
The programme information is displayed.
- To exit from banner information, press the INFO button.
Viewing the EPG (Electronic Programme Guide) Information
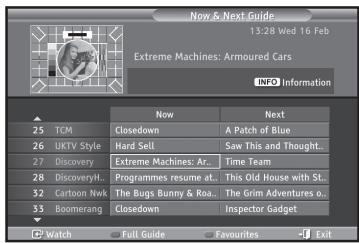
The EPG (Electronic Programme Guide) information is provided by the broadcasters. Programme entries may appear blank or out of date as a result of the information broadcast on a given channel. The display will dynamically update as soon as new information becomes available.
Now & Next Guide
For the six channels indicated in the left-hand column, displays the Current programme and the Next programme information.
Full Guide
Displays the programme information as time ordered One hour segments. Two hours of programme information is displayed which may be scrolled forwards or backwards in time.
-
Press the D.MENU button to display the DTV menu.
-
Press the ENTER button, to select "Guide".
-
Press the ▲ or ▼ button to select "Now & Next Guide" or "Full Guide". Press the ENTER button.
You can also display the guide menu simply by pressing the GUIDE button.
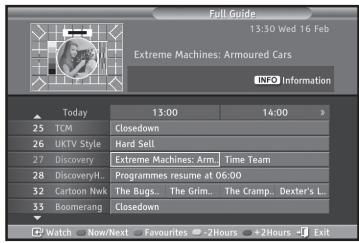
4.
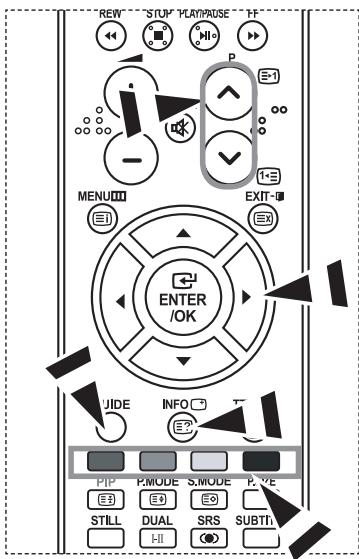
| To... | Then... |
| Watch a programme in the EPG list | Select a programme by pressing the ▲, ▼, ◀, ▶ button.Press the ENTER button. |
| If the next program is selected, it is scheduled with the clock icon displayed.If the ENTER button is pressed again, the scheduling is canceled with the clock icon gone. For details about scheduling programmes, refer to the next page. | |
| View programme information | Select a programme of your choice by pressing the ▲, ▼, ◀, ▶ button.Press the INFO button when the programme of your choice is highlighted. |
| Toggle between the "Now & Next Guide" or "Full Guide" | Press the red button repeatedly. |
| Display the "Favourites" and the "All Channels" list | Press the green button repeatedly. |
| Scrolls backwards quickly (2 hours). | Press the yellow button repeatedly. |
| Scrolls forward quickly (2 hours). | Press the blue button repeatedly. |
| Exit the guide | Press the EXIT button. |
The programme title is on the upper part of the screen center.
Please click on INFO button for the detailed information. Channel Number, Running Time, Status Bar, Parental Level, Video Quality Information(HD/SD), Sound Modes, Subtitle or Teletext, Languages of Subtitle or Teletext, and brief summary of the highlighted programme are included on the detailed information. "..." will be appeared if the summary is long.
➢ Six channels are displayed.
To scroll between channels, move to a channel using the ▲ or ▼ button. To display page by page, use the P ⚙ or ⏱ button.
Using the Scheduled List
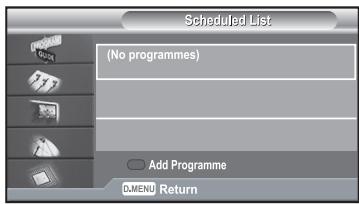
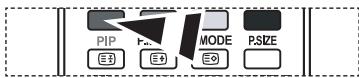
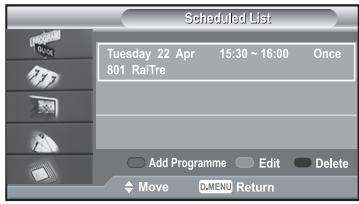
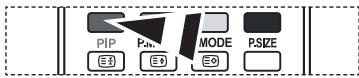
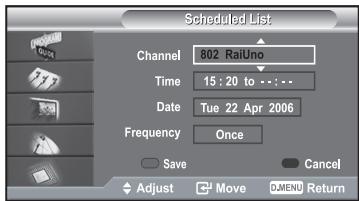
If you make a scheduled viewing list of programs you may like to see, the channel will be automatically switched to the scheduled program at the scheduled time even if you are watching another program.
- Press the D.MENU button to display the DTV menu.
- Press the ENTER button, to select "Guide".
- Press the ▲ or ▼ button to select "Scheduled List", then press the ENTER button.
- Press the red button.
The channel will be switched to the scheduled program.
- Press the ENTER button to select an item and adjust with the ◀ or ▶ button.
You can also set hour and minute by pressing the number buttons on the remote control.
- Channel: Set the channel.
• Time: Set the time.
• Date: Set Year, Month and Day. -
Frequency: Set the frequency. ("Once", "Daily", or "Weekly")
-
After setting the schedule, Press the red button.
-
Press the EXIT button to exit.
The Scheduled list may be displayed in the EPG menu.
• Save: Save the adjusted schedule.
- Cancle: Cancel the adjusted schedule.
- Add Programme: Add a new schedule.
- Edit: Re-adjust the selected schedule.
- Delete: Delete the selected schedule.
Setting the Default Guide
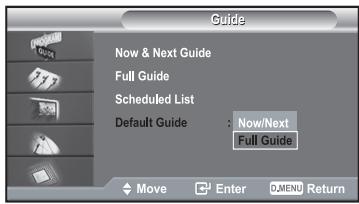
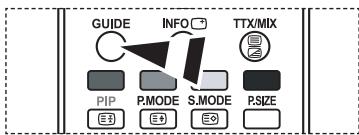
flowchart
graph TD
    A["GUIDE"] --> B["INFO"]
    B --> C["TTX/MIX"]
    D["PIP"] --> E["P.MODE"]
    E --> F["S.MODE"]
    F --> G["P.SIZE"]
You can select these options by simply pressing the GUIDE button on the remote control.
You can preset the default guide style.
- Press the D.MENU button to display the DTV menu.
- Press the ENTER button, to select "Guide".
- Press the ▲ or ▼ button to select "Default Guide", then press the ENTER button.
- Select "Now/Next" or "Full Guide" using the ▲ or ▼ button, and press the ENTER button.
- Press the EXIT button to exit.

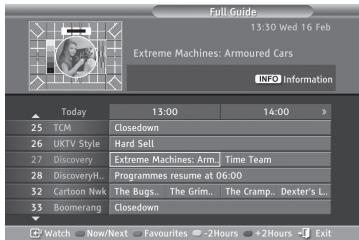
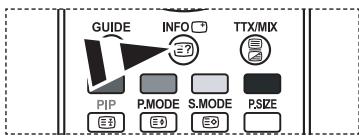
flowchart
graph TD
    A["GUIDE"] --> B["INFO"]
    B --> C["TTX/MIX"]
    D["PIP"] --> E["P.MODE"]
    D --> F["S.MODE"]
    D --> G["P.SIZE"]
    E --> H["E3"]
    F --> I["E9"]
    G --> J["E9"]
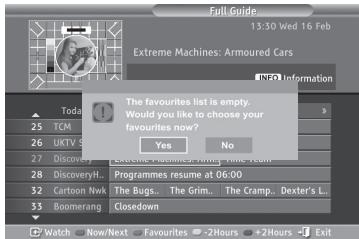
In the EPG menu, you can display all channels or favourite channels.
- Press the D.MENU button to display the DTV menu.
- Press the ENTER button again, to select "Guide".
- Select the your required guide ("Now & Next Guide" or "Full Guide") by pressing the ▲ or ▼ button.
- Press the ENTER button.
- Press the green button. All the channel lists and the favorite channel lists will be toggled.
- Select a programme of your choice by pressing the ▲, ▼, ◀, or ▶ button.
- Press the INFO button to display information about the highlighted programme.
- When the Edit Favourite Channels list has not been set up:
- "The favourites list is empty. Would you like to choose your favourites now?" message is displayed.
- Select "Yes".
The "Edit Favourite Channels" menu is displayed. If you select "No", all channels will remain unchanged.
• To edit the favourite channels, refer to page 36 for more details.
- Press the EXIT button to exit.
"All Channels" is the list of channels that have been scanned by the channel list update. All channels are displayed in the all channel mode.
"Favourites" (favourite channels) is the list of channels that has been set in the "Edit Favourite Channels" menu (refer to page 36).
Choosing Your Language
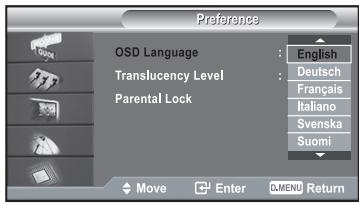
When you start using your set for the first time, you must select the language which will be used for displaying menus and indications.
- Press the D.MENU button to display the DTV menu.
- Press the ▲ or ▼ button to select "Preference", then press the ENTER button.
- Press the ▲ or ▼ button to select "OSD Language", then press the ENTER button.
- Select a particular language by pressing the ▲ or ▼ button repeatedly. Press the ENTER button.
You can choose one of 7 languages.
- Press the EXIT button to exit.

You can set the translucency of the menu.
- Press the D.MENU button to display the DTV menu.
- Press the ▲ or ▼ button to select "Preference", then press the ENTER button.
- Press the ▲ or ▼ button to select "Translucency Level", then press the ENTER button.
- Select the required option ("High", "Medium", "Low", or "Opaque") by pressing the ▲ or ▼ button, and press the ENTER button to change the setting.
- Press the EXIT button to exit.
Setting up the Parental Lock
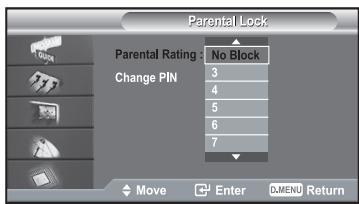
This feature allows you to prevent unauthorized users, such as children, from watching unsuitable programmes by a 4-digit PIN (Personal Identification Number) code that is defined by the user. The on-screen menu will instruct you to assign a PIN code (you can change it later, if necessary).
- Press the D.MENU button to display the DTV menu.
- Press the ▲ or ▼ button to select "Preference", then press the ENTER button.
- Press the ▲ or ▼ button to select "Parental Lock.", then press the ENTER button.
- The "Enter PIN" is displayed.
- Enter your current 4-digit PIN code by using the numeric buttons (0\~9). The options available in the "Parental Lock" group are displayed with the "Parental Rating" selected.
The default PIN code for a new TV set is 0000.
If you enter an invalid PIN code, the "Invalid PIN code. Please try again." message is displayed.
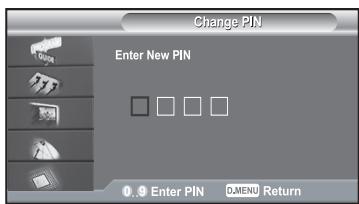
-
Press the ENTER button.
-
Press the ▲ or ▼ button to select the age rating you want to lock out. Press the ENTER button.
-
If you want to change the PIN code, select "Change PIN" by pressing the ▲ or ▼ button. Press the ENTER button.
The "Enter New PIN" is displayed.
- Enter your new PIN code by using the numeric buttons (0\~9).
The "Confirm New PIN" is displayed.
-
Re-enter your new PIN code to confirm by using the numeric buttons (0\~9). ➤ The "Your PIN code has been changed successfully" message is displayed.
-
Press the ENTER button.
-
Press the EXIT button to exit.
If you forget the PIN code, press the remote control buttons in the following sequence, which resets the PIN to 0-0-0-0: POWER (Off), MUTE, 8, 2, 4, POWER (On).
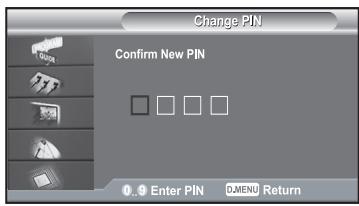
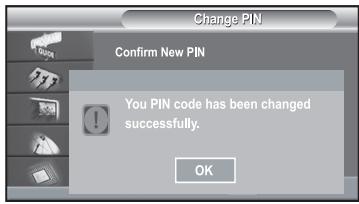
Setting the Subtitle
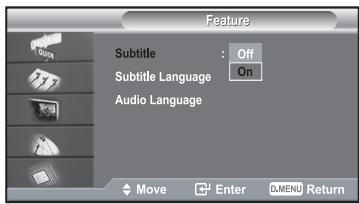
You can activate and deactivate the subtitles.
- Press the D.MENU button to display the DTV menu.
- Press the ▲ or ▼ button to select "Feature", then press the ENTER button.
- Press the ENTER button again, to select "Subtitle".
- Select "On" by pressing the ▲ or ▼ button. Press the ENTER button.
- Press the EXIT button to exit.
Selecting the Preferred Language (Subtitle or Audio)
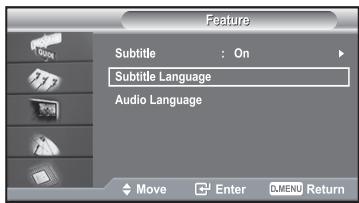
You can change the default value for subtitle and audio languages. Displays the language information for the incoming stream.
- Press the D.MENU button to display the DTV menu.
- Press the ▲ or ▼ button to select "Feature", then press the ENTER button.
- Press the ▲ or ▼ button to select "Subtitle Language" or "Audio Language". Press the ENTER button.
- Select the required option by pressing the ▲ or ▼ button, and press the ENTER button to change the setting. ➢ English is the default in cases where the selected language is unavailable in the broadcast.
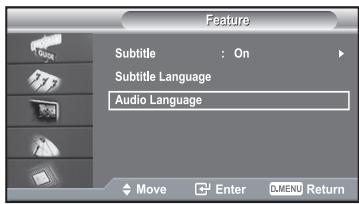
- Press the EXIT button to exit.
While viewing a programme, the subtitle can be selected. While viewing a programme, audio languages can be selected.
Viewing Product Information
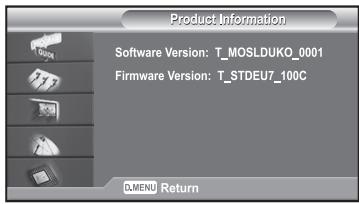
You can view your product information. For service or repair, please contact a Samsung approved dealer.
- Press the D.MENU button to display the DTV menu.
- Press the ▲ or ▼ button to select "System", then press the ENTER button.
- Press the ENTER button again, to select "Product Information".
The Product Information menu is selected. - Software Version, Firmware Version
- Press the EXIT button to exit.
Checking the Signal Information
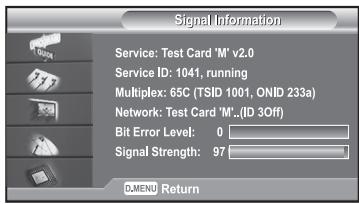
You can get information about the signal status.
- Press the D.MENU button to display the DTV menu.
- Press the ▲ or ▼ button to select "System", then press the ENTER button.
- Press the ▲ or ▼ button to select "Signal Information", then press the ENTER button.
- Press the EXIT button to exit.
If the signal status is poor, the "No signal." message is displayed.
Upgrading the Software (Option)
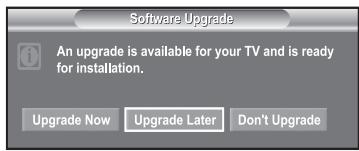
To keep your product up-to-date with new Digital Television features then software upgrades are periodically broadcast as part of the normal Television signal.
It will automatically detect these signals and display the software upgrade banner. You are given the option to install the upgrade.
◆ Upgrade Now
If you select "Upgrade Now", the "iDTV" immediately installs the new upgrade and then restarts.
◆ Upgrade Later
If you select "Upgrade Later", the upgrade is postponed until the next restart or channel change some 90 minutes later, when the upgrade dialog appears again.
Don't Upgrade
If you select "Don't Upgrade", the "iDTV" does not perform the upgrade and the software upgrade banner is not displayed again.
The upgrade is still stored internally, to subsequently upgrade to the new version then the following sequence of steps are performed.
- Press the D.MENU button to display the DTV menu.
- Press the ▲ or ▼ button to select "System", then press the ENTER button.
- Press the ▲ or ▼ button to select "Software Upgrade", then press the ENTER button.
- To switch to an alternative version, press the red button. Press the blue button to reset, activate the upgrade and restart.
- Press the EXIT button to exit.
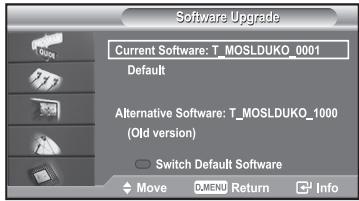

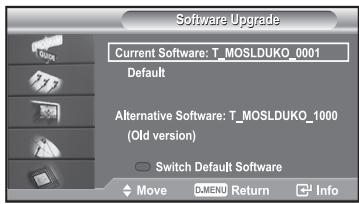

Viewing Common Interface
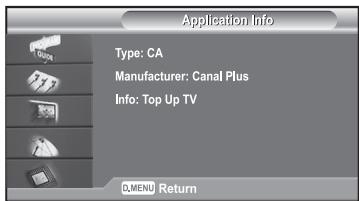
This contains information on CAM inserted in the CI slot and displays it.
- Press the D.MENU button to display the DTV menu.
- Press the ▲ or ▼ button to select "System", then press the ENTER button.
- Press the ▲ or ▼ button to select "Common Interface", then press the ENTER button.
-
Press the ENTER button to display the information for your application.
-
Press the EXIT button to exit.
The Application Info inserting is about the CI CARD.
You can install the CAM anytime whether the TV is ON or OFF.
-
Purchase the CI CAM module by visiting your nearest dealer or by phone.
-
Insert the CI CARD into the CAM in the direction of the arrow until it fits.
-
Insert the CAM with the CI CARD installed into the common interface slot. (Insert the CAM in the direction of the arrow, right up to the end so that it is parallel with the slot.)
-
Check if you can see a picture on a scrambled signal channel.
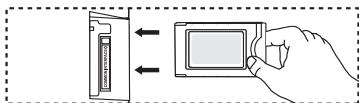
natural_image
Illustration of a hand inserting a card into a device (no text or symbols present)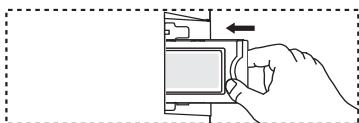
natural_image
Line drawing of a hand pressing a button on a device (no text or symbols)
natural_image
Pure technical line drawing of a mechanical component without any text, numbers, or symbolsSelecting the CI (Common Interface) Menu
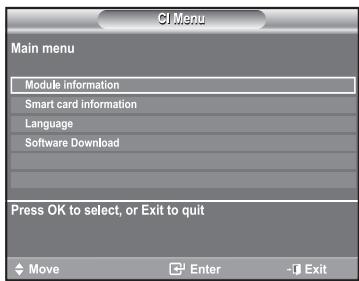
This enables the user to select from the CAM-provided menu.
- Press the D.MENU button to display the DTV menu.
- Press the ▲ or ▼ button to select "System", then press the ENTER button.
- Press the ▲ or ▼ button to select "Common Interface", then press the ENTER button.
-
Select to "CI Menu" by pressing the ▲ or ▼ button, and press the ENTER button.
-
Select the required option by pressing the ▲ or ▼ button, and press the ENTER button.
-
Press the EXIT button to exit.
Select the CI Menu based on the menu PC Card.
Resetting
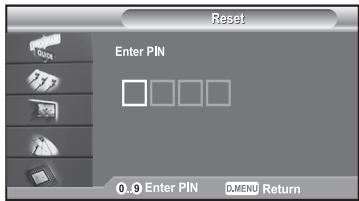
You can reset the values stored to the factory default values.
The Reset operation deletes all channel information and user preferences returning all values to their default factory state.
1. Press the D.MENU button to display the DTV menu.
2. Press the ▲ or ▼ button to select "System", then press the ENTER button.
3. Press the ▲ or ▼ button to select "Reset", then press the ENTER button.
4. The "Enter PIN" screen will appear.
5. Enter your current 4-digit PIN code by using the numeric buttons (0\~9).
➢ The warning message is displayed. All values will be reset by pressing the coloured buttons (red, green, yellow, and blue) in turn.
6. Press the EXIT button to exit.
Teletext Decoder
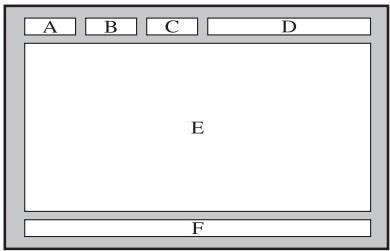
Most set channels carry "teletext", pages of written information that provide information such as:
◆ Television programme times.
◆ News bulletins and Weather forecasts.
◆ Sports results.
Subtitles for the hard of hearing.
The teletext pages are organized according to six categories:
| Part | Contents |
| A | Selected page number. |
| B | Broadcasting station identity. |
| C | Current page number or search status. |
| D | Date and time. |
| E | Text. |
| F | Status information. |
Displaying the Teletext Information
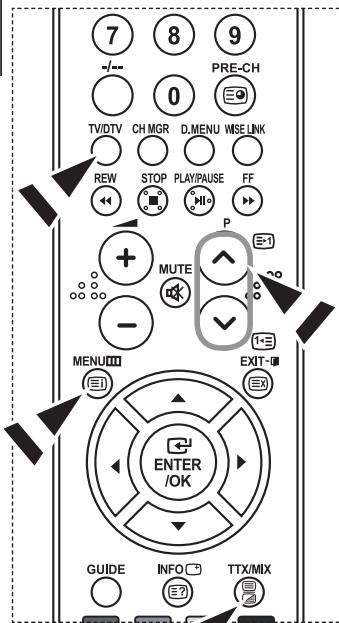
You can display teletext information at any time, but signal reception must be good.
Otherwise:
◆ Information may be missing.
◆ Some pages may not be displayed.
To activate the teletext mode and display the contents page:
- Using the P ⬇ (≡1) or P ⬇ (1≡) button, select the channel providing the teletext service.
- Press the TTX/MIX (☐/☐) button to activate the teletext mode.
The contents page is displayed. It can be redisplayed at any time by pressing the MI _i ( ) button.
- Press the TTX/MIX (≡/∅) button again.
The actual broadcast will be displayed with "Teletext", "Double", and "Mix" in order on the screen.
- Press the TV/DTV button to exit from the Text display.
If any broken character appears while Text is being viewed, make sure that the Text language is identical with the language in the "Setup" menu mode. If both languages are different, select the same language with the Text language on the "Setup" menu.
Selecting a Specific Teletext Page

Press the number buttons on the remote control to enter the page number directly:
- Enter the three-digit page number listed in the contents by pressing the corresponding numeric buttons.
- If the selected page is linked with several secondary pages, the secondary pages are displayed in sequence. To freeze the display on a given page, press the PIP (≡) button. Press the PIP (≡) button again to resume.
- Using the various display options:
| To display... | Press the... |
| Both teletext information and the normal broadcast | TTX/MIX (≡/∅) |
| Hidden text (answers to quiz games, for example) | INFO |
| The normal screen | INFO |
| A secondary page, by entering its 4-digit number | PRE-CH (≡) |
| The next page | P ⚠ (≡1) |
| The previous page | P √ (≡1) |
| Double-size letters in the: | P.MODE (≡) |
| • Upper half of the screen | • Once |
| • Lower half of the screen | • Twice |
| Normal screen | • Three times |
Using Fastext to Select a Teletext Page
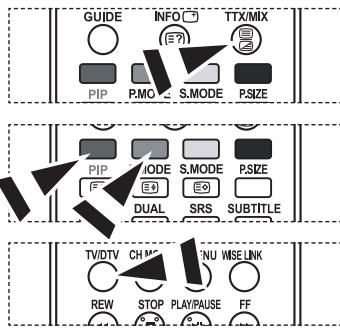
The various topics included in the teletext pages are colour-coded, and can be selected by pressing the coloured buttons on the remote control.
- Display the teletext contents page by pressing the TTX/MIX (☐/☑) button.
- Press the coloured button corresponding to the topic that you wish to select (The available topics are listed on the status information line).
- Press the Red button to display the previous page. Press the Green button to display the next page.
- Press the TV/DTV button to exit from the Text display.
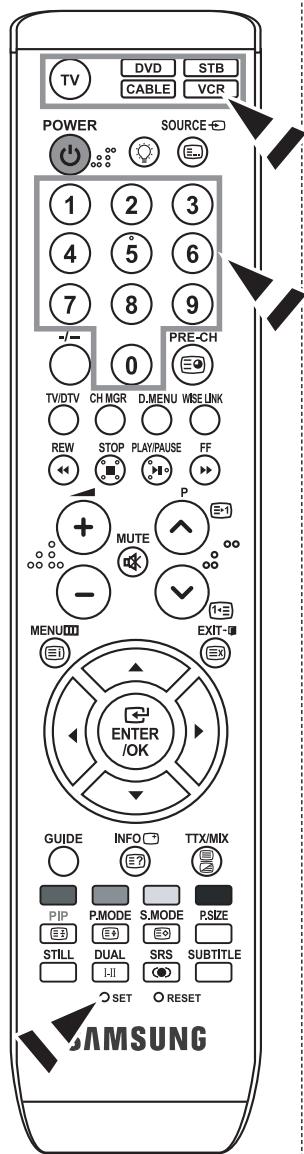
After it has been set up properly, your remote control can operate in five different modes: TV, DVD, Cable, Set-Top Box, VCR. Pressing the corresponding button on the remote control allows you to switch between these modes, and control whichever piece of equipment you choose.
The remote control might not be compatible with all DVD Players, VCRs, Cable boxes, and Set-Top Boxes.
Setting Up the Remote to Operate Your VCR
- Turn off your VCR.
- Press the VCR button on your TV's remote control.
- Press the SET button on your TV's remote control.
- Using the number buttons on your remote control, enter three digits of the VCR code listed on page 49 of this manual for your brand of VCR. Make sure you enter three digits of the code, even if the first digit is a "0". (If more than one code is listed, try the first one.)
- Press the POWER button on the remote control. Your VCR should turn on if your remote is set up correctly. If your VCR does not turn on after set up, repeat steps 2, 3, and 4, but try one of the other codes listed for your brand of VCR. If no other codes are listed, try each VCR code, 000 through 080.
Note on Using Remote Control Modes: VCR When your remote control is in "VCR" mode, the volume buttons still control your TV's volume.
Setting Up the Remote to Operate Your Cable Box
- Turn off your cable box.
- Press the CABLE button on your TV's remote control.
- Press the SET button on your TV's remote control.
- Using the number buttons on your remote control, enter three digits of the cable box code listed on page 50 of this manual for your brand of cable box. Make sure you enter three digits of the code, even if the first digit is a "0". (If there is more than one code listed, try the first one.)
- Press the POWER button on the remote control.
Your cable box should turn on if your remote is set up correctly.
If your cable box does not turn on after set up, repeat steps 2, 3, and 4, but try one of the other codes listed for your brand of cable box. If no other codes are listed, try each code, 000 through 046.
Note on Using Remote Control Modes: Cable Box When your remote control is in "CABLE" mode, the volume buttons still control your TV's volume.
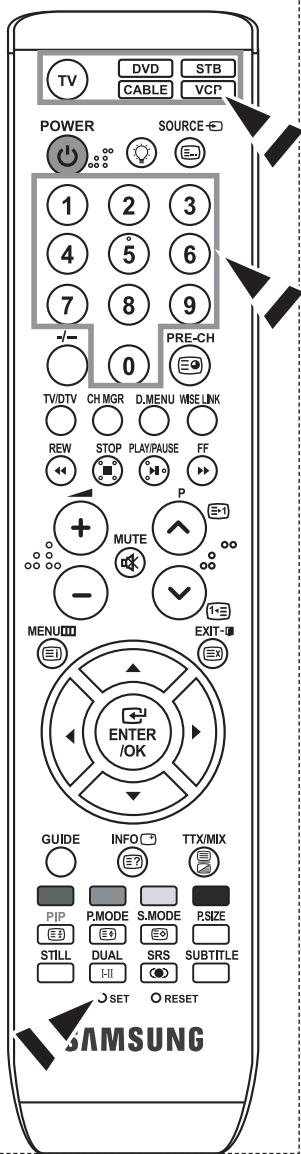
Setting Up the Remote to Operate Your DVD
- Turn off your DVD.
- Press the DVD button on your TV's remote control.
- Press the SET button on your TV's remote control.
-
Using the number buttons on your remote control, enter three digits of the DVD code listed on page 50\~51 of this manual for your brand of DVD.
Make sure you enter three digits of the code, even if the first digit is a "0". (If there is more than one code listed, try the first one.) -
Press the POWER ⏻ button on the remote control.
Your DVD should turn on if your remote is set up correctly. If your DVD does not turn on after set up, repeat steps 2, 3, and 4, but try one of the other codes listed for your brand of DVD. If no other codes are list-ed, try each code, 000 through 141.
Note on Using Remote Control Modes: DVD
When your remote control is in "DVD" mode, the volume buttons still control your TV's volume.
Setting Up the Remote to Operate Your STB
- Turn off your STB.
- Press the STB button on your TV's remote control.
- Press the SET button on your TV's remote control.
-
Using the number buttons on your remote control, enter three digits of the STB code listed on page 51 of this manual for your brand of STB.
Make sure you enter three digits of the code, even if the first digit is a "0". (If there is more than one code listed, try the first one.) -
Press the POWER ⏻ button on the remote control.
Your STB should turn on if your remote is set up correctly. If your STB does not turn on after set-up, repeat steps 2, 3 and 4, but try one of the other codes listed for your brand of STB. (If no other codes are listed, try each code, 000 through 074.)
Note on Using Remote Control Modes: STB
When your remote control is in "STB" mode, the volume buttons still control your TV's volume.
VCR
| Brand | Code |
| SAMSUNG | 000 001 002 003 004 005 077 078 079 |
| ADMIRAL | 020 |
| AIWA | 025 |
| AKAI | 004 027 032 |
| AUDIO DYNAMICS | 007 026 |
| BELL&HOWELL | 018 |
| BROKSONIC | 022 |
| CANDLE | 002 003 006 008 015 055 |
| CANON | 021 056 |
| CITIZEN | 002 003 006 008 015 055 |
| COLORTYME | 007 |
| CRAIG | 002 024 |
| CURTIS MATHES | 002 007 008 017 021 025 056 064 066 |
| DAEWOO | 003 010 011 012 013 014 015 016 |
| DB | 007 026 |
| DIMENSIA | 017 |
| DYNATECH | 025 |
| ELECTROHOME | 034 |
| EMERSON | 001 003 006 021 022 025 030 032 034 040 047050 052 060 063 065 066 067 069 073 |
| FISHER | 018 024 028 029 048 051 061 |
| FUNAI | 025 |
| GENERAL ELECTRIC | 002 005 017 021 056 |
| GO VIDEO | 002 |
| HARMAN KARDON | 007 |
| HITACHI | 019 025 041 042 074 |
| INSTANT REPLAY | 021 |
| JC PENNEY | 002 007 018 019 021 026 037 041 054 056 |
| JCL | 007 008 018 021 026 037 |
| JVC | 081 082 083 |
| KENWOOD | 007 008 018 021 026 037 |
| KLH | 070 |
| KONIA | 036 |
| LG(Goldstar) | 006 007 008 009 010 |
| LIOYD | 025 |
| LOGIK | 038 |
| LXI | 025 |
| MAGNAVOX | 021 056 059 |
| MARANTZ | 007 008 018 021 026 037 062 |
| MARTA | 006 |
| MEI | 021 |
| MEMOREX | 006 021 024 025 |
| MGA | 034 |
| MIDLAND | 005 |
| MINOLTA | 019 041 075 |
| MITSUBISHI | 019 034 041 046 |
| Brand | Code |
| MONTGOMERY WARD | 020 |
| MTC | 002 025 |
| MULTITECH | 002 005 025 038 |
| NEC | 007 008 018 026 037 062 064 |
| OPTIMUS | 020 |
| ORION | 073 074 075 076 |
| PANASONIC | 021 056 071 072 |
| PENTAX | 019 041 075 |
| PENTEX RESEARCH+ | 008 |
| PHILCO | 021 056 059 |
| PHILIPS | 021 080 |
| PIONEER | 019 026 039 053 |
| PORTLAND | 015 049 055 |
| PROSCAN | 017 |
| QUARTZ | 018 |
| QUASAR | 021 056 |
| RADIO SHACK/ REALISTIC | 006 018 020 021 024 025 029 034 048 056 |
| RCA | 002 017 019 021 035 041 043 057 068 076 |
| SANSUI | 026 |
| SANYO | 018 024 |
| SCOTT | 003 047 052 067 |
| SEARS | 006 018 019 024 028 029 041 048 051 |
| SHARP | 020 034 045 015 |
| SHIMTOM | 027 033 038 058 |
| SIGNATURE | 025 |
| SONY | 027 033 044 |
| SYLVANIA | 021 025 056 059 |
| SYMPHONIC | 025 |
| TANDY | 018 025 |
| TASHIKA | 006 |
| TATUNG | 037 |
| TEAC | 025 037 068 |
| TECHNICS | 021 |
| TEKNIKA | 006 021 025 031 |
| TMK | 066 |
| TOSHIBA | 003 019 029 051 052 |
| TOTEVISION | 002 006 |
| UNITECH | 002 |
| VECTOR RESEARCH | 007 026 |
| VICTOR | 026 |
| VIDEO CONCEPTS | 007 026 |
| VIDEOSONIC | 002 |
| WARDS | 002 003 006 019 020 021 024 025 034 038 041 |
| YAMAHA | 007 008 018 026 037 |
| ZENITH | 023 027 033 |
CABLE BOX
| Brand | Code |
| SAMSUNG | 000 001 002 003 004 005 006 007 |
| GI | 041 |
| HAMLIN | 003 024 031 |
| HITACHI | 025 030 |
| JERROLD | 038 039 |
| MACOM | 025 030 |
| MAGNAVOX | 019 023 028 |
| OAK | 026 |
| PANASONIC | 003 022 027 037 044 |
| PHILIPS | 019 021 023 028 |
| PIONEER | 004 018 020 044 |
| RCA | 014 022 040 |
| REGAL | 003 |
SAMSUNG DVD
| Product | Code |
| DVD | 000 001 002 |
| DVDR | 003 004 |
| BD Record | 005 006 |
| VCR COMBO | 007 008 009 010 011 |
| VCR Record | 012 |
| DHR COMBO | 013 |
DVD
| Brand | Code |
| ANAM | 030 |
| AUDIOVOX | 075 |
| AUDIOLOGIC | 085 |
| ANABA | 072 |
| APEX DIGITAL | 070 071 074 086 083 084 088 111 112 |
| AIWA | 114 |
| BROKSONIC | 062 |
| BLAUPUNKT | 074 |
| B&K | 122 123 |
| CURTIS MATHES | 027 |
| CYBER HOME | 077 078 079 082 |
| CLARION | 080 125 |
| CIRRUS | 081 |
| CYBER HOME | 065 |
| CINEVISION | 095 |
| DAEWOO | 066 |
| DENON | 146 |
| FARENHEIT | 067 068 |
| FISHER | 090 |
| GPX | 060 |
| GO VIDEO | 061 089 133 135 |
| GE | 069 074 |
| GREENHILL | 074 |
| HITACHI | 064 113 |
| HITEKER | 071 |
| HOYO | 073 |
| HARMAN / KARDON | 091 110 |
| IRT | 089 |
| Brand | Code |
| REGENCY | 015 023 |
| SA | 042 043 |
| SCIENTIFIC ATLAN | 042 043 |
| SPRUCER | 022 |
| STARGATE 2000 | 036 |
| SYLVANIA | 016 |
| TEXSCAN | 016 |
| TOCOM | 032 |
| UNIVERSAL | 033 034 |
| VIEWSTAR | 019 021 023 028 |
| WARNER AMEX | 046 |
| ZENITH | 017 029 035 037 045 |
| Product | Code |
| Home Theater VCR COMBO | 014 015 016 |
| HDD Recorder COMBO | 017 |
| TWIN TRAY COMBO | 018 |
| STB DVD COMBO | 019 |
| DVD Receiver | 020 |
| AV Receiver | 021 |
| Brand | Code |
| INTEGRA | 092 |
| JBL | 091 |
| JVC | 022 033 115 116 |
| JATON | 073 |
| KENWOOD | 051 108 109 |
| KISS | 073 |
| KONKA | 059 100 106 107 |
| KLH | 074 075 |
| LG(Goldstar) | 025 031 |
| LOEWE | 057 |
| LASONIC | 058 |
| MOBILE AUTHORITY | 054 |
| MEMOREX | 055 |
| MALATA | 056 |
| MAGNAVOX | 076 093 |
| MINTEK | 074 094 |
| MONYKA | 073 |
| NORCENT | 048 049 050 |
| NEXT BASE | 052 |
| NEC | 053 |
| NANTAUS | 144 |
| NESA | 074 |
| OPTOMEDIA ELECTRONICS | 105 |
| OPTIVIEW | 072 |
| ONKYO | 076 092 119 |
| PHILCO | 044 045 |
| PRINCETON | 046 047 |
| PROSCAN | 023 |
DVD
| Brand | Code |
| PANASONIC | 024 034 124 134 136 137 138 |
| PHILIPS | 036 076 |
| ROTEL | 117 118 |
| RIO | 120 |
| RCA | 023 035 074 075 131 132 |
| RAITE | 073 |
| ROWA | 038 |
| SAMPO | 104 |
| SONY | 026 029 126 127 128 129 130 141 |
| SHERWOOD | 039 041 |
| SVA | 042 |
| SYLVANIA | 043 093 |
| SHARP | 140 |
| SANSUI | 062 |
| SANYO | 062 090 |
| SHINSONIC | 094 |
SAMSUNG SET-TOP BOX
| Product | Code |
| Ground wave STB | 001 002 |
| Satellite STB | 003 |
| CABLE STB | 004 |
| STB DVD COMBO | 008 |
| Satellite STB HDD COMBO Standard | 009 |
SET-TOP BOX
| Brand | Code |
| ALPHASTAR | 023 |
| ANAM | 043 |
| CHANNEL MASTER | 018 034 |
| CROSSDIGITAL | 019 |
| CHAPARRAL | 035 |
| DIRECT TV | 015 016 017 019 022 045 060 061 062 065 066 067 068 |
| DAEWOO | 074 |
| DISH NETWORK SYSTEM | 069 070 |
| DISHPRO | 069 |
| DRAKE | 018 024 032 |
| DX ANTENNA | 027 |
| ECHOSTAR | 025 069 070 071 |
| EXPRESSVU | 069 |
| GOI | 069 |
| GE | 065 |
| GENERAL INSTRUMENT | 046 047 048 063 064 |
| HTS | 069 |
| HOME CABLE | 056 |
| HITACHI | 022 |
| HUGHES NETWORK | 015 017 |
| IQ | 020 |
| IQ PRISM | 020 |
| JANEIL | 059 |
| JERROID | 063 |
| JVC | 069 070 |
| LG(Goldstar) | 044 073 |
| Brand | Code |
| THOMSON | 145 |
| TOSHIBA | 028 062 076 |
| TECHNICS | 139 |
| TVIEW | 072 |
| TOKAI | 073 |
| TEAC | 096 |
| TECHWOOD | 097 |
| TREDEX | 098 099 101 |
| URBAN CONCEPTS | 076 |
| VENTURER | 075 |
| VOCOPRO | 102 |
| YAMAHA | 032 063 |
| YAMAKAWA | 040 073 |
| XWAVE | 103 |
| ZENITH | 076 121 |
| Product | Code |
| Satellite STB HDD COMBO Premium | 010 |
| CABLE STB HDD COMBO Standard | 011 |
| CABLE STB HDD COMBO Premium | 012 |
| Ground wave STB HDD COMBO Standard | 013 |
| Ground wave STB HDD COMBO Premium | 014 |
| Brand | Code |
| MAGNAVOX | 016 021 036 038 039 040 041 042 |
| MEMOREX | 016 |
| MOTOROLA | 064 |
| MACOM | 018 |
| MITSUBISHI | 015 |
| NEXT LEVEL | 047 048 064 |
| PHILIPS | 015 016 017 021 033 036 038 039 040 041 042 067 |
| PRIMESTAR | 046 049 050 063 |
| PANASONIC | 058 059 061 062 |
| PAYSAT | 016 |
| PROSCAN | 065 066 |
| RCA | 051 052 053 065 066 |
| RADIOSHACK | 064 |
| REALISTIC | 057 |
| STAR TRAK | 026 |
| STS | 020 027 |
| SKY | 031 |
| SKY LIFE | 005 006 007 |
| SHACK | 064 |
| STAR CHOICE | 064 |
| SONY | 054 060 |
| TOSHIBA | 015 017 028 029 030 072 |
| ULTIMATE TV | 060 066 |
| UNIDEN | 016 021 037 055 056 057 |
| ZENITH | 024 031 068 |
Setting up Your PC Software (Based on Windows XP)
The Windows display-settings for a typical computer are shown below. The actual screens on your PC may be different depending upon your particular version of Windows and your particular video card. Even if your actual screens look different, the same, basic set-up information will apply in almost all cases. (If not, contact your computer manufacturer or Samsung Dealer.)
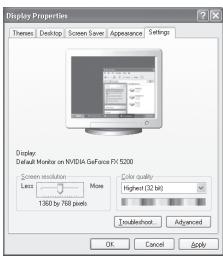
- First, click on "Control Panel" on the Windows start menu.
- When the control panel window appears, click on "Appearance and Themes" and a display dialog-box will appear.
- When the control panel window appears, click on "Display" and a display dialog-box will appear.
- Navigate to the "Settings" tab on the display dialog-box.
The correct size setting (resolution): Optimum- 1360 X 768
If a vertical-frequency option exists on your display settings dialog box, the correct value is "60" or "60 Hz". Otherwise, just click "OK" and exit the dialog box.
Display Modes
Both screen position and size will vary depending on the type of PC monitor and its resolution.
The resolutions in the table are recommended. (All resolutions between the supported limits are supported)
| Mode | Resolution | Horizontal Frequency (kHz) | Vertical Frequency (Hz) | Pixel Clock Frequency (MHz) | Sync Polarity (H/V) |
| IBM | 640 x 480 | 31.469 | 59.940 | 25.175 | - / - |
| 720 x 400 | 31.469 | 70.087 | 28.322 | - / + | |
| VESA | 640 x 480 | 37.861 | 72.809 | 31.500 | - / - |
| 640 x 480 | 37.500 | 75.000 | 31.500 | - / - | |
| 800 x 600 | 37.879 | 60.317 | 40.000 | + / + | |
| 800 x 600 | 48.077 | 72.188 | 50.000 | + / + | |
| 800 x 600 | 46.875 | 75.000 | 49.500 | + / + | |
| 1024 x 768 | 48.364 | 60.000 | 65.000 | - / - | |
| 1024 x 768 | 56.476 | 70.069 | 75.000 | - / - | |
| 1024 x 768 | 60.023 | 75.029 | 78.750 | + / + | |
| 1360 x 768 | 47.712 | 60.015 | 85.800 | + / + |
The interface mode is not supported.
The set might operate abnormally if a non-standard video format is selected.
HDMI/DVI does not support PC function.
Separate and Composite modes are supported. SOG is not supported.
Setting the PC

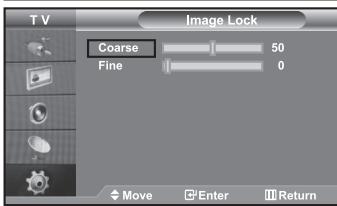
Coarse and Fine Tuning of the Image (Image Lock):
The purpose of picture quality adjustment is to remove or reduce picture noise. If the noise is not removed by Fine-tuning alone, then adjust the
frequency as best as possible (coarse) and Fine-tune again. After the noise has been reduced, re-adjust the picture so that it is aligned on the center of screen.
- Preset: Press the SOURCE button to select PC mode.
- Press the MENU button to display the menu.
Press the ▲ or ▼ button to select "Setup", then press the ENTER button. - Press the ▲ or ▼ button to select "PC", then press the ENTER button.
- Press the ENTER button to select "Image Lock".
- Press the ▲ or ▼ button to select "Coarse" or "Fine", then press the ENTER button.
- Press the ◀ or ▶ button to adjust the screen quality. Press the ENTER button.
- Press the EXIT button to exit.
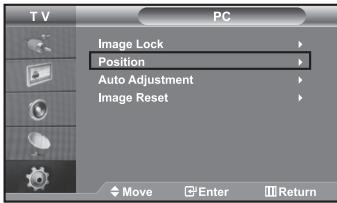

Changing the Image Position (Position):
Adjust the PC's screen positioning if it does not fit the TV screen.
- Follow the "Coarse and Fine Tuning of the Image (Image Lock)" instructions number 1 to 3.
- Press the ▲ or ▼ button to select "Position", then press the ENTER button.
- Press the ▲ or ▼ button to adjusting the Vertical-Position. Press the ◀ or ▶ button to adjust the Horizontal-Position. Press the ENTER button.
- Press the EXIT button to exit.
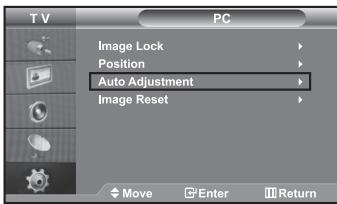
Adjusting the PC Screen Automatically (Auto Adjustment):
Auto adjustment allows the PC screen of set to self-adjust to the incoming PC video signal. The values of fine, coarse and position are adjusted automatically.
- Follow the "Coarse and Fine Tuning of the Image (Image Lock)" instructions number 1 to 3.
- Press the ▲ or ▼ button to select "Auto Adjustment", then press the ENTER button.
- Press the EXIT button to exit.
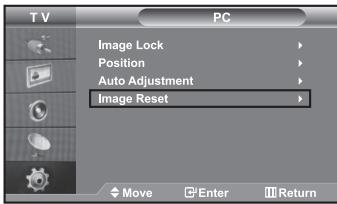
Initializing the Image Settings (Image Reset):
You can replace all image settings with the factory default values.
- Follow the "Coarse and Fine Tuning of the Image (Image Lock)" instructions number 1 to 3.
- Press the ▲ or ▼ button to select "Image Reset", then press the ENTER button.
- Press the EXIT button to exit.
Using the Anti-Theft Kensington Lock
The Kensington lock is a device used to physically fix the system when using it in a public place.
The locking device has to be purchased separately. The appearance and locking method may differ from the illustration depending on the manufacturer. Please refer to the manual provided with the Kensington lock for proper use.
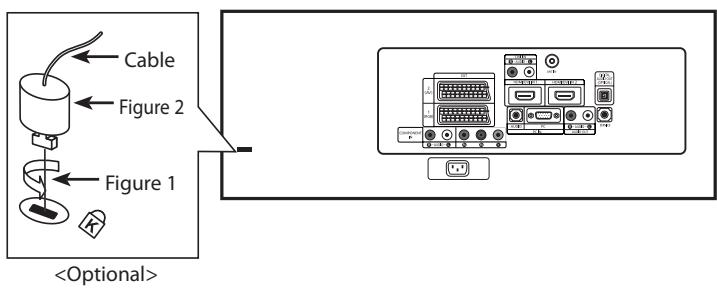
The place of the Kensington Lock may be different depending on its model.
- Insert the locking device into the Kensington slot on the LCD TV (Figure 1), and turn it in the locking direction (Figure 2).
- Connect the Kensington lock cable.
- Fix the Kensington lock to a desk or a heavy stationary object.
Troubleshooting: Before Contacting Service Personnel
| No sound or picture | Check that the mains lead has been connected to a wall socket.Check that you have pressed thebuttons on the front of the set.Check the picture contrast and brightness settings.Check the volume. |
| Normal picture but no sound | Check the volume.Check whether theMUTEbutton has been pressed on the remote control.Check if “Internal Mute” is off |
| No picture or black and white picture | Adjust the colour settings.Check that the broadcast system selected is correct. |
| Sound and picture interference | Try to identify the electrical appliance that is affecting the set and move it further away.Plug your set into a different mains socket. |
| Blurred or snowy picture, distorted sound | Check the direction, location and connections of your aerial.This interference is often due to the use of an indoor aerial. |
| Remote control malfunctions | Replace the remote control batteries.Clean the upper edge of the remote control (transmission window).Check the battery terminals. |
| “Check signal cable.” message is displayed. | Check that the signal cable is firmly connected to the PC or video sources.Check that the PC or video sources are turned on. |
| On PC mode, “Mode Not Supported.” message is displayed. | Check the maximum resolution and the frequency of the video adaptor.Compare these values with the data in the Display Modes. |
The TFT LCD panel uses a panel consisting of sub pixels (3,147,264) which require sophisticated technology to produce. However, there may be few bright or dark pixels on the screen. These pixels will have no impact on the performance of the product.
Technical and Environmental Specifications
| Model Name | LE32N7 | LE40N7 | LE46N7 |
| Screen Size (Diagonal) | 32 inch | 40 inch | 46 inch |
| Power Supply | AC 220-240 V, 50 Hz | AC 220-240 V, 50 Hz | AC 220-240 V, 50 Hz |
| Power Consumption | 155 W | 210 W | 275 W |
| PC Resolution | 1360 x 768 @ 60 Hz | 1360 x 768 @ 60 Hz | 1360 x 768 @ 60 Hz |
| Sound Output | 10 W x 2 | 10 W x 2 | 10 W x 2 |
| Dimension (WxDxH) | |||
| Body | 803 x 88.2x 539.2 mm | 994 x 92 x 647 mm | 1129 x 106 x 732 mm |
| With stand | 803 x 244.0 x 578.0 mm | 994 x 290 x 696 mm | 1129 x 320 x 788 mm |
| Weight | |||
| With stand | 15.6 kg | 24.3 kg | 35.3 kg |
| Environmental Considerations | |||
| Operating Temperature | 10 °C to 40 °C (50 °F to 104 °F) | 10 °C to 40 °C (50 °F to 104 °F) | 10 °C to 40 °C (50 °F to 104 °F) |
| Operating Humidity | 10 % to 80 %, non-condensing | 10 % to 80 %, non-condensing | 10 % to 80 %, non-condensing |
| Storage Temperature | -20 °C to 45 °C (-4 °F to 113 °F) | -20 °C to 45 °C (-4 °F to 113 °F) | -20 °C to 45 °C (-4 °F to 113 °F) |
| Storage Humidity | 5 % to 95 %, non-condensing | 5 % to 95 %, non-condensing | 5 % to 95 %, non-condensing |
This device is a Class B digital apparatus.
Stand Swivel (Left / Right)
natural_image
Two computer monitors connected by a curved arrow, no text or symbols present-20^ 20^
➢ Design and specifications are subject to change without prior notice.
Table des matières
CONNEXION ET PREPARATION DE VOTRE TELEVISEUR
natural_image
Diagram of a device with internal components and an external panel, showing no text or symbols.<2>
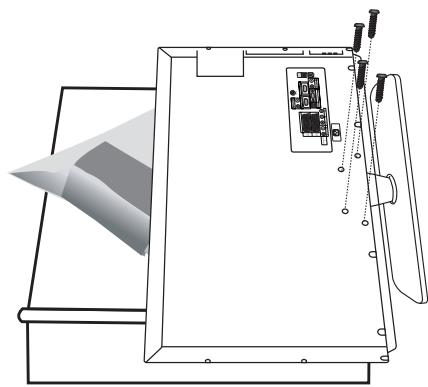
natural_image
Technical line drawing of a mechanical assembly with no visible text or symbols<3>
natural_image
Diagram of a device with a screen, internal components, and a separate panel with arrows indicating motion (no text or symbols)| Principal\Secondaire | TV | Ext.1 | Ext.2 | AV | S-Vidéo | Composant | PC | HDMI1 | HDMI2 | DTV |
| TV | X | X | X | X | X | X | X | O | O | O |
| Ext.1 | X | X | X | X | X | X | X | O | O | O |
| Ext.2 | X | X | X | X | X | X | X | O | O | O |
| AV | X | X | X | X | X | X | X | O | O | O |
| S-Vidéo | X | X | X | X | X | X | X | O | O | O |
| Composant | X | X | X | X | X | X | X | O | O | O |
| PC | O | O | O | O | X | X | X | X | X | X |
| HDMI1 | O | O | O | O | O | O | X | X | X | X |
| HDMI2 | O | O | O | O | O | O | X | X | X | X |
| DTV | X | X | X | X | X | X | X | X | X | X |
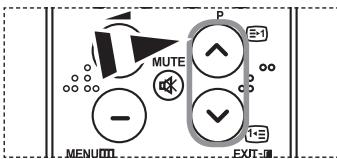

natural_image
Black and white photo of a butterfly perched on flower petals (no text or symbols visible)"Diaporama":
Lance un diaporama.
natural_image
Black and white close-up photo of a butterfly perched on a branch with white flowers (no text or symbols visible)"Rotat." :
natural_image
Black-and-white photo of a butterfly perched on flower petals (no text or symbols visible)"Zoom":

natural_image
Black-and-white photo of a butterfly perched on flower petals (no text or symbols visible)"Vitesse":
natural_image
Black-and-white photo of a butterfly perched on a flower, with no visible text or symbols."Fond musical":
"Liste":
natural_image
Black and white close-up photo of a butterfly perched on a branch with white flowers (no text or symbols visible)natural_image
Black-and-white photo of a butterfly perched on flower petals (no text or symbols visible)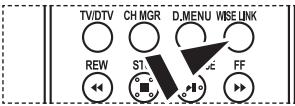


natural_image
Illustration of a hand inserting a card into a device (no text or symbols present)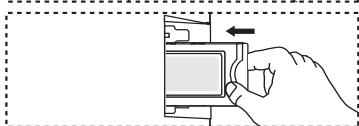
natural_image
Illustration of a hand pressing a button on a device (no text or symbols)
natural_image
Pure technical line drawing of a mechanical component without any text, numbers, or symbols
natural_image
Two identical computer monitors connected by a curved arrow, no text or symbols presentnatural_image
Simple line drawing of a trash bin with two crossed lines (no text or symbols)
Correct Disposal of This Product (Waste Electrical & Electronic Equipment)
(Applicable in the European Union and other European countries with separate collection systems)
This marking shown on the product or its literature, indicates that it should not be disposed with other household wastes at the end of its working life. To prevent possible harm to the environment or human health from uncontrolled waste disposal, please separate this from other types of wastes and recycle it responsibly to promote the sustainable reuse of material resources. Household users should contact either the retailer where they purchased this product, or their local government office, for details of where and how they can take this item for environmentally safe recycling. Business users should contact their supplier and check the terms and conditions of the purchase contract. This product should not be mixed with other commercial wastes for disposal.