400520 MIXSTAR - Blender MORPHY RICHARDS - Free user manual and instructions
Find the device manual for free 400520 MIXSTAR MORPHY RICHARDS in PDF.
| Product Type | Stand Mixer |
| Brand | Morphy Richards |
| Model | 400520 MIXSTAR |
| Bowl Capacity (dough) | 0.75 kg maximum flour |
| Bowl Capacity (fruit cake) | 1.4 kg maximum |
| Bowl Material | Stainless Steel |
| Accessories Included | 2 whisks, 2 beaters, 2 dough hooks, bowl scraper, bowl cover with orifice cover |
| Integrated Timer | Yes, progressive counter with reset |
| Speed Setting | Variable control dial (speed 1 to 5) |
| Maximum Continuous Use | 10 minutes, then cool for 20 minutes |
| Accessory Cleaning | Dishwasher (bowl and accessories) or hand wash |
| Motor Unit Cleaning | Wipe with a non-abrasive damp cloth |
| Safety | Do not immerse motor unit; do not use by children; stop and unplug before changing accessories |
| Warranty | 1 year standard, extendable to 2 years upon registration |
| Customer Service (UK) | 0344 871 0944 |
| Customer Service (Ireland) | 1800 409 119 |
Frequently Asked Questions - 400520 MIXSTAR MORPHY RICHARDS
User questions about 400520 MIXSTAR MORPHY RICHARDS
0 question about this device. Answer the ones you know or ask your own.
Ask a new question about this device
Download the instructions for your Blender in PDF format for free! Find your manual 400520 MIXSTAR - MORPHY RICHARDS and take your electronic device back in hand. On this page are published all the documents necessary for the use of your device. 400520 MIXSTAR by MORPHY RICHARDS.
USER MANUAL 400520 MIXSTAR MORPHY RICHARDS
smart ideas for your home

*Register at www.morphyrichards.co.uk/support UK and Ireland customers only
MIXSTAR Mixer
Please read and keep these instructions for future use
For competitions, product hints and tips and more join us at

www.morphyrichards.co.uk/blog

www.facebook.com/morphyrichardsuk

@loveyourmorphy
Health And Safety
The use of any electrical appliance requires the following common sense safety rules. Please read these instructions carefully before using the product.
- WARNING: Misuse of the appliance could cause personal injury.
- This appliance shall not be used by children.
- This appliance can be used by persons with reduced physical, sensory or mental capabilities, or lack of experience and knowledge, if they have been given supervision or instruction concerning the use of the appliance in a safe way and understand the hazards involved.
Children shall not play with the appliance. - Keep the appliance and its cord out of reach of children.
- Switch off the appliance and disconnect from the supply before changing accessories or approaching parts that move.
- CAUTION: In order to avoid a hazard due to inadvertent resetting of the thermal cut out, this appliance must not be supplied through an external switching device, such as a timer, or connected to a circuit that is regularly switched on and off by the utility.
- For cleaning refer to page 10.
- Do not use your Mixstar Mixer continuously for longer than 10 minutes. After using for these time periods, allow to cool for 20 minutes.
- Avoid touching moving parts. Keep hands, hair and clothing, and utensils away from the hand mixer attachments during operation, to prevent personal injury and/or damage to the appliance.
- Switch off the appliance and disconnect from the supply before cleaning accessories or approaching parts that move in use.
- If the mains cable is damaged, it must be replaced by the manufacturer, its service agent or similarly qualified person in order to avoid a hazard.
Location
Always locate your appliance away from the edge of the worktop.
- Do not place the Mixing Bowl used with the appliance on a highly polished wooden surface as damage may occur to the surface.
- Do not place the appliance on or near a hot surface, such as a hot plate or radiant rings or near a naked flame.
Mains Cable
- Do not let the mains cable hang over the edge of the worktop where a child could reach it.
- Do not let the lead run across an open space e.g. between a low socket and a table.
- Do not let the cable run across a cooker or other hot area which might damage the cable.
- The mains cable should reach from the socket to the base unit without straining the connections.
Personal Safety
WARNING: To protect against the risk of electric shock, NEVER immerse the appliance body in water or in any other liquid and always ensure the electrical connections are kept dry.
It is advisable to use the Bowl Cover on the Mixing Bowl for whisking.
- Ensure the attachments have stopped rotating before lifting the mixer head upwards.
Other Safety Considerations
- The use of attachments or tools not recommended or sold by Morphy Richards may cause fire, electric shock or injury.
- Do not use the appliance for anything other than its intended purpose.
Electrical Requirements
Check that the voltage on the rating plate of your appliance corresponds with your house electricity supply which must be A.C. (Alternating Current).
Should the fuse in the mains plug require changing, replace it with a fuse of the same rating as originally fitted.
Introduction
Thank you for your recent purchase of this Morphy Richards Mixstar Mixer.
Your Mixer comes with beater, whisk and dough hook accessories to make a multitude of dishes. Please read the instructions for information on how to use your Mixer before use.
Remember to visit www.morphyrichards.co.uk to register your product's two year guarantee.
Contents
Health And Safety 2
Introduction 3
Product Overview 4
Features 4
Before First Use 5
Using Your Mixstar Mixer 5
Using The Timer 6
Capacity 6
Hot Food 6
Mixing Bowl Setup 7
Twin Assembly Setup 8
Optional Bowl Scaper Setup 9
Dough Hook Setup 9
Attachments 10
Care In Use 10
Care and Cleaning 10
Contact Us 10
Recipes 11
Recipes - Whisks 12
Recipes - Beaters 13
Recipes - Dough Hook 17
Notes 18
Guarantee 20
Product Overview
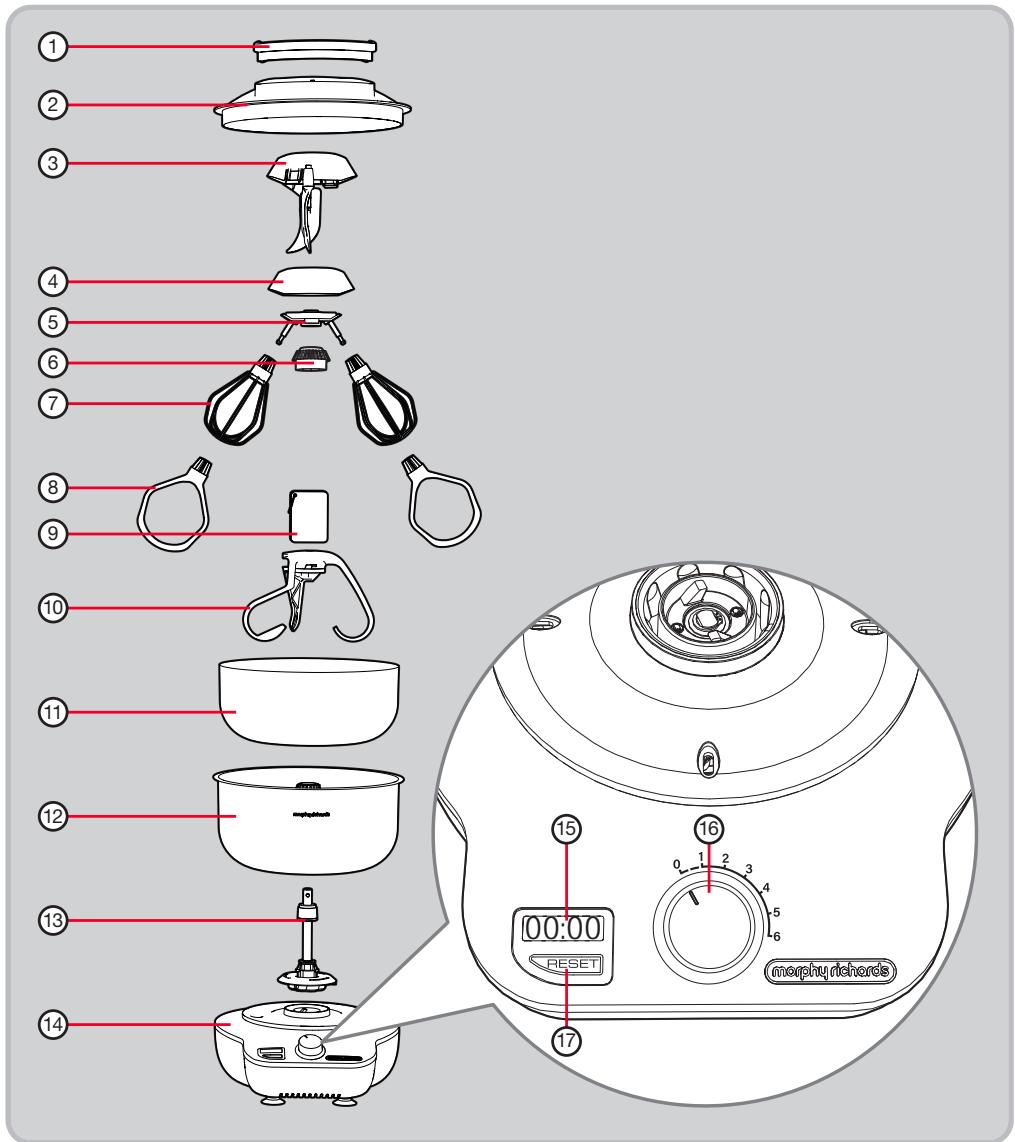
Features
(1) Inlet Cover
(2) Bowl Cover
(3) Bowl Scaper
(4) Twin Assembly Cover
(5) Twin Assembly Spindles
(6) Twin Assembly Gear
(7) Whisks
(8) Beaters
(9) Instruction Cards
(10) Dough Hooks
(11) Storage Bowl
(12) Mixing Bowl
(13) Drive Shaft
(14) Motor Housing
(15) Timer
(16) Control Dial
(17) Reset Button
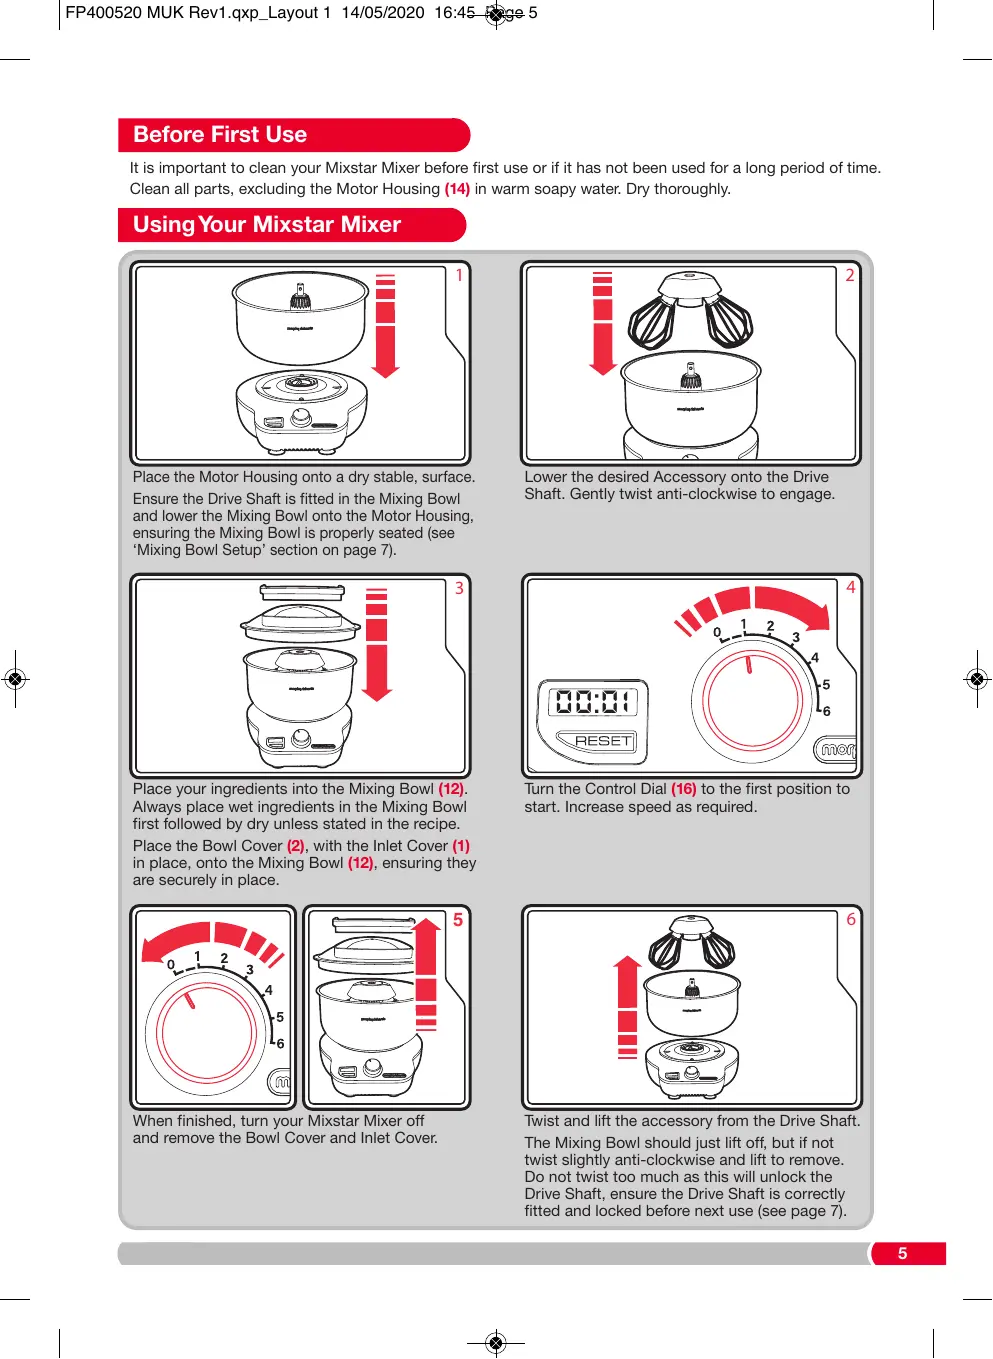
Before First Use
It is important to clean your Mixstar Mixer before first use or if it has not been used for a long period of time. Clean all parts, excluding the Motor Housing (14) in warm soapy water. Dry thoroughly.
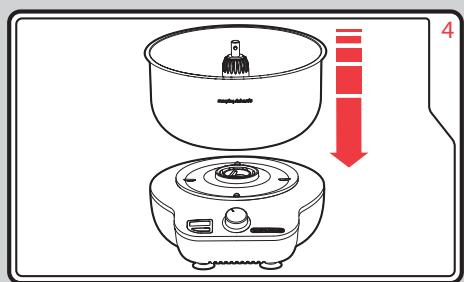
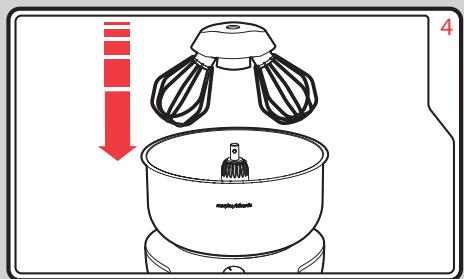
Using Your Mixstar Mixer
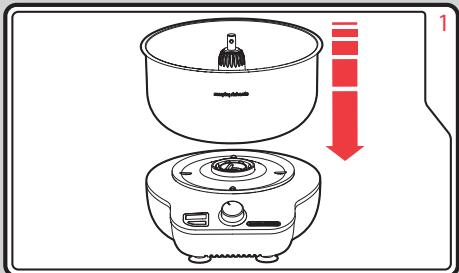
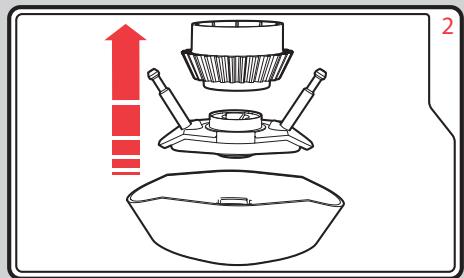
Place the Motor Housing onto a dry stable, surface. Ensure the Drive Shaft is fitted in the Mixing Bowl and lower the Mixing Bowl onto the Motor Housing, ensuring the Mixing Bowl is properly seated (see 'Mixing Bowl Setup' section on page 7).
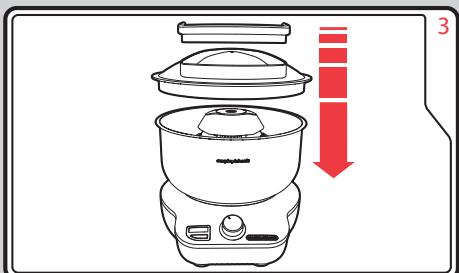
Place your ingredients into the Mixing Bowl (12). Always place wet ingredients in the Mixing Bowl first followed by dry unless stated in the recipe. Place the Bowl Cover (2), with the Inlet Cover (1) in place, onto the Mixing Bowl (12), ensuring they are securely in place.
When finished, turn your Mixstar Mixer off and remove the Bowl Cover and Inlet Cover.

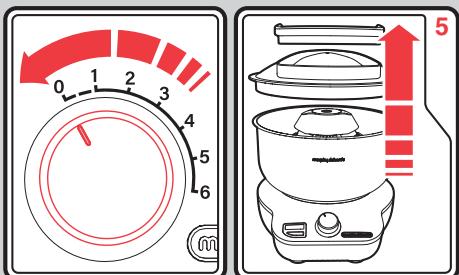
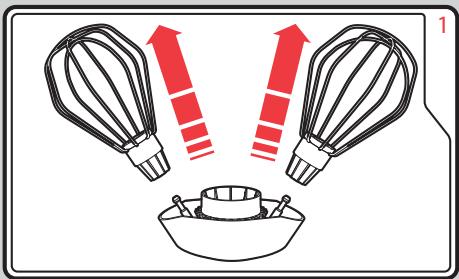
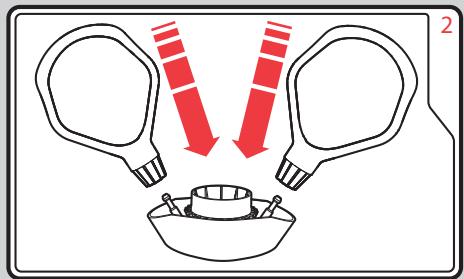
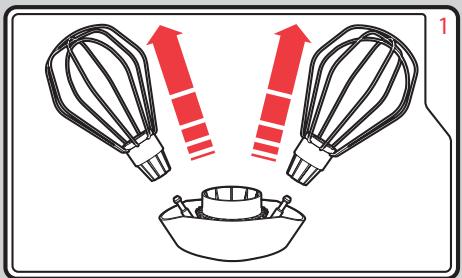
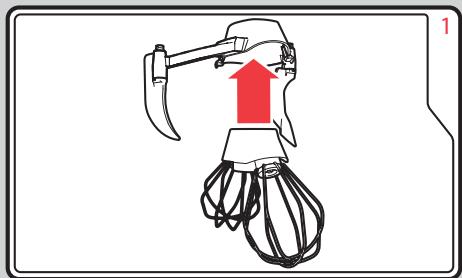
Lower the desired Accessory onto the Drive Shaft. Gently twist anti-clockwise to engage.

Turn the Control Dial (16) to the first position to start. Increase speed as required.
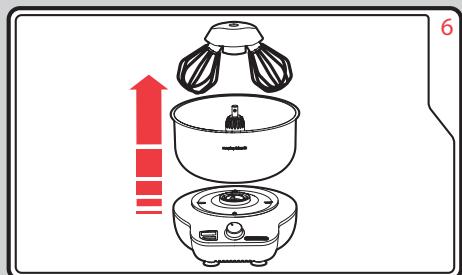
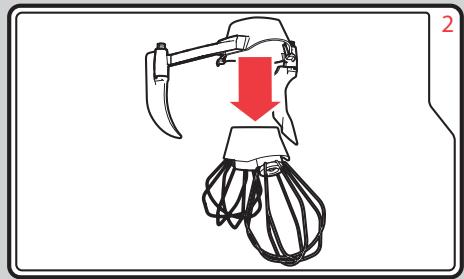
Twist and lift the accessory from the Drive Shaft. The Mixing Bowl should just lift off, but if not twist slightly anti-clockwise and lift to remove. Do not twist too much as this will unlock the Drive Shaft, ensure the Drive Shaft is correctly fitted and locked before next use (see page 7).
Using The Timer
To keep track on how long you have been mixing, there is an inbuilt count-up Timer (15). When the Mixstar Mixer power is on, the timer will automatically be on.
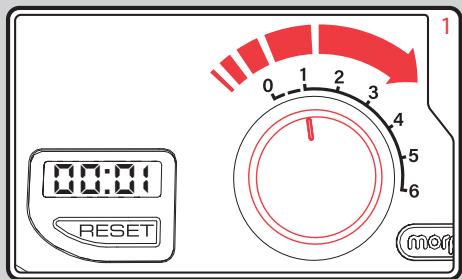
When you turn the Control Dial (16) to start mixing, the Timer (15) will automatically start counting up.
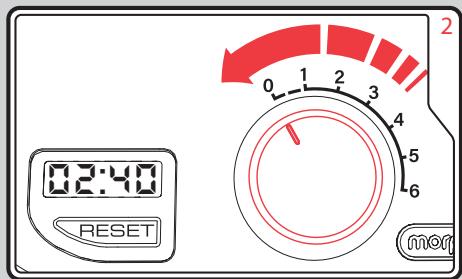
When you stop the Mixstar Mixer the Timer will pause.

The Timer will restart from the same point when you start mixing again.
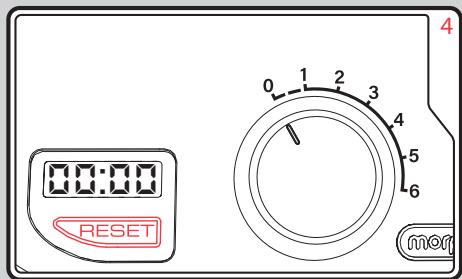
To zero the Timer, press the Reset Button (17) below the Timer.
Capacity
Do not overfill the Mixing Bowl (12). Overfilling may cause damage to the Mixstar Mixer. The maximum quantity is 1.4kg for fruit cake and 0.75kg for dough.
Hot Food
Your Mixstar Mixer is capable of mixing hot foods, however the Mixing Bowl is made of stainless steel which may get hot during use. Care must be taken when handling hot food and liquid in the Mixing Bowl (12).
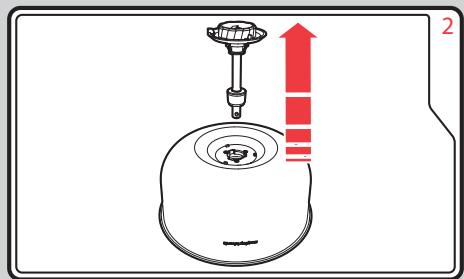
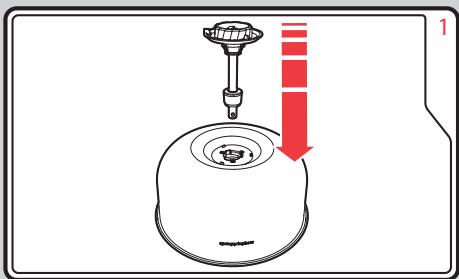
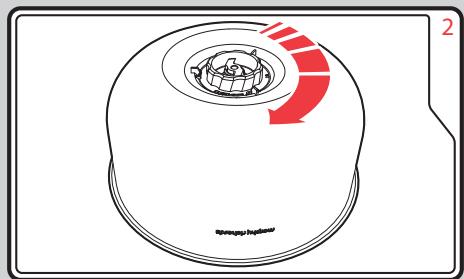
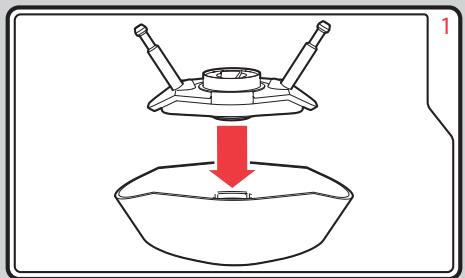
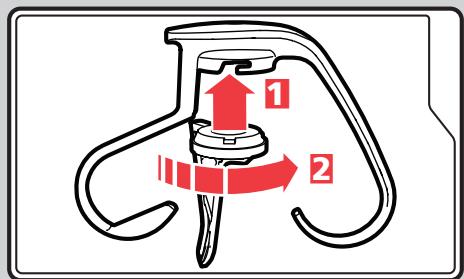
Mixing Bowl Setup
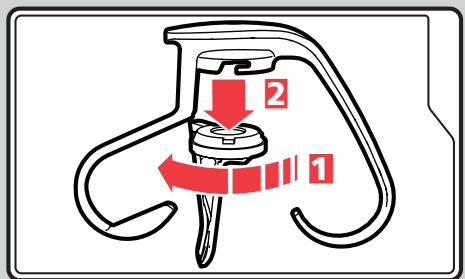
The Mixing Bowl (12) ships with the Drive Shaft (13) already attached. It can be disassembled for cleaning.
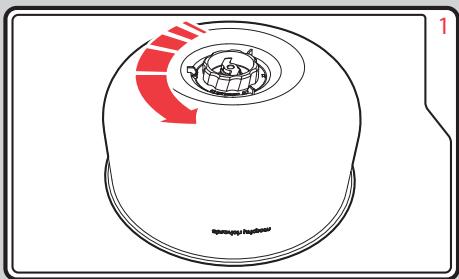
Disassembly
Assembly
Before use, ensure the drive shaft is correctly fitted and fully rotated clockwise (point 2).
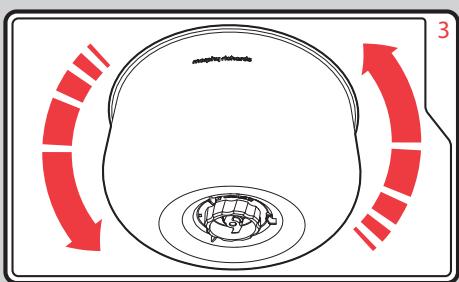
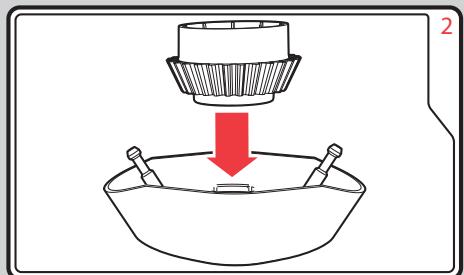
Twin Assembly Setup
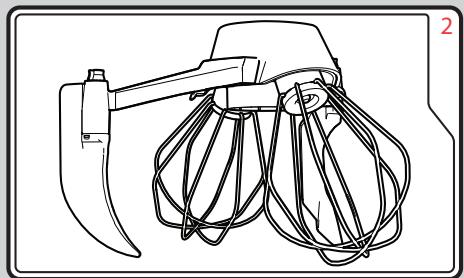
The Mixstar Mixer ships with the Whisks (7) already attached to the Twin Assembly. It can be disassembled for cleaning. The Beaters (8) may be used in place of the Whisks. To remove the Whisks or Beaters lay the Twin Assembly Spindles (5) on a flat surface, hold this firmly whilst pulling the Whisks (7) or Beaters (8) from the Spindles, these attachments are a tight fit. To replace, press each attachment onto the Spindles until you hear/feel a click. Securely fitting these attachments is important for correct performance.
Switching attachments
Disassembly
Assembly
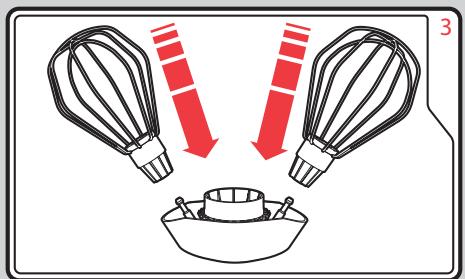
Optional Bowl Scaper Setup
The Bowl Scaper (3) can be used in conjunction with the assembled Whisks (7) or Beaters (8). The Twin Assembly (4) clips into the Bowl Scaper Assembly. The Bowl Scaper is not designed for use with the Dough Hook (10). The Bowl Scaper ships fully assembled and mounted onto the Twin Assembly. It can be disassembled for cleaning.

Disassembly
Assembly
Dough Hook Setup
Disassembly
Assembly
Attachments
Your Mixstar Mixer is supplied with three mixing attachments, each is designed for a specific task.
For guidance on how to used these attachments and adapt your recipes for Mixstar, please see below and look to the included recipes for best practice for mixing order.
Beaters (8)
Use the Beaters for creaming butter and sugar, mixing cake mixes and making short crust pastry.
When using the Beaters it is recommended to use speeds low to medium as higher speeds may cause splashing.
When adapting recipes for Mixstar we advise you to follow the same principles as outlined in our recipes.
For heavy mixes such as fruit cake, the maximum quantity of dry ingredients that can be mixed is 1.4kg .
Whisks (7)
The Whisks are ideal for whisking egg whites and cream. It is recommended to use the maximum speed with this attachment.
When beating egg whites, it will take roughly 2-3 minutes to achieve soft peaks. Mix a minimum of 4 large egg whites (200ml), use a maximum of 12 egg whites at one time.
Bowl Scaper (3)
The Bowl Scaper can be used in conjunction with the Beaters (8) and Whisks (7). It has been designed to help reduce the need for scraping down to a minimum, but some scraping may still be required for some mixes.
Dough Hook (10)
The Dough Hook is designed to knead dough for bread, pizza etc.
When adapting recipes for Mixstar, we advise you to follow the same principles as outlined in our recipes, add dry ingredients first and then gradually add the wet. When the dough combines and the dough hooks start to knead, the dough may rise and fall in the Mixing Bowl (12). When this occurs, you may need to remove the Bowl Cover (2) to allow this to happen. Please take extra caution to not allow anything to enter the mixing bowl whilst kneading.
The maximum quantity of dry ingredients that can be mixed is 0.75kg
Care in use
When using the Mixstar, always fit the Bowl Cover (2) after adding the ingredients, do not put your hands in or allow long hair to fall into the Mixing Bowl (12) or through the Inlet Cover (1) aperture when in use. Add ingredients during mixing when required through the Inlet Cover aperture with care, do not drop any spoons, knives or any other items into the mixer as damage may result.
Care And Cleaning
- Turn the Mixstar Mixer off, then unplug from the mains outlet when not in use, before assembling or disassembling parts and before cleaning. To unplug, grasp the plug and pull from the outlet, never pull from the cord.
- Ensure your Mixstar Mixer has cooled completely before cleaning.
- To clean the Motor Housing (14), wipe with a damp non-abrasive cloth and dry thoroughly. Do not immerse the Motor Housing or power cord in water or any other liquid. Do not use any abrasive or solvent-based cleaner.
- Wash the attachments in hot soapy water. Dry thoroughly.
Alternatively, the accessories and Mixing Bowl (12) are dishwasher safe.
- Remove the Drive Shaft (13) from the Mixing Bowl before cleaning. See 'Mixing Bowl Setup' section on page 7.
WARNING: Never immerse the main unit in water or other liquid.
Contact Us
Helpline
If you are having a problem with your appliance, please call our Helpline, as we are more likely to be able to help than the store you purchased the item from.
Please have the product name, model number and serial number to hand when you call to help us deal with your enquiry quicker.
UK Helpline: 0344 871 0944
IRE Helpline: 1800 409 119
Spares: 0344 873 0710
Talk To Us
If you have any questions or comments, or want some great tips or recipe ideas to help you get the most out of your products, join us online:
Blog: www.morphyrichards.co.uk/blog
Facebook: www.facebook.com/morphyrichardsuk
Twitter: @loveyourmorphy
Website: www.morphyrichards.com
Recipes


We have developed delicious recipes for you to try with your new Mixstar Mixer. From meringues to focaccia, there is something to suit every taste.
The recipes provided give you only a few suggestions of what you can make with your new Mixstar Mixer. When you are used to working with your Mixstar Mixer you will be able to easily adapt recipes for use from your favourite cookbooks.
Recipes - Whisks
Miscellaneous
300ml double cream, softly whipped: speed 5, 1 minute 15 seconds
600ml double cream, softly whipped: speed 5, 1 minute 15 seconds
300ml whipping cream, softly whipped: speed 5, 1 minute 30 seconds
450ml whipping cream, softly whipped: speed 5, 1 minute 15 seconds
600ml whipping cream, softly whipped: speed 5, 1 minute 45 seconds
4 egg whites (125ml), minimum quantity, stiff peaks: 2 minutes 15 seconds
12 egg whites, maximum quantity, stiff peaks: speed 5, 2 minutes 30 seconds
Chocolate Cloud
Preparation time: 40 minutes plus refrigeration
Serves: 4-6
Ingredients:
180g plain chocolate
4 medium eggs, separated
- 450ml whipping cream
Method:
1 Melt the chocolate in a large bowl over a pan of hot water (make sure the bowl does not touch the water and do not stir the chocolate whilst melting).
2 Remove the bowl and set aside to cool slightly.
3 Put the egg whites in the Mixing Bowl with the Whisks and Bowl Scaper and fit the Bowl Cover. Whisk on setting 5 until stiff (about 2 minutes 15 seconds).
4 Add the egg yolks to the chocolate then fold in the egg whites with a tablespoon until well incorporated. Set aside for 10 minutes.
5 Put the cream into the cleaned Mixing Bowl with the Whisks and Bowl Scaper and fit the Bowl Cover. Whisk on setting 5 until just holding its shape without being stiff (about 1 minute 15 seconds).
6 Fold half the cream into the chocolate mixture then put a layer of mixture into each of the ramekins. Follow with a layer of cream and finish with another layer of the chocolate mixture.
7 Leave to set in the refrigerator for about an hour or until ready to serve.
Meringues (makes 16)
Preparation time: 10 minutes
Cooking Time: 3 hours plus drying overnight
Ingredients:
200ml egg whites
240g caster sugar
Method:
1 Line two baking trays with non-stick baking paper and preheat the fan oven to 150^ / Gas Mark 2.
2 Put the egg whites in the Mixing Bowl, fit the Whisks, Bowl Scaper and Bowl Cover and whisk on speed 5 until stiff (about 2 minutes).
3 Add the caster sugar 1 tbsp at a time over the next 3 minutes while the Whisks are running.
4 Place rounded dessert spoons of the meringue in rows on the baking trays and bake for 15 minutes, then reduce the temperature to 110^ / Gas Mark 1 for 212 - 3 hours.
5 Turn the oven off leaving the meringues inside to dry out overnight.
6 Fill with whipped cream or use as a base for desserts such as Eton Mess.
Note: The meringues store well in an airtight tin.
Recipes - Beaters
Blueberry Muffins (makes 12)
Preparation time: 10 minutes
Cooking time: 25 minutes
Ingredients:
350g plain flour
2 level tsp baking powder
120g golden caster sugar
2 medium eggs, beaten
284ml carton buttermilk
120g unsalted butter, melted
150g fresh blueberries
Method:
1 Preheat the fan oven to 190^ / Gas Mark 5.
2 Line the cups of a 12 hole muffin tin with paper muffin cases.
3 Sieve the flour and baking powder into the Mixing Bowl and add the sugar, fit the Beaters, Bowl Scaper and Bowl Cover.
4 Mix on speed 2 for 20-30 seconds.
5 In a jug, mix together the eggs, buttermilk and melted butter.
6 Remove the Bowl Cover. Add the liquid mixture and blueberries to the Mixing Bowl and mix on speed 2 until just incorporated (about 20 seconds). Do not over mix.
7 Spoon the batter into the muffin cases and bake in the centre of the oven for about 20-25 minutes or until well risen and golden brown.
8 Leave in the tins to cool for a few minutes before placing on a wire rack to cool completely.
Almond Butter Cookies
Preparation time: 5 minutes
Cooking time: 10-12 minutes
Ingredients:
110g soft light brown sugar
110g soft margarine
- 75g almond butter
175g plain wholemeal flour
Method:
1 Lightly grease two baking trays or line with non-stick baking paper.
2 Preheat the fan oven to 170^ / Gas Mark 3.
3 Put the sugar and margarine into the Mixing Bowl, fit the Beaters and Bowl Scaper and cover with the Bowl Cover.
4 Gradually increase the speed to setting 3 and mix for a few seconds, then increase to speed 6 for approximately 2 minutes.
5 Add the almond butter and half the flour and mix on setting 3. Add the rest of the flour gradually whilst the Mixer is running until the mixture starts to bind.
6 Form the mixture into a ball with your hands and then shape into 20 walnut sized balls. Place slightly apart on the baking trays, flatten slightly and press lightly with the back of a fork.
7 Bake in the centre of the oven for 10-12 minutes until lightly browned, leave to firm up slightly on the baking tray then remove and cool completely on a wire rack.
Quick Lemon Drizzle Cake
Preparation time: 10 minutes
Cooking time: 1 hour
Ingredients:
170g self-raising flour
170g caster sugar
110g unsalted butter, softened
Zest of a lemon
2 medium eggs
- 4 tbsp milk
Syrup:
13 tbsp icing sugar, sieved
- Juice of a lemon
Method:
1 Line a 2lb loaf tin with non-stick baking paper or a paper loaf liner. Preheat the fan oven to 160^ / Gas Mark 3.
2 Put all the ingredients into the Mixing Bowl, fit the Beaters with Bowl Scaper and Bowl Cover.
3 Mix on speed 3 for 1 minute and then increase to speed 5 for a further minute.
4 Pour the mixture into the prepared tin.
5 Bake in the centre of the oven for about an hour, covering with baking paper after 30 minutes if becoming too brown. Test with a fine skewer in the middle of the loaf, if it comes out clean the cake is ready.
6 Put the icing sugar into a small bowl and mix in the lemon juice.
7 Whilst the cake is still warm prick the surface with a fine skewer or cocktail stick and spoon over the lemon syrup. Leave to cool completely in the tin.
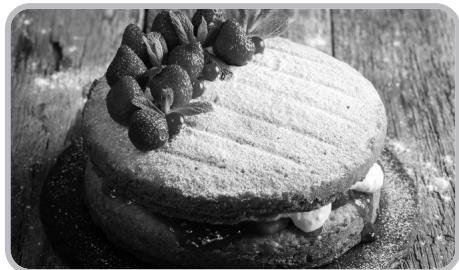
One Stage Victoria Sandwich
Preparation time: 10 minutes
Cooking time: 30 minutes
Ingredients:
150g caster sugar
150g soft margarine
150g self-raising flour
11/2 level tsp baking powder
3 medium eggs, beaten
Filling (Buttercream):
Preparation time: 5 minutes
100g soft margarine
200g icing sugar, sieved
- Seedless raspberry jam
Method:
1 Line 2 × 20 cm sandwich tins with non-stick baking paper circles.
2 Preheat the fan oven to 170^ Gas Mark 4.
3 Put the sugar and margarine into the Mixing Bowl, sieve in the flour and baking powder and add the eggs.
4 Fit Beaters with Bowl Scaper and the Bowl Cover.
5 Mix, for 1 minute on speed 3 until all ingredients are fully incorporated.
6 Divide the mixture equally between the tins.
7 Bake the cakes in the middle of the oven for about 30 minutes or until golden brown, well risen and springy to the touch.
8 Remove from the tins and cool completely on a wire rack.
9 Meanwhile make the buttercream: fit the Beaters with Bowl Scaper to the Mixing Bowl.
10 Put the margarine in the Mixing Bowl, fit the Bowl Cover and mix for 20 - 30 seconds on speed 3.
11 Add half the icing sugar and mix again until combined.
12 Add the remaining icing sugar through the chute while the Mixer is running. Refrigerate before use if required.
13 To serve, fill the cake with jam and buttercream and dust the top with a little sieved icing sugar.
Christmas Cake
Preparation time: 30 minutes
Cooking time: 3 hours
Ingredients:
375g currants
140g sultanas
130g raisins
- 50g mixed peel
- 75g glace cherries, halved
175g unsalted butter, softened and cubed
175g soft dark brown sugar
Zest of half lemon
215g plain flour
- 1 / 2 level tsp mixed spice
1 / 2 level tsp cinnamon
3 medium eggs, beaten
- 1 tbsp brandy
Method:
1 Lightly grease and line the sides and base of an 18cm round deep cake tin with non-stick baking paper.
2 Tie a double band of brown paper around the outside of the tin.
3 Sieve the flour, mixed spice and cinnamon into a bowl and set aside.
4 Put the currants, sultanas, raisins and mixed peel into a large bowl and stir well with a wooden spoon. Set aside.
5 Wash the glace cherries under cold running water and then dry thoroughly using a clean tea towel or kitchen paper. Coat with a little of the flour and spice mixture and set aside.
6 Preheat the fan oven to 130^ / Gas Mark 1.
7 Put the softened butter and sugar and lemon zest into the Mixing Bowl and fit the Beaters with Bowl Scaper and Bowl Cover. Cream together on speed 3 until pale and light (about 4 minutes).
8 While the Mixer is running add a little of the flour mixture and a little of the beaten egg, beating well after each addition until all the flour and egg has been added (about 4 minutes).
9 Mix in the brandy.
10 Reduce the setting to 1, then add the dried fruit and finally the cherries. Mix gently and then turn into the prepared tin. Level the surface with a spoon.
11 Bake in the centre of the oven for 3 hours, covering the top of the tin with baking paper after 112 - 2 hours if becoming too brown. Insert a skewer in the middle of the cake, if it's done the skewer will come out clean.
12 Leave to cool completely in the tin, then store upside down wrapped in a double layer of baking paper and over wrapped with foil.
13 Feed weekly, by pricking the surface of the cake with a fine skewer and slowly pouring over a tablespoon of brandy.
14 When required, decorate the cake with marzipan and royal or fondant icing.
Cheese Scones (makes 6-8)
Preparation time: 5 minutes Cooking Time 10 – 15 minutes
Ingredients:
225g self-raising flour
1 level tsp baking powder
Pinch salt
- 40g unsalted butter, softened and cut into pieces
100g mature cheddar cheese, grated
1 level tsp mustard powder
Approximately 150ml milk
Method:
1 Lightly grease a baking tray or line with non-stick baking paper.
2 Preheat the fan oven to 210^ / Gas Mark 7.
3 Sieve the flour, baking powder and salt into the Mixing Bowl, add the butter, fit the Beaters and Bowl Cover.
4 Mix on speed 4 until the mixture resembles fine breadcrumbs (approximately 1 - 112 minutes).
5 Add most of the cheese and the mustard powder and mix for 30 seconds on speed 2.
6 With the mixer running add most of the milk until a soft light dough forms (about 30 seconds, speed 2).
7 Tip the dough out of the Mixing Bowl onto a lightly floured surface, form into a ball, knead very lightly and then roll the dough out to about 2cm thick.
8 Cut out the scones using a 6 - 7cm plain cutter and place on the baking tray. Re-roll the dough as necessary.
9 Brush the tops of the scones with a little milk and sprinkle on the remaining cheese.
10 Bake near the top of the oven for about 10-15 minutes until well risen and golden brown.
11 Cool on a wire rack and serve warm or cold with butter.
Creamed potatoes
Preparation time: 5 minutes
Cooking time: 30 minutes
Ingredients:
- 750g Maris Piper potatoes, peeled and cut into even sized chunks
1 / 2 level tsp salt - 2 heaped teaspoons butter
100ml milk
Method:
1 Put the potatoes in a pan, cover with cold water and add the salt.
2 Boil the potatoes for 25 -30 minutes or until soft and then drain well.
3 Place the potatoes in the Mixing Bowl and fit the Beaters with Bowl Scaper and Bowl Cover.
4 Beat on speed 3 for about 1 minute then add the butter and milk and beat for a further minute on speed 5 until smooth and creamy.
Recipes - Dough Hook
White Spelt Rolls (makes 12)
Preparation time: 10 minutes plus rising time
Cooking Time: 15-20 minutes
Ingredients:
- 500g white spelt flour, plus a little extra for dusting
- 7g sachet fast action dried yeast
1 level tsp caster sugar
1/2 level tsp salt - 300ml warm water (30^ - 36^)
- 1 tbsp sunflower oil
Glaze:
- Beaten egg
- Seeds such as poppy, pumpkin or sunflower
Method:
1 Put the flour, yeast, sugar and salt in the Mixing Bowl.
2 Fit the Dough Hook Assembly and Bowl Cover.
3 Select setting 4 and gradually add the water. When all the water has been added, add the oil and reduce to setting 2 to knead for 5 minutes.
4 Remove the Dough Hook Assembly and then cover the Mixing Bowl with a clean tea towel and leave the dough to rise for 1 hour until doubled in size.
5 On a lightly floured surface, knead the dough for 1 minute and then shape into 12 equal sized rolls. Place on a baking tray lined with non-stick baking paper. Cover the rolls with a clean tea towel and leave to rise for 30 minutes. Preheat the oven to 200^ / Gas Mark 6.
6 Dust the tops with flour or glaze the rolls with a little beaten egg and sprinkle with seeds.
7 Bake for 15-20 minutes until golden brown and are hollow when tapped on the base.
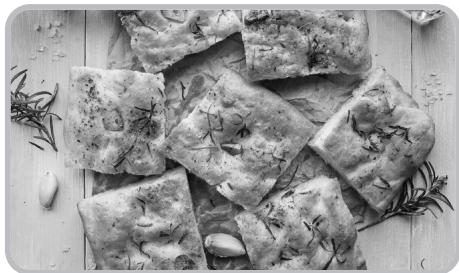
Focaccia
Preparation time: 15 minutes plus approximately 212 hours rising
Cooking time: 25 minutes
Ingredients:
- 500g strong white bread flour
- 7g sachet fast action dried yeast
1 level tsp caster sugar
2 level tsp salt
300ml warm water (30^ - 36^) - 50ml olive oil (plus extra for glazing)
A little rock salt - 2 - 3 fresh rosemary sprigs
Method:
1 Put the flour, yeast, sugar and salt into the Mixing Bowl. Fit the Dough Hook Assembly and Bowl Cover.
2 Select setting 4 and with the mixer running, gradually add the water and 50ml oil, until the dough forms a ball.
3 Reduce to setting 2 and knead for 5 minutes.
4 Remove the Bowl Cover and Dough Hook Assembly. Cover the Mixing Bowl with a damp tea towel and leave the dough to rise in a warm place until doubled in size (approximately 1 - 112 hours).
5 Line a baking tray with non-stick baking paper.
6 Sprinkle a little flour on the work surface, remove the dough from the Mixing Bowl and knead lightly. Shape into a circle, flatten slightly and place on the baking tray.
7 Brush the top with olive oil then dimple the surface with your fingers, sprinkle with rock salt and stud with sprigs of rosemary. Leave to rise for about an hour, loosely covered with cling film.
8 Preheat the oven to 210^ Gas Mark 7 and bake for 20-25 minutes until golden brown, well risen and hollow when tapped on the base.
9 Whilst still warm, drizzle a little more oil over the surface and serve warm or cold.
Vegan Pizza
Preparation time: 10 minutes plus rising time
Cooking time: 20 minutes
Dough:
225g strong white bread flour
- 7g sachet fast action dried yeast
1/2 level tsp salt
1 tbsp olive oil
150ml warm water (30 - 36^)
Topping:
- 200g mushrooms, sliced
3 tbsp olive oil
1 clove garlic, crushed
Salt and black pepper - 4 tbsp tomato passata
- 1 / 2 level tsp dried mixed herbs
1/2 level tsp dried oregano - 75g dairy-free mozzarella, grated
Method:
1 Put the flour, yeast and salt into the Mixing Bowl. Add the olive oil, fit the Dough Hook Assembly and Bowl Cover.
2 Select setting 4 and gradually add the water.
3 When the dough forms a ball (at about 1 minute) reduce the setting to 2 and knead for 5 minutes to make a soft dough.
4 Remove the Dough Hook Assembly and cover the Mixing Bowl with a clean tea towel. Leave the dough to rise for 1 - 1 12 hours until doubled in size.
5 Meanwhile prepare the topping: fry the mushrooms and garlic in 2 tbsp oil until softened, allow to cool, discarding any liquid.
6 Preheat the oven to 210^ / Gas Mark 7. Line a large baking tray with non-stick baking paper.
7 Remove the dough from the Mixing Bowl when ready and knead for about a minute on a lightly floured surface. Using a rolling pin, roll into a circle of approximately 30cm diameter and place on the prepared baking tray.
8 Sprinkle the pizza with a little salt and pepper and spread the passata over the surface to the edge. Sprinkle on the herbs, add the mushroom slices and top with the grated cheese. Drizzle 1 tbsp oil over the top then bake for 15-20 minutes or until the crust has browned and the cheese has melted.
9 Garnish with a sprig of fresh basil and serve immediately.
Notes
Notes
FP400520 MUK Rev1 05/20
Registering Your 2 Year Guarantee
Your standard one year guarantee is extended for an additional 12 months when you register the product within 28 days of purchase with Morphy Richards. If you do not register the product with Morphy Richards within 28 days, your product is guaranteed for 1 year. To validate your 2 year guarantee register with us online at
www.morphyrichards.co.uk
Or call our customer registration line
UK 0344 871 0242
IRE 1800409119
N.B. Each qualifying product needs to be registered with Morphy Richards individually.
Please note that the 2 year guarantee is only available in the UK and Ireland. Please refer to the one year guarantee for more information.
Your 1 Year Guarantee
It is important to retain the retailer's receipt as proof of purchase. Staple your receipt to this back cover for future reference.
Please quote the following information if the product develops a fault. These numbers can be found on the base of the product.
Model no.
Serial no.
All Morphy Richards products are individually tested before leaving the factory. In the unlikely event of any appliance proving to be faulty within 28 days of purchase, it should be returned to the place of purchase for it to be replaced.
If the fault develops after 28 days and within 12 months of original purchase, you should contact the Helpline number quoting Model number and Serial number on the product, or write to Morphy Richards at the address shown.
You may be asked to return a copy of proof of purchase.
Subject to the exclusions set out below (see Exclusions), the faulty appliance will then be repaired or replaced as appropriate and dispatched usually within 7 working days of receipt.
If, for any reason, this item is replaced or repaired during the 1 year guarantee period, the guarantee on the new item will be calculated from original purchase date. Therefore it is vital to retain your original till receipt or invoice to indicate the date of initial purchase.
To qualify for the 1 year guarantee, the appliance must have been used according to the instructions supplied. For example, crumb trays should have been emptied regularly.
Exclusions
Morphy Richards shall not be liable to replace or repair the goods under the terms of the guarantee where:
1 The fault has been caused or is attributable to accidental use, misuse, negligent use or used contrary to the manufacturer's recommendations or where the fault has been caused by power surges or damage caused in transit.
2 The appliance has been used on a voltage supply other than that stamped on the products.
3 Repairs have been attempted by persons other than our service staff (or authorised dealer).
4 The appliance has been used for hire purposes or non domestic use.
5 The appliance is second hand.
6 Morphy Richards reserves the right not to carry out any type of servicing under the guarantee at its discretion
7 Plastic filters for all Morphy Richards kettles and coffee makers are not covered by the guarantee.
8 Batteries and damage from leakage are not covered by the guarantee.
- This guarantee does not confer any rights other than those expressly set out above and does not cover any claims for consequential loss or damage. This guarantee is offered as an additional benefit and does not affect your statutory rights as a consumer. Morphy Richards products are intended for household use only. See usage limitations within the location safety instructions.
Disclaimer
Morphy Richards has a policy of continuous improvement in product quality and design. The company, therefore reserves the right to change the specification of it's models at any time.

For electrical products sold within the European Community. At the end of the electrical products useful life, it should not be disposed of with household waste.
Please recycle where facilities exist. Check with your Local Authority or retailer for recycling advice in your country
IF YOU ARE HAVING A PROBLEM WITH ONE OF OUR PRODUCTS, CALL OUR HELPLINE:
UK: 0344 871 0944
EIRE: 1800 409 119
SPARES: 0344 873 0710
morphyrichards
The After Sales Division
Morphy Richards Ltd
Mexborough, South Yorkshire,
England, S64 8AJ
Helplines (office hours)
UK 0344 871 0944
Spare Parts 0344 873 0710
Republic of Ireland 1800 409 119
www.morphyrichards.com