
FE9163CIN - Oven ROSIERES - Free user manual and instructions
Find the device manual for free FE9163CIN ROSIERES in PDF.
| Brand | ROSIERES |
| Model | FE9163CIN |
| Product type | Built-in oven |
| Power supply voltage | 230 V - 50 Hz |
| Maximum total power | 7.5 kW (approx) |
| Interior volume | 90 liters |
| Interior dimensions (H x W x D) | 360 x 630 x 395 mm |
| Cooking functions | Light, top heating element, bottom heating element, grill, grill+fan, traditional cooking, convection, forced air defrost |
| Timer/Programmer | Electronic with display, timer, semi-automatic and automatic cooking, audible signal |
| Rotisserie | Yes, included |
| Bulb type | Standard (25 W) |
| Door | Removable inner glass for cleaning, detachable |
| Cleaning | Enamel interior wall, clean with non-abrasive detergent |
| Safety | Temperature indicator light, automatic shut-off at end of cooking, child safety (supervision recommended) |
| Installation | Built-in, niche dimensions (see manual) |
| Warranty | 1 year from date of purchase |
| After-sales service | Original parts available from authorized centers |
Frequently Asked Questions - FE9163CIN ROSIERES
User questions about FE9163CIN ROSIERES
0 question about this device. Answer the ones you know or ask your own.
Ask a new question about this device
Download the instructions for your Oven in PDF format for free! Find your manual FE9163CIN - ROSIERES and take your electronic device back in hand. On this page are published all the documents necessary for the use of your device. FE9163CIN by ROSIERES.
USER MANUAL FE9163CIN ROSIERES
Oven Instructions for use, maintenance and installation
Technical specification Page 3
Preparing the oven Page 4
Control panel Page 5
Description of control panel symbols Page 6
Using the spit Page 7
Using the grill Page 7
Electronic programmer Page 8-9
Cleaning the removable glass panel Page 10
Removing the oven door Page 10
Replacing the bulb Page 10
Cleaning and maintenance Page 11
Technical support Page 11
Instructions for building in Page 12
Dear Customer,
Thank you for choosing One of our products. We are sure that it will satisfy all your requirements and guarantee excellent results at all times.
It is important to carefully follow the instructions for correct use of the appliance.
The manufacturer will not be liable for damage to property or injury to persons caused by faulty or incorrect installation.
The manufacturer reserves the right to make alterations to the product at any time without notice.
Technical specifications
This appliance complies with regulations for the suppression of radio interferences.
Power supply voltage
230V - 50 Hz.
Internal dimensions
| Height: | 360 mm |
| Width: | 630 mm |
| Depth: | 395 mm |
| Working volume: | 90 litres |
Absorption of heating elements (kW)
| Upper heating element: | 1.050 kW |
| Lower heating element : | 1.550 kW |
| Circular heating element : | 2.500 kW |
| Grill heating element : | 2.500 kW |
| Radial fan: | 0.025 kW |
| Spit gear motor: | 0.004 kW |
| Oven light: | 0.025 kW |
| Cooling fan: | 0.070 kW |
INSTALLATION
Declaration of conformity. The parts of this appliance designed to come into contact with foodstuffs comply with the prescriptions of EEC directive 89/109, assimilated by Legislative Decree n° 108 of25/01/92

Appliance compliant with European Directives 89/336/EEC, 73/23/EEC and subsequent modifications.
IMPORTANT
This appliance may only be used to cook foodstuffs.
Any other use (heating rooms, for example) is considered as improper and therefore dangerous.
The maker declines all responsibility for damage caused by improper, incorrect or unreasonable use.
The following fundamental rules must be observed when using an electrical appliance:
- do not remove the plug from its socket by pulling the power cable
- do not touch the appliance with wet or damp feet
- do not use the appliance barefooted
- children or incapable people may only use the appliance under supervision
- adapters, multiple sockets and extension cables should not be used.
- in case of faults and/or malfunctions, switch off the appliance; do not attempt to repair it yourself.
If the cable is damaged, replace it immediately as follows:
- open the terminal board cover, remove the power cable and replace it with one of a relative length with rubber insulation (H05RR-F) and sufficiently large for the rated power of the appliance.
This operation must be carried out by a qualified technician.
The earth wire (yellow - green) must be about 10 mm longer than the line wires.
In case the appliance needs repairing, contact an authorised technical service centre and make sure original spare parts are used.
Non-compliance with the above points may jeopardise the safety of the appliance.
Preparing the oven for use
Clean the inside of the oven using non-abrasive soap and warm water, then rinse and dry.
Switch the oven on at maximum temperature for approximately 20 minutes in order to eliminate oil, grease and remains of any other products used during manufacturing that can cause unpleasant smells during cooking. The appliance must be electrically disconnected before cleaning.
Caution!
Keep children well away from the oven during operation.
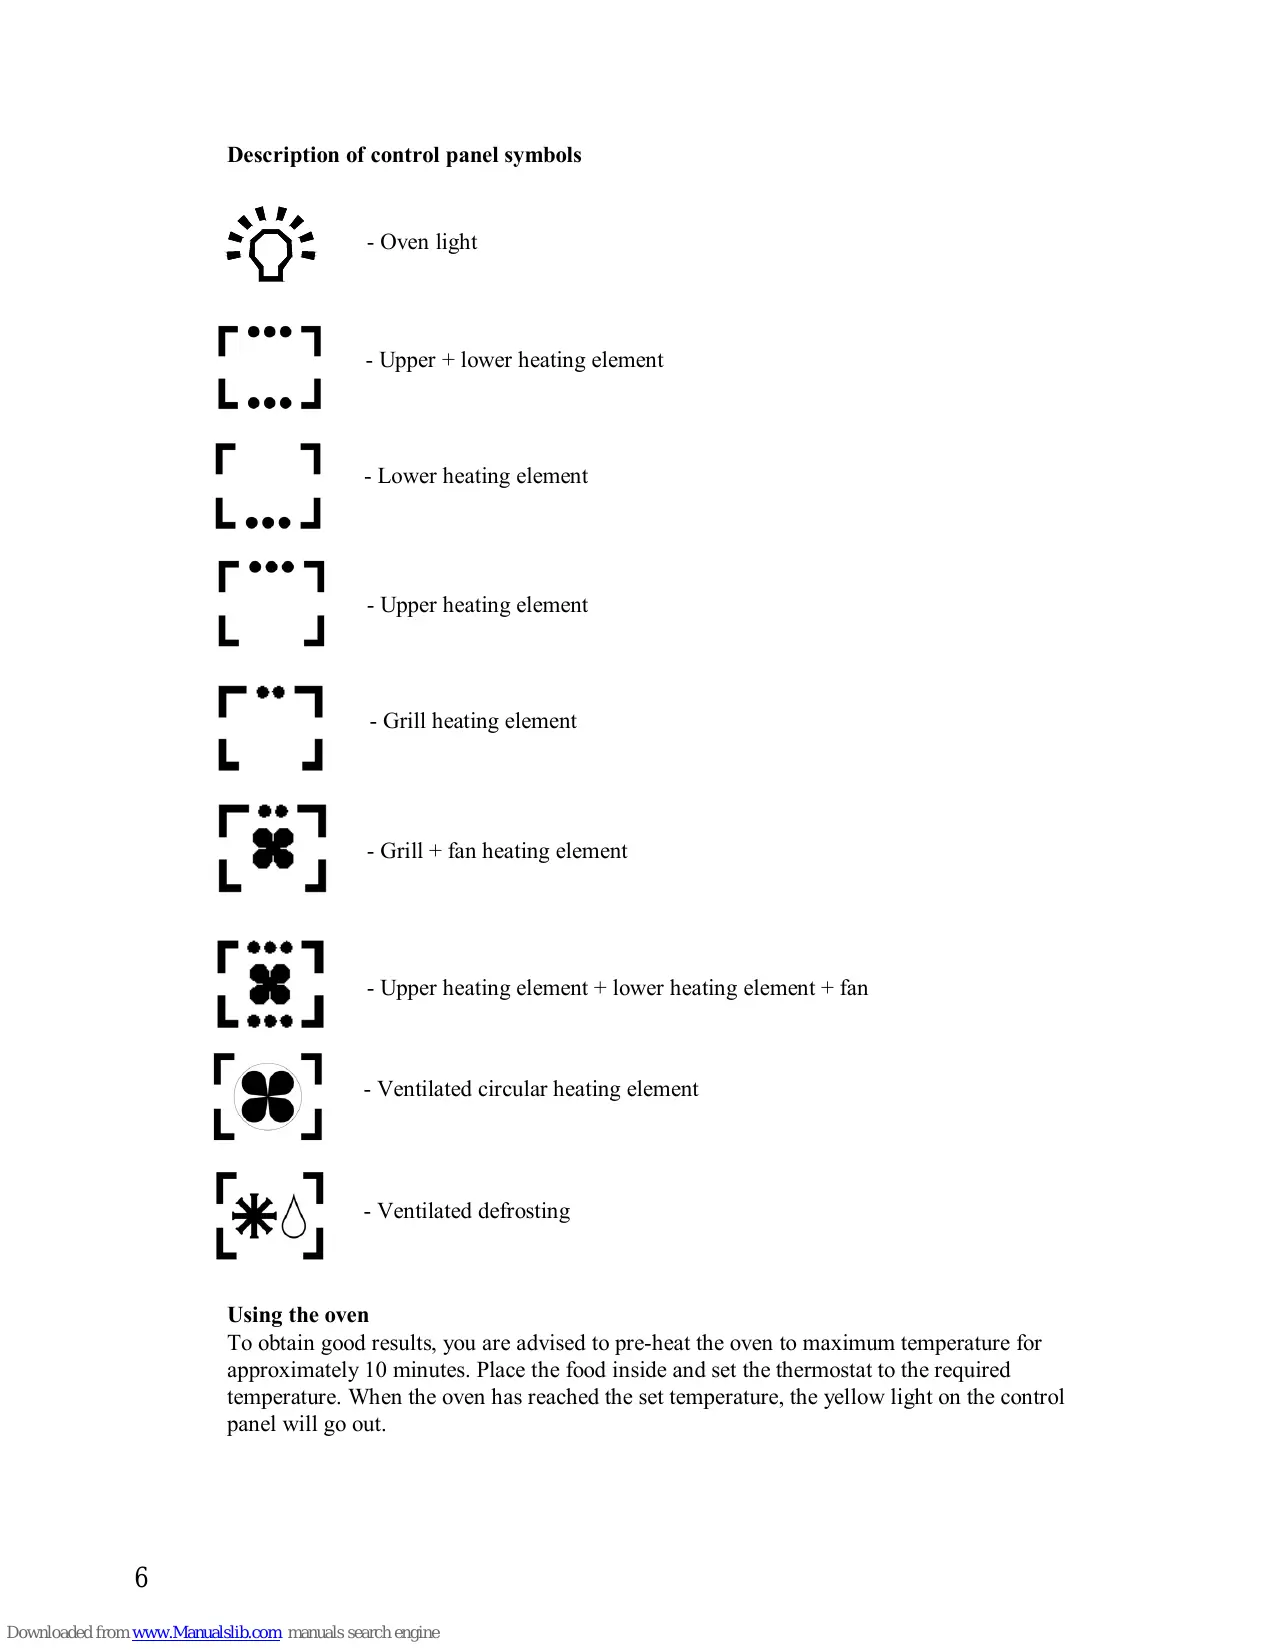
1 - Thermostat
2 - Selector
3 - Electronic programmer
4 - Power supply pilot light
5 - Temperature pilot light
Description of control panel symbols

- Oven light

- Upper + lower heating element

- Lower heating element

- Upper heating element

- Grill heating element

- Grill + fan heating element
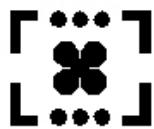
- Upper heating element + lower heating element + fan

- Ventilated circular heating element
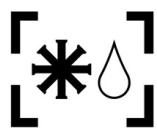
- Ventilated defrosting
Using the oven
To obtain good results, you are advised to pre-heat the oven to maximum temperature for approximately 10 minutes. Place the food inside and set the thermostat to the required temperature. When the oven has reached the set temperature, the yellow light on the control panel will go out.
Using the spit (fig. 1)
Insert the spit rod "A" into the drive unit and the groove "B" into the bend "C".
Turn the plastic handle "D" anticlockwise and slide the rack into the oven runners ensuring that the rod "E" slots into the hole "F".
The spit rack must always be fitted in the middle of the oven (second position from bottom).
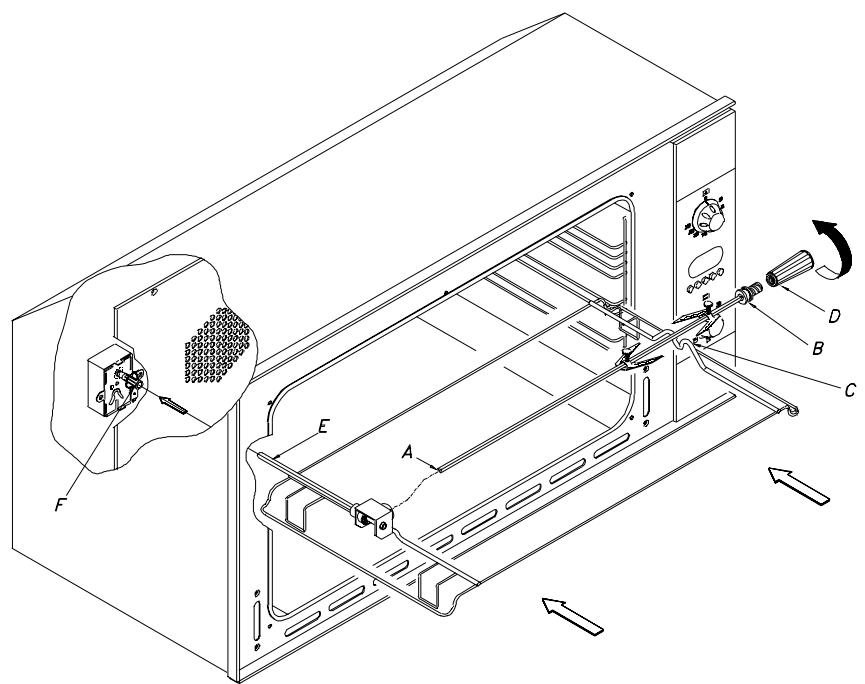
Fig. 1
Using the grill
Place the food to be grilled directly on the rack or insert on the spit.
The rack must be positioned at the top of the oven whereas the spit rack must always be positioned in the middle (second position from bottom).
The dripping pan can be fitted at the bottom to collect the fat.
CAUTION: WHILE THE GRILL IS OPERATING, THE ACCESSIBLE PARTS ARE VERY HOT - KEEP CHILDREN WELL AWAY FROM THE OVEN.
Note:
Do not use aluminium foil to cover the grill tray or to wrap the food being cooked as the reflected heat will damage the grill element and the aluminium foil can catch fire.
Ventilated cooking
The air distributed by the fan allows you to cook different types of food together (fish, meat etc.) without mixing smells and flavours. A fan uniformly distributes the heat provided by the heating element positioned behind the oven wall. Temperature range 50^-250^ .
Electronic Programmer

Timer

Cooking time with automatic function

End of cooking time

Move back numbers in all programs

Move ahead numbers in all programs

Automatic program

Duration and manual mode

Minute control
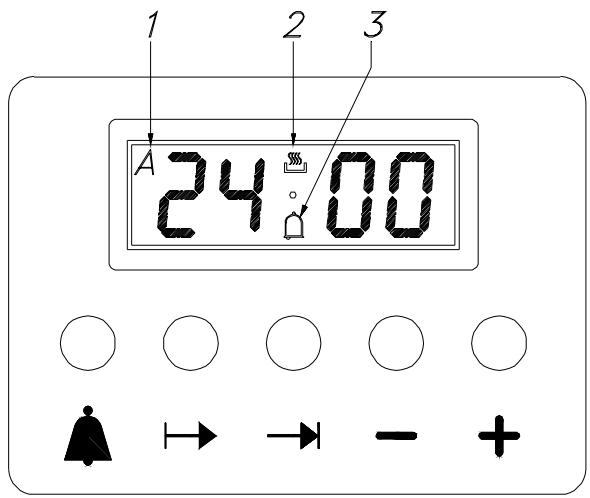
Fig. 2
Settings
After pressing a function button, the required time can be set via the +/- keys. For quicker regulation, keep the required key pressed. By pressing the function key and then releasing it, the pre-selected function appears on the display and remains for 5 seconds: during this time the setting can be performed (with one hand). Five seconds after releasing the function key or finishing the setting, the display returns to the clock. Any program set will start immediately. Program selection is accompanied by the sounding of a buzzer.
Setting the time (clock)
Select the clock function by simultaneously pressing the Duration and End of cooking time keys and adjust the clock by means of the +/- keys. All the programs set will be cancelled and the relay will switch off.
Manual operation
Simultaneously press the and (the auto symbol will be cancelled): the saucepan symbol will light up.
Any program set will be cancelled.
Semi-automatic operation and cooking duration
Press the Cooking duration key and set the duration by means of the +/- keys. The saucepan symbol will appear.
The relay output will be activated.
If clock = end of cooking time, the relay and saucepan symbol will be off.
The buzzer will sound and symbol A will blink.
Semi-automatic operation and end of cooking time
Press the end of cooking time key and set the required time by means of the +/- keys. The symbol A and the symbol of the saucepan will light up.
The relay output will be activated.
If clock = end of cooking time, the relay and saucepan symbol will switch off.
The buzzer will sound and the symbol A will blink.
Completely automatic operation
Press the duration key and set the required time by means of the +/- keys. The symbol A will appear.
The relay will come on and the saucepan symbol will appear.
Select the End of cooking time function - the minimum setting time will appear. Set the required time by means of the +/- keys.
The relay and the saucepan symbol will switch off.
The saucepan symbol will re-appear when the clock time = the calculated switch-on time.
After setting the automatic program the symbol A will blink. The buzzer will sound and the saucepan symbol and relay will switch off.
Minute control
Press the Minute control key and set the required time by means of the +/- keys.
While the set time runs, the bell symbol will appear.
When the set time elapses, the buzzer will sound.
Buzzer
The buzzer remains active for 7 minutes after the minute control cycle or the cooking program have finished.
Press any function key to stop the buzzer.
Program start-up and check
A set program is run when the required time has also been set. The remaining timers can be checked at any time by selecting the relevant function.
Setting error
The setting is not correct if the clock time is between the beginning of cooking time and the end of cooking time.
The error is indicated via sounding of a buzzer and blinking of the Auto symbol. An incorrect setting can be corrected by re-setting either the beginning or end of cooking time.
Cancelling a program
A program can be cancelled by selecting the manual function.
A set program is automatically cancelled when it reaches the end of its cycle.
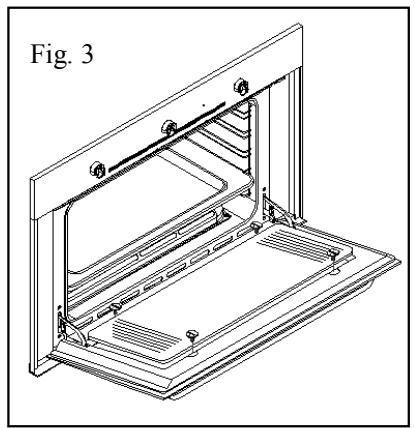
Oven door
Clean the oven do or using non-abrasive products. The glass panel can be easily removed and cleaned by unscrewing the four screws at the side (fig. 3).
natural_image
Technical line drawing of an open refrigerator with internal compartments and ventilation slots (no text or symbols)Removing the oven door
To make it easier to clear the oven, the door may be removed.
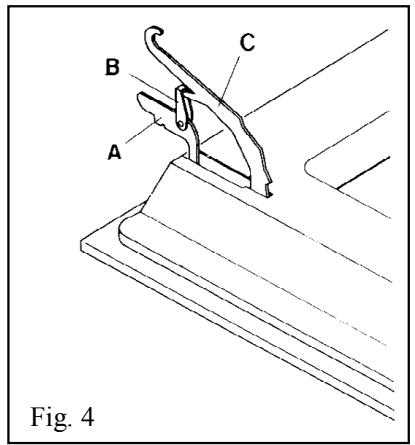
Hinge with mobile U-bolts (Fig. 4)
The hinges "A" are fitted with two mobile U-bolts "B" which block the door when it is completely open if they are hooked onto sections "C" of the hinges. After this has been done, the door must be lifted up and taken out. When carrying out this operation, hold the sides of the oven door beside the hinges.
To refit the door first slide the hinges into their grooves. Lastly, before closing the door do not forget to detach the two mobile U-bolts "B" which were used to hook the two hinges.
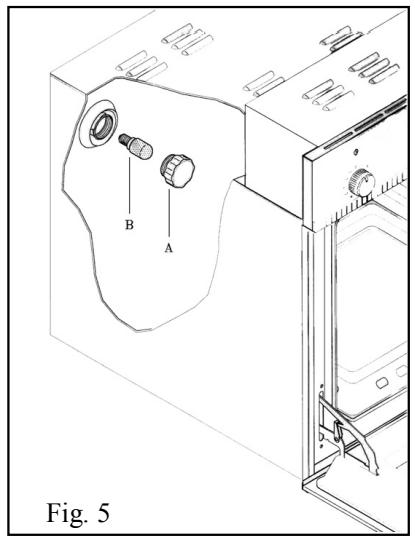
Replacing the bulb (fig. 5)
CAUTION: disconnect the oven power supply cable.
If you have to replace the bulb B, remove the protective cover A by turning it anticlockwise. After replacing the bulb, refit the protective cover A.
Cleaning and maintenance
Important: before carrying out maintenance on the oven, it must always be unplugged from the power supply or disconnected from the mains via the electrical system master switch.
The stainless steel and enamelled parts will keep their finish if cleaned with water or using specific products, drying them thoroughly.
Avoid using products that contain chlorine or diluted chlorine solutions, caustic soda, abrasive detergents, hydrochloric acid, vinegar and other products that can scratch.
Stains left on the bottom of the oven (sauces, sugary substances, egg white and fats) are caused by spatters or spillages of food. Spattering occurs during roasting and is due to the temperature being too high whereas spilling is due to containers being too small or to food increasing in volume during cooking.
These two problems can be solved by using high-sided containers or by using the dripping pan supplied with the oven. When cleaning the lower part of the oven, you are advised to remove any stains while the oven is still warm - the longer you wait, the more difficult it will be to remove them.
Immediately after use while the oven is still warm but switched off, you are also advised to place a cloth soaked in ammonia - a few drops are sufficient - on the bottom of the oven.
Close the oven door, wait approximately 10 minutes and then dry thoroughly.
Technical support
If the oven does not work correctly, you are advised to check the following before calling the technical support service:
CHECK THAT THE PLUG IS CORRECTLY INSERTED IN THE SOCKET
CHECK THE PROGRAMMING OF THE ELECTRONIC PROGRAMMER
If the cause of the fault is identified, switch the appliance off, do not tamper with it and call the Technical Support Service, specifying the model indicated on the identification plate at the bottom of the front of the oven.
The appliance is provided with a guarantee certificate which entitles the user to free use of the TECHNICAL SUPPORT SERVICE for one year from the date of purchase, the only expense being a fixed call-out fee. The guarantee certificate must be filled in and kept so that it can be shown to the TECHNICAL SUPPORT SERVICE.
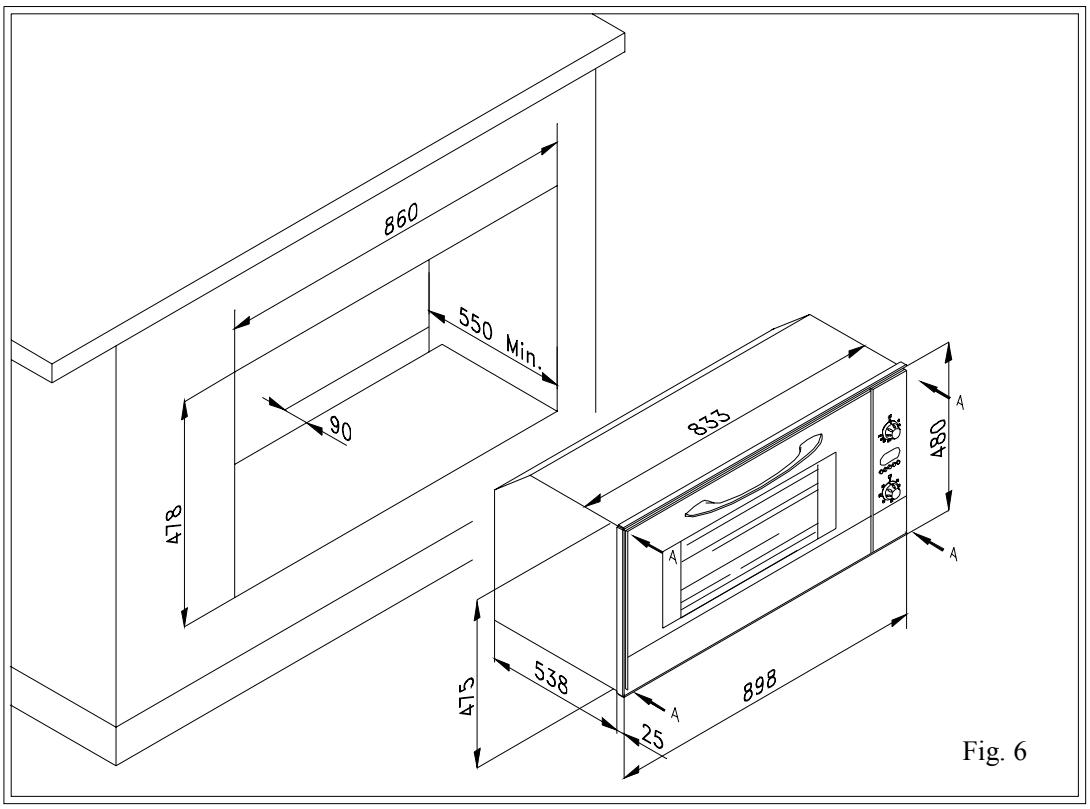
Instructions for building in the oven (fig. 6)
The oven can be housed below the worktop or in a column unit by means of 4 screws. Follow the drawing below.
IMPORTANT
To ensure the built-in appliance works correctly, the unit must correspond to certain characteristics.
The panels of the units near the oven must be made of heat-resistant material. Especially as regards veneered wooden furniture, the glues must withstand temperatures of up to 120^ C: plastic or binders that cannot withstand this temperature will deform or come unstuck.
In compliance with safety regulations, once the appliance is built in, contact with electrical components must no longer be possible.
All protective coverings must be fixed so they cannot be removed without the aid of a tool.
Index
Fig. 1
natural_image
Technical line drawing of an open refrigerator with internal compartments and ventilation slots (no text or symbols)Abb. 1
natural_image
Technical line drawing of an open refrigerator with ventilation grilles and mounting feet (no text or symbols)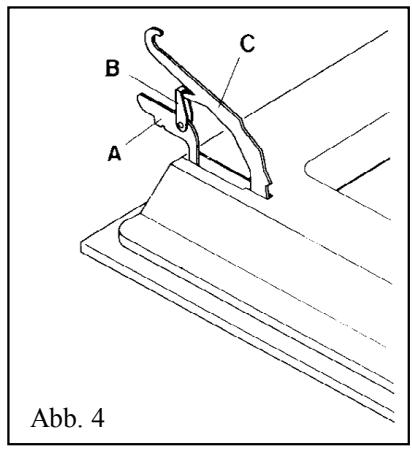
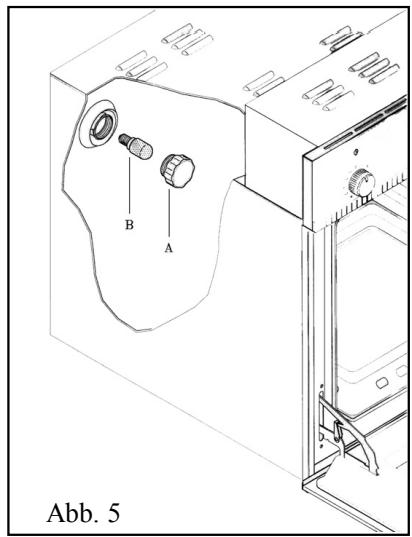
Fig. 1
natural_image
Technical line drawing of an open refrigerator with internal compartments and ventilation slots (no text or symbols)Fig. 1
natural_image
Technical line drawing of an open refrigerator with internal compartments and ventilation slots (no text or symbols)Fig. 1
natural_image
Technical line drawing of an open refrigerator with internal compartments and mounting feet (no text or symbols)- Dear Customer,
- Technical specifications
- Power supply voltage
- INSTALLATION
- IMPORTANT
- Preparing the oven for use
- Caution!
- Description of control panel symbols
- Using the oven
- Using the spit (fig. 1)
- Using the grill
- Note:
- Ventilated cooking
- Electronic Programmer
- Settings
- Setting the time (clock)
- Manual operation
- Semi-automatic operation and cooking duration
- Semi-automatic operation and end of cooking time
- Completely automatic operation
- Minute control
- Buzzer
- Program start-up and check
- Setting error
- Cancelling a program
- Oven door
- Removing the oven door
- Hinge with mobile U-bolts (Fig. 4)
- Replacing the bulb (fig. 5)
- Cleaning and maintenance
- Technical support
- Instructions for building in the oven (fig. 6)
- Index
Brand : ROSIERES
Model : FE9163CIN
Category : Oven