
SK22150 - Coffee machine SWAN - Free user manual and instructions
Find the device manual for free SK22150 SWAN in PDF.
User questions about SK22150 SWAN
0 question about this device. Answer the ones you know or ask your own.
Ask a new question about this device
Download the instructions for your Coffee machine in PDF format for free! Find your manual SK22150 - SWAN and take your electronic device back in hand. On this page are published all the documents necessary for the use of your device. SK22150 by SWAN.
USER MANUAL SK22150 SWAN
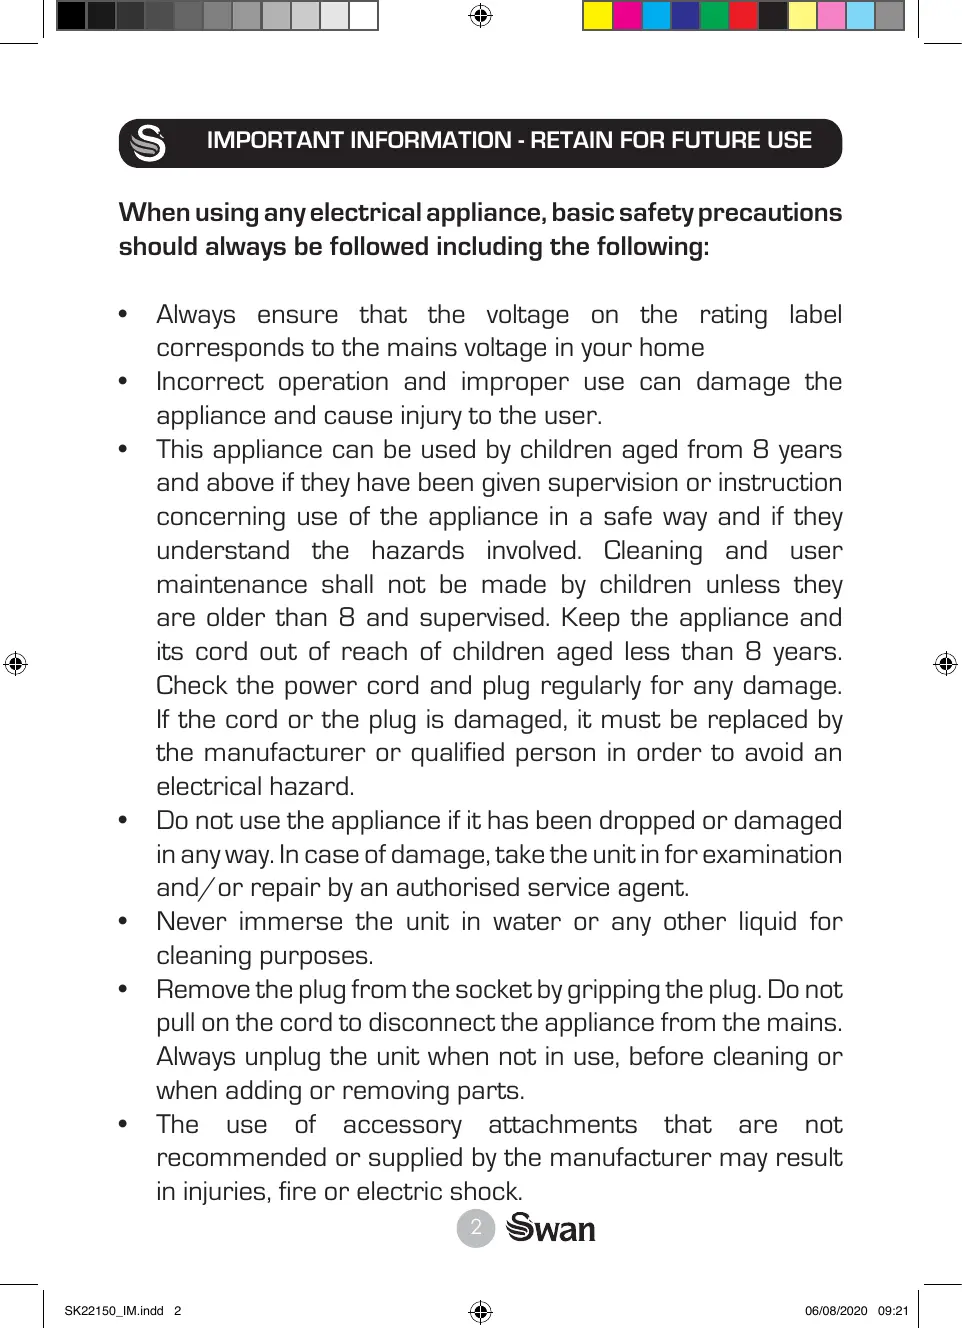
IMPORTANT INFORMATION - RETAIN FOR FUTURE USE
When using any electrical appliance, basic safety precautions should always be followed including the following:
- Always ensure that the voltage on the rating label corresponds to the mains voltage in your home
- Incorrect operation and improper use can damage the appliance and cause injury to the user.
- This appliance can be used by children aged from 8 years and above if they have been given supervision or instruction concerning use of the appliance in a safe way and if they understand the hazards involved. Cleaning and user maintenance shall not be made by children unless they are older than 8 and supervised. Keep the appliance and its cord out of reach of children aged less than 8 years. Check the power cord and plug regularly for any damage. If the cord or the plug is damaged, it must be replaced by the manufacturer or qualified person in order to avoid an electrical hazard.
- Do not use the appliance if it has been dropped or damaged in any way. In case of damage, take the unit in for examination and/or repair by an authorised service agent.
- Never immerse the unit in water or any other liquid for cleaning purposes.
- Remove the plug from the socket by gripping the plug. Do not pull on the cord to disconnect the appliance from the mains. Always unplug the unit when not in use, before cleaning or when adding or removing parts.
- The use of accessory attachments that are not recommended or supplied by the manufacturer may result in injuries, fire or electric shock.

IMPORTANT INFORMATION - RETAIN FOR FUTURE USE
- Do not let the cord hang over the edge of a table or counter. Ensure that the cord is not in a position where it can be pulled on inadvertently.
- Do not allow the cord to touch hot surfaces and do not place on or near a hot gas or electric burner or in a heated oven.
- Do not use the appliance on a gas or electric cooking top or over or near an open flame.
- Use of an extension cord with this appliance is not recommended. However, if it is necessary to use an extension lead, ensure that the lead is suited to the power consumption of the appliance to avoid overheating of extension cord, appliance or plug point. Do not place the extension cord in a position where it can be pulled on by children or animals or tripped over.
- This appliance is not suitable for outdoor use. Do not use the appliance for anything other than its intended use.
- Do not carry the appliance by the power cord.
- Do not leave the appliance unattended during use. Always unplug the unit when not in use or before cleaning.
- Always operate the appliance on a smooth, even, stable surface. Do not place the unit on or near a hot surface.
- Ensure that the unit is switched off after use.
- The manufacturer does not accept responsibility for any damage or injury caused by improper or incorrect use, or for repairs carried out by unauthorised personnel.
- In case of technical problems, switch off the product and do not attempt to repair it yourself. Return the appliance to an authorised service facility for examination, adjustment or repair. Always insist on the use of original spare parts.

IMPORTANT INFORMATION - RETAIN FOR FUTURE USE
Failure to comply with the above mentions precautions and instructions, could affect the safe operation of this product.
- Your appliance must never be switched on through an external timer or any kind of separate remote control system
- Do not operate the product without water
- This appliance is intended to be used in household and similar applications such as staff kitchen areas shops, offices and other working environments, farm houses, by clients in hotels, motels and other residential type environments, bed and breakfast type environments.
- Do not use outdoors.
DO NOT OVERFILL THE WATER TANK PAST THE MAX LEVEL. DOING SO POSES A SCALDING, ELECTRIC SHOCK OR FIRE RISK.

TECHNICAL DATA
Description: Espresso Coffee Machine
Model: SK22150 (all colours)
Input Voltage: 220-240V
Frequency: 50/60Hz
Power consumption: 1250 Watts


WARNING
HOT SURFACES
Beat the Daily Grind with our at home Barista Guide
The sweet scent of that first cup in the morning can melt all resistance to the day ahead and bring life to the sleep heavy limbs of any early morning riser. Coffee is truly man's best friend and as we launch our stylish and chic Retro Coffee Maker, we have some ways you can make the most of your coffee.
Keeping it Simple with Espresso
Perhaps expresso would be a better name, the espresso is favoured by the Italians for its quick hit and strong flavour. The espresso is coffee, simply. For a lighter caffeine hit a single shot of coffee will do, add a little water and, hey presto! An espresso is ready to spur you into the day ahead, or the night if you have big plans. If you need a little extra umph, add a second shot of coffee to feel the buzz last longer.
Some might call this simply, a black coffee. However, the Americano is Barista for a delicious steaming cup of Joe. 2/3 hot water and 1/3 espresso, this drink can be prepared using an espresso machine or the humble cafetiere. Hold that burning hot pot! If you're using a cafeteria, in order not to boil the nutty tones of this beverage, allow the boiled water five minutes to cool before pouring over your cool beans. Leave to brew for another three to five minutes and then, pour.
Never too Late for a Latte
The latte has evolved into a drink with so many opportunities for flavour it's almost overwhelming. Chai Latte, Caramel Latte, Vanilla Latte... heads have been known to spin right off in confusion on arriving at the local coffee shop, so struck by the numerous options available for this single drink. To keep things simple, it requires only one or two shots of water filtered coffee, and the addition of thinly foamed milk to create the original Café Latte.
Cap it off with a Cappuccino
A regular after dinner feature the cappuccino is a smooth and milky delight. A single shot of coffee first and then, the frothy top! Add approximately 6oz of milk to your metal jug and steam until the milk begins to swirl and has a delightful frothy appearance. Pour this into your shot of espresso and foam ahoy! Your cappuccino is ready. If you have a sweet tooth, sprinkle a light coating of chocolate powder or cinnamon on top.
The Unfathomable Flat White
White as a midnight Spector, mysterious as the lady of the lake. It seems that the Flat White-delicious, milky and maddening has become a talking point as nobody seems to know quite what it is. Well, mystery solved! One shot of espresso and the addition of very thin, ever so lightly steamed milk and what we have is the simply solved Flat White. I think we can all agree that the mystery was rather elementary, dear Watson.
Mix it up with a Mocha
Craving a little luxury? Need the caffeine hit but looking for a sweet fix as well? The mocha is a magical blend of coffee's enriching sustenance and chocolate's sweet seductive flavours. Add one shot of espresso to your favourite mug and a table-spoon or two of your favourite hot chocolate drink. Steam your milk until it's hot and smooth with a slight foam before adding it to your coffee-chocolate mix. Stir your potion until it's a mug of silky perfection. Indulge.
Have you been crafting some coffee magic in the kitchen? Share your favourite coffee brewing tips with us on social media so we can enjoy the perfect cappuccino, together. @swanbranduk

SAFETY TIPS
- Do not touch the hot surface of appliance (such as steam wand, and the coffee filter just after boiling). Use handle or knobs.
- Do not let the coffee maker operate without water.
DO NOT remove the porta-filter while brewing coffee. - Only remove the porta-filter to make additional coffee after at least 10 seconds.
- Caution should also be taken while removing the porta-filter since the metal parts will be hot. Please make sure to hold it by the handle and to use the filter retention clip to dispose the grounds.
- Caution should be used when moving unit with hot liquids.
This is so important, we have dedicated an entire page to it!
Have a quick look inside your kettle
Is there any lime scale in it?
- If there is then you need to use bottled water in this appliance because lime scale will clog the precision engineered parts and break it.
- If there isn't any lime scale and you never need to de-scale your kettle then you're probably OK with tap water.
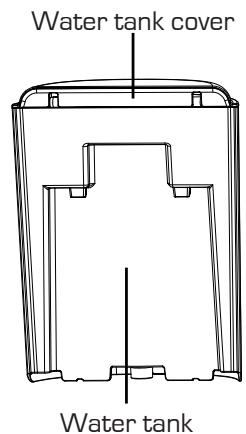
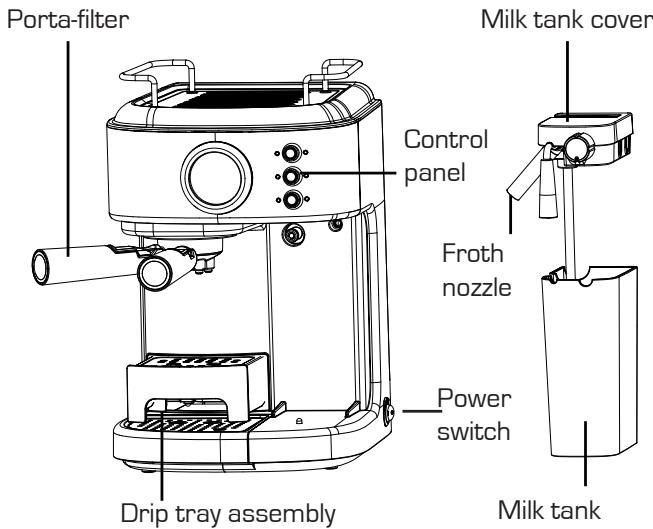
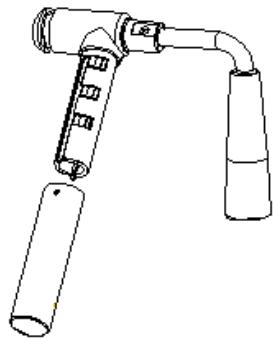
MAIN PARTS
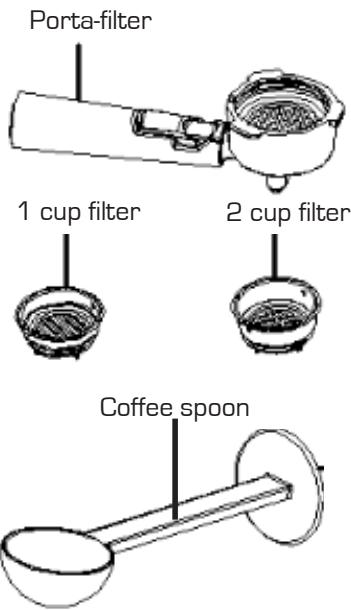
ACCESSORIES
SELECTION

HOW TO USE
INSERTING THE FILTER
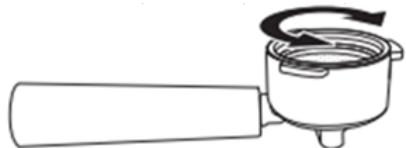
To insert the selected filter in the porta-filter, make sure to align the notch on the filter with the groove inside the porta-filter.
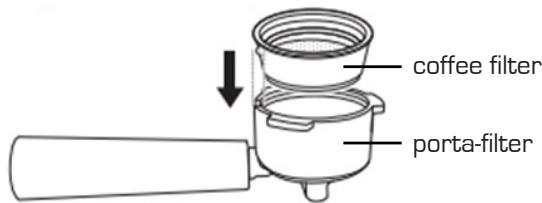
Turn the filter to the left or right to lock in place. This will help secure the filter in the porta-filter. There are two coffee filters: shallow (single shot) and deep (double shot).
BEFORE THE FIRST USE
Remove all packaging. Wash the water tank, milk tank, porta-filter, large & small filters and coffee spoon in warm soapy water. Rinse and dry thoroughly.
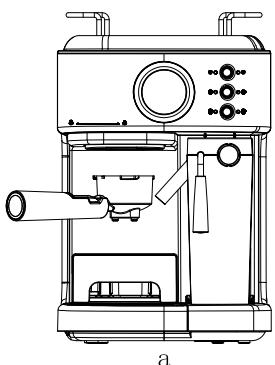
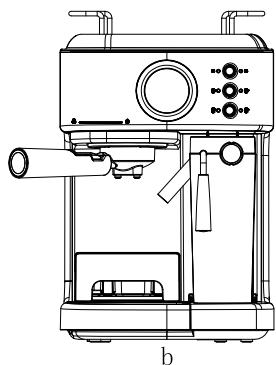
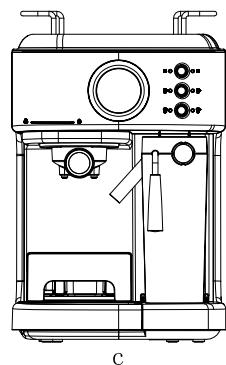
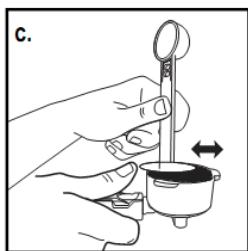
Refer to the drawing below on how to fit the porta-filter.
It is very important that the filter is in position as shown in fig C before starting the coffee making process.

HOW TO USE
CAUTION: PRESSURE
In order to avoid possible burns to body parts and/or other injury from hot steam and water or damage to the unit, never remove the water reservoir or the portal filter while your espresso/ cappuccino maker is brewing coffee or frothing.
Make sure the three lights are on before you remove the porta-filter to make additional cups of coffee. If you need to add more water or milk to the reservoirs, please make sure the three lights are on and ensure to switch off the unit by pressing the button on the side of the unit to the off position "O".
PRIMING THE UNIT
To prime unit, run the steam cycle for 90 seconds by following the steps below:
- Fill water tank between the "Min" and "Max" levels.
- Fill the milk tank with water between the "Min" and "Max" levels.
- Select one of the filters and place it in the porta-filter. Place the porta-filter in the unit ensuring it is properly locked and place a cup under it. Also, make sure the tip of the frothed milk dispensing tube is inside the cup.
- Plug the appliance into the appropriate outlet.
- Turn the switch on "I" (located at right hand side of the unit).
- The six control panel lights will start blinking. Once these lights become solid, press the cappuccino button twice.
- Once this process is completed, the six control panels will turn on solid.
Now your unit has been primed and is ready to be used.
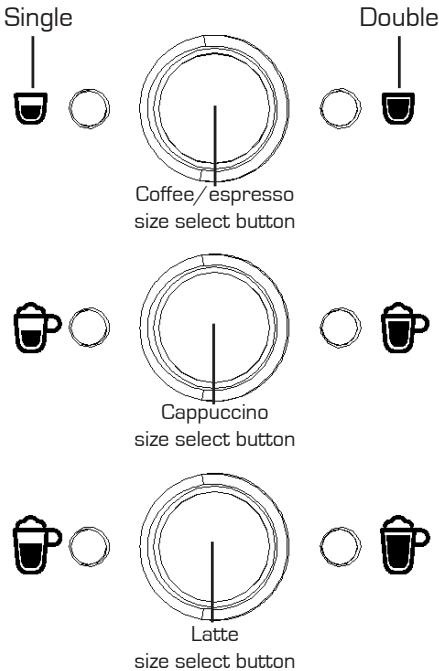
SELECTING THE RIGHT CUP
Before preparing your beverage, please make sure to select the right cup size according to the following table:
| BEVERAGE TYPE RATIO | ||
| ESPRESSO | Single Double | 60ml 119ml |
| CAPPUCCINO | Single Double | 178ml 355ml |
| LATTE | Single Double | 296ml 474ml |

HOW TO USE
- The coffee should be freshly ground and dark roasted. You may want to try a French or Italian roast ground for espresso.
- Pre-ground coffee will only retain its flavour for 7 - 8 days, provided it is stored in an airtight container and in a cool, dark area.
- Do not store in a refrigerator or freezer.
Whole beans are recommended to be ground just before use. Coffee beans stored in an airtight container will keep its flavour for up to 4 weeks.
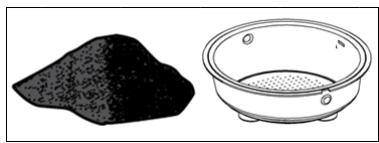
THE GRIND
This is a vital step in the espresso making process if you are grinding your own coffee and takes practice. The coffee must be of a fine grind.
The correct grind should look like salt.
- If the grind is too fine, the water will not flow through the coffee even under pressure. These grinds look like powder and feel like flour when rubbed between fingers.
- If the grind is too coarse, the water flows through the coffee too fast, preventing a full-flavoured extraction.
- Be sure to use a quality grinder for uniform consistency.
OPERATING INSTRUCTIONS
FILLING THE WATER TANK
- Fill the water tank with water, you may either use a jar to fill it up or remove it from the unit and then fill it up under the tap. If you have removed it from the unit to fill up with water, please make sure to place it back tightly in its place. Fill the reservoir with the desired amount of water ensuring it ranges within the "MIN" and "MAX" markings on the tank. Never use warm or hot water to fill the water reservoir
- Close the water reservoir lid and place it back in the unit ensuring it fits tightly
FILLING THE MILK TANK
- If you plan to prepare cappuccino or latte, remove the milk tank from the unit and open the lid then pour the quantity of cold milk you estimate you will need between the "MIN" and "MAX" levels. When done, place the milk tank back in the unit ensuring it fits tightly.
Note: You can use the type of milk of your preference, i.e. whole milk, low fat milk, organic or soy milk.

HOW TO USE
CHOOSE THE FILTER
Select the filter to be used as follows:
FOR A SINGLE SHOT- use the filter for a single shot of espresso if using ground - coffee
FOR A DOUBLE SHOT OR TWO SINGLE SHOTS - use the deeper filter for a double shot.
Note: If using filter pods, use ESE [45mm type]
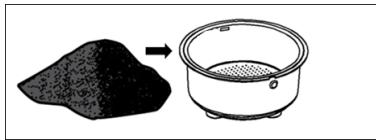
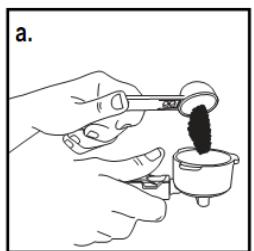
FILLING WITH COFFEE
Place selected filter in the porta-filter as follows:
FOR GROUND COFFEE:
- Fill the filter with fresh, fine ground espresso coffee (do not overfill). Note: the ground coffee amount can't exceed the MAX mark.
Tamp and compress firmly and evenly ground coffee.
Clean any excess coffee from the rim to ensure proper fit under brew head.
FIT THE PORTA-FILTER

- Position porta-filter underneath the brew head, attach it by first moving retainer clip back.
- Position handle so that the handle lines up with the open lock icon on the unit and fits into the groove.
- Then, slowly turn it to the right until the retention clip is aligned with the closed lock symbol on the unit. See drawing on page 9
Note: The frothing tube gets very hot. Please take care
PLACING THE CUP(S)
Pull out the drip tray bracket if you are using a small "demitasse" cup to brew espresso.
- Keep the drip tray bracket inside its compartment if you are using a larger cup to brew cappuccino.
- Keep the drip tray bracket inside its compartment if you are using a larger cup to brew latte.
CAUTION: When brewing cappuccino or latte, please make sure to adjust the frothing tube lever in order to position the milk dispensing tube inside the cup to be used. Additionally, you also can adjust the length of frothed milk dispensing tube by locking it onto different position of frothing tube lever to adapt to different size of cup. Note: This tube can be removed for cleaning.
TURNING THE UNIT ON
Make sure unit is plugged in.
- Turn unit on (switch on right hand side).
- The six control panel lights will start blinking during heating until the water reaches the perfect temperature.
Once six lights become solid, the unit is ready to use.
SELECT THE FUNCTION
PREPARING ESPRESSO
- Press the top coffee button once to brew a single cup coffee (single light illuminates).
- Press top coffee button twice to brew a double cup coffee. (double light illumina nates)
- Press and hold the top coffee button for 3 seconds (both lights illuminate), brew a large cup of coffee.
- The unit can brew espresso according to your setting, and it can stop automatically, when the light is solidly lit, it means brewing is finished.
- Press the button again if you want to stop the brewing process (eg. if the cup gets full!)
- Warning: after coffee is finishing brewing, please don't take out filter immediately, just wait for 10 seconds.

HOW TO USE
PREPARING CAPPUCCINO
Before brewing cappuccino, turn the froth control knob on the milk tank to middle position. You can adjust the quantity of frothed milk according to your preference by turning the Froth Control Knob to the right for more froth and to the left for less froth.
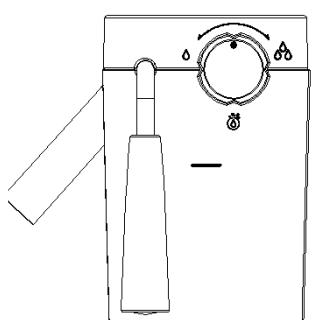
Normal froth
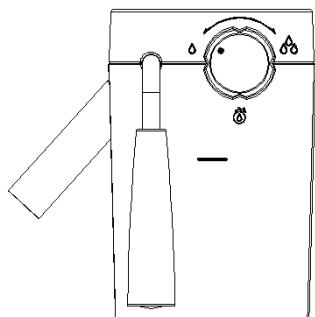
Less froth
More froth

Note: The froth intensity can be adjusted during the brewing cycle.
Press the Cappuccino Button once to brew a small cup of cappuccino.
Press the Cappuccino Button twice to brew a large cup of cappuccino.
The unit will start brewing the cappuccino according to your selection.
PREPARING LATTE
Prior to preparing your latte, adjust the quantity of frothed milk according to your preference by turning the Froth Control Knob to the right for more froth and to the left for less froth. See image above.
Press the Latte Button once to brew a small cup of latte.
Press the Latte Button twice to brew a large cup of latte.
PREPARING FROTHED MILK. The unit also allows you to prepare froth milk only. Press and hold the Cappuccino Button for 3 seconds if you wish to add more foam to your beverage or to prepare frothed milk for any other beverage, e.g. macchiatto, hot chocolate, Tea latte, etc. When done, press the Cappuccino Button once again to stop it.
AFTER PREPARING YOUR BEVERAGES WITH MILK. Once you are done preparing your beverage with milk, you can either store the unit's milk reservoir directly in the refrigerator (ready to be used for the next time) or dispose of the leftover milk.
If there is no operation or 15 minutes, the unit will enter sleep mode. You can press any button to wake up the unit.

wan

HOW TO USE
LIME SCALE
When you heat tap water, calcium and other mineral deposits attach themselves to the inside of your coffee maker, kettle, iron, washing machine etc.
Excessive lime scale build up will damage your Espresso Coffee Machine. The frothing tube is particularly vulnerable to lime scale blockage and should be cleaned regularly.
We recommend using pre-filtered or bottled water. If you cannot do this and use water straight from the tap then it will be necessary to de-scale the product regularly. There are plenty of good, inexpensive lime scale remedies available - including from Swan website.
HOW TO DE-SCALE
- With the milk reservoir placed in position, the appliance will remind the user to perform de-scaling. Six indicators quickly flashing alternately. At that time, the user shall fill the water tank with 600ml clean water and dedicated de-scale liquid solution.
- Press Espresso and Latte buttons simultaneously and then the appliance enters into de-scaling mode automatically, then the six indicators slowly flash alternately, after working for about half an hour, the six indicators quickly flash alternately.
Once that happens, empty the water tank and refill it with 600ml clean water. - That done, press Espresso and Latte buttons simultaneously again and the appliance continues to perform de-scaling, at that time, the six indicators slowly flash alternately, after working for about half a hour, the appliance stops working and goes back to the standby condition.
NOTE:
- You can press any functional buttons to cancel the de-scale warning and use as normal. However, we don't recommend it. The appliance will continue to remind you to perform de-scaling after each use.
The de-scale warning will only stop once a complete de-scale cycle has completed. - The default de-scale programme will trigger after 500 cycles but we recommend: Hard water de-scale after 40 cycles. Soft water after 80 cycles
Unplug from the mains and allow coffee maker cool down completely before

CLEANING & MAINTENANCE
cleaning.
- Clean housing of coffee maker with moisture-proof sponge often and clean water tank, drip tray and removable shelf regularly, then dry them.
- Do not clean with alcohol or solvent cleanser. Never immerse the housing in water for cleaning.
Clean all the attachments in the water and dry thoroughly.
Note: Clean the appliance after every use in order to keep it working properly.
DO NOT ALLOW WATER TO SIT IN THE TANK FOR MORE THAN 2 DAYS. IT IS UNHYGIENIC. MICROBES COULD TAINT THE TASTE OF THE WATER
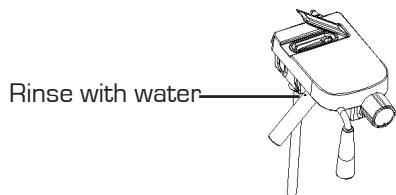
CLEANING THE MILK RESERVOIR AND FROTHING TUBE
Even though you can store the milk reservoir with left over milk in the refrigerator, it is important to clean the reservoir and frothing tube regularly to avoid clogging and building residues. In order to clean the milk reservoir, please follow the instructions listed below:
-
Remove the milk reservoir from the unit
-
Remove the lid from the reservoir.
-
The steam tube connector can be detached by rotating, you can clean it by tap water. After cleaning, please fix it into milk reservoir lid by rotating.
-
When cleaning milk reservoir, you can open the silicon cover (don't pull it out), wash it with tap water. After cleaning, refit the silicon cover.
-
Pour out any milk left and rinse and wash the milk reservoir and its lid thoroughly with warm soapy water. Rinse and dry well. Do not use abrasive cleaners and scouring pads, as they will scratch the finish. The milk reservoir is also dishwasher safe (top rack). Do not place the lid of the milk reservoir on the dishwasher.
-
Place a large empty cup under the frothing tube.
-
Turn the Froth Control Knob clockwise to the clean position “ ” then press and hold the latte/clean button for 3 seconds and release to activate the clean function. The unit will start releasing steam through the frothing tube, let it run for a few seconds until you don’t see any milk in the cup. When done press the Latte/ clean button once to stop the process.
Note: For disassembling the milk reservoir, you should raise it up a little, then pull it out.


CLEANING & MAINTENANCE
CLEANING THE BREW HEAD, THE PORTA-FILTER AND FILTER
- Switch the power button on the side of the unit to the off position "O" and unplug the power cord from the electrical outlet.
- Some of the metal parts might still be hot. Do not touch them with your hands until they have cooled.
- Remove the porta-filter and discard the coffee grounds or used pod. Wash both the porta-filter and filter with warm soapy water and rinse them well. Do not wash the porta-filter and filters in the dishwasher.
- Wipe lower part of the brew head in the unit with a damp cloth or paper towel to remove any coffee grounds that might have been left.
- Place the porta-filter (without any filter) back in the brew head in the unit.
- Place an empty large cup under the porta-filter.
- Press the espresso button once and let the unit brew with water only until it stops automatically.
CLEANING THE WATER RESERVOIR
Discard the remaining water by removing the reservoir and turning it upside down over the sink. It is recommended to empty the water reservoir between uses. Wash the water reservoir with soapy water, rinse it well and wipe it dry. The water reservoir is also dishwasher safe.
| Symptom | Cause | Remedy |
| Coffee doesn’t come out | Tank is empty. Coffee grind too fine. Coffee is too compressed | Fill tank. Use medium grind coffee. Don’t compress too hard. |
| Coffee comes from edge of porta-filter | There is some coffee powder on filter edge | Clean it off |
| Milk is not foamy after frothing or it is not coming out of the frothing tube | Out of steam. Milk not cold enough. Frothing tube blocked | Fill water tank. Chill milk. Clean milk tank and frothing tube |
| Coffee comes out too quickly | Ground coffee is too coarse. Not enough coffee | Use medium grind. Add more coffee |
| Weak coffee | Wrong filter fitted. Coffee too coarse | Fit appropriate filter. Use finer coffee |
| Control lights flashing | Tank is empty | Fill tank |

SPARE PARTS
If you need any spare parts for this product please visit our web site and search
www.swan-brand.co.uk

NOTES

WARRANTY
This product is guaranteed for 2 years from the date of original purchase. If any defect arises due to faulty materials of workmanship the faulty products must be returned to the place of purchase. Refunds or replacement is at the discretion of the store.
The following conditions apply:
The product must be returned to the retailer with proof of purchase.
The product must be installed and used in accordance with the instructions contained in this instruction guide.
It must be used only for domestic purposes.
It does not cover wear and tear, damage, misuse or consumable parts.
Swan Products Ltd has limited liability for incidental or consequential loss or damage.
This guarantee is valid in the UK and Eire Only.

BS PLUG
The wires in the mains lead are coloured in accordance with the following code:
BLUE NEUTRAL
BROWN LIVE
GREEN/YELLOW EARTH
As the colours of the wire in the mains lead of this appliance may not correspond with the colour markings identifying the terminals on your plug, proceed as follows:
The wire which is coloured BLUE must be connected to the terminal which is marked with the letter N or coloured black. The wire which is coloured BROWN must be connected to the terminal which is marked with the letter L or coloured red. The wire which is coloured GREEN/YELLOW must be connected to the terminal which is marked with the letter E or [earth symbol] and is coloured GREEN or GREEN/YELLOW.
WARNING: THIS APPLIANCE MUST BE EARTHED

DISPOSAL OF UNIT
Appliances bearing the symbol shown here may not be disposed of in domestic rubbish. You are required to dispose of old electrical and electronic appliances like this separately. Please visit www-recycle-more.co.uk or www-recyclenow.co.uk for access to information about the recycling of electrical items. Please visit www.weeireland.ie for access to information about the recycling of electrical items purchased in Ireland. The WEEE directive, introduced in
August 2006, states that all electrical items must be recycled, rather than taken to landfill. Please arrange to take this appliance to your local Civic Amenity site for recycling, once it has reached the end of its life.

www.swan-brand.co.uk

Scan this QR code to hear about our story

We love what we do

we're proud of our quality

Find us on Facebook
- on selected products
Copyright © Swan Products Ltd. PO Box 3117, Stoke-on-Trent ST4 9GD