
LBP6040 - Laser printer CANON - Free user manual and instructions
Find the device manual for free LBP6040 CANON in PDF.
| Product Type | Monochrome Laser Printer |
| Brand | Canon |
| Model | LBP6040 |
| Dimensions (W x D x H) | Approximately 360 x 370 x 200 mm |
| Weight | Approximately 5.5 kg |
| Power Supply | 220–240 V AC, 50/60 Hz |
| Power Consumption (Printing) | Approximately 800 W (max) |
| Power Consumption (Standby) | Approximately 2 W |
| Print Resolution | Up to 600 x 600 dpi |
| Print Speed | Up to 25 pages/min (A4) |
| Paper Capacity (Multipurpose Tray) | Up to 150 sheets (80 g/m²) |
| Supported Paper Types | Plain paper, envelopes, labels, transparencies |
| Connectivity | USB 2.0, Ethernet, Wi-Fi (depending on variant) |
| Main Functions | Single-sided printing, page layout, poster, watermark, toner saving |
| Consumable | Canon toner cartridge (depending on model, approx. 1500 pages) |
| Maintenance and Cleaning | Clean the exterior with a dry cloth; do not use solvents |
| Safety | Class 1 laser; do not open the case or expose to moisture |
| Spare Parts and Repairability | Parts available from authorized dealers; availability period 7 years after end of production |
Frequently Asked Questions - LBP6040 CANON
User questions about LBP6040 CANON
0 question about this device. Answer the ones you know or ask your own.
Ask a new question about this device
Download the instructions for your Laser printer in PDF format for free! Find your manual LBP6040 - CANON and take your electronic device back in hand. On this page are published all the documents necessary for the use of your device. LBP6040 by CANON.
USER MANUAL LBP6040 CANON
LBP6030w / LBP6030B / LBP6030
Important Safety Instructions 5
Installation 6
Power Supply 8
Handling 9
Maintenance and Inspections 11
Consumables 12
Basic Operations 14
Parts and Their Functions 15
Front Side 16
Back Side 17
Interior 18
Multi-Purpose Tray 19
Printer Status Window 20
Turning the Power ON and OFF 23
Saving Power 24
Setting Sleep Mode 25
Setting Auto Shutdown 26
Loading Paper 27
Loading Paper in the Multi-Purpose Tray 29
Loading Envelopes 31
Loading Preprinted Paper 33
34
Basic Print Operations 35
Canceling Print Jobs 37
Checking the Print Status 39
Various Print Settings 40
Enlarging or Reducing 41
Collating Printouts by Page 43
Printing Multiple Pages Onto One Sheet 44
Printing Posters 45
Printing Borders 46
Printing Dates and Page Numbers 47
Printing Watermarks 48
Printing According to the Document Type 50
Saving Toner 51
Combining and Printing Multiple Documents 52
Configuring Print Settings to Your Needs 55
Registering Combinations of Frequently Used Print Settings 56
Changing Default Settings 58
Network 59
Connecting to a Network 60
Connecting to a Wireless LAN 61
Setting IP Addresses 63
Setting IPv4 Address 64
Setting IPv6 Addresses 66
Viewing Network Settings 69
Configuring for Printing from a Computer 71
72
Configuring Printer Ports 75
Configuring the Machine for Your Network Environment 79
Changing the Maximum Transmission Unit 80
Setting a Wait Time for Connecting to a Network 82
Configuring DNS 84
Configuring WINS 88
Configuring NetBIOS 90
ConfiguringSNTP 92
Monitoring and Controlling the Machine with SNMP 95
Configuring SLP Communication with imageWARE 99
Security 101
Protecting the Machine from Unauthorized Access 102
Setting System Manager Passwords 103
Restricting Communication by Using Firewalls 105
Changing Port Numbers 108
Enabling SSL Encrypted Communication for the Remote UI 110
Configuring Settings for Key Pairs and Digital Certificates 113
Generating Key Pairs 114
Using CA-issued Key Pairs and Digital Certificates 116
Verifying Key Pairs and CA Certificates 119
Using the Remote UI 121
Starting the Remote UI 122
Remote UI Screens 124
Managing Documents and Checking the Machine Status 126
Changing Machine Settings 129
Setting Menu List 130
Troubleshooting 140
Clearing Paper Jams 141
When an Error Message Appears 143
Common Problems 147
Installation/Settings Problems 148
Printing Problems 150
When You Cannot Print Properly 152
Printing Results Are Not Satisfactory 153
Paper Creases or Curls 158
Paper Is Fed Incorrectly 160
When a Problem Cannot Be Solved 161
Maintenance 162
Cleaning the Machine 163
Replacing Toner Cartridges 165
Using Up All of the Toner 167
How to Replace Toner Cartridges 169
Printing Setting Lists 171
Viewing the Page Counter Value 173
Initializing Settings 174
Initializing Preferences Settings 175
Initializing System Management Settings 176
Initializing Key and Certificate Settings 178
Relocating the Machine 180
Appendix 181
Feature Highlights 182
Going Green and Saving Money 183
Improving Efficiency 184
So Much More 186
Specifications 188
Machine Specifications 189
Wireless LAN Specifications 191
Paper 192
Consumables 194
Manuals Included with the Machine 195
Using the e-Manual 196
Installing the e-Manual 197
Uninstalling the e-Manual 200
Screen Layout of the e-Manual 202
Viewing the e-Manual 206
Other 207
Basic Windows Operations 208
For Mac OS Users 213
Notice 214
Office Locations 219
Important Safety Instructions
This chapter describes important safety instructions for the prevention of injury to users of this machine and others, and damage to property. Read this chapter before using the machine, and follow the instructions to use the machine properly. Do not perform any operations not described in this manual. Canon will not be responsible for any damages resulting from operations not described in this manual, improper use, or repair or changes not performed by Canon or a third party authorized by Canon. Improper operation or use of this machine could result in personal injury and/or damage requiring extensive repair that may not be covered under your Limited Warranty.
Installation
To use this machine safely and in a trouble-free way, carefully read the following precautions and install the machine in an appropriate location.

WARNING
Do not install in a location that may result in a fire or electrical shock
A location where the ventilation slots are blocked (too close to walls, beds, sofas, rugs, or similar objects)
A damp or dusty location
A location exposed to direct sunlight or outdoors
A location subject to high temperatures
A location exposed to open flames
Near alcohol, paint thinners or other flammable substances
Other warnings
Do not connect unapproved cables to this machine. Doing so may result in a fire or electrical shock.
- Do not place necklaces and other metal objects or containers filled with liquid on the machine. If foreign substances come in contact with electrical parts inside the machine, it may result in a fire or electrical shock.
Do not use near medical equipment. Radio waves emitted from this machine may interfere with medical equipment, which may result in malfunctions and accidents.
If any foreign substance falls into this machine, unplug the power plug from the AC power outlet and contact your local authorized Canon dealer.

CAUTION
Do not install in the following locations
The machine may drop or fall, resulting in injury.
An unstable location
A location exposed to vibrations
Other cautions
When carrying this machine, follow the instructions in this manual. If carried improperly, it may fall, resulting in injury.
- When installing this machine, be careful not to get your hands caught between the machine and the floor or walls. Doing so may result in injury.
IMPORTANT
Do not install in the following locations
Doing so may result in damage to the machine.
A location subject to dramatic changes in temperature or humidity
A location near equipment that generates magnetic or electromagnetic waves
A laboratory or location where chemical reactions occur
A location exposed to corrosive or toxic gases
A location that may warp from the weight of the machine or where the machine is liable to sink (a carpet, etc.)
Avoid poorly ventilated locations
This machine generates a slight amount of ozone and other emissions during normal use. These emissions are not harmful to health. However, they may be noticeable during extended use or long production runs in poorly ventilated rooms. To maintain a
comfortable working environment, it is recommended that the room where the machine operates be appropriately ventilated. Also avoid locations where people would be exposed to emissions from the machine.
Do not install in a location where condensation occurs
Water droplets (condensation) may form inside the machine when the room where the machine is installed is heated rapidly, and when the machine is moved from a cool or dry location to a hot or humid location. Using the machine under these conditions may result in paper jams, poor print quality, or damage to the machine. Let the machine adjust to the ambient temperature and humidity for at least 2 hours before use.
When using wireless LAN (LBP6030w)
Install the machine at a distance of 50m or less from the wireless LAN router.
As far as possible, install in a location where communication is not blocked by intervening objects. The signal may be degraded when passing through walls or floors.
- Keep the machine as far as possible from digital cordless phones, microwave ovens, or other equipment that emits radio waves.
In altitudes of 3,000m or above sea level
Machines with a hard disk may not operate properly when used at high altitudes of about 3,000 meters above sea level, or higher.
Power Supply
This machine is compatible with voltages of 220 to 240V , and electrical frequency of 50 / 60Hz .

WARNING
Use only a power supply that meets the specified voltage requirements. Failure to do so may result in a fire or electrical shock.
Do not use power cords other than the one provided, as this may result in a fire or electrical shock.
- Do not modify, pull, forcibly bend, or perform any other act that may damage the power cord. Do not place heavy objects on the power cord. Damaging the power cord may result in a fire or electrical shock.
- Do not plug in or unplug the power plug with wet hands, as this may result in an electrical shock.
Do not use extension cords or multi- plug power strips with the machine. Doing so may result in a fire or electrical shock.
- Do not wrap the power cord or tie it in a knot, as this may result in a fire or electrical shock.
- Insert the power plug completely into the AC power outlet. Failure to do so may result in a fire or electrical shock.
- Remove the power plug completely from the AC power outlet during a thunder storm. Failure to do so may result in a fire, electrical shock, or damage to the machine.

CAUTION
Do not obstruct the power outlet where this machine is connected, so that you can unplug the power plug easily in an emergency.
IMPORTANT
When connecting power
Do not connect the power cord to an uninterruptible power source.
If you plug this machine into an AC power outlet with multiple sockets, do not use the remaining sockets to connect other devices.
Do not connect the power cord to the auxiliary AC power outlet on a computer.
Other precautions
Electrical noise may cause this machine to malfunction or lose data.

WARNING
- Immediately unplug the power plug from the AC power outlet and contact an authorized Canon dealer if the machine makes an unusual noise, emits an unusual smell, or emits smoke or excessive heat. Continued use may result in a fire or electrical shock.
- Do not disassemble or modify this machine. There are high-voltage and high-temperature components inside the machine. Disassembly or modification may result in a fire or electrical shock.
- Place the machine where children will not come in contact with the power cord and other cables or gears and electrical parts inside the machine. Failure to do so may result in unexpected accidents.
- Do not use flammable sprays near this machine. If flammable substances come into contact with electrical parts inside this machine, it may result in a fire or electrical shock.
When moving this machine, be sure to turn OFF the power of this machine and your computer, and then unplug the power plug and interface cables. Failure to do so may damage the power cord or interface cables, resulting in a fire or electrical shock. - When plugging or unplugging a USB cable when the power plug is plugged into an AC power outlet, do not touch the metal part of the connector, as this may result in an electrical shock.
If you are using a cardiac pacemaker
This machine generates a low level magnetic flux. If you use a cardiac pacemaker and feel abnormalities, please move away from this machine and consult your physician immediately.

CAUTION
Do not place heavy objects on this machine as they may fall, resulting in injury.
For safety, unplug the power plug if the machine will not be used for a long period of time.
Use caution when opening and closing covers to avoid injury to your hands.
- Keep hands and clothing away from the rollers in the output area. If the rollers catch your hands or clothing, this may result in personal injury.
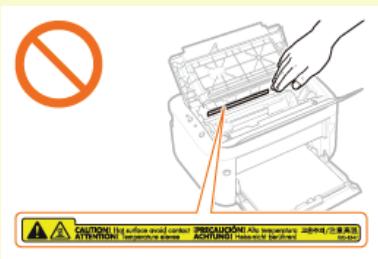
The inside of the machine and the output slot are very hot during and immediately after use. Avoid contact with these areas to prevent burns. Also, printed paper may be hot immediately after being output, so use caution when handling it. Failure to do so may result in burns.
Laser beam
This machine is classified as a Class 1 Laser Product under IEC 60825-1: 2007, EN60825-1: 2007. The laser beam can be harmful to the human body. The laser beam is confined in the laser scanner unit by a cover, so there is no danger of the laser beam escaping during normal machine operation. Read the following remarks and instructions for safety.
Never open covers other than those indicated in this manual.
Do not remove the caution label attached to the cover of the laser scanner unit.
If you operate the machine in manners other than the control, adjustment, and operating procedures prescribed in this manual, this may result in hazardous radiation exposure.
If the laser beam should escape and enter your eyes, exposure may cause damage to your eyes.
IMPORTANT
When transporting the machine
To prevent damage to the machine during transport, do the following.
Remove the toner cartridge.
- Securely pack the machine in the original box with the original packing materials.
Other precautions
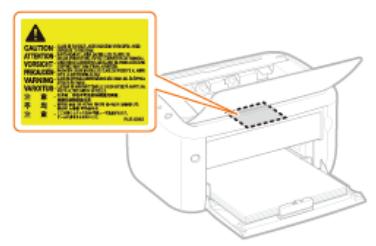
Follow the instructions on the caution label attached to this machine.
Do not subject the machine to strong shocks or vibration.
Do not forcibly open and close doors, covers, and other parts. Doing so may result in damage to the machine.
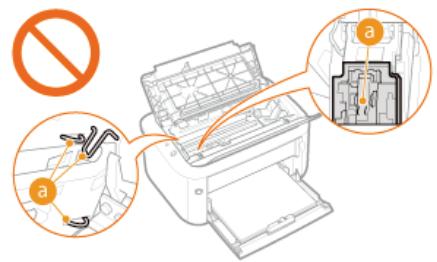
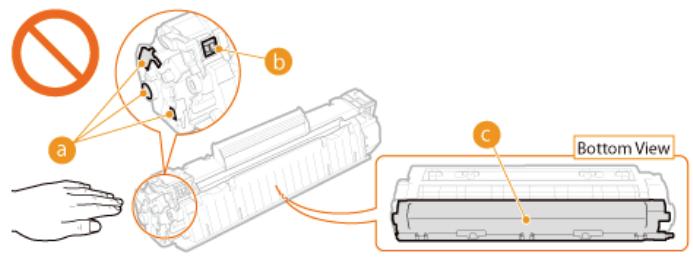
Do not touch the contacts (a). Doing so may result in damage to the machine.
Do not turn OFF the machine during printing. Also, do not open and close the cover and do not remove or insert paper during printing. Doing so can cause paper jams.
Maintenance and Inspections
Clean this machine periodically. If dust accumulates, the machine may not operate properly. When cleaning, be sure to observe the following. If a problem occurs during operation, see Troubleshooting. If the problem cannot be resolved or you feel the machine requires an inspection, see When a Problem Cannot Be Solved.
1WARNING
Before cleaning, turn OFF the power and unplug the power plug from the AC power outlet. Failure to do so may result in a fire or electrical shock.
Unplug the power plug periodically and clean with a dry cloth to remove dust and grime. Accumulated dust may absorb humidity in the air and may result in a fire if it comes into contact with electricity.
Use a damp, well wrung-out cloth to clean the machine. Dampen cleaning cloths with water only. Do not use alcohol, benzenes, paint thinners, or other flammable substances. Do not use tissue paper or paper towels. If these substances come into contact with electrical parts inside the machine, they may generate static electricity or result in a fire or electrical shock.
- Check the power cord and plug periodically for rust, bent prongs, fraying, cracks, or excessive heat generation. Use of poorly-maintained power cord or plug may result in a fire or electrical shock.
CAUTION
The inside of the machine has high-temperature and high-voltage components. Touching these components may result in injury or burns. Do not touch any part of the machine that is not indicated in the manual.
- When loading paper or removing jammed paper, be careful not to cut your hands with the edges of the paper.
IMPORTANT
When removing jammed paper or replacing toner cartridges, be careful not to get any toner on your hands or clothing. If toner gets on your hands or clothing, wash them immediately with cold water.

WARNING
Do not dispose of used toner cartridges in open flames. Also, do not store toner cartridges or paper in a location exposed to open flames. This may cause the toner or paper to ignite, and result in burns or fire.
If you accidentally spill or scatter toner, carefully sweep it up or wipe it up with a damp cloth, and avoid inhaling any toner dust. Do not use a vacuum cleaner to clean up loose toner unless it is equipped with safety measures to prevent dust explosions. Doing so may cause damage to the vacuum cleaner or result in a dust explosion due to static discharge.
If you are using a cardiac pacemaker
Toner cartridges generate a low level magnetic flux. If you use a cardiac pacemaker and feel abnormalities, please move away from toner cartridges and consult your physician immediately.

CAUTION
Use caution not to inhale any toner. If you should inhale toner, consult a physician immediately.
Use caution so that toner does not get into your eyes or mouth. If toner should get into your eyes or mouth, immediately wash it away with cold water and consult a physician.
Use caution so that toner does not come into contact with your skin. If it should, wash it off with soap and cold water. If your skin is irritated, consult a physician immediately.
- Keep toner cartridges and other consumables out of the reach of small children. If toner is ingested, consult a physician or poison control center immediately.
Do not disassemble or modify the toner cartridge. Doing so may cause the toner to scatter.
- Remove the sealing tape of the toner cartridge completely without using excessive force. Doing so may cause the toner to scatter.
IMPORTANT
Handling the toner cartridge
Be sure to use the holder to hold the toner cartridge.
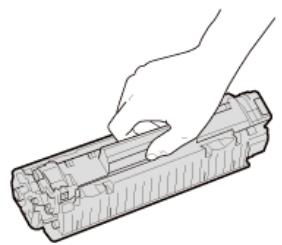
- Do not touch the electrical contacts (a) or toner cartridge memory (b). Do not open the drum protection shutter (c). Doing so risks scratching the drum surface or exposing it to light.
The toner cartridge is a magnetic product. Keep it away from floppy disks, disk drives, and other devices that can be affected by magnetism. Failure to do so may result in data loss.
Storing toner cartridges
To ensure safe and satisfactory performance, store toner cartridges under the following environmental conditions. Storage temperature range: 0 to 35^
Storage humidity range: 35 to 85% RH (relative humidity), no condensation*
Store without opening until the toner cartridge is to be used.
When removing the toner cartridge from this machine for storage, place the removed toner cartridge into the original
protective bag or wrap it with a thick cloth.
- When storing the toner cartridge, do not store it upright or upside down. The toner may solidify and not return to its original condition even if it is shaken.
- Even within the storable humidity range, water droplets (condensation) may develop inside the toner cartridge if there is a difference of temperature inside and outside the toner cartridge. Condensation inside the toner cartridge will adversely affect print quality.
Do not store the toner cartridge in the following locations
Locations exposed to open flames
Locations exposed to direct sunlight or bright light for five minutes or more
Locations exposed to excessive salty air
Locations where there are corrosive gases (i.e. aerosol sprays and ammonia)
Locations subject to high temperature and high humidity
- Locations subject to dramatic changes in temperature and humidity where condensation may easily occur
Locations with a large amount of dust
Locations within the reach of children
Be careful of counterfeit toner cartridges
Please be aware that there are counterfeit Canon toner cartridges in the marketplace. Use of counterfeit toner cartridge may result in poor print quality or machine performance. Canon is not responsible for any malfunction, accident or damage caused by the use of counterfeit toner cartridge.
For more information, see http://www.canon.com/counterfeit.
Availability of repair parts and toner cartridges
Repair parts and toner cartridges for this machine will be available for at least seven (7) years after production of this machine model has been discontinued.
Toner cartridge packing materials
Save the protective bag for the toner cartridge. It is required when transporting this machine.
Packing materials may be changed in form or placement, or may be added or removed without notice.
- Dispose of removed sealing tape according to local regulations.
Disposal of used toner cartridges
Place the toner cartridge into its protective bag to prevent the toner from scattering, and then dispose of the toner cartridge according to local regulations.
Basic Operations
This chapter describes the parts of the machine and basic operations, such as how to load paper.
Parts and Their Functions
This section describes the names and functions of the exterior and interior parts of the machine. Parts and Their Functions
■ Printer Status Window
This section explains how to use the "Printer Status Window" utility to check the machine's status and make machine settings. Printer Status Window
■Turning the Power ON and OFF
This section explains how to turn the power ON and OFF. Turning the Power ON and OFF
Saving Power
This section explains how to reduce the machine's power consumption. Saving Power
Loading Paper
This section explains how to load paper into the multi-purpose tray. Loading Paper
Parts and Their Functions
This section describes the parts of the machine (exterior, front and back side, and interior) and how they function. It also describes the parts of the machine used for basic operations such as loading paper and replacing the toner cartridge, and explains the meaning of indications by the keys and indicators on the front side. Read this section for tips on how to use the machine properly.

Front Side
Back Side
Interior
Multi-Purpose Tray
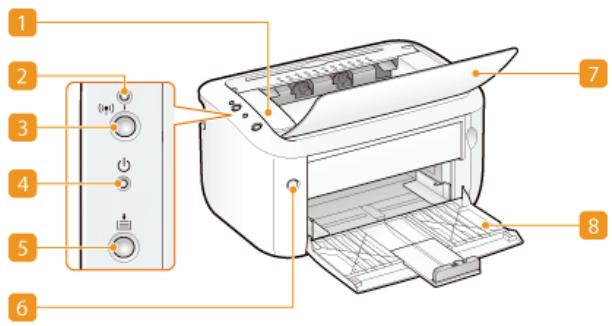
Top cover
Open the top cover to replace the toner cartridge or clear a paper jam. How to Replace Toner Cartridges Clearing Paper Jams
2 (p) (Wi-Fi) indicator (LBP6030w)
Lights up when the machine is connected to a wireless LAN.
3 (p) (Wi-Fi) key (LBP6030w)
Use this key when setting up a wireless LAN connection by using the WPS push-button method.
NOTE:
You can also keep the (p) (Wi-Fi) key pressed while turning ON the power to initialize the system management settings. Initializing by Using the Wi-Fi Key
4 (Power) indicator
Lights up when the machine is powered ON.
5 (Paper) key
Flashes when the machine is out of paper, when the paper is the wrong size, and after other errors when the paper needs to be checked. Reset the paper and press the key to restart printing.
NOTE:
You can also use the (Paper) key to print a list of network settings (with the machine ready to print, press the key and hold it down for 3 seconds). Viewing Network Settings
6 Power switch
Turns the power ON or OFF. Turning the Power ON and OFF
Output tray
Open this tray before printing. Printed paper is output to the output tray.
8 Multi-purpose tray
Load the paper to print in this tray. Loading Paper in the Multi-Purpose Tray
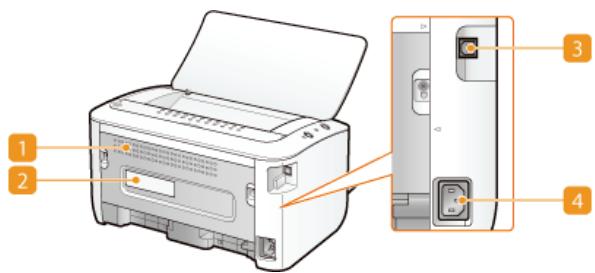
Ventilation slots
Air from inside the machine is vented out to cool down the inside of the machine. Note that placing objects in front of the ventilation slots prevents ventilation. Installation
Rating label
The label shows the serial number, which is needed when making inquiries about the machine. When a Problem Cannot Be Solved
3 USB port
Connect a USB cable when connecting the machine and a computer.
4 Power socket
Connect the power cord.
Interior
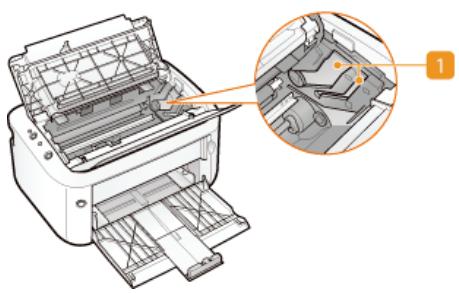
Toner cartridge guide
When loading a toner cartridge, align the protrusions on the left and right sides of the cartridge with the guide. How to Replace Toner Cartridges
LINKS
Replacing Toner Cartridges
Multi-Purpose Tray
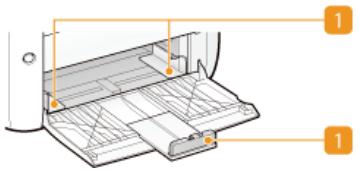
Paper guides
Adjust the paper guides to exactly the size of the loaded paper to ensure that paper is fed straight into the machine.
LINKS
Loading Paper in the Multi-Purpose Tray
Printer Status Window
The Printer Status Window is a utility that allows you to check the machine's status, view error information, and make settings related to the machine, such as power saving settings. You can also use it for operations such as cancelling a print job or printing a list of the machine's settings. The Printer Status Window utility is installed on your computer automatically when you install the printer driver (Printer Driver Installation Guide).
Displaying the Printer Status Window
Parts of the Screen and Their Functions
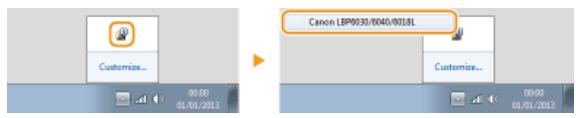
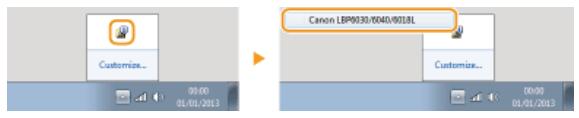
Displaying the Printer Status Window
Select the machine by clicking in the system tray.

NOTE
Automatic Display of the Printer Status Window
The Printer Status Window is displayed automatically when an error occurs during printing.
- You can change the setting that determines when the Printer Status Window is displayed automatically. Change it with the [Options] menu [Preferences (Users)] or [Preferences (Administrators)] dialog box of the Printer Status Window. For details, see the Help. [Help] menu
If you are using Windows 8/Server 2012
Display the Printer Status Window after moving to the desktop.
Displaying from the Printer Driver
Click in the printer driver screen.
Parts of the Screen and Their Functions
This section provides an outline of the main screen. For detailed descriptions of the dialog boxes that can be displayed with the controls and menus in this screen, see the Help. [Help] menu
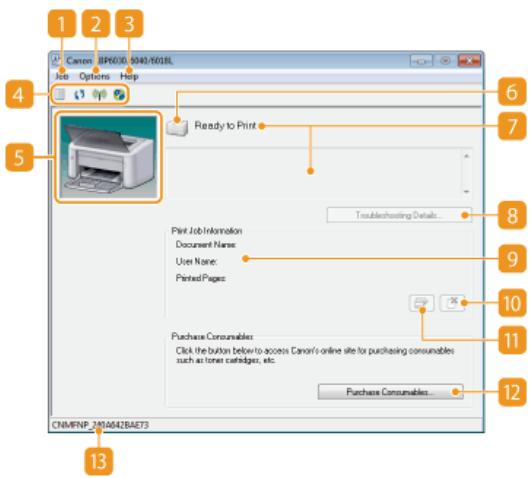
[Job] menu
Allows you to check documents that are printing or waiting. You can also select documents and cancel printing.
[Options] menu
Allows you to execute maintenance functions, such as printing setting lists or cleaning the fixing unit, and to make machine settings, such as power saving settings. You can also check information such as the total number of pages printed.
3 [Help] menu
Displays Help about the Printer Status Window and version information.
NOTE:
You can also display the Printer Status Window Help by clicking the [Help] button in the various dialog boxes. However, some dialog boxes do not have a [Help] button.
4 Toolbar
Print Queue)
Displays the print queue, a Windows function. See the Windows Help for more information about the print queue.
(Refresh)
Refreshes the Printer Status Window with the latest information.
(Wireless LAN Status) (LBP6030w)
Allows you to check the connection status (signal strength) of the wireless LAN.
Remote UI (LBP6030w)
Starts the Remote UI. Using the Remote UI
5 Animation area
Displays animations and illustrations about the machine's status. After an error occurs, this area may also display a simple explanation of how to deal with the error.
6 Icon
Displays an icon that indicates the machine's status. The normal status is but when an error occurs, the display changes to one of / , depending on the message.
7 Message area
Displays messages about the machine's status. If an error or warning occurs, this area displays an explanation beneath the error message or warning, together with information about how to deal with the problem. When an Error Message Appears
[Troubleshooting Details]
Displays troubleshooting information for problems described by messages.
[Print Job Information]
Displays information about the document that is currently being printed.
10 (Cancel Job)
Cancels the printing of the document currently being printed.
(Continue/Retry)
When an error has occurred, but printing can be continued, this button allows you to clear the error and resume printing. However, if you use the Continue/Retry function to resume printing, partially printed pages or other improper printing may occur.
[Purchase Consumables]
If you click [Purchase Consumables] select your country or region click [OK], a Canon Web site page is displayed where you can find information about purchasing consumables.
Displays the connection destination (port name) of the Printer Status Window.
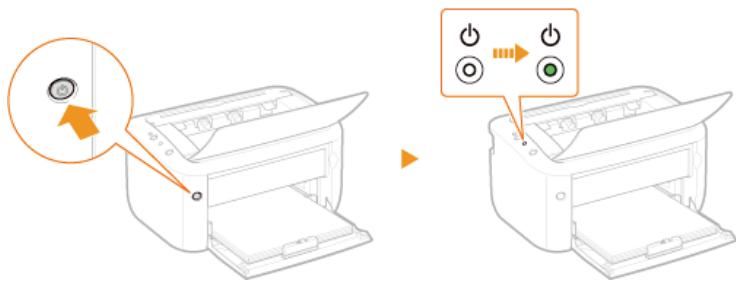
Turning the Power ON and OFF
Use the power switch on the front side of the machine to turn the power ON and OFF. To restart the machine, turn the machine OFF, wait for at least 10 seconds, and turn it back ON.
Turning the Power ON
Turning the Power OFF
Turning the Power ON
When you press the power switch, the (Power) indicator lights and the machine is ready for printing.
NOTE
A blank sheet of paper may be output when you turn ON the power for the first time after purchasing the machine. This is not a malfunction.
Turning the Power OFF
When you press the power switch, the (Power) indicator goes out and the power is turned OFF.

NOTE
Even when the power is turned OFF, the machine continues to consume a small amount of power. To reduce power consumption to zero, unplug the power plug from the AC power outlet.
Saving Power
You can save power by setting up the machine to automatically enter sleep mode or turn itself OFF after it remains idle for a certain length of time.
Setting Sleep Mode
Setting Auto Shutdown
Setting Sleep Mode
The sleep mode function reduces the amount of power consumed by the machine by temporarily stopping some internal operations. You can set up the machine to enter sleep mode automatically when it remains idle for a certain length of time. The factory default setting for the amount of time that elapses before the machine enters sleep mode is 1 minute. We recommend using the factory default setting to save the most power. If you want to change the amount of time that elapses before the machine enters sleep mode, follow the procedure below in the Printer Status Window.
NOTE
Situations in which the machine does not enter sleep mode
The machine does not enter sleep mode when it is receiving print data from a computer, when a cover is open, when a toner cartridge is not loaded, and in some other situations.
Depending on your environment, the machine may not enter sleep mode when it is connected to a wireless LAN network.
1 Select the machine by clicking in the system tray.

2 Select [Options] [Device Settings] [Sleep Settings].
![CANON LBP6040 - Select [Options] [Device Settings] [Sleep Settings]. - 1](/content/2024/11/223505/images/58b55ca2f71aed8a77a81f4184a2e97d08b38f15519738b34e9739c27240d93b.jpg)
3 Make sleep mode settings, and click [OK].
![CANON LBP6040 - Make sleep mode settings, and click [OK]. - 1](/content/2024/11/223505/images/e63e8088b3cd6541672ab8211061bcf44bb9bbca21377d5863e9936a96a464dd.jpg)
[Auto Sleep after Fixed Period]
Select the check box to enter sleep mode after the time specified with [Enter Auto Sleep After].
[Enter Auto Sleep After]
Specify the length of time after which the machine enters sleep mode. You can select from 1 to 180 minutes.
Setting Auto Shutdown
You can set up the machine to automatically turn itself OFF after it remains idle for a certain length of time. This prevents wasted power consumption caused by forgetting to turn the machine OFF. The factory default setting for the amount of time that elapses before the power is turned OFF is 4 hours. If you want to change this setting, perform the following procedure in the Printer Status Window.
NOTE
If you set the time until the power is turned OFF to a time shorter than the factory default setting, the lifetime of the toner cartridge may be shorter.
1 Select the machine by clicking in the system tray.

2 Select [Options] [Device Settings] [Auto Shutdown Settings].
![CANON LBP6040 - Select [Options] [Device Settings] [Auto Shutdown Settings]. - 1](/content/2024/11/223505/images/c2c7ea4d6f2ce14391cb387d2d6e7cf9c2175363e4f18a7247da85a456a188da.jpg)
3 Make auto shutdown settings, and click [OK].
![CANON LBP6040 - Make auto shutdown settings, and click [OK]. - 1](/content/2024/11/223505/images/c87883057f211c3c6263ef33c689cd0df5a1be2d3bc0b9c5d510732d263d875f.jpg)
[Auto Shutdown after Fixed Period]
Select the check box to enable auto shutdown after the time specified with [Auto Shutdown After].
[Auto Shutdown After]
Specify the length of time until the machine executes auto shutdown, starting from the time when the machine enters sleep mode. You can select from 1 hour to 8 hours, in units of 1 hour.
This section explains how to load paper into the multi-purpose tray. See Paper for information about available paper sizes.
![CANON LBP6040 - [Auto Shutdown After] - 1](/content/2024/11/223505/images/61b70079b9ba6f55e6a19f0dc3ec9c5bcc7d66db2559610c6a68e05c0d793f4e.jpg)
Paper Type and Printer Driver Paper Settings
Before printing, refer to the table below and make the appropriate paper settings in the printer driver, according to the type of paper that you have loaded. See Basic Print Operations for detailed information about paper settings, and see Paper for information about the number of sheets that can be set.
| Paper Type | Printer Driver Paper Setting | |
| Plain paper *1 | 60 to 63 g/m2 | [Plain L] |
| 64 to 89 g/m2 | [Plain] | |
| Heavy paper | 90 to 163 g/m2 | [Heavy] [Heavy H] *2 |
| Transparency *3 *4 | [Transparency] | |
| Labels *4 | [Labels] | |
| Envelope | [Envelope] | |
1 Recycled paper can be used.
2 If toner is not fully fixed and printouts are faded when you select [Heavy], select this instead.
3 Use laser printer transparencies.
4 Use A4 or Letter size only.
IMPORTANT
Do not use the following types of paper:
Wrinkled or creased paper
Curled or rolled paper
Torn paper
Damp paper
Very thin paper
Paper printed by a thermal transfer printer
Paper with a coarse texture
Glossy paper
Paper handling and storage
Store paper on a flat surface.
- Keep paper wrapped in its original package to protect the paper from moisture or dryness.
Do not store paper in a way that may cause it to curl or fold.
Do not store paper vertically or stack too many packages of paper.
Do not store paper in direct sunlight, or in a place subject to high humidity, dryness, or drastic changes in temperature or humidity.
NOTE
When printing on paper that has absorbed moisture
Steam may be emitted from the paper output area, or water droplets may form around the paper output area. This is not a
malfunction. It occurs when the heat used to fix toner on the paper causes moisture in the paper to evaporate (most likely to occur at low room temperatures).
Loading Paper in the Multi-Purpose Tray
Load the paper to print in the multi-purpose tray.
IMPORTANT
Always load paper in portrait orientation
Paper cannot be loaded in landscape orientation. Be sure to load paper in portrait orientation, as shown in the illustration below.
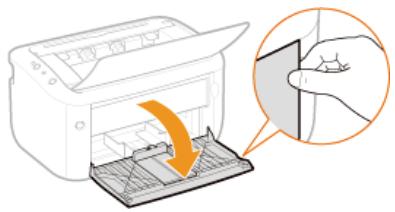
1 Open the multi-purpose tray.
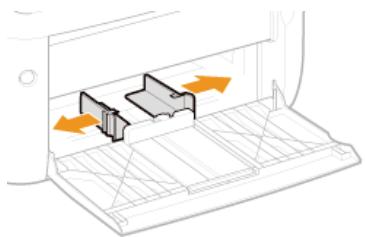
2 Spread the paper guides apart.
- Slide the paper guides outward.

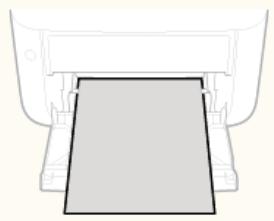
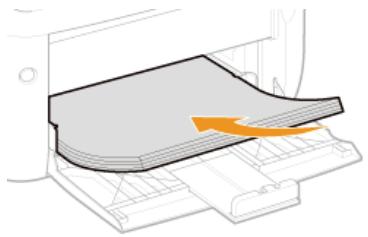
3 Load the paper and slide it all the way in, until it touches the back side.
- Load the paper in portrait orientation (with the short edge toward the machine) and the print side face up. Paper cannot be loaded in landscape orientation.
Before loading it, fan the paper stack well, and tap it on a flat surface to align the edges.
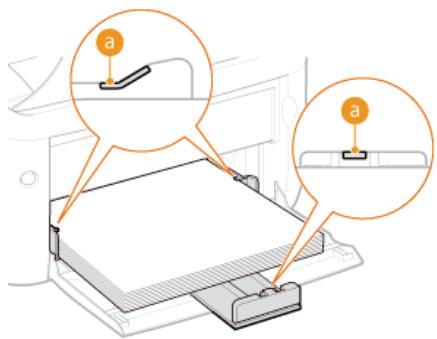
IMPORTANT:
Keep the paper stack within the load limit guides.
Make sure that the paper stack does not exceed the load limit guides (a). Loading too much paper can cause paper jams.
NOTE:
When loading envelopes or preprinted paper, see Loading Envelopes or Loading Preprinted Paper.
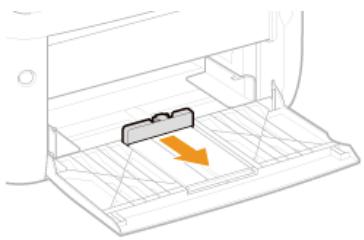
4 Align the paper guides against the edges of the paper.
Align the paper guides securely against the edges of the paper.
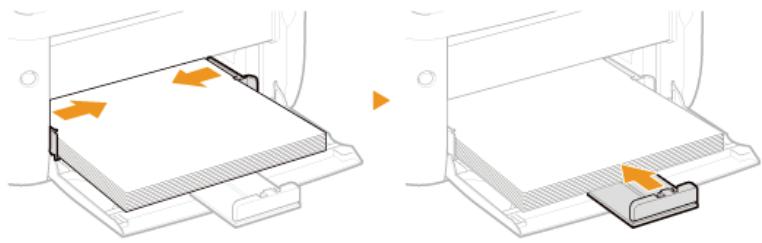
IMPORTANT:
Align the paper guides securely against the paper
Paper guides that are too loose or too tight can cause misfeeds or paper jams.
NOTE
After reloading paper that has run out during printing, or resetting the paper after a paper error notification, press the (Paper) key to restart printing.
Printing on the Back Side of Printed Paper (Manual 2-Sided Printing)
You can print on the back side of printed paper. Flatten any curls on the printed paper and insert it into the multi-purpose tray with the side to print face up (previously printed side face down).
- Load only one sheet of paper each time you print.
You can use only paper printed with this machine. - You cannot print on the side that has been previously printed.
LINKS
Paper
Loading Envelopes
Make sure to flatten any curls on envelopes before loading them. Also pay attention to the orientation of envelopes and which side is face up.
Before Loading Envelopes
Loading Envelopes in the Multi-Purpose Tray
NOTE
This section explains how to load envelopes in the orientation you want, as well as preparations that you need to complete before loading envelopes. For a complete description of the procedure for loading envelopes in the multi-purpose tray, see Loading Paper in the Multi-Purpose Tray.
Before Loading Envelopes
Follow the procedure below to prepare the envelopes before loading.
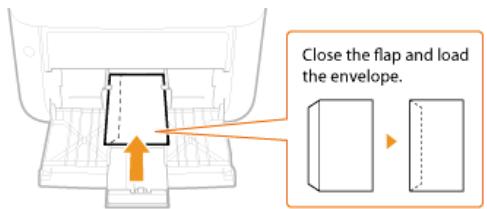
1 Close the flap of each envelope.
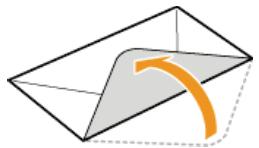
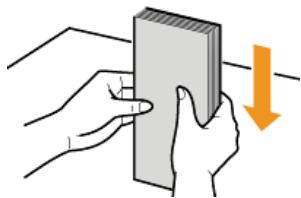
2 Press down to expel air from the envelopes and make sure that the folds on all four sides are sharp and that the stack is flat.

3 Remove curls by flexing the stiff sections at the four corners.
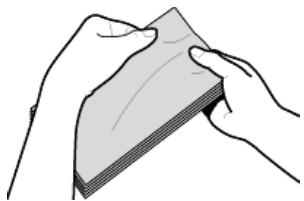
4 Tap the stack on a flat surface to even the edges of the envelopes.
Loading Envelopes in the Multi-Purpose Tray
Load the envelopes Monarch, No. 10 (COM10), DL, or C5 in portrait orientation (with the short edge toward the machine), with the nonglued side (front side) face up. You cannot print on the reverse side of envelopes.
NOTE
Load the envelopes so that the edge with the flap is toward the left side as shown in the illustration.
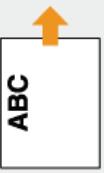
Loading Preprinted Paper
When you use paper that has been preprinted with a logo or other information, pay attention to the orientation of the paper when loading. Load the paper with the logo side (the side on which to print the document) face up and in the proper orientation for the layout of the document.

NOTE
This section explains how to load preprinted paper with the proper orientation and the right side face up. For a complete description of the procedure for loading paper in the multi-purpose tray, see Loading Paper in the Multi-Purpose Tray.
Printing Paper with a Logo in Portrait Orientation
Preprinted Paper
ABC

Document
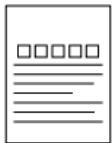
Print Result
Loading Orientation

ABC
Printing Paper with a Logo in Landscape Orientation
Preprinted Paper
ABC
Document
Print Result
ABC
0000
Loading Orientation
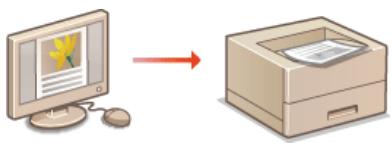
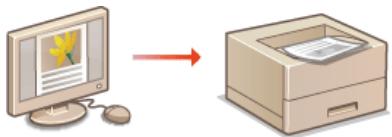
Printing
You can print documents made with applications on your computer by using the printer driver. There are useful settings in the printer driver, such as enlarging/reducing and poster printing, that enable you to print your documents in various ways. Before you can use these functions, you need to install the printer driver on your computer and complete some other preparations. For details, see Printer Driver Installation Guide.
NOTE
Depending on the operating system and the type or version of the printer driver you are using, the printer driver screens in this manual may differ from your screens.
About the Printer Driver Help
Clicking [Help] on the printer driver screen displays the Help screen. On this screen, you can see detailed descriptions that are not in the e-Manual.
Basic Print Operations
This section explains how to print a document on your computer by using the printer driver.
1 Open a document in an application and display the print dialog box.
- How to display the print dialog box differs for each application. For more information, see the instruction manual for the application you are using.
2 Select this machine and click [Preferences] or [Properties].
![CANON LBP6040 - Select this machine and click [Preferences] or [Properties]. - 1](/content/2024/11/223505/images/21557a5ec93a3f6b0c67ad0041395e80e20647dce601b02f5839367b1105c8bf.jpg)
The screen that is displayed differs depending on the application you are using.
3 Set the paper size.
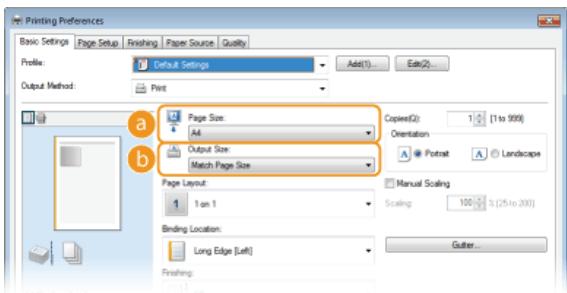
[Page Size]
Select the size that you used when you created the document in the application.
[Output Size]
Select the paper size to be used in the actual printing. If you select a size that differs from [Page Size], the printer driver will automatically enlarge or reduce the data to match the [Output Size]. Enlarging or Reducing
4 In the [Paper Source] tab, select the paper type.
- Set [Paper Type] according to the type of paper to be used in the printing. - Paper Type and Printer Driver Paper Settings
![CANON LBP6040 - In the [Paper Source] tab, select the paper type. - 1](/content/2024/11/223505/images/9ead4d501ecbbd738fc5895ed2c3101307ec43d50834333aff36ead51fc3c515.jpg)
5 Set other printing preferences as necessary. Various Print Settings
NOTE:
You can register the settings you specified in this step as a "profile" and use the profile whenever you print. This eliminates the need to specify the same settings every time you print. Registering Combinations of Frequently Used Print Settings
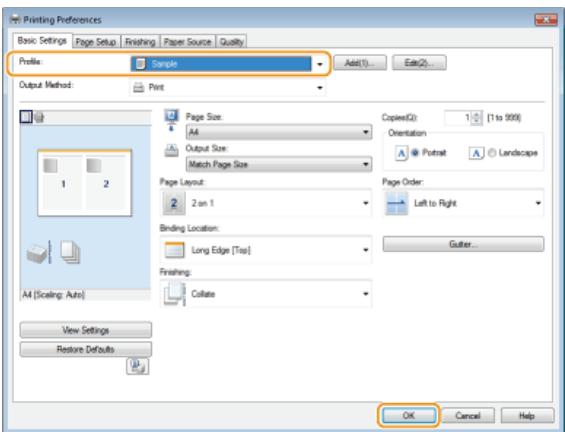
6
Click [OK].
7 Click [Print] or [OK].
![CANON LBP6040 - Click [Print] or [OK]. - 1](/content/2024/11/223505/images/be7d41870577f22fe7ab20b5ca2d951f19814952d5f0ac6eb4f51177eab7c9cc.jpg)
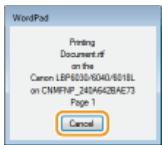
Printing starts. On some applications, a screen like the one shown below appears.
![CANON LBP6040 - Click [Print] or [OK]. - 2](/content/2024/11/223505/images/8ded05358fe27d01fc59a7d4fa65a6424720842d997c4e17f24371de74824379.jpg)
- If a screen like the one shown above appears, you can cancel printing by clicking [Cancel]. If the screen disappears or is never displayed, you can cancel printing in other ways. Canceling Print Jobs
IMPORTANT
Do not touch printed pages
Do not touch newly printed sheets with your fingers or a cloth. You may get your fingers or the cloth dirty, and the toner may smear or come off the page.
NOTE
When printing from a Windows Store app in Windows 8/Server 2012
Display the charms on the right side of the screen, and proceed as follows.
Windows 8/Server 2012
Tap or click [Devices] the machine you are using [Print].
Windows 8.1/Server 2012 R2
Tap or click [Devices] [Print] the machine you are using [Print].
When you print in this way, you can only use some of the print settings.
If the message
LINKS
Checking the Print Status
Canceling Print Jobs
You can cancel print jobs from the Printer Status Window.
1 Select the machine by clicking in the system tray.
The Printer Status Window is displayed.
2 Cancel the print job.
To cancel a print job that is currently printing


Printing of the current document is canceled.
To cancel a print job that is waiting
1 Select [Job] [Job Status].
![CANON LBP6040 - Select [Job] [Job Status]. - 1](/content/2024/11/223505/images/b7d65974033608074af9fc703071e3f7a85135b24b6abd28214ed07879393c89.jpg)
2 Select the document that you want to cancel, and click [Delete].
![CANON LBP6040 - Select the document that you want to cancel, and click [Delete]. - 1](/content/2024/11/223505/images/2122d4f919bb3bb3b61ce24826beb6ed4b455660cc4ed163ada390e66b6d84e7.jpg)
This screen displays up to five documents.
3 Click [OK].
![CANON LBP6040 - Click [OK]. - 1](/content/2024/11/223505/images/211e46d9467d8bab5a3686d2c5e585d13a6b5e03b353a98ebbf9b27fd92ae0c0.jpg)
Printing of the selected document is canceled.
NOTE
Several pages may be output after you cancel printing.
TIPS
Canceling from the Remote UI (LBP6030w)
You can cancel printing from the [Job Status] page on the Remote UI. Checking the Current Status of Print Documents
Canceling from an application
On some applications, a screen like the one shown below is displayed during printing. You can cancel printing by clicking [Cancel].
LINKS
Basic Print Operations
Checking the Print Status
Checking the Print Status
You can check the current print status in the Printer Status Window. This is convenient if you have been waiting for a long time for your document to be printed, and you want to see a list of the documents waiting to be printed.
1 Select the machine by clicking in the system tray.
2 Select [Job] [Job Status].
![CANON LBP6040 - Select [Job] [Job Status]. - 1](/content/2024/11/223505/images/6265d936a32768877fa67318e50a4e0b53e0abd60ce5bdef03a1b05f01d82484.jpg)
A list of up to 5 documents appears, showing documents that are being printed or waiting to be printed.
![CANON LBP6040 - Select [Job] [Job Status]. - 2](/content/2024/11/223505/images/4410c2e0460d40f21ecde2aecf5f24bc561d8d9acefb0cde57471925ad0c4dd4.jpg)
TIPS
Checking from the Remote UI (LBP6030w)
You can check the print status on the [Job Status] page of the Remote UI. Check the Current Status of Print Documents
Checking the history of printed documents (LBP6030w)
You can check the history of documents that have been printed on the [Job Log] page of the Remote UI. When you cannot find printouts that you thought had been printed, you may want to check whether an error has occurred.
Checking the History of Printed Documents
LINKS
Basic Print Operations
Canceling Print Jobs
Various Print Settings
There are a variety of print settings that you can use, such as enlarged/reduced printing and poster printing. Select the settings that you need for the document that you want to print.
Enlarging or Reducing

Collating Printouts by Page

Printing Multiple Pages Onto One Sheet
Printing Posters
Printing Borders
Printing Dates and Page Numbers

Printing Watermarks
Printing According to the Document Type
Saving Toner

Combining and Printing Multiple Documents
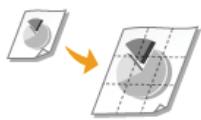
Enlarging or Reducing
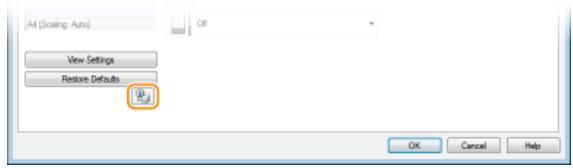
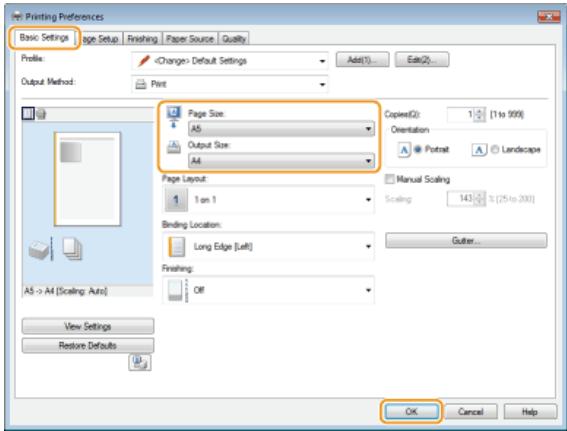
You can make enlarged or reduced printouts by using a preset print ratio, such as A5 to A4, or a custom print ratio that you set in increments of 1% .
Specifying the Print Ratio by Specifying the Original Document and Paper Size (Preset Ratio)
The print ratio is set automatically based on the document and paper size you have selected.

[Basic Settings] tab Select the document size in [Page Size] Select the paper size in [Output Size] [OK]
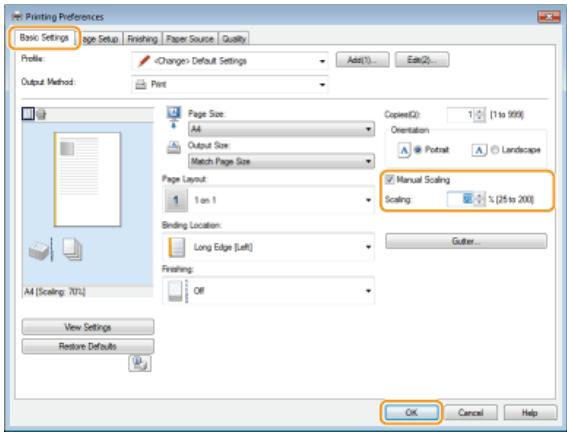
**Specifying the Print Ratio in Increments of 1%**

[Basic Settings] tab Select the [Manual Scaling] check box Enter the print ratio in [Scaling] OK
NOTE
Depending on the selected paper size, you may not be able to set an appropriate enlarging/reducing ratio. For example, there may be large blank spaces on your printout, or portions of the document may be missing.
The enlarging/reducing settings on some applications take priority over those of the printer driver.
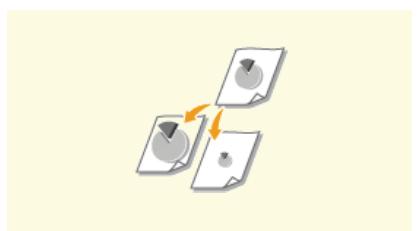
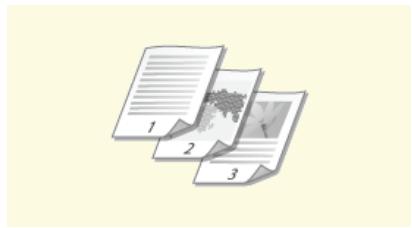
Collating Printouts by Page

When printing copies of multi-page documents, you can use the collate function to print complete sets in sequential page order. This function is useful when preparing handouts for meetings or presentations.

[Basic Settings] tab Select [Collate] or [Group] in [Finishing] [OK]
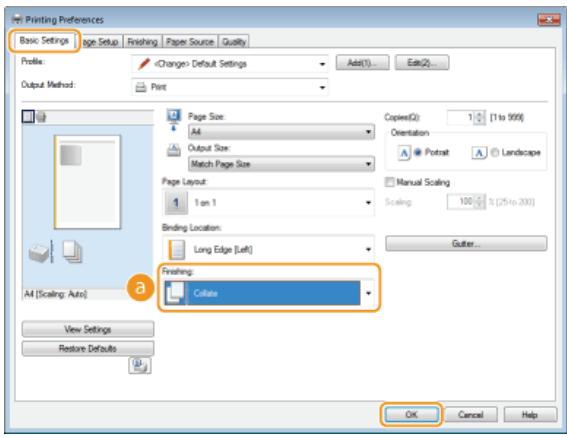
a [Finishing]
Specify the sorting method of the printouts when printing multiple-page documents.
| [Collate] | The printouts are grouped into complete sets in sequential page order. For example, if you are printing three copies of a four-page document, the printouts will be arranged in the following page order: 1, 2, 3, 4, 1, 2, 3, 4, 1, 2, 3, 4, 1, 2, 3, 4, 1, 2, 3, 4, 1, 2, 3, 4, 1, 2, 3, 4, 1, 2, 3, 4, 1, 2, 3, 4, 1, |
| [Group] | The printouts are not collated. For example, if you are printing three copies of a four-page document, the printouts will be arranged in the following page order: 1, 1, 1, 2, 2, 3, 3, 4, 4, 4, 1, 2, 3, 4, 1, 2, 3, 4, 1, 2, 3, 4, 1, 2, 3, 4, 1, 2, 3, 4, 1, 2, 3, 4, 1, 2, 3, 4, 1, 2, 3, 4 |
NOTE:
If you select [Off], whether the printouts are collated or not depends on the setting made in the application.
LINKS
Basic Print Operations
Printing Multiple Pages Onto One Sheet

You can print multiple pages onto a single sheet. For example, you can print four or nine pages onto a single sheet by using [4 on 1] or [9 on 1]. Use this function if you want to save paper or to view your document in thumbnails.

[Basic Settings] tab In [Page Layout], select the number of page to print onto a single sheet In [Page Order], select the page distribution layout OK
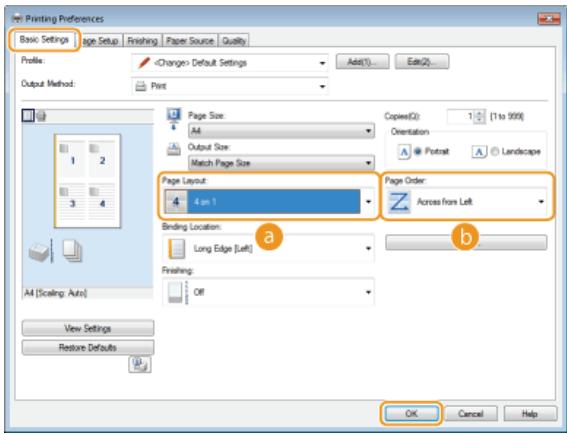
[Page Layout]
Select the number of pages to print onto a single sheet from [1 on 1] to [16 on 1]. For example, to print 16 pages onto a single sheet, select [16 on 1].
![CANON LBP6040 - [Page Layout] - 1](/content/2024/11/223505/images/d242ca9071c55bdeb1cbf703ed16ea5985078e825d220a2b42bb1d119cd6e66f.jpg)
NOTE:
For options such as [Poster [2× 2] ], see Printing Posters.
- Printing may not be performed properly if you combine this setting with an application setting for collating printouts.
b [Page Order]
Select a page distribution layout. For example, if you select [Across from Left], the first page is printed on the top left, and then the rest of the pages are arranged rightward.
![CANON LBP6040 - b [Page Order] - 1](/content/2024/11/223505/images/2973577b92b9b469ac6eeb7932e7fe98c4e4f6c56f9a1c1a0c16879cccf88806.jpg)
LINKS
Basic Print Operations
Printing Posters
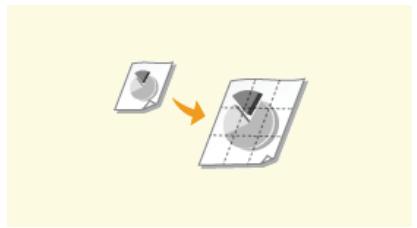
You can print parts of a single document page onto multiple pages, which can then be combined to make a poster. For example, if you divide an A4 page into nine parts, print each part nine times larger, and then combine the parts, you will have a poster as large as nine A4 pages.

[Basic Settings] tab In [Page Layout], select a poster size by specifying the number of parts to be printed, for example [Poster [3× 3] ] OK]
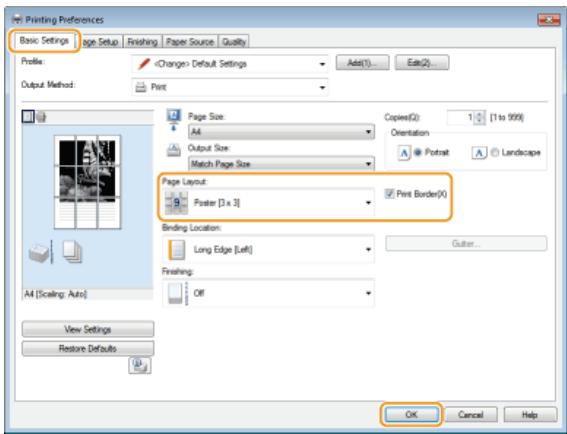
There are four size settings: [Poster [1× 2] ], [Poster [2× 2] ], [Poster [3× 3] ], and [Poster [4× 4] ].
- Select the [Print Border] check box to add borders on your printouts. The borders are helpful if you want to paste the printouts together or cut off the margins.
LINKS
Basic Print Operations
Enlarging or Reducing
Printing Borders

You can add borders, such as broken lines or double lines, in the margins of printouts.

[Page Setup] tab Click [Page Options] Select the border type in [Edging] [OK] [OK]
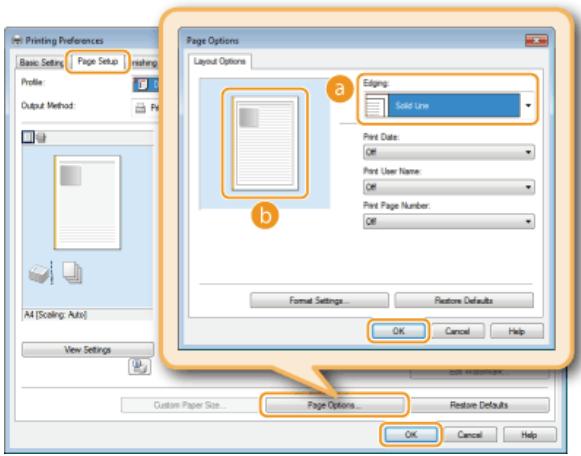
[Edging]
Selects the type of border to add to the document.
Preview
Displays a preview with the selected border.
LINKS
Basic Print Operations
Printing Dates and Page Numbers
Printing Watermarks
Printing Dates and Page Numbers
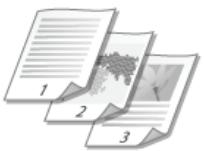
You can print information such as dates or page numbers, and you can specify where to print this information on the document (upper left, lower right, etc.).

[Page Setup] tab Click [Page Options] Select the printing position for the date, user name, and page number OK OK
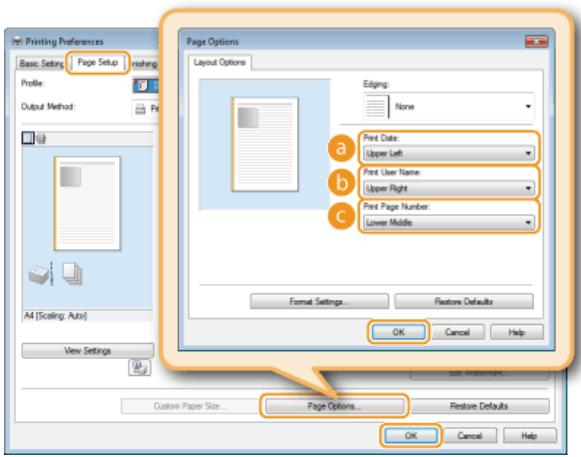
[Print Date]
Specifies the printing position for the print date.
[PrintUserName]
Specifies the position to print the user name (logon name) of the person using the computer that printed the document.
[Print Page Number]
Specifies the position to print the page number.
Changing the Print Format of Dates and Page Numbers
You can change formatting details such as font and font size when printing dates, logon names, or page numbers. Click [Format Settings] on the [Page Options] screen shown above to specify the details.
LINKS
Basic Print Operations
Printing Borders
Printing Watermarks
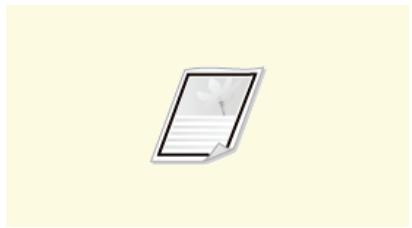
Printing Watermarks

You can print watermarks such as "COPY" or "CONFIDENTIAL" on the document. You can create new watermarks or use pre-registered watermarks.

[Page Setup] tab Select [Watermark] check box Select the watermark type with [Watermark Name] [OK]
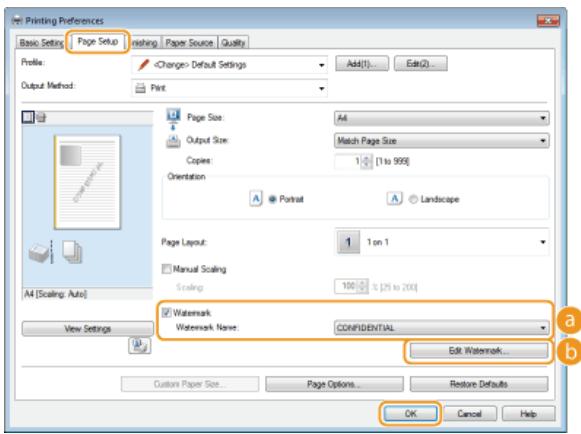
Watermark]/[Watermark Name]
Select the [Watermark] check box to display a list of watermarks in the [Watermark Name] drop-down list. Select a watermark to use from the list.
[Edit Watermark]
Displays the screen to create or edit watermarks.
![CANON LBP6040 - [Edit Watermark] - 1](/content/2024/11/223505/images/1e7fcf3008647dc0539b04617f084eb9d3cd49984ff0f67e15e06b2c7afe885a.jpg)
[Add]
Click to create a new watermark. Up to 50 watermarks can be registered.
[Name]
Enter the name of the new watermark.
[Attributes]/[Alignment]/[Print Style]
Click each tab to specify the text, color, or print position of the watermark name. For more information about the settings, click [Help] on the printer driver screen.
LINKS
Basic Print Operations
Printing Borders
Printing Dates and Page Numbers
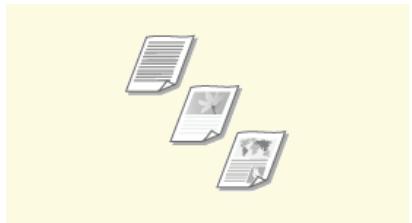
Printing According to the Document Type

You can specify the document type to ensure optimal image quality. There are different settings for photo documents, documents that have charts or graphs, and documents that have design drawings with fine lines.

[Quality] tab Select the document type in [Objective] OK
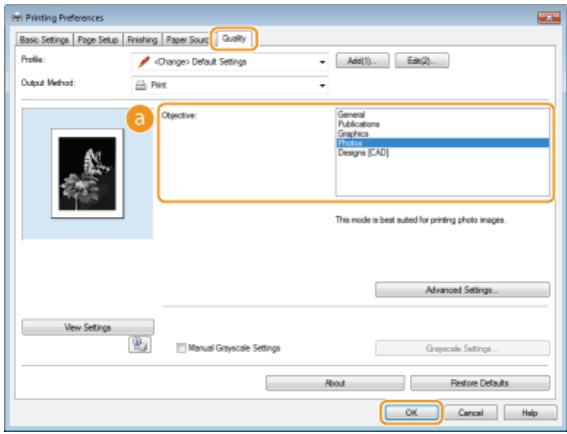
[Objective]
Select an option that suits the document type or purpose of printing. For example, select [General] for general use, or select [Photos] when you want to print photo images in optimal print quality.
| [General] | A versatile option that is suitable when printing most documents. |
| [Publications] | Suitable when printing documents that have a mix of photo images, charts, and graphs. |
| [Graphics] | Suitable when printing documents that have charts or graphs. |
| [Photos] | Suitable when printing photo images. |
| [Designs [CAD]] | Suitable when printing design drawings that have many fine lines. |
NOTE:
To specify detailed settings for each item selected with [Objective], click [Advanced Settings]. For more information about the settings, click [Help] on the printer driver screen.
LINKS
Basic Print Operations
Saving Toner
You can set the printer driver to print documents using less toner.
IMPORTANT
When the save toner setting is enabled, fine lines and sections with lighter density may be less sharp that normal.

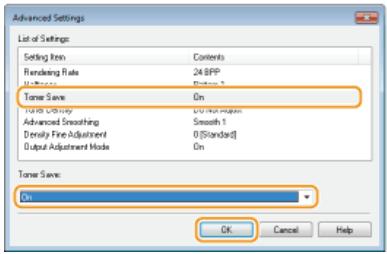
[Quality] tab Select the document type in [Objective] Click [Advanced Settings] Select [Toner Save] in the [Advanced Settings] screen Select [On] from the drop-down list [OK] [OK]
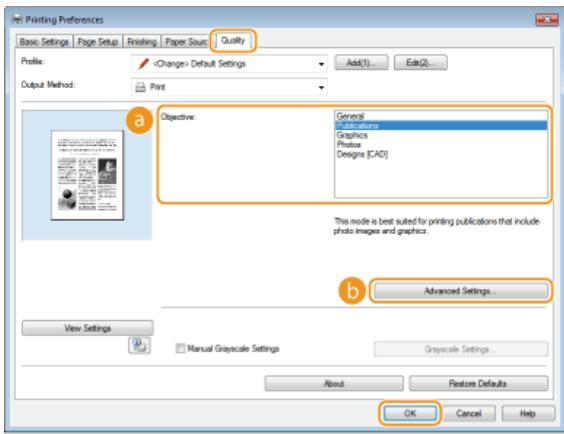
[Objective] Printing According to the Document Type
Selects the document type for which you want to enable the save toner setting.
b [Advanced Settings]
Displays a screen with a list of advanced settings. Click [Toner Save] and select [On] from the drop-down list at the bottom of the screen.
NOTE:
You can specify whether to enable the save toner setting for each document type. Specify the save toner setting for each document type listed in [Objective].
In the [Advanced Settings] screen, you can specify various print settings other than [Toner Save] settings. For more information about the settings, click [Help] on the printer driver screen.
LINKS
Basic Print Operations
Combining and Printing Multiple Documents
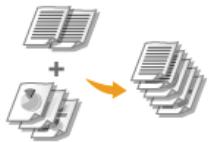
By using Canon PageComposer, you can combine multiple documents into one print job and print the job with specified print settings. For example, this function enables you to combine documents made with different applications and print all of the pages in the same paper size.
1 Open a document in an application and display the print dialog box.
- How to display the print dialog box differs for each application. For more information, see the instruction manual for the application you are using.
2 Select this machine and click [Preferences] or [Properties].
![CANON LBP6040 - Select this machine and click [Preferences] or [Properties]. - 1](/content/2024/11/223505/images/9b117a165d63005c9afa466c2d150bae1361bfea9f1cdaaaec35dc387f9fb925.jpg)
3 Select [Edit and Preview] in [Output Method].
- Click [OK] on the [Information] pop-up screen▶ Click [OK] in the printer driver screen.
![CANON LBP6040 - Select [Edit and Preview] in [Output Method]. - 1](/content/2024/11/223505/images/c35ad160f6af9bef4e69bdc2b91081108c43f2d1bc13fb3ab2464cc4e10e8a36.jpg)
4 Click [Print] or [OK].
![CANON LBP6040 - Click [Print] or [OK]. - 1](/content/2024/11/223505/images/d28830285f166eb72253aa73c8af726592e08d116e4bbc6804bbfee78d8aa16a.jpg)
Canon PageComposer starts. Printing does not start in this step.
5 Repeat steps 1 to 4 for the documents you want to combine.
The documents are added in Canon PageComposer.
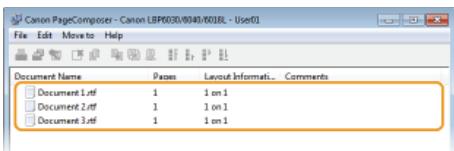
6 From the [Document Name] list, select the documents to combine, and click
To select multiple documents, click the documents while holding down the [SHIFT] key or [CTRL] key.
![CANON LBP6040 - From the [Document Name] list, select the documents to combine, and click - 1](/content/2024/11/223505/images/a4915b82e49e7a5f0a8a6163ad9bab3ce16818a9f6aab72a532bc70c2206f2be.jpg)
7 Change the settings as necessary, and click [Combine].
The documents selected in step 6 are combined.
![CANON LBP6040 - Change the settings as necessary, and click [Combine]. - 1](/content/2024/11/223505/images/a4958b5bbc62bbc4f898dda638cfdff830fe62a50b2edbedfdd17f499101856d.jpg)
[Print Preview]
Displays a preview of the document to be printed.
[Document List]/[Print Settings]
- Click the [Document List] tab to display the documents added in steps 1 to 4. You can remove documents by selecting them in the list and clicking [Delete from List].
![CANON LBP6040 - [Document List]/[Print Settings] - 1](/content/2024/11/223505/images/98ddcd067750b54e7ba9935a195fb58bbbb9a4b28ce32dfb9fd83feff668cf1d.jpg)
- Click the [Print Settings] tab to display the screen for specifying print settings such as the number of copies. The settings specified here are applied to the whole print job.
![CANON LBP6040 - [Document List]/[Print Settings] - 2](/content/2024/11/223505/images/0610f5b29fdb630fc083c3e3c0f9704e32b8636ff33582392315d8bcca354d7a.jpg)
NOTE:
For more information, click [Help] on the Canon PageComposer screen.
[Details]
Displays the print settings screen of the printer driver. There are fewer settings available than when using the ordinary printing method.
8 In the [Document Name] list, select the combined-document print job you want to print, and click
![CANON LBP6040 - In the [Document Name] list, select the combined-document print job you want to print, and click - 1](/content/2024/11/223505/images/34f2f643466f38d20ca4242492e6c6fc436ba6018e7063af74b033b7480197a2.jpg)
Printing starts.
To cancel printing, see Canceling Print Jobs.
LINKS
Basic Print Operations
Printing Multiple Pages Onto One Sheet
Configuring Print Settings to Your Needs
You can register combinations of settings as "profiles" to suit your different printing objectives. Also, you can register the settings that you frequently use as the default settings. Once the default settings are registered, they are displayed automatically in the printer driver screen, and you can skip the operations to specify them and proceed to printing immediately.

When I print highly confidential documents, I include a "TOP SECRET" watermark.

Set "TOP SECRET" as a watermark and register it in "profiles." You can then select this watermark from profiles whenever you need it. Registering Combinations of Frequently Used Print Settings

To save printing costs, I always print 2 document pages on 1 printout page.

Set [2 on 1] as a default setting in the printer driver. From the next print job, every printout page will show 2 pages from the document. Changing Default Settings
Registering Combinations of Frequently Used Print Settings
Specifying combinations of settings such as "1-sided landscape orientation on A4 size paper in save toner mode" every time you print is time consuming. If you register your frequently used combinations of print settings as "profiles," you can specify print settings simply by selecting one of the profiles from the list. This section explains how to register profiles and how to print using profiles.
Registering a Profile
Selecting a Profile
Registering a Profile
1 Change the settings that you want to register as a profile, and click [Add].
Make print settings as required on the [Basic Settings], [Page Setup], [Finishing], [Paper Source], and [Quality] tabs. Various Print Settings
![CANON LBP6040 - Change the settings that you want to register as a profile, and click [Add]. - 1](/content/2024/11/223505/images/befbab053dc6da77d837703ceaff87e30d5d0970f983b2efeda08cfe1949f194.jpg)
2 Enter a profile name in [Name], select an icon, and then click [OK].
As necessary, enter comments about the profile in [Comment].
- Click [View Settings] to see the settings that will be registered.
![CANON LBP6040 - Enter a profile name in [Name], select an icon, and then click [OK]. - 1](/content/2024/11/223505/images/0e7aef39d9117fdf0c7cf5858f61267456bfc7a292551fc2574ea0f48b0e997b.jpg)
NOTE
Editing a profile
By clicking [Edit] on the right side of [Profile] on the screen shown in step 1, you can change the name, icon, or comment of the profiles you have previously registered. However, you cannot edit the pre-registered profiles.
Selecting a Profile
Simply select the profile that suits your objective, and click [OK].
NOTE
Changing the settings of the currently selected profile
You can change the settings of the currently selected profile. In addition, the changed settings can be registered as another profile.
LINKS
Basic Print Operations
Changing Default Settings
Changing Default Settings
The default settings are the settings that are first displayed whenever you open the print settings screen of the printer driver. You can change these settings to the settings that you use most often. For example, if you always want to print 2 document pages on each printout page, set [2 on 1] as the default page layout setting. From the next time that you open the printer driver screen, the setting will always be [2 on 1], eliminating the need to change this setting every time you make prints.
IMPORTANT
To perform the following procedure, log on to your computer with an administrator account.
1 Open the printer folder. Displaying the Printer Folder
2 Right-click the icon of the machine and then click [Printing preferences].
![CANON LBP6040 - Right-click the icon of the machine and then click [Printing preferences]. - 1](/content/2024/11/223505/images/156154794b8c85f91c41bb338a91e8457a0784700988751cb818f9b52010d0c6.jpg)
3 Change the settings on the printing preferences screen, and click [OK].
Make print settings as required on the [Basic Settings], [Page Setup], [Finishing], [Paper Source], and [Quality] tabs. Various Print Settings
![CANON LBP6040 - Change the settings on the printing preferences screen, and click [OK]. - 1](/content/2024/11/223505/images/2f368b7aef28de2cc76ac3553122723d0be75f7769ab62c369bfb5eb987f8a0c.jpg)
LINKS
Basic Print Operations
Registering Combinations of Frequently Used Print Settings
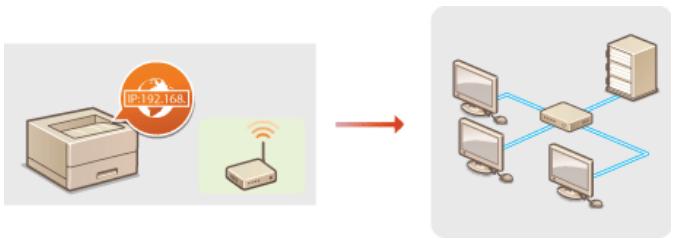
This machine has been designed for flexibility of use across a variety of environments. In addition to basic network features, it includes advanced network technologies. Make the required settings depending on your network environment. Do not worry if you are not a network expert, because the machine has also been designed for convenience and ease of use. Relax and proceed with the network setup one step at a time.
- Connecting to a Computer/Viewing the Machine's Network Settings
Connecting to a Network
Viewing Network Settings
- Configuring for Printing
Configuring for Printing from a Computer
■Customizing the Machine for a More Convenient Network Experience

Configuring the Machine for Your Network Environment
Connecting to a Network LBP6030w
You can connect the machine to a wireless LAN network, and you can use a unique IP address within the network. For specific IP address settings, contact your Internet service provider or network administrator.
IMPORTANT
If the machine is connected to an unsecured network, your personal information might be leaked to a third party.
NOTE
The machine does not come with a router. Have a router ready as necessary.
- If you are not sure whether your router supports wireless LAN, see the instruction manual provided with the router, or contact the manufacturer.
Before You Start
Follow these steps to connect the machine to a network.
1

Check the device and network settings.
- Have the computer and the router been connected properly? For more information, see the instruction manuals for the devices you are using, or contact the device manufacturers.
- Make sure that the network settings have been completed on the computer. If the network has not been set up properly, you will not be able to use the machine on the network, even if you perform the rest of the procedure below.
NOTE:
To check the machine's MAC address Viewing Network Settings
2

Connect to the wireless LAN.

Connecting to a Wireless LAN
3
Set the IP address as necessary.
This step is required when you want to assign a specific IP address to the machine or change the dynamic IP addressing protocol from the default DHCP.

Setting IP Addresses
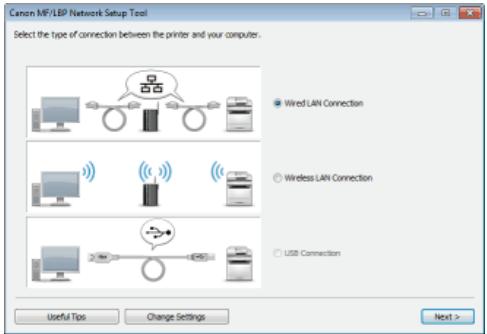
Wireless routers (or access points) connect the machine to a computer via radio waves. If your wireless router is equipped with Wi-Fi Protected Setup (WPS), you can configure your network with a simple button push. If your networking devices do not support automatic configuration, or if you want to specify authentication and encryption settings in detail, you need to set up the connection manually. To make wireless settings for this machine, use the MF/LBP Network Setup Tool from your computer. Make sure that your computer is correctly connected to the network.

IMPORTANT
Log on as an administrator
To perform the following procedure, log on to your computer with an administrator account.
Risk of information leak
Use wireless LAN connection at your own discretion and at your own risk. If the machine is connected to an unsecured network, your personal information might be leaked to a third party because radio waves used in wireless communication can go anywhere nearby, even beyond walls.
Wireless LAN security standards
This machine supports the following wireless LAN security standards. For the wireless security compatibility of your wireless router, see the instruction manual or contact the manufacturer.
128 (104)/64 (40) bit WEP
WPA-PSK (TKIP/AES-CCMP)
WPA2-PSK (TKIP/AES-CCMP)
NOTE
Required devices for wireless LAN connection
The machine does not come with a wireless router. Have the router ready as necessary.
The wireless router must conform to the IEEE 802.11b/g/n standards and be able to communicate in the 2.4 GHz band. For more information, see the instruction manual for your wireless router or contact the manufacturer.
1 Insert the User Software CD-ROM/DVD-ROM into the drive on the computer.
2 Click [Start Software Programs].
![CANON LBP6040 - Click [Start Software Programs]. - 1](/content/2024/11/223505/images/eb0e785900344d9c4ba04ff66187bb1836bd26092b740110b19881d14fa4be75.jpg)
NOTE:
If the above screen does not appear Displaying the [CD-ROM/DVD-ROM Setup] Screen
If [AutoPlay] is displayed, click [Run MInst.exe].
3 Click [Start] for [MF/LBP Network Setup Tool].
![CANON LBP6040 - Click [Start] for [MF/LBP Network Setup Tool]. - 1](/content/2024/11/223505/images/ef54bf98ee7ec5dd212a43f5611ab7ff008ce131a265b653c27145e651168e81.jpg)
4 Follow the on-screen instructions to configure the wireless LAN settings.
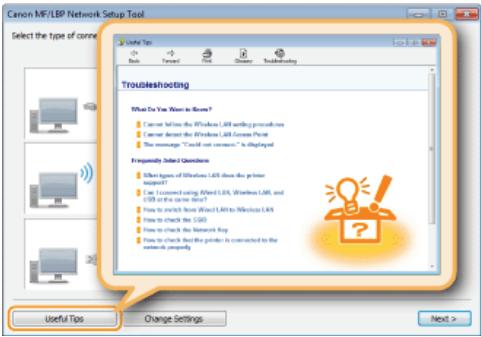
NOTE:
If there is something you do not understand
Click [Useful Tips] at the bottom left of the screen to display troubleshooting tips.
LINKS
Connecting to a Network
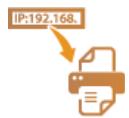
Setting IP Addresses
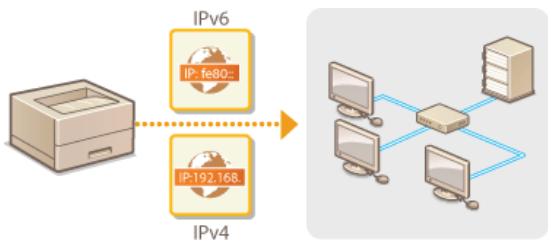
LBP6030w
Connecting the machine to a network requires an IP address that is unique in that network. There are two types of IP addresses: IPv4 and IPv6. Use the type required by your network environment. Note that before you can use an IPv6 address, you first need to properly configure an IPv4 address.
IP:192.168.
The machine's IPv4 address can be either assigned automatically by a dynamic IP addressing protocol, such as DHCP, or entered manually.
1 Start the Remote UI and log on in System Manager Mode. Starting the Remote UI
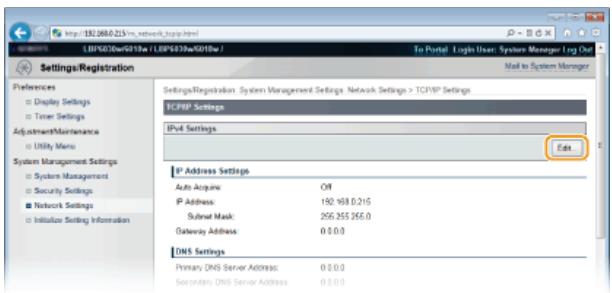
2 Click [Settings/Registration].

3 Click [Network Settings] [TCP/IP Settings].
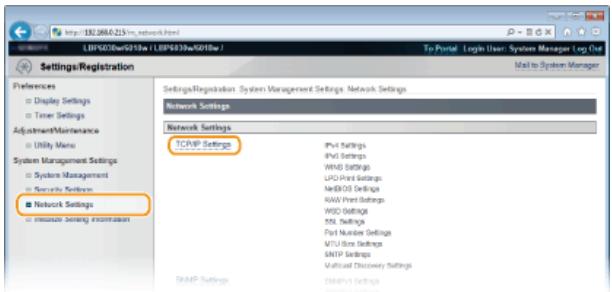
4 Click [Edit] in [IPv4 Settings].
5 Set the IP address.
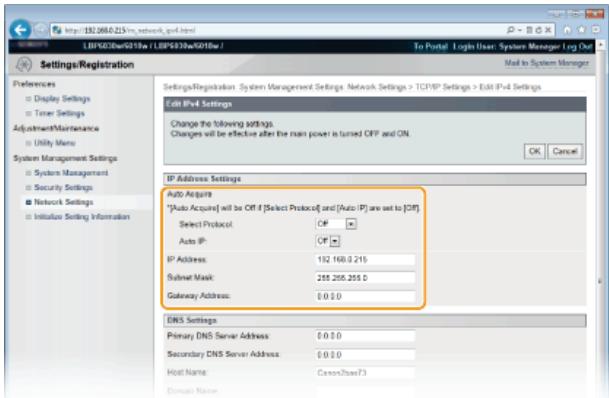
Automatically assigning an IP address
1 In the [Select Protocol] list, select [DHCP], [BOOTP], or [RARP].
NOTE:
If you do not want to use DHCP/BOOTP/RARP to assign an IP address automatically
Select [Off]. If you select the [DHCP], [BOOTP], or [RARP] protocol when these services are unavailable, the machine will waste time and communications resources searching the network for these services.
2 Check that [Auto IP] is set to [On].
If [Off] is selected, change the setting to [On].
NOTE:
Even if Auto IP is enabled, IP addresses assigned via DHCP/BOOTP/RARP override an address obtained via Auto IP.
Manually entering an IP address
1 Select [Off] for [Select Protocol] and [Auto IP].
2 Set the [IP Address], [Subnet Mask], and [Gateway Address] fields.
6 Click [OK].
7 Restart the machine.
Turn OFF the machine, wait for at least 10 seconds, and turn it back ON.
NOTE
Checking whether the settings are correct
Make sure that the Remote UI screen can be displayed with your computer. Starting the Remote UI
If you change the IP address after installing the printer driver
If you are using an MFNP port, and the machine and the computer are in the same subnet, then the connection will be maintained. You do not need to add a new port. If you are using a standard TCP/IP port, then you need to add a new port.
Configuring Printer Ports
- If you are not sure which type of port you are using, see Checking the Printer Port.
LINKS
Setting IPv6 Addresses
Viewing Network Settings
Configuring WINS

Use the Remote UI to set IPv6 addresses. Before setting IPv6 addresses, make sure that the IPv4 address has been set correctly (Viewing Network Settings). You can register up to nine of the following IPv6 addresses.
| Type | Maximum number available | Description |
| Link-local address | 1 | An address that is valid only within a subnet or link and cannot be used to communicate with devices beyond a router. A link-local address is set automatically when the IPv6 function of the machine is enabled. |
| Manual address | 1 | An address that is entered manually. Specify the prefix length and default router address. |
| Stateless address | 6 | An address that is generated automatically using the MAC address of the machine and a network prefix that is advertised by the router. Stateless addresses are discarded when the machine is restarted (or turned ON). |
| Stateful address | 1 | An address obtained from a DHCP server using DHCPv6. |
1 Start the Remote UI and log on in System Manager Mode. Starting the Remote UI
2 Click [Settings/Registration].

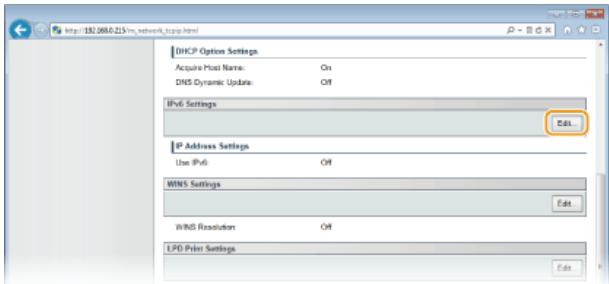
3 Click [Network Settings] [TCP/IP Settings].

4 Click [Edit] in [IPv6 Settings].
5 Select the [Use IPv6] check box and configure the required settings.
![CANON LBP6040 - Select the [Use IPv6] check box and configure the required settings. - 1](/content/2024/11/223505/images/31d2f2cb554fa04dd2e50ef81bd69bcd95791c79a9ea68d93356bde16dd903fb.jpg)
[Use IPv6]
Select the check box to use IPv6 on the machine. Clear the check box if you do not want to use IPv6.
[Stateless Address]
Check to use stateless addresses. Clear the check box if you do not want to use stateless addresses.
[Use Manual Address]
When you want to enter an IPv6 address manually, select the check box and enter values in the [IP Address], [Prefix Length], and [Default Router Address] text boxes. Clear the check box if you do not want to enter a manual address.
[IP Address]
Enter an IPv6 address. Addresses that start with "ff" (multicast addresses) and the loopback address (:1) cannot be entered.
[Prefix Length]
Enter the length (number of bits) of the network portion of the address.
[Default RouterAddress]
Specify the default router address, as necessary. Addresses that start with "ff" (multicast addresses) and the loopback address (:1) cannot be entered.
[Use DHCPv6]
Select the check box to use the stateful address. Clear the check box if you do not want to use the stateful address.
6 Click [OK].
![CANON LBP6040 - Click [OK]. - 1](/content/2024/11/223505/images/4a917b42255db5fad2e68a5dafd2435133eda35d147c9e568075e1dcc9726cb9.jpg)
7 Restart the machine.
- Turn OFF the machine, wait for at least 10 seconds, and turn it back ON.
NOTE
Checking whether the settings are correct
Make sure that the Remote UI screen can be displayed with your computer by using the IPv6 address of the machine.
Starting the Remote UI
If you change IP addresses after installing the printer driver
You need to add a new port. Configuring Printer Ports
LINKS
Setting IPv4 Address
Viewing Network Settings
Viewing Network Settings LBP6030w
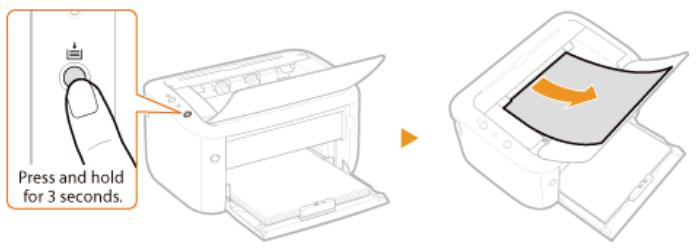
Press this machine's (Paper) key and hold it down for 3 seconds to print a partial list of network settings. This allows you to check IPv4 settings, the MAC address, and wireless LAN settings. The setting list is formatted to print on A4 size paper. Before printing, load A4 size paper in the multi-purpose tray. Loading Paper in the Multi-Purpose Tray
Output example:
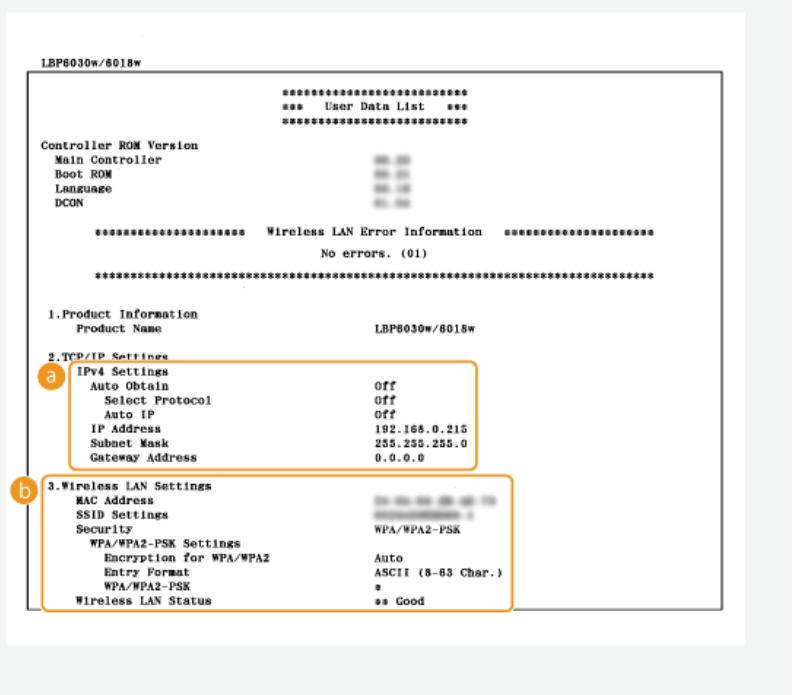
IPv4 Settings
Lists IPv4 settings.
Auto Obtain
Displays whether the IP address is assigned automatically by a protocol such as DHCP. "On" is displayed if automatic addressing is enabled.
Select Protocol
Displays the protocol used to assign the IP address automatically.
Auto IP
Displays whether Auto IP is enabled or disabled.
IP Address
Displays the IP address.
Subnet Mask
Displays the subnet mask.
Gateway Address
Displays the gateway address.
NOTE:
The IP address is not correctly configured if it is displayed as "0.0.0.0".
- Connecting the machine to multiple switching hubs or bridges for redundancy may result in a connection failure even when the IP address is correctly configured. This problem can be solved by setting a certain interval before the machine starts communicating. Setting a Wait Time for Connecting to a Network
Wireless LAN Settings
Displays MAC address and wireless LAN settings.
MAC Address
Displays the MAC address.
SSID Settings
Displays SSID settings.
Security
Displays the currently applied security settings. If the security settings have not been configured, "None" is displayed.
Wireless LAN Status
Displays the connection status (signal strength) of the wireless LAN. If the machine is not connected, "Inactive" or "Disconnected" is displayed.
NOTE
Note that you cannot check IPv6 settings and some other network settings on this setting list. If you want to check all network settings, print them by selecting [Network Status Print] in the Printer Status Window. Printing Setting Lists
LINKS
Connecting to a Wireless LAN
Setting IPv4 Address
Configuring for Printing from a Computer LBP6030w
When using the machine as a network printer, you can configure the protocols and ports used for printing. Before starting, make sure that you have completed all basic preparations for printing (Printer Driver Installation Guide).
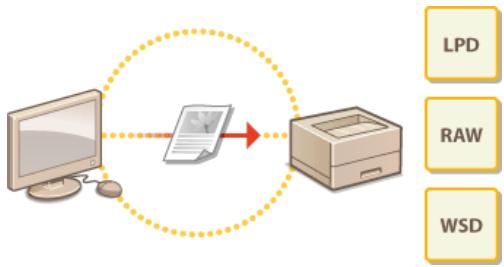
NOTE
- Printing protocols are rules for delivering document data created on a computer to the machine. You can select them according to the printing purpose or the network environment.
- Ports are gateways for passing printing data from a computer to the machine. Incorrect port settings are often the cause when documents cannot be printed from a network computer.
Setting Up a Print Server
By setting up a print server on the network, you can reduce the load on the computer that you print from. This also makes it possible to install printer drivers over the network, which saves the trouble of installing the drivers on each computer by using the CD-ROM/DVD-ROM. For information about how to set up a print server, see Printer Driver Installation Guide.
The following explains how to configure printing protocols for printing documents from computers. The protocols supported by the machine are LPD, RAW, and WSD (Web Services on Devices).
NOTE
To change protocol port numbers Changing Port Numbers
1 Start the Remote UI and log on in System Manager Mode. Starting the Remote UI
2 Click [Settings/Registration].
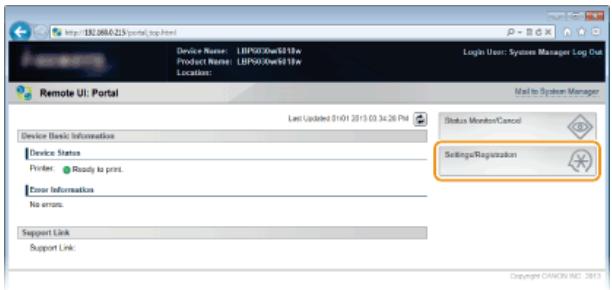
3 Click [Network Settings] [TCP/IP Settings].
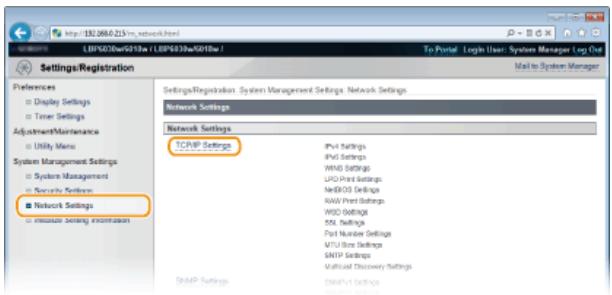
4 Configure the printing protocols.
- Configuring LPD or RAW
1 Click [Edit] in [LPD Print Settings] or [RAW Print Settings].
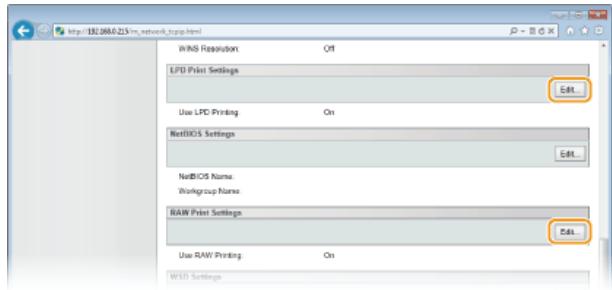
2 Configure the settings as necessary.
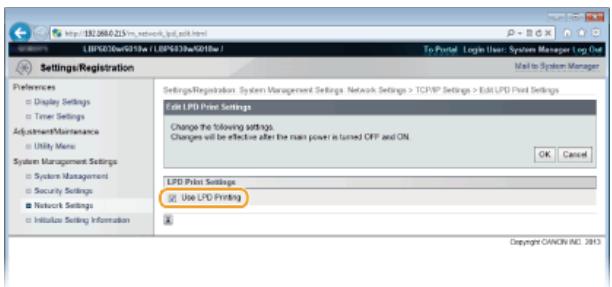
[Use LPD Printing]
Select the check box to print using LPD. Clear the check box if you do not want to use LPD printing.
[Use RAW Printing]
Select the check box to print using RAW. Clear the check box if you do not want to use RAW printing.
3 Click [OK].
- Configuring WSD
1 Click [Edit] in [WSD Settings].
![CANON LBP6040 - Click [Edit] in [WSD Settings]. - 1](/content/2024/11/223505/images/5e1cd82c70149468680bba52d6efc4c1f9415824626837becfe6d2d3c3fddc24.jpg)
2 Configure the settings as necessary.
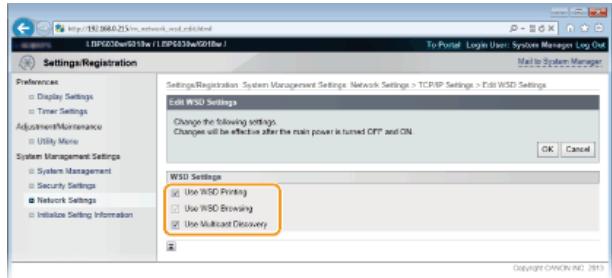
[Use WSD Printing]
Select the check box to print using WSD. Clear the check box if you do not want to use WSD printing.
[Use WSD Browsing]
Select the check box to obtain information about the machine from a computer via WSD. This check box is selected automatically when the [Use WSD Printing] check box is selected.
[Use Multicast Discovery]
Select the check box to set the machine to reply to multicast discovery messages. If the check box is cleared, the machine stays in sleep mode even when it receives a multicast discovery message from the network.
3 Click [OK].
5 Restart the machine.
Turn OFF the machine, wait for at least 10 seconds, and turn it back ON.
NOTE
Setting up WSD network devices on Windows Vista/7/8
Install the printer driver according to the procedure using WSD ports described in the Printer Driver Installation Guide.
Configuring Printer Ports LBP6030w
Printing errors can occur when the print protocol settings of the machine have been changed, or when a printer has been added via the Windows printer folder. These errors are typically caused by incorrect printer port settings, for example when a computer specifies an incorrect printer port number or type in the printer driver. To fix this type of problem, configure the printer port settings on the computer.
IMPORTANT
To perform the following procedure, log on to your computer with an administrator account.
1 Open the printer folder. Displaying the Printer Folder
2 Right-click the icon of the machine and click [Printer properties] or [Properties].
![CANON LBP6040 - Right-click the icon of the machine and click [Printer properties] or [Properties]. - 1](/content/2024/11/223505/images/adf7f4ca205374fc7f854bfbe9c6630dceb46917a2470610ccaa8c6da03d996a.jpg)
3 Click the [Ports] tab and configure the required settings.
![CANON LBP6040 - Click the [Ports] tab and configure the required settings. - 1](/content/2024/11/223505/images/0ec9267debb22d68744eef476ad56231829dac7055749bc9ac3eeabfe281f97e.jpg)
Adding a port
When an incorrect port was selected while installing a printer driver from the Windows printer folder, add a new port. There are two types of port: "MFNP Port" and "Standard TCP/IP Port." Select the port type according to your environment.
| MFNP Port (only for IPv4 environment) | This is a port that allows the IP address of the machine to be detected automatically. Even if the IP address of the machine is changed, the connection is maintained, provided that the machine and the computer are in the same subnet. You do not need to add a new port every time the IP address is changed. If you are using the machine in an IPv4 environment, you should normally select this type of port. IMPORTANT: You can add an MFNP port only when you installed the printer driver from the User Software CD-ROM/DVD-ROM, or when you downloaded and installed the printer driver from the Canon website. |
| Standard TCP/IP Port | This is a standard Windows port. When you use this type of port, you need to add a new port every time that the IP address of the machine is changed. Select this type of port when you are using the machine in an IPv6 environment and when you cannot add an MFNP port. |
Adding an MFNP port

1 Click [Add Port].
2 Select [Canon MFNP Port] in [Available port types] and click [New Port].
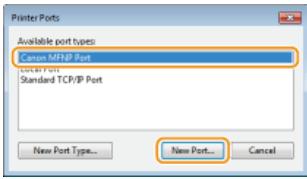
3 Select [Auto Detect] and select the machine when it is detected, and then click [Next].
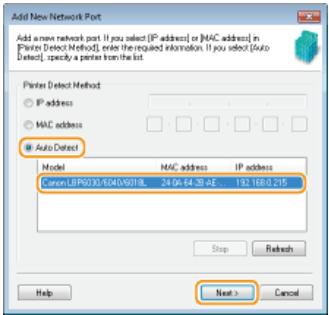
NOTE:
If the machine is not detected
Click [Refresh]. If the problem persists, select [IP address] or [MAC address], enter the IP address or MAC address of the machine (Viewing Network Settings) and then click [Next].

4 Click [Add] [Finish].
5 Click [Close].
Adding a standard TCP/IP port

1 Click [Add Port].
2 Select [Standard TCP/IP Port] in [Available port types] and click [New Port].
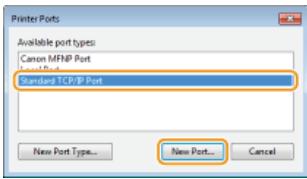
3 Click [Next].
4 Enter the IP address or the DNS name of the machine, and click [Next].
The [Port Name] is entered automatically. If necessary, you can change it.
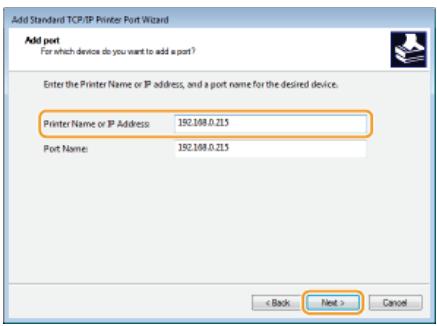
NOTE:
When the next screen is displayed, follow the instructions on the screen.
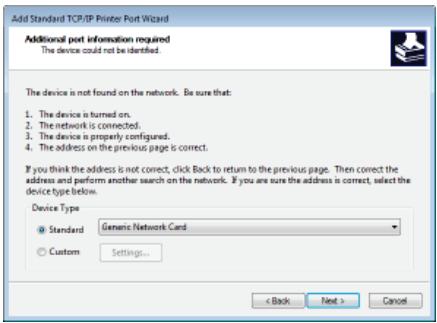
- When you select the [Device Type], select [Canon Network Printing Device with P9100] under [Standard].
5 Click [Finish].
6 Click [Close].
Changing the port type or number
If the printing protocol (LPD or RAW) has been changed on the machine side (Configuring Printing Protocols and Web Services) or the port number has been changed (Changing Port Numbers), the corresponding settings on the computer must also be configured. This operation is not needed for WSD ports.
MFNP port

1 Click [Configure Port].
2 Under [Protocol Type], select [RAW] or [LPR], and change the [Port Number].
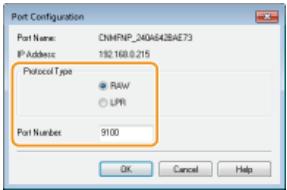
3 Click [OK].
Standard TCP/IP port

1 Click [Configure Port].
2 Under [Protocol], select [Raw] or [LPR].
If you selected [Raw], change the [Port Number].
If you selected [LPR], enter "Ip" in [Queue Name].
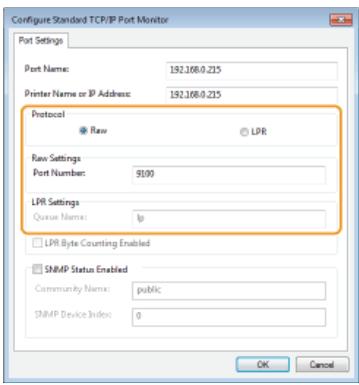
3 Click [OK].
4 Click [Close].
Configuring the Machine for Your Network Environment LBP6030w
The size and configuration of a network varies depending on the purpose of the network. This machine has been designed to be compatible with as many network configurations as possible, and it is equipped with a variety of network technologies. Consult your network administrator and set a configuration to suit your network environment.
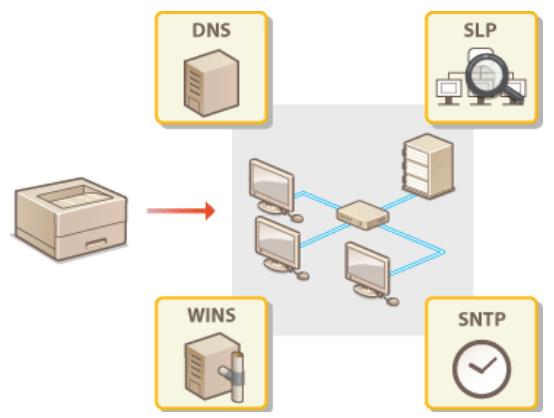
In most Ethernet networks, the maximum size of a packet that can be sent is 1500 bytes. A packet refers to a small chunk of data. The original data is divided into packets before being sent. The maximum transmission unit (MTU) may vary on each network. Change the settings of the machine as necessary. For more information, contact your network administrator.
1 Start the Remote UI and log on in System Manager Mode. Starting the Remote UI
2 Click [Settings/Registration].

3 Click [Network Settings] [TCP/IP Settings].

4 Click [Edit] in [MTU Size Settings].
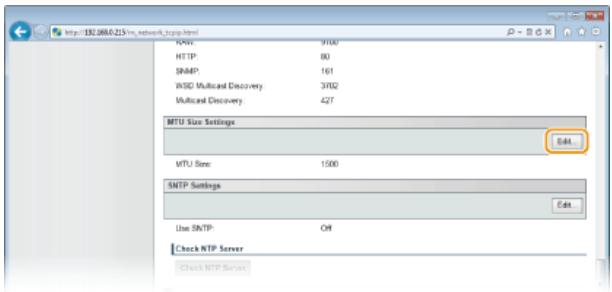
5 Select the maximum packet size, and then click [OK].
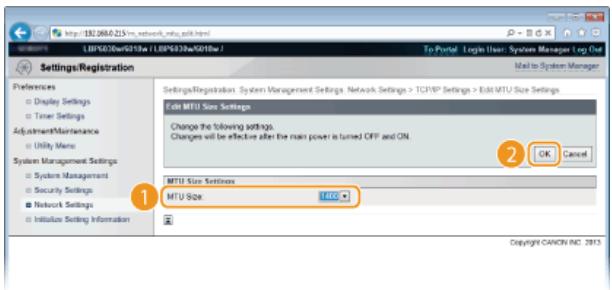
6 Restart the machine.
LINKS
Setting a Wait Time for Connecting to a Network
When a network is designed with multiple switching hubs or bridges in order to provide redundant connectivity, it must have a mechanism to prevent packets from looping. One effective solution is to define the role of each switch port. However, communication may still be disrupted for a certain time immediately after you change the network, for example by adding a new device. If this type of problem occurs, set a wait time for connecting the machine to the network.
1 Start the Remote UI and log on in System Manager Mode. 0Starting the Remote UI
2 Click [Settings/Registration].

3 Click [Network Settings] [Waiting Time for Connection at Startup].
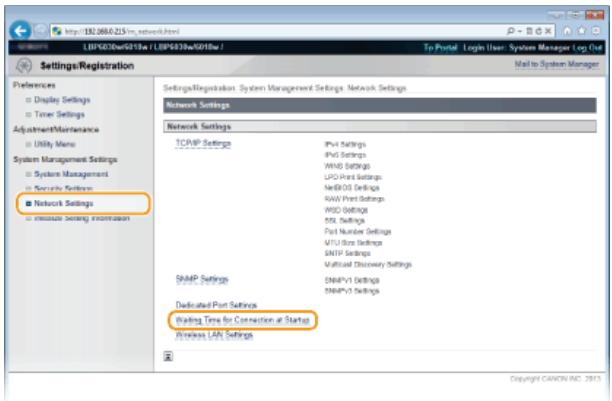
4 Click [Edit].
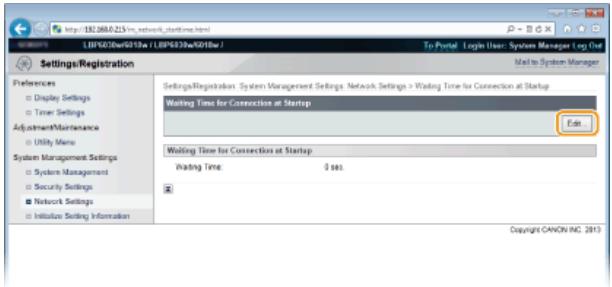
5 Enter the time to wait before beginning communication with the network, and then click [OK].
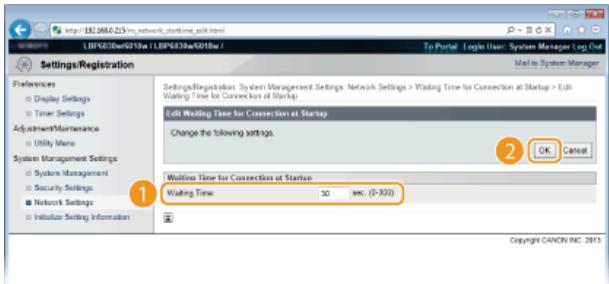
LINKS
Changing the Maximum Transmission Unit
DNS (Domain Name System) provides a service for name resolution that associates a host (or domain) name with an IP address. Configure the DNS, mDNS, or DHCP option settings as necessary according to your network. Note that the procedures for configuring DNS are different for IPv4 and IPv6.
1 Start the Remote UI and log on in System Manager Mode. 0Starting the Remote UI
2 Click [Settings/Registration].

3 Click [Network Settings] [TCP/IP Settings].
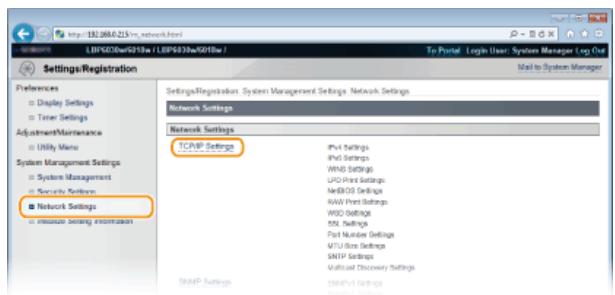
4 Configure the DNS settings.
- Configuring IPv4 DNS settings
1 Click [Edit] in [IPv4 Settings].
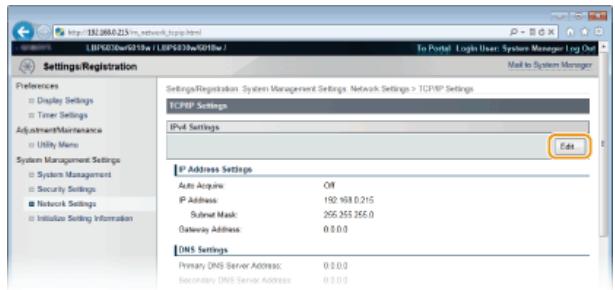
2 Configure the IPv4 DNS settings.
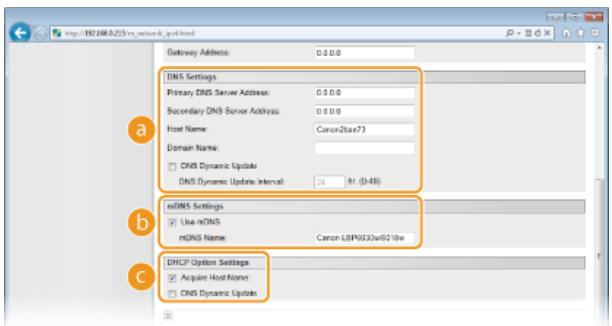
[DNS Settings]
[Primary DNS Server Address]
Enter the IP address of the DNS server.
[Secondary DNS Server Address]
When there is a secondary DNS server, enter its IP address.
[Host Name]
Enter up to 47 alphanumeric characters for the host name of the machine that is to be registered with the DNS server.
[Domain Name]
Enter up to 47 alphanumeric characters for the name of the domain the machine belongs to (such as "example.com").
[DNS Dynamic Update]
Select the check box to automatically update the DNS records whenever the association between the machine's IP address and its host name changes (for example, in a DHCP environment). To specify the interval between updates, enter the time in hours in the [DNS Dynamic Update Interval] text box. Clear the check box if you do not want to use dynamic updating.
b [mDNS Settings]
[Use mDNS]
Adopted by services such as Bonjour, mDNS (multicast DNS) is a protocol for associating a host name with an IP address without using DNS. Select the check box to enable mDNS and enter the mDNS name in the [mDNS Name] text box. Clear the check box if you do not want to use mDNS.
[DHCP Option Settings]
[Acquire Host Name]
Select the check box to enable Option 12 to obtain the host name from the DHCP server. Clear the check box if you do not want to use this function.
[DNS Dynamic Update]
Select the check box to enable Option 81 to dynamically update the DNS records through the DHCP server instead of through this machine. Clear the check box if you do not want to use this function.
3 Click [OK].
![CANON LBP6040 - Click [OK]. - 1](/content/2024/11/223505/images/df81f897041564f75c0829dfa76f02a9d043b15c91fc0e155d6f9eec3a0408ee.jpg)
- Configuring IPv6 DNS settings
1 Click [Edit] in [IPv6 Settings].
![CANON LBP6040 - Click [Edit] in [IPv6 Settings]. - 1](/content/2024/11/223505/images/ee11b0dfd36234eb60e1bc43e41d877ae4a9b8c00accbcec07cb9fadc2d05ca3.jpg)
2 Configure the IPv6 DNS settings.
The [Use IPv6] check box must be selected to configure the settings. Setting IPv6 Addresses
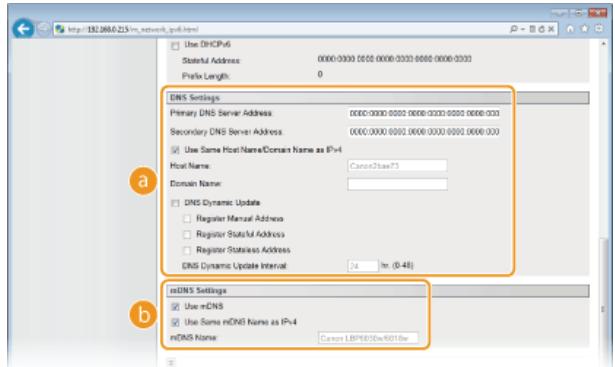
[DNS Settings]
[Primary DNS Server Address]
Enter the IP address of the DNS server. Addresses that start with "ff" (multicast addresses) and the loopback address (:1) cannot be entered.
[Secondary DNS Server Address]
When there is a secondary DNS server, enter its IP address. Addresses that start with "ff" (multicast addresses) and the loopback address (:1) cannot be entered.
[Use Same Host Name/Domain Name as IPv4]
Select the check box to use the same settings as in IPv4. The host name and domain name used in IPv4 will be set automatically after the machine restarts. Clear the check box if you want to use different settings from IPv4.
[Host Name]
Enter up to 47 alphanumeric characters for the host name of the machine that is to be registered with the DNS server.
[Domain Name]
Enter up to 47 alphanumeric characters for the name of the domain the machine belongs to (such as "example.com").
[DNS Dynamic Update]
Select the check box to automatically update the DNS records whenever the association between the machine's IP address and its host name changes (for example, in a DHCP environment). To specify the addresses you want to register with the DNS server, select one or more of the check boxes for [Register Manual Address], [Register Stateful Address], and [Register Stateless Address]. To specify the interval between updates, enter the time in hours in the [DNS Dynamic Update Interval] text box. Clear the check box if you do not want to use dynamic updating.
[MDNS Settings]
[Use mDNS]
Adopted by services such as Bonjour, mDNS (multicast DNS) is a protocol for associating a host name with an IP address without using DNS. Select the check box to enable mDNS. Clear the check box if you do not want to use mDNS.
[Use Same mDNS Name as IPv4]
Select the check box to use the same settings as in IPv4. The mDNS name used in IPv4 will be set automatically after the machine restarts. Clear the check box and enter a name in [mDNS Name] if you want to use different settings from IPv4.
3 Click [OK].
![CANON LBP6040 - Click [OK]. - 1](/content/2024/11/223505/images/7794d23999de6f1e02d70019720783481224212ef61ff595571cd7c4ce8873c1.jpg)
5 Restart the machine.
Turn OFF the machine, wait for at least 10 seconds, and turn it back ON.
Setting IPv4 Address
Setting IPv6 Addresses
Viewing Network Settings
Windows Internet Name Service (WINS) is a name resolution service that associates a NetBIOS name (a computer or printer name in a NetBIOS network) with an IP address. To use WINS, a WINS server must be specified.
IMPORTANT
To register this machine with a WINS server, a NetBIOS name and workgroup name must be set. Configuring NetBIOS
This function is not available in an IPv6 environment.
1 Start the Remote UI and log on in System Manager Mode. 串 Starting the Remote UI
2 Click [Settings/Registration].
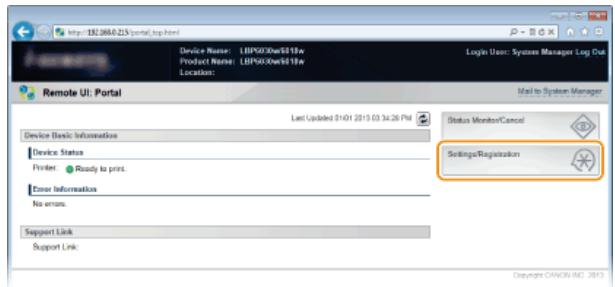
3 Click [Network Settings] [TCP/IP Settings].
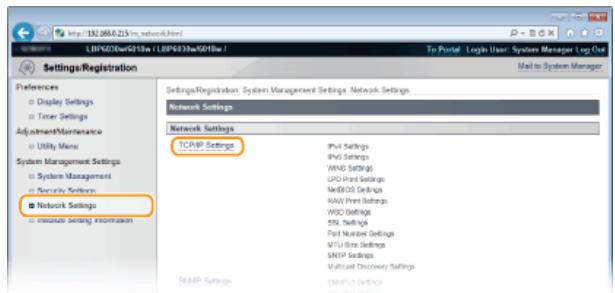
4 Click [Edit] in [WINS Settings].
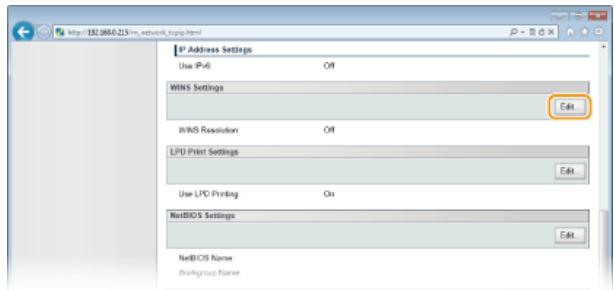
5 Select the [WINS Resolution] check box and enter the required information.
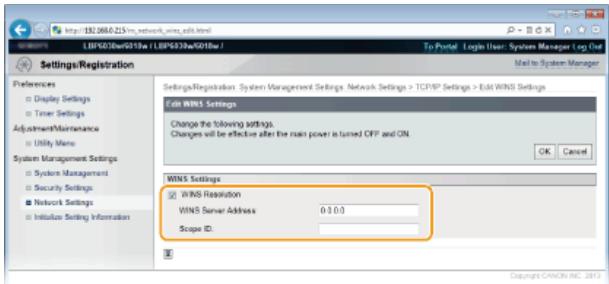
[WINS Resolution]
Select the check box to use WINS for name resolution. When not using WINS, clear the check box.
[WINS Server Address]
Enter the IP address (IPv4) of the WINS server.
IMPORTANT:
If the IP address of the WINS server is obtained from a DHCP server, the obtained IP address overrides the IP address entered in the [WINS Server Address] text box.
[Scope ID]
If the network is divided into several groups with scope IDs (identifiers for groups of devices in the network), enter up to 63 alphanumeric characters for the scope ID. Leave the text box blank if there is no scope ID set for your computer.
6 Click [OK].
7 Restart the machine.
- Turn OFF the machine, wait for at least 10 seconds, and turn it back ON.
LINKS
Setting IPv4 Address
To register this machine with a WINS server, a NetBIOS name and workgroup name must be set.
1 Start the Remote UI and log on in System Manager Mode. 0Starting the Remote UI
2 Click [Settings/Registration].
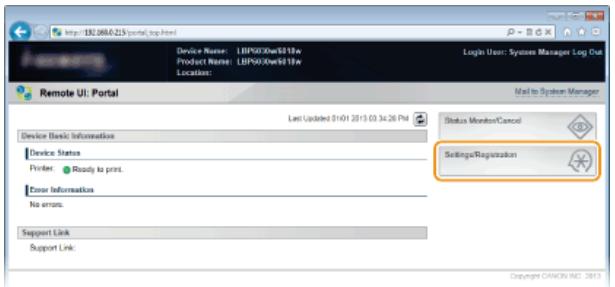
3 Click [Network Settings] [TCP/IP Settings].

4 Click [Edit] in [NetBIOS Settings].
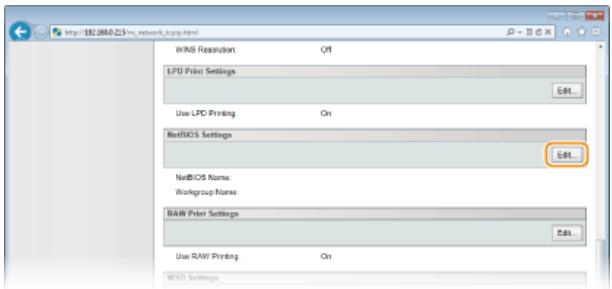
5 Enter the required information.
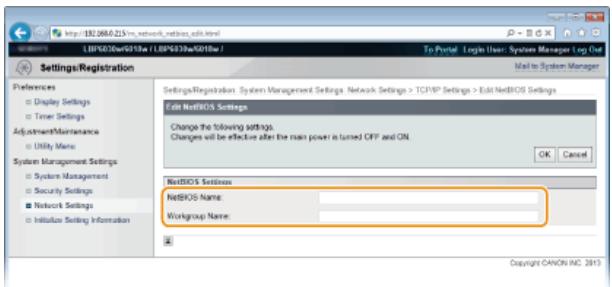
[NetBIOS Name]
Enter up to 15 alphanumeric characters for the NetBIOS name of the machine.
[Workgroup Name]
Enter up to 15 alphanumeric characters for the name of the workgroup that the machine belongs to.
IMPORTANT:
NetBIOS or workgroup names that start with an asterisk (*) cannot be registered with a WINS server.
6 Click [OK].
7 Restart the machine.
- Turn OFF the machine, wait for at least 10 seconds, and turn it back ON.
LINKS
Configuring WINS
Simple Network Time Protocol (SNTP) enables you to adjust the system clock by using a time server on the network. When you use SNMP, the system checks the timer server periodically, so that the system clock is always accurate. The time is based on Coordinated Universal Time (UTC), so specify the time zone setting before configuring SNMP (Timer Settings).
NOTE
The SNMP of the machine supports both NTP (version 3) and SNMP (versions 3 and 4) servers.
1 Start the Remote UI and log on in System Manager Mode. 0Starting the Remote UI
2 Click [Settings/Registration].
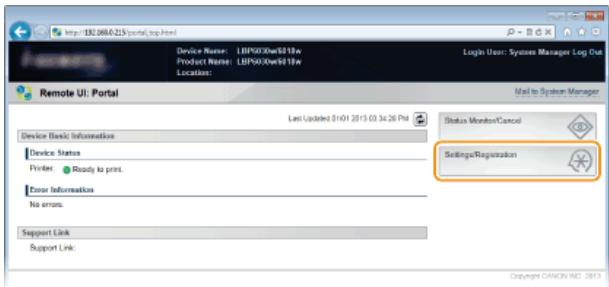
3 Click [Network Settings] [TCP/IP Settings].
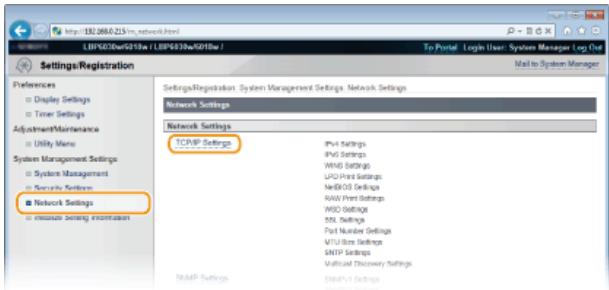
4 Click [Edit] in [SNTP Settings].
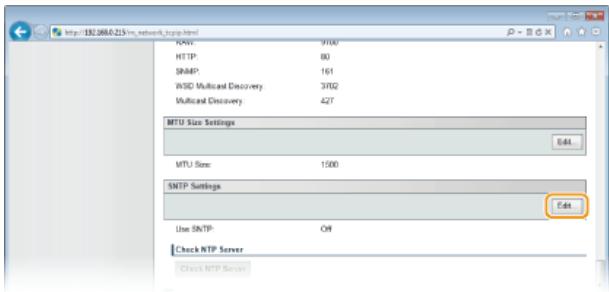
5 Select the [Use SNTP] check box and enter the required information.

[UseSNTP]
Select the check box to use SNMP for synchronization. Clear the check box if you do not want to use this function.
[NTP Server Name]
Enter the IP address of the NTP or SNMP server. If a DNS server is available on the network, you can enter "
[Polling Interval]
Enter an interval from 1 to 48 hours to specify how often to poll the time server.
6 Click [OK].
NOTE
Testing communication with the NTP/SNTP server
You can test whether the machine is communicating with the registered time server via SNMP. Click [Settings/Registration] [Network Settings] [TCP/IP Settings] to display [SNTP Settings], and then click [Check NTP Server]. If a proper connection has been established, the result is displayed as shown below. (Note that this operation only checks the connection. It does not adjust the system clock.)
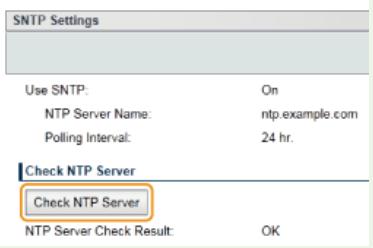
Synchronizing to the time set on the computer
You can notify the machine of the time set on your computer, and synchronize to that time. Make time notification settings in the Printer Status Window.
1 Select the machine by clicking in the system tray.

2 Select [Options] [Preferences (Administrators)].
![CANON LBP6040 - Select [Options] [Preferences (Administrators)]. - 1](/content/2024/11/223505/images/bb50fe9985cabd1e2e5e576a55ed6d21e0f1c81cc9fa4578280f6f5b0160b198.jpg)
3 Select the [Notify the Printer of the Time] check box and click [OK].
![CANON LBP6040 - Select the [Notify the Printer of the Time] check box and click [OK]. - 1](/content/2024/11/223505/images/6e175c6ca2128940cc9233cd0f8bc9cb0de13a487ef2f6fa66c843cc4910454c.jpg)
Monitoring and Controlling the Machine with SNMP LBP6030w
Simple Network Management Protocol (SNMP) is a protocol for monitoring and controlling communication devices in a network by using a Management Information Base (MIB) database. The machine supports SNMPv1 and security-enhanced SNMPv3. They allow you to check the status of the machine from a computer when you print documents or use the Remote UI. You can enable either SNMPv1 or SNMPv3, or both at the same time. Specify the settings for each version to suit your network environment and the purpose of use.
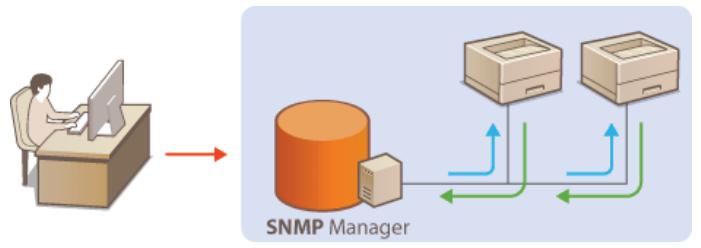
SNMPv1
SNMPv1 uses data called a "community string" (in effect a kind of password) to define the scope of SNMP communication. Because this information is exposed to the network in plain text, your network will be vulnerable to attacks. If you want to ensure network security, disable SNMPv1 and use SNMPv3.
SNMPv3
With SNMPv3, you can implement network device management that is protected by robust security features. Use the Remote UI to make settings. Before starting, enable SSL (Enabling SSL Encrypted Communication for the Remote UI).
NOTE:
The machine does not support the trap notification feature of SNMP.
To change the SNMP port numbers Changing Port Numbers
SNMP management software enables you to configure, monitor, and control the machine remotely from the computer where the software is installed. For more information, see the instruction manuals for your management software.
1 Start the Remote UI and log on in System Manager Mode. 口 Starting the Remote UI
2 Click [Settings/Registration].

3 Click [Network Settings] [SNMP Settings].
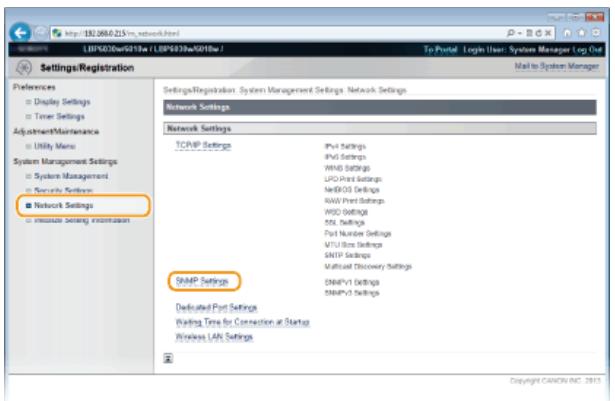
4 Click [Edit].
![CANON LBP6040 - Click [Edit]. - 1](/content/2024/11/223505/images/1a3a61b4688a1cf933cd68bb408ef8988f070cb3aab246aee72e40bee7e7c270.jpg)
5 Specify SNMPv1 settings.
If you do not need to change SNMPv1 settings, proceed to the next step.
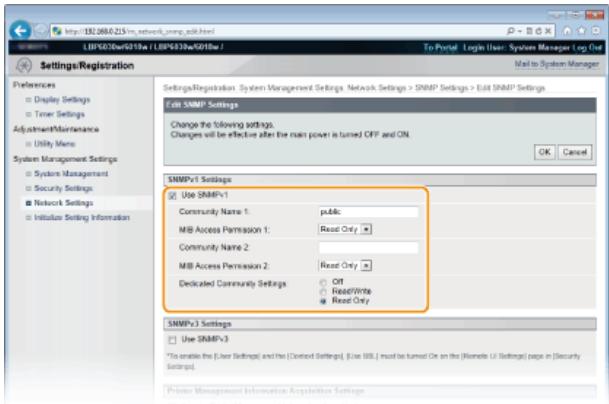
[UseSNMPv1]
Select the check box to enable SNMPv1. You can specify the rest of the SNMPv1 settings only when this check box is selected.
[Community Name 1]/[Community Name 2]
Enter up to 32 alphanumeric characters for the name of the community.
[MIB Access Permission 1]/[MIB Access Permission 2]
For each community, select [Read/Write] or [Read Only] for the access privileges to MIB objects.
| [Read/Write] | Allows both viewing and changing the values of MIB objects. |
| [Read Only] | Allows only viewing the values of MIB objects. |
[Dedicated Community Settings]
Dedicated Community is a preset community, intended exclusively for administrators using Canon software, such as imageWARE Enterprise Management Console. Select [Off], [Read/Write] or [Read Only] for access privileges to MIB objects.
| [Off] | Do not use the Dedicated Community. |
| [Read/Write] | Allows the Dedicated Community to both view and change the values of MIB objects. |
| [Read Only] | Allows the Dedicated Community to only view MIB objects. |
6 Specify SNMPv3 settings.
If you do not need to change SNMPv3 settings, proceed to the next step.
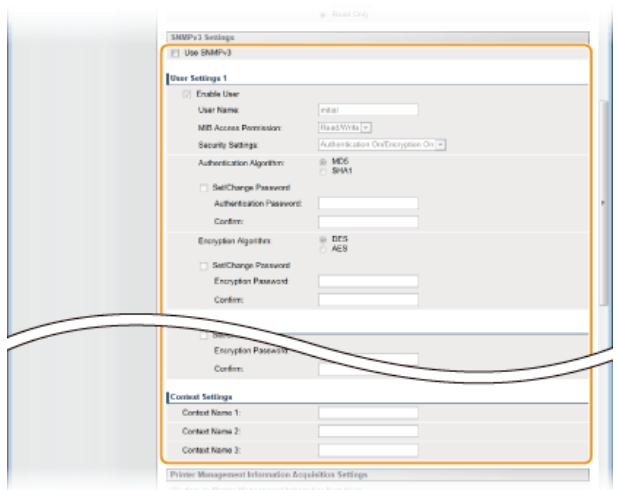
[UseSNMPv3]
Select the check box to enable SNMPv3. You can specify the rest of the SNMPv3 settings only when this check box is selected.
[Enable User]
Select the check box to enable [User Settings 1]/[User Settings 2]/[User Settings 3]. To disable user settings, clear the corresponding check box.
[UserID]
Enter up to 32 alphanumeric characters for the user name.
[MIB Access Permission]
Select [Read/Write] or [Read Only] for access privileges to MIB objects.
| [Read/Write] | Allows both viewing and changing the values of MIB objects. |
| [Read Only] | Allows only viewing the values of MIB objects. |
[Security Settings]
Select [Authentication On/Encryption On], [Authentication On/Encryption Off], or [Authentication Off/Encryption Off] for the desired combination of authentication and encryption settings.
[Authentication Algorithm]
When [Security Settings] has been set to [Authentication On/Encryption On] or [Authentication On/Encryption Off], select [MD5] or [SHA1] as the authentication algorithm, according to your environment.
[Encryption Algorithm]
When [Security Settings] has been set to [Authentication On/Encryption On], select [DES] or [AES] as the encryption algorithm, according to your environment.
[Set/Change Password]
To set or change the password, select the check box and enter between 6 and 16 alphanumeric characters for the password in the [Authentication Password] or [Encryption Password] text box. For confirmation, enter the same password in the [Confirm] text box. Passwords can be set independently for authentication and encryption algorithms.
[Context Name 1]/[Context Name 2]/[Context Name 3]
Enter up to 32 alphanumeric characters for context names. Up to three context names can be registered.
7 Specify printer management information acquisition settings.
- With SNMP, printer management information (such as printing protocols and printer ports) can be monitored and obtained regularly from a computer on the network.
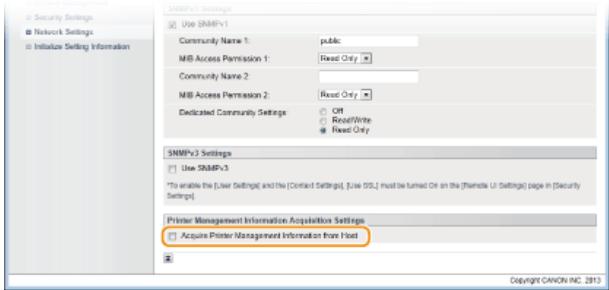
[Acquire Printer Management Information from Host]
Select the check box to enable monitoring of the printer management information of the machine via SNMP. To disable monitoring of the printer management information, clear the check box.
8 Click [OK].
![CANON LBP6040 - Click [OK]. - 1](/content/2024/11/223505/images/35ae0922a3b2c3e0ed188fea6f1449b8b6e1be955ea4790c2b23e8161f4da2b1.jpg)
9 Restart the machine.
Turn OFF the machine, wait for at least 10 seconds, and turn it back ON.
NOTE
Disabling both SNMPv1 and SNMPv3
If both versions of SNMP are disabled, some of the functions of the machine become unavailable, such as obtaining machine information via the printer driver.
Enabling Both SNMPv1 and SNMPv3
If both versions of SNMP are enabled, it is recommended that MIB access permission in SNMPv1 be set to [Read Only]. MIB access permission can be set independently in SNMPv1 and SNMPv3 (and for each user in SNMPv3). Selecting [Read/Write] (full access permission) in SNMPv1 negates the robust security features that characterize SNMPv3 because most of the machine settings can then be controlled with SNMPv1.
LINKS
Enabling SSL Encrypted Communication for the Remote UI
You can use device management software such as imageWARE Enterprise Management Console* to facilitate the collection and management of various information about networked devices. In an environment where such software is installed, information about device settings and errors is collected via a server on the network. If the machine is connected to an imageWARE network, imageWARE searches the network for the machine by using protocols such as Service Location Protocol (SLP). SLP settings can be specified via the Remote UI.
- For more information about imageWARE, contact your local authorized Canon dealer.
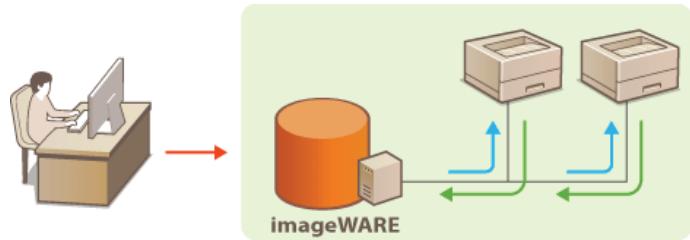
NOTE
To change the SLP port number Changing Port Numbers
1 Start the Remote UI and log on in System Manager Mode. 口 Starting the Remote UI
2 Click [Settings/Registration].

3 Click [Network Settings] [TCP/IP Settings].
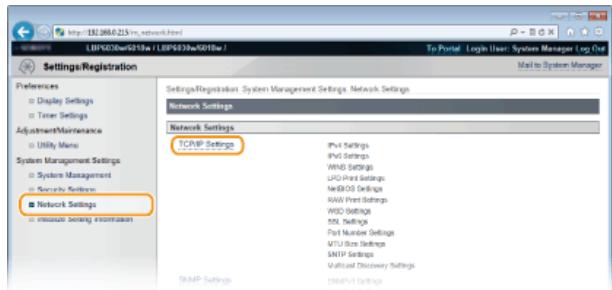
4 Click [Edit] in [Multicast Discovery Settings].
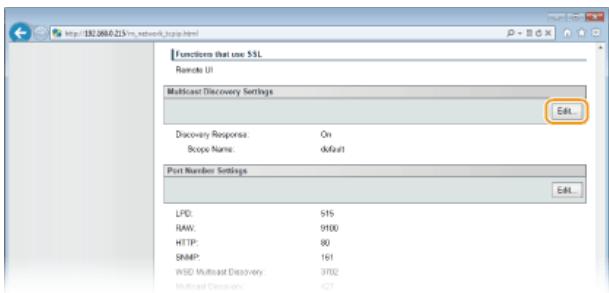
5 Select the [Respond to Discovery] check box and enter the required information.
![CANON LBP6040 - Select the [Respond to Discovery] check box and enter the required information. - 1](/content/2024/11/223505/images/12ec6cc4f4b44a74726da6d5404d500a2186f68daaf8c58e363a2239d8573f52.jpg)
[Respond to Discovery]
Select the check box to set the machine to respond to imageWARE multicast discovery packets and enable management by imageWARE. If you do not want to respond, clear the check box.
[Scope Name]
To include the machine in a specific scope, enter up to 32 alphanumeric characters for the scope name.
6 Click [OK].
7 Restart the machine.
Turn OFF the machine, wait for at least 10 seconds, and turn it back ON.
Security LBP6030w
Confidential information is handled by information devices everywhere, including computers and printers, and any of these devices may become a target for malicious third parties at any time. Attackers may directly gain unauthorized access to your devices, or indirectly take advantage of negligence or improper use. Either way, you may incur unanticipated losses when your confidential information is leaked. To counter these risks, this machine is equipped with a variety of security functions. Set the necessary configuration depending on your network environment.
■ Establishing the Basics of Information Security
Protecting the Machine from Unauthorized Access
Implementing Robust Security Features
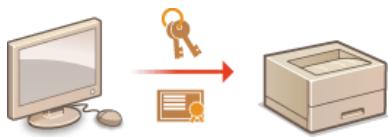
Enabling SSL Encrypted Communication for the Remote UI
Protecting the Machine from Unauthorized Access LBP6030w
To prevent unauthorized third parties from accessing and using the machine, you can implement multiple security measures, such as setting system manager passwords, using firewalls, and changing port numbers.
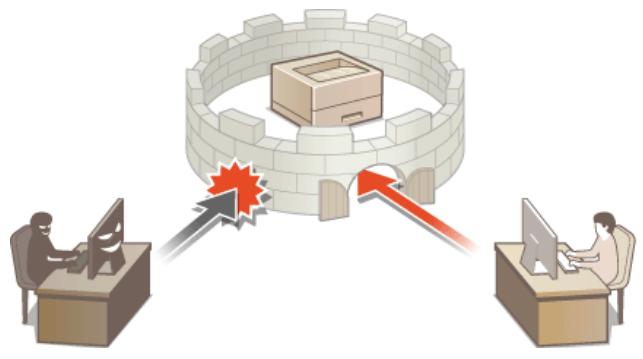
Administrator access rights are required to change machine settings from the Remote UI. After logging in as an administrator, use the following procedure to set the PIN (system manager password). The system manager password is critical to the security of the machine. Make sure that only system managers know the system manager password.
1 Start the Remote UI and log on in System Manager Mode. Starting the Remote UI
2 Click [Settings/Registration].
![CANON LBP6040 - Click [Settings/Registration]. - 1](/content/2024/11/223505/images/db780fb4a8213a847b4ffa17036fc190435f7edac0a800ca76743ecd923de133.jpg)
3 Click [System Management] [Edit].
![CANON LBP6040 - Click [System Management] [Edit]. - 1](/content/2024/11/223505/images/4bf2af0ea3c807e75d76540779c0356d30fd231f3f57f7def8af6e957b3988ad.jpg)
4 Enter the PIN.
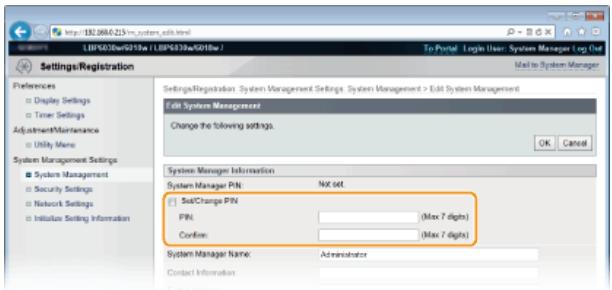
[Set/Change PIN]
To set or change a PIN, select the check box and enter a number of up to 7 digits. Enter the same number in both in the [PIN] and [Confirm] text boxes.
NOTE:
You cannot register a PIN that consists only of zeros, such as "00" or "0000000."
To clear a PIN setting, select the [Set/Change PIN] check box and click [OK] with the [PIN] and [Confirm] text boxes empty.
5 Enter the name and contact information of the system manager as necessary, and click [OK].
![CANON LBP6040 - Enter the name and contact information of the system manager as necessary, and click [OK]. - 1](/content/2024/11/223505/images/977477ae5faf4b13f418df342964750cc3150758283bb86c3726c961bafd72fe.jpg)
[System Manager Name]
Enter up to 32 alphanumeric characters for the name of the system manager.
[Contact Information]
Enter up to 32 alphanumeric characters for the contact information of the system manager.
[E-Mail Address]
Enter up to 64 alphanumeric characters for the e-mail address of the system manager.
[System Manager Comment]
Enter up to 32 alphanumeric characters for a comment about the system manager.
Restricting Communication by Using Firewalls LBP6030w
Without proper security, unauthorized third parties can access computers and other communication devices that are connected to a network. To lower the risk of unauthorized access, you can allow communication with devices having specified IP addresses and reject communication with other devices. Conversely, you can also reject communication with devices having specified IP addresses and allow communication with other devices. You can specify a single IP address or a range of IP addresses.
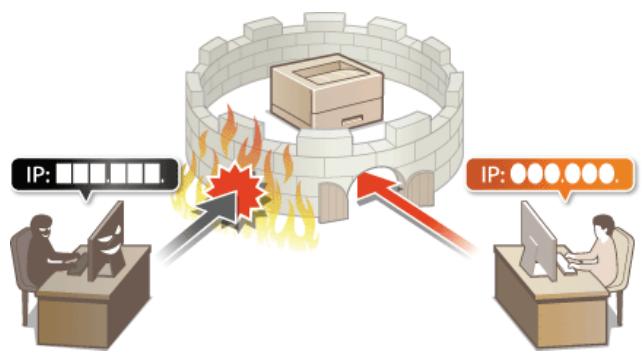
NOTE
Up to 16 IP addresses (or ranges of IP addresses) can be specified for both IPv4 and IPv6.
The communication protocols that can be restricted in this way are TCP, UDP, and ICMP.
1 Start the Remote UI and log on in System Manager Mode. Starting the Remote UI
2 Click [Settings/Registration].
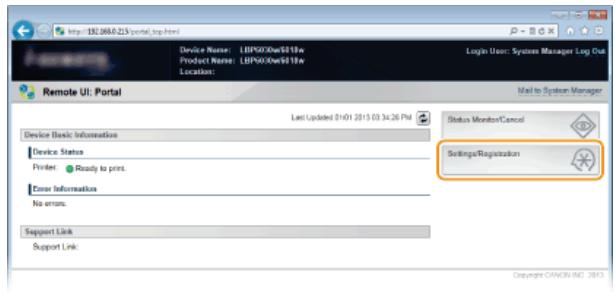
3 Click [Security Settings] [IP Address Filter].
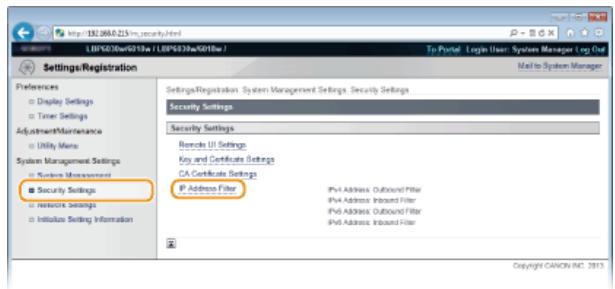
4 Click [Edit] to specify a filter type.
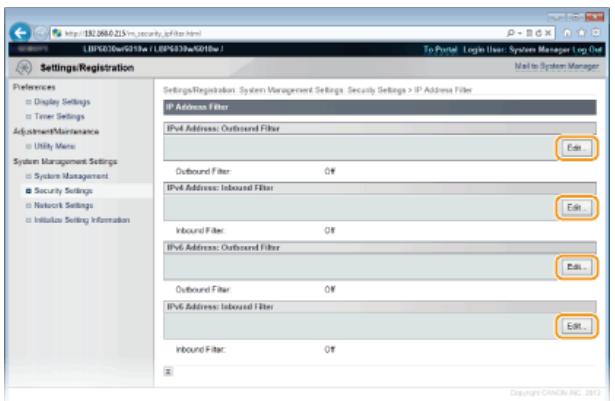
[IPv4 Address: Outbound Filter]
Restrict data sent from the machine to a computer by specifying an IPv4 address.
[IPv4 Address: Inbound Filter]
Restrict data received by the machine from a computer by specifying an IPv4 address.
[IPv6 Address: Outbound Filter]
Restrict data sent from the machine to a computer by specifying an IPv6 address.
[IPv6 Address: Inbound Filter]
Restrict data received by the machine from a computer by specifying an IPv6 address.
5 Specify the settings for filtering.
As the policy conditions, select a default policy to allow or reject communication between the machine and other devices. Then specify IP addresses for exceptions.
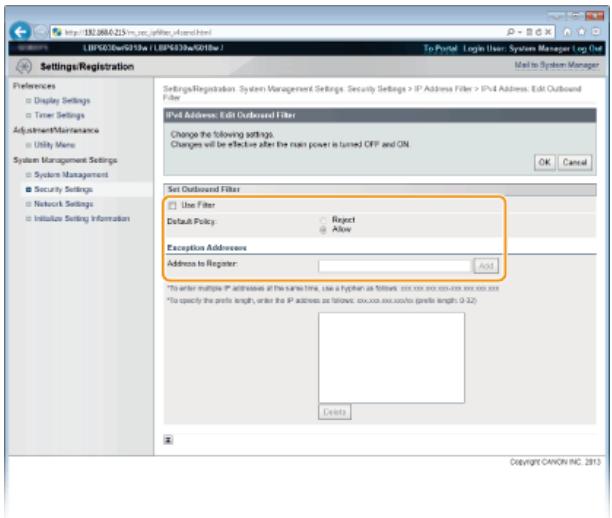
1 Select the [Use Filter] check box, and then select a policy with [Default Policy].
[Use Filter]
Select the check box to restrict communication. Clear the check box to communicate without restrictions.
[Default Policy]
As the policy conditions, select whether to allow or reject other devices to communicate with the machine.
| [Reject] | Select to allow communication only when the data is sent to or received from devices whose IP addresses are entered in [Exception Addresses]. Communication with other devices is prohibited. |
| [Allow] | Select to block data that is sent to or received from devices whose IP addresses are entered in [Exception Addresses]. Communication with other devices is allowed. |
2 Specify address exceptions.
Enter an IP address (or a range of IP addresses) in the [Address to Register] text box and click [Add].
NOTE:
Entry format for IP addresses
To enter a single address (IPv4)
Enter numbers delimited by ". ." (periods) (Example: "192.168.0.10").
To enter a single address (IPv6)
Enter hexadecimal numbers delimited by":" (colons) (Example: "fe80::10").
To specify a range of addresses
Insert a hyphen ("-") between the addresses (Examples: "192.168.0.10-192.168.0.20" "fe80::10-fe80::20").
To specify a range of addresses with a prefix
Enter an address, followed by a slash (/") and a number indicating the prefix length (Examples: "192.168.0.32/27" "fe80::1234/64").
When [Reject] is selected for an outbound filter
Outgoing multicast and broadcast packets cannot be filtered.
To delete an IP address that has been set
Select the IP address to delete, and then click [Delete].
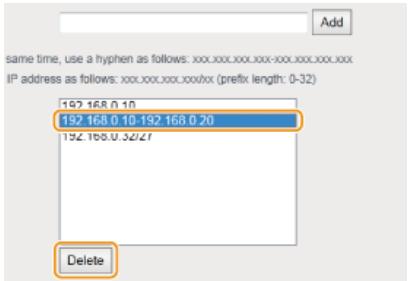
3 Click [OK].
6 Restart the machine.
- Turn OFF the machine, wait for at least 10 seconds, and turn it back ON.
Changing Port Numbers LBP6030w
Ports serve as endpoints for communicating with other devices. Typically, standard port numbers are used for major protocols, but devices that use these port numbers are vulnerable to attacks because these port numbers are well-known. To enhance security, some network administrators prefer to change the port numbers. When a port number has been changed, the new number must be shared between communicating devices, such as computers and servers. If a port number changes, set it on this machine as well.
1 Start the Remote UI and log on in System Manager Mode. Starting the Remote UI
2 Click [Settings/Registration].

3 Click [Network Settings] [TCP/IP Settings].
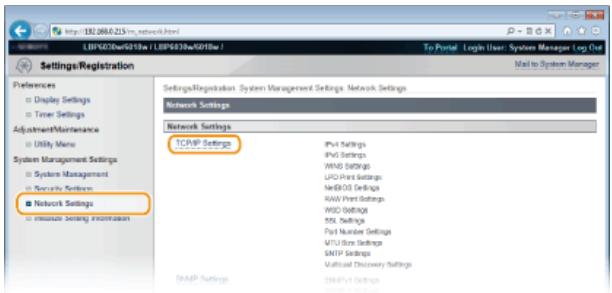
4 Click [Edit] in [Port Number Settings].
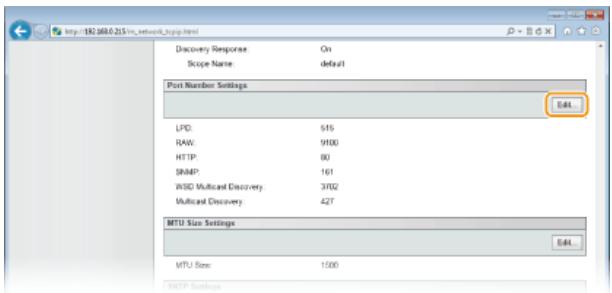
5 Change the port number, and click [OK].

[LPD]/[RAW]
Change the port used for LPD printing or RAW printing. For details about each protocol, see Configuring Printing Protocols and Web Services.
[HTTP]
Change the port used by HTTP. HTTP is used for communications over the network, such as when you access the machine via the Remote UI.
[SNMP]
Change the port used by SNMP. For details about SNMP, see Monitoring and Controlling the Machine with SNMP.
[WSD Multicast Discovery]
Change the port used for WSD multicast discovery. For details about WSD, see Configuring Printing Protocols and Web Services.
[Multicast Discovery]
Change the port used for SLP multicast discovery. For details about SLP, see Configuring SLP Communication with imageWARE.
6 Restart the machine.
- Turn OFF the machine, wait for at least 10 seconds, and turn it back ON.
LINKS
Configuring Printer Ports
Enabling SSL Encrypted Communication for the Remote UI
LBP6030w
Authorized users may incur unanticipated losses from attacks by malicious third parties, such as sniffing, spoofing, and tampering of data as it flows over a network. To protect your valuable data, you can encrypt Remote UI communication between the machine and a Web browser on the computer by using Secure Sockets Layer (SSL). SSL is a mechanism for encrypting data sent or received over the network. SSL must be enabled when the Remote UI is used to make settings for SNMPv3. To use SSL for the Remote UI, you need to set a key pair and enable the SSL function. Have a key pair ready to use (Configuring Settings for Key Pairs and Digital Certificates).
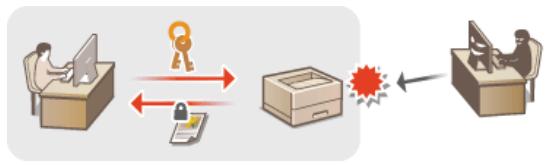
IMPORTANT
When you use SSL to encrypt communication with the Remote UI, set the time data of the machine. You can use either of the following methods to set the time data.
Use a network time server to adjust the machine's system clock Configuring SNTP
- Notify the machine of the currently set time on your computer Synchronizing to the time set on the computer
1 Start the Remote UI and log on in System Manager Mode. Starting the Remote UI
2 Click [Settings/Registration].

3 Click [Network Settings] [TCP/IP Settings].

4 Click [Key and Certificate] in [SSL Settings].
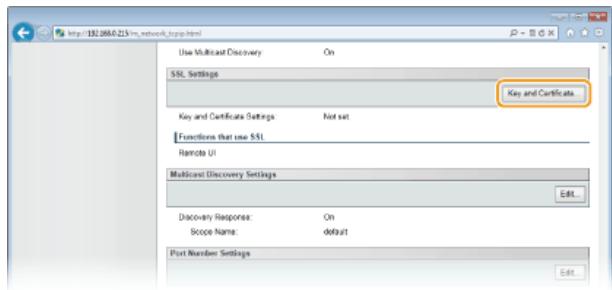
5 Select the key to use from the list of keys and certificates, and click [Register Default Key].
![CANON LBP6040 - Select the key to use from the list of keys and certificates, and click [Register Default Key]. - 1](/content/2024/11/223505/images/96a6198cf94c5a16140f908281bfb1320083a62aeeb22bdf135890528a346bdf.jpg)
NOTE:
Viewing details of a key pair or certificate
You can check the details of the certificate or verify the certificate by clicking the corresponding text link under [Key Name], or the certificate icon. Verifying Key Pairs and CA Certificates
6 Enable SSL.
1 Click [Security Settings] [Remote UI Settings].
![CANON LBP6040 - Click [Security Settings] [Remote UI Settings]. - 1](/content/2024/11/223505/images/3cafea04cf2d636026794c713923f670365b163cbedf793633818c44db6c9ded.jpg)
2 Click [Edit].
![CANON LBP6040 - Click [Edit]. - 1](/content/2024/11/223505/images/85c67c783c1ce5e2f1b80d4450d84b4d89ccae996563cd92b6b6767f86bbed08.jpg)
3 Select the [Use SSL] check box and click [OK].
![CANON LBP6040 - Select the [Use SSL] check box and click [OK]. - 1](/content/2024/11/223505/images/9220205f38035db057b64efc50cac27297ebca29302c899dac2f71952fd79560.jpg)
[Use SSL]
Select the check box to use SSL in communication with the Remote UI. Clear the check box if you do not want to use SSL.
7 Restart the machine.
- Turn OFF the machine, wait for at least 10 seconds, and turn it back ON.
NOTE
Starting the Remote UI with SSL enabled
If you start the Remote UI when SSL is enabled, a security alert may be displayed regarding the security certificate. In this case, check that the correct URL is entered in the address field, and then proceed to display the Remote UI.
Starting the Remote UI
LINKS
Generating Key Pairs
Using CA-issued Key Pairs and Digital Certificates
Monitoring and Controlling the Machine with SNMP
Configuring Settings for Key Pairs and Digital Certificates LBP6030w
In order to encrypt communication with a remote device, an encryption key must be sent and received over an unsecured network beforehand. This problem is solved by public-key cryptography. Public-key cryptography ensures secure communication by protecting valuable information from attacks, such as sniffing, spoofing, and tampering of data as it flows over a network.
Key Pair

A key pair consists of a public key and a secret key, both of which are required for encrypting or decrypting data. Data can be exchanged safely, because encrypted data cannot be decrypted without the other key in a key pair. You can register up to three key pairs (Using CA-issued Key Pairs and Digital Certificates). Key pairs can also be generated by the machine (Generating Key Pairs).
CA Certificate

Digital certificates including CA certificates are similar to other forms of identification, such as driver's licenses. A digital certificate contains a digital signature, which enables the machine to detect any spoofing or tampering of data. It is extremely difficult for third parties to abuse digital certificates. Digital certificates (including public keys) that are issued by a certificate authority (CA) are called CA certificates. You can register up to three CA certificates including the one that is preinstalled (Using CA-issued Key Pairs and Digital Certificates).
Key and Certificate Operating Requirements
Certificates for key pairs generated with the machine must conform to X.509v3. If you install a key pair or a CA certificate from a computer, make sure that they meet the following requirements.
| Format | Key pair: PKCS#12*1CA certificate: X.509v1 or X.509v3, DER (coded binary) |
| Files extension | Key pair:“.p12” or“.pfx”CA certificate:“.cer” |
| Public key algorithm(and key length) | RSA (512 bits*2, 1024 bits, 2048 bits, or 4096 bits) |
| Certificate signature algorithm | SHA1-RSA, SHA256-RSA, SHA384-RSA*3, SHA512-RSA*3, MD5-RSA, MD2-RSA |
| Certificate thumbprint algorithm | SHA1 |
1 Requirements for the certificate contained in a key pair shall follow the operating conditions for CA certificates.
*2 Not supported when the operating system of the communication partner device is Windows 8/Server 2012. Depending on the application of update programs, encrypted communication may also not be possible with other versions of Windows.
3 SHA384-RSA and SHA512-RSA are available only when the RSA key length is 1024 bits or more.
NOTE
The machine does not support use of a certificate revocation list (CRL).
The key pair required for encrypted communication via Secure Sockets Layer (SSL) can be generated with the machine. You can use SSL when accessing the machine via the Remote UI. Up to three key pairs can be registered on the machine.
1 Start the Remote UI and log on in System Manager Mode. Starting the Remote UI
2 Click [Settings/Registration].

3 Click [Security Settings] [Key and Certificate Settings].
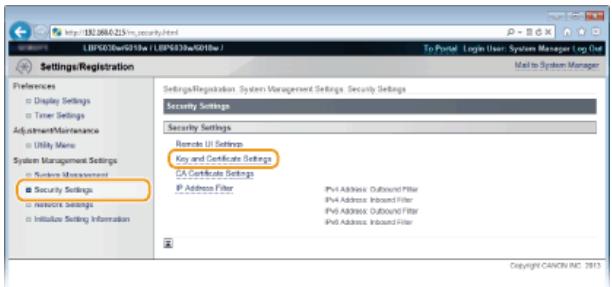
4 Click [Generate Key].
NOTE:
To delete a registered key pair
On the right side of the key pair that you want to delete, click [Delete] [OK].
A key pair cannot be deleted when "SSL" is displayed under [Key Usage], indicating that the key pair is currently in use. In this case, disable SSL or replace the key pair with another. You will then be able to delete it.
5 Specify settings for the key and certificate.
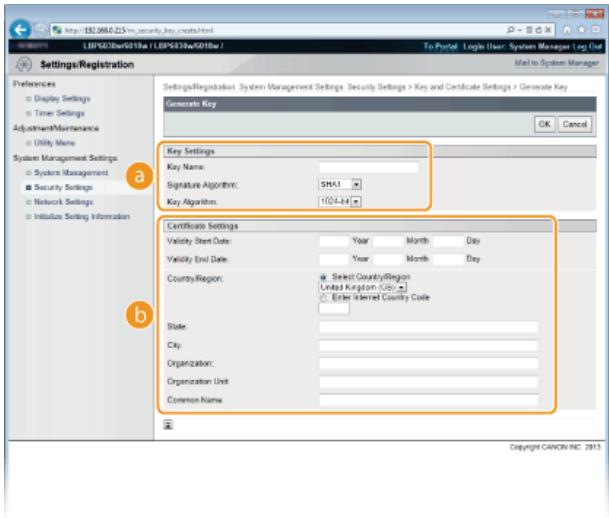

[Key Settings]
[Key Name]
Enter up to 24 alphanumeric characters for naming the key pair. Set a name that will be easy for you to find later in a list.
[Signature Algorithm]
Select the signature algorithm from the drop-down list.
[Key Algorithm]
The algorithm used to generate keys is RSA. Select the key length from the drop-down list. The larger the number for the key length, the slower the communication. However, the security is tighter.
NOTE:
[512-bit] cannot be selected for the key length, if [SHA384] or [SHA512] is selected for [Signature Algorithm].
![CANON LBP6040 - [Key Algorithm] - 1](/content/2024/11/223505/images/8fd055d7740c2e6f64d6b5ae066f2e921e0df4250d48172ddfdbaf0673e63d29.jpg)
[Certificate Settings]
[Validity Start Date]
Enter the first date of validity of the certificate in year/month/day format in the range 1 January 2000 to 31 December 2037.
[Validity End Date]
Enter the last date of validity of the certificate in year/month/day format in the range 1 January 2000 to 31 December 2037. A date earlier than the [Validity Start Date] cannot be set.
[Country/Region]
Click the [Select Country/Region] radio button and select the country/region from the drop-down list. You can also click the [Enter Internet Country Code] radio button and enter a country code, such as "US" for the United States.
[State]/[City]
As necessary, enter up to 24 alphanumeric characters for the address.
[Organization]/[Organization Unit]
As necessary, enter up to 24 alphanumeric characters for the name of the organization.
[Common Name]
As necessary, enter up to 48 alphanumeric characters for the common name of the certificate. "Common Name" is often abbreviated as "CN."
![CANON LBP6040 - [Common Name] - 1](/content/2024/11/223505/images/6dc279c7c3e5f35eccf869c2da08bdb494f378cb7158caac0fb7aaec1080f8e2.jpg)
Click [OK].
A key pair may take approximately 10 to 15 minutes to generate.
After a key pair is generated, it is automatically registered to the machine.
LINKS
Using CA-issued Key Pairs and Digital Certificates
Verifying Key Pairs and CA Certificates
Enabling SSL Encrypted Communication for the Remote UI
Key pairs and digital certificates can be obtained from a certification authority (CA) for use with the machine. After obtaining them from a CA, you can install and register key pairs and CA certificate files on the machine by using the Remote UI. Make sure that the key pair and the certificate satisfy the requirements of the machine (Key and Certificate Operating Requirements). You can register up to three key pairs and three CA certificates including the preinstalled ones.
1 Start the Remote UI and log on in System Manager Mode. 0Starting the Remote UI
2 Click [Settings/Registration].
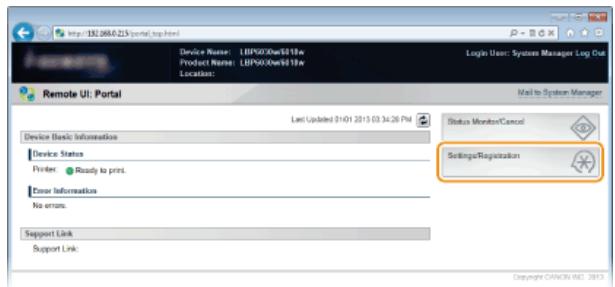
3 Click [Security Settings] Click [Key and Certificate Settings] or [CA Certificate Settings].
- Click [Key and Certificate Settings] to install a key pair, or [CA Certificate Settings] to install a CA certificate.

4 Click [Register Key and Certificate] or [Register CA Certificate].
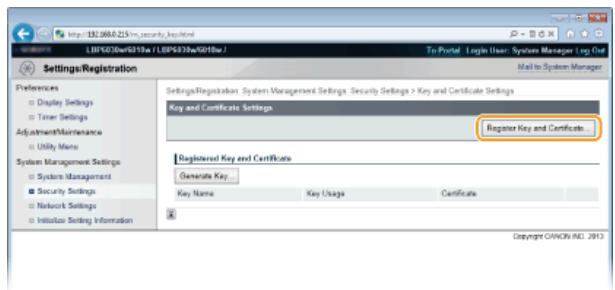
NOTE:
To delete a registered key pair or CA certificate
On the right of the key pair or CA certificate you want to delete, click [Delete] [OK].
A key pair cannot be deleted when "SSL" is displayed under [Key Usage], indicating that the key pair is currently in use. In this case, disable SSL or replace the key pair with another. You will then be able to delete it.
5 Click [Install].
- You can only install one file on this machine. If another file is already installed, click [Delete] [OK] to delete the previously installed file.
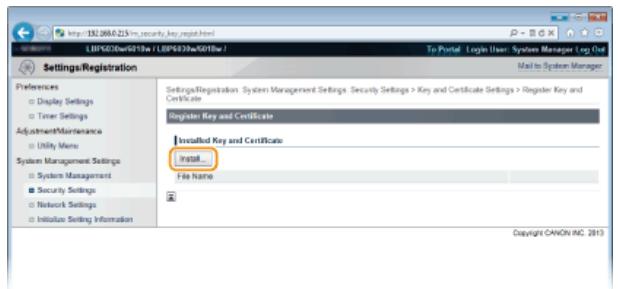
6 Click [Browse], specify the file to install, and click [Start Installation].
![CANON LBP6040 - Click [Browse], specify the file to install, and click [Start Installation]. - 1](/content/2024/11/223505/images/2a2ac5c5c17911df8842fd1d6db4097c9bedbdde92105fbc3ca2ebb1a63a7028.jpg)
The key pair or CA certificate from the computer is installed in the machine.
7 Register the key pair or CA certificate.
Registering a key pair
1 Click [Register] on the right of the key pair you want to register.
![CANON LBP6040 - Click [Register] on the right of the key pair you want to register. - 1](/content/2024/11/223505/images/83614131ecbec6e8ade5803c23efd12da3363af443d573d5d5d34eaa506afe5f.jpg)
2 Enter the name of the key pair and password, and then click [OK].
![CANON LBP6040 - Enter the name of the key pair and password, and then click [OK]. - 1](/content/2024/11/223505/images/5e7fe42d24e44234b00e8c98a5b5d6e666c53de0b3f48b2bbfb7397b9ab8ac9f.jpg)
[Key Name]
Enter a name of up to 24 alphanumeric characters for registering the key pair in the machine. Set a name that will be easy for you to find later in a list.
[Password]
Enter up to 24 alphanumeric characters for the password of the secret key that is set in the file to be registered.
Registering a CA certificate
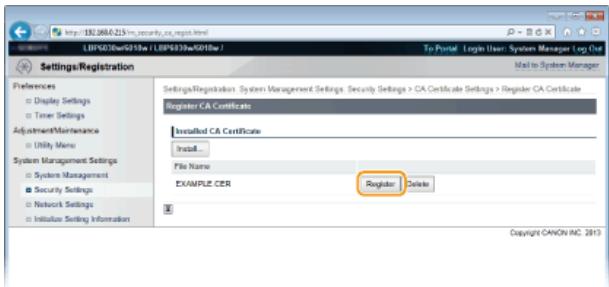
LINKS
Generating Key Pairs
Verifying Key Pairs and CA Certificates
Enabling SSL Encrypted Communication for the Remote UI
Once key pairs and CA certificates are registered, you can view their detailed information or verify their effective dates and signature.
1 Start the Remote UI and log on in System Manager Mode. 0Starting the Remote UI
2 Click [Settings/Registration].
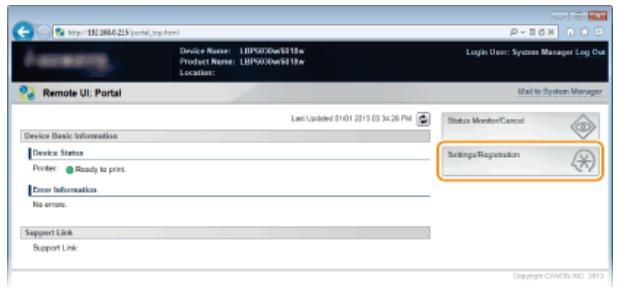
3 Click [Security Settings] Click [Key and Certificate Settings] or [CA Certificate Settings].
- Click [Key and Certificate Settings] to verify a key pair, or [CA Certificate Settings] to verify a CA certificate.
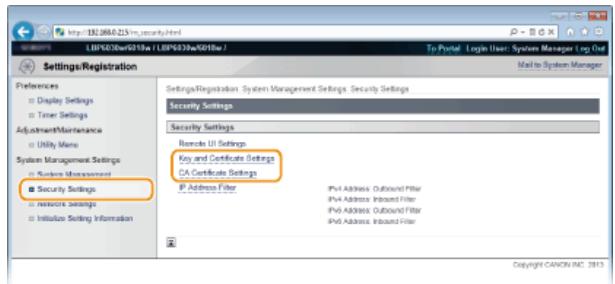
4 Click the icon for the key pair or CA certificate that you want to verify.
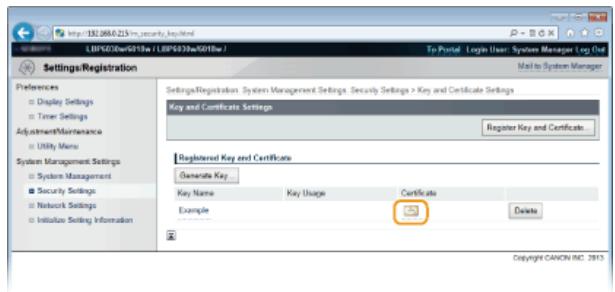
Certificate details are displayed.
5 Check the certificate details, and click [Certificate Verification].
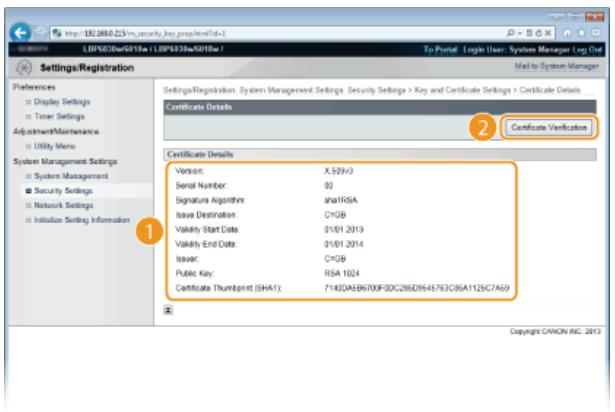

The result from verifying the certificate is displayed as shown below.
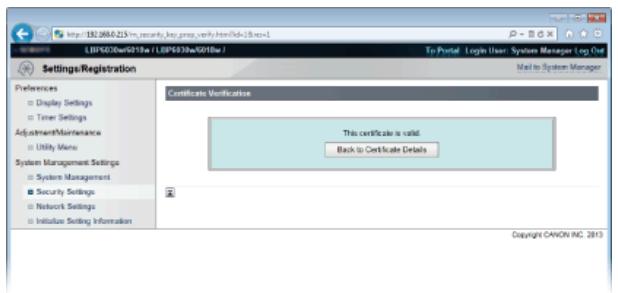
LINKS
Generating Key Pairs
Using CA-issued Key Pairs and Digital Certificates
You can use a Web browser to operate the machine remotely, check the documents waiting to be printed, and check the status of the machine. You can also make network and other settings for the machine. The "Remote UI" starts when you enter the IP address of the machine in your Web browser. It is very convenient, because it allows you to operate the machine remotely without leaving your desk or installing a special application.

Tasks you can do in the Remote UI
Managing Documents and Checking the Machine Status
Changing Machine Settings
How to use the Remote UI
Starting the Remote UI
Remote UI Screens
System Requirements
The following environment is required to use the Remote UI. In addition, set your Web browser to enable cookies.
Windows
Windows XP/Vista/7/8
Microsoft Internet Explorer 7.0 or later
Mac OS
Mac OS 10.4 or later
Safari 3.2.1 or later
To operate the machine remotely, start the Remote UI by entering the machine's IP address in your Web browser. Before starting, check the IP address that has been assigned to the machine (Viewing Network Settings). If you do not know the machine's IP address, ask your network administrator, or start the Remote UI from the Printer Status Window (Starting from the Printer Status Window).
1 Start the Web browser.
2 Enter "http://
If you are using an IPv6 address, enclose the IPv6 address with brackets (example: "http://[fe80:2e9e:fcff:fe4e:dbce]/").
NOTE:
If a host name for the machine is registered with a DNS server
Instead of <IP address of the machine>, you can enter <"host name" . "domain name"> (example:
"http://myPrinter.example.com").
If a security alert is displayed
A security alert may be displayed when communication with the Remote UI is encrypted (Enabling SSL Encrypted
Communication for the Remote UI). If there are no problems with certificate settings or SSL settings, continue browsing to the Remote UI site.
3 Select [System Manager Mode] or [End-User Mode].
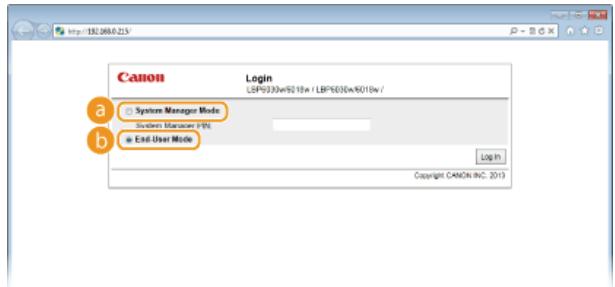
[System Manager Mode]
You can perform all Remote UI operations and make all settings. If a PIN (system manager password) has been set, enter it in [System Manager PIN]. (Setting System Manager Passwords) If a PIN has not been set (factory default setting), you do not need to input anything.
[End-User Mode]
You can check the status of documents or the machine, and you can also check the settings.
4 Click [Log In].
The Portal Page (main page) of the Remote UI appears. Remote UI Screens
![CANON LBP6040 - Click [Log In]. - 1](/content/2024/11/223505/images/048a245ce34d554d38e9f7e4cd086389d3f7ab441d6cd53222e40d631fd45090.jpg)
Starting from the Printer Status Window
1 Select the machine by clicking in the system tray.
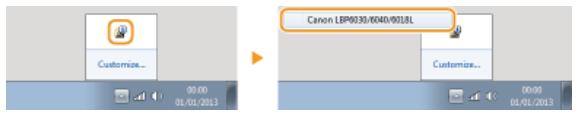
2 Click
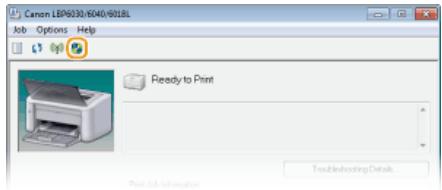
Your Web browser starts, and the login page of the Remote UI appears.
NOTE:
If a security alert is displayed
A security alert may be displayed when communication with the Remote UI is encrypted (Enabling SSL Encrypted Communication for the Remote UI). If there are no problems with certificate settings or SSL settings, continue browsing to the Remote UI site.
3 Select [System Manager Mode] or [End-User Mode].
![CANON LBP6040 - Select [System Manager Mode] or [End-User Mode]. - 1](/content/2024/11/223505/images/2f65c3f840af30331ed758ba95fdcbec547df2ceac2a4c2d4f4bf3ff793e751b.jpg)
System Manager Mode
You can perform all Remote UI operations and make all settings. If a PIN (system manager password) has been set, enter it in [System Manager PIN]. (Setting System Manager Passwords). If a PIN has not been set (factory default setting), you do not need to input anything.
b [End-User Mode]
You can check print documents, check the status of the machine, and view machine settings.
4 Click [Log In].
The Portal Page (main page) of the Remote UI appears. Remote UI Screens
![CANON LBP6040 - Click [Log In]. - 1](/content/2024/11/223505/images/17f4ff6297e79042fc25317b09e5765d09fa83f74b9acf92f3cb4f6ec37263fa.jpg)
This section describes the main screens of the Remote UI.
Portal Page (Main Page)
[Status Monitor/Cancel] Page
[Settings/Registration] Page
Portal Page (Main Page)
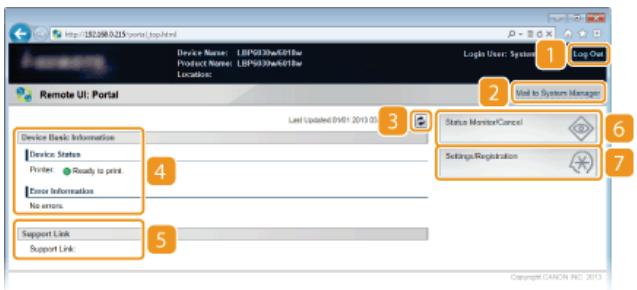
[Log Out]
Logs out from the Remote UI and returns to the log on page.
[Mail to System Manager]
Displays a window for creating an e-mail to the system manager. Contact information for the system manager is specified in [System Manager Information] under [System Management].
Refresh Icon
Refreshes the current page.
4 Device Basic Information
Displays the current status of the machine and error information. If an error has occurred, a link to the Error Information page is displayed.
Support Link
Displays a link to support information, as specified in [Device Information] under [System Management].
[Status Monitor/Cancel]
Displays the [Status Monitor/Cancel] page. You can use this page to check the current printing status, cancel print processing, and view a history of print jobs.
[Settings/Registration]
Displays the [Settings/Registration] page. When you are logged on in System Manager Mode, you can use this page to change machine settings. Changing Machine Settings
[Status Monitor/Cancel] Page
![CANON LBP6040 - [Status Monitor/Cancel] Page - 1](/content/2024/11/223505/images/3c167ad1beb7b13ad8070c2823b53c8be4394f36ae5e2d636bf50bf0b85559c3.jpg)
[To Portal]
Returns to the Portal Page (main page).
2 Menu
Click an item to display the content in the page on the right. Managing Documents and Checking the Machine Status
3Breadcrumb trail
Indicates the series of pages you opened to display the current page. You can use this to check which page you are currently displaying.
Refresh Icon
Refreshes the current page.
5 Top Icon
Moves up to the top of the page when it has been scrolled out of view.
[Settings/Registration] Page
![CANON LBP6040 - [Settings/Registration] Page - 1](/content/2024/11/223505/images/17f725b700f0581ae759cfc487114a090536734b849f9cd81da58e414938076f.jpg)
[To Portal]
Returns to the Portal Page (main page).
2Menu
Click an item to display the content in the page on the right. Changing Machine Settings
3Breadcrumb trail
Indicates the series of pages you opened to display the current page. You can use this to check which page you are currently displaying.
4 Top Icon
Moves up to the top of the page when it has been scrolled out of view.
NOTE
About [System Management Settings]
You can change system settings only when you have logged on in System Manager Mode.
- When you have logged on in End-User Mode, only [System Management] is displayed.
Checking the Current Status of Print Documents
Checking the History of Printed Documents
Checking Error Information
Checking the Maximum Print Speed
Checking System Manager Information
Viewing the Page Counter Value
NOTE
The name of the application that requested printing may be added to the file name of printed documents.
Checking the Current Status of Print Documents
You can check a list of up to five documents that are currently printing or waiting to be printed.

Log on to the Remote UI (Starting the Remote UI) [Status Monitor/Cancel] [Job Status]
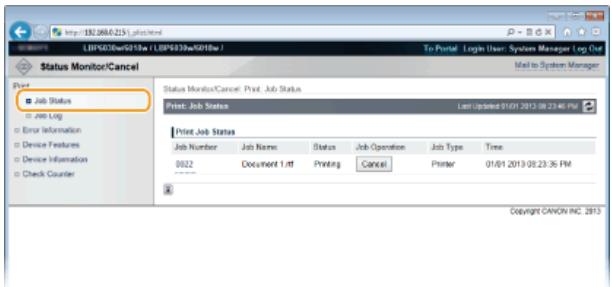
You can click [Cancel] to delete the print job for a document that is currently printing or waiting to be printed.
NOTE
- Click [Job Number] to display detailed information about a document. For example, you can check the user name and the print page count of the document.
- If an error occurs, but printing can continue nevertheless, [Continue/Retry] appears in [Job Operation]. You can click [Continue/Retry] to clear the error and resume printing. However, the printing may not be performed properly if you use the Continue/Retry function to clear the error and resume printing.
Checking the History of Printed Documents
The history displays a list of up to 50 printed documents.

Log on to the Remote UI (Starting the Remote UI) [Status Monitor/Cancel] [Job Log]
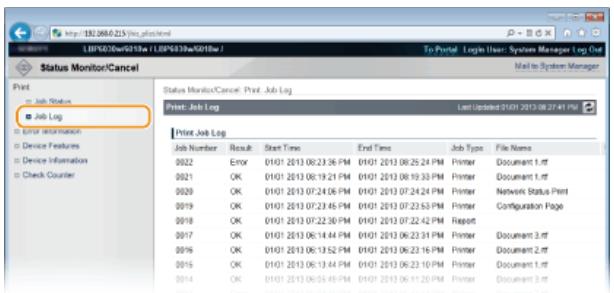
Checking Error Information
When an error occurs, you can display this page by clicking the message displayed under [Error Information] on the Portal Page (main page).

Log on to the Remote UI (Starting the Remote UI) [Status Monitor/Cancel] [Error Information]
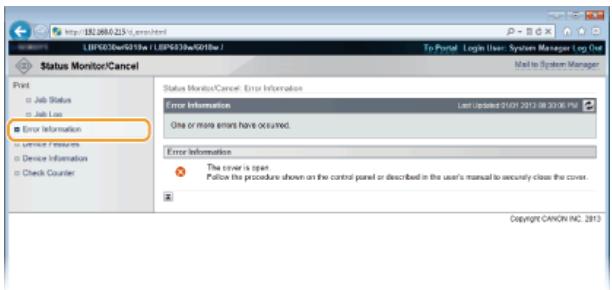
Checking the Maximum Print Speed
This page displays the maximum print speed of the machine.

Log on to the Remote UI (Starting the Remote UI) [Status Monitor/Cancel] [Device Features]
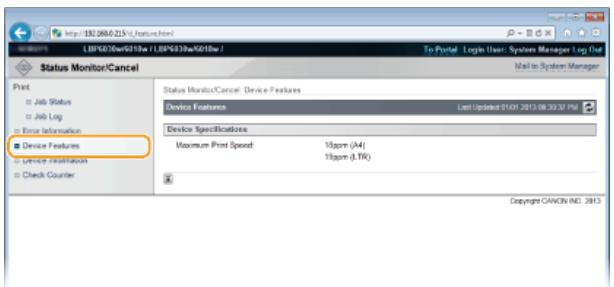
Checking System Manager Information
This page displays information about the machine and the system manager. This information is set in [System Management] on the [Settings/Registration] page (Changing Machine Settings).
1
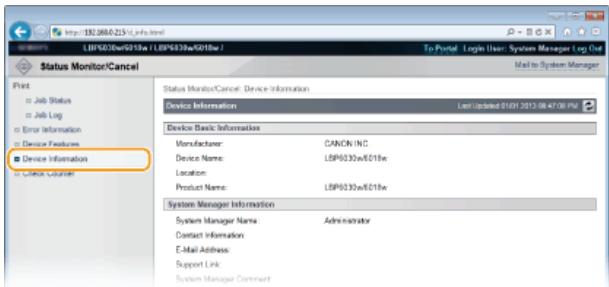
Viewing the Page Counter Value
This page displays a total page count of the documents that have been printed.

Log on to the Remote UI (Starting the Remote UI) [Status Monitor/Cancel] [Check Counter]
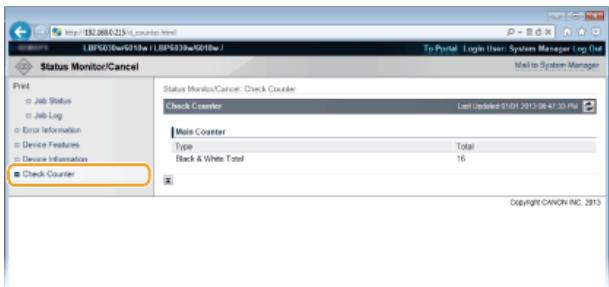
LINKS
Remote UI Screens
Changing Machine Settings LBP6030w
You can change various machine settings from your computer by using the Remote UI. For example, you can change network and security settings.
NOTE
However, to change settings under [System Management Settings], you must log on in System Manager Mode.
1 Start the Remote UI Starting the Remote UI
2 Click [Settings/Registration].
![CANON LBP6040 - Click [Settings/Registration]. - 1](/content/2024/11/223505/images/ac1f98a31cdfe2d4c2336c30674c3fd9b7b44af8a3bae9007fde9180a695dd0a.jpg)
3 Click the menu item you want to set, displaying it, and then click [Edit].
![CANON LBP6040 - Click the menu item you want to set, displaying it, and then click [Edit]. - 1](/content/2024/11/223505/images/f6cfa1a8d8125fd44a1a70758f5a94acd1777d116c5b91ec331c9fa6933f49df.jpg)
For details about the settings menu, see Setting Menu List.
LINKS
Remote UI Screens
Setting Menu List LBP6030w
This section describes the menu items that can be set using the Remote UI. Default settings are marked with a dagger () .
[Preferences] Menu
Display Settings
Timer Settings
[Adjustment/Maintenance] Menu
Utility Menu
[System Management Settings] Menu
System Management
Security Settings
Network Settings
Initialize Setting Information
Display Settings

Select the display language used for the Remote UI screens.
Remote UI Language
Chinese (Simplified)
English
French
German
Italian
Japanese
Spanish

Log on to the Remote UI (Starting the Remote UI) [Settings/Registration] [Display Settings] [Edit] Select the display language [OK]

[Remote UI Language]
Selects the display language used for the Remote UI screens.
Timer Settings

Make settings related to time, such as the time zone.
Time Zone
UTC-12:00 to UTC 0:00† to UTC+12:00
Use Daylight Saving Time
Off†
On
Start
January to March† to December
1st to Last†
Monday to Sunday†
End
January to October† to December
1st to Last†
Monday to Sunday†
Auto Sleep Time Off After 1 minute After 5 minutes After 10 minutes After 15 minutes After 30 minutes After 60 minutes After 90 minutes After 120 minutes After 150 minutes After 180 minutes
Auto Shutdown Time
Off
After 1 hour
After 2 hours
After 3 hours
After 4 hours†
After 5 hours
After 6 hours
After 7 hours
After 8 hours

Log on to the Remote UI (Starting the Remote UI) [Settings/Registration] [Timer Settings] [Edit] Item settings [OK]
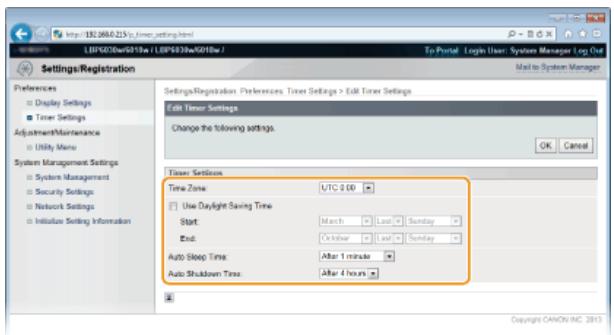
[Time Zone]
Set the time zone of the region where the machine will be used.
NOTE:
UTC
Coordinated Universal Time (UTC) is the primary time standard by which the world regulates clocks and time. The correct UTC time zone setting is required for Internet communications.
[Use Daylight Saving Time]
Enable or disable daylight saving time. If daylight saving time is enabled, specify the dates from which and to which daylight saving time is in effect.
[Auto Sleep Time]
The machine enters sleep mode automatically when it remains idle for a certain length of time. Specify the length of time until the machine enters auto sleep. We recommend using the factory default settings to save the most power. Setting Sleep Mode
[Auto Shutdown Time]
You can set up the machine to automatically turn itself OFF after it remains idle for a certain length of time. This prevents wasted power consumption caused by forgetting to turn the machine OFF. Specify the length of time until the machine turns itself OFF. Setting Auto Shutdown
Utility Menu
You can clean the fixing unit inside the machine.
Cleaning

Clean the fixing unit if black spots or streaks appear on printouts. Note that you cannot clean the fixing unit when the machine has documents waiting to be printed. To clean the fixing unit, you need plain A4 size paper. Before starting, load A4 size paper in the multi-purpose tray. (Loading Paper in the Multi-Purpose Tray)

Log on to the Remote UI (Starting the Remote UI) [Settings/Registration] [Utility Menu] [Cleaning] [Execute] [OK]
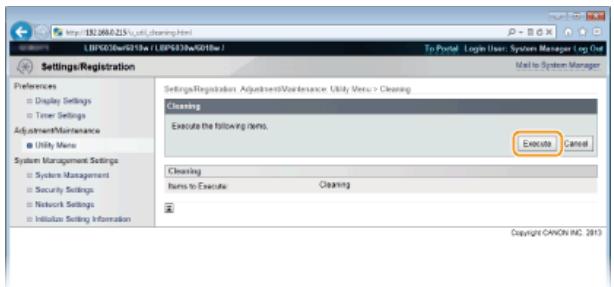

The paper is fed slowly into the machine, and cleaning starts. The cleaning is done when the paper is completely ejected.
- Cleaning cannot be cancelled once it starts. Wait until it finishes (approx. 140 seconds).
System Management

You can specify that a PIN (system manager password) is required when logging in to the Remote UI in System Manager Mode, and you can register information about the system manager, such as name and contact information. You can also register a name to identify this machine, and register its location.
System Manager Information
System Manager PIN
System Manager Name
Contact Information
E-Mail Address
System Manager Comment
Device Information
Device Name
Location
Support Link

Log on to the Remote UI in System Manager Mode (Starting the Remote UI) [Settings/Registration] [System Management] [Edit] Item settings [OK]
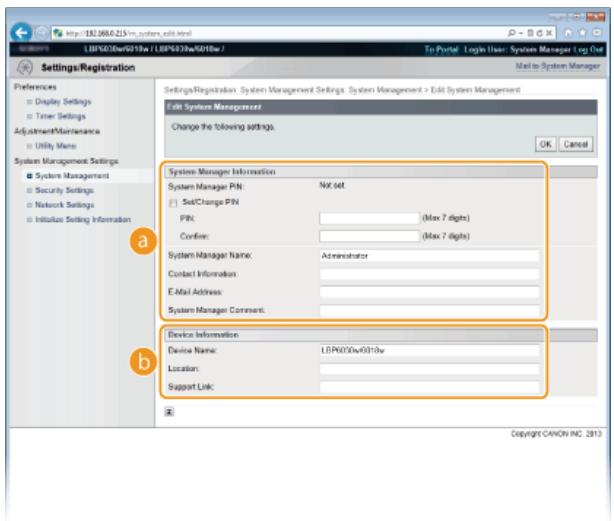
[System Manager Information]
Specify the PIN and other system manager information. Setting System Manager Passwords
[Device Information]
[Device Name]
Enter up to 32 alphanumeric characters for the name of the machine.
[Location]
Enter up to 32 alphanumeric characters for the location of the machine.
[Support Link]
Enter a link to support information about the machine. The link can be up to 128 alphanumeric characters long.
The link is displayed on the Portal Page (main page) of the Remote UI.
Security Settings
Enable or disable encrypted communication via SSL and IP address packet filtering.
Remote UI Settings
Select whether to use SSL encrypted communication. Enabling SSL Encrypted Communication for the Remote UI
Use SSL Off† On
Key and Certificate Settings
Register key pairs, or generate them on the machine. You can check and verify registered key pairs. Configuring Settings for Key Pairs and Digital Certificates
CA Certificate Settings
Register a CA certificate. One CA certificate is preinstalled. You can check and verify registered CA certificates. Configuring Settings for Key Pairs and Digital Certificates
IP Address Filter
Specify whether to allow or reject packets sent to or received from devices with specified IP addresses.
IPv4 Address: Outbound Filter
Do not allow the machine to send data to a computer with a specified IPv4 address. Restricting Communication by Using Firewalls
Use Filter Off + On
Default Policy Reject Allow
IPv4 Address: Inbound Filter
Reject data received by the machine from a computer with a specified IPv4 address. Restricting Communication by Using Firewalls
Use Filter Off+ On Default Policy Reject Allow
IPv6 Address: Outbound Filter
Do not allow the machine to send data to a computer with a specified IPv6 address. Restricting Communication by Using Firewalls
Use Filter Off+ On
Default Policy Reject Allow
IPv6 Address: Inbound Filter
Reject data received by the machine from a computer with a specified IPv4 address. Restricting Communication by Using Firewalls
Use Filter Off + On
Default Policy Reject Allow
Network Settings
Make settings related to network functions.
TCP/IP Settings
Specify settings for using the machine in a TCP/IP network, such as IP address settings.
IPv4 Settings
Specify settings for using the machine in an IPv4 network. Setting IPv4 Address Configuring DNS
IP Address Settings
Auto Acquire Select Protocol Off DHCP\* BOOTP RARP Auto IP On+ Off IP Address Subnet Mask Gateway Address
DNS Settings
Primary DNS Server Address Secondary DNS Server Address
Host Name
Domain Name
DNS Dynamic Update
Off+
On
DNS Dynamic Update Interval: 0 to 24^+ to 48 (hours)
mDNS Settings
Use mDNS
Off
On+
mDNS Name
DHCP Option Settings
Acquire Host Name
Off
On+
DNS Dynamic Update
Off
On
IPv6 Settings
Specify settings for using the machine in an IPv6 network. Setting IPv6 Addresses Configuring DNS
IP Address Settings
Use IPv6
Off
On
Stateless Address
Off
On†
Use Manual Address
Off+
On
IP Address
Prefix Length: 0 to 64^ to 128
Default RouterAddress
Use DHCPv6
Off
On
DNS Settings
Primary DNS Server Address
Secondary DNS Server Address
Use Same Host Name/Domain Name as IPv4
Off
On
Host Name
Domain Name
DNS Dynamic Update
Off+
On
Register Manual Address
Off1
On
Register Stateful Address
Off
On
Register Stateless Address
Off
On
DNS Dynamic Update Interval: 0 to 24^ to 48 (hours)
mDNS Settings
Use mDNS
Off
On+
Use Same mDNS Name as IPv4
Off
On+
mDNS Name
WINS Settings
Specify settings for Windows Internet Name Service (WINS), which provides a NetBIOS name for IP address resolutions in a mixed network environment of NetBIOS and TCP/IP. Configuring WINS
WINS Resolution
Off
On
WINS Server Address
Scope ID
LPD Print Settings
Enable or disable LPD, a printing protocol that can be used on any hardware platform or operating system. Configuring Printing Protocols and Web Services
Use LPD Printing
Off
On
NetBIOS Settings
Set a NetBIOS name and a workgroup name, which must be set to register this machine with a WINS server. Configuring NetBIOS
NetBIOS Name
Workgroup Name
RAW Print Settings
Enable or disable RAW, a Windows specific printing protocol. Configuring Printing Protocols and Web Services
Use RAW Printing
Off
On+
WSD Settings
Enable or disable automatic browsing and acquiring information for the machine by using the WSD protocol that is available on Windows Vista/7/8/Server 2008/Server 2012. Configuring Printing Protocols and Web Services
Use WSD Printing
Off
On+
Use WSD Browsing
Off
On
Use Multicast Discovery
Off
On+
SSL Settings
Specify the key pair to use when conducting SSL encrypted communication with the Remote UI. Enabling SSL Encrypted Communication for the Remote UI
Multicast Discovery Settings
Specify whether the machine should respond to discovery packets when multicast discovery is performed on the network using Service Location Protocol (SLP). Configuring SLP Communication with imageWARE
Respond to Discovery
Off
On†
Scope Name
Port Number Settings
Change port numbers for protocols according to your network environment. Changing Port Numbers
LPD
1 to 515^ to 65535
RAW
1 to 9100† to 65535
HTTP
1 to 80^ to 65535
SNMP
1 to 161+ to 65535
WSD Multicast Discovery
1 to 3702^ to 65535
Multicast Discovery
1 to 427+ to 65535
MTU Size Settings
Select the maximum size of packets the machine sends or receives. Changing the Maximum Transmission Unit
MTU Size 1300 1400 1500^
SNTP Settings
Specify whether to acquire the time from a time server on the network. Configuring SNTP
UseSNTP Off+ On NTP Polli
SNMP Settings
Specify the settings for monitoring and controlling the machine from a computer running SNMP-compatible software. Monitoring and Controlling the Machine with SNMP
SNMPv1 Settings
Use SNMPv1
Off
On+
Community Name 1
MIB Access Permission 1
Read/Write
Read Only
Community Name 2
MIB Access Permission 2
Read/Write
Read Only
Dedicated Community Settings
Off
Read/Write+
Read Only
SNMPv3 Settings
Use SNMPv3
Off
On
User Settings 1/User Settings 2/User Settings 3
Context Settings
Printer Management Information Acquisition Settings
Acquire Printer Management Information from Host
Off
On
Dedicated Port Settings

Enable or disable the dedicated port. The dedicated port is used when using the Printer Status Window to make machine settings and acquire information about the machine.
Use Dedicated Port
Off
On

Log on to the Remote UI in System Manager Mode (Starting the Remote UI) [Settings/Registration] [Network Settings] [Dedicated Port Settings] [Edit] Select whether to use [OK] Restart the machine
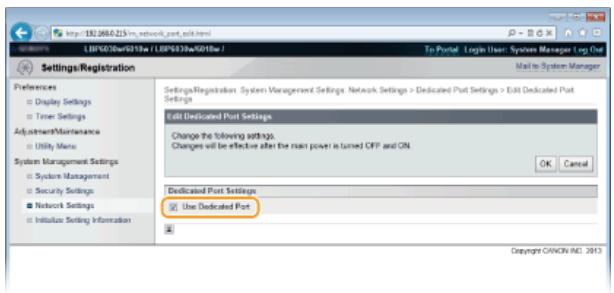
[Use Dedicated Port]
Select the check box to use the dedicated port. Clear the check box if you do not want to use it.
IMPORTANT:
If you clear the check box, the Printer Status Window cannot acquire machine information.
Waiting Time for Connection at Startup
Specify a wait time for connecting to a network. Select the setting depending on your network environment. Setting a Wait Time for Connecting to a Network
Waiting Time 0^ to 300 (seconds)
Wireless LAN Settings

You can check wireless LAN settings and status information. Wireless LAN settings cannot be changed from the Remote UI. Make wireless LAN settings from the computer using the MF/LBP Network Setup Tool. (Connecting to a Wireless LAN)

Log on to the Remote UI in System Manager Mode (Starting the Remote UI) [Settings/Registration] [Network Settings] [Wireless LAN Settings] Check settings and information
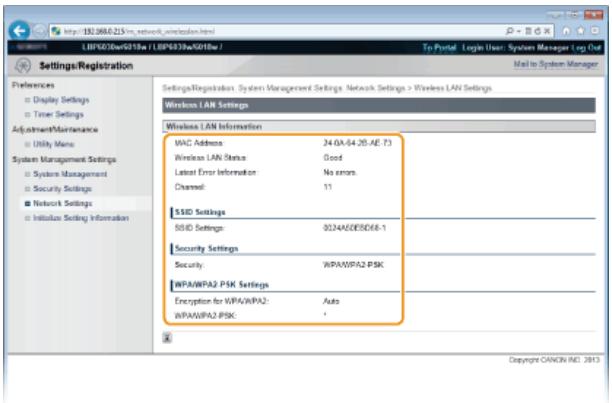
[MAC Address]
Displays the MAC address of the wireless LAN.
[Wireless LAN Status]
Displays the connection status (signal strength) of the wireless LAN.
[Latest Error Information]
Displays information about the latest failure to make a wireless LAN connection.
[Channel]
Displays the wireless LAN channel that is currently in use.
[SSID Settings]
Displays the SSID of the connected wireless LAN router.
[Security Settings]
Displays the type of encryption that is currently being applied.
Initialize Setting Information
Initializes settings and returns the machine to the factory default state.
Initialize Menu
Returns the settings in the [Preferences] Menu to the factory default settings. Initializing Preferences Settings
Initialize System Management Settings
Returns the settings in the [System Management Settings] Menu to the factory default settings. Initializing System Management Settings
Initialize Key and Certificate
Returns key and certificate settings to the factory default settings. Initializing Key and Certificate Settings
Troubleshooting
When a problem occurs, check this chapter to find out solutions before contacting Canon.
Paper Jams
If the paper jams, see Clearing Paper Jams to remove the jammed paper.
A Message Appears
If the Printer Status Window displays an error message, see When an Error Message Appears.
Common Problems
If you suspect that the machine is malfunctioning, see the following sections before contacting Canon.
Common Problems
Installation/Settings Problems
Printing Problems
■ Printing Results are Not Satisfactory
If printing results are not satisfactory, see When You Cannot Print Properly.

When a Problem Cannot Be Solved
If a problem persists, see the following to find out where to contact. When a Problem Cannot Be Solved

Clearing Paper Jams
If paper jams,
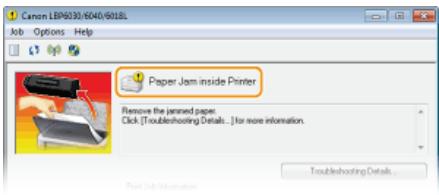
IMPORTANT
When removing the jammed paper, do not turn OFF the machine
Turning OFF the machine deletes the data that is being printed.
If paper tears
Remove all the paper fragments to prevent them from becoming jammed.
If paper jams repeatedly
Tap the paper stack on a flat surface to even the edges of the paper before loading it into the machine.
Check that the paper is appropriate for the machine. Paper
Check that no jammed paper fragments remain in the machine.
Do not forcibly remove jammed paper from the machine
Forcibly removing the paper may damage parts in the machine. If you are not able to remove the paper, contact your local authorized Canon dealer or the Canon help line. When a Problem Cannot Be Solved
NOTE
If you click [Troubleshooting Details], you can display the same troubleshooting methods that are described in this manual.
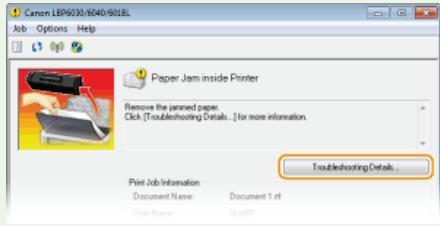
How to Clear Paper Jams
If there is paper loaded in the multi-purpose tray, remove it first. If the jammed paper cannot be removed easily, do not try to pull it out forcibly. Proceed to the next step.
1 Gently pull out the paper.
Pull the paper straight out.
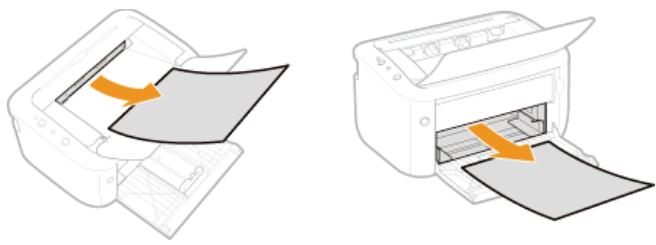
2 Check whether paper is jammed inside the machine.
1 Open the top cover.
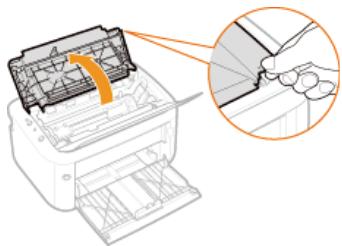
2 Remove the toner cartridge.

3 Gently pull out the paper.
Hold both edges of the paper, pull the leading edge of the paper down, and then pull it out.
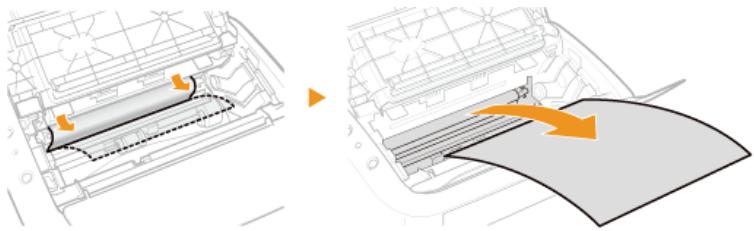
4 Replace the toner cartridge.
Align with the toner cartridge guide (3), and push firmly all the way in.
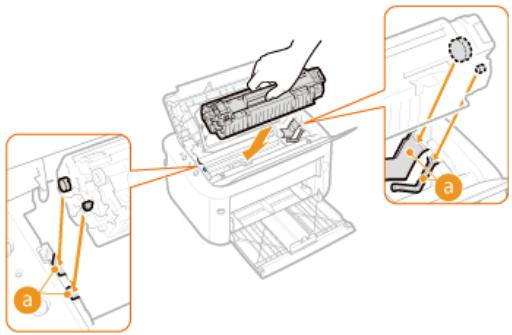
5 Close the top cover.
The paper jam message disappears, and the machine is ready to print.
When an Error Message Appears
An error message appears in the Printer Status Window when there is a problem with print processing, when the machine cannot communicate, or when some other problem prevents normal operation. See the following list for more information about error messages.
Cannot Communicate with Printer

Bidirectional communication is not enabled.
Enable bidirectional communication, and restart the computer.
Checking Bidirectional Communication
In a terminal connection environment, the machine is redirected and a setting problem prevents communication.
- If the machine has been redirected in a terminal connection environment, such as a remote desktop application or XenAPP (MetaFrame), there may be a problem with firewall or other settings that prevents communication with the machine. Check the communication settings of the server and client. For details, contact your network administrator.
Cannot Communicate with Server

Your computer is not connected to the print server.
Make the proper connection between your computer and the print server.
The print server is not running.
Start the print server.
The machine is not shared.
Make the proper printer sharing settings. Printer Driver Installation Guide
You lack user rights to connect to the print server.
- Ask the administrator of the print server to change your user rights.
[Network discovery] is not enabled. (Windows Vista/7/8/Server 2008/Server 2012)
- Enable [Network discovery].
- Enabling [Network discovery]
Check Paper

The paper size that was set in the printer driver is different from the paper size of the last print job.
- When you try printing with the machine after changing the paper size setting, this message is displayed to prompt you to check the paper size. Check the size of the paper that is loaded in the multi-purpose tray.
When the paper size specified in the printer driver matches, or when you want to print using the currently loaded paper
Without loading new paper, press the (Paper) key, or click in the Printer Status Window.
When the paper size specified in the printer driver does not match Load paper of the specified size, and press the (Paper) key on the machine. Loading Paper in the Multi-Purpose Tray
The job may not be printed normally.
can be clicked to continue printing. If you continue printing and the results are not satisfactory, print the job again.
Check Printer

The toner cartridge is not set.
Set the toner cartridge correctly.
How to Replace Toner Cartridges
There is paper from a paper jam left inside the machine.
- Thoroughly check for fragments of paper that may be left inside the machine. If you find any, remove them. If the paper is difficult to remove, do not try to forcibly pull it out of the machine. Follow the instructions in the manual to remove paper.
Clearing Paper Jams
Communication Error

The machine is not connected with a USB cable.
Connect the machine to your computer using a USB cable. Printer Driver Installation Guide
The machine is not turned ON.
The (Power) indicator does not light if the machine is not turned ON. Turn it ON. If the machine does not respond when you press the power switch, check to make sure that the power cord is connected correctly and then try again to turn the power ON.
Turning the Power ON
Incompatible Printer

A printer other than this machine is connected.
Make the proper connection between your computer and the machine.
Connecting to a Wireless LAN
NOTE
If you are not sure on how to make a USB connection, see Printer Driver Installation Guide.
Incorrect Port

The machine is connected to an unsupported port.
Check the port.
Checking the Printer Port
NOTE
If the port you need is not available
- If you are using a network connection, configure the port. Configuring Printer Ports
- If you are using a USB connection, reinstall the printer driver. Printer Driver Installation Guide
Insufficient Printer Memory

The document being printed contains a page with a very large amount of data.
This machine cannot print the data. Click to cancel the print job.
Network Communication Error

The machine is not connected via the network.
Make the proper network connection between your computer and the machine.
Connecting to a Wireless LAN
The machine is not turned ON.
The (Power) indicator does not light if the machine is not turned ON. Turn it ON. If the machine does not respond when you press the power switch, check to make sure that the power cord is connected correctly and then try again to turn the power ON.
Turning the Power ON
Communication is restricted by a firewall.
- Ask the system manager of the machine about the problem.
Restricting Communication by Using Firewalls
- If the machine cannot be accessed because of incorrect settings, use the (p) (Wi-Fi) key to initialize the system management settings.
Initializing by Using the Wi-Fi Key
Out of Paper or Paper Could Not be Fed

There is no paper in the multi-purpose tray. Or the paper could not be fed.
Set the paper correctly, and then press the (Paper) key on the machine.
Loading Paper in the Multi-Purpose Tray
Paper Jam inside Printer

There is a paper jam inside the machine.
Do not try to forcibly pull jammed paper out of the machine. Follow the instructions in the manual to remove paper.
Service Error

An error has occurred inside the machine.
- Turn OFF the machine, wait for at least 10 seconds, and turn it back ON. If the message does not reappear, you can continue using the machine.
If the same message reappears after you turn the power back ON, turn the power OFF, unplug the power plug from the AC power outlet and contact your local authorized Canon dealer. Make a note of the error code that is displayed, and have it ready when you contact your local authorized Canon dealer.
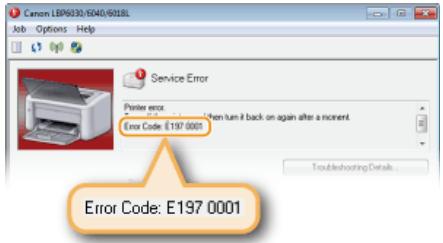
Top Cover Open

The top cover is not completely shut.
Shut the top cover firmly.
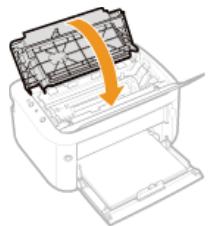
NOTE
If the top cover will not close completely, check to make sure that the toner cartridge has been pushed all the way in.
Common Problems
If you encounter problems when using the machine, check the items in this section before contacting us. If the problems persist, contact your local authorized Canon dealer or the Canon help line.
Check the Following
Is the machine turned ON? / Is the power cord connected?
The (Power) indicator does not light if the machine is not turned ON. If the machine does not respond when you press the power switch, check to make sure that the power cord is connected correctly and then try again to turn the power ON.
Turning the Power ON
Is the machine connected via wireless LAN (LBP6030w only) or a USB cable?
- Check whether the machine is connected correctly. In the case of wireless LAN, check whether the (p) (Wi-Fi) indicator is lit. If it is not lit, the machine is not connected via wireless LAN.
When the machine cannot connect to the wireless LAN
Does the Printer Status Window display an error message?
If a problem occurs, a message is displayed in the window.
Printer Status Window
When an Error Message Appears
If a problem persists even after checking
Click the link that corresponds to the problem.
Installation/Settings Problems
Printing Problems
Installation/Settings Problems
Together with this section, see Common Problems.
Problems with the Wireless LAN Connection (LBP6030w)
Problems with the USB Connection
Problems via the Print Server
Problems with the Wireless LAN Connection (LBP6030w)
Remote UI is not displayed.
The (Wi-Fi) indicator lights if a connection has been established. Check whether it is lit, and whether IP addresses are correct. Then try to start the Remote UI again.
Front Side
Viewing Network Settings
- Are you using a proxy server? If you are using a proxy server, add the machine's IP address to the [Exceptions] list (addresses that do not use the proxy server) in the Web browser's proxy settings dialog.
- Is communication on your computer restricted by a firewall? If the Remote UI cannot be displayed because of incorrect settings, use the (Wi-Fi) key to initialize the system management settings.
Restricting Communication by Using Firewalls
Initializing by Using the Wi-Fi Key
A connection to a network cannot be established.
Check whether the machine is properly installed and ready to connect to the network.
When the machine cannot connect to the wireless LAN
You are unsure of the IP address that was set.
Viewing Network Settings
When the machine cannot connect to the wireless LAN
1 Check the status of your computer
Have the settings of the computer and the wireless router been completed?
- Are the cables of the wireless router (including the power cord and LAN cable) correctly plugged in?
Is the wireless router turned ON?
If the problem persists even after checking the above:
Turn OFF all of the devices, and then turn them ON again.
Wait for a while, and try again to connect to the network.
Check whether the machine is turned ON
The (Power) indicator does not light if the machine is not turned ON.
If the machine is turned ON, turn it OFF, and then turn it back ON.
Check the installation site of the machine and the wireless router
Is the machine too far from the wireless router?
Are there any obstacles such as walls between the machine and the wireless router?
- Are there any appliances such as microwave ovens or digital cordless phones that emit radio waves near the machine?
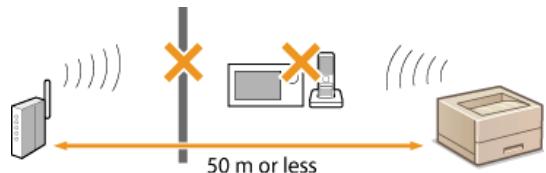
4

Reset the wireless LAN settings
Connecting to a Wireless LAN
NOTE
When you need to manually set up the connection
If the wireless router is set up as described below, enter the required information manually.
The stealth function is enabled.
ANY connection refusal* is enabled.
The WEP key number to use is set to a number from 2 to 4.
The automatically generated WEP key (hexadecimal) is selected.
- A function in which the wireless router refuses the connection if the SSID of the device to be connected is set to "ANY" or is blank.
When you need to change the settings of the wireless router
If the wireless router is set up as described below, change the settings of the router.
- MAC address filtering is enabled.
When only IEEE 802.11n is used for the wireless communication, WEP is selected or the WPA/WPA2 encryption method is set to TKIP.
Problems with the USB Connection
Communication is not possible.
Exchange the USB cable. If the USB cable is a long one, exchange it for a shorter one.
If you are using a USB hub, connect the machine directly to your computer using a USB cable.
Problems via the Print Server
You cannot find the print server to connect to.
Are the print server and computer connected correctly?
Is the print server running?
Do you have user rights to connect to the print server? If you are not sure, consult the print server's administrator.
Is [Network discovery] enabled? (Windows Vista/7/8/Server 2008/Server 2012)
Enabling [Network discovery]
You cannot connect to a shared printer.
- On the network, does the machine appear among the printers of the print server? If it is not displayed, contact the network or server administrator.
Displaying Shared Printers in the Print Server
Printing Problems
Together with this section, see Common Problems. For problems related to connection with the computer, see Installation/Settings Problems.
Printing results are not satisfactory, or the paper is curled or wrinkled.
When You Cannot Print Properly
You cannot print.
- Can you print a Windows test page? If you can print a Windows test page, there is no problem with the machine or the printer driver. Check the print settings of your application.
Printing a Test Page in Windows
If you cannot print a test page, check the following according to your environment.
Wireless LAN connection
Check the connection status (signal strength) of the wireless LAN.
Viewing Network Settings
NOTE:
If the connection is poor, try the following.
-
Change the channel of your wireless LAN router. If you have more than one router, set the channels to be at least five channels apart.
If you can change the radio output power of your wireless LAN router, raise the output power. -
If your computer is connected to the wireless LAN, are the computer and this machine using the same wireless LAN router SSID? If they are different, reset the wireless LAN connection settings of this machine.
Viewing Network Settings
Checking the SSID to Which Your Computer Is Connected
Connecting to a Wireless LAN
NOTE:
When you reset wireless LAN connection settings
- When making settings with the MF/LBP Network Setup Tool, select [Easy Setup] [My wireless LAN access point does not have a WPS button or I cannot find the button].
As the wireless LAN router, select the one with the SSID to which the computer is connected.
Have you selected the correct port? If there is no port to use, create a port.
Checking the Printer Port
Configuring Printer Ports
- Is communication on your computer restricted by a firewall? If the machine cannot be accessed because of incorrect settings, use the (W-Fi) key to initialize the system management settings.
Restricting Communication by Using Firewalls
Initializing by Using the Wi-Fi Key
- Disable security software and other resident software.
Reinstall the printer driver.
Printer Driver Installation Guide
- Can you print from other computers on the network? If you also cannot print from other computers, contact your local authorized Canon dealer or the Canon help line.
USB connection
Have you selected the correct port? If there is no port to use or you are not sure, reinstall the printer driver. When you reinstall the printer driver, the correct port is created automatically.
Checking the Printer Port
Printer Driver Installation Guide
Is bidirectional communication enabled? Enable bidirectional communication, and restart the computer.
Checking Bidirectional Communication
Disable security software and other resident software.
Connect to another USB port on the computer.
- Delete the USB class driver, and then reinstall the printer driver. Printer Driver Installation Guide
Can you print from a USB connection to another computer? If you also cannot print from other computers, contact
your local authorized Canon dealer or the Canon help line.
Via print server

- Can you print from the print server? If you can print from the print server, check the connection between your computer and the print server.
Problems via the Print Server - Disable security software and other resident software.
Reinstall the printer driver. Printer Driver Installation Guide - Can you print from other computers via the print server? If you also cannot print from other computers, contact your local authorized Canon dealer or the Canon help line.
It takes a long time before printing starts.
Did you print on narrow paper? After you print to narrow width paper, the machine may wait until the temperature inside the machine has fallen before resuming printing. This is done to maintain printing quality. As a result, it may take some time before the next job is printed. Wait until the machine is ready to print. Printing will resume when the temperature inside the machine has fallen.
A blank sheet is output (nothing is printed).
- Did you pull the sealing tape out when loading the toner cartridge? If you did not pull it out, remove the toner cartridge, pull the sealing tape out, and reload the toner cartridge.
How to Replace Toner Cartridges
When You Cannot Print Properly
If printing results are not satisfactory, or paper creases or curls, try the following solutions. If the problems persist, contact your local authorized Canon dealer or the Canon help line.
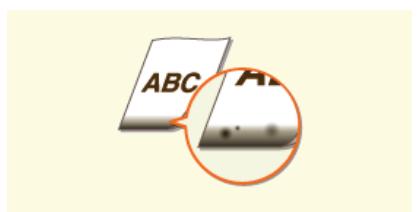
Smudge Marks Appear on the Bottom Edge of Printouts

Streaks Appear on Printouts

Toner Smudges and Splatters Appear

Afterimages Appear in Blank Areas

Printouts Are Faded
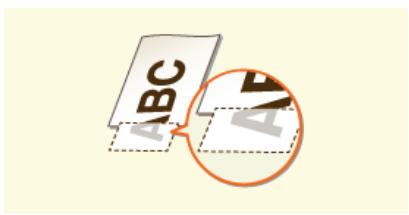
A Portion of the Page Is Not Printed/Printing Position is Wrong

White Streaks Appear/Printing is Uneven

White Spots Appear

Black Spots Appear

Reverse Side of Paper is Smudged
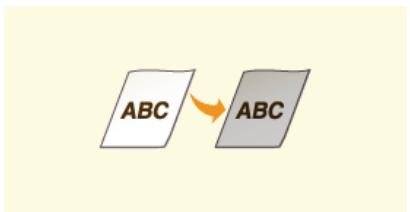
Printouts Are Grayish
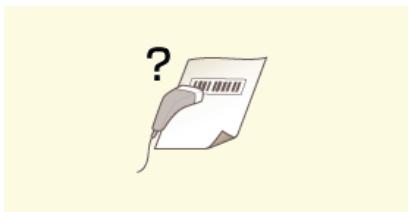
Printed Barcode Cannot Be Read

Paper Creases

Paper Curls

Paper Is Not Fed/Two or More Sheets Are Fed Together
Printing Results Are Not Satisfactory
Grime inside the machine may affect printing results. First try cleaning the machine. Cleaning the Machine
Smudge Marks Appear on the Bottom Edge of Printouts

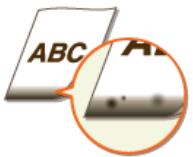
Did you print data without margins, all the way to the edge of the page?
This symptom occurs if a margin is set to none in the printer driver. The range that can be printed on this machine is the range inside a 5mm margin around the edge of the paper or a 10mm margin around the edge of envelopes. Make sure to have margins around the document to print.
[Finishing] tab [Advanced Settings] [Expand Print Region and Print] [Off]
Streaks Appear on Printouts


Are you using appropriate paper?
Check the usable paper types, and replace with appropriate paper.
Paper
In the printer driver, set [Output Adjustment Mode] to [On].
[Quality] tab [Advanced Settings] [Output Adjustment Mode] [On]
NOTE:
Printing speed may be slower if you set the mode to [On].
In the printer driver, change the setting of [Special Print Adjustment A]. The improvement effect is weakest for [Mode 1] and strongest for [Mode 4]. Try the adjustment starting with [Mode 1].
[Finishing] tab [Advanced Settings] [Special Print Adjustment A] Select mode
NOTE:
When you select a stronger improvement effect, the overall print density becomes lighter. Also, edges may become less sharp and details may be rougher.
In the Printer Status Window, enable [Reduce Toner Spots Around Text].
Displaying the Printer Status Window
[Options] [Device Settings] [Assisting Print Settings] Select the [Reduce Toner Spots Around Text] check box
IMPORTANT:
When you select this check box, print quality may be lower for some types of paper (especially thin paper) and some printing environments (especially environments with high humidity). In that case, clear the check box.
Turn over the paper (front to back) so that the print side is changed, and then reload the paper.
IMPORTANT:
Rarely, the symptoms may worsen depending on the type of paper you are using. In that case, get the print side back to original.
Toner may adhere when you replace the toner cartridge or when you leave the machine without printing for a
long period.
In the printer driver, change the setting of [Special Print Adjustment B]. The remedial effect is weakest for [Mode 1] and strongest for [Mode 3]. Try the adjustment starting with [Mode 1].
[Finishing] tab [Advanced Settings] [Special Print Adjustment B] Select mode
NOTE:
When you select a stronger improvement effect, printing speed becomes slower.
Toner Smudges and Splatters Appear


Are you using appropriate paper?
Check the usable paper types, and replace with appropriate paper.
Paper
In the Printer Status Window, enable [Reduce Toner Spots Around Text].
Displaying the Printer Status Window
[Options] [Device Settings] [Assisting Print Settings] Select the [Reduce Toner Spots Around Text] check box
IMPORTANT:
When you select this check box, print quality may be lower for some types of paper (especially thin paper) and some printing environments (especially environments with high humidity). In that case, clear the check box.
Afterimages Appear in Blank Areas


Are you using appropriate paper?
Check the usable paper types, and replace with appropriate paper.
Paper
Is it time to replace the toner cartridge?
Materials inside the toner cartridge may have deteriorated. Replace the toner cartridge.
How to Replace Toner Cartridges
Printouts Are Faded


Is toner running low?
Remove the toner cartridge, shake it 5 or 6 times to evenly distribute the toner inside the cartridge, and then
reload it into the machine.
Using Up All of the Toner
Are you using appropriate paper?
Check the usable paper types, and replace with appropriate paper.
Paper
Have you specified the correct paper type?
- Specify the type of paper again, according to the type of paper that you are using.
Basic Print Operations
A Portion of the Page Is Not Printed/Printing Position is Wrong

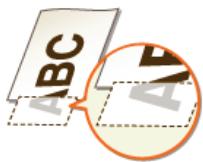
Did you print data without margins, all the way to the edge of the page?
This symptom occurs if a margin is set to none in the printer driver. The range that can be printed on this machine is the range inside a 5 mm argin around the edge of the paper or a 10 mm margin around the edge of envelopes. Make sure to have margins around the document to print.
[Finishing] tab [Advanced Settings] [Expand Print Region and Print] [Off]
White Streaks Appear/Printing is Uneven


Is toner running low?
- Remove the toner cartridge, shake it 5 or 6 times to evenly distribute the toner inside the cartridge, and then reload it into the machine.
Using Up All of the Toner
Is it time to replace the toner cartridge?
Materials inside the toner cartridge may have deteriorated. Replace the toner cartridge.
How to Replace Toner Cartridges
White Spots Appear


Are you using paper that has absorbed moisture?
Replace with appropriate paper.
Paper
Are you using appropriate paper?
Check the usable paper types, and replace with appropriate paper. Paper
Is it time to replace the toner cartridge?
Materials inside the toner cartridge may have deteriorated. Replace the toner cartridge. How to Replace Toner Cartridges
Are you printing a document with strong contrasts between light and dark, and does the white appear around text or edges in an image?
In the printer driver, set [Special Print Mode] to [Special Settings 2].
[Finishing] tab [Advanced Settings] [Special Print Mode] [Special Settings 2]
NOTE:
Compared to the [Off] setting, the [Special Settings 2] setting selects lighter print density.
Black Spots Appear


Have you cleaned the fixing unit?
Clean the fixing unit. Fixing Unit
Reverse Side of Paper is Smudged


Have you loaded paper that is smaller than the size of the print data?
Check to make sure that the paper size matches the size of the print data.
Printouts Are Grayish


Is the machine installed in a location where it is exposed to direct sunlight?
- Move the machine to a location where it is not exposed to direct sunlight. Relocating the Machine
Are you trying to read a small barcode or one with thick lines?
Enlarge the barcode.
In the printer driver, set [Special Print Mode] to [Special Settings 1].
[Finishing] tab [Advanced Settings] [Special Print Mode] [Special Settings 1]
NOTE:
When you specify [Special Settings 1], printouts may be faded.
Paper Creases


Is the paper loaded correctly?
- Paper may crease when it is not loaded below the load limit guides, or when it is loaded obliquely.
Loading Paper in the Multi-Purpose Tray
Are you using paper that has absorbed moisture?
Replace with appropriate paper.
Paper
- If you are using A4, Letter size, or Legal size paper, change the setting of [Wrinkle Adjustment] in the printer driver. The improvement effect is weaker for [Mode 1] and stronger for [Mode 2]. Try the adjustment starting with [Mode 1].
[Finishing] tab [Advanced Settings] [Wrinkle Adjustment] Select mode
NOTE:
Printing speed becomes slower if you select stronger improvement.
Are you using appropriate paper?
Check the usable paper types, and replace with appropriate paper.
Paper
In the printer driver, set [Output Adjustment Mode] to [On].
[Quality] tab [Advanced Settings] [Output Adjustment Mode] [On]
NOTE:
Printing speed may be slower if you set the mode to [On].
Paper Curls


Are you using paper that has absorbed moisture?
Replace with appropriate paper.
Paper
If you have set [Paper Type] to [Plain], try printing after setting [Paper Type] to [Plain L].
Basic Print Operations
NOTE:
When you set [Paper Type] to [Plain L], printouts may appear faded because toner does not adhere adequately to the paper.
In the Printer Status Window, enable [Perform Curl Correction for Output Paper].
Displaying the Printer Status Window
[Options] [Device Settings] [Assisting Print Settings] Select the [Perform Curl Correction for Output Paper] check box
NOTE:
Printing speed may be slower when you select this check box.
- If you are using A4, Letter size, or Legal size paper, change the setting of [Wrinkle Adjustment] in the printer driver. The improvement effect is weaker for [Mode 1] and stronger for [Mode 2]. Try the adjustment starting with [Mode 1].
[Finishing] tab [Advanced Settings] [Wrinkle Adjustment] Select mode
NOTE:
"Are you using appropriate paper?"
Check the usable paper types, and replace with appropriate paper.
Paper
Paper Is Not Fed/Two or More Sheets Are Fed Together

Is the paper loaded correctly?
Fan the paper stack thoroughly so that the sheets are not stuck together.
Check whether the paper is loaded correctly. Loading Paper in the Multi-Purpose Tray
Check whether the number of sheets of paper loaded is appropriate and whether the appropriate paper is used.
Check whether mixed sizes and types of paper are loaded together.
When a Problem Cannot Be Solved
If a problem cannot be resolved, contact your local authorized Canon dealer or the Canon help line.
IMPORTANT
Do not disassemble or repair the machine yourself
If you disassemble or repair the machine yourself, it may not be covered by warranty.
When Contacting Canon
When contacting us, have the following information ready.
Product name (LBP6030w / LBP6030B / LBP6030)
Dealer where you purchased the machine
Details about your problem (such as what you did, what happened as a result, and any messages that were displayed)
Serial number (10 alphanumeric characters long, found on the label on the back side of the machine)
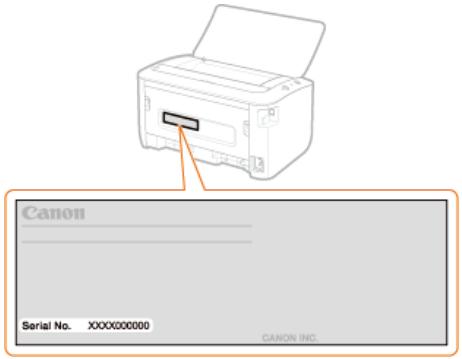
Maintenance
This chapter describes upkeep of the machine, including how to clean the machine and print setting lists.
■ Basic Maintenance Cleaning the Machine
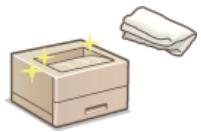
The machine becomes dirty Exterior
Smudge marks appear on printouts Fixing Unit
Replacing Toner Cartridges Replacing Toner Cartridges

If you want to use all of the toner Using Up All of the Toner
How to replace toner cartridges How to Replace Toner Cartridges
■ Printing Setting Lists
If you want to print a list of machine settings Printing Setting Lists
Checking the Total Pages Printed by the Machine
If you want to check the total number of pages printed by the machine Viewing the Page Counter Value
■ Initializing Settings LBP6030w
If you want to restore settings to the factory defaults Initializing Settings
Relocating the Machine
If you want to relocating the machine for maintenance or an office move Relocating the Machine
Cleaning the Machine
Clean the machine regularly to prevent deterioration in printing quality and to ensure safe and trouble-free operation. Carefully read the safety instructions before you start cleaning.
Where to Clean
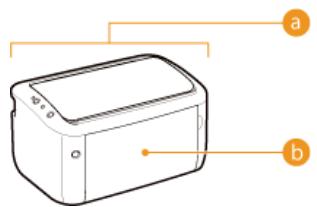
Exterior of the machine and ventilation slots
Exterior
Internal fixing unit
Fixing Unit
Exterior
Regularly wipe the exterior of the machine to keep it in good condition. Wipe the ventilation slots regularly to keep it free of dust.
1 Turn OFF the machine, and unplug the power plug from the AC power outlet.
- When you turn OFF the machine, data that is waiting to be printed is deleted.
2 Wipe the exterior of the machine and the ventilation slots.
Use a soft, well-wrung-out cloth dampened with water or a mild detergent diluted with water.
For the location of the ventilation slots, see Back Side.
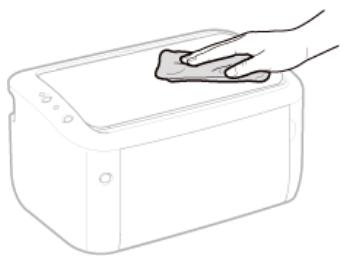
3 Wait for the exterior of the machine to dry completely.
4 Plug the power cord back into the AC power outlet.
Fixing Unit
Dirt may adhere to the fixing unit inside the machine and cause smudges and black streaks to appear on printouts. If this occurs, proceed as follows to clean the fixing unit. Note that you cannot clean the fixing when the machine has documents waiting to be printed. To clean the fixing unit, you need normal A4 size paper. Before starting, load A4 size paper in the multi-purpose tray. Loading Paper in the Multi-Purpose Tray
1 Select the machine by clicking in the system tray.

2 Select [Options] [Utility] [Cleaning].
![CANON LBP6040 - Select [Options] [Utility] [Cleaning]. - 1](/content/2024/11/223505/images/e4186bcaf573cd14b68db7d4df6a22ff886555cdcf3c1441ef7e49b64148af1f.jpg)
3 Click [OK].
![CANON LBP6040 - Click [OK]. - 1](/content/2024/11/223505/images/a4e528f34a48554935c936de304e068748a24d9578bfb170858c0986116db462.jpg)
The paper is fed slowly into the machine, and cleaning starts. The cleaning is done when the paper is completely ejected.
Cleaning cannot be cancelled once it starts. Wait until it finishes (approx. 140 seconds).
NOTE
Cleaning from the Remote UI
You can also clean the fixing unit from the [Utility Menu] page of the Remote UI. ☐Cleaning
Replacing Toner Cartridges
No warning message appears, even when toner begins to run low. Use the printout symptoms described below as a guide to when to replace the toner cartridge. How to Replace Toner Cartridges

White streaks appear

Faded

Uneven density

Afterimages Appear in Blank Areas

White Spots Appear
NOTE
When, of the above symptoms, one of "White streaks appear," "Faded," and "Uneven density" appears, you may be able to continue printing for a while longer by taking the steps in Using Up All of the Toner.
TIPS
You can specify that a message like the one shown below be displayed when print quality cannot be guaranteed because the toner cartridge has reached its lifetime or for some other reason. This allows you to avoid the waste of poor-quality printouts, because you are notified in advance when the time comes to replace the toner cartridge.
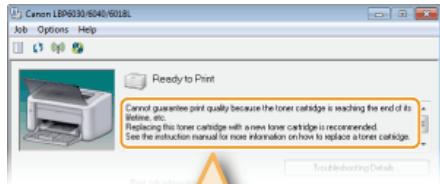
Cannot guarantee print quality because the toner cartridge is reaching the end of its lifetime, etc.
Replacing this toner cartridge with a new toner cartridge is recommended
See the instruction manual for more information on how to replace a toner cartridge.
1 Select the machine by clicking in the system tray.
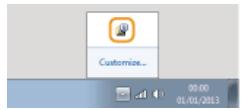

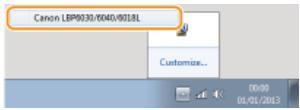
2 Select [Options] [Device Settings] [Warning Display Settings].
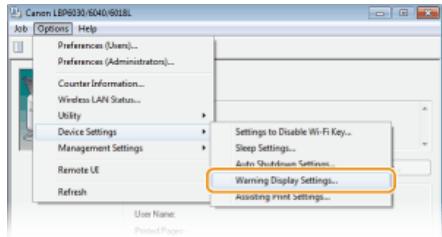
3 Select the [Display End of Toner Cartridge Lifetime Warning] check box and click [OK].
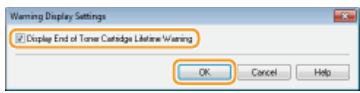
IMPORTANT
You can continue printing when this message is displayed, but the print quality may deteriorate.
Even if this message is not displayed, use the symptoms listed at the top of this page as a guide to replacing toner cartridges. Replace the toner cartridge when a symptom appears.
LINKS
Consumables
Using Up All of the Toner
Printout symptoms like the following appear when toner begins to run low.

White streaks appear

Faded

Uneven density
When symptoms like these appear, take the following steps. They will allow you to use up all of the toner in the toner cartridge. You will be able to continue printing for a while longer, until the toner runs out completely. If the symptoms do not improve after you take the following steps, replace the toner cartridge How to Replace Toner Cartridges). Before starting, read the safety instructions in
Maintenance and Inspections and Consumables.
1 Open the top cover.
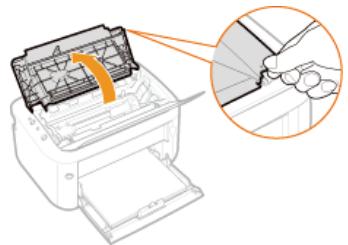
2 Remove the toner cartridge.
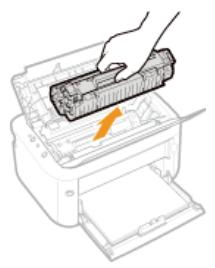
3 Shake the toner cartridge 5 or 6 times as shown below to evenly distribute the toner inside the cartridge.
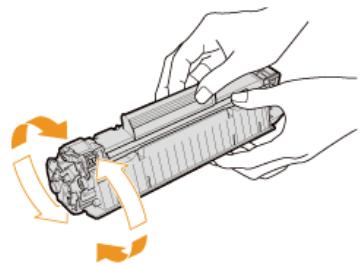
4 Replace the toner cartridge.
Align with the toner cartridge guide (3), and push firmly all the way in.
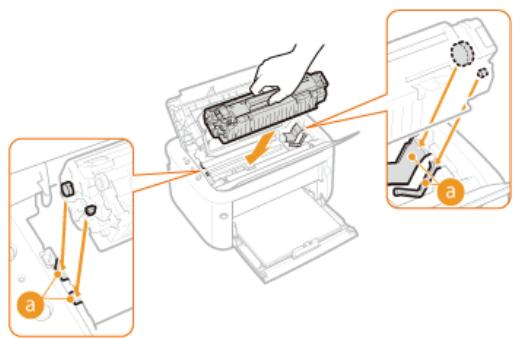
5 Close the top cover.
How to Replace Toner Cartridges
Before replacing a toner cartridge, read the precautions in Maintenance and Inspections and Consumables.
1 Open the top cover.
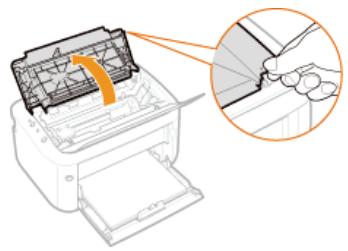
2 Remove the toner cartridge.
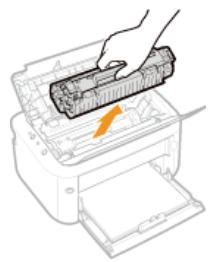
3 Remove the new toner cartridge from the protective bag.
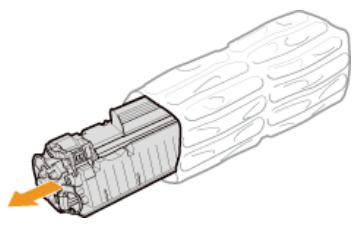
4 Shake the toner cartridge 5 or 6 times as shown below to evenly distribute the toner inside the cartridge, and then place it on a flat surface.
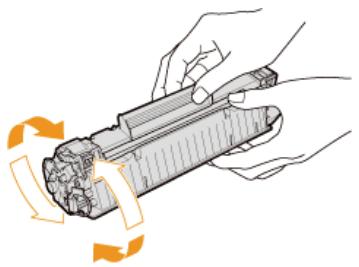
5 Pull the sealing tape straight out.
The full length of the sealing tape is approximately 50~cm
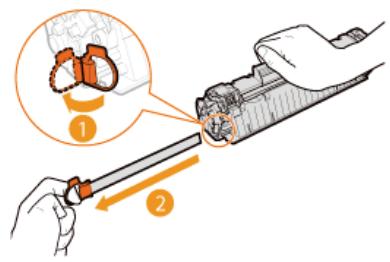
IMPORTANT:
When pulling out the sealing tape
If any sealing tape remains inside the toner cartridge, print quality may deteriorate.
Do not pull the sealing tape at an angle. If the sealing tape breaks, you may not be able to pull it out completely.
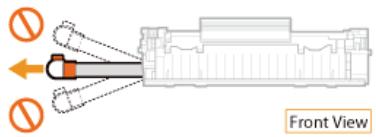
If the sealing tape becomes stuck when pulling it out, keep pulling until it is completely removed.
6 Replace the toner cartridge.
Align with the toner cartridge guide (a), and push firmly all the way in.

7 Close the top cover.
Printing Setting Lists
You can print setting lists from the Printer Status Window. This is convenient when you want to print a list of network settings or a list of power saving and other configuration settings for the machine. Setting lists are formatted to print on A4 size paper. Before starting, load A4 size paper in the multi-purpose tray. Loading Paper in the Multi-Purpose Tray
1 Select the machine by clicking in the system tray.

2 Select [Options] [Utility] [Configuration Page Print] or [Network Status Print].
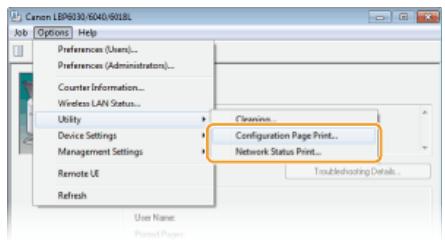
[Configuration Page Print]
Prints a list of the settings under [Options] [Device Settings] together with machine version information.
[Network Status Print] (LBP6030w)
Prints a list of the network settings of the machine.
3 Click [OK].
Output example: [Configuration Page Print]
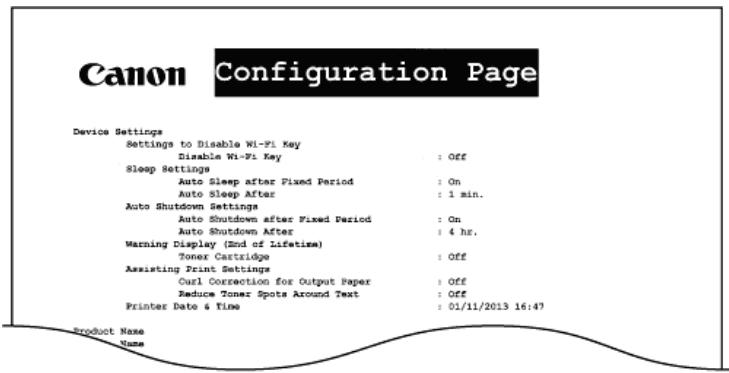
Output example: [Network Status Print]
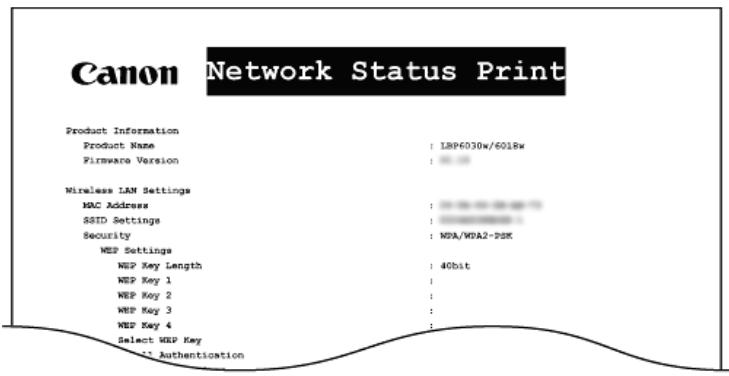
NOTE
You can also use the machine's (Paper) key to print and view a list of the machine's IPv4 settings, MAC address, wireless LAN settings, and version information. Viewing Network Settings
Viewing the Page Counter Value
You can check the total number of pages that the machine has printed by viewing the page counter in the Printer Status Window.
1 Select the machine by clicking in the system tray.

2 Select [Options] [Counter Information].
![CANON LBP6040 - Select [Options] [Counter Information]. - 1](/content/2024/11/223505/images/1f289599ce7f86a3c8a8f52bc1d07b74f6d95e723714d1e6ef0fd50d85d70dcd.jpg)
The total number of printed pages is displayed.
Initializing Settings
LBP6030w
You can restore the machine's settings to the factory default settings.
Initializing Preferences Settings
Initializing System Management Settings
Initializing Key and Certificate Settings
You can initialize the settings of the Remote UI [Preferences] menu (Setting Menu List) to return them to the factory default settings.
1 Start the Remote UI and log on in System Manager Mode. Starting the Remote UI
2 Click [Settings/Registration].

3 Click [Initialize Setting Information] [Initialize Menu].

4 Select the settings to initialize, and then click [Initialize].
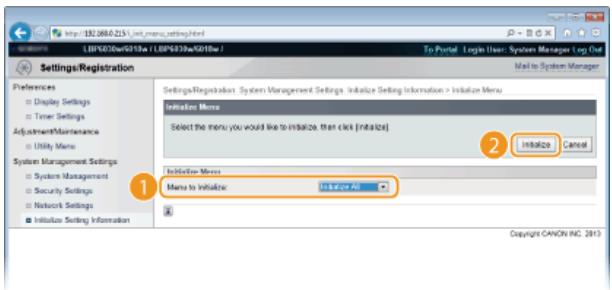
[Menu to Initialize]
Select the settings to initialize from the drop-down list. Select [Initialize All] to initialize both [Display Settings] and [Timer Settings].
5 Click [OK].
![CANON LBP6040 - [Menu to Initialize] - 1](/content/2024/11/223505/images/be3346abd59ec926397461f2df886f16f1afacec6ea23fb0bd544e5bc511ce00.jpg)
Initializing System Management Settings
LBP6030w
You can initialize the settings in the Remote UI [System Management Settings] menu (Setting Menu List) to return them to the factory default settings.
NOTE
To initialize [Key and Certificate Settings] and [CA Certificate Settings] in [Security Settings], see Initializing Key and Certificate Settings.
1 Start the Remote UI and log on in System Manager Mode. Starting the Remote UI
2 Click [Settings/Registration].

3 Click [Initialize Setting Information]▶[Initialize System Management Settings].
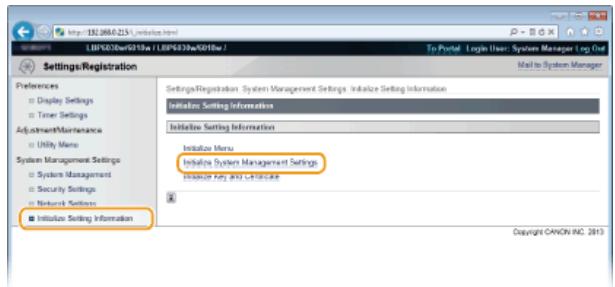
4 Select the settings to initialize, and then click [Initialize].
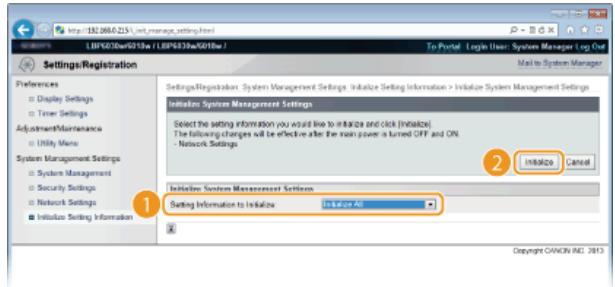
[Setting Information to Initialize]
Select the settings to initialize from the drop-down list. Select [Initialize All] to initialize all of the settings in [System Manager Information], [Device Information], [Security Settings], and [Network Settings] at once.
5 Click [OK].
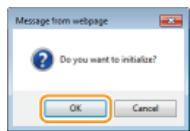
Initializing by Using the Wi-Fi Key
You can use the machine's (Wi-Fi) key to initialize the machine's system management settings. If you turn OFF the machine, and then turn ON the machine while pressing the (Wi-Fi) key, all of the settings in the [System Management Settings] menu (Setting Menu List) of the Remote UI are initialized at once. However, the [System Manager Name], [Device Name], and [Location] settings of [System Management] are not initialized.
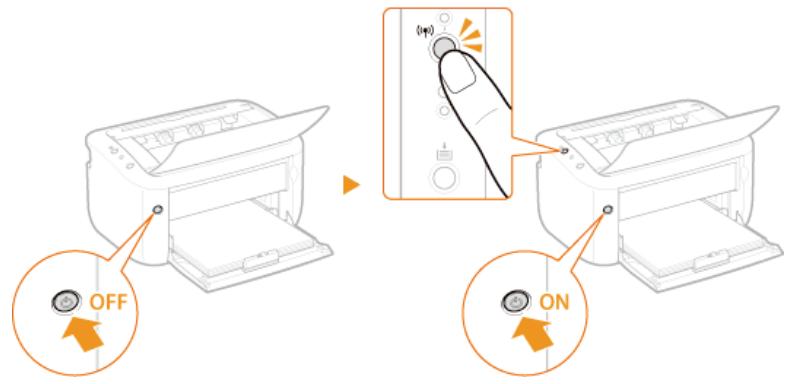
Initializing Key and Certificate Settings
LBP6030w
You can restore the settings of key pairs (Key and certificate settings) and CA certificates to the factory default settings. Note that any key pairs that you have registered in the machine and any CA certificates (except the preinstalled CA certificates) will be deleted by the initialization.
NOTE
If you perform this initialization, SSL encrypted communication requiring a key pair will not be possible. To use SSL encrypted communication, set another key pair and enable the function again.
1 Start the Remote UI and log on in System Manager Mode. 口 Starting the Remote UI
2 Click [Settings/Registration].

3 [Initialize Setting Information] [Initialize Key and Certificate].
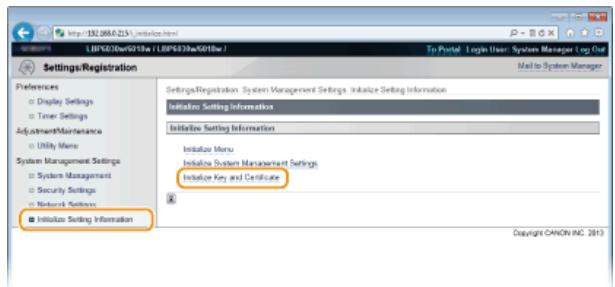
4 Click [Initialize].
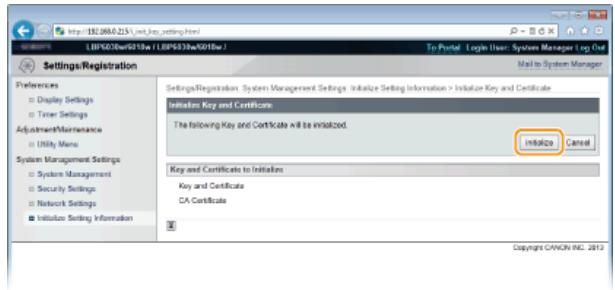
5 Click [OK].
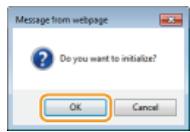
Configuring Settings for Key Pairs and Digital Certificates
Relocating the Machine
The machine is heavy. To avoid injury, be sure to follow the procedure below when moving the machine. Also be sure to read the safety instructions before you begin. Important Safety Instructions
1 Turn OFF the machine and computer.
When you turn OFF the machine, data that is waiting to be printed is deleted.
2 Disconnect the cables and cord from the machine in numerical order as in the illustration below.
- Whether or not a USB cable (3) is connected depends on your environment.
Power plug
Power cord
USB cable
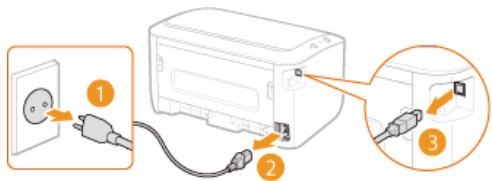
3 If you will be transporting the machine across a long distance, remove the toner cartridge. How to Replace Toner Cartridges
4 Close the multi-purpose tray and output tray, and carry the machine to its new location.
To carry the machine, grasp it on both sides with the front side facing you.
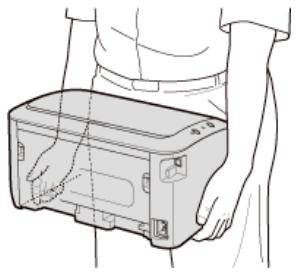
5 Carefully place the machine at its new location.
For the procedure to follow after moving the machine, see the "Getting Started." Manuals Included with the Machine
Appendix
This chapter contains technical specifications of this machine, instructions on how to use the e-Manual, disclaimers, copyright information, and other information that you may need. Refer to it as required.
Feature Highlights
Give the features that are described in this section a try. The features are grouped under four headings: "Going Green and Saving Money," "Improving Efficiency," and "So Much More."
Easy on the environment, easy on your wallet
There are lots of ways to cut back on paper, toner, power, and expenses.

01

Print Multiple Pages on a Single Sheet

When there are many pages in a document, the printout can be inconveniently bulky - hard to carry around and store, and also hard to read. But there is a solution. Print multiple pages onto one sheet! This allows you to save paper and make your documents slimmer and easier to handle.

For more information about this function, see Printing Multiple Pages Onto One Sheet.
02

Sleep Mode

You can save power by setting the machine to enter sleep mode automatically whenever it has not been used for a while. You don't need to turn OFF the power each time, but you can still have the machine minimize its power consumption. The auto shutdown function can boost the savings, by automatically turning OFF the machine if it remains idle for a longer time. These convenient functions work in the background to save power and money every day.
To save power by putting the machine into sleep mode: Setting Sleep Mode
To configure the machine to be automatically turned OFF: Setting Auto Shutdown
03

Save Toner

To economize on toner, you can use draft mode for drafts and test printouts. Or you can switch between modes according to purpose, using normal mode for beautiful photos and draft mode for company documents that do not require presentation quality.
For more information about this function, see Saving Toner.
Little things that save lots of time
Here are some simple operations that can make complicated tasks more efficient.

01

Remote Management with Printer Status Window and Remote UI

The Printer Status Window and Remote UI* allow you to manage the machine remotely from the computer at your desk. You can monitor the state of the machine from your computer, and also check error information. Whenever a printing error occurs, the Printer Status Window appears automatically to notify you with easy to understand messages and animations. Save time and trouble by eliminating trips between your desk and the machine. The Remote UI makes it simple to configure the machine, including the many network setting items.
- The Remote UI is available on the LBP6030w only.
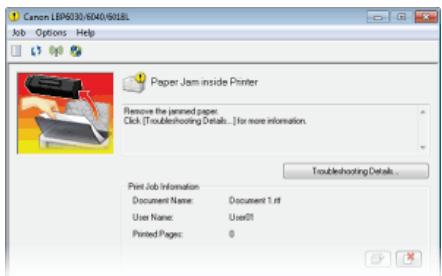
For more information about the Printer Status Window, see Printer Status Window.
For more information about the Remote UI, see Using the Remote UI.
02

Register Favorite Settings and Call Them Up at Any Time

Everyone in the office uses the printer. If you register the most popular settings as the default settings, you can use them right away. You can also register frequently used combinations of print settings as "profiles." Then you can call up your favorite settings in a single operation, by selecting a profile instead of selecting each setting every time you print.
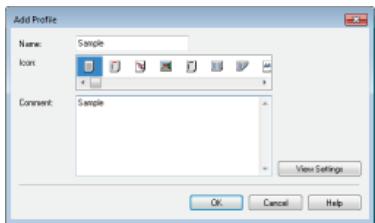
To change default print settings: Changing Default Settings
To register combinations of frequently used print settings as "profiles": Registering Combinations of Frequently Used Print Settings
03

Save Time with Shortcuts

When you have a number of documents to print, it would be convenient to print them all with one operation. Canon PageComposer allows you to combine multiple documents and print them all at once. It is an easy way to save time and work more efficiently.
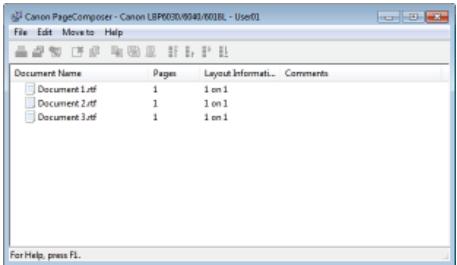
For more information about this function, see Combining and Printing Multiple Documents.
Just what you were looking for
There are a variety of features for whatever you need to do - at home or in the office.

01

Keep Your Printouts Private
For personal information and sensitive documents that you want to keep private, you can print watermarks such as "CONFIDENTIAL" or "TOP SECRET." In addition to these standard watermarks, you can also design your own watermarks.

For more information about this function, see Printing Watermarks.
02

Go Wireless (LBP6030w)

No cables, easy installation, simple maintenance. If you've got a WPS wireless LAN router, bypass the settings process altogether and be ready to go before you know it. Enjoy the kind of clutter-free and easy to use document system that you can only get from wireless. Compatible with IEEE 802.11b/g/n for stress-free wireless, and also supports WEP and WPA/WPA2-PSK (TKIP/AES-CCMP) for tighter security.
For more information about this function, see Connecting to a Wireless LAN.
03

Make Posters

Blow up a regular one-sheet printout and make an exceptionally large poster. A large poster will be printed out on nine sheets. Put them together in a 3 × 3 grid, and voila!

For more information about this function, see Printing Posters.
04

Automatically Collate Meeting Handouts

When you print multiple copies of a multi-page document, you can use the collate function to print one copy after another with all of the pages in the correct order. This is convenient when preparing handouts for meetings or presentations.


For more information about this function, see Collating Printouts by Page.
Specifications
Due to continuing product enhancements, the specifications of this machine are subject to change without notice.
Machine Specifications
Wireless LAN Specifications
Paper
Hardware Specifications
Software Specifications
Hardware Specifications
| Type | Desktop page printer |
| Printing System | Semiconductor laser + dry-type electrophotographic system |
| Toner Fixing System | On-demand fixing system |
| Print Speed*1 (Plain paper (60 to 89 g/m2), A4 continuous printing) | 18 pages/minute |
| Warm-Up Time*2 (from power ON until machine enters standby) | 10 seconds or less |
| Recovery Time*3 (recovery from sleep mode to standby) | 1 second or less |
| First Print Time*3 (A4 printing) | Approx. 7.8 seconds |
| Acceptable Paper Stock | Paper |
| Paper Capacity (Multi-purpose tray) | Approx. 150 sheets |
| Paper Output | Face down |
| Output Capacity*4 (Output tray) | Approx. 100 sheets |
| Noise (measured in accordance with ISO 7779, declared noise emission in accordance with ISO 9296) | LwAd (declared A-weighted sound power level (1 B = 10 dB)) • During standby: Inaudible*5 • During printing: 6.53 B or less LpAm (declared A-weighted sound pressure level (bystander position)) • During standby: Inaudible*5 • During printing: 49.3 dB |
| Environmental Conditions (machine only) | Operating Environment • Temperature: 10 to 30 °C • Humidity: 20 to 80% RH (no condensation) |
| Host Interface | LBP6030w • USB interface: Hi-Speed USB/USB • Network interface: IEEE 802.11b/g/n LBP6030B / LBP6030 • USB interface: Hi-Speed USB/USB |
| LBP6030w • | |
| User Interface | LED indicators: 3 Operation keys: 2 LBP6030B / LBP6030 LED indicators: 2 Operation keys: 1 |
| Power | 220 to 240 V (± 10%), 50/60 Hz (± 2 Hz) |
| Power Consumption*6 (20 °C) | Maximum: 870 W or less During operation: Approx. 330 W During standby: 1.8 W or less (USB connection) 2.8 W or less (wireless LAN connection) (LBP6030w only) During sleep mode: 0.8 W or less (USB connection) 1.6 W or less (wireless LAN connection) (LBP6030w only) When the power switch is turned OFF: 0.5 W or less |
| Consumables | Consumables |
| Weight | Machine and accessories Machine (excluding toner cartridge): Approx. 5.0 kg Toner cartridge: Approx. 0.5 kg Consumables Toner cartridge (Canon Cartridge 725): Approx. 0.5 kg |
1 Print speed may be slower depending on the settings for output adjustment mode, paper size and type, paper orientation, and number of copies printed.
2 May vary depending on conditions of use (installation environment, etc.).
3 May vary depending on the output environment.
4 May vary depending on the installation environment and type of paper used.
5 Indicates that the sound pressure level of each bystander position is below the ISO 7779 absolute criteria for the background noise level.
6 Even if the machine is turned OFF, a slight amount of power is still consumed while the power plug is plugged into the AC power outlet. To stop power consumption completely, unplug the power plug from the AC power outlet.
Software Specifications
| Printing Software | UFR II |
| Printable Area | ▲Printable Range |
| Standards | IEEE 802.11b/g/n |
| Transmission Scheme | DS-SS system, OFDM system |
| Frequency Range | 2,412 to 2,472 MHz |
| Data Transmission Rate | IEEE 802.11b 1/2/5.5/11 Mbps IEEE 802.11g 6/9/12/18/24/36/48/54 Mbps IEEE 802.11n • SGI Invalidated 20 MHz: 6.5/13/19.5/26/39/52/58.5/65 Mbps • SGI Validated 20 MHz: 7.2/14.4/21.7/28.9/43.3/57.8/72.2 Mbps • SGI Invalidated 40 MHz: 13.5/27/40.5/81/108/121.5/135 Mbps • SGI Validated 40 MHz: 15/30/45/60/90/120/150 Mbps |
| Communication Mode | Infrastructure mode |
| Security | WEP, WPA-PSK (TKIP/AES-CCMP), WPA2-PSK (TKIP/AES-CCMP) |
| Connection Method | WPS (Wi-Fi Protected Setup), Manual setup |
Supported Paper Sizes
Paper sizes that can be loaded in the multi-purpose tray are listed below.
A4 (210.0 mm × 297.0 mm)
B5 (182.0mm× 257.0mm)
A5 (148.5mm× 210.0mm)
Legal (215.9 mm x 355.6 mm)
Letter (215.9 mm × 279.4 mm)
Executive (184.2 mm x 266.7 mm)
Oficio (216.0 mm x 317.0 mm)
Brazil Oficio (216.0 mm × 355.0 mm)
Mexico Oficio (216.0 mm x 341.0 mm)
Foolscap (216.0mm× 330.0mm)
16K (195.0 mm × 270.0 mm)
Envelope Monarch (98.4 mm × 190.5 mm)
Envelope No. 10 (COM10) (104.7 mm x 241.3 mm)
Envelope DL (110.0 mm x 220.0 mm)
Envelope C5 (162.0 mm × 229.0 mm)
Custom paper size (Width 76.2 to 216.0mm× Length 188.0 to 356.0mm
Paper Tray Capacity by Paper Type
Chlorine-free paper can be used with this machine.
| Paper Type | Capacity (Multi-Purpose Tray) | |
| Plain paper*1 | 60 to 80 g/m2 | Approx. 150 sheets |
| 81 to 89 g/m2 | Approx. 120 sheets | |
| Heavy paper | 90 to 105 g/m2 | Approx. 100 sheets |
| 106 to 163 g/m2 | Approx. 60 sheets | |
| Transparency*2 *3 | Approx. 100 sheets | |
| Labels *3 | Approx. 50 sheets | |
| Envelope | Approx. 10 sheets | |
1 Recycled paper can be used.
2 Use laser printer transparencies.
*3 Use A4 or Letter size only.
Machine Settings for Paper Types
Loading Paper
Printable Range
The printable range is indicated in gray. Envelopes require a 10mm margin on the top, bottom, left, and right.
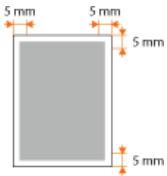
Consumables
The following is a guide to the estimated replacement time for the consumables used in this machine. Purchase consumables at your local authorized Canon dealer. Observe safety and health precautions when storing and handling consumables (Consumables).
NOTE
Depending on the installation environment, printing paper size, or document type, you may need to replace consumables before the end of the estimated lifetime.
Toner Cartridges
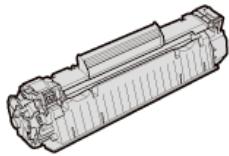
Supplied Toner Cartridges
The average yield* of the toner cartridge that comes with the machine is 700 sheets.
- The average yield is based on "ISO/IEC 19752" (the global standard related to "Method for the determination of toner cartridge yield for monochromatic electrophotographic printers and multi-function devices that contain printer components" issued by ISO [International Organization for Standardization]) when printing A4 size paper with the default print density setting.
Replacement Toner Cartridges
For optimum print quality, using Canon genuine toner cartridges is recommended.
| Canon Genuine Toner Cartridge | Average yield of toner cartridge* |
| Canon Cartridge 725 | 1,600 sheets |
NOTE
When replacing toner cartridges How to Replace Toner Cartridges
LINKS
Replacing Toner Cartridges
Manuals Included with the Machine
The manuals listed below are included with the machine. Refer to them as necessary.
| Getting Started | Read this manual first. It contains easy to understand explanations of everything you need to do to set up the machine, from removing the packing materials to configuring the settings. It also explains basic maintenance. | |
| This manual has descriptions in the following languages. Bulgarian, Croatian, Czech, Estonian, Greek, Hungarian, Latvian, Lithuanian, Persian, Portuguese, Romanian, Slovakian, Slovenian, Ukrainian | ||
| e-Manual (This Manual) | This manual describes all the functions of the machine. It is designed for viewing in a Web browser. You can browse information by category or enter a keyword to search for pages on a specific topic. Using the e-Manual | |
| Printer Driver Installation Guide | This manual explains how to install the printer drivers included on the User Software CD-ROM/DVD-ROM. | |
Using the e-Manual
The e-Manual is a manual that can be viewed on your computer. It describes all of the functions of the machine. You can search for information about what you want to do, or enter a keyword to quickly find the page you are looking for. You can use the e-Manual by installing it on your computer, or start the e-Manual directly from the CD-ROM/DVD-ROM. ☒Install the e-Manual
How to Find the Topic You Are Looking For
You can find the page you are looking for using the following three methods.
Search the contents
You can find the page you are looking for by selecting a topic from the [Contents] tab on the left side of the screen, or by selecting a chapter icon from the icons next to the topics.
Top Page
Topic Page
Search by keyword
You can search by entering keywords, such as "envelope" or "toner cartridge." Pages containing the keywords are displayed. You can also enter phrases such as "load paper." The search will find topics containing all of the words in the phrase (AND search).
Search Tab
Search the site map
Click [Site Map] on the top part of the screen to display a list of all the e-Manual topics. From there you can find the topic you are looking for.
Site Map
NOTE
System Requirements
To use the e-Manual, one of the following Web browsers is required. The content of the e-Manual may not display correctly if a browser not listed below is used.
Windows: Internet Explorer 8.0/9.0/10.0/11.0, Firefox 24.x ESR/26.0
Mac OS: Safari 7.0, Firefox 24.x ESR/26.0
Install the e-Manual on your computer by using the CD-ROM/DVD-ROM that comes with the machine.
1 Insert the User Software CD-ROM/DVD-ROM into the drive on the computer.
2 Click [Custom Installation].
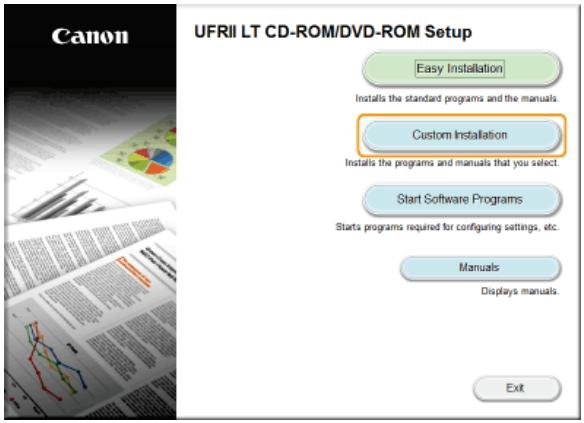
NOTE:
If the above screen does not appear Displaying the [CD-ROM/DVD-ROM Setup] Screen
If [AutoPlay] is displayed, click [Run MInst.exe].
3 Clear the [Printer Driver] check box, and click [Install].
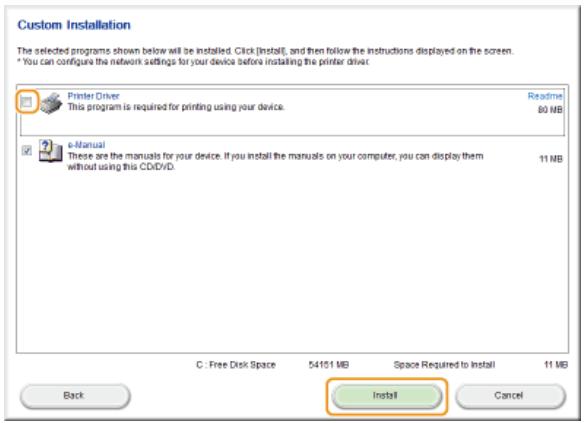
4 Read the License Agreement and click [Yes] to agree.
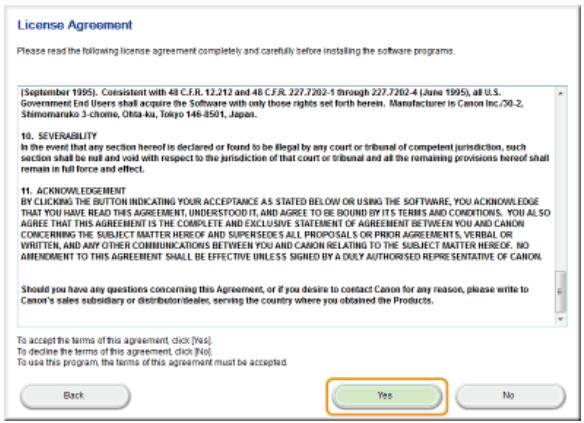
Click [Install].
5
If you want to change the installation destination, click [Browse] and select your desired location.
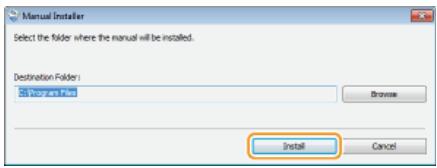

The installation begins.
6 Click [Exit].
![CANON LBP6040 - Click [Exit]. - 1](/content/2024/11/223505/images/3e0788b3e943dd3be07d9b6e7013f1583a3468792dbfe1179e95f9f87ed1d14a.jpg)
7 Click [Next] [Exit].
![CANON LBP6040 - Click [Next] [Exit]. - 1](/content/2024/11/223505/images/fec8903c618e71e391670ac44e66e909dd449e31d5a19bd803ac2f0925f9acb0.jpg)
![CANON LBP6040 - Click [Next] [Exit]. - 2](/content/2024/11/223505/images/90612e561783fec5366a207f45a74599960957e4d27cbdb01a3f17f65e284f8a.jpg)
Viewing the e-Manual
Double-click the shortcut icon of the e-Manual on the desktop.

LBP
Manual
If a security warning message appears
Click [Allow blocked content].
Internet Explorer restricted this webpage from running scripts or ActiveX controls.
Allow blocked content
Viewing the e-Manual Directly from the CD-ROM/DVD-ROM
1 Insert the User Software CD-ROM/DVD-ROM into the drive on the computer.
- If the [CD-ROM/DVD-ROM Setup] screen does not appear Displaying the [CD-ROM/DVD-ROM Setup] Screen
If [AutoPlay] is displayed, click [Run MInst.exe].
2 Click [Manuals].
3 Click [e-Manual].
Uninstalling the e-Manual
You can remove the e-Manual from the computer to restore the computer to the same state it was in before the e-Manual was installed.
1 Insert the User Software CD-ROM/DVD-ROM into the drive on the computer.
2 Click [Start Software Programs].

NOTE:
If the above screen does not appear Displaying the [CD-ROM/DVD-ROM Setup] Screen
If [AutoPlay] is displayed, click [Run MInst.exe].
3 Click [Start] for [Manual Uninstaller].
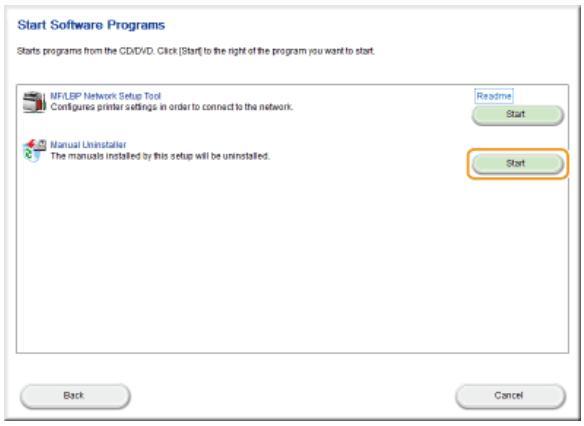
4 Click [Next].
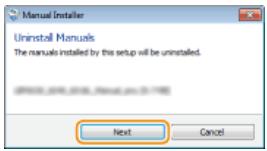

The uninstall begins.
5 Click [Exit].

Click [Back] [Exit].
![CANON LBP6040 - Click [Back] [Exit]. - 1](/content/2024/11/223505/images/d1813579ac5c5a6862d5dc49dc3b7a3035e72896e62f34175eb8dee8e96c4a1b.jpg)
![CANON LBP6040 - Click [Back] [Exit]. - 2](/content/2024/11/223505/images/cfc830fd59f500d845c8c70f64049e95b41c360da4c3fc5da0475c6f8ad5ff73.jpg)
![CANON LBP6040 - Click [Back] [Exit]. - 3](/content/2024/11/223505/images/3d02453bcaa663bbd4edbb84884608213b1ac099f84fac3fcd921a44d991d4d5.jpg)
Screen Layout of the e-Manual
The e-Manual is divided into different screens, and the content of each screen varies.
Top Page
This page appears when the e-Manual is started.
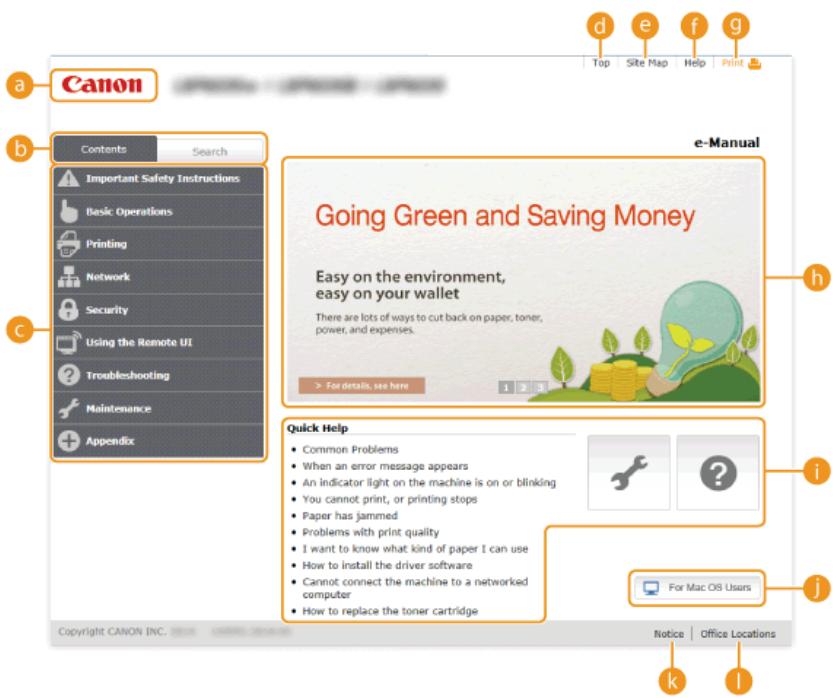
a Canon
Click to return to the top page from any other page.
[Contents] tab/[Search] tab
Click to toggle the display between the [Contents] tab and [Search] tab.
Contents
Displays the titles of chapters ( ). Place the mouse pointer over one of the titles to display the topics in that chapter on the right. Click a topic to display its page.
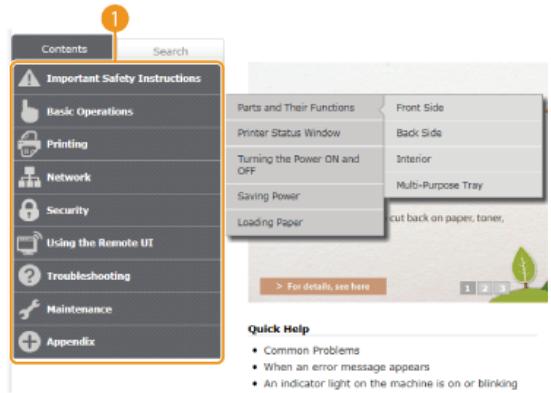
[Top]
Click to return to the top page from any other page.
[Site Map]
Click to display the titles of all e-Manual topics.
[Help]
Click to display information on how to view the e-Manual, how to perform a search, and other information.
[Print]
Click to print the currently displayed topic page.
Feature Highlights
This page provides a variety of practical examples of ways to use the machine. Click 1/2/3 to toggle the display of practical examples by category, or click the sliding display for more information about each category. The sliding display can be stopped by moving the pointer onto it. Feature Highlights
[Quick Help]/[Troubleshooting]/[Maintenance]
Click to view how to solve problems or maintain the machine.
For Mac OS Users
Click to view precautions when using Mac OS.
[Notice]
Click to view important information you should know when using the machine.
[Office Locations]
Click to display contact information for any inquiries about the machine.
Feature Highlights
This page provides a variety of practical examples of ways to use the machine.
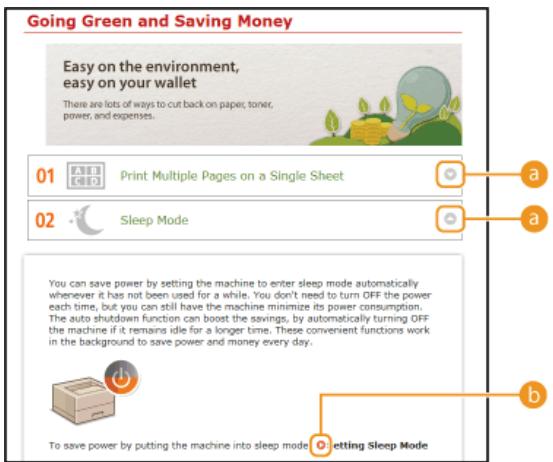
a
Click to expand the window to show the information. Click again to collapse the window.
b
Click to display the corresponding topic page.
Topic Page
Topic pages contain information about how to configure and use the machine.
Chapter icons and topic titles are displayed in this tab.

The [Contents] tab can be widened and narrowed.
[Expand All]/[Collapse All]
Click [Expand All] to display all of the subsections of all topics. Click [Collapse All] to close all of the subsections of all the topics.
Chapter icons
Click a chapter icon to navigate to the top of the corresponding chapter.
e Topics
Displays the topics of the selected chapter. If "+" is displayed on a topic, clicking it displays the subsections of that topic. Click "-" to close an expanded topic.
[Print all]
All pages of the selected chapter are opened in a separate window. You can print them as necessary.
Navigation
This shows which chapter topic you are currently viewing.

Click to return to the page top.

Click to display the previous or next topic.

Click to jump to the corresponding page. To return to the previous page, click the "Back" button on your Web browser.

Click to display hidden detailed descriptions. Click again to close the detailed descriptions.
Search Tab
This tab contains a text box to perform a search and find the page you are looking for.
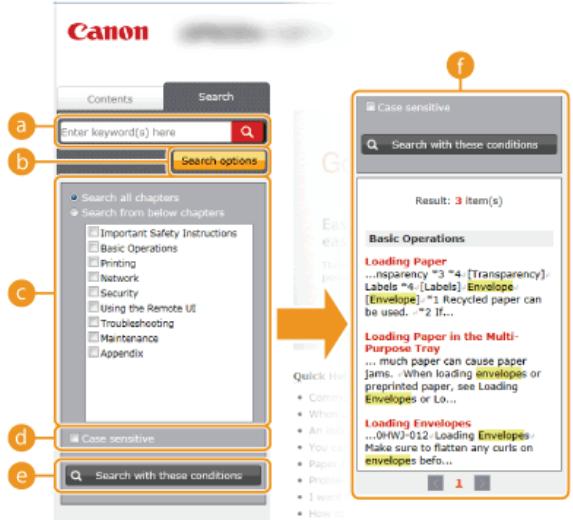
[Enter keyword(s) here]
Enter one or more keywords and click to display the search results in a results list. You can enter a phrase to find pages that contain all of the words in the phrase. To find the exact phrase, enclose it in double quotation marks.
[Search options]
Click to specify search conditions such as the scope of the search and case sensitivity.
Search scope selector
You can use this to select the individual chapters to search. This allows you to search more efficiently, when you can predict the chapters containing the topic that you are looking for.
Search options selector
Select the check box to make your search case-sensitive.
[Search with these conditions]
c and d specify the conditions. After setting them, press this to perform the search and display the results in the [Result] list.
Result list
Site Map
This page displays the titles of all topics in the e-Manual.
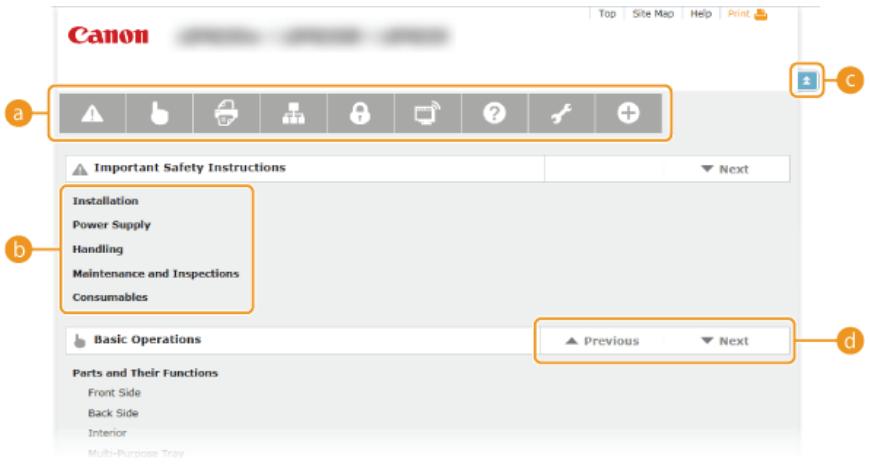
Chapter icons
Click to jump to the table of contents of the selected chapter.
Topic titles
Displays titles and topics. Click a title to jump to the corresponding topic page.
C
Click to return to the page top.
#
Click to go to the previous or next chapter.
Marks
Cautions regarding safety, restrictions and cautions regarding the handling of the machine, useful tips, and other information are indicated using the marks below.

WARNING
Indicates a warning concerning operations that may lead to death or injury to persons if not performed correctly. To use the machine safely, always pay attention to these warnings.

CAUTION
Indicates a caution concerning operations that may lead to injury to persons if not performed correctly. To use the machine safely, always pay attention to these cautions.

Indicates an operation that must not be performed. Read these items carefully, and make sure not to perform the described operations.
IMPORTANT
Indicates operational requirements and restrictions. Be sure to read these items carefully to operate the machine correctly and avoid damage to the machine or property.
NOTE
Indicates a clarification of an operation, or contains additional explanations for a procedure.
TIPS
Indicates useful functions or tips for using the machine.
Keys
Keys on the machine and buttons on the computer display are indicated with the following notations:
| Type | Example notation in the e-Manual |
| Machine key | (Paper) key |
| Buttons and other text interfaces on the computer display | [Preferences] |
Computer screens
Unless otherwise noted, displays used in the e-Manual are those for the LBP6030w. Depending on the operating system you are using, the appearance of the displays in this manual may differ slightly from the displays that you see. Also, the appearance of printer drivers and software may differ depending on their version.
Illustrations
Unless otherwise noted, illustrations used in the e-Manual are those for the LBP6030w.
Depending on the country or region, the shape of power cord plugs and AC power outlets may differ from those shown in the illustrations of the e-Manual.
Other
This section describes basic Windows operations and includes disclaimers, copyright information, and other information.
Basic Windows Operations
Displaying [Computer] or [My Computer]
Displaying the Printer Folder
Enabling [Network discovery]
Displaying Shared Printers in the Print Server
Displaying the [CD-ROM/DVD-ROM Setup] Screen
Printing a Test Page in Windows
Checking the Bit Architecture
Checking the Printer Port
Checking Bidirectional Communication
Checking the SSID to Which Your Computer Is Connected
Displaying [Computer] or [My Computer]
Windows XP/Server 2003
[Start] select [My Computer].
Windows Vista/7/Server 2008
[Start] select [Computer].
Windows 8/Server 2012
Right-click the lower-left corner of the screen select [File Explorer] [Computer] or [This PC].
Displaying the Printer Folder
Windows XP Professional/Server 2003
[Start] select [Printers and Faxes].
Windows XP Home Edition
[Start] select [Control Panel] [Printers and Other Hardware] [Printers and Faxes].
Windows Vista
[Start] select [Control Panel] [Printer].
Windows 7/Server 2008 R2
[Start] select [Devices and Printers].
Windows 8/Server 2012
Right-click the lower-left corner of the screen select [Control Panel] [View devices and printers].
Windows Server 2008
[Start] select [Control Panel] double-click [Printers].
Enabling [Network discovery]
If you are using Windows Vista/7/8/Server 2008/Server 2012, enable [Network discovery] to view the computers on your network.
Windows Vista
[Start] select [Control Panel] [View network status and tasks] under [Network discovery], select [Turn on network discovery].
Windows 7/Server 2008 R2
[Start] select [Control Panel] [View network status and tasks] [Change advanced sharing settings] under [Network discovery], select [Turn on network discovery].
Windows 8/Server 2012
Right-click the lower-left corner of the screen select [Control Panel] [View network status and tasks] [Change advanced sharing settings] under [Network discovery], select [Turn on network discovery].
Windows Server 2008
[Start] select [Control Panel] double-click [Network and Sharing Center] under [Network discovery], select [Turn on network discovery].
1 Open [Windows Explorer] or [File Explorer].
Windows XP/Vista/7/Server 2003/Server 2008
[Start] select [All Programs] or [Programs] [Accessories] [Windows Explorer].
Windows 8/Server 2012
Right-click the lower-left corner of the screen select [File Explorer].
2 Select a print server from [Network] or [My Network Places].
To check a computer on the network, you may need to enable [Network discovery] (Enabling [Network discovery]) or search for the computer on the network.
![CANON LBP6040 - Select a print server from [Network] or [My Network Places]. - 1](/content/2024/11/223505/images/a18d82d98613a46be8fce8998d8ab9e79f027a8bc7da0228423660e379e08ccc.jpg)
The shared printers are displayed.
![CANON LBP6040 - Select a print server from [Network] or [My Network Places]. - 2](/content/2024/11/223505/images/65bba8f4a88db9410677caaa7a118823a15af90868e70066965e089341726ad0.jpg)
■ Displaying the [CD-ROM/DVD-ROM Setup] Screen
If your computer does not display the [CD-ROM/DVD-ROM Setup] screen after you insert the CD-ROM/DVD-ROM, follow the procedure below. This following example uses "D:" as the name of the CD-ROM/DVD-ROM drive. The CD-ROM/DVD-ROM drive name may be different on your computer.
Windows XP/Server 2003
[Start] select [Run] enter "D:\MInst.exe" click [OK].
Windows Vista/7/Server 2008
[Start] enter "D:\MInst.exe" in [Search programs and files] or [Start Search] press the [ENTER] key on the keyboard.
Windows 8/Server 2012
Right-click the lower-left corner of the screen select [Run] enter "D:\MInst.exe" click [OK].
■ Printing a Test Page in Windows
You can check whether the printer driver is operational by printing a test page in Windows.
1 Load A4 size paper in the multi-purpose tray. Loading Paper in the Multi-Purpose Tray
2 Display the printer folder. 品 Displaying the Printer Folder
3 Right-click the icon of the machine and click [Printer properties] or [Properties].

4 In the [General] tab, click [Print Test Page].
![CANON LBP6040 - In the [General] tab, click [Print Test Page]. - 1](/content/2024/11/223505/images/efdc8cd0ecc3b8998e6945354ca59756229493eded50301a2674ed4f80a0b782.jpg)
![CANON LBP6040 - In the [General] tab, click [Print Test Page]. - 2](/content/2024/11/223505/images/ba9cec433e51ce88e639f6d4d5e8159e34453dda70ed1ea423dfe4ae7554201b.jpg)
Windows prints the test page.
Checking the Bit Architecture
If you are not sure whether your computer is running 32-bit or 64-bit Windows, follow the procedure below to check.
1 Display [Control Panel].
Windows Vista/7/Server 2008
[Start] select [Control Panel].
Windows 8/Server 2012
Right-click the lower-left corner of the screen select [Control Panel].
2 Display [System].
Windows Vista/7/8/Server 2008 R2/Server 2012
Click [System and Security] or [System and Maintenance] [System].
Windows Server 2008
Double-click [System].
3 Check the bit architecture.
32-bit operating systems
[32-bit Operating System] is displayed.
64-bit operating systems
[64-bit Operating System] is displayed.
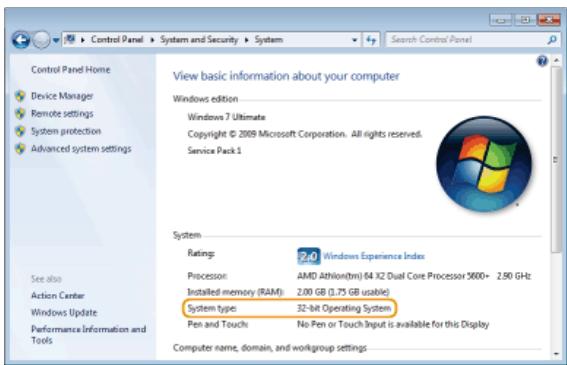
Checking the Printer Port
1 Display the printer folder. Displaying the Printer Folder
2 Right-click the icon of the machine and click [Printer properties] or [Properties].
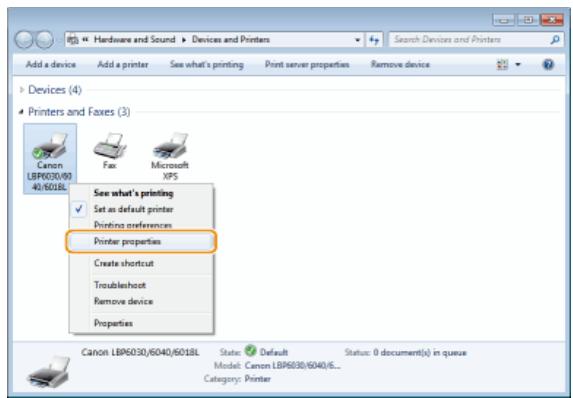
3 In the [Ports] tab, check that the port is selected correctly.
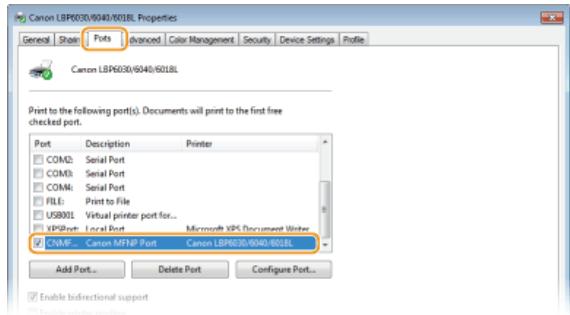
NOTE
If you are using a network connection and have changed the machine's IP address (LBP6030w)
If the [Description] of the selected port is [Canon MFNP Port], and the machine and the computer are on the same subnet, then the connection will be maintained. You do not need to add a new port. If it is [Standard TCP/IP Port], you need to add a new port. Configuring Printer Ports
Checking Bidirectional Communication
1 Display the printer folder. Displaying the Printer Folder
2 Right-click the icon of the machine and click [Printer properties] or [Properties].
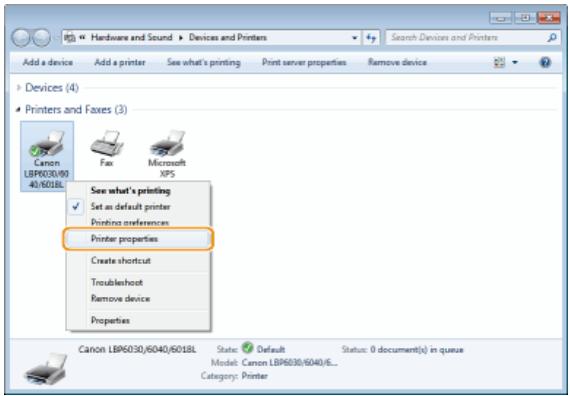
3 In the [Ports] tab, check that the [Enable bidirectional support] check box is selected.
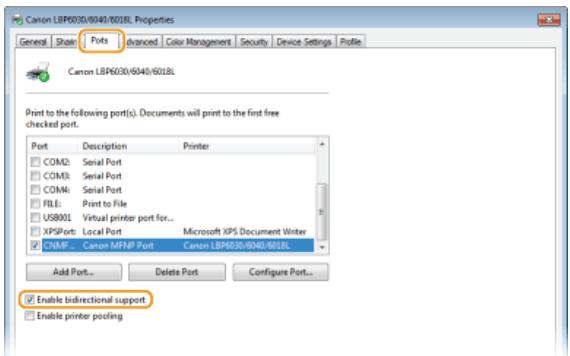
■ Checking the SSID to Which Your Computer Is Connected
If your computer is connected to a wireless LAN network, click or in the system tray to display the SSID of the connected wireless LAN router.
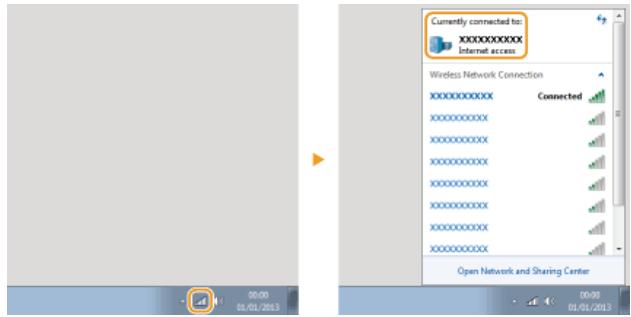
For Mac OS Users
Your machine may have not come with a driver for Mac OS depending on when you purchased the machine. The drivers are uploaded to the Canon website when they become needed. Check the operating system of your computer and download the appropriate driver from the Canon website. For the driver installation procedure and how to operate the driver, see the "Printer Driver Guide for Macintosh."
In the e-Manual and Printer Driver Installation Guide, methods to operate in the Windows environment are explained as examples. To view how to use the driver and utility for Mac OS, see the following guide or help.
| Object | Reference |
| Installing the driver | Printer Driver Guide for Macintosh |
| How to use the driver functions | Driver Help |
Displaying the Driver Guide
Double-click the following HTML file in the [SFP] folder on the supplied CD-ROM/DVD-ROM.
Printer Driver Guide for Macintosh
[SFP] - [Documents] - [XXXXXX]* - [GUIDE] - [index.html]
- For [XXXXXX], select your desired language.
Displaying the Driver Help
Click [?] on the driver.
Third Party Services and Software
Third Party Software (PDF)
You need Adobe Reader/Adobe Acrobat Reader to view files in the PDF format. If Adobe Reader/Adobe Acrobat Reader is not installed on your system, download the reader from the Adobe System's web site and install it.
Product Name
Safety regulations require the product's name to be registered.
In some regions where this product is sold, the following name(s) in parentheses ( ) may be registered instead.
LBP6030w / LBP6030B / LBP6030 (F166400)
EMC requirements of EC Directive
This equipment conforms with the essential EMC requirements of EC Directive. We declare that this product conforms with the EMC requirements of EC Directive at nominal mains input 230V , 50Hz although the rated input of the product is 220 to 240V , 50/60Hz . Use of shielded cable is necessary to comply with the technical EMC requirements of EC Directive.
Laser Safety
This product is certified as a Class 1 laser product under IEC60825-1:2007 and EN60825-1:2007. This means that the product does not produce hazardous laser radiation.
Since radiation emitted inside the product is completely confined within protective housings and external covers, the laser beam cannot escape from the machine during any phase of user operation. Do not remove protective housings or external covers, except as directed by the equipment's manuals.
The label shown below is attached to the laser scanner unit inside the machine.
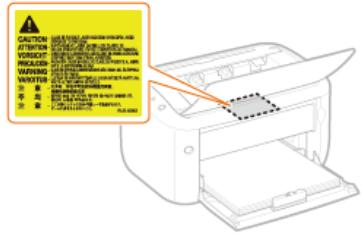
CLASS 1 LASER PRODUCT
LASER KLASSE 1
APPAREIL À LASER DE CLASSE 1
APPARECCHIO LASER DI CLASSE 1
PRODUCTO LAsER DE CLASE 1
APARELHO A LASER DE CLASSE 1
LUOKAN 1 LASER-TUOTE
LASERPRODUKT KCLASS 1
CAUTION
Use of controls, adjustments, or performance of procedures other than those specified in this manual may result in hazardous radiation exposure.

As an ENERGY STAR® Partner, Canon Inc. has determined that this product meets the ENERGY STAR Program for energy efficiency.
The International ENERGY STAR Office Equipment Program is an international program that promotes energy saving through the use of computers and other office equipment.
The program backs the development and dissemination of products with functions that effectively reduce energy consumption. It is an open system in which business proprietors can participate voluntarily.
The targeted products are office equipment, such as computers, displays, printers, facsimiles, and copiers. The standards and logos are uniform among participating nations.
WEEE Directive

Only for European Union and EEA (Norway, Iceland and Liechtenstein)
This symbol indicates that this product is not to be disposed of with your household waste, according to the WEEE Directive (2012/19/EU) and national legislation. This product should be handed over to a designated collection point, e.g., on an authorized one-for-one basis when you buy a new similar product or to an authorized collection site for recycling waste electrical and electronic equipment (EEE). Improper handling of this type of waste could have a possible negative impact on the environment and human health due to potentially hazardous substances that are generally associated with EEE. At the same time, your cooperation in the correct disposal of this product will contribute to the effective usage of natural resources. For more information about where you can drop off your waste equipment for recycling, please contact your local city office, waste authority, approved WEEE scheme or your household waste disposal service. For more information regarding return and recycling of WEEE products, please visit www.canon-europe.com/weee.
IPv6 Ready Logo

The protocol stack included in this machine has obtained the IPv6 Ready Logo Phase-1 established by the IPv6 Forum.
■ Product Information required by COMMISSION REGULATION (EU) No 801/2013 amending Regulation (EC) No 1275/2008
Power consumption of the product in networked standby if wired network ports are connected and all wireless network ports are activated (if they are available at the same time).
| Model Name | Power consumption of the product in networked standby |
| LBP6030w | 1.6 W |
NOTE
The above value(s) are the actual values for single machine, chosen arbitrarily, and may therefore vary from the value of the machine in use. Optional network ports are not connected and/or activated in the measurement.
Legal Limitations on the Usage of Your Product and the Use of Images
Using your product to scan, print or otherwise reproduce certain documents, and the use of such images as scanned, printed or otherwise reproduced by your product, may be prohibited by law and may result in criminal and/or civil liability. A non-exhaustive list of these documents is set forth below. This list is intended to be a guide only. If you are uncertain about the legality of using your product to scan, print or otherwise reproduce any particular document, and/or of the use of the images scanned, printed or otherwise reproduced, you should consult in advance with your legal advisor for guidance.
Paper Money
Travelers Checks
Money Orders
Food Stamps
Certificates of Deposit
Passports
Postage Stamps (canceled or uncanceled)
Immigration Papers
Identifying Badges or Insignias
Internal Revenue Stamps (canceled or uncanceled)
Selective Service or Draft Papers
Bonds or Other Certificates of Indebtedness
- Checks or Drafts Issued by Governmental Agencies
Stock Certificates
Motor Vehicle Licenses and Certificates of Title
Copyrighted Works/Works of Art without Permission of Copyright Owner
■ Wireless LAN Regulatory Information LBP6030w
Regulatory information
Users in the European Union and other European countries
LBP6030w includes Wireless LAN Module (Model name: AW-NM383).
This device complies with the essential requirements of the R&TTE Directive 1999/5/EC.
R&TTE Declaration of Conformity (Wireless LAN Module)
C
| Česky [Czech] | Společnost CANON INC. tímtó prohlásuje, ze zařizení AW-NM383 je v souladu se základním i požadavya a dalísmi príslušnými ustanoveními směrnice 1999/5/ES. |
| Dansk [Danish] | Undertegnede CANON INC. erklær herved, at AW-NM383 overholder de væsentlige krav og øvrige relevante krav i direktiv 1999/5/EF. |
| Deutsch [German] | Hiermit erklart CANON INC., dass sich das Gerät AW-NM383 in Übereinstimmung mit den grundlegenden Anforderungen und den übrigen einschlögigen Bestimmungen der Richtlinie 1999/5/EG befindet. |
| Eesti [Estonian] | Käesolevaga kinnitab CANON INC. seadme AW-NM383 vastavust direktivi 1999/5/EÜ olulistele nõuetele ja muudele asjakohastele sätetele. |
| English | Hereby, CANON INC., declares that AW-NM383 is in compliance with the essential requirements and other relevant provisions of Directive 1999/5/EC. |
| Espanol [Spanish] | Por medio de la presente CANON INC. declara que el AW-NM383 cumple con los requisitos esencias y cualesquiera除外 dispositions aplicables o exigibles de la Directiva 1999/5/CE. |
| Eλληνική [Greek] | Με την παρούσα, η CANON INC., δηλώνει ὄτι Μουντέλo AW-NM383 συμρόρώνεται πος τις ὅωπιώδεις ἀπαίŋσεις και τις λοιπές σχετικές διατάξεις τις Εθηγίας 1999/5/EK. |
| François [French] | Par laprésente, CANON INC. déclare que l'appareil AW-NM383 est conforme aux exigences essentielles et aux autres dispositions pertinentes de la directive 1999/5/CE. |
| Italiano [Italian] | Con la presente CANON INC. dichiarare che AW-NM383 è conforme ai requisiti essenziali ed alle autres disposizioni pertinenti stabilite alla direttiva 1999/5/CE. |
| Latviski [Latvian] | Ar šo CANON INC. deklarē, ka AW-NM383 atbilst Direktīvas 1999/5/EK būtiskajām prisibām un citiem ar to saistītajiem noteikumiem. |
| Lietuviç [Lithuanian] | Šiuo bendrové „CANON INC.” deklaruoja, kad AW-NM383 atitinka pagrindinius Direktyvoje 1999/5/EB išděstasyts reikalavimus irKitasJosnuostatas. |
| Nederlands [Dutch] | Hierbij verklaart CANON INC. dat AW-NM383 in overeenstemming is met de essentièle eisen en de andere relevante bepalingen vanrichtlijn 1999/5/EG. |
| Malti [Maltese] | Hawnhekk, CANON INC., jiddikjara li I-AW-NM383 jikkonforma mal-htigijet essenzjali u ma' dispożizzjonijiet relevanti ohra tad-Direttiva 1999/5/KE. |
| Magyar [Hungarian] | Alulírott CANON INC. nyilatkozom, hogy a AW-NM383 megfelel a vonatkoźó alapvető követelényeknek és az 1999/5/EC irányelv egyeb előirásainak. |
| Polski [Polish] | Niniejszym CANON INC. oswiadzca, ze model AW-NM383 jest zgodny z zasadniczymi wymogami oraz pozostalymi stosownymi postanowieniami Dyrektywy 1999/5/EC. |
| Portuguès [Portuguese] | Por este documento, a CANON INC. declara que o AW-NM383 está em conformidade com os requisitos essenciais e除外 dispositions relevantes da Diretiva 1999/5/CE. |
| Slovenskina [Slovenian] | Družba CANON INC. izjavlja, da je tiskalnik AW-NM383 skladni z bistvenimi zahévevami in ostalimi relevantnimi dolovi direktive 1999/5/ES. |
| Slovensky [Slovak] | CANON INC. támto vyhlasuje, ze AW-NM383 splína základné požiadavyká a věsetky príslušné ustanovenia Smernice 1999/5/ES. |
| Suomi [Finnish] | CANON INC. vakuuttaa täten, etta AW-NM383 -laite on direktivin 1999/5/ EY oleellisten vaatimusten ja sitä koskevien direktivin muiden ehtojen mukainen. |
| Svenska [Swedish] | Härmed intygar CANON INC. attenna AW-NM383 står i överensstättelse med deväsentliga egenskapskrav och övriga relevanta bestämelseer som framgår av direktiv 1999/5/EG. |
| Romānă [Romanian] | Prin prezenta, CANON INC., declară faptul că aparatul AW-NM383 este în conformitate cu cerințele esentiale și cu alte prevederi relevante incluse în Directiva 1999/5/CE. |
| Български еzieк [Bulgarian] | С nauseюшемо CANON INC. Декларupa, che AW-NM383 отrogая на сь自由贸易пейни здения и дугите пленожими защеба на Директува 1999/5/EC. |
| Íslenska [Icelandic] | Héri með lýsjir CANON INC. bví yfir að AW-NM383 sé,i samræmi við grunnkröfur og aðrar kröfur, sem gerðar eru;i tilskipun 1999/5/EC. |
| Norsk [Norwegian] | CANON INC. erklær herved at utstyret AW-NM383 er i samsvar med de grunnleggende krav og övrige relevante krav i direktiv 1999/5/EF. |
| Gaeilge [Irish] | Dearbáionn CANON INC. leis seo go gcloíonn AW-NM383 le ceanglais riachtanacha agus le forálacha ábhartha eile na Treorach 1999/5/CE. |
| Česky [Czech] | * Toto zařízení môme běyt provozováno na území AT, BE, BG, CH, CY, CZ, DE, DK, EE, ES, FI, FR, GB, GR, HU, IE, IS, IT, LI, LT, LU, LV, MT, NL, NO, PL, PT, RO, SE, SI, SK. |
| Dansk [Danish] | * Dette produkt má anwendes i AT, BE, BG, CH, CY, CZ, DE, DK, EE, ES, FI, FR, GB, GR, HU, IE, IS, IT, LI, LT, LU, LV, MT, NL, NO, PL, PT, RO, SE, SI, SK. |
| Deutsch [German] | * Dieses Gerät darf in folgenden Ländern betrieben werden AT, BE, BG, CH, CY, CZ, DE, DK, EE, ES, FI, FR, GB, GR, HU, IE, IS, IT, LI, LT, LU, LV, MT, NL, NO, PL, PT, RO, SE, SI, SK. |
| Eesti [Estonian] | * Seda seadet võib kasutada AT, BE, BG, CH, CY, CZ, DE, DK, EE, ES, FI, FR, GB, GR, HU, IE, IS, IT, LI, LT, LU, MT, NL, NO, PL, PT, RO, SE, SI, SK. |
| English | * This equipment may be operated in AT, BE, BG, CH, CY, CZ, DE, DK, EE, ES, FI, FR, GB, GR, HU, IE, IS, IT, LI, LT, LU, LV, MT, NL, NO, PL, PT, RO, SE, SI, SK. |
| Espanol [Spanish] | * Este equipo可以选择 ser utiliser en AT, BE, BG, CH, CY, CZ, DE, DK, EE, ES, FI, FR, GB, GR, HU, IE, IS, IT, LI, LT, LU, LV, MT, NL, NO, PL, PT, RO, SE, SI, SK. |
| François [French] | * Cet équipement peut être utilisable en AT, BE, BG, CH, CY, CZ, DE, DK, EE, ES, FI, FR, GB, GR, HU, IE, IS, IT, LI, LT, LU, LV, MT, NL, NO, PL, PT, RO, SE, SI, SK. |
| Italiano [Italian] | * Questo dispositivo pouë essereutilizzato in AT, BE, BG, CH, CY, CZ, DE, DK, EE, ES, FI, FR, GB, GR, HU, IE, IS, IT, LI, LT, LU, LV, MT, NL, NO, PL, PT, RO, SE, SI, SK. |
| Latviski [Latvian] | * Šо apríkobjumu dríkst lietot AT, BE, BG, CH, CY, CZ, DE, DK, EE, ES, FI, FR, GB, GR, HU, IE, IS, IT, LI, LT, LU, LV, MT, NL, NO, PL, PT, RO, SE, SI, SK. |
| Lietuviu [Lithuanian] | * Ši jirengini galima eksploatuoti AT, BE, BG, CH, CY, CZ, DE, DK, EE, ES, FI, FR, GB, GR, HU, IE, IS, IT, LI, LT, LU, LV, MT, NL, NO, PL, PT, RO, SE, SI, SK. |
| Nederlands [Dutch] | * Deze apparatuur kan worden gebruikt in de volgende landen AT, BE, BG, CH, CY, CZ, DE, DK, EE, ES, FI, FR, GB, GR, HU, IE, IS, IT, LI, LT, LU, LV, MT, NL, NO, PL, PT, RO, SE, SI, SK. |
| Suomi [Finnish] | * Laitetta voidaan käytäa saaraavassa maassa AT, BE, BG, CH, CY, CZ, DE, DK, EE, ES, FI, FR, GB, GR, HU, IE, IS, IT, LI, LT, LU, LV, MT, NL, NO, PL, PT, RO, SE, SI, SK. |
| Malti [Maltese] | * Dan l-apparat jista' jintuza f' AT, BE, BG, CH, CY, CZ, DE, DK, EE, ES, FI, FR, GB, GR, HU, IE, IS, IT, LI, LT, LU, MT, NL, NO, PL, PT, RO, SE, SI, SK. |
| Magyar [Hungarian] | * Ez a keszülék AT, BE, BG, CH, CY, CZ, DE, DK, EE, ES, FI, FR, GB, GR, HU, IE, IS, IT, LI, LT, LU, MT, NL, NO, PL, PT, RO, SE, SI, SK. |
| Polski [Polish] | * To urzadzeniemöme byc eksploatowane w AT, BE, BG, CH, CY, CZ, DE, DK, EE, ES, FI, FR, GB, GR, HU, IE, IS, IT, LI, LT, LU, MT, NL, NO, PL, PT, RO, SE, SI, SK. |
| Português [Portuguese] | * Este equipamento pode ser utilizesdo em AT, BE, BG, CH, CY, CZ, DE, DK, EE, ES, FI, FR, GB, GR, HU, IE, IS, IT, LI, LT, LU, LV, MT, NL, NO, PL, PT, RO, SE, SI, SK. |
| Slovenskina [Slovenian] | * To opre mo je dovoljeno uporabljati v AT, BE, BG, CH, CY, CZ, DE, DK, EE, ES, FI, FR, GB, GR, HU, IE, IS, IT, LI, LT, LU, MT, NL, NO, PL, PT, RO, SE, SI, SK. |
| Slovensky [Slovak] | * Toto zariadeniemöme byc použivané na území AT, BE, BG, CH, CY, CZ, DE, DK, EE, ES, FI, FR, GB, GR, HU, IE, IS, IT, LI, LT, LU, MT, NL, NO, PL, PT, RO, SE, SI, SK. |
| * Upozornenie k použivaniu tohvo tvrobku.Francúsko: Tento výrobok sa nesmie používať vonku. | |
| Еληνική [Greek] | * To napóν πορον μηρείνα χρησιμοιοιηθεί στην AT, BE, BG, CH, CY, CZ, DE, DK, EE, ES, FI, FR, GB, GR, HU, IE, IS, IT, LI, LT, LU, LV, MT, NL, NO, PL, PT, RO, SE, SI, SK. |
| Svenska [Swedish] | * Den har ultrustningen kanske fungerar i AT, BE, BG, CH, CY, CZ, DE, DK, EE, ES, FI, FR, GB, GR, HU, IE, IS, IT, LI, LT, LU, LV, MT, NL, NO, PL, PT, RO, SE, SI, SK. |
| Româna [Romanian] | * Acest echipament poate fi operat in AT, BE, BG, CH, CY, CZ, DE, DK, EE, ES, FI, FR, GB, GR, HU, IE, IS, IT, LI, LT, LU, LV, MT, NL, NO, PL, PT, RO, SE, SI, SK. |
| Български еMMC [Bulgarian] | * Това оборудане може за сеизюлзв в AT, BE, BG, CH, CY, CZ, DE, DK, EE, ES, FI, FR, GB, GR, HU, IE, IS, IT, LI, LT, LU, LV, MT, NL, NO, PL, PT, RO, SE, SI, SK. |
| Íslenska [Icelandic] | * Viðgerð á pessu tæki má annast á AT, BE, BG, CH, CY, CZ, DE, DK, EE, ES, FI, FR, GB, GR, HU, IE, IS, IT, LI, LT, LU, LV, MT, NL, NO, PL, PT, RO, SE, SI, SK. |
| Norsk [Norwegian] | * Detteprodukт мå anwendes i AT, BE, BG, CH, CY, CZ, DE, DK, EE, ES, FI, FR, GB, GR, HU, IE, IS, IT, LI, LT, LU, LV, MT, NL, NO, PL, PT, RO, SE, SI, SK. |
| Gaeilge [Irish] | * Féadfar an trealamh seo a fheidhmiú in AT, BE, BG, CH, CY, CZ, DE, DK, EE, ES, FI, FR, GB, GR, HU, IE, IS, IT, LI, LT, LU, LV, MT, NL, NO, PL, PT, RO, SE, SI, SK. |
Regulatory information for users in Jordan
LBP6030w includes approved Wireless LAN Module (Model name: AW-NM383).
Contains Wireless LAN Module approved by TRC/SS/2014/38
Regulatory information for users in UAE
LBP6030w includes approved Wireless LAN Module (Model name: AW-NM383).
TRA
REGISTERED No: ER0126617/14
DEALER No: DA0060877/11
■ Disclaimers
The information in this document is subject to change without notice.
CANON INC. MAKES NO WARRANTY OF ANY KIND WITH REGARD TO THIS MATERIAL, EITHER EXPRESS OR IMPLIED, EXCEPT AS PROVIDED HEREIN, INCLUDING WITHOUT LIMITATION, THEREOF, WARRANTY AS TO MARKETABILITY, MERCHANTIBILITY, FITNESS FOR A PARTICULAR PURPOSE OF USE OR NON-INFRINGEMENT. CANON INC. SHALL NOT BE LIABLE FOR ANY DIRECT, INCIDENTAL, OR CONSEQUENTIAL DAMAGES OF ANY NATURE, OR LOSSES OR EXPENSES RESULTING FROM THE USE OF THIS MATERIAL.
Copyright
Copyright CANON INC. 2014
No part of this publication may be reproduced, transmitted, transcribed, stored in a retrieval system, or translated into any language or computer language in any form or by any means, electronic, mechanical, magnetic, optical, chemical, manual, or otherwise, without the prior written permission of Canon Inc.
Trademarks
Apple, AppleTalk, EtherTalk, LocalTalk, Mac, Mac OS, Safari, and Bonjour are trademarks of Apple Inc., registered in the U.S. and other countries.
Microsoft, Windows, Windows Vista, Windows Server and Internet Explorer are either registered trademarks or trademarks of Microsoft Corporation in the United States and/or other countries.
All other product and brand names are registered trademarks, trademarks or service marks of their respective owners.
Office Locations
CANON INC.
30-2, Shimomaruko 3-chome, Ohta-ku, Tokyo 146-8501, Japan
One Canon Park, Melville, NY 11747, U.S.A.
CANON EUROPA N.V.
Bovenkerkerweg 59, 1185 XB Amstelveen, The Netherlands
15F Jinbao Building No.89, Jinbao Street, Dongcheng District, Beijing 100005, PRC
CANON SINGAPORE PTE LTD
1 HarbourFront Avenue, #04-01 Keppel Bay Tower, Singapore 098632
CANON AUSTRALIA PTY LTD
1 Thomas Holt Drive, North Ryde, Sydney NSW 2113, Australia
CANON GLOBAL WORLDWIDE SITES
http://www.canon.com/
LBP6030w / LBP6030B / LBP6030 Printer Driver Installation Guide
Introduction 3
System Requirements 4
Installing 5
Installing from the Supplied CD-ROM/DVD-ROM 6
Installing after Downloading from the Canon Website 13
Installing to Use WSD 17
Setting Up a Print Server 22
Configuring Settings on the Print Server Computer 23
Installing Drivers via the Print Server (Client Settings) 26
Updating and Uninstalling 27
Updating 28
Uninstalling 30
Troubleshooting 33
36
Appendix 38
Connecting the Printer to a Computer 39
Connecting via Wireless LAN 40
Connecting via USB 42
MF/LBP Network Setup Tool 43
Using the Installation Guide 45
Screen Configuration of the Installation Guide 46
Viewing the Installation Guide 49
Other 50
Basic Windows Operations 51
Notice 53
Introduction
This Installation Guide mainly explains how to install a printer driver and how to set up a print server.
NOTE
System requirements for installation of printer drivers System Requirements
■ Installing
This section explains how to install a printer driver and how to set up the printer so that it is ready to print. Installing
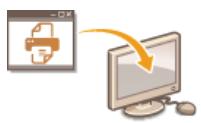
Setting Up a Print Server
This section explains how to set up a print server on the network, and how to install printer drivers on client computers via the print server. Setting Up a Print Server
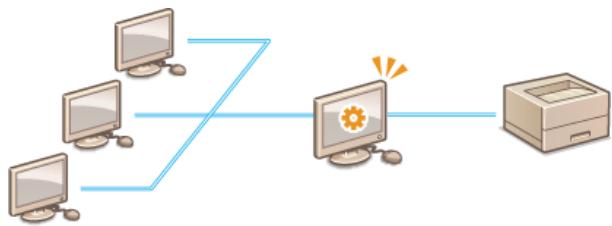
Updating and Uninstalling
This section explains how to update and uninstall printer drivers. Updating and Uninstalling
Troubleshooting
This section explains how to resolve problems that may occur during printer driver installation. Troubleshooting
Appendix
This section explains how to connect the printer to a computer, and how to start the MF/LBP Network Setup Tool manually. It also explains how to use the Installation Guide and provides other useful information. Appendix

System Requirements
The following system environment is required to install printer drivers.
| OS | Windows XP Windows Vista Windows 7 Windows 8 Windows 8.1 Windows Server 2003 Windows Server 2008 Windows Server 2008 R2 (64-bit version only) Windows Server 2012 (64-bit version only) Windows Server 2012 R2 (64-bit version only) |
| Computer | A computer running one of the above operating systems |
NOTE
For information about support for the latest operating systems and service packs, visit the Canon website (http://www.canon.com/).
Installing
This section explains how to install a printer driver on your computer and how to set up the printer so that it is ready to print. The printer driver is software that you need to use the printer. Read this section and install the printer driver correctly.
■ Installing from the Supplied CD-ROM/DVD-ROM
Install the printer driver from the User Software CD-ROM/DVD-ROM that is supplied with the printer. Perform the setup procedure, from connecting the printer and your computer to installation of the printer driver. Installing from the Supplied CD-ROM/DVD-ROM
■ Installing after Downloading from the Canon Website
The latest printer driver versions are available for downloading from the Canon website. Download a printer driver if, for example, the drivers on the CD-ROM/DVD-ROM do not support the operating system of your computer. Installing after Downloading from the Canon Website

NOTE
Adding a WSD Network Printer
If you are using Windows Vista/7/8/Server 2008/Server 2012, you can use WSD (Web Services on Devices) to add a network printer. Installing to Use WSD
Installing from the Supplied CD-ROM/DVD-ROM
The order of operations in an Easy Installation is "Configure network settings" "Install the printer driver" "Install the e-Manual." If you are connecting the printer and a computer via wireless LAN, read Things to Check before Starting before starting.
1 If you are making a USB connection, turn OFF the printer.
The printer may not be recognized if you install the printer driver with the printer turned ON. Always turn OFF the power before installing.
2 Log on to the computer with an administrator account.
3 Insert the User Software CD-ROM/DVD-ROM into the drive on the computer.
4 Click [Easy Installation].
![CANON LBP6040 - Click [Easy Installation]. - 1](/content/2024/11/223505/images/2faacae3fd971cf8297d49d9d3888e90a53134026b980192f47ac2a1a414a823.jpg)
NOTE:
If you do not want to install the e-Manual on your computer, click [Custom Installation].
If the above screen does not appear Displaying the [CD-ROM/DVD-ROM Setup] Screen
If [AutoPlay] is displayed, click [Run MInst.exe].
5 Click [Install].
![CANON LBP6040 - Click [Install]. - 1](/content/2024/11/223505/images/ab4d10f5b9860a2ef4d2e5aa2b7e8e4b1af9b229c52870236f83ff603b4e26ba.jpg)
NOTE:
If you clicked [Custom Installation] in step 4
Clear the [e-Manual] check box, and click [Install].
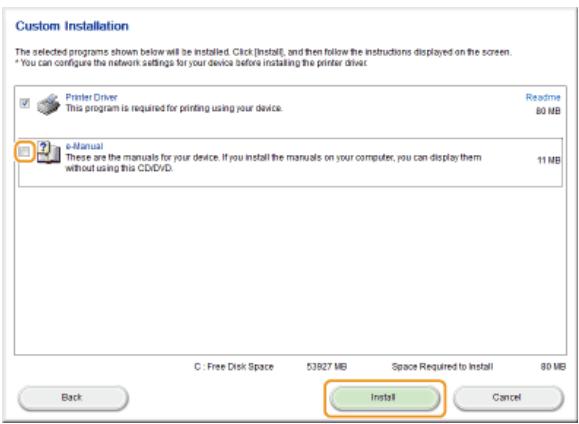
6 Read the License Agreement and click [Yes] to agree.
![CANON LBP6040 - Read the License Agreement and click [Yes] to agree. - 1](/content/2024/11/223505/images/28f4de9182105ce2324bb2aceb3fdcc62c09b9f4ed7669522ff8ec2d4379bac8.jpg)
7 Configure the network settings.
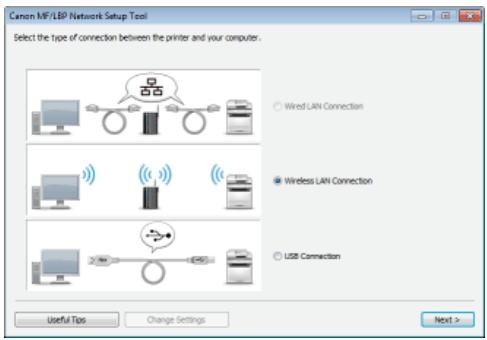
Wireless LAN Connection
1 Select [Wireless LAN Connection], and click [Next].
2 Follow the on-screen instructions to configure the network settings.
NOTE:
If there is something you do not understand
Click [Useful Tips] at the bottom left of the screen to display troubleshooting tips.
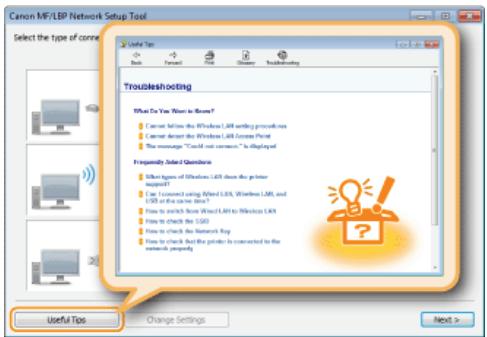
USB Connection
1 Select [USB Connection], and click [Next].
2 Click [Next].
8 Install the printer driver.
Wireless LAN Connection
1 Select [Standard], select the [Reactivate Printers in the Sleep Mode and Search] check box, and click [Next].
- If you are using the printer in an IPv6 environment, click [Detailed Settings] select [Standard TCP/IP Port] click [OK].
![CANON LBP6040 - Select [Standard], select the [Reactivate Printers in the Sleep Mode and Search] check box, and click [Next]. - 1](/content/2024/11/223505/images/63da4b87c2045ad3317350ebf40fbf9327f5121fecb22b5f91c00ca698d97338.jpg)
NOTE:
About [Detailed Settings] You can select the port type
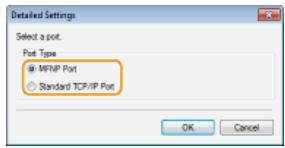
[MFNP Port] (only for IPv4 environment)
This is a port that enables automatic detection of the printer's IP address. Even if the IP address of the printer is changed, the connection between the printer and computer will be maintained, provided that they belong to the same subnet. Therefore, you do not need to add a new port every time the IP address is changed. If you are using the printer in an IPv4 environment, choose this setting.
[Standard TCP/IP Port]
This is a standard Windows port. Whenever the IP address of the printer is changed, a new port must be added.
2 Select check box for the printer that you want to install from the [Printer List].
If you want to use the printer in an IPv6 environment, click the [IPv6 Devices] tab.
![CANON LBP6040 - Select check box for the printer that you want to install from the [Printer List]. - 1](/content/2024/11/223505/images/893ee0f605f7b7a1b56c73b3e4c40cb7aacf334dda19efe705e8b8f4468d3d02.jpg)
NOTE:
If the [Select Process] screen is displayed
If a printer driver is already installed, the [Select Process] screen is displayed before the [Select Printers to Install] screen. For your printer, the selection made here makes no difference for the setup process. Simply click [Next].
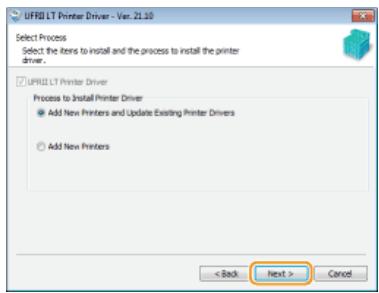
If the [IPv6 Devices] tab is not displayed
Return to the previous screen, and click [Detailed Settings] select [Standard TCP/IP Port].
If the printer that you want does not appear in [Printer List]
Problems with the Wireless LAN Connection
3 Select the [Set Printer Information] check box, and click [Next].
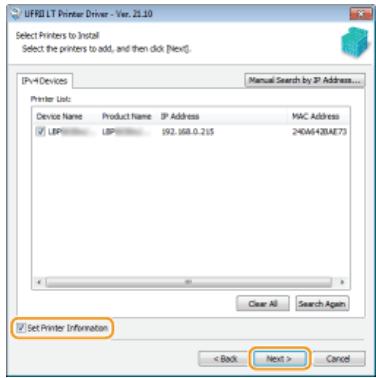
4 Set the printer information as necessary, and click [Next].
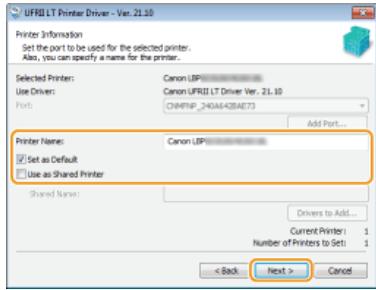
[Printer Name]
Change the printer name as necessary.
[Set as Default]
Select the check box if you want to use your printer as your default printer.
[Use as Shared Printer]
Select the check box if you want to share the printer (using the computer where you are performing the installation as a print server). Setting Up a Print Server during Printer Driver Installation
5 Check the printer information in [Printer List for Driver Installation], and click [Start].
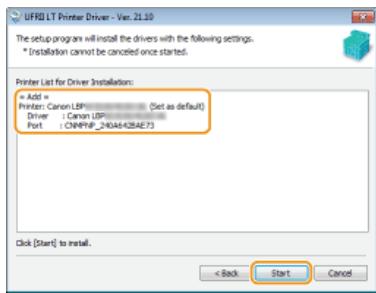
Installation of the printer driver starts.
1 Select [USB Connection], and click [Next].
![CANON LBP6040 - Select [USB Connection], and click [Next]. - 1](/content/2024/11/223505/images/d463501fd64a3dfb9b3d896716ed8369b11960a76ee750c2ac83a9d4b8903e17.jpg)
2 Click [Yes].
![CANON LBP6040 - Click [Yes]. - 1](/content/2024/11/223505/images/9411dcd5c553734b99542087efdea6145ca874f4b42ff6a12dbb43cf0bd6f0e9.jpg)
3 When the following screen appears, connect the computer and the printer with a USB cable (Connecting via USB), and turn ON the printer.

Installation of the printer driver starts.
NOTE:
If installation does not start Problems with the USB Connection
9 Install the e-Manual.
If you selected [Custom Installation], proceed to step 10.
1 Click [Install].
If you want to change the install destination, click [Browse] and select it.
![CANON LBP6040 - Click [Install]. - 1](/content/2024/11/223505/images/cf975b95f17a35169443fd72d8a55199a1155d4835bf86d04611ae4a58fafa66.jpg)
Installation of the e-Manual starts.
2 Click [Exit].
![CANON LBP6040 - Click [Exit]. - 1](/content/2024/11/223505/images/98dd2f91acc75b3fa23748fe854ea27f782898b3bfd925c68b997e168eb1cbc1.jpg)
10 Read the information in the following screen carefully, select [Accept] or [Do Not Accept], and click [Next].
![CANON LBP6040 - Click [Exit]. - 2](/content/2024/11/223505/images/681977eb3c48b1f708025fe978fa480b1d2682cf324f5ef27dd37cf76a61b359.jpg)
If you select [Accept], the Product Extended Survey Program is installed.
The Product Extended Survey Program is a program to send basic information related to installation and usage of the printer to Canon every month for 10 years. It does not send any other information, including your personal information. You can uninstall the Product Extended Survey Program at any time. Uninstalling the Product Extended Survey Program
11 Click [Next].
![CANON LBP6040 - Click [Next]. - 1](/content/2024/11/223505/images/9d3afca9c016ffa0f827d095e1ddc2e230d65416d050375eec05f781ef323718.jpg)
12 Select the [Restart Computer Now (Recommended)] check box, and click [Restart].
![CANON LBP6040 - Select the [Restart Computer Now (Recommended)] check box, and click [Restart]. - 1](/content/2024/11/223505/images/aa1e430bdab19a509b4390c17888c5c469ce4c663cacf9535b667c7e9cab5cfe.jpg)
■ Checking the Results of the Installation
If the printer driver has been installed correctly, an icon for the installed printer will be displayed in the printer folder (Displaying the Printer Folder).
If the e-Manual has been installed correctly, a shortcut icon for the e-Manual will be displayed on the desktop.
- However, the icon is not displayed if you selected [Custom Installation].

LBP
Manual
NOTE
If the icon is not displayed
Uninstall the printer driver (Uninstalling Printer Drivers) and repeat the setup from the beginning.
Installing after Downloading from the Canon Website
Install the printer driver after downloading the latest version from the Canon website.
1 Log on to the computer with an administrator account.
2 Download the printer driver from the Canon website (http://www.canon.com/).
For more information about how to download the printer driver, see the driver download page for your printer.
3 Unzip the downloaded file.
4 If you are making a wireless LAN connection, connect the printer to the computer. Connecting via Wireless LAN
Before starting installation of the printer driver, use the "MF/LBP Network Setup Tool" included in the downloaded file to configure network settings.
5 If you are making a USB connection, turn OFF the printer.
The printer may not be recognized if you install the printer driver with the printer turned ON. Always turn OFF the power before installing.
6 Open the folder where the printer driver is stored.
32-bit operating system
[UFRII] [uk_eng] [32BIT] folders of the downloaded file
64-bit operating system
[UFRII] [uk_eng] [x64] folders of the downloaded file
NOTE:
If you do not know whether to specify the 32-bit version or the 64-bit version for Windows Vista/7/8/Server 2008/Server 2012, see Checking the Bit Architecture.
7 Double-click "Setup.exe."
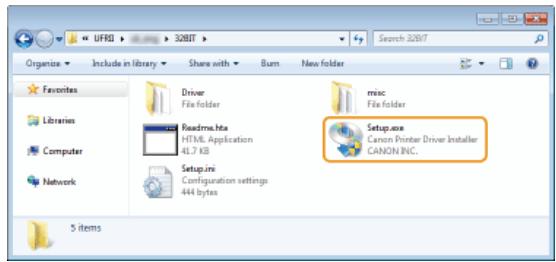
8 Read the License Agreement and click [Yes] to agree.
9 Install the printer driver.
Wireless LAN Connection
1 Select [Standard], select the [Reactivate Printers in the Sleep Mode and Search] check box, and click [Next].
If you are using the printer in an IPv6 environment, click [Detailed Settings] select [Standard TCP/IP Port] click [OK].
![CANON LBP6040 - Select [Standard], select the [Reactivate Printers in the Sleep Mode and Search] check box, and click [Next]. - 1](/content/2024/11/223505/images/c3550f60349dbb619abf7680530a9dc21b6353cf9669a6f55fb600e29be67e87.jpg)
NOTE:
About [Detailed Settings] You can select the port type
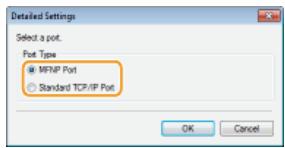
[MFNP Port] (only for IPv4 environment)
This is a port that enables automatic detection of the printer's IP address. Even if the IP address of the printer is changed, the connection between the printer and computer will be maintained, provided that they belong to the same subnet. Therefore, you do not need to add a new port every time the IP address is changed. If you are using the printer in an IPv4 environment, choose this setting.
[Standard TCP/IP Port]
This is a standard Windows port. Whenever the IP address of the printer is changed, a new port must be added.
2 Select check box for the printer that you want to install from the [Printer List].
If you want to use the printer in an IPv6 environment, click the [IPv6 Devices] tab.
![CANON LBP6040 - Select check box for the printer that you want to install from the [Printer List]. - 1](/content/2024/11/223505/images/39493c2c293e07371cc1a53e8981eca76e3a3028387a5c6ea7f324097361279c.jpg)
NOTE:
If the [Select Process] screen is displayed If a printer driver is already installed, the [Select Process] screen is displayed before the [Select Printers to Install] screen. For your printer, the selection made here makes no difference for the setup process. Simply click [Next].
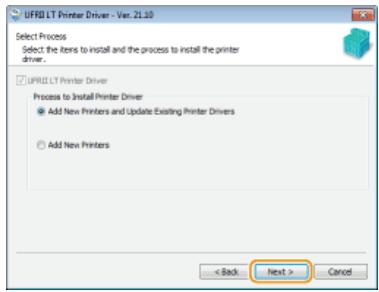
If the [IPv6 Devices] tab is not displayed
Return to the previous screen, and click [Detailed Settings] select [Standard TCP/IP Port].
If the printer that you want does not appear in [Printer List] Problems with the Wireless LAN Connection
3 Select the [Set Printer Information] check box, and click [Next].
![CANON LBP6040 - Select the [Set Printer Information] check box, and click [Next]. - 1](/content/2024/11/223505/images/b8ac15089e98287b51a58e3968449df7c5be4124bf10aea9291fd3715cc68853.jpg)
4 Set the printer information as necessary, and click [Next].
![CANON LBP6040 - Select the [Set Printer Information] check box, and click [Next]. - 2](/content/2024/11/223505/images/0419c30dfa5acd7af364f5d601ee1ee35e10a7441b1b706d662d9b6d6dd28359.jpg)
[Printer Name]
Change the printer name as necessary.
[Set as Default]
Select the check box if you want to use your printer as your default printer.
[Use as Shared Printer]
Select the check box if you want to share the printer (using the computer where you are performing the installation as a print server). Setting Up a Print Server during Printer Driver Installation
5 Check the printer information in [Printer List for Driver Installation], and click [Start].
![CANON LBP6040 - [Use as Shared Printer] - 1](/content/2024/11/223505/images/5bba969a827b21564ea7be57406327cf85b5a6003627c06b6862cea9616d3552.jpg)
Installation of the printer driver starts.
USB Connection
1 Select [USB Connection], and click [Next].
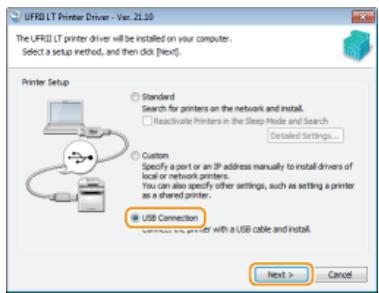
2 Click [Yes].
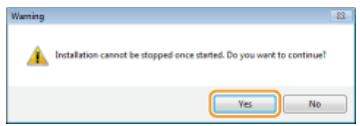
3 When the following screen appears, connect the computer and the printer with a USB cable (Connecting via USB), and turn ON the printer.

Installation of the printer driver starts.
NOTE:
If installation does not start Problems with the USB Connection
10 Select the [Restart My Computer Now] check box, and click [Restart].
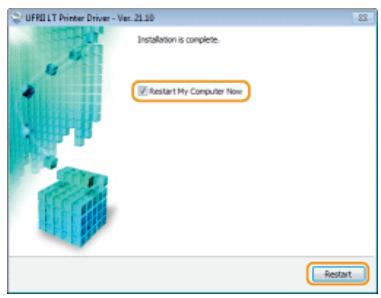
■ Checking the Results of the Installation
If the printer driver has been installed correctly, an icon for the installed printer will be displayed in the printer folder (Displaying the Printer Folder).
NOTE
If the icon is not displayed
Uninstall the printer driver (Uninstalling Printer Drivers) and repeat the installation from the beginning.
Installing to Use WSD
If you are using Windows Vista/7/8/Server 2008/Server 2012, you can print by using the WSD (Web Services on Devices) protocol. If you want to use WSD, first install the printer driver and then add a network printer.
Installing a Printer Driver
Adding a Network Printer
Installing a Printer Driver
1 Log on to the computer with an administrator account.
2 Open the printer folder. Displaying the Printer Folder
3 Click [Add a printer] or [Add Printer].
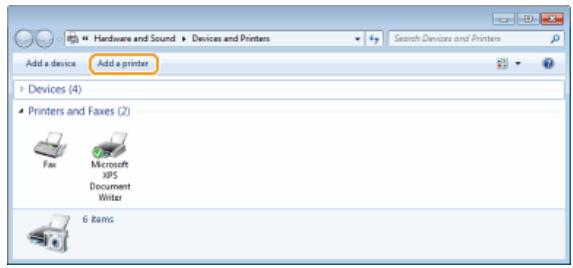
4 Click [Add a local printer].
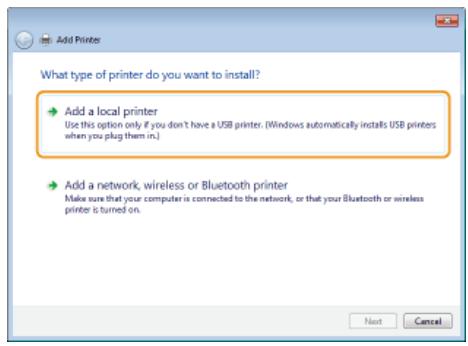
5 Check that [LPT1] is selected under [Use an existing port], and click [Next].
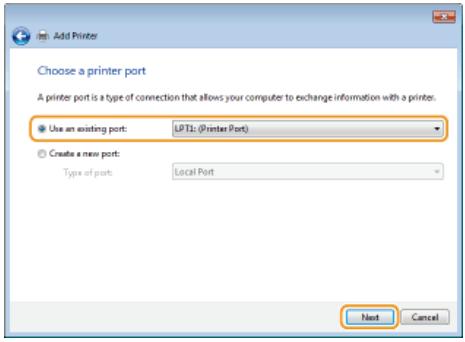
6 Click [Have Disk].
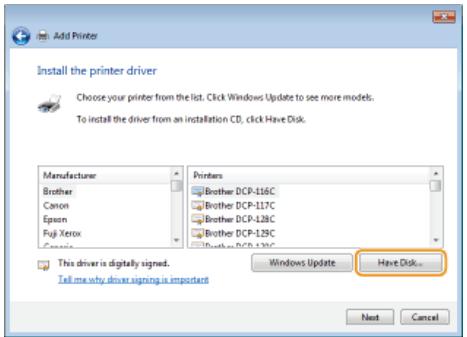
7 Click [Browse].
![CANON LBP6040 - Click [Browse]. - 1](/content/2024/11/223505/images/7280ebf4ff83ca41bea865d69fde2e68a9ec408370b10f401f082435cb3178cd.jpg)
8 Specify the folder where the printer driver is stored, select the Inf file, and click [Open].
![CANON LBP6040 - Specify the folder where the printer driver is stored, select the Inf file, and click [Open]. - 1](/content/2024/11/223505/images/fa92326904039d1970e38239801f08a4661f5ddc0eb38d64617c76520e08732e.jpg)
Specify the folder where the printer driver is stored as follows.
32-bit operating system
Specify [UFRII] [uk_eng] [32BIT] [Driver] folders of the CD-ROM/DVD-ROM or downloaded file.
64-bit operating system
Specify [UFRII] [uk_eng] [x64] [Driver] folders of the CD-ROM/DVD-ROM or downloaded file.
NOTE:
If you do not know whether to specify the 32-bit version or the 64-bit version Checking the Bit Architecture
9 Click [OK].
![CANON LBP6040 - Click [OK]. - 1](/content/2024/11/223505/images/b256428b3bce35508f63fc58bc1e04200c4e6ff2905dbf02deb431e05f67aaef.jpg)
10 Select your printer, and click [Next].
![CANON LBP6040 - Select your printer, and click [Next]. - 1](/content/2024/11/223505/images/621abcc1f45e6378647813a781b80c6489a5db86ea1e640174a698aee9c7b118.jpg)
11 Change the printer name as necessary, and click [Next].
![CANON LBP6040 - Change the printer name as necessary, and click [Next]. - 1](/content/2024/11/223505/images/7e5fbffb7ca8bbcb77b626cdbfcaa843256f8b4cd696fd4041e0b6f02618cc8c.jpg)
![CANON LBP6040 - Change the printer name as necessary, and click [Next]. - 2](/content/2024/11/223505/images/196cb671af801ff13b47b2b07969f0550a081e8fa120181e789563b93da4a183.jpg)
The installation starts.
12 Select [Do not share this printer], and click [Next].
If you want to share the printer, make sharing settings for the printer added with Adding a Network Printer.
( Configuring Settings on the Print Server Computer)
![CANON LBP6040 - Select [Do not share this printer], and click [Next]. - 1](/content/2024/11/223505/images/d06ed528d7a40b677b14683a3554105a659d6aa441b91203363d65e34f2ed17f.jpg)
13 Click [Finish].
![CANON LBP6040 - Click [Finish]. - 1](/content/2024/11/223505/images/35cd9a6d566412b219753cba80cd4f069e3fedfcdb229e8c79c6f5215495169e.jpg)
![CANON LBP6040 - Click [Finish]. - 2](/content/2024/11/223505/images/e867daae32608f283ce0ccef6c0190c31eaeafe77ef015da9a3fab54df6e3ab6.jpg)
An icon for the installed printer is displayed in the printer folder.
![CANON LBP6040 - Click [Finish]. - 3](/content/2024/11/223505/images/bf3e2a412acd466ebe5c620c44abe837433a7c26f55e4b8cf592999a9a532392.jpg)
Adding a Network Printer
1 Open the network folder.
Windows Vista/Server 2008
[Start] select [Network].
Windows 7/Server 2008 R2
[Start] [Computer] select [Network].
Windows 8/Server 2012
Right-click the lower-left corner of the screen [File Explorer] select [Network].
2 Right-click the newly added printer icon, and click [Install].
![CANON LBP6040 - Right-click the newly added printer icon, and click [Install]. - 1](/content/2024/11/223505/images/4598c981cbc55ffeffe2f86828c8efe31ba4e5f4e0804f236f8fc178298fc315.jpg)
Installation for using WSD is complete when an icon for the printer is added to the printer folder.
![CANON LBP6040 - Right-click the newly added printer icon, and click [Install]. - 2](/content/2024/11/223505/images/61b57a559ea02235e3513c824c06774fe8e8a094df2b03f886961b65c500a4a8.jpg)
NOTE
Deleting Unneeded Printer Icons
When you have finished installing the network printer, the icon added in step 13 of Installing a Printer Driver is no longer needed. To delete the icon, right-click it and select [Remove device] or [Delete] click [Yes].
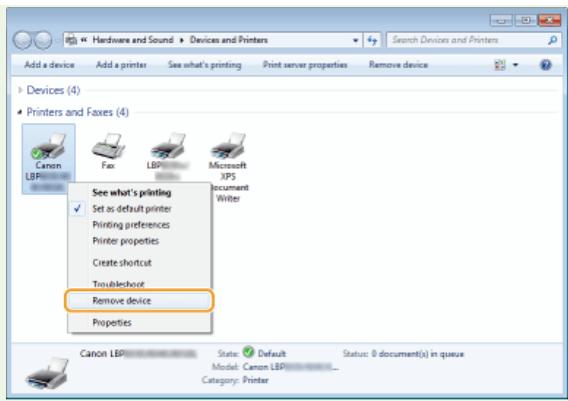
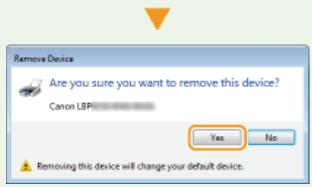
Setting Up a Print Server
You can lessen the burden on computers that request printing services by setting up a print server. You can also use the print server to install printer drivers on other computers, so that users of those computers do not need to install the printer driver from the CD-ROM/DVD-ROM.
■ Configuring Settings on the Print Server Computer
Configure printer sharing settings on the computer that you want to use as the print server. Configuring Settings on the Print Server Computer
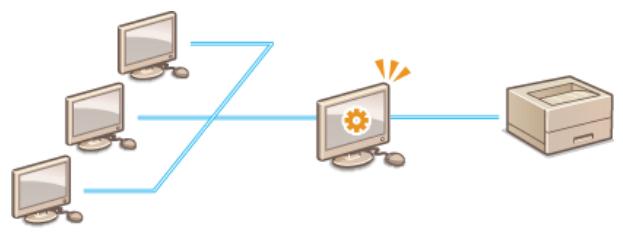
■ Installing Drivers via the Print Server (Client Settings)
You can use the print server to install printer drivers on other computers (clients) on the same network. This allows all of the computers to share the same printer. Installing Drivers via the Print Server (Client Settings)
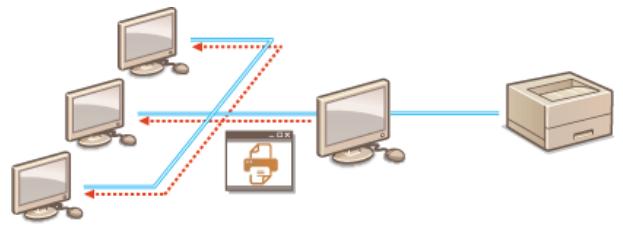
Configuring Settings on the Print Server Computer
Configure printer sharing settings on the computer that you want to use as the print server. The following procedure assumes that you have already installed the printer driver on the computer that you plan to use as the print server. If you have not installed the printer driver already, see Setting Up a Print Server during Printer Driver Installation.
IMPORTANT
It may not be possible to install printer drivers over the network if the client computers and the print server use different versions of the operating system (32-bit or 64-bit).
- Consult your network administrator if you want to set up a print server in a domain environment.
1 Log on to the computer with an administrator account.
2 Open the printer folder. Displaying the Printer Folder
3 Right-click the icon of the printer you are setting up and click [Printer properties] or [Properties].
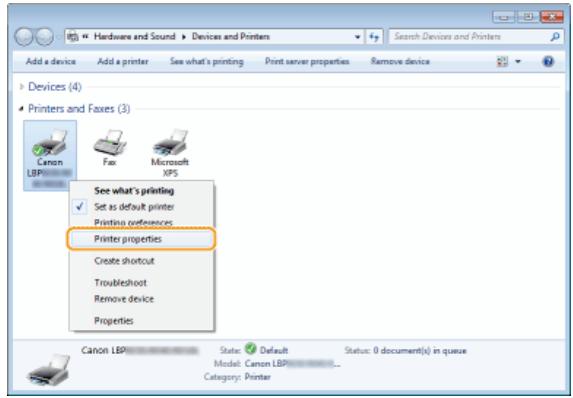
4 Click the [Sharing] tab, select [Share this printer], and enter the share name.
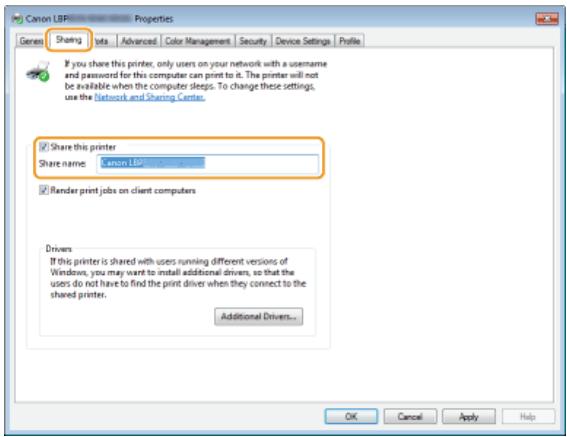
NOTE:
If [Change sharing options] is displayed
Click [Change sharing options].
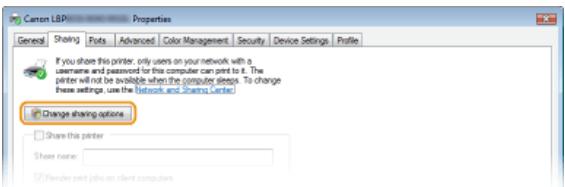
5 Install additional drivers as necessary.
During the procedure explained in Installing Drivers via the Print Server (Client Settings), this step is necessary if you want to use the print server to install printer drivers on computers that use different processor versions (32-bit or 64-bit) of the operating system.
1 Click [Additional Drivers].
2 Select the additional drivers, and click [OK].
![CANON LBP6040 - Select the additional drivers, and click [OK]. - 1](/content/2024/11/223505/images/2ed9dd3adaf73b628eceb0260a6900ff1f04aa3182ba6b1f7b645f31113f6c54.jpg)
- Select additional drivers as follows, according to the operating system of the print server.
| Print Server | Additional Drivers |
| 32-bit OS | Select [x64]. |
| 64-bit OS | Windows XP/Server 2003 Select [Windows 2000, Windows XP and Windows Server 2003] under [Version]. Windows Vista/7/8/Server 2008/ Server 2012 Select [x86] under [Processor]. |
NOTE:
If you do not know whether to specify the 32-bit version or the 64-bit version for Windows Vista/7/8/Server 2008/Server 2012, see Checking the Bit Architecture.
3 Insert the User Software CD-ROM/DVD-ROM into the drive on the computer.
- If you want to use printer drivers downloaded from the Canon website, download the additional drivers (printer drivers for processor versions that are different from that of the print server).
NOTE:
When the [CD-ROM/DVD-ROM Setup] screen is displayed, click [Exit].
4 Click [Browse].
![CANON LBP6040 - Click [Browse]. - 1](/content/2024/11/223505/images/0760f07bd0eb7b7d633e3fc0fcbbb3bf0d3f08d05147808527f72ad41001f413.jpg)
5 Specify the folder where the additional drivers are stored, select the Inf file, and click [Open].
![CANON LBP6040 - Specify the folder where the additional drivers are stored, select the Inf file, and click [Open]. - 1](/content/2024/11/223505/images/cf95bcfa50bcebe112eb5bb3bab6b5442fdce713f340629163a84c77e8457d00.jpg)
Specify the folder where the additional drivers are stored as follows.
When the print server uses a 32-bit OS
Specify [UFRII] [uk_eng] [x64] [Driver] folders of the CD-ROM/DVD-ROM or downloaded file.
When the print server uses a 64-bit OS
Specify [UFRII] [uk_eng] [32BIT] [Driver] folders of the CD-ROM/DVD-ROM or downloaded file.
6 Click [OK].
Installation of the additional driver starts. Wait until you are returned to the [Sharing] tab.
Setting Up a Print Server during Printer Driver Installation
If you are using a printer connected by wireless LAN, you can set up a print server at the time when you install the printer driver. To set the computer onto which you are installing the print driver as a print server, select [Use as Shared Printer] in the [Printer Information] screen, which is displayed when you install the printer driver.
IMPORTANT
If you are using a printer connected by USB, you cannot set up a print server at the time when you install the printer driver. Set up the print server after installing the printer driver, by using the procedure described above.
NOTE
For the complete installation procedure, see Installing.
[Printer Information] screen
![CANON LBP6040 - [Printer Information] screen - 1](/content/2024/11/223505/images/ba2b5438947f8d91e199f1f301000592fb334af398394f717d61324fe05adb35.jpg)
[Use as Shared Printer]
When this is selected, the computer onto which you are installing the printer driver is designated as a print server.
[Shared Name]
Enter the name of the shared printer.
[Drivers to Add]
Click to install additional drivers. During the procedure explained in Installing Drivers via the Print Server (Client Settings), additional drivers are necessary if you want to use the print server to install printer drivers on computers that use different processor versions (32-bit or 64-bit) of the operating system.
LINKS
Installing Drivers via the Print Server (Client Settings)
Installing Drivers via the Print Server (Client Settings)
You can use the print server to install printer drivers for a shared printer on other computers (clients) on the same network. Because the printer drivers are installed via the print server, users of the other computers do not need to use the printer's CD-ROM/DVD-ROM.
1 Log on to the computer with an administrator account.
2 Open [Windows Explorer] or [File Explorer].
Windows XP/Vista/7/Server 2003/Server 2008
[Start] select [All Programs] or [Programs] [Accessories] [Windows Explorer].
Windows 8/Server 2012
Right-click the lower-left corner of the screen select [File Explorer].
3 Select the print server from [Network] or [My Network Places].
To display a computer on the network, you may need to enable [Network discovery] (Enabling [Network discovery]) or search for the computer on the network.
NOTE:
If the print server is not discovered Problems via the Print Server
4 Double-click the shared printer.

5 Follow the instructions on the screen to install the printer drivers.
IMPORTANT:
It may not be possible to install printer drivers via the print server if the client computers and the print server use different processor versions (32-bit or 64-bit) of the operating system. In this case, install additional drivers on the print server.
Configuring Settings on the Print Server Computer
Updating and Uninstalling
This section explains how to update and uninstall printer drivers. It also explains how to uninstall the Product Extended Survey Program.
Updating
You can update installed printer drivers to the latest versions. Updating
Uninstalling
When you no longer need installed printer drivers or the Product Extended Survey Program, you can uninstall (delete) them. Uninstalling
Updating
Proceed as follows to download the latest printer driver from the Canon website and update the printer driver installed on your computer.
1 Log on to the computer with an administrator account.
2 Download the printer driver from the Canon website (http://www.canon.com/).
For more information about how to download the printer driver, see the driver download page for your printer.
3 Unzip the downloaded file.
4 Open the folder where the printer driver is stored.
32-bit operating system
[UFRII] [uk_eng] [32BIT] folders
64-bit operating system
[UFRII] [uk_eng] [x64] folders
NOTE:
If you do not know whether to specify the 32-bit version or the 64-bit version for Windows Vista/7/8/Server 2008/Server 2012, see Checking the Bit Architecture.
5 Double-click "Setup.exe."
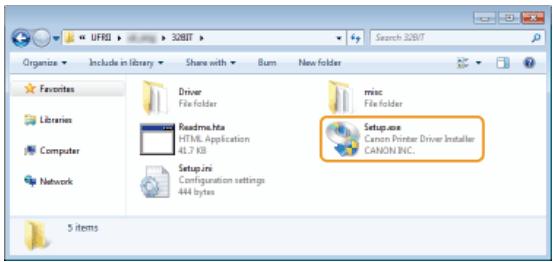
6 Read the License Agreement and click [Yes] to agree.
![CANON LBP6040 - Read the License Agreement and click [Yes] to agree. - 1](/content/2024/11/223505/images/5c79e64b0fa9c89dc683c03ba7cc88167181163a324dc6947add4d66cf83fc04.jpg)
7 Select [Custom], and click [Next].
![CANON LBP6040 - Select [Custom], and click [Next]. - 1](/content/2024/11/223505/images/4ffc58f52e3b4ba284d72e4549986c390703be81516be55c19e83d5ea2339adb.jpg)
8 Select [Update Existing Printer Drivers], and click [Next].
![CANON LBP6040 - Select [Update Existing Printer Drivers], and click [Next]. - 1](/content/2024/11/223505/images/34f49c9b7824919f9a7c2cf08e888bd690502ec8eb30707931ffe5e22cebbd28.jpg)
9 Check the printer information in [Printer List for Driver Installation], and click [Start].
![CANON LBP6040 - Check the printer information in [Printer List for Driver Installation], and click [Start]. - 1](/content/2024/11/223505/images/e5fe56d922c69182de5e409520ed593efb7d2b4ec77a02a6443d37c429dd3567.jpg)
Updatng of the printer driver starts.
10 Select [Restart My Computer Now], and click [Restart].
![CANON LBP6040 - Select [Restart My Computer Now], and click [Restart]. - 1](/content/2024/11/223505/images/10abe0374199b69df94663f8a4aaea667cbc26e07e2cdacaf8808b8c3b7895b2.jpg)
Uninstalling
When you no longer need installed printer drivers or the Product Extended Survey Program, you can uninstall them to delete them from your computer.
Uninstalling Printer Drivers
Uninstalling the Product Extended Survey Program
Uninstalling Printer Drivers
1 Log on to the computer with an administrator account.
2 Display [Programs and Features] or [Add or Remove Programs]. Displaying [Programs and Features] or [Add or Remove Programs]
3 Select the printer driver that you want to uninstall, and click [Uninstall/Change] or [Change/Remove].
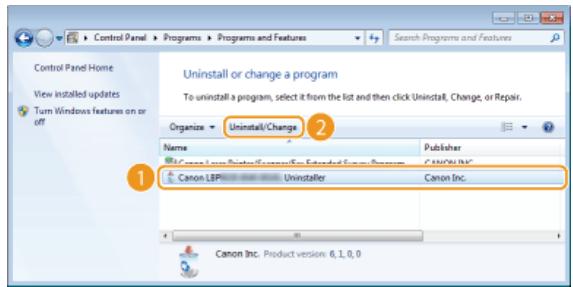
The uninstaller starts.
NOTE:
If you cannot find the printer driver that you want to uninstall

Start the uninstaller from the User Software CD-ROM/DVD-ROM or from the printer driver file that you downloaded.
1 Insert the User Software CD-ROM/DVD-ROM into the drive on the computer.
To start the uninstaller from a printer driver file that you downloaded, carry out the following step.
2 Open the folder where the uninstaller is stored.
32-bit operating system
[UFRII] [uk_eng] [32BIT] [misc] folders of the CD-ROM/DVD-ROM or downloaded file
64-bit operating system
[UFRII] [uk_eng] [x64] [misc] folders of the CD-ROM/DVD-ROM or downloaded file
NOTE:
If you do not know whether to specify the 32-bit version or the 64-bit version for Windows Vista/7/8/Server 2008/Server 2012, see Checking the Bit Architecture.
3 Double-click "UNINSTALL.exe."
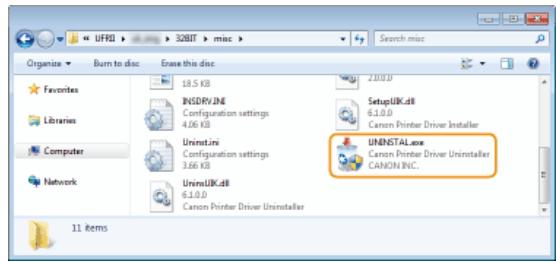
4 Select the printer that you want to uninstall, and click [Delete].
![CANON LBP6040 - Select the printer that you want to uninstall, and click [Delete]. - 1](/content/2024/11/223505/images/193f99fa78f264b4c3bb0b08836b384111872725041e0eb0ca055930ed2a2d02.jpg)
IMPORTANT:
If you click [Cleanup], then all files, directory information and other data related to all printers are deleted, not only for the selected printer but for all printers in the list. Normally you should use [Delete] to uninstall printer drivers. Click [Cleanup] when no printer is displayed in the list.
5 Click [Yes].
![CANON LBP6040 - Click [Yes]. - 1](/content/2024/11/223505/images/57fc4ac2d9517dd8d334f88b669eb11e485d49a3c5132947a2c05edff370b01d.jpg)
The uninstall starts.
When the following screen appears, click [Yes] or [Yes To All].
![CANON LBP6040 - Click [Yes]. - 2](/content/2024/11/223505/images/36a5d20c661d583373b99752905d674dc6b393b5dd24f8760805a26c670df97a.jpg)
6 Click [Exit].
![CANON LBP6040 - Click [Exit]. - 1](/content/2024/11/223505/images/31fe26ad3595d5408c60a9e0c79bff7b45e7769c036ecb762c6b9e982426c854.jpg)
Uninstalling the Product Extended Survey Program
1 Log on to the computer with an administrator account.
2 Display [Programs and Features] or [Add or Remove Programs]. Displaying [Programs and Features] or [Add or Remove Programs]
3 Select [Canon Laser Printer/Scanner/Fax Extended Survey Program], and click [Uninstall] or [Remove].
![CANON LBP6040 - Click [Exit]. - 2](/content/2024/11/223505/images/ab19670ee0a6fe64ff7af9e52497e8cd294dcdec8f1a11f757123d8cb66b8f36.jpg)
4 Click [OK].
![CANON LBP6040 - Click [OK]. - 1](/content/2024/11/223505/images/2f3814e99d985aa85a6addfd78d26ad459cb03e6761bcf5f2892181ac0a802f4.jpg)
Troubleshooting
If you encounter problems during installation of the printer driver, see the following sections before contacting Canon.
Problems with the Wireless LAN Connection
Problems with the USB Connection
Problems via the Print Server
Problems with the Wireless LAN Connection
The printer that you want does not appear in [Printer List].
- Click [Search Again] to search for the printer on the network.
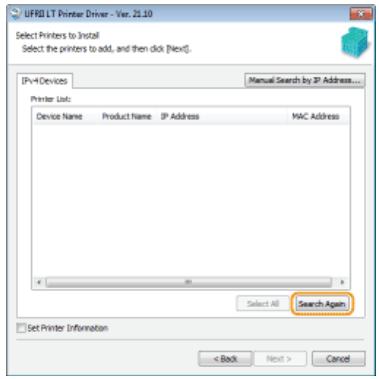
Check whether the printer is ready to connect to the network.
Cannot Connect to the Wireless LAN
Cannot Connect to the Wireless LAN
1 Check the status of your computer.
Have the settings of the computer and the wireless router been completed?
- Are the cables of the wireless router (including the power cord and LAN cable) correctly plugged in?
Is the wireless router turned ON?
If the problem persists even after checking the above:
Turn OFF all of the devices, and then turn them ON again.
Wait for a while, and try again to connect to the network.
Check whether the printer is turned ON.
If the printer is turned ON, turn it OFF, and then turn it back ON.
Check the installation site of the printer and the wireless router.
Is the printer too far from the wireless router?
- Are there any obstacles such as walls between the printer and the wireless router?
- Are there any appliances such as microwave ovens or digital cordless phones that emit radio waves near the printer?
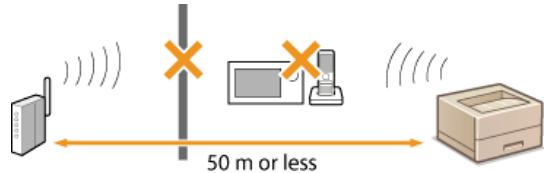
4

Reset the wireless LAN settings.
Configuring Wireless LAN Network Settings
NOTE
When you need to manually set up the connection
If the wireless router is set up as described below, enter the required information manually.
The stealth function is enabled.
ANY connection refusal* is enabled.
The WEP key number to use is set to a number from 2 to 4.
The automatically generated WEP key (hexadecimal) is selected.
- A function in which the wireless router refuses the connection if the SSID of the device to be connected is set to "ANY" or is blank.
When you need to change the settings of the wireless router
If the wireless router is set up as described below, change the settings of the router.
- MAC address filtering is enabled.
- When only IEEE 802.11n is used for the wireless communication, WEP is selected or the WPA/WPA2 encryption method is set to TKIP.
Problems with the USB Connection
Installation does not start.
Is the printer turned ON?
Are the printer and the computer connected correctly via a USB cable?
Connecting via USB
Was the printer turned ON before you installed the printer driver? If so, turn OFF the printer and unplug the USB cable, and then reinstall the printer driver.
Installing
IMPORTANT:
Always turn ON the printer when the following screen is displayed.

First delete the USB class driver, and then reinstall the printer driver.
Deleting the USB Class Driver
Installing
Problems via the Print Server
You cannot find the print server to connect to.
Are the print server and computer connected correctly?
Is the print server running?
Do you have user rights to connect to the print server? If you are not sure, consult the print server's administrator.
Is [Network discovery] enabled? (Windows Vista/7/8/Server 2008/Server 2012)
Deleting the USB Class Driver
Delete the USB class driver when it is not possible to install the printer driver correctly when using a USB connection. Note that even if you delete the USB class driver, it will be installed again automatically when you connect the printer and your computer with a USB cable.
1 Connect the printer and your computer with a USB cable ( Connecting via USB ), and turn ON the printer.
2 Log on to the computer with an administrator account.
3 Display [Device Manager]. Displaying [Device Manager]
4 Double-click [Universal Serial Bus controllers].
5 Right-click [USB Printing Support], and click [Uninstall].
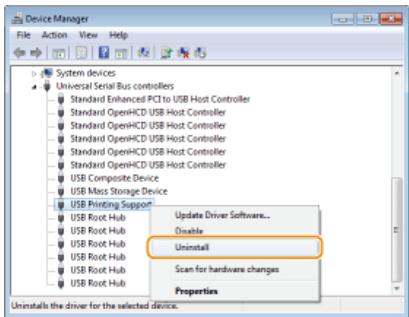
IMPORTANT:
Be careful to delete [USB Printing Support] only, and never delete any other devices or device drivers
Windows may not operate properly if you delete other devices or device drivers.
NOTE:
If [USB Printing Support] is not displayed
[USB Printing Support] is not displayed if the USB class driver is not installed properly. In this case, close [Device Manager] without doing anything further.
6 Click [OK].
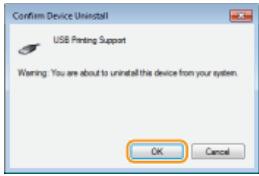
7 Close [Device Manager].
8 Unplug the USB cable, and restart your computer.
Appendix
The Appendix provides information you should know, such as how to connect the printer to your computer, how to use the Installation Guide, disclaimers, and copyright information. It also explains how to start the MF/LBP Network Setup Tool manually. Refer to it as necessary.
Connecting the Printer to a Computer
There are two ways to connect the printer to a computer: "via wireless LAN," and "via USB." Select the connection method that best suits your communication environment and devices.
Connecting via Wireless LAN
Connect the printer to a router via wireless communications. Connecting via Wireless LAN
Connecting via USB

Connect the printer to a computer via a USB cable. Connecting via USB
NOTE
The supported connection methods differ depending on the printer you are using. Refer to the "e-Manual" supplied with your printer for information about the supported connection methods.
Connecting via Wireless LAN
Connect the printer to a computer via a wireless LAN router. The printer and the router are connected wirelessly (via radio waves), so you do not need a LAN cable. To make wireless LAN settings, use the MF/LBP Network Setup Tool from your computer.
Things to Check before Starting
Configuring Wireless LAN Network Settings
Things to Check before Starting
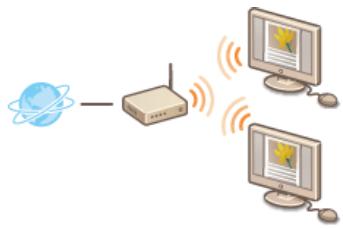
- Have the computer and the router been connected properly? For more information, see the instruction manuals for the devices you are using, or contact the manufacturer.
- Have the network settings been completed on the computer? If the network has not been set up properly, you will not be able to use the printer on the wireless LAN network, even if you perform the rest of the procedure below.
IMPORTANT
Risk of Information Leak
If the printer is connected to an unsecured network, your personal information might be leaked to a third party because radio waves used in wireless communication can go anywhere nearby, even beyond walls. Use wireless LAN connection at your own discretion and at your own risk.
Wireless LAN Security Standards
Refer to the "e-Manual" supplied with your printer for information about the security standards supported by the printer.
NOTE
The printer does not come with a wireless LAN router. Have one ready as necessary.
The wireless router must conform to the IEEE 802.11b/g/n standards and be able to communicate in the 2.4 GHz band. For more information, see the instruction manual provided with the router, or contact the manufacturer.
If you are using the printer in your office, consult your network administrator.
Configuring Wireless LAN Network Settings
1 Log on to the computer with an administrator account.
2 Start the MF/LBP Network Setup Tool.
There are two ways to start the MF/LBP Network Setup Tool: "Start it from the CD-ROM/DVD-ROM," and "Start it from a downloaded file."
Starting from the CD-ROM/DVD-ROM
Starting from a Downloaded File
3 Follow the on-screen instructions to configure the wireless LAN settings.
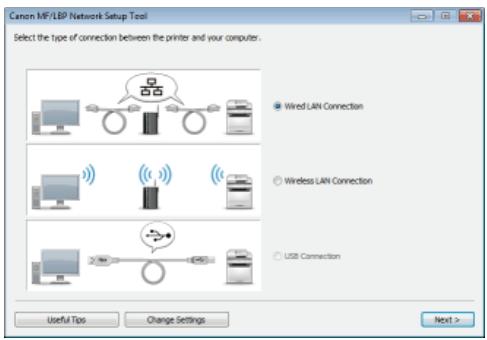
NOTE:
If there is something you do not understand
Click [Useful Tips] at the bottom left of the screen to display troubleshooting tips.
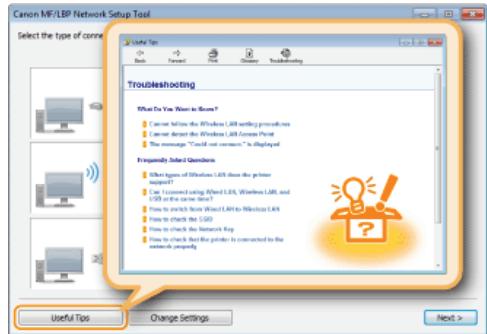
Connecting via USB
Connect the printer to a computer with a USB cable. Connect the flat connector of the USB cable (a) to the computer, and connect the square connector (b) to the printer.
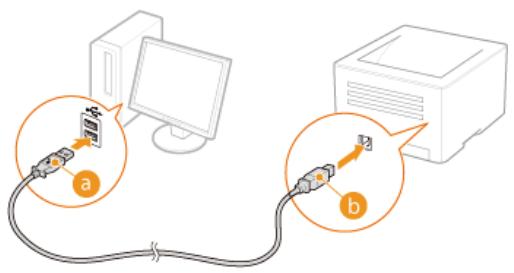
NOTE
If your printer does not come with a USB cable, you will need to provide your own cable separately.
Make sure that the USB cable you use has the following mark.

- If a Plug and Play automatic setup screen like the one shown below is displayed when you connect the USB cable, click [Close] or [Cancel] to close it.
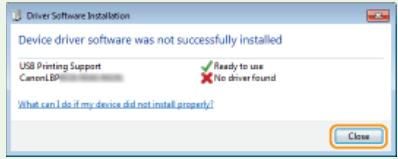
LINKS
Deleting the USB Class Driver
MF/LBP Network Setup Tool
The MF/LBP Network Setup Tool is a utility that allows you to configure initial network settings by following instructions on the screen. The Tool starts automatically when you install a printer driver from the User Software CD-ROM/DVD-ROM. If you want to start it alone manually, you can start it from the User Software CD-ROM/DVD-ROM or start it directly from a file downloaded from the Canon website.
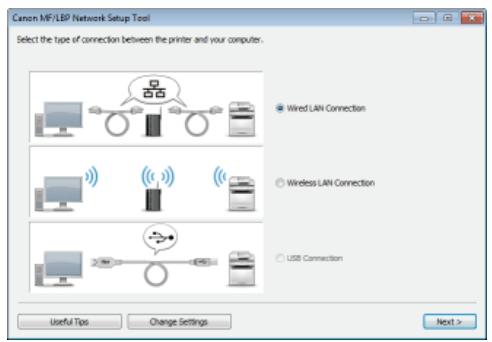
Starting from the CD-ROM/DVD-ROM
Starting from a Downloaded File
NOTE
- The system environment required to use the MF/LBP Network Setup Tool is the same as the system environment required for the printer driver. System Requirements
See Configuring Wireless LAN Network Settings for information about how to configure initial network settings by using the MF/LBP Network Setup Tool.
Starting from the CD-ROM/DVD-ROM
1 Log on to the computer with an administrator account.
2 Insert the User Software CD-ROM/DVD-ROM into the drive on the computer.
3 Click [Start Software Programs].
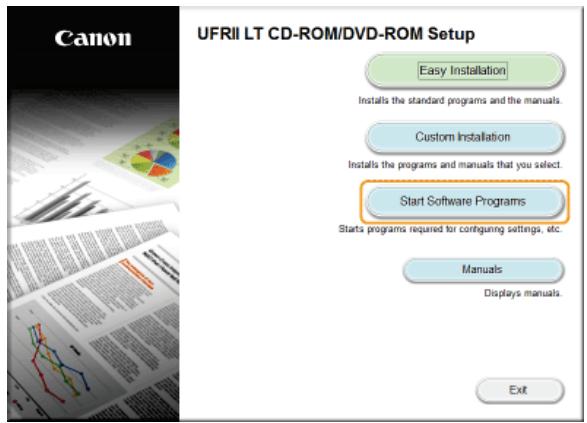
NOTE:
If the above screen does not appear Displaying the [CD-ROM/DVD-ROM Setup] Screen
If [AutoPlay] is displayed, click [Run MInst.exe].
4 Click [Start] of [MF/LBP Network Setup Tool].
![CANON LBP6040 - Click [Start] of [MF/LBP Network Setup Tool]. - 1](/content/2024/11/223505/images/44f288630369a9ee77b291b7b6c0457dcbb6e9898ca2a66ffd4367ce18188db6.jpg)
Starting from a Downloaded File
The MF/LBP Network Setup Tool is included among the files that you download to install a printer driver. Start by downloading the printer driver file, which contains the printer driver and associated files, from the Canon website (http://www.canon.com/).
1 Unzip the downloaded file.
2 Double-click "CNAN1STK.exe" in the [Network_Setting TOOL] folder.
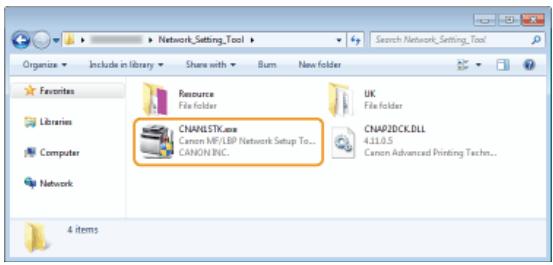
Using the Installation Guide
The Installation Guide is a manual that can be viewed on your computer. It provides information about the installation of printer drivers. You can find pages quickly by searching for what you want to do or by entering keywords.
How to Find the Topic You Are Looking For
You can find the page you are looking for using the following three methods.
Search the contents
You can find the page you are looking for by selecting a topic from the [Contents] tab on the left side of the screen, or by selecting a chapter icon from the icons next to the topics.
Top Page
Topic Page
Search by keyword
You can search by entering keywords, such as "USB" or "environment." Pages containing the keywords are displayed. You can also enter phrases such as "update driver." The search will find topics containing all of the words in the phrase (AND search).
Search Tab
Search the site map
Click [Site Map] on the top part of the screen to display a list of all the Installation Guide topics. From there you can find the topic you are looking for.
Site Map
NOTE
System requirements
To use the Installation Guide, one of the following Web browsers is required. The content of the Installation Guide may not display correctly if a browser not listed below is used.
Internet Explorer 7.0/8.0/9.0/10.0/11.0, Firefox 10.0.x ESR/16.0.x
Screen Configuration of the Installation Guide
The Installation Guide is divided into different screens, and the content of each screen varies.
Top Page
This page appears when the Installation Guide is started.
a Canon logo
Click to return to the top page from any other page.
[Contents] tab/[Search] tab
Click to toggle the display between the [Contents] tab and [Search] tab.
Contents
Displays the titles of chapters ( ). Place the mouse pointer over one of the titles to display the topics in that chapter on the right. Click a topic to display its page.
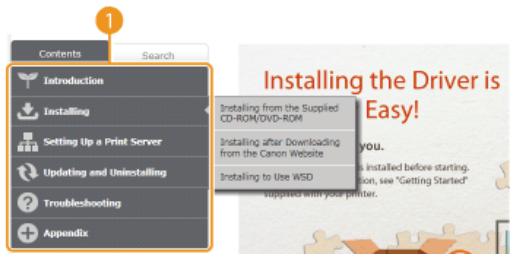
[Top]
Click to return to the top page from any other page.
[Site Map]
Click to display the titles of all Installation Guide topics.
[Help]
Click to display information on how to view the Installation Guide, how to perform a search, and other information.
[Print]
Click to print the currently displayed topic page.
[Notice]
Click to view important information you should know when using the printer.
Topic Page
Topic pages contain information about how to install printer drivers.
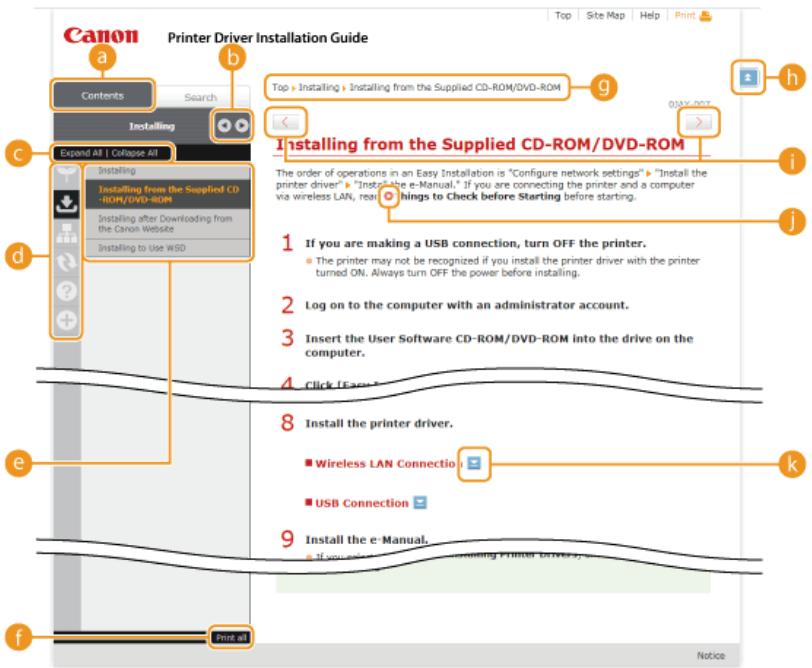
[Contents]
Chapter icons and topic titles are displayed in this tab.
6
The [Contents] tab can be widened and narrowed.
[Expand All]/[Collapse All]
Click [Expand All] to display all of the subsections of all topics. Click [Collapse All] to close all of the subsections of all the topics.
Chapter icons
Click a chapter icon to navigate to the top of the corresponding chapter.
Topics
Displays the topics of the selected chapter. If "+" is displayed on a topic, clicking it displays the subsections of that topic. Click "-" to close an expanded topic.
[Print all]
All pages of the selected chapter are opened in a separate window. You can print them as necessary.
Navigation
This shows which chapter topic you are currently viewing.
#
Click to return to the page top.
1 1
Click to display the previous or next topic.
#
Click to jump to the corresponding page. To return to the previous page, click the [Back] button on your Web browser.
#
Click to display hidden detailed descriptions. Click again to close the detailed descriptions.
Search Tab
This tab contains a text box to perform a search and find the page you are looking for.
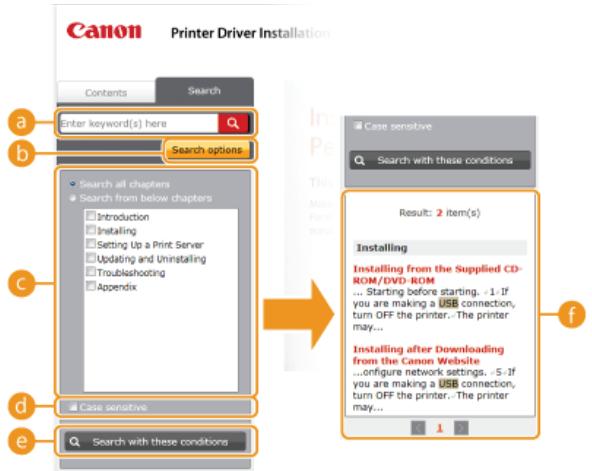
a [Enter keyword(s) here]
Enter one or more keywords and click to display search results in a results list. You can enter a phrase to find pages that contain all of the words in the phrase. To find an exact phrase, enclose it in double quotation marks.
[Search options]
Click to specify search conditions such as the scope of the search and case sensitivity.
Search scope selector
You can use this to select the individual chapters to search. This allows you to search more efficiently, when you can predict the chapters containing the topic that you are looking for.
Search options selector
Select the check box to make your search case-sensitive.
Search with these conditions]
c and d specify the conditions. After setting them, press this to perform the search and display the results in the [Result] list.
Result list
This displays pages that contain the specified keywords. From the results, locate the page you are looking for and click the topic title of the page. If the results cannot be displayed on one page, click / or a page number to display the results on the corresponding page.
Site Map
This page displays the titles of all topics in the Installation Guide.
Chapter icons
Click to jump to the table of contents of the selected chapter.
Topic titles
Displays titles and topics. Click a title to jump to the corresponding topic page.
C
Click to return to the page top.
#
Click to go to the previous or next chapter.
Viewing the Installation Guide
Marks
Restrictions and cautions regarding the handling of the printer, useful tips, and other information are indicated using the marks below.
IMPORTANT
Indicates operational requirements and restrictions. Be sure to read these items carefully to operate the printer correctly and avoid damage to the printer or property.
NOTE
Indicates a clarification of an operation, or contains additional explanations for a procedure.
Buttons
Buttons on the computer display are indicated with the following notation:
Example from the Installation Guide: [Next]
Computer Screens
Depending on the operating system you are using, the appearance of the displays in this guide may differ slightly from the displays that you see. Also, the appearance of printer drivers and software may differ depending on their version.
Other
This section describes basic Windows operations and includes disclaimers, copyright information, and other information.
Basic Windows Operations
Displaying the Printer Folder
Enabling [Network discovery]
Displaying the [CD-ROM/DVD-ROM Setup] Screen
Checking the Bit Architecture
Displaying [Programs and Features] or [Add or Remove Programs]
Displaying [Device Manager]
Displaying the Printer Folder
Windows XP Professional/Server 2003
[Start] select [Printers and Faxes].
Windows XP Home Edition
[Start] select [Control Panel] [Printers and Other Hardware] [Printers and Faxes].
Windows Vista
[Start] select [Control Panel] [Printer].
Windows 7/Server 2008 R2
[Start] select [Devices and Printers].
Windows 8/Server 2012
Right-click the lower-left corner of the screen select [Control Panel] [View devices and printers].
Windows Server 2008
[Start] select [Control Panel] double-click [Printers].
Enabling [Network discovery]
If you are using Windows Vista/7/8/Server 2008/Server 2012, enable [Network discovery] to view the computers on your network.
Windows Vista
[Start] select [Control Panel] [View network status and tasks] under [Network discovery], select [Turn on network discovery].
Windows 7/Server 2008 R2
[Start] select [Control Panel] [View network status and tasks] [Change advanced sharing settings] under [Network discovery], select [Turn on network discovery].
Windows 8/Server 2012
Right-click the lower-left corner of the screen select [Control Panel] [View network status and tasks] [Change advanced sharing settings] under [Network discovery], select [Turn on network discovery].
Windows Server 2008
[Start] select [Control Panel] double-click [Network and Sharing Center] under [Network discovery], select [Turn on network discovery].
■Displaying the [CD-ROM/DVD-ROM Setup] Screen
If your computer does not display the [CD-ROM/DVD-ROM Setup] screen after you insert the CD-ROM/DVD-ROM, follow the procedure below. This following example uses "D:" as the name of the CD-ROM/DVD-ROM drive. The CD-ROM/DVD-ROM drive name may be different on your computer.
Windows XP/Server 2003
[Start] select [Run] enter "D:\MInst.exe" click [OK].
Windows Vista/7/Server 2008
[Start] enter "D:\MInst.exe" in [Search programs and files] or [Start Search] press the [ENTER] key on the keyboard.
Windows 8/Server 2012
Right-click the lower-left corner of the screen select [Run] enter "D:\MInst.exe" click [OK].
Checking the Bit Architecture
If you are not sure whether your computer is running 32-bit or 64-bit Windows, follow the procedure below to check.
1 Display [Control Panel].
Windows Vista/7/Server 2008
[Start] select [Control Panel].
Windows 8/Server 2012
Right-click the lower-left corner of the screen select [Control Panel].
2 Display [System].
Windows Vista/7/8/Server 2008 R2/Server 2012
Click [System and Security] or [System and Maintenance] [System].
Windows Server 2008
Double-click [System].
3 Check the bit architecture.
32-bit operating systems
[32-bit Operating System] is displayed.
64-bit operating systems
[64-bit Operating System] is displayed.
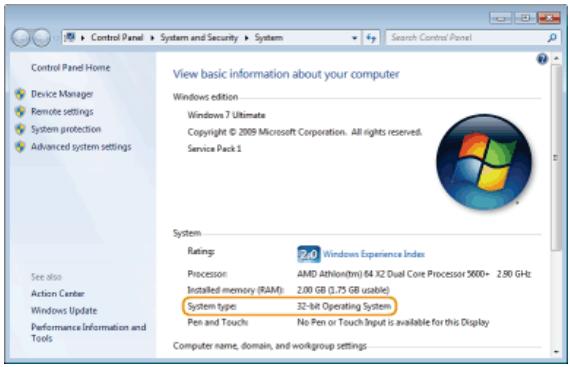
■ Displaying [Programs and Features] or [Add or Remove Programs]
Windows XP/Server 2003
[Start] [Control Panel] select [Add or Remove Programs].
Windows Vista/7/Server 2008 R2
[Start] [Control Panel] select [Uninstall a Program].
Windows 8/Server 2012
Right-click the lower-left corner of the screen [Control Panel] select [Uninstall a Program].
Windows Server 2008
[Start] select [Control Panel] double-click [Programs and Features].
Displaying [Device Manager]
Windows XP
[Start] [Control Panel] [Performance and Maintenance] [System] [Hardware] [select [Device Manager].
Windows Vista/7/Server 2008 R2
[Start] [Control Panel] [Hardware and Sound] or [Hardware] select [Device Manager].
Windows 8/Server 2012
Right-click the lower-left corner of the screen [Control Panel] [Hardware and Sound] select [Device Manager].
Windows Server 2003
[Start] [Control Panel] [System] [Hardware] [select [Device Manager]].
Windows Server 2008
[Start] select [Control Panel] double-click [Device Manager].
Notice
■ Disclaimers
The information in this document is subject to change without notice.
CANON INC. MAKES NO WARRANTY OF ANY KIND WITH REGARD TO THIS MATERIAL, EITHER EXPRESS OR IMPLIED, EXCEPT AS PROVIDED HEREIN, INCLUDING WITHOUT LIMITATION, THEREOF, WARRANTY AS TO MARKETABILITY, MERCHANTIBILITY, FITNESS FOR A PARTICULAR PURPOSE OF USE OR NON-INFRINGEMENT. CANON INC. SHALL NOT BE LIABLE FOR ANY DIRECT, INCIDENTAL, OR CONSEQUENTIAL DAMAGES OF ANY NATURE, OR LOSSES OR EXPENSES RESULTING FROM THE USE OF THIS MATERIAL.
Copyright
Copyright CANON INC. 2013
No part of this publication may be reproduced, transmitted, transcribed, stored in a retrieval system, or translated into any language or computer language in any form or by any means, electronic, mechanical, magnetic, optical, chemical, manual, or otherwise, without the prior written permission of Canon Inc.
Trademarks
Apple, AppleTalk, EtherTalk, LocalTalk, Mac, Mac OS, and Safari are trademarks of Apple Inc., registered in the U.S. and other countries.
Microsoft, Windows, Windows Vista, Windows Server and Internet Explorer are either registered trademarks or trademarks of Microsoft Corporation in the United States and/or other countries.
All other product and brand names are registered trademarks, trademarks or service marks of their respective owners.