
SW8220 - Sewing machine SOLAC - Free user manual and instructions
Find the device manual for free SW8220 SOLAC in PDF.
| Product Type | Sewing Machine |
| Brand | SOLAC |
| Model | SW8220 |
| Power Supply | AA alkaline batteries (4 × LR6) or mains adapter (included) via foot pedal |
| Sewing Speed | Adjustable (slow/fast) via switch or foot pedal |
| Stitches | Straight stitch, zigzag stitch, reverse stitch, buttonhole, overlock |
| Free Arm | Yes, for sewing tubular pieces (sleeves, legs) |
| Thread Tension | Adjustable (upper thread tension dial) |
| Lighting | Built-in lamp |
| Included Accessories | Foot pedal, mains adapter, standard presser foot, buttonhole foot, needle threader, metal bobbins (3), needles, spools (2), thread cutter |
| Maintenance | Clean with a damp cloth and mild detergent; do not use solvents or immerse |
| Safety | Unplug before cleaning or changing accessories; do not sew without fabric; keep fingers away from the needle |
| Spare Parts and Repairability | Metal bobbins recommended; standard needles; adapter and pedal available via customer service |
| Battery Use | Set switch to 'PEDAL' to save battery; remove batteries if not used for a long time |
| Warranty | Not specified in the manual (contact customer service) |
Frequently Asked Questions - SW8220 SOLAC
User questions about SW8220 SOLAC
0 question about this device. Answer the ones you know or ask your own.
Ask a new question about this device
Download the instructions for your Sewing machine in PDF format for free! Find your manual SW8220 - SOLAC and take your electronic device back in hand. On this page are published all the documents necessary for the use of your device. SW8220 by SOLAC.
USER MANUAL SW8220 SOLAC
ENGLISH SEWING MACHINE SW8221
USE AND CARE:
- Do not use the appliance if its accessories are not properly fitted.
- Do not use the appliance if the accessories attached to it are defective. Replace them immediately.
- Never run the machine when there's thread in the needle, but no fabric on the machine. This could damage the machine.
- Always keep your hands away from the needle, hand wheel, upper thread tension dial and pattern selection dial when the appliance is running.
- Keep fingers away from moving parts. Special care is required around the sewing machine needle.
- Never sew with a damaged needle plate as this can cause needle to break.
- Do not use bent needles
- Do not pull or push fabric while stitching. It may deflect the needle causing it to break.
- Never drop or insert any object into any opening.
- Do not use the appliance if the on/off switch does not work.
- Use the appliance handle/s, to catch it or move it.
- Disconnect the appliance from the mains when not in use and before undertaking any cleaning task.
- Unplug the appliance from the mains before replacing any accessory.
- Store this appliance out of reach of children and/or persons with physical, sensory or reduced mental or lack of experience and knowledge.
- Keep the appliance in a dry, dust-free place, out of direct sunlight.
- Make sure that dust, dirt or other foreign objects do not block the fan grill on the appliance.
- Keep the appliance in good condition. Check that the moving parts are not misaligned or jammed and make sure there are no broken parts or anomalies that may prevent the appliance from operating correctly.
- Use the appliance and its accessories and tools in accordance with these instructions, taking into account the working conditions and the work to be performed. Use the appliance for operations different from those intended could result in a hazardous situation.
- Never leave the appliance unattended while in use.
- Do not open the battery/ies under any circumstances whatsoever.
- Use the device only with the battery/ies for which has been specifically designed. The use of any other battery/ies can cause an explosion or fire hazard.
DESCRIPTION
A Tension disk
B Upper thread spindle
C Thread cap
D Upper thread
E Under threads winding shaft
F Stop poling
G Hand wheel
K Presser foot filter
H Reverse lever
1 On/off/velocity/pedal switch
J Free arm
K Light
L Pattern selection dial
M Upper thread tension dial
N Take-up lever
O Grip
P Thread cutter
Q Thread guide
R Presser foot lock lever
S Presser foot
T Feet doc bobbin case lid
U Needle clamp screw
W Bobbin case lid release button
X Presser foot filter
Y Adaptor socket
Z Food pedal socket
A.A Foot pedal
A.B Adaptor
A.C Buttonhole,Threader, Needle, Spoot x2, Bobbin x3
If the model of your appliance does not have the accessories described above, they can also be bought separately from the Technical Assistance Service.
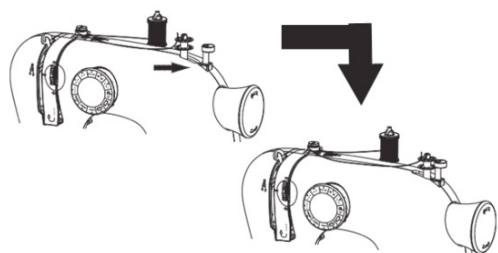
THREADING THE UPPERTHREAD
- Replace the thread as follows when you run out of thread or if you want to change thread colour.
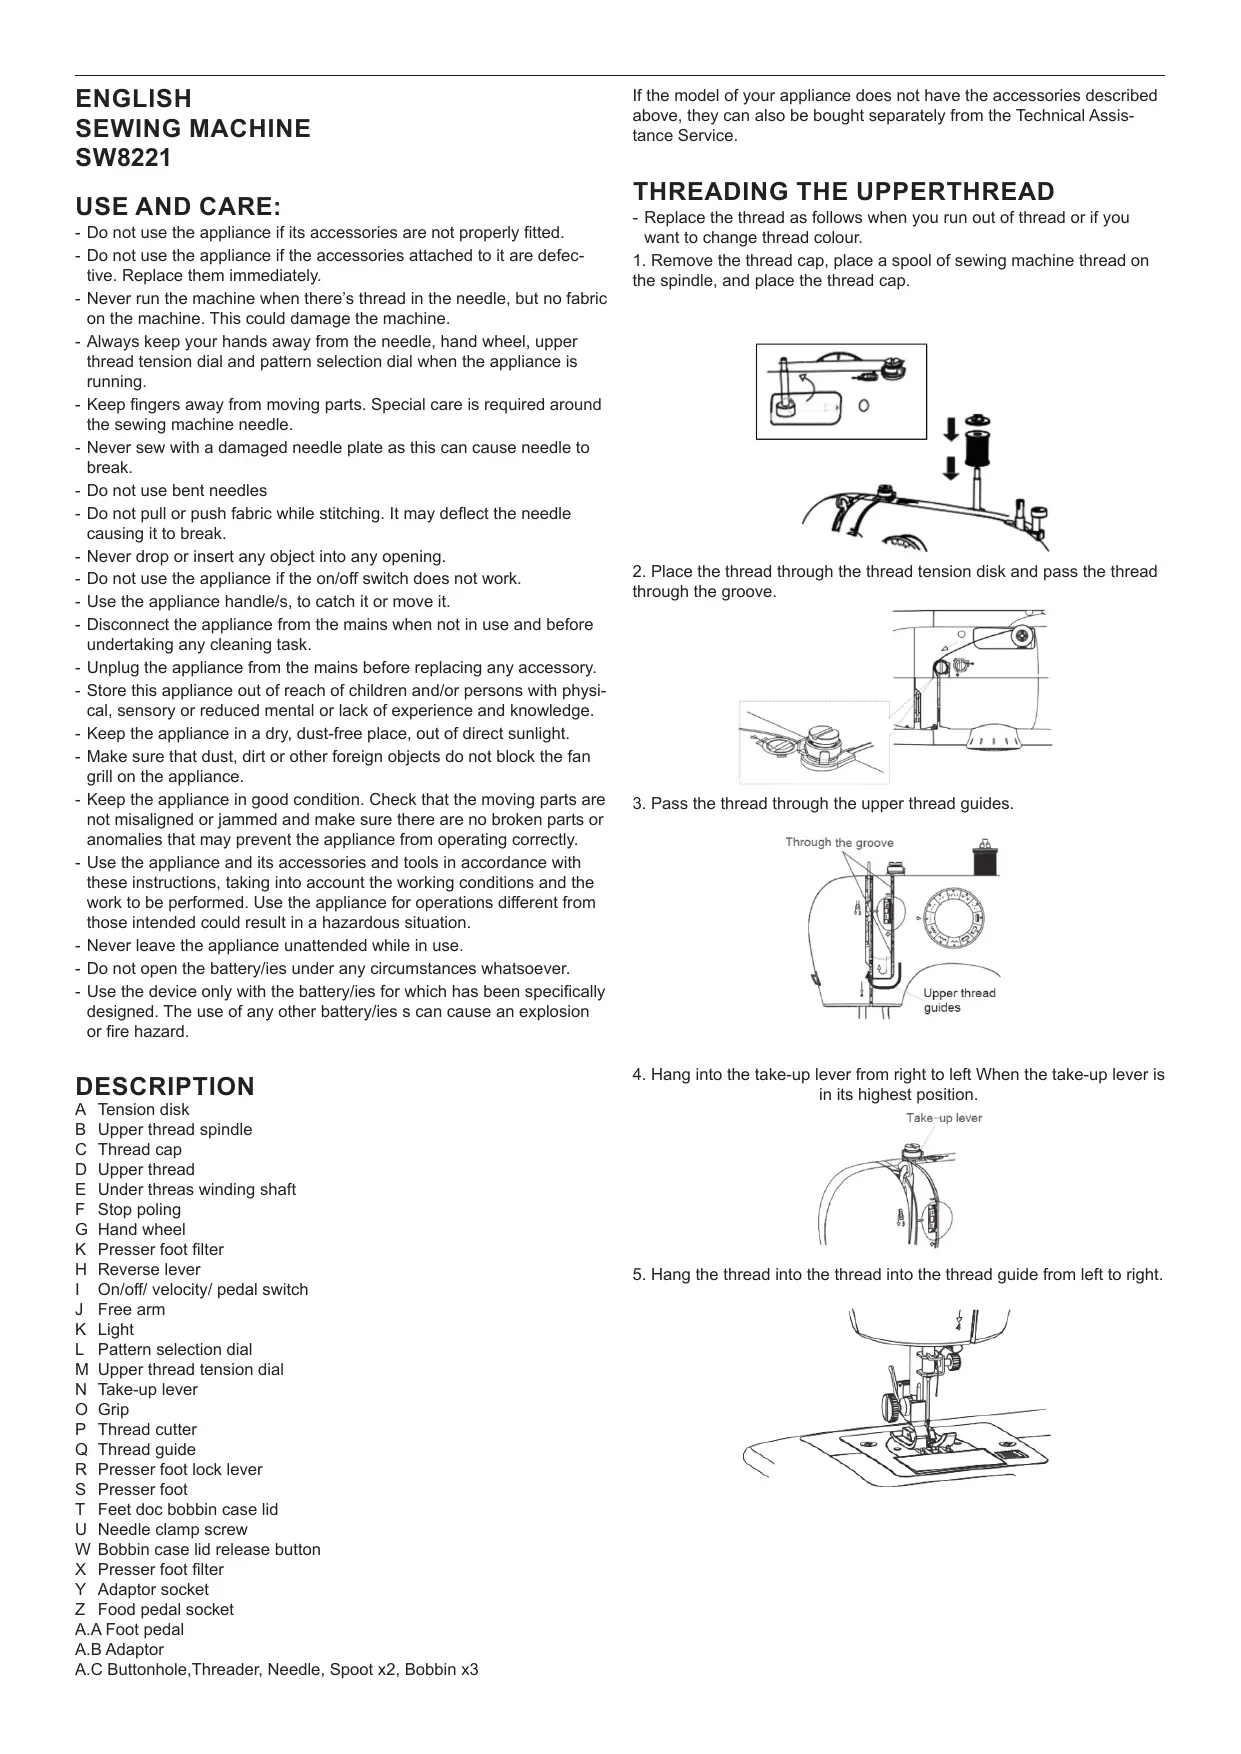
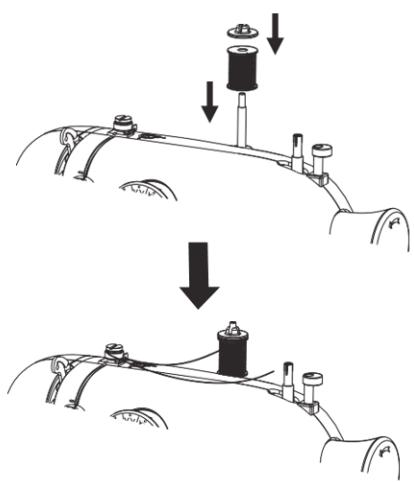
- Remove the thread cap, place a spool of sewing machine thread on the spindle, and place the thread cap.
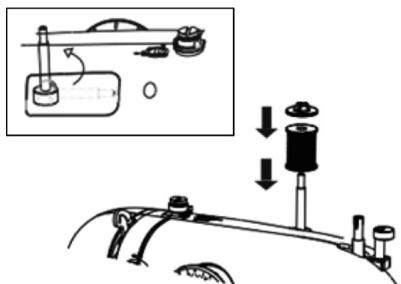
- Place the thread through the thread tension disk and pass the thread through the groove.
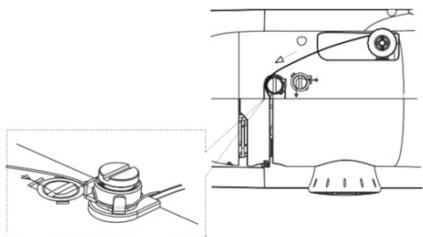
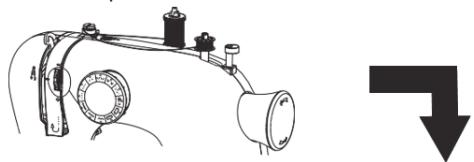
- Pass the thread through the upper thread guides.
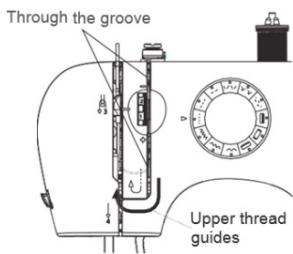
- Hang into the take-up lever from right to left When the take-up lever is in its highest position.
Take-up lever
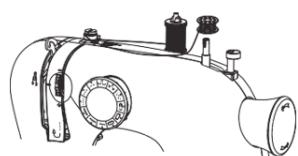
- Hang the thread into the thread into the thread guide from left to right.
- Rotate the hand wheel to raise the needle to its highest position and pass the thread through the eye of the needle from the front to the back.
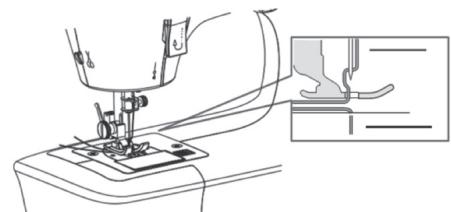
Use of the needle threads
- Pass the tip of the needle threader through the eye of the needle from the rear of the machine to the front.
- Pass the thread through the ring.
- Gently pull on the needle threads to pass the thread through the eye of the needle from the front toward therear.
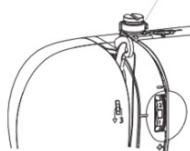
THREAD THEBOBBINTRHEAD
- Thread the upper thread before threading the bobbin thread. You will not be able to bring up the bobbin thread unless you have already threaded the upper thread.
- CAUTION: Be sure to use metalbobbins.
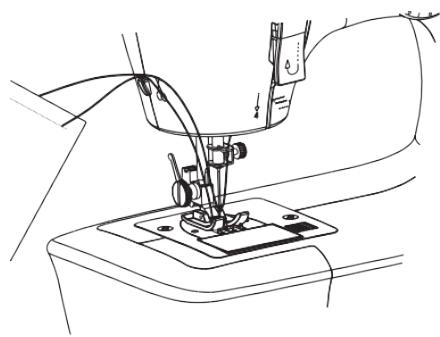
- Rotate the hand wheel toward you (counter clockwise) to raise the needle to its highest position. Lift the presser foot lifter.
- Push the hook cover plate release button to remove it.
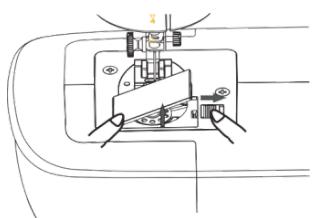
- Pull out about 10cm of thread from the bobbin and insert the bobbin so it winds to the right.
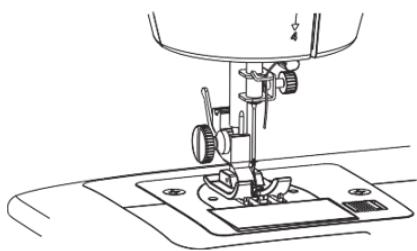
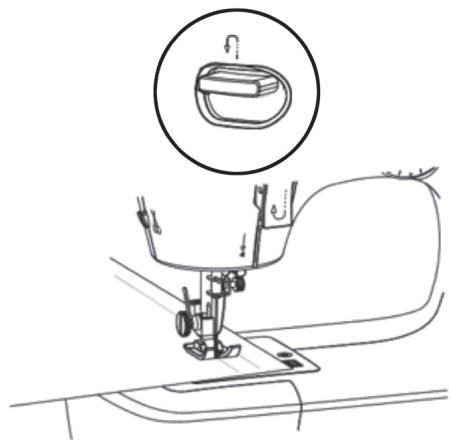
- Hold the end of the upper thread and rotate the hand wheel toward you (counter clockwise) while gently pulling on the upper thread until the bobbin thread emerges from the bobbin thread hole.
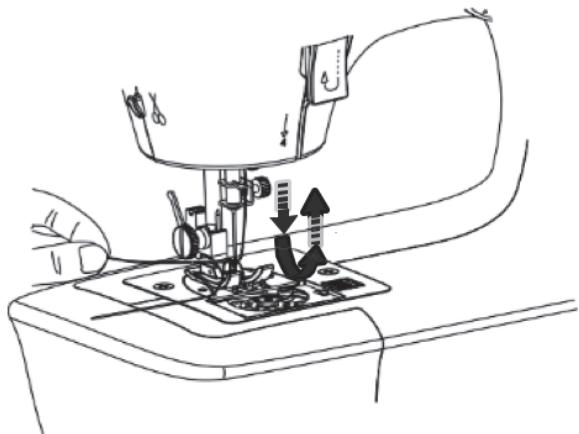
- Pull the bobbin thread when it emerges from the bobbin thread hole. It's easier to pull the thread out if you use a rod with a small tip.
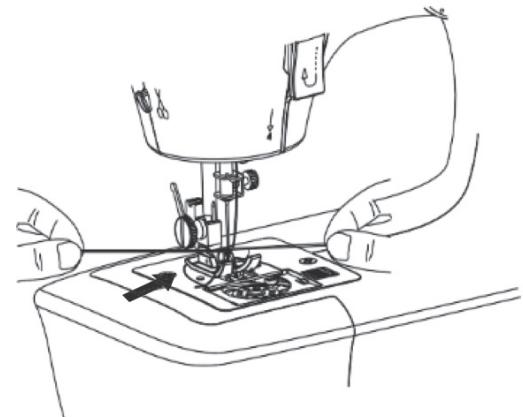
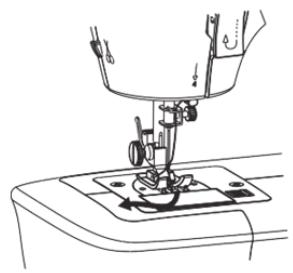
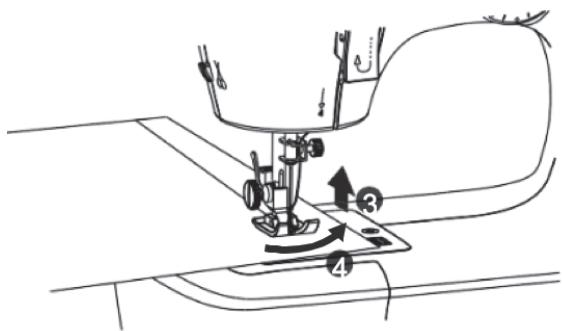
- Pass the upper and bobbin threads to the rear under the presser foot, pulling them out together about 10cm .
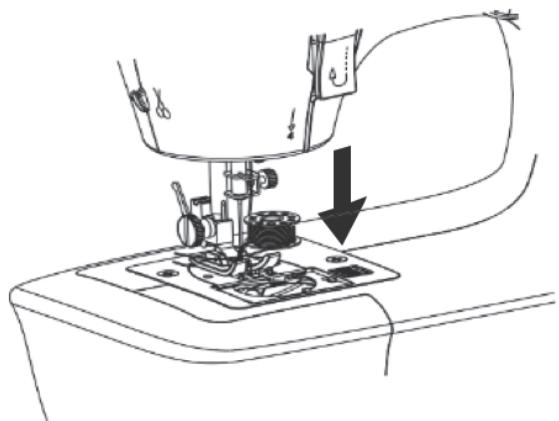
- Attach the hook cover plate.
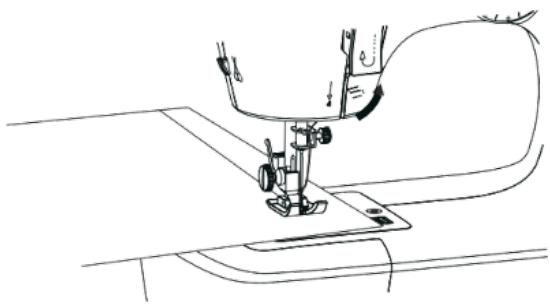
- Note: The upper and bobbin thread must be correctly installed. Sew a test piece to make sure the machine is sewing correctly and then begin sewing your project.
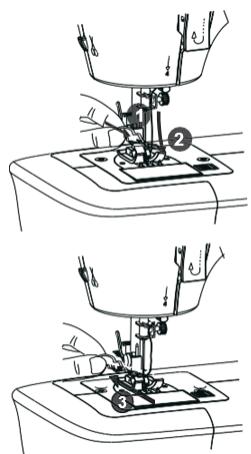
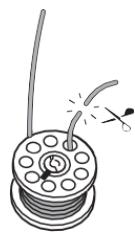
WINDING THREAD ONTO THE BOBBIN
- This is how you wind thread onto an empty bobbin (Make sure the needle thread is not being threaded).
- CAUTION: Be sure to use metalbobbins.
- Place a spool of sewing machine thread onto the thread spindle and place the thread cap or place the thread spool on the desk (If the thread spool is big).
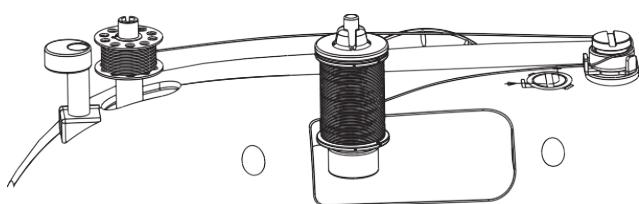
- As shown in the drawing, the thread passes through the bobbin hole, and is winded 3-4 times to the right around the bobbin.
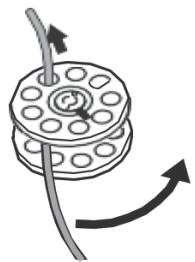
- Align the groove in the centre of the bobbin with the fitting on the bobbin thread winding spindle and press down.

- Slide the bobbin winding spindle to the right.
- Move the power switch to "I" or "II" to start winding the bobbin.

- Be careful because the needle will move up and down.
- Stop the machine after you have wound the appropriate length of thread onto the bobbin.
- Slide the bobbin winding spindle back to the left and remove the bobbin from the spindle.
- Cut the bobbin thread.Cut the thread short.
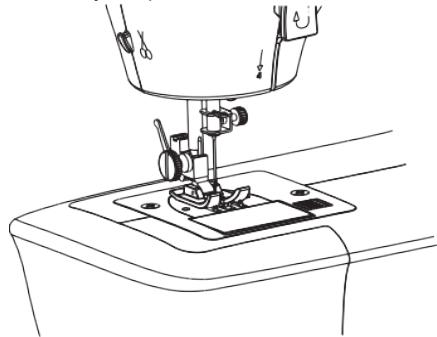
REPLACING THENEEDLE
- Use the following method to replace the needle if the needle becomes bent or broken.
-
CAUTION: To prevent accidents when replacing the needle, be sure to turn the power switch" FOOT PEDAL". (It is even safer to remove and the AC adaptor.). Be sure too that batteries are removed.
-
Rotate the hand wheel toward you (counter clockwise) and raise the needle to approximately the position indicated in the drawing.
- While holding the used needle, use a bobbin/ coin to loosen the needle clamp screw counter clockwise to remove the needle. Remove the needle and dispose of it appropriately.
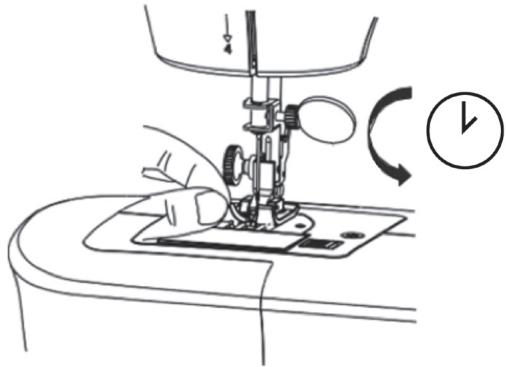
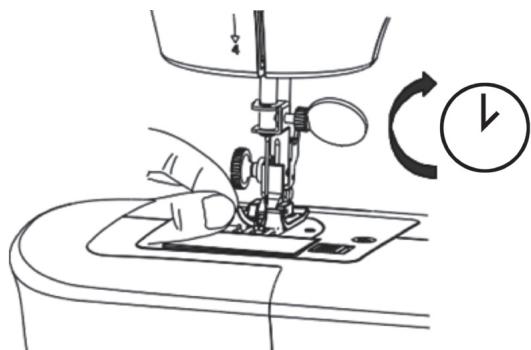
- Insert a new needle in the needle clamp so that the flat part faces the back, turn the needle clamp screw clockwise, and tighten the needle in place. Make sure to push the needle all the way into the clamp and you fully insert the needle. If not, the needle may break.
-
Slowly rotate the hand wheel towards you to make sure that the needle is functioning properly.
-
Note: When installing or removing the needle, rotate the hand wheel to adjust the needle to a convenient heightStitch adjustment (thread tension)
- Try a few test stitches before you start sewing to check on the condition of the thread.
- Since thread tension will vary depending on the type of fabric used, do some test sewing when you change fabrics to check on the condition of the thread.
- CAUTION: Use either the bobbin that is provided as an accessory or an off-the-shelf metal bobbin. Thread tension cannot be adjusted if you use a plastic bobbin.
| ○ | In normal stitches, the upper thread in the bobbin thread will cross in the fabric. |
| × The bobbin thread should appear straight ↓ Upper thread is too loose | ○ |
| - Increase the number of the upper thread tension dial. - Turn the upper thread tension dial down to increase the number until the stitches become normal and the upper thread tension is tight. | ○ |
| × The upper thread should appear straight ↓ Upper thread is too tight | ○ |
| - Reduce the number on the upper thread tension dial. - Slowly turn the upper thread tension dial up to reduce the number until the stitches become normal and the upper thread tension isreduced. | ○ |
INSTRUCTIONS OF USE
- Make sure that all the product's packaging has been removed.
- Some parts of the appliance have been lightly greased. Consequently, the first time the appliance is used a light smoke may be detected. After a short time, this smoke will disappear.
- Prepare the appliance according to the function you wish to use:
- This device can be mains or battery operated.
- Note: If you want to operate machine on batteries, unplug the adapter from the mains and then from the sewing machine.
INSTALLING THE BATTERIES:
- Caution: During the handling of batteries, do not touch both poles at the same time, as this will provoke the partial discharge of the stocked energy therefore affecting longevity.
- Check that the plastic covering that protects the battery has been removed (some batteries are sold with a protective covering)
- It is essential that the batteries should always be the same kind and the same charge. Never mix alkaline batteries with normal one (Carbon-Zinc) and/or rechargeable ones.
- Do not combine new batteries with older batteries, and not reverse the polarity.
-
To stop the machine from starting when fitting the batteries, use one of the following options:
-
Plug the adapter into the machine but not into the mains power socket.
-
Set the speed switch to the "FOOT PEDAL" position.
-
Tilt the sewing machine on its side and remove the cover of the battery compartment on the bottom.
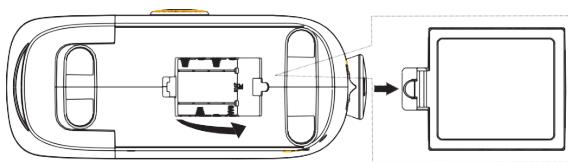
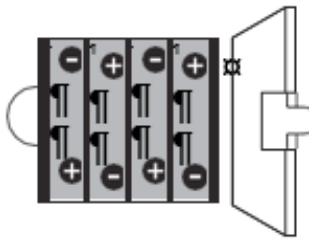
- Insert four AA alkaline batteries (LR6). Only use new batteries.
- Make sure the batteries are correctly oriented.
- Then close the cover.
- Remove the batterie if you will not be using the machine for long period of time. Batteries left in the machine may leak.
- NOTE: machine light will be always on if batteries are placed on the appliance.
USING THE FOOT PEDAL AND ADAPTOR
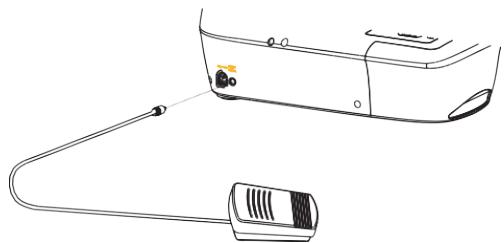
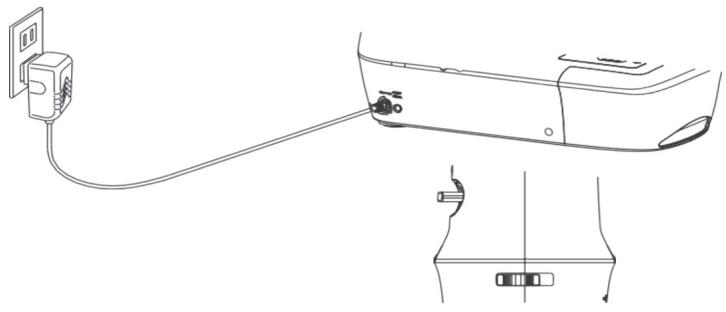
- Connect the foot pedal by inserting the jack into the foot pedal input socket. Then you can use the foot pedal turn on the machine instead of using the hand switch (Power off and speed switch), so it's easy and convenient.
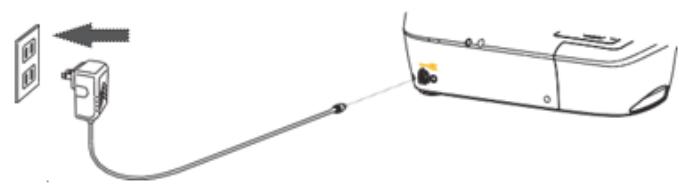
- Connect the adaptor's jack to the DC input socket (?) on the back of the machine and connect the plug to the main power supply.
- CAUTION: make sure the foot pedal is unplugged from the machine when you're not using it, so the sewing machine won't accidentally start up.
HOW TO USE THE SEWING MACHINE WITH THE FOOT PEDAL
- Make sure power /speed switch in "pedal" position when you operate sewing machine with Foot pedal. Using speed button and foot pedal at the same time may cause injury.
- The machine will operate only while you are pressing the pedal with your foot.
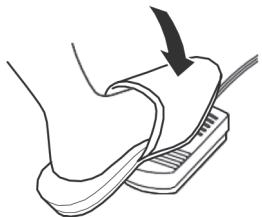
- Be sure to use the foot pedal supplied with the appliance.
- The sewing machine will run faster if you use the foot pedal without a speed control feature.
Sewing basics
- Let's try making a straight stitch, the most basic kind of sewing.
- Make sure the upper thread and the bobbin thread have been correctly installed.
- Turn the hand wheel toward you (counter clockwise) to raise the take-up lever and the needle to their highest position.
- Pull the upper thread and the bobbin thread together so they come out behind the needle by about 10 cm. Make sure that the upper thread and the bobbin thread come out beneath the pressure foot.
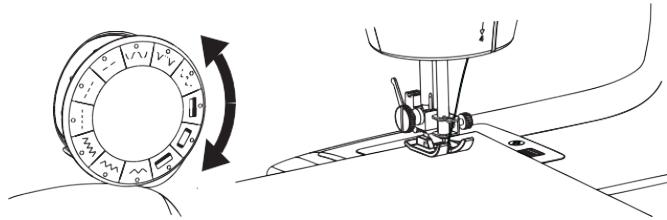
- Turn the pattern selection dial to select the stitch pattern.
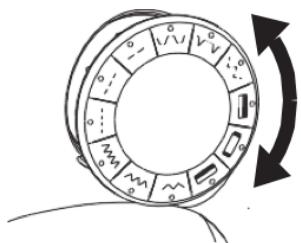
- When rotating the Pattern selection dial, make sure the needle is in the raised position.
- Here," Set the machine for "straight stitch
- Raise the presser foot and place the fabric under it
- When you use the sewing machine for the first time, remove the test piece (this is a piece of fabric used for test sewing when the machine is shipped from the factory).
- Turn the hand wheel toward you (counter clockwise) to lower the needle to the position where you wish to start sewing.
- Lower the presser foot lifter to fasten the fabric.
- Make sure that the Power / Speed switch is set to "Foot pedal position" and the adaptor is plugged in.
-
Start sewing again while pressing the fabric gently.
-
How to use the operating power/ speed switch
-
FOOT Pedal position: Appliance only works with the foot pedal
- I: The machine will move slowly.
-
II: The machine will move quickly.
-
When using the foot pedal (one speed foot pedal):
- Make sure power / speed switch is in "FOOT PEDAL" position.
-
The machine will run only while you are pressing the pedal with your foot.
-
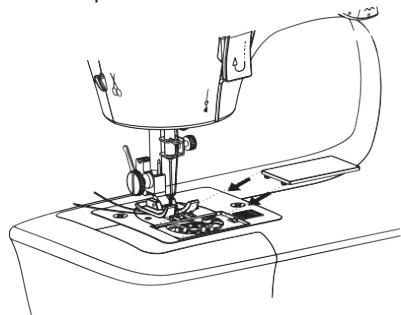
When you have finished sewing, rotate the hand wheel toward you (counter clockwise) to raise the needle and the take-up lever, and raise the presser foot lifter.
- Remove the fabric and cut the thread with the thread cutter.
- Hints: If the thread is caught and you cannot remove the fabric, rotate the hand wheel back and forth slightly to make it easier to remove the thread and the fabric.
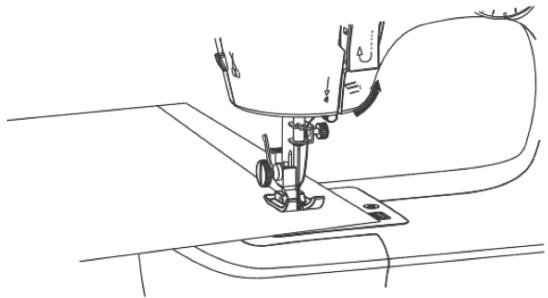
WHEN REVERSE STITCHING
- The machine will sew in reverse only while the reverse lever is pushed down.
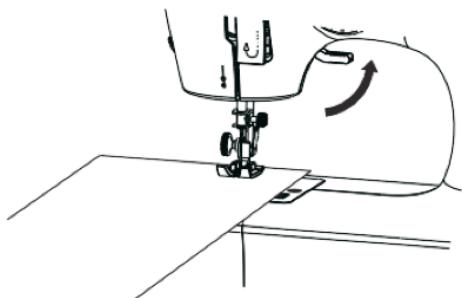
WHEN CHANGING SEWINGDIRECTION
- OFF: Stop the sewing machine placing the sped knob to "Foot pedal position"

- Lower the needle by turning the hand wheel toward you (counter clockwise) to insert the needle into the cloth.
- Raise the presser foot lifter to raise the presser foot.
- Rotate the fabric.
- Lower the presser foot lifter to begin sewing again.
VARIOUS TYPES OF SEWING
| Mark | - | - | - | - | - | - | - | - | - | - | - |
| Type | Straight stitch | Blind Stitch | Buttonhole sewing | Zigzag stitch | |||||||
| Presser | Normal presser foot | Presser foot for buttonhole sewing | Normal presser foot | ||||||||
| Uses | Fine stitches Coarse stitches | Hemming Sewing cuffs, etc. | Sew around the buttonhole | Finishing the end of the fabric (overcast stitching). Applique Patchwork, etc | |||||||
if you want to change the stitch while sewing
-
- Stop the machine, rotate the hand wheel toward you counter clockwise, and move the take-up lever and the needle to their highest position.
- CAUTION: Do not turn the pattern selector dial while the machine is running or while the needle is in the fabric. Doing so can result in the machine damage.
- Turn the pattern selection dial to align with the mark indicating the desired stitch.
- Hints: Stitches can be used when sewing two layers of fabric too. The straight stitch is best when you are sewing soft fabrics or silks.

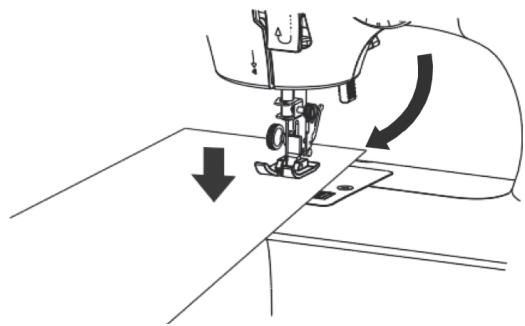
When sewing tubular items
- Slide tubular items like sleeves and trouser legs over the arm so you can sew them.
- Hints: It is helpful to remove the auxiliary table when you sew tubular items like sleeves.

BUTTONHOLE SEWING
- You can sew buttonholes by using the buttonholepressor foot accessory. We recommend that sew a few pieces before you sew actual material.
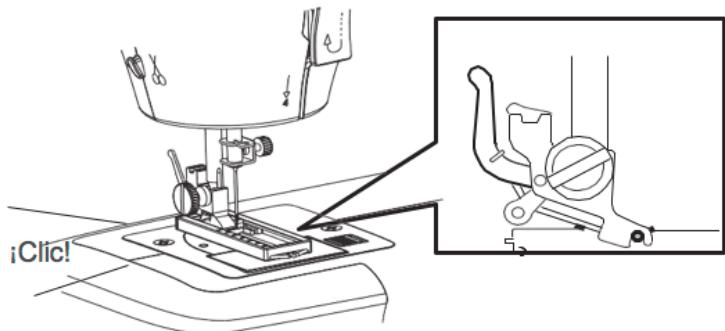
Install the buttonhole presser foot.
- Raise the presser foot and lift the needle to its highest position.
- Raise the presser foot lifter and remove the presser foot.
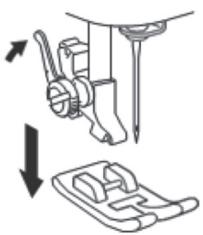
- Hold the buttonhole presser foot and place it under the holder. Align the presser foot pin so it lines up right under the holder.
- Lower the presser foot to lower the presser foot holder.
- Raise the presser foot lock lever to secure the presser foot to the presser holder.
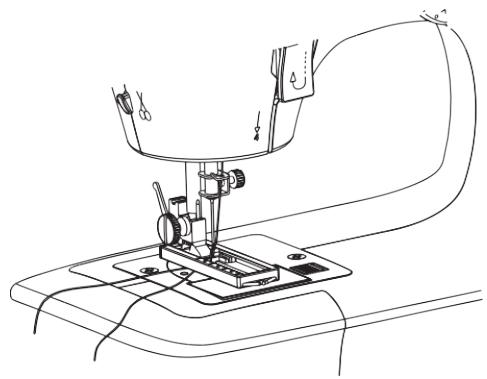
- Raise the presser foot lifter, pass the upper thread and the bobbin thread through the buttonhole presser foot so they come out from the side.
Sewing a buttonhole
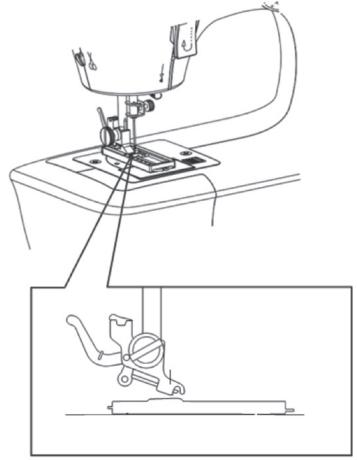
- Using tailor's chalk, mark the position of the buttonhole on the fabric.
- Attach the buttonhole presser foot and place the fabric beneath the presser foot.

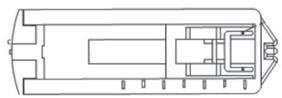
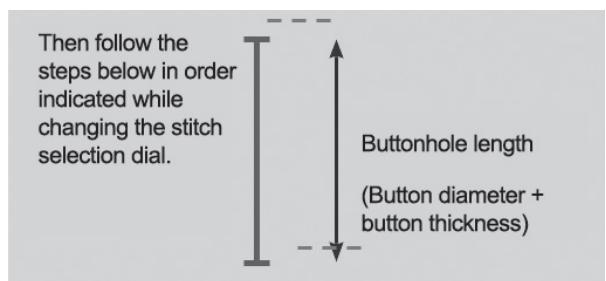
- Draw both of needle and bobbin thread to the left. Slider frame of buttonhole is removable. Move the slider frame toward you so that the top mark on the slider meets the start mark.

- Choose the buttonhole length as per your requirement by stopping slider frame movement. Please see the following picture.
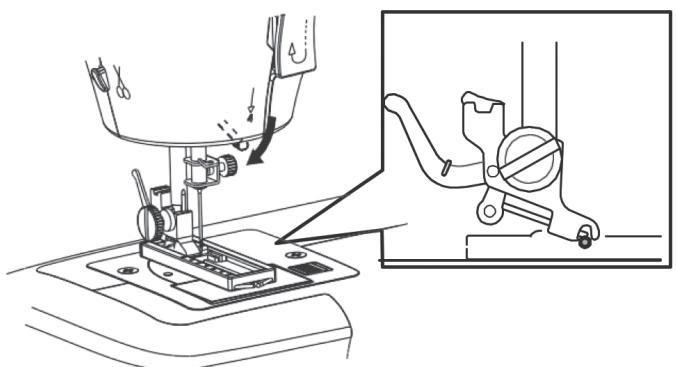
- Lower presser foot lifter and make sure the needle is in its high position.
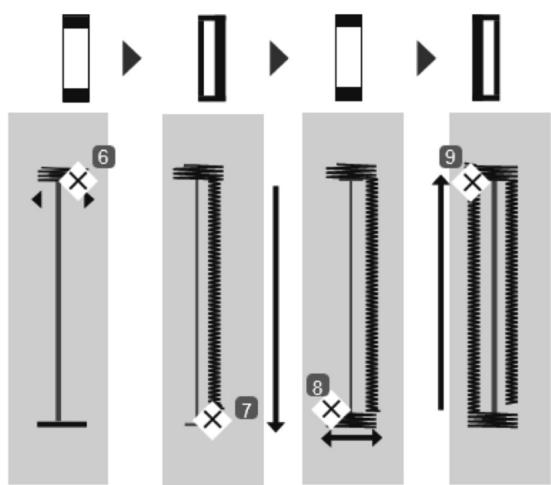
- Select Pattern selection dial to "[]" to sew back bar tack for 4 or 5 stitches.
- Select Pattern selection dial to "[]" to sew right side bar tack.
- Select Pattern selection dial to "□" to sew front bar tack for 4 or 5 stitches.
- Select Pattern selection dial to "[]" to sew left side bar tack until the needle reaches the stitches sew in step 6.
- Hints: our sewing will be neater if you guide the fabric as it passes through the machine.
-
CAUTION: Stop the sewing machine and raise the needle and the thread tension lever to their highest positions when you rotate the pattern selection dial. Turning the dial while the machine is running can damage the machine.
-
When you have finished sewing, pull the fabric slightly and cut the thread.
- To keep the thread from unravelling, pull out the upper thread from the rear of the fabric and tie it off with the bobbin thread.

OTHER FUNCTIONS
Overlocked
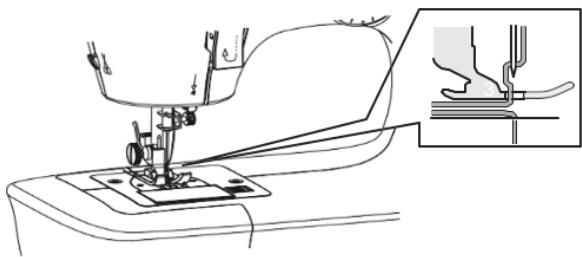
- To finish off the edges of any fabric, start sewing 0.3cm from the edge.
- We must select an overlock or overlock stitch, leaving the width and length values that come by default. (depending on the machine they will be one or the other)
- Advancing slowly, the fabric that we have left, while the needle is making the overlock or overlock stitch to obtain a perfect finish on the piece. When the end of the fabric is reached, we finish off.
Pre-riveted drilling
- It consists of moving the needle without thread front and back to pierce the fabric and thus be able to put a brooch or a rivet.
- If you want a bigger hole you should change the needle to a thicker one.
ONCE YOU HAVE FINISHED USING THE APPLIANCE:
-
Turn the appliance off:
-
If you are using batteies, put the knob to "FOOT pedal position"
-
If you are connected to the main. Put the knob to FOOT pedal position and unplug from the mains,
-
Clean the appliance.
- Remove the batteries from the appliance.
CLEANING
- Disconnect the appliance from the mains and allow it to cool before undertaking any cleaning task.
- If appliance has assembled bateries remove them to before cleaning.
- Clean the equipment with a damp cloth with a few drops of washing-up liquid and then dry.
- Do not use solvents, or products with an acid or base pH such as bleach, or abrasive products, for cleaning the appliance.
- Do not let water or any other liquid get into the air vents to avoid damage to the inner parts of the appliance.
- Never submerge the appliance in water or any other liquid or place it under running water.
STORAGE AND DISPOSAL
-
Store this product in a dry and safe location, and no keep it in any of the following locations:
-
Locations tat are subjected to extrem heat or cold.
- Dusty or wet locations.
- Near heat sources or fire.
- Outdoors or direct sunlight.
- Oily, smoky or steamy locations
- Within reach of children or near pets.
- When storing the product, keep it away from grease, oil, mud, snow, wet paint, and slippery objects.
- When storing the product, keep it clean and keep it away from hazardous substances.
- Store the product in falt and safe location.
- Remove the batteries.
TROUBLESHOOTING:
| Trouble | Causes | Solution |
| Lamp does not illuminate | 1. No pwer supply. 2. AC adaptor are not installed correctly. 3. AC adaptor are dead | 1. Turn the power supply switch ON and supply power. 2. Make sure the AC adaptor are oriented correctly and reinstall them 3. Install new the AC adaptor |
| Machine runs slowly | 1. No pwer supply. 2. AC adaptor are not installed correctly. 3. AC adaptor are dead | 1. Turn the power supply switch ON and supply power. 2. Make sure the AC adaptor are oriented correctly and reinstall them 3. Install new the AC adaptor |
| Machine does not run | 1. No pwer supply. 2. AC adaptor are not installed correctly. 3. AC adaptor are dead | 1. Turn the power supply switch ON and supply power. 2. Make sure the AC adaptor are oriented correctly and reinstall them 3. Install new the AC adaptor |
| Stitches not regular | 1. Upper thread not threaded correctly. 2. Needle is bent. 3. Dust buildup in the bobobbin case | 1. Correctly thread the upper thread. 2. Remove the old needle. Install a new needle. 3. Clean the bobbin case |
| Bobbin thread does not come out from the bobbin | 1. Out of bobbin thread. 2. Incorrect threading. | 1. Wind thread onto the bobbin or install a loaded bobbin. 2. Thread the needle correctly (from the front). |
| Thread keeps breaking | 1. Knots and tagles in the thread. 2. Upper thread or bobbin thread threaded incorrectly. 3. Needle is bent. 4. Needle incorrectly installed. 5. Too much thread tension. | 1. Use scissors to cut out thread knots and tangles. 2. Check how to assemble upper thread or bobbin thread, to thread the machine correctly. 3. Remove the old needle and install a new one. 4. Install needle correctly. 5. Turn the upper thread adjustment dial for 3-5 degrees and loosen thread tension. |
| Stitches are loose or uneven. | 1. Upper thread does not feed properly from the thread spool. 2. The upper thread is too loose. | 1. Reinstall the spool and make sure the spool turns smoothly. 2. Reinstall the spool and make sure the spool turns smoothly. |
| Needle breaks | 1. Needle is bent or deformed. 2. Needle incorrectly installed. 3. Needle clamp screw is loose. | 1. Remove the old needle. Install a new needle. 2. Install needle correctly. 3. Firmly tighten the needle clamp screw. |
| Threat gets tangled and does not work | 1. Thread gets tangled inside | 1. Turn off the power and slowly turn the pulley toward you to pull out the tangled thread. |
| Needle gets stuck in thick fabric | 1. Needle does not penetrate smoothly. | 1. Set the operating switch to STOP, turn the pulley toward you, try making 2-3 stitches, and then move the operating switch. |
| Stitch (thread tension) out of adjustment- | 1. Using a non-metallic bobbin. | 1. Use a metal bobbin |
| Needle hit needle palate or foot presser | 1. The needle is bent or deformed | 1. Install a new needle |
EMMAGATZEMATGE I ABOCAMENT


- ENGLISH SEWING MACHINE SW8221
- USE AND CARE:
- DESCRIPTION
- THREADING THE UPPERTHREAD
- Use of the needle threads
- THREAD THEBOBBINTRHEAD
- WINDING THREAD ONTO THE BOBBIN
- REPLACING THENEEDLE
- INSTRUCTIONS OF USE
- INSTALLING THE BATTERIES:
- USING THE FOOT PEDAL AND ADAPTOR
- HOW TO USE THE SEWING MACHINE WITH THE FOOT PEDAL
- Sewing basics
- WHEN REVERSE STITCHING
- WHEN CHANGING SEWINGDIRECTION
- VARIOUS TYPES OF SEWING
- if you want to change the stitch while sewing
- When sewing tubular items
- BUTTONHOLE SEWING
- Install the buttonhole presser foot.
- Sewing a buttonhole
- OTHER FUNCTIONS
- Overlocked
- Pre-riveted drilling
- ONCE YOU HAVE FINISHED USING THE APPLIANCE:
- CLEANING
- STORAGE AND DISPOSAL
- EMMAGATZEMATGE I ABOCAMENT
Brand : SOLAC
Model : SW8220
Category : Sewing machine