
ATLAS - Range hood FALMEC - Free user manual and instructions
Find the device manual for free ATLAS FALMEC in PDF.
| Product Type | Extractor hood |
| Brand | FALMEC |
| Model | ATLAS |
| Power Supply | 230 V, 50 Hz (check rating plate) |
| Minimum Distance with Cooking Surface | ≥ 65 cm |
| Operating Modes | Extracting (external exhaust) / Recirculating (recycling with charcoal filters) |
| Available Controls | 2-button, 5-button, electronic with optional remote control |
| Motor Speeds | 3 or 4 speeds (depending on version), with timed intensive speed (15 min) |
| Lighting | Halogen or fluorescent bulbs (max. 20-25 W depending on type) |
| Anti-grease Metal Filters | Dishwasher safe or washable in hot detergent water (monthly) |
| Activated Carbon Filters | Replace every 3-4 months (not washable) |
| Filter Saturation Alarm | Yes, after approx. 30 hours of operation (red button) |
| Automatic Shut-off Timer | 15 minutes of operation |
| Exterior Cleaning | Soft cloth with neutral detergent or denatured alcohol (every 15 days) |
| Remote Control | Optional, max. range 5 meters |
| Warranty | Conditions noted on the back of the manual |
Frequently Asked Questions - ATLAS FALMEC
User questions about ATLAS FALMEC
0 question about this device. Answer the ones you know or ask your own.
Ask a new question about this device
Download the instructions for your Range hood in PDF format for free! Find your manual ATLAS - FALMEC and take your electronic device back in hand. On this page are published all the documents necessary for the use of your device. ATLAS by FALMEC.
USER MANUAL ATLAS FALMEC
INSTRUCTIONS BOOKLET
Dear Sir/Madam, congratulations!
You have purchased a prestigious range hood of guaranteed quality. For best results, we suggest that you carefully follow the operating and maintenance instructions provided in this booklet; in addition, to order spare charcoal filters, use the special coupon on the cover.
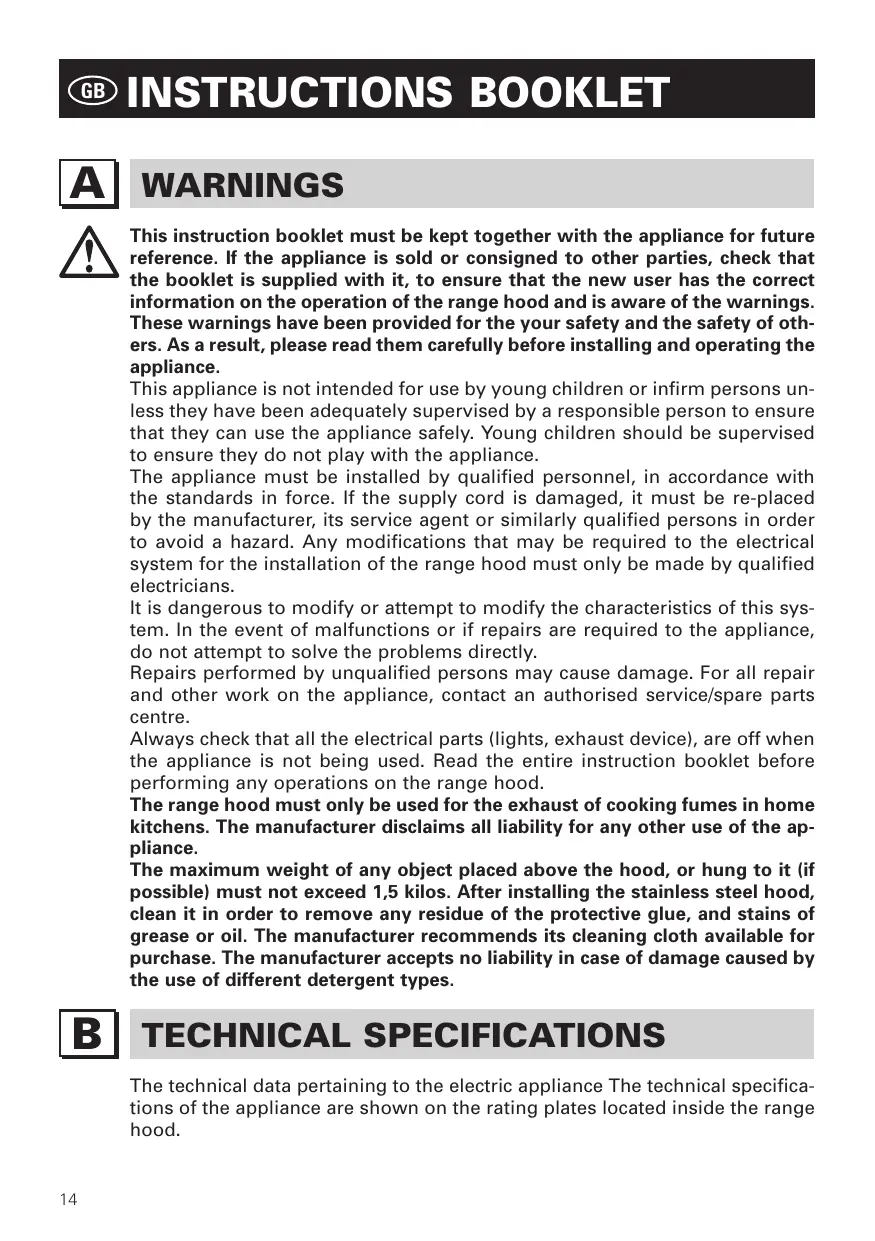
NEW FIXING SYSTEM WITH MAGNETS
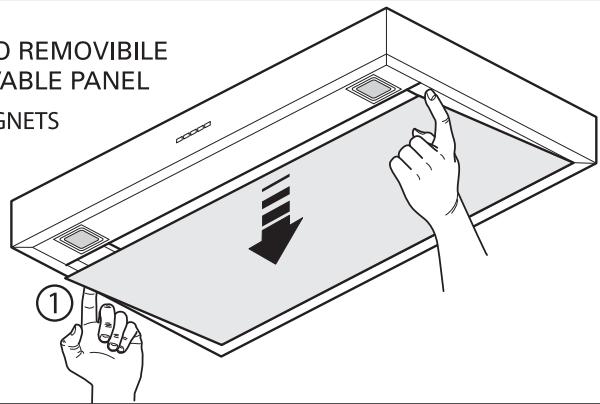
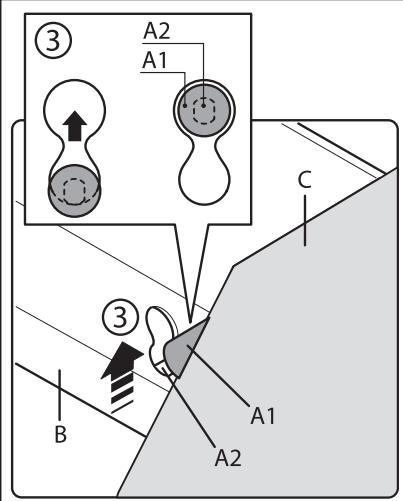
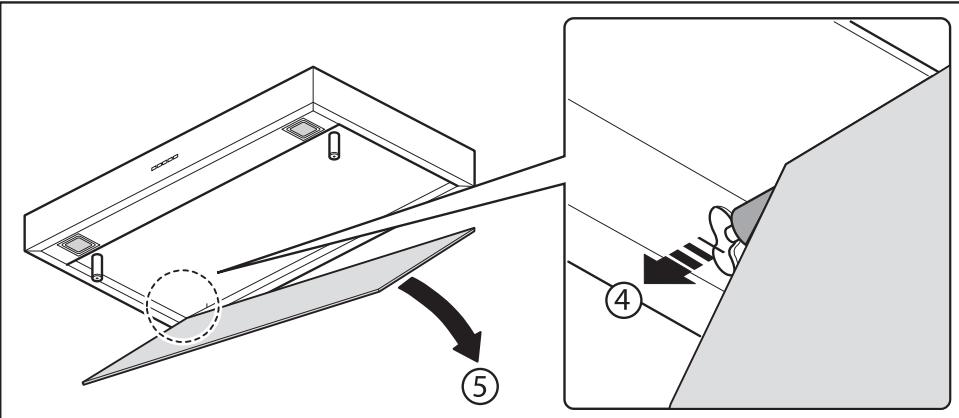
Fig. H3

AVVERTENZE

3. PANNELLO REMOVIBLE
Square halogen light
3. LAMPADA FLUORESCENTE
This instruction booklet must be kept together with the appliance for future reference. If the appliance is sold or consigned to other parties, check that the booklet is supplied with it, to ensure that the new user has the correct information on the operation of the range hood and is aware of the warnings. These warnings have been provided for the your safety and the safety of others. As a result, please read them carefully before installing and operating the appliance.
This appliance is not intended for use by young children or infirm persons unless they have been adequately supervised by a responsible person to ensure that they can use the appliance safely. Young children should be supervised to ensure they do not play with the appliance.
The appliance must be installed by qualified personnel, in accordance with the standards in force. If the supply cord is damaged, it must be replaced by the manufacturer, its service agent or similarly qualified persons in order to avoid a hazard. Any modifications that may be required to the electrical system for the installation of the range hood must only be made by qualified electricians.
It is dangerous to modify or attempt to modify the characteristics of this system. In the event of malfunctions or if repairs are required to the appliance, do not attempt to solve the problems directly.
Repairs performed by unqualified persons may cause damage. For all repair and other work on the appliance, contact an authorised service/spare parts centre.
Always check that all the electrical parts (lights, exhaust device), are off when the appliance is not being used. Read the entire instruction booklet before performing any operations on the range hood.
The range hood must only be used for the exhaust of cooking fumes in home kitchens. The manufacturer disclaims all liability for any other use of the appliance.
The maximum weight of any object placed above the hood, or hung to it (if possible) must not exceed 1,5 kilos. After installing the stainless steel hood, clean it in order to remove any residue of the protective glue, and stains of grease or oil. The manufacturer recommends its cleaning cloth available for purchase. The manufacturer accepts no liability in case of damage caused by the use of different detergent types.

TECHNICAL SPECIFICATIONS
The technical data pertaining to the electric appliance The technical specifications of the appliance are shown on the rating plates located inside the range hood.
(Section reserved for qualified installers of the range hood)
Minimum distance: distance between the pan supports of the cooker and the bottom-most section of the hood. When the hood is positioned above a gas equipment this minimum distance must be at least 65~cm (see picture C1) or even more, if this is specified in the instructions for use of the gas cooker.
In the outside exhaust version, the diameter of the fume discharge duct must be no smaller than the range hood connection.
In the horizontal sections, the duct must slope slightly (around 10% ) upwards, so as to better convey the air outside of the room.
Avoid using angled pipes, make sure that the pipes are at least of the minimum length.
Comply with the current regulations on air discharge into the atmosphere. If a boiler, stove, fireplace, etc. that uses gas or other fuels is being used at the same time, make sure the room where the fumes are extracted is well ventilated, in compliance with the current regulations.
Mounting instruction: see section "O" of the booklet.

ELECTRICAL CONNECTIONS
(Section reserved for qualified installers)
WARNING!
Before doing any work inside the range hood, disconnect the appliance from the mains power supply.
Check that the wires inside the range hood are not disconnected or cut; if this is the case, contact your nearest service centre. The electrical connections must be performed by qualified personnel.
The connections must be performed in compliance with the legal standards in force. Check that the relief valve and the electrical system are able to support the load of the appliance (see the technical specifications in point B).
Some types of appliance are supplied with a cable without plug; in this case, "standardised" plugs must be used, keeping in mind that:
- the yellow-green wire must be used for the earth,
- the blue wire must be used for the neutral,
- the brown wire must be used for the phase; the cable must not come into contact with hot parts (over 70^ ).
- fit a plug that is suitable for the load to the power cable, and connect it to a suitable power outlet.
For appliances that come supplied with cable and plug please ensure they are plugged into a circuit suitable for this appliance.
Please refer to a qualified person. (See technical specifications in point B).
The manufacturer declines all liability if the safety standards are not observed.

RANGE HOOD WITH OUTSIDE
DISCHARGE (exhaust)
In this version, the fumes and steam from the kitchen are conveyed outside through an exhaust duct.
The exhaust conveyor that protrudes from the upper part of the range hood must be connected to a duct that carries the fumes and steam outside. In this version, the charcoal filters, if fitted, should be removed; to do this, see the instructions in point F. There must be adequate ventilation of the room when the range hood is used at the same time as appliances burning gas or other fuels, according to the standard.
Deviation for Germany:
When the range hood and appliances supplied with energy other than electricity are simultaneously in operation, the negative pressure in the room must not exceed 4 Pa (4x10 E-5 bar).

RECIRCULATING RANGE
HOOD (with filter)
In this version, the air passes through charcoal filters for purification, and is then recirculated back into the kitchen.
Check that the charcoal filters are fitted to the motor, and if not, install them as described in the instructions in point H.
If the hood is of filtering type, remove the non-return valve fitted at the motor's outlet.

For maximum efficiency, the third speed should be used when there are strong odours or a lot of steam, the second speed in normal conditions, and the first speed for keeping the air clean with minimum energy consumption.
The range hood should be switched on when starting to cook, and left on until the odours disappear.

OPERATION
1. TWO BUTTON CONTROL PANEL
LIGHT - Switch A
Position 0: the light is off.
Position 1: the light is on.
SPEED - Switch B
This is used to start and set the speed of the motor, from 1 to 3, or with continuous speed variator, depending on the version.
LIGHT-C
Motor operation indicator light.
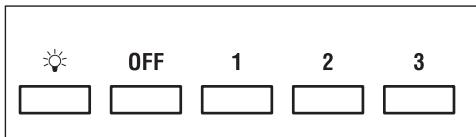
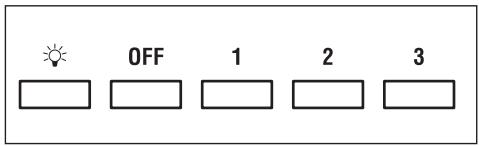
2. FIVE BUTTON CONTROL PANEL
LIGHT- button

Pressed: the light is on
Released: the light is off
MOTOR button - 1, 2, 3, OFF
1: starts the motor at minimum speed
2: starts the motor at medium speed
3: starts the motor at maximum speed
OFF: stops the motor
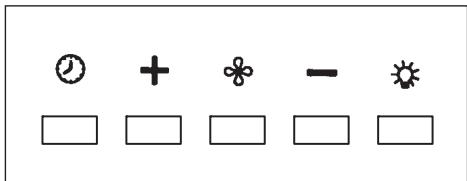
3. ELECTRONIC CONTROL PANEL
Light pushbutton

- ON: light on (the pushbutton is lit);
OFF: light off;
Pushbutton -
Press to reduce motor speed
Speed 1, 2 and 3 are indicated by the number of LEDs that light up (excluding the light and the timer LEDs).
Pushbutton +
Press to increase motor speed
Speed 1, 2 and 3 are indicated by the number of LEDs that light up (excluding the light and the timer LEDs).
(In the 4-speed version the pushbutton + blinks. The fourth speed remains on for a set duration of time. After 15 minutes the motor returns to the third speed).
Mode pushbutton
Function: it turns hood motor on and off.
The function "desired speed" enables to start the motor at the speed that was selected before the hood was last turned off.
Optional: version with remote control (some versions only).
WARNING:
Install the hood away from sources of electromagnetic waves, as these could affect the correct operation of the electronic system.
Maximum operating distance: 5 metres. The maximum operating distance could be less than 5 metres in case of electromagnetic interference by other equipment.
Light pushbutton on remote control: light on/off.
- and + pushbutton: increase/decrease speed (to start the motor press either the + or the - pushbutton).
Timer pushbutton: see instructions below.
Timer and 'filter clogged' alarm pushbutton
- This function allows the automatic turning off of the hood after running for 15 minutes at the speed previously set (the pushbutton shows a flickering light).
- After about 30 hours of running the pushbutton indicates the need for washing the metal filters (the pushbutton shows a solid red light). To disable the alarm press the pushbutton for a few seconds until the red light turns off. Then turn the hood off and on again to check that the alarm has disappeared.

FILTERS REMOVING AND REPLACING'S INSTRUCTIONS
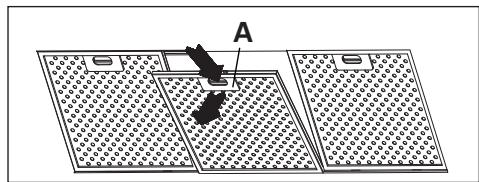
1. METAL FILTERS
To remove the metal grease-trapping filter, simply pull the handle A until releasing it from the front guide; then tilt it slightly downwards, and slide it out of the rear guide. To reposition the filter, repeat the operation in the reverse order.
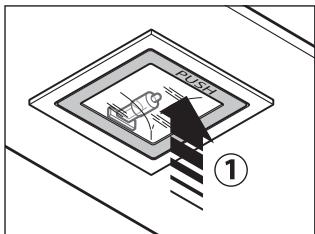
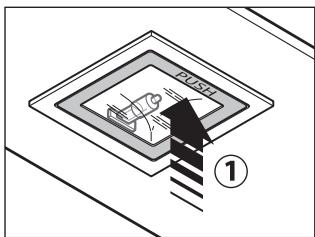
Hoods with perimeter suction:
- Open the panel (see fig. 1). Use handle A to remove the metal grease filter.
2. CHARCOAL FILTERS
To replace the charcoal filters, proceed as follows: remove the metal filters as described above. The two filters located at the ends of the motor can now be easily accessed.
To install the new filters see picture.
In case of hood with the motor box the filter is located on the bottom part of the motor box.
To install the new filters see picture.
To order new charcoal filters contact the distributor/retailer.
VALID ONLY FOR ITALY: download the appropriate order form from:
www.falmec.com (access the assistance drop-down menu).
3. REMOVABLE PANEL
Follow the instructions on fig. H3 to remove the panel.

LIGHTING ASSEMBLY AND REPLACEMENT
1. LIGHT BULB
To replace the light bulb:
a) Make sure the appliance is disconnected from the mains power supply.
b) Unscrew the support screw A and remove the light cover.
c) Replace the light bulb with the same model as the original (max 25 W, see the markings near the light).

WARNING! Light bulbs with different shapes and power ratings from the original may seriously damage the light compartment.
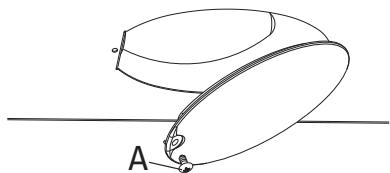
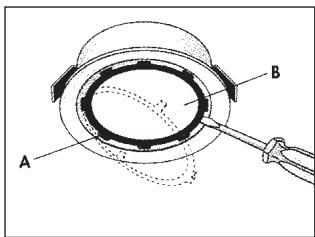
2. SPOTLIGHT
To replace the lamp for "Round halogen light":
a) Make sure the appliance is disconnected from the mains power supply.
b) Remove, by levering with a screwdriver, the support ring A for the cover glass.
c) Remove the cover glass B to access the light compartment.
d) Replace the lamp with the same type (halogen, max 20 W, 12 Volt, G4 fitting).
e) Replace the glass cover B and fasten it using the special ring A.
Round halogen light
How to replace the dicroic lamp:
a) Check that the equipment is disconnected from the power supply.
b) Remove the lamp with the help of a screwdriver (see figure)
c) Replace the lamp with a similar one (dichroic, max 20 W, 12 Volt).
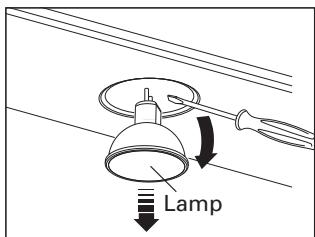
Dicroic spot
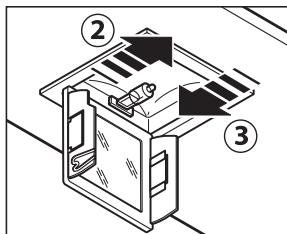
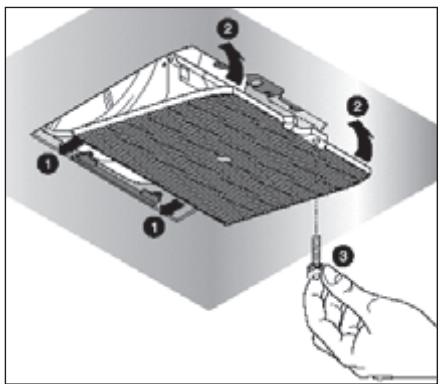
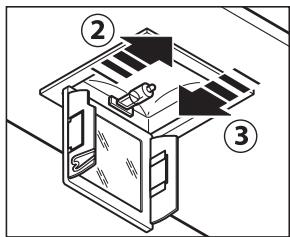
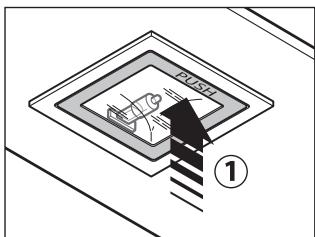
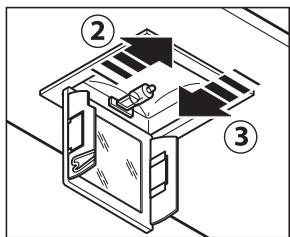
How to replace a square halogen light:
a) Check that the equipment is disconnected from the power supply.
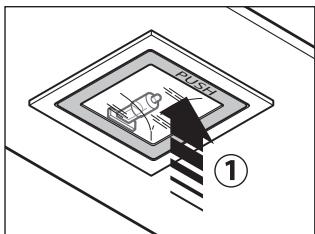
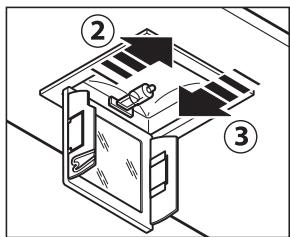
b) Open the panel completely till 90^ (see figure) pressing the PUSH button
c) Replace the lamp with a similar one (halogen, max 20 W, 12 Volt, G4 connection).
d) Close the panel. If the panel does not close correctly repeat the operation at point b.
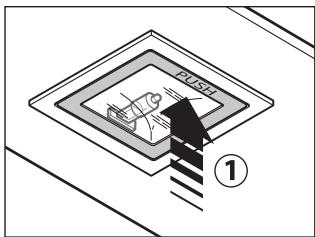
Square halogen light
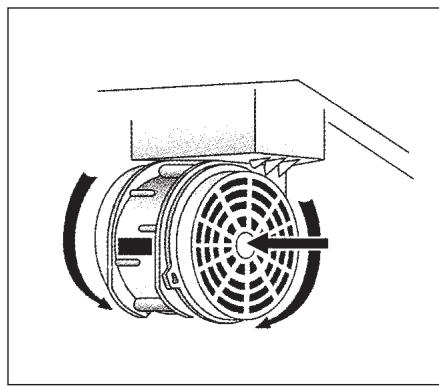
3. FLUORESCENT TUBE
(Section reserved for qualified installers)
Replacing the fluorescent tube:
a) Disconnect the device from the mains;
b) Unscrew the fixing screws and remove the bottom panel;
c) Remove the fluorescent tube, by rotating through 90^ , and replace it with one of similar features (8W-13W-21W-28W according with the model);
d) Reconnect the device to the mains.

MAINTENANCE AND CLEANING
Constant maintenance ensures the correct operation and efficiency of the appliance over time. Special attention should be paid to the metal grease-trapping filters and the charcoal filters. Frequent cleaning of the filters and their supports will ensure that fats and grease do not accumulate on the range hood, with the consequent risk of fire.
1. METAL GREASE-TRAPPING FILTERS
These trap the fat and grease particles suspended in the air, and therefore should be washed every month in hot water and detergent, without bending them. Wait until they are completely dry before repositioning them.
To remove and replace these filters, see the instructions in point H1. This operation should be performed at regular intervals.
2. CHARCOAL FILTERS
These trap the odours present in the stream of air that passes through them. The air is purified by passing a number of times through the filters and being recirculated into the kitchen. The charcoal filters cannot be cleaned, and should be replaced on average every 3-4 months (according to use). To replace the charcoal filters, see the instructions in point H2.
3. CLEANING THE OUTSIDE OF THE APPLIANCE
It is advised to clean the external hood surfaces at least every 15 days in order to avoid that oily or greasy substances affect the steel surfaces. The outside of the range hhod should be cleaned using a damp cloth and neutral liquid detergent or denatured alcohol.
In case of fingerprint-less finish (fasteel) clean only with water and neutral soap using clean with a soft cloth, rinse and wipe dry thoroughly. Do not use products that contain abrasive substances, rough cloths or cloths specifically designed for cleaning steel. Using abrasive substances or rough cloths will inevitably damage the finish of steel. The steel surface will be irrevocably damaged if the instructions above are not complied with. Keep these instructions together with the instructions for use of your hood.
The manufacturer accepts no liability for any damage caused by non-compliance with the instructions above.
4. CLEANING THE INSIDE OF THE APPLIANCE
The electrical parts or parts of the motor assembly inside the range hood must not be cleaned using liquids or solvents.

Do not use abrasive products.
All the above operations must be performed after having disconnected the appliance from the mains power supply.

SAFETYWARNINGS


The electrical system features an earth connection in compliance with international safety standards; furthermore, it is compliant with the European standard for electromagnetic compatibility.
Do not connect the appliance to flues (from boilers, fireplaces, etc.). Make sure the mains voltage corresponds to the values on the rating plate located inside the range hood. The minimum safety distance between the cooktop and the range hood must be at least 65~cm .
Never cook on "open" flames under the range hood.
Check deep-fryers during use: superheated oil may be flammable.
- Ensure there is adequate ventilation of the room when the rangehood is used at the same time as appliances burning gas or other fuels.
- Do not flambe under the rangehood
- The exhaust air must not be discharged into a flue which is used for exhausting fumes from appliances burning gas or other fuels.
- Ensure that all regulations concerning the discharge of exhaust air have been fulfilled before you use the appliance.

Before performing any cleaning or maintenance operations, disconnect the appliance by unplugging it or using the main switch. The manufacturer dis
claims all liability for any damage that may be directly or indirectly caused to people, things and animals due to the failure to follow all the instructions provided in this booklet and above all the warnings relating to the installation, operation and maintenance of the appliance.

WARRANTY
The new equipment is covered by warranty.
The warranty conditions are provided by the distributor.

The manufacturer is not liable for any inaccuracies in this booklet resulting from printing or transcription errors. The manufacturer reserves the right to modify its products as it considers necessary or in the interests of the user, without compromising their essential safety and operating characteristics.

MOUNTING INSTRUCTIONS, RANGE HOODS WITH BOX
Step 1
- Rest the support bar against the wall (A-Fig. 1) at a height from the cooktop determined by the sum of the distance X + Y + 320 mm .
- Check the horizontal alignment with a spirit level and mark the 2 holes to be drilled at the ends of the bar.
- Drill the holes, insert 2 × 8mm dia. screw anchors, and fasten the bar using the corresponding screws.
Step 2
- Hook the range hood to the support bar (Fig. 2).
- Adjust the alignment of the range hood using the screws on the brack-ets (Fig. 2). The top screw (B) adjust the distance from the wall, the bottom screw (C) adjust the height.
Step 3
- Fix the hood on the wall with an expansion anchor and with a screw, using the holes on the back side of the hood or with the cover brackets, in order to prevent it from detaching due to the pressure below.
In case of the suction version, connect the outlet fitting of the fan to the external discharge with appropriate pipes.
- Carry out the electrical connections after having disconnected the hood power supply.
Step 4
- Insert the extension cable (H) in the cook hood stack (G) and fix the assembly on the hood body using the 8 screws as shown in (V1).
- Unfold the extension cable (H) until reaching the required length.
- Once the ideal position is reached, lay the bracket (L) on the wall and check the horizontal alignment using a spirit level and mark 2 holes at the edges.
- Drill the holes and insert 2 expansion anchors with a diameter of 4mm and fasten the bracket (L) with the screws.
- Tighten the extension cable (H) to the bracket (L) by means of the screws (M) Power the hood in compliance with the regulations in force (section D).

HINWEISE

3. ELEKTRONISCHES BEDIENFELD
Lichtknopf
Square halogen light
Square halogen light


Square halogen light
MEPbI INPEIOCTOPOXHOCTN

OueHb BaxHo, YTO6bl DaHHoe PyKOBODCTBO NO 3KcNJIyaTaun XpaHnIOcb BmecTe c annapaTpyo JnB O3MOxHOn Heo6XoIMocTn KOHCyJbTaunn B 6yduem.
Pnp npodaxe npnbopa nnn nepeadae ero dpyromy nucy K npnbopy 6b3atelbno doJXnO npnilaratbcry PKOBODCTBO, YTO6bl HOBbI NOlb3OBaTeIb 6bl B Kypce TOrO, KaN NOlb3OBaTbcR BbITgKoN KaKne COOTBeTCTByIOUme Mebl npedoctopoxHcTo Heo6xOdmo Co6IHOaTb.
ДанhoePykoBoDCTBO6bIIOcoCTaBNeHOДЯ6e3OnacHocTnKaBaWe,Tak n OkpykaIoUxN,No3ToMу npocmBac BnHMaTeIbHo C Hm O3HaKOMtbcr neped yctaHOBkOи 3KnJIyatauNei np6opa.
IeTAM I60JIbHbIM JIOJAM pa3peWaeTc NOJIb3OBAtbcra npIbOpom JINUb IOd aJeKBaTHbIM KOHTPOEm OTBETCTBeHHbIX JNlC, KOTOpbIE MOryT OBeCneuBaTb 6e3OnacHoe NcNoJIb3OBAHne npIbopa.
OTBETCTBEHHOMy IInuY Heo6xOIMo CJeINr, YTo6bI JeTn He IrpaJIc npi6Opom.
Pa60tI no yCTaHOBKe DoJXhbl IpOBoDnTbCRA KOMPeTeHTHBIMn KBaJIncPfUPOBaHHbIMn CneuaJINCtAmN COrIacHO DeIcTBYIOUM HOpMaM.
JIIO6oe Heo6xOJIMOE JnY yCTaHOBKn BbITJXKN N3MeHHe B 3JIeKTPuYeCKOM 6JIOKe DoJIKHO OCyUeCTBJIaTbC TOnJBKO KOMIeTeHTbIM JINlOm.
I3MeHHeNe IJIN NONbITKa I3MeHEnHa xapaKTepncTn npnbopa onacHo! B clyuae HeKOppeKTHoI pa60TbI BbITaJIteKn He nbITaJIteCb yCTpaHHTb HencnpaBHOCTb CAMOCTOReJIbHO.
Pemont, npoBeHbI HeKOMPeTeHTbIM IuOm, MoKeT Bbl3BaTb NOBpeJdeHn.
E BbITJXHOE YCTPOICTBO C BbIBPOCOM BO3dYXA HAPYKU
B 3ToM oDJI n DbIM n nap O T rOToBKn Bbl6paCbIbAOTc HApJy Up3 Tpy6y.
Tpy6aДЯ BBy6pOca, KOTOPaBbICTynaTn3 BpxH YAcTHn BbITJxKKn DOLXHa 6bITb COdINHc Tpy6oN, KOTOPaBbIOdNT DbIM n Nap BH NOMUHN, PNC.
B daHHoM oJIn CHImaIOTc qJIbTpbl Ha aKTbUbpOBaHHom yJI, cJN OHYcTaHOBJHb; KaK OHN CHImaIOTc, CM. NyHKT F. EcJN KyXOHHa BbITaKKaNCNoJIb3yTcO JHOBpMHNO I dJr dpYrNX np6OpOB, pa60taIOxN Ha ra3yIIN dpyrom TOnJIHB, POMsH NDoJIxHo IMMb BO3MOxHOCt b DOCTaTOHOro nPoBTPuBaHn.

BbITJXHOE YCTPOIcTBOC PEUNPKUJIaUNEIN BO3dYXA (cФиьТрацn)
B 3toM MoIIN BO3dyN npoxOHT p3 fIbTpbl C aKTHBnPOBaHHbIM yrIm, IOnuATcN BO3BpaaTcR B NOMUHN KUYHNI.
Y6DNTcb, YTO yrOJIbHbI qINJIbTpbl yCTaHOJIbHbI Ha MOTop, pnc. 6, B npOTNBOM CJIyHa yCTaHOBnT INX, KAK yKa3aHO B nyHKT F INCHtpKcnn.
CKOPOCTb - npKJIIOUaTlb B
I03BOJIAT BKNIOaTa n pryJINPOBaT cKOpOCTb pa6OtBI MOTOPA B
3aBnCIMoCTNOTMOdJInc1no3,JIb6OcHnppbIBHOprJnPoBKOCKOpocTn.
ИндIKATOPHЯ ЛAMПА - C
OFF: MOTOP BvIKJIIOUaTc.
3. KHONKIC 3JEKTPOHhbIM YYPABJIEHNEM
KnaBnua ocBeueHnra

ON:ocBeueHneBnOyeHo (KHOIIKa CBeTITcra)
OFF:ocBeueHHe BbIKIIOueHo;
KnaBnsa -
KnaBnua OcBeueHnHa npNbTe:CBETBKn./BbIKn. (on/off).
KnaBnla - e + yMeHbWeHne/YBeIuYeHne cKOpocTn (Дя 3anycka MToopa MoKHO HaKaTb KaK KnaBnUy +, TaK N KnaBnUy -).
KnaBnTaTMepa:cm. HnKe nHCTpyKuHIO.
KnaBnwa TaMepa n HacbIeHnA qNbTPOB
IyCTaHOBKn/3aMeHbICM.
B BbITJXKkax C MOTOpHbIM OTCEkOM ΦnIbTp paCNoJoxeH B HIXKHeJ YactN 3TOrO OTcKa.ДЯ yCTaHOBKn/3aMeHbI CM.
Square halogen light
3.ФЛYOPECUEHTHAJ LAMNA (pa3dIe IЯс cIeuaJIncTOB)
3aMeHaФnyopeceHTHOJ lambli:
a) OTKJIouHTb np6Op OT cETn NITaHn;
6) CHaTb MeTJIuYeCKyIO paHeJIb, OTKpyTNb KpeNexHbIe BnHTbl, ecII TaKOBaYIMeETcR.
B ueJx 6e3oNaChOCTn paCCToHHe OT BapOCHIOBepXHOCTn Do BbITaKKN DOJIKNHO COCTaBJTb He MeHee 65 cm.
Helenzra roTOBnTB nIuHa OTKpbITOM orHe nOД bblrKoJ. CJIeDInTe 3a dpHTOpHnUcAmn: nepepeTeOE macNo MoKeT 3aropeTbcra.
- Y6eIntecb B TOM, UTO B NOMESEHIN IMeETcA DOCaTouHae BEHTnJIaCJIA, ECJIY BbITJXKA IcNOLb3yeTcB COBMecTHO C dpyrIMn pnp6OpAMn, pa6oTaIOUcIMn Ha rase nIIN dpyrom Tropuoyem.
- He 3axniratne OTKpbTbI OOrHb IOD BbITXKoN.
- He подклочауп prибор К Трубам, OTвогдяшм ДыIM OT croрань ТОПЛВА (КOTлbl, КAMINHbl И.T..).
- Y6eIITecb B CO6JIIODeHnBCEx DeIcTByIOUx HOpM N0 BBIOy B03dyXa HApJy I3 NOMESeHn, IpexKde Yem N0lb3OBaTbCBy BbITJIKoN.

Ipepe npoBeHnem IIO6bIX MaHnnylaun no QnCTKe nIy uxOdy BbIKJUChte np6Op, BbITaunB BNkky n3 PO3eTK nIIN C NOMOu bIO oOcero BbIKJUChteJI. PpeepnTne-3rTOOBntelb He HecET OTBETCTBEHHOCTH 3a BO3MOxHbI BpeD, PnpuHHeHHbI, PpMo nI IN KOCBeHHO, IIOdAM, PpeMeTaM nI IN Domaunm XJBOTbIM BCJeCDTBne HecO6JIouDeHHn PpeDnucAHn, yKa3aHHbIX B PykoBOdCTBe NO 3KcnNyataun, OCO6eHH B TOM, YTO kacaetc npabUNyctahOBKn n 3KcnNyataun np6Opa n yXoDa 3a Hm.

ГAPAHТИ
Hobb np6op haoDITcnoD nCTBm rapaHTn.
TapaHTnHbI yCIOBnI NOHOCtBIO npVBdHbI Ha NocNdH CTpaHnI 3TOI n3DaHnI.

Pon3BODNTlb H OTBuat 3a BO3MOXHbI HTOUHOCTN N OwHbK B daHHOM n3daHn, BO3HKn npn pTuATn nn npnTaTBaHnn. PpON3BODNTlb OCTabJrT 3a c6oB npaBO Ha T MoDnΦHKaCn CO6CTBHHO npOyKcN, KOTOpbl COHTT Ho6XoHmblIMn nn NOJ3HbIMn, a TaKx B INHTpcax NOJb3OBaTJr, H BJIraIOuHa rIaBbHbI ΦyHKcNoHaJIbHbI XapaKtpnCTNK N 63OnacHOctb.

Инструкции по моNTаЖу ВытЯЖКСпразMbIM KOLПаКOM
3ran 1
-ПилloxнтКСТНHсуцуюпкладиHy(A,pnc.1)HapacctToHnOTBapOHyI NaHIn,CoCTaBJIaIOUcM cyMMy BbICOT X+Y+320 MM.
-Пи помоци пьзьрковогу уровь yбдntсьВ roриэтаянHom NOJIOxHn,И OTMtbT NO Кразим пкладинь 2TOUKNДЯ OTBpCTN.
- IpocBpJIrT OTBpCTnIa, BcTaBbT 2ДIO6JIaДnAmTpOM 8 MM n 3aKpNIT npKlaDInHy shypynam.
3tan2
- 3aunnt BbTgXH0 yCtpoiCTBO 3a Hcuyu npKlaDnHy, pnc.2.
- OTPrpylnpynt pOBHocTb NOdBUNBaHN BbITXKHO YcTPOIcTBa npn NOMOUIBnHTOB Ha KPOHsTmH, PNC. 2. BpxHn BnHT B prylnpyT pacCToAHN OT cTHbl, HxHn C - BPTkAJIbHo NOJoxHn.
3ran 3
- YTo6bI BbITaKKa He OTKpePnIaCb 13-3a DaBHeHna CHN3y, ee CneDyeT npNKpeNTb K CTHe C NOMOsbIO DIO6eJn COOTBeCTByIOUeero BNHTa, INCNoJIb3yra CneuJaIbHbIe OTBepCTnA C TblbHOI CTOpOHb I BbITaKKn IJIINCKo6bI KpbIshKn.
B BbITaKke BCaCbBaIOUeRo Tnna Heo6XoDNMO NODcoEINHHTb BbIpyCKHO NaTpPy6OK BeHTnJIToPA K HApYxHOMy BblnyCKHOMy OTBepCTNIO C NOMOuBIO COOTBeTCTByIOUe Tpy6bl.
- BbIpoJIHnITb IOnkJIHOueHHe K NcTOUHNY 3JIeKTPnueCKO rNtAHrToTobko PocLe OTKJIHOueHnE 3JIeKTPnueCKO rNtAHr CaMOB bItJxKn.
3tan 4
- BCTaBnTb ydIINHnTeJIb (H) B dIbIMOByTO Tpy6y (G) I 3akpeNITb INx BmecTe K KOpNcYy BbITJAKKNC NOMOuBIO8 BNHTOB (V1).
- PpOaBnHyTb ydlnHntJIb (H) Do HUxKHO BbICOTbl.
- Nocle HaxoJdeHnO ONTImaJIbHO NOLOKeHnI npNJIOXHTb K cTeHe CkO6y
(L), npOBepntb c nOMOosbIy yOBHb BbipaBnBaHne no rOpN3oHTaII N OTMeNTb Ha KOHcax 2 TOUKN DJIe CBepHeHJ.
- BbINOHNtB CBePHeHn, BCTaBHTb DBa 2 IIO6eIg 4MM n npNKpePiNtB cKo6y (L) COOTBEcTByIOUIMN BNHTaMn.
-ПиВИNTиТВИNTaMn(M)уДлИнТeль(H)ксКоБe(L).
-Подать Злелктуческoe питаяне на Вьтяжky,придерхиваясь HOPM Deистуюцero 3akOHODaTeIbCTBa (pa3Д. D).

OSTRZEŽENIA

FILTRY INSTRUKCJE WYJMOWANIA I WYMIANY
1. FILTRY METALOWE
Square halogen light
3. LAMPA JARZENIOWA
- AVVERTENZE
- PANNELLO REMOVIBLE
- LAMPADA FLUORESCENTE
- TECHNICAL SPECIFICATIONS
- (Section reserved for qualified installers of the range hood)
- ELECTRICAL CONNECTIONS
- (Section reserved for qualified installers)
- WARNING!
- RANGE HOOD WITH OUTSIDE
- DISCHARGE (exhaust)
- RECIRCULATING RANGE
- HOOD (with filter)
- OPERATION
- TWO BUTTON CONTROL PANEL
- FIVE BUTTON CONTROL PANEL
- LIGHT- button
- MOTOR button - 1, 2, 3, OFF
- ELECTRONIC CONTROL PANEL
- Light pushbutton
- Pushbutton -
- Pushbutton +
- Mode pushbutton
- WARNING:
- Timer and 'filter clogged' alarm pushbutton
- FILTERS REMOVING AND REPLACING'S INSTRUCTIONS
- METAL FILTERS
- CHARCOAL FILTERS
- REMOVABLE PANEL
- LIGHTING ASSEMBLY AND REPLACEMENT
- LIGHT BULB
- SPOTLIGHT
- FLUORESCENT TUBE
- MAINTENANCE AND CLEANING
- METAL GREASE-TRAPPING FILTERS
- CLEANING THE OUTSIDE OF THE APPLIANCE
- CLEANING THE INSIDE OF THE APPLIANCE
- SAFETYWARNINGS
- WARRANTY
- MOUNTING INSTRUCTIONS, RANGE HOODS WITH BOX
- Step 1
- Step 2
- Step 3
- Step 4
- HINWEISE
- ELEKTRONISCHES BEDIENFELD
- MEPbI INPEIOCTOPOXHOCTN
- E BbITJXHOE YCTPOICTBO C BbIBPOCOM BO3dYXA HAPYKU
- BbITJXHOE YCTPOIcTBOC PEUNPKUJIaUNEIN BO3dYXA (cФиьТрацn)
- ИндIKATOPHЯ ЛAMПА - C
- KHONKIC 3JEKTPOHhbIM YYPABJIEHNEM
- KnaBnua ocBeueHnra
- KnaBnsa -
- KnaBnwa TaMepa n HacbIeHnA qNbTPOB
- 3.ФЛYOPECUEHTHAJ LAMNA (pa3dIe IЯс cIeuaJIncTOB)
- ГAPAHТИ
- Инструкции по моNTаЖу ВытЯЖКСпразMbIM KOLПаКOM
- 3ran 1
- 3tan2
- 3ran 3
- 3tan 4
- OSTRZEŽENIA
- FILTRY INSTRUKCJE WYJMOWANIA I WYMIANY
- FILTRY METALOWE
- LAMPA JARZENIOWA
Brand : FALMEC
Model : ATLAS
Category : Range hood