ULTRA VMC5040 - Surveillance Camera ARLO - Free user manual and instructions
Find the device manual for free ULTRA VMC5040 ARLO in PDF.
User questions about ULTRA VMC5040 ARLO
0 question about this device. Answer the ones you know or ask your own.
Ask a new question about this device
Download the instructions for your Surveillance Camera in PDF format for free! Find your manual ULTRA VMC5040 - ARLO and take your electronic device back in hand. On this page are published all the documents necessary for the use of your device. ULTRA VMC5040 by ARLO.
USER MANUAL ULTRA VMC5040 ARLO
Get the Arlo app 5
Meet your Arlo Ultra Camera 6
Meet Your Arlo SmartHub 7
Connect your SmartHub to the Internet. 8
SmartHubLED 8
Use the Arlo app for installation and setup 9
Insert the battery into your camera 9
Tips for optimal WiFi performance 10
Magnetic mount 11
Install a screw mount. 12
Find a good spot to detect motion. 13
Arlo Ultra's field of view 14
Position your camera. 14
Test motion detection 15
Arm your camera to detect motion 15
View your camera feeds 17
Look back video. 18
Record clips from live video 19
Take a snapshot from live video 19
Talk and Listen. 19
Turn the camera spotlight on and off 20
Turn the camera siren on and off 20
Customize your camera feed image. 20
Motion detection activity zones. 21
Cloud recordings 23
View recordings and snapshots 23
Download recordings 24
Charge your camera battery 26
Replace a camera battery. 26
4. Image Quality Features 28
High Dynamic Range (HDR) 28
Local 4K streaming and recording. 28
HEVC 4K playback supported devices 29
Start 4K streaming 29
Auto Zoom and Tracking 31
5. Modes, Rules, and Alerts 33
33
Select a mode 34
Rules 34
Change motion sensitivity 34
Automatically stop recording when motion stops. 35
Control whether the spotlight turns on when motion is detected at night 35
Change audio sensitivity 36
Manage alerts. 36
Schedule your camera rules 37
Set up geofencing 38
Geofencing with multiple mobile devices 39
Custom modes 40
6. Change Your Settings 42
Change your password and user name 42
Grant access to friends 42
Change the time zone 44
Camera settings 44
Customize the camera spotlight settings. 47
View device information 49
Remove a device from your account 49
7.Use SD Card Storage 50
Insert a microSD card. 50
View the SD card status 51
View available SD card storage 51
Turn SD card recording off and on 51
Turn local 4K recording off and on .51
Change the SD card overwrite setting 52
Format a microSD card 52
Safely eject an SD card 52
View videos on a microSD card. 53
8. FAQs and Troubleshooting 54
FAQs 54
Battery FAQs. 55
Activity zones and CVR aren't working 56
Can't see video streams in a browser 56
WiFi signal interference 57
Not receiving push notifications. 57
Verify that the Arlo SmartHub is online 59
The SmartHub is offline 59
Reset the Arlo SmartHub to factory settings. 61
9. Rechargeable Battery Safety 62
Safety rules for rechargeable batteries. 62
1. Get to Know Arlo Ultra
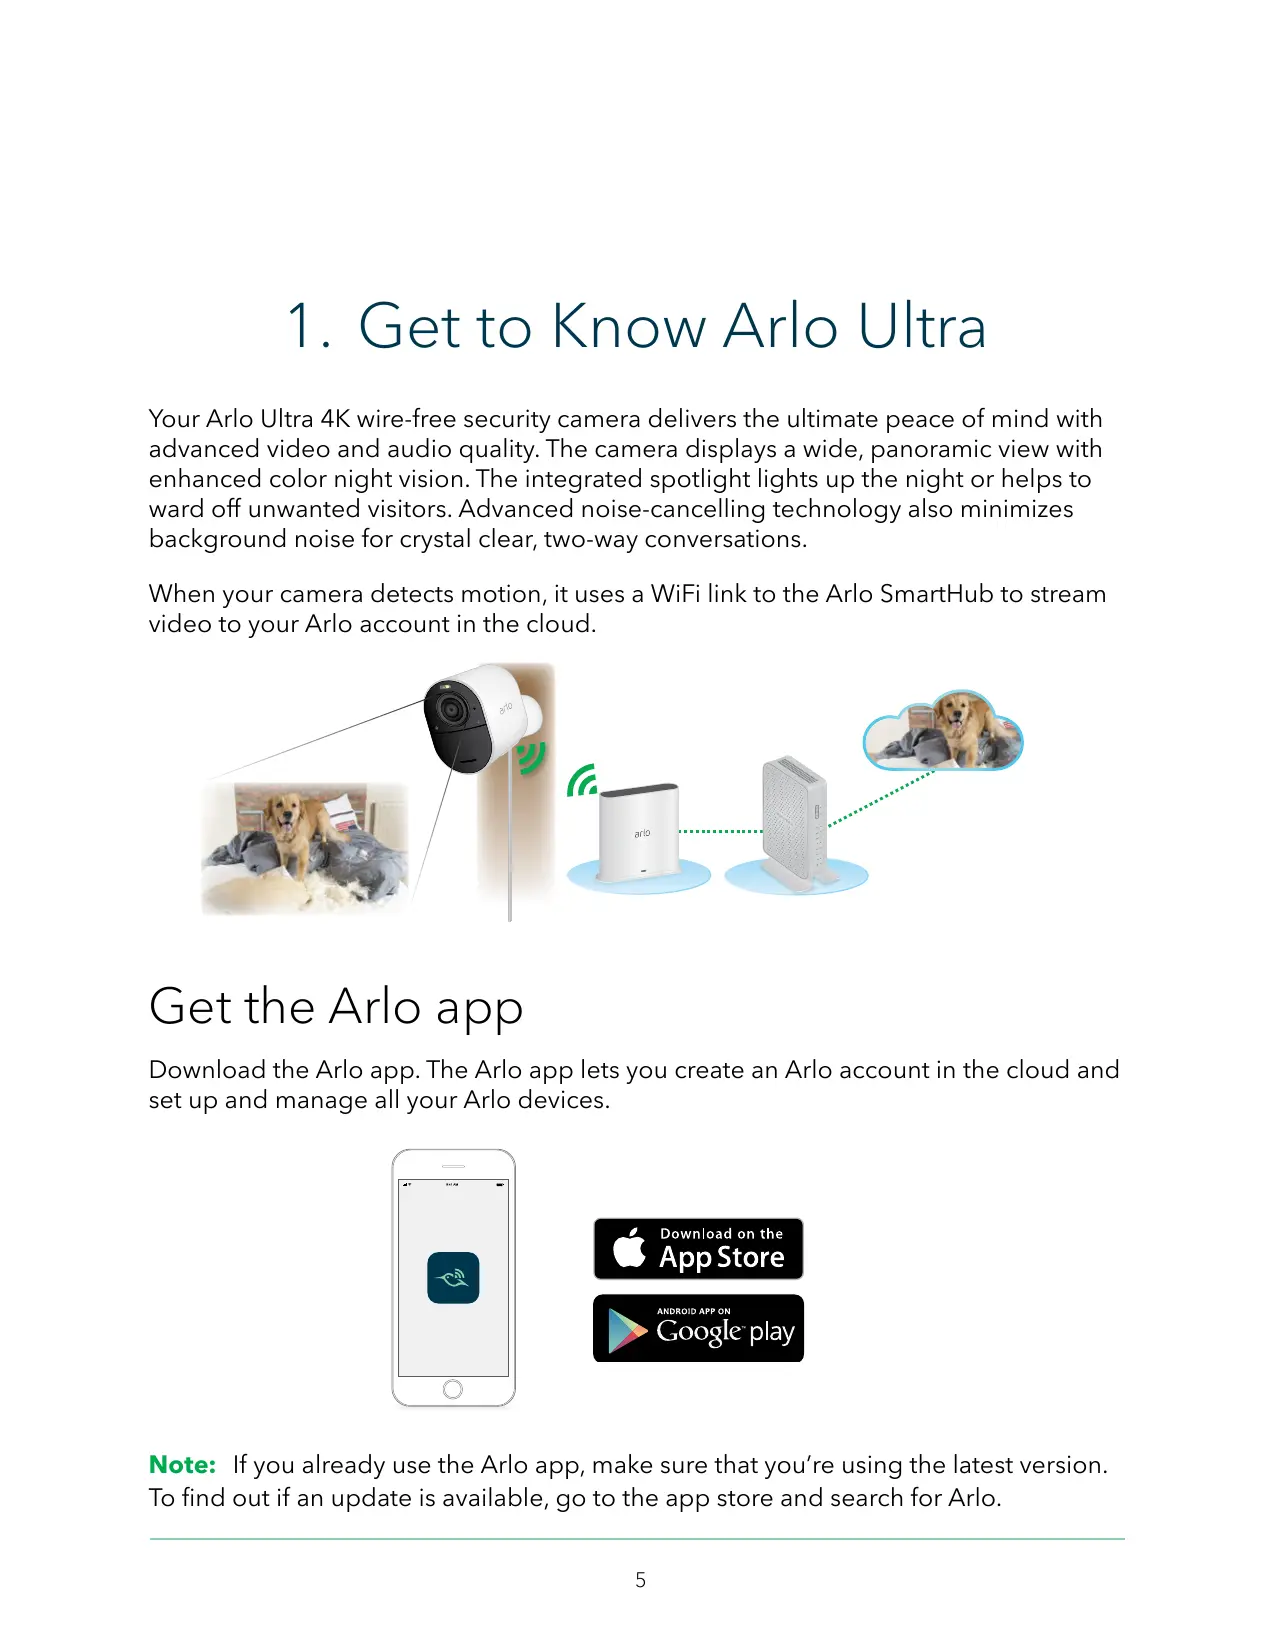
Your Arlo Ultra 4K wire-free security camera delivers the ultimate peace of mind with advanced video and audio quality. The camera displays a wide, panoramic view with enhanced color night vision. The integrated spotlight lights up the night or helps to ward off unwanted visitors. Advanced noise-cancelling technology also minimizes background noise for crystal clear, two-way conversations.
When your camera detects motion, it uses a WiFi link to the Arlo SmartHub to stream video to your Arlo account in the cloud.
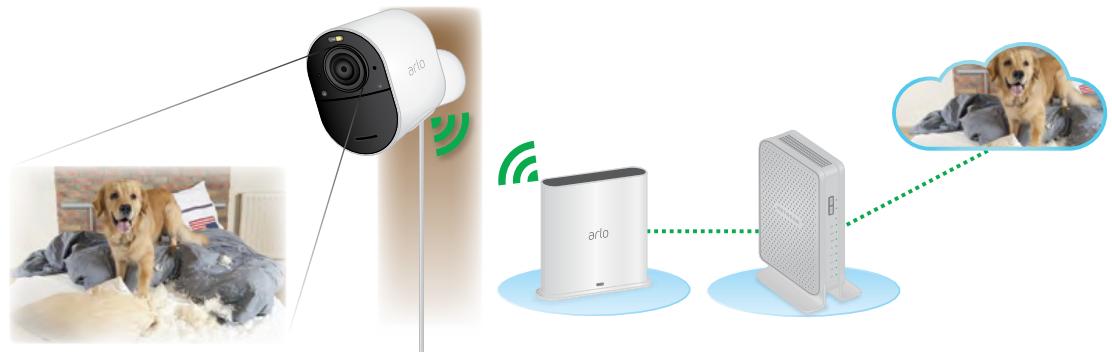
Get the Arlo app
Download the Arlo app. The Arlo app lets you create an Arlo account in the cloud and set up and manage all your Arlo devices.
Note: If you already use the Arlo app, make sure that you're using the latest version. To find out if an update is available, go to the app store and search for Arlo.
Meet your Arlo Ultra Camera
Your Arlo Ultra consists of two parts, the housing and the camera with a battery compartment.
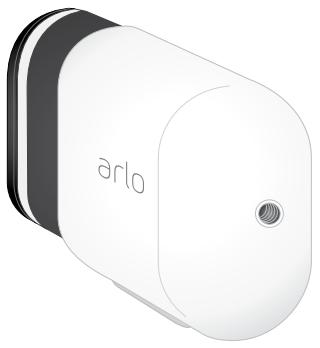
Arlo Ultra camera features
- 4K & HDR. See a crystal clear picture in every detail through Arlo Ultra's new high performance lenses.
- Enhanced night vision. See what's lurking with color night vision allowing you to see video in color rather than traditional black and white.
- Integrated spotlight. Light up the night and ward off unwelcome guests using Arlo Ultra's integrated spotlight.
- 180 degree view. See a full panoramic view with auto image correction that reduces the fisheye effect. The lens is a 180-degree diagonal lens with a matching wide range for motion detection.
- Noise canceling technology. Listen and speak to visitors with crystal clear, full 2-way audio that reduces wind and noise.
- Auto zoom and tracking. Auto-focus on moving objects with clarity and detail
- Magnetic charging. Quickly charge your camera and easily snap the connecting cable into place.
- Custom activity zones. Create specific areas of focus to reduce false alerts
Built in smart siren. Trigger your siren remotely or automatically during an event. - Rechargeable battery. Take the expense out of security with the convenient and long lasting battery.
Meet Your Arlo SmartHub
The Arlo SmartHub helps to protect your footage by adding a secure, personal network to your router. SmartHub also helps to regulate WiFi traffic, improves battery life, and comes with local storage (microSD cards are sold separately).
The Arlo SmartHub is compatible with Arlo Ultra and all previous Arlo wire-free cameras.
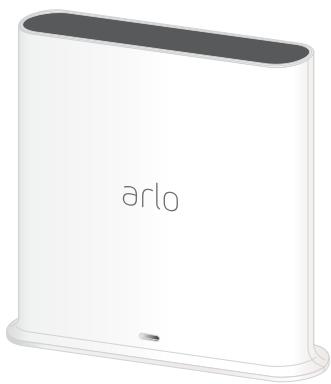
SmartHub features:
Additional WiFi radios to build the smart security ecosystem.
- Works with other smart home devices for simplified integration.
- A microSD card slot for local storage of streaming content. See Insert a microSD card on page 50.
2. Get Started
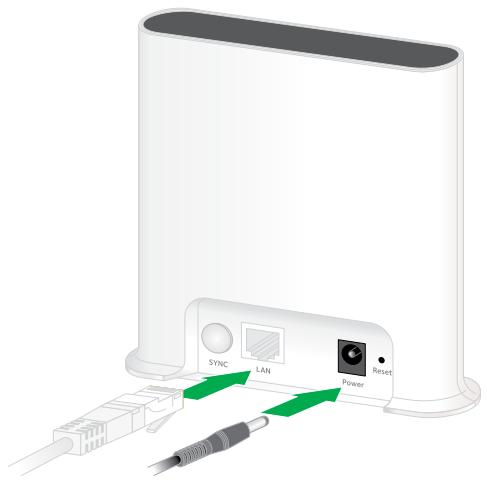
Connect your SmartHub to the Internet
The Arlo SmartHub connects to your home network and allows you to view your camera streams from anywhere.
- Connect the SmartHub to your router with an Ethernet cable.
- Connect the AC adapter to the SmartHub and plug it in. The LED on the front of the SmartHub lights.
SmartHub LED
The SmartHub LED indicates the status of the SmartHub. The SmartHub blinks once when it is first powered on. Then the LED lights as follows:
- Solid blue. The SmartHub is connected to the Internet.
- Slow blinking blue. The SmartHub is ready to sync and pair with a camera or is connecting with a camera.
- Fast blinking blue. The SmartHub paired with a camera.
- Solid amber. An error occurred or something is wrong with the connection.
- Slow blinking amber. The SmartHub can't connect to the camera. The camera can't be found, is out of range, or another connection error occurred.
- Alternating blue and amber. A firmware update or a reset is in progress.
Use the Arlo app for installation and setup
You must use the Arlo app to install and set up your Arlo SmartHub and Arlo Ultra Camera. The Arlo app guides you through setup in this order:
- Create your Arlo account. You use the same account to manage all your Arlo devices.
- Connect the Arlo SmartHub to the Internet and add it to your account.
- Add each Arlo Ultra camera and pair it with the Arlo SmartHub.
Once you set up your Arlo account, you can access it by using the Arlo app on a smartphone or tablet, or from a computer using a web browser. If you're using a computer, enter https://my.arlo.com/#/login in the address bar of the browser.
After installation, you can use the Arlo app to view your camera feed, customize alerts and notifications, create schedules for your cameras, and more.
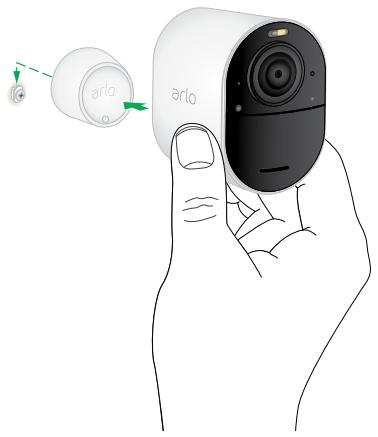
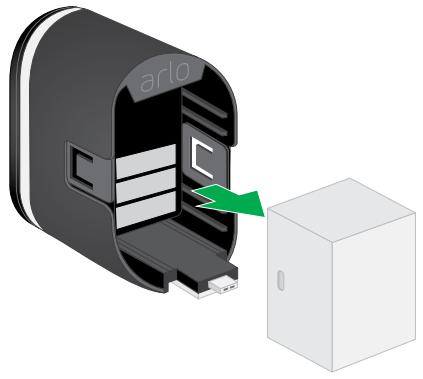
Insert the battery into your camera
Your Arlo Ultra camera consists of two parts. The camera and battery are in one part, and the camera housing is the second part.
- Align the battery and insert it into the battery compartment.
The battery only inserts one way.
The LED on the Arlo Ultra camera blinks blue.
- Insert the camera into the camera housing until it clicks into place.
Do this by pushing down on both the left and right sides of the camera.
For more information about batteries, see the following topics:
- Arlo Ultra Camera LED on page 10
- Replace a camera battery on page 15
- Safety rules for rechargeable batteries on page 62
Arlo Ultra Camera LED
The LED on the camera lights when the camera is powered on. The LED changes color and blinks depending on the battery charge and to indicate the status of activities such as pairing the camera and updating the camera firmware.
- Slow blinking blue. The camera is in the process of pairing with the SmartHub.
- Fast blinking blue. The camera paired with the SmartHub.
- Blinking amber. The camera is out of range, a connection error occurring during pairing, or the camera battery charge is low (15% or less).
- Alternating blue and amber. The camera failed to pair with the SmartHub, or a firmware update is in process, or a reset is in process.
Tips for optimal WiFi performance
Place your Arlo Ultra camera in a location with a good WiFi signal to the SmartHub.
The distance between WiFi devices can affect the WiFi signal:
- Maximum recommended distance. Place your camera a maximum of 300 feet (90 meters) from the SmartHub. The maximum line-of-sight range of 300 feet is reduced by each wall, ceiling, or other major obstruction between the camera and SmartHub.
- Minimum recommended distance. To reduce WiFi interference, place the SmartHub 6 feet (1.8 meters) away from your WiFi router. Place your Arlo Ultra cameras 10 feet (3 meters) away from the SmartHub, and allow at least 6 12 feet (2 meters) between cameras.
The following materials can reduce WiFi signal strength if they are located between WiFi devices such as your SmartHub and Arlo Ultra cameras:
- Unusually thick walls and ceilings
Brick
Concrete
Stone - Ceramic
- Glass, especially mirrors
Metal
Large quantities of water, such as the water in a fish tank or water heater
For information about optimizing 4K streaming with multiple Ultra cameras, see the Arlo support article https://kb.arlo.com/000062190/How-can-I-reduce-connectivityissues-when-I-live-stream-in-4K-on-multiple-cameras.
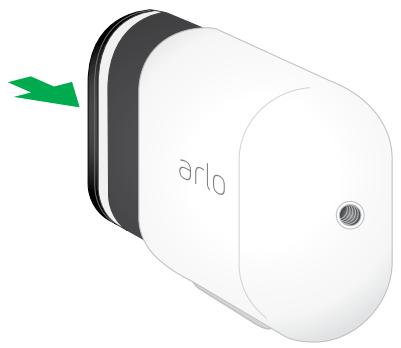
Magnetic mount
Arlo Ultra comes with a new, magnetic-based mounting solution that provides articulation in ways never before possible. The newly designed mount perfectly mates with the shape of the camera, providing new mounting scenarios that were never before possible, including mounting from a ceiling.
It also has a built in groove where you can hide your cable and provide strain relief for those situations where you want to keep the camera mounted and plugged into a wall source.
Install a magnetic mount
You can mount your camera on a wall or ceiling.
- Fasten the mouting screw into a wall or ceiling.
Note: The magnetic wall mount is not designed to be attached to a drop ceiling.
If you're working with drywall, use the plastic drywall anchor that we provide.
Use the plastic stopper to help guide how far to screw into the wall or ceiling.
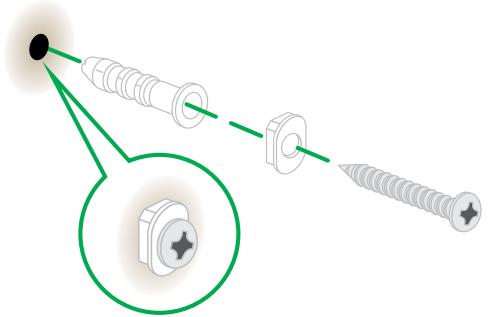
- If you're using Arlo Ultra connected to a charging cable, wrap the excess charging cable around the back side of the mount.
- Snap the magnetic mount onto the screw and the stopper. The mount clicks into place.
- Attach your Arlo Ultra camera to the wall mount.
The magnet in the mount holds the camera onto the mount.
- Adjust the Arlo Ultra camera to your preferred viewing angle.
Note: You can replace the battery in Arlo Ultra cameras without removing the camera housing from the indoor wall mount.
Install a screw mount
Some Arlo Ultra kits include a screw mount. Screw mounts are also sold separately.
- Place the outdoor mount and secure it with screws. If you're mounting the camera on drywall, use the drywall anchors we provide.
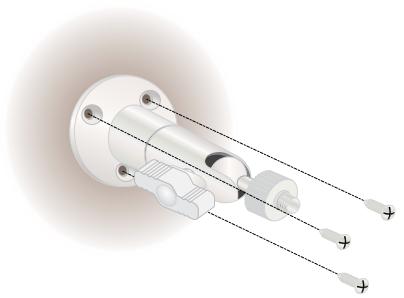
- Attach the camera to the mount.
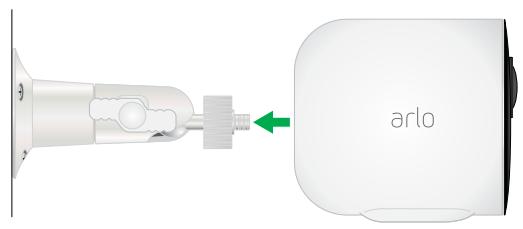
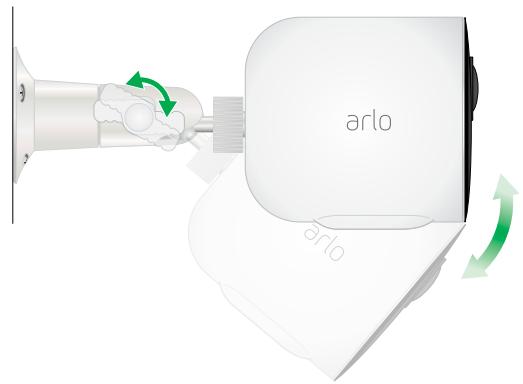
- Adjust the camera angle.
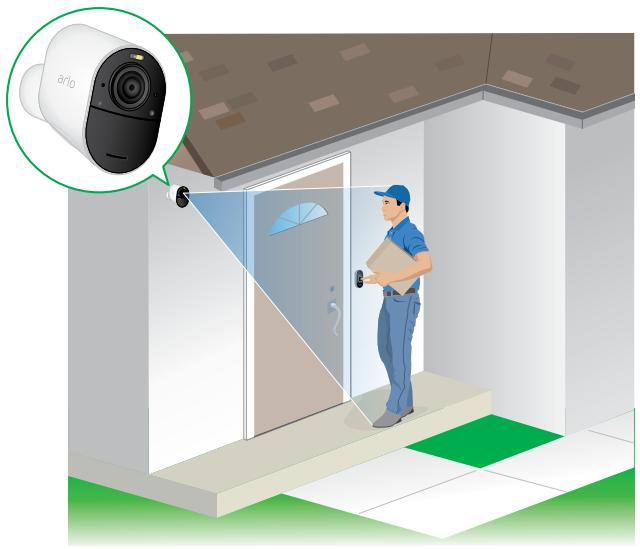
Find a good spot to detect motion
When positioning your Arlo Ultra camera, keep these tips in mind:
- Place your camera so the area you want to monitor is within the camera's field of view.
- Mount your camera at least 7 feet (2 meters) above the floor or the ground and aim it slightly downward for the best sensor performance.
- Place your camera so that side-to-side traffic crosses its field of view. Arlo's motion sensor is most sensitive to side-to-side motion that's 5 to 20 feet (1.5 to 6 meters) from the camera.
Arlo Ultra's field of view
The field of view is the area in which the camera can detect motion. You can set the field of view to Full (120 degrees), Wide (155 degrees), or Super wide (180 degrees).
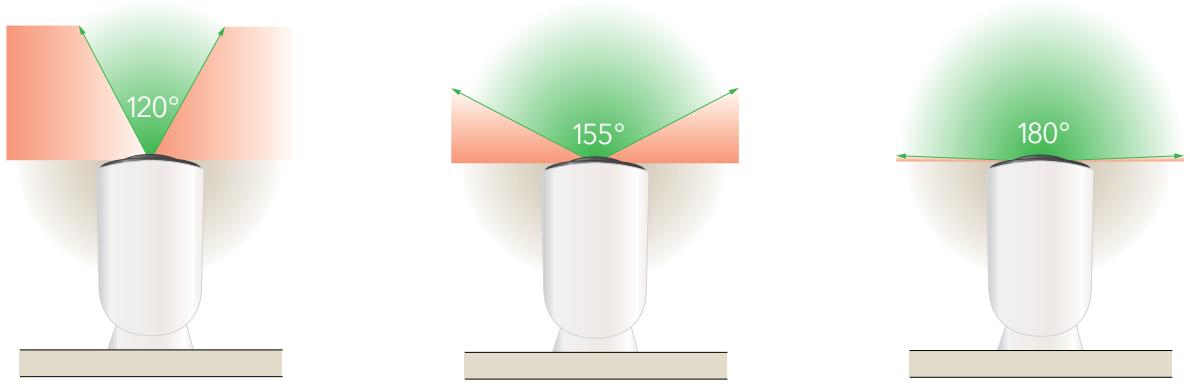
Each setting auto corrects the image to reduce the fisheye effect. The Full setting completely eliminates the fisheye effect.
Change the field of view
- Open the Arlo app.
- Tap Settings > My Devices.
- Select the camera.
- Tap Video Settings > Video Mode.
- Tap a field of view to automatically apply it to your camera.
Position your camera
Camera positioning is available only when the camera is not streaming, recording motion, or using the Motion Detection test. During camera positioning, the camera streams video as fast as possible, without buffering. You can aim your camera while watching on your smartphone and making near real-time adjustments to the camera position. This means that you might see lower-quality video while you are positioning your camera.
- Open the Arlo app.
- Tap Settings > My Devices.
- Select the camera.
- Tap Device Utilities > Camera Positioning.
The camera starts streaming video. The signal strength bar indicates the WiFi signal that your Ultra camera is receiving at its current location.
Test motion detection
You can use the motion detection test to find the right motion sensitivity setting for each camera.
- Open the Arlo app.
- Tap Settings > My Devices.
- Select the camera.
- Tap Device Utilities > Motion Detection Test.
- Move in front of the camera. During this test, the camera LED blinks amber when motion is detected.
Arlo Ultra Camera
- Move the slider to adjust the motion sensitivity level as needed.
- Edit the rule for your camera to enter the motion sensitivity level that you want to use. See Change motion sensitivity on page 34.
Arm your camera to detect motion
You control when your camera detects motion and the rules it uses to record and alert you by selecting a mode. The Arlo app comes with four modes, Armed, Disarmed, Schedule, and Geofending. You can customize each mode and you can also create custom modes. For information about how to do this, see 6. Modes, Rules, and Alerts on page 33.
3. Arlo Ultra Basics
When you open the Arlo app, the Devices page displays your camera feeds.
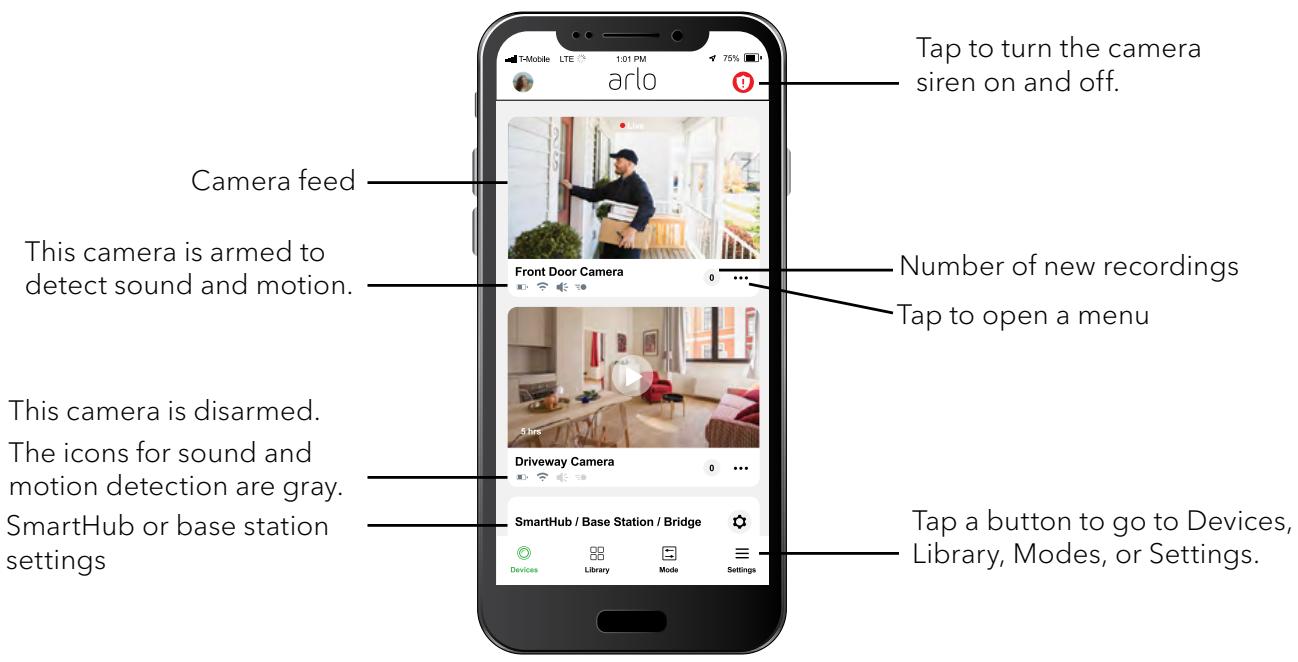
| Camera icon | Located below each camera feed | Camera feed icon | Tap the camera feed to display these icons |
| Battery charge | Play/Stop | ||
| WiFi signal from the SmartHub | Mute the audio | ||
| Audio detection is on | Talk and Listen | ||
| Motion detection is on | Record video manually | ||
| Open a menu and view or change the camera settings | Take a snapshot | ||
| View or change the camera settings | Turn the camera spotlight on and off. |
View your camera feeds
- Open the Arlo app.
- Tap the camera feed. The camera feed updates and camera feed icons display.
- To stop viewing and listening to the live feed, tap the Stop icon .
Local live 4K streaming
You can live stream in 4K from Arlo Ultra if you use the Arlo app on a mobile device that is on the same local network as the Arlo SmartHub. If you enable 4K live streaming in your Arlo Ultra video settings, 4K live video streams when you tap Play on the camera stream in the Arlo app. You can also manually record in 4K by tapping the play button and then tapping Record .
To enable local live 4K streaming:
- Open the Arlo app.
- Tap Settings > My Devices.
- Select the camera.
- Tap Video Settings.
- Tap Local 4K Live Streaming to toggle live streaming on and off.
Pan and zoom video
You can pan and zoom to focus in on the high-def details of any live or recorded video. Just pinch and drag any image as you do with photos on your smartphone.
- Open the Arlo app.
- Tap Library.
- Tap any live video or prerecorded video from your Arlo library.
-
To pan and zoom using a mobile device:
-
Pinch to zoom in and out of the video.
- Touch and drag to move around the zoomed-in frame.
Arlo Ultra Camera
-
To pan and zoom using a computer, do the following:
-
Click the Zoom icon.
- Use your mouse to move around the frame.
Pan and zoom live video with Smart Zoom
When you're viewing a live stream recording, Smart Zoom lets you zoom into any area of the recording up to 8x. The image quality of the zoomed-in area doesn't deteriorate, allowing you to view a zoomed-in image with true 1080p video resolution.
When Smart Zoom is activated, your Arlo Ultra camera can zoom in on an object and track its movement when it detects motion in its field of view. Smart Zoom requires an Arlo Smart plan and you must turn it on for each camera. See Turn on Smart Zoom on page 45.
- Open the Arlo app.
- Tap Play l on the camera feed.
On a mobile device, use the pinch gesture to zoom and touch and drag to move around the zoomed-in frame.
On a computer, double-click click to zoom. Left-click and hold and drag to move around the zoomed-in frame.
After zooming in, the image stops and buffers for about five seconds to improve the quality of video. When the buffering stops, your zoomed-in video renders in high quality.
Look back video
When plugged in, your Arlo Ultra camera records continuously, but discards the video after three seconds if no motion is detected. This means that your motion-triggered video recordings start before any motion happens; you don't miss a thing.
- Plug in your Arlo Ultra camera.
- Make sure the camera is using a motion-detection mode such as Armed.
When the camera detects motion, it records the three seconds before the motion happened.
Record clips from live video
- Open the Arlo app.
- Tap the camera feed image.
- Tap Record to begin recording. This icon turns red to indicate that you are recording the live feed.
- To stop recording, tap Record again.
Take a snapshot from live video
- Open the Arlo app.
- Tap the camera feed image.
- Tap Snapshot
The snapshot is saved in your library.
Talk and Listen
The Ultra camera includes microphones that allow you to talk and listen. The two microphones in the Arlo Ultra camera create Beamforming for spatial filtering of sound. This lets Arlo Ultra hone-in on sound from a particular area or subject. The microphones also enable noise-cancelling and wind noise reduction. For information about the wind noise reduction setting, see Change the camera audio settings on page 48.
Use Talk and Listen
- Open the Arlo app.
- Tap the camera feed image.
- Tap Talk and Listen .
- The first time you use Talk and Listen, allow Arlo to use your phone's microphone.
- Tap the microphone button.
Two-way audio automatically opens, allowing you to talk and listen.
Turn the camera spotlight on and off
Your Arlo Ultra camera spotlight can be used at night for better video quality. You can turn the spotlight on and off. When your camera is armed and detects motion at night, the spotlight turns on. You can adjust the spotlight behavior and brightness.
Turn the spotlight on and off from the camera feed
- Open the Arlo app.
- Tap the camera feed.
- Tap Spotlight
- To adjust the brightness, tap and hold the icon and adjust the slider.
- To turn off the spotlight, tap Spotlight .
For information about how to customize the spotlight settings, see Change the camera spotlight settings on page 47.
Turn the camera siren on and off
- Open the Arlo app.
- Tap Siren on the upper right.
- Tap Activate Siren.
If you have multiple Arlo Ultra cameras, you are prompted to select one.
- Swipe the siren icon to the right.
The camera siren turns on. - To turn off the siren, tap the slider at the top of the Devices page.
Customize your camera feed image
If you use more than one camera, you can change the order in which the camera feeds display on the Devices page. You can also zoom, invert, or rotate the camera feed image.
Change the camera order
- Open the Arlo app.
- Tap Settings.
- Under SYSTEM, tap Device Order.
- If you are using a smartphone or tablet, tap Edit at the top of the page.
A list icon displays.
- Tap and hold the list icon and drag each device to the correct position on the list.
- Tap Save.
Invert a Camera Feed
You can invert the video feed image.
- Open the Arlo app.
- Tap Settings > My Devices.
- Select the camera.
- Tap Video Settings.
- Rotate the image.
If you're using an iOS device, tap Rotate Image 180^ .
If you're using an Android device, tap the slider to OFF and then rotate the image.
Motion detection activity zones
You can designate zones within the camera view where you want the camera to detect and record motion. After you create the zones, you can select which zone or zones detect motion.
Add an activity zone
- Open the Arlo app.
- Tap Settings > My Devices.
- Select the camera.
- UnderVIDEO, tap Activity Zones.
Arlo Ultra Camera
- Tap+.
An activity zone box displays in the camera feed image. - Move the zone to the desired position in the camera feed image.
- To change the size or shape of the zone, drag the 8-points on the edges of the zone.
- To reposition the zone, tap and hold the zone and move it.
- To customize the zone name, tap Edit and enter a name. If you're using a web browser, click next to the zone name.
10.Tap Save.
Change an activity zone
- Open the Arlo app.
- Tap Settings > My Devices.
- Select the camera.
- Under VIDEO, tap Activity Zones.
- Tap a zone to select it.
- Move the zone to the desired position in the camera feed image.
- To change the size or shape of the zone, drag the 8-points on the edges of the zone.
- To reposition the zone, tap and hold the zone and move it.
- To customize the zone name, tap Edit and enter a name. If you're using a web browser, click next to the zone name.
10.Tap Save.
Delete an activity zone
- Open the Arlo app.
- Tap Settings > My Devices.
-
Select the camera.
-
UnderVIDEO, tap Activity Zones.
- Tap a zone to select it.
- Delete the device.
On an iOS device, slide the motion detection zone to the left and tap Delete.
On an Android device, slide the motion detection zone to the left.
Cloud recordings
Arlo Ultra cameras record when they are in an armed mode and they detect motion or sound. Your Arlo recordings are sent to your Arlo account in the cloud for storage in your library. Recordings are encrypted with your user name and password.
You can access your recordings from the Arlo app on your mobile device or by using a web browser to visit https://my.arlo.com/#/login. You can download recordings from the cloud and save them.
View recordings and snapshots
Your Arlo Ultra camera stores recordings and snapshots in the library. You can use the filter and the calender to find and view specific recordings.
Use the Library
You can use the library to find and view recordings based on the date.
- Open the Arlo app.
- Tap Library.
- If it's more than one month since you started recording, use the arrows on either side of the month to select a month to view.
A green circle indicates the selected day. A green dot below the date indicates each day on which a video clip was recorded.
- Tap a highlighted date.
Recordings from that date display below the calendar.
Arlo Ultra Camera
Use the filter
You can use the filter to find and view recordings based on criteria that you select.
- Open the Arlo app.
- Tap Library.
- Tap Filter in the upper left corner of the page.
- Tap the filtering criteria that you want to use.
- Tap Done.
Turn off the filter
- Open the Arlo app.
- Tap Library.
- Tap Filter in the upper left corner of the page.
- Tap Reset.
- Tap Done.
Download recordings
- Open the Arlo app.
- Tap Library.
- Tap a recording.
- Tap Download.
- Tap OK to confirm.
Make a recording a favorite
- Open the Arlo app.
- Tap Library.
- Tap a recording.
- Tap Favorite.
Share recordings
- Open the Arlo app.
- Tap Library.
- Tap a recording.
- Tap Share.
- Share the file.
Donate recordings for research
You can donate video or snapshot files to Arlo to use for research and development of Arlo products.
- Open the Arlo app.
- Tap Library.
- Tap a recording.
- Tap Donate.
- Tap OK to confirm.
Delete recordings
- Open the Arlo app.
- Tap Library.
- Tap a recording.
- Tap Delete.
- Tap OK to confirm.
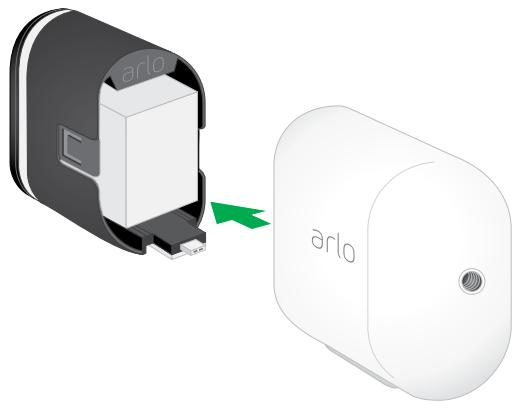
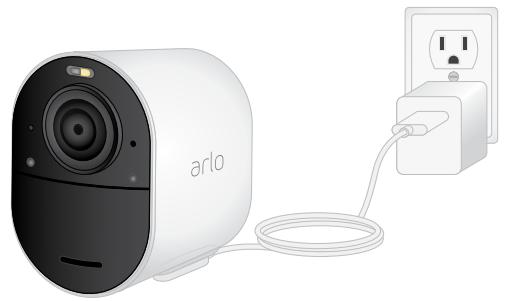
Charge your camera battery
Your camera battery comes partially charged. Plugging in the camera charges the battery.
- Snap the magnetic power cable into the camera's power input.
- Connect the AC adapter to the power cable and plug it in.
Note: You can buy spare rechargeable batteries and charge them in the Arlo Dual Charging Station (sold separately).
Replace a camera battery
You can leave the camera housing in place so the camera position stays the same.
- Release the Arlo Ultra camera from the camera housing.
Press the button on the charging port underneath the Arlo Ultra camera. The camera clicks as it disengages from the camera housing.
- Pull the camera all the way out of the camera housing.

Arlo Ultra Camera
- Remove the battery by pulling on it until it slides out of the camera.
- Align the battery and insert it into the battery compartment. The battery only inserts one way.
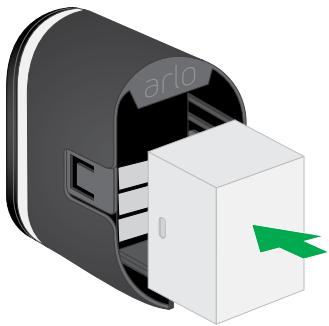
The LED on the Arlo Ultra camera blinks blue.
- Insert the camera into the camera housing until it clicks into place.
To do this, place your thumbs on either side of the lens and push on both sides of the camera.
4. Image Quality Features
High Dynamic Range (HDR)
HDR solves the problem with over- or under-exposed images of scenes with both bright and dark areas in the same picture. Arlo Ultra automatically determines when to use HDR. HDR is optimized for outdoor environments. Your Ultra camera comes set to use HDR automatically, but you can turn it on and off. See Turn Auto HDR on and off on page 47.
Local 4K streaming and recording
4K means you can see more details in every image, even when zoomed in. Arlo Ultra outputs 3840 x 2160 resolution at a 16 x 9 aspect ratio.
Arlo Ultra streams 4K while providing the following:
180-degree diagonal field of view that does real-time image de-warping
Real-time high dynamic range (HDR)
- An integrated spotlight with dual noise-cancelling microphones
Arlo Ultra does all of this processing in parallel and in real time. Efficient video encoding and battery optimization algorithms between the camera and SmartHub allow 4K to work when your camera is running on battery power.
To use 4K streaming, you need an Arlo Ultra camera paired with an Arlo SmartHub. For basic use of 4K, we recommend an average upload bandwidth speed of 4 Mbps per camera.
You can stream 4K content without a subscription. You can use 4K by local live streaming or recording 4K motion content onto a microSD card in the SmartHub. You can also purchase an add on service to store 4K, motion-activated clips to the Arlo Cloud for access anywhere your mobile app has a data connection.
HEVC 4K playback supported devices
High Efficiency Video Coding (HEVC) is a video compression standard that enables you to download and stream 4K videos with ease. To use HEVC on the Arlo app, you must use a supported device and meet the minimum requirements.
To support HEVC, your device must:
- Run iOS 9.0 or higher (Apple devices).
- Run Android 5.0 or higher (Android devices).
- Have the latest version of the Arlo app (for mobile).
- Use a web browser that supports HEVC.
Note: Check if your web browser supports HEVC, visit https://caniuse.com/#feat=hevc.
HEVC is supported on the following devices:
- iPhone 7/7 Plus or newer.
- iPad Pro or newer.
Samsung Galaxy S7/S7 Plus or newer. - Galaxy Note 8 or newer.
- Google Pixel/Pixel XL or newer.
Huawei P9 or newer. - Xiaomi Mi 5 or newer.
LG G5 or newer. - HTC U10 or newer.
- Sony Xperia X or newer.
- Moto Z or newer.
OnePlus 3 or newer.
Start 4K streaming
You can view live video in 4K from Arlo Ultra in these ways:
- Your computer or mobile device is connected to the same local network as your Arlo SmartHub or base station. This lets you live stream 4K content.
- You inserted a microSD card into your SmartHub and selected 4K video recording. This lets you record all motion events in 4K quality. See Turn local 4K recording off and on on page 51.
Arlo Ultra Camera
- You subscribed to the Arlo Premier Video add-on service to store motion recordings in 4K quality to the Arlo Cloud to access wherever you have a mobile date connection.
Turn local live streaming off and on
- Open the Arlo app.
- Tap Settings > My Devices.
- Tap the camera.
- Tap Video Settings.
- Tap Local 4K Live Streaming.
Local live streaming toggles off and on.
Turn 4K video recording off and on
- Open the Arlo app.
- Tap SmartHub/Base Station/Bridge > Storage Settings.
- Tap 4K Video Recording.
4K recording toggles off and on.
Optimize multiple 4K streams
You might experience connectivity issues if you're running multiple 4K live streams on your Arlo app. To optimize connectivity, check your network environment and adjust your Arlo Ultra camera settings as needed.
Check your network environment:
- If you are using a mobile device, make sure you're connected to your home router through the 5 GHz WiFi band.
- Make sure your average bandwidth speed is at least 4 Mbps.
Note: To check your Internet speed, visit www.speedtest.net. The result of the Internet speed test might change, depending on varying amounts of traffic. For accurate results, run the speed test multiple times.
If you are still experiencing connectivity issues after checking your WiFi connection and Internet speed, do the following tasks in order until your connection is back to normal.
Arlo Ultra Camera
Adjust your Arlo Ultra camera settings in the Arlo app in this order:
- Change the power management settings on each camera to Optimized.
Note: Do this on one camera at a time.
See Change the video quality and battery usage on page < .
- Change the power management settings on each camera to Best Battery Life.
See Change the video quality and battery usage on page < .
- Turn off 4K microSD card recording.
See Turn SD card recording off and on on page < .
- Turn off 4K local live streaming.
See Turn local live streaming off and on on page < ? >
Auto Zoom and Tracking
To use Auto Zoom and Tracking and local live streaming, you need an Arlo Ultra camera paired with an Arlo SmartHub.
When your Ultra camera detects motion and records video, Auto Zoom and Tracking lets your camera zooms in on the object and tracks its movement while the motion is within its field of view. When Auto Zoom and Tracking is active and you're viewing a live stream recording, you can zoom into any point of the recording. Arlo Ultra uses its advanced image sensor to enhance the image quality of the zoomed-in area.
Note: When Auto Zoom and Tracking is on, the zoomed-in image is in 1080p video resolution.
When Auto Zoom and Tracking is activated, Arlo Ultra automatically zooms in and tracks the motion for a curated clip. To access Auto Zoom and Tracking clips, tap Library in the Arlo app to view your library.
Turn on Auto Zoom and Tracking
- Open the Arlo app.
- Tap Settings > My Devices.
- Tap the camera.
- Tap Video Settings.
Arlo Ultra Camera
5. Tap Auto Zoom and Track.
Use Auto Zoom and Track when you're live streaming
- Open the Arlo app.
- Tap the camera feed.
- Pinch and drag to zoom in to any area you would like to see enhanced.
- Let go after you have zoomed in. An indicator on the live feed shows that Arlo is enhancing the image.
5. Modes, Rules, and Alerts
Modes and rules let you tell your Arlo system what to do in different situations. For example, you can set your Arlo system to record a video when it detects motion and send you an email alert.
Modes
Modes let you tell your Arlo cameras to respond differently at different times. For example, you probably don't want to receive an alert about motion in the living room while you're doing yoga there. You might want to turn on a different mode when you're away on vacation than when you're out at the store for an hour. Arlo modes give you control over how your cameras respond to motion or sound.
You can create your own modes, but Arlo Ultra comes with these modes:

Armed. Detection is on for this camera.

Disarmed. Detection is off for this camera.

Schedule. Manage detection based on a schedule.

Geofencing. You can arm, disarm, or resume a schedule mode when you arrive at or leave a given location based on your mobile device location.
You can customize the Armed and Schedule modes and you can add new modes. You might want to create a mode in which some motion sensors and cameras are active but others are not. For example, when you're sleeping, you might want your exterior cameras to be active, but your interior cameras to be inactive.
Note: You can create different modes for the same camera, but the camera can use only one mode at a time.
Select a mode
You can select a mode or set modes to activate according to a schedule.
- Open the Arlo app.
- Tap Mode.
- Tap the SmartHub. A list of modes displays.
- Tap a mode to activate it.
The mode that you selected turns on immediately. The mode stays active until you change it.
Rules
Each mode uses one or more rules to control your Arlo system. You can set these options.
- Trigger device. The trigger device is the camera that detects motion or sound. You can adjust the motion and sound sensitivity to minimize false alarms.
- Action device. The action device responds to motion or sound detection on the trigger device. For example, you might want your backyard camera or your driveway camera to trigger your door camera to start recording video. You decide what action each Arlo Ultra Camera takes when motion or sound is detected.
- Notifications. When a trigger is detected, Arlo can send you push notifications, email alerts, or both. You can also send email alerts to friends, family members, pet sitters, or anyone who might need to respond when a camera is triggered.
Change motion sensitivity
You can edit a rule to change the motion sensitivity level for Arlo Ultra cameras.
- Open the Arlo app.
- Tap Mode.
- Tap the SmartHub.
- Tap Edit l next to the mode.
-
Tap Edit l next to the rule.
-
Under If the following, tap Edit next to Motion is detected.
- Move the slider to adjust the sensitivity level for motion detection for this camera. If you used a mobile device to specify the settings, your settings are saved.
- If you used a browser to specify the settings, click Save.
Automatically stop recording when motion stops
- Open the Arlo app.
- Tap Mode.
- Tap the SmartHub.
- Tap Edit l next to the mode.
- Under Then do the following, tap Edit next to Record video.
- Select Record until activity stops (up to 300 sec).
Control whether the spotlight turns on when motion is detected at night
Unless you changed its settings, your Arlo Ultra camera automatically turns on its spotlight when it detects motion at night. Your camera detects motion when it is in Armed mode or another mode that uses a rule for detecting motion. When the spotlight turns on at night, it allows your Arlo Ultra camera to record video in color.
Note: You can also turn the spotlight on and off from the camera feed. (See Turn the camera spotlight on and off on page 20.
To control whether the spotlight turns on when motion is detected, you can change the low-light settings for your camera.
- Open the Arlo app.
- Tap Settings > My Devices.
- Tap the Ultra camera.
-
Tap Video Settings > Low Light Settings.
-
Tap Spotlight to toggle the setting off and on.
Change audio sensitivity
- Open the Arlo app.
- Tap Mode.
- Tap the SmartHub.
- Tap Edit l next to the mode.
- Under If the following, tap Edit next to Audio is detected.
- Move the slider to the desired level of audio detection. If you used a mobile device to specify the settings, your settings are saved.
- If you used a browser to specify the settings, click Save.
Manage alerts
Arlo can push notifications to your smartphone, send you email alerts, or do both. To receive Arlo notifications on your phone, you must install the Arlo app on your phone.
Note: If you log out of the Arlo app on your smartphone or mobile device, you will stop receiving push notifications.
-
Tap Edit l next to the mode.
-
Open the Arlo app.
- Tap Mode.
- Tap the SmartHub.
Note: The Disarmed mode does not send alerts.
- Under Alert, tap Push Notification to turn alerts on and off for your mobile device.
- Under Alert, tap Email Alerts to turn email notifications on and off.
- To specify an email address, tap Edit next to Email Alerts and enter the email address.
Schedule your camera rules
You can set a schedule to arm and disarm cameras automatically. Schedules recur weekly. For example, the schedule for Tuesday is repeated every Tuesday as long as the schedule is turned on. Arlo is preconfigured with this schedule:
- Monday through Friday, 8:00 a.m. to 5:00 p.m. All motion sensors are on.
- All other times. All motion sensors are off.
Add a schedule
- Open the Arlo app.
- Tap Mode.
- Tap the SmartHub.
- Tap Schedule L.
- Tap Edit next to Schedule.
- Tap + Add.
- Set the days and times and then tap Save.
Edit a schedule
- Open the Arlo app.
- Tap Mode.
- Tap the SmartHub.
- Tap Schedule L.
- Tap Edit l next to Schedule.
- Tap a green box.
- Change the start and stop times and tap Save.
Set up geofencing
Geofencing is a virtual fence around a location called a zone. You can use Arlo geofencing to arm, disarm, or resume schedule modes when your mobile device is in zone or out of zone. To set up geofencing, you must use your mobile device and allow the Arlo app to use your location.
Geofencing accuracy
For accuracy, geofencing uses a combination of GPS, cellular data, and WiFi data. The local environment affects geofencing as follows:
- In urban environments, where the cell towers and WiFi routers are more dense, geofencing accuracy can reach 100-200 meters.
Note: If you live in a skyscraper, geofencing might not work reliably due to GPS inaccuracies. Using the Large radius setting might help. - In rural areas, where cell towers and WiFi routers are sparse, geofencing accuracy can reach several hundred meters.
To improve geofencing accuracy, make sure that your mobile device meets these conditions:
WiFi is turned on.
GPS or location services are turned on.
Prepare your mobile device for geofencing
- Enable GPS or location services so that Arlo can locate your device.
- Enable WiFi.
Set up geofencing for the first time and set up modes
- Open the Arlo app.
- Tap Mode.
- Tap the SmartHub.
- Tap Geofencing.
- Allow Arlo to use your mobile device's location. Geofencing works only if Arlo can locate your mobile device. The Location Address page displays your current address.
Arlo Ultra Camera
- To change the radius setting, tap Radius and select a radius size.
Radius size sizes are Small, Medium, and Large (approximately 150 meters, 250 meters, and 500 meters, respectively).
-
Tap Device Location and enter a name for your location.
-
Tap Away Mode and select a mode.
Your camera uses the Away mode when your mobile device is outside the radius of your camera's location. Most people select Armed, Schedule, or Custom Mode so that the camera detects motion while they're gone.
- Tap Home Mode and select a mode.
Your camera uses this mode when your mobile device is within the radius of your camera's location. Most people select Disarmed while they're home.
If you use more than one enabled mobile device, you might be asked to select an Arlo device to connect it to.
- To select the preferred mobile device, tap the device and then tap Next.
11.Tap Save.
Geofencing with multiple mobile devices
Arlo geofencing works with multiple multiple mobile device.
Arlo uses the first in, last out principal to manage households where more than one person uses geofencing. When no one is home, your Arlo Ultra cameras are armed because no one is inside the geofence. When at least one person is home (first in), the cameras are disarmed. If one person leaves, but another stays home, the cameras are still disarmed until the last person leaves (last out).
Make sure that these conditions are met:
- Your Arlo devices are online.
- Geofencing is enabled.
- Your friends' and family's mobile devices are added to your account.
For information about adding devices, see Enable or disable geofencing for friends' mobile devices on page 40.
- (Required when your friend wants to participate in geofencing) Your friend is logged in to the Arlo app on his or her mobile device and the GPS or location service is enabled on your friend's mobile device.
Enable or disable geofencing for friends' mobile devices
- Open the Arlo app.
- Tap Mode.
- Tap the SmartHub.
- Tap the Edit icon next to Geofencing.
- Tap Enabled Devices.
A list of mobile devices displays. A check mark appears next to the device name when geofencing is enabled.
- Tap one or more mobile devices.
The device location displays as either In Zone or Out of Zone.
- To disable geofencing, tap the mobile device again.
The check mark disappears when geofencing disabled.
For more information, see Set up geofencing on page 38.
Custom modes
You can add modes in addition to the modes that come with Arlo and give the new modes custom names, such as Vacation. You can create one rule for each mode.
You can create multiple rules within the same mode so that each camera performs different actions and sends different alerts. You can also use Schedule mode to activate modes automatically at different times of the day or week. (See Add a schedule on page 37.)
Add a mode
- Open the Arlo app.
- Tap Mode.
- Tap the SmartHub.
- Tap Add a Mode.
- Enter the mode name and tap Next.
Arlo Ultra Camera
- Select the trigger device and tap Next.
This is the camera that detects motion and/or sound. - Enter the trigger device settings for the When motion is detected and When audio is detected sections and then tap Next.
- Use the slider to set the motion sensitivity for the trigger device and tap Next. Higher motion sensitivity settings usually trigger your camera to capture videos more frequently.
- Set the audio sensitivity for the trigger device and tap Next.
- Select an action device and tap Next.
This is the Arlo device that performs an action when the trigger device detects motion or sound. You can select the same Arlo device you're using as a trigger or a different Arlo device.
- Select an action and tap Next.
For an Arlo Ultra camera, you can select Record video, Turn alarm ON, or Do nothing.
If you're using a computer web browser, you can also specify the recording time setting.
- Select the notifications for Arlo to send when motion or audio is detected and then tap Next.
- Review your settings and tap Save.
6. Change Your Settings
Change your password and user name
Once you set up your Arlo account, you can access it by using the Arlo app on a smartphone or tablet, or from a computer using a web browser. If you're using a computer, enter https://my.arlo.com/#/login in the address bar of the browser.
- Open the Arlo app.
- Tap Settings > Profile.
- Enter the new user name and password.
On an iOS device, tap Edit at the top of the page.
On an Android device, tap the tab for each field and then tap OK.
Grant access to friends
You can add friends to your Arlo account. Friends can view live streams from your cameras; record video clips; view, share, mark as favorite, and delete clips from your library; and take snapshots. Friends are granted limited access to some of the settings and features of your Arlo account. You can select which cameras friends can see and what administrative rights are available to them.
Friends without access rights can:
- Play and view library content
View live footage - Zoom and drag video footage
- Control brightness
- Enter full-screen view
Arlo Ultra Camera
Friends who are granted access rights can also:
- Play and pause video footage
- Record video footage
- Mute the speaker
- Access and change modes
- View motion detection statuses
- Manually record
- Take snapshots
- Mark as a favorite, share, download, and delete video footage
- Use a camera's microphone
Add a friend
- Open the Arlo app.
- Tap Settings.
- Under ACCOUNT, tap Grant Access.
- Tap Add or +.
- Enter your friend's first name, last name, and email address.
- Tap the Arlo devices that you want your friend to access.
- To grant access rights to your friend, tap Allow Access Rights.
Selecting Allow Access Rights allows this friend to change your account and camera settings.
- Tap Send Invite.
An email message is sent inviting your friend to create an Arlo account. This friend's name is displayed with the status Pending. When the friend accepts your invitation, the status changes to Accepted.
Edit a friend's access privileges
- Open the Arlo app.
- Tap Settings.
- Under ACCOUNT, tap Grant Access. A list of your friends displays with the status of their accounts.
Arlo Ultra Camera
- Tap the friend, and tap Edit
- Tap cameras to select or deselect them.
- Tap Allow Access Rights.
Selecting Allow Access Rights allows this friend to change your account and camera settings.
- Tap Done.
Delete a friend
- Open the Arlo app.
- Tap Settings.
- Under ACCOUNT, tap Grant Access.
- Select the friend, and tap Edit
- Tap Delete Friend.
- Tap Yes.
Change the time zone
- Open the Arlo app.
- Tap Settings > My Devices.
- Tap the SmartHub.
- Tap Time Zone.
- Tap a time zone.
If you're using a mobile device, your settings are saved.
- If you're using a computer, click Save.
Camera settings
You can view or change the settings for each camera. You can do this by tapping Settings > My Devices and selecting the camera, or by tapping the Menu icon ... or the Device Settings icon below the camera feed.
Change the camera name
- Open the Arlo app.
- Tap Settings > My Devices.
- Tap the camera.
- Tap Edit next to the camera name.
- Enter a new name that reminds you of the camera's location, such as Garage or Front Door. Camera names are limited to 32 characters.
- Tap Save.
Turn on Smart Zoom
- Open the Arlo app.
- Tap Settings > My Devices.
- Tap the camera.
- Tap Video Settings.
- Tap Smart Zoom.
Turn off the camera LED
The LED on the camera lights in different colors. You can turn off this LED.
- Open the Arlo app.
- Tap Settings > My Devices.
- Tap the camera.
- Tap Camera LED.
- Tap Battery Fully Charged Indicator to turn the LED off and on. If you're using a mobile device, your settings are saved.
- If you're using a computer, click Save.
Change the video quality and battery usage
You can set the video resolution as Best Video, Optimized, or Best Battery Life. Using the Best Battery Life setting reduces the WiFi bandwidth that is required.
- Open the Arlo app.
- Tap Settings > My Devices.
- Tap the camera.
- Tap Video Settings > Power Management.
- Tap to select Best Battery Life, Optimized, or Best Video.
Turn color video recording at night off and on
- Open the Arlo app.
- Tap Settings > My Devices.
- Tap the camera.
- Tap Video Settings > Low Light Settings.
- Tap Color.
The Color setting toggles on and off.
Turn night vision on and off
When night vision is enabled, the camera automatically turns on infrared (IR) LEDs to record in low-light conditions. We recommend that you turn off night vision if the camera is facing reflective surfaces, such as windows.
- Open the Arlo app.
- Tap Settings > My Devices.
- Tap the camera.
- Tap Video Settings > Low Light Settings.
- Tap Night Vision.
If you're using an Android device, tap the slider.
Turn Auto HDR on and off
- Open the Arlo app.
- Tap Settings > My Devices.
- Tap the camera.
- Tap Video Settings.
- Tap Auto HDR.
If you're using an Android device, tap the slider.
Change the camera audio settings
You can adjust the settings to reduce wind noise, turn the microphone off and on, and adjust the speaker.
- Open the Arlo app.
- Tap Settings > My Devices.
- Tap the camera.
- If you're using a mobile device, tap Audio Settings.
-
Adjust the settings:
-
Reduce Wind Noise toggle turns this feature off and on.
- Microphone toggle turns the microphone off and on.
- Speaker toggle and volume. To turn the speaker off and on, tap Speaker. To change the speaker volume, move the Speaker Volume slider.
Customize the camera spotlight settings
Your Arlo Ultra camera spotlight is set to automatically turn on when your camera detects motion at night. The spotlight improves video quality and allows your camera to record color video at night. You can turn the spotlight on and off and you can adjust the spotlight behavior and brightness.
Turn the spotlight on and off
You can turn the spotlight on and off at any time from the camera feed by tapping Spotlight . See Turn the spotlight on and off from the camera feed on page 20.
Arlo Ultra Camera
You can also control whether the spotlight comes on automatically when your Arlo Ultra camera detects motion at night.
- Open the Arlo app.
- Tap Settings > My Devices.
- Tap the camera.
- Tap Video Settings > Low Light Settings.
- Tap Spotlight.
The Spotlight setting toggles off and on. When the Spotlight setting is set to the On position, the spotlight automatically turns on when your Arlo camera detects motion at nigiht.
SmartHub settings
You can view or change SmartHub settings.
Change the SmartHub name
- Open the Arlo app.
- Tap Settings > My Devices.
- Tap the SmartHub.
- Tap Edit next to the SmartHub name.
- Enter a new name for the SmartHub.
- Tap Save.
Adjust the SmartHub flicker setting
The combination of certain artificial light sources and the camera shutter speed might result in flickering in recorded video. The default setting for the SmartHub is Auto, but you can change the flicker adjustment.
- Open the Arlo app.
- Tap Settings > My Devices.
-
Tap the SmartHub.
-
Tap Flicker Adjustment.
- Tap a setting.
Restart the SmartHub
- Open the Arlo app.
- Tap Settings > My Devices.
- Tap the SmartHub.
- Scroll down and tap Restart.
View device information
You can view the firmware version, hardware version, and the serial number
- Open the Arlo app.
- Tap Settings > My Devices.
- Tap the device.
- Tap Device Info.
Remove a device from your account
- Open the Arlo app.
- Tap Settings > My Devices.
- Tap the camera.
- Scroll down and tap Remove Device.
7. Use SD Card Storage
You can insert a microSD card into your Arlo SmartHub and store your Arlo recordings both in the cloud and on the SD card. If the SmartHub is not connected to the Internet, recordings continue to be saved on the microSD card. If you have an active live stream connection between an Arlo Ultra camera and a SmartHub, then you can record to a microSD card. Your Arlo app notifies you if the SD card is low on storage space or is full.
MicroSD card format
Your SmartHub accepts SDHC or SDXC microSD cards. We recommend using microSD cards with a minimum of 16 GB capacity, Speed Class 10, UHS-!, V10. Arlo supports up to Class 10 UHS-3 V90.
If your microSD card isn't formatted or is formatted with an incompatible file system, you can use your Arlo app to format the microSD card. See Format a microSD card on page 52.
Insert a microSD card
- Insert the microSD card into the slot on the bottom of the SmartHub.
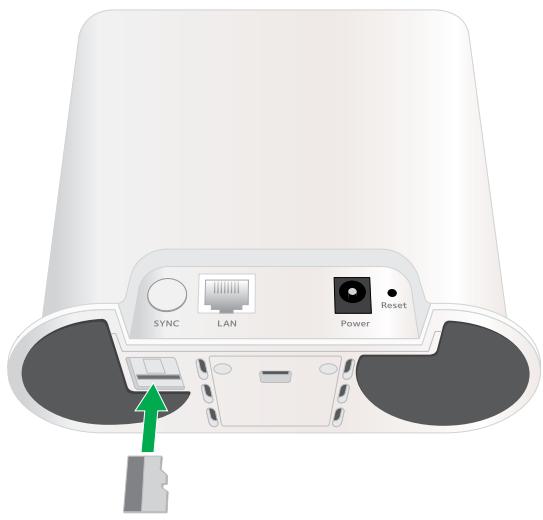
- Press the edge of the microSD card until it's completely seated in the slot.
View the SD card status
- Open the Arlo app.
- Tap SmartHub/Base Station/Bridge.
- Check the SD card icon. When a microSD card is inserted in the SmartHub, this icon is yellow.
- To view more information about the microSD card status, under LOCAL STORAGE, tap Storage Settings.
The SD Card Status displays GOOD or shows if the SD card needs to be formatted, or is full. The Arlo app also notifies you if this occurs.
View available SD card storage
The Arlo app notifies you if the SD card is getting full, but you can also view the available storage.
- Open the Arlo app.
- Tap SmartHub/Base Station/Bridge > Storage Settings.
The Available Storage field displays the amount of storage available on the SD card.
Turn SD card recording off and on
- Open the Arlo app.
- Tap SmartHub/Base Station/Bridge
- Select the SmartHub.
- Tap Storage Settings > SD Card Recording.
SD card recording toggles off and on.
Turn local 4K recording off and on
The SmartHub recordings saved onto the SD card are 1080p, but you can change this setting and save 4K recordings onto the SD card.
-
Open the Arlo app.
-
Tap SmartHub/Base Station/Bridge
- Select the SmartHub.
- Tap Storage Settings > 4K Video Recording.
Local 4K recording toggles off and on.
Change the SD card overwrite setting
By default, if the SD card fills up, the oldest Arlo recording is erased to make room for new recordings. Files on the SD card that are not in the Arlo folder are not deleted to make room for Arlo recordings. You can change the setting so that no Arlo recordings are automatically erased.
- Open the Arlo app.
- Tap Base Station & Bridge > Storage Settings.
- Tap Overwrite Automatically.
The overwrite setting toggles off and on.
Format a microSD card
Your SmartHub accepts micro SD cards, SDHC or SDXC only, with up to 32 GB capacity, file format FAT32. The Arlo app displays a message to let you know if you need to format the SD card. The SmartHub can format the SD card.
- Open the Arlo app.
- Tap SmartHub/Base Station/Bridge > Local Storage.
- Tap the red Format SD Card button.
Safely eject an SD card
It's important to safely remove the microSD card from your SmartHub. If you remove an SD card while information is being recorded on it, the SD card might become permanently unusable or the files on the card might be corrupted.
- Open the Arlo app.
- Tap SmartHub/Base Station/Bridge > Local Storage.
- Tap Safely Eject SD Card.
Arlo Ultra Camera
-
Wait for the Unmounting SD Card progress message to close.
-
Remove the SD card from your SmartHub by pressing in on the edge of the card until it ejects.
WARNING: Do not interrupt power to the SmartHub or remove the SD card while unmounting the SD card.
- The SD card icon changes from yellow to gray to indicate that no microSD card is in the slot.
Arlo SD card recording is disabled until you insert another SD card.
View videos on a microSD card
To view Arlo videos saved on a microSD card, you must remove the microSD card from your SmartHub and use a microSD card reader.
The microSD card reader can be part of your computer or a memory card reader with a USB or micro USB connector. If you purchase an SD card reader, make sure that you choose one that can read microSD cards.
- Safely eject the microSD card.
For more information, see Safely eject an SD card on page 52. - Insert the microSD card into the slot in your card reader.
- Wait for the microSD card to appear in the list of available drives on your computer, and then open the drive folder to view the files on your microSD card.
- Open the Arlo folder.
Recorded videos are saved in this folder in MP4 format. Video files are named according to this system: camera serial number(video number_date片子 clip tag. Dates are in the format YYYYMMDD.
Note: If you're unable to play MP4 files on your computer, update your media player software to the latest version and try again. You can also download a free universal multimedia player, such as VLC.
8. FAQs and Troubleshooting
FAQs
Does Arlo Ultra output 4K resolution?
Yes. Arlo Ultra outputs 3840x2160 resolution at 16x9 aspect ratio. For more information, see Chapter 4. Image Quality Features on page 28,
What is High Dynamic Range (HDR)?
HDR solves the problem with over- or under-exposed images of scenes with both bright and dark areas in the same picture. Arlo Ultra automatically determines when to use HDR. HDR is optimized for outdoor environments.
Is Arlo Ultra backward compatible with my existing Arlo System?
Yes. Arlo Ultra can connect to an Arlo base station, as well as existing outdoor security mounts. It is not backward compatible with previous Arlo batteries or previous Arlo charging cables.
Can I use Arlo Ultra indoors and outdoors?
Yes. Arlo Ultra is outdoor weather-resistant. It is wire-free and does not require continuous power. With an additional, outdoor-rated charge cable, you can use Arlo Ultra outdoors.
Note: When you eject and expose the inside compartment of the camera, it is no longer weather-resistant.
What is the auto zoom and track feature?
When Arlo Ultra detects motion, it automatically zooms in and tracks the motion for you. This tracking shows up as curated clips that are stored in the cloud for your easy access and playback. The curated clips in the cloud are 1080p resolution.
What is the minimum upload bandwidth speed required?
Arlo recommends an average upload bandwidth speed of 4 Mbps per camera.
Battery FAQs
How can I recharge the camera battery?
Your rechargeable battery is ready for use when it leaves the factory. You can use the power adapter cable to plug the camera into an electrical outlet to charge the battery. You can also use the Arlo Dual Charging Station (sold separately) to charge the battery. You can purchase a spare battery and the charging station. Then you can put the spare battery into the camera while you recharge the battery. The charging station can recharge two batteries simultaneously.
What do I need to know about using Arlo cameras in cold weather?
Cold temperatures can affect any battery's capacity, due to the chemistry of batteries. This means that if you install your Arlo camera outside in cold temperatures, you might notice a shorter battery duration for the camera, or a faster than expected drop in the displayed battery capacity.
Why does one Arlo camera battery drain faster than another Arlo camera battery?
Your Arlo camera is flexible and you can use it in a wide range of environments. Your environment might include elements that affect battery life. In some cases your Arlo Ultra camera may use more battery life than others:
- Arlo cameras work well in the dark. They use infrared sensors to monitor motion in the dark. These use more battery power than cameras monitoring motion in a well-lit room.
- Arlo cameras work well when they are as far away as 300 feet from the SmartHub. Cameras positioned farther away from the SmartHub use more battery power than cameras positioned close to the SmartHub.
- Arlo cameras let you choose the quality level of the videos that they record. Cameras set to high-quality video recording use more battery power than cameras set to low-quality video recording.
Does my WiFi environment affect my Arlo camera battery?
Yes. If you are in a noisy WiFi environment, your Arlo camera battery might drain faster. Use a WiFi analyzer to test the WiFi noise in your environment.
What is the battery life for rechargeable batteries?
The camera rechargeable battery life is four to six months with normal usage and can be extended for optimal usage if you use key settings and follow certain tips. The cameras offer the best battery life when set up to record when they detect motion.
How can I extend the camera battery life?
To extend the battery life, follow these tips:
- Check your camera's video quality and battery usage setting. To extend your battery life, select the Best Battery Life setting. This setting trades video quality for improved battery life. (See Verify that the Arlo SmartHub is online on page 59.)
- Normal usage is defined as four minutes of viewing or recording per day with the camera in the Optimized setting.
- Depending on your specific usage, you might see different results. Also note that a camera's distance from the SmartHub can affect its battery life.
Activity zones and CVR aren't working
The following features are available only while the camera is plugged in:
Activity zones
CVR
- Prebuffering
Note: Connecting your camera to the Arlo Solar Panel (sold separately) to charge the battery does not provide AC power. To use activity zones and CVR, you must plug the camera into an AC power outlet.
If you set up activity zones or CVR on your camera and the zones aren't operating, make sure that your camera is plugged in. As soon as the camera is plugged in, activity zones, CVR, and prebuffering are available again.
Your activity zone and CVR settings persist even while the camera is not plugged in-- you don't need to set up CVR or activity zones again when you plug the camera back in. If your camera isn't plugged in, you can't set up CVR or use activity zones.
Can't see video streams in a browser
The Arlo web client uses the Adobe Flash plug-in to display your camera streams in a browser. Make sure that your browser isn't blocking the plug-in and that you're using the latest version of Adobe Flash.
Your router might be blocking the ports to which Arlo sends data. To make sure that Arlo can stay connected, you must keep ports 443 and 80 open on your router.
To troubleshoot problems with the video stream, check for the conditions in the following sections: WiFi signal interference on page 57, Out of range on page 57 and Low battery on page 57.
WiFi signal interference
Environments with multiple WiFi networks, WiFi devices, or frequencies can cause signal interference with your Arlo system. Minimize the number of networks, WiFi devices, and transmitted frequencies in the area where you place your SmartHub and cameras.
Also, place your camera at least 1 to 3 feet (30 to 100 centimeters) from the SmartHub, and allow at least 6 12 feet (2 meters) between cameras. Follow these guidelines to prevent WiFi signals between the devices from interfering with each other.
Out of range
Make sure that your camera is no farther than 300 feet (90 meters) from the SmartHub. The range might be less if metal objects or thick walls and ceilings are between a camera and the SmartHub.
Make sure that your cameras display three or four bars of signal strength in the area where you intend to install them. The cameras can work when signal strength is at one or two bars, but they might go out of range intermittently due to fluctuations in the environment.
Low battery
Recharge or change the battery in the camera to make sure that the battery level is no less than two bars. A low battery can cause the camera to stream intermittently.
Not receiving push notifications
You must be logged in to the Arlo app to receive Arlo alerts on your smartphone or mobile device. Arlo registers your device for push notification when you log in. If you used the logout option instead of simply exiting the app, you must log back in to the app. You receive Arlo alerts even if your device is sleeping.
Check the rules for armed modes
Check the rules in your modes. Make sure that push notification is enabled in the Armed mode or in a custom mode if you created one.
- Open the Arlo app.
- Tap the Mode button.
Arlo Ultra Camera
- Select the SmartHub. A list of modes display
- Tap Edit l next to Armed.
- Tap Edit l next to the rule.
- Under Alert, make sure that the Push Notification check box is selected.
- If you made changes, tap Save.
Check the Arlo app notification settings on an iOS device
Make sure that you allow the Arlo app to receive push notifications. The Arlo app push notifications can be disabled on iOS and Android devices.
- Tap the Settings icon for your iOS device.
- Tap Notifications > Arlo.
- Make sure that Allow Notification is selected.
Check the Arlo app notification settings on an Android device
Make sure that you allow the Arlo app to receive push notifications. The Arlo app push notifications can be disabled on iOS and Android devices.
- Tap the Settings icon for your Android device.
- Tap Application Manager > Arlo.
- Make sure that the Show Notifications setting is selected.
If you said no to push notifications at installation
When you install the Arlo app for the first time, to receive alerts, you must select Allow when asked if you want Arlo to send you push notifications. For iOS apps, after you respond to this alert, it isn't presented again unless the device is restored to factory settings or the app is uninstalled for at least a day.
If you said no on an iOS device, uninstall the app, wait for a day, and then reinstall it, and allow notifications. If you don't want to wait a day before you reinstall the app, you can use the system clock on your device to simulate a day. Set the system clock forward a day or more, turn your device off, and then turn the device back on. After you reinstall the app, return the system clock to the correct setting.
Verify that the Arlo SmartHub is online
To determine whether your SmartHub is online, check the Internet LED on the front of the SmartHub:
- If the LED is solid blue, the SmartHub is connected to the Internet.
- If the LED is amber, the SmartHub isn't connected to the Internet.
If you are not at the same location as your Arlo SmartHub, log in to your Arlo account:
- If you can review the video feed from each of your cameras, your SmartHub is connected to the Internet.
- If you see an error message (such as "SmartHub Offline" or something similar) instead of the video feed, your SmartHub isn't connected to the Internet.
The SmartHub is offline
If you are not sure whether the SmartHub is offline, see Verify that the Arlo SmartHub is online on page 59.
- Check the Ethernet cable.
Make sure that it's securely connected to the back of your SmartHub and to your router. Also make sure that you're using the Ethernet cable that came with your system.
- Check the power adapter.
Make sure that the power adapter is securely connected to the back of your SmartHub and securely plugged into an outlet.
- Try to connect to the Internet from another device that is connected directly to your router.
Try an Ethernet-connected device, not a device that is connected using WiFi (you can turn WiFi off on the device to make sure that the device is connecting through the Ethernet cable). Make sure that you can browse the Internet from this device by doing the following:
- If you can't browse the Internet from this device, you must restore your router's connection to the Internet.
-
If you can browse the Internet from this device, continue troubleshooting.
-
Power cycle your SmartHub.
Unplug the power adapter from the outlet, wait one minute, and reconnect the power adapter to the outlet. The SmartHub takes one to two minutes to start.
Arlo Ultra Camera
When the LED lights solid blue, your SmartHub is connected to the Internet. If the LED is amber, continue troubleshooting.
- Check your router's DHCP settings and client list.
Make sure that DHCP is enabled and that router's DCHP client list supplied an IP address to the SmartHub. (If it did, the SmartHub appears in the client list.) For more information, see your router documentation.
- If you were previously able to connect your SmartHub to the Internet but now can't connect, check the router's security settings and firmware to make sure that no changes were made since the last time it successfully connected.
You might want to temporarily lower the security settings on the router or temporarily place the SmartHub in the DMZ to rule out any firewall restrictions. If you make these changes, power cycle your SmartHub as described in Step 4.
- Check to make sure that ports 443 and 80 are open on your router.
Note: If you don't manage your Internet environment, contact your IT department for assistance with any firewall or router configurations. The Arlo SmartHub can't connect through most proxy servers. Check with your IT team and Internet service provider (ISP) about ways to bypass any proxy servers. Ask your IT team to make sure that ports 443 and 80 are open.
- Perform a factory reset on your SmartHub.
For more information, see Reset the Arlo SmartHub to factory settings on page 61.
If you are still unable to get your SmartHub to connect, visit support.arlo.com and submit a support case describing the steps you took and provide the following information:
- SmartHub serial number
- User name (email address used to register your Arlo account)
- Internet service provider (ISP) name
- Internet connection type (DSL, cable, and so on) and speed (Arlo requires at least 1 Mbps upstream)
- Internet router model
List of other devices connected directly to your router - The last time and place that your SmartHub successfully connected to the Internet
Reset the Arlo SmartHub to factory settings
Performing a factory reset returns your SmartHub to the default settings. It also removes the serial number from your Arlo account.
- Use a straightened paper clip to press and hold the Reset button on the back of the SmartHub for about 10 seconds.
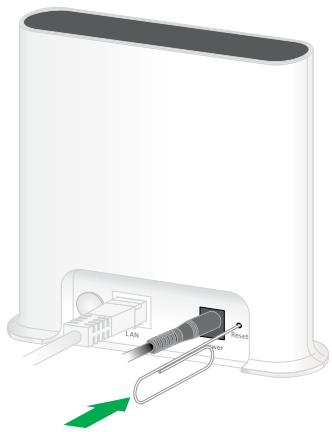
When the SmartHub reset completes, the LEDs on the front of the SmartHub blink amber. When the LEDs stop blinking amber, your SmartHub reboots. The SmartHub is removed from your Arlo account.
- To add the SmartHub and set it up, wait for the LEDs to light solid blue and then open the Arlo app.
- Tap New to Arlo?.
- Follow the setup instructions.
If your Arlo cameras were paired to the SmartHub, you might need to pair the cameras to the SmartHub again.
9. Rechargeable Battery Safety
Safety rules for rechargeable batteries
Arlo Ultra Cameras use rechargeable batteries and can go wherever you need them. But ALL batteries can EXPLODE, CATCH FIRE, and CAUSE BURNS if disassembled, punctured, cut, crushed, short-circuited, incinerated, or exposed to water, fire, or high temperatures, so handle them with care.
To use rechargeable batteries safely, follow these guidelines:
- ALWAYS store spare batteries in a cool, dry, ventilated area.
- ALWAYS make sure that the battery compartment is clean and free of any debris before inserting new batteries.
- ALWAYS make sure the battery contacts are aligned.
- ALWAYS keep all batteries away from children.
- ALWAYS follow local waste and recycling laws when throwing away used batteries
- ALWAYS use an Arlo Ultra power adapter or an Arlo Dual Charging Station (sold separately) to charge Arlo Ultra rechargeable batteries.
- NEVER place rechargeable batteries in a pocket, purse, or other receptacle, especially those containing metal objects.
- NEVER store rechargeable batteries with hazardous or combustible materials.
- NEVER let a rechargeable battery or battery compartment get wet-before, during, or after installation. (Remember that your camera itself is weatherproof, but its interior battery compartment and batteries aren't.)
- NEVER disassemble, cut, crush, puncture, short-circuit, dispose of a rechargeable battery in fire or water, or expose your battery to temperatures above 60^ C (140°F).
Support
For product updates and web support, visit http://www.arlo.com/en-us/support/.
Arlo Technologies, Inc.
2200 Faraday Ave. Suite 150
Carlsbad, CA 92008 USA
Document publication date: March 2019
PN 202-11937-01
Trademarks
© Arlo Technologies, Inc. Arlo, Arlo logo, and Every Angle Covered are trademarks of Arlo Technologies, Inc. App Store is a service mark of Apple Inc. Google Play and the Google Play logo are trademarks of Google LLC. Amazon and all related logos are trademarks of Amazon.com, Inc. or its affiliates. Any other trademarks are for reference purposes.
Compliance
For regulatory compliance information including the EU Declaration of Conformity, visit www.arlo.com/about/regulatory/.
See the regulatory compliance document before connecting the power supply.