X4 PRO STANDARD (H109S) FPV RTF - Drones HUBSAN - Free user manual and instructions
Find the device manual for free X4 PRO STANDARD (H109S) FPV RTF HUBSAN in PDF.

User questions about X4 PRO STANDARD (H109S) FPV RTF HUBSAN
0 question about this device. Answer the ones you know or ask your own.
Ask a new question about this device
Download the instructions for your Drones in PDF format for free! Find your manual X4 PRO STANDARD (H109S) FPV RTF - HUBSAN and take your electronic device back in hand. On this page are published all the documents necessary for the use of your device. X4 PRO STANDARD (H109S) FPV RTF by HUBSAN.
USER MANUAL X4 PRO STANDARD (H109S) FPV RTF HUBSAN
Read the instruction manual carefully!
IMPORTANT SAFETY NOTES
OPERATION:
Be extremely careful and responsible when using the X4 Pro. Small electronic components can be damaged by crashes or by dropping the X4 Pro in water. To avoid further damage to the unit, people, or property, do not use X4 Pro with broken or damaged components. Always inspect propellers for damage and proper tightness.
Flight:
■ Take responsibility for your safety and the safety of others when you fly the X4 Pro!
■ Do not fly the X4 Pro in crowded places. It needs plenty of space to operate.
- Do not fly in bad weather.
- Never try to catch the X4 Pro while it is in flight.
This model is intended for experienced pilots age 14+.
■ Power off the X4 Pro after flight, to prevent the propellers from causing injuries.
Always remove the battery after you stop flying to avoid injuries from accidentally powering on the motors.
Always use great caution to protect yourself when near the propellers. The flight system will start after power on regardless of the transmitter signal. The high speed propellers are very dangerous.
■ Power off the X4 Pro after every flight or the propellers may still rotate and cause injury.
SYMBOL EXPLANATION

No operating

Important Notice

Instruction

Explanation, reference
USAGE ADVICE
Hubsan provides you with two manuals for your X4 Pro:
- "Disclaimer"
- "Hubsan X4 Pro Instruction Manual"
View the instruction videos and Disclaimer first, then read the manuals.
CAUTION
RISK OF EXPLOSION IF BATTERY IS REPLACED BY AN INCORRECT TYPE.
DISPOSE OF USED BATTERIES ACCORDING TO THE INSTRUCTIONS
INDEX
IMPORTANT SAFETY NOTES
SYMBOL EXPLANATION
USAGE ADVICE
INDEX
02
GENERAL INTRODUCTION
1 ACCESSORIES INCLUDED
2 INTRODUCTION
PREPARE FOR USE
1 PREPARE THE LIPO BATTERY
1.1 LiPo battery in the X4 Pro
1.2 Charging
1.3 Power on/ off the X4 Pro LiPo Battery
1.4 Check The LiPo Battery Power
2 SAFETY NOTES
2.1 Important Notes
2.2 LiPo Battery Safety Notes
3 PREPARE THE X4 PRO
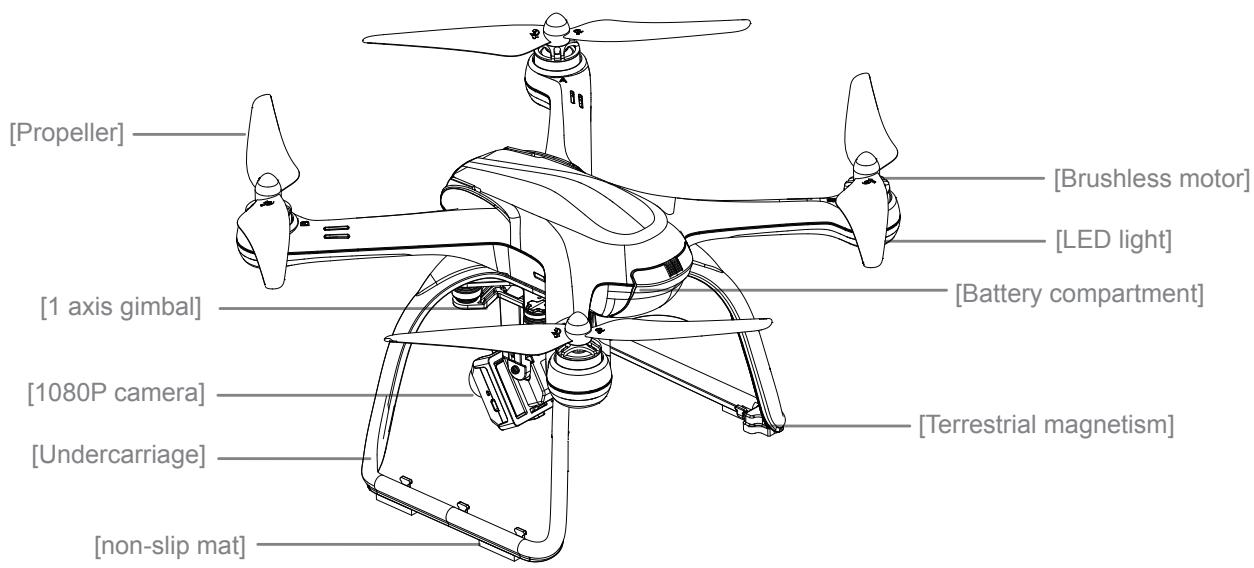
3.1 Introduction to the X4 Pro
3.2 Prepare the Camera
3.3 Prepare the 1 Axis Gimbal
3.4 Install 5.8GHz Transmitter Antenna
3.5 Prepare the Propeller Set
03
04
04
05
4 PREPARAE THE FPV TRANSMITTER 15
4.1 Introduction and Functions 15
4.2 Installing the TX Battery 18
4.3 Transmitter Calibration 18
4.4 Antenna Signal Instruction 19
4.5 Frequency Selectable 5.8Ghz 19
START TO FLY
5 BINDING THE TRANSMITTER AND X4 PRO 20
6 COMPASS CALIBRATION 21
6.1 Calibration 21
6.2 Check the GPS Condition 21
7 START/ STOP THE MOTORS 22
8 BASICFLIGHT 22
9 SIGNAL LOSS PROTECTION FUNCTION 24
9.1 Conditions Which Activate the Signal Loss Protection Mode. 24
9.2 Exiting RTH Mode 24
10 INTELLIGENT BATTERY ALARM FUNCTION 25
TROUBLESHOOTING
25
GENERAL INTRODUCTION
The Hubsan X4 Pro is a high-tech, mid-size quadcopter which is perfect for aerial photography. It is equipped with a stable and accurate 1-axis gimbal, 1080P HD aerial photography camera, and an advanced flight control system. The Android transmitter is capable of long distance camera control, video transmission, ground station automatic flight, FPV flight, social network sharing and even more functions. The Hubsan X4 Pro will help you shoot stable, professional-grade HD videos and pictures.

FPV: First Person View provides a one of a kind flying experience to X4 Pro users. It allows you to see every moment of the flight from the quad's view.
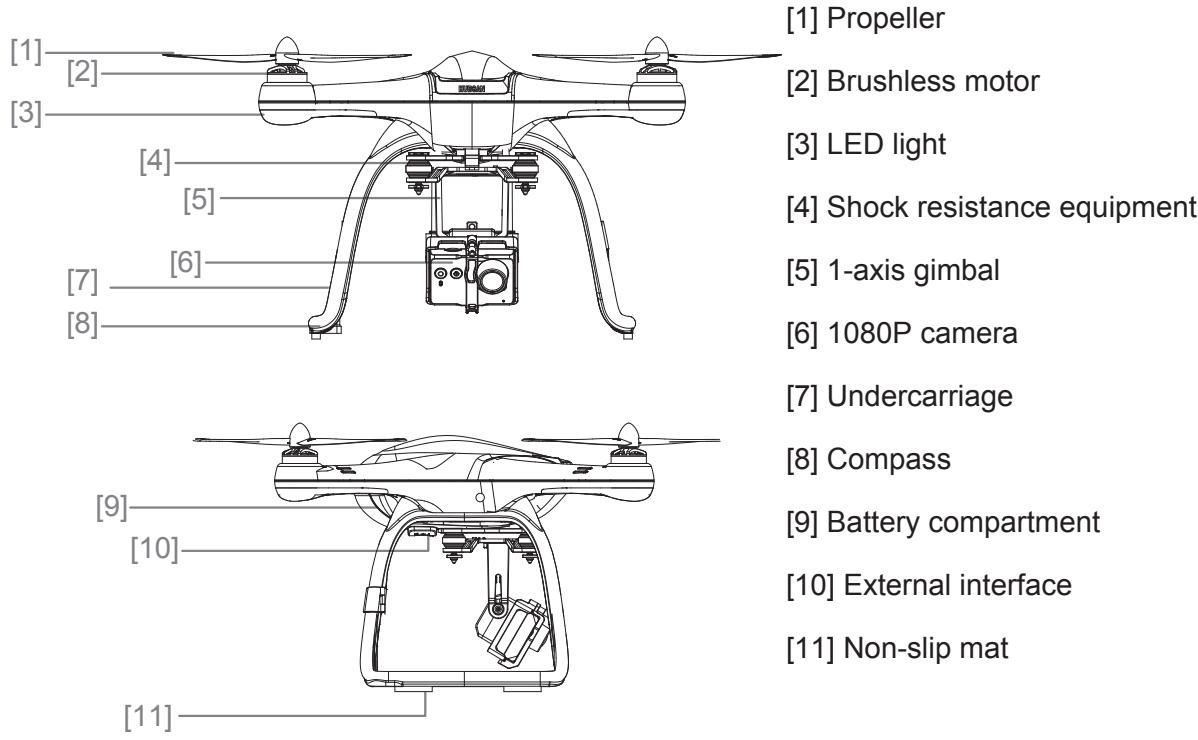
1. ACCESSORIES INCLUDED
Check all the accessories in the package before use.
| S/N | Part Name | Photos | Q'ty | Remarks |
| 1 | The X4 Pro | 1PC | Equipped with smart flight controller, GPS and compass | |
| 2 | Propellers | 4PCS | Propeller A 2pcs, Propeller B 2pcs | |
| 3 | 1-axis stabilized gimbal | 1PC | 1-axis stabilized gimbal | |
| 4 | Propeller removal wrench | 1PC | For removing propellers | |
| 5 | Transmitter | 1PC | FPV Transmitter, equipped with 8 X AA battery (Not included) | |
| 6 | Smart Phone Clip | 1PC | Hold the smart phone | |
| 7 | LiPo battery for X4 Pro | 1PC | Insert in the X4 Pro | |
| 8 | LiPo Charger Adapter | 1PC | 110-240V | |
| 9 | LiPo Balance charger | 1PC | Use to recharge the LiPo battery | |
| 10 | Propeller guard | 4PCS | Ensures the safety of the X4 Pro |
| 11 | Micro-USB cable | 1PC | To read the camera data |
| 12 | User Manuals | 2PCS | Disclaimer Hubsan X4 Pro Instruction Manual |
| 13 | 1080P camera | 1PC | HD camera |
| 14 | Transmitter Antenna | 1PC | 5.8 GHz Transmitter Antenna |
2. INTRODUCTION
The Hubsan X4 Pro system consists of the quadcopter, camera, gimbal, propeller guard, power system, flight control system, and radio transmission system.
Transmitter equipment: Dual data transmission, FPV transmission mode, Video and picture shooting modes.
X4 Pro equipment: 1-axis gimbal, camera, power system (brushless motors and propellers), propeller guard
X4 Pro working Mode: Altitude Hold Mode, Position-hold Mode, RTH Mode, Headless Mode
FPV Transmitter, equipped with 8 X AA battery(Not included)
PREPARATIONS FOR USE
Thanks for buying HUBSAN products!
1 PREPARE THE LIPO BATTERY
Make sure the following equipment is fully charged before flight.
| EQUIPMENT | SUPPLIED POWER |
| Camera | 3.7V 650mAh rechargeable LiPo battery |
| X4 Pro with gimbal | 11.1V 7000mAh rechargeable LiPo battery |
1.1 LIPO BATTERY IN THE X4 PRO
The X4 Pro is equipped with a 11.1V, 3 cell, 7000mAh rechargeable LiPo battery. Always charge the LiPo battery with the Hubsan charger.
BATTERY SPECIFICATIONS
Charging temperature: 0^ 40^
Discharging temperature: - 20^ 50^
Charging/ Discharging humidity: < 80%
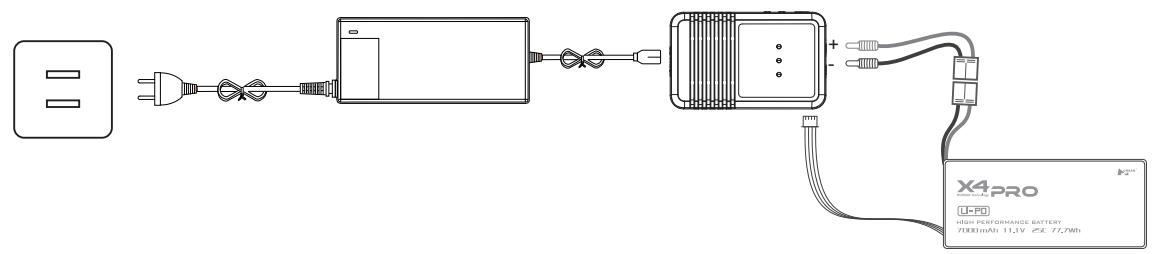
1.2 CHARGING
Connect battery to balance charger and wall charger. The two LED lights will turn red when charging and turn green when charging is finished. The charging time is about 180 mins.

(1) Overcharge protection
Overcharge protection prevents battery damage by automatically ending charging when the battery reaches 12.8V.
(2) Over-discharge protection
Over-discharge protection protects the battery by cutting off power when the battery reaches 8.4V.
(3) Short circuit protection
Short circuit protection powers off the X4 Pro as soon as a short circuit is detected.
1.3 POWER ON/ OFF THE X4 PRO LIPO BATTERY
Power on: Put the battery into the battery compartment and connect the battery plug with the correct polarity. When the X4 Pro is power on, the blue LEDs on X4 Pro will blink in a rotating pattern.
Power off: Disconnect the battery connector plug to remove power from the X4 Pro. The LEDs will turn off.
1.4 CHECK THE LIPO BATTERY POWER
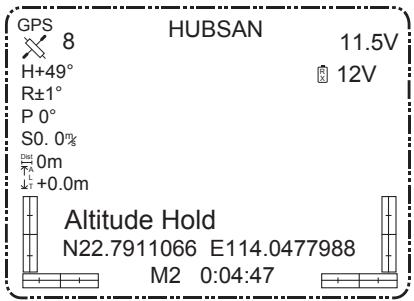
After the X4 Pro and the Transmitter finish pairing, the battery power will display on the LCD
screen.
Always partially charge your LiPo battery before storage.
LiPo batteries retain a charge over a long period at about a 50% or 3.5V per cell storage charge. It is not normally necessary to recharge stored LiPo batteries unless stored for periods longer than 3-6 months.
If your LiPo battery has been over-discharged, it will not be possible to recharge it again.
LiPo Battery Disposal & Recycling

Lithium-Polymer (LiPo) batteries must not be placed in with household trash. Please contact your environmental or waste agency or the supplier of your model for local regulations and the location of your nearest LiPo battery recycling center.
2 SAFETY NOTES
2.1 IMPORTANT NOTES
This X4 Pro is not a toy. Any improper use of this product will result in serious injury. Be aware of your personal safety, the safety of others and your surrounding environment. We strongly recommend that beginners learn to fly with proper instruction from more experienced pilots before attempting to fly the X4 Pro for the first time. It is your responsibility to comply with your country's remote controlled and Unmanned Aerial Vehicle flight regulations!
2.2 LIPO BATTERY SAFETY NOTES
The X4 Pro is powered by a lithium-polymer (LiPo) battery. To avoid risk of fire or damage, never recharge your battery while it is inserted in the plane. If you do not plan to fly the plane for a week or more, store the battery approximately 50% charged to maintain battery performance and life.

SAFETY ADVISORY NOTICE
Lithium-Polymer (LiPo) Batteries
LiPo batteries are different from conventional batteries in that their chemical contents are encased in a relatively lightweight foil packaging. This has the advantage of significantly reducing their weight, but does make them more susceptible to damage if roughly or inappropriately handled. As with all batteries, there is a risk of fire or explosion if safety practices are ignored:
- Charge and store LiPo batteries in a location where a battery fire or explosion (including smoke hazard) will not endanger life or property.
- Keep LiPo batteries away from children and animals.
l Never charge the LiPo battery that has ballooned or swelled. - Never charge the LiPo battery that has been punctured or damaged.
l After a crash, inspect the battery pack for signs of damage. Discard in accordance with your country's recycling laws. - Never charge the LiPo battery in a moving vehicle.
l Never overcharge the LiPo battery.
l Never leave the LiPo battery unattended during recharging. - Do not charge LiPo batteries near flammable materials or liquids.
l Ensure that charging leads are connected correctly. Reverse polarity charging can lead to battery damage, fire, or explosion.
Have a suitable fire extinguisher (electrical type) OR a large bucket of dry sand near the charging area. Do not try to extinguish (LiPo) battery fires with water. - Reduce risks from fire/explosion by storing and charging LiPo batteries inside a LiPo charge sack.
l Protect your LiPo battery from accidental damage during storage and transportation. (Do not put battery packs in pockets or bags where they can short circuit or can come into contact with sharp or metallic objects.)
If your LiPo battery is subjected to a shock (such as a crash), place it in a metal container and observe for signs of swelling or heating for at least 30 minutes.
l Do not attempt to disassemble, modify, or repair the LiPo battery.
3 PREPARE THE X4 PRO
3.1 INTRODUCTION THE X4 PRO
3.1.1 FLIGHT CONTROL SYSTEM INTRODUCTION
The Hubsan X4 Pro is easy to operate and very stable. It is capable of all basic flight actions and also includes control loss failsafes, a power alarm, and IOC functions.
| Modules on flight control system | Function |
| Main Control Module | CPU of the flight control system, connects to all the modules for central control processes. |
| IMU Module | Includes inertial sensor, stabilizes flight; includes a barometer to measure the flight altitude. |
| GPS & Compass Module | Position hold and Navigation. |
| LED indicating lights | Indicating the flight control system's condition. |
Environmentally friendly disposal

Old electrical appliances must not be disposed of together with the residual waste, but have to be disposed of separately. The disposal at the communal collecting point via private persons is for free. The owner of old appliances is responsible to bring the appliances to thise collecting points or to similar collection points. With this little personal effort, you contribute to recycle valuable raw materials and the treatment of toxic substances.
3.2 PREPARE THE CAMERA
Insert battery into the camera and attach the camera onto the gimbal. Power on the camera. You can press the buttons on the camera to shoot pictures and videos.
| Camera specifications | |||
| Recording resolution | 1920*1080 Full HD | Battery | 3.7V 650mAh |
| Recording frame rate | 30FPS | Working temperature | 10~+70℃ |
| Video format | MOV | Working humidity | 30%~80% |
| Image Sensor | 3 million pixel MJPG | Working power | 1.9W |
| Image pixel | 2048*1536 pixel | Standby power | 1.33W |
| Lens format | 1/3" | Storage temperature | -40~+125℃ |
| Lens FOV | 170° (MAX) | Storage humidity | 30%-90% |
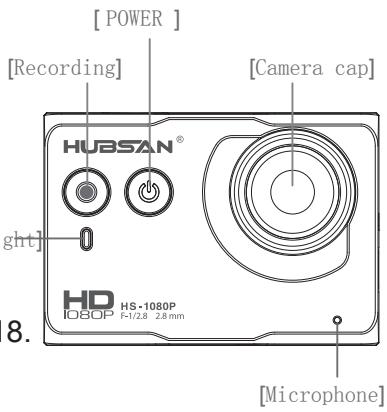
3.2.1 CAMERA BUTTONS INSTRUCTION
Power on/off: Press the power button(<2sec), power on; Hold down the power button(≥2sec), power off.
Video shooting: Press the video button, start recording; Hold down the video button, stop recording. [Indica]
NOTE: You can shoot pictures or videos through the FPV1 Transmitter. For more details, please refer to the tablet on page 18.
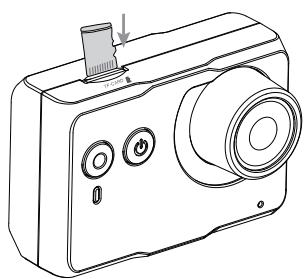
3.2.2 MICRO-SD CARD
Only insert or remove the micro memory card when the power is off. The right picture shows where to insert the memory card.
A micro memory card is not included in the Hubsan X4 Pro package. Users must supply their own class 4-6, 4GB-32GB memory card and format it before use.
-
Do not insert/remove the Micro-SD card when the camera is on. Doing so can corrupt the SD card and files.
-
Format your micro memory card by pressing the recording button for 5 seconds, or format it for 32KB size allocation unit on a computer before installing it in the camera.
3.2.3 READING DATA AND CHARGING THE CAMERA
With the camera on, use the included Micro-USB cord to connect to a computer and copy your pictures and videos over to the hard drive. The camera battery will recharge once connected to the computer.
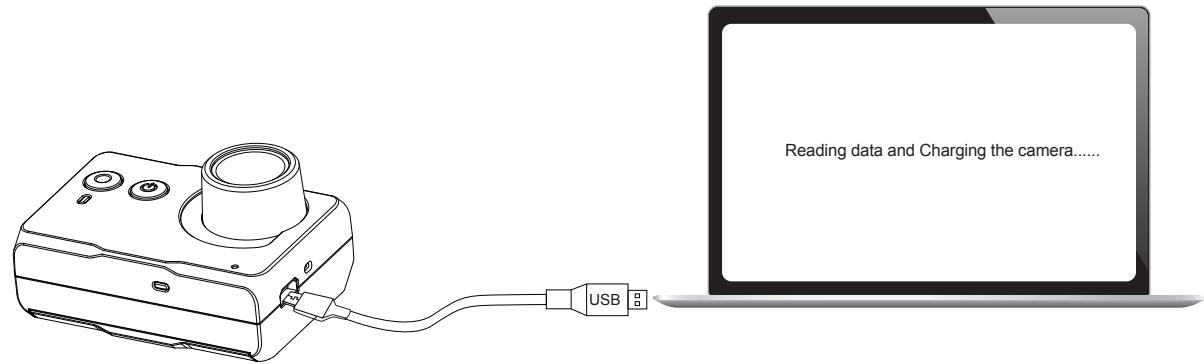

- The camera will recharge while connected to the X4 Pro or the PC. It recharges at about 500mAh and has a 3.7V/670mAh battery.
3.2.4 CAMERA LIGHTS
| Camera LIGHT | Camera condition |
| Blue light turns on | Standby |
| Blue light turns on, red light blinks once every second | Recording |
| Blue light turns on, red light turns on | Camera module is faulty |
| Blue light blinks every second | Micro-SD card will be full/ no SD card/ faulty SD card |
| Blue light blinks quickly | Micro-SD card is full |
| Red light blinks quickly | Battery power is low |
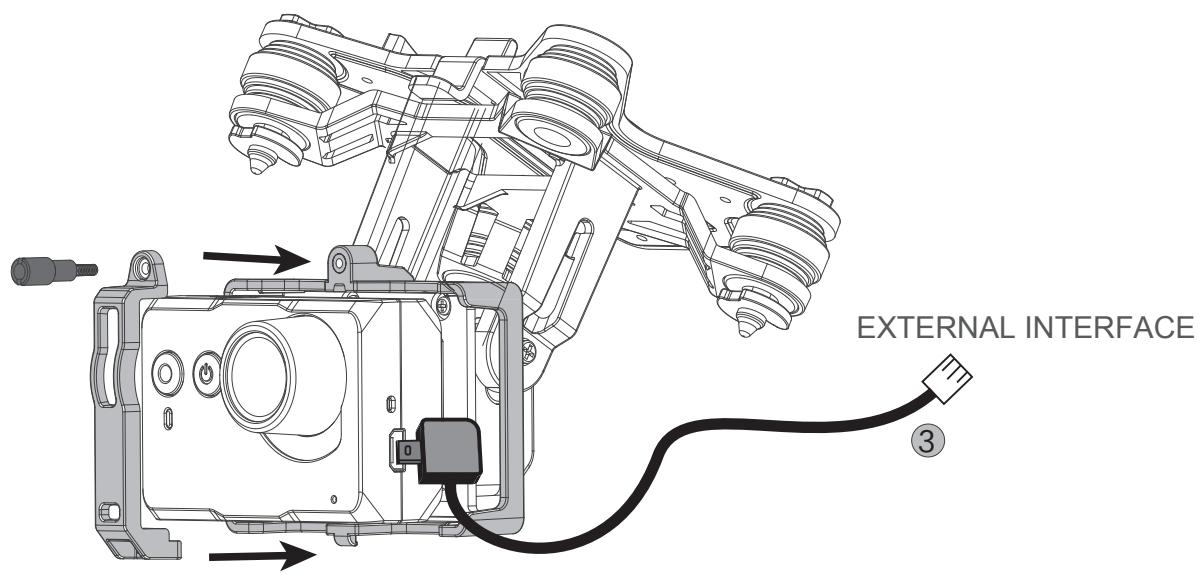
3.2.5 INSTALL THE CAMERA
Method: 1. Unscrew the bracket to remove the camera mount.
- Put the camera on the slot (camera facing outside). Reinstall the camera mount with screws.
- Plug the camera data wire into the USB interface. Plug the other end into the X4 Pro external interface (see more details on 3.3.1).
3.3 PREPARE THE 1-AXIS STABLE GIMBAL
| Features of the gimbal | |
| Control accuracy | ±0.03° |
| Control range | Pitch angle: +90°~-90° |
| Stabilized design | Rotate automatically when the X4 Pro tilts to ensure stable filming |
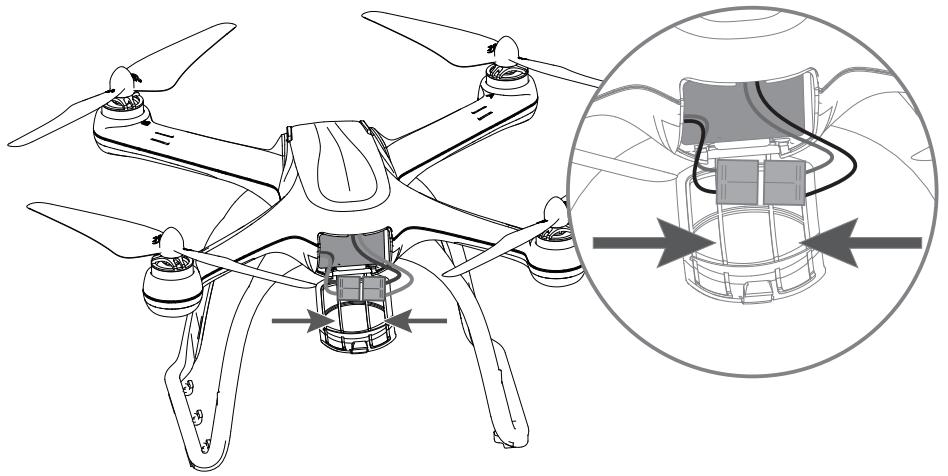
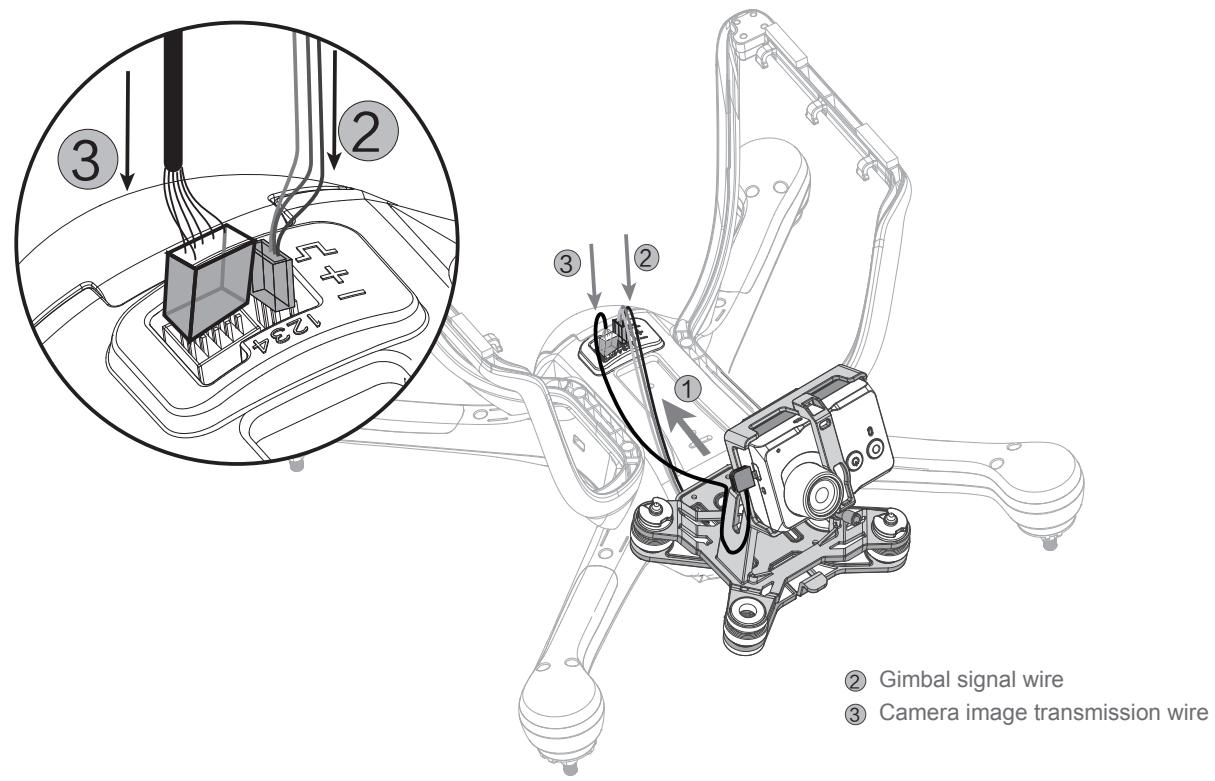
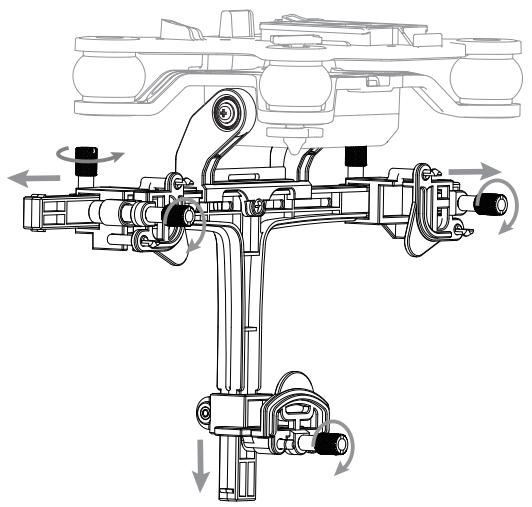
3.3.1 INSTALL THE 1-AXIS GIMBAL
Step 1: Take out the 1-axis gimbal from its box. position it at the bottom slot with shock resistance equipment slot and slip into the bottom of the frame.
Step 2: Insert the gimbal signal wire into the second slot (the brown wire and red wire line with negative “-” and positive “+”).
Step 3: Insert the camera signal plug into the left slot.
After installation, power on the X4 Pro and the 1 axis gimbal will power on and adjust automatically. The T2 rotary switch can also be used to control gimbal rotation.
3.3.2 INSPECTING THE GIMBAL AND HANDLING ERRORS

-
Abnormal gimbal alignment may be due to a crash, hit, or non-level surface. For correct gimbal alignment, place the X4 Pro on a clear, level surface before flight where there will be no obstructions to gimbal rotation when it turns on.
-
Flying in fog or clouds can cause condensation and lead to faulty gimbal alignment. Allow the gimbal to dry before use.
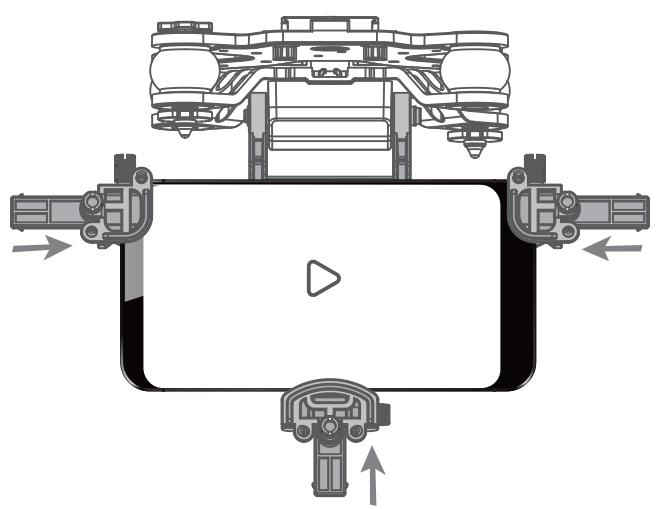
3.3.3 INSTALL THE 1 AXIS GIMBAL WITH SMART PHONE CLIP
The Hubsan X4 Pro also includes 1 axis gimbal with smart phone clip. It can hold your smart phone to shooting videos.
Step 1: Install the gimbal as 3.3.1 shows.
Step 2: Loose the screws and adjust it to a suitable distance to put your smart phone in it (the maximum smart phone size: 6.1^2.85^0.51 inch).
Step 3: Tighten the screws to fix your smart phone.
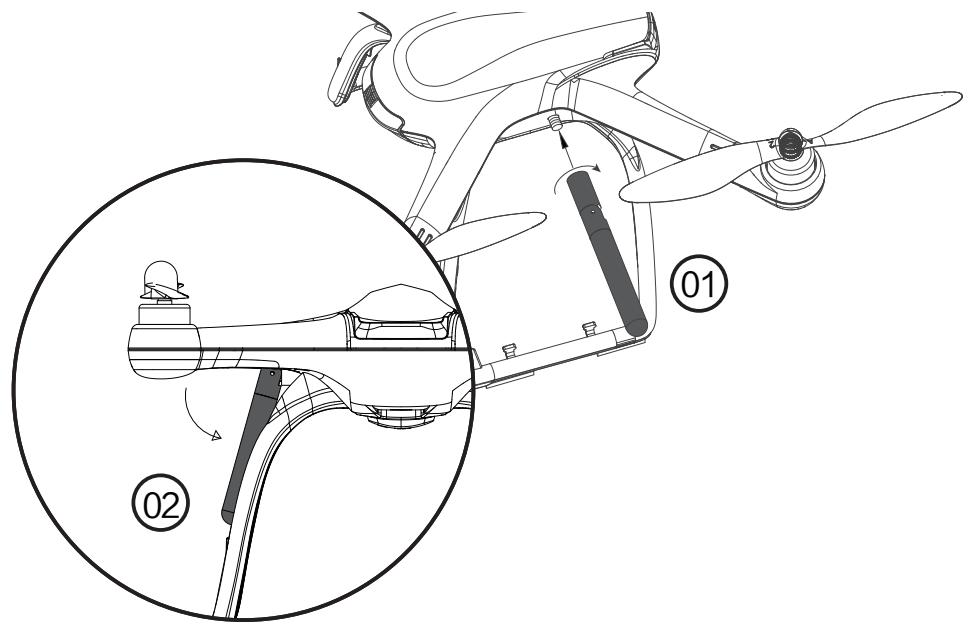
3.4 INSTALL 5.8 GHZ TRANSMITTER ANTENNA
Method: 1) Align the antenna with its connector on the X4 Pro. Turn clockwise to fasten it.
2) Make sure the antenna is straight and in line with the undercarriage.
3.5 PREPARE THE PROPELLER SET
The Hubsan X4 Pro is equipped with gray and black 9 inch propellers. Propellers are the most likely part of the quad to be damaged. Spares are available through Hubsan.
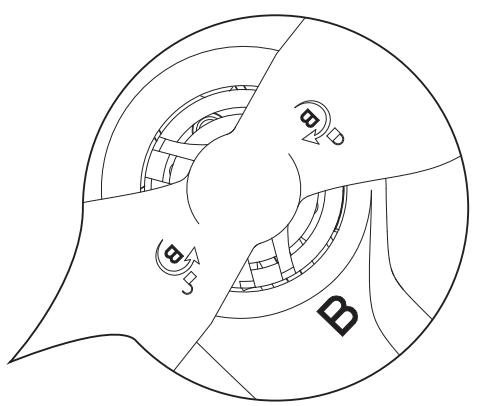
3.5.1 INTRODUCTION
| propeller A | propeller B | |
| Diagram | ||
| Installation Position | ||
| Symbol explanation | LOCK: In this direction, tighten the propeller onto the motor shaft UNLOCK: In this direction, remove the propeller from the motor shaft | |
3.5.2 METHOD
Take out the four propellers and install them tightly on the corresponding motor shafts.
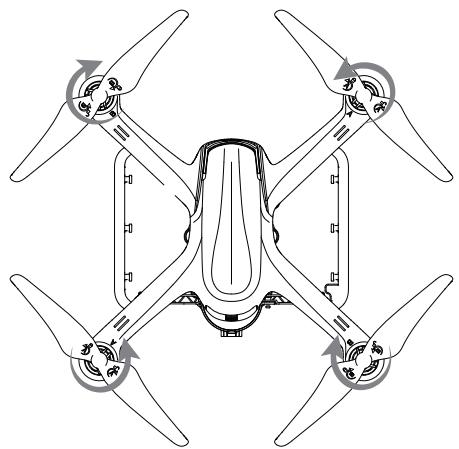
The propellers are designed to tighten automatically. Do not overtighten the screws and do not use any type of screw glue.
- Make sure that the black and gray, A and B propellers are installed correctly. The X4 Pro will not fly if propellers are improperly installed.
- Wear gloves when installing the propellers to avoid scratches from the thin, sharp propellers.
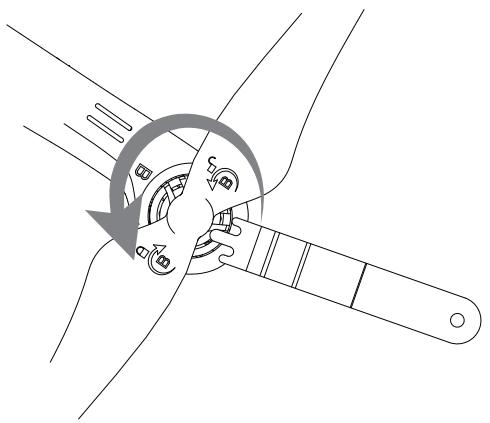
3.5.3 REMOVE PROPELLER
Hold the motor with the Propeller removal wrench. Remove the propeller by rotating it counter-clockwise to unlock.
WARNING
HAZARDOUS MOVING PARTS
KEEP FINGERS AND OTHER
BODY PARTS AWAY
-
Check that the propellers are correctly installed and tightened before every flight.
-
Exchange broken, aging, or poor quality propellers before every flight.
- To avoid injury, do not touch the high-speed props or motors during operation.
- Always use Hubsan propellers to ensure best flight experience.
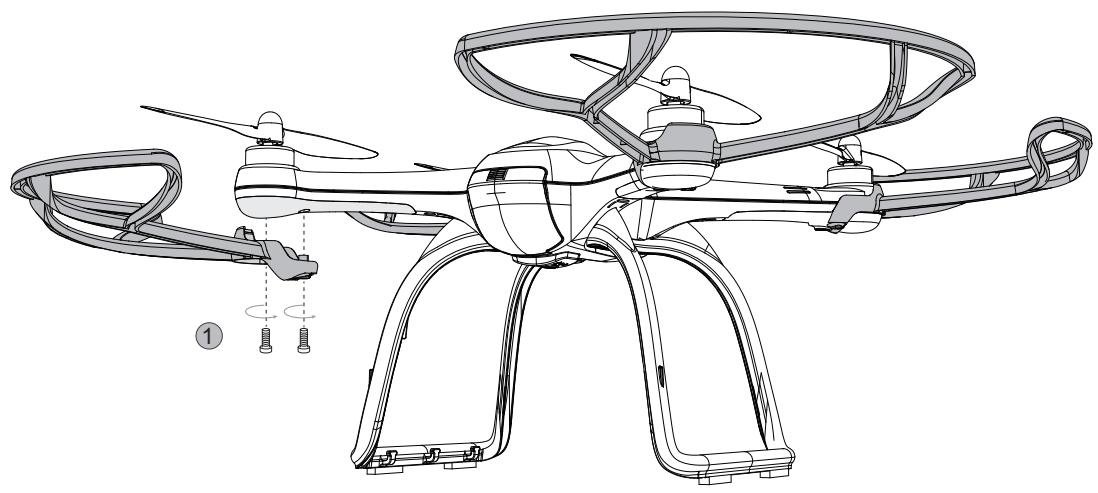
3.5.4 PREPARE THE PROPELLER GUARD
Propeller guards are optional, but we recommend that beginners use them to facilitate safe flying.
Method: Fasten the screws to install the propeller guard as the below picture shows.
4 PREPARE THE FPV TRANSMITTER
4.1 INTRODUCTION AND FUNCTIONS
4.1.1 MAIN MENU

MODE 1
MODE 2
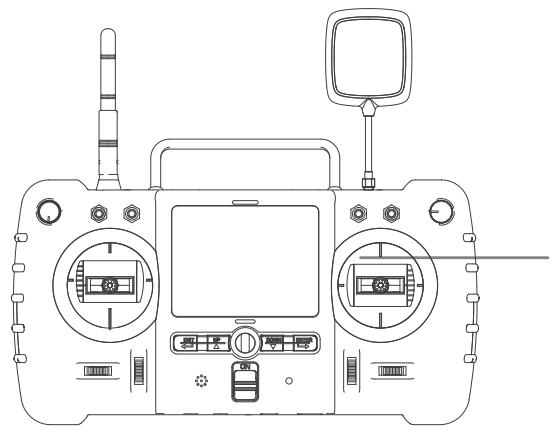
4.1.2 TRANSMITTER
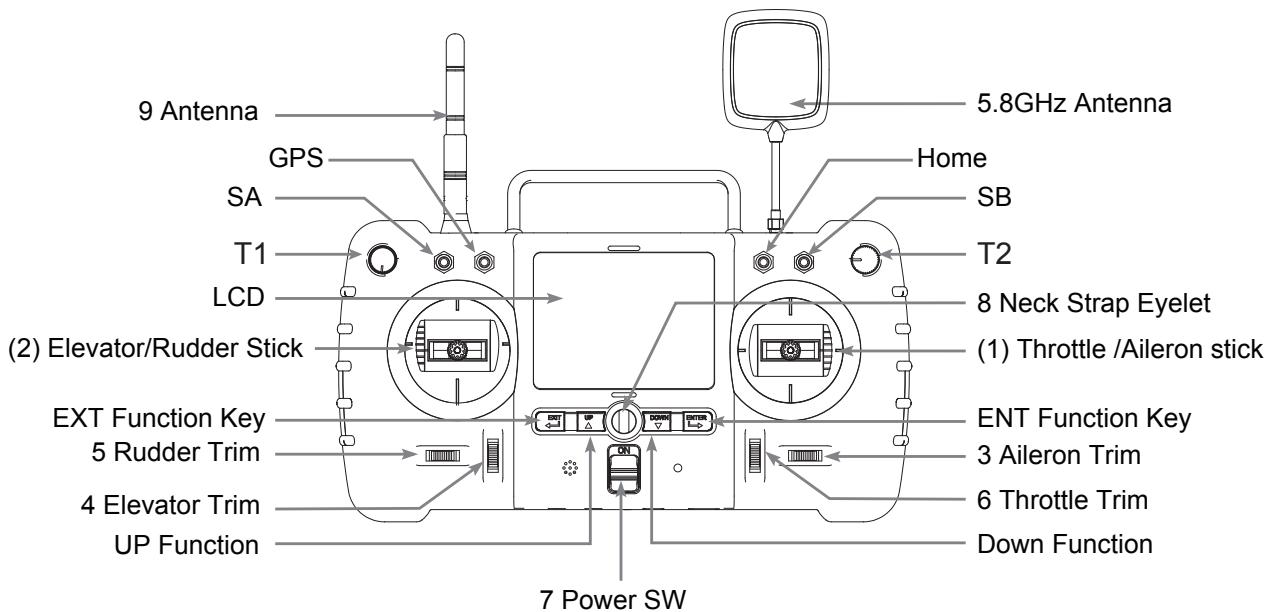
(MODE 1)
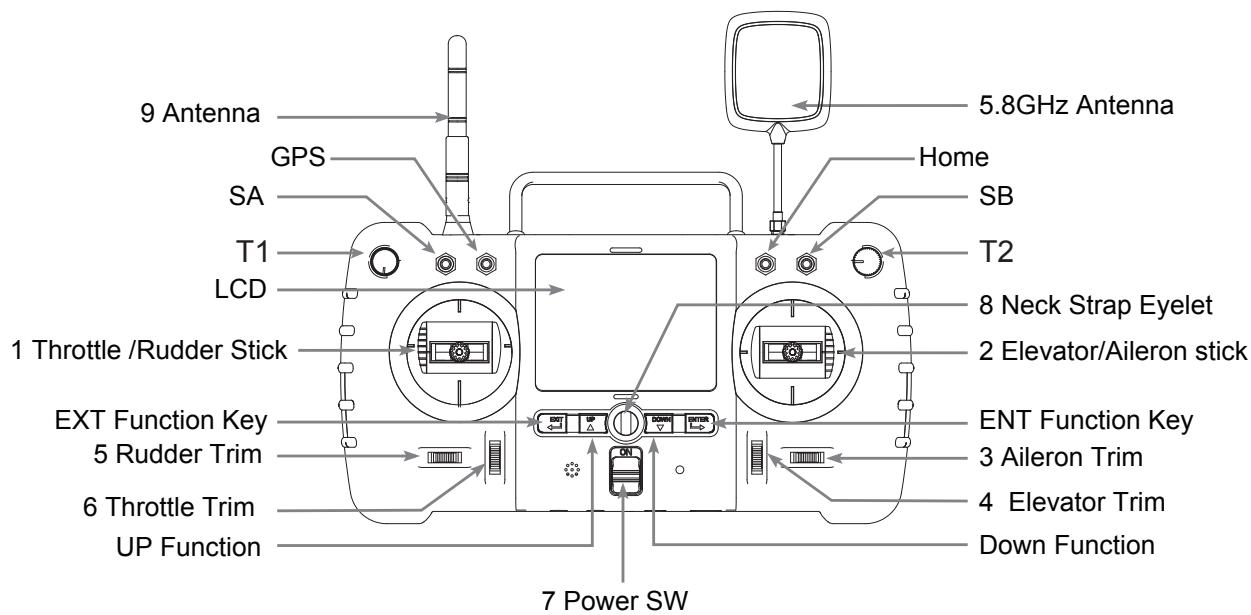
(MODE 2)
Video glasses socket
| S/N | IDENTIFICATION | FUNCTION |
| 1 | Throttle/Rudder Stick | Forward and backward movement of the stick will make the X4 Pro increase or decrease speed respectively.Left and right movement of the stick makes the X4 Pro yaw left/right respectively. |
| 2 | Elevator/Aileron Stick | Forward and backward movement of the stick makes the X4 Pro nose point up/down respectively. Left and right movement of the stick makes the X4 Pro roll left/right to initiate a turn. |
| (1) | Throttle /Aileron stick | Forward and backward movement of the stick will make the X4 Pro increase or decrease speed respectively.Left and right movement of the stick makes the X4 Pro roll left/right to initiate a turn. |
| (2) | Elevator/Rudder Stick | Forward and backward movement of the stick makes the X4 Pro nose point up/down respectively. Left and right movement of the stick makes the X4 Pro yaw left/right respectively. |
| 3 | Aileron Trim | Aileron trim adjusts left and right roll. |
| 4 | Elevator Trim | Elevator trim adjusts up and down movement. |
| 5 | Rudder Trim | Rudder trim adjusts left and right yaw. |
| 6 | Throttle Trim | Throttle trim adjusts speed of motor. |
| 7 | Power SW | Pushing the switch up powers on the transmitter, pulling it down switches it off. |
| 8 | Neck Strap Eyelet | For the attachment of a neck strap which eases the tension of your hands from holding the transmitter. |
| 9 | Antenna | Transmits the 2.4Ghz wireless signal. |
| 10 | T2 | T2 Rotary Switch controls the pitch rotation of the gimbal. |
| 11 | SA | Push: Headless FunctionPull down: Normal Function |
| 12 | GPS | Push: Altitude mode and Position ModePull down: Exit the Altitude Mode and Position Mode |
| 13 | Home | Push: Enter the RTH function.Pull down: Exit the RTH function. |
| 14 | T1/ SB | No function for now. |
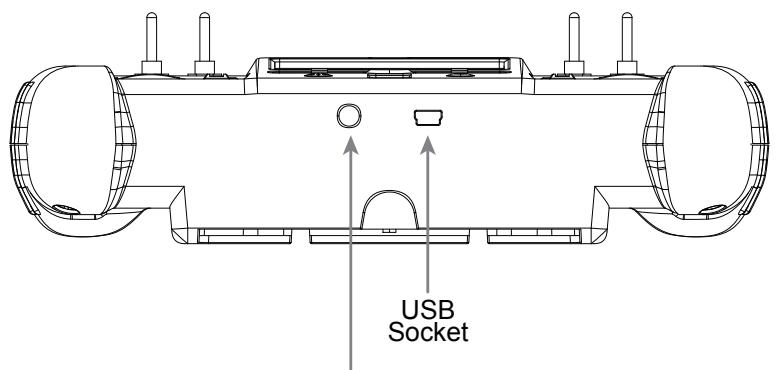
| 15 | USB Socket | Only for engineer to upgrade the software, please do not use it to connect computer. |
| 16 | EXT Function Key | Exit settings; Shoot videos/ take photos/ play back when in camera mode. |
| 17 | ENT Function Key | Enter settings; Controls the camera mode: shoot videos, take photos, play back videos/photos. |
4.2 INSTALLING THE TRANSMITTER BATTERY
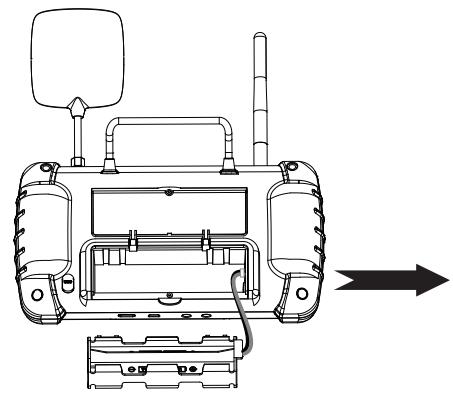
Open the cover, take out the holder
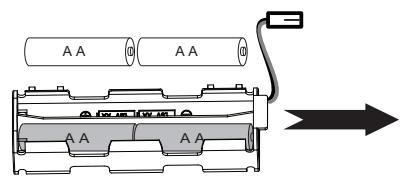
According to the correct polarities, install 8 x AA battery
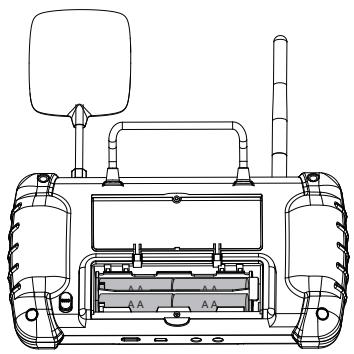
Insert the plug into the power jack, fasten the cover with a screw

- Do not mix old and new batteries
-
Do not charge non-rechargeable battery.
-
Do not mix different types of batteries
4.3 TRANSMITTER CALIBRATION
MODE 1 transmitter
Push the left joystick to the top on the left, and the right joystick to the top on the right. Keep them in this position and then turn on the transmitter. The LCD screen will show "Calibrate Stick". Move the joysticks in a circling motion about three times and then release and press any trim to save stick calibration.
MODE 2 transmitter
Push the two joysticks to the top on the left and keep them in this position, and then turn on the transmitter. The LCD screen will show "Caliberate Stick". Move the joysticks in a circling motion about 3 times, and then release the joystick and press any trim to save and exit.
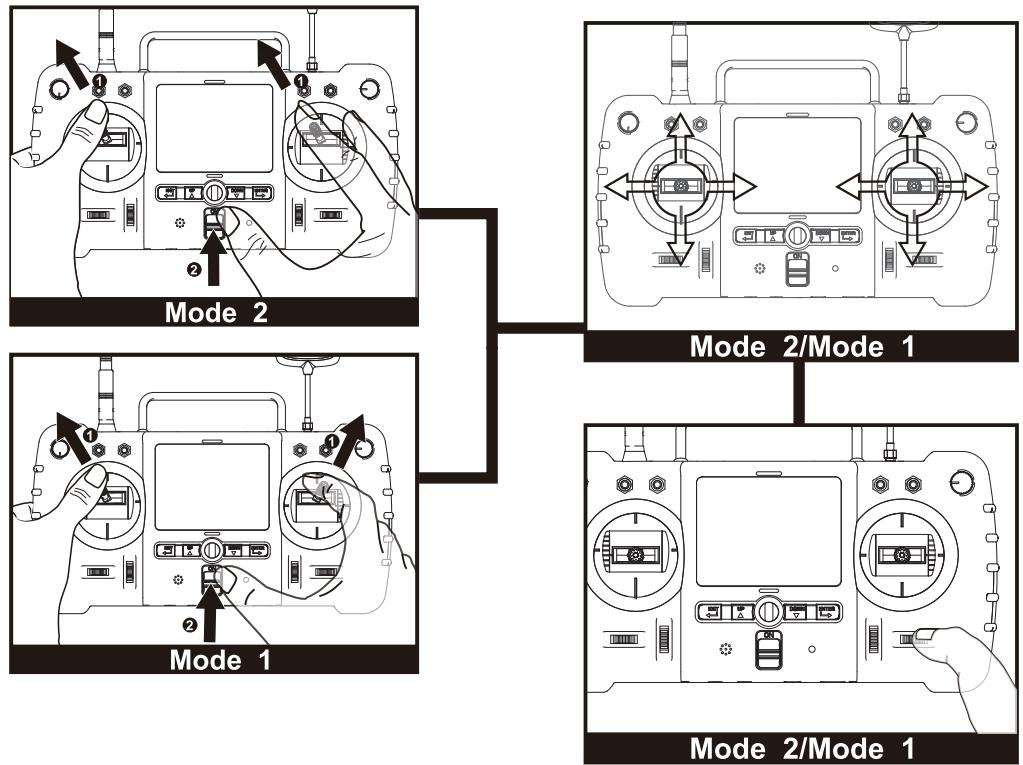
You can change the mode as you like by following the above method.
4.4 ANTENNA SIGNAL INSTRUCTION
The live video distance is around 1000 meters. In order to gain the furthest communication distance, make sure the transmitter's antenna is pointed vertically with no obstacles between it and the X4 Pro when in flight. Keep the antenna vertical and always point the signal surface (the logo side) towards the X4 Pro video signal antenna.
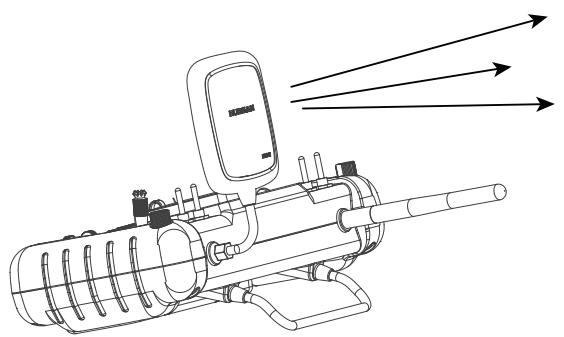


Bend the transmitter antenna vertically, and keep the signal surface pointed towards the X4 Pro video signal antenna. Ensure there are no obstacles between the two, or the X4 Pro will lose the control signal.
You can only bend the antenna to adjust the angle and direction, do not spin it, or it will be damaged.
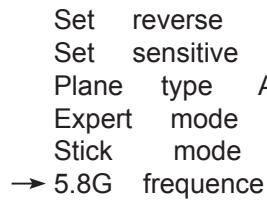
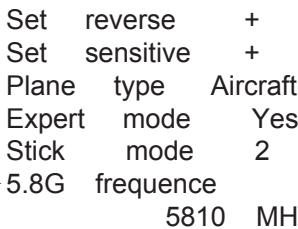
4.5 FREQUENCY SELECTABLE 5.8GHz
The transmitter will automatically find the best frequency to ensure quality live video transmission. In case there is any interference in your location, you can change the frequency for longer range and better video transmission.
Pull the throttle stick down to the bottom then hold down the ENTER key for 1 second to enter into the setting interface, move the arrow to 5.8G FREQUENCY with up/down key, press the ENTER key again and select the frequency you need with up/down key, hold down the EXIT key for 2 seconds to confirm and exit.

HUBSAN
11.5V

HUBSAN
11.5V
START TO FLY
When assembly is finished, it is best to do some practice or receive training before flying the X4 Pro. Flight simulators are great practice tools and there are many experienced pilots who will be more than happy to show you how to fly. Please choose a safe, suitable environment to fly your X4 Pro.
THE FLIGHT ENVIRONMENT FOR X4 PRO
(1) Fly the X4 Pro in a large open area. The GPS signal may become weaker and the position hold and RTH function may not be reliable when the X4 Pro flies around trees and buildings.
(2) Do not fly the X4 Pro in bad weather such as strong wind, heavy snow, rain and foggy conditions.
(3) When flying the X4 Pro stay away from barriers, people, power cables, trees, and other obstructions.
(4) Do not fly the X4 Pro near radio towers or airports.
(5) Magnetic interference will prevent many of the X4 Pro's features from operating at the North and South Poles.
(6) Do not fly the X4 Pro in or near restricted areas based on your country's laws and regulations.
CHECK BEFORE FLYING
(1) Make sure the batteries for Transmitter, X4 Pro, parachute, and camera are fully charged before takeoff.
(2) Make sure the propellers are tight, not damaged, and installed correctly.
(3) Check that gimbal vibration is minimized and that installation is correct.
(4) If using a parachute, check if the plug of the parachute is in or out and make sure the battery for the parachute is charged.
(5) If you intend to shoot video or take photos, make sure that the memory card is installed and has sufficient memory remaining for your purposes.
(6) Test the function of the camera and gimbal before takeoff.
(7) Check to make sure all motors are working properly before takeoff.
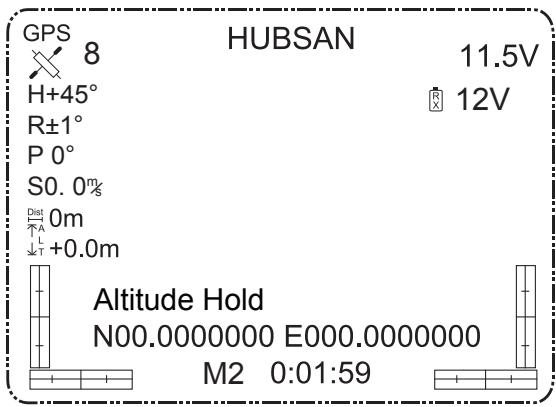
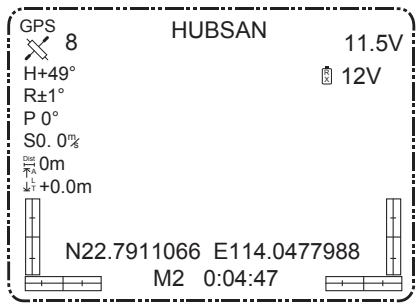
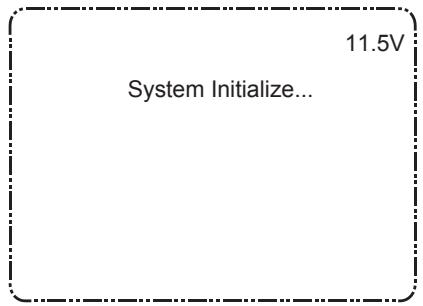
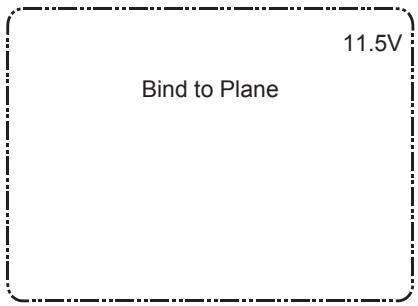
5. BINDING THE TRANSMITTER AND X4 PRO
Power on the transmitter, then the X4 Pro; the transmitter will show the lipo battery voltage and other values as below shows. If no value shows, need to bind the transmitter to the X4 Pro. Power on the transmitter, and press the ENTER button in the same time until the LCD displays "System initialize", power on the X4 Pro when the LCD screen displays "Bind to Plane", the binding will be finished in 3 seconds.
6. COMPASS CALIBRATION
After the X4 Pro powers on, the blue LED of the X4 Pro will blink in a rotating pattern. Put the X4 Pro on a level surface and do not move it. The transmitter display will show "Check Compass", indicating that the X4 Pro is checking the compass. Keep the X4 Pro on a level surface and slowly rotate it until the "Check Compass" disappears.
If the X4 Pro senses abnormalities in the compass sensor, it will enter compass calibration mode. The transmitter screen will show "CAL compass 1"-spin the X4 Pro horizontally until the LCD screen switches to "CAL compass 2", then vertically spin the X4 Pro until "CAL compass 2" disappears. The compass will now be properly calibrated.
You can also follow the below method to calibrate the compass using GPS switch.
Do not calibrate the compass in areas of a strong magnetic field.
- Do not have keys, magnets, or mobile phones on you while calibrating the compass.
- Avoid large masses of metal while calibrating the compass.
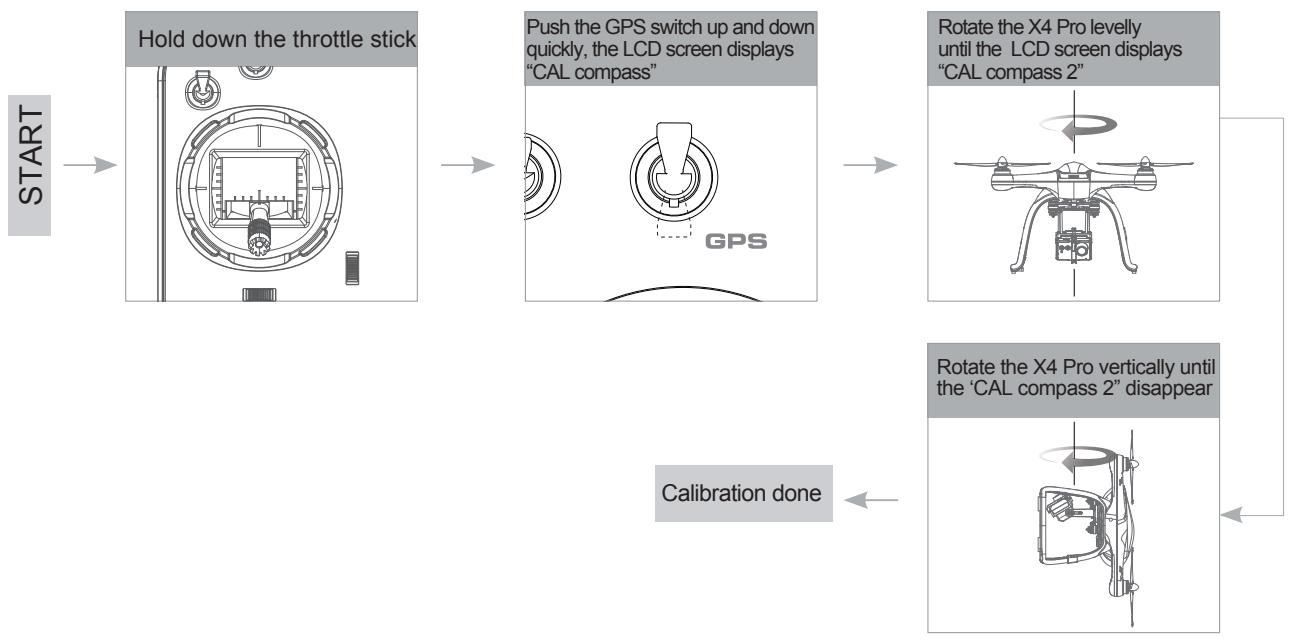
6.1 CALIBRATION
Method of calibration: Hold the Throttle Stick full down, quickly move the GPS Switch until the transmitter display "CAL compass 1", levelly spin the X4 Pro until the LCD screen shows "CAL compass 2", then vertically spin the X4 Pro until the "CAL compass 2" disappears, indicating a successful calibration.
6.2 CHECK THE GPS CONDITION
Fly the X4 Pro after the GPS satellites change to 6 or above for proper hold and RTH function.
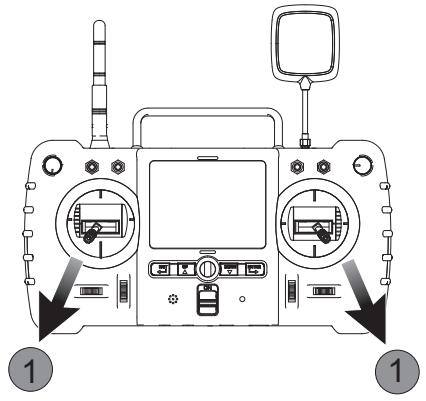
7. START/ STOP THE MOTORS
Start the motors
Method : Pull the two sticks as the picture shows. Release them after the motors start.
Stop the motors
Method : Pull the sticks again, as seen in the picture, and release them after the motors stop.
Do not stop the motors during the flight or it will crash.

Move the sticks as neatly as you can. Release the sticks after the motors start or stop.
8 BASIC FLIGHT
The operation mode for the transmitter is Mode 1 or Mode 2. The manual will use Mode 2 as an example to illustrate the transmitter's operation.

- The stick return to the center: The transmitter's stick is in the center.
- Stick's rudder offset: The offset of the transmitter sticks from the center.
| Transmitter (Model 2) | X4 Pro | Control Ways |
| UP DOWN | The throttle stick controls the ascent and descent of the X4 Pro. The X4 Pro will ascend when the sticks are moved up, descend when the stick is moved down, and remain unchanged when the stick is centered. Move the throttle stick above the center position to take off. (Move the stick gradually to prevent the X4 from ascending too quickly.) | |
| TURN RIGHT TURN LEFT | The rudder stick controls the facing direction of the X4 Pro. The X4 Pro will rotate counterclockwise when you move the stick to the left and clockwise when you move the stick to the right. The rotation angle is zero and the X4 Pro doesn't rotate when the stick is centered. A harder push in either direction will cause the X4 to rotate faster in the corresponding direction. |
| forward backward | The elevator stick moves the X4 Pro forward and backward. Move the stick forward, the X4 Pro will tilt and fly forward. Move the stick backward, the X4 Pro will tilt and fly backward. At center stick the aircraft should hold position. The degree of stick movement corresponds to the degree of tilt and flying speed. |
| left | The aileron stick controls left and right flight. Moving the stick left makes the X4 Pro tilt and fly left. Moving the stick right makes the X4 Pro tilt and fly right. The X4 Pro should be horizontal and unmoving at center stick. The flight speed and tilt angle are linked to the distance pressed on the sticks. |
| right | The T2 Rotary Switch controls the gimbal. Rotate the switch clockwise to tilt the camera down. Rotate the switch counterclockwise to tilt the camera up. The camera will keep the current angle until moved with the T2 switch. |
| upward | The GPS Switch is position-hold function switch. In position 1 (up), the GPS functions are active. In position 2 (down), the GPS functions are deactivated. |
| position 2 (downward) | The SA switch activates and deactivates the headless function. Up (position 1) is on. Down (position 2) is off. |
| [GPS] [SA] [SB] | The Home Switch is the RTH function switch. Up (Position 1) activates the RTH function. Down (Position 2) deactivates the RTH function. |
| Switch SB has no function now. |
9 SIGNAL LOSS PROTECTION FUNCTION
If the X4 Pro loses transmitter signal, the flight control system will take control of the model and either land it or return it to the 'home' position and land automatically. This helps prevent operators from losing or crashing their X4 Pro.

DEPARTURE POINT: When the X4 Pro enters the safe flight state (no GPS) from semi-safe flight states, the X4 Pro will record that position as the 'home' point.
9.1 CONDITIONS WHICH ACTIVATE THE SIGNAL LOSS PROTECTION MODE.
(1) Transmitter power is off.
(2) The flight distance is beyond the effective distance of the transmitter's signal transmission.
(3) There are obstacles between the X4 Pro and the transmitter.
(4) The transmitter's signal was interrupted by some other strong electronic interference.
9.2 EXITING RTH MODE
Pull down the RTH function switch, the X4 Pro will exit the RTH Mode.


- To ensure that the X4 Pro can return safely to its home point when signal is lost, fly the X4 Pro in the safe flight state.
- If the quantity of GPS satellites drops below six for more than 20 seconds while the X4 Pro is returning to home, the X4 Pro will descend automatically.
- The X4 Pro will not avoid obstacles automatically while in RTH mode.
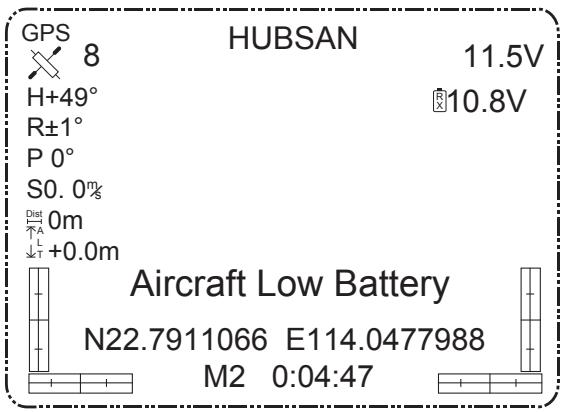
10 INTELLIGENT BATTERY ALARM FUNCTION
When the voltage of the X4 Pro battery drops below 10.8V, the LCD screen will show "Aircraft Low Battery", the quad will begin to descend slowly. At this point, the quad will still ascend when throttle is increased, but you should land the X4 Pro as soon as possible.
TROUBLESHOOTING
1. The X4 Pro drifts during flight.
When you turn on the X4 Pro, keep it steady for 10 seconds to calibrate the sensors.
2. The GPS position hold is not good.
Please check your surroundings carefully for things that might interfere with the GPS signal. If the area is clear, recalibrate the compass sensor.
3. The Transmitter sounds "Beep, Beep"
Please check the power of the battery. Stop flying and charge the battery.
4. The X4 Pro will sound "Beep, Beep" when the power is on.
Update the flight control program again.
5. The transmitter loses control and the X4 Pro cannot be found.
Push Home Switch upward, and the RTH function starts. When the transmitter locates the X4 Pro and receives the signal, if users want to manually operate the X4 Pro, the Home Switch and the Flight course Switch(SB) need to be pulled downward.
6. No videos on the screen.
Check the camera. If the camera's connecting wires are loose or its LiPo battery has low power, no videos will be seen.
7. Gimbal does not work after moving the rotary switches.
Please check the wire connecting the gimbal. After a crash, it may loosen.
FCC INFORMATION
This equipment has been tested and found to comply with the limits for a Class B digital device, pursuant to Part 15 of the FCC Rules. These limits are designed to provide reasonable protection against harmful interference in a residential installation. This equipment generates, uses, and can radiate radio frequency energy and, if not installed and used in accordance with the instructions, may cause harmful interference to radio communications. However, there is no guarantee that interference will not occur in a particular installation. If this equipment does cause harmful interference to radio or television reception, which can be determined by turning the equipment off and on, the user is encouraged to try to correct the interference by one or more of the following measures:
- Reorient or relocate the receiving antenna.
- Increase the separation between the equipment and receiver.
- Connect the equipment into an outlet on a circuit different from that to which the receiver is connected.
- Consult the local dealer or an experienced radio/TV technician for help.
Changes or modifications not expressly approved by the party responsible for compliance could void the user's authority to operate the equipment.
This device complies with Part 15 of the FCC Rules. Operation is subject to the following two conditions: (1) this device may not cause harmful interference, and (2) this device must accept any interference received, including interference that may cause undesired operation.
Electrical and electronic equipment that are supplied with batteries (including internal batteries)
WEEE Directive & Product Disposal
At the end of its serviceable life, this product should not be treated as household or general waste. It should be handed over to the applicable collection point for the recycling of electrical and electronic equipment, or returned to the supplier for disposal.
Internal / Supplied Batteries.
This symbol on the battery indicates that the battery is to be collected separately.
This battery is designed for separate collection at an appropriate collection point.

User manual is subject to change without prior notice.
Download the latest user manual from
WWW.HUBSAN.COM VERSION 1.1 EN