
BEBOP 2 WITH SKYCONTROLLER RTF - BEBOP DRONE RTF - BEBOP DRONE WITH SKYCONTROLLER RTF - BEBOP-PRO 3D MODELING RTF - Drone PARROT - Free user manual and instructions
Find the device manual for free BEBOP 2 WITH SKYCONTROLLER RTF - BEBOP DRONE RTF - BEBOP DRONE WITH SKYCONTROLLER RTF - BEBOP-PRO 3D MODELING RTF PARROT in PDF.
| Product Type | Drone with Skycontroller remote control |
| Power supply | Rechargeable LiPo battery, charging time about 1 hour, remote control battery life up to 150 minutes, drone battery life about 11 minutes |
| Main functions | Joystick control, photo and video capture, automatic return to home, co-piloting via smartphone, video display on HDMI screen or FPV goggles |
| Connection | Wi-Fi 2.4 GHz or 5 GHz, optimal range with adjustable antenna |
| Application | FreeFlight 3 (free on App Store and Google Play) |
| Maintenance and cleaning | Avoid exposure to sand, dust, and moisture; do not leave in direct sunlight; do not use in humid conditions |
| Safety | Do not fly over populated areas, respect Wi-Fi frequency restrictions, not recommended for children under 14 |
| Spare parts and repairability | Use only accessories and parts approved by Parrot; 12-month warranty on the product (6 months for consumables) |
| General information | Brand Parrot, model Bebop 2 with Skycontroller, requires smartphone or HDMI screen for settings |
Frequently Asked Questions - BEBOP 2 WITH SKYCONTROLLER RTF - BEBOP DRONE RTF - BEBOP DRONE WITH SKYCONTROLLER RTF - BEBOP-PRO 3D MODELING RTF PARROT
User questions about BEBOP 2 WITH SKYCONTROLLER RTF - BEBOP DRONE RTF - BEBOP DRONE WITH SKYCONTROLLER RTF - BEBOP-PRO 3D MODELING RTF PARROT
0 question about this device. Answer the ones you know or ask your own.
Ask a new question about this device
Download the instructions for your Drone in PDF format for free! Find your manual BEBOP 2 WITH SKYCONTROLLER RTF - BEBOP DRONE RTF - BEBOP DRONE WITH SKYCONTROLLER RTF - BEBOP-PRO 3D MODELING RTF - PARROT and take your electronic device back in hand. On this page are published all the documents necessary for the use of your device. BEBOP 2 WITH SKYCONTROLLER RTF - BEBOP DRONE RTF - BEBOP DRONE WITH SKYCONTROLLER RTF - BEBOP-PRO 3D MODELING RTF by PARROT.
USER MANUAL BEBOP 2 WITH SKYCONTROLLER RTF - BEBOP DRONE RTF - BEBOP DRONE WITH SKYCONTROLLER RTF - BEBOP-PRO 3D MODELING RTF PARROT
Charging the battery. 5
Installing the battery. 5
Installing the neck strap. 6
Installing a smartphone 6
Installing the sunshade cover. 8
Using FreeFlight 3. 9
Connecting to the Parrot Bebop Drone 10
Piloting 12
Orienting the Parrot Skycontroller. 15
Orienting the antenna 16
Movements. 17
Photos and videos. 17
Return home. 18
Battery 18
Co-piloting. 19
Using a HDMI screen 20
Navigating in FreeFlight 3 via a HDMI screen. 20
Settings 22
Calibrating the Parrot Skycontroller 22
Changng the function of the buttons 22
Product name 24
Wi-Fi 24
Updating 26
General information 27
Safety precautions and maintenance 27
Wi-Fi 27
Warning on invasion of privacy 27
Battery 28
Warranty 28
Modifications 29
Disposal of this product at the end of its life 29
Declaration of conformity. 30
Registered trademarks 30
Before starting
Note: For easy reading, iPhone®, iPad® and other compatible telephones or tablets are referred to as 'smartphones' in the manual.
Charging the battery
- Insert the plug converter corresponding to your country to the transformer.
- Plug the battery to the charger.
- Plug the charger to the mains.
The charger's led lights up in red when charging. Once the battery is fully charged, the led turns green. The battery takes about 1 hour to charge.
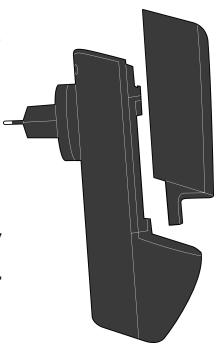
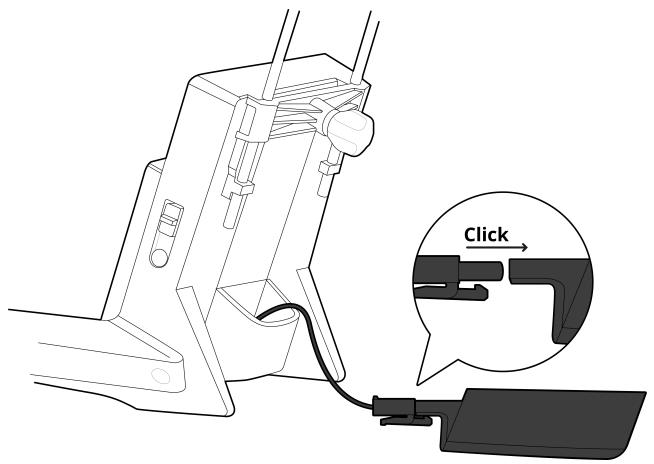
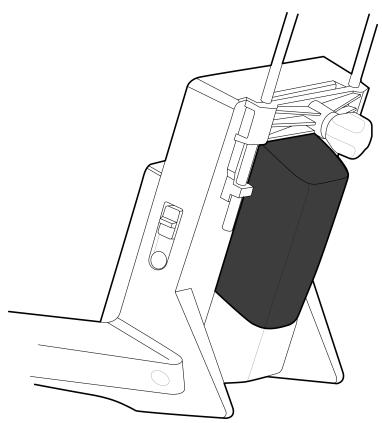
Installing the battery
- Connect the battery to the Parrot Skycontroller power cable.
- Insert the battery into the battery compartment.
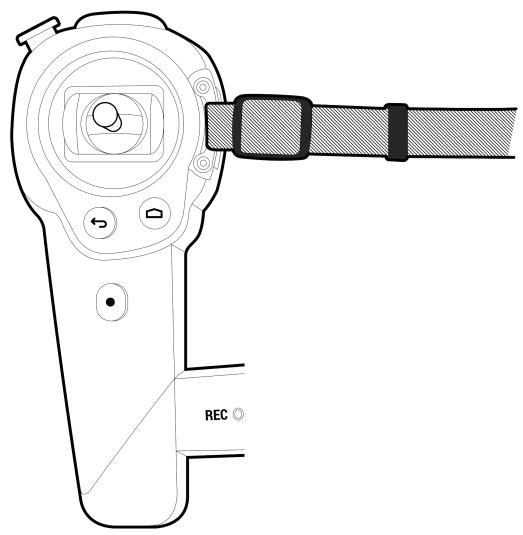
Installing the neck strap
Before the first use, attach the neck strap to the Parrot Skycontroller.
Before each use, ensure that the neck strap is correctly attached.
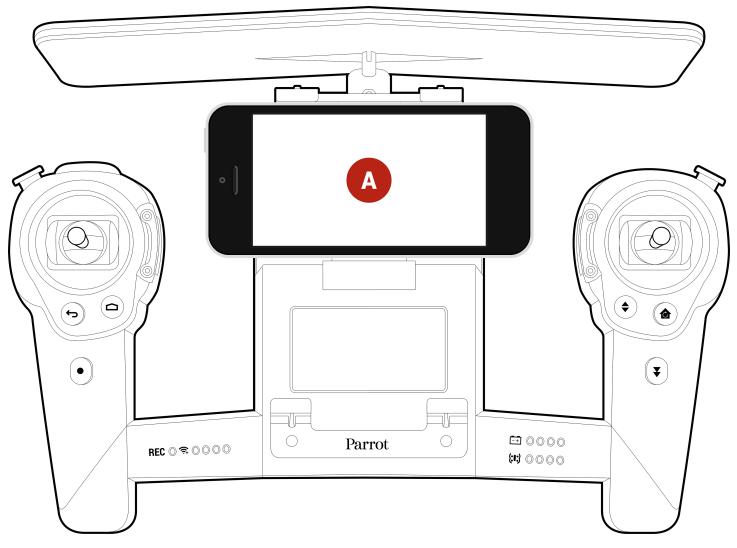
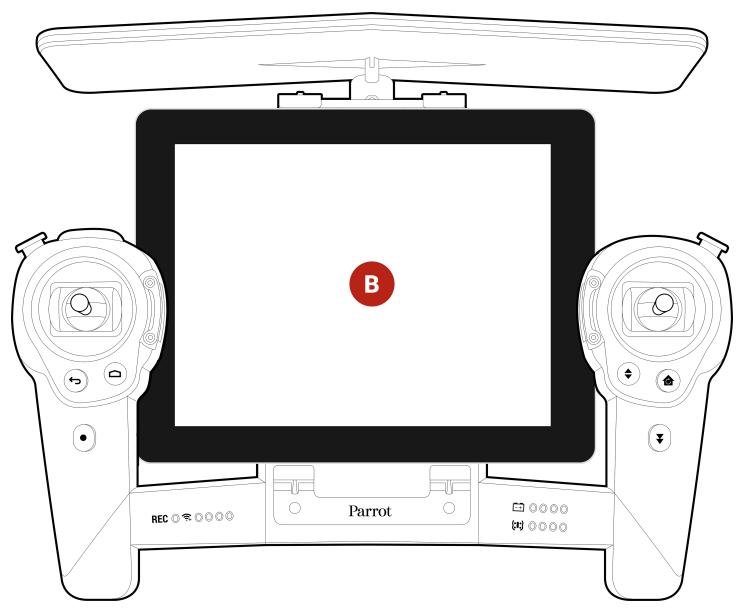
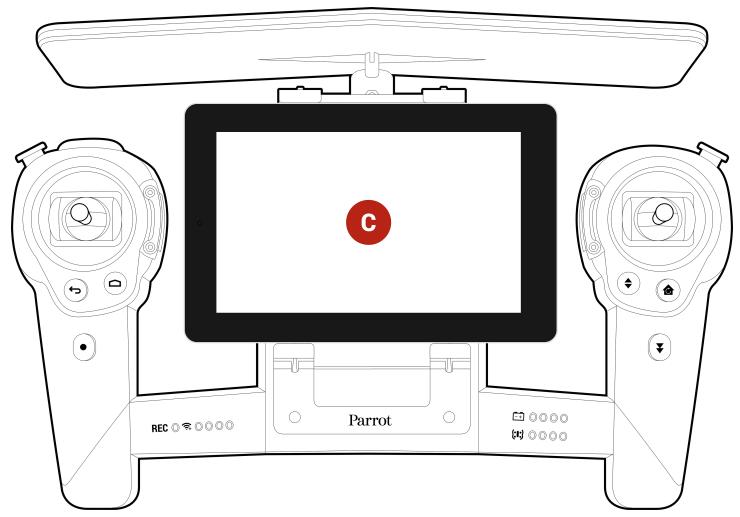
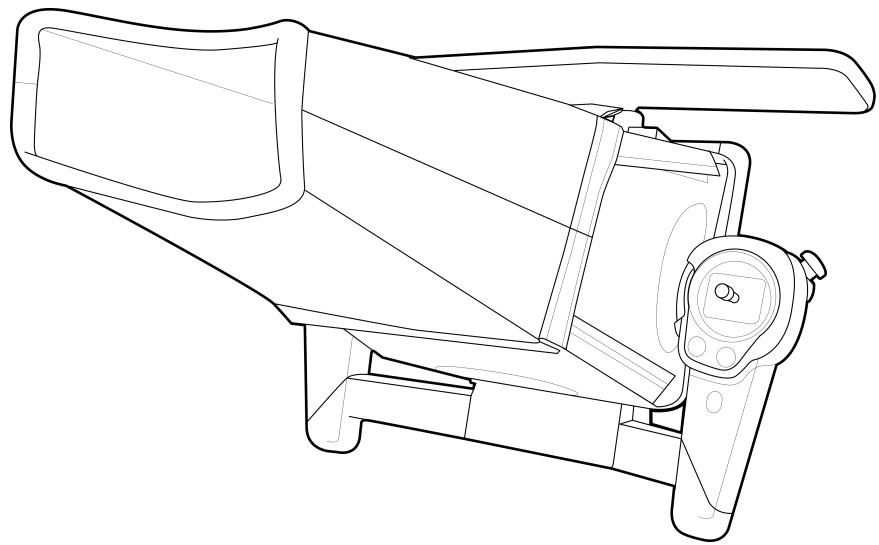
Installing a smartphone
The Parrot Skycontroller can be used with a smartphone or tablet in order to have a video feedback.
-
Place your device horizontally onto the appropriate support:
-
use the upper compartment for smartphones (A);
- use the bottom compartment for tablets (B);
-
use the adapting support (supplied) for 7-inch tablets (C). Unscrew the removable part of the bottom compartment to install it.
-
Slide down the upper part of the support by pushing it slightly.
- Screw the bottom handwheel located on the back of the Parrot Skycontroller to lock your device on the support.
Note: Ensure that the Parrot Skycontroller does not apply pressure on the buttons of your smartphone. If it does, move your smartphone towards right or left.
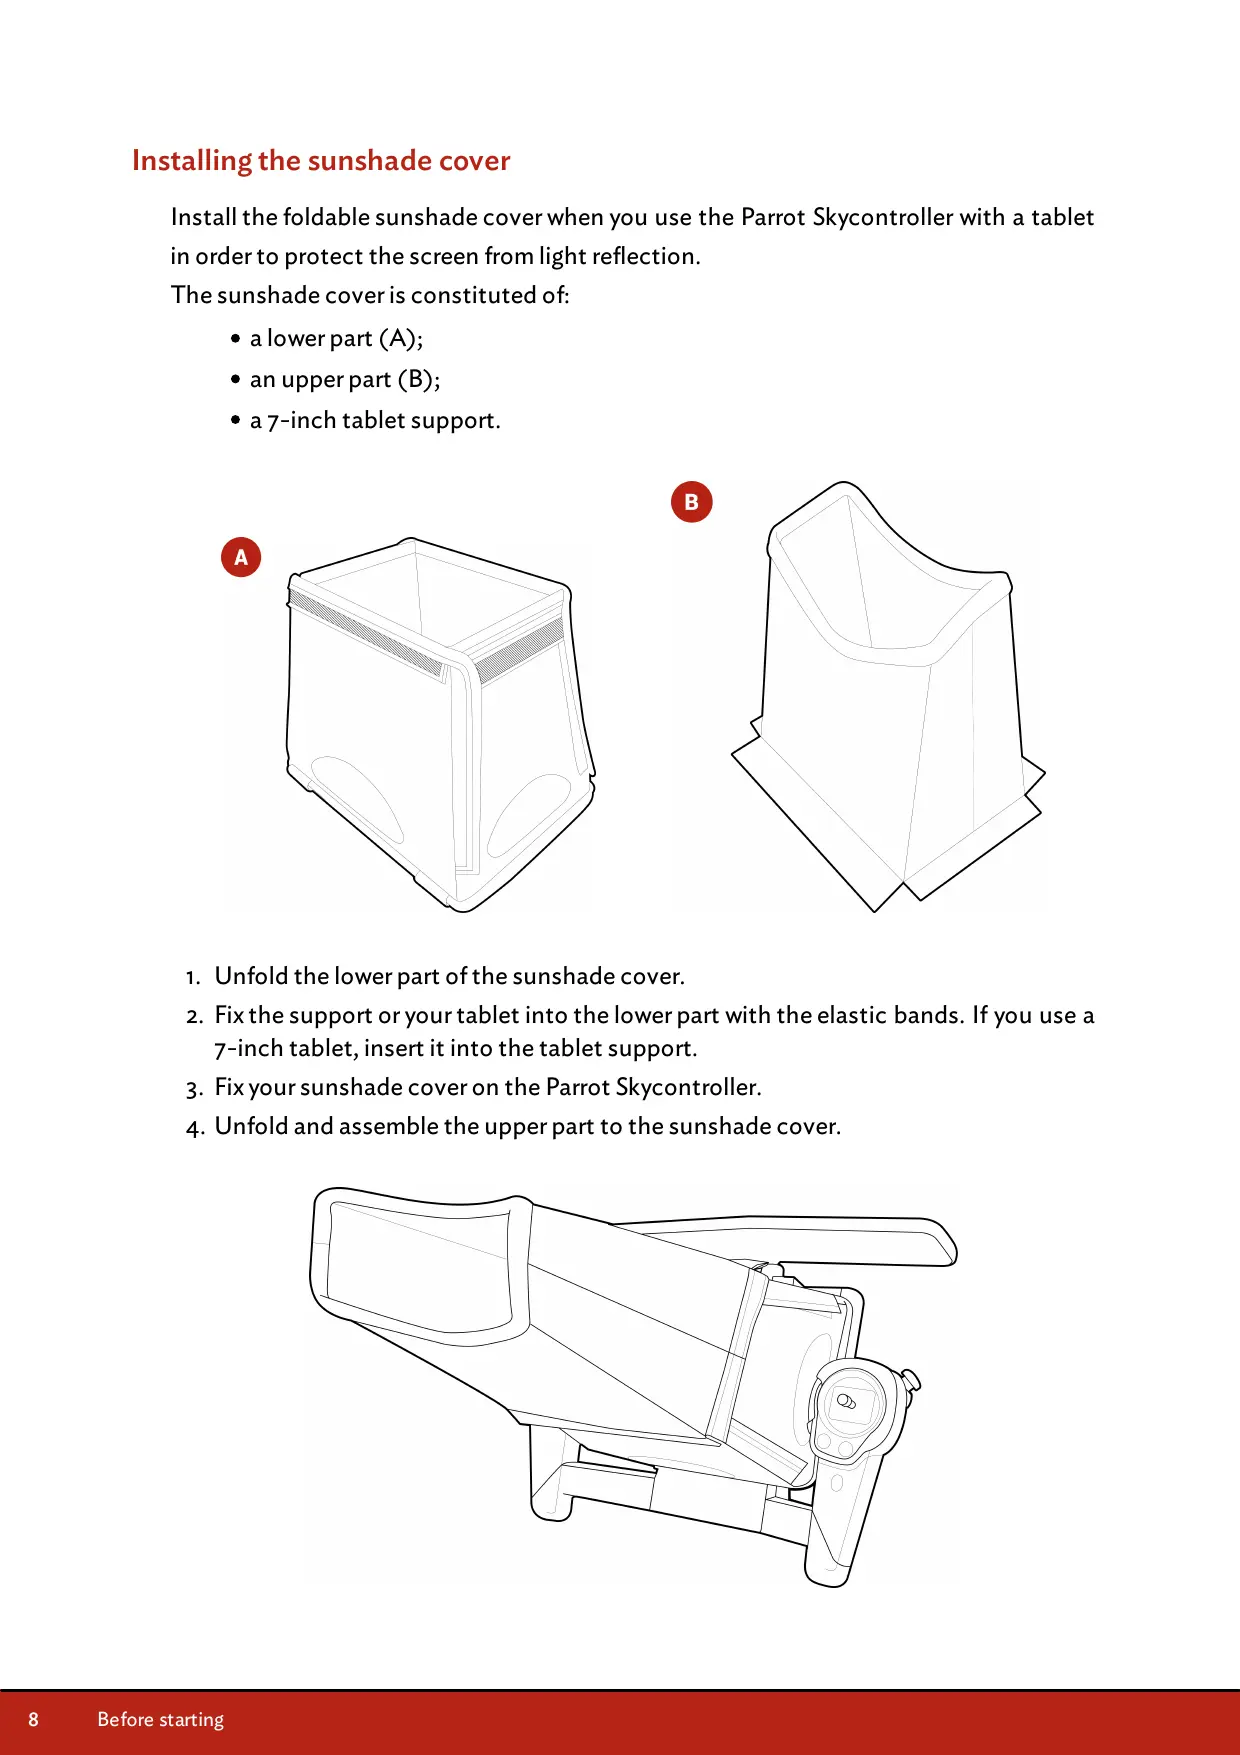
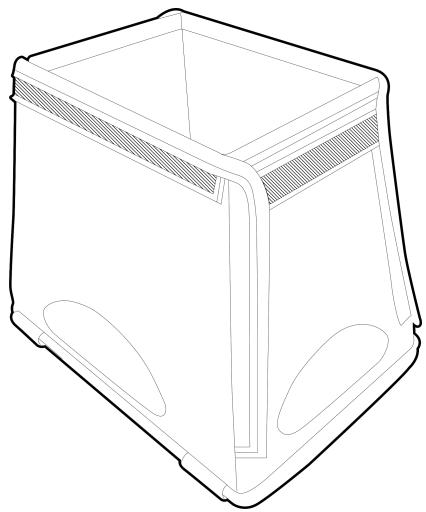
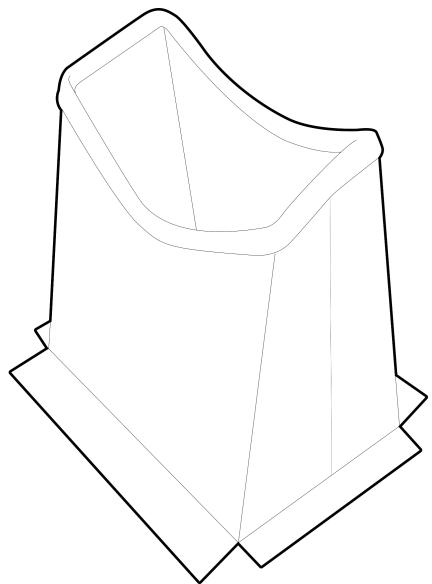
Installing the sunshade cover
Install the foldable sunshade cover when you use the Parrot Skycontroller with a tablet in order to protect the screen from light reflection.
The sunshade cover is constituted of:
- a lower part (A);
- an upper part (B);
- a 7-inch tablet support.
A
B
- Unfold the lower part of the sunshade cover.
- Fix the support or your tablet into the lower part with the elastic bands. If you use a 7-inch tablet, insert it into the tablet support.
- Fix your sunshade cover on the Parrot Skycontroller.
- Unfold and assemble the upper part to the sunshade cover.
Using FreeFlight 3
The FreeFlight 3 app enables you to:
- display the piloting screen,
- set the Parrot Skycontroller and the Parrot Bebop Drone,
- connect a Parrot Bebop Drone to the Parrot Skycontroller that are not paired by default,
- use the Drone Academy.
For further information about FreeFlight 3, see the Parrot Bebop Drone user guide.
You can launch FreeFlight 3:
- on your smartphone,
- on FPV (First Person View) glasses with a HDMI cable,
- on a HDMI screen with a HDMI cable.
Launching FreeFlight 3 on a smartphone
- Connect to the App Store or Google PlayTM and download the FreeFlight 3 application for free.
- Switch the Parrot Skycontroller and the Parrot Bebop Drone on.
-
Search for available Wi-Fi® networks on your device:
-
If you are using an iPhone® or an iPad®, go to Settings > Wi-Fi
-
If you are using an Android™ smartphone, go to Settings > Wireless and networks > Wi-Fi.
-
Select the Skycontrollerxxxxxx network. Wait for your smartphone to connect to the Parrot Skycontroller Wi-Fi network. The Wi-Fi symbol will usually appear on your smartphone when connection is complete.
- Launch the FreeFlight 3 application.
If the Parrot Skycontroller and the Parrot Bebop Drone are already paired, the video feedback appears. If they are not paired, see the Manual connection via smartphone section.
launching FreeFlight 3 on a HDMI screen
Note: The FreeFlight 3 application is already installed in the Parrot Skycontroller.
- Plug the HDMI cable to the HDMI screen (or FPV glasses).
- Plug the HDMI cable into the HDMI port located on the left of the Parrot Skycontroller.
- Switch on the Parrot Skycontroller, the Parrot Bebop Drone and the HDMI screen
(or FPV glasses).
If the Parrot Skycontroller and the Parrot Bebop Drone are already paired, the video feedback appears. If they are not paired, see the Manual connection via screen with HDMI port section.
To browse in the FreeFlight 3 from a HDMI screen, use the commands of the Parrot Skycontroller. For further information, see the Using HDMI screen section.
Connecting to the Parrot Bebop Drone
The Parrot Skycontroller automatically connects to the Parrot Bebop Drone it is sold with.
Switch the Parrot Bebop Drone and the Parrot Skycontroller on.
A signal tone indicates that the Parrot Bebop Drone is connected to the Parrot Skycontroller. The Parrot Bebop Drone battery leads and the Wi-Fi leads light up. The Parrot Bebop Drone is ready to be piloted with the Parrot Skycontroller.
If you have bought the Parrot Skycontroller and the Parrot Bebop Drone separately, connect them manually:
- from your smartphone via the FreeFlight 3 application;
- from a screen with HDMI port (inclind First Person View glasses).
Manual connection via smartphone
- Switch the Parrot Skycontroller and the Parrot Bebop Drone on.
-
Search for available Wi-Fi® networks on your device:
-
If you are using an iPhone® or an iPad®, go to Settings > Wi-Fi
-
If you are using an Android™ smartphone, go to Settings > Wireless and networks > Wi-Fi.
-
Select the Skycontrollerxxxx network. Wait for your smartphone to connect to the Parrot Skycontroller Wi-Fi network. The Wi-Fi symbol will usually appear on your smartphone when connection is complete.
- Launch the FreeFlight 3 application, available for free on App Store or Google PlayTM.
- Press Manager Wi-Fi.
- Select the Parrot Bebop Drone you want to connect.
A pop-up asks you to connect your Parrot Bebop Drone.
- Press OK.
A signal tone indicates that the Parrot Bebop Drone is connected to the Parrot Skycontroller. The Parrot Bebop Drone battery leads and the Wi-Fi led light up. The Parrot Bebop Drone is ready to be piloted with the Parrot Skycontroller.
Note: If the FreeFlight 3 main screen does not display the Parrot Bebop Drone video feedback, press , then, select the Parrot Bebop Drone.
Manual connection via screen with HDMI port
- Switch the Parrot Skycontroller, the Parrot Bebop Drone and the screen (or First Person View glasses) on.
- Plug the HDMI cable (or FPV glasses) on the HDMI port located on the left side of the Parrot Skycontroller.
- Press Manager Wi-Fi. For further information about the use of FPV glasses, see Using FPV glasses.
- Select your Parrot Bebop Drone.
A pop-up asks you to connect your Parrot Bebop Drone.
5. Press OK.
A signal tone indicates that the Parrot Bebop Drone is connected to the Parrot Skycontroller. The Parrot Bebop Drone battery leads and the Wi-Fi led light up. The Parrot Bebop Drone is ready to be piloted with the Parrot Skycontroller.
Note: If the FreeFlight 3 main screen does not display the Parrot Bebop Drone video feedback, press , then select the Parrot Bebop Drone.
Piloting
You can use the Parrot Skycontroller with or without video feedback.
The video feedback enables you to access the FreeFlight 3 application. You can then change the Parrot Skycontroller and Parrot Bebop Drone settings. For further information, see the Parrot Bebop Drone user guide.
Note: It is not possible to perform flips if you use the Parrot Skycontroller without smartphone.
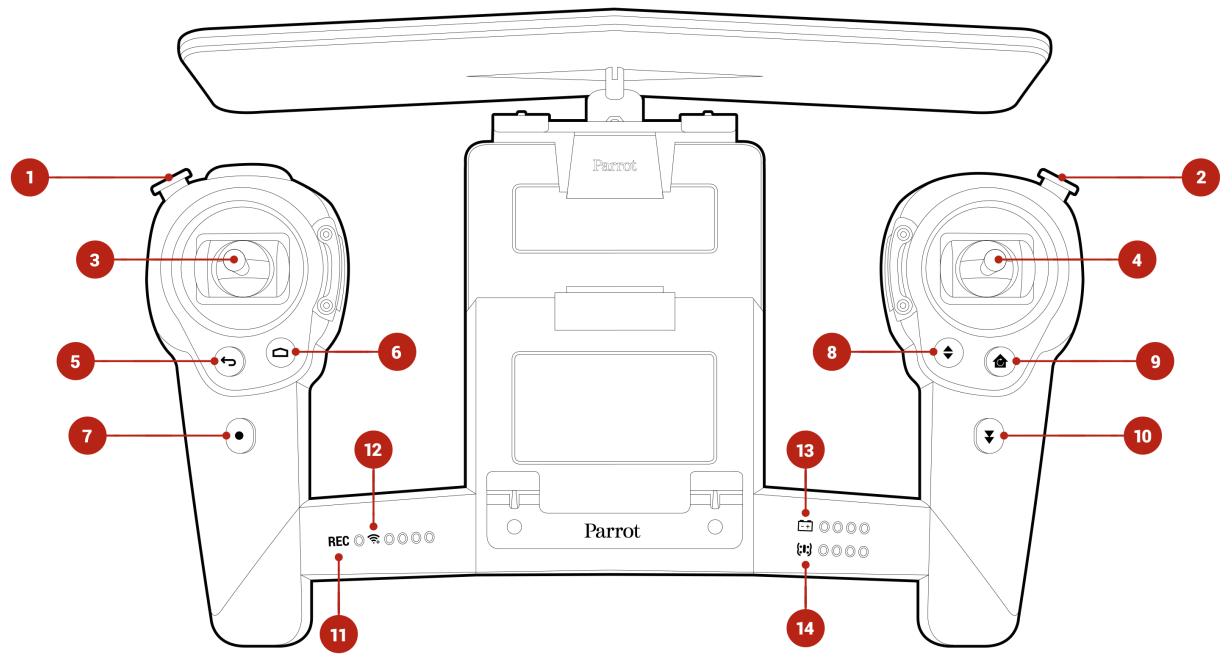
| # | Description |
| 1 | Navigation in the Parrot Skycontroller application (with HDMI screen or FPV glasses only) |
| 2 | Taking photos and orienting the angle of the camera |
| 3 | Left joystick |
| 4 | Right joystick |
| 5 | Previous screen of the Parrot Skycontroller application (with HDMI screen or FPV glasses only) |
| 6 | Straightening up the Parrot Bebop Drone camera Main screen of the Parrot Skycontroller application (with HDMI screen or FPV glasses only) |
| 7 | Video record |
| 8 | Take off and landing |
| 9 | Return to starting point |
| 10 | Emergency landing |
| 11 | Video record signal |
12 Wi-Fi signal
13 Parrot Skycontroller battery level
14 Parrot Bebop Drone battery level
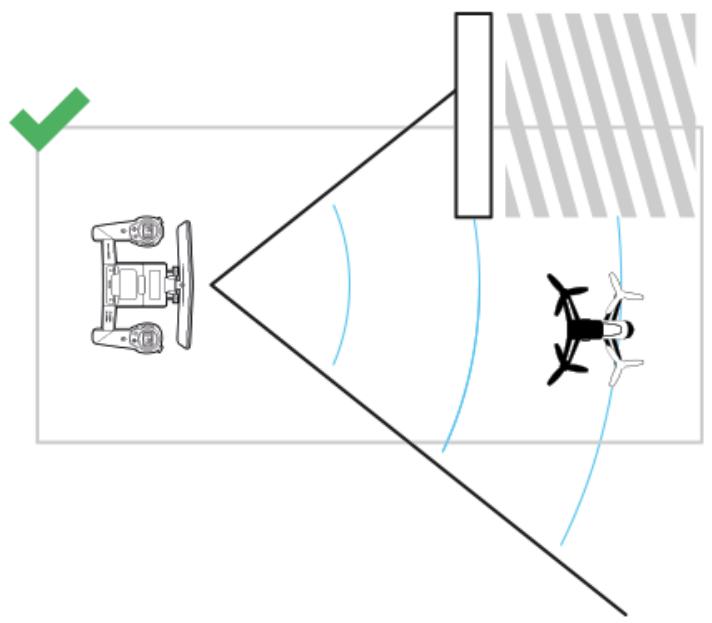
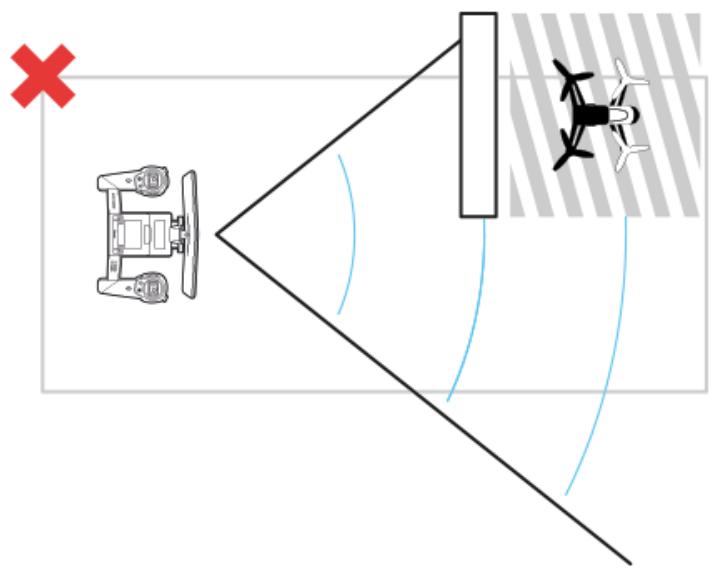
Orienting the Parrot Skycontroller
For better performances and to keep the Parrot Bebop Drone under control:
- always point the Parrot Skycontroller at the Parrot Skycontroller. The radar scope is displayed on the piloting screen when FreeFlight 3 is launched. It enables to locate the Parrot Bebop Drone.
Note: To display the radar scope correctly, ensure the Parrot Skycontroller is calibrated. For further information, see Calibration.

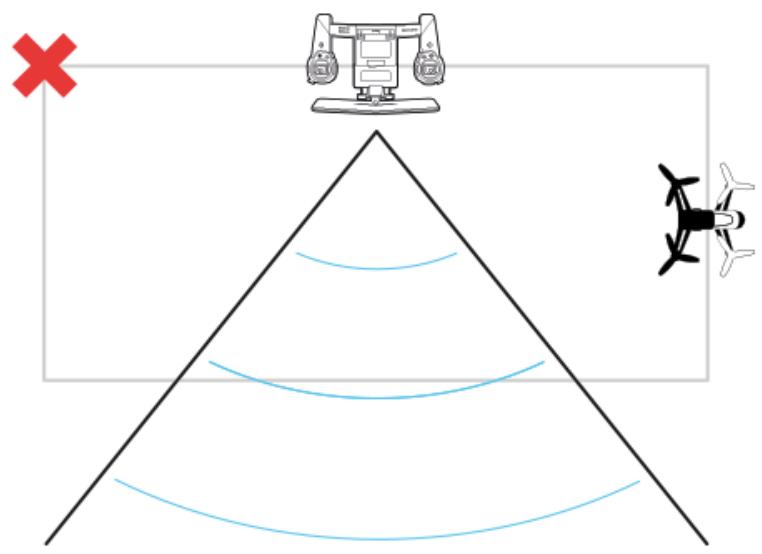
- always keep the Parrot Bebop Drone in your line of sight.
Orienting the antenna
Steer the antenna towards the Parrot Bebop Drone to improve the Wi-Fi signal reception.
To lock the antenna, turn the upper handwheel located at the back of the Parrot Skycontroller.
Left joystick
Right joystick
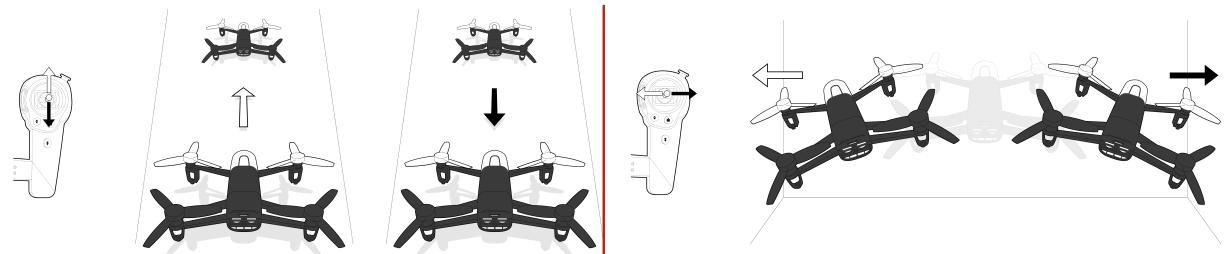
Pitching (moving on towards or backwards)
Rolling (turning towards left or right)
Photos and videos
Press the button (2) to take a picture.
Press the button(7) to record a video or to stop the video recording. When the REC led is red, the Parrot Bebop Drone is recording.
Note: The video mode is activated by default. In video mode, the recording starts automatically when the Parrot Bebop Drone takes off.
Use the joystick located (2) to change the angle of the camera.
To change the recording settings, see the Parrot Bebop Drone user guide.
Note: The video recording stops after 25 minutes of recording.
Note: It is not possible to transfer video files to the Parrot Bebop Drone.
Return home
Press (9) to make the Parrot Bebop Drone fly back towards:
- the last take off location,
- your smartphone location if the Parrot Skycontroller has received no GPS signal.
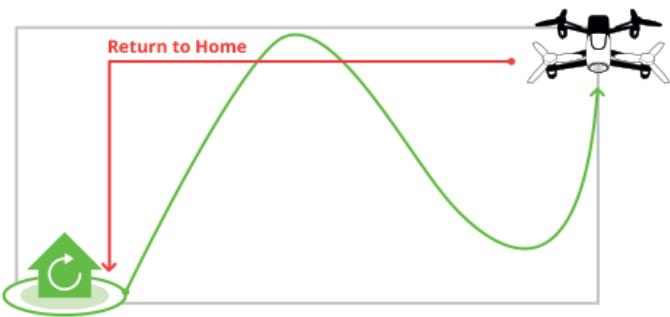
If the Parrot Skycontroller altitude is below 10m , it will reach an altitude of 10m before returning to its starting point in order to avoid any obstacle.
If the connection between your smartphone and the Parrot Skycontroller is lost, the Parrot Skycontroller returns to its starting point automatically after 30 s of disconnection.
Note: To activate Return home, the Parrot Bebop Drone must be calibrated an receive a GPS signal.
Battery
The leds located at the bottom right of the Parrot Skycontroller indicate the battery level:
- of the Parrot Skycontroller for the leds located next to the - + icon. The Parrot Skycontroller battery lasts 150 mn approximately.
- of the Parrot Bebop Drone for the leds located next to the icon. The Parrot Bebop Drone battery lasts 11 mn approximately.
When the battery level of the Parrot Skycontroller or the Parrot Bebop Drone is low, the last led turns red. The Parrot Skycontroller makes a sound signal every 10 seconds.
Co-piloting
The co-piloting mode enables the co-pilot to take control over the Parrot Bebop Drone at any time with a smartphone. The smartphone of the co-pilot must be connected to the Parrot Skycontroller. To do so, see Launching FreeFlight 3 on a smartphone.
Note: The co-piloting mode can be activated from a smartphone only.
To take control over the Parrot Bebop Drone, press on the top right of the piloting screen.
The Parrot Bebop Drone is piloted from the smartphone.
To regain control over the Parrot Bebop Drone from the Parrot Skycontroller, press
Using a HDMI screen
Use a screen with a HDMI port (including FPV glasses) to navigate in the FreeFlight 3 application of the Parrot Skycontroller. FPV glasses enable you to fly the Parrot Bebop Drone with Head Tracking feature.
Warning: If you use the Parrot Skycontroller with FPV glasses, always pilot the Parrot Skycontroller with a copilot. The copilot must keep the Parrot Skycontroller in his/her line of sight and have the smartphone connected to the Parrot Skycontroller. For further information, see Before starting > Using FreeFlight 3. In case of emergency, the copilot must take control over the Parrot Bebop Drone and pilot it.
Navigating in FreeFlight 3 via a HDMI screen
| # | Icon | Description |
| 1 | (Joystick) | Navigating in the application |
| 1 | (Click) | Clicking on a buttonWhen the piloting screen is displayed, the button opens the setting screens. |
| 6 | Opening main screen | |
| 5 | Opening last screen |
To access Android™ operating system from HDMI screen (including FPV glasses):
- Go to the FreeFlight 3 main screen.
- Press
A pop-up asks you if you want to exit the application.
- Press OK.
You can navigate through the Android™ operating system. Press the FreeFlight 3 icon to launch the application again.
Settings
To open the settings screens via a smartphone:
- Launch FreeFlight 3. For further information, see Using FreeFlight 3.
- Press Start >
To open the settings screens via a HDMI screen (including FPV glasses):
- Plug the HDMI screen to the Parrot Skycontroller.
The piloting screen appears.
- Press the joystick.
The settings screens appear.
- To slide the screens, turn the joystick to the left or right.
For further information about Parrot Skycontroller settings, see the Parrot Bebop Drone user guide.
Calibrating the Parrot Skycontroller
Calibration enables to locate the Parrot Bebop Drone on the radar scope. When you use the Parrot Skycontroller for the first time, an alert asks you to calibrate it.
- Press the radar scope (red circle).
- Follow the instructions on the screen.
- One you completed the three steps, press
Note: You can calibrate your Parrot Skycontroller at any time. To do so, select the Skycontroller settings screen..
Changing the function of the buttons
You can change the function of each button and joystick of the Parrot Skycontroller.
Note: To set the Parrot Skycontroller buttons, ensure the last software version is installed. For further information, see the Update tap of the support webpage.
To change the buttons and joysticks function:
- Select the Joystick configuration screen.
If you use a tablet, the joystick configuration appears on one screen. If you use a smartphone, it appears on three consecutive screens.
- Press the button or joystick that you wish to change.
The scrolling list of actions appears.
- Press the action you wish to assign to the button or joystick.
Note: You can assign the same function to several buttons.
To reset the functions by default, press .
Functions of buttons
Note: You cannot assign button functions to a joystick.
| Name | Description |
| Back | Last scree (for HDMI screen or FVP glasses only) |
| Emergency | Emergency landing |
| Photo | |
| Record | Video recording |
| Takesoff/landing | |
| Reset camera | Straightening up the camera tilt |
| Settings | Displaying setting screens (for HDMI screen or FVP glasses only) |
| Return home |
Functions of axis
Note: You cannot assign an axis function (joystick) to a button. The X and Y axis of the same joystick cannot have the same function.
| Name | Description |
| Roll | Rotating to the right or left |
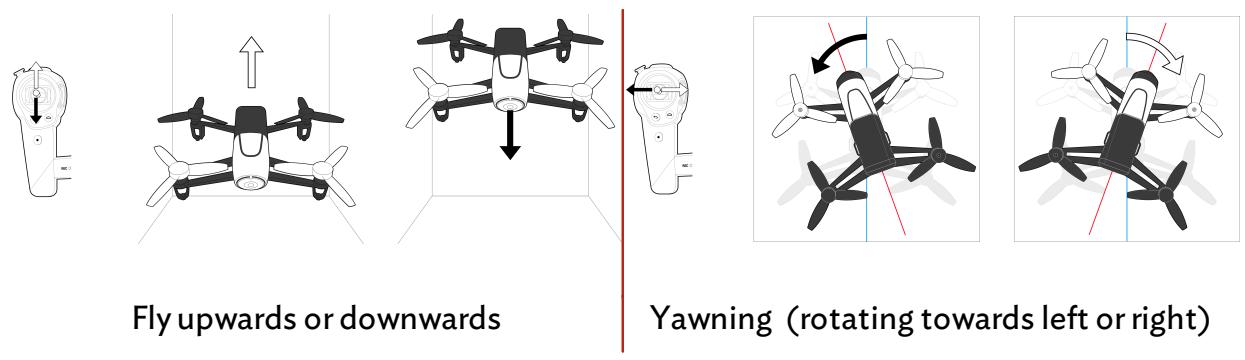
| Gaz | Flying upwards or downwards |
| Yaw | Flying right or left |
| Pitch | Flying forwards or backwards |
| Camera tilt | Tilting the camera upwards or downwards |
| Camera pan | Rotating the camera to the right or left |
Joisticks sensitivity
To set the sensitivity of the joysticks, press .
To change the setting mode, press Linear or Exponential.
To change the sensitivity of both joysticks simultaneously, press
To reset the default configuration, press .
Product name
Select the Skycontroller settings screen.
The network name of your Parrot Skycontroller appears in your smartphone peripheral devices list and in the FreeFlight 3 application settings menu. The name change will only
take effect after restarting the Parrot Skycontroller.
Note: The network name of the Parrot Skycontroller can only contain letters, numerals and underscores ("_"). It must not exceed 32 characters in length.
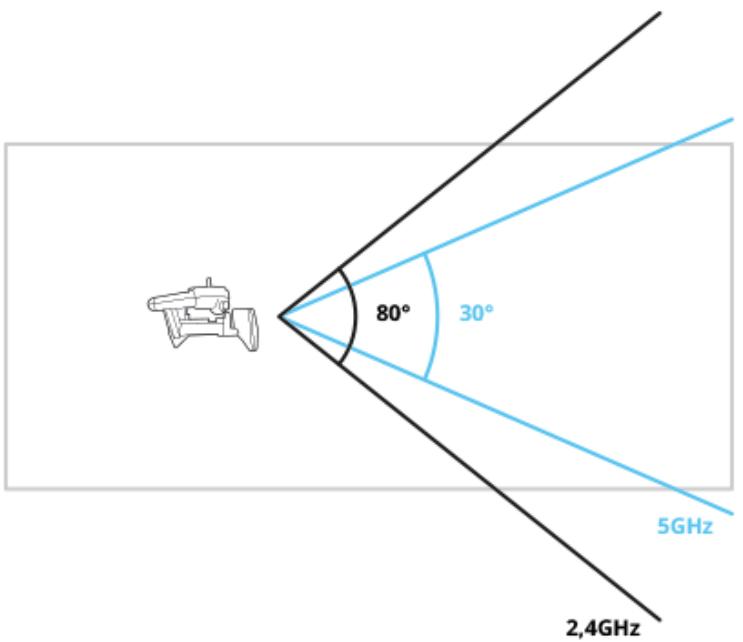
Wi-Fi
Note: Before flying the Parrot Bebop Drone, please ensure that you comply with the Wi-Fi frequencies restrictions of your place of flight. Certain frequencies may be restricted or forbidden. For example, in certain countries using the 5 GHz Wi-Fi band may be prohibited in outdoor mode.
You can connect the Parrot Skycontroller to the 2.4 GHz or 5 GHz Wi-Fi bands.
- The 2.4 GHz Wi-Fi band enables you to fly the Parrot Skycontroller from a greater distance. It is generally more congested than the 5 GHz Wi-Fi band in urban areas.
- The 5 GHz Wi-Fi band enables you to obtain a better connection between the Parrot Skycontroller and the Parrot Bebop Drone.
To switch the Wi-Fi band (2.4 GHz or 5 Ghz), hold down (REC) and (Emergency landing) buttons for 5 seconds.
To change the Wi-Fi bands via the FreeFlight 3 application:
- Select the Skycontroller settings screen.
- Press the band and the channel you wish.
When the Wi-Fi signal is low, the Parrot Skycontroller makes a tone signal every 10 seconds.
Updating
Update the Parrot Skycontroller via USB, by downloading the update file from our website. A computer and an USB flashdrive are necessary.
For further information, see the Parrot Skycontroller update procedures.
General information
The Parrot Skycontroller is aimed to remotely fly the Parrot Bebop Drone and is not suitable for use by children under 14 years of age.
REMEINDER: The Parrot Bebop Drone is a model aircraft designed only for entertainment, and competitions between model aircraft. Fly responsibly. Do not fly your Parrot Bebop Drone over any populated area, such as beaches, others people's backyards, heavily populated parks, or sports ovals where a game is in progress, over gathering of animals. Do not fly near an airfield. Do not fly for money. If you want to fly your Parrot Bebop Drone in any populated area or near an air field, do contact your local aerial authority to get the appropriate authorization.
Do not use spare parts and accessories other than those specified by Parrot.
Safety precautions and maintenance
The Parrot Skycontroller may be irreversibly damaged if you allow sand or dust to penetrate it.
Do not use the Parrot Skycontroller in wet conditions.
Do not leave the Parrot Skycontroller in direct sunlight for long periods.
Small parts may be swallowed. All materials for fastening or packing purposes are not part of the product and should be discarded for children's safety.
This equipment is restricted to indoor operation in 5.15 - 5.25GHz.
Wi-Fi
Before flying the Parrot Skycontroller, please ensure that you comply with the Wi-Fi frequencies restrictions of your place of flight. Certain frequencies may be restricted or forbidden. For example, in certain countries using the 5 GHz Wi-Fi band may be prohibited in outdoor mode.
Warning on invasion of privacy
Recording and circulating an image of an individual may constitute an infringement of their image and privacy for which you could be liable. Ask for authorisation before filming individuals, particularly if you want to keep your recordings and/or circulate
images on the Internet or any other medium. Do not circulate a degrading image or one which could undermine the reputation or dignity of an individual. The use of the Parrot Skycontroller for surveillance or espionage is strictly forbidden and could result in your prosecution under the law. Check that your use of the cameras on board the Parrot Skycontroller complies with the legal provisions on the protection of privacy.
Battery
Read the entire instruction sheet included with this battery. Failure to follow all instructions could cause permanent damage to the battery and its surroundings, and cause bodily harm. Never use anything except a LiPo approved charger. Always use a LiPo cell balancing charger or a LiPo cell balancer. Never charge through the discharge lead. Never trickle charge, or allow to discharge below 2.5V per cell. Never allow the battery temperature to exceed 140^ ( 60^ ). Never disassemble or modify pack wiring in any way or puncture cells. Never place on combustible materials or leave unattended during charge. Always charge in a fireproof location. Always set charger's output volts to match battery volts. Always keep out of reach of children. Improper battery use may result in a fire, explosion or other hazard.
The battery terminals should not be allowed to short-circuit. The product should be connected only to class II appliances which display the symbol.
Warranty
Without prejudice to any applicable statutory warranty, Parrot warrants that the Parrot Skycontroller will be free from defects in material and workmanship for a period of 12 months from the initial date of purchase (excluding consumables which are warranted during 6 months from the initial date of purchase) upon presentation of proof of purchase to the retailer or to Parrot (including the date and place of purchase, product serial number). Return to retailer is not applicable in the USA - return shall be made to Parrot. During the contractual warranty period, any defective product should be returned in its original packaging to the retailer's or Parrot's after-sales service. After inspection of the product, Parrot will, at its sole discretion, either repair or replace the defective part or product, excluding any other indemnification of any nature. Parrot's warranty does not cover: defects due to damage caused by an accidental collision or fall; defects due to abnormal use of the product or if spare parts have been installed without following the recommendations and instructions provided by Parrot in this guide or on www.parrot.com or if the Parrot Skycontroller has been customised by the end-user; defects caused by repairs carried out by the end-user or an unauthorised third party, except spare parts provided by PARROT; defects due to the use of spare parts not provided by PARROT in the original packaging.the use of spare parts not
approved by Parrot, in particular, the use of batteries not approved by Parrot; defects caused by any reason other than a defect in material or workmanship the gradual power loss of the Parrot rechargeable battery (o86x) over time, which does not constitute as a defect in material or workmanship, If upon technical tests being carried out any product is found non defective we reserve the right to return such product to the sender at the sender's cost and to levy a charge to cover Parrot's technical test fees. Upon expiration of the 12-month warranty period or if the defect is not covered by the warranty, any defective product can be returned to Parrot's after-sales service in order to be repaired or for a defective part to be replaced at the sender's costs. Repair will be carried out only after acceptance of the corresponding quotation. Except in relation to consumables, spare parts are subject to a 12 month warranty and are subject to the same terms and conditions as those described above. The warranty does not cover: damage to non Parrot products, including devices used to operate the Parrot Skycontroller.
Modifications
The explanations and specifications in this guide are given for information purposes only and may be modified without prior notice. They are deemed to be correct at time of going to press. The utmost care has been taken when writing this guide, as part of the aim to provide you with accurate information. However, Parrot shall not be held responsible for any consequences arising from any errors or omissions in the guide, nor for any damage or accidental loss of data resulting directly or indirectly from the use of the information herein. Parrot reserves the right to amend or improve the product design or user guide without any restrictions and without any obligation to notify users. As part of our ongoing concern to upgrade and improve our products, the product that you have purchased may differ slightly from the model described in this guide. If so, a later version of this guide might be available in electronic format at Parrot's website at www.parrot.com.
Disposal of this product at the end of its life
At the end of this product's life, please do not dispose of this product in your general household waste. Instead, in order to prevent possible harm to the environment or human health from uncontrolled waste disposal, please dispose of this product separately in accordance with your local laws and regulation. For more information on the separate collection systems for waste electrical and electronic equipment that are available for consumers, near your home, free of charge, please contact your local municipality authority. You can also contact the retailer from which you purchased your Parrot Skycontroller – he might have put in place recycling services or he may be
part of a specific recycling scheme.
Declaration of conformity
Parrot SA, 174 quai de Jemmapes, 75010 Paris, France, declare under their sole responsibility that the product described in this user guide complies with technical standards EN 301489-17, EN300328, EN71-1, EN71-2, EN71-3, EN62115 following the provision of the Radio Equipment, Telecommunication Equipment directive (1999/5/EC R&TTE), and of the General Safety directive (2001/95/EC).
http://www.parrot.com/ce/?bebop-drone
Registered trademarks
Parrot, Parrot Skycontroller are trademarks or registered trademarks of Parrot SA.
App Store is a trademark of Apple Inc.
Google Play is a trademark of Google Inc. Wi-Fi® is a registered trademark of Wi-Fi Alliance®.
All other trademarks mentioned in this guide are protected and are the property of their respective owners.