
UAG50 - VPN Router ZYXEL - Free user manual and instructions
Find the device manual for free UAG50 ZYXEL in PDF.
| Product Type | VPN Router (Unified Access Gateway) |
| Brand | ZYXEL |
| Model | UAG50 |
| Dimensions (approx.) | 272 x 185 x 45 mm |
| Weight (approx.) | 1.2 kg |
| Power Supply | 100-240 V AC, 50/60 Hz |
| Power Consumption | 15 W (max.) |
| Network Interfaces | 4 LAN ports 10/100/1000 Mbps, 1 WAN port 10/100/1000 Mbps |
| VPN Functions | IPsec, SSL VPN, PPTP, L2TP |
| Firewall Functions | SPI firewall, packet inspection, stateful filtering |
| Bandwidth Management | BWM (Bandwidth Management) per user or SSID |
| Hotspot Authentication | Captive portal, user agreement, SMS, print ticket, PayPal |
| Wireless Management | Access point management via AP profile, up to 2 SSID |
| Layer 2 Isolation | Client isolation with whitelist for printers/servers |
| USB Storage | USB 2.0 port for log storage and backup |
| Log Sending | Remote Syslog (Kiwi) and to USB device |
| Maintenance and Cleaning | Clean with a soft dry cloth. Do not use abrasive products. |
| Security | Integrated firewall, MAC address filtering, whitelist, intrusion detection |
| Spare Parts and Repairability | Replaceable external power supply. ZYXEL technical support. |
| General Information | Professional VPN router for SMBs, hotels, and public hotspots. |
Frequently Asked Questions - UAG50 ZYXEL
User questions about UAG50 ZYXEL
0 question about this device. Answer the ones you know or ask your own.
Ask a new question about this device
Download the instructions for your VPN Router in PDF format for free! Find your manual UAG50 - ZYXEL and take your electronic device back in hand. On this page are published all the documents necessary for the use of your device. UAG50 by ZYXEL.
USER MANUAL UAG50 ZYXEL
Unified Access Gateway
Version 4.00
Edition 1, 04/2014
Application Note
Table of Contents
Scenario 1 - How to Activate a Paid Access Hotspot 3
1.1 Application scenario 3
1.2 Login with ticket by Printer to get the access for Internet 4
1.3 Pay with PayPal payment service to get the access for Internet 6
Scenario 2 - How to Activate a Free Access Hotspot 13
2.1 Application Scenario 13
2.2 Configuration Guide 14
Scenario 3 - Use BWM to control trial user and billing user 23
3.1 Application scenario 23
3.2 Configuration Guide 23
Scenario 4 - Using Function of Layer 2 Isolation and White List 36
4.1 Application scenario 36
4.2 Configuration Guide 36
Scenario 5 - Sending the system log to a remote syslog server and the USB device 42
5.1 Application Scenario 42
5.2 Configuration Guide 42
Scenario 6 – Manage multiple APs by AP profile 49
6.1 Application scenario 49
6.2 Configuration Guide 49
Appendix 57
Scenario 1 – How to Activate a Paid Access Hotspot
1.1 Application scenario
In the hotspot, there are various customer need access Internet, we can use UAG to effective control the customer access for Internet. If we want customer use payment service to access Internet, there are two main ways can be used on UAG: one is use Printer, and another one is PayPal payment service. For Printer, customer can buy ticket from reception desk, which generated by thermal printer. And for PayPal payment service, customer can pay with their PayPal account to access Internet by browser on smart phone or laptop.

Network conditions:
SP350E:
Default IP address (DHCP): 172.16.0.200/16
User Name: admin
Password: 1234
Port Number: 9100
<h1 id="goals-to-achieve">Goals to achieve:</h1>
1) Easier control customer access Internet with payment service.
2) Customer can pay with PayPal or buy ticket from reception, then they can get access for Internet promptly.
<h1 id="12-login-with-ticket-by-printer-to-get-the-access-for-internet">1.2 Login with ticket by Printer to get the access for Internet</h1>
<h1 id="uag-configuration">UAG configuration:</h1>
Step 1: Setting Printer Manager GUI
(1) Configuration > Printer Manager > check General > Edit Port with printer: 9100.

(2) Add a printer with the printer's IP address in the GUI.

Step 2: Configuration > Monitor > Printer Status > check the Status with " sync success".

Step 3: Select Configuration > Printer Manager > check Printout Configuration > you can choose Use Customized Printout Configuration to upload a customized printout configuration. Then you can customize the ticket information by downloading the example and modifying the ticket.

Step 4: Configuration > Printer Manager > check Printout Configuration > you can choose Use Default or Customized Printout Configuration > Preview: press Printout Preview > pop out the Default printout configuration or the Customized printout configuration ticket format for preview.


<h1 id="13-pay-with-paypal-payment-service-to-get-the-access-for-internet">1.3 Pay with PayPal payment service to get the access for Internet</h1>
<h1 id="create-and-set-test-account-on-the-paypal-server">Create and Set test account on the PayPal server:</h1>
About Register an account on the PayPal server, we have registered a test account for test the function on this, please refer to the Appendix part.
<h1 id="uag-configuration-2">UAG configuration:</h1>
Step 1: Configuration > Billing > Payment Service > Enable Payment Service > Enter the seller Account and Identity Token.

(1) You can use Seller account Login to www.sandbox/paypal.com and go to profile > Website payments preferences to check the identity token.
<h1 id="payment-data-transfer-optional">Payment Data Transfer (optional)</h1>
Payment Data Transfer allows you to receive notification of successful payments as they are made. The use of Payment Data Transfer depends on your system configuration and your Return URL. Please note that in order to use Payment Data Transfer, you must turn on Auto Return.
Payment Data Transfer:


Identity Token:xnS25wofWOW9JGTrnGtyglzKQZo-1f5KdKg0z-AN5pjH1FUGQG5OmVdt18
(2) Enter the Payment Gateway with - https://www.sandbox/paypal.com/cgi-bin/webscr
Since it's the test web site so the payment gateway should setup as
https://www.sandbox/paypal.com/cgi-bin/webscr
But not default https://www.Paypal.com/cgi-bin/webscr
Step 2: Test the dynamic account to pay the bill by payment function
(1) Open the Login page, after enable the payment function, then you will saw the link on the login page.

(2) Click the link on the screen > then the page will redirected to billing profile page.

(3) As the test, you can Select 3 hour billing profile > click ok > then the device will redirect to PayPal authentication page.
HongSong Chen's Test Store

(4) After login to PayPal page, you can make sure your order.
HongSong Chen's Test Store

(5) After click the Agree and Continue button > then you can click Pay Now button to pay the bill.
<h1 id="hongsong-chens-test-store">HongSong Chen's Test Store</h1>

(6) After click Pay Now button > PayPal will pop out following web page > then redirect the login information to you after 10 seconds.
<h1 id="hongsong-chens-test-store-2">HongSong Chen's Test Store</h1>
<table><tr><td>Thanks for your order</td><td>PayPal</td></tr><tr><td>Your payment of €3.00 EUR is complete.</td><td></td></tr><tr><td>You're now going back to HongSong Chen's Test Store.</td><td></td></tr><tr><td>If you are not redirected within 10 seconds, click here.</td><td></td></tr><tr><td>PayPal. The safer, easier way to pay.</td><td></td></tr><tr><td>For more information, read our User Agreement and Privacy Policy.</td><td></td></tr><tr><td>Test Site</td><td></td></tr></table>
(7) You can see the login username and password on the screen.

(8) Then you can login device with the username and password in time period.

Step 3: Check the balance in buyer and seller account.
(1) Login to Buyer account to check on sandbox web site.

(2) Login to Seller account to check on sandbox web site.

<h1 id="scenario-2-how-to-activate-a-free-access-hotspot">Scenario 2 – How to Activate a Free Access Hotspot</h1>
<h1 id="21-application-scenario">2.1 Application Scenario</h1>
Some hotels need to provide free Internet services to hundreds of guests on a daily basis, and managing Internet access for so many people can be very complicated without the right equipment. With web authentication such as user agreement and web portal, hotel guests are redirected to the web-based authentication portal upon the first attempt to access the network. In some countries, the law requires to identify and track users who use public internet access. UAG can authenticate people by forcing them to receive an authentication code via SMS to their phone. In this way, UAG can authorize user Internet access via their mobile phone number and keep log on the device in case of illegal activities in the hotspot. Guests can get free access to the Internet in a matter of seconds simply by entering all required personal contact information and agreeing to the policy of user agreement without a guest account, or browse the Internet free of charge for a specified period of time by entering his or her mobile phone number to receive guest account information by SMS.
(Note: UAG2100 SMS ticketing function is license optional.)

User Agreement
Free Time
2. Click OK and access granted

<h1 id="22-configuration-guide">2.2 Configuration Guide</h1>
<h1 id="network-conditions-2">Network conditions:</h1>
WAN: 10.59.3.54
LAN 1: 172.16.0.1/255.255.0.0
User's laptop: 172.16.2.0
<h1 id="goals-to-achieve-2">Goals to achieve:</h1>
(1) Users must fill in personal information and accept the service usage agreement before they can access the Internet. After the form is submitted, the advertisement web site is pop up in a new window.
(2) Allow any user to get account information by SMS and use the Internet for a limited free time.
<h1 id="usg-configuration">USG configuration:</h1>
Task 1. Configure User Agreement to let users access the Internet without a guest account by agreeing to the policy of user agreement. Add advertisement web page as the first page when an authenticated user is attempts to access the Internet.
Step 1: Configuration > Web Authentication > check "User Agreement"
(1) Enable Idle Detection. The default value of idle timeout is 3 minutes.
(2) Select "Internal User Agreement"
(3) Add authentication policy for every source.

<h1 id="step-2-configuration-advertisement">Step 2: Configuration > Advertisement</h1>
(1) Enable Advertisement
(2) Add the URL of the website

<h1 id="verification">Verification:</h1>
1. When the user opens the browser, he/she will be redirected to the user agreement page. Fill in all required information and click "Agree".

2. Click "OK" and then the user can access the Internet.

3. The advertisement web page will be displayed in a new frame as the first page whenever the user connects to the Internet.

Task 2. Enable SMS service on UAG and select SMS as the delivery method in Free Time.
Step 1: Get an account from ViaNett at http://www.vianett.com. You can register a trial account to test the SMS function.

<h1 id="step-2-after-vianett-account-is-ready-go-to-configuration-sms">Step 2: After ViaNett account is ready, go to Configuration > SMS</h1>
(1) Enable SMS.
(2) Fill in your local phone country code as the default country code.
(3) Add authentication policy for every source.

<h1 id="step-3-configuration-free-time">Step 3: Configuration > Free Time</h1>
(1) Enable Free Time and set up the free time period. By default, the Reset time will be at AM 00:00. You can also setup how many times a MAC address can access the internet.
(2) Select "SMS" to deliver login information to the mobile phone.

<h1 id="step-4-configuration-web-authentication-check-web-portal">Step 4: Configuration > Web Authentication > check "Web Portal"</h1>
(1) Select Internal Web Portal
(2) Add authentication policy for every source.

<h1 id="verification-2">Verification:</h1>
1. Users will be redirected to the login page before being permitted to access the Internet. Click on the link to get a free account.

2. Select the "Free Time" on the screen and submit your mobile phone number.

3. The account and password is sent to your mobile phone.

4. Check your account information.

5. Fill in the account information received on your mobile phone and click "Login".

6. You can start to access the Internet.

<h1 id="scenario-3-use-bwm-to-control-trial-user-and-billing-user">Scenario 3 - Use BWM to control trial user and billing user</h1>
<h1 id="31-application-scenario">3.1 Application scenario</h1>
In the hotel network hotspot applications, UAG can support different bandwidth control by different SSID, we can use this design like NXC, SSID mapping to a VLAN. Then VLAN can mapping to an IP address subnet. In this scenario, we add 2 SSIDs and enable Free Time function on the device, and also add the Billing profiles on the device. After add the policy to limit the user bandwidth via BWM function, we can login to device via trial-user or billing-user to check the speed controlled by UAG.


<h1 id="32-configuration-guide">3.2 Configuration Guide</h1>
Network conditions:
UAG:
WAN1: 10.59.3.54
LAN2: 172.17.0.1
Goal to achieve:
UAG can support add the rules on the device to control different user type by BWM function for control the bandwidth with user account.
Task 1: Add the AP profiles on the device
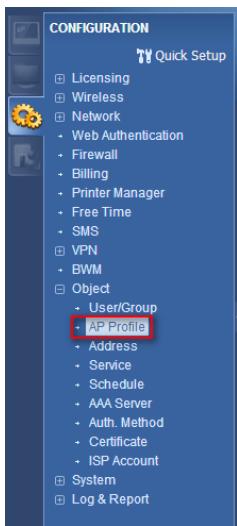
Step 1: Go to Configuration > Object > AP Profile > SSID > SSID list
(1) Modify the default SSID name as "Free".

(2) Add the other SSID for Billing user

(3) Go to Configuration > Object > AP Profile > Radio to Broadcast these two SSIDs in 2.4 G and 5 G Radios.


(4) Go to Configuration > Wireless > AP Management to apply the AP profile to AP.
Task 2: Enable Free Time function on the device
Step 1: Go to Configuration > Free time page to enable the Free time function.
(You can setup how long time and how many times that user can access for free.)

Task 3: Add the Billing profiles on the device
Step 1: Go to Configuration > Billing > Billing profile page to add the billing profile.
Ex: 1 hour = 1€, 2 hours = 2€, 3 hours = 3€


<h1 id="step-2">Step 2:</h1>
Go to Configuration > Billing > General page to check the general setting in billing function.
(1) Make sure the accounting method type, currency, setting is correct.
(2) Add the SSID profile in the general setting

Task 4: Configuring the Payment service page
Make sure the Payment service already configured correct.

Task 5: Add the policy to limit the user bandwidth via BWM function
Step 1: Go to Configuration > BWM > Add the policy to limit the Bandwidth by user type.
(1) User: Trail-Users, Inbound=1000Kbps, Out bound=1000Kbps, Priority =7

(2) Billing-Users, Inbound=2000Kbps, Out bound=2000Kbps, Priority =1

<h1 id="3-enable-bwm-function">(3) Enable BWM function.</h1>

Task 6: Enable the Web authentication policy on the device
Go to Configuration > Web Authentication > Web Authentication > Web Portal.
Enable Web authentication policy to force LAN2 user must authentication with device.

Task 7: Login to device via trial user
Step 1: Click the link to get a dynamic user account.

Step 2: After click the link on the login page, the device will redirect the billing profile to you.
Then you can select the "Free Time" on the screen, and click "OK" Button.

Step 3: Then device will pop out the user name and password to you.
Or you can click "Login Now" Button to login to device directly.

Step 4: Use browser to "http://www.speedtest.net/" to test the Speed.
The test result is around 1 Mbps. It's the same as our setup.

Task 7: Login to device via billing-user, and test the speed.
Step 1: Click the link to get a dynamic account to access the internet.

Step 2: Select 1 hour profile to test this.

Step 3: Then device will pop out the PayPal page to you.
Please enter the correct user name and password in the check box. And click "Log in" button on the browser.

HongSong Chen's Test Store
And PayPal will help you balance your bill. Then you can click "Pay Now" button.

Step 4: After you click Pay Now button, the PayPal will redirected the user name and password to you. And you can click "Login now" to access the internet directly.

Step 5: Use browser to "http://www.speedtest.net/" to test the Speed.
The test result is around 2 Mbps. It's the same as our setup.

<h1 id="scenario-4-using-function-of-layer-2-isolation-and-white-list">Scenario 4 - Using Function of Layer 2 Isolation and White List</h1>
<h1 id="41-application-scenario">4.1 Application scenario</h1>
In the hotel network hotspot applications, if you want to easily control and manage that Clients will be unable to connect to each other, you can enable the Layer2 Isolation function to block which interface unable to connect to each other. In this scenario, we have set two Client laptops, and an online printer for Client use, after enable the Layer2 Isolation, we can control that Clients side can't access each other laptop. And by using White list, we also can manage Client side also can access online printer.

<h1 id="42-configuration-guide">4.2 Configuration Guide</h1>
Network conditions:
UAG:
LAN 1: 172.16.0.1/255.255.0.0
Printer IP: 172.16.1.1
Client 1's laptop: 172.16.1.2
Client 2's laptop: 172.16.2.0
<h1 id="goals-to-achieve-3">Goals to achieve:</h1>
1) With enable the Layer2 Isolation function, it can easily control and manage to block which interface unable to connect to each other.
2) Using White list, it can manage which server that Client side also can access.
<h1 id="usg-configuration-2">USG configuration:</h1>
Task 1. Using enable "Layer2 Isolation" function to manage internal unable to connect to each other.
Step1: Connect Printer on UAG Lan1, and make sure the Client's laptop is also in the same Lan1 subnet.
Printer IP:
```txt
Microsoft Windows [Version 6.1.7601]
Copyright (c) 2009 Microsoft Corporation. All rights reserved.
C:\Users\CSO>ipconfig
Windows IP Configuration
Connection-specific DNS Suffix .. .
Link-local IPv6 Address . . . . . . . . . . . . . . . . . . . . . . . . . . . . . . . . . . . . . . . . . . . . . . . . . . . . . . . . . . . . . . . . . . . . . . . . . . . . . . . . . .
IPv4 Address.. .. .. ... .. .. .. .. .. .. .. .. .. .. .. .. .. .. .. .. .. .. .. .. .. .. .. .. .. .. .. .. .. .. .. .. .. .. .. .. .. .. .. .. .. .. .. .. .. .. .. .. ..
Subnet Mask.. ... ... ... ... ... ... ... ... ... ... ... ... ... ... ... ... ... ... ... ... ... ...
Default Gateway.. ... ... ... ... ... ... ... ... ... ... ... ... ... ... ...
Tunnel adapter isatap.(8E4806B7-8351-4AFA-8557-1DA78CBA8D2E):
Media State.. .. .. .. .. .. .. ..
Connection-specific DNS Suffix..
Connection-specific DNS Suffix..
IPv6 Address.. ... ... ... ... ... ... ...
Link-local IPv6 Address.. ... ... ... ... ...
Default Gateway.. ... ... ... ... ... ...
Client2's laptop IP:
Connection-specific DNS Suffix : IP Address. .. .. .. .. .. .. .. .. .. .. .. .. .. .. .. .. .. .. .. .. .. .. .. .. .. .. .. .. .. .. .. .. .. .. .. .. .. .. .. .. .. .. .. .. .. .. .. .. .. .. .. .. .. .. .. .. .. .. .. .. .. .. . 172.16.2.0 Subnet Mask.. ... ... ... ... ... ... ... ... ... ... ... ... ... ... ... ... ... ... ... ... ... ... ... ... ... ... ... ... ... ... ... ... ... ... ... ... Default Gateway.. . . . . . . . . . . . . . . . . . . . . . . . . . . . . . . . . . . . . . . . . . . . . . . . . . . . . . . . .
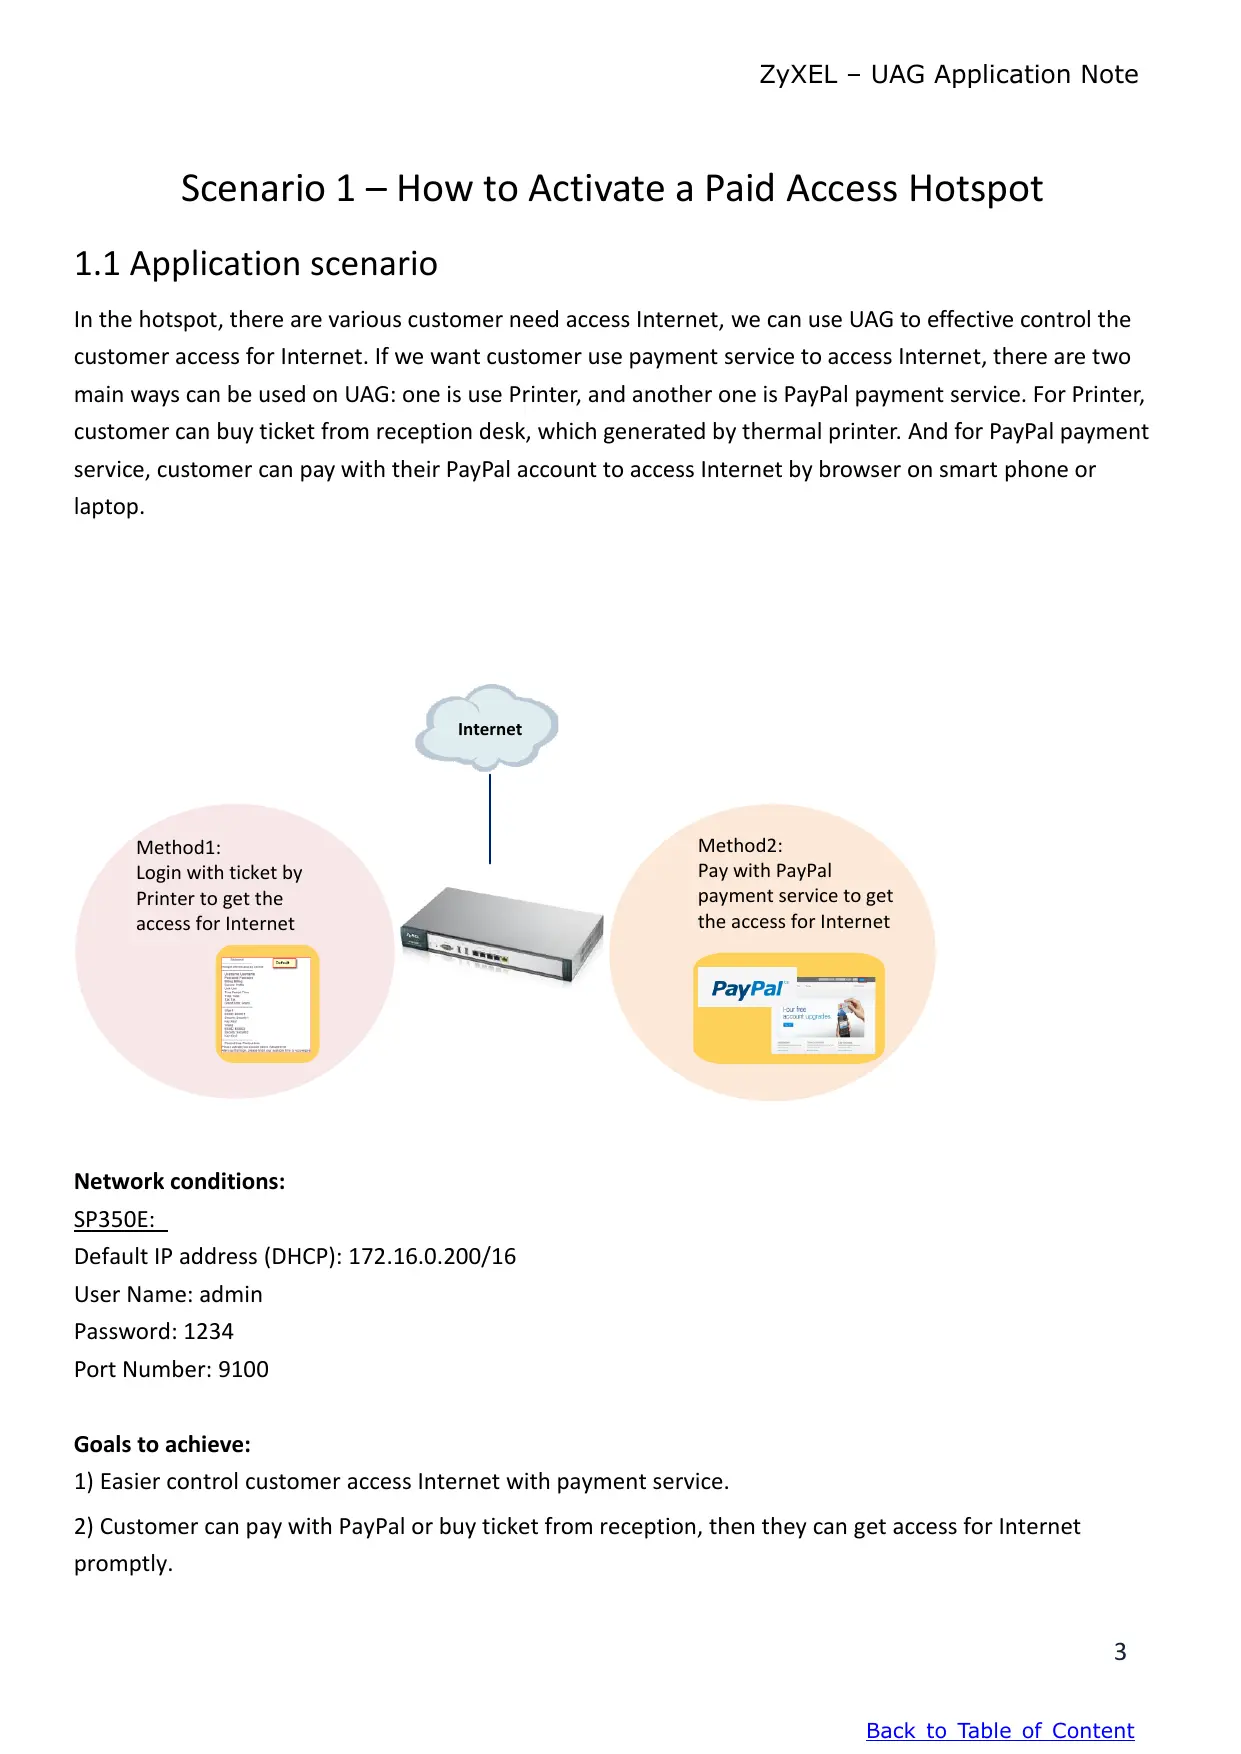
Step2: Since the Layer2 Isolation function only takes effect if the firewall is enabled, so you have to enable firewall first.
Configuration > Network > Firewall > Enable Firewall
Step3. Configuration > Network > Layer 2 Isolation
(1) Enable Layer 2 Isolation
(2) Move the Ian1 interface to the Member list to let all Ian1 internal unable to connect to each other.

Verification:
Client2's laptop can't connect to online printer (172.16.1.1), and Client1's laptop (172.16.1.2).
C:\Documents and Settings\user\ring 172.16.1.1
Pinging 172.16.1.1 with 32 bytes of data:
Reply from 172.16.0.1: Destination host unreachable.
Reply from 172.16.0.1: Destination host unreachable.
Reply from 172.16.0.1: Destination host unreachable.
Reply from 172.16.0.1: Destination host unreachable.
Ping statistics for 172.16.1.1:
Packets: Sent = 4, Received = 4, Lost = 0 (0% loss),
Approximate round trip times in milli-seconds:
Minimum = 0ms, Maximum = 0ms, Average = 0ms
C:\Documents and Settings user\ping 172.16.1.2
Pinging 172.16.1.2 with 32 bytes of data:
Reply from 172.16.0.1: Destination host unreachable.
Reply from 172.16.0.1: Destination host unreachable.
Reply from 172.16.0.1: Destination host unreachable.
Reply from 172.16.0.1: Destination host unreachable.
Ping statistics for 172.16.1.2:
Packets: Sent = 4, Received = 4, Lost = 0 (0% loss),
Approximate round trip times in milli-seconds:
Minimum = 0ms, Maximum = 0ms, Average = 0ms
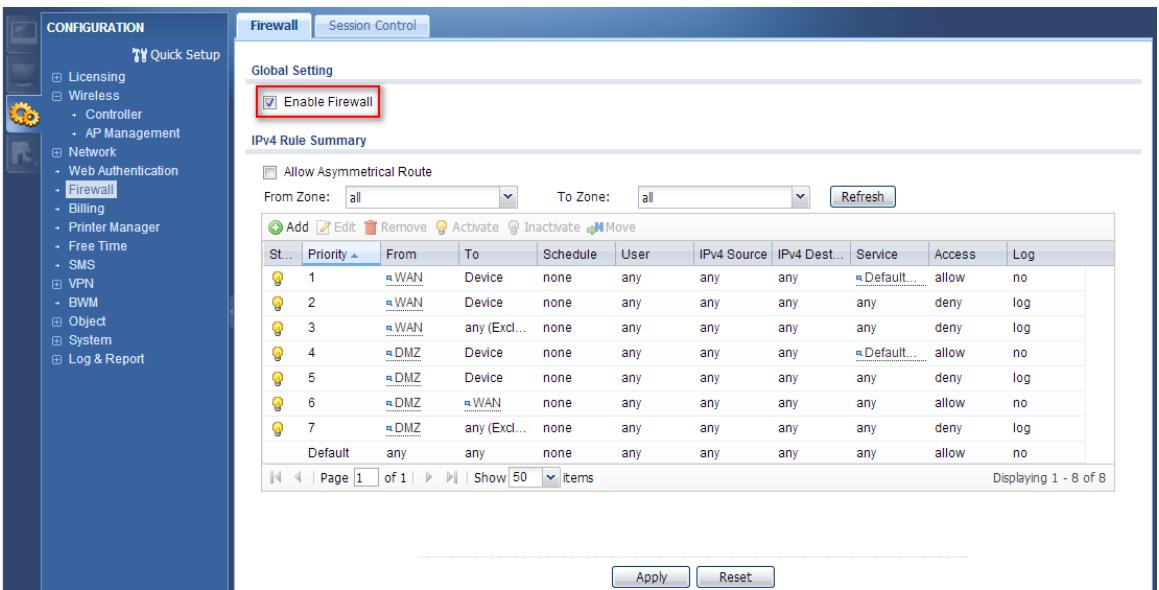
Task 2. Using "White list" function to manage Client side also can access online printer.
Step1. Using IP/MAC Binding to make sure the Printer IP is correct host.
Configuration > Network > IP/MAC Binding > Ian1
(1) Enable IP/MAC Binding
(2) Insert the Printer IP binding with the correct MAC Address
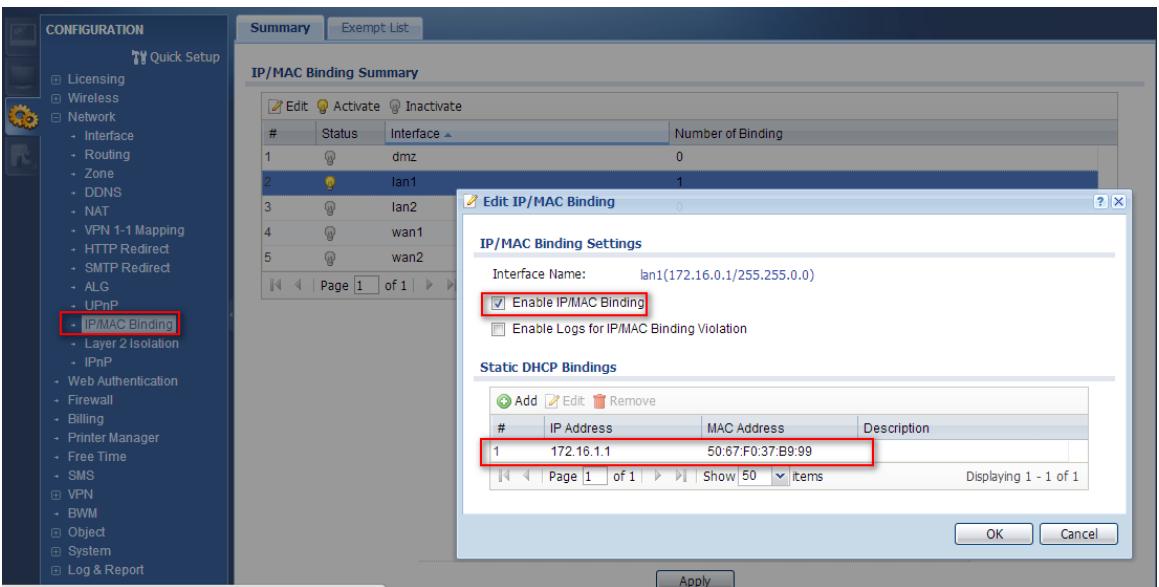
Step2. Configuration > Network > Layer2 Isolation > White List
(1) Enable White List
(2) Add the White List Rule with Host IP Address: 172.16.1.1 to let Client's laptop can connect to the Printer
Verification:
Client2's laptop can connect to online Printer (172.16.1.1) which in White List, but still can't connect to Client1's laptop (172.16.1.2).
C:\Documents and Settings\user>ping 172.16.1.1
Pinging 172.16.1.1 with 32 bytes of data:
Reply from 172.16.1.1: bytes=32 time=5ms TTL=127
Reply from 172.16.1.1: bytes=32 time=7ms TTL=127
Reply from 172.16.1.1: bytes=32 time=8ms TTL=127
Reply from 172.16.1.1: bytes=32 time=11ms TTL=12?
Ping statistics for 172.16.1.1:
Packets: Sent = 4, Received = 4, Lost = 0 (0% loss),
Approximate round trip times in milli-seconds:
Minimum = 5ms, Maximum = 11ms, Average = 7ms
C:\Documents and Settings user ping 172.16.1.2
Pinging 172.16.1.2 with 32 bytes of data:
Reply from 172.16.0.1: Destination host unreachable.
Reply from 172.16.0.1: Destination host unreachable.
Reply from 172.16.0.1: Destination host unreachable.
Reply from 172.16.0.1: Destination host unreachable.
Ping statistics for 172.16.1.2:
Packets: Sent = 4, Received = 4, Lost = 0 (0% loss),
Approximate round trip times in milli-seconds:
Minimum = 0ms, Maximum = 0ms, Average = 0ms
Scenario 5 – Sending the system log to a remote syslog server and the USB device
5.1 Application Scenario
For the management purposes, administrators can easily monitor events occurring on UAG by reading syslog. The syslog is very useful for administrators; especially, when the administrator receives complaints from the users regarding slow or unstable Internet connection. The administrator can use these reports as a troubleshooting reference. In this scenario, we are showing how the UAG exports system logs to a Kiwi syslog server and a USB device connected to UAG.
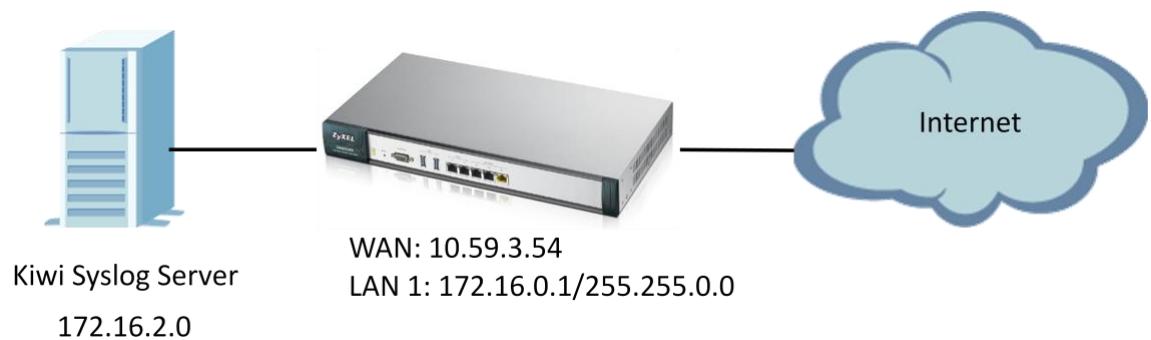
5.2 Configuration Guide
Network conditions:
WAN: 10.59.3.54
Kiwi Syslog Server: 172.16.2.0
Goals to achieve:
The administrator will be able to see system logs on the Kiwi syslog server and a USB storage.
USG configuration:
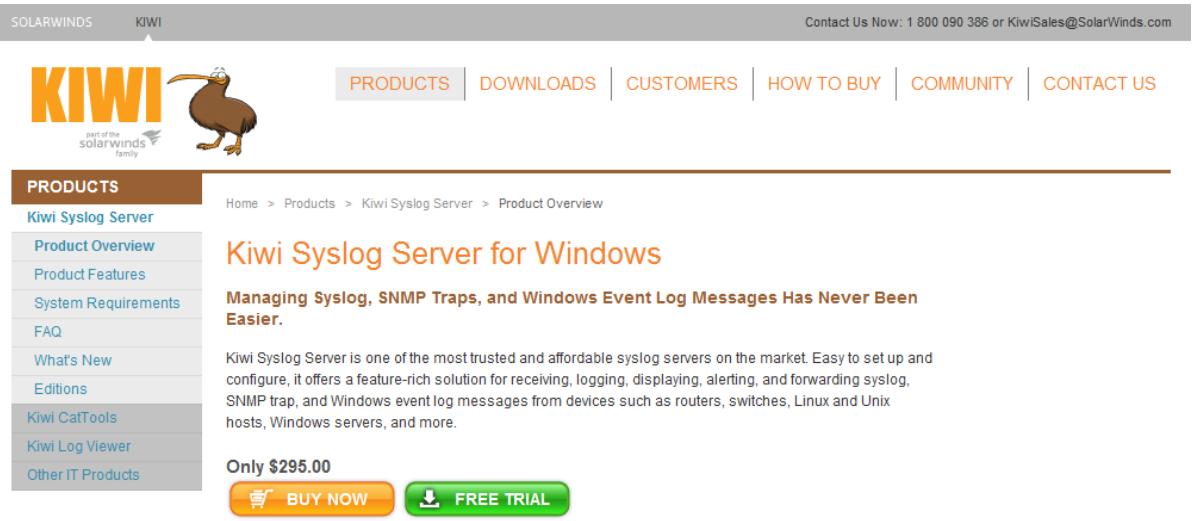
Task 1. Install Kiwi syslog server on the PC and send log information to Kiwi syslog server.
Step 1: Install Kiwi syslog server on the PC and connect this PC to LAN of UAG.
Here is the website for Kiwi syslog server.
http://www.kiwisyslog.com/products/kiwi-syslog-server/product-overview.aspx
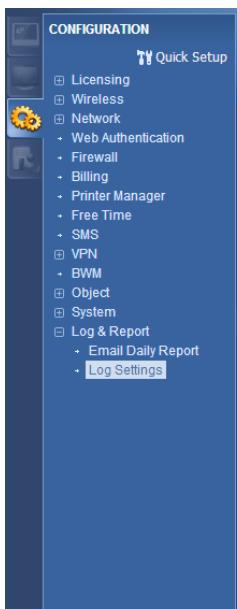
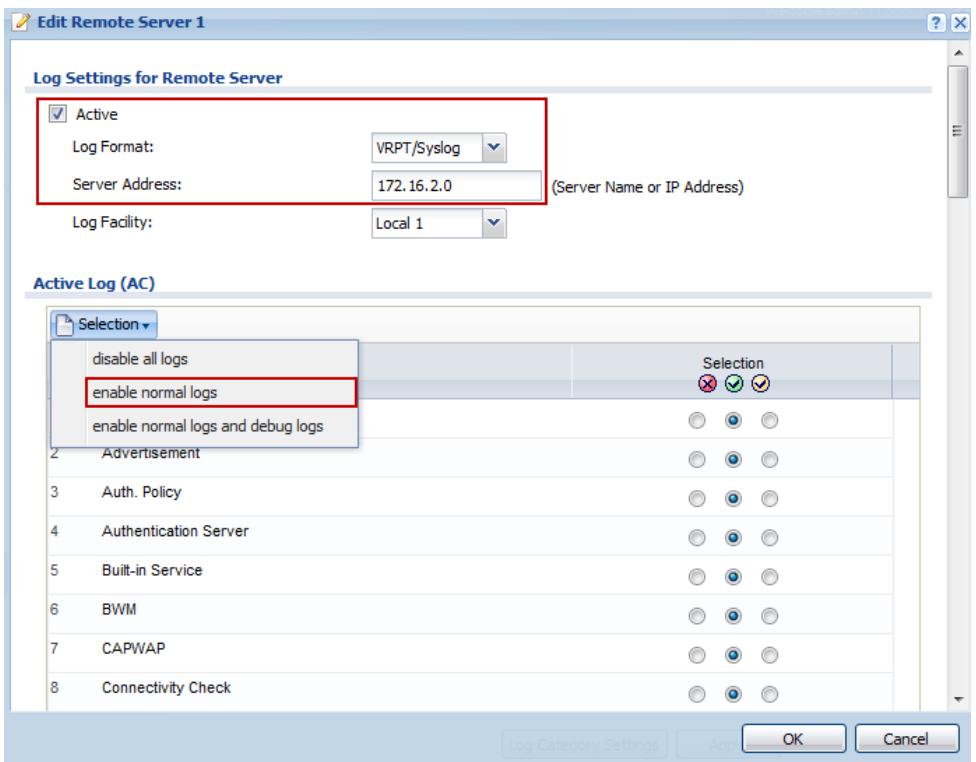
Step 2: Configuration > Log & Report > Log Settings and click on "Remote Server 1" to edit log on Kiwi syslog server.
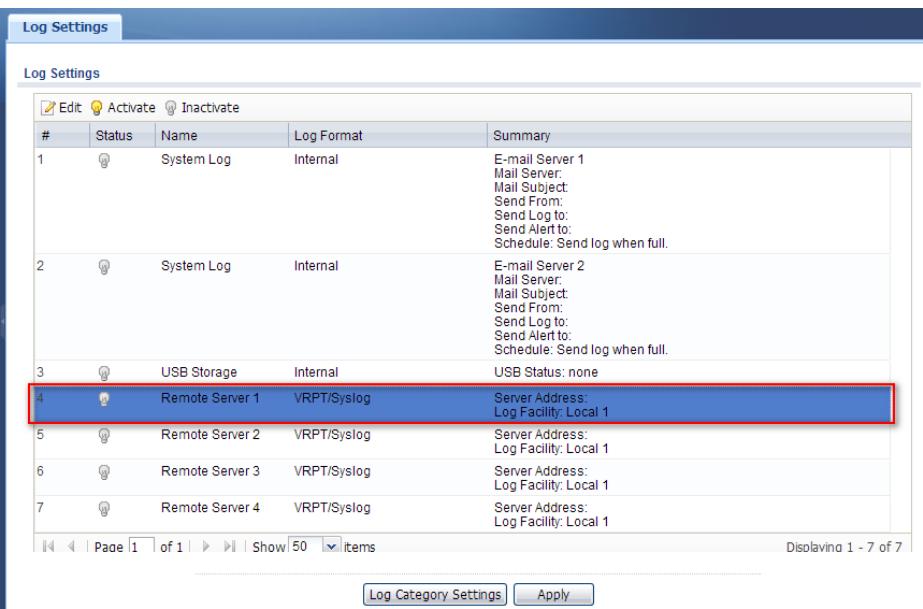
Step 3: Type the server name or the IP address of the Kiwi syslog server and check "Active" to send log information to the server. Select what information you want to log from each log category. You can simply enable normal logs to send all normal logs to Kiwi syslog server.
Verification:
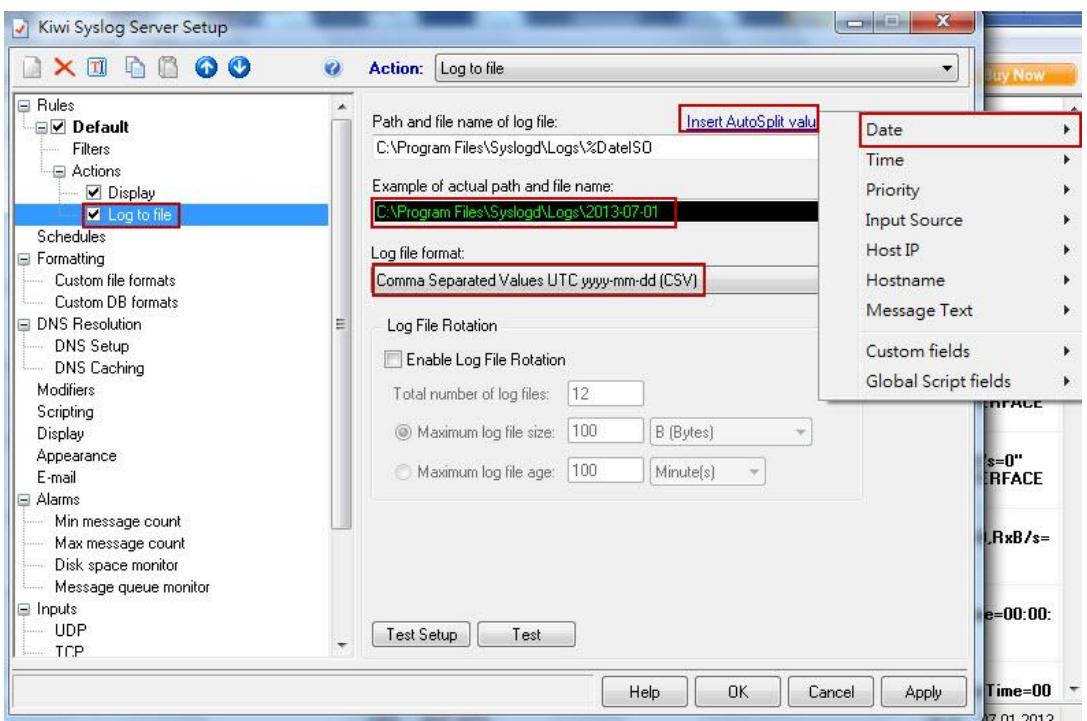
- Open Kiwi syslog server console and click Manage > Start the Sysogd service to start syslog service.

- Go to File > Setup and click to "Log to file" to edit the path and file name of log file.
In this example, we select "ISO Date (YYYY-MM-DD)" as the log file name. Select the log file format in the list.
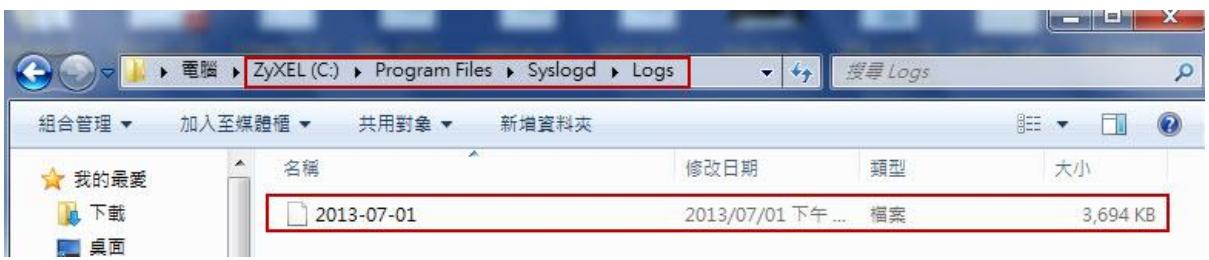
3. Go to the path where you save the log file and view the log.
Task 2. Store the system log to the USB device.
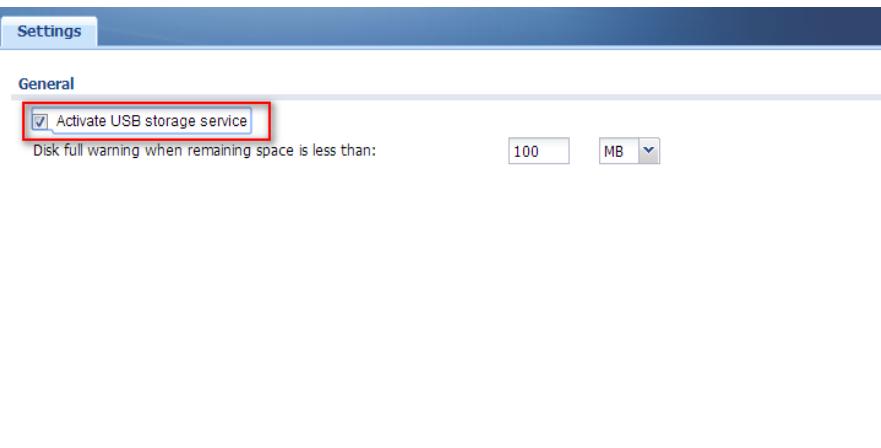
Step 1: Plug in an external USB storage device and activate USB storage service to store system log. USB storage devices with FAT16, FAT32, EXT2, or EXT3 file systems are supported for connection to the USB port of UAG. Also, you have to set a disk full warning limit once the storage space is less than this criterion.
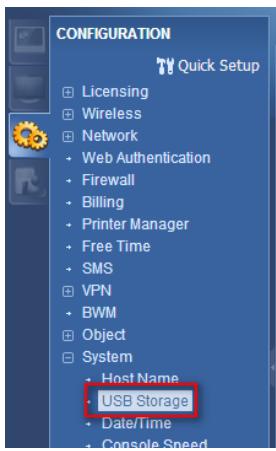
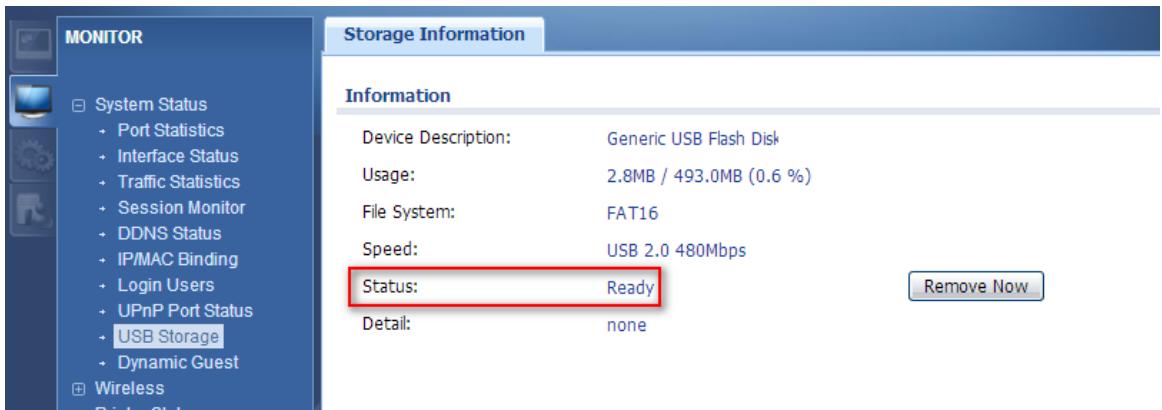
Step 2: Check if the status of USB storage is ready at Monitor > USB Storage > Storage Information.
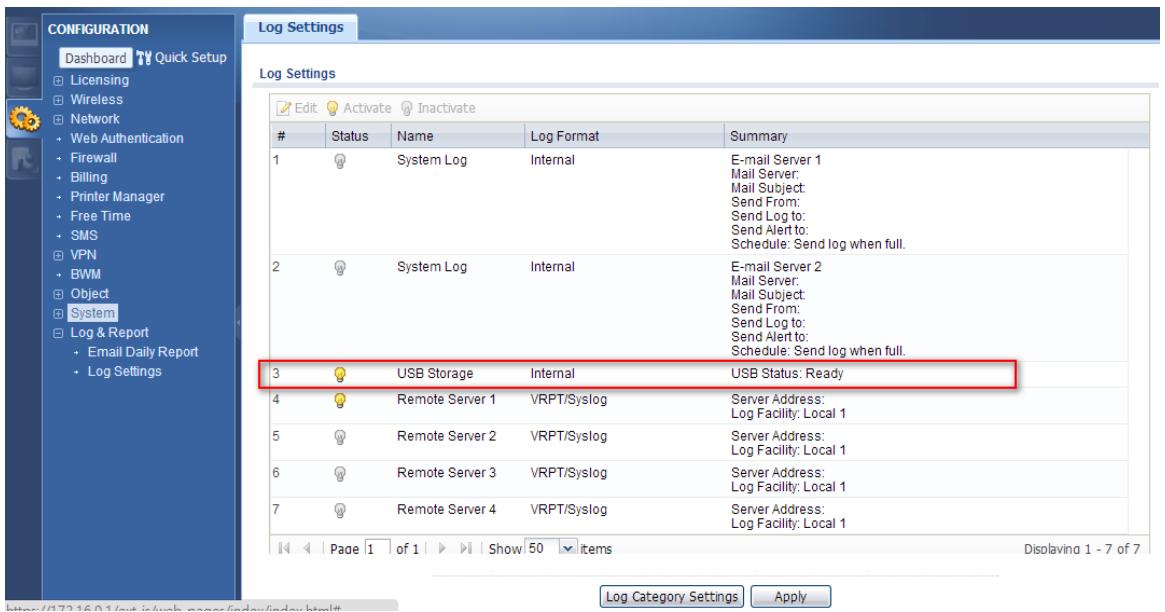
Step 3: Configuration > Log & Report > Log Settings and click on "USB storage" to edit log on USB storage setting.
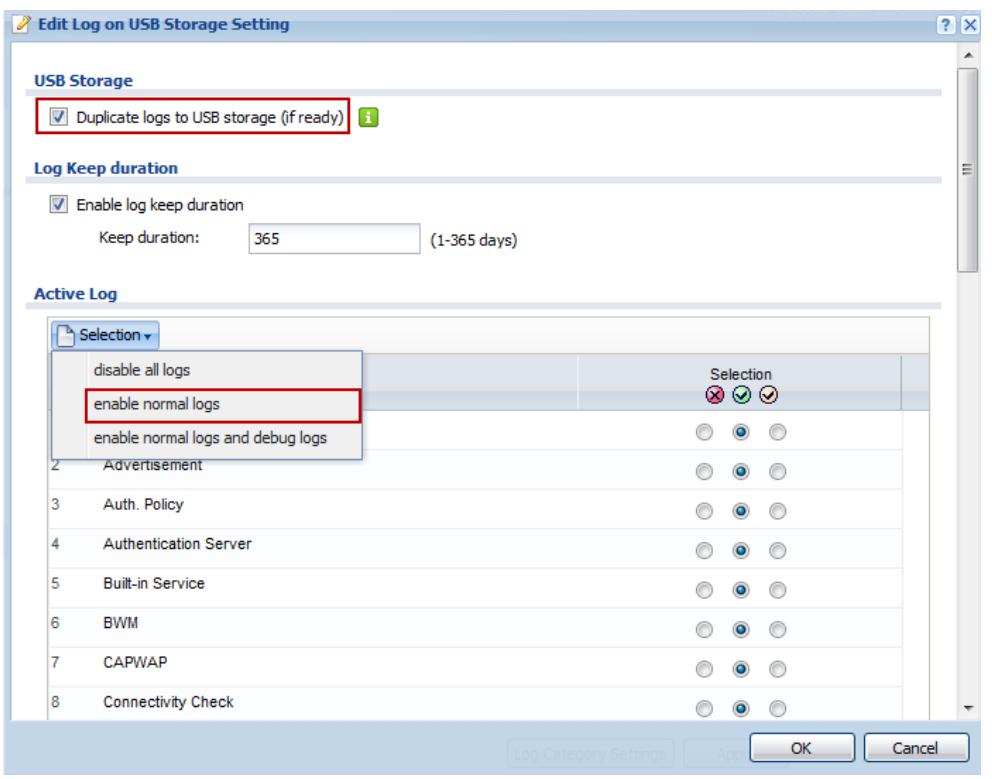
Step 4: Check "Duplicate logs to USB storage" and select what information you want to log from each log category. You can simply enable normal logs to save all normal logs to USB device.
Verification:
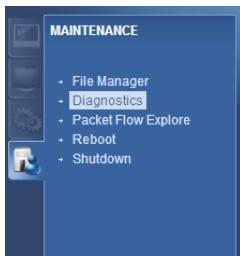
Go to Maintenance > Diagnostics > System Log and click "Download" to view the log.

Scenario 6 – Manage multiple APs by AP profile
6.1 Application scenario
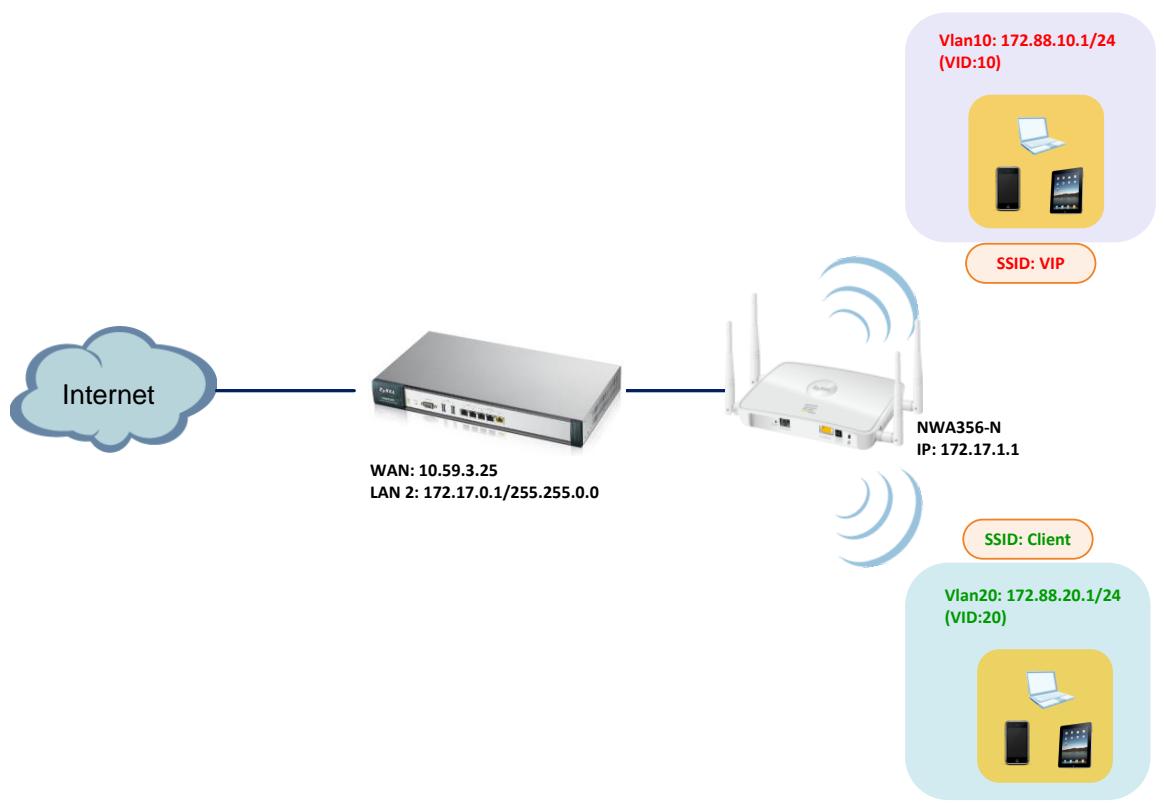
In the company, since there are several conference room might in different VLAN, and also far distance from each other, thus you can use AP profile to manage and control other APs in different VLAN. In this scenario, we use UAG to control and manage the AP of NWA3560N which connect to LAN2, and set up two SSID in different VLAN. By using function of AP profile, we can control and manage the AP to provide access Internet in different VLAN.
6.2 Configuration Guide
Network conditions:
UAG:
WAN: 10.59.3.25
LAN2: 172.17.0.1/255.255.0.0
NWA3560-N IP: 172.17.1.1
Vlan10 IP: 172.88.10.1/24
Vlan20 IP: 172.88.20.1/24
Goals to achieve:
1) Control multiple APs by AP profile
2) Manage the AP to provide access Internet in different VLAN
USG configuration:
Task 1. Configure VLAN interface to let two SSID can belong to different VLAN first.
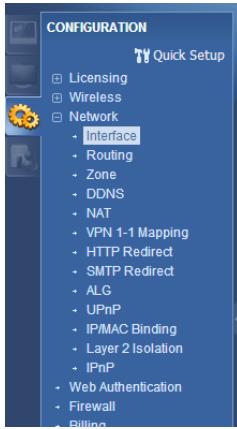
Step 1: Configuration > Network > Interface > VLAN
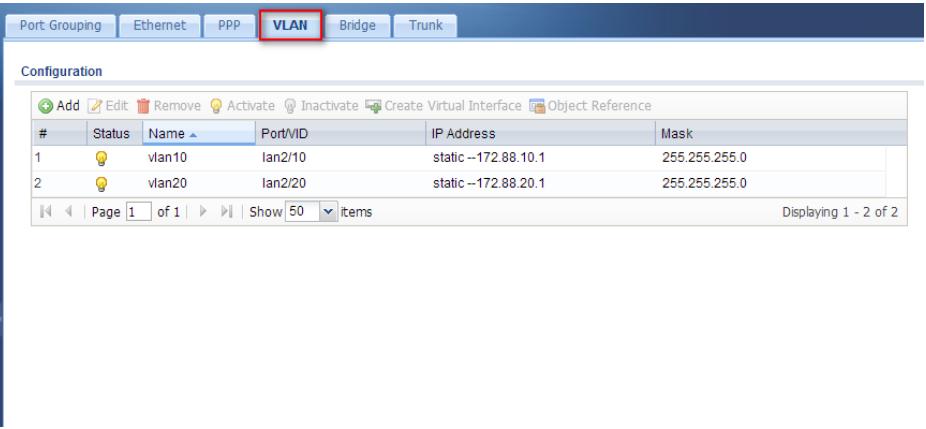
(1) Add internal VLAN base on lan2 port, and set VLAN ID: 10
(2) Set the VLAN interface IP Address with 172.88.10.1/24
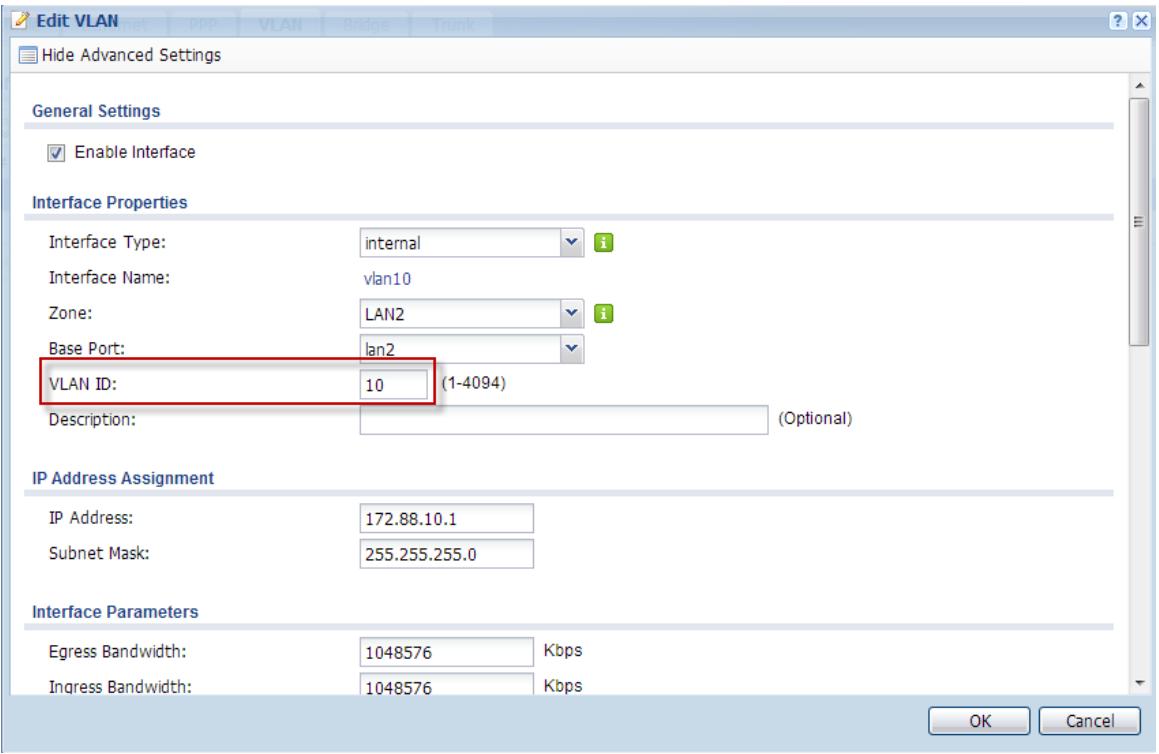
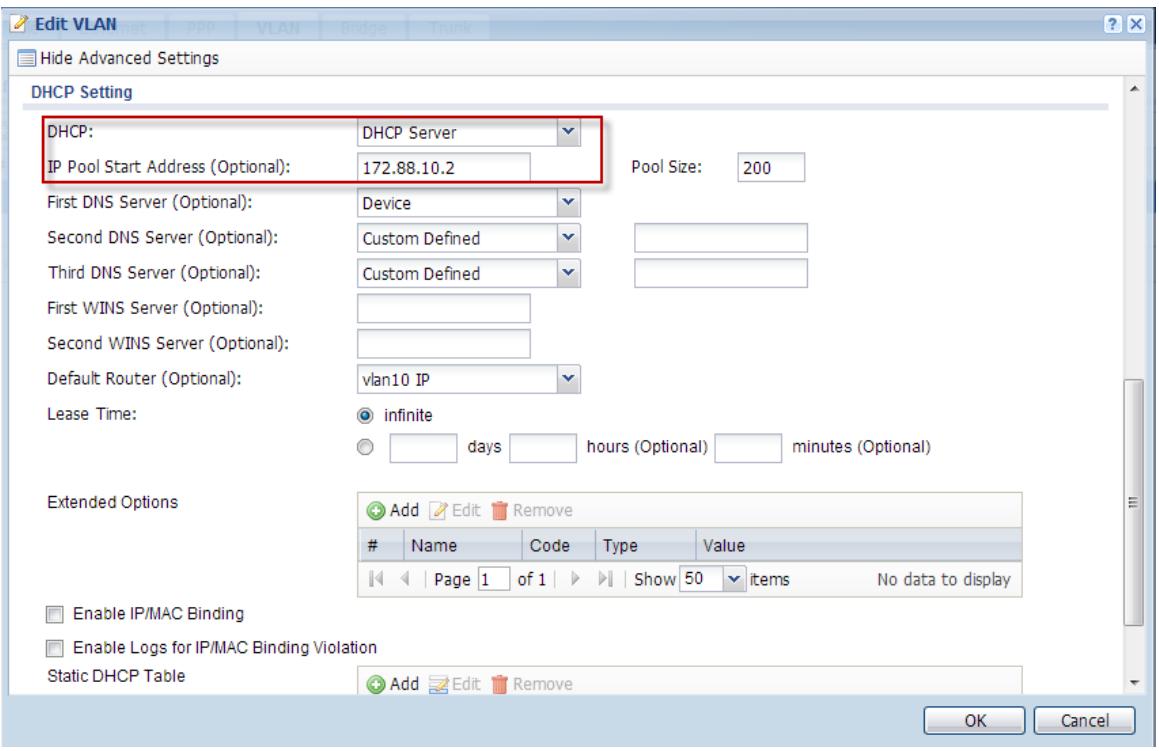
(3) Set DHCP Server with IP Pool Start Address from 172.88.10.2
Step 2: Configuration > Network > Interface > VLAN
(1) Add internal VLAN base on lan2 port, and set VLAN ID: 20
(2) Set the VLAN interface IP Address with 172.88.20.1/24
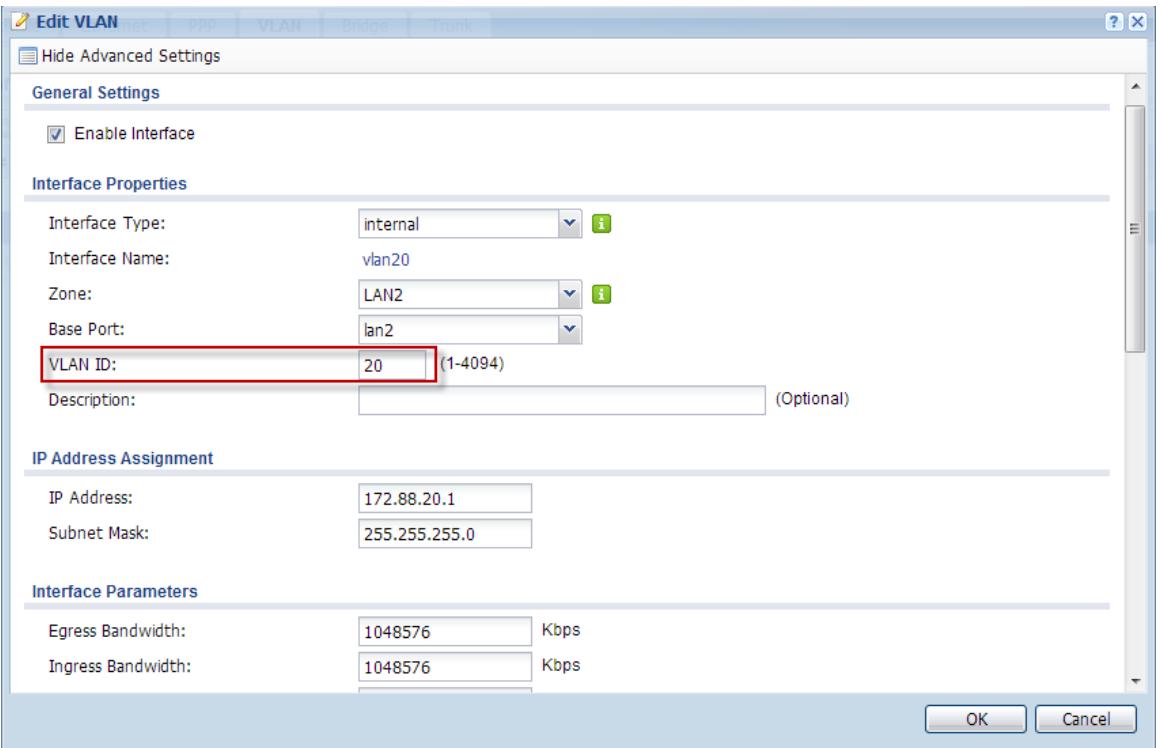
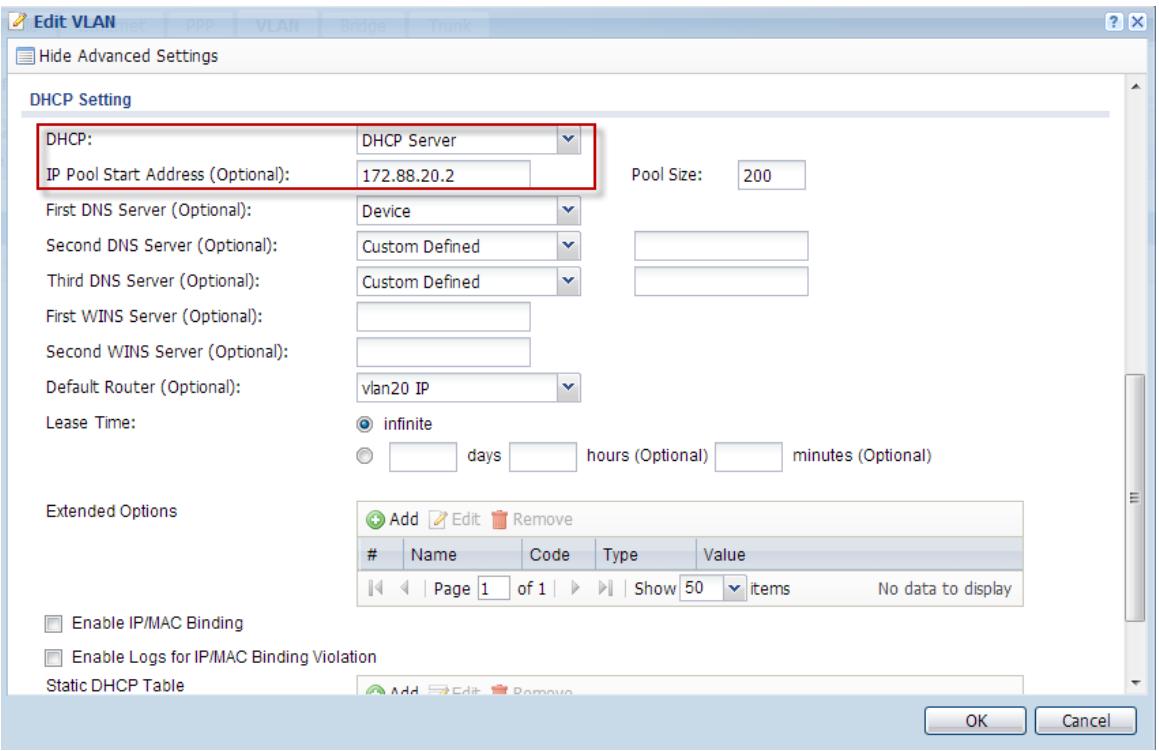
(3) Set DHCP Server with IP Pool Start Address from 172.88.20.2
Task 2. Control AP by AP Profile to provide SSID for access.
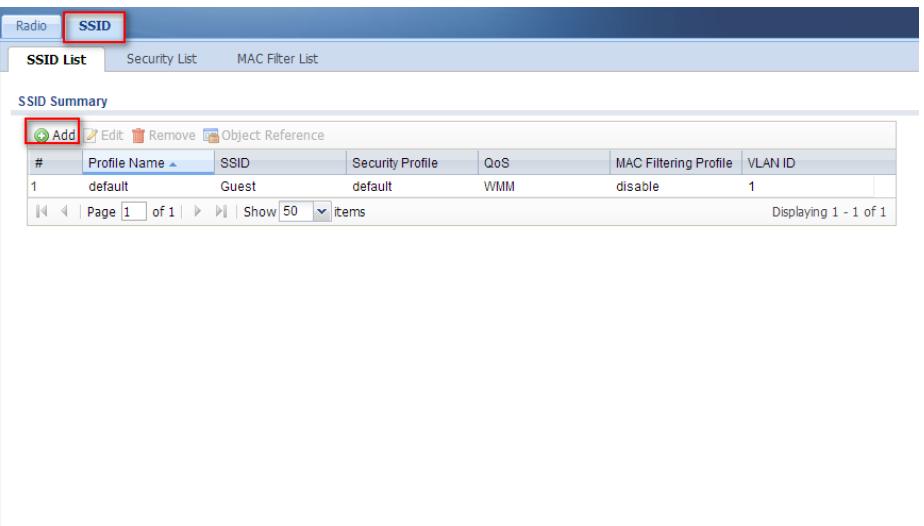
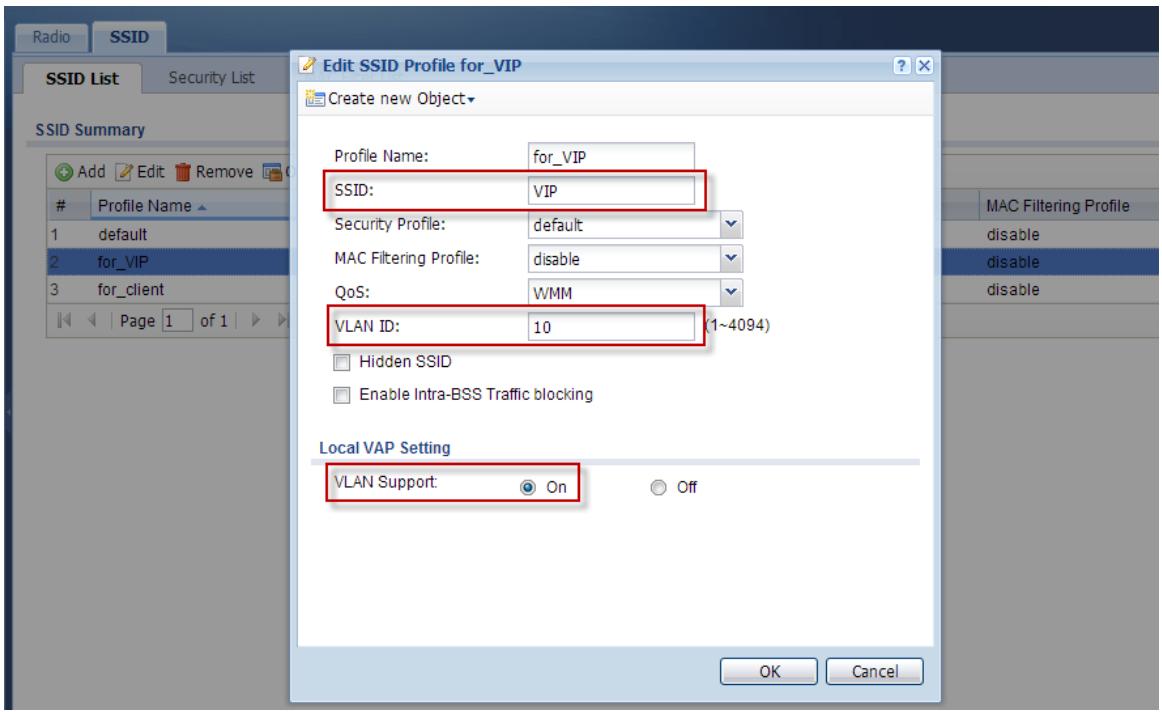
Step 1: Configuration > Object > AP Profile > SSID > Add
(1) Add the SSID of VIP for VIP use
(2) Select the VLAN ID: 10 to connect with VLAN10
(3) Choose VLAN Support with On
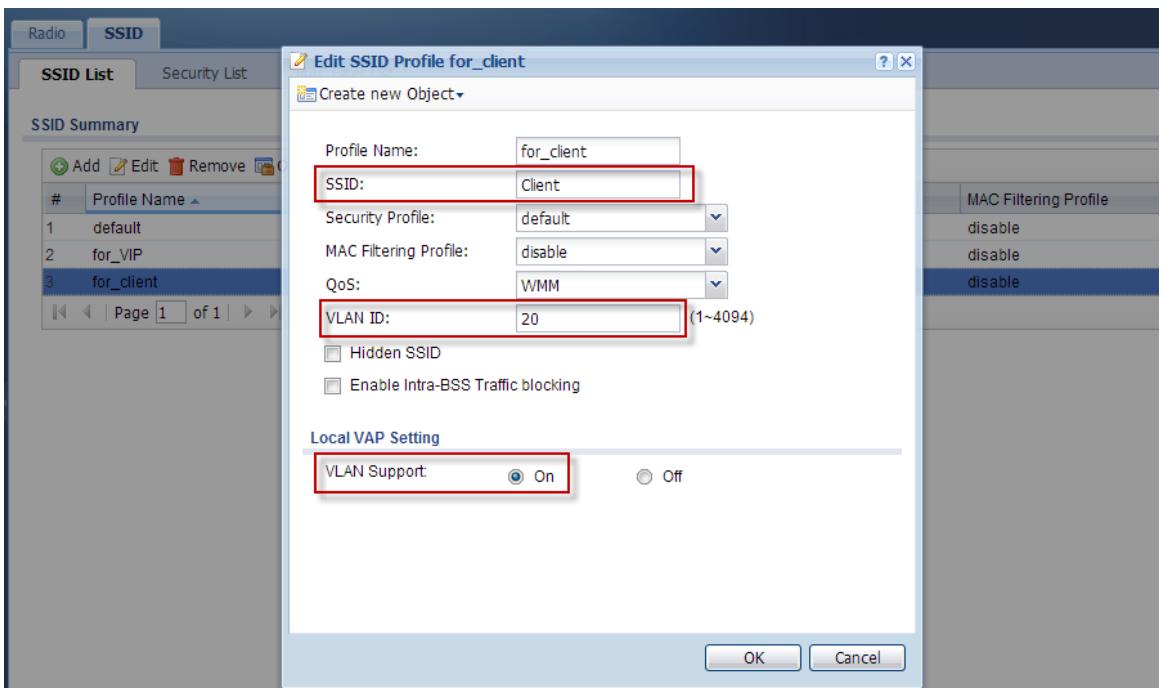
Step 2: Configuration > Object > AP Profile > SSID > Add another SSID
(1) Add the SSID of Client for Client use
(2) Select the VLAN ID: 20 to connect with VLAN20
(3) Choose VLAN Support with On
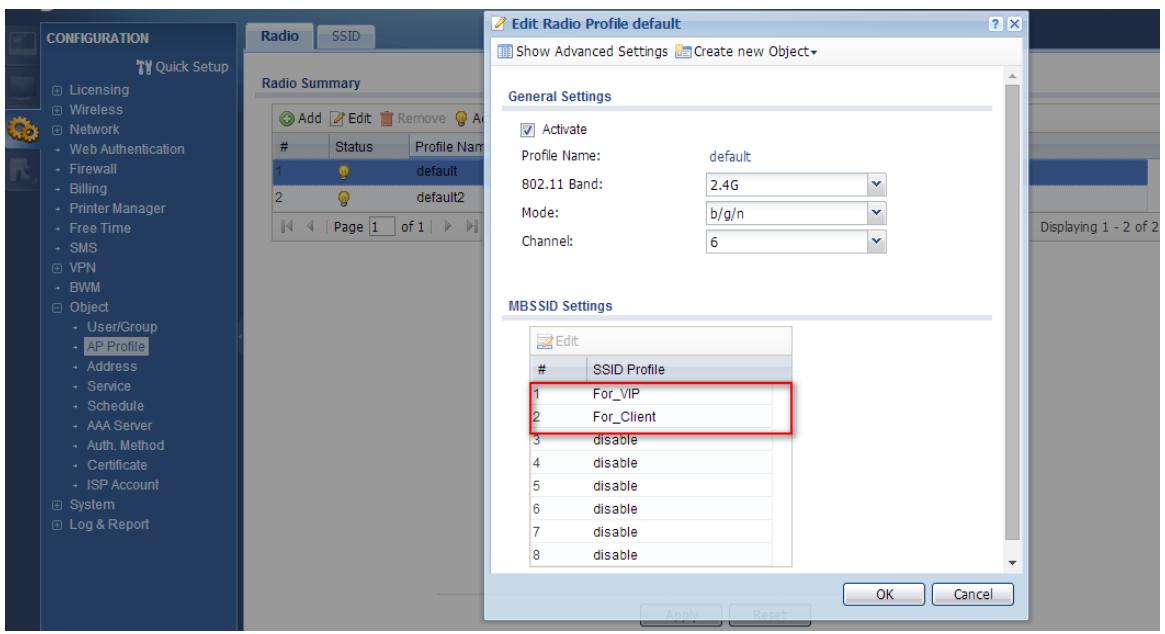
Step 3: Configuration > Object > AP Profile > Ratio > you can select default 2.4G or default2 5G by device ratio.
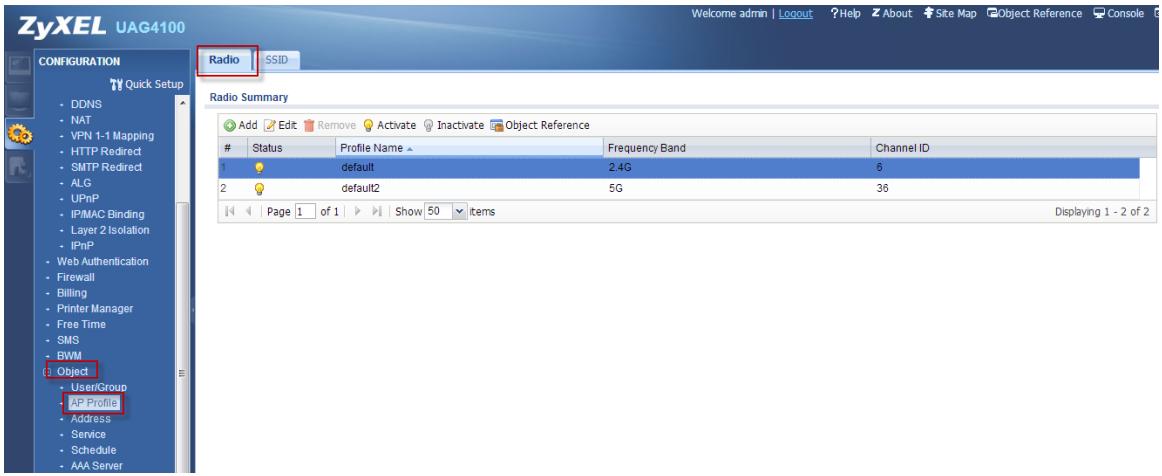
(1) Set SSID Profile with "for_VIP" which we configured AP Profile
(2) Set SSID Profile with "for_client" which we configured AP Profile
Verification:
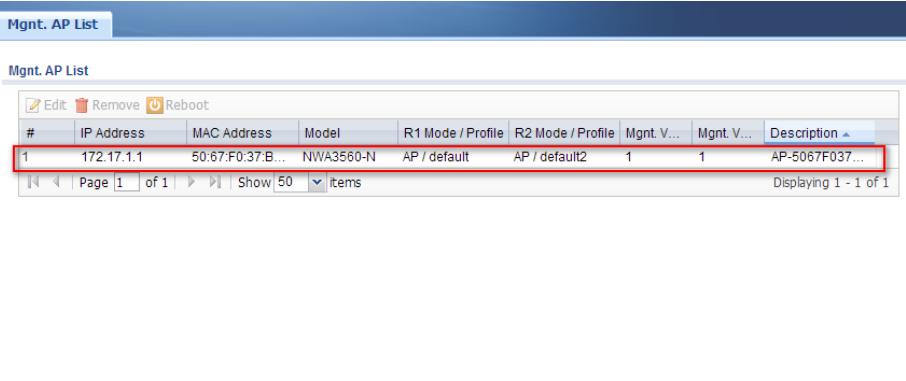
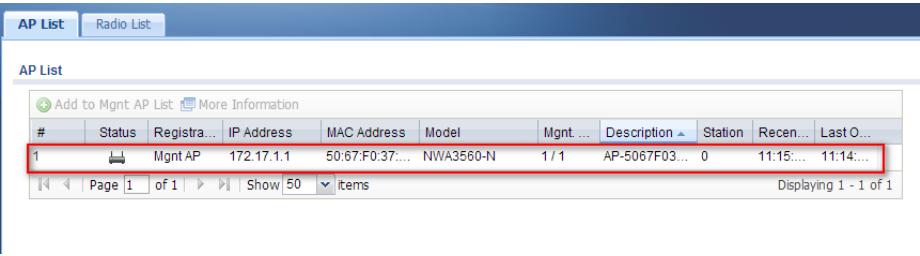
- Connect NWA3560-N AP directly under UAG Lan2 and check Configuration > Wireless > AP Management
(1) Check UAG has manage and control the model of NWA3560-N
(2) And NWA3560-N AP has get the IP with 172.17.1.1 under Lan2
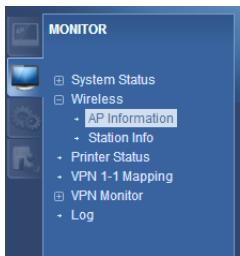
- You can also double confirm Monitor > Wireless > AP Information
(1) Check UAG has manage and control the model of NWA3560-N
(2) And NWA3560-N AP has get the IP with 172.17.1.1 under Lan2
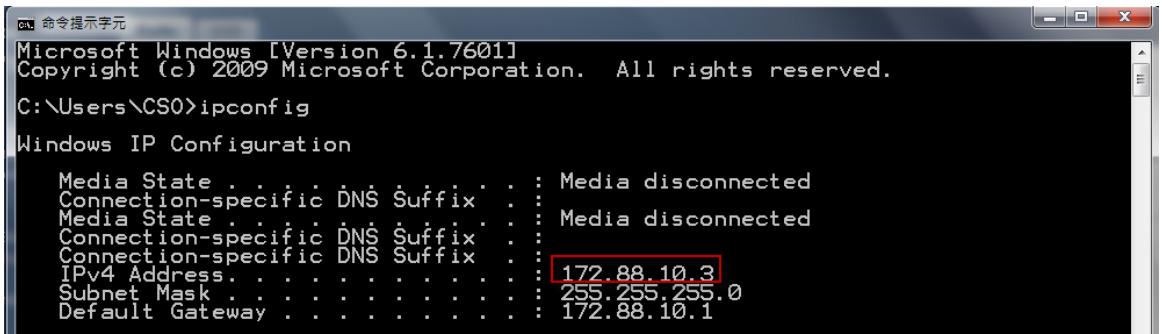
- Connect laptop with SSID VIP, and you can get the IP Address of 172.88.10.3 under VLAN10 from AP.
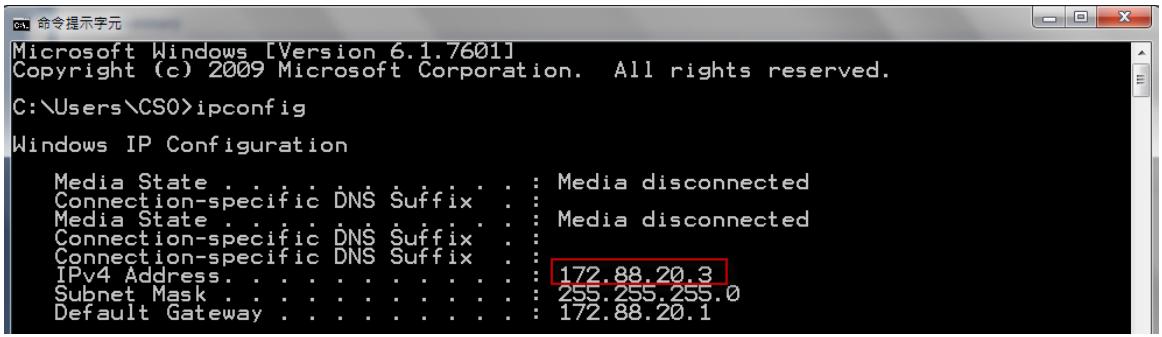
- Connect laptop with SSID Client, and you can get the IP Address of 172.88.20.3 under VLAN20 from AP.
Appendix
Create and Set test account on the PayPal server:
Step 1: Register a personal account on the PayPal server.
(1) Go to https://www/paypal.com and Click "Sign up" button to start the registration process.
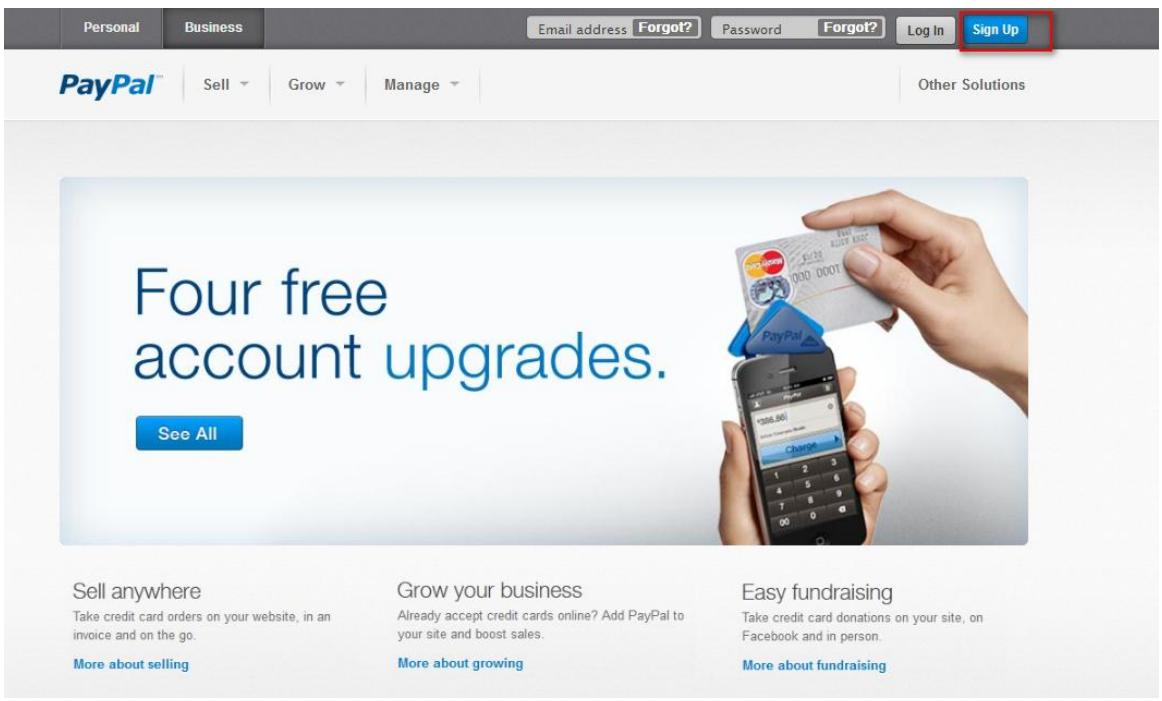
(2) Click Personal type to Get Started register a PayPal account.
Log In | Help | Security Center
PayPal
Create your PayPal account
Your country or region
Taiwan
Your language:
English
Personal
For individual who shop online
Get Started
Free to register. The perfect account for buyers who want to shop online.
Secure

Already have a PayPal account? Upgrade now.
Premier
For individual who buy and sell online
Get Started
Free to register. Low fees charged for receiving payments.
- The perfect account for casual sellers who make occasional sales and purchases online.
Business
For merchants who use a company or group name
Get Started
Free to register. Low fees charged for receiving payments.
The account for business merchants who use a company or group name with high transaction volumes.
- You can accept all payment types for low fees, even from customers without PayPal accounts.
Learn about PayPal fees.
(3) Register your account information in the check box and click "Agree and Create account". And then enter the Security code in the check box and enter the Security question to submit the registration.
PayPal
Enter your information
Secure

Please fill in all fields.
Email address
You will use this to log in to PayPal.
jerry751016@hotmail.com
Choose a password
··
Re-enter password
中
Last name
(Pleases enter your name as shown on your bank account. If it is Chinese, enter Chinese characters.)
Chen
First name (Given name)
HongSong
Date of birth
www
1986
mm
10
B
6
Nationality
Taiwan

City / County
Taipei County

Township / District
Wugu Dist.
Postal code (optional)
248
Address line 1
No.3, Sec. 3, Lingyun Rd., Wugu Dist
Address line 2 (optional)
Phone number Why is this needed? (+886)
0988268681
Consumer advisory - The PayPalTM payment service is regarded as a stored value facility under Singapore law. PayPal Pte.
Ltd., the Holder of the PayPal^TM stored value facility, does not require the approval of the Monetary Authority of Singapore.
Consumers (users) are advised to read the terms and conditions carefully.
By clicking the button, I agree to the PayPal User Agreement
Agree and Create Account
Contact Us
Copyright © 1999-2013 PayPal. All rights reserved.
Consumer advisory-PayPal Pte.Ltd.,the holder of PayPal's stored value
facility, does not require the approval of the Monetary Authority of Singapore
Users are advised to read the terms and conditions carefully
(4) Since we just register an account to test the PayPal function, so you can choose to ignore the Credit card information at this part.
PayPal
Log Out | Help | Security Center
Congratulations! You've signed up for a PayPal account

There are a couple of things you'll need to do to get started using your account.
Confirm your email address jerry751016@hotmail.com to activate your PayPal account.
Add your credit card to start buying with PayPal right away.

Go to My Account
Contact Us
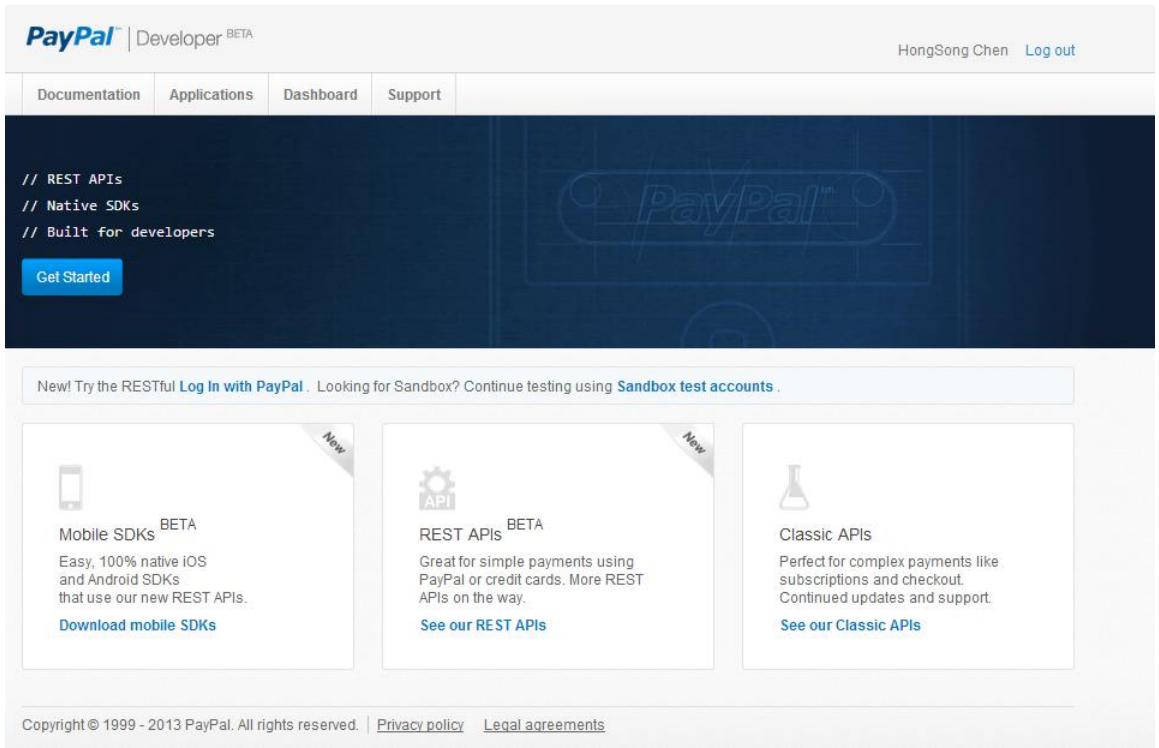
Step 2: Login to PayPal and register the test account on developer web site, first create a Seller account in developer web site.
(1) Access to https://developer.psypal.com web site and login the PayPal account.
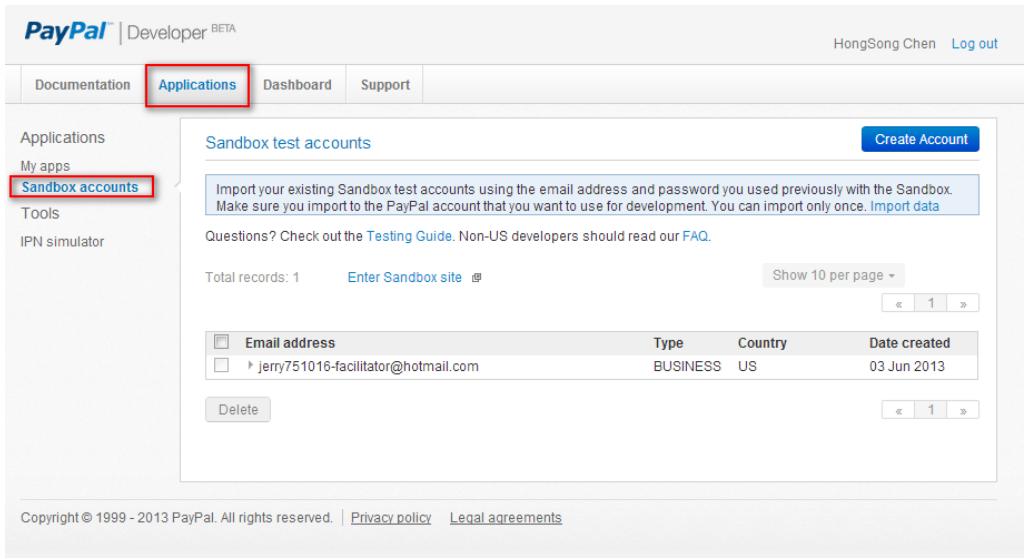
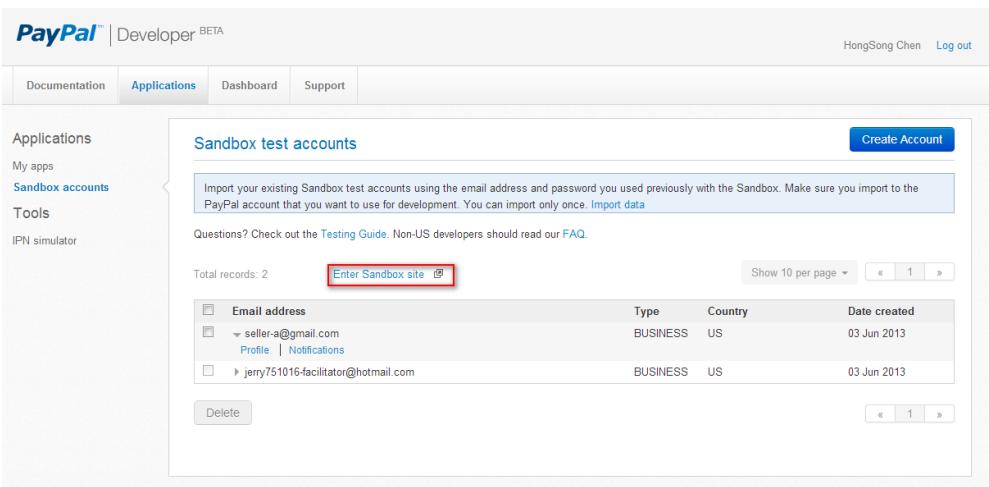
(2) Click Applications> Sandbox accounts button to create the account on developer web site.
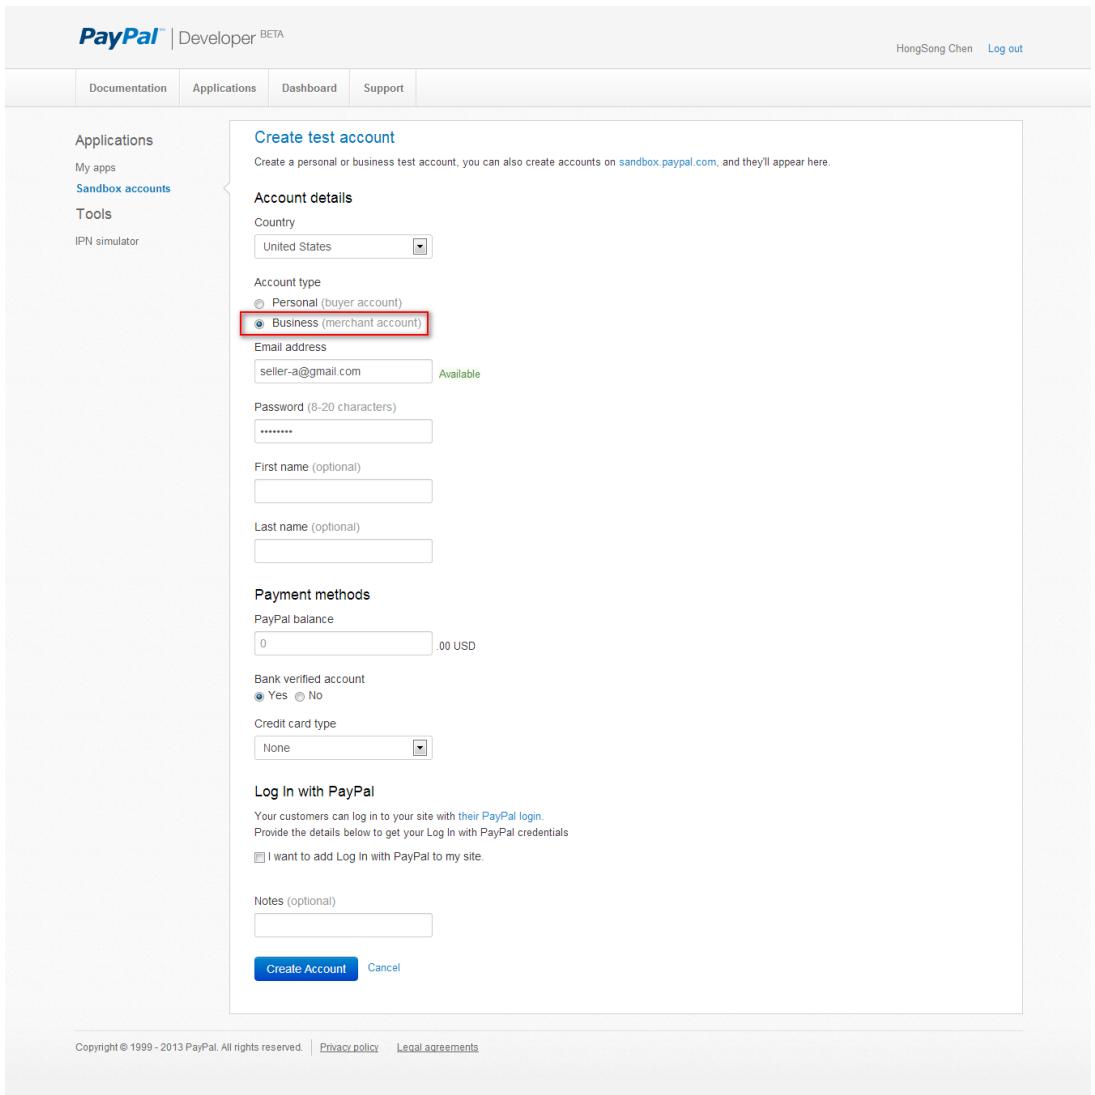
(3) Click Create Account button to create a "Seller" account on developer web site.
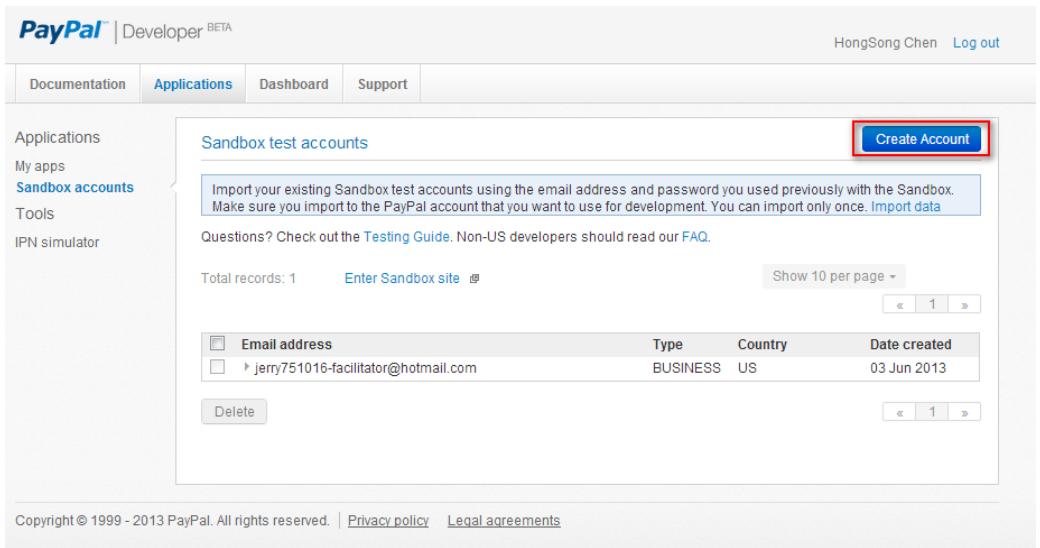
(4) Enter the Seller e-mail and password. And the account type should select as "Business".
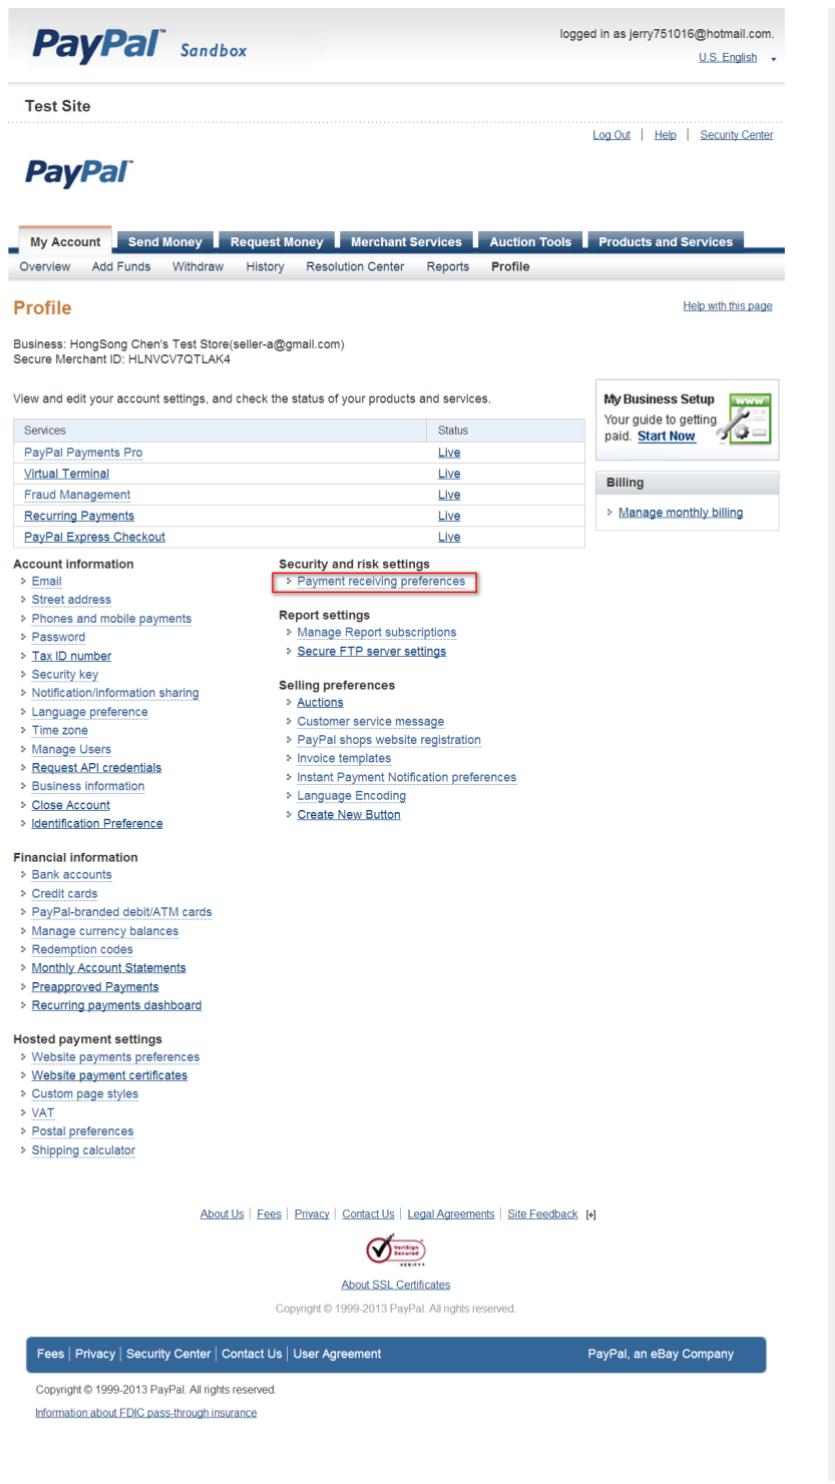
(5) Use Seller's account to login to Sandbox web site to modified profile information. (https://www.sandbox.vaalpa.com/)
a. Go to Profile > Website payments preferences to enable Auto Return for Website Payments.

Notice that setting Website Payment Preferences with Turn on "Auto Return", and Enter Return URL: http://1.1.1.1, and also Turn on "Payment Data Transfer".
LogOut | Help | SecurityCenter |
PayPal
My Account
Send Money:
Request Money
Merchant Services
Auction Tools
Products and Services
Overview
Add Funds
//thdraw
History
Resolution Co.
Reports
Profile
Back to My Profile
Website P:
Auto Return for Website Payments
Auto Return for Website Payments brings your buyers back to your website immediately after payment completion. Auto Return applies to PayPal Website Payments, including Buy Now, Donations, Subscriptions, and Shopping Cart. Learn More
Auto Return:
On
Off
Return URL: Enter the URL that will be used to redirect your customers upon payment completion. This URL must meet the guidelines detailed below Learn More
Return URL
http://1.1.1.1
Return URL Requirements: The following items are required in order to set up Auto Return.
- Per the user agreement, you must provide verbiage on the page displayed by the Return URL that will help the buyer understand that the payment has been made and that the transaction has been completed.
- You must provide verbiage on the page displayed by the Return URL that explains that payment transaction details will be emailed to the buyer.
Example: Thank you for your payment. Your transaction has been completed, and a receipt for your purchase has been emailed to you. You may log into your account at www.sandbox.psypal.com/us to view details of this transaction.
Payment Data Transfer (optional)
Payment Data Transfer allows you to receive notification of successful payments as they are made. The use of Payment Data Transfer depends on your system configuration and your Return URL. Please note that in order to use Payment Data Transfer, you must turn on Auto Return.
Payment Data Transfer
On
Encrypted Website Payments
Using encryption enhances the security of website payments by decreasing the possibility that a 3rd party could manipulate the data in your button code. If you plan on only using encrypted buttons you can block payments from non-encrypted ones.
Learn more about Encrypted Website Payments
Note: If you enable Encrypted Website Payments, all of your Buy Now, Donations, and Subscriptions buttons must be encrypted via one of the following methods:
- Using the Button Factory with the security settings enabled.
- Using your own code, you encrypt all website payments before sending them to PayPal.
By enabling this feature, any Buy Now, Donation, or Subscription button that is not encrypted will be rejected by PayPal.
Block Non-encrypt
On
Payment
Off
PayPal Account Optional
When this feature is turned on, your customers will go through an optimized checkout experience. This feature is available for Buy Now, Donations, and Shopping Cart buttons, but not for Subscription buttons. Learn More
PayPal Account Optional:
On
Off
Contact Telephone Number
When you activate this option, your customers will be asked to include a Contact Telephone Number with their payment information. Learn More
Note: Selecting On (Required Field) could have a negative effect on buyer conversion.
Contact Telephone
On (Optional Field)
On (Required Field)
- Off (PayPal recommends this option)
Express Checkout Settings
With this setting you determine if you technically support the German funding methods giropay and bank transfer in your Express Checkout implementation.
Support giropay and bank
Yes
transfer payments.
No

Cancel
About Us Fees Privacy Contact Us Legal Agreements Site Feedback
Copyright © 1999-2013 PayPal. All rights reserved.
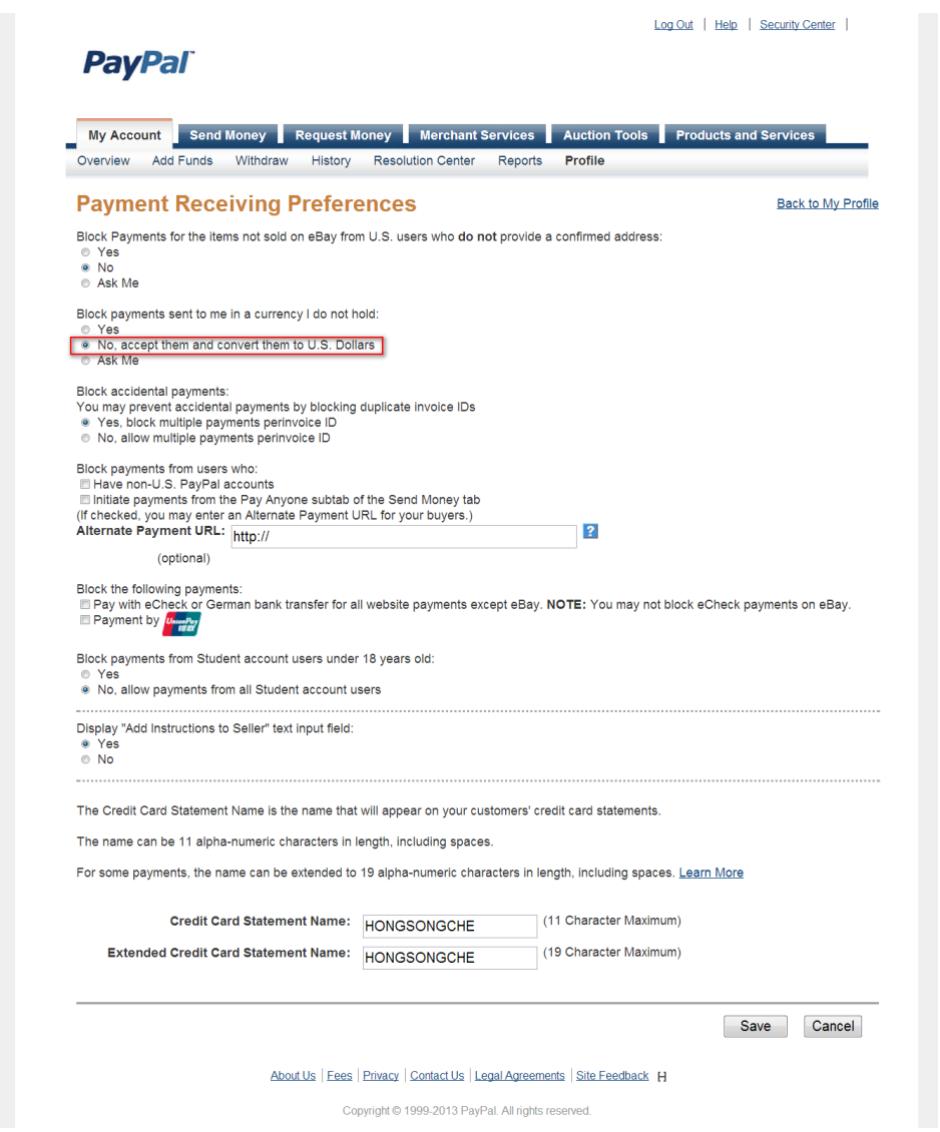
b. Go to Payment receiving preferences to modify allow different currency to my account.
Notice that to select "No, accept them and convert them to U.S. Dollars".
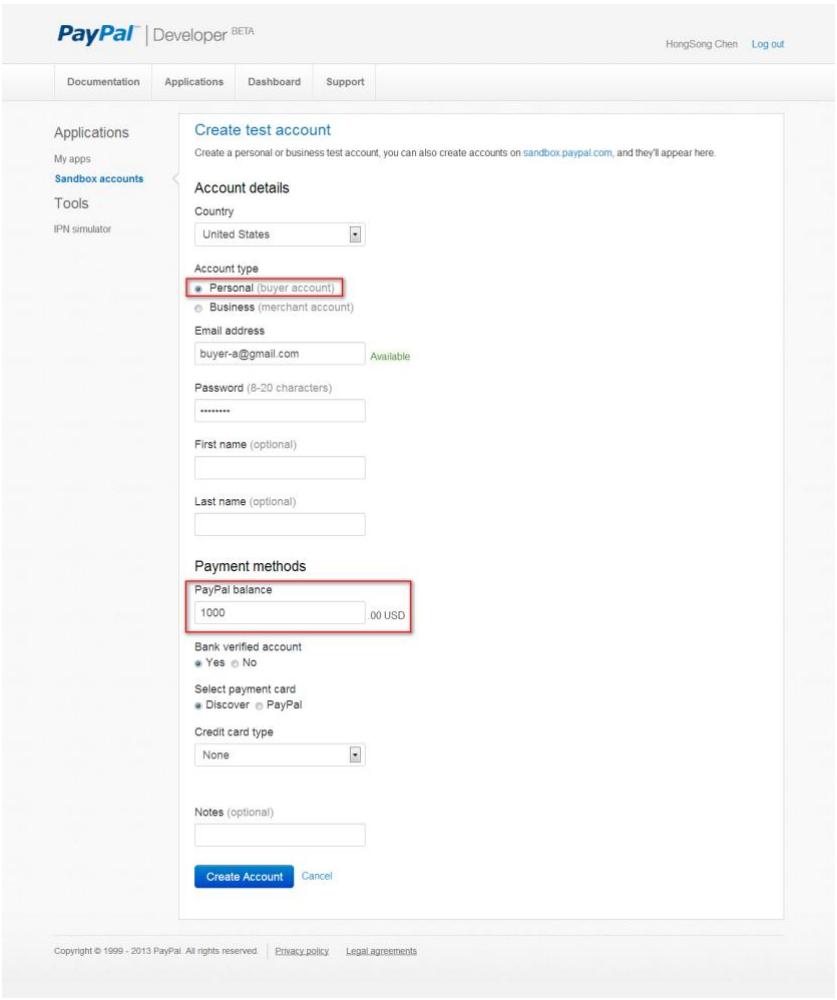
Step 3: Login to PayPal and register the test account on developer web site, second create a Buyer account in developer web site.
(1) Click Create Account button to create a "Buyer" account on developer web site.

(2) Enter the Buyer e-mail and password. And the account type should select as "Personal", and also you can setup this user has 1000 USD in this account.
- Application Note
- Table of Contents
- Scenario 1 - How to Activate a Paid Access Hotspot 3
- Scenario 2 - How to Activate a Free Access Hotspot 13
- Scenario 3 - Use BWM to control trial user and billing user 23
- Scenario 4 - Using Function of Layer 2 Isolation and White List 36
- Scenario 5 - Sending the system log to a remote syslog server and the USB device 42
- Scenario 6 – Manage multiple APs by AP profile 49
- Appendix 57
- Scenario 1 – How to Activate a Paid Access Hotspot
- Application scenario
- Network conditions:
- Step3. Configuration > Network > Layer 2 Isolation
- Enable Layer 2 Isolation
- Verification:
- Step2. Configuration > Network > Layer2 Isolation > White List
- Scenario 5 – Sending the system log to a remote syslog server and the USB device
- Application Scenario
- Configuration Guide
- Go to the path where you save the log file and view the log.
- Scenario 6 – Manage multiple APs by AP profile
- Application scenario
- Configuration Guide
- USG configuration:
- Step 2: Configuration > Network > Interface > VLAN
- Step 2: Configuration > Object > AP Profile > SSID > Add another SSID
- Appendix
- Create and Set test account on the PayPal server:
- PayPal
- Create your PayPal account
- Personal
- Get Started
- Premier
- Business
- Enter your information
- Contact Us
- Congratulations! You've signed up for a PayPal account
- Payment Data Transfer (optional)
- Encrypted Website Payments
- Learn more about Encrypted Website Payments
- PayPal Account Optional
- Contact Telephone Number
- Express Checkout Settings
Brand : ZYXEL
Model : UAG50
Category : VPN Router