
CFF 1864XM - Chest Freezer CANDY - Free user manual and instructions
Find the device manual for free CFF 1864XM CANDY in PDF.
| Product Type | Chest Freezer |
| Brand | Candy |
| Model | CFF 1864XM |
| Net Capacity | 186 litres (estimate) |
| Climate Class | SN, N, ST, T |
| Ambient Temperature | +10°C to +43°C according to class |
| Power Supply | 220-240 V, 50 Hz |
| Refrigerant | R600a (isobutane) |
| Insulation | Cyclopentane |
| Temperature Setting | Rotary knob from 1 (warm) to 6 (cold) |
| Super Freeze Function | Yes, activation by button, duration 52 hours |
| Max Freezing Capacity / 24h | Indicated on rating plate |
| Power failure autonomy | Up to 20 hours without opening the lid |
| Defrost Type | Manual, with drain hole |
| Included Accessories | 1 basket, handle with lock |
| Number of baskets | 1 |
| Casters | Yes, for easy movement |
| Recessed handle | Yes |
| Indicator lights | Operation, super freeze, alarm |
| Sensor fault alarm | Yes, flashing LEDs |
| Condenser cleaning | Recommended once a year |
| Country of manufacture | Not specified |
Frequently Asked Questions - CFF 1864XM CANDY
User questions about CFF 1864XM CANDY
0 question about this device. Answer the ones you know or ask your own.
Ask a new question about this device
Download the instructions for your Chest Freezer in PDF format for free! Find your manual CFF 1864XM - CANDY and take your electronic device back in hand. On this page are published all the documents necessary for the use of your device. CFF 1864XM by CANDY.
USER MANUAL CFF 1864XM CANDY
natural_image
Pure technical line drawing of a rectangular frame with a small circular mark and a small inset rectangle (no text or symbols)LANGUAGES
Italiano....4
English 15
Français 27
Español 37
Deutsch 47
Portuguese 57
Nederlands....67
Ελληνικά 77
Hrvatski 87
Srpski 97
Čeština 107
Polski 117
Slovenščina.... 129
Slovinčina 139
Română 150
Български 161
Magyar 173
русский 183
SOMMARIO
SAFETY INFORMATION....15
OVERVIEW....18
INSTALLATION INSTRUCTIONS....19
Positioning....20
FIRST USE 21
DAILY USE....21
Helpful hints and tips 22
Defrosting of the freezer 23
SCRAPPING OLD APLIANCES....25
Inglese
Thank you for purchasing this product.
Before using your refrigerator, please carefully read this instruction manual in order to maximize its performance. Store all documentation for subsequent use or for other owners. This product is intended solely for household use or similar applications such as:
- the kitchen area for personnel in shops, offices and other working environments
- on farms, by clientele of hotels, motels and other environments of a residential type
- at bed and breakfasts (B & B)
- for catering services and similar applications not for retail sale.
This appliance must be used only for purposes of storage of food, any other use is considered dangerous and the manufacturer will not be responsible for any omissions. Also, it is recommended that you take note of the warranty conditions. Please, to obtain the best possible performance and trouble free operation from your appliance it is very important to carefully read these instructions. Failure to observe these instructions may invalidate your right to free service during the guarantee period.
SAFETY INFORMATION
This guide contains many important safety information. Please, we suggest you keep these instructions in a safe place for easy reference and a good experience with the appliance.
The refrigerator contains a refrigerant gas (R600a: isobutane) and insulating gas (cyclopentane), with high compatibility with the environment, that are, however, inflammable.

Caution: risk of fire
If the refrigerant circuit should be damaged:
- Avoid opening flames and sources of ignition.
Thoroughly ventilate the room in which the appliance is situated.
WARNING!
- Care must be taken while cleaning/carrying the appliance to avoid touching the condenser metal wires at the back of the appliance, as you might injure your fingers and hands or damage your product.
- This appliance is not designed for stacking with any other appliance. Do not attempt to sit or stand on top of your appliance as it is not designed for such use. You could injure yourself or damage the appliance.
- Make sure that mains cable is not caught under the appliance during and after carrying/moving the appliance, to avoid the mains cable becoming cut or damaged.
- When positioning your appliance take care not to damage your flooring, pipes, wall coverings etc. Do not move the appliance by pulling by the lid or handle. Do not allow children to play with the appliance or tamper with the controls. Our company declines to accept any liability should the instructions not be followed.
- Do not install the appliance in humid, oily or dusty places, nor expose it to direct sunlight and to water.
- Do not install the appliance near heaters or inflammable materials.
- If there is a power failure do not open the lid. Frozen food should not be affected if the failure lasts for less than 20 hours. If the failure is longer, then the food should be checked and eaten immediately or cooked and then refrozen.
- If you find that the lid of the chest freezer is difficult to open just after you have closed it, don't worry. This is due to the pressure difference which will equalize and allow the lid to be opened normally after a few minutes.
- Do not connect the appliance to the electricity supply until all packing and transit protectors have been removed.
- Leave to stand for at least 4 hours before switching on to allow compressor oil to settle if transported horizontally.
- This freezer must only be used for its intended purpose (i.e. storing and freezing of edible foodstuff).
- Do not store medicine or research materials in the Wine Coolers. When the material that requires a strict control of storage temperatures is to be stored, it is possible that it will deteriorate or an uncontrolled reaction may occur that can cause risks.
- Before performing any operation, unplug the power cord from the power socket.
- On delivery, check to make sure that the product is not damaged and that all the parts and accessories are in perfect condition.
- If in the refrigeration system a leak is noted, do not touch the wall outlet and do not use open flames. Open the window and let air into the room. Then call a service center to ask for repair.
- Do not use extension cords or adapters.
- Do not excessively pull or fold the power cord or touch the plug with wet hands.
- Do not damage the plug and/or the power cord; this could cause electrical shocks or fires.
- If the supply cord is damaged, it must be replaced by the manufacturer, its service agent or similarly qualified person in order to avoid a hazard.
- Do not place or store inflammable and highly volatile materials such as ether, petrol, LPG, propane gas, aerosol spray cans, adhesives, pure alcohol, etc. These materials may cause an explosion.
- Do not use or store inflammable sprays, such as spray paint, near the Wine Coolers. It could cause an explosion or fire.
- Do not place objects and/or containers filled with water on the top of the appliance.
- We do not recommend the use of extension leads and multi-way adapters.
- Do not dispose of the appliance on a fire. Take care not to damage, the cooling circuit/pipes of the appliance in transportation and in use. In case of damage do not expose the appliance to fire, potential ignition source and immediately ventilate the room where the appliance is situated.
- The refrigeration system positioned behind and inside the Wine Coolers contains refrigerant. Therefore, avoid damaging the tubes.
- Do not use electrical appliances inside the food storage compartments of the appliance, unless they are of the type recommended by the manufacturer.
- Do not damage the refrigerant circuit.
- Do not use mechanical devices or other means to accelerate the defrosting process, other than those recommended by the manufacturer.
- Do not use electrical appliances inside the food storage compartments, unless they are of the type recommended by the manufacturer.
- Do not touch internal cooling elements, especially with wet hands, to avoid cracks or injuries.
- Maintain the ventilation openings in the appliance enclosure or in the built-in structure, free of obstruction.
- Do not use pointed or sharp-edged objects such as knives or forks to remove the frost.
- Never use hairdryers, electrical heaters or other such electrical appliances for defrosting.
- Do not scrape with a knife or sharp object to remove frost or ice that occurs. With these, the refrigerant circuit can be damaged, the spill from which can cause a fire or damage your eyes.
- Do not use mechanical devices or other equipment to hasten the defrosting process.
- Absolutely avoid the use of open flame or electrical equipment, such as heaters, steam cleaners, candles, oil lamps and the like in order to speed up the defrosting phase.
- Never use water wash the compressor position, wipe it with a dry cloth thoroughly after cleaning to prevent rust.
- It is recommended to keep the plug clean, any excessive dust residues on the plug can be the cause fire.
- The product is designed and built for domestic household use only.
- The guarantee will be void if the product is installed or used in commercial or non-residential domestic household premises.
- The product must be correctly installed, located and operated in accordance with the instructions contained in the User Instructions Booklet provided.
- The guarantee is applicable only to new products and is not transferable if the product is resold.
- Our company disclaims any liability for incidental or consequential damages.
- The guarantee does not in any way diminish your statutory or legal rights.
- Do not perform repairs on this Wine Coolers. All interventions must be performed solely by qualified personnel.
SAFETY CHILDREN!
- If you are discarding an old product with a lock or latch fitted to the door, ensure that it is left in a safe condition to prevent the entrapment of children.
- This appliance can be used by children aged from 8 years and above and by persons with reduced physical, sensory or mental capabilities or with a lack of experience and knowledge; provided that they have been given adequate supervision or instruction concerning how to use the appliance in a safe way and understand the hazards involved.
- Children should not play with the appliance. Cleaning and user maintenance should not be made by children without supervision.

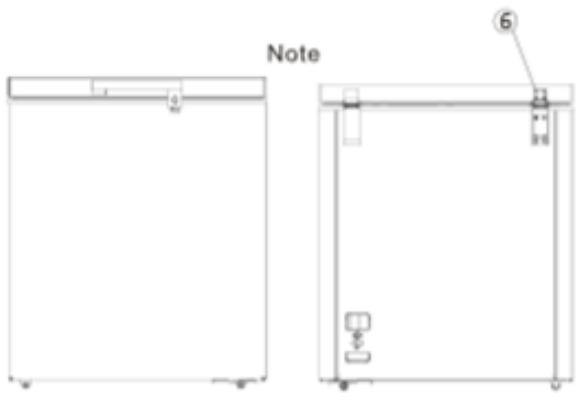
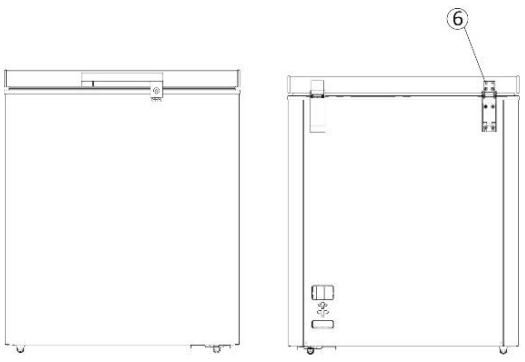
1 Recessed handle
2 Wheel
3 Basket
4 Thermostat knob
5 Supper Button
6 Drain hole
Note: Above-picture is for reference only. Real appliance probably is different.
Installation
Install door external handle (if external handle is present)
Step1

flowchart
graph TD
    A[" "] --> B["②"]
    A --> C[" "]
    B --> C
Step1
Pick out the screws② on the freezer door by tools, and pick out the handle base with lock ① handle cover ③
Step2

Step2
Fix the handle base ① on the door by driving 4 pieces of screws picked
Step3

natural_image
Pure diagram of a horizontal beam with two rectangular components and a numbered label (3) at the end, without any text or symbols.Step3
Fix the handle cover ③ in the way of handle orbit ①
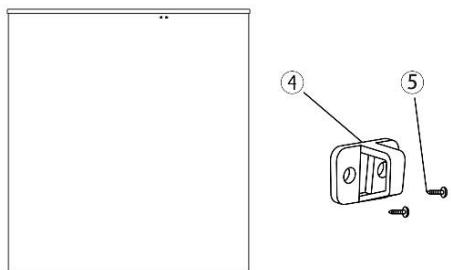
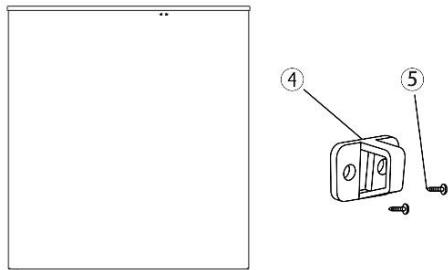
Step4

Step4
Fix the lock ring ④ on the freezer cabinet using the balanced 2 screws ⑤
Note:
If the lock ring failed to hold the lock when installing handle, please unscrew the round head screws on the back of door and adjust the position of door upper and lower. Then drive the screw to fix the handle
Space Requirement
The following are recommend.
Clearances around the chest freezer
Sides……10cm
Back 10cm
Top 70cm

Positioning
Install this appliance at a location where the ambient temperature corresponds to the climate class indicated on the rating plate of the appliance:
| Climate class | Ambient temperature |
| SN | +10°C to +32°C |
| N | +16°C to +32°C |
| ST | +16°C to +38°C |
| T | +16°C to +43°C |
Location
The appliance should be installed well away from sources of heat such as radiators, boilers, direct sunlight etc. Ensure that air can circulate freely around the back of the cabinet. To ensure best performance, if the appliance is positioned below an overhanging wall unit, the minimum distance between the top of the cabinet and the wall unit must be at least 100 mm. Ideally, however, the appliance should not be positioned below overhanging wall units. Accurate leveling is ensured by one or more adjust-able feet at the base of the cabinet.
Warning! It must be possible to disconnect the appliance from the mains power supp-ly; the plug must therefore be easily accessible after installation.
Electronical connection
Before plugging in, ensure that the voltage and frequency shown on the rating plate correspond to your domestic power supply. The appliance must be earthed. The power supply cable plug is provided with a contact for this purpose. If the domestic power supply socket is not earthed, connect the appliance to a separate earth in compliance with current regulations, consulting a qualified electrician. The manufacturer declines all responsibility if the above safety precautions are not observed. This appliance complies with the E.E.C. Directives.
First use
Cleaning the interior
Before using the appliance for the first time, wash the interior and all internal accessories with lukewarm water and some neutral soap so as to remove the typical smell of a brand new product, then dry thoroughly.
Important! Do not use detergents or abrasive powders, as these will damage the finish.

1.0 Electrical connection
When the appliance is plugged in, all LED indicator lights will flash once. Then the appliance will resume the mode previously set before the electrical outage.
2.0 Temperature Setting
Setting: turn the knob to adjust the temperature. Scale 1 is the warmest setting, scale 6 is the coldest setting. When compressor begins to produce cold energy, The running LED is on. If the compressor is stopped, the LED is switched off.
Super Freezing
√ After press "supper-freezing" button, 5 second later, the appliance goes in to supper-freezing mode from knob setting. the supper indicating LED is ON.
√ The compressor keeps working in supper freezing mode, and running LED is switched on.
√ If press "super-freezing" button again, the appliance aquit from super-freezing mode and back to knob setting status, and super-freezing indicating LED is off.
√ If don't press "super-freezing" button again, the appliance will keep working in super-freezing mode for 52 hours, and then it will quit form this mode to before knob setting status. The super freezing indicating LED is switched off.
2.1 Power On & Power Off
Turning the knbo to Scale 0 to turn off the appliance, turn it to other position, such as from scale 1 to 6, the appliance is switched on.
3.0 Resumption Function
The appliance will automatically resume the mode previously set before the electrical outage.
4.0 Temperature Sensor Fault Alarm
When there is a disconnection or short out of the temperature sensor as a fault alarm, the running and super-freezing indicating LEDs will flash from left to right every 0.5 second. compressor will run cycles of running 20min and stopping 20 min.
Daily use
Freezing fresh food
- The freezer compartment is suitable for freezing fresh food and storing frozen and deep-frozen food for a long time.
- Place the fresh food to be frozen in the bottom compartment.
• The maximum amount of food that can be frozen in 24 hours is specified on the rating plate.
• The freezing process lasts 24 hours: during this period do not add other food to be frozen.
Storing frozen food
When first starting-up or after a period out of use. Before putting the product in the compartment let the appliance run at least 2 hours on the higher settings.
Important! In the event of accidental defrosting, for example the power has been off for longer than the value shown in the technical characteristics chart under "rising time", the defrosted food must be consumed quickly or cooked immediately and then re-frozen (after cooked).
Thawing
Deep-frozen or frozen food, prior to be used, can be thawed in a fridge compartment or at room temperature, depending on the time available for this operation.
Small pieces may even be cooked still frozen, directly from the freezer. In this case, cooking will take longer.
Helpful hints and tips
Hints for freezing
To help you make the most of the freezing process, here are some important hints:
• the maximum quantity of food which can be frozen in 24 hrs. is shown on the rating plate;
• the freezing process takes 24 hours. No further food to be frozen should be added during this period;
- only freeze top quality, fresh and thoroughly cleaned, foodstuffs;
- prepare food in small portions to enable it to be rapidly and completely frozen and to make it possible subsequently to thaw only the quantity required;
- wrap up the food in aluminium foil or polythene and make sure that the packages are airtight;
- do not allow fresh, unfrozen food to touch food which is already frozen, thus avoiding a rise in temperature of the latter;
- lean foods store better and longer than fatty ones; salt reduces the storage life of food;
- water ices, if consumed immediately after removal from the freezer compartment, can possibly cause the skin to be freeze burnt;
- it is advisable to show the freezing in date on each individual pack to enable you removal from the freezer compartment, can possibly cause the skin to be freeze burnt;
- it is advisable to show the freezing in date on each individual pack to enable you to keep tab of the storage time.
Hints for storage of frozen food
To obtain the best performance from this appliance, you should:
• make sure that the commercially frozen foodstuffs were adequately stored by the retailer;
- be sure that frozen foodstuffs are transferred from the food store to the freezer in the shortest possible time;
• not open the door frequently or leave it open longer than absolutely necessary.
- Once defrosted, food deteriorates rapidly and cannot be refrozen.
- Do not exceed the storage period indicated by the food manufacture.
Cleaning
For hygienic reasons the appliance interior, including interior accessories, should be cleaned regularly.

Caution! The appliance may not be connected to the mains during cleaning. Danger of electrical shock! Before cleaning switch the appliance off and remove the plug from the mains, or switch off or turn out the circuit breaker or fuse. Never clean the appliance with a steam cleaner. Moisture could accumulate in electrical components, danger of electrical shock! Hot vapors can lead to the damage of plastic parts. The appliance must be dry before it is placed back into service.
Important! Ethereal oils and organic solvents can attack plastic parts, e.g. lemon juice or the juice form orange peel, butyric acid, cleanser that contain acetic acid.
- Do not allow such substances to come into contact the appliance parts.
- Do not use any abrasive cleaners
- Remove the food from the freezer. Store them in a cool place, well covered.
- Switch the appliance off and remove the plug from the mains, or switch off or turn out the circuit breaker of fuse.
- Clean the appliance and the interior accessories with a cloth and lukewarm water. After cleaning wipe with fresh water and rub dry.
- Accumulation of dust at the condenser increases energy consumption. For this reason carefully clean the condenser at the back of the appliance once a year with a soft brush or a vacuum cleaner. ^13
• After everything is dry place appliance back into service.
Defrosting of the freezer
The freezer, however, will become progressively covered with frost. This should be removed.
Never use sharp metal tools to scrape off frost from the evaporator as you could damage it.
However, when the ice becomes very thick on the inner liner, complete defrosting should be carried out as fellows:
- Unplug the unit. Remove the drain plug from the inside of the freezer. Defrosting usually takes a few hours. To defrost faster keep the freezer door open.
- For draining, place a tray beneath the outer drain plug. Pull out the drain dial.

- Rotate the drain dial 180 degree. This will let the water flow out in the tray. When done, push the drain dial in. Replug the drain plug inside the freezer compartment. Note: monitor the container under the drain to avoid overflow.
- Wipe the interior of the freezer and replace the electrical plug in the electrical outlet.
- Reset the temperature control to the desired setting.
1) If the condenser is at back of appliance.
Caution! Before troubleshooting, disconnect the power supply. Only a qualified electrician of competent person must do the troubleshooting that is not in this manual.
⚠️ Important! There are some sounds during normal use (compressor, refrigerant circulation).
| Problem | Possible cause | Solution |
| Appliance dose not work | Mains plug is not plugged in or is loose | Insert mains plug. |
| Fuse has blown or is defective | Check fuse, replace if necessary. | |
| Socket is defective | Mains malfunctions are to be corrected by an electrician. | |
| Appliance freezes too much | Temperature is set too cold or the appliance runs at "7" setting. | Turn the temperature regulator to a warmer setting temporarily. |
| The food is not frozen enough | Temperature is not properly adjusted. | Please look in the initial Temperature Setting section. |
| Door was open for an extended period. | Open the door only as long as necessary. | |
| A large quantity of warm food was placed in the appliance within the last 24 hours. | Turn the temperature regulation to a colder setting temporarily. | |
| The appliance is near a heat source. | Please look in the installation location section. | |
| Heavy build-up of frost on the door seal. | Door seal is not air-tight. | Carefully warm the leaking sections of the door seal with a hair dryer (on a cool setting). At the same time shape the warmed door seal by hand such that it sits correctly. |
| Unusual noises | Appliance is not level. | Check the appliance and level it by some articles. |
| The appliance is touching the wall or other objects. | Move the appliance slightly. | |
| A component, e.g. a pipe, in the side of the appliance is touching another part of the appliance or the wall. | If necessary, carefully bend the component out of the way. |
If the malfunction shows again, contact the Service Center.
These data are necessary to help you quickly and correctly. Write the necessary data here, refer to the rating plate.

This appliance is marked according to the European directive 2012/19/EU on Waste Electrical and Electronic Equipment (WEEE).
WEEE contains both polluting substances (which can cause negative consequences for the environment) and basic components (which can be re-used). It is important to have WEEE subjected to specific treatments, in order to remove and dispose properly all pollutants, and recover and recycle all materials.
Individuals can play an important role in ensuring that WEEE does not become an environmental issue; it is essential to follow some basic rules:
WEEE should not be treated as household waste.
WEEE should be handed over to the relevant collection points managed by the municipality or by registered companies. In many countries, for large WEEE, home collection could be present.
In many countries, when you buy a new appliance, the old one may be returned to the retailer who has to collect it free of charge on a one-to-one basis, as long as the equipment is of equivalent type and has the same functions as the supplied equipment.
Conformity
By placing the mark CE on this product, we are confirming compliance to all relevant European safety, health and environmental requirements which are applicable in legislation for this product.
TABLE DES MATIÈRES
INFORMATIONS SUR LA SÉCURITÉ....27
VUE GENERALE 30
INSTRUCTIONS D'INSTALLATION....30
MISE AU REBUT ....35
Francese
natural_image
Pure electrical circuit lines without any symbolsÉtape 4

natural_image
Technical line drawing of two views of a rectangular enclosure or enclosure with internal components and mounting holes (no text or symbols)Remarque :
Turn the knob to Scale 0 to turn off the appliance, turn it to other position, such as from scale 1 to 6, the appliance is switched on.
1 Tirador empotrado
2 Rueda
3 Cesto
INSTALLATIONSANWEISUNG....50
natural_image
Technical line drawing of a two-view architectural or mechanical structure with no visible text or symbolsHinweis:
natural_image
Pure geometric diagram with no text, numbers, or symbols
natural_image
Pure technical line drawing of a mechanical assembly without any text, numbers, or symbolsNota:
- in bed and breakfasts (B & B)
natural_image
Pure electrical circuit lines without any symbolsnatural_image
Technical line drawing of a two-view mechanical or architectural component, showing front and side views with no visible text or symbols.Opmerking:
1 Χωνευτή χειρολαβή
2 Τροχός
3 Καλάθι
4 Κουμπί θερμοστάτη
natural_image
Pure electrical circuit lines without any symbolsΒήμα 4
natural_image
Blank white image with a faint horizontal line above it and a small black dot at the top (no text or symbols)natural_image
Technical line drawing of two views of a rectangular enclosure or enclosure with internal components, no text or symbols present.Σημείωση:
natural_image
Simple line diagram showing two points connected by a line and a triangle, with no text or symbols present.-
korak
Koristeći alat, rasporedite vijke na vratima zamrzivača i pripremite osnovu ručke s poklopcem ručke s bravom -
korak

natural_image
Pure electrical circuit lines without any symbolsKorak 3
Pričvrstite poklopac ručke tako da bude ispravno postavljen u pravcu povlačenja ručke
-
korak

Korak 2
Pričvrstite osnovu ručke na vrata zavrtanjem četiriju raspoređenih vijaka -
korak
Korak 4
Pričvrstite prsten brave na komoru zamrzivača koristeći dva vijka
Napomena

natural_image
Technical line drawing of a two-view mechanical assembly (no text or symbols)Napomena:
Ako prsten brave ne drži bravu pri ugradnji ručke, odvijte vijke okruglom glavom sa stražnje strane vrata i namjestite položaj vrata s donje i gornje strane. Zatim zavrnite vijak tako da pričvrstite ručku.
Svakodnevna uporaba
Zahtjevi u vezi s prostorom
Korak3
Pričvrstite poklopac ručke tako da bude ispravno postavljen u pravcu povlačenja ručke

korak4 Pričvrstite prsten brave na komoru zamrzivača koristeći 2 zavrtnja
Napomena
natural_image
Technical line drawing of a two-view mechanical assembly (no text or symbols)Napomena:
Ukoliko prsten brave ne drži bravu pri ugradnji ručke, ovijte zavrtnje sa okruglom glavom sa zadnje strane vrata i podesite položaj vrata s donje i gornje strane. Zatim zavrnite zavrtanj tako da pričvrstite ručku.
- farmy, v hotely, motely a jiné typy residencí
- noclehárny (B & B)
natural_image
Technical line drawing of a two-view mechanical or architectural component, showing front and side views with no visible text or symbols.Poznámka:
1 Vgreznjen ročaj
2 Kolo
3 Košara
4 Gumb termostata
5 Odtočna luknja
natural_image
Technical line drawing of a two-view architectural or mechanical structure with no visible text or symbolsOpomba:
natural_image
Technical line drawing of a two-view mechanical or architectural component, showing front and side views with no visible text or symbols.Poznámka:
natural_image
Technical line drawing of two views of a rectangular enclosure or enclosure with internal components and mounting holes (no text or symbols)Забележка:
natural_image
Pure electrical circuit lines without any symbols- lépés
3. lépés
natural_image
Technical line drawing of a two-view architectural or mechanical structure with no visible text or symbolsMegjegyzés:
When there is a disconnection or short out of the temperature sensor as a fault alarm, the running and super-freezing indicating LEDs will flash from left to right every 0.5 second. Compressor will run cycles of running 20 min and stopping 20 min.
Napi használat
natural_image
Technical line drawing of two views of a rectangular enclosure or enclosure with internal components and mounting holes (no text or symbols)Примечание.
- LANGUAGES
- SOMMARIO
- Inglese
- SAFETY INFORMATION
- WARNING!
- SAFETY CHILDREN!
- Installation
- Note:
- Space Requirement
- Positioning
- Location
- Electronical connection
- First use
- Cleaning the interior
- Electrical connection
- Temperature Setting
- Power On & Power Off
- Resumption Function
- Temperature Sensor Fault Alarm
- Daily use
- Freezing fresh food
- Storing frozen food
- Thawing
- Helpful hints and tips
- Hints for freezing
- Hints for storage of frozen food
- Cleaning
- Defrosting of the freezer
- Conformity
- TABLE DES MATIÈRES
- Francese
- Remarque :
- Hinweis:
- Nota:
- Opmerking:
- Σημείωση:
- Napomena:
- Svakodnevna uporaba
- Zahtjevi u vezi s prostorom
- Korak3
- Poznámka:
- Opomba:
- Забележка:
- lépés
- Megjegyzés:
- Napi használat
- Примечание.
Brand : CANDY
Model : CFF 1864XM
Category : Chest Freezer