
OPTI-DELUXE - OPTI-DELUXE - Vacuum Cleaner VALBERG - Free user manual and instructions
Find the device manual for free OPTI-DELUXE - OPTI-DELUXE VALBERG in PDF.

| Device type | Canister vacuum cleaner with bag |
| Brand | VALBERG |
| Model | OPTI-DELUXE (VCB46BCE3-80) |
| Power supply | 220-240 V~, 50-60 Hz |
| Nominal power | 800 W |
| Suction power | 180 W |
| Dust bag capacity | 3 L |
| Filter type | HEPA H12 (washable) |
| Noise level | 63 dB |
| Cable length | 9 m |
| Included accessories | Floor brush, mini brush, round brush (pet hair), crevice tool |
| Power levels | 4 (MIN, 2, 3, MAX) |
| Display | LED screen with level and full bag indicator |
| Remote control | On the flexible hose handle (pause, +, -) |
| Weight | 7.4 kg |
| Telescopic tube | Metal, adjustable from 58 to 90 cm |
| Flexible hose | 148 cm |
| Warranty | 2 years (upon presentation of receipt) |
| Intended use | Household only |
| Protection class | Class II |
Frequently Asked Questions - OPTI-DELUXE - OPTI-DELUXE VALBERG
User questions about OPTI-DELUXE - OPTI-DELUXE VALBERG
0 question about this device. Answer the ones you know or ask your own.
Ask a new question about this device
Download the instructions for your Vacuum Cleaner in PDF format for free! Find your manual OPTI-DELUXE - OPTI-DELUXE - VALBERG and take your electronic device back in hand. On this page are published all the documents necessary for the use of your device. OPTI-DELUXE - OPTI-DELUXE by VALBERG.
USER MANUAL OPTI-DELUXE - OPTI-DELUXE VALBERG

CONDITION DE GARANTIE
FR
This product is guaranteed against faults caused by defects in manufacturing or the materials used for a period of two years, starting from the date of purchase.* This warranty does not cover defects or damage caused by failure to install the device correctly, incorrect use of the product, or excessive wear and tear.
*proof of purchase required.
GARANTIEVOORWAARDEN
NL
VALBERG


flowchart
graph TD
    A["Engine with battery"] --> B["Battery with grid panel"]
    B --> C["Fan with fan icon"]
    C --> D["Drain with drain icon"]
    D --> E["Water drop with faucet icon"]
Merci !
Thank you for choosing this VALBERG product.
VALBERG products are chosen, tested, and recommended by ELECTRO DEPOT, so you can be sure you are getting a top-quality, easy-to-use product that won't let you down.
We're confident your new device will be a pleasure to use every day!
Welcome to ELECTRO DEPOT.
Table of Contents

Product overview
Parts
Product overview
Intended use
Specifications

Product usage
Assembly/Disassembly
Operation

Cleaning and maintenance
Cleaning and maintenance
Emptying the dust bag
Cleaning the dust bag compartment and HEPA filters
Cleaning the wheels
Clearing blockages
Troubleshooting
Storage
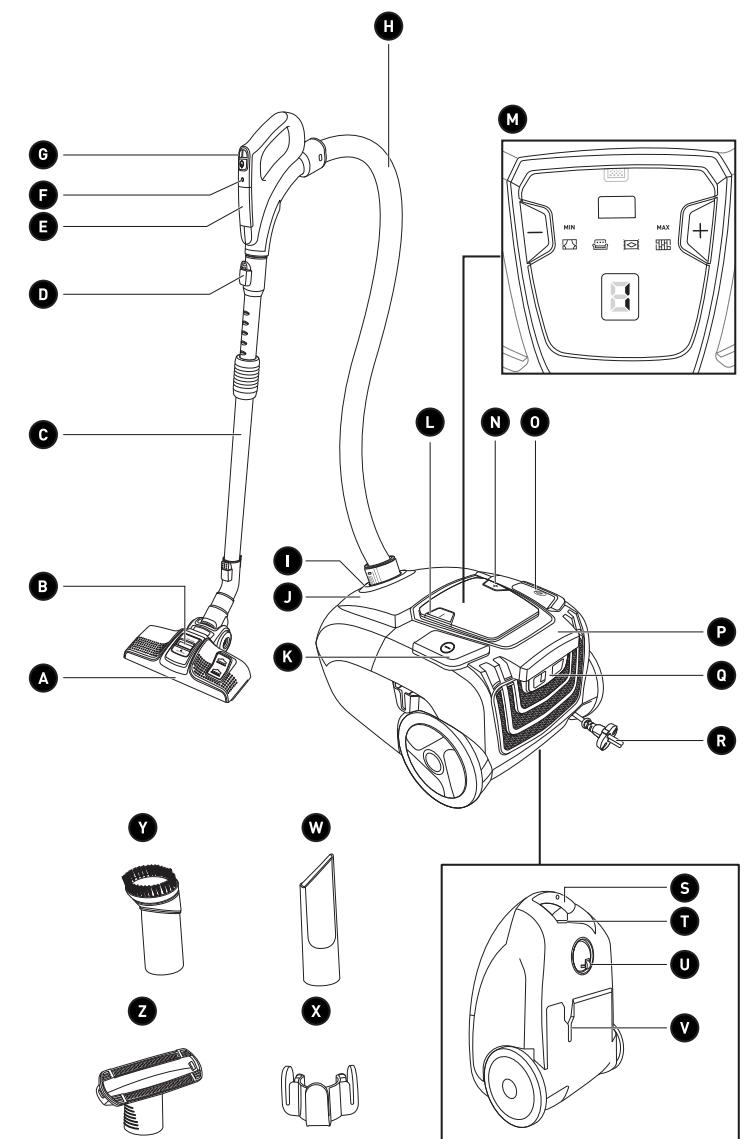
Parts
A Multi-angle floor brush - for smooth floors and carpets
B Air outlet
C Metal extension tube
D Metal extension tube release button
E Battery compartment
F Indicator light
Remote control panel
- PAUSE button
- “+” button to increase the suction power
- “-” button to reduce the suction power
H Flexible hose
I Flexible hose-connecting inlet
J Front cover (houses the dust compartment)
K On/Off button
“-” button to reduce the suction power
M LED screen which displays the suction levels for the different surfaces
N “+” button to increase the suction power
0 Power cable rewind button
P Main unit
Q Air outlet latch
R Power cable and plug
S Handle
T Dust bag release latch
U 360° wheel
v Floor brush storage slot
W Crevice tool - for crevices and recesses
X Tool storage area
Round brush - for animal hair on rugs and cushions
Mini brush - removes stubborn dirt from furniture, smooth floors and carpets
Product overview
- Unpack and remove all labels from the unit. Please check that all of the unit's parts are included and intact. If the unit is damaged or faulty, do not use it and take it to your retailer or after-sales service centre.
- Keep all packaging out of the reach of children. There is a risk of accidents if children play with packaging materials.
Intended use
- This vacuum cleaner is for household use only. It has not been designed for industrial or professional use by cleaning companies.
• Any other use may damage the unit or cause injury.
Specifications
| Model: | VCB46BCE3-80 |
| Operating voltage: | 220-240 V ~, 50-60 Hz |
| Power: | 800 W |
| Standby power: | 0.25 W |
| Power levels: | 4 |
| Suction power: | 180 W |
| Noise level: | 63 dB |
| Vacuum pressure: | 15 kPa |
| Air flow: | 23 L/s |
| Cable length: | 9.0 m |
| Extension tube length: | 58-90 cm |
| Flexible hose length: | 148 cm |
| Floor brush width: | 28 cm |
| Operating range: | 11.3 m |
| Filter: | HEPA: H12 |
| Dust compartment capacity: | 3 L (bag) |
| Weight: | 7.4 kg |
| Water resistance: | IP X0 – this unit is not waterproof |
| Protection class: | Class II |
| Batteries: | 2 x 1.5 V AAA batteries |
Assembly/Disassembly

WARNING!
• Never use the unit without a dust bag.
- Make sure the unit is switched off and unplugged from the mains socket before attaching or detaching any tools.
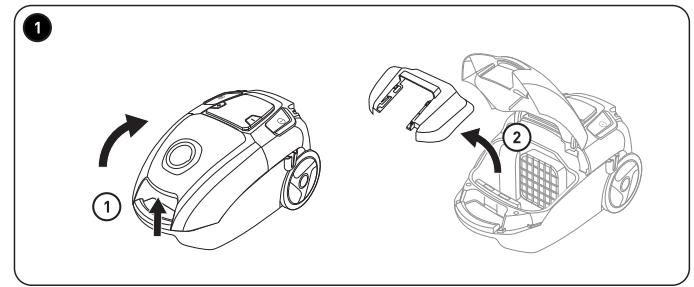
To assemble:
1 ① To install a dust bag, press the dust bag release latch and lift up the front cover.
② Extract the dust bag holder from the main unit.
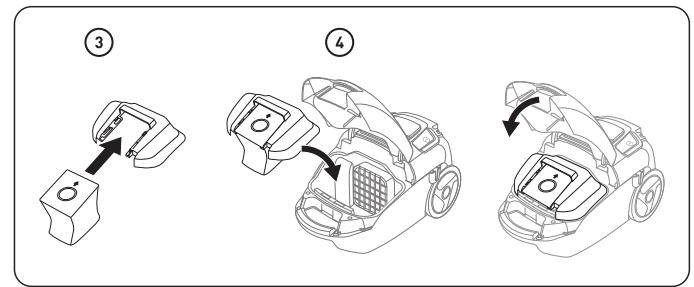
③ Slide the cardboard part on the top of the dust bag into the dust bag holder.
4 Place the dust bag in the dust bag compartment and reinsert the dust bag holder. Close the front cover.
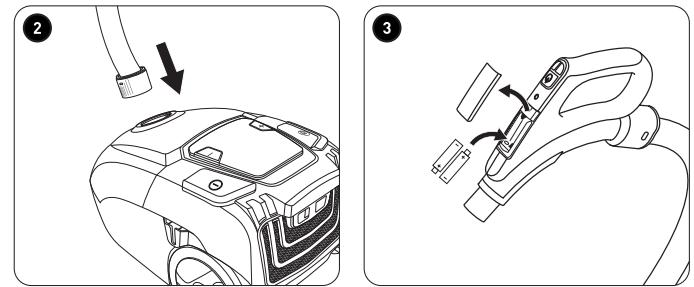
2 Align the protruding sections on the flexible hose with the notches on the main unit's flexible hose-connecting inlet, then push to insert it as far as it will go.
-
Remove the battery compartment cover found on the flexible hose.
-
Insert the batteries (2 x 1.5 V AAA, not supplied) making sure to match the polarity (+/-) as indicated in the battery compartment.
-
Reposition the battery compartment cover.
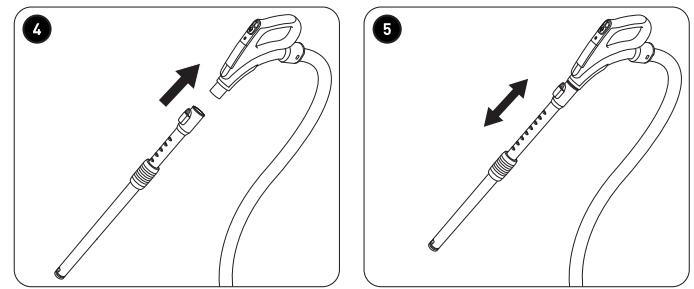
4 Insert the metal extension tube into the flexible hose.
5 To adjust the length of the metal extension tube, grasp hold of the tube's handle and pull outwards to lengthen the tube or push inwards to shorten it.
6 Fit one of the tools by inserting it into the metal extension tube or flexible hose.
① Floor brush for various types of flooring. Press the pedal to retract the brush (for carpets or rugs) or extend it (for smooth floors).
② Mini brush for furniture. Round brush for animal hair. Crevice tool for nooks, recesses and corners. Use the metal extension tube to get to hard-to-reach areas.

NOTE: The floor brush may scratch or damage certain types of flooring or carpet. Make sure to test the surface first before using the brush on delicate surfaces. Alternatively, you can use the mini brush or round brush, should these be suitable.
To disassemble:
- Check that the unit is switched off and unplug the plug from the mains socket.
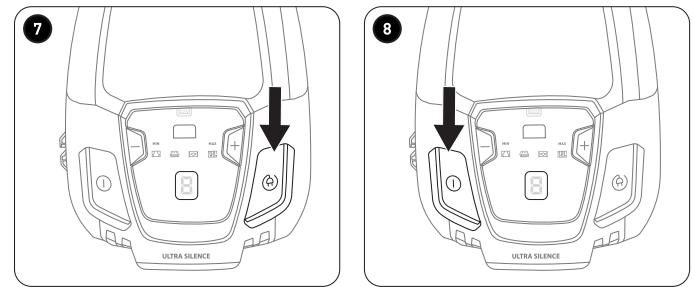
7 • Press the cable rewind button to stow away the power cable.
- Pull off the flexible hose, mini brush, round brush or crevice tool, or press the release button on the metal extension tube/floor brush to detach these tools from the main unit. Store the tools as shown in the Storage section.
Operation
- Insert the plug into the mains socket.
- The power cable can be unwound up to the yellow mark. Should the red mark be visible, this means that you have unwound the cable too far.
8 Press the On/Off button on the main unit to turn the vacuum cleaner on or off.
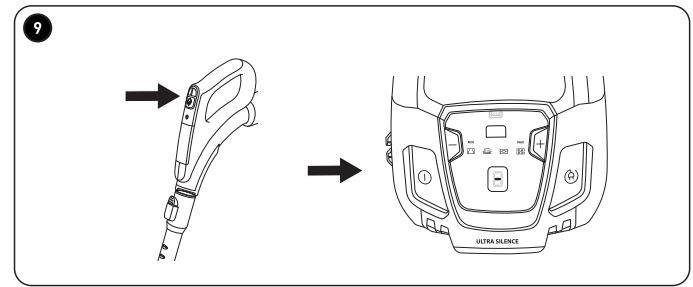
9 To pause the vacuum cleaner whilst it is in use, press the PAUSE button on the remote control panel. A dash "-" will then flash on the LED screen to indicate that the unit has been paused. Press the PAUSE button again to resume operation.

NOTE: The indicator turns on whenever any button is pressed on the control panel, located on the handle of the flexible hose.
10 Press the + or - button on the main unit's/remote control's panel to increase or decrease the suction level.
The following symbols are indicated on the vacuum cleaner:
| 1 MIN |  | Curtains, textiles (lowest setting) |
| 2 |  | Sofas, cushions |
| 3 |  | Normal carpet |
| 4 MAX |  | Wooden, stone or other flooring (highest setting) |
 | Dust bag full |
B
Product usage
11 When the vacuum cleaner is in use, you can use the air outlet cover to adjust its suction power. Push the air outlet cover upwards to open the air outlet and use the EASY CLEAN function. Push the air outlet cover downwards to close the air outlet and use the DEEP CLEAN function.
Always turn off the unit when you have finished using it. Unplug it from the mains socket and rewind the power cable.

NOTE: When vacuuming heavily soiled surfaces, regularly turn the unit off and check the mouth of the tool to ensure that it is clean and to avoid scratching delicate surfaces.
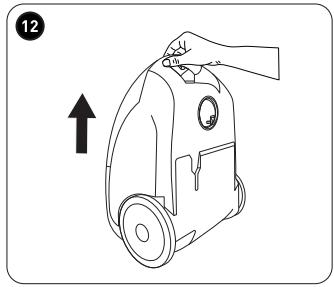
12 Use the handle to carry the vacuum.
Cleaning and maintenance

CAUTION!
- To prevent the risk of electrocution, always turn off and unplug the unit from the mains socket before cleaning it.
- Never immerse the main unit, or the power cable (including the plug) in water or any other liquid. Never rinse them under a tap.

NOTE: Under no circumstances should solvents, chemical or abrasive cleaning agents, wire brushes, sharp objects or scouring pads be used to clean the vacuum.
- Detach all the tools from the main unit before performing any cleaning operations.
| Main unitFlexible hoseMetal extension tube | Use a slightly damp soft cloth to clean these. Make sure that no liquid enters the main unit. |
| Filters (all parts)Floor brushMini brushCrevice toolRound brush | Tap to remove any excess dirt, then rinse under a tap. Shake off any excess water and allow to air dry thoroughly.Press the floor brush pedal to extend the bristles and make the tool easier to clean.When cleaning the brushes, make sure that all hair/fur is removed from the bristles. |
- After cleaning, thoroughly dry the unit and reposition all the parts.
Emptying the dust bag
- The dust bag is full when the dust bag indicator appears on the LED screen, or the suction power decreases.
- Press the dust bag release latch and lift up the front cover.
• Extract the dust bag holder from the main unit. - Slide the dust bag out of the dust bag holder. Empty the dust bag's contents into a bin and either use it again or insert a new dust bag.
- Reposition all the parts in reverse order.

NOTE: The front cover will not close if a dust bag hasn't been fitted.
Cleaning the dust bag compartment and HEPA filters
Clean the filters once a month or whenever there is a visible build-up of dirt. Replace the filters, should they be in any way damaged.
Cleaning the motor filter
- Remove both the dust bag holder and dust bag.
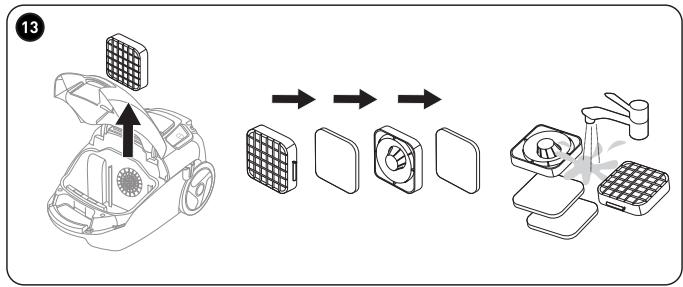
13 1. Pull the motor filter holder upwards out of the dust bag compartment.
- Remove the foam filter located behind the filter holder.
-
To remove the filter inside the filter holder, insert your thumb into the holes in the grille to separate the holder in two. Remove the foam filter.
-
Wipe the dust bag compartment with a dry cloth.
- The foam filters and filter holder can be cleaned under running water.
- Let all the parts dry naturally, then reposition them on the main unit. Be sure to insert the assembled filter holder into the slots on the back of the dust bag compartment.
Cleaning the air outlet filter
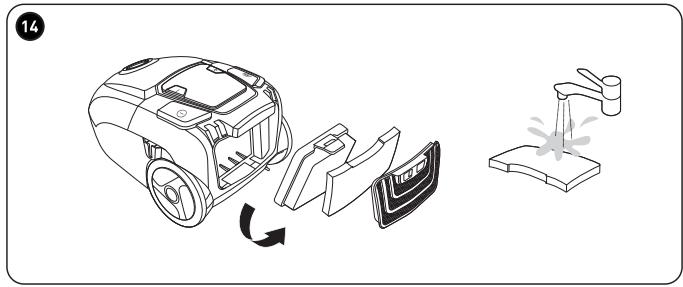
14 1. Press both sides of the air outlet latch on the back of the main unit, then remove the air outlet cover. Extract the foam filter from the air outlet cover.
-
Pull the lever at the top of the HEPA filter backwards, then extract the filter from the main unit. Remove the foam filter.
-
Tap all the filter parts over a bin to remove the worst of the dust, then wash them thoroughly under running water.
- Let all the parts dry naturally, then reposition them on the main unit. Be sure to place the HEPA filter and air outlet cover on the bottom first, then push the top part in until it clicks into place.

CAUTION! To avoid damaging the vacuum cleaner, only use dry, intact filters!
Cleaning the wheels
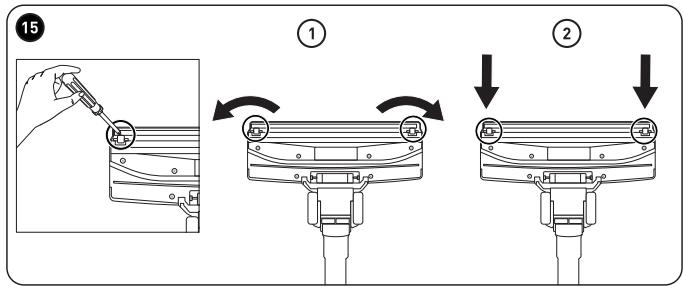
15 ① Should threads or dirt block one of the wheels, gently insert a screwdriver under the wheel axle and push up to pry it out. Remove any thread or object jamming the wheel.
② Reposition the wheel by firmly pressing it back into its compartment. Make sure it spins smoothly.
Clearing blockages
Small objects, carpet fibres, etc., can occasionally jam the vacuum cleaner.
• In the event of a blockage or loss of suction during use, turn off the vacuum cleaner.
- Detach the flexible hose, metal extension tube and brush/tools to find the blockage and clear it.
Troubleshooting
| Problem | Possible Cause | Solution |
| The unit does not work. | The unit is not connected to the mains socket.The dust bag is full. | Securely insert the plug into the mains socket. Press the On/Off button to turn on the vacuum cleaner. If the unit is still not working, get it checked by a qualified technician.Empty the dust bag. |
| The suction power is weak, there is no suction or the motor vibrates. | The tool is blocked.The filter is blocked, dirty or broken. | Remove the blockage.Clean the filter.If necessary, replace the filter with a new one. |
Storage
16 Insert the floor brush into the back of the unit for easy storage.
C
Cleaning and maintenance
17 ① Clip the tool storage holder onto the metal extension tube.
② Insert the tools into the tool storage holder.
• Always unplug the unit before storing it.
- Store the unit in a fresh, dry and dust-free place, out of the reach of children and pets.
- Please retain the packaging and use it to store your unit when it is not in use for an extended period of time.

