
YC-MG51EC - Microwaves SHARP - Free user manual and instructions
Find the device manual for free YC-MG51EC SHARP in PDF.

User questions about YC-MG51EC SHARP
0 question about this device. Answer the ones you know or ask your own.
Ask a new question about this device
Download the instructions for your Microwaves in PDF format for free! Find your manual YC-MG51EC - SHARP and take your electronic device back in hand. On this page are published all the documents necessary for the use of your device. YC-MG51EC by SHARP.
USER MANUAL YC-MG51EC SHARP
Your product is marked with this symbol.
It means that used electrical and electronic products should not be mixed with general household waste. There is a separate collection system for these products.

www. sharpconsumer.com/ contact/

www. sharpconsumer.com/ support/

www.conformity.com
A. Information on Disposal for Users (private households)
1. In the European Union
Attention: If you want to dispose of this equipment, please do not use the ordinary dustbin!
Used electrical and electronic equipment must be treated separately and in accordance with legislation that requires proper treatment, recovery and recycling of used electrical and electronic equipment.
Following the implementation by member states, private households within the EU states may return their used electrical and electronic equipment to designated collection facilities free of charge*.
In some countries* your local retailer may also take back your old product free of charge if you purchase a similar new one.
*) Please contact your local authority for further details.
If your used electrical or electronic equipment has batteries or accumulators, please dispose of these separately beforehand according to local requirements. By disposing of this product correctly you will help ensure that the waste undergoes the necessary treatment, recovery and recycling and thus prevent potential negative effects on the environment and human health which could otherwise arise due to inappropriate waste handling.
2. In other Countries outside the EU
If you wish to discard this product, please contact your local authorities and ask for the correct method of disposal.
For Switzerland: Used electrical or electronic equipment can be returned free of charge to the dealer, even if you don't purchase a new product.
Further collection facilities are listed on the homepage of www.swico.ch or www.sens.ch.
B. Information on Disposal for Business Users
1. In the European Union
If the product is used for business purposes and you want to discard it: Please contact your SHARP dealer who will inform you about the take-back of the product. You might be charged for the costs arising from take-back and recycling. Small products (and small amounts) might be taken back by your local collection facilities.
For Spain: Please contact the established collection system or your local authority for take-back of your used products.
2. In other Countries outside the EU
If you wish to discard of this product, please contact your local authorities and ask for the correct method of disposal.
PRECAUTIONS TO AVOID POSSIBLE EXPOSURE TO MICROWAVE ENERGY
- Do not attempt to operate this oven with the door open as this can result in harmful exposure to microwave energy. It is important not to defeat or tamper with the safety interlocks.
- Do not insert anything between the oven front face and the door or allow debris or cleaner residue to accumulate on sealing surfaces.
- Do not operate the oven if it is damaged. It is very important that the oven door closes properly and that there is no damage to the door, hinges, latches or door seals and sealing surfaces.
- Do not attempt to repair or adjust the oven.
CONTENTS
IMPORTANT SAFETY INSTRUCTIONS 3
INSTALLATION 10
SPECIFICATIONS 11
OVEN AND ACCESSORIES 12
CONTROL PANEL. 13
BEFORE OPERATION 14
SETTING THE CLOCK. 14
MICROWAVE POWER LEVEL 15
MANUAL OPERATION 16
MICROWAVE COOKING 17
GRILL COOKING/MIX GRILL COOKING* 18
OTHER CONVENIENT FUNCTIONS 19
TIME DEFROST AND WEIGHT DEFROST OPERATION 20
AUTO MENU OPERATION 21
AUTO MENU CHART 22
SUITABLE OVENWARE 23
CLEANING AND CARE 24
MICROWAVE COOKING ADVICE 25
DEFROSTING ADVICE 27
REHEATING ADVICE 28
TROUBLESHOOTING 29
BEFORE CALLING FOR ASSISTANCE 30
IMPORTANT SAFETY INSTRUCTIONS
READ CAREFULLY AND KEEP FOR FUTURE REFERENCE
To avoid the danger of fire. The microwave oven should not be left unattended during operation. Power levels that are too high, or cooking times that are too long, may overheat foods resulting in a fire.
This oven is designed to be used on a countertop only. It is not designed to be built into a kitchen unit. Do not place the oven in a cabinet. The electrical outlet must be readily accessible so that the unit can be unplugged easily in an emergency.
The AC power supply must be 230-240 V, 50 Hz, with a minimum 10 A distribution line fuse, or a minimum 10A distribution circuit breaker. A separate circuit serving only this appliance should be provided.
Do not place the oven in areas where heat is generated. For example, close to a conventional oven. Do not install the oven in an area of high humidity or where moisture may collect. Do not store or use the oven outdoors.
If smoke is observed, switch off or unplug the oven and keep the door closed in order to stifle any flames.
Use only microwave-safe containers and utensils. Utensils should be checked to ensure that they are suitable for use in microwave ovens.
When heating food in plastic or paper containers, keep an eye on the oven due to the possibility of ignition.
Clean the waveguide cover and the oven cavity. These must be dry and free from grease. Built up grease may overheat and begin to smoke or catch fire.
Do not place flammable materials near the oven or ventilation openings. Do not block the ventilation openings.
Remove all metallic seals, wire twists, etc., from food and food packages. Arcing on metallic surfaces may cause a fire.
Do not use the microwave oven to heat oil for deep frying. The temperature cannot be controlled and the oil may catch fire.
To make popcorn, use only special microwave popcorn makers.
Do not store food or any other items inside the oven.
Check the settings after you start the oven to ensure the oven is operating as desired.
Do not leave the oven unattended while it is operating.
To avoid overheating and fire, special care must be taken when cooking or reheating foods with a high sugar or fat content, for example, Sausage rolls, Pies or Christmas pudding. See the corresponding hints in the user manual.
To avoid the possibility of injury. WARNING:
Do not operate the oven if it is damaged or malfunctioning.
Check the following before use:
a) Make sure the door closes properly and ensure it is not misaligned or warped.
b) Check to make sure the hinges and safety door latches are not broken or loose.
c) Ensure that the door seals and sealing surfaces have not been damaged.
d) Make sure inside the oven cavity or on the door are no dents.
e) Ensure that the power supply cord and plug are not damaged.
If the door or door seals are damaged, the oven must not be operated until it has been repaired by a competent person.
Never adjust, repair or modify the oven yourself. It is hazardous for anyone other than a competent person to carry out any service or repair operation which involves the removal of a cover which gives protection against exposure to microwave energy.
Do not operate the oven with the door open or alter the door safety latches in any way. Do not operate the oven if there is an
object between the door seals and sealing surfaces.
Do not allow grease or dirt to build up on the door seals and adjacent parts. Clean the oven at regular intervals and remove any food deposits.
Follow the instructions for "Care and Cleaning". Failure to maintain the oven in a clean condition could lead to a deterioration of the surface that could adversely affect the life of the appliance and possibly result in a hazardous situation.
Individuals with PACEMAKERS should check with their doctor or the manufacturer of the pacemaker for precautions regarding microwave ovens.
To avoid the possibility of electric shock.
- Under no circumstances should you remove the outer cabinet.
- Never spill or insert any objects into the door lock openings or ventilation openings. In the event of a spill, turn off and unplug the oven immediately, and call an authorised SHARP service agent.
- Do not immerse the power supply cord or plug in water or any other liquid.
- Do not let the power supply cord hang over the edge of a table or work surface.
- Keep the power supply cord away from heated surfaces, including the rear of the oven.
- Keep the appliance and its cord out of reach of children less than 8 years.
- Do not attempt to replace the oven lamp yourself or allow anyone who is not an electrician authorised by SHARP to do so. If the oven lamp fails, please consult your dealer or an authorised SHARP service agent.
- If the power supply cord is damaged, it must be replaced by an authorised SHARP service agent.
WARNING: Liquids and other foods must not be heated in sealed containers since they are liable to explode. Microwave heating of beverages can result in delayed eruptive boiling; therefore, care must be taken when handling the container. To avoid the possibility of explosion and sudden boiling:
Never use sealed containers. Remove seals and lids before use. Sealed containers can explode due to a build-up of pressure even after the oven has been turned off. Take care when microwaving liquids. Use a wide mouthed container to allow bubbles to escape.
Never heat liquids in narrow necked containers such as baby bottles, as this may result in the contents erupting from the container when heated and cause burns.
To prevent sudden eruption of boiling liquid and possible scalding:
- Do not use excessive amount of time.
- Stir liquid prior to heating/reheating.
- It is advisable to insert a glass rod or similar (not metal) into the liquid whilst reheating.
- Let liquid stand for at least 20 seconds in the oven at the end of cooking time to prevent delayed eruptive boiling.
Do not cook eggs in their shells, and whole hard-boiled eggs should not be heated in microwave ovens since they may explode even after microwave cooking has ended. To cook or reheat eggs which have not been scrambled or mixed, pierce the yolks and the whites. Shell and slice hard boiled eggs before reheating them in the microwave oven.
Pierce the skin of such foods as potatoes, sausages and fruit before cooking, or they may explode.
WARNING: The contents of feeding bottles and baby food jars must be stirred or shaken and the temperature checked before consumption, in order to avoid burns. Use
pot holders or oven gloves when removing food from the oven to prevent burns. To avoid the possibility of burns:
- Always open containers, popcorn makers, oven cooking bags, etc., away from the face and hands to avoid steam burns and eruption of boiling. To avoid burns, always test food temperature and stir before serving and pay special attention to the temperature of food and drink given to babies, children or the elderly. Accessible parts may become hot during use. Young children should be kept away.
- Temperature of the container is not a true indication of the temperature of the food or drink; always check the food temperature.
- Always stand back from the oven door when opening it to avoid burns from escaping steam and heat.
- Slice stuffed baked foods after heating to release steam and avoid burns.
- Keep children away from the door to prevent them burning themselves.
WARNING: Only allow children aged from 8 years and above to use the oven without supervision when adequate instructions have been given so that the child is able to use the oven in a safe way and understands the hazards of improper use.
When the appliance is operated in the GRILL, MIX GRILL, CONVECTION, MIX CONVECTION and AUTO MENU mode (mode applicable to model), children should only use the oven under adult supervision due to the temperature generated.
This appliance is not intended for use by persons (including children) with reduced physical, sensory or mental capabilities, or lack of experience and knowledge, unless they have been given supervision or instruction concerning use of the appliance by a person responsible
for their safety.
Children should be supervised to ensure that they do not play with the appliance. Cleaning by children should be monitored.
Models with Electronic touch panel are enabled with a child lock mode.
Do not lean or swing on the oven door. Do not play with the oven or use it as a toy.
Children should be taught all important safety instructions: use of pot holders, careful removal of food coverings - paying special attention to packaging (e.g., self-heating materials) designed to make food crisp, as they may be extra hot.
Other warnings
Never modify the oven in any way.
Do not move the oven while it is in operation.
This appliance is intended to be used in household. This oven is for home food preparation and may only be used for cooking food and beverages. Drying of food or clothing and heating of warming pads, slippers, sponges, damp cloth and similar may lead to risk of injury, ignition or fire. It is not suitable for commercial or laboratory use.
To promote trouble-free use of your oven and avoid damage.
Never operate the oven when it is empty. When using a browning dish or self-heating material, always place a heat-resistant insulator such as a porcelain plate under it to prevent damage to the oven base due to heat stress. The preheating time specified in the dish's instructions must not be exceeded.
Do not use metal utensils, which reflect microwaves and may cause electrical arcing. Do not put cans in the oven.
To prevent the turntable or base of the oven breaking:
a) Before cleaning with water, leave to cool.
b) Do not put hot or cold foods or hot utensils on a cold
turntable/oven base.
c) Do not place anything on the outer cabinet during operation.
NOTE:
Do not use plastic containers for microwaving if the oven is still hot from using a combination mode (oven model dependant) because they may melt.
Plastic containers must not be used during above modes unless the container manufacturer says they are suitable.
If you are unsure how to connect your oven, please consult an authorised, qualified electrician.
Neither the manufacturer nor the dealer can accept any liability for damage to the oven or personal injury resulting from failure to observe the correct electrical connection procedure.
Water vapour or drops may occasionally form on the oven walls or around the door seals and sealing surfaces. This is a normal occurrence and is not an indication of microwave leakage or a malfunction.
This appliance is intended for use in household and similar applications such as; Kitchen areas reserved for staff in stores, offices and other professional environments / Farms / Use by clients of hotels, motels and other residential type environments / Bed and breakfast type environments.

This symbol means that the surfaces are liable to get hot during use.
INSTALLATION
- Remove all packing materials from the inside of the oven cavity and remove any protective film found on the microwave oven cabinet surface.
- Check the oven carefully for any signs of damage.
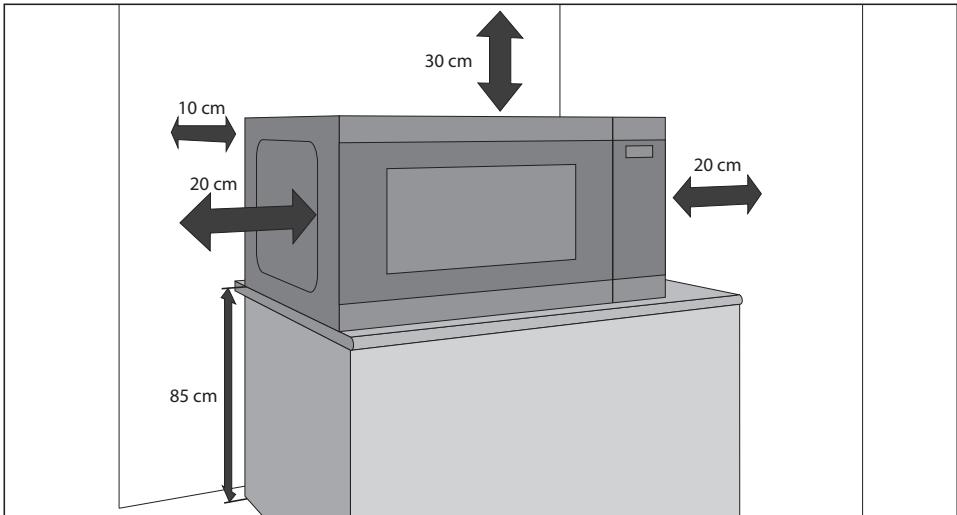
- Place the oven on a secure, level surface, strong enough to take the oven weight, plus the heaviest item likely to be cooked in the oven. Do not place the oven in a cabinet.
-
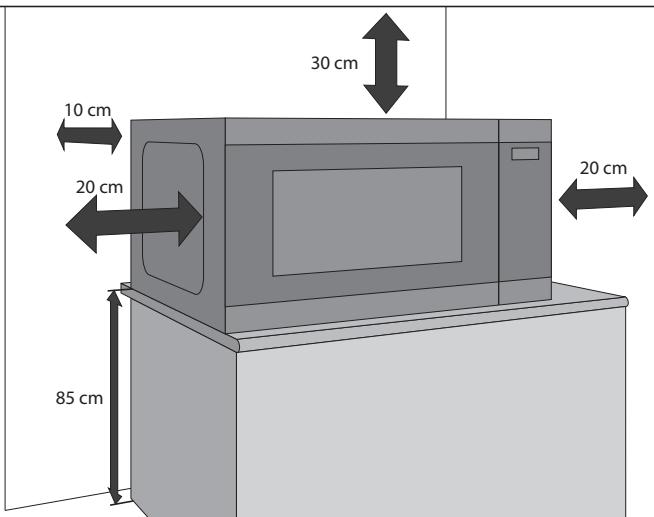
Select a level surface that provide enough open space for the intake and/or outlet vents. See picture on the first page. The rear surface of appliance can be placed against a wall.
-
The minimum installation height is 85 cm .
- A minimum space of 20 cm is required between the sides of the microwave oven and any adjacent walls or objects.
- Leave a minimum space of 30 cm above the oven.
- Do not remove the feet from the bottom of the oven.
- Blocking the intake and/or outlet openings can damage the oven.
- Place the oven as far away from radios and TV as possible. Operation of microwave oven may cause interference to your radio or TV reception.
- Securely connect the plug of the oven to a standard earthed (grounded) household electrical outlet.
WARNING:
Do not place the oven where heat, moisture or high humidity are generated, (for example, near or above a conventional oven) or near combustible materials (for example, curtains).
Do not block or obstruct air vent openings.
Do not place objects on top of the oven.
Do not touch the exterior of the microwave oven during or shortly after operation as it will be hot.
SPECIFICATIONS
| Model name | YC-MS02E | YC-MG02E | YC-MS51E | YC-MG51E | YC-MG81E | |
| AC Line Voltage | 230 V/50 Hz single phase | |||||
| Distribution line fuse/circuit breaker | 10 A | 10 A | 10 A | 10 A | 10 A | |
| AC Power required | 1270 W | 1270 W | 1450 W | 1450 W | 1450 W | |
| Output power: | Microwave | 800 W | 800 W | 900 W | 900 W | 900 W |
| Grill | 1000 W | 1000 W | 1100 W | |||
| Standby | < 1,0 W | < 1,0 W | < 1,0 W | < 1,0 W | < 1,0 W | |
| Energy Save Mode | < 0,5 W | < 0,5 W | < 0,5 W | < 0,5 W | < 0,5 W | |
| Microwave Frequency | 2450 MHz* | 2450 MHz* | 2450 MHz* | 2450 MHz* | 2450 MHz* | |
| Outside Dimensions (W) x (H) x (D) mm | 440 x 258 x 324 | 440 x 258 x 324 | 513 x 306 x 394 | 513x 306 x 394 | 512 x 300 x 396 | |
| Cavity Dimensions (W) x (H) x (D)** mm | 306 x 205 x 304 | 306 x 205 x 304 | 328 x 206 x 368 | 328 x 206 x 368 | 348 x 240 x 356 | |
| Oven Capacity | 20 litres** | 20 litres** | 25 litres** | 25 litres** | 28 litres** | |
| Grill Rack Size (Diameter x Height in mm) | 315 x 308 | 315 x 308 | 315 x 308 | 315 x 308 | 315 x 308 | |
| Turntable (Diameter in mm) | 255 | 255 | 315 | 315 | 315 | |
| Weight (kg) | approx. 11,3 kg | approx. 11,9 kg | approx. 14,5 kg | approx. 15,4 kg | approx. 15,8 kg | |
| Oven Bulb (LED type) | 1,5 W | 1,5 W | 1,5 W | 1,5 W | 1,5 W | |
-
- This Product fulfils the requirement of the European standard EN55011.
In conformity with this standard, this product is classified as group 2 class B equipment.
Group 2 means that the equipment intentionally generates radio-frequency energy in the form of electromagnetic radiation for the heat treatment of food.
Class B equipment means that the equipment is suitable to be used in domestic establishments.
**- Internal capacity is calculated by measuring maximum width, depth and height. Actual capacity for holding food is less. AS PART OF A POLICY OF CONTINUOUS IMPROVEMENT, WE RESERVE THE RIGHT TO ALTER DESIGN AND SPECIFICATIONS WITHOUT NOTICE.
- This Product fulfils the requirement of the European standard EN55011.
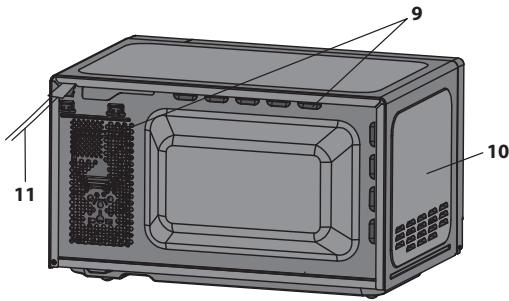
OVEN AND ACCESSORIES
- Door Safety Lock System
- Oven Window
- Glass Tray
- Roller Ring
- Turntable Coupling
- Waveguide Cover (Do Not remove)
- Power and Time controls
- Door opening button
- Ventilation openings
- Outer cabinet
- Power supply cord
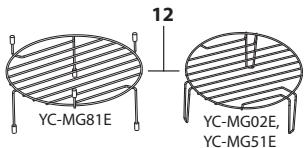
- Grill rack
Check to make sure the following accessories are provided: Roller Ring, Turntable Coupling and Glass Tray
Grill ovens only:
- Grill Rack - for use when cooking on the grill function only.
- The Grill Rack is designed for use with grill ovens only. DO NOT use the rack when using the microwave function.
- For use of the Grill Rack refer to the GRILL sections of this User Manual.
Never touch the grill when it is hot.
NOTE: When you order accessories, please mention two items: part name and model name.
NOTES:
- The waveguide cover is fragile. Care should be taken when cleaning inside the oven to ensure that it is not damaged.
- After cooking fatty foods without a cover, always clean the cavity and especially the grill heating element thoroughly, these must be dry and free from grease. Built-up grease may overheat and begin to smoke or catch fire.
- Always operate the oven with the turntable and turntable support fitted correctly. This promotes thorough, even cooking. A badly fitted turntable may rattle, may not rotate properly and could cause damage to the oven.
- All food and containers of food are always placed on the turntable for cooking.
- The turntable rotates clockwise or anti-clockwise. The rotary direction may change each time you start the oven. This does not affect cooking performance.


WARNING: This symbol means that the surfaces are liable to get hot during use. The door, outer net, oven cavity, accessories and dishes will become very hot during operation. To prevent burns, lays use thick oven gloves.
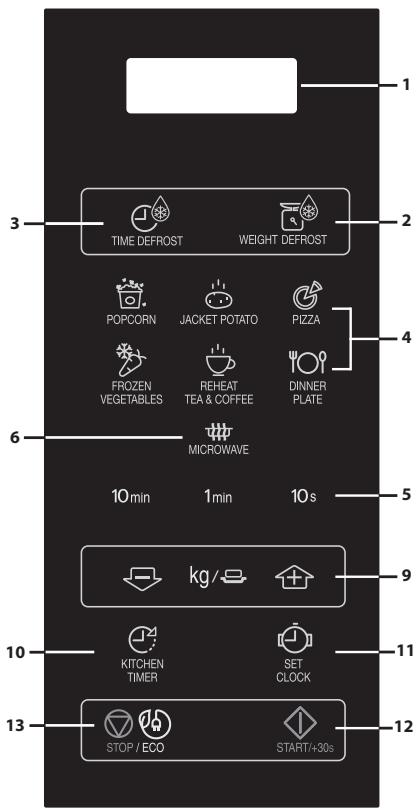
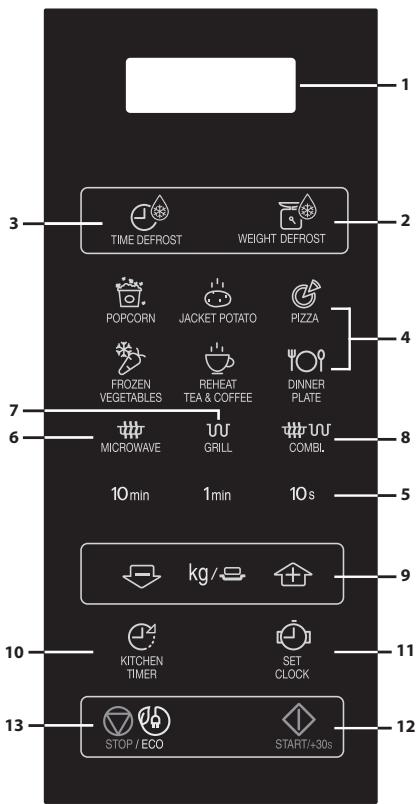
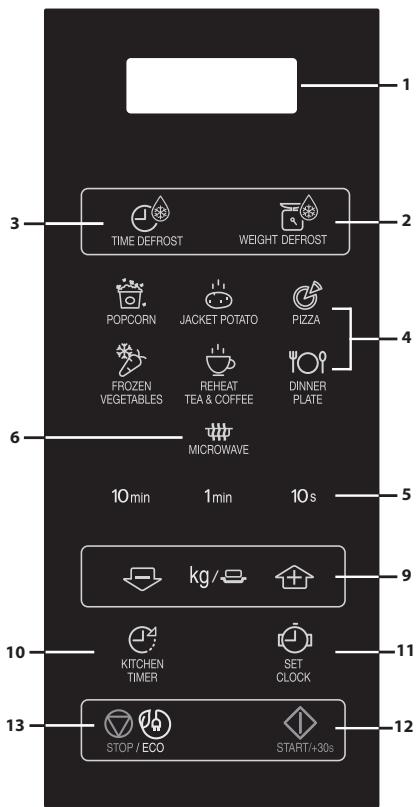
CONTROL PANEL
- DISPLAY - Cooking time, power, indicators and clock time are displayed.
- WEIGHT DEFROST - Press once to defrost based on weight.
- TIME DEFROST - Press to select defrosting by time.
- AUTO MENU - Press to select auto cooking menu.
- TIME - Set the clock and timer.
- MICROWAVE POWER LEVEL - Press to select microwave power level.
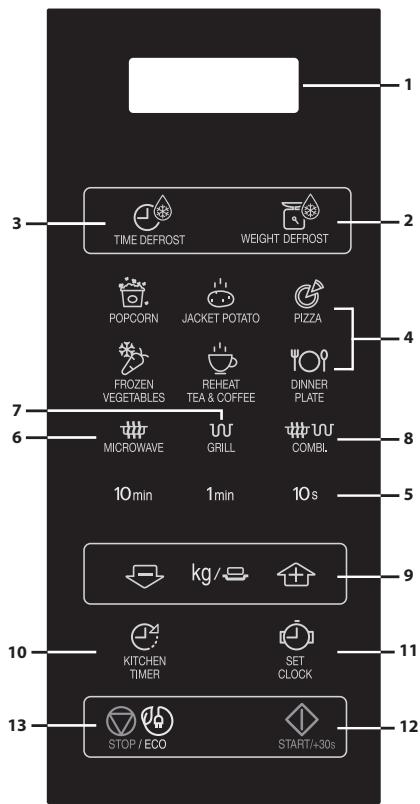
- GRILL - Press to set grill cooking program.
- COMBI. - Press to set up combination (Microwave and Grill) cooking.
- WEIGHT/PORTION - Use these buttons to select weight or portions.
- KITCHEN TIMER - Press to use as a minute timer, or to programme standing time.
- SET CLOCK - Use to set clock time.
- START/+30s - Start button. Press once to cook for 30 seconds on full power.
- STOP/ECO - Press once to pause cooking or twice to cancel operation. Also used to set ECO mode.
microwave solo
microwave + grill
BEFORE OPERATION
- Plug in the oven. The oven display will display: "0:00", an audible signal will sound once.
- This model has a clock function and the oven uses less than 1.0W in stand by mode. To set the clock, see below.
SETTING THE CLOCK
Your oven has a 24 hour clock mode.
- Press the CLOCK SET key once and "00:00" will flash.
- Press the time keys and enter the current time. Enter the hours by pressing the 10 min key and enter the minutes by pressing the 1 min and 10 s keys.
- Press the CLOCK SET key to finish clock setting.
NOTES:
- If the clock is set, when cooking is complete, the display will show the correct time of day. If the clock has not been set, the display will only show "0:00" when cooking is complete.
- To check the time of day during a cooking process, press CLOCK SET key and the LED will display the time of day for 2-3 seconds. This does not affect the cooking process.
- While in the clock setting mode, if the STOP key is pressed or if there is no operation within 1 minute, the oven will go back to the former setting.
- If the electrical power supply to your microwave oven is interrupted, the display will intermittently show "0:00" after the power is reinstated. If this occurs during cooking, the programme will be erased. The time of day will also be erased.
- Your oven has 11 power levels, as shown.
- To change the power level for cooking, press the MICROWAVE POWER LEVEL key until the display indicates the desired level. Set up the desired cooking time by pressing time keys. Press the START key to start the oven.
- To check the power level during cooking, press the MICROWAVE POWER LEVEL key.
As long as your finger is pressing the MICROWAVE POWER LEVEL key the power level will be displayed. The oven continues to count down although the display will show the power level.
- If "0P" is selected, the oven will work with fan for no power. You can use this level to remove any odours.
Generally the following recommendations apply:
100P/90P - (HIGH) used for fast cooking or reheating e.g. for casseroles, hot beverages, vegetables etc.
80P/70P - (MEDIUM HIGH) used for longer cooking of dense foods such as roast joints, meat loaf and plated meals, also for sensitive dishes such as sponge cakes. At this reduced setting, the food will cook evenly without over cooking at the sides.
60P/50P - (MEDIUM) for dense foods which require a long cooking time when cooked conventionally, e.g. beef casserole, it is advisable to use this power setting to ensure the meat will be tender.
40P/30P - (MEDIUM LOW) to defrost, select this power setting, to ensure that the dish defrosts evenly. This setting is also ideal for simmering rice, pasta, dumplings and cooking egg custard.
20P/10P - (LOW) For gentle defrosting, e.g. cream, gateaux, or pastry.
MANUAL OPERATION
Opening the door:
To open the oven door, press door opening button.
Starting the oven:
Prepare and place food in a suitable container onto the turntable or place directly onto the turntable.
Close the door and press the START/◇ +30s key after selecting the desired cooking mode. You may extend the desired cooking time during manual cooking by pressing TIME keys or START/◇ +30s key.

START/+30s
Once the cooking programme has been set and the START/◇+30s key is not pressed in 1 minute, the setting will be cancelled.
The START/+30s key must be pressed to continue cooking if the door is opened during cooking. The audible signal will sound once when the button is pressed in the correct manner.
Use the STOP key to:
- Erase a mistake during programming.
- Stop the oven temporarily during cooking.
- Cancel a programme during cooking, press the STOP key twice.
- To set and to cancel the child lock.

STOP / ECO
NOTE
- If the Microwave is not used for a period of 5 minutes (and the door is closed) the safety lock will automatically activate. The keypad will no longer operate. To turn the safety lock off simply open the door to the Microwave and the keypad will become active again.
MICROWAVE COOKING
Your oven can be programmed for up 99 minutes 50 seconds (99.50).
MANUAL COOKING/MANUAL DEFROSTING
- Enter the cooking time and use microwave power levels 100P to 10P to cook or defrost.
- Stir or turn the food, where possible, 2 - 3 times during cooking.
After cooking, cover the food and leave to stand, where recommended. - After defrosting, cover the food in foil and leave to stand until thoroughly defrosted.
Example:
To cook 2 minutes and 30 seconds on 70% microwave power.
| 1. Input the power level by pressing the MICROWAVE POWER LEVEL key 4 times for 70 P. | 2. Enter the cooking time by pressing the 1 min key twice and then the 10 s key 3 times. | 3. Press the START/◇ +30s key to start the timer. (The display will count down through the set cooking/defrosting time.) |
| 7:0P | 2:30 | 2:30 |
NOTE:
- When the oven starts, the oven lamp will light and the turntable will rotate clockwise or anticlockwise.
- If the door is opened during cooking/defrosting to stir or turn over food, the cooking time on the display stops automatically. The cooking/defrosting time starts to count down again when the door is closed and the START key is pressed.
- When cooking/defrosting is complete, open the door or press STOP key and the time of day will reappear on the display, if the clock has been set.
- If you wish to know the power level during cooking, press the MICROWAVE POWER LEVEL key. As long as your finger is pressing the MICROWAVE POWER LEVEL key, the power level will be displayed.
IMPORTANT:
- Close the door after cooking/defrosting. Please note that the light will remain on when the door is open, this is for safety reason to remind you to close the door.
- If you cook food for more than the standard time (see chart below) using the same cooking mode, the oven's safety mechanisms automatically activate. The microwave power level will be reduced or the grill heating element will turn on and off.
| Cooking Mode | Standard time |
| Microwave 100 P | 30 minutes |
| Grill cooking* | Intermittent operation, temperature controlled |
| Mix grill cooking* | 99 mins 50 sec |
The grill at the top of the oven cavity has one power setting only. The grill is assisted by the turntable which rotates simultaneously to ensure even browning. Use the rack for grilling small items of food such as bacon, gammon and teacakes. Food can be placed either directly onto the rack, or into a flan dish/heat-resistant plate on the rack.
Example:
To grill for 20 minutes, using GRILL key.
| 1. Press GRILL key once. ∞ x1 | 2. Enter the required heating time by pressing the 10 min key twice. | 3. Press the START/◇ +30s key to start the grilling. (The display will count down through the set grilling time.) |
| G | 20:00 | 20:00 |
MIX GRILL combines microwave power with the grill. MIX means to cook by Microwave power and Grill power alternately.
The combination of microwave power with the grill reduces cooking time and provides a crisp, brown finish.
There are 2 choices for the combination:
COMBINATION 1 (Display: C-1)
55% time for microwave power, 45% time for grill cooking. Use for fish and au gratin.
COMBINATION 2 (Display: C-2)
36% time for microwave cooking, 64% time for grill cooking. Use for pudding omelets, and poultry.
Example:
To cook for 15 minutes, using MIX GRILL with 55% time microwave power and 45% grill power (C-1).
| 1. Press MIX GRILL key once. ∞ x1 | 2. Enter the required heating time by pressing the 10 min key once and the 1 min key 5 times. | 3. Press the START/◇ +30s key to start the cooking. (The display will count down through the set cooking time.) |
| C-1 | 15:00 | 15:00 |
NOTES for GRILL and MIX GRILL COOKING:
It is not necessary to preheat the grill.
- When browning foods in a deep container, place on the turntable.
- You may detect smoke or a burning smell when using the grill for the first time. This is normal and not a sign that the oven is faulty. To avoid this problem, when first using the oven, heat the oven without food for 20 minutes on grill.
IMPORTANT: During operation, to allow smoke or smells to disperse open a window or switch the kitchen ventilation on.
NOTE: When using the grill function, the grill will turn on and off at regular intervals to prevent overheating.

WARNING: The door, outer cabinet, oven cavity and accessories will become very hot during operation. To prevent burns, always use thick oven gloves.
-
- Only for models with Grill.
OTHER CONVENIENT FUNCTIONS
1. SEQUENCE COOKING
This function allows you to cook using up to 2 different stages which can include manual cooking time and mode and/or time defrost as well as weight defrost function. Once programmed there is no need to interfere with the cooking operation as the oven will automatically move onto the next stage. The audible signal will sound once after the first stage.
Note: Auto menu cannot be set as one of the multiple sequences.
Example: If you want to defrost the food for 5 minutes, then to cook with 80P microwave power for 7 minutes.
The steps are as follows:
- Press the TIME DEFROST key once, in the LED display will appear dEF2.
- Enter the cooking time by pressing the 1 min key 5 times.
- Input the power level (80P) by pressing the MICROWAVE POWER LEVEL key 3 times.
- Enter the cooking time by pressing the 1 min key 7 times.
- Press the START key once to start cooking.
2. +30s FUNCTION (Auto-start)
The +30s key allows you to operate the two following functions:
a. Direct start
You can directly start cooking on 100P microwave power level for 30 seconds by pressing the +30s key.
b. Extend the cooking time
You can extend the cooking time during manual cooking, time defrost and auto menu operation for multiples of 30 seconds if the +30s key is pressed while the oven is in operation. You may extend the desired cooking time also by pressing TIME keys "10min", "1min", "10s". During the weight defrost, the cooking time cannot be increased.
NOTE: The cooking time may be extended to a maximum of 99 minutes 50 seconds.
3. KITCHEN TIMER FUNCTION:
You can use the kitchen timer for timing where microwave cooking is not involved for example to time boiled eggs cooked on conventional hob or to monitor the standing time for cooked/defrosted food.
Example:
To set the timer for 5 minutes.
| 1. Press the KITCHEN TIMER key once. | 2. Enter the desired time by pressing the 1 min key 5 times. | 3. Press the START/◇ +30s key to start the timer. | 4. Check the display. (The display will count down through the set cooking/defrosting time.) |
When the timer time arrives, the audible signal will sound 5 times and the LED will display then time of day.
You can enter any time up to 99 minutes, 50 seconds. To cancel the KITCHEN TIMER whilst counting down, simply press the STOP key.
NOTE: The KITCHEN TIMER function cannot be used whilst cooking.
4. CHILD LOCK:
Use to prevent unsupervised operation of the oven by little children.
a. To set the CHILD LOCK:
Press and hold the STOP key for 3 seconds, a long bleep will be heard and the display will indicate "LOC". The oven is now in the CHILDLOCK mode. While in this mode, the display will show the clock, if any key is pressed or the door is opened, "LOC" will be seen for ten seconds.
b. To cancel the CHILD LOCK:
Press and hold the STOP key for 3 seconds until a long beep sound.
5. ECO MODE:
In standby mode, press the "ECO" button once, the LED display will be off and microwave oven enter to ECO mode, any operation can light the LED display again, and the microwave oven will return to standby mode.

STOP / ECO
TIME DEFROST AND WEIGHT DEFROST OPERATION
1. TIME DEFROST
This function quickly defrosts food while enabling you to choose a suitable defrost period, depending on the food type. Follow the example below for details on how to operate this function. The time range is 0:10 - 99:50.
Example: To defrost the food for 10 minutes.
| 1. Select the menu required by pressing the TIME DEFROST key once. x1 | 2. Enter the cooking time by pressing the 10 min key once. | 1. Press the START/◇+30s key to start the defrosting. |
| the display will show: dEF2 | 10:00 |
Notes for Time Defrost:
- After cooking the audible signal will sounds five times and the LED will display then time of day, if the clock has been set. If the clock has not been set, the display will only show "0:00" when cooking is complete.
- The preset microwave power level is 30P and can not be changed.
2. WEIGHT DEFROST
The microwave oven is pre-programmed with a time and power level so that the following food is defrosted easily: Pork, beef and chicken. The weight range for this food is from 0.1kg - 2kg in 0.1kg steps.
Follow the example below for details on how to operate these functions.
Example: To defrost a Meat joint weighing 1.2kg using WEIGHT DEFROST.
Place the meat in a flat dish or microwave oven defrost rack on the turntable.
| 1. Select the menu required by pressing the WEIGHT DEFROST key once. x1 | 2. Enter the weight by pressing the WEIGHT/PORTION keys until the desired weight is displayed | 3. Press the START/◇ +30s key to start the defrosting. (The display will count down through defrosting time) |
| the display will show: dEF1 | kg/◇ display: 1.2 |
Frozen foods are defrosted from -18^
NOTES FOR WEIGHT DEFROST:
- Before freezing foods, ensure food is fresh and of good quality.
- Food weight should be rounded up to the nearest 0.1kg , for example, 0.65kg to 0.7kg .
- If necessary, shield small areas of meat or poultry with flat pieces of aluminium foil. This will prevent the areas from becoming warm during defrosting. Ensure the foil does not touch the oven walls.
AUTO MENU OPERATION
The AUTO MENU keys automatically work out the correct cooking mode and cooking of the foods. Follow the example below for details on how to operate this function.
Example: To cook two jacket potatoes (0.46kg) by using the AUTO MENU function.
| 1. Select the menu required by pressing the Jacket Potato key once. x1 | 2. Press WEIGHT/PORTION UP/DOWN keys or continue to press the Jacket Potato key to choose the required number of potatoes (up to 3). | 3. Press the START/◇ +30s key to start the cooking. (The display will count down through cooking time) |
| the display will show: 1 | kg/2 display: 2 |
NOTES:
- The weight or quantity of the food can be input by pressing the WEIGHT/PORTION UP/DOWN keys until the desired weight/quantity is displayed. Enter the weight of the food only. Do not include the weight of the container.
- For food weighing more or less than the weights/quantities given in the AUTO MENU chart.
AUTO MENU CHART
| Auto Menu | WEIGHT/ PORTION / UTENSILS | Procedure |
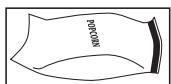
| Popcorn | 0.05kg, 0.1kg | Place the popcorn bag directly on the turntable. (Please see the note below: 'Important Information About Microwave Popcorn Feature') |
| Jacket Potato | 1, 2, 3 potatoes (pieces) 1 potato = approx. 0.23kg (initial temp. 20°C) | Please use potatoes with a similar size of approx. 230g. Pierce each potato in several places and place towards the edge of the turntable. Turn over and re-arrange halfway through cooking. Stand for 3 - 5 minutes before serving. |
| Pizza | 0.1kg, 0.2kg, 0.4kg (initial temp 5°C) Plate | Place the Pizza on a plate in the centre of the turntable. Do not cover. |
| Frozen vegetable e.g. Brussel sprouts, green beans, peas, mixed vegetables, broccoli | 0.15kg, 0.35kg, 0.5kg (initial temp -18°C) Bowl and lid | Place vegetables in a suitable container. Add 1 tbsp of water per 100g of vegetables, cover the dish and place on the turntable. Stir halfway through cooking and after cooking. |
| REHEAT TEA & Coffee (120ml/ cup) | 1, 2, 3 (initial temp. 5°C) Cup | Place the cup(s) on the turntable and stir after heating. |
| Dinner Plate | 0.25kg, 0.35kg, 0.5kg (initial temp. 5°C) Plate | Place the plate in the centre of the turntable. Do not cover. Stir after cooking. |
Notes:
- The final temperature will vary according to the initial food temperature. Check food is piping hot after cooking. If necessary, you can extend the cooking manually.
- The results when using auto cook depend on variances such as the shape and size of the food and your personal preference as regards cooking results. If you are not satisfied with the programmed result, please adjust the cooking time to match your requirement.
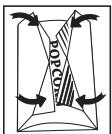
Important Information about Microwave Popcorn Feature:
- When selecting 100 grams of popcorn, it is suggested that you fold down a triangle on each corner of the bag before cooking. Refer to the picture at right.
- If/When the popcorn bag expands and no longer rotates properly, please press STOP key once and open the oven door and adjust the bag position to ensure even cooking.
SUITABLE OVENWARE
To cook/defrost food in a microwave oven, the microwave energy must be able to pass through the container to penetrate the food. Therefore it is important to choose suitable cookware. Round/oval dishes are preferable to square/oblong ones, as the food in the corners tends to overcook. A variety of cookware can be used as listed below.
| Cookware | Microwave Safe | Grill | Comment |
| Aluminium foil Foil Containers | ✓/× | ✓ | Small pieces of aluminium foil can be used to shield food from overheating. Keep foil at least 2 cm from the oven walls, as arcing may occur. Foil containers are not recommended unless specified by the manufacturer, e.g. Microfoil®, follow instructions carefully. |
| Browning dishes | ✓/× | × | Always follow the manufacturers instructions. Do not exceed heating times given. Be very careful as these dishes become very hot. |
| China and ceramics | ✓/× | × | Porcelain, pottery, glazed earthenware and bone china are usually suitable, except for those with metallic decoration. |
| Glassware e.g. Pyrex® | ✓ | ✓ | Care should be taken if using fine glassware as it can break or crack if heated suddenly. |
| Metal | × | ✓ | It is not recommended to use metal cookware as it will arc, which can lead to fire. |
| Plastic/Polystyrene e.g fast food containers | ✓ | × | Care must be taken as some containers warp, melt or discolour at high temperatures. |
| Cling film | ✓ | × | It should not touch the food and must be pierced to let the steam escape. |
| Freezer/Roasting bags | ✓ | × | Must be pierced to let steam escape. Ensure bags are suitable for microwave use. |
| Paper - Plates, cups and kitchen paper | ✓ | × | Do not use plastic or metal ties, as they may melt or catch fire due to the metal 'arcing'. |
| Straw and wooden Containers | ✓ | × | Only use for warming or to absorb moisture. Care must be taken as overheating may cause fire. |
| Recycled paper and newspaper | × | ✓ | Always attend the oven when using these materials as overheating may cause fire. May contain extracts of metal which will cause 'arcing' and may lead to fire. |
NOTE: Do not leave your oven unattended while in use.

WARNING: When heating food in plastic or paper containers, monitor the oven due to the possibility of ignition.
CLEANING AND CARE
CAUTION: DO NOT USE COMMERCIAL OVEN CLEANERS, STEAM CLEANERS, ABRASIVE, HARSH CLEANERS, ANY THAT CONTAIN SODIUM HYDROXIDE OR SCOURING PADS ON ANY PART OF YOUR MICROWAVE OVEN.
Before cleaning, make sure the oven cavity, door, oven cabinet and accessories are completely cool. CLEAN THE OVEN AT REGULAR INTERVALS AND REMOVE ANY FOOD DEPOSITS - Keep the oven clean, or the oven could lead to a deterioration of the surface. This could adversely affect the life of the appliance and possibly result in a hazardous situation.
NOTE: When cooking, condensation can build up inside the oven cavity, cavity face and door. The amount of condensation will depend upon the temperature of the oven surfaces and the moisture content of the food being microwaved. Ensure that when you have finished cooking that any moisture which collects on these surfaces are wiped away with a soft, moisture absorbent cloth.
Oven exterior
The outside of your oven can be cleaned easily with mild soap and water. Make sure the soap is wiped off with a moist cloth, and dry the exterior with a soft towel.
Control panel
Open the door before cleaning to de-activate the control panel. Care should be taken in cleaning the control panel. Using a cloth dampened with water only, gently wipe the panel until it becomes clean.
Avoid using excessive amounts of water. Do not use any sort of chemical or abrasive cleaner.
Oven Interior
- For cleaning, wipe any splatters or spills with a soft damp cloth or sponge after each use while the oven is still warm.
For heavier spills, use a mild soap and wipe several times with a damp cloth until all residues are removed.
Built-up splashes may overheat and begin to smoke or catch fire, and cause arcing. Do not remove the waveguide cover.
- Make sure that mild soap or water does not penetrate the small vents in the walls which may cause damage to the oven.
- Do not use spray type cleaners on the oven interior.
- Heat up your oven regularly by using the grill and heat the oven without food for 20 minutes on grill. Remaining food or fat splashed can cause smoke or bad smell.
Keep the waveguide cover clean at all times.
The waveguide cover is constructed from a fragile material and should be cleaned with care (follow the cleaning instructions above).
NOTE: Excessive soaking may cause disintegration of the waveguide cover.
The waveguide cover is a consumable part and without regular cleaning, will need to be replaced.
Accessories
The accessories like turntable, turntable support and rack should be washed in a mild washing up liquid solution and dried. They are dishwasher safe.
Door
To remove all trace of dirt, regularly clean both sides of the door, the door seals and adjacent parts with a soft, damp cloth. Do not use abrasive cleaner.
NOTE: A steam cleaner should not be used.
Cleaning tip - For easier cleaning of your oven:
Place half a lemon in a bowl, add 300 ml (1/2 pint) water and heat on 100% for 10 - 12 minutes. Wipe the oven clean using a soft, dry cloth.
Microwaves cook food faster than conventional cooking. It is therefore essential that certain techniques are followed to ensure good results. Many of the following techniques are similar to those used in conventional cooking.

WARNING: Liquids and foods must not be heated in sealed containers or jars/containers with lids on, as pressure will build up inside and may cause the jar/container to explode.
COOKING ADVICE NOTES:
Always attend the oven when in use.
- Ensure that the utensils are suitable for use in a microwave oven.
- Refer to the charts in the cookbook section for recommended cooking times and power levels.
- Only use microwave popcorn within the recommended packaging (follow the manufacturers instructions). Never use oil unless specified by the manufacturer and never cook for longer than instructed.

WARNING: Follow instructions in the SHARP operation manual at all times. If you exceed recommended cooking times and use power levels that are too high, food may overheat, burn and, in extreme circumstances, catch fire and damage the oven.
Arrange
Place the thickest parts of food towards the outside of the dish. e.g. Chicken drumsticks.
Foods that are placed towards the outside of the dish will receive more energy, so cook quicker, than those in the centre.
Cover
Certain foods benefit from being covered during microwave cooking.
Use vented microwave cling film or a suitable lid.
Pierce
Foods with a shell, skin or membrane must be pierced in several places before cooking or reheating as steam will build up and may cause food to explode. e.g. Potatoes, Fish, Chicken, Sausages.
NOTE: Eggs should not be heated using microwave power as they may explode, even after cooking has ended. e.g. poached, fried, hard boiled.
Stir, turn and rearrange
For even cooking it is essential to stir, turn and rearrange food during cooking. Always stir and rearrange from the outside towards the centre.
Stand
Standing time is necessary after cooking so it enables the heat to disperse equally throughout the food.
| Food Characteristics | |
| Composition | Foods high in fat or sugar (e.g. Christmas pudding, mince pies) require less heating time. Care should be taken as overheating can lead to fire. Bones in food conduct heat, making the food cook more quickly. Care must be taken so that the food is cooked evenly. |
| Density | Food density will affect the amount of cooking time needed. Light porous foods, such as cakes or bread, cook more quickly than heavy, dense foods, such as roasts and casseroles. |
| Quantity | The number of microwaves in your oven remains the same regardless of how much food is being cooked. The cooking time must be increased as the amount of food placed in the oven increases. e.g. Four potatoes will take longer to cook than two. |
| Size | Small foods and small pieces cook faster than large ones, as microwaves can penetrate from all sides to the centre. For even cooking make all the pieces the same size. |
| Shape | Foods which are irregular in shape, such as chicken breasts or drumsticks, take longer to cook in the thicker parts. For even cooking, place the thickest parts to the outside of the dish where they will receive more energy. Round shapes cook more evenly than square shapes when microwave cooking. |
| Temperature of food | The initial temperature of food affects the amount of cooking time needed. Chilled foods will take longer to cook than food at room temperature. The temperature of the container is not a true indication of the temperature of the food or drink. Cut into foods with fillings, for example jam doughnuts, to release heat or steam. |

WARNING: Face & Hands: Always use oven gloves to remove food or cookware from the oven. Stand back when opening the oven door to allow heat or steam to disperse. When removing covers (such as cling film), opening roasting bags or popcorn packaging, direct steam away from face and hands.

WARNING: Check the temperature of food and drink, stir before serving. Take special care when serving to babies, children or the elderly. The contents of feeding bottles and baby food jars are to be stirred or shaken and the temperature is to be checked before consumption to avoid burns.
DEFROSTING ADVICE
Using your microwave oven is the quickest defrosting method. It is a simple process but the following instructions are essential to ensure the food is thoroughly defrosted.
- Remove all packaging and wrapping before defrosting.
- To defrost food, use the Medium/Low or Defrost microwave power setting.
- Please refer to the further information below.
Rearrange
Foods that are placed towards the outside of the dish will defrost quicker than foods in the centre. It is therefore essential that the food is rearranged up to 4 times during defrosting.
Move closely packed pieces from the outside to the centre and rearrange over-lapping areas.
This will ensure that all parts of the food defrosts evenly.
Separate
Foods may be stuck together when removed from the freezer. It is important to separate foods as soon as it is possible during defrosting.
e.g. bacon rashers, chicken fillets.
Shield
Some areas of food being defrosted may become warm. To prevent them becoming warmer and starting to cook, these areas can be shielded with small pieces of foil, which reflect microwaves, e.g. legs and wings on a chicken.
Stand
Standing time is necessary to ensure food is thoroughly defrosted.
Defrosting is not complete once the food is removed from the microwave oven. Food must stand, covered, for a length of time to ensure the centre has completely defrosted.
Turn over
It is essential that all foods are turned over up to 4 times during defrosting.
This is important to ensure thorough defrosting.
REHEATING ADVICE
For the reheating of foods, follow the advice and guidelines below to ensure food is thoroughly reheated before serving.
Plated meals
Remove any poultry or meat portions, reheat these separately, see below.
Place smaller items of food to the centre of the plate, larger and thicker foods to the edge. Cover with vented microwave cling film and reheat on the Medium/Low microwave power level stir/rearrange halfway through reheating.
NOTE: Ensure the food is thoroughly reheated before serving.
Sliced meat
Cover with vented microwave cling film and reheat on the Medium/Low microwave power level. Rearrange at least once to ensure even reheating.
NOTE: Ensure the meat is thoroughly reheated before serving.
Poultry portions
Place thickest parts of the portions to the outside of the dish, cover with vented microwave cling film and reheat on the Medium microwave power level.
Turn over halfway through reheating.
NOTE: Ensure the poultry is thoroughly reheated before serving.
Casseroles
Cover with vented microwave cling film or a suitable lid and reheat on the Medium/Low microwave power level. Stir frequently to ensure even reheating.
NOTE: Ensure the food is thoroughly reheated before serving.
To achieve the best results when reheating, select a suitable microwave power level appropriate to the type of food. e.g. A bowl of vegetables can be reheated using the High microwave power level while a lasagne which contains ingredients that cannot be stirred, should be reheated using power level the Medium/Low microwave power level
NOTES:
- Remove food from foil or metal containers before reheating.
- Reheating times will be affected by the shape, depth, quantity and temperature of food together with the size, shape and material of the container.

WARNING: Never heat liquids in narrow-necked containers, as this could result in the contents erupting from the container and may cause burns.
- To avoid overheating and fire, special care must be taken when reheating foods with a high sugar or fat content, e.g. mince pies or Christmas pudding.
- Never heat oil or fat for deep frying as this may lead to overheating and fire.
- Canned potatoes should not be heated in the microwave oven, follow the manufacturer's instructions on the can.

WARNING: The contents of feeding bottles and baby food jars are to be stirred or shaken and the temperature is to be checked before consumption to avoid burns.
TROUBLESHOOTING
If you think the oven is not working properly there are some simple checks you can carry out yourself before calling an engineer. This will help prevent unnecessary service calls if the fault is something simple.
Follow this simple check below:
Place half a cup of water on the turntable and close the door. Set the timer know to cook for 1 minute using microwave the High microwave power level.
- Does the oven lamp come on when it is cooking?
- Does the cooling fan work? (Check by placing your hand above the air vent openings).
- After 1 minute does the audible signal sound?
- Is the water in the cup hot?
If you answer "NO" to any question first check that the oven is plugged in properly and the fuse has not blown. If there is no fault with either, check against the troubleshooting chart below.

WARNING: Never adjust, repair or modify the oven yourself. It is hazardous for anyone other than a SHARP trained engineer to carry out servicing or repairs. This is important as it may involve the removal of covers that provide protection against microwave energy.
- The door seal stops microwave leakage during oven operation, but does not form an airtight seal. It is normal to see drops of water, light or feel warm air around the oven door. Food with a high moisture content will release steam and cause condensation inside the door which may drip from the oven.
- Repairs and Modifications: Do not attempt to operate the oven if it is not working properly.
- Outer Cabinet & Lamp Access: Never remove the outer cabinet. This is very dangerous due to high voltage parts inside which must never be touched, as this could be fatal.
Your oven is not fitted with a lamp access cover. If the lamp fails, do not attempt to replace the lamp yourself, call a SHARP approved service facility.
TROUBLESHOOTING CHART
| QUERY | ANSWER |
| Draught circulates around the door. | When the oven is working, air circulates within the cavity. The door does not form an airtight seal so air may escape from the door. |
| Condensation forms in the oven, and may drip from the door. | The oven cavity will normally be colder than the food being cooked, and so steam produced when cooking will condense on the colder surface. The amount of steam produced depends on the water content of the food being cooked. Some foods, such as potatoes have a high moisture content. Condensation trapped in the door glass should clear after a few hours. |
| Flashing or arcing from within the cavity when cooking. | Arcing will occur when a metallic object comes into close proximity to the oven cavity during cooking. This may possibly roughen the surface of the cavity, but would not otherwise damage the oven. |
| Arcing potatoes. | Ensure all "eyes" are removed from the potatoes and that they have been pierced, place directly onto the turntable or in a heat resistant flan dish or similar. |
| Oven does not work when the timer control is turned away from 0. | Check the door is closed properly. |
| Oven cooks too slowly. | Ensure correct power level has been selected. |
| Oven makes a noise. | The microwave energy pulses ON and OFF during cooking/defrosting. |
| Outer cabinet is hot. | The cabinet may become warm to the touch - keep children away. |
BEFORE CALLING FOR ASSISTANCE
Before asking for service, please check each item below:
- Check to ensure that the oven is plugged in securely. If it is not, remove the plug from the outlet, wait 10 seconds, and plug it in again securely.
- Check for a blown circuit fuse or a tripped main circuit breaker. If these seem to be operating properly, test the outlet with another appliance.
- Check to ensure that the power and timer knobs are set correctly.
- Check to ensure that the door is securely closed engaging the door safety lock system. Otherwise, the microwave energy will not flow into the oven
IF NONE OF THE ABOVE RECTIFIES THE SITUATION, THEN CONTACT A QUALIFIED TECHNICIAN. DO NOT TRY TO ADJUST OR REPAIR THE OVEN YOURSELF.
Achtung:

www. sharpconsumer.com/ support/

www.conformity.com

www. sharpconsumer.com/ support/

www.conformity/
LIMPEZA E MANUTENÇÂO
ATENÇAO: NÃO USE PRODutos DE LIMPEZA DO FORNO COMERCIAIS, LIMPEZA A VAPOR, PRODutos ABRASIVOS OU ÁSPEROS, QUE CONTENHAM HIDRÓXIDO DE Sódio OU ESFREGÖES EM NENHUMA PARTE DO SEU FORNO MICRO-ONDAS.

www. sharpconsumer.com/ support/

www.conformer.com/ documents-of-conformity/
Remover, giraryvolveracolocar

www. sharpconsumer.com/ support/

www.conformity/
A. Oplysninger om bortskaffelse for brugere (private husholdninger)
1.IEU
Rør不同程度 in the presence of a single drug.
SPECIFICATIONER
| Modelavn | YC-MS02E | YC-MG02E | YC-MS51E | YC-MG51E | YC-MG81E | |
| Vekselstrømsspænding | 230 V~, 50 Hz, enkelfaset | |||||
| Strømsikring/overstrømsbeskyttelse | 10 A | 10 A | 10 A | 10 A | 10 A | |
| Krævet vekselstrømseffekt | 1270 W | 1270 W | 1450 W | 1450 W | 1450 W | |
| Udgangseffekt: | Mikrobølge | 800 W | 800 W | 900 W | 900 W | 900 W |
| Grill | 1000 W | 1000 W | 1100 W | |||
| Standby | < 1,0 W | < 1,0 W | < 1,0 W | < 1,0 W | < 1,0 W | |
| Energisparetilstand | < 0,5 W | < 0,5 W | < 0,5 W | < 0,5 W | < 0,5 W | |
| Mikrobølgefrekvens | 2450 MHz* | 2450 MHz* | 2450 MHz* | 2450 MHz* | 2450 MHz* | |
| Udvendige mål (B) x (H) x (D) mm | 440 x 258 x 324 | 440 x 258 x 324 | 513 x 306 x 394 | 513 x 306 x 394 | 512 x 300 x 396 | |
| Ovnummets mål (B) x (H) x (D)** mm | 306 x 205 x 304 | 306 x 205 x 304 | 328 x 206 x 368 | 328 x 206 x 368 | 348 x 240 x 356 | |
| Ovnkapacitet | 20 liter** | 20 liter** | 25 liter** | 25 liter** | 28 liter** | |
| Grillrist størrelse (Diameter x højde i mm) | 315 x 308 | 315 x 308 | 315 x 308 | 315 x 308 | 315 x 308 | |
| Drejetallerken (Diameter i mm) | 255. | 255. | 315. | 315. | 315. | |
| Vægt (kg) | ca. 11,3 kg | ca. 11,9 kg | ca. 14,5 kg | ca. 15,4 kg | ca. 15,8 kg | |
| Ovnlampe (LED-type) | 1,5 W | 1,5 W | 1,5 W | 1,5 W | 1,5 W | |
MANUEL TILBEREDNING/MANUEL OPTØNING
1. OPTØNING EFTER TID
GODE RÄD OM OPTØNING

www. sharpconsumer.com/ support/

www.sharperconsumer.com/ documents-of-conformity/
FONCTIONNEMENT MANUEL

www. sharpconsumer.com/ support/

www.conformity/
2. +30s-FUNKTION (Auto-start)
INNAN DURINGER OM HJÄLP
Innan du ber om service, kontrollera varje post nedan:

www. sharpconsumer.com/ support/

www.sharperconsumer.com/ documents-of-conformity/

www. sharpconsumer.com/ support/

www.conformity.com
MIKROAALLOILLA KYPSENNYS
MANUAALINEN KYPSENNYS/ MANUAALINEN SULATUS
1. KYPSENNYS VAIN GRILLILLA

www. sharpconsumer.com/ support/

www.sharperconsumer.com/ documents-of-conformity/
MANUELL TILBEREDNING / MANUELL TINING
- Legg inn tilberedningsstiden og bruk mikrobølgeeffektnivå 100P til 10P for Å tilberede eller tine.
Ror ell snu 2-3 ganger i Ilopet av tilberedningstiden maten der dette er mulig. - Dekk til maten og la den hvile etter tilberedningen der dette anbefales.
- Etter opptingen dekkes maten med folie og skal stä inntil den er fullstendig opptint.
Eksempel:
2. +30s-FUNKSJON (Auto-start)
TINING PÅ TID ELLER I HENHOLD TIL VEKT
1. TINING PÅ TID
Denne funksjonen tiner raskt opp mat samtidig som du kan velge en passende tiningsperiode, avhengig av mattype. Følg eksemplet nedenfor for detaljer om hvordan du brukerijke funksjonen. Tidsomrædet er 0.10 - 99.50.
Eksempel: For a tine opp mat i 10 minutter.
| 1. Velg ønsket meny ved ø trykke TINING PÅ TID-tasten en gang. x1 | 2. Still inn tilberedningstiden ved ø trykke 10 min-tasten en gang. | 1. Trykk START/◇+30s-tasten for ø starte oppitiningen. |
| Displayet vil vise: dEF2 | 10:00 |
2. TINING I HENHOLD TIL VEKT
RENGJØRING OG VEDLIKEHOLD
Advarsel: Ikke bruk kommersiell ovnsrengjoring, DAMPVASKERE, slipende, harde rengjoringsmidler, VASKEMIDLER SOM INNEHOLDER SODIUM HYDROKSID eller stålull på noen del av mikrobøgeovnen.
För rengjöring mä du pASE at ovsrommet, doren, ovskabinetet og annet tilbehör er fullstendig avkjølt. RENGJÖR OVNEN REGELMESSAGE IG FJERN MATRESTER - Hold ovenen ren. I motsatt fall kan overflatene ta skåde. Dette kan virke negativ inn på ovnens livslengde og medfère farlige situasjoner.

www. sharpconsumer.com/ support/

www.conformity/
ANDERE HANDIGE FUNCTIONS
1. KOPEN IN ETAPPES
2. +30s FUNCTHE (Auto-start)
3. KOOKWEKKERFUNCTIE:

www. sharpconsumer.com/ support/

www.conformity.com
GATIRE MANUALA / DECONGELARE MANUALA

www. sharpconsumer.com/ support/

www.conformity/
OLULISED OHUTUSJUHISED
LUGEGE HOOLIKALT LÄBI JA HOIDKE TULEVASEKS UUESTI LÄBIVAATAMISEKS ALLES

www. sharpconsumer.com/ support/

www.conformity/

www. sharpconsumer.com/ support/

www.conformity/
VAŽNE SIGURNOSNE UPUTE
PAŽLJIVO PROČITAJE IČUVAJTE ZA BUDUCU UPOTREBU
Da biste izbjegli požar, mikrovalnu pećnicu tijekom rada nemojte ostavljati bez nadzora. Previsoko postavljena snaga ili predugo vrijeme kuhanja mogu pregrijati hranu, što može rezultirati požarom.

www. sharpconsumer.com/ support/

www.conformity/

www. sharpconsumer.com/ support/

www.sharperconsumer.com/ documents-of-conformity/
A.ИнформачаЗИЗБжданeоТуnotpe6a (часн Домakнства)
1. B Ebponeeckn cbl03
BhimaHne: Ako jenaete da n3xBpIte To3n ype, moJr He n3noJI3BaIte o6nKHOBeHa Kofoa 3a 6oklyk.
I3nON3BaHOTe eNEKTPnuEecko O6OpUyBaHe Tp86Ba Da 6bJe NocTaBeHO OTdEnHO CbTnAChO 3aKoHOdaTeNCTBOTO, KOEt O3NCKBa npaBnHO TpeTnpaHe, ONoN3OTBOPaBeHe n peuNKnPaHa He n3Jn3NoTo OT ynOtpe6a eNEKTPnuEecko n eNEKTPoHNO O6OpYBaHe.
CneBaaKn npakTuKaTHa Na cTpaHnte-NeHKn, qacTHnTe DomaKinHCTBa B EC MoRaT BpSuT CBOITe I3Ie3IOn OyNtpe6a eNEKtpuYeCKn ENEKTPoHNuypeiHa onpeDeJeHm MecTa 3a 6e3nlaTHO cb6bnpaHe.
BЯкоистан" MeCTHnAT TbPROMCKI pIeCTaBHTeM MozeJa b3eMe BaSIna CTap ypeD 6e3IIaTHO pIu n Pokynkata Ha HOB pIoDyKT.
*) 3a noBuey INHΦOpMaζη MoKTe da ce o6bρHeTe KbM MeCTHNte Bnactn. Ako BaIHTe eEKeTprUeCKn IIN eEKeTPOHNn UpeDn IMAT 6aTePn nn aKymlaTOPn, e Heo6xOAnMO da rI n3XbBpNIte OTdEnHO, CbflnacHO MeCTHNte n3NcKBaHnry. Ype3 npaBnHToO n3BexJaHnHa To3N pODoYKT OT ekCIIoataZn, Bne NOIbOMarate npepa60Tkata Ha OtnaDbu, TjXHOTO ONJ03TOBOPaBaHe n pezIKJIpaHn. PoTo3n HauHn Ce npedOTbPaTaBAt Bb3MOxHNTe HeratNBn Bb3DeiCTBnBbpxO kOJInHaTa cPeDa n OObEwKOto 3dPaBe, KOINTo 6nxA MoRn Da Bb3HKnHt Pnp HeNPaBUNHO n3XbBpJIHe.
2.BCTpaHn m3BbH EC
Ako nckaTe da n3XbPnIte To3n pOdyKT, MoJIa CbPjKeTe ce c MeCTHITe BlaCTn i pa36peTe npaBUNHna HauIN 3a n3XbPJIHe.
3a Ⅲbeuapnra: N3na3noTo OT ynoTpe6a enektpnuecko n enektponHO 06opuybahe MoKeJa bDe BbPNaTo Ha TbproBeua n 6e3 da ce KynyBa HO npodykT.
Доиьнгелпгс bopьжениязббирае caизбрөнHa haалнотастарицha www.swico.ch Или www.sens.ch.
5.ИнфорmaцязаиЗХБрлесипpepa60Тka ot npomшлениnotpe6nteni
1. B Ebponeeckna cbl03
Ako npOdykTbTe 6nI n3noI3BaH 3a cToIaHcKn ceJIu I nCKaTe da ro n3XbPnIte:
3a INHΦopMaIg OTHOCHO o6paTHO pIpIeMaHe Ha I npOyKta ce O6bPheTe KbM NaH-6nI3KmI pIepdCTabITe H SA SHARP. Bb3MoXHO e Da 6bJTe TaKcYBaHN 3a pa3xOoIte, pON3TNUaIg OT o6paTHO pIpIeMaHe n PeuKlnpaHe. MaKn IpoDyKTn (m MaKN KOLIueCTBa) 6bxa MoIIN da 6bDat B3Et O6paTHO OT MeCTHn PnyHKT 3a Cb6IpuAHe.
3a IcnpnHa: MoJ, cBbpxKe ce c yctahOBeHaTa cNCTema 3a cb6bpAne, nIi Ce o6bPheTe KbM MeCTHIne Bnactn 3a o6paTHo npniEmaHe Ha BaunTe ynotpe6BaHn pOdykTn.
2.BCTpaHn m3BbH EC
Ako nckate da n3xBbplnte To3n npOdyKT, MoJc CbBypeTe ce c MeCTHNTe BlaCTN pa36peTe npaBvInHnaHn 3a n3XBbPJIHe.
MEPKI 3A BE3OPIACHOCT IPOTNIB I3JIAGAHE HA MINKPOBbJIHOBOJbYEHNE
- He onntBaIte da pa6oTne c cyphnata npri ot TBOpHea Bpata.ToBa MoKe da doBoeDe do n3naIarHe Ha MmKPOBbIHOBO IbUeHHe.IpaTe o6eOanCTeHNTE 6Joknpaun yctpoiCTBa OT Nobpeu H He Tn MoDnFnnpaTe NnHKaKbB NaHH.
- He noctabraye Hnio Mekdy nuebata cTpaHa n BpTaHa Ha yphHa; He no3BolraBte Bbyx yIbTHnTeHNITe NOBbpxHOCTNa da Ce HATpyNBat OCTaTbUn OT xpaHa IIN NOnuNCTBaun npenapTuN.
- He n3no13BaIte fpyhata, ako noka3Ba pni3Haun Ha heu3npabHoc. Ot nbpBocTeenHO 3auHne E bpaTata Ha fypHata da ce 3aTBapra IIbTHO I da 6bJe HAnbIno I3npabHa, 3aeJHo C naHTnte, 3aknUcbAuNTe MexAHN3MN uynbTHINTEHN NOBbpxHOctn.
- He npabete onintn da nonpabte nIIM moNΦnucnPate Φpyhata.
CbДbPЖAHNE
BAKHN INHCTPYKLIM 3A BE3OPACHOCT. 3
MOHTAX 11
CPEUΦIKALUN 12
ФУРHAИAKCECOAPN 13
IIAHEN3A UYPABJIENIE 14
PPEIN PA6OTA C YPEIa. 15
HACTPOIBAHE HA YACOBHINA 15
HIBO HA MUKPOBbJIHOBA MOUHOCT. 16
PbueH PEXKIM HA PA5OTA. 17
MVKPOBbJIHOBO TOTBEHE 18
TOTBEHE HA TPNJI/MIKC TPNJI 19
ДРУПУДОБИЗФУHKЦИ 20
ФУнКЦИ PA3MPA3RABAHE NO BPEME И PA3MPA3RABAHCEСРЯМО TEПLO... 21
PEKIM ABTOMATNUHO MEHIO 22
TAbJIuIa 3A ABtOMATnUHO MEHIO 23
IPOXODJI KUXHEHCKCbIOBE 24
ПОЧECTBAHE И ПROФИАKTИKA 25
IPEIIOPBk3A MIKPOBbJIHOBO TOTBEHE 26
ПЕПОВБКИ 3A PA3MPA3RABAHE. 28
PENEOPbKN 3A PEPOTJIANE. 29
OTCTPAHRAHE HA HEN3IPABHOCTN 30
PENEINDAIOTbPCNTEPOMOUI 31
BAKHNHCHTPYKUIM 3A BE3OPIACHOCT
ПОНЧETЕВИМATEЛНОИЗАЗETE3AБДЕЦINСПAPВКИ
He noctabry Te yphata B HeNOCpeDCTBeHa 6n3OcT Do npyri
n3TOUHnI Ha TOnJIHa, HApPImep KOHBeHnOHaJIHa yphA.
He noctabry Te yphata Ha MxCTo C BnCoka BnaJXHOCT nIi Ha
MeCTa, KbJeTo e Bb3MOxHo Da ce cb6npa Bnara. He cxbxaHraBaiTe n He n3NoJ3BaYTe yphata Ha OTKpntO.
Ako 3a6eJXnTe dIIM, n3KJIouHe ΦypHaTa OT 3axpaHbAHeTo I He OTBapYIte BpTaTAt, 3a Da npeKbCHeTe DoCTbNa Ha KncloPoiD IO PnAmbUnte.
HnKora He n3PbIhJaBaiTe camocToTEnHo peMOHTn IIn MoiΦnKaaun BbyPx yypHaTa. N3BbPbBaHeTo Ha BcKaKBn peMOHTn DeHOCTu, BKJIouyBaun CBaJIaHe Na KaNaKa, npedna3BaU OT MnKpOBblHObAta eHeprN, OT HeyPbIhOMoSeHn Liuca e OnaCHO.
He pa6oTe c fypHaTa npn OTBopeHa BpaTa n He npenpaBny-Te KJIouaJIKnTe NO HnKaKbB HaunH. He n3NoJ3BaIe fypHaTa BVcLyuai, ye MeJdy yNtBHeHnra Ta Ha BpaTa n yNtBTHaUaTa IOBbpxHOCT mMa HkaKbB O6ekt.
He no3BOLAe Te no ynIbTHEnHra Ta Ha BpaTaT a N CbIbTCTBaIHTe Yactn Da ce HATpyNBaT Ma3HNH N MPbCOTN. PoynCTBaIte peoOBHO fypHaT a N OTCTpaHraBaIte BCaKaBbOCTaTbU O T XpHa.
CneDbaiTe Hnctpykunnte B pa3dien "TpiXka N nouchTbaHe". LInncata Ha noDpBjKka MoKe Ja DoBeede Do BNoShaBaHe Ha CbCToHnETo Ha NOBbpxHOCTnTe, KaTO TOBa MoKe Da Noblinye He6laIarOpnptno BVbpxy XNBota Ha ypea n Da DoBeede Do OnaChn CNTyaqnn.
Xopa c n3kyctBeHn BODaun Ha cbpueTo Tp86Ba da ce KOHCyItpaT CnnHnA lekap nllc npOn3BOUnteJHa BODaay Ha cbpTeO OTHOCHO ppeJa3HNTe MEPKN IO OTHOSeHne Ha MINKPOBbJIHOBInTe yprHn.
ПредOTВраТЯВаHe Ha риСka OT TOKOB уДар
B HnKaKbB CnyaH He npemaxBaIe BbHsHnKaNaK.
- HnKora He pa3JIbAaiTe nIi He NoCTaBaiTe ppeMMeTn B OTBOpHTe 3a 3aKJIIOUBaHe nIi B OTBOpHTe 3a BeHTnlaCnIy. B cIyauH Na pa3JIbAhe n3KJIIOUeTe He3a6aBHo fypHaTa n ce o6aJeTe Ha OToPn3IpaH cepBn3 Ha SHARP.
He notanpaIte 3axpaHbaaunKa6en nn nIeNceLa BbB Boa nn npura TeuHOCT.
He n03B0JIbaIte 3axpaHbauJia Ka6eJ da BnCn haPb6 Ha Maca IIN Ha Pa6OTHa NOBbpxHOCT. - Дръжтешхранвашия кабел далаче OT толл поьрхонсти, КAKTO И OT заднату act на Фурнata.
- Пазete урEDA и Кабela му на MeCTa, НedoctbПи 3a Deca noD 8 roДиша Вьзразс.
He ce OINTBaIte Da IOIMeHJe TaMnata Ha 0yPNaTa camn H He IIO3BOJBAIte Ha HIKo, KOITo He e JElEKTPOTEXNk, OTOpN3npaH OT SHARP 3a TOBa. Ako Iamnata n3rOpi, MoJa, KOHCyJItnpaIte Ce c BaIINr TbprOBeu cn C OTOpN3npaH cepBn3 Ha SHARP.
B cIyauy ue 3axpaHbuaaT ka6eI 6bJe IOBpeJeH, cbuIyT Tp86Ba da 6bJe 3aMeHeH B cepBn3, yIbJIHOMoUeH OT SHARP.
He ce npkTe n He ce IIOJeTHe h BpaTaHa Ha yphata. He cn nIgpaIte c fypHaTa n He r N3NoJ3BaIte KaTO ngpaUka.
Bcunkn Baxn HNCTpykun 3a 6e30napocT Tp8Ba Da 6bDaT pa3rncHeH Na Deuata, a IMeHHO: n3PON3BaHe Ha KuxHeHcK npKaBnCn, BHIMaTeJnHO npemaxBaHe Ha OBVBKnTe Ha XpaHnTe - da Ce o6pb7a CpeuaJnHO BHIMaHne Ha ONaKOBKnTe (HaPnI-Mep Ha cAmO3aTOJnA7nTe ce MaTeprnaJn), npEJa3HaueHn Da NOndbpxkaT xpaHaTa CBexa, Tb' KaTO cb7nTe MoarT da 6bDaT MHOro HArOpeseHn.
Другни р dedурждени.
HnKOra n IO HnKaKbB NaunH He n3BbPbBaIe MoiNΦnKaunn Bbpxy fypHaTa.
He npemeCTBaIte ypHaTa dOKaTo pa6oTu.
To3n npOdyKT e npEHa3HaueH 3a yNpOTpe6a B domaunu ycNoBn. Ta3n fOpHa e npEHa3HaueHa eINHCTBeHO 3a domauno npriGOTbIHe Ha xpaHn i HaNTkN. CySeHTo Ha xpaHa nIi DpeXn, KaKTo N HaPraBaHTo Ha OTOpJIteHN I OndIOJxKn, YexLn, Tb6n, BnaJKN KbPnn i T.H. MoJc Da IOBede Do pNCK OT HapaHЯBaHe nIi NoJap. He ce npenopbUba yNpOTpe6a B TbprOBckn nIi Ia6opatOpHn ycNoBn.
Ppei3BaHe Ha BbptTaaTa YHHnI IINI PLOaTa OT CUYBaHe:
a) Праздддддддддддддддддддддддддддддддддддддддддддддддддддддддддддддддддддддддддддддддддддддддддддддддддддд徴аааааааааааааааааааааааааааааааааааааааааааааааааааааааааааааааааааааааааааааааааааааааааааааааааааа
b) He nocTaBraIte HaropeSeHn IIn CTyDeHn XpaHn IIn HaropeSeHn CbIOBe BbPxHy CTyDeHa BbPTaHa QHHa/IIoHa.
c) He nocTaBraIte HnIe O BbPxy BbHsHaTa KyTna NO BpeMe Ha pa6Ota.
3A6EJIEXKA:
HHTO npoI3BOIDITeJIaT, HHTO TbPROBeuT He NOeMaT OTROBOPHOCT 3a NOBpeiN IO fypHaTb CJIeIcTBHe Ha HeCnA3BaHe Ha npoUeDypaT a No npaBnIHOTO eJeKTpueecko CBp3BaHe.
ПонякORA могату се образувах ВODна пара плп Калки по CTehNTe Ha Фурнata, по ультэнята и 3ОнITE 3a ультэня-baHe. Тoba e Hopmaлино яВ lien e He eПриЗнak 3a Teч плп 3a Hen3правноCT.
To3n ypeE npedHa3NaueH 3a 6ntoBa n dpyra noo6Ha ynoTpe6a, Hanp.: B KuxHeNcK N OmeSeHn8 3a nepcoHaJ B MaRa-3HH, Ofncn I dp.; B 3eMeJeLcKn CToIaHCTBa; OT KJIeHTn HaXOTEJI, MOTeJI N dpyrN MeCTa 3a HactaHЯBaHe; B MeCTa 3a HactaHЯBaHe TIN HOUyBka N 3aKycka.
MOHTAX
- OCTpaHETe BCNUKOnaKOBbUHN MaTePnAIn OT BbTpEshOCTTa HaΦypHaTAt, KaKTo N BCNUKN ppeNa3Baun JeHTN NO NobpXHOCTnTE Ha BbTpEshHaTAt qACT.
- Повере te BнIMaTeNHO Фунта 3a BCЯKaBn CJIeNi OT NOBpeDa.
-
NocTabete fpyhata ha cnrgyha, paBna nobbpxnoct,doCTaTbHOn CTabnHa da n3dbpxn TerIto Ha fypHATA nnIOc Hau-Tekkna npOkyKT, koTo moKe da 6bJe pniroTBe h Bb fypHata. He nocTabaTe fpyhata B wkaΦ.
4.ИЗберета равна NOВьхнoc,OCIурвацДОСТаTьHо CБОДиno ПОСТраНСТВО 3a BeHTINaUIOHnITE OTBOPN. BЖ.N3OБражehNETo Na TьРВа CTpaHиц.3aHnATA CTpaHa NaФунata MOne da 6bde pa3nOLOJeHa cpeuCTeHa. -
МИнималhaо мОТаЖна Виcoунa e 85 cm.
MunmamHOTO OTCTOHNHe Ha yPHaTa O T CbceDnTe CTEN NIN N6eKtn e 20 cm. - Octabete MUNHIMYM 30 cm. CBO6OJHO npoctpaHCTBO haD yphata.
He oTcpaHraBaiTe Kpaayetata O TbHOTo Ha yPHaTa.
-БлOKирайКВЕТИнlaцIHнHTe OTBOPN MОжTe ДЯ NOВpeДNTe Фурнata.
IocTabeTe yphnata Bb3MOxHO hain-daneue ot paDIOnpneHmHnI n TeBEN3OpN. Pa6OtaTHa MmKpObJIHOBaTa cypha moke da npEIN3BnKA cmUeHnHa paDINO / TEBEN3IOHNNnCnHnA1.
- CbpxteCTa6nHIO uencena Ha cyphatha KbM cTaHapTeH (3a3eMeH) DOMAKHNCK KOHTAKT.
IPEdynPExKdHNE:
He n3naarateyfhpata hontnina,Boa nInn Bncoka Blaxnoct (Hap. B 6n3oCT nInn Bbypx KoHNBeHOnHaHa ypHa); He naonarate HneocpeCTBeHO doJecho3anaMm MaepnA (Hap. 3aBecn).
He 6JokupaTe BeHTnlaaHNOHHte OTBOpN.
He noctabayite npedmetn Bbpxy fypnata.
IbBpeHa pa6oTa IIN HeNocpeCTBeHO CJIe TOBa BbHUNITE NOBpXHOCTn Ha MKNPOBbJHOBAt a FpyHa MoRat da 6bDat HaropeuHen I npI dOKOCBaHe CbIeCTByBa ONACHOT O3rnapaHe.
CNEUΦUKAU
| Наименованные на мобеля | YC-MS02E | YC-MG02E | YC-MS51E | YC-MG51E | YC-MG81E | |
| ПROMENЛВО Мразково наразожени | 230 V/50 Hz монофазно | |||||
| Линецн поедлaitentel/празьсвач | 10 A | 10 A | 10 A | 10 A | 10 A | |
| Избкваня за пROMENЛВOTOKOBа моши noctot: | 1270 W | 1270 W | 1450 W | 1450 W | 1450 W | |
| Изхочида моши noctot: | Бezорасни за | 800 W | 800 W | 900 W | 900 W | 900 W |
| Грил | 1000 W | 1000 W | 1100 W | |||
| В р散热им на ratов noctot | < 1,0 W | < 1,0 W | < 1,0 W | < 1,0 W | ||
| В р散热им за пechтende на сеньгий | < 0,5 W | < 0,5 W | < 0,5 W | < 0,5 W | < 0,5 W | |
| Мink政府采购 м� чесота | 2450 MHz* | 2450 MHz* | 2450 MHz* | 2450 MHz* | 2450 MHz* | |
| Въшни размени (шишина) x (Височина) x (Дълбочина) мм | 440 x 258 x 324 | 440 x 258 x 324 | 513 x 306 x 394 | 513 x 306 x 394 | 512 x 300 x 396 | |
| Въшени размени (шишина) x (Височина) x (Дълбочина)** мм | 306 x 205 x 304 | 306 x 205 x 304 | 328 x 206 x 368 | 328 x 206 x 368 | 348 x 240 x 356 | |
| КалачтET на Фунatable | 20 питра** | 20 питра** | 25 питра** | 25 питра** | 28 питра** | |
| Размени на поставкута за ргел (діnamетър x височина в мм) | 315 x 308 | 315 x 308 | 315 x 308 | 315 x 308 | 315 x 308 | |
| Въrtая симпя (діnamетър в мм) | 255 | 255 | 315 | 315 | 315 | |
| Терло (kg) | прибл. 11,3 кг | прибл. 11,9 кг | прибл. 14,5 кг | прибл. 15,4 кг | прибл. 15,8 кг | |
| Въ传统产业 LED осв点亮eningе за Фурна | 1,5W | 1,5W | 1,5W | 1,5W | 1,5W | |
* - Tozu npOdykm om2o6apn ha u3sckbaHma Ha EponeuKc mAndapm EN55011. Cb6pb3No mo3u cmandapm, npOdykmBm ce knaucuupa kamo 06opybae 2pyna 2 Knac B. pyna 2 Ozhauaba, ye mozu ypeu zenehacooH npou3beKda padouoecmoma h eep2u noD ophiMama ha enEkpmpomauMaHmu padoaun 3a monlnuHa pa6bomka na xpaHama. 6OpoydeBa om KnaC B o3nauva, ye mozu ypeD moxe da 6bde U3nON3Ban b domaHnu cyloBua.
**BbmyuHnmaKanauemceU3uCnueAup3uMepaHaMaKcunmHaMaUPuHa,du6oHua u buOcuHa. DeicummuHnsmkanauumme HA Kamepama 3xpaHa e noMalbk.
KATO YACT OT NOJITUKATA 3A HENPEKbCHATO YCbBbPJEHCTBAHE, HNE CNI 3AIIA3BAME PIPABOTO DA IPIOMEHARE NIN3AIHA IN CIEUNIΦIKALUINTE BE3 IPNDEYIPEXKDEHNE.
ФУРHA N AKCECOAPN
- 3aKlouBaua CnCTema 3a 6e3onacnoct
- Празорец
- CtbkneHa nnoya
- Bodea poIka
- CbeHnHTeHNO 3BeHO
- Kanak Na BbIHOBOda (HE CBAJIYTE)
- Пибори за уypаравлике на мінкровлновамоцноctи вретмтахe
- ByToH 3a OTBapRHe Na BpaTnUkKaTa
- OTbOpn 3a BeHTnlaun
- BbHnHa Kytna
11.3axpaHbau Ka6eI
12.Пoctabka 3a Гпн
Ybepete Ce, Ye cneHnIte akcecoapr ca HauuHn: BOeua polka, cbeHNHTeHNO 3BHeN OCTKNEHa PnOua
Cama npm moen c rpn:
- NocTBa 3a rpln - IN3NOJ3Ba ce eDINHCTBEHO npri rotBeHe C yHKUJr rpln.
Otobacka3a rpn e npdHa3aHaeHa 3a yonTp6ea ednHCTbeNo npn Fpyhco C rpHn. HE RaN3IOJ3BAIITE npn MmKPOBbHNOROrTBEHe.
Повецейнфорmaцьо OТСОЧУ ynotpe6ata Na noctabkaTa 3a Гил може Te Да НамерпуВ pa3дели Гил на HabсториTO pБКOBODCTBO.
Hikora He dokocbaite rpnla,dokaTo e haropeuen.
3A6EJIEXKKA: Korato nopbyBate prnHaJNeXHOCTN, MoJy YONMeHete Da eIEMeHTa: HAmHeMoBAHHe Na YaCTTaN HaMHeMOBAHmE Ha MoJaEna.
3A6ELEKKN:
- KanakbT ha BbJIHOBOa e Kpexbk. TpI6Ba da ce BHMMAba da He ce noBpeNi npnNouchTaBeBbTpewHocCTTa Ha cyphata.
Cnei npiroTbHeTo Ha Ma3Hn XpaHn 6e3 KanaK, BnHaR nOuNCTBaIte cTaPaTeJIHO KyxHnAHa, OcOBeHO HargBaUaIg rpnI eMeENT, KoITo Tp46Ba Da e BnHaR n Cyu N 6e3 Ma3HnHn IIO Hero. 3acBxHnA no Hero Ma3HnHa MoKe da nperpee, da 3anOue He da puyn nn Da ce 3anAIn.
BnHa n pabotete c cyphna c npabunho noctabeHn Bbptraa ce yHHn I NOCTBA. Toba nomara npri rotbeHe. loo noctabeHa Bbptraa ce yHHn MOKe da dpbHn, da He ce Bbptn npabunHO n da doBepe Do nobpeHa h cyphhata. - Pnri rotBeHe BCnUckn XpaHn I OnaKOBKn C XpaHn Ce NoCTaBt BnHaRn BbPxy BbptTaaTa Ce YHHNIA.
Bbpttata Ce cHnna Moke da ce Bbpttn no nocoka Ha yacobnKOBa t CtePkn Ka nio obaTHe. Nocokata Ha Bbptne H meKe da Ce npomehn BnHaHn npedn CTapTaHa hpyhata.ToBa Hma OTHOseHn Km pInrTOBHeTo Ha xpaHata.


I PNEUYPEXJDEHME: To3n CmBON noka3Ba, Ye npu ekCnnoataa nOBbpxHOCTnte (BpaTata, KopnycBt, BbTreUHOCCTTa Ha cyphata N akcecoapnte) Morat da ce haropeuart. 3a da npedotbparnte n3rapnna, BNHaru n3non3BaIte De6enl pbkauu 3a cypha.
ПАHEЛ 3A УПРавЛЕнUE
- INCJIEN -NOKa3Ba BpeMeTpaHe Ha rotBeHe, MOUHOCT, INHdNKaTOPn I TOeH qac.
- WEIGHT DEFROST (Pa3mpa3raBaHe cnPRAMo terIIO) - HATNCHeTe eHOKpaTHO 3a n36Op Ha fynKcTAta 3a pa3mpa3raBaHe cnPRAMo terIIO.
- TIME DEFROST (Pa3mpa3raBaHe no BpeMe) - NaTnCHte eHOKpaTHo 3a n36op Ha yHKuYraTa 3a pa3mpa3raBaHe no BpeMe.
- ABTOMATNUHO MEHIO -и360р на abTOMaTNUHO MeHIO 3a rotBeHe.
- BPEME-3aDaBaHe Ha ToeH Yac Nn TaIMepe.
- HNBO HA MKNPOBbJIHOBA MOUHOCT - 136op Ha MKNPOBbJIHOBA MOUHOCT.
- GRILL (Грел) - заadingаные на рогама за ratовец с рел.
8.COMBI. (KoM6HnHaHO roTBeHe) - npOprama 3a KOM6HnHaHO roTBeHe C MmKpOBbJHObA eHeprna n rpnI. - TERNO/NOTION - 6yToHn 3a n36Op Ha TERNo nIIN nopCnn.
- KITCHEN TIMER (Kyxhenck TaMep) - Moxe da 6bnde n3PON3BaH KaTO MNHyTeH TaIMep NII 3 npOrpaMaPaHe H BpeMe 3a pceToRaHe.
- SET CLOCK (YacobnK) - 3aDaBaHe Ha ToyeH YaC.
- START/+30s - Bytoh 3a CTaptnpahe Ha nporpaMa. HataHcHeTe eNOKpatHo 3a roTbeHe c npoDbJnxTeJIHOCT 30 cekyHdn pni PbIHa MOUHocT.
- STOP/ECO (Ctôn / EheproctneTBAuP pejM) - npri eJHOKpatHO hATNCaHe nporpamata ce noCTabY B na?a; cnEe Dbe HATNcKaHn pnorpamata ce OTMeH.N3noJI3Ba ce 3a 3aDaBaHe Na EheproctneTBAuP pejM.
cAmOCToTeJIHO MmKpOBbJIHOBO rOTBeHe/pa3Mpa3BaHe
MKNpOBbJIHOBO rOTBeHe +rpnI
ПЕДИ PAБOTA СУРEDA
BkIouhe foyphata. Bbpxu dinpneJe ue ce n3nne "0:00" u ne npo3Byu an ayno cunHan.
To3n moen pa3noIaracfynKcuny cAcobHnK, KaTO KOHCymaJraTa Ha eHeprna BpeKIM Ha rTOOBHOCT e NO-MaJIka ot 1,OW. 3a noboe neopdo6hoCTn OTHOCHo HAcPOBaHe Na CAcobHnKa Bk. No-dony.
HACTPOIBAHE HA YACOBHnKA
Bawata fpyHa nMa yacOBnK c 24 yacOB peXIM.
- HatncheTe eHNOKpaTHo 6yToH CLOCK SET [I].Bbpxy dncnpeJe zaoNeJa npemrBa "0:00".
- BbBeTeToUHO BpeMe C NOMOuTa Ha CbOTBEHTHe 6yTOHn - 10 min 3a Yac n 1 min n 10 sec 3a MInHyTN.
- Hatnche6ytoh CLOCK SET 1,3a da notbpynte hactpoikata.
3A6EJIEXK:
Ako yacobnkbte hactpoeh, cnei npknlovahe ha roTbeHTo Bbpyx nCnIeJe 6bJe noka3An ToHHaT aC. B npotBHe CNyau, cnei kaTo roTbeHTo 6bJe 3aBbpSeHo, ige ce n3nIse "0:00".
3a npoBepka Ha toueh uac no BpeMe Ha rotBeHe HATNCHE 6yToH CLOCK SET. ToHOTo BpeMe 6bJe n3nncAo Bbpxu DCnPnE 3a 2-3 cekyni. Toba He OKa3Ba BnIaHHe Bbpyx npocea Ha rotBeHe.
- Ako no Bpeme Ha hactpoiBaHe Na hacobHnka 6bJe haTncHAT 6yToH STOP nIIN IInCBA deIcTBne 3a NOBuee OT eHa MNHyTa, fypHata ige CBm NpeDnHHTe HactpoiKn.
Ako eeneKtpnuecknT 3axpaHbau kaeBnHa Baata fypHa e npkekbchat, cIeBb3ctaHOBAhe Ha 3axpaHbAHeto, H daCIIpe Ie ce nokaxe: "0:00". Ako ToBa ce cnuyn no Bpeme Ha rotBeHe, npogpamata 6e 6bJe n3TPnTa. DHeBHOTo Bpeme CbIo 0e Ce n3TPne.
HIBO HA MUKPOBbJIHOBA MOUHOCT
Cnei kaTo npOrpaMaTa 3a roTbe He 6bJe 3aJaHeHa, aKO 6yToH START/ 10 +30s He 6bJe HATncHaT Do 1 MInHyTa, NaCTpoKATA ue ce anHnIPA.
Ako Bpata Ta 6bJe OTBOpena Hn BpeMe Ha rotBHe, 6yToH START/ 12 + 30s Tp8BaJa 6bJe HATncHt 3a npOdbJIkaBaHa nporpaMaT. Pn HAtnCKaHe Ha 6byoHa 9e npOzBuyn eDnOKpaTeH 3ByKOB CnHnA.
BytoH STOPMOKe da 6bDe n3non3BaH 3a:
1.ИЗТРИВАЕHa Г佩а Кп ВсЕмHa HabТрОДВАнeto.
2. BpemeHHo cnpahe Ha yphhata no BpeMe Ha rotBeHe.
3. 3a OTMHa Ha npOrpama nO BpeMe Ha rotBeHe HATnCHeTe 6yToH STOP dBa Tn.
4. 3aIaBaHe n OTMHa Ha yHKuYraTa 3a 3akIIOUbaHe 3a JeTcKa 6e3OnacHOCT.

STOP / ECO
3A6EJIEXKKA
Ako MnkpoBbIHOBaTafyphnHe Ce 3nON3Ba B npOdbJIxHene Ha 5 MNHyTN, a BpTaTa e 3aTBOpEna, fynKcIyra 3a 3akIIOUbaHe 3a DeTcKa 6e3oNacHoc Tte 6bJe AKTNBpuHa ABTomAtuHo. LcPpOBaTa KlaBnaTpA Te npctane Ha da 6bJe AKTNBaHa. 3a DeAKTNBpuHa He fynKcIyra 3a 3akIIOUbaHe e Heo6xoJIMo cMo d a OTBOpTe n 3aTBOpTe BpaTata. CLeD ToBa DeIcTBe NcPpOBaTa KlaBnaTpA tse Moke Da 6bJe 3nON3BaHa.
MVKPOBbJIHOBO TOTBEHE
Bauata fypna moke da ce nporpaMnpa do 99 mHytn n 50 cekyHdn (99.50).
Pb4HOTBEHE / Pb4HOPA3MPA3RAHAE
BbBeTe BpeMeTpaeHe HnBO Ha MoUHcT O T 100P Do 10P 3a rotBeHe nn pa3Mpa3BaHe.
Pa36bpkBaIte n 3aBpTaIe xpaHaTaN, KOraTo e Bb3MOxH0, 2-3 nTn Ha rotBeHe.
Cnei roTbeHe, nokpiTe xpaHata i octaBeTe da npctoI, kOrato ToBa ce npenopbUba.
- Cnépá3mpa3raBaHe, pOKpnIte xpaHaTa C φOIIIO N OCTaBeTe da npeCTOn Do nbIHO pa3mpa3raBaHe.
Ppumep:
3a da rotbnte 2 mHytni 30 cekyHn npn MoOIOHcT Ha MmKpOBbIHaTa 70%
3a roTbeHe Ha rpiB n npOdbIxKeHne Ha 20 MmHyTn c NMOuTa Ha 6yToH GRILL.
| 1. Hatис Hedge ednokpaTHO 6byToH GRILL. ∞x1 | 2. Бъединения Нeo6хODIMOTO врeme 3a награване чрз дуКраТно натискане на 6byToH 10 min. | 3. Hatис Hedge 6byToH START/+ +30s, за старurate ргILA. (Bьрух дисп leя сьдe показано образно овsprяван на зада徵TOВрeme.) |
| G | 20:00 | 20:00 |
- HatncheTe eHOKpaTHo 6yTOH KUXHEHCKN TAIMEP.

-
BbBeTeJKeJHOTo BpeMeTpaHe Upe3 HaNTsKaHe Ha 6yToH 1 min 5 nTn.
-
Hatnche6ytoh START/ +30s 3a da cTapnpate TaMepa.
4.Пибоверетиспья. (Ile6bIe noka3aHOb 6bpaTHO OTbpoRbAHe Na 3aJaDeHOTOB WpeMeTaPeHe Na rotBeHe/ pa3Mpa3RaVe.)
Korato BpeMeTo Na6nJxN, 1e np03Byu nNetkpaTeH 3BykoB cnHaJI n LED 1e nokaxe BpeMeTo.
Mожete дa вьбende врeme до 99 мнунуtn, 50 секунд. 3a дa anулпаTe KUVHEHCKN TайМЕР, дokato otбразва HamajnteNo, habtchete 6byToH STOP.
BELEXKA:Функцята KXYHEHCKI TAIMEP He moze da ce n3noJ3Ba no BpeMe Ha rotBeHe.
4. 3AKJIIOUBAHE 3A DETCKA BE3OJNACHOCT:
I3no3Ba ce 3a npedotbpaTbaHe Ha HexeHaO aKTHBpuAe OTe Da 6e3 poDntEckn KOHTpOJ.
a. AKTINBIPAhe Ha PEXKIM 3A DETCKA BE3OIIACHOCT:
HaTnCSHe n 3aDpBxTe 6yToH STOP 3a 3 cekyni. Ie npO3Byu npOdbJxnteneh ayIO cnHAn, a Bbpx yncnpe Ie 6bde n3ncaHO "LOC". PeximbTe eakTbupan. Ipi pa6oTa B To3n peXIM, Bbpy dncnpe Ie 6bde noka3BaH ToCHnTac. CneI haTnCKaHe Ha hKoI OT 6yToHte IIN OTbapJe H BpaTa, NaPncbT "LOC" Ie 6bde n3nCBAH 3a 10 cekyni.
b. OTmHa HaФyHKuYTa3AKJIIOUBAHE 3A DETCKA BE3OINACHOCT:
HaTnchete n 3aDpbkTe 6yToH STOP 3a 3 cekyni,doKaTo He npOzByu npOdbNKeTeHe aydno cnHnA.
5. PEXKUM EKO:
B pexim Ha rotobhoct HaTnchete eHOKpTaHO 6yToH "ECO". TeuHKpCTaHnIe TnCnne Ie ce n3KJIouN upebT ue npemHe B pexim EKO. DncPteMT oMe Ja 6bJe aKtubpan npn BCaKo cNeBaAso DeiCTBne, KaTO MnkPoBbJHoBata fypHa Ie Ce B pexim Ha rotobhoct.


Фундяр RA3MPA3BAHE IO BPEME IN PA3MPA3BAHE CПЯМО TEGIO
1. PA3MPA3RABAHE IO BPEME
Ta3n yHKnna pa3Mpa3aBa 6bP3O xpaHa, KaTO n03B0JraBa da ce n36epe noDxOJaI nepoI 3a pa3Mpa3aBaHe, B 3aBVCIMOCT OT
Bvda xpaHa. CneBaIte doHnIte npImepn 3a noDpo6HocTn kaK ce pa6oTn c a3n fynKcNy. BpeMeBaTa paka e: 0:10-99:50.
PpMep:3a pa3mpa3BaHe Na xpaHn 3a 10 MInHyTN.
| 1. Изберете Нжното мени, натуckай的服务ьх 6утон Быр3О PA3MPA3ЯBAHE. x1 | 2. Въединения вретмраиме за говtrighteme чегоз endokpaшно натуckане на 6утон 10 min. | 1. натумене 6утон START/ +30s, за стартаpe pa3mpa3ява themselves. |
| Ди检пей-byт ще пokedges: dEF2 | dEF2 |
Bélekni OTHOCHO pa3mpa3raBaHTo IO Bpeme:
Cnei roTbeHe 1 np03Byu nIeKpaTeH 3ykoB cnHn Ha LED 1e ce nokae BpeMeTo, aKO yacOBna e HarnaceH.
Aк уасовика He e harlaceн, dinрлягт ще пкалу само "0:00" korato rotbeHeTo npNKJIIOUH.
- HarlaseHaTMOUHcTe 30P n He moKe da 6bJe npomeHeHa.
2. PA3MPA3RABAHE CIPRAIMO TEJIIO
Фурнata pa3nolara cnpedBapntelno 3aadeHn nporpamn, BkIouBaun pa3nHNO BpeMeTpaHe n HbA ha MoHocT, Taka ye xpaHn KaTO CBNcKO, Teleko n NIIeKo da MOrAT da 6bDat pa3Mpa3raBaHn NO-JeCHO.ДиаP3OHT ha Terlnoto Moke da Bapupa ot O,1kr do 2Kr b INTEPBaHn ot O,1kr.
CneBaeTepnimepa no-dony 3a noBoepe noDpo6HocTN OTHOCHOpaOtaHa Te3n fynKcim.
PpMep:Pa3mpa3yBaHe na Meco c Terno 1,2 Kr c nomoouta Na yHKnuaT a PA3MPA3RABAHE CIPRMO TEJIO.
IocTabeTe MeCOTOBIIITbKcBdNIIHaNoCTaBkata3a pa3Mpa3BaHe Bbpxy BbpTaTaCe YHHia.
| 1. Изберете необхимото мени чес сеньокатно наимскаце на 6уто PA3MPA3ЯBAHE СПРЯМО TEГЛ.O. x1 | 2. Вьberete TEглOTO, наимскайки 6уто TEГЛО/ПОPLДИ, дOKATO Желанота сстюст ce поны Вьрух диспley. | 3. наимснete 6уто START/ +30s, за ссторiate pa3mpa3яBAHe. (Bbvpx duicпley сze б自由贸易 noобразно otбожиBaHe на задени… В徕е за ралмра3яBAHe.) |
| Диаспейът се пokаме: dEF1 | kg/1- | 1.2 |
3ampa3eHnTe xpaHn ce pa3mpa3raB aT -18°C.
BEJIXKIN 3A PA3MPA3RAHAHETO NO TETIO:
- Праздддддддддддддддддддддддддддддддддддддддддддддддддддддддддддддддддддддддддддддддддддддддддддддддддддд徴а
- Дулгадулгадулгадулгадулгадулгадулгадулгадулгадулгадулгадулгадулгадулгадулгадулгадулгадулгадулгадулгадулg
- Дулгадулгадулгадулгадулg
- Дулгадулгадулg
- Дулгадулg
- Дулгадулg
- Дулгадуl
- Дулгадуl
- Дулгадуl
- Дулгадуl
- Дулгадуl
- Дулгадуl
- Дулгадуl
- Дулгадуl
- Дулгадуl
- Дулгадуl
- Дулгадуl
- Дулгадуl
- Terloto Ha xpaHata ce 3akpbIra Harope Ha 0,1 Kr, Hanp.0,650 Kr KbM 0,7 Kr.
Ako e Heo6xOIMO, 3auiTe MaJIK 30HJ OT MecO tIIN ITuTa C MaJIK npUeTa anyMnHHe BO fOJIIO. Toba ue npEioTbPaTI 3OHTE OT 3aToPJIHe NO Bpeme Ha pa3Mpa3BaHeTo. YBepTe ce, ye fOJIINO He JdoKocBa CTehnte Ha cyphata.
PEKIM ABTOMATNUHO MEHIO
C nomouta Na 6byoHTne O T ABOTMATUHO MEHIO ypHaT a abTomaTuHO u3bnpa npaBnIHnTe peKIM IN BpeMeTpahe 3a roTbeHe. IpoCneTe nocOeHnI npimep 3a no-iodpo6Ha HhOpMaunr OTHOCHO pa6oTaTc Ta3N fHyHKnIy.
Плumsер: Пиговаяне на да пьнени karpoф(a 0,46 к)с поюцта на Функция ABTO MEHIO.
| 1. Изберете необховимо мени чес有很大оградно на лессян 6утон Jacket Potato (Пылен kapтоф). | 2. Наточete сь沫они TEGЛО/ ПОЛЦИ HATOPE/HАДOLЛУ и… пожддеге за на лессян Jacket Potato за на лессят… неберете небховимь сbroй картофи (до 3). | 3. Наточete сь沫он START/ +30s, за ссторiate rotbehene. (Bырух диссяя ( бъд покеано образно otspraybahe на заадаеното breme за rotbehene.) |
| Диаспleyыт я: 1 | ka/- 2 | diasпley: |
3A6ELEKKN:
BbHnHa qacrHa yphhata
BbHnata qact Na BawaTa yphra Tpr6Ba da ce nouchtBA BHMaTeIHO C MEK canyu H BOa. YBepeTe ce ye canya e OTMNT C BlaxHa KbPna n CneT TOBA noNDcywete.
Paanen 3a ynpablenne
OTbopete Bpata Napei YnCTHe 3a Da JeakTbnBpate KOHTPOnHnaHEn, KaTO Tp8Ba DA BHNMaBaTe PnI NOuchTBAHETo My.. N3NoP3BaTe CAMO KbPnA C BoDA, BHMaTeHNO I36bPwEt e NaHEn aDOKaTo Ce NouNCTn. IV36BaRbte N3NoP3BaHETo H npeKOpemHn KOnUeCTBa BOJa. He N3NoP3BaTe KaKBnTo n Da ex XmMnueckn nIin abP3a3NBn npenapatn.
Bbtpewha qact Ha yphata
TABJIMUCA 3A OTCTPAHRABE HA HEN3IPABHOCTN
| Сьмн EHINE | OTTOBOP |
| Hаичие на Вьздушно туение okono вразата. | Дожато Фурнata работи, ВьздухьтВ Heйнatable Вьтrewhoct сиркунлра. Улльтэнята на вразата не заразягету phунataхерmetиески, тaka чe e Вьзможно ИЗпсуckeане на Вьздухнави. |
| Вьфурнata ce образува Конден3, кочо e Вьзможно да порokane ot вразатa. | Овикновeto Вьзгшостта на Фурнata с по-stудана от priи�отьната xраha, тaka чe пага, поучеса по говенeto, с поелению pod Формatura на Конден3 Вьху по-stуданыnotьхост. Количесъю на пага зависи от сьдьржанению на Вoda в priи�otьната xраha. Няковхрани(нарр). картофи) сьдьржат ВИСОКО кOLINHECTBO Вoda. Конден3ыт, ЗатборенВ СтБКЛOTO на Вразата, Трава на ИЗчесны do Няковко уаса. |
| Посвettingае ил Искрение ot Вьтressesността на Фурнatura по Вразeme на rotbehene. | При пблінжавае на метален обekt до Вьтrewhoctта на Фурнatura по Вразeme на разота Вьзнikka Искрени. Вьзможно с обая на hapрави поьчхостта по-груба, но не си р dedизвигало nobpeda в самата Фурна. |
| Искр squи картофи. | Уberete ce, che BCNUKи Кьнове с отстaramени, a karpofoite ca produyчени, поставени ДИРЕТНО Вьху Вьtrightацда упиня ил в Термоустий Сыd. |
| Фурнata не пботи, korato приборьт за управлиения на Вразementsанно e постaven н поэция разлuchа от 0. | Пожевete дали вразата e пообerte заразенha. |
| Готьенeto ce ИЗвршва празално Бабно. | Уberete ce, che e ИЗбарно правлиotto НИВо на мошноct. |
| Фурнata Иддаваш汞. | Прожеве на rotbehе/разимрадявае мінкововынobataе eheprгия поточа на Импунци. |
| Вьшниот калak e haropeшen. | Калakьт можедане с наогорши. Дрьжто Deцата настара. |
ПЕДИ ДА NOTБСТЕ ПOMОШ
Ipei Da notbpcnte nomo 3a peMOHT n o6cnykBaHe, npOBepe TaI:
-Фурната в БКлочета Надпекно Кьм eелктуческaita Мржka. Ак това не сда, ИЗкlioчete сицсени, Изчakайт
10 cekyHdn n Г ВКлочete OTOHO.
- HякоупnpednataeiteNe He e n3rOprn i dajn HЯma 3aJeCtBaH nIpaBEN npEkbcba. Ako BCnUKO n3rIeJda Hapei, BkIIOUeTe Dpyr ypeB CbSsIa KOnTakT, 3a da npOBepuTe daJI pa6OTn.
- Pπi6opnte 3a ynpablenne Ha MmKpObJlnHOBA MOUHOC T BpeMeTpaEne Ca B npaBnHa NO3nIyra.
Bpaatae 3aTbopeHa npabnlo, cakTNbnpaHa cnctema 3a 3akniOuBaHe. B npotnbEn cnuyaYpeBt He fynKcnoHnpa.
AKO HIKOE OT ONICAHNTE OBCCTORTEJICTBA HE PA3PEUIN IPOBJIEMA, CE O5bPHETE KbM KBALINΦUINPAH TEXHUK. HE ONITBAIHTE DA IONPABTTE NIM MOINΦUINPATE ΦYPHATA CAMOCTORTJEHO.
Pažnja:
Vas proizvod je oznaZen ovim simbolom.

www. sharpconsumer.com/ support/

www.conformity/
A. Informacije o uklanjanju od strane korisnika (privatna domacinstva)
1. U Evropskoj Uniji
Paznaj: ukoliko ze lite da se re site ove opreme, molimo da ne koristite obicnu kantu za otpatke!
Upotrebljena elektricna i elektronska oprema se mora odlagati posebno u skladu sa propisima koji nalažu pravilnu upotrebu, popravku i preradu upotrebljene elektricne i elektronske opreme.
Kao što to važi za države Članice, privatna domačinstva unutar država EU mogu vratiti svju upotrebljenu elektrčnu i elektronsku opremu ovlasćenim objektima za príkupljanje ove opreme i to besplatno*.
VAŽNA BEZBEDNOSNA UPUTSTVA
PAŽLJIVO PROČITAJITE IČUVAJITE ZA BUDUĆU REFERENCU
Izbegavati opasnost od požara. Mikrotalasnu ernu ne treba ostaviti bez nadzora tokom rada. Nivoi napajanja koji su previsoki, ili vremena kuvanja koja su prevelika mogu pregrejati hranu i dovesti do požara.
Ova rerna je dizajnirana za korišćenje samo na radnoj povrsini. Nije dizajnirana da se ugradi na kuhinjsku jedinicu. Ne stavljaje rennu u ormarić. Elektrčni izlaz mora biti pristupačan kako bi jedinica mogla da se isključi laku u hitnim slučajevima.
Napajanje naizmeničnom strujom mora biti 230-240 V, 50 Hz, sa osiguračem jačine 10 A za distributivnu liniju, ili prekidačem distribucije najmanje jačine od 10 A. Odvojeno kolo koje služi samo za ovaj urežaj mora da se dostavi.
Ne stavljajte ernu u područja gde se toplota nagomilava. Na primer, blizu konvencionalne rerne. Ne instalirajte ernu u područjima visoke vlažnosti ili gde vlaga moze da se prikupi. Ne Čuvajte niti koristite ernu napolju.

www. sharpconsumer.com/ support/

www.conformity.com
A. Informação o likvidáciai pre používatelov (sukromné domácnosti)
1. V Europskej unii
DÔLEŽITÉ BEZPECNOSTNÉ POKNY
POZORNE SI ICH PREČÍTAJTE A USCHOVAJTE SI ICH
TABULKA RIESENIA PROBLEMOV

www. sharpconsumer.com/ support/

www.conformity/

www. sharpconsumer.com/ support/

www.conformity/
He cnpaTeCnHa DBePcTa Neu i He po3xntyIe ix. He rpaTeCn 3 Niuchu N He BnKOpNCTOBuYTe ii B JKOcti irpaWKn.
Heo6xio 03NaHOMTu DiTei 3 ycima BaJINBIMn npaBnIaMn 6e3neKn: KopncTyBaTnscr pyukamn dIy nocdy, o6epexHo 3HimATn shkipky 3 npOdyKTiB, 3BepTaTN oc6blNBy yBaRy Ha naKyBaJIbHi MaTepiAHI (HaNPKlaid, MaTepiAHI, 3daTHI do camOpOzirpBy), npu3HaueHi dIy 36epxeHHra CBIXoCTi npOdyKTiB, OCKIbKn BOHm MoKytb 6utyN dyJxe rapYHMn.
Inchi3acTepeXeHHa
HeHAMaRaITeCsAkyIMOCb YINHOMMOiKyBaTNIiU.
He nepecsybaIte niu nIud acseknpyaTaucii.
He BnKOpNCToBvIe MeTaJIeBn Nocyd, 1o BiI6NbAe MlKpOxBnIi MoKe BnKJIuKaTn IcKpy. He CtABTe B pIy KOHcePBHi 6JIaShaHKN.
36epexhenna ciinichocti nobopothoro cToIka nn deka:
a) Першни мити поворотné столк чп.dekoВ Bodi, 3auekaite, pOKn BiH Oxolone.
b) He klaidiTb Ha xolodHn IOBOPOTn CTOLIK uN deKO rapauy ixy a6o rapaun nocyd.
c)Пдчас ekcnnyataцii neqi He KlaadiTb Ha ii 3OBhiHniKOpnyc XODHI npedmetn.
ПРИMITKA:
He kopructytecIЯ mikpoxbunboooi o6p06kn pnaCTNKOBIMN EMHOCTAMn, kso niu He oxolona nicra po6OTn B KOM6iHOBAHOMy peKIMi (3aJexHo BiD moJeI neu): BOHN MOxUbPO3PnabUTncb.
UeYMOBnI 3HaK O3Haaye, 1o NOBepxHIn HarpBaIOb8cPiD yac ekCnLyatauii npnilaay.
MOHTAX
- BnIMtB 3 BNYtpiHbOJI kamepni neci yci nakyBaIbHI MaTepiAIN 3HIMtB 3axNCHy nnIBKy 3 nobepxhi KopnyCy mIKPOXBnIbOBOOI neci.
- YBaXHo OOrIaHbTe NiHa NpEaMeT 6yDb-kaKnx NooKoDKeHb.
- BctahOBJIouTe niu ha NadiIHy rOpNIOHTaJIbHy NOBepXHIO, MiUHCt b KaOJ IOZBOJNTb BVTPmuTn BaTy nei pa3OM 3 NaHBaxyIM npEeMToM, kKm moKHa B Hi HarpibATn. He CTABTE niu y uAphi.
- Bn6epitb ronp3oHTaJIbHy nobepxHIO, Micu ha kki doctaTHBO JnI doTpMaHnHeo6xHOrO npocTopy hABKO bIXdHnx i (a60) BxixdHnx BEHTmuaizHHX OTbopIB. NIB. pncyHOK Ha nepuich ctopiHci. 3aHbHO CTINKHO anapat MOxHa NOCTaBtUN Do CTINH.
Mihimalha MOHTaxHa BnCota CKnaa 85 cm.
Bidctahb mix 6iHMMn CTIHKMn MIXPOXBilboOoi neqi CymixHMn CTIHAMn CHydb-akmm iHIMMn npedmetamm MaC tAHOBNTn He MeHwe HIX 20 cm.
Bucota BilbHoro npocTopy Hnd niuHMo Ma cTaHOBuTn He MeHwe hIX 30 cm. - He 3nImaTe HixKu 3Диua neui.
- IpeekpmbaHnB BxIDnix i (a60) BxIXIHnx OTbOpIB MOKe CnpuHHTN NOWKODJHNN nei.
- P03taoObyTe nii yakomora dani biD paio-Ta teneBizHnX npinMaHiv. KopncTyBaHnMikpoxBnIbOBOIO niyO MoKe cnpuHnTn BUNHKHeHHa 3abd y npinMaHHi paio-Ta teneBizHnHO rHaNo.
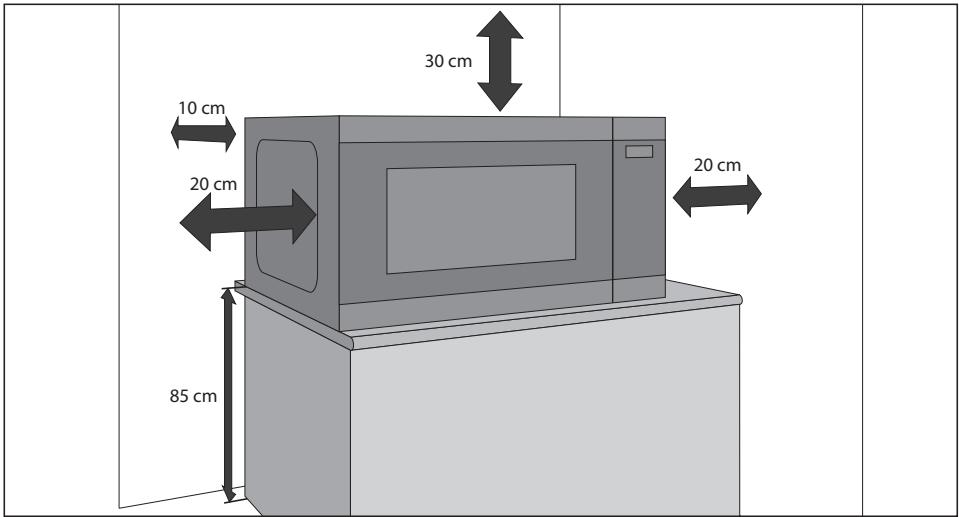
- HadiHb BCTaBte BNkny nei do tAndaprHoI 3aemJeHOI no6yTOBoI eJektpoO3eKn.
YBARA!
He ctabte nii 6iIy dkepei Tepna, BONOrn a6o B BONOrnx Micx (HapnPKnad, 6iIy 3BnuaHoo iDyXOBKn), a TaKoJ 6iIy 3aMnCTnx MATEpianib (HapnPKnad, 7tOp).
He nepekpuBaIte BeHTnJIaIciHi OTbOpN.
He cTaBTe Ha niu XoDi NipeDMeTn.
IiD uac po60ti npotraFOM neBHoro yacy niCIA 3akIHueHnpo6OTNI MIKPOXBnBObOIO neHi He doTOpKaITecbdo II Koxyxa:BINMOE6byTNrapaYIM.
TEXHIHIXAPAKTEPNUCTUKN
Hikon He TopkainTeca rapaoyi pewitkn.
PIMITKA: 3aMOBIAJIOU pIuADJa, Ha3BiTb Ha3By DeTani I MOeIb nei.
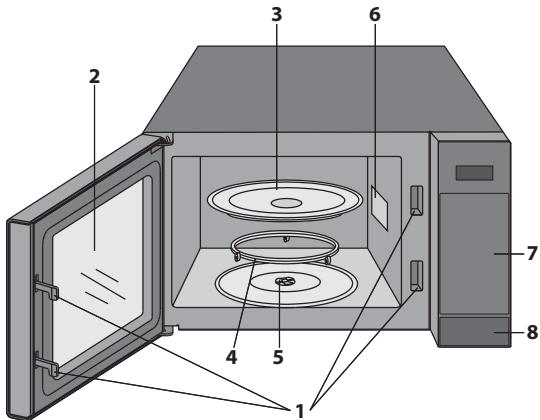
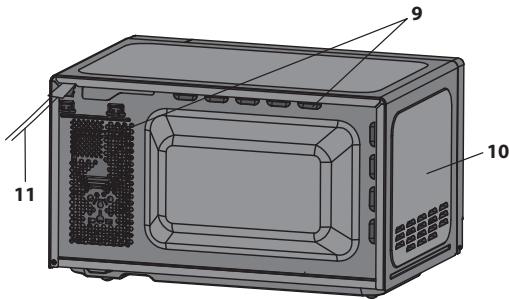
ПРМITКИ:
Ouynuoyn iuy 3cepeyHn, ydbte dyke obepexhi, uo6 he nookodtn naMky Kpniuky XBunleBody.
ToTyIOUH JxNPHI CTpABN 63 KPNsKIN, NO 3aBepuHEni peTebHO OOnuYte BnTpIpiHNO KAMEpy OOCbIMNo HarpBaJIbHN eMeENT rPNIIO. BOHN MaOTb 3aBKnD 6yTN CxyMm NcTmN. IpeperPiBaHHa3actapInOrO Xnpy MoKe npIN3BeCTNO DBOHNKHeHHaDMUY NnONkExi.
- Pered BnKOpNCTaHnM nei 3abJn nepeKoHyIeTcB TOMy, IIO nobOPOTnI CTOnIK i NOrO nIDCTaBky BCTaHOHeH aLeXHM YHOM. Ze 3a6e3neuMb peTeJIbHe i pIBHomipHe npriroTyBaHHa CtpAB. HenpaBInbHO BCTaHOBeH cToNK nID cac EKnPlyatauii MOKe rypKOTiN, noraHO o6eptaTmC Hn HabITb NOOkODHTn NiY.
-Дя npriroTyBaHnI iXi II ta EMHOCTI 3 HeIO 3aBXd n CII d CTaBHTn Ha NOBOPOTnI CTOINK.
- Поворотнистолик обертаевся за рогинниковоюстпкову у有很大 полесхому наразмky. Наразмокобертыня зminюевся кожного pa3y, коли пч BMNKaIoTB. Zeждим чином не влпiningае на有很大 поцеспригтува相关内容
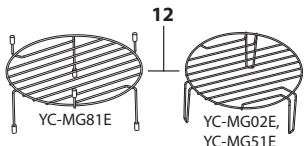
I NOPEDEXEHH: La no3nauka o3naue, 0o nac po6otn nobepxhi moxytb harpiBatnc. Pia c aoc p6obTu dBeprata, 30BniuHm KOpync, BnYtpiunHa Kamepa, npuaTaN Ta nocyd Moxytb CInbHO Harpibatnc. Uo6 yHnKHytn onikiv, 3abXdN Kopucryteca TOBCTMn pykabuukamn.
ПАHEЛБ KEPYBAHHЯ
- DINGJIEN-BiO6paXaε lac npnroTyBaHH,notxHicTB,ihdkaTOpni ac 3a roDHHNKOM.
- PO3MOPOXKYBAHH 3A MACOIO -ДЯ рОЗМОРОЖУВАнь 3aMACOIO cIiHaTINCHYTN OДИH pa3.
- PO3MOPOXyBAHHa 3A yACOM -ДЯpo3MOPoxyBaHHa 3a yAcOM.
- ABTOMEHIO — Bn6ip MEHIO aBtOMaTHUHO npNroTyBaHHA.
- YAC-Bn6ip roDHHNka i TaMepa.
- MICROWAVE (NOTYKHICTb MIKPOXBUNJBOBORO NOJRA) - Bn6ip pIBHra NOTyXHOCTi MIKPOXBUNJBOBORO NOJRA.
- GRILL (ΓριMb) - BCTaHOBHeNHa nporpaMn nprirotyBaHHa hrpiJIi.
8.COMBI.(KOMBI)-Bn6ip KOM6iHOBaHOro pexmmy npriroTyBaHHa (MikpoxBnI Ta rpnJIb). - MACA/K-CTb NOPiB -Bn6ip Macu YN KjIbKoCTi npOji.
- KITCHEN TIMER (KXYOHHNI TAIMEP) - KHONika Do3BOLJIe KOPINCTyBaTnCSa TIaMePOM 3aDaTIc npInroTyaBHnA.
- SET CLOCK (HAJAWTYBATN FOINHHNK) - KONka DO3BOJAE HanaWtYBaTn Yac 3a FOINHHNKOM.
- START/+30s (CTAPT/+30cek) - KhoNka nycky. HaTncHyBn Odn pa3, moXHa roTyBaTn npotrrom 30 ha nobHi nOtuyxHocti.
- STOP/ECO (CTON/EKO): OJHOKpaTHe HaTNCaHHa D03BOJIa TUMcAOBo PpINnHInTn PpIroTyBaHHa, aDbOKpaTHe —ckacybTaN Ioro. TaKoX BVKOpncSTOByETcbdIra HanaHTyBaHHa peXmMy eKOHOMii eheprii.

JIiue mikpoxBnIbOba nii

Mikpoxbilboba niu i3 rpnneM
ПЕPS HIX PO3ПОЧАТЕКСПЛУATAЦИ
- YbimkhItb nii. Ha dincnpei 3'ABtbcra cac "0:00", i niu BnidaCTb OndHopaOBI 3BYKOBNI CnHaI.
- Lma moelb maé yhkuio roHHnka, a B pexmi ouikybaHn cnoxnbAe MeHs k 1,0 Bt. Ipo hanauTyBaHHraoHHnka dNB. HNkye.
HAJIASTYBAHHI ROINHHNKA
TodHHNK nei npaioe B 24-ToDHHOMy pexmi.
- HataHcHb Odn HaP3 KhoNky «3AaATn YAc» [O] Yac «00:00» NoUHe 6IImaTn.
- HATNCKAQUH KONKN HAJIaSTyBaHHaCay, BBeiTb IOTouHn qac. BBeiTb roHN, HATNCKAQUH KNONKY 10 min, Ta XBNJINH, HATNCKAQUH KONKN 1 min Ta 10 s.
- HataChiB KhoNkUe 3AADTu YAC), 106 3aKiHUnHaJaawTbAHnroDHHnka.
ПРМITКИ:
- RaKIO roDINHHNK HalaustBoHaO, Ha DNcPiNei nicI pyriroTyBaHnN poka3yBaTmEcbr npabInbHn cac. RaKIO JROdINHHNK He halaustBoHaO, Ha DNcPiNei no 3aBepWeHHi priroTyBaHn6 Bye noka3aHoc «0:00».
- Ⅲo6 niiac nprirotyaBHnI3HATncsac daO6n, HATNCHITb KhoNky BCTAHOBJIeHHr IODINHHNKA - ToDi Ha dncnnei ha 2-3 cekyndn 3'YABTbcra cac do6n. Lc He BpInHe na pnoec nprirotyaBHnH.
-Якшо в рекшинлувань ratinннka Hatinchyn KhoNKy CTON aboякшпpoTAROM 1 xBnHnH HiOTo He BiD6byatmtebca, niv BiDHOBNTb nonepeHne HanaWtBuHNH. - Y pa3i BiHbOJIeHHJ XINBHeHHI niCII nepe6oIO Ha DnCIIeMikPOxBnIbOBoI nei 6bnIMaTmNE NOBIOMJIeHHN "0:00". RaKIO CE TpAnITbcI niD cac pnpiroTyBaHH, 3aHa I nporpaMa 6yde cKaocBaHa. Yac do6n TaKoK 6yde cKInHYto.
PIBEHb NOTUxKHOCTI MIKPOXBnIbOBOTo IIOJa
| Ровенnotужност | НатOMICity Конь PIBEN ПOTУЖHOCTI MIKPOXBUNBOOJE EHEPП. | Ди检пел Прочent |
| ВИСOKИ | x1 | 100P |
| x2 | 90P | |
| ПОМIPNO ВИСOKИ | x3 | 80P |
| x4 | 70P | |
| CEРДИ | x5 | 60P |
| x6 | 50P | |
| ПОМIPNO ИЗБКА (POЗМОPOЖУBAHЯ) | x7 | 40P |
| x8 | 30P | |
| ИЗБКА | x9 | 20P |
| x10 | 10P | |
| x11 | 0P |
- JI K NOKa3aHo, Niu Mae 11 pIBHb notyXHOCTi.
Дязminи рьнnotужnoti nic acnpirotybaHHaHTNCKaTe KONKy"PIBEHb NOTYJXHOCTI"doBIDopaxeHHa nDCnnei notpi6hoi notyHKoHcTI. BBeDITb 6axaHm yac npirotybaHHaTNCaOuN KONKn BCTaHOBJIeHHa cuy npirotybaHH.ДяЗanCky neci haTNCiHTb KONKny"CTAPT". - Ⅲo6 niz cac npirotoybaHH nepebipuPiPBHeB notyKHOCTi, HATNCHTb KHONky "PIBEHb NOTYXHOCTI". POKn Yc KHOtKa HATNCHeHa, Ha DCNpIe BiIO6paJxATmETbCra PBHeB notyKHOCTi. Y toi vac, KOJI Na DCNpIe BiIO6paJxATmETbCra PBHeB notyKHOCTi, 3BOPOTHI BIDNIk pOIOOBxyBATmETbCra.
- RaIIO BIVbpaTn pIBeHb "OP", nIu npAicOBaTMe 3 yBIMKHeHIM BeHTINlAToPOM, aIe 3 HynboOIO nOTyXHICTIO. LcI peJIM MOJHa BVKOpICTOBByTaN dJIY CUYHeHHa 3aNaXy.
Y6iBbOcTI BUNaIKIB peKOMeHDoBaHO BVOKOpNCTOByBatn Taki pIBHi nOtJxHoCTi:
100P/90P-(BWCOKA) BnKopncTobyeTbCra dIa WbNkoT npriroTyBaHn yu po3irpiBaHn, HapnKnad, 3anikaHok, rapaHx hanoiv, oOoiv Tsoio.
80P/70P-(IOMIPHO BNCOKA) BnKOpNCTOByETbCra IJrTpRbAlIwO npriToTyBaHnnpoKyTbIiNbHOI KOHCtEHNJI, k-OT CmXeHOrO M'rca, M'rCHOrO XJI6a Ta rTOBnX cTpaB y TapiInkax, a TAKOX HIXHNx CTpaB, HApNKnLaID, 6iCKBtIHnx TICTeUOK. YcbomypeXMMI 3HnXeHoiNOTyXhOci IxA rTOYETcB pIBHomipHO 6e3 nepeCMaxyBaHHa 3 6okib.
60P/50P-(CEPEHJ)ДЯ npoуктв сьлhoКонсcteи, lo BmaraioTpBaIoro npirotoBaHHa, KOINOTyIOBcT TpaDnuiHIM CTOOCObM, HapriKnaI, Дя CTpab 3 JIOBUnHIn. PekomeHdyETbcra BIKOPiCTOBvBaTn cei peKHM, lo6 M'rco 6yNo HiKHM.
40P/30P - (ПОМIPHO HN3bKA) ВИКОPGИСТОВЕТСД LAЯ рОЗМОРОЖУBAнH; ВИБИРАЕ TЮnotужHICТь ДЯп рIBHOMIPHRO рОЗМОРОЖУBAнH. BOHA тAKOД IEально nacyЕ LAЯ BAPKIN pUCy, cnaTei, raNYuWOK tApnroTByAHHЯячHorO 3aBapHOrO крemy.
20P/10P-(HIV3bKA) BnKOpNCtOByETbcra IaI NOBilbHOrO po3MopOxyBaHHa, HApNklaI, KpEmOBx TopTb UIN BnNiuch.
Puchni PEKIM POBOTN
BiDunHeHHaDbepuT:
IooB BiDunHInT DBePcTa,HaNTCHItb KHOINKy BiDUnHeHHa DBePcT.
3anyck neui:
Плготуе порodyкт,在нладьixупдатуару i noctавtle ii habовогистолikч noklaдьстару пото на Нboro.Вбравши notporihн ржим пirotoувань,заунithы дерета n hatuchitkh konky "CTAPT/+30 cek".Плс уас пirotoувань嘉兴у bprchny можна 6iibwntu

START/+30s
3aDahn uac, HATNCKAIOU KHOKN "UAC PUNIOTYBAHH" a6o KhoNky "CTAPT/+30ceK".
Kaio 3aata nporpamy npirotoybaHH, ane He nAtncHt N KhoNky "CTAPT/ ① +30cek" npotraGM 1 XbuiHn, HanaatyyBaHH 6bye cKaocobaHO.
KhONkY "CTAPT/ +30se k " Heo6XiHNO haTnCHTu, JAKUO npOTAROM npriOTyBaHHa 6bIyo BIDuHHeNo DBePcTa. JAKUO KHOJIKY HaTnCHTu pRaBnJIbHo, BOHO CynpOBoDxkyeTbCra ODHopa3OBm 3ByKOBm CnHaJOM.
Kopnteyteca KhoNkoTo "CTOn", 06:
- BnnpaBHTN NOMILKny iD Yac nporpaMyBaHHra;
- Na deaKni yac 3ynHHTn niu nd ac npiroTyBaHHa;
- ckybTu nporpamy niD uac npiroTybaHHa;Ia IboRo HATNCiB KHONKy "CTOn"Dbiu;
- YbIMKHyTN CHBIMKHyTN yHKLIO6JLOkyBaHHB iD iTei.

STOP / ECO
ПРИМITKA:
-Якшо протягом 5хилин Мікрхьnlboа nii He BnKOpncTObyetyc8a (а дерцутazaunHe), abTomatuHOBMnkaetcb3axnche 6IokyBaHH.прпннгпрацobatn klaibiatypa.Пб6прпнntu 3axnche 6IokyBaHH,посто bIDUnHITb dervzeta -todi klanbiAtya 3HOby nochne pauObatn.
ПРИГOTУBAHЯ СТРав Y MIKPOXBUNьОВIйпechi
BCTaHOBUNTaMepHa5XbUINH.
- Hatnchitb KhoiKy KITCHEN TIMER ("KXYOHNI TAIMEP") oIN pa3.

-
Bveitb 6aXaHnYac pInrOToBaHNHaTINCHyBmN KONKy1 min5pa3ib.
-
Hatncitb kHONky "CTAPT/ +30 cek", 063aynctntu TaMep.
4.ПодыltьсаHa duinnei.(Ha dincneiBilO6paKATMImeTbCBAPOtHnBIdNkBCaHOBNHOrOyacnyPnIROTyBaHNHу pOMMOxOyBAHNH.)
KoHn HacTaHe 3aDaHn dJa TaMepa Yac, NiY BnJaCTb 5-KpaTHn 3ByKObN CnHaI, NiCJy OTO Ha DnCnJIe 3'ABNTbCn Yac Do6n.
Bn mokeTe BCTaHOBHTn 6ydb-ynuac do 99 xBNH, 50 cekyhd. llo6 3ynHnTn BiDnK yacy Ha KYXOHOMY
TAYMEPI, npocTo HATnCHiTB KONKy "CTON".
PIMITKA:Функцio "KXYOHHNI TAIMEP" He moxHa KopncTyBaTnca nД yapac npiroToYBaHnI iKi.
4.ФУHKUЯБLOKYBAHHA BIDДITEH:
BukopunctobyeTbca dIa3ano6iraHnHa HecaHKzioHOBaHOMy BukopunctaHHIO.
3AYBAXEHH IIO DO PO3MOPOXYBAHH 3A MACOIO:
- Пешед заморожуванham поевір'te, чіnpodyктс CBIXI ta kicihi.
Bary ctpabn 3aokpyrIIOJb do 6iNbIooT 3ToUHicTIO do 0,1 Kf, HapnPKlaD, 0,65 Kf 3aokpyrIIOJb do 0,7 Kf.
3a Heo6xIDHocti HapknIte DeKJI dINHKN M'ra Ca YI nTIuIe HBeENIKIMU IMaTOyKAMn AIOMIHIcE BoI fOJbI. Ie nonepeDITb HarpBaHnRA uXn DInHOK niD hac Po3MOpOxyBaHnR. CTeXTe 3a Tm, Uo6 fOnIbRa he TopkanaCtIHOK neui.
POBOTA B PEXKIMI ABTOMEHIO
KhoNk ABTOMEHIO ABOTAMUHO BCTAHOBNIOTb NpTi6hni peXm npriToYBaHH iKi (Doklndiue duB.c. UA-4 ta UA-23).Ioo 3po3ymITn, knpaioe cyfHKci, BVKohaiTe npNKnad HnJxpe.
Hapnka: Pnprotybattn Dbi Kaptonnnn (0,46 Kr) B nywnnn Hi 3actocybaaHm yHKui ABtomeHo.
| 1. Виберов Небхiadно пункт �нно, натучевшим коноку Jacket Potato (Картоль Бушлинhi). | 2. Натскайто Кнокки 36ышени/ Зменения маси/nорцii abo праздожуто Натскати Кноку Jacket Potato (Картоль Бушлинhi), соб Вибрази по triбу КльькICTь karтоллн (До 3). | 3. Наточь Кноку START/ +30s (CTAPT/+30сек), цоб розочати пригOTУВANHA. (Hа дисл ei ВidiбражатмЕtsя ЗворOTиBIDIK часу пригOTУВANHA.) |
| Ha дисл ei nevi зявітбя: 1 | kg/2 |
ПРМITКИ:
Macy nkiBkictb npodykTIB MOKHa BBeCTn, HATNCKaOuH KONKn 36JIbSeHHr/3MeHSeHHMaCm/NopciJ ax do BiDobpaXeHH NoTpi6HOi Macn/KilbKoCTi. BBeiTi Nlme Macy iXi. He BBObTe Macy nocdy.
-Дя В蜱еннь сььwoич Meнwoi Barn,нix habepeHOB Ta6linci «ABTOMEHIO».
TABLIÇA ABTOMEHIO
TABUNIPOWUKYHECINPABHOCTEI

www. sharpconsumer.com/ support/

www.conformity.com

www. sharpconsumer.com/ support/

www.conformity.com

www. sharpconsumer.com/ support/

www.sharperconsumer.com/ documents-of-conformity/
MIKROHULLÁMÜ TELJESİTMÉNYSZINT
1. MOD (Kijelzö: C-1)

www. sharpconsumer.com/ support/

www.sharperconsumer.com/ documents-of-conformity/
Sharp Consumer Electronics Poland sp. z o.o.
Ostaszewo 57B,87-148 Lysomice,Poland
SHARP CORPORATION
1 Takumi-cho, Sakai-ku
Sakai City, Osaka
590-8522, Japan
SDA/MAN/0213