USER MANUAL MO 38MF KX 225C - 38L MF VALBERG
This product has a 2-year warranty as of the date of purchase*, covering any fault resulting from a manufacturing or material defect. This warranty does not cover defects or damage resulting from incorrect installation, improper use or abnormal wear of the appliance.
*upon presentation of the sales receipt.
WARRANTY CONDITIONS
FR
Thanks!
Thank you for choosing this VALBERG product. Chosen, tested and recommended by ELECTRO DEPOT, the products of the VALBERG brand are easy to use, reliable and of an impeccable standard. Thanks to this appliance, you can be sure that each use will bring you satisfaction.
Welcome to ELECTRO DEPOT.
Visit our website: www.electrodepot.fr

Preview of the appliance
Description of the appliance

Using the appliance
Before first use
Using your oven

Useful information
Cleaning and maintenance
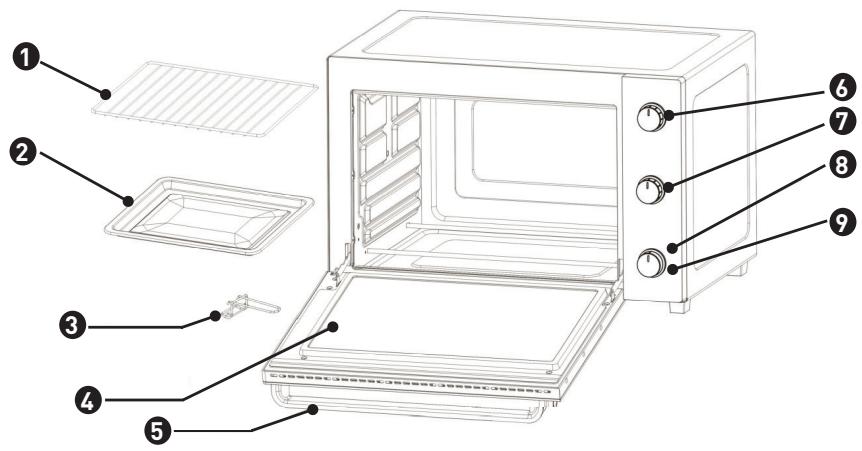
Description of the appliance
1 Grill rack (supports 5kg MAX)
2 Food tray
3 Food tray handle
4 Glass door
5 Door handle
6 Thermostat knob
7 Function knob
8 Power indicator - The power indicator indicates that the appliance is in operation
9 Timer knob
Features
Knob: Temperature Knob, Function Knob and Timer Knob.
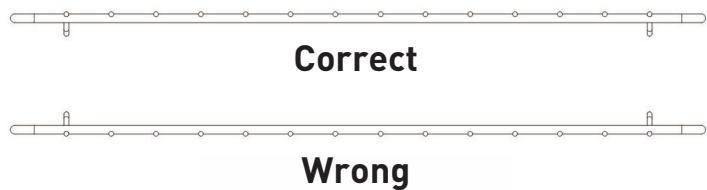
Grill Rack: For toasting, baking, and general cooking in casserole dishes and loading food tray.
Food Tray: For use in broiling and roasting various foods that contain water or will release water or oil during cooking.
Food Tray Handle: Allows you to pick up Food Tray and Grill Rack to avoid any scald.
Door handle: Cool handle to avoid any scald.
Glass Door: Transparent tempered glass allows you to view the cooking process conveniently.
Before first use
Remove all packing materials from the appliance.
• Take all the accessories (rack, tray) out of the appliance. - Wipe the oven and accessories with a damp cloth and then dry them. • Fully unwind the power cord. Then plug it into an electrical outlet. - Set the function selector to - Set the thermostat knob to 230°C . - Set the timer knob to 15 minutes in order to operate the oven empty (without food or accessory) during this period.
ATTENTION
The oven may emit a slight odor and some smoke when it is used for the first time. This is normal and will stop very quickly. Make sure that the appliance operates in a well ventilated place.
Using your oven
Tips
For baking and grilling, it is advisable to always preheat the oven to the desired cooking temperature in order to achieve perfect cooking.
- Place the drip tray under the baking rack to avoid fat from dripping onto the heating elements and the bottom of the oven.
- If the food to be cooked is oily or greasy, you can use two sheets of aluminum foil. Place one on the drip tray and cover the food with the other sheet. This helps prevent oil and grease splashing on the oven walls during cooking.
Functions

Stop oven cooking

Upper heating

Lower heating

Dual heating

Upper heating with fan assist function

Dual heating with fan assist function
Traditional Cooking
This function automatically initiates upper and lower heating.
- Place griddle in lower position.
- Set function selector at
- Set cooking temperature with thermostat button.
- Set cooking time with timer button.
- Wait until oven reaches temperature set, and then put food in.
- Should cooking be finished before end of time set, turn timer button manually to "0".
Cooking with fan assist function
This function is ideal when combined with using your oven for traditional cooking or keeping food warm. The fan function circulates heat in the oven, allowing you to quickly cook red meat, poultry, and fish, ensuring they are tender, succulent, and juicy.
- Place the griddle in the lower position.
- Set the function selector to the appropriate setting.
- Set the cooking temperature using the thermostat knob.
- Set the cooking duration using the timer knob.
- Wait until the oven reaches the set temperature, then place the food inside.
- If cooking finishes before the set time, turn the timer knob manually to "0".
Grilling with fan assist function
This method is ideal for grilling minced beef steaks, chops, sausages, etc. It is also excellent for browning foods such as scallops.
Place the griddle in the upper position and the grease collection tray below the element.
TIP
We recommend pouring two glasses of water into the tray to prevent smoke and burnt grease patches, and to make cleaning easier.
- Set the function selector to the appropriate setting.
- Set the cooking temperature using the thermostat knob.
- Set the cooking duration using the timer knob. Preheat the oven for about 5 minutes with the door slightly ajar.
- Place food on the grill, then close the door until it is ajar. Consider turning the food when it is half-cooked.
- If cooking is finished before the end of the set time, turn the timer button manually to "0".
The fan at the back of the device is intended to keep it cool and may continue operating for a long time after using the device for optimal cooling.
Cleaning and maintenance
Allow your oven to cool completely before cleaning. Unplug it from the wall socket.
- The griddle, drip pan, and grease collection tray can be cleaned in the normal way either by hand or in the dishwasher. Always use a damp sponge to clean external surfaces.
- Do not use abrasive substances, as they might damage the coating. Take care that no water or detergent leaks into the oven through the air holes located on its surface.
- Never immerse the oven in water or any other liquid.
- When cleaning the inside, never use corrosive substances (spray detergents) and never scrape surfaces with sharp or pointed objects.
- If the appliance is not kept in a good state of cleanliness, its surface may be damaged, which would negatively affect its life and lead to a dangerous situation. The oven should be cleaned regularly and any food residue should be removed.
Removing and cleaning the grease collection tray
- Remove and clean the grease collection tray by pulling its handle.
- Wash it in soapy water and leave it to dry.
- Never use abrasive substances.
- Replace the grease collection tray.
Replacing the lamp
This product contains a light source exempted from energy efficiency class.
The light source in this product can be replaced by the end user. Please unplug the appliance before any light source change operation.
The light source shall be removed at the end of the product's useful life, with sorting and recycling done separately.
![graph LR A["Sun"] --> B{Checkmark} B --> C["Sun"]](/content/2024/12/214802/images/4dfb01a02250bf147f59e6ace9ed0f6541566e8eaaccd27468317d7ba9465836.jpg)