ZCV550G1XA - Cooker ZANUSSI - Free user manual and instructions
Find the device manual for free ZCV550G1XA ZANUSSI in PDF.


User questions about ZCV550G1XA ZANUSSI
0 question about this device. Answer the ones you know or ask your own.
Ask a new question about this device
Download the instructions for your Cooker in PDF format for free! Find your manual ZCV550G1XA - ZANUSSI and take your electronic device back in hand. On this page are published all the documents necessary for the use of your device. ZCV550G1XA by ZANUSSI.
USER MANUAL ZCV550G1XA ZANUSSI
Hob - Helpful hints and tips ____ 7
Hob - Care and cleaning ____ 7
Oven - Daily use ____ 7
Oven - Clock functions ____ 9
Oven - Using the accessories ____ 9
Oven - Helpful hints and tips ____ 10
Oven - Care and cleaning ____ 15
What to do if... 17
Installation 18
Environment concerns 19
GREAT BRITAIN & IRELAND - Guarantee/Customer
Service ____ 19
www.electrolux.com ____ 20
Subject to change without notice

Safety information
Before the installation and use, read this manual carefully:
- For your own safety and the safety of your property
- For the protection of the environment
- For the correct operation of the appliance.
Always keep these instructions with the appliance also if you move or sell it.
The manufacturer is not responsible if incorrect installation or use results in damage.
Children and vulnerable people safety
- This appliance can be used by children aged from 8 years and above and persons with reduced physical, sensory or mental capabilities or lack of experience and knowledge if they have been given supervision or instruction concerning use of the appliance in safe way and understand the hazards involved. Children shall not play with the appliance.
- Keep all packaging away from children. There is the risk of suffocation or physical injury.
- Keep children and animals away from the appliance when the door is open or the appliance is in operation. There is the risk of injury or other permanent disability.
- If the appliance has Child lock or Key lock function, use it. It prevents children and animals from accidental operation of the appliance.
General safety
- Do not change the specifications of this appliance. There is the risk of injury and damage to the appliance.
- Do not let the appliance stay unattended during operation.
- Switch off the appliance after each use.
Installation
- The adjustment conditions for this appliance are described on the label (or data plate).
- Only an approved technician can install and connect the appliance. Contact an approved service centre. This is to prevent the risks of structural damage or physical injury.
- Make sure that the appliance is not damaged because of transport. Do not connect a damaged appliance. If necessary, contact the supplier.
- Remove all packaging, stickers and layers from the appliance before first use. Do not remove the rating plate. It can invalidate the guarantee.
- Fully obey the laws, ordinances, directives and standards in force in the country where you use the appliance (safety regulations, recycling regulations, electrical or gas safety rules etc.).
- Be careful when you move the appliance. The appliance is heavy. Always use safety gloves. Do not pull the appliance by the handle.
- Make sure that the appliance is disconnected from the power supply during the installation (if applicable).
- Keep the minimum distances to the other appliances and units.
- Do not put the appliance on a base.
- The appliance must be earthed.
- Make sure that the electrical data on the rating plate agree with your domestic power supply.
• Information on the voltage is on the rating plate.
Electrical connection
- You must have the correct isolation devices: line protecting cut-outs, fuses (screw type fuses removed from the holder), earth leakage trips and contactors.
- The electrical installation must have an isolation device which lets you disconnect the appliance from the mains at all poles. The isolation device must have a contact opening width of minimum 3 mm.
- The shock protection parts must be fixed in such a way that they cannot be undone without tools.
- Always use a correctly installed shockproof socket.
- When you connect electrical appliances to mains sockets, do not let cables touch or come near the hot appliance door.
- Do not use multi-way plugs, connectors and extension cables. There is a risk of fire.
- Make sure not to squash or cause damage to the mains plug (if applicable) and cable behind the appliance.
- Make sure that the mains connection is accessible after the installation.
- Do not pull the mains cable to disconnect the appliance. Always pull the mains plug (if applicable).
- Do not replace or change the mains cable. Contact the service centre.
Use
- Only use the appliance for domestic cooking tasks. Do not use the appliance for commercial and industrial use. This is to prevent physical injury to persons or prevent damage to property.
• Always monitor the appliance during operation.
- Always stay away from the appliance when you open the door while the appliance is in operation. Hot steam can release. There is a risk of burns.
- Do not use this appliance if it is in contact with water. Do not operate the appliance with wet hands.
- Do not use the appliance as a work surface or storage surface.
- The cooking surface of the appliance becomes hot during use. There is a risk of burns. Do not put metallic objects, for example cutlery or saucepans lids, on the surface, as they can become hot.
- The interior of the appliance becomes hot during use. There is a risk of burns. Use gloves when you insert or remove the accessories or pots.
- The appliance and its accessible parts become hot during use. Take care to avoid touching the heating ele-
ments. Young children must be kept away unless continuously supervised.
- Open the door carefully. The use of ingredients with alcohol can cause a mixture of alcohol and air. There is the risk of fire.
- Do not let sparks or open flames come near the appliance when you open the door.
- Do not put flammable products or items that are wet with flammable products, and/or fusible objects (made of plastic or aluminium) in, near or on the appliance. There is a risk of explosion or fire.
- Set the cooking zones to "off" after each use.
- Do not use the cooking zones with empty cookware or without cookware
- Do not let cookware boil dry. This can cause damage to the cookware and hob surface.
- If an object or cookware falls on the hob surface, the surface can be damaged.
- Do not put hot cookware near to the control panel because the heat can cause a damage to the appliance.
- Be careful when you remove or install the accessories to prevent damage to the appliance enamel.
- Cookware made of cast iron, cast aluminium or with damaged bottoms can scratch the hob surface if you move them on the surface.
- Discoloration of the enamel has no effect on the performance of the appliance.
- To prevent damage or discoloration to the enamel:
- do not put any objects directly on the appliance floor and do not cover it with aluminium foil;
- do not put hot water directly into the appliance;
- do not keep moist dishes and food in the appliance after you finish the cooking.
- Do not apply pressure on the open door.
- Do not put flammable materials in the compartment below the oven. Keep there only heat-resistant accessories (if applicable).
- Do not cover oven steam outlets. They are at the rear side of the top surface (if applicable).
- Do not put anything on the hob that is liable to melt.
- If there is a crack on the surface, disconnect the power supply. There is a risk of electric shock.
- Do not put heat-conducting materials (e.g. thin metal mesh or metal-plated heat conductors) under the cook-
ware. Excessive heat reflection can damage the cooking surface.
Care and cleaning
- Before maintenance, make sure that the appliance is cold. There is a risk of burns. There is a risk that the glass panels can break.
- Keep the appliance clean at all times. A build-up of fats or other foodstuff can result in a fire.
- Regular cleaning prevents the surface material from deteriorating.
- For your personal safety and the safety of your property, only clean the appliance with water and soap. Do not use flammable products or products that can cause corrosion.
- Do not clean the appliance with steam cleaners, high-pressure cleaners, sharp objects, abrasive cleaning agents, abrasive sponges and stain removers.
- If you use an oven spray, follow the instructions from the manufacturer. Do not spray anything on the heating elements and the thermostat sensor (if applicable).
- Do not clean the glass door with abrasive cleaning agents or metal scraper. Heat resistant surface of the inner glass can break and shatter.
-
When the door glass panels are damaged they become weak and can break. You must replace them. Contact the service centre.
-
Be careful when you remove the door from the appliance. The door is heavy.
- Bulb lamps used in this appliance are special lamps selected for household appliances use only. They cannot be used for the full or partial illumination of a household room.
- If it becomes necessary to replace the lamp use one of the same power and specifically designed for household appliances only.
- Disconnect the appliance from the power supply before the replacement of the oven lamp. There is the risk of electrical shock. Cool down the appliance. There is a risk of burns.
- Do not clean catalytic enamel.
Service centre
- Only an approved engineer can repair or work on the appliance. Contact an approved service centre.
- Use only original spare parts.
Disposal of the appliance
- To prevent the risk of physical injury or damage:
- Disconnect the appliance from the power supply.
- Cut off the mains cable and discard it.
- Discard the door catch. This prevents children or small animals from being closed inside of the appliance. There is a risk of suffocation.
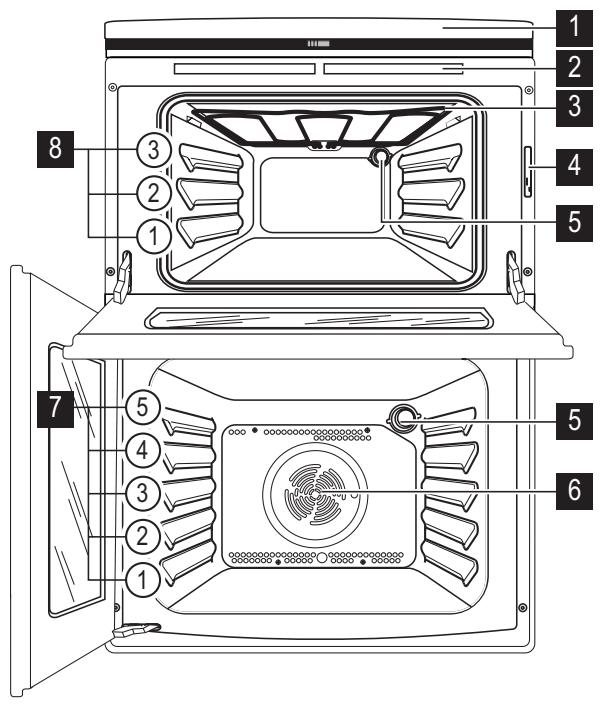
General overview
text_image
1 2 3 4 5 8 7 5 6 3 2 1 4 51 Control panel and hob
2 Air vents for cooling fan
3 Heating element
4 Rating plate
5 Oven lamp
6 Fan and heating element
7 Shelf positions of the main oven
8 Shelf positions of the top oven
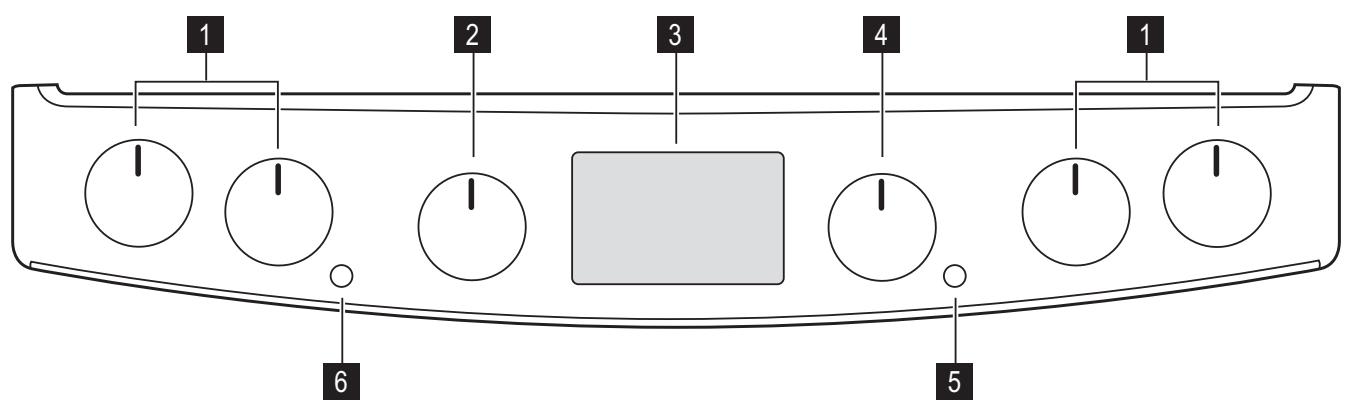
Control panel
text_image
1 2 3 4 1 6 51 Hob control knobs
2 Top oven / Grill control
3 Electronic timer
4 Main oven control
5 Main oven indicator
6 Top oven / Grill indicator
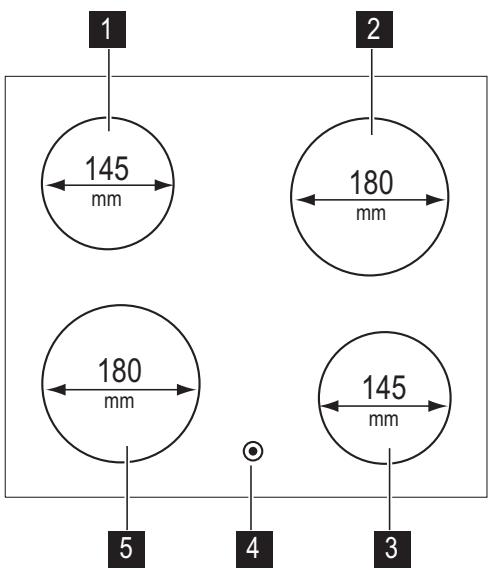
Cooking surface layout
text_image
1 145 mm 180 mm 180 mm 145 mm 5 4 3Accessories
- Deep grill roasting pan
To bake and roast or as pan to collect fat. - The roasting pan grid
Before first use

Warning! Refer to "Safety information" chapter.
Initial Cleaning
- Remove all parts from the appliance.
- Clean the appliance before first use.
Important! Refer to chapter "Care and Cleaning".
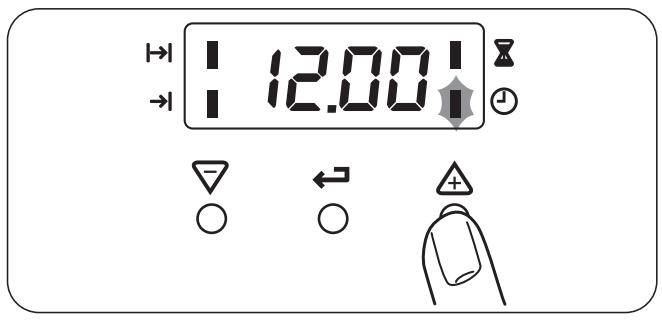
Setting the time

The oven only operates after time set.
text_image
12.00Hob - Daily use

Warning! Refer to "Safety information" chapter.
1 Single cooking zone 1200 W
2 Single cooking zone 1800 W
3 Single cooking zone 1200 W
4 Residual heat indicator
5 Single cooking zone 1800 W
To put in the deep roasting pan.
- Oven shelf
For cookware, cake tins, roasts.
When you connect the appliance to the electrical supply or in case of a power cut, the Time function indicator flashes automatically.
To set the current time use " + " or " - " button.
After approximately 5 seconds, the flashing stops and the display shows the time of day set.
For time change you must not set an automatic function (Duration I→I or End →|) at the same time.
Preheating
Set an oven function and maximum temperature and run an empty oven for 45 minutes, to burn off any residue from the cavity surface. Accessories can become hotter than in normal use. During this period an odour can be emitted. This is normal. Make sure the room is well ventilated.
Preheat the two ovens. Heat up one oven at a time.
Heat settings
| Control knob | Function |
| 0 | Off position |
| 1-6 | Heat settings(1 = lowest heat setting; 6= highest heat setting) |
Hob - Helpful hints and tips

Warning! Refer to "Safety information" chapter.
Cookware

- The bottom of the cookware must be as thick and flat as possible.
- Cookware made of enamelled steel and with aluminium or copper bottoms can cause discoloration on glass ceramic surface.
Energy saving

- If possible, always put the lids on the cookware.
- Put cookware on a cooking zone before you start it.
- Stop the cooking zones before the end of the cooking time to use residual heat.
Hob - Care and cleaning

Warning! Refer to "Safety information" chapter.
Clean the appliance after each use.
Always use cookware with clean bottom.

Scratches or dark stains on the glass ceramic have no effect on how the appliance operates.
To remove the dirt:
- – Remove immediately: melted plastic, plastic foil, and food with sugar. If not, the dirt can cause damage to the appliance. Use a special scraper
Oven - Daily use

Warning! Refer to "Safety information" chapter.
- Turn the control knob to a necessary heat setting.
- To complete the cooking process, turn the control knob to the "0" position.
Residual heat indicator
The residual heat indicator comes on when a cooking zone is hot.

Warning! Risk of burns from residual heat!
- The bottom of pans and cooking zones must have the same dimension.
Examples of cooking applications
| Heat setting: | Use to: |
| 1 | Keeping warm |
| 2 | Gentle simmering |
| 3 | Simmering |
| 4 | Frying / browning |
| 5 | Bringing to the boil |
| 6 | Bringing to the boil / quick frying / deep-frying |
for the glass. Put the scraper on the glass surface at an acute angle and move the blade on the surface.
- Remove after the appliance is sufficiently cool:limescale rings, water rings, fat stains, shiny metallic discolorations. Use a special cleaning agent for glass ceramic or stainless steel.
- Clean the appliance with a moist cloth and some detergent.
- At the end rub the appliance dry with a clean cloth.
Cooling fan
When the appliance operates, the cooling fan switches on automatically to keep the surfaces of the appliance cool. If
you switch off the appliance, the cooling fan continues to operate until the appliance cools down.
Activating and deactivating the top oven
- Turn the knob for the top oven and grill to an oven function.
The oven power indicator comes on while the appliance operates. - To deactivate the appliance, turn the knob for the top oven and grill to the Off position.
Activating and deactivating the main oven
- Turn the knob for the main oven functions to an oven function.
The oven power indicator comes on while the appliance operates.
The main oven indicator comes on while the temperature in the appliance increases.
- To deactivate the appliance, turn the knob for the main oven functions and the knob for the main oven temperature to the Off position.
Top oven functions
| Oven function | Application | |
 | OFF position | The appliance is OFF. |
| Oven lamp | To light up the oven interior. | |
| 100-250 | Conventional Cooking | Particularly suitable for cooking larger quantities of food. |
 | Single Circuit Grill | To grill flat food items in small quantities in the middle of the shelf. To make toasts. |
 | Dual Circuit Grill | To grill food items in medium quantities in the middle of the shelf. To make toasts. |
 | Full Grill | The full grill element is on. To grill flat food items in large quantities. To make toasts. |
Main oven functions
| Oven function | Application | ||
 | OFF position | The appliance is OFF. | |
| Oven lamp | Lights up without any cooking function. | ||
 | Defrost | Thaws frozen food. The temperature control knob must be on off position | |
| 100-250 | Thermaflow | The fan function particularly suitable for cooking larger quantities of food. | |
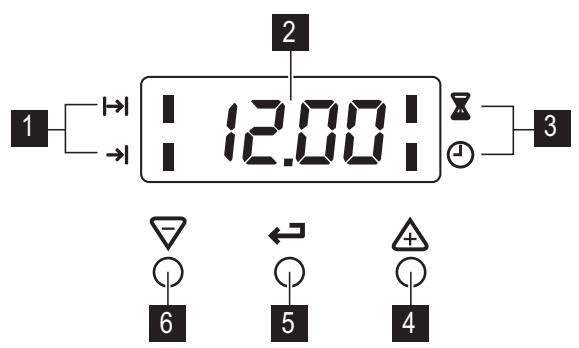
Electronic programmer
text_image
1 2 12.00 3 6 5 41 Function Indicators
2 Time display
3 Function Indicators
4 Button "+"
5 Selector Button
6 Button "-"
| Clock function | Application | |
| ➊ | Time of day | Shows the time. To set, change or check the time. |
| ➇ | Minute minder | To set a countdown time.A signal sounds, after the time period is completed.This function has no effect on the operation of the oven. |
| I→I | Duration | To set how long the oven has to be in operation. |
| →I | End | To set the switch-off time for an oven function. |
i Duration I and End I can be used at the same time, if the oven is to be switched on and off automatically later. In this case first set Duration I, then End I.
Setting the clock functions
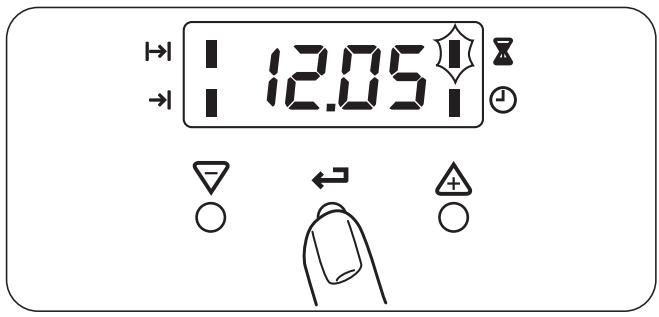
text_image
12.05- Push the Selection button again and again until necessary function indicator flashes.
Oven - Using the accessories
- To set the time for Minute minder ☒, Duration |→| or End →|, use "+" or "-" button.
The related function indicator comes on.
When the time period is completed, the function indicator flashes and an acoustic signal sounds for 2 minutes.
With the functions Duration and End the oven switches off automatically. - Push any button to stop the signal.
Cancelling the clock functions
- Push the Selection button again and again until necessary function indicator flashes.
- Push and hold button "-". After some seconds the clock function goes out.

Warning! Refer to "Safety information" chapter.
Grilling set
The grilling set includes the roasting pan grid and the deep roasting pan. You can use the roasting pan grid on the two sides.

Warning! Risk of burns when removing the accessories from a hot oven.
You can use the grilling set to roast larger pieces of meat or poultry on one level:
You can use the grilling set to grill flat dishes in large quantities and to toast:
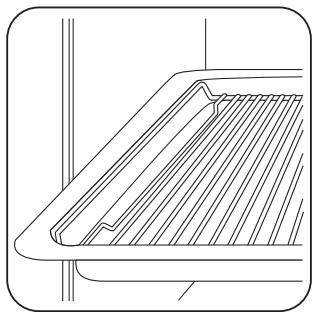
natural_image
Line drawing of a window with horizontal slats and a small object on the right side (no text or symbols)Put the roasting pan grid inside the deep roasting pan so that the supports of the oven shelf point upwards.
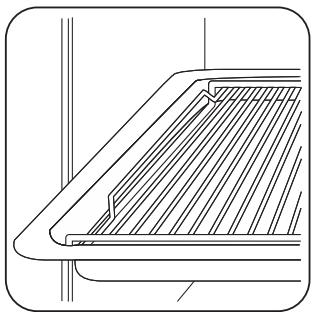
natural_image
Technical line drawing of a structural component with diagonal bracing (no text or symbols)Put the roasting pan grid inside the deep roasting pan so that the supports of the oven shelf point downwards.
Put the deep roasting pan in the oven at the necessary level.
Oven - Helpful hints and tips

Warning! Refer to "Safety information" chapter.

The temperature and baking times in the tables are guidelines only. They depend on the recipes, quality quantity of the ingredients used.

Caution! Use a Deep grill roasting pan for very moist cakes. Fruit juices can cause permanent s on the enamel.
Top oven
The top oven is the smaller of the two ovens. It has 3 shelf levels. Use is to cook smaller quantities of food. It gives especially good results when used to cook fruitcakes, sweets and savoury flants or quiche.
Main oven
The main oven is particularly suitable for cooking larger quantities of food.
Baking
General instructions
- Your new oven may bake or roast differently to the appliance you had before. Adapt your usual settings
(temperature, cooking times) and shelf levels to the values in the tables.
- With longer baking times, the oven can be switched off about 10 minutes before the end of baking time, to use the residual heat.
When you use frozen food, the trays in the oven can twist during baking. When the trays get cold again, the distortion will be gone.
How to use the Baking Tables
- We recommend to use the lower temperature the first time.
- If you cannot find the settings for a special recipe, look for the one that is almost the same.
- Baking time can be extended by 10–15 minutes, if you bake cakes on more than one level.
- Cakes and pastries at different heights do not always brown equally at first. If this occurs, do not change the temperature setting. The differences equalize during the baking procedure.
Tips on baking
| Baking results | Possible cause | Remedy |
| The cake is not browned sufficiently below | Incorrect oven level | Put the cake on a lower oven level |
| The cake sinks (becomes soggy, lumpy, streaky) | Oven temperature too high | Use a lower setting |
| The cake sinks (becomes soggy, lumpy, streaky) | Baking time is too short | Set a longer baking timeDo not set higher temperatures to decrease baking times |
| The cake sinks (becomes soggy, lumpy, streaky) | Too much liquid in the mixture | Use less liquid. Look at the mixing times, specially when you use mixing machines |
| Cake is too dry | Oven temperature too low | Set a higher oven temperature |
| Cake is too dry | Baking time too long | Set a shorter baking time |
| Cake does not brown equally | Oven temperature too high and baking time too short | Set a lower oven temperature and a longer baking time |
| Cake does not brown equally | No equal mixture | Put the mixture equally on the baking tray |
| Cake does not cook in the baking time set | Temperature too low | Use a slightly higher oven temperature setting |
Top Oven

Shelf Positions are not critical but ensure that oven shelves are evenly spaced when more than one is
used (e.g. shelf positions 1 and 3)
Baking
| Food | Shelf Position | Temperature [°C] | Approx Cook Time (mins) |
| Biscuits | 2 | 170 - 190 | 10 - 20 |
| Bread | 2 | 200 - 220 | 30 - 35 |
| Bread rolls/buns | 2 | 200 - 220 | 10 - 15 |
| Cakes: Small & Queen | 2 | 160 - 180 | 18 - 25 |
| Cakes: Sponges | 2 | 160 - 175 | 20 - 30 |
| Cakes: Victoria Samdwich | 2 | 160 - 170 | 18 - 25 |
| Cakes: Madeira | 2 | 140 - 150 | 75 - 90 |
| Cakes: Rich Fruit | 2 | 140 - 150 | 120 - 150 |
| Cakes: Gingerbread | 2 | 140 - 150 | 80 - 90 |
| Cakes: Meringues | 2 | 90 - 100 | 150 - 180 |
| Cakes: Flapjack | 2 | 160 - 170 | 25 -30 |
| Cakes: Shortbread | 2 | 130 - 150 | 45 - 60 |
| Cakes: Apple Pie | 2 | 170 - 180 | 50 - 60 |
| Casseroles: Beef/Lamb | 2 | 160 -170 | 150 - 180 |
| Casseroles: Chicken | 2 | 160 - 180 | 80 - 90 |
| Convenience Foods | 2 | Follow manufacturer's instructions | |
| Fish | 2 | 170 - 190 | 20 - 30 |
| Fish Pie (Potato Topped) | 2 | 190 - 200 | 20 - 30 |
| Fruit Pies, Crumbles | 2 | 190 - 200 | 30 - 50 |
| Milk Puddings | 2 | 150 - 170 | 90 -120 |
| Pasta Lasagne etc. | 2 | 170 - 180 | 40 -50 |
| Pastry: Choux | 2 | 180 - 190 | 30 - 40 |
| Pastry: Eclairs, Profiteroles | 2 | 180 - 190 | 30 - 40 |
| Pastry: Flaky/Puff Pies | 2 | 210 - 220 | 30 - 40 |
| Shortcrusts: Mince Pies | 2 | 190 - 200 | 15 - 20 |
| Shortcrusts: Meat Pies | 2 | 190 - 210 | 25 - 35 |
| Shortcrusts: Quiche, Tarts, Flans | 2 | 180 - 200 | 25 - 50 |
| Scones | 3 | 220 - 230 | 8 - 12 |
| Shepard`s Pie | 2 | 190 - 200 | 30 - 40 |
| Souffles | 2 | 170 - 180 | 20 - 30 |
| Vegetables: Baked Jacket Potatos | 2 | 180 - 190 | 60 - 90 |
| Vegetables: Roast Potatos | 2 | 180 - 190 | 60 - 90 |
| Yorkshire Pudding Large | 2 | 220 - 210 | 25 - 40 |
| Yorkshire Pudding Individ-ual | 2 | 210 - 220 | 15 - 25 |
| Roasting Meat, Poultry | 2 | See roasting chart | |
Main Oven
i Shelf Positions are not critical but ensure that oven shelves are evenly spaced when more than one is used (e.g. shelf positions 1 and 3)
Baking
| Food | Temperature [°C] | Approx Cook Time (mins) | Shelf Position |
| Biscuits | 180 - 190 | 10 - 20 | 1 / 3 |
| Bread | 190 - 210 | 30 - 35 | 2 |
| Cakes: Small & Queen | 150 - 170 | 18 - 25 | 1 / 3 |
| Cakes: Sponges | 160 - 170 | 20 - 25 | 3 |
| Cakes: Madeira | 140 - 160 | 60 - 80 | 3 |
| Cakes: Rich Fruit | 130 - 140 | 120 - 150 | 3 |
| Cakes: Christmas | 130 - 140 | 180 - 270 | 3 |
| Cakes: Apple Pie | 160 - 170 | 50 - 60 | 3 |
| - Shortbread | 130 - 150 | 45 - 60 | 1 / 3 |
| Fish | 160 - 180 | 30 - 40 | 3 |
| Fruit Pies, Crumbles | 170 - 180 | 30 - 50 | 3 |
| Milk Puddings | 140 - 160 | 60 - 90 | 3 |
| Pastry: Choux | 180 - 190 | 30 - 40 | 3 |
| Pastry: Shortcrust | 180 - 190 | 25 - 35 | 3 |
| Pastry: Flaky | 180 - 190 | 30 - 40 | 3 |
| Pastry: Puff | Follow manufacturer's instructions. Reduce the temperature for Fan oven by 20°C | 3 | |
| Plate Tarts | 180 - 190 | 25 - 45 | 3 |
| Quiches/Flans | 170 - 180 | 25 - 45 | 3 |
| Scones | 210 - 230 | 8 - 12 | 1 / 3 |
| Roasting: Meat, Poultry | 160 - 180 | see Roasting Chart | 2 |
Roasting
Roasting dishes
- Use heat-resistant ovenware to roast (please read the instructions of the manufacturer).
-
Large roasting joints can be roasted directly in the deep roasting pan or on the oven shelf above the deep roasting pan. (If present)
-
Roast lean meats in a roasting tin with a lid. This well keep the meat more succulent.
- All types of meat, that can be browned or have crackling, can be roasted in the roasting tin without the lid.
Roasting
| Meat | Temperature [°C] | Cooking Time |
| Beef/Beef boned | 170 - 190 | 20-35 minutes per 0.5 kb (1 lb) and 20-30 minutes over |
| Mutton/Lamb | 170 - 190 | 20-35 minutes per 0.5 kb (1 lb) and 25-35 minutes over |
| Pork/Veal/Ham | 170 - 190 | 30-40 minutes per 0.5 kb (1 lb) and 30-40 minutes over |
| Chicken | 180 - 200 | 20-25 minutes per 0.5 kb (1 lb) and 20 minutes over |
| Turkey/Goose | 170 - 190 | 15-20 minutes per 0.5 kg (1 lb) up to 3.5 kg (7 lb) then 10 minutes per 0.5 kg (1 lb) over 3.5 kg (7 lb) |
| Duck | 180 - 200 | 25-35 minutes per 0.5 kb (1 lb) and 25-30 minutes over |
| Pheasant | 170 -190 | 35-40 minutes per 0.5 kb (1 lb) and 35-40 minutes over |
| Rabbit | 170 - 190 | 20 minutes per 0.5 kb (1 lb) and 20 minutes over |
Grilling ▼ ▼ ▼
Always use the grilling function with maximum temperature setting
Important! Always grill with the oven door closed
Always pre-heat the empty oven with the grill functions for 5 minutes.
- Set the grilling set in the shelf level as recommended in the grilling table.
- Grill only flat pieces of meat or fish.
Top Oven - Dual Circuit Grill
Adjust shelf position and grilling set to suit different thicknesses of food.
Grilling
| Food | Shelf Position | Grill Time (min) |
| Bacon Rashers | 3 | 5 - 6 |
| Beefburgers | 3 | 10 - 20 |
| Chicken Joints | 2 | 20 - 40 |
| Chops - Lamb | 2 - 3 | 15 - 25 |
| Chops - Pork | 2 - 3 | 20 - 25 |
| Fish - Whole/Trout/Makarel | 2 | 10 - 12 |
| Fillets - Plaice/Cod | 2 | 4 - 6 |
| Kebabs | 2 - 3 | 12 - 18 |
| Kidneys - Lamb/Pig | 2 - 3 | 6 - 10 |
| Sausages | 3 | 20 - 30 |
| Steaks: Rare | 3 | 4 - 6 |
| Steaks: Medium | 3 | 6 - 8 |
| Steaks: Well Done | 3 | 12 - 15 |
| Toasted Sandwiches | 3 | 3- 4 |
Defrosting
- Put the food out of the packaging and set it on a plate on the oven shelf.
- Do not cover with a plate or bowl. This can extend the time to defrost very much.
- Put the oven shelf in the first shelf level from the bottom.
Oven - Care and cleaning
Information on acrylamides
Important! According to the newest scientific knowledge, if you brown food (specially the one which contains starch), acrylamides can pose a health risk. Thus, we recommend that you cook at the lowest temperatures and do not brown food too much.

Warning! Refer to "Safety information" chapter.
- Clean the front of the appliance with a soft cloth with warm water and cleaning agent.
- To clean metal surfaces use a usual cleaning agent
- Clean the oven interior after each use. Thus you can remove dirt more easily and it does not burn on.
- Clean stubborn dirt with a special oven cleaner.
- Clean all oven accessories (with a soft cloth with warm water and cleaning agent) after each use and let them dry.
- If you have nonstick accessories, do not clean them using an aggressive agents, sharp edged objects or dishwasher. It can destroy nonstick coating!

Stainless steel or aluminium appliances:
Clean the oven door with a wet sponge only. Dry it with a soft cloth.
Do not use steel wool, acids or abrasive materials as they can damage the oven surface. Clean the oven control panel with the same precautions
Catalytic walls
The walls with a catalytic coating are self-cleaning. They absorb fat which collects on walls while the oven operates.
To support this self-cleaning process heat the oven without any food regularly:
- Turn the oven light on.
- Remove accessories from the oven.
- Select an oven function.
- Set the oven temperature to 250 °C and let oven operate for 1 hour.
- Clean the bottom of the cavity with a soft and damp sponge.
Do not clean the catalytic surface.

Discolouration of the catalytic surface has no effect on catalytic properties.
Oven Ceiling
You can fold down the heating element on the oven ceiling to clean the oven ceiling easily.
Folding down the heating element
- Remove the shelf support rails.
- Hold the heating element with the two hands at the front
- Pull it forwards against the spring pressure and out along the support on both sides.
- The heating element folds down. The oven ceiling is ready to clean.
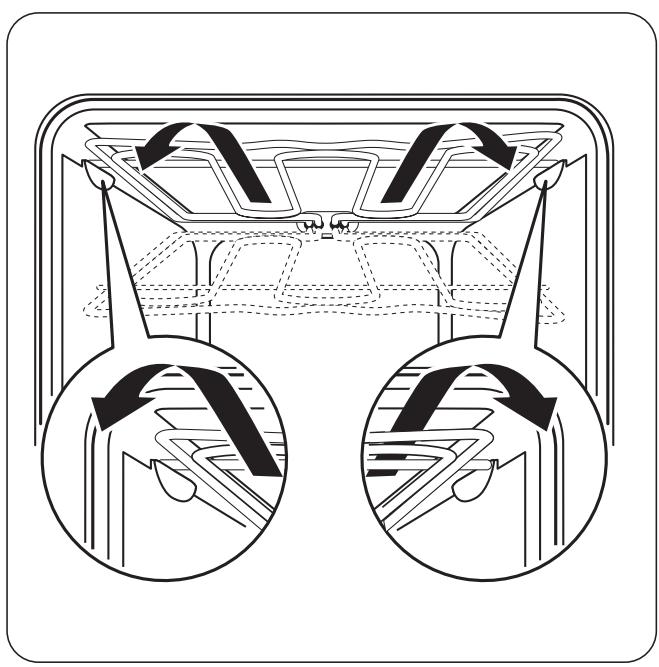
natural_image
Diagram of a vehicle roof structure with directional arrows indicating airflow or movement, showing structural components and mounting points (no text or symbols present)Installing the heating element
- Install the heating element in opposite sequence.
Important! Install the heating element correctly on the two sides above the support on the inner wall of the oven.
- Insert shelf support rails.
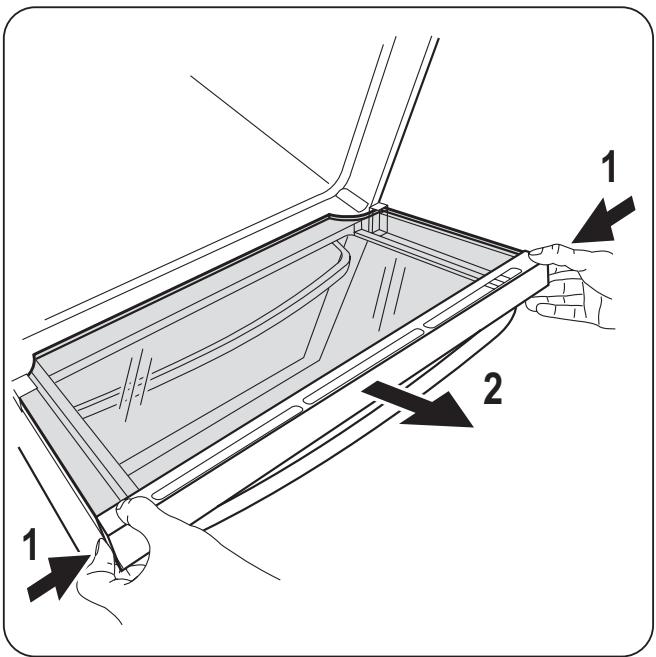
Cleaning the top oven glass panels
The door glass on your product can be different in type and shape from what you see in diagrams. The number of glasses can be different.
Removing the glass:
- Open the door.
- Push the door trim at both sides to release the clips. Refer to the picture.
- Remove the glass panels.
text_image
Technical diagram showing a mechanical component with labeled parts 1 and 2, indicating assembly or assembly steps.To replace the glass obey the procedure in opposite sequence.
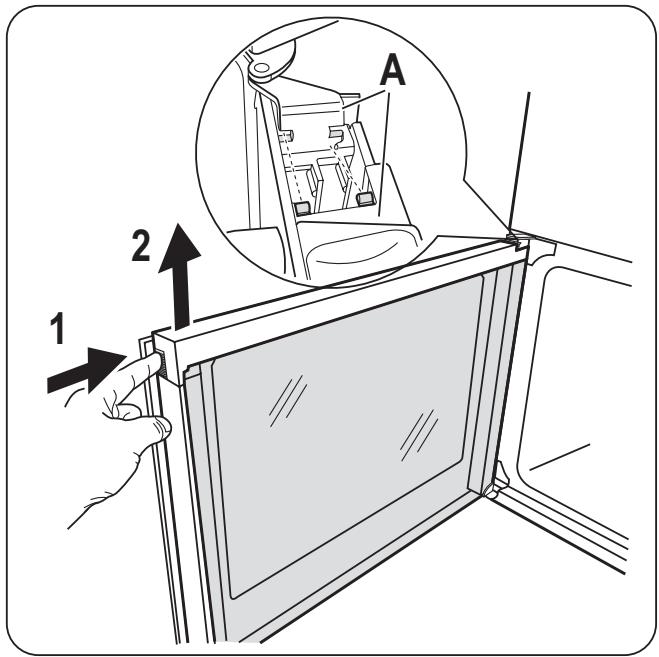
Cleaning the oven door
The door glass on your product can be different in type and shape from what you see in diagrams. The number of glasses can be different.
Removing the glass:
- Push the door trim at one side to remove it. Refer to the picture.
- Pull up the trim.
- Remove the glass panels.
text_image
A 1 2To replace the glass panels obey the procedure in opposite sequence. Before you lower the trim attach the A trim part to the door. Refer to picture.
Oven lamp
Warning! There is a danger of electrical shock!
Before you change the oven lamp:
- Switch off the oven.
- Remove the fuses in the fuse box or switch off the circuit breaker.
Put a cloth on the bottom of the oven for protection of the oven light and glass cover.
What to do if...
Warning! Refer to "Safety information" chapter.
Replacing the oven lamp
- You can find the lamp glass cover at the back of the cavity.
Turn the lamp glass cover counterclockwise to remove it. - Clean the glass cover.
- Replace the oven lamp with applicable 300^ C heat-resistant oven lamp.
Important! Use the same oven lamp type. - Install the glass cover.
| Problem | Possible cause | Remedy |
| The hob does not operate | The heat setting is not set | Set the heat setting |
| The oven does not heat up | The oven is not switched on | Switch on the oven |
| The oven does not heat up | The clock is not set | Set the clock |
| The oven does not heat up | The necessary settings are not set | Control the settings |
| The oven does not heat up | The fuse in the fuse box is released | Control the fuse. If the fuse is re-leased more than one time, refer to a qualified electrician. |
| The oven lamp does not operate | The oven lamp is defective | Replace the oven lamp |
| Steam and condensation settle on the food and in the oven cavity | You left the dish in the oven for too long | Do not leave the dishes in the oven for longer than 15-20 minutes after the cooking process ends |
| The display shows “12.00” | A power cut | Reset the clock |
| The residual heat indicator does not come on | The cooking zone is not hot because it operated only for a short time. | If the cooking zone must be hot, speak to the Service Centre. |
If you cannot find a solution to the problem yourself, contact your dealer or the service centre.
The necessary data for the service centre is on the rating plate. The rating plate is on the front frame of the oven cavity.
We recommend that you write the data here:
Model (MOD.)
Product number (PNC)
Serial number (S.N.)
Important! First read "Safety information" chapter carefully.
Technical Data
| Dimensions | |
| Height | 900 mm |
| Width | 550 mm |
| Depth | 600 mm |
| Top oven capacity | 37 l |
| Main oven capacity | 74 l |
Location of the appliance
You can install your freestanding appliance with cabinets on one or two sides and in the corner.
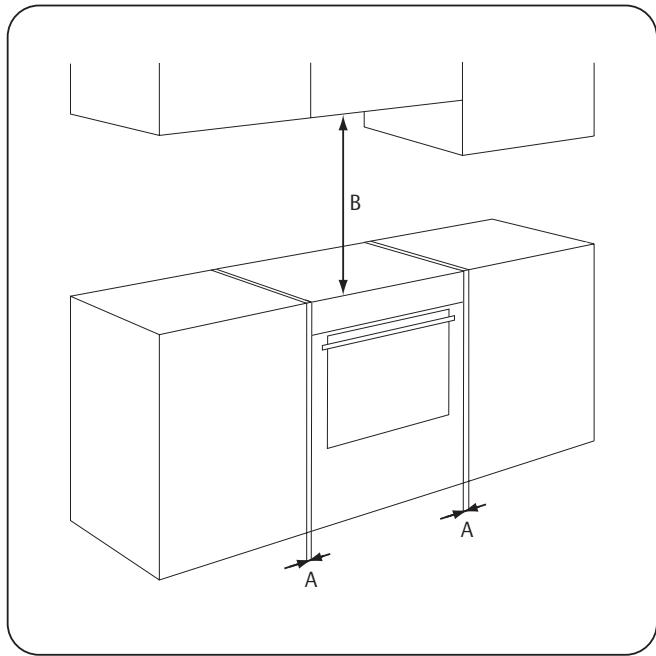
text_image
B A AMinimum distances
| Dimension | mm |
| A | 2 |
| B | 685 |
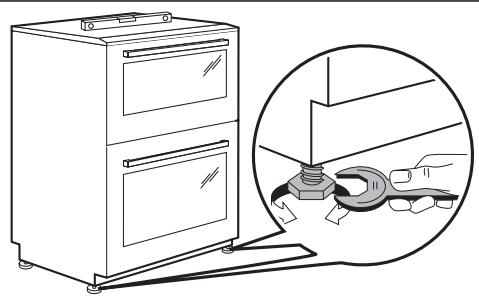
Levelling
Use small feet on the bottom of appliance to set same level of cooker top surface with other surfaces
natural_image
Line drawing of a double-door oven next to a magnified view of a hand using a wrench, showing the process (no text or symbols present)- Appliance left the factory fully packaged. If it is delivered without packaging and damage has occurred, the manufacturer cannot accept responsibility. Contact your supplier for advice.
- Do not move the appliance by hand after removed the packaging. Do not use a sack barrow or any other aid to lift the appliance. It can cause a damage.
- To move the appliance, open the oven door and lift the appliance by holding inside the top of the component.
- You can fit your freestanding appliance with cabinets on one or both sides and in the corner.
- Protect sidewalls above the hob level by heat resistant noncombustible material and provide minimum 40 mm distance from the sidewalls to the hob side.
- Provide minimum 2 mm air gap at either side of the appliance to enable moving it into position.
- Surfaces above the hob (also cooker hoods) must be a minimum of 685 mm above the hob.
Electrical installation

Warning! Only a qualified and competent person must do the electrical installation.

The manufacturer is not responsible if you do not follow safety precautions from the chapter "Safety nation".
This appliance is supplied without a main plug or a main cable.
Covering terminal board
The recommended cross-section area is six square millimetres (6 mm ^4 ).
When you refit the mains terminal cover, make sure that the lower tabs are located inside the bottom edge of the aperture, before you fix the two screws into the top edge of the mains terminal cover.
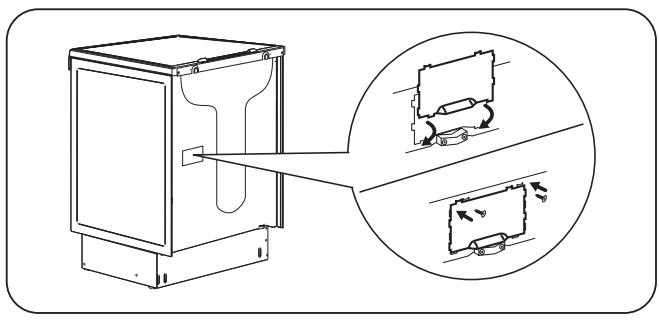
text_image
Diagram showing a refrigerator with internal components and a magnified view of the front panel, likely illustrating a mechanical or electrical component assembly.Make sure that the cover is securely fastened.

To open the cover of terminal board obey the procedure in opposite sequence.
Environment concerns
The symbol 📄 on the product or on its packaging indicates that this product may not be treated as household waste. Instead it should be taken to the appropriate collection point for the recycling of electrical and electronic equipment. By ensuring this product is disposed of correctly, you will help prevent potential negative consequences for the environment and human health, which could otherwise be caused by inappropriate waste handling of this product. For more detailed information about recycling of this product, please contact
Terminal board
Make sure that the links are fitted as shown.
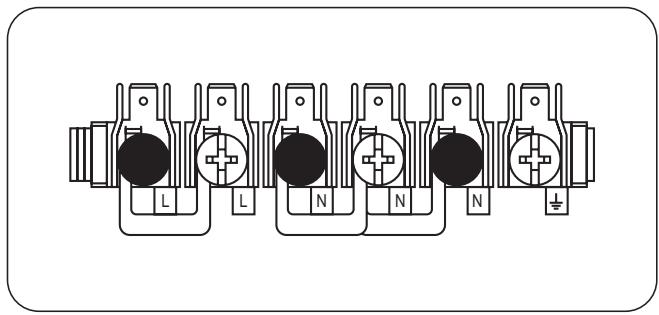
natural_image
Pure electrical connector diagram without any text, numbers, or symbols
Do not remove blanking plates.
your local council, your household waste disposal service or the shop where you purchased the product.

Warning! Refer to "Safety information" chapter.

Packaging material
The packaging material is environmentally-friendly and recyclable. Plastic parts are marked with international abbreviations such as PE, PS, etc. Dispose of the packaging material in the containers provided for this purpose at your local waste management facility.


GREAT BRITAIN & IRELAND - Guarantee/Customer Service
Standard guarantee conditions: We, Electrolux, undertake that if within 12 months of the date of the purchase this Electrolux appliance or any part thereof is proved to be defective by reason only of faulty workmanship or materials, we will, at our option repair or replace the same FREE OF CHARGE for labour, materials or carriage on condition that:
- Appliance has been correctly installed and used only on the electricity supply stated on the rating plate.
- Appliance has been used for normal domestic purposes only, in accordance with manufacturer's instructions.
- Appliance hasn't been serviced, maintained, repaired, taken apart or tampered with by person not authorised by us.
-
Electrolux Service Force Centre must undertake all service work under this guarantee
-
Any appliance or defective part replaced shall become the Company's property.
- This guarantee is in addition to your statutory and other legal rights.
Exclusions
- Damage, calls resulting from transport, improper use, neglect, light bulbs, removable parts of glass, plastic.
- Costs for calls to put right appliance which is improperly installed, calls to appliances outside United Kingdom.
- Appliances found to be in use within a commercial environment, plus those which are subject to rental agreements.
- Products of Electrolux manufacturer that are not marketed by Electrolux
Service and Spare Parts. Please contact your local Service Force Centre: 08445 616 616 (Call will be routed to Serv-
ice Force Centre covering your postcode area). For address of local Service Force Centre and further information, please visit: www.serviceforce.co.uk Before calling out an engineer, please ensure you have read the details under the heading "What to do if...". When you contact the Service Force Centre you will need to give the following details: Your name, address and postcode, your telephone number, clear concise details of the fault, model and serial number of the appliance (found on the rating plate), the purchase date. Please note a valid purchase receipt or guarantee documentation is required for in guarantee service calls.
Customer Care. Please contact our Customer Care Department: Electrolux Major Appliances, Addington Way, Luton, Bedfordshire, LU4 9QQ or visit our website at www.electrolux.co.uk
| Customer Care Department, | Tel: (Calls may be recorded for training purposes) |
| Electrolux | 08445 613 613 |
| AEG-Electrolux | 08445 611 611 |
| Zanussi-Electrolux | 08445 612 612 |
For Customer Service in The Republic of Ireland please contact us at the address below:
Electrolux Group (Irl) Ltd, Long Mile Road, Dublin 12, Republic of Ireland
Tel: +353 (0)1 4090751, Email: service.eid@electrolux.ie
GB European Guarantee: This appliance is guaranteed by Electrolux in each of the countries listed at the back of this user manual, for the period specified in the appliance guarantee or otherwise by law. If you move from one of these countries to another of the countries listed, the appliance guarantee will move with you subject to the following qualifications:-
- The appliance guarantee starts from the date you first purchased the appliance which will be evidenced by production of a valid purchase document issued by the seller of the appliance.
-
The appliance guarantee is for the same period and to the same extent for labour and parts as exists in your new country of residence for this particular model or range of appliances.
-
The appliance guarantee is personal to the original purchaser of the appliance and cannot be transferred to another user.
- The appliance is installed and used in accordance with instructions issued by Electrolux and is only used within the home, i.e. is not used for commercial purposes.
- The appliance is installed in accordance with all relevant regulations in force within your new country of residence.
The provisions of this European Guarantee do not affect any of the rights granted to you by law.
www.electrolux.com
| [w873] |  | [ЭН4К] |
| Albania | +35 5 4 261 450 | Rr. Pjeter Bogdani Nr. 7 Tirane |
| Belgique/België/Belgien | ++32-2-7162444 | Raketstraat 40, 1130 Brussel/Bruxelles |
| Česká republika | +420 261 302 261 | Budějovická 3, Praha 4, 140 21 |
| Danmark | +45 70 11 74 00 | Strevelinsvej 38-40, 7000 Fredericia |
| Deutschland | +49 180 32 26 622 | Fürther Str. 246, 90429 Nürnberg |
Eesti | +37 2 66 50 030[АННН] | Pärnu mnt. 153, 11624 Tallinn |
| España | +34 902 11 63 88 | Carretera M-300, Km. 29,900 Alcalá de Henares Madrid |
| France | 08 44 62 26 53 | www.electrolux.fr |
| Great Britain | +44 8445 616 616 | Addington Way, Luton, Bedfordshire LU4 9QQ |
| Hellas | +30 23 10 56 19 70 | 4, Limnou Str., 54627 Thessaloniki |
| Hrvatska | +385 1 63 23 338 | Slavonska avenija 3, 10000 Zagreb |
| Ireland | +353 1 40 90 753 | Long Mile Road Dublin 12 |
| Italia | +39 (0) 434 558500 | C.so Lino Zanussi, 26 - 33080 Porcia (PN) |
| Latvija | +371 67313626 | Kr. Barona iela 130/2, LV-1012, Riga |
| Lietuva | +370 5 278 06 03 | Ozo 10a, LT-08200 Vilnius |
| Luxembourg | +352 42 431 301 | Rue de Bitbourg, 7, L-1273 Hamm |
| Magyarország | +36 1 252 1773 | H-1142 Budapest XIV, Erzsébet kirá- lyné útja 87 |
| Nederland | +31 17 24 68 300 | Vennootsweg 1, 2404 CG - Alphen aan den Rijn |
| Norge | +47 81 5 30 222 | Risløkkvn. 2 , 0508 Oslo |
| Österreich | +43 18 66 400 | Herziggasse 9, 1230 Wien |
| Polska | +48 22 43 47 300 | ul. Kolejowa 5/7, Warszawa |
| Portugal | +35 12 14 40 39 39 | Quinta da Fonte - Edificio Gonçalves Zarco - Q 35 -2774-518 Paço de Arcos |
| Romania | +40 21 451 20 30 | Str. Garii Progresului 2, S4, 040671 RO |
| Schweiz - Suisse - Svizzera | +41 62 88 99 111 | Industriestrasse 10, CH-5506 Mägenwil |
| Slovenija | +38 61 24 25 731 | Gerbičeva ulica 110, 1000 Ljubljana |
| Slovensko | +421 2 32 14 13 34-5 | Electrolux Slovakia s.r.o., Electrolux Domáce spotrebiče SK, Galvaniho 17/B, 821 04 Bratislava |
| Suomi | www.electrolux.fi | |
| Sverige | +46 (0)771 76 76 76 | Electrolux Service, S:t Göransgatan 143, S-105 45 Stockholm |
| Türkiye | +90 21 22 93 10 25 | Tarlabași caddesi no : 35 Taksim İstanbul |
| Россия | 8-800-200-3589 | 129090 Москва, Олимпийский проспект, 16, БЦ "Олимпик" |
| Україна | +380 44 586 20 60 | 04074 Київ, вул.Автозаводська, 2а, БЦ "Алкон" |

www.zanussi.com/shop