
M5 - Smartphone MEIZU - Free user manual and instructions
Find the device manual for free M5 MEIZU in PDF.


User questions about M5 MEIZU
0 question about this device. Answer the ones you know or ask your own.
Ask a new question about this device
Download the instructions for your Smartphone in PDF format for free! Find your manual M5 - MEIZU and take your electronic device back in hand. On this page are published all the documents necessary for the use of your device. M5 by MEIZU.
USER MANUAL M5 MEIZU
An Internet phone of a brand new generation, Meizu M351 is designed to bring users countless surprise and joy.
users are welcome to visit the official MEIZU website at: http://www.meizu.com
On our website, users can browse for software, download firmware upgrades, participate in online discussions, learn more using tips, and much more!
Because the constant improvements we made for our products, the features found in the user manual users are currently reading may differ from the actual product. Makesure to always download the latest manual from our official website.
This manual was last updated January 18, 2011.
This manual was last updated July 22, 2013. Meizu M351
Legal information
© 2003-2012 Meizu Inc. All rights reserved.
Meizu and the Meizu logo are trademarks belonging to Meizu both in the PRC and overseas.
Google, Google logo, Android, Google search, Gmail, Google Mail and Android Market are trademarks of Google, Inc.
Street View Images © 2010 Google.
Bluetooth and the Bluetooth logo are trademarks of Bluetooth SIG, Inc.
Java, J2ME and all other Java-based trademarks are registered trademarks belonging to Sun Microsystems, Inc. in the United States and other countries.
Meizu (or Meizu's licensors) own all legal rights to the product, trademarks and interests, including but not limited to any intellectual property rights found in services (whether those rights have been registered, and regardless of where in the world those rights may exist). Meizu company services may include information designated as confidential. Without the prior written consent of Meizu; transcription, replication, reproduction or translation of some or all of said contents are prohibited. Users who disregard legal boundaries and use the product to for illegal activities, bears the full legal responsibility for their actions. Please take note of the software license agreement for Meizu and third-party software pertaining to the installation and updating of the software.
The manufacturers and importers do not take any responsibility for accidental damage to the device (including human error or other force majeure).
Meizu does not undertake errors or omissions in this document for any liability arising, Meizu company will continue to provide new product development success. This document is subject to change without notice.
Meizu is committed to improvie its products to better meet consumer demand.
Please read through the contents of this document before the use of this product.
Product features may change with time. To obtain the latest product information, please visit http://en.meizu.com.
All references to other companies, products and services names are trademarks or service marks of their respective owners.
Table of Contents
Important Notices 5
Getting Started 6
Getting Started 6
Accessories 6
Phone Overview. 7
Battery. 10
Touch Screen 11
Firmware Upgrade. 13
Power on, off and the lock screen. 14
Home Screen 15
Text Input 17
Basic Operations 19
How to Start. 19
File Transfer. 19
Safe Removal of Disk 20
Network Connection 20
App Guide 21
Phone. 21
25
Browser 27
Email 32
Music 36
Video 38
Gallery. 40
Camera 42
App Center 43
Documents 45
Calendar 47
Notes 49
Alarm Clock 50
Recorder. 51
52
Settings. 53
Other 58
Troubleshooting 58
Care tips. 59
Important Notices

To avoid unwanted damages, please read the following information before using MEIZU M351.
| ·Traffic safety | Please comply with all local laws and regulations. Keep users' hands free while driving. |
| ·Safe operation | When using a wireless device may cause interference or danger; turn the phone off. |
| ·Interference | All wireless devices may be susceptible to interference, which could affect performance. |
| ·Hospitals | Please turn off the phone in hospitals during situations where it may interfere with medical equipment. |
| ·Flights | Follow safety instructions provided by airline staff. Wireless devices can cause interference in aircrafts. |
| ·Gas stations | Do not use the device at gas stations when refueling. Do not use this device near gas or other chemicals. |
| ·Demolition sites | Follow any local restrictions. Do not use the device near demolition sites. |
| ·Service & repairs | Only qualified personnel may service or repair this device. |
| ·Accessories | Please use original accessories and batteries. Do not use incompatible products. |
| ·Water damage | This device is not water resistant. Keep it dry. |
| ·Backups | Back up important information stored on the phone to prevent the loss of valuable data. |
| ·Connecting with other devices | Before connecting to any other device, read its user guide for detailed safety instructions. Do not connect with incompatible products. |
| ·Emergency calls | After starting up, ensure the phone has network reception. If necessary, unlock the device from standby mode. Open the Phone app, enter the emergency number, and tap the call button. Tell the emergency staff about users' location and the relevant circumstances. |
Getting Started
Accessories
Included in package:
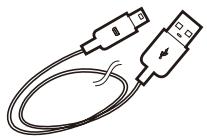
USB cable
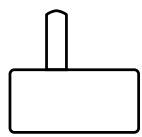
Poweradapter
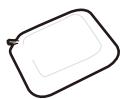
SIM card adapter and cutting template

Quick Start Guide

Warranty Certificate
- The above picture is only for reference, with the possibility that accessories available in users' area are different.
- users can buy accessories from a certified MEIZU store, or the official MEIZU website (http://en.meizu.com).
- Please only use software from MEIZU's official software center. MEIZU will not be held accountable for any problems caused by unofficial software.
Phone Overview
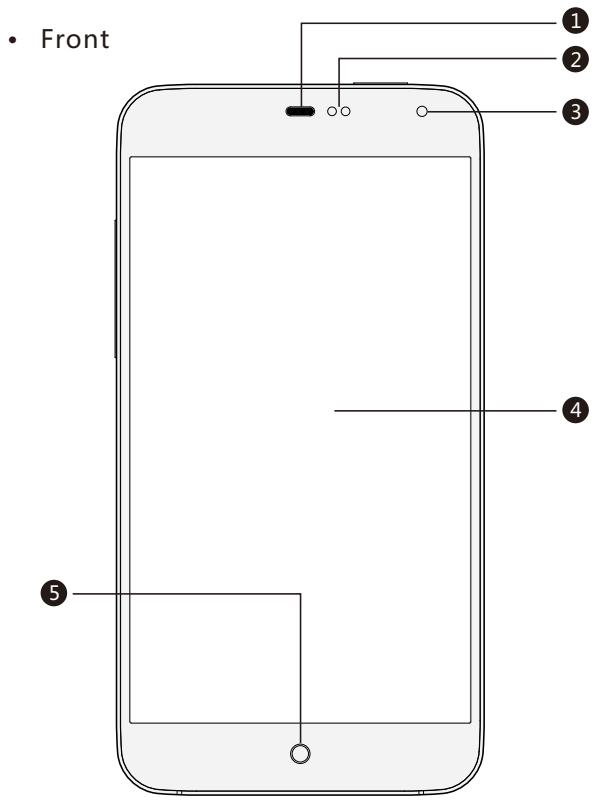
Name of the phone parts
- Top

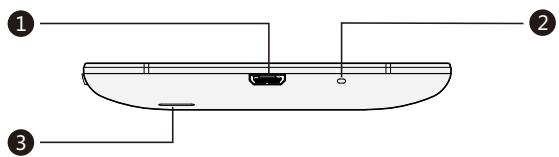
Bottom
1 Receiver
2 Infrared sensor
3 Front camera
4 Touch screen
5 Home button
1 Headphone jack
2 Power / lock button
1 Micro USB port
2 Main microphone
3 Loudspeaker
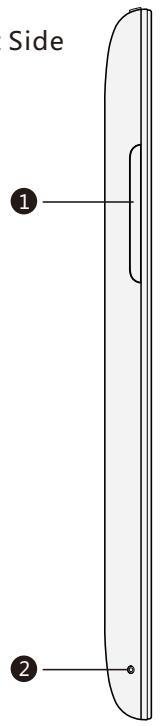
- Left Side

1 Volume control key
2 Back cover opening spring
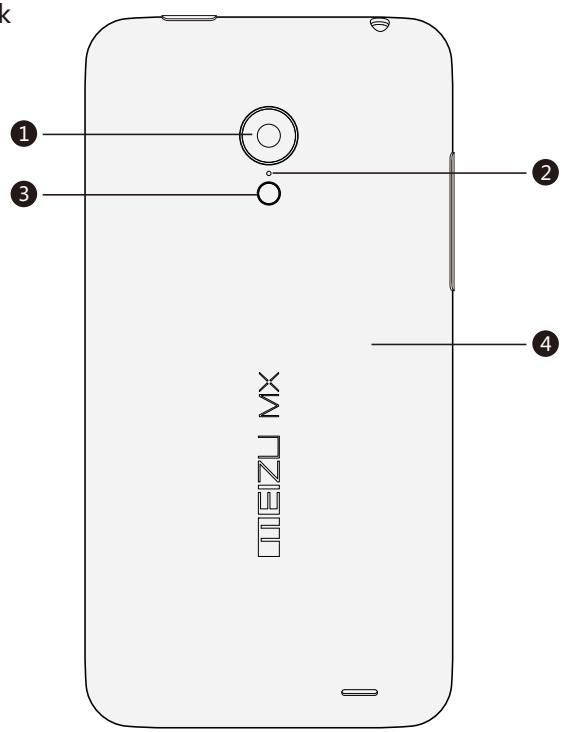
Back
1 Rear camera Flash
2 Noise-canceling microphone
3 Flashlight
4 Back cover
Buttons
Using M351, different keys gives users access to different phone functions.
Here are some commonly used shortcuts and methods of operation.
| Power button | Briefly press this button to lock / activate the screen; Holding this button will cause a "Power Off/Restart" dialog box to pop up; |
| Volume keys | Increases and decreases volume; |
| Home button | When locked, double tap the home button to activate it; When unlocked, tap to return to the Home screen; During a call, press the Home button to return to the Home screen. The Power button can be used to hang up. |
Battery
Charging the battery
M351 is equipped with built-in rechargeable battery.
Note:Do not attempt to remove the back cover to take out or repair the battery.
Use only the supplied power adapter and USB cable to charge the battery.
Do not remove the battery from the phone when charging the phone through power adapter or automobile-used adapter.
How to charge the phone:
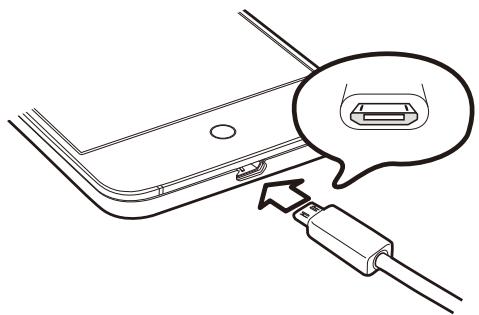
- Make sure the USB cable is placed correctly, and then plug the cable into the M351's micro USB port which is in the bottom of the phone;
- Plug the power adapter into a power outlet with standard AC power applicable to the phone.
If the battery is critical, the M351 will not boot. Connect it to a power adapter, and M351 will display the charging animation. The Locked screen would display charging status. When the battery is full, a full green battery would be shown on the Locked screen, and the animation stops. Disconnect the power adapter from the power outlet, and then disconnect the M351.
Note:
- If the battery is critical, the M351 will not boot. Please try booting after 5 minutes of charging.
- It normally takes 2-3 hours to fully charge the phone. This can vary depending on if the phone is on, if there are any calls while charging, etc.
- For safety reasons, please use the standard USB cable and power adapter.
Touch Screen
The main way to control the phone system is using users' fingers to operate icons, buttons, menu items, the keyboard and other items on the touch screen. What's more, users can change the direction of the screen.
- Touch / tap
- Touch the screen gently with users' finger.
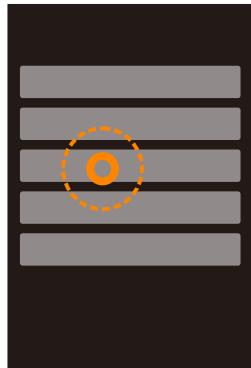
- Hold Use users' finger to touch and hold on the touch screen.
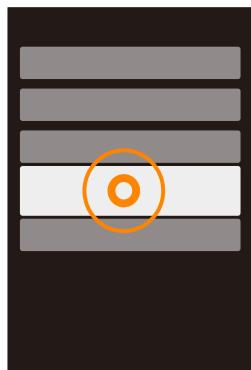
- Double-tap
- Tap the screen twice.
- In the web browser, users can swipe to browse fastly. users can also double tap to zoom in and out of the web page.
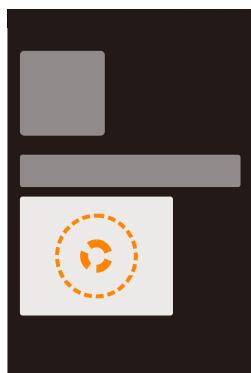
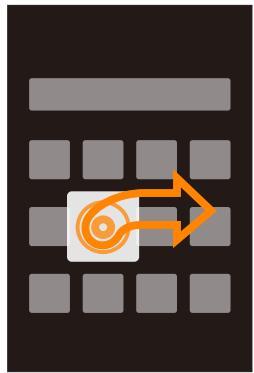
Drag
Touch and hold an icon, and then move it to a desired location.
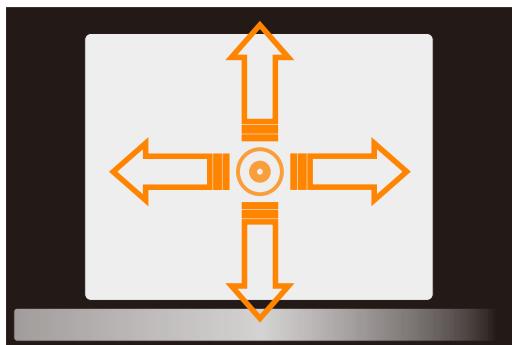
- Quick swipe or Swipe
Swipe users' fingers vertically or horizontally with quick dragging motion. users can switch content pages within an app by using this gesture.
Pinch
In some applications such as the Gallery or Browser, users can use two fingers to pinch and zoom in and out of photos and web pages.


- Rotate
When supported, the phone automatically changes screen orientation depending on how users hold it. This can be turned off under "Settings" > "Display".
Firmware Upgrade
How to upgrade the firmware
- Use the USB cable to connect the Meizu M351 with a computer, and copy the new firmware (update.bin) to the M351 root director;
- Safely unplug the USB and turn off the Meizu M351.
Note:Please make sure the phone has sufficient battery, or it might be unable to upgrade or boot due to power failure.
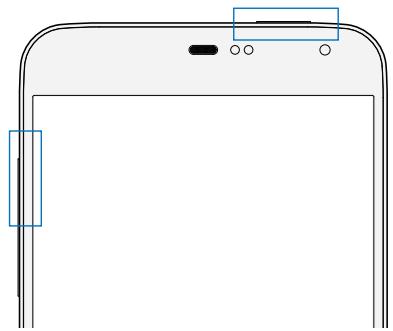
- Start the phone while simultaneously holding the "Power" button and "Volume Up" button (as pictured).
- Wait until the "System Upgrade" appears on the screen.
- Tap the "Start" icon to begin the upgrade process or tap the "Cancel" icon to exit upgrade mode. If data erasing is needed, please check "Clear Data" option before upgrading. Only the phone data (such as notes, messages, contacts) will be removed. Data on the SD card (such as music and photos) will remain intact.
- Do not power off the device while upgrading.
-
When the upgrade is complete, M351 will automatically reboot.
-
To download the latest firmware, software and drivers; please visit http://www.meizu.com
Note: Emails are not backed up on Flyme. When clearing data, users will lose all users' emails. users can also upgrade the firmware by system-provided upgrade function; more details please go to "Settings" > "About phone".
Power on, off and Lock screen
Powering on
Hold down the "Power button" until the phone shortly vibrates and the "MEIZU" logo is displayed.
If users' SIM card on the M351 has a PIN code enabled, users will need to enter a PIN code after powering on the phone.
If users enter the wrong PIN for three times, users will need users' PUK code to unlock the device. Please contact users' network operator for users' PUK code.
Restart or powering off
To power off or restart the phone, hold down the "Power button" until the popup selection box appears, and then select "Power off" or "Restart".
More controls
Hold down the "Power button" until the popup selection box appears. Here, users find shortcut controls for silent mode, vibration, flight mode, and more.
Locking and unlocking the screen
By default, M351 will automatically lock and shutdown the screen to save battery if users do not touch it for one minute. Under its locked state, the touch screen will not respond to any operation, but users can still enjoy the music, answer the phone, etc. Press the Home button to activate the phone screen, and drag "✔" icons upwards to designated area to unlock the screen. If a screen password has been set, users will need to enter users' unlock password at this point. Screen lock settings can be found under "Settings" > "Security" > "Set Up Screen Lock".
Home Screen
The home screen displays app icons, folders, and various widgets such as weather and information, etc. users can choose pictures to be users' home screen wallpapers.
Home screen icons
Tap any icons to launch their respective apps.
Browse
Swipe the home screen to the left and right to browse users' icons list.
Touch the "A 6 B" scroll bar to look through all users' apps.
- Adding
Tap the "Settings" icon on the home screen and choose "Customize" to add items on the screen.
"Themes", "Live Wallpapers", "Wallpapers" and "Gallery Wallpapers".
Themes: original default themes as well as themes designed and provided by third parties.
Live Wallpapers: Tap "Live Wallpapers" >choose one> "Set Wallpaper"
Wallpapers: Tap "Wallpapers" menu (which is provided by the system) to set a system-provided picture as standby wallpaper or home screen wallpaper.
Gallery Wallpapers: Tap "Gallery" > "Gallery Wallpapers" > "Set Wallpaper".
New folder
Drag one icon to another icon, a new folder would be automatically created.
Widgets
Hold the screen until users see an option of "Widget", tap it and then choose the widget that users want to add. Hold the chosen widget and drag it to the wanted screen.
- Moving and deleting
Anywhere on the Home screen users can tap and hold an icon to detach it from the icons grid, and then drag the icon to move it to any blank area. Drag the icon to the edges of the screen to jump to the previous or next Home screen. A detached icon can also be deleted or uninstalled by dragging it downwards unto the "Uninstall" or "Remove" area to delete the app or widget.
Note: System applications cannot be uninstalled.
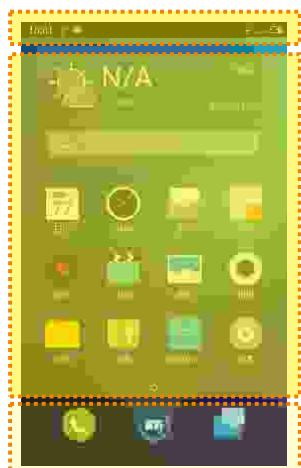
Notification Bar
Displays date, app notifications, signal strength, battery status and time.
Widgets and Icons
Displays widgets, apps and folders, etc.
Bottom Stripe
Contains three icons for Phone, Browser and Messaging. users can also customize users' own stripe by dragging the apps icons to this area.

button
Tap the

button to enter the Phone function;

button
Tap the

button to enter Web Browser;

button
Tap the

button to enter Messaging.
Notification Bar
This bar displays date, notifications (such as new email, calendar reminder, alert, current calling status and the device status, etc.), signal strength, battery status and time.
- Open notification bar
Notification bar: Show users' network provider and all other received notifications. When notification is received, slide down from the Notification bar and a panel will be dragged out. Touch on the notification can open the corresponding app. For other notifications such as new voice mail or network off-line, users can open the network list directly in current page to reconnect to the Internet. Slide the read notifications to delete.
- Close notification bar
Hold and slide up the icon to close or touch anywhere outside the notification bar.
Text input
users can use the phone to input text by using the keyboards on the screen to add contact information, write text messages, or take notes memos, etc.;by using the on-screen keyboard, users can input Chinese, English, symbols and numbers.
Using the keyboard
- When users touch a text input area, the keyboard will automatic pop-up, marked by the blinking cursor.
- Proceed to tap the keys on the keyboard.
Keyboards
When is displayed in the lower left corner of the keyboard:
Tap and hold CH, to open the "Select input method" popup menu, where users can choose among "Simplified Chinese - Pinyin", "Stroke", "Handwriting", "Other input methods" and "Settings" (with which users can set users' keyboard preferences).
Tap to switch to the English keyboard, displayed as EN
English keyboard
When EN is displayed in the lower left corner of the keyboard, English language input is selected.
To type uppercase letters, touch , so that the icon becomes illuminated . Tap again to switch to lowercase .
Double tap the to keep letters uppercase
Numbers and symbols
Tap the 123 icon to enter numbers and tap the * _ 串 icon enter symbols. Tap ^ icon to select other symbols.
Hiding the keyboard
While typing, users can tap < , button so as to see the contents clearly. The button near the "enter" key can also hide the keyboard. Touch the input area to activate the keyboard again.
Text editing
Apps such as text files, emails, messages and other apps which adopts multi-line editing support copy and paste function. Tap and hold a text input area to activate the text editing popup with the following options:
"Copy all" Copy all contents of the text input area to the clipboard.
"Select all" Select all contents of the text input area.
"Select" Select the current word. The arrow keys can be used to adjust the selection.
"Cut" Cut the selected text.
"Copy" Copy selected text to the clipboard.
"Paste" Paste the latest clipboard item into the text area.
Basic Operations
How to Start
When using the M351 for the first time, please follow the steps outlined below:
- Connect the M351 to users' computer with the USB cable, which will simultaneously charge the M351.
- Pull the notifications bar down > tap "USB Storage" control key (lights up when turned on) to turn on storage connection to users' computer;
- Copy music, videos, photos and other files from users' computer to corresponding folders on the M351.
- Pull the notifications bar down > tap the "USB Storage" control key (lights down when turned off) to terminate the connection to users' computer.
- Disconnect the USB cable of the M351 and computer.
- Start using the device.
users can begin listening to music, watching videos and making phone calls by tapping corresponding icons to launch the apps on the Home screen.
File Transfer
Note:Please make sure the M351device is connected to the computer.
users can download music, video, photos and other files from disks and websites and then copy them to the M351 USB device. The following the example shows how to copy music to M351:
- Select the documents users want to copy on users' compute;
- Select [Copy] or press Ctrl + C;
- Double-click [Computer] desktop icon to open the Computer window and double click [Removable Disk];
- Browse to the Music folder.
- Select [Paste] or press Ctrl + V.
6 When the files have been copied, the music files will appear in the [MEIZU M351] Music folder.
Disconnect the device and launch the Music app to listen to music.
For the M351 to automatically recognize users' media, please place the files to their corresponding folders on the M351: copy videos to the Video folder, photos to the Photo folder, music to the Music folder, or the program of M351 may not be able to recognize the files correctly. users can browse through all files in the Documents app.
Safe Removal of Disk
With an active USB connection, files can be copied between the M351 and the computer.
- After connecting M351 to the computer, open "Removable Disk";
- Copy the selected audios, videos, pictures and other files to the computer;
- After saving the files, click the × icon on the computer taskbar;
- Click on the below message when it appears;
- "Safety Remove Hardware" window will be displayed.
- Confirm by clicking the "OK" button and then unplug the USB.
To keep users' data safe and the disk free from damage a removable disk, always safely disconnect users' hardware from users' computer. If the dialog box below is shown, it does not mean that the product is faulty. Simply wait a moment and try again.
Network Connection
Note:Make sure the SIM card has been inserted into the M351.
Setting up data connectivity
With just a few simple steps, users can unlock the M351's data networking capabilities which gives users connectivity with the world anytime, anywhere.
- After starting the phone: go to "Settings" > "Networks" and activate the "Enable data" switch.
- Select users' carrier or operator under "Access Point Names".
- Under "Network mode", select "GSM/3G auto", "GSM only" or "3G only"
- Tap the Back key < to complete the setup.
When data connectivity is not needed, it is recommended to deactivate the "Enable data" switch.
Note: Before using the network, please confirm users' data consuming status or use WLAN whenever possible to avoid exceeding users' data package plan.
App Guide
Phone
Before making a call, please make sure that there is network connection.
Tap Phone icon to launch the Phone app.
Dialing a number
- Direct dialing
Tap to open the dial pad, then enter a number and tap to call. Use the × button to correct any mistakes. If the phone number is from a saved contact, the contact name will be displayed on the dial screen. After entering a number tap to "Add to new contact" or "Add to existing contact".
Make a call from History
Tap to view recent call history list. Tap the avatars or icons on the left side can call back immediately.
Answering the phone
When there is an incoming call, the contact information of the incoming caller is displayed, together with a ringtone or vibration. Drag the icon to to answer the call, and drag it to to reject the call.
While answering the phone, users can carry out the following operations:
- Tap button to enter Contacts list and check contacts' information;
- Tap to shutdown microphone for current call so the caller cannot hear users' voice;
- Tap to hold current call if possible under the current network;
- Tap to record current call as audio; users can find and play the audios in folder Files > Storage > Recorder > Call.
- Tap to save the number users just input, which can be dialed directly after users' current call;
- Tap to activate dial pad, which can be used to input information that required by auto voice response system.
- Tap to enable the loudspeaker;
- Tap to end the call.
Adjust the receiver volume
During a call, users can press the volume key on the left side of the phone to adjust volume of the receiver. Press up key to volume up and press the lower key to volume down.
Call holding
During a call, if there is a second incoming call, users will have the choice to hang up the current call and take the new call, hold the current call and take the new call, or reject the incoming call. This feature is only available if users' carrier supports it.
Call holding can be turned on and off from "Phone settings" > "Call holding". If a second call is connected, the first call will be automatically put on hold.
Conference calls
Conference calls, which allow more than two people to talk at once, are also supported if supported by the carrier.
How to establish a conference call:
1 Start a normal phone call.
2 When the second phone call connects, the first call will be put on hold.
3 Tap the [Merge] button, which will initiate conference calling. If successful, multiple names will be displayed on the call screen and all three callers can hear each other.
While in a conference call, tapping the "Hold" button will put all participants on hold. Tapping the "Hold" button again will resume the call.
Making an emergency call
As long as users' phone is in a GSM service area, users can make an emergency call, even if there is no SIM card in the phone. Dial 112 (China) to make an emergency call.
Note:A password locked or PIN locked screen can still be bypassed by tapping on the emergency call button.
To hang up, either press the Power button twice, or swipe the top call drawer downwards. Use the volume buttons to mute an incoming call. Once connected, the in-call interface is displayed. Missed calls are displayed in a notifications box on the lock screen.
International calls
In the dial pad, tap and hold the [0] button until the "+" sign appears. Enter the country code, area code and phone number and tap
View call log
- Tap to open up the call log.
2 Tap a contact on the list for detailed information including call details, phone numbers, etc.
If the phone number belongs to a contact in the contacts list, their contact information will be displayed in the call log. To clear all call history, tap on the Menu key "... and tap the "Clear call log" button, and then confirm by tapping "OK". The call details include information on phone numbers, contact names, email addresses, group, call
records, and more. If the number does not belong to a contact, users can add it to a new contact by tapping the number and then choose "Add to New Contact" to save the number as new contact or add to existing contact.
On the call details page, users can tap the icon to send messages to the number, or users can call the number by tapping it.
Search for contacts
M351 can match the inputted letters with the Chinese and English initials of contacts' names. For example, users can type "BD" and the phone will match "Bob Dylan" (only when the contact exists).
Tap on a certain contact and then users can see the details of this contact. In the details page, users can tap icon to send a message to the contact, or users can call him directly by tapping the number.
Contacts
users can save contact names in the M351, together with phone numbers and other related information.
- New contacts
If a stranger calls users, emails users, or sends users a text message; users can save the contact information to a new contact.
- Adding new contacts
To add a new contact, tap the phone Menu key "... >" New contact" button. Then, input related content such as name, phone number and email address. Tap "Add another field" for additional items. users can tap the icon which is left to the typed item and choose the item tag users would like in the popup by
-
Add a contact from the dial pad
-
Dial the number on the phone dial pad, tap on the icon, and then select between "Add to new contact" or "Add to existing contact".
-
Edit the contact information, then tap "Save".
-
Add or change contact display picture
-
Tap + and select a contact.
- On the contact details screen, tap the Menu key "... >"Edit" to enter edit mode.
-
Tap picture area and then select between "Take photo" or "Choose photo from gallery".
-
Deleting contacts
Tap and select a contact. Tap "... > "Delete", and confirm by tapping the "OK" button.
- Sharing contacts
Tap , and select a contact. Tap "... > "Share", and several sharing options will appear, which allow users to share contacts by "Email", "MMS", and "Bluetooth".
Note:If there is a third party app, a contact can also be shared via the apps.
Phone settings
While in the Phone app, tap the Menu key "...> "Phone Settings".
- Contacts
Contact accounts: set up Exchange accounts and select default account.
Import and export contacts:
Import contacts: Check Vcard files > "Import";
Export contacts: Check groups or contacts > "Export"
SIM contacts: users can view, import and delete contacts that saved in users' SIM card.
Call
Vibrates when get through: Upon activation, the phone will shortly vibrate when an outgoing call gets answered by the other party.
Prefix/IP number: Set up a prefix/IP number and when long hold the calling key, the prefix will add to the number automatically.
- Incoming call
Block calls from strangers: When this function is turned on, calls from strangers except International calls will be blocked.
Message recording: When there is no one to answer users' phone, the phone will automatically answer the call and record the voice message; there are three options: "Disabled", "Record when no answering" and "Record for all incoming calls"
Note: This service will only charge the caller for normal calling fees.
- Spam call filter: Interception records will be saved in the Spam Call list. It can also synchronize with Flyme public blacklist or add a number on User blacklist.
-
Call forwarding: Call forwarding enables users forward all users' incoming calls to other telephone number. This feature requires network support; please contact users' network operator for more information. Call forwarding has the following options:
-
Always forward: Forward all calls.
2.Forward if busy: Forward calls when on the line.
3.Forward if unanswered: Forward unanswered calls.
4.Forward if unreachable: Forward calls when not in service.
5DISABLE all call: Cancel all call forwarding settings. -
Call waiting: To notify incoming calls when users are on the line. This function needs network support.
- Other settings
When Auto Call Record function is turned on, the system automatically records all calls without opening the calling interface.
Caller ID: Display users' number on other people's screen as operator's default network settings when make calls.
Messaging
The Messaging app makes it easy and intuitive for users to send and receive text messages. Messaging app can be launched by tapping on the Messaging icon on the Home screen.
Creating and viewing messages
- Tap the button to start writing a new text message. Enter the recipient number directly, or tap the right button to browse the contact list. users can also send a message from the Home screen > contacts list, select contact > tap the button to the right of the phone number;
- Type users' message, then tap "Send";
Contacts: When the number matches those of existing contacts, a drop-down menu will be displayed for users' selection.
Replying
- In the dialog list, tap on any one to open the dialog;
- Tap the text input zone at the bottom of the screen, type in users' reply; then tap to send.
Forwarding
- In the dialog list, tap on any one to open the dialog;
- Tap and hold a message;
- Tap "Forward" from the popup box;
- Enter the recipient, then to send.
Deleting a dialog
- In the dialog list, tap the dot that is right to the dialog which users want to delete, check it (or check as many as users want);
- Tap the button to delete;
- In the confirmation box, tap "OK".
Deleting a certain message within a dialog
- In the dialog list, tap on any one to open the dialog;
- Tap and hold the message which users want to delete;
- Tap "Delete".
Smilies and MMS
- Tap the icon to create new a message;
- Tap the button and choose the content which users want to add. users can tap icon to switch to smile key board. Smilies and contacts information (text form) will be delivered as short messages, while contacts Vcard, photos, audios and videos will be delivered as MMS. The MMS attachment size cannot exceed 300 Kb. Sending a MMS requires corresponding carrier service and correct settings.
- Tap to send.
Search
- Tap "... under the dialog list;
- Enter the search term users are looking for in the search dialog box.
- Relevant information will be displayed in the results list automatically.
Settings
Tap the Menu key "... under the dialog list to set up the following items:
Display
Notifications: When activated, message content will be displayed in the notifications bar when users receive a new message.
Delivery report: When activated, a delivery report will be requested for all messages sent. It is a service provided by the carrier which enables the system to show whether the message is successfully delivered.
Allows screen rotation: Allows horizontal screen when it is selected.
Advanced Settings
Spam filter: Filtered messages will automatically be moved to trash. It is also possible to sync with the Flyme public spam list to block numbers reported by other users. Smart filter is available which can spam the messages by judging through the contents;
Roaming auto-retrieve: Automatically download message data when roaming.
- Other settings
Flyme messages: When activated, users can receive Flyme messages for free;
SMS center: Set the number of the SMS center.
Browser
M351 makes users' web browsing experience more convenient and exciting.
To start surfing, tap the Browser icon on the Home screen, or type users' desired URL in the Quick Search Box.
Launching through the Browser icon
Tap the Browser icon to launch the browser and load the home page in full screen mode.
-
Open a web page
-
Tap the top URL input box.
- Enter the desired URL.
- Tap the "Go" button on keyboard.
Refresh the current page
Tap on the button at the bottom of the screen;
The page will reload to display the latest content.
New window
Tap on the number key at the bottom of the screen and the number key will become a + button, tap on the + button again.
View favorites
Tap the at the bottom of the screen to view users' favorites.
- Close the current page
Tap on the number key 6 at the bottom of the screen, tap the upper area of the page or drag the thumbnail upwards.
- Close the current page
Tap on the number key at the bottom of the screen and then drag any thumbnail downwards.
- Set users' home page
Whenever users open a new browser, users' home page will be loaded.
- Tap the Menu key "... > "Settings" > "Set home page".
- Choose "Custom" and enter the desired home page URL, then tap "OK".
To set the home page as a blank page, simply edit the homepage but leave the URL blank. This allows new browser windows to open faster. It is also possible to set the current page or website from Favorites as the home page.
Navigating a web page
As the mobile screen size is limited, users can use zooming or scrolling to help users better navigate the content.
- Scroll
To scroll, slide users' finger on the screen.
- Zoom in or out
Finger on the screen, double-click zoom to view the content page, and double-click again to reduce the view.
-
Copying page content
-
Navigate to the content users want.
- Tap and hold on the content.
- Use the text selection arrows to select users' desired content, and then tap "Copy".
Web browsing
The Browser allows users to open a link as in computer web browser.
- Opening a link
Tap a link to open its page.
- Navigating back on the opened page
Tapping the back key <
- Address and phone number of quick links
The browser can set up quick links directly for some of the phone number, address and similar information (which already have links).
Multiple browser windows
users can open multiple browser windows and easily switch between them.
- Open a new browser window
Tap on the button > enter URL or select from Favorites, History or Most Visited.
-
Switch between browser windows
-
Tap the number key at the middle bottom of the screen, a thumbnail of all opened pages will be displayed.
-
Touch a thumbnail to switch to that page.
-
Close window
-
Tap the number key at the middle bottom of the screen to see the thumbnail of all opened pages;
- Tap the zone above a thumbnail or simply drag a thumbnail upwards to close the page; or users can slide downwards on the screen to close all the pages.
Favorites
users can save users' favorite web sites for future convenience.
-
Add a new favorite
-
Tap the icon;
-
Tap the left zone to see Favorite, History and Most Visited.
-
Add a website to favorites
-
Tap the Menu key "...";
- Tap "Add to favorites";
-
Edit the name and address and choose the category to users' liking, and save by tapping "OK".
-
Editing favorites
-
Tap the Favorite button;
- Tap the dot right to the website to make it as chosen >
-
Tap edit button on the screen bottom.
-
Deleting a favorite
-
Tap the Favorite button;
- Tap the dot right to the website to make it as chosen >
- Tap the delete button on the screen bottom.
Create a new folder Tap to input folder name > "OK".
Create,edit and delete folders Create a folder
- Tap "Favorite" icon >
- Hold the "Default Folder" or other folders which users want to edit;
- Tap "Create a new folder";
- Type the folder name and then tap "OK".
Edit folders
- Tap "Favorite" icon > ☑;
- Hold the folder name;
- Type a new name for the folder.
Delete
- Tap "Favorite" icon > ☐;
- Hold the folder name;
- Tap the × icon on the right side.
Note:The default folder cannot be deleted.
Share a web page
Tap the menu key "... > "Share".
Add to Favorite
While browsing, tap the menu key "... > "Bookmark it" to save to Favorite.
Request desktop site
Open Internet Browser > Tap the menu key "... > "Request desktop site" to switch between mobile and desktop site.
Clear history
While browsing, tap the menu key "... > "Clear history".
Browser settings
users can configure the browser settings and manage users' personal information.
Open the Browser menu, and then, tap "... > "Settings".
- Browser identification: The name of the browser which sometimes will affect website layout and video format.
- Home page settings: Set the default URL that loads when users start the Browser.
- Privacy mode: When under this mode, the browser will keep no records of users' history, cache and download; all the above information will be erased once the browser is closed.
- Landscape display: When turned on, the browser will show landscape display when the phone rotates.
- Auto-fill: Type in appropriate information and the web form will be filled automatically.
- Clear all cookie data: Tap "Clear all cookie data" to delete all cookies.
- More settings
Enable Flash: "Always", "On demand" or "Off".
Load images: Switching this off will stop the Browser from loading pictures, which increases the load speed of websites.
Accept cookies: Accept cookies, which are needed for websites to recognize users, for instance, auto-login features.
Enable JavaScript: Turn JavaScript on and off.
Block pop-up windows: Prevents pop-up window from being automatically opened.
Open pages in overview: Overview mode shows the entire page, giving users an overview over its content.
Search result preloading: To pre-loaded search results, choose from "Never", "Only on Wi-Fi" and "Always".
Text encoding: users can change the coding standard of the website text on the Browser; users have the following options: Latin-1(ISO-8859-1), Unicode (UTF-8), Chinese (GBK), Chinese (Big5), Japanese (ISO-2022-JP), Japanese (SHIFT_JIS), Japanese (EUC-JP) and Korean (EUC-KR).
Show security warnings: A security warning appears when security problems such as outdated or invalid certificates arise.
Enable location: Allow websites to request users' location.
Website settings: Manage advanced settings of websites.
Reset to default: Restore all browser settings to their original state.
M351 adopts standard mail system which enables users read and send emails via Email app. It's configured to work with most major email providers. On the Home screen, tap the "Email" icon to launch the app.
Open Email and account page users can read users' mails in Email apps.
- Open Email app
Tap the Email icon on home screen; if users are using this app for the first time, users need to go through a tour which will lead users to set up users' Email account; after setting up, the app will show users' inbox.
- Open account page
Tap Email app icon to enter inbox.
The recent Emails will be displayed, while the earlier Emails need to be downloaded by sliding down the screen.
Mails
users can read and write mails in " Inbox" or any other folders of valid account. Slide right the screen to see a side bar on the left screen, users can tap on the folders such as "Sent", "Trash", "Notes", etc.
On the page of mail list, users can tap on the dot on the right side to select mails and to move the mails to another folder.
Tap to update
Tap to write a new mail.
Tap a to search.
Replying to emails
users can reply, forward, delete or manage messages users receive.
- Reply or forward Enter the Inbox and tap on a title to see the mail content
Reply;
Reply all;
Forward;
-
Mark it as a new (or read) mail When reading a mail, tap "... > "Mark unread".
-
Delete a mail
-
users can delete mails by tapping the dot right to the mail title and then tap to delete, or users can tap "... > "Delete" after reading the mail.
-
Starred mails
- On the mail list page, users can tap on the dot right to the mail title > "Add star" to mark the mail. users can slide right the screen to activate side bar and tap "Starred" to see all users' starred mails.
- This setting will be synchronized in email server.
On most types of accounts, deleted messages are stored in a folder. If users deleted emails by accident, it is often possible to recover them. In the Email app, slide right the screen to activate side bar, and then open the "Trash" folder.
Composing and sending email
users can send emails to individual contacts or groups.
- In the Email app, tap the 2 button to start writing;
- Enter the recipient's email address; when there is a suggested address from existing contacts users can touch it to add to recipient;
- Enter the desired "CC / BCC" addresses. Tap the "CC / BCC" button reveal two fields, for "CC" and "BCC" respectively.
- Hold "Recipient" or "CC/BCC", the address would be movable, users can drag the address to the column users want;
5.Type users' subject;
6.Type users'message. - Tap "Attach" to add files to the email. Tap 四 to add photos from Gallery, Tap to send.
-
When ready, send the email by using the "Send" button. If users are not ready to send, tap the Back key. The email will be automatically saved to Drafts.
-
Account folders
- Each account has Inbox, Drafts, Outbox, Sent, Trash and Spam folders. Depending on users' email provider, users might have additional folders.
Adding and editing email accounts
The first time users open Email, users are prompted to set up an email account. After this, users can configure the Email app to receive and send email from other accounts. Accounts are configured from the Email settings screen.
The email setup wizard can help users set up most popular email providers, including those based on POP3, IMAP and SMTP.
users can also configure an Exchange account.
- Add account
- Open the Email app.
- Tap the phone's Menu key "... > "Settings" > "Add account" In the setup process, enter users' email address, password, and name (optional). If users have multiple email addresses set up, users can select a default account for outgoing email.
- Select the appropriate account type and tap "Done". Settings can vary depending on the email provider. If users are unsure of the settings, please contact users' email service provider.
If the setup wizard requires additional information, users will be prompted to enter more details after tapping "Done". Contact users' email service provider if users are unsure of the required settings.
Once set up, emails will beynced from users' mail server, and users can start using the new account to send and receive messages.
E-mail account settings
Tap on the phone Menu key "... > "Settings" > select a mail account.
- Synchronization Frequency
- Select Sync select synchronization frequency: "Three days", "One week", "One Month" or "All".
- Incoming settings
- Configure the incoming server of users' email account.
- Mailbox setting
- Add, rename or delete an account, or configure the mail push.
- Signature users' signature will be included at the end of all emails.
- Remove account
- Select the account which users want to remove and tap
- Tap "OK".
Default account
Select the default account from which to send emails from.
General settings
users can change users' account settings, including Inbox refresh frequency, notification settings, BCC'ing users'self, and more.
Email filter: Emails from blacklisted senders will automatically be trashed.
Automatically empty the Trash folder:
users can set frequency for which the Trash
folder will clear the trash mails automatically; the options are "Off", "A week", "Two weeks" or "A month";
Blacklist: Emails from blacklisted senders will automatically be trashed;
Flyme public blacklist: users can also sync with the Flyme public blacklist; Picture compressing inquiry: When turned on, an inquiry would always pop up when attach pictures.
Auto-load attachments: When on mobile data, choose whether or not to automatically load attachments.
Allow landscape mode: When turned on, the landscape mode is enabled.
Email notifications: Update the notifications bar when there are incoming emails.
Always BCC myself: Send a BCC copy of the email to users'self.
When users are finished making changes, tap the Back key to return and save the settings.
Search for mails
Tap Q to search. The searching result will be shown in a list.
Sort mails by subjects
Tap "...> "Threaded" to sort mails by subjects.
Music
A variety of music formats are supported, complete with album art, spectrum, lyrics and equalizer features. Tap the "Music" icon from the Home screen to launch the Music app.
Play
Music can be organized and played through playlists, individual songs, albums or all music.
Control
| Play / Pause music: | Tap ▲ and □ to play and pause music. |
| Next/prev: | Tap ▲ or □ to skip to the previous or next song. |
| Volume: | Increase or decrease the volume by dragging the volume slider, or use the hardware volume controls. |
| Music controls: | Use the playback sliders to control the music. |
| Repeat: | Tap the repeat icon, □ to repeat one song, □ to repeat all songs in playlist, □ to disable the repeat. |
| Shuffle: | Tap ▲ to enter shuffle mode □ , and tap again exit. |
Creating a new playlist
- Select a song, and tap icon in the bottom screen.
- Type the desired playlist name, then tap "OK".
- Adding songs to the playlist: Or users can enter "All music" >Select songs by tapping the dot right to the title >tap >add to a playlist.
Editing a playlist
- Select list by tapping the dot right to the title
- Tap [V] > tap "Rename playlist" > "Save".
Add the current song to playlist
- Select a song, tap to play the song;
- When playing a song, tap to add song to the current playlist.
Removing songs
Select the songs users want to remove, then tap to complete removal. Select one to delete only one song, multi-selection means delete several songs.
Enter a playlist and select the songs that users want to remove, then tap to remove the songs from the playlist.
Delete playlist
Tap on the right side of the playlist > choose "Delete" > Delete completed.
Note: This operation will only delete the playlist, not the songs that saved in the disk. And except for the chosen playlist, other playlist will not be deleted.
Search for songs
Tap search icon the the right bottom of the screen to enter searching page.
Update music information database
Music files copied to the \Music folder will automatically be added to the music library.
The speed of which new songs are added depend mainly on the number of songs. More songs will take longer to update.
Tap the gray music control widget on the bottom screen to enter Now Playing interface; in this interface, users can tap to turn back to the previous interface.
Stop timer
In the music playing interface, tap "... > "Stop timer" and then set time.
Equalizer
When attached to a headset or earphone, tap "... > "Equalizer" to adjust sound effect.
Only update via WLAN
Update the music information only under WLAN connection.
Video
M351 plays high definition videos from a wide variety of video formats and enjoy a visual feast. To launch the video player, tap the "Video" app from the Home screen. Video playback
In the video app, tap a video thumbnail to play the video.
Homepage
Tap the Video icon on the Home screen to enter video homepage. Tap any video to play. Slide to the right can activate the menu.
- Personal center
Favorite: users' collections of favorite videos
Record: the list of videos which users have watched
Channels
Video center has channels such as TV series, entertainment shows, anime, documentaries, open courses, sports, recreation, fashion, Dolby channel, etc. Every channel can be entered and watched by a simple touch. The contents in every channel can be ranked by time, popularity and reviews.
My video
The player will automatically adjust the directions and mode when playing a video.
Tap the screen to activate playing control.
| Play / pause: | Tap▶or||to play and pause. |
| Skip: | Drag anywhere along the timeline to skip in the video. |
| Back to video list: | When playing a video, touch the screen to activate controlling options, touch < to return to video list. |
| Brightness adjustment: | Drag the Brightness slider to adjust video brightness when the controlling options appear. |
| Overviews of all videos: | Tap the screen to activate controlling menu, tap to see the overview of all videos. Or users can slide up the screen while playing a video to see the playlist. |
| Play mode: | When playing a video, tap to activate menu, tap “...” and choose “Single play”, “Single cycle”, “Continued play” etc. |
| Zoom mode: | When playing, double-tap on the video to switch between the three zoom modes. Pinch the screen to zoom in and out freely. |
Switch to another video: When playing, tap the screen to activate menu, tap or go next or previous.
Delete video: In the video list, tap and hold a video, and then drag it to the trash can to delete it.
Gallery
M351 makes it easy to browse images. From the Home screen, tap the "Gallery" icon to launch the Gallery app.
Viewing images
- Tap the image folder users want to browse.
- Tap an image thumbnail from to view a full screen picture; tap the play button to start a slideshow.
- Swipe left or right to view the previous or next photo.
-
Viewing photos in landscape: Rotate the M351 90 degrees, the photos will rotate automatically and fit to the screen.
-
When viewing individual pictures, users can:
① Zoom in on specific part:
Double-tap the part users want to zoom in, double-tap again to zoom out.
② Zoom in or out:
Pinch with two fingers on the screen to zoom in or out of images.
③ Moving photos:
When zoomed in, slide users' finger on the screen to move the photo.
④ Zoom in or out with single hand:
When using the phone single-handed, double tap and drag the picture to zoom in or out.
Sharing photos
When viewing a picture in full-screen, users can touch the picture > tap the picture (the selected picture would be highlighted, tap again to cancel) > "share via Email"; users can choose from "Email", "MMS", "Bluetooth" and more by tapping.
Deleting photos
When viewing a picture in full-screen, tap the picture > "Delete"; or users can tap the picture > tap pictures (multi-selection is available) > "Delete".
Editing photos
When viewing a picture in full-screen, tap the picture to tailor the picture; Within the blue frame is reserved area, while outside the frame is going to be cut off. users can adjust the reserved area by dragging the four corners > tap "Freely" to choose a scale of the photo > "Save".
More
When viewing individual images, tap the picture > the Menu key "...";
Edit: users can choose a filter for the picture on the bottom area (None, Bright, Toy, Light, Old photo, Morning, etc.)
Rotate: Rotate left , Rotate right ;
Label: users can label the picture with doodles or words;
Details: users can see the details of the photo such as title, date, width, hight, direction, manufacturer, model, focal length, aperture, location, etc.
Set as wallpaper: Set the photo as a "Lock screen" or "Home screen" wallpaper.
Camera
The M351 camera is designed for users to share wonderful moments with friends and family, through photos and video clips. Tap the "Camera" icon on the Home screen to launch the app.
Taking photos
Tap on the screen to focus, and when the focus frame turns to green, tap to take the photo. Double-tap the screen to activate the exposure compensation adjusting slider which has an initial value of 0.
Front / rear camera
Tap to switch between the front and rear camera.
Shooting video
- To start recording, tap > . The upper left corner shows recording time.
- To pause the video, tap
- To stop recording, tap
- To watch the recorded video clip, tap the bottom left thumbnail button.
The flashlight
When shooting photos with rear camera: tap > "On", "Off" or "Auto". When shooting videos with rear camera: tap > "On" or "Off".
Viewing photos and videos
-
users can view photos and videos directly from the Camera app:
-
When in photo or video shooting mode;
- Tap the thumbnail in the lower left corner (The thumbnail would be the latest photo/video).
3.The Gallery opens, allowing users to browse through photos or videos in full screen with just a touch on the thumbnail.
Slide left or right can enable users to check previous or next photo.
App Center
Meizu developers have created a rich variety of applications, which users can browse based on date, popularity and category. Tap the "App Center" icon on the Home screen to launch the app.
Home
1.When launch the app, the Homepage of the App Center will be displayed:
2.The homepage will recommend some hot and excellent apps;
3.Tap the picture or icon on the homepage can lead users to the app details;
4 users can download or share the app in the details page;
5. After downloading, users can post users' review or rate to this app in the details page.
Hot
The Hot App list can be ranked as rates, downloads, installations and purchasing etc.
1.Launch App Center and tap "Hot" to see the hottest apps;
2.Tap the app can enter the details page to download, review and share the app.
Recommendation
This area will display the apps which picked out by editors and illustrated with fine pictures and instructions.
Games
The hottest game apps with categories: "Role Playing", "Action", "Leisure", "Strategy" and "Sports".
Free apps
Apps with "Free" logo on the right corner can be downloaded for free. Tap the app icon can enter the detail page where users can download and install the app.
Paid apps
- Apps with "¥X" logo on the right corner need to be paid before installation;
2.Tap the app icon can enter the detail page where users can download and install the app's trial version for free.
3.Tap “¥X” to login and pay for the download.
Search for apps
1.Tap in the bottom area to enter searching page;
2.Type the app name and then tap "Search";
3.When there is a searching result list, tap the app users need can enter its detail page where users can download, review and share the app.
My apps
After entering the app center, tap the icon in the bottom area to enter My Apps where users can manage the installed apps such as update and uninstall; if users have Flyme account, users can download apps which are not on the current device.
Categories
After entering the app center, slide right the screen to see the categories list on the left side.
1.There are categories including Hot apps, Themes, Games, Utility, Multimedia, Transportation, Social network, News and Finance;
2 users can enter the category which users need and download apps.
Personal center
After entering the app center, slide right the screen, on the bottom of the left-side bar there is a personal account center;
- users can recharge and transfer under the personal center page;
2 users' purchase and recharge history will be displayed.
Documents
Users can view all files and folders in M351 storage as well as deal with all files and folders such as copy, delete, move, encrypt, etc.
Tap Documents icon on the Home screen to launch the app.
Browsing
Open "Documents", tap a folder to open it. The directory folder will be displayed on the left, and you can tap the left side of the folder name to return. Tapping a file will automatically open it in its default application. For instance, for music files, tapping on a song will automatically open the Music app and music will begin player.
Note:The last viewed folder is remembered on exit. Tap the Back key to return to the directory folder.
Editing files
You can batch copy or move files from one folder to another. You can also change file names. In the Documents app, tap the selection bullet next to a file to select the desired file, then tap "... to "Select all", "Copy", "Rename", "Compress", "Encrypt" and other operations.
Sharing files
- Open "Documents" and select the file(s) to send.
- Tap "...". Depending on the file type; you can send it via email, Bluetooth or MMS.
Email: If email accounts are set up, files can be sent as email attachments.
Bluetooth: Turn on Bluetooth and select the receiving Bluetooth device.
MMS: Contacts vCards, photos, audio or video files less than 300Kb can be sent in an MMS.
Note: Folders can not be shared.
Deleting files
- Open "Documents" and select the file(s) to delete.
- Tap the icon, and confirm by tapping "Delete".
Note:Deleted files and folders can not be recovered.
Creating a new folder
- Open "Documents", tap the phone Menu key "... > "New folder".
- Type a folder name, then tap "Save".
Encrypting files
- Select the files that need to be encrypted, tap “...” and then tap “Move to Vault”.
2.If a password is set, the screen will show the files have successfully moved.
3.Type the correct password and tap "OK" to finish the encryption;
Note: If there is no system password, then a prompt will pop up to guide users to set a password.
- Once a file or a folder is encrypted, it will need password to open. And if the encrypted file is a picture, thumbnail will not be displayed.
Compressing documents
- Open "Documents" and select the file(s) or folder(s) to be compressed.
2.Tap "...> "Compress" and then type the name for compressed files;
3.Tap "OK" to save.
Decompressing documents
- Open "Documents" and select the file(s) or folder(s) to be decompressed.
2.Tap "Decompress" on the right bottom of the screen and remember the location where the decompressed files are kept.
Calendar
The Calendar can be used to keep track of dates and appointments. To launch the Calendar app, tap its icon on the Home screen.
Viewing month, day or list of appointments
Monthly mode: Show all events of this month;
Weekly mode: Tap to switch to weekly mode which shows all events of this week;
Daily mode: Tap any day under the monthly or weekly mode to enter daily mode which shows every events of this day;
Events
Adding an event
1. Enter the daily mode;
2. Set up the event;
Set up event name, start and end time, location, description, repeat and alerts.
3. Tap "Save".
Deleting an event
- Tap a specific date, then tap an event time slot to open the event to be deleted;
- Tap "Delete event", and confirm by tapping "OK".
Editing an event
- Tap a specific date, then tap the event you want to edit;
- In the detailed view, tap to edit event;
- When complete, tap "Save".
Searching through events
- Tap "... > "Search";
- Type your keywords in the input box, then tap "Search" in the bottom right corner of the keyboard. Search results will be displayed in a list.
Settings
Tap on the Menu key "... > "Settings" to set up calendar accounts, alerts and notifications, as well as reminder times.
Calendar view settings
Popping notifications: enabled or disabled
Default remind time: Set time to remind users
The first day of a week: Choose the day which you want it to be the first day of week
Calendar display
Contact's birthday: Turn on or off the contact's birthday display
Account list: Turn on or off a certain account's events display
Default calendar: Choose an account to be default account.
Notes
Notes app allows you to quickly and easily write what is on your mind. On the Home screen, tap the "Notes" icon to start taking notes.
Tap on a note to read or edit it.
Creating a note
- Tap to begin writing a new note;
- Enter the desired note.
Tap T- T+ to adjust font size, and to change background color; Tap to attach a shopping list; tap to insert a picture which can be chosen from both Gallery and Documents; tap to record voices and transfer the sounds to words which will be shown on the voice card.
Tap "... to change "Paper color", "Delete", "Export" etc.
- When done, tap the Back key < to exit. Your note will be saved automatically.
Editing a note
Note: Pictures and voice cards can also be deleted by moving the cursor, just as the notes of words;
- Enter the note detail page;
- Tap anywhere on a note to begin editing it;
- When done, tap the Back key < to exit. Your note will be saved automatically.
Deleting a note
- Enter the note detail page;
- Tap the Menu key "... > "Delete".
- Tap "OK" to confirm deletion.
Note:Select a note and drag it to the trash icon can delete the note directly.
Sharing a note
Open a note and tap the Menu key "... > "Share". A note can be shared by Bluetooth, Email or SMS. Notes can also be exported as pictures and texts by tapping "Export as pictures" or "Export as text"
Alarm Clock
Tap the Alarm Clock icon on the Home Screen to launch the app.
Tap > setting an alarm clock
Adding an alarm
You can set up multiple alarms.
- Tap " + " > "Add alarm".
- set the alarm:
Time: Set up alarm time.
Repeat: Choose how often the alarm repeats. The default is "Never".
Labels: Add a descriptive text for your alarm.
Snoopze: Set up the snooze delay interval.
Ringtone: Select the sound that is played with the alarm.
Volume: Slide the volume bar to adjust the volume of the alarm clock;
Editing and deleting an alarm
Tap > choose from "Edit" or "Delete" the clock; tap "Edit" to enter editing page, while tap "Delete" and "OK" can delete the clock.
Turn on the clock
Tap the switch on the right side, if the switch is lightened up then the clock is on.
Tap ① > Stopwatch; tap "tart" toS start keep time, tap "Lap" to record; tap "Reset" to clear the records.
Tap to set a Timer; tap "Start" to start keep time; tap "New task" to define your own events; tap "Tone" to set the reminding ringtone.
Recorder
Tap the Recorder icon on the Home screen to start the app. Recorder lets you record and playback sound.
Start recording
Tap the button to start recording.
Tap to switch to receiver mode; tap to switch to speaker mode.
Stop recording
Tap the button to stop recording.
Audio files are automatically stored in the /Recorder folder.
Pause recording
Tap the button and the recording will be paused, tap again to continue recording.
Rename recording
Select the record > tap [ ] > Input file name > Save
Share a recording
When the recording operation is complete, check the recording by its selection bullet > tap to share, then choose between sharing via "Mail", "MMS" or "Bluetooth".
Delete recording
Select the record > tap to delete the recording.
Play recording
Tap on a recording in the list for direct playback.
Tap + , to record time of playing which can be resumed if the playing get interrupted.
Calculator
The calculator app lets you do basic operations, such as addition, subtraction, multiplication, and division. Tap the Calculator icon on the Home screen to launch the app.
c : Clear data.
: Tap to switch to scientific calculator; tap again to switch back
_ : Tap to make the calculator floated above the home screen; tap again to switch to the original mode.
Settings
You can change settings on the M351 and customize ringtones, date and time, and much more. Tap the Settings icon on the Home screen to launch.
Customize
You can add widget to the screen such as widgets, themes, live wallpapers, gallery wallpapers or system wallpapers.
Theme: Both from the system and third parties.
Live wallpapers: Tap "Live wallpapers" menu > "Set"
Wallpapers: Tap "Wallpaper" menu which is a built-in item of the system, can set the system picture as standby screen and home screen;
Gallery wallpapers: Tap "Gallery wallpapers" > "Set".
Networks
- Portable hotspot: Set up and manage wireless portable hotspots.
Portable hotspots shares your mobile data connection through WLAN. - Data enabled: Enable data access to connect to the internet.
- VPN: Set up and manage VPNs.
- Data limits: Users can define the limits of data;
- APN: Set up carrier access point names to enable data.
Network mode: Automatically switches the network mode between "GSM/3G auto", "GSM only" or "3G only" depending on connectivity - Data roaming: When enabled, data access will be available when roaming.
- Prioritize calls: Only for GSM networks.
- Network operator: Manage network operator settings. If you select a network manually, when there is no available network, the notification bar will show "No Service" and under that circumstance you cannot use network.
- PPPoE: Set up PPPoE username and password setting.
WLAN
Enable to turn on the wireless radios.
- Connect to network: user-defined network which can configure name and security (WEP, WPA/WPA2 PSK, 802.1x EAP, WAPI PSK);
- Connect via WPS: Connect to nearby WPS networks.
- WLAN Direct: Search for WLAN Direct network;
- Advanced settings
Bluetooth
M351uses Bluetooth technology to wirelessly connect to other Bluetooth devices and exchange data. When turned on, you can edit the "Device name" that other devices will see. When "Discoverable" is turned on, other Bluetooth devices nearby can find the M351. If "Discoverable is turned off, other Bluetooth devices cannot find the M351.
Note:The phone might be incompatible with other devices, and the Bluetooth connections will be affected by the environment.
Display
- Display
Sleep: Set the amount of time before the phone goes to sleep. Sleep time is not recommended to be set to too long, as it uses battery and may damage the screen.
Font size: Set the font size for calling history, contacts, messages and etc.
Battery percentage: When turned on, the percentage of battery remained will be shown on the notification bar.
- Brightness
Auto brightness: Automatically adjust screen brightness according to the environment.
Screen brightness: Use the slider to adjust screen brightness. Higher brightness uses more battery.
Light keys: Adjust the brightness of the light keys.
Output
Wireless display: Turn on/off.
Sound
Sound
Silent mode: In silent mode, all sounds are muted except for when when the alarm starts.
Vibration: The Vibration switch allows you to turn the phone vibration on or off.
Fade-in: The ringtone gradually adjusts the volume from low to high.
Volume: You can set the ringtone volume by dragging the volume slider.
- Ringtone and notification
Phone ringtone:
Set the phone ringtone
Message tone:
Set the message and tone
New email tone:
Set the new email and message tone
Calendar alert tone:
Set the alert tone for calendar
Notification tone:
Set the notification tone
Feedback
Dialpad touch tones:
Play sounds when using the dialpad
Keyboard sound:
Play sounds as you type on the virtual keyboard
Screen lock sound:
Play a sound when unlocking the screen
Camera shutter sound:
Play a sound when taking pictures
Apps control
Turn on/off the apps' notification.
Security & location
Screen unlock
Set up screen lock: Prevent the phone being used without permission.
- Enter at least four digits to create a password;
- Enter the number again to confirm;
- Tap "OK".
To remove unlock password, please turn off the password lock. If you want to change the password, please tap "Reset". Enable the screen lock will need correct password to get to Home screen. Users can define their own password and also can activate Guest mode.
- Location services
Turned on location services: record locations information.
Use GPS satellites:
Turning on GPS will give you a location precise to street level. GPS accuracy depends on actual sky conditions and other factors. Use wireless networks When enabled, WLAN networks are used to improve location accuracy.
- Permissions and credentials
Allow installation of apps of unknown sources:
when turned on, unknown sources apps can be installed;
Device administrators:
View or deactivate device administrators.
Install certificates from disk:
Install encrypted certification from disk.
Clear credentials:
Erase all credentials and reset password.
- Join user experience improving program
- The statistics will only be used to improve the product. Users' private information will not be leaked.
Language & time
- Select language Chinese(traditional), Chinese(simplified), English, etc.
- Keyboard Set up automatic capitalization, update dictionary and select which input languages to use.
- Date & time
Automatic: Automatically request date and time settings from carrier. Set Date: If "Automatic" is disabled, tap to manually set the system date.
Select the time zone: If "Automatic" is disabled, tap to manually set the time zone.
Set time: If "Automatic" is disabled, tap to manually set the time.
Use 24-hour format: Use 24-hour time format instead of AM/PM.
Accessibili
Haptic feedback: Vibrate phone when using the Home button.
LED notifications: When turned on, the phone's light keys will blink when there are missed calls, unread emails and messages or other notifications.
USB quick charge: When turned on, the speed of USB charging becomes faster.
Power saving mode: Save power when turned on.
Proximity sensor calibration: Calibrate the proximity sensor.
- Developer options
- USB debugging: Enable debugging mode when USB is connected;
- Stay awake: Screen will never sleep while charging;
- Allow mock locations: When turned on, the phone will allow developers to mock locations for tests.
- More settings
- Third party app installation path:
- When turned on, all third party app temp files will be installed to the directory VirtualSD;
- Set the scope of the back gesture:
- drag the scope slider to set the scope of back gesture.
Accounts
Add Flyme account and other accounts.
About phone
Includes device name, storage, information about system updates (OTA updates), status, legal information, model, system version, baseband version, hardware version, Kernel version, serial number and IMEI.
Other
Troubleshooting
In case of problems, please refer to this guide. If the problems persist, contact your dealer or visit our website. You can find frequently asked questions and a community forum on our official English website at http://en.meizu.com.
Entering PIN
Enter your SIM card PIN code. If you do not know the code, contact your carrier for information.
Entering PUK
After entering the PIN code incorrectly three times, your SIM card will be locked. To unlock, you must enter the PUK code.
Unable to send messages
Please check that the network signal is normal.
No SIM card inserted
Confirm SIM card is properly inserted. Check that the SIM card is working properly as it may be defective or faulty. If so, contact your carrier for a replacement.
Out of service or network failure
Check the signal strength. If there is no network signal, you may be in a network blind spot. Move to another spot to regain signal.
Poor sound quality, echo or noise during conversation
Hang up and dial again.
Short battery life
Where the signal is weak, the phone will constantly be looking for signal, which drains the battery. When you do not need the phone function, you can turn the phone radio off. If the battery has been used for too long, battery life will deteriorate, and battery should be replaced.
Phone does not boot
Check the battery status.
Care tips
In order to improve mobile performance, reduce the radio emission, reduce battery power consumption and ensure safe operation, please observe the following instructions:
How to correctly use the phone:
1 Keep the phone and parts and accessories out of children's reach.
2 Keep the phone dry and in a ventilated environment when charging. Do not use water, chemicals or cleaning solvents to clean the phone. Also, avoid rain, moisture and liquids that contain minerals that corrode electronic circuit boards.
3 Do not attempt unauthorized disassembly of the phone. If you have questions, please contact Meizu or a local Meizu store.
4 Do not store the device in extreme temperatures as it can shorten the life of electronic devices and damage the battery. Recommended use environment is between -10 and 5^ .
5 Do not drop, knock or strongly shake the mobile phone, as it may result in damage to the internal circuit board.
6 If dropped in water water, make sure to turn off the mobile and send it to the local Meizu Certified Store immediately for repair. Do not attempt to dry it by using any heating equipment such as dryers, microwave ovens, etc.
7 Do not attempt to repair any product at home. If the phone is not working, consult Meizu for after-sales service.
8 Prolonged phone calls, web surfing sessions and gaming may result in the phone warming up, especially when charging. This is normal phenomenon among modern smartphones.
9 The phone has a built-in antenna. Do not damage or perform unauthorized modifications to the antenna, which may result in reduced equipment efficiency and increased SAR values exceeding the recommended range.
10 Do not place heavy objects on, or press hard on the phone, to avoid damage to the phone or its touch screen display.
Mobile security and backup:
The device supports internet connectivity. Like computers, it may be exposed to viruses, malicious information or applications, and other harmful content. Please only open messages, accept connectivity requests, download content and accept installation requests from reliable sources. Please back up important information regularly to prevent the loss of data.
Battery
- Do not attempt to open the case for the removal or repair mobile phone battery. This product contains a lithium-ion polymer battery. Incorrect installation of battery may lead to fire danger or combustion. Do not disassemble the battery, its external short circuit contacts, expose the battery to extreme temperature (outside of the recommended - 10^ C to 55^ C range), and do not dispose of batteries in a fire as general waste.
-
Please keep the battery and device dry and away from water or other liquids, to avoid short circuiting the device.
-
The battery standard: GB/T 18287-2000, limited charge voltage: 4.3V
Please follow the relevant laws and regulations, and do not use the phone in the following environments:
- Gas stations, chemical storage warehouses, environments containing flammable gas or other chemicals.
- Hospital operating rooms, emergency rooms, intensive care units and other places. In order to avoid interference with medical devices work, do not use phone.
- When in an aircraft, follow the aviation safety requirements and turn off your phone when asked to.
- To protect you and other people's safety while driving, do not use the phone.
- Do not use phone outdoors during a lightning storm to avoid accidents.
- When charging the phone, do not use the phone close to your face when calling.
- Follow any other laws governing mobile phone usage.
Accessory caution
- Place all accessories (such as SIM or USIM card, power adapter, etc.) out of children's reach to avoid choking hazards.
- As the mobile phone accessories are not water-resistant, keep all parts dry.
- When the detaching the power cord of any accessory, pull the plug and not the cord.
Traffic Safety
According to research, texting or talking on the phone while driving significantly increases the fatality risk. Please follow below instructions:
- If you want to use the phone in the car, use a hands-free device.
- Make sure your mobile phone and hands-free device do not hinder any vehicle airbags or other safety equipment.
Radio wave radiation safety precautions
- Avoid using the device in the vicinity of metal structures (such as steel construction sites).
- Avoid using the device in the vicinity of strong electromagnetic sources, such as microwave ovens, speakers, TV and radios.
- Use only original manufacturer approved accessories, or those that do not contain any metal parts.
- Using non-original manufacturer approved accessories may violate your local RF exposure guidelines.
Radio wave (RF) signals
The mobile phone contains a radio transceiver, where the electromagnetic radiation energy does not exceed the upper limit of Chinese regulations. These limits are part of a comprehensive set of guidelines set based on human electromagnetic energy radiation tolerance. These guidelines are set after thorough independent research and are regularly updated and reassessed. These standards include ensure that persons of any age or health status can use the devices safely.
The exposure standard for mobile phones is defined by the electromagnetic energy absorption ratio (Specific Absorption Rate, or SAR) unit of measurement. Based on this model, the maximum allowed SAR value is 2.0W / Kg .
The SAR value is tested in accordance with standard test procedures, such as the use of normal phone positioning, and recording the maximum output power through testing a variety of frequencies. Tthe SAR value is based on the highest measured rate, but general real life mobile use will result in SAR levels well below this maximum. Mobile phones are designed to use power flexibly, and to adjust the the power output to achieve the base station demand level. In general, the closer to the base station the mobile is, the less power it needs.
SAR information
This mobile device meets international guidelines for radio wave exposure. The maximum SAR limit is at a value of 2.0W / Kg , while the measured maximum SAR of this device is 0.823W / Kg , in line with the P.R.C. national standard GB21288-2007, "Limits for human local exposure to electromagnetic fields emitted by mobile phones".
- SAR values may vary by country, region and test environment. The use of accessories may result in different absorption rates.