SUPER2 039611 CROQ/GAUFRE/GAUFRETTE - Waffle Maker LAGRANGE - Free user manual and instructions
Find the device manual for free SUPER2 039611 CROQ/GAUFRE/GAUFRETTE LAGRANGE in PDF.
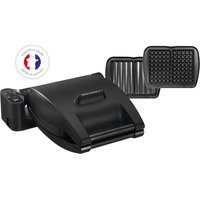
| Product type | Multifunction waffle maker with interchangeable plates (waffles, waffle sticks, croque-monsieur, panini, grill) |
| Brand | LAGRANGE |
| Model | SUPER2 039611 CROQ/GAUFRE/GAUFRETTE |
| Power supply | 230 V, 50 Hz, 1200 W |
| Plate material | Solid cast aluminum with non-stick coating |
| Plates included | Waffle, waffle stick, croque-monsieur, grill/panini plates (depending on version) |
| Plates sold separately | Ref. 010 122 (2 waffles), 010 222 (4 waffle sticks), 010 322 (grill/panini), 010 422 (2 croque-monsieur) |
| Cooking adjustment | Browning dial and finish button (soft/crispy) |
| Indicators | Orange light (power on), green light (preheating and cooking complete), audible end-of-cooking signal |
| Plate ejection system | Ejection button for easy plate removal |
| Handles | Insulating Bakelite handles |
| Power cord | Removable, type HO5RR-F 3x0.75 mm² |
| Safety | Never immerse, cord must not touch hot parts, use under supervision |
| Care and cleaning | Unplug and let cool; plates washable in warm water with soft sponge; lids and base cleaned with damp sponge |
| Closing clip | Included accessory to keep the appliance closed (for waffle sticks, croque-monsieur, paninis) |
| Usage | Household use only |
| Warranty | 2 years, extendable by 1 year upon online registration |
| Spare parts availability | 5 years from date of manufacture |
| Consumer service | LAGRANGE, 17 chemin de la Plaine, ZA Les Plattes, CS30228, 69390 VOURLES, France - conso@lagrange.fr |
Frequently Asked Questions - SUPER2 039611 CROQ/GAUFRE/GAUFRETTE LAGRANGE
User questions about SUPER2 039611 CROQ/GAUFRE/GAUFRETTE LAGRANGE
0 question about this device. Answer the ones you know or ask your own.
Ask a new question about this device
Download the instructions for your Waffle Maker in PDF format for free! Find your manual SUPER2 039611 CROQ/GAUFRE/GAUFRETTE - LAGRANGE and take your electronic device back in hand. On this page are published all the documents necessary for the use of your device. SUPER2 039611 CROQ/GAUFRE/GAUFRETTE by LAGRANGE.
USER MANUAL SUPER2 039611 CROQ/GAUFRE/GAUFRETTE LAGRANGE
GAUFRES AUX AMANDES OU AUX NOISETTES
CONDITIONS DE GARANTIE
BESCHRIJVING VAN HET APPARAAT
2. WAFELTJES - BRICELETS - DROGE WAFELS
DESCRIPTION OF APPLIANCE
- Base
- Control panel
- Browning control (soft/crispy)
- Cooking control knob: for selecting doneness
- Orange power indicator light
- Green ready-to-eat indicator light
- Plug for detachable cord
- Removable plates
- Plate eject button
- Handle
- Accessory: locking mechanism for mini-waffles/toasted sandwiches/Panini
- Cord
- Large waffle plates
- Mini-waffle plates
- Toasted sandwich plates
- Grill/Panini plates
SAFETY INSTRUCTIONS
Carefully read these instructions and keep them for future reference.
- Check that the voltage of the power supply is the same as that indicated on the appliance's nameplate.
- Always unwind the cord completely.
- When using an extension, always use a model equipped with an earth connection and with wires of a section equal to or greater than 0.75 ~mm^2 .
- Place the appliance away from easily flammable objects (curtains, etc.).
- Never place the appliance on hot surface or near a flame.
- Never leave the appliance unattended when it is switched on.
- The appliance is for home use only and must be used as indicated in the instructions.
-
Never immerse the appliance in water or any other liquid, be it for cleaning or any other purpose. Never place it in the dishwasher.
-
Do not use or store the appliance outside, and keep it in a dry place.
- Never move the appliance by pulling the power cord. Ensure that the power cord cannot be caught accidentally, to prevent any risk of the appliance falling. Do not wind the cord around the appliance, or bend it, and do not allow it to come into contact with the cooking plates.
- Do not touch the appliance's metallic parts when it is switched on, as these are hot.
- This unit is not intended for people, including children of at least 8 years of age, whose physical, sensorial or mental capacities are reduced, or who do not have the necessary knowledge or experience, unless they are trained in and supervised for the safe use of this unit and are aware of the risks involved. Do not let children play with the unit. Only children over the age of 8 may, with adult supervision, clean and maintain the unit.
-
Keep the unit and the power cord out of reach of children under the age of 8 years.
-
These appliances are not designed to be activated using an external timer or a separate remote control system.
NEVER SWITCH ON THE APPLIANCE WHEN THE PLATES ARE NOT IN PLACE.
SPECIFICATIONS
- Sturdy cast aluminium plates with anti-stick coating
- Multifunctional: interchangeable plates available separately from LAGRANGE
- Browning control (soft / crispy)
* Cooking control knob - Orange power indicator light
- Green ready-to-bake and ready-to-eat indicator light
- Audible ready-to-eat tone
* Plate eject button
* Bakelite handles - Detachable cord
- 230V- 50Hz - 1200W
PLATE SETS SOLD SEPARATELY FOR ALL PREMIUM® WAFFLE IRON MODELS:
- Plates for 2 waffles (REF 010 122)
- Plates for 4 mini-waffle (REF 010 222)
- Grill/Panini plates (REF 010 322)
- Plates for 2 toasted sandwiches (REF 010 422)
CORD
Examine the power cord carefully before using it. If it is damaged, you must not use the unit. The cord should only be replaced by LAGRANGE, its after-sale service department or a qualified person approved by LAGRANGE in order to avoid danger for the user. The cord used is a H05RR-F 3G 0.75mm^2
These units are in compliance with directives 2006/95/CE, 2004/108/ CE, DEEE 2002/96/CE, RoHs 2002/95/CE and the CE food contact regulation 1935/2004.
ENVIRONMENT
Protection of the environment - DIRECTIVE 2002/96/CE
In order to protect our environment and our health, electrical units at the end of their working lives must be disposed of according to very specific rules requiring the involvement of everyone, both suppliers and users.

That is why your unit, as indicated by the symbol on its nameplate, must not be put into a public or private garbage can intended for household wastes.
At the time of its disposal, it is your responsibility to bring your unit to a public collection center designated for the recycling of electrical and electronic equipment. If you need information about centers for the collection and recycling of discarded units, please contact the local authorities in your region, the household waste collection services or the store where you bought your unit.
FIRST USE AND DAILY OPERATION
FIRSTUSE
- We recommend cleaning the cooking plates before the first use with a little hot water and a sponge. Dry thoroughly.
- A new appliance may smoke slightly when used for the first time. To reduce the chance of smoking, heat the appliance for 10 minutes and then let cool for approximately half an hour.
DAILY OPERATION
- Unroll the cord completely.
- Plug the appliance in.
- The green light comes on and the ready signal sounds to indicate when the ideal cooking temperature has been reached. You may then grease the plates and begin cooking (see Cooking Tips).
AFTER USE
*To turn off the appliance, unplug the cord.
CHANGING PLATES
- Unplug the appliance.
*Allow it to cool completely. - Press the plate eject buttons immediately next to the plates.
- Remove the plates and insert new plates.
MAINTENANCE
IMPORTANT:
- Always unplug appliance and allow to cool completely before cleaning.
- Never submerse the appliance in water.
- Never use oven cleaners or other stripping products.
- Lid and base: clean with a damp sponge and, if necessary, mild detergent.
- Non-stick cooking plates: Generally soak for a few minutes, clean using a soft sponge and mild detergent and then rinse with warm water. Dry the plates thoroughly before placing them back into the appliance.
COOKING TIPS
1. WAFFLES
IMPORTANT:
Never grease the appliance before pre-heating but instead just before pouring in the batter.
- Heat the appliance until the green light comes on and the ready signal sounds.
- Although plates in the appliance have non-stick coating, we recommend greasing them lightly.
-
Open the appliance and grease both plates using a silicone brush, paper towel or piece of cotton. (If using a brush, dip it into a small cup of cooking oil to cover it well.) Grease again only lightly before cooking the next waffles. After that, grease again only if the waffles start to stick on opening the lid.
-
Use the control panel for precise control over browning of your waffles. Use the dial to adjust the waffle iron temperature and control browning precisely. Adjust the selection control to modify cooking time:
-
Faster cooking for softer waffles (seared to keep them soft and chewy on the inside and crispy on the outside)
-
Slower cooking for extra-crispy waffles (heated longer to remove all moisture from the inside and make them crispy through and through).
-
Pour the batter onto only one plate taking care to cover all squares completely. Note that it is much easier to use a jug with spout for this instead of a ladle.
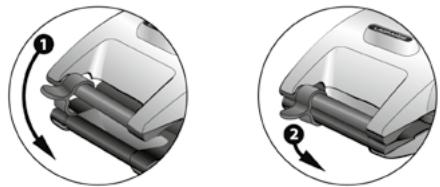
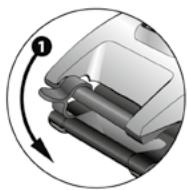
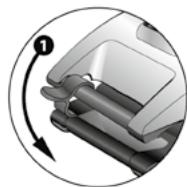
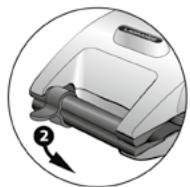
- Close the lid, wait 3 to 4 seconds and then rotate the head.
- After 2 more minutes, rotate the head back to its starting position. IMPORTANT: The rotation process is important for making the best waffles. If you do not do this, your waffles will look less appetizing (squares on top tray not filled in completely, light spots on waffle making the surface irregular). Even with rotation, this may happen also if you do not use enough batter. However, be careful as the appliance may release steam during turning. We recommend using a potholder or mitt when rotating.
- The green light will come on and the appliance will emit four short tones when it is time to open the lid.
IMPORTANT: Cooking waffles is a subtle art in which the slightest change in ingredient proportions in the dough can affect appearance and flavour significantly. The timing of the green ready light was calculated based on a standard waffle dough recipe and the opinions of a representative consumer panel. Differences in timing due to your own particular preferences are not to be considered a defect of the appliance.
- Remove the waffles by piercing each one with a sharp-tipped knife and lifting away gently from the cooking plate.
1.1 Troubleshooting
- Waffle top and bottom coming apart: removing too quickly from mould.
- Waffles breaking apart: batter too watery or too dry (not enough fat).
- Waffles burning: cooking too long or forgetting about waffles!
- Waffles burnt on one side, uncooked on the other: filled improperly or batter too watery or appliance not rotated.
- Waffles sticking to moulds: plates greased incorrectly or plates too hot for first waffles or too much sugar or not enough fat in the batter.
1.2 What to do in the event of problems
For all problems:
- Unplug the appliance.
- Allow to cool, remove the plates and soak for 5 minutes, brush the plates with a nylon or other plastic dish brush. Dry the plates thoroughly, insert them again, plug the appliance back in and follow the cooking instructions carefully from the start.
- Apply grease repeatedly if cooking many waffles. We guarantee beautiful waffles if you follow the provided instructions closely.
2. MINI-WAFFLES, BRICELETS AND DRY WAFFLES
- We recommend starting with positions 2.5 and 'moelleux' ('soft').
- Heat the appliance until the green light comes on.
-
Grease the plates just before pouring the batter.
-
Spread about a tablespoon (or four smaller spoonfuls if four moulds) of thick batter on the lower plate.
- Close the lid and squeeze the handles for a few moments to help distribute the batter evenly. Close the locking mechanism securely. Note: This mechanism may be left attached to the appliance. Position it to the left or right depending on whether you are right or left-handed.
* Do not turn over the iron as for waffles.
The green indicator light will go out after about 10 seconds.
When the green light comes on again, you may open the iron. Keep in mind that the timing of the green light was configured for cooking waffles. Ideal cooking time may vary depending on the recipe. In this case, you may check before the green light comes on to see whether cooking is complete by opening the lid; if your mini-waffles, etc., are ready, then remove them from the appliance and continue the cooking cycle ignoring the green light.
If your mini-waffles appear to be stuck to both plates, do not open the lid any further; if you hold it in its current position for a few moments, the mini-waffles should come away from the top plate under their own weight. If they do not, insert a spatula and carefully tease the mini-waffles away from the plate.
The mini-waffles may appear soft, but they become firm very quickly. If you want to roll them up, you may do so using a dowel
stick directly on the cooking plate. To roll up the miniwaffles, place the dowel on a mini-waffle, lift up one edge of the waffle, roll it up quickly and then remove the dowel.
- You may also roll them up into cones to eat as they are, filled with a frozen dessert or folded into triangles, halves or quarters.
- Note that unlike waffles, mini-waffles or wafers are generally served entirely cold. They may also be stored for several days in a biscuit tin.
3. TOASTED SANDWICHES
- Toasted sandwiches are quick and easy to make. Where possible, prepare all ingredients before heating the appliance.
- We recommend starting with positions 2.5 and 'moelleux' ('soft').
- Heat the appliance until the green light comes on.
- The two outside faces of the sandwich coming into contact with the plates should be lightly buttered.
- Place two sandwiches in the appliance.
Close the lid slowly and gently. Close the locking mechanism securely. Note: This mechanism may be left attached to the appliance. Position it to the left or right depending on whether you are right or left-handed.

-
Do not turn over the iron as for waffles.
-
When the green light comes on and the ready signal sounds, you may remove the toasted sandwich.
4. PANINIS
- Paninis are quick and easy to make. Where possible, prepare all ingredients before heating the appliance.
- We recommend starting with positions 2.5 and 'moelleux' ('soft').
- Make paninis with 'special panini' bread or pieces of precooked baguettes about 20cm long. For the panini fillings, use your imagination: thinly-sliced tomatoes, cured ham, basil, mozzarella, etc. Be careful not to overstuff your paninis and make sure that the bread does not go beyond the width of the plates.
- Put two paninis in the unit.
- Close the unit by tightening it gently and progressively. Install the closing clip and use it to lock the unit. This is important so that the bread is properly flattened and your paninis are properly cooked and marked.
Note: This mechanism may be left attached to the appliance. Position it to the left or right depending on whether you are right or left-handed.
- Do not turn over the iron as for waffles.
- As soon as the green light goes on and your hear the signal, you can remove the paninis.
5. COOKING MEAT
- We recommend starting with positions 2 and 'moelleux' ('soft').
- Heat the appliance until the green light comes on.
- Use only steaks, fillets, rib steaks..., do not cook meat on the bone such as chops, rib of beef...
- Put the meat in the unit.
- Do not use the tightening clip as this could crush the meat if it is thick.
- Monitor the cooking and take out the meat when it is cooked to your taste.
RECIPES
To begin, here is some advice on the ingredients to use, according to your preferences...
- For soft waffles, use milk and cream. These waffles must be eaten as soon as they are removed from the mould.
- For light, crunchy waffles use water and beer.
- Be they soft or crunchy, it is important to use yeast.
(Use 10g of yeast per 500g of flour – leave the batter to stand for 30 to 60 minutes).
Using baker's yeast gives better quality waffles but requires the batter to stand for around 2 hours.
WARNING: when standing, batter made with baker's yeast can expand to several times its initial volume... So make sure you use a big enough container!
WAFFLES
SWEET WAFFLES
(For 10 to 15 waffles)
WAFFLES LYONNAISE
500g of flour - 1 sachet of baking powder - 3/4 L of liquid (water, beer or milk, its your choice!) - a pinch of salt - 125g of butter - 30g of sugar - 2 sachets of vanilla sugar - vanilla essence, kirsch or rum - 3 or 4 eggs.
Melt the butter and allow to cool slightly. Pour the flour into a mixing bowl. Add the salt, sugar and eggs. Beat with a whisk.
In a bowl, dissolve the baking powder in the liquid. Pour this mixture into the mixing bowl together with the melted butter. Flavour according to taste. Beat until the batter is completely uniform. Leave to stand for 30 minutes.
Eat the waffles when still warm, sprinkled with icing sugar or with jam, honey, chestnut purée, chocolate, Chantilly cream, maple syrup, ice cream, fresh fruit, etc.
WAFFLES WITH CREME FRAICHE
500g of flour - 150g of butter - 10g of baking powder - 14 L of water - 14 L of crème fraîche - 4 eggs - a pinch of salt.
Pour the flour, salt and egg yokes into a mixing bowl. In a bowl, dissolve the baking powder in the liquid. Pour this mixture into the mixing bowl and beat with a whisk until you obtain a uniform batter. Add the melted butter, cream, and egg whites, having beaten them stiff.
Leave to stand for 12 an hour at room temperature. Eat the waffles when still warm, sprinkled with icing sugar.
SAVOURY
WAFFLES WITH HAM
500g of flour - 200g of finely chopped ham - a pinch of salt - 3 or 4 eggs - 1 sachet of baking powder - 125g of butter - 34L of liquid (water, milk and, if you wish, a glass of dry white wine).
Pour the flour into a terrine dish. Add the salt and egg yokes. Beat with a whisk together with the water (having dissolved the baking powder in the water) and white wine. Add the melted butter. Beat once more. Add the finely chopped ham. Then fold in the egg whites, having beaten them stiff. Leave to stand for 12 and hour. Eat the waffles immediately after cooking.
WAFERS
(or bricelets or dry waffles)
The results are always better when using ordinary flour rather than cake flour.
BRICELETS DE DIVONNE
4 eggs - 200g of sugar - 250g of melted butter - the zest from 2 lemons - 250g of flour - a pinch of salt.
Beat the eggs, then add the sugar, melted butter, lemon zests, salt and sifted flour. The batter will be runny. Leave to stand for 24 hours in a cool place. Place a quantity of batter the size of a walnut on the plate.
TOASTED SANDWICHES
Always put a pat of butter at the exterior of each slice of bread.
TOASTED CHEESE CANAPES
Gruyere, Chester or any other type of cheese you can grate. Beat the following in a saucepan:
30g of butter - 30g of flour - 14 litre of milk - 2 egg yokes.
Mix and gradually add 50g of grated cheese. Add seasoning and spread the batter on slices of French bread or white loaf (1cm thick).
CROQUE-MONSIEUR
Garnish a slice of bread with grated gruyere. Place a slice of ham on top of the gruyere. Cover with more gruyere and place the second slice of bread on top.
CROQUE 'COCOTTE'
Make a hollow in the first slice of bread with the back of a spoon, break an egg into it and add seasoning (salt and pepper). With the spoon, make a similar hollow in the other slice of bread and place it on top of the egg.
PANINI
NEAPOLITAN PANINI
Fill your 'special panini' bread with slices of tomato, fresh basil leaves, and then slices of mozzarella. Add a dash of olive oil. Close the panini and grill it for a few minutes.
CHEESE PANINI
Fill your 'special panini' bread with mozzarella and gorgonzola. Close the panini and grill it for a few minutes.
N.B. For a Savoyard panini, replace the mozzarella and gorgonzola with raclette cheese or Reblochon.
CURED HAM/PARMESAN PANINI
Fill your 'special panini' bread with a slice of cured ham and mozzarella. Add a few leaves of rocket and shavings of parmesan. Close the panini and grill it for a few minutes.
GUARANTEE TERMS
Guarantees for LAGRANGE household appliances.
Your unit is guaranteed for 2 years.
In order to receive an additional year of guarantee free of charge, register on the LAGRANGE web site (www.lagrange.fr). The guarantee includes parts and labor and covers manufacturing defects. The guarantee does not cover deterioration due to poor use or non-observation of the instructions for use or breakage due to falling.
THIS GUARantee APPLIES TO HOUSEHOLD USES. IT CANNOT APPLY TO PROFESSIONAL OR SEMI-PROFESSIONAL USES.
The legal guarantee due from the seller does not in any way exclude the legal guarantee due from the Manufacturer for manufacturing flaws or defects according to articles 1641 to 1649 of the Civil Code. In the event of a breakdown or malfunction, contact your retailer. In the event of technical defects observed within one week of purchase, the units will be exchanged.
Beyond this period, they will be repaired by the LAGRANGE after-sale service.
To benefit from this guarantee, the user must present a copy of the invoice specifying the date of purchase of the unit.
Duration of availability of spare parts
In accordance with article L 111-2 of the consumer code, the availability of spare parts that we provide for a repairable product is 5 years as of its date of manufacturing.
However, this availability is only guaranteed in the country where the product was purchased.
Shipping costs for returns
After the first year which benefits from the dealer's guarantee, you will only have to pay the costs for returning the product to the factory. We will ship it back to you at our expense as quickly as possible.
If you have any other questions about our products, you can contact us at the following address: