
MC28M6055CK - Microwaves SAMSUNG - Free user manual and instructions
Find the device manual for free MC28M6055CK SAMSUNG in PDF.


User questions about MC28M6055CK SAMSUNG
0 question about this device. Answer the ones you know or ask your own.
Ask a new question about this device
Download the instructions for your Microwaves in PDF format for free! Find your manual MC28M6055CK - SAMSUNG and take your electronic device back in hand. On this page are published all the documents necessary for the use of your device. MC28M6055CK by SAMSUNG.
USER MANUAL MC28M6055CK SAMSUNG
1-2 Special High Voltage Precautions 5
- Specifications 6
2-1 Features 6
2-2 Table of Specifications 7
2-3 Accessory 8
- Disassembly and Reassembly 9
3-1 Tool for assembly and disassembly 9
3-2 Disassembly of Magnetron, Motor Assembly and Lamp 10
3-3 Replacement of High Voltage Transformer 13
3-4 Replacement of Door Assembly. 15
3-5 Replacement of Drive Motor 16
3-6 Replacement of Control Circuit Board 17
3-7 Replacement of Grill heater 18
- Troubleshooting 19
4-1 Parts checking method. 19
4-2 Information Code Numbering Rule. 20
4-3 Information Code List. 21
4-4 Electrical Malfunction 22
5.PCB Diagrams 25
5-1PCB Diagrams 25
- Schematic Diagrams 29
7-1 Schematic Diagrams 29
1. Precaution
PRECAUTIONS TO BE OBSERVED BEFORE AND DURING SERVICING TO AVOID POSSIBLE EXPOSURE TO EXCESSIVE MICROWAVE ENERGY
(a) Do not operate or allow the oven to be operated with the door open.
(b) Make the following safety checks on all ovens to be serviced before activating the magnetron or other microwave source, and make repairs as necessary:
(1) Interlock operation,
(2) Proper door closing
(3) Seal and sealing surfaces (arcing, wear, and other damage
(4) Damage to or loosening of hinges and latches,
(5) Evidence of dropping or abuse.
(c) Before turning on microwave power for any service test or inspection within the microwave generating compartments, check the magnetron, wave guide or transmission line, and cavity for proper alignment, integrity, and connections.
(d) Any defective or misadjusted components in the interlock, monitor, door seal, and microwave generation and transmission systems shall be repaired, replaced, or adjusted by procedures described in this manual before the oven is released to the owner.
(e) A Microwave leakage check to verify compliance with the Federal performance standard should be performed on each oven prior to release to the owner.
1. Precaution
Follow these special safety precautions. Although the microwave oven is completely safe during ordinary use, repair work can be extremely hazardous due to possible exposure to microwave radiation, as well as potentially lethal high voltages and currents.
1-1 Safety precautions (
- All repairs should be done in accordance with the procedures described in this manual. This product complies with Federal Performance Standard 21 CFR
- Microwave emission check should be performed to prior to servicing if the oven is operative.
- If the oven operates with the door open :Instruct the user not to operate the oven and contact the manufacturer and the center for devices and radiological health immediately.
- Notify the Central Service Center if the microwave leakage exceeds 5mW/cm2 .
- Check all grounds.
- Do not power the MWO from a "2-prong" AC cord. Be sure that all of the built-in protective devices are replaced. Restore any missing protective shields.
- When reinstalling the chassis and its assemblies, be sure to restore all protective devices, including: nonmetallic control knobs and compartment covers.
- Make sure that there are no cabinet openings through which people --particularly children--might insert objects and contact dangerous voltages. Examples: Lamp hole,ventilation slots.
- Inform the manufacturer of any oven found to have emission in excess of 5 ~mW / cm^2 , Make repairs to bring the unit into compliance at no cost to owner and try to determine cause. Instruct owner not to use oven until it has been brought into compliance.
CENTRAL SERVICE CENTER
- Service technicians should remove their watches while repairing an MWO.
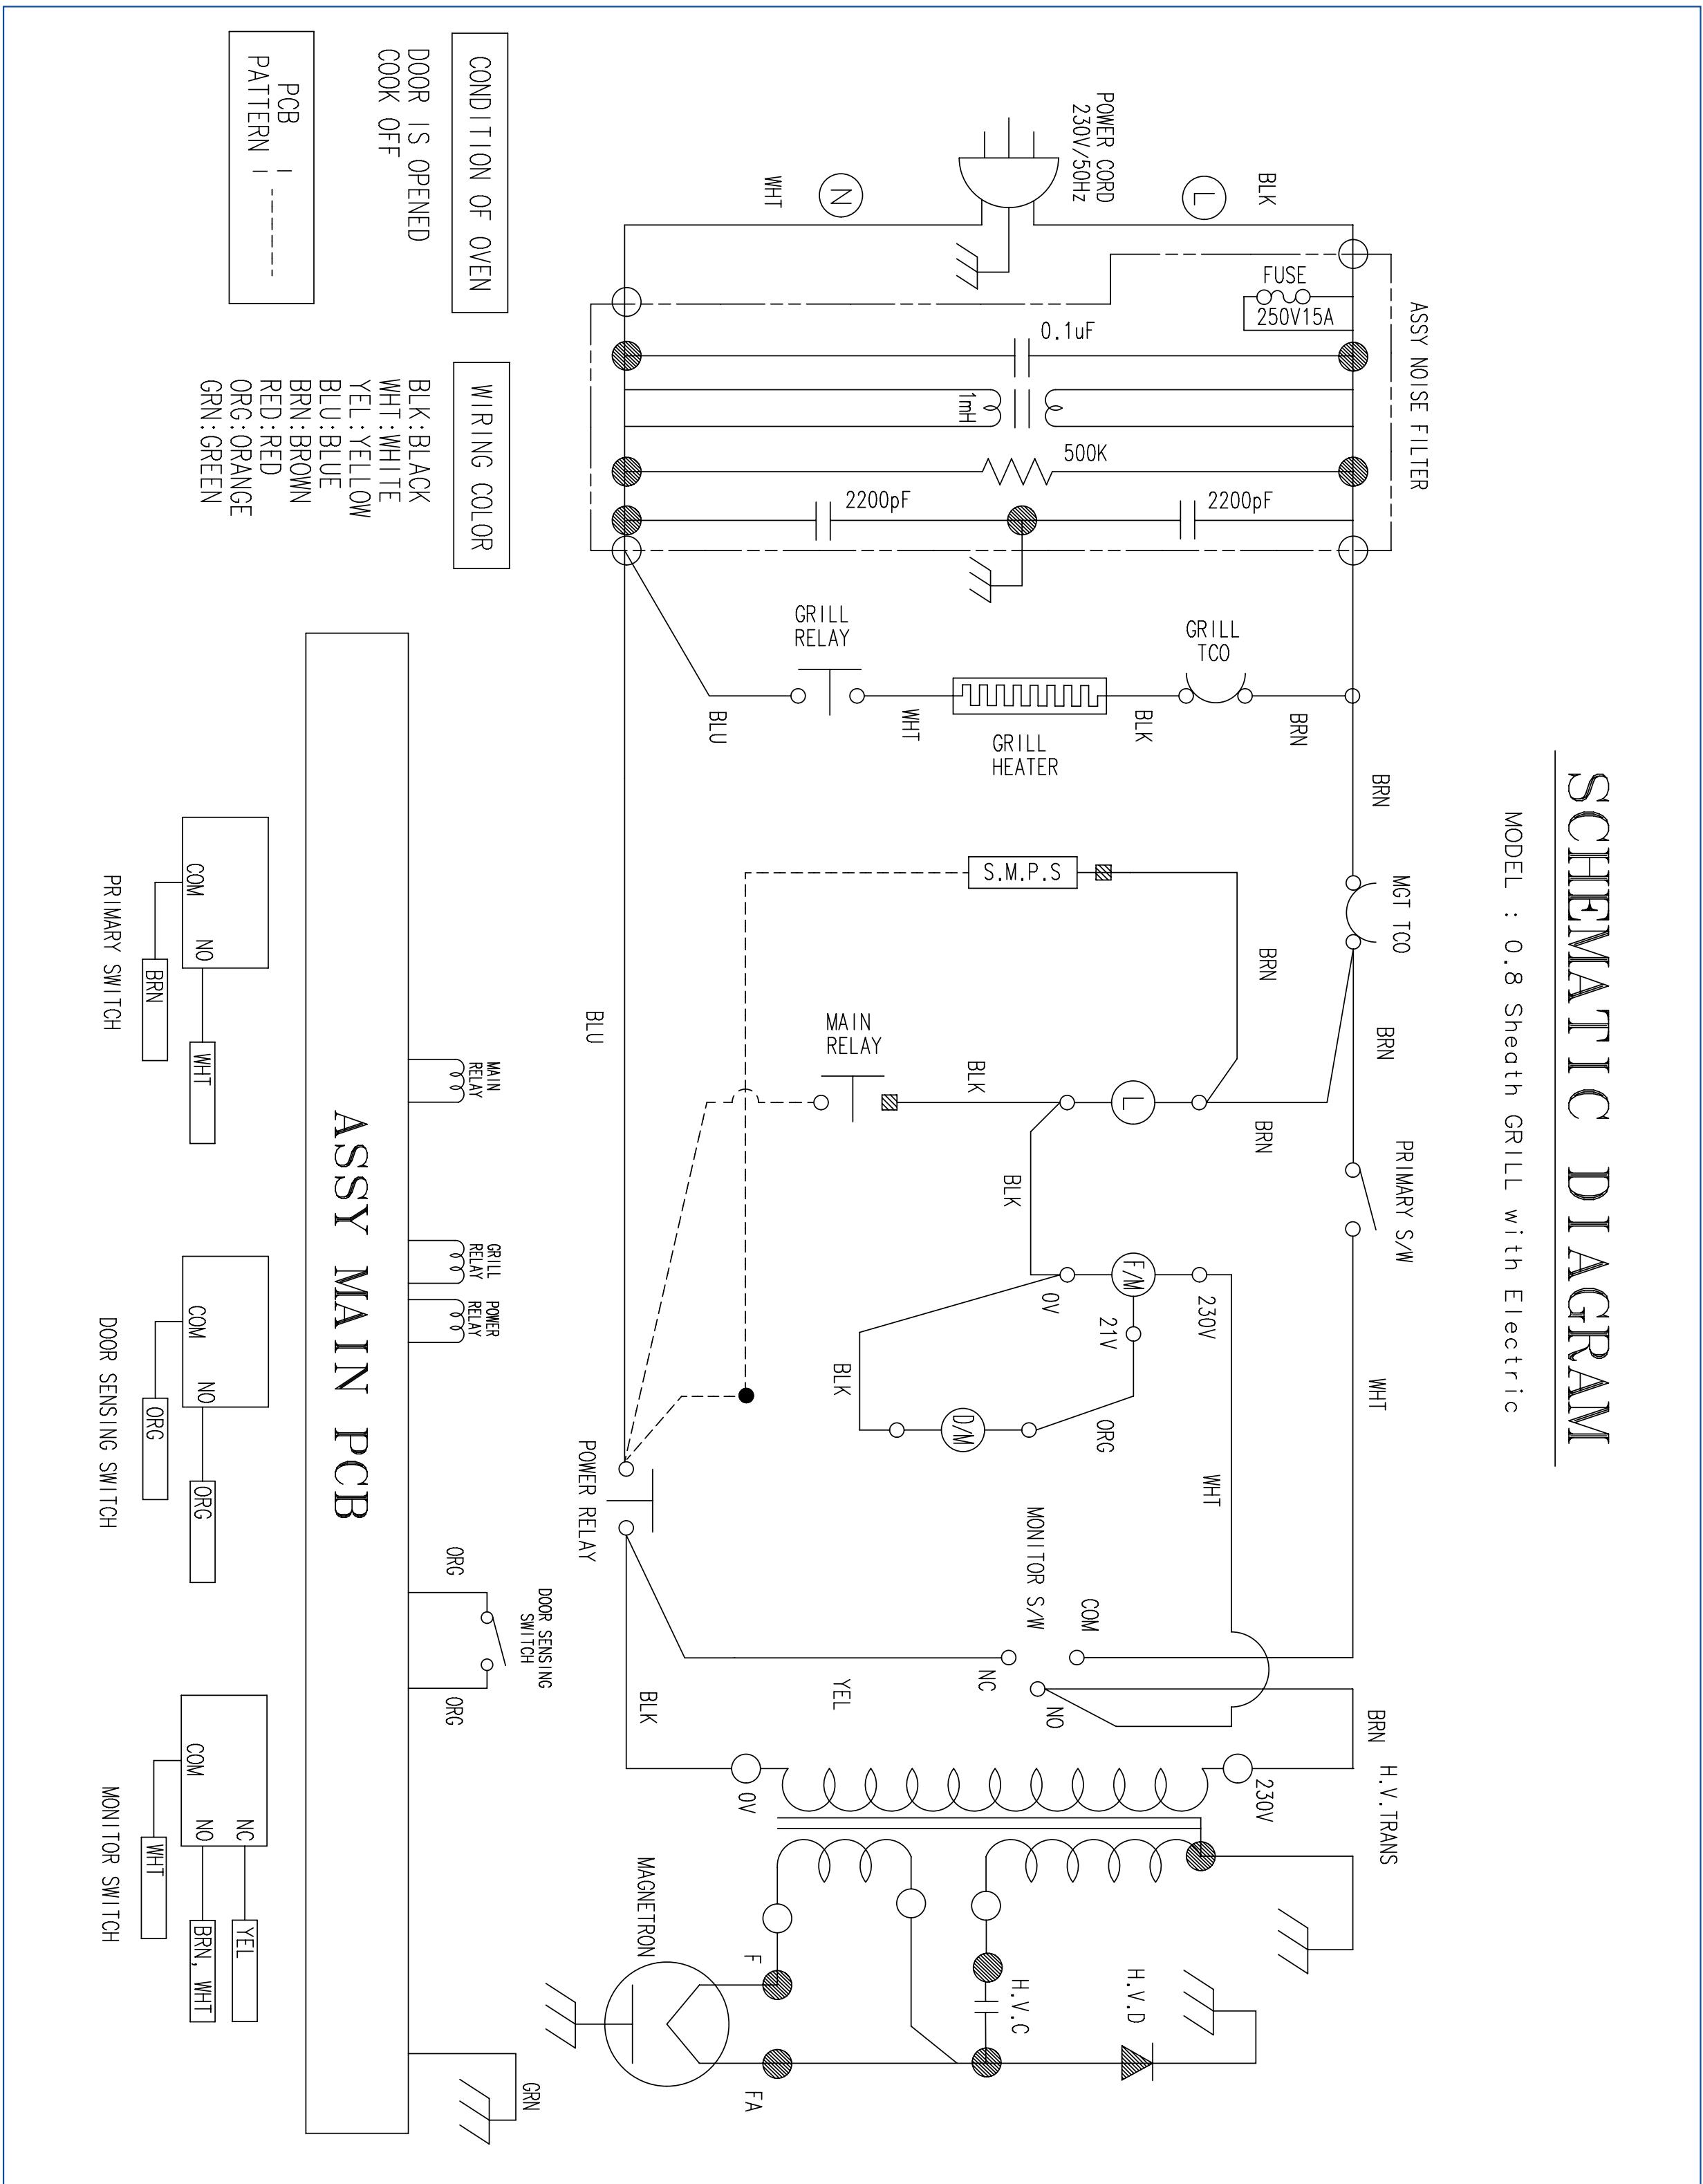
- To avoid any possible radiation hazard, replace parts in accordance with the wiring diagram. Also, use only the exact replacements for the following parts: Primary and secondary interlock switches, interlock monitor switch.
-
If the fuse is blown by the Interlock Monitor Switch: Replace all of the following at the same time: Primary, door sensing switch and power relay, as well as the Interlock Monitor Switch. The correct adjustment of these switches is described elsewhere in this manual. Make sure that the fuse has the correct rating for the particular model being repaired.
-
Design Alteration Warning: Use exact replacement parts only, i.e., only those that are specified in the drawings and parts lists of this manual. This is especially important for the Interlock switches, described above. Never alter or add to the mechanical or electrical design of the MWO. Any design changes or additions will void the manufacturer's warranty. Always unplug the unit's AC power cord from the AC power source before attempting to remove or reinstall any component or assembly.
- Never defeat any of the B+ voltage interlocks. Do not apply AC power to the unit (or any of its assemblies) unless all solid-state heat sinks are correctly installed.
- Some semiconductor ("solid state") devices are easily damaged by static electricity. Such components are called Electrostatically Sensitive Devices (ESDs). Examples include integrated circuits and field-effect transistors. Immediately before handling any semiconductor components or assemblies, drain the electrostatic charge from your body by touching a known earth ground.
- Always connect a test instrument's ground lead to the instrument chassis ground before connecting the positive lead; always remove the instrument's ground lead last.
- When checking the continuity of the witches or transformer, always make sure that the power is OFF, and one of the lead wires is disconnected.
- Components that are critical for safety are indicated in the circuit diagram by shading, A or A.
- Use replacement components that have the same ratings, especially for flame resistance and dielectric strength specifications. A replacement part that does not have the same safety characteristics as the original might create shock, fire or other hazards. NOTE : Connect the oven to a 20A. When connecting the oven to a 15A, make sure that circuit breaker can operate.
1. Precaution
1-2 Special High Voltage Precautions
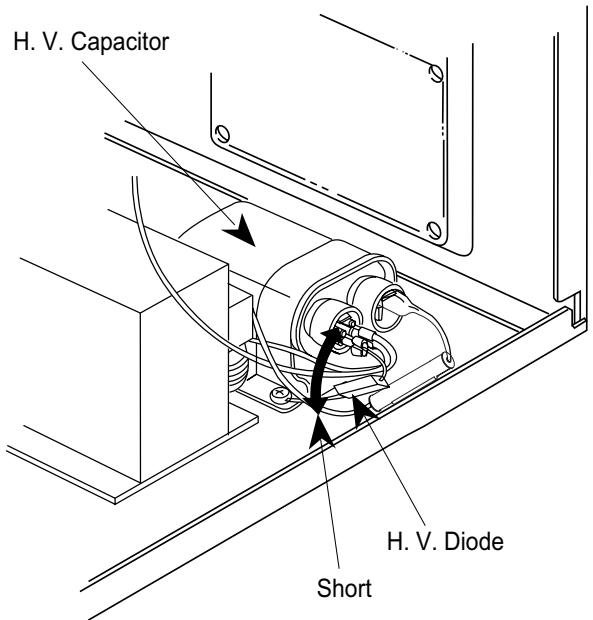
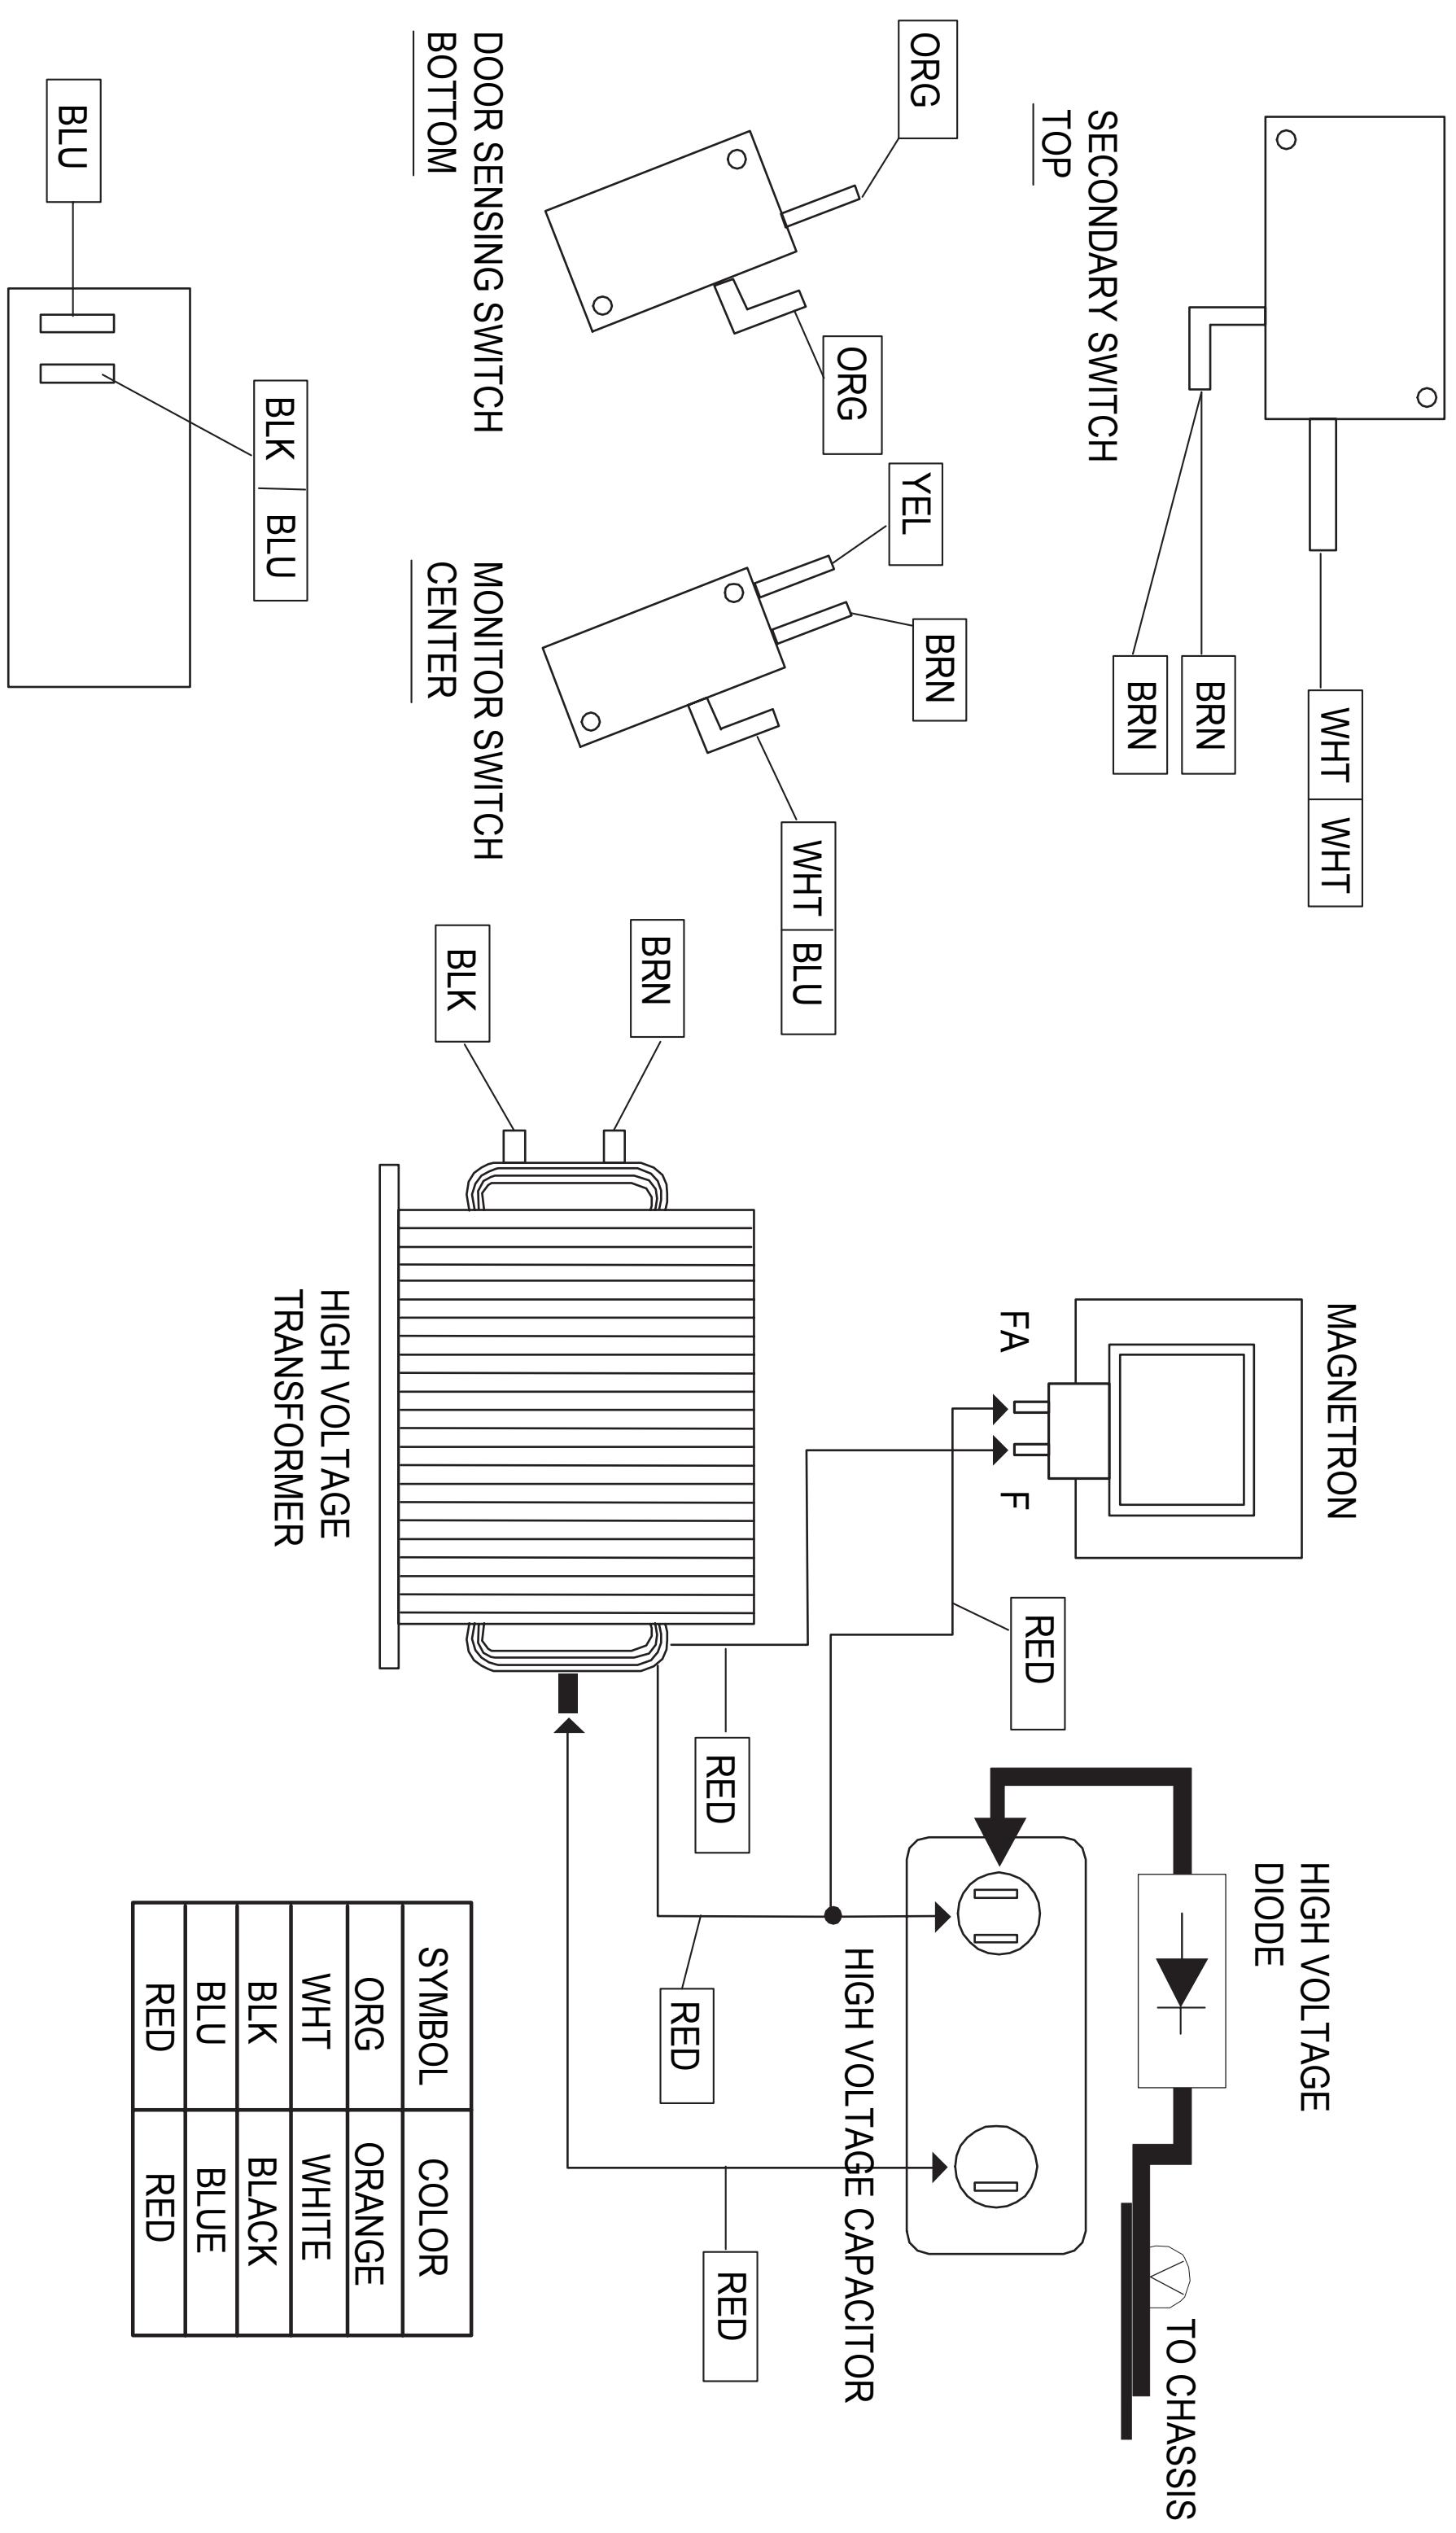
- High Voltage Warning Do not attempt to measure any of the high voltages --this includes the filament voltage of the magnetron. High voltage is present during any cook cycle. Before touching any components or wiring, always unplug the oven and discharge the high voltage capacitor (See Figure 1-1)
- The high-voltage capacitor remains charged about 30 seconds after disconnection. Short the negative terminal of the high-voltage capacitor to the oven chassis. (Use a screwdriver.)
- High voltage is maintained within specified limits by close-tolerance, safety-related components and adjustments. If the high voltage exceeds the specified limits, check each of the special components.

PRECAUTION
There exists HIGH VOLTAGE ELECTRICITY with high current capabilities in the circuits of the HIGH VOLTAGE TRANSFORMER secondary and filament terminals. It is extremely dangerous to work on or near these circuits with the oven energized.
DO NOT measure the voltage in the high voltage circuit including filament voltage of magnetron.

PRECAUTION
Servicemen should remove their watches whenever working close to or replacing the magnetron.

PRECAUTION
Never touch any circuit wiring with your hand nor with uninsulated tool during operation.
2. Specifications
2-1 Features
Features
Auto Cook Menu
Don't know how to cook? Samsung's new Microwave Oven auto cooking technology offers preset functions resulting in perfectly cooked dishes every time. Simply select a cooking menu, and the cooking results will astound you.
■ Ceramic Coating Cavity
The interior fully coated with Ceramic Enamel offers solid surface that never scratches and cracks. So you can enjoy the same new interior even after long use. Moreover, it prevents the bacteria and the sooth surface. It is easy to clean as well. The significantly higher cooking temperature and animal protein can cause severe discoloration and cleaning issue. But the Ceramic Enamel Interior prevents all of them.
Aesthetic Design
The Mirror exterior delivers a luxurious look to your kitchen. The design matches perfectly with your other kitchen appliances, providing a harmonious kitchen interior.
2. Specifications
2-2 Table of Specifications
| Item | Basic | New | ||
| GE83KRQW-1/BW | MG23J5133AK/EF | |||
| General | Capacity | 23L | 23L | |
| Power | Power Source | 230V~50Hz AC | 230V~50Hz AC | |
| Output Power(Microwave) | 800W | 800W | ||
| Output Power(Grill) | 1100W | 1100W | ||
| Power consumption(MW) | 1200W | 1200W | ||
| Max Output Power | 2300W | 2300W | ||
| Output Power | 800W(IEC-705) | 800W(IEC-705) | ||
| Operation Frequescy | 2450MHz | 2450MHz | ||
| Type | CMO | CMO | ||
| Display | LED | LED | ||
| Control Method | MEMBRANE | MEMBRANE | ||
| Door Open Mechanism | Push Button | Push Button | ||
| MW Distribution Mechanism | SIDE FEEDING | SIDE FEEDING | ||
| Volume | 0.8 Cu.ft | 0.8 Cu.ft | ||
| Dimension | Outside | 489 x 275 x 372mm | 489 x 275 x 354mm | |
| (W x H x D) | Cavity | 330 x 211 x 324mm | 330 x 211 x 324mm | |
| Weight | Net | 12.5 kg | 13.5 kg | |
| Gross | 14.0 kg | 15.0 kg | ||
| Export Zone | RUSSIA | FRANCE | ||
| Feature | MWO Mode | 1. MW | YES | YES |
| Grill Mode | 1. GRILL | YES | YES | |
| Combi Mode | 1. MW + GRILL | YES(300W,450W,600W) | YES(300W,450W,600W) | |
| Auto Cook | 1. RUSSIAN MENUS | YES(27) | YES(27) | |
| 2. HEALTHY COOKING | YES(20) | YES(20) | ||
| 3. SOUP/DRINKS | YES(19) | YES(19) | ||
| 4. DEFROST | YES(RAPID 4) | YES(RAPID 4) | ||
| 5. SOFTEN/MELT | YES (4) | YES (4) | ||
| Keep Warm | YES | YES | ||
| ECO | YES | YES | ||
| Clock | YES | YES | ||
| Max time Cooking | MW | 99 min | 99 min | |
| Power Level | YES(6) | YES(6) | ||
| Setting | Sound Option | YES | YES | |
| Clock System Option | 24H+12H | 24H+12H | ||
| Child Lock | YES | YES | ||
| Material & Finishes | Outer Panel Color | WHITE | BLACK | |
| Door Color | WHITE | BLACK | ||
| Cavity Interior | Ceramic Enamel | Ceramic Enamel | ||
| Packing Case | ECO Box | ECO Box | ||
2. Specifications
2-3 Accessory
| Item | Description | Code NO. | Q'ty |
| Assy-Guide Roller | DE97-00193D | 1 | |
| Tray-cooking | DE74-20102D | 1 | |
| Rack-Wire | DE74-70071D | 1 |
3. Disassembly and Reassembly
3-1 Tool for assembly and disassembly
| Tool | Type | Remark |
| 7mm vox driver | ||
| Screwdriver | ||
| Nipper |
3. Disassembly and Reassembly
3-2 Disassembly of Magnetron, Motor Assembly and Lamp
Remove the magnetron including the shield case, permanent magnet, choke coils and capacitors (all of which are contained in one assembly)
| Parts | Explanation Photo | Explanation |
| Magnetron, Motor Assembly and Lamp | 1. Disconnect all lead wires from the magnetron and lamp. | |
| 2. Remove a screw securing air cover. | ||
| 3. Remove the air cover. |
3. Disassembly and Reassembly
3-2 Disassembly of Magnetron, Motor Assembly and Lamp
| Parts | Explanation Photo | Explanation |
| Magnetron, Motor Assembly and Lamp | 4. Remove screws securing the magnetron to the wave guide. | |
| 5. Take out the magnetron very carefully. | ||
| 6. Remove two nuts from the back panel. | ||
| 7. Take out the fan motor. |
3. Disassembly and Reassembly
3-2 Disassembly of Magnetron, Motor Assembly and Lamp
| Parts | Explanation Photo | Explanation |
| Magnetron, Motor Assembly and Lamp | 8. Remove the oven lamp from hole of air cover. |
NOTE1: When removing the magnetron, make sure that its antenna does not hit any adjacent parts, or it may be damaged.
NOTE2: When replacing the magnetron, be sure to remount the magnetron gasket in the correct position and make sure the gasket is in good condition.
3. Disassembly and Reassembly
3-3 Replacement of High Voltage Transformer
| Parts | Explanation Photo | Explanation |
| High Voltage Transformer | 1. Discharge the high voltage capacitor. | |
| 2. Disconnect all the leads. | ||
| 3. Remove the mounting bolts. |
3. Disassembly and Reassembly
3-3 Replacement of High Voltage Transformer
| Parts | Explanation Photo | Explanation |
| High Voltage Transformer | 4. Replace the High Voltage Transformer 5. After replace, reconnect the leads correctly and firmly. |

PRECAUTION
Servicemen should remove their watches whenever working close to or replacing the magnetron.

PRECAUTION
There exists HIGH VOLTAGE ELECTRICITY with high current capabilities in the circuits of the HIGHVOLTAGE TRANSFORMER secondary and filament terminals. It is extremely dangerous to work on or near these circuits with the oven energized.
DO NOT measure the voltage in the high voltage circuit including filament voltage of magnetron.
3. Disassembly and Reassembly
3-4 Replacement of Door Assembly
| Parts | Disassembly Photo | Explanation |
| Removal of Door "C" | Door "C" Door "A"— | Insert flat screwdriver into the gap between Door "A" and Door "C" to remove Door "C". Be careful when handling Door "C" because it is fragile. Then remove the door assembly. |
| Removal of Door Assembly | Lift up the Door Assembly from Cavity. | |
| Removal of Door "E" | Following the procedure as shown in the figure, insert and bend a thin metal plate between Door "E" and Door "A" until you hear the 'tick' sound. • Insertion depth of the thin metal plate should be 0.5mm or less. | |
| Removal of Key Door & Spring | Remove the Spring from Door "E" and Key door. |
3. Disassembly and Reassembly
3-5 Replacement of Drive Motor
| Parts | Explanation Photo | Explanation |
| Drive Motor | : Point of cutting | 1. Take out the glass tray, guide roller from oven cavity, disconnect power. 2. Remove turn table motor cover from case bottom. CAUTION: Remove sharp edge after cover removal. |
| 3. Disconnect leads from motor. 4. Remove the screws securing motor to bottom of over cavity. | ||
| Drive Motor | 5. Lift out the motor. 6. When replacing the motor, be sure to remount it in the correct position. NOTE: The shaft of motor should fit tip coupler. | |
| 7. When reassemble a drive motor cover, give a turn in a 180° and fix with a screw. NOTE: Bring the spare screw from service center. |
3. Disassembly and Reassembly
3-6 Replacement of Control Circuit Board
| Parts | Explanation Photo | Explanation |
| Removal of Control Box Assembly | 1. Be sure to ground any static electric charge in your body and never touch the control circuit. 2. Disconnect the connectors from the control circuit board. 3. Remove screws securing the control box assembly. | |
| Removal of Ass'y P.C.B Assembly | Assy Key Module | 1. Remove screws securing the control circuit board. 2. Lift up the control circuit board from the Ass'y control box. |
3. Disassembly and Reassembly
3-7 Replacement of Grill heater
| Parts | Explanation Photo | Explanation |
| Braket Upper | 1. Remove 2 screw from the Bracket upper. | |
| Spring Plate | 2. Press the Center of spring plate and Slice with tools. | |
| Grill Heater | 3. Remove fan motor and then remove the Nuts for disassemble the Grill Heater and lead Wire. |
4. Troubleshooting
4-1 Parts checking method
| Parts | Photo | Good | No Good |
| Fuse | 0.42 0.1~1Ω | 0.1~1Ω | 100 MΩ exceed |
| T.C.O | 0.57 0.1~1Ω | 0.1~1Ω | 100 MΩ exceed |
| H.V Trans | 43 1~9Ω | 1~9Ω | 100 MΩ exceed |
| Fan Motor | 566 | 10~99Ω | 100 MΩ exceed |
| Grill Heater | 783 | 10~99Ω | 100 MΩ exceed |
4. Troubleshooting
4-2 Information Code Numbering Rule
- Information CODE NUMBERING RULE is applied to a microwave oven and an oven. (CMO, OTR, Grill, Convection, Commercial etc.)
- All sensors and devices have their own number. ex) Gas/Easy/PH Sensor = 1 ,Temp.Sensor = 2 ,...
- Of each device, No.0~2 refer to Check Option 1~3
| C | - | 1 | 0 |
| 0 - Others | 0 - Check option 1 | ||
| 1 - Gas/Easy/PH Sensor | 1 - Check option 2 | ||
| 2 - Temp Sensor | 2 - Check option 3 | ||
| 7 - Steam Sensor | . | ||
| A - Function | . | ||
| d - Door/Key | . | ||
| F - Master/Slave Communication | |||
| X - additional Information code |
4. Troubleshooting
4-3 Information Code List
| Device | Information Code | Symptom | Solution | Page |
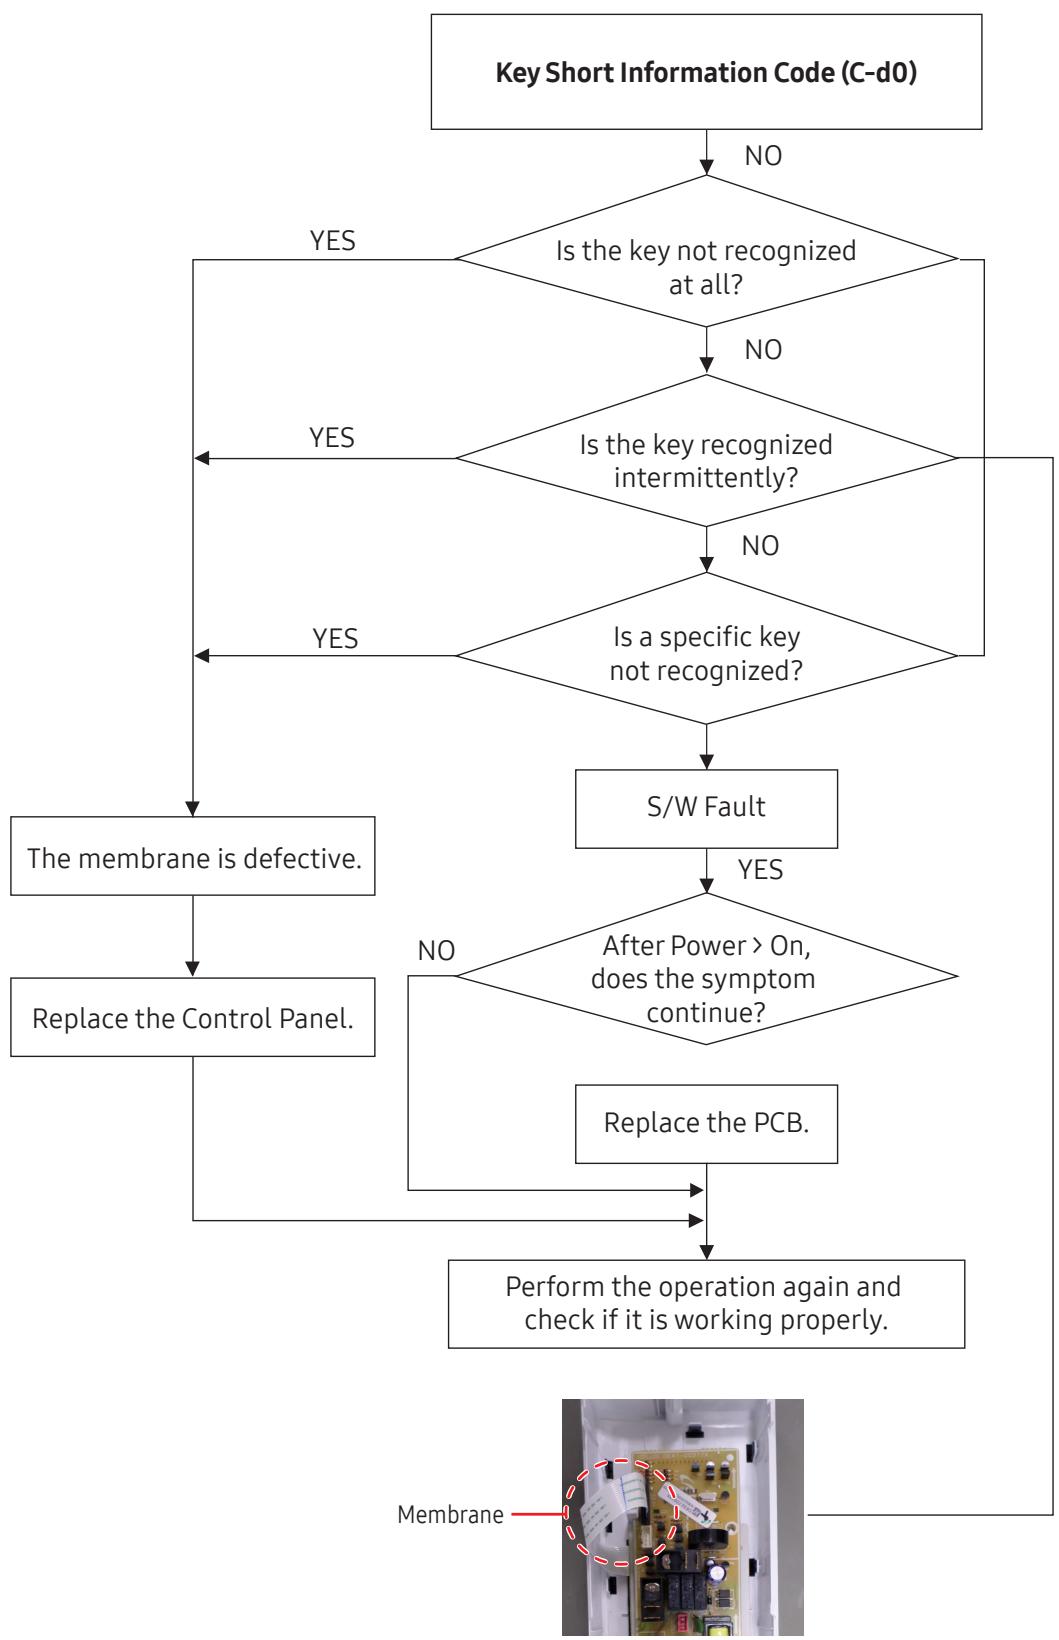
| Door/Key | C-d0 | Key Short Information code (10 seconds)If KEY input is successive more than 10 seconds, marks C-d0 and converts to cancel mode. | Turn off set and restart | 22 page |
4. Troubleshooting
4-4 Electrical Malfunction
4-4-1 C-d0
4. Troubleshooting
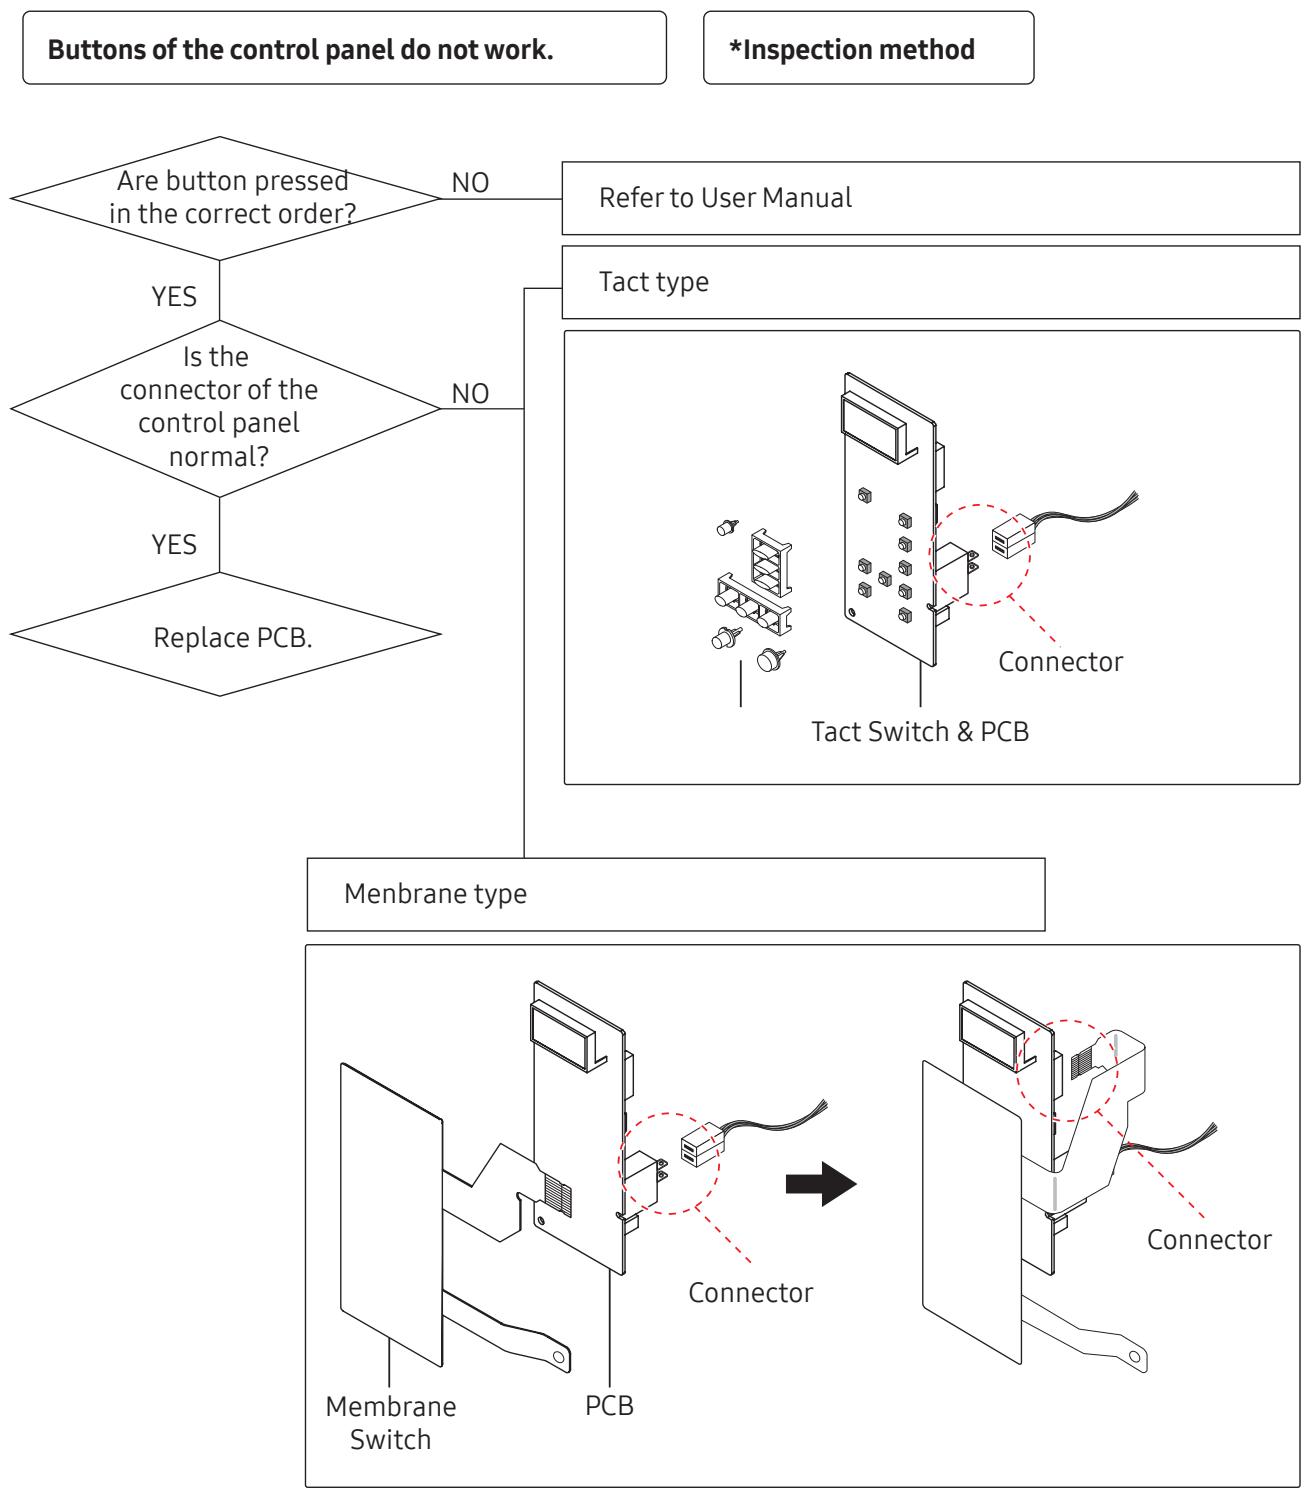
4-4-2 If button malfunction
4. Troubleshooting
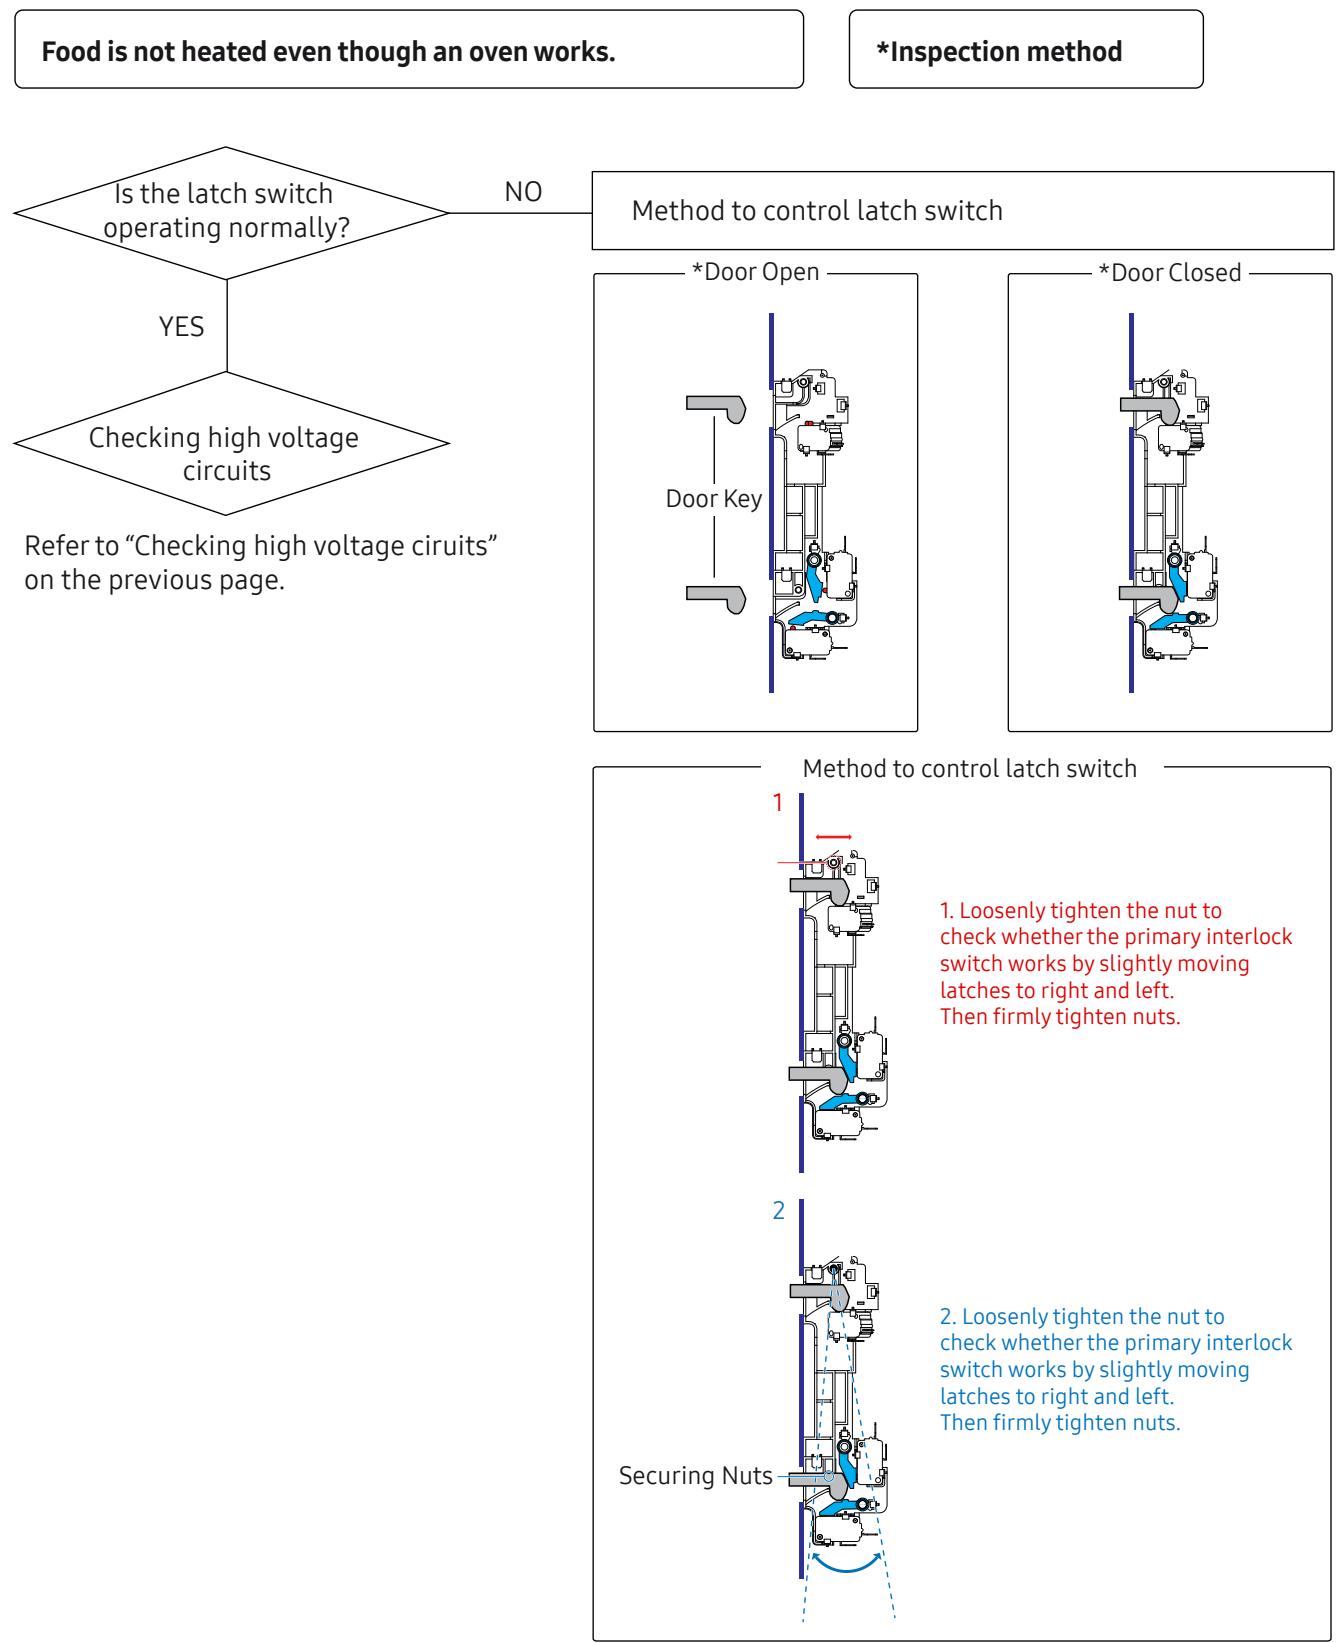
4-4-3 If food is not heated even though an oven works

| No | Part Number | Part Name | Function and Rule |
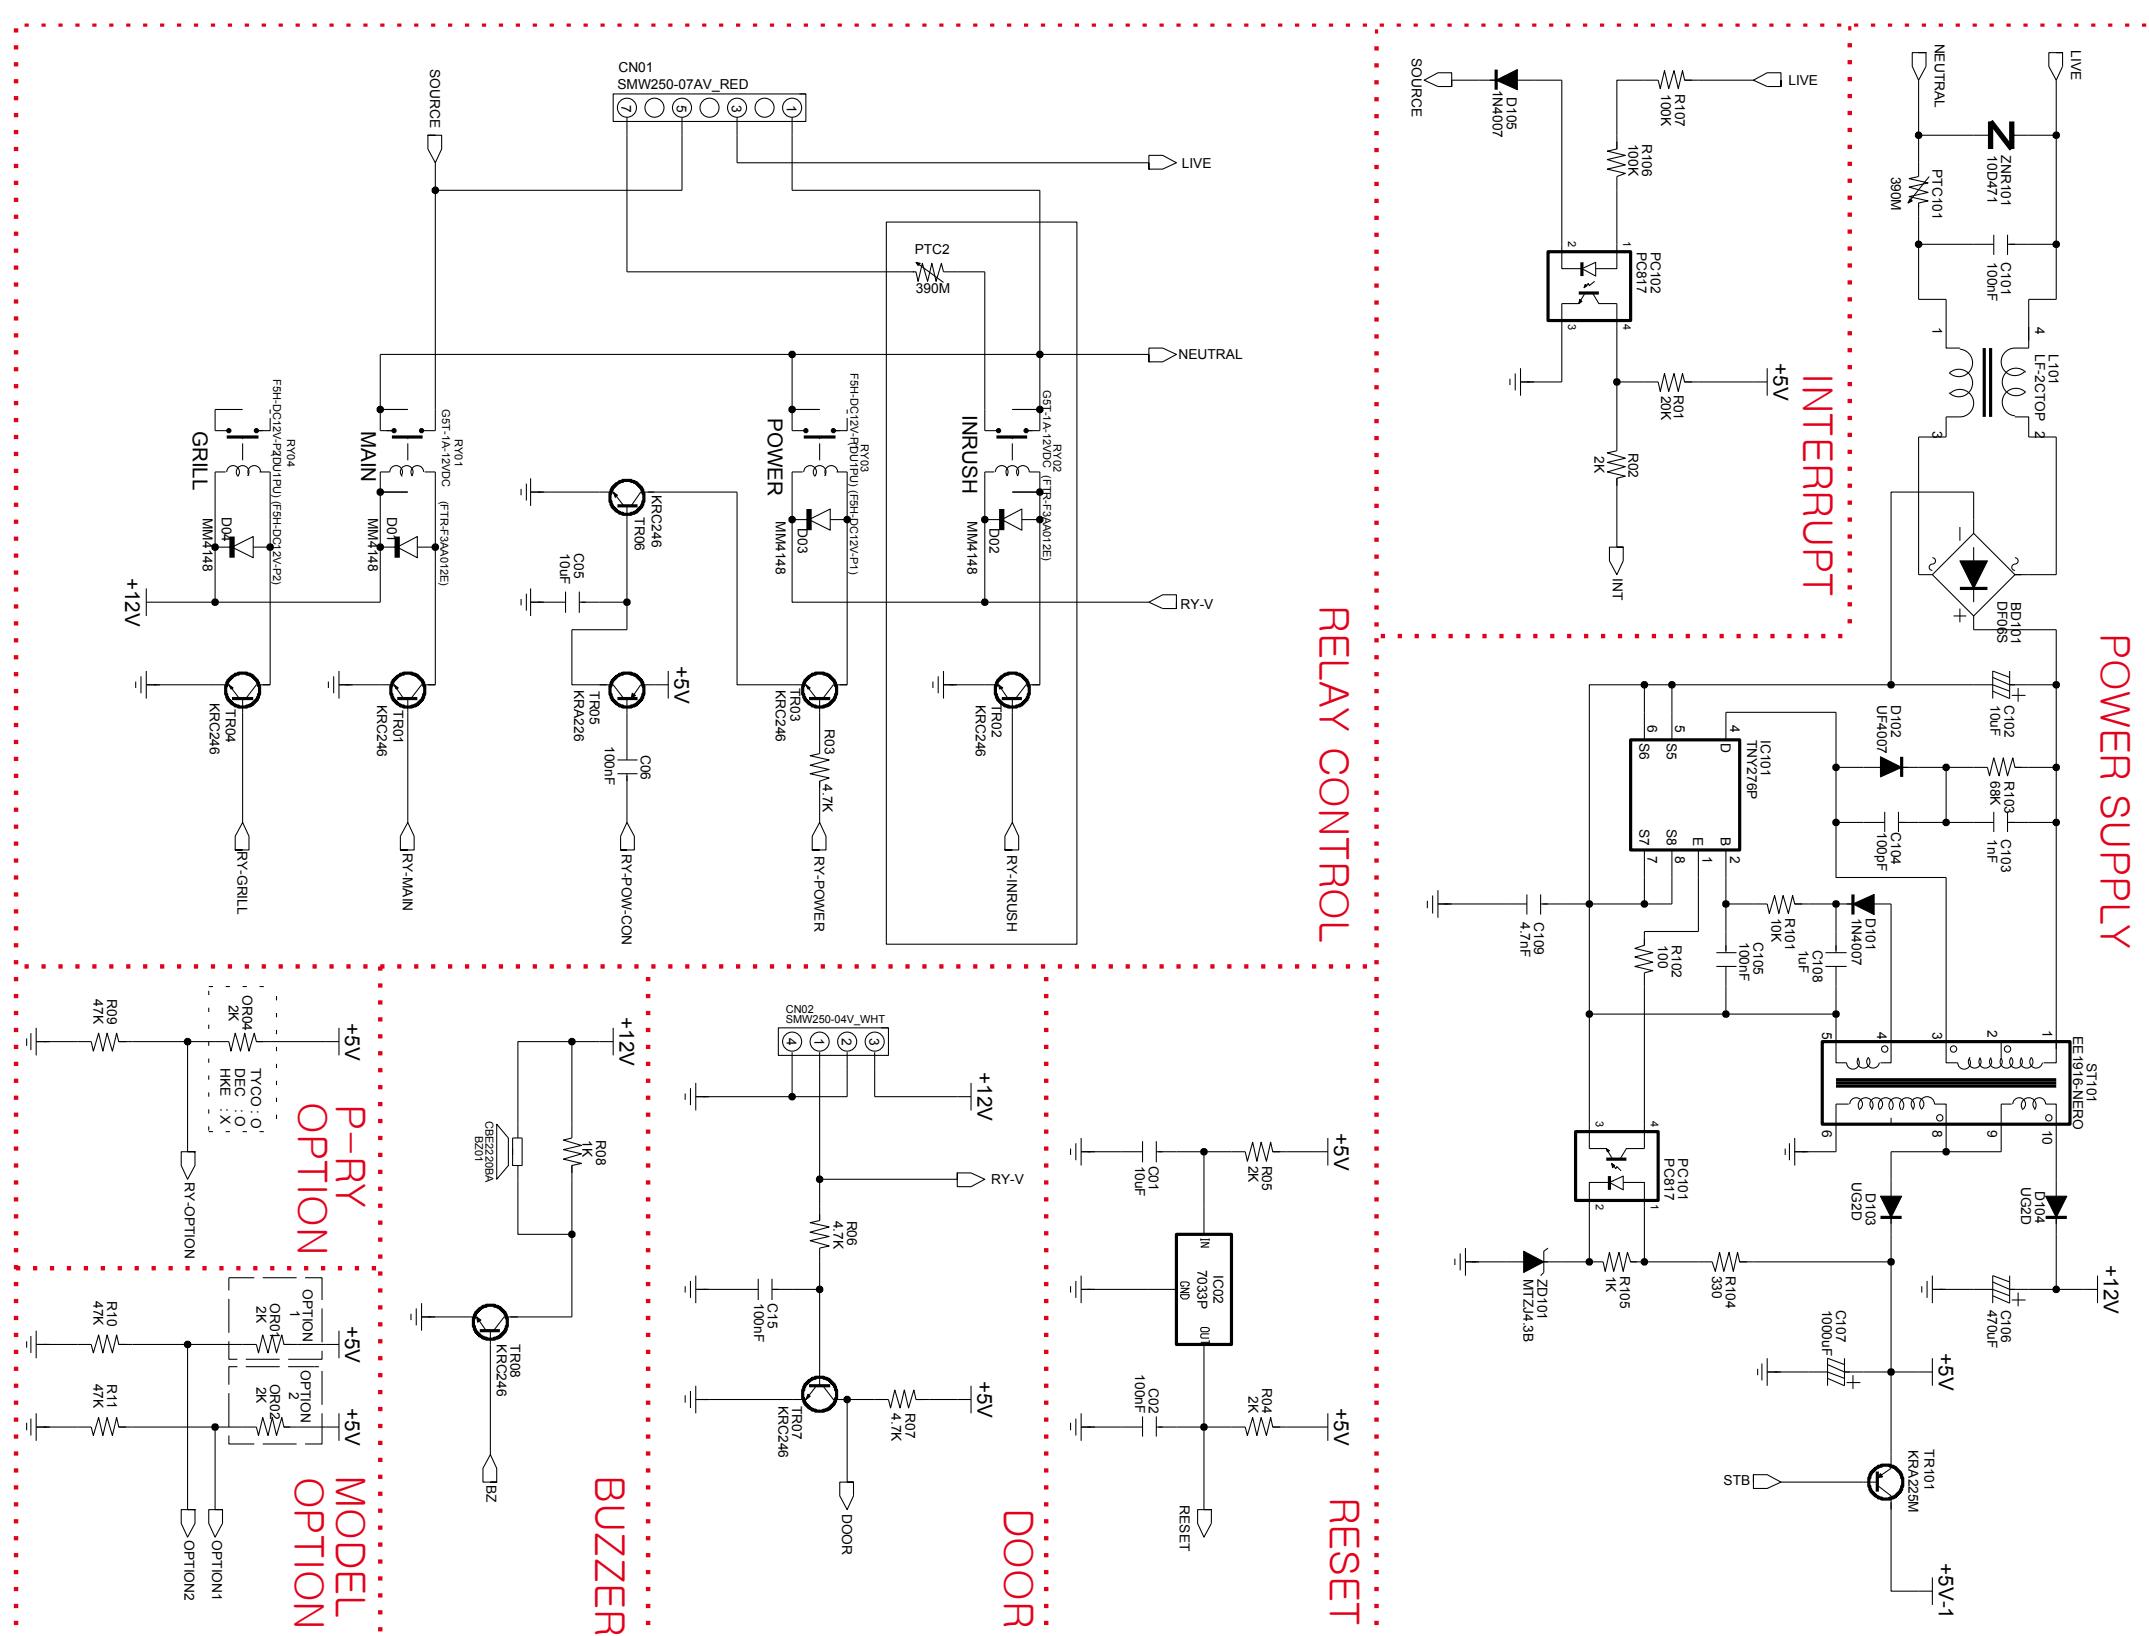
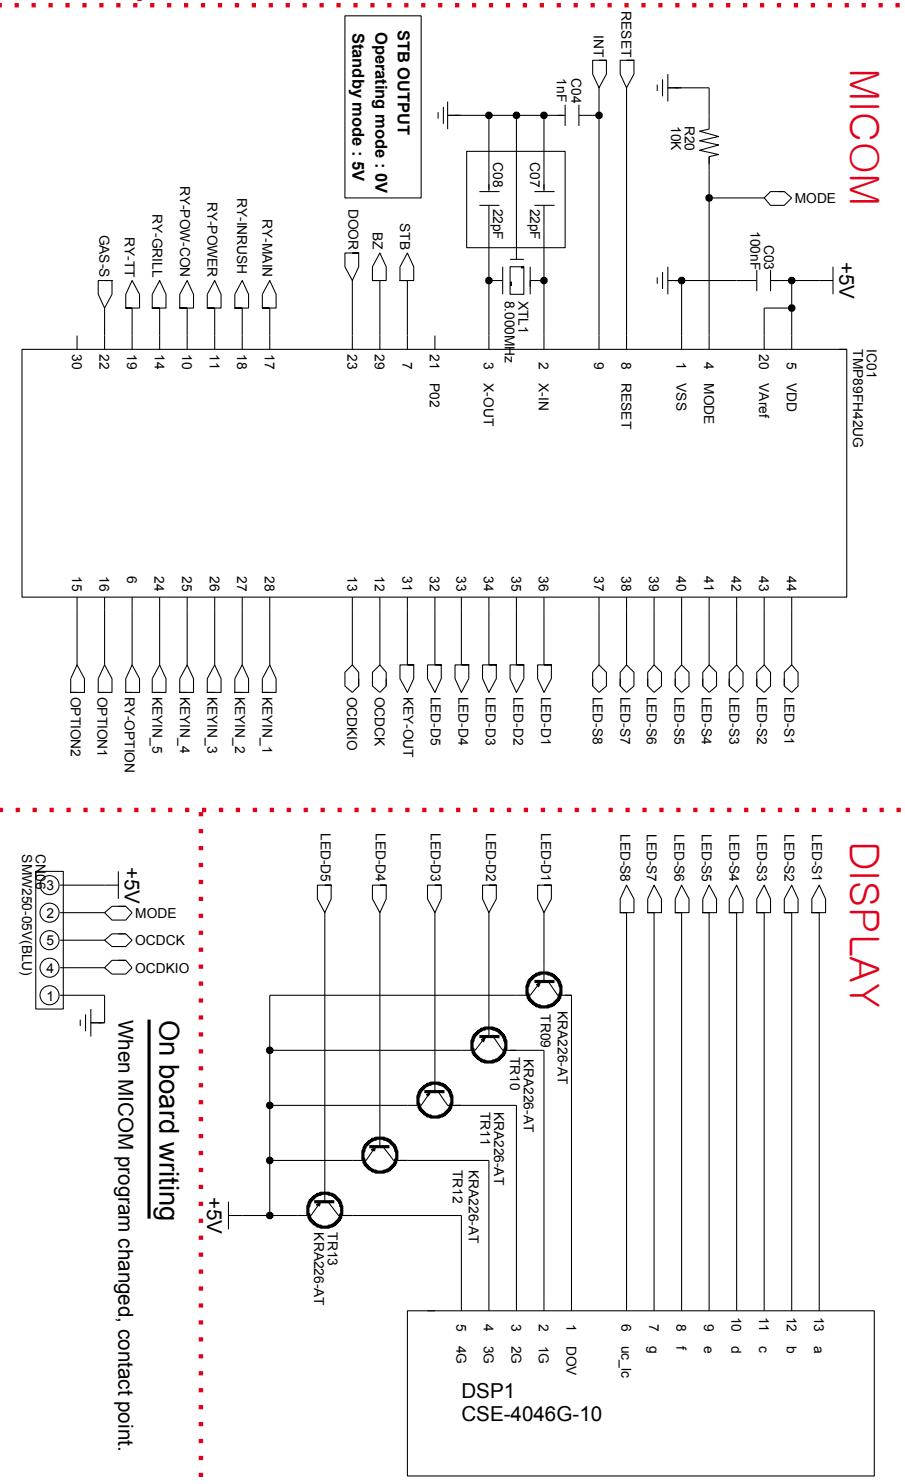
| 1 | RY01 | Main Relay | Fan, Lamp, T/T Control |
| 2 | RY02 | Inrush Relay | Inrush Electric Current Decrease |
| 3 | RY03 | Power Relay | MW Power Control |
| 4 | RY04 | Grill Heater Relay | Grill Heater Control |
| 5 | RY05 | T/T Relay | Turn Table Motor Control (model option) |
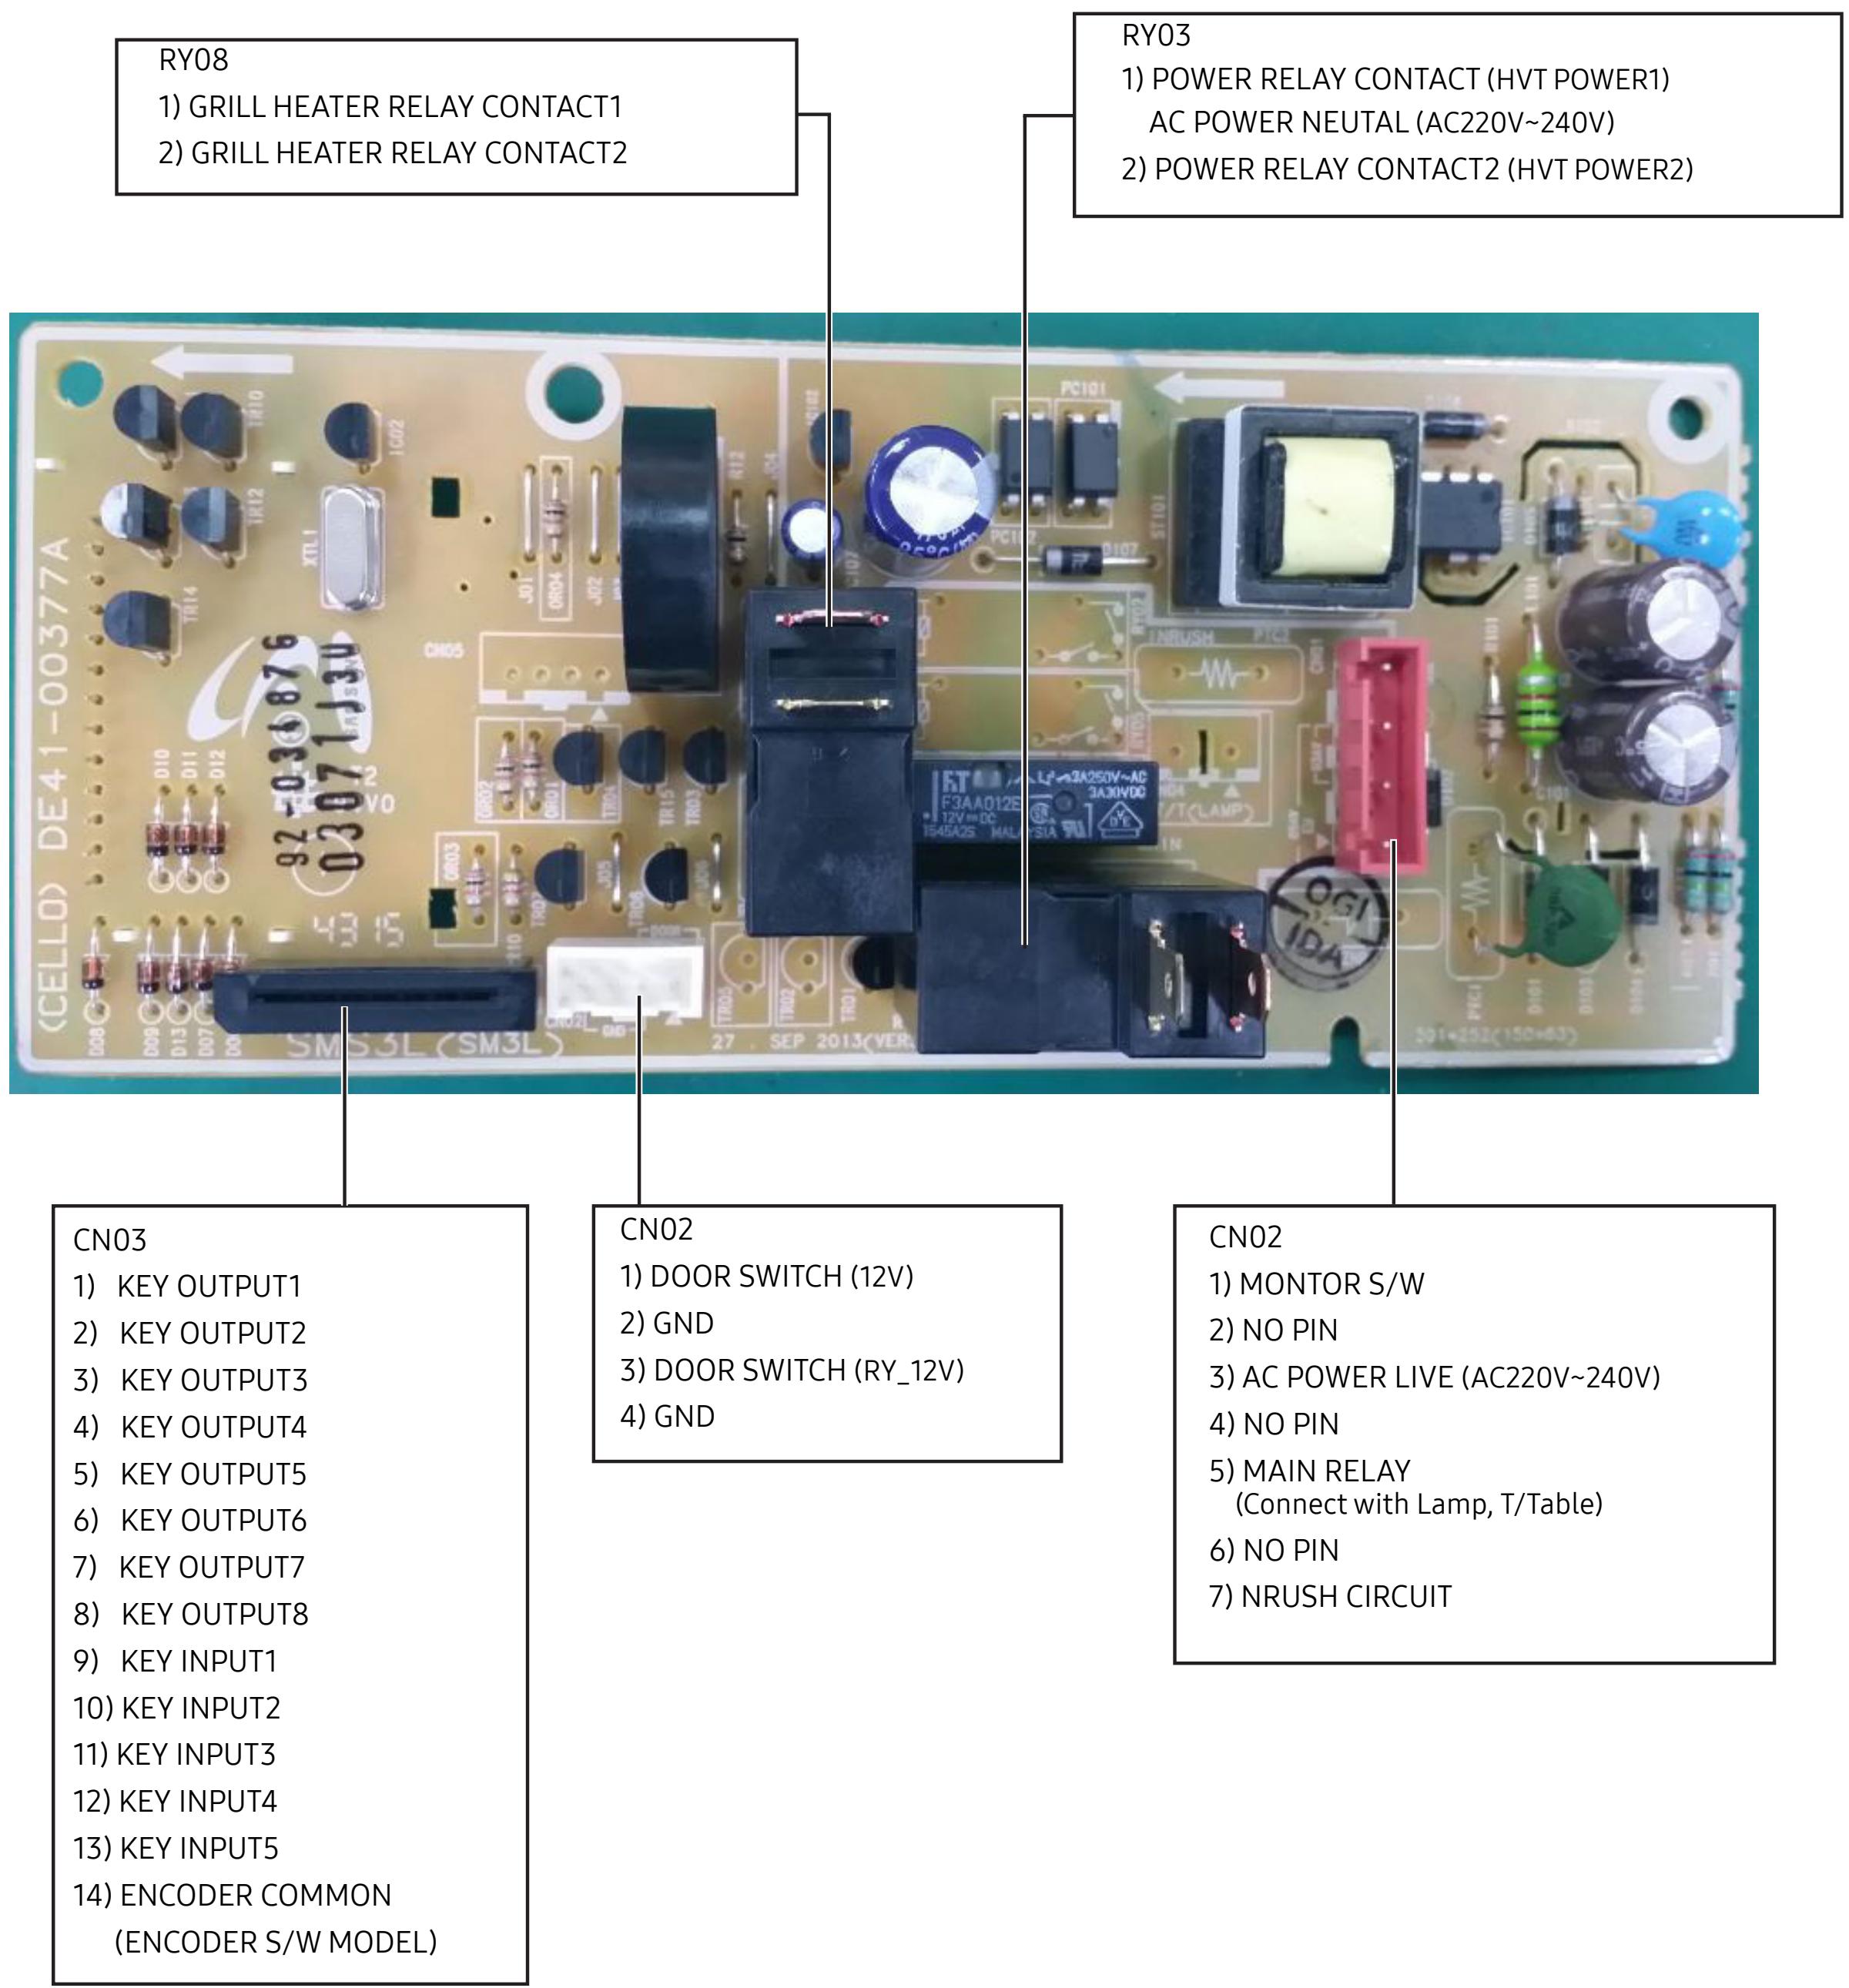
| 6 | CN01 | Power & Relay Connector | A Terminal for Connecting with Power supply & Relay Contact(Load Control) |
| 7 | CN02 | Door switch Sensing Connector | A Terminal for Connecting with Door Switch |
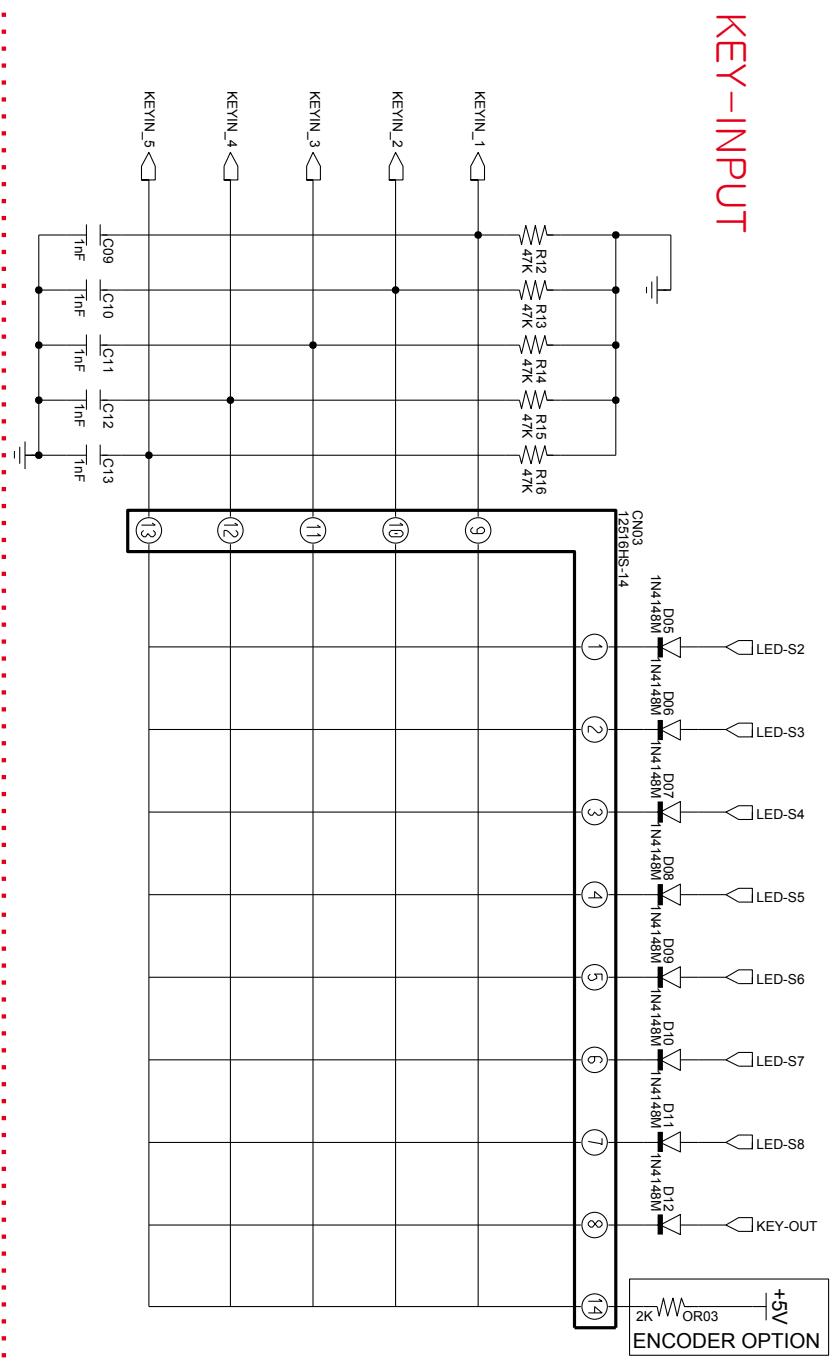
| 8 | CN03 | Membrane switch Connector | A Terminal for Connecting with Membrane Switch |
| 9 | CN04 | T/T Connector | A Terminal for Connecting with T/T Connector |
| 10 | CN05 | PH Sensor | A Terminal for Connecting with PH Sensor |
AeMDo
SAMSUNG
GSPN (GLOBAL SERVICE PARTNER NETWORK)
| Area | Web Site |
| Europe, CIS, Mideast & Africa | gspn1.samsungcportal.com |
| Asia | gspn2.samsungcportal.com |
| North & Latin America | gspn3.samsungcportal.com |
| China | china.samsungportal.com |
This Service Manual is a property of Samsung Electronics Co., Ltd. Any unauthorized use of Manual can be punished under applicable International and/or domestic law.
Samsung Electronics Co., Ltd. 2018 Printed in Korea