
RBBS 100 - Fridge ROSIERES - Free user manual and instructions
Find the device manual for free RBBS 100 ROSIERES in PDF.
| Brand | ROSIERES |
| Model | RBBS 100 |
| Product type | Refrigerator with freezer compartment |
| Climate class | SN, N, ST, T |
| Supply voltage | 220-240 V, 50 Hz |
| Refrigerant | R600a (isobutane) |
| Insulating gas | Cyclopentane |
| Refrigerator defrosting | Automatic |
| Freezer defrosting | Manual (when the ice layer exceeds 3 mm) |
| Lighting | LED (replacement by after-sales service) |
| Temperature setting | 4 main levels + intermediate sub-levels |
| Door opening | Reversible (by qualified technician) |
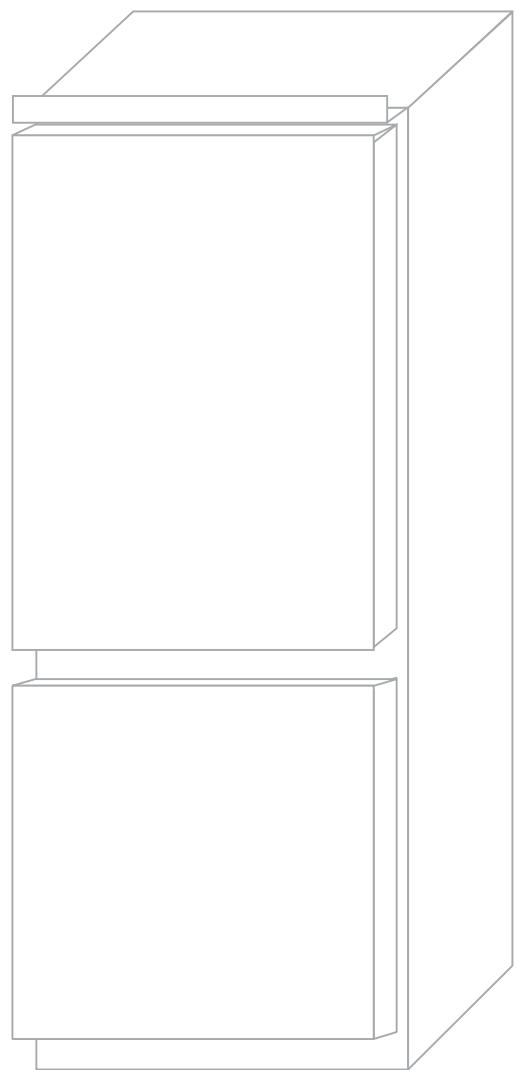
| Installation | Built-in (column) |
| Dimensions (H × W × D) | Approximately 1770 × 540 × 550 mm |
| Net weight | Approximately 50 kg |
| Care | Cleaning with warm water and baking soda or neutral soap |
| Safety | Do not use flames or sharp objects for defrosting; avoid flammable products nearby |
| Spare parts | Contact after-sales service |
| Repairability | Interventions by qualified personnel only |
Frequently Asked Questions - RBBS 100 ROSIERES
User questions about RBBS 100 ROSIERES
0 question about this device. Answer the ones you know or ask your own.
Ask a new question about this device
Download the instructions for your Fridge in PDF format for free! Find your manual RBBS 100 - ROSIERES and take your electronic device back in hand. On this page are published all the documents necessary for the use of your device. RBBS 100 by ROSIERES.
USER MANUAL RBBS 100 ROSIERES
GUIDA RAPIDA DI MANUTEZZIONE E D'USO IT
MAINTENANCE AND USER'S GUIDE EN
MANUEL D'ENTRETIEN ET D'UTILISATION FR
GUIA RAPIDA DE USO Y MANTENIMIENTO ES
BEDIENUNGS- UND INSTALLATIONSANLEITUNG DE
GUIARAPIDO DE MANUTENCAOE USO PT
HANDLEIDING VOOR ONDERHOUD EN GEBRUIK NL
ΓPΓΟΡΟΣ OΔΗΓΟΣ ΣYNTHΡΗΣΗΚΑΙ XΡΗΣΗ
KROTKA INSTRUKCJA KONSERWACJI I UZYTKOWANIA PL
STRUÇNÁVOD PRO POUŽITÍ A UDRŽBU CZ
INHCTPYKUJ3A EKCPILOATAUJI 6T
COMBINE FRIGORIFICE MANUAL DE UTILIZARE RO
NAVODILA ZA UPORABO SL
ITALIANO
pag. 1--10
Congratulations on purchasing this fridge, which has been designed using the latest technologies for an easy-to-use, environmentally friendly appliance.
We recommend you read this guide and the technical datasheet carefully to find out everything you need to know about your new fridge.
FRANÇAIS
page 21--30
SOLUTIONE DEI PROBLEMI 10--10
PRODUCT DIMENSION AND BUILT-IN COMPARTMENT.. 17--18
INSTALLATION OF THE APPLIANCE IN THE COLUMN.... 18--18
COPLING OF THE PANELS OF THE BUILT-IN COLUMN
OF THE APPLIANCE DOORS 19--19
PRECAUTIONS FOR THE CORRECT OPERATION 19--19
SUSPENDING USE OF THE APPLIANCE 19--19
TROUBLESHOOTING 20--20
Thank you for purchasing this product.
Before using your refrigerator, please carefully read this instruction manual in order to maximize its performance. Store all documentation for subsequent use or for other owners. This product is intended solely for household use or similar applications such as:
-
the kitchen area for personnel in shops, offi ces and other working environments
-
on farms, by clientele of hotels, motels and other environments of a residential type
-
at bed and breakfasts (B & B)
-
for catering services and similar applications not for retail sale.
This appliance must be used only for purposes of storage of food, any other use is considered dangerous and the manufacturer will not be responsible for any omissions. Also, it is recommended that you take note of the warranty conditions.
SAFET INFORMATION
The refrigerator contains a refrigerant gas (R600a: isobutane) and insulating gas (cyclopentane), with high compatibility with the environment, that are, however, inflammable.
We recommend that you follow the following regulations so as to avoid situations dangerous to you:
-
Before performing any operation, unplug the power cord from the power socket.
-
The refrigeration system positioned behind and inside the refrigerator contains refrigerant. Therefore, avoid damaging the tubes.
-
If in the refrigeration system a leak is noted, do not touch the wall outlet and do not use open flames. Open the window and let air into the room. Then call a service centre to ask for repair.
-
Do not scrape with a knife or sharp object to remove frost or ice that occurs. With these, the refrigerant circuit can be damaged, the spill from which can cause a fire or damage your eyes.
-
Do not install the appliance in humid, oily or dusty places, nor expose it to direct sunlight and to water.
-
Do not install the appliance near heaters or inflammable materials.
-
Do not use extension cords or adapters.
-
Do not excessively pull or fold the power cord or touch the plug with wet hands.
-
Do not damage the plug and/or the power cord; this could cause electrical shocks or fires.
-
It is recommended to keep the plug clean, any excessive dust residues on the plug can be the cause fire.
-
Do not use mechanical devices or other equipment to hasten the defrosting process.
-
Absolutely avoid the use of open flame or electrical equipment, such as heaters, steam cleaners, candles, oil lamps and the like in order to speed up the defrosting phase.
-
Do not use or store inflammable sprays, such as spray paint, near the refrigerator. It could cause an explosion or fire.
-
Do not use electrical appliances inside the food storage compartments, unless they are of the type recommended by the manufacturer.
-
Do not place or store inflammable and highly volatile materials such as ether, petrol, LPG, propane gas, aerosol spray cans, adhesives, pure alcohol, etc. These materials may cause an explosion.
-
Do not store medicine or research materials in the refrigerator. When the material that requires a strict control of storage temperatures is to be stored, it is possible that it will deteriorate or an uncontrolled reaction may occur that can cause risks.
-
Maintain the ventilation openings in the appliance enclosure or in the built-in structure, free of obstruction.
-
Do not place objects and/or containers filled with water on the top of the appliance.
-
Do not perform repairs on this refrigerator. All interventions must be performed solely by qualified personnel.
-
This appliance can be used by children aged from 8 years and above and by persons with reduced physical, sensory or mental capabilities or with a lack of experience and knowledge, provided that they have been given adequate supervision or instruction concerning how to use the appliance in a safe way and understand the hazards involved.
Children should not play with the appliance. Cleaning and user maintenance should not be made by children without supervision.
Turning the knob fully counterclockwise, you will hear a click which corresponds to the switch-off of the product.
When the appliance is installed, the electrical cord and the current socket must be easily reached.
The socket is compatible with the plug of the appliance. If not, request replacement of the plug by an authorized technician; do not use extension cords and/or multiple connectors.
Do not touch the internal parts or frozen food with moist or wet hands as it can cause burns.
This appliance is marked according to the European directive 2012/19/EU on Waste Electrical and Electronic Equipment (WEEE). WEEE contains both polluting substances (which can cause negative consequences for the environment) and basic components (which can be re-used). It is important to have WEEE subjected to specific treatments, in order to remove and dispose properly all pollutants, and recover and recycle all materials. Individuals can play an important role in ensuring that WEEE does not become an environmental issue; it is essential to follow some basic rules:
- WEEE should not be treated as household waste;
- WEEE should be handed over to the relevant collection points managed by the municipality or by registered companies. In many countries, for large WEEE, home collection could be present.
In many countries, when you buy a new appliance, the old one may be returned to the retailer who has to collect it free of charge on a one-to-one basis, as long as the equipment is of equivalent type and has the same functions as the supplied equipment.
Conformity
By placing the C E mark on this product, we are confirming compliance to all relevant European safety, health and environmental requirements which are applicable in legislation for this product.
INSTALLATION
WARNING:
- Do not install the appliance in a damp or wet location as this could compromise the insulation and result in leakage.
Furthermore, on the exterior of the same, condensate could accumulate - Do not place the appliance in locations outside or near sources of heat or exposed to direct sunlight.
The appliance operates properly within the range of environmental temperatures indicated:
+10 +32°C for the climatic class SN
+16 +32°C for the climatic class N
+16 +38°C for the climatic class ST
+16 +43°C for the climatic class T
(See the nameplate of the product)
- Do not place containers with liquids on top of the appliance.
- Wait at least 3 hours after final placement before placing the appliance in operation.
Electrical connection
After shipping, place the appliance vertically and wait at least 2 - 3 hours before connecting it to the electrical system. Before inserting the plug into the electrical socket, make sure that:
- The socket is earthed and in compliance with the law.
- The socket can withstand the maximum power load of the appliance, as indicated on the nameplate of the refrigerator.
- The power supply voltage is within the amounts indicated on the nameplate of the refrigerator.
- The cord must not be folded or compressed.
- The cord must be checked regularly and replaced solely by authorized technicians.
- The manufacturer declines any liability whenever these safety measures are not respected.
Appliance start-up
Remove all wrapping/packaging present inside the appliance and clean with water and baking soda or neutral soap.
After the installation, wait 2 - 3 hours to allow time for the refrigerator/ freezer to stabilize at normal working temperature, before placing fresh or frozen foods inside.
If the power cord becomes disconnected, wait at least five minutes before restarting the refrigerator/ freezer. At this point, the appliance is ready for use.
OPERATION
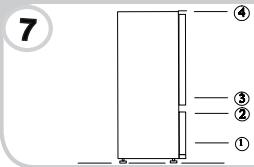
Turning On/Off
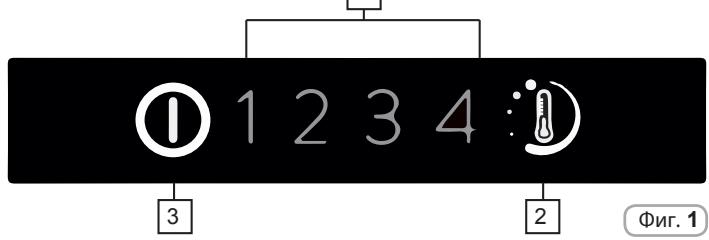
Control panel

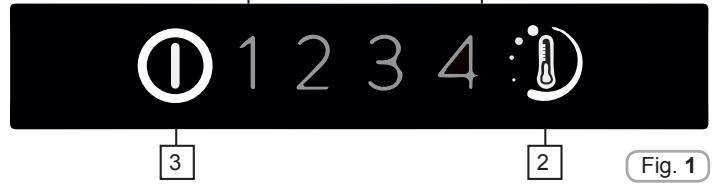
- Temperature indicator LED
- Temperature control
- ON/OFF button
Turning the appliance ON:
Plug the appliance in, if all the temperature indicators LEDs are off, press ON/OFF (3) for 1 second. When you release the ON/OFF button (3) a temperature light will come on and the appliance will beep.
Turning the appliance OFF:
Press the ON/OFF button (3) for 1 second, when you release it, the temperature light will go out and the appliance will beep. In the event of a power failure, when the power comes back on, the appliance will run using the last saved setting.
Setting the temperature
Press the button for setting the temperature until you reach the level you want where level 1 is the warmest and level 4 is the coldest. Under normal operating conditions, we recommend using an intermediate setting (level 2)
On/Off 1 2 3 4
Press button (2) for less than 2 seconds to change the temperature level.
On/Off 1 2 3 4
Advanced settings menu:
Use this menu to set an intermediate level.
On/Off 1 2 3 4
Press button (2) for more than 2 seconds. When you release it, LED 2 will flash
On/Off 1 2 3 4
The next time you press button (2) for less than 2 seconds, the intermediate level will be set. This operation works in cycles every time you press the button.
On/Off 1 2 3 4
On/Off 1 2 3 4
If you do not press the button (2) for more than 5 seconds, the settings will be saved.
The temperature levels in advanced settings are set from warmest to coldest e.g. 2/2.1/2.3/2.4 which means there are 4 sub-levels for every main level.
Door open alarm
If the door is left open for longer than 90 seconds, an alarm is sounded. To turn it off, simply close the door or press button 2.
Fig.1
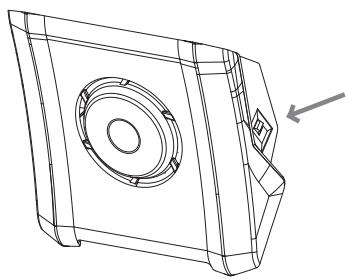
Refrigerator Compartment Fan (if present)
The fan is preset to OFF.
To activate, press the switch (Fig. 2).
To optimize energy consumption, it is recommended that you turn the fan on only when the ambient air temperature exceeds 28 to 30^ .
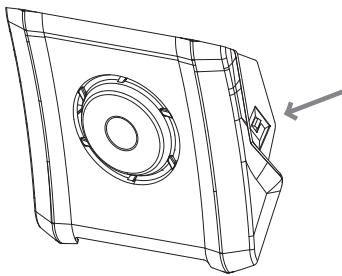
Fig. 2
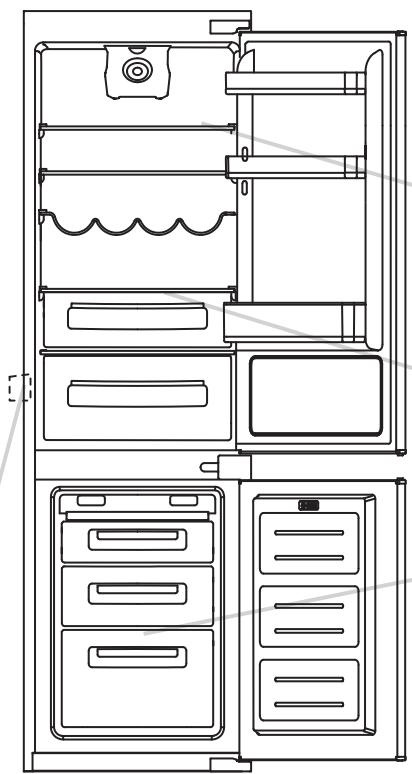
CONSERVATION
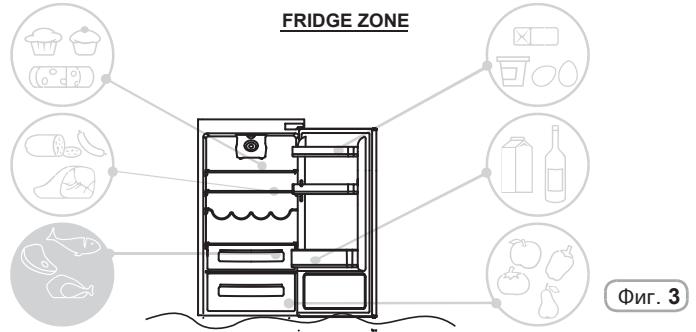
- To maintain the best flavour, nourishment and freshness of foods, it is advisable to store them in the refrigerator compartment as shown in Fig. 5 below, making sure to wrap them in aluminium or plastic sheets or in appropriate covered containers to avoid cross-contamination.
Refrigerator zone
Fruit / Vegetables
- To decrease fruit and vegetable moisture losses they must be wrapped in plastic materials such as, for example, films or bags and then inserted in the fruit/vegetable zone. In this way rapid deterioration is avoided.
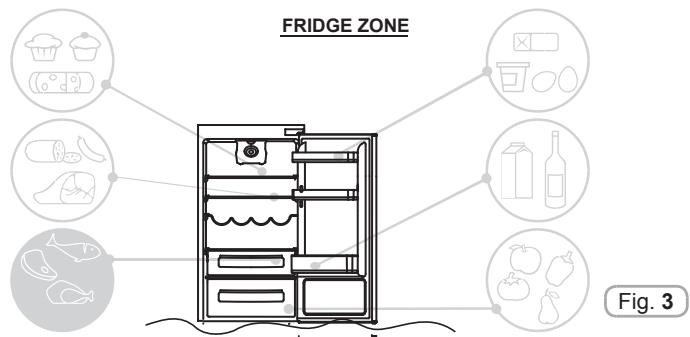
Refrigerated section fresh zone
(not all models)
The zone shown below is recommended for meat, fish, poultry, etc.; do not store fruit and vegetables because they can freeze;
Indicator of the temperature in the coldest zone
(not all models)
Some models are equipped with an indicator of the temperature in the refrigerator compartment in the coldest zone, for you to be able to control the average temperature.
This symbol indicates the coldest zone of the refrigerator (Fig. 4).
Fig. 4
Check that on the indicator of the temperature, the word OK is clearly shown (Fig. 5). If the word does not appear, this means that the temperature is too high: adjust the temperature to a cooler setting and wait for about 10 hours.
Recheck the indicator: if necessary, proceed with a new adjustment.
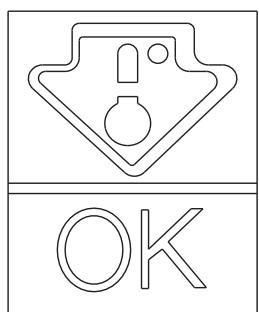
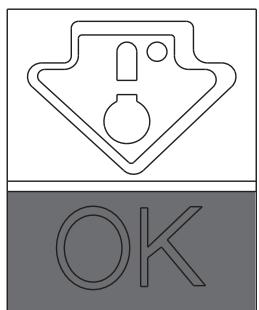
Fig. 5
NOTE:
If large quantities of food are inserted or the refrigerator door frequently opened, it is normal for the indicator fails to show OK. Wait for at least 10 hours before setting the temperature at its coldest levels (3,4).
Freezer zone
Use the table below for the compartments
Freezing process can only occur in the compartments

2-3 MONTHS


4-6 MONTHS


6-8 MONTHS


10-12 MONTHS


Practical recommendations
Place food on the shelves in a homogeneous manner to allow air to circulate properly and to cool it.
- Avoid contact between the food and the far end walls of the refrigerator compartment.
- Do not introduce hot foods as they can cause deterioration of existing ones and increase energy consumption.
- Remove the wrappings of foods before inserting them.
- Do not put in dishes or other containers unless previously washed.
- Do not obstruct the cold air ventilator openings with food.
- Do not cover the glass shelf of the vegetable bin to allow for proper air circulation.
- Do not store bottles in the freezer compartment as they can burst when frozen.
- In the case of prolonged power outage, keep the doors closed so that foods remain cold as long as possible.
- The installation of the appliance in a hot and humid location, with frequent door openings and storing large amounts of vegetables can cause the formation of condensate and affect the performance of the unit itself.
-
To prevent excessive energy consumption, the frequent or prolonged opening of the doors is not recommended.
-
Foods must be fresh.
- Freeze small amounts of food at a time in order to freeze quickly. Never exceed the maximum amount indicated on the rating label.
- During freezing, do not open the freezer door.
- Food must be sealed, airtight.
- Separate food to be frozen by those already frozen.
- Label bags or containers to keep an inventory of frozen foods.
- Once defrosted, do not ever refreeze foods and consume them promptly.
NOTE:
The temperature doesn't usually need to be adjusted.
Only in case you find excessive cooling of the products contained in the refrigerator compartment, gently set the warmest temperature levels (1,2).
On completion of freezing, set the warmest temperature levels (1,2).
Defrosting the refrigerator compartment
During normal functioning, the refrigerator is automatically defrosted. There is no need to dry the drops of water present on the rear wall or to eliminate the frost (depending on functioning). The water is conveyed to the rear part through the drain hole found there and the heat of the compressor causes it to evaporate.
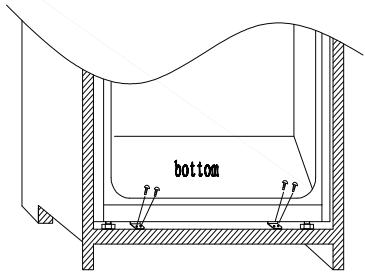
- Keep the drainage pipe (Fig. 6) clean in the refrigerator compartment to keep it free of water.
The rating plate states the maximum quantity of foods that can be frozen, (see Figure 6).
Defrosting of the fridge compartment occurs automatically in this product.
(Figure 6)
A small amount of frost or drops of water on the back of the fridge compartment when the fridge is working is normal.
Make sure the water outlet is always clean and make sure foods do not touch the back or sides of the freezer compartment.
We recommend you defrost the freezer area when the layer of frost is more than 3mm thick.
N.B. Here you will find your appliance rating plate: it includes all the data to be transmitted to the Customer Service should a fault arise.
Important: if your ambient temperature is high, the appliance may operate continuously, thus building up excessive frost on the inner wall of the fridge. Set the warmest temperature levels (1,2).
Defrosting the freezer compartment
(static products without NO-FROST technology)
When the layer of frost present in the freezer compartment exceeds 3mm , it is recommended to proceed with the defrosting as it increases energy consumption.
1) Press the ON / OFF button (3) for 1 second.
2) Disconnect the power cord.
3) Remove the frozen food and temporarily place them in a cool place.
4) Leave the freezer door open to speed defrosting.
5) Collect the water on the bottom of the product.
6) Dry the freezer.
7) Reconnect the power cord and set the desired values.
8) Wait a moment and reintroduce the frozen foods.
WARNING:
Absolutely avoid the use of open flames or electrical appliances, such as heaters, steam cleaners, candles, oil lamps and the like to accelerate the defrosting phase.
Do not scrape with a knife or sharp object to remove frost or ice present. These can damage the refrigerant circuit, the leakage of which can cause a fire or damage your eyes.d.
Defrosting the freezer compartment
(NO-FROST products)
Defrosting is automatic.
MAINTENANCE AND CLEANING
Lighting
LED lighting
The p roduct is equipped with LED lights, please contact the Technical Assistance Service in case of replacement.
Compared to traditional light bulbs, the LEDs last longer and are environmentally friendly.
Cleaning
NOTICE:
- Before each operation, remove the refrigerator plug from the power socket to prevent electric shocks.
- Do not pour water directly on the outside or inside of the refrigerator itself. This could lead to oxidation and damaging of the electrical insulation.
IMPORTANT:
To prevent cracking of the inside surfaces and plastic parts, follow these suggestions:
- Wipe away any food oils adhered to plastic components.
- The internal parts, gaskets and external parts can be cleaned with a cloth with warm water and baking soda or a neutral soap. Do not use solvents, ammonia, bleach or abrasives.
- Remove the accessories, for example, the shelves, from the refrigerator and from the door. Wash in hot soapy water. Rinse and thoroughly dry.
- The back of the appliance tends to accumulate dust which can be eliminated with the use of a vacuum cleaner, after having switched off and disconnected the appliance from the electrical outlet. This provides greater energy efficiency.
ENERGY SAVINGS
For better energy savings, we suggest:
- Installing the appliance away from heat sources and not exposed to direct sunlight and in a well ventilated room.
- Avoid putting hot food into the refrigerator to avoid increasing the internal temperature and therefore causing continuous functioning of the compressor.
- Do not excessively stuff foods so as to ensure proper air circulation.
- Defrost the appliance in case there is ice (see DEFROSTING) to facilitate the transfer of cold.
- In case of absence of electrical energy, it is advisable to keep the refrigerator door closed.
- Open or keep the doors of the appliance open as little as possible
- Avoid adjusting the thermostat to temperatures too cold.
- Remove dust present on the rear of the appliance (see CLEANING).
AVOIDING NOISES
During its operation, the refrigerator emits some absolutely normal noises, such as:
HUMMING, the compressor is running.
-
RUMBLINGS, RUSTLINGS and HISSING, the refrigerant is flowing through the tubes.
-
TICKS and Clicks, the operation shutdown of the compressor.
Small measures to reduce the vibration nois es:
-
Containers touch each other: Avoid contact between containers and glass recipients.
-
Drawers, shelves, bins vibrate: Check the proper installation of internal accessories.
NOTE:
The refrigerant gas produces noise even when the compressor is off; it is not a defect, it is normal.
If you hear a clicking sound inside the appliance, it is normal as due to expansion of the various materials.
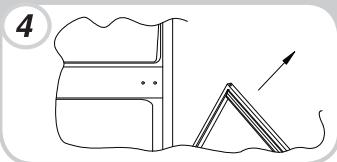
REVERSIBILITY OF THE DOOR
The doors of the appliance can be reversed so as to allow the opening to the right or left according to exigency.
NOTE:
- Inversion of the doors must be performed by qualified technical personnel.
- Inversion of the doors is not covered by the warranty.
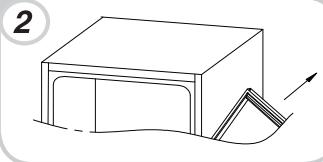
Remove the upper plate and hinge by screw driver.
Remove the right bottom hinge and left plastic plugs, and refit them onto the opposite side.
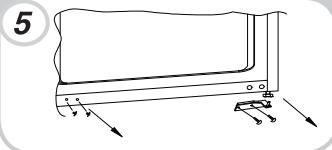
Remove the upper door.

Use the opposite hinge and cover and fit into the left bottom.
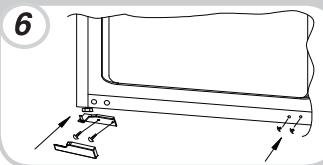
Remove the middle hinge and its connecting pin underneath.

Reassemble the doors and hinges.
workings from bottom to top, from 1-4.
Remove the bottom door.

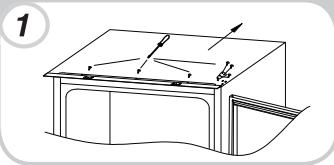
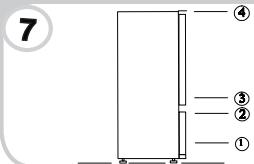
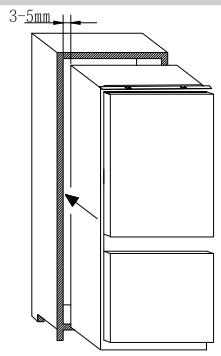
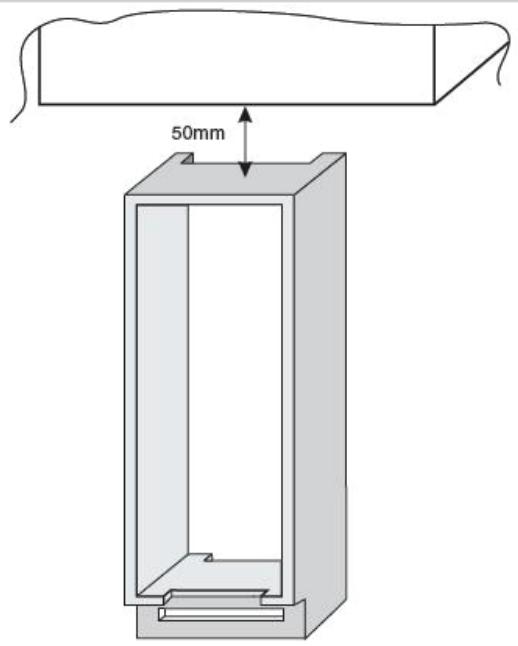
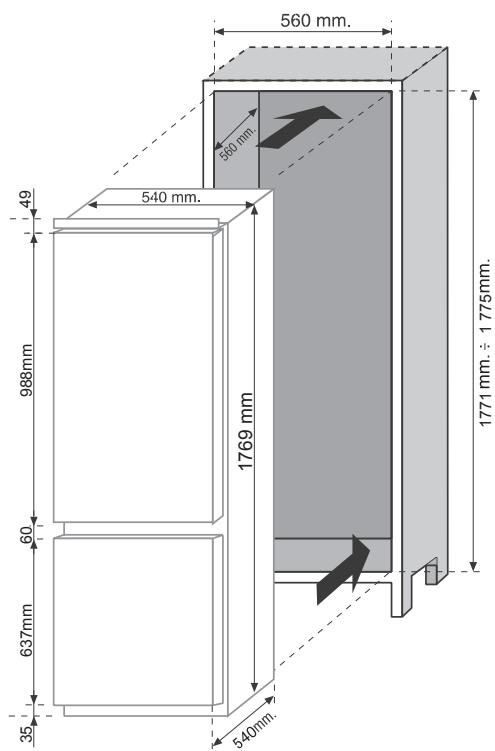
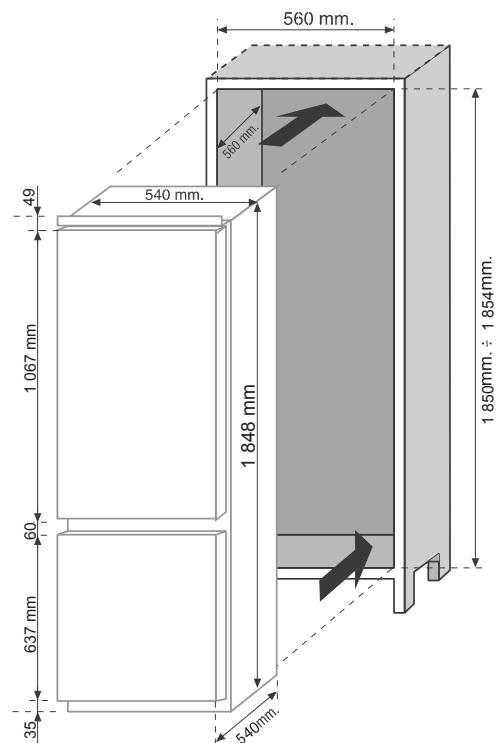
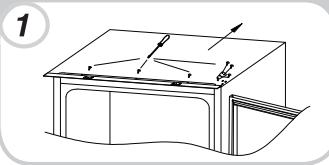
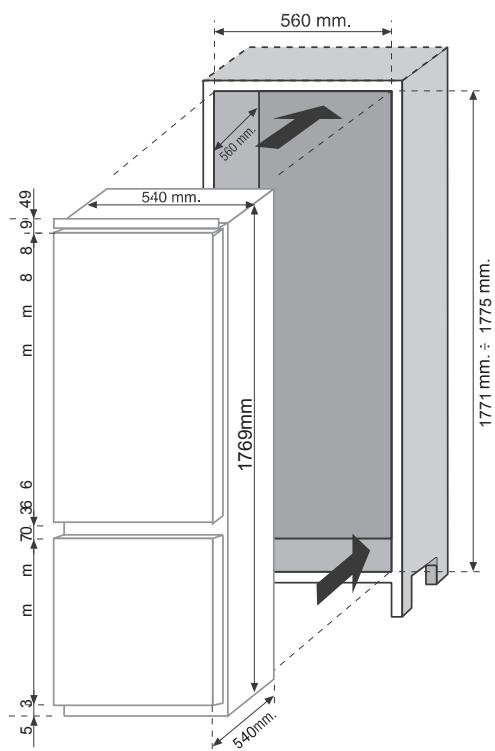
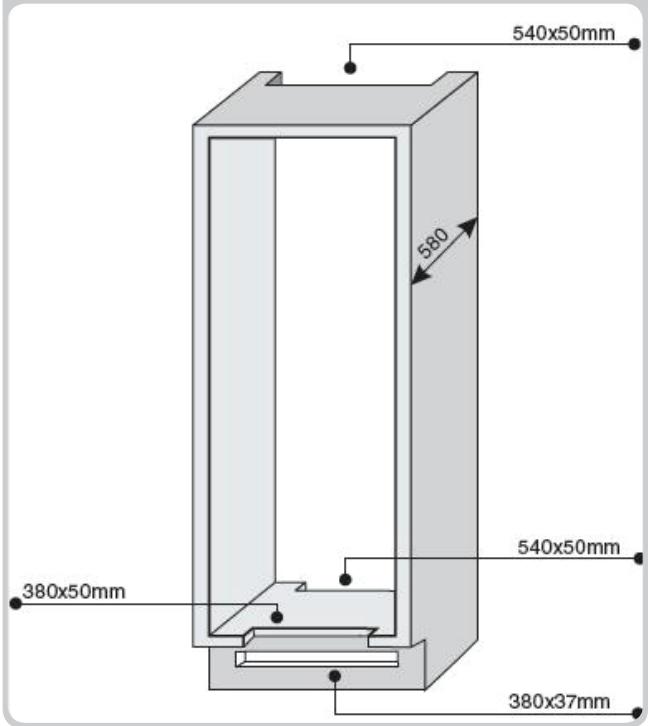
PRODUCT DIMENSIONS AND BUILT-IN COMPARTMENT


Insert the appliance into the column, placing it on the opposite site of the hinges, and make sure 3-5 mm distance gap.
1
After ensuring the match between appliance door and column door, then screw the appliance upper part to the cabinet
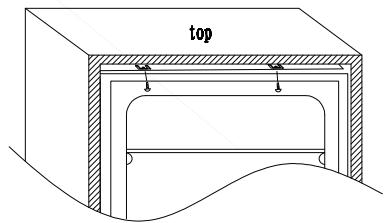
2
Screw the appliance lower part.
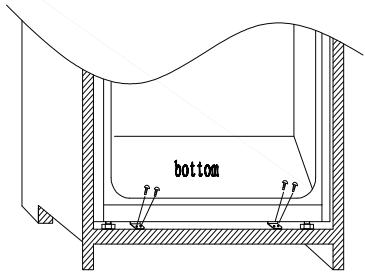
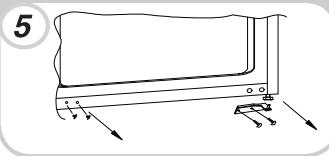
3
Fit the seal to the appliance, cut off the excessive part if necessary. Fit the bottom parts with plastic covers.
4
Use a cross-screwdriver to loosen the connecting pin underneath the right middle hinge, and adjust to screw onto the right cabinet wall.

5
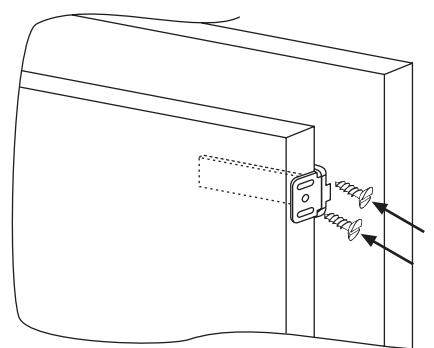
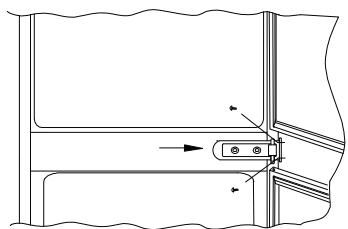
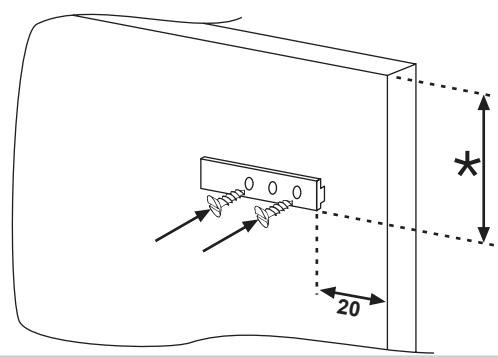
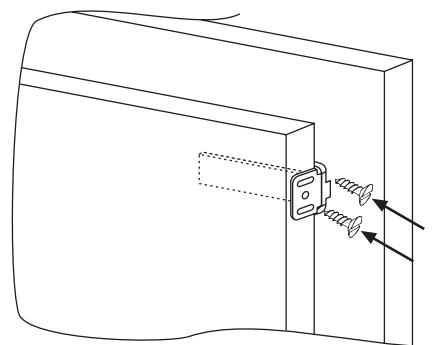
COUPLING OF THE PANELS OF THE BUILT-IN COLUMN OF THE APPLIANCE DOORS
The appliance is equipped with coupling devices for the appliance doors with the column panels (loader slide).
Secure the slide in the inner part of the panel of the built-in column at the desired height and at approx. 20mm . From the outer wire of the door.
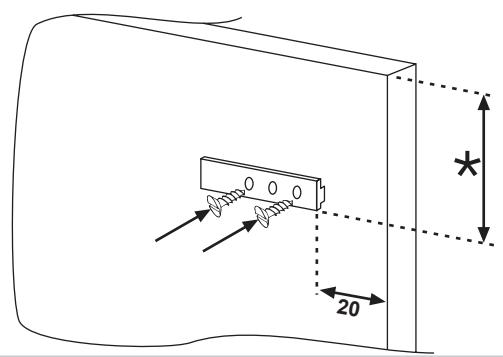
Open the doors of the built-in column and the fridge. Position the built-in loader in the slide, then fit it into the fridge door.
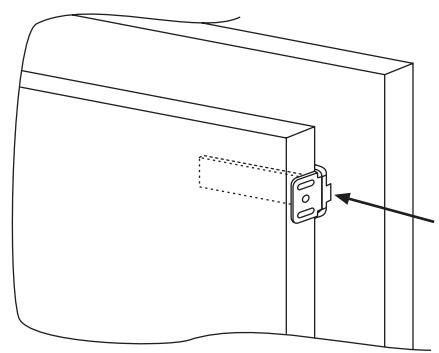
Mark the fixing points for the screws and drill with a bit of a diameter of 2.5mm.
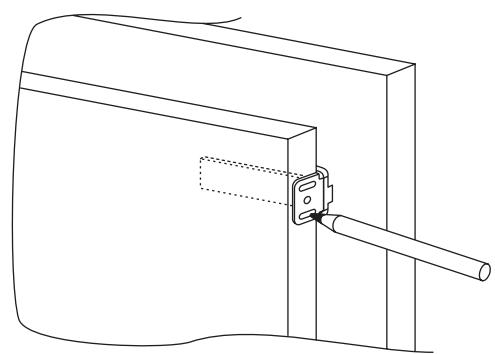
Connect the appliance door to the cabinet panel keeping the loader slots as guidelines.
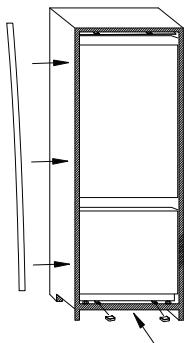
PRECAUTIONS FOR THE CORRECT OPERATION
Once the product has been embedded, place the rear part of the column in contact with the wall so as to prevent access to the compressor compartment.
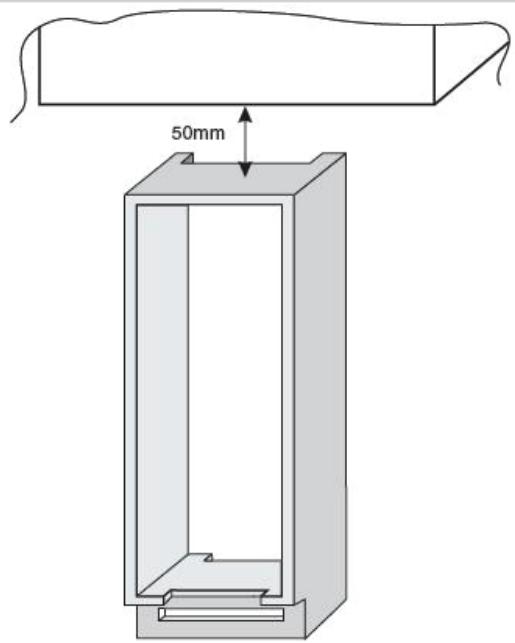
For the product to operate correctly it is essential to allow adequate air circulation so as to cool down the condenser located in the rear part of the appliance.
For this reason, the column must be equipped with a rear chimney, whose upper opening must not be blocked and with a front slot which will be covered with a ventilation grill.
Size of the unit cut outs.

Room to leave between the unit and ceiling.
SUSPENDING USE OF THE APPLIANCE
If the appliance is not to be used for a long time:
1) Turn the appliance OFF (see Operation).
2) Extract the plug or remove the safety device.
3) Clean the appliance
4) Leave the doors of the appliance open.
TROUBLESHOOTING
| PROBLEM | CAUSE | REMEDY |
| The inside illumination light bulb does not turn on. | ·Electricity absence. | ·The power cord is not properly plugged in. ·Check whether the appliance is switched off. (see Temperature Adjustment). ·Ensure that there is a current in the house. ·Check that it is active. |
| The refrigerator and freezer do not sufficiently cool. | ·The doors are not closed. ·The doors are frequently opened ·Erroneous setting of the temperature. ·The refrigerator and freezer have been excessively filled. ·Surrounding temperature is too low. ·No electrical power. | ·Check that the door and gaskets close properly. ·Avoid unnecessary opening of the doors for a period of time. ·Check the temperature setting and, if it is possible, cool even more (see Temperature adjustment) ·Wait for the stabilization of the temperature of the refrigerator or freezer. ·Check that the ambient temperature is in accordance with what is indicated on the nameplate (see Installation). ·The power cord is not properly plugged in. ·Check whether the appliance is switched off (see Temperature adjustment) ·Ensure that in the home there is current. |
| The food in the refrigerator freezes. | ·Erroneous setting of the temperature. ·Food in contact with the back wall. ·The freezing of too much fresh food causes a lowering of the temperature of the refrigerator | ·Check the temperature setting (see Temperature Adjustment) and, if possible, decrease temperature setting. ·Separate the food from the back wall of the refrigerator. ·Do not exceed the maximum amount to be frozen (see Freezing). |
| The bottom of the refrigerator compartment is wet or droplets are present. | The drain tube could be clogged. | ·Clean the drain tube with a stick or the like to allow the discharge of water. |
| Presence of drops or water on the back wall of the refrigerator. | ·Normal operation of the refrigerator. | ·It is not a defect (see Defrosting). |
| Presence of water in the vegetable drawer. | ·Lack of air circulation. ·Vegetables and fruits with too much moisture. | ·Verify that your glass shelf tray vegetables are not put foods that prevent air circulation. ·Wrap the fruit and vegetable materials plastic such as, for example, films, bags or containers. |
| The motor runs continuously. | ·The doors are not closed. ·The doors are opened frequently. ·Ambient temperature is very high. ·Thickness of frost than 3mm. | ·Make sure the doors are closed and if the seals close properly. ·Avoid unnecessary open ports for a certain period. ·Verify that the ambient temperature is in accordance with the specifications on the nameplate (see Installation). ·Set the display/thermostat a warmer temperature. ·Defrost the unit (see Defrosting). |
| The frozen food is thawing. | ·The ambient temperature range below climate class of the product. The compressor starts rarely ·The freezer door is not closed. | ·Move the unit to a warmer or heat the room. ·Make sure the door is closed and that the gasket is sealing properly. |
| WI-FI light flashes 3 sec on -1 sec off. | ·Router off. ·Lacking connection. | ·Switch the router on. ·Reset the product (see WI-FI) |
IF YOU ARE NOT SOLVED THE PROBLEM, CONTACT THE SERVICE CENTER, PLEASE GIVE THE TYPE OF FAULT AND THE INFORMATION ON THE PLATE OF THIS APPARATUS TO INSIDE THE REFRIGERATOR COMPARTMENT:
The model of equipment.
The number of series.
CONTENU
FR
INFORMATIONS SUR LA SECURITE 22--22
INSTALLATION 23--23
FONCTIONNEMENT 23--23
CONSERVATION 24--24
CONGELATION 25--25
DEGIVRAGE 25--25
MAINTENANCE ET NETTOYAGE 26--26
ECONOMIES D'ENERGIE 26--26
DIMENSIONS DU PRODUIT ET COMPARTIMENT
ENCASTRE 27--28
INSTALLATION DE L'APPAREIL DANS LA COLONNE .... 28--28
ASSEMBLAGE DES PANNEAUX DE LA COLONNE
ENCASTREMENT DES PORTES DE L'APPAREIL 29--29
PRECAUTIONS RELATIVES AU FONCTIONNEMENT
CORRECT 29--29
SUSPENDRE L'UTILISATION DE L'APPAREIL 29--29
DEPANNAGE 30--30
DIMENSIONS DU PRODUIT ET COMPARTIMENT ENCASTRE
ACOPLAMENTO DOS PAINEIS NA COLUNA EMBUTIDA
DAS PORTAS DO APARELHO 59--59
MANUTENÇÂO E LIMPEZA
Illuminação
Illuminação LED
PAINÉIS DE ACOPLAMENTO DA COLUNA INCLUDEA NAS PORTAS DO APARELHO
BkIIOUBaHe/U3KIOUBaHe
KoHTpOlen nahan
- Иndикатop LED за НИВО на ТемпаТура
- PerynatoHHa HNBOTo Ha TemnepaTpa
- ByToH ON/OFF
BkIouBaHe:
IocTaBete 7eCenBa KOnTakTa, aKo BCNUCKu LED uHnDnKaTOpn 3a HNBOTo Ha Tempepatypata ca n3KJIOUeHN HaTNCHeTe 6yToHa ON/OFF (3) 3a 1 cekyHda. Korato OTnycHeTe 6yToHa ON/OFF (3) BkNIOUbaHoTe e noCneDbAo n IOTBbPdEHO OT AKTNBpuAHeTo Ha eDHO HNBO Ha TEMpePaTpyo N ot AKTNBpuAHeTo Ha 3ByKOvCBnHaJ.
N3KJIIOUyBaHe:
HaTnSchTe 6yToHa ON / OFF (3) 3a 1 cekuHda, npn ocbo6oxdaBaHeTo Ha 6yToHa ON/OFF (3) n3KnIOUbaHeTo e nocLeDaHO n oTbPdEHO ot n3KnIOUbaHeTo HA LED nIINkaTOPute 3a HO BO h Tempepatypa n OT aKTHBpuHaTo Ha 3ByKOBNA cnHaN. B cIpya Hn pKeKcBaHe Ha 3axpaHbAHeTo npn NobTOpHbBKNIOUbaHe, npOdyKTbT ue ce BbPhe KbM nocJeHaTa 3ana3eHa NaCTpoJa.
HactpoJaHa TemnepaTypaTa
HaTusheTe 6yToHa 3a peruHpaHe Ha HNBO TemnepaTypa Do DocTuHa He CaBOTBeTHOTo HNBO, HNBO 1 No-TOJIa HAcTpoKa, HNBO 4 No-CTUdeHa HAcTPOka, PnH HopMaIHN yCIOBna, Ce npenOpbUba Da ce n3PON3Ba eHn MaKdINHn HaCTpOka (HnBO 2)
On/Off 1 2 3 4
HaTnCKaHTo Ha 6yToH (2) 3a No-MaJIko OT 2 cek., ce IpomHe HbOTO Ha TEMN.
On/Off 1 2 3 4
MehIO Ha pa3wnpeHn HacTpoiKn:
Toba MeHIO N03BOLIbA eHa Na HAcTpoIka Ha MeKdINHIO HnBO MeKdY pa3JIuHInTe HnBa.
On/Off 1 2 3 4
HaTnCKaHTo Ha 6yToN (2) 3a NOBue ot 2 cek, npn OTnyckaHe Ha 6yToHa, INDnKaTopbT led 2 mura.
On/Off 1 2 3 4
Пи сдьшоTO haNTSCaHe Ha 6yToHa (2) 3a no-MaIko ot 2 cek, ce akTNBIPA MEXDHHOTO HINBO I Taka LKJNUHO 3a BCRAKO HAtSCaHe.
On/Off 1 2 3 4
On/Off 2 3 4
B clyaHa Iunca Ha HATnCKaHe Ha 6yToHa (2) 3a noBeue ot 5 ceK., NaCTpOuKNTe ce 3ana3BaT.
HnBaTa Ha TempePaTypaTa B pa3uInpeHnTe HactpoKn Ca B peO t NaH-ToNtIoTo Do NaH-CTyHeHTo, KaKTo B npImep 2/2,1/2,3/2,4, KoEto N03BOJIA Ba perynipaHTo Ha 4 NOd-HnBa 3a BCaKO OCHOBHO HnBO.
AnapMa otBbopeHa Bpata:
Отварянeto на вразата за поеве ог 90 сек. се сигниизра от пюкту сбс 3BykOBa сигниизаша, за ду ГИКЛЮЧИТЕ, посто за ТВОБЕРЕ Вразата и наотснichte бутона (2).
BeHTnlaTop Ha XlaIaHIOHOTO OTdJeHHe (aKO IMa)
Bentnataropa no peseymu e n3kliouen
3a da ro akTNBupate, HATnCHeTe 6yToHa (DnR 2).
3a ONTIMM3IpaHe Na IOTpe6JIeHNeTo Ha eHeprJna, e npenopbUHTeJIHO da BkIOuHTe BEHTINaTOPa cMo KOraTO TempepaTypaTa Ha Bb3dYxa eHa28do 30^
Φn.r.2
CbXPAHEHNE
- 3a da ce noДьржAT NaH-ДбОрte BkyCObN KaueCTBa n CBexKecTa ha xpaHITe, npenOpBvAme Da ce CbO6pa3NTe C TxAHOTo pa3NoJIoKHeHne, KaKTo e NOkazHo NO-Dony Ha ΦIr 5. MoKe Da rN noCTaBHTe B OTdEHN KytIN NII Na rN yBnTe C ΦOInO, 3a Da He Ce noJyUcMecBaHep Ha apOMaTInTe.
XlaanHa3OHa
Плобов/Зеленчуц
3a da ce Hamaann 3ary6bata Ha Bnara B nIOoBete n 3eNeHuCHTe, Te Tpr6Ba da 6bDat oakOBAHn B Top6uKn nn PVC fOJno n Tpr6Ba da 6bDat noCTaBeHN B OTdJeHHeTo 3a nIOoBE n 3eNeHuZn, 3a da ce U36erHe 6bp3OTo m pa3BaJIaHe
XnaHnHaΦpew3OHa
(He npBcUckmoDenn)
3oHaTnoka3aHaDonyce npenopbUba 3a pnb6a, Meco, nTnucn np. He ce npenopbUba cxbxaHeneHTo Ha nIIOBoe n3eJeHuCn 3a da He 3ampb3HaT
UpeNi 3a BrpaKaJaHe
3a da npedotbpaTne HanyKBaHe Ha BbTpseHnTe NOBbpxHOCTN INPAACTMACOBU YactN, CNEBaHTe Te3N CbBETN:
- ɪn36þpùsèTe BCnUKN pa3něTú Ma3HnHn OT ΠIaCTaMaCobnte Yaactɪ
BbtpeunHte qactn, ynlbtheHnraTaN BbHUnHe NOBbpxHOCTN, MOraT de ce nouchTbAT C Kbpna C TOIIA BOa I COda 3a XJIA6 IIN HeYtpaJIe canyh. He n3IOn3BaIte pa3TBOpHTenn, amOHK, 6eINHa IIN a6pa3NBn. - Maxhete akcecoapnte, Hanpimep, pafoBeTe ot xnaunnHa n OT bpaTata. ɪzmnɪte c tonla canyHeHa BOa.ɪznnakHete n noDcyuWeTe.
- Ha 3aHaTa yact Ha ypeDa obHKHOBeHNO ce HATpyNb npax, KOITo MoKe da 6bJe n3uHCTeH c npaxOCMyKaUka, npn n3KJIoueh OT KOHTaTxaJauJIHnK. ToB e do6pe 3a NOBIIaBaHe Ha eheprnHaTa efeKTNBHOCT.
ИКOHOMЯ HA EHEPTЯ
3a da IKOHOMUcaTe eHepnra, BN npenopbUBaMe:
- Инстелейусядамец OT Источни на ТОПлиа, 6e3 пяка Сычевая CBETлиа и в добеше поветрино РOMEшени.
- ɪЗɜːrɪbaɪte ᵠ cʌlɑræte Tɔŋla xρaɪba V xlaɪdɪnɪnka. Tɔba ʒe noɒbɪnɪn
- Bʌtpeɪshɪnata Tempeɪpaɪtya n ʌe iðobende do Hænpɛkʰcɪhata paʊbota hɑ kɒmnpecopa
- He HatapynbaiTe Mhoro XpaHa, 3a da ocunrgpnte do6pa cipkyana Ha B3dyxa
- Pa3Mpa3RBAHe Na ypeBa B cnuya, Ye mHa JeI (BnK PA3MPA3RABAHE) 3a Da rapaHTnpaTe Do6pna PpeHoc Ha cydeHHa
BcnyaHa npkekbcaHe Ha en. eHepnTa npenOpbVbMe Da He OTBaPte BpataHa XlaJINHnka.
-ДрьжтБразаТОВоpeHA3aMaKcIMaJIHNoKpaTkoВрeme - He 3aBbptaIte TepMoCTaTa KbM IpeKaJIeHO CTyDeHO.
-ПпeмaxbaIte npaxa CB6paH Na Tb6aHa ypeda(BnK NIOUHCTBAHE)
LIYMOBE
По Врeme на сбова pa60ta, в Хладинда Кма Няков ab6conlOTHO HopmaHnшуMObe, kaTO Hanpimep:
- BPbMYeHE - komppecopa pa6oTu
- UYMONEHE, CbCKAHE - xnaadinHnra areHT ce npudBnxBa Ttp6nte
- PA3TPNCAHINuIcKaHINr- npn n3KlNoUbaHe na KOMnpecopa MoKe da ce B3emat MaJkn MepKn 3a HamaJraBaHe an Bm6BaunTe
- CbdoBe ce DoKocBaT eDIN Do npyr: N36aRbaTe KOHTaTaHa OTDeJIHInTe CbdoBe
- YeKMeJxKeTa, paΦToBe, KoUxTe Ba6pRuPaT: ПрOBepTe dAin ca npaBnJIHO MOHTnpaHn akCeCoapuTe 3A6EJIEXKA:
XlaJIINHnA areHT npOn3BExJa 7um, IopN KOraTO KOMnpecopa e n3KIIIOueH; TOBa He e DeΦeKT n e HOpMaJIHO.
Ako yyeTe 3bKaa3 28yK B XlaIINHnKa, TOBa MoKe 6n Ce IblJxN Ha pa3wnpaBaHe Ha pa3NIuHm MaTepnaHn H e HopMaHNO
OBPbUaHE HABPATATA
BpataHa ypea MoKe Za ce MOHTnpa Taka Que da ce OTbapra Ha JIABO nIHa DaCHO Cnopei BaunTe PneepnoTuHnIa
3A6EJIeKKA
- 06pbuanaheTo Ha BpaTata, Tp86Ba da ce n3BbPun ot KbaIuΦnupaH cneuaJIncT
- 06pbuaneHaBpaTneHece nokpmbaOraPahneta.
Maxhete rohpata nlaHka n naHTa COTBepTka
CbaIeTe JraChata DoJHa naHTa I neBnTe 3aNyUbaun TaII IN IM pa3MeHeTe MeCTata
Maxhete rophata Bpata
IocTabeTe naHTaTa n KaNaUKeNte DONYB LABO

IpeMaxBaHeHa cpeHaTa NaHTa n Cbpb3BaAsuΦT OToDony.

Crlno6eTe naHTnte n BpATne, KaTO cnEaBte CtbnKn ot 1 do 4
Maxhete DonHaTa BpTa
PA3MEPN HA IPOДУКТА И HИШATA 3A BГРAXДАНЕ

BkapaIte ypeDa B KOLOHaT, NOCTABeTe ro Ha npOTbONOJXHATA qACT Ha naHTnte nCe y6eTeYe mHa pa3CToRHe N0He 3-5 MM

1
Hanachete BpataHa ypeDa KbM Me6eHnata Bpata N 3abInTe rohpata YaCT Ha ypeDa

2
3aBnIte donHaTa qCT Ha ypeDa
3
Iocabete ynlbTneHmEtOn Ha ypea, kato Otpejete n3nshHa taa cako e Heo6xOIMO. Iocabete doJy nactamCobmte kanaukni

4
Изменьaite крьста OTBepтka, за на рахлбпente CBp3baшия BINT NOД срedingata Дэса панта ида Perynipate BnHTA Ha Дэсната Вatura нашkaфa
5
Сбьр3BAHE HA BPATATA HA BGРАЕняУPECД CMEБЕЛHATA BPATA
YpeBt e 606pyBaH C yctpoiCTBO 3a 3akpenBaHe Ha Me6eHnHaTa BpaTa KbM BpaTaTa Ha XlaIINHnKa
3aKpenete PnAnKaTa Ha BbTpEeHaTata cact Ha Me6EnHaTbPaTa Ha JeNaHATA BnCOuHa H a OKoNo 20 MM OT BbHnHnPB6.
OToBopTe BpTaIte Ha XlaDnHnKa Na HsKaΦa NnNoCTabete nHaNkata Ha BpaTaTb Ta3n Ha Me6enHnTa Yact.

MapKntaTe MeCTaHa OTBOpHTe n pa3npo6nTe CbC CBpeJIO 2,5MM

3aBnTe PnAhkata Na BpaTata NocTabeB PnAhkata Ha Me6eHaTa BpTa 3a Da MoRat da ce PnB3rat EaHa KbM dpYra
ПРавиJA 3A ПРавиЛHA PABOTA
Clek kato ypea e Brpaen, onpeTe 3aHaTa cTeHa Ha Me6eHnna ShkaΦ pIbTHO B CteHaTa, Taka Ye da Ce npedOTBpaTn DoCTbNa do OTdeneHneTo c KOMnpecopa
3a da fynkunohnpnpaBnHOp ypea, e ot CbIeCTBeHO 3naeHne, da ce dae Bb3MOXHOCT Ha aKeBbTaHa cIPKpNaCnHa Hb3Dyxa, 3a da ce OXlaNi KOHNHe3aTopa HamnPauCi Ce b 3aHaTata cact
3aTOBA KOJONHTa Tp86Ba Da e O6OpyDbHa C BcHTnlaZIOHNN OTBOPN B 3aJHaTa CN Yact, KOnTO He Tp86Ba Da 6bDat 6IoKnpaHH N C ppeDeH OTBOP, HA KOJTo Ce nOCTabRA BEHTnlaZIOHHaTapeWetKa
Pa3mepn Ha BeHTnlaZIOHnTe OTbOpN
Pa3cTOnHnme MeJy MoJyNa n TaBaHa
ИЗКЛЮУBAHE HA YPEДА
Ako ypea Hma da 6bde n3non3BaH nbIro BpeMe:
1)Изклочeteуpeda(BиЖЕКПЛОATALIЯ)
2) N3KNIOUeTe ΣeNcena OTKaKTa
3)Почисте урEDA
4)Octabete BpaNTte OTbOpeHN
OTCTPAHBAHE HA HEN3ПРABHOCTN
| ПОНБЛЕМ | ПРИСИHA | OTCTPAHЯBAHE |
| He se bknioчba b'treeshno to ocbetlenne ha ypeda | • Hama 3axpaHbAne | • He e bkniochenn 3axpaHbAun Ka6en• BvIXte daIaNe He e n3KnIOuEN ypeDa (npobepete nploXeHnETo Ha termoctata)• YbepeTe ce ye B xJinIeTe OMa ToK |
| • BloKipal e kIooa Ha Bpata Ta | • Y6eTe ce ye kIooa e akTINBEN | |
| Xlaadnilnka i φprzIeRa ne IpnO3BexkDat doctatbUHO CTydeHInha | • Bpatite He ca 3aTbOpEni• Bpatite ce otBparT cheTo | • YbepeTe ce ye Bpatite uynIbTHeHnIaTe ce 3aTbApTdo6pe• N36IgBaIte da OTbPaTe Bpatite 3a dlIbIb nepoiD oT BpeMe• Ppobepete NaCtroPknata 3a Tempepatura i ako e b3MoxHo yBeIcHete CTeNEnHa na PodabAne Ha CTydeHnHa |
| • Iporpeuho NaCtroPka Ha Tempepatyrata. | • N34KaiTe 3a CStbIuImIpaHene TMpepatura i | |
| • Xlaadnilnka i φprzIeRa pa 6blm MNoRo HapblIeHn | • N34KaiTe 3a CStbIuImIpaHene TMpepatura i | |
| • BbHsHata Tempepatya e TBbIpe HnCKa | • YbepeTe ce, ye Tempepatyrata Ha OKoHnata cpeLa e BcOTBeCTBme C TOBA, Koeto e uKazAnH o (BvIXte NcHcTaNIPA). | |
| • Hama en. 3axpaHbAne | • 3axpaHbAun Ka6el He e npablIHO BknIOuEN• Ppobepete daIa NyeBdTe E n3KnIOuEN (npobepete nploXeHnETo Ha terpoMocTaTa) • YbepeTe ce ye B xJinIeUeTo IMa TOK | |
| XpanaTb V Xlaadnilnka 3ampb3Ba. | • IporpeuHa NaCtroPka Ha Tempepatyrata. | • Ppobepete NaCtroPkaTa 3a Tempepatura ako e Bb3MoXHO yBeIcHete CTeNEnHa na PodabAne Ha CTydeHnHa |
| • XpanaTe e DOnpIaHa Do 3aDnata CTeHa | • P3aDaneueTe xpaHata OTe 3aDnata CTeHa Ha XlaadnilnHa | |
| • 3aPaz3BaHaeTo Ha TBbIpe MNoTo pReSNI XpanaHnHaknKaba TMpepatyrata B XlaadnilnHa | • Da He se 3aPaz3BaBa nOToIaMO KOnUeCTBO Xpana To HeoxOIMOTO | |
| B dIbHoto Ha Xlaadnilnka Ima Bnara Ilin kAnuizu Boda | ДрenvaHnata Trb6 Ma Moze da e 3aYuShena | • POnucTe dePenaXnHata Tp6b, 3a da moKeJa da 3aToHua Cbo6DoHO BODATA |
| HanuHne Ha Bnara Ilin kAnu Boda Ha 3aDnata CTeHa Ha XlaadnilnHa | • Toba e HopMaIIHNo 3a XlaadnilnHa | • Toba He e DeΦeKT (BIXx PA3MPA3RABAHE) |
| HanuHne Ha Boda B chekmedjEto 3a ZelenuChu. | • Ilnonca Ha zirpkunauia Ha Bb3duX | • YbepeTe ce Ye Ha CTbKleHata POnuHa He ca NoctabEni proOdkTu npeueuHa Ha zirpkUnauiauHa |
| • PIoDobe Ha 3eIelenuChu c pReKalJeH MNoTo Bnara. | • N30IaRJaTe pIoDobete n ZelenuChuTe, KaTo rIyBmeTe BbB φolino Ilin rIg NocTABITE B Top6uHn | |
| Motobt pa6otn 6e3 ppekbSbAne | • Bpatite He ca 3aTbOpEni | • YbepeTe ce Ye Bpatite uynIbTHeHnIaTe ce 3aTbApTdo6pe |
| • Bpatite ce otBparT cheTo | • N36IaRaiTe da OTbPaTe Bpatite 3a dlIbIg nepoiD oT BpeMe | |
| • Tempepatura Ha OKoHnata cpeLa e MNoTo Bnoka. | • YbepeTe ce, Ye Tempepatyrata Ha OKoHnata cpeLa e BcOTBeCTB nce CneuФи KauzIne Ha ta6eKata (BIXx INCTAL ipaHe). | |
| • De6eHnata Ha lea e Naid 3 MM | • Hacrpo Ite Ha dinIeJIe/TerMoCTa Ta noBvncKa TMpepatyrata a | |
| 3aMpa3eHata xpaHa 3aNoCbVa da ce pa3mpa3Ba | • Tempepatrynla DiIana3OH Ha OKoHnata cpeLa e pod KIIMMaTIuHc Knac Ha npodukta. KompepcobT pa6otn pyIko | • PpemecTe te UpeLa Ha no-ToIoo Ilin 3aToIeTe cTaJaTa |
| • BpataT ha φprzIepHata cact He e 3aTbOpeHa | • YbepeTe ce Ye Bpatite uynIbTHeHnIaTe ce 3aTbApTdo6pe | |
| WI-F1 lcbetnilnata mriga 3 cekBkl - 1 sec 3kkl | • Pyerpa e n3KnIOuH• Hama Bpv3ka | • BkvIOuTe pyerpa• Pecaptrpain Te npodukta (BIXx WI-FI) |
Ako He cte peuHn npo6nema, moJI CbBpKTe CbC cepBn3nna CEHTbp. IocOe Te Bua Ha noBpeDa Ta nHfOpMaunra,Ha perncTpaunOHnHaTa Tabena Ha yCTpoNCTBOTo HA BtpeHnata qaTc HxlaDnHOTo OTdeneHe:
- Moja ha ypea
CepinHnH Homep
CUPRINS
RO
MÁSURI PRIVIND SIGURANTA 112--112
INSTALARE 113--113
FUNCTIONARE 113--113
CONSERVAREA ALIMENTELOR 114--114
CONGELARE 115--215
DECONGELARE 115--115
INTRETINERE SICURATARE 116--116
REDUCEREA CONSUMULUI DE ENERGIE 116--116
ZGOMOTE PRODUSE DE APARAT. 116--116
MODIFICAREA SENSULUI DE DESCIDERE A UŞII... 116--117
DIMENSIUNI ALE PRODUSULUI ŞI ALE SPATIULUI
DE INCORPORARE. 117--118
INSTALAREA APARATULUI IN CORP DE MOBILIER TIP COLOANÄ 118--118
FIXAREA PANOURILOR DE MOBILIER PE U\$ILE APARATULUI 119--119
MÁSURI DE SIGURANTA PENTRU O FUNCTIONARE CORECTA A APARATULUI 119--119
PERIOADE INDELUNGATE DE NEUTILIZARE 119--119
PROBLEM IN FUNCTIONARE 120--120
NAVODILA ZA VARNO UPORABO
- ITALIANO
- FRANÇAIS
- SAFET INFORMATION
- Conformity
- INSTALLATION
- WARNING:
- Electrical connection
- Appliance start-up
- OPERATION
- Turning On/Off
- Turning the appliance ON:
- Turning the appliance OFF:
- Setting the temperature
- Advanced settings menu:
- Door open alarm
- Refrigerator Compartment Fan (if present)
- CONSERVATION
- Refrigerator zone
- Fruit / Vegetables
- Refrigerated section fresh zone
- Indicator of the temperature in the coldest zone
- NOTE:
- Freezer zone
- Practical recommendations
- Defrosting the refrigerator compartment
- Defrosting the freezer compartment
- MAINTENANCE AND CLEANING
- Lighting
- LED lighting
- Cleaning
- NOTICE:
- IMPORTANT:
- ENERGY SAVINGS
- For better energy savings, we suggest:
- AVOIDING NOISES
- REVERSIBILITY OF THE DOOR
- PRODUCT DIMENSIONS AND BUILT-IN COMPARTMENT
- COUPLING OF THE PANELS OF THE BUILT-IN COLUMN OF THE APPLIANCE DOORS
- PRECAUTIONS FOR THE CORRECT OPERATION
- SUSPENDING USE OF THE APPLIANCE
- TROUBLESHOOTING
- CONTENU
- FR
- DIMENSIONS DU PRODUIT ET COMPARTIMENT ENCASTRE
- MANUTENÇÂO E LIMPEZA
- Illuminação
- Illuminação LED
- PAINÉIS DE ACOPLAMENTO DA COLUNA INCLUDEA NAS PORTAS DO APARELHO
- BkIIOUBaHe/U3KIOUBaHe
- BkIouBaHe:
- N3KJIIOUyBaHe:
- HactpoJaHa TemnepaTypaTa
- MehIO Ha pa3wnpeHn HacTpoiKn:
- AnapMa otBbopeHa Bpata:
- BeHTnlaTop Ha XlaIaHIOHOTO OTdJeHHe (aKO IMa)
- CbXPAHEHNE
- XlaanHa3OHa
- Плобов/Зеленчуц
- XnaHnHaΦpew3OHa
- ИКOHOMЯ HA EHEPTЯ
- LIYMOBE
- OBPbUaHE HABPATATA
- 3A6EJIeKKA
- PA3MEPN HA IPOДУКТА И HИШATA 3A BГРAXДАНЕ
- Сбьр3BAHE HA BPATATA HA BGРАЕняУPECД CMEБЕЛHATA BPATA
- ПРавиJA 3A ПРавиЛHA PABOTA
- ИЗКЛЮУBAHE HA YPEДА
- OTCTPAHBAHE HA HEN3ПРABHOCTN
- CUPRINS
- RO
- NAVODILA ZA VARNO UPORABO
Brand : ROSIERES
Model : RBBS 100
Category : Fridge