
PG6045 - Hair clippers REMINGTON - Free user manual and instructions
Find the device manual for free PG6045 REMINGTON in PDF.

User questions about PG6045 REMINGTON
0 question about this device. Answer the ones you know or ask your own.
Ask a new question about this device
Download the instructions for your Hair clippers in PDF format for free! Find your manual PG6045 - REMINGTON and take your electronic device back in hand. On this page are published all the documents necessary for the use of your device. PG6045 by REMINGTON.
USER MANUAL PG6045 REMINGTON
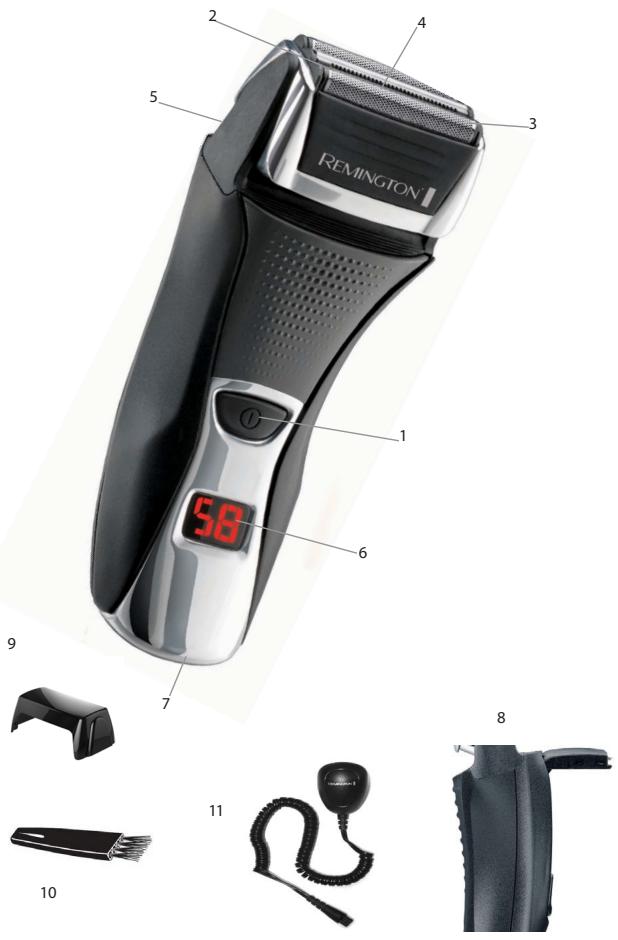
Titanium-X Foil Shaver

Thank you for choosing Remington*. Our products are designed to meet the highest standard of quality, functionality and design.
We hope you enjoy using your new Remington® product. Please read the instructions for use carefully and keep in a safe place for future reference.

CAUTION
- Use this appliance only for its intended use as described in this manual. Do not use attachments not recommended by Remington*
- Do not use this product if it is not working correctly, if it has been dropped or damaged, or dropped in water.

KEY FEATURES
1 On/off switch
2 Screens
3 Cutter assembly
4 Intercept trimmer
5 Hairpocket
6 LED fuel gauge (F5800) LCD display (F7800)
7 Power port
8 Pop-up trimmer
9 Head guard
10 Cleaning brush
11 Power cord
2 year guarantee

GETTING STARTED
For best shaving performance, it is recommended that you use your new shaver daily for up to four weeks to allow time for your beard and skin to become accustomed to the new shaving system.

CHARGING YOUR SHAVER
- Ensure that your hands, shaver and power cord are dry before charging your shaver.
- Turn the appliance off.
- Connect the shaver to the adapter, then to the mains and charge for at least 24 hours when using for the first time.
- F7800 - Place your shaver in the charging stand, connect the charging adaptor to the stand and then to the mains.
After the sahver batteries are fully charged the fuel gauge (F5800) or the LCD display (F7800) will indicate the shaver is fully charged.
- Use product until the battery is low. This is indicated by illuminated red light (F5800), or by the digital display (F7800).
- Fully recharge for 24 hours every 6 months to maintain battery condition.
- When empty, the battery will be fully charged within 2 hours.
- The shaver adapts automatically to a mains voltage between 100V and 240V.
CORDED USE
- Connect the shaver to the adaptor, then to the mains and recharge for 5 minutes before using.

CAUTION
Extended mains only use will result in the reduction of the battery life.
HOW TO USE

SHAVING
Make sure your shaver is properly charged
- Switch the shaver on.
- Stretch the skin with your free hand so the hairs stand upright
- Hold the shaving head so that the foils touch your face
Use short, circular strokes.

TRIMMING
- While your shaver is switched on, slide the on/off switch upwards to activate the trimmer.
- Push the trimmer release button.
- Hold the trimmer at a right angle to your skin
- To retract the trimmer push the top rear of the trimmer downward until it locks under the trimmer release button.

Tips for best results
- Ensure your skin is dry. Always hold the shaver at right angles to the skin so that all three heads are touching the skin with equal pressure.
- Use moderate to slow stroking movements. The use of short circular motions in stubborn areas may obtain a closer shave, especially along the neck and chin line.
- DO NOT press hard against the skin in order to avoid damage to the foil.

CARE FOR YOUR SHAVER
- Care for your appliance to ensure a long lasting performance.
We recommend you clean your appliance after each use. - The easiest and the most hygienic way to clean the appliance is by rinsing the appliance head after use with warm water.
- Keep the trimmer in the "off" position when the shaver is not in use.

DRY CLEANING
- Ensure the shaver is switched off and unplugged from the mains outlet.
Pull the foil assembly up to remove from hair pocket. - Thoroughly blow out the stubble from the foils and cutters.
- Tap out excess hair shavings and use a cleaning brush if necessary.
-
Do not clean the shaving foil with a brush.
-
Replace head assembly.

WASHABLE CLEANING
- Ensure the shaver is switched off and unplugged from the mains outlet.
- Pull the foil assembly up to remove from hair pocket.
- Foils – do not use the brush to clean the foils. Instead, blow the shavings out or rinse the foils under cold water or warm water.
- Cutters & Trimmers - Use the cleaning brush to sweep any loose hairs from the cutter and trimmer. Rinse them in cold or warm water. Do not use hot water.
After cleaning, replace the head assembly. - Replace head assembly.

CAUTION
Never submerge your shaver completely under water.

TRIMMER
Lubricate the teeth of the trimmer every six months with one drop of sewing machine oil.

PLACING THE FOILS & CUTTERS
To ensure the continued highest quality performance from your shaver, we recommend that foils and cutters are replaced regularly.

INS THAT YOUR FOILS AND CUTTERS NEED REPLACING:
Irritation: As foils get worn, you may experience skin irritation.
Pulling: As the cutters wear, your shave may not feel as close and you may feel your cutter pulling your hair.
Wear through: You may notice that the cutters have worn through the foils.

REPLACE THE FOIL
Pull the foil assembly up to remove from the hair pocket.
- Insert new foil assembly in hair pocket until it snaps into place.

REPLACE THE CUTTERS
- Grasp cutter between thumb and forefinger and pull forward.
- Snap both new cutter assemblies into top of oscillator tips.
DO NOT press on the cutter ends as this may cause damage.
Rotary heads replacement model: SPF-300

IMPORTANT SAFETY INSTRUCTIONS
WARNING - TO REDICATE THE RISK OF BURNS, ELECTROCUTION, FIRE, OR INJURY TO PERSONS:
- An appliance should never be left unattended when plugged in to a power outlet, except when charging.
- Keep the power plug and cord away from heated surfaces.
- Make sure the power plug and cord do not get wet.
- Do not plug or unplug the appliance with wet hands.
- Do not use the product with a damaged cord. A replacement can be obtained via our International Service Centres.
Do not twist or kink the cable, and don't wrap it around the appliance.
- Store the product at a temperature between 15^ and 35^ .
- Only use the parts supplied with the appliance.
- The appliance, including its cord, must not be used, played with, cleaned or maintained by persons under eight years old and should at all times be kept out of their reach.
- Use, cleaning or maintenance of the appliance by children over eight or by anyone with a lack of knowledge, experience or with reduced physical, sensory or mental capabilities should only be undertaken after receiving appropriate instruction and under the adequate supervision of a responsible adult to ensure that they do so safely
and that the hazards involved are understood and avoided.
- Don't put the appliance in liquid, don't use it near water in a bath-tub, basin or any other vessel, and don't use it outdoors.


TROUBLESHOOTING
- If your shaver battery is completely empty or the shaver has not been used for an extended period of time, the shaver may not start when operated using the cord. If this occurs, charge the shaver for approximately 15 sec. before shaving.

ENVIRONMENTAL PROTECTION
To avoid environmental and health problems due to hazardous substances in electrical and electronic goods, appliances marked with this symbol must not be disposed of with assorted municipal waste, but recovered, reused or recycled.


BATTERY REMOVAL
The battery must be removed from the appliance before it is scrapped.
- The appliance must be disconnected from the supply mains when removing the battery.
Using a small screwdriver, pry off the (2) side panels.
- Using Philips screwdriver remove the (4) screws from the front of shaver and remove the front housing.
- Using Philips screwdriver remove (8) screws from the front of the shaver.
- Remove and open the core from the shaver to expose the batteries.
- Cut the wires connecting the batteries to the circuit board and remove the batteries.
The battery is to be disposed of safety.

SERVICE AND GUARANTEE
This product has been checked and is free of defects.
We guarantee this product against any defects that are due to faulty material or workmanship for the guarantee period from the original date of consumer purchase.
If the product should become defective within the guarantee period, we will repair any such defect or elect to replace the product or any part of it without charge, provided there is proof of purchase.
This does not mean an extension of the guarantee period.
In the case of a guarantee simply call the Service Centre in your region.
This guarantee is offered over and above your normal statutory rights.
The guarantee shall apply in all countries in which our product was sold via an authorised dealer.
This guarantee does not include damage to the product by accident or misuse, abuse, alteration to the product or use inconsistent with the technical and/or safety instructions required.
This guarantee shall not apply if the product has been dismantled or repaired by a person not authorised by us.
If you call the Service Centre, please have the Model No. to hand, as we won't be able to help you without it.
It's on the rating plate which can be found on the appliance.
UW SCHEERAPPARAAT OPLADEN
MET WATER SCHOONMAKEN
REEMPLACEMENT D'UNE GRILLE
ASSISTÊNCIA E GARANTIA
DOLEZITE BEZPE NOSTNÉ POKNY
UPOZORNENIE-ZNIZOVANIE RIZIKA POPALENIA,SMRTI SPOSBENEJELEKTRICKYM PRUDOM,POZIARU ALEBO ZRANENIA OSOB:
He norpykaite 6pntbY noHIOCTbO B Ody.

TPUMMEP
Kazdble noIroda cma3bBAaTe 3y6cbl TpmmMepa Kaanne MaCna dIy WBeHbIX MaunH.
3AMEHAΦJIbΓI N IJIe3BNI
JANTO YTOBNI BOPNBA CNYKUNA BAM DOJIRO N KAYCTBEHO, POKOMENHYETC PERYIARPHO MEHATB FOJIby N LEZBH.
Pn3HAKI TORO, UTO OJbry I ne3Bna nopa MeHArTb
Pa3dpaxKeHne: Nmpe n3HaunBaHHn oJbTu MoKet NOBnTbcra pa3dpaxKeHne Koxn.
OTTARIMBAHNE: POMeHE N3HaUIMBAHnI NE3Bm Cpe3AHne BONOCB NOPcMXOJNT He NaJaJIeKaJSeM yOpBE, IN BbI HauNHaEte YCbCTBOBaTb, YTO bPITBa BbIePrIMBaET BONCKN.
- N3HOC: Bbl moXeTe 3aMeTntb, qToJe3BnI npOpbIbaOT oJbIy.
3AMEHAΦOJIbΓI
- Notaryte cetky BBepx u CHMnTe ee c oTceKa dJa c6opa BOnoc.
BCTaBbTe BOTcEK dJa c6opa BOJoc HObIy CeTOHbI 6JOK Do UeJUka.
3AMEHAJI3BNI
Bo3bMnte ne3Bne 60nbHm u yka3aTeNbHbIM naIbEm nNotraHnTe KBepxy.
Bctabte 6o haOBbIX 6IokaJe3BnB BepxHIOU qactb KOHNKOB BN6paTopa.
HE haxmaite Ha KOHcIJIe3BnA,3TO MoXeT NOBpeDntb erO.
MoeJIb 3aMeHbI BpaUaIooxxCra roNoBok: SPF-200.

HNCPTPYKUINIPOBE3ONACHOCTN
BHHAMAHIEI-JIAN CHINJECHHNI PNCKA OXOTOB,UYAPA 3NEKTPNUECKNEM TOKOM,BO3OFAPAHNI UINTPABMbI:
He octabJrTe BkIoueHHb npn6Op 6e npncMoTpa.
- Pn60bBcerda doJxhen 6bItb cyxum.
- UcpoiCTBO CneJeT KnaCTb TOJIbKO Ha TepMOCTOyIO NOBepxHOCTb.
He nCnoB3yIte np6Op,ecn OH noBpeKdEN nn pa6OaTe C nepe6oMaN.
EcnI Ka6bN bOpRBeH, OH OJANHEK 6bTb3aMeHEN pOImB3Obitnem, CepBHCbHM areHTOM nIM dpyrTN KBAbnfIOPOBAHBN HmUIoN mI rnpDpBTBaEPHAn oNAChOTC.
He nepekpyuBaIte n He nepereu6aIte Ka6eIb, He 3akpyuBaIte erO BOKpyr npu60pa.
- Icnoj3ynte xpaHnTe np6op npn Tempepatye ot 15^ do 35^
- IcnoIb3yIte TOnIbKO npnHaIeJXHOCTN HacAdk NT pOun3BOIDTeJIa.
YcTPOINCTOM, BKIIOUChA UHpy, He OJOLXHbI NOfb3OBaBtCg, IyrpaTb, YCHCTMb INN o6cbNJMBAbTeTn Do BOcBmN LeT; YcTPOINCTBO DOnJXHO xpaHInTbCg BHe IVX DOcRAFMAOCTM.
IcN0n53ObaHme, YcNTKa, OcNcLyKbAHnHe YcTPOCTBd AeTbMa CTaPme BoCbMn IET nIIN
IInzAMn, He O6NaAdoUeMMn DOCTaOTHyBMn 3HaNAHMn INOTbIM, NtIaMn C
OrpAaYeuHbIMn 4hneueckmMn, CEcoHPOMMn IINy IMCTBEHbIMn CNOC6bHOCTMn
BO3MOxHO ToIbKO NOcNE COOBETCTBYIOe IHOCTpyKTaja N IOJ NaIeJekaAMn
PnpCMTOPM B3POCNoRTO OTBETCTBEHBOr QeNOBeka, QTObBi Oe6neuHTb Be3OAnachyIO
EKnCPlaTuAIO YcTPOCTBa, a TAKKe noHIMaHne I N36BeaHne OAnchOtei, CB3aHHbx C eO rKcNlayatauaie.
He norpykaite npia6op B xkdoctb, He nCnObn3yIte erOp ydAm C BOIOB B BACSEHNE Nm Ipyrom cocSye Hne nCnObn3yIte erO bNe NOMeuehen.


NONCK HENCPABHOCTEIN
- Ecnn 6atapere 6pntBb nonnoctbIpoa3pa3raIinaac bI npitBa He nCpObn3oBaIanab C TeyHeNe dInntelbHOro nepmoJaBpeMeHn, 6pntBa moKET He BKNIOuHTcBcA DaKe, cNn PoKnloUeHa shypom K cTeiPiTahn. B TakOM cnUyae cJeNyet 3apJrDb 6pntBy B TeyHeNe pnp6bnlntelbHO 15 MNHT do 6pntBa.

3AHTA OKPYXAIOUI CPEbl
DahHoe n3dene npOBepHo H He coOpKHT deEeKTOB.
JaHHa rapaHTnpaCnpoctpaHReTcHa deΦeKtbl, BO3HnKwne Bpe3yNbTaTe
INCNOB3bOAnBaHNeKHeaCtBeCHENHOrMATEpIaJIaNII INPOI3B0DCTBEHNHO BrPAKaB T E HENMe RapaHnIHOro nepINOda.CUYTAOT DAtbI NOKynKnI INdEINI.
EcnI B TeuHHe rapaHTnHOrO nepHOaB I3dEniN 6bHApYKBaIoTc HENoJaKn, Mbl 6ecnIaTHo NOUHHM erO nnZaMeHM N3eJeN nEr eoTcb, pnp YCNoBN HauNHy JOKyMHTA, noDTBepKDaIOUe NOKYNK.
DahHoe deIcTBHe He nOpa3yMeBaET npoJleHnra pArHTnHoro nepNoa.
ПИЗ BOKNHOKOBENHI rapaHTNHORO cLNYAЯ pOCTO NO3BOHITE B cepBICHbI CEHTP BBAUEM PERIOHE.
DaanHra papaTHn npedocTabIeTcN NOMMO BaIxN 06bIyHbX 3aKOHbX npaB.
AnhaarapaHanrnaIeIcTBInelbHA BO BCex CTpaHax, rge Haue I3neJe npOdaBANocb uepe3 ABOTIOZOBAHORO Dnepha.
HaCTOaIaRapaHTnHe pAcnpocptpaHReTc H aOBpeKdEHHaN 13dEHHa, BO3NHKUme B 3eYbIte HecacThORo CnYaH, HnpeBaINbHOrO O6baueHHa, BHECEHHa N3MeHEnH bN3dJIe NII KcNpyaTuAaNN He B COOTBeTcTBm CTexHHueCKMn HcHTpyKuMaMn NII npabInamMbe3oanACoTHc.
HaTcOuaaRaPAnTHNeHeDCTBtEnbLa, eCNs n3dne pa36bpaONCb nINn noDaBepranocBp
peMOTy HEyNOLHOMOeHNbMIUMo.
3BONA B CEPBNCbHc NcHTP, COO6uHTe HOMep MOeJI, NPOKOBky 6e3 Hero Mbl He cMOXEM BAM NOMOy.
Oh hanecen Ha Ta6nueKe, npKpenlenHno K yctpoiCTby.
3NeKtpo6pntBa+F5800&F7800
VAZNE SIGURNOSNE UPUTE
UPOZORENJE - KAKO BISTE SANJILI RIZIK OD OPEKLINA, UDARASTRUJE, POZARA LII OZLJEDA OSOBA:
- Ne ostavlajte uredaj bez nadzora dok je ukopčan.
Ure'daj treba uvijek biti suh. - Ure'daj postaviti samo na povrsinu otpornu na topliu.
- Nemojte koristiti uredaj ak je ostecen ili neispravan.
Ako jek全面建成, radii zjbebajvanja opasnosti, mora ga zamijeniti proizvodač, ovlasteni servisi ili osoba sline strucnosti.
Kabel se ne smije rotirati, presavijati i umotavati okay urederaja - Ovaj proizvod koristite i cuvajte na temperaturi izmedu 15^ i 35^
- Nemojte koristiti dijelove ili dodatke drugih proizvodaça.
- Ureadj, uključujić i kabel, ne smije biti korišen, cisćen ili njegojav od strane osoba mladih od osam godina i treba bitr dižan sve vrijeme vanjhovog domašaja. Uporaba, cisćanje i njega uredaj od strane djece starijih od 8 godina ili osoba bez znanja, iskustva ili smanjenih fizickih, perceptivnih ili mentalinh sposobnosti bi trebale rabiti samo nakon odgovarujuciuh uputa i adeptkatnim nagledanjem odgovarajuće odras od osobe kojaće sobrinutdi oni to cine bezbjedno i da se moguce opasnosti ruzumiju i izbjugnu.
- Ne uranjajte uredaj u tekuchina, ne rabite g blizu vode u kadi, umivaonikui li drugih posuda i ne rabite uredaj vani


RJESAVANJE PROBLEM
- Ako je baterija Vaseg brijaca potpuno prazna ili ukoliko brijac nje rabljen tijekom duljeg vremenskog razdobla, brijac moza de ne ceradi kad se koristi s kabelom. U tom sluceju, napunite brijac optrilike 15 sekundizi prije brijanja.

ZASTITA OKOLISA
Da bis e izbegle stetne posljedice na okolis i zdravljce zbog opasnih supstanci u elektricnim i elektronskim provodizma, svi uredaji obiljezeni ovim simbolom ne smju se zbrinjavati kao razeravrstani komunalni optrad, vece se moraju prikupiti, ponovno koristiti ili recikirlatri.


UKLANJANE BATERIJE
Baterija mora biti uklonjena preNgu sto se urejad baci.
- Ure'daj mora biti iskopcan iz struje prije no sto se baterija izvadi.
- Pomócu malog odvijača, skinite bočne dijelove (2) brijáča.
Pomoču odvjáča marke Philips odvjte (4) vija s prednje strane brijáča i skinite prednje kucîste.
- Pomócu odvijača marke Philips odvjte (8) vijaka s prednje strane brijaca.
- Skinite i otvorite srednji dio brijaca kako biste vidjeli baterije.
Presijecite zice koje povezuju baterije sa sklopmnom pločicom i izvadite baterije.
Zbog bezbjednosti baterija se baca.

SERVISI JAMSTVO
a a a a a a a a a a a a a a a a a a a a a a a a a a a a a a a a a a a a a a a a a a a a a a a a a a a a a a a a a aaa
Aeae
a 2
()
a. shi g 1000
y 1
y
1
y 1
y
A
j 1
jlll jai la jyba i yda J
yjyjyj
4.139 203 210
e alaaa aalaii jiaaiai
Jgbl 2d Jzai c3i
yaii jao yao jia jiaai ayai jay jaiy
alnd 15 ay jlll i, aab y bae ae a
P 1
.
yolll 211211
jai jia 1
a
aal aal 1
a 1
aee
Jll
y
a
glll 1
4a aai 1
alololjolol
g 100000000000000000000000000000000000000000000000000000000000000000000000
g
j 1
中
C1J2Aipu#y 8
g()
a 1
Xai jai jil Juae y
y 1
i 1
y 1
d
10
1
a
y
A
g dndnndndndndndndndndndndndndndndndndndndndndndndndndndndndndndndndndndndndndndndndndndndndndndndndndndndndndndndndndndndndndndndndndndndndndndndndndnd
2000
g 1
yduo 1
y
jie kai jie jie jie jie jie jie jie jie jie jie jie jie jie jie jie jie jie jie jie jie jie jie jie jie jie jie jie jie jie jie jie jie jie jie jie jie jie jie jie jie jie
jihg jieh jyj 100
y
中
100
1
jllg jlll 0a
AaBaaBaaBaaBaaBaaBaaBaaBaaBaaBaaBaaBaaBaaBaaBaaBaaBaaBaaBaaBaaBaaBaaBaaBaaBaaBaaBaaBaaBaaBaaBaaBaaBaaBaaBaaBaaBaaBaaBaaBaaBaaBaaBaaBaaBaaBaaBaaBaaBaaBaaBaaa
yaii 1
a
a 1
y
y
y
Aa aalll Aaiiaai 1aaii 1aaai
j
1 1
5 1
jai 2g jia dai kai jai y ai gai gai
a
aai jlll 10000000000000000000000000000000000000
a
y
AIS
(8)()
y
Aaal aal 1
y
SPF2008
1
:
y
2
i#
a 1
Jy 1
Remington
y 1
15 1
435
j0g+0j+1j21
j4yallldi jL yjH pia
1 = 2
jai
a a 1
a 1
y j 1
jll jll 1
piai jiaaiial 5j 10x yie gaiol gaii j ai
aalaa aalaa aalaa aalaa aalaa aalaa aalaa
aaiy j gail dl al y jaii
A
jda jaaa aal jy yaa
A
jde jadll daii aaiiaai iai
j4
| GERMANY | Central Europe |
| BENELUX | 00800/821 700 821 |
| FRANCE | |
| ITALY | |
| SCANDINAVIA | Mo.-Fr.9 a.m.-5 p.m. Central European Time (free call) |
| AUSTRIA | E-Mail: service@remington-europe.com |
| SWITZERLAND | www.remington-europe.com |
| SPAIN | +34 902 10 45 17; 08.00 - 13.00; lunes - viernes (Posventa) |
| +34 932 070 166 (Información al consumidor final) | |
| PORTUGAL | +351 299 942 915; renase@presat.net |
| MALTA | Tel.+356 21 664488 Miller Distributors Ltd, Miller House - Airport Way, Tarxien Road, Luqa LQA 1814, www.millermaltacom |
UNITED KINGDOM
Tel. +44 0800 212 438 (free call)
Spectrum Brands (UK) Limited, Fir Street, Failsworth, Manchester, M35 0HS, UNITED KINGDOM, www.remonting.co.uk
CESKA REPUBLIKA
6 Tel. +420 487 754 605
VARTA Bateria spol.s.r.o., Jindificha Z Lipte 108, 470 01 Ceska Lipa, CESKA REPUBLICA, www.cz.remington-europe.com
IRELAND
Tel. +353 (0) 1460 4711
Remington Consumer Products, Unit 7C, Riverview Business Park, New Nangor Road, Dublin 22, IRELAND, www.remington.co.uk
MAGYARORSZAG
Tel.+3613300404
V.R. Trading (LL.C), Khalid Bin Waleed street, Al Jawhara Blvd 504, Dubai, U.A.E., www.remington-europe.com
CROATIA
Tel. +385 1248111
Alca Zagreb d.o.o., Zitnjak bb, 10000 Zagreb, Croatia, www.remington-europe.com
CYPRUS
6 Tel. +357 24-532220
Thetaco Traders Ltd, Elearherias Ave 75, 7100 Aradippou, Cyprus, www/remington-europe.com
ROMANIA
6 Tel. +40 21 411 92 23
Best Expert Service Jak SRL, 4th, Drumul Taberei St., sector 6, Bucharest, Romania, www.remington-europe.com
SLOVENIA
Tel.+386(0)15616630
Jezek Trgovina Service d.o.o., Cesta 24 Junja 21, 1231 LJUBLJANA - Crnuche Republica Slokova www.remington-europe.com
GREECE
6 Tel. +30 210 94 10 699
D. J. DAMKALIDIS S.A., Import Agencies, 44 Zefyrou str., www.remington-europe.com
Model No. F5800& F7800
Remington* is a Registered Trade Mark of Spectrum Brands, Inc., or one of its subsidiaries
VARTA Consumer Batteries GmbH & Co. KGaA, Alfred-Krupp-Str. 9,
73479 Ellwangen, Germany
www.remington-europe.com
© 2012SBI

BZ02