
CLICK CONNECT - Baby transport system GRACO - Free user manual and instructions
Find the device manual for free CLICK CONNECT GRACO in PDF.
| Product type | Baby transport system |
| Brand | Graco |
| Model | Click Connect |
| Dimensions (car seat) | 44 x 65 x 52 cm |
| Weight (car seat) | 4.5 kg |
| Power source | None (manual) |
| Main features | Car seat with click base, stroller compatibility, 5-point harness, adjustable headrest, reinforced side protection |
| Installation | Attachment via ISOFIX base or seat belt |
| Use | From birth to 13 kg (approximately 12 months) |
| Maintenance and cleaning | Removable cover machine washable at 30°C, clean plastic parts with a damp cloth |
| Safety | Compliant with ECE R44/04 standard, side impact resistance test |
| Spare parts and repairability | Spare parts available on the Graco website (bases, covers, harnesses) |
| Warranty | 2 years |
| General information | Modular system compatible with Graco Click Connect strollers |
Frequently Asked Questions - CLICK CONNECT GRACO
User questions about CLICK CONNECT GRACO
0 question about this device. Answer the ones you know or ask your own.
Ask a new question about this device
Download the instructions for your Baby transport system in PDF format for free! Find your manual CLICK CONNECT - GRACO and take your electronic device back in hand. On this page are published all the documents necessary for the use of your device. CLICK CONNECT by GRACO.
USER MANUAL CLICK CONNECT GRACO
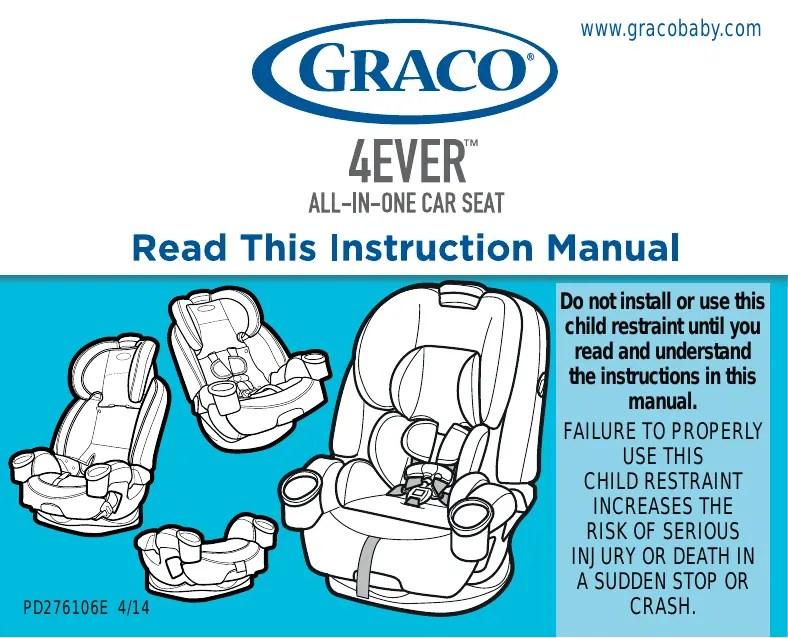
Read This Instruction Manual
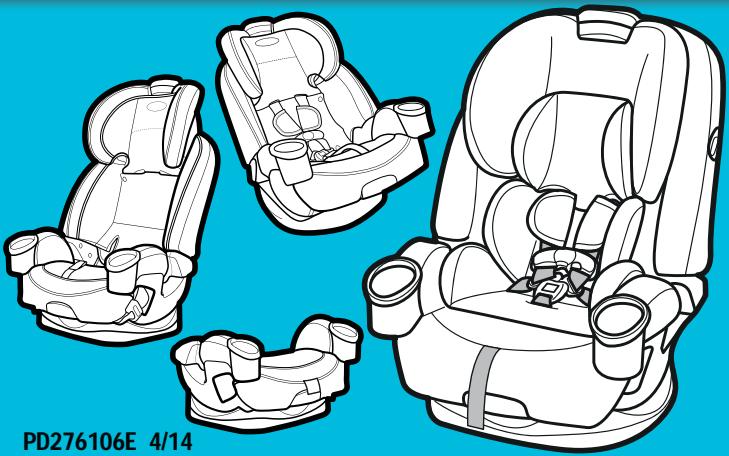
PD276106E 4/14
Do not install or use this child restraint until you read and understand the instructions in this manual.
FAILURE TO PROPERLY USE THIS
CHILD RESTRAINT
INCREASES THE
RISK OF SERIOUS
INJURY OR DEATH IN
A SUDDEN STOP OR
CRASH.
Important
1-A Safe Use Checklist
1-B Before You Begin
Register This Car Seat
If You Need Help
Certification
Car Seat's Useful Life
Vehicle Seat Protection
Warm Weather Use
1-C SafetyWarnings
1-D Right Mode of Use
Features
2-A Car Seat Features
Rear-Facing Use
3-A Rear-Facing Checklist
3-B Prepare to Install LATCH Rear-Facing 2
Rear-Facing Continued
3-C Installing With LATCH Straps
3-D Installing With Vehicle Seat Belt
Forward-Facing Use
Pages 39-53
4-A Forward-Facing Checklist
4-B Prepare to Install LATCH Forward-Facing
4-C Installing Using the LATCH Strap
4-D Installing Using the Vehicle Seat Belts
Belt-Positioning Booster Use
Pages 54-68
5-A Booster Seat Checklist
5-B Prepare for Backed Booster Use
5-C Install Backed Booster
5-D Prepare Backless Booster Use
5-E Install Backless Booster
Securing Child
6-A Securing Child 5-Point Harness
6-B Securing Child Backed Booster
6-C Securing Child Backless Booster
6-D Securing With Belt-Positioning Clip
Care & Cleaning
7-A Cleaning Seat Pad
7-B Cleaning Crotch Buckle
7-C Cleaning Harness and LATCH Straps
7-D Accessories
Additional Information
8-A Choosing Vehicle Seat Location
8-B Unsafe Vehicle Seat Locations
8-C What is LATCH?
Additional Information Continued
8-D Choosing LATCH or Seat Belts
8-E How to Remove LATCH and Tether
8-F Vehicle Seat Belts
1-A Welcome to the Graco Family!
Your child's safety depends on you. No car seat can guarantee protection from injury in every situation, but proper use helps reduce the risk of serious injury or death.
Even if this car seat seems easy to figure out on your own, you must follow the detailed instructions in this instruction manual to ensure the steps below are performed correctly.
SAFE USE CHECKLIST
Choose the correct mode of use for your child, depending on their weight.
Rear-Facing: 4-40 lbs. (1.8-18 kg)
- Forward-Facing: 20-65 (9-30 kg)
49 in. (125 cm) or less
- Booster Use: With back: 30-100 lbs. (14-45 kg) 38-57 in. (96-145 cm) Without back: 40-120 lbs. (18.1-54 kg) 40-57 in. (101-145 cm)
Children less than 20 lbs (9 kg) MUST use this car seat rear-facing.
For More Information...
Review section 1-D.
| SAFE USE CHECKLIST | For More Information... |
| Choose a suitable location for this car seat in your vehicle. ·Never place a child rear-facing in a seating position with an active frontal airbag. ·You MUST use a lap and shoulder vehicle seat belt when using as a booster seat. | Review section 8-A. |
| Install this car seat tightly in your vehicle. ·Car seat should not move at the belt path more than 1 in. (2.5 cm) from side to side, front to back when installed rear facing or forward-facing. ·Use the top tether strap when using forward-facing. | Review sections: Rear-Facing 3-C or 3-D. Forward-Facing 4-C or 4-D. Booster 5-C or 5-D |

SAFE USE CHECKLIST
For More Information...
Secure your child tightly in this car seat.
- Rear-Facing: Harness strap height MUST be at or just below top of child's shoulders. Top of head must be 1 in. below the headrest adjustment lever.
- Forward-Facing: Harness strap height MUST be at or just above top of child's shoulders. Top of child's ears below top of headrest.
- Harness strap snug enough you cannot pinch the strap.
- Chest clip at armpit level.
- Booster Use: shoulder belt should lie between child's neck and edge of shoulder and the lap belt should lay low on the child's hips.
Review section 6.
1-B Before You Begin
Register This Child Restraint
Please fill out the prepaid registration postcard attached to the harness and mail it in today or register online at www.gracobaby.com/ carseatregistration.
Child restraints could be recalled for safety reasons. You must register this restraint to be reached in a recall. Send your name, address, and the restraint's model number and manufacturing date to:
Graco Children's Products, Inc.
Attn: Customer Service
3 Glenlake Parkway Atlanta, GA 30328
or call 1-800-345-4109
or register online at
www.gracobaby.com/carseatregistration
For recall information, call the U.S. Government's Vehicle Safety Hotline at 1-888-327-4236 (TTY: 1-800-424-9153), or go to http://www.NHTSA.gov.
For future reference or if you change addresses, record the model name, model number, date of manufacture and purchase date of this car seat on the below. You can find this information either on the registration card if you still have it or on the date label located on the back of the car seat.
Model Name
Model Number
Date of Manufacture
Date of Purchase
If You Need Help
In the U.S.A, please contact our Customer Service Department with any questions you may have concerning parts, use, or maintenance. When you contact us, please have your product's model number and date of manufacture ready so that we may help you efficiently. These numbers can be found on a sticker on the back side of your car seat.
For additional resources or to get your car seat checked by a child passenger safety technician, please visit the following web sites:
www.nhtsa.gov • www.seatcheck.org • www.safekids.org • www.cpsc.gov
Certification
This child restraint meets or exceeds all applicable requirements of Federal Motor Vehicle Safety Standard 213 for use in motor vehicles.

This child restraint is certified for use in aircraft only when used with the internal harness system.

This child restraint is NOT certified for use in aircraft when used as a booster seat because aircrafts do not have shoulder belts.
Contact the airline for their specific polices.
Car Seat's Useful Life
STOP using this car seat and throw it away 10 years after the date of manufacture. Look for this sticker on back of the car seat.
Graco Children's Products Inc. advises against loaning or passing along a car seat unless you know the complete history of the product. We also advise against purchasing a car seat second hand.
Vehicle Seat Protection
Protect vehicle seat. Use a car seat mat, towel, or thin blanket under and behind car seat.
Warm Weather Use
Car seat parts can get very hot in the sun or warm weather. To avoid burns, always check before putting child in car seat.
1-C SafetyWarnings
No car seat can guarantee protection from injury in every situation, but proper use helps reduce the risk of serious injury or death. READ THIS MANUAL CAREFULLY.
WARNING!
Failure to follow these instructions and child restraint's labels can result in child striking the vehicle's interior during a sudden stop or crash.
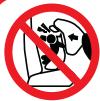
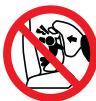
! NEVER PLACE THIS CHILD RESTRAINT REAR-FACING IN A VEHICLE SEATING LOCATION THAT HAS AN ACTIVE FRONT AIR BAG.
If an air bag inflates, it can hit the child and car seat with great force and cause serious injury or death to your child.
! Review your vehicle owner's manual for more information about air bags and car seat use.
! If your vehicle does not have a back seat, review your vehicle owner's manual.
! The American Academy of Pediatrics (AAP) and National Highway Traffic Safety Administration (NHTSA) recommends that children be rear-facing until age 2 or until they reach the maximum rear-facing height and weight rating for their seat.

! Choose the correct mode of use for the car seat depending on your child's size. Infants less than 20 lbs. (9 kg) MUST use this car seat rear-facing.
! Select a suitable location for the car seat in your vehicle.
! Secure car seat with a vehicle seat belt or LATCH that is properly routed as shown in this manual.
! Vehicle seat belt system MUST hold car seat securely. Not all vehicle seat belts can be used with a car seat.
! If vehicle seat belt does not hold car seat securely, read "Vehicle Seat Belts" section 8-F and your vehicle owner's manual.
! Always secure car seat with LATCH or a vehicle seat belt, even when unoccupied. In a crash, an unsecured car seat can injure passengers.
! If car seat is in a crash, it must be replaced. DO NOT use it again! A crash can cause unseen damage and using it again could result in serious injury or death.
! DO NOT use car seat if it is damaged or missing parts.
1 DO NOT use accessories or parts other than those provided by Graco. Their use could alter the performance of the car seat.
! DO NOT remove LATCH system from car seat. If using vehicle seat belt to secure car seat, LATCH connectors must be stored.
! Never leave child unattended, even when sleeping. Child may become tangled in harness straps and suffocate or strangle.
! Rear-facing car seat must be properly leveled:
- Too reclined can result in injury or ejection.
- Too upright can result in breathing difficulties.
! Never attach two LATCH connectors to one vehicle lower anchor point unless specifically allowed by the vehicle manufacturer.
! Do not use both the vehicle belt and LATCH belts
at the same time when using the car seat rear or forward facing.
1-D Right Mode of Use
4 lbs (1.8 kg)
20 lbs (9 kg)
30 lbs (14 kg)
40 lbs (18 kg)
65 lbs (30 kg)
120 lbs (54 kg)
Rear-Facing with 5-Point Harness
4-20 lbs (1.8-9 kg) less than 1 year old MUST be rear-facing.
20-40 lbs (9-18 kg) CAN be rear-fcing.
Forward-Facing with 5-Point Harness 20-40 lbs (9-18 kg) can sit upright unassisted CAN be forward-facing. 40-65 lbs (18-30 kg) SHOULD be forward-facing.
Booster Mode with Vehicle Lap/Shoulder Seat Belt 30-65 lbs (14-30 kg) CAN be in backed booster mode. 40-65 lbs (18.1-30 kg) CAN be in backless booster mode. Over 65 lbs (30 kg) MUST be in booster mode.
Note: Preterm or low birth weight infants may be at special risk in a vehicle or aircraft. According to the AAP, these infants may suffer breathing issues if improperly reclined in a car seat. When rear-facing, use the corrected age for preemies. Graco advises that you have your physician or hospital staff evaluate your infant and recommend the proper car seat or car bed before you and your infant leave the hospital.
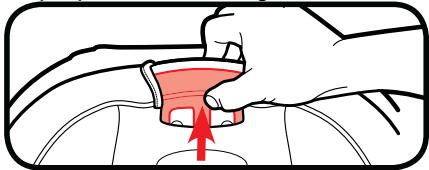
2-A Install Cup Holders
Cup Holders
To attach the cup holders, match the right cup holder to the right side of the seat and the left to the left. Align the tab on the cup holder with the slot in the seat and slide down. You will hear a "Click" when they are secured in place.

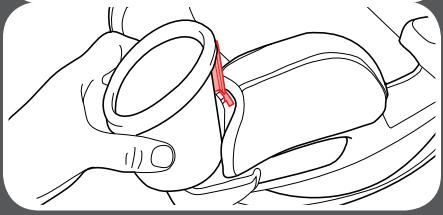

Cup Holders
s
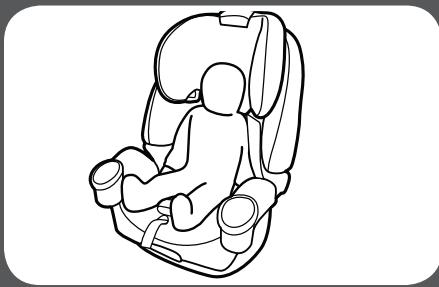
2-B Car Seat Features

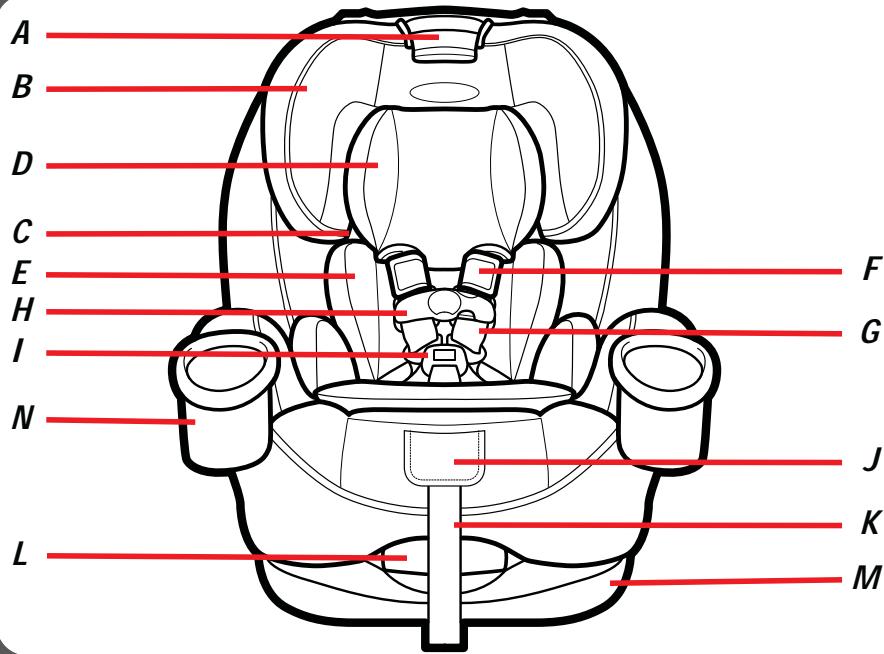
A Headrest/Harness Adjustment Lever
B Headrest
C Booster Shoulder Belt Guide
D Headrest Infant Pillow
E Infant Body Pillow
F Harness Covers
G Harness Straps
H Chest Clip
I Buckle
J Harness Release Lever (under flap)
K Harness Adjustment Strap
L Recline Handle
M Seat Base
N Cup Holder

s
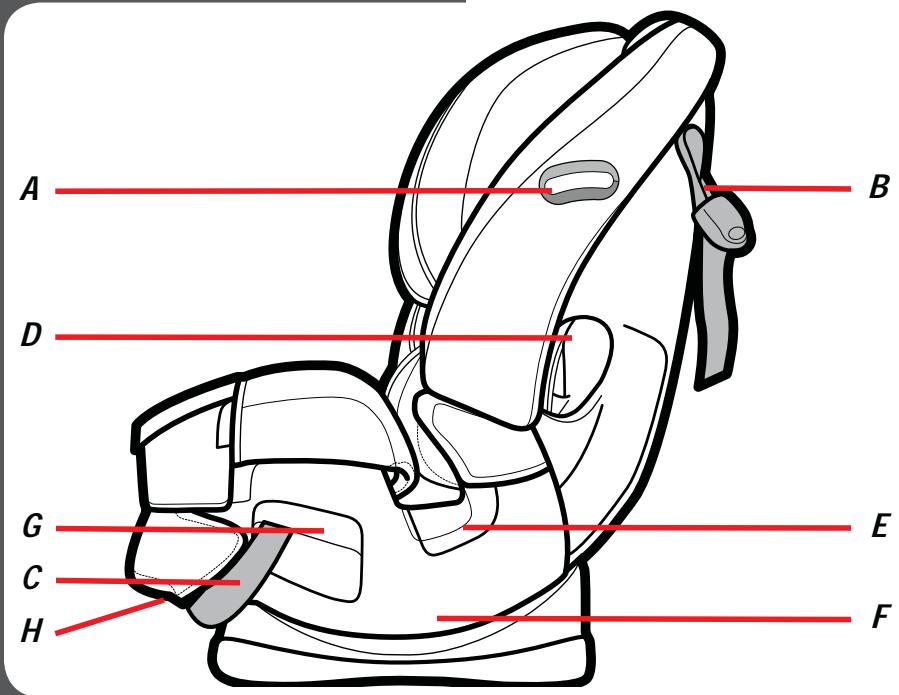
A Level Indicator
B Top Tether Strap
C LATCH Strap
D Forward-Facing Belt Path
E Booster Lap Belt Path
F Recline Position Indicator
G Rear-Facing Belt Path
H Rear-Facing LATCH Strap Storage (under seat)

s
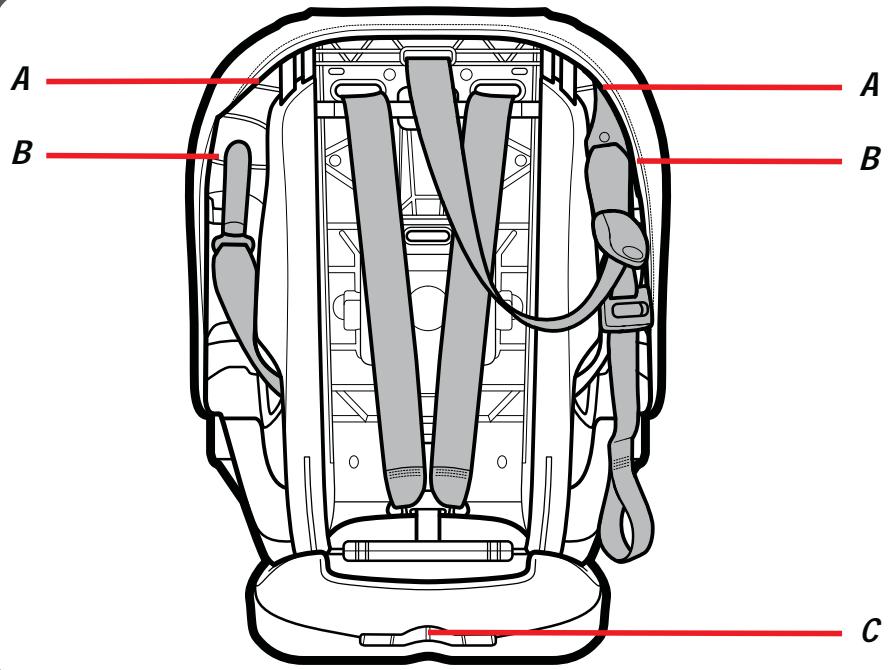
A Top Tether Strap Storage
B Forward-Facing LATCH Strap Storage
C Instruction Manual Storage

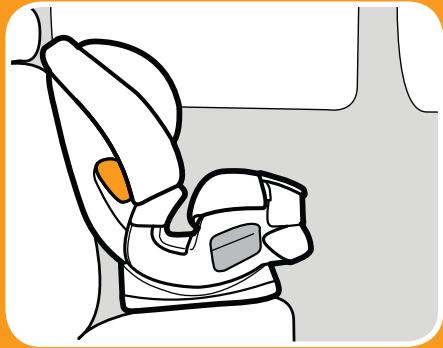
3-A Rear-Facing
LATCH Strap
Vehicle Seat Lap/Shoulder Belt
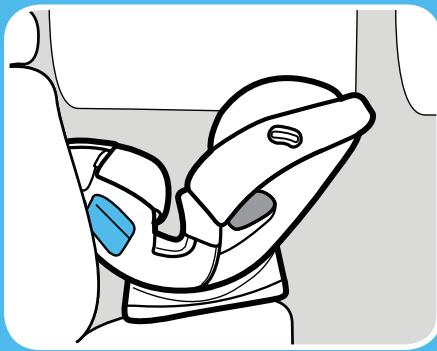
Rear-Facing:
4-40 lbs (1.8-18 kg)
- Place car seat rear-facing in the vehicle back seat.
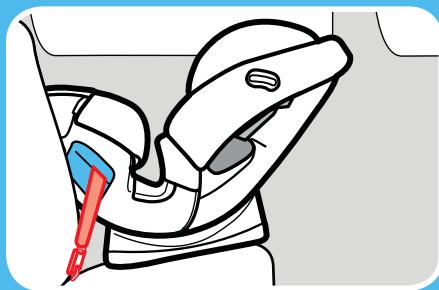
- Make sure LATCH strap or vehicle seat belt is routed through the rear-facing belt path marked with a blue label.
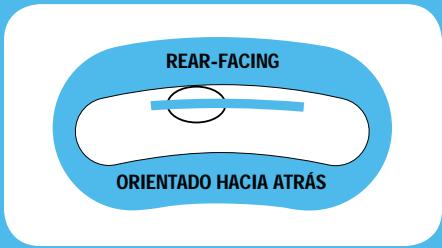
Install this car seat tightly in your vehicle. Car seat should not move at the rear-facing belt path more than 1 in. (2.5 cm) from side to side, front to back. - Check recline level making sure the bubble is within the blue area.
- Harness straps need to be even with or just below the top of child's shoulders and chest clip is at armpit level.


Facing
- Infants who weigh less than 20 lbs (9 kg) MUST be rear-facing.
- The American Academy of Pediatrics (AAP) and NHTSA recommend that children be rear-facing until the age of 2 or until they reach the maximum rear-facing height and weight. This car seat can remain rear-facing up to 40 lbs.
WARNING!
NEVER place this child restraint rearfacing in a vehicle seating location that has an active front air bag.

Vehicle Seat Lap Belt

Facing
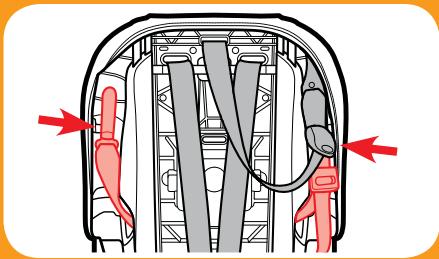
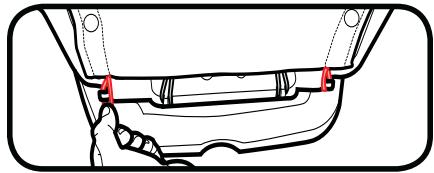
3-B Prepare to Install LATCH Rear-Facing
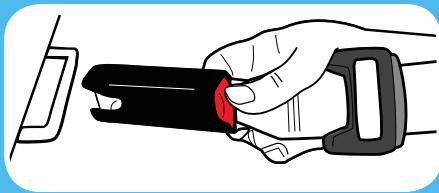
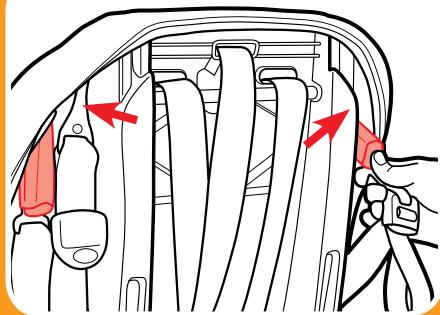
- Remove LATCH Strap from Storage Location
Push in on the red buttons on the LATCH connectors and remove from storage position.
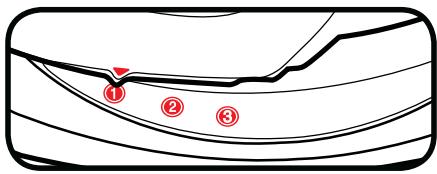
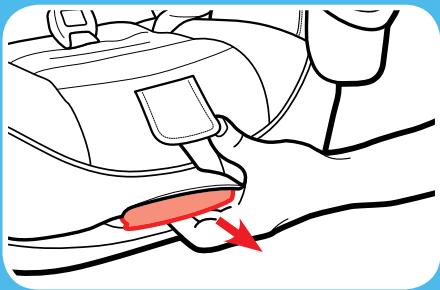
- Decline the Car Seat
Place the car seat in 1st, 2nd or 3rd recline position.

Rear
- Make Sure LATCH Strap is in the Rear-Facing Belt Path Marked With a Blue Label
If correct, skip to section 3-C. Continue to next step if it is not.
To Move LATCH Strap to Rear-Facing Belt Path
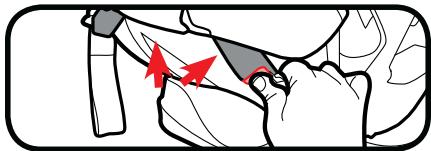
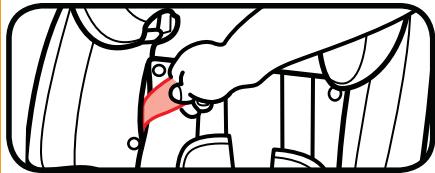
- Loosen Harness Straps
Lift up on the harness release lever while pulling out on the harness straps at the chest clip.
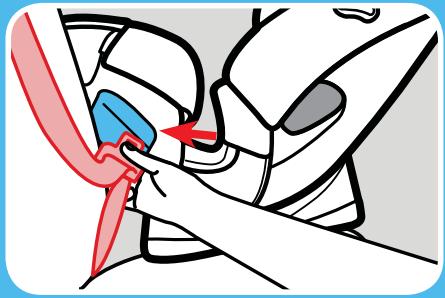
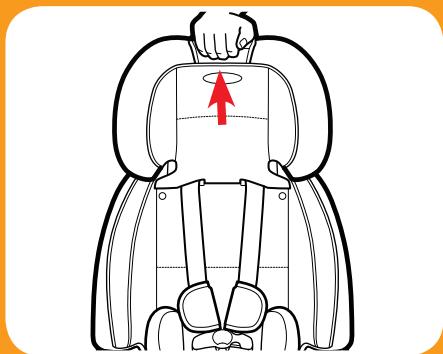
5. Raise Headrest
Squeeze the red handle and lift headrest up.
6. Unsnap Pad and Expose Seat Pan
Undo the 2 snaps and pull bottom of seat pad to expose the plastic shell.


Rear Facing
-
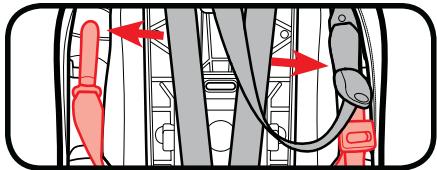
Pull LATCH Connectors Out of Forward-Facing Belt Path
-
Slide Entire LATCH Strip Along Bar to the Front of the Seat
-
Push Each Connector Into the Rear-Facing Belt Path in Front of Crotch Belt


Facking
10. Replace Seat Pad
Move headrest back to its proper position for your child.

Rear
3-C Installing With LATCH Straps
Review your vehicle's owner manual for LATCH location and use.
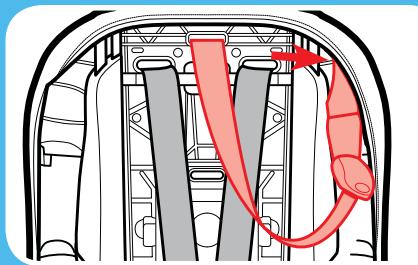
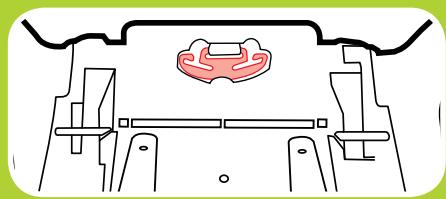
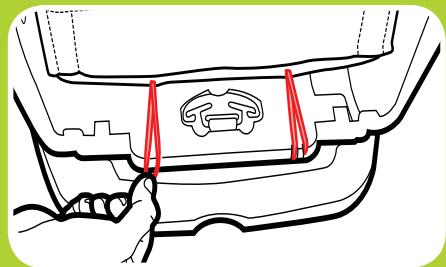
1. Store Top Tether Strap
Attach tether hook to the plastic bar on either side of the car seat.
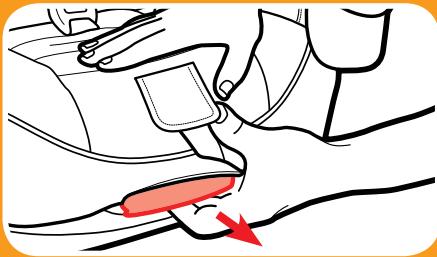
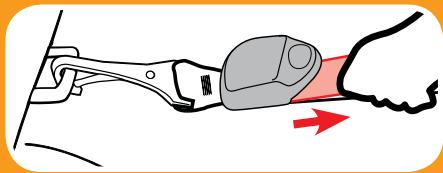
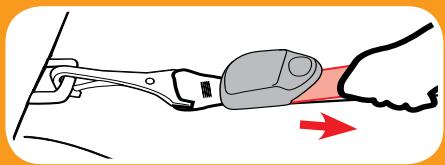
2. Extend the LATCH Strap.
For easier installation, extend the LATCH strap to its maximum length by pressing the grey button and pulling on the strap.

Facing

Rear
3. Place Car Seat Rear-Facing in Back Seat of the Vehicle
Place rear-facing in vehicle seat and center the car seat between the lower LATCH anchors. The base should sit as flat as possible on the vehicle seat.
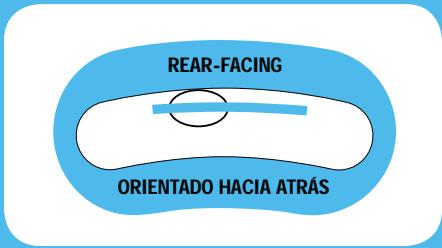
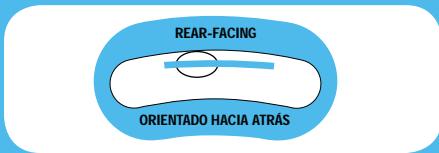
4. Check the Level Indicator
Check the level indicator on the car seat. The bubble must be completely within the blue zone.
Adjust the recline until the bubble is completely within the blue zone.
5. Attach LATCH Connectors to Vehicle's Lower LATCH Anchors.
LATCH strap should lie flat and not be twisted.
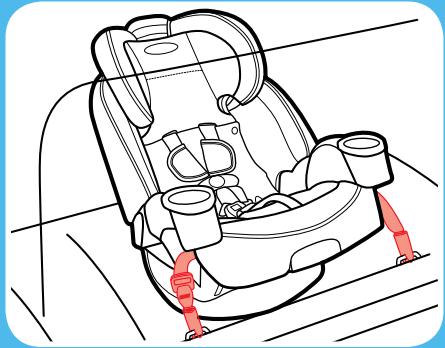
6. Tighten the LATCH Strap
Press down firmly in the center of the car seat while tightening the LATCH strap. You may need to tighten through the slit in the pad at the belt path as shown.
33
continue next page

Facing
Rear

Rear Facing
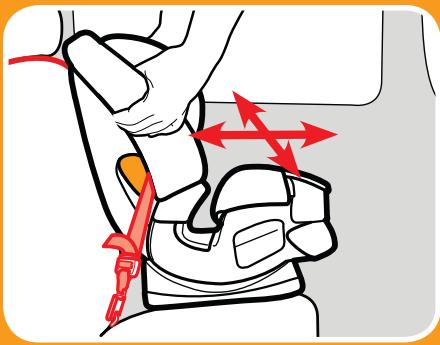
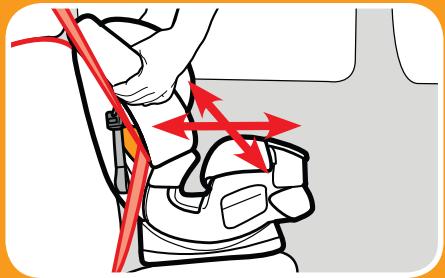
7. Test For Tightness
Grab the sides of the seat where the LATCH strap is and slide the car seat side-to-side and front-to-back.
If the seat moves less than 1 in. (2.5 cm), it is tight enough.
8. Check the Level Indicator
Check the level indicator on the car seat. The bubble must be completely within the blue zone. Readjust if needed.
9. To Remove LATCH Strap From Vehicle
Push in on the red buttons on the LATCH connects and pull them off the anchor bars.
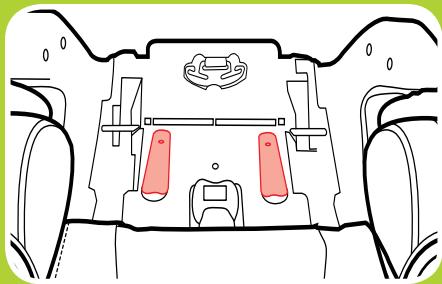
3-D Installing With Vehicle Seat Belt
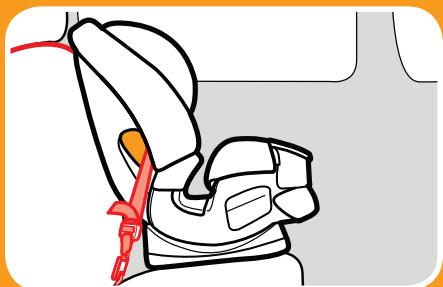
1. Store Top Tether and LATCH Strap
Attach tether hook and LATCH connectors to the plastic bars as shown.
2. Decline the Car Seat
Place the car seat in 1st, 2nd or 3rd recline position.
35

Facing
Rear


Rear
3. Place Car Seat Rear-Facing in Back Seat of the Vehicle
Place rear-facing in vehicle seat. The base should sit as flat as possible on the vehicle seat.
4. Check the Level Indicator
Check the level indicator on the car seat. The bubble must be completely within the blue zone.
Adjust the recline until the bubble is completely within the blue zone.
Review your vehicle's owner manual for vehicle seat belt use
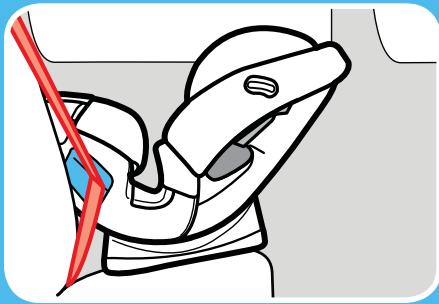
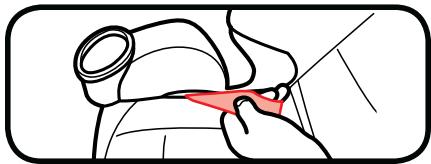
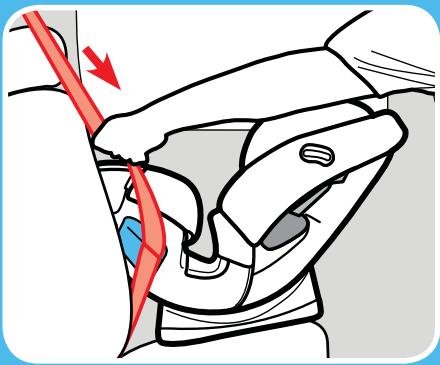
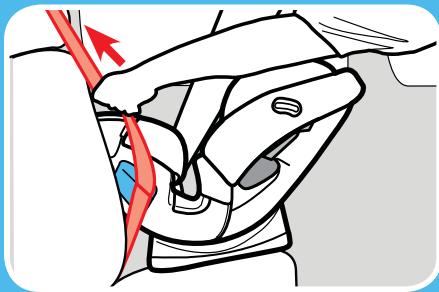
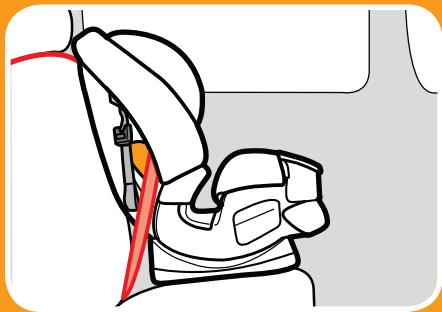
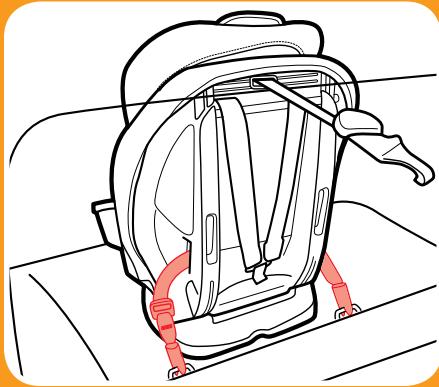
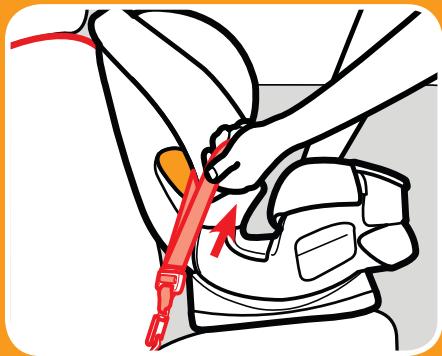
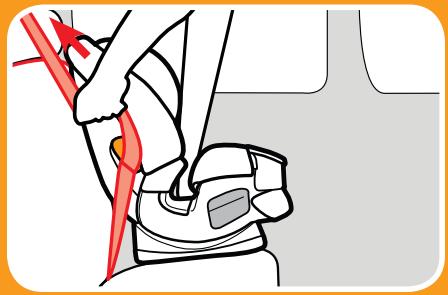
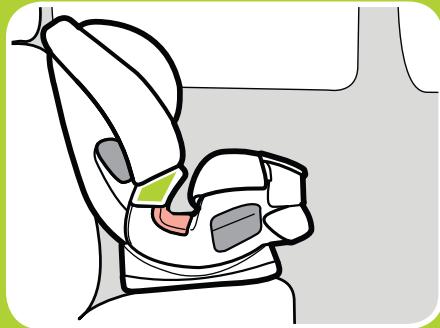
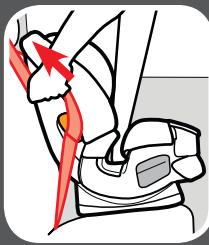
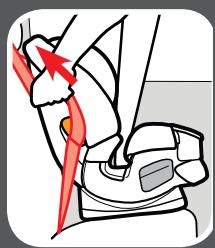
5. Route the Vehicle Seat Belt
Thread vehicle seat belt through the rear-facing belt path (marked with a blue label) and out the other side. Buckle it. The seat belt should lie as flat as possible and not be twisted.
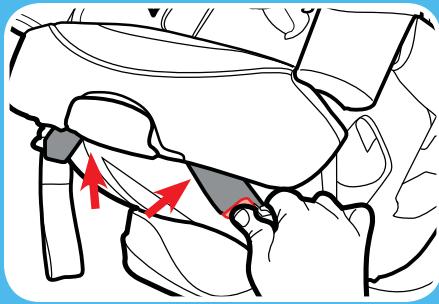
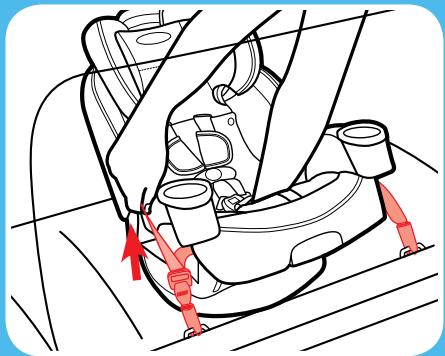
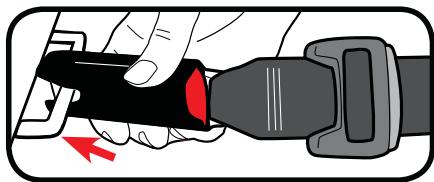
6. Tighten the Vehicle Seat Belt
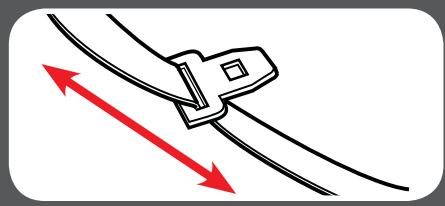
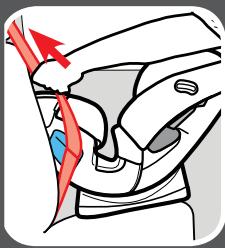
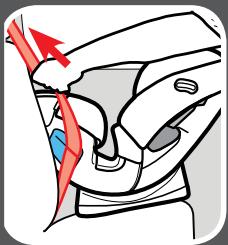
In most vehicles today, slowly pull the shoulder belt all the way out and then let it go back in. You will hear a clicking sound. Slowly pull out on the belt and it should be locked. If not, review your car's owner manual and section 8-F.


Rear
Press down firmly in the center of the car seat. Pull on the shoulder belt to tighten while feeding the slack back in the retractor.
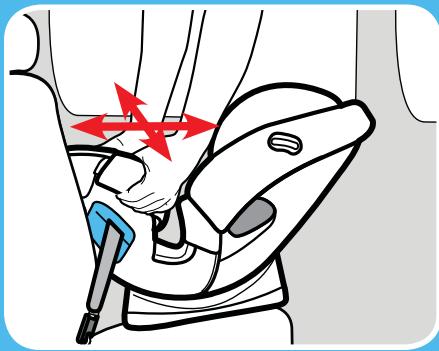
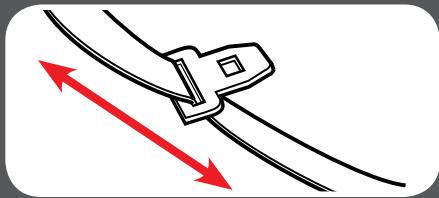
7. Test For Tightness
Grab the sides of the seat where the vehicle seat belt is and slide the car seat side-to-side and front-to-back.
If the seat moves less than 1 in. (2.5 cm), it is tight enough.
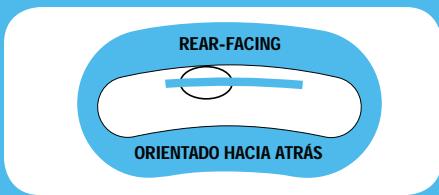
8. Check the Level Indicator
Check the level indicator on the car seat. The bubble must be completely within the blue zone. Readjust if needed.
4-A Forward-Facing
Forward Facing
Forward-Facing:
20-65 lbs (9-30 kg)
49 inches (125 cm) or less
- For children 20-40 lbs (9-18 kg) you MUST use recline position 4.
- Place car seat forward-facing in the vehicle back seat.
- Make sure LATCH strap or vehicle seat belt is routed through the forward-facing belt path marked with a orange label.
- Do not use the lower anchors of the child restraint anchorage system (LATCH system) to attach this child restraint when restraining a child weighing more than 42 lbs (19 kg) with the internal harnesses of the child restraint.
LATCH Strap

Vehicle Lap/Shoulder Seat Belt

Ferarrrrnnnne
Vehicle Seat Lap Belt
Install this car seat tightly in your vehicle. Car seat should not move at the forward-facing belt path more than 1 in. (2.5 cm) from side to side, front to back.
- Harness straps need to be even with or just above the top of child's shoulders and chest clip is at armpit level.
- The American Academy of Pediatrics (AAP) and NHTSA recommend that children be rear-facing until the age of 2 or until they reach the maximum rear-facing height and weight. This car seat can remain rear-facing up to 40 lbs.
4-B Prepare to Install LATCH Forward-Facing
- Remove LATCH Strap from Storage Location
Push in on the red buttons on the LATCH connectors and remove from storage position.
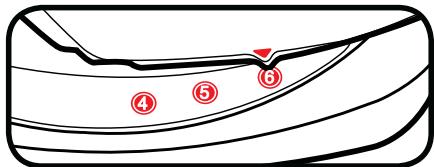
- Adjust the Car Seat
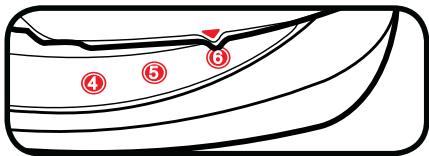
Place the car seat in the 4th, 5th or 6th recline position.

Ferad
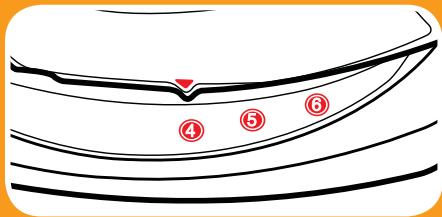
For Children 20-40 lbs (9-18 kg)
MUST use recline position 4.
- Make Sure LATCH Strap is in the Forward-Facing Belt Path Marked with Orange Label
If correct, skip to section 4-C. Continue to next step if it is not.
To Move LATCH Strap to Forward-Facing Belt Path
4. Loosen Harness Straps
Lift up on the harness release lever while pulling out on the harness straps at the chest clip.
Forward Facing
5. Raise Headrest
Squeeze the red handle and lift headrest up.

Ferarrrr
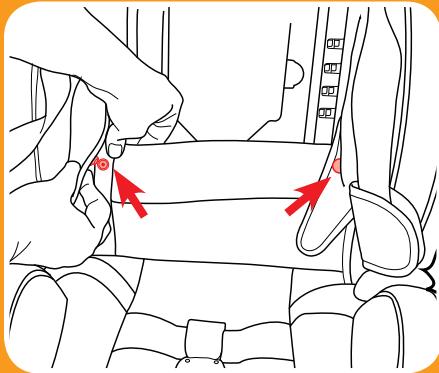

- Unsnap Pad and Expose Seat Pan
Undo the 2 snaps and pull bottom of seat pad to expose the plastic shell.
- Pull LATCH Connectors Out of Rear-Facing Belt Path
- Slide Entire LATCH Strap Up Along Bar to the Top
9. Push Each Connector Into the Forward-Facing Belt Path

Facing
Forward
10. Replace Seat Pad
Move headrest back to its proper position for your child.

4-C Installing With LATCH Straps
Do not use the lower anchors of the child restraint anchorage system (LATCH system) to attach this child restraint when restraining a child weighing more than 42 lbs (19 kg) with the internal harnesses of the child restraint.
Review your vehicle's owner manual for LATCH location and use.
1. Extend the LATCH Strap.
For easier installation, extend the LATCH strap to its maximum length by pressing the grey button and pull out on the strap.
2. Unhook Top Tether Strap From Storage
3. Place Car Seat Forward-Facing in Back Seat of the Vehicle
Place forward-facing in vehicle seat and center the car seat between the lower LATCH anchors. The base should sit as flat as possible on the vehicle seat.
4. Loosely Attach Top Tether Strap
Do not tighten. Consult vehicle's owner manual for specific location.

Forward Facing

Ferarrrrnnnne
- Attach LATCH Connectors to Vehicle's Lower LATCH Anchors.
LATCH strap should not be twisted.
- Tighten the LATCH Strap
Press down firmly in the center of the car seat while tightening the LATCH strap. You may need to tighten through the slit in the pad at the belt path as shown.
7. Tighten the Tether Strap
Push the car seat back while tightening the tether strap to remove all the slack.
8. Test For Tightness
Grab the sides of the seat where the LATCH strap is and slide the car seat side-to-side and front-to-back.
If the seat moves less than 1 in. (2.5 cm), it is tight enough.
9. To Remove LATCH Strap From Vehicle
Push in on the red buttons on the LATCH connects and pull them off the anchor bars.

Facing

4-D Installing With Vehicle Seat Belt
PjEMJ
6
1. Store LATCH Strap
Attach LATCH connectors to the plastic bars as shown.
2. Adjust the Car Seat
Place the car seat in the 4th, 5th or 6th recline position.

For Children 20-40 lbs (9-18 kg)
MUST use recline position 4.
-
Unhook Top Tether Strap From Storage
-
Place Car Seat Forward-Facing in Back Seat of the Vehicle
Place forward-facing in vehicle seat. The base should sit as flat as possible on the vehicle seat.
- Loosely Attach Top Tether Strap
Do not tighten. Consult vehicle's owner manual for specific location.

Forward Facing


Review your vehicle's owner manual for vehicle seat belt use
Forward Facing

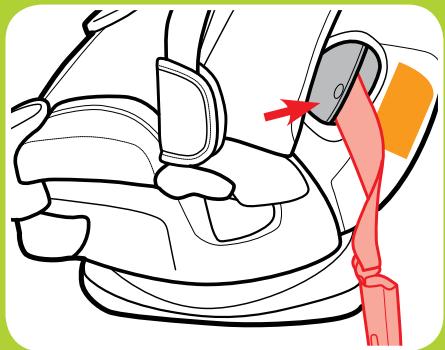
6. Route the Vehicle Seat Belt
Thread vehicle seat belt through the forward-facing belt path (marked with a orange label) and out the other side. Buckle it. The seat belt should lie as flat as possible and not be twisted.
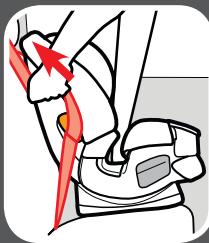
7. Tighten the Vehicle Seat Belt
In most vehicles today, slowly pull the shoulder belt all the way out and then let it go back in. You will hear a clicking sound. Slowly pull out on the belt and it should be locked. If not, review your car's owner manual and section 8-F.
Press down firmly in the center of the car seat. Pull on the shoulder belt to tighten while feeding the slack back in the retractor.
8. Tighten the Tether Strap
Push the car seat back while tightening the tether strap to remove all the slack.
9. Test For Tightness
Grab the sides of the seat where the vehicle seat belt is and slide the car seat side-to-side and front-to-back.
If the seat moves less than 1 in. (2.5 cm), it is tight enough.

Forward Facing

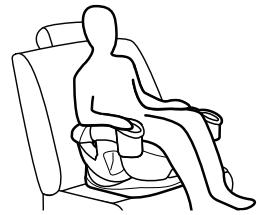
5-A Belt-Positioning Booster
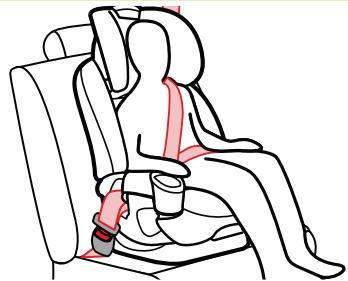
Vehicle Lap/Shoulder Seat Belt
Vehicle Seat Lap/Shoulder Belt
Booster Use With Back:
30-100 lbs (14-45 kg)
38-57 in. (96-145 cm)
at least 3 years old
Booster Use Without Back:
40-120 lbs (18.1-54 kg)
40-57 in. (101-145 cm)
at least 4 years old
- Place car seat forward-facing in the vehicle back seat.
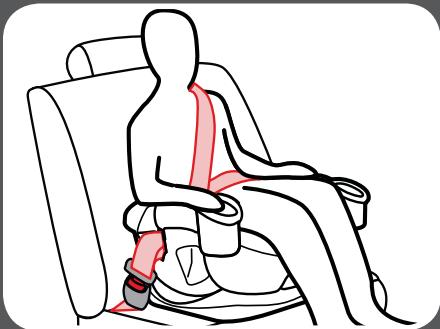
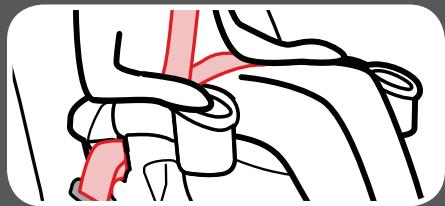
- Make sure vehicle seat's lap belt is adjusted snugly and lays low on the child's hip and is routed behind the armrest in the booster's belt path.
-
Vehicle belts MUST lie flat against child and MUST NOT be twisted.
-
Vehicle seat's shoulder belt is adjusted snugly and should lie between child's neck and edge of shoulder.
- Never use a vehicle lap-only belt across front of child.
- DO NOT position vehicle shoulder belt under the child's arm or back.
- DO NOT allow child to slouch or slide down in the booster seat.
- DO NOT position vehicle belt over top of armrests.
- Vehicle's seat headrest SHOULD NOT create a gap between vehicle seat and booster seat.
- The front of booster seat MUST NOT hang over front of vehicle seat.
- If child will not keep vehicle belt properly positioned, DO NOT use this booster seat. Use a different car seat.
Never use a vehicle lap-only belt across front of child.


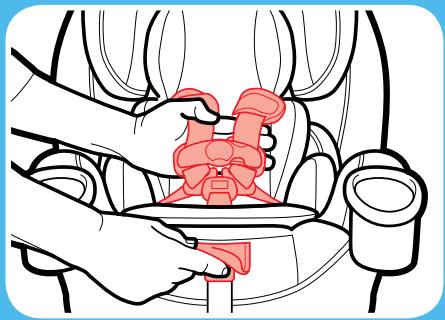
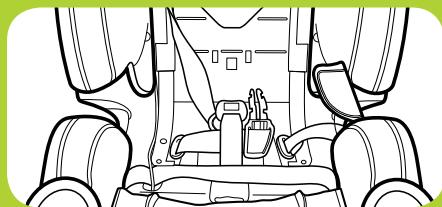
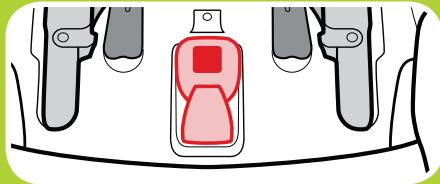
5-B Prepare for Backed Booster Use
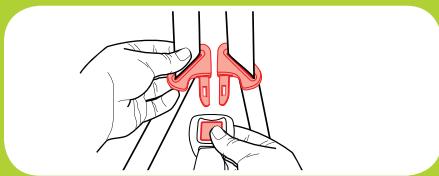
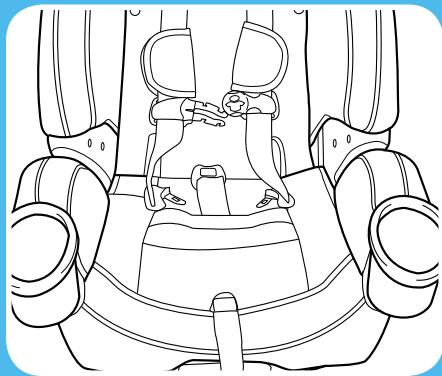
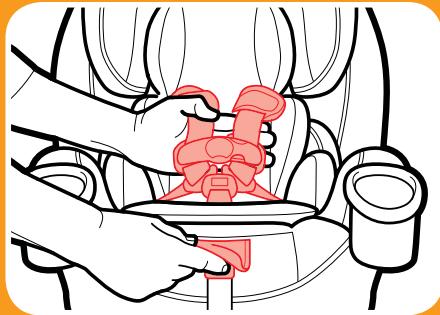
1. Store the Harness Straps
Loosen the shoulder straps as much as possible.
Raise the headrest to the highest position.
Unbuckle the chest clip and the crotch buckle.
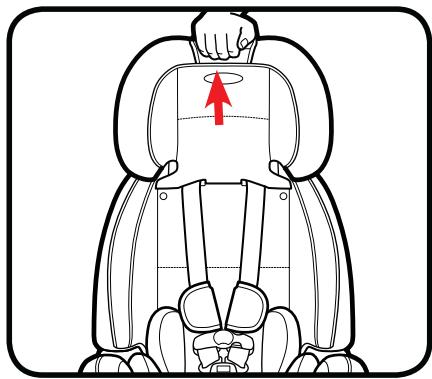
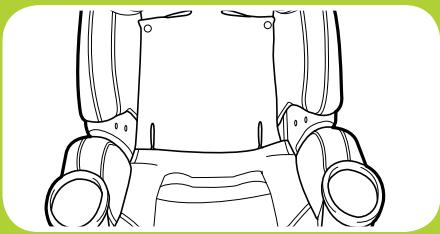
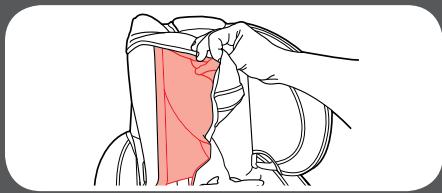
2. Unsnap Pad and Expose Seat Back
Undo the 2 snaps in the headrest pad.
Lift the headrest pad flap up out of the way.
3. Unsnap Bottom Seat Pad
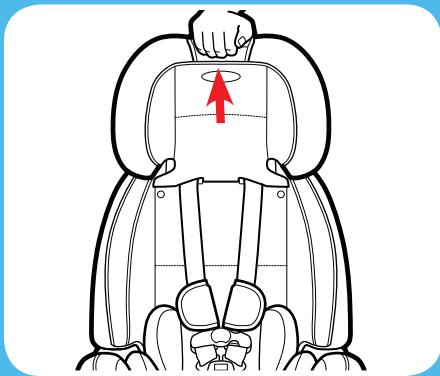
Undo the 2 lower snaps.

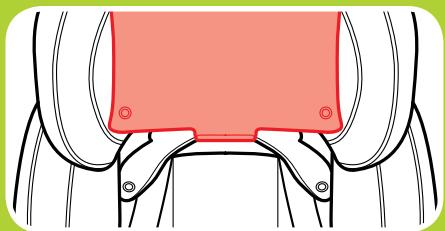


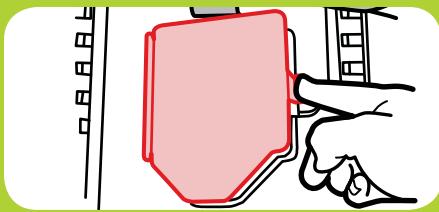
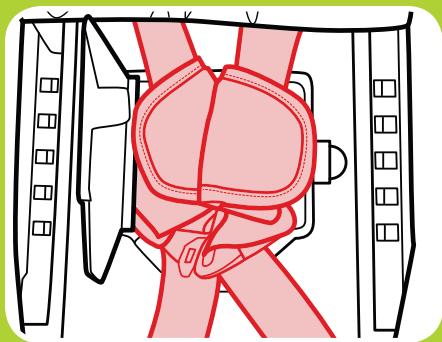
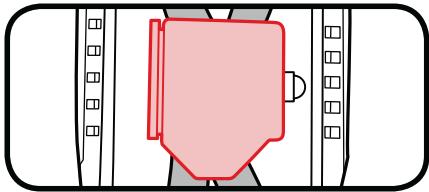
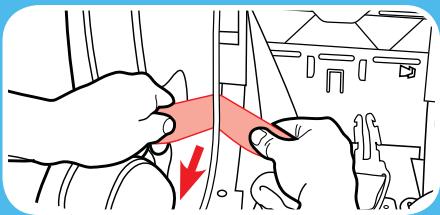
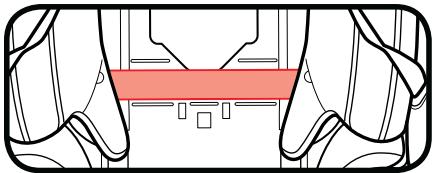
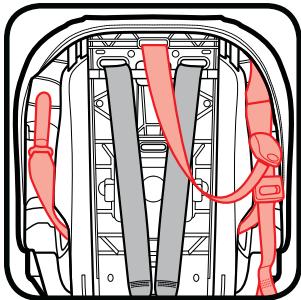
- Pull Bottom Seat Pad Back To Expose the Plastic Shell
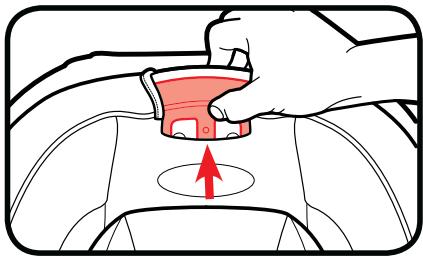
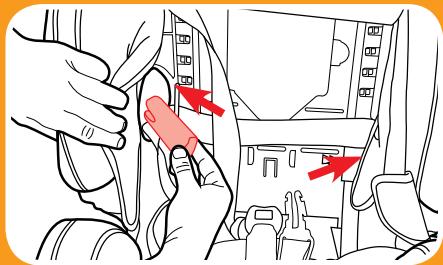
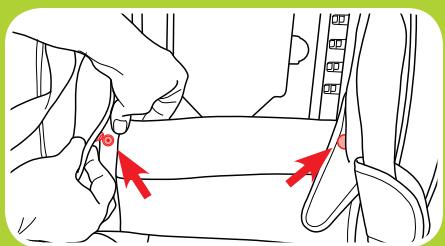
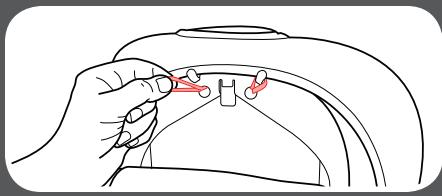
- Open the Harness Storage Door
- Place Harness, Chest Clip, Buckle Tongues Inside Storage Compartment and Close the Door
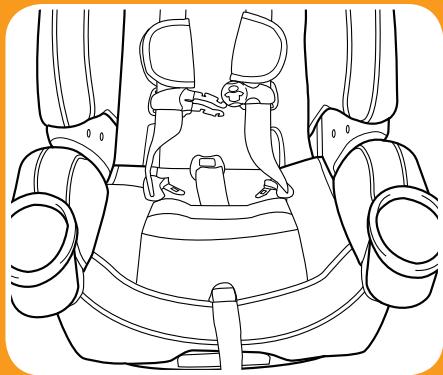
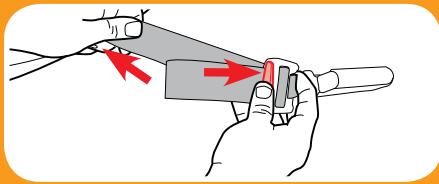
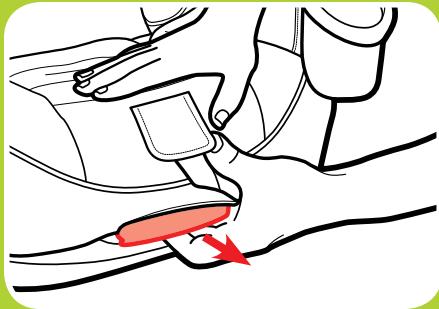
7. Store Buckle as Shown
8. Replace Seat Pad
Move the headrest back to its proper position for your child.

Booster
5-C Install Backed Booster
If your vehicle has LATCH, you can secure the booster seat to the vehicle using LATCH, as long as it does not interfere with the vehicle seat belt or buckle.
If the LATCH interferes with the vehicle seat belt or if your vehicle does not have LATCH, you MUST store the LATCH strap and tether as shown.
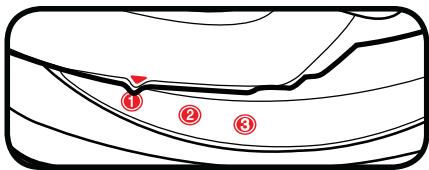
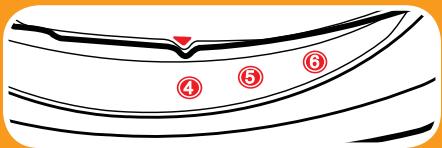
1. Adjust the Car Seat
Place the booster seat in the 6th recline position.

2. Place the Booster Seat Forward-Facing in the Back Seat of Vehicle
Place forward-facing on a vehicle seat that has a lap/shoulder seat belt. The base should sit as flat as possible on the vehicle seat.
Skip to Step 8 if Not Using LATCH
3. If Using LATCH, Make Sure LATCH Strap is in the Forward-Facing Belt Path
Continue to next step if correct. See section 4-C if it is not.


4. Loosely Attach Top Tether Strap
Do not tighten. Consult vehicle's owner manual for specific location.
5. Attach LATCH Connectors to Vehicle's Lower LATCH Anchors.
LATCH strap should not be twisted.
6. Tighten the LATCH Strap
Press down firmly in the center of the car seat while tightening the LATCH strap.
7. Tighten the Tether Strap
Push the car seat back while tightening the tether strap to remove all the slack.
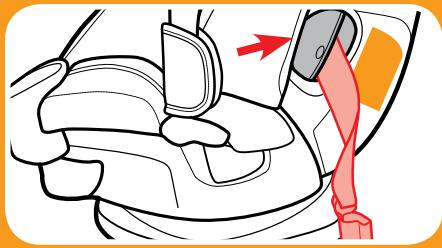
8. Thread the Vehicle Seat Shoulder Belt Through Seat Belt Guide on the Headrest

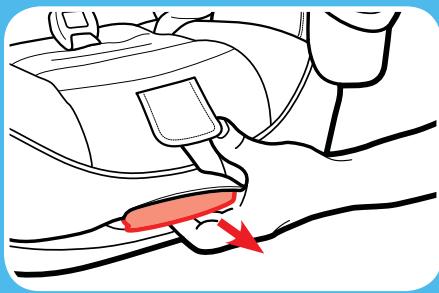
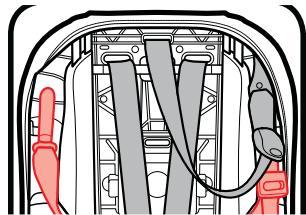
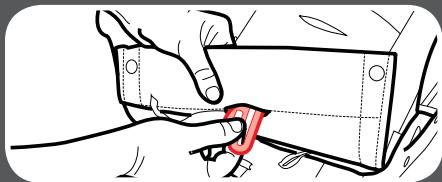
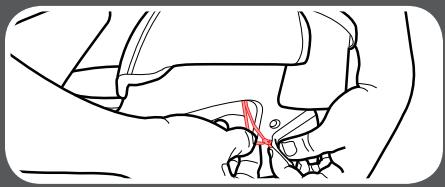
5-D Prepare Backless Booster Use

- Remove the Seat Back by First Loosening the Harness Straps
Lift up on the harness release lever while pulling out on the harness straps at the chest clip. Unbuckle the chest clip and the crotch buckle.

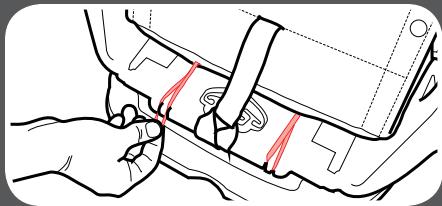
-
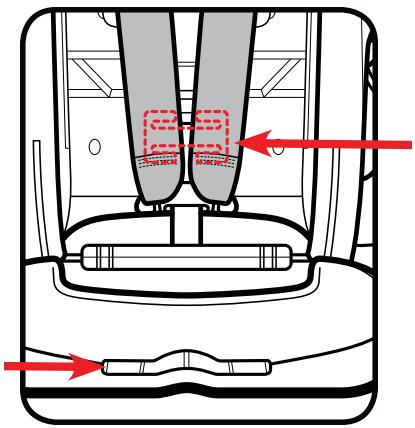
Remove Harness Straps from Splitter Plate
-
Make Sure LATCH Straps are in the Forward-Facing Belt Path and in the Stored Position
See section 4-B to change positions.
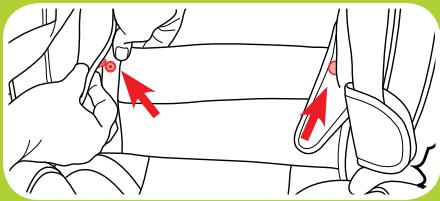
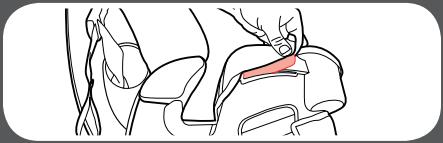
- Unsnap Bottom Seat Pad
Unsnap seat pad and expose the bottom of seat base.
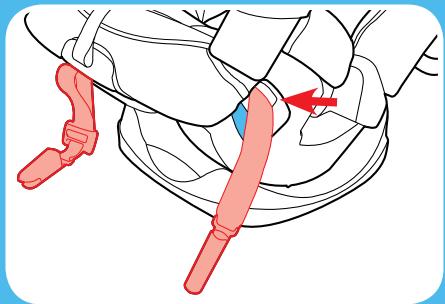
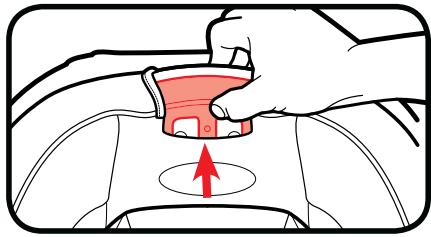
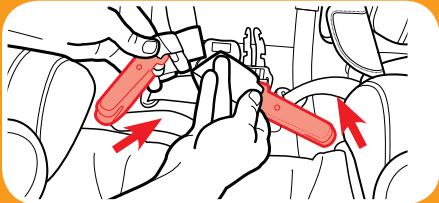
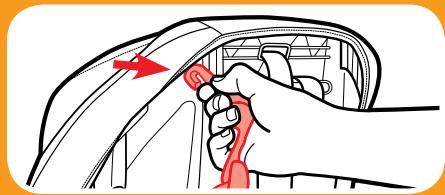
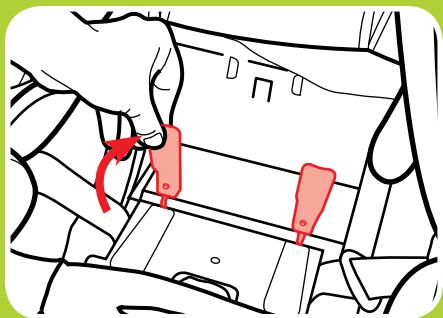
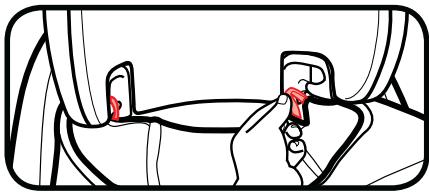
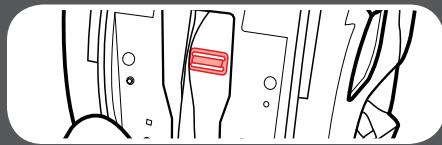
- Lift the Red Backrest Lock Up
Lift the red backrest locks up and slide together.


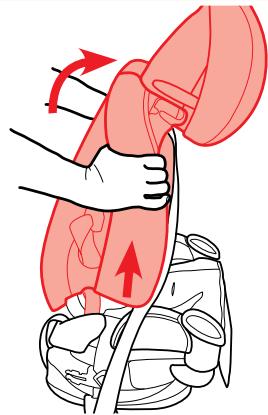
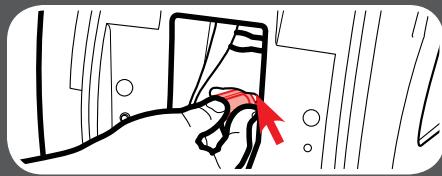
6. Remove Seat Back from Seat Base
Push the seat back up and lift out of base.
To replace the seat back, reverse steps 4 though 6.
7. Relock the Red Backrest Locks
Make sure they are both flat and locked into place
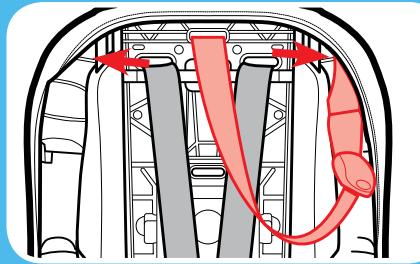
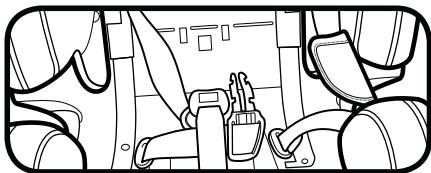
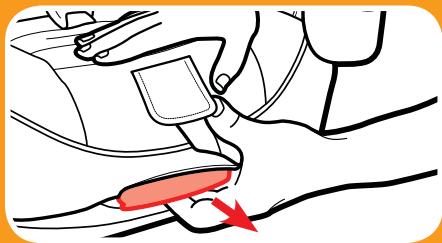
8. Store Splitter Plate
Pull the harness adjustment strap all the way out and then store the splitter plate.
9. Store Buckle Strap
10. Attach Base Pad to the Back of Base
Attach the elastic straps onto base as shown.
5-E Install Backless Booster

- Place the Booster Seat Forward-Facing in the Back Seat of Vehicle
Place forward-facing on a vehicle seat that has a lap/shoulder seat belt. The base should sit as flat as possible on the vehicle seat.
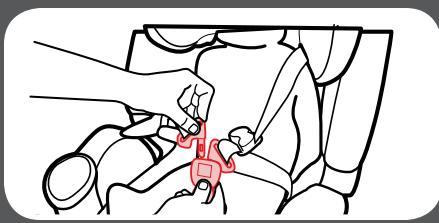
6-A Securing Child 5-point Harness
1. Loosen Harness Straps
Lift up on the harness release lever while pulling out on the harness straps at the chest clip. Unbuckle the chest clip and the crotch buckle. Place harness straps off to the sides.


Securing
Rear-Facing
2. Place Your Child in the Seat
Make sure their back is flat against the car seat back.
Avoid bulky or heavy clothing. Doing so will prevent the harness straps from being tighten properly. Place a blanket over the child after you have secured the child.
3. Place Harness Straps Over Child's Shoulders and Buckle
You will hear a "click" when buckle tongues are securely attached. Pull up on each buckle tongue to make sure it is securely attached.
4. Be Sure the Harness Straps Are at the Proper Height
Rear-Facing: Harness straps should be at or just below the child's shoulders. Top of head must be 1 in. below the headrest adjustment lever.
Forward-Facing: Harness straps should be at or just above the child's shoulders. Top of child's ears below top of headrest.
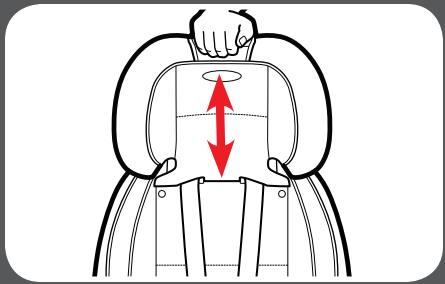
5. To Raise or Lower Headrest/Harness Adjustment Lever
Squeeze the adjustment lever and lift or lower headrest for the proper harness height.
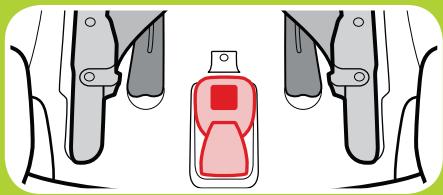
6. Check the Crotch Buckle Position
The correct slot the one that is closest to your child without being underneath your child.
Forward-Facing
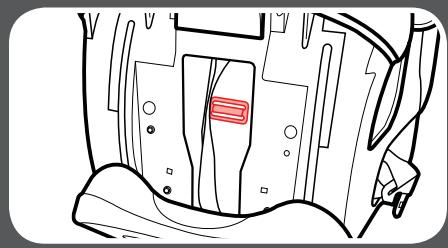
7. To Adjust Crotch Strap
Recline the car seat and locate the metal retainer under the car seat shell.
8. Rotate Metal Retainer and Insert It Up Through the Shell and Pad
From the top of the car seat, pull the crotch buckle out.
9. Insert Metal Retainer in the New Crotch Buckle Slot
Reach underneath the car seat and pull the metal retainer through.

Securing Child
- Pull Up on Crotch Strap to Make Sure it is Secured
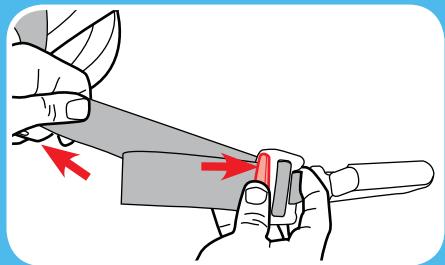
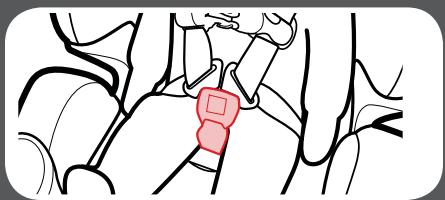
11. Buckle the Chest Clip
You will hear a "click" when the chest clip is securely buckled.
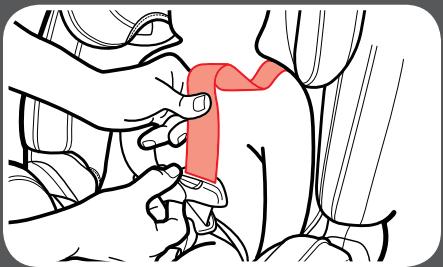
12. Pull All the Slack Out From Around the Waist
Pull up on the harness strap while pushing the chest clip down. Do this to both sides.
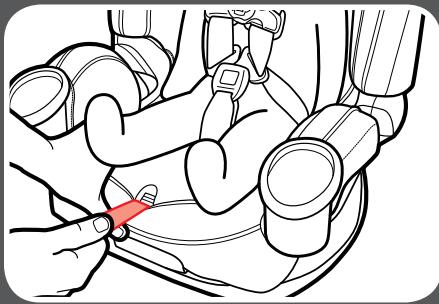
13. Tighten the Harness by Pulling the Harness Adjustment Strap
When you are not able to pinch any of the harness webbing at your child's shoulder, the harness is tight enough.
A snug harness should not allow any slack. It lies in a relatively straight line without sagging. It does not press on the child's flesh or push the child's body into an unnatural position.
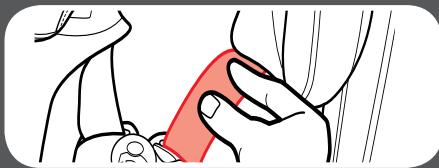
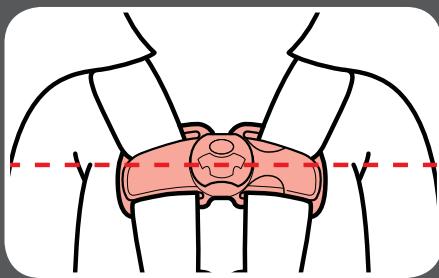
14. Raise the Chest Clip to Child's Armpit Level

Securing Child
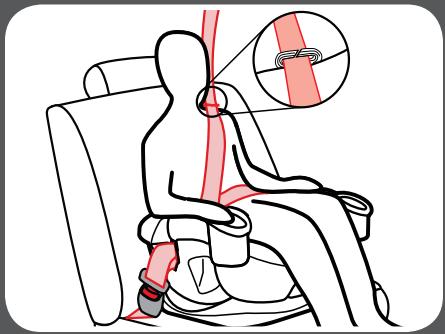
6-B Securing Child Backed Booster
WARNING! Use only the vehicle lap and shoulder belt system when restraining the child in the booster seat.
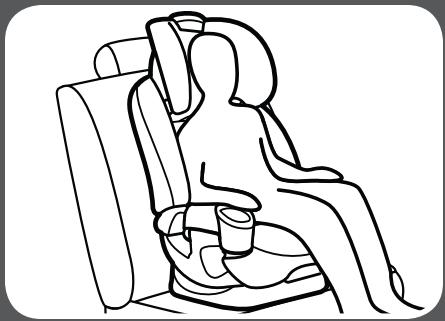
1. Place Child In Seat
Have your child sit in the booster seat, with his/her back flat against the back of the booster seat.
- Thread Vehicle's Shoulder Belt Into Seat Belt Guide in the Headrest


ecuringChild ,
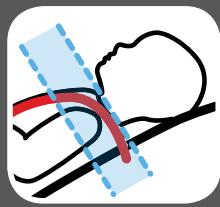
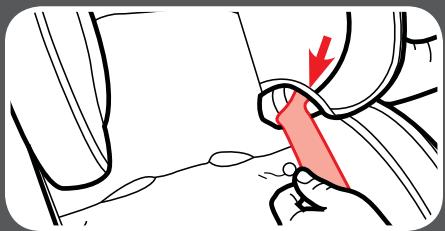
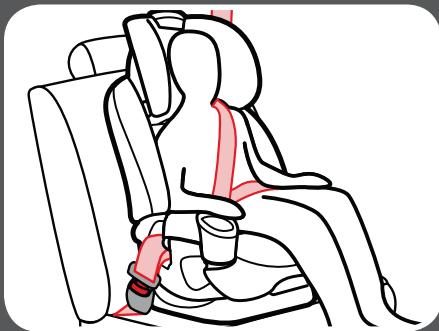
3. Buckle the Vehicle Lap/Shoulder Seat Belt
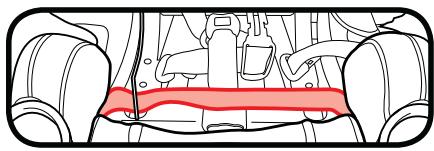
Be sure the lap portion of the vehicle seat belt goes behind the armrests.
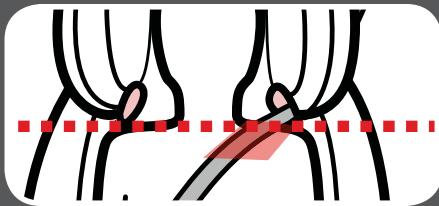
Be sure the lap portion of the vehicle seat belt lies low across your child's hips.
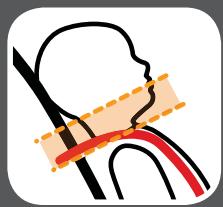
Be sure the shoulder belt lies across your child's shoulders, between the neck and edge of shoulder. The belt guides should be even with or just above the shoulders.
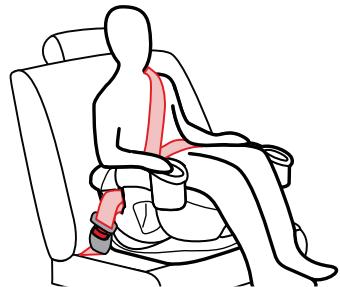
6-C Securing Child Backless Booster
WARNING! Use only the vehicle lap and shoulder belt system when restraining the child in the booster seat.
1. Place Child In Seat
Have your child sit in the booster seat, with his/her back flat against the back of the vehicle seat.
2. Buckle the Vehicle Lap/Shoulder Seat Belt
Be sure the lap portion of the vehicle seat belt goes behind the armrests.
Be sure the lap portion of the vehicle seat belt lies low across your child's hips.
Be sure the shoulder belt lies across your child's shoulders, between the neck and edge of shoulder.
You may need to use the belt positioning clip to help get a good fit. See section 6-D.

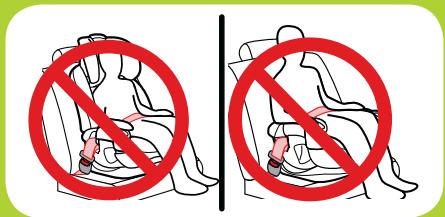
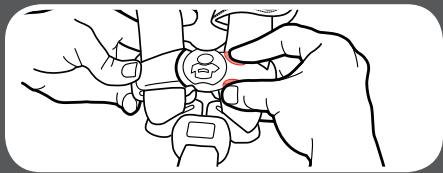
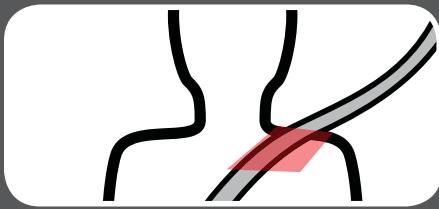
6-D Securing With Belt Positioning Clip
WARNING! Use only the vehicle lap and shoulder belt system when restraining the child in the booster seat.
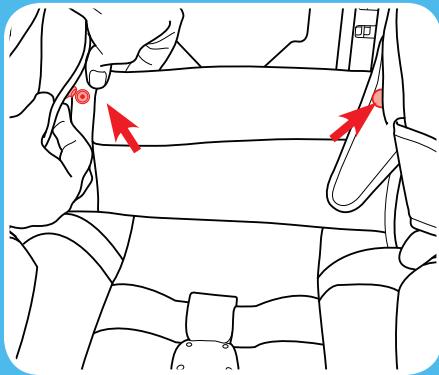
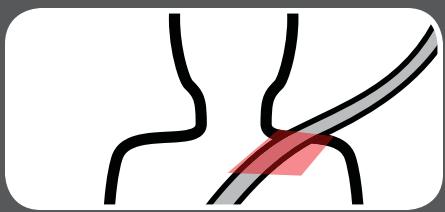
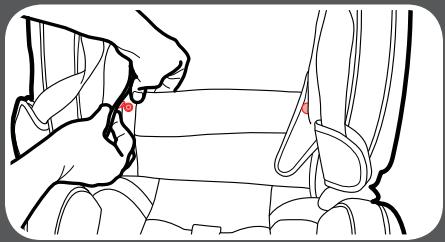
- Make Sure Vehicle's Seat Shoulder Belt Lays in the Red Zone As Shown
If the vehicle's seat shoulder belt lays outside this zone, you MUST use the belt positioning clip.
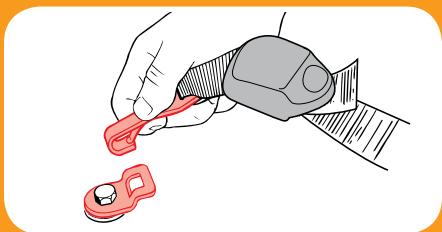
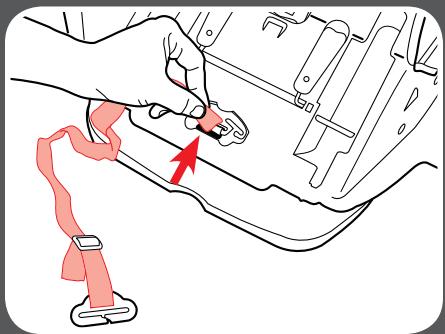
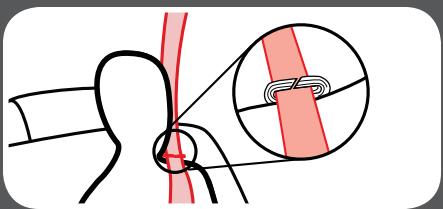
- Attach Belt Positioning Clip
Insert the loop end of the strap through the same slot as the harness adjustment strap as shown.
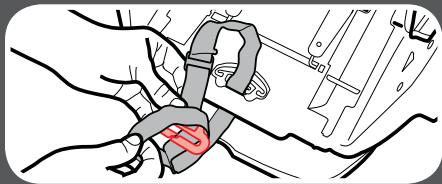
- Push Clip and Strap Through Loop
- Pull to Tighten Strap
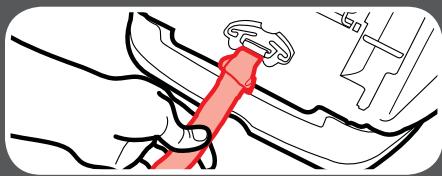
- Push Clip Through Slot In Pad
- Attach Seat Pad to Base
Securing Child
80
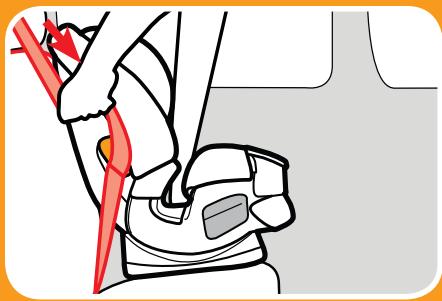
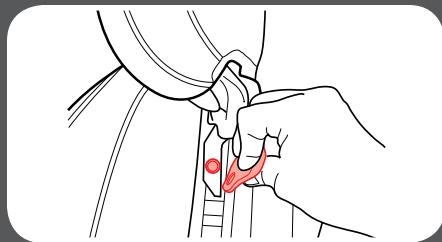
7. Place Child in Seat, Buckle Child In Seat and Attach Belt Positioning Clip
With child's back flat against the back of the vehicle seat, buckle child in. Then slide the clip onto the vehicle's seat shoulder belt as shown.
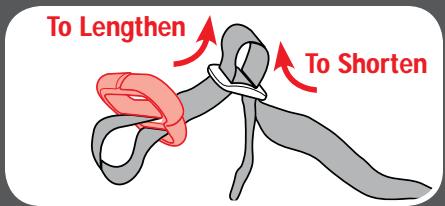
8. Adjust the Belt Positioning Clip to Fit Your Child
Lengthen or shorten the belt length as shown.
Clip should fit right at the top of should as shown.
Child
Securing
7-A Cleaning Seat Pad

aree
Cleaning
Refer to seat pad care tag for washing instructions.
Headrest Pad
Clean with a damp sponge using mild soap and cool water. If needed, pad may be removed for cleaning.
To remove, unsnap headrest pad from plastic shell.
Undo the 2 elastic straps from the back of headrest and remove the pad. Slide the elastic retaining loops out of the belts guides.
Machine wash pad in cold water on delicate cycle and drip-dry. DO NOT USE BLEACH.
Reverse the steps to reattach the pad on the headrest.
Seat Pad
Clean with a damp sponge using mild soap and cool water. If needed, cover may be removed for cleaning.
To remove, unsnap base pad from side pad. Undo the elastic straps in the rear-facing belt path. Pull plastic tab out of armrest. Undo the 2 elastic straps by the recline handle.
Machine wash pad in cold water on delicate cycle and drip-dry. DO NOT USE BLEACH.
Reverse the steps to reattach the pad to the shell.

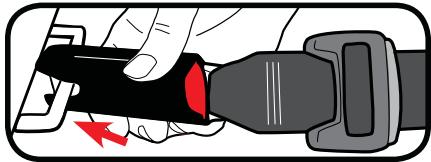
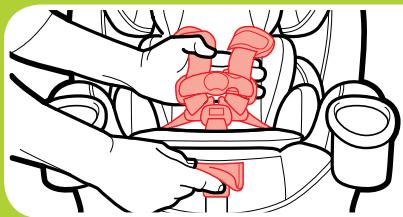
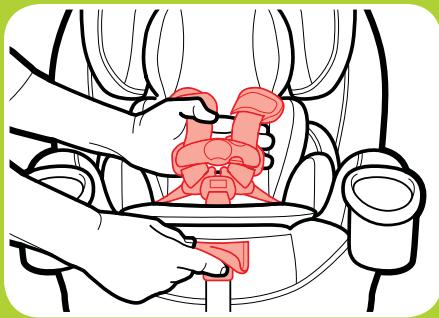
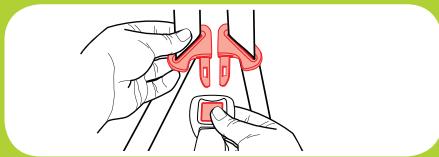
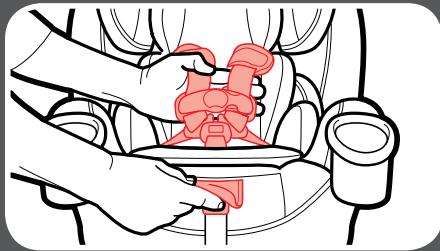
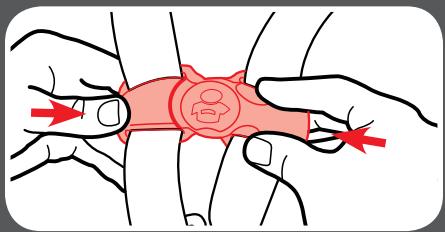
7-B Cleaning Crotch Buckle
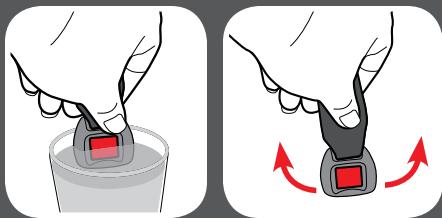
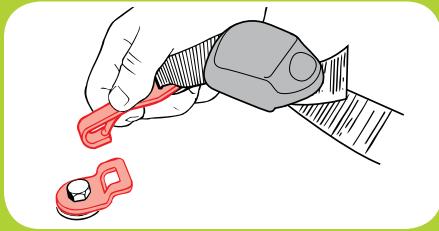
WARNING! Inspect and clean buckle from time to time to remove any objects or debris that could prevent latching.
Recline the car seat and locate the metal retainer. Rotate the metal retainer up through the shell and pad. From the front, pull the crotch buckle out.
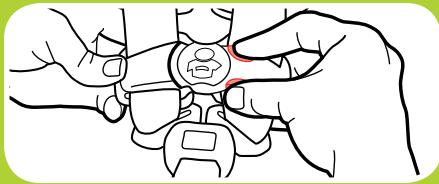
To clean buckle, place in a cup of warm water and gently agitate the buckle. Press the red button several times while in the water.
DO NOT SUBMERGE THE BUCKLE STRAP. DO NOT USE SOAPS, HOUSEHOLD DETERGENTS or LUBRICANTS.
Shake out excess water and allow to air dry. Repeat steps as needed until it fastens with a click. Re-insert the buckle into the same slot it was removed. Pull up on crotch buckle to make sure it is secured.

7-C Cleaning Harness and LATCH Straps
Surface wash only with mild soap and damp cloth. DO NOT IMMERSE THE HARNESS STRAPS or LATCH STRAP IN WATER Doing so may weaken the straps.
If harness straps or LATCH belt are frayed or heavily soiled, contact Customer Service at www.gracobaby.com or 1-800-345-4109.
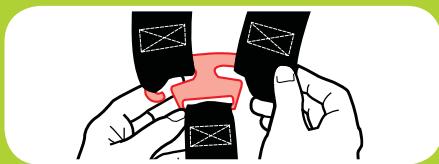
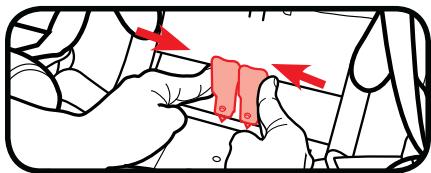
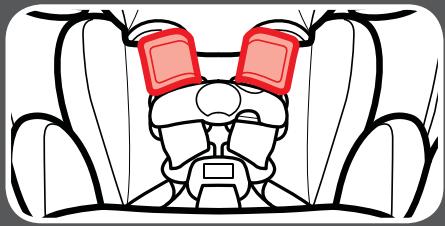
7-D Accessories (on select models)
Harness Covers
Make sure that harness covers do not interfere with placement of the chest clip at armpit level.
To remove, undo the fastening strips and remove.


aree &
Cneannnnn
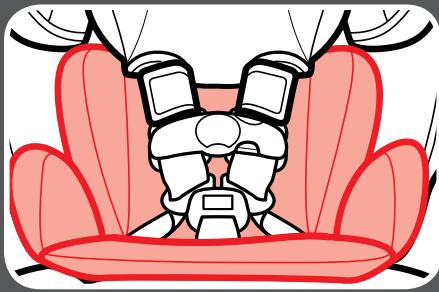
Body Support
Use only in the rear-facing mode.
Body support must be used if shoulders are below the lowest harness setting.
Never allow body support to bunch or fold behind child.
Headrest Pillow
Use only in the rear-facing mode. To adjust the pillow, pull up until desired height. Do not use without the body pillow.
To remove, slide the pillow out from the body support.
8-A Choosing Vehicle Seat Location
Review your vehicle owner's manual for seating locations.
The best seating location for this car seat is one that:
- Is recommended by your vehicle owner's manual, and
Results in a secure installation of this car seat
According to accident statistics, the safest place for your child in any vehicle is the back seat. The center of the back seat can be the safest during a possible side impact.
Some vehicles have specific requirements for where the car seat can be installed, so be sure to check your vehicle owner's manual for available seating positions, if any. For example, sometimes the center rear seat has a lap belt only vehicle seat belt, which cannot be used when this car seat is in Booster mode.
In the event there is no available back seat and / or you have no other option than to place a child other than an infant in a rear-facing car seat in a front passenger seating position, the National Highway Traffic Safety Administration (NHTSA) recommends that you take the following steps:
- Ensure the child is properly restrained according to their age and size
- Move the seat as far back as possible
- Make sure the child is not leaning out of position, such as leaning forward into the deployment path of the air bag
- Set the air bag ON-OFF switch, if available, to the OFF position
- Move the seat as far back as possible
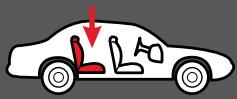
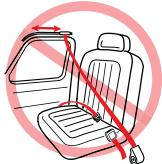
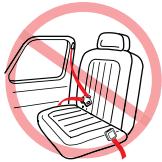
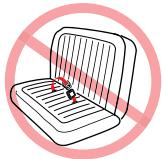
8-B Unsafe Vehicle Seat Locations
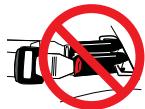
Never install this car seat in any of the following vehicle seating locations:
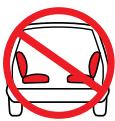

rear-facing or side-facing vehicle seats

rear-facing with an active front air bag
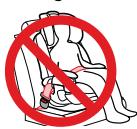
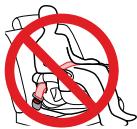
booster mode with vehiclelap belt only seat belt
8-C What is LATCH?
This car seat can be installed using your vehicle's LATCH system, if your vehicle is equipped with LATCH. All 2003 and newer model year vehicles are required to have a LATCH system, although some manufacturers began including LATCH earlier. Some vehicle owner manuals use the term ISOFIX to identify the LATCH system.
LATCH consists of lower anchors and top tether anchors, which are built-in to your vehicle, and connecting hooks that are built-in to your car seat. Lower anchors are used INSTEAD of the vehicle's seat belt to secure the child seat to the vehicle. Top tethers are used IN ADDITION to the lower anchors OR the vehicle's seat belt to secure a forward-facing car seat to the vehicle.
Review your vehicle's owner manual for exact location and use.
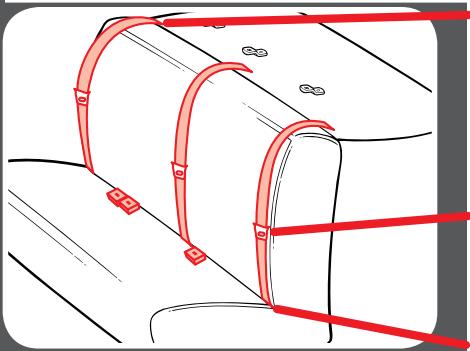
Vehicle Top Tether, Anchor Points

Vehicle Seat Bight

Typical seat in a passenger vehicle. Other vehicle types may have different LATCH locations.
Vehicle Lower Anchor Points

8-D Choosing LATCH or Seat Belts
This car seat can be installed in your vehicle using either the vehicle seat belt OR the LATCH system.
The LATCH system allows you to securely attach your safety seat in your car without using the vehicle seat belt and possibly to get a better fit. For more information on LATCH and how to determine if your vehicle is equipped with LATCH, see section 8-D: What is LATCH?.
For seating positions equipped with LATCH, experts recommend trying the LATCH installation first and only using the seat belt in that seating position if LATCH, for some reason, results in a looser fit. If you want to use the center rear seat and LATCH is not available in that position (check the vehicle owner's manual), try the seat belt to be sure you can get a tight installation. If you cannot, try using LATCH in a different seating position. Remember to only use LATCH in seating positions recommended by your vehicle manufacturer.
Do not use the lower anchors of the child restraint anchorage system (LATCH system) to attach this child restraint when restraining a child weighing more than 42 lbs (19 kg) with the internal harnesses of the child restraint.
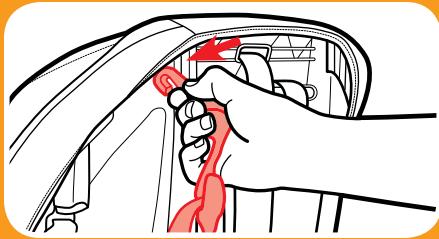
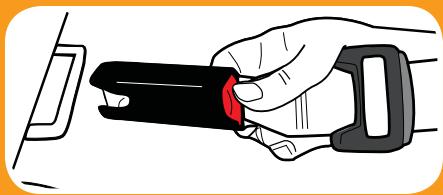
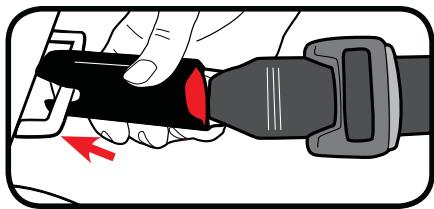
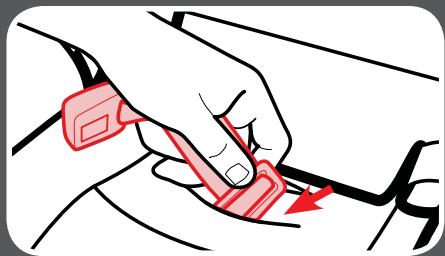
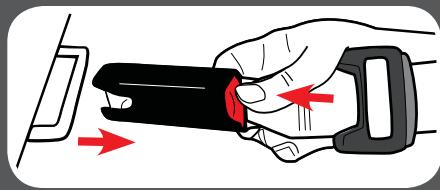
8-E How to Remove LATCH and Tether
LATCH
To remove the LATCH from the lower anchors, push in on the red buttons and pull them off.

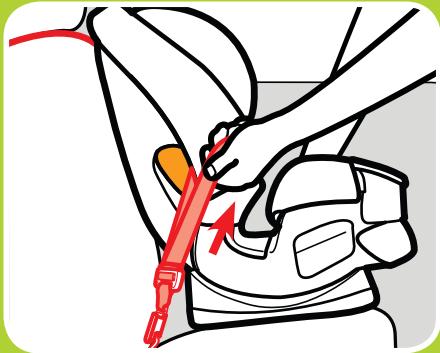
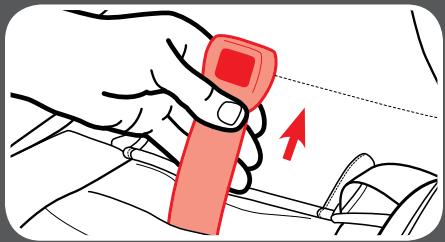
Top Tether
To remove, lift up on the tether lock to release the tension.
Press in on the hook's spring.
Push tether hook in, then lift up and pull away from tether anchor.

8-F Vehicle Seat Belts
Review your vehicle owner's manual for vehicle seat belt use
This car seat can be installed using a vehicle seat belt. To do this, you will need to change the seat belt to a locked mode for use with car seats. With some vehicle seat belts, this is done with the latchplate; with other vehicle seat belts, this is done with the retractor.
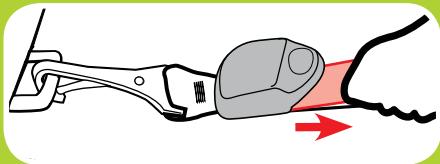
Vehicle Seat Belt Terms
Retractor
A device that winds up the unused vehicle seat belt. It is often hidden inside the panels on the walls of the vehicle or in the vehicle seatback.
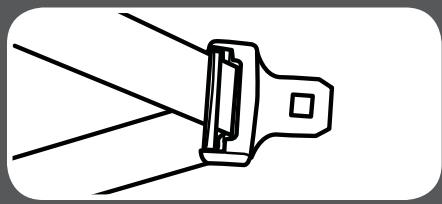
Latch Plate
The male end of the seat belt with the silver tongue.
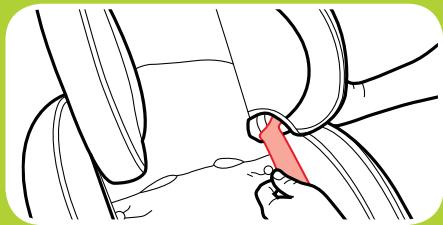
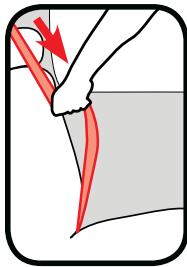
Seat Bight
The crease where the vehicle seat back and seat bottom meet.
Identify Your Seat Belt Type
There are two different types of vehicle seat belts that can be used with this car seat:
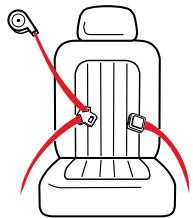
Lap/Shoulder Belt
3 connections points. Can be used in all car seats modes of use.
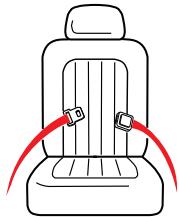
Lap Belt Only
2 connection points. Can ONLY be used in harness mode.
The following types of vehicle seat belts CANNOT be used safely with this car seat:
Lap Belt with Motorized Shoulder Belt
Lap Belt or Shoulder Belt Mounted on Door
Belts Forward of the Seat Bight
Lap/Shoulder Belt Installation - Rear-Facing/Forward Facing Modes
Always review your vehicle owner's manual for specific information about your vehicle seat belts.
There are three types of retractors: ELR (Emergency Locking Retractor), ALR (Automatic Locking Retractor), and Switchable (ELR switch to ALR). To determine your type of retractor, follow these steps:
- Slowly pull the belt out about halfway and stop.
- Let the belt retract back several inches.
- Try to slowly pull the belt out more. If the belt cannot be pulled any further, it is ALR. If it can be pulled further, go to the next step.
- Slowly pull the belt all the way out, and then allow it to retract several inches.
- Try to pull the belt all the way out again. If it cannot be pulled out, it is Switchable. If it can still be pulled out freely, it is ELR.
Note: Most vehicles manufactured after 1996 will have Switchable retractors in the back seat. If you have any questions about your retractor type, consult your vehicle owner's manual or call Graco for assistance.
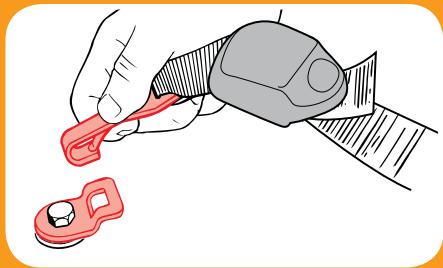
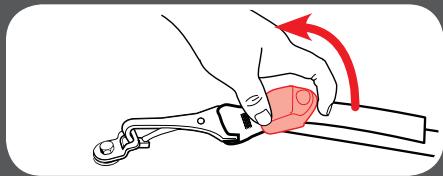
How to Lock Your Lap and Shoulder Vehicle Seat Belt
Sliding Latch Plate and Switchable Retractor
A latchplate that slides freely on the belt webbing and cannot, by itself, hold the belt snug around a car seat.
When installing the car seat, route the vehicle seat belt through the proper belt path and buckle it in. Slowly pull the shoulder belt all the way out to switch it to locking mode. Then, as you pull the vehicle seat belt tight, feed all the slack back into the retractor.
Grab the sides of the seat at the belt path and slide the seat side-to-side and front-to-back. The seat should not move more than 1 inch (2.5 cm).

Note: With the vehicle seat belt in this locking mode, all the tension is upwards in the shoulder belt. This may start to tilt your car seat sideways. If this happens, use a locking clip instead of this switching the retractor. See Sliding Latch Plate and ELR Retractor.
Locking Latchplate and ELR Retractor
A latchplate that holds the lap belt snug after it has been adjusted; contains a metal bar on the underside of the hardware that "locks" the belt in position.
When installing the car seat, route the vehicle seat belt through the proper belt path and buckle it in. Then, pull upwards on the shoulder belt so that the lap belt gets tight around the car seat.
Grab the sides of the seat at the belt path and slide the seat side-to-side and front-to-back. The seat should not move more than 1 inch (2.5 cm).
Sliding Latch Plate and ALR Retractor
A latchplate that slides freely on the belt webbing and cannot, by itself, hold the belt snug around a car seat.
Slowly pull the shoulder belt all the way out. Route the vehicle seat belt through the proper belt path and buckle it in. Then, as you pull the vehicle seat belt tight, feed all the slack back into the retractor.
Grab the sides of the seat at the belt path and slide the seat side-to-side and front-to-back. The seat should not move more than 1 inch (2.5 cm).


Sliding Latch Plate and ELR Retractor
A latchplate that slides freely on the belt webbing and cannot, by itself, hold the belt snug around a car seat.
With this retractor, you will need to use the locking clip to lock the vehicle seat belt.
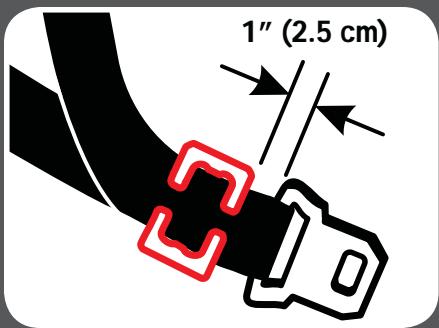
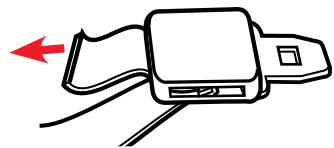
Route the vehicle seat belt through the proper belt path and buckle it in. Pull the vehicle seat belt tight. While pushing down on seat, pinch the two straps together behind the buckle tongue. Unbuckle the belt without allowing it to slip.
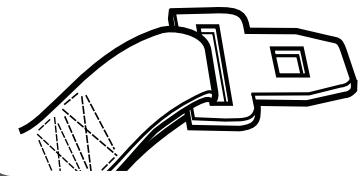
Attach locking clip to lap and shoulder belts as shown.
Rebuckle belt. Check that lap belt does not move by pulling hard. If belt loosens or lengthens, repeat procedure.
Lap Belt Installation - DO NOT use in Booster Mode
Always review your vehicle owner's manual for specific information about your vehicle seat belts.
Locking Latch Plate and No Retractor
When installing the car seat, route the lap seat belt through the proper path and buckle it in. Then, pull upwards on the tail of the belt so that the lap belt gets tight around the car seat.
Sewn On Latch Plate and ALR
Slowly pull the lap belt all the way out. Route the vehicle seat lap belt through the proper belt path and buckle it in. Then, pull the lap belt tight while feeding all the slack back into the retractor.
Grab the sides of the seat at the belt path and slide the seat side-to-side and front-to-back. The seat should not move more than 1 inch (2.5 cm).
Replacement Parts
To purchase parts or accessories in the United States, please contact us at the following:
www.gracobaby.com
or 1-800-345-4109

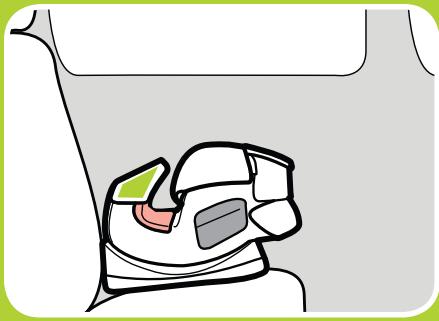
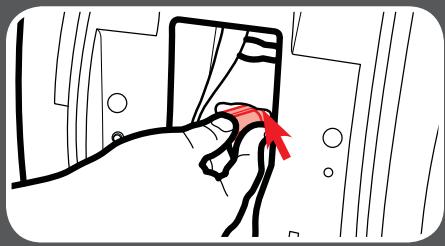
Store instruction manual in the slot with the instruction book icon as shown.
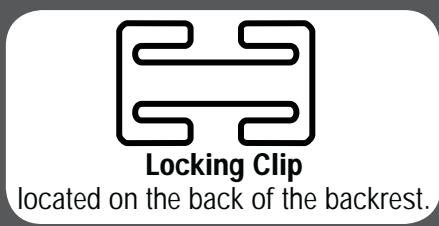
Locking Clip Storage (behind harness straps)

4EVER™
Graco Children's Products, Inc.
Attn: Customer Service
3 Glenlake Parkway Atlanta, GA 30328
o Iame al 1-800-345-4109
o inscribase en linea en www.gracobaby.com/carseatregistration
- Read This Instruction Manual
- Important
- Features
- Rear-Facing Use
- Rear-Facing Continued
- Forward-Facing Use
- Belt-Positioning Booster Use
- Securing Child
- Care & Cleaning
- Additional Information
- Additional Information Continued
- 1-A Welcome to the Graco Family!
- SAFE USE CHECKLIST
- For More Information...
- 1-B Before You Begin
- Register This Child Restraint
- If You Need Help
- Certification
- Car Seat's Useful Life
- Vehicle Seat Protection
- Warm Weather Use
- 1-C SafetyWarnings
- WARNING!
- 1-D Right Mode of Use
- 2-A Install Cup Holders
- Cup Holders
- 2-B Car Seat Features
- 3-A Rear-Facing
- Rear-Facing:
- 4-40 lbs (1.8-18 kg)
- 3-B Prepare to Install LATCH Rear-Facing
- To Move LATCH Strap to Rear-Facing Belt Path
- Raise Headrest
- Unsnap Pad and Expose Seat Pan
- Replace Seat Pad
- 3-C Installing With LATCH Straps
- Store Top Tether Strap
- Extend the LATCH Strap.
- Place Car Seat Rear-Facing in Back Seat of the Vehicle
- Check the Level Indicator
- Attach LATCH Connectors to Vehicle's Lower LATCH Anchors.
- Tighten the LATCH Strap
- Test For Tightness
- Check the Level Indicator
- To Remove LATCH Strap From Vehicle
- 3-D Installing With Vehicle Seat Belt
- Store Top Tether and LATCH Strap
- Decline the Car Seat
- Review your vehicle's owner manual for vehicle seat belt use
- Route the Vehicle Seat Belt
- Tighten the Vehicle Seat Belt
- 4-A Forward-Facing
- Forward Facing
- Forward-Facing:
- 20-65 lbs (9-30 kg)
- inches (125 cm) or less
- 4-B Prepare to Install LATCH Forward-Facing
- To Move LATCH Strap to Forward-Facing Belt Path
- Loosen Harness Straps
- Push Each Connector Into the Forward-Facing Belt Path
- 4-C Installing With LATCH Straps
- Extend the LATCH Strap.
- Unhook Top Tether Strap From Storage
- Place Car Seat Forward-Facing in Back Seat of the Vehicle
- Loosely Attach Top Tether Strap
- Tighten the Tether Strap
- Test For Tightness
- 4-D Installing With Vehicle Seat Belt
- Store LATCH Strap
- Adjust the Car Seat
- Route the Vehicle Seat Belt
- Tighten the Vehicle Seat Belt
- Tighten the Tether Strap
- Test For Tightness
- 5-A Belt-Positioning Booster
- 5-B Prepare for Backed Booster Use
- Store the Harness Straps
- Unsnap Pad and Expose Seat Back
- Unsnap Bottom Seat Pad
- Store Buckle as Shown
- Replace Seat Pad
- 5-C Install Backed Booster
- Adjust the Car Seat
- Place the Booster Seat Forward-Facing in the Back Seat of Vehicle
- Skip to Step 8 if Not Using LATCH
- If Using LATCH, Make Sure LATCH Strap is in the Forward-Facing Belt Path
- Thread the Vehicle Seat Shoulder Belt Through Seat Belt Guide on the Headrest
- 5-D Prepare Backless Booster Use
- Remove Seat Back from Seat Base
- Relock the Red Backrest Locks
- Store Splitter Plate
- Store Buckle Strap
- Attach Base Pad to the Back of Base
- 5-E Install Backless Booster
- 6-A Securing Child 5-point Harness
- Loosen Harness Straps
- Place Your Child in the Seat
- Place Harness Straps Over Child's Shoulders and Buckle
- Be Sure the Harness Straps Are at the Proper Height
- To Raise or Lower Headrest/Harness Adjustment Lever
- Check the Crotch Buckle Position
- To Adjust Crotch Strap
- Rotate Metal Retainer and Insert It Up Through the Shell and Pad
- Insert Metal Retainer in the New Crotch Buckle Slot
- Buckle the Chest Clip
- Pull All the Slack Out From Around the Waist
- Tighten the Harness by Pulling the Harness Adjustment Strap
- Raise the Chest Clip to Child's Armpit Level
- 6-B Securing Child Backed Booster
- Place Child In Seat
- Buckle the Vehicle Lap/Shoulder Seat Belt
- 6-C Securing Child Backless Booster
- Buckle the Vehicle Lap/Shoulder Seat Belt
- 6-D Securing With Belt Positioning Clip
- Place Child in Seat, Buckle Child In Seat and Attach Belt Positioning Clip
- Adjust the Belt Positioning Clip to Fit Your Child
- 7-A Cleaning Seat Pad
- Headrest Pad
- Seat Pad
- 7-B Cleaning Crotch Buckle
- 7-C Cleaning Harness and LATCH Straps
- 7-D Accessories (on select models)
- Harness Covers
- Body Support
- Headrest Pillow
- 8-A Choosing Vehicle Seat Location
- The best seating location for this car seat is one that:
- 8-B Unsafe Vehicle Seat Locations
- 8-C What is LATCH?
- Review your vehicle's owner manual for exact location and use.
- 8-D Choosing LATCH or Seat Belts
- 8-E How to Remove LATCH and Tether
- LATCH
- Top Tether
- 8-F Vehicle Seat Belts
- Review your vehicle owner's manual for vehicle seat belt use
- Retractor
- Latch Plate
- Seat Bight
- Identify Your Seat Belt Type
- Lap/Shoulder Belt Installation - Rear-Facing/Forward Facing Modes
- How to Lock Your Lap and Shoulder Vehicle Seat Belt
- Sliding Latch Plate and Switchable Retractor
- Locking Latchplate and ELR Retractor
- Sliding Latch Plate and ALR Retractor
- Sliding Latch Plate and ELR Retractor
- Lap Belt Installation - DO NOT use in Booster Mode
- Locking Latch Plate and No Retractor
- Sewn On Latch Plate and ALR
- Replacement Parts
- 4EVER™
Brand : GRACO
Model : CLICK CONNECT
Category : Baby transport system