
V313W - Printer DELL - Free user manual and instructions
Find the device manual for free V313W DELL in PDF.


| Product Type | Inkjet Multifunction Printer |
| Brand | DELL |
| Model | V313W |
| Dimensions (W x D x H) | Approximately 46 x 36 x 17 cm |
| Weight | Approximately 5.1 kg |
| Power Supply | 100-240 V AC, 50/60 Hz, power adapter |
| Power Consumption | Average 20 W, standby 5 W, energy-saving mode |
| Main Functions | Printing, copying, scanning, photo printing |
| Connectivity | USB 2.0, Wi-Fi 802.11b/g/n, Bluetooth (via USB adapter), PictBridge |
| Print Type | Color and black inkjet |
| Supported Paper Sizes | A4, Letter, envelopes, cards, labels, photo paper, transparencies |
| Paper Tray Capacity | Up to 100 sheets of plain paper |
| Ink Cartridges | Black series 21/22, color series 21/22 (standard and high capacity) |
| Display | Monochrome LCD display with backlight |
| Print Speed (Black) | Up to 20 ppm in draft mode |
| Print Speed (Color) | Up to 15 ppm in draft mode |
| Print Resolution | Up to 4800 x 1200 dpi optimized |
| Maintenance and Cleaning | Cleaning of print head nozzles, alignment, external cleaning with a soft cloth |
| Safety | Plug into an easily accessible outlet, do not use near water, disconnect before cleaning |
| Spare Parts and Repairability | Ink cartridges available, replaceable print head, specific power adapter |
Frequently Asked Questions - V313W DELL
User questions about V313W DELL
0 question about this device. Answer the ones you know or ask your own.
Ask a new question about this device
Download the instructions for your Printer in PDF format for free! Find your manual V313W - DELL and take your electronic device back in hand. On this page are published all the documents necessary for the use of your device. V313W by DELL.
USER MANUAL V313W DELL
Information in this document is subject to change without notice.
Reproduction in any manner whatsoever without the written permission of Dell Inc. is strictly forbidden. Trademarks used in this text: Dell and the DELL logo are trademarks of Dell Inc.; Microsoft and Windows are registered trademarks of Microsoft Corporation. Other trademarks and trade names may be used in this document to refer to the entities claiming the marks and names of their products. Dell Inc. disclaims any proprietary interest in trademarks and trade names other than its own.
Contents
Safety information....7
About your printer....8
Thank you for choosing this printer!......8
Minimizing your printer's environmental impact....8
Finding information about the printer....9
Understanding the parts of the printer....11
Ordering and replacing supplies....13
Replacing ink cartridges....13
Ordering ink cartridges....14
Recycling Dell products....15
Using the printer control panel buttons and menus......16
Using the printer control panel....16
Using the printer menus....18
Changing temporary settings into new default settings....19
Changing the Power Saver timeout....20
Resetting to factory settings....21
Saving energy with Eco-Mode....21
Using the printer software....23
Minimum system requirements....23
Using the Windows printer software....23
Updating the printer software (Windows only)....25
Reinstalling the printer software....25
Loading paper and original documents....26
Loading paper....26
Saving paper default settings....28
Loading original documents on the scanner glass....29
Printing....30
Tips for printing....30
Printing basic documents....30
Printing specialty documents....32
Printing on both sides of the paper (duplexing) manually....33
Working with photos....35
Printing from a Bluetooth-enabled device....40
Managing print jobs....43
Copying....45
Tips for copying....45
Making copies....45
Copying photos....46
Enlarging or reducing images....46
Adjusting copy quality....46
Making a copy lighter or darker....47
Collating copies using the printer control panel....47
Repeating an image on one page....48
Copying multiple pages on one sheet....48
Making a duplex copy manually....48
Canceling copy jobs....49
Scanning....50
Tips for scanning....50
Scanning to a local or network computer....50
Scanning to a flash drive or memory card....51
Scanning photos into an editing application....51
Scanning documents into an editing application....52
Scanning directly to e-mail....53
Scanning to a PDF....53
Scanning FAQ....53
Canceling scan jobs....54
Networking....55
Installing the printer on a wireless network....55
Advanced wireless setup....59
Networking FAQ....63
Maintaining the printer....73
Maintaining ink cartridges....73
Cleaning the exterior of the printer....74
Cleaning the scanner glass....75
Troubleshooting....76
Before you troubleshoot....76
Using the Service Center to solve printer problems....76
If Troubleshooting does not solve your problem....76
Setup troubleshooting....76
Jams and misfeeds troubleshooting....81
Print troubleshooting....83
Copy and scan troubleshooting....84
Memory card troubleshooting....86
Wireless troubleshooting....88
Index....103
Safety information
Connect the power cord to an electrical outlet that is near the product and easily accessible.
Do not place or use this product near water or wet locations.
Use only the power supply and power cord provided with this product or the manufacturer's authorized replacements.
This product is designed, tested, and approved to meet strict global safety standards with the use of specific manufacturer's components. The safety features of some parts may not always be obvious. The manufacturer is not responsible for the use of other replacement parts.

CAUTION—POTENTIAL INJURY: Do not cut, twist, bind, crush, or place heavy objects on the power cord. Do not subject the power cord to abrasion or stress. Do not pinch the power cord between objects such as furniture and walls. If any of these things happen, a risk of fire or electrical shock results. Inspect the power cord regularly for signs of such problems. Remove the power cord from the electrical outlet before inspecting it.
Refer service or repairs, other than those described in the user documentation, to a professional service person.

CAUTION—SHOCKHAZARD: To avoid the risk of electric shock when cleaning the exterior of the printer, unplug the power cord from the wall outlet and disconnect all cables from the printer before proceeding.

CAUTION—SHOCK HAZARD: Do not use the fax feature during a lightning storm. Do not set up this product or make any electrical or cabling connections, such as the fax feature, power cord, or telephone, during a lightning storm.
SAVE THESE INSTRUCTIONS.
About your printer
Thank you for choosing this printer!
We've worked hard to make sure it will meet your needs.
To start using your new printer right away, use the setup materials that came with the printer, and then skim the User's Guide to learn how to perform basic tasks. To get the most out of your printer, read the User's Guide carefully, and make sure you check the latest updates on our Web site.
We're committed to delivering performance and value with our printers, and we want to make sure you're satisfied. If you do encounter any problems along the way, one of our knowledgeable support representatives will be delighted to help you get back on track fast. And if you find something we could do better, please let us know. After all, you are the reason we do what we do, and your suggestions help us do it better.
Minimizing your printer's environmental impact
We are committed to protecting the environment and are continually improving our printers to reduce their environmental impact. By selecting certain printer settings or tasks, you may be able to reduce your printer's environmental impact even further.
Conserving energy
- Eco-Mode. This feature sets the screen brightness to low and sets the printer to change to Power Saver mode after the printer is left idle for 10 minutes. Eco-Mode is enabled by default in your printer.
- Select the lowest Power Saver timeout. The Power Saver feature puts the printer in a minimum-power standby mode after the printer has been idle for a set amount of time (the Power Saver timeout).
- Share your printer. Wireless/network printers allow you to share a single printer among multiple computers, thus conserving energy and other resources.
Conserving paper
- Print more than one page image on one side of the paper. The "Pages per sheet" feature allows you to print multiple pages on one sheet. You can print up to 8 page images on one side of a sheet of paper.
- Print on both sides of the paper. Duplexing lets you print on both sides of the paper manually or automatically (depending on your printer model).
- Preview print jobs before printing. Use the preview features found in the Print Preview dialog or the printer display (depending on your printer model).
- Scan and save. To avoid printing multiple copies, you can scan documents or photographs and save them to a computer program, application, or flash drive for presentation.
- Use recycled paper.
Conserving ink
- Use Quick Print or Draft Mode. These modes can be used to print documents using less ink than normal and are ideal for printing documents that are mostly text.
- Use High Yield cartridges. Inks in High-Yield cartridges allow you to print more pages with fewer cartridges.
- Clean the printhead. Before replacing and recycling your ink cartridges, try using the "Clean Printhead" and "Deep Clean Printhead" features. These features clean the printhead nozzles to improve the quality of your prints.
Recycling
- Return empty ink cartridges for reuse or recycling through the Dell Cartridge Collection Program. To return an empty ink cartridge, go to www.dell.com/recycling to request a postage-paid bag.
• Recycle the product packaging. - Recycle your old printer instead of throwing it away.
• Recycle paper from discarded print jobs. - Use recycled paper.
Finding information about the printer
Publications
| What are you looking for? | Find it here |
| Initial setup instructions:Connecting the printerInstalling the printer software | Setup documentationThe setup documentation came with the printer. |
| Additional setup and instructions for using the printer:Selecting and storing paper and specialty mediaLoading paperPerforming printing, copying, scanning, and faxing tasks, depending on your printer modelConfiguring printer settingsViewing and printing documents and photosSetting up and using printer softwareSetting up and configuring the printer on a network, depending on your printer modelCaring for and maintaining the printerTroubleshooting and solving problems | User's GuideThe User's Guide is available on the installation software CD. For updates, check our Web site atsupport.dell.com. For updates, check our Web site atsupport.dell.com. |
| Help using the printer software | Windows HelpOpen a printer software program or application, and then clickHelp.Click ⚙ to view context-sensitive information.Notes:The Help installs automatically with the printer software.The printer software is located in the printer Program folder or on the desktop, depending on your operating system. |
| The latest supplemental information, updates, and online technical support:Troubleshooting hints and tipsFrequently asked questionsDocumentationDriver downloadsLive chat supportE-mail supportTelephone support | Dell Support Web site—support.dell.comNote:Select your region, and then select your product to view the appropriate support site.Support telephone numbers and hours of operation for your region or country can be found on the Support Web site.Have the following information ready when you contact support so that they may serve you faster:Service TagExpress Service CodeNote:The Service Tag and Express Service Code appear on labels located on your printer. |
| Software and Drivers—Certified drivers for your printer and installers for Dell printer softwareReadme files—Last-minute technical changes, or advanced technical reference material for experienced users or technicians | Installation software CDNote:If you purchased your Dell computer and printer at the same time, then documentation and drivers for your printer are already installed on your computer. |
| Supplies and accessories for your printerReplacement cartridges | Dell Printer Supplies Web site—dell.com/suppliesYou can purchase printer supplies online, by telephone, or in select retail stores. |
| Safety information for preparing to operate your printerRegulatory informationWarranty information | Product Information Guide Note:The Product Information Guide may not be available in your country or region. Note:The Product Information Guide may not be available in your country or region. |
Understanding the parts of the printer
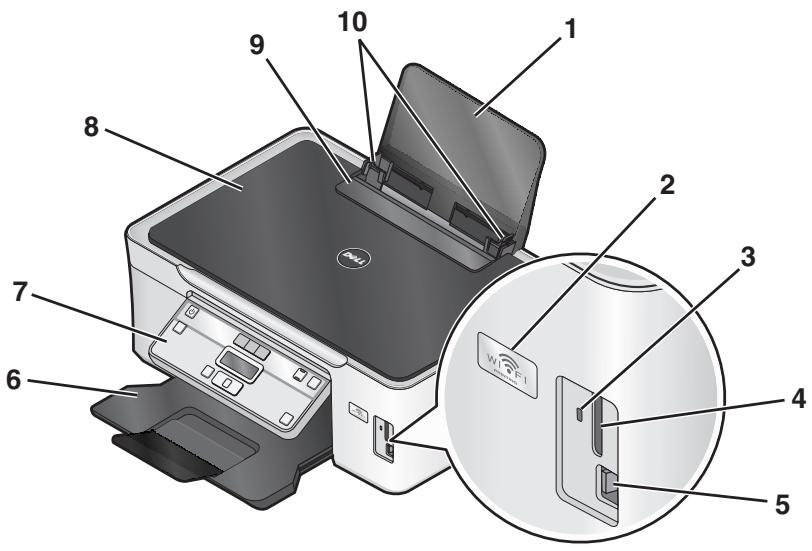
| Use the | To | |
| 1 | Paper support | Load paper. |
| 2 | Wi-Fi indicator | Check wireless status.Note: This feature is available in selected models only. |
| 3 | Card reader light | Check card reader status. The light blinks to indicate that a memory card is being accessed. |
| 4 | Memory card slots | Insert a memory card. |
| 5 | PictBridge and USB port | Connect a PictBridge-enabled digital camera, USB Bluetooth adapter, or a flash drive to the printer. |
| 6 | Paper exit tray | Hold paper as it exits. |
| 7 | Printer control panel | Operate the printer. |
| 8 | Top cover | Access the scanner glass. |
| 9 | Paper feed guard | Prevent items from falling into the paper slot. |
| 10 | Paper guides | Keep paper straight when feeding. |
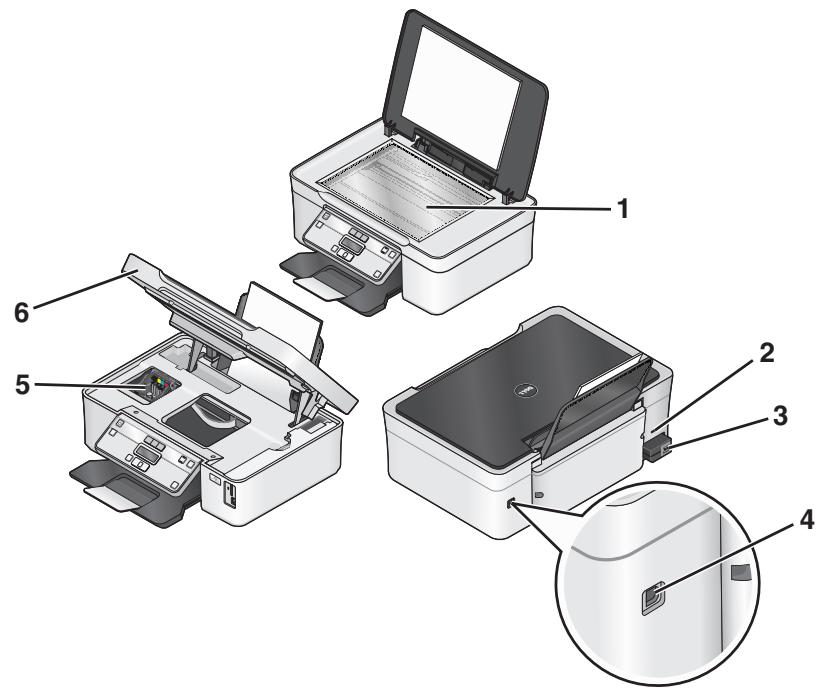
| Use the | To | |
| 1 | Scanner glass | Scan and copy photos and documents. |
| 2 | Security slot | Install an anti-theft cable on your printer. |
| 3 | Power supply with port | Connect the printer to a power source. |
| 4 | USB port | Connect the printer to a computer using a USB cable.Warning—Potential Damage: Do not touch the USB port except when plugging in or removing a USB cable or installation cable. |
| 5 | Printhead | Install, replace, or remove ink cartridges. |
| 6 | Scanner unit | • Access the ink cartridges and printhead.• Remove paper jams. |
Ordering and replacing supplies
Replacing ink cartridges
Make sure you have a new ink cartridge or cartridges before you begin. You must install new cartridges immediately after removing the old ones, or the ink remaining in the printhead nozzles may dry out.
1 Turn on your printer.
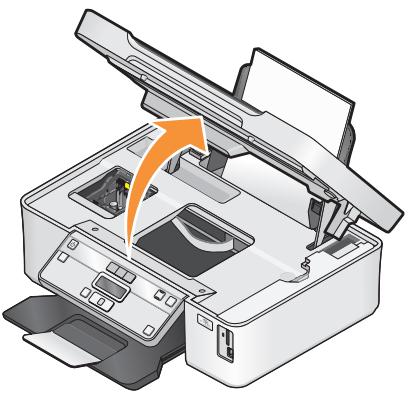
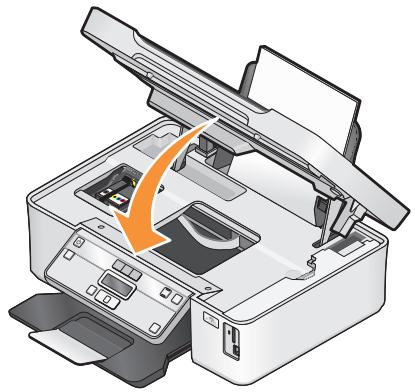
2 Open the printer.
natural_image
Illustration of a printer printer with an orange arrow indicating the open lid (no text or symbols present)Note: The printhead moves to the cartridge installation position.
3 Press the release tab, and then remove the used ink cartridge or cartridges.
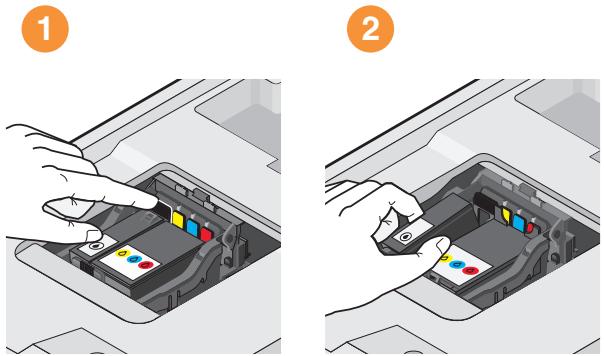
Note: Do not reinstall used ink cartridges once you remove them from the printhead.
4 Remove the new cartridges from the foil, and then remove the protective cap from each of the ink cartridges. Install the black ink cartridge and then the color ink cartridge. Use two hands to install each cartridge.
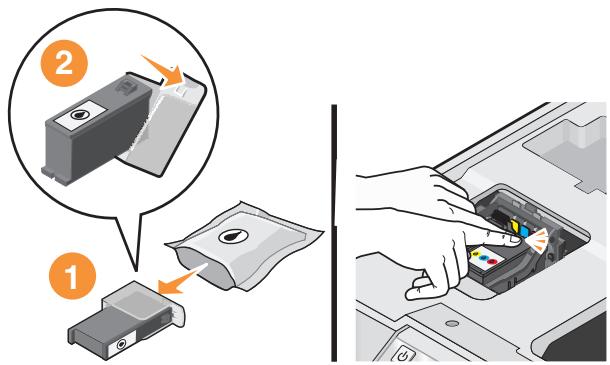
Note: Install the ink cartridges immediately after removing the protective cap to avoid exposing the ink to air.
5 Close the printer.
natural_image
Diagram of an open printer with a paper airplane being inserted, showing internal components and a yellow arrow indicating the process (no text or symbols present)Ordering ink cartridges
Page yields available at www.dell.com/supplies. For best results, use only Dell ink cartridges.
| Item | Licensed cartridge ^1 | Regular cartridge |
| Black cartridge | Series 21 | Series 21R |
| Black cartridge, high yield ^2 | Series 22 | Series 22R |
| Color cartridge | Series 21 | Series 21R |
| Color cartridge, high yield ^2 | Series 22 | Series 22R |
| ^1 Licensed for a single use only. After use, return this cartridge to Dell for remanufacturing, refilling, or recycling. To know more about recycling Dell products, visitwww.dell.com/recycling. ^2 Available only on the Dell Web site atwww.dell.com/supplies. | ||
Recycling Dell products
To return Dell products to Dell for recycling:
1 Click 📄 or Start.
2 Click All Programs or Programs, and then select the printer program folder from the list.
3 Select Printer Home.
4 Choose your printer from the printer drop-down list.
5 Click Order supplies in the Maintenance tab.
6 Click
7 Follow the instructions on the computer screen.
Using the printer control panel buttons and menus
Using the printer control panel
The following diagrams explain the sections of the printer control panel:
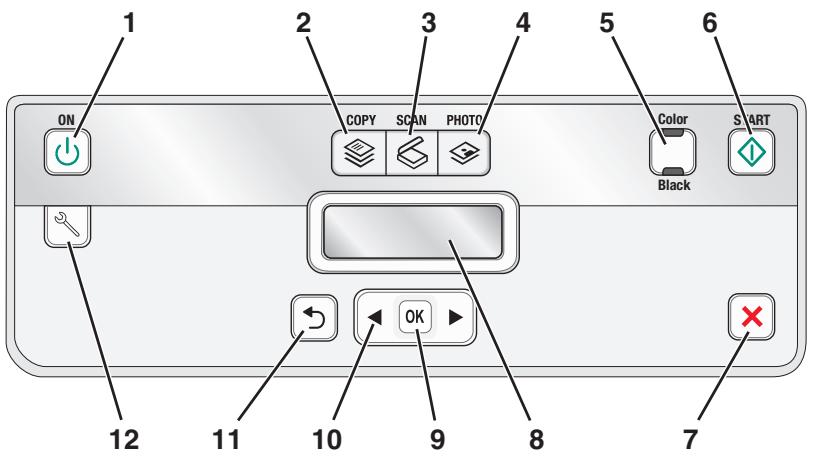
| Use the: | To | |
| 1 | Power button | Turn the printer on and off.Switch to Power Saver mode.Note:When the printer is on, press ⏻ to switch to Power Saver mode. Press and hold ⏻ for three seconds to turn off the printer. |
| 2 | Copy button | Access the copy menu and make copies. |
| 3 | Scan button[0WT3] | Access the scan menu and scan documents. |
| 4 | Photo button | Access the photo menu and print photos. |
| 5 | Color/Black | Switch to color mode or black-and-white mode. |
| 6 | Start button | Start a print, scan, or copy job, depending on which mode is selected. |
| 7 | Cancel button | Cancel a print, copy, or scan job in progress.Exit from a menu level of the Copy, Scan, Photo, or File Print menu to the top level of a menu.Exit from a menu level of the Setup menu to the top level of the previous mode.Clear current settings or error messages, and return to default settings. |
| 8 | DisplayNote:The display is turned off in Power Saver mode. | View:Printer statusMessagesMenus |
| 9 | Select button | Select menu options.Save settings.Feed or eject paper. Press and hold for 3 seconds to feed or eject paper from the printer. |
| 10 | Arrow buttons | Choose a menu or submenu item that appears on the display. |
| 11 | Back button | Return to the previous screen.Exit from one menu level to a higher one. |
| 12 | Setup button | Access the setup menu and change printer settings.Note:The Copy, Scan and Photo button lights are off when this button is selected. |
Using the printer menus
| Copy menu | Scan menu | PictBridge menu^1 |
| CopiesQualityLighter/DarkerResizeOriginal SizePhoto ReprintCollatePages per SheetCopies per SheetContent TypeID Card Copy | Scan toComputer– Application– Quality– Original SizeNetwork– Quality– File Type– Original SizeUSB Flash Drive– Quality– File Type– Original SizeMemory Card– Quality– File Type– Original Size | Paper SizePhoto SizePaper TypeQualityLayout |
| ^1 This menu appears only when a PictBridge-enabled camera is inserted into the PictBridge port. | ||
Note: The File Print menu is enabled when you insert a memory device that contains document files into the printer. The menu is composed of the folders and files stored on the memory device.
| Photo menu | |||
| Easy Photo• Print– Last Photo– All Photos– Date Range– Photo Number• Paper Size• Photo Size | Print Photos• Print– Last Photo– All Photos– Date Range– Photo Number– Print DPOF1• Lighter/Darker | • Photo Effects– None– Auto Enhance– Sepia– Antique Grey– Antique Brown• Paper Size• Photo Size• Paper Type• Layout• Quality | Proof Sheet• Print Last 20• Print All• Print Date Range• Scan SheetSave Photos• Computer• USB Flash Drive2• Memory Card2Select Computer (appears only in printers connected to a network) |
| 1This menu appears only when there is a valid DPOF file in your memory device.2This menu appears only when a memory device is inserted into the card slot or USB port.Setup menu | |||
| Paper Setup• Paper Size• Paper TypeMaintenance• Ink Levels• Clean Printhead• Deep Clean Printhead• Align Printer• Print Test Page• Replace Printhead | Device Setup• Language• Country/Region• Power Saver• Auto Screen Dim• Eco-Mode• Clear Settings TimeoutNetwork Setup1• Print Setup Page• Wi-Fi Protected Setup• Wireless Information• TCP/IP• File Print• Reset Network Adapter Defaults | Bluetooth Setup2• Enable• Discovery• Printer Name• Security Level• Paper Size• Photo Size• Paper Type• Quality• Pass Key• Clear Device List | Defaults• Photo Print Size• Set Defaults— Use Current— Use FactoryDemo Mode• On• Off |
| 1This menu appears only in printers that support wireless printing.2This menu appears only when a USB Bluetooth adapter is inserted into the USB port. | |||
Changing temporary settings into new default settings
The following menus revert to default settings after two minutes of inactivity or after the printer is turned off:
| Copy menu | CopiesQualityLighter/DarkerResizeOriginal SizePages per SheetCopies per SheetContent Type |
| Scan menu | QualityOriginal Size |
| Fax menu (selected models only) | Lighter/DarkerQuality |
| Photo menu | The following Photo options will not time out after two minutes of inactivity or after you turn off the printer, but they will return to the factory default settings when a memory card or flash drive is removed.· Photo Effects· Photo Size· Layout· Quality |
To change the temporary settings into new default settings
1 From the printer control panel, press 🔊.
2 Press the arrow buttons to scroll to Defaults, and then press OK.
3 Press the arrow buttons to scroll to Set Defaults, and then press OK.
Use Current appears on the display.
4 Press OK again to select Use Current.
5 Press ← until you exit Setup, or press another mode button.
To disable the settings timeout feature
You can disable the settings timeout feature if you do not want the printer to revert to the default settings after two minutes of inactivity or after the printer is turned off.
1 From the printer control panel, press 🔊.
2 Press the arrow buttons to scroll to Device Setup, and then press OK.
3 Press the arrow buttons to scroll to Clear Settings Timeout, and then press OK.
4 Press the arrow buttons to scroll to Never, and then press OK.
5 Press ← until you exit Setup, or press another mode button.
Changing the Power Saver timeout
The Power Saver timeout is the time it takes for the printer to switch to Power Saver mode when the printer is left idle. The Power Saver feature optimizes energy efficiency by reducing the printer power consumption (as much as 28 percent on some printer models) compared to the default printer settings. To save the most energy, select the lowest Power Saver timeout.
1 From the printer control panel, press 🔊.
2 Press the arrow buttons to scroll to Device Setup, and then press OK.
3 Press the arrow buttons to scroll to Power Saver, and then press OK.
4 Press the arrow buttons to select a Power Saver timeout, and then press OK.
5 Press ← until you exit Setup, or press another mode button.
Resetting to factory settings
Resetting to factory default settings will delete all the printer settings you have previously selected.
Using the printer control panel menus
1 From the printer control panel, press 🔒.
2 Press the arrow buttons to scroll to Defaults, and then press OK.
3 Press the arrow buttons to scroll to Set Defaults, and then press OK.
4 Press the arrow buttons to scroll to Use Factory, and then press OK.
5 When prompted to set the initial settings of your printer, make your selections using the printer control panel buttons.
Initial Setup Complete appears on the display.
Using a button combination (if you cannot read the current language)
1 Turn off the printer.
Note: If you have set the Power Saver timeout in the Setup menu, then press and hold the ⏻ for three seconds to turn off the printer.
2 From the printer control panel, press and hold ◆ and ✗, and then press ⏻ to turn the printer on.
3 Release all three buttons.
4 When prompted to set the initial settings of your printer, make your selections using the printer control panel buttons.
Initial Setup Complete appears on the display.
Saving energy with Eco-Mode
The Eco-Mode feature optimizes energy efficiency and saves money.
When Eco-Mode is enabled, the printer automatically switches to the following settings:
- The printer display is dimmed.
- The printer changes to Power Saver mode after ten minutes.
Notes:
- If you are using Eco-Mode, then the Eco-Mode settings override any changes you may make to individual settings that are part of Eco-Mode.
- Eco-Mode is enabled by default.
To change the Eco-Mode setting:
1 From the printer control panel, press 🔊.
2 Press the arrow buttons to scroll to Device Setup, and then press OK.
3 Press the arrow buttons to scroll to Eco-Mode.
4 Select the Eco-Mode setting, and then press OK.
5 Press ↩ until you exit Setup, or press another mode button.
Using the printer software
Minimum system requirements
The printer software requires up to 500 MB of free disk space.
Supported operating systems
- Microsoft Windows 7 (Web only)
- Microsoft Windows Vista
- Microsoft Windows XP
• Microsoft Windows 2000 (SP4 or greater)
• Linux Ubuntu 8.04 LTS and 8.10 (Web only)
• Linux OpenSUSE 11.0 and 11.1 (Web only)
• Linux Fedora 10 (Web only)
Using the Windows printer software
Software installed during printer installation
When you set up the printer using the installation software CD, all the necessary software was installed. You may have chosen to install some additional programs. The following table provides an overview of various software programs and what they can help you do.
If you did not install these additional programs during initial installation, then reinsert the installation software CD, run the installation software, and then select Install Additional Software from the Software Already Installed screen.
Note: Your printer may not come with some of these programs or some of the functions of these programs, depending on the features of the printer that you purchased.
Printer software
| Use the | To |
| Dell Printer Home(referred to as Printer Home) | Launch applications or programs.Access the Fax Solutions software.Scan or e-mail a photo or document.Edit scanned documents.Scan documents to PDF.Adjust settings for the printer.Order supplies.Maintain ink cartridges.Print a test page.Register the printer.Contact technical support. |
| Dell Fast Pics(referred to as Fast Pics) | Manage, edit, transfer, and print photos and documents. |
| Adobe^TM Photo Album Starter Edition | View, manage, and edit photos. |
| Dell Toolbar(referred to as Toolbar) | Print, scan, or convert local files from Windows. |
| Dell Ink Management System | Order ink. |
| Dell Fax Solutions(referred to as Fax Solutions) | Send a fax.Receive a fax in three-in-one printers.Add, edit, or delete contacts in the built-in phone book.Access the Dell Fax Setup Utility. Use the Fax Setup Utility to set the Speed Dial and Group Dial numbers, set Ringing and Answering, and print fax history and status reports. |
| Abbyy Sprint OCR | Scan a document and produce text that you can edit with a word-processing program. |
| Dell Wireless Setup Utility(referred to as Wireless Setup Utility) | Set up the wireless printer on a wireless network.Change the wireless settings of the printer.Note: This program is installed automatically with the printer software if the printer has wireless capability. |
| Dell Service Center(referred to as Service Center) | Troubleshoot the printer.Access the printer maintenance functions.Contact technical support.Notes:This program is installed automatically with the printer software.You may be prompted to install this program from the Web, depending on your printer model. |
| Printing Preferences | When you select File → Print with a document open and then click Properties, a Printing Preferences dialog appears. The dialog lets you select options for the print job, such as the following:Select the number of copies to print.Print two-sided copies.Select the paper type.Add a watermark.Enhance images.Save settings.Note: Printing Preferences is installed automatically with the printer software. |
Updating the printer software (Windows only)
Checking for software updates
1 Click 📄 or Start.
3 Select Printer Home.
4 Choose your printer from the printer drop-down list.
5 From the Support tab, select Check for updates.
6 Follow the instructions on the computer screen.
2 Click All Programs or Programs, and then select the printer program folder from the list.
Reinstalling the printer software
If you encountered problems while installing, or if your printer does not appear in the Printers folder or as a printer option when you send a print job, then try removing and reinstalling the printer software.
Uninstalling the printer software
1 Click or Start.
2 Click All Programs or Programs, and then select the printer program folder from the list.
3 Select the uninstall option.
4 Follow the instructions on the computer screen to remove the software.
5 Once the uninstall process in complete, restart your computer.
Installing the printer software
Note: If you installed the printer software on this computer before but need to reinstall the software, then uninstall the current software first.
1 Close all open software programs.
2 Insert the installation software CD.
If the Welcome screen does not appear after a minute, then launch the CD manually:
a Click 📄, or click Start and then click Run.
b In the Start Search or Run box, type D:\setup.exe, where D is the letter of your CD or DVD drive.
3 Follow the instructions on the Welcome screen.
Using the World Wide Web
Updated printer software may be available at www.support.dell.com.
Loading paper and original documents
Loading paper
1 Fan the paper.

natural_image
Three-step illustration showing hands folding a book with rotation arrows, then holding a curved-bound document (no text or symbols)2 Center the paper on the paper support.
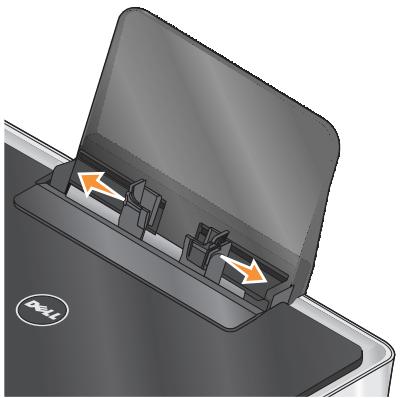
3 Adjust the paper guides so they rest against the edges of the paper.
natural_image
Diagram of a device with a lid and internal compartments, showing directional arrows (no text or symbols)Note: Do not force paper into the printer. The paper should be flat against the paper support, and the edges should be flush against both paper guides.
Paper and specialty media guidelines
| Load up to: | Make sure that: |
100 sheets of plain paper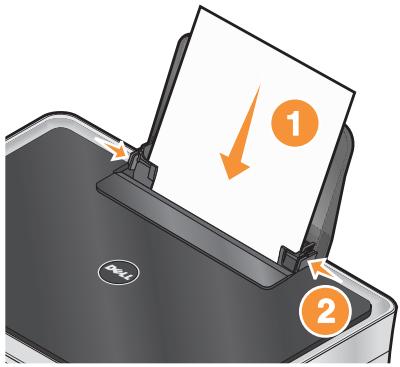 | The paper guides rest against the edges of the paper.You load letterhead paper with the print side faceup and the top of the letterhead going into the printer first. |
| 25 sheets of heavyweight matte paper | The print side of the paper is faceup.The paper guides rest against the edges of the paper.You selectAutomatic, Normal, orPhotoprint quality.Note:Draft mode is available but is not recommended for use with expensive paper such as heavyweight matte, labels, photo cards and glossy paper. |
20 sheets of banner paper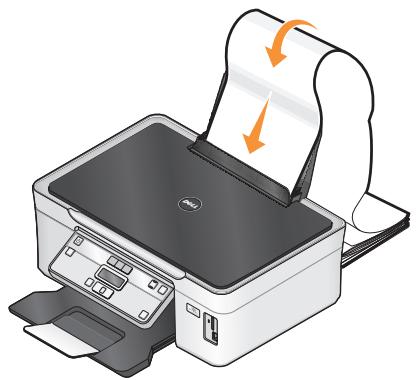 | You remove all paper from the paper support before inserting banner paper.You use banner paper designed for inkjet printers.You place a stack of banner paper on or behind the printer, and feed in the first sheet.The paper guides rest against the edges of the paper.You selectA4 Banner or Letter Bannerpaper size. |
10 envelopes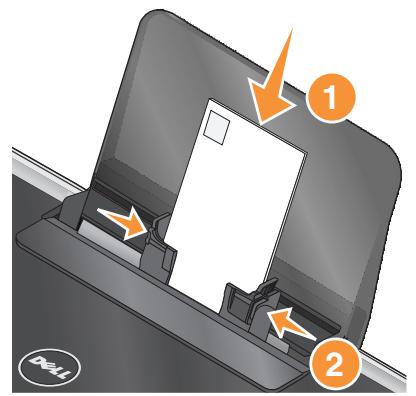 | The print side of the envelope is faceup.The paper guides rest against the edges of the envelopes.You print the envelopes withLandscapeorientation.Note:If you are mailing within Japan, then the envelope can be printed in Portrait orientation with the stamp in the lower right corner or in Landscape orientation with the stamp in the lower left corner. If you are mailing internationally, then print in Landscape orientation with the stamp in the upper left corner.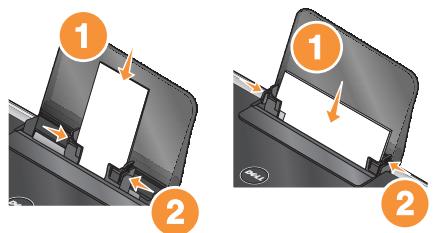 You select the correct envelope size. Select the next biggest size if the exact envelope size is not listed, and set the left and right margins so your envelope is correctly positioned. You select the correct envelope size. Select the next biggest size if the exact envelope size is not listed, and set the left and right margins so your envelope is correctly positioned. |
| 25 sheets of labels | The print side of the label is faceup.The paper guides rest against the edges of the paper.You selectAutomatic, Normal, orPhotoprint quality.Note:Draft mode is available but is not recommended for use with expensive paper such as heavyweight matte, labels, photo cards and glossy paper. |
25 greeting cards, index cards, postcards, or photo cards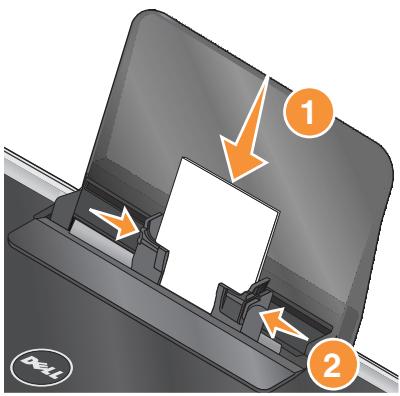 | The print side of the card is faceup.The paper guides rest against the edges of the cards.You selectAutomatic, Normal, orPhotoprint quality.Note:Draft mode is available but is not recommended for use with expensive paper such as heavyweight matte, labels, photo cards and glossy paper. |
| 25 sheets of photo/glossy paper | The print side of the paper is faceup.The paper guides rest against the edges of the paper.You selectAutomatic, Normal, orPhotoprint quality.Note:Draft mode is available but is not recommended for use with expensive paper such as heavyweight matte, labels, photo cards and glossy paper. |
| 10 iron-on transfers | You follow the loading instructions on the iron-on transfer packaging.The print side of the transfer is faceup.The paper guides rest against the edges of the transfer.You selectAutomatic, Normal, orPhotoprint quality. |
| 50 transparencies | The rough side of the transparencies is faceup.The paper guides rest against the edges of the transparencies. |
Saving paper default settings
You can set the default paper size, paper type, and photo print size for the documents and photos that you print.
Note: These default settings apply only to print, copy, and scan jobs that you initiate from the printer.
1 From the printer control panel, press 📁.
2 Choose the default settings:
- If you want to set the default paper size:
a Press OK to select Paper Setup.
b Press the arrow buttons to scroll to Paper Size, and then press OK.
c Press the arrow buttons to select the default paper size for the printer, and then press OK.
- If you want to set the default paper type:
a Press OK to select Paper Setup.
b Press the arrow buttons to scroll to Paper Type, and then press OK.
c Press the arrow buttons to select the default paper type for the printer, and then press OK.
- If you want to set the default photo print size:
a Press the arrow buttons to scroll to Defaults, and then press OK.
b Press OK to select Photo Print Size.
c Press the arrow buttons to select the default photo print size for the printer, and then press OK.
3 Press ← until you exit Setup, or press another mode button.
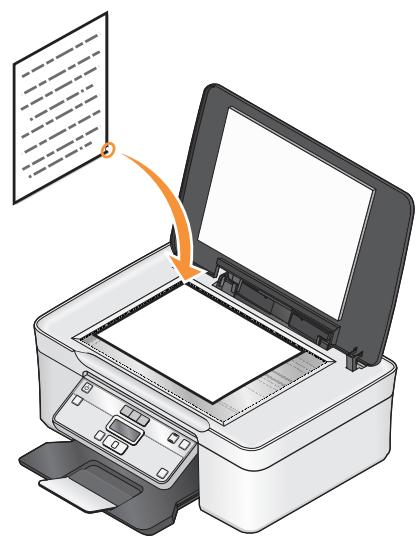
Loading original documents on the scanner glass
1 Open the top cover and place the document facedown on the scanner glass.
2 Close the top cover.
natural_image
Illustration of a printer with an open lid and paper sheet being inserted (no text or symbols visible)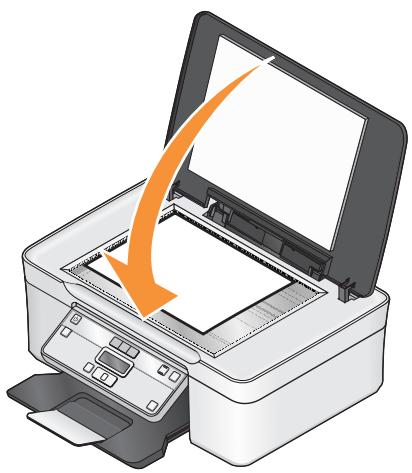
natural_image
Illustration of a printer with an orange arrow indicating the process (no text or symbols present)Printing
Tips for printing
- Use the appropriate paper for your print job.
- Select a higher print quality for better prints.
- Make sure there is enough ink in the ink cartridges.
- Remove each sheet as it is printed when printing photos or when working with specialty media.
- Select the borderless setting when printing photos.
Printing basic documents
Printing a document
1 Load the paper in the printer.
2 Send the print job:
a With a document open, click File → Print.
b Click Properties, Preferences, Options, or Setup.
c Select the print quality, the number of copies to print, the type of paper to use, and how the pages should print.
d Click OK to close any printer software dialogs.
e Click OK or Print.
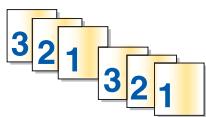
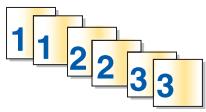
Collating printed copies
If you print multiple copies of a document, then you can choose to print each copy as a set (collated) or to print the copies as groups of pages (not collated).
Collated
Not collated
Notes:
- The collate option is available only when you are printing multiple copies.
- To prevent smudging when printing photos, remove each photo as it exits the printer, and then let it dry before stacking.
1 With a document open, click File → Print.
2 Click Properties, Preferences, Options, or Setup.
3 From the Copies section of the Print Setup tab, enter the number of copies that you want to print, and then select Collate Copies.
4 Click OK to close any printer software dialogs.
5 Click OK or Print.
Printing pages in reverse order
By default, the first page is printed first. If you want to reverse the order in which pages print to make documents ready to read with the first page on top, then do the following:
1 With a document open, click File → Print.
2 Click Properties, Preferences, Options, or Setup.
3 From the Copies section of the Print Setup tab, select a page order:
- To print the last page first, select Print Last Page First.
- To print the first page first, clear the Print Last Page First check box.
Note: If two-sided printing is enabled, then you cannot print the last page first. To change the print order, you must first disable two-sided printing.
4 Click OK to close any printer software dialogs.
5 Click OK or Print.
Printing multiple pages on one sheet
1 With a document open, click File → Print.
2 Click Properties, Preferences, Options, or Setup.
3 From the Layout list of the Advanced tab, select Pages per sheet.
4 Select the number of page images to print on each page.
If you want each page image to be surrounded by a border, then select Print Page Borders.
5 Click OK to close any printer software dialogs.
6 Click OK or Print.
Printing documents from a memory card or flash drive
To enable the File Print function:
- The printer must be connected to a computer through a USB cable or through a network.
- The printer and the computer must be on.
- The memory card or flash drive must contain document files that are supported by the printer. For more information, see “Supported memory cards and file types” on page 36.
- The computer must contain applications that support the file types in the memory device.
1 Insert a memory card or flash drive.
When the printer detects the memory device, Memory Card Detected or Storage Device Detected appears on the display.
2 If only document files are stored on the memory device, then the printer automatically switches to File Print mode. If document files and image files are stored on the memory device, then press OK to select Documents.
3 Select and print the document:
If the printer is using a USB connection
a Press the arrow buttons to select the file name of the document that you want to print or the folder where the document is saved in the memory device.
b Press OK, and then press ◆ to start printing the document.
If the printer is using a Wireless connection (selected models only)
a Press the arrow buttons to select the file name of the document that you want to print.
b Press OK, and then wait for the printer to connect to the network computer or to finish searching the network for available computers.
c When prompted, press the arrow buttons to select the name of the network computer, and then press OK to start printing the document.
Notes:
- You may be prompted to enter a PIN if the computer requires it. Enter the PIN using the keypad.
- To assign a computer name and a PIN to the computer, see the Help for the printer software associated with your operating system.
Printing specialty documents
Printing envelopes
1 Load the envelopes in the printer.
2 Send the print job:
a With a document open, click File → Print.
b Click Properties, Preferences, Options, or Setup.
c From the Paper Type list of the Print Setup tab, select Plain Paper.
d From the Paper Size list, select the envelope size.
Note: To print on a custom-size envelope, select Custom Size, and then specify the height and width of the envelope.
e Select an orientation.
f Click OK to close any printer software dialogs.
g Click OK or Print.
Notes:
- Most envelopes use landscape orientation.
- Make sure the same orientation is also selected in the software application.
Printing labels
1 Load the label sheets in the printer.
2 Send the print job:
a With a document open, click File → Print.
b Click Properties, Preferences, Options, or Setup.
c From the Paper Size list of the Print Setup tab, choose a paper size that matches the size of the label sheet. If no paper size matches the label sheet size, then set a custom size.
If necessary, choose the appropriate type of paper from the Paper Type list.
d Click OK to close any printer software dialogs.
e Click OK or Print.
Tips on loading label sheets
- Make sure the top of the label sheet feeds into the printer first.
- Make sure the adhesive on the labels does not extend to within 1 mm of the edge of the label sheet.
- Make sure the paper guide or paper guides rest against the edges of the label sheet.
- Use full label sheets. Partial sheets (with areas exposed by missing labels) may cause labels to peel off during printing, resulting in a paper jam.
Note: Labels require more drying time. Remove each label sheet as it exits, and then allow it to dry to avoid ink smudging.
Printing on custom-size paper
Before beginning these instructions, load the custom-size paper in the printer.
1 With a document open, click File → Print.
2 Click Properties, Preferences, Options, or Setup.
3 From the Paper Size list of the Print Setup tab, select Custom Size.
The Define Custom Paper Size dialog appears.
4 Set the paper size.
5 Select the measurement units to use (inches or millimeters).
6 Click OK to close any printer software dialogs.
7 Click OK or Print.
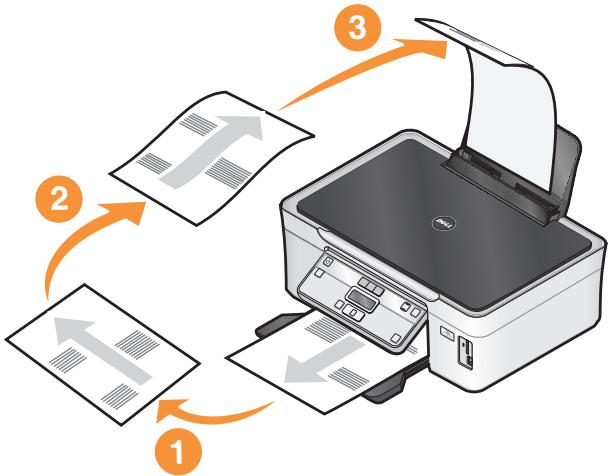
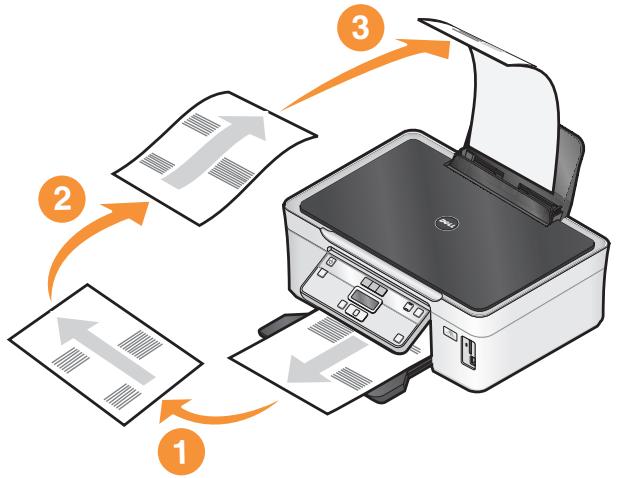
Printing on both sides of the paper (duplexing) manually
1 With a document open, click File → Print.
2 Click Properties, Preferences, Options, or Setup.
3 Click the Advanced tab.
4 From the 2-Sided Printing section, select Manual.
Note: The Print Instruction Page to Assist in Reloading item is selected automatically.
5 Click OK. The printer prints the odd-numbered pages and the instruction sheet.
6 Flip and reload the paper, following the directions on the instruction sheet to complete the print job.
flowchart
graph TD
    A["1: Paper Receipt"] --> B["2: Paper Collection"]
    B --> C["3: Printer Output"]
    C --> D["4: Paper Release"]
    D --> E["5: Paper Exit"]
Note: To return to single-sided printing, return to the Advanced tab. From the 2-Sided Printing section, select Off from the drop-down menu.
Working with photos
Using a memory card or flash drive with the printer
Memory cards and flash drives are storage devices frequently used with cameras and computers. You can remove the memory card from the camera or the flash drive from the computer and insert it directly into the printer.
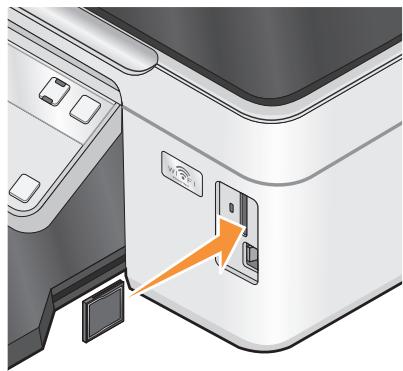
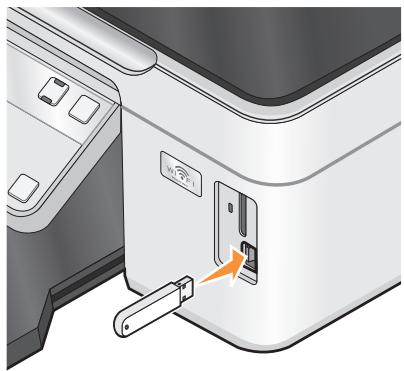
1 Insert a memory card into the card slot or a flash drive into the USB port.
Inserting a memory card
natural_image
Illustration of a printer with an orange arrow pointing to a device (no text or symbols visible)Inserting a flash drive
natural_image
Close-up of a white printer with a door and cable inserted, showing a close-up of the door (no text or symbols visible)Notes:
- Insert the card with the brand name label facing right.
- Make sure any arrows on the card point toward the printer.
- If necessary, connect the memory card to the adapter that came with it.
- Make sure that the memory card inserted is supported by the printer. For more information, see "Supported memory cards and file types" on page 36.
Notes:
- The flash drive uses the same port that is used for a PictBridge camera cable.
- An adapter may be necessary if your flash drive does not fit directly into the port.
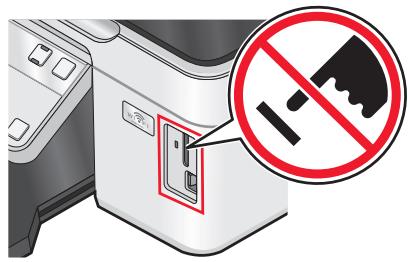
Warning—Potential Damage: Do not touch any cables, any network adapter, any connector, the memory device, or the printer in the areas shown while actively printing, reading, or writing from the memory card. A loss of data can occur.
2 Look for Memory Card Detected or Storage Device Detected on the display.
Notes:
- If the printer does not recognize the memory device, then remove and reinsert it.
- If a flash drive or a digital camera set to mass storage mode is inserted into the USB port while a memory card is in the card slot, then a message appears on the display prompting you to choose which memory device to use.
Supported memory cards and file types
| Memory Card | File Type |
| Secure Digital (SD)Micro Secure Digital (with adapter) (Micro SD)Mini Secure Digital (with adapter) (Mini SD)MultiMedia Card (MMC)Reduced Size MultiMedia Card (with adapter) (RS-MMC)MultiMedia Card mobile (with adapter) (MMCmobile)Memory StickMemory Stick PROMemory Stick Duo (with adapter)Memory Stick PRO Duo (with adapter)xD-Picture CardxD-Picture Card (Type H)xD-Picture Card (Type M)Secure Digital High Capacity (SDHC) | Documents: .doc (Microsoft Word).xls (Microsoft Excel).ppt (Microsoft PowerPoint).pdf (Adobe Portable Document Format).rtf (Rich Text Format).docx (Microsoft Word Open Document Format).xlsx (Microsoft Excel Open Document Format).pptx (Microsoft PowerPoint Open Document Format).wpd (WordPerfect)Images: JPEGTIFF |
Printing photos using the printer control panel
1 Load photo paper.
2 From the printer control panel, press 🔒.
3 Insert a memory card, flash drive, or digital camera set to mass storage mode.
If image files and document files are stored in the memory device, then press the arrow buttons to select Photos.
4 Press the arrow buttons to scroll to Easy Photo or Print Photos, and then press OK.
Notes:
- Select Easy Photo if you want to print photos quickly.
- Select Print Photos if you want to customize the photos before printing them.
5 Press the arrow buttons to select a photo printing option, and then press OK.
Note: You can choose to print the most recent photo, print all the photos, print photos that fall within a date range, print photos by selecting the photo numbers on a proof sheet, or print pre-selected photos from a digital camera using Digital Print Order Format (DPOF). The DPOF option appears only when there is a valid DPOF file in your memory device.
6 Adjust the print settings:
- If you are in the Easy Photo menu, then press the arrow buttons to select the paper size and photo size. Press OK each time you make a selection.
- If you are in the Print Photos menu, then press the arrow buttons to select the photo size, paper size, paper type, layout, photo effects, and quality of the photos, and to adjust the brightness and color effects of the photos. Press OK each time you make a selection.
7 Press the Color/Black button to set a color or black-and-white print.
When you select color or black-only printing, the light near your choice comes on.
8 Press ◆.
Note: For best results, allow the prints to dry at least 24 hours before stacking, displaying, or storing.
Printing photos from a memory device using the printer software
1 Load photo paper with the glossy or printable side faceup. (If you are not sure which side is the printable side, then see the instructions that came with the paper.)
2 From the printer control panel, press 🔒.
3 Insert a memory card, flash drive, or digital camera set to mass storage mode.
If document files and image files are stored on the memory device, then press the arrow buttons to scroll to Photos. Press OK.
4 Transfer or print the photos:
If the printer is using a USB connection
- Fast Pics launches automatically when you insert the memory device. Follow the instructions on the computer screen to transfer the photos to the computer or to print.
If the printer is using a Wireless connection (selected models only)
a Press the arrow buttons to scroll to Select Computer, and then press OK.
b Press the arrow buttons to select the network computer where you want to save the photos, and then press OK.
c Transfer or print the photos:
- Fast Pics launches on the computer. Follow the instructions on the computer screen to transfer the photos to the computer or to print.
Printing photos from a PictBridge-enabled digital camera
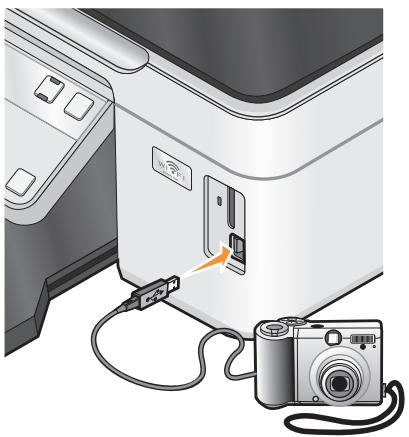
PictBridge is a technology available in most digital cameras that lets you print directly from your digital camera without using a computer.
1 Insert one end of the USB cable into the camera.
Note: Use only the USB cable that came with the camera.
2 Insert the other end of the cable into the PictBridge port on the front of the printer.
natural_image
Illustration of a printer with attached cable and camera, showing no text or symbolsNotes:
- Make sure that the PictBridge-enabled digital camera is set to the correct USB mode. If the camera USB selection is incorrect, then the camera is detected as a flash drive, or an error message will be displayed on the printer control panel. For more information, see the camera documentation.
- The printer reads only one memory device at a time.
Warning—Potential Damage: Do not touch the USB cable, any network adapter, any connector, or the printer in the area shown while actively printing from a PictBridge-enabled digital camera. A loss of data can occur.
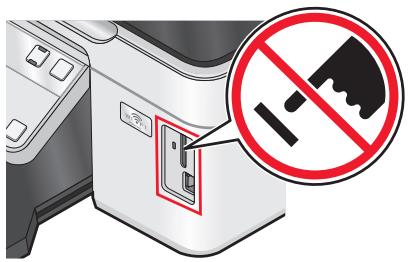
3 If the PictBridge connection is successful, then the following message appears on the display: PictBridge Camera detected. Press OK to change settings.
4 Press OK to access the PictBridge menu.
5 Press the arrow buttons to select the paper size, paper type, photo size, and layout of the photos that you want to print. Press OK each time you make a selection.
6 See the documentation for your camera to begin printing.
Note: If you insert the camera while the printer is performing another job, then wait for the job to finish before printing from the camera.
Printing photos from a memory device using the proof sheet
1 Load letter- or A4-size plain paper.
2 From the printer control panel, press 🔒.
3 Insert a memory card or flash drive.
4 Press the arrow buttons to scroll to Proof Sheet, and then press OK.
5 Press the arrow buttons to select an option to print a proof sheet.
You can print a proof sheet:
- For all photos on the memory device.
- For the 20 most recent photos, if there are 20 or more photos on the memory device.
- By date, if the photos on the card were taken on different dates. If you choose this option, then press the arrow buttons to set the start and end dates, and then press OK to save your selections.
6 Press ◊.
The proof sheet prints.
7 Follow the instructions on the proof sheet to select which photos to print, the number of copies per photo, red-eye reduction, page layout, print options, and paper size.
Note: When making selections, make sure to fill in the circles completely.
8 Load the proof sheet facedown on the scanner glass.
Scan Proof Sheet appears on the display.
Note: If this option does not appear on the display, then press the arrow buttons until it appears on the display.
9 Press ◊.
The printer scans the proof sheet.
10 Load photo paper with the glossy or printable side faceup. (If you are not sure which side is the printable side, then see the instructions that came with the paper.)
Note: Make sure that the paper matches the size that you selected on the proof sheet.
11 Press the Color/Black button to set a color or black-and-white print.
When you select color or black-only printing, the light near your choice comes on.
12 Press ◆ to print the photos.
Note: To prevent smudging or scratching, avoid touching the printed surface with your fingers or sharp objects. For best results, remove each printed sheet individually from the paper exit tray, and then allow the prints to dry at least 24 hours before stacking, displaying, or storing.
Printing photos from a digital camera using DPOF
If your camera supports Digital Print Order Format (DPOF), then you can specify which photos to print, how many of each, and the print settings while the memory card is still in the camera. The printer recognizes these settings when you insert the memory card into the printer or connect the camera to the printer.
Note: If you specify a photo size while the memory card is still in the camera, then make sure that the size of the paper loaded in the printer is not smaller than the size you specify in the DPOF selection.
1 Load photo paper with the glossy or printable side faceup. (If you are not sure which side is the printable side, then see the instructions that came with the paper.)
2 From the printer control panel, press 🔒.
3 Insert a memory card.
Memory Card Detected appears on the display.
4 Press the arrow buttons to scroll to Print Photos, and then press OK.
5 Press the arrow buttons to scroll to Print DPOF, and then press ◆ to print the photos.
Note: This option appears only if a DPOF file is detected in the memory card.
Note: To prevent smudging or scratching, avoid touching the printed surface with your fingers or sharp objects. For best results, remove each printed sheet individually from the paper exit tray, and allow the prints to dry at least 24 hours before stacking, displaying, or storing.
Printing from a Bluetooth-enabled device
- This printer is compliant with Bluetooth Specification 2.0. It supports the following profiles: Object Push Profile (OPP) and Serial Port Profile (SPP). Check with your Bluetooth-enabled device manufacturers (cellular phone or PDA) to determine their hardware compatibility and interoperability. It is recommended that you use the latest firmware on your Bluetooth-enabled device.
- To print Microsoft documents from your Windows Mobile/Pocket PC PDA, additional third-party software and drivers are required. For more information about the required software, see the documentation for your PDA.
Setting up a connection between your printer and a Bluetooth-enabled device
Note: The printer does not support printing files from your computer using a Bluetooth connection.
You need to set up a connection between a Bluetooth-enabled device and your printer if you are sending a print job from the Bluetooth device for the first time. You will need to repeat the setup if:
- You reset the printer to its factory default settings.
-
You change the Bluetooth security level or the Bluetooth pass key.
-
The Bluetooth-enabled device you are using requires users to set up a Bluetooth connection on every print job. For more information, see the documentation for your Bluetooth device.
- The name of the Bluetooth device you are using is automatically deleted from the Bluetooth device list.
When the Bluetooth security level is set to High, the printer saves a list of up to eight Bluetooth devices that have previously set up a connection with the printer. When the printer detects more than eight devices, the least recently used device is removed from the list. You need to repeat the setup of the deleted device to be able to send a print job to the printer.
Note: You need to set up a connection for each Bluetooth device that you use to send a print job to the printer.
To set up a connection between the printer and a Bluetooth-enabled device:
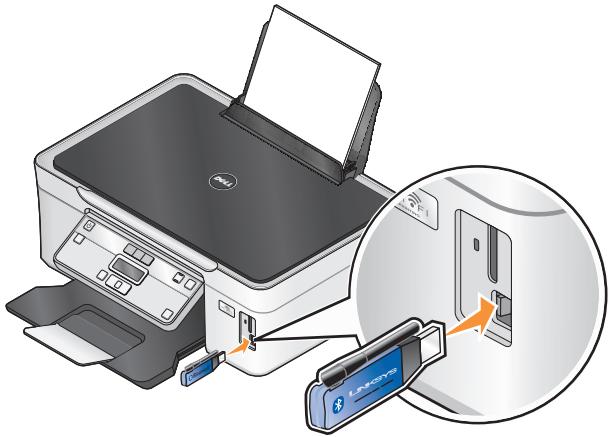
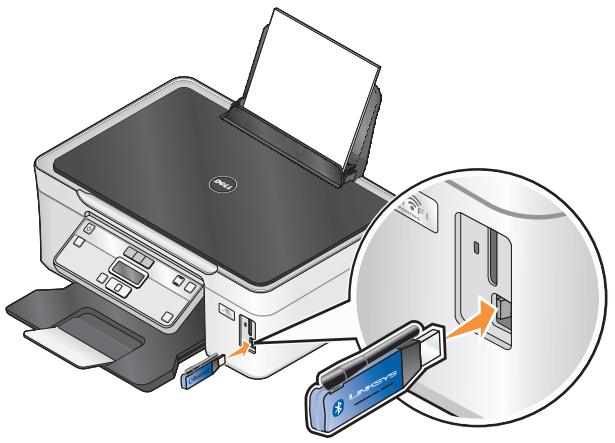
1 Insert a USB Bluetooth adapter into the USB port located on the front of the printer.
natural_image
Illustration of a printer being inserted into a device, showing paper and card placement (no text or symbols)Bluetooth Dongle Connected appears on the display.
Note: A Bluetooth adapter is not included with the printer.
2 From the printer control panel, press 📁.
3 Press the arrow buttons to scroll to Bluetooth Setup, and then press OK.
4 Press the arrow buttons to scroll to Discovery, and then press OK.
5 Make sure Discovery is set to On. If necessary, press the arrow buttons to scroll to On, and then press OK.
The printer is now ready to accept a connection from a Bluetooth-enabled device.
6 Configure the Bluetooth-enabled device to set up a connection to the printer. For more information, see the documentation for your Bluetooth device.
Note: If the Bluetooth Security Level on the printer is set to High, then you must enter a pass key.
Setting the Bluetooth security level
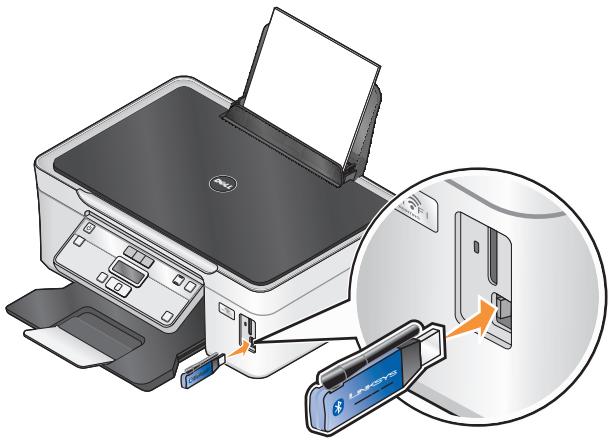
1 Insert a Bluetooth USB adapter into the USB port.
natural_image
Illustration of a printer being inserted into a device, showing the printer's internal structure and the printer's base (no text or symbols present)Bluetooth Dongle Connected appears on the display.
Note: A Bluetooth adapter is not included with the printer.
2 From the printer control panel, press 🔒.
3 Press the arrow buttons to scroll to Bluetooth Setup, and then press button OK.
4 Press the arrow buttons to scroll to Security Level, and then press OK.
5 Press the arrow buttons to select the security level, and then press OK.
- Select Low to allow Bluetooth devices to connect and send print jobs to your printer without requiring users to enter a pass key.
- Select High to require users to enter a four-digit numeric pass key on the Bluetooth device before connecting and sending print jobs to the printer.
6 The Bluetooth Pass Key menu appears on the display if you set the security level to High. Use the keypad to enter your four-digit pass key, and then press OK.
Printing from a Bluetooth-enabled device
Note: The printer does not support printing files from your computer using a Bluetooth connection.
1 Insert a USB Bluetooth adapter into the USB port.
natural_image
Illustration of a printer being inserted into a device, showing the printer's internal structure and the printer's base (no text or symbols present)Printing
Bluetooth Dongle Connected appears on the display.
Warning—Potential Damage: Do not touch cables, any network adapter, any connector, the USB Bluetooth adapter, or the printer in the areas shown while actively printing, reading, or writing from a Bluetooth-enabled device. A loss of data can occur.
Notes:
- A Bluetooth adapter is not included with the printer.
- Your printer automatically switches to Bluetooth mode when you insert a USB Bluetooth adapter.
2 Make sure the printer is set up to receive Bluetooth connections. For more information, see "Setting up a connection between your printer and a Bluetooth-enabled device" on page 40.
3 Set up the Bluetooth device to print to the printer. For more information, see the documentation for your Bluetooth device.
4 See the documentation for your Bluetooth device to begin printing.
Note: If the Bluetooth Security Level on the printer is set to High, you must enter a pass key.
Managing print jobs
Setting your printer as the default printer
Your printer should be selected automatically from the Print dialog when you send a print job. If you have to manually select your printer, then it is not the default printer.
To set the default printer:
1 Click 📋, or click Start and then click Run.
2 In the Start Search or Run box, type control printers.
3 Press Enter, or click OK.
The printer folder opens.
4 Right-click the printer, and then select Set as Default Printer.
Changing the printing mode
To conserve ink, you can change the default printing mode for all print jobs to Quick Print. It uses less ink and is ideal for printing text-only documents. If you need to change to a different print mode to print photos or other high-quality documents, then you can select a different mode from the Print dialog before sending the print job.
To change the default print mode:
1 Click 📋, or click Start and then click Run.
2 In the Start Search or Run box, type control printers.
3 Press Enter, or click OK.
The printer folder opens.
4 Right-click the printer, and then select Printing Preferences.
5 Select Quick Print as the printing mode.
Changing the printing mode for a single print job
1 With a document open, click File → Print.
2 Click Properties, Preferences, Options, or Setup.
3 Select Automatic, Quick Print, Normal, or Best.
Note: Printing in Draft mode uses less ink and is ideal for printing text documents.
Pausing print jobs
1 Click 📄, or click Start and then click Run.
2 In the Start Search or Run box, type control printers.
3 Press Enter, or click OK.
The printer folder opens.
4 Right-click the printer, and then select Pause Printing.
Resuming print jobs
1 Click 📄, or click Start and then click Run.
2 In the Start Search or Run box, type control printers.
3 Press Enter, or click OK.
The printer folder opens.
4 Right-click the printer, and then select Open.
5 Resume the print job:
- If you want to resume a particular print job, then right-click the document name, and then select Resume.
- If you want to resume all print jobs in the queue, then click Printer, and then clear the selection for Pause Printing.
Canceling print jobs
To cancel a print job from the printer control panel, press ✗. To cancel a print job from the computer, do the following:
1 Click 📄, or click Start and then click Run.
2 In the Start Search or Run box, type control printers.
3 Press Enter, or click OK.
The printer folder opens.
4 Right-click the printer, and then select Open.
5 Cancel the print job:
- If you want to cancel a particular print job, then right-click the document name, and then select Cancel.
- If you want to cancel all print jobs in the queue, then click Printer → Cancel All Documents.
Copying
| Automatic Document Feeder (ADF) | Scanner glass |
| Use the ADF for multiple-page documents.Note:The ADF is available only on selected models. If you purchased a printer without an ADF, then load original documents or photos on the scanner glass. | 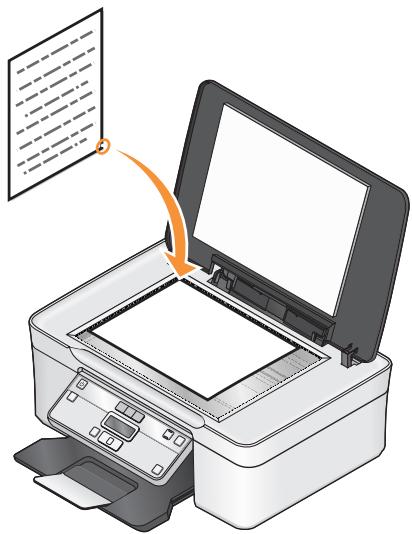 Use the scanner glass for single pages, small items (such as postcards or photos), transparencies, photo paper, or thin media (such as magazine clippings). Use the scanner glass for single pages, small items (such as postcards or photos), transparencies, photo paper, or thin media (such as magazine clippings). |
Tips for copying
- When using the ADF, adjust the paper guide on the ADF to the width of the original document.
- When using the scanner glass, close the top cover to avoid dark edges on the scanned image.
- Do not load postcards, photos, small items, transparencies, photo paper, or thin media (such as magazine clippings) into the ADF. Place these items on the scanner glass.
Making copies
1 Load paper.
2 Load an original document faceup into the ADF or facedown on the scanner glass.
3 From the printer control panel, press 📋.
4 Press the arrow buttons to select the number of copies, and then press the Color/Black button to set a color or black-and-white copy.
When you select color or black-only printing, the light near your choice comes on.
5 Press ◊.
Copying photos
1 Load photo paper with the glossy or printable side faceup. (If you are not sure which side is the printable side, then see the instructions that came with the paper.)
2 Place a photo facedown on the scanner glass.
3 From the printer control panel, press 📋.
4 Press OK until Photo Reprint appears.
5 Press the arrow buttons to scroll to Yes, and then press OK.
6 Press the arrow buttons to select the desired paper size, and then press OK.
7 Press ◊.
Note: To prevent smudging or scratching, avoid touching the printed surface with your fingers or sharp objects. For best results, remove each printed sheet individually from the paper exit tray, and allow the prints to dry at least 24 hours before stacking, displaying, or storing.
Enlarging or reducing images
1 Load paper.
2 Load an original document facedown on the scanner glass.
3 From the printer control panel, press 📋.
4 Press OK until Resize appears.
5 Press the arrow buttons until the setting that you want appears.
Notes:
- If you select Custom % Resize, then press OK, and then press the arrow buttons to select the desired custom percent value. Press OK to save the setting.
- If you select Borderless, then the printer will reduce or enlarge the document or photo as necessary to print a borderless copy on the paper size that you selected. For best results with this resize setting, use photo paper and set the paper type to Photo, or let the printer automatically detect the paper type.
6 Press ◆.
Note: After the copy job is finished, press ✗ to reset the settings to the default. The resize setting also switches to 100% after two minutes of printer inactivity.
Adjusting copy quality
1 Load paper.
2 Load an original document faceup into the ADF or facedown on the scanner glass.
3 From the printer control panel, press 📋.
4 Press OK until Quality appears.
5 Press the arrow buttons to set the copy quality to Automatic, Draft, Normal, or Photo, and then press OK to save your setting.
6 Press ◆.
Making a copy lighter or darker
1 Load paper.
2 Load an original document faceup into the ADF or facedown on the scanner glass.
3 From the printer control panel, press 🎨.
4 Press OK until Lighter/Darker appears.
5 Press the arrow buttons to adjust the slider, and then press OK to save your setting.
Note: Pressing the left arrow button makes the copy lighter, and pressing the right arrow button makes the copy darker.
6 Press ◆.
Collating copies using the printer control panel
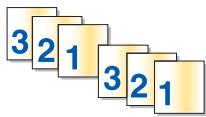
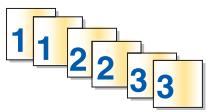
If you print multiple copies of a document, then you can choose to print each copy as a set (collated) or to print the copies as groups of pages (not collated).
Collated
Not collated
1 Load paper.
2 Load an original document faceup into the ADF or facedown on the scanner glass.
3 From the printer control panel, press 📋.
4 Press the arrow buttons to select the number of copies, and then press OK.
5 Press OK until Collate appears.
6 Press the arrow buttons to scroll to On.
7 Press ◆ to save the image to the printer memory.
8 When asked if you want to scan another page, press OK to select Yes.
9 Load the next page of the original document faceup into the ADF or facedown on the scanner glass, and then press OK.
10 Repeat steps 8 and 9 until all the pages that you want to copy have been saved to the printer memory.
11 When asked if you want to scan another page, press the arrow buttons to scroll to No, and then press OK to start printing the copies.
Repeating an image on one page
You can print the same page image multiple times on one sheet of paper. This option is helpful when creating items such as labels, decals, flyers, and handouts.
1 Load paper.
2 Load an original document faceup into the ADF or facedown on the scanner glass.
3 From the printer control panel, press 📋.
4 Press OK until Copies per Sheet appears.
5 Press the arrow buttons to select the number of times that an image is repeated on a page: once, four times, nine times, or 16 times.
6 Press ◊.
Copying multiple pages on one sheet
The Pages per Sheet setting lets you copy multiple pages on one sheet by printing smaller images of each page. For example, you can condense a 20-page document into five pages if you use this setting to print four page images per sheet.
1 Load paper.
2 Load an original document faceup into the ADF or facedown on the scanner glass.
3 From the printer control panel, press 📋.
4 Press OK until Pages per Sheet appears.
5 Press the arrow buttons to select the number of pages that you want to copy on a sheet of paper. You may choose to copy one, two, or four page images on a sheet.
Note: If you are copying four pages in landscape format, scan pages 3 and 4 first, and then scan pages 1 and 2.
6 Press ◆ to save the image of the page to the printer memory.
7 When asked if you want to scan another page, press OK to select Yes.
8 Load the next page of the original document faceup into the ADF or facedown on the scanner glass, and then press OK.
9 Repeat steps 7 and 8 until all the pages that you want to copy have been saved to the printer memory.
10 When asked if you want to scan another page, press the arrow buttons to scroll to No, and then press OK to start printing.
Making a duplex copy manually
1 Load paper.
2 Load an original document faceup into the ADF or facedown on the scanner glass.
3 From the printer control panel, press 📋.
4 Press the left or right arrow button to select the number of copies, and then press the Color/Black button to set a color or black-and-white copy.
When you select color or black-only printing, the light near your choice comes on.
5 Press ◆.
6 Load the next page of the document.
- If you are copying a one-sided document, then load the next page faceup into the ADF or facedown on the scanner glass.
- If you are copying a two-sided document, then flip the original document, and then reload it faceup into the ADF or facedown on the scanner glass.
7 Remove the paper from the paper exit tray, and then reload the paper to print the other side of the document.
flowchart
graph TD
    A["1: Paper Receipt"] --> B["2: Paper Collection"]
    B --> C["3: Printer Output"]
    C --> D["4: Paper Release"]
    D --> E["5: Paper Exit"]
8 Press ◆.
Canceling copy jobs
To cancel a copy job, press ✗.
Scanning stops and the printer returns to the previous menu.
Scanning
| Automatic Document Feeder (ADF) | Scanner glass |
| Use the ADF for multiple-page documents.Note:The ADF is available only on selected models. If you purchased a printer without an ADF, then load original documents or photos on the scanner glass. | Use the scanner glass for single pages, small items (such as postcards or photos), transparencies, photo paper, or thin media (such as magazine clippings). |
Tips for scanning
- When using the ADF, adjust the ADF paper guide to the width of the original document.
- When using the scanner glass, close the scanner lid to avoid dark edges on the scanned image.
- Do not load postcards, photos, small items, transparencies, photo paper, or thin media (such as magazine clippings) into the ADF. Place these items on the scanner glass.
- Select the PDF file type if you want to scan multiple pages and save them as one file.
Scanning to a local or network computer
1 Load an original document faceup into the ADF or facedown on the scanner glass.
2 From the printer control panel, press ◊.
3 Press the arrow buttons to scroll to Computer or Network, and then press OK.
4 Press the arrow buttons to select the name of a local or network computer, and then press OK.
The local or network computer is the destination that will receive the scan.
Notes:
- You may be prompted to enter a PIN if the computer requires it. Enter the PIN using the keypad.
- To assign a computer name and a PIN to the computer, see the Help for the printer software associated with your operating system.
5 Wait until the printer has finished downloading a list of the scan applications available on the selected computer.
6 Press the arrow buttons to select an application, and then press OK.
7 Press the arrow buttons to select the resolution quality and the original image size. Press OK each time you make a selection.
8 Press ◆ to start scanning.
The scan is complete when the application you selected in step 6 opens on the destination computer, and the scan appears within the application as a new file.
Scanning to a flash drive or memory card
Before you begin, make sure your flash drive or memory card is not write protected.
1 Load an original document faceup into the ADF or facedown on the scanner glass.
2 From the printer control panel, press ◊.
3 When Scan to appears on the display, insert the flash drive or memory card.
4 Press the arrow buttons to scroll to USB Flash Drive or Memory Card, and then press OK.
5 Press the arrow buttons to select the resolution quality, the type of output you want to create, and the original image size. Press OK each time you make a selection.
6 Press ◆ to start scanning.
The scan is complete when a message appears on the printer control panel indicating that the file you scanned has been saved.
Scanning photos into an editing application
Using the printer control panel
1 Load the photo or photos facedown on the scanner glass.
2 From the printer control panel, press
3 Press the arrow buttons to scroll to Computer or Network, and then press OK.
4 Press the arrow buttons to select the name of a local or network computer, and then press OK.
The local or network computer is the destination that will receive the scan.
5 Wait until the printer has finished downloading the list of scan applications available on the selected computer.
6 Press the arrow buttons to select a photo editing application, and then press OK.
7 Press the arrow buttons to select the resolution quality, the type of output you want to create, and the original image size. Press OK each time you make a selection.
8 Press ◆ to start scanning.
9 When asked if you want to scan another page, press OK to select Yes.
10 Load the next photo or photos facedown on the scanner glass, and then press OK.
11 Repeat steps 9 and 10 until all the photos that you want to scan are saved to the printer memory.
12 When asked if you want to scan another page, press the arrow buttons to scroll to No, and then press OK.
The scan is complete when the photo editing application you selected in step 6 opens on the destination computer, and the scan appears within the application as a new file.
Using the printer software
1 Load a photo or photos facedown on the scanner glass.
2 Click 📄 or Start.
3 Click All Programs or Programs, and then select the printer program folder from the list.
4 Select Printer Home.
5 Choose your printer from the printer drop-down list.
6 Click Photo.
- If you want to scan a single photo, or multiple photos as a single image, then select Single photo.
- If you want to scan multiple photos at once and save them as separate images, then select Split into individual photos.
Scanning starts and the scan progress dialog appears.
7 Save the photo or photos and open in a photo editing application to edit.
Scanning documents into an editing application
An Optical Character Recognition (OCR) application allows you to edit an original text document that has been scanned. In order for this to work, you must have an OCR application stored on a local or network computer and you must be able to choose it from the list of applications when you set up the scan.
When selecting settings for the scan:
- Select to scan to the local computer or network computer where the OCR is installed.
- Select to scan to the highest resolution.
1 Load an original document faceup into the ADF or facedown on the scanner glass.
2 Click 📄 or Start.
3 Click All Programs or Programs, and then select the printer program folder from the list.
4 Select Printer Home.
5 Choose your printer from the printer drop-down list.
6 Click Document.
Scanning starts and the scan progress dialog appears.
7 When the scan is finished, save the document in a word-processing application.
8 Open the document in the selected application to edit it.
Scanning directly to e-mail
1 Load an original document faceup into the ADF or facedown on the scanner glass.
2 Click 📄 or Start.
3 Click All Programs or Programs, and then select the printer program folder from the list.
4 Select Printer Home.
5 Choose your printer from the printer drop-down list.
6 Click Email, and then select Photo, Document or PDF.
Scanning starts and the scan progress dialog appears.
7 When the scan is finished, a new e-mail message is created with the scanned document automatically attached.
8 Compose your e-mail message.
Note: If your e-mail program does not open automatically, then you can scan the document to the computer and then send it through e-mail as an attachment.
Scanning to a PDF
1 Load an original document faceup into the ADF or facedown on the scanner glass.
2 Click 📄 or Start.
3 Click All Programs or Programs, and then select the printer program folder from the list.
4 Select Printer Home.
5 Choose your printer from the printer drop-down list.
6 Click PDF.
Scanning starts and the scan progress dialog appears.
7 Save the document as a PDF.
Scanning FAQ
How can I improve the quality of a scan?
- Make sure your original documents are in good condition.
- Make sure the application that receives the scanned document is appropriate. For example, if you are scanning a photo to edit it, then make sure you choose a photo editing application to receive the scan. If you are scanning a document to edit the text, then make sure you choose an OCR application.
- Use a high resolution.
How do I scan in black and white?
Color is the default for all scans. To scan in black and white, press the Color/Black button on the printer control panel to switch from color to black and white.
Why am I being asked for a PIN?
PINs are a security measure used to restrict the scanned information from going into certain locations, or to keep what is being scanned from being seen or used by others. You may be prompted to enter a PIN if the network computer you are scanning to require one.
To learn how PINs get assigned to network computers, see the Help for the printer software associated with your operating system.
What is an application list, and how do I update it?
When you scan a file, you can choose which application to use to open it on your computer. The printer downloads this application list from your computer when scanning for the first time. If you do not see the application you want on the list, or if you install new applications on your computer, then update the application list in the printer.
Updating the application list
1 From the printer control panel, press ≈.
2 Press the arrow buttons to scroll to Computer or Network.
3 Select a local or network computer to receive the scan and then press OK.
4 Select REFRESH from the list of scan applications.
This updates the application list in the printer.
Canceling scan jobs
Press ✗ on the printer control panel, or click Cancel on the computer screen.
Networking
Installing the printer on a wireless network
Wireless network compatibility
Your printer contains an IEEE 802.11 g wireless print server. Your printer is compatible with IEEE 802.11 b/g/n routers that are Wi-Fi certified. If you are having issues with an n router, verify with your router manufacturer that the current mode setting is compatible with g devices, as this setting varies depending on the router brand/model.
Supported network security options
The printer supports three wireless security options: no security, WEP, and WPA/WPA2.
No Security
It is not recommended to use no security at all on a home wireless network. Using no security means that anyone within range of your wireless network can use your network resources—including Internet access, if your wireless network is connected to the Internet. The range of your wireless network may extend far beyond the walls of your home, allowing access to your network from the street or from your neighbors' homes.
WEP
WEP (Wireless Equivalent Privacy) is the most basic and the weakest type of wireless security. WEP security relies on a series of characters called the WEP key.
Every device on the wireless network must use the same WEP key. WEP security can be used on both ad hoc and infrastructure networks.
A valid WEP key has:
- Exactly 10 or 26 hexadecimal characters. Hexadecimal characters are A–F, a–f, and 0–9
or - Exactly 5 or 13 ASCII characters. ASCII characters are letters, numbers, punctuation, and symbols found on a keyboard.
WPA/WPA2
WPA (Wi-Fi Protected Access) and WPA2 (Wi-Fi Protected Access 2) offer stronger wireless network security than WEP. WPA and WPA2 are similar types of security. WPA2 uses a more complex encryption method and is more secure than WPA. Both WPA and WPA2 use a series of characters, called the WPA pre-shared key or passphrase, to protect wireless networks from unauthorized access.
A valid WPA passphrase has:
- From 8 to 63 ASCII characters. ASCII characters in a WPA passphrase are case-sensitive.
or - Exactly 64 hexadecimal characters. Hexadecimal characters are A–F, a–f, and 0–9.
Every device on the wireless network must use the same WPA passphrase. WPA security is an option only on infrastructure networks with wireless access points and network cards that support WPA. Most newer wireless network equipment also offers WPA2 security as an option.
Note: If your network uses WPA or WPA2 security, then select WPA Personal when you are prompted to select the type of security your network uses.
Printing a network setup page
A network setup page lists the configuration settings of the printer, including the IP address and MAC address of the printer.
1 Load plain paper.
2 From the printer control panel, press 📋.
3 Press the arrow buttons to scroll to Network Setup, and then press OK.
Print Network Setup Page appears.
4 Press OK to print the network setup page.
Information you will need to set up the printer on a wireless network
To set up the printer for wireless printing, you need to know:
- The name of your wireless network. This is also known as the Service Set Identifier (SSID).
- If encryption was used to secure your network.
- The security key (either a WEP key or WPA passphrase) that allows other devices to communicate on the network if encryption was used to secure your network.
You can locate your network WEP key or WPA passphrase by accessing your wireless access point or router and checking the security information.
If your wireless access point (wireless router) is using Wired Equivalent Privacy (WEP) security, the WEP key should be:
- Exactly 10 or 26 hexadecimal characters. Hexadecimal characters are A–F, a–f, and 0–9.
or - Exactly 5 or 13 ASCII characters. ASCII characters are letters, numbers, punctuation, and symbols found on a keyboard.
If your wireless access point is using Wi-Fi Protected Access (WPA) security, the WPA passphrase should be:
- From 8 to 63 ASCII characters. ASCII characters in a WPA passphrase are case-sensitive.
or
- Exactly 64 hexadecimal characters. Hexadecimal characters are A-F, a-f, and 0-9.
If your wireless network is not using security, then you will not have a security key.
Note: If you do not know the SSID of the network that your computer is connected to, launch the wireless utility of the computer network adapter and look for the network name. If you cannot find the SSID or the security information for your network, see the documentation that came with the wireless access point, or contact your system support person.
Installing the printer on a wireless network
Before you install the printer on a wireless network, make sure that:
- Your wireless network is set up and working properly.
- The computer you are using is connected to the same wireless network where you want to set up the printer.
1 Close all open software programs.
2 Insert the installation software CD.
If the Welcome screen does not appear after a minute, then launch the CD manually:
a Click 📄, or click Start and then click Run.
b In the Start Search or Run box, type D:\setup.exe, where D is the letter of your CD or DVD drive.
3 Follow the instructions on the Welcome screen to set up the printer.
Installing the printer on other computers
Once the printer is set up on the wireless network, it can be accessed wirelessly by any other computer on the network. However, you will need to install the printer driver on every computer that will access it. You do not need to configure the printer again, although you will need to run the setup software on each computer to install the driver.
1 Close all open software programs.
2 Insert the installation software CD.
If the Welcome screen does not appear after a minute, then launch the CD manually:
a Click 📄, or click Start and then click Run.
b In the Start Search or Run box, type D:\setup.exe, where D is the letter of your CD or DVD drive.
3 Follow the instructions on the computer screen for installing a configured printer on a new computer.
Interpreting the colors of the Wi-Fi indicator light
The colors of the Wi-Fi indicator light show the network status of the printer.
- Off means one of the following:
- The printer is turned off or is powering up.
- The printer is not connected to a wireless network and is in Power Saver mode. In Power Saver mode, the power light pulses on and off.
• Solid orange means one of the following:
- The printer has not yet been configured for a wireless network.
- The printer is configured for an ad hoc connection, but it is not currently communicating with another ad hoc device.
- Blinking orange means one of the following:
- The printer is out of the range of the wireless access point (wireless router).
- The printer is trying to communicate with the wireless access point, but the wireless access point is turned off or not working properly.
- Either the configured printer or the wireless access point has been turned off and back on, and the printer is trying to establish communications with the network.
- The wireless settings of the printer may no longer be valid.
- Green means that the printer is connected to a wireless network and is ready for use.
Special wireless installation instructions
The following instructions apply to customers outside of North America who are using a wireless broadband box. Some examples of these boxes include LiveBox, AliceBox, N9UF Box, FreeBox, and Club Internet.
Before you begin
- Make sure your box is wireless-enabled and activated to work on a wireless network. For more information about configuring the box to work wirelessly, see the documentation that came with your box.
- Make sure your box is turned on and that your computer is on and connected to your wireless network.
Adding the printer to your wireless network
1 Set up your printer for wireless networking using the setup instructions provided.
Stop when you are prompted to select a network.
2 If there is an association/registration button on the back of your box, press it before selecting a network.
Note: After pressing the association/registration button, you have five minutes to complete the printer installation.
3 Return to the computer screen.
From the list that appears in the "Choose your wireless network" dialog, select your network, and then click Continue.
If your wireless network does not appear in the list:
a Select Unlisted Network, and then click Continue.
b Enter the details about your wireless network.
Note: Your WEP, WPA, or WPA2 key may be obtained from the bottom of the box, the user's guide that came with the box, or from the box Web page. If you have already changed the key for your wireless network, use the key you created.
4 Follow the instructions on your screen to complete installation.
Assigning a static IP address
The printer will be assigned an IP address automatically through DHCP on most wireless networks.
If you want to assign a static IP address to your printer, do the following:
1 Complete the wireless setup, allowing the printer to receive a DHCP address from a DHCP server on the network.
2 Print a network setup page to see what IP address is currently assigned to the printer.
3 Open a Web browser and then type the printer IP address in the address field. Press Enter.
The printer Web page loads.
4 Click the Configuration link.
5 Click the TCP/IP link.
6 Click the Set Static IP Address link.
7 Type the IP address you want to assign to the printer in the IP Address field.
8 Click the Submit button.
The Submitting Selection message appears.
To confirm that the address was successfully assigned, type the static IP address in the Web browser address field and then press Enter. The printer Web page loads if the address was successfully assigned.
For more information, contact your system support person.
Changing wireless settings after installation
To change wireless settings on the printer, such as the configured network, the security key, or other settings, do the following:
1 Click 📄 or Start.
2 Click All Programs or Programs, and then select the printer program folder from the list.
3 Select Printer Home.
4 Click the Settings tab.
5 Click the Wireless setup utility link.
6 Follow the instructions on the computer screen to configure the printer for wireless access with the new settings.
Advanced wireless setup
Creating an ad hoc wireless network
The recommended way to set up your wireless network is to use a wireless access point (wireless router). A network set up this way is called an infrastructure network. If you have an infrastructure network, you should configure the printer for use on that network.
Note: The printer can communicate on only one wireless network at a time. Configuring the printer for an ad hoc wireless network will keep it from working on any other wireless network, either ad hoc or infrastructure.
You can set up an ad hoc network if you:
- Do not have an access point or wireless router
- Do not already have a wireless network (but do have a wireless adapter for your computer)
- Want to set up a standalone network between the printer and a computer with a wireless network adapter
In Windows Vista
1 Click .
2 Click Control Panel.
3 Click Network and Internet.
4 Under Network and Sharing Center, click Connect to a Network.
5 In the Connect to a Network dialog, click Set up a wireless ad-hoc (computer-to-computer) network, and then click Next.
6 Follow the instructions in the "Set up a wireless ad hoc network" wizard. As part of the setup:
a Create a network name or SSID for the network between the computer and your printer.
b Write down the name of your network. Be sure to use the exact spelling and capitalization.
c Go to the Security Type list, select WEP, and then create a WEP key.
WEP keys must be:
- Exactly 10 or 26 hexadecimal characters. Hexadecimal characters are A-F, a-f, and 0-9. or
- Exactly 5 or 13 ASCII characters. ASCII characters are letters, numbers, and symbols found on a keyboard
d Write down the password for your network. Be sure to use the exact spelling and capitalization.
Windows Vista will enable the ad hoc network for you. It will appear in the "Connect to a network" dialog under "Available networks," indicating that the computer is configured for the ad hoc network.
7 Close the Windows Control Panel and any remaining windows.
8 Insert the installation software CD, and follow the directions for wireless installation.
Note: Do not connect the installation or network cables until instructed to do so by the setup software.
9 When the available networks are displayed, provide the network name and the security information you created in step 6. The installer will configure the printer for use with your computer.
10 Store a copy of your network name and security information in a safe place for future reference.
In Windows XP
1 Click Start.
2 Click Control Panel.
3 Click Network and Internet Connections.
4 Click Network Connections.
5 Right-click the icon for your wireless network connection.
6 Click Enable, if it appears in the pop-up menu.
Note: If Disable appears, your wireless connection is already enabled.
7 Right-click the Wireless Network Connection icon.
8 Click Properties.
9 Click the Wireless Networks tab.
Note: If the Wireless Networks tab does not appear, your computer has third-party software that controls your wireless settings. You must use that software to set up the ad hoc wireless network. For more information, see the documentation for the third-party software to learn how to create an ad hoc network.
10 Select the Use Windows to configure my wireless network settings check box.
11 Under Preferred Networks, delete any existing networks.
a Select the network to be removed.
b Click Remove to delete the network from the list.
12 Click Add to create an ad hoc network.
13 In the Network Name (SSID) box, type the name you want to give your wireless network.
14 Write down the network name you chose so you can refer to it when running the wireless setup. Be sure to use the exact spelling and capitalization.
15 If Network Authentication appears in the list, select Open.
16 In the "Data encryption" list, select WEP.
17 If necessary, clear the "The key is provided for me automatically" check box.
18 In the Network Key box, type in a WEP key.
19 Write down the WEP key you chose so you can refer to it when running the wireless setup. Make sure you copy it down exactly, including any capital letters.
20 In the "Confirm network key" box, type the same WEP key.
21 Select This is a computer-to-computer (ad hoc) network; wireless access points are not used.
22 Click OK twice to close the two open windows.
23 It may take a few minutes for your computer to recognize the new settings. To check on the status of your network:
a Right-click the Wireless Network Connections icon.
b Select View Available Wireless Networks.
- If the network is listed but the computer is not connected, select the ad hoc network and then click Connect.
- If the network does not appear, wait a minute and then click Refresh network list.
24 Insert the installation software CD, and follow the directions for wireless installation.
Note: Do not connect the installation or network cables until instructed to do so by the setup software.
25 When the available networks are displayed, provide the network name and the security information you created beginning in step 13. The installer will configure the printer for use with your computer.
26 Store a copy of your network name and security information in a safe place for future reference.
In Windows 2000
- Refer to the documentation that came with your wireless network adapter for information on configuring an ad hoc network with Windows 2000.
Adding a printer to an existing ad hoc wireless network
Note: The printer can communicate on only one wireless network at a time. Configuring the printer for an ad hoc wireless network will remove it from any other wireless network, either ad hoc or infrastructure, for which it is configured.
1 Click 📄 or Start.
2 Click All Programs or Programs, and then select the printer program folder from the list.
3 Select Printer Home.
4 Click the Settings tab.
5 Click Wireless setup utility link.
6 Follow the instructions on the computer screen.
Configuring the printer wirelessly using WPS (Wi-Fi Protected Setup)
Wi-Fi Protected Setup (WPS) is a method of configuring computers and printers on a secure wireless network. WPS is faster and eliminates typing errors when new devices are added to a wireless network. The SSID and WPA passphrase are automatically detected and configured for you. The printer supports WPS and can be configured for a wireless access using WPS. In order to use WPS to configure the printer, the wireless router must also support WPS.
If you want to use WPS to set up your printer, then insert the CD and follow the instructions on the computer screen.
Note: To use WPS to configure the printer wirelessly, all of the devices on your wireless network must support WPS. If any device on your network does not support WPS, then you must type the SSID and security information when prompted.
Switching between USB and wireless connections (Windows only)
You can change the way you access your printer, depending on your needs. The following procedures assume that you have configured your printer for one type of connection and that the printer drivers are installed on the computer. See related topics on troubleshooting specific connection types if you encounter difficulties during configuration.
Using the printer wirelessly
1 Click or Start.
2 Click All Programs or Programs, and then select the printer program folder from the list.
3 Select Printer Home.
4 Click the Settings tab.
5 Click the Wireless setup utility link.
6 Follow the instructions on the computer screen to set up the printer wirelessly.
Note: There is no need to remove the USB cable connecting the printer to the computer during wireless configuration.
Using the printer locally (USB)
1 Attach a USB cable to the computer and to the printer.
2 Wait a moment for Windows to locate the driver and finish setting up the printer.
Note: You can continue to use the printer wirelessly.
Sharing a printer in a Windows environment
1 Prepare the computers to share the printer:
a Make all computers printing to the printer accessible through Network Neighborhood by enabling File and Print Sharing. See the Windows documentation for instructions on enabling File and Print Sharing.
b Install the printer software on all computers that will print to the printer.
2 Identify the printer:
a On the computer that is attached to the printer, do one of the following:
1 Click 📋, or click Start and then click Run.
2 In the Start Search or Run box, type control printers.
3 Press Enter, or click OK. The printer folder opens
b Right-click the name of your printer.
c Click Sharing.
d From the Sharing tab, select Share this printer or Shared as, and then assign a distinctive name.
e Click OK.
3 Locate the printer from the remote computer:
Note: The remote computer is the one that is not attached to the printer.
a Do one of the following:
1 Click 📄, or click Start and then click Run.
2 In the Start Search or Run box, type control printers.
3 Press Enter, or click OK. The printer folder opens.
b Right-click the name of your printer.
c Click Properties.
d Click the Ports tab, and then click Add Port.
e Select Local Port, and then click New Port.
f Type the Universal Naming Convention (UNC) Port name, which consists of the server name and the distinctive printer name that was specified in step 2 on page 62. The name should be in the form \server\printer.
g Click OK.
h Click Close on the Printer Ports dialog.
i Make sure the new port is selected on the Ports tab, and then click Apply. The new port is listed with the printer name.
j Click OK.
Networking FAQ
What is Wi-Fi Protected Setup?
Wi-Fi Protected Setup (WPS) is a product certification that provides simple and secure configuration. WPS assists users in establishing wireless home networks and enabling network security without requiring prior knowledge of Wi-Fi technology. WPS configures the network name (SSID) and WPA passphrase for network devices. WPS only supports networks that communicate through access points or routers and is not applicable in ad hoc networks.
We support the following methods in adding new wireless network devices:
- Personal Identification Number (PIN)—A PIN from the new device is entered into the access point.
- Push Button Configuration (PBC)—The user pushes a button on both the access point and the new device.
Look for any of these identifier marks to check if your device is WPS certified:



You can find these WPS logos on the side, back, or top of your access point or router.
Where do I find my WEP key or WPA passphrase?
To find the WEP key or WPA passphrase for the wireless network, view the security settings on the access point or wireless router. Most access points have a Web page that can be accessed using a Web browser.
You can also check the manual that came with your access point or router. If your access point or router is using the default settings, you can find the information in the manual. If someone else set up your network for you, that person or company may have included the information in the manual.
If you do not know how to access the Web page, or if you do not have administrator access to the wireless access point on your network, and are unable to locate the information in the manual, contact your system support person.
What is an SSID?
A Service Set Identifier (SSID) is the name that identifies a wireless network. All devices on the network must know the SSID of the wireless network or they will not be able to communicate with each other. Usually, the wireless network broadcasts the SSID to allow wireless devices in the area to connect to it. Sometimes, the SSID is not broadcast for security reasons.
If the SSID of your wireless network is not broadcast, it cannot be detected automatically and will not show up in the list of available wireless networks. You must enter the network information manually in this situation.
An SSID can contain up to 32 alphanumeric characters.
Where do I find my SSID?
You can find the SSID for the wireless network by viewing the settings on the access point or wireless router. Most access points have a built-in Web server that can be accessed using a Web browser.
Many network adapters provide a software application that allows you to view the wireless settings of your computer, including your SSID. Check your computer to see if a program was installed with your network adapter.
If you are unable to locate your SSID using either of these methods, contact your system support person.
What is a network?
A network is a collection of devices such as computers, printers, Ethernet hubs, wireless access points, and routers connected together for communication through cables or through a wireless connection. A network can be wired, wireless, or designed to have both wired and wireless devices.
Devices on a wired network use cables to communicate with each other.
Devices on a wireless network use radio waves instead of cables to communicate with each other. For a device to be able to communicate wirelessly, it must have a wireless network adapter attached or installed that lets it receive and transmit radio waves.
How do I find out what type of security my network is using?
You must know the WEP key or WPA passphrase and the type of security (WEP, WPA, or WPA2) used on the wireless network. To obtain this information, see the documentation that came with your wireless access point (wireless router), see the Web page associated with the wireless access point, or consult your system support person.
Note: The WEP key or WPA passphrase is not the same as the password for the wireless access point. The password allows you to access the wireless access point settings. The WEP key or WPA passphrase allows printers and computers to join your wireless network.
How are home networks configured?
For desktop computers, laptops, and printers to communicate with each other over a network, they must be connected by cables and/or have wireless network adapters built in or installed in them.
There are many different ways a network can be set up. Four common examples appear below.
Note: The printers in the following diagrams represent printers with internal print servers built into them so that they can communicate over a network.
Wireless network examples
Scenario 1: Mixed wired and wireless connections on a network with Internet access
- All computers and printers connect to the network through a router with Ethernet and wireless capabilities.
- Some computers and printers connect wirelessly to the router; others connect over a wired connection.
- The network is connected to the Internet through a DSL or cable modem.
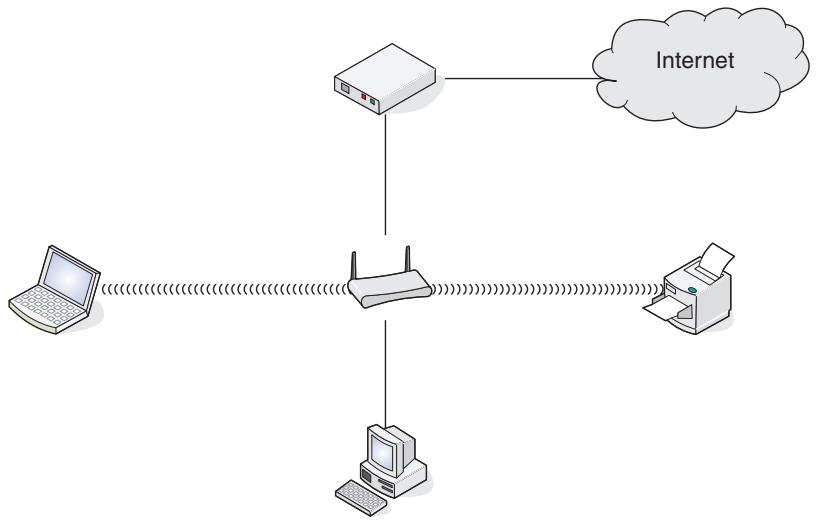
flowchart
graph TD
    A["Internet"] --> B["Router"]
    B --> C["Laptop"]
    B --> D["Printer"]
    B --> E["Printer"]
Scenario 2: Wireless network with Internet access
- All computers and printers connect to the network using a wireless access point or wireless router.
- The wireless access point connects the network to the Internet through a DSL or cable modem.
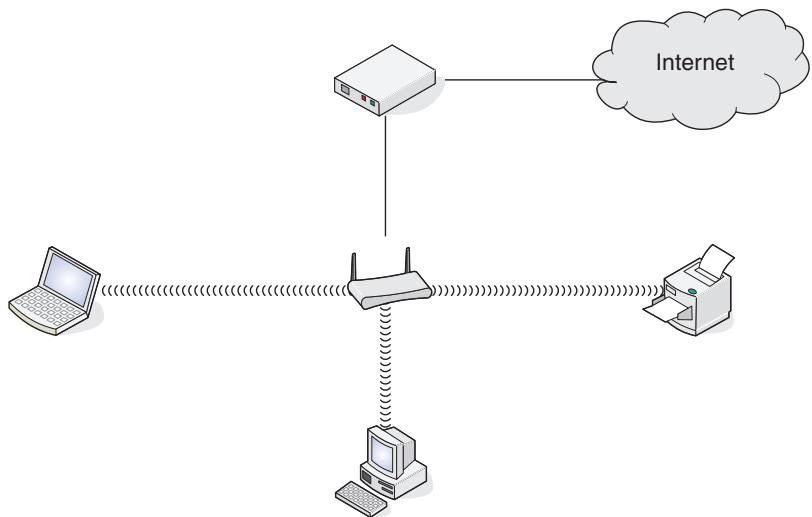
Scenario 3: Wireless network with no Internet access
- Computers and printers connect to the network using a wireless access point.
- The network has no connection to the Internet.
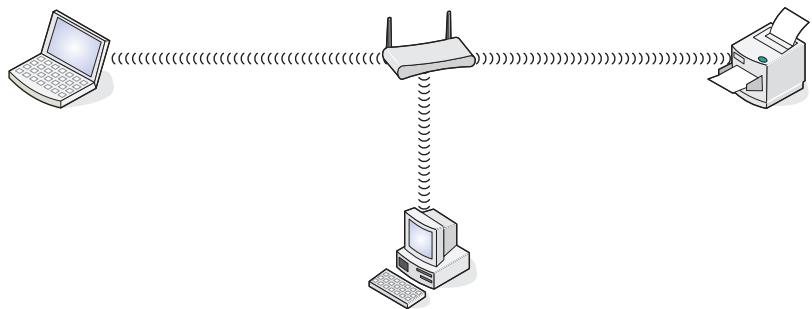
Scenario 4: Computer connected wirelessly to a printer without Internet access
- A computer is directly connected to a printer without going through a wireless router.
- This configuration is referred to as an ad hoc network.
- The network has no connection to the Internet.

natural_image
Illustration of a laptop and a printer with a QR code, no text or symbols presentNote: Most computers can connect to only one wireless network at a time. If you access the Internet over a wireless connection, you will lose Internet access if you are connected to an ad hoc network.
Why do I need an installation cable?
When setting up the printer on your wireless network, the printer will need to temporarily connect to a computer using the installation cable. This temporary connection is used to set up the wireless settings of the printer.
The installation cable connects to a rectangular USB port on the installing computer and the square USB port on the printer.
How do I attach the installation cable?
The installation cable attaches to a USB port on the computer and to the square connector on the back of the printer. This connection allows you to configure the printer for a networked or locally attached installation.
1 Attach the large, rectangular connector to any USB port on your computer. USB ports may be on the front or the back of the computer, and may be horizontal or vertical.
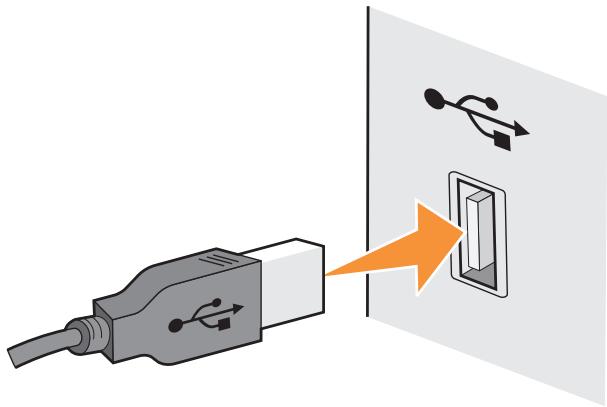
natural_image
Illustration of a USB plug connected to a switch, showing an orange arrow pointing to the switch (no text or symbols present)2 Attach the small, square connector to the printer.
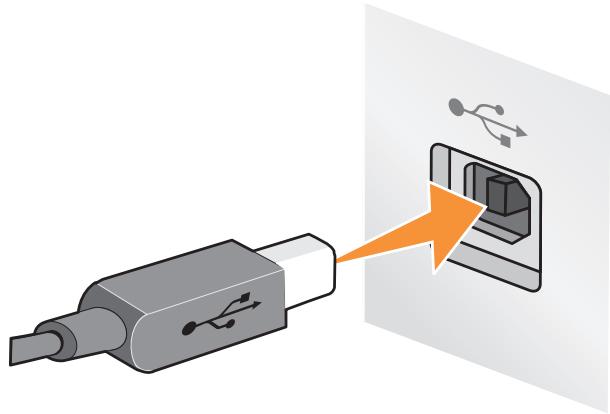
natural_image
Illustration of a USB connector with an orange arrow pointing to a device outlet (no text or symbols)3 Continue following the on-screen instructions.
How are infrastructure and ad hoc networks different?
Wireless networks can operate in one of two modes: infrastructure or ad hoc.
In infrastructure mode, all devices on a wireless network communicate with each other through a wireless router (wireless access point). Devices on the wireless network must have valid IP addresses for the current network and share the same SSID and channel as the wireless access point.
In ad hoc mode, a computer with a wireless network adapter communicates directly with a printer equipped with a wireless print server. The computer must have a valid IP address for the current network and be set to ad hoc mode. The wireless print server must be configured to use the same SSID and channel that the computer is using.
The following table compares the characteristics and requirements of the two types of wireless networks.
| Infrastructure | Ad hoc | |
| Characteristics | ||
| Communication | Through wireless access point | Directly between devices |
| Security | More security options | WEP or no security |
| Range | Determined by range and number of wireless access points | Restricted to range of individual devices on network |
| Speed | Usually faster | Usually slower |
| Requirements for all devices | ||
| Unique IP address for each device | Yes | Yes |
| Mode set to | Infrastructure mode | Ad hoc mode |
| Same SSID | Yes, including the wireless access point | Yes |
| Same channel | Yes, including the wireless access point | Yes |
We recommend setting up a network in infrastructure mode using the installation CD that came with the printer.
Infrastructure mode is the recommended setup method because it provides:
- Increased network security
- Increased reliability
- Faster performance
- Easier setup
Finding the signal strength
Wireless devices have built-in antennas that transmit and receive radio signals. The signal strength listed on the printer network setup page indicates how strongly a transmitted signal is being received. Many factors can affect the signal strength. One factor is interference from other wireless devices or other devices such as microwave ovens. Another factor is distance. The farther two wireless devices are from each other, the more likely it is that the communication signal will be weaker.
The strength of the signal received by your computer can also affect the connectivity of the printer with the network during configuration. When you installed the wireless adapter in your computer, the adapter software probably placed an icon in your system tray. Try double-clicking this icon, and it will tell you how strongly the computer is receiving the wireless signal from the network.
To improve signal quality, remove sources of interference and/or move wireless devices closer to the wireless access point (wireless router).
How can I improve wireless signal strength?
A common reason wireless printers fail to communicate over a network is poor wireless signal quality. If the signal is too weak, too distorted, or blocked by an object, it cannot carry information between the access point and the printer. To determine if the printer is receiving a strong signal from the access point, print a network setup page. The Quality field indicates the relative strength of the wireless signal the printer is receiving. Drops in signal strength can be intermittent, however, and although the signal quality appears high, it may drop during certain conditions.
If you think signal strength is a problem between your access point and the printer, try one or more of the following:
Notes:
- The solutions below are for infrastructure networks. If you are using an ad hoc network, adjust the computer when the solution suggests adjusting the access point.
- Ad hoc networks have a much shorter range than infrastructure networks. Try moving the printer closer to the computer if they seem to have trouble communicating.
MOVE THE PRINTER CLOSER TO THE WIRELESS ACCESS POINT/WIRELESS ROUTER
If the printer is too far away from the access point, it will not be able to communicate with other devices on the network. For most indoor wireless networks, the maximum distance between the access point and the printer is approximately 100 feet (30 meters). This distance could be longer or shorter, depending upon the layout of the network and the limitations of the access point.
REMOVE OBSTACLES BETWEEN THE ACCESS POINT AND THE PRINTER
The wireless signal from your access point will pass through most objects. Most walls, floors, furniture and other objects will not block the wireless signal. However, there are materials that are too dense for the signal to pass through. Objects containing metal and concrete can block the signal. Arrange your printer and access point so that the signal is not blocked by such objects.
REMOVE SOURCES OF INTERFERENCE
Other types of radio frequencies can cause problems with the wireless signal on your network. These sources of interference can cause printing issues that seem to come and go. Turn off potential sources of interference where possible. Avoid using microwaves and cordless phones when printing over your wireless network.
If another wireless network is operating in the vicinity, change the wireless channel on the access point.
Do not place your access point on a printer or other electronic device. Such devices can also interfere with the wireless signal.
ARRANGE THE NETWORK TO REDUCE SIGNAL ABSORPTION
Even when the wireless signal is able to pass through an object, it is slightly weakened. If it passes through too many objects, it can be significantly weakened. All objects absorb part of the wireless signal when it passes through them, and certain types of objects absorb enough to cause communications problems. Place your access point as high in the room as possible to avoid signal absorption.
How can I make sure my computer and printer are connected to the same wireless network?
If the printer is not on the same wireless network as the computer, you will not be able to print wirelessly. The SSID of the printer must match the SSID of the computer, if the computer is already connected to the wireless network.
1 Obtain the SSID of the network that the computer is connected to:
a Type the IP address of your wireless access point (wireless router) into the address field of your Web browser. If you do not know the IP address of the wireless access point:
1 Click 📄, or click Start and then click Run.
2 In the Start Search or Run box, type cmd.
3 Press Enter, or click OK.
The Command Prompt window opens.
4 Type ipconfig, and then press Enter. Check the Wireless Network Connection section:
- The "Default Gateway" entry is typically the wireless access point.
- The IP address appears as four sets of numbers separated by periods, such as 192.168.2.134.
b Type the user name and password of the router when prompted.
c Click OK.
d On the main page, click Wireless or any other selection where settings are stored. The SSID will be displayed.
e Write down the SSID.
Note: Make sure you copy it exactly, including any capital letters.
2 Print the printer network setup page.
In the Wireless section, look for SSID.
3 Compare the SSID of the computer and SSID of the printer.
If the SSIDs are the same, then the computer and the printer are connected to the same wireless network.
If the SSIDs are not the same, then run the utility again to set up the printer on the wireless network used by the computer.
Can I use my printer on a USB and a network connection at the same time?
Yes, the printer supports a simultaneous USB and network connection. The printer can be configured in the following ways:
- Locally attached (connected to a computer using a USB cable)
- Wireless network
- Wireless network and locally attached simultaneously
What is a MAC address?
A Media Access Control (MAC) address is a 48-bit identifier associated with the hardware of network equipment. The MAC address may also be called the physical address because it is connected to the hardware of a device instead of its software. The MAC address is displayed as a hexadecimal number in this format: 01-23-45-67-89-AB.
Every device capable of communicating on a network has a MAC address. Network printers, computers, and routers, whether Ethernet or wireless, all have MAC addresses.
While it is possible to change the MAC address of a network device, it is not common practice to do so. For this reason, MAC addresses are considered permanent. IP addresses are easily changed, so MAC addresses are a more reliable method of identifying a specific device on a network.
Routers with security capabilities may allow filtering of MAC addresses on networks. This allows a managed list of devices to access the network, identified by their MAC addresses. MAC address filtering can help prevent access on the network from unwanted devices, such as from intruders on a wireless network. MAC address filtering can also prevent legitimate access if you forget to add a new device to the router's list of allowed addresses. If your network uses MAC address filtering, be sure to add the MAC address of the printer to the list of allowed devices.
How do I find the MAC address?
Most network equipment has a unique hardware identification number to distinguish it from other devices on the network. This is called the Media Access Control (MAC) address.
When installing the printer on a network, make sure you select the printer with the correct MAC address.
The MAC address label is located inside the printer.
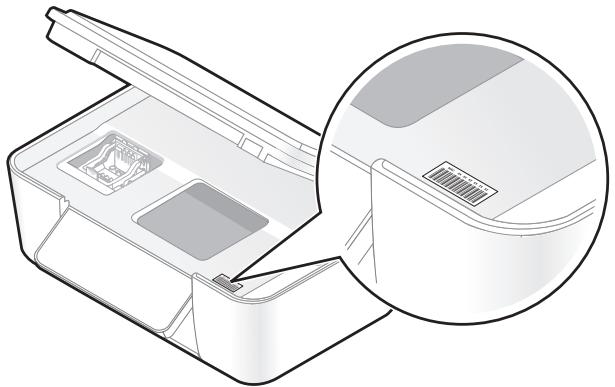
natural_image
Technical illustration of a printer's internal structure with an inset magnified view showing the exterior panel detail (no text or symbols present)The MAC address of the internal print server is a series of letters and numbers. Other devices sometimes use a type of MAC address called Universally Administered Address (UAA).
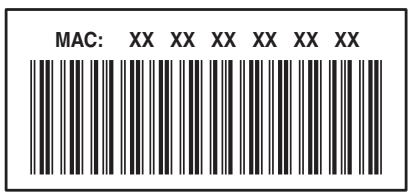
Note: A list of MAC addresses can be set on an access point (router) so that only devices with matching MAC addresses are allowed to operate on the network. This is called MAC filtering. If MAC filtering is enabled in your access point and you want to add a printer to your network, then the MAC address of the printer must be included in the MAC filter list.
What is an IP address?
An IP address is a unique number used by devices (such as a wireless printer, computer, or wireless access point) on an IP network to locate and communicate with each other. Devices on an IP network can communicate with each other only if they have unique and valid IP addresses. A unique IP address means no two devices on the same network have the same IP address.
An IP address is a group of four numbers separated by periods. An example of an IP address is 192.168.100.110.
What is TCP/IP?
Networks are able to function because computers, printers, and other devices are able to send data to each other, either through cables or by using wireless signals. This transfer of data is made possible by sets of data transmission rules called protocols. A protocol can be thought of as a language, and like a language, it has rules allowing participants to communicate with each other.
Different types of networks use different protocols, but Transmission Control Protocol/Internet Protocol (TCP/IP) is the most popular. TCP/IP is used to send data over the Internet as well as over most corporate and home networks.
Because computers do not understand words and instead rely upon numbers for communication, TCP/IP requires that every device on a network using TCP/IP to communicate must have an IP address. IP addresses are essentially unique computer names in a numeric format, used to transfer data around a network. IP addresses allow TCP/IP to confirm requests for and receipt of data by various devices on the network.
How do I locate IP addresses?
1 Click 📄, or click Start and then click Run.
2 In the Start Search or Run box, type cmd.
3 Press Enter, or click OK.
The Command Prompt window opens.
4 Type ipconfig, and then press Enter.
The IP address appears as four sets of numbers separated by periods, such as 192.168.0.100.
How to locate a printer IP address
- You can locate the printer IP address by viewing the printer network setup page.
How are IP addresses assigned?
An IP address may be assigned automatically by the network using DHCP. Once the printer is set up on a computer, the computer sends all print jobs across the network to the printer using this address.
If the IP address is not automatically assigned, you will be asked during wireless setup to manually enter an address and other network information after selecting your printer from the available list.
What is a key index?
A wireless access point (wireless router) can be configured with as many as four WEP keys. Only one key is used on the network at a time, however. The keys are numbered, and the number of a key is referred to as its key index. All devices on the wireless network must be configured to use the same key index when multiple WEP keys are configured on the wireless access point.
Select the same key index on your printer as you are using on your wireless access point.
Maintaining the printer
Maintaining ink cartridges
Checking ink levels
Using the printer control panel
1 From the printer control panel, press 🔒.
2 Press the arrow buttons to scroll to Maintenance, and then press OK.
3 Press OK again to select Ink Levels.
4 Press the arrow buttons to check the ink level in each cartridge.
Using the printer software
1 Click 📄 or Start.
3 Select Printer Home.
4 Choose your printer from the printer drop-down list.
5 From the Maintenance tab, click Check ink levels.
2 Click All Programs or Programs, and then select the printer program folder from the list.
Aligning the printhead
If the characters or lines on your printer image appear jagged or wavy, then you may need to align the printhead.
Using the printer control panel
1 Load plain paper.
2 From the printer control panel, press 🔒.
3 Press the arrow buttons to scroll to Maintenance, and then press OK.
4 Press the arrow buttons to scroll to Align Printer, and then press OK.
5 Press OK again.
An alignment page prints.
Note: Do not remove the alignment page until printing is finished.
Using the printer software
1 Load plain paper.
2 Click 📄 or Start.
3 Click All Programs or Programs, and then select the printer program folder from the list.
4 Select Printer Home.
5 Choose your printer from the printer drop-down list.
6 From the Maintenance tab, click Align cartridges.
7 Follow the instructions on the computer screen.
If you aligned the cartridges to improve print quality, then print your document again. If print quality has not improved, then clean the printhead nozzles.
Cleaning the printhead nozzles
Poor print quality is sometimes due to clogged printhead nozzles. Clean the printhead nozzles to improve the quality of your prints.
Notes:
- Cleaning the printhead nozzles uses ink, so clean them only when necessary.
- Deep cleaning uses more ink, so try the Clean Printhead option first to save ink.
- If the ink levels are too low, you must replace the ink cartridges before you can clean the printhead nozzles.
Using the printer control panel
1 From the printer control panel, press 🔊.
2 Press the arrow buttons to scroll to Maintenance, and then press OK.
3 Press the arrow buttons to scroll to Clean Printhead or Deep Clean Printhead, and then press OK.
4 Press OK to clean the printhead nozzles.
A cleaning page prints.
Using the printer software
1 Click 📄 or Start.
2 Click All Programs or Programs, and then select the printer program folder from the list.
3 Select Printer Home.
4 From the Maintenance tab, click Clean Cartridges.
Cleaning the exterior of the printer
1 Make sure that the printer is turned off and unplugged from the wall outlet.

CAUTION—SHOCK HAZARD: To avoid the risk of electric shock when cleaning the exterior of the printer, unplug the power cord from the wall outlet and disconnect all cables to the printer before proceeding.
2 Remove paper from the paper support and paper exit tray.
3 Dampen a clean, lint-free cloth with water.
Warning—Potential Damage: Do not use household cleaners or detergents, as they may damage the finish of the printer.
4 Wipe only the outside of the printer, making sure to remove any ink residue that has accumulated on the paper exit tray.
Warning—Potential Damage: Using a damp cloth to clean the interior may cause damage to your printer.
5 Make sure the paper support and paper exit tray are dry before beginning a new print job.
Cleaning the scanner glass
1 Dampen a clean, lint-free cloth with water.
2 Gently wipe the scanner glass clean.
Note: Make sure all ink or corrective fluid on a document is dry before placing the document on the scanner glass.
Troubleshooting
Before you troubleshoot
Use this checklist to solve most printer problems:
- Make sure the power cord is plugged into the printer and into a working electrical outlet.
- Make sure the printer is not plugged into any surge protectors, uninterrupted power supplies, or extension cords.
- Make sure the printer is turned on.
- Make sure the printer is securely connected to the host computer, print server, or other network access point.
- Check the printer for error messages, and resolve any errors.
- Check for paper jam messages, and clear any jams.
- Check the ink cartridges, and install new cartridges if necessary.
- Use the Service Center to locate and solve the problem (Windows only).
- Turn the printer off, wait about 10 seconds, and then turn the printer back on.
Using the Service Center to solve printer problems
The Service Center provides step-by-step troubleshooting help and contains links to printer maintenance tasks and customer support.
To open the Service Center, use one of these methods:
| Method 1 | Method 2 |
| If it appears on an error message dialog, click theFor additional assistance, use the Service Center link. | 1 Click 📋 or Start.2 Click All Programs or Programs, and then select the printer program folder from the list.3 Select Printer Home.4 From the Support tab, select Service Center. |
If Troubleshooting does not solve your problem
Visit our Web site at support.dell.com to find the following:
• Live online technical support
- Contact numbers for telephone technical support
Setup troubleshooting
- "Incorrect language appears on the display" on page 77
- "Printhead error" on page 77
- "Software did not install" on page 78
-
"Print job does not print or is missing pages" on page 79
-
"Printer is printing blank pages" on page 80
- "Printer is busy or does not respond" on page 80
- "Cannot delete documents from the print queue" on page 81
- "Cannot print through USB" on page 81
Incorrect language appears on the display
If the "Before you troubleshoot" checklist does not solve the problem, then try one or more of the following:
CHANGE THE LANGUAGE USING THE PRINTER MENUS
1 From the printer control panel, press 🔊.
2 Press the arrow buttons to scroll to Defaults, and then press OK.
3 Press the arrow buttons to scroll to Set Defaults, and then press OK.
4 Press the arrow buttons to scroll to Use Factory, and then press OK.
5 Complete the initial printer setup.
CHANGE THE LANGUAGE USING A BUTTON COMBINATION (IF YOU CANNOT READ THE CURRENT LANGUAGE)
1 Turn the printer off.
2 Press and hold down ◆ and ✗, and then press ⏻ to turn the printer on.
The printer resets and starts the initial printer setup.
3 Complete the initial printer setup.
Printhead error
If the "Before you troubleshoot" checklist does not solve the problem, then try the following:
REMOVE AND REINSERT THE PRINTHEAD
1 Open the printer and lift the latch.
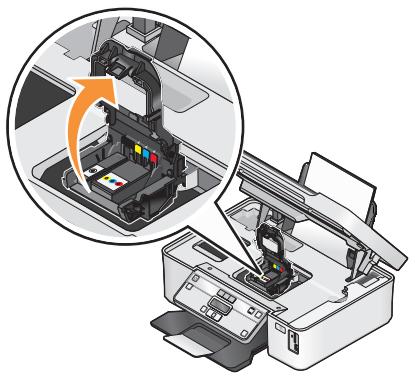
natural_image
Illustration of a printer with an inset showing internal components (no text or symbols visible)2 Remove the printhead.
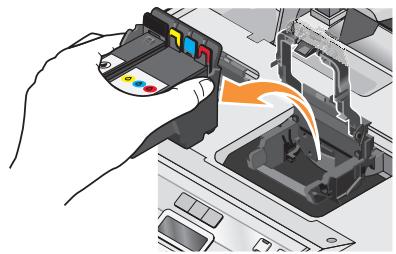
natural_image
Illustration of a hand inserting a color-coded component into a device (no text or symbols visible)3 Wipe the printhead contacts using a clean, lint-free cloth.
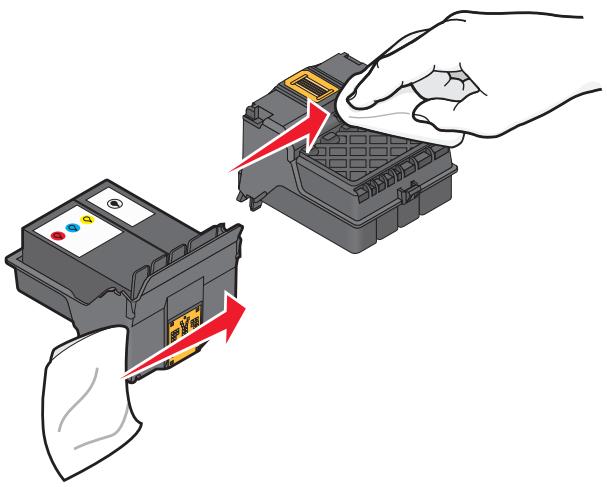
natural_image
Illustration of a hand inserting a component into a battery pack, showing red arrows indicating process (no text or symbols present)4 Reinsert the printhead.
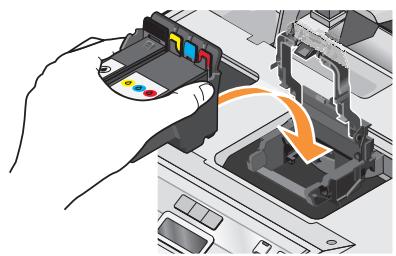
natural_image
Illustration of a hand inserting a color-coded component into an electronic device (no text or symbols visible)Note: If removing and reinserting the printhead does not resolve the error, then contact technical support.
Software did not install
If you encountered problems while installing, or if your printer does not appear in the list in the Printers folder or as a printer option when sending a print job, then try removing and reinstalling the software.
Before you reinstall the software, do the following:
MAKE SURE THAT YOUR COMPUTER MEETS THE MINIMUM SYSTEM REQUIREMENTS LISTED ON THE PRINTER BOX
TEMPORARILY DISABLE SECURITY PROGRAMS IN WINDOWS BEFORE INSTALLING THE SOFTWARE
CHECK THE USB CONNECTION
1 Check the USB cable for any obvious damage. If the cable is damaged, then use a new one.
2 Firmly plug the square end of the USB cable into the back of the printer.
3 Firmly plug the rectangular end of the USB cable into the USB port of the computer.
The USB port is marked with a USB symbol.
RECONNECT THE PRINTER POWER SUPPLY
1 Turn off the printer, and then unplug the power cord from the wall outlet.
2 Gently remove the power supply from the printer, and then reinsert it.
3 Plug the power cord into the wall outlet, and then turn on the printer.
Print job does not print or is missing pages
If the "Before you troubleshoot" checklist does not solve the problem, then try one or more of the following:
MAKE SURE THE INK CARTRIDGES ARE INSERTED CORRECTLY
1 Turn the printer on, and then open the printer.
2 Make sure the cartridges are inserted correctly.
The cartridges should click firmly into the matching color slot of the printhead.
3 Close the printer.
SELECT YOUR PRINTER FROM THE PRINT DIALOG BEFORE SENDING THE PRINT JOB
MAKE SURE THE PRINT JOB IS NOT PAUSED
MAKE SURE YOUR PRINTER IS SET AS THE DEFAULT PRINTER
RECONNECT THE PRINTER POWER SUPPLY
1 Turn off the printer, and then unplug the power cord from the wall outlet.
2 Gently remove the power supply from the printer, and then reinsert it.
3 Plug the power cord into the wall outlet, and then turn on the printer.
REMOVE AND RECONNECT THE USB CABLE CONNECTED TO YOUR PRINTER
CHECK THE USB CONNECTION
1 Check the USB cable for any obvious damage. If the cable is damaged, then use a new one.
2 Firmly plug the square end of the USB cable into the back of the printer.
3 Firmly plug the rectangular end of the USB cable into the USB port of the computer.
The USB port is marked with a ●→ USB symbol.
REMOVE AND REINSTALL THE PRINTER SOFTWARE
Printer is printing blank pages
Blank pages may be caused by improperly installed ink cartridges.
REINSTALL THE INK CARTRIDGES AND DEEP CLEAN AND ALIGN THE PRINthead
1 Reinstall the ink cartridges, see "Replacing ink cartridges" on page 13 for more information.
If the cartridges do not seem to fit, make sure the printhead is properly seated, and then try installing the cartridges again.
2 Load plain paper.
3 From the printer control panel, press 🔒.
4 Press the arrow buttons to scroll to Maintenance, and then press OK.
5 Press the arrow buttons to scroll to Deep Clean Printhead, and then press OK.
A cleaning page prints.
6 Press the arrow buttons to scroll to Align Printer, and the press OK.
An alignment page prints.
Note: Do not remove the alignment page until printing is finished.
Printer is busy or does not respond
If the "Before you troubleshoot" checklist does not solve the problem, then try one or more of the following:
MAKE SURE THE PRINTER IS NOT IN POWER SAVER MODE
If the power light is blinking on and off slowly, then the printer is in Power Saver mode. Press ⏻ to wake up the printer.
If the printer will not come out of Power Saver mode, then reset the power:
1 Unplug the power cord from the wall outlet, and then wait 10 seconds.
2 Insert the power cord into the wall outlet, and then turn on the printer.
If this problem persists, then check our Web site for updates for your printer software or firmware.
RECONNECT THE PRINTER POWER SUPPLY
1 Turn off the printer, and then unplug the power cord from the wall outlet.
2 Gently remove the power supply from the printer, and then reinsert it.
3 Plug the power cord into the wall outlet, and then turn on the printer.
Cannot delete documents from the print queue
If you have jobs stuck in the print queue and cannot delete them to get other jobs to print, then the computer and printer may not be communicating.
RESTART THE COMPUTER AND TRY AGAIN
Cannot print through USB
If the "Before you troubleshoot" checklist does not solve the problem, then try one or more of the following:
CHECK THE USB CONNECTION
1 Check the USB cable for any obvious damage. If the cable is damaged, then use a new one.
2 Firmly plug the square end of the USB cable into the back of the printer.
3 Firmly plug the rectangular end of the USB cable into the USB port of the computer.
The USB port is marked with a ●→ USB symbol.
MAKE SURE THE USB PORT IS ENABLED IN WINDOWS
1 Click 📄, or click Start and then click Run.
2 In the Start Search or Run box, type devmgmt.msc.
3 Press Enter, or click OK.
The Device Manager opens.
4 Click the plus sign (+) beside Universal Serial Bus controllers.
If USB Host Controller and USB Root Hub are listed, then the USB port is enabled.
For more information, see the computer documentation.
REMOVE AND REINSTALL THE PRINTER SOFTWARE
Jams and misfeeds troubleshooting
- "Paper jam in the printer" on page 81
- "Paper jam in the paper support" on page 82
- "Paper or specialty media misfeeds" on page 82
Paper jam in the printer
Note: The parts inside the printer are sensitive. Avoid unnecessarily touching these parts while clearing jams.
1 Press ⏻ to turn off the printer.
2 Check the paper tray or lift the scanner unit to check for jammed paper.
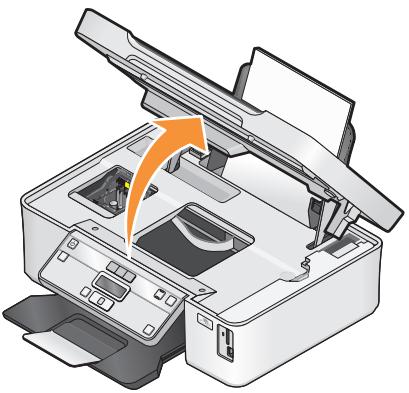
natural_image
Illustration of a printer printer with an orange arrow indicating the process (no text or symbols present)3 Firmly grasp the paper, and then gently pull it out.
Note: Be careful not to tear the paper while removing it.
4 Press ⏻ to turn the printer back on.
Paper jam in the paper support
Note: The parts inside the printer are sensitive. Avoid unnecessarily touching these parts while clearing jams.
1 Press ⏻ to turn off the printer.
2 Firmly grasp the paper, and then gently pull it out.
Note: Be careful not to tear the paper while removing it.
3 Press ⏻ to turn the printer back on.
Paper or specialty media misfeeds
These are possible solutions if paper or specialty media misfeeds or skews, or if multiple sheets feed or stick together. Try one or more of the following:
CHECK PAPER CONDITION
Use only new, unwrinkled paper.
CHECK PAPER LOADING
- Load a smaller amount of paper into the printer.
- Load paper with the print side faceup. (If you are not sure which side is the printable side, see the instructions that came with the paper.)
- Check the loading instructions for your paper or specialty media.
REMOVE EACH PAGE AS IT IS PRINTED
ADJUST THE PAPER GUIDES TO FIT THE LOADED PAPER
Print troubleshooting
- "Poor quality at the edges of the page" on page 83
- "Streaks or lines on printed image" on page 83
- "Print speed is slow" on page 84
- "Computer slows down when printing" on page 84
Poor quality at the edges of the page
If the "Before you troubleshoot" checklist does not solve the problem, then try one or more of the following:
CHECK MINIMUM PRINT SETTINGS
Unless you are using the borderless feature, use these minimum print margin settings:
• Left and right margins:
- 6.35 mm (0.25 in.) for letter-size paper
- 3.37 mm (0.133 in.) for all paper sizes except letter
- Top margin: 1.7 mm (0.067 in.)
• Bottom margin: 12.7 mm (0.5 in.)
SELECT THE BORDERLESS PRINT FEATURE
1 With a document or photo open, click File → Print.
2 Click Properties, Preferences, Options, or Setup.
3 From the Paper Options section of the Print Setup tab, select Borderless.
Streaks or lines on printed image
If the "Before you troubleshoot" checklist does not solve the problem, then try one or more of the following:
CHECK THE INK LEVELS
Replace low or empty ink cartridges.
SELECT A HIGHER PRINT QUALITY FROM THE PRINTER SOFTWARE
MAKE SURE THE INK CARTRIDGES ARE PROPERLY INSTALLED
ALIGN THE PRINTHEAD
CLEAN OR DEEP CLEAN THE PRINTHEAD NOZZLES
Note: If these solutions do not remove the streaks or lines on the printed image, then contact technical support.
Print speed is slow
If the "Before you troubleshoot" checklist does not solve the problem, then try one or more of the following:
MAXIMIZE COMPUTER PROCESSING SPEED
- Close all applications not in use.
- Minimize the number and size of graphics and images in the document.
- Remove as many unused fonts as possible from your system.
ADD MEMORY
Consider purchasing more RAM.
SELECT A LOWER PRINT QUALITY FROM THE PRINTER SOFTWARE
MANUALLY SELECT A PAPER TYPE THAT MATCHES THE TYPE OF PAPER YOU ARE USING
REMOVE AND REINSTALL THE PRINTER SOFTWARE
Computer slows down when printing
These are possible solutions. Try one of the following:
IF YOU ARE USING A USB CONNECTION, THEN TRY A DIFFERENT USB CABLE
IF YOU ARE ON A NETWORK, THEN RESET THE POWER OF THE ACCESS POINT (ROUTER)
1 Unplug the power cord from the access point.
2 Wait ten seconds, and then insert the power cord.
Copy and scan troubleshooting
- "Copier or scanner does not respond" on page 85
- "Scanner unit does not close" on page 85
- "Poor copy or scanned image quality" on page 85
- "Partial copies or scans of documents or photos" on page 85
- "Scan was not successful" on page 86
- "Scanning takes too long or freezes the computer" on page 86
- "Cannot scan to a computer over a network" on page 86
Copier or scanner does not respond
If the "Before you troubleshoot" checklist does not solve the problem, then try one or more of the following:
SET YOUR PRINTER AS THE DEFAULT PRINTER
REMOVE AND REINSTALL THE PRINTER SOFTWARE
Scanner unit does not close
1 Lift the scanner unit.
2 Remove any obstruction keeping the scanner unit open.
3 Lower the scanner unit.
Poor copy or scanned image quality
If the "Before you troubleshoot" checklist does not solve the problem, then try one or more of the following:
CLEAN THE SCANNER GLASS
ADJUST THE SCAN QUALITY FROM THE PRINTER SOFTWARE
REVIEW THE TIPS FOR COPYING, SCANNING, AND IMPROVING PRINT QUALITY
USE A CLEARER VERSION OF THE ORIGINAL DOCUMENT OR IMAGE
MAKE SURE THE DOCUMENT OR PHOTO IS LOADED FACEDOWN ON THE SCANNER GLASS AND IN THE CORRECT CORNER
Partial copies or scans of documents or photos
If the "Before you troubleshoot" checklist does not solve the problem, then try one or more of the following:
MAKE SURE THE DOCUMENT OR PHOTO IS LOADED FACEDOWN ON THE SCANNER GLASS AND IN THE CORRECT CORNER
SELECT A PAPER SIZE FROM THE PRINTER SOFTWARE THAT MATCHES THE LOADED PAPER
MAKE SURE THE ORIGINAL SIZE SETTING MATCHES THE SIZE OF THE DOCUMENT YOU ARE SCANNING
Scan was not successful
If the "Before you troubleshoot" checklist does not solve the problem, then try one or more of the following:
CHECK THE USB CONNECTION
1 Check the USB cable for any obvious damage. If the cable is damaged, then use a new one.
2 Firmly plug the square end of the USB cable into the back of the printer.
3 Firmly plug the rectangular end of the USB cable into the USB port of the computer.
The USB port is marked with a ●→ USB symbol.
RESTART THE COMPUTER
Scanning takes too long or freezes the computer
If the "Before you troubleshoot" checklist does not solve the problem, then try one or more of the following:
CLOSE OTHER SOFTWARE PROGRAMS THAT ARE NOT BEING USED
USE A LOWER SCANNING RESOLUTION
Cannot scan to a computer over a network
If the "Before you troubleshoot" checklist does not solve the problem, then try one or more of the following:
MAKE SURE THE PRINTER AND THE DESTINATION COMPUTER ARE CONNECTED TO THE SAME NETWORK
MAKE SURE THE PRINTER SOFTWARE IS INSTALLED ON THE DESTINATION COMPUTER
Memory card troubleshooting
- "Memory card troubleshooting checklist" on page 86
- "Nothing happens when a memory card is inserted" on page 87
- "Cannot print documents from a memory card or flash drive" on page 87
- "Photos do not transfer from a memory card across a wireless network" on page 87
Memory card troubleshooting checklist
Before you troubleshoot, use the following checklist to solve most memory card problems:
- Make sure you insert the memory card into the correct slot.
- Make sure the memory card is not damaged.
- Make sure memory card contains supported file types.
- Make sure that the memory card you are using can be used in the printer.
Nothing happens when a memory card is inserted
If the "Memory card troubleshooting checklist" does not solve the problem, then try one or more of the following:
The memory card may have been inserted too slowly. Remove and then reinsert the memory card quickly.
CHECK THE USB CONNECTION
1 Check the USB cable for any obvious damage. If the cable is damaged, then use a new one.
2 Firmly plug the square end of the USB cable into the back of the printer.
3 Firmly plug the rectangular end of the USB cable into the USB port of the computer.
The USB port is marked with a ●→ USB symbol.
CHECK THE NETWORK CONNECTION
If the printer and computer are connected over a network, then make sure that the correct host and device are communicating. Select the printer from the computer or the computer from the printer.
Cannot print documents from a memory card or flash drive
If the "Memory card troubleshooting checklist" does not solve the problem, then try the following:
CHECK THE USB CONNECTION
1 Check the USB cable for any obvious damage. If the cable is damaged, then use a new one.
2 Firmly plug the square end of the USB cable into the back of the printer.
3 Firmly plug the rectangular end of the USB cable into the USB port of the computer.
The USB port is marked with a USB symbol.
CHECK THE NETWORK CONNECTION
If the printer and computer are connected over a network, then make sure that the correct host and device are communicating. Select the printer from the computer or the computer from the printer.
Photos do not transfer from a memory card across a wireless network
If the "Memory card troubleshooting checklist" does not solve the problem, then try one or more of the following:
MAKE SURE THAT BOTH THE PRINTER AND THE DESTINATION COMPUTER ARE TURNED ON AND READY
SET YOUR PRINTER AS THE DEFAULT PRINTER FROM THE DESTINATION COMPUTER
SELECT THE CORRECT COMPUTER NAME FROM THE SCAN DESTINATION LIST ON THE PRINTER
MAKE SURE YOUR WIRELESS NETWORK IS CONNECTED AND ACTIVE
If your wireless connection is down, then use a USB cable to connect your printer to your computer.
Wireless troubleshooting
- "Wireless troubleshooting checklist" on page 88
- "Resetting the wireless settings to factory defaults" on page 89
- "Cannot print over wireless network" on page 89
- "The Continue button is unavailable" on page 91
- "Cannot print and there is a firewall on the computer" on page 92
- "Wi-Fi indicator light is not lit" on page 93
- "Wi-Fi indicator light is green but the printer does not print (Windows only)" on page 93
- "Wi-Fi indicator light is still orange" on page 94
- "Wi-Fi indicator light is blinking orange during installation" on page 95
- "Wireless print server not installed" on page 98
- “Communication not available” message displays when printing wirelessly” on page 98
- "Communication with printer lost when connected to Virtual Private Network (VPN)" on page 100
- "Resolving intermittent wireless communications issues" on page 100
Wireless troubleshooting checklist
Before beginning to troubleshoot the wireless printer, verify the following:
- The printer, the computer, and the wireless access point are all plugged in and turned on.
-
The wireless network is working properly.
Try accessing other computers on your wireless network.
If your network has Internet access, try connecting to the Internet over a wireless connection. -
Your SSID is correct.
Print a network setup page to verify the SSID the printer is using.
If you are not sure if your SSID is correct, then run the wireless setup again.
- Your WEP key or WPA passphrase is correct (if your network is secure).
Log into the wireless access point (wireless router) and check the security settings.
A security key is like a password. All devices on the same wireless network using WEP, WPA, or WPA2 share the same security key.
If you are not sure if your security information is correct, run the wireless setup again.
- The printer and the computer are within the range of the wireless network.
For most networks, the printer and the computer should be within 100 feet (30 meters) of the wireless access point (wireless router).
- The Wi-Fi indicator light is lit and is solid green.
- The printer driver is installed on the computer from which you are performing a task.
- The correct printer port is selected.
- The computer and printer are both connected to the same wireless network.
- The printer is located away from obstacles or electronic devices that could interfere with the wireless signal.
Make sure the printer and wireless access point are not separated by poles, walls, or support columns containing metal or concrete.
Many devices can interfere with the wireless signal, including baby monitors, motors, cordless phones, security system cameras, other wireless networks, and some Bluetooth devices.
Resetting the wireless settings to factory defaults
1 From the printer control panel, press 🔒.
2 Press the arrow buttons to scroll to Network Setup, and then press OK.
3 Press the arrow buttons to scroll to Reset Network Adapter to Factory Defaults, and then press OK.
4 Press the arrow buttons to scroll to Yes, and then press OK.
The printer wireless settings are reset to factory default settings. To verify, print a network setup page.
Cannot print over wireless network
If you encountered problems while installing, or if your printer does not appear in the printers folder or as a printer option when sending a print job, then you can try uninstalling and reinstalling the software.
Before you reinstall the software, check the troubleshooting checklist, and then do the following:
MAKE SURE YOUR COMPUTER IS CONNECTED TO YOUR WIRELESS ACCESS POINT (WIRELESS ROUTER)
• See if you have access to the Internet by opening your Web browser and accessing any site.
- If there are other computers or resources on your wireless network, then check to see if you can access them from your computer.
MOVE THE COMPUTER AND/OR PRINTER CLOSER TO THE WIRELESS ROUTER
Although the possible distance between devices in 802.11b or 802.11g networks is 300 feet, the maximum range for optimal performance is generally 100-150 feet.
MOVE YOUR ACCESS POINT AWAY FROM OTHER ELECTRONIC DEVICES
There may be temporary interference from electronic devices such as microwave ovens or other appliances, cordless phones, baby monitors, and security system cameras. Make sure your access point is not positioned too closely to these devices.
MAKE SURE THAT YOUR COMPUTER AND PRINTER ARE CONNECTED TO THE SAME WIRELESS NETWORK
If the printer is not on the same wireless network as the computer, you will not be able to print wirelessly. The SSID of the printer must match the SSID of the computer, if the computer is already connected to the wireless network.
1 Obtain the SSID of the network that the computer is connected to.
a Type the IP address of your wireless access point (wireless router) into the address field of your Web browser. If you do not know the IP address of the wireless access point:
1 Click 📄, or click Start and then click Run.
2 In the Start Search or Run box, type cmd.
3 Press Enter or click OK.
The Command Prompt window opens.
4 Type ipconfig, and then press Enter. Check the Wireless Network Connection section:
- The "Default Gateway" entry is typically the wireless access point.
- The IP address appears as four sets of numbers separated by periods, such as 192.168.2.134.
b Type the user name and password of the router when prompted.
c Click OK.
d On the main page, click Wireless or any other selection where settings are stored. The SSID will be displayed.
e Write down the SSID.
Note: Make sure you copy it exactly, including any capital letters.
2 Print the printer network setup page.
In the Wireless section, look for SSID.
3 Compare the SSID of the computer and SSID of the printer.
If the SSIDs are the same, then the computer and the printer are connected to the same wireless network.
If the SSIDs are not the same, then run the utility again to set up the printer on the wireless network used by the computer.
CHECK YOUR WEP KEY OR WPA PASSPHRASE
If your wireless access point is using Wireless Equivalent Privacy (WEP) security, then the WEP key should be:
- Exactly 10 or 26 hexadecimal characters. Hexadecimal characters are A–F, a–f, and 0–9. or
- Exactly 5 or 13 ASCII characters. ASCII characters are letters, numbers, and symbols found on a keyboard. ASCII characters in a WEP key are case-sensitive.
If your wireless access point is using Wi-Fi Protected Access (WPA) security, then the WPA passphrase should be:
- From 8 to 63 ASCII characters. ASCII characters in a WPA passphrase are case-sensitive. or
- Exactly 64 hexadecimal characters. Hexadecimal characters are A–F, a–f, and 0–9.
Note: If you do not know this information, then see the documentation that came with the wireless network, or contact the person who set up your wireless network.
DISCONNECT FROM VPN SESSION
When you are connected to another network through a VPN connection, you will not be able to access the printer over your wireless network. End your VPN session and try printing again.
CHECK YOUR ADVANCED SECURITY SETTINGS
- If you are using MAC address filtering to limit access to your wireless network, then you must add the printer MAC address to the list of addresses allowed to connect to the wireless access point.
- If you set the wireless access point to issue a limited number of IP addresses, then you must change this so that the printer can be added.
Note: If you do not know how to make these changes, then see the documentation that came with the wireless network, or contact the person who set up your wireless network.
The Continue button is unavailable
Try the following solutions in the order they appear until the Continue button becomes active and can be clicked:
CHECK IF THE USB CABLE IS SECURELY PLUGGED INTO THE USB PORTS ON BOTH THE COMPUTER AND THE PRINTER
USB ports are marked with the symbol.
MAKE SURE THAT THE PRINTER IS PLUGGED IN AND TURNED ON
Check to see if the ⏻ button is lit. If you have just turned on the printer, then you might need to disconnect the USB cable and reconnect it.
MAKE SURE THAT THE USB PORT ON THE COMPUTER IS WORKING
Test the USB port by connecting other devices to it. If you can successfully use other devices from the port, then the port is working.
If the USB port on the computer is not working, then try using the other USB ports on the computer.
MAKE SURE THAT THE USB CABLE IS WORKING
Try using a different USB cable. If you are using a cable longer than 10 feet, then try using a shorter cable.
MAKE SURE THAT YOU ARE USING THE CORRECT CD FOR YOUR PRINTER MODEL
Compare the printer model on the CD to the printer model on the printer. The numbers should either match exactly or be within the same series.
If you have any doubts, look for an updated version of the printer software on our Web site. For more information, see "Installing the printer software" in the User's Guide. You can access the User's Guide from the link at the bottom of the installation screen.
RECONNECT THE POWER SUPPLY
1 Turn off the printer.
2 Unplug the power cord from the power outlet.
3 Remove the power supply from the back of the printer and then plug it back in.
4 Plug the power cord back into the power outlet.
5 Turn on the printer, and then resume the installation on your computer.
1 Close the installer.
2 Remove the CD, and then restart the computer.
3 Insert the CD and then run the installer again.
Notes:
- When you get to the Software Already Installed screen, make sure you select Install a printer.
- If you have already set up your printer, select Additional Computer when you get to the Setting up a new printer? screen to skip the hardware setup wizard.
CHECK THAT YOUR COMPUTER IS ABLE TO ACKNOWLEDGE USB ACTIVITY ON THE USB PORT
Open the Device Manager to check if it has activity whenever a USB device is connected to a USB port:
1 Click 📄, or click Start and then click Run.
2 In the Start Search or Run box, type devmgmt.msc.
3 Press Enter, or click OK.
The Device Manager opens.
4 Watch the Device Manager window while connecting a USB cable or another device to the USB port. The window refreshes when Device Manager recognizes the USB connection.
- If there is activity on Device Manager but none of the previous solutions worked, call Customer Support.
- If there is no activity on Device Manager, there may be a problem with your computer and its USB support. The computer must recognize the USB connection in order for installation to work.
Cannot print and there is a firewall on the computer
Third-party (non-Microsoft) firewalls can interfere with wireless printing. If the printer and computer are configured correctly, and the wireless network is working, but the printer will not print wirelessly, then a firewall could be the problem. If there is a firewall (other than the Windows firewall) on the computer, try one or more of the following:
- Update the firewall using the most recent update available from the manufacturer. Refer to the documentation that came with your firewall for instructions on how to do this.
- If programs request firewall access when you install the printer or try to print, make sure you allow those programs to run.
- Temporarily disable the firewall and install the wireless printer on the computer. Re-enable the firewall when you have completed the wireless installation.
Wi-Fi indicator light is not lit
CHECK POWER
If the Wi-Fi indicator light is off, make sure the ⏻ light is on. If the ⏻ light is not on, check the following:
- Make sure the printer is plugged in and turned on.
- Make sure the printer is plugged into a working outlet.
- If the printer is plugged into a power strip, make sure it is turned on and working.
Wi-Fi indicator light is green but the printer does not print (Windows only)
If you have completed the configuration for wireless printing and all of the settings appear to be correct, but the printer does not print, then try one or more of the following:
ALLOW THE WIRELESS INSTALLATION TO COMPLETE
Do not attempt to print, remove the installation CD, or detach the installation cable until you see the Wireless Setup Successful screen.
ENABLE THE PRINTER
Confirm that the printer is enabled:
1 Click 📄, or click Start and then click Run.
2 In the Start Search or Run box, type control printers.
3 Press Enter, or click OK.
The printer folder opens.
4 Right-click the new printer; from the menu, select Use Printer Online.
5 Close the Printers or Printers and Faxes window and try printing again.
SELECT THE WIRELESS PRINTER
You may need to select the wireless printer from your computer to use the printer wirelessly.
1 Click 📄, or click Start and then click Run.
2 In the Start Search or Run box, type control printers.
3 Press Enter, or click OK.
The printer folder opens.
4 Right-click the printer in the folder with the matching name and model number followed by "(Network)."
5 Select Use Printer Online from the menu.
6 Close the Printers or Printers and Faxes window and try printing again.
SELECT THE WIRELESS PORT
If you have previously set up your printer as a locally attached printer, then you may need to select the wireless printer to use the printer wirelessly.
1 Click 📄, or click Start and then click Run.
2 In the Start Search or Run box, type control printers.
3 Press Enter, or click OK.
The printer folder opens.
4 Right-click the printer, and then select Properties from the menu.
5 Click the Ports tab.
6 Locate the selected port. The selected port has a check beside it in the Port column.
7 If the Description column of the selected port indicates that it is a USB port, scroll through the list and select the port with Printer Port in the Description column. Check the printer model in the Printer column to make sure you select the right printer port.
8 Click OK, and then try to print again.
Wi-Fi indicator light is still orange
When the Wi-Fi indicator light is orange, it may indicate that the printer is:
- Not configured in infrastructure mode
- Waiting to make an ad hoc connection to another wireless device
The printer may be unable to join the network because of interference, its distance from the wireless access point (wireless router), or until its settings are changed.
These are possible solutions. Try one or more of the following:
CHECK NETWORK NAME
Make sure your network does not have the same name as another network near you. For example, if you and your neighbor both use a manufacturer's default network name, your printer could be connecting to your neighbor's network.
If you are not using a unique network name, consult the documentation for your wireless access point (wireless router) to learn how to set a network name.
If you set a new network name, you must reset the printer and computer SSID to the same network name.
CHECK SECURITY KEYS
If you are using WEP security
A valid WEP key is:
- Exactly 10 or 26 hexadecimal characters. Hexadecimal characters are A–F, a–f, and 0–9.
or
- Exactly 5 or 13 ASCII characters. ASCII characters are letters, numbers, and symbols found on a keyboard.
If you are using WPA security
A valid WPA passphrase is:
- From 8 to 63 ASCII characters. ASCII characters in a WPA passphrase are case-sensitive.
or
- Exactly 64 hexadecimal characters. Hexadecimal characters are A-F, a-f, and 0-9.
If your wireless network is not using security, then you will not have a security key. Using a wireless network with no security is not recommended because it can allow intruders to use your network resources without your consent.
MOVE YOUR PRINTER
Move the printer closer to the wireless access point (wireless router). Although the possible distance between devices in 802.11b or 802.11g networks is 300 feet, the maximum range for optimal performance is generally 100-150 feet.
You can find the strength of the network signal on the printer network setup page.
CHECK MAC ADDRESS
If your network uses MAC address filtering, make sure that you include the MAC address of the printer in the MAC address filter list. This will allow the printer to operate on the network.
Wi-Fi indicator light is blinking orange during installation
When the Wi-Fi indicator light is blinking orange, it indicates that the printer has been set up for wireless networking but cannot connect to the network for which it has been configured. The printer may be unable to join the network because of interference, its distance from the wireless access point (wireless router), or until its settings are changed.
These are possible solutions. Try one or more of the following:
MAKE SURE THE ACCESS POINT IS ON
Check the access point and, if necessary, turn it on.
MOVE YOUR ACCESS POINT TO MINIMIZE INTERFERENCE
There may be temporary interference from other devices such as microwave ovens or other appliances, cordless phones, baby monitors, and security system cameras. Make sure your access point is not positioned too closely to these devices.
MOVE THE COMPUTER AND/OR PRINTER CLOSER TO THE WIRELESS ACCESS POINT (WIRELESS ROUTER)
Move the computer and/or printer closer to the access point. Although the possible distance between devices in 802.11b or 802.11g networks is 300 feet, the maximum range for optimal performance is generally 100–150 feet.
You can find the signal strength of the network on the network setup page.
CHECK YOUR WEP KEY OR WPA PASSPHRASE
A WEP key or WPA passphrase is like a password. All devices on a WEP-secured wireless network must share the same WEP key, and all devices on a WPA-secured wireless network must share the same WPA passphrase.
Note: Make sure you copy it exactly, including any capital letters, and store it in a safe place for future reference.
If you are using WEP security
A valid WEP key is:
- Exactly 10 or 26 hexadecimal characters. Hexadecimal characters are A–F, a–f, and 0–9.
or
- Exactly 5 or 13 ASCII characters. ASCII characters are letters, numbers, and symbols found on a keyboard.
If you are using WPA security
A valid WPA passphrase is:
- From 8 to 63 ASCII characters. ASCII characters in a WPA passphrase are case-sensitive.
or
- Exactly 64 hexadecimal characters. Hexadecimal characters are A–F, a–f, and 0–9.
If your wireless network is not using security, then you will not have a security key. Using a wireless network with no security is not recommended because it can allow intruders to use your network resources without your consent.
CHECK MAC ADDRESS
If your network uses MAC address filtering, make sure that you include the MAC address of the printer in the MAC address filter list. This will allow the printer to operate on the network. For more information, see "How do I find the MAC address?" on page 71.
PING THE ACCESS POINT TO MAKE SURE THE NETWORK IS WORKING
1 If you do not already know it, find the IP address of the access point:
a Click 📄, or click Start and then click Run.
b In the Start Search or Run box, type cmd.
c Press Enter, or click OK.
The Command Prompt window opens.
d Type ipconfig, and then press Enter.
- The "Default Gateway" entry is typically the wireless access point.
- The IP address appears as four sets of numbers separated by periods, such as 192.168.2.134.
2 Ping the access point:
a Click 📋, or click Start and then click Run.
b In the Start Search or Run box, type cmd.
c Press Enter, or click OK.
The Command Prompt window opens.
d Type ping followed by a space and the IP address of the wireless access point. For example: ping 192.168.1.100
e Press Enter.
3 Check to see whether the access point responds:
- If the access point responds, you will see several lines appear that start with "Reply from." It is possible that the printer did not connect to the wireless network. Turn off and then restart the printer to try to connect again.
- If the access point does not respond, it will take several seconds and then you will see "Request timed out."
Try the following:
a Click 📄, or click Start and then click Run.
b In the Start Search or Run box, type ncpa.cp1, and then press Enter.
c Press Enter or click OK.
d Select the appropriate connection from the ones shown.
e Right-click the connection, and then click Repair.
MAKE SURE YOUR COMPUTER CAN COMMUNICATE WITH THE PRINTER
1 Obtain the printer IP address by printing a network setup page.
2 Click 📄, or click Start and then click Run.
3 In the Start Search or Run box, type cmd.
4 Press Enter, or click OK.
The Command Prompt window opens.
5 Type ping followed by a space and the IP address of the printer. For example:
ping 192.168.1.100
6 Press Enter.
If the printer does not respond, then "Request timed out" displays.
- Your computer might not be connected to the network.
- You may need to change the settings of your printer. Run the Wireless Setup Utility again.
7 If the printer responds, you will see several lines that display the number of bytes received from the printer. This ensures that your computer is communicating with your printer.
CONFIGURE THE PRINTER FOR WIRELESS ACCESS AGAIN
If your wireless settings have changed, you must run the printer wireless setup again. Some reasons your settings may have changed include your having manually changed your WEP or WPA keys, channel, or other network settings; or the access point having been reset to factory defaults.
Running the wireless setup again can also resolve issues due to misconfigurations that occurred when configuring the printer for wireless access.
Notes:
- If you change network settings, change them on all the network devices before changing them for the access point.
- If you have already changed the wireless network settings on your access point, then you must change the settings on all the other network devices before you can see them on the network.
1 Click 📄 or Start.
2 Click All Programs or Programs, and then select the printer program folder from the list.
3 Select Printer Home.
4 Click the Settings tab.
5 Click the Wireless setup utility link.
Note: You may be prompted to connect the printer to the computer again using the installation cable as part of the setup process.
6 Follow the instructions on the computer screen.
Wireless print server not installed
You may see a message during installation indicating that the printer does not have a wireless print server installed. If you are sure the printer is capable of wireless printing, try the following:
CHECK POWER
Make sure the ⏻ light is on.
"Communication not available" message displays when printing wirelessly
These are possible solutions. Try one or more of the following:
MAKE SURE YOUR COMPUTER AND PRINTER HAVE VALID IP ADDRESSES FOR THE NETWORK
If you are using a laptop and have power saving settings enabled, you may see the Communication not available message on your computer screen when you attempt to print wirelessly. This can occur if the laptop hard drive has powered down.
If you see this message, wait a few seconds and then try to print again. The laptop and printer require a few seconds to power up again and reattach to the wireless network.
If you see this message again after you have waited long enough for the printer and the laptop to attach to the network, there may be a problem with your wireless network.
Make sure that the laptop and printer have both received IP addresses:
1 Click 📄, or click Start and then click Run.
2 In the Start Search or Run box, type cmd.
3 Press Enter, or click OK.
The Command Prompt window opens.
4 Type ipconfig, and then press Enter.
The IP address appears as four sets of numbers separated by periods, such as 192.168.0.100.
How to locate a printer IP address
- You can locate the printer IP address by viewing the printer network setup page.
If the printer and/or the laptop does not have an IP address, or if either has an address of 169.254.x.y (where x and y are any two numbers between 0 and 255):
1 Turn off the device that does not have a valid IP address (the laptop, the printer, or both).
2 Turn on the device(s).
3 Check the IP addresses again.
If the laptop and/or printer still does not receive a valid IP address, there is a problem with your wireless network. Try the following:
- Make sure you wireless access point (wireless router) is turned on and is working.
- Remove any objects that could be blocking the signal.
- Temporarily turn off any unnecessary wireless devices on your network and pause any network-intensive activities, like large file transfers or network games. If the network is too busy, it is possible that the printer is not receiving the IP address within the allowed time.
- Make sure your DHCP server, which may also be your wireless router, is working and is configured to assign IP addresses. If you are not sure how to do this, refer to the manual that came with your wireless router for more information.
If the printer and computer have valid IP addresses and the network is operation correctly, continue troubleshooting.
MAKE SURE THE WIRELESS PORT IS SELECTED
1 Click 📄, or click Start and then click Run.
2 In the Start Search or Run box, type control printers.
3 Press Enter, or click OK.
The printer folder opens.
4 Right-click the printer, and then select Properties from the menu.
5 Click the Ports tab.
6 Locate the selected port. The selected port has a check beside it in the Port column.
7 If the Description column of the selected port indicates that it is a USB port, scroll through the list and select the port with Printer Port in the Description column. Check the printer model in the Printer column to make sure you select the right printer port.
8 Click OK, and then try to print again.
MAKE SURE BIDIRECTIONAL COMMUNICATION IS ENABLED
1 Click 📄, or click Start and then click Run.
2 In the Start Search or Run box, type control printers.
3 Press Enter, or click OK.
The printer folder opens.
4 Right-click the printer, and then select Properties from the menu.
5 Click the Ports tab.
6 Click the box next to Enable bidirectional support if it is not already checked.
7 Click Apply.
8 Click OK, and then try to print again.
Communication with printer lost when connected to Virtual Private Network (VPN)
You will lose your connection to a wireless printer on your local network when connected to most Virtual Private Networks (VPNs). Most VPNs allow users to communicate with only the VPN and no other network at the same time. If you would like to have the ability to connect to your local network and to a VPN at the same time, the system support person for the VPN must enable split tunneling. Be aware that some organizations will not allow split tunneling due to security or technical concerns.
Resolving intermittent wireless communications issues
You may notice that your printer works for a short time and then stops working, although apparently nothing has changed on your wireless network.
Many different issues can interrupt network communications, and sometimes more than one problem exists at the same time. These are possible solutions. Try one or more of the following:
DISCONNECT FROM ALL VPNs WHEN ATTEMPTING TO USE THE WIRELESS NETWORK
Most Virtual Private Networks (VPNs) allow computers to communicate with only the VPN and no other network at the same time. Disconnect from the VPN before installing the driver on the computer or before running the wireless setup on the computer.
To check if the computer is currently connected to a VPN, open your VPN Client software and check your VPN connections. If you do not have a VPN Client software installed, check the connections manually using the Windows VPN Client.
If you would like to have the ability to connect to your local network and to a VPN at the same time, the system support person for the VPN must enable split tunneling. Be aware that some organizations will not allow split tunneling due to security or technical concerns.
TURN OFF THE WIRELESS ACCESS POINT (WIRELESS ROUTER) AND TURN IT BACK ON AGAIN
ELIMINATE NETWORK CONGESTION
If a wireless network is too busy, the computer and printer may have difficulty communicating with each other. Some causes of wireless network congestion can include:
• Transferring large files across the network
- Networked games
- Peer-to-peer file swapping applications
- Streaming video
- Too many computers on the wireless network at once
ELIMINATE SOURCES OF INTERFERENCE
Common household items can potentially disrupt wireless network communications. Cordless phones (but not cellular phones), microwave ovens, baby monitors, almost any kitchen appliance, wireless surveillance equipment, nearby wireless networks, and any appliance containing a motor can disrupt wireless network communications.
Try turning on any potential sources of interference and see if it causes the problem. If it does, separate your wireless network from the device.
CHANGE THE CHANNEL THE WIRELESS ROUTER USES
You can sometimes eliminate interference from unknown sources by changing the channel your wireless router uses to broadcast. There are three distinct channels on a router. Check the documentation that came with your router to determine which three apply. Other channels are offered as options, but these overlap. If the router is configured to use the default settings, change the channel setting to use a different distinct channel. Refer to the manual that came with your wireless router if you are not sure how to change the channel.
CONFIGURE THE WIRELESS ROUTER WITH A UNIQUE SSID
Many wireless networks use the SSID that the router was originally configured by the manufacturer to use. Using the default SSID can cause problems when more than one network is operating in the same area with the same SSID. The printer or computer may attempt to attach to the wrong network, although it will appear to be trying to connect to the correct network.
To avoid this type of interference, change the SSID on your wireless router from the default. Refer to the manual that came with your router if you are not sure how to change the SSID.
Note: You must change the SSID on all of the other devices that access your wireless network if you change the SSID on the router.
ASSIGN STATIC IP ADDRESSES TO ALL DEVICES IN THE NETWORK
Most wireless networks use a DHCP server (dynamic host configuration protocol) built in to the wireless router to assign IP addresses to clients on the wireless network. DHCP addresses are assigned when they are needed, as when a new device is added to the wireless network or when it is powered on. Wireless devices must send a request to the router, and receive an IP address in response so they can function on the network. Because the router performs many other tasks besides assigning addresses, it sometimes does not respond quickly enough with an address. The requesting device sometimes gives up before it receives an address.
Try assigning static IP addresses to the devices in your network to resolve this issue. Static IP addresses cut down on the work your wireless router has to do. Refer to the manual that came with your router and your operating system documentation if you are not sure how to assign static IP addresses.
To assign a static IP address to the printer, do the following:
1 Complete the wireless setup, allowing the printer to receive a DHCP address from a DHCP server on the network.
2 Print a network setup page to see what IP address is currently assigned to the printer.
3 Open a Web browser and then type the printer IP address in the address field. Press Enter. The printer Web page loads.
4 Click the Configuration link.
5 Click the TCP/IP link.
6 Click the Set Static IP Address link.
7 Type the IP address you want to assign to the printer in the IP Address field.
8 Click the Submit button.
The Submitting Selection message appears.
Confirm that the IP address is updated by typing the static IP address in the browser address field and checking to see if the printer Web page reloads.
CHECK FOR KNOWN ISSUES WITH THE WIRELESS ROUTER
Some wireless routers have documented defects that were identified and resolved by the manufacturers. Visit the company Web site of the router manufacturer. Check for firmware updates and other advice from the manufacturer. Check the manual that came with your wireless router if you are not sure how to reach the manufacturer Web site.
CHECK FOR WIRELESS ADAPTER UPDATES
If you are having trouble printing from one particular computer, check the Web site of the manufacturer of the network adapter card in that computer. It is possible that there is an updated driver available that could resolve the issue.
CHANGE ALL NETWORK DEVICES TO THE SAME TYPE
While it is possible to successfully mix 802.11b, 802.11g, and 802.11n devices on the same wireless network, the faster devices will sometimes prevent the slower devices from communicating. Wireless devices are designed to wait for a gap in wireless network communications before attempting to send information. If newer, faster devices are constantly using the wireless network, then older, slower devices will not have a chance to send data.
Try only turning on the network devices of the same type and see if network communications improve. If this solves the problem, you may want to upgrade your older devices with newer network adapters.
PURCHASE A NEW ROUTER
If your router is several years old, it may not be fully compatible with the newer wireless devices on your network. Consider purchasing a newer router that is fully compliant with the 802.11 IEEE specifications.
Index
A
ad hoc
SSID 59
WEP 59
ad hoc network 67
ad hoc wireless network
adding a printer 61
creating using Windows 59
additional computers
installing wireless printer 57
AliceBox 58
aligning the printhead 73
appliances
wireless network 69
application list
downloading 54
updating 54
assigning IP address 72
B
banner paper 27
bidirectional communication
enabling 98
black and white scanning 53
Bluetooth
printing 42
setting the security level 42
setting up a connection 40
buttons, printer control panel
Back 17
Cancel 17
Color/Black 16
Copy 16
Display 17
Photo 16
Power 16
Scan 16
Select 17
Settings 17
Start 16
C
cable
installation 66, 67
USB 67
camera
connecting 38
canceling
copy job 49
print job 44
scan job 54
cannot delete documents from
print queue 81
cannot print from a flash drive 87
cannot print over wireless
network 89
cannot print through USB 81
cannot scan to computer over a
network 86
changing Power Saver timeout 20
changing printing mode 43
changing temporary settings into
default 19
changing wireless settings after
installation (Windows) 59
checking an unresponsive
printer 76
checking ink levels 73
checklist
before you troubleshoot 76
memory card troubleshooting 86
cleaning exterior of the printer 74
cleaning printhead nozzles 74
Club Internet 58
collating copies 47
Communication not available
message 98
computer slows down when
printing 84
configuring
IP address 58
connection
configurations 70
conserving energy, ink, and
paper 8
conserving paper
using Eco-Mode 21
continue button greyed out 91
continue button not working 91
continue button unavailable 91
copier or scanner does not
respond 85
copies
making 45
copy and scan troubleshooting
cannot scan to computer over a
network 86
copier or scanner does not
respond 85
partial document or photo
scans 85
poor scanned image quality 85
scan not successful 86
scanning takes too long or freezes
the computer 86
copy job
canceling 49
copy quality, adjusting 46
copy troubleshooting
scanner unit does not close 85
copying 45
adjusting quality 46
collating copies 47
enlarging an image 46
making a copy lighter or
darker 47
multiple page images on one
sheet 48
on both sides of the paper 48
Pages per Sheet 48
photos 46
reducing an image 46
repeating an image 48
tips 45
custom-size paper
printing on 33
D
default printer, setting 43
defaults
resetting factory defaults 21
disabling settings timeout 19
documents
loading on scanner glass 29
printing 30
scanning for editing 52
scanning using the printer control
panel 50
duplex
copying, manual 48
printing, manual 33
E
Eco-Mode
using 21
energy conserving 8
enlarging an image 46
envelopes 27
loading 32
printing 32
error using memory card 86
Ethernet 70
exterior of the printer cleaning 74
e-mailing scanned documents 53
F
factory default settings
resetting internal wireless print server 89
resetting to 21
file types
supported 36
finding
information 9
MAC address 71
publications 9
Web site 9
firewall on computer 92
flash drive
inserting 35
printing documents from 31
printing photos using the proof sheet 39
scanning to 51
France
special wireless setup instructions 58
FreeBox 58
G
greeting cards 28
H
heavyweight matte paper 27
|
improving scan quality 53
incorrect language appears on
display 77
index cards 28
information finding 9
information needed for setting up
printer on wireless network 56
infrastructure network 67
ink conserving 8
ink cartridges
ordering 14
replacing 13
ink levels checking 73
inserting a memory card or flash
drive 35
installation cable 66, 67
installing network printer 72
installing printer on wireless network (Windows) 57
installing printer software 25
installing wireless printer additional computers 57
interference wireless network 69
internal wireless print server resetting to factory default settings 89
IP address 71, 72 configuring 58
IP address, assigning 72
iron-on transfers 28
J
jams and misfeeds troubleshooting
paper jam in the paper support 82 paper jam in the printer 81 paper or specialty media 82
K
key index 72
L
labels 27 printing 33
language changing 77
LiveBox 58
loading
documents on scanner glass 29 envelopes 32
loading paper 26
locating
SSID 64
WEP key 64
WPA passphrase 64
M
MAC address 70 finding 71
MAC address filtering 70
memory card inserting 35
printing documents from 31
printing photos using the proof sheet 39
scanning to 51
supported types 36
memory card cannot be inserted 86
memory card slots 11
memory card troubleshooting cannot print from a flash drive 87 checklist 86
nothing happens when memory card is inserted 87
menus diagram of 18
menus list 18
minimum system requirements 23
multiple WEP keys 72
N
N9UF Box 58
network connection with USB 70
network overview 64
network printer installing 72
network security 65
network setup page printing 56
networking
finding IP address of computer 72
finding IP address of printer 72 IP addresses 72
no wireless network 59
nothing happens when memory
card is inserted 87
P
page does not print 79
Pages per Sheet copies 48
paper
conserving 8
paper and media
banner paper 27
envelopes 27
heavyweight matte paper 27
index cards 28
iron-on transfers 28
photo cards 28
photo/glossy paper 28
plain paper 26
postcards 28
transparencies 28
paper default settings
saving 28
paper exit tray 11
paper feed guard 11
paper guides 11
paper jam in the paper support 82
paper jam in the printer 81
paper or specialty media
misfeeds 82
paper support 11
partial document or photo
scans 85
parts
memory card slots 11
paper exit tray 11
paper feed guard 11
paper guides 11
paper support 11
PictBridge port 11
power supply port 12
printer control panel 11
printhead 12
scanner glass 12
scanner unit 12
security slot 12
top cover 11
USB port 12
password 65
pausing
print job 44
creating from scan 53
photo cards 28
photo/glossy paper 28
photos
copying photos 46
making borderless copies 46
printing from digital camera using DPOF 40
printing using printer control panel 36
printing using the proof sheet 39
scanning for editing 51
photos do not print from memory
card across wireless network 87
photos from memory device
printing using printer software 37
PictBridge port 11
PictBridge-enabled camera
connecting 38
plain paper 26
poor quality at the edges of
page 83
poor scanned image quality 85
postcards 28
Power Saver timeout
changing 20
power supply port 12
print job
canceling 44
pausing 44
resuming 44
print media
greeting cards 28
labels 27
print speed is slow 84
print troubleshooting
cannot delete documents from print queue 81
computer slows down when printing 84
poor quality at the edges of page 83
slow print speed 84
streaks or lines on printed image 83
printer
sharing 62
sharing in Windows 62
printer control panel 11
using 16
printer does not print
wireless 92
printer does not print wirelessly 93
printer does not respond 80
printer menus 18
printer printing blank pages 80
printer problems, basic
solutions 76
printer software
installing 25
uninstalling 25
printer, setting as default 43
printhead 12
aligning 73
printhead error 77
printhead nozzles
cleaning 74
printing
collate 30
custom-size paper 33
documents 30
documents from memory card or flash drive 31
envelopes 32
from a Bluetooth-enabled device 42
from a PictBridge-enabled camera 38
labels 33
last page first 31
multiple pages on one sheet 31
network setup page 56
on both sides of the paper 33
photos from digital camera using DPOF 40
photos from memory device using printer software 37
photos using printer control panel 36
photos using the proof sheet 39
reverse page order 31
tips 30
two-sided 33
printing in draft mode 43
printing mode
changing 43
proof sheet
using 39
protocol 72
publications
finding 9
R
recycling 8
Dell products 15
reducing an image 46
repeating an image 48
replacing ink cartridges 13
resetting
internal wireless print server to
factory default settings 89
resetting to factory defaults 21
resuming
print job 44
reverse page order 31
S
safety information 7
saving paper default settings 28
scan
black and white 53
improving quality 53
PIN 54
scan job
canceling 54
scan was not successful 86
scanner glass 12
cleaning 75
scanner unit 12
scanner unit does not close 85
scanning
creating a PDF from scan 53
documents for editing 52
documents for e-mailing 53
photos for editing 51
tips 50
to a computer 50
to a flash drive 51
to a memory card 51
to a network 50
using the printer control
panel 50
scanning takes too long or freezes
the computer 86
security
wireless network 55
security information
wireless network 65
security key 65
selecting the wireless port 98
Service Center 76
setting up printer
on wireless network
(Windows) 57
settings timeout
disabling 19
setup troubleshooting
cannot print through USB 81
incorrect language appears on
display 77
page does not print 79
printer does not respond 80
printer printing blank pages 80
printhead error 77
software did not install 78
sharing printer in Windows 62
software
Service Center 76
software did not install 78
software updates
checking 25
enabling 25
SSID
ad hoc 59
finding 70
locating 64
wireless network 64
streaks or lines on printed
image 83
supported memory cards and file
types 36
supported operating systems 23
switching from USB
to wireless 62
switching from wireless
to USB 62
T
TCP/IP 72
technical support 76
temporary settings
changing into default 19
tips for
copying 45
printing 30
scanning 50
top cover 11
transparencies 28
troubleshooting
checking an unresponsive
printer 76
contacting technical support 76
Service Center 76
solving basic printer problems 76
wireless network 88
troubleshooting, copy
scanner unit does not close 85
troubleshooting, copy and scan
cannot scan to computer over a network 86
copier or scanner does not respond 85
partial document or photo scans 85
poor scanned image quality 85
scan not successful 86
scanning takes too long or freezes the computer 86
troubleshooting, jams and
misfeeds
paper jam in the paper support 82
paper jam in the printer 81
paper or specialty media 82
troubleshooting, memory card
cannot print from a flash drive 87
checklist 86
nothing happens when memory card is inserted 87
troubleshooting, print
cannot delete documents from print queue 81
computer slows down when printing 84
poor quality at the edges of page 83
slow print speed 84
streaks or lines on printed image 83
troubleshooting, setup
cannot print through USB 81
incorrect language appears on display 77
page does not print 79
printer does not respond 80
printer printing blank pages 80
printhead error 77
software did not install 78
troubleshooting, wireless
cannot print over wireless network 89
changing wireless settings after installation (Windows) 59
photos do not print from memory card across wireless network 87
resolving communication problems 100
Wi-Fi indicator light is blinking orange 95
Wi-Fi indicator light is not lit 93
Wi-Fi indicator light is still orange 94
U
UK
special wireless setup
instructions 58
uninstalling printer software 25
updating printer software 25
updating the application list 54
USB 62,70
cable 67
USB connection
with network connection 70
USB port 12
V
Virtual Private Network 100
VPN
lose connection to printer 100
W
Web site
finding 9
WEP 55
ad hoc 59
WEP key
key index 72
locating 64
Windows
installing printer on wireless network 57
Windows software
Abbyy Sprint OCR 23
Fast Pics 23
Fax Setup Utility 23
Fax Solutions software 23
Printer Home 23
Printing Preferences 23
Service Center 23
Toolbar 23
Wireless Setup Utility 23
wireless 62,70
printer does not print 92
troubleshooting 93, 100
wireless network
adding a printer to existing ad hoc network 61
common home configurations 65
creating an ad hoc network using
Windows 59
information needed for setting up
wireless printing 56
installing printer on
(Windows) 57
interference 69
resolving communication
problems 100
security 55
security information 65
signal strength 68
SSID 64
troubleshooting 88
types of wireless networks 67
wireless network compatibility 55
wireless print server
not installed 98
wireless setup
information needed for 56
wireless signal
strength 68
wireless signal absorption 69
wireless troubleshooting
cannot print over wireless network 89
changing wireless settings after installation (Windows) 59
photos do not print from memory card across wireless network 87
printer and computer on different networks 70
printer works intermittently on wireless network 100
Wi-Fi indicator light is blinking orange 95
Wi-Fi indicator light is not lit 93
Wi-Fi indicator light is still orange 94
Wi-Fi indicator
description of colors 57
light is not lit 93
Wi-Fi indicator light is blinking orange 95
Wi-Fi indicator light is green printer does not print 93
Wi-Fi indicator light is still orange 94
Wi-Fi Protected Setup 62 using 63
Wi-Fi Protected Setup logo identifying 63
WPA 55
WPA passphrase
locating 64
WPA2 55
WPS 62
- Contents
- Safety information....7
- About your printer....8
- Ordering and replacing supplies....13
- Using the printer control panel buttons and menus......16
- Using the printer software....23
- Loading paper and original documents....26
- Printing....30
- Copying....45
- Scanning....50
- Networking....55
- Maintaining the printer....73
- Troubleshooting....76
- Index....103
- Safety information
- About your printer
- Thank you for choosing this printer!
- Minimizing your printer's environmental impact
- Conserving energy
- Conserving paper
- Conserving ink
- Recycling
- Finding information about the printer
- Understanding the parts of the printer
- Ordering and replacing supplies
- Replacing ink cartridges
- Ordering ink cartridges
- Recycling Dell products
- Using the printer control panel buttons and menus
- Using the printer control panel
- Changing temporary settings into new default settings
- To change the temporary settings into new default settings
- To disable the settings timeout feature
- Changing the Power Saver timeout
- Resetting to factory settings
- Using the printer control panel menus
- Using a button combination (if you cannot read the current language)
- Saving energy with Eco-Mode
- Notes:
- Using the printer software
- Minimum system requirements
- Supported operating systems
- Using the Windows printer software
- Software installed during printer installation
- Updating the printer software (Windows only)
- Checking for software updates
- Reinstalling the printer software
- Uninstalling the printer software
- Installing the printer software
- Using the World Wide Web
- Loading paper and original documents
- Loading paper
- Saving paper default settings
- Loading original documents on the scanner glass
- Printing
- Tips for printing
- Printing basic documents
- Printing a document
- Collating printed copies
- Collated
- Not collated
- Printing pages in reverse order
- Printing multiple pages on one sheet
- Printing documents from a memory card or flash drive
- If the printer is using a USB connection
- If the printer is using a Wireless connection (selected models only)
- Printing specialty documents
- Printing envelopes
- Printing labels
- Tips on loading label sheets
- Printing on custom-size paper
- Printing on both sides of the paper (duplexing) manually
- Working with photos
- Using a memory card or flash drive with the printer
- Supported memory cards and file types
- Printing photos using the printer control panel
- Printing photos from a memory device using the printer software
- Printing photos from a PictBridge-enabled digital camera
- Printing photos from a memory device using the proof sheet
- Printing photos from a digital camera using DPOF
- Printing from a Bluetooth-enabled device
- Setting up a connection between your printer and a Bluetooth-enabled device
- Setting the Bluetooth security level
- Managing print jobs
- Setting your printer as the default printer
- Changing the printing mode
- Changing the printing mode for a single print job
- Pausing print jobs
- Resuming print jobs
- Canceling print jobs
- Copying
- Tips for copying
- Making copies
- Copying photos
- Enlarging or reducing images
- Adjusting copy quality
- Making a copy lighter or darker
- Collating copies using the printer control panel
- Repeating an image on one page
- Copying multiple pages on one sheet
- Making a duplex copy manually
- Canceling copy jobs
- Scanning
- Tips for scanning
- Scanning to a local or network computer
- Scanning to a flash drive or memory card
- Scanning photos into an editing application
- Scanning documents into an editing application
- Scanning directly to e-mail
- Scanning to a PDF
- Scanning FAQ
- How can I improve the quality of a scan?
- How do I scan in black and white?
- Why am I being asked for a PIN?
- What is an application list, and how do I update it?
- Updating the application list
- Canceling scan jobs
- Networking
- Installing the printer on a wireless network
- Wireless network compatibility
- Supported network security options
- No Security
- WEP
- WPA/WPA2
- Printing a network setup page
- Information you will need to set up the printer on a wireless network
- Installing the printer on other computers
- Interpreting the colors of the Wi-Fi indicator light
- Special wireless installation instructions
- Before you begin
- Adding the printer to your wireless network
- Assigning a static IP address
- Changing wireless settings after installation
- Advanced wireless setup
- Creating an ad hoc wireless network
- In Windows Vista
- In Windows XP
- In Windows 2000
- Adding a printer to an existing ad hoc wireless network
- Configuring the printer wirelessly using WPS (Wi-Fi Protected Setup)
- Switching between USB and wireless connections (Windows only)
- Using the printer wirelessly
- Using the printer locally (USB)
- Sharing a printer in a Windows environment
- Networking FAQ
- What is Wi-Fi Protected Setup?
- Where do I find my WEP key or WPA passphrase?
- What is an SSID?
- Where do I find my SSID?
- What is a network?
- How do I find out what type of security my network is using?
- How are home networks configured?
- Wireless network examples
- Scenario 1: Mixed wired and wireless connections on a network with Internet access
- Scenario 2: Wireless network with Internet access
- Scenario 3: Wireless network with no Internet access
- Scenario 4: Computer connected wirelessly to a printer without Internet access
- Why do I need an installation cable?
- How do I attach the installation cable?
- How are infrastructure and ad hoc networks different?
- Finding the signal strength
- How can I improve wireless signal strength?
- MOVE THE PRINTER CLOSER TO THE WIRELESS ACCESS POINT/WIRELESS ROUTER
- REMOVE OBSTACLES BETWEEN THE ACCESS POINT AND THE PRINTER
- REMOVE SOURCES OF INTERFERENCE
- ARRANGE THE NETWORK TO REDUCE SIGNAL ABSORPTION
- How can I make sure my computer and printer are connected to the same wireless network?
- Can I use my printer on a USB and a network connection at the same time?
- What is a MAC address?
- How do I find the MAC address?
- What is an IP address?
- What is TCP/IP?
- How do I locate IP addresses?
- How to locate a printer IP address
- How are IP addresses assigned?
- What is a key index?
- Maintaining the printer
- Maintaining ink cartridges
- Checking ink levels
- Aligning the printhead
- Cleaning the printhead nozzles
- Cleaning the exterior of the printer
- Cleaning the scanner glass
- Troubleshooting
- Before you troubleshoot
- Using the Service Center to solve printer problems
- If Troubleshooting does not solve your problem
- Setup troubleshooting
- Incorrect language appears on the display
- CHANGE THE LANGUAGE USING THE PRINTER MENUS
- CHANGE THE LANGUAGE USING A BUTTON COMBINATION (IF YOU CANNOT READ THE CURRENT LANGUAGE)
- Printhead error
- REMOVE AND REINSERT THE PRINTHEAD
- Software did not install
- CHECK THE USB CONNECTION
- RECONNECT THE PRINTER POWER SUPPLY
- Print job does not print or is missing pages
- MAKE SURE THE INK CARTRIDGES ARE INSERTED CORRECTLY
- SELECT YOUR PRINTER FROM THE PRINT DIALOG BEFORE SENDING THE PRINT JOB
- MAKE SURE THE PRINT JOB IS NOT PAUSED
- MAKE SURE YOUR PRINTER IS SET AS THE DEFAULT PRINTER
- REMOVE AND RECONNECT THE USB CABLE CONNECTED TO YOUR PRINTER
- REMOVE AND REINSTALL THE PRINTER SOFTWARE
- Printer is printing blank pages
- REINSTALL THE INK CARTRIDGES AND DEEP CLEAN AND ALIGN THE PRINthead
- Printer is busy or does not respond
- MAKE SURE THE PRINTER IS NOT IN POWER SAVER MODE
- Cannot delete documents from the print queue
- RESTART THE COMPUTER AND TRY AGAIN
- Cannot print through USB
- MAKE SURE THE USB PORT IS ENABLED IN WINDOWS
- Jams and misfeeds troubleshooting
- Paper jam in the printer
- Paper jam in the paper support
- Paper or specialty media misfeeds
- CHECK PAPER CONDITION
- CHECK PAPER LOADING
- REMOVE EACH PAGE AS IT IS PRINTED
- ADJUST THE PAPER GUIDES TO FIT THE LOADED PAPER
- Print troubleshooting
- Poor quality at the edges of the page
- CHECK MINIMUM PRINT SETTINGS
- SELECT THE BORDERLESS PRINT FEATURE
- Streaks or lines on printed image
- CHECK THE INK LEVELS
- SELECT A HIGHER PRINT QUALITY FROM THE PRINTER SOFTWARE
- MAKE SURE THE INK CARTRIDGES ARE PROPERLY INSTALLED
- ALIGN THE PRINTHEAD
- CLEAN OR DEEP CLEAN THE PRINTHEAD NOZZLES
- Print speed is slow
- MAXIMIZE COMPUTER PROCESSING SPEED
- ADD MEMORY
- SELECT A LOWER PRINT QUALITY FROM THE PRINTER SOFTWARE
- MANUALLY SELECT A PAPER TYPE THAT MATCHES THE TYPE OF PAPER YOU ARE USING
- Computer slows down when printing
- IF YOU ARE USING A USB CONNECTION, THEN TRY A DIFFERENT USB CABLE
- IF YOU ARE ON A NETWORK, THEN RESET THE POWER OF THE ACCESS POINT (ROUTER)
- Copy and scan troubleshooting
- Copier or scanner does not respond
- Scanner unit does not close
- Poor copy or scanned image quality
- Partial copies or scans of documents or photos
- Scan was not successful
- RESTART THE COMPUTER
- Scanning takes too long or freezes the computer
- Cannot scan to a computer over a network
- Memory card troubleshooting
- Memory card troubleshooting checklist
- Nothing happens when a memory card is inserted
- CHECK THE NETWORK CONNECTION
- Cannot print documents from a memory card or flash drive
- Photos do not transfer from a memory card across a wireless network
- MAKE SURE THAT BOTH THE PRINTER AND THE DESTINATION COMPUTER ARE TURNED ON AND READY
- SET YOUR PRINTER AS THE DEFAULT PRINTER FROM THE DESTINATION COMPUTER
- SELECT THE CORRECT COMPUTER NAME FROM THE SCAN DESTINATION LIST ON THE PRINTER
- MAKE SURE YOUR WIRELESS NETWORK IS CONNECTED AND ACTIVE
- Wireless troubleshooting
- Wireless troubleshooting checklist
- Resetting the wireless settings to factory defaults
- Cannot print over wireless network
- MAKE SURE YOUR COMPUTER IS CONNECTED TO YOUR WIRELESS ACCESS POINT (WIRELESS ROUTER)
- MOVE THE COMPUTER AND/OR PRINTER CLOSER TO THE WIRELESS ROUTER
- MOVE YOUR ACCESS POINT AWAY FROM OTHER ELECTRONIC DEVICES
- MAKE SURE THAT YOUR COMPUTER AND PRINTER ARE CONNECTED TO THE SAME WIRELESS NETWORK
- CHECK YOUR WEP KEY OR WPA PASSPHRASE
- DISCONNECT FROM VPN SESSION
- CHECK YOUR ADVANCED SECURITY SETTINGS
- The Continue button is unavailable
- CHECK IF THE USB CABLE IS SECURELY PLUGGED INTO THE USB PORTS ON BOTH THE COMPUTER AND THE PRINTER
- MAKE SURE THAT THE PRINTER IS PLUGGED IN AND TURNED ON
- MAKE SURE THAT THE USB PORT ON THE COMPUTER IS WORKING
- MAKE SURE THAT THE USB CABLE IS WORKING
- MAKE SURE THAT YOU ARE USING THE CORRECT CD FOR YOUR PRINTER MODEL
- RECONNECT THE POWER SUPPLY
- CHECK THAT YOUR COMPUTER IS ABLE TO ACKNOWLEDGE USB ACTIVITY ON THE USB PORT
- Cannot print and there is a firewall on the computer
- Wi-Fi indicator light is not lit
- CHECK POWER
- Wi-Fi indicator light is green but the printer does not print (Windows only)
- ALLOW THE WIRELESS INSTALLATION TO COMPLETE
- ENABLE THE PRINTER
- SELECT THE WIRELESS PRINTER
- SELECT THE WIRELESS PORT
- Wi-Fi indicator light is still orange
- CHECK NETWORK NAME
- CHECK SECURITY KEYS
- If you are using WEP security
- If you are using WPA security
- MOVE YOUR PRINTER
- CHECK MAC ADDRESS
- Wi-Fi indicator light is blinking orange during installation
- MAKE SURE THE ACCESS POINT IS ON
- MOVE YOUR ACCESS POINT TO MINIMIZE INTERFERENCE
- MOVE THE COMPUTER AND/OR PRINTER CLOSER TO THE WIRELESS ACCESS POINT (WIRELESS ROUTER)
- PING THE ACCESS POINT TO MAKE SURE THE NETWORK IS WORKING
- MAKE SURE YOUR COMPUTER CAN COMMUNICATE WITH THE PRINTER
- CONFIGURE THE PRINTER FOR WIRELESS ACCESS AGAIN
- Wireless print server not installed
- "Communication not available" message displays when printing wirelessly
- MAKE SURE YOUR COMPUTER AND PRINTER HAVE VALID IP ADDRESSES FOR THE NETWORK
- MAKE SURE THE WIRELESS PORT IS SELECTED
- MAKE SURE BIDIRECTIONAL COMMUNICATION IS ENABLED
- Communication with printer lost when connected to Virtual Private Network (VPN)
- Resolving intermittent wireless communications issues
- DISCONNECT FROM ALL VPNs WHEN ATTEMPTING TO USE THE WIRELESS NETWORK
- TURN OFF THE WIRELESS ACCESS POINT (WIRELESS ROUTER) AND TURN IT BACK ON AGAIN
- ELIMINATE NETWORK CONGESTION
- ELIMINATE SOURCES OF INTERFERENCE
- CHANGE THE CHANNEL THE WIRELESS ROUTER USES
- CONFIGURE THE WIRELESS ROUTER WITH A UNIQUE SSID
- ASSIGN STATIC IP ADDRESSES TO ALL DEVICES IN THE NETWORK
- CHECK FOR KNOWN ISSUES WITH THE WIRELESS ROUTER
- CHECK FOR WIRELESS ADAPTER UPDATES
- CHANGE ALL NETWORK DEVICES TO THE SAME TYPE
- PURCHASE A NEW ROUTER
- Index
- A
- B
- C
- D
- E
- F
- G
- H
- |
- J
- K
- L
- M
- N
- P
- R
- S
- T
- U
- V
- W
Brand : DELL
Model : V313W
Category : Printer