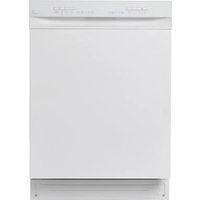
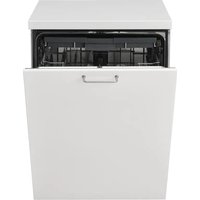
USER MANUAL RENODLAD IKEA
Please refer to the chapter IKEA GUARANTEE for contact details of the after sales customer service centre.
ENGLISH
Contents
| Safety information | 4 | Daily use | 14 |
| Safety instructions | 6 | Hints and tips | 16 |
| Product description | 7 | Care and cleaning | 17 |
| Control panel | 8 | Troubleshooting | 19 |
| Before first use | 9 | Technical information | 23 |
| Programmes | 9 | Environmental concerns | 23 |
| Options | 11 | IKEA guarantee | 23 |
| Settings | 12 | | |
Subject to change without notice.
Before the installation and use of the appliance, carefully read the supplied instructions. The manufacturer is not responsible for any injuries or damages that are the result of incorrect installation or usage. Always keep the instructions in a safe and accessible location for future reference.
Children and vulnerable people safety
General Safety
-
This appliance is intended to be used in household and similar applications such as:
-
farm houses; staff kitchen areas in shops, offices and other working environments;
-
by clients in hotels, motels, bed & breakfast and other residential type environments.
-
Do not change the specification of this appliance.
- The operating water pressure (minimum and maximum) must be between 0.5 (0.05) / 8 (0.8) bar (MPa)
- Obey the maximum number of 14 place settings.
- If the supply cord is damaged, it must be replaced by the manufacturer, its Authorised Service Centre or similarly qualified persons in order to avoid a hazard.
- Put the cutlery in the cutlery basket with the sharp ends pointing down or put them in the cutlery drawer in a horizontal position with the sharp edges down.
- Do not leave the appliance with the open door unattended to avoid stepping accidentally onto it.
- Before any maintenance operation, deactivate the appliance and disconnect the mains plug from the socket.
- Do not use high pressure water sprays and/or steam to clean the appliance.
- If the appliance has ventilation openings in the base, they must not be covered e.g. by a carpet.
- The appliance is to be connected to the water mains using the new supplied hose-sets. Old hose sets must not be reused.
Safety instructions
Installation

Warning! Only a qualified person must install this appliance.
- Remove all the packaging.
- Do not install or use a damaged appliance.
- Do not install or use the appliance where the temperature is less than 0^ .
- Follow the installation instructions supplied with the appliance.
Always take care when moving the appliance as it is heavy. Always use safety gloves and enclosed footwear.
- Make sure that the appliance is installed below and adjacent to safe structures.
Electrical connection

Warning! Risk of fire and electric shock.
- The appliance must be earthed.
- Make sure that the parameters on the rating plate are compatible with the electrical ratings of the mains power supply.
Always use a correctly installed shockproof socket.
- Do not use multi-plug adapters and extension cables.
- Make sure not to cause damage to the mains plug and to the mains cable. Should the mains cable need to be replaced, this must be carried out by our Authorised Service Centre.
- Connect the mains plug to the mains socket only at the end of the installation. Make sure that there is access to the mains plug after the installation.
-
Do not pull the mains cable to disconnect the appliance. Always pull the mains plug.
-
This appliance complies with the E.E.C. Directives.
UK and Ireland only. This appliance is fitted with a 13 A mains plug. If it is necessary to change the mains plug fuse, use only a 13 A ASTA (BS 1362) fuse.
Water connection
- Do not cause damage to the water hoses.
- Before connection to new pipes, pipes not used for a long time, where repair work has been carried out or new devices fitted (water meters, etc.), let the water flow until it is clean and clear.
- Ensure that there are no visible water leaks during and after the first use of the appliance.
- The water inlet hose has a safety valve and a sheath with an inner mains cable.
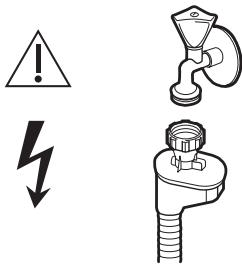

Warning! Dangerous voltage.
- If the water inlet hose is damaged, immediately close the water tap and disconnect the mains plug from the mains socket. Contact the Authorised Service Centre to replace the water inlet hose.
Use
Internal lighting

Warning! Risk of injury.
- This appliance has an internal lamp that comes on when you open the door and goes off when the door is closed.
- The type of lamp used for this appliance is for household appliances only. Do not use it for house lighting.
To replace the internal lighting, contact the Authorised Service Centre.
Service
To repair the appliance contact an Authorised Service Centre.
- Use original spare parts only.
Disposal

Warning! Risk of injury or suffocation.
- Disconnect the appliance from the mains supply.
- Cut off the mains cable and discard it.
- Remove the door catch to prevent children and pets to get closed in the appliance.
Product description
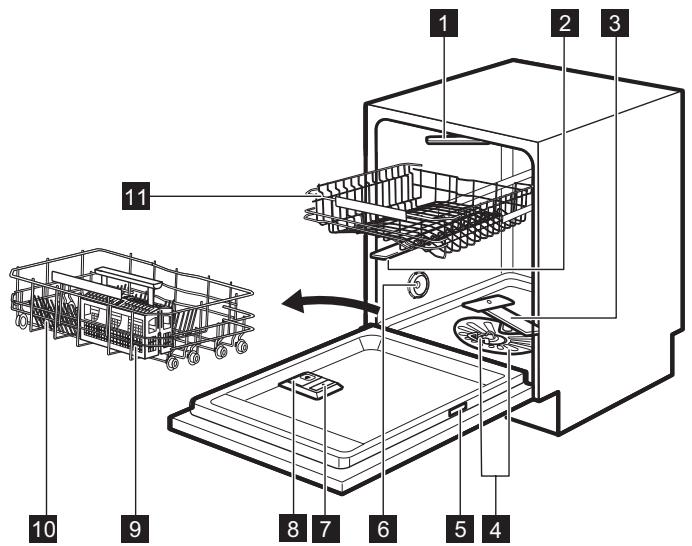
1 Top spray arm
2 Upper spray arm
3 Lower spray arm
4 Filters
5 Rating plate
6 Air vent
7Rinse aid dispenser
8 Detergent dispenser
9 Cutlery basket
10 Lower basket
Upper basket
Beam-on-Floor
Beam-on-Floor is a light that is displayed on the floor below the appliance door.
- When a programme starts, a white light is on and stays on for the duration of the programme.
- When the programme is completed, the white light is off.
- When the appliance has a malfunction, the white light flashes.
i Beam-on-Floor is off when the appliance is deactivated.
When AutoOpen is activated during the drying phase, the projection on the floor may not be completely visible. To see if the cycle has ended, check the control panel.
Control panel

1 On/off button
2 Display
3 Delay button
4 Programme button (up)
5 Programme button (down)
6 ExtraHygiene button
7 DryPlus button
8 RESET button
9 Indicators
Indicators
| Indicator | Description |
| →| | End indicator. |
| ※ | Rinse aid indicator. It is always off while the programme operates. |
| ◇ | Door indicator. It comes on when the appliance door is open or is not correctly closed. |
Before first use

Caution! Remove the protection film from the control panel.
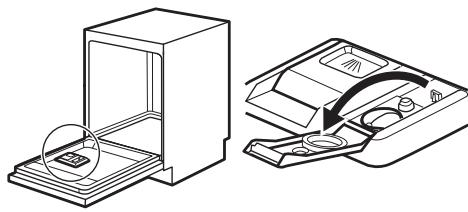
- Fill the rinse aid dispenser.
- Open the water tap.
- Start the programme (P3) to remove any residuals from the manufacturing process. Do not use detergent and do not put dishes in the baskets.
Filling the rinse aid dispenser
1
2
3
4
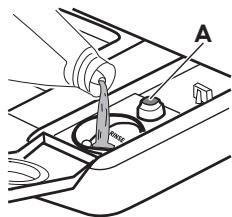
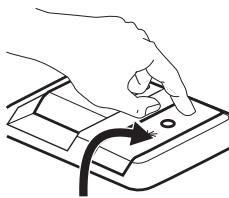
Fill the rinse aid dispenser until the rinse aid reaches the marking "MAX". Remove the spilled rinse aid with an absorbent cloth to prevent too much foam.
Fill the rinse aid dispenser when the indicator (A) becomes clear and the rinse aid indicator on the control panel is on.
Programmes
Once you switch the appliance on, the display shows the programme number P4 by default.
Use and to change the programme selection.
| Programme | Degree of soil Type of load | Programme phases | Options |
| P1 AUTO 1) | AllCrockery, cutlery,pots and pans | PrewashWash from 45 °C to 70 °CRinseDry | ExtraHygieneDryPlus |
| P2 | ·Heavy soil
·Crockery, cutlery, pots and pans | ·Prewash
·Wash 70 °C
·Rinse
·Dry | ·ExtraHygiene
·DryPlus |
| P3
(1 ≧ 2) | ·Fresh soil
·Crockery and cutlery | ·Wash 60 °C
·Rinse | ·ExtraHygiene
·DryPlus |
| P4
ECO 3) | ·Normal soil
·Crockery and cutlery | ·Prewash
·Wash 50 °C
·Rinse
·Dry | ·ExtraHygiene
·DryPlus |
| P5 | ·Light soil
·Delicate crockery and glassware | ·Wash 45 °C
·Rinses
·Dry | ·DryPlus |
| P6
(4) | ·All | ·Prewash | |
| P7
(5) | ·Normal soil
·Crockery and cutlery | ·Prewash
·Wash 50 °C
·Rinse
·Dry | ·DryPlus |
1) The appliance senses the degree of soil and the quantity of items in the baskets. It automatically adjusts the temperature and the quantity of water, the energy consumption and the programme duration.
2) This programme is suitable for washing a load or a half load with fresh or light soil in a short time.
3) This programme offers the most efficient use of water and energy consumption for crockery and cutlery with normal soil. This is the standard programme for test institutes.
4) With this programme, you can quickly rinse off food remains from dishes and prevent odours forming in the appliance. Do not use detergent with this programme.
5) This is the most silent programme. The wash pump works at a very low speed to reduce the noise generated by the appliance. Due to the low speed, the programme duration is long.
Consumption values
| Programme 1) | Water (I) | Energy (kWh) | Duration (min) |
| P1 AUTO | 7.0 - 14.0 | 0.9 - 1.6 | 90 - 160 |
| P2 ☐ | 12.5 - 14.5 | 1.4 - 1.7 | 170 - 190 |
| P3 | 10.5 | 0.7 | 38 |
| P4ECO | 11.4 | 0.76 | 138 |
| P5 | 12 - 14 | 0.7 - 0.9 | 82 - 92 |
| P6 | 4 | 0.01 | 14 |
| P7 | 9.0 - 10.0 | 1.1 - 1.3 | 230 - 250 |
1) The pressure and the temperature of the water, the variations of the mains supply, the options and the quantity of dishes can change the values.
To receive the necessary information for conducting performance tests (e.g. according to EN60436), send an email to:
info.test@dishwasher-production.com
In your request please include the product number code (PNC) found on the rating plate.
For any other questions regarding your dishwasher please refer to the service book provided with your appliance.
Options

Desired options must be activated every time before you start a programme. It is not possible to activate or deactivate options while a programme is running.
Not all options are compatible with each other. If you select non compatible options, the appliance automatically deactivates one or more of them. Only the indicators of the still active options are on.
If an option is not applicable to a programme, the related indicator is off or it flashes quickly for a few seconds and then goes out.
i Activating options can affect the water and energy consumption as well as the programme duration.
DryPlus
Activate this option to boost the drying performance.
The combination of DryPlus and rinse aid ensures even better drying results.
DryPlus is a permanent option for all programmes other than P4 (ECO). It is automatically activated in next cycles. This configuration can be changed at any time.
Every time P4 (ECO) is activated, DryPlus is off and needs to be chosen manually.
How to activate DryPlus
Press
Settings
Programme selection mode and user mode
When the appliance is in programme selection mode it is possible to set a programme and to enter the user mode.
Settings available in the user mode:
- The activation or deactivation of the rinse aid empty notification.
- The level of rinse aid according to the required dosage.
- Activation or deactivation of the acoustic signal for the end of a programme.
- The activation or the deactivation of the optionAutoOpen.
As the appliance stores the saved settings, there is no need to configure it before every cycle.
The related indicator is on.
The display shows the updated programme duration.
This option provides better hygiene results by keeping the temperature at 70^ for at least 10 minutes during last rinsing phase.
Press
The related indicator is on.
The display shows the updated programme duration.
The ExtraHygiene option is not applicable to the following programmes:
P5 (Glass)
P6 (Rinse & Hold)
P7 (Extra Silent)
How to set the programme selection mode
The appliance is in programme selection mode when the display shows the programme number P4.
After activation, the appliance is in programme selection mode by default. If not, set the programme selection mode the following way:
Press and hold RESET until the appliance is in programme selection mode.
How to enter user mode
Make sure the appliance is in programme selection mode.
To enter the user mode, press and hold simultaneously and until the
indicators (n, and flash and the display is blank.
The rinse aid empty notification
The rinse aid helps to dry the dishes without streaks and stains.
The rinse aid is automatically released during the hot rinse phase.
When rinse aid chamber is empty, the rinse aid indicator is turned on notifying to refill rinse aid. If the drying results are satisfactory while using multi-tablets only, it is possible to deactivate the notification for refilling rinse aid. However, for best drying performance, always use rinse aid.
If standard detergent or multi-tablets without rinse aid are used, activate the notification to keep the rinse aid refill indicator active.
How to deactivate the rinse aid empty notification
Make sure the appliance is in user mode.
- Press
The indicators , and
The indicator still flashes.
- The display shows the current setting.
The rinse aid level
It is possible to set the released quantity of rinse aid between level 1 (minimum quantity) and level 6 (maximum quantity).
Level 0 deactivates the rinse aid dispenser and no rinse aid is released.
Factory setting: level 4.
How to set the rinse aid level
Make sure the appliance is in user mode.
- Press
The indicators _h, and are off.
- The indicator still flashes.
The display shows the current setting: e.g. 4A = level 4.
The levels of rinse aid are from 0A to 6A where level 0A means rinse aid is not used.
- Press repeatedly to change the setting.
- Press the on/off button to confirm the setting.
Acoustic signals
Acoustic signals sound when a malfunction of the appliance occurs. It is not possible to deactivate these acoustic signals.
There is also an acoustic signal that sounds when the programme is complete. This acoustic signal is activated by default and you can deactivate it.
In addition, an acoustic signal sounds before the AutoOpen opens the door. This acoustic signal stops only if AutoOpen is deactivated.
How to deactivate the acoustic signal for the end of a programme
Make sure the appliance is in user mode.
- Press
The indicators _h and are off.
The indicator still flashes.
- The display shows the current setting.
AutoOpen
AutoOpen improves the drying results with less energy consumption. During the drying phase, the door opens automatically and remains ajar.
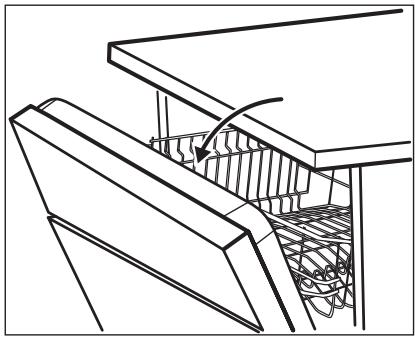
AutoOpen is automatically activated with all programmes excluding (if applicable).
Daily use
- Open the water tap.
- Press the on/off button to activate the appliance.
Make sure that the appliance is in programme selection mode.
If the rinse aid indicator is on, fill the rinse aid dispenser.
- Load the baskets.
- Add the detergent.
- Set and start the correct programme for the type of load and the degree of soil.
To improve the drying performance refer to the DryPlus option or activate AutoOpen.
Do not try to close the appliance door within 2 minutes after automatic opening. This can cause damage to the appliance.
If children, pets or people with disabilities have access to the appliance, deactivate AutoOpen. The automatic opening of the door may pose a danger and expose possible hazards inside the appliance (such as knives, sharp objects, chemicals).
How to deactivate AutoOpen
Make sure the appliance is in user mode.
- Press
The indicators and are off.
The indicator still flashes.
- The display shows the current setting.
- AutoOpen is deactivated.
- = AutoOpen is activated.
- Press to change the setting.
- Press on/off to confirm the setting.
Using the detergent
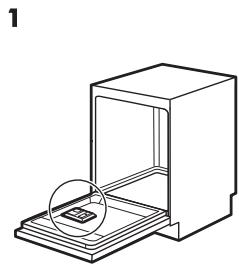
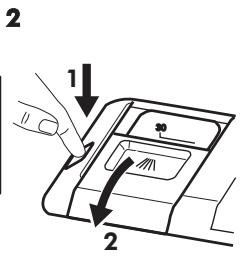
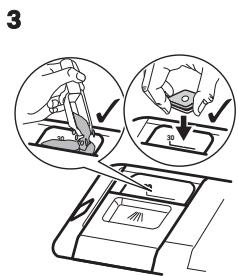
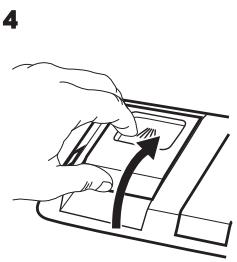
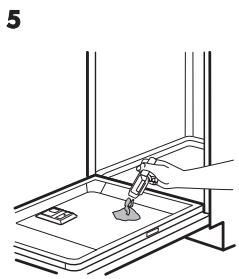
If the programme has a prewash phase, put a small quantity of detergent on the inner part of the appliance door.
Setting and starting a programme
The Auto Off function
This function decreases energy consumption by automatically deactivating the appliance when it is not operating.
The function comes into operation:
- 5 minutes after the completion of the programme.
After 5 minutes if the programme has not started.
Starting a programme
Caution! Do not remove the baskets from the dishwasher before a wash cycle.
- Keep the appliance door ajar.
- Press the on/off button to activate the appliance. Make sure that the appliance is in programme selection mode.
- Press or repeatedly until the display shows the number of the programme you want to start. The display will show the programme number for approximately 3 seconds and next the programme duration.
- Set the applicable options.
- Close the appliance door to start the programme.
Starting a programme with delay start
- Set a programme.
- Press repeatedly until the display shows the delay time you want to set (from 1 to 24 hours).
The delay indicator comes on.
- Close the appliance door to start the countdown.
While a countdown is running it is possible to increase the delay time but not to change the selection of the programme and options.
When the countdown is completed, the programme starts.
Opening the door while the appliance operates
Opening the door while a programme is running stops the appliance. It may affect the energy consumption and the programme duration. After closing the door, the appliance continues from the point of interruption.

If the door is opened for more than 30 seconds during the drying phase, the running programme ends. It does not happen if the door is opened by AutoOpen function.
Cancelling the delay start while the countdown operates
When you cancel the delay start you have to set the programme and options again.
Press and hold RESET until the appliance is in programme selection mode.
Cancelling the programme
Press and hold RESET until the appliance is in programme selection mode.
Make sure that there is detergent in the detergent dispenser before you start a new programme.
End of the programme
When the programme is completed the display shows 0:00 and the indicator is on.
All buttons are inactive except for the on/off button.
-
Press the on/off button or wait for the Auto Off function to automatically deactivate the appliance. If you open the door before the activation of Auto Off, the appliance is automatically deactivated.
-
Close the water tap.
Hints and tips
General
The following hints will ensure optimal cleaning and drying results in daily use and also help to protect the environment.
- Remove larger residues of food from the dishes into the waste bin.
- Do not pre-rinse dishes by hand. When needed, use the prewash programme (if available) or select a programme with a prewash phase.
Always use the whole space of the baskets.
-
When loading the appliance, make sure that the dishes can be completely reached and washed by the water released from the spray arm nozzles. Make sure that items do not touch or cover each other.
-
You can use dishwasher detergent and rinse aid separately or you can use the multi-tablets. Follow the instructions written on the packaging.
- Select the programme according to the type of load and degree of soil. With the ECO programme you have the most efficient use of water and energy consumption for crockery and cutlery with normal soil.
Using rinse aid and detergent
- Only use rinse aid and detergent for dishwasher. Other products can cause damage to the appliance.
- The rinse aid helps, during the last rinsing phase, to dry the dishes without streaks and stains.
- Detergent tablets do not fully dissolve with short programmes. To prevent
detergent residues on the tableware, we recommend that you use the tablets with long programmes.
- Do not use more than the correct quantity of detergent. Refer to the instructions on the detergent packaging.
Loading the baskets

Refer to the supplied leaflet with examples of the load of the baskets.
- Only use the appliance to wash items that are dishwasher-safe.
- Do not put in the appliance items made of wood, horn, aluminium, pewter and copper.
- Do not put in the appliance items that can absorb water (sponges, household cloths).
- Remove remaining food from the items.
- Soak items with remaining burned food in water.
- Put hollow items (cups, glasses and pans) with the opening down.
- Make sure that cutlery and dishes do not bond together. Mix spoons with other cutlery.
- Make sure that glasses do not touch other glasses.
- Put small items in the cutlery basket.
- Put light items in the upper basket. Make sure that the items do not move.
Make sure that the spray arm can move freely before you start a programme.
Before starting a programme
Make sure that:
- The filters are clean and correctly installed.
- The spray arms are not clogged.
There is dishwasher rinse aid.
- The position of the items in the baskets is correct.
The programme is applicable for the type of load and for the degree of soil.
The correct quantity of detergent is used.
Unloading the baskets

For better drying results keep the appliance door ajar for some minutes before you remove the dishes.
-
Let the dishes cool down before you remove them from the appliance. Hot dishes are easily damaged.
-
First remove items from the lower basket then the upper basket.

At the end of the program water can still remain on the sides and on the door of the appliance.
Care and cleaning

Warning! Before maintenance, deactivate the appliance and disconnect the mains plug from the main socket.

Dirty filters and clogged spray arms decrease the washing results. Make a check regularly and, if necessary, clean them.
Cleaning the filters
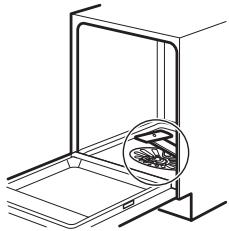
1
Make sure that there are no residues of food or soil in or around the edge of the sump.
2
3
4
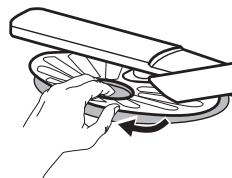
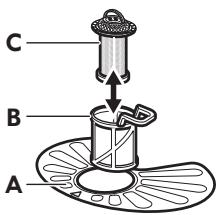
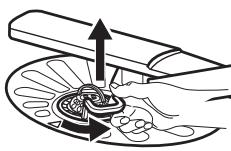
To remove filters (B) and (C) turn the handle counterclockwise and remove. Pull apart filter (B) and (C). Wash the filters with water.
Remove filter (A). Wash the filter with water.
5
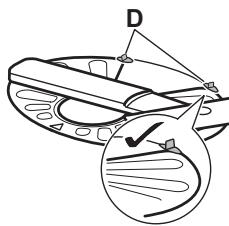
Put the flat filter (A) back in place. Make sure that it is correctly positioned under the 2 guides (D).
6
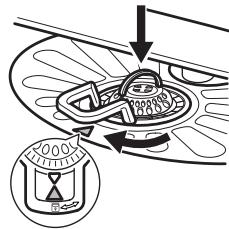
Assemble filters (B) and (C). Put them into position in filter (A). Turn the handle clockwise until it locks.
i
An incorrect position of the filters can cause bad washing results and damage to the appliance
Cleaning the filter of the inlet hose
1
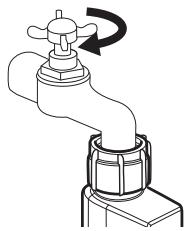
Close the water tap.
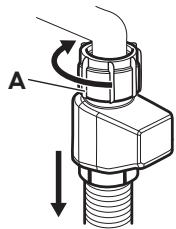
2
Disconnect the hose.
Turn the fastener A clockwise.
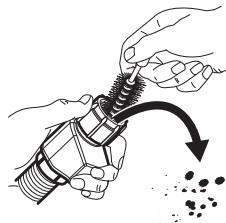
3
Clean the filter of the inlet hose.
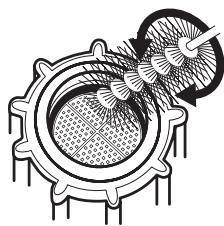
4
Cleaning the upper spray arm
We recommend to clean the upper spray arm regularly to prevent soil from clogging the holes.
Clogged holes can cause unsatisfactory washing results.
- Pull out the upper basket.
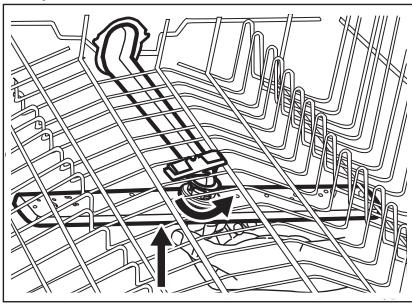
- To detach the spray arm from the basket, press the spray arm upwards and simultaneously turn it clockwise.
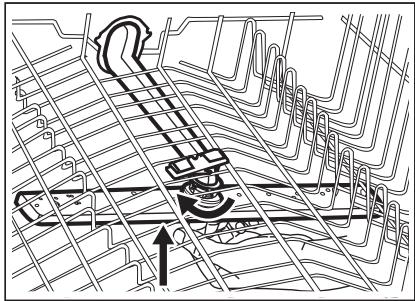
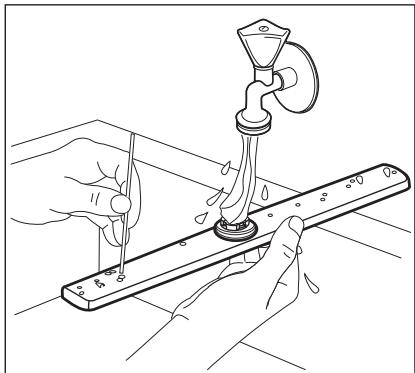
- Wash the spray arm under running water. Use a thin pointed tool, e.g. a toothpick, to remove particles of soil from the holes.
- To install the spray arm back, press the spray arm upwards and simultaneously
turn it counterclockwise until it locks into place.
External cleaning
- Clean the appliance with a moist soft cloth.
- Only use neutral detergents.
- Do not use abrasive products, abrasive cleaning pads or solvents.
Internal cleaning
- Carefully clean the appliance, including the rubber gasket of the door, with a soft damp cloth.
- To maintain the performance of your appliance, use a cleaning product designed specifically for dishwashers at least once a month. Carefully follow the instructions on the packaging of the product.
- Do not use abrasive products, abrasive cleaning pads, sharp tools, strong chemicals, scourer or solvents.
- Using short-duration programmes regularly can cause grease and limescale buildup inside the appliance. Run long-duration programmes at least twice a month to prevent the buildup.
Troubleshooting
If the appliance does not start or it stops during operation. Before you contact an
Authorised Service Centre, check if you can solve the problem by yourself with the help of the information in the table.

Warning! Repairs not properly done may result in serious risk to the safety of the user. Any repairs must be performed by qualified personnel.
With some problems, the display shows an alarm code.
The majority of problems that can occur can be solved without the need to contact an Authorised Service Centre.
| Problem and alarm code | Possible solution |
| You cannot activate the appliance. | ·Make sure that the mains plug is connected to the mains socket.
·Make sure that there is no damaged fuse in the fuse box. |
| The programme does not start. | ·Make sure that the appliance door is closed.
·If the delay start is set, cancel the setting or wait for the end of the countdown. |
| The appliance does not fill with water.
The display shows /0 or /
11. | ·Make sure that the water tap is open.
·Make sure that the pressure of the water supply is not too low. For this information, contact your local water authority.
·Make sure that the water tap is not clogged.
·Make sure that the filter in the inlet hose is not clogged.
·Make sure that the inlet hose has no kinks or bends. |
| The appliance does not drain the water.
The display shows 20. | ·Make sure that the sink spigot is not clogged.
·Make sure that the drain hose has no kinks or bends. |
| The anti-flood device is on.
The display shows 30. | ·Close the water tap and contact an Authorised Service Centre. |
| The appliance stops and starts more times during operation. | ·It is normal. It provides optimal cleaning results and energy savings. |
| The program lasts too long. | ·If the delayed start option is set, cancel the delay setting or wait for the end of the countdown. |
| The remaining time in the display increases and skips nearly to the end of program time. | ·This is not a defect. The appliance is working correctly. |
| Small leak from the appliance door. | ·The appliance is not levelled. Loosen or tighten the adjustable feet (if applicable).
·The appliance door is not centred on the tub. Adjust the rear foot (if applicable). |
| The appliance door is difficult to close. | ·The appliance is not levelled. Loosen or tighten the adjustable feet (if applicable).
·Parts of the tableware are protruding from the baskets. |
| Rattling/knocking sounds from inside the appliance. | ·The tableware is not properly arranged in the baskets. Refer to basket loading leaflet.
·Make sure that the spray arms can rotate freely. |
| The appliance trips the circuit-beaker. | ·The amperage is insufficient to supply simultaneously all the appliances in use. Check the socket amperage and the capacity of the meter or turn off one of the appliances in use.
·Internal electrical fault of the appliance. Contact an Authorised Service Centre. |
Refer to "Before first use", "Daily use", or "Hints and tips" for other possible causes.
Once you have checked the appliance, deactivate and activate the appliance. If
the problem occurs again, contact an Authorised Service Centre.
For alarm codes not described in the table, contact an Authorised Service Centre.
The washing and drying results are not satisfactory
| Problem | Possible cause and solution |
| Poor washing results. | Refer to "Daily use", "Hints and tips" and basket loading leaflet.
Use more intensive washing programmes.
Clean spray arm jets and filter. Refer to "Care and Cleaning". |
| Poor drying results. | Tableware has been left for too long inside a closed appliance.
There is no rinse aid or the dosage of rinse aid is not enough. Set the rinse aid dispenser to a higher level.
Plastic items may need to be towel dried.
For the best drying performance activate the option DryPlus and set AutoOpen.
We recommend to always use rinse aid, even in combination with multi-tablets. |
| There are whitish streaks or bluish layers on glasses and dishes. | The release quantity of rinse aid is too much. Adjust the rinse aid level to a lower level.
The quantity of detergent is too much. |
| There are stains and dry water drops on glasses and dishes. | The released quantity of rinse aid is not sufficient. Ad-just the rinse aid level to a higher level.
The quality of the rinse aid can be the cause. |
| The dishes are wet. | For the best drying performance activate the option DryPlus and set AutoOpen.
The programme does not have a drying phase or has a drying phase with low temperature.
The rinse aid dispenser is empty.
The quality of the rinse aid can be the cause.
The quality of the multi-tablets can be the cause. Try a different brand or activate the rinse aid dispenser and use rinse aid and multi-tablets together. |
| The interior of the appliance is wet. | This is not a defect of the appliance. it is caused by the humidity in the air that condenses on the walls. |
| Unusual foam during washing. | Use the detergent for dishwashers only.
There is a leak in the rinse aid dispenser. Contact an Authorised Service Centre. |
| Traces of rust on cutlery. | Silver and stainless steel cutlery were placed together. Avoid to put silver and stainless steel items close to-gether. |
| There are residues of detergent in the dispenser at the end of the programme. | The detergent tablet got stuck in the dispenser and therefore was not completely washed away by water.
Water cannot wash away the detergent from the dispenser. Make sure that the spray arm is not blocked or clogged.
Make sure that items in the baskets do not impede the lid of the detergent dispenser from opening. |
| Odours inside the appliance. | Refer to "Internal cleaning". |
| Dull, discoloured or chipped tableware. | Make sure that only dishwasher-safe items are washed in the appliance.
Load and unload the basket carefully. Refer to basket loading leaflet.
Place delicate items in the upper basket. |
Refer to "Before first use", "Daily use" or "Hints and tips" for other possible causes.
Technical information
| Dimensions | Width / height / depth (mm) | 596 / 818 - 898 / 550 |
| Electrical connection 1) | Voltage (V) | 200 - 240 |
| Frequency (Hz) | 50 / 60 |
| Water supply pressure | Min. / max. bar (MPa) | 0.5 (0.05) / 8 (0.8) |
| Water supply | Cold water 2) | min 5 °C |
| Capacity | Place settings | 14 |
| Power consumption | Left-on mode (W) | 5.0 |
| Off-mode (W) | 0.10 |
1) Refer to the rating plate for other values.
2) Cold water connection is recommended for best washing performance.
Environmental concerns
Recycle materials with the symbol . Put the packaging in relevant containers to recycle it. Help protect the environment and human health by recycling waste of electrical and electronic appliances. Do not
IKEA guarantee
How long is the IKEA guarantee valid?
This guarantee is valid for 5 years from the original date of purchase of Your appliance at IKEA Pty Ltd, ABN 84006270757 or at Cebas Pty Ltd, ABN 15 009 156 003 (Both Trading as IKEA). The original sales receipt is required as proof of purchase. If service work is carried out under guarantee, this
dispose of appliances marked with the symbol with the household waste. Return the product to your local recycling facility or contact your municipal office.
will not extend the guarantee period for the appliance.
Who will execute the service?
IKEA service provider will provide the service through its own service operations or authorized service partner network. Contact IKEA for further information.
If you encounter any trouble with the appliance and wish to register a service call or make a claim, please refer to www.ikea.com.au for your local store after sales customer service center phone number, online email and opening times.
The principal address and contact details in Australia are:
For Queensland, New South Wales, and Victorian customers please contact:
| IKEA Pty Ltd |
| IKEA Pty Ltd
IKEA Service Office
L1 Clock Tower, 630 Princes Highway
Tempe, NSW 2044 |
| Contact - IKEA Customer Service at
www.IKEA.com.au |
For Western Australian and South Australian customers please contact:
| Cebas Pty Ltd |
| 8c Sunray Drive, Innaloo WA 6018
Australia |
| Contact - IKEA Customer Service at
www.IKEA.com.au |
What does this guarantee cover?
The guarantee covers faults of the appliance, which have been caused by faulty construction or material faults from the date of purchase from IKEA. This guarantee applies to domestic use only. The products have been designed and tested for domestic purposes only and this guarantee does not cover damage arising from use of the Product in a commercial environment.
The exceptions are specified under the headline "What is not covered under this guarantee?" Within the guarantee period,
the costs to remedy the fault e.g. repairs, parts, labour and travel will be covered, provided that the appliance is accessible for repair without special expenditure. Replaced parts become the property of IKEA.
The guarantee exists only if the appliance complies and is installed in accordance with:
The technical specifications.
- The Assembly Instructions and user manual Safety Information.
IKEA's guarantee is subject to Australian Consumer Law - see Schedule 2 to Competition and Consumer Act, 2010. This guarantee is in addition to (and does not exclude, restrict or modify in any way) any non-excludable statutory warranties in Australia.
What will IKEA do to correct the problem?
IKEA appointed service provider will examine the product and decide, at its sole discretion, if it is covered under this guarantee. They will notify you as to whether your claim is covered under this guarantee. If your claim is approved, the IKEA service provider or its authorized service partner, will then, at its sole discretion, either repair the defective product or replace it with the same or a comparable product.
What is not covered under this guarantee?
Normal wear and fear.
- Deliberate or negligent damage, damage caused by failure to observe operating instructions, incorrect installation or by connection to the wrong voltage, damage caused by chemical or electro-chemical reaction, rust, corrosion or water damage including but not limited to damage caused by excessive lime in the water supply, damage caused by abnormal environmental conditions.
- Consumable parts including batteries and lamps.
- Non-functional and decorative parts which do not affect normal use of the appliance, including any scratches and possible colour differences.
- Accidental damage caused by foreign objects including insect or vermin infestation or substances and cleaning or unblocking of filters, drainage systems or soap drawers.
- Damage to the following parts: ceramic glass, accessories, crockery and cutlery baskets, feed and drainage pipes, seals, lamps and lamp covers, screens, knobs, casings and parts of casings. Unless such damages can be proved to have been caused by production faults.
- Cases where no fault could be found during a technician's visit.
- Repairs not carried out by our appointed service providers and/or an authorized service contractual partner or where non-original parts have been used.
- Repairs caused by installation which is faulty or not according to specification.
- The use of the appliance in a non-domestic environment i.e. professional use.
- Transportation damages. If a customer transports the product to their home or other address, IKEA is not liable for any damage that may occur during transport. However, if IKEA delivers the product to the customer's delivery address, then damage to the product that occurs during this delivery will be covered by this guarantee.
-
Cost for carrying out the initial installation of the IKEA appliance. However, if an IKEA service provider or its authorized service partner repairs or replaces the appliance under the terms of this guarantee, the service provider or its authorized service partner will reinstall the repaired appliance or install the replacement, if necessary.
-
The appliance's serial number or warranty seal has been removed or defaced.
How country law applies
Our goods come with guarantees that cannot be excluded under the Australian Consumer Law (ACL). You are entitled to a replacement or refund for a major failure and compensation for any other reasonably foreseeable loss or damage.
You are also entitled to have the goods repaired or replaced if the goods fail to be of acceptable quality and the failure does not amount to a major failure.
This guarantee is not intended in any way to limit or exclude such rights and remedies that you may have under law.
You can find out more information about the Australian Consumer Law on the ACCC website: www.accc.gov.au
Area of validity
This IKEA guarantee applies only to products purchased and installed in AUSTRALIA.
What you must do to make a claim under the guarantee:
To make a claim under the guarantee contact IKEA after sales customer service center at the above address, the IKEA catalogue or refer to www.ikea.com.au for your local store customer service phone number, online email and opening times. Please describe the problem that you are facing with the appliance in detail along with your product article number (8 digit code) and date of purchase at the time of call registration.
Please do not hesitate to contact the dedicated after sales customer service center for IKEA appliances to:
- Make a service request under this guarantee;
- Ask for clarification on installation of the IKEA appliance in the dedicated IKEA kitchen furniture.
- Ask for clarification on user manual contents and specifications of the IKEA appliance.
To ensure that we provide you with the best assistance, please read carefully the Assembly Instructions and/or the User Manual section of this booklet before contacting us.
How to reach us if you need our service
The IKEA after sales customer service centre will assist you on the phone with basic trouble shooting for your appliance at the time of service call request. Please refer to the IKEA catalogue or www.ikea.com.au and select your local store for local store phone numbers and opening times.
i Please describe the problem that you are facing with the appliance in detail along with your product article number (8 digit code) and date of purchase at the time of call registration.
SAVE THE SALES RECEIPT!
Kindly keep all these details and original invoice of purchase handy during the service technician's visit to enable him to carry out the job. It is your proof of purchase and required for the guarantee to apply. Note that the receipt reports also the IKEA article name and number (8 digit code) for each of the appliances you have purchased.