
BTDT2-918 - TV Decoder BRIGMTON - Free user manual and instructions
Find the device manual for free BTDT2-918 BRIGMTON in PDF.

User questions about BTDT2-918 BRIGMTON
0 question about this device. Answer the ones you know or ask your own.
Ask a new question about this device
Download the instructions for your TV Decoder in PDF format for free! Find your manual BTDT2-918 - BRIGMTON and take your electronic device back in hand. On this page are published all the documents necessary for the use of your device. BTDT2-918 by BRIGMTON.
USER MANUAL BTDT2-918 BRIGMTON
natural_image
Abstract 3D curved shape with smooth gradient, no text or symbols presentBRIGMTON
surfing technology
Resolución
Búsqueda automática
País
Low Voltage Directive 2006/95/EC
EN 60065:2002+A1:2006
EMC Directive 2004/108/EC
EN 55 013:2001+A1:2003+A2:2006
EN 55 020:2007
EN 61 000-3-2:2006
EN 61 000-3-3:2008
natural_image
Abstract curved gray ring shape on white background (no text or symbols)BRIGMTON
surfing technology
INSTRUCTION MANUAL
DVBT2 - PVR - TIME SHIFT - HDMI
BTDT2-918
SECURITY
- Read these instructions.
- Keep these instructions.
- Heed all warnings.
- Follow all instructions.
- Do not use this equipment near water.
- Clean only with a dry cloth.
- Protect the power cord from damage or stress.
-
Use the equipment in moderate climates.
-
Do not place near heat sources such as radiators, heat registers, stoves, or other apparatus (including amplifiers) that produce heat.
-
Use this product only with the type of power indicated on the label. If you are not sure of the type of power in your home, consult your local company. Disconnect the unit from power before servicing and prior to any installation procedure.
-
Only use attachments / accessories specified by the manufacturer.
-
Unplug this apparatus during lightning storms or when unused for long periods of time.
-
For any repair or service, refer servicing to qualified personnel. Your equipment requires service when the apparatus has been damaged in any way, including damage to the cable or main connector, if the unit has been exposed to liquid or moisture, dropped or malfunctions.
-
Do not block the airflow to the unit, avoid blocking the ventilation ports.
-
Pay attention to the environmental aspects before disposing of your batteries.
CAUTION: To reduce the risk of fire or electric shock, do not expose the equipment to rain or moisture.
WARNING: Batteries should not be exposed to excessive heat, such as direct sunlight, fire, etc.

This symbol indicates that there are important instructions for use and maintenance in the instructions accompanying this unit.

This symbol indicates that this product incorporates double insulation between the dangerous supply voltage and the parts to which the user has access. When servicing the equipment, if you need repairs use only identical parts.

This symbol on the equipment or in the instructions means that when your electrical and electronic equipment expires, you must dispose of them separately from your regular waste. There are special collection systems for recycling.
For more information, please contact your local authorities or the distributor from whom you purchased the product.
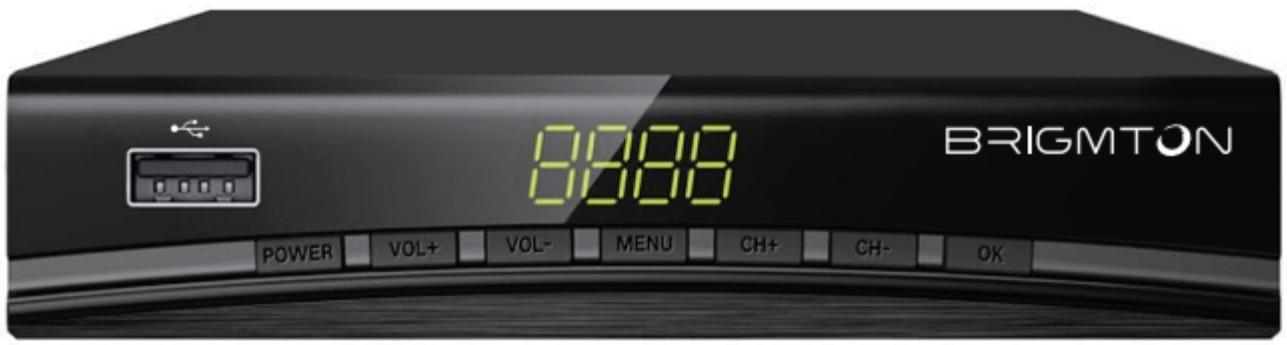
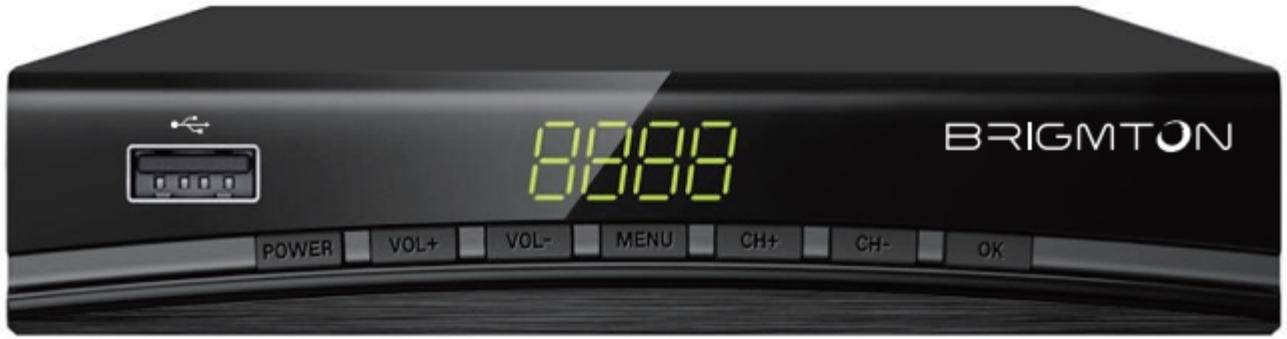
FRONT AND REAR PANEL
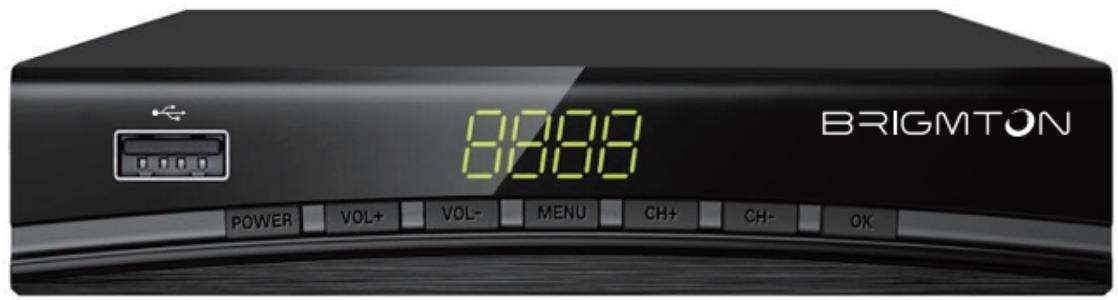
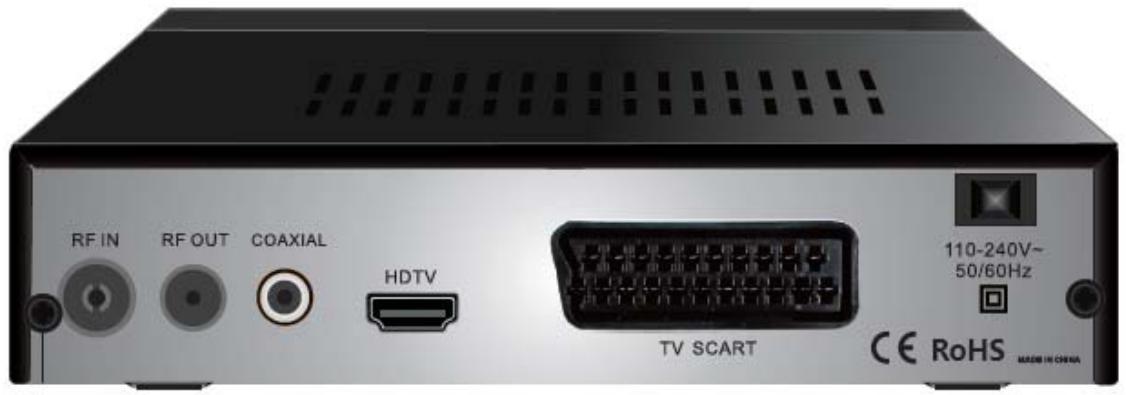
- RF Input: This port connects your external antenna.
- RF Output: This port will feed the RF signal to your television or any other video system.
- Video, Left, Right: These ports connect to your TV or AV receiver.
- Coax: connect to the coaxial port of your surround sound system.
- HDTV: High-definition audio and video output used to connect your TV to an HDTV device.
REMOTE CONTROL
- STANDBY: To switch the unit on or standby (unit off).
- AUTO SEARCH: Automatically searches for available TV channels.
- CH3 / CH4: Select the output between channel 3 or channel 4 when using the RF output connection.
- MUTE: Disable (mute) or enable audio output.
- EPG: Display the electronic program guide window.
- INFO: Display additional information about the current TV program.
- CC: Select the subtitle options.
- REC: Start recording. A USB memory stick is required for recording.
- AUDIO: Select audio mode or audio language.
- USB: Display the contents of a USB device.
- MENU: Display the menu options.
- EXIT: Exit the current menu or return to the previous menu screen.
- OK: Confirm the selection of an option.
- VOL- / VOL +: Adjust the volume level.
- CH + / CH-: Search for options within a menu.
- FAV: View or edit the favorite channel list.
- TV / RADIO: Switch between TV and Radio modes.
- 0-9: Buttons used to enter a channel number or a channel number Numeric option within a menu.
- RECALL: Return to the last selected channel or menu.
- GOTO: Start media playback at a specified time.
- REV: Scan backward during average playback.
- FWD: Scan forward during average playback.
- PAGE +: Fast forward within a menu.
- PAGE-: Return quickly within a menu.
- PLAY: Start playback.
- TIMESHIFT: Pause or resume Pause playback of media or a TV program. This function requires a USB memory stick.
- STOP: Stop media playback.
- REPEAT: Selects the repeat play mode.
- RED / GREEN / YELLOW / BLUE: Triggers Functions
- RED / GREEN / YELLOW / BLUE: Triggers functions labeled by each respective color within a text screen.
30 .:-: Use together with the numeric keypad to tune a substation of a channel. For example, to tune the channel substation 4-2, press "4", "--", "2".
Using the remote control
To use the remote control, point to the front of the digital receiver.
The remote control has a range of up to 7 meters from the receiving box at an angle of up to 60 degrees.
The remote control will not operate if there are obstacles in its path.
Very bright sunlight or light could decrease the sensitivity of the remote control.
CONNECTING TO THE TV
For a basic connection of your DTT to your TV, use a SCART or HDMI cable. Connect the end of the antenna that comes out of your wall to the antenna input of the DTT. And connect the SCART or HDMI to your TV.
FIRST INSTALLATION
Once all connections have been made correctly, turn on your television and make sure the unit is connected to a power source. Press the Power button to turn the unit on. If you are using the unit for the first time, or if you are restoring factory settings, the installation guide menu will appear on your TV screen.
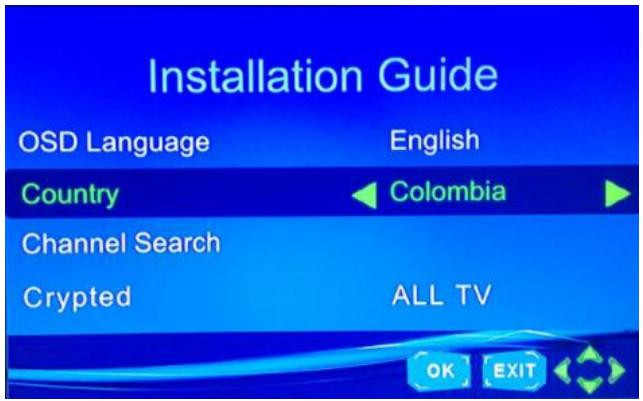
- [On-Screen Language] press LEFT / RIGHT to select the language.
- [Country] press LEFT / RIGHT to select the country in which you live.
- [Channel Search] press RIGHT or OK to start automatic channel search
- Once the tuning is complete, you can start watching TV.
PLAYING
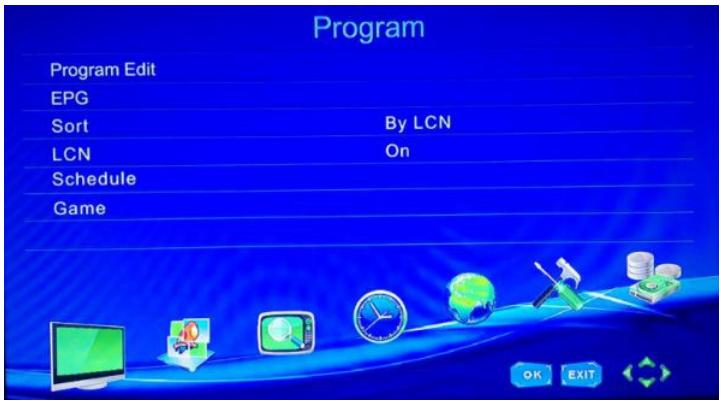
To access the menu, press the MENU button and select [PROGRAM], using the RIGHT / LEFT buttons to navigate the menu. The menu will provide
options for adjusting the programming operation. Select an option and press OK or the RIGHT button to adjust the setting. Press EXIT to exit the menu.
EDIT PROGRAM
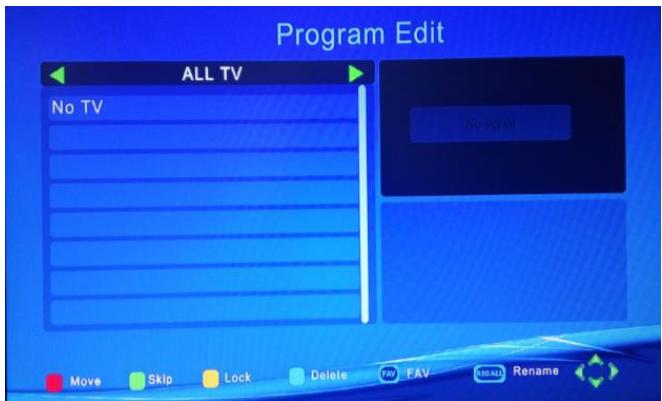
To edit your programming preferences (block, skip, bookmark, move, delete), you will need to enter the programming edit menu. This menu requires a password to enter. Enter the default password '000000'. The unlock master password is '888888'.
SET FAVORITE CHANNELS
You can create a short list of your favorite programs that you can easily access.
To set a favorite TV or radio show:
- Select the desired channel and press the FAV button. A heart-shaped symbol will appear and the channel will be marked as a favorite.
- Repeat the previous step to select more favorite channels.
- Press EXIT to confirm and exit the menu.
DISABLE FAVORITE CHANNELS
Select the favorite channel and press the FAVORITE button on the remote control to cancel.
VIEW FAVORITE CHANNELS
- During normal playback mode, press the FAVORITE button to display the favorite menu.
- Press the UP / DOWN buttons to navigate between your favorite channels.
- Press ENTER to select the desired channel.
CLEAR A CHANNEL OR STATION
- Select the desired channel and press the BLUE button, a warning message will be displayed, press OK to delete the channel.
- Repeat the previous step to delete more channels
SKIP TV CHANNELS OR RADIO STATIONS
- Select the channel you want to skip and press the GREEN button. A "jump" symbol will be displayed. The channel was marked as "channel to jump".
- Repeat the above steps to skip more channels.
- Press Exit to save the settings and exit the menu.
DISABLING THE CHANNEL SKIPPING FUNCTION
Select the channel that usually jumps and press the GREEN button on the remote control to cancel.
MOVE TV OR RADIO CHANNELS OR STATIONS
- Select your desired channel and press the RED button. A "move" symbol will be displayed on the screen.
- Press UP / DOWN to move the channel.
- Press OK to confirm.
- Repeat the above steps to move more channels.
LOCK CHANNEL OR STATION
You can block the desired channels or stations.
Lock a TV channel or Radio station
- Select the desired channel and press the YELLOW button. A lock symbol will be displayed. The channel is locked.
- Repeat the above steps to select more channels.
- Press the EXIT button to confirm your settings and exit the menu.
- Press the YELLOW button to deactivate the lock function of a channel.
- To view blocked channels, you need to enter the password. The default password is '000000', the master password is '888888'.
EPG (Electronic Program Guide)
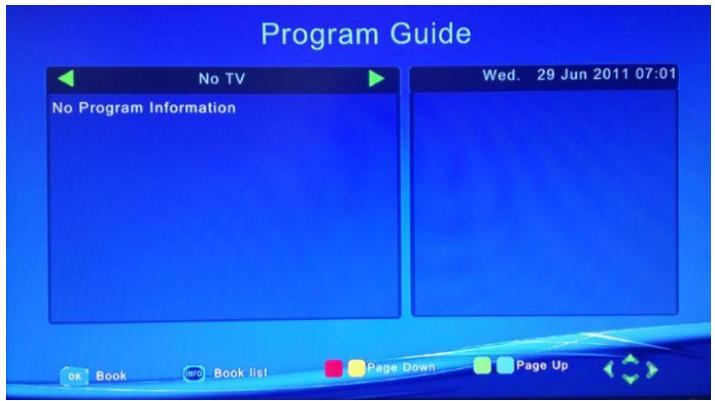
The electronic program guide is a guide that is displayed on the TV screen and shows the schedule of the programs transmitted on each channel. Press the EPG button on the remote control to access this guide.
You can use the UP / DOWN buttons to select different channels. If there is more than one page of information use the BLUE button to go to the next page and the YELLOW button to go to the previous page.
Order
Order your channels using one of the following options:
[By LCN] - Sort channels in ascending order.
[By service name] - Sort channels in alphabetical order.
[By Service ID] - Sort the channels according to the station.
[By ONID] - Sort channels according to ONID.
LCN (Logical channel number)
Turn the channel number on and off.
Image Settings
To access the menu, press MENU and then select [Image] using the LEFT / RIGHT buttons. The menu will provide adjustment options for the video settings. Press UP / DOWN to select an option and press LEFT / RIGHT to set the option. Press EXIT to exit the menu.
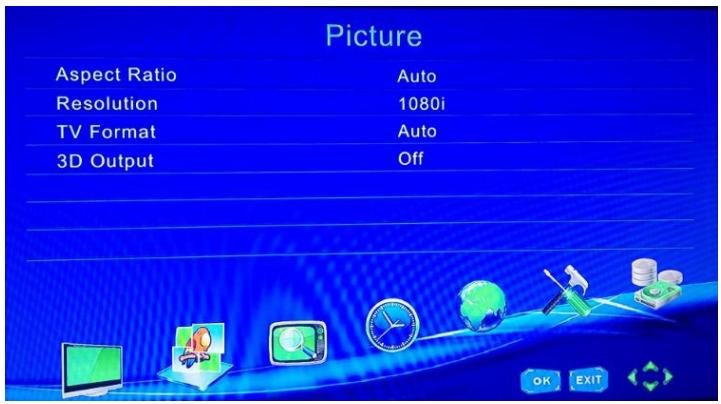
Resolution
You can change this setting if the resolution appears to be incorrect. This setting is used to synchronize with the most common HDTV setting.
[480P]: for NTSC TV system.
[576P]: for PAL TV system.
[720P]: for NTSC or PAL TV system
[1080I]: for NTSC or PAL TV system
[1080P]: for NTSC or PAL TV system
TV format
If the image is not viewed correctly, you can change this setting. It should match the common TV setting in your country.
[NTSC]: For NTSC TV systems.
[PAL]: For PAL TV systems.
Search channels
To access the menu, press MENU and select [Channel Search] using the LEFT / RIGHT buttons.
This menu will provide you with setting options for different channel search options.
Press the UP / DOWN buttons to select an option, then press LEFT / RIGHT to set the option.
Press EXIT to exit the menu.
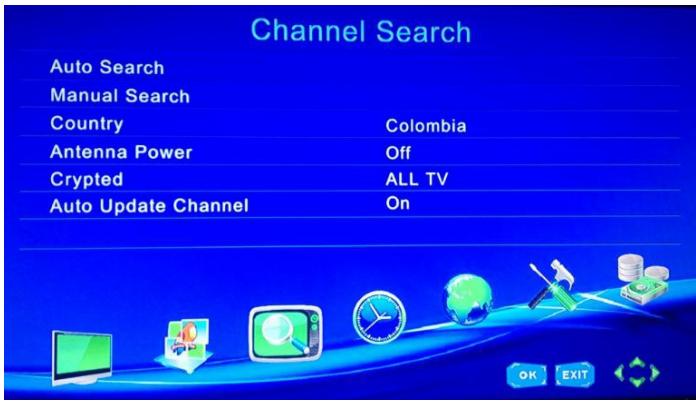
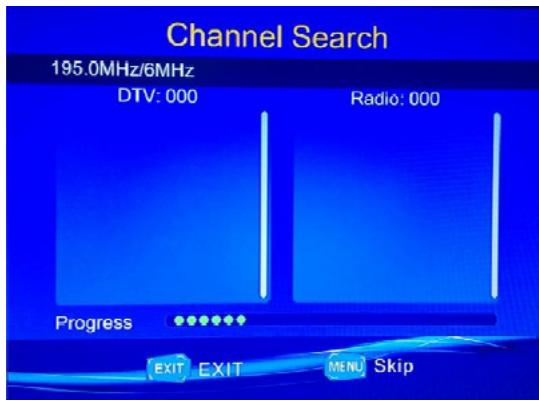
Automatic Search
This option will automatically search for and store channels after scanning. All previously stored channels and settings will be erased.
- Select AUTO SEARCH and press OK or RIGHT arrow to start the channel search.
- Press EXIT to cancel the channel search, any channel found will be saved.
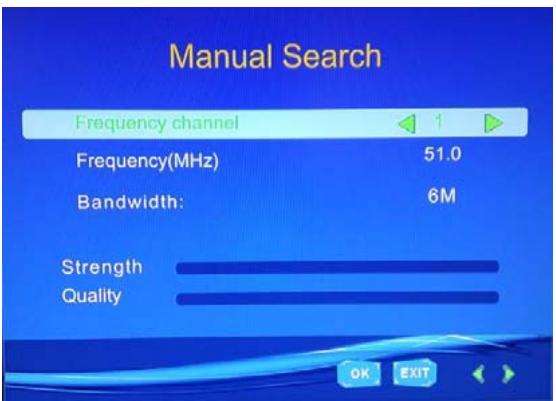
Manual search
This option allows you to search for new channels without deleting previously stored settings and channels.
- Select [Manual Search] then press OK or RIGHT arrow. The manual search screen appears on the screen.
- Press LEFT / RIGHT to select channel frequency.
- Press OK to start the channel search.
If any channel is found, it will be saved and added to the existing channel list. If no channel is found during the search, the unit will automatically exit the channel.
Auto Off
Select ON / OFF auto-off to turn the unit off programmed.
Country
Select your country of residence.
Antenna power
Turn on the power of the antenna if an external antenna is connected.
Setting the time
To access the menu, press MENU, then select [TIME] using the LEFT / RIGHT buttons. The menu will provide setting options for the time.
Press the UP / DOWN buttons to select an option and press the LEFT / RIGHT buttons to set the option. Press EXIT to exit the menu.
Scrolling schedule
Select automatic or manual GMT offset settings.
Region
Select your region when the Time Shift is in automatic mode.
Time zone
Select your time zone when the Time Shift is in manual mode.
Options
To access the menu, press MENU and select [Options] using the LEFT / RIGHT buttons. This menu will provide on-screen language, subtitle and audio language adjustment options.
Select an option and press the LEFT / RIGHT buttons to set this option.
Press EXIT to exit the menu.
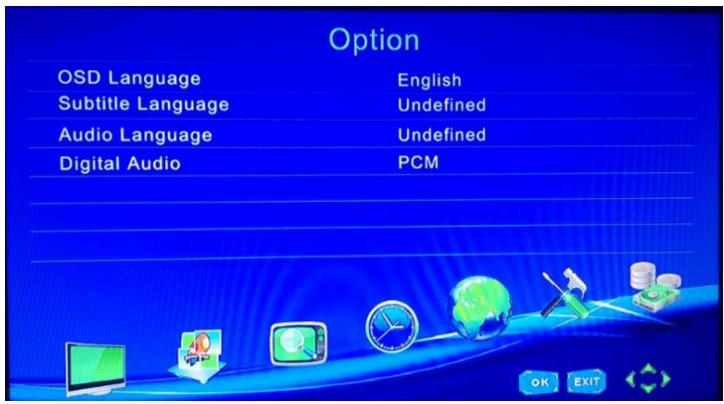
On-screen language
Select an on-screen language.
Subtitle
Select a language for subtitles.
Audio language
Select your favorite audio language to watch TV. If the language is not available, the default channel language will be used.
Digital Audio
Select a digital audio output mode.
System configuration
To access the menu, press MENU and select [System] using the LEFT / RIGHT buttons. The menu will provide setting options for system setup.
Press the UP / DOWN buttons to select an option, and press the LEFT / RIGHT buttons to set the option. Press EXIT to exit the menu.
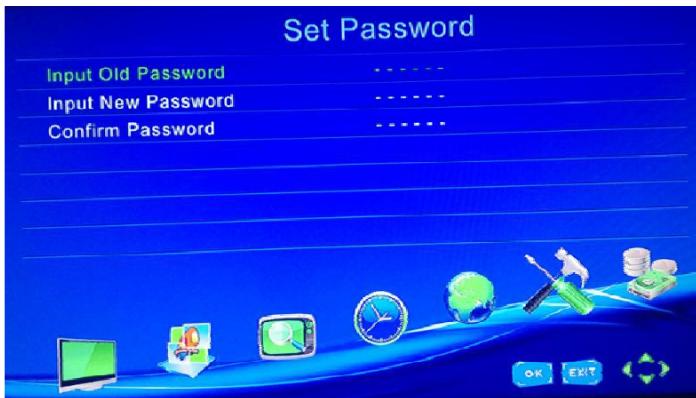
Set Password
Set or change the password for locked programs. Enter your old password or the default password '000000'. You will be prompted to enter your new password. Press OK to confirm your new password.
Once you confirm it, press EXIT to exit the menu. The master password for unlocking is '888888'.
Reset Factory Settings
Reset your digital box to factory settings.
In the main menu, select [Restore factory settings] using the LEFT / RIGHT buttons and press OK or the RIGHT arrow to select. Enter your password or the default password '000000' and press OK to confirm. This option will erase all pre-set channels and previously stored settings. The unlock master password is '888888'.
Information
You can see information about the model, hardware and software.
Start Time
This is the time at which the unit will look for new software updates.
Parental control

Select the age level and confirm.
Follow the steps to set a password:
Software update
If this mode is on, a new broadcasting software will be searched according to the time set in the "Start Time" parameter.
USB
To access the menu, press MENU and select [USB] using the LEFT / RIGHT buttons. The menu will provide options for playing music, photos and multimedia files. It supports AVI, MP3, JPEG and BMP formats.
The unit only supports USB devices with FAT32 file system.
It does not support NTFS file system.
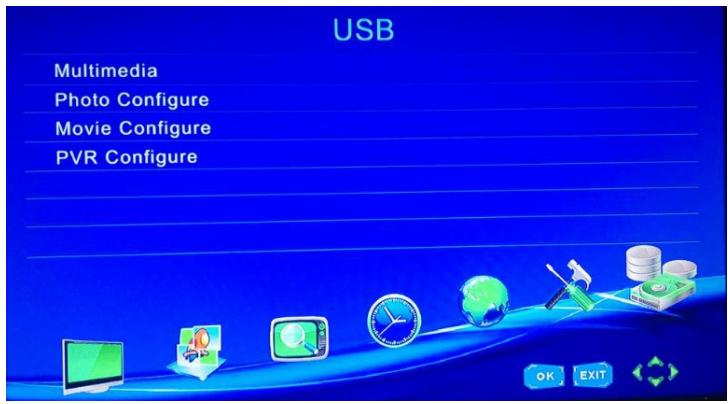
Multimedia
When you connect a USB device to your computer, you can select music, photos or videos in this menu using the LEFT / RIGHT buttons and the OK button to confirm. If no USB memory is connected, the warning message "NO USB DEVICE IS FOUND" will be displayed.
Music
Select the file to be played with the directional buttons:
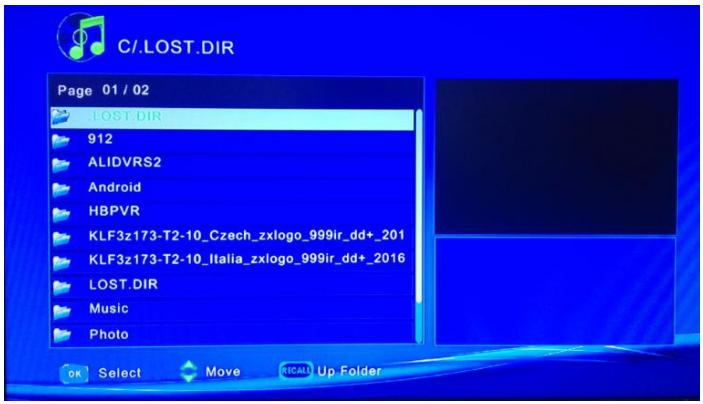
Photo Settings
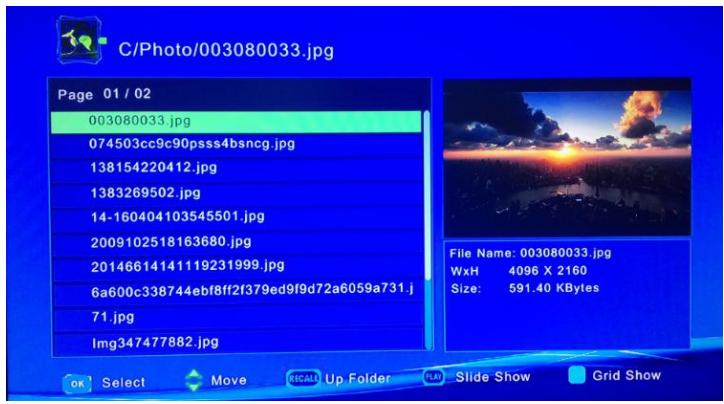
Slide Interval: Set the time interval between slides of 1 \~ 8 seconds.
Slideshow Mode: Adjust the effects of the slide show in 0 \~ 59 or random mode.
Aspect Ratio:
[Hold]: Playback images with their original appearance
[Discard]: Play back images in full screen.
Video

Select the file to be played with the directional buttons.
See the functions of the remote control for playback.
NOTE: We can not guarantee compatibility with all USB mass storage devices and assume no responsibility for any loss of information that may occur when connecting your device to this unit.
With large amounts of information, it may take longer for the system to read the contents of a USB device.
Some USB devices may not be recognized correctly.
Still having the correct format, some files may not play according to content.
Recording-PVR
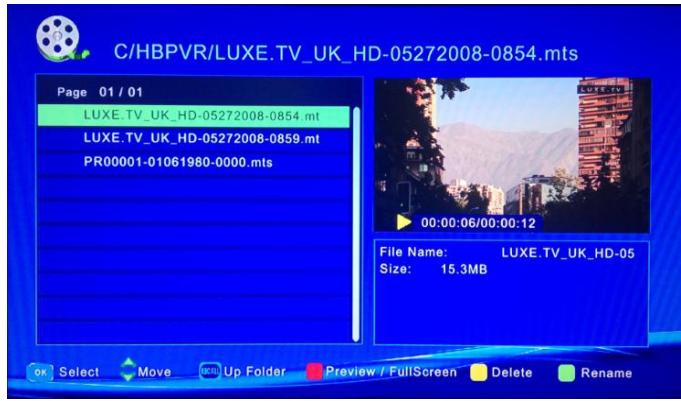
Press the REC button to start a recording.
Select the file to be played with the directional buttons.
See the functions of the remote control for playback.
Press the PLAY / PAUSE button to start Time Shift recording and stop the current display. Press Stop to end the recording.
Press the red button to view the saved file., Press yellow to delete. Press the green button to rename the file.
NOTE: To perform any of the recording functions, you must first insert a USB device with sufficient space.
"Features can change without notice"
BRIGMTON
surfing technology
IMPORTED
FERSON ELECTRÓNICA, S.A.
CIF: A-41111881
SANTA CLARA DE CUBA 12
SEVILLA
ESPAÑA
DECLARATION OF CONFORMITY
Ferson Electrónica, S.A. declares under our responsibility that the equipment meets the requirements indicated in the following directives:
EMC DIRECTIVES
Low Voltage Directive 2006/95/EC
EN 60065:2002+A1:2006
EMC Directive 2004/108/EC
EN 55 013:2001+A1:2003+A2:2006
EN 55 020:2007
EN 61 000-3-2:2006
EN 61 000-3-3:2008
Description of apparatus:
BRIGMTON Model BTDT2-918
DVBT
CE

BRIGMTON
surfing technology