MN512IX - Microwave Oven HOTPOINT - Free user manual and instructions
Find the device manual for free MN512IX HOTPOINT in PDF.
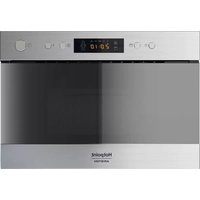
| Product type | Built-in microwave oven |
| Brand | Hotpoint |
| Model | MN512IX |
| Capacity | 25 L |
| External dimensions | 594 x 410 x 388 mm |
| Net weight | 19.7 kg |
| Power supply | 230 V ~ 50 Hz |
| Microwave power (output) | 900 W |
| Microwave power (input) | 1450 W |
| Grill power | 1000 W |
| Turntable diameter | 315 mm |
| Cooking functions | Microwave, Grill, Combi (C-1: 55% MW + 45% grill, C-2: 36% MW + 64% grill) |
| Defrost | By weight (100 to 2000 g) |
| Automatic menus | 8 programs (Pizza, Meat, Vegetables, Pasta, Potatoes, Fish, Drinks, Popcorn) |
| Additional functions | Quick start, Multi-stage cooking, Clock, Child lock |
| Cleaning | Damp cloth; tip: half lemon + 300 ml water, 10 min at 100% |
| Safety | Door safety lock, Child safety, Earthing required |
| Supplied accessories | Glass tray, Turntable support, Grid (for grill) |
| Installation | Built-in, min height 85 cm, cabinet width 60 cm, min depth 55 cm |
Frequently Asked Questions - MN512IX HOTPOINT
User questions about MN512IX HOTPOINT
0 question about this device. Answer the ones you know or ask your own.
Ask a new question about this device
Download the instructions for your Microwave Oven in PDF format for free! Find your manual MN512IX - HOTPOINT and take your electronic device back in hand. On this page are published all the documents necessary for the use of your device. MN512IX by HOTPOINT.
USER MANUAL MN512IX HOTPOINT
Installation, 102-106
MaTePnAblb, pIruOndhble Ia CBu-Neu
MaTePnAbl, HenpiroHbIe Ia CBu-Neu
Texnueckoe 6cbnyxbanne u xo,137
yxoD
HeucnpaBHOCTn MeToDblnx yctpaHEnn, 138
CepBnchoe o6cIyXuBaHne,139
! BнмATENBIO npOHTaIte HAcTObIe INHCTpyKcII INpeId hauJIOM nCpOJIb3OBAHnBaIe MmKpOBJHOBOI neuN COxpaHITe INB HaJeXHOM MeCTe. Co6JIoDeHne INHCTpyKcII rapaHTnpyET DOJIrN cPOK cnJxkbI BaIe MmKpOBJHOBOI neuN.
!COXPAHNTE HACTOJIUE INHCTPYKUNB HADEXHOM MECTE
PPEIOCTOPOXHOCTNДЛЯ PPEIOTBPAUSEHNA BO3ENCTBNA YPE3MEPHOROCBU OBJYUEHNA.
a) He nbItaIteBb KJIIOHaTb NeYb C OTKpbITOn DBepcei, TAK KAk 3TO BeDenK BpeHOMy BO3JeCTBNIO CBU obJyuHn. 3TO BaXHo BO n36ExKaHne NOBpeKdEHHa 3aUHTHOI 6NOKIpOBKn.
b) He nomeuaiTe HnKaKne IpeDMeTbI MeJy DBePcei npamKoI neH, ydaJIaYTe 3aIpr3HeHnI N OCTaTKN MOIOeBO BeIecTBa C yIIOHTnITbIbHbIX NOBepxHOCTe.
c) IPEdUYPEXKDEHNE: Ecnn DBepeu nIn ynpIoTHEnn DBepebl NOBpeKDeHbI, HeJIb3a POJIb3OBAbTcR nebIdo ee peMOHTa B yINOHOMOeHHOM CepBnCe.
ПРИJOXЕНЕ
Ecnn n3dene He coepkntc B YnCTOte,ero NOBepxHOCTb npTNTc, yTO cOKpaaaet CpOK cnjXbbln3dneNIMoKeT pInBecTN KOnaChbIM CNTyaCnIyM.
YcTaHOBka NIOdKJIouHne
1.Данhoeи3делипрдн3ачehoTOlbkoДлЯ 6byTOBOrO INcNoIb3OBaHnI.
2.Данная NeчпеднаЗразу Тольк Ддя Встpoевно установки.Ее Heльзя установи на Кухонь.TOTИПВУТPBшkaфa.
3. CobliouaTe cneuaIbHbIe INCTpyKmI NO yCTaHOBKe.
4.ИЗделноМожетбыть установлесив Habteнhoинишеширно60cm(He Mehee55cmIpybnoи И на ВсICOTe85cmOTпona).
5.Издение уkomпеньтованоштеньhoи Влкови Должно бить COeДиненoc npaВиьhoустановленьhoe,3a3emпеньон сетево розков.
6. HanpЯЖнe B cETnДОЛЖНо COOTbETCTBOBaTb HanpЯЖнo, yka3aHHOMy Ha 3aBOJcKoI Ta6JIuYe H3dJIIny.
7. YctaHOBky CeTeBOI pO3eTKI 3aMeHcy CeTeBOI pOBOda DOJIKeH BbIPOJHRArTb TOnbKO KBAINФiUpOBaHHbI 3JIeKTPNK. EcII npI yCTaHOBKe pO3eTKa OKa3bIBaETcR HeIOCTyIHNo, HEoXoIMO yCTaHOBtB MHOITONJIrpHbI pa3beDInHITeNb CO CTOpOHbI YCTaHOBKn C paCCTOJHnEM MeKdY KOHTaKTAmH He MeHee 3 MM.
- 3anpeucaetcncnojb3oBaTb nepexoHnKn, TpoHnKn uDInHnteN. Ipeperpy3ka MoKet npuBecTn K BO3ropaHnIO.
Ooctynhna nOBepxHoctb MoKet HarpeTbc npn pa6ote neu.
A. BctpoeHHa yCTaHOBka
Hnla, B KOTOpUy BCtpanBaetc neyb, He DoJnxHa nMeTb 3aDHei CTeHN.
MHHMaJIbHaB YbICota HnIa 85cm. He3akpbIbAaTe BeHTnIaCIOHbIe npope3n n OTBepCTn BO3dYxO3a6opa.


RU
B. ПодгOTOBka Hmши

EcnBbXOTHeNCNoB3OBArTB“ABTomatueeckoe MeHIO"dIpynpiroTOBnEHHy pb6b BEcOM 350 rp.:
1) Hαχmnte KhoNkCy "Auto-Menu" Do Tex nop, noka HaДиСплee He ПОЯВИТСА "A-6".
2) Hαχmite KhONkY “OK/START”Длг NOДТВЕРЖдЕнЯ.
3) ПовернITE ретуларов "с"do ТЕХ nop,пoka на диспjee He NOЯВИТСА "350".
4)Hajmnte KhoNky“OK/START"ДлЯ NaHaJa npuROTOBLeHnIy.
Ta6nla aBtOMaTHuecknx peKHMOB
| Мени | Вес | Диаспей |
| A-1ПИцZA | 200 g | 200 |
| 400 g | 400 | |
| A-2Ясо | 250 g | 250 |
| 350 g | 350 | |
| 450 g | 450 | |
| A-3Овоши | 200 g | 200 |
| 300 g | 300 | |
| 400 g | 400 | |
| A-4Мakаронныизделя | 50 g(c 450 млхоладноь В overdы) | 50 |
| 100 g(c 800 млхоладноь В overdы) | 100 | |
| A-5Картофел | 200 g | 200 |
| 400 g | 400 | |
| 600 g | 600 | |
| A-6Рыба | 250 g | 250 |
| 350 g | 350 | |
| 450 g | 450 | |
| A-7Напитк / Кожe | (120 ml) | 1 |
| (240 ml) | 2 | |
| (360 ml) | 3 | |
| A-8Попkopн | 50 g | 50 |
| 100 g | 100 |
7. Mhoro3tanHoe npnroTOBJeHne
Moxho 3aadaTb MaKcHymm Dba 3Taana. Ecnn OndHm n3 3TaNOB YBJIaETcpa3MopaxNBAHne, OH DoJXeH 6bITb NepBbIM. BkJIIOuaETcOOnH 3ByKOBo CnHaI NO 3aBepSeHn ODoHO rO 3Taana HauJa cNeDyUoIero.
Примechанe:В качесТve OДНОи3ЭТANOB MHOOrOТАнHOrO ПИROTOВЛeHЯ HeIb3a BbIbpaTb peKIM ABTom.
Празмер:
MaTePnAbl, npriOndhble IJra CBu-neu
| Посuya | Примочаюя |
| Алійинецьая Фольга | Толък дд покрытney 6blюd. Иебльше гладкие кусян сфаль могут 6blty Испльзованы дд зашиты ог creхоньч acteи мра с ilлпцы.Есл сфаль слшком блзко кстенcam peуи, оha может bbl3baы тугову разряд.Ф olьга длжнога haxodntься на paastotьни He Mehbyse 2,5 cm ot stehok peуи. |
| Посuya дд порумянваня | СледуITE Inhctpykuzim npoin3bODHTeJЯ. Дд NO pocrdyдд Залеканki дд Залекану haxodntься на paastotьни He Mehee yem 5 MM OT bpaazauocheя сарелк. Hnравиьhoe Испльзоване может prinbeCTN K nobpejdeHIO bpaazauocheя сарелк. |
| Столовая росuya | Толък п预制ная дд CBU-пechey. СледуITE Inhctpykuzimnpoin3bODHTeJЯ. He Incpohl3yite trpechtuу olin nadkoJOTyU pocrnyd. |
| Столегные санки | Вcertда снимайе крblshу. ИспльзуITE TOLьКДЯ ЛergКOrO harpeBaHryS coDEPJKIMORO. БolyшнсвTO CTeklnHNOI TaBly He ABLaTeTcR TepMOCTOKОY M OMeKET loNHUTb. |
| Столегная росuya | Толък тер'moc'toyke cteknlo, п预制ная дд CBU-пechey. ПрOBерыte, чтобу Ha nocsydne He sbilno metalanlueckoi OTdeLkn. He incpohl3yite trpechtuу olin nadkoJOTyU pocrnyd. |
| Пakétы дд neуей | СледуITE Inhctpykuzim npoin3bODHTeJЯ. He 3abyaBaiTe metalanlueckoi npobolokoi ПрodeJaite CBepxu B nakeTe dblpochki dnd BvIXOda napa. |
| Бумжные rapelknii и салкны | ИспьзуITE TolьКДЯ StblcTrpo rpoirotOBlenHa/parOreBa. He octablayte pevy b bez princmOTra B proceccse prinrotOBlenHa. |
| Бумжные полотенцa | ИспьзуITE дд покрытney 6blioDдд NOBtropHoro pa30rpeBa I dnd BnITbIBAHryЖURA.ИспьзуITE pod kONTPoEm TOLьКДЯ StblcTrpo prinrotOBlenHa. |
| Пекарская ("пекramentная")бумага | ИспьзуETCBA KauchetBe POKpbITny dnd PreedotBpAuzhena ra36pbI3rIVBaHry Ilin B kauchetBe oberTBiBaHry dnd prinrotOBlenHa Na napy. |
| Пл actikobovа росuya | Толък п预制ная дд CBU-пechey. СледуITE Inhctpykuzimnpoin3bODHTeJЯ. Hal nosуde doJoxkhbI 6blTy Mapknopobka "Дд CBU-пechey". HeKOToptbie pIactIKOBblekopobkStahOBYTCs Clerka maryKIMMn u3-3a HarpeBa IX CODePJKIMORO. ГOTobbie 6blJODA B pIactIKOBbIX yNAKOBkax I pIoTHO 3akpbITbIe pIactIKOBbIE pAnKeTbI DoJXHbI 6blItbOTkpbl, pIPOKJIOTbl CBepxu, co6blOaIte INhCTpyKuzm Ha yNAKOBke. |
| Оbertocнay пelenka | Толък п预制ная дд CBU-пechey. ИспьзуETCBA PaINOKpbITny dnd POKpbITny 6blIOB D proceccse prinrotOBlenHa dnd CoXpaHENa coUHOCSTn. Плелka He doJoxHa kacaTbcS edbl. |
| Терmonetры | Толък п预制ная дд CBU-пechey (termometры dnd Мяca I kondnterpckoi BvIneukn). |
| Вошени оберочьая сумага | ИспьзуETCBA KaucheTBE POKpbITny dnd PreedotBpAuzhena pa36pbI3rIVBaHry I dnd coXpaHENa coUHOCSTn. |
MaTePnaIbI, HenpIroHbIe IJЯ CBu-neu
Installation, 162-166
Installation and connection
Built-in furniture
Prepare the Cabinet
Install the oven
Turntable Installation
Setting up your oven, 167
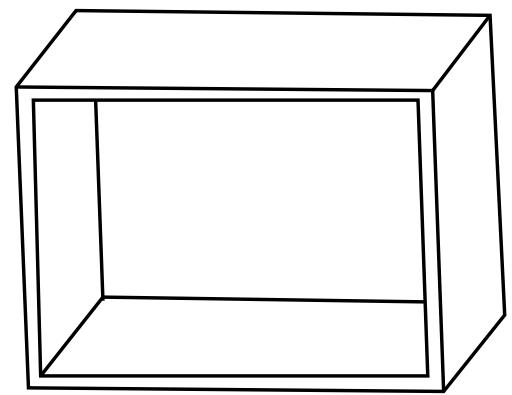
Overall view
Names of Oven Parts and Accessories
Start-up and use, 168-170
Operation instruction
Important safety instructions, 171-174
Utensils, 175-176
Utensil Test
Materials you can use in microwave oven
Materials to be avoided in microwave oven
Maintenance and care, 177
Cleaning
Troubleshooting, 178
Assistance, 179
! Read these instructions carefully before using your microwave oven, and keep it carefully. If you follow the instructions, your oven will provide you with many years of good service.
! SAVE THESE INSTRUCTIONS CAREFULLY
PRECAUTIONS TO AVOID POSSIBLE EXPOSURE TO EXCESSIVE MICROWAVE ENERGY.
a) Do not attempt to operate this oven with the door open since this can result in harmful exposure to microwave energy. It is important not to break or tamper with the safety interlocks.
b) Do not place any object between the oven front face and the door or allow soil or cleaner residue to accumulate on sealing surfaces.
c) WARNING: If the door or door seals are damaged, the oven must not be operated until it has been repaired by a competent person.
ADDENDUM
If the apparatus is not maintained in a good state of cleanliness, its surface could be degraded and affect the lifespan of the apparatus and lead to a dangerous situation.
Installation and connection
- This appliance is only intended for domestic use.
- This oven is intended for built-in use only. It is not intended for counter-top use or for use inside a cupboard.
- Please observe the special installation instructions.
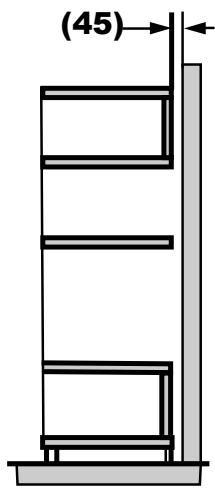
- The appliance can be installed in a 60cm wide wallmounted cupboard(at lease 55cm deep and 85cm off the floor).
- The appliance is fitted with a plug and must only be connected to a properly installed earthed socket.
- The mains voltage must correspond to the voltage specified on the rating plate.
- The socket must be installed and connecting cable must only be replaced by a qualified electrician. If the plug is no longer to accessible following installation, an all-pole disconnecting device must be present on the installation side with a contact gap of at lease 3mm.
- Adapters, multi-way strips and extension leads must not be used. Overloading can result in a risk of fire. Questo forno a microonde è dotato di un moderno sistema di controllo elettronico per regolare al meglio i parametri di cottura in base alle esigenze dell'utente.
Please Read the Manual Carefully Before Installation.
Please Note
Electrical connection
The oven is fitted with a plug and must be only connected to a properly installed earthed socket. In accordance with the appropriate regulations, the socket must only be installed and the connecting cable must only be replaced by a qualified electrician. If the plug is no longer accessible following installation and all-pole isolating switch must be present on the installation side with a contact gap at least 3mm.
A. Built-in furniture
The built-in cabinet shall not have a rear wall behind the appliance.
Minimum installation height is 85cm.
Do not cover ventilation slots and air intake points.


EN
EN

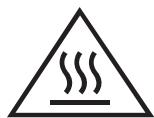
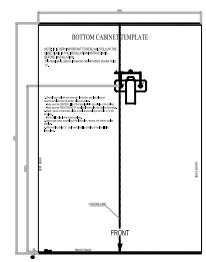
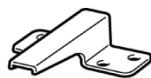
B. Prepare the Cabinet
- Read the instruction on the BOTTOM CABINET TEMPLATE, put the template on the bottom plane of cabinet.
- Make marks on the bottom plane of cabinet according to marks "a" of the template.
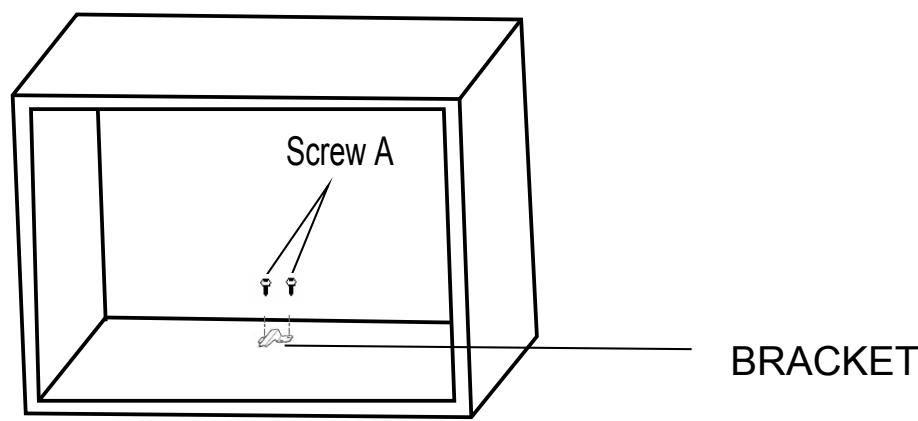
- Remove the BOTTOM CABINET TEMPLATE, and fix the BOTTOM BRACKETS with SCREW A.
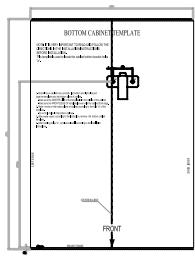
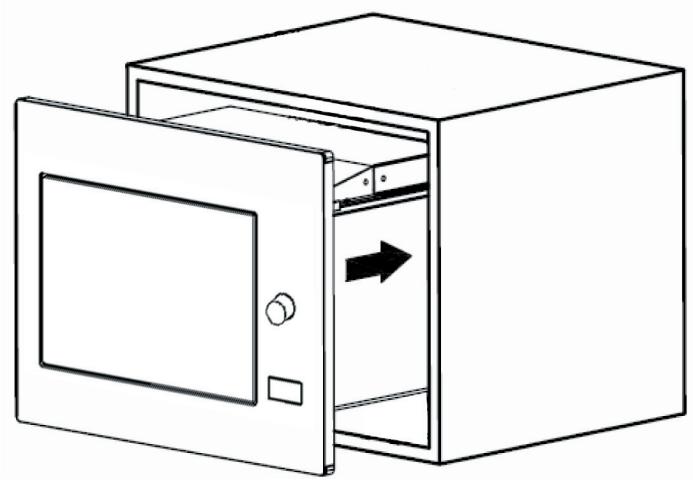
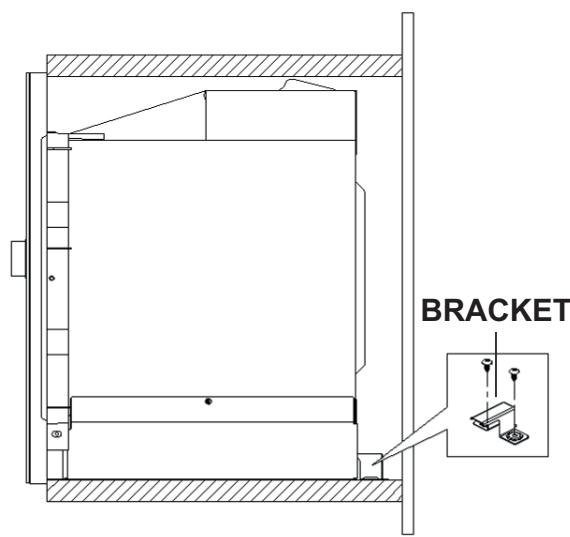
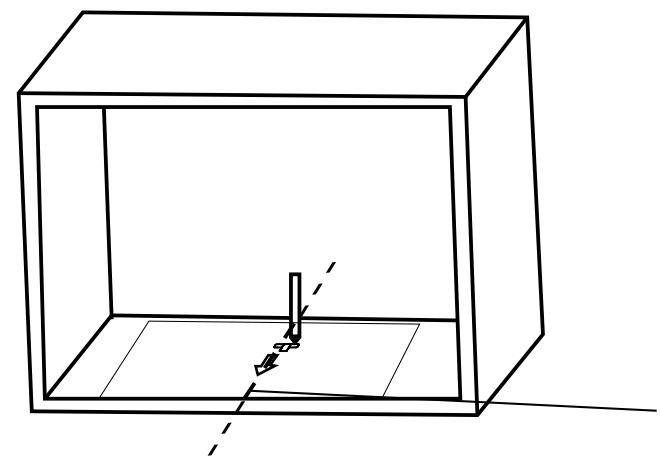
C. Install the oven
-
Install the oven into the cabinet.
-
Make sure the back of the oven is locked by bracket.
- Do not trap or kink the power cord.

- Open the door, fix the oven to the cabinet with Screw B, at the installation hole.
Specifications
| Model: | MWHA 222.1 X |
| Rated Voltage: | 230V~50Hz |
| Rated Input Power (Microwave): | 1450W |
| Rated Output Power (Microwave): | 900W |
| Rated Input Power (Grill): | 1000W |
| Oven Capacity: | 25L |
| Turntable Diameter: | ø 315mm |
| External Dimensions: | 594x410x388mm |
| Net Weight: | Approx. 19.7 kg |
| According to Waste of Electrical and Electronic Equipment (WEEE) directive, WEEE should be separately collected and treated. If at any time in future you need to dispose of this product please do NOT dispose of this product with household |
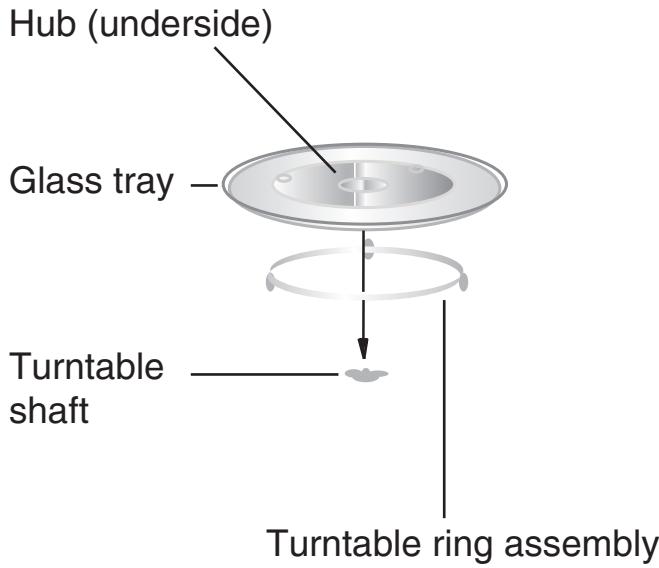
Turntable Installation
a) Never place the enamel tray upside down. The enamel tray should never be restricted.
b) Both glass tray and turntable ring assembly must always be used during cooking.
c) All food and containers of food are always placed on the enamel tray for cooking.
d) If enamel tray cracks or breaks, contact your nearest authorized service center.
Overall view
Names of Oven Parts and Accessories
Remove the oven and all materials from the carton and oven cavity. Your oven comes with the following accessories:
Glass Tray 1
Turntable ring assembly 1
Instruction Manual 1
A) Control panel
B) Turntable shaft
C) Turntable ring assembly
D) Glass tray
E) Observation window
F) Door assembly
G) Safety interlock system
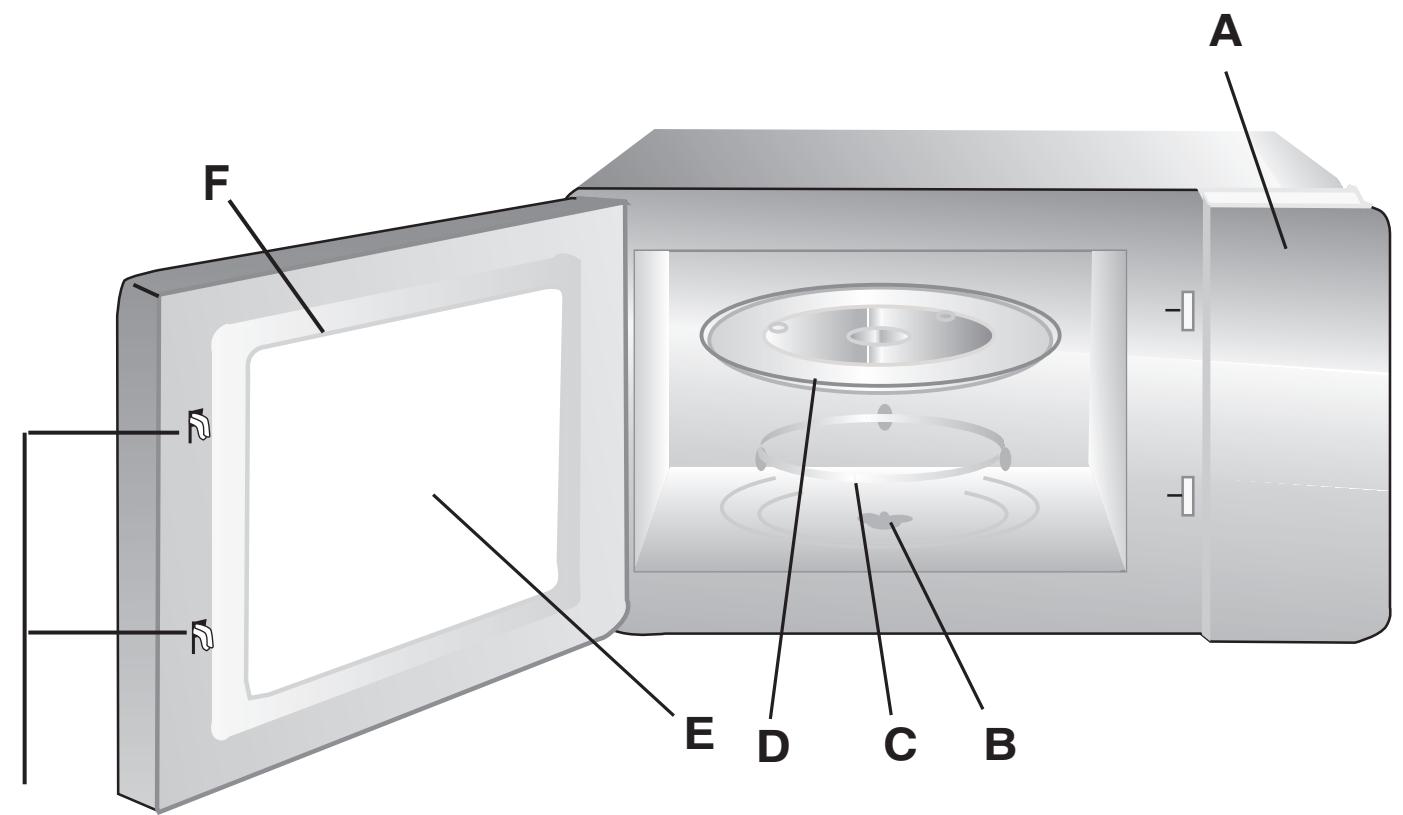
G
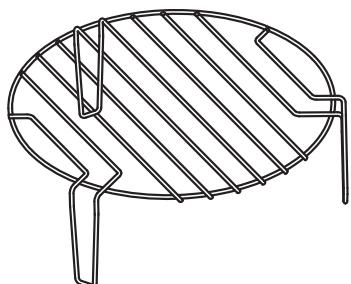
Grill Rack (Only for Grill series)
EN
EN
Operation instruction
This microwave oven uses modern electronic control to adjust cooking parameters to meet your needs better for cooking.
1.Clock Setting
When the microwave oven is electrified, "0:00" will blink, buzzer will ring once.
1) Press "CLOCK" once. "00:00" displays.
2) Turn " m " to adjust the hour figures, the input time should be within 0--23 (24-hour).
3) Press "CLOCK", the minute figures will flash.
4) Turn " h " to adjust the minute figures, the input time should be within 0--59.
5) Press "CLOCK" to finish clock setting.
":" will flash.
Note:
1) If the clock is not set, it would not function when powered.
2) During the process of clock setting, if you press "STOP/CLEAR", the oven will go back to the previous status automatically.
2. Microwave Cooking
Press "MW" the LED will display "900".
Press "MW" for times or turn " to choose the power you want, and "900", "720", "450", "270" o "90" will display for each added press.
Then press "OK/START" to confirm, and turn " " to set cooking time from 0:05 to 95:00.
Press "OK/START" again to start cooking.
Example:
If you want to use 720W microwave power to cook for 20 minutes, you can operate the oven as the following steps.
1) Press "MW" once, the screen display "900".
2) Press "MW" once again or turn " 一 to choose 720W microwave power.
3) Press "OK/START" to confirm, and the screen displays "720".
4) Turn " " to adjust the cooking time until the oven displays "20:00".
5) Press "OK/START" to start cooking.
Note:
the step quantities for the adjustment time of the coding switch are as follow:
| 0---1 min | 5 seconds |
| 1---5 min | 10 seconds |
| 5---10 min | 30 seconds |
| 10---30 min | 1 minute |
| 30---95 min | 5 minutes |
| MW Pad Instructions Order | Display | Microwave Power |
| 1 | 900 | 900 W |
| 2 | 720 | 720 W |
| 3 | 450 | 450 W |
| 4 | 270 | 270 W |
| 5 | 90 | 90 W |
3. Grill or Combi. Cooking
Press "Grill/Combi" the LED will display "G", and
press "Grill/Combi" for times or turn the " ^ to choose the power you want, and "G", "C-1", "C-2", will display for each added press. Then press "OK/START"
to confirm, and turn " to set cooking time from 0:05 to 95:00. Press "OK/START" again to start cooking.
Example:
If you want to use 55% microwave power and 45% grill power (C-1) to cook for 10 minutes, you can operate the oven as the following steps.
1) Press "Grill/Combi" once, the screen display "G".
2) Press "Grill/Combi" once again or turn " " to choose combi. 1 mode, and the screen displays "C-1", the grill and microwave icons will light.
3) Press "OK/START" to confirm.
4) Turn " " to adjust the cooking time until the oven displays "10:00"
5) Press "OK/START" to start cooking.
| “Grill/Combi.” Order | Pad Instructions Display | Microwave Power | Grill Power |
| 1 | G | 0% | 100% |
| 2 | C-1 | 55% | 45% |
| 3 | C-2 | 36% | 64% |
Note: If half the grill time passes, the oven sounds twice, and this is normal. In order to have a better effect of grilling food, you should turn the food over, close the door, and then press "OK/START" to continue cooking. If no operation, the oven will continue working.
4. Speed Cooking
In waiting state, turn " " to set cooking time with 100% microwave power, then press "OK/START" to start cooking.
5. Defrost By Weight
1) Press “DEFROST” once, and the microwave and defrosting icons will light.
2) Turn " " to to select the weight of food from 100 to 2000 g.
3) Press "OK/START" to start defrosting, and the microwave and defrosting icons will flash.
6.Auto Menu
1) Press "Auto-menu" to set auto menu function.
Turn " ” to choose the different menu, “A- 1” to "A- 8" will display. And the microwave icon, "Auto" and the food selected will light in screen.
2) Press "OK/START" to confirm.
3) Turn "h" to choose the preset weight. Refer to the "The menu chart".
4) Press "OK/START" to start cooking.
Example:
If you want to use "Auto Menu" to cook fish for 350g.
1) Press "Auto-menu" till "A-6" displays.
2) Press "OK/START" to confirm.
3) Turn " √" to select the weight of fish till "350" displays.
4) Press "OK/START" to start cooking.
Tabella Menu Automatico:
| Menu | Weight | Display |
| A-1 Pizza | 200 g | 200 |
| 400 g | 400 | |
| A-2 Meat | 250 g | 250 |
| 350 g | 350 | |
| 450 g | 450 | |
| A-3 Vegetable | 200 g | 200 |
| 300 g | 300 | |
| 400 g | 400 | |
| A-4 Pasta | 50g (with 450 ml cold water) | 50 |
| 100g (with 800 ml cold water) | 100 | |
| A-5 Potato | 200 g | 200 |
| 400 g | 400 | |
| 600 g | 600 | |
| A-6 Fish | 250 g | 250 |
| 350 g | 350 | |
| 450 g | 450 | |
| A-7 Beverage | 1 cup (120 ml) | 1 |
| 2 cups (240 ml) | 2 | |
| 3 cups (360 ml) | 3 | |
| A-8 Popcorn | 50 g | 50 |
| 100 g | 100 |
7. Multi-Stage Cooking
Two stages can be maximally set. If one stages is defrosting, it should be put in the first stage. The buzzer will ring once after each stage and the next stage will begin.
Note: Auto menu cannot be set as one of the multi-stage.
Esemblio:
If you want to defrost 200 gr of food, then to cook with 720W microwave power for 7 minutes. The steps are as following:
1) Press “DEFROST” once, and the microwave and defrosting icons will light.
2) Turn " _h " to select the food weight till "200" displays.
3) Press "MW" the LED will display "900" and the microwave icon will light.
4) Repeatedly press "MW" or turn " ” until "720" displays.
5) Press "OK/START" to confirm.
6) Turn " _h " to adjust the cooking time till the oven displays "7:00".
7) Press "OK/START" to start cooking, and buzzer will sound once for the first section, defrosting time counts down; buzzer will sound once again entering the second cooking. When multi-section cooking finishes, buzzer sounds five times.
8. Inquiring Function
1) In states of microwave, grill and combination cooking, press "MW", the current power will be displayed for 3 seconds. After 3 seconds, the oven will turn back to the former state.
2) In cooking state, press "Clock" to inquire the time and the time will display for 3 seconds.
9. Lock-out Function for Children
Lock:
In waiting state, press "STOP/CLEAR" for 3 seconds, there will be a long "beep" denoting entering into the children-lock state and "O indicator will light. LED will display current time or [ ]
Lock quitting:
In locked state, press "STOP/CLEAR" for 3 seconds, there will be a long "beep" denoting that the lock is released, and "I-O" indicator will disappear.
IMPORTANT SAFETY INSTRUCTIONS
WARNING
To reduce the risk of fire, electric shock, injury to persons or exposure to excessive microwave oven energy when using your appliance, follow basic precautions, including the following:
- Warning: Liquids and other foods must not be heated in sealed containers since they are liable to explode.
- Warning: It is hazardous for anyone other than a competent person to carry out any service or repair operation that involves the removal of a cover which gives protection against exposure to microwave energy.
- Warning: Only allow children to use the oven without supervision when adequate instructions have been given so that the child is able to use the oven in a safe way and understand the hazards of improper use.
- Warning: When the appliance is operated in the combination mode, children should only use the oven under adult supervision due to the temperatures generated. (only for grill series).
- Only use utensils suitable for use in microwave ovens.
-
The oven should be cleaned regularly and any food deposits should be removed.
-
Read and follow the specific:"PRECAUTIONS TO AVOID POSSIBLE EXPOSURE TO EXCESSIVE MICROWAVE ENERGY".
- When heating food in plastic or paper containers, keep an eye on the oven due to the possibility of ignition.
- If smoke is observed, switch off or unplug the appliance and keep the door closed in order to stifle any flames.
- Do not overcook food.
- Do not use the oven cavity for storage purposes. Do not store items, such as bread, cookies, etc. inside the oven.
- Remove wire twist-ties and metal handles from paper or plastic containers/bags before placing them in the oven.
- Install or locate this oven only in accordance with the installation instructions provided.
- Eggs in the shell and whole hard-boiled eggs should not be heated in microwave ovens since they may explode, even after microwave heating has ended.
- Use this appliance only for its intended uses as described in manual. Do not use corrosive chemicals or vapors in this appliance. This oven is especially designed to heat. It is not designed for industrial or laboratory use.
Important safety instructions
EN
- If the supply cord is damaged, it must be replaced by the manufacturer, its service agent or similarly qualified persons in order to avoid a hazard.
- Do not store or use this appliance outdoors.
- Do not use this oven near water, in a wet basement or near a swimming pool.
- The temperature of accessible surfaces may be high when the appliance is operating. The surfaces are liable to get hot during use. Keep cord away from heated surface, and do not cover any events on the oven.
- Do not let cord hang over edge of table or counter.
- Failure to maintain the oven in a clean condition could lead to deterioration of the surface that could adversely affect the life of the appliance and possibly result in a hazardous situation.
- The contents of feeding bottles and baby food jars shall be stirred or shaken and the temperature checked before consumption, in order to avoid burns.
-
Microwave heating of beverages can result in delayed eruptive boiling, therefore care must be taken when handling the container.
-
The appliance is not intended for use by persons (including children) with reduced physical, sensory or mental capabilities, or lack of experience and knowledge, unless they have been given supervision or instruction concerning use of the appliance by a person responsible for their safety.
- Children should be supervised to ensure that they do not play with the appliance.
- The microwave oven shall not be placed in a cabinet unless it has been tested in a cabinet.
- The appliances are not intended to be operated by means of an external timer or separate remote-control system.
- WARNING: Ensure that the appliance is switched off before replacing the lamp to avoid the possibility of electric shock.
- Accessible parts may become hot during use. Young children should be kept away.
- Steam cleaner is not to be used.
- Surface of a storage drawer can get hot.
-
Do not use harsh abrasive cleaners or sharp metal scrapers to clean the oven door glass since they can scratch the surface, which may result in shattering of the glass.
-
During use the appliance becomes hot. Care should be taken to avoid touching heating elements inside the oven.
- Only use the temperature probe recommended for this oven.(for ovens provided with a facility to use a temperature-sensing probe.)
- During the first use there is a particular smell due to production oils to protect some components.
- This appliance can be used by children aged from 8 years and above and persons with reduced physical, sensory or mental capabilities or lack of experience and knowledge if they have been givensupervision or instruction concerning useof the appliance in a safe way andunderstand the hazards involved.Children shall not play with the appliance.Cleaning and user maintenance shallnot be made by children unless they are older than 8 and supervised.
-
Keep the appliance and its cord out of reach of children less than 8 years.
-
This appliance is intended to be used in household and similar applications such as:
-
staff kitchen areas in shops, offices and other working environments;
- by clients in hotels, motels and other residential type environments;
- farm houses;
-bed and breakfast type environments.
- WARNING: The appliance and its accessible parts become hot during use. Care should be taken to avoid touching heating elementsChildren less than 8 years of age shall be kept away unless continuously supervised.
READ CAREFULLY AND KEEP FOR FUTUREREFERENCE
Important safety instructions
EN
DANGER
Electric Shock Hazard Touching some of the internal components can cause serious personal injury or death. Do not disassemble this appliance.
WARNING
Electric Shock Hazard Improper use of the grounding can result in electric shock. Do not plug into an outlet until appliance is properly installed and grounded.
This appliance must be grounded. In the event of an electrical short circuit, grounding reduces the risk of electric shock by providing an escape wire for the electric current.
This appliance is equipped with a cord having a grounding wire with a grounding plug.
The plug must be plugged into an outlet that is properly installed and grounded.
Consult a qualified electrician or serviceman if the grounding instructions are not completely understood or if doubt exists as to whether the appliance is properly grounded. If it is necessary to use an extension cord, use only a 3-wire extension cord.
1) A short power-supply cord is provided to reduce the risks resulting from becoming entangled in or tripping over a longer cord.
2) If a long cord set or extension cord is used:
1) The marked electrical rating of the cord set or extension cord should be at least as great as the electrical rating of the appliance.
2) The extension cord must be a grounding type 3-wire cord.
3) The long cord should be arranged so that it will not drape over the counter top or tabletop where it can be pulled on by children or tripped over unintentionally.
CAUTION
Personal Injury Hazard
It is hazardous for anyone other than a competent person to carry out any service or repair operation that involves the removal of a cover which gives protection against exposure to microwave energy.
Disposal
- When disposing of packaging material: observe local legislation so that the packaging may be reused.
- The European Directive 2012/19/EEC on Waste Electrical and Electronic Equipment (WEEE), requires that old household electrical appliances must not be disposed of in the normal unsorted municipal waste stream. Old appliances must be collected separately in order to optimise the recovery and recycling of the materials they contain and reduce the impact on human health and the environment. The crossed out "wheeled bin" symbol on the product reminds you of your obligation, that when you dispose of the appliance it must be separately collected.
Consumers may take their old appliance to public waste collection areas, other communal collection areas, or if national legislation allows return it to a retailer when purchasing a similar new product.
All major household appliance manufacturers are active in the creation of systems to manage the collection and disposal of old appliances.
See the instructions on "Materials you can use in microwave oven or to be avoided in microwave oven."
There may be certain non-metallic utensils that are not safe to use for microwaving. If in doubt, you can test the utensil in question following the procedure below.
Utensil Test:
1) Fill a microwave-safe container with 1 cup of cold water (250ml) along with the utensil in question.
2) Cook on maximum power for 1 minute.
3) Carefully feel the utensil. If the empty utensil is warm, do not use it for microwave cooking.
4) Do not exceed 1 minute cooking time.
Materials you can use in microwave oven
| Utensils | Remarks |
| Aluminum foil | Shielding only. Small smooth pieces can be used to cover thin parts of meat or poultry to prevent overcooking. Arcing can occur if foil is too close to oven walls. The foil should be at least 1 inch (2.5cm) away from oven walls. |
| Browning dish | Follow manufacturer's instructions. The bottom of browning dish must be at least 3/16 inch (5mm) above the turntable. Incorrect usage may cause the turntable to break. |
| Dinnerware | Microwave-safe only. Follow manufacturer's instructions. Do not use cracked or chipped dishes. |
| Glass jars | Always remove lid. Use only to heat food until just warm. Most glass jars are not heat resistant and may break. |
| Glassware | Heat-resistant oven glassware only. Make sure there is no metallic trim. Do not use cracked or chipped dishes. |
| Oven cooking bags | Follow manufacturer's instructions. Do not close with metal tie. Make slits to allow steam to escape. |
| Paper plates and cups | Use for short-term cooking/warming only. Do not leave oven unattended while cooking. |
| Paper towels | Use to cover food for reheating and absorbing fat. Use with supervision for a short-term cooking only. |
| Parchment paper | Use as a cover to prevent splattering or a wrap for steaming. |
| Plastic | Microwave-safe only. Follow the manufacturer's instructions. Should be labeled “Microwave Safe”. Some plastic containers soften, as the food inside gets hot. “Boiling bags” and tightly closed plastic bags should be slit, pierced or vented as directed by package. |
| Plastic wrap | Microwave-safe only. Use to cover food during cooking to retain moisture. Do not allow plastic wrap to touch food. |
| Thermometers | Microwave-safe only (meat and candy thermometers). |
| Wax paper | Use as a cover to prevent splattering and retain moisture. |
Materials to be avoided in microwave oven
| Utensils | Remarks |
| Aluminum tray | May cause arcing. Transfer food into microwave-safe dish. |
| Food carton with metal handle | May cause arcing. Transfer food into microwave-safe dish. |
| Metal or metal-trimmed utensils | Metal shields the food from microwave energy. Metal trim may cause arcing. |
| Metal twist ties | May cause arcing and could cause a fire in the oven. |
| Paper bags | May cause a fire in the oven. |
| Plastic foam | Plastic foam may melt or contaminate the liquid inside when exposed to high temperature. |
| Wood | Wood will dry out when used in the microwave oven and may split or crack. |
Cleaning
Be sure to unplug the appliance from the power supply.
1) Clean the inside of the oven after using with a slightly damp cloth.
2) Clean the accessories in the usual way in soapy water.
3) The door frame and seal and neighboring parts must be cleaned carefully with a damp cloth when they are dirty.
4. Do not use harsh abrasive cleaners or sharp metal scrapers to clean the oven door glass since they can scratch the surface, which may result in shattering of the glass.
5. Cleaning Tip---For easier cleaning of the cavity walls that the food cooked can touch: Place half a lemon in a bowl, add 300ml (1/2 pint) water and heat on 100% microwave power for 10 minutes.
Wipe the oven clean using a soft, dry cloth.
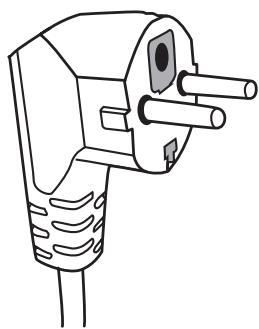
Two-round-pin plug
EN
Problem
Microwave oven interfering TV reception
Dim oven light.
Steam accumulating on door, hot air out of vents.
Oven started accidentally with no food in.
Oven can not be started.
Oven does not heat.
Glass turntable makes noise when microwave oven operates
Possible causes/Remedy
- Radio and TV reception may be interfered when microwave oven operating. It is similar to the interference of small electrical appliances, like mixer, vacuum cleaner, and electric fan. It is normal.
- In low power microwave cooking, oven light may become dim. It is normal.
- In cooking, steam may come out of food. Most will get out from vents. But some may accumulate on cool place like oven door. It is normal.
- It is forbidden to run the unit without any food inside. It is very dangerous.
Power cord not plugged in tightly. Unplug. Then plug again after 10 seconds. - Fuse blowing or circuit breaker works. Replace fuse or reset circuit breaker (repaired by professional personnel of our company).
Test outlet with other electrical appliances. - Door not closed well. Close door well.
- Dirty roller rest and oven bottom. Refer to "Maintenance of Microwave" to clean dirty parts.
Before contacting the After Sales Service:
make sure you can't fix the anomaly yourself;
- if you can't, contact an authorized Technical Assistance Service.
! Never engage non-authorized technicians.
Report:
the type of anomaly;
the oven model (Mod.);
the serial number (S/N).
This information is on the ratings plate on the Microwave Oven.
EN

Italiano, 1

Français, 21

Espanol, 41

Portugues, 61

Nederlands, 81

Deutsch, 101

Pycckn,121

Polski, 141

English, 161

Turkish, 181

Ka3aKwa, 201
MWHA 222.1 X
icindekiler
Kurulum, 182-186
Kurulum ve Baglantilar
Ankastre Mobilya
OpHaTy aIdbIHda HycKayJIbIKTbI MyKnA T OKbln WblfblHb13.
EckepiHi3:
3neKtp KocblbIM
Neu aawameh Xa6dbiktaIraH XeHe Ohbl TeK Tnicti Typde opHaTbIraH, Jepre KocblraH po3etkaFa XaIray Kepek. Tnicti epekeinepre cai po3etkaHbI opHaTybl XeHe XaIraBII Ka6JIbdi aybICTbpydI TEK 6bnIKTI 3neKtpNK opbIHaybI KepeK. Erep opHaTuDan KeiH aWara KOn JeTeKi3y MymKin bOImaca, opHaTy opHbIHda baJNaHbIC caHbIaybI KeMInDe 3 MM bapbIK nolIOcti OkUaynaTbIH Kockbl WbonybKepeK.
A. Kipictipinren Xnha3
KipictipiIreH uKaΦTa KypblIbI apTbIHda apTkbl KaobIpfa 6oJmaybi Kepek.
Eh a3 opHaTy 6niktiri - 85 cm.
JKeIeTeTy caHbIaynapbIH KHe aya Kipy caHbIaynapbIH KaIIpaHbI3.

B.Шkaфтыдайындану
- TÖMEHΓI ΜΚΑΦ YÜΠΙCΙΝΕΓΗνχκaydβο ὅΚβιHβι3, ηύπιΗ ΜΚαφΤbɪH TΘεmHri ἀλαβιKTbɪfBiHa KɔŋbɪHb3.
A BYPAHДACbl

KPOHUTEN
OPTAJIbIK
Cb13blK
- YnliriH «a» 6enrilepihe cai wkaΦtbiH TeMeHri Jka3bIKtbfIHda 6enrilep JkacaHbI3.
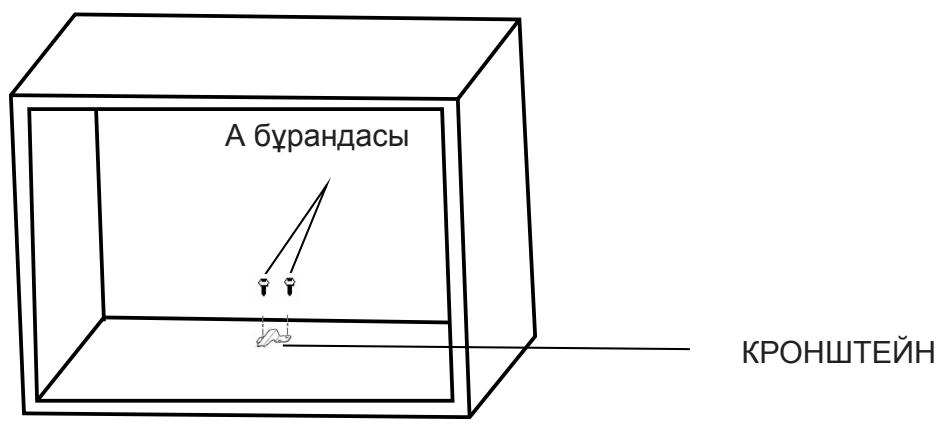
- TOMEHII IUKAΦ YIICIH aIbIbI3 JxHe TOMEHII KPOHI TEHIDEPDI A 6ypaHdacbImeH 6ekiriH3.

C. Newti opHaTy
-
Newti ukaopha ophaTbIbI3.
-
PenuTih apTBkpoHHTeHMHe KylbIITaHaBt HekcepH3.
KyaT Ka6eJIH KbIcBIn KaJIMaHbI3 Hemece 6ypamaHbI3.

- EciKi aIbIbI3, neIe IkaΦKa B 6ypaHdacbIme opHaTy teciriHe 6ekiTih3.
TexHnKaJIbIK cNaTTaMaJIap
| Улгi | MWHA 222.1 X |
| Номиналды керney: | 230V~50Hz |
| Номиналды кіріс куат (Кыска толкови дар): | 1450W |
| Номиналды Шьіfbіс Куат (Кыска толкови dар): | 900W |
| Номиналды кіріс Kуат (rриль): | 1000W |
| Пeш сынbalдыліы: | 25L |
| Айhalатун дәнгелектін діаметri: | 315 mm |
| СырTKы олшем'deri: | 594x410x388mm |
| Таза салмâгы: | Шamамен 19,7 кг |
| CE | Кokьс злікт ржәнe элікtrpoндаік жабдік (WEEE) діректівасьіна сай WEEE бәné кізінay Және он'deу кер. Еер болашakта кez Кел'reн урасыті осbl Чінімdi КOKьсіcka ЛаKTыру Керек бүлса, buл онімdi Турмістык КOKьістпeн Біpresе пakърmaньiz |
AinHaIaTbIH DeHreNeKTI opHaTy
KyTy KyiHnde 100% KbIcKa TOnkBiHdap KyaTbImeH 3zipney yaKbITbIH opHaTy yuIN "TytKacBn 6ypaHbI3, codan KeiiH 3zipNeYdi bactay yuIN "OK/START" TyMeciH 6acblbI3.
5. Calmak 6oynbHwa epiTy
- DEFROST TγινΜεсίH δip pet δαςθήβι3, coῦς Κυκάν τούκηνιδρ Ϝαπε ερίγτη δελίπωνερει καναύβι.
- 100 xəHe 2000 r apacbHaH TaMaK caJMaFbIH TaHdAy yuH "h" TyTkAcbH 6ypaHbI3.
- EpiTydi 6actay yushiN "OK/START" TyMecin 6acbHbI3, coHda KblcKa TOnKbHdap XHe epity 6enriwepepi KblbJIbIKTaIbI.
6. ABTomAttbI M3ip
1.ABTOMaTTbI M33ip 4yHKcIINcbIH opHaTy yHInAuto-menu
Tуймecin bacsbIbI3. Baca məsipdi taHday yuHIn " TuyTKacbH 6ypaHbI3, «A-1»ЖэHe «A-8» KepcetiJIeI. 3KpaHda KaIcKa toNkbHdap bEnriUeci, «Auto» Jka3ybl XəHe TaHaJFaH TaMaK JkaHaIbI.
- Pactay yuin «OK/START» Tymecin 6acbHb3.
- Andbin ana opHaTbInFaH caImaKtbl TaHday ywiH" TyTKacbH 6ypbHbI3. M三 i p keCTeci> 6eJIIMH kapaHbI3.
- Θεπηγι δαςτay γιδιν “OK/START” TΥΜείην 6açbɪhɒl3.
Mbizal:
350 r 6aJIbIKtbl 3eIpyy uH Auto-menu naIdaIaNHy kepek 6oJca.
- Auto-menu TγιMeciH «A-6» KερceTiπrEηwé δacblb3.
- Pactay yuishiN «OK/START» TyuMecin 6acbIb3.
- BaIbIK caImarBih «350» KepceTirreHwe TaHday ywiH TTKacbiH 6ypbl3.
- Θεπηγίδ δαςτάγ γιδιν ἄς ὅς ἀντός ἄς ἀντός ἄς ἀντός ἄς ἀντός ἄς ἀντός ἄς ἀντός ἄς
| Мэзір | Салмавы | Диаспей |
| A-1 Пица | 200 g | 200 |
| 400 g | 400 | |
| A-2 Ет | 250 g | 250 |
| 350 g | 350 | |
| 450 g | 450 | |
| A-3 Көкөністер | 200 g | 200 |
| 300 g | 300 | |
| 400 g | 400 | |
| A-4 Пасва | 50 g (450 мл салкын су бар) | 50 |
| 100 g (800 мл салкын су bap) | 100 | |
| A-5 Kapтон | 200 g | 200 |
| 400 g | 400 | |
| 600 g | 600 | |
| A-6 Балык | 250 g | 250 |
| 350 g | 350 | |
| 450 g | 450 | |
| A-7 Сухин | 1 Шынсыаяк (120 ml) | 1 |
| 2 Шынсыаяк (240 ml) | 2 | |
| 3 Шынсыаяк (360 ml) | 3 | |
| A-8 Попкорн | 50 g | 50 |
| 100 g | 100 |
BvJ KypblfblHb6JIweKeTeMeHi3.
ECKEPTY
Tok cory kayni 6ap. Kepre Kocydbl Tnicti emec naDanaHy TK COfByHa eKeenyi MymkiH. KpybIbI dypbIC opHaTbIbIN, Kepre Kocblfahwa po3eTKaFA KOCnAHbI3.
Бул Крьлгынгьхерг Кocу Kepeк.ДеКтр КбСа Туьltаижafдайындахерг Кocу TOK YшIH ShbIFy CBIMbIH KaMTaMaCbI3 eTy apKbIbIbI TOK COfY KayinH a3aITaIbI.
Бул Крblfblжepre Kocy awhacbl bapжepre Kocy cbIMbIMeH xa6dblKtJFaH.
AshaHbi DypbIC OPhaTbIJFaH XHe JKepre KocblJFaH po3eTKaFa Kocy KepeK.
JKepre Kocy TpyaIbI HcyKaynapDbI TOIbIFbIMeH TyciHoceHi3 HeMece KypblfBbIHx Jxepre DvpbICTan KocblnybHa KaTbICTbI Kydk Bap 6oJCa, 6iIKTI 3JIeKTPnKke HeMece KbI3Met KOpCETy MaMaHbHa xaBapNaCbIHbI3. 3apTkblcBIMbl NaJaIaNHy KaKeT 6oJCa, TeK 3 cbIMdbI y3apTkblcBIMbl NaJaIaNbAHbIHbI3.
- Y3bIbIpaK CbIMfA ⅦaTacy Hemece ⅦaJIbHy HəTNJxcicHderi KayinTePdi a3aHTy yuIH KbICKa KyaTpeH KaMTy CbIMbl KaMTaMaCbl3 etiInreH.
-
Erep y3bIH cbIMdap XnblHbI Hemece y3apTKblcBIM naJaIaHaHbIca:
-
CbIMdap XnblHbIbIH HeMece y3apTkblc bIMhbIH 6eJIrIeHReH 3JeKtp KepcETkisi KEMiHDe KpyblfblH IN 3JeKtp KepcETkiImen 6ipDei 6Onybl Kepek.
- Y3apTkblcBIM Jepre KocblaTbH 3 TapMaKTbl Cblm 60nybl KepeK.
- Y3bIH cIIMdbI 6aIaIap TapTybl MymKIH HeMece Ke3deicok 7aJIbHybl MymKIH catyubI cepeciHemecE yCTeJ 6etHeH caIbipan TypMaHTbIHdAn opHaIacTbIPyKepeK.
HA3AP AYdAPbIHbI3
XKeke kapaKaT kayni
BiiikTi aadamhaH baca Ke3 KeIReH aadamhbH KbICKa TOJIkbIHdap 3HeprnrcbHaH Kopfaydbi 6epeTih KaKnaKTbI aIyblbap Ke3 KeIReH KbI3MeT KOpceTy Hemece XeHDey apeketIH opbIHdaybI Kayinti.
Kokbicka NaKTbipy
Opama MaTePnaJIbIH KOKbIcKa JaKTbIPfAHaOpamAH KaIta NaIdaIaHy MymKiH 6OlybI ySiH JKeprIiKTI 3aHHaMaHbI CaKTaHbI3.
- Θл ekтпik JэHe əЛeКТрОндьИ
- Кабдыктарды Jою (WEEE) Тураны
-Еурonaльд ДиpeKТиВа 2012/19/EEС
-ТурмьICTык əЛeКТ acnAnTapbl KapanaыbIM
-СурьNTaJImaFah KOKbICTap CNYKTbI
-Жоьылмayын Tалan eTeDi. Курамындаы
-МATEрnaДарды KaIInbHa KeNtIPydi JэHe
-Кайta eHdeydi OHTaIIaNDbIpy JэHe aIam
-ДeHCaylbIbI MeH KOpшafH opTaFa aCepdi
-ЗаиТу уSiH eCKI KypblfblIapDblБeJelk
-ЖиHay Kepek. Θhimderi yCTi CbI3blfAH
-“KOKbIC KOHTeINHepi” BeIlrici acnAnTbI
-ЖоЯFaHda Obl БeJelk XInHay Kepektiri
-Тураны мIHdTeiHi3di ecke calaны.
TytbIHyMbIJaP eCKI KypblfbcIH KOfaMdbIK KOkbIC XnHay ayMaKTapbHa, backa KOMMyHaJIbIK XnHay ayMaKTapbHa anapa Hemece YTTbIK 3aHHaMa pyKcAT etCe, YKcac XaHa OHIMdi caTbIN aJFaHda OHbl PnteInpe KaITapa aJadbl.
BapIbIK Heri3ri TyPbICTbIK Kypblfbl
eHdipyuWinepi ecki KypblfblnapdbI XnHay
XHe KOkBCKa NaKTbIPyDbI backapy
KyuInepin BencenDi Tpyde JacaNdI.
«Kbicka TOJkbIHdbI neWTe naJaIaNHyfA 6OJaTbIH MaTePnAnDap HeMece Kbicka TOJkbIHdbI neWTe naJaIaNHyfA 6OImaTbIH MaTePnAnDap» 6eJIIMiHderi HcckaynapDbI kappaHbI3.
Kbicka TOnkblHdapMeH 3zipney ywiH naJdaIaHy KayinTi 6enriri bip metaJIe emec Kypalnap bap. Kymeni3 bonca, KapacTbIPbIbIN OTbIPfAH KypaIbI ToMeHderi npOeIpyaHbI opbHdAn TeKcepe aJacB13.
KypaIbI TeKcepy:
- KbICKa TOnKbIHap ywiH KayiNCi3 bIDbcTbI 1 WbIHbIAk CaIKbIH cyMeH (250 M), epi KapacTBipBIn OTbIPFaH KypaJImeH TOITbIPbIHbI3.
- EHHKOFapbl KyaTneH 1 MmHy T6oBb e3ipNeH3.
- KypaIra aKbIpbIH TnHi3. Erep 6oc KypaJI XblBb6oJca, Ohbl KbICKa TOJIbIHdapMeH 3ipJey ysiH naJaHaHa6aHbI3.
- 1 MInyT e3ipney yaKbIbIH aCbIpMaHbI3.
Kbicka TOLkbHdbI neWTe naIdaHaHyfa 6oJaTbIH MaTePnaJdap
| Куралдар | Есkeptпелер |
| Алюмни Фольга | Тек калkahanday. Шаын тERIC сөліктөрді aptык озірleydi оьліырмay ушін жуka et hemecе кUCС eti бөліктөрін жâбу ушін пайдануfa сөлâді. Фolybra new karâырflapын taыm жakсын bOLÇa, dofa пайда bOLуы мумкін. Фolybra new karâырflanapынан кемнDE 1 дійм (2,5 CM) karâыктвікту bOLуы kepek. |
| Кызэрту bIDысbl | Θндірuyшінн hyckayларын opbyнданы3. Кызэрту bIDысblнн TVбіаіналатын Deнгrelікten KeMінDE 3/16 дійм (5 MM) жогары bOLуы kepek. Дурьс emec пайдануа hyналатын Deнгrelіктін сынbayын эkeліу мумкін. |
| ыдьс | Тек кыcke тОньнларрfa kayinci3. Θндірuyшінн hyckayларын opbyнданы3. Харыктэрь hemece сыньктэрь бар bIDыстэрь пайданhanbahtb3. |
| Шыны bANKалap | Θрkaшан кaknaкты aшыны3. Тек тамakълхь solлганша кыздіру ушін пайданын bID. БANKалapын keniшіrinigі кызуfa тezimdi emec xәнсьсын мукін. |
| Шыны bIDыc | Тек bICTBKKа тЗимdi neшke aphalfahншын bIDыc. Металл кабat жok ekенih tekcepihi3. Xapbyктэрь hemece сыньктэрь sbap bIDыстэрь пайданhanbahtb3. |
| Пешто озірney пaketterepl | Θндірuyшінн hyckayларын opbyнданы3. Металл кыickьшын яллпаны3. Буdьншынун мукіндік berу ушін tecikterжасаны3. |
| Кагац тэрkenep Жэne shыныяктarp | Тек Кыcke морзімdi озірney/жынчін пайданын bID. ᵓзірney кезінde neшті karaycsbl Калдьрmaнbl3. |
| Кагац сулгир | Кыздіру жэн майыс dihpy ушін tamakълхь жâбу ушін пайданын bID. Кадafanaymen Tek Kыcke мерзіді озірney ушін пайданhanын bl3. |
| Пергамent | Шаырayды boLDырмay ушін кakпak hemece sbum hemen oзірney ушін opam petінDE пайданhanын bl3. |
| Пл actик | Тек Кыcke тОньнларрfa kayinci3. Θндірuyшінн hyckaylnapын opbyнданы3. «Кыcke тОньнларрfa Kayinci3» дeн soltrilenyi kepek. lшінderi tamak кызflahanda кeіbip пл actikь bIDыстаржUMcapaы. «Кайнатылatableн пakettperdi» xэне тыflыз жâбу ушін пайданын bID. Берінrene déte tecу hemece кeел'dety kepek. |
| Пл actик opam | Тек Кыcke тОньнларрfa kayinci3. bIlnfal'dы сaktay ушін озірney кeзінDE tamakълхь жâбу ушіn пайданынbl3. Пл actikm OPAMHbN TamaKka TINOHexon seprmehi3. |
| Терmometrрлр | Тек Кыcke тОньнлару ушін kayinci3 (et xэнe кэмпNT termometrрлр). |
| Балaybl3 Karaaz | Шаырayды boLDырмay xэнe bIlnfal'dы сaktay ушін кakпak petiHde пайданын bl3. |
Kbicka TOnkblIbI neWTe naJaIaNHyFa 6oJMaIbIH MaTePnaIap
New Kbl36aIdb.IwbifaIbI.
IbHb aHaHaTaBH INeHreNEK KbICKa TOnKbIHDbI neu XyMbic icTeereHne wI yBifapaabI
KypbInfbiDan yWKBiHap wBfAdbI.
blktmamce6enTp/eweim
Kbicka TOnkblHdbI neW Kymbc icTeN KAtKaHda paAno XaHe Td Ka6blndaybHa Keepri KeTtipinyi Mymki. Byn MMcep, WaHcOpfbu WHe 3NeKtp BEHTnAToP CnAeTbI WaBIn 3NeKtp KypblfblnapdbH KeepriinepiE YKcaHdbI. Byn KaJIbIntbI.
Tomeh KyaTTbI Kbicka ToJIKbIHapMeH 03ipney Ke3iHne neu kapaftbI KyHriptTeHyi MymkiH. Byn KaJIbInTbI.
- Θ3ipney ke3iHne TaMaKTan 6by 8bIfybl MymKiH. Ohbl H KEN 6eNiri caHbIaaynap apKbIbI 8bIfaBb. BIPAk 6ipaaBNeew eciri cnaKtbl caKNbH opbHaJxHaJIybl MymKiH. Byn KaIbInTbI.
Kypblfblb iHne eibip TamaKcb3 icke Kocyfa TbiBIM caIbHaDb. By n eTe kayinti.
KyaT CbIMbl po3eTKaFA TbIfbI3 KOCblImaHaP03eTKaDaH aXbIpaTbIHbI3. Coan KeiH 10ceKyHdTaH KeiH KaTadaH po3eTKaFA KOCblbI3.
- CaKaTHdbIpfbIi Kyiin KeTei Hemece aBTOMaTbI eWipriu XyMbIc icTei. CaKaTHdbIpfbIuTbI aybICTbIPbIHbI3 Hemece aBTOMaTbI eWipriuTi bICbIPbIHbI3 (6i3diKOMnHaHnHaHbI KAcINKO mAmHaapblXeHnei).
BaCKa 3NeKTp Kpyblfblnap KocblmHaH po3eTKaHbI TeKcepin KepiH3.
EciK xaKcbIaN Jxa6blMaHa. EciKti XaKcbIaN Jxa6blHbI3.
Ponik tiperi xehe neuTHy6I lac. Jac 6eJIkTepei Ta3anay yuiH «KbICKa TOnKbIHdbI neuKe TexNkaJIbIK Kbl3Met KepceTy» 6eJIIMn KapaHbI3.
KypblfblbMykraT Ta3anaHb3; Ke3 KeIreH Kip i3depin, TamaK 6eJIikTepiH, T.6. KeTIpiH3. Neu Ka6bpflapbHa JkaBn MeTann 3aTTap Jok eKeHiN TeKcepH3. EwKaUan Cepede MeTann 3aTTapDbI naJaIaanHbAhl3. EwKaUan neWti 6oc Kynde naJaIaanHbAhl3.
CAtydaH KeiH KbI3MeT KepCeTy opTaIbIbIHa xa6apIacy aIbIHa:
McEJIeH e3iH3 1eWe aIMaIbTbIHbIbI3dbI TeKcepH3;
- IWeIe aIIMacaHbI3, eKilneTTi TexHnKaJbIK KEmE Kbl3MeTHe xa6apnaLacBhl3.
! Eшkaшан ekilneTTi emec TexHnikTepei shaKbIpMaHbI3.
Ecen:
Macele Tpyi;
- new ynlrici (Mod.);
- cepnajbik Hemip (S/N).
BynaknapaTkbicKaToNkbiHdbiNeWtiH KepceTkuiTep TaKaiuacbHaDa bepinreH.
KZ
Genel bilgi: