
SF4606WMCNX - Built-in oven SMEG - Free user manual and instructions
Find the device manual for free SF4606WMCNX SMEG in PDF.
| Product type | Built-in oven |
| Brand | SMEG |
| Model | SF4606WMCNX |
| Capacity | 70 L |
| Dimensions (H x W x D) | 595 x 595 x 568 mm |
| Weight | 35 kg |
| Power supply | 220-240 V / 50-60 Hz / 16 A |
| Energy class | A+ |
| Cooking types | Fan-assisted, natural convection, grill, fan-assisted + grill, defrost, forced air |
| Cleaning | Catalytic (rear and side walls) |
| Child safety | Yes (control lock) |
| Cool door | Yes (3-layer glass) |
| Interior lighting | Halogen, 25 W |
| Included accessories | Rack, drip tray, rotisserie (depending on model) |
| Timer | Electronic with delayed end of cooking |
| Display | Digital LED |
| Color | Stainless steel |
| Repairability index | 8/10 |
| Availability of spare parts | 10 years after purchase |
| Warranty | 2 years |
Frequently Asked Questions - SF4606WMCNX SMEG
User questions about SF4606WMCNX SMEG
0 question about this device. Answer the ones you know or ask your own.
Ask a new question about this device
Download the instructions for your Built-in oven in PDF format for free! Find your manual SF4606WMCNX - SMEG and take your electronic device back in hand. On this page are published all the documents necessary for the use of your device. SF4606WMCNX by SMEG.
USER MANUAL SF4606WMCNX SMEG
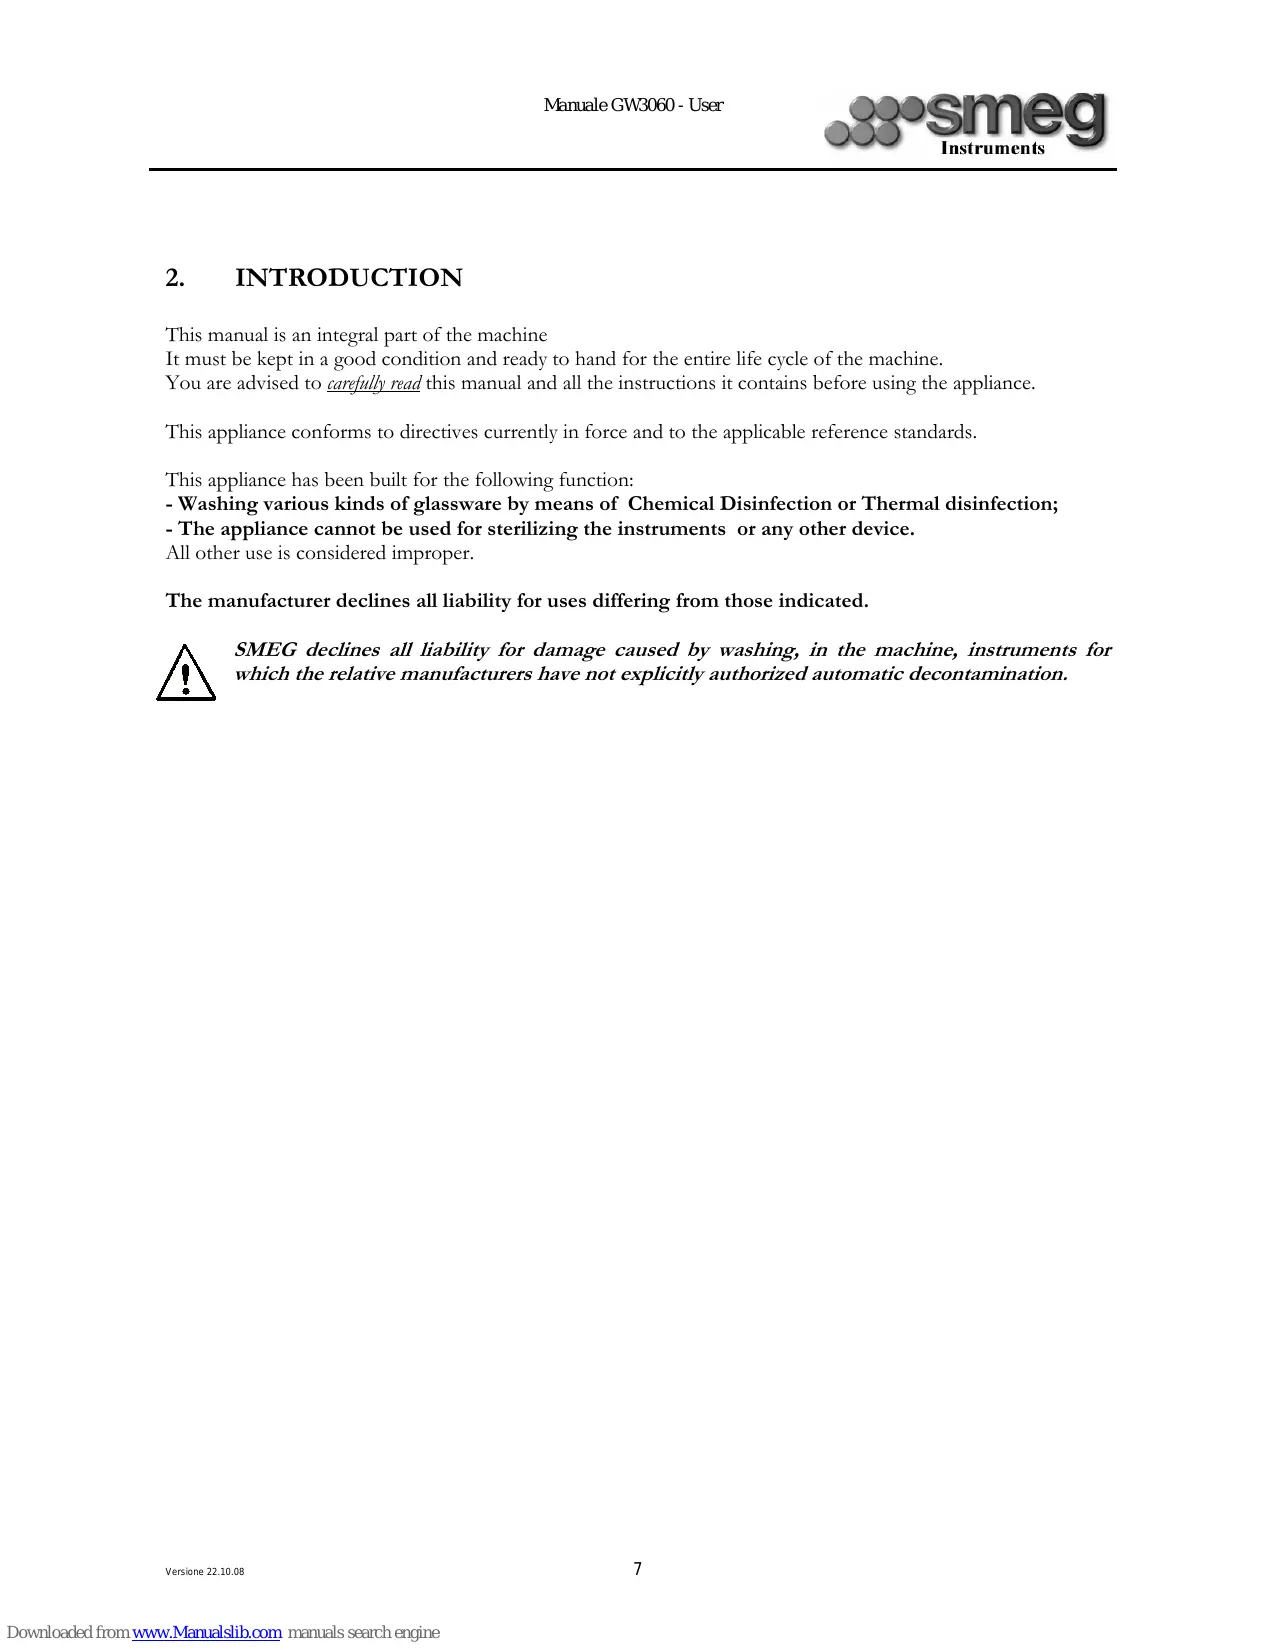
SMEG GW3060 GLASSWARE WASHER
natural_image
Exterior view of a stainless steel kitchen appliance (no visible text or symbols)CE
USER MANUAL
(code 914773904)
SMEG S.p.A.
Via Leonardo da Vinci, 4
Tel. +39 0 522 821 1
e-mail: instruments@smeg.it
42016 Guastalla (RE) – Italy
Fax +39 0 522 821 592
internet: www.smeg-instruments.com
CAREFULLY READ THIS INSTRUCTION MANUAL
Failure to read or fully understand the instruction manual, or incorrect interpretation of the instructions herein may cause damage to the appliance as well as being a source of danger for the operator and lowering the performances provided by the machine to a considerable extent.
The manufacturer declines all liability for uses differing from those listed below.

The appliance must only be installed, serviced and repaired by Smeg's authorized personnel.

The warranty provided will immediately become void if the machine issued in ways that FAIL TO CONFORM to the instructions given by the manufacturer SMEG.
This manual is for informational purposes only. The contents of this manual and the appliance described herein may be liable to modification without prior notice. In no case may SMEG be held liable for any direct or accidental damages deriving from or concerning the use of this manual.
| MANUAL N° | ||||
| REV | ECR/ECN | DATE | DESCRIPTION | BY |
Do you need information or Assistance for the appliances manufactured by SMEG's Instrument Division?
Please contact us from 8:00 to 18:00 hrs at the following numbers and addresses:
0522-8211
0522-821592
http://www.smeg-instruments.com
instruments@smeg.it
TEL
FAX
Internet Home Page
Service E-Mail Address
Our Sales Department staff will provide information about prices and offers. You can examine our entire product range in our Internet web site along with our innovations.
Our Technical Assistance Department can tell you anything you need to know about how to use your appliance in the proper way and can also put you in contact with your nearest authorized Assistance Centre if necessary.
International customers, please contact your local SMEG distributor.
TABLE OF CONTENTS
-
KEY TO THE SYMBOLS USED IN THE MANUAL AND ON THE MACHINE 6
-
INTRODUCTION 7
-
GENERAL RECOMMENDATIONS 8
-
GENERAL OPERATING INSTRUCTIONS 9
4.1 POWERING 9
4.2 CONTROLS 9
- BRIEF DESCRIPTION OF THE OPERATING CYCLE 12
5.1 HOW TO CARRY OUT A WASHING/DISINFECTING CYCLE 12
5.2 PRINTING THE LAST CYCLE EXECUTED 14
5.3 HOW TO SELECT A WASHING/DISINFECTING CYCLE 15
5.4 DEFERRED CYCLE START 15
5.5 HOW TO OPEN THE WASHING CHAMBER DOOR IN EMERGENCY 16
5.6 SECURITY POLICY, USER PASSWORD AND SUPER USER 17
5.7 BUILT-IN SOFTENER 19
5.7.1 How to add salt 19
5.7.2 Use of the appliance with softened mains water 20
5.7.3 Forced resin regeneration 21
5.8 HOW TO REGULATE THE WASHING PRESSURE IN THE SPRAYING ARMS 22
5.9 HOW TO FILL THE WASHING TROLLEYS 22
5.10 DETERGENT DISPENSING SYSTEM 23
-
PREPARATION FOR THE WASHING AND DISINFECTING PHASE 25
-
WASHING PROGRAMS - DESCRIPTION 26
7.1 WASHING AND DISINFECTING PROGRAMS 27
7.2 EFFICACY OF THE WASHING ACTION AND DETERGENTS 28
7.2.1 Arrangement of the instruments in the washing trolley 28
7.2.2 Quality and quantity of water 28
7.2.3 Water pressure 28
7.2.4 Washing temperature 28
7.2.5 Detergents used 29
7.2.6 First-aid measures for use of detergents 30
7.3 THE THERMAL DISINFECTION PROCESS 31
8. ALARM MESSAGES 37
9. CLEANING AND SERVICING 42
9.1 ROUTINE INSPECTIONS 42
9.2 HOW TO CLEAN THE SPRAYING ARMS 42
9.3 HOW TO CLEAN THE FILTERS 42
9.4 HOW TO CLEAN THE INLET FILTERS 43
9.5 INSPECTION 43
9.6 LONG IDLE PERIODS 43
9.7 EXTERNAL CLEANING 44
9.8 HOW TO SERVICE THE APPLIANCE 44
10. INSTALLED MACHINE SET-UP 45
1. KEY TO THE SYMBOLS USED IN THE MANUAL AND ON THE MACHINE

Read with the utmost care

Warning, danger
Warning, hot surfaces
2. INTRODUCTION
This manual is an integral part of the machine
It must be kept in a good condition and ready to hand for the entire life cycle of the machine.
You are advised to carefully read this manual and all the instructions it contains before using the appliance.
This appliance conforms to directives currently in force and to the applicable reference standards.
This appliance has been built for the following function:
- Washing various kinds of glassware by means of Chemical Disinfection or Thermal disinfection;
- The appliance cannot be used for sterilizing the instruments or any other device.
All other use is considered improper.
The manufacturer declines all liability for uses differing from those indicated.

SMEG declines all liability for damage caused by washing, in the machine, instruments for which the relative manufacturers have not explicitly authorized automatic decontamination.
3. GENERAL RECOMMENDATIONS

Never use alcohol or solvents such as turpentine in the appliance as they could cause explosions. Do not place materials dirtied with ash, wax or paint in the appliance.
- Do not rest or sit on the open door of the instrument washer as this could cause the appliance to tip over and endanger persons.
- Never ever touch the heating elements in the tub just after a washing program has terminated.
- The heating elements could become slightly discoloured as the instrument washer is used. This is normal as it depends on the operating mode and will in no way impair the way the appliance operates.
- Discarded appliances must be rendered unusable. Cut off the power flex after having detached the terminals from the electric panel. After this, the appliance must be consigned to a differentiated waste collection center.
- If the appliance functions in a faulty way, disconnect it from the electricity main and shut off the water cocks. After having done this, call the nearest authorized Assistance Center.

The machine must only be used by specifically trained persons. It is Smeg's task to train the designated users when the appliance is installed.
Smeg declines all liability for malfunctioning or accidents due to the appliance having been used by untrained persons.
4. GENERAL OPERATING INSTRUCTIONS
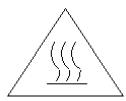
4.1 POWERING
Switch S1 that powers model GW3060 is situated on the front panel.
4.2 CONTROLS
The keyboard, positioned on the right side of the front panel, is divided into two separate sections:

. The left-hand part of the display with keys for starting and stopping a program, and for the reset process; . The right-hand part of the display, which contains the keys used for selecting/editing programs, selecting the machine parameters and the various functions/adjustments.
A complete list of the keys and their relative functions is given below:

START: starts the selected program

STOP: stops the current program

RESET: forces the machine to run through a reset procedure (both in the case of a deadlock and in other situations, such as those after an alarm has occurred)

ARROW UP: selection key

ARROW DOWN: selection key

ARROW LEFT – DRYER ON: key used to select the separate drying cycle (if available); it is also used for moving to the right in each menu

ARROW RIGHT – DRYER OFF: selection key for deactivating the drying cycle (if available); it is also used for moving to the right in each menu.

ENTER: confirms the selection made/program selection; door opening

INC: increases the value in question/ selects yes

ESC: quits the current mask and goes back to the previous step

DEC: decreases the value in question/ selects no
The keys appear on the bottom line of the display as they are activated.
5. BRIEF DESCRIPTION OF THE OPERATING CYCLE
5.1 HOW TO CARRY OUT A WASHING/DISINFECTING CYCLE
Once the appliance has been installed correctly, connect the cans of detergent, load the trolley/s, then proceed in the following way to conduct a washing/disinfecting cycle:
. open the cabinet door and turn the switch to position 1;
. wait a few seconds, to allow the system to initialize;
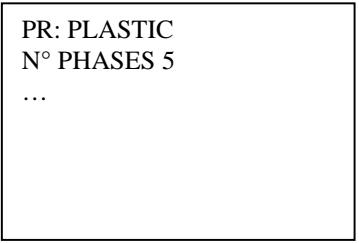
. after the SMEG logo has appeared, the system will access the menu of the selected program (e.g. “PLASTIC 70°C”);
PR: PLASTIC 70°C (000003)
N° Phases: 5
Duration: 1:10:00
05/02/06
08:30:17
. in this menu, various keys will appear on the bottom line of the display:

to begin the cycle (once the door has been shut);

to conduct a reset cycle;

to print the last cycle conducted;

to select a separate drying cycle;

to select/deselect the drying cycle;

to open the door to the washing chamber;

to enter the deferred starting function (max 24 h);

to go back to the immediately higher level menu.
If the

key is selected, the system will access the program execution menu:
PR: PLASTIC 70°C
Phase1 - FILLING
TL 22.2 TC 22.1
RunT:0:01:17
This menu displays the following information:
. the name of the program activated;
. the phase in which the appliance is operating (the appliance is being filled with water in the example);
. the temperature in the washing chamber (TL);
. the test temperature (TC);
. the time that has elapsed since the program began (RunT).
When a program is running, the only key that can be pressed is STOP:

Once this key has been pressed, either the door can be opened (if the temperature is no higher than 40^ C) or the cycle can be continued.
The following message will appear once the cycle has terminated:
PR: PLASTIC 70°C
Program terminated
Open the door?
The door can be opened and the processed instruments removed.
The machine is now ready to begin a fresh washing/disinfecting cycle.

It is advisable to wait a few minutes between one cycle and the next, with the door of the appliance open: this allows the washing chamber to cool down and makes the washing process of the next cycle more effective.
The combined time and temperature action of the detergents is used to the full if the temperature is low at the beginning of the washing cycle.
5.2 PRINTING THE LAST CYCLE EXECUTED
A printout can be made of the last cycle executed when the machine is in standby mode: proceed as follows.
Press the STOP button. The following screen will appear:
LAST CYCLE PRINTOUT
At this point, press the ENTER key to print out the data regarding the last cycle executed.
5.3 HOW TO SELECT A WASHING/DISINFECTING CYCLE
Access the initial menu:
PR: PLASTIC 70°C (000003)
N° Phases: 5
Duration: 1:10:00
05/02/06
08:30:17
press

to move to a higher menu where the list of programs can be scrolled with keys

and

<PREWASH>
<DEMI PREWASH >
<PLASTIC 70°C>
<BASES 70°C>
<BASES 80°C>
<NURS.BOT. 93°C>
When the cursor has reached the required program, select it and confirm the selection with key

The system will now access the menu of the selected program (see § 3.1).
5.4 DEFERRED CYCLE START
Access mask
PR: PLASTIC 70°C (000003)
N° Phases: 5
Duration: 1:10:00
05/02/06
08:30:17
Press + to access the mask where a deferred starting time can be selected for the chosen cycle:
Pr: deferred
Digitize period
Ore <00> Min <00>
Use keys + and – to enter the time interval. Use “RH ARROW” and “LF ARROW” keys to move the cursor
Starting can be postponed for up to 24 hours.
5.5 HOW TO OPEN THE WASHING CHAMBER DOOR IN EMERGENCY
The washing chamber can only be opened by means of button

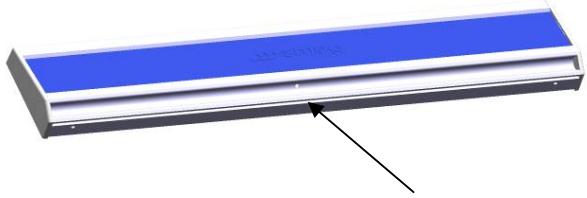
In a power failure, the door can be forced open by hand using a flat screwdriver at least 10 cm in length with a diameter of 3-3.5mm. Proceed as described below to open the door:
. find the hole under the lower profile of the door;
fig 5.6.1.1
natural_image
3D rendering of a rectangular electronic component with blue top and white side, no visible text or symbols. insert the screwdriver into the hole;
. push on the screwdriver delicately without forcing until you hear the closing mechanism release.

The door may be opened during the cycle only if the temperature inside the washing chamber has not exceeded 40^ C. Use the keyboard to open the door.
Depending on the settings chosen for the system, a password must be entered to open the door during a washing cycle. However, it is always advisable to wait until the cycle terminates before opening the door.

It is dangerous to open the door when the temperature inside the washing chamber exceeds 50^ C!
Smeg declines all liability for damage to persons or property caused by forcing the door open during a thermal disinfection cycle.
5.6 SECURITY POLICY, USER PASSWORD AND SUPER USER
For safety reasons, Smeg implements a protection policy with four password levels that enable or deny access to the menus of the appliance. These are, in increasing order:
. user level: concerns the people who actually operate the machine (nurses, assistants, department heads). This password enables access to the “program selection” (see § 4.3) and “change password” (see § 11.1) menus only.
. super user level: concerns the person in charge of the machine (department head, clinical engineer, etc.).
This password can be used to access the following menus:
. PROGRAMMING -> Loading Programs;
. PROGRAM EDITING -> only in relation to the amount of detergent and the drying parameters;
.COPY
NEW PROGRAM
. UTILITY -> accesses all the sub-menus (can also change the user passwords)
. WASHING PARAMETERS -> only certain sub-menus, as listed below:
. WATER CONNECTION
. WATER TRAP WASH
. REGENERATION
. DRAINING
. Smeg technical level: concerns Smeg's authorized technicians.
All the menus in the lower levels as well as other “WASHING PARAMETERS” submenus can be accessed from this level, i.e.:
. EXTRA FILLING TIME
. DRAINED WATER RECOVERY
. CONDENSER ACTIVATION
. DETERGENT DISPENSERS
. FLOWMETER
. CONDUCTIVITY SENSOR
. DWP ACTIVATION
. TEMPERATURE ADJUSTMENT
. MAINTENANCE
. Smeg level: concerns the manufacturer of the appliance.
The appliance leaves the factory with the following passwords entered:
| USER | PASSWORD | USER | PASSWORD |
| User 1 | 1 | User 11 | B |
| User 2 | 2 | User 12 | C |
| User 3 | 3 | User 13 | D |
| User 4 | 4 | User 14 | E |
| User 5 | 5 | User 15 | F |
| User 6 | 6 | User 16 | G |
| User 7 | 7 | User 17 | H |
| User 8 | 8 | User 18 | I |
| User 9 | 9 | User 19 | J |
| User 10 | A | User 20 | K |
| Super User | ZZZ |

Remember to change the password when the appliance is used for the first time so as to be certain of who is enabled to access the machine (see § 11.1).

The “User Control Activation” option can be activated to make sure that the appliance is operated by authorized users (see § 11.6).
5.7 BUILT-IN SOFTENER
The machine has a softener for the washing water.
The amount of lime in the water (denoting its hardness) is responsible for the whitish stains on the dry instruments, which tend to become opaque after a certain period of time. The instrument washer is equipped with an automatic decalcifier which removes the hardening substances from the water by means of specific regenerating salt.
- Before the instrument washer is used for the first time, pour 1 kg of salt into the reservoir along with a little water to fill. Make sure that the plug is firmly closed each time the reservoir is filled. The water and detergent mixture must not penetrate into the salt reservoir as this would prevent the regeneration system from operating correctly. Moreover, the washing tub and the instruments inside it would be damaged if salt were to spill out. If this were to occur, the warranty would become void.
Only use regenerating salt for domestic dishwashers. Do not use normal kitchen salt.
- Edible salt must not be used as it contains insoluble substances that could damage the decalcifying system over a period of time.
The ionic exchange resins of the water softener are regenerated by sodium chloride, i.e. common salt (NaCl). The only routine maintenance required is to add coarse salt to the reservoir when the appliance is installed and after this, whenever the following alarm message appears on the display:
!!!ALARM: W075
No
salt
    Ignore??
    <NO>
When this message appears on the display, it can be ignored by pressing key

and then key

However, it is inadvisable to ignore this message since a softener that fails to function correctly will impair the quality of the washing result and could even damage the processed instruments over time.
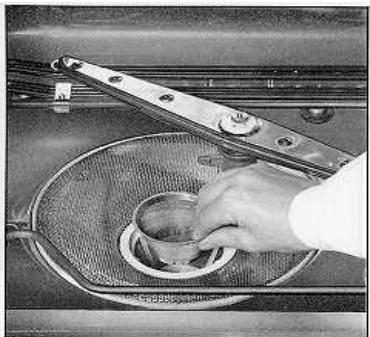
5.7.1 How to add salt
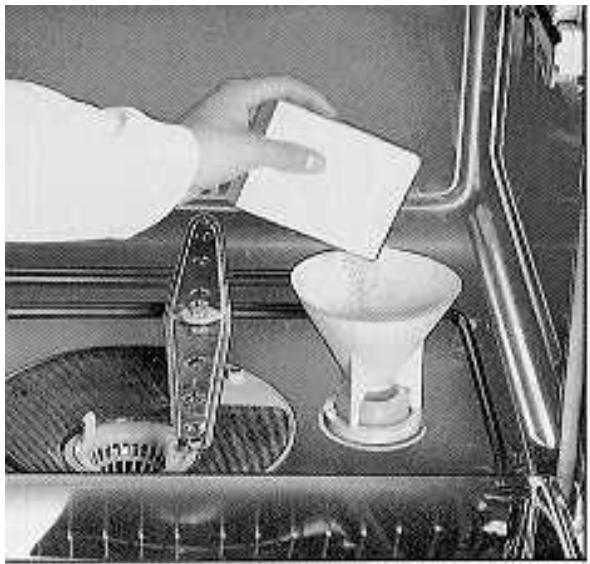
If the water used is of medium hardness, fresh salt must be added after every 20 washing cycles approximately. The reservoir of the decalcifier contains about 1kg of coarse salt. The reservoir is situated at the bottom of the instrument washer (see fig. 3.2.2.1). Remove the lower basket, unscrew the reservoir's plug by turning it in the anti-clockwise direction and then pour salt inside using the funnel supplied with the appliance.
Do not use compressed salt tablets or fine salt as these can clog the regeneration valve.
Close the reservoir by turning the plug clockwise. Make sure that the plug is not blocked by salt residues. The plug must be screwed fully into place without forcing.
Before proceeding with a new washing cycle, it is advisable to run the “Prewash” program 1 to eliminate any salt residues that may have remained in the tub along with the excess initial salt.
natural_image
Person pouring liquid into a conical flask on a machine (no visible text or symbols)Fig. 3.2.2.1
After the salt has been added, remember that the resins will only regenerate automatically for the first time after several work cycles, i.e. when the softener's operating capacity has terminated.
Since the softener's new resins are not always regenerated to the full extent, the glassware may appear opaque during the first 2/3 cycles owing to lime residues.
To prevent this from happening, the softener's resins can be subjected to a Forced Regeneration cycle. Consult the next chapter: "FORCED REGENERATION OF THE SOFTENER".
5.7.2 Use of the appliance with softened mains water
If already softened hot or cold mains water is available with a hardness value of less than 15^ F (expressed in
French degrees) or 8^ D (expressed in German degrees), the regeneration cycle of the built-in softener must be
inhibited and salt must not be added to the softener.
Consult chapters xxx How to program the softener's regeneration process), 3.5 (How to memorize the wet connections) and xxx (Connection to the softened water main) for instructions about how to inhibit the built-in softener.
It is very important to make the adjustments described in the above-mentioned chapters in the correct way as the passage of softened water through a softener designed to treat hard water will entrain chlorides and sodium carbonates along with the washing water. These inorganic salts can leave whitish stains on the washed glassware and, in the case of surgical instruments, may turn the metal yellow or reddish brown.
These whitish deposits on the glassware or colourings on the surgical instruments can be removed by means of a special acid washing cycle using 200 / 250ml of neutralizer.
If the colouring on the surgical instruments is persistent, it may be necessary to treat them with an appropriate stain remover.
5.7.3 Forced resin regeneration
Simply enter 0 in the PHASE NUMBER data item in the menu below to make the machine perform a forced regeneration cycle immediately.
HARDNESS IN °F
HARDNESS IN °T
HARDNESS IN °I
PHASE NUMBER
5.8 HOW TO REGULATE THE WASHING PRESSURE IN THE SPRAYING ARMS
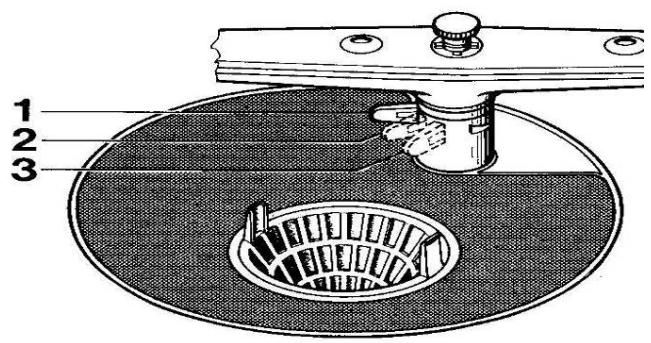
The pressure of the washing water in the top and bottom spraying arms can be regulated by means of the adjuster under the spraying arm itself. Turn the adjuster lever fully towards the left (normal position) to obtain the maximum pressure in the top spraying arm or in the injection system.
Turn the lever towards the right (towards the bottom of the tub) to obtain the maximum pressure in the bottom spraying arm as the top one will be throttled.
Pressure regulator
1 Maximum flow at top level
2 Balanced flow
3 Maximum flow from bottom arm
5.9 HOW TO FILL THE WASHING TROLLEYS
The machine is supplied without trolleys. The Customer chooses the trolleys he needs from a vast range of available solutions.
These trolleys are simply placed on the door and allowed to slide inside. Connection to the hydraulic circuit is automatic. It may be necessary to initially adjust the upper funnel at the water inlet.

A loaded trolley can weigh as much as 20 kg: take care when handling it. Persons with problems affecting their backs or articulations should not load or unload the trolleys.
Smeg declines all liability for problems concerning the health of persons caused by lengthy use of the machine.

Take great care when positioning the instruments in the baskets/trolleys: a good position, where all the surfaces are exposed to the washing action certainly contributes towards the result of the washing and disinfecting cycle.
5.10 DETERGENT DISPENSING SYSTEM
The machine is equipped with 4 peristaltic pumps as a maximum that dispense liquid detergents.

natural_image
Close-up of mechanical components with metallic surfaces and bolts, no visible text or symbolsThey are placed at the rear cover of the machine on the right end; depending on the machine model, there may be 1 or 2 pumps by default.
Each tube is marked by a tag that indicates the number of the pump and the relative additive it can dispense: take care not to invert the tubes!
The level of the liquid is monitored by means of level sensor.
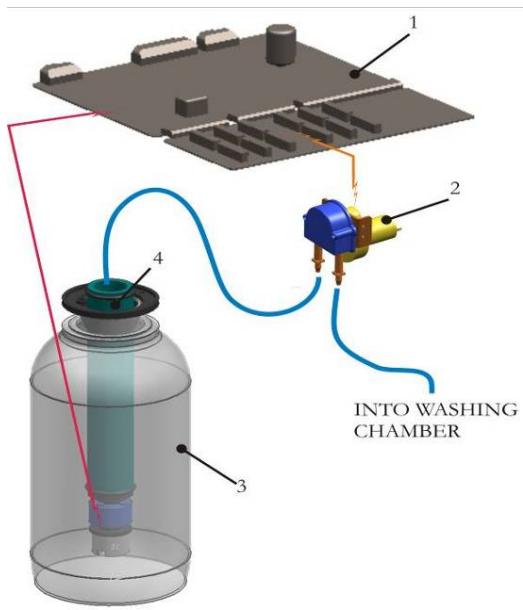
The plug must be removed from each can and the suction device with its plug inserted instead.

If detergent spills out of the container it must be dried immediately.
The amount of detergent to dispense during a phase is programmed by means of the general programming menu.
Consult the ‘PROGRAMMING AND PROGRAM EDITING’ chapter for further details about programming and modifying the programs.
| MODEL GW3060-GW4090 | |||
| Dispenser settingsRecommended programming values * | |||
| Product | value | ap. ml/cycle | |
| PUMP P1 | Alkaline detergent | 15-25 | 30 - 50 |
| PUMP P2 | Acid neutralizer | 15-20 | 25 – 40 |
| PUMP P3 | Caustic soda (33% sol. approx) | 45-60 | 90 – 120 |
| PUMP P4 | Antifoam | 2-5 | 5-10 |
- If necessary, the detergent dispensing values can be changed within the tolerated value range.
The accuracy of the dispensing system depends on the condition of the suction and delivery tubes: in the worst case, the error will not exceed 5% of the measured quantity.
* The values to be entered are equivalent to the ml/lt
6. PREPARATION FOR THE WASHING AND DISINFECTING PHASE
Effective disinfection starts with the instrument preparation phase. To ensure that, eliminate any possible coarse residue remaining from previous activities using suitable soaking methods and treatments before placing the instruments in the appropriate baskets “delicately.”
Instruments made in stainless steel cannot be immersed in physiological solutions of sodium chloride for any reason, as extended contact with this solution provokes corrosion creating holes and damage to the surface due to stress corrosion.
Avoid overloading the instrument basket holders. Slag, skin disinfectant residue, physiological solutions, etc. must not enter the treatment containers. The containers must always remain closed to avoid additional drying. It is advisable to perform dry treatments when possible.
The instruments are immersed in a combined solution of disinfectant and detergent with no fixed protein effects, as a preference when treating liquids. However, disinfectants based on aldehydes have a fixing effect. Therefore, we strongly suggest precisely following the indications provided by the manufacturer regarding concentrations and action times, as well as the possible addition of detergent additives.
Always avoid long time intervals between this preliminary treatment and the instrument washer treatment as the risk of corrosion exists for both methods.
The instruments must be placed appropriately in instrument holders suitable for machine washing. To assure effective cleaning, the articulated instruments (scissors, clamps and forceps) must be opened to avoid overlapping their surfaces as much as possible. The instrument holders, such as baskets, racks and fixing devices, must be designed to prevent shadow areas in the following cleaning and disinfecting phase.
Instruments that can be disassembled must be put away according to the instructions provided by the manufacturer.
Instruments used for micro-surgery must be placed on special racks or appropriate fixing devices.
Residue present on orthodontic instruments, such as material used for lead sealing or acid substances used for removing cement, must be eliminated immediately after use to prevent the risk of hardening and/or corrosion.
Components of motor operated surgery systems must be disassembled immediately after use according to the instructions provided by the manufacturer.
Simple tools, such as drills or saw blades can be treated like surgical instruments only if they are reusable medical-clinical products.
Avoid direct and repeated contact with dirty instruments as much as possible.
Always use extreme caution. Use all the individual protective devices available for this type of operation, before and after treatment.
7. WASHING PROGRAMS - DESCRIPTION
SMEG's ‘original’ programs are installed in program positions 1 to 20. These programs have been researched and formulated so as to guarantee the best possible washing and disinfecting results. However, they can be changed in relation to the quantity of detergent.
The remaining 10 positions from 21 to 30 are empty and can be used by the customer to create his own programs. These new programs can either be created in the manual mode by means of the keyboard, or by using Smeg's application software WDTRACE (which can be purchased as an optional).
It is always possible to reinstall the original programs by loading them (consult the relative section).
7.1 WASHING AND DISINFECTING PROGRAMS
Table 7.3.1 describes the functions accomplished by the 20 Operating Theater default programs.
Only peristaltic pumps 1 and 2 are activated in the standard programs. To activate the other pumps, access the programming menu and activate them in the required phase.
A drying phase for the material can be added to the washing program (see Drying Programs section).
Warning
To prevent possible contamination amongst the various cycles due to water residues that may have remained after a program, it is advisable to run program N° 1 (tub prewash) at the beginning of a work day as a preventive safety measure.
A washing program generally comprises phases of different types:
- Prewash with mains or demineralized water dilutes or softens the pollutants on the instruments; Use cold water without additives to eliminate coarse dirt and foam substances.
- Hot alkaline wash effective action that detaches the pollutants from the walls and solubilizes them; this phase is usually performed at temperatures between 40°C and 65°C for a few minutes. Alkaline or neutral detergents are used.
- Neutralizing in an acid environment action that eliminates alkaline residues solubilization of the calcium carbonate precipitates from the surfaces of the instruments prevents the surfaces from becoming opaque
- Rinsing with mains water dilution of the previously used chemical additives every rinse dilutes the initial concentration of the pollutant by about 99%
- Rinsing in demineralized water dilutes the inorganic salts and any organic fractions in the mains water
- Thermal disinfection Thermal disinfection is a hot alkaline washing phase where the washing temperature exceeds 70^ C and is maintained for a period of time that depends on the required thermal disinfection action. Consult the next section for details about the thermal disinfection process.
7.2 EFFICACY OF THE WASHING ACTION AND DETERGENTS
To ensure that the materials processed by the instrument washer are completely washed and disinfected, the washing phase/s must be as efficacious as possible.
The following factors contribute towards improving the efficacy of the washing process:
. arrangement of the instruments in the washing trolley in the best possible way;
. quality and quantity of the water;
. pressure of the water in the washing ducts;
. temperature at which washing occurs;
. detergents used.
7.2.1 Arrangement of the instruments in the washing trolley
Take the following precautions:
. do not fill the trolleys with too much material at the same time;
. make sure that the instruments are positioned so that they do not overlap each other;
. if the instruments have articulated parts, open out the articulations as far as they will go;
. do not place instruments covered with blood or other substances that have been allowed to dry, into the trolleys;
. bulky instruments must be put in the baskets in a manner that prevents “shadow areas” from being created, as these areas obstruct cleaning of other instruments;
. instruments with cavities (flexible tubes, respiration systems, etc.) must have the possibility of being completely rinsed, even internally. Therefore, inserts with washing devices designed specifically for treating this type of instrumentation must be used;
. position the instruments so that they are unable to obstruct the spraying arms.
7.2.2 Quality and quantity of water
It is essential for the water to be of a good quality. Have the water in the water supply system periodically checked. Connect the demineralized water supply when possible (conductivity < 8-10 S ).
It may be advisable to increase the amount of water used for each phase (by means of the relative menu), depending on the washing trolley and program selected; this parameter may not be changed for Smeg's programs.
7.2.3 Water pressure
By operating correctly, the washing pump ensures that the pressure in the machine's hydraulic circuit is correct. An alarm message will appear on the display if the pressure is incorrect.
7.2.4 Washing temperature
The optimum temperature at which washing takes place depends on the type of detergent used and the instruments to process. However, washing temperatures must usually exceed 50^ C, otherwise the chemicals will be inefficacious.
7.2.5 Detergents used
The detergents used represent the most important factor for obtaining an optimum washing result. Smeg guarantees that optimum washing results are obtained so long as the customer uses the products tested along with the appliance.
Smeg has prepared two groups of programs that differ as to the type of detergents used: both groups provide optimum washing and disinfecting results, depending on the case in question.
Here are the products for which Smeg guarantees the envisaged washing results:
alkaline detergents: Smeg's DETERLIQUID D and D2
acid neutralizers: Smeg's ACIDGLASS P and P2
soda caustic 33%: to be supplied by the end-user
anti-foam agent: Smeg's F1-S or F2-S

Handle cans containing detergents with care: always wear protective gloves when transferring liquids, topping up and inserting the suction devices.
Wash the affected area immediately with water if detergent substances splash on to the skin. Consult the next section for further details.
7.2.6 First-aid measures for use of detergents

Smeg's DETERLIQUID D and D2
General advice: Remove any contaminated garments and take them to a safe place
Contact with the skin: Immediately wash the affected area with plenty of water if the product splashes on to the skin. Apply a sterile gauze if possible.
Contact with the eyes: If the product splashes into the eyes, rinse them immediately with plenty of water (for at least 10 minutes). Apply a sterile gauze if possible and consult a physician.
Swallowing: Rinse out the mouth with plenty of water and drink lots of water. Consult a physician immediately. Do not make the victim vomit.

Smeg's ACIDGLASS P and P2
General advice: Remove any contaminated garments.
Contact with the skin: Immediately wash the affected area with plenty of water if the product splashes on to the skin.
Contact with the eyes: If the product splashes into the eyes, rinse them immediately with plenty of water (for at least 10 min.) and consult a physician.
Swallowing: Rinse out the mouth with plenty of water and drink lots of water. Consult a physician immediately. Do not make the victim vomit.

Smeg's F1-S
General advice: Remove any contaminated clothing immediately.
Contact with the skin: Immediately wash the affected area with plenty of water if the product splashes on to the skin.
Contact with the eyes: Thoroughly and immediately rinse the eyes with water if the product splashes into them.
Swallowing: Rinse out the mouth with plenty of water and drink lots of water.

This last page should be photocopied and affixed near the machine so that they can be easily consulted if problems arise.
7.3 THE THERMAL DISINFECTION PROCESS
Over the last few years, many efforts have been made to improve the decontamination of instruments and glassware: specific standards for both the process and techniques used have been issued and have defined the state-of-the-art. All this has provided the end-user with quality and safety advantages.
We would now like to go on to describe the A_0 concept (see Tab. 1 on the next page) defined by EN ISO 15883, which explains the meaning of the temperature and time values indicated in the thermal disinfection programs.
Value A_0 indicates the degree of thermal disinfection of the corresponding program: thermal disinfection is all the more efficacious and suitable for particular instruments the higher its value is.
Research has been conducted according to which, by conducting washing cycles that comply with these 2 parameters, i.e. temperature @93°C and holding time @10 min., one obtains a high degree of microbiological disinfection in the treated materials, such as to inactivate the majority of the bacteria (with the exception of spores) and heat-resistant viruses such as the HIB viruses of hepatitis A and B as well as the HIV virus responsible for AIDS.
Thermal disinfection processes that provide a good degree of disinfection can also be carried out at lower temperatures and with shorter holding times. The temperature/holding time combination depends on which type of disinfection is required.
A stands for the equivalent time in seconds required to produce a given disinfection effect at a temperature of 80^ C (taken as a reference). If D is the time required to reduce the bioburden on the instrument treated by a factor 10 (thus with a 90% “lethality” degree) at a particular temperature, value z can be expressed as the temperature increase (in K degrees) required to reduce D (in boldface) by a factor 10. In view of this, A_0 stands for the value of A when the temperature is 80^ C and value z equals 10.
In short, the value of A_0 expresses the degree of “lethality” in seconds at a temperature of 80^ , released by the thermal disinfection process to the device under treatment, with reference to microorganisms that possess a z value of 10 (a characteristic valid for many microorganisms). The A_0 value that must be obtained depends on both the type and number of microorganisms on the contaminated medical device and on its successive use.
According to EN ISO 15883 and the recommendations of the Robert Kock Institute (European authority on the subject), an A_0 of 600 is considered as the minimum standard for non-critical medical devices, i.e. for those that only come into contact with uninjured skin. A further condition required is that microbic contamination must only be slight and there must be no heat-resistant pathogens present. An A_0 value of 600 can be obtained by maintaining a temperature of 80^ for 10 minutes or 90^ for 1 minute or again, 70^ for 100 minutes (lowerer temperature are not recommended).
If instruments are contaminated with heat-resistant viruses, such as those of hepatitis B, the value of A_0 must be at least 3000. This can be obtained by maintaining a temperature of 90^ for 5 minutes.
An A_0 value of 3000 is considered the minimum value to apply to all medical devices considered to be critical. Programs that include thermal disinfection have therefore been designed to offer the following A_0 values:
| TEMPERATURE AND TIME | A_0 |
| 90°C for 1 min | 600 |
| 90°C for 5 min | 3000 |
| 93°C for 5 min | 6000 |
| 93°C for 10 min | 12000 |
For the sake of convenience, the formula for calculating A_0 is given below
$$ A _ {0} = \tau \bullet 1 0 ^ {\left(\frac {T - 8 0}{1 0}\right)} $$
where:
= time in seconds for which the disinfection temperature must be maintained
T = disinfection temperature in ^
| DESCRIPTION OF PROGRAMS | ||||||||
| PROG. NUMBER | PROGRAM NAME | PHASE 1 | PHASE 2 | PHASE 3 | PHASE 4 | PHASE 5 | PHASE 6 | CYCLE TIME (MIN) |
| 1 | PREWASH | COLD RINSE | 5 | |||||
| 2* | PLASTIC WASH | WASH AT 75°C WITH ALKALINE DETERGENT | NEUTRALIZATION WITH ACID DETERGENT | RINSE | RINSE IN DEMINERALIZED WATER | RINSE IN DEMINERALIZED WATER AT 60 °C | 35 | |
| 3* | GLASSWARE QUICK WASH | WASH AT 75°C WITH ALKALINE DETERGENT | NEUTRALIZATION WITH ACID DETERGENT | RINSE | RINSE IN DEMINERALIZED WATER AT 75°C | 30 | ||
| 4* | GLASSWARE MEDIUM WASH | WASH AT 75°C WITH ALKALINE DETERGENT | NEUTRALIZATION WITH ACID DETERGENT | RINSE IN DEMINERALIZED WATER | RINSE IN DEMINERALIZED WATER AT 75°C | 30 | ||
| 5* | GLASSWARE STANDARD WASH | WASH AT 80° WITH ALKALINE DETERGENT | NEUTRALIZATION WITH ACID DETERGENT | RINSE | RINSE IN DEMINERALIZED WATER | RINSE IN DEMINERALIZED WATER AT 75°C | 40 | |
| 6 | GLASSWARE INTENSIVE WASH | HOT PREWASH WITH ALKALINE DETERGENT | WASH AT 90°C FOR 3 MIN. WITH ALKALINE DETERGENT | NEUTRALIZATION WITH ACID DETERGENT | RINSE | RINSE IN DEMINERALIZED WATER | RINSE IIN DEMINERALIZED WATER AT 75°C | 50 |
| 7 | BLOOD STAINED GLASSWARE INTENSIVE WASH | COLD PREWASH WITH ALKALINE DETERGENT | WASH AT 95°C FOR 3 MIN. WITH ALKALINE DETERGENT | NEUTRALIZATION WITH ACID DETERGENT | RINSE | RINSE IN DEMINERALIZED WATER | RINSE IN DEMINERALIZED WATER AT 75°C | 50 |
| 8 | AGAR STAINED GLASSWARE WASH | HOT PREWASH WITH ALKALINE DETERGENT | WASH AT 95°C FOR 3 MIN. WITH ALKALINE DETERGENT | NEUTRALIZATION WITH ACID DETERGENT | RINSE | RINSE IN DEMINERALIZED WATER | RINSE IN DEMINERALIZED WATER AT 75°C | 50 |
| 9 | AGAR STAINED GLASSWARE INTENSIVE WASH | PREWASH AT 80°C WITH ALKALINE DETERGENT, CAUSTIC SODA & ANTIFOAM | WASH AT 95°C FOR 5 MIN. WITH ALKALINE DETERGENT, CAUSTIC SODA & ANTIFOAM | NEUTRALIZATION WITH ACID DETERGENT | RINSE | RINSE IN DEMINERALIZED WATER | RINSE IN DEMINERALIZED WATER AT 75°C | 60 |
| 10* | THERMAL DISINFECTION 95°C 3' | THERMAL DISINFECTION AT 95° FOR 3 MIN. WITH ALKALINE DETERGENT | NEUTRALIZATION WITH ACID DETERGENT | RINSE IN DEMINERALIZED WATER | RINSE IN DEMINERALIZED WATER AT 75°C | 40 | ||
| 11* | THERMAL DISINFECTION 95°C 10' | THERMAL DISINFECTION AT 95° FOR 10 MIN. WITH ALKALINE DETERGENT | NEUTRALIZATION WITH ACID DETERGENT | RINSE IN DEMINERALIZED WATER | RINSE IN DEMINERALIZED WATER AT 75°C | 45 | ||
| 12 | INTENSIVE THERMAL DISINFECTION 95°C 3' | COLD PREWASH WITH ALKALINE DETERGENT | THERMAL DISINFECTION AT 95° FOR 3 MIN. WITH ALKALINE DETERGENT | NEUTRALIZATION WITH ACID DETERGENT | RINSE | RINSE IN DEMINERALIZED WATER | RINSE IN DEMINERALIZED WATER AT 75°C | 50 |
| 13 | INTENSIVE THERMAL DISINFECTION 95°C 10' | COLD PREWASH WITH ALKALINE DETERGENT | THERMAL DISINFECTION AT 95° FOR 10 MIN. WITH ALKALINE DETERGENT | NEUTRALIZATION WITH ACID DETERGENT | RINSE | RINSE IN DEMINERALIZED WATER | RINSE IN DEMINERALIZED WATER AT 75°C | 60 |
| 14 | OIL STAINED GLASSWARE WASH | HOT PREWASH | WASH AT 95°C FOR 1 MIN. WITH ALKALINE DETERGENT & CAUSTIC SODA | NEUTRALIZATION WITH ACID DETERGENT | RINSE | RINSE IN DEMINERALIZED WATER | RINSE IN DEMINERALIZED WATER AT 75°C | 50 |
| DESCRIPTION OF PROGRAMs | ||||||||
| PROG. NUMBER | PROGRAM NAME | PHASE 1 | PHASE 2 | PHASE 3 | PHASE 4 | PHASE 5 | PHASE 6 | CYCLE TIME (MIN) |
| 15 | OIL STAINED GLASSWARE INTENSIVE | HOT PREWASH WITH ALKALINE DETERGENT | WASH AT 95°C FOR 1 MIN. WITH ALKALINE DETERGENT & CAUSTIC SODA | NEUTRALIZATION WITH ACID DETERGENT | RINSE | RINSE IN DEMINERALIZED WATER | RINSE IN DEMINERALIZED WATER AT 75°C | 50 |
| 16 | OIL-GREASE STAINED GLASSWARE | PREWASH AT 50°C WITH ALKALINE DETERGENT & CAUSTIC SODA | WASH AT 95°C FOR 1 MIN. WITH ALKALINE DETERGENT & CAUSTIC SODA | NEUTRALIZATION WITH ACID DETERGENT | RINSE | RINSE IN DEMINERALIZED WATER | RINSE IN DEMINERALIZED WATER AT 75°C | 50 |
| 17 | MINERAL OIL STAINED GLASSWARE | PREWASH AT 75°C WITH ALKALINE DETERGENT & CAUSTIC SODA | WASH AT 95°C FOR 10 MIN. WITH ALKALINE DETERGENT, CAUSTIC SODA & ANTIFOAM | NEUTRALIZATION WITH ACID DETERGENT | RINSE | RINSE IN DEMINERALIZED WATER | RINSE IN DEMINERALIZED WATER AT 75°C | 60 |
| 18 | PETROL STAINED GLASSWARE WASH | WASH AT 95°C FOR 10 MIN. WITH ALKALINE DETERGENT & CAUSTIC SODA | NEUTRALIZATION WITH ACID DETERGENT | RINSE | RINSE IN DEMINERALIZED WATER | RINSE IN DEMINERALIZED WATER AT 75°C | 65 | |
| 19 | DIESEL STAINED GLASSWARE | HOT PREWASH WITH ALKALINE DETERGENT | WASH AT 95°C FOR 1 MIN. WITH ALKALINE DETERGENT | NEUTRALIZATION WITH ACID DETERGENT | RINSE | RINSE IN DEMINERALIZED WATER | RINSE IN DEMINERALIZED WATER AT 75°C | 45 |
| 20 | PETROL STAINED GLASSWARE INTENSIVE | WASH AT 95°C FOR 10 MIN. WITH ALKALINE DETERGENT, CAUSTIC SODA & ANTIFOAM | WASH AT 95°C FOR 10 MIN. WITH ALKALINE DETERGENT, CAUSTIC SODA & ANTIFOAM | NEUTRALIZATION WITH ACID DETERGENT | RINSE | RINSE IN DEMINERALIZED WATER | RINSE IN DEMINERALIZED WATER AT 75°C | 100 |
NOTE \*
Programmes marked with a star need the 5^th peristaltic pump!
NOTE \*\* WASHING TIMES:
The times given in the table are indicative and refer to the following operating conditions:
400V - 7.0 kW three-phase electric power supply
Cold water supplied at 20^ C – 3 bar
Programs 1 and 2 are actually not washing programs but simple prewashes lasting 5 minutes. They are useful if the appliance is partially filled with materials dirtied with blood and a true washing program need not be used at that time. This prevents the blood from coagulating, thus making the instruments easier to clean and preventing longer washing programs from having to be used.
8. ALARM MESSAGES
Different messages appear on the display if the appliance operates in a faulty way or water and/or detergent are lacking. There are two different situations, depending on how serious the fault is:
. warning messages;
. true alarm signals.
In he first case, there will be a message allowing the user to ignore the warning and proceed with the selected cycle while in the second case, the user must press the Reset button and comply with the relative procedure in order to overcome the situation.
By and large, an alarm indicates that the machine is operating in a faulty way and needs to be repaired by a technician. Sometimes, however, the alarm may be caused by a temporary situation. Before calling the authorized Technical Assistance service you are therefore advised to make a Reset and repeat the cycle a second time. Call the authorized Technician if the alarm persists.
The possible alarm messages are indicated below.

To release the machine when one of these messages appears, depress the RESET key for a couple of seconds in order to activate the RESET cycle.
If a cycle has been stopped during a high temperature phase, remember that the temperature must drop below 45^ C before the door can be opened.
| Alarm ID | Message | Action |
| 1 | WATER HEATING FAILED | Check the condition of the safety thermostat (first plunger on the upper wall of the detergent reservoir). Call the Technical Assistance Service if the fault persists. |
| 2 | TEMP. PROBE TL1-TC | Repeat the cycle: It could be a temporary alarm. |
| 4 | OVERTEMPERATURE TL1 | Repeat the cycle: It could be a temporary alarm. |
| 5 | PROBE TL1 DISCONNECTED | Call the Technical Assistance Service |
| 7 | PROBE TA1 DISCONNECTED | Call the Technical Assistance Service |
| 9 | PROBE TB DISCONNECTED | Call the Technical Assistance Service |
| 10 | PROBE TCL DISCONNECTED | Call the Technical Assistance Service |
| 11 | LACK OF COLD WATER | Check the water supply (cock open/closed, water pressure, connection pipe, etc.) |
| 12 | LACK OF WARM WATER | Check the water supply (cock open/closed, water pressure, connection pipe, etc.) |
| 13 | LACK OF DEMI WATER | Check the water supply (cock open/closed, water pressure, connection pipe, etc.) |
| 14 | COLD WATER PRESSURE | Check the water supply (cock open/closed, water pressure, connection pipe, etc.) |
| 15 | WARM WATER PRESSURE | Check the water supply (cock open/closed, water pressure, connection pipe, etc.) |
| 16 | DEMI WATER PRESSURE | Check the water supply (cock open/closed, water pressure, connection pipe, etc.) |
| 17 | COLD WATER LOAD TIME EXCEEDED | Check the water supply (cock open/closed, water pressure, connection pipe, etc.) |
| 18 | WARM WATER LOAD TIME EXCEEDED | Check the water supply (cock open/closed, water pressure, connection pipe, etc.) |
| 19 | DEMI WATER LOAD TIME EXCEEDED | Check the water supply (cock open/closed, water pressure, connection pipe, etc.) |
| 20 | WATER LOAD SYSTEM FAILURE | Check the water supply (cock open/closed, water pressure, connection pipe, etc.) |
| 21 | FLOWMETER CONNECT. INVERTED | Call the Smeg Technical Assistance Service |
| 22 | COLD WATER FLOWMETER FAILURE | Check the water supply (cock open/closed, water pressure, connection pipe, etc.) Repeat the cycle |
| 23 | INSUFFICIENT WATER IN CHAMBER | Check the water supply (cock open/closed, water pressure, connection pipe, etc.) |
| 24 | NO WATER IN CHAMBER | Check the water supply (cock open/closed, water pressure, connection pipe, etc.) |
| 25 | NO PRESS IN HYD SYS: FOAM | Check the type of detergent used.Repeat the cycle. |
| 26 | EVF LEAKAGE | Check the water supply (cock open/closed, water pressure, connection pipe, etc.)Repeat the cycle. Call the Technical Assistance Service if the fault persists. |
| 27 | EVC LEAKAGE | Check the water supply (cock open/closed, water pressure, connection pipe, etc.)Repeat the cycle. Call the Technical Assistance Service if the fault persists. |
| 28 | EVD LEAKAGE | Check the water supply (cock open/closed, water pressure, connection pipe, etc.)Repeat the cycle. Call the Technical Assistance Service if the fault persists. |
| 29 | WASHING CHAMBER DRAINAGE FAILURE | Make sure that the drain pipe is positioned as indicated in the manual. |
| 30 | SAFETY CHAMBER LEVEL EXCEEDED | Repeat the cycle. Call the Technical Assistance Service if the fault persists. |
| 31 | SAFETY LEVEL FAILED | Repeat the cycle. Call the Technical Assistance Service if the fault persists. |
| 32 | SUMP FULL | Make a Reset cycle. Repeat the cycle. Call the Technical Assistance Service if the fault persists. |
| 33 | LACK OF WATER IN THE STEAM CONDENSER | Check the water supply (cock open/closed, water pressure, connection pipe, etc.)Repeat the cycle. Call the Technical Assistance Service if the fault persists. |
| 34 | CONDENSER DRAINAGE FAILED | Make sure that the drain pipe is positioned as indicated in the manual. |
| 35 | CONDENSER LEVEL SWITCH FAILED | Repeat the cycle. Call the Technical Assistance Service if the fault persists. |
| 36 | CONDENSER DRAINING PUMP FAILED | Repeat the cycle. Call the Technical Assistance Service if the fault persists. |
| 37 | NOT REACHED TARGET DRAINAGE AT T= | Repeat the cycle. Call the Technical Assistance Service if the fault persists. |
| 38 | COOLED DRAINAGE FAILED | Repeat the cycle. Call the Technical Assistance Service if the fault persists. |
| 41 | DETERGENT 1 INFLOW FAILED (flowmeter nr.1 optional) | Make sure that the suction tubes of can P1 are in a good condition and not squashed. Repeat the cycle. Call the Technical Assistance Service if the fault persists. |
| 42 | DETERGENT 2 INFLOW FAILED (flowmeter nr.2 optional) | Make sure that the suction tubes of can P2 are in a good condition and not squashed. Repeat the cycle. Call the Technical Assistance Service if the fault persists. |
| 43 | DETERGENT 3 INFLOW FAILED (flowmeter nr.3 optional) | Make sure that the suction tubes of can P3 are in a good condition and not squashed. Repeat the cycle. Call the Technical Assistance Service if the fault persists. |
| 44 | DETERGENT 4 INFLOW FAILED(flowmeter nr.4 optional) | Make sure that the suction tubes of can P4 are in a good condition and notsquashed. Repeat the cycle. Call the Technical Assistance Service if the fault persists. |
| 46 | PUMP 1 TUBE CLOGGED | See 41 |
| 47 | PUMP 2 TUBE CLOGGED | See 42 |
| 48 | PUMP 3 TUBE CLOGGED | See 43 |
| 49 | PUMP 4 TUBE CLOGGED | See 44 |
| 50 | PUMP 5 TUBE CLOGGED | See 45 |
| 51 | VERIFY CONNECTIONS FLOWMETER/PUMPS | Repeat the cycle. Call the Technical Assistance Service if the fault persists. |
| 52 | DOOR 1 ELECTRICALLY OPEN | Make sure that the door is properly closed before beginning a cycle. Call the Technical Assistance Service if the fault persists. |
| 54 | DOOR 1 MECHANICALLY OPEN | Make sure that the door is properly closed before beginning a cycle. Call the Technical Assistance Service if the fault persists. |
| 56 | DOORLOCK 1 FAILURE | Make sure that the door is properly closed before beginning a cycle. Call the Technical Assistance Service if the fault persists. |
| 58 | DRYING 1 FAILURE | Repeat the cycle. Call the Technical Assistance Service if the fault persists. |
| 60 | DRYING 1 SAFETY SWITCH ON | Press the 2nd button located on the bottom of the drawer (see §17.1) and repeat the cycle. If the fault persists, call the Technical Assistance Service. |
| 62 | HEATING THERMOSTAT ON | Press the 1st button located on the bottom of the bottom drawer (see §17.1) and repeat the cycle. If the fault persists, call the Technical Assistance Service. |
| 63 | BLOWER 1 FAILED | Call the Technical Assistance Service |
| 65 | FAN SENSOR 1 FAILED | Call the Technical Assistance Service |
| 67 | COOLING FAILED -WARNING: HIGH TEMP | Call the Technical Assistance Service |
| 68 | TANK 1 EMPTY | Fill the relative can. |
| 69 | TANK 2 EMPTY | Fill the relative can. |
| 70 | TANK 3 EMPTY | Fill the relative can. |
| 71 | TANK 4 EMPTY | Fill the relative can. |
| 73 | ARCHIVE ERROR | Error inside the microprocessor. Call the Technical Assistance Service if the fault persists. |
| 74 | CHAMBER LEAKAGE | Call the Technical Assistance Service |
| 75 | LACK OF SALT | Fill the softener's salt reservoir (plug in tub). |
| 76 | BOILER SAFETY SWITCH ON | If it is present, try to reactivate the thermostat and repeat the cycle. If the problem persists, call the Technical Assistance Service. |
| 77 | TEMPERATURE >45°C | Appears (if option selected) if the temperature of the water entering in the first phase exceeds 45°C. |
| 78 | RECOVERY FAILED | Error inside the microprocessor. Call the Technical Assistance Serviceif the fault persists. |
| 79 | PROGRAM NOT CONGRUENT | Incongruent program error. Check the settings of the required cycle. |
| 80 | WARM WATER FLOWMETER FAILURE | Repeat the cycle. Call the Technical Assistance Service if the fault persists. |
| 81 | DEMI WATER FLOWMETER FAILURE | Repeat the cycle. Call the Technical Assistance Service if the fault persists. |
| 82 | SYSTEM FAILURE SOL.1 | Repeat the cycle. Call the Technical Assistance Service if the fault persists. |
| 84 | OVERTEMPERATURE TA1 | Repeat the cycle. Call the Technical Assistance Service if the fault persists. |
| 86 | PUMP P1 BLOCKED | Repeat the cycle. Call the Technical Assistance Service if the fault persists. |
| 87 | PUMP P2 BLOCKED | Repeat the cycle. Call the Technical Assistance Service if the fault persists. |
| 88 | PUMP P3 BLOCKED | Repeat the cycle. Call the Technical Assistance Service if the fault persists. |
| 89 | PUMP P4 BLOCKED | Repeat the cycle. Call the Technical Assistance Service if the fault persists. |
| 91 | ARCHIVE FULL | Download the data from the archive. |
| 92 | CHANGE FILTER | Air filter replacement. Call the Technical Assistance Service |
| 93 | MAINTENANCE REQUEST | Air filter replacement. Call the Technical Assistance Service |
9. CLEANING AND SERVICING
Before proceeding with any servicing work, disconnect the electrical and hydraulic connections, i.e. make sure that the water cocks are shut and that the switches of both the machine and electric panel are in the OFF positions.
9.1 ROUTINE INSPECTIONS
The following inspections must be carried out periodically to make sure that the machine remains in a perfect condition.
Each day
Power the appliance
Check the detergent levels
Clean the spraying arms, the filters and the washing chamber
Visually check the washing indicators
Check the temperature parameters with a thermologger
Thermal disinfection of the empty washing chamber
Visual inspection of the washing results after each cycle
Each week
Check the suction action of the dispensers (adjust the positions of the tubes if necessary)
Every six months
Servicing by an authorized technician
Each year
Validation in accordance with EN ISO 15883
Biological controls
9.2 HOW TO CLEAN THE SPRAYING ARMS
The spraying arms can be easily removed in order to clean the nozzles and prevent clogging. Periodically remove the spraying arms after having unscrewed the knurled nuts, wash them carefully, fit them back in their housings and fully tighten the knurled nuts. It is particularly important to make sure that the small circular hole at the end of the spraying arm is perfectly clean.
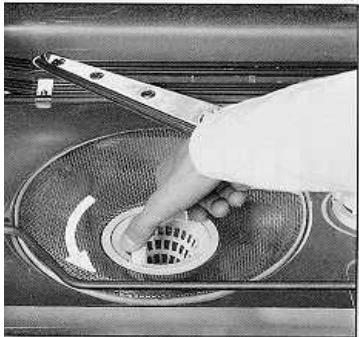
9.3 HOW TO CLEAN THE FILTERS
The filtering unit comprises a circular filter with a filter cone, a microfilter and a coarse filter. To ensure that the machine functions in an efficient way, it is extremely important to keep the filters clean. Inspect the filters often (e.g. if glassware with paper labels is washed, the filters must be checked after each cycle) and remove any deposits that could impair the way the appliance operates.
Coarse filter
Remove the coarse filter by pressing on the lobes and pulling upwards (fig. 19). Clean the filter and set it back in position.
Microfilter
This is positioned under the coarse filter (fig. 20). It is advisable to check and clean it when the coarse filter is inspected.
Use a brush and hot water to clean this filter perfectly.
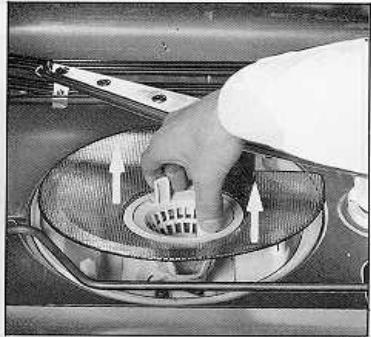
Circular filter
Proceed as described below to disassemble this filter:
- hold the coarse filter by its lobes and turn it in the anti-clockwise direction (fig. 21).
- lift the entire assembly (i.e. filter, filter cone, coarse filter and microfilter) without pressing the lobes (fig. 22). When this filter is cleaned, it is also advisable to clean the others.

natural_image
Close-up of a hand pressing down on a circular mechanical component with arrows indicating motion (no visible text or symbols)19
natural_image
Close-up of a hand cleaning a circular object with a mesh fan (no visible text or symbols)20
natural_image
Close-up of a hand using a tool to press down a circular component on a mechanical device (no visible text or symbols)21
natural_image
Close-up of a hand pressing down on a mechanical component with arrows indicating motion (no visible text or symbols)22
9.4 HOW TO CLEAN THE INLET FILTERS
The inlet filters installed at the entrance to the cocks must be periodically cleaned. This is done by simply unscrewing the supply pipes.
9.5 INSPECTION
If the appliance fails to function, before calling the Assistance Service make sure that:
the fuses are efficient and the appliance is receiving power
the powering knob has been turned and the display is on
the cocks are fully open
the water filters are not clogged
the fill pipe is not bent
9.6 LONG IDLE PERIODS
If the machine is to remain idle for a long period of time, it is advisable to:
- Carry out 3 soaking cycles without a load
- Detach the electrical connections
- Dose several liters of water into the tank by hand (use demineralized water if available)
- Leave the door open to prevent unpleasant odours from forming
- Detach the hydraulic and electrical connections
9.7 EXTERNAL CLEANING
The external parts of the appliance must be periodically cleaned.
The front panel can be cleaned with a soft cloth, using water and a delicate detergent (such as the ones used for crockery) in diluted form.
Do not use alcohol, solvents or the ammonia-based products used for cleaning windows.
The steel surfaces can be cleaned with alcohol and various detergents.
If there are heavy incrustations, use a fine abrasive paste with an electric polisher and soft pads.
After this, normal detergent products can be used.
In places where strong acids are used (hydrochloric/sulphuric/nitric), it is advisable to clean the machine with a soft cloth soaked in paraffin oil. This film will protect the steel from acid vapour aggression.
9.8 HOW TO SERVICE THE APPLIANCE
The user must call SMEG's authorized technicians at least once every 12 months (once every 6 months is better) for preventive maintenance purposes and for the visual inspection required for safety reasons.
The technician must:
- replace all the tubes and cans containing liquids if necessary, since faults could arise if these parts are defective
- check the safety thermostats, the ground terminals and protection conductors, replacing any defective or worn components if necessary.
All the replaced components must be supplied by SMEG or by one of SMEG's authorized centers.

Make sure that there is a clear area of at least 1m^2 in front of the machine before proceeding with any maintenance/repair work.
10. INSTALLED MACHINE SET-UP
Model machine:
Machine serial number.
Accessories present on the machine (place a check next to the accessory present and write the quantity provided):
. Peristaltic Pump n°1...... □
. Peristaltic Pump n°2...... □
. Peristaltic Pump n°3...... □
. Peristaltic Pump n°4...... □
. WD-CHECK KIT RACC GW4090 cod.901704 (outer probe introduction kit)......□
. Level sensor...1.....□
. Level sensor... 2 .........□
.Level sensor...3....□
. Level sensor...4.....□
. double drain valve....□
Notes
- SMEG GW3060 GLASSWARE WASHER
- CAREFULLY READ THIS INSTRUCTION MANUAL
- Do you need information or Assistance for the appliances manufactured by SMEG's Instrument Division?
- TABLE OF CONTENTS
- KEY TO THE SYMBOLS USED IN THE MANUAL AND ON THE MACHINE
- INTRODUCTION
- GENERAL RECOMMENDATIONS
- GENERAL OPERATING INSTRUCTIONS
- POWERING
- CONTROLS
- BRIEF DESCRIPTION OF THE OPERATING CYCLE
- HOW TO CARRY OUT A WASHING/DISINFECTING CYCLE
- PRINTING THE LAST CYCLE EXECUTED
- HOW TO SELECT A WASHING/DISINFECTING CYCLE
- DEFERRED CYCLE START
- HOW TO OPEN THE WASHING CHAMBER DOOR IN EMERGENCY
- SECURITY POLICY, USER PASSWORD AND SUPER USER
- BUILT-IN SOFTENER
- How to add salt
- Use of the appliance with softened mains water
- Forced resin regeneration
- HOW TO REGULATE THE WASHING PRESSURE IN THE SPRAYING ARMS
- Pressure regulator
- HOW TO FILL THE WASHING TROLLEYS
- DETERGENT DISPENSING SYSTEM
- PREPARATION FOR THE WASHING AND DISINFECTING PHASE
- WASHING PROGRAMS - DESCRIPTION
- WASHING AND DISINFECTING PROGRAMS
- Warning
- EFFICACY OF THE WASHING ACTION AND DETERGENTS
- Arrangement of the instruments in the washing trolley
- Quality and quantity of water
- Water pressure
- Washing temperature
- Detergents used
- First-aid measures for use of detergents
- Smeg's DETERLIQUID D and D2
- Smeg's ACIDGLASS P and P2
- Smeg's F1-S
- This last page should be photocopied and affixed near the machine so that they can be easily consulted if problems arise.
- THE THERMAL DISINFECTION PROCESS
- NOTE \*
- NOTE \*\* WASHING TIMES:
- ALARM MESSAGES
- CLEANING AND SERVICING
- ROUTINE INSPECTIONS
- Each day
- Each week
- Every six months
- Each year
- HOW TO CLEAN THE SPRAYING ARMS
- HOW TO CLEAN THE FILTERS
- Coarse filter
- Microfilter
- Circular filter
- HOW TO CLEAN THE INLET FILTERS
- INSPECTION
- LONG IDLE PERIODS
- EXTERNAL CLEANING
- HOW TO SERVICE THE APPLIANCE
- INSTALLED MACHINE SET-UP
- Model machine:
- Machine serial number.
- Accessories present on the machine (place a check next to the accessory present and write the quantity provided):
Brand : SMEG
Model : SF4606WMCNX
Category : Built-in oven