USER MANUAL GFMC53WHT GLEM
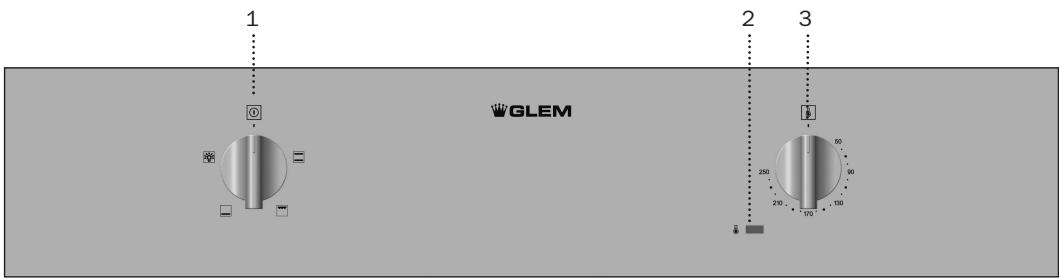
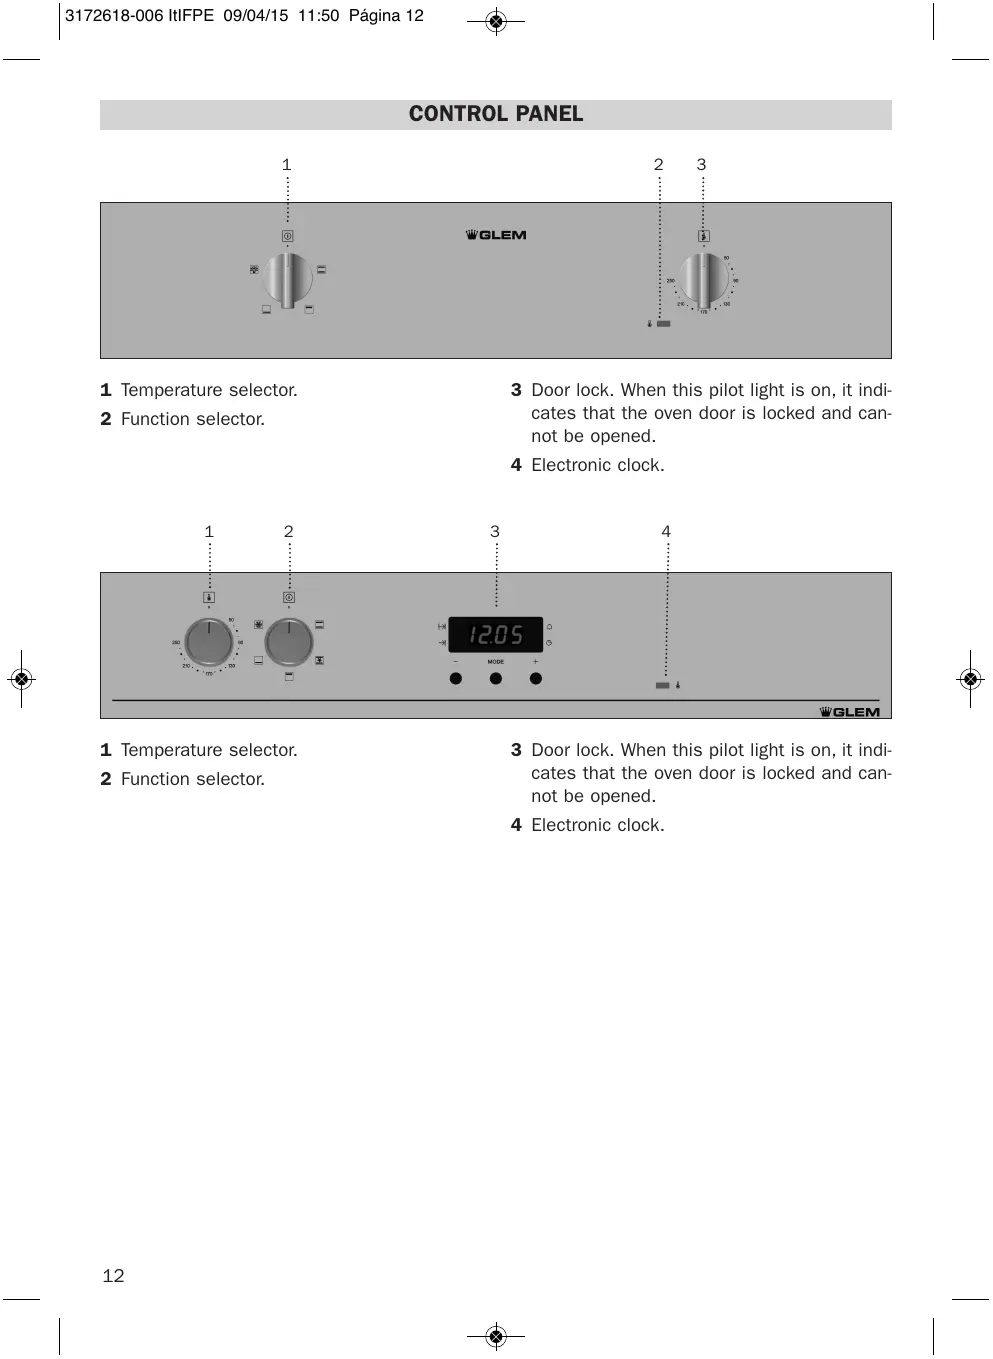
1 Temperature selector.
2 Function selector.
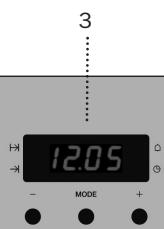
3 Door lock. When this pilot light is on, it indicates that the oven door is locked and cannot be opened.
4 Electronic clock.
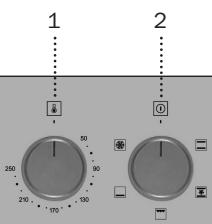

1 Temperature selector.
2 Function selector.
3 Door lock. When this pilot light is on, it indicates that the oven door is locked and cannot be opened.
4 Electronic clock.
Oven Functions
Model GFEP: / / / / /
Model GFMP-GFLP: / / / / / / / /
Switch off oven
Conventional
It is used for sponges and cakes where the heat received must be uniform to achieve a spongy texture.
Conventional with fan
Appropriate for roasts and cakes. The fan spreads the heat uniformly inside the oven.
/ Grill
For preparing dishes with superficial roasting. It allows the outer layer to be browned without affecting the inside of the food. Ideal for flat food, such as steaks, ribs, fish, toast.
/ MaxiGrill
Allows greater surfaces to be prepared, than with the grill, together with higher power reducing the time required for browning of the food.
The grill or maxigrill can also be used in combination with the turnspit for meat items of greater volume, such as whole chickens or joints of beef or lamb.
MaxiGrill with fan
Allows uniform roasting at the same time as surface browning. Ideal for grills. Special for large volume pieces, such as poultry, game, etc. It is recommended to put the item on a rack with a tray beneath to collect the stock and juices.
This cooking function was used as a function of forced-air convection operation for energy efficiency testing according to EC regulation 65/2014.
Caution
While using the Grill, MaxiGrill or MaxiGrill with fan, the door must be kept closed.
Turbo
The fan distributes the heat coming from an element located at the back of the oven. As a result of the evenly distributed temperature, food can be cooked on two levels at the same time.
Lower Element with Turbo (pizza)
Ideal for baking pizzas, pies, and fruit tarts or sponges.
Lower element
Heats only from beneath. Suitable for heating dishes and raising pastry and similar.
Defrosting
This cooking mode is suitable for gently defrost- ting of food. In special food to be consumed unwarmed, e.g.: cream, custard, pastry, tarts, cakes, fruit, etc.
Pyrolytic Function
This programme allows you to carry out a pyrolytic cleaning cycle which involves the oxidation and carbonisation of grease accumulated during cooking, through the high temperatures that are reached inside the oven. During the cleaning cycle the light inside the oven will remain off.
NB
The light remains on through all cooking functions except the pyrolytic function.
Use of the Oven
Setting the time on the Electronic Clock
When the oven is connected to the power supply, the word TIME and the indication 00:00 flash on the display. Press or to set the time on the clock. The clock beeps twice to confirm the selected time.
If you wish to modify the time, press or until the word TIME and the current time flash
on the screen. Press K . Then press or to modify the time. The clock beeps twice to confirm the modification.
Manual Operation
The oven is ready to be used when the clock has been set. Select a cooking function and a temperature.
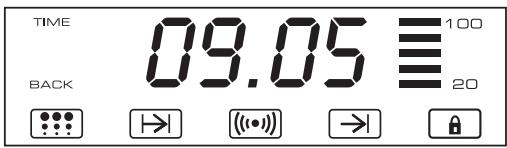
When you begin cooking, symbol lights up gradually until the oven heats up 100% to the selected temperature.
Set the controls to to turn the oven off.
Symbol _^ gradually goes out as the temperature inside the oven drops.
Functions of the Electronic Clock
Alarm: Creates an alarm signal when the period of time finishes; the oven does not need to be in use in order to use this function.
Cooking Time: To cook for a selected length of time; the oven turns itself off automatically when the time finishes.
End Cooking Time: To cook until a set time; the oven turns itself off automatically when the time finishes.
Cooking time and End Cooking Time: To cook for a selected length of time and end at a set time. When this function is set, the oven comes on automatically at the time required in order to cook for the set length of time (Cooking time) and end automatically at the indicated time (End Cooking Time).
Child Safety Function
This function blocks the oven to prevent small children from interfering with the controls.
Programming the Pyrolytic function
Programming the Alarm
1 Press until symbol ([i]) lights up. Press OK.
2 Set the period of time after which you wish the alarm to sound by pressing or .
3 The clock beeps twice, the current time is displayed and symbol (()) lights up permanently to indicate that the alarm has been set.
4 When the set period of time comes to an end, the alarm sounds and symbol ( (i * ) ) starts to flash.
5 Press any button to stop the alarm; symbol (()) goes out.
You can consult the remaining time at any moment by pressing or until symbol ( ) flashes and then pressing . You can also modify the set time at this point by pressing or . The clock beeps twice to confirm the change.
If you wish the remaining time to be displayed until the end of the set period of time, press or until symbol [(())] flashes and then press and keep it pressed in. Symbol [(())] flashes and the word BACK lights up. Keep pressed in again to return to the real time.
Setting the Cooking Time
1 Press or until symbol lights up. Press OK.
2 Select the period of time you wish to cook for by pressing or .
3 The clock beeps twice, the current time is displayed and symbol 1 lights up permanently to indicate that the oven will turn itself off automatically.
4 Select a cooking function and temperature.
5 When the cooking time comes to an end, the oven turns itself off, the alarm sounds and symbol 1 flashes.
6 Press any button to stop the alarm and turn the oven back on again.
7 Set the controls to to turn the oven off.
You can consult the remaining cooking time at any moment by pressing or until symbol flashes and then pressing OK. You can also modify the set time at this point by pressing or . The clock beeps twice to confirm the change.
If you wish the remaining time to be displayed until the end of the set period of time, press or until symbol flashes and then press OK and keep it pressed in. Symbol OK flashes and the word BACK lights up. Keep OK pressed in again to return to the real time.
Setting the End Cooking Time
1 Press or until symbol lights up. Press K .
2 Select the time you wish the cooking process to finish at by pressing or .
3 The clock beeps twice, the current time is displayed and symbol lights up permanently to indicate that the oven will turn itself off automatically.
4 Select a cooking function and temperature.
5 When the set time is reached, the oven turns itself off, the alarm sounds and symbol flashes.
6 Press any button to stop the alarm and turn the oven back on again.
7 Set the controls to to turn the oven off.
You can consult the end cooking time at any moment by pressing or until symbol flashes and then pressing OK. You can also modify the end cooking time at this point by pressing or . The clock beeps twice to confirm the change.
This function can be used even when you are already using the oven. To do this, follow the instructions indicated above except point number 4.
Setting the Cooking Time and the End Cooking Time
1 Press or until symbol + lights up. Press .
2 Select the period of time you wish to cook for by pressing or .
3 The clock beeps twice, the current time is displayed and symbol 1 1 lights up permanently.
4 Press or until symbol lights up. Press .
5 Select the time you wish the cooking process to finish at by pressing or .
6 The clock beeps twice, the current time is displayed and symbol lights up permanently.
7 Select a cooking function and temperature.
8 The oven remains off with symbols and lit up. Your oven is set.
9 When the time to start cooking is reached, the oven starts up and cooks for the set period of time.
10 When the set end cooking time is reached, the oven turns itself off, the alarm sounds and symbols 1 1 and 2 1 flash.
11 Press any button to stop the alarm and turn the oven back on again.
12 Set the controls to [] to turn the oven off. You can modify the end cooking time by pressing or until symbol lights up and then pressing OK. You can now modify the end cooking time by pressing or . The clock beeps twice to confirm the change.
Child Safety Function.
Keep pressed in to activate this function. The clock beeps twice and symbol lights up. The clock is blocked.
If the child safety function is activated when the oven is off (function control set to []), then the oven cannot be turned on until the function is deactivated. If the child safety function is activated when the oven is set to a cooking function, then the clock settings cannot be modified until the function is deactivated.
Keep pressed in to deactivate this function. The oven beeps twice and symbol goes out.
Important
In the event of a power cut, all the electronic clock settings are deleted and the indication 00:00 flashes on the display. It is necessary to set the time and programme the clock again.
PROGRAMMING AND OPERATING THE PYROLYTIC FUNCTION
Follow the instructions below to carry out a pyrolytic cleaning cycle:
1 IMPORTANT: Remove all accessories (shelves, grids, side supports to hold up the shelves, telescopic guide rails) from inside the oven.
2 Turn the cooking control dial to Pyrolysis position
3 Next, press the PIRO key, the word PIRO should appear on the timer display.
4 After a few seconds, P2 (pyrolysis programme 2) will appear on the timer display, the BACK symbol will also remain lit up.
5 You can now change the pyrolysis programme to P1, P2 or P3 by pressing the + or - keys: P1: Minimum programme. Duration 1 hour P2: Standard programme. Duration 1 hour and 30 minutes P3: Maximum programme. Duration 2 hours
6 You will hear 2 consecutive beeps after several seconds or by pressing the PIRO key confirming the chosen programme.
7 You can still change the pyrolysis programme by pressing the PIRO key and the + or - keys.
8 After a short time, you will see the time remaining for the selected programme to end and the symbols ... and BACK lit up on the timer display. The pilot light will turn on and the oven door cannot be opened, as the heating will have begun.
IMPORTANT: If you don't press the PIRO key after turn the dial to Pyrolysis position, the oven will start to heat and it will make the P3 pyro cycle along 2 hours.
In the display, you will see the current time and not the P3 program. Also, It will not possible to modify the pyro program to P1 or P2.
IMPORTANT: At this point, the oven is programmed and the pyrolytic cleaning cycle is underway. During the cycle, none of the timer functions can be selected, except the child lock. Do not try to open the oven door as it may interrupt the cleaning process.
9 When the pyrolytic cleaning cycle has finished, an alarm will sound, the symbol will flash and you will see the correct time on the display.
10 Press any of the timer's keys to disable the alarm.
11 Set the cooking control dial to position .
12 The oven's heating process has ended, however the oven is extremely hot and cannot be used. The cooling motor will operate until the oven cools down, pilot light will remain on and the symbol will flash on the timer display.
IMPORTANT
The cooling process may last up to 2 hours owing to the high temperatures inside the oven.
13 Once the oven has cooled down, pilot light will automatically turn off.
14 Press the PIRO key to stop symbol 9 flashing.
IMPORTANT
To open the door (pilot light on), the control dial must be in position. If you did not follow instruction 11 set the control dial to position and wait a few minutes until the door unlocks and the pilot light switches off.
15 Open the oven door and wipe the inside with a damp cloth, cleaning up the ash from the cleaning cycle. Areas in the oven that are difficult to access will need to be cleaned with a non-metallic fibre scourer.
16 Once the oven is clean, do not forget to replace the supports and accessories.
17 The oven is now ready to be used.
IMPORTANT: If any incidents are detected in the programming and operating of this function, consult the section "Incidents while Operating the Pyrolytic Function".
CANCELLING THE PYROLYTIC CYCLE
Pyrolysis is an automatic function and therefore can only be activated from the timer programme. To cancel a cleaning cycle it is necessary to reset the oven, following the instructions below:
1 Set the control dial to position .
2 Unlock the oven door.
3 Cancel the pyrolysis programme.
1 Set the control dial to position . The oven will no longer heat up. Wait a few minutes before continuing with the instructions to unlock the door.
2 Unlock the oven door. To cancel the cleaning cycle, the oven door must be unlocked. To do so, consider the following:
a) Unlocking the door 30 minutes after the cleaning cycle. If the oven has been operating for more than 30 minutes, the door will unlock automatically once the oven has cooled down to the safe temperature. Then, pilot light G will switch off.
b) Unlocking the door in the first 30 minutes (at a low temperature). Within the first 30 minutes the oven door will unlock automatically. Follow the instructions below:
1 Turn the control dial to position
2 Wait for approximately 1 minute.
3 Turn the control dial to position .
4 Approximately, 1 minute later pilot light will turn off and the oven door can be opened.
3 Cancel the pyrolysis programme. To cancel the programme you must:
1 Turn the control dial to position and then to position.
2 Press the PIRO key for 3 seconds.
3 Next, the timer display will show the correct time and symbol (\boxed{\text{串串串串串串串串串串串串串串串串串串串串串串串串串串串串串串串串串串串串串串串串串串串串串串串串串串串串串串串串串串串串串串串串串串串串串串串串串串串串串串串串串串串串串串串串串串串串串串串串串串串串
INCIDENTS WHEN OPERATING THE PYROLYTIC FUNCTION
| INCIDENT | CAUSE | SOLUTION |
| My accessories and shelf supports are damaged. | You have not removed the accessories and supports during the pyrolytic cleaning cycle. | You must replace them and remove them in later cleaning cycles. |
| The enamel colour has changed and stains have appeared. | The chemical composition of some foodstuffs may cause changes in the enamel. | This is normal and does not damage the properties of the enamel. |
| The oven door is locked, pilot light ➁ is lit up but the oven is not hot. | You have turned the control dial to position ➁ and no other additional operation has been performed. | Switch off the oven and follow the instructions to unlock the door in the first 30 minutes at a low temperature.
Next, select the pyrolytic function, carefully following the instructions. |
| I have turned the control dial to position ➁, pressed the PIRO key, I can see the P1, P2 or P3 on the display but the pilot light ➁ is not lit up and the oven is not heating up. | The oven door is not closed properly, so the door cannot be locked. | Check the door and make sure that it is closed properly. |
| I have turned the control dial to position ➁, pressed the PIRO key, I can see the P1, P2 or P3 on the display but the pilot light ➁ is not lit up and the oven is not heating up. | The door switch is not working even though the door is properly closed. | Call Technical Assistance Service as there is a fault in the door switch. |
| I have programmed the pyrolysis function, the oven is working properly but pilot light ➁ is not lit up. | Pilot light ➁ does not work properly. | Call the Technical Assistance Service. |
| The pyrolysis programme has ended and the oven is cold, but the door is locked and symbol ➁ is flashing. | You did not turn the control dial to position ➁ when the pyrolysis programme ended. | 1. Turn the control dial to position ➁ and wait for 1 minute.
2. Turn the control dial to position ➁ and wait for 1 minute.
3. Turn the control dial to position ➁ again and wait until pilot light ➁ turns off.
4. Press the PIRO key for 3 seconds. |
| The control dial is in position ☐ and the door is still locked. | The oven has not cooled down to the safe temperature. | Wait until the temperature lowers and pilot light ☑turns off. Then, cancel the pyrolysis programme. |
| The control dial is in position ☐, the oven is cold and the door is still locked. | You have not followed the instructions to cancel the operation correctly. | 1. Turn the control dial to position ☐ and wait for 1 minute.
2. Turn the control dial to position ☐ and wait for 1 minute.
3. Turn the control dial to position ☐ again and wait until pilot light ☐ turns off. |
| I have put the control dial in position ☐ and the door is unlocked, however symbol ☑ is still lit up and the remaining time of the cleaning cycle can be seen on the display. | You have not followed the instructions to cancel the operation correctly. | Follow the instructions to cancel the pyrolysis programme. |
Use of Turnspit
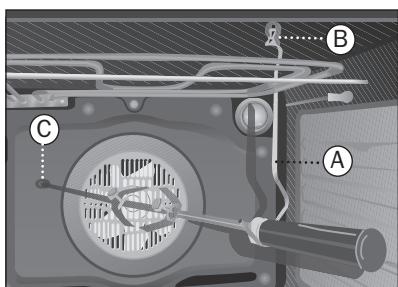
The turnspit accessory consists of a rotary motor, a support hook and a complete spit with handle. It is used in the following way:
1 Connect the hook (A) to the support (B) situated at the top of the oven. See figure.
2 Insert the end of the spit in the motor fitting (C). The other end of the spit is supported on the hook (A).
3 Set the mode selector to or function.
Warning
Do not forget to unscrew the handle from the spit before cooking, otherwise it will not be possible to close the oven door.
Panneau Frontal de Commande