
RH8771 - Cordless vacuum ROWENTA - Free user manual and instructions
Find the device manual for free RH8771 ROWENTA in PDF.
| Brand | Rowenta |
| Model | RH8771 |
| Product type | Cordless vacuum cleaner |
| Power supply | Rechargeable NiMh battery 18V or 24V |
| Compatible charger | Original charger 18V/24V ref. RS-RH5277 |
| Charging time | Approximately 10 hours (first full charge) |
| Battery life (18V) | Up to 35 min (Min speed), 25 min (Medium), 20 min (Turbo) |
| Battery life (24V) | Up to 45 min (Min speed), 35 min (Medium), 25 min (Turbo) |
| Dustbin capacity | 0,5 L |
| Filter type | Motor protection foam filter (washable) |
| Main brush | Delta head with integrated motorized brush (rotating motorized brush) |
| Suction speeds | 3 speeds: Min, Medium, Turbo |
| Charge indicator | Blue LED indicator (flashes at end of battery life) |
| Battery type | Integrated NiMh battery (replacement by professional) |
| 18V battery reference | RS-RH5233 |
| 24V battery reference | RS-RH5278 |
| Weight | Approximately 2,5 kg (estimate) |
| Dimensions | Approximately 110 x 25 x 20 cm (estimate) |
| Noise level | Not specified but standard for cordless vacuum |
| Usage | Indoor, hard floors and carpets |
| Maintenance | Regular cleaning of dustbin, foam filter and motorized brush |
| Warranty | Manufacturer's warranty, valid for domestic use |
| Country of manufacture | Not specified (probably China) |
Frequently Asked Questions - RH8771 ROWENTA
User questions about RH8771 ROWENTA
0 question about this device. Answer the ones you know or ask your own.
Ask a new question about this device
Download the instructions for your Cordless vacuum in PDF format for free! Find your manual RH8771 - ROWENTA and take your electronic device back in hand. On this page are published all the documents necessary for the use of your device. RH8771 by ROWENTA.
USER MANUAL RH8771 ROWENTA
- Precautions before use 12
- Electric power source 13
- Repairs 13
DESCRIPTION 13
BEFORE FIRST USE 13
- How to assemble the appliance 13
- Charging the battery 14
- Turning on the appliance 14
- Storage 15
CLEANING AND MAINTENANCE 16
- Cleaning the dust tray. 16
- Cleaning the foam rubber motor protection filter 16
- Vacuum cleaner care and maintenance 17
BATTERIES 17
- Battery replacement 17
- 17
ENVIRONMENT 17
REPAIRS 18
GUARANTEE 18
SECURITY ADVICE
For your safety, this appliance complies with applicable rules and regulations (Low Tension Guidelines, Electromagnetic Compatibility, Environmental Regulations...).
This appliance is not designed to be used by individuals (including children) with reduced physical, sensory or mental capacities, nor by individuals lacking experience or knowledge in the use of the appliance, unless they have the benefit of being under the surveillance of a responsible person, or of having received proper instructions. It is advisable to keep an eye on children in order to make sure that they do not use the appliance as a toy.
This appliance may be used by children over eight (8) years old and by individuals with reduced physical, sensory or mental capacities, or lacking experience or knowledge, as long as they are properly supervised by a responsible person, as long as they have received instruction concerning the safe use of the appliance, and as long as all possible risks have been addressed. Children should not play with the appliance. User cleaning and care should not be carried out by children unless they are aged 8 years and over and supervised.
Keep the appliance and its lead out of reach of children under 8 years of age.
1 • Precautions before use
Read the instructions carefully and then store them safely.
- Your vacuum cleaner is an electric appliance: it must always be used under normal conditions. Use and store the appliance away from children's reach. Never leave the appliance on and unattended. Never hold the end of the vacuum tube near your eyes or ears.
- Never vacuum wet surfaces or liquids, no matter what their nature; hot substances; ultra-fine substances such as plaster, cement or ashes; large cutting waste materials such as glass; toxic products such as solvents or paint strippers; aggressive products such as acids or strong cleaners; or gasoline or alcohol-based flammable or explosive materials.
- Never submerge the product or charge it under water or under any other liquid. Never spray water on the appliance or on the charger.
- Do not store the appliance outdoors and keep it in a cool, dry place at all times.
- Do not place the appliance near a heat source (ovens, electric heaters or hot radiators).
- Do not expose the batteries to a room temperature above 104^ (40^) .
- Do not take the vacuum cleaner apart while it is on.
- Never use your vacuum cleaner without the dust tray and the foam rubber motor protection filter.
- Do not use the appliance:
- If it fell and shows visible signs of deterioration or functional anomalies.
- If the charger or the charger cable are damaged.
In any of these cases, do not try to take the appliance apart. Rather, take it to the authorized Rowenta Service Center nearest to your home, because special tools will be needed in order to safely carry out any repairs.
- Repairs must only be carried out by specialists using original replacement parts.
- To attempt the repair of an electronic appliance at home may be hazardous to the user.
- Only use original, guaranteed Rowenta replacement parts (filters, batteries...).
This appliance is intended for domestic use only. In case it is used inappropriately, not following the given instructions, Rowenta will not be subject to any liabilities whatsoever.
2 • Electric power source
- Make sure that the voltage indicated on the rating plate of the charger corresponds to that of your power source.
- Never unplug the charger by pulling the electric cord.
- If the charger cord is damaged or if the charger itself does not function properly, do not use any other charger, different from the model provided by the manufacturer, and contact the Rowenta Consumer Service or go to the authorized Service Center nearest to your home.
3 • Repairs
Repairs must only be carried out by specialists using original replacement parts. To attempt the repair of an electronic appliance at home may be hazardous to the user, and will invalidate the guarantee.
DESCRIPTION
- Ergonomic handle
- Stop/Start button
2.a Stop position -
Light speed signals
3.a « Minimum » position
3.b « Medium » position
3.c « Turbo » position -
Light charge signal
- Neck
- Main body
- Locking screw
- Air outlet grill
- Dust tray
9.a Dust receiver (0,5L)
9.b Dust separator
9.c Foam rubber motor protection filter
9.d Lid
- Connection tube
- Delta vacuum head with integrated electro-brush
11.a Electro-brush
11.b Latches
11.c Trap
12.Wheels
13. Charger
-
18V and 24V: ref. RS-RH5277*
-
Batteries
- 18V:ref.RS-RH5233*
- 24V:ref.RS-RH5278*
- Tool
BEFORE FIRST USE
1 • How to assemble the Appliance
Unpack your appliance and throw away any tags attached. Make sure to keep your guarantee and read the instructions carefully before using the appliance for the first time.
- Remove the screw from the neck and leave the nut in its place.
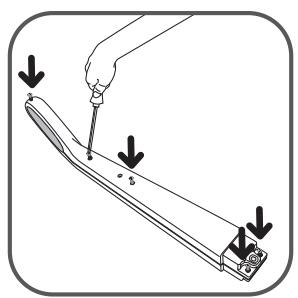
Fix the neck by carefully inserting it in the upper portion of the main body (fig.1). - Insert the locking screw (7) into the neck and screw it tightly using the tool provided with the appliance (fig.2).
Fix the Delta vacuum head (11) by locking it into place in the lower portion of the main body (fig.3).
Fix the dust tray on the main body of the appliance (fig 19).
Please note : In order to detach the Delta vacuum head, press the ejection button located at the back of the main body (fig.4) and pull to remove.
2 • Charging the battery
IMPORTANT: Use only the original charger provided with the appliance. Do not charge the appliance at temperatures lower than 32^ ( 0^ ) or higher than 104^ ( 40^ ). Using a universal charger will automatically invalidate the guarantee.
EN
Before you use your vacuum cleaner for the first time, you must charge the battery completely (for about 10 hours).
While the battery is being charged, the Stop/Start button must be in the Stop position (2.a)
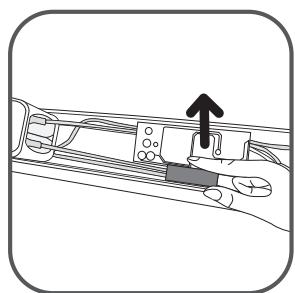
- Place the vacuum cleaner near an electric power point.
- Plug the charger in and connect it to the vacuum cleaner using the socket located at the back of the neck (fig.5).
- The charge signal (4) located at the front of the main body will light in blue. Leave the vacuum cleaner to charge. Once the charge cycle is completed (after about 10 hours), the light charge signal will turn off automatically.
The vacuum cleaner can stay connected to the charger permanently, without any hazard. Keep in mind, however, that if you decide to keep the charger connected it might become slightly hot. This would be a completely normal phenomenon.
It is advisable to charge the vacuum cleaner immediately after each use in order to always have it available with a fully charged battery. Thus, you will gain the maximum benefit from its cleaning and autonomous performance functions. However, in case you plan to be absent for a long period of time (on vacation, for example), it is advisable to unplug the charger for, in this case, the autonomous performance function could be diminished due to automatic power loss.
3 • Turning on the appliance
Unplug the charger cord from the vacuum cleaner. If the charger remains connected to both the power point and to the appliance, the latter will not function.
Hold the vacuum cleaner by the handle and slide the Stop/Start button downwards, towards one of the following three speeds (fig.6):
- "Minimum": Used to vacuum clean thick or delicate rugs and carpets (3.a), as well as fragile surfaces.
Please note: always make sure that the wheels located at the back of the base are clean. - "Medium": Used for better vacuuming of all floor types, and in case of light dirt marks (3.b).
- "Turbo": Used for optimum vacuum performance on all floor types, and in case of strong dirt marks (3.c).
Vacuum cleaner running times* for each usage speed (with a fully charged battery):
| Speed 1 « Minimum » | Speed 2 « Medium» | Speed 3 « Turbo » | |
| 18 Volts | Up to 35 minutes | Up to 25 minutes | Up to 20 minutes |
| 24 Volts | Up to 45 minutes | Up to 35 minutes | Up to 25 minutes |
Functioning of the light charge signal (4)
- About one (1) minute before running time ends, the light charge signal starts to flicker in blue (4).
- When the brush becomes uncharged, it stops automatically (the light charge signal continues to flicker in blue for about ten (10) seconds). It is now time to recharge your appliance.
-
Before you can use your vacuum cleaner again, you will need to recharge it for at least ten (10) minutes.
-
If the appliance does not turn on after this time, and the light charge signal continues to flicker, it means that the battery is still uncharged. In this case, you will need to charge it.
USING THE ELECTRO-BRUSH
The electro-brush is a rotating, motorized brush that guarantees maximum cleaning effectiveness by allowing the appliance to suck up dirt and clean in depth. The bristles, located all along the brush, remove threads, hair and fur that might be caught on the surface of rugs and carpets.
Please note: If the vacuum head adheres too closely to the surface you are cleaning, change the speed to « Minimum ».
ATTENTION: Do not vacuum large fragments of broken objects, as they could block and damage the brush. Do not use the electro-brush on long hair carpets, on animal fur, or on fringes.
REMOVING AND CLEANING THE ELECTRO-BRUSH
ATTENTION: Always turn off the appliance and unplug it before storing or cleaning.
Using the tool provided with the appliance (15), press in the two latches located on each side of the lower side of the Delta head (fig.7). Lift the trap located on top of the electro-brush (fig.8). Remove the electro-brush and its lateral bearing in order to clean them (fig.9). Carefully remove any threads, hair, fur, etc. from the electro-brush (fig.10). Once clean, replace the electro-brush and its lateral bearing (fig.11), then replace the trap over it (fig.12). Finally, using the tool provided with the appliance, close both latches (fig.13).
FOR YOUR SAFETY
- Do not touch any rotating parts before you turn off and unplug the vacuum cleaner.
- Do not use the appliance on wet surfaces.
- Do not immerse the appliance in water.
ELECTRO-BRUSH MALFUNCTION
The electro-brush does not function properly or makes an unusual sound
- Either the rotating brush or the axis is blocked: turn off the appliance and clean them.
- The brush is worn out: visit an authorized Service Center in order to have the brush changed.
- The belt is worn out: if the belt makes noise, it means that it is slipping because it's worn out. Visit an authorized Service Center in order to have the belt changed.
The electro-brush stops while you are vacuuming
- The thermal security feature has been activated: Turn off the vacuum cleaner by moving the Stop/Start button to the Stop position (2.a) and unplug it. Check to see if any solid object is blocking the rotation of the brush. If this is the case, remove the object and clean the electro-brush (fig.10), then you may keep using the vacuum cleaner.
The electro-brush moves with difficulty
If you find that your vacuum cleaner slides with difficulty along surfaces, progressively reduce the speed until you reach the « Minimum » position (3.a). If the problem persists, take your appliance to the authorized Rowenta Service Center nearest to your home.
See the list of authorized Rowenta Service Centers or contact the Rowenta Consumer Service department.
4 • Storage
After use, turn off your vacuum cleaner by moving the Stop/Start button to the Stop position (2a). Now you may store your appliance vertically wherever you like, thanks to the parking position.
To place the vacuum cleaner in the parking position: Place the neck vertically in order to block the appliance. To continue using the vacuum cleaner: Take it by the handle and make it swing backwards in order to unblock it and leave the parking position.
CLEANING AND MAINTENANCE
IMPORTANT: Always turn off the appliance and unplug it before storing or cleaning.
1 • Cleaning the dust tray (9)
1.a Fast emptying
Whenever the dust tray is full and reaches the "MAX" level, empty it as follows: remove the tray by sliding it downwards (fig.14), place it over a bin and press the "Push" button in order to open the trap and empty the tray's contents (fig.15). Close the trap (fig.16) and replace the dust tray on the main body of your appliance (fig.19).
1.b Complete cleaning procedure
It is advisable to clean the dust tray regularly.
- Remove the dust tray (fig.14), then separate each of its components (9).
- Remove the foam rubber motor protection filter (9c).
- Place the dust receiver (9a), the dust filter (9b) and the lid (9d) under warm water (fig.20); then let them stand to dry or dry them with a dry cloth.
- Wash the foam rubber motor protection filter (see paragraph 2).
- Once the components of the dust tray are all dry, reassemble them; do the same with the extra foam rubber motor protection filter (9c) provided as a supplement with your appliance.
- Close the dust tray and reposition it on the main body of your appliance (fig.19).
2 • Cleaning the foam rubber motor protection filter (9c)
ATTENTION: Never use your vacuum cleaner without the foam rubber motor protection filter.
In order to maintain the high performance level of your appliance, do not vacuum ultra-fine substances such as plaster, cement or ashes, and clean the foam rubber motor protection filter at least once a month. If you perceive that your vacuum cleaner is performing under regular average level, we recommend that you clean the foam rubber motor protection filter more frequently.
- Remove the dust tray lid (9d) and then remove the foam rubber motor protection filter (9c) (fig.21).
- Clean the foam rubber motor protection filter (9c) with warm, soapy water.
Rinse and let dry for at least 12 hours before replacing the filter on the appliance (fig.22).
IMPORTANT: In order to assure optimal motor protection, make sure that the foam rubber filter is completely dry before replacing it on the appliance. You will need to let it dry for at least 12 hours before reinserting it into the dust tray. An extra foam rubber motor protection filter is provided with your vacuum cleaner so that you may use the appliance while the first filter is still drying.
ATTENTION: Never place the dust tray components or the foam rubber motor protection filter in an automatic dishwasher.
3 • Vacuum cleaner care and maintenance
Wipe the main body of the appliance with a soft, damp cloth; then dry it with a dry cloth (fig.23).
IMPORTANT: Do not use detergents, or aggressive or abrasive products. The transparent color of the dust tray and/or of the separator lid may change with time; however, this will not modify the performance of the appliance.
BATTERIES
1 • Battery replacement
This appliance contains nickel-metal hydride (NiMh) accumulators which are, for safety reasons, only accessible to professional engineers. When the battery is no longer capable of retaining its charge, the NiMh block must be removed. In order to replace the accumulators, please visit the authorized Service Center nearest to your home.
2 • Throwing away the appliance
It is important that you remove the batteries before throwing away your appliance. In order to do this, visit an authorized Service Center or proceed as follows: disconnect the appliance from the electricity network, dismount the neck from the main body removing the central screw, and then remove the five (5) assembly screws located at the back of the neck (fig.24). Carefully lift the upper cover of the neck and unscrew the two electric circuit screws, then unplug the battery block by pulling the plug (fig.25). Do not throw the battery bloc into the waste bin; take it to the authorized Rowenta Service Center nearest to your home or to a place specially designated to process such type of waste.
24
25
ENVIRONMENT
- According to current regulation, any appliance that is out of service must be taken to an authorized Service Center, where it will be safely disposed of.
- Environment: Regulation 2002/95/CE
Warning
Do not place a block of rechargeable batteries with non-rechargeable batteries.
If you wish to change the batteries, visit an authorized Service Center.
The batteries are designed to be used indoors only. Do not immerse them in water. Handle the batteries with care. Do not place the batteries in your mouth. Do not let the batteries come in contact with other metal objects such as rings, nails or screws. Be careful not to provoke internal short-circuits in the batteries by inserting metal objects through their extremities. If a short-circuit does occur, the
temperature of the batteries could rise dangerously, causing serious burns or even catching fire. If the batteries start leaking, do not rub your eyes or mucous membranes. Wash your hands and rinse your eyes with clean water. If irritation persists, consult your physician.
Let's help protect the environment!
① Your appliance contains numerous useful or recyclable materials.
Take the appliance to a collection spot so that it can be disposed of properly.

REPAIRS
IMPORTANT: If you notice that your vacuum cleaner is not functioning properly, before any revision, turn it off by placing the Stop/Start button in the Stop position.
Repairs should only be carried out by specialists using original replacement parts. To attempt the repair of an electronic appliance at home may be hazardous to the user.
If your vacuum cleaner does not start
Make sure that the charger is completely unplugged from the appliance. If it is, it means that the appliance is not charged, so proceed to charge it.
If the blue light charge signal starts to flicker very rapidly when you plug the charger to the vacuum cleaner, it means that you are not using the appropriate charger or that the one you are using is faulty.
If your appliance does not vacuum
- The electro-brush is dirty: clean it.
- The separator is clogged up: remove the dust tray and clean the separator.
If your vacuum cleaner seems less efficient, makes noise or whistles
- The tube or the hose are partially clogged up: unclog them.
- The dust receiver is full: empty and clean it.
- The dust tray is not well positioned: place it correctly.
- The Delta vacuum head is dirty: demount the electro-brush and clean it.
- The foam rubber motor protection filter is saturated: clean it.
If the separator gets filled with dust
- The separator sometimes accumulates dust. Make sure that nothing is blocking the duct between the separator and the dust tray.
- The dust tray opening is blocked: Remove the dust tray, empty it and clean the opening.
The vacuum head moves with difficulty
Lower the vacuum speed by moving the appropriate switch button.
If the problem persists, take your vacuum cleaner to the authorized Rowenta Service Center nearest to your home. See the list of authorized Rowenta Service Centers or contact the Rowenta Consumer Service department.
GUARANTEE
This appliance is intended for domestic use only. In case it is used inappropriately, not following the given instructions, Rowenta will not be subject to any liabilities whatsoever and the guarantee will be invalidated.
Read the instructions before using the appliance for the first time: using the appliance in any way different from the one indicated here would free Rowenta of all liabilities.
CONTENIDO
Páginaa
UNTKA IN TEXHINUECKOE OBCJIYJXIBAHNE 64
- Ouchstka KOHTeHepa IJIy IIJIN 64
- Ouchka npopoJHOBOrO fIJIbTpA dJa 3aIITbI DBNrataTeIa 64
- YxOnd TeXnueckoe o6cnyKuBaHne nbIeCoCa 65
AKKUMYJATOPbl 65
- 3aMeHa aKKyMylTopa 65
- YtniHaun yctpoNCTBa 65
OXPAHA OKPYKAIOJI CPEIbI 66
PEMOHT 66
TAPAHNTY 67
COBETbI NO 6E3OПАСHОCTN
- yd06ha pyka
- KhoNka BkIIOuHTb/BbIKIOuHTb
2.a.Позиця Вькл.
- CBeTOBbIe CNrHaJIbI INHTeHCNBHOCTN
3.aI03nucn(MnH)
3.b POnzunra «CpeHnH» pejkm
3.cПозиця«Турбо»
- CBeTOB0 CNrHaI 3apJa aKKymyIaTopa
- Šeinerka
- OCHOBHOI KOpNyc
- CToIopHbI BnHT
8.Bo3dyxOBbInyckHapeWetKa - KoHTeHep IJIЯ nbIJIa
9.a HakonnteIb nbIIN (0,5 I)
9.b PacnpedeJInteIb nbln
9.cIopoloHObBIΦnJIbTpДЯ3aUHTbMOTopa
9.d KpbiKh
- CoeinnHtJIbHaT py6a
11.ДeЛьТОВИДнай Насадka Пылесocа C nHTerTpnpOBaHHoN эЛ ekTpoUSeTKoN
11.a 3JIeKToPoIeTka
11.b 3auneIka
11.c 3aedepekXnBaIOuIeNΦnJIbTp
- Koneca
-
3apdHoe yCTpoNCTBO
-
18B n 24B: cm. RS-RH5277*
-
AkkymytaTopbI
-
18B: CM. RS-RH5233*
- 24B: CM. RS-RH5278*
15.Интурмент
3NeKtpo-1eTka DnBxkETcC TpydOM
EcnBbO6hApxnn, TTo BaN PbIeCoc C TpydOM NepemMeaTc BdoJI NOBepXHOCTn, NOCTepeHHo CHN3bTe INHTeHcNBHOCTb DO PO3uCiN «MInHmAlbHaJ» (3.a). Ecn np6Iema He yctpaHeHa, OTHeCNTe PbIeCOC B 6nKaAaN ABTOpN3OBaHNbI cepBncHbI ueHrRowenta.
Cm. cnncok aBTopn3OBaHHbIX cepBnCHbIX ceHTpOB Rowenta nIi o6paTntecb B OTdJI O6cJyXBaHnKJIeHTOB Rowenta.
4·XpaHeHne
Iocne nCnOJb3OBaHnA, BbKJIouHtne nbIeOC, nepemecTNB KHOJky BcJIouHTb/BbIKHOuHTb do ynpa (2a). TepeB Bbl MojTe rJe yroDHO xpaHNTb np6Op c NOMoUb VO BerTnKaJIbHOrO napKOBOUHO rIOLOXeHn. YTo6bl NOCTaBtB nbIeOC B napKOBOUHoe IIOJOxHne: NocTaBte WeiKy BeTnKaJIbHo, YTo6bl 3a6LokuPoBaTb uCTpOietBO. YTo6bl npOdoJnxTb nCNoJIb3OBaHne nbIeCoCa: BO3bMIte eRo 3a pyuKy n KaunHe eRo Ha3ad, YTo6bl pa36LoKupoBaTb n BblTu n3 napKOBOUHO rIOLOXeHn.
ЧИСТКА И TEXПИЕСКOE OБСЛУЖИBAHINE
BHMAHHE: Bcerda BbIKHuaTe N OTKHuaTe yCTpoiCTBO OT NHTaHnpeD XpaHeHnem IIN ONUCTKOI.
1•OuNTka KOHTeHepa IJIy IIJI (9)
1a.БыICTpoe onopoxKHeHne KOHTeHepa
Bcakn pa3, KOrda IOTOK dIy Ibln HanoJIHReTc DOCTnrae T ypoBHr «MAKC», ONOpOxHnTe 3TO CLeDyUoIIM o6pa3OM: cHmnte KOHTeHep, cDbHvB erO BHN3 (fig.14), NOMECTnTe erO NaMycOPHBIM aIuKOM n HaxMtE Ha KNOpKy "Push", uTo6bl OTkpbl 3aJepXnBaIOuIe nn fNltp IN Bbl6pocNTb coDepeXnMoE KOHTeHepa (fig.15). 3aKpOte nnTp (fig.16) n NOMECTnTe KOHTeHep Ha MeCtO B OCHOBHO uactn PbIleCoca (fig.19).
1.bIpoueDypaNoJHNOuNCTKn
PekomeHdyeTcpeyIpyrno uNCTnTb KOHTeHep dIa c6opa nbIIn.
- BbIaHInTe KOHTeHep IaI NaIIu (fig.14), NOTOM pa36epnte ero Ha Yaactn (9).
- BbTiHnTe nopoJIoHObBiy nIbTp 3aunTb MoTopa (9c).
- Iorpy3nte HakoOnTeIb nbIIn (9a), pacnpeJeJIteIb nbIIn (9b) n KpbIshky B TeNnyo Body (fig.20); DaITe IM BbICOXHyTb IIIN BbITpIte IN cyXOJ TkaHbIO;
- Промоу Te nopoJOHOb布局 Φиьтгзацntы DBИгATEля (сm. pa3дeн 2).
- KaK TOnbKO DeTaN KOHTeHepa dJa c6opa nbIbn BbICoxHyT, C6epeNTe Nx; CdenaTe To Je cAmoe C DOJONHITeNbHbIM NOPOLHObBIM 0nJIbTpOM 3aunTbI DvRaTeN (9c), KOTOpBIO NOCTAbJeTcB KaueCTBe DOJONHeHnK BaWemy nbIneCocy.
- 3akpoTe KOHTeHep IJIa c6Opa NbIIN NOCTaBbTe eRO Ha MeCTO B OCHOBHOJ KOpNc IIJIeCOCA (fig.19).
2·OuNCTka nopoloHOBOrO fIbTpa IJIa3aIITbI DvIraTeJIa (9c)
BHIMAHHE: HnKoIgDa He nCpOJIb3yIte TbIJIeCoc 6e3 nopOJHOBOrO fNJIbTpa dJa 3aunTbI dBnraTeJIa.
ДяТOrO,TO6bI NOdEprJINBaT BbICOKn yPoBeH npOn3BOaNTeJIbHOCTN nbIeCoca, He nbIeCoSbTe yIbTpTa-TOhKne BeSeCTBa,TakNe KaK rInc,ZeMeHT nIi 30Ja,N npOBoDnte OuNCtky nopOLOHOBOrO fNbIbTpA dIy 3aunTbI dBurataJe, no KpaHne Mepe, pa3B MecaIc. EcnBbI cHTaTe,уTO BaIbIeOC pa6Otae HIXe HopMaJIbHOrO cpeHero yPoBHn,MbI peKOMeHdyem Bam YnCTnTB NOPOLHObY bINbTp dIy 3aunTbI dBurataJe YAse.
- ChIMITE KpbiUkky KOHTeHepa IJIy IIIN (9d), a 3aTeM BbITAHnte NOpOLOHOBBI IbTp 3aUNTbI DBNrAteJRA (9c) (fig.21).
OuHCTnTe NOPoHObBMy OINbTp DIA 3aunTbI DBnraTeJe (9c) C TeNIOy MblbHO BDOy. IPONoJIoUHTe N DaITe BBICOXHyTB TeueHne, NO KpaHNe Mepe, 12 YacOB npexJe yem NOMEuaTb OINbTp Ha MeTo (fig.22).
BAXHO:ДяТOrOчTo6bl obecneuHbONTImaJIbHyIO 3aIHTy DBnraTeJIa, y6eIITecb,уTO nOpOLOHObBI ΦnIbTp NOJIHOCTbIO BbICOX,пржde Yem CTaBnTB eRO Ha MeCTO.ДaIte emy BbICoxHyTB TceHne,po KpaHNe Mpe,12 YacOB,3aTeM BcTaBbTe eRO B KOHTeHep dJa c6opa nbJIM.C BaIIM nbIleCOCOM NOCTaBJIaETcRA DOIpOIHNITeJIbHbI NOPoLOHObBI ΦnIbTp 3aIHTbI DBnraTeJIa,po 3TOMy Bbl MoXeTe NcPOnJIb3OBAt b PbInecOC,B TO BpEma KaK IepBbI ΦnIbTp no- npexHHemy cyuNTcra.
BHIMAHNE: HnkOrda He cTaBte DeTaII NKTeHepa dJa c6opa nbln nn NopOJHObIy 0nnbTp dJa 3aunTbI DnRatela B nocydomoeyHuMoHNHy.
3·Чистka и Тхнисторе облужимане
Ecnn nblncoc He BKJIIOyaeTcR
y6eintecb, yTO 3aprHoe yCTpoiCTBO NOIHOCTbO OTcoeHNHeHO OT nbilecoca. Ecnn OTKJIueHo, 3NaHT, aKKymJLTop pa3pJxKeH. 3aprNte aKKymJLTop.
Ecn CBeTOBOH HndkaTOp 3apraHaauHaeT ouehb 6bICTpo MuraTb, KOrda Bbl NODKlnuHn3apdHOe yCTPOBCTBO DO nbIleCocA, 3TO 3NaHT, UTO Bbl nCpOJIb3yeTe He npabNlbHOe 3apdHOe yCTPOBCTBO, IIN yCTPOBCTBO, KOtOpoe Bbl nCpOJIb3yeTe HeNCpPaBHoe.
Ecn nIbIeCoc He nbIeCocNT
- Θлектpoшетka 3acopnilacb:прочитte ee.
- PacnpedeHnteIb 3a6nt: BbITAHnTe KOHTeHep IJra c6opa nbIIN OOuCTnte pacnpedeJIrTeIb
Ecnn nbilecoc pa6oTaET nIoXO, BbIaet CBNCT nIu shym
Tpy6kn nn nlaHn qactnHO 3acopehbl: npoucnTe nx.
- Hakonntelb nbiln 3aOpJHHe: onopoxhnte n oucntte ero.
- KonTeHep dIa c6opa nbln nIIOxo yCTaHOBLeH: NOMEcTlTe erO npaBnIbHo.
-ДeльТовиднанада Наска nbIlecoаЗагрЯнeca: Демонтуй Te Аль КюшЕ КИ Oчinctite ee.
- Popolohobii Φильтгзацntы ДВигателя загяЗнлс: Ouchte ero.
Ecn paonpeelenteIb 3arpaHnncra
- PacnpedeJInteIb INHOrda HakaJIINBaET nbIb. Y6eJIInTeCb, yTO HnUTo He 6IoKInpyeT KaHaJ MExdY pacnpedeJInteIem N KOHTeHepOM dJa c6Opa nbIIn.
3a6lOKnpoBaHO OTKpbITne KOHTeHepa IJIyIbIN: BbITrHtE KOHTeHep, ONOPoKHTe N OUcHtTe erO.
TolOBka nbIneocOa DbIXeTcA TpydOM
Y6aBbTe INHTeHCNBHOCTb NblIEcOCA C NOMOuH COOTBeTCTBYUoSeK HONKN.
Ecn npo6nema He 6ydt yctpaheha, OTHeCtte nbIeocc Rowenta B 6nJxu aBTOp3OBAHbI cepBnchbl uehtp. Cm. cnCOK aBTOp3OBAHHbIX cepBuchbl x ceHTpoB Rowenta nn o6paTntecb V otDen obCnykBaHnKJIneHTOB Rowenta.
「APAHT」
UcTpoIcTB OpeHa3HauEHO ToJIbKO dJa IcNoJb3OBAHnB B DoMaunHX ycNoBnX. KomnaHnR Rowenta He HeCet OTBeTCTBeHHoCTNa YcTpoIcTB O B Cnyae HeNpaBnBHOrO NcNoJb3OBAHnA, KOTOpoe npOTnBOpeuNT daHHo IHCTpyKcUN.
PekomeHdyetbcpepylaepHO ouuSyBaTu KOHTeHep IJIy.
- BuntarHitb KOHTeHep IaI nnly (fig.14), notim po36epiMb Ioro Ha qactuHN (9).
- BntaHtB nopoJIoHObni φiJIbTp 3axncty dBnuIgamma (9c).
- 3aHypTe nIIIO36ipHnK (9a), po3noDiIIOBau nIy (9b) i KpniUky B TeNpy BOdy (fig.20); daIte IM BnCOxHyTu a6o BVntpiTb ix cyxoIO TkaHnHOIO;
- ПомиTe nopoIoHOBи Флтр зхиctу ДВИгунa (ДИВ. рОЗдi 2).
- Jk Tijbkn DeTani KOHTeHepa DnI Ny BnCOxHytB, 36epiTb ix; 3po6iTb Te xcame 3 DoTaKOBm NopoloHOBm fJbTpom 3axNCTy DBNrHa (9c), kyn nocTaaeTbcB R kOcTi DoaAtky do BaWo r OnpoxoTjra.
- 3akpnTe KOHTeHep IЯ nIy i nOCTaBte NOro Ha Micse B OCHOBnK Kopnyc npoxotra (fig.19).
2·OuHHeHHI nopolHOBOrO fIbTpa IJIa 3axncty DvNrgyna (9c)
YBAGA: Hikon He BnKOpNCbOyIte npoxoTg 6e3 nopOnHOBOr o iNbTp a nla 3axncty dBnrgna.
ДлгTOrO,ибпдгIMyBaTn BnCOKn piBeH npOdyKTINBHOCTi nopoxOTЯ,н epbpaToHKe 3a6pydHeHHa, Take Jk rinc, cemeH Tn noni, i npOBoIbTe OunSeHnN NopOLOHOBOrO fIbTpA Dl3axNCTy DBnryHa 0OnaHmEnHse, pa3 B micZb. kIoo Bn BBaKaTe, lo BaW npOxOTar npaucuE HnKue HopMaJIbHOrO cepeHbOrO pIBH, Mn peKOMeHdUcMo Bam ouHsByBaTn NopOLOHOBn fIbTpДЯ 3axNCTy DBnryHaЧаTiWe.
- 3HIMITb KPNsKy KOHTeHepa IJI INLy (9d), a TODi BNTaRHiTb NOPoJHOBn IJIbTp dJa 3axuCTy DBNrHa (9c) (fig.21).
OuNCTIb nOpOHOBn fIbTp dJa 3axnty DBNrHa (9c) TeNIOIO MInlbHOIO BOIOIO.
PpOMnTe i daTBe BnCOxHyTn BnpoIDOBX, OOnaMEnHse 12 rOdIN, NepSe HIX CTaBtN fIbTp Ha Micse (fig.22).
BAJKJINBO:ДяТOrO,о63a6e3neuTOn ONTImaJIbHn 3axNCT DBUryHa,pepeKoHaIteCb,so POpOIoHOBnФiNbTp nobHicTIO BnCOxHyB,пepш HIX CTaBtN IOrO Ha MlcJe.ДаTe Iomy BnCOxHyTN BnPoIDOBx loHaMMeHsE 12 rOdn,TOdi BCTaBTE Noro B KOHTeHep DЯПИу.3BaIIM POpOXOTROM B KOMIIeKT BXODITb DOdaTKOBn POpOIoHOBnФiNbTp DЯ 3axNCTy DBUryHa, TOMy BN MoKeTe KOpNCYBaTnc NobOXOTrGM ToDi,Як nepShnФiNbTp BCE ue coXHe.
YBAGA: Hikoli He CTaBTe DeTani KoHTeHepa Dnay NiLy Chn NopOLOHOBn FInbTp Dnla 3axncty DBNHyHa Do NocUdOmHoi MaunHn.
-
Tekerlekler
-
Sarj cihazi
-
18V ve 24V: ref. RS-RH5277*
-
Piller
-
18V: ref. RS-RH5233*
-
24V: ref. RS-RH5278*
-
Alet
ILK KULLANIM ÖNCESI
3A BALIATA 6E3OIIACHOCT
- He dokocbaite Bbpta ce yactn, npedn da n3knohtpe npaxocmykaKaTa o6ytoHa o NT KOHTa.
- He n3πολ3BaIte ypeIa Bbpxu Mokprn noBbpxHocTn.
- He noTaTnIe ypeJa BbB BOJa.
HEN3ПРABHOCT HA EJEKTPINQUECKATA YETKA
EleKtpueckKaTa cheKa He pa60Tu 3npaBNo IInn 3daBa Heo6uHaen yUm
Bbpttata tka nll octa e 6loKnpaHa: n3KJIouTe ypeDa n IIN nouCTe.
- YeTkata e n3HocHe: NOCTeTe LInCeH3npaH cepBn3e HcHTbP, 3a da 6bJe CmHeHa YeTkata.
- 3aДВИЖБАШИТ рЕмьк e ИЗнOCHeN: aKO peMbКbT ИЗДаВа ШуM, TOBa O3HaЧаВа, Que ToI npINПь3Вa, 3aДОTO e IN3HOCeH. NOcTeTe ЛицЕНЗИран СервИЗЕн ZeHTbp, 3a Дa 6Бdе CmEHeH peMbKa
EneKtpnueckaT ayeKa cnpa,doKaTo n3non3BaTe npaxOcmykaUkata
-ФункцяТаHa TepmuaHata 3aunTa ce e akTbnpaJa:ИЗклочeп praxocmykaKaKaTa KaTo npMeCTIte 6byToHa 3a cnipaHe/nyckaHe KbM noLoJxHeNe Stop (CnnpaHe) (2.a)иЯ n3KlNoHTe OT KOHTaKtA.ПрOBepTe,зд a BnDInTe dAn HяКо TBbpД,ppeДmet He e 6blokpAL BbpTeHTo Ha YetKaTa.АкToBa e TaKa,OTcPahete ppeMeta I NOuCTeTe eJIeKTPnueckaTa YETKa (ФИr.10),а сеД TOBa MoKeTe DA npOdbJnxTe DA n3NOL3BaTe praxocmykaKaKaTa.
EneKtpnueckKaTa YeTka Ce DnKu Tpydno
Ako KOHCTaTnpaTe,Ye npaxocmykaKata Ce nIb3ra CbC 3aTpPydHeHne NO NOBbpXHOCTnTe,IOCTeNEHNO HaMaJIeTe CKOpOCTTa,doKATO He DoCTnIRHeTe Do noLOxKeHne „MInHmAlHa" (3.a). Ako npo6nembT npoDbJkaba,OTHeCeTe ypeDa B Na-6nn3kn IuIeH3npan cepBn3en ΚeHTbp Ha Rowenta.
BnKTe CnncbKa C IuIeH3npaHn cepBn3Hn cIeHTpOBe Ha Rowenta nIe Ce CBpXeTe C OTdela 3a O6CnykBaHe Ha KIneHTn Ha Rowenta.
4 • Cьхразнayahe
Cleid ynoTpe6a, n3KIOUeTe npaxOCmyKaUkata KaTO npMeCTnTe 6yToHa 3a CnnpaHe/nyckaHe KbM noLoXeHne Stop (CnnpaHe) (2a). Cera moXeTe da cBxpaHbAte ypeDa BbB BepTKaJIHO noLoXeHne HABcKaIbe, 6laOdapeHne Ha noLoXeHneTo 3a napKnpaHe.
3a da noCTaBnTe npaxocmykaKaTa B noLoXeHne 3a napKnpaHe: NocTaBeTe ydJIkeHneTo BepTKKaIHo, 3a da 6loKnpaTe ypeJa.
3a da npoDbIknTe da n3nOJI3BaTe npaxOCMyKaUkTa: XbaHeTe 3a pbKOXBtKaTa n 3aBbPTe He3aD, 3a da ce pa36Jokupa n da n3Je3e ot noIoXeHne 3a napKupaHe.
ПОЧИСТВАЕ И ПОДДРБЖKA
BAXH0: BinaHn n3KJIIOUbaIte ypeHa ot 6yToHa I OT KOHTaKta Ipei Da fo OCTaBITE 3a cbXpaHeHne nn INTOUCHTBaHe.
AKYMYLATOPHIN BATEPHN
1 • Смяна на akумунатоне бateрши
To3n ypeD cbdbpXa HnKeJ-MeTaIxNdpHn (NiMh) akymyIaTOPHn 6aTePnn, DocTbN do KOnTO mMaT cMo cepBn3Hn INHexepn nopadn cb6paXeHnna 3a 6e3OpacHocT. Korato akymyIaTOPHa7a 6aTePnBaue He MoJc Da 3aPa3n CBO4 3apd, akymyIaTOPHnT (NiMh) 6loK Tp8Ba Da ce n3BaAn. 3a CmHa Ha akymyIaTOPHnTe 6aTePnn, MOJa NocTeTe Na-6bn3kn IunceH3npaH cepBn3eh ueTbp.
He 3aMeHnTe 6JOK c akymlyaTopn 6aTeepn C 6bKnHOBeHn 6aTeepn.
Ako JeaTe da CmeHnte akymylaTopHnte 6aTepnn, NocTeTe IInuEHNpaH cEpBn3eH zHeTbp.
AkymylaTopnHte 6aTeepnCa npEHa3NaueHn 3a yNtpe6a cAmo Ha 3akpnto.He rI nOtanayTe BbB BOda.Pa60TeTe C
akymylaTOPHnTE 6aTePnBHNMaTeJIHO.He rNnotanTBe B yCTata.. He N03BOJBAite akymylaTOPHnTE 6aTePn Da BVIA3AT B KOHTaKT C dpyrMeTaJIHn PpeDMeTn KaTO PbCTeHI, INPOHN IIN BnHTObE. BHImaBaIte Da He npEdn3BVkATE BbTpewHO KbCO CbeDNHeHne B aKymylaTOPHnTE 6aTePn KaTO NOCTABrTe MeTAHn PpeDMeTn PO Kpanuata IM.AKO BV3HNKHe KbCO CbeNDHeHne,
TeMnepaTpyaHa akymylaTopHnTe 6aTePnn MoKe Da Ce NOBuN OnaCHO n Da NpeDn3BnKa TeKKn N3rapnna I DOpn noxap. Ako akymylaTopHnTe 6aTePnn 3anOuaH a TeKaT, He DoKocBaTe OUnTe Cn nn Lnirabuata. N3mnte PbUteCn n N3nlaKHeTe OUnTe Cn C uNCTa BOda. Ako dpa3HeHTo npoDbJXkaba, NtbpceTe JekapcKa pOMOu.
Heka nOMorHem 3a ona3BaHe Ha OKoJHaTa cpea!
① UpeBbT CbDbPjx MHOr O NOJIe3Hn I N OJdIeJxu H a peUKNlpaHe MaTePnaJI.
3aHecete ypeDa B nyHKT 3a BTOpUHN CypOBHH, 3a Da MoKe ToJ da 6bJe peuKlnpaH nO noDxoJaHaunH.
PEMOHTN
BAxH0: Ako 3a6eJeknte, ye npaxocmykaKaTa He pa6Otn n3npaBHO, npeDn KaKbBTO n da e npereIed, ro n3KJIuOte KaTo NOCTaBtTe 6yToHa 3a CnIPAHe/NyCKaHe B NpOJOKeHne Stop (CnIPAHe).
Pemontte Tpr6ba da ce n3BpWBat cmo OT cneuaJICTn KaTO ce n3noJ3BaT opunHauHn pe3epBHN qactn. Ont 3a peMOHT ha ekeTroHeH ypeD y doma, moKe da ce okake OnaceH 3a notpe6ntela.
Ako npaxocmykaukkata He moke da 6bnde nychata
YBepTe ce, ye 3apAnHTo yCTpOiCTBO e HnblHO n3KlUoyeHO OT ypeJa. Ako e TaKa, TOBa O3HaayBa, ye ypeT He e 3apeDen h 3aTOBa npOdbLkTe da ro 3apeJdaTe.
Ako CnHnT INDnKaTOp 3a 3apeKdahe 3anOHe da npIMrBa MHOro 6bp30, KOraTO BKIOHTe 3apdHOTO yCTPOICTBO B npaxOCMykaKata, TOBa O3HaUba, Ye BNe He n3PON3BaTe npabINHO TApdHO yCTPOICTBO nIn Ne 3apdHOTO yCTPOICTBO e HEn3PabHO.
Ako npaxocmykaKaTa He 3acMyKba
- EneKtpnueckaTa ueTka e 3aMbpcHa: NoouncTe Ta.
- CenapaTopbTe 3aanyuH: cBaIeTe KolekToPA 3a npax I noUcTeTe cenapaTopa.
Ako npaxocmykaqukata pa60tn no-cna6o, n3daBa wum uIN BVEHe
- Tpb6ata nll Mapkya ca yactnHNo 3aanyseHH: OTnyseTe rN.
Kollektopbt 3a npax e npbIeH: n3npa3HeTe ro I ro noHTeTe... - KolékTopbT 3a npax He e nocTaBeH npabuHIO: nocTaBeTe ro npabuHIO.
-ДелТа-нakраинкьт eзambрсен: demOHntupaite eneKtpnueckaTa cheTka nЯ поистe. - 3aunTHnTf nIbP Ha eJelKtpOMOTopa OT nopecK kayuk e 3aJIbJIHHe: NOUCTeTe rO.
Ako cenapaTopbT ce HanbHn C npax
- Понякога в сенapatopa ce haTPynBa npax. Ybepete ce, che nHIO He 6Iokupa npaxa mexdy cenapatopa in KOlektopa 3a npax.
- OTbopbT Ha KonekTopa 3a npax e 3aNyueh: CbaIe Te KonekTopa 3a npax, n3npa3HeTe ro n nouCteTe OTbopa.
HakpaHHKbT Ha npaxocmykaKaTa ce DBNKn Tpydno
HaMaIeTe cKOpocTt Ha npaxOcMykaKaKaTa Upe3 IpemecTbAHe Ha cbOTBeTHn6 ByToH.
Ako npo6IeMbT npOdbIkaBa, OTHeCeTe npaxocMyKaUkKaTa B Na-6Iu3KJy IuIeH3IpaH cepBn3e H cHTbP Ha Rowenta. BIXte CnIscbKa Ha IuIeH3IpaHcpeBn3H N cHTpOBe Ha Rowenta nn Ce CbIpxTe C OTdJIa 3a 06ClyjXbaHe Ha KIneHTn Ha Rowenta.
OBE3NEUHNE
BG
To3n ypeI e npdeBnuIeH cmo 3a ynoTpe6a B dOmaKInHCTBOTo. B clyaI, ye ce n3IOJI3Ba HnnpaBnIHo, He ce cna3BaT daJeHnte yka3aHnra, Rowenta hMa da Hocn KaKbATO n da e OTROBOPHOCT rapaHcIyTa ige CTaHe HeBaJIuIHa.
Ipooyete yka3aHnra Tnpen Da n3noJ3BaTe ypea 3a npBpN nbT: Rowenta Hma da Hocn KaKbTo n da e OTROBOPHOCT B cnuaH Na n3noJ3BaHe Ha ypea no HauH, pa3nueH OT NOCOeHn TYK
172
CUPRINS
Pages
INSTRUCTIONS DE SIGURANTA 174
- Precauţii inainte de prima utilizes 174
- Alimentarea electrica 175
- Reparati 175