KD-X341 BT - Car stereo JVC - Free user manual and instructions
Find the device manual for free KD-X341 BT JVC in PDF.
User questions about KD-X341 BT JVC
0 question about this device. Answer the ones you know or ask your own.
Ask a new question about this device
Download the instructions for your Car stereo in PDF format for free! Find your manual KD-X341 BT - JVC and take your electronic device back in hand. On this page are published all the documents necessary for the use of your device. KD-X341 BT by JVC.
USER MANUAL KD-X341 BT JVC
KD-R881BT / KD-R781BT
CD RECEIVER
INSTRUCTION MANUAL
CD
jiannnnn
JVCKENWOOD Corporation
CONTENTS
BEFORE USE 2
BASICS 3
GETTING STARTED 4
1 Cancel the demonstration
2 Set the clock and date
3 Set the basic settings
RADIO 5
CD/USB/iPod/Android 7
Pandora
(Applicable for Australia or
New Zealand models only) 9
BLUETOOTH 10
AUX 17
AUDIO SETTINGS 17
DISPLAY SETTINGS 23
REFERENCES 24
Maintenance
More information
TROUBLESHOOTING 26
SPECIFICATIONS 28
INSTALLATION /
CONNECTION 29
BEFORE USE
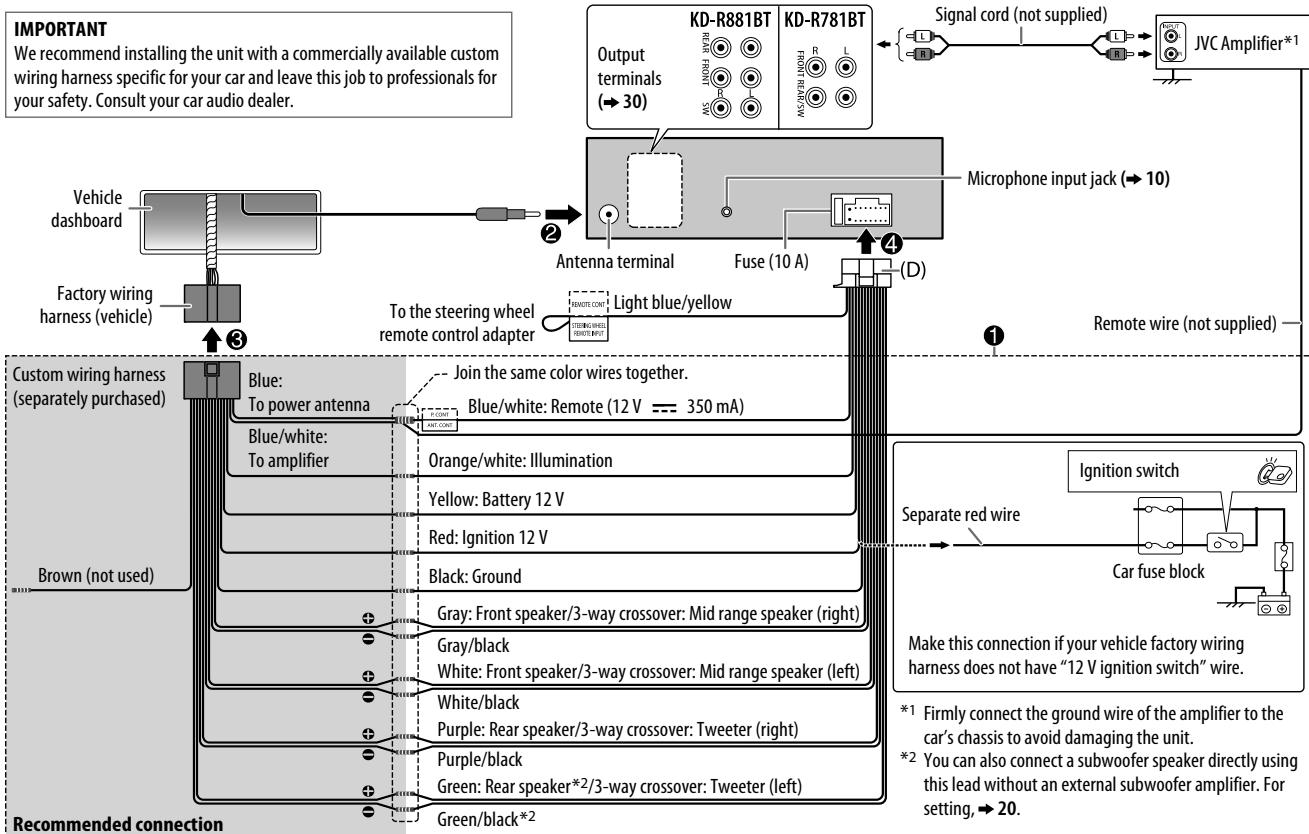
IMPORTANT
- To ensure proper use, please read through this manual before using this product. It is especially important that you read and observe Warning and Caution in this manual.
- Please keep the manual in a safe and accessible place for future reference.
WARNING
- Do not operate any function that takes your attention away from safe driving.
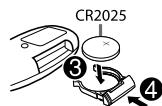
- Do not ingest the battery, Chemical Burn Hazard
The remote control supplied with this product contains a coin/bottom cell battery.
If the coin/button cell battery is swallowed, it can cause severe internal burns in just 2 hours and can lead to death.
Keep new and used batteries away from children.
If the battery compartment does not close securely, stop using the product and keep it away from children.
If you think batteries might have been swallowed or placed inside any part of the body, seek immediate medical attention.
Caution
Volume setting:
- Adjust the volume so that you can hear sounds outside the car to prevent accidents.
- Lower the volume before playing digital sources to avoid damaging the speakers by the sudden increase of the output level.
General:
- Avoid using the external device if it might hinder safe driving.
- Make sure all important data has been backed up. We shall bear no responsibility for any loss of recorded data.
- Never put or leave any metallic objects (such as coins or metal tools) inside the unit, to prevent a short circuit.
- If a disc error occurs due to condensation on the laser lens, eject the disc and wait for the moisture to evaporate.
Remote control (RM-RK52):
- Do not leave the remote control in hot places such as on the dashboard.
- The Lithium battery is in danger of explosion if replaced incorrectly. Replace it only with the same or equivalent type.
- The battery pack or batteries shall not be exposed to excessive heat such as sunshine, fire or the like.
How to read this manual
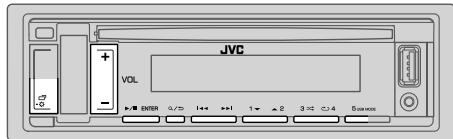
- Operations are explained mainly using buttons on the faceplate of KD-R881BT.
- English indications are used for the purpose of explanation. You can select the display language from the menu. ( 5)
- [XX] indicates the selected items.
- ( XX) indicates references are available on the stated page.
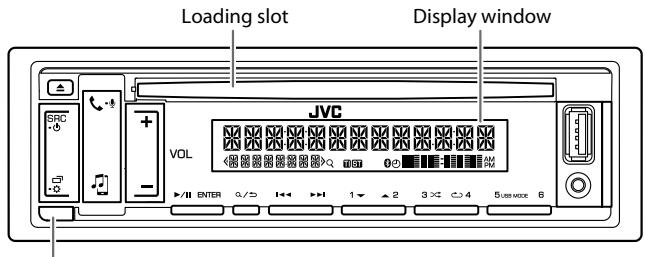
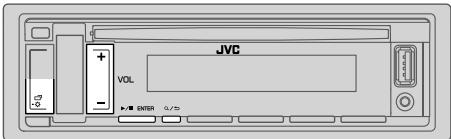
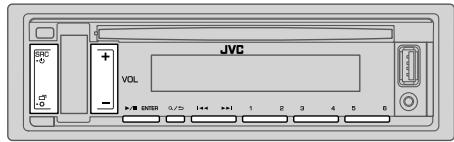
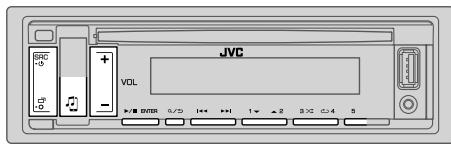
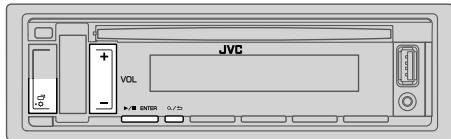
Faceplate
Detach button
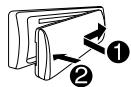
Attach
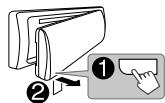
Detach
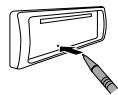
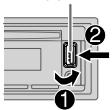
How to reset
Remote control (RM-RK52)
Remote sensor (Do not expose to bright sunlight.)
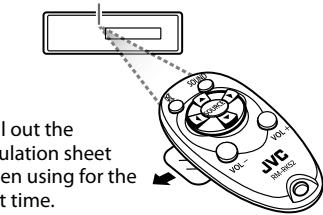
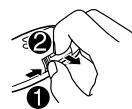
How to replace the battery
To
Turn on the power
Adjust the volume
On the faceplate
Press SRC-。
- Press and hold to turn off the power.
Press VOL+/-.
- Press and hold VOL + to continuously increase the volume to 15.
Press▶/I ENTER to mute the sound or pause playback.
- Press again to cancel.
Press SRC- repeatedly.
- Press SRC·, then press VOL+/within 2 seconds.
Select a source
Change the display information
Press repeatedly. ( 25)
On the remote control
(Not available)
Press VOL + or VOL -
- Press and hold VOL + to continuously increase the volume to 15.
Press to mute the sound or pause playback.
- Press again to cancel.
Press SOURCE repeatedly.
(Not available)

Cancel the demonstration
When you turn on the power (or [FACTORY RESET] is set to [YES]), the display shows: "CANCEL DEMO" "PRESS ENTER"
1 Press /IENTER.
[YES] is selected for the initial setup.
2 Press▶IIENTER again.
"DEMO OFF" appears.

Set the clock and date
1 Press and hold
2 Press VOL + / - to select [CLOCK], then press /I ENTER.
To adjust the clock
3 Press VOL + / - to select [CLOCK ADJUST], then press / ENTER.
4 Press VOL +/− to make the settings, then press▶/I ENTER. Hour → Minute
5 Press VOL + / - to select [CLOCK FORMAT], then press / IENTER.
6 Press VOL + / - to select [12H] or [24H], then press ENTER.
To set the date
7 Press VOL+/to select [DATE SET], then press▶/I ENTER.
8 Press VOL + / - to make the settings, then press /ENTER. Day Month Year
9 Press to exit.
To return to the previous setting item, press / .

Set the basic settings
1 Press and hold
2 Press VOL + / - to select an item (see the following table), then press /I ENTER.
3 Repeat step 2 until the desired item is selected or activated.
4 Press to exit.
To return to the previous setting item, press .
Default: XX
| SYSTEM | |
| KEY BEEP | (Not applicable when 3-way crossover is selected.)ON: Activates the keypress tone. ; OFF: Deactivates. |
| SOURCE SELECT | |
| AM SRC* | ON: Enables AM in source selection. ; OFF: Disables. (⇒ 5) |
| SW1 SRC* | ON: Enables SW1 in source selection. ; OFF: Disables. (⇒ 5) |
| SW2 SRC* | ON: Enables SW2 in source selection. ; OFF: Disables. (⇒ 5) |
| PANDORA SRC* | ON: Enables PANDORA in source selection. ; OFF: Disables. (⇒ 9) |
| BUILT-IN AUX* | ON: Enables AUX in source selection. ; OFF: Disables. (⇒ 17) |
| F/W UPDATE | |
| UPDATE SYSTEM | |
| F/W UP xxxx | YES: Starts upgrading the firmware. ; NO: Cancels (upgrading is not activated).For details on how to update the firmware, see:<http://www.jvc.net/cs/car/>. |
| FACTORY RESET | YES: Resets the settings to default (except the stored station). ;NO: Cancels. |
- Not displayed when the corresponding source is selected.
GETTING STARTED
| CLOCK | |
| TIME SYNC | ON: The clock time is automatically set using the Clock Time (CT) data in FM Radio Data System signal. ; OFF: Cancels. |
| CLOCK DISPLAY | ON: The clock time is shown on the display even when the unit is turned off. ; OFF: Cancels. |
| ENGLISH | Select the display language for menu and music information if applicable. |
| ESPHANOL | By default, ENGLISH is selected. |
RADIO
"ST" lights up when receiving an FM stereo broadcast with sufficient signal strength.
Search for a station
1 Press SRC- repeatedly to select FM, AM, SW1 or SW2.
2 Press / (or press / on the remote control) to search for a station automatically. (or) Press and hold / (or press and hold / on the remote control) until "M" flashes, then press repeatedly to search for a station manually.
Settings in memory
You can store up to 18 stations for FM, 6 stations for AM/SW1/SW2.
Store a station
While listening to a station....
Press and hold one of the number buttons (1 to 6). (or)
1 Press and hold ENTER until "PRESET MODE" flashes.
2 Press VOL + / - to select a preset number, then press /IENTER. The preset number flashes and "MEMORY" appears.
Select a stored station
Press one of the number buttons (1 to 6). (or)
1 Press Q /
2 Press VOL+/ to select a preset number, then press /I ENTER.
Other settings
1 Press and hold
2 Press VOL+/- to select an item (see the following table), then press ENTER.
3 Repeat step 2 until the desired item is selected/activated or follow the instructions stated on the selected item.
4 Press to exit.
To return to the previous setting item, press .
Default: XX
TUNER SETTING
RADIO TIMER Turns on the radio at a specific time regardless of the current source.
1 ONCE/DAILY/WEEKLY/OFF: Select how often the timer will be turned on.
2 FM/AM/SW1/SW2: Select a band.
3 01 to 18 (for FM)/01 to 06 (for AM/SW1/SW2): Select a preset station.
4 Set the activation day*1 and time.
"O" lights up when complete.
Radio Timer will not activate for the following cases.
The unit is turned off.
- [OFF] is selected for [AM SRC]/[SW1 SRC]/[SW2 SRC] in [SOURCE SELECT] after Radio Timer for AM/SW1/SW2 is selected. ( 4)
SSM SSM 01-06/SSM 07-12/SSM 13-18: Automatically preset up to 18 stations for FM. "SSM" stops flashing when the first 6 stations are stored. Select SSM 07-12/SSM 13-18 to store the following 12 stations.
LOCAL SEEK ON: Searches only AM/SW1/SW2 stations with good reception. ; OFF: Cancels. Settings made are applicable only to the selected source/station. Once you change the source/station, you need to make the settings again.
| IF BAND | AUTO: Increases the tuner selectivity to reduce interference noises from adjacent FM stations. (Stereo effect may be lost.) ; WIDE: Subjects to interference noises from adjacent FM stations, but sound quality will not be degraded and the stereo effect will remain. |
| MONO SET | ON: Improves the FM reception, but the stereo effect will be lost. ; OFF: Cancels. |
| NEWS SET*2 | ON: The unit will temporarily switch to News Programme if available. ; OFF: Cancels. |
| REGIONAL*2 | ON: Switches to another station only in the specific region using the “AF” control. ; OFF: Cancels. |
| AF SET*2 | ON: Automatically searches for another station broadcasting the same program in the same Radio Data System network with better reception when the current reception is poor. ; OFF: Cancels. |
| TI*2 | ON: Allows the unit to temporarily switch to Traffic Information if available (“TI” lights up). ; OFF: Cancels. |
| PTY SEARCH*2 | Select a PTY code (see below). If there is a station broadcasting a program of the same PTY code as you have selected, that station is tuned in. |
1 Selectable only when [ONCE] or [WEEKLY] is selected in step 1.
2 Only for FM source.
PTY code NEWS, AFFAIRS, INFO, SPORT, EDUCATE, DRAMA, CULTURE, SCIENCE, VARIORED, POP M (music), ROCK M (music), EASY M (music), LIGHT M (music), CLASSICS, OTHER M (music), WEATHER, FINANCE, CHILDREN, SOCIAL, RELIGION, PHONE IN, TRAVEL, LEISURE, JAZZ, COUNTRY, NATION M (music), OLDIES, FOLK M (music), DOCUMENT
Start playback
The source changes automatically and playback starts.

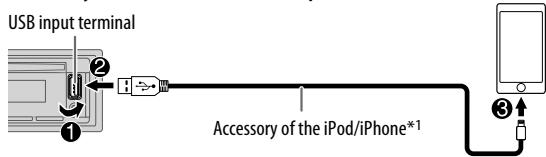
CD
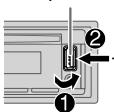
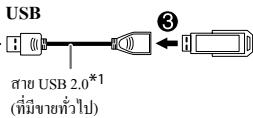
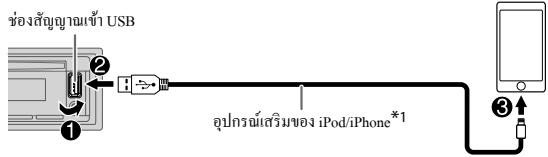
USB input terminal
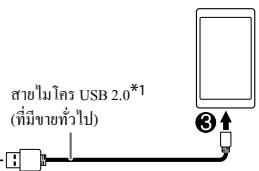
USB ⑥ USB2.0 cable*1 (commercially available)
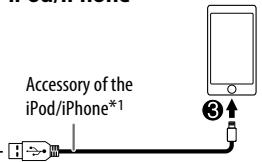
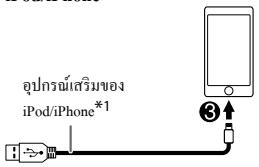
iPod/iPhone
ANDROID*2
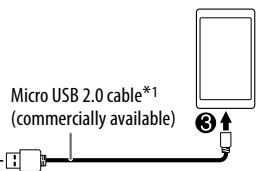

Selectable sources:
KD-R881BT: CD/USB/iPod USB/Android
1 Do not leave the cable inside the car when not using.
2 When connecting an Android device, "Press [VIEW] to install JVC MUSIC PLAY APP" is shown. Follow the instructions to install the application. You can also install the latest version of JVC MUSIC PLAY application on your Android device before connecting. For more information, visit http://www.jvc.net/cs/car/.
3 For ANDROID: Applicable only when [AUTO MODE] is selected. (→ 8)
4 For CD: Only for MP3/WMA/AAC files. This does not work for iPod/ANDROID.
*5 For iPod/Android: Applicable only when [HEAD MODE]/[AUTO MODE] is selected. (⇒ 8)
Select control mode
While in iPod USB source, press 5 USB MODE repeatedly.
HEAD MODE: Control iPod from this unit.
IPHONE MODE: Control iPod using the iPod itself. However, you can still play/pause or file skip from this unit.
While in Android source, press 5 USB MODE repeatedly.
AUTO MODE: Control Android device from this unit via JVC MUSIC PLAY application installed in the Android device.
AUDIO MODE: Control Android device using the Android device itself via other media player applications installed in the Android device. However, you can still play/pause or file skip from this unit.
Select music drive
While in USB source, press 5 USB MODE repeatedly.
Stored songs in the following drive will be played back.
- Selected internal or external memory of a smartphone (Mass Storage Class).
- Selected drive of a multiple drives device.
Settings to use JVC Remote application (for KD-R881BT)
JVC Remote application is designed to control the JVC car receiver's operations from the iPhone/iPod (via USB input terminal).
Preparation:
Install the latest version of JVC Remote application on your device before connecting. For more information, visit http://www.jvc.net/cs/car/.
You can make the settings in the same way as connection via Bluetooth.
(→16)
Select a file from a folder/list
For iPod/Android, applicable only when [HEAD MODE]/[AUTO MODE] is selected.
1 Press /
2 Press VOL + / - to select a folder/list, then press /ENTER.
3 Press VOL+/-to select a file, then press /I ENTER.
Quick Search (applicable only for CD, USB and Android source) If you have many files, you can search through them quickly. Press and hold VOL + / - to browse through the list quickly.
Alphabet search (applicable only for iPod USB andAndroid source) You can search for a file according to the first character.
For iPod USB source
Press 2 ▲/1▼ to select the desired character (A to Z, 0 to 9, OTHERS).
- Select "OTHERS" if the first character is other than A to Z, 0 to 9.
ForAndroidosource
1 Press 2 /1 to enter character search.
2 Press 2 /1 to select the desired character.
A :Upper case (A to Z)
_A_\: Lowor case (a to z)
-0- : Numbers (0 to 9)
-OTHERS- : Character other than A to Z, 0 to 9
3 Press ENTER to start searching.
To return to the previous setting item, press / .
To cancel, press and hold Q /
Preparation:
Install the latest version of the Pandora application on your device (iPhone/iPod touch), then create an account and log in to Pandora. Select [ON] for [PANDORA SRC] in [SOURCE SELECT]. ( 4)
KD-R781BT: You can only listen to Pandora via Bluetooth connection with an Android device. ( 10,16)
Start listening
1 Open the Pandora application on your device.
2 Connect your device to the USB input terminal.
3 Press SRC- repeatedly to select PANDORA.
Broadcast starts automatically.
| To | On the faceplate | On the remote control |
| Playback/pause | Press▶/II ENTER. | Press ✦. |
| Skip a track | Press▶i. | Press ➔. |
| Thumbs up or thumbs down*2 | Press 2 ▲/1▼. | Press ▲/▼. |
1 Do not leave the cable inside the car when not using.
2 If thumbs down is selected, the current track is skipped.
Create and store a new station
1 Press /
2 Press VOL + / - to select [NEW STATION], then press /ENTER.
3 Press VOL + / - to select [FROM TRACK] or [FROM ARTIST], then press / II ENTER.
A new station is created based on the current song or artist.
4 Press and hold one of the number buttons (3, 4, 5 or 6) to store.
To select a stored station: Press one of the number buttons (3, 4, 5 or 6).
Search for a registered station
1 Press /
2 Press VOL + / - to select an item, then press /I ENTER. [BY DATE]: According to the registered date [A-Z]: By alphabetical order
3 Press VOL + / - to select the desired station, then press / ENTER.
To cancel, press and hold / .
Bookmark current song information
Press and hold /ENTER.
"BOOKMARKED" appears and the information is stored to your device.
- The bookmark is available on your Pandora account but not on this unit.
BLUETOOTH - Connection
Supported Bluetooth profiles
- Hands-Free Profile (HFP)
- Advanced Audio Distribution Profile (A2DP)
- Audio/Video Remote Control Profile (AVRCP)
- Serial Port Profile (SPP)
- Phonebook Access Profile (PBAP)
Supported Bluetooth CODECS
- Sub Band Codec (SBC)
- Advanced Audio Coding (AAC)
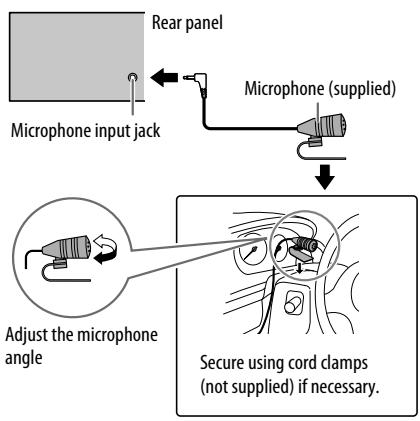
Connect the microphone
Pair and connect a Bluetooth device for the first time
1 Press SRC- to turn on the unit.
2 Search and select "KD-R8BT"/"KD-R7BT" on the Bluetooth device. "BT PAIRING" flashes on the display.
- For some Bluetooth devices, you may need to enter the Personal Identification Number (PIN) code immediately after searching.
3 Perform (A) or (B) depending on what appears on the display.
For some Bluetooth devices, pairing sequence may vary from the steps described below.
(A) "[Device Name]" "XXXXXX" "ENTER - YES" "BACK - NO"
"XXXXXXXX" is a 6-digit passkey randomly generated during each pairing.
1 Ensure that the passkeys appear on the unit and Bluetooth device are the same.
Press /ENTER to confirm the passkey.
3 Operate the Bluetooth device to confirm the passkey.
(B) "[Device Name]" "ENTER-YES" "BACK-NO"
Press ENTER to start pairing.
2. If "PAIRING" "PIN 0000" scrolls on the display, enter the PIN code "0000" into the Bluetooth device.
You can change to a desired PIN code before pairing. ( 14)
- If only "PAIRING" appears, operate the Bluetooth device to confirm pairing.
"PAIRING COMPLETED" appears when pairing is completed and "8" will light up when the Bluetooth connection is established.
- This unit supports Secure Simple Pairing (SSP).
- Up to five devices can be registered (paired) in total.
- Once the pairing is completed, the Bluetooth device will remain registered in the unit even if you reset the unit. To delete the paired device, 14, [DEVICE DELETE].
- A maximum of two Bluetooth phones and one Bluetooth audio device can be connected at any time.
However, while in BT AUDIO source, you can connect to five Bluetooth audio devices and switch between these five devices. ( 15)
- Some Bluetooth devices may not automatically connect to the unit after pairing. Connect the device to the unit manually.
Refer to the instruction manual of the Bluetooth device for more information.
Auto Pairing
When you connect the following devices to the USB input terminal, pairing request (via Bluetooth) is automatically activated.
KD-R881BT: iPhone/iPod touch/Android device
KD-R781BT: Android device
Press ENTER to pair once you have confirmed the device name.
Automatic pairing request is activated only if:
- Bluetooth function of the connected device is turned on.
- [AUTO PAIRING] is set to [ON]. ( 14)
- JVC MUSIC PLAY application is installed on the Android device ( 7) and [AUTO MODE] is selected ( 8) .
BLUETOOTH — Mobile phone
Symbolic button

Receive a call
When there is an incoming call:
- The symbolic button will blink in the color you have selected in [RING COLOR]. ( 12)
- The unit answers the call automatically if [AUTO ANSWER] is set to a selected time. ( 12)
During a call:
- The symbolic button stop blinking and illuminate in the color you have selected in [RING COLOR]. ( 12)
- If you turn off the unit or detach the faceplate, the Bluetooth connection is disconnected.
The following operations may differ or not available depending on the connected phone.
| To | On the faceplate | On the remote control |
| First incoming call... | ||
| Answer a call | Press ↗ or ↗/IIIENTER. | Press ▲/▼/ ↗. |
| Reject a call | Press and hold ↗ or ↗/IIIENTER. | Press and hold ▲/▼/ ↗. |
| End a call | Press and hold ↗ or ↗/IIIENTER. | Press and hold ▲/▼/ ↗. |
| To | On the faceplate | On the remote control |
| While talking on the first incoming call... | ||
| Answer another incoming call and hold the current call | Press ⋅ or ➔/IENTER. | (Not available) |
| Reject another incoming call | Press and hold ⋅ or ➔/IENTER. | (Not available) |
While having two active calls...
| End current call and activate held call | Press and hold ↓ or ▷/■ ENTER. | Press and hold ▲/▼/▲/▶. |
| Swap between the current call and held call | Press ↓. | (Not available) |
| Adjust the phone volume*1 [00] to [35] (Default: [15]) | Press VOL +/− during a call. | (Not available) |
| Switch between hands-free and private talk modes*2 | Press Q, / ▷ during a call. | (Not available) |
1 This adjustment will not affect the volume of the other sources.
2 Operations may vary according to the connected Bluetooth device.
Improve the voice quality
While talking on the phone....
1 Press and hold
2 Press VOL + / - to select an item (see the following table), then press / IENTER.
3 Repeat step 2 until the desired item is selected or activated.
4 Press to exit.
To return to the previous setting item, press .
Default: XX
| MIC GAIN | LEVEL -10 to LEVEL +10 (LEVEL -04): The sensitivity of the microphone increases as the number increased. |
| NR LEVEL | LEVEL -05 to LEVEL +05 (LEVEL 00): Adjust the noise reduction level until the least noise is being heard during a phone conversation. |
| ECHO CANCEL | LEVEL -05 to LEVEL +05 (LEVEL 00): Adjust the echo cancellation delay time until the least echo is being heard during a phone conversation. |
Make the settings for receiving a call
1 Press to enter Bluetooth mode.
2 Press VOL + / - to select an item (see the following table), then press ENTER.
3 Repeat step 2 until the desired item is selected or activated.
To return to the previous setting item, press / .
Default: XX
| SETTINGS | |
| AUTO ANSWER | 01 SEC to 30 SEC: The unit answers incoming call automatically in the selected time (in seconds). ; OFF: Cancels. |
| RING COLOR | COLOR 01 to COLOR 49 (COLOR 08): Selects the illumination color for symbolic button as notification when there is an incoming call and during a call. ; OFF: Cancels. |
Make a call
You can make a call from the call history, phonebook, or dialing the number. Call by voice is also possible if your mobile phone has the feature.
1 Press to enter Bluetooth mode.
("First device name)" appears.
- If two Bluetooth phones are connected, press again to switch to another phone.
"Second device name)" appears.
2 Press VOL+/-to select an item (see the following table), then press /I ENTER.
3 Repeat step 2 until the desired item is selected/activated or follow the instructions stated on the selected item.
To return to the previous setting item, press .
| RECENT CALL | (Applicable only if the phone supports PBAP.)1 Press VOL+/ to select a name or a phone number. ·“<” indicates call received,“>” indicates call made,“M” indicates call missed. ·“NO HISTORY” appears if there is no recorded call history or call number.2 Press▶/II ENTER to call. |
| PHONEBOOK | (Applicable only if the phone supports PBAP.)1 Press 2▲/1▼ to select the desired letter (A to Z, 0 to 9, and OTHERS). ·“OTHERS” appears if the first character is other than A to Z, 0 to 9.2 Press VOL+/ to select a name, then press▶/II ENTER.3 Press VOL+/ to select a phone number, then press▶/II ENTER to call. ·The phonebook of the connected phone is automatically transferred to the unit when pairing. ·This unit can display only non-accent letters. (Accent letters such as “U” is shown as “U”). |
| DIAL NUMBER | 1 Press VOL+/ to select a number (0 to 9) or character (×, #, +).2 Press▶/▶ to move the entry position. Repeat steps 1 and 2 until you finish entering the phone number.3 Press▶/II ENTER to call. |
| VOICE | Speak the name of the contact you want to call or the voice command to control the phone functions. (→Make a call using voice recognition) |
Make a call using voice recognition
1 Press and hold to activate the connected phone.
2 Speak the name of the contact you want to call or the voice command to control the phone functions.
- Supported Voice Recognition features vary for each phone. Refer to the instruction manual of the connected phone for details.
- This unit also supports the intelligent personal assistant function of iPhone.
Settings in memory
Store a contact in memory
You can store up to 6 contacts into the number buttons (1 to 6).
1 Press to enter Bluetooth mode.
2 Press VOL + / - to select [RECENT CALL], [PHONEBOOK] or [DIAL NUMBER], then press ENTER.
3 Press VOL + / - to select a contact or enter a phone number.
If a contact is selected, press▶/I ENTER to show the phone number.
4 Press and hold one of the number buttons (1 to 6). "MEMORY P(select preset number)" appears when the contact is stored.
To erase a contact from the preset memory, select [DIAL NUMBER] in step 2 and store a blank number.
Make a call from memory
1 Press to enter Bluetooth mode.
2 Press one of the number buttons (1 to 6).
3 Press▶/ENTER to call.
"NO PRESET" appears if there is no contact stored.
Bluetooth mode settings
1 Press and hold
2 Press VOL+/-to select an item (see the following table), then press ENTER.
3 Repeat step 2 until the desired item is selected/activated or follow the instructions stated on the selected item.
4 Press to exit.
To return to the previous setting item, press Q .
Default: XX
| BT MODE | |
| PHONE SELECT* | Selects the phone or audio device to connect or disconnect. |
| AUDIO SELECT* | "×" appears in front of the device name when connected. |
| "▷" appears in front of the current playback audio device. | |
| DEVICE DELETE | 1 Press VOL+/—to select a device to delete, then press▶/IENTER. |
| 2 Press VOL+/—to select [YES] or [NO], then press▶/IENTER. | |
| PIN CODE EDIT (0000) | Changes the PIN code (up to 6 digits). |
| 1 Press VOL+/—to select a number. | |
| 2 Press ↓/▶/ ↑ to move the entry position. | |
| Repeat steps 1 and 2 until you finish entering the PIN code. | |
| 3 Press▶/IENTER to confirm. | |
| RECONNECT | ON: The unit automatically reconnect when the last connected Bluetooth device is within range.; OFF: Cancels. |
| AUTO PAIRING | ON: The unit automatically pair supported Bluetooth device (iPhone/iPod touch/Android device) when it is connected through USB input terminal. Depending on the operating system of the connected device, this function may not work.; OFF: Cancels. |
| INITIALIZE | YES: Initialized all the Bluetooth settings (including stored pairing, phonebook, and etc.).; NO: Cancels. |
| INFORMATION | MY BT NAME: Displays the unit name ("KD-R8**BT"/"KD-R7**BT").; MY ADDRESS: Shows address of this unit. |
- You can only connect a maximum of two Bluetooth phones and one Bluetooth audio device at any time.
Bluetooth compatibility check mode
You can check the connectivity of the supported profile between the Bluetooth device and the unit. - Make sure there is no Bluetooth device paired.
1 Press and hold
"BLUETOOTH" "CHECK MODE" appears. "SEARCH NOW USING PHONE" "PIN IS 0000" scrolls on the display.
2 Search and select "KD-R8BT"/"KD-R7BT" on the Bluetooth device within 3 minutes.
3 Perform (A), (B) or (C) depending on what appears on the display.
(A) “PAIRING” “XXXXXX” (6-digit passkey):
Ensure that the same passkey appears on the unit and Bluetooth device, then operate the Bluetooth device to confirm the passkey.
(B) "PAIRING" "PIN IS 0000": Enter "0000" on the Bluetooth device.
(C) "PAIRING": Operate the Bluetooth device to confirm pairing.
After pairing is successful, "PAIRING OK" "[Device Name]" appears and Bluetooth compatibility check starts.
If "CONNECT NOW USING PHONE" appears, operate the Bluetooth device to allow phonebook access to continue.
"TESTING" flashes on the display.
The connectivity result flashes on the display. "PAIRING OK" and/or "HANDS-FREE OK"1 and/or "AUD STREAM OK"2 and/or "PBAP OK"*3: Compatible
1 Compatible with Hands-Free Profile (HFP)
2 Compatible with Advanced Audio Distribution Profile (A2DP)
*3 Compatible with Phonebook Access profile (PBAP)
After 30 seconds, "PAIRING DELETED" appears to indicate that pairing has been deleted, and the unit exits check mode.
- To cancel, press and hold SRC to turn off the power, then turn on the power again.
BLUETOOTH - Audio
While in BT AUDIO source, you can connect to five Bluetooth audio devices and switch between these five devices.
Audio player via Bluetooth
1 Press SRC- repeatedly to select BT AUDIO (or press SOURCE on the remote control).
- Pressing enters BT AUDIO directly.
2 Operate the Bluetooth audio player to start playback.
| To | On the faceplate | On the remote control |
| Playback/pause | Press▶/■ENTER. | Press▲. |
| Select group or folder | Press 2 ▲/1 ▼. | Press ▲/▼. |
| Reverse skip/Forward skip | Press↓/▶■. | Press▲/▶. |
| Reverse/Fast-forward | Press and hold ↓/▶■. | Press and hold ↓/▶. |
| Repeat play | Press 4 ▶ repeatedly. TRACK REPEAT, ALL REPEAT, REPEAT OFF | (Not available) |
| Random play | Press 3 ▶ repeatedly. GROUP RANDOM, ALL RANDOM, RANDOM OFF | (Not available) |
| Select a file from a folder/list | Refer to “Select a file from a folder/list” on page 8. | (Not available) |
| Switch between connected Bluetooth audio devices | Press 5.* | (Not available) |
- Pressing the "Play" key on the connected device itself also causes switching of sound output from the device.
Operations and display indications may differ according to their availability on the connected device.
Settings to use JVC Remote application
JVC Remote application is designed to control the JVC car receiver's operations from the following devices.
KD-R881BT: iPhone/iPod (via Bluetooth or via USB input terminal) or Android smartphone (via Bluetooth)
KD-R781BT: Android smartphone (via Bluetooth)
Preparation:
Install the latest version of JVC Remote application on your device before connecting. For more information, visit http://www.jvc.net/cs/car/.
1 Press and hold
2 Press VOL + / - to select an item (see the following table), then press / ENTER.
3 Repeat step 2 until the desired item is selected or activated.
4 Press to exit.
To return to the previous setting item, press Q .
Default: XX
REMOTE APP
| SELECT | Select the device (IOS or ANDROID) to use the application. |
| IOS | YES: Selects iPhone/iPod to use the application via Bluetooth or connected via USB input terminal. ; NO: Cancels. If IOS is selected, select iPod BT source (or iPod USB if your iPhone/iPod is connected via USB input terminal) to activate the application. • The connectivity of the application will be interrupted or disconnected if: - You change from iPod BT source to any playback source connected via the USB input terminal. - You change from iPod USB source to iPod BT source. |
| ANDROID | YES: Selects Android smartphone to use the application via Bluetooth. ; NO: Cancels. |
| ANDROID LIST*: Selects the Android smartphone to use from the list. | |
- Displayed only when [ANDROID] of [SELECT] is set to [YES].
STATUS Shows the status of the selected device.
IOS CONNECTED: You are able to use the application using the iPhone/iPod connected via Bluetooth or USB input terminal.
IOS NOT CONNECTED: No IOS device is connected to use the application.
Android CONNECTED: You are able to use the application using the Android smartphone connected via Bluetooth.
Android NOT CONNECTED: No Android device is connected to use the application.
Listen to iPhone/iPod via Bluetooth (for KD-R881BT)
You can listen to the songs on the iPhone/iPod via Bluetooth on this unit.
Press SRC- repeatedly to select iPod BT.
- You can operate the iPod/iPhone in the same way as iPod/iPhone via USB input terminal. ( 7)
- If you plug in an iPhone/iPod to the USB input terminal while listening to iPod BT source, the source automatically change to iPod USB. Press SRC-0 to select iPod BT if the device is still connected via Bluetooth.
Internet radio via Bluetooth
You can listen to Pandora on the following devices via Bluetooth on this unit.
- Make sure the USB input terminal is not connected to any device.
KD-R881BT: iPhone/iPod touch/Android device
KD-R781BT:Android device
Listen to Pandora (Applicable for Australia or New Zealand models only)
Preparation:
Select [ON] for [PANDORA SRC] in [SOURCE SELECT]. ( 4)
1 Open the Pandora application on your device.
2 Connect your device via Bluetooth connection. ( 10)
3 Press SRC-① repeatedly to select PANDORA (for iPhone/iPod) or PANDORA BT (for Android device).
The source switches and broadcast starts automatically.
- You can operate Pandora in the same way as Pandora via USB input terminal. ( 9)
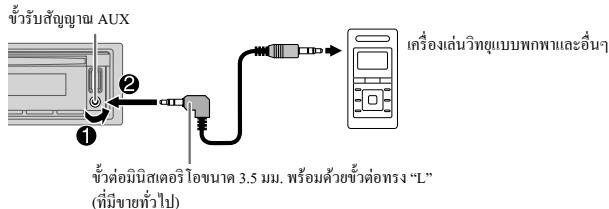
Use a portable audio player
1 Connect a portable audio player (commercially available).
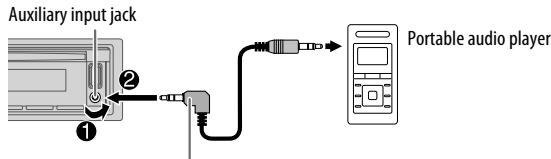
3.5 mm stereo mini plug with "L" shaped connector (commercially available)
2 Select [ON] for [BUILT-IN AUX] in [SOURCE SELECT]. ( 4)
3 Press SRC- repeatedly to select AUX.
4 Turn on the portable audio player and start playback.

Use a 3-core plug head stereo mini plug for optimum audio output.
AUDIO SETTINGS
1 Press and hold
2 Press VOL+/- to select an item (see the following table), then press▶/I ENTER.
3 Repeat step 2 until the desired item is selected/activated or follow the instructions stated on the selected item.
4 Press to exit.
To return to the previous setting item, press Q .
Default: XX
EQ SETTING
| PRESET EQ | Select a preset equalizer suitable to the music genre. • Select [USER] to use the settings made in [EASY EQ] or [PRO EQ]. FLAT/DRVN 3/DRVN 2/DRVN 1/HARD ROCK/HIP HOP/JAZZ/POP/R&B/USER/CLASSICAL Drive equalizer (DRVN 3/DRVN 2/DRVN 1) boosts specific frequencies in the audio signal to reduce the noise heard from outside the car or running noise of the tyres. | |
| EASY EQ | Adjust your own sound settings. • The settings are stored to [USER]. • The settings made may affect the current settings of [PRO EQ]. SUB.W SP*1*2: 00 to +06 (Default: 03 SUB.W*1*3: -50 to +10 00 BASS: LVL -09 to LVL +09 LVL 00 MID: LVL -09 to LVL +09 LVL 00 TRE: LVL -09 to LVL +09 LVL 00) | |
1, 2, *3: (⇒ 18)
| PRO EQ | Adjust your own sound settings. · The settings are stored to [USER]. · The settings made may affect the current settings of [EASY EQ]. | |
| 62.5HZ | ||
| LEVEL -09 to LEVEL +09 (LEVEL 00): Adjusts the level to memorize for each source. (Before making an adjustment, select the source you want to adjust.) | ||
| ON: Turns on the extended bass.; OFF: Cancels. | ||
| 100HZ/160HZ/250HZ/400HZ/630HZ/1KHZ/1.6KHZ/2.5KHZ/4KHZ/6.3KHZ/10KHZ/16KHZ | ||
| LEVEL -09 to LEVEL +09 (LEVEL 00): Adjusts the level to memorize for each source. (Before making an adjustment, select the source you want to adjust.) | ||
| Q FACTOR | 1.35/1.50/2.00: Adjust the quality factor. | |
| AUDIO CONTROL | ||
| BASS BOOST | LEVEL +01 to LEVEL +05: Selects your preferred bass boost level. ; OFF: Cancels. | |
| LOUDNESS | LEVEL 01/LEVEL 02: Boosts low or high frequencies to produce a well-balanced sound at low volume. ; OFF: Cancels. | |
| SUB.W LEVEL *1 | SPK-OUT *2 | (Not applicable when 3-way crossover is selected.) SUB.W 00 to SUB.W +06 (SUB.W +03): Adjusts the output level of the subwoofer connected via speaker lead. (→31) |
| PRE-OUT *3 | SUB.W -50 to SUB.W +10 (SUB.W 00): Adjusts the output level of the subwoofer connected to the lineout terminals (SW or REAR/SW) through an external amplifier. (→31) | |
| SUBWOOFER SET*3 | ON: Turns on the subwoofer output. ; OFF: Cancels. | |
| FADER | (Not applicable when 3-way crossover is selected.) POSITION R15 to POSITION F15 (POSITION 00): Adjusts the front and rear speaker output balance. |
| BALANCE*4 | POSITION L15 to POSITION R15 (POSITION 00): Adjusts the left and right speaker output balance. |
| VOLUME ADJUST | LEVEL -15 to LEVEL +06 (LEVEL 00): Preset the initial volume level of each source (compared to the FM volume level). Before adjustment, select the source you want to adjust. |
| AMP GAIN | LOW POWER: Limits the maximum volume level to 25. (Select if the maximum power of each speaker is less than 50 W to prevent damaging the speakers.) ; HIGH POWER: The maximum volume level is 35. |
| SPK/PRE OUT | (Not applicable when 3-way crossover is selected.) Depending on the speaker connection method, select the appropriate setting to get the desired output. (⇒ 19, Speaker output settings) |
| SPEAKER SIZE | Depending on the crossover type you have selected (⇒ 19, [X' OVER TYPE]), 2-way crossover or 3-way crossover setting items will be shown. (⇒ 20, Crossover settings) By default, 2-way crossover type is selected. |
| X' OVER | |
| DTA SETTINGS | For settings, ⇒ 22, Digital Time Alignment settings. |
| CAR SETTINGS |
1 Displayed only when [SUBWOOFER SET] is set to [ON].
2 For 2-way crossover: Displayed only when [SPK/PRE OUT] is set to [SUB.W/SUB.W]. (→ 19)
3 For 2-way crossover: Displayed only when [SPK/PRE OUT] is set to [REAR/SUB.W] or [SUB.W/SUB.W]. (→ 19)
4 This adjustment will not affect the subwoofer output.
AUDIO SETTINGS
| X' OVER TYPE | Caution: Adjust the volume before changing the [X' OVER TYPE] to avoid the sudden increase or decrease of the output level. |
| 2-WAY | (Displayed only when [3-WAY] is selected.) YES: Selects two way crossover type.; NO: Cancels. |
| 3-WAY | (Displayed only when [2-WAY] is selected.) YES: Selects three way crossover type.; NO: Cancels. |
| SOUND EFFECT | |
| SPACE ENHANCE | (Not applicable for TUNER source.) SMALL/MEDIUM/LARGE: Virtually enhances the sound space.; OFF: Cancels. |
| SND RESPONSE | LEVEL1/LEVEL2/LEVEL3: Virtually makes the sound more realistic.; OFF: Cancels. |
| SOUND LIFT | LOW/MIDDLE/HIGH: Virtually adjust the sound position heard from the speakers.; OFF: Cancels. |
| VOL LINK EQ | ON: Boosts the frequency to reduce the noise heard from outside the car or running noise of the tyres.; OFF: Cancels. |
| K2 TECHNOLOGY | (Not applicable for TUNER source and AUX source.) ON: Improve the sound quality of compressed music.; OFF: Cancels. |
Speaker output settings [SPK/PRE OUT]
(Applicable only if [X 'OVER TYPE] is set to [2-WAY])
Select the output setting for the speakers [SPK/PRE OUT], based on the speaker connection method.
![JVC KD-X341 BT - Speaker output settings [SPK/PRE OUT] - 1](/content/2024/12/188863/images/d86c33ff0d268eaab377d6222c305769205598dafd28d3d137138d1e528add24.jpg)
Connection via lineup terminals
For connections through an external amplifier. ( 31)
KD-R881BT:
| Setting on [SPK/PRE OUT] | Audio signal through lineup terminal | ||
| FRONT | REAR | SW | |
| REAR/REAR (default) | Front speakers output | Rear speakers output | Subwoofer output |
| REAR/SUB.W | (Not available) | (Not available) | (Not available) |
| SUB.W/SUB.W | Front speakers output | L(left): Subwoofer output R(right): (Mute) | Subwoofer output |
KD-R781BT:
| Setting on [SPK/PRE OUT] | Audio signal through lineup terminal | |
| FRONT | REAR/SW | |
| REAR/REAR | Front speakers output | Rear speakers output |
| REAR/SUB.W (default) | Front speakers output | Subwoofer output |
| SUB.W/SUB.W | Front speakers output | Subwoofer output |

Connection via speaker leads
For connections without using an external amplifier. However, with this settings you can also enjoy the subwoofer output. ( 31)
| Setting on [SPK/PRE OUT] | Audio signal through rear speaker lead | |
| L (left) | R (right) | |
| REAR/REAR | Rear speakers output | Rear speakers output |
| REAR/SUB.W | Rear speakers output | Rear speakers output |
| SUB.W/SUB.W | Subwoofer output | (Mute) |
If [SUB.W/SUB.W] is selected:
- [120HZ] is selected in [SUBWOOFER LPF] and [THROUGH] is not available.
- [POSITION R02] is selected in [FADER] and selectable range is [POSITION R15] to [POSITION 00].
Crossover settings
Below are the available setting items for 2-way crossover and 3-way crossover.
Caution
Select a crossover type according to how the speakers are connected. ( 31) If you select a wrong type:
- The speakers may damage.
The output sound level may be extremely high or low.
SPEAKER SIZE
Selects according to the connected speaker size for optimum performance.
- The frequency and slope settings are automatically set for the crossover of the selected speaker.
- When 2-way crossover is selected, if [NONE] is selected for [TWEETER] of [FRONT], [REAR] and [SUBWOOFER] for [SPEAKER SIZE], the [X'OVER] setting of the selected speaker is not available.
- When 3-way crossover is selected, if [NONE] is selected for [WOOFER] of [SPEAKER SIZE], the [X'OVER] setting of [WOOFER] is not available.
X'OVER (crossover)
- [FRQ]/[F-HPF FRQ]/[R-HPF FRQ]/[SW LPF FRQ]/[HPF FRQ]/[LPF FRQ]: Adjusts the crossover frequency for the selected speakers (high pass filter or low pass filter). If [THROUGH] is selected, all signals are sent to the selected speakers.
- [SLOPE]/[F-HPF SLOPE]/[R-HPF SLOPE]/[SW LPF SLOPE]/[HPF SLOPE]/[LPF SLOPE]: Adjusts the crossover slope. Selectable only if a setting other than [THROUGH] is selected for the crossover frequency.
- [SW LPF PHASE]/[PHASE]: Selects the phase of the speaker output to be in line with the other speaker output.
- [GAIN LEFT]/[GAIN RIGHT]/[F-HPF GAIN]/[R-HPF GAIN]/[SW LPF GAIN]/[GAIN]: Adjusts the output volume of the selected speaker.
2-way crossover setting items
SPEAKER SIZE
| FRONT | SIZE | 8CM/10CM/12CM/13CM/16CM/17CM/18CM/4×6/5×7/6×8/6×9/7×10 |
| TWEETER | SMALL/MIDDLE/LARGE/NONE (not connected) | |
| REAR*1 | 8CM/10CM/12CM/13CM/16CM/17CM/18CM/4×6/5×7/6×8/6×9/7×10/NONE (not connected) | |
| SUBWOOFER*2*3 | 16CM/20CM/25CM/30CM/38CM OVER/NONE (not connected) | |
X'OVER
| TWEETER | FRQ | 1KHZ/1.6KHZ/2.5KHZ/4KHZ/5KHZ/6.3KHZ/8KHZ/10KHZ/12.5KHZ |
| GAIN LEFT | -08DB to 00DB | |
| GAIN RIGHT | -08DB to 00DB | |
| FRONT HPF | F-HPF FRQ | 30HZ/40HZ/50HZ/60HZ/70HZ/80HZ/90HZ/100HZ/120HZ/150HZ/180HZ/220HZ/250HZ/THROUGH |
| F-HPF SLOPE | -06DB/-12DB/-18DB/-24DB | |
| F-HPF GAIN | -08DB to 00DB | |
| REAR HPF*1 | R-HPF FRQ | 30HZ/40HZ/50HZ/60HZ/70HZ/80HZ/90HZ/100HZ/120HZ/150HZ/180HZ/220HZ/250HZ/THROUGH |
| R-HPF SLOPE | -06DB/-12DB/-18DB/-24DB | |
| R-HPF GAIN | -08DB to 00DB | |
| SUBWOOFERLPF*2*3 | SW LPF FRQ | 30HZ/40HZ/50HZ/60HZ/70HZ/80HZ/90HZ/100HZ/120HZ/150HZ/180HZ/220HZ/250HZ/THROUGH |
| SW LPF SLOPE | -06DB/-12DB/-18DB/-24DB | |
| SW LPF PHASE | REVERSE (180°)/NORMAL (0°) | |
| SW LPF GAIN | -08DB to 00DB |
3-way crossover setting items
| SPEAKER SIZE | ||
| TWEETER | SMALL/MIDDLE/LARGE | |
| MID RANGE | 8CM/10CM/12CM/13CM/16CM/17CM/18CM/4×6/5×7/6×8/6×9 | |
| WOOFER*3 | 16CM/20CM/25CM/30CM/38CM OVER/NONE (not connected) | |
| X' OVER | ||
| TWEETER | HPF FRQ | 1KHZ/1.6KHZ/2.5KHZ/4KHZ/5KHZ/6.3KHZ/8KHZ/10KHZ/12.5KHZ |
| SLOPE | -06DB/-12DB | |
| PHASE | REVERSE (180°)/NORMAL (0°) | |
| GAIN | -08DB to 00DB | |
| MID RANGE | HPF FRQ | 30HZ/40HZ/50HZ/60HZ/70HZ/80HZ/90HZ/100HZ/120HZ/150HZ/180HZ/220HZ/250HZ/THROUGH |
| HPF SLOPE | -06DB/-12DB | |
| LPF FRQ | 1KHZ/1.6KHZ/2.5KHZ/4KHZ/5KHZ/6.3KHZ/8KHZ/10KHZ/12.5KHZ/THROUGH | |
| LPF SLOPE | -06DB/-12DB | |
| PHASE | REVERSE (180°)/NORMAL (0°) | |
| GAIN | -08DB to 00DB | |
| WOOFER*3 | LPF FRQ | 30HZ/40HZ/50HZ/60HZ/70HZ/80HZ/90HZ/100HZ/120HZ/150HZ/180HZ/220HZ/250HZ/THROUGH |
| SLOPE | -06DB/-12DB | |
| PHASE | REVERSE (180°)/NORMAL (0°) | |
| GAIN | -08DB to 00DB | |
1 Displayed only when [SPK/PRE OUT] is set to [REAR/REAR] or [REAR/SUB.W]. (→ 19)
2 KD-R781BT: Displayed only when [SPK/PRE OUT] is set to [REAR/SUB.W] or [SUB.W/SUB.W]. (→ 19)
*3 Displayed only when [SUBWOOFER SET] is set to [ON]. (→ 18)
Digital Time Alignment settings
Digital Time Alignment sets the delay time of the speaker output to create a more suitable environment for your vehicle.
- For more information, Determining the value for [DISTANCE] and [GAIN] of [DTA SETTINGS].
DTA SETTINGS
| POSITION | Selects your listening position (reference point). ALL: Not compensating; FRONT RIGHT: Front right seat; FRONT LEFT: Front left seat; FRONT ALL: Front seat • [FRONT ALL] is displayed only when [X' OVER TYPE] is set to [2-WAY]. (→19) |
| DISTANCE*1 | 0CM to 610CM: Fine adjust the distance to compensate. |
| GAIN*1 | -8DB to 0DB: Fine adjust the output volume of the selected speaker. |
| DTA RESET | YES: Resets the settings ([DISTANCE] and [GAIN]) of the selected [POSITION] to default.; NO: Cancels. |
| CAR SETTINGS | Identify your car type and rear speaker location in order to make the adjustment for [DTA SETTINGS]. |
| CAR TYPE | COMPACT/FULL SIZE CAR/WAGON/MINIVAN/SUV/ MINIVAN(LONG): Selects the type of vehicle. ; OFF: Not compensating. |
| R-SP LOCATION*2 | Selects the location of the rear speakers in your vehicle to calculate the furthest distance from the listening position selected (reference point). • DOOR/REAR DECK: Selectable only when [CAR TYPE] is selected as [OFF], [COMPACT], [FULL SIZE CAR], [WAGON] or [SUV]. • 2ND ROW/3RD ROW: Selectable only when [CAR TYPE] is selected as [MINIVAN] or [MINIVAN(LONG)]. |
Determining the value for [DISTANCE] and [GAIN] of [DTA SETTINGS]
![JVC KD-X341 BT - Determining the value for [DISTANCE] and [GAIN] of [DTA SETTINGS] - 1](/content/2024/12/188863/images/78a28a19da81050ca4bbe8ef9ea6ea02f4f18536431e22bbc63b7e9106484133.jpg)
If you specify the distance from the center of the currently set listening position to every speaker, the delay time will be automatically computed and set.
1 Determine the center of the currently set listening position as the reference point.
2 Measure the distances from the reference point to the speakers.
3 Calculate the differences between the distance of the furthest speaker (rear speaker) and other speakers.
4 Set the [DISTANCE] calculated in step 3 for individual speakers.
5 Adjust [GAIN] for individual speakers.
Example: When [FRONT ALL] is selected as the listening position
*1 Before making an adjustment, select the speaker:
When 2-way crossover is selected:
FRONT LEFT/FRONT RIGHT/REAR LEFT/REAR RIGHT/SUBWOOFER
- [REAR LEFT], [REAR RIGHT] and [SUBWOOFER] is selectable only if a setting other than [NONE] is selected for [REAR] and [SUBWOOFER] of [SPEAKER SIZE]. (→ 21)
When 3-way crossover is selected:
TWEETER LEFT/TWEETER RIGHT/MID LEFT/MID RIGHT/WOOFER
- [WOOFER] is selectable only if a setting other than [NONE] is selected for [WOOFER] of [SPEAKER SIZE]. ( 21)
*2 Displayed only when [X' OVER TYPE] is set to [2-WAY] (→ 19) and if a setting other than [NONE] is selected for [REAR] of [SPEAKER SIZE]. (→ 21)
DISPLAY SETTINGS
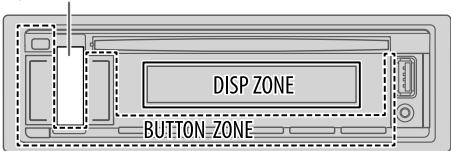
Symbolic button
1 Press and hold
2 Press VOL+/- to select an item (see the following table), then press ENTER.
3 Repeat step 2 until the desired item is selected/activated or follow the instructions stated on the selected item.
4 Press to exit.
To return to the previous setting item, press / .
Default: XX
DISPLAY
DIMMER
Dim the illumination.
OFF: Dimmer is turned off. Brightness changes to [DAY] setting.
ON: Dimmer is turned on. Brightness changes to [NIGHT] setting.
( [BRIGHTNESS])
DIMMER TIME: Set the dimmer on and off time.
1 Press VOL + / - to adjust the [ON] time, then press IENTER.
2 Press VOL + / - to adjust the [OFF] time, then press IENTER. (Default: [ON]: PM6:00; [OFF]: AM6:00)
DIMMER AUTO: Dimmer turns on and off automatically when you turn off or on the car headlights. *1
BRIGHTNESS
Set the brightness for day and night separately.
1 DAY/NIGHT: Select day or night.
2 Select a zone. (See illustration on the left column.)
3 LEVEL 00 to LEVEL 31: Set the brightness level.
(Default: [DAY]: LEVEL 31; [NIGHT]: LEVEL 15)
TEXT SCROLL*2
SCROLL ONCE: Scrolls the display information once.
SCROLL AUTO: Repeats scrolling at 5-second intervals.;
SCROLL OFF: Cancels.
COLOR (for symbolic button only)
PRESET
Select an illumination color for the symbolic button.
Default color: [COLOR FLOW01]
COLOR 01 to COLOR 49
- USER: The color you have created for [DAY COLOR] or [NIGHT COLOR] is shown.
COLOR FLOW01 to COLOR FLOW03: Color changes at different speeds.
- Preset color: CRYSTAL, FLOWER, FOREST, GRADATION, OCEAN, SUNSET, RELAX
DAY COLOR
Store your own day and night illumination colors for the symbolic button.
Default color: [RED 31], [GREEN 31], [BLUE 23]
1 RED/GREEN/BLUE: Select a primary color.
2 00 to 31: Select the level.
NIGHT COLOR
Repeat steps 1 and 2 for all primary colors.
- Your setting is stored to [USER] in [PRESET].
- [NIGHT COLOR] or [DAY COLOR] is changed by turning on or off your car's headlight.
MENUCOLOR
ON: The illumination color of the symbolic button changes to white color when in menu mode or when selecting a music file from a folder/list. OFF: Cancels.
1 The illumination control wire connection is required. (→ 31)
2 Some characters or symbols will not be shown correctly (or will be blanked).
■ Maintenance
Cleaning the unit
Wipe off dirt on the faceplate with a dry silicone or soft cloth.
Cleaning the connector
Detach the faceplate and clean the connector gently with a cotton swab, being careful not to damage the connector.

Connector (on the reverse side of the faceplate)
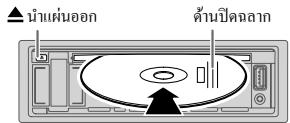
Handling discs:
- Do not touch the recording surface of the disc.
- Do not stick tape etc. on the disc, or use a disc with tape stuck on it.
- Do not use any accessories for the disc.
- Clean from the center of the disc and move outward.
- Clean the disc with a dry silicone or soft cloth. Do not use any solvents.
- When removing discs from this unit, pull them out horizontally.
- Remove burrs from the center hole and disc edge before inserting a disc.
■ More information
For: - Latest firmware updates and latest compatible item list
JVC original application
- Any other latest information
Visit http://www.jvc.net/cs/car/.
General
- This unit can only play the following CDs:

- DualDisc playback: The Non-DVD side of a "DualDisc" does not comply with the "Compact Disc Digital Audio" standard. Therefore, the use of Non-DVD side of a DualDisc on this product cannot be recommended.
- For detailed information and notes about the playable audio files, visit http://www.jvc.net/cs/car/.
Playable files
- Playable audio file:
For disc:
KD-R881BT: MP3 (.mp3), WMA (.wma), AAC (.aac)
KD-R781BT: MP3 (.mp3), WMA (.wma)
For USB mass storage class device:
KD-R881BT: MP3 (.mp3), WMA (.wma), AAC (.aac), WAV (.wav), FLAC (.flac)
KD-R781BT: MP3 (.mp3), WMA (.wma), WAV (.wav), FLAC (.flac)
- Playable disc media: CD-R/CD-RW/CD-ROM
- Playable disc file format: ISO 9660 Level 1/2, Joliet, Long file name
- Playable USB device file system: FAT12, FAT16, FAT32
Even when audio files comply with the standards listed above, playback may be impossible depending on the types or conditions of media or device.
The AAC (.m4a) file in a USB device or a CD encoded by iTunes cannot be played on this unit.
Unplayable discs
- Discs that are not round.
- Discs with coloring on the recording surface or discs that are dirty.
- Recordable/ReWritable discs that have not been finalized.
- 8 cm CD. Attempting to insert using an adapter may cause malfunction.
About USB devices
- You cannot connect a USB device via a USB hub.
- Connecting a cable whose total length is longer than 5m may result in abnormal playback.
- This unit cannot recognize a USB device whose rating is other than 5V and exceeds 1.5A .
About iPod/Phone
- Via USB input terminal:
Made for
- iPod touch (5th and 6th generation)
- iPod nano (7th generation)
iPhone 4S, 5, 5S, 5C, 6, 6 Plus, 6S, 6S Plus, SE
REFERENCES
- Via Bluetooth:
Made for - iPod touch (5th and 6th generation)
iPhone 4S, 5, 5S, 5C, 6, 6 Plus, 6S, 6S Plus, SE - It is not possible to browse video files on the "Videos" menu in [HEAD MODE].
- The song order displayed on the selection menu of this unit may differ from that of the iPod/iPhone.
Depending on the version of the operating system of the iPod/ iPhone, some functions may not operate on this unit.
About Android device
- This unit supports Android OS 4.1 and above.
- Some Android devices (with OS 4.1 and above) may not fully support Android Open Accessory (AOA) 2.0.
- If the Android device supports both mass storage class device and AOA 2.0, this unit always playback via AOA 2.0 as priority.
About Pandora
- Pandora is only available in certain countries.
For more information, visit http://www.pandora.com/legal. - Because Pandora is a third-party service, the specifications are subject to change without prior notice. Accordingly, compatibility may be impaired, or some or all of the services may become unavailable.
- Some functions of Pandora cannot be operated from this unit.
- For issues using the application, please contact Pandora at Pandora-support@pandora.com.
About Bluetooth
- Depending on the Bluetooth version of the device, some Bluetooth devices may not be able to connect to this unit.
- This unit may not work with some Bluetooth devices.
- Signal conditions vary, depending on the surroundings.
Change the display information
Each time you press , the display information changes.
- If the information is unavailable or not recorded, "NO TEXT", "NO NAME", or other information (eg. station name) appears.
| Source name | Display information |
| FM or AM | Frequency (Date/Clock) ⇒ Frequency (Date/Clock) with music synchronisation* ⇒ (back to the beginning) |
| (For FM Radio Data System stations only) Station name (PS)/Program type (PTY) (Date/Clock) ⇒ Radio text (Date/Clock) ⇒ Radio text + (Radio text+) ⇒ Song title (Artist) ⇒ Song title (Date/Clock) ⇒ Frequency (Date/Clock) ⇒ Station name (PS)/Program type (PTY) (Date/Clock) with music synchronisation* ⇒ (back to the beginning) | |
| CD or USB | (For CD-DA) Track title (Artist) ⇒ Track title (Disc name) ⇒ Track title (Date/Clock) ⇒ Playing time (Date/ Clock) ⇒ Track title (Artist) with music synchronisation* ⇒ (back to the beginning) |
| (For MP3/WMA/AAC/WAV/FLAC files) Song title (Artist) ⇒ Song title (Album name) ⇒ Song title (Date/Clock) ⇒ File name (Folder name) ⇒ File name (Date/Clock) ⇒ Playing time (Date/Clock) ⇒ Song title (Artist) with music synchronisation* ⇒ (back to the beginning) | |
| iPod USB/iPod BT or ANDROID | When [HEAD MODE]/[AUTO MODE] is selected (⇒ 8): Song title (Artist) ⇒ Song title (Album name) ⇒ Song title (Date/Clock) ⇒ Playing time (Date/ Clock) ⇒ Song title (Artist) with music synchronisation* ⇒ (back to the beginning) |
| PANDORA/ PANDORA BT | Station name (Date/Clock) ⇒ Shared/Radio (Date/Clock) ⇒ Song title (Artist) ⇒ Song title (Album name) ⇒ Song title (Date/Clock) ⇒ Playing time (Date/Clock) ⇒ Station name (Date/ Clock) with music synchronisation* ⇒ (back to the beginning) |
| BT AUDIO | Song title (Artist) ⇒ Song title (Album name) ⇒ Song title (Date/Clock) ⇒ Playing time (Date/ Clock) ⇒ Song title (Artist) with music synchronisation* ⇒ (back to the beginning) |
| AUX | AUX (Date/Clock) ⇒ AUX (Date/Clock) with music synchronisation* ⇒ (back to the beginning) |
- The illumination color of the symbolic button changes and synchronises with the music.
TROUBLESHOOTING
| Symptom | Remedy | |
| General | Sound cannot be heard. | Adjust the volume to the optimum level. Check the cords and connections. |
| "MISWIRING CHECK WIRING THEN PWR ON" appears. | Turn the power off, then check to be sure the terminals of the speaker wires are insulated properly. Turn the power on again. | |
| "PROTECTING SEND SERVICE" appears. | Send the unit to the nearest service center. | |
| Source cannot be selected. | Check the [SOURCE SELECT] setting. (→4) | |
| Radio | Radio reception is poor. Static noise while listening to the radio. | Connect the antenna firmly. |
| CD/USB/IPod | Disc cannot be ejected. | Press and hold▲to forcibly eject the disc. Be careful not to drop the disc when it is ejected. |
| "IN DISC" appears. | Make sure nothing is blocking the loading slot when you eject the disc. | |
| "PLEASE EJECT" appears. | Press▲, then insert the disc correctly. | |
| Playback order is not as intended. | The playback order is determined by the file name (USB) or the order in which files were recorded (disc). | |
| Elapsed playing time is not correct. | This depends on the recording process earlier. | |
| "NOT SUPPORT" appears and track skips. | Check whether the track is a playable format. (→24) | |
| "READING" keeps flashing. | Do not use too many hierarchical levels and folders. Reload the disc or reattach the USB device. | |
| "UNSUPPORTED DEVICE" appears. | Check whether the connected device is compatible with this unit and ensure the file systems are in supported formats. (→24) Reattach the device. | |
| "UNRESPONIVE DEVICE" appears. | Make sure the device is not malfunction and reattach the device. | |
| Symptom | Remedy | |
| CD/USB/iPod | "USB HUB IS NOT SUPPORTED" appears. | This unit cannot support a USB device connected via a USB hub. |
| "CANNOT PLAY" appears. | Connect a USB device that contains playable audio files. | |
| The iPod/iPhone does not turn on or does not work. | Check the connection between this unit and iPod/iPhone. Detach and reset the iPod/iPhone using hard reset. | |
| "LOADING" appears when you enter search mode by pressing Q/→ | This unit is still preparing the iPod/iPhone music list. It may take some time to load, try again later. | |
| Correct characters are not displayed. | This unit can only display uppercase letters, numbers, and a limited number of symbols. Depending on the display language you have selected (⇒ 5), some characters may not be displayed correctly. | |
| Android | • Sound cannot be heard during playback. • Sound output only from the Android device. | Reconnect the Android device. If in [AUDIO MODE], launch any media player application on the Android device and start playback. If in [AUDIO MODE], relaunch the current media player application or use another media player application. Restart the Android device. If this does not solve the problem, the connected Android device is unable to route the audio signal to unit. (⇒ 25) |
| Cannot playback at [AUTO MODE]. | Make sure JVC MUSIC PLAY APP is installed on the Android device. (⇒ 7) Reconnect the Android device and select the appropriate control mode. (⇒ 8) If this does not solve the problem, the connected Android device does not support [AUTO MODE]. (⇒ 25) | |
| "NO DEVICE" or "READING" keeps flashing. | Switch off the developer options on the Android device. Reconnect the Android device. If this does not solve the problem, the connected Android device does not support [AUTO MODE]. (⇒ 25) | |
TROUBLESHOOTING
| Symptom | Remedy | |
| Android | Playback is intermittent or sound skips. | Turn off the power saving mode on the Android device. |
| “CANNOT PLAY” | ·Make sure Android device contains playable audio files. ·Reconnect the Android device. ·Restart the Android device. | |
| Pandora | “ADD ERROR” | New station creation is unsuccessful. |
| “CHK DEVICE” | Check the Pandora application on your device. | |
| “NO SKIPS” | The skip limit has been reached. | |
| “NO STATIONS” | No stations are found. | |
| “STATION LMT” | The number of registered stations has reached its limit. Retry after deleting unnecessary stations from your device. | |
| “UPGRADE APP” | Make sure you have installed the latest version of the Pandora application on your device. | |
| “CONNECT ERR” | Communication is unstable. | |
| “RATING ERR” | Registration of thumbs up/thumbs down has failed due to insufficient network connectivity. | |
| “THUMBS N/A” | Registration of thumbs up/thumbs down is not allowed. | |
| “LICENSE ERR” | You try to access from a country which Pandora is not deliverable. | |
| Bluetooth® | No Bluetooth device is detected. | ·Search from the Bluetooth device again. ·Reset the unit. (→3) |
| Pairing cannot be made. | ·Make sure you have entered the same PIN code to both the unit and Bluetooth device. ·Delete pairing information from both the unit and the Bluetooth device, then perform pairing again. (→10) | |
| Symptom | Remedy | |
| Bluetooth® | Echo or noise occurs. | ·Adjust the microphone unit's position. (→10) ·Check the [ECHO CANCEL] setting. (→12) |
| Phone sound quality is poor. | ·Reduce the distance between the unit and the Bluetooth device. ·Move the car to a place where you can get a better signal reception. | |
| Sound is being interrupted or skipped during playback of a Bluetooth audio player. | ·Reduce the distance between the unit and the Bluetooth audio player. ·Turn off, then turn on the unit and try to connect again. ·Other Bluetooth devices might be trying to connect to the unit. | |
| The connected Bluetooth audio player cannot be controlled. | ·Check whether the connected Bluetooth audio player supports Audio/Video Remote Control Profile (AVRCP). (Refer to the instructions of your audio player.) ·Disconnect and connect the Bluetooth player again. | |
| “PLEASE WAIT” | The unit is preparing to use the Bluetooth function. If the message does not disappear, turn off and turn on the unit, then connect the device again. | |
| “NOT SUPPORT” | The connected phone does not support Voice Recognition feature. | |
| “ERROR” | Try the operation again. If “ERROR” appears again, check if the device supports the function you have tried. | |
| “H/W ERROR” | Reset the unit and try the operation again. If “H/W ERROR” appears again, consult your nearest service center. | |
If you still have troubles, reset the unit. ( 3)
SPECIFICATIONS
| Tuner | FM Frequency Range | 87.5 MHz — 108.0 MHz (50 kHz step) |
| Usable Sensitivity (S/N = 26 dB) | 8.2 dBf (0.71 μV/75 Ω) | |
| Quieting Sensitivity (DIN S/N = 46 dB) | 17.2 dBf (2.0 μV/75 Ω) | |
| Frequency Response (±3 dB) | 30 Hz — 15 kHz | |
| Signal-to-Noise Ratio (MONO) | 64 dB | |
| Stereo Separation (1 kHz) | 40 dB | |
| AM | Frequency Range | Band 1 (AM): 531 kHz — 1 602 kHz (9 kHz step) Band 2 (SW1): 2 940 kHz — 7 735 kHz (5 kHz step) Band 3 (SW2): 9 500 kHz — 10 135 kHz / 11 580 kHz — 18 135 kHz (5 kHz step) |
| Usable Sensitivity (S/N = 20 dB) | AM: 29 dBμ (28.2 μV) SW: 30 dBμ (32 μV) | |
| CD player | Laser Diode | GaAlAs |
| Digital Filter (D/A) | 8 times over sampling | |
| Spindle Speed | 500 rpm — 200 rpm (CLV) | |
| Wow & Flutter | Below measurable limit | |
| Frequency Response (±1 dB) | 20 Hz — 20 kHz | |
| Total Harmonic Distortion (1 kHz) | 0.01 % | |
| Signal-to-Noise Ratio (1 kHz) | 105 dB | |
| Dynamic Range | 90 dB | |
| Channel Separation | 85 dB | |
| MP3 Decode | Compliant with MPEG-1/2 Audio Layer-3 | |
| WMA Decode | Compliant with Windows Media Audio | |
| AAC Decode | AAC-LC“.aac” files (for KD-R881BT) |
| USB | USB Standard | USB 1.1, USB 2.0 (Full speed) |
| Compatible Devices | Mass storage class | |
| File System | FAT12/ 16/ 32 | |
| Maximum Supply Current | DC 5 V——1.5 A | |
| D/A Converter | 24 Bit | |
| MP3 Decode | Compliant with MPEG-1/2 Audio Layer-3 | |
| WMA Decode | Compliant with Windows Media Audio | |
| AAC Decode | AAC-LC ".aac" files (for KD-R881BT) | |
| WAV Decode | Linear-PCM | |
| FLAC Decode | FLAC files (Up to 24 Bit/48 kHz) |
| Auxiliary | Frequency Response (±3 dB) | 20 Hz — 20 kHz |
| Input Maximum Voltage | 1 000 mV | |
| Input Impedance | 30 kΩ | |
| Bluetooth | Version | Bluetooth 3.0 |
| Frequency Range | 2.402 GHz — 2.480 GHz | |
| Output Power | +4 dBm (MAX), 0 dBm (AVE) Power Class 2 | |
| Maximum Communication Range | Line of sight approx. 10 m (32.8 ft) | |
| Pairing | SSP (Secure Simple Pairing) | |
| Profile | HFP1.6 (Hands-Free Profile) A2DP (Advanced Audio Distribution Profile) AVRCP1.5 (Audio/Video Remote Control Profile) PBAP (Phonebook Access Profile) SPP (Serial Port Profile) |
SPECIFICATIONS
| Audio | Maximum Output Power | 50 W × 4 or 50 W × 2 + 50 W × 1 (Subwoofer = 4 Ω) |
| Full Bandwidth Power | 22 W × 4 (at less than 1 % THD) | |
| Speaker Impedance | 4 Ω — 8 Ω | |
| Preout Level/Load (CD/USB) | 4 000 mV/10 kΩ load | |
| Preout Impedance | ≤ 600 Ω | |
| General | Operating Voltage (10.5 V — 16 V allowable) | 14.4 V |
| Maximum Current Consumption | 10 A | |
| Operating Temperature Range | -10°C — +60°C | |
| Installation Size (W × H × D) | 182 mm × 53 mm × 159 mm | |
| Net Weight (includes Trimplate, Mounting Sleeve) | 1.2 kg |
Subject to change without notice.
INSTALLATION/CONNECTION
Warning
- The unit can only be used with a 12VDC power supply, negative ground.
- Disconnect the battery's negative terminal before wiring and mounting.
- Do not connect Battery wire (yellow) and Ignition wire (red) to the car chassis or Ground wire (black) to prevent a short circuit.
- Insulate unconnected wires with vinyl tape to prevent a short circuit.
- Be sure to ground this unit to the car's chassis again after installation.
Caution
- For safety's sake, leave wiring and mounting to professionals. Consult the car audio dealer.
- Install this unit in the console of your vehicle. Do not touch the metal parts of this unit during and shortly after use of the unit. Metal parts such as the heat sink and enclosure become hot.
- Do not connect the wires of speakers to the car chassis or Ground wire (black), or connect them in parallel.
- Connect speakers with a maximum power of more than 50W . If the maximum power of the speakers is lower than 50W , change the [AMP GAIN] setting to avoid damaging the speakers. ( 18)
- Mount the unit at an angle of less than 30^ .
- If your vehicle wiring harness does not have the ignition terminal, connect Ignition wire (red) to the terminal on the vehicle's fuse box which provides 12 V DC power supply and is turned on and off by the ignition key.
- Keep all cables away from heat dissipate metal parts.
- After the unit is installed, check whether the brake lamps, blinkers, wipers, etc. on the car are working properly.
- If the fuse blows, first make sure the wires are not touching car's chassis, then replace the old fuse with one that has the same rating.
Basic procedure
1 Remove the key from the ignition switch, then disconnect the terminal of the car battery.
2 Connect the wires properly.
See Wiring connection. ( 31)
3 Install the unit to your car.
See Installing the unit (in-dash mounting). ( 30)
4 Connect the terminal of the car battery.
5 Press SRC- to turn on the power.
6 Detach the faceplate and reset the unit. ( 3)
Installing the unit (in-dash mounting)
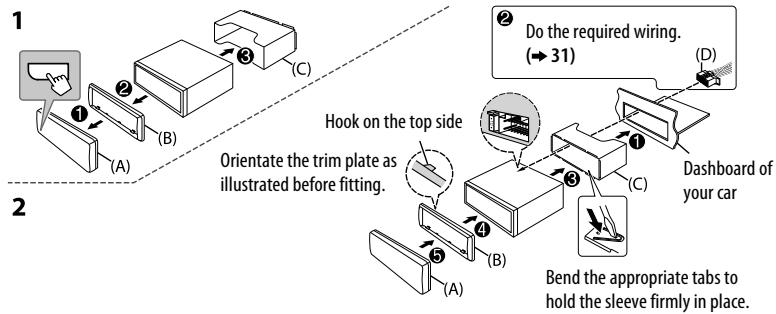
When installing without the mounting sleeve
1 Remove the mounting sleeve and trim plate from the unit.
2 Align the holes in the unit (on both sides) with the vehicle mounting bracket and secure the unit with screws (commercially available).

Use only the specified screws. Using wrong screws might damage the unit.
How to remove the unit
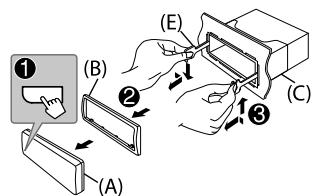
Part list for installation
(A) Faceplate
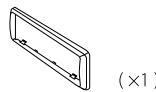
(B) Trim plate
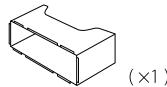
(C) Mounting sleeve
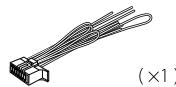
(D) Wiring harness
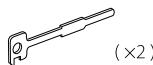
(E) Extraction key
Output terminals
For 2-way crossover setting
| KD-R881BT | REAR | : Rear output |
| FRONT | : Front output | |
| SW | : Subwoofer output | |
| KD-R781BT | FRONT | : Front output |
| REAR/SW | : Rear/subwoofer output |
For 3-way crossover setting
| KD-R881BT | REAR | : Tweeter output |
| FRONT | : Mid Range output | |
| SW | : Woofer output | |
| KD-R781BT | FRONT | : Mid Range output |
| REAR/SW | : Woofer output |
Wiring connection
y
naun 2
3
4
1 mnnnnnna
2 1
3
m 5
CD/USB/iPod/Android 7
Pandora* (1)
BLUETOOTH 10
AUX 17
17
Hnnnnaannnnaa 23
8 24
mnnnnae
26
yoyouw 28
1 29
nouy
y
n 1
nunuuee 1nnnaaennnne nannn
A
- 13700000000000000000000000000000000000000000000000000000000000000000000000000
A
n
- 1
aennnnnne nnnnne aannnnnne ane annnnnne ane ane ane ane ane ane ane ane
y:
- nanadnntnnnnnnnnnnnnnnnnnnnnnnnnnnnnnnnnnnnnnnnnnnnnnnnnnnnnnnnnnnnnnnnnnnnnnnnnnnnnnnnnnnnnnnnnnnnnnnnnnnnnnnnn
yaaanannnnnnaa aannnnnnnnnnnnnnnnnnnnnnnnnnnnnnnnnnnnnnnnnnnnnnnnnnnnnnnnnnnnnnnnnnnnnnnnnnnnnnnnnnnnnnnnnnnnnn
Wulndanonuunuunuunuunuunuunuunuunuunuunuunuunuunuunuunuunuunuunuunuunuunuunuunuunuunuunuunuunuunuunuunuunuunuunuunuunuunuunuunu - wnnnne nnnnne nnnnne nnnnne nnnnne nnnnne nnnnne nnnnne nnnnne nnnnne
Tnnnna (RM-RK52):
oTunnnnnsaunnnnnnnnnnnnnnnnnnnnnnnnnnnnnnnnnnnnnnnnnnnnnnnnnnnnnnnnnnnnnnnnnnnnnnnnnnnnnnnnnnnnnnn
- 1
- 01972453678900000000000000000000000000000000000000000
aannnnnne
SSM 07-12/SSM 13-18 wouwnn 12 woune
LOCAL SEEK
ON:nnnnaamAM/SW1/SW2 naygaaon;OFF:om
aannnnnnaeennnnnne nnnnnnnnnnnnnnnnnnnnnnnnnnnnnnnnnnnnnnnnnnnnnnnnnnnnnnnnnnnnnnnnnnnnnnnnnnnnnnnnnnnnnnnnnnnnnnnnnnnnnnnnnnnnnnnnnnnnnnnnn
| IF BAND | AUTO: 썼류류류류류류류류류류류류류류류류류류류류류류류류류류류류류류류류류류류류류류류류류류류류류류류류류류류류류류류류류류류류류류류류류류류류류류류류류류류류류류류류류류류류류류류류류류류류류류류류류류류류務; WIDE: 썼류류류류류류류류류류류류류류류류류류류류류류류류류류류류류류류류류류류류류류류류류류류류류류류류류류류류류류류류류류류류류류류류류류류류류류류류류류류류류류류류류류류류류류류류류류류류류류류務; OFF: onlan |
| MONO SET | ON: 150000000000000000000000000000000000000000000000000000000000000000000000000000000000000000000000000000 |
| NEWS SET*2 | ON: 15000000000000000000000000000000000000000000000000000000000000000000000000000000000000000000000 |
| REGIONAL*2 | ON: 150000000000000000000000000000000000000000000000000000000000000000000000000000000000000000000 |
| AF SET*2 | ON: 15000000000000000000000000000000000000000000000000000000000000000000000000000000000000000000 |
| TI*2 | ON: 1500000000000000000000000000000000000000000000000000000000000000000000000000000000000000 |
| PTY SEARCH*2 | 15000000000000000000000000000000000000000000000000000000000000000000000000000000 |
^1 duon [ONCE] WEEKLY 1
2 anuunua FM n
PTY
NEWS, AFFAIRS, INFO, SPORT, EDUCATE, DRAMA, CULTURE, SCIENCE, VARIORED
POP M (waa), ROCK M (wa3), EASY M (wa3), LIGHT M (wa3), CLASSICS, OTHER M (wa3),
WEATHER, FINANCE, CHILDREN, SOCIAL, RELIGION, PHONE IN, TRAVEL, LEISURE, JAZZ
COUNTRY, NATION M (w), OLDIES, FOLK M (w), DOCUMENT

aannnnnnaanennnnnnnnnnnnnnnnnnnnnnnnnnnnnnnnnnnnnnnnnnnnnnnnnnnnnnnnnnnnnnnnnnnnnnnnnnnnnnnnnnnnnnnn
CD
iPod/iPhone
ANDROID*2
mnnnne nnnnne
KD-R881BT: CD/USB/iPod USB/ANDROID
*1
*2 1 JnJnJnJnJnJnJnJnJnJnJnJnJnJnJnJnJnJnJnJnJnJnJnJnJnJnJnJnJnJnJnJnJnJnJnJnJnJnJnJnJnJnJnJnJnJnJnJnJnJnJn
3 a m u Android: 1 w oien [AUTO MODE] w (→8)
4 丹麦 CD:丹麦 MP3/WMA/AAC i丹麦 iPod/Android
*5 w iPod/Android: 1000000000000000 [HEAD MODE] [AUTO MODE] w (→8)
aannnnnne
waeiipnnaaayanipod USB n5 USB MODE
HEAD MODE: iPod
IPHONE MODE: nipod iPod wipod 103 o7n nn nnnnnnnnnnnnnnnnnnnnnnnnnnnnnnnnnnnnnnnnnnnnnnnnnnnnnnnnnnnnnnnnnnnnnnnnnnnnnnnnnnnnnnnnnnnnnnn
vaznqumadnqanm ANROID no15 USB MODE
AUTO MODE: Android JVC MUSIC PLAY Android
AUDIO MODE: Android AndroidAndroidAndroidAndroidAndroidAndroidAndroidAndroidAndroidAndroid
enny
wzngnnaaagnnn USB n 5 USB MODE
yuaanwanaanuunnnaa
- 1
- 1
JVC Remote (amwKD-R881BT)
JVC Remote 0nnnnnnnnnnnnnnnnnnnnnnnnnnnnnnnnnnnnnnnnnnnnnnnnnnnnnnnnnnnnnnnnnnnnnnnnnnnnnnnnnnnnnnnnnnnnnnnnnnnnnnnnnnnnnnnnnnnnnnnnnnnnnnnnnnnnnnn nn
(n)
1
JVC Remote 1
nwnnnnnnnnnnnnnnnnnnnnnnnnnnnn nnnn nnnn nnnn nnnn nnnn nnnn nnnn nnnn nnnn nnnn nnnn nnnn nnnn nnnn nnnn nnnn nnnn nnnn nnnn nnnn nnnn nnnn nnnn nnnn nnnn nnnn nnnn nnnn nnnn nnnn nnnn nnnn nnnn nannn nannn nannn nannn nannn nannn nannn nannn nannn nannn nannn nannn nannn nannn nannn nannn nannn nannn nannn nannn nannn nannn nannn nannn nannn nannn nannn nannn nannn nannn nannn nannn nannn nann
aonWanwnWannn
ipod/Android [HEAD MODE][AUTO MODE]
1 nQ/
2 2 VOL+/-/waiaeanwaiae/wnnnnnaI/II ENTER
3 nVOL+/-iiaenlndnunnaI/IIENTER
nunnnn nn nannn (wnnnnnn nn CD, USB naZAndroid)
VOL+/-
nwnnnnneyn (wnnnnnnnnnnipod USB nae ANDROID)
wunwnnWanwnnnn
mnnnnaeaaepin iPod USB
2A/1V 7Aeieneneyn (A Z,09,OTHERS)
OTHERS" 1A Z,09
amnnnannnnn ANDROID
1 na2A/1V
2 2A/1V
A^ :W(A-Z)
A:
-0- : (0 - 9)
-OHTERS- : 0nnuuunnnnnaA-Z,0-9
3 ⅡENTER
Q/
wnanlaunnQ/
1
Panda
- [ON] - [PANDORA SRC] [SOURCE SELECT] (→ 4)
KD-R781BT: PANDORA Bluetooth Android ( 10,16)
1
1 1
2 1
3 nSRC- 4 PANDORA
nnnnnnnnnnnnnnnnnnnnnnnnnnnnnnnnnnnnnnnnnnnnnnnnnnnnnnnnnnnnnnnnnnnnnnnnnnnnnnnnnnn
| ### | ### | ### |
| ### | ### | ### |
| ### | ### | ### |
| ### | ### | ### |
| ### | ### | ### |
*1
*2 iδaδαδαδαδαδαδαδαδαδαδαδαδαδαδαδαδαδαδαδαδαδαδαδαδαδαδαδαδαδαδαδαδαδαδαδαδαδαδαδαδαδαδαδαδαδαδαδαδαδαδαδ
Jnnaaannnnnnnnn
1 nQ/
2 nVOL+/-[NEWSTATION]IENTER
3 nVOL+/Wan [FROM TRACK] [FROM ARTIST] /I ENTER
4 nannnnnnaaannnnnnnnnnn (3,4,5 nae 6) nnnnn
meaennnnnne nannnnnaeennnnn (3.4.5 6)
aannnnnne
1 nuiu
2 nVOL+/-[RECENTCALL],[PHONEBOOK] [DIAL NUMBER]
3 VOL+/-WIOAEOONNNOONNNNNNNNNNNNNNNNNNNNNNNNNNNNNNNNNNNNNNNNNNNNNNNNNNNNNNNNNNNNNNNNNNNNNNNNNNNNNNNNNNNNNNNNNNNNNNNNNNNNNNNNN
4 nannnnnnaeennnnnnnnnnnnnnnnnnnnnnnnnnnnnnnnnnnnnnnnnnnnnnnnnnnnnnnnnnnnnnnnnnnnnnnnnnnnnnnnnnnnnnnnnnnnnnnnnnnnnnnnnnnnnnnnnnnnnnnnnnnnnnnnnnnnnnnnnnnnnnnnnnnnn nn
Hnnnne nnnnnnnnnnnnnnnnnnnnnnnnnnnnnnnnnnnnnnnnnnnnnnnnnnnnnnnnnnnnnnnnnnnnnnnnnnnnnnnnnnnnnnnnnnnnnnnnnnnnnnn
[DIAL NUMBER] 2 wannnnnnaaannnnnna
nnnnnnnnnnnnnnnnnnnnnnnnnnnnnnnnnnnnnnnnnnnnnnnnnnnnnnnnnnnnnnnnnnnnnnnnnnnnnnnnnnnnnnnnnnnnnnnnnnnnnnnnnnn
1 nathu
2 aannnnnnaaennnnn (1 6)
3 /IENTER
nnnn nnnn Bluetooth
1
2 nVOL+/-wOaantunr (gunrnnn) mwnna▶/III ENTER
3 mnnnne 2 nnnnnnnnnnnnnnnnnnnnnnnnnnnnnnnnnnnnnnnnnnnnnnnnnnnnnnnnnnnnnnnnnnn
4 4
nnaaannnnnnnnnnnnn nn Q/
nui:XX
wnnios IOS wannnnnnnnnnnnipod BT (wipod USB wipn iPone/iPod w
- n#
- 100000000000000000000000000000000000000000000000000000000000000000
- nipod USB iPod BT
Android YES:AndroidAndroid Android
Android LIST*: iDanatwnwU Android dunuonn
- wawwawwawwawawawawawawawawawawawawawawawawawawawawawawawawawawawawawawawawawawawawawawawawawawawawawawawawawawawawawawawawawawawawawawawawawawawawawawawawawawawawawawawawawawawawawawawawawawaw
STATUS
IOS CONNECTED: qunwnn nnwnnn n iPhone/iPod wannnnu Bluetooth wannnnn n USB
IOS NOT CONNECTED: liuqunluyios nienwneiuiuwwan
ANDROID CONNECTED: nuaaunuauuauuauuuuauuuuauuauuauuauuauuauuuuauuuuuuuuuuuuuuuuuuuuuuuuuuuuuuuuuuuuuuuuuuuuuuuuuuuuuuuuuuuuuuuuuuuuuuuuuuuuuuuuuuuuuuuuuuuuuuuuuuuuuuuuuuuuuuuuuuuuuuuuuuuuuuuuuuuuuuuuuuuuuuuuuuuuuuuuuuuuuuuuuuuuuuuuuuuuuuuuuuuuuuuuuuuuuuuuuuuuuuuuuUU
ANDROID NOT CONNECTED:Android
Snuuiphone/iPod 互联网Bluetooth(KoKD-R881BT)
nwnnnnnnnnnnnnnnnnnn nn nnnnnnnnnnnnnnnnnnnnnnnnnnnnnnnnnnnnnnnnnnnnnnnnnnnnnnnnnnnnnnnnnnnnnnnnnnnnnnnnnnnnnnnnn
nSRC-@ wioiaipod BT
- iPod/iPhone iPod/iPhone USB (→7)
- wwnmnnnne iPhone/iPod nnnnnnnnnnnn nn USB nnnnnnnnnnnnnnnn iPod BT nnnn nn nnnn nn n nn n nn n nn n nn n nn n nn n nn n nn n nn n nn n nn n nn n nn n nn n nn n nn n nn n nn n nn n nn n nn n nn n nn n nn n nn n nn n nn n nn n nn n nn n nn n nn n nn n nn n nn n nn n nn n nn n nn n nn n nn n nn n nn n nn n nn n nn n nn n nn n nn n nn
Jingouan Jiaochu Bluetooth
PandopnueuauuauuauuauuauuuuauuuuauuuuuuuuuuuuuuuuuuuuuuuuuuuuuuuuuuuuuuuuuuuuuuuuuuuuuuuuuuuuuuuuuuuuuuuuuuuuuuuuuuuuuuuuuuuuuuuuuuuuuuuuuuuuuuuuuuuuuuuuuuuuuuuuuuuuuuuuuuuuuuuuuuuuuuuuuuuuuuuuuuuuuuuuuuuuuuuuuuuuuuuuuuuuuuuuuUU
- USB 2.0/USB 1.0/USB 0.0/USB 0.0/USB 0.0/USB 0.0
KD-R881BT: qunui iPhone/iPod touch/Android
KD-R781BT: qunna Android
Pandora (
1
aen[ON]amu [PANDORA SRC]lu [SOURCE SELECT] ( 4)
1 PauwwnPandora uuaa
2 2001-09-06 2001-09-06 2001-09-06 2001-09-06 2001-09-06 2001-09-06 2001-09-06 2001-09-06 2001-09-06 2001-09-06
3 SRC-(PANDORA (iPhone/iPod) PANDORA BTAndroid)
muaa aannnnaaannnnnnaanennnnnnaaannnnn
Pandora Pandora USB ( 9)
y
1 4
2 aon[ON]aun[BUILT-IN AUX]u [SOURCE SELECT] ( 4)
3 nSRC-0 1nuaaonAUX
4 1a

n 3 nnnnnnnnnnnnnnnnnnnnnnnnnnnnnnnnnnnnnnnnnnnnnnnnnnnnnnnnnnnnnnnnnnnnnnnnnnnnnnnnnnnnnnnnnnnnnnnnnnnnnnn
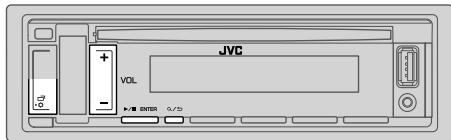
1
2 VOL+/-waoanrnnn (gannnnnnaa) aannnraI /IIENTER
3 2aonlndnlae
4
nannnnnnnnnnnnnnnnnnaa
n:XX
EQ SETTING
PRESET EQ aononananaananaananaananaananaananaananaananaananaananaananaananaananaananaananaananaananaananaananaananaananaananaananaananaananaananaananaananaananaananaananaananaananaananaananaananaananaananaananaananaananaananaananaananaananaananaananaananaananaananaanara
- iien [USER] nE EEN TNNN Nn [EASY EQ] nE [PRO EQ]
FLAT/DRVN 3/DRVN 2/DRVN 1/HARD ROCK-HIP HOP JAZZ/POP/R&B/USER CLASSICAL
EASY EQ
- nnnnneennnnnne [USER]
PRO EQ]
SUB.WSP*1*2: 00+06 (nTuWu: 03
SUB.W*1*3:-50+10 00
BASS: LVL-09LVL+09 LVL00
MID: LVL-09LVL+09 LVL00
TRE: LVL-09LVL+09 LVL00
1, 2, *3: (⇒ 18)
| FADER | ((''1'0'0'0'0'0'0'0'0'0'0'0'0'0'0'0'0'0'0'0'0'0'0'0'0'0'0'0'0'0'0'0'0'0'0'0'0'0'0'0'0'0'0'0'0'0'0'0'0'0'0' 3 m) POSITION R15 0° POSITION F15 (POSITION 00): 0'0'0'0'0'0'0'0'0'0'0'0'0'0'0'0'0'0'0'0'0'0'0'0'0'0'0'0'0'0'0'0'0'0'0'0'0'0'0'0'0'0'0'0'0'0'0'0'0'0 0'0'0'0'0'0'0'0'0'0'0'0'0'0'0'0'0'0'0'0'0'0'0'0'0'0'0'0'0'0'0'0'0'0'0'0'0'0'0'0'0'0'0'0'0'0'0'0'0'0' 0'0'0'0'0'0'0'0'0'0'0'0'0'0'0'0'0'0'0'0'0'0'0'0'0'0'0'0'0'0'0'0'0'0'0'0'0'0'0'0'0'0'0'0'0'0'0'0'0'0'' 0'0'0'0'0'0'0'0'0'0'0'0'0'0'0'0'0'0'0'0'0'0'0'0'0'0'0'0'0'0'0'0'0'0'0'0'0'0'0'0'0'0'0'0'0'0'0'0'0'0" | |
| BALANCE*4 | POSITION L15 0° POSITION R15 (POSITION 00): 0'0'0'0'0'0'0'0'0'0'0'0'0'0'0'0'0'0'0'0'0'0'0'0'0'0'0'0'0'0'0'0'0'0'0'0'0'0'0'0'0'0'0'0'0' 0" | |
| VOLUME ADJUST | LEVEL -15 0° LEVEL +06 (LEVEL 00): 0'0'0'0'0'0'0'0'0'0'0'0'0'0'0'0'0'0'0'0'0'0'0'0'0'0'0'0'0'0'0'0'0'0'0'0'0'0'0'0'0'0'0'0'0'0'0' 0" | |
| AMP GAIN | LOW POWER: 0'0'0'0'0'0'0'0'0'0'0'0'0'0'0'0'0'0'0'0'0'0'0'0'0'0'0'0'0'0'0'0'0'0'0'0'0'0'0'0'0'0'0'0'0'0'0'0'0' 25 (1234567890) 0'0'0'0'0'0'0'0'0'0'0'0'0'0'0'0'0'0'0'0'0'0'0'0'0'0'0'0'0'0'0'0'0'0'0'0'0'0'0'0'0'0'0'0'0'0'0'0'0'0'' 50 W (1234567890) HIGH POWER: 0'0'0'0'0'0'0'0'0'0'0'0'0'0'0'0'0'0'0'0'0'0'0'0'0'0'0'0'0'0'0'0'0'0'0'0'0'0'0'0'0'0'0'0'0'0'0'0' 35 | |
| SPK/PRE OUT | (1234567890) 1234567890 1234567890 1234567890 1234567890 1234567890 1234567890 1234567890 1234567890 1234567890 1234567890 (1234567890) 1234567890 1234567890 1234567890 1234567890 1234567890 1234567890 1234567890 123456789 123456789 123456789 123456789 123456789 123456789 123456789 123456789 123456789 123456789 12345678 123456789 123456789 123456789 123456789 123456789 123456789 123456789 123456789 123456789 1234567889 123456789 123456789 123456789 123456789 123456789 123456789 123456789 123456789 123456789 123456 123456789 123456789 123456789 123456789 123456789 123456789 123456789 123456789 123456789 12345678 | |
| SPEAKER SIZE | 1234567890 1234567890 1234567890 1234567890 1234567890 123456789 123456789 123456789 123456789 1234 123456789 123456789 123456789 123456789 123456789 123456789 123456789 123456789 123456789 12345678 | |
| X ' OVER | ||
| DTA SETTINGS | 123456789 123456789 123456789 123456789 123456789 123456789 123456789 123456789 123456789 123456789 | |
| CAR SETTINGS |
1 zuaowuovnauon [SUBWOOFER SET] nu [ON] mnu
2 2019-2020: zuaaavauuau [SPK/PRE OUT] u [SUB.W/SUB.W] u (→19)
*3 duu 2 nu: uauu [SPK/PRE OUT] uu [REAR/SUB.W] uu [SUB.W/SUB.W] uuu (→19)
*4 nssuunnnnnaaannnnaanennnnae annnnnne aee
| X'OVER TYPE | (###) ### [3-WAY] ###; NO: ### (###) [2-WAY] [###) YES: ### |
| 2-WAY | |
| 3-WAY | |
| SOUND EFFECT | |
| SPACE ENHANCE | (###) ### TUNER) SMALL/MEDIUM/LARGE: ###; OFF: ### |
| SND RESPONSE | LEVEL1/LEVEL2/LEVEL3: ###; OFF: ### |
| SOUND LIFT | LOW/MIDDLE/HIGH: ###; OFF: ### |
| VOL LINK EQ | ON: ###; OFF: ###; TUNER ###; TUNER ###; ON: ###; OFF: ### |
| K2 TECHNOLOGY | (###) ### TUNER ###; TUNER ###; ON: ###; OFF: ### |
nngnnnnaaannnna [SPK/PRE OUT]
(1) N 100000000000000000000000000000000000000000000000000000000000000000000000000000000
aennnnnne nnnnnnnnnnnnnnnn nn [SPK/PREOUT]
![JVC KD-X341 BT - nngnnnnaaannnna [SPK/PRE OUT] - 1](/content/2024/12/188863/images/f841ebf495d84cab79605ed9d65457ad6f993517cae3aa405b7928c4ef879563.jpg)
nne nnnnne nee
aunnnnneannnnnaanennn (→31)
KD-R881BT:
| SPK/PRE OUT | ||
| L (€10) | R (€21) | |
| REAR/REAR | ||
| REAR/SUB.W | ||
| SUB.W/SUB.W | (100%) | |
mnden [SUB.W/SUB.W]:
- 120HZ] [SUBWOOFER LPF] a7 [THROUGH]
- iαn [POSITION R02] [FADER] uαaunuaan [POSITION R15] [POSITION 00]
n
n 2 mnnm
A
aennnnnne nnnnnnnnnnnnnnnnnnnnnn (→31)
mmnnnnaaann:
·
SPEAKER SIZE
Digital Time Alignment
Digital Time Alignment (unstrut)
- 10000000000000000000000000000000000000000000000000000000000000000000000000000000000
DTA SETTINGS
| POSITION | ### |
| DISTANCE*1 | OCM 610CM: ### |
| GAIN*1 | -8DB 0DB: ### |
| DTA RESET | YES: ###[DISTANCE] ### [GAIN] ### [POSITION] ### NO: ### |
| CAR SETTINGS | ###[DDT]###[DDT]### |
| CAR TYPE | COMPACT/FULL SIZE CAR/WAGON/MINIVAN/SUV/ MINIVAN(ONG): ###OFF: ### |
| R-SP LOCATION*2 | ### |
Wntwma [DISTANCE] [GAIN] [DTA SETTINGS]
![JVC KD-X341 BT - Wntwma [DISTANCE] [GAIN] [DTA SETTINGS] - 1](/content/2024/12/188863/images/f5eb9e305fdebf26059138f70585e31acab12e8cb4b51953e98fa805f5c40470.jpg)
nnae aenanae nne ane nean eae nne nne nne nne nne nne nne nne nne nne nne nne nne nne nne nne nne nne nne nne nne nne nne nne nne nne nne nne nne nne nne nne nne nne nne nne nne nne nne nne nne nne nne nne nne nne nne nne nne nne nnee
1 1
2
3 1nnaaannnnnnnnnnnnnnnnnnnnnnnnnnnnnnnnnnnnnnnnnnnnnnnnnnnnnnnnnnnnnnnnnnnnnnnnnnnnnnnnnnnnnnnnnnnnnnnnnnnnnnnnnnnnnnnnnnnnnnnnnnnn
4 11111111111111111111111111111111111111111111
5 [GAIN] wuWau
1 RED/GREEN/BLUE: 10000000000000000000000000000000000000000000000000000000000000000000000000000000000000000000000000000
MENUCOLOR ON:dlwdoaiaiivwauanueeouuuaaueoogunnuuau
*1 33
*2
nngnn
nnnnnnnnnnnnnnnnnnnnnnnnnnnnnnnnnnnnnnnnnnnnnnnnnnnnnnnnnnnnnnnnnnnnnnnnnnnnnnnnnnnnnnnnnnnnnnnnn
nneonnnnnnnnnnnnnnnnnnnnnnnnnnnnnnnnnnnnnnnnnnnnnnnnnnnnnnnnnnnnnnnnnnnnnnnnnnnnnnnnnnnnnnnnnnn
nnnnnnnnnnnnnnnnnnnnnnnnnnnnnnnnnnnnnnnnnnnnnnnnnnnnnnnnnnnnnnnnnnnnnnnnnnnnnnnnnnnnnnnnnnnnnnnnnnnnnnnnnnnnnnnnnnn
aannnnnnae nnnnne aennnne ne ane annne
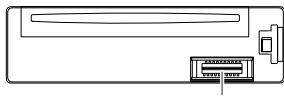
()
nannnnnnaa:
- iiaanannnnnne ane aen annn
Jnnnnnne nnnnnnnnnnnnnnnnnnnnnnnnnnnnnnnnnnnnnnnnnnnnnnnnnnnnnnnnnnnnnnnnnnnnnnnnnnnnnnnnnnn - mnnnnaaannnnnnnnnnnnnnnnnnnnnnnnnnnnnnnnnnnnnnnnnnnnnnnnnnnnnnnnnnnnnnnnnnnnnnnnnnnnnnnnnnnnnnnnnnnnnnnnnnnnnnnnnnnnnnnn
- 电
- 陳藥藥藥藥藥藥藥藥藥藥藥藥藥藥藥藥藥藥藥藥藥藥藥藥藥藥藥藥藥藥藥藥藥藥藥藥藥藥藥藥藥藥藥藥藥藥藥藥藥藥藥藥藥藥藥藥
yayawann
a: -nnaananaananaananaananaananaananaananaananaananaananaananaananaananaananaananaananaananaananaananaananaananaananaananaananaananaananaananaananaananaananaananaananaananaananaananaananaananaananaananaananaananaananaananaananaananaananaananaananaananaananaanara
- uwnn JVC
http://www.jvc.net/cs/car/>
#
-

DIGITAL AUDIO

DIGITAL AUDIC
Recordable


DIGITAL AUDIO
DuaDisc:DVD DualDisc"duu DVD DualDisc"duu DVD DualDisc
- 100000000000000000000000000000000000000000000000000000000000000000
Wanannouduu
Iwaiauuaiau
mnnn
KD-R881BT: MP3 (.mp3), WMA (.wma), AAC (.aac)
KD-R781BT: MP3 (.mp3), WMA (.wma)
amununumnuuua USB:
KD-R881BT: MP3 (.mp3), WMA (.wma), AAC (.aac), WAV (.wav), FLAC (.flac)
KD-R781BT: MP3 (.mp3), WMA (.wma), WAV (.wav), FLAC (.flac)
- CD-R/CD-RW/CD-ROM
- 315100000000000000000000000000000000000000000000000000000000000
- Wawwovonu USB FAT12, FAT16, FAT32
waii waii iin nnnn nn nnnn nnnn nnnn nnnn nnnn nnnn nnnn nnnn nnnn
wAAC (m4a) 1uus USB CD iTunes iTunes
wannnnnnaa
- uannnnn nn nnnn
- wuuaanwauunwuuunwauunwauun
- Recordable/ReWritable
uCDV8 1
#
iPod touch (5th 6th generation)
- iPod nano (7th generation)
- iPhone 4S, 5, 5S, 5C, 6, 6 Plus, 6S, 6S Plus, SE
-
WiFi Bluetooth: Made for
-
iPod touch (5th 11a6th generation)
iPhone 4S, 5, 5S, 5C, 6, 6 Plus, 6S, 6S Plus, SE
"Jauwraanrnnnnaaannnnaaennnnae "Videos" lu [HEAD MODE]
- iPod/iPhone
- iPod/iPhone
muyuunr Android
Android OS 4.1
Android Open Accessory (AOA) 2.0
- wannnnnne nnnnnnnnnnnnnnnnnnnnnnnnnnnnnnnnnnnnnnnnnnnnnnnnnnnnnnnnnnnnnnnnnnnnnnnnnnnnnnnnnnnnnnnnnnnnnnnnnnnnnnnnnnnnnnnnnnnnnnnnn
Panda
| ### | ### | ### |
| CD/USB/PC | "###" | "###" |
| "###" | "###" | |
| "###" | "###" | |
| "###" | "###" | |
| "###" | "###" | |
| "###" | "###" | |
| "###" | "###" | |
| "###" | "###" | |
| "###" | "###" | |
| "###" | "###" | |
| CD/USB/iPod | ||
| Android | ||
| “CANNOT PLAY” | ||
| Pandora | “ADD ERROR” | |
| “CHK DEVICE” | ||
| “NO SKIPS” | ||
| “NO STATIONS” | ||
| “STATION LMT” | ||
| “UPGRADE APP” | ||
| “CONNECT ERR” | ||
| “RATING ERR” | ||
| “THUMBS N/A” | ||
| “LICENSE ERR” | ||
| Bluetooth* | ||
| Bluetooth* | ||
mmnnnnnnnnnnnnnnnnnne (→3)
| Tuner | FM | 87.5 MHz — 108.0 MHz (MHz: 50 kHz) | |
| 7.2 dBf (0.71 μV/75 Ω) | |||
| 17.2 dBf (2.0 μV/75 Ω) | |||
| 30 Hz — 15 kHz | |||
| 64 dB | |||
| 40 dB | |||
| AM | 1 (AM): 531 kHz — 1 602 kHz (MHz: 9 kHz) 2 (SW1): 2 940 kHz — 7 735 kHz (MHz: 5 kHz) 3 (SW2): 9 500 kHz — 10 135 kHz / 11 580 kHz — 18 135 kHz (MHz: 5 kHz) | ||
| AM: 29 dBμ (28.2 μV) SW: 30 dBμ (32 μV) | |||
| CD | GaAlAs | ||
| 8.5 GHz (D/A) | |||
| 500 GHz (CLV) | |||
| 20 Hz — 20 kHz | |||
| 0.01 % | |||
| 105 dB | |||
| 90 dB | |||
| 85 dB | |||
| MPEG-1/2 Audio Layer-3 | |||
| Windows Media Audio | |||
| " AAAAC-LC "aac" (MPEG-1/2 CD-R881BT) | |||
| USB | USB 1.1, USB 2.0 (Nanorawar) | |
| USB 1.1, USB 2.0 (Nanorawar) | ||
| USB 1.1, USB 2.0 (Nanorawar) | ||
| USB 1.1, USB 2.0 (Nanorawar) | ||
| USB 1.1, USB 2.0 (Nanorawar) | ||
| USB 1.1,USB 2.0 (Nanorawar) | ||
| USB 1.1, USB 2.0 (Nanorawar) | ||
| USB 1.1, USB 2.0 (Nanorawar) | ||
| USB 1.1, USB 2.0 (Nanorawar) | ||
| USB 1.1, USB 2.0 (Nanoroawar) | ||
| USB 1.1, USB 2.0 (Nanorawar) | ||
| USB 1.1, USB 2.0 (Nanorawar) | ||
| USB 1.1, USB 2.0 (Nanorawar) | ||
| USB 1.1, USB 2.0 (Nanorawar) | ||
| \( \frac{1}{\text{変換}} \) | \( \frac{1}{\text{変換}} \) | \( \frac{1}{\text{変換}} \) |
| \( \frac{1}{\text{変換}} \) | \( \frac{1}{\text{変換}} \) | |
| \( \frac{1}{\text{変換}} \) | \( \frac{1}{\text{変換}} \) | |
| \( \frac{1}{\text{変換}} \) | \( \frac{1}{\text{変換}} \) |
| Bluetooth | iμ | Bluetooth 3.0 |
| iμ | 2.402 GHz — 2.480 GHz | |
| iμ | +4 dBm (500kHz), 0 dBm (AVE) Power Class 2 | |
| iμ | 10 ms (32.8 ft) | |
| iμ | SSP (Secure Simple Pairing) | |
| iμ | HFP1.6 (Hands-Free Profile) A2DP (Advanced Audio Distribution Profile) AVRCP1.5 (Audio/Video Remote Control Profile) PBAP (Phonebook Access Profile) SPP (Serial Port Profile) |
| 50 W × 4 W 50 W × 2 + 50 W × 1 (ΦN=4 Ω) | ||
| 22 W × 4 (ΦN=4 % THD) | ||
| 4 Ω - 8 Ω | ||
| 1Ω/4000 mV/10 kΩ | ||
| ≤600 Ω | ||
| 14.4 V | ||
| 10 A | ||
| -10°C - +60°C | ||
| 182 mV, × 53 mV, × 159 mV | ||
| 1.2 nV |
- 12V uanwnn w DC 12 V uanwnn
aannnnnne aannnnnne nnnnne annnnnne nnnnne nnnnne nnnnne nnnnne nnnnne nnnnne nnnnne nnnnne nnnnne nnnnne nnnnne nnnnne nnnnne nnnnne nnnnne nnnnne nnnnne nnnnne nnnnne nnnnne nnnnne nnnnne nnnnne nnnnne nnnnne
- 1
- a
A
aannnnnnae aen nnnnne ane neanennnne eae annnee
- AmpGAIN]
- 100
WDC12Vuaa - iuunnnnnae nnne nnnnnae naaee nne aee
nannnnnnnnnnnnnnnnnnnnnnnnnnnnnnnnnnnnnnnnnnnnnnnnnnnnnnnnnnnnnnnnnnnnnnnnnnnnnnnnnnnnnnnnnnnnnnnnnnnnnnnnnnnnnnnnnnnnnn
nnae nne eae nee ene nee nee nee nee nee nee nee nee nee nee nee nee nee nee nee nee nee nee nee nee nee nee nee nee nee nee nee nee nee nee nee nee nee nee nee nee nee nee nee nee nee nee nee nee nee nee nee nee nee nee
Xn
1 0000000000000000000000000000000000000000000000
2 1
3 电
4 电
5 na SRC·
6 0nnnnnnaaannn (→3)
(n)
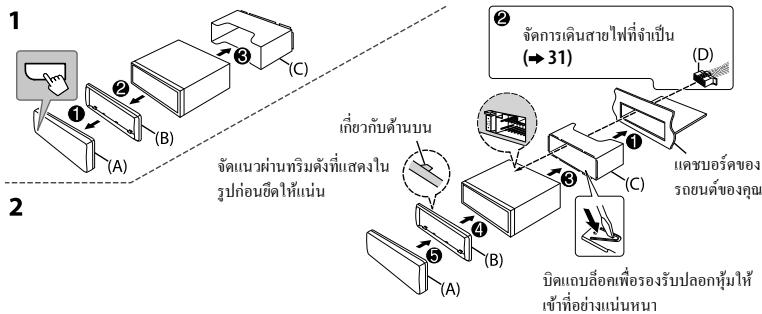
mnnnnnnaaannnnn
1 000000000000000000
2 1000000000000000000000000000000000000000000000000000000000
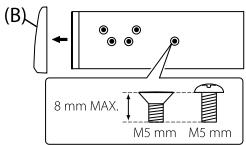
- Microsoft and Windows Media are either registered trademarks or trademarks of Microsoft Corporation in the United States and/or other countries.
- "Made for iPod," and "Made for iPhone" mean that an electronic accessory has been designed to connect specifically to iPod, or iPhone, respectively, and has been certified by the developer to meet Apple performance standards. Apple is not responsible for the operation of this device or its compliance with safety and regulatory standards. Please note that the use of this accessory with iPod or iPhone may affect wireless performance.
- iPhone, iPod, iPod classic, iPod nano, iPod touch and iTunes are trademarks of Apple Inc., registered in the U.S. and other countries.
Lightning is a trademark of Apple Inc. - Pandora, the Pandora logo, and the Pandora trade dress are trademarks or registered trademarks of Pandora Media, Inc., used with permission.
Android is trademark of Google Inc. - The Bluetooth® word mark and logos are registered trademarks owned by Bluetooth SIG, Inc. and any use of such marks by JVC KENWOOD Corporation is under license. Other trademarks and trade names are those of their respective owners.
libFLAC
Copyright (C) 2000,2001,2002,2003,2004,2005,2006,2007,2008,2009 Josh Coalson
Redistribution and use in source and binary forms, with or without modification, are permitted provided that the following conditions are met:
- Redistributions of source code must retain the above copyright notice, this list of conditions and the following disclaimer.
- Redistributions in binary form must reproduce the above copyright notice, this list of conditions and the following disclaimer in the documentation and/or other materials provided with the distribution.
- Neither the name of the Xiph.org Foundation nor the names of its contributors may be used to endorse or promote products derived from this software without specific prior written permission.
THIS SOFTWARE IS PROVIDED BY THE COPYRIGHT HOLDERS AND COLNTRIBUTORS "AS IS" AND ANY EXPRESS OR IMPLIED WARRANTY, INCLUDING, BUT NOT LIMITED TO, THE IMPLIED WARRANTY OF MERCHANTABILITY AND FITNESS FOR A PARTICULAR PURPOSE ARE DISCLAIMED. IN NO EVENT SHALL THE FOUNDATION OR COLNTRIBUTORS BE LIABLE FOR ANY DIRECT, INDIRECT, INCIDENTAL, SPECIAL, EXEMPLARY, OR CONSEQUENTIAL DAMAGES (INCLUDING, BUT NOT LIMITED TO, PROCEDURE OF SUBSTITUTE GOODS OR SERVICES; LOSS OF USE, DATA, OR PROFITS; OR BUSINESS INTERUPTION) HOWEVER CAUSED AND ON ANY THEORY OF LIABILITY, WHETHER IN CONTRACT, STRICT LIABILITY, OR TORT (INCLUDING NEGLIGENCE OR OTHERWISE) ARISING IN ANY WAY OUT OF THE USE OF THIS SOFTWARE, EVEN IF ADVISED OF THE POSSIBILITY OF SUCH DAMAGE.
CLASS 1 LASER PRODUCT
The marking of products using lasers
The label is attached to the chassis/case and says that the component uses laser beams that have been classified as Class 1. It means that the unit is utilizing laser beams that are of a weaker class. There is no danger of hazardous radiation outside the unit.
1
thnnnnnne nnnnnnnnnnnnnnnnnnnnnnnnnnnnnnnnnnnnnnnnnnnnnnnnnnnnnnnnnnnnnnnnnnnnnnnnnnnnnnnnnnnnnnnnnnnnnnnnnnnnnnnnnnnnnnnnnnnnnnnnnnnnnnnnnnnnnnnnnnnnnnnnnn nn
jLl plssuWU Lc uLc
J 1 J 1 J 1 J 1 J 1 J 1 J 1 J 1 J 1 J 1 J 1 J 1 J 1 J 1 J 1 J 1 J 1 J 1 J 1 J 1 J 1 J 1 J 1 J 1 J 1 J 1 J 1 J 1 J 1 J 1 J 1 J 1 J 1 J 1 J
jolosallyL
001 1 1 1 1 1 1 1 1 1 1 1 1 1 1 1 1 1 1 1 1 1 1 1 1 1 1 1 1 1 1 1 1 1 1 1 1 1 1 1 1
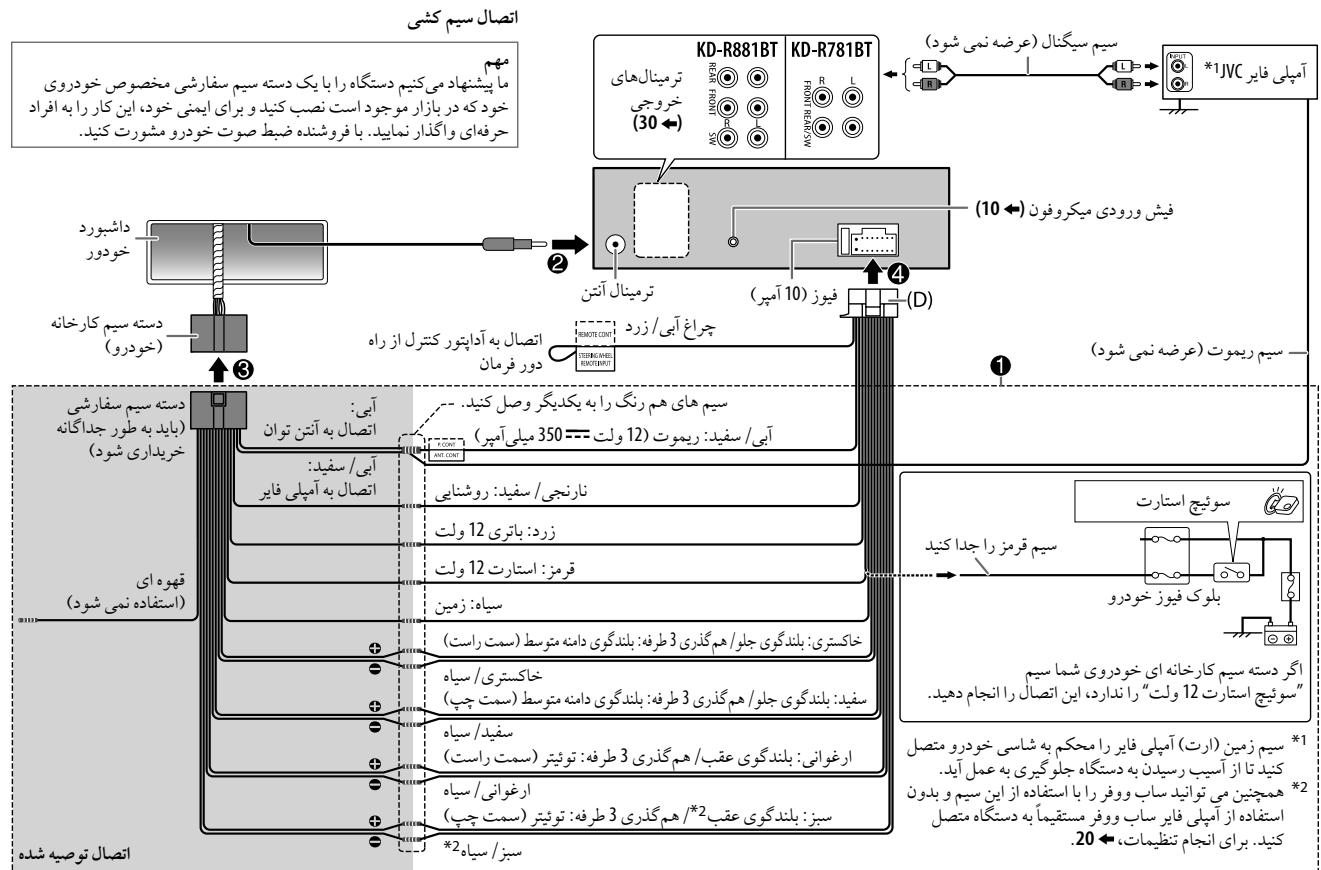
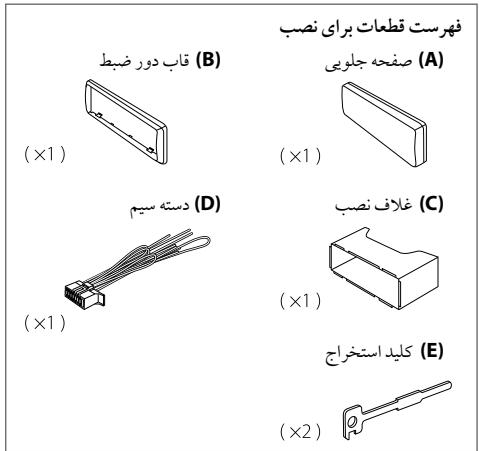

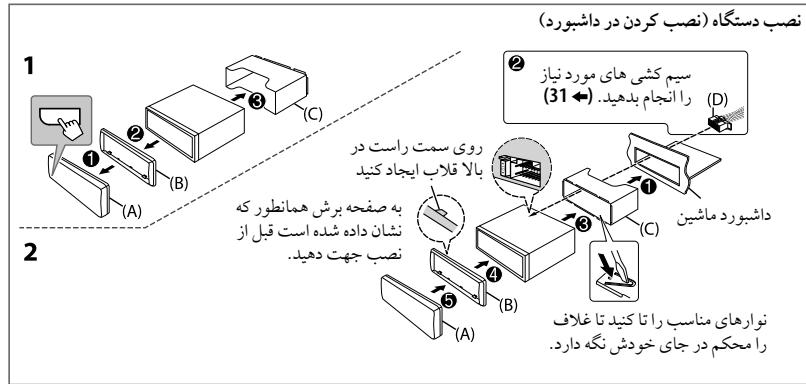
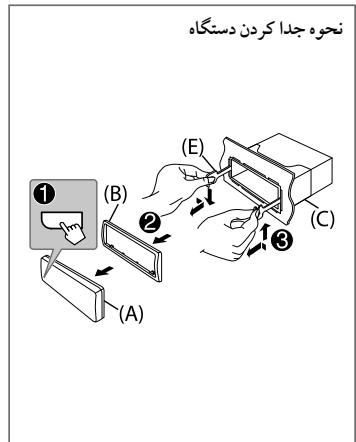
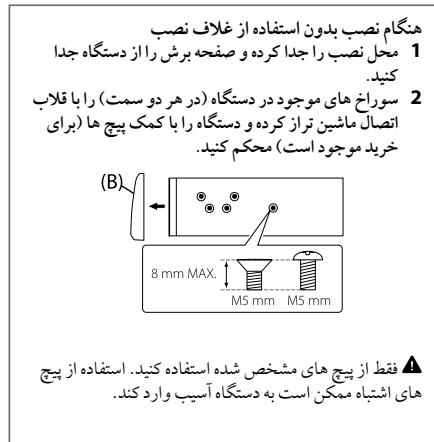


$$ \therefore \text {d} \left(\frac {\mathrm {d} \cos \theta}{\mathrm {d} t}\right) = \frac {\sin \theta}{\sin \theta_ {1}} \cdot \frac {\sin \theta}{\sin \theta_ {2}} $$
$$ \therefore \lim _ {x \to 1} \frac {\sin^ {2} x}{\cos^ {2} x + \cos^ {2} x} = \frac {1}{3} $$
$$ \begin{array}{l} \left. \right.\left. \right.\left. \right.\left. \right.\left. \right.\left. \right.\left. \right.\left. \right.\left. \right.\left. \right.\left. \right.\left. \right.\left.\left.\left.\left.\left.\left.\left.\left.\left.\left.\left.\left.\left.\left.\left.\left.\left.\left.\left.\left.\left.\left. \text {的} \right]\right]\right]\right]\right]\right]\right]\right]\right]\right]\right]\right]\right]\right]\right]\right]\right]\right]\right]\right]\right]\right] \ \dots \dots \dots \dots \dots \dots \dots \dots \dots \dots \dots \dots \dots \dots \dots \dots \dots \dots \dots \dots \ \therefore \Delta_ {S} S \cong \Delta_ {L} L \cong \Delta_ {R} R \cong \Delta_ {U} U \cong \Delta_ {V} V \cong \Delta_ {W} W \cong \Delta_ {X} X \cong \Delta_ {Y} Y \cong \Delta_ {Z} Z \cong \Delta_ {W} W \cong \Delta_ {X} X \cong \Delta_ {Y} Y \cong \Delta_ {Z} Z \ \therefore \text {d} \left| o _ {3} \right| = \int_ {\omega} \omega \left| \frac {\partial f}{\partial x} \right| d x = \int_ {\omega} \omega \left| \frac {\partial f}{\partial x} \right| d x = \int_ {\omega} \omega \left| \frac {\partial f}{\partial x} \right| d x = \int_ {\omega} \omega \left| \frac {\partial f}{\partial x} \right| d x \ \end{array} $$

$$ \left. \right.\left. \right.\left. \right.\left. \right.\left.\left.\left.\left.\left.\left.\left.\left.\left.\left.\left.\left.\left.\left.\left.\left.\left.\left.\left.\left.\left.\left.\left.\left.\left.\left.\left.\left.\left.\left.\right.\right.\right.\right.\right.\right.\right.\right.\right.\right.\right.\right.\right.\right.\right.\right.\right.\right.\right.\right.\right.\right.\right.\right.\right.\right.\right.\right.\right.\right. $$
$$ \therefore $$
$$ \cos \alpha \sin \beta \cos \gamma \sin \delta \cos \alpha \sin \beta \cos \gamma \sin \delta \cos \alpha \sin \beta \cos \gamma \sin \delta $$
$$ \therefore \text {i g} \text {g} \text {g} \text {g} \text {g} \text {g} \text {g} \text {g} \text {g} \text {g} \text {g} \text {g} \text {g} \text {g} \text {g} \text {g} \text {g} \text {g} \text {g} \text {g} \text {g} \text {f l o w s} \text {f l o w s} \text {f l o w s} \text {f l o w s} \text {f l o w s} \text {f l o w s} \text {f l o w s} $$
$$ (s) j _ {0} \omega_ {0} \omega_ {0} \omega_ {0} \omega_ {0} \omega_ {0} \omega_ {0} \omega_ {0} \omega_ {0} \omega_ {0} \omega_ {0} \omega_ {0} \omega_ {0} \omega_ {0} \omega_ {0} \omega_ {0} \omega_ {0} \omega_ {0} $$
$$ \dots \dots \dots \dots \dots \dots \dots \dots \dots \dots $$
$$ \left. \right.\left. \right.\left. \right.\left. \right.\left. \right.\left. \right.\left. \right.\left. \right.\left. \right.\left. \right.\left. \right.\left. \right.\left. \right.\left. \right.\left. \right.\left. \right.\left. \right.\left. \right.\left. \right.\left. \right.\left. \right.\left. \right.\left. \right.\left. \right.\left. \right.\left. \right.\left. \right.\left. \right.\left. \right.\left. \right.\left. \right.\left. \right.\left. \right.\left. \right. \text {山} 5 0 j l s i n s i n s i n s i n s i n s i n s i n s i n s i n s i n s i n s i n s i n s i n s i n s i n s i n s i n s i n s i n s i n s i n s i n s i n s i n s i n s i n s i n s i n s i n s i n s i n s i n s i n S I L S I L S I L S I L S I L S I L S I L S I L S I L S I L S I L S I L S I L S I L S I L S I L S I L S I L S I L S I L S I L S I L S I L S I L S I L S I L S I L S I L S I L S I L S I L S I L S I L S I L $$
$$ (1 8 \leftarrow). \dots \text {d e s t a n t} [ A M P G A I N ] \text {a l p h a} \text {d i s t a n t} \text {d i s t a n t} \text {d i s t a n t} \text {d i s t a n t} \text {d i s t a n t} \text {d i s t a n t} \text {d i s t a n t} \text {d i s t a n t} \text {d i s t a n t} $$
$$ \dots \dots \dots \dots \dots \dots \dots \dots \dots \dots \dots \dots \dots \dots \dots \dots \dots \dots \dots \dots \dots $$
$$ j g \dot {g} 4 a _ {1} j g 2 a _ {2} g g g g g g g g g g g g g g g g g g g g g g g g g g g g g g g g g g g g g g g g g g g g g g g g g g g g g g g g g g g g $$
$$ \int \cos 2 \sin 2 \cos 2 \sin 2 \cos 2 \sin 2 \cos 2 \sin 2 \cos 2 \sin 2 \cos 2 \sin 2 \cos 2 \sin 2 \cos 2 \sin 2 \cos 2 \sin 2 \cos 2 \sin 2 \cos 2 \sin 2 \cos 2 \sin 2 \cos 2 \sin 2 $$
$$ \therefore S $$
$$ \dots \dots \dots \dots \dots \dots \dots \dots \dots \dots \dots \dots \dots \dots \dots \dots \dots \dots \dots \dots $$
1.5 2.5 3.5 4.5 5.5 6.5 7.5 8.5
| (NL) USB 2.0, USB 1.1 | USB | |
| 32 /16 /FAT12 | JL | US |
| 1.5=DC L25 | JL | US |
| 24 | D/A L25 | |
| MPEG-1/2 Audio Layer-3 L25 | MP3 | JL |
| Windows Media Audio L25 | WMA | JL |
| (KD-R881BT JL25) "aac" AAC-LC | AAC | JL |
| PCM | WAV | JL |
| (12.8 ft) 10 L25 | FLAC | JL |
| Bluetooth 20 — JL25 | (JL25 ±3) | JL |
| 1000 mV | JL | JL |
| 1000 mV | JL | JL |
| Bluetooth 3.0 | JL | JL |
| Bluetooth 3.0 | JL | JL |
| Bluetooth 2.480 — JL25 | JL | JL |
| Power Class 2 (AVE) 0 dBm (MAX) +4 dBm | JL | JL |
| (32.8 ft) 10 L25 | JL | JL |
| (12.8 ft) 10 L25 | JL | JL |
| (12.8 ft) 10 L25 | JL | JL |
| (12.8 ft) 10 L25 | JL | JL |
| (12.8 ft) 10 L25 | JL | JL |
| (12.8 ft) 10 L25 | ||
| (12.8 ft) 10 L25 | ||
| (12.8 ft) 10 L25 | ||
| (12.8 ft) 10 L25 | ||
| (12.8 ft) 10 L25 | ||
| (12.8 ft) 10 L25 | ||
| (12.8 ft ) 10 L25 | ||
| (12.8 ft ) 10 L25 | ||
| (12.8 ft ) 10 L25 | ||
| (12.8 ft ) 10 L25 | ||
| (12.8 ft ) 10 L25 | ||
| (12.8 ft ) 10 L25 | ||
| 108.0-23μV 87.5 (5μV 50 μS) | FM |
| (75Ω/0.71μV) 8.2 dBf | (5μV 26=S/N) |
| (75Ω/2.0μV) 17.2 dBf | (5μV 46=DIN S/N) |
| :23μs 15-23μs 30 | (5μV ±3) |
| :23μs 64 | (5μs) |
| :23μs 40 | (5μs 1) |
| :(AM) 1 μs | AM |
| :23μs 1602-23μs 531 (5μs 9 μS) :(SW1) 2 μs | |
| :23μs 7735-23μs 2940 (5μs 5 μS) :(SW2) 3 μs | |
| /23μs 10135-23μs 9500 :23μs 18135-23μs 11580 (5μs 5 μS) | |
| (28.2μV) 29 dBμ:AM (32μV) 30 dBμ:SW | (5μs 20=S/N) |
| GaAlAs | dωjzij |
| 8a8zijzai | (D/A) ∫LJLJLJLJLJLJLJLJLJLJLJLJLJLJLJLJLJLJLJLJLJLJLJLJLJLJLJLJLJLJLJLJLJLJLJLJLJLJLJLJLJLJLJLJLJLJLJLJLJLJL |
| CLV)aaaaaaaaaaaaaaaaaaaaaaaaaaaaaaaaaaaaaaaaaaaaaaaaaaaaaaaaaaaaaaaaaaaaaaaaaaaaaaaaaaaaaaaaaaaaaaaaaaaaaaaaaaaaaaaaaaaaaaaaaaaaaaaaaaaaaaaaaaaaaaaaaaaaaaaaaaaaaaaaaaaaaaaaaaaaaaaaaaaaaaaaaaaaaaaaaaaaaaaaaaaaaaaaaaaaaaaaaaaaaaaaaaaaaaaaaaaaaaaaaaaaaaaaaaaaaaaaaaaaaaaaaaaaaaaaaaaaaaaaaaaaaaaaaaaaaaaaaaaaaaaaaaaaaaaaaaaaaaaaaaaaaaaaaaaaaaaaaaaaaaaaaaaaaaaaaaaaaaaaaaaaaaaaaaaaaaaaaaaaaaaaaaaaaaaaaaaaaaaaaaaaaaaaaaaaaaaaaaaaaaaaaaaaaaaaaaaaaaaaaaaaaaaaaaaaaaaaaaaaaaaaaaaaaaaaaaaaaaaaaaaaaaaaaaaaaaaaaaaaaaaaaaaaaaaaaaaaaaaaaaaaaaaaaaaaaaaaaaaaaaaaaaaaaaaaaaaaaaaaaaaaaaaaaaaaaaaaaaaaaaaaaaaaaaaaaaaaaaabbb | |
| 0.01% | (Σjzjzjzjzjzjzjzjzjzjzjzjzjzjzjzjzjzjzjzjzjzjzjzjzjzjzjzjzjzjzjzjzjzjzjzjzjzjzjzjzjzjzjzjzjzjzjzjzjzjzj |
| (Σjzjzjzjzjzjzjzjzjzjzjzjzjzjzjzjzjzjzjzjzjzjzjzjzjzjzjzjzjzjzjzjzjzjzjzjzjzjzjzjzjzjzjzjzjzjzjzjz | |
| MPEG-1/2 Audio Layer-3 | MP3 |
| Windows Media Audio | WMA |
| (KD-R881BT)“aac”AAC-LC | AAC |
| (10←)... | ... |
| (12←)... | ... |
| ... | ... |
| ... | ... |
| ... | ... |
| ... | ... |
| ... | ... |
| ... | ... |
| ... | ... |
| ... | ... |
| ... | ... |
| ... | ... |
| ... | ... |
| ... | ... |
| ... | ... |
| ... | ... |
| ... | ... |
| ... | ... |
| ... | ... ... |
| ... | ... ... |
| ... | ... ... |
| ... | ... ... |
| ... | ... ... |
| ... | ... ... |
| ... | ... ... |
| ... | ... ... |
| ... | ... ... |
| ... | ... ... |
| ... | ... ... |
| ... | ... ... |
| ... | ... ... |
| ... | ... ... |
| ... | ... ... |
(3) 1.25 p100 1.25001, 1.25001, 1.25001, 1.25001, 1.25001, 1.25001, 1.25001
(6th generation , 5th) iPod touch -
SE .6S Plus .6S .6 Plus .6 .5C .5S .5 iPhone 4S -
[HEAD MODE]d"Videos" sJ 1s Jy jy yjy
.2g 2
aaii i 1
. iPiOe /iPod 000000000000000000000000000
jSooLssSsJ i jiphone /iPod Jolc pnnnne n
S 150
yjdlolg 0j
15 4.1
1 4.1 1
2.0 (AOA) Android Open Accessory
mass storage 150
j 2000 AOA 2.0 (p
A0A2.0
Pandora
Pandora
Pandora
i 1
Jss Js Jg Jg Jg Jg Jg Jg Jg Jg Jg Jg Jg
.
Pandora slas
jai jybjj lalai jolai jolai jolai jolai jolai jolai
Pandora 山 pandora-support@pandora.com
jgi jgi jgl slo oicj gl aai oio
Lsi jS iSj ySj 0000j Sj Cw
.
1 > 1 即 1.5 < u < 10
:
S ADB = S CBD + S_ BDO
(.aac) AAC (.wma) WMA (.mp3) MP3 :KD-R881BT
(.wma)WMA(.mp3)MP3:KD-R781BT
:USB.
(.flac)FLAC(.wav)WAV(.aac)AAC(.wma)WMA(.mp3)MP3:KD-R881BT
(.flac) FLAC (.wav) WAV (.wma) WMA (.mp3) MP3 :KD-R781BT
CD-ROM/CD-RW/CD-R:
Long Jlfa Joliet. ISO 9660 Level 1/2:
:USB 5000000000000000000000000000000
Made for
(6th generation , 5th) iPod touch –
(7th generation) iPod nano -
SE .6S Plus .6S .6 Plus .6 .5C .5S .5 iPhone 4S -

()
S
000000
S 1
1
14.5 54
1
l0 : l0( x0,y0) = - k( x - x0,y0 - y_0)
Sss 11s sss
Sic 105
Sio 15i j
S 10000000000000000000000000000000
J: [LPF FRQ] /[HPF FRQ] /[SW LPF FRQ] /[R-HPF FRQ] /[F-HPF FRQ] /[FRQ]
.()
JgJgJgJgJgJgJgJgJgJgJgJgJgJgJgJgJgJgJgJgJgJgJgJgJgJgJgJgJgJgJgJgJgJgJgJgJgJgJgJgJgJgJgJgJgJgJgJgJgJgJ
: [LPF SLOPE] /[HPF SLOPE] /[SW LPF SLOPE] /[R-HPF SLOPE] /[F-HPF SLOPE] /[SLOPE]
15 15
[THROUGH] jz
LILpKgSgSgSgSgSgSgSgSgSgSgSgSgSgSgSgSgSgSgSgSgSgSgSgSgSgSgSgSgSgSgSgSgSgSgSgSgSgSgSgSgSgSgSgSgSgSgSgSgSgSg
山 山 :[GAIN]/[SW LPF GAIN]/[R-HPF GAIN]/[F-HPF GAIN]/[GAIN RIGHT]/[GAIN LEFT]
15 121 10
[SPK/PRE OUT] laaal aai
j 1
(31)
:KD-R881BT
| (lineout) | SUSALJADSPYIAYLIL | ||
| SW | REAR | FRONT | |
| \( \text{d} \) | ( \( \text{d} \) ) | ||
| \( \text{d} \) ( \( \text{d} \) ) | \( \text{d} \) ( \( \text{d} \) ) | \( \text{d} \) ( \( \text{d} \) ) | REAR/REAR |
| \( \text{d} \) | REAR/SUB.W | ||
| \( \text{d} \) | SUB.W/SUB.W | ||
:KD-R781BT
| [ON] (S) [SUBWOOFER SET] S# & b# *1 |
| [SUB.W/SUB.W] S# & [SPK/PRE OUT] S# & b# 2 S, S# *2 |
| (19 ←).S# S# S# S# |
| [SUB.W/SUB.W] S# [REAR/SUB.W] S# & b# S# S# 2 S, S# *3 |
| (19 ←).S# S# S# S# S# S# S# S# S# S# S# S# S# S# S# S# S# S# S# S# S# S# S# S# S# S# S# S# S# S# S# S# S# S# S# S# S# S# S# S# S# S# S# S# S# S# S# S# S# S# S# |
| PRO EQ . . . . . . . . . . . . . . . . . . . . . . . . . . . . . . . . . . . . . . . . . . . . . . . . . . . . . . . . . . . . . . . . . . . . . . . . . . . . . . . . . . . . . . . . . . . . . . . . . . . . .. . . . . . . . . . . . . . . . . . . . . . . . . . . . . . . . . . . . . . . . . . . . . . . . . . . . . . . . . . . . . . . . . . . . . . . . . . . . . . . . . . . . . . . . . . . . . . . . . . . .. 62.5HZ | |
| J (J) | . . . . . . . . . . . . . . . . . . . . . . . . . . . . . . . . . . . . . . . . . . . . . . . . . . . . . . . . . . . . . . . . . . . . . . . . . . . . . . . . . . . . . . . . . . . . . . . . . . . . (LEVEL 00) LEVEL +09 J LEVEL -09 (.. . . . . . . . . . . . . . . . . . . . . . . . . . . . . . . . . . . . . . . . . . . . . . . . . . . . . . . . . . . . . . . . . . . . . . . . . . . . . . . . . . . . . . . . . . . . . . . . . . . . J LEVEL J . . . . . . . . . . . . . . . . . . . . . . . . . . . . . . . . . . . . . . . . . . . . . . . . . . . . . . . . . . . . . . . . . . . . . . . . . . . . . . . . . . . . . . . . . . . . . . . . . . J LEVEL 00 J LEVEL -09 J LEVEL -09 (.. . . . . . . . . . . . . . . . . . . . . . . J LEVEL 00 J LEVEL -09 J LEVEL -09 . . . . . . . . . . . . J LEVEL 00 J LEVEL -09 J LEVEL -09 . . . . . . J LEVEL 00 J LEVEL -09 J LEVEL -09 . . . . J LEVEL 00 J LEVEL -09 J LEVEL -09 . . . J LEVEL 00 J LEVEL -09 J LEVEL -09 . . J LEVEL 00 J LEVEL -09 J LEVEL -09 . J LEVEL 00 J LEVEL -09 J LEVEL -09 . J LEVEL 00 J LEVEL -09 J LEVEL -09 . J LEVEL 00 J LEVEL -09 J LEVEL -09 . J LEVEL 00 J LEVEL -09 J LEVEL -09 . J LEVEL 00 J LEVEL -09 J LEVEL -09 . J LEVEL 00 J LEVEL -09 J LEVEL -08 J LEVEL -08 . J LEVEL 00 J LEVEL -08 J LEVEL -08 . J LEVEL 00 J LEVEL -08 J LEVEL -08 . J LEVEL 00 J LEVEL -08 J LEVEL -08 . J LEVEL 00 J LEVEL -08 J LEVEL -08 . J LEVEL 00 J LEVEL -08 J LEVEL -08 . J LEVEL 00 J LEVEL -08 J LEVEL -08 . J LEVEL J . J LEVEL J . J LEVEL J . J LEVEL J . J LEVEL J . J LEVEL J . J LEVEL J . J LEVEL J . J LEVEL J . J LEVEL J . J LEVEL J . J LEVEL J . J LEVEL J . J LEVEL J . J LEVEL J . J LEVEL J . J LEVEL J . J LEVEL J . J LEVEL J . J LEVEL J . J LEVEL 00 J LEVEL -09 J LEVEL -09 . J LEVEL 00 J LEVEL -09 J LEVEL -09 . J LEVEL 00 J LEVEL -09 J LEVEL -09 . J LEVEL 00 J LEVEL -09 J LEVEL -09 . J LEVEL 00 J LEVEL -09 J LEVEL -09 . J LEVEL 00 J LEVEL -09 J LEVEL-09 . J LEVEL 00 J LEVEL -09 J LEVEL -09 . J LEVEL 00 J LEVEL -09 J LEVEL -09 . J LEVEL 00 J LEVEL -09 J LEVEL -09 . J LEVEL 00 J LEVEL -09 J LEVEL -09 . J LEVEL 00 J LEVEL -09 J LEVEL -09 . J LEVEL 00 J LEVEL -09J LEVEL -09 . J LEVEL 00 J LEVEL -09 J LEVEL -09 . J LEVEL 00 J LEVEL -09 J LEVEL -09 . J LEVEL 00 J LEVEL -09 J LEVEL -09 . J LEVEL 00 J LEVEL -09 J LEVEL -09 . J LEVEL 00 J LEVEL -09 J LEVEL -09 . J LEVEL 00 J LEVEL -10 J LEVEL -50 . J LEVEL 00 J LEVEL -50 . J LEVEL 00 J LEVEL -50 . J LEVEL 00 J LEVEL -50 . J LEVEL 00 J LEVEL -50 . J LEVEL 00 J LEVEL -50 . J LEVEL 00 J LEVEL -50 . J LEVEL 00 J LEVEL -50 . J LEVEL 00 J LEVEL -50 . J LEVEL 00 J LEVEL-50 . J LEVEL 00 J LEVEL -50 . J LEVEL 00 J LEVEL -50 . J LEVEL 00 J LEVEL -50 . J LEVEL 00 J LEVEL -50 . J LEVEL 00 J LEVEL -50 . J LEVEL 00 J LEVEL -50 . J LEVEL 00 J LEVEL -50 . J LEVEL 00 J LEVEL -50 J LEVEL 00 J LEVEL -50 . J LEVEL 00 J LEVEL -50 . J LEVEL 00 J LEVEL -50 . J LEVEL 00 J LEVEL -50 . J LEVEL 00 J LEVEL -50 . J LEVEL 00 J LEVEL -50 . J LEVEL 00 J LEVEL -50 . J LEVEL 00 J LEVEL -50 . J LEVEL 01 J LEVEL -50 . J LEVEL 01 J LEVEL -50 . J LEVEL 01 J LEVEL -50 . J LEVEL 01 J LEVEL -50 . J LEVEL 01 J LEVEL -50 . J LEVEL 01 J LEVEL -50 . J LEVEL 01 J LEVEL -50 . J LEVEL 01 J LEVEL -50 . J LEVEL 01 J LEVEL -49 . J LEVEL 01 J LEVEL -49 . J LEVEL 01 J LEVEL -49 . J LEVEL 01 J LEVEL -49 . J LEVEL 01 J LEVEL -49 . J LEVEL 01 J LEVEL -49 . J LEVEL 01 J LEVEL -49 . J LEVEL 01 J LEVEL -49 . J LEVEL 01 J LEVEL -49 . J-level 01 J LEVEL -49 . J-level 01 J LEVEL -49 . J-level 01 J LEVEL -49 . J-level 01 J LEVEL -49 . J-level 01 J LEVEL -49 . J-level 01 J LEVEL -49 . J-level 01 J LEVEL -49 . J-level 01 J LEVEL -49 . J-level 01J LEVEL -49 . J-level 01J LEVEL -49 . J-level 01J LEVEL -49 . J-level 01J LEVEL -49 . J-level 01J LEVEL -49 . J-level 01J LEVEL -49 . J-level 01J LEVEL -49 . J-level 01J LEVEL -49 . J-level 01J LEVEL -48 . J-level 01J LEVEL -48 . J-level 01J LEVEL -48 . J-level 01J LEVEL -48 . J-level 01J LEVEL -48 . J-level 01J LEVEL -48 . J-level 01J LEVEL -48 . J-level 01J LEVEL -48 . J-level 01J LEVEL -48 . J- J- J- J- J- J- J- J- J- J- J- J- J- J- J- J- J- J- J- J- J- J- J- J- J- J- J- J- J- J- J- J- J- J- J- J- J- J- J- J- J- J- J- J- J- J- J- J- J- J- J- j- J- J- J- J- J- J- J- J- J- J- J- J- J- J- J- J- J- J- J- J- J- J- J- J- J- J- J- J- J- J- J- J- J- J- J- J- J- J- J- J- J- J- J- J- J- J- J- J- J- I J J J J J J J J J J J J J J J J J J J J J J J J J J J J J J J J J J J J J J J J J J J J J J J J J J I J J J J J J J J J J J J J J J J J J J J J J J J J J J J J J J J J J J J J J J J J J J J J J J J J J J J J J J J J J J J J J J J J J J J J J J J J J J J J J J J J J J J J J J J J J J J J J J J J J J I J J J J J J J J J J J J J J J J J J J J J J J J J J J J J J J J J J J J J J J J J J J J J J J J J J J J J J J J J J J J J J J J J J J J J J J J J J J J J J J J J J J J J J J J J J J J J J J J J J J j J J J J J J J J J J J J J J J J J J J J J J J J J J J J J J J J J J J J J J J J J J J J J J J J J JI JI JI JI JI JI JI JI JI JI JI JI JI JI JI JI JI JI JI JI JI JI JI JI JI JI JI JI JI JI JI JI JI JI JI JI JI JI JI JI JI JI JI JI JI JI JI JI JI JI J J J J J J J J J J J J J J J J J J J J J J J J J J J J J J J J J J J J J J J J J J J J J J J J J L J J J J J J J J J J J J J J J J J J J J J J J J J J J J J J J J J J J J J J J J J J J J J J J J J R J J J J J J J J J J J J J J J J J J J J J J J J J J J J J J J J J J J J J J J J J J J J J J J J J C J J J J J J J J J J J J J J J J J J J J J J J J J J J J J J J J J J J J J J J J J J J J J J J J J EASY EQ] |

$$ \therefore \text {d} _ {j} \text {d} _ {j} \text {d} _ {j} \text {d} _ {j} \text {d} _ {j} \text {d} _ {j} \text {d} _ {j} \text {d} _ {j} \text {d} _ {j} \text {d} _ {j} \text {d} _ {j} \text {d} _ {j} $$
$$ \begin{array}{l} \begin{array}{l} \dots \text {I I E N T E R} _ {\text {J J}} \text {V O L} + / - (\text {d i s k}) \text {S} \text {J} \text {J} \text {J} \text {J} \text {J} \text {J} \text {J} \text {J} \text {J} \text {J} \text {J} \text {J} \text {J} \text {J} \text {J} \text {J} \text {J} \text {J} \text {J} \text {J} \text {L} \text {L} \text {L} \text {L} \text {L} \text {L} \text {L} \text {L} \text {L} \text {L} \text {L} \text {L} \text {L} \text {L} \text {L} \text {L} \text {L} \text {L} \text {L} \text {L} \text {1 2} \end{array} \ 3 \ \dots \dots \dots \dots \dots \dots \dots \dots \dots \ \dots \dots \dots \dots \dots \dots \dots \dots \dots \dots \dots \dots \dots \dots \dots \dots \dots \dots \dots \dots \dots \dots \dots \dots \dots \dots \dots \dots \dots 4 \ \therefore \quad \text {a l p h a} _ {i} \text {a l p h a} _ {j} \text {a l p h a} _ {k} \text {a l p h a} _ {l} \text {a l p h a} _ {m} \ \end{array} $$
XX:
EQ SETTING
| JAZZ/HIP HOP/HARD ROCK/DRVN 2/DRVN 3/FLAT CLASSICAL/USER/R&B/POP |
| 03:### | +06 100 | SUB.W SP*1*2: |
| 00 | +10 1-50 | SUB.W*1*3: |
| LVL 00 | LVL +09 1 LVL -09 | BASS: |
| LVL 00 | LVL +09 1 LVL -09 | MID: |
| (LVL 00 | LVL +09 1 LVL -09 | TRE: |
$$ (1 8 \leftarrow): ^ { 3} \cdot^ { 2} \cdot^ {* 1} $$
jLjLj j0000000000000000000000000000
LJ (c)2g yj 45 Jd j d S
1
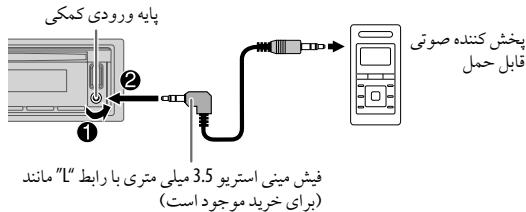
$$ \begin{array}{l} (4 \leftarrow). \because \text {S L} \cup \text {S L} [ O N ] \text {S L} [ \text {S O U R C E S E L E C T} ] \text {S L} [ \text {B U I L T - I N A U X} ] \text {S L} \ \therefore \text {S R C} - \text {A U X} \quad 3 \ \dots \dots \dots \dots \dots \dots \dots \dots \dots \dots \dots \dots \dots \dots \dots \dots \dots \dots \dots \dots \dots \dots \dots \dots \dots \dots \dots \dots \dots \dots \dots \dots \dots \dots \dots \dots 4 \ \end{array} $$
150 1

STATUS
.
IOS CONNECTED
.
USB
.
IOS NOT CONNECTED
.
Android CONNECTED
.
USB
.
Android NOT CONNECTED
(KD-R881BT) iPod/iPhone
iPod/iPhone 1, SRC· iPod BT w/23100000000000000000000000000000000000000000000000000000000000000000
USB 5S 1 iPod /iPhone .iPod BT 2 3 4 5 6 7 8 9 10 11 12 13 14 15 16 17 18 19 20 21 22 23 24 25 26 27 28 29 30 31 32 33 34 35 36 37 38 39 40 41 42 43 44 45 46 47 48 49 50 51 52 53 54 55 56 57 58 59 60 61 62 63 64 65 66 67 68 69 70 71 72 73 74 75 76
. 1234567890123456789012345678901234567890123456789012345678901234567890123456789012345678901234567890123456789
()Pandora 1
:la sJluo oJl
(4←) .S [ON] [SOURCE SELECT] [PANDORA SRC] 1
.5 j2 0
Pandora a1j
1
(10←) .S JJ G j j j j j j
PANDORA BT (iPod /iPhone) PANDORA 3
.245
.225
(9 一 _ 一 .205
USB
JVC Remote wj josui b
JVC Remote
(20 kJv)
iPod /iPhone :KD-R881BT
(Kjy)
JVC Remote 1
http://www.jvc.net/cs/car/
1
1
2
3
4
XX:
| REMOTE APP | |
| بُزَلَسَبْعَنَهُ بِيَالَّهُ وَالَّهُّةِ | SELECT |
| لَّطَالْحَسَبْعَنَهُ بِيَالَّهُّةِ وَالَّهُّةِ وَالَّهُّةِ وَالَّهُّةِ وَالَّهُّةِ وَالَّهُّةِ وَالَّهُّةِ وَالَّهُّةِ وَالَّهُّةِ وَالَّهُّةِ وَالَّهُّةِ | IOS |
| بُزَلَسَبْعَنَهُ بِيَالَّهُّةِ وَالَّهُّةِ وَالَّهُّةِ وَالَّهُّةِ وَالَّهُّةِ وَالَّهُّةِ وَالَّهُّةِ | iOS |
| بُزَلَسَبْعَنَهُ بِيَالَّهُّةِ وَالَّهُّةِ وَالَّهُّةِ وَالَّهُّةِ وَالَّهُّةِ | iOS |
| بُزَلَسَبْعَنَهُ bَيَالَّهُّةِ وَالَّهُّةِ bَيَالَّهُّةِ bَيَالَّهُّةِ bَيَالَّهُّةِ bَيَالَّهُّةِ bَيَالَّهُّةِ bَيَالَّهُّةِ bَيَالَّهُّةِ bَيَالَّهُّةِ bَيَالَ�َّهُّةِ bَيَالَّهُّةِ bَيَالَ�َّهُّةِ bَيَالَ�َّهُّةِ bَيَالَسَّرْدْتَبَيَالَسَّرْدْتَبَيَالَسَّرْدْتَبَيَالَسَّرْدْتَبَيَالَسَّرْدْتَبَيَالَسَّرْدْتَبَيَالَسَّرْدْتَbَيَالَسَّرْدْتَbَيَالَسَّرْدْتَbَيَالَسَّرْdْtَbَيَالَسَّرْdْtَbَiَالَسَّرْdْtَbَiَالَسَّرْdْtَbَiَالَسَّرْdْtَbَiَالَسَّرْdْtَbَiَالَسَّرْdْtَbَiَالَسَّرْdْtَbَiَالَسَّرْd^\text{空}b\text{空}\text{空}\text{空}\text{空}\text{空}\text{空}\text{空}\text{空}\text{空}\text{空}\text{空}\text{空}\text{空}\text{空}\text{空}\text{空}\text{空}\text{空}\text{空}\text{空}\text{空}\text{空}\text{空}\text{空}\text{空}\text{空} | NO |
| بُزَلَسَبْعَنَهُ bَيَالَّهُّةِ bَيَالَّهُّةِ bَيَالَّهُّةِ bَيَالَّهُّةِ bَيَالَّهُّةِ bَيَالَّهُّةِ bَيَالَّهُّةِ bَيَالَّهُّةِ bَيِالَ�َّهُّةِ bَيَالَ�َّهُّةِ bَيَالَ�َّهُّةِ bَيَالَ�َّهُّةِ bَيَالَسَّرْd^\text{空}\text{空}\text{空}\text{空}\text{空}\text{空}\text{空}\text{空}\text{空}\text{空}\text{空}\text{空}\text{空}\text{空}\text{空}\text{空}\text{空}\text{空}\text{空}\text{空}\text{空}\text{空}\text{空}\text{空}\text{空}} | iOS |
| بُزَلَسَبْعَنَهُ bَيَالَّهُّةِ bَيَالَّهُّةِ bَيَالَّهُّةِ bَيَالَّهُّةِ bَيَالَ�َّهُّةِ bَيَالَ�َّهُّةِ bَيَالَسَّرْd^\text{空}\text{空}\text{空}\text{空}\text{空}\text{空}\text{空}\text{空}\text{空}\text{空}\text{空}\text{空}\text{空}\text{空}\text{空}\text{空}\text{空}\text{空}\text{空}\text{空} | NO |
| بُزَلَسَبْعَنَetre bَيَالَّهُّةِ bَيَالَّهُّةِ bَيَالَّهُّةِ bَيَالَ�َّهُّةِ bَيَالَ�َّهُّةِ bَيَالَسَّرْd^\text{空}\text{空}\text{空}\text{空}\text{空}\text{�}\text{空}\text{空}\text{空}\text{空}\text{空}\text{空}\text{空}\text{空}\text{空}\text{空}\text{空}\text{空}\text{空}\text{空}\text{空}\text{空}\text{空}\text{空}\text{空}\text{空}\text{空}\text{空}\text{空}\text{空}\text{�}\text{空}\text{空}\text{空}\text{空}\text{空}\text{空}\text{空}\text{空}\text{空}\text{空}\text{空}\text{空}\text{空}\text{空}\text{空}\text{空}\text{空}\text{空}\text{空} | NO |
| بُزَلَسَبْعَنَetre bَمَّلَسَبْعَنَهُ bَمَّلَسَبْعَنَهُ bَمَّلَسَبْعَنَهُ bَمَّلَسَبْعَنَهُ bَمَّلَسَبْعَنَهُ bَمَّلَسَبْعَنَهُ bَمَّلَسَبْعَنِ bَمَّلَسَبْعَنِ bَمَّلَسَبْعَنِ bَمَّلَسَبْعَنِ bَمَّلَسَبْعَنِ bَمَّلَسَبْعَنِ bَمَّلَسَبْعَنِ bَمَّلَسَb\text{空}\text{空}\text{空}\text{空}\text{空}\text{空}\text{空}\text{空}\text{空}\text{空}\text{空}\text{空}\text{空}\text{空}\text{空}\text{空}\text{空}\text{空}\text{空}\text{空}\text{空}\text{空}\text{空}\text{空}\text{\text{空}} | NO |
| بُزَلَسَبْعَنَetre bَمَّلَسَبْعَنَهُ bَمَّلَسَبْعَنَهُ bَمَّلَسَبْعَنَهُ bَمَّلَسَبْعَنِ bَمَّلَسَبْعَنِ bَمَّلَسَb\text{空}\text{空}\text{空}\text{空}\text{空}\text{空}\text{空}\text{空}\text{空}\text{空}\text{空}\text{空}\text{空}\text{空}\text{�}\text{空}\text{空}\text{空}\text{空}\text{空}\text{空}\text{空}\text{空}\text{空}\text{空} | NO |
| بُزَلَسَبْعَنَetre bَمَّلَسَبْعَنَهُ bَمَّلَسَبْعَنَهُ bَمَ�َّلَسَبْعَنَهُ bَمَ�َ�\( \text{空}\text{空}\text{空}\text{空}\text{空}\text{空}\text{空}\text{空}\text{空}\text{空}\text{空}\text{空}\text{空}\text{空}\text{空}\text{空}\text{空}\text{空}\text{空}\text{空}\text{空}\text{空}\text{空}\text{空}\text{空} \text{空}\text{空}\text{空}\text{空}\text{空}\text{空}\text{空}\text{空}\text{空}\text{空}\text{空}\text{空}\text{空}\text{空}\text{空}\text{空}\text{空}\text{空}\text{空}\text{空}\text{空}\text{空}\text{空}\text{空}\text{�} | NO |
| بُزَلَسَبْعَنَetre bَمَ�َ�\( \text{空}\text{空}\text{空}\text{空}\text{空}\text{空}\text{空}\text{空}\text{空}\text{空}\text{空}\text{空}\text{空}\text{空}\text{空}\text{空}\text{空}\text{空}\text{空}\text{空}\text{空}\text{空}\text{�} | NO |
.500000000000000000000000000000000000000000000000000000000000000000000000
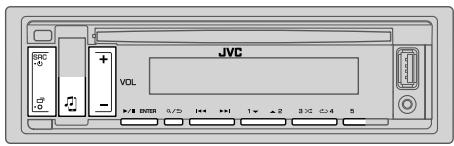
BLUETOOTH
BTAUDIO 2000
1000
1000
$$ \therefore \text {i} _ {j} = \text {S} _ {\text {i}} = \text {S} _ {\text {i}} = \text {S} _ {\text {i}} = \text {S} _ {\text {i}} = \text {S} _ {\text {i}} = \text {S} _ {\text {i}} = \text {S} _ {\text {i}} = \text {S} _ {\text {i}} = \text {S} _ {\text {i}} = \text {\Delta S} $$
$$ \mathrm {U} _ {2} / \text {,} ^ { 1}" \text {H A N D S - F R E O K " U} _ {2} / \text {,} ^ {} \text {P A I R I N G O K "} $$
$$ j \text {j w}: ^ { 3}" P B A P O K " l / , ^ { 2}" A D U S T R E A M O K " $$
$$ (H F P) \left{s j \dot {j} \dots s \right} \left{s j \dot {j} \dots s \right} \left{s j \dot {j} \dots s \right} ^ {*} 1 $$
$$ (A 2 D P) \omega_ {i} \omega_ {j} \omega_ {k} \omega_ {l} \omega_ {m} \omega_ {n} \omega_ {o} \omega_ {p} \omega_ {q} \omega_ {r} \omega_ {s} \omega_ {t} \omega_ {u} \omega_ {v} \omega_ {w} \omega_ {x} \omega_ {y} \omega_ {z} \omega_ {w} \omega_ {x} \omega_ {y} \omega_ {z} \omega_ {w} \omega_ {x} \omega_ {y} \omega_ {z} \omega_ {w} \omega_ {x} \omega_ {y} \omega_ {z} \omega_ {w} \omega_ {x} \omega_ {y} \omega_ {z} \omega^ {* 2} $$
$$ (P B A P) \quad j _ {1} 5 5 \quad j _ {2} 3 2 \quad j _ {3} 4 0 \quad j _ {4} 6 0 \quad j _ {5} 7 0 \quad j _ {6} 8 0 \quad j _ {7} 9 0 \quad j _ {8} 1 0 0 * 3 $$
$$ \text {P A I R I N G D E L T E D} ^ {\prime \prime} \text {a l p h a 3 0 j} $$
$$ \left. \int_ {0} ^ {1} \frac {1}{x} \right| _ {0} ^ {1} \frac {1}{x} d x = \int_ {0} ^ {1} \frac {1}{x} \frac {1}{x} d x = \int_ {0} ^ {1} \frac {1}{x} \frac {1}{x} d x = 0 $$
$$ . 2 g \dot {w} ^ {2} s ^ {0} $$
$$ \text {S C R} \cdot $$
$$ \dots \dot {s} s \dot {s} s \dot {s} s \dot {s} s \dot {s} s \dot {s} s \dot {s} s $$
| الإستعمال الحرفية | الإستعمال الحرفية | الإستعمال |
| .الإستعمال الحرفية | .الإستعمال الحرفية | .الإستعمال |
| .الإستعمال الحرفية | .الإستعمال الحرفية | .الإستعمال |
| .الإستعمال الحرفية | .ال,enrollment | .ال,enrollment |
| .ال,enrollment | .ال,enrollment | .ال,enrollment |
| .ال,enrollment | .ال,enrollment | .ال,enrollment |
| .ال,enrollment | .ال,enrollment | .ال,enrollment |
| .ال,enrollment | .ال,enrollment | .ال,enrollment |
| .ال,enrollment | .ال,enrollment | .ال,enrollment |
| .ال,enrollment | .ال,enrollment | .ال,enrollment |
| .ENROLLMENT | .ENROLLMENT | .ENROLLMENT |
| .ENROLLMENT | .ENROLLMENT | .ENROLLMENT |
| .ENROLLMENT | .ENROLLMENT | .ENROLLMENT |
| .ENROLLMENT | .ENROLLMENT | .ENROLLMENT |
| .ENROLLMENT | .ENROLLMENT | .ENROLLMENT |
| .ENROLLMENT | .ENROLLMENT | .ENROLLMENT |
| .ENROLLMENT | .ENROLLMENT | . ENROLLMENT |
| .ENROLLMENT | .ENROLLMENT | . ENROLLMENT |
| .ENROLLMENT | .ENROLLMENT | . ENROLLMENT |
| .ENROLLMENT | .ENROLLMENT | . ENROLLMENT |
| .ENROLLMENT | .ENROLLMENT | . ENROLLMENT |
| .ENROLLMENT | .ENROLLMENT | . ENROLLMENT |
| .ENROLLMENT | .ENROLLMENT | |
| .ENROLLMENT | .ENROLLMENT | |
| .ENROLLMENT | .ENROLLMENT | |
| .ENROLLMENT | .ENROLLMENT | |
| .ENROLLMENT | .ENROLLMENT | |
| .ENROLLMENT | .ENROLLMENT | |
| .ENROLLMENT | .ENROLLMENT | |
| .ENROLLMENT | .ENROLLMENT | |
| .ENROLLMENT | ENROLLMENT | |
| .ENROLLMENT | ENROLLMENT | |
| .ENROLLMENT | ENROLLMENT | |
| .ENROLLMENT | ENROLLMENT | |
| .ENROLLMENT | ENROLLMENT | |
| .ENROLLMENT | ENROLLMENT | |
| .ENROLLMENT | ENROLLMENT | |
| .ENROLLMENT | ENROLLMENT | |
| .ENROLLMENT | ENROLLMENT | ENROLLMENT |
| .ENROLLMENT | ENROLLMENT | ENROLLMENT |
| .ENROLLMENT | ENROLLMENT | ENROLLMENT |
| .ENROLLMENT | ENROLLMENT | ENROLLMENT |
| .ENROLLMENT | ENROLLMENT | ENROLLMENT |
| .ENROLLMENT | ENROLLMENT | ENROLLMENT |
| .ENROLLMENT | ENROLLMENT | ENROLLMENT |
| .ENROLLMENT | ENLOADMENT | ENLOADMENT |
| .ENLOADMENT | ENLOADMENT | ENLOADMENT |
| .ENLOADMENT | ENLOADMENT | ENLOADMENT |
| .ENLOADMENT | ENLOADMENT | ENLOADMENT |
| .ENLOADMENT | ENLOADMENT | ENLOADMENT |
| .ENLOADMENT | ENLOADMENT | ENLOADMENT |
| .ENLOADMENT | ENLOADMENT | ENLOADMENT |
| .ENLOADMENT | ENLOADMENT | ENLOADMENT ENLOADMENT |
| .ENLOADMENT | ENLOADMENT | ENLOADMENT |
| .ENLOADMENT | ENLOADMENT | ENLOADMENT |
| .ENLOADMENT | ENLOADMENT | ENLOADMENT |
| .ENLOADMENT | ENLOADMENT | ENLOADMENT |
| .ENLOADMENT | ENLOADMENT | ENLOADMENT |
| .ENLOADMENT | ENLOADMENT | ENLOADMENT |
| .ENLOADMENTS | ENLOADMENT | ENLOADMENT |
| .ENLOADMENTS | ENLOADMENT | ENLOADMENT |
| .ENLOADMENTS | ENLOADMENT | ENLOADMENT |
| .ENLOADMENTS | ENLOADMENT | ENLOADMENT |
| .ENLOADMENTS | ENLOADMENT | ENLOADMENT |
| .ENLOADMENTS | ENLOADMENT | ENLOADMENT |
| .ENLOADMENTS | ENLOADMENT | ENLOADMENT |
100000000000000000000000000000000000000
1
#
$$ j _ {i} \text {与} j _ {i} \text {与} j _ {i} \text {与} j _ {i} \text {与} j _ {i} \text {与} j _ {i} \text {与} j _ {i} \text {与} j _ {i} \text {与} j _ {i} $$
$$ \therefore \sin \left(\omega_ {1} + \omega_ {2}\right) = 1 $$
$$ \therefore \text {l i l} \quad \text {l i l} \quad \text {l i l} \quad \text {l i l} \quad \text {l i l} \quad \text {l i l} \quad \text {l i l} \quad \text {l i l} \quad \text {l i l} \quad \text {l i l} \quad \text {l i l} \quad \text {l i l} \quad $$
$$ \therefore \text {i} \text {j} \text {k} \text {l} \text {o} \text {s} \text {d} \text {e} \text {f} \text {g} \text {h} \text {i} \text {j} \text {k} \text {l} \text {o} \text {s} \text {d} \text {e} \text {f} \text {g} \text {h} \text {i} \text {j} \text {k} \text {l} \text {o} \text {s} \text {d} \text {e} \text {f}. 1 $$
$$ \therefore \text {C H C K M O D E} ^ {\prime \prime} \leftrightarrow \text {B L U E T O O T H} ^ {\prime \prime} $$
$$ \left. \text {P I N} 0 0 0 0 ^ {\prime \prime} \rightleftharpoons \text {S E A R C H N O W U S U N G P H O N E} ^ {\prime \prime} $$
$$ \therefore \sin \alpha = \sin \beta $$
$$ \left. \text {J} ^ {\prime \prime} K D - R 7 * * B T ^ {\prime \prime} / K D - R 8 * * B T ^ {\prime \prime} \right. \text {d i s t a t e d} 3 $$
$$ \therefore \lim _ {y \to 0} \frac {\sin^ {2} y}{\cos^ {2} y} = \frac {1}{3} $$
$$ \left|\right. _ {j \rightarrow j} (C) \downarrow (B) \cdot (A), \quad \text {s o l v e} \quad \text {s o l v e} \quad \text {s o l v e} \quad \text {s o l v e} \quad \text {s o l v e} \quad \text {s o l v e} \quad \text {s o l v e} \quad \text {s o l v e} \quad \text {s o l v e} \quad \text {s o l v e} $$
$$ \dots $$
$$ \left{j a l o w: \left(j a l o w j 6 j a l o w\right) ^ {\prime \prime} X X X X X X ^ {\prime \prime} \neq^ {\prime \prime} P A I R I N G ^ {\prime \prime} (A) \right. $$
$$ \Delta y _ {i} y _ {j} \Delta x _ {i j} \Delta x _ {i j} \Delta x _ {i j} \Delta x _ {i j} \Delta x _ {i j} \Delta x _ {i j} \Delta x _ {i j} \Delta x _ {i j} \Delta x _ {i j} \Delta x _ {i j} \Delta x _ {i j} \Delta x _ {i j} \Delta x _ {i j} $$
$$ \dots \dots \dots \dots \dots \dots \dots \dots \dots \dots \dots \dots \dots \dots \dots \dots \dots $$
$$ \because \text {I} _ {\text {J}} ^ {\prime \prime} 0 0 0 0 ^ {\prime \prime}: ^ {\prime \prime} P I N I S 0 0 0 0 ^ {\prime \prime} \Leftarrow^ {\prime \prime} P A I R I N G ^ {\prime \prime} (B) $$
$$ \therefore \Delta = 2, \Delta = 3, \Delta = 4 $$
$$ \left. \right.\left. 1, \omega , \omega , \omega , \omega , \omega , \omega , \omega , \omega , \omega , \omega , \omega , \omega , \omega , \omega , \omega , \omega , \omega , \omega , \omega , \omega , \omega , \omega , \omega , \omega , \omega , \omega , \omega , \omega , \omega , \omega , \omega , \omega , \omega , \omega , 1, 2, 3, 4, 5, 6, 7, 8, 9, 1 0, 1 1, 1 2, 1 3, 1 4, 1 5, 1 6, 1 7, 1 8, 1 9, 2 0, 2 1, 2 2, 2 3, 2 4, 2 5, 2 6, 2 7, 2 8, 2 9, 3 0, 3 1, 3 2, 3 3, 3 4, 3 5, 3 6, 3 7, 3 8, 3 9, 4 0, 4 1, 4 2, 4 3, 4 4, 4 5, 4 6, 4 7, 4 8, 4 9, 5 0, 5 1, 5 2, 5 3, 5 4, 5 5, 5. \right} ^ {n} = " P A I R I N G" (C) $$
$$ \therefore \mathrm {L i s} \mathrm {J a i} $$
$$ \leftarrow^ {\prime \prime} P A I R I N G O K ^ {\prime \prime}, \quad \text {p l a t i c a l} \quad \text {c o n s t a n t} \quad \text {s i g m a} \quad \text {s i g m a} \quad \text {s i g m a} \quad \text {s i g m a} \quad \text {s i g m a} $$
$$ \dots \text {d} \left[ \begin{array}{l l l l l l l l l l l l} \frac {1}{2} & \frac {1}{2} & \frac {1}{2} & \frac {1}{2} & \frac {1}{2} & \frac {1}{2} & \frac {1}{2} & \frac {1}{2} & \frac {1}{2} & \frac {1}{2} & \frac {1}{2} & \frac {1}{2} & \frac {1}{2} & \frac {3}{4} \end{array} \right] $$
$$ \because C O N N E C T \quad N O W U S U N G P H O N E ^ {\prime} $$
$$ \therefore \Delta A B C \cong \Delta A D E \cong \Delta A C D \cong \Delta A D E \cong \Delta A C D \cong \Delta A D E \cong \Delta A C D $$
$$ . 2 j \omega_ {1} \omega_ {2} \omega_ {3} \omega_ {4} \omega_ {5} \omega_ {6} \omega_ {7} \omega_ {8} “ T E S T I N G ” C H _ {2} O _ {2} \downarrow $$
#
$$ \therefore \text {d} _ {j} \text {d} _ {j} \text {d} _ {j} \text {d} _ {j} \text {d} _ {j} \text {d} _ {j} \text {d} _ {j} \text {d} _ {j} \text {d} _ {j} \text {d} _ {j} \text {d} _ {j} \text {d} _ {j} $$
$$ \left. \cdot \right| _ {1} \cdot \left| _ {2} \right| _ {3} \cdot \left| _ {4} \right| _ {5} \cdot \left| _ {6} \right| _ {7} \cdot \left| _ {8} \right| _ {9} \cdot \left| _ {1 0} \right| _ {1 1} \cdot \left| _ {1 2} \right| _ {1 3} \cdot \left| _ {1 4} \right| _ {1 5} \cdot \left| _ {1 6} \right| _ {1 7} $$
$$ \left. \int_ {0} ^ {1} \frac {1}{x} \right| _ {0} ^ {1} \int_ {0} ^ {1} \frac {1}{y} \int_ {0} ^ {1} \frac {1}{z} \int_ {0} ^ {1} \frac {1}{w} \int_ {0} ^ {1} \frac {1}{\theta} \int_ {0} ^ {1} \frac {1}{\varphi} \int_ {0} ^ {1} \frac {1}{\psi} \int_ {0} ^ {1} \frac {1}{\tau} \int_ {0} ^ {1} \frac {1}{\omega} \int_ {0} ^ {1} \frac {1}{\varphi^ {2}} \int_ {0} ^ {1} \frac {1}{\varphi^ {2}} \int_ {0} ^ {1} \frac {1}{\varphi^ {2}} \int_ {0} ^ {1} \frac {1}{\varphi^ {2}} \int_ {0} ^ {1} \frac {1}{\varphi^ {2}} \int_ {0} ^ {1} \int_ {\theta} ^ {\pi / 2} \int_ {\varphi^ {2}} ^ {\pi / 2} \int_ {\varphi^ {2}} ^ {\pi / 2} \int_ {\varphi^ {2}} ^ {\pi / 2} \int_ {\varphi^ {2}} ^ {\pi / 2} \int_ {\varphi^ {2}} ^ {\pi / 2} \int_ {\varphi^ {2}} ^ {\pi / 2} \int_ {\varphi^ {\prime}} ^ {\pi / 2} \int_ {\varphi^ {\prime}} ^ {\pi / 2} \int_ {\varphi^ {\prime}} ^ {\pi / 2} \int_ {\varphi^ {\prime}} ^ {\pi / 2} \int_ {\varphi^ {\prime}} ^ {\pi / 2} \int_ {\varphi^ {\prime}} ^ {\pi / 2} $$
$$ \therefore \angle S $$
$$ \dots \dots \dots \dots \dots \dots \dots \dots \dots \dots \dots \dots \dots \dots \dots \dots \dots \dots \dots \dots \dots \dots \dots \dots \dots \dots \dots \dots \dots \dots 4 $$
$$ \therefore \text {a} \neq \frac {1}{2} \text {a} \neq \frac {1}{2} \text {a} \neq \frac {1}{2} \text {a} \neq \frac {1}{2} \text {a} \neq \frac {1}{2} \text {a} \neq \frac {1}{2} \text {a} \neq \frac {1}{2} $$
$$ \begin{array}{c} \text {X X}: \ \text {x i s t e r m a l} \end{array} $$
| BT MODE | |
| .155 | PHONE SELECT* |
| .200 | AUDIO SELECT* |
| .250 | DEVICE DELETE |
| .300 | DEVICE DELETE |
| .350 | PIN CODE EDIT |
| .400 | (0000) |
| .450 | RECONNECT |
| .500 | AUTO PAIRING |
| .600 | INITIALIZE |
| .700 | INFORMATION |
L 10000000000000000000000000000000000000000000
110
1
2
1 1
la jolil 1y oolil glllgl lal 1y
iPhone 1
#
100
(61)Sds 6
1
[DIAL NUMBER] [PHONEBOOK] [RECENT CALL] 2
I ENTER VOL+/-
3
.
HENTER
.5 0000
4
"MEMORY P (a) 1000000000000000000000000000000000000000000000000000
.200012 40000000
[DIAL NUMBER]
L 2
a b c d e f g h i j k l m n o p q r s t
1
2
HENTER 3
NO PRESET
2g 5
y j 1
a 1
1
.5a"(Jg0)
a3 = a1 + 2 = 3
IENTERVOL+/-(sJzJzJzJzJzJzJzJzJzJzJzJzJzJzJzJzJzJzJzJzJzJzJzJzJzJzJzJzJzJ
3
A
(.)PBAPj jaiS UuiuUus
1
1
NO HISTORY
IENTER 2
PBAJ jai s Jui jia jao
(.OTHERS 910.2A) 2A/1V,
"OTHERS". 9UZA
ENTERVOL+/-p 2
I ENTER Vol+/-.
.
Jieao oOoo 0o jso yjso yjso jso Joo ooo Joo ooo
RECENTCALL
PHONEBOOK
.225 50
1 1
(.)021 1
1
1 2
.28 1
ENTER 3
DIAL NUMBER
VOICE
$$ \therefore \text {s u b s c r i p t} _ {1} S R C = 0. 4 5 2 0. 0 5 2 0. 0 5 2 0. 0 5 2 0. 0 5 2 0. 0 5 2 0. 0 5 2 0. 0 5 2 0. 0 5 2 0. 0 5 2 0. 0 5 2 0. 0 5 2 0. 0 $$
$$ \dots \dots \dots \dots \dots \dots \dots \dots \dots \dots \dots \dots \dots \dots \dots \dots \dots \dots \dots \dots \dots \dots \dots \dots \dots \dots \dots \dots \dots \dots \dots \dots \dots \dots \dots \dots \dots \dots \dots \dots \dots \dots \dots \dots \dots \dots \dots \dots \dots \dots \dots \tag {2} $$
$$ \begin{array}{l} \dots \text {j} \text {j} \text {j} \text {j} \text {j} \text {j} \text {j} \text {j} \text {j} \text {j} \text {j} \text {j} \text {j} \text {j} \text {j} \text {j} \text {j} \text {j} \text {j} \text {j} \text {j}, \ 2 j, j, j, j, j, j, j, j, j, j, j, j, j, j, j, j, j, j, j, j, j, j, j, j, j, j, j, j, j, j, j, j, j, j, j, j, j, j, j, j, j, j, j, j, j, j, j, j, j, j, j. \end{array} $$
$$ \left. \right.\left. \right.\left. \right.\left. \right.\left. \right.\left. \right.\left. \right.\left. \right.\left. \right.\left. \right.\left. \right.\left. \right.\left. \right.\left.\left.\left.\left.\left.\left.\left.\left.\left.\left.\left.\left.\left.\left.\left.\left.\left.\left.\left.\left.\left. \text {l o g} (\mathrm {b}) \right] _ {\mathrm {b}} (\mathrm {b}) \right] _ {\mathrm {b}} (\mathrm {b}) \right] _ {\mathrm {b}} (\mathrm {b}) \right] _ {\mathrm {b}} (\mathrm {b}) \right] _ {\mathrm {b}} (\mathrm {b}) \right] _ {\mathrm {b}} (\mathrm {b}) \right] _ {\mathrm {b}} (\mathrm {b}) \right] _ {\mathrm {b}} (\right)\right] _ {\mathrm {b}} (\right)\right] _ {\mathrm {b}} (\right)\right] _ {\mathrm {b}} (\right)\right] _ {\mathrm {b}} (\right)\right] _ {\mathrm {b}} (\right)\right] _ {\mathrm {b}} (\right) $$
$$ \therefore \Delta A B C \sim \Delta A D E $$
$$ " B A C K - N O " \Leftarrow " E N T E R - Y E S " \Leftarrow " X X X X X X " \Leftarrow [ d ] $$
$$ . 2 \dot {s} \dot {s} \dot {s} \dot {s} \dot {s} \dot {s} \dot {s} \dot {s} \dot {s} \dot {s} \dot {s} \dot {s} \dot {s} \dot {s} \dot {s} \dot {s} \dot {s} \dot {s} \dot {s} \dot {s} \dot {s}, 6 \dot {s} s _ {\prime} ^ {\prime \prime} “ X X X X X X ” $$
$$ \therefore \text {i n t e r n a l} \quad \left(s, s _ {1}, s _ {2}\right) \text {i n t e r n a l} \quad \left(s _ {3}, s _ {4}\right) \text {i n t e r n a l} \quad \left(s _ {5}, s _ {6}\right) \text {i n t e r n a l} \quad \left(s _ {7}, s _ {8}\right) $$
$$ \dots \dots \dots \dots \dots \dots \dots \dots \dots \dots \dots \dots \dots \dots \dots \dots \dots \dots \dots \dots \dots \dots \dots \dots \dots \dots \dots \dots \dots \dots \dots \dots \dots \dots \tag {2} $$
$$ \therefore \Delta S _ {\Delta} = \Delta S _ {\Delta} ^ {1} + \Delta S _ {\Delta} ^ {2} + \Delta S _ {\Delta} ^ {3} + \dots $$
$$ " B A C K - N O " \Leftarrow " E N T E R - Y E S " \Leftarrow [ d \text {公} ] ^ {\prime \prime} (B) $$
$$ \dots \dots \dots \dots \dots \dots \dots \dots \dots \dots \dots \dots \dots \dots \dots \dots \dots \dots \dots \dots \dots \dots \dots \dots \dots \dots \dots \dots \dots \dots \dots \dots \dots \dots \dots \dots \dots \dots \dots \dots \dots \tag {1} $$
$$ \therefore \Delta S _ {2} = 3 0, \Delta S _ {3} = 6 0 $$
$$ (1 4 \leftrightarrow) \dots \dots \dots \dots \dots \dots \dots \dots \dots \dots \dots \dots \dots \dots \dots \dots \dots \dots \dots \dots \dots \dots \dots \dots \dots \dots \dots \dots \dots \dots \dots \dots \dots \dots \dots \dots \dots \dots \dots \dots \dots \dots \dots \dots \dots \dots \dots \dots \dots $$
$$ \therefore \Delta S _ {1} \Delta S _ {2} \Delta S _ {3} \Delta S _ {4} \Delta S _ {5} \Delta S _ {6} \Delta S _ {7} \Delta S _ {8} \Delta S _ {9} \Delta S _ {1 0} \Delta S _ {1 1} \dots “ P A I R I N G ” \text {B i a l} $$
$$ j _ {i} j _ {j} j _ {j} j _ {j} j _ {j} j _ {j} j _ {j} j _ {j} j _ {j} j _ {j} j _ {j} j _ {j} j _ {j} j _ {j} j _ {j} j _ {j} j _ {j} j _ {j} j _ {j} j _ {j} j _ {j} j _ {i} j _ {i} j _ {i} j _ {i} j _ {i} j _ {i} j _ {i} j _ {i} j _ {i} j _ {i} j _ {i} j _ {i} j _ {i} j _ {i} j _ {i} j _ {i} j _ {i} j _ {i} j _ {i} j _ {i} j _ {j} \text {" P A I R I N G C O M P L E T E D " } \text {" } \text {" } \text {" } \text {" } \text {" } \text {" } \text {" } \text {" } \text {" } \text {" } \text {" } \text {" } \text {" } \text {" } \text {" } \text {" } \text {" } \text {" } \text {" } \text {" } \text {" } \text {" } \text {" } \text {" } \text {" } \text {} $$
$$ \dots \dot {s} \dot {s} \dot {s} \dot {s} \dot {s} \dot {s} \dot {s} \dot {s} \dot {s} \dot {s} \dot {s} \dot {s} \dot {s} \dot {s} \dot {s} \dot {s} \dot {s} \dot {s} \dot {s} \dot {s} $$
$$ \therefore \text {S u} \quad \text {S u} \quad \text {S u} \quad \text {S u} \quad \text {S u} \quad \text {S u} \quad \text {S u} \quad \text {S u} \quad \text {S u} \quad \text {S u} \quad \text {S u} \quad \text {S u} \quad \text {S u} \quad \text {T h e t a} $$
$$ . 2 S (c i d) c i d 1 0 l s i n c i d y j s l s i n c i d y $$
$$ \therefore \text {d} S = \int_ {D} \left[ \frac {1}{2} \sin \theta + \frac {1}{2} \cos \theta \right] d \theta $$
$$ . [ D E V I C E D E L T E ] \cdot 1 4 \leftarrow \omega_ {i} \omega_ {j} \omega_ {k} \omega_ {l} \omega_ {m} $$
$$ \therefore \lim _ {x \rightarrow - \infty} \frac {\sin^ {2} x}{\cos^ {2} x + \cos^ {2} x} = \frac {\sin^ {2} x}{\cos^ {2} x + \cos^ {2} x} $$
$$ (1 5 \leftarrow) \dots \dots \dots \dots \dots \dots \dots \dots \dots \dots \dots \dots \dots \dots \dots \dots \dots \dots \dots \dots \dots \dots \dots \dots \dots \dots \dots \dots \dots \dots \dots \dots \dots \dots \dots \dots \dots \dots \dots \dots \dots \dots \dots \dots \dots \tag {15} $$
$$ 4 4 \text {g} \omega \text {d} \text {c} \text {r} \omega \text {d} \text {a} \text {l} \text {o} \text {k} \text {s} \text {u} \text {s} \text {d} \text {i} \text {j} \text {a} \text {o} \text {o} \text {k} \text {s} \text {u} \text {s} \text {a} \text {y} \text {b} \text {d} \text {e} \text {f} \text {g} \text {h} \text {i} \text {j} \text {d} \text {a} \text {e} \text {f} \text {g} \text {h} \text {i} \text {g} \text {d} \text {o} \text {k} \text {s} \text {u} \text {s} \text {j} \text {g} \text {h} \text {i} \text {d} \text {a} \text {e} \text {f} \text {g} \text {h} $$
$$ \therefore \sin \angle 1 = \frac {1}{2} $$
$$ \therefore \Delta E F G \sim \Delta B G D \sim \Delta O B C \sim \Delta O A C \sim \Delta S A B \sim \Delta C B D \sim \Delta C A E $$
JUZU—BLUETOOTH
$$ \therefore \lim _ {x \to 0} \frac {\sin^ {2} x}{x + 1} = \frac {1}{x} $$
$$ (H F P) \left{a, b, c, d, e, f \right} - $$
$$ (A 2 D P) \because \frac {1}{2} \frac {1}{2} \frac {1}{2} \frac {1}{2} \frac {1}{2} \frac {1}{2} \frac {1}{2} \frac {1}{2} \frac {1}{2} \frac {1}{2} \frac {1}{2} \frac {1}{2} \frac {1}{2} \frac {1}{2} \frac {1}{2} \dots $$
$$ (A V R C P) _ j j j j j j j j j j j j j j j j j j j j j j j j j j j j j j j j j j j j j j j j j j j j j j j j j j j j j j j j j j j j j j j j j j j j j j j j j j j j j j j j j j j j j j j j $$
$$ (S P P) \cup_ {j} \cup_ {j} \cup_ {j} \cup_ {j} \cup_ {j} \cup_ {j} \cup_ {j} - $$
$$ (P B A P) \int_ {0} ^ {1} \frac {\sin x}{x} d x = \int_ {0} ^ {1} \frac {\sin x}{x} d x = 0 $$
$$ \therefore \text {d i s t} \left(\frac {1}{2}, \frac {1}{2}\right) $$
$$ (S B C) \quad \text {s u b s c r i p t} $$
$$ (A A C) \because \frac {1}{2} \sum_ {i = 1} ^ {n} \sum_ {j = 1} ^ {m} \sum_ {l = 1} ^ {n} \sum_ {r = 1} ^ {m} \sum_ {s = 1} ^ {n} \sum_ {t = 1} ^ {m} \sum_ {u = 1} ^ {n} \sum_ {v = 1} ^ {m} $$
$$ \therefore \sin 3 5 ^ {\circ} = \frac {1}{2} \cos 3 5 ^ {\circ} $$

$$ \therefore \lim _ {g \to 0} \frac {\sin^ {2} g}{\cos^ {2} g} = \frac {1}{2} $$
$$ \therefore \text {a l l} _ {j} Q / \supset 1 $$
$$ \left. \right.\left. \right.\left. \right.\left. \right.\left. \right.\left. \right.\left. \right.\left. \right.\left. \right.\left. \right.\left. \right.\left. \right.\left. \right.\left. \right.\left. \right.\left. \right.\left.\left.\left.\left.\left.\left.\left.\left.\left.\left.\left.\left.\left.\left.\left.\left.\left.\left. \text {新} ^ {\prime} = 1 - 2\right) ^ {\prime} = 1 - 2\right) ^ {\prime} = 1 - 2\right) ^ {\prime} = 1 - 2\right) ^ {\prime} = 1 - 2\right) ^ {\prime} = 1 - 2\right) ^ {\prime} = 1 - 2\right) ^ {\prime} = 1 - 2\right) ^ {\prime} = 1 - 2\right) ^ {\prime} = 0\right) ^ {\prime} = 0\right) ^ {\prime} = 0\right) ^ {\prime} = 0\right) ^ {\prime} = 0\right) ^ {\prime} = 0\right) ^ {\prime} = 0\right) ^ {\prime} = 0\right) ^ {\prime} = 0\right) ^ {\prime} = 0 $$
$$ \therefore \angle A D C = 1 8 0 ^ {\circ} $$
$$ 1, \triangleright / I I E N T E R \quad \text {V O L} + / -. [ F R M A R T I S T ] \cup [ F R M T R A C K ] \quad \text {J} \quad \text {I} \quad \text {J} \quad \text {J} \quad \text {J} \quad \text {J} \quad \text {J} \quad \text {J} \quad \text {J} \quad \text {J} \quad \text {J} \quad \text {J} \quad \text {J} \quad \text {J} \quad \text {J} \quad \text {J} \quad \text {J} $$
$$ \therefore \lim _ {x \to 0} \frac {1}{x + 2} $$
$$ \therefore \Delta g ^ {\prime} = \Delta g ^ {\prime} \Delta g ^ {\prime} \Delta g ^ {\prime} \Delta g ^ {\prime} \Delta g ^ {\prime} \Delta g ^ {\prime} \Delta g ^ {\prime} \Delta g ^ {\prime} \Delta g ^ {\prime} \Delta g ^ {\prime} \Delta g ^ {\prime} \Delta g ^ {\prime} $$
$$ \therefore \text {d} \left(\frac {\partial f}{\partial x}\right) = \frac {\partial f}{\partial y} + \frac {\partial f}{\partial z} $$
$$ \therefore \text {d} \text {s} \text {j} \text {l} \text {i} _ {1} (\mathbf {6} \text {l} \mathbf {5}. \mathbf {4}. \mathbf {3}) \text {j l o g a} \text {l i s} \text {a} \text {o} \text {s} \text {j} \text {l} \text {s} \text {j}: \text {o l o g a} \text {r o r} \text {o l o g a} \text {l i s} \text {s} \text {j} \text {l} $$
$$ \therefore S _ {1} = \frac {1}{2} \cdot 0. 5 \times \frac {1}{2} \times 0. 5 \times 0. 5 = 0. 5 $$
$$ \dots \dots \dots \dots \dots \dots \dots \dots \dots \dots \dots \dots \dots \dots \dots \dots \dots \dots \dots \dots \dots \dots \dots \dots \dots \dots \dots \dots \dots \dots 1 $$
$$ \therefore \text {I I E N T E R} _ {\text {S S S}} \text {V O L} + / - \text {S S S} \text {S S S} \text {S S S} 2 $$
$$ [ B Y D A T E ] $$
$$ \left[ \begin{array}{l l l} \text {L i d} & \text {L i d} & \text {L i d} \ \text {L i d} & \text {L i d} & \text {L i d} \end{array} \right] = \left[ \begin{array}{l l l} \text {L i d} & \text {L i d} & \text {L i d} \ \text {L i d} & \text {L i d} & \text {L i d} \end{array} \right] $$
$$ \therefore \text {I I E N T E R} _ {\text {J}} \text {V O L} + / - 1 = 1, \text {J}, \text {J}, \text {J}, \text {J}, \text {J}, \text {J}, \text {J}, \text {J}, \text {J}, \text {J}, \text {J}, \text {J}, \text {J}, \text {J}, \text {J}, \text {J}, \text {J}, \text {J}, \text {J}, \text {J}, \text {J} $$
$$ \therefore \text {山} \leqslant \frac {1}{2} \text {山} \leqslant \frac {1}{2} \text {山} \leqslant \frac {1}{2} \text {山} \leqslant \frac {1}{2} \text {山} \leqslant \frac {1}{2} \text {山} \leqslant \frac {1}{2} \text {山} \leqslant \frac {1 0}{3} $$
$$ \therefore \left| \frac {1}{2} \right| = \frac {1}{2} $$
$$ \downarrow \downarrow \downarrow \downarrow \downarrow \downarrow \downarrow \downarrow \downarrow \downarrow \downarrow \downarrow \downarrow \downarrow \downarrow \downarrow \downarrow \downarrow \downarrow \downarrow \downarrow \downarrow \downarrow \downarrow \downarrow \downarrow \downarrow \downarrow \downarrow \downarrow \downarrow \downarrow \downarrow \downarrow \Downarrow $$
$$ . 2 \frac {1}{2} \frac {1}{2} \frac {1}{2} \frac {1}{2} \frac {1}{2} \frac {1}{2} \frac {1}{2} \frac {1}{2} \frac {1}{2} \frac {1}{2} \frac {1}{2} \frac {1}{2} \frac {1}{2} \frac {1}{2} \frac {1}{2} \text {B O O K M A R K E D} ^ {\prime \prime} $$
$$ \therefore \text {P a n d o r a} \quad \text {L a w} \quad \text {L a w} \quad \text {L a w} $$
$$ : l o (s l o w o l) $$
$$ \left(i P o d t h o u t / i P h o n e\right) \quad \text {P a r s i l y} \quad \text {P a r s i l y} \quad \text {P a r s i l y} \quad \text {P a r s i l y} \quad \text {P a r s i l y} \quad \text {P a r s i l y} \quad \text {P a r s i l y} \quad \text {P a r s i l y} \quad \text {P a r S L} $$
$$ \therefore \Delta_ {2} \sim \Delta_ {1} \sim \Delta_ {3} $$
$$ (4 \leftarrow). \therefore \text {I} _ {\text {J}} [ \text {O N} ] \text {I} _ {\text {J}} \text {J} _ {\text {J}} [ \text {S O U R C E S E L E C T} ] \text {J} _ {\text {J}} [ \text {P A N D O R A S R C} ] \text {J} _ {\text {J}} \cdot $$
$$ \therefore \Delta_ {i j} \leqslant \sum_ {j = 1} ^ {n} \Delta_ {i j} \text {P a n d o r a} \quad i, j \in {1, 2, \dots , n - 1 }, \quad j \in {1, 2, \dots , n - 1 }, $$
$$ (1 6. 1 0 \Leftrightarrow) $$
$$ \therefore \frac {1}{2} \times 3 = \frac {1}{2} \times 3 = \frac {1}{2} $$
$$ \dots \text {P a n d o r a} $$
$$ \dots \dots \dots \dots \dots \dots \dots \dots \dots \dots \dots \dots \dots \dots \dots \dots \dots \dots \dots \dots \dots \dots \dots \dots \dots \dots \dots \dots \dots $$
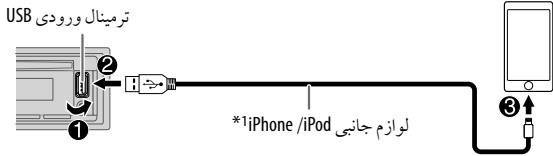
$$ \therefore \text {S R C} = 0. \quad \text {P A N D O R A} \quad \text {的} $$
$$ \therefore \Delta = \Delta_ {1} + \Delta_ {2} + \Delta_ {3} + \Delta_ {4} + \Delta_ {5} + \Delta_ {6} + \Delta_ {7} + \Delta_ {8} $$
$$ \left. \begin{array}{l l} \text {j} & \text {j} \ \text {j} & \text {j} \end{array} \right} \text {s} \tag {4} $$
$$ \therefore \text {I I E N T E R} \quad \frac {\Delta S _ {1}}{\Delta S _ {2}} $$
$$ . \downarrow \downarrow \downarrow \downarrow \downarrow \downarrow \downarrow \downarrow \downarrow \downarrow \downarrow \downarrow \downarrow \downarrow \downarrow \downarrow \downarrow \downarrow \downarrow \downarrow \downarrow $$
$$ \dots \dots \dots \dots \dots \dots \dots \dots \dots \dots \dots \dots \dots \dots \dots \dots \dots \dots \dots \dots \dots \dots \dots \dots \dots \dots \dots \dots \dots $$
$$ ^ {* 2} \vdash $$
$$ \therefore \sin \angle 1, \cos \angle 2 = j _ {1} l _ {1}, j _ {1} l _ {2}, \therefore \sin \angle 1 = \frac {1}{2}, \cos \angle 2 = \frac {1}{3}, $$
$$ \therefore \lim _ {x \rightarrow - \infty} \frac {\sin^ {2} x}{\cos^ {2} x} = \frac {1}{\sqrt {3}} $$
$$ \left. \frac {1}{a + b} \frac {1}{b + c} \frac {1}{c + d} S _ {1} \right| \text {w i t h} $$
[AUTO MODE]/[HEAD MODE]45
.
1 1
IENTERVOL+/-cysyS 2
I ENTER VOL+/- 3
| (sembl#Android # USB .CD gla#g#y b## y## b##la#d) ### |
| ########## ## #### ## ## ## ## ## ## ## ## ## ## ## ## ## ## ## ## ## ## ## ## ## ## ## ## ## ## ## ## ## ## ## ## ## ## ## ## ## ## ## ## ## ## ## ## ## ## ## ## ## ## ## ## ## ## ## ## ## ## ## ## ## ## ## ## ## ## ## ## ## ## ## ## ## ## ## ## ## ## ## ## ## ## ## ## ## ## ## ## ## ## ## ## ## ## ## ## ## ## ## ## # |
| VOL+/-### |
| (sembl#Android # iPod USB # gla#g#y b## y## b## y## b##la#d) ### |
| ########## ## #### ## ## ## ## ## ## ## ## ## ## ## ## ## ## ## ## ## ## ## ## ## ## ## ## ## ## ## ## ## ## ## ## ## ## ## ## ## ## ## ## ## ## ## ## ## ## ## ## ## ## ## ## ## ## ## ## ## ## ## ## ## ## ## ## ## ## ## ## ## ## ## ## ## ## ## ## ## ## ## ## ## # |
| pod USB # #### # #### # #### # #### # #### # #### # #### # #### # #### # #### # #### # #### # #### # #### # #### # #### # #### # #### # #### # #### # #### # #### # #### # #### # #### # #### # #### # #### # #### # #### # #### # #### # #### # #### # #### # #### # #### # #### # #### # #### # #### # #### # #### # #### # #### # #### # #### # #### # #### # #### # ##### |
| (OTHERS .9 0 0 .Z 0 A) ###### ###### ###### ###### ###### ###### ###### ###### ###### ###### ###### ###### ###### ###### ###### ###### ###### ###### ###### ###### ###### ###### ###### ###### ###### ###### ###### ###### ###### ###### ###### ###### ###### ###### ###### ###### ###### ###### ###### ###### ###### ###### ###### ###### ###### ###### ###### ###### ###### ###### ##### |
| ANDROID # #### # #### # #### # #### # #### # #### # #### # #### # #### # #### # #### # #### # #### # #### # #### # #### # #### # #### # #### # #### # #### # #### # #### # #### # #### # #### # #### # #### # #### # #### # #### # #### # #### # #### # #### # #### # #### # #### # #### # #### # #### # #### # #### # #### # #### # #### # #### # #### # #### # ######### |
| 1 |
| 2 |
| 3 |
JQ/0 1234567890
A 1
J2 = aib_i
5 USB MODE.iPod USB
.1iPodJ:HEAD MODE
Ossss s jj j j j j j j j j j j j j j j j j j j j j j j j j j j j j j j j j j j j j j j j j j j j j j j j j j j j j j j j j j j j j j j j j j j
S OAB = S COD + S BDO - S BOC
5 USB MODE. Android
JVC MUSIC PLAY 400000000000000000000000000000000000000000000
: AUTO MODE
| !IF BAND !IF BAND !IF BAND !IF BAND !IF BAND !IF BAND !IF BAND !IF BAND !IF BAND !IF BAND !IF BAND !IF BAND !IF BAND !IF BAND !IF BAND !IF BAND !IF BAND !IF BAND !IF BAND !IF BAND !IF BAND |
| !MONO SET !MONO SET !MONO SET !MONO SET !MONO SET !MONO SET !MONO SET !MONO SET !MONO SET !MONO SET !MONO SET !MONO SET !MONO SET !MONO SET !MONO SET !MONO SET !MONO SET !MONO SET !MONO SET !MONO SET !MONO SET |
| . | |
| PTY |
| VARIED,SCIENCE,CULTURE,Drama,EDUCATE,SPORT,INFO,AFFAIRS,NEWS |
| CLASSICS,LIGHT M (اللهtzر),EASY M (اللهtzر),ROCK M (اللهtzر),POP M (اللهtzر) |
| PHONE IN,RELIGION,SOCIAL,CHILDREN,FINANCE,WEATHER,OTHER M (اللهtzر) |
| FOLK M (اللهtzر),OLDIES,NATION M (اللهtzر),COUNTRY JAZZ,LEISURE,TRAVEL |
| ### | |
| 1 | |
| 2 | |
| 3 | |
| 4 |
XX:
| TUNER SETTING | ||
| ...dss | RADIO TIMER | |
| ...dss | ||
| ...dss | SW2 / SW1 / AM / FM 2 | |
| ...dss | (SW2 / SW1 / AM) (bajal) 06 l 01 / (FM) (bajal) 18 l 01 3 | |
| ...dss | ...dss | ...dss |
| ...dss | ...dss | ...dss |
| ...dss | ...dss | ...dss |
| ...dss | ...dss | ...dss |
| ...dss | ...dss | ...dss |
| ...dss | ...dss | ...dss |
| ...dss | ...dss | ...dss |
| ...dss | ...dss | ...dss |
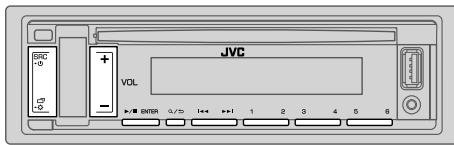
"ST" FM
S
SRSCW2SW1AMFM 1
2
()
wJy"M"45uJgUjUjUjUjUjUjUjUjUjUjUjUjUjUj
J 1 J 1 J 1 J 1 J 1 J 1 J 1 J 1 J 1 J 1 J 1 J 1 J 1 J 1 J 1 J 1 J 1 J 1 J 1 J 1
a 1 a 1 1 1 1 1 1 1 1 1 1 1 1 1 1 1 1 1 1 1 1 1
blzol A
p s,p 2s
J 1 J 1 J 1 J 1 J 1 J 1 J 1 J 1 J 1 J 1
a a a a a a a a a a a a a a a a a a a a a a a a
:
aaljaii iiaai 100000000000000000000000000000000000000000
J 1
.
: (RM-RK52) 0001 jJ J
S_ OBC = 12 · CD · BC = ( 0 + 2) × 5
.24 10000000000000000000000000000000000000
2 0
3
4
1
a1 = 2,b1 = - 4
3x + 3 = 2 + k ,
5
7 ANDROID/iPod/USB/CD
Pandora
JyLgS WLo gJgJ Jn Jn Jn Jn Jn Jn Jn Jn
sll 10000000000000000000000000000000000000
A
| USB HUB IS NOT SUPPORTED" | |
| "USB HUB IS NOT SUPPORTED" | |
| "CANNOT PLAY" | |
| IPD/USBCD | |
| ipPhone/iPod ipPhone/iPod ipPhone/iPod ipPhone/iPod ipPhone/iPod ipPhone/iPod ipPhone/iPod ipPhone/iPod ipPhone/iPod ipPhone/iPod ipPhone/iPod ipPhone/iPod ipPhone/iPod ipPhone/iPod ipPhone/iPod ipPhone/iPod ipPhone/iPod ipPhone/iPod ipPhone/iPod ipPhone/iPod ipPhone/iPod | "USB HUB IS NOT SUPPORTED" |
| "CANNOT PLAY" | |
| "JL2022" | |
| "JL2022" | |
| "JL2022" | |
| "JL2022" | |
| "JL2022" | |
| "JL2022" | |
| "JL2022" | |
| "JL2022" | |
| "JL2022" | |
| JLHACIL JALLO | JLHACIL JALLO |
| . . . . . . . . . . . . . . . . . . . . . . . . . . . . . . . . . . . . . . . . . . . . . . . . . . . . . . . . . . . . . . . . . . . . . . . . . . . . . . . . . . . . . . . . . . . . . . . . . . . . . . . . . . . . . . . . . . . . . . . . . . . . . . . . . . . . . . . . . . . . . . . . . . . . . . . . . . . . . . . . . . . . . . . . . . . . . . . . . . . . . . . . . . . . . . . . . . . . . . . . .. . . . . . . . . . . . . . . . . . . . . . . . . . . . . . . . . . . . . . . . . . . . . . . . . . . . . . . . . . . . . . . . . . . . . . . . . . . . . . . . . . . . . . . . . . . . . . . . . . . . . . . . . . . . . . . . . . . . . . . . . . . . . . . . . . . . . . . . . . . . . . . . . . . . . . . . . . . . . . . . . . . . . . . . . . . . . . . . . . . . . . . . . . . . . . . . . . . . . . . . . . (4←) [SOURCE SELECT] ↓ ↓ ↓ ↓ ↓ ↓ ↓ ↓ ↓ ↓ ↓ ↓ ↓ ↓ ↓ ↓ ↓ ↓ ↓ ↓ ↓ ↓ ↓ ↓ ↓ ↓ ↓ ↓ ↓ ↓ ↓ ↓ ↓ ↓ ↓ ↓ ↓ ↓ ↓ ↓ ↓ ↓ ↓ ↓ ↓ ↓ ↓ ↓ ↓ ↓ ↓ ↓ ↓ ↓ ↓ ↓ ↓ ↓ ↓ ↓ ↓ ↓ ↓ ↓ ↓ ↓ ↓ ↓ ↓ ↓ ↓ ↓ ↓ ↓ ↓ ↓ ↓ ↓ ↓ ↓ ↓ ↓ ↓ ↓ ↓ ↓ ↓ ↓ ↓ ↓ ↓ ↓ ↓ ↓ ↓ ↓ ↓ ↓ ↓ ↓ ← ↓ ↓ ↓ ↓ ↓ ↓ ↓ ↓ ↓ ↓ ↓ ↓ ↓ ↓ ↓ ↓ ↓ ↓ ↓ ↓ ↓ ↓ ↓ ↓ ↓ ↓ ↓ ↓ ↓ ↓ ↓ ↓ ↓ ↓ ↓ ↓ ↓ ↓ ↓ ↓ ↓ ↓ ↓ ↓ ↓ ↓ ↓ ↓ ↓ ↓ ↓ ↓ ↓ ↓ ↓ ↓ ↓ ↓ ↓ ↓ ↓ ↓ ↓ ↓ ↓ ↓ ↓ ↓ ↓ ↓ ↓ ↓ ↓ ↓ ↓ ↓ ↓ ↓ ↓ ↓ ↓ ↓ ↓ ↓ ↓ ↓ ↓ ↓ ↓ ↓ ↓ ↓ ↓ ↓ ↓ ↓ ↓ ↓ ↓ _ _ _ _ _ _ _ _ _ _ _ _ _ _ _ _ _ _ _ _ _ _ _ _ _ _ _ _ _ _ _ _ _ _ _ _ _ _ _ _ _ _ _ _ _ _ _ _ _ _ [ . . . . . . . . . . . . . . . . . . . . . . . . . . . . . . . . . . . . . . . . . . . . . . . . . . . . . . . . . . . . . . . . . . . . . . . . . . . . . . . . . . . . . . . . . . . . . . . . . . .. . ①/②/③/④/⑤/⑥/⑦/⑧/⑨/⑩/⑪/⑫/⑬/⑭/⑮/⑯/⑰/⑱/⑲/⑳/⑴/⑵/⑶/⑷/⑸/⑹/⑺/⑻/⑼/⑽/⑾/⑿/⑷/⑸/⑹/⑺/⑻/⑼/⑹/⑺/⑻/⑼/⑹/⑺/⑻/⑼/⑹/⑺/⑻/⑼/⑹/⑺/⑻/⑼/⑹/⑺/⑻/⑼/⑹/⑺/⑻/⑼/⑹/⑺/⑻/⑼/⑹/⑺/⑻/⑼/⑹/ . . . . . . . . . . . . . . . . . . . . . . . . . . . . . . . . . . . . . . . . . . . . . . . . . . . . . . . . . . . . . . . . . . . . . . . . . . . . . . . . . . . . . . . . . . . . . . . . . . . . ? . . . . . . . . . . . . . . . . . . . . . . . . . . . . . . . . . . . . . . . . . . . . . . . . . . . . . . . . . . . . . . . . . . . . . . . . . . . . . . . . . . . . . . . . . . . . . . . . . . . - 100% - 100% - 100% - 100% - 100% - 100% - 100% - 100% - 100% - 100% - 100% - 100% - 100% - 100% - 100% - 100% - 100% - 150% - 150% - 150% - 150% - 150% - 150% - 150% - 150% - 150% - 150% - 150% - 150% - 150% - 150% - 150% - 150% - 150% - - - - - - - - - - - - - - - - - - - - - - - - - - - - - - - - - - - - - - - - - - - - - - - - - - - - - - - - - - - - - - - - - - - - - - - - - - - - - - - - - - - - - - - - - - - - - - - - - - - - - - . . . . . . . . . . . . . . . . . . . . . . . . . . . . . . . . . . . . . . . . . . . . . . . . . . . . . . . . . . . . . . . . . . . . . . . . . . . . . . . . . . . . . . . . . . . . . . . . . . . - . . . . . . . . . . . . . . . . . . . . . . . . . . . . . . . . . . . . . . . . . . . . . . . . . . . . . . . . . . . . . . . . . . . . . . . . . . . . . . . . . . . . . . . . . . . . . . . . . . . 25 30 35 40 45 50 55 60 65 70 75 80 85 90 95 100 105 110 115 120 125 130 135 140 145 150 155 160 165 170 175 180 185 190 195 200 205 210 215 220 225 230 235 240 245 250 255 260 265 270 275 280 285 290 295 300 305 310 315 320 325 330 335 340 345 350 355 360 365 370 375 380 385 390 395 400 405 410 415 420 425 430 435 440 445 450 455 460 465 470 475 480 485 490 495 500 505 510 515 520 525 530 535 540 545 550 555 560 565 570 575 580 585 590 595 600 605 610 615 620 625 630 635 640 645 645 650 655 655 660 665 665 665 665 665 665 665 665 665 665 665 665 665 665 665 665 665 665 665 665 665 665 665 665 665 66 66 66 66 66 66 66 66 66 66 66 66 66 66 66 66 66 66 66 66 66 66 66 66 66 66 66 66 66 66 66 66 66 66 |
LiljI Loglo j
auiuuii ciogloe yai i 1o ciauua Lg5 alauu uic gil aegio ciogloai (a)
| (الإستعمال الحرفية) | الإستعمال الحرفية |
| (الإستعمال الحرفية) ⇌ **(الإستعمال الحرفية) ⇌ (الإستعمال الحرفية) ⇌ (الإستعمال الحرفية) ⇌ (الإستعمال الحرفية) ⇌ (الإستعمال الحرفية) ⇌ (الإستعمال الحرفية) ⇌ (الإستعمال الحرفية) ⇌ (الإستعمال الحرفية) ⇌ (الإستعمال الحرفية) ⇌ (الإستعمال الحرفية) ⇌ (الإستعمال الحرفية) ⇌ **(الإستعمال الحرفية) ⇌ **(ال,enGLISH) ⇌ (ال,enGLISH) ⇌ (ال,enGLISH) ⇌ (ال,enGLISH) ⇌ (ال,enGLISH) ⇌ (ال,enGLISH) ⇌ (ال,enGLISH) ⇌ (ال,enGLISH) ⇌ (ال,enGLISH) ⇌ (ال,enGLISH) ⇌ (ال,enGLISH) ⇌ (ال,enGLISH) ⇌ (ال,enGLISH) ⇌ (ال,enGLISH) ⇌ (ال,enGLISH) ⇌ (ال=enGLISH) ⇌ (ال,enGLISH) ⇌ (ال,enGLISH) ⇌ (ال,enGLISH) ⇌ (ال,enGLISH) ⇌ (ال,enGLISH) ⇌ (ال,enGLISH) ⇌ (ال,enGLISH) ⇌ (ال,enGLISH) ⇌ (ال,enGLISH) ⇌ (ال,enGLISH) ⇌ (ال,enGLISH) ⇌ (ال,enGLISH) ⇌ (ال,enGLISH) ⇌ (ال,enGLISH) (الإستعمال الحرفية) ⇌ (ال,enGLISH) ⇌ (ال,enGLISH) ⇌ (ال,enGLISH) ⇌ (ال,enGLISH) ⇌ (ال,enGLISH) ⇌ (ال,enGLISH) ⇌ (ال,enGLISH) ⇌ (ال,enGLISH) ⇌ (ال,enGLISH) ⇌ (ال,enGLISH) ⇌ (ال,enGLISH) ⇌ (ال,enGLISH) ⇌ (ال,enGLISH) ⇌ (ال,enGLISH) ↦ (ال,enGLISH) ↦ (ال,enGLISH) ↦ (ال,enGLISH) ↦ (ال,enGLISH) ↦ (ال,enGLISH) ↦ (ال,enGLISH) ↦ (ال,enGLISH) ↦ (ال,enGLISH) ↦ (ال,enGLISH) ↦ (ال,enGLISH) ↦ (ال,enGLISH) ↦ (ال,enGLISH) ↦ (ال,enGLISH) ↦ (ال,enGLISH) ↦ (ALI) ↦ (ALI) ↦ (ALI) ↦ (ALI) ↦ (ALI) ↦ (ALI) ↦ (ALI) ↦ (ALI) ↦ (ALI) ↦ (ALI) ↦ (ALI) ↦ (ALI) ↦ (ALI) ↦ (ALI) ↦ (ALI) ↦ (ALI) ↦ (ALI) ↦ | AM g1 FM |
| (CD-DA) ⇌ (ال,enGLISH) ⇌ (ال,enGLISH) ⇌ (ال,enGLISH) ⇌ (ال,enGLISH) ⇌ (ال,enGLISH) ⇌ (ال,enGLISH) ⇌ (ال,enGLISH) ⇌ (ال,enGLISH) ⇌ (ال,enGLISH) ⇌ (ال,enGLISH) ⇌ (ال,enGLISH) ⇌ (ال,enGLISH) ⇌ (ال,enGLISH) ⇌ (ال,enGLISH) ⨀ (ال,enGLISH) ⇌ (ال,enGLISH) ⇌ (ال,enGLISH) ⇌ (ال,enGLISH) ⇌ (ال,enGLISH) ⇌ (ال,enGLISH) ⇌ (ال,enGLISH) ⇌ (ال,enGLISH) ⇌ (ال,enGLISH) ⇌ (ال,enGLISH) ⇌ (ال,enGLISH) ⇌ (ال,enGLISH) ⇌ (ال,enGLISH) ⇌ (ال,enGLISH) ⇌ (ALI) ↦ (ALI) ↦ (ALI) ↦ (ALI) ↦ (ALI) ↦ (ALI) ↦ (ALI) ↦ (ALI) ↦ (ALI) ↦ (ALI) ↦ (ALI) ↦ (ALI) ↦ (ALI) ↦ (ALI) ↦ (ALI) ↦ (ALI) ↦ (ALI) (FLAC/WAV/AAC/WMA/MP3 LLaJ) ⇌ (ال,enGLISH) ⇌ (ال,enGLISH) ⇌ (ال,enGLISH) ⇌ (ال,enGLISH) ⇌ (ال,enGLISH) ⇌ (ال,enGLISH) ⇌ (ال,enGLISH) ⇌ (ال,enGLISH) ⇌ (ال,enGLISH) ⇌ (ال,enGLISH) ⇌ (ال,enGLISH) ⇌ (ال,enGLISH) ⇌ (ال,enGLISH) ⇌ (ال,enGLISH)⇌ (8 ↦ [HEAD MODE]/[AUTO MODE] ⇌ (ال,enGLISH) ⇌ (ال,enGLISH) ⇌ (ال,enGLISH) ⇌ (ال,enGLISH) ⇌ (ال,enGLISH) ⇌ (ال,enGLISH) ⇌ (ال,enGLISH) ⇌ (ال,enGLISH) ⇌ (ال,enGLISH) ⇌ (ال,enGLISH) ⇌ (ال,enGLISH) ⇌ (ال,enGLISH) ⇌ (ال,enGLISH) ⇌ (ال,enGLISH) ⇎ (8 ↦ [HEAD MODE]/[AUTO MODE] ⇌ (ال,enGLISH) ⇌ (ال,enGLISH) ⇌ (ال,enGLISH) ⇌ (ال,enGLISH) ⇌ (ال,enGLISH) ⇌ (ال,enGLISH) ⇌ (ال,enGLISH) ⇌ (ALI) ↦ (ALI) ↦ (ALI) ↦ (ALI) ↦ (ALI) ↦ (ALI) ↦ (ALI) ↦ (ALI) ↦ (8 ↦ [HEAD MODE]/[AUTO MODE] ⇌ (ال,enGLISH) ⇌ (ال,enGLISH) ⇌ (ال,enGLISH) ⇌ (ال,enGLISH) ⇌ (ال,enGLISH) ⇌ (ال,enGLISH) ⇌ (ALI) ↦ (ALI) ↦ (ALI) ↦ (ALI) ↦ (ALI) ↦ (ALI) ↦ (ALI) ↦ (ALI) ↦ (ALI) ↦ (AlI) ↦ (ALI) ↦ (ALI) ↦ (ALI) ↦ (ALI) ↦ (ALI) ↦ (ALI) ↦ (ALI) ↦ (ALI) ↦ (ALI) ↦ (ALI) ↦ (ALI) ↦ (ALI) ↦ (ALI) ↦ (ALI) ↦ (ALI) ↦ (ALI) ↨ (ALI) ↦ (ALI) ↦ (ALI) ↦ (ALI) ↦ (ALI) ↦ (ALI) ↦ (ALI) ↦ (ALI) ↦ (ALI) ↦ (ALI) ↦ (ALI) ↦ (ALI) ↦ (ALI) ↦ (ALI) ↦ (ALI) ↦ (ALI) ↦ (ALI (8 ↦ [HEAD MODE]/[AUTO MODE] ⇌ (ال,enGLISH) ⇌ (ال,enGLISH) ⇌ (ال,enGLISH) ⇌ (ال,enGLISH) ⇌ (ال,enGLISH) ⇌ (ال,enGLISH) ⇌ (ALI) ↦ (ALI) ↦ (ALI) ↦ (ALI) ↦ (ALI) ↦ (ALI) ↦ (ALI) ↦ (8 ↦ [HEAD MODE]/[AUTO MODE] ⇌ (ال,enGLISH) ⇌ (ال,enGLISH) ⇌ (ال,enGLISH) ⇌ (ال,enGLISH) ⇌ (ALI) ↦ (ALI) ↦ (ALI) ↦ (ALI) ↦ (ALI) ↦ (ALI) ↦ (ALI) ↦ (ALI) ↦ (ALI) ↦ (ALI) ↦ (ALI) ↦ (ALI) (8 ↦ [HEAD MODE]/[AUTO MODE] ⇌ (ال,enGLISH) ⇌ (ال,enGLISH) ⇌ (ال,enGLISH) ⇌ (ال,enGLISH) ⇌ (ALI) ↦ (ALI) ↦ (ALI) ↦ (ALI) ↦ (ALI) ↦ (ALI) ↦ (ALI) ↦ (ALI) ↦ (ALI) ↦ (ALI) (8 ↦ [HEAD MODE]/[AUTO MODE] ⇌ (ال,enGLISH) ⇌ (ال,enGLISH) ⇌ (ال,enGLISH) ⇌ (ALI) ↦ (ALI) ↦ (ALI) ↦ (ALI) ↦ (ALI) ↦ (ALI) ↦ (ALI) ↦ (ALI) ↦ (ALI) ↦ (ALI) ↦ (ALI) ↦ (ALI) ↦ (ALI) | |
| (8 ↦ [HEAD MODE]/[AUTO MODE] ⇌ (ال,enGLISH) ⇌ (ال,enGLISH) ⇌ (ال,enGLISH) ⇌ (ALI) ↦ (ALI) ↦ (ALI) ↦ (ALI) ↦ (ALI) ↦ (ALI) ↦ (ALI) ↦ (ALI) ↦ (ALI) ↦ (ALI) ↦ (ALI)↘ (8 ↦ [HEAD MODE]/[AUTO MODE] ⇌ (ال,enGLISH) ⇌ (ال,enGLISH) ⇌ (ال,enGLISH) ⇌ (ALI) ↦ (ALI) ↦ (ALI) ↦ (ALI) ↦ (ALI) ↦ (ALI) ↦ (ALI) ↦ (ALI) ↦ (ALI) ↦ (ALI) ↦ (ALI) ↨ (8 ↦ [HEAD MODE]/[AUTO MODE] ⇌ (ال,enGLISH) ⇌ (ال,enGLISH) ⇌ (ال,enGLISH) ⇌ (ALI) ↦ (ALI) ↦ (ALI) ↦ (ALI) ↦ (ALI) ↦ (ALI) ↦ (ALI) ↦ (ALI) ↦ (ALI) ↦ (ALI) ↦ (ALI)↘ (8 ↦ [HEAD MODE]/[AUTO MODE] ⇌ (ال,enGLISH) ⇌ (ال,enGLISH) ⇌ (ال,enGLISH) ⇌ (ALI) ↦ (ALI) ↦ (ALI) ↦ (ALI) ↦ (ALI) ↦ (ALI) ↦ (ALI) ↦ (ALI) ↦ (ALI) ↦ (ALI) ↦ (ALI) | |
| (8 ↦ [HEAD MODE]/[AUTO MODE] ⇌ (ال,enGLISH) ⇌ (ال,enGLISH) ⇌ (ALI) ↦ (ALI) ↦ (ALI) ↦ (ALI) ↦ (ALI) ↦ (ALI) ↦ (ALI) ↦ (ALI) ↦ (ALI) ↦ (ALI) ↦ (ALI) ↦ (ALI) ↦ (ALI) ↦ (ALI) ↨ (8 ↦ [HEAD MODE]/[AUTO MODE] ⇌ (ال,enGLISH) ⇌ (ال,enGLISH) ⇌ (ALI) ↦ (ALI) ↦ (ALI) ↦ (ALI) ↦ (ALI) ↦ (ALI) ↦ (ALI) ↦ (ALI) ↦ (ALI) ↦ (ALI) ↦ (ALI) ↦ (ALI) ↦ (8 ↦ [HEAD MODE]/[AUTO MODE] ⇌ (ال,enGLISH) ⇌ (ال,enGLISH) ⇌ (ALI) ↦ (ALI) ↦ (ALI) ↦ (ALI) ↦ (ALI) ↦ (ALI) ↦ (ALI) ↦ (ALI) ↦ (ALI) ↦ (ALI) ↦ (ALI) ↦ (ALI) ↨ (8 ↦ [HEAD MODE]/[AUTO MODE] ⇌ (ال,enGLISH) ⇌ (ال,enGLISH) ⇺ (ALI) ↦ (ALI) ↦ (ALI) ↦ (ALI) ↦ (ALI) ↦ (ALI) ↦ (ALI) ↦ (ALI) ↦ (ALI) ↦ (ALI) ↨ (8 ↦ [HEAD MODE]/[AUTO MODE] ⇌ (ال,enGLISH) ⇌ (ال,enGLISH) ⇌ (ALI) ↦ (ALI) ↨ (8 ↦ [HEAD MODE]/[AUTO MODE] ⇌ (ال,enGLISH) ⇌ (ال,enGLISH) ⇌ (ALI) ↦ (ALI) ↨ (8 ↦ [HEAD MODE]/[AUTO MODE] ⇌ (ALI) ↨ (8 ↦ [HEAD MODE]/[AUTO MODE] ⇌ (ALI) ↨ (8 ↦ [HEAD MODE]/[AUTO MODE] ⇌ (ALI) ↨ (8 ↦ [HEAD MODE]/[AUTO MODE] ⇌ (ALI) ↨ (8 ↦ [HEAD MODE]/[AUTO MODE] ⇌ (ALI) ↨ (8 ↦ [HEAD MODE]/[AUTO MODE] ⇤ (ALI) ↨ (8 ↦ [HEAD MODE]/[AUTO MODE] ⇌ (ALI) ↨ (8 ↦ [HEAD MODE]/[AUTO MODE] ⇌ (ALI) ↨ (8 ↦ [HEAD MODE]/[AUTO MODE] ⇌ (ALI) ↨ (8 ↦ [HEAD MODE]/[AUTO MODE] ⇌ (ALI) ↨ (8 ↦ [HEAD MODE]/[AUTO MODE] ⇓ (ALI) ↨ (8 ↦ [HEAD MODE]/[AUTO MODE] ⇌ (ALI) ↨ (8 ↦ [HEAD MODE]/[AUTO MODE] ⇌ (ALI) ↨ (8 ↦ [HEAD MODE]/[AUTO MODE] ⇌ (ALI) ↨ (8 ↦ [HEAD MODE]/[AUTO MODE] ⇌ (ALI) ↨ (8 ↦ [HEAD MODE]/[AUTO MODE] ⇐ (ALI) ↨ (8 ↦ [HEAD MODE]/[AUTO MODE] ⇌ (ALI) ↨ (8 ↦ [HEAD MODE]/[AUTO MODE] ⇌ (ALI) ↨ (8 ↦ [HEAD MODE]/[AUTO MODE] ⇌ (ALI) ↨ (8 ↦ [HEAD MODE]/[AUTO MODE] ⇌ (ALI) ↨ (8 ↦ [HEAD MODE]/[AUTO MODE] ⇑ (ALI) ↨ (8 ↦ [HEAD MODE]/[AUTO MODE] ⇌ (ALI) ↨ (8 ↦ [HEAD MODE]/[AUTO MODE] ⇌ (ALI) ↨ (8 ↦ [HEAD MODE]/[AUTO MODE] ⇌ (ALI) ↨ (8 ↦ [HEAD MODE]/[AUTO MODE] ⇌ (ALI) ↨ (8 ↦ [HEAD MODE]/[AUTO MODE] ⇒ (ALI) ↨ (8 ↦ [HEAD MODE]/[AUTO MODE] ⇌ (ALI) ↨ (8 ↦ [HEAD MODE]/[AUTO MODE] ⇌ (ALI) ↨ (8 ↦ [HEAD MODE]/[AUTO MODE] ⇌ (ALI) ↨ (8 ↦ [HEAD MODE]/[AUTO MODE] ⇌ (ALI) ↨ (8 ↦ [HEAD MODE]/[AUTO MODE] ⇔ (ALI) ↨ (8 ↦ [HEAD MODE]/[AUTO MODE] ⇌ (ALI) ↨ (8 ↦ [HEAD MODE]/[AUTO MODE] ⇌ (ALI) ↨ (8 ↦ [HEAD MODE]/[AUTO MODE] ⇌ (ALI) ↨ (8 ↦ [HEAD MODE]/[AUTO MODE] ⇌ (ALI) ↨ (8 ↦ [HEAD MODE]/[AUTO MODE] ⇊ (ALI) ↨ (8 ↦ [HEAD MODE]/[AUTO MODE] ⇌ (ALI) ↨ (8 ↦ [HEAD MODE]/[AUTO MODE] ⇌ (ALI) ↨ (8 ↦ [HEAD MODE]/[AUTO MODE] ⇌ (ALI) ↨ (8 ↦ [HEAD MODE]/[AUTO MODE] ⇌ (ALI) ↨ (8 ↦ [HEAD MODE]/[AUTO MODE] ⇋ (ALI) ↨ (8 ↦ [HEAD MODE]/[AUTO MODE] ⇌ (ALI) ↨ (8 ↦ [HEAD MODE]/[AUTO MODE] ⇌ (ALI) ↨ (8 ↦ [HEAD MODE]/[AUTO MODE] ⇌ (ALI) ↨ (8 ↦ [HEAD MODE]/[AUTO MODE] ⇌ (ALI) ↨ (8 ↦ [HEAD MODE]/[AUTO MODE] ⇎ (ALI) ↨ (8 ↦ [HEAD MODE]/[AUTO MODE] ⇌ (ALI) ↨ (8 ↦ [HEAD MODE]/[AUTO MODE] ⇌ (ALI) ↨ (8 ↦ [HEAD MODE]/[AUTO MODE] ⇌ (ALI) ↨ (8 ↦ [HEAD MODE]/[AUTO MODE] ⇌ (ALI) ↨ (8 ↦ [HEAD MODE]/[AUTO MODE] ⇏ (ALI) ↨ (8 ↦ [HEAD MODE]/[AUTO MODE] ⇌ (ALI) ↨ (8 ↦ [HEAD MODE]/[AUTO MODE] ⇌ (ALI) ↨ (8 ↦ [HEAD MODE]/[AUTO MODE] ⇌ (ALI) ↨ (8 ↦ [HEAD MODE]/[AUTO MODE] ⇌ (ALI) ↨ (8 ↦ [HEAD MODE]/[AUTO MODE] ⇞ (ALI) ↨ (8 ↦ [HEAD MODE]/[AUTO MODE] ⇌ (ALI) ↨ (8 ↦ [HEAD MODE]/[AUTO MODE] ⇌ (ALI) ↨ (8 ↦ [HEAD MODE]/[AUTO MODE] ⇌ (ALI) ↨ (8 ↦ [HEAD MODE]/[AUTO MODE] ⇌ (ALI) ↨ (8 ↦ [HEAD MODE]/[AUTO MODE] ⇗ (ALI) ↨ (8 ↦ [HEAD MODE]/[AUTO MODE] ⇌ (ALI) ↨ (8 ↦ [HEAD MODE]/[AUTO MODE] ⇌ (ALI) ↨ (8 ↦ [HEAD MODE]/[AUTO MODE] ⇌ (ALI) ↨ (8 ↦ [HEAD MODE]/[AUTO MODE] ⇌ (ALI) ↨ (8 ↦ [HEAD MODE]/[AUTO MODE] ⇥ (ALI) ↨ (8 ↦ [HEAD MODE]/[AUTO MODE] ⇌ (ALI) ↨ (8 ↦ [HEAD MODE]/[AUTO MODE] ⇌ (ALI) ↨ (8 ↦ [HEAD MODE]/[AUTO MODE] ⇌ (ALI) ↨ (8 ↦ [HEAD MODE]/[AUTO MODE] ⇌ (ALI) ↨ (8 ↦ [HEAD MODE]/[AUTO MODE] ⇕ (ALI) ↨ (8 ↦ [HEAD MODE]/[AUTO MODE] ⇌ (ALI) ↨ (8 ↦ [HEAD MODE]/[AUTO MODE] ⇌ (ALI) ↨ (8 ↦ [HEAD MODE]/[AUTO MODE] ⇌ (ALI) ↨ (8 ↦ [HEAD MODE]/[AUTO MODE] ⇌ (ALI) ↨ (8 ↦ [HEAD MODE]/[AUTO MODE] ⇍ (ALI) ↨ (8 ↦ [HEAD MODE]/[AUTO MODE] ⇌ (ALI) ↨ (8 ↦ [HEAD MODE]/[AUTO MODE] ⇌ (ALI) ↨ (8 ↦ [HEAD MODE]/[AUTO MODE] ⇌ (ALI) ↨ (8 ↦ [HEAD MODE]/[AUTO MODE] ⇌ (ALI) ↨ (8 ↦ [HEAD MODE]/[AUTO MODE] ⇻ (ALI) ↨ (8 ↦ [HEAD MODE]/[AUTO MODE] ⇌ (ALI) ↨ (8 ↦ [HEAD MODE]/[AUTO MODE] ⇌ (ALI) ↨ (8 ↦ [HEAD MODE]/[AUTO MODE] ⇌ (ALI) ↨ (8 ↦ [HEAD MODE]/[AUTO MODE] ⇌ (ALI) ↨ (8 ↦ [HEAD MODE]/[AUTO MODE] ⇽ (ALI) ↨ (8 ↦ [HEAD MODE]/[AUTO MODE] ⇌ (ALI) ↨ (8 ↦ [HEAD MODE]/[AUTO MODE] ⇌ (ALI) ↨ (8 ↦ [HEAD MODE]/[AUTO MODE] ⇌ (ALI) ↨ (8 ↦ [HEAD MODE]/[AUTO MODE] ⇌ (ALI) ↨ (8 ↦ [HEAD MODE]/[AUTO MODE] ⇮ (ALI) ↨ (8 ↦ [HEAD MODE]/[AUTO MODE] ⇌ (ALI) ↨ (8 ↦ [HEAD MODE]/[AUTO MODE] ⇌ (ALI) ↨ (8 ↦ [HEAD MODE]/[AUTO MODE] ⇌ (ALI) ↨ (8 ↦ [HEAD MODE]/[AUTO MODE] ⇌ (ALI) ↨ (8 ↦ [HEAD MODE]/[AUTO MODE] ⇆ (ALI) ↨ (8 ↦ [HEAD MODE]/[AUTO MODE] ⇌ (ALI) ↨ (8 ↦ [HEAD MODE]/[AUTO MODE] ⇌ (ALI) ↨ (8 ↦ [HEAD MODE]/[AUTO MODE] ⇌ (ALI) ↨ (8 ↦ [HEAD MODE]/[AUTO MODE] ⇌ (ALI) ↨ (8 ↦ [HEAD MODE]/[AUTO MODE] ⇪ (ALI) ↨ (8 ↦ [HEAD MODE]/[AUTO MODE] ⇌ (ALI) ↨ (8 ↦ [HEAD MODE]/[AUTO MODE] ⇌ (ALI) ↨ (8 ↦ [HEAD MODE]/[AUTO MODE] ⇌ (ALI) ↨ (8 ↦ [HEAD MODE]/[AUTO MODE] ⇌ (ALI) ↨ (8 ↦ [HEAD MODE]/[AUTO MODE] ⇃ (ALI) ↨ (8 ↦ [HEAD MODE]/[AUTO MODE] ⇌ (ALI) ↨ (8 ↦ [HEAD MODE]/[AUTO MODE] ⇌ (ALI) ↨ (8 ↦ [HEAD MODE]/[AUTO MODE] ⇌ (ALI) ↨ (8 ↦ [HEAD MODE]/[AUTO MODE] ⇌ (ALI) ↨ (8 ↦ [HEAD MODE]/[AUTO MODE] ⇘ (ALI) ↨ (8 ↦ [HEAD MODE]/[AUTO MODE] ⇌ (ALI) ↨ (8 ↦ [HEAD MODE]/[AUTO MODE] ⇌ (ALI) ↨ (8 ↦ [HEAD MODE]/[AUTO MODE] ⇌ (ALI) ↨ (8 ↦ [HEAD MODE]/[AUTO MODE] ⇌ (ALI) ↨ (8 ↦ [HEAD MODE]/[AUTO MODE] ⇯ (ALI) ↨ (8 ↦ [HEAD MODE]/[AUTO MODE] ⇌ (ALI) ↨ (8 ↦ [HEAD MODE]/[AUTO MODE] ⇌ (ALI) ↨ (8 ↦ [HEAD MODE]/[AUTO MODE] ⇌ (ALI) ↨ (8 ↦ [HEAD MODE]/[AUTO MODE] ⇌ (ALI) ↨ (8 ↦ [HEAD MODE]/[AUTO MODE] ⇾ (ALI) ↨ (8 ↦ [HEAD MODE]/[AUTO MODE] ⇌ (ALI) ↨ (8 ↦ [HEAD MODE]/[AUTO MODE] ⇌ (ALI) ↨ (8 ↦ [HEAD MODE]/[AUTO MODE] ⇌ (ALI) ↨ (8 ↦ [HEAD MODE]/[AUTO MODE] ⇌ (ALI) ↨ (8 ↦ [HEAD MODE]/[AUTO MODE] ⇅ (ALI) ↨ (8 ↦ [HEAD MODE]/[AUTO MODE] ⇌ (ALI) ↨ (8 ↦ [HEAD MODE]/[AUTO MODE] ⇌ (ALI) ↨ (8 ↦ [HEAD MODE]/[AUTO MODE] ⇌ (ALI) ↨ (8 ↦ [HEAD MODE]/[AUTO MODE] ⇌ (ALI) ↨ (8 ↦ [HEAD MODE]/[AUTO MODE] ⇼ (ALI) ↨ (8 ↦ [HEAD MODE]/[AUTO MODE] ⇌ (ALI) ↨ (8 ↦ [HEAD MODE]/[AUTO MODE] ⇌ (ALI) ↨ (8 ↦ [HEAD MODE]/[AUTO MODE] ⇌ (ALI) ↨ (8 ↦ [HEAD MODE]/[AUTO MODE] ⇌ (ALI) ↨ (8 ↦ [HEAD MODE]/[AUTO MODE] ⇙ (ALI) ↨ (8 ↦ [HEAD MODE]/[AUTO MODE] ⇌ (ALI) ↨ (8 ↦ [HEAD MODE]/[AUTO MODE] ⇌ (ALI) ↨ (8 ↦ [HEAD MODE]/[AUTO MODE] ⇌ (ALI) ↨ (8 ↦ [HEAD MODE]/[AUTO MODE] ⇌ (ALI) ↨ (8 ↦ [HEAD MODE]/[AUTO MODE] ⇚ (ALI) ↨ (8 ↦ [HEAD MODE]/[AUTO MODE] ⇌ (ALI) ↨ (8 ↦ [HEAD MODE]/[AUTO MODE] ⇌ (ALI) ↨ (8 ↦ [HEAD MODE]/[AUTO MODE] ⇌ (ALI) ↨ (8 ↦ [HEAD MODE]/[AUTO MODE] ⇌ (ALI) ↨ (8 ↦ [HEAD MODE]/[AUTO MODE] ⇺ (ALI) ↨ (8 ↦ [HEAD MODE]/[AUTO MODE] ⇌ (ALI) ↨ (8 ↦ [HEAD MODE]/[AUTO MODE] ⇌ (ALI) ↨ (8 ↦ [HEAD MODE]/[AUTO MODE] ⇌ (ALI) ↨ (8 ↦ [HEAD MODE]/[AUTO MODE] ⇌ (ALI) ↨ (8 ↦ [HEAD MODE]/[AUTO MODE] ⇩ (ALI) ↨ (8 ↦ [HEAD MODE]/[AUTO MODE] ⇌ (ALI) ↨ (8 ↦ [HEAD MODE]/[AUTO MODE] ⇌ (ALI) ↨ (8 ↦ [HEAD MODE]/[AUTO MODE] ⇌ (ALI) ↨ (8 ↦ [HEAD MODE]/[AUTO MODE] ⇌ (ALI) ↨ (8 ↦ [HEAD MODE]/[AUTO MODE] ⇨ (ALI) ↨ (8 ↦ [HEAD MODE]/[AUTO MODE] ⇌ (ALI) ↨ (8 ↦ [HEAD MODE]/[AUTO MODE] ⇌ (ALI) ↨ (8 ↦ [HEAD MODE]/[AUTO MODE] ⇌ (ALI) ↨ (8 ↦ [HEAD MODE]/[AUTO MODE] ⇌ (ALI) ↨ (8 ↦ [HEAD MODE]/[AUTO MODE] ⇰ (ALI) ↨ (8 ↦ [HEAD MODE]/[AUTO MODE] ⇌ (ALI) ↨ (8 ↦ [HEAD MODE]/[AUTO MODE] ⇌ (ALI) ↨ (8 ↦ [HEAD MODE]/[AUTO MODE] ⇌ (ALI) ↨ (8 ↦ [HEAD MODE]/[AUTO MODE] ⇌ (ALI) ↨ (8 ↦ [HEAD MODE]/[AUTO MODE] ⇀ (ALI) ↨ (8 ↦ [HEAD MODE]/[AUTO MODE] ⇌ (ALI) ↨ (8 ↦ [HEAD MODE]/[AUTO MODE] ⇌ (ALI) ↨ (8 ↦ [HEAD MODE]/[AUTO MODE] ⇌ (ALI) ↨ (8 ↦ [HEAD MODE]/[AUTO MODE] ⇌ (ALI) ↨ (8 ↦ [HEAD MODE]/[AUTO MODE] ⇟ (ALI) ↨ (8 ↦ [HEAD MODE]/[AUTO MODE] ⇌ (ALI) ↨ (8 ↦ [HEAD MODE]/[AUTO MODE] ⇌ (ALI) ↨ (8 ↦ [HEAD MODE]/[AUTO MODE] ⇌ (ALI) ↨ (8 ↦ [HEAD MODE]/[AUTO MODE] ⇌ (ALI) ↨ (8 ↦ [HEAD MODE]/[AUTO MODE] ⇲ (ALI) ↨ (8 ↦ [HEAD MODE]/[AUTO MODE] ⇌ (ALI) ↨ (8 ↦ [HEAD MODE]/[AUTO MODE] ⇌ (ALI) ↨ (8 ↦ [HEAD MODE]/[AUTO MODE] ⇌ (ALI) ↨ (8 ↦ [HEAD MODE]/[AUTO MODE] ⇌ (ALI) ↨ (8 ↦ [HEAD MODE]/[AUTO MODE] ⇷ (ALI) ↨ (8 ↦ [HEAD MODE]/[AUTO MODE] ⇌ (ALI) ↨ (8 ↦ [HEAD MODE]/[AUTO MODE] ⇌ (ALI) ↨ (8 ↦ [HEAD MODE]/[AUTO MODE] ⇌ (ALI) ↨ (8 ↦ [HEAD MODE]/[AUTO MODE] ⇌ (ALI) ↨ (8 ↦ [HEAD MODE]/[AUTO MODE] ⇫ (ALI) ↨ (8 ↦ [HEAD MODE]/[AUTO MODE] ⇌ (ALI) ↨ (8 ↦ [HEAD MODE]/[AUTO MODE] ⇌ (ALI) ↨ (8 ↦ [HEAD MODE]/[AUTO MODE] ⇌ (ALI) ↨ (8 ↦ [HEAD MODE]/[AUTO MODE] ⇌ (ALI) ↨ (8 ↦ [HEAD MODE]/[AUTO MODE] ⇜ (ALI) ↨ (8 ↦ [HEAD MODE]/[AUTO MODE] ⇌ (ALI) ↨ (8 ↦ [HEAD MODE]/[AUTO MODE] ⇌ (ALI) ↨ (8 ↦ [HEAD MODE]/[AUTO MODE] ⇌ (ALI) ↨ (8 ↦ [HEAD MODE]/[AUTO MODE] ⇌ (ALI) ↨ (8 ↦ [HEAD MODE]/[AUTO MODE] ⇭ (ALI) ↨ (8 ↦ [HEAD MODE]/[AUTO MODE] ⇌ (ALI) ↨ (8 ↦ [HEAD MODE]/[AUTO MODE] ⇌ (ALI) ↨ (8 ↦ [HEAD MODE]/[AUTO MODE] ⇌ (ALI) ↨ (8 ↦ [HEAD MODE]/[AUTO MODE] ⇌ (ALI) ↨ (8 ↦ [HEAD MODE]/[AUTO MODE] ⇂ (ALI) ↨ (8 ↦ [HEAD MODE]/[AUTO MODE] ⇌ (ALI) ↨ (8 ↦ [HEAD MODE]/[AUTO MODE] ⇌ (ALI) ↨ (8 ↦ [HEAD MODE]/[AUTO MODE] ⇌ (ALI) ↨ (8 ↦ [HEAD MODE]/[AUTO MODE] ⇌ (ALI) ↨ (8 ↦ [HEAD MODE]/[AUTO MODE] ⇁ (ALI) ↨ (8 ↦ [HEAD MODE]/[AUTO MODE] ⇌ (ALI) ↨ (8 ↦ [HEAD MODE]/[AUTO MODE] ⇌ (ALI) ↨ (8 ↦ [HEAD MODE]/[AUTO MODE] ⇌ (ALI) ↨ (8 ↦ [HEAD MODE]/[AUTO MODE] ⇌ (ALI) ↨ (8 ↦ [HEAD MODE]/[AUTO MODE] ⇦ (ALI) ↨ (8 ↦ [HEAD MODE]/[AUTO MODE] ⇌ (ALI) ↨ (8 ↦ [HEAD MODE]/[AUTO MODE] ⇌ (ALI) ↨ (8 ↦ [HEAD MODE]/[AUTO MODE] ⇌ (ALI) ↨ (8 ↦ [HEAD MODE]/[AUTO MODE] ⇌ (ALI) ↨ (8 ↦ [HEAD MODE]/[AUTO MODE] ✓(ALI) ↨ (8 ↦ [HEAD MODE]/[AUTO MODE] ✓(ALI) ↨ (8 ↦ [HEAD MODE]/[AUTO MODE] ✓(ALI) ↨ (8 ↦ [HEAD MODE]/[AUTO MODE] ✓(ALI) ↨ (8 ↦ [HEAD MODE]/[AUTO MODE] ✓(ALI) ↨ (8 ↦ [HEAD MODE]/[AUTO MODE] ✓(ALI) ↡(8 ↦ [HEAD MODE]/[AUTO MODE] ✓(ALI) ↡(8 ↦ [HEAD MODE]/[AUTO MODE] ✓(ALI) ↡(8 ↦ [HEAD MODE]/[AUTO MODE] ✓(ALI) ↡(8 ↦ [HEAD MODE]/[AUTO MODE] ✓(ALI) ↡(8 ↦ [HEAD MODE]/[AUTO MODE] ✓(ALI) ↡(8 ↦ [腱]) |
Bluetooth
Made for
(6th generation , 5th) iPod touch —
SE .6S Plus .6S .6 Plus .6 .5C .5S .5 iPhone 4S —
Android Open Accessory (AOA) 2.0 JolS JSu, aabg accs
9 151 jjssii iia jg> no J5 pcnd Android jgs> jL 13i
AoA 2.0 a
Pandora J_9
Pandora
JL Lg Jg Lgosj oosj Pandora gbbj
(6th generation , 5th) iPod touch —
(7th generation) iPod nano
SE .6S Plus .6S .6 Plus .6 .5C .5S .5 iPhone 4S —
#
j4.1
acll jlae ae bgl 10g5w plasily aagll no gill
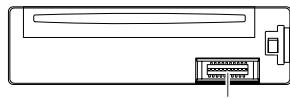
a>100 a<100 100
Jagol
a h a jg jagj gagjg c
Jgagall pccg cag g
:LiIgwh810JoloeJI
aillbawyJolil Jwll 2
LgLc Lgalo ailghaw pssw 8g aiighw glc aLio g jzj g gai 2
上
aJgshuU LaoLo g1 pssui 2
jlll gaiiio no ailghwai jbiy
aai 100
Lai jn JgJgJ1 0o
aillgbw gag jiailgbw21 aIg waiiaal dae no clljlll aljj
LogLeJj
aegio gaoi aiee ie eaiiee eae
JVC-
SsX1 LogLeoJI sO
PLc
aillll CD Lilgbw Jie wio ooi gbiw


o DualDisc"DVD" - 10000000000000000000000000000000000000000000000
aillbawl jiei iai 2.1igj wll aill bawu g
iiaai l iie aie aie bivdVD -
a Juaalalalagallalalao gaa: lba>log alao cLoge Jgauu
.http://www.jvc.net/cs/car/ aL
| BRIGHTNESS | |
| : . . . . . . . . . . . . . . . . . . . . . . . . . . . . . . . . . . . . . . . . . . . . . . . . . . . . . . . . . . . . . . . . . . . . . . . . . . . . . . . . . . . . . . . . . . . . . . . . . . . .. (LEVEL 15 : [NIGHT] : [LEVEL 31 : [DAY] : [LIFE]) | |
| : . . . . . . . . . . . . . . . . . . . . . . . . . . . . . . . . . . . . . . . . . . . . . . . . . . . . . . . . . . . . . . . . . . . . . . . . . . . . . . . . . . . . . . . . . . . . . . . : . . . . . . . . . . . . . . . . . . . . . . . . . . . . . . . . . . . . . . . . . . . . . . . . . . . . . . . . . . . . . . . . . . . . . . . . . . . . . . . . . . . . . . . . . . . . . . . . . .. : (2023) 5 LGA 5 GGA 5 GGA 5 GGA 5 GGA 5 GGA 5 GGA 5 GGA 5 GGA 5 GGA 5 GGA 5 GGA 5 GGA 5 GGA 5 GGA 5 GGA 5 GGA 5 GGA 5 GGA 5 GGA 5 GGA 5 GGA 5 GGA 5 GGA 5 GGA 5 GGA 5GGA 5GGA 5GGA 5GGA 5GGA 5GGA 5GGA 5GGA 5GGA 5GGA 5GGA 5GGA 5GGA 5GGA 5GGA 5GGA 5GGA 5GGA 5GGA 5GGA 5GGA 5GGA 5GGA 5GGA 5GGA 5 GGA 5 GGA 5 GGA 5 GGA 5 GGA 5 GGA 5 GGA 5 GGA 5 GGA 5 GGA 5 GGA 5 GGA 5 GGA 5 GGA 5 GGA 5 GGA 5 GGA 5 GGA 5 GGA 5 GGA 5 GGA 5 GGA 5 GGA 5 GGA 5 : SCROLL ONCE : (2023) 5 LGA 5 GGA 5 GGA 5 GGA 5 GGA 5 GGA 5 GGA 5 GGA 5 GGA 5 GGA 5 GGA 5 GGA 5 GGA 5 GGA 5 GGA 5 GGA 5 GGA 5 GGA 5 GGA 5 GGA 5 GGA 5 GGA 5 GGA : SCROLL AUTO : FLAPS : SCROLL OFF | |
| (上色下色下色下色下色下色下色下色下色下色下色下色下色下色下色下色下色下色下色下色下色下色下色下色下色下色下色下色下色下色下色下色下色下色下色下色下色下色下色下色下色下色下色下色下色下色下色下色下色下色下色 [COLOR FLOW01] : [ALL UNION FLOWAS COLOR 49 ] COLOR 01 · g (2023) [DAY COLOR] ↓ ↓ ↓ ↓ ↓ ↓ ↓ ↓ ↓ ↓ ↓ ↓ ↓ ↓ ↓ ↓ ↓ ↓ ↓ ↓ ↓ ↓ ↓ ↓ ↓ ↓ ↓ ↓ ↓ ↓ ↓ ↓ ↓ ↓ ↓ ↓ ↓ ↓ ↓ ↓ ↓ ↓ ↓ ↓ ↓ ↓ ↓ ↓ ↓ ↓ ↓ ↓ ↓ ↓ ↓ ↓ ↓ ↓ ↓ ↓ ↓ ↓ ↓ ↓ ↓ ↓ ↓ ↓ ↓ ↓ ↓ ↓ ↓ ↓ ↓ ↓ ↓ ↓ ↓ ↓ ↓ ↓ ↓ ↓ ↓ ↓ ↓ ↓ ↓ ↓ ↓ ↓ ↓ ↓ ↓ ↓ ↓ ↓ ↓ ↓ | |
| PRESET | |
| : RED SUND SUNSET OCEAN | |
| DAY COLOR | |
| : FLGA 12 LGA 12 LGA 12 LGA 12 LGA 12 LGA 12 LGA 12 LGA 12 LGA 12 LGA 12 LGA 12 LGA 12 LGA 12 LGA 12 LGA 12 LGA 12 LGA 12 LGA 12 LGA 12 LGA 12 LGA 12LGA 12 LGA 12 LGA 12 LGA 12 LGA 12 LGA 12 LGA 12 LGA 12 LGA 12 LGA 12 LGA 12 LGA 12 LGA 12 LGA 12 LGA 12 LGA 12 LGA 12 LGA 12 LGA 12 LGA 12 : FLGA 12 LGA 12 LGA 12 LGA 12 LGA 12 LGA 12 LGA 12 LGA 12 LGA 12 LGA 12 LGA 12 LGA 12 LGA 12 LGA 12 LGA 12 LGA 12 LGA 12 LGA 12 LGA 12 LGA 2 g 1 g 1 g 1 g 1 g 1 g 1 g 1 g 1 g 1 g 1 g 1 g 1 g 1 g 1 g 1 g 1 g 1 g 1 g 1 g 1 g 1 g 1 g 1 g 1 g 1 g 1 g 1 g 1 g 1 g 1 g 1 g 1 g 1 g 1g : FLGA 12 LGA 12 LGA 12 LGA 12 LGA 12 LGA 12 LGA 12 LGA 12 LGA 12 LGA 12 LGA 12 LGA 12 LGA 12 LGA 12 LGA 12 LGA 12 LGA 12 LGA 12 LGA 12 LGA : FLGA 12 LGA 12 LGA 12 LGA 12 LGA 12 LGA 12 LGA 12 LGA 12 LGA 12 LGA 12 LGA 12 LGA 12 LGA 12 LGA 12 LGA 12 LGA 12 LGA 12 LGA 12 LGA 12 LGA | |
| NIGHT COLOR | |
| : FLGA 12 LGA 12 LGA 12 LGA 12 LGA 12 LGA 12 LGA 12 LGA 12 LGA 12 LGA 12 LGA 12 LGA 12 LGA 12 LGA 12 LGA 12 LGA 12 LGA 12 LGA 12 LGA 2 g 1 g 1g 1g 1g 1g 1g 1g 1g 1g 1g 1g 1g 1g 1g 1g 1g 1g 1g 1g 1g 1g 1g 1g 1g 1g 1g 1g 1g 1g 1g 1g 1g 1g 1g 1g : FLGA 12 LGA 12 LGA 12 LGA 12 LGA 12 LGA 12 LGA 12 LGA 12 LGA 12 LGA 12 LGA 12 LGA 12 LGA 12 LGA 12 LGA 12 LGA 12 LGA 12 LGA 12 LGA 18 : FLGA 12 LGA 12 LGA 12 LGA 12 LGA 12 LGA 12 LGA 12 LGA 12 LGA 12 LGA 12 LGA 12 LGA 12 LGA 12 LGA 12 LGA 12 LGA 12 LGA 12 LGA 12 LGA 12 LGA | |
| MENUCOLOR | |
| : FLGA 12 LGA 12 LGA 12 LGA 12 LGA 12 LGA 12 LGA 12 LGA 12 LGA 12 LGA 12 LGA 12 LGA 12 LGA 12 LGA 12 LGA 12 LGA 12 LGA 12 LGA 12 LGA 18 : FL GA 12 LGA 12 LGA 12 LGA 12 LGA 12 LGA 12 LGA 12 LGA 12 LGA 12 LGA 12 LGA 12 LGA 12 LGA 12 LGA 12 LGA 12 LGA 12 LGA 12 LGA 12 LGA 12 LGA 12 LLA : FL GA 12 LGA 12 LGA 12 LGA 12 LGA 12 LGA 12 LGA 12 LGA 12 LGA 12 LGA 12 LGA 12 LGA 12 LGA 12 LGA 12 LGA 12 LGA 12 LGA 12 LGA 12 LGA 12 LGA : FL GA 12 LGA 12 LGA 12 LGA 12 LGA 12 LGA 12 LGA 12 LGA 12 LGA 12 LGA 12 LGA 12 LGA 12 LGA 12 LGA 12 LGA 12 LGA 12 LGA 12 LGA 12 LGA 12 LGA | |
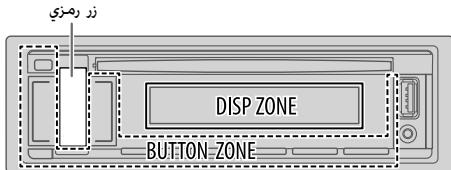
1
2
3
4
XX :
| DISPLAY |
| DIMMER |
| [DAY] ALL Egbwbl ybj ybj ybj ybj OFF ([BRIGHTNESS] ⇌) .[NIGHT] ALL Egbwbl ybj ybj ybj ybj ON ybj ALL jbj jj cbj bbj 12 DIMMERTIME [ON] ALL Egbwbl ybj ybj Egbwbl VOL +/- 12 1 ▷/ⅡENTER [OFF] ALL Egbwbl ybj ybj Egbwbl VOL +/- 12 2 ▷/ⅢENTER 12 (AM6:00 [OFF] : PMG:00 [ON] : ybj ybj ybj |
.[DTA SETTINGS] [GAIN] g [DISTANCE]
eaiwIgogjso jso aoLall 131
Lwpaaw,dcawJ5gllLjLlog
Lilali jai jilil g h
1
a.o.o a.b.o.s
2
C. l_1 l_2 l_3
aclawll aLwuuu uuuu 3
gogos logoo [FRONTALL] gS:Loic JIio
E
![JVC KD-X341 BT - .[DTA SETTINGS] [GAIN] g [DISTANCE] - 1](/content/2024/12/188863/images/27e5042b876553d02798e6312efb2fbdd9f30edcf5a229c4488a69dea139ba81.jpg)
:clawj jsl . 1s yj
jLio jJie aei JoS Loic
SUBWOOFER/REAR RIGHT/REAR LEFT/FRONT RIGHT/FRONT LEFT
[SUBWOOFER] [REAR RIGHT] [REAR LEFT]
(21 ).[SPEAKER SIZE] [SUBWOOFER] , [REAR] [NONE]
:olio 3 a joo Loic
WOOFER/MID RIGHT/MID LEFT/TWEETER RIGHT/TWEETER LEFT
[WOOFER] [NONE] [WOOFER]
(21 .[SPEAKER SIZE]
125 189 (19) [2-WAY] JI BGGIOX [X'OVERTYPE] LIOIC IIOI
(21 ).[SPEAKER SIZE] [REAR] [NONE]
y
a 10000000000000000000000000000000000000000000
LjL JaoLo jS1
GAIN]g [DISTANCE] aJ J
[DTA SETTINGS]
DTA SETTINGS
[THROUGH] [SUBWOOFER LPF] [120HZ] -
[FADER] [POSITION R02] [POSITION R15]
[POSITION 00] [POSITION R15]
[SPK/PRE OUT] aL
([2-WAY]JIOO [X'OVER TYPE]JL51J1
actowlJyjgi jzjbi yI sloci [SPK/PRE OUT].clawlJyjdi
yj
(13)
:KD-R881BT
| [ON] | # | # | # | # | # | # | # | # | # | # | # | # | # | # | # | # | # | # | # | # | # | # | # | # | # | # | # | # | # | # | # | # | # | # | # | # | # | # | # | # | # | # | # | # | # | # | # | # | # | # | |
| # | # | # | # | # | # | # | # | # | # | # | # | # | # | # | # | # | # | # | # | # | # | # | # | # | # | # | # | # | # | # | # | # | # | # | # | # | # | # | # | # | # | # | # | # | # | # | # | # | # (19←) | . | [SUB.W/SUB.W] |
| # | # | # | # | # | # | # | # | # | # | # | # | # | # | # | # | # | # | # | # | # | # | # | # | # | # | # | # | # | # | # | # | # | # | # | # | # | # | # | # | # | # | # | # | # | # | # | # | # (9←) | . | [SUB.W/SUB.W] |
| PRO EQ [USER] ↓ ↓ ↓ ↓ ↓ ↓ ↓ ↓ ↓ ↓ ↓ ↓ ↓ ↓ ↓ ↓ ↓ ↓ ↓ ↓ ↓ ↓ ↓ ↓ ↓ ↓ ↓ ↓ ↓ ↓ ↓ ↓ ↓ ↓ ↓ ↓ ↓ ↓ ↓ ↓ ↓ ↓ ↓ ↓ ↓ ↓ ↓ ↓ ↓ ↓ ↓ ↓ ↓ ↓ ↓ ↓ ↓ ↓ ↓ ↓ ↓ ↓ ↓ ↓ ↓ ↓ ↓ ↓ ↓ ↓ ↓ ↓ ↓ ↓ ↓ ↓ ↓ ↓ ↓ ↓ ↓ ↓ ↓ ↓ ↓ ↓ ↓ ↓ ↓ ↓ ↓ ↓ ↓ ↓ ↓ ↓ ↓ ↓ ↓ ↓ | ||
| 62.5HZ | ||
| Joc Jc Jc Jc Jc Jc Jc Jc Jc Jc Jc Jc Jc Jc Jc Jc Jc Jc Jc Jc Jc Jc Jc Jc Jc Jc Jc Jc Jc Jc Jc Jc Jc Jc Jc Jc Jc Jc Jc Jc Jc Jc Jc Jc Jc Jc Jc Jc Jc Jc Jc Jd Jc Jc Jc Jc Jc Jc Jc Jc Jc Jc Jc Jc Jc Jc Jc Jc Jc Jc Jc Jc Jc Jc Jc Jc Jc Jc Jc Jc Jc Jc Jc Jc Jc Jc Jc Jc Jc Jc Jc Jc Jc Jc Jc Jc Jc Jc Jc Jc Jc Jcd Jc Jc Jc Jc Jc Jc Jc Jc Jc Jc Jc Jc Jc Jc Jc Jc Jc Jc Jc Jc Jc Jc Jc Jc Jc Jc Jc Jc Jc Jc Jc Jc Jc Jc Jc Jc Jc Jc Jc Jc Jc Jc Jc Jc Jc Jc Jc Jc Jc Jb Jc Jc Jc Jc Jc Jc Jc Jc Jc Jc Jc Jc Jc Jc Jc Jc Jc Jc Jc Jc Jc Jc Jc Jc Jc Jc Jc Jc Jc Jc Jc Jc Jc Jc Jc Jc Jc Jc Jc Jc Jc Jc Jc Jc Jc Jc Jc Jc Jc Jbc Jc Jc Jc Jc Jc Jc Jc Jc Jc Jc Jc Jc Jc Jc Jc Jc Jc Jc Jc Jc Jc Jc Jc Jc Jc Jc Jc Jc Jc Jc Jc Jc Jc Jc Jc Jc Jc Jc Jc Jc Jc Jc Jc Jc Jc Jc Jc Jc Jc Jac Jc Jc Jc Jc Jc Jc Jc Jc Jc Jc Jc Jc Jc Jc Jc Jc Jc Jc Jc Jc Jc Jc Jc Jc Jc Jc Jc Jc Jc Jc Jc Jc Jc Jc Jc Jc Jc Jc Jc Jc Jc Jc Jc Jc Jc Jc Jc Jc Jc Jcc Jc Jc Jc Jc Jc Jc Jc Jc Jc Jc Jc Jc Jc Jc Jc Jc Jc Jc Jc Jc Jc Jc Jc Jc Jc Jc Jc Jc Jc Jc Jc Jc Jc Jc Jc Jc Jc Jc Jc Jc Jc Jc Jc Jc Jc Jc Jc Jc Jc Jca Jc Jc Jc Jc Jc Jc Jc Jc Jc Jc Jc Jc Jc Jc Jc Jc Jc Jc Jc Jc Jc Jc Jc Jc Jc Jc Jc Jc Jc Jc Jc Jc Jc Jc Jc Jc Jc Jc Jc Jc Jc Jc Jc Jc Jc Jc Jc Jc Jc Jce Jc Jc Jc Jc Jc Jc Jc Jc Jc Jc Jc Jc Jc Jc Jc Jc Jc Jc Jc Jc Jc Jc Jc Jc Jc Jc Jc Jc Jc Jc Jc Jc Jc Jc Jc Jc Jc Jc Jc Jc Jc Jc Jc Jc Jc Jc Jc Jc Jc Jdc Jc Jc Jc Jc Jc Jc Jc Jc Jc Jc Jc Jc Jc Jc Jc Jc Jc Jc Jc Jc Jc Jc Jc Jc Jc Jc Jc Jc Jc Jc Jc Jc Jc Jc Jc Jc Jc Jc Jc Jc Jc Jc Jc Jc Jc Jc Jc Jc Jc Jcr Jc Jc Jc Jc Jc Jc Jc Jc Jc Jc Jc Jc Jc Jc Jc Jc Jc Jc Jc Jc Jc Jc Jc Jc Jc Jc Jc Jc Jc Jc Jc Jc Jc Jc Jc Jc Jc Jc Jc Jc Jc Jc Jc Jc Jc Jc Jc Jc Jc Jxc Jc Jc Jc Jc Jc Jc Jc Jc Jc Jc Jc Jc Jc Jc Jc Jc Jc Jc Jc Jc Jc Jc Jc Jc Jc Jc Jc Jc Jc Jc Jc Jc Jc Jc Jc Jc Jc Jc Jc Jc Jc Jc Jc Jc Jc Jc Jc Jc Jc Jcx Jc Jcx Jcx Jcx Jcx Jcx Jcx Jcx Jcx Jcx Jcx Jcx Jcx Jcx Jcx Jcx Jcx Jcx Jcx Jcx Jcx Jcx Jcx Jcx Jcx Jcx Jcx Jcx Jcx Jcx Jcx Jcx Jcx Jcx Jcx Jcx Jcx Jcx Jcx Jcx Jcx Jcx Jcx Jcx Jcx Jcx Jcx Jcx Jcx Jcx Jcx Jxc Jxc Jxc Jxc Jxc Jxc Jxc Jxc Jxc Jxc Jxc Jxc Jxc Jxc Jxc Jxc Jxc Jxc Jxc Jxc Jxc Jxc Jxc Jxc Jxc Jxc Jxc Jxc Jxc Jxc Jxc Jxc Jxc Jxc Jxc Jxc Jxc Jxc Jxc Jxc Jxc Jxc Jxc Jxc Jxc Jxc Jxc Jxc Jxc Jxc JxCJxcJxcJxcJxcJxcJxcJxcJxcJxcJxcJxcJxcJxcJxcJxcJxcJxcJxcJxcJxcJxcJxcJxcJxcJxcJxcJxcJxcJxcJxcJxcJxcJxcJxcJxcJxcJxcJxcJxcJxcJxcJxcJxcJxcJxcJxcJxcJxcJxcJxcJXCJxcJxcJxcJxcJxcJxcJxcJxcJxcJxcJxcJxcJxcJxcJxcJxcJxcJxcJxcJxcJxcJxcJxcJxcJxcJxcJxcJxcJxcJxcJxcJxcJxcJxcJxcJxcJxcJxcJxcJxcJxcJxcJxcJxcJxcJxcJxcJxcJxcJxCJxcJxcJxcJxcJxcJxcJxcJxcJxcJxcJxcJxcJxcJxcJxcJxcJxcJxcJxcJxcJxcJxcJxcJxcJxcJxcJxcJxcJxcJxcJxcJxcJxcJxcJxcJxcJxcJxcJxcJxcJxcJxcJxcJxcJxcJxcJxcJxcJxc JxcJxcJxcJxcJxcJxcJxcJxcJxcJxcJxcJxcJxcJxcJxcJxcJxcJxcJxcJxcJxcJxcJxcJxcJxcJxcJxcJxcJxcJxcJxcJxcJxcJxcJxcJxcJxcJxcJxcJxcJxcJxcJxcJxcJxcJxcJxcJxcJxcJxc JdxJdxJdxJdxJdxJdxJdxJdxJdxJdxJdxJdxJdxJdxJdxJdxJdxJdxJdxJdxJdxJdxJdxJdxJdxJdxJdxJdxJdxJdxJdxJdxJdxJdxJdxJdxJdxJdxJdxJdxJdxJdxJdxJdxJdxJdxJdxJdxJdxJdxJdxJPdxJdxJPdxJdxJPdxJdxJPdxJdxJPdxJdxJPdxJdxJPdxJdxJPdxJdxJPdxJdxJPdxJdxJPdxJdxJPdxJdxJPdxJdxJPdxJdxJPdxJdxJPdxJdxJPdxJdxJPdxJdxJPdxJdxJPdxJdxJPdxJdxJPdxJdxJPdxJdxJPdxJdxJPdxJdxJdxJPdxJdxJPdxJdxJPdxJdxJPdxJdxJPdxJdxJPdxJdxJPdxJdxJPdxJdxJPdxJdxJPdxJdxJPdxJdxJPdxJdxJPdxJdxJPdxJdxJPdxJdxJPdxJdxJPdxJdxJPdxJdxJPdxJdxJPdxJdxJPdxJdxJPdxJdxJPdxJdxJPdxJPdxJdxJPdxJdxJPdxJdxJPdxJdxJPdxJdxJPdxJdxJPdxJdxJPdxJdxJPdxJdxJPdxJdxJPdxJdxJPdxJdxJPdxJdxJPdxJdxJPdxJdxJPdxJdxJPdxJdxJPdxJdxJPdxJdxJPdxJdxJPdxJdxJPdxJdxJPdxJdxJPdxJdxJPdxJPdxJPdxJdxJPdxJdxJPdxJdxJPdxJdxJPdxJdxJPdxJdxJPdxJdxJPdxJdxJPdxJdxJPdxJdxJPdxJdxJPdxJdxJPdxJdxJPdxJdxJPdxJdxJPdxJdxJPdxJdxJPdxJdxJPdxJdxJPdxJdxJPdxJdxJPdxJdxJPdxJdxJPdxJdxJdxJdxJPdxJdxJPdxJdxJPdxJdxJPdxJdxJPdxJdxJPdxJdxJPdxJdxJPdxJdxJPdxJdxJPdxJdxJPdxJdxJPdxJdxJPdxJdxJPdxJdxJPdxJdxJPdxJdxJPdxJdxJPdxJdxJPdxJdxJPdxJdxJPdxJdxJPdxJdxJPdxJdxJdxJPdxJPdxJdxJPdxJdxJPdxJdxJPdxJdxJPdxJdxJPdxJdxJPdxJdxJPdxJdxJPdxJdxJPdxJdxJPdxJdxJPdxJdxJPdxJdxJPdxJdxJPdxJdxJPdxJdxJPdxJdxJPdxJdxJPdxJdxJPdxJdxJPdxJdxJPdxJdxJPdxJdxJPdxJPdxJdxJdxJPdxJdxJPdxJdxJPdxJdxJPdxJdxJPdxJdxJPdxJdxJPdxJdxJPdxJdxJPdxJdxJPdxJdxJPdxJdxJPdxJdxJPdxJdxJPdxJdxJPdxJdxJPdxJdxJPdxJdxJPdxJdxJPdxJdxJPdxJdxJPdxJdxJPdxJdxJPdxJdxJdxJdxJdxJPdxJdxJPdxJdxJPdxJdxJPdxJdxJPdxJdxJPdxJdxJPdxJdxJPdxJdxJPdxJdxJPdxJdxJPdxJdxJPdxJdxJPdxJdxJPdxJdxJPdxJdxJPdxJdxJPdxJdxJPdxJdxJPdxJdxJPdxJdxJPdxJdxJPdxJdxJPdxJPdxJdxJPdxJPdxJdxJPdxJdxJPdxJdxJPdxJdxJPdxJdxJPdxJdxJPdxJdxJPdxJdxJPdxJdxJPdxJdxJPdxJdxJPdxJdxJPdxJdxJPdxJdxJPdxJdxJPdxJdxJPdxJdxJPdxJdxJPdxJdxJPdxJdxJPdxJdxJPdxJdxJPdxJdxJdxJPdxJdxJdxJPdxJdxJPdxJdxJPdxJdxJPdxJdxJPdxJdxJPdxJdxJPdxJdxJPdxJdxJPdxJdxJPdxJdxJPdxJdxJPdxJdxJPdxJdxJPdxJdxJPdxJdxJPdxJdxJPdxJdxJPdxJdxJPdxJdxJPdxJdxJPdxJdxJPdxJdxJPdxJPdxJdxJdxJdxJPdxJdxJPdxJdxJPdxJdxJPdxJdxJPdxJdxJPdxJdxJPdxJdxJPdxJdxJPdxJdxJPdxJdxJPdxJdxJPdxJdxJPdxJdxJPdxJdxJPdxJdxJPdxJdxJPdxJdxJPdxJdxJPdxJdxJPdxJdxJPdxJdxJPdxJdxJPdxJPdxj dxJPdxj dxJPdxj dxJPdxj dxJPdxj dxJPdxj dxJPdxj dxJPdxj dxJPdxj dxJPdxj dxJPdxj dxJPdxj dxJPdxj dxJPdxj dxJPdxj dxJPdxj dxJPdxj dxJPdxj dxJPdxj dxJPdxj dxJPdxj dxJPdxj dxJPdxj dxJPdxj dxJPdxj dxJPdxj dyJPdxj dyJPdxj dyJPdxj dyJPdxj dyJPdxj dyJPdxj dyJPdxj dyJPdxj dyJPdxj dyJPdxj dyJPdxj dyJPdxj dyJPdxj dyJPdxj dyJPdxj dyJPdxj dyJPdxj dyJPdxj dyJPdxj dyJPdxj dyJPdxj dyJPdxj dyJPdxj dyJPdxj dyJPdxjdyJPdxj dyJPdxj dyJPdxj dyJPdxj dyJPdxj dyJPdxj dyJPdxj dyJPdxj dyJPdxj dyJPdxj dyJPdxj dyJPdxj dyJPdxj dyJPdxj dyJPdxj dyJPdxj dyJPdxj dyJPdxj dyJPdxj dyJPdxj dyJPdxj dyJPdxj dyJPdxj dyJPdxj dyJPdxj DYJPdxj DYJPdxj DYJPdxj DYJPdxj DYJPdxj DYJPdxj DYJPdxj DYJPdxj DYJPdxj DYJPdxj DYJPdxj DYJPdxj DYJPdxj DYJPdxj DYJPdxj DYJPdxj DYJPdxj DYJPdxj DYJPdxj DYJPdxj DYJPdxj DYJPdxj DYJPdxj DYJPdxj DYJPdxj YDJPdxj YDJPdxj YDJPdxj YDJPdxj YDJPdxj YDJPdxj YDJPdxj YDJPdxj YDJPdxj YDJPdxj YDJPdxj YDJPdxj YDJPdxj YDJPdxj YDJPdxj YDJPdxj YDJPdxj YDJPdxj YDJPdxj YDJPdxj YDYJPdxj YDYJPdxj YDYJPdxj YDYJPdxj YDYJPdxj YDYJPdxj YDYJPdxj YDYJPdxj YDYJPdxj YDYJPdxj YDYJPdxj YDYJPdxj YDYJPdxj YDYJPdxj YDYJPdxj YDYJPdxj YDYJPdxj YDYJPdxj YDYJPdxj YDYJPdxj YDJPdxj YDYJPdxj YDYJPdxj YDYJPdxj YDYJPdxj YDYJPdxj YDYJPdxj YDYJPdxj YDYJPdxj YDYJPdxj YDYJPdxj YDYJPdxj YDYJPdxj YDYJPdxj YDYJPdxj YDYJPdxj YDYJPdxj YDYJPdxj YDYJPdxj YDJPdxj YDJPdxj YDJPdxj YDJPdxj YDJPdxj YDJPdxj YDJPdxj YDJPdxj YDJPdxj YDJPdxj YDJPdxj YDJPdxj YDJPdxj YDJPdxj YDJPdxj YDJPdxj YDJPdxj YDJPdxj YDJPdxj YOFP | ||
| AUDIO CONTROL | ||
| BASS BOOST | ||
| LOUDNESS | ||
| SUB.W LEVEL*1 | ||
| PRE-OUT*3 | ||
| SUBWOOF SET*3 | ||
1
2
ENTER
3
Jisss
4
Q/2 1c bcl 1 1 1 1 1 1 1 1 1 1 1
XX:
| EQ SETTING | ||
| EASY EQ LVL 00 LVL 00 (LVL 00) | PRESET EQ EASY EQ LVL 00 LVL 00 (LVL 00) | |
| [PRO EQ] | EASY EQ LVL 00 LVL 00 (LVL 00) | |
| [PRO EQ] | EASY EQ LVL 00 LVL 00 (LVL 00) | |
| [PRO EQ] | EASY EQ LVL 00 LVL 00 (LVL 00) | |
| [PRO EQ] | EASY EQ LVL 00 | +06 JI 00 |
| [PRO EQ] | +10 JI -50 | |
| LVL 00 | LVL +09 JI LVL -09 | |
| LVL 00 | LVL +09 JI LVL -09 | |
| LVL 00 | LVL +09 JI LVL -09 |
(18) 3.2.2.1
Jgagglgagll
(1) (2) (3)
jLgJU
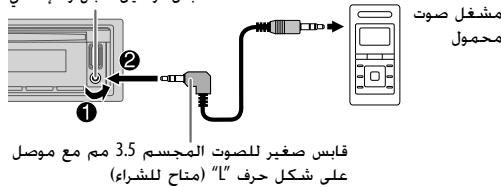
(4 ) . [SOURCE SELECT] [BUILT-IN AUX] [ON] 2
.AUXJxSIOJSSRC-0
Jg00000000000000000000000000000000000000000
J 1

STATUS
Jg
jglgpls wyl glll plssw glbiwi IOS CONNECTED
JL USB JLS21 3gbluetooth
jbbil jgogios IOS jgs
andai plaswl g hll plsiw gAndroid CONNECTED
- Bluetooth
J 2Android NOT CONNECTED
Bluetooth iPod/Phone jLg
(KD-R881BTJ)
blt 100
.iPod BT, 8, 8, 8, 8, SRC
iPod/iPhone jg> 0s Lioic aiaa iPod/iPhone jg> Jie
(7←).USB JLs281 3, b jsc Jgog
JL 150 USB Jd21 iPod/iPhone j4
iPod BT SRC-iPd USB iPod BT
Bluetooth
Bluetooth
Lgblc Bluetooth 2021Panda 15
jgl jll xgog USB Jl,21 20 20 20
Android 山 _ 4 一 iPod touch/iPhone KD-R881BT
Android kD-R781BT
(1)Panda (2)
(4 [SOURCE SELECT] [PANDORA SRC] [ON]
Panda 1
(10 ).Bluetooth jwj jJ 2
(iPod/iPhone jLj)PANDORA J LjSJRJ SRC-0 hj 3
PANDORA BT
Lalai jll 12g jss
(9) USB JxJyPc Pandora JyJyPcPdPdPdPdPdPdPdPdPdPdPdPdPdPdPdPdPdPdPdPdPdPdPdPdPdPdPdPdPdPdPdPdPdPdPdPdPdPdPdPdPdPdPdPdPdPdPdPdPdPdPdl
JVC Remote gill
JvC JvI JVC
A. 1,2 , 3,4 , 5,6
山 山 山 山 山 山 山 山 山 山 山 山 山 山 山 山 山 山 山 山 山 1 (USBJLsbluBt oD) iPod/iPhone kKD-R881BT
(Bluetooth)
(Blueoth 2008)
Jc Jc Jc Jc Jc Jc Jc Jc Jc Jc Jc Jc Jc Jc Jc Jc Jc Jc Jc Jc Jc Jc Jc Jc Jc Jc Jc Jc Jc Jc Jc Jc Jc Jc Jc Jc Jc
1
2
▶/I ENTER
3
4
A/2c bai 1
XX
REMOTE APP
(Mass Storage Class)
Jilwll sio jgj jinall Jieoll
(KD-R881BTJ) JVC Remote
jLJ 00 jLJU JVC JIJI UO JIJI UO JIJI UO JVC Remote
(.USB Jldj) iPod/iPhone
#
Jc Jc Jc Jc Jc Jc Jc Jc Jc Jc Jc Jc Jc Jc Jc Jc Jc Jc Jc Jc Jc Jc
(16 ).Bluetooth
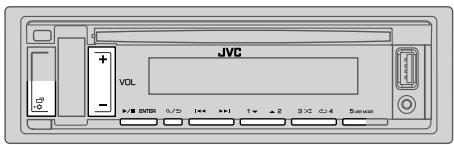

Jie jiljag Jlalj, jaoj
CD
JU JU JU JU JU
ANDROID/iPod USB/USB/CD :KD-R881BT
ANDROID/USB/CD :KD-R781BT
| FM | IF BAND |
| :WIDE:(j) | MOONO SET |
| :JLCLM | NEWS SET*2 |
| :JLCLJ | REGIONAL*2 |
| :JLCLJOFF | AF SET*2 |
| :JLCLJ | AF SET*2 |
| :JLCLJOFF | TI*2 |
| :JLCLJOFF:(“TJ”)(“JLCLJ”)(“JLCLJ”)(“JLCLJ”)(“JLCLJ”)(“JLCLJ”)(“JLCLJ”)(“JLCLJ”)(“JLCLJ”)(“JLCLJ”)(“JLCLJ”)(“JLCLJ”)(“JLCLJ”)(“JLCLJ”)(“JLCLJ”)(“JLCLJ" | |
| :JLCLJ | PTY SEARCH*2 |
1.1 a[ WEEKLY] [ONCE] 2020 2020 2020 *1 2020 FM 2020
PTY JARIED SCIENCE CULTURE.DRAMA EDUCATE SPORT INFO AFFAIRS NEWS LIGHT M (JAWG)EASYM (JAWG)ROCK M (JAWG)POPM (JAWG)RELIGION SOCIAL CHILDREN FINANCE WEATHER OTHER M (JAWG)CLASSICS OLDIES NATION M (JAWG)COUNTRY JAZZ LEISURE TRAVEL PHONE IN DOCUMENT FOLKM (JAWG)
| ### | 1 |
| ### (JLJ) | 2 |
| VOL+/- | 3 |
| INTER | 4 |
XX
| TUNER SETTING | |
| RADIO TIMER | |
| OFF/ WEEKLY/DAILY/ONCE 1 . . . . . . . . . . . . . . . . . . . . . . . . . . . . . . . . . . . . . . . . . . . . . . . . . . . . . . . . . . . . . . . . . . . . . . . . . . . . . . . . . . . . . . . . . . . . . . . . . . . . .. SW2/SW1/AM/FM 2 (SW2/SW1/AM AGA) 06 01/(FM AGA) 18 01 01 3 LAI SAI AGA ALABO JI LAI SAI AGA ALABO JI LAI SAI AGA ALABO JI LAI SAI AGA ALABO JI LAI SAI AGA ALABO JI LAI SAI AGA ALABO JI LAI SAI AGA ALABO JI LAI SAI AGA ALABO JI LAI SAI AGA ALABO JI LAI sAI AGA ALABO JI LAI SAI AGA ALABO JI LAI SAI AGA ALABO JI LAI SAI AGA ALABO JI LAI SAI AGA ALABO JI LAI SAI AGA ALABO JI LAI SAI AGA ALABO JI LAI SAI AGA ALABO JI LAI SAI AGA FL LAI SAI AGA FL LAI SAI AGA FL LAI SAI AGA FL LAI SAI AGA FL LAI SAI AGA FL LAI SAI AGA FL LAI SAI AGA FL LAI SAI AGA FL LAI SAI AGA FL LAI SAI AGA FL LAI SAI AGA FL LAI SAI AGA FL LAI sAI AGA FL LAI sAI AGA FL LAI sAI AGA FL LAI sAI AGA FL LAI sAI AGA FL LAI sAI AGA FL LAI sAI AGA FL LAI sAI AGA FL LAI sAI AGA FL LAI sAI AGA FL LAI sAI AGA FL LAI sAI AGA FL LAI sAI AGAFL LAI sAI AGAFL LAI sAI AGAFL LAI sAI AGAFL LAI sAI AGAFL LAI sAI AGAFL LAI sAI AGAFL LAI sAI AGAFL LAI sAI AGAFL LAI sAI AGAFL LAI sAI AGAFL LAI sAI AGAFL LAI sAI AGAFL LAI SAI AGAFL LAI sAI AGAFL LAI sAI AGAFL LAI sAI AGAFL LAI sAI AGAFL LAI sAI AGAFL LAI sAI AGAFL LAI sAI AGAFL LAI sAI AGAFL LAI sAI AGAFL LAI sAI AGAFL LAI sAI AGAFL LAI sAI AGA FL LAI sAI AGA FL LAI sAI AGA FL LAI sAI AGA FL LAI sAI AGA FL LAI sAI AGA FL LAI sAI AGA FL LAI sAI AGA FL LAI sAI AGA FL LAI sAI AGA FL LAI sAI AGA FL LAI sAI AGA FL LAI SAI AGA FL LAI sAI AGA FL LAI sAI AGA FL LAI sAI AGA FL LAI sAI AGA FL LAI sAI AGA FL LAI sAI AGA FL LAI sAI AGA FL LAI sAI AGA FL LAI sAI AGA FL LAI sAI AGA FL LAI sAI AGAFL LAI sAI AGA FL LAI sAI AGA FL LAI sAI AGA FL LAI sAI AGA FL LAI sAI AGA FL LAI sAI AGA FL LAI sAI AGA FL LAI sAI AGA FL LAI sAI AGA FL LAI sAI AGA FL LAI sAI AGA FL LAI SAI AGA FL LAI SAI AGA FL LAI sAI AGA FL LAI sAI AGA FL LAI sAI AGA FL LAI sAI AGA FL LAI sAI AGA FL LAI sAI AGA FL LAI sAI AGA FL LAI sAI AGA FL LAI sAI AGA FL LAI sAI AGAFL LAI sAI AGAFL LAI sAI AGA FL LAI sAI AGA FL LAI sAI AGA FL LAI sAI AGA FL LAI sAI AGA FL LAI sAI AGA FL LAI sAI AGA FL LAI sAI AGA FL LAI sAI AGA FL LAI sAI AGA FL LAI SAI AGA FL LAI sAI AGA FL LAI SAI AGA FL LAI sAI AGA FL LAI sAI AGA FL LAI sAI AGA FL LAI sAI AGA FL LAI sAI AGA FL LAI sAI AGA FL LAI sAI AGA FL LAI sAI AGA FL LAI sAI AGA FL LAI sAI AGAFL LAI sAI AGA FL LAI sAI AGAFL LAI sAI AGAFL LAI sAI AGAFL LAI sAI AGAFL LAI sAI AGAFL LAI sAI AGAFL LAI sAI AGAFL LAI sAI AGAFL LAI sAI AGAFL LAI sAI AGAFL LAI sAI AGAFL LAI SAI AGAFL LAI SAI AGAFL LAI sAI AGAFL LAI sAI AGAFL LAI sAI AGAFL LAI sAI AGAFL LAI sAI AGAFL LAI sAI AGAFL LAI sAI AGAFL LAI sAI AGAFL LAI sAI AGAFL LAI sAI AGAFL LAI sAI AGA FL LAI sAI AGAFL LAI sAI AGAFL LAI sAI AGAFL LAI sAI AGAFL LAI sAI AGAFL LAI sAI AGAFL LAI sAI AGAFL LAI sAI AGAFL LAI sAI AGAFL LAI sAI AGAFL LAI SAI AGAFL LAI sAI AGAFL LAI SAI AGAFL LAI sAI AGAFL LAI sAI AGAFL LAI sAI AGAFL LAI sAI AGAFL LAI sAI AGAFL LAI sAI AGAFL LAI sAI AGAFL LAI sAI AGAFL LAI sAI AGAFL LAI sAI AGA FL LAI sAI AGAFL LAI sAI AGA FL LAI sAI AGAFL LAI sAI AGAFL LAI sAI AGAFL LAI sAI AGAFL LAI sAI AGAFL LAI sAI AGAFL LAI sAI AGAFL LAI sAI AGAFL LAI sAI AGAFL LAI SAI AGAFL LAI sAI AGAFL LAI sAI AGAFL LAI SAI AGAFL LAI sAI AGAFL LAI sAI AGAFL LAI sAI AGAFL LAI sAI AGAFL LAI sAI AGAFL LAI sAI AGAFL LAI sAI AGAFL LAI sAI AGAFL LAI sAI AGA FL LAI sAI AGAFL LAI sAI AGAFL LAI sAI AGA FL LAI sAI AGAFL LAI sAI AGAFL LAI sAI AGAFL LAI sAI AGAFL LAI sAI AGAFL LAI sAI AGAFL LAI sAI AGAFL LAI sAI AGAFL LAI sAI AGAFL LAI SAI AGAFL LAI SAI AGAFL LAI sAI AGAFL LAI SAI AGAFL LAI sAI AGAFL LAI sAI AGAFL LAI sAI AGAFL LAI sAI AGAFL LAI sAI AGAFL LAI sAI AGAFL LAI sAI AGAFL LAI sAI AGAFL LAI sAI AGA FL LAI sAI AGA FL LAI sAI AGA FL LAI sAI AGAFL LAI sAI AGAFL LAI sAI AGAFL LAI sAI AGAFL LAI sAI AGAFL LAI sAI AGAFL LAI sAI AGAFL LAI sAI AGAFL LAI sAI AGAFL LAI SAI AGAFL LAI sAI AGAFL LAI SAI AGAFL LAI SAI AGAFL LAI sAI AGAFL LAI sAI AGAFL LAI sAI AGAFL LAI sAI AGAFL LAI sAI AGAFL LAI sAI AGAFL LAI sAI AGAFL LAI sAI AGAFL LAI sAI AGA FL LAI sAI AGAFL LAI sAI AGA FL LAI sAI AGA FL LAI sAI AGA FL LAI sAI AGA FL LAI sAI AGA FL LAI sAI AGA FL LAI sAI AGA FL LAI sAI AGA FL LAI sAI AGA FL LAI sAI AGA FL LAI SAI AGA FL LAI SAI AGA FL LAI SAI AGA FL LAI sAI AGA FL LAI sAI AGA FL LAI sAI AGA FL LAI sAI AGA FL LAI sAI AGA FL LAI sAI AGA FL LAI sAI AGA FL LAI sAI AGA FL LAI sAI AGAFL LAI sAI AGAFL LAI sAI AGAFL LAI sAI AGA FL LAI sAI AGA FL LAI sAI AGA FL LAI sAI AGA FL LAI sAI AGA FL LAI sAI AGA FL LAI sAI AGA FL LAI sAI AGA FL LAI sAI AGA FL LAI SAI AGA FL LAI sAI AGA FL LAI sAI AGA FL LAI SAI AGA FL LAI sAI AGA FL LAI sAI AGA FL LAI sAI AGA FL LAI sAI AGA FL LAI sAI AGA FL LAI sAI AGA FL LAI sAI AGA FL LAI sAI AGA FL LAI sAI AGAFL LAI sAI AGAFL LAI sAI AGA FL LAI sAI AGAFL LAI sAI AGAFL LAI sAI AGAFL LAI sAI AGAFL LAI sAI AGAFL LAI sAI AGAFL LAI sAI AGAFL LAI sAI AGAFL LAI SAI AGAFL LAI sAI AGAFL LAI sAI AGAFL LAI sAI AGAFL LAI SAI AGAFL LAI sAI AGAFL LAI sAI AGAFL LAI sAI AGAFL LAI sAI AGAFL LAI sAI AGAFL LAI sAI AGAFL LAI sAI AGAFL LAI sAI AGA FL LAI sAI AGA FL LAI sAI AGA FL LAI sAI AGA FL LAI sAI AGAFL LAI sAI AGAFL LAI sAI AGAFL LAI sAI AGAFL LAI sAI AGAFL LAI sAI AGAFL LAI sAI AGAFL LAI sAI AGAFL LAI SAI AGAFL LAI sAI AGAFL LAI sAI AGAFL LAI SAI AGAFL LAI SAI AGAFL LAI sAI AGAFL LAI sAI AGAFL LAI sAI AGAFL LAI sAI AGAFL LAI sAI AGAFL LAI sAI AGAFL LAI sAI AGAFL LAI sAI AGA FL LAI sAI AGA FL LAI sAI AGA FL LAI sAI AGAFL LAI sAI AGA FL LAI sAI AGAFL LAI sAI AGAFL LAI sAI AGAFL LAI sAI AGAFL LAI sAI AGAFL LAI sAI AGAFL LAI sAI AGAFL LAI SAI AGAFL LAI sAI AGAFL LAI sAI AGAFL LAI sAI AGAFL LAI sAI AGAFL LAI SAI AGAFL LAI sAI AGAFL LAI sAI AGAFL LAI sAI AGAFL LAI sAI AGAFL LAI sAI AGAFL LAI sAI AGAFL LAI sAI AGA FL LAI sAI AGA FL LAI sAI AGA FL LAI sAI AGA FL LAI sAI AGA FL LAI sAI AGAFL LAI sAI AGAFL LAI sAI AGAFL LAI sAI AGAFL LAI sAI AGAFL LAI sAI AGAFL LAI sAI AGAFL LAI SAI AGAFL LAI sAI AGAFL LAI sAI AGAFL LAI sAI AGAFL LAI SAI AGAFL LAI SAI AGAFL LAI sAI AGAFL LAI sAI AGAFL LAI sAI AGAFL LAI sAI AGAFL LAI sAI AGAFL LAI sAI AGAFL LAI sAI AGA FL LAI sAI AGA FL LAI sAI AGA FL LAI sAI AGA FL LAI sAI AGAFL LAI sAI AGA FL LAI sAI AGAFL LAI sAI AGAFL LAI sAI AGAFL LAI sAI AGAFL LAI sAI AGAFL LAI sAI AGAFL LAI SAI AGAFL LAI sAI AGAFL LAI sAI AGAFL LAI sAI AGAFL LAI sAI AGAFL LAI sAI AGAFL LAI SAI AGAFL LAI sAI AGAFL LAI sAI AGAFL LAI sAI AGAFL LAI sAI AGAFL LAI sAI AGAFL LAI sAI AGA FL LAI sAI AGA FL LAI sAI AGA FL LAI sAI AGA FL LAI sAI AGA FL LAI sAI AGA FL LAI sAI AGAFL LAI sAI AGAFL LAI sAI AGAFL LAI sAI AGAFL LAI sAI AGAFL LAI sAI AGAFL LAI SAI AGAFL LAI sAI AGAFL LAI sAI AGAFL LAI sAI AGAFL LAI sAI AGAFL LAI SAI AGAFL LAI SAI AGAFL LAI sAI AGAFL LAI sAI AGAFL LAI sAI AGAFL LAI sAI AGAFL LAI sAI AGAFL LAI sAI AGA FL LAI sAI AGA FL LAI sAI AGA FL LAI sAI AGA FL LAI sAI AGA FL LAI sAI AGAFL LAI sAI AGA FL LAI sAI AGAFL LAI sAI AGAFL LAI sAI AGAFL LAI sAI AGAFL LAI sAI AGAFL LAI SAI AGAFL LAI sAI AGAFL LAI sAI AGAFL LAI sAI AGAFL LAI sAI AGAFL LAI sAI AGAFL LAI sAI AGAFL LAI SAI AGAFL LAI sAI AGAFL LAI sAI AGAFL LAI sAI AGAFL LAI sAI AGAFL LAI sAI AGA FL LAI sAI AGA FL LAI sAI AGA FL LAI sAI AGA FL LAI sAI AGA FL LAI sAI AGA FL LAI sAI AGA FL LAI sAI AGAFL LAI sAI AGAFL LAI sAI AGAFL LAI sAI AGAFL LAI sAI AGAFL LAI SAI AGAFL LAI sAI AGAFL LAI sAI AGAFL LAI sAI AGAFL LAI sAI AGAFL LAI sAI AGAFL LAI SAI AGAFL LAI SAI AGAFL LAI sAI AGAFL LAI sAI AGAFL LAI sAI AGAFL LAI sAI AGAFL LAI sAI AGA FL LAI sAI AGA FL LAI sAI AGA FL LAI sAI AGA FL LAI sAI AGA FL LAI sAI AGA FL LAI sAI AGAFL LAI sAI AGA FL LAI sAI AGAFL LAI sAI AGAFL LAI sAI AGAFL LAI sAI AGAFL LAI SAI AGAFL LAI sAI AGAFL LAI sAI AGAFL LAI sAI AGAFL LAI sAI AGAFL LAI sAI AGAFL LAI sAI AGAFL LAI sAI AGAFL LAI SAI AGAFL LAI sAI AGAFL LAI sAI AGAFL LAI sAI AGAFL LAI sAI AGA FL LAI sAI AGA FL LAI sAI AGA FL LAI sAI AGA FL LAI sAI AGA FL LAI sAI AGA FL LAI sAI AGA FL LAI sAI AGA FL LAI sAI AGAFL LAI sAI AGAFL LAI sAI AGAFL LAI sAI AGAFL LAI SAI AGAFL LAI sAI AGAFL LAI sAI AGAFL LAI sAI AGAFL LAI sAI AGAFL LAI sAI AGAFL LAI sAI AGAFL LAI SAI AGAFL LAI SAI AGAFL LAI sAI AGAFL LAI sAI AGAFL LAI sAI AGAFL LAI sAI AGA FL LAI sAI AGA FL LAI sAI AGA FL LAI sAI AGA FL LAI sAI AGA FL LAI sAI AGA FL LAI sAI AGA FL LAI sAI AGAFL LAI sAI AGA FL LAI sAI AGAFL LAI sAI AGAFL LAI sAI AGAFL LAI SAI AGAFL LAI sAI AGAFL LAI sAI AGAFL LAI sAI AGAFL LAI sAI AGAFL LAI sAI AGAFL LAI sAI AGAFL LAI sAI AGAFL LAI sAI AGAFL LAI SAI AGAFL LAI sAI AGAFL LAI sAI AGAFL LAI sAI AGA FL LAI sAI AGA FL LAI sAI AGA FL LAI sAI AGA FL LAI sAI AGA FL LAI sAI AGA FL LAI sAI AGA FL LAI sAI AGA FL LAI sAI AGA FL LAI sAI AGAFL LAI sAUAG A LALAG A LALAG A LALAG A LALAG A LALAG A LALAG A LALAG A LALAG A LALAG A LALAG A LALAG A LALAG A LALAG A LALAG A LALAG A LALAG A LALAG A LALAG A LALAG A LALAG A LALA LALA LALA LALA LALA LALA LALA LALA LALA LALA LALA LALA LALA LALA LALA LALA LALA LALA LALA LALA LALA LALA LALA LALA LALA LALA LALA LALA LALA LALA LALA LALA LALA LALA | |
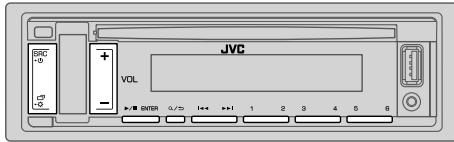
aLs aJyfo FM aoo ooo oo oo oo oo oo oo oo oo oo oo oo oo oo oo oo oo oo oo oo oo oo oo oo oo oo oo oo oo oo oo oo oo oo oo oo oo oo oo oo oo oo oo oo oo oo oo oo oo oo oo oo oo oo oo oo oo oo oo oo oo oo oo oo oo oo oo oo oo oo oo oo oo oo oo oo oo oo oo oo oo oo oo oo oo oo oo oo oo oo oo oo oo oo oo oo oo oo oo oo oo
aboojoc
SW2 g1 SW1 g1 AM g1 FM 1 1 1 1 1 1 1 1 1 1 1 1 1 1 1 1 1 1 1 1 1 1 1 1 1 1 1 1 1 1 1 1 1 1 1 1 1 1 1 1 1 1 1 1 1 1 1 1 1 1 2
y
.SW2/SW1/AM aJgol 6f FM aJgol abn 18 Jl J Loo
absoo 15aolwsl
(6 1 0) aai j 1j 1j 1j 1j 1j 1j 1j 1j 1j 1j 1j 1j 1j 1j 1j 1j 1j
.PRESET MODE" IENTER 已 _ 1 ^ 一 VOL+/-2 1
IENTER
aijioafoj
(6 1n) A L L n pLj jnnn nn nnnn (g)
a/b 指数
I/IIENTER 2VOL+/-12
| CLOCK | |
| plassthewly l'aliell alclll cag baccar ON pallai y alall Clock Time (CT) cabbll sall OFF : FM Radio Data System baccar ailll OFF : | TIME SYNC |
| ailll alll alll alll alll cag gaccar ON sall Off : alallb oall l'ollic cag | CLOCK DISPLAY |
| cloglalq alq alll alll alll alll jali gacbbll alll alll cals l l ENGLISH | ENGLISH |
| ESPANOL | |
aWwJ1 cJb

1
2
-ENTER
3
4
Q/2 1c bcl 1 1 1 1 1 1 1 1 1 1 1 1
XX:
| SYSTEM | |
| (.(العاني 3 مصحيى نهير بعس ورطمن للاويات الحرفية بعس بعس بعس بعس بعس بعس بعس بعس بعس بعس بعس بعس بعس بعس بعس بعس بعس بعس بعس بعس بعس بعس بعس بعس بعس بعس بعس بعس بعس بعس بعس بعس بعس بعس b. | KEY BEEP |
| SOURCE SELECT | |
| (5 ⇌).مبيعة : OFF : محيى AM نهير ON | AM SRC* |
| (5 ⇌).مبيعة : OFF : محيى SW1 نهير ON | SW1 SRC* |
| (5 ⇌).مبيعة : OFF : محيى SW2 نهير ON | SW2 SRC* |
| (9 ⇌).مبيعة : OFF : محيى PANDORA نهير ON | PANDORA SRC* |
| (17 ⇌).مبيعة : OFF : محيى AUX نهير ON | BUILT-IN AUX* |
| F/W UPDATE | |
| UPDATE SYSTEM | |
| (العاني نهير بعس ورطمن للاويات الحرفية بعس بعس بعس بعس بعس بعس بعس بعس بعس بعس بعس بعس بعس بعس بعس بعس بعس بعس بعس بعس بعس بعس بعس بعس بعس بعس بعس بح睜 نهير بعس بعس بعس بعس بعس بعس بعس بعس بعس بعس بعس بعس بعس بعس بعس بعس بعس بعس بعس بعس بعس بعس بعس بعس بعس بعس بعس بعس بعس بعس بعس بعس بعس-b. | F/W UP xxxxx |
| . | . |
| . | FACTORY RESET |
| . | FACTORY RESET |
jblll jaoai laoic 8

JwWgAolac
(1
iLl [YES] [FACTORY RESET] 1000000000 "PRESS ENTER" "CANCEL DEMO"
IENTER 1
[YES]
11ENTER 2 DEMO OFF
jgl jclwJ
(2)
1
1
2
acwll b
. / / ENTER [CLOCK ADJUST] VOL+/-
/IIENTER 已 1 已 1 已 1 已 1 已 1 已 1 已 1 已 1 已 1 已 1
aLw
.1/IIENTER [CLOCK FORMAT]VOL+/- 5
.ENTER [24H] [12H] VOL+/-
中
.ⅡIENTER [DATE SET] VOL+/- 7
/IITERERVOL+/-8
4.1w←g-(p)
9
A/21 1
(RM-RK52)
Jc Jc Ksll WwL (jLwI wWgJw
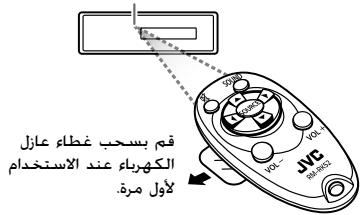
j4 = j + 1j2 = 19
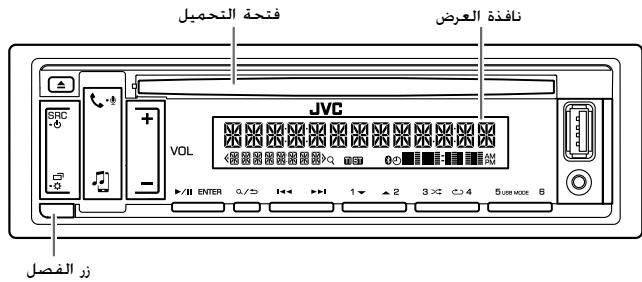
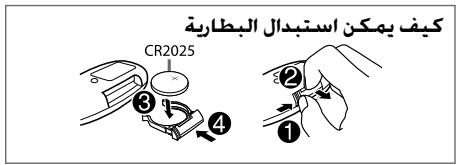

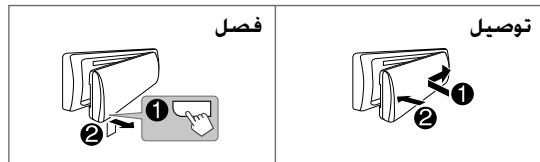
j/aliac aie jiae ayaiyaiyaiyaiyai yaiyaiyaiyaiyaiyaiyaiyaiyaiyaiyaiyaiyaiyaiyaiyaiyaiyaiyaiyaiyaiyaiyaiyaiyaiyaiyaiyaiyaiyaiyaiyaiyaiyaiyaiyaiyaiyaiyaiyaiyaiyaiyaiyaiyaiyaiyaiyaiyaiyaiyai
#
A
:
gall jn no kai g yjlll gl cagllg Lau LL bui bui gssuus u