
GRD10GFBC - Electric grill GEORGE FOREMAN - Free user manual and instructions
Find the device manual for free GRD10GFBC GEORGE FOREMAN in PDF.

| Product type | Electric grill |
| Brand | GEORGE FOREMAN |
| Model | GRD10GFBC |
| Power supply | 120 V AC, 60 Hz, grounded outlet |
| Temperature range | 125°C to 200°C (250°F to 400°F) |
| Cooking surface | Non-stick plate, large capacity |
| Drip tray | Removable with handle, to collect grease |
| Temperature control | Detachable, part no. 22795, with heating indicator light |
| Spatula | Plastic, part no. 20493, suitable for non-stick surfaces |
| Power cord | Short (approx. 60 cm), for safety |
| Use | Household only, indoors |
| Cleaning | Plate hand wash with warm soapy water; tray and spatula dishwasher safe (top rack) |
| Maintenance | Wipe the control with a damp cloth, do not immerse |
| Safety | Hot surfaces, do not leave unattended, short cord, grounded plug |
| Replacement parts available | Temperature control (22795), drip tray (22794), spatula (20493) |
| Warranty | 2 years, covering defects in material and workmanship |
| Customer service | 1-800-231-9786 (USA/Canada); accessories: 1-800-738-0245 |
| Country of manufacture | People's Republic of China |
Frequently Asked Questions - GRD10GFBC GEORGE FOREMAN
User questions about GRD10GFBC GEORGE FOREMAN
0 question about this device. Answer the ones you know or ask your own.
Ask a new question about this device
Download the instructions for your Electric grill in PDF format for free! Find your manual GRD10GFBC - GEORGE FOREMAN and take your electronic device back in hand. On this page are published all the documents necessary for the use of your device. GRD10GFBC by GEORGE FOREMAN.
USER MANUAL GRD10GFBC GEORGE FOREMAN
Please Read and Save this Use and Care Book
Accessories/Parts (USA / Canada)
When using electrical appliances, basic safety precautions should always be followed, including the following:
Read all instructions.
- Do not touch hot surfaces. Use handles or knobs.
To protect against electric shock do not immerse cord, plugs or temperature control probe in water or other liquid.
- Close supervision is necessary when any appliance is used by or near children.
- Unplug from outlet when not in use and before cleaning. Allow to cool before putting on or taking off parts, and before cleaning the appliance.
- Do not operate any appliance with a damaged cord or plug, or after the appliance malfunctions or has been damaged in any manner. Return appliance to the nearest authorized service facility for examination, repair or adjustment. Or, call the appropriate toll-free number on the cover of this manual.
The use of accessory attachments not recommended by the appliance manufacturer may cause injuries.
Do not use outdoors.
- Do not let cord hang over edge of table or counter, or touch hot surfaces.
Do not place on or near a hot gas or electric burner, or in a heated oven.
Extreme caution must be used when moving an appliance containing hot oil or other hot liquids.
Always attach temperature control probe to appliance first, then plug cord into the wall outlet. To disconnect, turn any control to OFF, then remove plug from wall outlet.
Do not use appliance for other than intended use
SAVE THESE INSTRUCTIONS.
This product is for household use only.
ADDITIONAL IMPORTANT SAFEGUARDS
Caution! Hot Surfaces: This appliance generates heat and escaping steam during use. Proper precautions must be taken to prevent the risk of burns, fires or other injury to persons or damage to property.
Caution: This appliance is hot during operation and retains heat for some time after turning off. Always use oven mitts when handling hot materials and allow metal parts to cool before cleaning. Do not place anything on top of the appliance while it is operating or while it is hot.
- All users of this appliance must read and understand this Use & Care Manual before operating or cleaning the appliance.
- The cord to this appliance should be plugged into a 120V AC electrical outlet only.
- If this appliance begins to malfunction during use, immediately unplug cord from outlet. Do not use or attempt to repair the malfunctioning appliance.
- Do not leave this appliance unattended during use.
- When using this appliance, provide adequate air space above and on all sides for air circulation. Do not allow this appliance to touch curtains, wall coverings, clothing, dish towels or other flammable materials during use.
Caution: The temperature control probe is designed to yield precise results. Use care not to drop, hit, or impact it against hard surfaces. Never pull on the cord of the temperature control probe. Always grip the body of the temperature control probe when handling.
GROUNDED PLUG
As a safety feature, this product is equipped with a grounded plug, which will only fit into a three-prong outlet. Do not attempt to defeat this safety feature. Improper connection of the grounding conductor may result in the risk of electric shock. Consult a qualified electrician if you are in doubt as to whether the outlet is properly grounded.
ELECTRICAL CORD
a) A short power-supply cord is to be provided to reduce the risk resulting from becoming entangled in or tripping over a longer cord.
b) Longer extension cords are available and may be used if care is exercised in their use.
c) If an extension cord is used,
1) The marked electrical rating of the cord set or extension cord should be at least as great as the electrical rating of the appliance, and
2) The cord should be arranged so that it will not drape over the countertop or tabletop where it can be pulled on by children or tripped over unintentionally.
3) If the appliance is of the grounded type, the extension cord should be a grounding-type 3-wire cord.
TAMPER-RESISTANT SCREW
Warning: This appliance is equipped with a tamper-resistant screw to prevent removal of the outer cover. To reduce the risk of fire or electric shock, do not attempt to remove the outer cover. There are no user-serviceable parts inside. Repair should be done only by authorized service personnel.
Note: If the power supply cord is damaged, it should be replaced by qualified personnel or in Latin America by an authorized service center.
Product may vary slightly from what is illustrated.
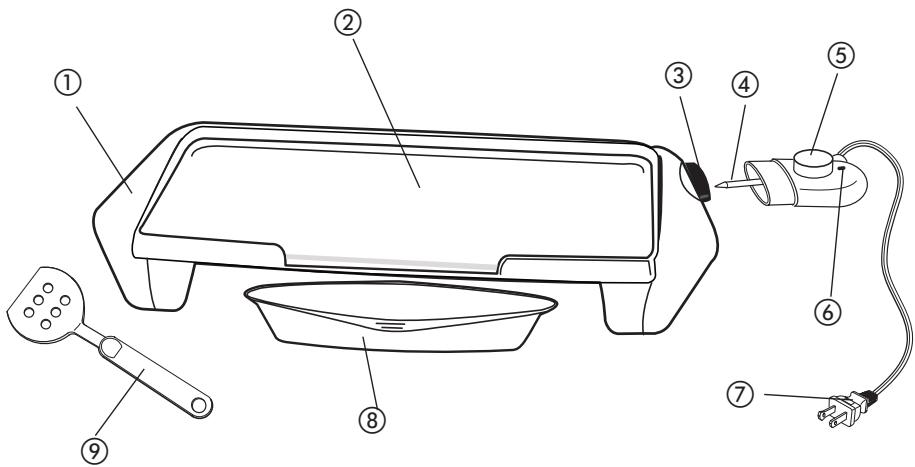
- Cool Touch Handle (both sides)
- Griddle Plate
- Probe Receptacle
† 4. Temperature Control Probe (Part # 22795)
5. Temperature Control Knob
6. Power-On Light
7. Power Cord
† 8. Drip Tray (Part # 22974)
† 9. Plastic Spatula (Part # 20493)
Note: t indicates consumer replaceable/removable parts
How to Use:
This product is for household use only.
GETTING STARTED
- Remove all packing material and any stickers.
- Remove and save literature.
- Wash all removable parts as instructed in CARE AND CLEANING section of this manual.
- Wipe cooking surface with a damp cloth or sponge to remove any dust. Wipe dry with a soft cloth or paper towel.
- Select location where unit is to be used, leaving enough space between back of unit and wall to allow heat to flow without damage to cabinets and walls.
USING YOUR GRIDDLE
- Before using this appliance for the first time, clean griddle as outlined in CARE AND CLEANING.
- Slide drip tray beneath the front of the unit with handle facing out.
- To preheat: Turn the temperature control knob to Off. Insert the temperature control probe fully into the probe receptacle. Plug the cord into a 120V AC outlet. The variable temperature control allows you to cook at a specific heat setting, 200^ - 400^ (95^ - 200^) . Align selected temperature with the preheat indicator light. As the griddle is heating, the preheat indicator light turns on and it will remain ON until the set temperature has been reached.
Note: Preheat indicator light will cycle on and off, as needed, to maintain the set temperature.
- Allow griddle to preheat except where noted on the Cooking Chart. The preheat time will vary, depending on the heat setting you have selected. The higher the heat setting, the longer the preheat time.
- Carefully place items to be cooked on the griddle.
- Allow food to cook, turning halfway through cooking time, if needed.
Important: Do not leave appliance unattended during use!
- When finished cooking, turn the temperature control knob to Off. Disconnect plug from wall outlet.
- Remove food using the plastic spatula. Be sure to always use either silicone, plastic or wooden utensils so as not to scratch the nonstick surface. Never use metal tongs, forks or knives as these can damage the coating on the griddle plate.
- Let appliance cool completely. When cool, the drip tray may be removed and emptied.
Important: Be sure liquid has cooled before removing drip tray.
COOKING CHART
The following times are meant to be used as guidelines only. Times will vary due to the cut or thickness of the meat being cooked. To be sure that the food is truly done, use a cooking thermometer.
| Food | Temperature | Time | Directions |
| Bacon | 325°F / 165°C | 8 – 16 min. | DO NOT PREHEAT. Turn often. |
| Eggs | 350°F / 180°C | 2 – 4 min. | Turn halfway through cooking |
| Fish steaks, 1” (2.5 cm) thick | 400°F / 200°C | 10 – 16 min. | Turn halfway through cooking |
| French toast | 350°F / 180°C | 6 – 12 min. | Turn halfway through cooking |
| Hamburger | 350°F / 180°C | 6 – 18 min. | Turn halfway through cooking |
| Ham slices | 350°F / 180°C | 15 – 20 min. | Turn halfway through cooking |
| Pancakes | 375°F / 190°C | 3 – 6 min. | Pour batter onto griddle. When bubbles appear on top side, turn |
| Pork chops, 1½” (1.25 cm) thick | 350°F / 180°C | 6 – 10 min. | Brown both sides, then reduce temp to 325°F (165°C). Turn halfway through remaining cooking time |
| Sandwiches | 350°F / 180°C | 5 – 8 min. | Butter outside and brown both sides |
| Sausage | 325°F / 165°C | 15 – 20 min. | DO NOT PREHEAT. Turn often. |
| Steaks, 3¼” (2 cm) thick | 400°F / 200°C | Rare: 6 – 11 min. Med: 9 – 16 min. Well: 15 – 22 min. | Turn halfway through cooking time |
Please note: To be sure your food is fully cooked the USDA recommends the following guidelines. Use a meat thermometer to test for doneness by inserting the meat thermometer into the center of the food being cooked and make sure the thermometer is not touching the bone or griddle plate.
| FOOD TO BE COoked | MEDIUM | WELL DONE OR FULLY COoked |
| Chicken Breast | 170°F 77°C | |
| Chicken Thigh | 180°F 82°C | |
| Beef / Lamb / Veal | 160°F 71°F | 170°F 77°C |
| Pork | 160°F 71°C | |
| Reheated cooked meats and poultry | 165°F 74°C |
COOKING HINTS AND TIPS
Use tender cuts of meat.
- Marinate tougher cuts of meat to tenderize them before cooking.
- To avoid drying out meat and fish, do not pierce with a utensil.
- Better cooking results will be achieved with boneless cuts of meat, chicken and fish.
- Cut edge of meat in several places to prevent curling.
- When cooking fish or chicken breast fillets, tuck extremely thin parts under to prevent overcooking.
- If cooking more than one item, select foods of even thickness. This will promote consistent doneness and appearance.
- When cooking small portions, make sure meat is centered on griddle. When cooking larger portions, distribute evenly and allow 1 inch of space between foods to promote uniform cooking.
- Some foods such as eggs and pancakes cook better if the nonstick surface is conditioned with vegetable shortening before preheating. If necessary, remove excess oil with a paper towel.
- Adjust heat setting gradually and only as necessary. Cooking foods at too high a temperature can cause them to dry out.
- If food is undercooked when removed from griddle, simply return to griddle for additional cooking time.
Care and Cleaning
This product contains no user serviceable parts. Refer service to qualified service personnel.
CLEANING
Warning: To avoid electric shock, unplug from outlet when not in use and before cleaning. Do not immerse temperature control probe, cord or plug in water or other liquid. Caution: To avoid accidental burns, allow griddle to cool thoroughly before cleaning.
- Before cleaning, turn the temperature control knob to Off and unplug from the wall outlet. Remove temperature control probe, wipe with a damp cloth and dry thoroughly.
- Place drip tray under front of griddle with the handle facing out. Using the spatula, scrape off any excess fat and food particles.
- Empty the drip tray.
- Wash griddle, drip tray and spatula in warm soapy water; rinse and dry thoroughly.
Caution: temperature control probe and probe receptacle must always be completely dry before use. The drip tray and plastic spatula may be washed in the dishwasher, top-rack only. Do not wash griddle in the dishwasher.
5. Stubborn Build-up: If necessary, use a nonmetallic scrubbing pad to clean the griddle. Do not use steel wool, scouring pads or abrasive cleaners on any part of the appliance.
STORAGE
Unplug unit, allow to cool and clean before storing. Store in a clean, dry place. Never store griddle while it is hot or still plugged in. Never wrap cord tightly around the appliance, as this could cause the cord to fray and break.
RECIPES
QUICK AND EASY PORK TENDERLOINS
8 boneless pork tenderloins, 12 inch (1.25 cm) thick
14 cup (60 ml) low sodium soy sauce
1 / 2 tbsp. (7.5 ml) ground ginger
1 clove garlic, chopped
14 tsp. (1 ml) black pepper
- Preheat griddle on 350^ / 180^ for 10 minutes.
- Remove all visible fat from pork.
- Combine soy sauce, ginger, garlic and pepper in a flat glass pan.
- Dip each tenderloin into soy ginger sauce and place onto the hot griddle.
- Grill for 3-4 minutes, turn over and continue grilling another 3-4 minutes or until done according to your preference.
Serves 4-8
THE CLASSIC RUBEN
12 slices rye bread
34 lb. (340g) deli corned beef, thinly sliced
112 cups (355 ml) sauerkraut, rinsed and well drained
6 slices Swiss cheese
1/3 cup (80ml) butter, softened
12 cup (120 ml) Thousand Island dressing
14 cup (60 ml) catsup
Salt and pepper to taste
1. Preheat griddle on 350^ / 180^ for 10 minutes.
2. Brush each bread slice with butter on one side only.
3. Season sauerkraut with salt and pepper and mix catsup with Thousand Island dressing.
4. Spread dressing equally over non-buttered sides of bread. Place slices of bread (buttered side down) onto the griddle.
5. Top each slice with corned beef, sauerkraut and a cheese slice.
6. Top each sandwich with another slice of bread (buttered side up).
7. Grill for 4 - 5 minutes or until golden brown, flip sandwich over and continue to grill another 4 - 5 minutes or until golden brown.
Serves 6
ENGLISH MUFFINS WITH CANADIAN BACON, EGG AND CHEESE
2 English muffins
4 slices Canadian bacon, 3'' (8 cm) diameter
1/3 cup (80 ml) Egg Beaters®
4 slices sharp cheddar cheese
Butter, softened
Salt and pepper
- Preheat griddle on 350^ / 180^ for 10 minutes.
- Spread butter on cut side of English muffins. Place butter side down on griddle.
- Add Canadian bacon slices.
- Drop 12 tsp. (2.5 ml) of butter on the griddle and pour Egg Beaters® on top of the butter. Add salt and pepper to taste.
- Turn Canadian bacon over and top with cheese slices.
- Turn eggs over after they have set.
- When egg is done and cheese is soft, turn over English muffin, top with Canadian bacon, cheese side down and then add egg.
Serves 2-4
IMPORTANT CONSIGNES DE SECURITÉ
For service, repair or any questions regarding your appliance, call the appropriate 800 number on the cover of this book. DO NOT return the product to the place of purchase. Also, please DO NOT mail product back to the manufacturer, nor bring it to a service center. You may also want to consult the website listed on the cover of this manual.
Two-Year Limited Warranty
(Applies only in the United States and Canada)
What does it cover?
- Any defect in material or workmanship provided; however, Applica's liability will not exceed the purchase price of the product.
For how long?
- Two years after the date of original purchase.
What will we do to help you?
- Provide you with a reasonably similar replacement product that is either new or factory refurbished.
How do you get service?
- Save your receipt as proof of date of sale.
- Check our on-line service site at www.prodprotect.com/applica, or call our toll-free number, 1-800-231-9786, for general warranty service.
- If you need parts or accessories, please call 1-800-738-0245.
What does your warranty not cover?
- Damage from commercial use
- Damage from misuse, abuse or neglect
- Products that have been modified in any way
- Products used or serviced outside the country of purchase
Glass parts and other accessory items that are packed with the unit - Shipping and handling costs associated with the replacement of the unit
- Consequential or incidental damages (Please note, however, that some states do not allow the exclusion or limitation of consequential or incidental damages, so this limitation may not apply to you.)
How does state law relate to this warranty?
- This warranty gives you specific legal rights, and you may also have other rights that vary from state to state or province to province.
BESOIN D'AIDE?
Applica Consumer Products, Inc.
2009/5-12-74E/F
Copyright © 2009 Applica Consumer Products, Inc.
Made in People's Republic of China
Printed in People's Republic of China

- SAVE THESE INSTRUCTIONS.
- ADDITIONAL IMPORTANT SAFEGUARDS
- GROUNDED PLUG
- ELECTRICAL CORD
- TAMPER-RESISTANT SCREW
- Product may vary slightly from what is illustrated.
- How to Use:
- GETTING STARTED
- USING YOUR GRIDDLE
- Important: Do not leave appliance unattended during use!
- COOKING CHART
- COOKING HINTS AND TIPS
- Care and Cleaning
- CLEANING
- STORAGE
- RECIPES
- QUICK AND EASY PORK TENDERLOINS
- THE CLASSIC RUBEN
- ENGLISH MUFFINS WITH CANADIAN BACON, EGG AND CHEESE
- IMPORTANT CONSIGNES DE SECURITÉ
- Two-Year Limited Warranty
- (Applies only in the United States and Canada)
- What does it cover?
- For how long?
- What will we do to help you?
- How do you get service?
- What does your warranty not cover?
- How does state law relate to this warranty?
- BESOIN D'AIDE?
Brand : GEORGE FOREMAN
Model : GRD10GFBC
Category : Electric grill