I100 - Bluetooth speaker SCANSONIC - Free user manual and instructions
Find the device manual for free I100 SCANSONIC in PDF.
| Product Type | Bluetooth Speaker |
| Brand | SCANSONIC |
| Model | I100 |
| Dimensions (L x W x H) | 200 x 100 x 80 mm |
| Weight | 500 g |
| Power Supply | Rechargeable lithium-ion battery, 5V DC power adapter |
| Battery Life | Up to 8 hours |
| Bluetooth Version | 5.0 |
| Bluetooth Range | 10 meters |
| Speakers | 2 x 5W (stereo) |
| Frequency Response | 100 Hz - 20 kHz |
| Inputs | Bluetooth, 3.5 mm auxiliary socket, USB charging port |
| Main Functions | Bluetooth playback, hands-free mode, volume controls, play/pause, track skip |
| Care and Cleaning | Wipe with a soft, dry cloth. Do not use abrasive products. Avoid moisture. |
| Safety | Do not expose to water or extreme temperatures. Disconnect during thunderstorms. |
| Spare Parts and Repairability | Internal battery replaceable by a professional. No spare parts available at retail. |
| General Information | Indoor and outdoor use (not waterproof). Compatible with all Bluetooth devices. |
Frequently Asked Questions - I100 SCANSONIC
User questions about I100 SCANSONIC
0 question about this device. Answer the ones you know or ask your own.
Ask a new question about this device
Download the instructions for your Bluetooth speaker in PDF format for free! Find your manual I100 - SCANSONIC and take your electronic device back in hand. On this page are published all the documents necessary for the use of your device. I100 by SCANSONIC.
USER MANUAL I100 SCANSONIC
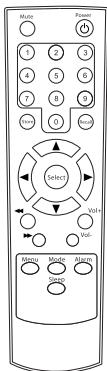
- Power: Enter the standby mode
- Mute: Volume turn off
3.0-9: Present number 1-10 - Recall: Recall Preset Station
- Store: Add the current station to my favorite
- Select: Item selected
7.▲:Up
8.▼:Down - Back
10.▶:Forward - 一 _ 1 Next
- : Previous
- Vol +: Volume up
- Vol : Volume down
- Menu: Back to Main Menu
16.Mode:Shift play mode - Alarm: Alarm setting
- Sleep: Sleep Timer

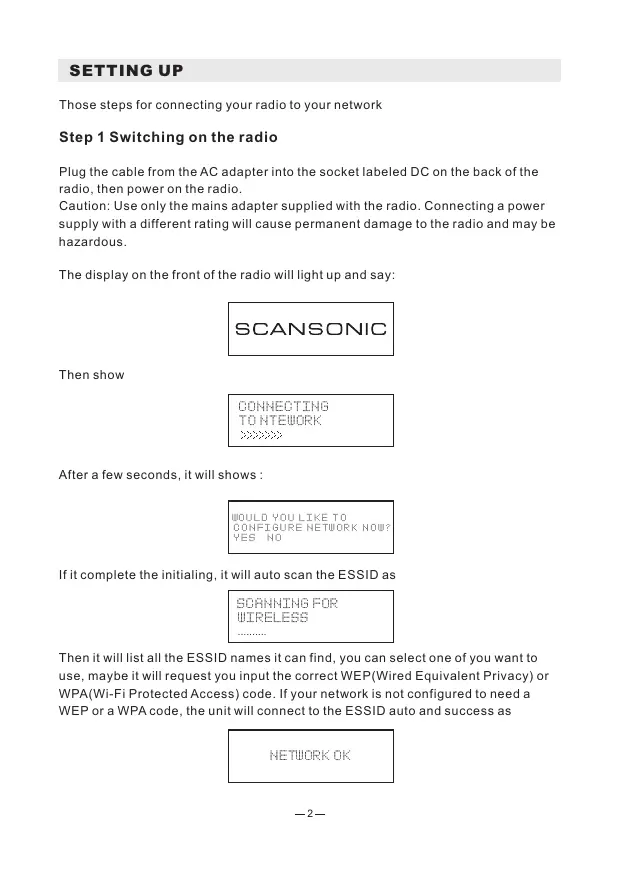
Those steps for connecting your radio to your network
Step 1 Switching on the radio
Plug the cable from the AC adapter into the socket labeled DC on the back of the radio, then power on the radio.
Caution: Use only the mains adapter supplied with the radio. Connecting a power supply with a different rating will cause permanent damage to the radio and may be hazardous.
The display on the front of the radio will light up and say:
SCANSONIC
Then show
CONNECTING TO NTEWORK
After a few seconds, it will shows:
WOULD YOU LIKE TO CONFIGURE NETWORK NOW? YES NO
If it complete the initialing, it will auto scan the ESSID as
SCANNING FOR WIRELESS
Then it will list all the ESSID names it can find, you can select one of you want to use, maybe it will request you input the correct WEP(Wired Equivalent Privacy) or WPA(Wi-Fi Protected Access) code. If your network is not configured to need a WEP or a WPA code, the unit will connect to the ESSID auto and success as
NETWORK OK
Or if you are requested to input the encryption, you can do as below
- Select the one you want to use
- Then it will show you

Note: The encryption code would have been set up by the person who set up and configured your network.
After 3 seconds the display goes into the code entry mode or press "enter".
Please refer to the 1.2.5 to know clear of the "Remote control character list" for you to enter the passwords. Press "▶" button to go to the next word, press "▲" button to delete the wrong word you have entered.
- If you complete the key then you can use "Enter" to confirm. The display shows "Connect WIFI" as the radio connects to the network.
CONNECTING TO NETWORK
- If the connecting is OK, it will show you
MY MEDIAU INTERNET RADIO MEDIA CENTER
1. FUNCTION
1.1 My mediaU
Description: You can login the website: http://www.mediyou.net and play My mediaU list.
Function Indication:
1.Preparation for media U use:
[1]Register from the website and login with your Use Account and passwords.
[2]Set the series numberXXXXXX of i100 on the website when you register my mediaU
[3] After setting, you can enter My mediaU without Use Account and passwords.
2.You can read the mediaU list from this website and play it as well.
3. If you register many Use Accounts of mediaU with a same series numberXXXXXX, you can go to the 'Setup' and enter 'My mediaU Management' and select a default one for your login.
Remark: If the Internet network is not availabel, please use the function later.
1.2 Internet Radio
1.2.1 My Favorite
Description: This is to store your favorite stations for 250 stations.
Function Indication: (You can modify the favorite folder)
I. Press "▶" into modify
- Delete
Remark: Stop the presetting radio station playing and delete. - Location shift (up, down)
Remark: Stop the presetting radio station playing and modify the location shift. - Rename (Max> = 40)
Remark: If the character is empty or space, you can press "Enter" button without store and remain on "Add to new station" - Playing
1.2.2 Internet Radio/Music
Description: List of Internet Radio
Function Indication: (You can modify the internet radio list)
i. Press"▶"into modify
- Add into my favorite
i. press 'STORE' from the remote control to store the currently station into my favorite.
ii. You can enter the Internet Radio menu and select "Add into my favorite" and press "SELECT" button to confirm the store.
2.Auto Scan
(playing every station from the currently list for your review.)
Remark: Cycle playing all stations again and again.
Press 'SELECT' to stop station scanning and keep playing the currently one.
- Playing
1.2.3 Recent History
Description: You can read 10 maximum recent history of internet radio list
Function Indication: (You can modify the recent history list)
Same as 1.2.2 Internet Radio/Music - Function indication
1.2.4 Service-Search Radio Station
Description: Array the radio station by letters so that the user can search them easily.
Function Indication: (You can modify the radio station list)
i. Press into modify
1.Add to my favorite
Remark: Same as 1.2.2-1
2.Auto Scan
Remark: Same as 1.2.2-2
3.Play
Remark: Same as 1.2.2-3
1.2.5 Service-Add New Radio Station
Description: You can input a new link address by yourself and add to my favorite.
250 words maximum
Remote control character list
Key "0"——0, 'DEL'
Key "1"--'1'->'@'->' (space) ->'!' ->'' (double quotes) -> '#' -
$$ \begin{array}{l} > ^ {\prime} \mathbb {S} ^ {\prime} - > ^ {\prime} \% ^ {\prime} - > ^ {\prime} \& ^ {\prime} - > ^ {\prime \prime} (\text {s i n g l e q u o t e s}) - > ^ {\prime} (^ {\prime} - > ^ {\prime}) ^ {\prime} - > ^ {\prime \prime} - > ^ {\prime} + - > ^ {\prime}, ^ {\prime} - > ^ {\prime} - > \ ! ^ {\prime} - > ^ {\prime} / ^ {\prime} - > ^ {\prime} / ^ {\prime} - > ^ {\prime} / ^ {\prime} - > ^ {\prime} - > ^ {\prime} / ^ {\prime} - > ^ {\prime} / ^ {\prime} - > ^ {\prime} / ^ {\prime} - > ^ {\prime} / ^ {\prime} - > ^ {\prime} / ^ {\prime} - > ^ {\prime} / ^ {\prime} - > ^ {\prime} / ^ {\prime} - > ^ {\prime} / ^ {\prime} - > ^ {\prime} / ^ {\prime} - > ^ {\prime} / \ > ^ {\prime} ] ^ {\prime} \rightarrow^ {\prime} \sim^ {\prime} \ \end{array} $$
Key "2" —— 2, A, B, C, a, b, c
Key "3" —— 3, D, E, F, d, e, f
Key "4" —— 4, G, H, I, g, h, i
Key "5" —— 5, J, K, L, j, k, l
Key "6"——6, M, N, O, m, n, o
Key "7" 7, P, Q, R, S, p, q, r, s
Key "8" 8, T, U, V, t, u, v
Key "9" —— 9, W, X, Y, Z, w, x, y, z
Remark: press '▶' into next character and press 'Enter' button to confirm. Quit the store if the character is empty / space and remain on the status of 'Add new radio station'.
1.3 Media Center
1.3.1UPNP
Description: Visit the shared folder from your PC
1.4 Information Center
1.4.1 Weather
Description: You can learn the weather forecast all over the world. Function Indication:
- Add to Standby Display
- "Currently Date & Time" and "Currently Weather" will be on alternation display every 10 seconds under the standby mode if the weather forecast display is started.
1.4.2 Financial Information
Description: You can learn the information of Stock Market all over the world
1.4.3 System Information
Description: You can learn the information of Version / Wlan Mac / Ip address.
1.5 Configuration
1.5.1 Configuration-Internet
1.5.1.1 Wireless Setting
Description: Setting WiFi to Enable or Disable.
Function Indication:
- Select "Enable" and connect to the AP which you wish from "WIFI AP List"
- Passwords required on WEP/WPA if the AP is with protect code which is 30 words maximum; You can access network directly if it's without any passwords
Remark: 1) When you enter this menu, it will remain on the previous option.
1.5.1.2 WiFi IP Property
Description: WIFI IP setting
Function Indication:
- You can select 'Auto setting' / 'Manual setting'
- When you select 'Manual setting', you need to do the setting as following steps:
Step1: IP Address setting
Step2: Subnet Mask setting
Step3: Default Gateway setting
Step4: Preferred DNS Server setting
Step5: Alternate DNS Server setting
Remark: It will be turned into a required screen:" Quit the setting or not" when any key will be skipped, and you can select "Yes" for exit and "No" for back to the previous step.
Remark: 1) When you enter this menu, it will remain on the previous option.
1.5.2 Configuration-Date & Time
1.5.2.1 Date & Time setting
Description: Currently Date & Time setting
Remark: You can press“▲”“▼”buttons for parameter setting, and move cursor with“▲”“▶”buttons and press 'Enter' to confirm.1.5.2.2 Time Format setting
Description: Time format setting: 12hours / 24hours
Remark: When you enter this menu, it will remain on the previous option.
1.5.2.2 Date Format setting
Description: Date format: YY/MM/DD, DD/MM/YY and MM/DD/YY
Remark: When you enter this menu, it will remain on the previous option.
1.5.2.3 Daylight Saving Time (DST)
Description: Daylight Saving Time setting: On / Off Remark: When you enter this menu, it will remain on the previous option.
1.5.2.4 GMT
Description: Set the currently time as GMT
1.6 Configuration—Alarm Clock
Description: Alarm Clock setting, Alarm Clock goes off on the setting time.
Function Indication:
1. Alarm Clock types (3 Alarm Clock setting)
Alarm Clock(1): You can select your favorite Alarm setting for every day
Alarm Clock(2): Same as (1)
Alarm Clock(NAP): You can set a certain time such as 1 hour later/2 hours later/any hours later as you wish from the beginning setting.
2. Alarm Clock NAP types: (one choice only)
Alarm Clock: End the time of NAP Alarm Clock after setting
5minutes(NAP): Alarm Clock goes off after 5 minutes (1 time only)
10minutes(NAP): Alarm Clock goes off after 10 minutes (1 time only)
20minutes(NAP): Alarm Clock goes off after 20 minutes (1 time only)
30minutes(NAP): Alarm Clock goes off after 30 minutes (1 time only)
60minutes(NAP): Alarm Clock goes off after 60 minutes (1 time only)
90minutes(NAP): Alarm Clock goes off after 90 minutes (1 time only)
120minutes(NAP): Alarm Clock goes off after 120 minutes (1 time only)
3. Alarm Sounds setting:
- When the Alarm Clock goes off, press any key except for "Power" button, you can enter the "Snoopze" mode. You can press "Power" button to stop the ringing when the alarm goes off 5 minutes later again.
- You also can set Alarm Clock with 'Alarm' key from remote control.
Remark: You can select any internet station as Alarm tone from the function of internet station.
When the internet station doesn't work in 1 minute, it will auto set into Beep.
1.7 Configuration—Language
Description: Language setting
Function Indication:
1.Language options
2.1.English 2.German 3.Spanish 4.French 5.Portuguese 6.Dutch 7.Italian
8.Russian
1.8 Configuration - Dimmer
Description: Set the Screen Backlight
Function Indication:
1.Power saving
Remark: When the backlight is under the Low-power mode, it will turn into highlight when you press any key, and low-power mode will be Auto started again after 15 seconds without any operation.
- Turn on (Default setting) 20 Levels option of backlight
1.9 Configuration-Sleep Timer
Description: You can set a related time to enter standby mode automatically. Function Indication:
- Options:
1) Off
2) 15minutes
3) 30minutes
4) 60minutes
5) 90minutes
6) 120minutes
7) 150minutes
8) 180minutes
- You also can do the setting with the "Sleep" button from remote control
Remark: When you enter this menu, it will remain on the previous option.
1.10 Configuration-Buffer
Description: Buffer time for internet radio playing
Function Indication:
- Options:
1) 2 seconds (default setting)
2) 4 seconds
3) 8 seconds
Remark: When you enter this menu, it will remain on the previous option.
1.11 Configuration-Weather
Description: You can set the display of weather forecast on the standby mode and the temperature units.
Function Indication:
1.You can select Weather Display On/Off
2.Temperature units:
1) Centigrade (^)
2)Fahrenheit (^)
1.12 Configuration—Factory Reset
Description: You can do this factory reset to empty all of the settings and it comes back to default settings
1) Language: English
2) Tone:15
3) Mute: Off
4) Time format: 12hours
5) Alarm Clock: Off
6) Alarm Clock (1)/(2)Time: 00:00
7) Alarm Sounds(1)/(2)/NAP: Beep
8) Backlight: Turn on
9) Sleep Timer: Off
10) Buffer: 2seconds
11) Weather Display: Off
12) Temperature Unit: Fahrenheit
13) Default Alarm Clock station: Empty
14) Internet Radio Alarm Sounds: Nil
15) Time Zone: hour=0, Min=0
16)WiFi Setup: Disable
17)WiFi DHCP:On
18) WiFi IP Address/ Subnet Mask/Default Gateway/DNS1/2: Empty
19)WiFiESSID,ESSIDPW:Empty
20) Default weather forecast display: Berlin
21) my mediaU Default ID: Empty
Remark: Playing stopped when it comes back to default settings and skip into Language Setting automatically, after that it will turn to the internet setting.
2 Figure Button
Description:
i. Figure button input
ii. When you input the letters, cycle pressing the keys will be the characters as below:
Key 0: '0' -> 'DEL' (Delete button)
Key 1: '1'->'@'->'' (Space) ->'!'->'' (double quotes)
$$ \begin{array}{l} - > ^ {\prime \prime} - > ^ {\prime} \$ ^ {\prime} - > ^ {\prime} \% ^ {\prime} - > ^ {\prime} & ^ {\prime} & ^ {\prime} (\text {s i n g l e q u o t e s}) - > ^ {\prime} \ - > ^ {\prime}) ^ {\prime} - > ^ {\prime \prime} - > ^ {\prime} + ^ {\prime} - > ^ {\prime}, - > ^ {\prime} - > ^ {\prime}, - > ^ {\prime} / ^ {\prime} - > ^ {\prime}, - > ^ {\prime} - > ^ {\prime} \ > ^ {\prime} = ^ {\prime} - > ^ {\prime} - > ^ {\prime}? ^ {\prime} - > ^ {\prime} [ ^ {\prime} - > ^ {\prime} ] ^ {\prime} - > ^ {\prime} \wedge^ {\prime} - > _ {-} ^ {\prime} - > ^ {\prime} - > ^ {\prime} [ ^ {\prime} - > ^ {\prime} ] ^ {\prime} - > ^ {\prime} \ \end{array} $$
Key 2: 2^ - > A^ - > B^ - > C^ - > a^ - > b^ - > c^
Key 3: 3^ - > D^ - > E^ - > F^ - > d^ - > e^ - > f^
Key 4: 4^ - > G^ - > H^ - > I^ - > g^ - > h^ - > i^
Key 5: '5'->'J'->'K'->'L'->'j'->'k'->'l'
Key 6: '6'->M'->N'->O'->m'->n'->o
Key 7: '7'->'P'->'Q'->'R'->'S'->'p'->'q'->'r'->'s'
Key 8: '8' -> 'T' -> 'U' -> 'V' -> 't' -> 'u' -> 'v'
Key 9: 'W' -> 'X' -> 'Y' -> 'Z' -> 'w' -> 'x' -> 'y' -> 'z'
SCANSONIC
Brugsanvisning
i100
PLACERING AF KONTROLLER
FJERNBETJENING
- Power: Gà til standby-tilstand
- Mute: Sluk for lyden
3.0-9:Forudindstillet nummer 1-10 - Recall: Genkald forudindstillet station
- Store: Fjden aktuelle station til mine favoritter
- Select: Punkt udvalgt
7.▲:Op - :Ned
- : Tilbage
10.▶:Fremad - 一 _ 一 Neste
- :Forrige
- Lydstyrke op
- Lydstyrke ned
- Menu: Tilbage til hovedmenu
- Mode: Skift afspilningsfungtion
- Alarm: Alarmindstilling
- Sleep: Sleep-indstilling
OPSÄTNING
SCANNING FOR WIRELESS
1/1 -#DUE- INPUT:0-3↑;OK
Tast 2^2^ -> 'A' -> 'B' -> 'C' -> 'a' -> 'b' -> 'c'
Tast 3^3^ D^ E^ F^ d^ e^ f^
Tast 4^4^ G^ H^ I^ g^ h^ i^
Tast 5^5^ J^ K^ L^ j^ k^ l^
Tast 6^6^ M^ N^ O^ m^ n^ o^
Tast 7^7^ ->'P'-> 'Q' -> 'R' -> 'S'-> 'p' -> 'q' -> 'r' -> 's'
Tast 8^8^ 'T^ 'U^ 'V^ 't^ 'u^ 'v^
Tast 9^9^ - > X^ - > Y^ - > Z^ - > W^ - > X^ - > Y^ - > Z^
SCANSONIC
Bedienungsanleitung

i100
BEDIENELEMENTE UND FUNKTIONEN

FERNBEDIENUNG
Taste 6:6,M,N,O,m,n,o
Taste 7: 7, P, Q, R, S, p, q, r, s
Taste 8:8,T,U,V,t,u,v
Taste 9: 9, W, X, Y, Z, w, x, y, z
SCANNING FOR WIRELESS
Touche "7" 7, P, Q, R, S, p, q, r, s
Touche "8" 8, T, U, V, t, u, v
Touche "9" 9, W, X, Y, Z, w, x, y, z
SCANNING FOR WIRELESS
1/1 -MOUE= INPUT:0-3↑;OK
- Lagesforandring (upp,ned)
Tangent "0"-0, 'DEL'
Tangent "1"-- '1'->'@'->'' (space) ->''! ->'' (dubbla citattecken) ->'#' ->'\$
-
'%' -> '&&->''(enkla citattecken) ->'(->') ->'*'->'+->', -
'<->'<><'/'->'<->'<->'<->'='->'>'>'->'['<><']'->
A' - > ' - > ' - > {' - > '} - > ' - >
Tangent "2"-- 2,A,B,C,a,b,c
Tangent "3" 3, D, E, F, d, e, f
Tangent "4" 4, G, H, I, g, h, i
Tangent "5"-5, J, K, L, j, k, I
Tangent "6" 6, M, N, O, m, n, o
Tangent "7" 7, P, Q, R, S, p, q, r, s
Tangent "8" 8, T, U, V, t, u, v
Tangent "9" 9, W, X, Y, Z, w, x, y, z
SCANNING FOR WIRELESS
Nappain "2" 2,A,B,C,a,b,c
Nappain"3"-3,D,E,F,d,e,f
Nappain"4"-4,G,H,I,g,h,i
Nappain"5"-5,J,K,L,j,k,I
Nappain"6"-6,M,N,O,m,n,o
Nappain"7" 7, P, Q, R, S, p, q, r, s
Nappain"8" 8,T,U,V,t,u,v
Nappain"9"-9,W,X,Y,Z,w,x,y,z
nappain 0 '0'-> 'DEL'(poistonappain)
nappän 1'1' -> '@' -> ' ('(vãillyonti) -> '!' -> ''' (kaksosilainausmerkit) -> '#' -> '$' -> '%' -> '&' -> '''' (lainausmerkit) -> '(?' ->)' -> '''' -> '+' -> ', '->' -> '!' -> ':' -> ':' -> ':' -> ':' -> ':' -> ':' -> ':' -> ':' -> ':' -> ':' -> ':' -> ':' -> ':' -> ':'
näppän 2'2' -> 'A' -> 'B' -> 'C' -> 'a' -> 'b' -> 'c'
nappain 3^3^ · · · D^ · · · E^ · · · F^ · · · d^ · · · e^ · · · f^
nappain 4^4^ >G^ >H^ >I^ >g^ >h^ >i^
näppän 5^5^ -J^ 'K^ -L^ -J^ -K^ -I^
nappain 6^6^ M^ N^ O^ m^ n^ o^
näppän 7'7' -> 'P' -> 'Q' -> 'R' -> 'S' -> 'p' -> 'q' -> 'r' -> 's'
näppän 8^8^ T^ U^ V^ t^ u^ v^
nappain 9^9^ X^ Y^ Z^ w^ x^ y^ z^