
1830 - Iron T-FAL - Free user manual and instructions
Find the device manual for free 1830 T-FAL in PDF.
| Brand | T-FAL |
| Model | 1830 |
| Category | Iron |
| Type | Steam iron |
| Power supply | 120 V, 13 A (alternating current) |
| Reservoir capacity | Approximately 200 ml (MAX mark) |
| Main functions | Automatic steam, spray, super pressing, anti-drip, vertical steaming |
| Thermostat | Adjustment by fabric name with temperature indicator light |
| Auto-stop safety | Shuts off after 8 min on heel or 30 s flat |
| Anti-scale rod | Removable, clean every 2 months in white vinegar or lemon juice |
| Self-cleaning | Perform twice a month to remove impurities |
| Soleplate | Smooth, cleanable when warm with a non-metal scraper |
| Maintenance | Soleplate cleaning, descaling anti-scale rod, self-cleaning |
| Recommended water type | Tap water or mixture 50% tap water + 50% demineralized water |
| Water to avoid | Pure demineralized water, dryer water, scented water, softened water, etc. |
| Storage | On heel, cord wrapped around heel, fixing clip |
| Safety instructions | Unplug before filling, do not immerse, check cord, do not leave unattended |
| Spare parts | Anti-scale rod (ref. not specified) |
| Vertical use | Yes, for steaming hanging clothes (thermostat on MAX) |
| Auto-stop safety indicator light | Flashes in case of shutdown |
Frequently Asked Questions - 1830 T-FAL
User questions about 1830 T-FAL
0 question about this device. Answer the ones you know or ask your own.
Ask a new question about this device
Download the instructions for your Iron in PDF format for free! Find your manual 1830 - T-FAL and take your electronic device back in hand. On this page are published all the documents necessary for the use of your device. 1830 by T-FAL.
USER MANUAL 1830 T-FAL
Be careful! (depending on the model) Take off the soleplate protection before heating the iron.
Your iron is equipped with an integrated system that protects against the effects of lime-scale (depending on the model).

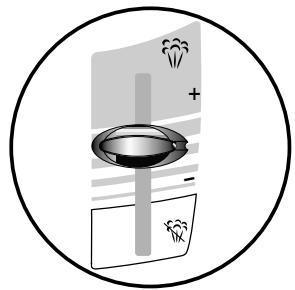
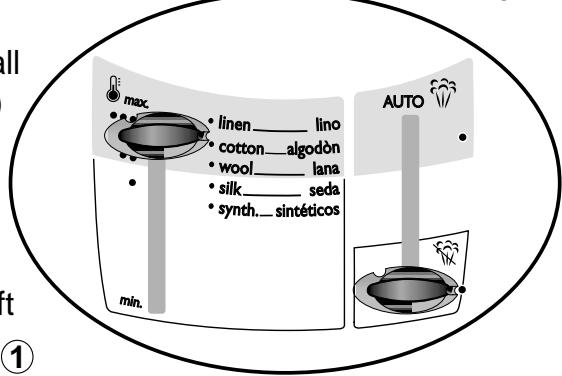
A. Steam control.
B. Thermostat control.
C. Maximum tank filling point (do not fill beyond this limit).
D. Anti-calc valve.
E. Spray.
F. Water tank filler.
G. Spray button (for dampening laundry).
H. Boost of steam button (for extra steam and vertical steam).
I. Thermostat light (goes out when the required temperature has been reached).
J. Auto shut-off pilot light (depending on the model) (turns the iron off if it has been forgotten).
K. Soleplate
L. Clip (for fastening the cord).
SPANISH
When using your clothes iron, basic safety precautions should always be followed, including the following :
- Use iron only for its intended use.
- To protect against a risk of electric shock, do not immerse the iron or the base of the iron in water or other liquids.
- When fitted with an on/off switch the iron should always be turned OFF before plugging or unplugging from outlet. Never yank cord to disconnect from outlet ; instead, grasp plug and pull to disconnect.
- Do not allow cord to touch hot surfaces. Let iron cool completely before putting away. Wrap cord loosely around iron when storing.
- Always disconnect iron from electrical outlet when filling with water or emptying and when not in use.
- Do not operate iron with a damaged cord or if the iron has been dropped or damaged. To avoid the risk of electric shock, do not disassemble the iron. Return iron to the factory (see warranty) for examination and repair. Incorrect reassembly can cause a risk of electric shock when the iron is in use.
- Close supervision is necessary for any appliance being used by or near children. Do not leave iron unattended while connected or on an ironing board.
- Burns can occur from touching hot metal parts, hot water or steam. Use caution when you turn a steam iron upside down - there may be hot water in the reservoir.
- This appliance is only for domestic and personal use.
SPECIAL INSTRUCTIONS
- To avoid a circuit overload, do not operate another high-wattage appliance on the same circuit.
- If an extension cord is absolutely necessary, a 13 ampere cord should be used. Cords rated for less amperage may overheat. Care should be taken to arrange the cord so that it cannot be pulled or tripped over.
SAVE THESE INSTRUCTIONS

THE WATER TO USE IN YOUR IRON
ENG
Your iron has been designed to be used with tap water. However, the self-cleaning feature has to be used regularly to eliminate any mineral build-up in the steam chamber. If your water is very hard (check with your local environmental services or water company), you can use a mix of half tap water and half demineralized water.

TYPES OF WATER TO BE AVOIDED
Heat concentrates the elements contained in the water when it evaporates. The types of water indicated below contain organic or mineral elements which may eventually cause spitting, brown stains or wear your iron out prematurely: pure demineralised water, water from clothes driers, perfumed water, softened water, water from refrigerators, battery water, water from air conditioners, distilled water or rain water.
A. STEAM IRONING
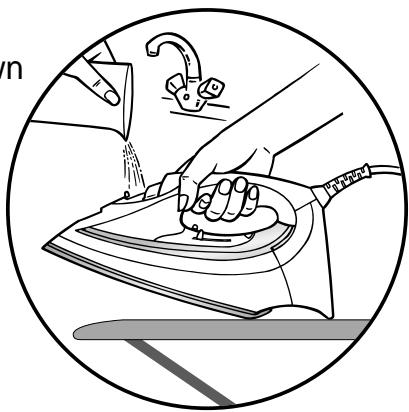
1. Fill the tank
1- Place the steam control on DRY
2- Open the flap of the reservoir, place the iron on a table, as shown in the diagram below, and then fill it.
Be careful!
You should not fill the tank beyond the MAX level.
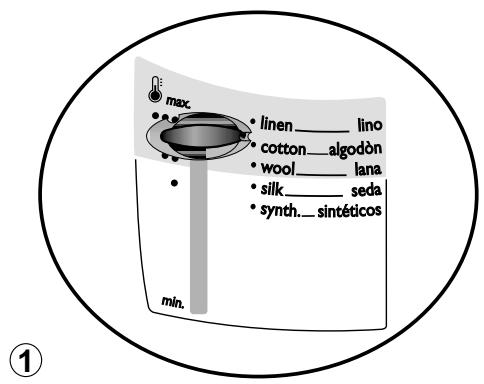
2. Setting the temperature and steam level
Place the thermostat control on the type of fabric to be ironed.
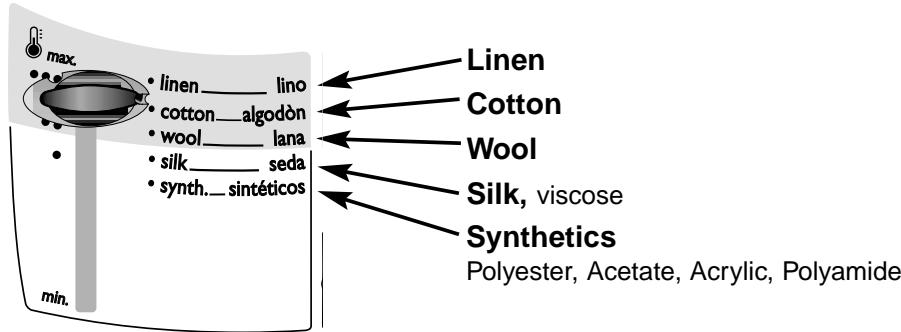
The light comes on. Wait for the light to go off and come again before you start ironing.
■The first time the appliance is used, there may be fumes and smell but this is not harmful, will not affect use and will disappear rapidly.
We recommend that you:
- Start with the fabrics to be ironed at a low temperature () and finish with those which respond best to higher temperatures ( or MAX)
- If you lower the thermostat, wait until the light comes on again before ironing.
- If you iron a fabric made of a blend of fibres: set the temperature for the most fragile fibre.
■Be careful! Your iron will only produce steam when the thermostat control is in the coloured zone.
3. Automatic steam
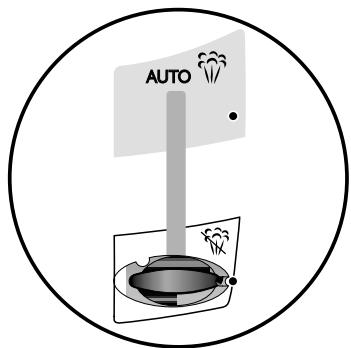
Place the Steam Control on AUTO (depending on the model) The production of steam automatically adjusts to the temperature selected.
4. Variable steam (depending on the model)
You can set the steam manually.
It is not advisable to use steam on silk or synthetics. This could cause stains.
5. Anti-drip function (depending on the model)
The supply of water is cut off automatically to avoid any drips from the soleplate when the temperature of the iron is insufficient to produce steam. When first using the iron, wait for 2 minutes for steam to be produced.
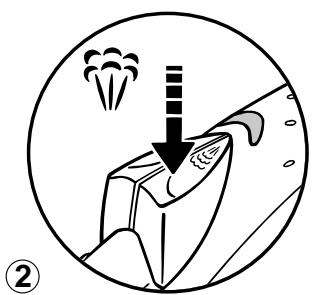
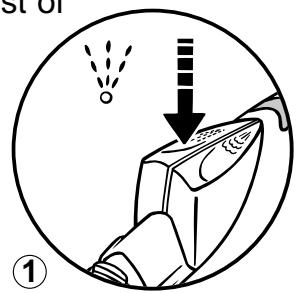
6. Vertical steam (depending on the model)
1 Hang the garment up and hold the fabric taut.
2 Place the thermostat control on MAX. ①
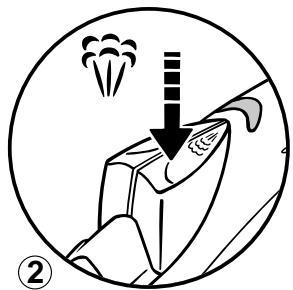
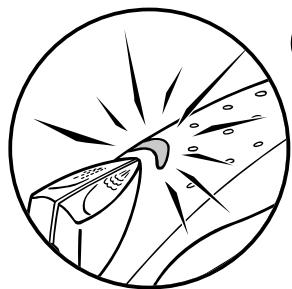
3 Press repeatedly on the Burst of Steam button (♂) ② and move the iron from top to bottom ③
4 Hold the iron a few centimetres from the garment to avoid burning delicate fabrics.
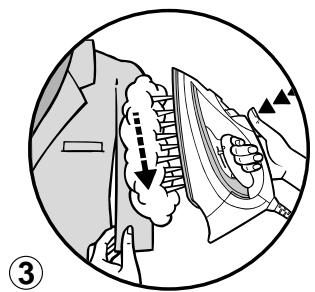
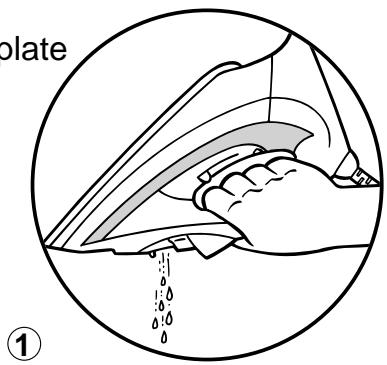
7. Removing stubborn creases
1 Press repeatedly on the Spray button ( ) to dampen the fabric. ①
2 Or, use the Burst of Steam button (hat),
pressing repeatedly to obtain a more powerful burst of
steam. ②
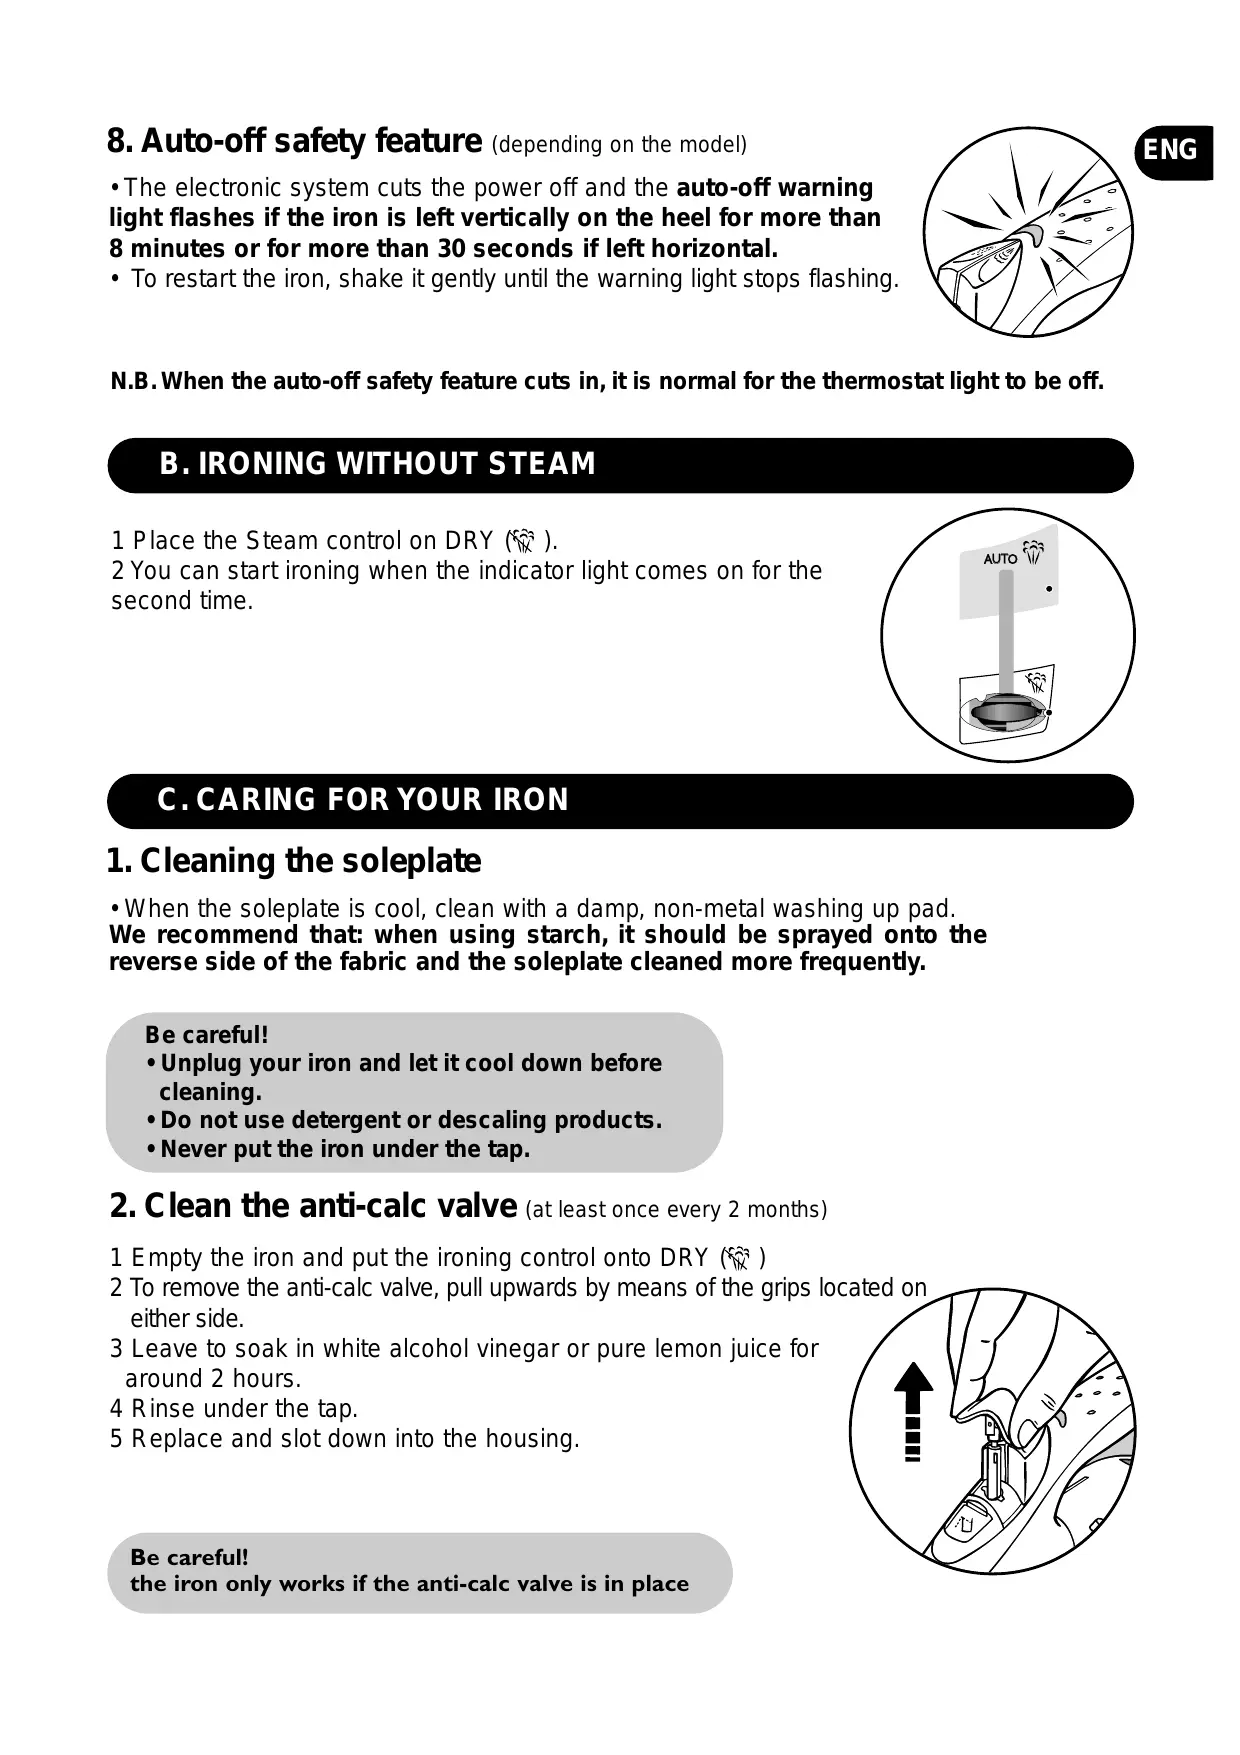
8. Auto-off safety feature (depending on the model)
- The electronic system cuts the power off and the auto-off warning light flashes if the iron is left vertically on the heel for more than 8 minutes or for more than 30 seconds if left horizontal.
- To restart the iron, shake it gently until the warning light stops flashing.
N.B. When the auto-off safety feature cuts in, it is normal for the thermostat light to be off.
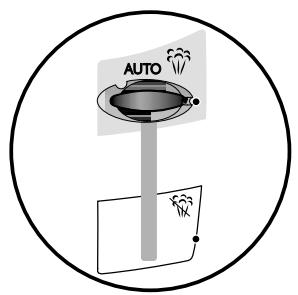
B. IRONING WITHOUT STEAM
1 Place the Steam control on DRY ( ).
2 You can start ironing when the indicator light comes on for the second time.
C. CARING FOR YOUR IRON
1. Cleaning the soleplate
- When the soleplate is cool, clean with a damp, non-metal washing up pad. We recommend that: when using starch, it should be sprayed onto the reverse side of the fabric and the soleplate cleaned more frequently.
Be careful!
- Unplug your iron and let it cool down before cleaning.
- Do not use detergent or descending products.
- Never put the iron under the tap.
2. Clean the anti-calc valve (at least once every 2 months)
1 Empty the iron and put the ironing control onto DRY (
2 To remove the anti-calc valve, pull upwards by means of the grips located on either side.
3 Leave to soak in white alcohol vinegar or pure lemon juice for around 2 hours.
4 Rinse under the tap.
5 Replace and slot down into the housing.
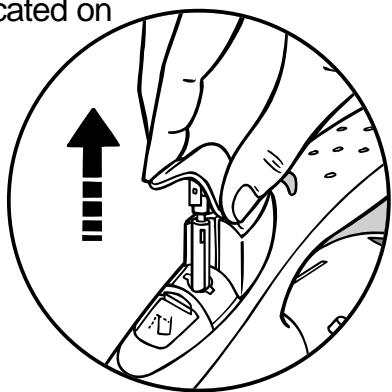
Be careful!
the iron only works if the anti-calc valve is in place
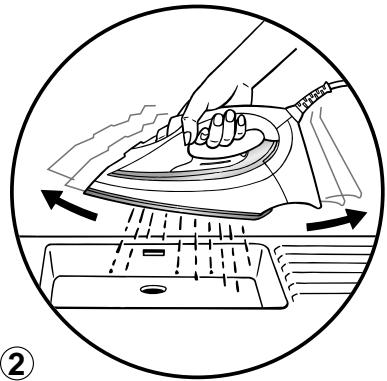
3. Self-cleaning (twice a month)
1 Fill the tank to the MAX mark (see our recommendations on the type of water to use)
2 Put the thermostat control on MAX and the steam control on DRY (①)
3 Place the iron on its heel and wait until the light goes out.
5 Remove the anti-calc valve
6 Shake the iron gently until all the water (and any impurities) has drained from the soleplate. ②
7 Replace the anti-calc valve. 8 When the soleplate is just warm, wipe the iron with a soft cloth.
4 Unplug the iron and place over the sink.
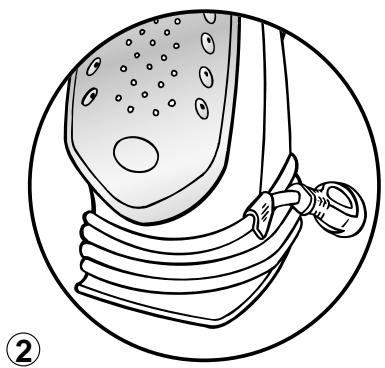
4. PUTTING YOUR IRON AWAY
1 Place the cursor on DRY ( )
2 Unplug the iron and wait until the soleplate has cooled.
3 Empty the tank①
4 Wind the cord around the heel and fix the clip onto the cord ②
5 Store the iron upright on its heel.
D. SAFETY PRECAUTIONS
- Be careful! Your electrical installation must correspond to that of your iron (120 V a.c.). Connecting to the wrong voltage may cause irreparable damage to the iron and your guarantee will be voided.
- This iron must be plugged into an earthed socket. If you are using an extension lead, ensure that it is bipolar (13A) with an earth.
- If the cord is damaged, it must be replaced immediately by an Approved Service Centre as this is dangerous.
- Never immerse the iron in water!
- The appliance must be unplugged before filling or emptying the tank
- If the iron is dropped, have it checked by a professional before reuse: invisible damage may be dangerous.
-
The soleplate of the iron may be very hot:
-
never touch it
- always leave it to cool before you put it away
- never leave your iron unattended when plugged in or when the soleplate is still hot.
-
keep your iron away from children.
-
Never take your iron apart: consult your Approved Service Centre.
Problems and possible causes
Solutions
Your iron produces little or no steam
- Your iron is new.
The temperature selected is too low.
The steam control is on DRY -
Your iron is clogged with scale or has been used dry for too long
-
When you first use, wait 2 minutes until steam is produced.
-
Place the cursor of the thermostat on , , or MAX and the steam setting cursor on the coloured zone (
Put the Steam control on AUTO. -
Clean the anti-calc valve and set the self-clean feature in motion.
Water is dripping from the holes in the soleplate
- You have been using the Burst of Steam control too often
The thermostat is not functioning correctly
Steam used before the iron is hot - Iron put away with water in the tank and the cursor on the steam position
Wait a few seconds before each use.
Take the iron to an approved service centre.
Wait until the thermostat indicator light goes out before using the steam.
- Empty the tank and put the iron away vertically, standing on its heel. Position the cursor on DRY.
Brownish water is dripping from the soleplate and is staining the laundry
- You are using chemical descaler products or pure demineralised water
-
Fabric fibres have accumulated in the soleplate holes or between the iron body and the soleplate and are singeing
-
Operate the self-clean feature and follow our recommendations (see the paragraph: "The water to use").
- Clean the soleplate with a non-metal, washing up pad. Vacuum the soleplate holes from time to time. Operate the self-clean feature.
The soleplate is dirty or brown and is soiling the laundry
You are using a temperature that is too high ....
- Your laundry has not been sufficiently rinsed or you are using starch.
- Clean the soleplate. See the paragraph "Setting the temperature".
- Clean the soleplate. Spray starch on the other side of the fabric to the side being ironed.
The soleplate is scratched or damaged
- You have placed your iron horizontally on a metal support
Always place your iron on its heel.