
MEDIA-LINK MXL-580 - TV ADS TECH - Free user manual and instructions
Find the device manual for free MEDIA-LINK MXL-580 ADS TECH in PDF.
User questions about MEDIA-LINK MXL-580 ADS TECH
0 question about this device. Answer the ones you know or ask your own.
Ask a new question about this device
Download the instructions for your TV in PDF format for free! Find your manual MEDIA-LINK MXL-580 - ADS TECH and take your electronic device back in hand. On this page are published all the documents necessary for the use of your device. MEDIA-LINK MXL-580 by ADS TECH.
USER MANUAL MEDIA-LINK MXL-580 ADS TECH
North America Support Hours
Phone: 562-926-4338
M-F: 8:00 am - 5:00 pm, PST
www.adstech.com
Support: www.adstech.com/support/support.asp
ADS TECH
NORTH AMERICAN OFFICE
Cerritos, CA 90703
Phone. 562.926.1928
Support. 562.926.4338
EUROPE OFFICE
Unit 1b, Shannon Industrial Estate,
Shannon, County Clare, Ireland
Phone. +353.61.702042
Support. +353.61.702001
SOUTHERN EUROPE OFFICE
51-55 rue Hoche
94200 Ivry sur Sein
Phone. 33+(0) 1.43.90.19.20
Fax. 33+(0) 1.46.58.67.06
User's Guide
Table of Contents
SECTION ONE · Setting Up Media-Link
1 Getting To Know Media-Link
2 Setting Up Media-Link
3 How To Access Media-Link Software
4 How To Add Media-Link Software
5 How To Edit Media-Link Software
6 How To Delete Media-Link Software
SECTION TWO · Configuring Media-Link
7 How To Configure Media-Link
8 IP Configuration Page Setup
9 WIFI Page Setup
10 Time Page Setup
11 Update ROM Page
SECTION THREE · Appendix
12 Appendix A: Troubleshooting
13 Appendix B: Technical Specifications
14 Appendix C:Prerequisite / How To Detect IP's Address
SECTION THREE • French
16 French Manual: Table of contents
© 2004 ADS Technologies. All Rights Reserved
First Edition: January, 2004
Windows XP is a registered trademark of Microsoft Corporation.
IBM is a registered trademark of the International Business Machines, Inc.
ADS is a registered trademark of ADS Technologies Inc.
ADS Technologies (ADS) makes no warranty of any kind with regard to this material,
including but not limited to, the implied warranties of merchantability and fitness for a
particular purpose. The information furnished within this written document is for
information purposes only and is subject to change without notice. ADS Technologies assumes no
responsibility or liability for any errors or inaccuracies that may appear herein. ADS makes no commit
ment to update or to keep current information contained within this document. (rtt)
Getting to know Media-Link
Media-Link :
A compact, stylish and sophisticated hardware, which served as the "bridge" between your personal computer and your TV. Thanks to its integrated media playing technology, you can now-play all your high-quality media on your TV.
Package Contents:
Media Link unit
Power adapter
AV Cable
- Manual
CD
Remote Control
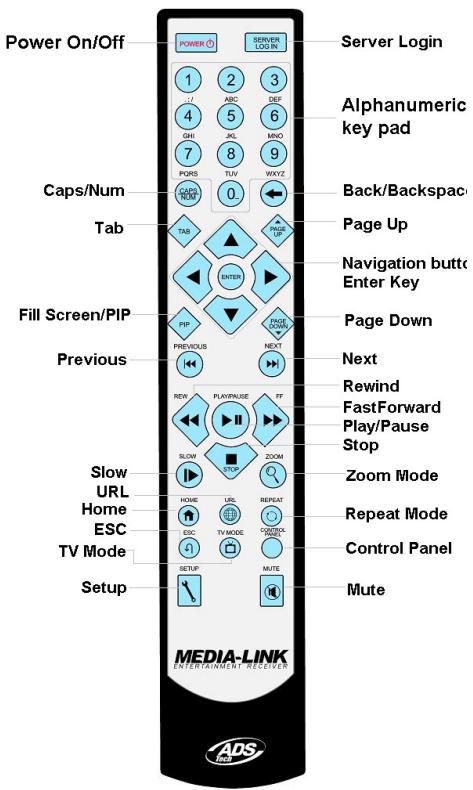
Remote Control:
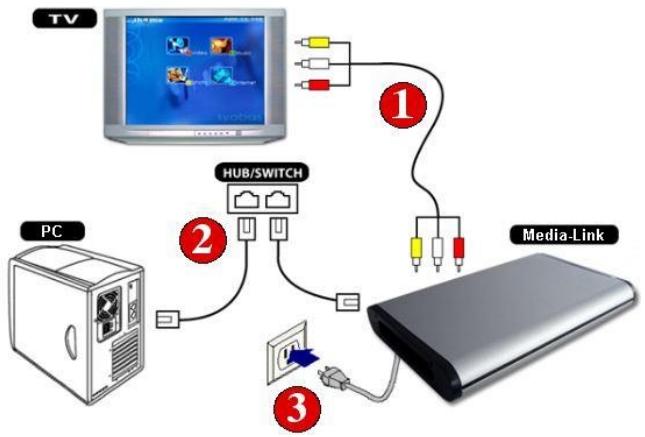
Setting up Media-Link
How to connect Media-Link to your computer and TV
How to access Media-Link software
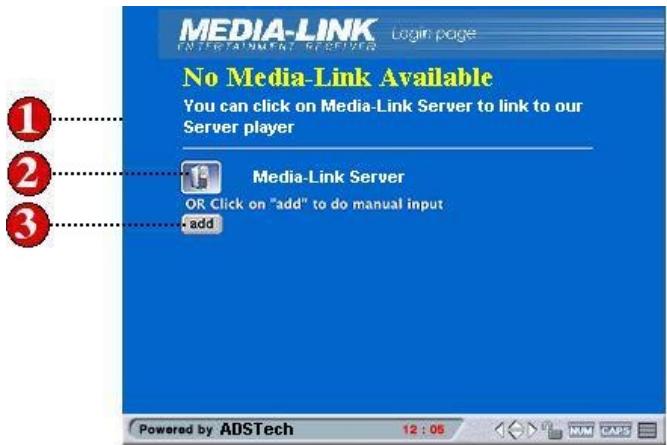
- If you see the above page, it means that the Media-Link Software is not present or installed on any of the PCs in your local network. Please make sure that the software has been installed and is running.
- Click on Media-Link Software Server to search again for a PC with the Media-Link Software installed.
- You can also manually add a Media-Link Software PC by selecting the add button.
How to access Media-Link software
Simple steps on how to access your Media-Link software
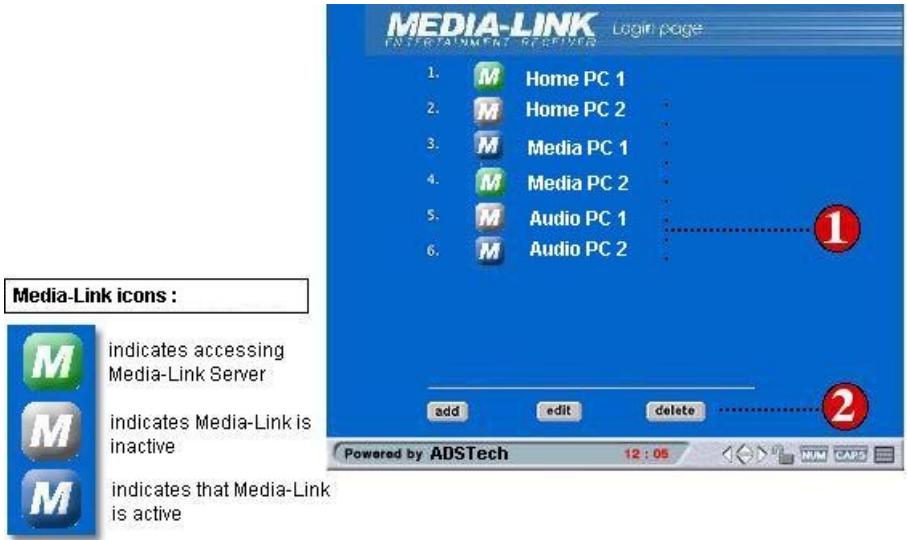
- Once detected, Media-Link Software will list all the Media Link Software PCs available on your network. Please select the PC Server that contains your media files.
- You can also choose to add, edit or delete a PC Sever from the list by clicking on the respective buttons.
- The icon for each of the PC Server will show you the status for that Server.
a. Blue - means that the PC Server is available
b. Green - means that the PC Server is accessible
c. Gray - means that the PC Server is inactive (Turned off).
How to add Media-Link software
Simple steps on how to add a new Media-Link Software PC
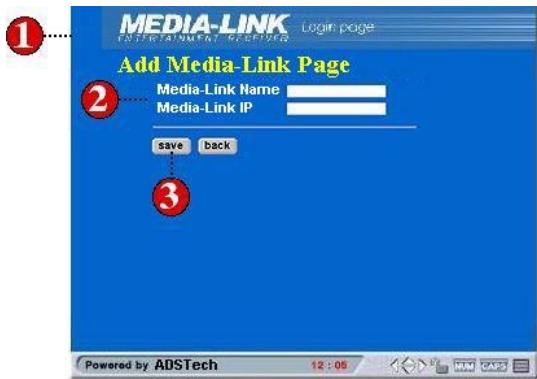
- To add, click add button at main page. Add Media-Link Software page will appear.
- Enter your corresponding computer name and its corresponding IP address.
- Click save when you are done.
How to edit Media-Link Server PC
Simple steps on how to edit your Media-Link Server PC. This is needed if the IP address of the Server PC has changed.
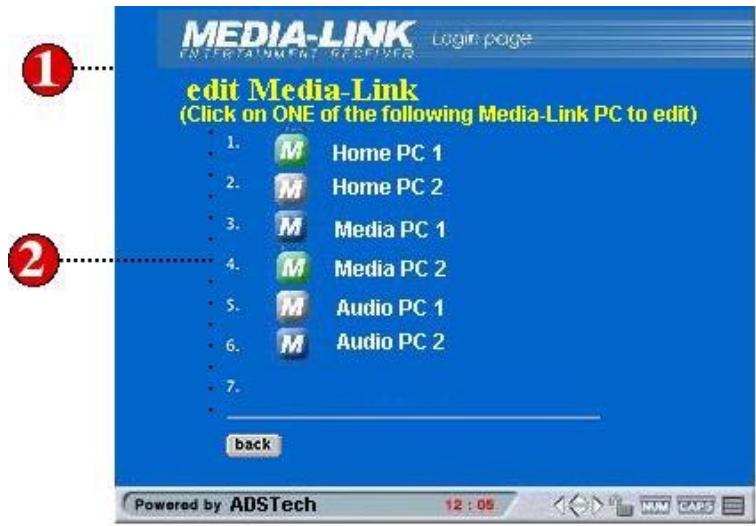
- To start editing Media-Link Software, click edit button on the Media-Link Software main page.
- Choose the Media-Link Server PC that you want to edit.
- Once selected, the name of the Server PC will be displayed.
- Enter the new IP address for your Server PC running the Media-Link Software.
- You must save for the changes to take effect.
How to delete a Media-Link server PC
Simple steps on how to delete a PC running Media-Link Software
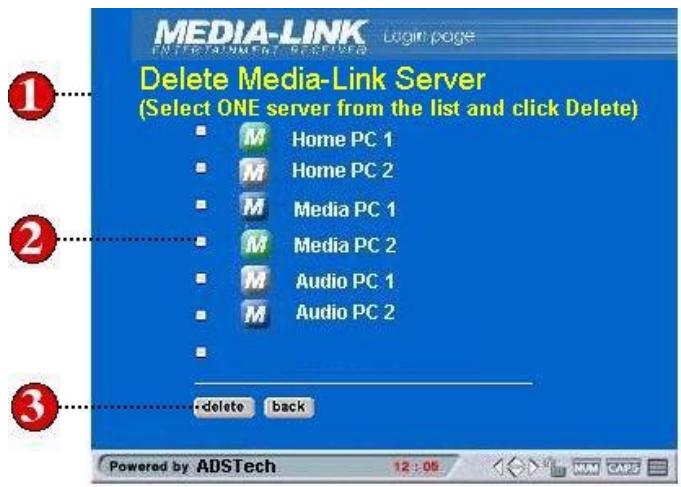
- Select delete from the main Login Page.
- Select the Media-Link Server PC by checking the box.
- Select delete when you are done.
SECTION TWO: Configuring Media-Link
How to configure your Media-Link

- Press the Setup button on your remote control.
- You are now on the Options menu of the Setup Page
- Adjust your settings according to your preference.
- Select save for your changes to take effect.
IP configuration page setup
Simple steps on how to configure your IP
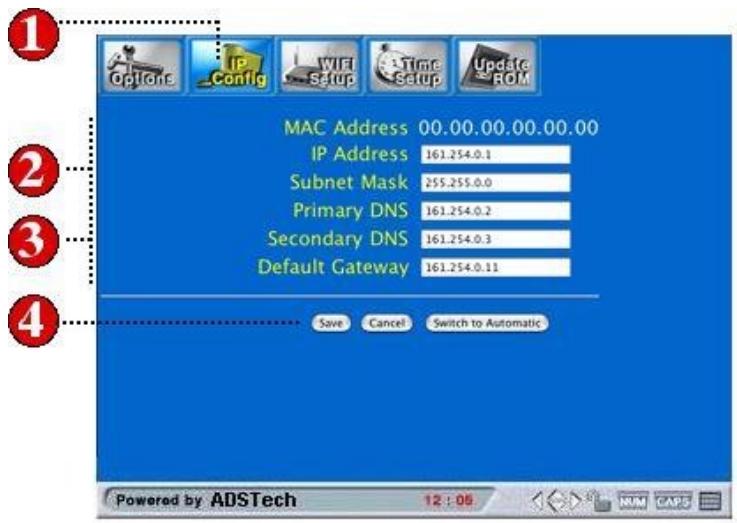
- Navigate to IP Config menu and press Enter to open the IP Configuration page.
- You can choose to use manual or automatic configuration. In Manual mode, fill in all the fields listed in the IP Config setup page and select Save.
- In Automatic mode, you must make sure that your net work is set to obtain IP automatically.
- To complete your changes, please select Save.
WIFI page setup - For Wireless Network configurations Simple steps on how to setup your WIFI
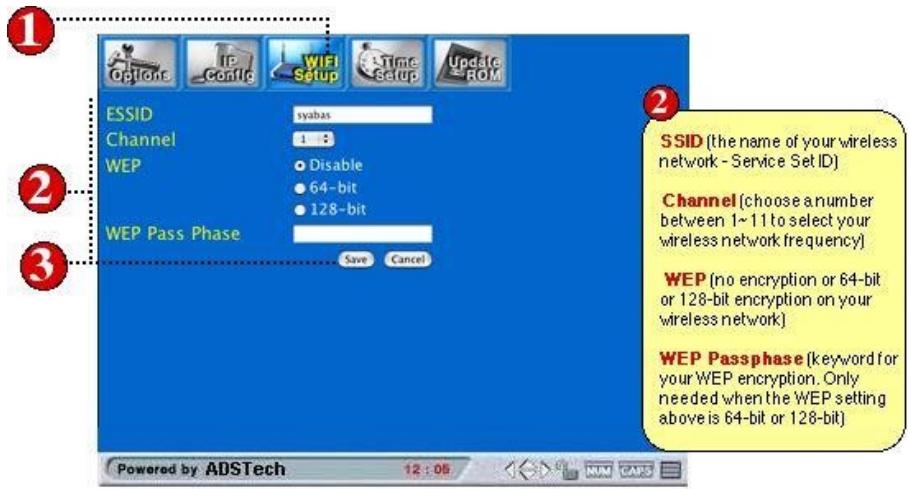
- Navigate to WIFI Setup menu and press Enter to open the WIFI Setup page.
- Make sure the following fields are exactly the same as the setting at your existing wireless network (setting at your Access Point).
- Press the Save button to save your settings. The system will then reboot using the new settings. Press the Cancel button to discard your changes.
Time page setup
Simple steps on how to setup the time page
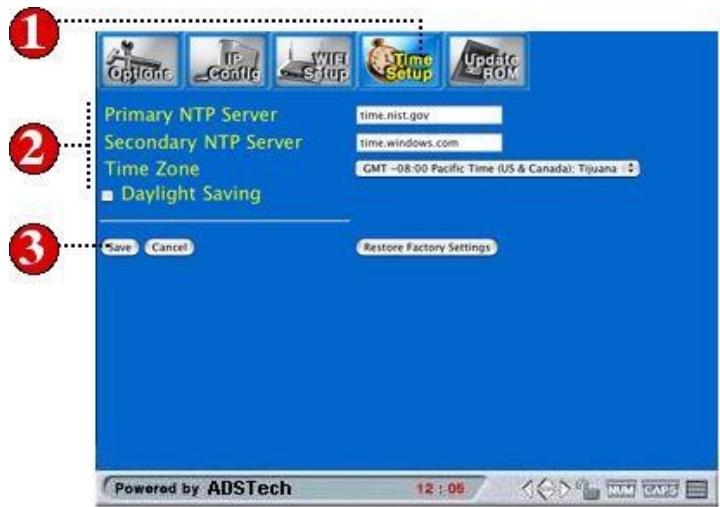
- Navigate to Time Setup menu and press Enter to open the Time Setup page.
- Fill in the fields listed in the Time Setup page and choose the time zone for your location.
- You can also choose to set Daylight Savings option if you want to.
- When finished, press the Save button on the screen
Update ROM page
Simple steps on update ROM page
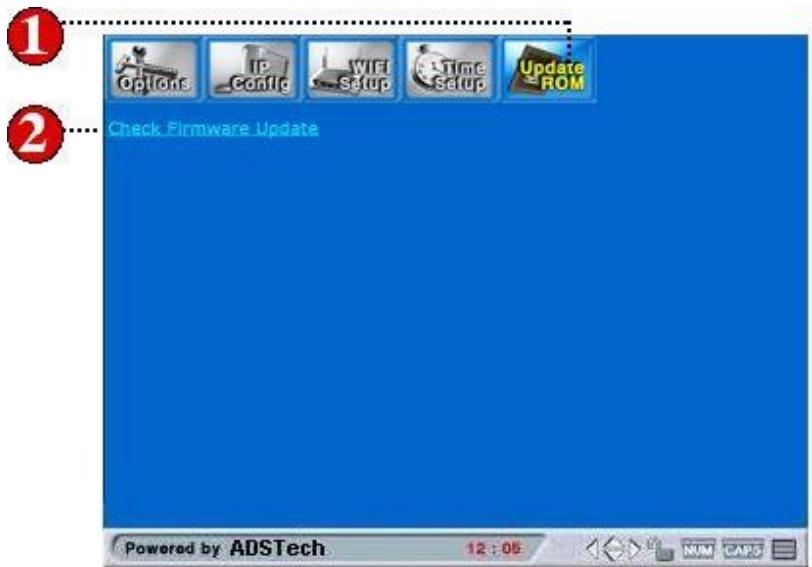
- Navigate to Update ROM icon and press Enter to open the Update ROM page.
- Select Check for firmware update link to load the latest firmware available for your unit.
Appendix A: Troubleshooting
This section answers some Frequently Asked Questions (FAQ). These are the answers for the most common problems encountered. If your problem persists, contact with our Technical Support Department.
Q1: Media-Link Device is not connecting to Media-Link Software
Answer: Your Media-Link device can be connected to Media-Link Server PC via a home network using either a wired or wireless configuration. Firstly, go into the IP Configuration setup page : Press the Setup button on your Remote Control. Select IP Config using the Navigational buttons on your remote control, press Enter. Make sure that automatic configuration is selected if you have a DHCP server available in your home network. If not, please manually key-in the configuration according to your network environment settings.
Q2: Media-Link Device still not connecting to Media-Link Software although the network settings are configured properly
Answer: If you have a wired network configuration make sure that the LAN cable is firmly plugged into both your Media-Link device and the switch/hub you are using.
Q3: Media-Link Device is not connecting to the internet
Answer: Your Media-Link Device may be connected to the internet via your home network if you have a DSL or Broadband Internet connection. Make sure that the following connections are active and working:
- Your Media-Link's connection to your home network.
- Your home network's connection to the internet
If your Media-Link device is having trouble connecting to the internet, please check the following :
Check the internet link is available
Using your PC, try to navigate the Internet by accessing any website. If you have problems, you need to verify if your ISP (Internet Service Provider) is working correctly or not.
If you are using Dial Up Service connection
Ensure that the dial-up modem is connected to the phone line and that internet activity is available by first surfing the net through via your browser.
Using broadband
If you have a broadband internet connection, try connecting to any website that always have reliable access. Also ensure that the broadband internet connection is always connected.
Check Online Support
Check for further FAQ on our online support at http://www.adstech.com/ for additional support.
Q4: Media-Link is not connecting to my home network
Answer: Any of the following may help you troubleshoot the problem. You may not need to follow every step of the following, just follow the ones that most fit to the symptom you are facing.
Check network adapter
For wireless networking, the network adapter connected may not be supported. If the network adapter you are using is compatible and functioning properly, check for the MAC address by going to the IP Configuration setup page. Make sure that the MAC address, which is a 6 field with 2 digit number, is displayed. If you do not see a value, then the network adapter is not recognized by Media-Link or the network adapter is not working properly. Further steps would be to check on your base station you are using. Ensure that there is LAN connectivity and activity. For wired networking, the network cable could be defective. Upon plugging in the network cable to the Media-Link device, you should see the LINK/ACT LED light ON (in front of the Media-Link device). If you have another cable available, try swapping it.
Check connection to the network adapter
Unplugged either the WIFI network adapter or your LAN cable and plug it back in again. Make sure the card or cable is plugged all the way in. Once if it is connected correctly, you will be able to see the LED turn ON in the LINK/ACT indicator.
Restart Media-Link
The network settings may not be complete during the initial start up of your Media-Link device. Please reboot your system by pressing the "Power" button on your remote control.
Check physical connection and activity
Ensure that all network equipment is receiving power and that all cable connections for routers, hub, access points and computers in your home network are working. Verify the "LINK/ACT" light is lit on all the devices connected to the network.
Power-Cycle Network Devices
If you have a wireless access point or a router, please reset it by turning off the power and turning it back on. Wait for a few minutes to allow these devices to complete it's startup. And retry your home network connection again.
Check your network settings
Verify that your Network Settings are correct. Complete the TCP IP settings on your DHCP server, if one is available. Else, ensure that the manually input IP address is correct to the corresponding server.
Checking static IP address
If you have assigned a static IP address for you Media-Link, make sure that the IP address is unique in your network and within the same network Class specifications. Which is to confirm the first 3 sets of the IP address in Media-Link are same as the other devices connected to your home network. For example, if your computer's IP address starts with "192.168.0", then your Media Link IP address should be set to "192.168.0". Further static IP address settings are available in Page 6.
Q5: Media-Link is not connecting to my Wireless Network
Answer: Checking the power on your access point
Make sure that the wireless access point or wireless router in your home network is receiving power and that the "LINK/ACT" light is ON.
Check access point settings
Maybe the channel settings and the encryption format doesn't tally with the ones set on your access point. You can follow the instructions on these setups in Wifi Setup Page, Page 7.
Check for 802.11b compliant in your access point
Media-Link uses the 802.11b wireless network standard and is currently not compatible with other wireless network standards such as 802.11a and 802.11g. However, some access point with 802.11a and 802.11g may be backward compatible to the 802.11b network standard.
Check signal strength.
The following steps may be able to help improve the signal strength: Make sure the wireless adapter is placed well away from any power supply, power line or surge protectors. Any of these items may cause interference and reduces the signal strength. Some household appliances (e.g. cordless phone, microwave, etc.) may also reduce the signal strength.
- Make sure that the access point's antenna is fully extended.
- Move the access point to higher position or give a better line of site to your wireless network adapter.
- Reduce the distance between your wireless adapter card and access point. Wireless networks typically have a range of 100 to 300 feet. This distance may vary depending on any physical blockage found (i.e. wall, partitions, etc.).
- Consider adding signal booster to your network (available from some wireless equipment manufacturers)
Check network name
In the WIFI settings in your Media-Link, ensure that the network name (SSID) is listed correctly. For further details on the WIFI settings, please refer to Wifi Setup Page, Page 7.
Appendix B: Technical specifications
CPU/System Board
150MHz 32-bit ARM based System On Chip
- 4 Mbytes of flash ROM,
- 16 Mbytes of SDRAM for host and 8Mbytes of SDRAM for video buffer.
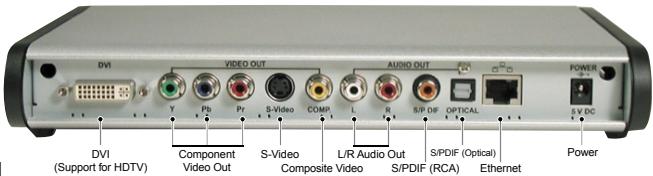
Output Interfaces
- Video: Composite Video, S-Video, Component Video (Progressive and Interlace) and DVI
- Audio: Stereo, SPDIF Digital audio output on both Coaxial and Optical
Networking Interfaces
- Ethernet interface, 10-baseT/100-base T
- PCMCIA Card Slot for 802.11b
Video DecodeFormats
- MPEG-1, MPEG-2, MPEG-4, DivX, MOV and AVI
Audio Formats
- MPEG Audio layer 1&2, MP3, OGG, AC3, AAC (optional) and WMA (optional).
Graphics Formats
- JPEG, Bitmap, GIF, animated GIF and PNG
Power Requirement
- AC adapter
100-240 AC/ 50-60 Hz
Power consumption 15W
Media-Link (i.e. Set-Top-Box) Software Support
Web Browser
WIFI PCMCIA card supported by ADS Media-Link :
| Manufacturer: | Model: | |
| 3Com | 3CRWE73796B | |
| Avaya | Orinoco Silver | |
| Avaya | Orinoco Gold | |
| Belkin | F506020 ver.2 | |
| Buffalo | WLI-PCM-L11GP | |
| Buffalo | WLI-PCM-L11G | |
| Dell | TrueMobile 1150 | |
| D-Link | DWL-650 | (16-bit PCMCIA version) |
| Linksys | WPC11 | |
| Linksys | WPC11 ver.2.5 | |
| Linksys | WPC11 ver.3 | |
| Lucent | Orinoco Silver | |
| Lucent | Orinoco Gold | |
| Microsoft | MN-510 | |
| NetGear | MA401 | |
| Proxim | Orinoco Silver | |
| Proxim | Orinoco Gold | |
| Sony | PCWA-C100 | |
WIFI PCMCIA card NOT supported by ADS Media-Link :
Cisco Aironet PCM342
Cisco Aironet PCM352
PC Requirements
- 500 MHz Pentium III or faster
- Windows operating systems : Windows XP Professional (Service Pack 1), XP Home, 2000 Professional (Service Pack 3),98 2nd Edition, ME
- Minimum 50MB of available HD space (not including media files)
- Minimum memory of 256MB recommended.
- Ethernet interface
Appendix C: Prerequisite / How to detect IP's address
Prerequisite
- Home network with hub/switch socket available for Media-Link (i.e. one LAN card connection)
Find out your PC's IP address and default gateway address - Assign a static IP address for your Media-Link Device
- Obtain your DNS server IP from your ISP or through your internet connected personal computer
How to detect your computer's IP address?
- Open command prompt.
- Type 'ipconfig'.
- Press Enter.
- You should be able to see your PC's IP address and default gateway IP address.
Table of Contents French
SECTION UN 1 · Installation de Media-Link
150MHz 32-bit ARM based System On Chip
- 4 Mbytes of flash ROM,
- 16 Mbytes of SDRAM for host and 8Mbytes of SDRAM for video buffer.
Output Interfaces
- Video: Composite Video, S-Video, Component Video (Progressive and Interlace) and DVI
- Audio: Stereo, SPDIF Digital audio output on both Coaxial and Optical
Networking Interfaces
- Ethernet interface, 10-baseT/100-base T
- PCMCIA Card Slot for 802.11b
Video DecodeFormats
- MPEG-1, MPEG-2, MPEG-4, DivX, MOV and AVI
Audio Formats
- MPEG Audio layer 1&2, MP3, OGG, AC3, AAC (optional) and WMA (optional).
Graphics Formats
- JPEG, Bitmap, GIF, animated GIF and PNG
Power Requirement
- AC adapter
- 100-240 AC/50-60 Hz
- Power consumption 15W
Media-Link (i.e. Set-Top-Box) Software Support
Web Browser
WIFI PCMCIA card supported by ADS Media-Link :
| Manufacturer: | Model: |
| 3Com | 3CRWE73796B |
| Avaya | Orinoco Silver |
| Avaya | Orinoco Gold |
| Belkin | F506020 ver.2 |
| Buffalo | WLI-PCM-L11GP |
| Buffalo | WLI-PCM-L11G |
| Dell | TrueMobile 1150 |
| D-Link | DWL-650 |
| (16-bit PCMCIA version) | |
| Linksys | WPC11 |
| Linksys | WPC11 ver.2.5 |
| Linksys | WPC11 ver.3 |
| Lucent | Orinoco Silver |
| Lucent | Orinoco Gold |
| Microsoft | MN-510 |
| NetGear | MA401 |
| Proxim | Orinoco Silver |
| Proxim | Orinoco Gold |
| Sony | PCWA-C100 |
WIFI PCMCIA card NOT supported by ADS Media-Link :
Cisco Aironet PCM342
Cisco Aironet PCM352
PC Requirements
- 500 MHz Pentium III or faster
- Windows operating systems : Windows XP Professional (Service Pack 1), XP Home, 2000 Professional (Service Pack 3), 98 2nd Edition, ME
- Minimum 50MB of available HD space (not including media files)
- Minimum memory of 256MB recommended.
- Ethernet interface