DVD1056 - DVD player CURTIS - Free user manual and instructions
Find the device manual for free DVD1056 CURTIS in PDF.
| Product Type | DVD Player |
| Brand | CURTIS |
| Model | DVD1056 |
| Compatible Disc Formats | DVD, VCD, CD, HD-CD, MP3, JPEG |
| Dimensions (W x D x H) | 360 x 240 x 40 mm |
| Weight | 1.5 kg |
| Power Supply | AC 100-240 V, 50/60 Hz |
| Power Consumption | 10 W |
| Video Outputs | Composite, S-Video, YUV, Progressive Scan |
| Audio Outputs | Analog stereo, optical, coaxial |
| Playback Functions | Normal playback, repeat, shuffle, programmed playback, A-B repeat, zoom, search, slow motion, fast forward |
| Additional Functions | Subtitles, audio language switching, camera angles, parental control |
| OSD Menu Languages | English, French, Spanish, Portuguese, German, Italian |
| Screensaver | Yes |
| Laser Class | Class 1 |
| Safety | Do not expose to water, do not open the casing |
| Maintenance and Cleaning | Unplug before cleaning, use a damp cloth |
| Included Accessories | Remote control, audio/video cables, user manual |
| Repairability | Contact a qualified technician |
Frequently Asked Questions - DVD1056 CURTIS
User questions about DVD1056 CURTIS
0 question about this device. Answer the ones you know or ask your own.
Ask a new question about this device
Download the instructions for your DVD player in PDF format for free! Find your manual DVD1056 - CURTIS and take your electronic device back in hand. On this page are published all the documents necessary for the use of your device. DVD1056 by CURTIS.
USER MANUAL DVD1056 CURTIS
Table of Contents. 1-2
Safety Precaution. 3
Important Safety Instructions. 4-5
Chapter 1 Basic Operation. 6-8
I. Turn on your DVD player. 6
2. Place a disc into the tray. 6
3. Playing discs 6
a) Menu Play (compatible with DVD, VCD2.0 discs). 6-8
b) Title Play (compatible with DVD discs only). 8
c) Sequence Play (compatible with DVD, VCD, HD-CD, MP3/JPEG discs). 8
d) Program Play (compatible with DVD, VCD, CD, HD-CD, MP3/JPEG discs). 8
Chapter 2 Additional Operation. 8-13
- Selecting Tracks (compatible with DVD, VCD, CD, HD-CD, MP3/JPEG discs). 8
- Skipping Tracks (compatible with DVD, VCD, CD, HD-CD, MP3/JPEG discs)
- Multi speed Fast Motion Playback (compatible with DVD, VCD, CD, MP3/JPEG discs) 8-9
- Multi speed Slow Motion Playback (compatible with DVD, VCD, CD, HD-CD, MP3/JPEG discs). 9
- Freeze Frame and Frame Advance (compatible with DVD, VCD, CD, HD-CD, MP3/JPEG discs) 9
- Using the Repeat Feature (compatible with DVD, VCD, CD, HD-CD, MP3/JPEG discs) 9-10
- Using the Display Feature (compatible with DVD, VCD, CD, MP3/JPEG discs)
- Using the Search Feature (compatible with DVD, VCD, CD, HD-CD discs). 10
- Using the Browse / Scan / Index feature (compatible with VCD discs; the scan feature is also compatible with CD, HD-CD discs) 10-11
- Changing the Audio Language (compatible with DVD discs) 11
- Subtitles (compatible with DVD discs) 12
- Changing the Camera Angle (compatible with DVD discs) 12
- Mute the Audio Output (compatible with DVD, VCD, CD, HD-CD, MP3/JPEG
discs) 12
- Zoom In the Video ImageCompatible with DVD, VCD, JPEG discs) 12
- Repeat a Specific Segment on the Disc that You Define (compatible with DVD, VCD, CD, HD-CD, MP3 discs) 12-13
- Volume control (compatible with DVD, VCD, CD, HD-CD, MP3/JPEG discs). 13
Chapter 3 Playing MP3 and JPEG discs. 14-15
Chapter 4 The Setup Menu System. 16-20
- General Steps of Setup Menu 16
- Setup Items Introduction 16
a) System Setup. 16-18
b) Language Setup. 18
c) Audio Setup. 18-19
d) Video Setup. 19
e) Speaker Setup. 19
f) Digital Setup. 19-20
Chapter 5 DVD Player User's Manual. 21-22
- Types of Discs Your DVD Player Will Play 21
- Remote Controller 22-23
- Specification 24
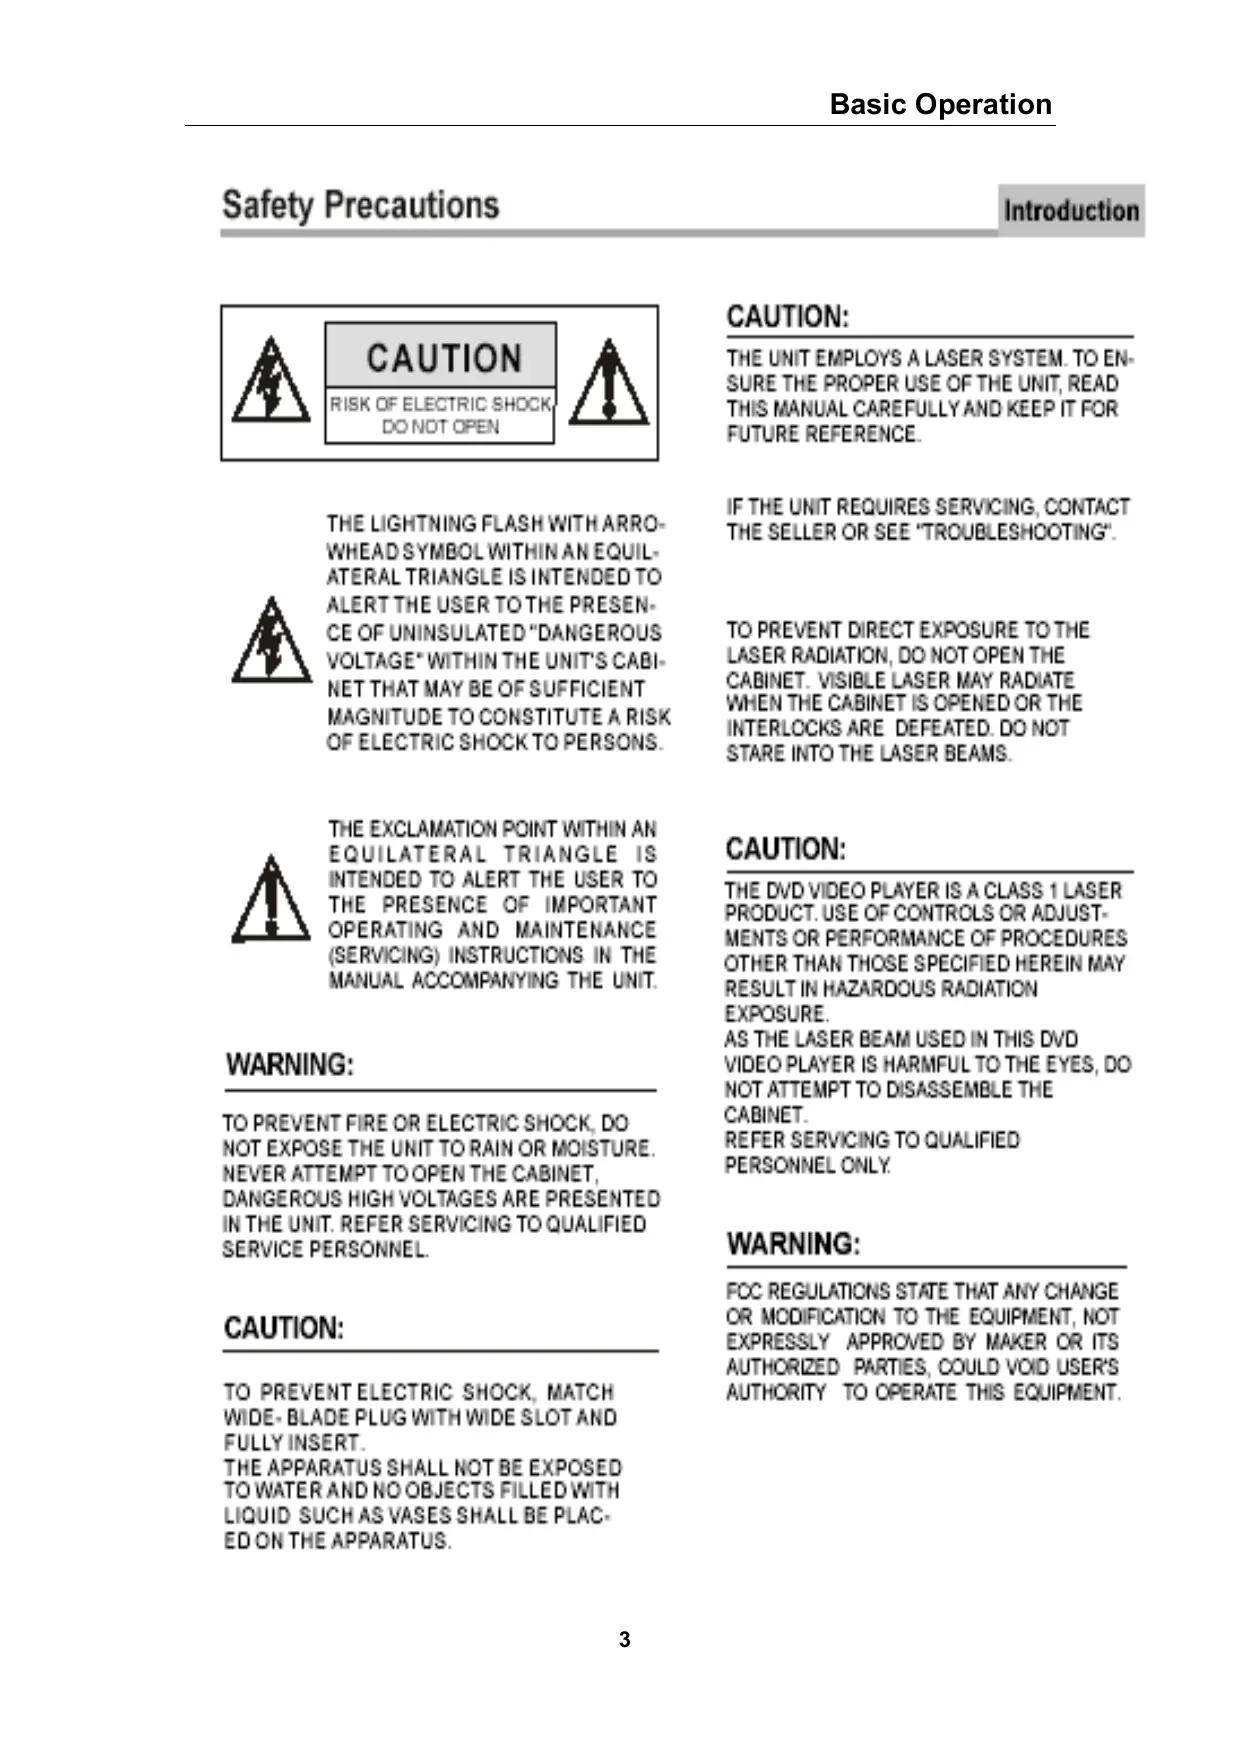
CAUTION:
THE UNIT EMPLOYS A LASER SYSTEM. TO ENSURE THE PROPER USE OF THE UNIT, READ THIS MANUAL CAREFULLY AND KEEP IT FOR FUTURE REFERENCE.

THE LIGHTNING FLASH WITH ARROWHEAD SYMBOL WITHIN AN EQUILATERAL TRIANGLE IS INTENDED TO ALERT THE USER TO THE PRESENCE OF UNINSULATED "DANGEROUS VOLTAGE" WITHIN THE UNIT'S CABINET THAT MAY BE OF SUFFICIENT MAGNITUDE TO CONSTITUTE A RISK OF ELECTRIC SHOCK TO PERSONS.
IF THE UNIT REQUIRES SERVICING, CONTACT THE SELLER OR SEE "TROUBLESHOOTING".
TO PREVENT DIRECT EXPOSURE TO THE LASER RADIATION, DO NOT OPEN THE CABINET. VISIBLE LASER MAY RADIATE WHEN THE CABINET IS OPENED OR THE INTERLOCKS ARE DEFEATED. DO NOT STARE INTO THE LASER BEAMS.

THE EXCLAMATION POINT WITHIN AN EQUILATERAL TRIANGLE IS INTENDED TO ALERT THE USER TO THE PRESENCE OF IMPORTANT OPERATING AND MAINTENANCE (SERVICING) INSTRUCTIONS IN THE MANUAL ACCOMPANYING THE UNIT.
CAUTION:
THE DVD VIDEO PLAYER IS A CLASS 1 LASER PRODUCT. USE OF CONTROLS OR ADJUSTMENTS OR PERFORMANCE OF PROCEDURES OTHER THAN THOSE SPECIFIED HEREIN MAY RESULT IN HAZARDOUS RADIATION EXPOSURE. AS THE LASER BEAM USED IN THIS DVD VIDEO PLAYER IS HARMFUL TO THE EYES, DO NOT ATTEMPT TO DISASSEMBLE THE CABINET. REFER SERVICING TO QUALIFIED PERSONNEL ONLY.
WARNING:
TO PREVENT FIRE OR ELECTRIC SHOCK, DO NOT EXPOSE THE UNIT TO RAIN OR MOISTURE. NEVER ATTEMPT TO OPEN THE CABINET, DANGEROUS HIGH VOLTAGES ARE PRESENTED IN THE UNIT. REFER SERVICING TO QUALIFIED SERVICE PERSONNEL.
WARNING:
FOC REGULATIONS STATE THAT ANY CHANGE OR MODIFICATION TO THE EQUIPMENT, NOT EXPRESSLY APPROVED BY MAKER OR ITS AUTHORIZED PARTIES, COULD VOID USER'S AUTHORITY TO OPERATE THIS EQUIPMENT.
CAUTION:
TO PREVENT ELECTRIC SHOCK, MATCH WIDE-BLADE PLUG WITH WIDE SLOT AND FULLY INSERT. THE APPARATUS SHALL NOT BE EXPOSED TO WATER AND NO OBJECTS FILLED WITH LIQUID SUCH AS VASES SHALL BE PLACED ON THE APPARATUS.
Important Safety Instructions
Introduction
1. Read Instructions
All the safety and operating instructions should be read before the product is operated.
2. Retain Instructions
The safety and operating instructions should be retained for future reference.
3. Heed Warnings
All warnings on the product and in the operating instructions should be adhered to.
4. Follow Instructions
All operating instructions should be followed.
6. Cleaning
Unplug this product from the wall outlet before cleaning. Do not use liquid cleaners or aerosol cleaners. Use a damp cloth for cleaning.
6. Attachments
Do not use attachments not recommended by the product manufacturer as they may cause hazards.
7. Water and Moisture
Do not use this product near water for example, near a bathtub, wash bowl, kitchen sink, or laundry tub; in a wet basement; or near a swimming pool; and the like.
U. Accessories
Do not place this product on an unstable cart, stand, tripod, bracket, or table. The product may fail, causing serious injury to a child or adult, and serious damage to the product. Use only with a cart, stand, tripod, bracket, or table recommended by the manufacturer, or sold with the product. Any mounting of the product should follow the manufacturer's instructions, and should use a mounting accessory recommended by the manufacturer.
9. Portable Cart Warning
A product and cart combination should be moved with care. Quick stop, excessive force, and uneven surface may cause the product and cart combination to overturn.

(Symbol provided by RETAC)
10. Ventilation
Slots and openings in the cabinet are provided for ventilation and to ensure reliable operation of the product and to protect it from overheating, and these openings must not be blocked or covered. The openings should never be blocked by placing the product on a bed, sofa, rug, or other similar surface. This product should not be placed in a built-in installation such as a bookcase or rack unless proper ventilation is provided or the manufacturer's instructions have been adhered to.
11. Power Sources
This product should be operated only from the type of power source indicated on the marking label. If you are not sure of the type of power supply to your home, consult your product dealer or local power company. For products intended to operate from battery power or other sources, refer to the operating instructions.
12. Grounding or Polarization
This product may be equipped with a polarized alternating current line plug (a plug having one blade wider than the other). This plug will fit into the power outlet only one way. This is a safety feature. If you are unable to insert the plug fully into the outlet, try reversing the plug. If the plug should still fail to fit, contact your electrician to replace your obsolete outlet. Do not defeat the safety purpose of the polarized plug.
13. Power Cord Protection
Power supply cords should be routed so that they are not likely to be walked on or pinched by items placed upon or against them, paying particular attention to cords at plugs, convenience receptacles, and the point where they exit from the product.
Important Safety Instructions
Introduction
1. Read Instructions
All the safety and operating instructions should be read before the product is operated.
2. Retain Instructions
The safety and operating instructions should be retained for future reference.
3. Heed Warnings
All warnings on the product and in the operating instructions should be adhered to.
4. Follow Instructions
All operating instructions should be followed.
6. Cleaning
Unplug this product from the wall outlet before cleaning. Do not use liquid cleaners or aerosol cleaners. Use a damp cloth for cleaning.
6. Attachments
Do not use attachments not recommended by the product manufacturer as they may cause hazards.
7. Water and Moisture
Do not use this product near water for example, near a bathtub, wash bowl, kitchen sink, or laundry tub; in a wet basement; or near a swimming pool; and the like.
B. Accessories
Do not place this product on an unstable cart, stand, tripod, bracket, or table. The product may fail, causing serious injury to a child or adult, and serious damage to the product. Use only with a cart, stand, tripod, bracket, or table recommended by the manufacturer, or sold with the product. Any mounting of the product should follow the manufacturer's instructions, and should use a mounting accessory recommended by the manufacturer.
9. Portable Cart Warning
A product and cart combination should be moved with care. Quick stop, excessive force, and uneven surface may cause the product and cart combination to overturn.

(Symbol provided by RETAC)
10. Ventation
Slots and openings in the cabinet are provided for ventilation and to ensure reliable operation of the product and to protect it from overheating, and these openings must not be blocked or covered. The openings should never be blocked by placing the product on a bed, sofa, rug, or other similar surface. This product should not be placed in a built-in installation such as a bookcase or rack unless proper ventilation is provided or the manufacturer's instructions have been adhered to.
11. Power Sources
This product should be operated only from the type of power source indicated on the marking label. If you are not sure of the type of power supply to your home, consult your product dealer or local power company. For products intended to operate from battery power or other sources, refer to the operating instructions.
12. Grounding or Polarization
This product may be equipped with a polarized alternating current line plug (a plug having one blade wider than the other). This plug will fit into the power outlet only one way. This is a safety feature. If you are unable to insert the plug fully into the outlet, try reversing the plug. If the plug should still fail to fit, contact your electrician to replace your obsolete outlet. Do not defeat the safety purpose of the polarized plug.
13. Power Cord Protection
Power supply cords should be routed so that they are not likely to be walked on or pinched by items placed upon or against them, paying particular attention to cords at plugs, convenience receptacles, and the point where they exit from the product.
Basic Operation
1. Turn On the TV and Your DVD Player
Press the Power button on the player or the remote controller, and "Read" appears on the TV screen. If there hasn't a disc in the DVD player, "No disc" will be displayed on the screen
2. Place A Disc
Press the Open / Close button on the remote controller or the front of the DVD player, and "Open" appears on the screen. Then Place a disc gently into the tray with the disc's label facing up (double-sided discs have content on both sides, so you can place either side up), and press the Open / Close button again to close the disc tray, "Close" appears and the player starts to read. Then the disc starts playing automatically. (Note: Of some certain type discs, after reading out the type, the Play or Enter button should be pressed to start playing.)
3. Play
The contents of each disc menu vary according to how the disc was authored and what features are included. The disc menu will be turned on for you to select, when Root button pressed. Also play and pause can be switched with the Pause button on the remote. Moreover, such as menu play, title play, sequence play etc., these different play modes are offered.
a) Menu Play (compatible with DVD, VCD2.0 discs)
I. Press Root Button
- TV screen displays the DVD Root Menu when a DVD disc is loaded.
- When a VCD 2.0 disc is loaded, VCD 2.0 menu will be displayed on the screen (when PBC is off) (At this moment, press PBC button once to display current PBC state).
PBC is initialized on when a VCD2.0 disc is loaded.
II. When a DVD disc is loaded, you can press Arrow buttons to highlight the menu item you want to choose; As VCD2.0, you can press Numeric buttons to select a track to play.
III. Press Enter or Play button, you can begin play with the highlighted.
IV. Return when playing: When a DVD disc is playing, press Root button, and you can return to Root Menu; As VCD2.0, and PBC is on, press PBC button, you can return to the menu.
V. Stop
1) When you press Stop button for the first time, the player turns into quasi stop state. At the same time the OSD appears "Quasi Stop". To begin the title over, press Stop twice.
2) In quasi stop state, the player remembers where you stopped, when you start playing the disc again, the DVD player picked up where you left off.
3) In stop state, when you press Play, the player enters sequence playback mode.
-
For the disc protection, before you press Open / Close button to eject the disc tray when playing, please press Stop button at first. After taking out the disc, press Open / Close again to close the tray.
-
If you're not going to use the DVD player for a long time, be sure to remove the electronic plug.
b) Title Play (compatible with DVD discs only)
I. During DVD playback, press Title button to display the DVD title content.
II. Press the Arrow buttons to highlight the title you want to choose, and press Enter; Also you can press numeric buttons to choose.
III. The DVD player begins with the chapter 1 of the chosen title.
c) Sequence Play (compatible with DVD, VCD, HD-CD, MP3/JPEG discs)
I. When a VCD disc is loaded and PBC is on, once PBC button pressed, PBC switches off. Then the player can play in sequence playback mode; when PBC button pressed twice, PBC switches on.
II. Except for VCD discs, in the stop state, when press Play button, the player then enters sequence playback mode. This feature is effective to all the compatible discs.
d) Program Play (compatible with DVD, VCD, CD, HD-CD, MP3/JPEG discs)
The Program Playback option allows you to enter the order in which you want chapters or tracks to play, maximum to 16.
- Program Menu:
If PBC is on, this operation will turn PBC off while the chapters / tracks plays in programmed order.
-
According to the highlight, use the Numeric buttons to enter the chapters / tracks in the order you want them to play. Then press Play or use Arrow buttons to highlight the "PLAY" item and press Enter. The chapters / tracks will play in the programmed order.
You can program maximum 16 titles / chapters / tracks. -
According to the Direction Indicator on the menu, you can press Arrow buttons to highlight where you want to enter.
-
During Program Playback, if PROG button pressed, the programmed order and the contents will be displayed on the screen, and the Program Playback will be stopped; Also you can press Stop and Play to resume normal playback.
Notes:
To clear the programmed order, use Arrow buttons to highlight the “CLEAR” item, then press Enter.
To modify the programmed order, use Arrow buttons to highlight the modifying item and enter the new chapter / track you want to program directly.
- Meanwhile, the playing chapter / track also illuminate.
Chapter 2 Additional Operation
1. Selecting Tracks (compatible with DVD, VCD, CD, HD-CD, MP3/JPEG discs)
a) When playing a DVD disc, press Numeric buttons on the menu or title page to select tracks; During DVD playback, you can input desired title number directly.
b) As a VCD disc, during sequence playback, press Numeric buttons to select tracks. (During ProgramPlayback and PBC is on, you can only press Prev/Next button to select)
c) As for CD, HD-CD discs, press Numeric buttons directly to select tracks.
d) When playing MP3 / JPEG discs, press Numeric buttons to select different tracks on current track list.
Notes: To select tracks from 1 to 10, press corresponding Numeric buttons (1-9, 10)
To select tracks above 10, press 10+ button. For example, to select the track 15, press 10+ and 5 button.
If the selected track is not available, the input would be invalid.
2. Skipping Tracks (compatible with DVD, VCD, CD, HD-CD, MP3/JPEG discs)
a) To skip forward to the beginning of the next title / chapter / track on a disc, press Next on the remote or the front of the player
b) To skip backward to the beginning of the preceding title / chapter / track on a disc, press Prev on the remote or the front of the player.
- When playing the last chapter / track on a VCD disc with PBC off, pressing Next button will stop the playback; When playing the first chapter / track., pressing Prev button will stop the playback; When stop, pressing Next / Prev button will be invalid.
- If a DVD disc is loaded, it varies according to how the disc was configured.
3. Multi speed Fast MotionPlayback (compatible with DVD, VCD, CD, MP3/JPEG discs)
You can search in forward or reverse mode during playback.
a) Press the FWD button on the remote during playback to search through a disc. Press the button again on the remote to search at the next speed. Fast Forward Playback has four speeds: × 2 , × 4 , × 8 , × 20 . With each consecutive press of the button, the search speed increases. If you press the button five times, Fast Forward Playback cycles back to normal playback.
During DVD playback, when Fast Forward Playback gets to the beginning of the next title / chapter, it resumes normal playback; During VCD playback with PBC on, when Fast Forward Playback gets to the beginning of the next track, it resumes normal playback.
- Press Play button to resume normal playback.
- During CD, HD-CD or MP3 playback, with the speed F.F × 2, the player has audio output.
b) Press the REV button on the remote during playback to search through a disc. Press the button again on the remote to search at the next speed. Fast Reverse Playback has four
speeds: × 2, × 4, × 8, × 20 . With each consecutive press of the button, the search speed increases. If you press the button five times, Fast Reverse Playback cycles back to normal playback.
During DVD playback, when Fast ReversePlayback gets to the beginning of the playing title / chapter, it resumes normal playback; During VCD playback with PBC on, when Fast ReversePlayback gets to the beginning of the playing track, it resumes normal playback.
- Press Play button to resume normal playback.
- During CD, HD-CD or MP3 playback, with the speed F.R × 2, the player has audio output.
4. Multi speed Slow MotionPlayback (compatible with DVD, VCD, CD, HD-CD, MP3/JPEG discs)
Press Slow button when pictures moving, you can enter Slow Motion Playback mode.
Press the Slow button on the remote during playback. Press the button again on the remote to play at the next speed. Slow Motion Playback has six speeds: 1/2, 1/3, 1/4, 1/5, 1/6, 1/7. With each consecutive press of the button, the play speed decreases. If you press the button seven times, Slow Motion Playback cycles back to normal playback.
Press Play button to resume normal playback.
5. Freeze Frame and Frame Advance (compatible with DVD, VCD, CD, HD-CD, MP3/JPEG discs)
a) During CD, HD-CD or MP3 / JPEG playback, press Pause once to freeze playback; Press the Pause button again or Play button to resume normal playback.
b) During DVD or VCD playback, press Pause once to freeze playback; Press of the Pause button again to advance the picture one frame at a time; Press Play to resume normal playback.
6. Using the Repeat Feature (compatible with DVD, VCD, CD, HD-CD, MP3/JPEG discs)
While a disc is playing, press Repeat button once, and the repeat banner appears to show current repeat mode.
a) In VCD, CD, HD-CD or MP3 / JPEG sequence playback mode, press Repeat button again to turn on repeat mode.
Press the button again on the remote to turn to the next repeat mode. There are three repeat options: Off, Track Repeat, and Disc Repeat. With each consecutive press of the button, the repeat mode switches. If you press the button four times, repeat mode cycles back to Off.
b) In DVD playback, press Repeat button again to turn on repeat mode.
There are three repeat options: Off, Chapter Repeat, and Title Repeat. With each consecutive press of the button, the repeat mode switches. If you press the button four times, repeat mode cycles back to Off.
c) In MP3 / JPEG playback, press Repeat button again to turn on repeat mode.
There are four repeat options: Off, Track Repeat, Directory Repeat, and Disc Repeat. With each consecutive press of the button, the repeat mode switches. If you press the
button five times, repeat mode cycles back to Off.
7. Using the Display Feature (compatible with DVD, VCD, CD, MP3/JPEG discs)
a) Loading and playing DVDs (two pages)
Press OSD button once to show the first page: "Disc Type, Title * / * (the playing title / total titles), Chapter * / * (the playing chapter / total chapters), Elapsed Time of the Disc".
- Press the button again to show the second page: "Language * / * (the serial number of playing language / the amount of optional languages) or Off, Language Type, Audio Type, Subtitle * / * (the serial number of playing subtitle / the amount of optional subtitles) or Off, Angle * / * (the serial number of playing angle / the amount of optional angles) or Off".
- Press the button for the third time, the display menu fades out.
b) Loading and playing VCD
- Press OSD button once to show the first page: "Disc Type, Track * / * (the playing track / total tracks), Mute, PBC, Repeat Mode, Elapsed Time of the Playing Track".
- Press the button again, the display menu fades out.
c) Loading and playing CD, HD-CD, MP3 / JPEG discs
- Press OSD button once to show the first page: "Disc Type, Track * / * (the playing track / total tracks), Mute, Repeat Mode, Elapsed Time of the Playing Track".
- Press the button again, the display menu fades out.
8. Using the Search Feature (compatible with DVD, VCD, CD, HD-CD discs)
You can use Search feature to select a title / chapter / track number or go to a specific point in a title. Firstly, press TIME button on the remote controller to bring up the search menu and enter the edit state; Secondly, press Arrow buttons to highlight the title / chapter / track number or the time option; Thirdly, use Numeric buttons to enter the title / chapter / track you want to play or the elapsed time you want to go to in that title; At last, press Enter button to start playback. For example, entering 01:23:56 will start playback one hour, twenty-three minutes and fifty-six seconds into the title. If the input number is illegal, the error information “INVALID KEY” will be displayed on the screen.
Notes
I. This feature does not work in Program Play mode.
II. If PBC is on, it will turn off automatically when Search Playback starts.
III. When playing WMA, MP3 / JPEG discs, Search Feature does not work.
9. Using the Browse / Scan / Index feature (compatible with VCD discs; the scan feature is also compatible with CD, HD-CD discs)
a) Press PREV button during Stop state
I. When a VCD disc is loaded, the screen displays small pictures or "thumbnails" of the available tracks. According to the tracks' sequence on the disc, up to nine thumbnails are displayed per screen, and each thumbnail plays 3 seconds.
- If PBC is on, it will turn off automatically when Browse Playback starts.
- To view the next nine thumbnails, press the Next button to go forward and the Prev button to go to the previous page.
- To exit the digest and resume normal playback from current track, press the Play button.
- Each thumbnail has a number in the corner. You can select and play a track by press that number on the remote.
II. When a CD or HD-CD disc is loaded, according to the tracks' sequence on the disc, each track plays 15sec.
- You can select a track to start Scan Playback by press Number buttons on the remote.
- To exit the Scan Playback and resumes normal playback from the scanning track, press the Play button.
- During normal playback, press Preview button to start Scan Playback from current track (if the track has played for more than 15sec, it will start from the next track).
b) Press the PREV button again, that is to press the button during Browse Playback, the screen displays big pictures instead of thumbnails. According to the tracks' sequence on the disc, each picture plays 15sec.
- You can select a track to start Index Playback by press Numeric buttons on the remote.
- To exit the digest and resume normal playback from current track, press the Play button.
c) During normal playback, press the PREV button to show thumbnails of the currently selected track.
- If PBC is on, it will turn off automatically when Browse Playback starts.
- To view the next nine thumbnails, press the Next button to go forward and the Prev button to go to the previous page.
- To exit the digest and resume normal playback from the current picture, press the Play button.
Each thumbnail has a number in the corner. You can select and play a picture by press that number on the remote.
10. Changing the Audio Language (compatible with DVD disc)
During disc playback, press Language on the remote once, and the audio language info banner appears.
When a DVD is recorded with multiple soundtracks, you can use the Language feature to temporarily change the audio language (the language of the soundtrack)
There are 6 supported languages: English, French, Spanish, Portuguese, Germany and Italian. With each consecutive press of the Language button, the audio language switches and the corresponding serial number appears on the screen. For example, "Language Icon: [1 English 6CH] or [Off]" (the availability of the languages are disc-dependent).
11. Subtitles (compatible with DVD disc)
Press the Subtitle button on the remote once, and the subtitle info banner appears.
When a DVD is recorded with subtitles, you can use the Subtitle feature to view the subtitles on-screen. By default, subtitles are off. The info banner will display Subtitle Off.
To display subtitles, press the Subtitle button again. The default language with its corresponding serial number will be displayed in the info banner and subtitles will be displayed in that language. There are 6 supported subtitles: English, French, Spanish, Portuguese, Germany and Italian. With each consecutive press of the Subtitle button, the subtitle switches. For example, "Language Icon: [1 English 6CH] or [Off]" (the availability of the subtitles are disc-dependent). To turn subtitles off, press the Subtitle button until Subtitle Off is displayed.
12. Changing the Camera Angle (compatible with DVD discs)
During disc playback, press Angle on the remote once, and the angel icon appears.
Some DVDs contain multiple angles of a particular scene or sequence, so you can use the Angle feature to view.
Press the Angle button again to go to the next camera angle. If multiple camera angles are available, the Angle icon displays the current angle number and the number of angles available. For example: "Angle Icon: [^ / ^] or [Off]"; 1 / 4 indicates that angle one is being displayed, and there are four different angles available. (This feature is disc-dependent. If no additional camera angles are available, the "Invalid Key" will be displayed.)
13. Mute the Audio Output (compatible with DVD, VCD, CD, HD-CD, MP3/JPEG discs)
Pressing the Mute button allows you to reduce sound to an inaudible level, and "MUTE" will be displayed on screen. Press the button again or press the Vol +/- button to return to the normal condition.
Notes:
- If the player playback disc without sound, please try to press Mute button to resume.
14. Zoom In the Video Image (compatible with DVD, VCD, JPEG discs)
a) The Zoom Function allows you to enlarge or zoom out the video image and to pan though the image. Press Zoom repeatedly to activate the function and choose the required zoom factor: Zoom 1, Zoom 2, Zoom 3, Zoom 1/2, Zoom 1/3, Zoom 1/4, Zoom Off.
Notes:
This feature does not work when the Disc Menu appears.
b) Use the Arrow buttons to pan across the screen when the zoom factor is 1, 2 or 3.
15. Repeat a Specific Segment on the Disc that You Define (compatible with DVD, VCD, CD, HD-CD, MP3 discs)
a) During the normal or fast motion playback, press the A-B button once, and “REPEAT A-” will appear on the screen. This indicates the start of the loop to be repeated.
b) During the normal of fast motion playback, press A-B again, and "REPEAT A-B" will appear on the screen. It indicates the end of the loop.
- Looping will run from set point A to set point B until you turn off Repeat.
c) Press A-B again to cancel A-B loop mode.
- When playing a VCD, or CD disc, you can repeat a specific segment only in one track. When the next track begins, A-B Repeat turns off automatically.
- When playing a DVD disc, you can repeat a specific segment only in one title / chapter.
16. Volume control (compatible with DVD, VCD, CD, HD-CD, MP3/JPEG discs)
- You can press the Volume button on the front of TV set or the amplifier to control the sound level.
- Pressing the Vol+ button on the remote allows you to amplify the sound level; Pressing Vol- will reduce the sound level.
Notes:
- During DVD PCM output playback, this feature does not work.
Chapter 3 Playing MP3 and JPEG discs
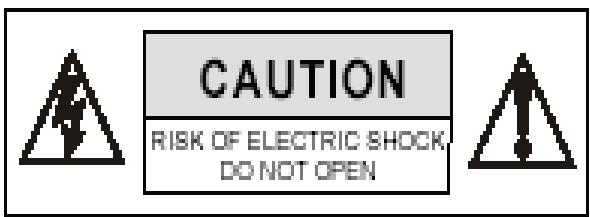
Place a MP3 / JPEG disc into the tray, and the player will auto search the directories saved MP3 / JPEG files. After searching, it will auto go to the first directory saved MP3 files (to the disc containing both mp3 and jpeg files; To the disc containing single type of files, it will auto go to the first directory) and play the first song in the directory ("01:" is highlighted). The screen displays as the picture below:
Use the Arrow buttons to enter the Directory Region and highlight the desired directory, then the first track under it starts playback; Also you can use the Arrow buttons to enter the File Region and select the file you want to play.
Notes:
I. Press the Left and Right arrow buttons, you can activate Directory Region, File Region and File Switch Region separately.
II. The highlight in Directory Region and File Region is shown as the picture above; While it
appears a transparent rectangle in File Switch Region.
III. In File Switch Region, you can press the Left and Right arrow buttons to switch the highlight, then press Enter; the "M", "P", and "G" button is illustrated in the above picture. For example, if a disc with MP3 and JPEG files but without any NES files is loaded, the color of the letter "M" and "P" will appear to white and "G" black. If a MP3 file playing, "M" turns darker.
IV. To the disc with MP3 and JPEG files, when playing a JPEG picture, press the Return button to return to JPEG list.
V. You can press the Number buttons to select the file you want to play. For example, if you desire the 15^th track in current list, press the "10+" button once, then press "5", the 15^th starts playback.
Notes: When playing a disc with MP3 files, video cannot be output while only digital audio can.
VI. When playing JPEG pictures, press the Program button to choose the pictures switched mode. There are 17 switch modes; Press Program repeatedly to activate the function and choose the required switch mode: Spread from Up to Down, Spread from Down to Left, Spread from Left to Right, Spread from Right to Left, Spread from Left up to Right Down, Spread from Right up to Left Down, Spread Left Down to Right Up, Spread from Right Down to Left Up, Spread from Center to Up / Down, Fold from Up / Down to Center, Fold from Left / Right to Center, Horizontal Shutter, Vertical Shutter, Fold from the Corners to the Center, Random Play, Off.
VII. When a picture playing or pausing, press the Arrow buttons to change the display angle: Up: flip vertical
Down: flip horizontal
Left: rotate 908 counter-clockwise
Right:rotate908clockwise
VIII. When a picture playing or pausing, press the Menu button, the screen displays small pictures. Up to 12 small pictures are displayed per screen. To view the next 12 pictures, press the Next button to go forward and the Prev button to go to the previous page. You can also select and play a picture in full screen by press that number on the remote.
Chapter 4 The Setup Menu System
1. General Steps of Setup Menu
a) Press the Setup button, the main setup menu appears.
- When the main menu displayed, the DVD system will auto pause.
b) Press the Left and Right arrow buttons to highlight the icon of the desired page, then press the Down or Up arrow button to activate that page; For example, if you want to setup the video page, press Right to highlight the video icon, the video page will be displayed on the screen.
c) Press the Down arrow button to highlight the desired option. Press Enter or press Right to select, the choices of that option appear on the right; For example, press the Down arrow button to highlight the BRIGHTNESS option, then press Enter to select, the brightness choices appear on the right.
d) Press the Arrow buttons to highlight the Exit Setup option, then press Enter or Setup again to exit Setup Menu.
Notes:
- When setup, the pressing of the following buttons will turn off the setup menu, while the choices that have been changed will be saved: Subtitle, FWD, REV, Vol +/-, PBC, Title, Return, Play, Stop, Pause, Next, Prev, Zoom, PREV, TIME, PROG, Repeat, A-B, Angle, language, OSD, Mute, Setup.
2. Setup Items Introduction
a) SYSTEM SETUP
TV SYSTEM
According to the Color System of the TV, you can choose the TV System.
- AUTO: Choose this settings if your DVD player is connected to a multi-system TV.
- NTSC: Choose this settings if your DVD player is connected to a NTSC TV.
PAL: Choose this settings if your DVD player is connected to a PAL TV.
PAL60: Choose this settings if your DVD player is connected to a PAL60 TV.
SCREENSAVER
If the screen saver is on, when your DVD player is in Stop, Open, or No Disc state, or there is a frame frozen for more than 60sec, the screen saver will be displayed. This feature can protect the screen from damage.
- ON: Choose this setting to activate the screen saver.
OFF: Choose this setting to cancel the screen saver
The default setting is ON.
VIDEO
- Interlace-YUV: Choose this setting if your DVD player is connected to a TV with Y, Cb, Cr video cables.
- TV-RGB: Choose this setting if your DVD player is connected to a TV with an
S-Video cable or composite video cables.
- P-SCAN: Choose this setting if your DVD player is connected to a progressive scan TV with Y, Cb, Cr video cables.
Notes:
- When your DVD player output composite video, you can choose the setting randomly.
- Choose TV-RGB / P-SCAN if your DVD player is connected to a progressive scan TV.
TV TYPE
- 16:9 (Wide Screen): Choose this setting if your DVD player is connected to a wide screen TV. If you choose this setting and you don't have a wide screen TV, the images on the screen may appear distorted due to vertical compression.
- 4:3 LB (Letter Box): Choosing this setting if your DVD player is connected to a normal ratio TV. You'll see the movies in their original aspect ratio (height-to-width ratio). You'll see the entire frame of the movie, but it will take up a smaller portion of the screen vertically. The movie might appear with black bars at the top and bottom of the screen.
- 4:3 PS (Pan & Scan): Choosing this setting if your DVD player is connected to a normal ratio TV. You can fill the movie to the entire screen of your TV. This might mean that parts of the picture (the left and right edges) won't be seen.
Notes:
- The image display ratio is related to the recorded disc format. Some disc can not display images in the aspect ratio you choose.
- If you play a disc recorded in 4:3 format on a wide screen TV, black bars will appear on the left and right side of the screen.
- You must adjust the screen setting depending on the type of the television you have.
PASSWORD
The password option is initialized locked, and you cannot set the ratings limit or change the password. In order for the Ratings feature work, the password mode must be turned on. If you want to set the ratings limit, you will need to enter the default password, which is 0000, then press Enter to confirm. To change the password, you will be prompted for the old password, then be prompted for a new. Enter a 4-digit number (this is your password).
RATING
The Rating feature is a rating limit system, like movie ratings. It works with DVD discs that have been assigned a rating. This helps you control the types of DVDs that your family watches.
There are two rating options: NO ADULT and KID SAFE.
- Select the VIEW ALL option to cancel the rating limit.
The default setting is VIEW ALL.
Notes:
- If the password option is locked, you cannot set the ratings limit; the rating limit does not work when the password option is unlocked.
DEFAULT
Choose this option to resume all the setup options to default settings.
b) LANGUAGE SETUP
Highlight the OSD LANGUAGE option, and press the Arrow buttons to choose the OSD language you prefer. Press Enter to confirm, and it will display OSD in that language; There are 6 optional OSD languages: English, French, Spanish, Portuguese, German and Italian.
Highlight the AUDIO LANG option, and press the Arrow buttons to choose the audio language you prefer. Press Enter to confirm. If the disc you are playing has that language available, it will output audio in that language; There are 6 optional audio languages: English, French, Spanish, Portuguese, German and Italian.
Highlight the SUBTITLE LANG option, and press the Arrow buttons to choose the subtitle language you prefer. Press Enter to confirm. If the disc you are playing has that language available, it will displays subtitles in that language; There are 6 optional audio languages: English, French, Spanish, Portuguese, German, Italian and Off.
Highlight the MENU LANG option, and press the Arrow buttons to choose the menu language you prefer. Press Enter to confirm. If the disc you are playing has that language available, it will displays menu in that language; There are 6 optional menu languages: English, French, Spanish, Portuguese, German, Italian.
Notes:
- If your preferred language isn't available, the disc's default language will be played.
The default language of your DVD player is English.
c) AUDIO SETUP
Highlight the AUDIO OUT option, and press the Arrow buttons to choose the audio output mode you prefer. Press Enter to confirm; There are 3 optional audio output modes: ANALOG, SPDIF / RAW, and SPDIF/ PCM.
- ANALOG: From the Coaxial Output jack and the Optical Output jack, no signal is output.
- SPDIF/ RAW: Choose this setting if your DVD player is connected to a power amplifier with a coaxial cable or an optical cable; When playing a disc recorded with Dolby Digital, MPEG audio formats, the corresponding digital signals will be output from the Coaxial Output jack or Optical Output jack. This player's digital output jacks are designed for a connection to a Dolby Digital, DTS , or MPEG
receiver or decoder.
- SPDIF / PCM: Choose this setting if your DVD player is connected to a 2-channel digital stereo amplifier; When playing a disc recorded with Dolby Digital and MPEG audio formats, audio signals will be modulated into a 2-channel PCM signal, and it will be output from the Coaxial Output jack or Optical Output jack.
d)VIDEO SETUP
BRIGHTNESS
Use the Up and Down arrow button to move the scroll and adjust the brightness.
CONTRAST
Use the Up and Down arrow button to move the scroll and adjust the contrast.
HUE
Use the Up and Down arrow button to move the scroll and adjust the hue.
SATURATION
Use the Up and Down arrow button to move the scroll and adjust the saturation.
e) SPEAKER SETUP
DOWNMIX
Use the Up and Down arrow button to move the scroll and adjust the saturation.
- LT / RT: Choose this setting, it will be sound like in a movie theatre if the original movie the disc was recorded from was encoded in the Pro Logic Dolby Digital format.
- STEREO: Choose this setting, when 5.1-channel sound playing, two channels of signals will be output from the left and right soundtrack; when 2-channel sound playing, stereo signal will be output.
- VSS: Choose this setting, when a disc recorded with 5.1-channel sound format playing, the fictitious surround soundtracks effect will be heard from the main soundtrack.
f) DIGITAL SETUP
The video setup options are illustrated below:
OP MODE
- LINE OUT: Choose this setting to line out the input signal. It will be more suitable for playing in the night time, for the output volume is low.
- RF REMOD: It will be more suitable to choose this setting for playing in the day time, for the output volume is high.
DYNAMIC RANGE: When "LINE OUT" is selected, choose this setting to adjust the line out ratio and get different effect. If adjusting to FULL, the audio signal peak value will be the minimum; while adjusting to OFF, maximum.
NOTE:
This option will be validated when the DOWNMIX OFF.
DUAL MONO (LEFT + RIGHT)
Choose this option to setup the L and R mono output mode; There are four modes in this option: STEREO, MONO L, MONO R, and MIX MONO.
REFERENCE:
- To protect your DVD player, the interval between two consecutive Power button operations must be above 30 seconds.
- No using for a period of time, please pull out the plug from the electronic outlet.
- The player should be operated only on condition that the type of power supply corresponds to the marking label. Otherwise, it doesn't work or even be damaged.
The player may not be compatible with some encrypted discs.
If the player stops playback by accident, please power it on again.
Types of Discs Your DVD Player Will Play
| Types of Discs | Diameter | Playback Time | Data Format | Remark |
| DVD | 12cm | 1 layer: 12min | DVD Format Disc: Compressed Digital Audio Compressed Digital Video (Moving picture) | |
| 2 layers: 240min | ||||
| 8cm | 1 layer: 80min | |||
| 2 layers: 180min | ||||
| VCD | 12cm | 74min | MPEG1 Compressed Digital Audio Compressed Digital Video (Moving picture) | Include: VCD2.0、 VCD1.1、 VCD1.0、 DVCD |
| 8cm | 20min | |||
| CD | 12cm | 74min | CD-DA: Digital Audio | |
| 8cm | 20min | |||
| HD-CD | 12cm | 74min | HD-CD: Digital Audio | |
| MP3/JPEG | 12cm | 600min | Compressed Digital Audio |
Remote Controller:
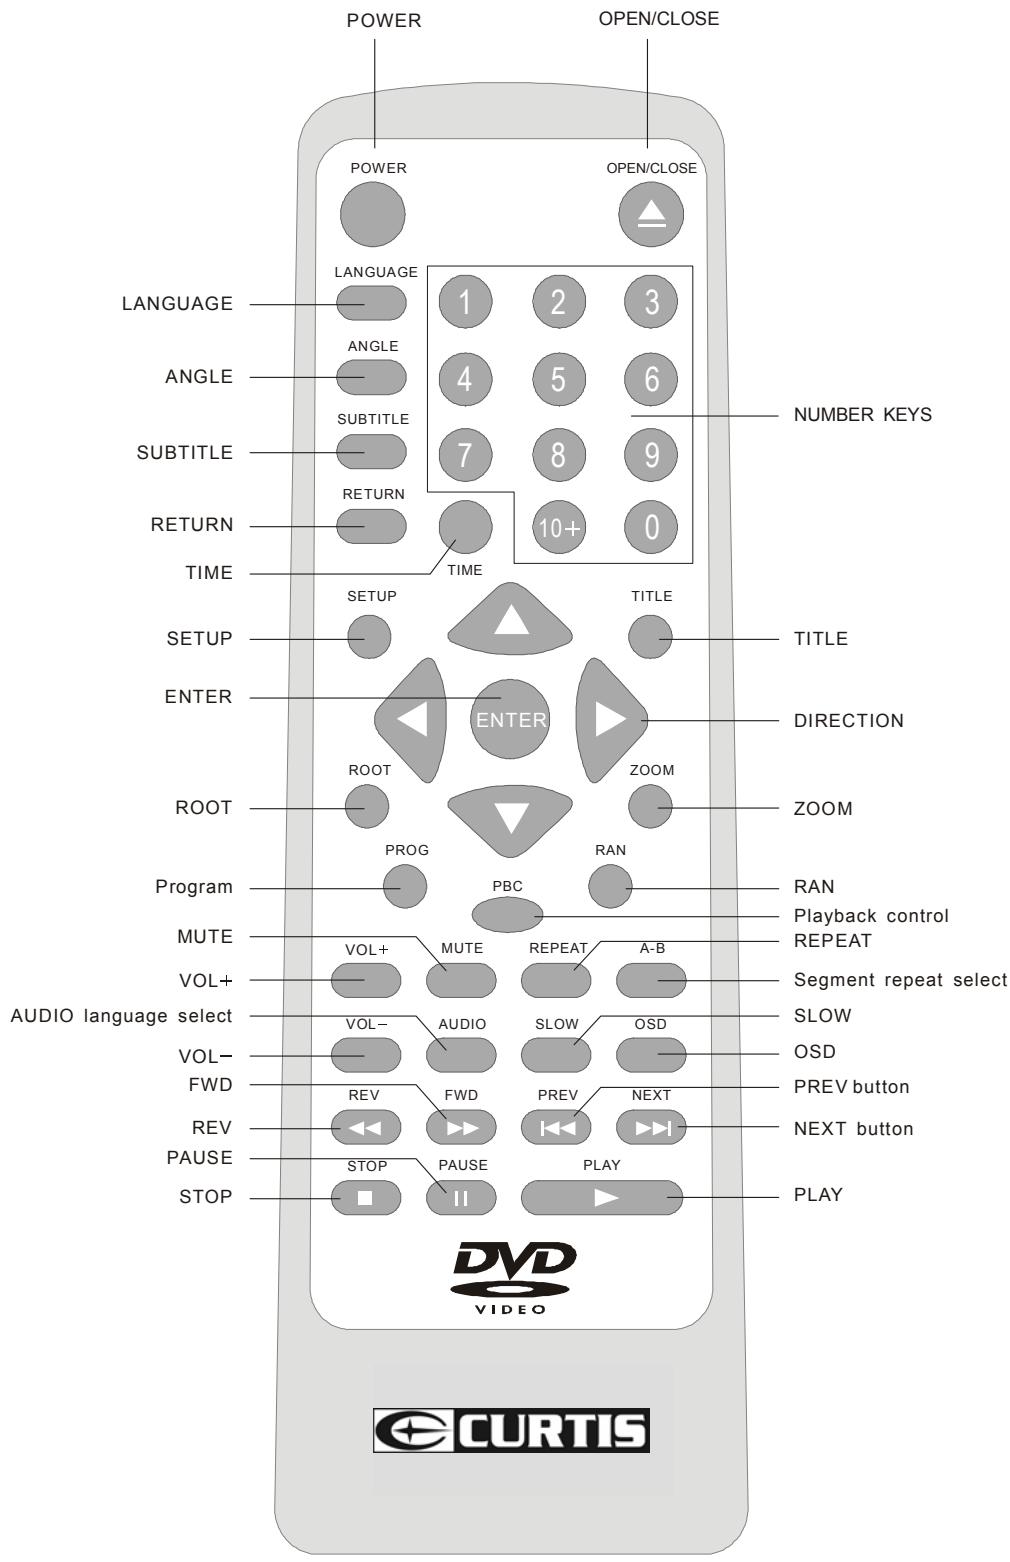
Remote control surface