
DVD1046 - DVD player CURTIS - Free user manual and instructions
Find the device manual for free DVD1046 CURTIS in PDF.


| Product Type | DVD Player |
| Brand | Curtis |
| Model | DVD1046 |
| Dimensions (W x D x H) | 360 x 240 x 45 mm |
| Weight | 1.2 kg |
| Power Supply | AC 100-240V, 50/60Hz |
| Power Consumption | 10 W (max) |
| Disc Compatibility | DVD, DVD±R/RW, CD, CD-R/RW, MP3, JPEG |
| Video Output | Composite AV, Component YPbPr |
| Audio Output | Analog stereo RCA, Digital coaxial |
| Playback Features | Play, Pause, Stop, Fast Forward, Rewind, Repeat, Random, Zoom |
| Remote Control | Included (batteries not included) |
| Display | LED front panel |
| Cleaning | Wipe with dry cloth; do not use liquids |
| Safety | Class 1 laser product; no modification allowed |
| Spare Parts & Repairability | Contact manufacturer or authorized service center |
Frequently Asked Questions - DVD1046 CURTIS
User questions about DVD1046 CURTIS
0 question about this device. Answer the ones you know or ask your own.
Ask a new question about this device
Download the instructions for your DVD player in PDF format for free! Find your manual DVD1046 - CURTIS and take your electronic device back in hand. On this page are published all the documents necessary for the use of your device. DVD1046 by CURTIS.
USER MANUAL DVD1046 CURTIS

Please read this User Manual carefully to ensure proper use of this product and keep this manual for future reference.
IMPORTANT SAFETY INSTRUCTIONS

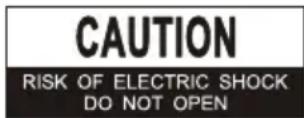

The lightning flash with arrowhead symbol within an equilateral triangle intended to alert the user to the presence of uninsulated dangerous voltage within the product's enclosure that may of sufficient magnitude to constitute a risk of electric shock to persons.
The exclamation point within an equilateral triangle is intended to alert the user to the presence of important operating and maintenance (servicing) instructions in the literature accompanying the appliance.
-
READ INSTRUCTIONS - All the safety and operating instructions should be read before the product is operated.
-
RETAIN INSTRUCTIONS - The safety and operating instructions should be retained for future reference.
-
HEED WARNINGS - All warnings on the product and in the operating instructions should be adhered to.
-
FOLLOW INSTRUCTIONS - All operating and use instructions should be followed.
-
CLEANING - Unplug this product from the wall outlet before cleaning. Do not use liquid cleaners or aerosol cleaners. Use a damp cloth for cleaning.
-
ATTACHMENTS - Do not use attachments not recommended by the product manufacturer as they may cause hazards.
-
WATER AND MOISTURE - Do not use this product near water - for example, near a bath tub, wash bowl, kitchen sink, or laundry tub; in a wet basement; or near a swimming pool; and the like.
-
ACCESSORIES - Do not place this product on an unstable cart, stand, tripod, bracket, or table. The product may fall, causing serious injury to a child or adult, and serious damage to the product.
Use only with a cart, stand, tripod, bracket, or table recommended by the manufacturer, or sold with the product. Any mounting of the product should follow the manufacturer's instructions, and should use a mounting accessory recommended by the manufacturer.
A Product and Cart Combination Should Be Moved with Care - Quick stops, excessive force and uneven surfaces may cause the product and cart combination to overturn.

-
VENTILATION - Slots and openings in the cabinet are provided for ventilation and to ensure reliable operation of the product and to protect it from overheating, and these openings must not be blocked or covered. The openings should never be blocked by placing the product on a bed, sofa, rug or other similar surface. This product should not be placed in a built-in installation, such as a bookcase or rack, unless proper ventilation is provided or the manufacturer's instructions have been adhered to.
-
POWER SOURCES - This product should be operated only from the type of power source indicated on the marking label. If you are not sure of the type of power supply to your home, consult your product dealer or local power company. For products intended to operate from battery power, or other sources, refer to the operating instructions.
-
GROUNDING OR POLARIZATION - This product may be equipped with a polarized alternating-current line plug (a plug having one blade wider than the other). This plug will fit into the power outlet only one way. This is a safety feature: If you are unable to insert the plug fully into the outlet, try reversing the plug. If the plug should still fail to fit, contact your electrician to replace your obsolete outlet. Do not defeat the safety purpose of the polarized plug.
-
POWER-CORD PROTECTION - Power supply cords should be routed so that they are not likely to be walked on or pinched by items placed upon or against them, paying particular attention to cords at plugs, convenience receptacles, and the point where exit from the product.
IMPORTANT SAFETY INSTRUCTIONS
-
NONUSE PERIODS - The power cord of the product should be unplugged from the outlet when left unused for long periods of time.
-
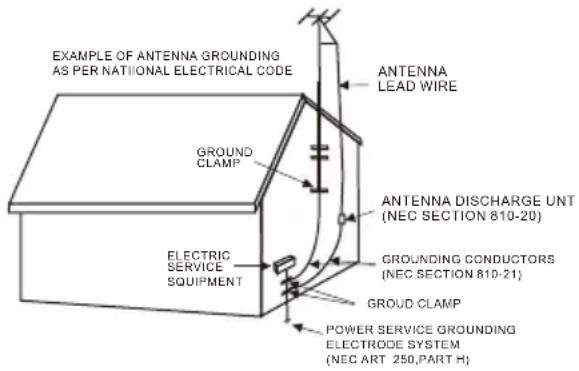
OUTDOOR ANTENNA GROUNDING - If an outside antenna or cable system is connected to the product, be sure the antenna or cable system is grounded so as to provide some protection against voltage surges and built-up static charges. Article 810 of the National Electrical Code, ANSI/NFPA 70, provides information with regard to proper grounding of the mast and supporting structure, grounding of the lead-in wire to an antenna discharge unit, size of grounding conductors, location of antenna-discharge unit, connection to grounding electrodes, and requirements for the grounding electrode. See Figure 1.
- LIGHTNING - For added protection for this product during a lightning storm, or when it is left unattended and unused for long periods of time, unplug it from the wall outlet and disconnect the antenna or cable system. This will prevent damage to the product due to lightning and power-line surges.
- POWER LINES - An outside antenna system should not be located in the vicinity of overhead power lines or other electric light or power circuits, or where it can fall into such power lines or other electric light or power circuits. When installing an outside antenna system, extreme care should be taken to keep from touching power lines or circuits as contact with them might be fatal.
- OVERLOADING - Do not overload wall outlets, extension cords, or integral convenience receptacles as this can result in a risk of fire or electric shock.
-
OBJECT AND LIQUID ENTRY - Never push objects of any kind into this product through openings as they may touch dangerous voltage points or short-out parts that could result in a fire or electric shock. Never spill liquid of any kind on the product.
-
SERVICING - Do not attempt to service this product yourself as opening or removing covers may expose you to dangerous voltage or other hazards. Refer all servicing to qualified service personnel.
20. DAMAGES REQUIRING SERVICE -
Unplug this product from the wall outlet and refer servicing to qualified service personnel under the following conditions.
a) When the power-supply cord or plug is damaged.
b) If liquid has been spilled, or objects have fallen into the product.
c) If the product has been exposed to rain or water.
d) If the product does not operate normally by following the operating instructions. Adjust only those controls that are covered by the operating instructions as an improving adjustment of other controls may result in damage and will often require extensive work by a qualified technician to restore the product to its normal operation.
e) When the product exhibits a distinct change in performance - this indicates a need for service.
- REPLACEMENT PARTS - When replacement parts are required, be sure the service technician has used replacement parts specified by the manufacturer or have the same characteristics as the original part, Unauthorized substitutions may result in fire, electric shock or other hazards.
- SAFETY CHECK - Upon completion of any service or repair to this product, ask the service technician to perform safety checks to determine that the product is in proper operating condition.
- HEAT - The product should be situated away from heat sources such as radiators, heat registers, stoves or other products (including amplifiers) that produce heat.
IMPORTANT SAFETY INSTRUCTIONS
To protect intellectual property, the involved organizations partition the world into six regions, each of which can only use the DVD player and DVD disc with the given regional code.
The illustration on the right shows symbols of the six regions. One DVD player with a given regional code cannot play disc of another regional code. The partition of regional codes is shown as follows:
- Canada, USA;
- Japan, Europe, South Africa, Middle East
- Southeast Asia, East Asia
- Australia, New Zealand, Oceania, Central America, Mexico, Latin America, Caribbean Sea;
- Russia, India, Africa, Korea, Mongolia.
- China.

TV connections for DVD discs recorded in PAL and NTSC systems
Generally, DVD discs are recorded in PAL or NTSC systems, please refer to the following table:
■ Connecting to the multi-system TV
| DISC | TV MONITOR | |
 PAL PAL |  | Play in PAL system |
 NTSC NTSC |  | Play in NTSC system |
■ Connecting to NTSC TV Connecting to PAL TV
| DISC | TV MONITOR | |
| PAL |  | No clear images are shown on the screen. |
| NTSC |  | Play in NTSC system |
| DISC | TV MONITOR | |
 PAL PAL |  | Play in PAL system |
 NTSC NTSC |  | No clear images are shown on the screen. |
Please read the user manual carefully before connection or operation
TABLE OF CONTENT
Important Safety 1
Features 5
Precautions 5
Accessories 6
Front Panel 6
Rear Panel 6
Remote Control 7
Basic Connection 8
Remote Control Preparation 10
Operations 11
Preparation 11
Play 11
Stop....11
Prev/Next 11
FB/FF 11
Slow 11
Step 11
Pause 11
Number(0-9,10+) button 11
Mute 12
VOL+/VOL- 12
Return 12
OSD 12
Zoom 12
A-B Repeat 12
Repeat 12
Angle/Audio 12
Program 12
PBC 12
GO TO 13
Title/Chapter search 13
Menu 13
Subtitle 13
Clear 13
N/P 13
Setup 14
Reference(Menu/Submenu/Options) 15
Handing Precautions....16
player Maintenance....16
Definition of terms 17
Specifications 17
Troubleshooting 18
FEATURES
DVD - A completely new dimension in video entertainment
- Subtitles may be displayed in one of a maximum of 32 languages available (multi-subtitles DVD only).
• Audio soundtrack can be heard in up to 8 languages (multi-languages DVD only). - Multi-angle function allows you to choose the viewing angles of scene (for DVD with multiple camera angles only).
Other convenient features
- Parental lock settings to prevent playing unsuitable discs for some audiences (DVD only). A full function remote control provides quick access to DVD functions.
Compatible with PAL DVD and NTSC DVD
- This player can play discs recorded in either PAL or NTSC system.
Compatible with CD besides DVD, MP3, CD-R
• This player could play various discs such as DVD, CD (8cm/12cm discs).
PRECAUTIONS
- Please read these precautions before operating this unit.
Power cord protection
- To avoid any malfunctions of the unit, and to protect against electric shock, fire or personal injury, please observe the following.
- Hold the plug firmly when connecting or disconnecting the AC power cord to this unit.
- Do not connect or disconnect the AC power cord when your hands are wet.
- Keep the AC power cord away from heating appliances.
- Never put any heavy object on the AC power cord.
- Do not attempt to repair or reconstruct the AC power cord.
- Remove dust, dirt etc. on the plug regularly.
- If the unit has been dropped or otherwise damaged, turn off the power and disconnect the AC power cord.
- If you find smoke, unusual odour or noise from the unit, turn off the power and disconnect the AC power cord.
Placement
The internal parts may be seriously damaged if the unit is placed in areas of:
- Direct sunlight or heating radiators or closed automobiles;
• High temperature (over 35°C) or high humidity (over 90%) - Excessive dust;
• Strong magnetic or static electricity;
• Vibration, impact or where the surface is tilted.
Non-use Periods
- Turn off the power when the unit is not used.
- It should be unplugged when the unit is idle for a long period of time.
No fingers or other objects inside
- Touching internal parts of this unit is dangerous, and may cause serious damage to the unit and even human injury.
- Do not try to disassemble this unit.
- Do not put any other object on the disc tray.
Keep away from water and magnets
- Keep the unit away from flower vases, tubs, sinks, etc. If liquids are spilled into the unit, serious damage could occur.
- Never place magnetic objects such as speakers near the unit.
Stacking
- Place the unit in a horizontal position and do not place anything heavy on it.
- Do not put the unit on amplifiers or other equipment.
Condensation
Moisture may form on the lens under the following conditions:
• In a steamy or very humid room.
- Immediately after a heater is turned on.
- If moisture forms inside this unit, it may not operate properly. In this case, turn on the power and wait for about 1 hour to evaporate it.
Interference for the TV broadcast
- Depending on the reception condition of the TV, interference may appear on the TV screen while you are watching a TV broadcast and the unit is turned on. This is not a malfunction of the unit of the TV. Just ensure that the unit is turned off when you watch a TV broadcast.
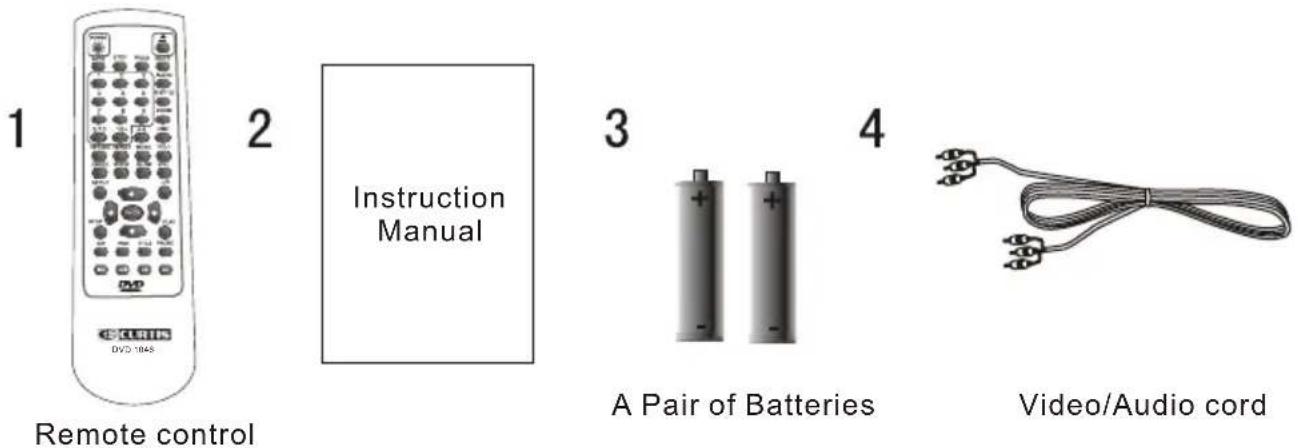
ACCESSORIES
(Please check whether all the following accessories are available after unpacking.)
FRONT PANEL
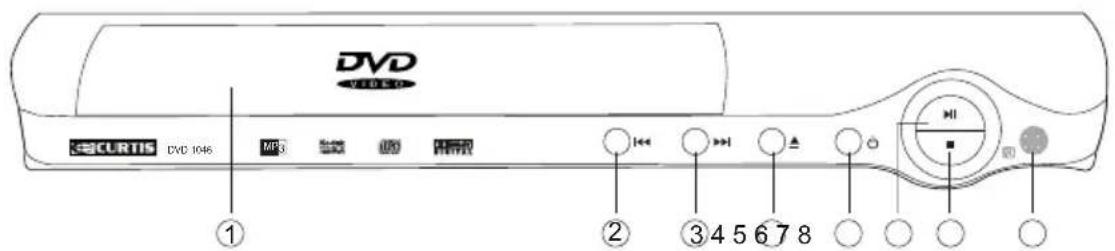
- Disc tray
- Prev key
- Next key
- Open/Close key
5.Power switch key
6.Play/Pause key
7. Stop key
8.Remote control sensor
REAR PANEL

- Right audio output jack
- Video output
- Left audio output jack
- S-video output jack
5.AC power cord
Note:
Unplug the plug-in and keep the power cord well when the player is idle for a long period in order to avoid electricity leak and shock resulted from scratched power cord.
REMOTE CONTROL
- OPEN/CLOSE button
- Program button
- Mute button
- Audio button
- Subtitle button
- Zoom button
- A-B button
- OSD button
- Menu button
- VOL+ button
- Slow button
- VOL- button
- L/R button
- Enter button
- Play button
- Title button
- Pause button
- Fast reverse button
- Fast forward button
- Prev button
- Next button
- N/P button
- PBC button
- Stop button
- ◀▶▼▲ button
- Setup button
- Angle button
- Clear button
- Return button
- Repeat button
- Number (0-9) button
- GO TO button
- Step button
- Power button

Note:
The same buttons on remote control and front panel have identical functions.
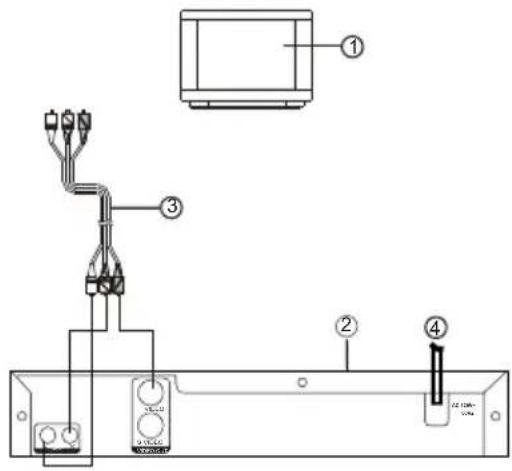
BASIC CONNECTION
- Ensure that the power switch of this unit and other equipment to be connected is turned off before commencing connection.
- Read through the instructions before connecting other equipment.
- Ensure that you observe the colour-coding when connecting audio and video cords.
A: Connecting to a stereo TV set
- TV set (optional)
- DVD/CD player
- Connecting Video, R/L audio cords
- To TV set audio input connector
- AC power cord
To get the best viewing quality you are advised to use S-video cord to connect the TV set with S-video input and to change the TV set to S-video input mode.
B: Connection to monophonic TV
- TV set (optional)
- DVD/CD player
- Connecting L/R audio cords
- To TV set audio input connector
- Component connector cord (video)
C: Connection to audio equipment
- Audio player (optional)
- TV set (optional)
- DVD/CD players
- To TV video input connector (yellow)
- To audio input connectors (red, white)
- To TV S-video input connector
A
B

C

BASIC CONNECTION
D: Connecting to AV amplifier with 2-channel input connector
- TV set (optional)
- DVD / CD player
- Video/ S-video cord (optional)
- Amplifier with 2 channel input jacks
- To audio input connector (L,R)
6.Left speaker
7.Right speaker

REMOTE CONTROL PREPARATION
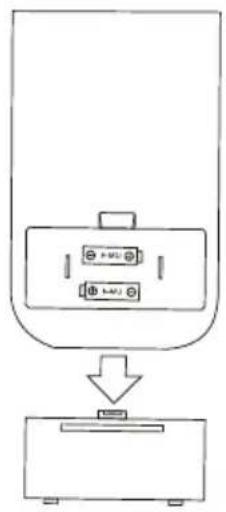
Battery Installation
Insert the batteries while observing the positive (+) and Negative (-) polarities as Figure A.
Service life of batteries
The batteries normally last for a year although this depends on the operation and on how often the remote control is used.
If the remote control unit fails to work even when it is operated near the player, replace the batteries with new ones. Use size AAA UM-4 batteries (2 pieces).
Notes:
- Do not use rechargeable (Ni-Cd) batteries.
- Do not attempts to recharge, short circuit, disassemble, heat or throw the batteries into fire.
- Do not drop, step on the remote control, otherwise it may damage the parts or lead to malfunctioning.
- Do not mix old and new batteries. If the remote control is not going to be used for a long time remove the batteries. Otherwise, electrolyte may leak and lead to malfunctioning or even burns by electrolyte.
- Wipe away any electrolyte leaking inside the remote control, and install new batteries.
- If the leaking electrolyte has contact with some parts of your body, wash it off thoroughly with water.
- Remote control operation range
- The operation range of the remote control is no more than 5m from and within about 60 degree wide in front of the unit (Figure B).
- The operating distance may vary according to the brightness of the room.
Notes:
- Do not point bright lights to the remote control sensor.
- Do not place objects between the remote control and the remote control sensor.
- Do not use this remote control together with the remote control of any other equipment.
A
B
Remoto control sensor

OPERATION
PREPARATION BEFORE PLAYING DISC
- The option of display language catalogue is preset to English. Please refer to Setup operation
- Most functions are operated by remote control. Either operation of remote control of front panel is effective when their buttons indicate the same function.
Preparation
- Turn the TV on and select AV as the TV input.
- Switch on the related system power if the player has been connected to amplifier equipment etc.
◆ PLAY
- Connect AC power cord to AC outlet.
- Switch on the power, the displayed LOADING indicates the normal power supply. (Note: the disc information appears after several seconds if there has disc after LOADING displayed otherwise appears NO DISC).
- Press OPEN/CLOSE.
- Place a disc (8cm or 12cm) onto the tray. (For one-sided disc, position it with printed title side facing up. For two-sided disc, position side to be playback facing down).
- Press OPEN/CLOSE again to close disc tray.
- Press PLAY to playback disc. You may operate according to MENU indication after MENU shows on screen then press ENTER button to play back.
Some discs may play automatically after loaded.
◆ STOP
Press STOP button to stop playing (TV show "PRESTOP"). When playback is stopped the unit records the point where STOP was pressed (resume function). Press PLAY again, and play will resume from this point. Press STOP button twice, resume function will be cancelled. Resume function is suitable for discs showing playing time during playback.
PREV/NEXT
Press PREV button or NEXT button on remote control when playing a disc, a chapter (DVD) or a track (CD) is skipped backward or forward correspondingly each time the button is pressed.
◆ FB/FF
Press FB/FF button on the remote control during playback, the disc will be played in a status of forward or reverse correspondingly. Forward or Reverse speed is relatively slow at first. When press again, the speed becomes faster. The more times that you press the buttons, the faster the Fast forward or reverse speed will be. There are 5 levels of speed available: X2, X4, X8, X16 and X32. To return to normal play, press PLAY button on the player or the remote control.
Note: Some discs including MP3 disc have no such function.
◆ SLOW
Press SLOW button on the remote control during playback and the unit will enter slow forward status. There are 5 speeds available: 1/2, 1/4, 1/8, 1/16 and 1/32. To return to normal play. Press PLAY button on player or remote control again.
Note: Some discs including MP3 disc have no such function.
STEP
Press STEP button during play, the player will enter the still picture mode. If the button is pressed again, the disc is advanced by one frame (step). When the button is kept pressed, consecutive frame advance works. To return to normal play, press PLAY button.
Note: Some discs do not have such function.
◆ PAUSE
Press PAUSE key to stop playing and restore play by pressing PLAY key again.
◆ Number (0-9,10+) button
By pressing the Number (0-9) button, you can access directly to the desired track or chapters while a disc is played. For track or chapter over 10, press 10+ and then 0-9 button.
OPERATION
◆MUTE
Press MUTE button during play, the player shows mute and there is no audio output (silence), press again to cancel MUTE.
♦VOL+/VOL-
Press VOL+/VOL- button play may change volume for audio output.
RETURN
For VCD when playing 2.0 PBC is operating. Press RETURN key, it will return to menu mode. When playing DVD/MP3/JPG discs. Press RETURN key, it will return to menu mode.
♦OSD
Press OSD button during play to show the disc's relevant information on TV screen(such as playing time, chapter number, playback status).
ZOOM
Zoom function can only be operated in JPEG disc and VCD/DVD format disc. By pressing zoom button when playing DVD/VCD discs, there are 3 levels of zoom available (ZOOMx2, ZOOMx4, ZOOMx1). When playing JPEG disc, there 5 levels of zoom available(150%, 200%, 25%, 50%, 100%)
Note: Note: Zoom function is not working on PAL system DVDs.
MP3 does not have this function
◆A-B REPEAT
Press A-B button during playback at the point where repeat play is to commence (a) then press again at the point where repeat play is to be concluded (B). Repeat playback between point (A) and point (b) starts. Press A-B button once more where TV screen appears REP OFF to return to normal play.
REPEAT
Press the repeat key to choose repeat play chapter or title (DVD) and play single audio or full disc (VCD, CD, MP3).
Note: Some VCD do not have repeat function with PBC ON state.
◆ANGLE/AUDIO
Press ANGLE continuously during playback DVD disc to toggle the disc between available angles recorded on the disc if the disc has multi-angle function. Press AUDIO button during playback to toggle between available audio language recorded on the disc if the disc has this multi-language. Note: Press AUDIO button could toggle available audio language soundtracks.
◆PROGRAM
Press PROGRAM button, the program playback screen appears on the TV monitor, 20 tracks or chapters can be programmed. Use ↑↓←→ button on the remote control to select your preferred track (CD/VCD) or title and chapter (DVD), then press ENTER button to confirm(also you can press the number button to input the track number or title/chapter number directly).
Note: It is invalid to input the number larger than available. Use CLEAR button to amend false or unsatisfied settings. You can only press the PLAY button on the remote control to start playing after you finish the program setting. Press the PROGRAM button directly to return to normal play mode. In this case, the program is not confirmed.
“↑↓←→: SELECT ▶: PLAY ” shown on screen is only used for indication, no function for cursor.
◆PBC function (only VCD)
When playing VCD 2.0 press PBC button to display title menu use number key choice and ENTER button to play music.
OPERATION
◆ GO TO
In the play, you press GO TO button on the remote control. You can search the disc based on its title/chapter/track as shown in the figure. Press GO TO button, a search menu will display. Use button to select the search item/time/titel/chapter. The selected will be shown in highlight.
Use number button to select the search item/time/title/chapter, and press ENTER button to play. For example:
● Time search: To search 16 min 50 secretary: input 1,6,5 and0.
To search 1 hr 14 min: input 1,1,4,0,0.
• Title/chapter search:
To search titel 1/chapter 2: input 1 in the highlight titel column, move the cursor right to the highlight area and input 2.
Note:
- For some DVD discs which cannot be searched, invalid will be appear on TV screen.
- Input the time, title and chapter of the disc to search.
- For VCD in PBC mode is ON, it can only search for the time.
MENU
Press MENU button on remote control when playing a disc, a list of titles on the disc (depends on discs) will be displayed on TV monitor. Use the direction or number button to select your preferred items then press ENTER button to play as selected.
SUBTITLE
Press SUBTITLE button on remote control during playback. Subtitle: [1] will be displayed on TV monitor that means a kind of language. Press once more, Subtitle: [2] appeared on TV monitor means another kind of language and accordingly subtitles appear that represents how many kind os language being selected. Subtitle: [OFF] appears that toggle subtitle.
Note: This function is valid only for DVD discs with subtitle function. It is invalid for DVD disc with single subtitle function.
◆ CLEAR
This function is only available in program input mode.
◆N/P
Press N/P button during stop state can switch output signal to NTSC, PAL or AUTO. The default setting is NTSC.
SETUP
◆ SETUP
Once the initial settings have been completed, the player can always be operated under the same conditions (especially with DVD discs). The settings will be retained in the memory even after turning off the power until the settings are changed. We set the initial language to English when the player is out of factory. You may change the language into that you preferred.
Operation
- In stop mode, Press SETUP button to enter setup interface as followed, you can setup Language, Screen, Custom.
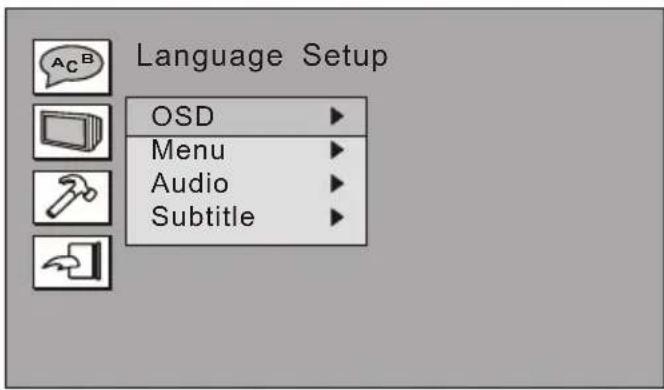
- Press ◀ and ▶ to choose the desired section and ENTER button to enter submenu or press SETUP to leave the setup screen. Following is the language setup screen for your reference where you can set OSD menu, DVD menu, Audio Language and Subtitle Language.

REFERENCE
◆Menu, Submenu and Options
| MENU | SUBMENU OPTION | ONSDESCRIPTION | ON |
| LANGUAGE | OSD | English | English On Screen Display |
| French | French On Screen Display | ||
| Geman | Geman On Screen Display | ||
| Italian | Italian On Screen Display | ||
| Spanish | Spanish On Screen Display | ||
| MENU | English | English On Screen Display | |
| French | French On Screen Display | ||
| Geman | Geman On Screen Display | ||
| Italian | Italian On Screen Display | ||
| Spanish | Spanish On Screen Display | ||
| others | |||
| Audio | English | English On Screen Display | |
| French | French On Screen Display | ||
| Geman | Geman On Screen Display | ||
| Italian | Italian On Screen Display | ||
| Spanish | Spanish On Screen Display | ||
| others | |||
| Subtitle | English | English On Screen Display | |
| French | French On Screen Display | ||
| Geman | Geman On Screen Display | ||
| Italian | Italian On Screen Display | ||
| Spanish | Spanish On Screen Display | ||
| others | |||
| Off |
REFERENCE
| MENU | SUBMENUOPTION | SDESCRIPTION | |
| SCREEN | TV Type | 4:3 PS | Set TV screen at 4:3 Pan Scan |
| 4:3 LB | Set TV at screen 4:3 Letter Box | ||
| 16:9 | Set TV at screen 16:9 | ||
| Screen Saver | On | Set screen saver to ON or OFF. | |
| Off | |||
| TV System | NTSC | Output signal as NTSC | |
| PAL | Output signal as PAL | ||
| AUTO | Output signal as per default of disc | ||
| Video output | CVBS+S-Video | CVBS+S-Video output | |
| Brightness | Normal | Select normal, bright, or soft to personal preference. | |
| Bright | |||
| Soft | |||
| Contrast | -3 | Select various levels to adjust the contrast according to personal preference. | |
| -2 | |||
| -1 | |||
| 0 | |||
| +1 | |||
| +2 | |||
| +3 | |||
| +4 | |||
| Audio Setup | Down mix | Lo/Ro | Left only/Right only |
| Lt/Rt | Left total/Right total | ||
| CUSTOM | Parental Ctrl | 1 | No one under 8 admitted |
| 2 | |||
| 3 | |||
| 4 | |||
| 5 | |||
| 6 | |||
| 7 | |||
| 8 | |||
| Off | |||
| Password | Old | Input number by users to change password, default setting:8888 | |
| New | |||
| Verify | |||
| Style | Style 1 | Change the background of colour OSD | |
| Style 2 | |||
| Style 3 | |||
| Style 4 | |||
| Angle Mark | On | Set the Angle mark to ON or OFF | |
| Off | |||
| Default | Read | Return to factory setup |
◆ Handling Precautions
Maintenance
Hold the disc by the edge so the surface will not be soiled with fingerprints. Fingerprints, dirt and scratches can cause skipping and distortion. Do not use record cleaning sprays, benzene, thinner. Static electricity prevention liquids or any other solvent. Be careful not to drop or bend the disc. Do not try to close the disc tray when disc is not installed properly. Be sure to store the disc in its exclusive case when not in use.
Handling
Wipe gently with a soft, damp (water only) cloth. Move the cloth from the centre hole towards the outer edge. Improper disc disc storage: Discs may be damaged if they are stored in the following places: Areas exposed to direct sunlight; Humid or dusty areas; Areas directly exposed to a heat outlet or heating appliance.
◆ Player Maintenance
Be sure to turn the unit off and disconnect the AC power cord before maintaining the unit. Keep the unit clean. If the surfaces are extremely dirty, wipe the unit with a dry soft cloth. Never use alcohol, benzene or other chemicals. Do not use compressed air to remove dust. Ask the technician to maintain the unit when trouble happens.
REFERENCE
◆Definition of terms
Angle
Recorded onto some DVD discs are scenes which have been simultaneously shot from a number of different angles (i.e. The same scene is shot from the from, left side and right side etc.). With such discs, the ANGLE button can be used to view the scene from different angles.
Chapter Number
These numbers are recorded on DVD discs, A title is subdivided into many sections. Each of them is number and specific parts of video presentations can be searched quickly using these numbers.
DVD disc
This refers to a high-density optical disc on which high quality pictures and sound have been recorded by means of digital signals. Incorporating a new video compression technology (MPEG2) and high-density recording technology, DVD enables full-motion video to be recorded over long periods of time (for instance, a whole movie can be recorded).
Subtitles
These are the printed lines appearing at the bottom of the screen which translate or transcribe the dialogue. They are recorded on DVD discs and up to 32 languages.
PBC
The language indicates on TV screen to imply operation or disc information.
Audio
Language recorded on discs and the maximum languages are up to 8.
Time
This indicates the play time elapsed from the start of a disc or a title. It can be used to find a specific scene quickly (it may not work with some discs).
Title Number
These numbers are recorded on DVD discs. When a disc contains two or more movies, these movies are numbered as title1, title2, etc.
Track Number
These numbers are assigned to the tracks which are recorded on audio CDS. They enable specific tracks to be located quickly. RAW The original DTS, AC-3 signals non-decoded. If users choose RAW as audio setting, they must connect a decoder to decode those original audio signals.
SPECIFICATIONS
Power requirement: AC 120V\~60Hz
Power consumption: 15W
Signal system: NTSC/PAL/AUTO
Dimension: 260mm x 38mm x 260mm
Disc played:
- DVD-video disc
-
CD disc
-
12cm single-sided, single-layer
- 12cm single-dided, double-layer
- 12cm double-dided, double-layer
- 8cm single-sided, single-layer
- 8cm single-sided, double-layer
- 8cm double-sided, double-layer
Video output
• Output level: 1 ± 0.2Vp-p (75 ohm)
• Horizontal resolution: >500 lines
- S/N ratio: >60dB
Audio output (Impedance: 10k ohm):
• Output level: 1.8+0.2/-0.8Vrms (1KHz 0dB)
- Harmonic distortion: <0.01% (JIS-A 1KHz, typical)
● Dynamic range: >80 dB (JIS-A 1KHz, typical)
• S/N ratio: 90dB (JIS-A 1KHz, typical)
Weight and dimensions are approximate Specifications are subject to change with or without notice.
TROUBLESHOOTING
Check the chart below for a possible cause of the problem you are experiencing before requesting service for this unit, Some simple checks or minor adjustment on your part may eliminate the problem and restore proper operation. Let the technician maintain the unit. Keep away from static electricity properly before maintenance as loader, key IC are easy to be damaged by it.
| Trouble | Suggested solution |
| No power | Plug the power cord into the power outlet tight to turn on/off once |
| Cannot read disc | Disc access time within 10-20 seconds is normalThe disc is scratched or defiled (change disc)The code of disc is different from the code of unit (change the disc)PAL to NTSC error (Set video output as AUTO) |
| No picture | If your TV does not have P-Scan function, pressing VIDEO button on the remote may cause this. Press VIDEO button again to rectify. |
| No sound | Ensure that the equipment is connected properly.Ensure that the TV or audio equipments are not muted.Ensure that the audio output setting is correct. |
| Picture is distorted during fast forward or reverse | The picture will be somewhat distorted at times.This is normal advance or reverse. |
| No (4:3)(16:9) picture | Choose the correct setup at TV TYPE item that matches the TV set. |
| Remote control does not function | Check the batteries being installed with correct polarities.Replace the batteries depleted. Point at remote control sensor and operate it within 5 meters. |
| Unit's or remote control buttons are not functioning or other abnormal phenomena | Turn the unit off and then back to on. Alternatively, turn off the unit, disconnect the AC power cord for 5 to 10 minutes and then reconnect it. |
| Audio soundtrack and/or subtitle language not found in settings | If the audio soundtrack and/or subtitle language does not exist in the disc, the language selected at the initial settings will not be seen/heard. Alternative audio soundtrack (or An alternative language is not selected with discs which contain subtitle) language cannot be more than one language selected. |
| Can not change angle | This function depends on software availability.Even if a disc has a number of angles recorded, these angles may be recorded for specific scenes only. |
| No playback menu | This function is suitable for VCD with playback control disc. |
| Miscellaneous | In program playing mode, no repeat, A-B functions are available. |
- IMPORTANT SAFETY INSTRUCTIONS
- DAMAGES REQUIRING SERVICE
- TV CONNECTIONS FOR DVD DISCS RECORDED IN PAL AND NTSC SYSTEMS
- CONNECTING TO THE MULTI-SYSTEM TV
- CONNECTING TO NTSC TV CONNECTING TO PAL TV
- PLEASE READ THE USER MANUAL CAREFULLY BEFORE CONNECTION OR OPERATION
- TABLE OF CONTENT
- FEATURES
- DVD - A COMPLETELY NEW DIMENSION IN VIDEO ENTERTAINMENT
- OTHER CONVENIENT FEATURES
- COMPATIBLE WITH PAL DVD AND NTSC DVD
- COMPATIBLE WITH CD BESIDES DVD, MP3, CD-R
- PRECAUTIONS
- POWER CORD PROTECTION
- PLACEMENT
- NON-USE PERIODS
- NO FINGERS OR OTHER OBJECTS INSIDE
- KEEP AWAY FROM WATER AND MAGNETS
- STACKING
- CONDENSATION
- INTERFERENCE FOR THE TV BROADCAST
- ACCESSORIES
- FRONT PANEL
- REAR PANEL
- NOTE
- REMOTE CONTROL
- BASIC CONNECTION
- A: CONNECTING TO A STEREO TV SET
- B: CONNECTION TO MONOPHONIC TV
- C: CONNECTION TO AUDIO EQUIPMENT
- D: CONNECTING TO AV AMPLIFIER WITH 2-CHANNEL INPUT CONNECTOR
- REMOTE CONTROL PREPARATION
- BATTERY INSTALLATION
- SERVICE LIFE OF BATTERIES
- NOTES
- OPERATION
- PREPARATION BEFORE PLAYING DISC
- PREPARATION
- ◆ PLAY
- ◆ STOP
- PREV/NEXT
- ◆ FB/FF
- ◆ SLOW
- STEP
- ◆ PAUSE
- ◆ NUMBER (0-9,10+) BUTTON
- ◆MUTE
- ♦VOL+/VOL
- RETURN
- ♦OSD
- ZOOM
- ◆A-B REPEAT
- REPEAT
- ◆ANGLE/AUDIO
- ◆PROGRAM
- ◆PBC FUNCTION (ONLY VCD)
- ◆ GO TO
- MENU
- SUBTITLE
- ◆ CLEAR
- ◆N/P
- SETUP
- ◆ SETUP
- REFERENCE
- ◆ HANDLING PRECAUTIONS
- MAINTENANCE
- HANDLING
- ◆ PLAYER MAINTENANCE
- ◆DEFINITION OF TERMS
- ANGLE
- CHAPTER NUMBER
- DVD DISC
- SUBTITLES
- PBC
- AUDIO
- TIME
- TITLE NUMBER
- TRACK NUMBER
- SPECIFICATIONS
- DISC PLAYED
- VIDEO OUTPUT
- TROUBLESHOOTING
Brand : CURTIS
Model : DVD1046
Category : DVD player