
116802 - Combi steam oven BARTSCHER - Free user manual and instructions
Find the device manual for free 116802 BARTSCHER in PDF.



| Product type | Combination steam oven |
| Brand | BARTSCHER |
| Model | 116802 |
| Dimensions (W x D x H) | 610 x 685 x 743 mm |
| Weight | 50 kg |
| Electrical supply | 3.3 kW / 220 V |
| Maximum temperature | 260 °C |
| Moisture content | Up to 100% |
| Thermal probe | Yes, range 20 - 99 °C |
| Timer | Yes, programmable |
| Control | Electronic, 20 programs with 6 phases |
| Cooking mode | Steam, convection, combination |
| Compatible containers | GN 1/1 or trays 400 x 600 mm |
| Slides | Yes, for GN containers |
| Interior lighting | Yes |
| Door | Double glazing with internal ventilation |
| Steam generation | By direct injection |
| Water connection | 3/4 inch |
| Drain | DN 50 with slope of 3 to 5% |
| Material | Stainless steel |
| Safety | Safety thermostat, automatic shut-off, burn protection |
| Maintenance | Clean after each use with warm water and soap, avoid abrasives |
| Spare parts | Available from authorized after-sales service |
| Repairability | Interventions reserved for qualified personnel |
| General information | Instruction manual included, CE declaration of conformity |
Frequently Asked Questions - 116802 BARTSCHER
User questions about 116802 BARTSCHER
0 question about this device. Answer the ones you know or ask your own.
Ask a new question about this device
Download the instructions for your Combi steam oven in PDF format for free! Find your manual 116802 - BARTSCHER and take your electronic device back in hand. On this page are published all the documents necessary for the use of your device. 116802 by BARTSCHER.
USER MANUAL 116802 BARTSCHER
116.402, 116.404, 116.406, 116.410, 116.802, 116.806, 116.810
Instruction manual Combi steamer
from page 30 to 58
1.1 Information about the instruction manual 31
1.2 Key to symbols 31
1.3 Liability and Warrantees 31-32
1.4 Copyright protection 32
1.5 Declaration of conformity 32
2. Safety 32
2.1 General information 32-33
2.2 Safety instructions for the commercial use of the device 33
2.3 Intended use 33-34
3.Delivery,packaging and storage 34
3.1 Delivery check 34
3.2 Packaging 34
3.3 Storage 35
4. Technical data 35
4.1 Characteristics of the Combi Steamer 35
4.2 Technical specification 36-42
5. Installation and operation 43
5.1 Safety instructions 43
5.2 Installation and connection 43-45
5.3 Operating 46-49
5.4 Cooking modes 50-53
5.5 Cooking charts 53-57
6. Cleaning and maintenance 57
6.1 Safety advice 57
6.2 Cleaning 57-58
6.3 Safety instructions for maintenance 58
Bartscher GmbH
1.1 Information about the instruction manual
This instruction manual contains information about the installation, operation and maintenance of the device, and should be consulted as an important source of information and reference guide.
Awareness of the safety instructions and instructions for use in this manual will ensure the safe and correct use of the device.
In addition to the information given here, you should comply with any local Health and Safety Controls and generally applicable safety regulations.
The instruction manual forms part of the product; it should be kept near the device and be easily accessible for anyone carrying out installation, servicing, maintenance or cleaning.
1.2 Key to symbols
In this manual, symbols are used to highlight important safety instructions and any advice relating to the device. The instructions should be followed very carefully to avoid any risk of accident, personal injury or material damage.

WARNING!
This symbol highlights hazards which could lead to injury.
Please follow the instructions very carefully and proceed with particular attention in these cases.

WARNING! Electrical hazard!
This symbol draws attention to potential electrical hazards. If you do not follow the safety instructions, you may risk injury or death.

CAUTION!
This symbol highlights instructions which should be followed to avoid any risk of damage, malfunctioning and/or breakdown of the device.

NOTE!
This symbol highlights tips and information which have to be followed for an efficient and trouble-free operation of the device.
1.3 Liability and Warrantees
All the information and instructions in this manual take into account standard safety regulations, current levels of technical engineering as well as the expertise and experience we have developed over the years.
The instruction manual was translated with all due care and attention. However, we do not accept liability for any translation errors. The German version of this instruction manual is definitive.
If the delivery consists of a special model, the actual scope of delivery may differ from the descriptions and illustrations in this manual. This is also the case for special orders or if the
device has been modified in line with new technology. If you have any questions, you should contact the manufacturer.

NOTE!
Read the instruction manual carefully before using the device. The manufacturer does not accept liability for any damage or malfunction resulting from not following the instructions for use.
The instruction manual should be kept near the device, easily accessible for anyone wishing to work with or using it. We reserve the right to make technical changes for the purpose of developing and improving its useful properties.
1.4 Copyright protection
The instruction manual including any texts, drawings, images or other illustrations is copyrighted. No part of this publication may be reproduced, transmitted or used in any form or by any means without permission in writing from the manufacturer. Any person committing an unauthorized act in relation to this publication shall be liable to claims for damages. All rights reserved.

NOTE!
The contents, texts, drawings, pictures and any other illustrations are copyrighted and subject to other protection rights. Any person unlawfully using this publication is liable to criminal prosecution.
1.5 Declaration of conformity
The device complies with the current standards and directives of the EU, as certified in the EC declaration of conformity.
If required, we will be glad to send you the according declaration of conformity.
2. Safety
This section provides an overview of all important safety aspects.
In addition, every chapter provides precise safety advice for the prevention of dangers which are highlighted by the use of the above-mentioned symbols.
Furthermore, attention should be paid to all pictograms, markers and labels on the device, which must be kept in a permanent state of legibility.
By following all important safety advice, you will gain an optimal protection against all hazards as well as the assurance of a safe and trouble-free operation.
2.1 General Information
This device is designed in accordance with the presently applicable technological standards. However, the device can pose a danger if handled improperly and inappropriately.
Knowing the contents of the instruction manual as well as avoiding mistakes, and thus operating this device safely and in a fault-free manner, is very essential to protect yourselves from any hazards.
To prevent hazards and to ensure optimum efficiency, no modifications or alterations to the device that are not explicitly approved by the manufacturer may be undertaken.
This device may only be operated in technically proper and safe condition.
The device complies with the basic requirements of the low voltage directives 73/23/EEC and 93/68/EEC.
It also complies with the regulations of the following directives:
EN 60335-1 + following amendments;
EN60335-2-46 + following amendments;
EN60335-2-42 + following amendments;
EN60335-2-36 + following amendments;
The device complies with the basic requirements of the directives for electromagnetic compatibility 89/336/EEC.
2.2 Safety instructions for commercial use of the device
The specifications regarding industrial safety are based on the Regulations of the European Union applicable at the time of manufacturing the device. If the device is used commercially, the user is obliged to ensure that the said industrial safety measures concur with the state of the rules and regulations applicable at the time in question for the entire period of use of the device, and to comply with the new specifications. Outside the European Union, the industrial safety laws applicable at the place of installation of the device and the regional territorial provisions must be complied with.
Besides the industrial safety instructions in the instruction manual, the general safety and accident prevention regulations as well as environment protection regulations applicable for the areas of application of the device must be followed and complied with.

CAUTION!
The device is not intended for use by individuals (including children) with physical or mental disabilities, insufficient experience, and/or insufficient knowledge unless such persons are under the care of a person responsible for their safety or have received instructions regarding appropriate use of the device.
Children should be observed to ensure that they are not playing with the device.
o Keep this manual in a safe place. When passing on/selling the device to a third party, the manuals must be handed over along with the device.
○ Every person using the device must act in accordance with the manuals and under consideration of the safety advice.
The device is to be used indoors only.
2.3 Intended use

ATTENTION!
This device has been designed for commercial use only and must be operated by qualified kitchen personnel only.
Safe operation can only be guaranteed when using the device for its intended purpose. Any technical interventions, as well as assembly and maintenance are to be made by a qualified customer service only.
The Combi Steamer is meant for the following ways of cooking only:
- Preparation of meat, fish and vegetables;
- Baking of bread, cake and tortes;
- Warming of foods;
- Defrosting of frozen products;
- Cooking au gratin;
- Preparation of refrigerated or deep-frozen foods.
The Combi Steamer may not be used for:
Heating of rooms;
- Drying of clothes;
- Storing of combustible materials and objects;
- Warming and heating of inflammable, noxious, easily volatilizing or similar fluids or materials.

CAUTION!
Do not use the device for anything beyond or other than its intended use.
The manufacturer and/or authorized parties do not accept any claims resulting from damage caused by using the device not according to its intended use.
The operator is totally liable for any such damage.
Observing the instructions for installation, use, maintenance and cleaning is considered part of the intended use.
3. Transport, packaging and storage
3.1 Delivery check
Please check the delivery for completeness and transport damage immediately after receipt. In case of visible damage, do not accept or accept the delivery with reservation only. Note the extent of damage on the carrier's bill of delivery and notify us of any recorded damage.
Hidden damages should be reclaimed immediately after detection, as claims for damages can only be asserted within the effective period for complaints.
3.2 Packaging
Please do not throw away the covering carton of your device as it might be useful for storage purposes, when moving or, in case of damages, when the device must be sent back to a repair center. The outer and inner packing material should be removed completely from the device before installation.

NOTE!
Observe the regulations applicable in your country when disposing of the packaging. Supply re-usable packing materials to the recycling centre.
Please inspect the device for completeness. In case any part is missing, please contact our customer service center immediately.
3.3 Storage
Keep the package closed until installation and under consideration of the positioning- and storage markings indicated on the outside.
Packages should be stored under consideration of the following:
- Do not store outdoors.
- Keep it dry and dust-free.
- Do not expose it to aggressive media.
- Do not expose it to direct sunlight.
- Avoid mechanical shocks and vibrations.
- In case of longer storage (>3 months), make sure you check the state of the packaging and the parts regularly. If required, refresh or renew.
4. Technical data
4.1 Characteristics of the Combi Steamer
Cooking chamber temperature up to 260^
- Steam moisture up to 100%
Core temperature sensor 100^
Clock timer
- Handy cross-slide-in
For GN 1/1 or bakery standard 400 × 600 mm
- Oscillating (right/left) engine operation for optimized baking results
Cooking chamber lighting
Double-door glazing with inside-ventilated glass pane
- Distance between trays in the cooking chamber 70-80 mm
- Steam generation via direct injection
Water connection 3/4 inch
Electronic control allows for presetting of 20 programs
6 settings per program
Plain symbols for easy operation
4.2 Technical specification
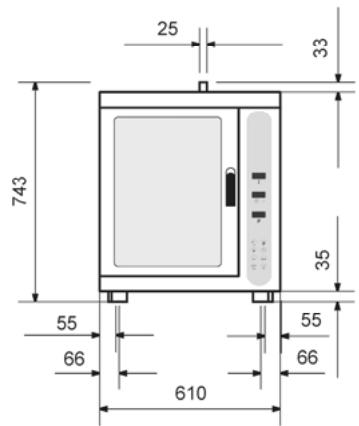
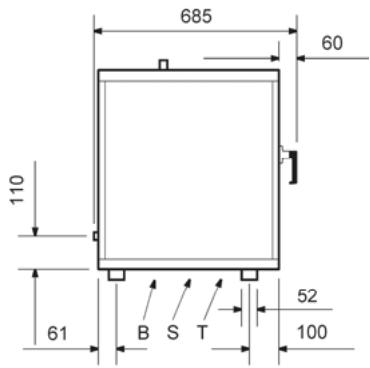
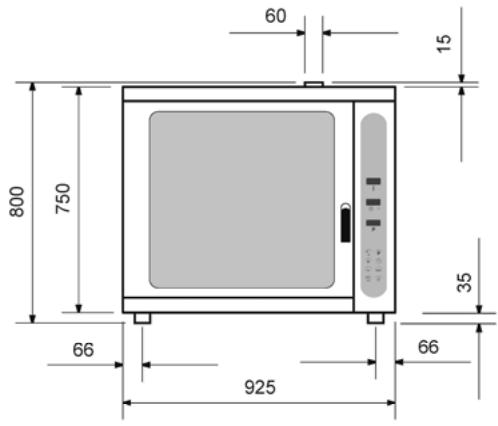
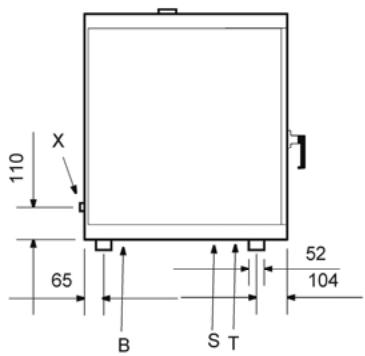
Combi Steamer 5 x 2/3 GN
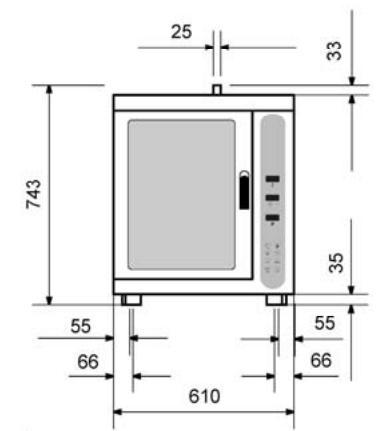
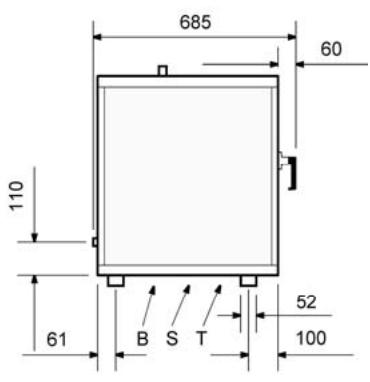
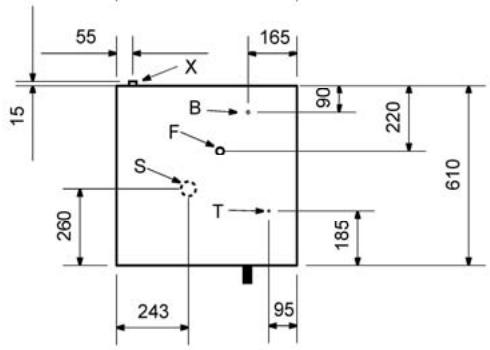
Size in mm
Combi Steamer 5 × 2 / 3 GN
Power: 3,3 kW 220 V
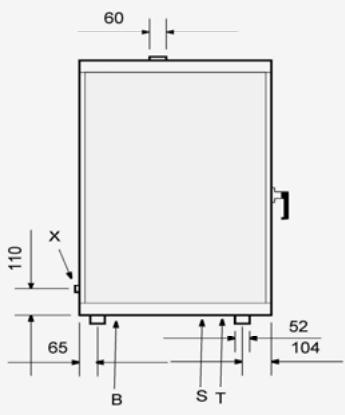
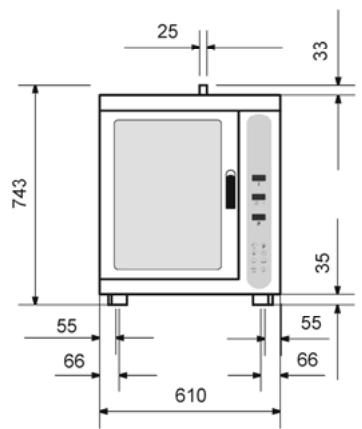
Size: W 610 x D 685 x H 743 mm
Distance between trays: 70~mm
Weight: 50kg
Code-No. 116.402
Explanations
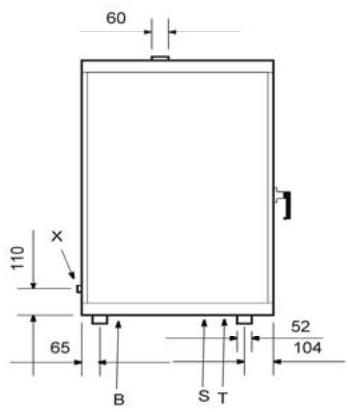
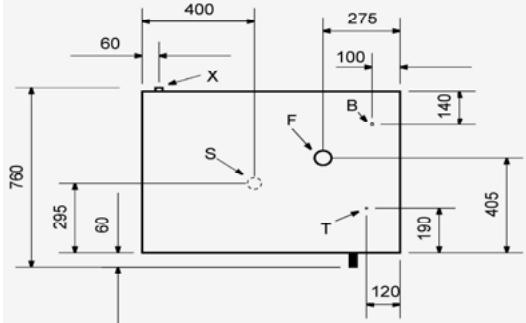
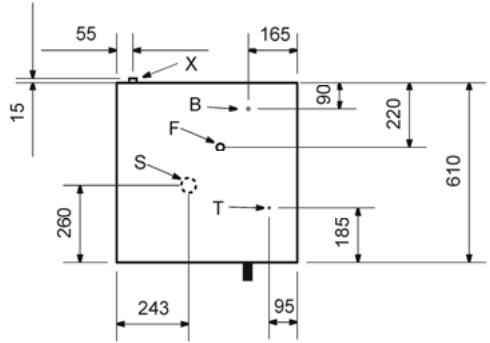
X = Incoming water 3/4"
F = Steam outlet 25~mm
B = Electrical feeding
T = Safety thermostat
S = Water drain
Combi Steamer 6 x 1/1 GN
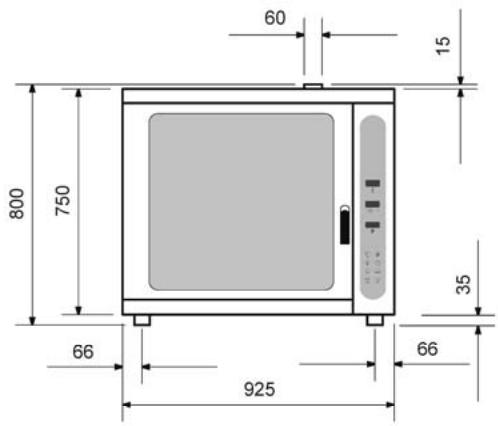
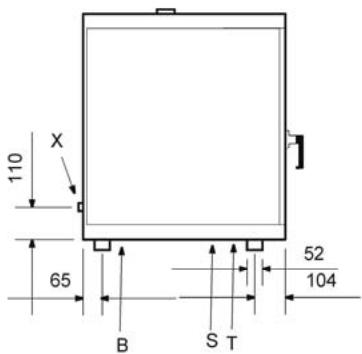
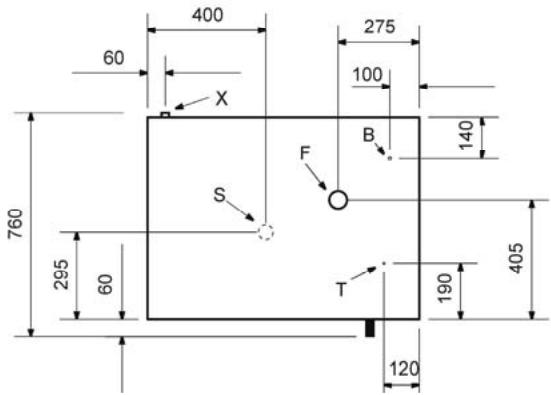
Size in mm
Combi Steamer 6 x 1/1 GN, 6 x 600x400
Power: 8,0 kW / 2 NAC 400 V
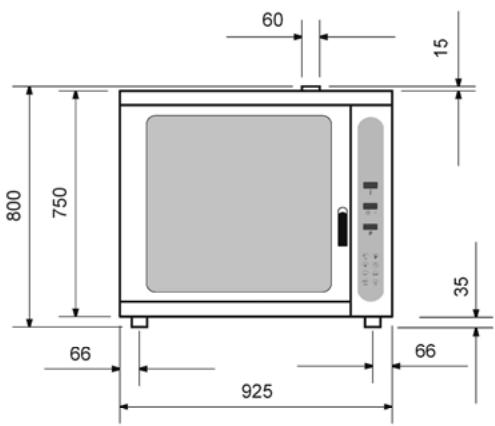
Size: W 925 x D 760 x H 800 mm
Distance between trays: 80 mm
Weight: 80kg
Code-No. 116.406
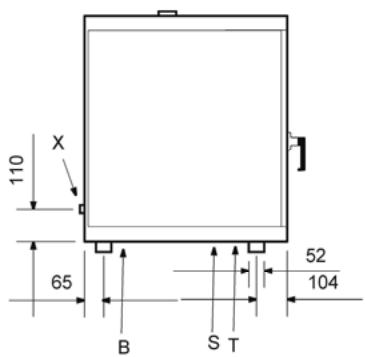
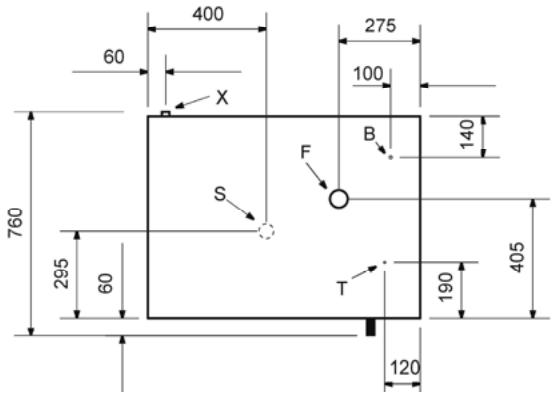
Explanations
X = Incoming water 3/4"
F = Steam outlet 60~mm
B = Electrical feeding
T = Safety thermostat
S = Water drain
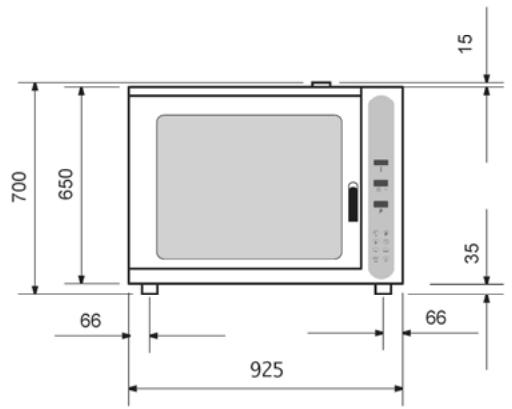
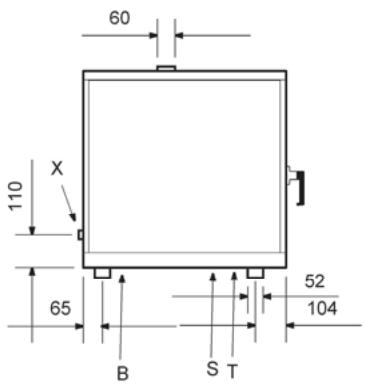
Combi Steamer 4 x 1/1 GN
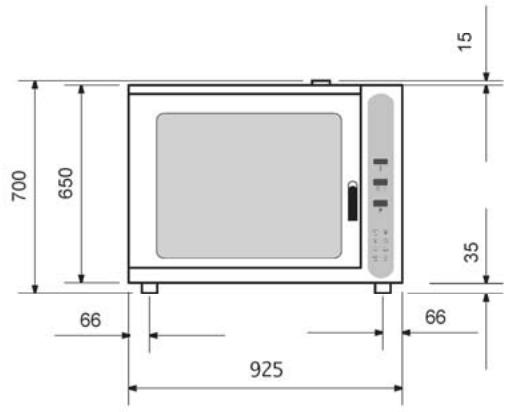
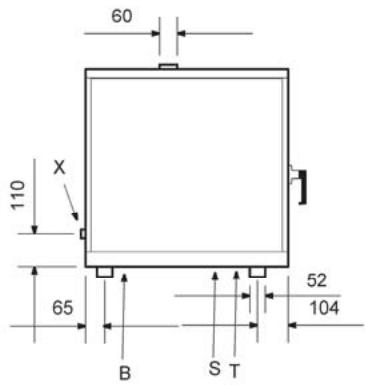
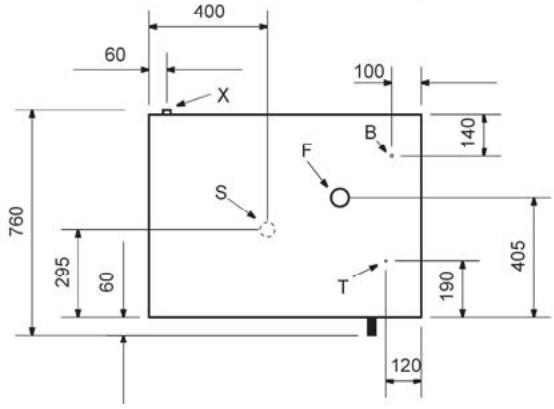
Size in mm
Combi Steamer 4 x 1/1 GN, 4 x 600x400
Power: 6,6 kW / 2 NAC 380 V
Size: W 925 x D 760 x H 700 mm
Distance between trays: 80 mm
Weight: 60 kg
Code-No. 116.404
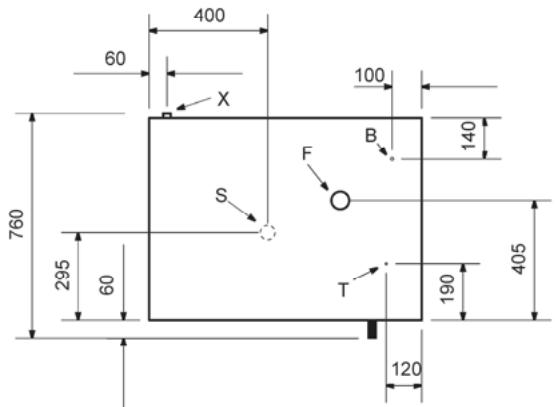
Explanations
X = Incoming water 3/4"
F = Steam outlet 60 mm
B = Electrical feeding
T = Safety thermostat
S = Water drain
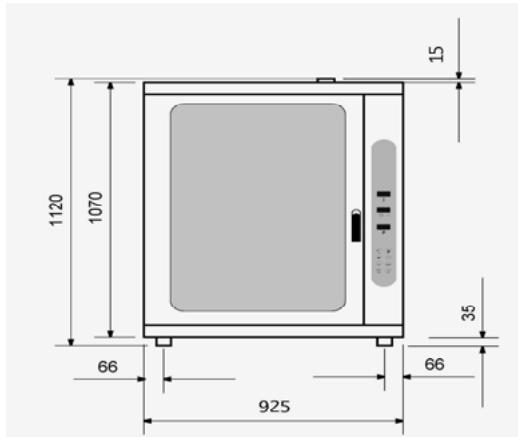
Combi Steamer 10 x 1/1 GN

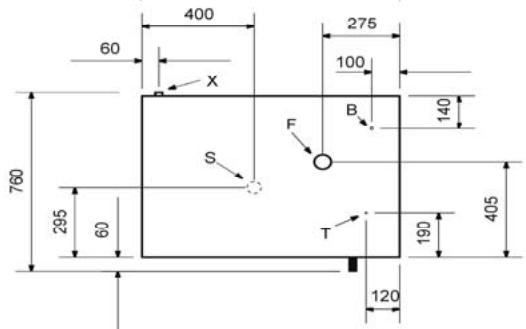
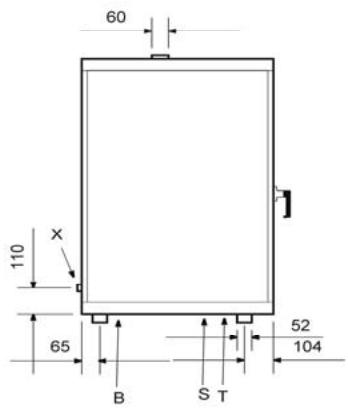
Size in mm
Combi Steamer 10 x 1/1 GN, 10 x 600x400
Power: 12,0kW / 3 NAC 380-400 V
Size: W 925 x D 760 x H 1120 mm
Distance between trays: 80 mm
Weight: 110 kg
Code-No. 116.410
Explanations
X = Incoming water 3/4"
F = Steam outlet 60 mm
B = Electrical feeding
T = Safety thermostat
S = Water drain
Combi Steamer „Easy“ 5 x 2/3 GN
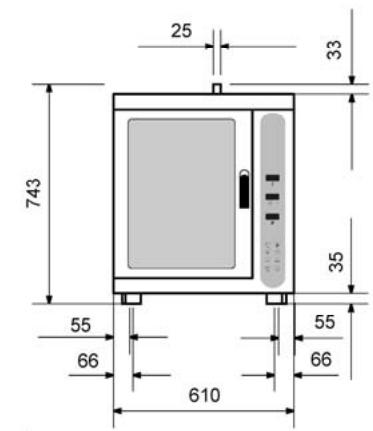
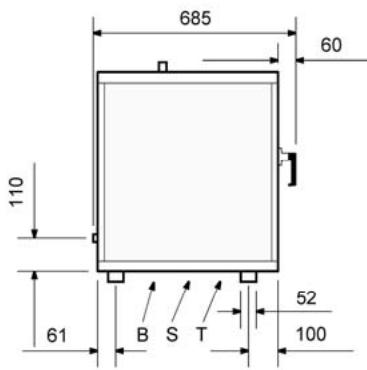
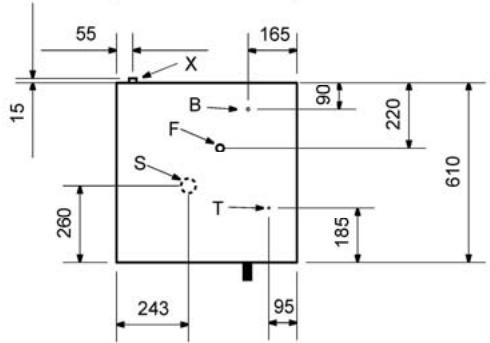
Size in mm
Combi Steamer „Easy“ 5 x 2/3 GN
Power: 3,3 kW 220 V
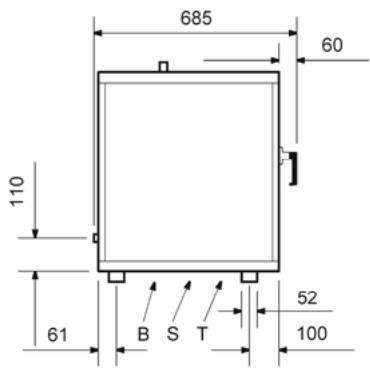
Size: W 610 x D 685 x H 743 mm
Distance between trays: 70~mm
Weight: 50kg
Code-No. 116.802
Explanations
X = Incoming water 3/4"
F = Steam outlet 25~mm
B = Electrical feeding
T = Safety thermostat
S = Water drain
Combi Steamer „Easy“ 6 x 1/1 GN
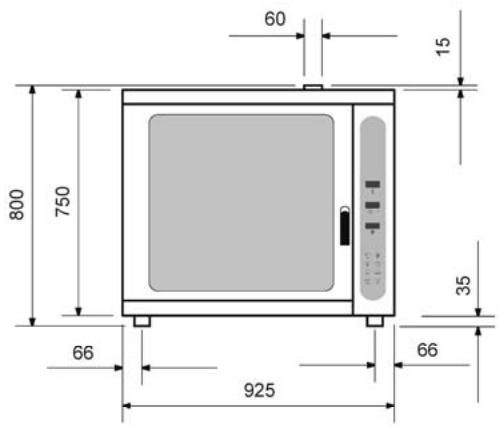
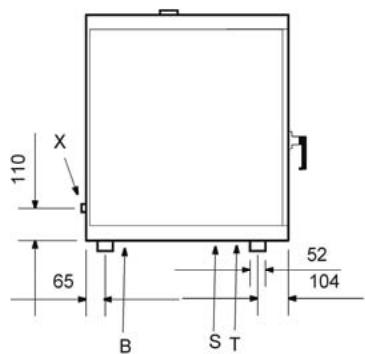
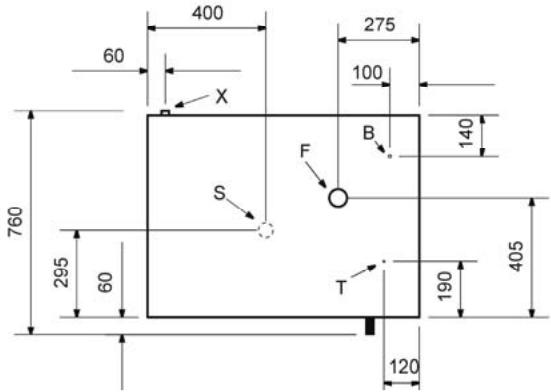
Size in mm
Combi Steamer „Easy“ 6 x 1/1 GN, 6 x 600x400
Power: 8,0 kW / 2 NAC 400 V
Size: W 925 x D 760 x H 800 mm
Distance between trays: 80 mm
Weight: 80kg
Code-No. 116.806
Explanations
X = Incoming water 3/4"
F = Steam outlet 60 mm
B = Electrical feeding
T = Safety thermostat
S = Water drain
Combi Steamer „Easy“ 10 × 1 / 1 GN
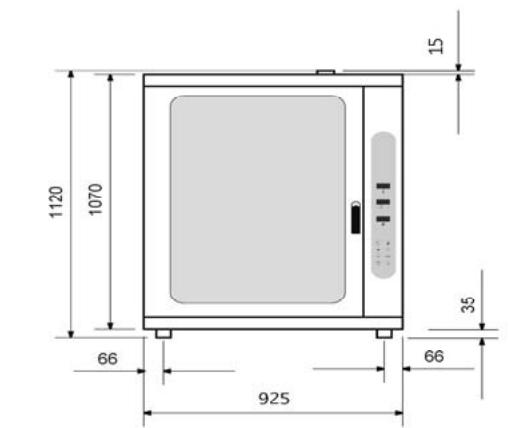
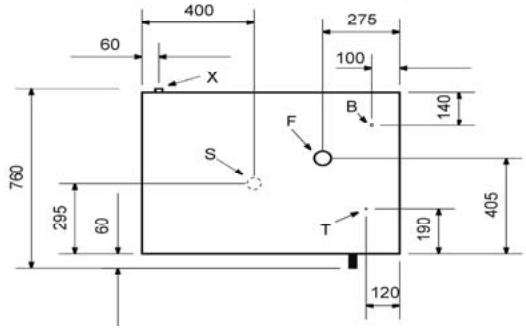
Size in mm
Combi Steamer „Easy“ 10 x 1/1 GN, 10 x 600x400
Power: 12,0 kW / 3 NAC 380-400 V
Size: W 925 x D 760 x H 1120 mm
Distance between trays: 80 mm
Weight: 110kg
Code-No. 116.810
Explanations
X = Incoming water 3/4"
F = Steam outlet 60~mm
B = Electrical feeding
T = Safety thermostat
S = Water drain
5. Installation and operation
5.1 Safety instructions

WARNING! Electrical hazard!
Connect the device to a properly installed and grounded single power socket. Never yank cord to disconnect from outlet. Cable must not touch any hot parts.
See that the cable does not touch any heat sources or sharp edges. Do not let the cable dangle over the counter edge.

WARNING! Danger of burn!
During operation some parts of the device become very hot. In order to avoid injuries do not touch any hot parts!
Do not use the device if it does not function properly, has been damaged or dropped.
o Do not use any accessory or spare parts that have not been recommended by the manufacturer. These can be dangerous for the user, or lead to damage of the device or personal injury, and furthermore invalidate the warranty.
Do not lay the cable over carpets or heat insulations. Do not cover the cable. Keep the cable away from operating range and do not dunk it into water.
Do not move or tilt the device during operation!

WARNING! Hazard via electrical current!
The device may cause injuries due to improper installation!
Before installation, the local power grid specification should be compared with that of the device (see type label).
Connect the device only in case of compliance! Take note of the security advice!
5.2 Installation and connection

ATTENTION!
Installation and maintenance operations may only be performed by qualified professionals!
Installation
- Discard the complete packing material after unpacking the device.
- Place the device on top of an even and safe surface which supports the weight of the device and is not heat sensitive.
Not at any time should you place the device on an inflammable surface. - You must not position the device near open fireplaces, electric ovens/arc furnaces, furnaces/electric heaters or other heat sources.
- Position the device in such a way that the plug is easily accessible.
Install the device in a well ventilated area.
- Place the device in a way, so that the ventilation openings at the back are not covered or blocked.
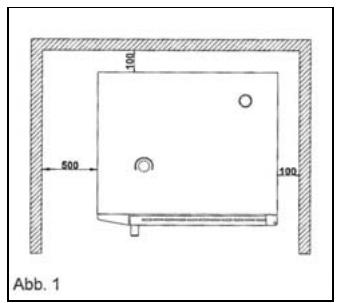
- So not place the device directly at walls or other objects that are made of combustible materials. Keep a minimum distance of 100mm between walls or other objects and the right side, back and top of the device. Keep a minimum distance of 500mm to the left side of the device and other objects. (Figure 1).
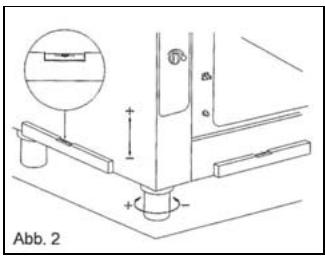
- The levelling and height adjustment using the adjustable legs should be performed as shown in Figure 2.
Harsh differences in height or level may affect the functioning of the device.
Remove the protective foil from the outer panels. Slowly pull these off so that no glue or adhesive residuals remain.
Make sure that the openings and slots for suction and cooling are not blocked.
Connection
Electrical connection
- Before connecting the device to power supply, make sure that the voltage and frequency values on the rating plate comply with the values of the available power supply system. A voltage deviation of note more than ± 10% is tolerable.
- Make sure, that there is an earth conductor that complies with the applicable regulations. See that you use a cable with an appropriate cross-section when connecting the device to power supply.
- The electrical connection requires the interconnection of an all-pole main switch (corresponding to the load) between the device and the power supply system. This switch has contacts with a minimum opening distance of 3mm and must be placed easily accessible.
- Observe the VDE (VDE Association for Electrical, Electronic & Information technologies) regulations of the local energy supplier.
- In certain cases the device should be connected to an equipotential bonding system, here the applicable regulations are to be observed.
Water connection
Water pressure: max. (250KPa) 2,5 bar.
We recommend the installation of a softening agent 8÷ 10 F
- Let a certain amount of water drain before connection, in order to remove iron residues from the pipe.
- In case of a new installation, always let a sufficient amount of water drain before connection the device to the water supply so that no impurities penetrate the magnetic valves.
Make sure that the filters of the magnetic valves are clean. - Connect the „Water“ pipe to cold water supply and interpose a stop-valve.
Drain connection
Drainage into open outlet with specially designed pipe.
Pipe DN 50 with constant minimum gradient of 3 to 5% . Effective standard: DIN 1986, T 1. Sewage temperature approx. 60^ .
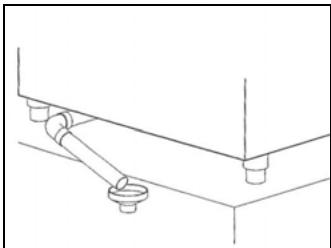
The water outlet is mounted underneath the Combi Steamer and is connected to a rigid pipe, as the pipe diameter must not be less than the diameter of the water outlet connection piece.
In order to assure a trouble-free water drainage the pipe must stay at least 20 cm underneath the connection piece.
Possible outlet obstructions may cause bad smells in the cooking/baking chamber or lead to emission of steam from the door of the Combi Steamer.
We recommend the installation of a water softening device in order to avoid limescale.
5.3 Operating
"Programmable" Combi Steamer
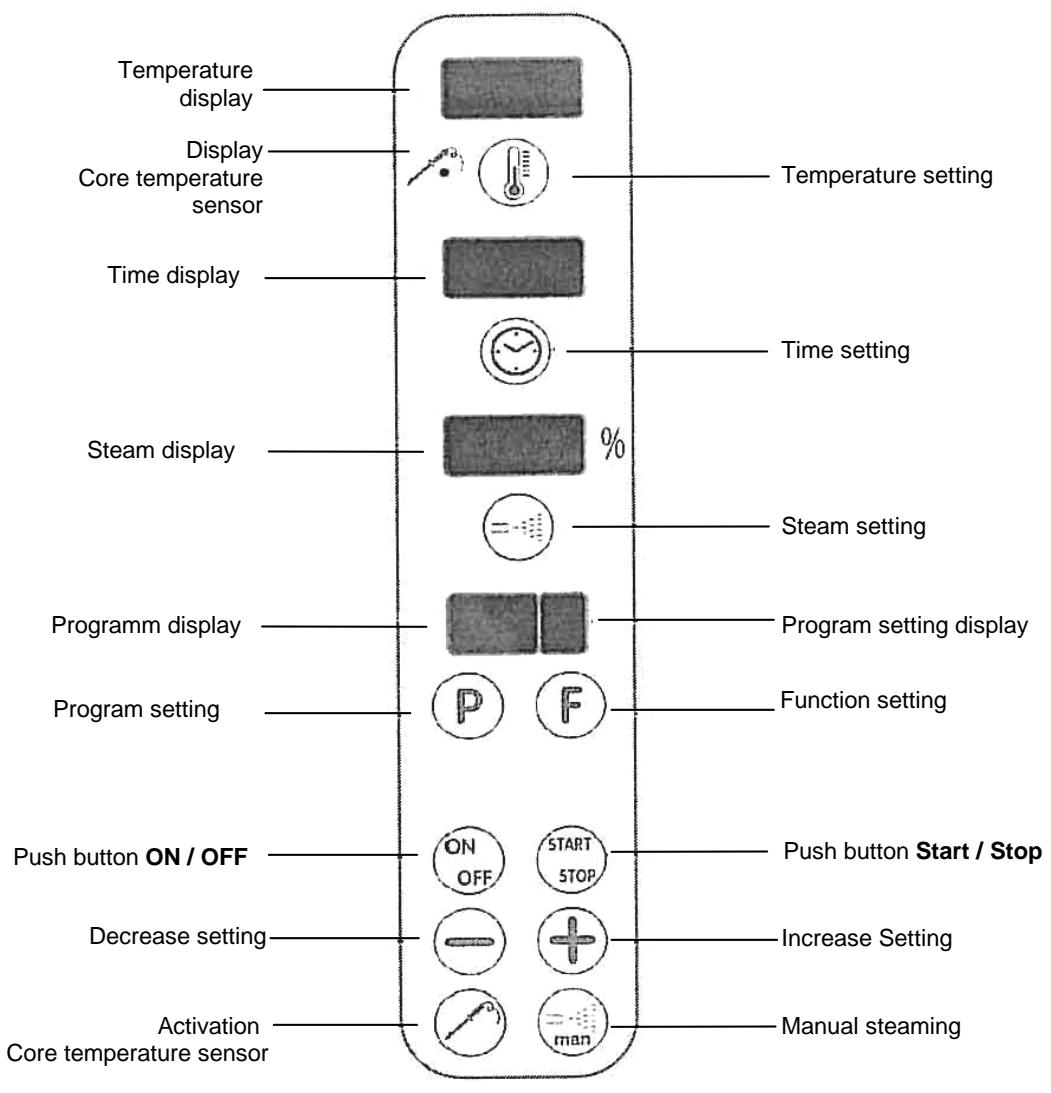
ON OFF The first push of the button activates the displays, the second push deactivates them and as the card supply remains.
This push button selects the number of the program.
F This push button selects the number of the function.
This push button increases the displayed flashing value.
This push button decreases the displayed flashing value.
START STOP This push button (de-)activates the back clock timer.
This push button selects the temperature.
This push button selects the baking/cooking time.
This push button selects the percentage of steam.
This push button (de-)activates the product sensor.
This push button manually increases steam.
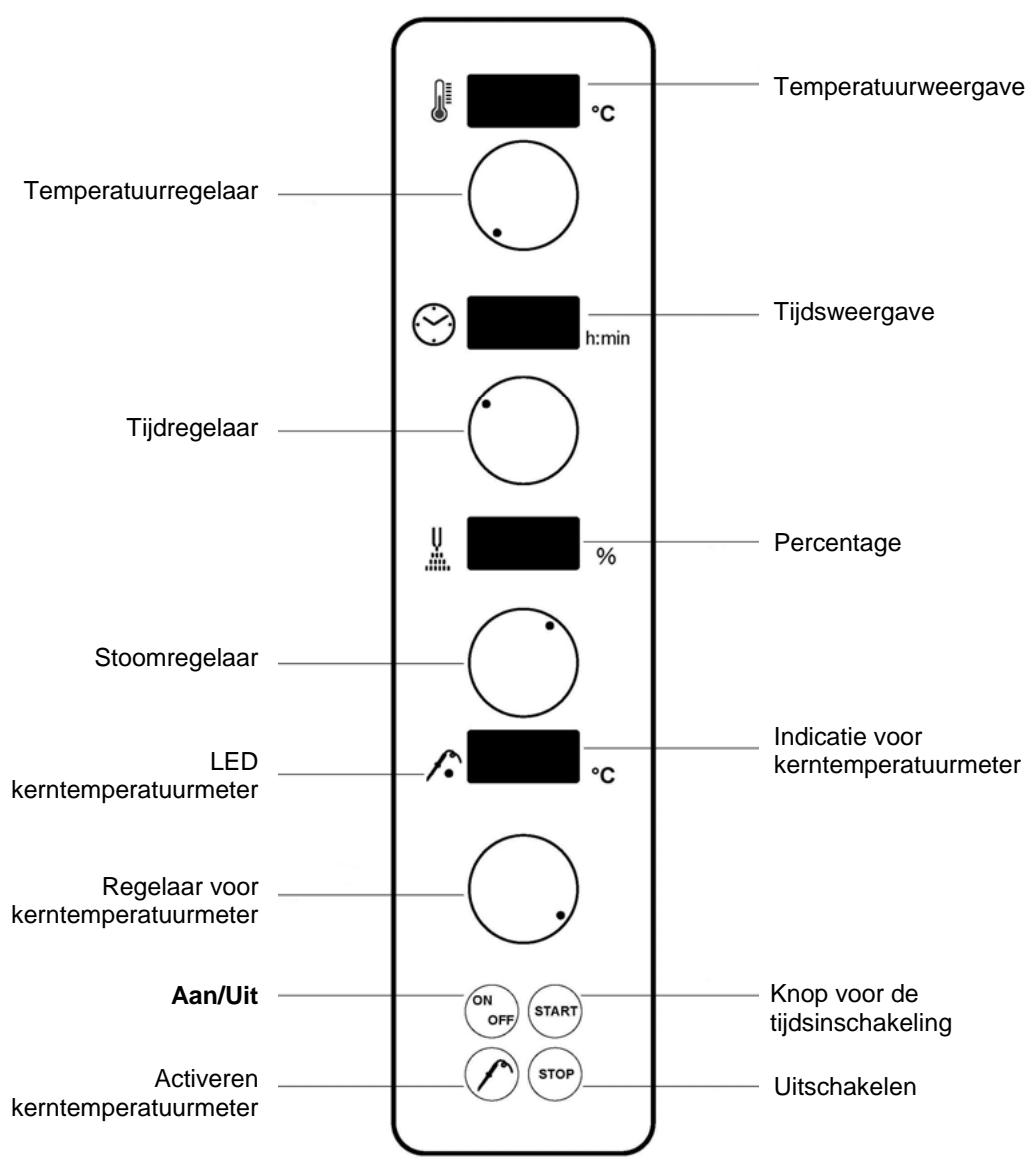
Combi Steamer „Easy“
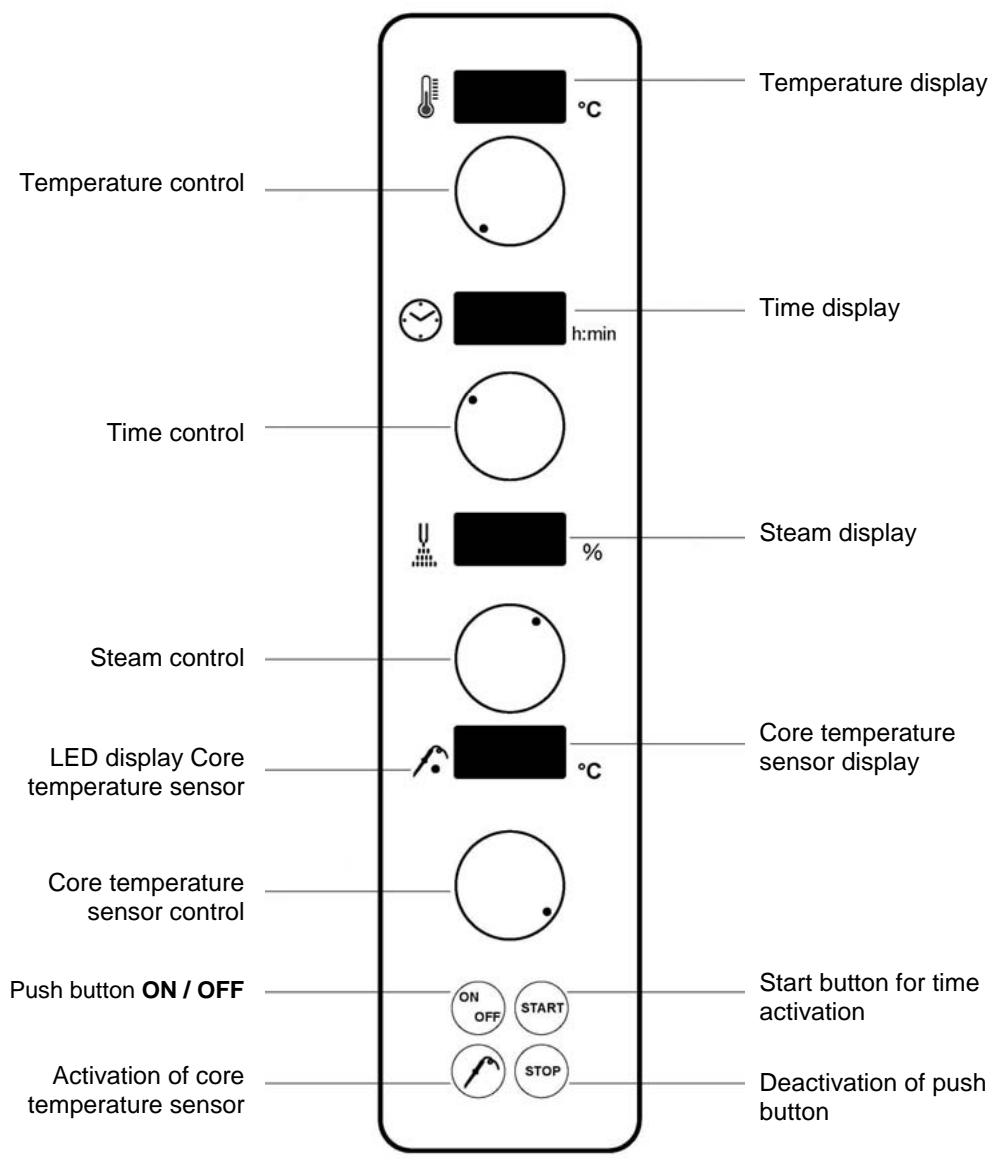

Press the „ON/OFF“-button to switch on the device, now choose setting as required. See the cooking charts for values and set accordingly – the oven heats up automatically. When the desired temperature is reached fill the oven with the foods.

Set the time using the time control.

Then press the „Start“-button. This automatically activates the time. After the set time has elapsed, an acoustic signal resounds and the oven switches off automatically.

In case you want to apply core temperature, simply insert the tip of the core temperature sensor into the center spot of the food. Now press the button for activation of the core temperature sensor. The yellow LED light of the core temperature sensor flashes up in the display.

Set the desired core temperature using the control of the core temperature sensor thereafter.

Adjust the steam using the steam control

and the temperature with the temperature control.

Press the „Start“-button to start the cooking process. When the set core temperature is reached the oven automatically switches off. In case you want to use the steamer for á La Carte via the lunch or dinner service, we recommend you start the oven and set a standard temperature, e.g. 130^ , and let the oven operate.

This allows for heating up the device easy and quickly to the desired temperature by adjusting the temperature control. If you do not activate the time setting, the oven automatically continues operation at the chosen temperature.
5.4 Cooking modes
| Cooking mode | Temperature in ℃ | Cooking chamber humidity in % |
| Frying | 150 – 230 | 0 – 40 |
| Baking | 120 – 220 | 0 – 20 |
| Steaming | 95 – 130 | 60 – 100 |
| Stewing | 90 – 100 | 60 – 80 |
| Poaching | 60 – 90 | 60 – 90 |
| Grilling | 180 – 270 | 0 – 10 |
| Cooking au gratin | 220 – 270 | 0 |
Cooking with hot air
General
Hot air basically can be used for all foods that should be crispy and brown.
This operation mode utilizes ventilated air. An all around browning is assured via the air flow. You may choose arbitrarily from a temperature range of 50 to 270^ .
- Do not use too deep containers and keep a certain between the containers and the foods below. Only a sufficient distance between the containers ensures an optimized air flow which allows for best results in food preparation.
- The device must always be preheated. In order to avoid loss of temperature we recommend a preheating temperature of 40 to 50^ above the required temperature, so that temperature losses caused by the opening of the door can be compensated.
Cooking modes
Frying, Cooking au gratin, Baking ...
Helpful hints
Meat, Fish: Sear roast pieces. Place a GN-container underneath the grill in order to collect the meat juice. Place breaded roast pieces on an enamelled tray, as you reach best browning results due to optimal heat distribution.
Cooking au gratin: Place the foods or forms on the tray, so that the heat mainly operates from above.
Baking: When baking with the Combi Steamer, the temperature is usually set approx. 10% lower than with usual ovens. When preparing finished goods, please always read the instructions on the packing.
Cooking with the Core Temperature Sensor
General
- Cooking with the Core Temperature Sensor allows for a constant control of the temperature inside the food.
-
Measuring the core temperature guarantees a permanent control over the cooking process of the foods. Consistent operating results in less loss of food weight. Every degree Celsius above the optimal core temperature leads to a higher loss of food weight.
-
When switching on the Combi Steamer the default temperature is 20^ . If the Core Temperature Sensor, which can be found at the side of the control panel, was properly inserted into the food, the displayed core temperature should be 5^ below the set temperature for the cooking chamber. Using the Core Temperature Button you may choose from a core temperature between 20 and 99^ .
Helpful hints
The sensor needle should always be cold when inserted into the food, as otherwise it may cause a burn hole. If necessary, the needle should be cooled down. Choose the thickest spot at the middle of the food to insert the Core Temperature Sensor. Insert the sensor from the side for flat pieces of food in order to hit the middle.

WARNING! Risk of burn!
The Core Temperature Sensor becomes very hot during operation!
Avoid direct contact with the Core Temperature Sensor when pulling it out. Use safety gloves or oven cloth!
Examples for operation with core temperature
| Food | Cooking state | Core temperature in °C |
| Fillet of beef | pink | 55 – 58 |
| Roast beef | pink | 52 – 58 |
| Beef | well done | 80 – 85 |
| Boiled beef | well done | 90 |
| Leg of pork | well done | 82 |
| Pork loin | well done | 78 |
| Knuckle of pork | well done | 82 |
| Pickled knuckle of pork | well done | 85 |
| Boneless pork back | pink | 52 – 58 |
| Smoked pork chop loin | pink | 55 – 60 |
| Meat loaf | well done | 78 |
| Leg of veal | well done | 78 |
| Saddle of veal | pink | 65 – 70 |
| Breast of veal | well done | 75 – 78 |
| Leg of lamb | well done | 78 |
| Chicken | well done | 85 |
| Goose | well done | 90 |
| Duck | well done | 80 – 85 |
| Turkey | well done | 80 – 85 |
These are just standard values, deviances may occur due to different qualities and sizes, as well as requirements of the product.
Combi-steaming
General
- Basically all kinds of roast pieces and large poultry are suited for combi-steaming.
- This operation mode is a combination of hot air and steam. Both are brought into fast motion by a fan wheel inside the cooking chamber. This ensures an optimal steam flow and best browning results without the foods running dry. Basting of the meat pieces is not necessary. Furthermore, it allows for gentle heating of foods, so they cannot be distinguished from freshly prepared foods.
- In case a heavy crusting is desired the temperature is increased for a short period at the end of cooking time.
- You may prepare and cook different foods at the same time, without mixing up the flavours and tastes.
Cooking modes
Combi-steaming, Regeneration ...
Helpful hints
Meat: The roast pieces should never be arranged too close to each other, as they will not become brown at the touching sides. The resulting juice should be collected by a GN-container. In that container you may as well parallel cook e.g. bones and vegetables for a full sauce.
Regeneration: Add sauces to the foods only after regeneration, as otherwise you may encounter burn residues or the formation of "skin" on the sauce surface.
Steaming
General
Generally speaking, any food that may be cooked in water or stock can be cooked with steam. All types of vegetables, sides, fish and meat are suited.
- The fan wheel rotates during this operation mode. The temperature may be chosen arbitrarily up to 100^ . So it allows for steaming below 100^ , so one of the most gentle cooking methods. It preserves form and taste as well as vitamins, trace elements and nutrients to the greatest extent as they are not washed out with the cooking water or boiled out by the heat.
- You may prepare and cook different foods at the same time, without mixing up the flavours and tastes.
Cooking modes
Scalding, Poaching, Stewing, Cooking, Vacuum-Cooking, Blanching, Defrosting, Preserving ...
Helpful hints
Steaming at 60 - 130°C
Fish: Cooking without addition of stock.
Desserts/Sweets: Prepare Crèmes in many different ways and cover with foil.
Vakuum-cooking: Place vacuum-packed foods on grill for cooking.
Steaming at 99^
Vegetables: As steamed vegetables tend to keep on cooking quench them quickly after cooking. Do not fill the containers up to more than 2/3 of their height. Deep frozen vegetables should not be cooked while frozen in block.
Sides: Put boiled potatoes into salted water for approx. 1 hour before cooking.
5.5 Cooking charts
Beef
| Food | Cooking chamber humidity in % | Cooking chamber temperature in ℃ | Time in min. | Core temperature in ℃ | GN- container |
| Roast beef, warm | 15 | 160 | 60 | normal | |
| Roast beef, cold | 15 | 160 | 54 | normal | |
| Rump steak, medium | 230 | 7 – 9 | 55 | enamelled | |
| Fillet/Tenderloin steak, medium | 230 | 7 – 9 | 55 | enamelled | |
| Roast beef | 20 | 130 | 10 | 85 | normal |
| 2. Work step | 20 | 170 | 82 | ||
| Beef roll | 20 | 170 | 50 – 70 | normal | |
| Beef, boiled | 100 | 125 | 90 | 85 – 90 | normal |
Veal
| Food | Cooking chamber humidity in % | Cooking chamber temperature in ℃ | Time in min. | Core temperature in ℃ | GN- container |
| Fillet of veal, whole piece | 230 | 68 | enamelled | ||
| Medaillons of veal | 230 | 6 – 10 | enamelled | ||
| Saddle of veal | 10 | 170 – 180 | 40 | 72 | enamelled |
| Veal chop | 230 | 12 – 15 | enamelled | ||
| Knuckle of veal | 100 | 130 | 10 | normal | |
| 2. Work step | 20 | 160 – 180 | 70 – 90 | normal | |
| Roast veal | 100 | 130 | 10 | normal | |
| 2. Work step | 20 | 160 – 180 | 80 – 120 | 78 | normal |
| Breast of veal, roasted | 100 | 130 | 10 | normal | |
| 2. Work step | 20 | 160 – 180 | 80 – 120 | 78 | normal |
Pork
| Food | Cooking chamber humidity in % | Cooking chamber temperature in ℃ | Time in min. | Core temperature in ℃ | GN- container |
| Pork fillet | 230 | 68 | enamelled | ||
| Pork medallion | 230 | 6 – 10 | enamelled | ||
| Pork cutlet | 230 | 12 – 16 | enamelled | ||
| Cutlet, nature | 230 | 15 – 20 | normal | ||
| Roasted neck | 100 | 130 | 10 | normal | |
| 2. Work step | 20 | 170 | 78 | ||
| Crispy roast | 100 | 130 | 10 | normal | |
| 2. Work step | 20 | 170 | 82 | ||
| Knuckle of pork | 100 | 130 | 10 | normal | |
| 2. Work step | 20 | 170 | 82 | ||
| Smoked pork chop | 100 | 130 | 10 | normal | |
| 2. Work step | 20 | 170 | 78 | ||
| Meat loaf | 20 | 140 | 78 | normal | |
| Meatballs | 180 – 200 | 15 – 20 | normal | ||
| Spare ribs | 180 – 200 | 15 – 25 | grill |
Venison and Lamb
| Food | Cooking chamber humidity in % | Cooking chamber temperature in ℃ | Time in min. | Core temperature in ℃ | GN- container |
| Medallion of venison | 230 | 6 – 10 | enamelled | ||
| Saddle of venison | 10 | 180 – 200 | 68 | enamelled | |
| Leg of deer | 100 | 130 | 10 | normal | |
| 2. Work step | 20 | 170 | 78 | ||
| Roast venison | 100 | 130 | 10 | normal | |
| 2. Work step | 20 | 170 | 78 | ||
| Hare leg | 20 | 170 | 40 – 50 | normal | |
| Rown roast of lamb | 230 | 18 – 25 | enamelled | ||
| Medallion of lamb | 230 | 6 – 10 | enamelled | ||
| Boneless lamb back | 230 | 8 – 12 | enamelled | ||
| Shoulder of lamb | 100 | 130 | 10 | normal | |
| 2. Work step | 20 | 170 | 78 | ||
| Leg of lamb | 100 | 130 | 10 | normal | |
| 2. Work step | 20 | 170 | 78 |
Poultry
| Food | Cooking chamber humidity in % | Cooking chamber temperature in ℃ | Time in min. | Core temperature in ℃ | GN- container |
| Chicken | 100 | 130 | 4 | normal | |
| 2. Work step | 200 | 25 – 35 | |||
| Chicken leg | 100 | 130 | 4 | normal | |
| 2. Work step | 200 | 20 – 30 | |||
| Chicken fricassee | 100 | 125 | 60 – 90 | normal | |
| Duck | 100 | 130 | 10 | normal | |
| 2. Work step | 10 | 190 | 45 – 65 | ||
| Breast of duck | 100 | 130 | 5 | enamelled | |
| 2. Work step | 10 | 230 | 15 – 25 | ||
| Breast of goose | 100 | 130 | 10 | normal | |
| 2. Work step | 10 | 170 | 100–150 | ||
| Goose leg | 100 | 130 | 10 | normal | |
| 2. Work step | 10 | 170 | 45 – 55 | ||
| Turkey | 10 | 130 | 10 | 78 – 82 | normal |
| 2. Work step | 10 | 170 | 70 – 120 | ||
| Turkey breast | 100 | 130 | 10 | normal | |
| 2. Work step | 10 | 170 | 72 | ||
| Medallion of turkey | 230 | 10 – 15 | enamelled |
Fish
| Food | Cooking chamber humidity in % | Cooking chamber temperature in ℃ | Time in min. | Core temperature in ℃ | GN- container |
| Trouts, roasted | 230 | 15 – 20 | enamelled | ||
| Trouts, blue | 80 | 100 | 12 – 18 | normal | |
| Mussels | 80 | 100 | 12 – 18 | normal | |
| Salmon, whole piece | 80 | 80 | 74 | normal | |
| Salmon | 200 | 12 – 18 | enamelled | ||
| Halibut, whole piece | 80 | 80 | 20 – 25 | normal | |
| Spiny lobster | 80 | 80 | 74 | normal | |
| Fish fillet, breaded | 10 | 230 | 12 – 18 | enamelled |
Sides and Eggs
| Food | Cooking chamber humidity in % | Cooking chamber temperature in ℃ | Time in min. | Core temperature in ℃ | GN- container |
| Boiled potatoes | 100 | 125 | 30 – 40 | perforated | |
| Jacket potatoes | 100 | 125 | 30 – 40 | perforated | |
| Potatoes en papillote | 60 | 180 | 25 – 35 | perforated | |
| Potats au gratin | 20 | 160 – 180 | 30 – 50 | normal | |
| Fried potatoes | 230 | 15 – 20 | normal | ||
| Macaire potatoes | 230 | 15 – 20 | normal | ||
| Potato dumpling | 100 | 120 | 20 – 30 | normal | |
| Bread dumpling | 100 | 120 | 20 – 30 | normal | |
| Rice | 100 | 140 | 25 – 35 | normal | |
| Rice pudding | 100 | 120 | 25 – 35 | normal | |
| Lasagna | 20 | 160 – 180 | 25 – 35 | normal | |
| Eggs, soft | 100 | 100 | 7 – 8 | perforated | |
| Eggs, hard | 100 | 100 | 10 – 12 | perforated | |
| Royale | 100 | 90 | 25 – 30 | normal |
Vegetables
| Food | Cooking chamber humidity in % | Cooking chamber temperature in ℃ | Time in min. | Core temperature in ℃ | GN- container |
| Carrots | 100 | 100 | 12 – 15 | perforated | |
| Pease | 100 | 100 | 12 – 15 | perforated | |
| Cauliflower | 100 | 100 | 12 – 15 | perforated | |
| Broccoli | 100 | 100 | 12 – 15 | perforated | |
| Brussels sprouts | 100 | 100 | 12 – 15 | perforated | |
| Beans | 100 | 100 | 12 – 15 | perforated | |
| Asparagus | 100 | 100 | 12 – 15 | perforated | |
| Kohlrabi | 100 | 100 | 12 – 15 | perforated | |
| Tomatoes | 100 | 100 | 2 – 3 | perforated | |
| Spinach | 100 | 100 | 9 | perforated | |
| Savoy leaves, blanched | 100 | 100 | 4 – 6 | normal | |
| Vegetable casserole | 20 | 100 | 12 - 20 | normal |
These are just standard values, deviances may occur due to different qualities and sizes, as well as requirements of the product.
6. Cleaning and care
6.1 Safety advice
Before beginning with repair the device has been disconnected from the power socket (pull the power plug!!!) and has cooled down.
o Do not use any acid agents and make sure no water ingresses the device.
To protect yourself from electric shock, never immerse the device, its cables and the plug in water or other liquids.

CAUTION!
The device is not suited for direct washing via water jets. Therefore, you must not use any kind of pressure water jet for cleaning the device!
6.2 Cleaning
Clean the device after every use in order to avoid a baking in of baking or frying residues.
Clean the device on the in- and outside with a damp soft, cloth.
The device should be cleaned on a daily basis.
o Do not at any time use steel-wool, brushes or scrapers made of regular steel.
○ Use lukewarm soap water to clean the cooking chamber. Make sure no residues of the cleaning agent remain after cleaning.
○ Use special detergents for ovens only and do not use any kind of detergents for grills or trays that are chemically too aggressive and have a high content of caustic soda as the use of inappropriate detergents may lead to corrosion of the oven accessories.
Only use a soft cloth and make sure you never use any kind of abrasive agents or pads which could scratch the surface.
After the cleaning procedure, you should use a soft and dry cloth to wipe dry and polish the surface.
o Make sure the device has been cleaned properly before storing it in a dry place.
6.3 Safety instructions for maintenance
Check the mains lead from time to time to ensure it is not damaged in any way. Never use the device if the lead is damaged. If the lead is damaged, it must be replaced by a qualified electrician.
In case of damage or malfunction, please contact your stockist or our customer service centre.
o Only a qualified technician using original spare parts and accessories should carry out repairs and maintenance of the device. Do not attempt to repair the device yourself.
Bartscher GmbH
Combi-steamer 5 x 2/3 GN
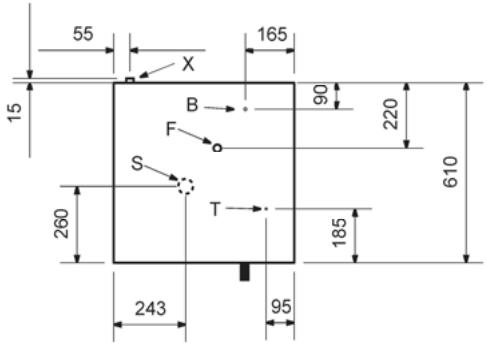
Afmetingen in mm
Combi-steamer 5 × 2 / 3 GN
Combi-steamer 6 x 1/1 GN
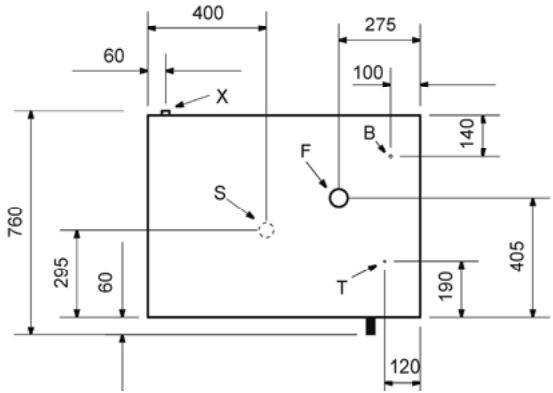
Afmetingen in mm
Combi-steamer 6 x 1/1 GN 6 x 600x400
Combi-steamer 4 x 1/1 GN
Afmetingen in mm
Combi-steamer 4 x 1/1 GN 4 x 600x400
Combi-steamer 10 x 1/1 GN
Afmetingen in mm
Combi-steamer 10 x 1/1 GN 10 x 600x400
Combi-steamer "Easy" 5 x 2/3 GN
Afmetingen in mm
Combi-steamer "Easy" 5 × 2 / 3 GN
Combi-steamer "Easy" 6 x 1/1 GN
Afmetingen in mm
Combi-steamer "Easy" 6 x 1/1 GN, 6 x 600x400
Combi-steamer "Easy" 10 x 1/1 GN
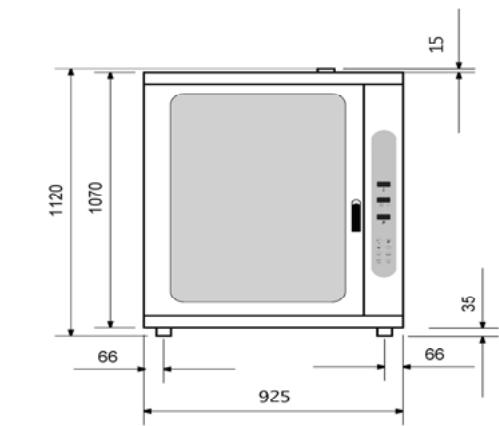
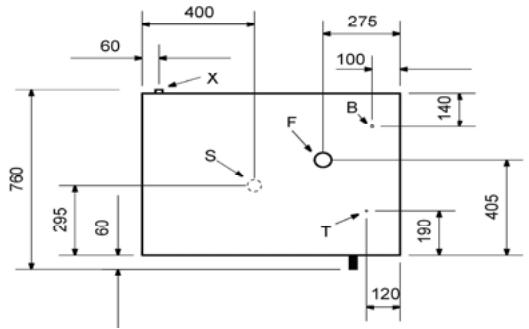

Afmetingen in mm
Combi-steamer "Easy" 10 x 1/1 GN, 10 x 600x400
WAARSCHUWING! Verbrandingsgevaar!
"Programmeerbare" combi-steamer
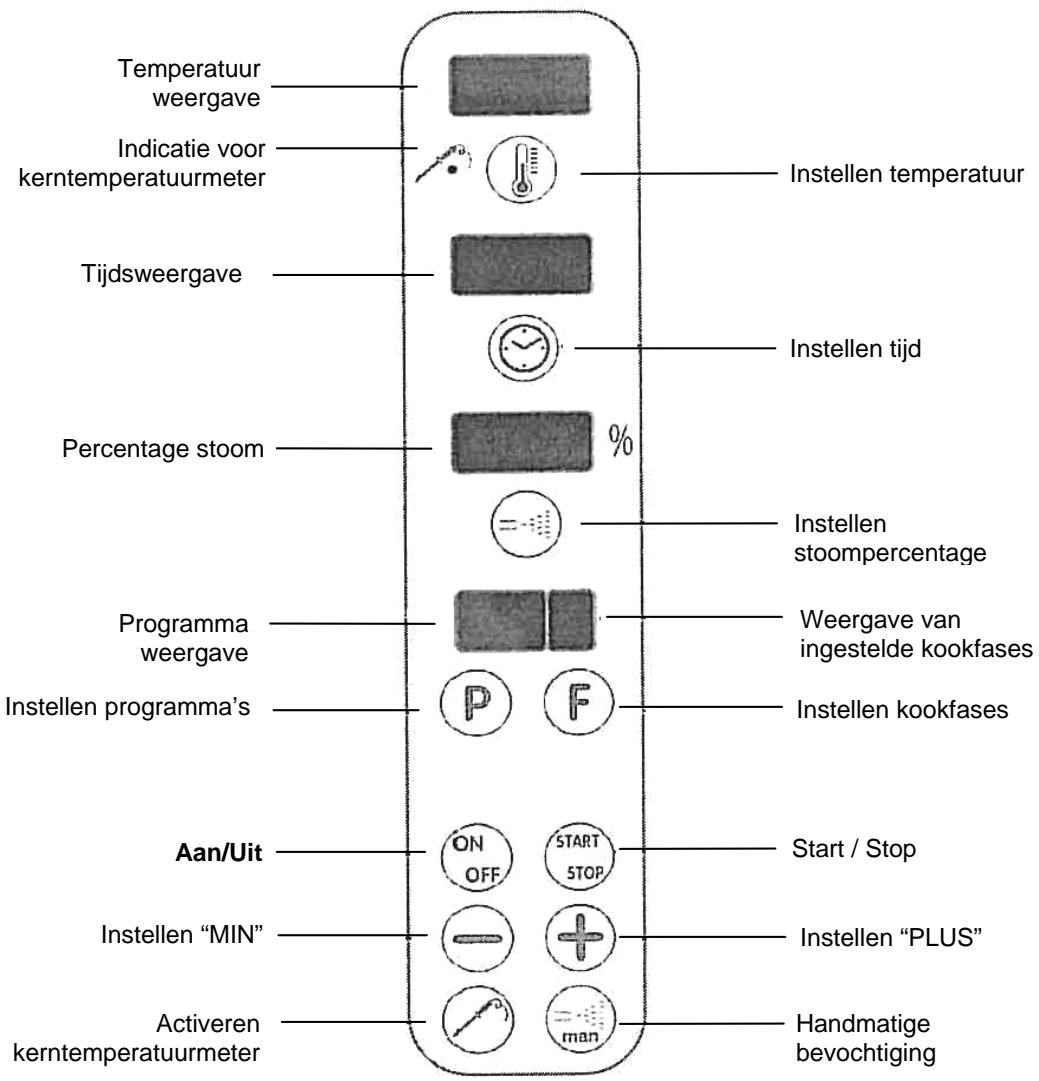
Combi-steamer "Easy" 5 x 2/3 GN

- Safety 32
- 3.Delivery,packaging and storage 34
- Technical data 35
- Installation and operation 43
- Cleaning and maintenance 57
- Information about the instruction manual
- Key to symbols
- WARNING!
- WARNING! Electrical hazard!
- CAUTION!
- NOTE!
- Liability and Warrantees
- Copyright protection
- Declaration of conformity
- Safety
- General Information
- Safety instructions for commercial use of the device
- Intended use
- ATTENTION!
- Transport, packaging and storage
- Delivery check
- Packaging
- Storage
- Technical data
- Characteristics of the Combi Steamer
- Technical specification
- Combi Steamer 5 × 2 / 3 GN
- Explanations
- Combi Steamer 6 x 1/1 GN
- Combi Steamer 4 x 1/1 GN
- Combi Steamer 10 x 1/1 GN
- Combi Steamer „Easy“ 5 x 2/3 GN
- Combi Steamer „Easy“ 6 x 1/1 GN
- Combi Steamer „Easy“ 10 × 1 / 1 GN
- Installation and operation
- Safety instructions
- WARNING! Danger of burn!
- WARNING! Hazard via electrical current!
- Installation and connection
- Installation
- Connection
- Electrical connection
- Water connection
- Drain connection
- Operating
- Combi Steamer „Easy“
- Cooking with hot air
- General
- Cooking modes
- Helpful hints
- Cooking with the Core Temperature Sensor
- WARNING! Risk of burn!
- Combi-steaming
- Steaming
- Steaming at 60 - 130°C
- Steaming at 99°C
- Cooking charts
- Cleaning and care
- Safety advice
- Cleaning
- Safety instructions for maintenance
- Combi-steamer 5 x 2/3 GN
- Combi-steamer 5 × 2 / 3 GN
- Combi-steamer 6 x 1/1 GN 6 x 600x400
- Combi-steamer 4 x 1/1 GN
- Combi-steamer 10 x 1/1 GN
- Combi-steamer 10 x 1/1 GN 10 x 600x400
- Combi-steamer "Easy" 5 x 2/3 GN
- Combi-steamer "Easy" 5 × 2 / 3 GN
- Combi-steamer "Easy" 6 x 1/1 GN
- Combi-steamer "Easy" 10 x 1/1 GN
- WAARSCHUWING! Verbrandingsgevaar!
- "Programmeerbare" combi-steamer
Brand : BARTSCHER
Model : 116802
Category : Combi steam oven