
VOYAGER - Communication system UNIDEN - Free user manual and instructions
Find the device manual for free VOYAGER UNIDEN in PDF.
| Product Type | Portable Marine VHF Radio |
| Brand | Uniden |
| Model | Voyager |
| Dimensions (without antenna) | 97 x 62 x 33 mm |
| Weight (with battery and antenna) | 250 g (8.8 oz) |
| Power Supply | Rechargeable Lithium Ion battery 7.4V / 850mAh |
| Standby Current | Approximately 40 mA (squelched) |
| Key Features | Waterproof (JIS7), Triple Watch, NOAA Weather Alert, NWR-SAME, Memory Scan, 10 Weather Channels, TX Power 1W/5W |
| Marine Channels | 54 transmit channels (USA/International/Canada), 89 receive |
| Frequency Ranges | Transmit: 156-158 MHz, Receive: 156-164 MHz |
| Operating Temperature | -20°C to +50°C (-4°F to +122°F) |
| Waterproof Rating | JIS7 compliant (submersible, antenna and battery properly attached) |
| Included Charger | Drop-in desktop charger (wall or counter mountable) |
| Included Accessories | Antenna, Lithium Ion battery, charger, AC/DC adapter, belt clip, wrist strap, mounting screws |
| Optional Accessories | External microphone (HHVTA07), mounting kit, replacement battery (Voyager BP) |
| Care and Cleaning | Clean with a soft, dry cloth; do not use abrasive cleaners or solvents |
| Battery Safety | Do not expose to temperatures >60°C, do not short-circuit, charge only with the included charger |
| Warranty | 3 years (excluding battery), 1 year for Lithium Ion battery |
| Country of Manufacture | China |
| Technical Support | 1-800-586-0409 (USA), www.uniden.com |
Frequently Asked Questions - VOYAGER UNIDEN
User questions about VOYAGER UNIDEN
0 question about this device. Answer the ones you know or ask your own.
Ask a new question about this device
Download the instructions for your Communication system in PDF format for free! Find your manual VOYAGER - UNIDEN and take your electronic device back in hand. On this page are published all the documents necessary for the use of your device. VOYAGER by UNIDEN.
USER MANUAL VOYAGER UNIDEN
Controls and Indicators 2
Warning! 4
Introduction 6
Features 6
Technical Support and Service 7
Maritime Radio Services Operation 7
Included in your Package 8
Getting Started 9
Mounting the Drop-in Charger 9
Attaching the Antenna 9
Attaching the Battery Pack 10
Attaching the Beltclip 10
Charging the Battery Pack 11
Operation 12
Turning On the Unit and Setting Squelch 12
Selecting a Channel 13
One-touch Channel 16/9/TRI 13
Triple Watch 14
Monitoring Weather Channels 15
Weather Alert 16
NWR-SAME Alert 17
Registering FIPS Code 18
USA, International and Canadian Channels 19
Programming a Channel into Memory 19
Deleting a Channel from Memory 20
Scanning 20
Transmitting 21
Lighted Keys and Display 21
Battery Indicator 22
Key Lock 22
Marine Channels - USA 23
Marine Channels - International 25
Marine Channels - Canada 27
NWR-SAME Alert Level 29
Optional Parts and Replacement Accessories 31
Specifications 32
Troubleshooting 33
FCC RF EXPOSURE INFORMATION 34
Warranty 35
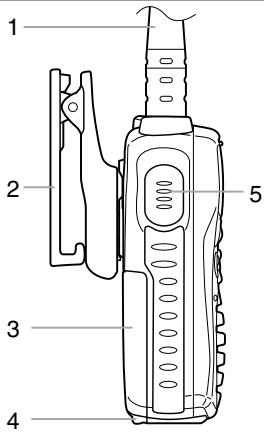
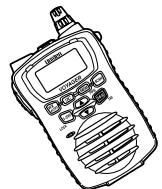
1 Antenna
2 Belt Clip
3 Battery
4 Battery Release Clip
5 PTT (Push to Talk) Key
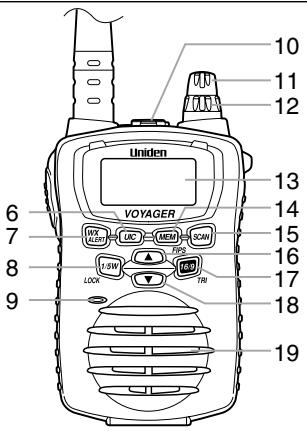
6 USA/International/Canadian Button (UIC)
7 WX Mode/Weather Alert Button (WX/ALERT)
8 TX Power/Lock Button (1/5W/LOCK)
9 Microphone
10 Speaker MIC (Optional) Jack
11 Volume/Power Knob
12 Squelch Knob
13 LCD Display
14 Memory/FIPS Button (MEM/FIPS)
15 Scan Button (SCAN)
16 Channel Up Button (▲)
17 16/9 - Triple Watch Button (16/9/TRI)
18 Channel Down Button (▼)
19 Speaker
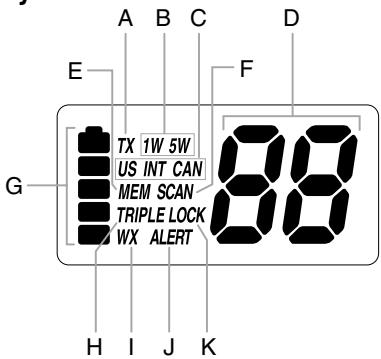
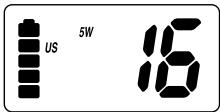
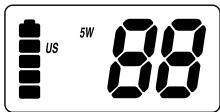
LCD Display
A Transmit Indicator
B TX Power Indicator
C USA/International/Canadian (US/INT/CAN) Indicator
D Channel Number Display
E Memory Indicator
F Scan Indicator
G Battery Indicator
H Triple Watch Indicator
I Weather Mode Indicator
J Weather Alert Indicator
K Key Lock Indicator
Warning!
- The VOYAGER is waterproof only when both the antenna and the battery are properly attached.
- Do not operate the transmitter of any radio equipment unless all the Radio Frequency (RF) connectors are secure and any open connectors are properly terminated.
- Do not operate the transmitter of any radio equipment near electrical blasting caps or in an explosive atmosphere.
- Do not let children operate any transmitter-equipped radio equipment without proper supervision.
- Have your radio equipment serviced by a qualified technician.
- Do not operate the transmitter of any radio equipment with the antenna touching or close to the eyes, face, or exposed body parts.
Lithium Ion Battery Pack Warning
- This equipment contains a Lithium Ion Battery Pack.
- Lithium is a chemical known to the State of California to cause cancer.
- The Lithium Ion Battery Pack contained in this equipment may explode if disposed of in a fire.
- Do not short-circuit the Battery Pack.
- Do not charge the Lithium Ion Battery Pack used in this equipment in any charger other than the one designed to charge this Battery Pack. Using another charger may damage the Battery Pack or cause the Battery Pack to explode.
- Lithium Ion batteries must be disposed of properly.
- Avoid exposing the Lithium Ion Battery, attached or unattached to the radio, in direct sunshine, heated cars, or in areas with temperatures below -20^ (-4^) or above +60^ (+140^) . Exposing the chemicals contained within the battery pack to temperatures above +60^ (+140^) may cause the battery to rupture, fail or reduce performance.
In case of exposure to cell contents, wash the affected area thoroughly, and seek medical attention.

The exclamation point within an equilateral triangle is intended to alert the user to the presence of important operating and maintenance (servicing) instructions in the literature accompanying the appliance.
The VOYAGER is a waterproof, portable two-way VHF transceiver. It is compact, lightweight, rugged and fits easily in your hand. This handheld VHF marine radio will give you consistent, outstanding performance in virtually all conditions and situations. To ensure that you get the most from the VOYAGER's features, please read this operating guide carefully before using the unit.
Features
- Waterproof (meets JIS7 waterproof specifications)
- Triple Watch Mode
- Priority Channel Startup (Channel 16)
- Programmable Memory
One-Touch Channel 16/9
10 Weather Channels - Weather Alert
NWR-SAME Alert - Programmable FIPS Code
Memory Scan
USA, International and Canadian Channels - Table-Top Drop-In Charger (can also be wall-mounted)
- Rechargeable Lithium Ion Battery Pack
- Battery Save Operation
Key Lock - Back-Lit Keys and Display
- Belt Clip
Wrist Strap
TX Power 1W/5W
Technical Support and Service
Your Uniden dealer can provide you with sales assistance and information. If your marine radio does not perform properly, follow the troubleshooting tips in the back of this operating guide.
For technical support contact Uniden at 1-800-586-0409. The radio contains no user-serviceable parts.
Unauthorized adjustment will void the warranty and may cause illegal radio operation.
Be sure that a qualified technician services your radio equipment.
Caution: Changes or modifications to this product not expressly approved by Uniden, or operation of this product in any way other than as detailed by this Operating Guide, can void your authority to operate this product.
Maritime Radio Services Operation
This transmitter will operate on channels/frequencies that have restricted use in the United States. The channel assignments include frequencies assigned for exclusive use of the U.S. Coast Guard, use in Canada, and use in international waters. Operation in these frequencies without proper authorization is strictly forbidden. For frequencies/channels that are currently for use in the world see page 23~28. Please contact the FCC Call Center at 1-888-CALL-FCC for any additional channel information.
VOYAGER

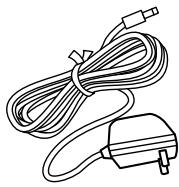
AC Adapter (BADY0510001)

Antenna (HH9408)

DC Adapter

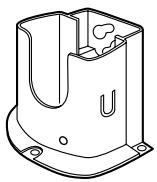
Drop-in Charger

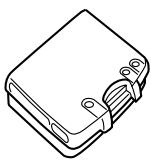
Lithium Battery (Voyager BP)
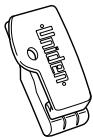
Beltclip

Wrist Strap (RETC484647Z)

Mounting Screws

Reference Guide/ Printed Material
If any of these items are missing from the box, contact your Uniden Dealer or the Uniden Parts Department at (800)-554-3988.
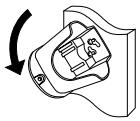
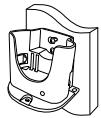
Mounting the Drop-in Charger
1 Mount the drop-in charger to either a counter or wall.
To counter:
Attach the drop-in charger using the mounting screws and washers as follows.
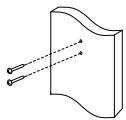
To wall:
Insert the two mounting screws into the wall keeping the same space as the holes on the charger.
Place the charger with the screws through the larger holes then turn the charger.
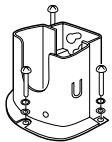
Plug one end of the AC adapter into the wall outlet and the other end into the drop-in charger.
When you mount the drop-in charger on your boat, use the DC adapter instead.

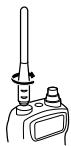
Attaching the Antenna
Attach the antenna to the VOYAGER.
Be sure the antenna is firmly seated.
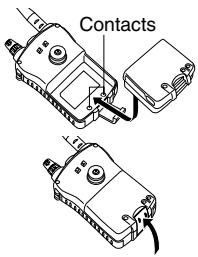
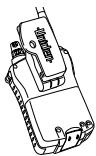
Attaching the Battery Pack
1 Place the battery pack onto the back of the radio. It will only fit in one way.
Snap the battery release clip until it clicks. Be sure the battery pack fits tightly against the VOYAGER's body.
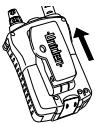
Attaching the Beltclip
1 Hold the beltclip in the direction as follows.
2 Apply it to the hanger piece on the back of the radio. Then slid it up.
3 You will hear a click. The beltclip is firmly attached.
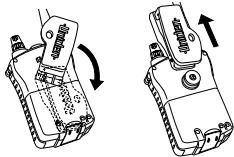
4 To take the beltclip off the radio, turn it and slid it up.

Charging the Battery Pack
Your marine radio is powered by a specially designed Lithium Ion battery pack.
- Before operating the VOYAGER, charge the Lithium Ion battery pack for 4 hours without interruption in the drop-in charger.
1 Place the VOYAGER in the drop-in charger.
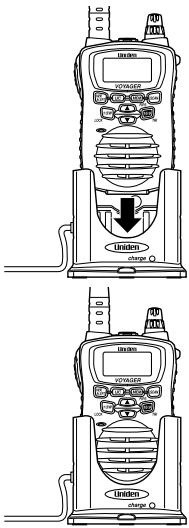
The red LED illuminates and stays On.
- The charger won't overcharge the battery pack. When charging is completed, the charge LED is no longer illuminated.
- Do not transmit when the VOYAGER is in the drop-in charger!
-
You can monitor incoming calls while the VOYAGER is in the drop-in charger.
-
See "Controls and Indicators" (page. 2) for button, knob, and key positions.
- When you turn On your VOYAGER, it is automatically tuned to channel 16, the United States Coast Guard frequency for distress, safety, and calling.
- When you press any key (except PTT), a short tone sounds.
Turning On the Unit and Setting Squelch
Before you turn On the unit, turn the Squelch knob fully counterclockwise.
2 Then, turn On the unit by turning the Volume/Power knob clockwise until you hear a hissing sound.
3 Turn the Squelch knob clockwise, just until the hissing sound stops. Use the knob to adjust to the desired squelch level. Think of the squelch control as a frequency gate which controls access to weak or strong signals depending on its setting.

Strong Signals
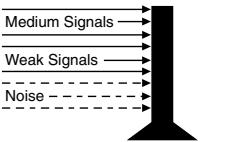
- To listen to a weak or distant station, turn the knob counterclockwise. If reception is poor, turn it clockwise to cut out weak transmissions.
- If the squelch control is adjusted so you continually hear a hissing sound, the unit will not scan properly.
4 To turn Off the unit, turn the Volume/Power knob counterclockwise until it clicks.
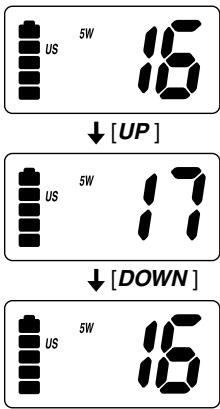
Selecting a Channel
1 Turn On your VOYAGER.
To select a higher channel, press the button.
3 To select a lower channel, press the button.
- To change the channel continuously, press and hold the or button for more than 1 second.
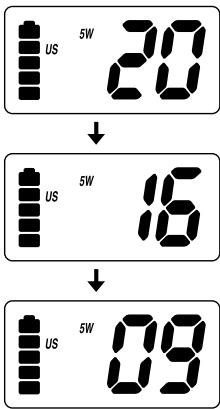
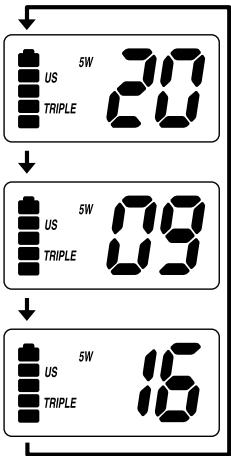
One-touch Channel 16/9/TRI
Example: While you are monitoring channel 20, you want to check channel 16 or channel 9.
1 You are now on channel 20.
2 To monitor channel 16, press the 16/9/TRI button.
3 To monitor channel 9, press the 16/9/TRI button again.
4 To return to channel 20, press the 16/9/TRI button again.
Triple Watch
Triple Watch mode monitors channels 16 and 9 for a signal while you listen to the currently selected channel. The marine radio checks channel 16 and 9 for activity every 2 seconds.
1 To select Triple Watch mode, press and hold the 16/9/TRI button for 1.5 seconds. A double confirmation tone sounds.
2 To exit from Triple Watch, press and hold 16/9/TRI for 1.5 seconds. A double confirmation tone sounds.
- While in Triple Watch mode, you can change the currently selected channel using the or button.
- A momentary press of the 16/9/TRI button interrupts Triple Watch mode and remains on 16, or on channel 9 if you press once more. To return to the previous mode, simply press the button again.
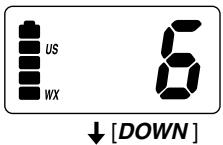
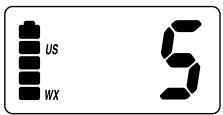
Monitoring Weather Channels
The VOYAGER has 10 preprogrammed weather channel frequencies, represented by 0 through 9.
1 To listen to the weather channels in your area, press WX/ALERT.
appears on the display.
2 To move up, press the button.
3 To move down, press the button.
4 To exit, press WX/ALERT.
disappears from the display.
- To change the channel continuously, press and hold the or button for more than 1 second.

Weather Alert
Weather Alert allows your VOYAGER to function as a severe weather warning radio. If the NOAA issues a severe weather warning while the Weather Alert is turned On, the VOYAGER sounds an alert tone. You will then hear the emergency weather broadcast.
1 To use Weather Alert, select the weather channel in your area.
2 Press and hold WX/ALERT for 1.5 seconds. A double confirmation tone sounds.
3 When the unit receives a warning signal, it beeps for 5 seconds. WX, ALERT, and the channel number blink.
4 To turn Off Weather Alert, press and hold WX/ALERT for 1.5 seconds. A double confirmation tone sounds.
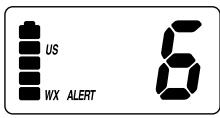

- When Weather Alert is activated, the highest priority is given this function. If the unit is in Scan, Triple Watch, or any other marine channels, it checks the weather alert signals every 7 seconds and switches to the warning receive mode automatically.
NWR-SAME Alert
In addition to the conventional Weather Alert, your VOYAGER is compatible with NWR-SAME Weather Alert.
Specific Area Message Encoding (S.A.M.E.) are NOAA's coded emergency weather signals that identify a specific geographic area affected by an emergency. The VOYAGER receives the emergency weather alert.
The unit changes its alert beep tone according to the level of severity.
1 To use NWR-SAME Alert, select the weather channel in your area.
Press and hold the WX/ALERT button for 1.5 seconds to activate this feature.
3 When the unit receives a warning signal, it sounds a tone defined by severity. WK and FALERT start blinking.
The channel indicator displays the weather channel number and the severity level alternately.
NWR-SAME Alert Level
A1: Warning A3: Statement
A2: Watch A4: Test

4 To turn Off NWR-SAME Alert, press and hold the WX/ALERT button for 1.5 seconds.
- This feature is effective in the weather channel mode only.
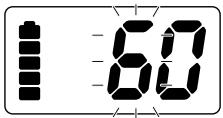
Registering FIPS Code
Six digit FIPS Codes are programmable in 15 channels, number 1~15 for NWR-SAME Weather Alert. If there is no data registered in location number 1, all of the signals are decoded. Contact the National Weather Service at 1-888-NWR-SAME for the FIPS Codes in the area of interest, or visit http://www.nws.noaa.gov/nwr/indexnw.htm
1 Press and hold the MEM/FIPS key for 1.5 seconds.
2 Select the channel, numbers 1~15, you want to program using the or key.
3 Press the MEM/FIPS key to enter the FIPS Code edit mode.
4 To enter the first digit of the code, change the left blinking digit on the display using the or key and press the MEM/FIPS key. The right digit starts to blink.
5 To enter the second digit of the code, change the right blinking digit on the display using the or key and press the MEM/FIPS key.
The entered digit moves to the left and the right digit starts to blink.


6 Repeat step 5 for the remaining digits of the code.
After the last digit registers, the entered code appears on the display automatically for confirmation.
8 To exit from this mode, press and hold the MEM/FIPS key for 1.5 seconds.
9 Press UIC to clear the stored FIPS Code in the displayed location.
- Pressing the MEM/FIPS key for more than 1.5 seconds in the middle of the above steps prevents registration.
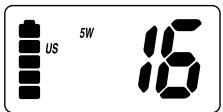
USA, International and Canadian Channels
1 The VOYAGER is initially set for USA marine channels when you turn On your radio.
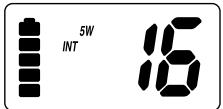
2 To listen to international marine channels, press UIC once.
3 To listen to Canadian marine channels, press UIC again.
4 The radio will keep the last mode setting that was selected when turned back On.
- For USA, international and Canadian marine channels and functions, refer to the tables starting on page 23.

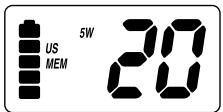
Programming a Channel into Memory
Before using the scanning feature, you have to program channels into memory.
1 Select the channel to enter into memory by pressing the or button.
Press the MEM/FIPS button to store the channel. MEM appears on the display.
Deleting a Channel from Memory
1 Select the channel to delete from memory by pressing the or button.
Press the MEM/FIPS button. MEM disappears from the display.
Scanning
1 To begin scanning the programmed channels, press the SCAN button. SCAN and TRIPLE appear on the display.
2 To stop scanning, press the SCAN button once more. SCAN and TRIPLE disappear from the display.
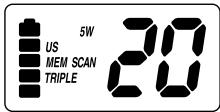
- Scanning starts from the lowest to highest channel and stops when it finds an active channel. It remains on that channel until the transmission ends, then resumes scanning after a 3 second delay period.
- When in the scan mode, the unit automatically activates the Triple Watch feature. To deactivate Triple Watch from the scanning mode, press and hold the 16/9/TRI button for 2 seconds.
TRIPLE disappears from the display.
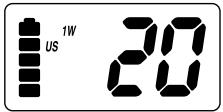
Transmitting
1 Transmission power can be set to either 5W or 1W.
Press the 1/5W/LOCK button to make the change, then the 5w or the 1w indicator on the display changes accordingly.
2 To transmit, press and hold the PTT key.
TX appears on the display.
3 To return to receive, release the PTT key.
TX disappears from the display.
- If the PTT key is pressed for more than 5 minutes, TX starts blinking and the transmission ends. The TX time out tone will sound until the PTT key is released.
- If the battery indicator drops to the 1-mark level on the display, when the PTT key is pressed, the radio will not transmit and the TX icon starts blinking.
(Refer to the description of the Battery Indicator on the next page.)
Lighted Keys and Display
To light the display, press any key excluding the PTT key.
- If you press any button other than the PTT key while the display and keypad are illuminated, it remains illuminated for another 5 seconds.
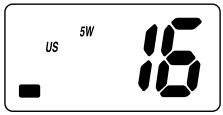
Battery Indicator
When the unit is On, battery power is always indicated on the display.
When the battery is fully charged, the battery indicator appears as follows:
When the battery is nearly discharged, the battery indicator appears as follows:
- When the battery indicator drops to the 1-mark level on the display, the radio will receive but will not transmit.

Key Lock
To prevent accidental entries, you can lock the keypad.
1 Press and hold the 1/5W/LOCK key for 1.5 seconds. The unit will beep two times to confirm that the keypad is locked with LOCK indication on the display.
2 To unlock the keypad, press and hold the 1/5W/LOCK key again for 1.5 seconds. The unit will beep twice to confirm that the keypad is unlocked, and LOCK will disappear.
- You can also unlock the keypad by turning the radio Off and then On again.
| Channel Design | Frequency (MHz) Transmit Receive | Traffic Type | Note | Ship to Ship | Ship to Shore | |
| WX0 | — | 163.275 | NOAA Weather | RX Only | RX Only | |
| WX1 | — | 162.550 | NOAA Weather | RX Only | RX Only | |
| WX2 | — | 162.400 | NOAA Weather | RX Only | RX Only | |
| WX3 | — | 162.475 | NOAA Weather | RX Only | RX Only | |
| WX4 | — | 162.425 | NOAA Weather | RX Only | RX Only | |
| WX5 | — | 162.450 | NOAA Weather | RX Only | RX Only | |
| WX6 | — | 162.500 | NOAA Weather | RX Only | RX Only | |
| WX7 | — | 162.525 | NOAA Weather | RX Only | RX Only | |
| WX8 | — | 161.650 | Can. Weather | RX Only | RX Only | |
| WX9 | — | 161.775 | Can. Weather | RX Only | RX Only | |
| 01 | 156.050 | 156.050 | Com'I, Port Ops, VTS | Yes | Yes | |
| 02 | ||||||
| 03 | 156.150 | 156.150 | Com'I, Port Ops, VTS | Yes | Yes | |
| 04 | ||||||
| 05 | 156.250 | 156.250 | Port Ops, VTS | Yes | Yes | |
| 06 | 156.300 | 156.300 | Safety | Yes | No | |
| 07 | 156.350 | 156.350 | Com'I | Yes | Yes | |
| 08 | 156.400 | 156.400 | Com'I | Yes | No | |
| 09 | 156.450 | 156.450 | Com'I & Non Com'I | Yes | Yes | |
| 10 | 156.500 | 156.500 | Com'I | Yes | Yes | |
| 11 | 156.550 | 156.550 | Com'I, VTS, SMS | Yes | Yes | |
| 12 | 156.600 | 156.600 | Port Ops, VTS, SMS | Yes | Yes | |
| 13 | 156.650 | 156.650 | Navigational | 1W | Yes | No |
| 14 | 156.700 | 156.700 | Port Ops | Yes | Yes | |
| 15 | RX Only | 156.750 | Environmental | RX Only | ||
| 16 | 156.800 | 156.800 | Distress, Safety, Calling | Yes | Yes | |
| 17 | 156.850 | 156.850 | State Control | Yes | Yes | |
| 18 | 156.900 | 156.900 | Com'I | Yes | Yes | |
| 19 | 156.950 | 156.950 | Com'I | Yes | Yes | |
| 20 | 157.000 | 157.000 | Port Ops | Yes | Yes | |
| 21 | 157.050 | 157.050 | U.S. Govt Only | Yes | Yes | |
| 22 | 157.100 | 157.100 | Coast Guard | Yes | Yes | |
| 23 | 157.150 | 157.150 | U.S. Govt Only | Yes | Yes | |
| Channel Desig | Frequency (MHz) TransmitReceive | Traffic Type | Note | Ship to Ship | Ship to Shore | |
| 24 | 157.200 | 161.800 | Public Corresp. | DUP | No | Yes |
| 25 | 157.250 | 161.850 | Public Corresp. | DUP | No | Yes |
| 26 | 157.300 | 161.900 | Public Corresp. | DUP | No | Yes |
| 27 | 157.350 | 161.950 | Public Corresp. | DUP | No | Yes |
| 28 | 157.400 | 162.000 | Public Corresp. | DUP | No | Yes |
| 60 | INH | |||||
| 61 | 156.075 | 156.075 | ||||
| 62 | INH | |||||
| 63 | 156.175 | 156.175 | ||||
| 64 | 156.225 | 156.225 | ||||
| 65 | 156.275 | 156.275 | Port Ops | No | Yes | |
| 66 | 156.325 | 156.325 | Port Ops | Yes | Yes | |
| 67 | 156.375 | 156.375 | Com'I | 1W | Yes | No |
| 68 | 156.425 | 156.425 | Non Com'I | Yes | Yes | |
| 69 | 156.475 | 156.475 | Non Com'I | Yes | Yes | |
| 70 | RX Only | 156.525 | ||||
| 71 | 156.575 | 156.575 | Non Com'I | Yes | Yes | |
| 72 | 156.625 | 156.625 | Non Com'I | Yes | No | |
| 73 | 156.675 | 156.675 | Port Ops | Yes | Yes | |
| 74 | 156.725 | 156.725 | Port Ops | Yes | Yes | |
| 77 | 156.875 | 156.875 | Port Ops | Yes | No | |
| 78 | 156.925 | 156.925 | Non Com'I | Yes | Yes | |
| 79 | 156.975 | 156.975 | Com'I | Yes | Yes | |
| 80 | 157.025 | 157.025 | Com'I | Yes | Yes | |
| 81 | 157.075 | 157.075 | U.S. Govt Only | Yes | Yes | |
| 82 | 157.125 | 157.125 | U.S. Govt Only | Yes | Yes | |
| 83 | 157.175 | 157.175 | U.S. Govt Only | Yes | Yes | |
| 84 | 157.225 | 161.825 | Public Corresp. | DUP | No | Yes |
| 85 | 157.275 | 161.875 | Public Corresp. | DUP | No | Yes |
| 86 | 157.325 | 161.925 | Public Corresp. | DUP | No | Yes |
| 87 | 157.375 | 161.975 | Public Corresp. | DUP | No | Yes |
| 88 | 157.425 | 157.425 | Com'I | Yes | No | |
| Channel Desig | Frequency (MHz) Transmit Receive | Traffic Type | Ship to Ship | Ship to Shore | Permanent Scan List | |
| WX0 | — | 163.275 | NOAA Weather | RX Only | RX Only | Weather |
| WX1 | — | 162.550 | NOAA Weather | RX Only | RX Only | Weather |
| WX2 | — | 162.400 | NOAA Weather | RX Only | RX Only | Weather |
| WX3 | — | 162.475 | NOAA Weather | RX Only | RX Only | Weather |
| WX4 | — | 162.425 | NOAA Weather | RX Only | RX Only | Weather |
| WX5 | — | 162.450 | NOAA Weather | RX Only | RX Only | Weather |
| WX6 | — | 162.500 | NOAA Weather | RX Only | RX Only | Weather |
| WX7 | — | 162.525 | NOAA Weather | RX Only | RX Only | Weather |
| WX8 | — | 161.650 | Can. Weather | RX Only | RX Only | Weather |
| WX9 | — | 161.775 | Can. Weather | RX Only | RX Only | Weather |
| 01 | 156.050 | 160.650 | Duplex | Yes | Yes | |
| 02 | 156.100 | 160.700 | Duplex | Yes | Yes | |
| 03 | 156.150 | 160.750 | Duplex | Yes | Yes | |
| 04 | 156.200 | 160.800 | Duplex | Yes | Yes | |
| 05 | 156.250 | 160.850 | Duplex | Yes | Yes | |
| 06 | 156.300 | 156.300 | Yes | No | ||
| 07 | 156.350 | 160.950 | Duplex | Yes | Yes | |
| 08 | 156.400 | 156.400 | Yes | No | ||
| 09 | 156.450 | 156.450 | Yes | Yes | Fish | |
| 10 | 156.500 | 156.500 | Yes | Yes | ||
| 11 | 156.550 | 156.550 | Yes | Yes | ||
| 12 | 156.600 | 156.600 | Yes | Yes | ||
| 13 | 156.650 | 156.650 | Yes | Yes | ||
| 14 | 156.700 | 156.700 | Yes | Yes | ||
| 15 | 156.750 | 156.750 | Yes | Yes | Environmental | |
| 16 | 156.800 | 156.800 | Yes | Yes | ||
| 17 | 156.850 | 156.850 | Yes | Yes | ||
| 18 | 156.900 | 161.500 | Duplex | Yes | Yes | |
| 19 | 156.950 | 161.550 | Duplex | Yes | Yes | |
| 20 | 157.000 | 161.600 | Duplex | Yes | Yes | |
| 21 | 157.050 | 161.650 | Duplex | Yes | Yes | |
| 22 | 157.100 | 161.700 | Duplex | Yes | Yes | |
| 23 | 157.150 | 161.750 | Duplex | Yes | Yes | |
| 24 | 157.200 | 161.800 | Duplex | No | Yes | Busy Tel. |
| 25 | 157.250 | 161.850 | Duplex | No | Yes | Busy Tel. |
| 26 | 157.300 | 161.900 | Duplex | No | Yes | Busy Tel. |
| 27 | 157.350 | 161.950 | Duplex | No | Yes | Busy Tel. |
| 28 | 157.400 | 162.000 | Duplex | No | Yes | Busy Tel. |
| 60 | 156.025 | 160.625 | Duplex | |||
| 61 | 156.075 | 160.675 | Duplex | |||
| 62 | 156.125 | 160.725 | Duplex | |||
| 63 | 156.175 | 160.775 | Duplex | |||
| 64 | 156.225 | 160.825 | Duplex | |||
| 65 | 156.275 | 160.875 | Duplex | Yes | Yes | |
| 66 | 156.325 | 160.925 | Duplex | Yes | Yes | |
| 67 | 156.375 | 156.375 | Yes | No | ||
| 68 | 156.425 | 156.425 | Yes | Yes | Fish | |
| 69 | 156.475 | 156.475 | Yes | Yes | Fish | |
| 70 | RX Only | 156.525 | ||||
| 71 | 156.575 | 156.575 | Yes | Yes | Fish | |
| 72 | 156.625 | 156.625 | Yes | No | Fish | |
| 73 | 156.675 | 156.675 | Yes | Yes | ||
| 74 | 156.725 | 156.725 | Yes | Yes | ||
| 77 | 156.875 | 156.875 | Yes | No | ||
| 78 | 156.925 | 161.525 | Duplex | Yes | Yes | |
| 79 | 156.975 | 161.575 | Duplex | Yes | Yes | |
| 80 | 157.025 | 161.625 | Duplex | Yes | Yes | |
| 81 | 157.075 | 161.675 | Duplex | Yes | Yes | Coast Guard |
| 82 | 157.125 | 161.725 | Duplex | Yes | Yes | |
| 83 | 157.175 | 161.775 | Duplex | Yes | Yes | Coast Guard |
| 84 | 157.225 | 161.825 | Duplex | No | Yes | Busy Tel. |
| 85 | 157.275 | 161.875 | Duplex | No | Yes | Busy Tel. |
| 86 | 157.325 | 161.925 | Duplex | No | Yes | Busy Tel. |
| 87 | 157.375 | 161.975 | Duplex | No | Yes | Busy Tel. |
| 88 | 157.425 | 162.025 | Duplex | Yes | No | Busy Tel. |
Marine Channels - Canada
| Channel Design | Frequency (MHz) Transmit Receive | Traffic Type | Ship to Ship | Ship to Shore | Permanent Scan List | |
| WX0 | — | 163.275 | NOAA Weather | RX Only | RX Only | |
| WX1 | — | 162.550 | NOAA Weather | RX Only | RX Only | |
| WX2 | — | 162.400 | NOAA Weather | RX Only | RX Only | |
| WX3 | — | 162.475 | NOAA Weather | RX Only | RX Only | |
| WX4 | — | 162.425 | NOAA Weather | RX Only | RX Only | |
| WX5 | — | 162.450 | NOAA Weather | RX Only | RX Only | |
| WX6 | — | 162.500 | NOAA Weather | RX Only | RX Only | |
| WX7 | — | 162.525 | NOAA Weather | RX Only | RX Only | |
| WX8 | — | 161.650 | Can. Weather | RX Only | RX Only | |
| WX9 | — | 161.775 | Can. Weather | RX Only | RX Only | |
| 01 | 156.050 | 160.650 | Duplex | Yes | Yes | |
| 02 | 156.100 | 160.700 | Duplex | Yes | Yes | |
| 03 | 156.150 | 160.750 | Duplex | Yes | Yes | |
| 04 | 156.200 | 156.200 | Yes | Yes | ||
| 05 | 156.250 | 156.250 | Yes | Yes | ||
| 06 | 156.300 | 156.300 | Yes | No | ||
| 07 | 156.350 | 156.350 | Yes | Yes | ||
| 08 | 156.400 | 156.400 | Yes | No | ||
| 09 | 156.450 | 156.450 | Yes | Yes | Fish | |
| 10 | 156.500 | 156.500 | Yes | Yes | ||
| 11 | 156.550 | 156.550 | Yes | Yes | ||
| 12 | 156.600 | 156.600 | Yes | Yes | ||
| 13 | 156.650 | 156.650 | 1W | Yes | Yes | |
| 14 | 156.700 | 156.700 | Yes | Yes | ||
| 15 | 156.750 | 156.750 | 1W | Yes | Yes | Environmental |
| 16 | 156.800 | 156.800 | Yes | Yes | ||
| 17 | 156.850 | 156.850 | 1W | Yes | Yes | |
| 18 | 156.900 | 156.900 | Yes | Yes | ||
| 19 | 156.950 | 156.950 | Yes | Yes | ||
| 20 | 157.000 | 161.600 | Duplex, 1W | Yes | Yes | |
| 21 | 157.050 | 157.050 | Yes | Yes | ||
| 22 | 157.100 | 157.100 | Yes | Yes | ||
| 23 | 157.150 | 161.750 | Duplex | Yes | Yes | |
| Channel Desig | Frequency (MHz) Transmit Receive | Traffic Type | Ship to Ship | Ship to Shore | Permanent Scan List | |
| 24 | 157.200 | 161.800 | Duplex | No | Yes | Busy Tel. |
| 25 | 157.250 | 161.850 | Duplex | No | Yes | Busy Tel. |
| 26 | 157.300 | 161.900 | Duplex | No | Yes | Busy Tel. |
| 27 | 157.350 | 161.950 | Duplex | No | Yes | Busy Tel. |
| 28 | 157.400 | 162.000 | Duplex | No | Yes | Busy Tel. |
| 60 | 156.025 | 160.625 | Duplex | |||
| 61 | 156.075 | 156.075 | ||||
| 62 | 156.125 | 156.125 | ||||
| 63 | INH | |||||
| 64 | 156.225 | 156.225 | ||||
| 65 | 156.275 | 156.275 | Yes | Yes | ||
| 66 | 156.325 | 156.325 | Yes | Yes | ||
| 67 | 156.375 | 156.375 | Yes | No | ||
| 68 | 156.425 | 156.425 | Yes | Yes | Fish | |
| 69 | 156.475 | 156.475 | Yes | Yes | Fish | |
| 70 | RX Only | 156.525 | ||||
| 71 | 156.575 | 156.575 | Yes | Yes | Fish | |
| 72 | 156.625 | 156.625 | Yes | No | Fish | |
| 73 | 156.675 | 156.675 | Yes | Yes | ||
| 74 | 156.725 | 156.725 | Yes | Yes | ||
| 77 | 156.875 | 156.875 | Yes | No | ||
| 78 | 156.925 | 156.925 | Yes | Yes | ||
| 79 | 156.975 | 156.975 | Yes | Yes | ||
| 80 | 157.025 | 157.025 | Yes | Yes | ||
| 81 | 157.075 | 157.075 | Yes | Yes | Coast Guard | |
| 82 | 157.125 | 157.125 | Yes | Yes | ||
| 83 | 157.175 | 157.175 | Yes | Yes | Coast Guard | |
| 84 | 157.225 | 161.825 | Duplex | No | Yes | Busy Tel. |
| 85 | 157.275 | 161.875 | Duplex | No | Yes | Busy Tel. |
| 86 | 157.325 | 161.925 | Duplex | No | Yes | Busy Tel. |
| 87 | 157.375 | 161.975 | Duplex | No | Yes | Busy Tel. |
| 88 | 157.425 | 162.025 | Duplex | Yes | No | Busy Tel. |
NWR-SAME Alert Level
| Event Code | Standard | VOYAGER | ||||
| Warning(A1) | Watch(A2) | Statement(A3) | Test(A4) | Ignore | ||
| Administrative Message | ADR | O | ||||
| Avalanche Warning | AVW | O | ||||
| Avalanche Watch | AVA | O | ||||
| Blizzard Warning | BZW | O | ||||
| Civil Danger Warning | CDW | O | ||||
| Civil Danger Watch | CDA | O | ||||
| Civil Emergency Massage | CEM | O | ||||
| Coastal Flood Warning | CFW | O | ||||
| Coastal Flood Watch | CFA | O | ||||
| Emergency Action Notification | EAN | O | ||||
| Emergency Action Termination | EAT | O | ||||
| Fire Warning | FRW | O | ||||
| Flash Flood Statement | FFS | O | ||||
| Flash Flood Warning | FFW | O | ||||
| Flash Flood Watch | FFA | O | ||||
| Flood Statement | FLS | O | ||||
| Flood Warning | FLW | O | ||||
| Flood Watch | FLA | O | ||||
| Hazardous Material Warning | HMW | O | ||||
| Hazardous Material Watch | HMA | O | ||||
| High Wind/Dust Storm Warning | HWW | O | ||||
| High Wind/Dust Storm Watch | HWA | O | ||||
| Hurricane Statement | HLS | O | ||||
| Hurricane/Tropical Storm Warning | HUW | O | ||||
| Hurricane/Tropical Storm Watch | HUA | O | ||||
| Immediate Evacuation Notice | EVI | O | ||||
| Immediate Evacuation Warning | IEW | O | ||||
| Law Enforcement Warning | LEW | O | ||||
| Local Area Emergency | LAE | O | ||||
| National Hazard Warning | NHW | O | ||||
| National Information Center | NIC | O | ||||
| National Periodic Test | NPT | O | ||||
| Network Message Notification | NMN | O | ||||
| Radiological Hazard Warning | RHW | O | ||||
| Radiological Hazard Watch | RHA | O | ||||
| Required Monthly Test | RMT | O | ||||
| Required Weekly Test | RWT | O | ||||
| Service Thunderstorm Warning # | SVW | O(&SVR) | ||||
| Service Thunderstorm Watch | SVA | O | ||||
| Service Weather Statement | SVS | O | ||||
| Shelter In Place Warning | SPW | O | ||||
| Special Marine Warning | SMW | O | ||||
| Special Weather Statement | SPS | O | ||||
| System Demonstration/Practice | DMO | O | ||||
| Tomado Warning # | TOW | O(&TOR) | ||||
| Tomado Watch | TOA | O | ||||
| Transmitter Backup On | TXB | O | ||||
| Transmitter Primary On | TXP | O | ||||
| Transmitter Radiate Off | TXF | O | ||||
| Transmitter Radiate On | TXO | O | ||||
| Tsunami Warning | TSW | O | ||||
| Tsunami Watch | TSA | O | ||||
| Unrecognizable PIL | ACE | O | ||||
| Volcano Warning | VOW | O | ||||
| Volcano Watch | VOA | O | ||||
| Winter Storm Warning | WSW | O | ||||
| Winter Storm Watch | WSA | O | ||||
AC Adapter (BADY0510001)


Mounting Screws
Antenna (HH9408)

Wrist Strap (RETC484647Z)
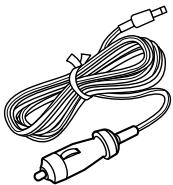
DC Adapter
Lithium Battery (VOYGER BP)
Drop-in Charger

Reference Guide
Uniden Parts Department
(800)-554-3988
Hours: M-F 7:00AM to 5:00PM CST
We can also be reached on the web at
www.uniden.com
General
Channels Transmit 54 US/International/Canada
Receive 89 US/International/Canada
Weather 10
Freq. Control PLL
Freq. Tol. Transmit 1.5 PPM (at 25^ )
Receive 1.5 PPM (at 25^ )
Oper.Temp. -4^ (-20^) to
+122^ F(+50^ C)
Antenna Flexible Whip
Microphone Built-in Electret type
Display Liquid Crystal Display
Speaker 8Ω1Watt
Power Source Rechargeable Lithium Ion Battery Pack
7.4V 850 mA h
Size (without antenna) 3.8 (H) x 2.4 (W) x 1.3 (D) inch
Weight (w/battery & antenna) 8.8 oz (250g)
Transmitter
Frequency Range 156~158 MHz
Frequency Stability ±10 PPM
Power Output 1.0 W & 5W
Spurious Emissions -70 dBc (5W)
Current Drain 700mA (1W), 1500mA (5W)
Receiver
Receiver Type Double Conversion Super
Heterodyne Phase
Locked Loop system for Local Oscillator
Frequency Range 156~164 MHz
Sensitivity 0.35 V for 12dB SINAD
Squelch Sensitivity Threshold 0.25 V
Audio ±6 dB 500 to 2000Hz
Frequency Response
Adjacent Channel 65 dB @ ±25 kHz
Selectivity
Hum & Noise Ratio 43 dB
Audio Output Power 0.6 W @ 10% THD
Current Drain Squelched 40mA
Max. Audio 170mA
Specifications shown are typical and subject to change without notice.
Not enough range
Cause: Line of sight blocked
Increase antenna height.
■ Will not transmit on 5 watt range but will transmit on the 1 watt range.
Cause: Low voltage
Recharge or replace the batteries.
■ Will not transmit while on the charger.
Cause: Low voltage
The unit is not designed to transmit while on the charger. The charger does not supply enough power for transmitting.
Battery will not charge.
Cause: Charger inoperative
Replace charger. Damage to the charger can be a result of keying up the radio while on the charger.
FCC RF EXPOSURE INFORMATION
WARNING! Read this information before using the VOYAGER In August 1996 the Federal Communications Commission (FCC) of the United States with its action in Report and Order FCC 96-326 adopted an updated safety standard for human exposure to radio frequency electromagnetic energy emitted by FCC regulated transmitters. Those guidelines are consistent with the safety standard previously set by both U.S. and international standards bodies. The design of the VOYAGER complies with the FCC guidelines and these international standards.
- Never allow children to operate the radio without adult supervision and the knowledge of the following guidelines.
WARNING! It is up to the user to properly operate this radio transmitter to insure safe operation. Please adhere to the following:
Use only the supplied or an approved antenna. Unauthorized antennas, modifications, or attachments could impair call quality, damage the VOYAGER, or result in violation of FCC regulations.
Do not use the VOYAGER with a damaged antenna. If a damaged antenna comes into contact with the skin, a minor burn may result. Please contact your local dealer for a replacement antenna.
Body-worn Operation
This device was tested for typical body-worn operations using the supplied belt-clip, which typically provides a space of 1 inch from the body. To maintain compliance with FCC RF exposure requirements, body-worn operations are restricted to the supplied belt-clip.
For hand-held operation, the radio should be held 1 inch from the user's face. The use of accessories that do not satisfy these requirements may not comply with FCC RF exposure requirements and should be avoided. For more information about RF exposure, please visit the FCC website at www.fcc.gov.
- When using an external speaker microphone, USE ONLY THE UNIDEN MODEL HHVTA07. Use of any other accessory for this purpose may invalidate your authority to operate this device.
Important! Evidence of original purchase is required for warranty service.
WARRANTOR: Uniden
ELEMENTS OF WARRANTY: Uniden warrants for three years, to the original retail owner, this Product excluding Li-ion battery pack to be free from defects in materials and craftsmanship with only the limitations or exclusions set out below. Uniden warrants for 12 months, to the original retail owner, the Lithium Ion battery pack to be free from defects in material and craftmanship with only the limitations or exclusions set out below.
WARRANTY DURATION: This warranty to the original user shall terminate and be of no further effect 36 months (12 months for the Lithium Ion battery pack) after the date of original retail sale. The warranty is invalid if the Product is (A) damaged or not maintained as reasonable or necessary, (B) modified, altered, or used as part of any conversion kits, subassemblies, or any configurations not sold by Uniden, (C) improperly installed, (D) serviced or repaired by someone other than an authorized Uniden service center for a defect or malfunction covered by this warranty, (E) used in any conjunction with equipment or parts or as part of any system not manufactured by Uniden, or (F) installed or programmed by anyone other than as detailed by the Operation Guide for this product.
STATEMENT OF REMEDY: In the event that the product does not conform to this warranty at any time while this warranty is in effect, warrantor will either, at its option, repair or replace the defective unit and return it to you without charge for parts, service, or any other cost (except shipping and handling) incurred by warrantor or its representatives in connection with the performance of this warranty. Warrantor, at its option, may replace the unit with a new or refurbished unit. THE LIMITED WARRANTY SET FORTH ABOVE IS THE SOLE AND ENTIRE WARRANTY PERTAINING TO THE PRODUCT AND IS IN LIEU OF AND EXCUSES ALL OTHER WARRANTYES OF ANY NATURE WHATSOEVER, WHETHER EXPRESS, IMPLIED OR ARISING BY OPERATION OF LAW, INCLUDING, BUT NOT LIMITED TO ANY IMPLIED WARRANTYES OF MERCHANTABILITY OR FITNESS FOR A PARTICULAR PURPOSE. THIS WARRANTY DOES NOT COVER OR PROVIDE FOR THE REIMBURSEMENT OR PAYMENT OF INCIDENTAL OR CONSEQUENTIAL DAMAGES. Some states do not allow this exclusion or limitation of incidental or consequential damages so the above limitation or exclusion may not apply to you.
LEGAL REMEDIES: This warranty gives you specific legal rights, and you may also have other rights which vary from state to state.
This warranty is void outside the United States of America.
PROCEDURE FOR OBTAINING PERFORMANCE OF WARRANTY: If, after following the instructions in this Operating Guide you are certain that the Product is defective, pack the Product carefully (preferably in its original packaging). The Product should include all parts and accessories originally packaged with the Product. Include evidence of original purchase and a note describing the defect that has caused you to return it. The Product should be shipped freight prepaid by traceable means to warrantor at:
Uniden America Corporation
Parts and Service Division
4700 Amon Carter Blvd.
Ft Worth, TX 76155
(800) 235-3874, 8 AM to 5 PM. Central, Monday through Friday
Thank you for purchasing a Uniden Marine Radio.
A World Without Wires
Uniden
www.uniden.com
FCC WANTS YOU TO KNOW
Changes or modifications to this product not expressly approved by
Uniden, or operation of this product in any way other than as detailed
by the owner's manual, could void your authority to operate this product.
© 2002 Uniden America Corporation, Fort Worth, TX
All rights reserved.
Contains additional foreign articles.
Custom manufactured in China.
UTZZ01889ZB
- Controls and Indicators 2
- Warning! 4
- Introduction 6
- Included in your Package 8
- Getting Started 9
- Operation 12
- Marine Channels - USA 23
- Marine Channels - International 25
- Marine Channels - Canada 27
- NWR-SAME Alert Level 29
- Optional Parts and Replacement Accessories 31
- Specifications 32
- Troubleshooting 33
- FCC RF EXPOSURE INFORMATION 34
- Warranty 35
- Warning!
- Lithium Ion Battery Pack Warning
- Features
- Technical Support and Service
- Maritime Radio Services Operation
- Mounting the Drop-in Charger
- Attaching the Antenna
- Attaching the Battery Pack
- Attaching the Beltclip
- Charging the Battery Pack
- Turning On the Unit and Setting Squelch
- Selecting a Channel
- One-touch Channel 16/9/TRI
- Triple Watch
- Monitoring Weather Channels
- Weather Alert
- NWR-SAME Alert
- NWR-SAME Alert Level
- Registering FIPS Code
- USA, International and Canadian Channels
- Programming a Channel into Memory
- Deleting a Channel from Memory
- Scanning
- Transmitting
- Lighted Keys and Display
- Battery Indicator
- Key Lock
- Marine Channels - Canada
- General
- Transmitter
- Receiver
- FCC RF EXPOSURE INFORMATION
- Body-worn Operation
- WARRANTOR: Uniden
- Thank you for purchasing a Uniden Marine Radio.
Brand : UNIDEN
Model : VOYAGER
Category : Communication system