
DC-600UW - Digital Camera AGFAPHOTO - Free user manual and instructions
Find the device manual for free DC-600UW AGFAPHOTO in PDF.

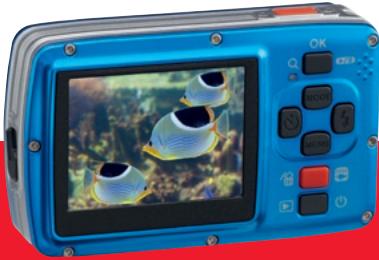
| Product type | Waterproof and shockproof compact digital camera |
| Brand | AGFAPHOTO |
| Model | DC-600UW |
| Sensor | 1/2.5-inch CCD, 6 effective megapixels (2864 x 2160) |
| Maximum resolution | 10 MP (3680 x 2760) by interpolation |
| Lens | Fixed focal length 6.09 mm (35mm equivalent: 36.5 mm), aperture F3.2 / F7.0 |
| Digital zoom | Up to 5x |
| Screen | 2.4-inch TFT color |
| Focus | Fixed: normal from 1.2m to infinity, macro at 20cm |
| Shutter speed | 2s to 1/1000s (normal), 8s to 1/1000s (night scene) |
| ISO sensitivity | Auto, 100, 200, 400, 800, 1600 |
| Flash | Auto, red-eye reduction, forced, slow sync, off |
| Video recording | 640x480 (VGA) at 30fps, 320x240 (QVGA) |
| Internal storage | 32MB NAND (approx. 16MB available) |
| External storage | SD/SDHC card up to 8GB |
| File formats | Image: JPEG (DCF, EXIF 2.2, DPOF 1.1, PictBridge 1.0); Video: AVI (MJPEG); Audio: WAV |
| Water resistance | IPX8: waterproof up to 10 meters for 60 minutes |
| Shock resistance | Yes, according to AgfaPhoto standards |
| Power supply | 2 AA batteries (alkaline or Ni-MH recommended) |
| Dimensions (W x H x D) | 101 x 61 x 32 mm |
| Weight | Approx. 131g (without batteries and card) |
| Connectivity | USB 2.0 high speed, AV output |
| Underwater mode | Dedicated for underwater photos and videos |
| Maintenance and cleaning | Wipe with a non-woven cloth after underwater use; do not use chemical products |
| Included accessories | Software CD, USB/AV cable, wrist strap, case, 2 AA batteries, user manual |
Frequently Asked Questions - DC-600UW AGFAPHOTO
User questions about DC-600UW AGFAPHOTO
0 question about this device. Answer the ones you know or ask your own.
Ask a new question about this device
Download the instructions for your Digital Camera in PDF format for free! Find your manual DC-600UW - AGFAPHOTO and take your electronic device back in hand. On this page are published all the documents necessary for the use of your device. DC-600UW by AGFAPHOTO.
USER MANUAL DC-600UW AGFAPHOTO
Important Information about water and shock resistant features 2
1.0 Overall Introduction 3
1.1 Accessories 3
1.2 External View 3
1.3 Display Information 4
2.0 Getting Ready 5
2.1 Turn on / off Camera 5
2.2 Inserting the batteries 5
2.3 Insert / Remove a memory card 5
2.4 Attaching Wrist Strap 5
3.0 Buttons & Function 5
3.1 Shutter Button 5
3.2 Tele / Play & Pause / OK Button 5
3.3 UP / Mode Button 5
3.4 Left / Self-timer Button 5
3.5 Right / Flash Button 6
3.6 Down / Menu Button 6
3.7 Underwater / Delete Button 6
3.8 Power / Playback Button 6
3.9 Macro Button 6
4.0 DSC Mode 7
4.1 Shooting 7
4.2 Function Introduction 7
4.2.1 Mode Set 7
4.2.2 Flash 7
4.2.3 Self-timer 7
4.2.4 Macro 7
4.2.5 Menu Mode 7
4.2.5.1 Size 7
4.2.5.2 Quality 7
4.2.5.3 EV 7
4.2.5.4 ISO 7
4.2.5.5 White Balance 7
4.2.5.6 Metering 8
4.2.5.7 Shooting 8
4.2.5.8 Sharpness 8
4.2.5.9 Effect 8
4.2.5.10 Frame 8
4.2.5.11 OSD Information 8
4.2.5.12 Face Detection 8
5.0 DV Mode 9
5.1 Movie Recording 9
5.2 Function Introduction 9
5.2.1 Movie Mode 9
5.2.2 Self-timer 9
5.2.3 Macro Mode 9
5.2.4 Menu Mode 9
5.2.4.1 Video Size 9
5.2.4.2 EV 9
5.2.4.3 White Balance 9
5.2.4.4 Metering 9
5.2.4.5 Effect 9
5.2.4.6 OSD Information 9
6.0 Voice Recording Mode 9
6.1 Voice Recording 9
7.0Playback Mode 9
7.1Playback of Still Image 9
7.2Playback of Movie Clip 9
7.3Playback of Voice Clip 9
7.4 Thumbnail Display 9
7.5 Enlargement 9
7.5.1 Trimming 9
7.6 Menu Mode 9
7.6.1 Protect 9
7.6.2 Slide 10
7.6.3 Delete 10
7.6.4 Photo Exif 10
7.6.5 Voice Memo 10
7.6.6 DPOF 10
7.6.7 Copy To Card 10
7.6.8 Resize 10
7.6.9 Rotate 10
7.6.10 Effect 10
8.0 SEPUP Mode 11
8.1 General Introduction 11
8.2 Start-up Image 11
8.3 Start-up Sound 11
8.4ShutterSound 11
8.5 System Sound 11
8.6 Q.View 11
8.7 Power Save 11
8.8 Imprint 11
8.9 Date 11
8.10 Time 11
8.11 Language 12
8.12 File 12
8.13 USB 12
8.14 Video 12
8.15 Battery Type 12
8.16 Reset All 12
8.17 Format 12
9.0 PictBridge Mode 12
9.1 Image 13
9.2 Auto Set 13
9.3 Custom Set 13
9.4 Print 13
9.5 DPOF Print 13
9.6 Reset 13
10.0 TV/PC Connection 13
10.1 TV Connection 11
10.2 Computer / Notebook Connection 13
11.0 Software Application 14
12.0 Appendix 14
13.0 Specifications 15
14.0 Customer care 16
14.1 Disposal of Waste Equipment by Users in Private Households in the European Union 16
14.2 FCC Compliance and Advisory 16
14.3 Declaration of Conformity 16
Thank you for purchasing this AgfaPhoto digital camera. Please read these operating instructions carefully in order to use the digital camera correctly. Keep the instructions in a safe place after reading so that you can refer to them later.
Precautions
Before using the camera, please ensure that you read and understand the safety precautions described below. Always ensure that the camera is operated correctly.
- Do not aim the camera directly into the sun or other intense light sources which could damage your eyesight.
- Do not try to open the case of the camera or attempt to modify this camera in any way. High-voltage internal components create the risk of electric shock when exposed. Maintenance and repairs should be carried out only by authorized service providers.
- Do not fire the flash too close to the eyes of animals or people, especially for young children. Eye damage may result. In particular, remain at least one meter away from infants when using flash.
- Keep the camera and its accessories out of the reach of children and animals to prevent accidents or damage to the camera.
If you notice smoke or a strange odor coming from the camera, turn the power off immediately. Take the camera to the nearest authorized service center for repair. Never attempt to repair the camera on your own.
- Use only the recommended power accessories. Use of power sources not expressly recommended for this equipment may lead to overheating, distortion of the equipment, fire, electrical shock or other hazards.
Disclaimer
We assume no responsibility over and above the provisions of the Product Liability Law for damages suffered by the user or third parties as a result of inappropriate handling of the product or its accessories, or by their operational failure and by their use. We reserve the right to make changes to this product and its accessories without prior notice.
Warning! Never disconnect to open the camera or remove any parts of it. This will invalidate all guarantee claims.
Important Information about water and shock resistant features
Water resistant features: As determined by AgfaPhoto pressure testing equipment in accordance with IEC Standard Publication 529 IPX8. This means that the camera can be used normally underwater at a specified water pressure and during a specified period of time.
The warranty on water and shock resistant features of this product is according to AgfaPhoto determined testing method.
Before Use
- Check the battery/card/connector chamber cover for foreign material including dirt, dust or sand. Please use the non-woven fabric to remove foreign material.
■ Be sure there's no crack and damages at battery/card/connector chamber cover. - Be sure to close the battery cover and card/connector chamber cover firmly once click sound happens as well as double check the batter cover until silver metal frame on side of open switch is visible.
- Don't open the battery/card chamber cover and connector cover with wet hands while underwater, or in a damp or dusty environment. (beach, lake, river)
This camera sinks underwater. - Do not use the camera in hot spring.
During using in water
■ Please do not operate/carry the camera underwater at depths over 10m or for over 60 minutes.
- Do not open the battery/card/connector chamber cover in water.
- Avoid subjecting the camera substantial shocks as this may cause the battery/card/ connector chamber cover to open in water.
After Use
- Be sure to wipe off any water or debris by non-woven fabric after using the camera underwater. After cleaning the camera, it is allowed to open the battery/card/connector chamber cover.
After opening the chamber cover, be sure to wipe off the excess water inside the cover.
Storage and Maintenance
- Don't leave the camera in an environment at high temperature (40°C or more) at low temperature (-10°C or less). Failure to do so may break down water resistance.
- Don't use chemicals for cleaning, rush prevention, anti-fogging, repairing, etc. Failure to do so may break down water resistance.
■ After using in water, be sure to close the battery/card/connector chamber cover firmly and put the camera into a bucket filled with water. After 10 minutes in the water bucket, take out the camera and dry it naturally in a ventilated and shady place. - Don't leave the camera in the water bucket for a long time (over 60 minutes). Failure to do so will cause damage to the camera's appearance and/or deteriorate water resistance. In order to preserve the water resistance feature, as with any underwater housing, it is recommended that the waterproof packing (seals) are replaced annually.
■ All the accessories (including batteries) for the camera do not support water resistant features beside hand strap.
If the camera is subjected to a great shock, its waterproof feature could fail.
■ Be sure there is no water and foreign materials inside the camera. Under fire accident or getting an electric shock, once the camera falls into water incautiously, it could be permeated with water and foreign materials. The user should pick the camera from the water and remove the batteries immediately. Send the malfunctioned camera to the service center for repair or contact with the store you bought from. - Do not wet the terminal of the batteries when using underwater or seawater.
- Do not touch or take the batteries with wet hands which may cause an electric shock or malfunction.
1.0 Overall Introduction
1.1 Accessories

DC-600uw

Camera Driver & Software CD

User Manual
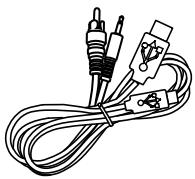
USB/AV Cable
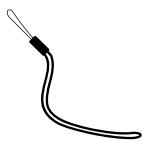
Wrist Strap

Camera Pouch

2xAA Batteries
1.2 External View
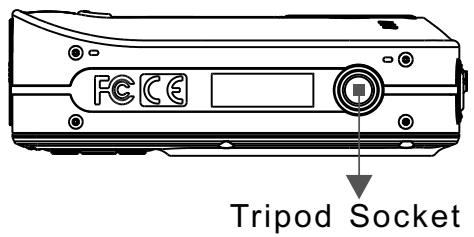
Top
Bottom
Key Function Button
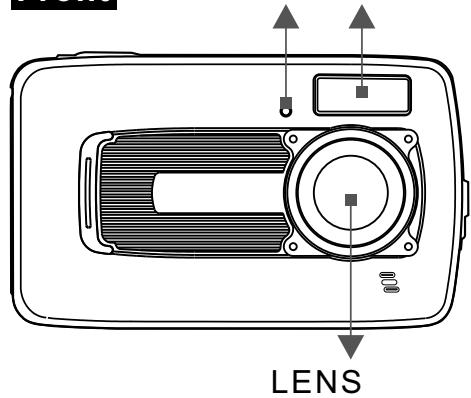
Front
Side-A
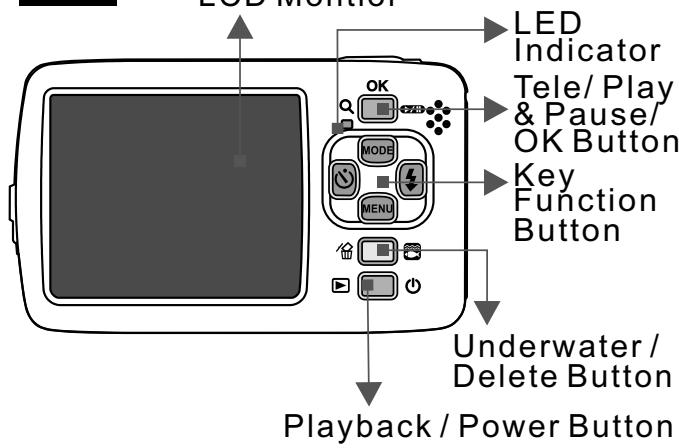
Back
UP / Mode Button
Right / Flash Mode
Down / Menu
Left/ Self-timer
Battery
Memory Card
USB Connector
Chamber Cover
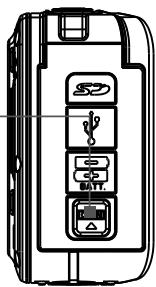
Side-B
1.3 Display Information
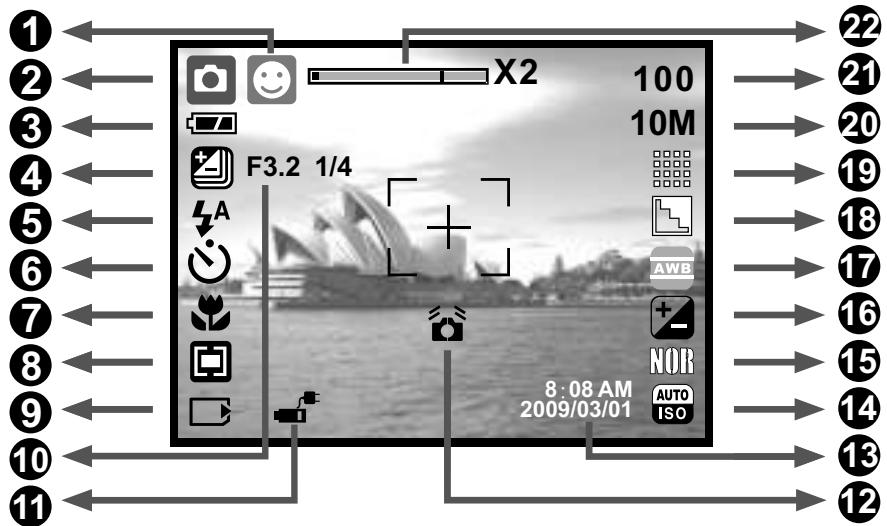
1 ( ) Face Detection
2 Working& Scene Mode
(回) Image Shooting Mode
( )Playback Mode
()MovieClipMode
(9) Voice Recording Mode
()Auto Mode
( ) Program Mode
( ) Portrait Mode
( ) Landscape Mode
Night Scenery Mode
(Sunset Mode
() Back light Mode
() Fireworks Mode
()Candle light Mode
( ) Beach Mode
(Auction Mode
() Underwater DSC Mode
Underwater DV Mode
3 Battery Status
Battery Full
Battery Half Drained
(□) Battery Drained
4 Shooting
Single
( ) Continuous
()AEB
5 Flash Mode
(A) Auto Flash
( ) Auto Flash with Red-eye reduction
()Fill-inFlash
(4s) Slow Sync
( ) Flash Off
6 Self-timer
(3) 10 Seconds
(^2s) 2 Seconds
(^) Double
7 Focus Range (Macro
8 Metering
()Multi ()Spot
9 Memory Card
(3) Memory Card inserted
Internal Memory
10 Manual Exposure (Night Scenery)
Shutter Speed: Auto, 1/8, 1/4,
1/2, 1, 2, 4, 8
F. No.: Auto, 3.2, 7.0
11 Battery Type
(Alkaline battery
(Rechargeable battery
12 (O)WARNING:
Holding Camera Stable
13 Time & Date
14 ISO Value
(Auto)Auto (100)100 ISO
(200) 200 (400) 400
(600)800 (1600)1600
15 EFFECT
(NON)NORMAL
()B/W
()SEPIA
()NEGATIVE
16 EV
(2) Exposure ±2EV (0.5 EV/Steps)
17 White Balance
(AwB) Auto
()Daylight
( )Cloudy
()Fluorescent
()Tungsten
()Sunset
()Custom
18 Sharpness
()Soft
()Normal
()Vivid
19 Quality
()S.Fine
()Fine
()Normal
20 Image Size
(10M)(by interpolation)
(6M)
(3M)
(VGA)
Video Size
(640) 640 x 480
(320) 320 × 240
21 (100) Available Shots
22 Zoom Status Indicator
()
5.0X Digital Zoom
2.0 Getting Ready
2.1 Turn on / off Camera
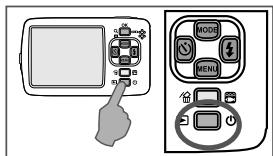
Press the Power Button (approx. 2 seconds) to turn on the camera.
Press the Power Button again to turn off the camera.
2.2 Inserting the batteries
- Power off the camera.
- Push the battery cover following the arrow to open it.
- Follow the polarity (+ / -) indications and insert the batteries.
- Close the battery cover, to press down battery door until silver metal frame on side of open switch is visible.
Note: Silver metal frame on the switch is designed to check if the battery door is tightly sealed.
The indication of the battery status.
( l ): Battery power is full.
(4): Battery power is half drained.
(5): Battery power is drained.
Replace with new batteries.
Battery type: AA Battery, to recommend to use Alkaline or Ni-MH Battery.
The batteries may run out if kept inside the camera and not in use for a long time.
The batteries may not work normally under 0^ or over 40^ .
2.3 Insert / Remove a memory card
- Power off the camera.
- Open the Battery Cover.
- Insert the memory card into the card slot and press it down until a click sound is heard.
- Please press the memory card again to get it out once a click sound happens.
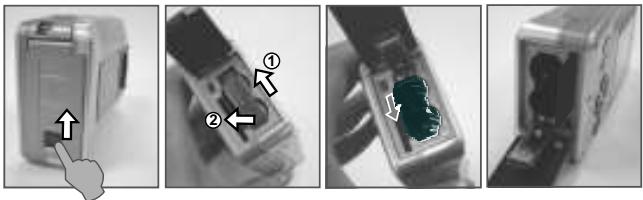
2.4 Attaching Wrist Strap

When attaching the wrist strap, move the length adjustment buckle slightly away from the end of the wrist strap.
3.0 Buttons & Function
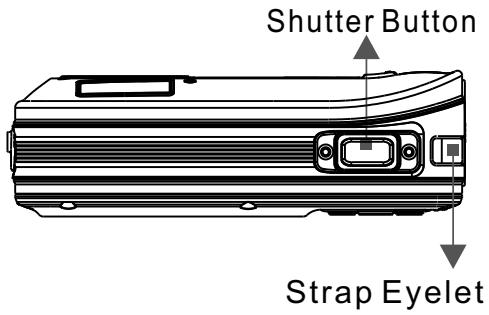
3.1 Shutter Button
Fully press the shutter button to capture an image.
3.2 Tele / Play&Pause / OK Button
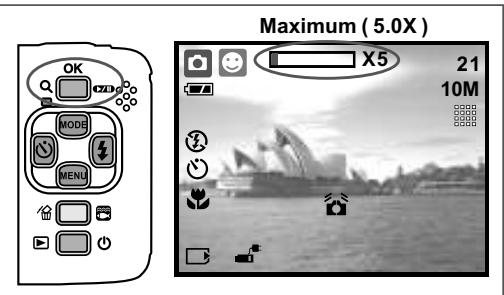
Press the Tele Button, the Zoom Bar Indicator appearing on the top side of the LCD Monitor will show the current zoom status. The camera allows maximum 5.0x digital zoom.
When the menu is not displayed on the LCD monitor, the UP Button operates as Pause & Resume function for playing movie clip file in Playback Mode.
When the menu is displayed on the LCD monitor, the OK Button is used for confirming settings.
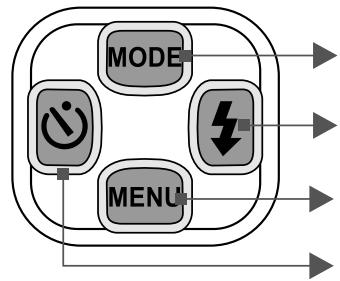
3.3 UP/ModeButton
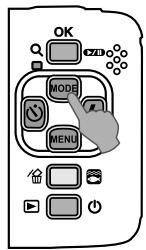
Press the UP Button to move up the submenu cursor. When the menu is not displayed on the LCD monitor, the UP Button also operates as Mode function.
There are three modes.
3.4 Left / Self-timer Button
Press the Left Button to move the cursor to the left tab.
When the menu is not displayed on the LCD monitor, the Left Button operates as Self-timer function.
With the 10 sec. Self-timer ( Ⓞ): The image will be taken after an interval of 10 seconds once the Shutter Button is released.
With the 2 sec. Self-timer (^2s) : The image will be taken after an interval of 2 seconds once the Shutter Button is released.
With the Double Self-timer ( ⌒): The image will be taken twice once the Shutter Button is released. The first image will be taken after 10 seconds and the second image 2 seconds after that.
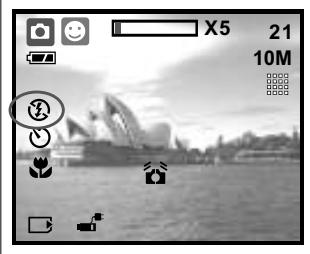
3.5 Right / Flash Button
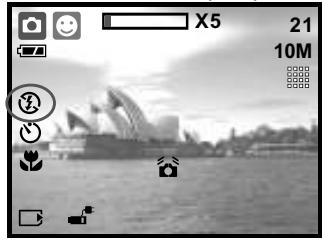
Maximum (5.0X)
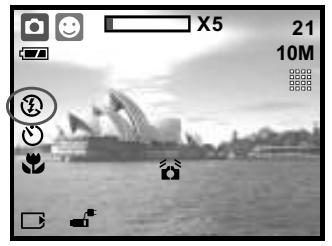
Press the Right Button ( ±b ) to move the cursor to the right tab.
When the menu is not displayed on the LCD monitor, the Right Button ( ) operates as Flash function.
By pressing the Flash Button ( ±b ) you can select different flash options as follows.
| A | Auto Flash | The flash fires automatically as required under shooting mode. |
| ○ | Auto Flash with Red-eye Reduction | To avoid the subject's eyes appear red in the picture, use this mode to effectively minimize the Red-eye effect. |
| ↓ | Fill-in Flash | This mode will enable the flash to fire in any circumstances. |
| 4S | Slow Sync | The flash will fire and the camera will set the shutter speed at a proper speed. |
| 3 | Flash Off | The mode will disable the flash to fire in any circumstances. |
3.6 Down / Menu Button
Press the Menu Button to go to the menu selection. Press the Down Button to move down the submenu cursor.
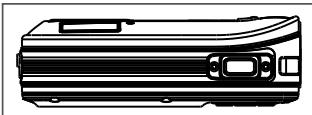
3.7 Underwater/Delete Button
Press the Underwater Button to change to Underwater DSC ( ) or DV ( ) Mode, press again to go back to the previous mode. In Playback Mode, you can press the Delete ( ) Button to delete still images, movie clips and voice clips.

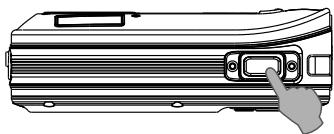
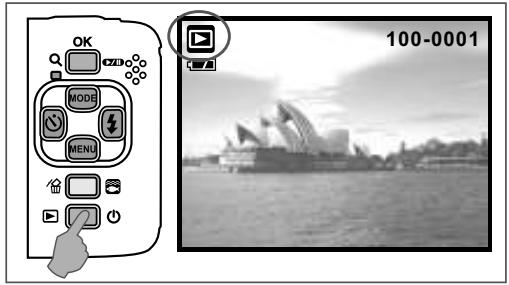
3.8 Power/Playback Button
Select the Playback Mode by pressing the Playback Button (▶).
Playback Mode will show still images and movie clips.
Select an image by pressing the Left and Right Buttons.
Long-press the Power Button to turn on/off the camera. If there is no operation for a period of time, the camera will power off automatically to save battery life.
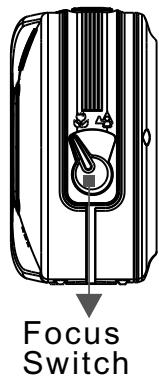
3.9 Macro Button
The focus range: Normal: 1.2~infinity Macro: 20cm
Note: Please make sure that the Focus is set correctly. Otherwise, the image will be out of focus.
Move the Focus Switch to the left to activate Macro function. The Macro icon ( ) will appear on the LCD Monitor.
4.0 DSC Mode
4.1 Shooting
Taking a Picture
- Press the POWER Button to power on the camera.
- Make sure the camera is at still shooting mode.
- Press the OK Button to zoom in.
- Fully press the Shutter Button to capture the image.

It is recommended to attach a tripod or other device if the hand shaking icon ( ) appears.
4.2 Function Introduction
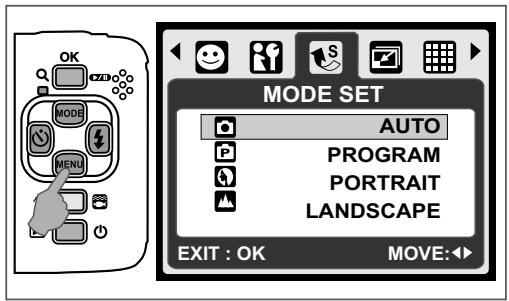
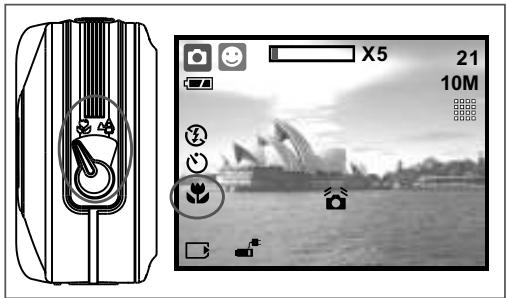
4.2.1 Mode Set
This feature is for you to choose the scene of the image from the following options.
Auto Mode
(2) Program Mode
(9) Portrait Mode
(4) Landscape Mode
Night Scenery Mode
Sunset Mode
Back light Mode
()FireworksMode
Candle light Mode
(2) Beach Mode
(Auction Mode
Underwater DSC Mode (Operate with hot key)
()Underwater DV Mode (Operate with hot key)
Note: The scene mode features cannot be selected when you use underwater DSC / DV mode.
4.2.2 Flash
Please refer to 3.5 Flash description on Page 6.
4.2.3 Self-timer
Please refer to 3.4 Self-timer on Page 5.
4.2.4 Macro
Please refer to 3.9 Macro on Page 6.
4.2.5 Menu Mode
4.2.5.1 Size
Image Size is to select the image resolution.
(10M) 3680 × 2760 (by interpolation)
(6M) 2816 x 2112
(3M) 2048 x 1536
(VGA) 640 × 480
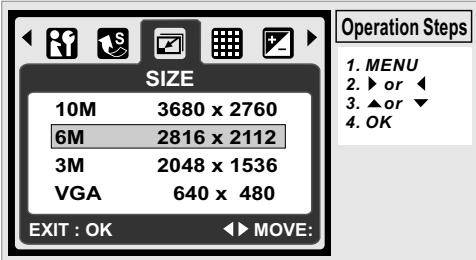
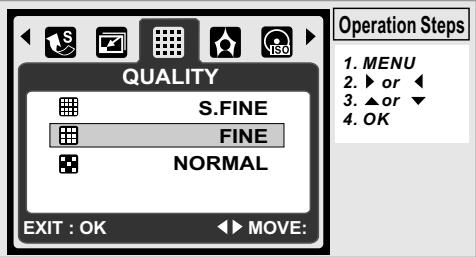
4.2.5.2 Quality
Quality is to select the appropriate compression ratio for the captured and recorded images.
Note: If your size setting is 10M, the available Quality setting is "Fine".
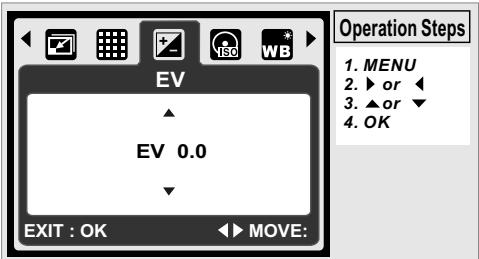
4.2.5.3 EV
Press the Menu Button to set the Exposure value which is ranged from -2EV to +2EV.
Press the UP/Down Button to set the Exposure value.
After the preferred value is selected press the OK Button to confirm the setting.
Exposure (+) will be shown on the bottom right of LCD monitor.
The higher the EV value, the brighter the image will be.
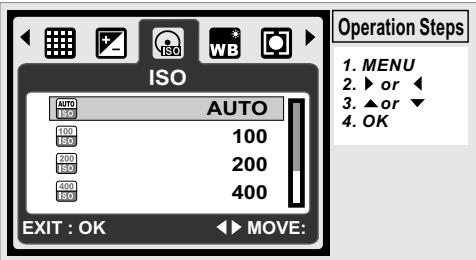
4.2.5.4 ISO
Press the Menu Button and select the Program Mode
(P) first.
Press the Menu Button and select ISO to set the ISO value.
Choose the ISO value you prefer.
Note: This feature can only be used under Program Mode.
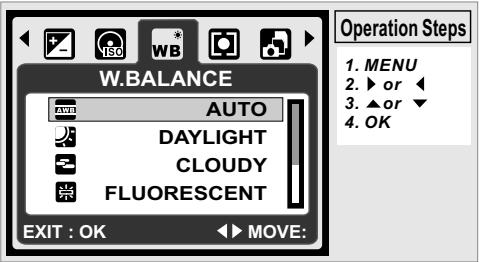
4.2.5.5 White Balance
In Program mode (P), select WB of Menu Mode.
| AWB | Auto | Adjust the white balance automatically |
| Daylight | For strong light environment | |
| Cloudy | For cloudy light environment | |
| Fluorescent | For fluorescent light environment | |
| Tungsten | For tungsten light environment | |
| Sunset | For sunset light environment | |
| Custom | For uncertain light environment |
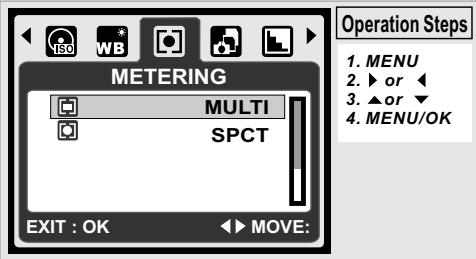
4.2.5.6 Metering
In Program Mode (P), select Metering of Menu Mode. Metering provides more superior exposure condition and brighter pictures.
Multi Metering: Exposure will be evaluated according to the average of the available light source in the image area. This is suitable for general use.
Spot Metering: If the subject is against the light source or has little contrast, you can use this function to make the subject brighter.
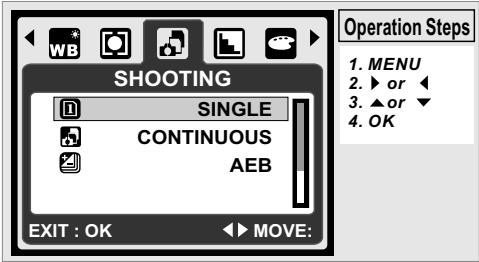
4.2.5.7 Shooting
In Program Mode (P), select Shooting of Menu Mode.
1. SINGLE: No continuous shooting.
2. CONTINUOUS: You can have the continuous shooting function starting by pressing and holding the Shutter Button and ending by releasing the Shutter Button.
3. AEB (Auto Exposure Bracketing)
Take three pictures in a series in different exposures, short exposure (-0.5EV), standard exposure (0.0EV) and over exposure (+0.5EV).
Note: The continuous shooting function will not be canceled until " SINGLE" is selected.
Note: When Continuous shooting or AEB function is selected, flash will be disabled.
4.2.5.8 Sharpness
In Program Mode (P), select Sharpness of Menu Mode.
| Soft | This effect can make the edge of the captured image look smoother, which is suitable for image editing on PC. | |
| Normal | This effect can make the edge of the captured mage look sharp, which is suitable for printing out. | |
| Vivid | This effect can make the edges of your captured image look sharper but may result in more image noise. |

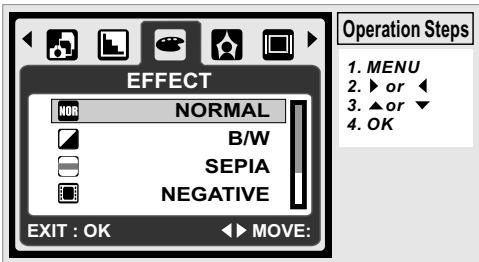
4.2.5.9 Effect
In Program Mode (P), select Effect of Menu Mode.
| NORMAL | NON | No special effect is added to the picture. |
| B/W | Turn the image into black and white. | |
| SEPIA | Turn the image into yellowish brown. | |
| NEGATIVE | Turn the image into negative film effect. |
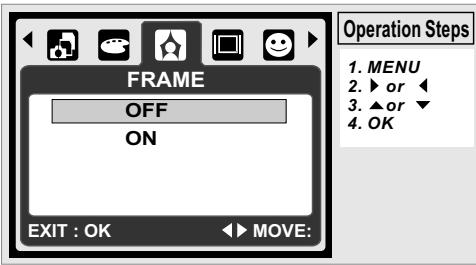
4.2.5.10 Frame
You can select and add a photo frame to the image you captured.
After using this function, cancel photo frame if you prefer not to add a photo frame to the next image.
Note: The photo frame feature cannot be used in image size of 10m.
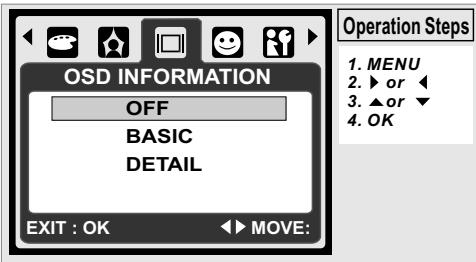
4.2.5.11 OSD Information
There are 3 options for the OSD information.
- OFF: No OSD information is required.
- BASIC: Only basic information is required.
- DETAIL: Detailed information is required.
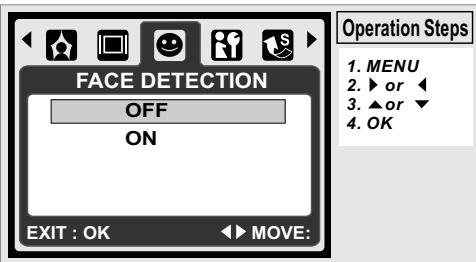
4.2.5.12 Face Detection
Face Detection allows you to focus on human faces. It is effective with the camera held horizontally or vertically.
Face Detection can only be used with still image. Face Detection is effective within a distance 2.5m.
Subjects not suitable for Face Detection:
- The face is obscured by glasses, a hat or hair.
- A person turned sideways, or who has his head lifted.
- The subject is too far to be recognized as a face.
Note: The Face Detection ( ) icon will be displayed on the top of the LCD Monitor.
5.0 DV Mode
5.1 Movie Recording
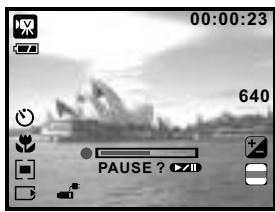
- Press the Power Button to turn on the camera.
- Press the Mode Button to change to Movie Clip Mode().
- Press the Shutter Button to start or stop movie recording.
- Press the OK Button to pause / resume during recording.
Note: The max. recording time for one video file is about 57 minutes only.
5.2 Function Introduction
5.2.1 Movie Mode
Press the Mode Button and then select Movie Mode.
5.2.2 Self-timer
Press refer to 3.4 Self-timer on Page 5.
5.2.3 Macro Mode
Press refer to 3.9 Macro Mode on Page 6.
5.2.4 Menu Mode
Press refer to 4.2.5 Menu Mode on Page 7.
5.2.4.1 Video Size
The video size options are provided as follows: 640 (640 x 480) 320 (320 x 240)
5.2.4.2 EV
Please refer to 4.2.5.3 EV on Page 7.
5.2.4.3 White Balance
Please refer to 4.2.5.5 WB on Page 7.
5.2.4.4 Metering
Please refer to 4.2.5.6 Metering on Page 8.
5.2.4.5 Effect
Please refer to 4.2.5.9 Effect on Page 8.
5.2.4.6 OSD Info
Please refer to 4.2.5.11 OSD Info on Page 8.
6.0 Voice Recording Mode
6.1 Voice Recording

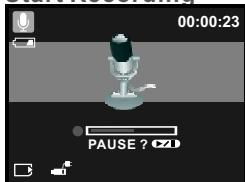
Start Recording

Stop
- Press the Mode Button and select Voice Recording Mode().
- Press the Shutter Button to start the recording and press the Shutter Button to stop the recording.
- During recording, press the Play/Pause (CZD). Button to put the recording on hold and press it again to continue recording.
7.0 Playback Mode
7.1 Playback of Still Image
Please press the Playback Button to view the images taken.
Press the Right or Left Button to go to the next or the previous image.
Press the Delete ( ) Button to delete the image.
Note: The icon ( ) shows up when viewing a still image with a voice memo (Please refer to Page 11).
7.2Playback of Movie Clip
Press the Playback Button to play the Movie Clips.
Press the Play / Pause (OzD) Button to play or pause the movie clip when browsing a video file.
During Video Playback, press the Left Button for Rewind, press the Right Button for Fast forward.
Press the Delete ( ) Button to delete the movie clip.
Note: The icon ( ) on the top left of the LCD Monitor represents a Movie clip, not a still image.
7.3 Playback of Voice Clip
Press the Playback Button to browse the Audio Clips.
Press the Delete ( ) Button to delete the Voice clip.
Note: The icon ( ) on the top left of the LCD Monitor represents an audio clip, not a still image or movie clip.
Note: Please connect with PC by USB cable to play the audio clip on PC.
7.4 Thumbnail Display
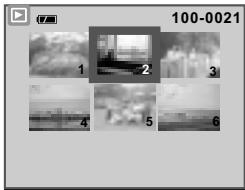
Thumbnail Display is a convenient tool for you to find the image you took from the list. In Playback Mode, you can press the Playback Button to have Thumbnail Display.
(Press the Playback Button again or the OK Button to go back to normal Playback display.) Select a file and press the Tele Button to enlarge the selected image or file.
7.5 Enlargement
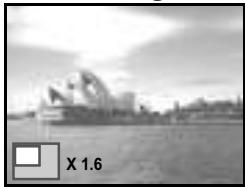
- Select a file and press the Tele Button to enlarge the selected image or file.
- Press and hold the Tele Button to enlarge the image to up to 8.0X. (Depending on the original size of image.)
- Use the UP/DOWN/LEFT/RIGHT Button to explore the image and check the focus.
- Press and hold the Tele Button to return the image to its normal size.
Enlargement
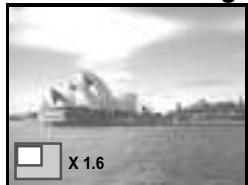
7.5.1 Trimming
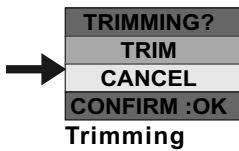
Enlargement
- Select an image.
- Press the Tele Button to select the size of the enlargement.
- Press the Playback Button if you want to trim and save the new image showing on the screen.
- The camera will save the trimmed image after you confirm the request.
7.6 Menu Mode
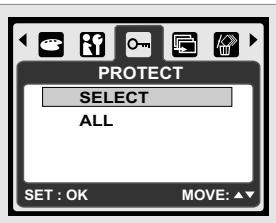
7.6.1 Protect
Set selected image(s) with Protection
- In Playback Mode, press the Menu Button and select "Protect" and "Select".
- Press the OK Button to confirm the request.
- Select one image and press the OK Button to lock the image.
-
(O - m) will show on the LCD monitor when the protection is set.
-
Press the OK Button again to cancel the protection.
Set all images with Protection
- Press the Menu Button and select "Protect" and "All".
- Press the OK Button to confirm the request.
-
(O_) will show on the LCD Monitor when the protection is set.
-
Press the OK Button again to cancel the protection.
7.6.2 Slide
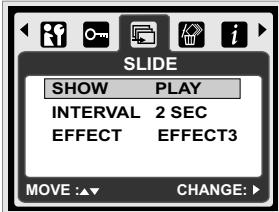
- This option enables you to view your photos with slide show.
- Press the Menu Button and select "SLIDE".
- There are 3 interval options available.
(a) Show: Play, Repeat
(b) Interval: 2, 3, 5, 10 sec.
(c) Effect: Effect 1, 2, 3, 4, MIX
- Select the OK Button to confirm the request.
7.6.3 Delete
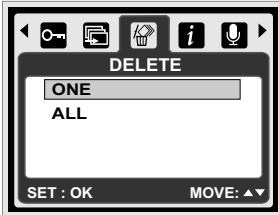
Delete single image
- Select the image you'd like to delete and press the Menu Button and select "DELETE" and "ONE".
- Press the OK Button to confirm the request or select cancel to give up the request.
Delete all image(s)
Select "DELETE" and "ALL" and press the OK Button to confirm the request or select cancel to give up the request.
7.6.4 Photo Exif
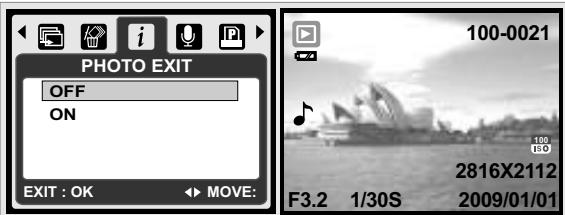
- Press the Menu Button and Select ON and press the OK Button.
- The image information will be displayed on the below of LCD Monitor.
- Or select OFF and press the OK Button to cancel the request.
7.6.5 Voice Memo
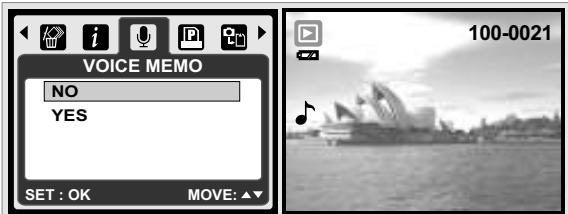
-
Select a still image which you wish to add a voice memo.
-
Press the Menu Button and Select "YES" and press OK to start recording memo.
- 10 seconds of voice memo will be recorded.
- ( ) icon will be displayed on the LCD Monitor as a reminder.
- Or select "NO" and press the OK Button to cancel the request.
7.6.6 DPOF
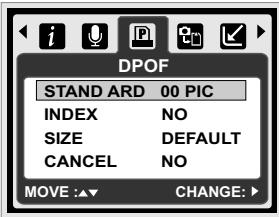
This function can only be used when a memory card is inserted.
This option allows you to put the print quantity (MAX.30 pcs) on your memory card.
[ONE PIC] - specifies the number of copies for a selected image.
[ALL PICS] - specifies the number of copies for all pictures apart from movie clips and voice recording files. Note: You cannot see the "PRINT" function on the LCD Monitor if a memory card is not inserted.
7.6.7 Copy To Card
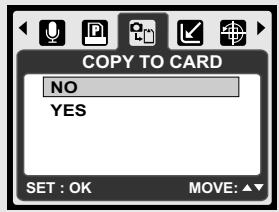
This function allows you to copy all the images stored in the internal flash memory into the memory card.
7.6.8 Resize
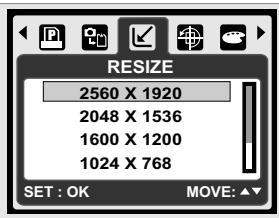
This function allows you to resize a still image.
- Select the image you would like to resize.
- Press the Menu Button and select "RESIZE".
- Select the image size you prefer.
-
The resized image will be stored as a new image.
-
You can select your own image as the start-up image by selecting "USER IMAGE 1" &"USER IMAGE 2".
- Select the image you would like to use.
- Select "USER IMAGE 1" & "USER IMAGE 2".
Note: To set the "USER IMAGE 1" & "USER IMAGE 2" as the start-up image, please refer to "Start-Up Image" under Set up Mode.
7.6.9 Rotate
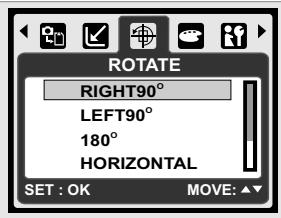
With this setting you can rotate the image RIGHT 90^ , LEFT 90^ , 180^ , HORIZONTAL and VERTIC
- Choose the image you would like to rotate.
- Press the Menu Button and choose "ROTATE".
-
Choose the rotation you prefer and press the OK Button.
-
The image after rotation will be stored as a new image.
7.6.10 Effect
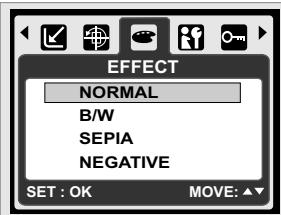
This function allows you to set an image with special effect.
- Choose the image you would like to set with a special effect.
- Press the Menu Button and choose "EFFECT".
-
Choose the special effect you Prefer and press the OK Button.
-
The image with the special effect will be stored as a new image.
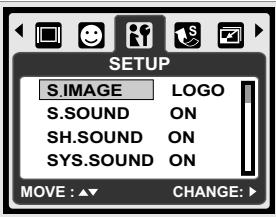
8.0 SETUP Mode
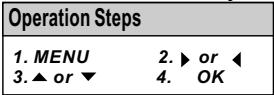
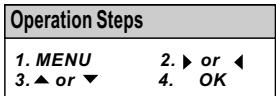
8.1 General Introduction

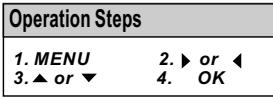
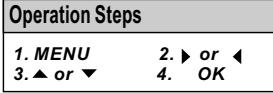
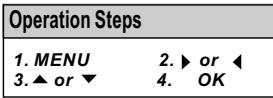
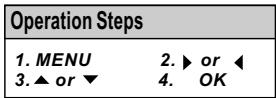
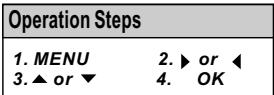
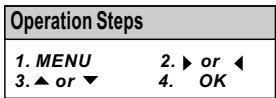
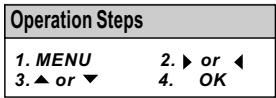
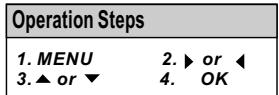
| Operation Steps | |
| 1. MENU | 2. ▶ or □ |
| 3. ▲ or ▼ | 4. OK |
You can enter Setup Mode by pressing the MENU Button and select "Setup" ( ).
- S. Image
- SYS. Sound
- Imprint
- Language
- Video
-
Format
-
S. Sound
- Q. View
- Date
- File
-
Battery Type
-
SH. Sound
- Power Save
- Time
- USB
- Reset All
8.2 Start-up Image (Default: LOGO)
To set up the start-up image, please follow the steps below.
1. Press the Menu Button and select "Setup".
2. Select "S. Image".
- Select the image you prefer and press the OK Button to confirm the setting. Or you can select [OFF] to not have a start-up image when power on the camera.
To set an image as a user start-up image option, please refer to "Slide Show" under Playback Mode.
8.3 Start-up Sound (Default: ON)
To set up the start-up sound please follow the steps below.
-
Press the Menu Button and select "S.Sound" and "ON", or
-
You can select "OFF" to turn off the start-up sound.
8.4 Shutter Sound (Default: ON)
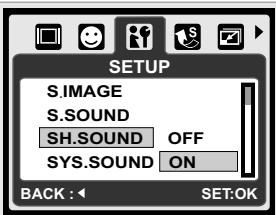
To set up the Shutter Sound, please follow the steps below.
-
Press the Menu Button and select "SH.Sound" and "ON", or
-
you can select "OFF" to turn off the Shutter Sound.
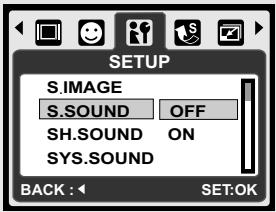
8.5 System Sound (Default: ON)

To set up the System Volume, please follow the steps below.
-
Press the Menu Button and select "SYS.Sound" and "ON", or
-
You can select "OFF" to turn off the System Sound.
Note: The System Sound includes the start-up sound and shooting sound.
8.6 Q. View (Default: 0.5 SEC)

SH.SOUND 0.5 SEC SYS.SOUND 1 SEC Q.VIEW 3 SEC BACK:1 SET:OK
-
Select the time you prefer, or
-
You can select "OFF" to have no Quick View Time after capture.
8.7 Power Save (Default: 3MIN)

SYS.SOUND 1 MIN Q.VIEW 3 MIN PWR SAVE 5 MIN BACK:4 SET:OK
- Select the time you prefer for the power saving and confirm the setting, or
- You can select "OFF" to disable the power saving function.
Note: If it is set at "OFF", the camera will not turn off automatically. The batteries may get drained quickly if the camera is turned on for a long time.
8.8 Imprint (Default: OFF)

This function allows you to print the date or date & time on the image.
8.9 Date (Default: YY/MM/DD)

This function allows you to select the date format.
- Date Format: YY/MM/DD
MM/DD/YY
DD/MM/YY
OFF
8.10 Time

This function allows you to select the time format.
- Time Format: 00:00
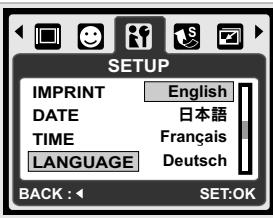
8.11 Language
There are 14 languages:
- English 6. Portuguese 11. Traditional Chinese
- German 7. Turkish 12. Simplified Chinese
- Spanish 8. Czech 13. Japanese
- Italian 9. Polish 14. Thai
- French 10. Russian
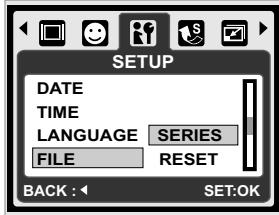
8.12 File (Default: SERIES)
This setting allows you to name the files.
If SERIES is selected, the file name will follow the latest stored file name.
If RESET is selected, the next file name will be set from 0001 even after formatting, deleting all, or inserting a new memory card.
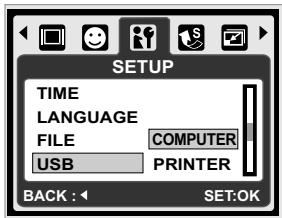
8.13 USB (Default: COMPUTER)
You can select an external device to connect the camera by using the supplied USB Cable.
Computer:
If Computer is selected, the camera turns off the LCD Monitor and automatically connects to the PC. Printer:
If Printer is selected, the camera allows you to select detail options of printer setting via PictBridge function when printer is connected.
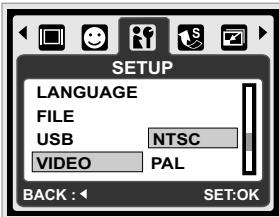
8.14 Video
- NTSC: U.S.A. Canada, Japan, South Korea, Taiwan, Mexico.
- PAL: Australia, Austria, Belgium, China, Denmark, Finland, Germany, U.K., Italy, Kuwait, Malaysia, New Zealand, Singapore, Spain, Sweden, Switzerland, Thailand, Norway.
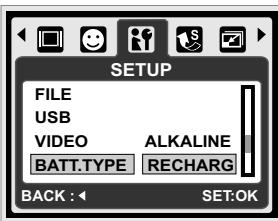
8.15 Battery Type (Default: ALKALINE)
- Insert the batteries.
- Select the type of the batteries inserted.
- Press the OK Button to go back to previewing the image.
8.16 Reset All (Default: 60Hz)
This option provides the function of recalling all default setting except the Date, Time, Language and Light Frequency.
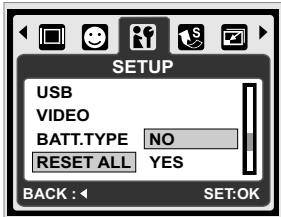

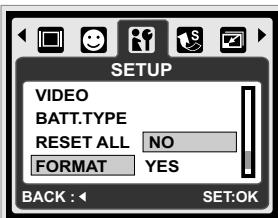
8.17 Format (Default: NO)
This function allows you to format the memory card or the built-in flash memory.
Note: All the data stored in the memory card or flash memory will be deleted after the formatting.
9.0 PictBridge Mode
PictBridge-supported Mode
- Power On the camera and the printer.
- Press the Menu Button to go to Setup Mode.
- Go to USB and select PRINTER for printer connection.
- Use the supplied USB cable to connect the camera to the PictBridge supported printer.
9.1 IMAGE
Setting the Number of Copies to Print
- Select [ONE PIC] or [ALL PICS]. A screen where you can set the number of copies to print will appear on the screen.
- Press the Up/Down Button to select the number of prints. Maximum 30 prints.
- Use the Left/Right Button to select another picture and select the number of prints for another picture.
- After setting the number of prints, press the OK Button to save.
- Press the Playback Button to return to the menu without setting the number of prints.


[ONE PIC]: The PictBridge function will be applied only to the picture currently displayed.
[ALL PICS]: The PictBridge function will be applied to all pictures.(Max. 99 prints).
9.2 AUTO SET
[YES]: All values in the [CUSTOM SET] are automatically changed.
[NO]: [CUSTOM SET] values are kept.
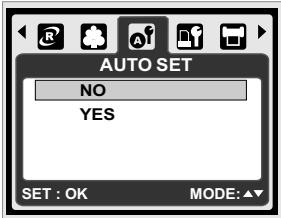
| Operation Steps | |
| 1. MENU | 2. ▶ or □ |
| 3. ▲ or ▼ | 4. OK |
9.3 CUSTOM SET
| SIZE | Sets the size of the printing paper |
| LAYOUT | Sets the number of pictures to be printed on a sheet of paper |
| TYPE | Sets the type of the printing paper |
| QUALITY | Sets the quality of the picture to be printed |
| DATE | Sets whether to print the date |
| FILE NAME | Sets whether to print the file name |
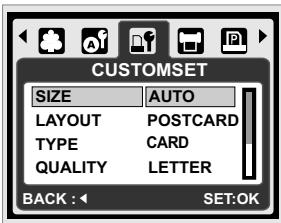
You can select the Paper Size, Print Format, Paper Type, Print Quality, Date Print, and File Name Print menus for printed pictures.
9.4 PRINT
[STANDARD]: Print the pictures stored in the memory card in set number. Each picture will be printed on one piece of paper.
[INDEX]: Print multiple images on one sheet of paper. Please press the OK Button to stop printing.
| Operation Steps | |
| 1. MENU | 2. ▶ or □ |
| 3. ▲ or ▼ | 4. OK |
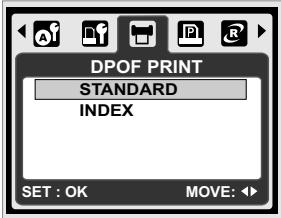
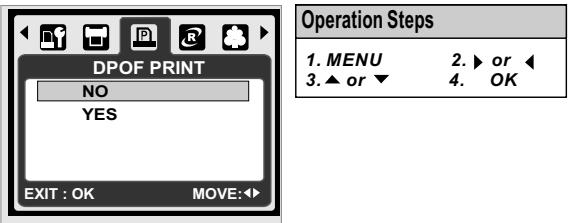
9.5 DPOF PRINT
This function allows you to print the files with DPOF information.
[YES]: Directly print the file with the DPOF information.
[NO]: Cancel the printing; Depending on the manufacturer and printer model, some menus may not be available.
If the camera is connected to a printer without supporting the DPOF, the menu is still displayed but the function is not available.
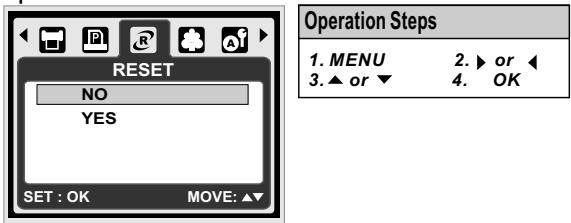
9.6 RESET
This function allows you to initialize user-changed configurations.
[YES]: All print and image settings will be reset back to the default.
[NO]: Settings will not be reset.
All default printer settings are based on those of the printer manufacturer.
10.0 TV/PC Connection
10.1 TV Connection
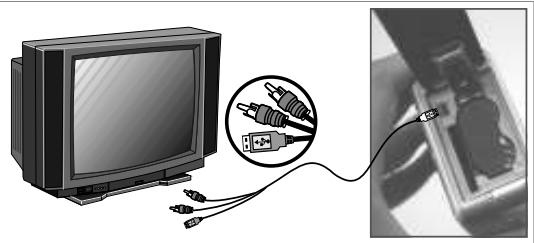
Connect the USB/Video connector of the camera to video input ports of the TV set with the supplied USB/USB/Video Cable. Turn on the TV and switch the Video switch to A/V Mode. Power on the camera and then switch to the Playback Mode. Press the Left or Right Button to go to the next or last image for TV reviewing.
10.2 Computer/Notebook Connection
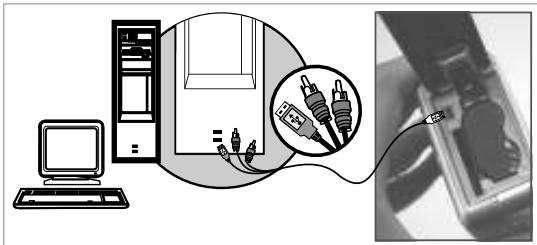
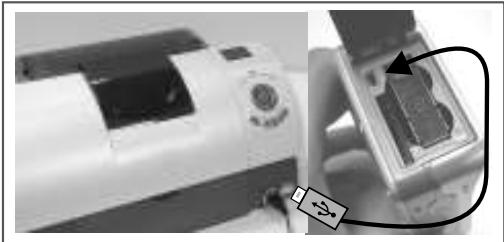
Press the Menu Button to go to Setup Mode. Go to USB and select COMPUTER for computer connection. When the USB/Video Cable is in connection with the computer while the camera is on, the camera will automatically go to the PC Mode from any working mode and turn off LCD monitor. In Computer Mode, you can download the images from camera to your you computer.
11.0 Software Application

ArcSoft Medialmpression™ Introduction
Manages your media for you, and gives you tons of fun and exciting ways to create and share projects featuring your photo and video. Create your own movies or photo slide shows, complete with soundtrack; edit, enhance, and add fun creative effects to your photos; and share your files easily through simple email attachments or popular photo printing and video sharing websites!
Easy Link With YouTube by Arcsoft
- Browse & Upload in YouTube™ with ArcSoft MediaImpression™
- Easy To Be a Movie Maker
- Login & Upload by Legal and Safety Software
- Unnecessary Complicated Setting for Varied Users.
ArcSoft MediaImpression™ supports Windows: 2000/XP/Vista only.
Please follow 9 steps as following to log-in and upload.

Click "Extra"

2 Choose "YouTube Account SETUP".
3 Choose "Step 1" to log-in "YouTube" account.
4 Choose "YouTube Account" or "Google Account" to log-in.
5 Choose "Step 2" to get authorization.
6 Click "Allow" to get permission.
7 User will see "UserName" after log-in.
1. Choose file that you like to upload.
2.Click "Upload to YouTube".
9 1. Watch your video in YouTube™ after upload.
Note: All brands and product names are registered trademarks of their respective owners. YouTube™ is a brand of Google, Inc and YouTube™, LLC, Mountain View, California, US.
12.0 Appendix
Error Message Table
| Messages | Causes | Solutions |
| CARD FULL | There is insufficient card memory capacity for storing an image. | Delete the stored image(s) in the memory card or insert a new memory card. |
| MEMORY FULL | There is insufficient internal memory capacity for storing an image. | Delete the stored image(s) in the flash memory. |
| CARD LOCKED (ICON BLINKING) | The memory card is under protection. | Set the card protection switch at non-protection position. |
| LOCK | The image can not be deleted under protection. | Unlock the protected image. |
| NO IMAGE | There is no image stored in the memory card or built-in flash memory. | |
| FILE ERROR | File format error. | Insert a new memory card or format the built-in flash memory. |
| MEMORY ERROR | Memory is damaged or fails. | Format the memory card or built-in flash memory. |
| CARD ERROR | Card is damaged or fails. | Insert a new memory card. |
| LOW BATTERY! (ICON BLINKING) | Battery power is drained. | Insert a new battery. |
| LOW LIGHT! | The environment is too dark in Flash off or "Night Scene". | Set the flash mode to Auto Flash or Fill-in Flash. |
| HAND SHAKE ICON | The environment is too dark in Flash off or "Night Scene". | Avoid shake. Set the flash mode to Auto Flash or Fill-in Flash. |
| NO PAPER! | Paper has run out. | Please put more paper in the paper tray of the Printer. |
| CAMERA HANGS | 1. Remove the battery. 2. Reload the battery. 3. Switch on the camera. |
13.0 Specifications
| Specifications | |||
| Image Sensor | Type | 1/2.5" 6M CCD | |
| Effective Pixels | 2864(H) x 2160(V) | ||
| Lens | Focal Length | f=6.09mm (35mm film equivalent: 36.5mm) | |
| F No. | F3.2, F7.0 | ||
| Digital Zoom | Still Image Mode: 1X ---->2X ---->3X ---->4X ---->5X ---->1X Playback Mode: 1.1~8X (depends on image size) | ||
| LCD Display | 2.4" Color TFT LCD | ||
| Focusing | Type | Fixed Focus | |
| Range | Normal: 1.2M ~ infinity Macro: 20cm | ||
| Shutter | Type | Mechanical & Electrical Shutter | |
| Speed | Normal: 2 sec. - 1/1000 sec., Night Scene: 8 sec. - 1/1000 sec. | ||
| Exposure | Control | Program AE | |
| ISO Equivalent | Auto, 100, 200, 400, 800, 1600 | ||
| Flash | Modes | Auto, Auto & Red-eye Reduction, Fill-in flash, Slow Sync, Flash Off | |
| Effect | Normal, B&W, Sepia, Negative | ||
| Sharpness | Soft, Normal, Vivid | ||
| White Balance | Auto, Daylight, Cloudy, Fluorescent, Tungsten, Sunset, Custom | ||
| Face Detection | Yes | ||
| Voice recording | Voice Recording (depends on capacity) | ||
| Voice Memo in Still Image (max. 10 sec.) | |||
| Date Imprinting | Date, Date & Time, Off (user selectable) | ||
| Shooting | Still Image | Mode | Modes: Single Image, Continuous Shooting, AEB |
| Image Size | [10M]: 3680 X 2760 pixel (by interpolation), [6M]: 2816 X 2112 pixel [3M]: 2048 X 1536 pixel, [VGA]: 640 X 480 pixel | ||
| Image Quality | Super Fine, Fine, Normal | ||
| Self-timer | 2 sec., 10 sec., Double | ||
| Scene modes | Auto, Program, Portrait, Landscape, Night Scenery, Sunset, Back light, Fireworks, Candle light, Beach, Auction, Underwater | ||
| Movie Clip | Movie Size | 640 x 480 (VGA), 320 x 240 (QVGA) | |
| Frame | 30fps | ||
| Zoom | Digital Zoom: up to 5X | ||
| Storage | Media | Built-in Nand Flash (32MB) | |
| Supported Media Card: up to SD 2GB, SDHC 8GB | |||
| File Format | Still Imag | JPEG (DCF), EXIF 2.2, DPOF 1.1, PictBridge 1.0 | |
| Movie Clip | AVI (MJPEG) | ||
| Audio | Audio for Voice Recording and Memo: WAV | ||
| Capacity | Approx. left 16MB Internal Memory for Storage | ||
| PictBridge (Direct Printing) | Yes | ||
| Image Play | Type | Single Image, Thumbsails, Slide Show, Movie Clip | |
| Interface | Digital output connector: USB 2.0 (High Speed) AV out, MIC-in | ||
| Power Source/Rechargeable | AAx2 batteries | ||
| Dimensions | 101 x 61 X 32mm | ||
| Weight | Approx. 131g (without batteries and card) | ||
| Operation Temperature | 0°~40°C | ||
| Operation Humidity | 5°~80% | ||
| Special Features Software | Camera Driver | Mass Storage supports Win 2000 / ME / XP / Vista & Mac 10 or later without driver (only Win 98SE needs driver) | |
| Application | ArcSoft Medialpression (Windows: 2000/ME / XP / Vista) | ||
| System Requirement | |||
| For Windows | • PC with processor better than MMX Pentium 233MHz (XP: Pentium II 300MHz) • Windows 2000 Professional (SP4)/Windows ME/ Windows XP (SP2)/Window Vista Minimum 64MB RAM (XP: 128MB) • 140MB of available hard-disk space • USB port (1.1 or 2.0 standard interface) • CD-ROM drive • 800×600 pixels, 16-bit color display compatible monitor (24-bit color display recommended) | ||
| For Macintosh | • Power Mac G3 or later • Mac OS 10.0 ~ 10.4 • Minimum 64MB RAM • 110MB of available hard-disk space • USB port • CD-ROM Drive | ||
| ArcSoft-Medialpression System Requirement | |||
| For Windows | • Pentium III 1 GHz or equivalent • Windows 2000 /Windows XP /Window Vista • Minimum 512MB RAM • 150MB of available hard-disk space • USB port (1.1 or 2.0 Standard interface) • 800×600 pixels, 16-bit color display compatible monitor | ||
"Specifications and product design are subject to change without any notice for further improvement"
14.0 Customer care
More information about the complete AgfaPhoto digital camera product range can be found under www.plawa.com / www.plawausa.com
Service & Repair (USA/ Canada):
1-866 475 2605
www.plawausa.com
Service & Repair Hotline (EU):
00800 752 921 00 (from a landline only)
Service & Support Hotline (Germany):
0900 1000 042'(1.49 Euro/ min. from a German landline only)
Online Service / International contact:
support-apdc@plawa.com
To return a product, you will need an RMA number which must be clearly visible on the returned shipment. You can find further information on the return of goods either by phoning our Support Hotlines or via the plawa website under the Menu item "Service & Support".
Manufactured by
AgfaPhoto is used under license of Agfa-Gevaert NV & Co. KG or Agfa-Gevaert NV. Neither Agfa-Gevaert NV & Co. KG nor Agfa-Gevaert NV manufacture this product or provide any product warranty or support. For service, support and warranty information, contact the distributor or manufacturer. All other brands and product names are registered trademarks of their respective owners. Product design and technical features can be changed without notice. Contact: AgfaPhoto Holding GmbH, www.agfaphoto.com
14.1 Disposal of Waste Equipment by Users in Private Households in the European Union
This symbol on the product or on its packaging indicates that this product must not be disposed of with your other household waste. Instead, it is your responsibility to dispose of your waste equipment by handing it over to a designated collection point for the recycling of waste electrical and electronic equipment. The separate collection and recycling of your waste equipment at the time of disposal will help to conserve natural resources and ensure that it is recycled in a manner that protects human health and the environment. For more information about where you can drop off your waste equipment for recycling, please contact your local city office, your household waste disposal service or the shop where you purchased the product.
14.2 FCC Compliance and Advisory
This device complies with Part 15 of the FCC Rules. Operation is subject to the following two conditions: 1.) this device may not cause harmful interference, and 2.) this device must accept any interference received, including interference that may cause unsatisfactory operation. This equipment has been tested and found to comply with the limits for a Class B peripheral, pursuant to Part 15 of the FCC Rules. These limits are designed to provide reasonable protection against harmful interference in a residential installation. This equipment generates, uses, and can radiate radio frequency energy and, if not installed and used in accordance with the instructions, may cause harmful interference to radio communication. However, there is no guarantee that interference will not occur in a particular installation. If this equipment does cause harmful interference to radio or television reception, which can be determined by turning the equipment off and on, the user is encouraged to try to correct the interference by one or more of the following measures.
- Reorient or relocate the receiving antenna.
- Increase the separation between the equipment and receiver.
- Connect the equipment to an outlet on a circuit different from that to which the receiver is connected.
- Consult the dealer or an experienced radio/TV technician for help.
Any changes or modifications not expressly approved by the party responsible for compliance could void the user's authority to operate the equipment. When shielded interface cables have been provided with the product or when specified additional components or accessories have elsewhere been designated to be used with the installation of the product, they must be used in order to ensure compliance with FCC regulations.
14.3 Declaration of Conformity
We herewith confirm the following designated product: AgfaPhoto digital camera DC-600uw has been tested and found to comply with the requirements set up in the council directive on the approximation of the law of members' states relating to the EMC Directive 2004/108/EC. For the evaluation regarding to the electromagnet compatibility, the following standards were applied:
EN 55022: 2006, Class B ITE
EN 61000-3-2:2006
EN 61000-3-3:1995+A1:2001+A2:2005
EN 55024:1998+A1:2001+A2:2003
IEC 61000-4-2: 2001
IEC 61000-4-3:2006
IEC 61000-4-4:2004
IEC 61000-4-5:2005
IEC 61000-4-6:2006
IEC 61000-4-8:2001
IEC 61000-4-11:2004
The device is marked with CE logo.


- Precautions
- Disclaimer
- Important Information about water and shock resistant features
- Before Use
- During using in water
- After Use
- Storage and Maintenance
- Overall Introduction
- Accessories
- External View
- Display Information
- ( ) Face Detection
- Working& Scene Mode
- Battery Status
- Shooting
- Flash Mode
- Self-timer
- Focus Range (Macro
- Metering
- Memory Card
- Manual Exposure (Night Scenery)
- Battery Type
- (O)WARNING:
- Time & Date
- ISO Value
- EFFECT
- EV
- White Balance
- Sharpness
- Quality
- Image Size
- Video Size
- (100) Available Shots
- Zoom Status Indicator
- Getting Ready
- Turn on / off Camera
- Inserting the batteries
- Insert / Remove a memory card
- Attaching Wrist Strap
- Buttons & Function
- Shutter Button
- Tele / Play&Pause / OK Button
- UP/ModeButton
- Left / Self-timer Button
- Right / Flash Button
- Down / Menu Button
- Underwater/Delete Button
- Power/Playback Button
- Macro Button
- DSC Mode
- Shooting
- Function Introduction
- Mode Set
- Flash
- Self-timer
- Macro
- Menu Mode
- Size
- Quality
- EV
- ISO
- White Balance
- Metering
- Shooting
- Sharpness
- Effect
- Frame
- OSD Information
- Face Detection
- Subjects not suitable for Face Detection:
- DV Mode
- Movie Recording
- Function Introduction
- Movie Mode
- Self-timer
- Macro Mode
- Menu Mode
- Video Size
- EV
- White Balance
- Metering
- Effect
- OSD Info
- Voice Recording Mode
- Voice Recording
- Playback Mode
- Playback of Still Image
- 7.2Playback of Movie Clip
- Playback of Voice Clip
- Thumbnail Display
- Enlargement
- Enlargement
- Menu Mode
- Set selected image(s) with Protection
- Set all images with Protection
- Slide
- Delete
- Delete single image
- Delete all image(s)
- Photo Exif
- Voice Memo
- DPOF
- Copy To Card
- Resize
- Rotate
- Effect
- SETUP Mode
- General Introduction
- Start-up Image (Default: LOGO)
- Start-up Sound (Default: ON)
- Shutter Sound (Default: ON)
- System Sound (Default: ON)
- Q. View (Default: 0.5 SEC)
- Power Save (Default: 3MIN)
- Imprint (Default: OFF)
- Date (Default: YY/MM/DD)
- Time
- Language
- File (Default: SERIES)
- USB (Default: COMPUTER)
- Computer:
- Video
- Battery Type (Default: ALKALINE)
- Reset All (Default: 60Hz)
- Format (Default: NO)
- PictBridge Mode
- PictBridge-supported Mode
- IMAGE
- Setting the Number of Copies to Print
- AUTO SET
- CUSTOM SET
- DPOF PRINT
- RESET
- TV/PC Connection
- TV Connection
- Computer/Notebook Connection
- Software Application
- ArcSoft Medialmpression™ Introduction
- Easy Link With YouTube by Arcsoft
- Appendix
- Error Message Table
- Customer care
- Disposal of Waste Equipment by Users in Private Households in the European Union
- FCC Compliance and Advisory
- Declaration of Conformity
Brand : AGFAPHOTO
Model : DC-600UW
Category : Digital Camera