
7004ABR - Router SMC - Free user manual and instructions
Find the device manual for free 7004ABR SMC in PDF.


User questions about 7004ABR SMC
0 question about this device. Answer the ones you know or ask your own.
Ask a new question about this device
Download the instructions for your Router in PDF format for free! Find your manual 7004ABR - SMC and take your electronic device back in hand. On this page are published all the documents necessary for the use of your device. 7004ABR by SMC.
USER MANUAL 7004ABR SMC
Broadband Router with built in 4 port switch and Print server
Installation Guide
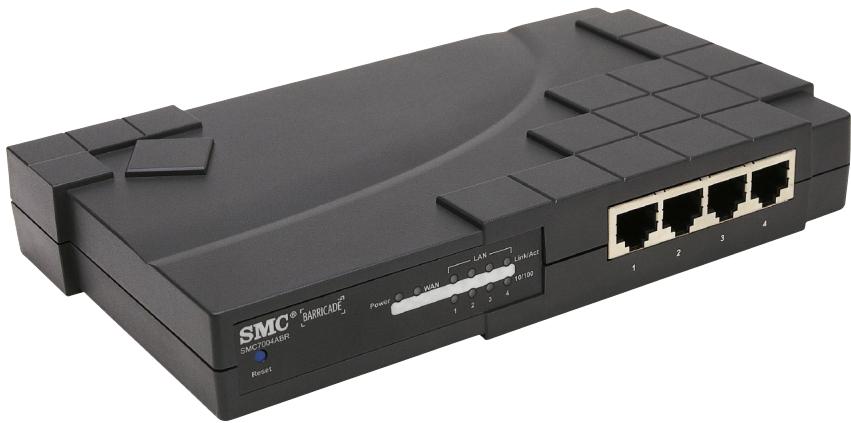
Table of Contents
Hardware Setup 4
Configuring Your Computer 6
Configuring Your Computer with Windows 95/98/ME 6
Configuring Your Computer with Windows 2000 11
Configuring Your Computer with Windows NT 4.0 14
Configuring Your Macintosh Computer 18
Configuring Your Barricade 21
Configuring Your Barricade for a Dynamic IP Address 25
Configuring Your Barricade for a Static IP Address 28
Configuring Your Barricade for PPPoE 30
Configuring Your Barricade for Dialup on Demand 32
Configuring Your Computer for the Barricade Print Server 33
Configure the Network Printer in Unix Systems 36
PPtP Installation 37
Specifications and Certification 38
Congratulations on your purchase of the SMC Barricade™ Broadband Router.
The SMC Barricade is a Broadband Router designed to share Internet Access, provide security, and to network multiple devices for a variety of users. The Barricade's simple installation setup can be used by the least experienced of users, while providing networking professionals with easy to configure advanced features. Please read the User Guide for advanced features of this product.
Thank you for purchasing an SMC product. We know you will enjoy the many features of the SMC Barricade.
This Package Contains:
One SMC Barricade
One Power Adapter
This Quick Installation Guide
One Installation CD
One Category 5 Fast Ethernet Cable
Confirm That You Meet Installation Requirements
Before proceeding with the installation of your Barricade, please be sure you have the following:
A computer with an Ethernet network card installed.
- Your Windows CD, if your computer is running Windows 95, 98, or ME
- An Internet connection through a cable or DSL modem or an external dial-up or ISDN modem.
An additional Ethernet network cable.
- A Web browser such as Internet Explorer or Netscape.
Hardware Setup
- Connecting Computers: Connect computers directly to the Barricade on ports 1-4 on the front panel. If you have more than 4 computers to plug in, connect a hub or a switch (using its uplink port) and connect additional computers to that device.
- Connecting a Cable Modem or DSL Modem: Connect your Cable or DSL modem to the WAN port on the rear panel.
- Connecting a Dial-up Modem: If you use an external dial-up modem or ISDN modem, connect it to the COM port on the rear panel.
- Connecting a Printer: If you have a printer that you want to share between computers, connect it to the Printer port using a standard parallel printer cable.
- Power: Plug the power cord into the power jack.

SMC7004ABR - Front Panel

SMC7004ABR - Rear Panel
Indicator LEDs
The front panel of the Barricade provides indicator LEDs (Light Emitting Diodes) for easy monitoring. The following table defines the function of each LED.
| LED | Condition | Status |
| Power (green) | On | Barricade is receiving power. |
| WAN (green) | On | The WAN port has established a valid network connection. |
| Flashing | The WAN port is transmitting or receiving data. | |
| Link/Act (green) | On | The indicated LAN port has established a valid network connection. |
| Flashing | The indicated LAN port is transmitting or receiving data. | |
| 10/100 (amber) | On | The indicated LAN port is operating at 100Mbps. |
| Off | The indicated LAN port is operating at 10Mbps. |
Configuring Your Computer with Windows 95/98/ME
You may find that the instructions here do not exactly match your version of Windows. This is because these steps and screenshots were created from Windows 98. Windows 95 and Windows Millennium Edition are very similar, but not identical, to Windows 98.
Step 1. Configure TCP/IP Settings
After you have completed the hardware setup by connecting your devices, you need to configure your computer to connect to your Barricade. You need to determine how your ISP issues your IP address. Many ISPs issue these numbers automatically using a networking technology known as Dynamic Host Control Protocol, or DHCP. Other ISPs will specify your IP address and associated numbers, which you must enter manually. This is also known as a static IP address.
How your ISP assigns your IP address determines how you will configure your computer.
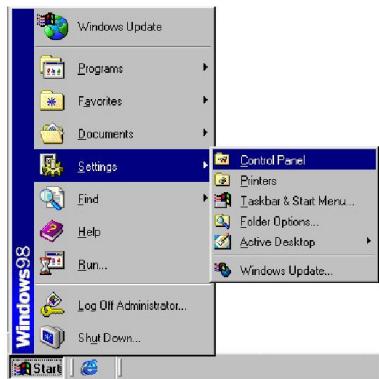
- From the Windows desktop, click the "Start" button. Choose "Settings," then click "Control Panel."
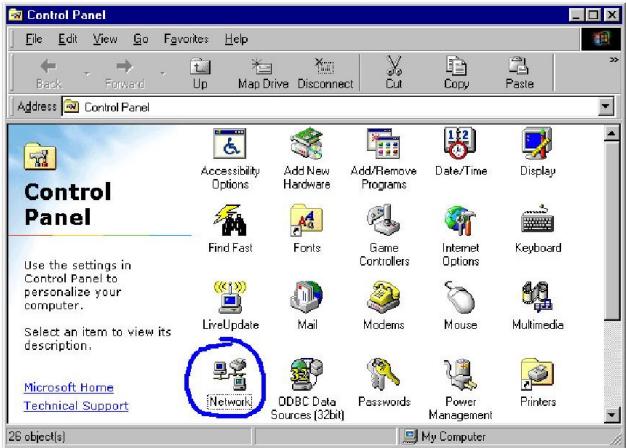
- From "Control Panel," double-click the "Network" icon.
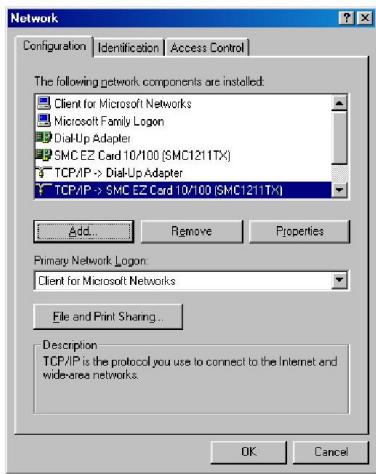
- In the "Network" window, under the "Configuration" tab, double-click the "TCP/IP" entry that is listed with your network card.
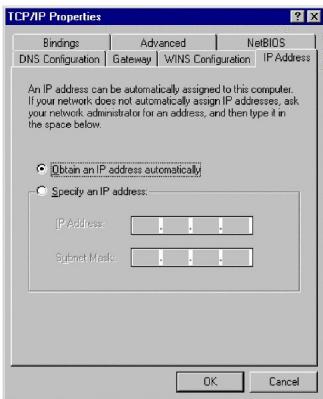
- Select the "IP Address" tab.
If "Obtain an IP address automatically" is already selected, your computer is already configured for DHCP.
Click "Cancel" to close each window, and skip to Step 2 "Disable HTTP Proxy."
- Locate your IP address and Subnet Mask. Record them in the spaces provided below.
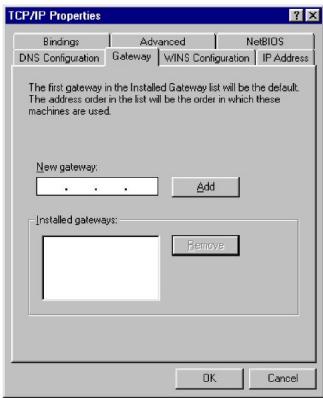
- Click the "Gateway" tab and record the numbers listed under "Installed gateways."
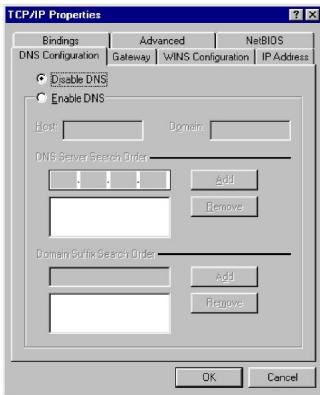
- Click the "DNS Configuration" tab. Locate the DNS servers listed under "DNS Server Search Order." Record the listed addresses.
- After writing down your settings, check to make sure you have recorded them correctly. Click the "IP Address" tab and then click "Obtain an IP address automatically." Click OK.
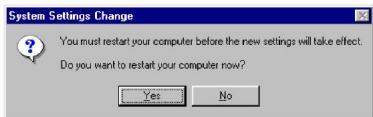
- Windows may need your Windows 95/98/ME CD to copy some files. After it finishes copying, it will then prompt you to restart your system. Click “Yes” and your computer will shut down and restart.
TCP/IP Configuration Setting
IP Address
Subnet Mask
Primary DNS Server
Secondary DNS Server
Default Gateway
Step 2. Disable HTTP Proxy
You will need to verify that the "HTTP Proxy" feature of your Web browser is disabled. This is so that your Web browser will be able to view the configuration pages inside your Barricade.
The following steps are for Internet Explorer and for Netscape.
Determine which browser you use and follow the appropriate steps.
Internet Explorer
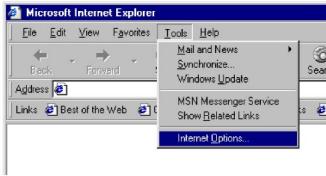
- Open Internet Explorer and click the stop button. Click "Tools," then "Internet Options."
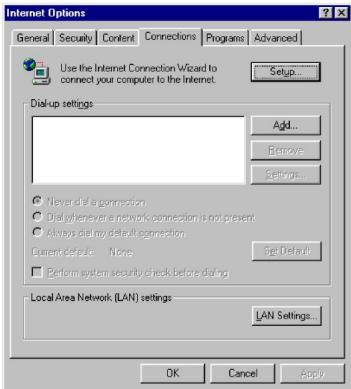
- In the "Internet Options" window click the "Connections" tab. Next, click the "LAN Settings..." button.
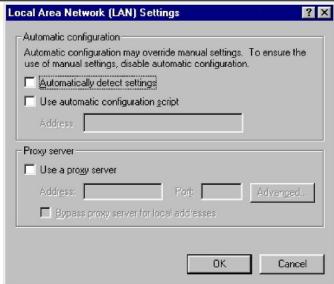
- Clear all the checkboxes.
- Click "OK," and then click "OK" again to close the "Internet Options" window.
Netscape
- Open Netscape and click the stop button. Click "Edit," then click "Preferences..."
- In the "Preferences" window, under "Category" double-click "Advanced," then click "Proxies." Select "Direct connection to the Internet." Click "OK."
- Repeat these steps for each Windows 95/98/Me computer connected to your Barricade.
Step 3. Obtain IP Settings from Your Barricade
Now that you have configured your computer to connect to your Barricade, it needs to obtain new network settings. By releasing any old IP settings and renewing them with settings from your Barricade, you will also verify that you have configured your computer correctly.
- Click "Start," then "Run..."
- Type "WINIPCFG" and click "OK." It may take a minute or two for the "IP Configuration" window to appear.
- From the drop-down menu, select your network card. Click "Release" and then "Renew." Verify that your IP address is now 192.168.2.xxx, your Subnet Mask is 255.255.255.0 and your Default Gateway is 192.168.2.1. These values confirm that your Barricade is functioning. Click "OK" to close the "IP Configuration" window.
Configuring Your Computer with Windows 2000
Step 1. Configure TCP/IP Settings
After you have completed the hardware setup, you need to configure your computer to connect to your Barricade. You also need to determine how your ISP issues your IP address. Many ISPs issue these numbers automatically, using a networking technology known as Dynamic Host Control Protocol, or DHCP. Other ISPs will specify your IP address and associated numbers, which you must enter manually. This is also known as a static IP address. How your ISP assigns your IP address determines how you will configure your computer.
- From the Windows desktop, click the "Start" button. Choose "Settings," then click "Control Panel."
- Double-click the "Network & Dial-Up Connections" icon.
- Double-click the icon that corresponds to the connection to your Barricade.
- Click "Properties."
- Double-click "Internet Protocol (TCP/IP)."
- All the information that you need to record is on the "Internet Protocol (TCP/IP) Properties" dialog box. Use the spaces below to record the information. If "Obtain an IP address automatically" and "Obtain DNS server address automatically" are already selected, your computer is already configured for DHCP. Click "Cancel" to close each window, and skip to Step 2 "Disable HTTP Proxy."
- Select "Obtain an IP address automatically" and then select "Obtain DNS server address automatically." Then click "OK." Click "OK" or "Close" to close each window.
TCP/IP Configuration Setting
| IP Address | _______ |
| Subnet Mask | _______ |
| Primary DNS Server | _______ |
| Secondary DNS Server | _______ |
| Default Gateway | _______ |
Step 2. Disable HTTP Proxy
You will need to verify that the "HTTP Proxy" feature of your Web browser is disabled. This is so that your Web browser will be able to view the configuration pages inside your Barricade.
The following steps are for Internet Explorer and for Netscape. Determine which browser you use and follow the appropriate steps.
Internet Explorer
- Open Internet Explorer and click the stop button. Click "Tools," then "Internet Options."
- In the "Internet Options" window click the "Connections" tab. Next, click the "LAN Settings..." button.
- Clear all the checkboxes.
- Click “OK,” and then click “OK” again to close the “Internet Options” window.

Netscape
- Open Netscape and click the stop button. Click "Edit," then click "Preferences..."
- In the "Preferences" window, under "Category" double-click "Advanced," then click "Proxies." Select "Direct connection to the Internet." Click "OK."
Step 3. Obtain IP Settings From Your Barricade
Now that you have configured your computer to connect to your Barricade, it needs to obtain new network settings. By releasing any old IP settings and renewing them with settings from your Barricade, you will also verify that you have configured your computer correctly.
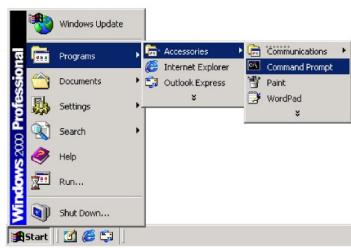
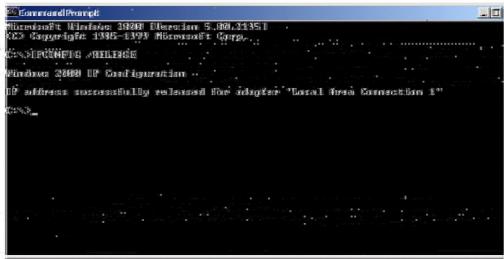
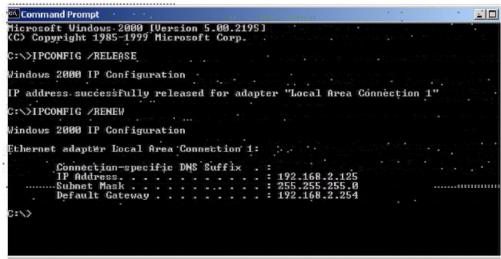
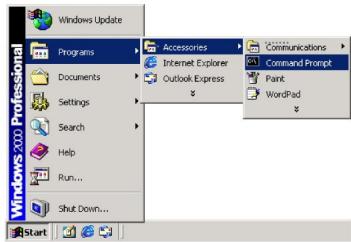
- From the Windows desktop, click the "Start" button, then "Programs," then "Accessories," and then click "Command Prompt."
- In the "Command Prompt" window, type "IPCONFIG /RELEASE" and press the
key. - Type "IPCONFIG /RENEW" and press the
key. Verify that your IP address is now 192.168.2.xxx (2-255), your Subnet Mask is 255.255.255.0 and your Default Gateway is 192.168.2.1. These values confirm that your Barricade is functioning. - Type "EXIT" and press
to close the "Command Prompt" window.
Configuring Your Computer with Windows NT 4.0
Step 1. Configure TCP/IP Settings
After you have completed the hardware setup, you need to configure your computer to connect to your Barricade. You need to determine how your ISP issues your IP address. Many ISPs issue these numbers automatically using a networking technology known as Dynamic Host Control Protocol, or DHCP. Other ISPs will specify your IP address and associated numbers, which you must enter manually. This is also known as a static IP address. How your ISP assigns your IP address determines how you will configure your computer:
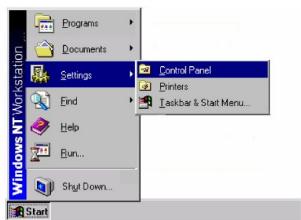
- From the Windows desktop click "Start," then "Settings," and click "Control Panel."
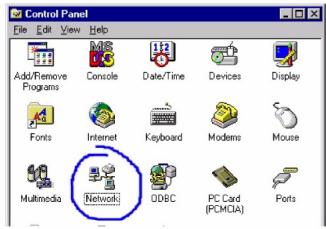
- Double-click the "Network" icon.
- Select the "Protocols" tab.
- Double-click "TCP/IP Protocol."
-
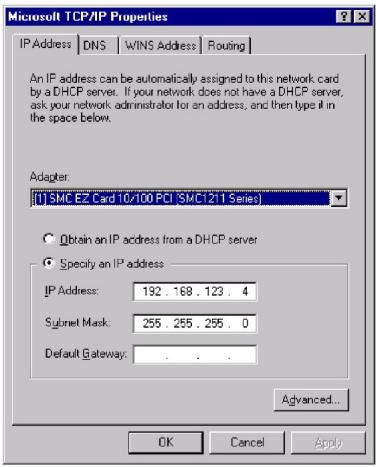
Select the "IP Address" tab.
-
In the "Adapter" drop-down list, be sure your Ethernet adapter is selected. If "Obtain an IP address automatically" is already selected, your computer is already configured for DHCP. Click "Cancel" to close each window, and skip to Step 2 "Disable HTTP Proxy."
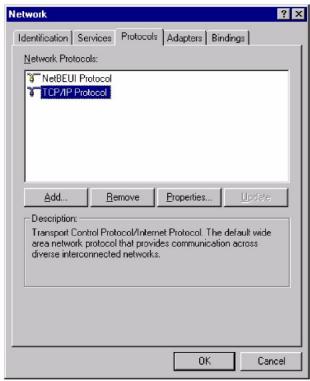
- In the "TCP/IP Properties" dialog box, click the IP address tab to locate your IP address, subnet Mask, and default gateway. Record these values in the space provided below.
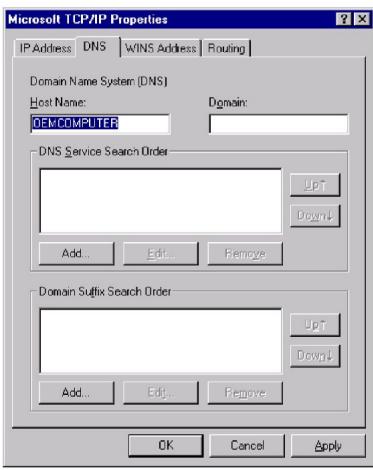
- Click the "DNS" tab to see the primary and secondary DNS servers. Record these values in the appropriate spaces below.
- After writing down your IP settings, click the IP address tab. Select "Obtain IP address automatically" and click OK. Click OK again to close the "Network" window.
- Windows may copy some files, and will then prompt you to restart your system. Click "Yes" and your computer will shut down and restart.
TCP/IP Configuration Setting
| IP Address | ___________ |
| Subnet Mask | ___________ |
| Primary DNS Server | ___________ |
| Secondary DNS Server | ___________ |
| Default Gateway | ___________ |
Step 2. Disable HTTP Proxy
You will need to verify that the "HTTP Proxy" feature of your Web browser is disabled. This is so that your Web browser will be able to view the configuration pages inside your Barricade.
The following steps are for Internet Explorer and for Netscape.
Determine which browser you use and follow the appropriate steps.
Internet Explorer
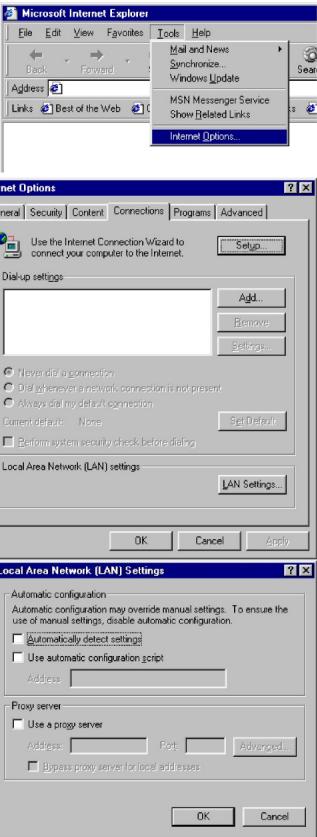
- Open Internet Explorer and click the stop button. Click "Tools," then "Internet Options."
- In the "Internet Options" window click the "Connections" tab. Next, click the "LAN Settings..." button.
- Clear all the checkboxes.
- Click "OK," and then click "OK" again to close the "Internet Options" window.
Netscape
- Open Netscape and click the stop button. Click "Edit," then click "Preferences..."
- In the "Preferences" window, under "Category" double-click "Advanced," then click "Proxies." Select "Direct connection to the Internet." Click "OK."
Step 3. Obtain IP Settings From Your Barricade
Now that you have configured your computer to connect to your Barricade, it needs to obtain new network settings. By releasing any old IP settings and renewing them with settings from your Barricade, you will also verify that you have configured your computer correctly.
- From the Windows desktop, click the "Start" button, then "Programs," and then select "Command Prompt."
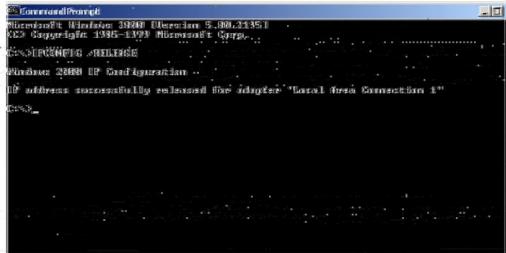
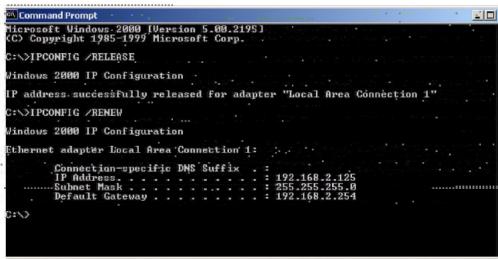
- In the "Command Prompt" window, type "IPCONFIG /RELEASE" and press the
key. - Type "IPCONFIG /RENEW" and press the
key. Verify that your IP address is now 192.168.2.xxx, your Subnet Mask is 255.255.255.0 and your Default Gateway is 192.168.2.1. These values confirm that your Barricade is functioning. - Type “EXIT” and press
to close the "Command Prompt" window.
Configuring Your Macintosh Computer
You may find that the instructions here do not exactly match your screen. This is because these steps and screenshots were created using Mac OS 8.5. Mac OS 7.x and above are all very similar, but may not be identical to Mac OS 8.5.
Step 1. Configure TCP/IP Settings
After you have completed the hardware setup, you need to configure your computer to connect to your Barricade. You need to determine how your ISP issues your IP address. Many ISPs issue these numbers automatically using a networking technology known as Dynamic Host Control Protocol, or DHCP. Other ISPs will specify your IP address and associated numbers, which you must enter manually. This is also known as a static IP address. How your ISP assigns your IP address determines how you will configure your computer.
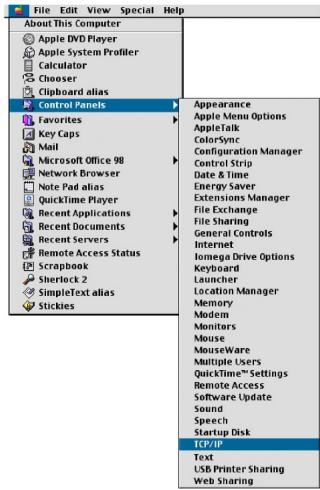
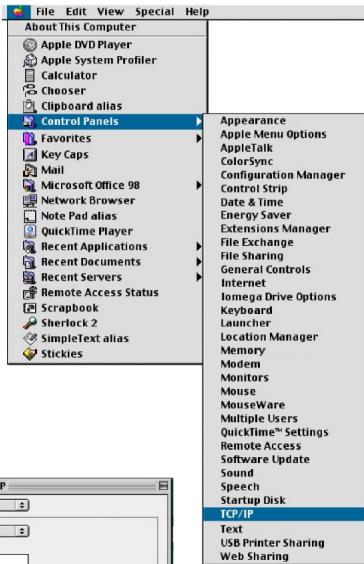
- Pull down the Apple Menu. Click "Control Panels" and select TCP/IP.
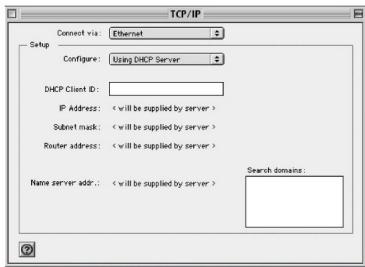
- In the TCP/IP dialog box, make sure that "Ethernet" is selected in the "Connect Via:" field. If "Using DHCP Server" is already selected in the "Configure" field, your computer is already configured for DHCP. Close the TCP/IP dialog box, and skip to Step 2 "Disable HTTP Proxy."
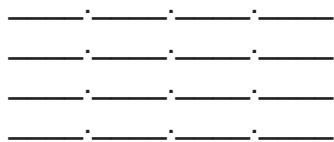
- All the information that you need to record is on the "TCP/IP" dialog box. Use the space below to record the information.
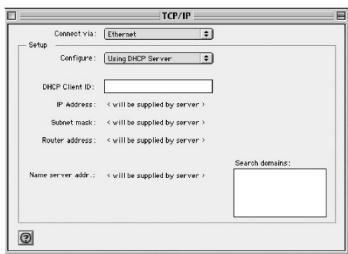
- After writing down your IP settings, select "Using DHCP Server" in the "Configure" field and close the window.
- Another box will appear asking whether you want to save your TCP/IP settings. Click Save.
TCP/IP Configuration Setting
IP Address
Subnet Mask
Router
Name Server
Step 2. Disable HTTP Proxy
You will need to verify that the "HTTP Proxy" feature of your Web browser is disabled. This is so that your Web browser will be able to view the configuration pages inside your Barricade.
The following steps are for Internet Explorer and for Netscape. Determine which browser you use and follow the appropriate steps.
Internet Explorer
- Open Internet Explorer and click the stop button. Click "Edit" and select "Preferences."
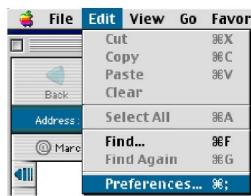
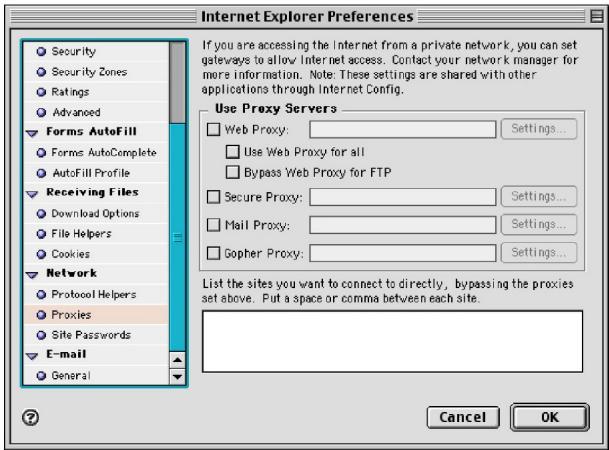
- In the Internet Explorer Preferences window, under Network, select Proxies.
- Uncheck all checkboxes and click OK.
Netscape
- Open Netscape and click the stop button. Click "Edit" and select "Preferences."
- In the "Preferences" dialog box, In the left-hand column labeled "Category," select "Advanced." Under the "Advanced" category, select "Proxies."
- Select "Direct Connection to the Internet" and click "OK"
Step 3. Obtain IP Settings From Your Barricade
Now that you have configured your computer to connect to your Barricade, it needs to obtain new network settings. By releasing any old IP settings and renewing them with settings from your Barricade, you will also verify that you have configured your computer correctly.
- Pull down the Apple Menu. Click "Control Panels" and select TCP/IP.
- In the TCP/IP window, your new settings will be shown. Verify that your IP address is now 192.168.2.xxx, your Subnet Mask is 255.255.255.0 and your Default Gateway is 192.168.2.1. These values confirm that your Barricade is functioning.
- Close the TCP/IP window.
Configuring Your Barricade
Now that you have successfully configured your computer and retrieved your new network settings from your Barricade, you are ready to configure the Barricade's settings for your LAN.
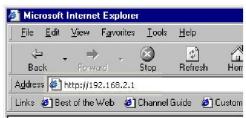
- Open your Web browser (i.e., Internet Explorer or Netscape Navigator) and click the stop button.
- In the “Address” field type “http://192.168.2.1” and press
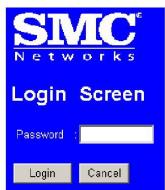
. - The Barricade login screen will appear. Leave the Password field empty and click on "login". There is no password by default. For security reasons, you should assign a password as soon as possible.
Note that the password login in case sensitive.
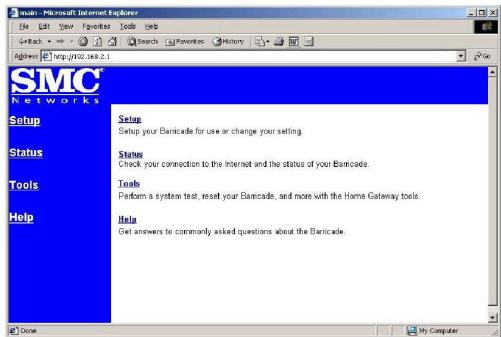
- On the main page of the Barricade Web console, click "Setup."
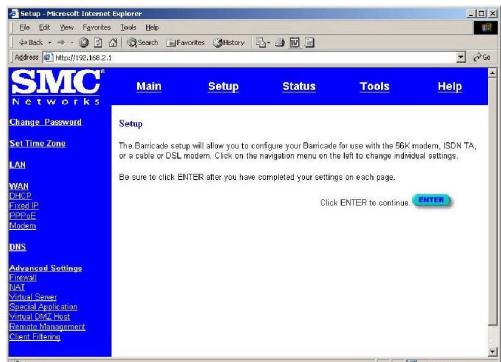
- The Barricade's automated setup process will take you through each step for setting up your Barricade. Click "Enter" to start the process.
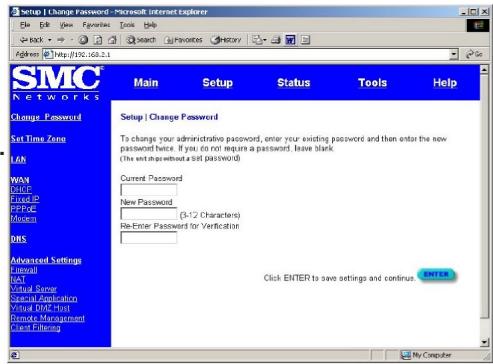
Using a password can protect your Barricade from unauthorized changes. Not using a password can easily leave your Barricade-and your network-open to security risks. We recommend using a password for the security of your network. If you use a password, write it down and keep it in a safe place, or make sure you can remember it.
- In the "Change Password" screen, enter your current password in the "Current Password" field. If you have not yet set a password, leave it blank. Choose a password for your Barricade and enter it in the next two fields, "New Password" and "Re-Enter Password for Verification."
- Click "ENTER" when finished.
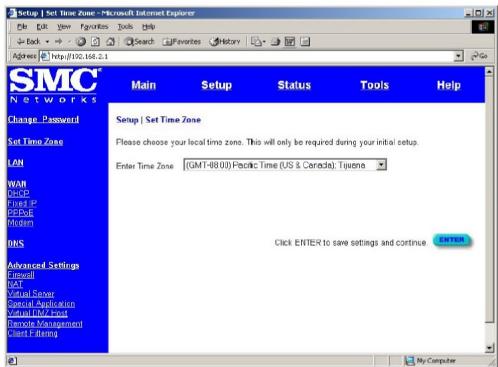
- Select your time zone from the list and click "ENTER." The LAN screen is where you configure the LAN (Local Area Network) settings of your Barricade. These settings will only be visible to your local network and not to the Internet.
- In most applications, you should not change the "IP address" from the default (192.168.2.1). However, if you are implementing your Barricade into an existing network, you may need to change it to match your current addressing scheme.
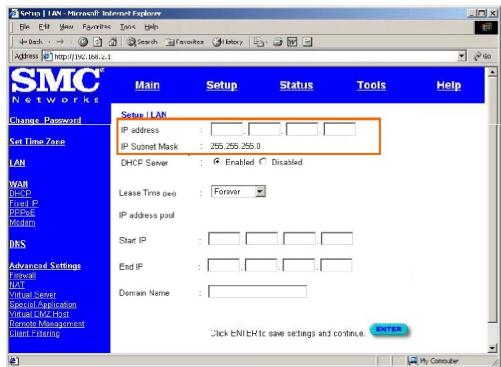
By using the Barricade's built-in DHCP (Dynamic Host Control Protocol) server you are allowing the Barricade to handle all the IP addressing on your Local Area Network (LAN). This can save you much of the time and hassle of administrating your network. If you have a server on your network that requires a static IP address, you may still use the DHCP server and manually assign a static IP address to your server. We recommend leaving the DHCP Server "Enabled."
- In most applications, you should leave the DHCP Server "Enabled." If you prefer to handle all the IP addressing on your network yourself, click disable.
- There is usually no need to change the IP address pool. If you change the pool range, make sure the first three octets match the Barricade's IP address, i.e., 192.168.2.xxx thru 192.168.2.yyy
A Domain Name Server (DNS) is like an index of names and Web addresses. If you type a Web address into your browser, such as www.smc-europe.com, a DNS server will find that name in its index and find the matching IP address: 198.137.240.92. Most ISPs provide a DNS server for speed and convenience. Since you are connecting to the Internet with dynamic IP settings, it is likely that your DNS servers are also provided dynamically.
- Click "ENTER" when finished.
At this point, the LAN side of your Barricade is now configured. But you must still configure it to connect to the Internet. There are three different general configurations for high-speed Internet connections. You need to know about your Internet connection to determine which configuration to use. You found out most of what you need to know when you recorded your IP settings in earlier steps. Here are some guidelines to determine which configuration you should use:
If you connect to the Internet using a Cable Modem, your ISP probably uses DHCP to issue an IP address to you. If you use a Cable Modem or you know you use a dynamic IP address, please go to "Configuring Your Barricade for a Dynamic IP Address".
If you connect to the Internet using a DSL Modem, your ISP probably requires you to manually enter your TCP/IP settings. If you have a DSL connection or if you know you use a static IP address, please go to "Configuring Your Barricade for a Static IP Address".
If you connect to the Internet using a DSL Modem and you use a login name and password, your ISP uses PPPoE. If your ISP requires a login name and a password or you know your ISP uses PPPoE, please go to "Configuring Your Barricade for PPPoE".
Configuring Your Barricade for a Dynamic IP Address
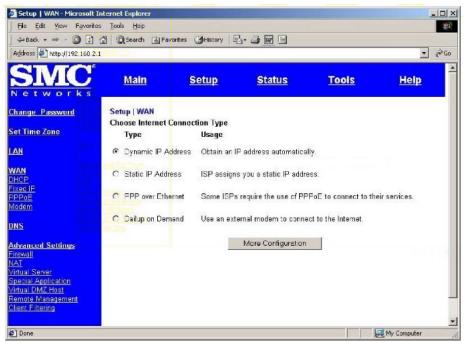
- Select "Dynamic IP address," and click "More Configuration." Both options on this page for further configuring your dynamic IP address are optional, depending upon how your ISP works. If your ISP does not require you to change either of these you may skip these settings.
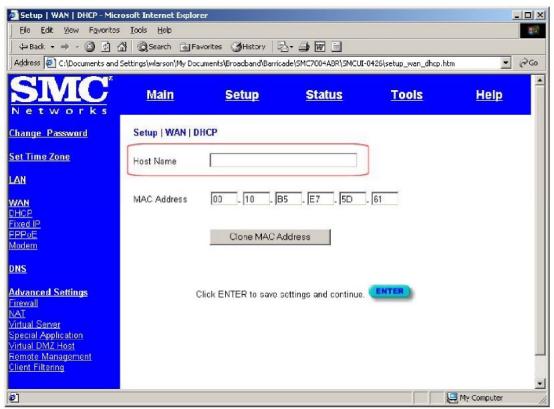
The @Home network usually requires your computer to have a "Host Name" to obtain an IP address from their network.
- If you have a host name provided by your ISP (i.e., CX-1234-56789) enter it in the "Host Name" field.
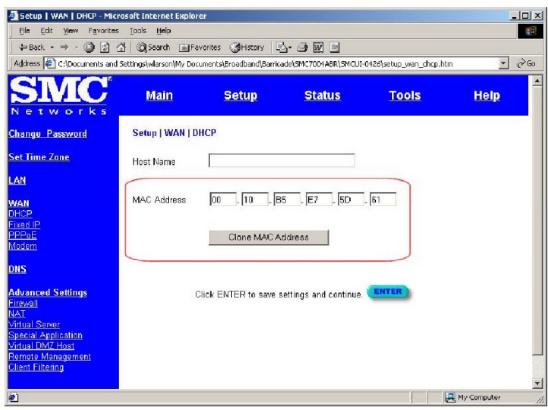
Some ISPs register the MAC Address of your network card. A MAC (Media Access Control) Address is a unique identification number (in hexadecimal digits) given to each networking device. Once registered, the ISP's server will check to make sure that the MAC address they have registered matches the one connecting to their servers. If it does not match, you cannot connect. The Barricade's MAC Address will not be the same as your network card's address so you may need the Barricade to "Clone" the address from your network card. Then the ISP will find a MAC Address that matches the one they have recorded.
- If you need to "Clone" the MAC Address from your network card, click "Clone MAC Address." The MAC Address field will display the new address.
- Click "ENTER" when finished.
A Domain Name Server (DNS) is like an index of names and Web addresses. If you type a Web address into your browser, such as www.smc-europe.com, a DNS server will find that name in its index and find the matching IP address: 198.137.240.92. Most ISPs provide a DNS server for speed and convenience. Since you are connecting to the Internet with dynamic IP settings, it is likely that your DNS servers are also provided dynamically.
- If you are connecting to the Internet with a dynamic IP address, you probably do not need to enter anything here. However, if there is a DNS server that you would rather use, enter the DNS server addresses in the spaces provided.
- Click "ENTER" when finished.
Many ISPs use modems that automatically configure themselves. Sometimes connection information is stored on the modem and needs to be updated. You may need to shut down and restart your modem after you have configured your Barricade. - Restart your cable modem by removing the power, waiting a few seconds, and then reconnecting it.
Congratulations!
Configuration is complete and your Barricade is now connected to the Internet. There are also some advanced configuration options that may be configured, but we do not recommend making any changes to these options unless you need to. You can consult the User Guide for information on these advanced settings.
Configuring Your Barricade .for a Static IP Address
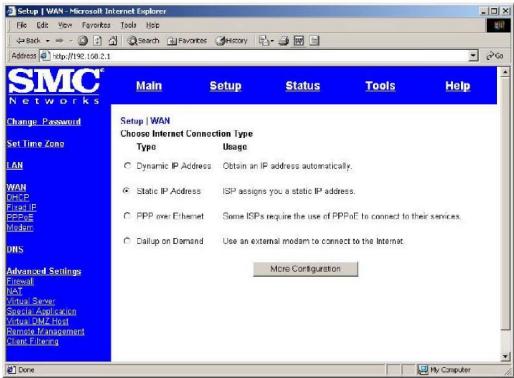
- Select "Static IP address," and click "More Configuration."
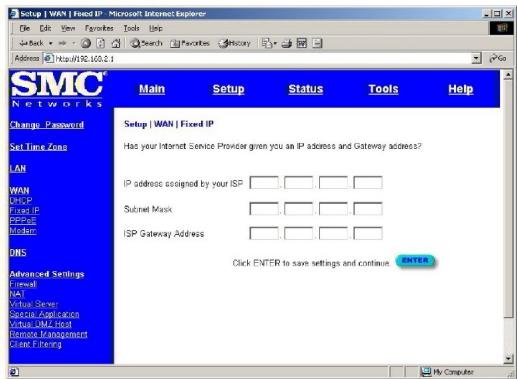
- Enter the IP address, subnet mask, and gateway provided to you by your ISP in the appropriate fields. You recorded these numbers earlier when you configured your computer to connect to the Barricade.
- Click "ENTER" when finished.
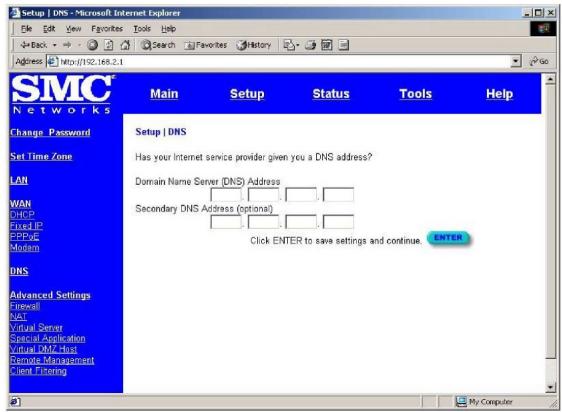
A Domain Name Server (DNS) is like an index of names and Web addresses. If you type a Web address into your browser, such as www.smc-europe.com, a DNS server will find that name in its index and find the matching IP address: 198.137.240.92. Most ISPs provide a DNS server for speed and convenience. Since you are connecting to the Internet with static IP settings, it is likely that your ISP also provided DNS server addresses.
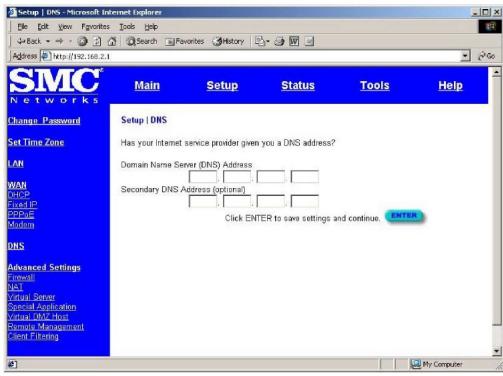
- Enter the DNS server address (es) in the spaces provided.
- Click "ENTER" when finished.
Many ISPs use modems that provide auto-configuration. Sometimes connection information is stored on the modem and needs to be updated. You may need to shut down and restart your modem after you have configured your Barricade.
6. Restart your DSL modem by removing the power, waiting a few seconds, and then reconnecting it.
Congratulations! Configuration is complete and your Barricade is now connected to the Internet.
There are also some advanced configuration options that may be configured, but we do not recommend making any changes to these options unless you need to.
Configuring Your Barricade for PPPoE
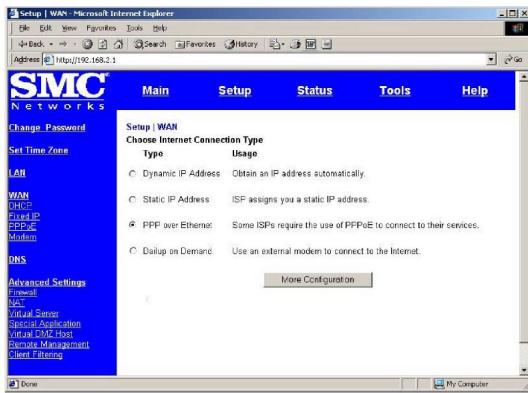
- Select "PPP over Ethernet," and click "More Configuration."
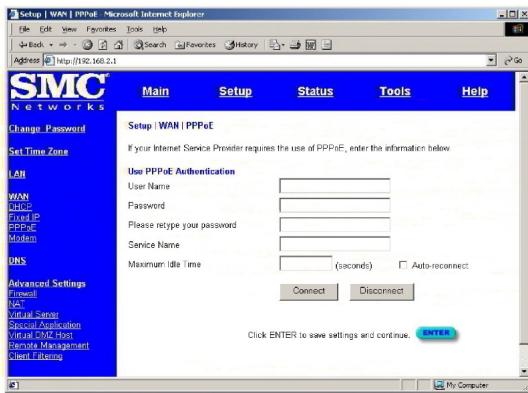
- Enter the User Name and Password required by your ISP in the appropriate fields. Enter the password again for verification in the "Please retype password" field.
- If your ISP has provided you with a "Service Name" enter it in the "Service Name" field, otherwise, leave it blank.
- Click "ENTER" when finished.
A Domain Name Server (DNS) is like an index of names and Web addresses. If you type a Web address into your browser, such as www.smc-europe.com, a DNS server will find that name in its index and find the matching IP address: 198.137.240.92. Most ISPs provide a DNS server for speed and convenience. Since you are connecting to the Internet with dynamic IP settings, it is likely that your DNS servers are also provided dynamically.
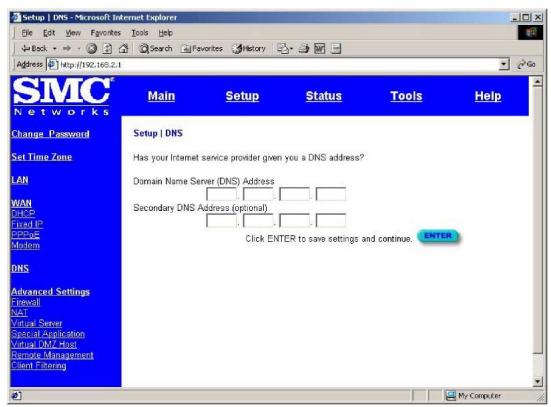
- If you are connecting to the Internet through PPPoE, you probably do not need to enter anything here. However, if there is another DNS server that you would rather use, enter the DNS server addresses in the spaces provided.
- Click "ENTER" when finished.
Many ISPs use modems that provide auto-configuration. Sometimes connection information is stored on the modem and needs to be updated. You may need to shut down and restart your modem after you have configured your Barricade.
- Restart your DSL modem by removing the power, waiting a few seconds, and then reconnecting it.
Congratulations! Configuration is complete and your Barricade is now connected to the Internet.
There are also some advanced configuration options that may be configured, but we do not recommend making any changes to these options unless you need to.
Configuring Your Barricade for Dialup on Demand
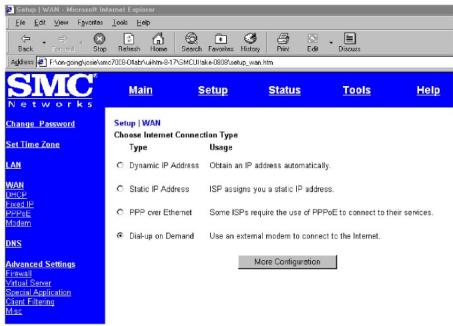
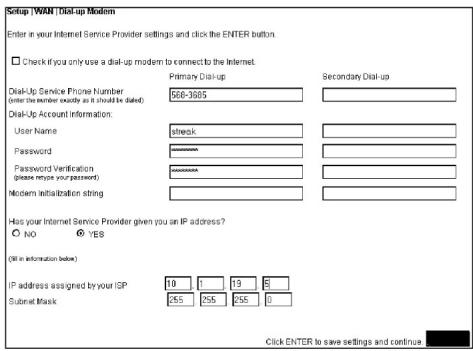
- Select "Dialup on Demand," and click "More Configuration."
- If the serial port is used for primary Internet access, then mark the item "Check if you only use a dial-up modem to connect to the Internet." If not marked, then this connection will only be used for backup access if the primary WAN link fails.
- Enter your ISP account user name and password in the "Dial-Up Account Information."
- Enter the "Modem Initialization String" provided by your modem manufacturer. The following is a sample initialization string:
"ATQ1SO=1&D0&K0&W" as defined below:
Q1: Inhibit result codes to DTE
S0=1 : Auto answer on first ring
D0: Don't care DTR
K0: Disables DTE/DCE flow control
W: Write command to modem memory
- In the "Maximum Idle time" field, enter the maximum idle time for the Barricade (in second).
- If you are assigned a dynamic IP address every time you dial up, mark "No" for "Has your Internet Service Provider given you an IP address?" However, if your ISP has assigned a fixed IP address for you to use, mark "Yes" for this item and enter the IP address and subnet mask.
- If your ISP has given you a secondary phone number, or if you have a secondary Internet service account, then fill in the relevant fields under
Configuring Your Computer for the Barricade Print Server
If you are not connecting your printer to your Barricade, skip this section.
With the Barricade's built-in print server, you can connect your printer to the Barricade and print from any computer on your network. Each computer needs to have a "client" installed that will communicate with the Barricade's print server. Windows 2000 and UNIX and Linux operating systems have a print client already installed. If you are running Windows 95, 98, ME, 2000 or NT, you must use the SMC Barricade Print Server Monitor as your print client.
Configuring Your Computer for the Barricade Print Server for Windows 95/98/NT/ME/2000
Step 1: Installing SMC Barricade Print Server Monitor
You must first install the software that will allow your programs to print to the printer attached to the Barricade.
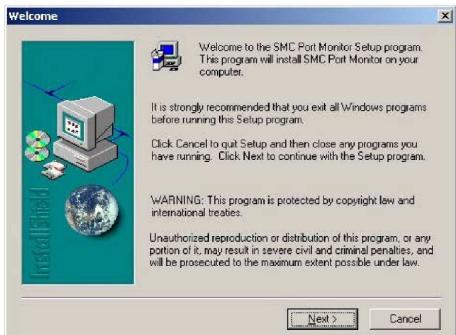
- Insert the Installation CD into your CD-ROM drive.
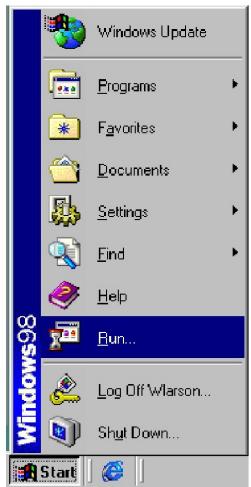
- Click "Start" and "Run..."
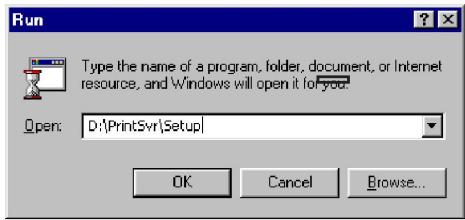
- Type "D:\PrintSvr\Setup" and click "OK."
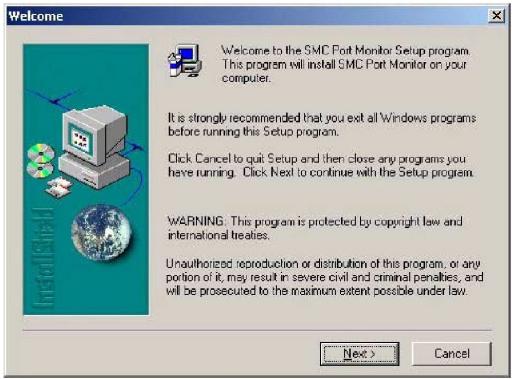
- InstallShield will guide you through the installation process. Click "Next >" for each window and "Finish" when complete.
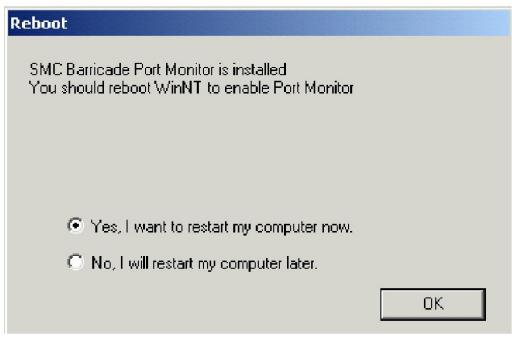
- Windows must reboot for the changes to take place. When asked if you want to reboot now, select yes and click "OK."
- Insert the Installation CD into your CD-ROM drive.
-
Click "Start" and "Run..."
-
Type "D:\PrintSvr\Setup" and click "OK."
-
InstallShield will guide you through the installation process. Click “Next >” for each window and “Finish” when complete.
- Windows must reboot for the changes to take place. When asked if you want to reboot now, select yes and click "OK."
Step 2: Configuring SMC Barricade Print Server Monitor
Now that the software is installed, it must be configured to work properly.
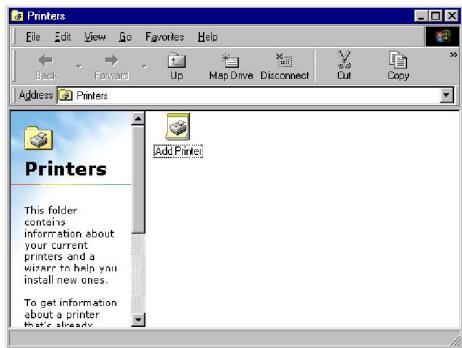
- Click "Start," click "Settings," and then select "Printers."

- Double-click "Add Printer."
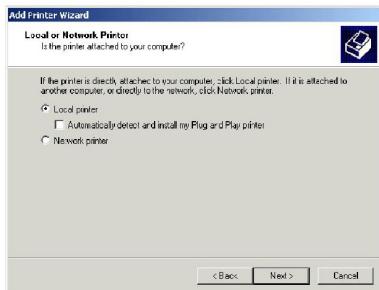
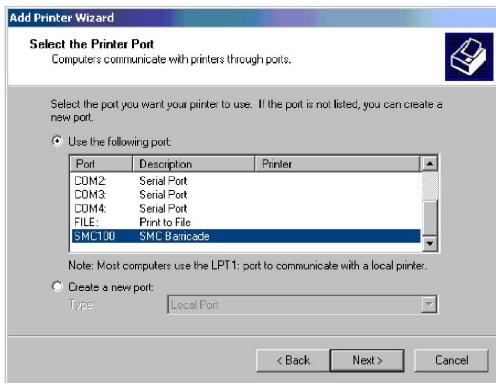
- Follow the screen prompts to add your printer as a "Local printer" for Windows 95/98/ME/2000 or as a printer managed by "My Computer" for Windows NT.
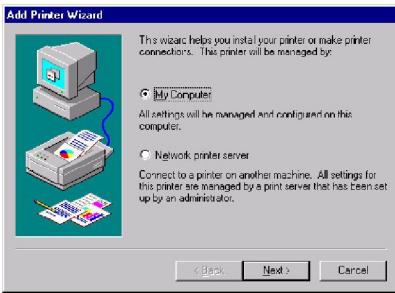
- From the list of manufacturers and printers in the next window, select the printer you have attached to the Barricade.
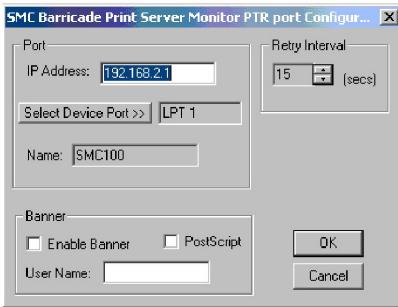
- Select the SMC Barricade Print Server Monitor (the default port name is "SMC 100") and click "Configure Port" 6. Enter the Barricade's IP address in the "IP address" field (default is 192.168.2.1) and click "OK."
- You will be asked if you want to print a test page. Click "Yes" to make sure that your printer is configured correctly.
- Your printer will now appear in the "Printers" window. Your computer is configured to print via the Barricade Print Server. Repeat these steps on each computer connected to the Barricade.

Configure the Network Printer in Unix Systems
Follow the traditional configuration procedure on Unix platforms to set up the Barricade print server. The printer name is "Ipt1."
PPtP Installation
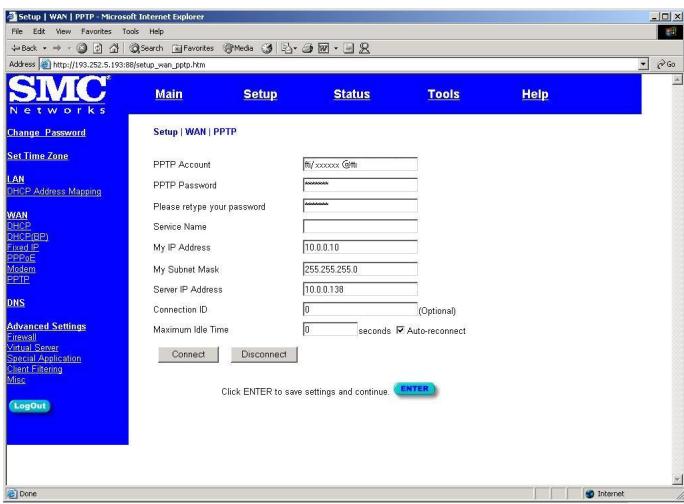
Enter PPtP user account and password given by your Internet service provider. Service name is generally not necessary ; but may be needed by some internet service providers.
"My IP Address" and "My subnet mask" fields are IP address and subnet mask given by your Internet service provider. "Server IP address" is the Ip address for your modem, given by your Internet Service Provider.
Copyright
Information furnished by SMC Networks, Inc. (SMC) is believed to be accurate and reliable. However, no responsibility is assumed by SMC for its use, nor for any infringements of patents or other rights of third parties which may result from its use. No license is granted by implication or otherwise under any patent or patent rights of SMC. SMC reserves the right to change specifications at any time without notice.
Copyright © 2001 by
SMC Networks, Inc.
6 Hughes
Irvine, CA 92618
All rights reserved. Printed in Taiwan
Trademarks:
SMC is a registered trademark; and Barricade is a trademark of SMC Networks, Inc. Other product and company names are trademarks or registered trademarks of their respective holders.
LIMITED WARRANTY
Limited Warranty Statement: SMC Networks, Inc. ("SMC") warrants its products to be free from defects in workmanship and materials, under normal use and service, for the applicable warranty term. All SMC products carry a standard 90-day limited warranty from the date of purchase from SMC or its Authorized Reseller. SMC may, at its own discretion, repair or replace any product not operating as warranted with a similar or functionally equivalent product, during the applicable warranty term. SMC will endeavor to repair or replace any product returned under warranty within 30 days of receipt of the product.
The standard limited warranty can be upgraded to a Limited Lifetime* warranty by registering new products within 30 days of purchase from SMC or its Authorized Reseller. Registration can be accomplished via the enclosed product registration card or online via the SMC web site. Failure to register will not affect the standard limited warranty. The Limited Lifetime warranty covers a product during the Life of that Product, which is defined as the period of time during which the product is an 'Active' SMC product. A product is considered to be 'Active' while it is listed on the current SMC price list. As new technologies emerge, older technologies become obsolete and SMC will, at its discretion, replace an older product in its product line with one that incorporates these newer technologies. At that point, the obsolete product is discontinued and is no longer an 'Active' SMC product. A list of discontinued products with their respective dates of discontinuance can be found at: http://www.smc.com/smc/pages_html/support.html
All products that are replaced become the property of SMC. Replacement products may be either new or reconditioned. Any replaced or repaired product carries either a 30-day limited warranty or the remainder of the initial warranty, whichever is longer. SMC is not responsible for any custom software or firmware, configuration information, or memory data of Customer contained in, stored on, or integrated with any products returned to SMC pursuant to any warranty. Products returned to SMC should have any customer-installed accessory or add-on components, such as expansion modules, removed prior to returning the product for replacement. SMC is not responsible for these items if they are returned with the product.
Customers must contact SMC for a Return Material Authorization number prior to returning any product to SMC. Proof of purchase may be required. Any product returned to SMC without a valid Return Material Authorization (RMA) number clearly marked on the outside of the package will be returned to customer at customer's expense. For warranty claims within North America, please call our toll-free customer support number at (800) 762-4968. Customers are responsible for all shipping charges from their facility to SMC. SMC is responsible for return shipping charges from SMC to customer.
IF AN SMC PRODUCT DOES NOT OPERATE AS
WARRANTED ABOVE, CUSTOMER'S SOLE REMEDY SHALL BE REPAIR OR REPLACEMENT OF THE PRODUCT IN QUESTION, AT SMC'S OPTION. THE FOREGOING WARRANTY AND REMEDIES ARE EXCLUSIVE AND ARE IN LIEU OF ALL OTHER WARRANTYES OR CONDITIONS, EXPRESS OR IMPLIED, EITHER IN FACT OR BY OPERATION OF LAW, STATUTORY OR OTHERWISE, INCLUDING WARRANTYES OR CONDITIONS OF MERCHANTABILITY AND FITNESS FOR A PARTICULAR PURPOSE. SMC NEITHER ASSUMES NOR AUTHORIZES ANY OTHER PERSON TO ASSUME FOR IT ANY OTHER LIABILITY IN CONNECTION WITH THE SALE, INSTALLATION, MAINTENANCE OR USE OF ITS PRODUCTS. SMC SHALL NOT BE LIABLE UNDER THIS WARRANTY IF ITS TESTING AND EXAMINATION DISCLOSE THE ALGEGED DEFECT IN THE PRODUCT DOES NOT EXIST OR WAS CAUSED BY CUSTOMER'S OR ANY THIRD PERSON'S MISUSE, NEGLECT, IMPROPER INSTALLATION OR TESTING, UNAUTHORIZED ATTEMPTS TO REPAIR, OR ANY OTHER CAUSE BEYOND THE RANGE OF THE INTENDED USE, OR BY ACCIDENT, FIRE, LIGHTNING, OR OTHER HAZARD. LIMITATION OF LIABILITY: IN NO EVENT, WHETHER BASED IN CONTRACT OR TORT (INCLUDING NEGLIGENCE), SHALL SMC BE LIABLE FOR INCIDENTAL, CONSEQUENTIAL, INDIRECT, SPECIAL, OR PUNITIVE DAMAGES OF ANY KIND, OR FOR LOSS OF REVENUE, LOSS OF BUSINESS, OR OTHER FINANCIAL LOSS ARISING OUT OF OR IN CONNECTION WITH THE SALE, INSTALLATION, MAINTENANCE, USE, PERFORMANCE, FAILURE, OR INTERRUPTION OF ITS PRODUCTS, EVEN IF SMC OR ITS AUTHORIZATION RESELLER HAS BEEN ADVISED OF THE POSSIBILITY OF SUCH DAMAGES. SOME STATES DO NOT ALLOW THE EXCLUSION OF IMPLIED WARRANTYES OR THE LIMITATION OF INCIDENTAL OR CONSEQUENTIAL DAMAGES FOR CONSUMER PRODUCTS, SO THE ABOVE LIMITATIONS AND EXCLUSIONS MAY NOT APPLY TO YOU. THIS WARRANTY GIVES YOU SPECIFIC LEGAL RIGHTS, WHICH MAY VARY FROM STATE TO STATE. NOTHING IN THIS WARRANTY SHALL BE TAKEN TO AFFECT YOUR STATUTORY RIGHTS.
- SMC will provide warranty service for one year following discontinuance from the active SMC price list. Under the limited lifetime warranty, internal and external power supplies, fans, and cables are covered by a standard one-year warranty from date of purchase.
FCC - Class B
This equipment has been tested and found to comply with the limits for a Class B digital device, pursuant to Part 15 of the FCC Rules. These limits are designed to provide reasonable protection against harmful interference in a residential installation.
This equipment generates, uses and can radiate radio frequency energy and, if not installed and used in accordance with instructions, may cause harmful interference to radio communications. However, there is no guarantee that the interference will not occur in a particular installation. If this equipment does cause harmful interference to radio or television reception, which can be determined by turning the equipment off and on, the user is encouraged to try to correct the interference by one or more of the following measures:
Reorient the receiving antenna
- Increase the separation between the equipment and receiver
- Connect the equipment into an outlet on a circuit different from that to which the receiver is connected
- Consult the dealer or an experienced radio/TV technician for help
EC Conformance Declaration - Class B
SMC contact for these products in Europe is:
SMC Networks Europe,
Edificio Conata II,
Calle Fructuós Gelabert 6-8, 2 o , 4 a ,
08970 - Sant Joan Despi,
Barcelona, Spain.
This information technology equipment complies with the requirements of the Low Voltage Directive 73/23/EEC and the EMC Directive 89/336/EEC, and carries the CE Mark accordingly. It conforms to the following specifications:
EMC: EN55022 (1988)/CISPR-22 (1995)
IEC 1000-4-2
IEC 1000-4-3 (1995)
IEC 1000-4-4 (1995)
IEC 1000-4-6 (1995)
Class B
4 kV CD, 8 kV AD
3 V/m
1.0 kV - (power line)
0.5 kV - (signal line)
3 Vrms
Safety Compliance
Underwriters Laboratories Compliance Statement
Important! Before making connections, make sure you have the correct cord set. Check it (read the label on the cable) against the following:
Operating Voltage 120 Volts
Cord Set Specifications
UL Listed/CSA Certified Cord Set
Minimum 18 AWG
Type SVT or SJT three conductor cord
Maximum length of 5M
Parallel blade, grounding type attachment
plug rated 15A, 125V
240 Volts
(Europe only) Cord Set with H05VV-F cord having three conductors with minimum diameter of 0.75 mm 2 IEC-320 receptacle Male plug rated 10A, 250V
The unit automatically matches the connected input voltage. Therefore, no additional adjustments are necessary when connecting it to any input voltage within the range marked on the rear panel.
| WAN Interface | 10/100BASE-T, 1 RJ-45 port Serial, 1 RS232 DB-9 connector |
| LAN Interface | 10BASE-T/100BASE-TX 4 RJ-45 ports |
| Printer Interface | Parallel 1 DB-25 printer port |
| Management | Web management |
| Advanced Features | Dynamic IP Address Configuration – DHCP, DNS Firewall – Client privileges, hacker prevention and logging, NAT Virtual Private Network – PPTP, L2TP, IPSec Backup Internet Connection – Dial-on-demand via secondary WAN port Print server |
| Internet Standards | ARP (RFC 826), IP (RFC 791), ICMP (RFC 792), UDP (RFC 768),TCP (RFC 793), Telnet (RFC 854-859), MD5 (RFC 1321), BOOTP Extension (RFC 1497), PPP LCP Extension (RFC 1570), PPPoE (RFC 2516), NAT (RFC 1631), PPP (RFC 1661), HTML (RFC 1866), HTTP (RFC 1945), CHAP (RFC 1944), DHCP (RFC 2131), PPTP (RFC 2637) |
| Indicator Panel | LAN (Link, Activity), WAN (Link, Activity), Power |
| Dimensions | 19.2 x 11.3 x 3.05 cm |
| Weight | 1.023 kg |
| Input Power | 12V DC (2.4A) |
| Maximum Current | 0.40A RMS max.@110V, 0.4A RMS max.@240V |
| Power Consumption | 6.5 Watts max. @ 100-240 VAC |
| Heat Dissipation | 144 BTU/hr max. @ 100-240 VAC |
| Temperature | Operating 32 to 104°F (0 to 40°C) Storage -40 to 158°F (-40 to 70°C) |
| Humidity | 5% to 95% (noncondensing) |
| Compliances | CE Mark |
| Emissions | |
| FCC Class B | |
| VCCI Class B | |
| Industry Canada Class B | |
| EN55022 (CISPR 22) Class B | |
| C-Tick - AS/NZS 3548 (1995) Class B | |
| Immunity | |
| IEC 1000-4-2/3/4/6 | |
| Safety | |
| UL 1950 | |
| EN60950 (TÜV) | |
| CSA 22.2 No. 950 | |
| Warranty | Limited Lifetime |