
XHD6420 - Graphic card DUAL - Free user manual and instructions
Find the device manual for free XHD6420 DUAL in PDF.
| Product Type | AM/FM car stereo with HD Radio™ tuner and CD/MP3/WMA player |
| Brand | DUAL |
| Model | XHD6420 |
| Dimensions | 178 × 178 × 51 mm (7 × 7 × 2 inches) |
| Power Supply | 11-16 VDC, negative ground |
| Output Power | 17 Watts RMS × 4 channels (4 ohms, ≤ 1% THD+N) |
| Speaker Impedance | 4 to 8 ohms |
| Line Output Voltage | 2 Volts |
| Fuse | 10 A ATM (blade type) |
| FM Frequency Range | 87.5 MHz - 108.1 MHz |
| AM Frequency Range | 530 kHz - 1710 kHz |
| Supported Audio Formats | CD-DA, CD-R, CD-RW, MP3, WMA |
| Signal-to-Noise Ratio | 80 dBA (ref. 1 W/4 ohms) |
| FM Stereo Separation | 40 dB (1 kHz) |
| HD Radio Stereo Separation | 85 dB (1 kHz) |
| CD Frequency Response | 10 Hz - 20 kHz |
| FM Frequency Response | 30 Hz - 13 kHz |
| HD Radio Frequency Response | 30 Hz - 20 kHz |
| AM Frequency Response | 240 Hz - 3 kHz |
| AM HD Radio Frequency Response | 30 Hz - 4.4 kHz |
| Auxiliary Input | 3.5 mm front panel jack (enable/disable) |
| Display | Clock, frequency, track information, ID3 tag (version 1.x) |
| Built-in Equalizer | Presets POP, JAZZ, CLASSIC, BEAT, ROCK, and OFF; bass/treble adjustment |
| Additional Features | Detachable face, IR remote control, steering wheel control compatible (via adapter) |
| Maintenance | Clean with a soft, dry cloth; use CD lens cleaning spray if necessary |
Frequently Asked Questions - XHD6420 DUAL
User questions about XHD6420 DUAL
0 question about this device. Answer the ones you know or ask your own.
Ask a new question about this device
Download the instructions for your Graphic card in PDF format for free! Find your manual XHD6420 - DUAL and take your electronic device back in hand. On this page are published all the documents necessary for the use of your device. XHD6420 by DUAL.
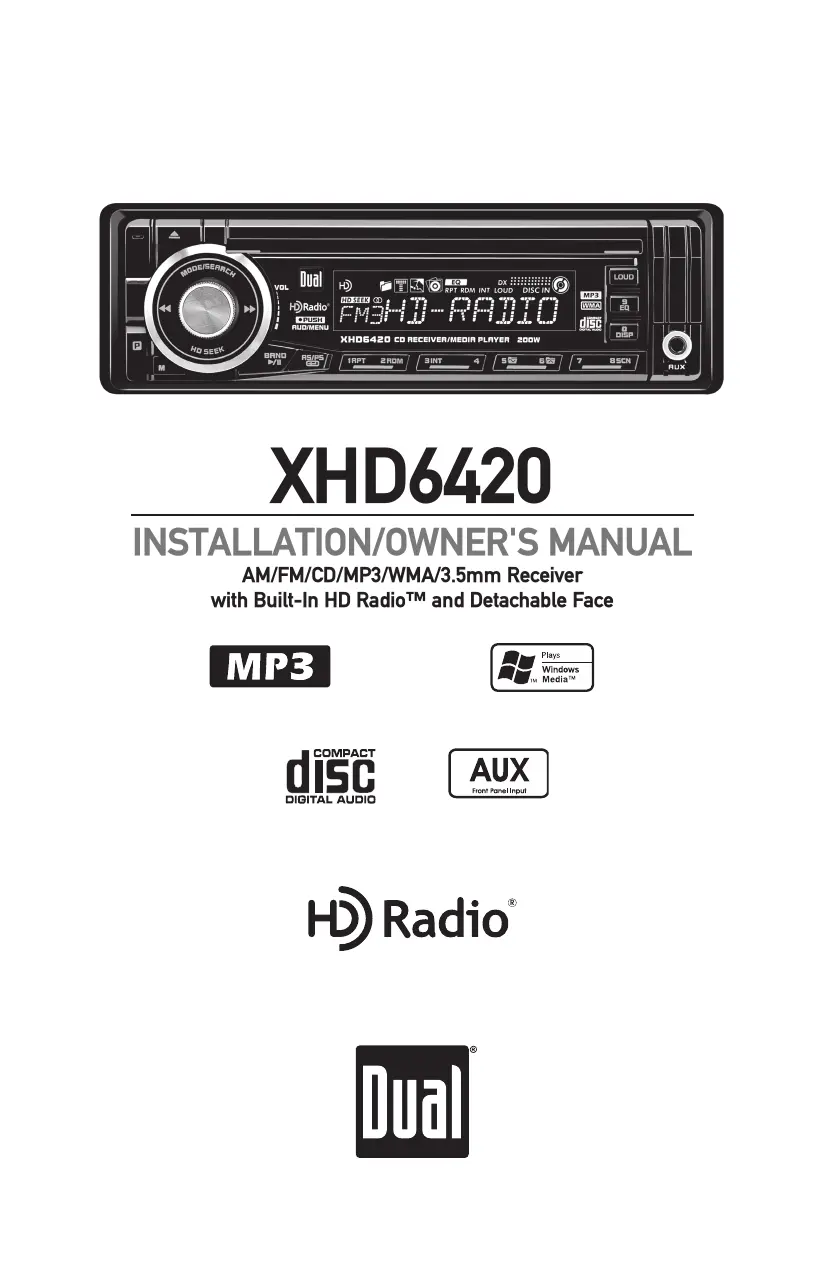
USER MANUAL XHD6420 DUAL
INSTALLATION/OWNER'S MANUAL
AM/FM/CD/MP3/WMA/3.5mm Receiver with Built-In HD Radio™ and Detachable Face
MP3


Preparation
Please read entire manual before installation.
Before You Start
- Disconnect negative battery terminal. Consult a qualified technician for instructions.
- Avoid installing the unit where it would be subject to high temperatures, such as from direct sunlight, or where it would be subject to dust, dirt or excessive vibration.
Getting Started
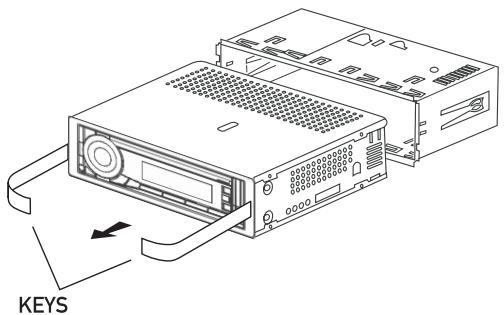
- Remove trim ring from unit.
- Remove 2 transit screws located on top of the unit.
- Insert the supplied keys into the slots as shown, and slide the unit out of the mounting sleeve.
Install mounting sleeve into opening, bending tabs to secure. - Connect wiring harness and antenna. Consult a qualified technician if you are unsure.
- Certain vehicles may require an installation kit and/or wiring harness adapter (sold separately).
- Test for correct operation and slide into mounting sleeve to secure.
- Snap trim ring into place.
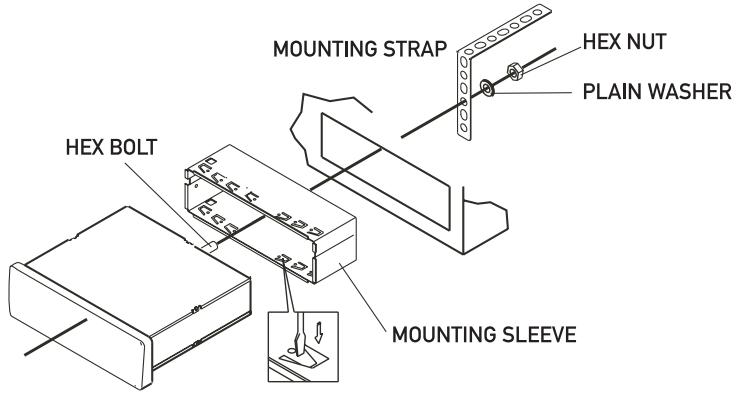
TYPICAL FRONT-LOAD DIN MOUNTING METHOD
Wiring Diagram
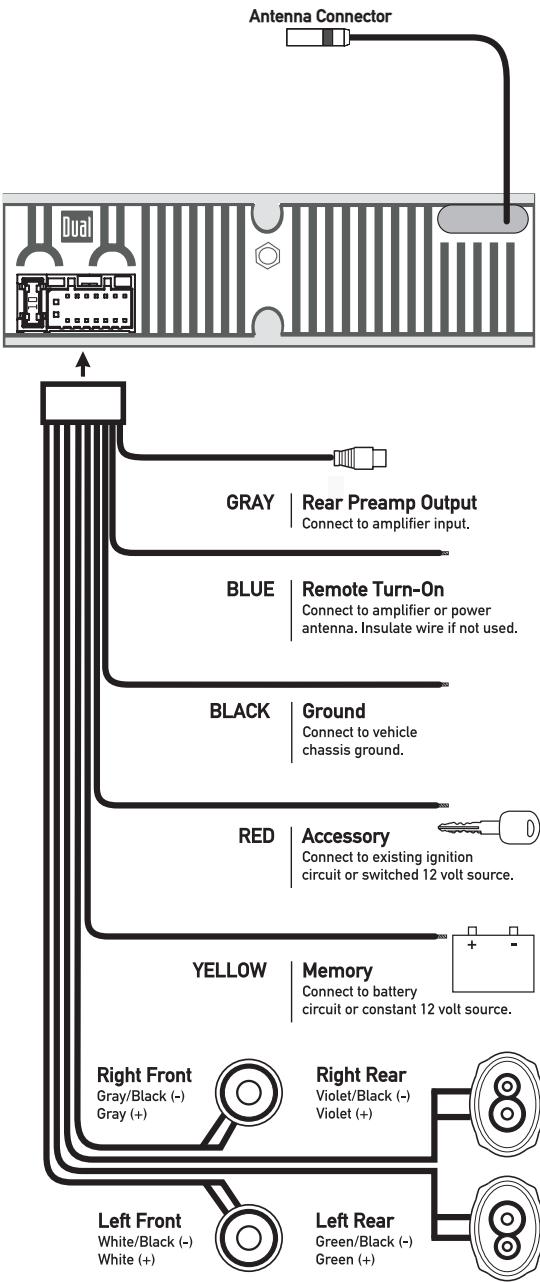
FUSE
When replacing the fuse, make sure new fuse is the correct type and amperage. Using an incorrect fuse could damage the radio. The XHD6420 uses one 10 amp ATM fuse located beside the wiring connector.
Control Locations - Receiver
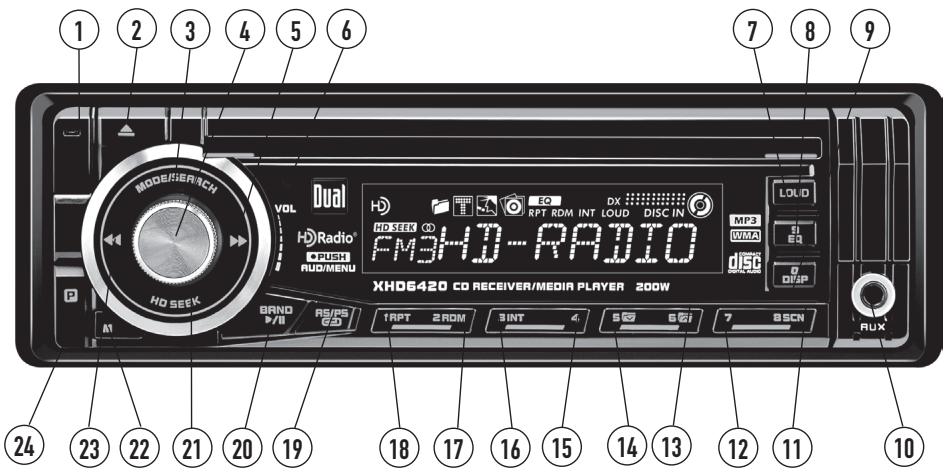
(1) Release
Eject
3 Mode/Search
Volume/Audio/Setup
⑤ Tune/Track Up
IR Remote Sensor
⑦ Loudness
⑧ EQ/Key 9
⑨ Display/Key 0
10 Auxiliary Input
(11) Tuner Scan/Key 8
⑫ Key 7
13 Preset 6/Folder Up
14 Preset 5/Folder Down
15 Preset 4
16 Preset 3/Intro
17 Preset 2/Random
(18) Preset 1/Repeat
19 Auto Store/Preset Scan/Enter
20 Band/Play/Pause
(21) HD Seek
(22) Mute
(23) Tune/Track Down
24 Power
The XHD6420 allows playback of your favorite MP3 and WMA files recorded on CD-R and CD-RW discs. Its powerful on-board DSP processor decodes the compressed audio while maintaining near-CD sound quality. An internal SRAM buffer provides ESP (Electronic Skip Protection) to virtually eliminate skipping and allows alphanumeric or direct track search - even while a song is currently playing!
Function keys 7, 8, 9 and 0 apply to MP3/WMA operation only.
General Operation
Faceplate Removal
Press RELEASE and pull away from the left side to remove. To re-install, insert right side of faceplate first then push left side to secure.
Semi-Permanent Faceplate Installation
Remove trim ring and install supplied #1 x 7/32" Phillips head screw through left side of mounting frame into faceplate.
Power On/Off
Press POWER or any other button (except eject) to turn the unit on. Inserting a disc will turn the unit on automatically. Press POWER to turn the unit off.
Mode
Press MODE to select between AM/FM. CD player and auxiliary input. Modes of operation are indicated in the display.
NOTE: CD mode will not appear unless a CD is inserted.
Auxiliary Input
Insert 3.5mm plug to connect your portable audio device.
Volume
Adjust volume using rotary encoder (00-46).
Programmable Turn-On Volume
Press and hold POWER for 3 seconds to program currently selected volume level. "P-VOL" and the current volume level will momentarily appear in the display.
Mute
Press MUTE to silence the audio. "MUTE" will flash in the display. Press MUTE again to cancel.
Preset EQ Curves
Press EQ to select between POP, JAZZ, CLASSIC, BEAT, ROCK and OFF (default) equalization curves. Any adjustment to the Bass or Treble settings automatically cancels the current EQ curve (if one is selected).
Reset
Press to RESET the unit upon initial installation or if abnormal operation occurs. The reset button is located behind the faceplate.
Display
Press DISP to select between clock and different types of information, such as radio frequency, HD Radio song information, CD track/elapsed time or MP3/WMA song information.
General Operation
Set the Clock
With the unit on, press and hold DISP until the clock begins to flash, then release. Press TUNE to adjust the hours and TUNE to adjust the minutes. Press DISP momentarily to save the selected time.
Setup Menu
Press and hold the rotary encoder for more than 3 seconds to access the setup menu. Press the rotary encoder momentarily to select between the menu functions and rotate the rotary encoder left/right to adjust or activate the desired function.
Setup Menu
| Menu Function | Options | Action |
| Clock Display | CLK OFF | Programs the unit to not display the clock when the power is off. |
| CLK ON | Programs the unit to display the clock when the power is off. | |
| Auxiliary Input | AUX ON | Enables the front panel 3.5mm auxiliary input. |
| AUX OFF | Disables the auxiliary input. | |
| Beep Confirmation | BEEP OFF | Disables the confirmation beep. |
| BEEP ON | Enables the confirmation beep. | |
| Local/Distance Tuning | LOC OFF | Activates distance tuning. |
| LOC ON | Activates local tuning for strong station reception only. | |
| Power on Message | MSG OFF | Disables power on message. |
| MSG ON | Enables power on message to be displayed. | |
| Demonstration Mode | DEMO OFF | Disables the demonstration mode. |
| DEMO ON | Enables the "BUILT IN HD RADIO" message. | |
| Display Scrolling | SCRL ON | Programs the unit to scroll display information continuously. |
| SCRL OFF | Disables the display scroll feature. |
General Operation
| Audio | Press rotary encoder momentarily to select between Volume (default), Bass, Treble, Balance, & Fader. |
| →VOLUME → BASS → TREBLE → BALANCE → FADER | |
| Bass | Press rotary encoder until BAS appears then rotate encoder left/right to adjust (-6 minimum / +6 maximum). |
| Treble | Press rotary encoder until TRE appears then rotate encoder left/right to adjust (-6 minimum / +6 maximum). |
| Balance | Press rotary encoder until BAL appears then rotate encoder left/right to adjust (BAL L 12-BAL 00-BAL R 12). BAL 00 represents equal balance |
| Fader | Press rotary encoder until FAD appears then rotate encoder left/right to adjust (FAD F 12-FAD 00-FAD R 12). FAD 00 represents equal fader |
| Source Audio Memory | Individual Bass and Treble settings are retained in memory for AM, FM, CD and AUX modes. This allows you to save the Bass and Treble settings separately for each mode. |
| Note: Any adjustment to the Bass or Treble settings automatically cancels the current EQ curve (if one is selected). |
HD Radio™ AM/FM Tuner Operation
| Analog and Digital Tuning | The following tuning functions will access both analog and digital stations. Refer to the HD SEEK mode section on page 10 for instructions on tuning to only digital stations. |
| Seek Tuning | Press TUNE←or TUNE▶momentarily to seek the next strong station. |
| When an HD Radio station is selected, an HD Radio logo will begin to flash on the display. In about five seconds, HD or HD1 will illuminate after the radio frequency. ·If "HD" appears, the radio station is broadcasting a higher quality sound. No additional stations are available. ·If "HD1" appears, additional multicast channels (HD2 and/or HD3) are available. Press TUNE←or TUNE▶to tune to other available multicast channels. | |
| Manual Tuning | Press TUNE←or TUNE▶for more than two seconds, then release. "MANUAL" will momentarily appear in the display. Press TUNE←or TUNE▶momentarily to move radio frequency up or down one step at a time. Press and hold to advance quickly. If tuning is not adjusted for five seconds, the unit will return to seek tuning mode (default). "AUTO" will momentarily appear in the display. |
| Scan Tuning | Press SCN to preview strong stations on the current band, pausing for five seconds at each. Press SCN again to cancel. |
| Storing and Recalling Station Presets | Up to 18 FM stations and 12 AM stations can be stored, including HD Radio stations. To store a station, first select the desired band and station. Press and hold the desired preset button (1-6) for more than two seconds. When stored, the preset number appears in the display. The station can be recalled by pressing the corresponding preset button. |
| Note: Function keys 7, 8, 9 and 0 apply to MP3/WMA operation only. |
HD Radio™ AM/FM Tuner Operation
Automatically Store Stations
Press AS/PS for more than two seconds to automatically store the six strongest stations in the current band. Automatic local tuning is activated during initial band scan.
Preset Scan
Press AS/PS momentarily to scan preset 1-6 on the current band, pausing for five seconds at each. Press AS/PS again to cancel.
Band
Press BAND to select FM1, FM2, FM3, AM1 or AM2.
Display
When the unit is tuned to an analog station, press DISP to toggle the display between the following options:

When the unit is tuned to an HD Radio station, press DISP to toggle the display between the following options:

When information is unavailable, "NO DATA" appears in the display.
HD Seek Mode
Press HD SEEK to activate digital-only tuning mode. The HD SEEK icon will appear on the display, indicating that the unit will skip over analog stations and tune to HD Radio stations only. Follow the instructions on page 9 to access seek, manual and scan tuning.
- Storing and Recalling Station Presets
- HD Radio multicast stations (HD2 and HD3) can also be stored as presets. When a preset multicast station is recalled, "LINKING" appears in the display until the download process is complete (approximately 5 seconds).
- Note: If the HD radio signal on the preset is unavailable, the unit reverts to the previous analog or digital station.
- Automatically Store Stations While in HD SEEK mode, press AS/PS to automatically store HD Radio stations to preset 1-6. Multicast channels (HD2 and/or) HD3 are not stored but can be accessed by pressing TUNE from the HD1 station.
CD Player Operation
| Insert CD | With the label facing up, insert a standard size CD into the CD slot. The CD will automatically begin playback. |
| Eject CD | Press EJECT to eject the CD. The unit will change to previous mode of operation (tuner or AUX). If the disc is not removed within 10 seconds, the unit will reload the disc. The unit does not have to be turned on to eject CD. |
| Track Select | Press TRACK▶→ to skip to the beginning of the next track. Press TRACK←→ to return to the beginning of the current track. Pressing TRACK←→ again skips to the beginning of the previous track. |
| Fast Forward and Reverse | Press and hold TRACK▶→ or TRACK←→ to fast forward or reverse a track. |
| Pause | Press▶/■ to temporarily stop CD playback. Press▶/■ again to resume playback. |
| Scan | Press INT to play the first 10 seconds of each track. Press INT again to cancel. |
| Repeat | Press RPT to continuously repeat selected track. Press RPT again to cancel. |
| Random | Press RDM to play all tracks in random order. Press RDM again to cancel. Random mode is retained in memory when selecting between AM, FM, CD and AUX modes and when the unit is turned on/off. |
| CD-R/CD-RW Compatibility | Some CD-Rs and CD-RWs may be incompatible with this unit, depending on media type and recording method. In addition, the following CDs may be incompatible with this unit: CDs exposed to extreme temperatures or direct sunlight for extended periods of time. CDs recorded in which a recording session failed or a re-recording was attempted and, or encrypted or copy-protected CDs which do not conform to the audio CD-DA red book recording standard. |
CD Player Operation - MP3/WMA Files
| Playing an MP3/WMA Disc | When an MP3/WMA encoded disc is first inserted, "READING" will appear in the display. Depending on the number of files and folders, this may take several seconds. |
| Displaying Information | Press DISP to select between track number/ elapsed time (default), clock, track name, directory name, title, artist and album. "NO ID3 TAG" will be displayed if the MP3 file contains no ID3 tag information. "UNKNOWN" will be displayed if the WMA file contains no WMA tag information. "ROOT" will be displayed if the directory name of a root folder is not labeled. |
| Title Icon | This icon will illuminate when the song title is displayed. |
| Artist Icon | This icon will illuminate when the artist name is displayed. |
| Album Icon | This icon will illuminate when the album name is displayed. |
| Folder Icon | This icon will illuminate when the folder name is displayed. |
| Character Support | Maximum character display information • Track name – 32 character maximum • Directory name – 23 character maximum • *Song title – 30 character maximum • *Artist name – 30 character maximum • *Album name – 30 character maximum *Song title, Artist Name and Album name will only be displayed if included with the MP3/WMA file. |
| When referring to MP3/WMA playback, the following terms are synonymous: • File name and track name • Folder name and directory name |
CD Player Operation - MP3/WMA Files
Refer to the following button function table when selecting, searching or navigating MP3/WMA files and folders:
| MP3/WMA Button Function Table | |
| Button | Function |
| SEARCH | Direct Select, Search and Navigate Modes |
| Enter/Confirm | |
| Preset #1 | A, B, C, 1 |
| Preset #2 | D, E, F, 2 |
| Preset #3 | G, H, I, 3 |
| Preset #4 | J, K, L, 4 |
| Preset #5 | M, N, 0, 5 |
| Preset #6 | P, Q, R, 6 |
| Key #7 | S, T, U, 7 |
| Key #8 | V, W, X, 8 |
| Key #9 | Y, Z, /, 9 |
| Key #0 | - , -, +, 0 |
| Rotary Encoder (push) | Character Shift |
| Rotary Encoder (rotate) | Character Select (A, B, C ~ 8, 9, 0) |
| MUTE | Character Backspace |
Direct Select, Search and Navigate Modes
Direct File Select Step 1
Press SEARCH for more than 3 seconds, to select between the following modes:
- Direct File Select
- Alphanumeric File or Folder Search
- File or Folder Navigate
Press SEARCH for more than 3 seconds, then release. "MP3 T" or "WMA T" will flash in the display. Use the buttons in the above table (3 keystroke maximum input), or the rotary encoder to enter the desired file number.
Step 2
Press to confirm the selected file number or wait for the input cycle to time out (approximately 5 seconds). If the file is not available, "NO FILE" will be displayed momentarily and the current file will continue to play.
CD Player Operation - MP3/WMA Files
Alphanumeric File or Folder Search
Step 1
Press SEARCH for more than 3 seconds, then release.
Press SEARCH again, an " ^ 串 " will flash in the display.
Use the buttons in the table on page 12 (32 character maximum input) or the rotary encoder to enter the desired alphanumeric search characters. Press the rotary encoder to advance one character to the right.
Step 2 Press to initiate the selected alphanumeric search.
Step 3 Turn the rotary encoder to preview the search results. If the search returns a folder, the icon will illuminate.
Step 4 Press to select the desired file or folder. If a folder is selected, "/" will be displayed. Turn the rotary encoder to the right to begin searching files in the folder.
Step 5 Press to select the desired file within the folder.
Note:
If the file is not available, "NO FILE" will be displayed momentarily and the current file will continue to play.
File/Folder Navigate
Press SEARCH for more than 3 seconds, then release.
Step 1
Press SEARCH again two times to navigate files/folders on the disc. The current folder name will scroll one time followed by available files and folders.
Step 2
Turn the rotary encoder to preview files/folders in the current folder. If a folder is selected, the icon will illuminate.
Step 3
Press to select the desired file or folder. If a folder is selected, "/" will be displayed. Turn the rotary encoder to the right to begin searching files in the folder.
Step 4
Press to select the desired file within the folder.
*Folder Access (Up one level)
When navigating folders (and "/" is displayed), press MUTE to access the previous level (up one level).
*Only available on MP3/WMA discs recorded with more than one folder.
CD Player Operation - MP3/WMA Files
| Navigating Note | After navigating by direct select, alphanumeric search or file/folder navigate modes, the track number and elapsed time will be displayed by default. Press DISP momentarily to select clock, track name, directory name, title, artist and album. |
| *Folder Access | Press ➔ to select the previous folder. Press ➔ to select the next folder. |
| *Folder access is only available on MP3/WMA discs recorded with more than one folder. | |
| File Repeat | Press RPT momentarily to continuously repeat selected file. Press RPT again to cancel. |
| File Repeat(Current Folder Only) | Press RPT for more than 2 seconds to consecutively repeat all files in the current folder only. The ➔ icon will appear in the display when in folder repeat mode. Press RPT again to cancel. |
| Disc Random | Press RDM momentarily to play all files on entire disc in random order. Press RDM again to cancel. |
| Folder Random | Press RDM for more than 2 seconds to play all files in current folder only in random order. The ➔ icon will appear in the display when in folder random mode. Press RDM again to cancel. |
| Disc Intro | Press INT momentarily to play the first 10 seconds of each file on the entire MP3/WMA disc. Press INT again to cancel. |
| Folder Intro | Press INT for more than 2 seconds to play the first 10 seconds of each file in the current folder only. The ➔ icon will appear in the display when in folder intro mode. Press INT again to cancel. |
| Note: File repeat (current folder only), folder random and folder intro is only available on MP3/WMA discs recorded with more than one folder. |
CD Player Operation - MP3/WMA Files
Media Compatibility
The following types of discs/files are compatible:
CD-ROM (ISO), CD-R, CD-RW
CD-DA
- MP3 data
WMA data
The following types of discs/files are not compatible:
- WMA files that are protected by DRM (Digital Rights Management).
WMA lossless format - Discs recorded with Track At Once or packet writing
- MP3 PRO format
- MP3 playlists
WAV format
Playback Order
Compatible Recording Formats
MP3/WMA playback sequence is based on recorded order of files and begins in the root folder of the disc. Any empty folders or folders that do not include MP3/WMA files are skipped. This unit may not play files in the order they were recorded in. Refer to your recording software's user's manual for more information.
ISO9660 level 1
ISO9660 level 2
Yellow Book MODE 1
- Yellow Book MODE 2 FORM 1
- Multi session
Maximum folders and files - 256
Maximum folder levels - 8
MPEG-1/2/2.5 Audio Layer-3
ISO9660 standards:
Maximum nested folder depth is 8 (including the root folder).
- Valid characters for folder/file names are letters A-Z (all caps), numbers 0-9, and “_” (underscore). Some characters may not be displayed correctly, depending on the character type.
- This device can play back discs in Joliet, Romeo, and other standards that conform to ISO9660. MP3/WMA written in the formats other than the above may not play and/or their file names or folder names may not be displayed properly.
CD Player Operation - MP3/WMA Files
| Additional MP3/WMA Information | An internal buffer provides ESP (Electronic Skip Protection) to virtually eliminate skipping. |
| When playing a disc recorded with regular audio files (CD-DA or .WAV) and MP3/WMA files, the unit will play the MP3/WMA files only. | |
| Only MP3 files with filename extension (.mp3) can be played. Only WMA files with filename extension (.wma) can be played. | |
| Do not attempt to play discs which contain non-MP3/WMA files with the MP3/WMA extension. | |
| Sampling Frequency Rates | 8kHz ~ 48kHz |
| MP3 | 32kHz ~ 48kHz |
| WMA | 32kbps ~ 320kbps constant Variable bit rates |
| Transfer Bit rates | 32kbps ~ 192kbps constant Variable bit rates |
| MP3 | Note: Some files may not play or be displayed correctly, depending on sampling rates and bit rates. |
| WMA | ID3 tags Version 1.x This model will not display ID3 Version 2.0 or greater tags. |
| MP3 Tag Display | For best results, use the following settings when burning an MP3 disc: 128kbps or higher constant bit rate 44.1kHz or higher sampling frequency |
| Recommended Settings | For best results, use the following settings when burning a WMA disc: 64kbps or higher constant bit rate 32kHz or higher sampling frequency |
Limited One Year Warranty
This warranty gives you specific legal rights. You may also have other rights which vary from state to state.
Dual Electronics Corp. warrants this product to the original purchaser to be free from defects in material and workmanship for a period of one year from the date of the original purchase.
Dual Electronics Corp. agrees, at our option, during the warranty period, to repair any defect in material or workmanship or to furnish an equal new, renewed or comparable product (whichever is deemed necessary) in exchange without charges, subject to verification of the defect or malfunction and proof of the date of purchase. Subsequent replacement products are warranted for the balance of the original warranty period.
Who is covered? This warranty is extended to the original retail purchaser for products purchased and used in the U.S.A.
What is covered? This warranty covers all defects in material and workmanship in this product. The following are not covered: installation/removal costs, damage resulting from accident, misuse, abuse, neglect, product modification, improper installation, incorrect line voltage, unauthorized repair or failure to follow instructions supplied with the product, or damage occurring during return shipment of the product.
What to do?
- Before you call for service, check the troubleshooting guide in your owner's manual. A slight adjustment of any custom controls may save you a service call.
- If you require service during the warranty period, you must carefully pack the product (preferably in the original package) and ship it by prepaid transportation with a copy of the original receipt from the retailer to an authorized service center.
- Please describe your problem in writing and include your name, a return UPS shipping address (P.O. Box not acceptable), and a daytime phone number with your shipment.
- For more information and for the location of the nearest authorized service center please contact us by one of the following methods:
Call us toll-free at 1-866-382-5476
E-mail us at cs@dualav.com
Exclusion of Certain Damages: This warranty is exclusive and in lieu of any and all other warranties, expressed or implied, including without limitation the implied warranties of merchantability and fitness for a particular purpose and any obligation, liability, right, claim or remedy in contract or tort, whether or not arising from the company's negligence, actual or imputed. No person or representative is authorized to assume for the company any other liability in connection with the sale of this product. In no event shall the company be liable for indirect, incidental or consequential damages.
Troubleshooting
| Problem | Cause | Action |
| Unit will not turn on (no power) | Yellow wire not connected or incorrect voltage Red wire not connected or incorrect voltage | Check connections for proper voltage (11~16VDC) |
| Black wire not connected | Check connection to ground | |
| Fuse blown | Replace fuse | |
| Unit has power (but no sound) | Speaker wires not connected | Check connections at speakers |
| One or more speaker wires touching each other or touching chassis ground | Insulate all bare speaker wires from each other and chassis ground | |
| Unit blows fuses | Yellow or red wire touching chassis ground | Check for pinched wire |
| Speaker wires touching chassis ground | Check for pinched wire | |
| Incorrect fuse rating | Use fuse with correct rating | |
| Excessive skipping | Unit is not mounted correctly or backstrap is not secure | Check mounting sleeve and backstrap support |
| Physical defect in media (CD, CD-R or CD-RW) | Check media for scratches | |
| ERROR-01 appears on display | Disc read error | Press EJECT or RESET |
| ERROR-02 appears on display | Focus error or disc is in upside down | Press EJECT or RESET |
| PROTECT appears on display | The WMA file is copy-protected by DRM (Digital Rights Management) | Write disc using WMA files that are not copy-protected |
| NO FILE appears on display | Selected file is not available in direct or alphanumeric search modes | Repeat search using valid parameters |
| INVALID appears on display | The file format is incompatible | Write disc using valid audio files with .mp3 or .wma file extensions |
| Unit will not accept a disc | CD mechanism position out of alignment | Press and hold EJECT for 3 seconds to reset CD mechanism position |
| CD transit screws still in place | Remove 2 transit screws located on top of the unit | |
| NO SUPPORT appears on display | An invalid ID3 tag version is present | Version 1.x ID3 tags are supported. Version 2.0 or greater are not supported |
Specifications
CD Player
Frequency response: 10Hz - 20kHz
Channel separation @ 1kHz: >65dB
D/A converter: 1 Bit
FM Tuner
Tuning range: 87.5MHz-108.1MHz
Usable sensitivity: 8.5dBf
50dB quieting sensitivity: 10dBf
Stereo separation @ 1kHz: 40dB
HD radio stereo separation @ 1kHz: 85dB
Frequency response: 30Hz-13kHz
HD radio frequency response: 30Hz - 20kHz
AM Tuner
Tuning range: 530kHz-1710kHz
Usable sensitivity: 22uV
Frequency response: 240~3KHz
HD radio frequency response: 30~4.4KHz
HD radio stereo separation @ 1kHz: 85dB
General
Operating voltage: 11-16 VDC, negative ground
Speaker output impedance: 4~8 ohms
Line output voltage: 2 Volts
Dimensions: 7'' × 7'' × 2'' (178 × 178 × 51 mm)
Design and specifications subject to change without notice.

CEA-2006 Power Standard Specifications
(reference: 14.4VDC +/- 0.2V, 20Hz~20kHz)
Power Output: 17 Watts RMS x 4 channels at 4 ohms and ≤ 1% THD+N
Signal to Noise Ratio: 80dBA (reference: 1 watt into 4 ohms)

Dual Electronics Corp.
Toll Free: 1-866-382-5476
www.dualav.com ©2007 Dual Electronics Corp. All rights reserved.
Windows Media and the Windows logo are trademarks, or registered trademarks of Microsoft Corporation in the United States and or other countries.
HD Radio™ Technology Manufactured Under License from iBiquity Digital Corporation. U.S. and Foreign Patents. HD Radio™ and the HD Radio logo are proprietary trademarks of iBiquity Digital Corp.
Other trademarks and trade names are those of their respective owners.