METEOR 0.5, METEOR 0.5 - Speaker TRIANGLE - Free user manual and instructions
Find the device manual for free METEOR 0.5, METEOR 0.5 TRIANGLE in PDF.

User questions about METEOR 0.5, METEOR 0.5 TRIANGLE
0 question about this device. Answer the ones you know or ask your own.
Ask a new question about this device
Download the instructions for your Speaker in PDF format for free! Find your manual METEOR 0.5, METEOR 0.5 - TRIANGLE and take your electronic device back in hand. On this page are published all the documents necessary for the use of your device. METEOR 0.5, METEOR 0.5 by TRIANGLE.
USER MANUAL METEOR 0.5, METEOR 0.5 TRIANGLE
MANUFACTURE ELECTROACQUSTIQUE
Manuel utiliseur
TRIANGLE
You have just purchased a TRIANGLE audio video product. We would like to congratulate you and thank you for your confidence in us.
We hope you will have many hours of enjoyment and listening pleasure with this product, which has benefited from continuous care and attention during its manufacture. Your TRIANGLE loud speaker has been developed to bring you ease of use and considerable listening pleasure. You will get the best from this high-quality product by following the instructions below.
UNPACKING
Open the box and remove all staples, then take out the subwoofer.
If you notice any defects on any elements when unpacking, contact your dealer.
Before disposing of the packaging, check that nothing remains inside.
INSTALLATION PRECAUTIONS
Before installing:
Before connecting your installation, make sure all equipment is switched off. Make sure the switch is on OFF before removing or connecting cables. Do not connect the power supply cable before completing all connections.
Moving the unit:
Always disconnect the power supply cable and the cables between any other audio components when moving the unit. This is in order to prevent any short-circuiting or damage to plugs and connection cables.
Before switching the unit on:
Check once again that all connections are correct and that volume buttons are at a minimum.
Places to avoid:
Avoid placing your enclosure near damp areas or areas exposed to excessive sunlight and install it in a cool place.
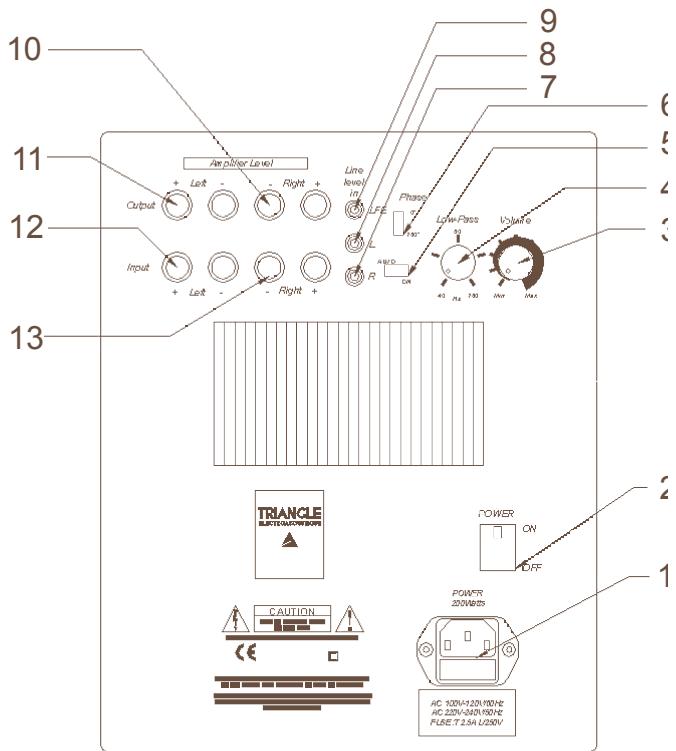
- Power plug and fuse holder
- Remote / Off
- Volume
- Cutoff frequency setting (40-160 Hz)
- Auto / Remote
- Phase inversion button 0-180°
- Low level inputs (right)
- Low level inputs (left)
- Low level inputs without filtering
- High level outputs (right)
- High level outputs (left)
- High level inputs (left)
- High level inputs (right)
CONNECTIONS
Before connecting your installation, make sure all equipment is switched off. If you have any doubts about connecting your installation, we recommend you contact your authorized dealer.
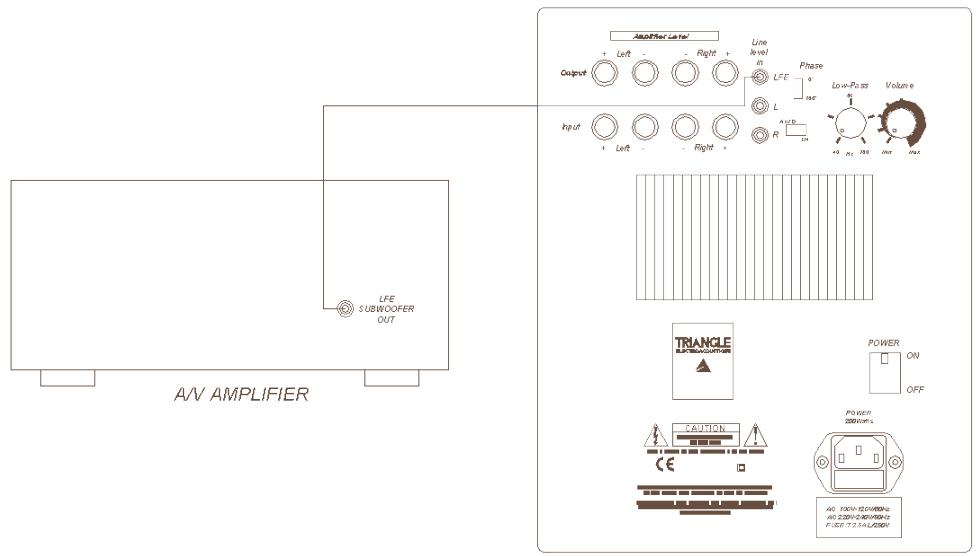
Connection to a multi-channel audio-video amplifier:
Preferably use the SUBW00FER or LFE output with a RCA and connect it to one of the Low-pass inputs (R or L) on your enclosure.
SUBWOOFER
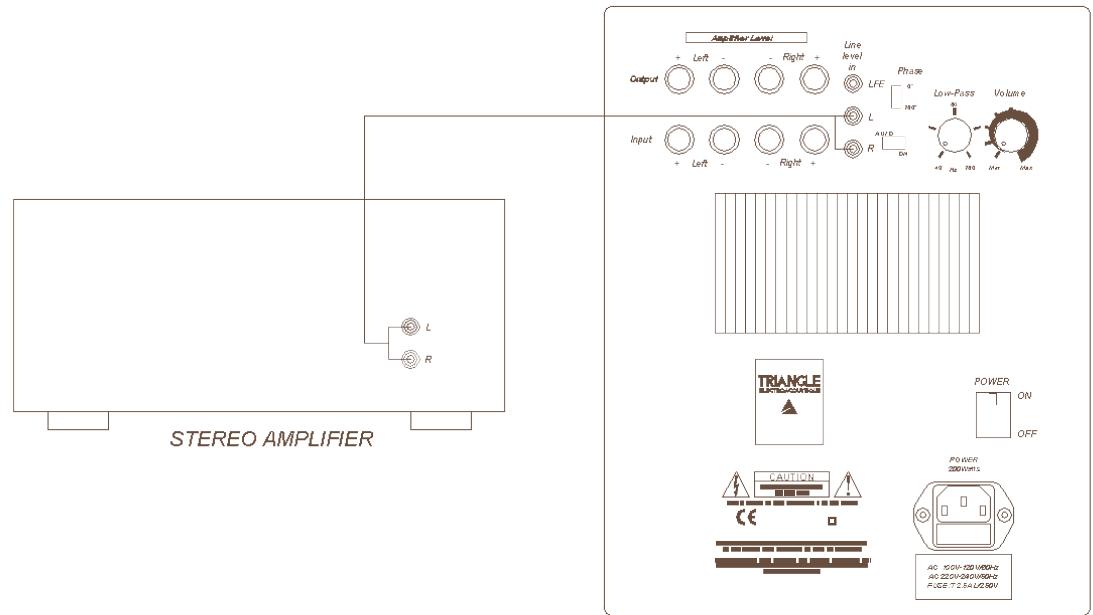
Connection to a stereo amplifier:
You can use:
- either a PRE-OUT (R + L) output on your preamplifier or on your stereo integrated amplifier (see the owner's manual of your equipment) and connect it to the Low-pass inputs on the enclosure (R + L) ,
SUBWOOFER
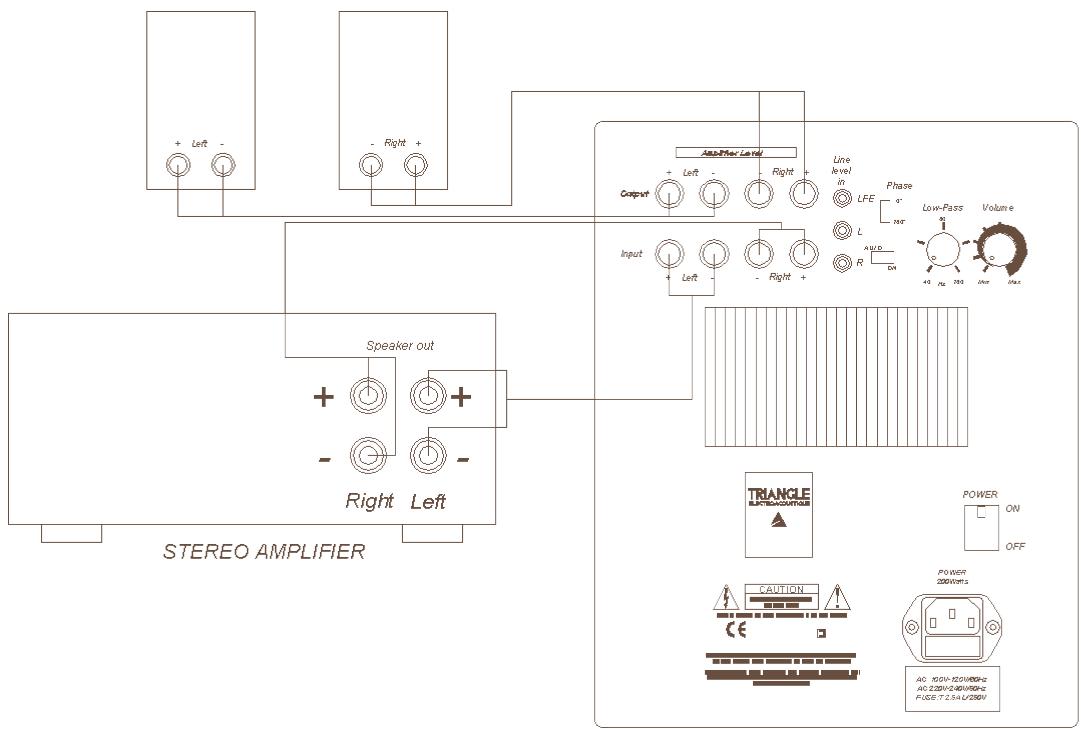
- or the high level inputs of the subwoofer enabling direct connection to the loudspeaker outputs of your stereo amplifier. To do so, use high-quality hi-fi cable (pure copper of diameter minimum 1.5 mm). On connection, it is essential to the coherence of the end result, to respect polarity. Connect the red + terminals of the subwoofer to the red + terminals on your amplifier. Similarly, the black - terminals on the subwoofer should be connected to the black - terminals on your amplifier.
SUBWOOFER
POWERING ON
Powering on should be carried out as follows :
- Check once again that all connections are correct and that volume buttons are at a minimum (speaker and amplifier).
- Connect the power plug (after checking that your power supply voltage corresponds to that of the equipment 230V or 120V ).
- Place the Auto/Remote selector switch to Remote (to deactivate automatic powering on and use remote control to switch on) or Auto (to activate automatic powering on).
- Switch the On/OFF switch to «ON».
- Adjust the volume, frequency and phase buttons (see Settings).
Note: Cut off the power supply to the subwoofer using the power switch when it is not in use for several days.
POSITIONING AND SETTINGS
Position your subwoofer in the forward listening zone (if possible between the two main speakers) for better sound resolution. However, do not place it against the television set as the speaker is not shielded.
This subwoofer can be used with any type of speaker.
The ideal setting should correspond to a realistic reproduction of the basses and be as much in tune as possible with your main loudspeakers. It should not be possible to «feel» the subwoofer, the bass should seem to come from the main speakers.
The phase inversion switch can be used to search for the best results. This switch is used to inverse the phase of the sound signals coming from the subwoofer.
Depending on the position of the subwoofer in the room in relation to the main speakers, inverting the subwoofer phase can lead to better coherence of the system's global response to bass frequencies.
We recommend you carry out various tests to find the setting which suits you best. Use a recording you know well and study the result according to your tastes and expectations.
Using the subwoofer's internal filtering:
The frequency is tuned to the main speakers using the «LOW PASS» potentiometer. The adjustment is made in the frequency range between 40Hz and 160Hz. Carry out tests by first positioning the setting switch between 40 and 80 Hz with large size main speakers, between 80 and 160 Hz for small size speakers.
Using the A/V amplifier's filtering:
You can use your A/V amplifier (if it allows) to filter the bass frequencies of the subwoofer. Position the volume button at 3 14 . Make the settings on your A/V amplifier (see the owner's manual of your equipment at the section setting subwoofer mode and the crossover frequency).
Use the LFE input (yellow RCA input) on your subwoofer. In this way, the signal no longer passes through the subwoofer's internal filter, but directly to the amplifier.
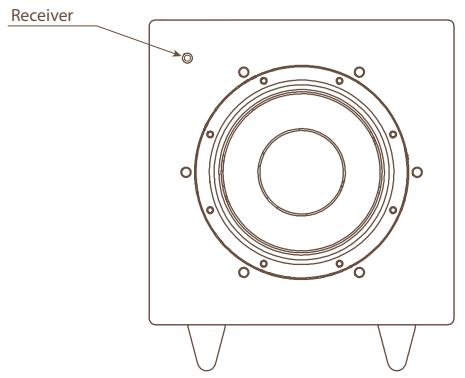
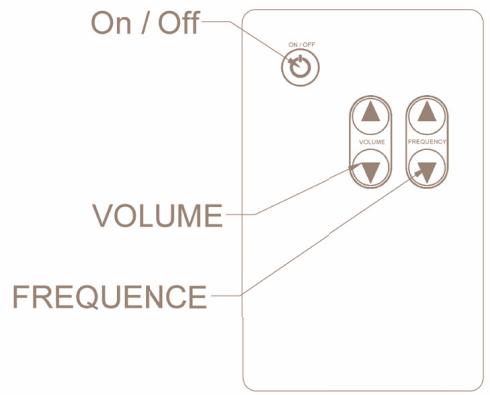
USING OF REMOTE CONTROL
With the remote control, you can turn on or turn off, control volume and frequency cut. When you are using remote control, you must aim at the receiver placed on the front panel of subwoofer.
CLEANING THE SUBWOOFER
Clean with a soft cloth and never use detergent or solvent as you risk damaging the surface finish of your subwoofer.
RECYCLING
Your product contains valuable materials which can be recovered or recycled. Leave it at local point.

TROUBLESHOOTING
If the equipment fails to operate correctly, check the points below. If the problem continues, a malfunction may be possible. Disconnect the power supply immediately and contact your dealer.
| SYMPTOM | CAUSE | REMEDIES |
| The subwoofer is not working | There is no power supply to the subwoofer | Check in order : if the switch is on ON or AUTO if the power supply cable is connected if the power plug is working |
| No sound comes from the subwoofer | There is no input signal in your subwoofer | Check in order : if the subwoofer is correctly connected to the amplifier if the A/V amplifier or stereo is switched on if you're A/V amplifier or stereo has a working source of music (CD, DVD, etc.) if the signal sent by the A/V amplifier is not too weak or if the subwoofer function is not on NO (see your owner's manual) |
| The level of sound is weak, although the subwoofer volume is at maximum | Incorrect adjustment of the A/V amplifier | Check the settings of the subwoofer at the A/V amplifier (see your owner manual) |
| The subwoofer shuts off at loud peaks. | The sound level of the subwoofer is too high and the integrated electronic protection sets in | Lower the sound level (on the A/V amplifier or directly on the subwoofer) |
| The subwoofer shut off immediately on first powering on. | The power fuse is blown. | The voltage selected in the subwoofer electronics (230V or 120V) does not correspond to your power supply voltage. |
- Never open the subwoofer for risk of electrical shock.
- Only replace a damaged power fuse with a fuse of identical specifications.
| TECHNICAL SPECIFICATIONS | SUBWOOFERS |
| Speaker diameter | 210mm |
| Total bandpass | 35-160 Hz |
| Filter cutoff frequency6 pts | 40/160 Hz |
| RMS amplifier output | 100 W |
| Phase | 0 - 180° |
| Inputs | L&R high and low level |
| Output | High Level |
| Magnetic shielding | No |
| Dimensions (HxWxD) | 370x320x340 |
| Weight | 14,5 Kg |
For any further information concerning your system, please consult our website :
www.triangle-fr.com

BENUTZERHANDBUCH P.24 - P.35
MANUEL DE L'UTILISATEUR P.1-P.11
OWNER'S MANUAL P.12 - P.23
EIN AKTIVER SUBWOOFER
METEOR 0.1TC
VORWORT
LieberKunde,
Your TRIANGLE loudspeaker is covered by a 5-year warranty (Amplifier 2 years). This warranty takes effect from the date of purchase and covers any manufacturing defect or damage your loudspeaker may suffer as a result of these same defects. This warranty is granted solely to the first user of the product, and is not transmissible in the case of resale. For prompt after sale service, please fill out the enclosed coupon and mail it to a TRIANGLE authorized distributor in your country (the pre-paid envelope can only be used inside FRANCE), together with proof of purchase (copy of invoice). Please note, this warranty is void if any fault arises from misuse or careless handling of the product.
The following are not guaranteed:
- Burned voice coil due to overload
- Any fault arising from professional use (sounding, public-address, etc.)
- Any fault arising from storage in high humidity environments
Crushed paper cone
Crushed cone or dome - Any fault resulting from a mechanical shock
- Any fault arising from the intervention of a person not authorized by TRIANGLE
- Crushed cabinet
GARANTIEHINWEIS

MANUFACTURE ELECTROACOUSTIQUE
Avenue Flandres Dunkerque
Z.l. les Etomelles - 02200 Villeneuve Saint Germain - France
T. +33 (0)3 23 75 38 20 - F. +33 (0)3 23 75 38 21