
SLIM 311R - Webcam GENIUS - Free user manual and instructions
Find the device manual for free SLIM 311R GENIUS in PDF.


| Product Type | Webcam |
| Brand | Genius |
| Model | Slim 311R |
| Maximum Resolution (interpolated) | 1280 x 1024 pixels |
| Native Resolution | 640 x 480 pixels |
| Built-in Microphone | Yes |
| Night Vision | Yes, via red infrared illumination |
| Capture Button (Snapshot) | Yes |
| Swivel Base and Clip | Yes, adjustable clip for CRT, LCD, or laptop screen |
| Connection | USB 2.0 |
| Power Supply | Via USB port |
| Compatible Operating Systems | Windows Vista, XP, 2000, Me, 98SE |
| Included Software | Genius WebCAM Mate, CrazyTalk Avatar Creator, CrazyTalk CamSuite |
| Main Functions | Photo capture, video recording, security mode (motion detection), image effects |
| Focus Adjustment | Manual by rotating the lens |
| Messaging Compatibility | MSN Messenger, Yahoo Messenger, AOL Instant Messenger |
| Maintenance and Cleaning | Clean with a soft, dry cloth. Do not use abrasive products. |
| Safety Instructions | Do not expose to moisture. Observe separate collection symbols for electronic waste. |
| Weight | 200 g (estimated) |
| Dimensions (L x W x H) | 80 x 60 x 90 mm (estimated) |
Frequently Asked Questions - SLIM 311R GENIUS
User questions about SLIM 311R GENIUS
0 question about this device. Answer the ones you know or ask your own.
Ask a new question about this device
Download the instructions for your Webcam in PDF format for free! Find your manual SLIM 311R - GENIUS and take your electronic device back in hand. On this page are published all the documents necessary for the use of your device. SLIM 311R by GENIUS.
USER MANUAL SLIM 311R GENIUS
CrazyTalkAvatarCreator 20-42
CrazyTalk CamSuite 43-70
Trouble shooting for web camera 71
Symbol for Separate Collection in European Countries
This symbol indicates that this product is to be collected separately.
The following apply only to users in European countries:
- This product is designated for separate collection at an appropriate collection point. Do not dispose of as household waste.
- For more information, contact the retailer or the local authorities in charge of waste management.
Slim 311R Features
The Slim 311R is designed as an all-hours web camera. The red-infrared technology allows you to video chat in a low-light environment. If you want to chat with a family member or a friend late in the evening, and don't want to disturb anyone, then the Slim 311R is the ideal web camera for those who like to stay up late.
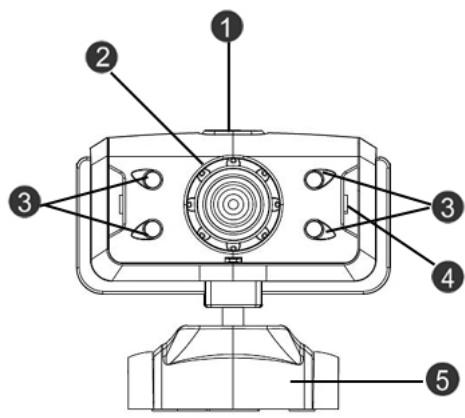
1.SnapShot Button
You can press the snapshot button to take still images.
2.Lens
Adjust the focus by twisting the lens.
3.Red-Infrared light
The red-infrared allows you to video chat in a low-light environment.
4.Microphone
5.Swivel and Clipping Base
The adjustable clipping base fits easily to almost anything - notebook panel, CRT, and LCD monitors.
Installing the Slim 311R
You need to install device drivers and applications before using your webcam.
Do not connect your webcam to your computer before installing the drivers.
- Installing the Slim 311R driver Windows Vista/XP/2000/Me/98SE Environment
a. Insert the Slim 311R Installation CD into the CD-ROM drive.
b. The Autorun screen will bring up the installation screen. Click on "Windows Driver" then simply follow the on-screen instructions.
c. Install DirectX from the CD if your pc didn't have it on your system or the version was older.

NOTE
If the Autorun screen doesn't start, please follow these steps
- Click on "Start Menu"
- Type D:\SETUP.EXE, then click the Enter key.
(Assume your CD-ROM is in Drive D)
- Follow the instructions on the screen to complete the installation.
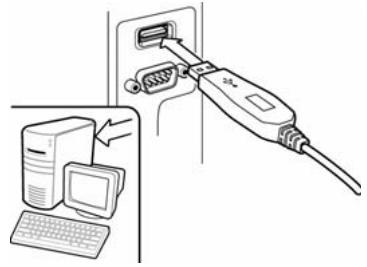
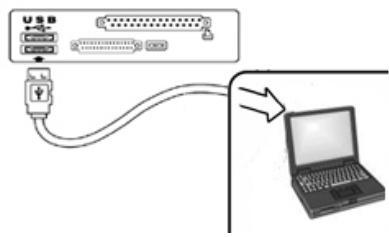
- Insert the Slim 311R's USB cable to your desktop or laptop USB port.
-
Restart your computer after all the applications have been installed.
-
The software and hardware installation is now complete. You can install the software you would like to use for video conferencing or chat with your friends.

NOTE
The web camera can work properly with any video chat software that supports a video feature.
6. Position Camera
Place the camera in the middle of your computer monitor for optimal eye contact. The camera can pivot vertically or horizontally, allowing you to find the best position.
Free angle clipper, fits on any screen
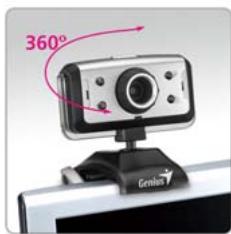
For LCD Panel
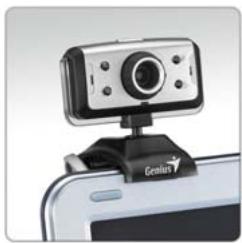
For Notebook
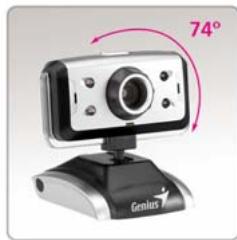
Desktop

NOTE
To remove the driver installation in Windows 98SE/Me/2000/XP/Vista
Environment:
Please go to the taskbar and follow "Start Program Slim 311R
Click "Uninstall", then follow the on-screen instructions to remove the driver.
About Genius Application-WebCAM Mate
You can use Genius WebCAM Mate software to capture the real-time image, record or execute the simple security function.

NOTE
After installing the Genius Application software, the system will automatically create a file (C:\WINDOWS\Album or C:\WINNT\Album) to save the images you take using the Genius Application.
Genius application available in windows Vista/XP/2000/Me/98SE
1. Main Menu
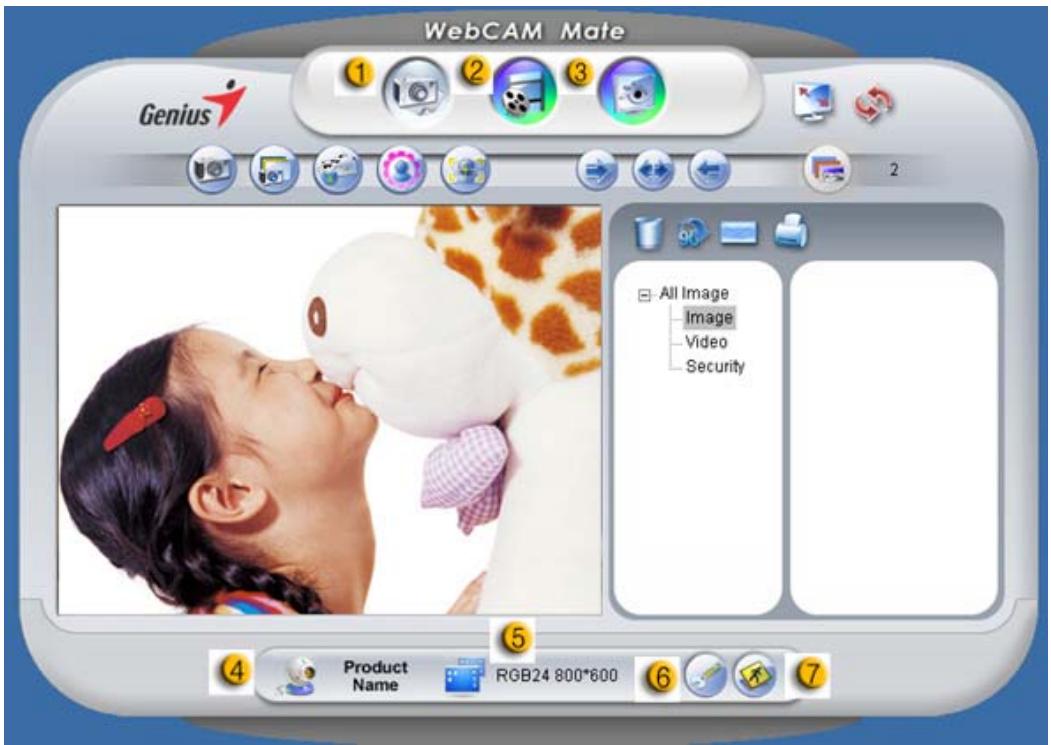
| Item | Mode | Description |
| 1 | Picture Mode | Still image capture mode. |
| 2 | Video Mode | Video recording mode. |
| 3 | Security Mode | Security monitoring mode. |
| 4 | Device Selection | Select different webcam device. |
| 5 | Resolution Selection | Resolution selections according to device. RGB24: 1280x1024 (*), 1024x768 (*), 800x600 (*), 640x480, 352x288, 320x240, 176x144, 160x120 I240: 1280x1024 (*), 1024x768 (*), 800x600 (*), 640x480, 352x288, 320x240, 176x144, 160x120 |
| 6 | Property page | Preference setting to view your setting and properties. |
| 7 | Exit | Exit the Genius UI. |
- This resolution is by software interpolation.
Remark:
-Property page
Settings
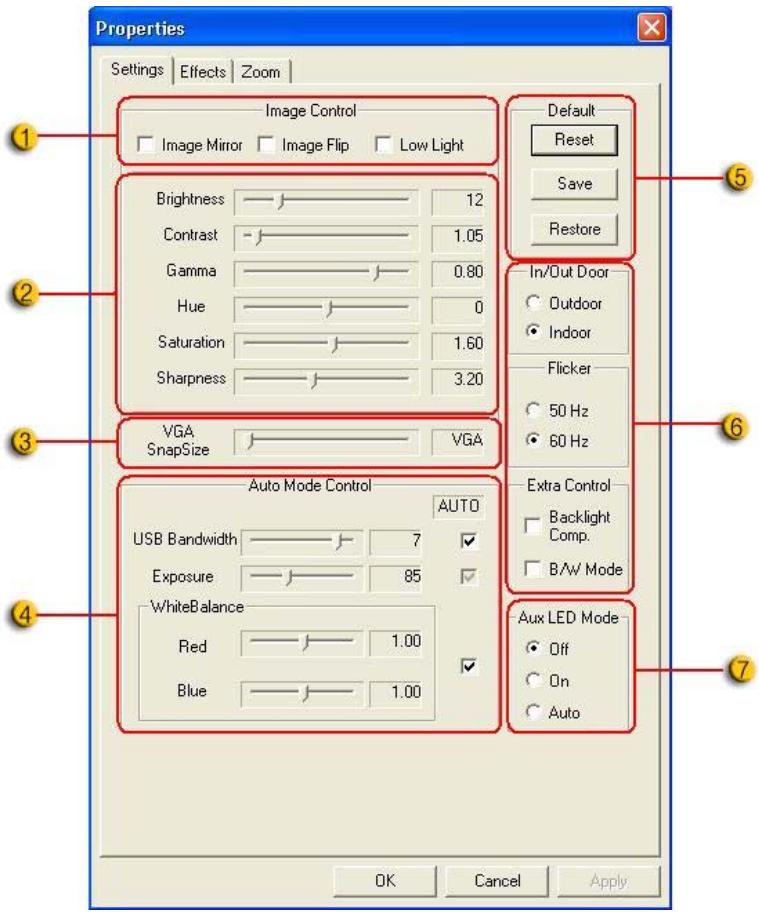
| Item | Description |
| 1 | - You can flip the image horizontally or vertically by choosing “Image Mirror” or “Image Flip”. - When the light is not sufficient, you may click on “Low Light” to get a clear image. |
| 2 | You can adjust different values for different circumstances and environment. |
| 3 | You may adjust values toward image appearance. Before adjusting values, you have to unlock “Auto” to unlock. |
| 4 | -Press “Reset” to return to the manufacturer’s settings. -Press “Restore” to return to the previous settings. -Press “Save” to save the values you set up. |
| 5 | Select the correct frequency according to the country where you are using the web camera. (Before doing this, you will need to select “Indoor”). |
| 6 | -If your web camera is located in backlight position, you may click “Backlight compensation” to get a sharper image. -You can have a black-and-white photo effect by clicking on “B/W Mode”. |
| 7 | Activates the red-infrared light to show images in low-light environments. |
Effect
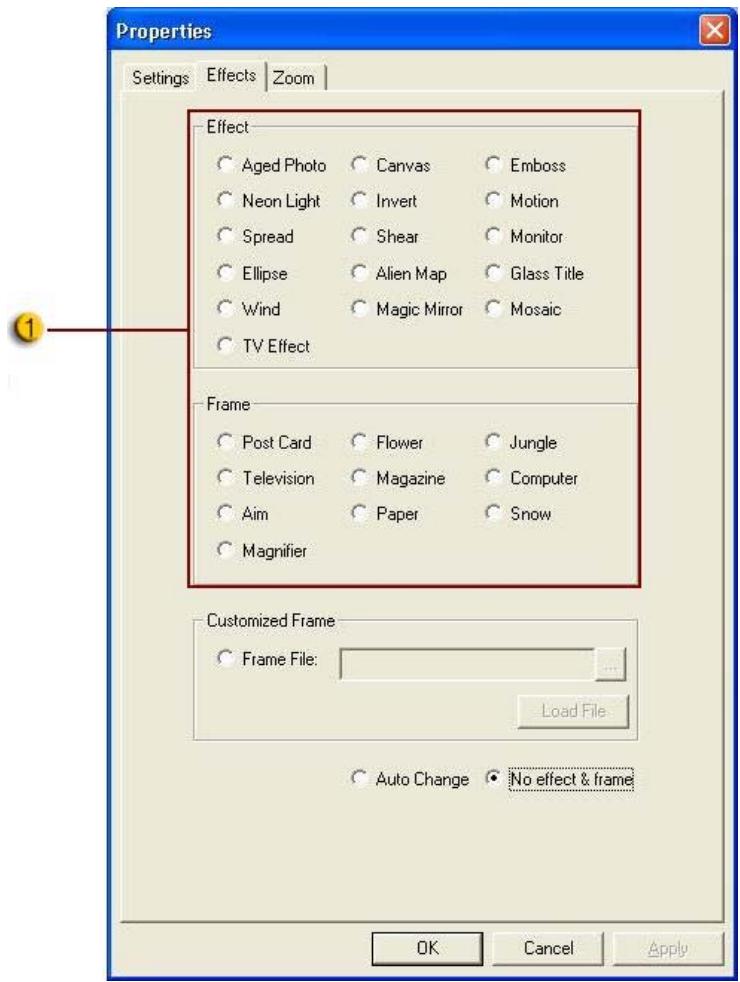
| Item | Description |
| 1 | There will be 26 different kinds of video effects/frames for you to select. The effects can also be applied to the video chat software, like MSN Messenger. You can directly connect to this effect page from the web camera settings in the video chat software. |
Zoom
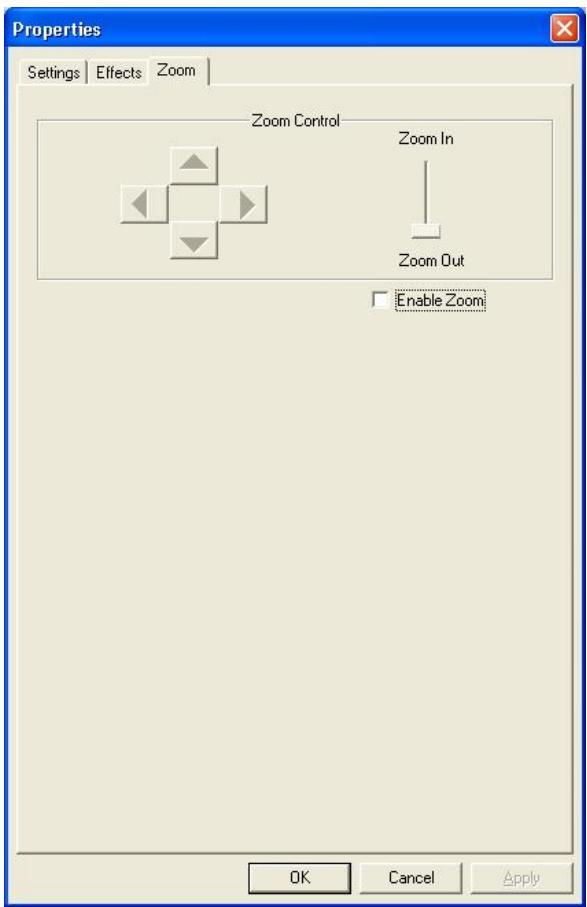
| Item | Description |
| 1 | In this section, you can enable the “Zoom” function. Please select “Enable Zoom” before zooming. -Scroll the bar to zoom in or zoom out -Press the 4-direction button to move the image upward, downward, leftward, and rightward. |
2. Picture Mode

Take a picture right away and share with your friends.
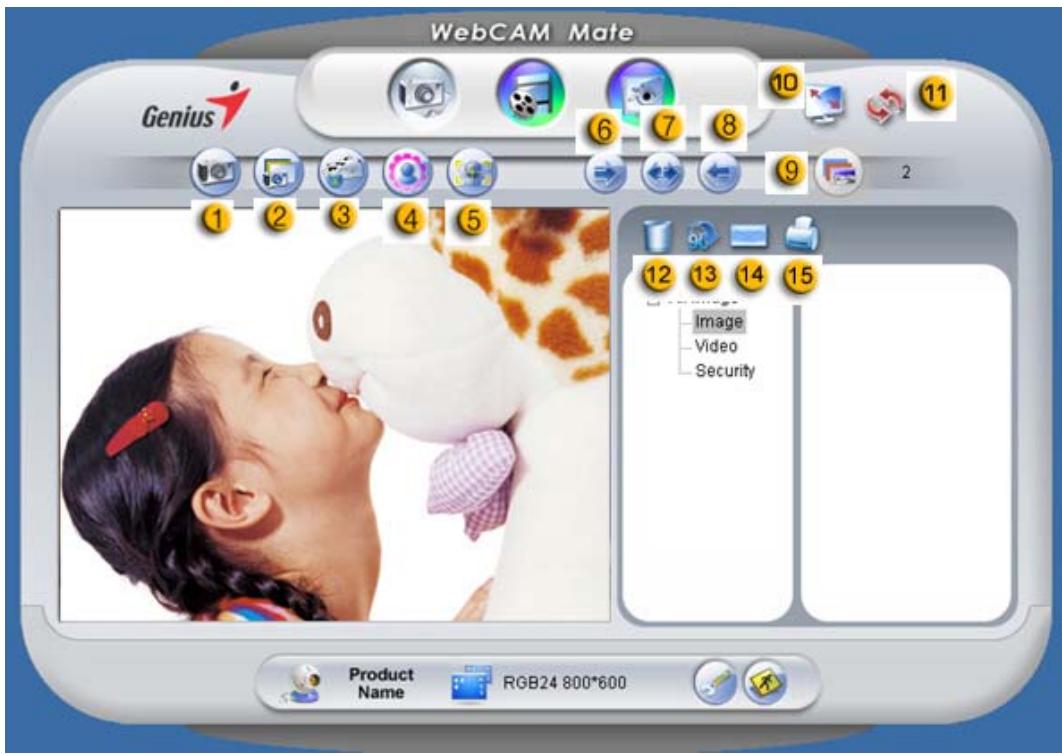
| Item | Mode | Description |
| 1 | Shot | Still image capture mode. |
| 2 | Multi-Snapshot | Capture continuous still images based on multi-snapshot number. |
| 3 | Send photo by email. | |
| 4 | Adding Frame | Select photo frame to add inside still image. (*) |
| 5 | Tracking Face | Click this button, and the screen will auto appear in the center of the frame. When you are watching the display, your face should appear in the acquired image. In an auto stereoscopic display, the image will auto digital zoom. |
| 6 | Rotate | Rotate still image 45 degrees counter-clockwise. (*) |
| 7 | Center | Rotate still image to center. (*) |
| 8 | Rotate | Rotate still image 45 degrees anti-clockwise. (*) |
| 9 | Multi-shot number | Select multi-shot number from 2 to 10. |
| 10 | Full Screen Mode | Display your web camera over the entire screen. Press ESC to exit full screen mode or click left mouse to return to normal mode. |
| 11 | Refresh Device | Refresh web camera. |
| 12 | Delete File | Delete the selected files. |
| 13 | Rotate Image | Rotate the selected image file 90 degrees in title list display. |
| 14 | Email file | Attach the selected image file to an email. |
| 15 | Print Picture | Print the selected image file. |
Remark:
* This function must use the resolution of 640x480 or 320x240. Please make sure the resolution is correct before executing this function.
3. Video Mode

You can record real-time video in this section.
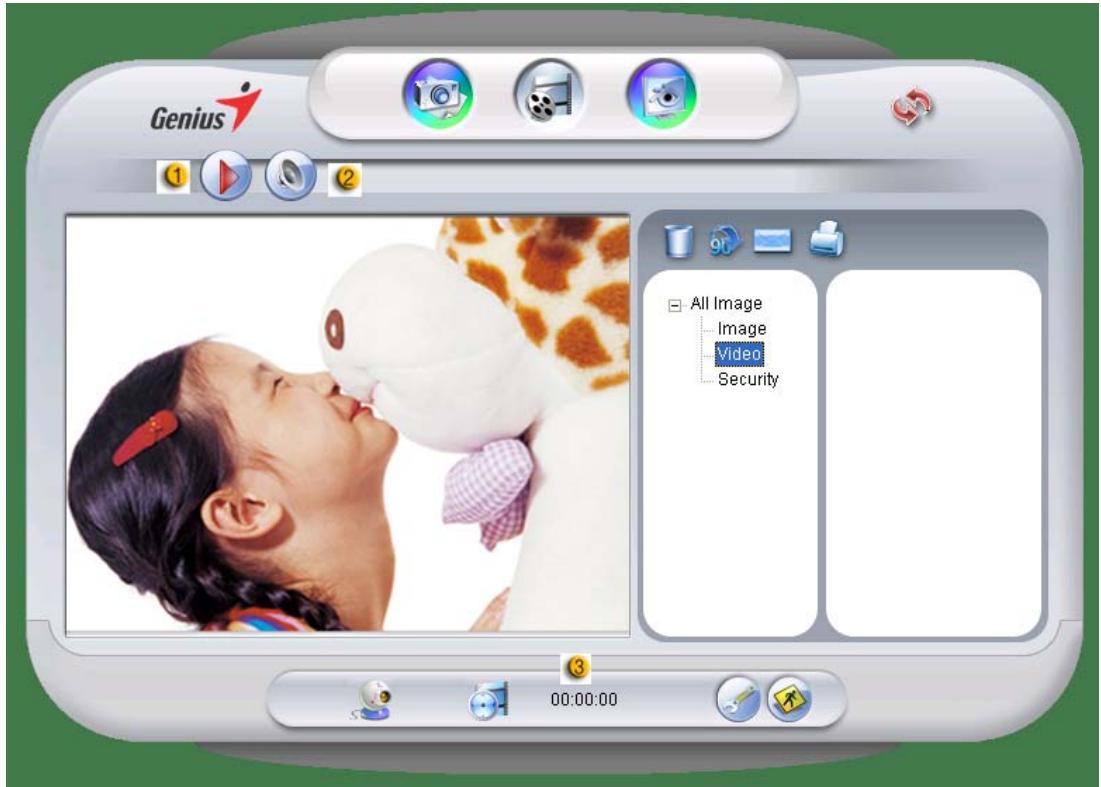
| Item | Mode | Description |
| 1 | Recording Start/Stop | To begin recording video from your web camera. Click to stop recording video. |
| 2 | Audio Setting | Setting the audio device. |
| Audio Device Setting SoundMAX Digital Audio MUTE Volume Balance SoundMAX Digital Audio Volume 0x00 | ||
| 3 | Recording time display | Displays recording time. “00:00:00” mean hours, minutes, seconds. |
4. Security Mode

Using motion detection function, it records any movements that appear in front of your monitor automatically. It can also record anytime until the HD is full. If there's no movement, it will shut down automatically after four seconds or otherwise it will be active when detecting new movement.
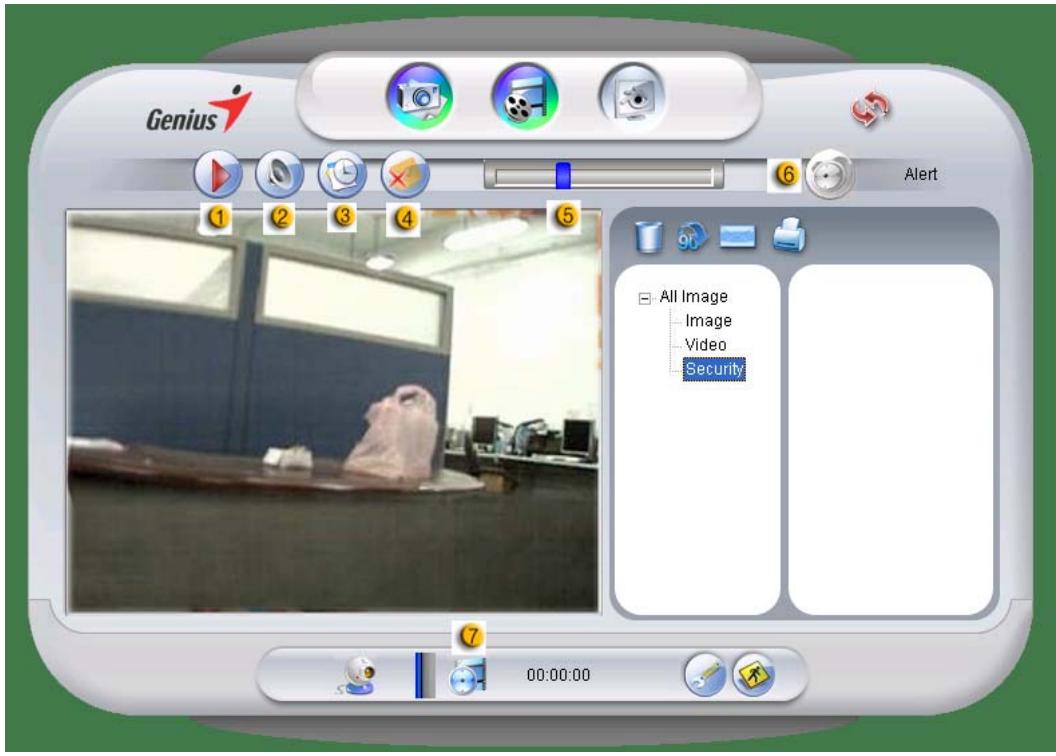
| Item | Mode | Description | |
| 1 | Recording Start/Stop | To begin recording monitor video from your web camera. Click to stop recording video. | |
| 2 | Audio Setting | Setting the audio device. | |
| Item | Mode | Description | |
| Audio Device Setting Volume Balance MUTE Network Maximum Throughput Network Maximum Available Throughput Network Maximum Available Bandwidth Network Maximum Available Bandwidth Network Maximum Bandwidth Network Maximum Bandwidth Network Maximum Bandwidth Network Maximum Bandwidth Network Maximum Bandwidth Network Maximum Bandwidth Network Maximum Bandwidth Network Maximum Bandwidth Network Maximum Bandwidth Network Maximum Bandwidth Network Maximum Bandwidth Network Maximum Bandwidth Network Maximum Bandwidth Network Maximum Bandwidth Network Maximum Bandwidth Network Maximum Bandwidth Network Maximum Bandwidth Network Maximum Bandwidth Network Maximum Bandwidth Network Maximum Bandwidth Network MAXIMUM TIME From 0 To 23 From 19 To 19 From 12 To 13 From 14 To 15 From 15 To 16 From 16 To 16 From 18 To 18 From 19 To 20 From 20 To 20 From 21 To 21 From 22 To 22 From 23 To 23 From 24 To 24 From 25 To 25 From 26 To 26 From 27 To 27 From 28 To 28 From 29 To 29 From 30 To 30 From 31 To 31 From 32 To 32 From 33 To 33 From 34 To 34 From 35 To 35 From 36 To 36 From 37 To 37 From 38 To 38 From 39 To 39 From 40 To 40 From 41 To 41 From 42 To 42 From 43 To 43 From 44 To 44 From 45 To 45 From 46 To 46 From 47 To 47 From 48 To 48 From 49 To 49 From 50 To 50 From 51 To 51 From 52 To 52 From 53 To 53 From 54 To 54 From 55 To 55 From 56 To 56 From 57 To 57 From 58 To 58 From 59 To 59 From 60 To 60 From 61 To 61 From 62 To 62 From 63 To 63 From 64 To 64 From 65 To 65 From 66 To 66 From 67 To 67 From 68 To 68 From 69 To 69 From 70 To 70 From 71 To 71 From 72 To 72 From 73 To 73 From 74 To 74 From 75 To 75 From 76 To 76 From 77 To 77 From 78 To 78 From 79 To 79 From 80 To 80 From 81 To 81 From 82 To 82 From 83 To 83 From 84 To 84 From 85 To 85 From 86 To 86 From 87 To 87 From 88 To 88 From 89 To 89 From 90 To 90 From 91 To 91 From 92 To 92 From 93 To 93 From 94 To 94 From 95 To 95 From 96 To 96 From 97 To 97 From 98 To 98 From 99 To 99 | |||
| Set up time for the security monitoring system. | |||
| Monitor Schedule Setting Please select the time of recording, this function should run with this WebCAM Mate application. Sun From 0 To 23 Mon From 18 To 30 Tue From 12 To 40 Wed From 14 To 00 Thu From 15 To 20 Fri From 17 To 40 Sat From 19 To 00 To 20 To 00 | |||
| When this button is enabled, it will send out an email if an alert happens during recording. | |||
| 5 | Sensitive adjustable | Set up the degree of variance for every second of recording video. When the differences are over the setup degree, the system will alert you. | |
| 6 | Warning sound selection | Set up the different alerting sound effects. | |
| 7 | Recording time display | Displays monitor recording time. “00:00:00” mean hours, minutes, seconds. | |
Using MSN Messenger, Yahoo Messenger, AOL
MSN Messenger
a. For live video function, you'll need MSN Messenger version 6 or later. If you don't have it, please refer to the website: http://messenger.msn.com to download.
b. Sign onto MSN Messenger service.
c. Choose a friend on the contact list and Click "OK" to confirm.
d. Double-click on your friends, who are available to chat. Click on
the webcam icon.
e. Your friend will then receive an invitation message. When your friend confirms to talk, the video chat will start.
f. For the further information, please refer to the website at http://messenger.msn.com
Yahoo Messenger
a. Download Yahoo Messenger at http://messenger.yahoo.com and finish the registration, if you don't have it.
b. Sign onto Yahoo Messenger.
c. From the main window, click Tools menu, then select "Start My Webcam".
d. Right-click on a name in your Messenger List and choose "View Webcam".
e. Your friend will then receive an invitation message. When your friend clicks YES, the video chat will start.
f. For the further information, please refer to the website at http://messenger.yahoo.com
AOL Instant Messenger
a. You can download AOL Instant Messenger free at http://www.aim.com and finish the registration, if you don't have it.
b. Sign onto AOL Instant Messenger.
c. Click on "Show Messenger Lists" and choose the friend you want to start with video chat.
d. Your friend will then receive an invitation message. When your friend confirms to talk, the video chat will start.
e. For the further information, please refer to the website at http://www.aim.com

NOTE
Please make sure you already connected the camera to the computer before running video conferencing or video chat programs.
Please make sure you close other webcam programs before running the video conferencing or video chat program.
CrazyTalk Avatar Creator Introduction
Overview
CrazyTalk Avatar Creator is an innovative and easy-to-use software tool for creating animated talking characters and digital hosts for video files and greeting cards from your own photograph or digital image collection.
Animate any person, animal, or illustration with CrazyTalk Avatar Creator's easy-to-use professional editing tools.
Your photos are brought to life in amazing animation by fitting them with CrazyTalk Avatar Creator's proprietary Facetrix, facial morphing technology.
CrazyTalk Avatar Creator's then gives a voice to your photos by allowing them to lipsync with audio recordings and spoken text messages using the exclusive Expressix speech animation technology.
Once your project is complete. CrazyTalk Avatar Creator offers all new support for popular video editing and greeting cards.
You can send your talking messenger or card image in a variety of formats including .cab, .mht file or an .AVI movie.
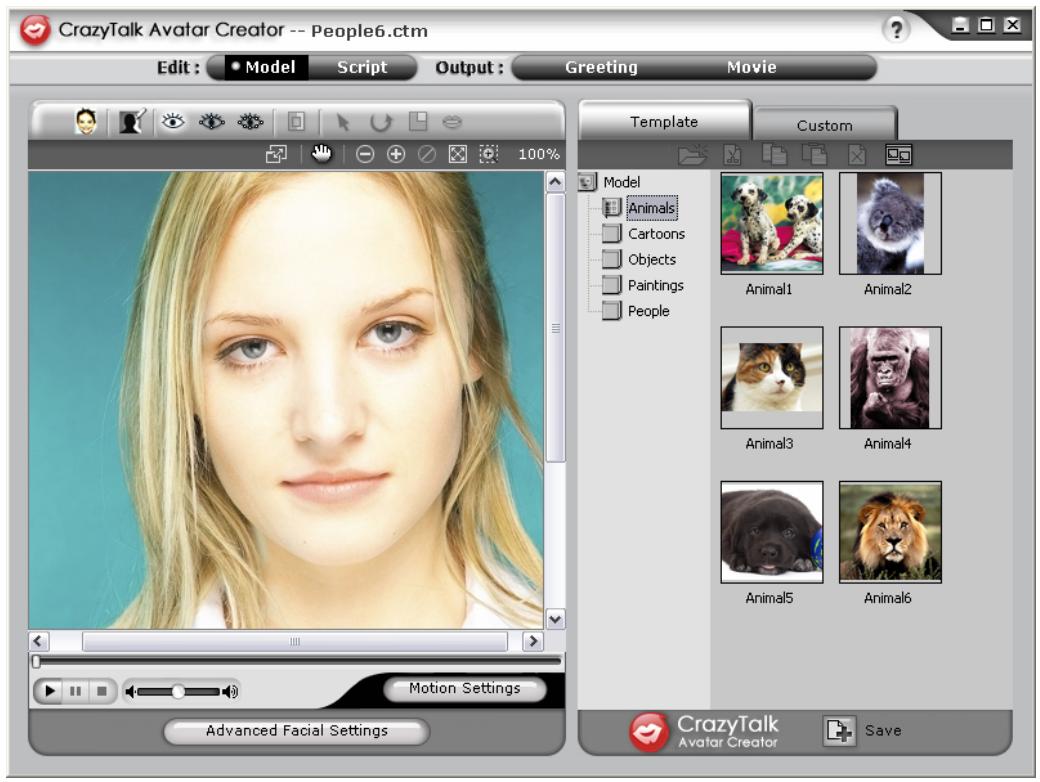
Getting Started
Operating System
- Windows Vista/XP/2000
CrazyTalk Avatar Creator allows you to import any digital photo, image or likeness of a face, with the innovative real time image
morphing-NaturalVoice technology and/or TTS (Text-To-Speech)
technology, to bring your favorite photos to life! A message combined with your talking image provides a CrazyTalk Avatar character to send to your friends and colleagues using various output options.
You can send animated greeting cards or even export movie files of numerous formats with CrazyTalk Avatar Creator.
Getting Started-Creating a CrazyTalkAvatar Creator Model
You can create your own customized CrazyTalk Avatar Creator Model using any digital image.
Click Edit/Model to start creating a CrazyTalk Avatar Creator model.
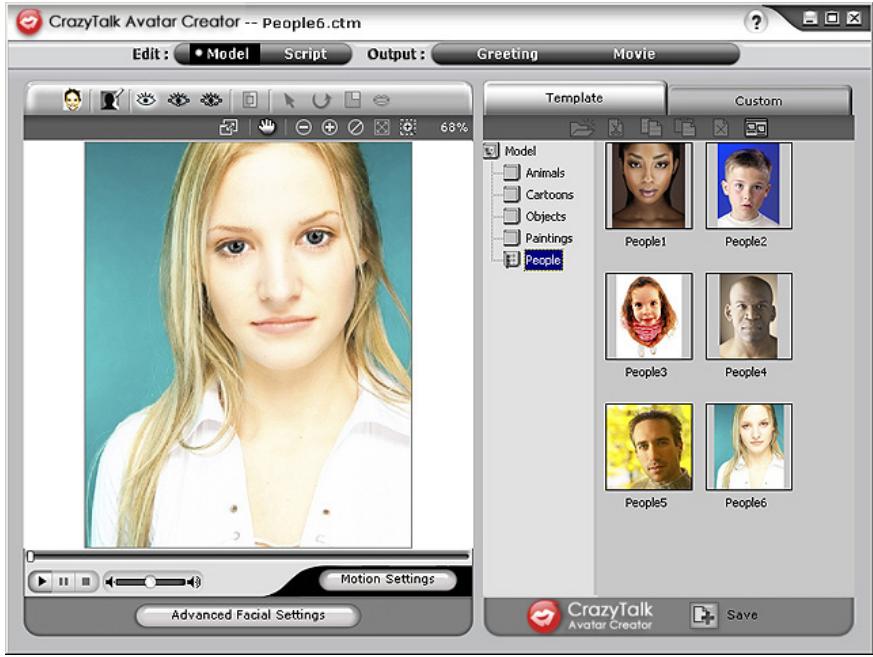
To create a CrazyTalk Avatar Creator Model:

- Click Import Image
The Open dialog box appears. Select
the desired image and click Open to load it.
- The Image Processing tools will be automatically launched.
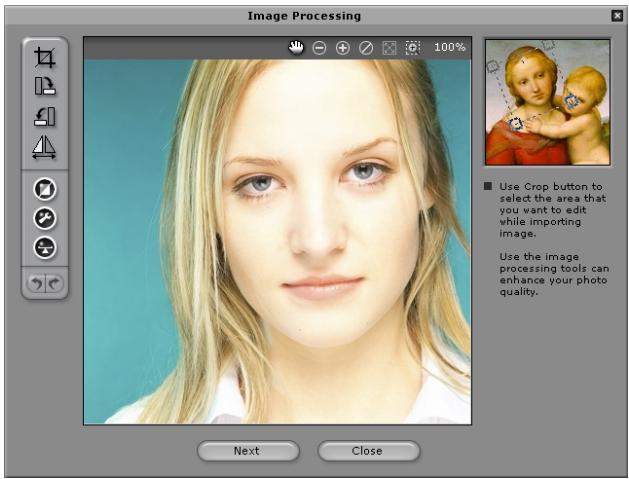
Crop Image : Select the required image area.
Rotate CW /Rotate CCW : Rotate the image by 90 degrees clockwise or counterclockwise.
Mirror : Flip the image horizontally as a mirrored reflection.
Smart Level : Adjust the color levels of the image automatically.
Color Level : Adjust the brightness, contrast, hue, and saturation levels of the image manually.
Color Balance : Adjust the color balance manually.
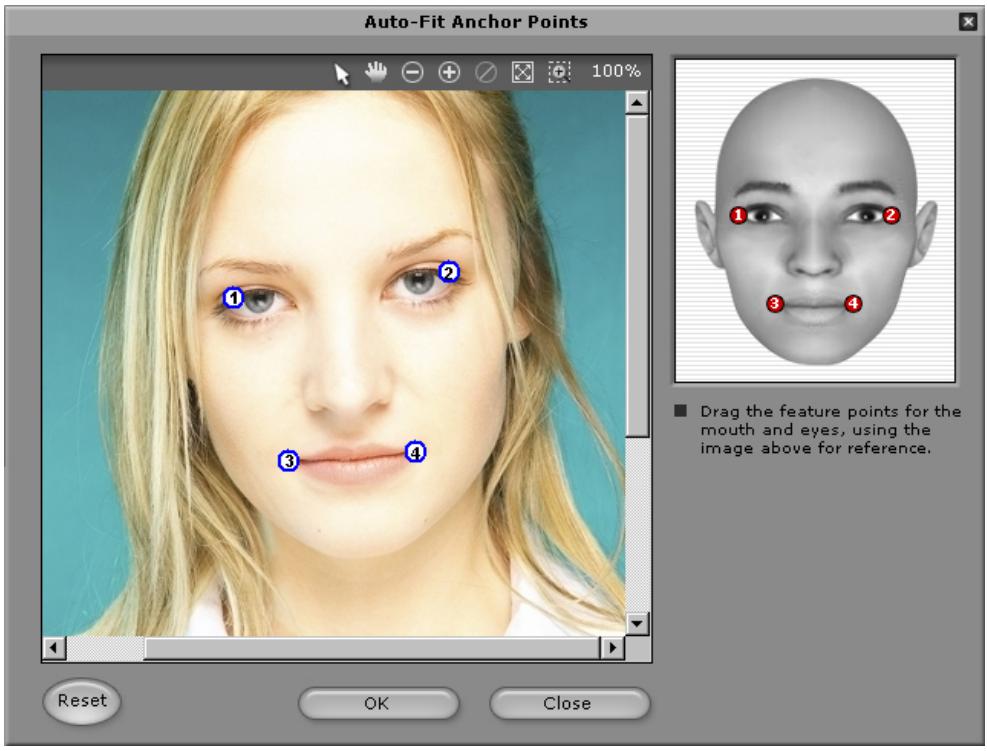
- Click Next and the Auto-Fit Anchor Points dialog box pops up. Follow the guide sample image at the right side to place the 4 points for the fitting process.
- Background Mask Editing : Modify the mask of the image (also known as alpha channel) to specify the none-effect part of the image.
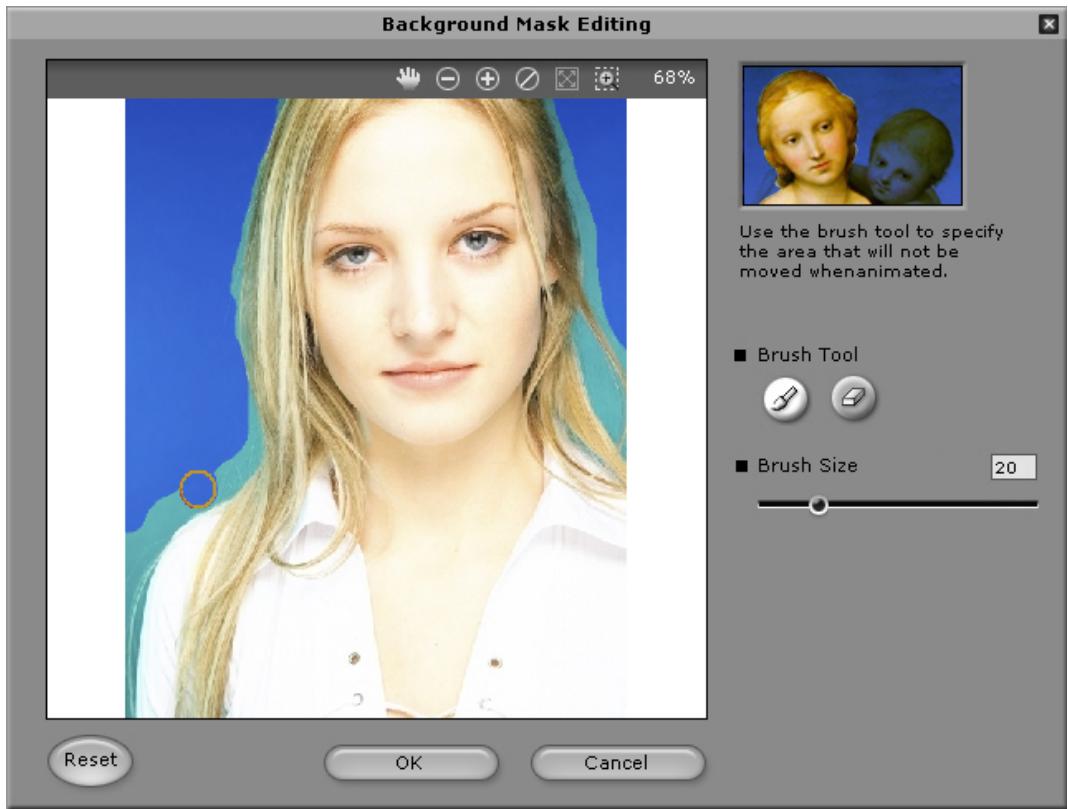
Brush Tool:
Increase : To enlarge the background area in the image.
Decrease : To erase parts of the background mask.
Brush Size: Move the slider to adjust the size of the brush tool.
Advanced Facial Settings: Click to open a dialog box with four tabs.
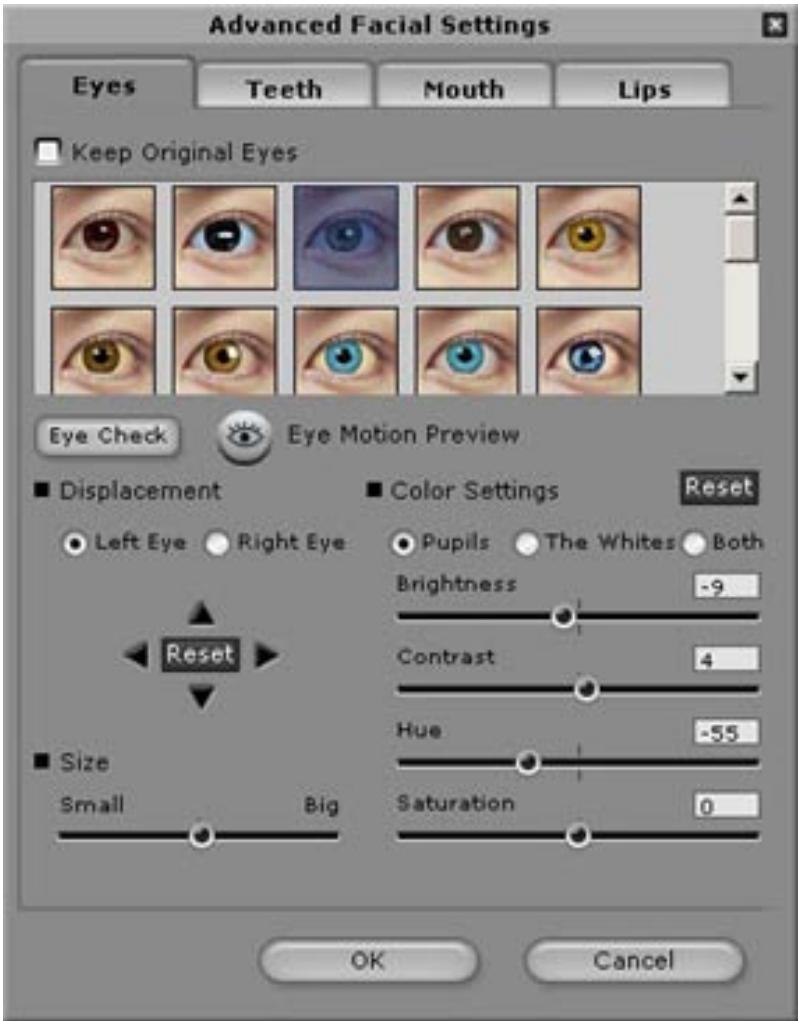
Eyes: Add virtual eyes and adjust the color of each part of the eyes.
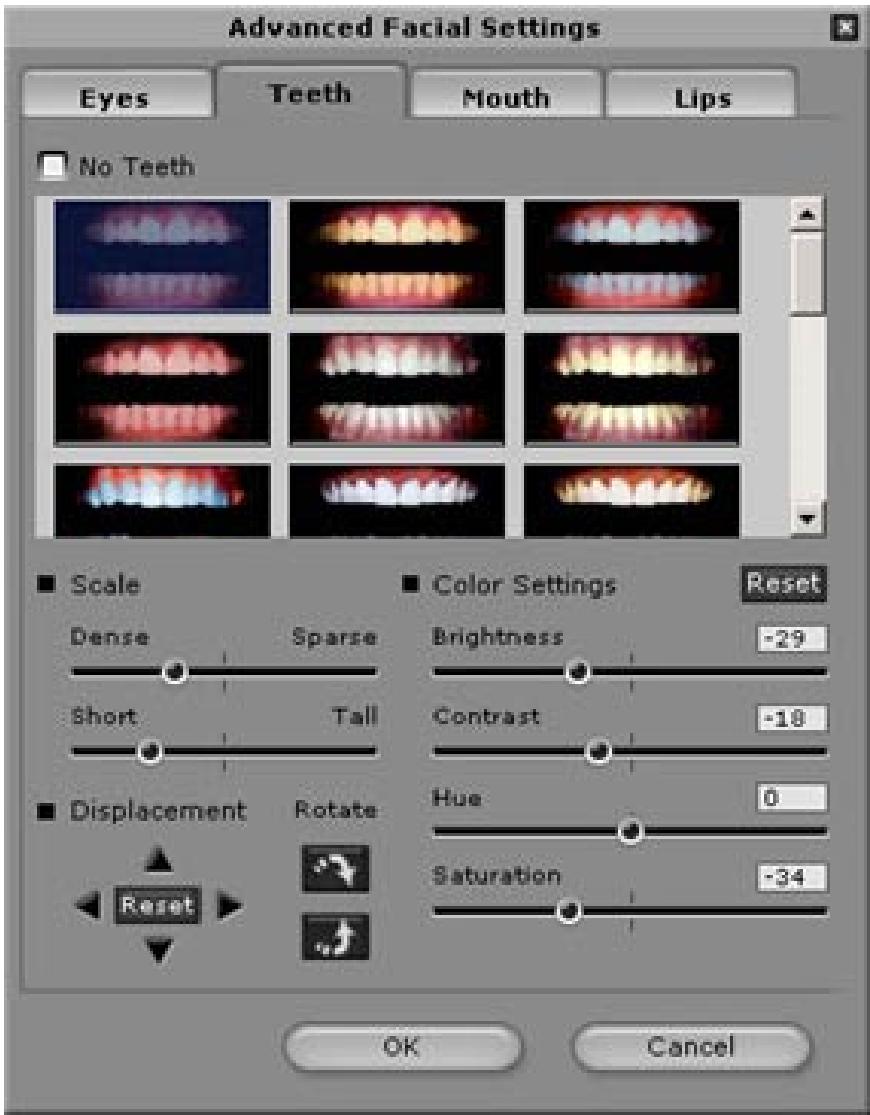
Teeth: Add virtual teeth and adjust the teeth.
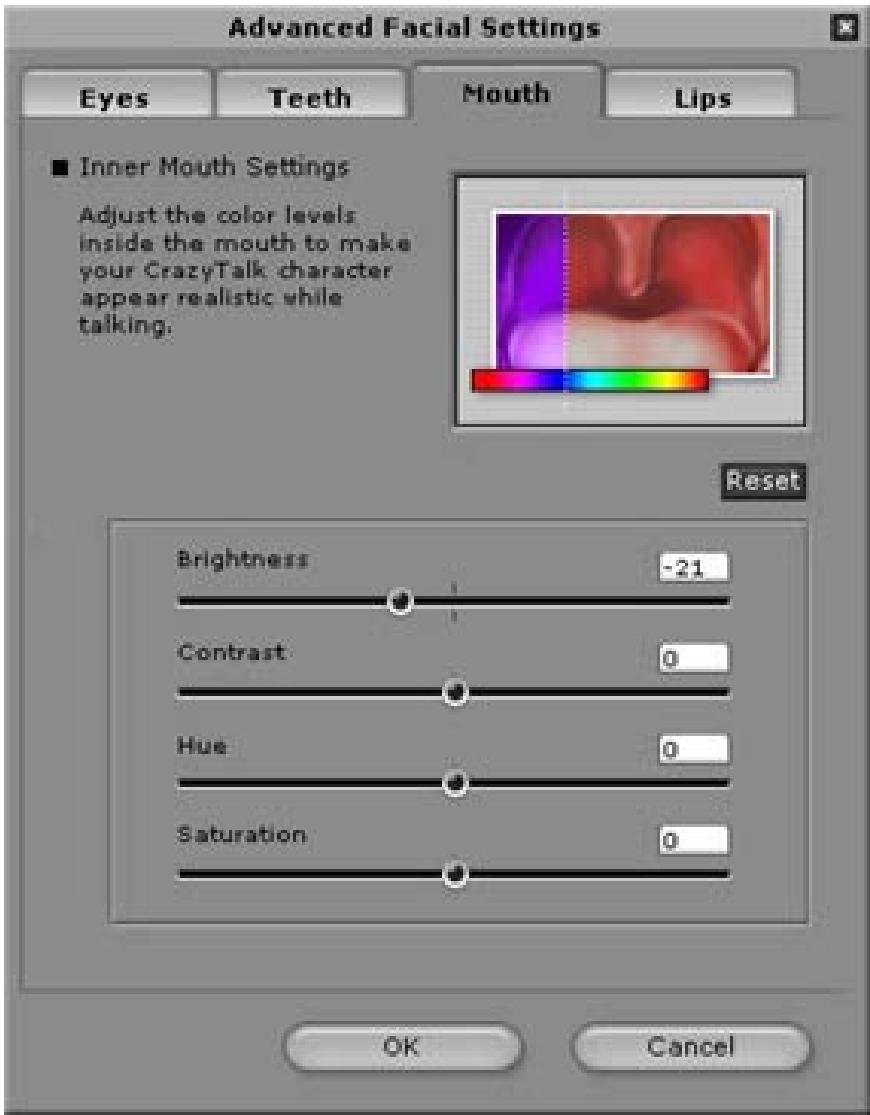
Mouth: Adjust the color levels of the inner mouth.
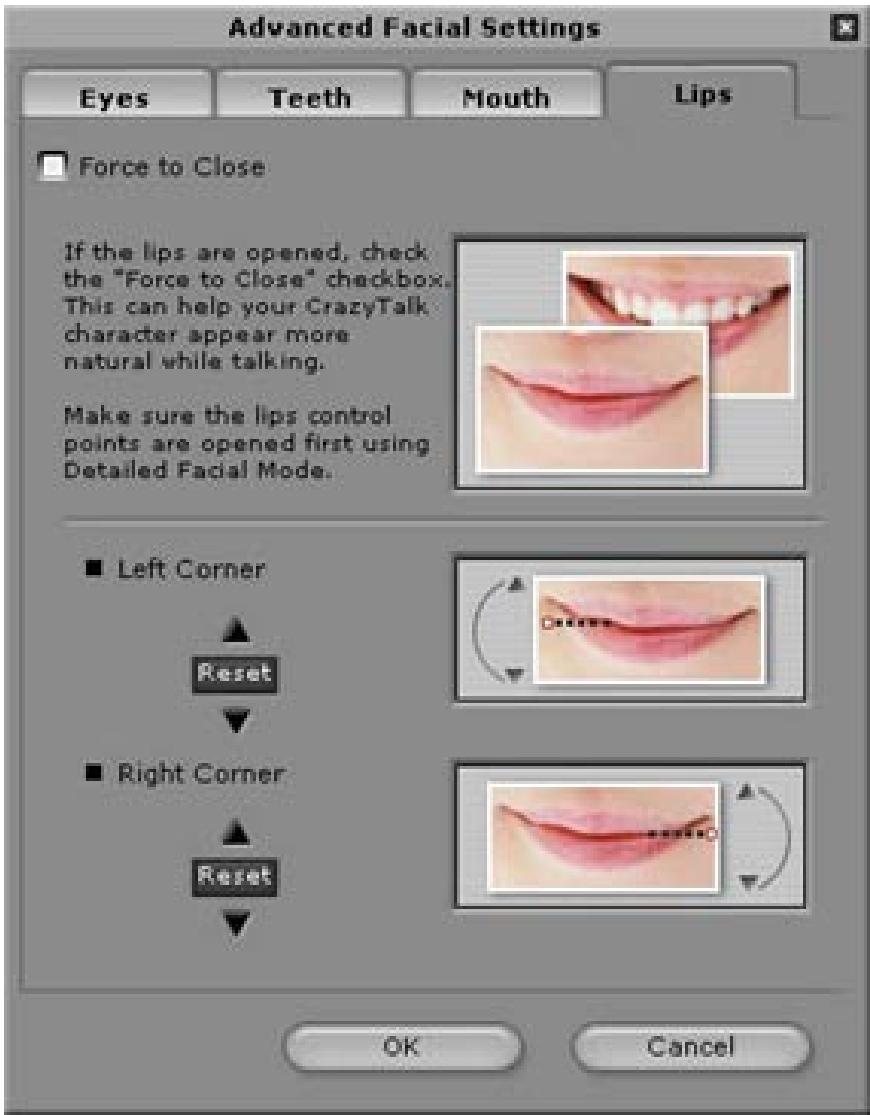
Lips: To close an open mouth in the image and set the position of the lips.
Getting Started-Creating a CrazyTalkAvatar Creator Script
The Script page is the critical phase in CrazyTalk's process of creating a talking model with expressions, facial movements, and special effects.
Select Edit/Script:
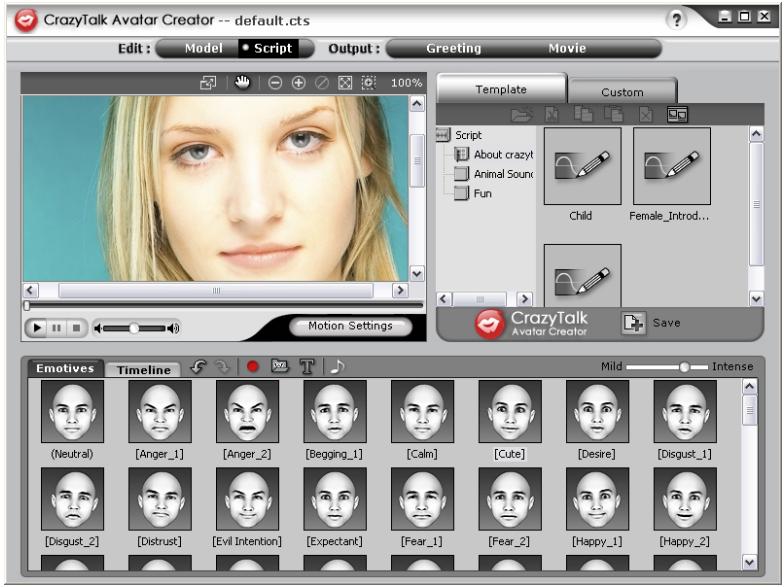
To create a Talking Message:
-
To specify the speech for the talking model, do one of the following:
-
Voice Recorder : Click to open the sound recorder menu.

Click the Record button to start recording from the audio source specified.
- Import Wave File : Import a speech file in PCM WAV format and use it as the script text.
- Edit by Text-To-Speech : Click to open the TTS dialog box.
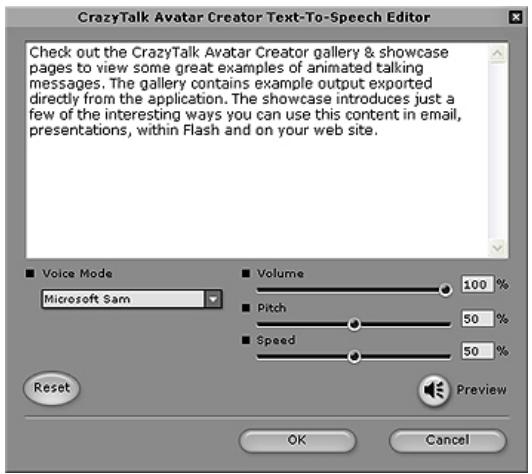
Type in the text. Click the Voice Mode drop-down list box to select the voice type for your model. Adjust the voice quality to achieve a real-life effect using the Volume,
Pitch, and Speed sliders. Click button to Preview the result.

NOTE
Download the text-to-speech converter from Microsoft, or browse Reallusion's website for more information.
- Click Background Audio for inserting background music.
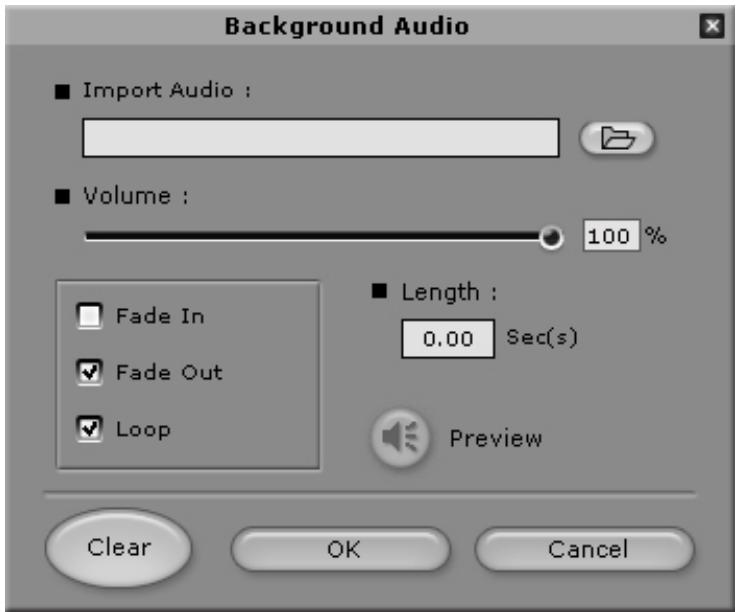
- Browse: Click to import PCM WAV file as background music.
Volume: Move the slider to adjust the volume. - Fade In/Fade Out: Check to specify if the audio fades in or out respectively.
-
Loop: Check to repeat the audio continuously.
Preview: Click to playback the audio. -
Click the Emotives tab, double-click on the desired profile for applying to the model, and the project plays automatically.
-
Use the slider to adjust the strength of the model's expression.
- Click the Timeline tab and you are prompted to upgrade for full features of the Timeline.
- Click the Save button to save the current script as a customized profile.
Getting Started-Creating a CrazyTalkAvatar Creator Greeting Card
You can create a greeting card with a talking image, personalized message, and special effects. The card can be saved as .MHT (Multipurpose HTML - Embedded in e-mail orHtml pages) or .CAB (compressed) file.
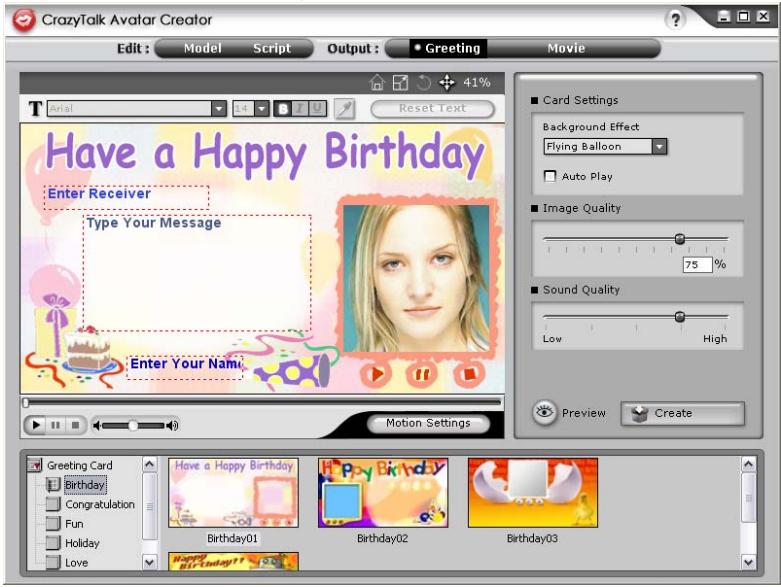
To create a card, do the following:
- Select a CrazyTalk Avatar Creator model with facial features, motions and expressions specified.
- Create a CrazyTalk Avatar Creator script to specify the animation and speech.
-
Click the Output/Greeting tab.
-
Double-click a card template in the card gallery to apply to the model. Use the playback controls to preview the card.
- Resize Model : Adjust the size of the mode to fit it into the card frame.
- Rotate Model : Rotate the talking image.
- Move Model : Pan the image within the card frame.
- Reset Model : Discard all changes to the model and restart again.
- Type texts into fields (Enter Receiver, Type Your Message, Enter Your Name) of the card accordingly with customized text styles by using the Text Editing Tools. Reset Text: Discard all changes to the text.
- Card Settings:
Image Effect: Select a JavaScript effect to apply onto the card.
Auto Play: Automatically playback the card as it is opened.
- Image Quality: Move the slider or enter a number to the edit box to adjust the image quality.
- Sound Quality: Move the slider to adjust the audio quality.
- Preview: Click to preview and play the card. (Auto Play checked).
- Create: Click to open the Save As dialog box. Specify the name, location, file type (.MHT - for inserting into your e-mail or web
pages, and .CAB - compressed) of the card and click Save to create the card.
Getting Started-Exporting Movie Files
Movie files supported by CrazyTalk Avatar Creator: AVI, Real Media (RM), WAV, Sequence BMPs/TGA, Animation GIF and Windows Media (WMV) files.

NOTE
Install WMVEncoder9 from the Microsoft website for exporting WMV files format.
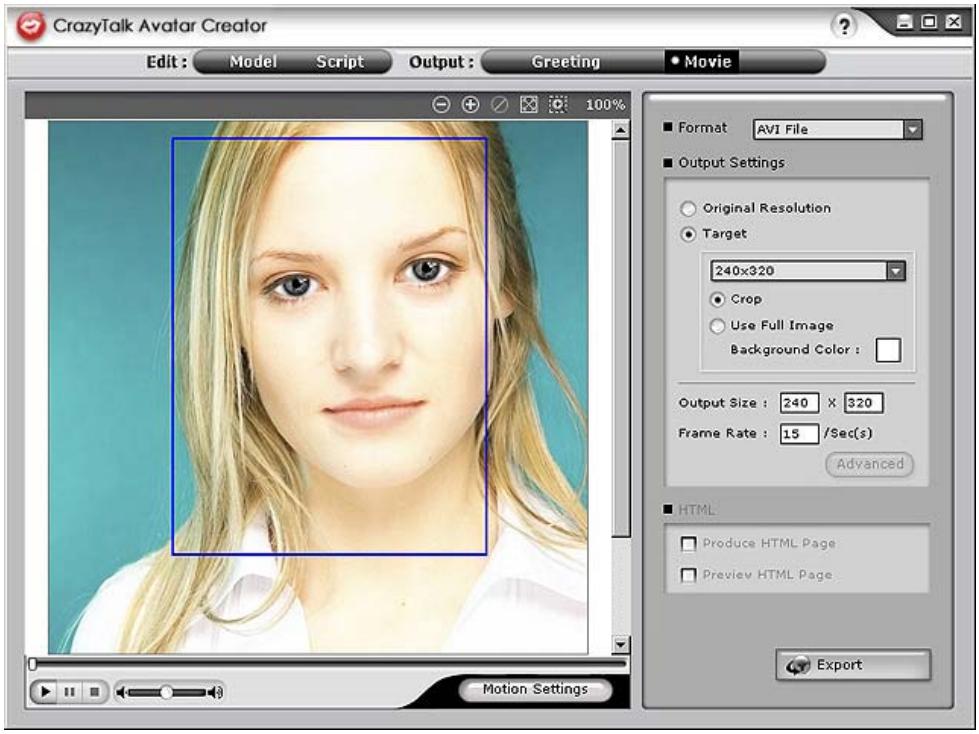
To export movie, do the following:
- Select a CrazyTalk Avatar Creator model with facial features, motions and expressions specified.
- Create a CrazyTalk Avatar Creator script to specify the animation and speech.
- Click Output/Movie tab.
- A crop box shows. Move and resize it (drag the box or edit the Output Size options) to the desired portion of the image for exporting.
- Click the format drop-down list box to select the media format.
- Check the Original Resolution to retain the same resolution as the source file.
- Check the Target to specify the resolution corresponded to the media format.
- Check the Use Full Image to export media with the whole image.
- Check the Crop option if you want to crop talking image on the sides.
- Click the Background Color box to select the background from the color palette.
- Specify the dimensions of the output frame by entering the height and width in pixels under Output Size.
- Specify the frames per second in the Frame Rate box.
-
The HTML options are available if you select a RM or WMV file from the media format.
-
Check the Produce HTML Page to create an HTML page (in the same location as the media file) with the media content embedded.
-
Check the Preview HTML Page to preview the HTML page before exporting.
-
Click the Export button to export the selected talking image to multimedia format.
Tips and Suggestions Facial Fitting Tips
- How can I fine-tune the model image for more realistic facial movement?
a. The control point 1, 2, 3 and 4 are the key to control the facial mesh morphing. 1, 2 control the vertical movement strength and 3, 4 controls the horizontal movement strength.
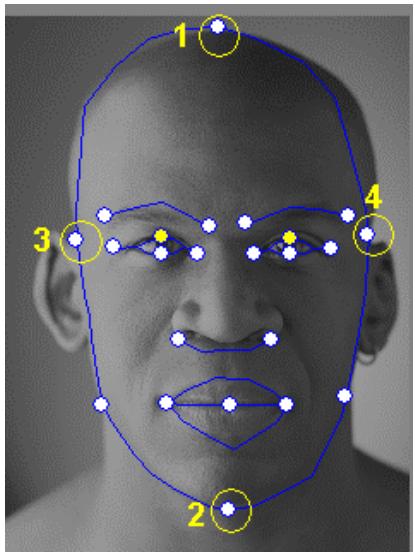
b. Press Motion Settings on model page and check the Head Motion Preview to preview the movement. If not perfect, you can close the dialog and try to change the location of control point 1-4.
Motion Settings


How can I make the chin movie more naturally while talking?
a. Drag the chin control point out of the face.
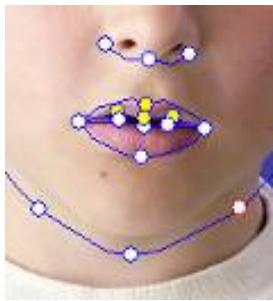

Good
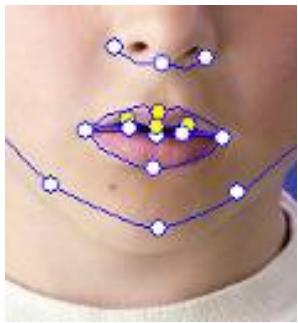

Bad
b. Continue using Head Motion Preview to preview the result, and drag down the mouse to preview the mouth open while you lower the head.
- How can I make the eyes look more real?
If you are not using virtual eyes, but retaining the eyes in the original picture, move the control points outside the eyelids to create an even more realistic blinking action.
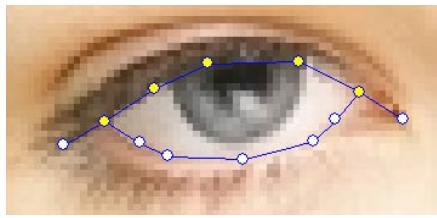
Incorrect
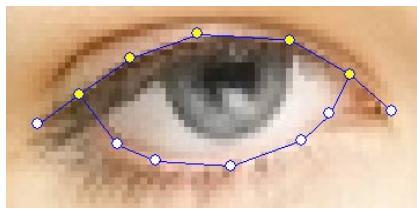
Correct
If you are using eyes from the CrazyTalk eye library, you need to set the eye control points inside the eyelids This improves the realistic quality of the animated eyes.
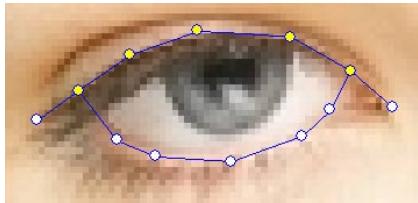
Incorrect
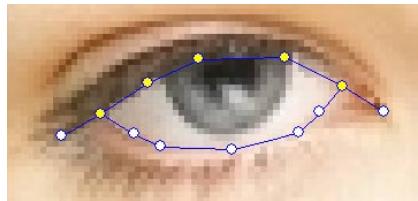
Correct
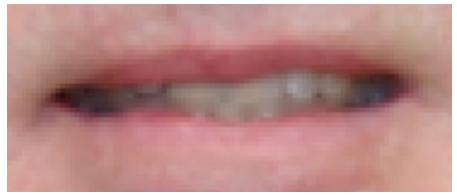
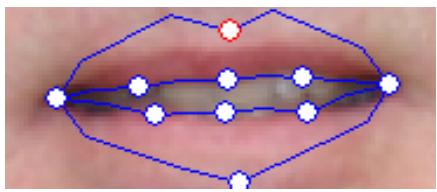
- How can I improve the mouth movements for a photo with an open mouth?
Use the Detailed Facial Mode to keep the upper and lower lips separate. Use the Force to Close function to close the mouth while speaking.
The following illustration shows how to fit an open mouth with the anchor points.
- How can I avoid background movement without changing the original background?
Use the Background Mask Editing button and spread out the background using the brush and clear tools. Don't get the mask too close to the facial area and make sure that it does not overlap the head of the model.
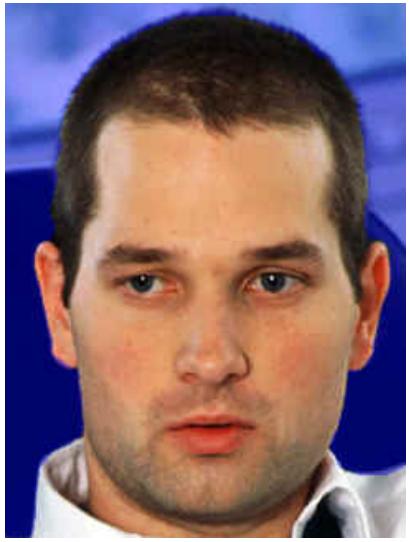
Incorrect

Correct
- How can I use the Close Mouth Points feature to speed up the facial fitting?
When you press the Close Mouth Points button, the mouth will snap shut causing the points for the upper and lower lip to move together in a single line. If your character has a closed mouth, enable this feature so no dark line is visible between the lips while the mouth is closed. If your model has an open mouth, disable this feature so you can fit the points to the upper and lower region of the lips
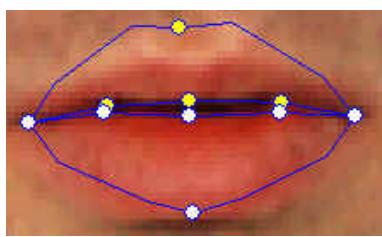
Before closing
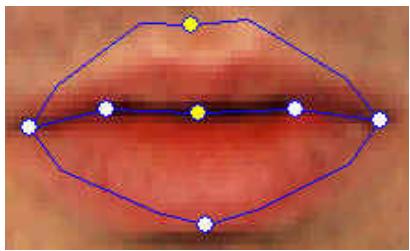
After closing
- How do I know which control point is the upper or lower control points?
Control points that are yellow in color indicate that they are the upper control points.
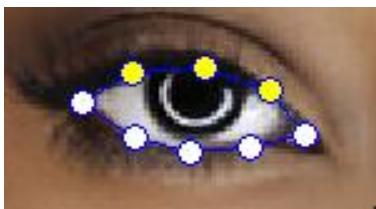
Control points of the eyelid
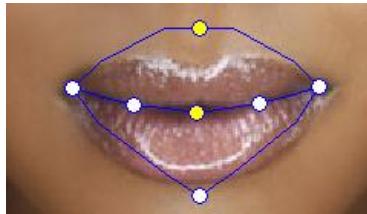
Control points of the upper lip
CrazyTalk CamSuite Introduction

CrazyTalk
Cam Suite
Overview
Welcome to CrazyTalk Cam Suite, an animated messaging tool featuring customizable emotive facial animation that gives you much more fun than the conventional video chatting on instant-messaging applications. With CrazyTalk Cam Suite, you can start videoconferencing with or without a web camera installed in your PC.
With the easy interface of CrazyTalk Cam Suite, what your messenger friends see is your chosen avatar conveying lip-synching, instant emotive animations and special effects on your behalf. Alternatively, they can see your face with different expressions and special effects featuring by MagicMirror.
You can download a variety of avatar content from the Reallusion website or create your own avatar from a photo using CrazyTalk Avatar Creator. So any photo of yourself, your family or friend, your pet, from cartoons or comics, can be magically brought to life as an animated character on your messenger. On the website, you may also purchase more expressions, and comic effects to fulfill your favorite library. And of course, the fun rolls bigger
and bigger when you share this amazing program with all your friends on instant-messaging applications!
Getting Started
Operating System
- WindowsVista/XP/2000
Refer to the following steps to quickly start using CrazyTalk Cam Suite in your instant-messaging video conference. For more details on how to use each feature of CrazyTalk Cam Suite, refer to the rest of this Online Help.
- If you have an instant-messages application installed on your OS, please manually change the audio/video devices.
- You may apply the features in the AvATAR tab.
i. Click one emotion item to preview the avatar video. You can also initiate a video call, and see the avatar video display in your messenger video window.
ii. Click to select an emotion from Emotions.
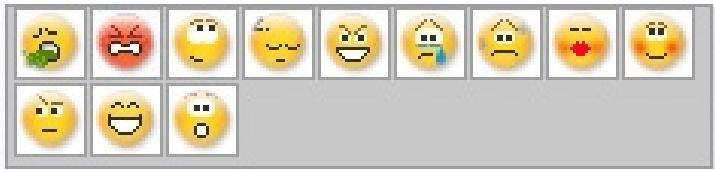
Emotions offers a wide range of emotive expressions such as happy, sad, surprised, scared, angry, and crying. Click to apply an emotion to your avatar along with the sound effect. If you are
using video conference, the lipsync and emotive animation are both visible to your conferencing partner.
iii. Click to select an avatar from Avatars. You will see your selected avatar appear in the preview window.
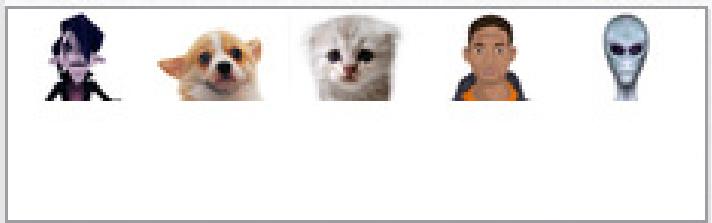
Avatars shows the default avatars provided by CrazyTalk Cam Suite as well as any imported avatars. Click to select an avatar and it will be displayed in the preview window. If you are on a video session, your partner will be able to see the avatar and the animation, even if your partner does not have CrazyTalk Cam Suite installed.
- Alternatively, you can utilize your own face applied different effects in the MagicMirror tab.
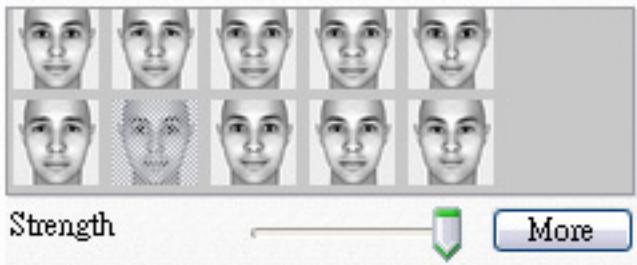
i. Click on one of the expression to apply to your face. The result will be reflected on both the preview window in MagicMirror and your messenger conference window.. Expression library provides numbers of expressions such as, alien, bull, young, thin, sad, .etc. You may switch your expression anytime according to the subject of your conversation.
ii. Drag the Strength slider to increase or decrease the strength of your expression. One single expression then generates different aspects.
Face Morph :
Apply Expression
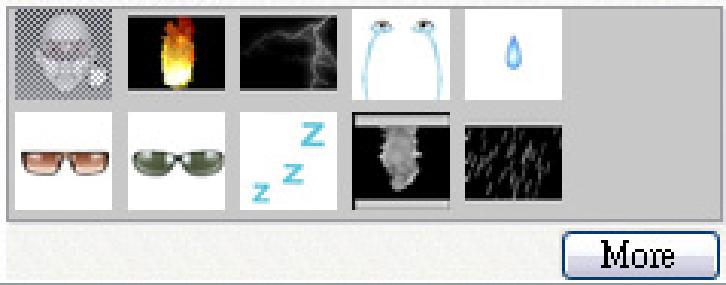
iii. You may optionally click on the Comic templates to give a sudden impact to your partner during the video session. The comic library contains fire, thunder rain, sweat, etc. effects. Click one of the comic effects and it will display on your face instantly in the preview window.
Comic Effect :
Apply Comic
- Plug in a microphone and your avatar can lip-sync whatever you say instantly.
- You are now ready to use a wide range of animated expressions along with your video avatar on your instant messaging applications. Refer to the other parts of this Online Help for more information about CrazyTalk Cam Suite.
About the Interface
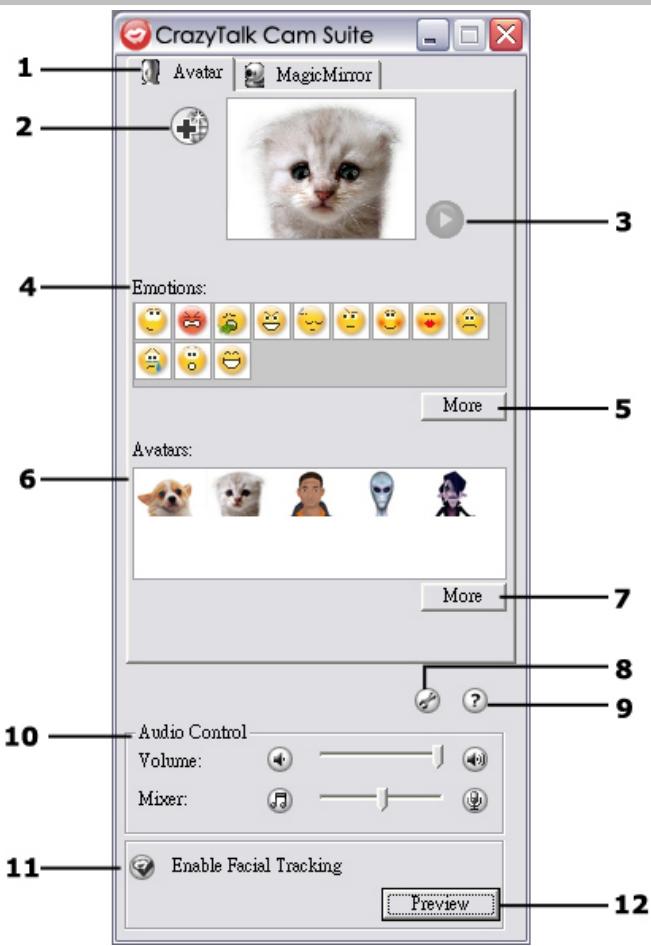
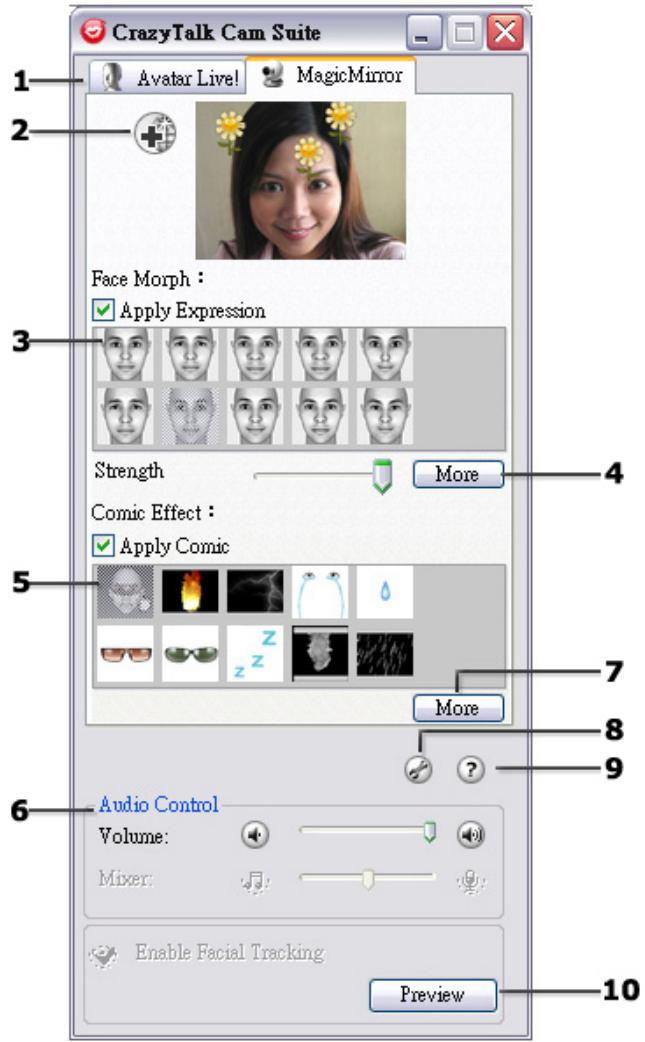
The following illustrations show the components of CrazyTalk Cam Suite interface:
Avatar Interface:
- Modes
- Add Content from web site
- Play Control
- Emotions
- More Emotions
- Avatars
- More Avatars
- Settings
- Help
- Audio Control
- Enable Facial Tracking
- Preview
MagiceMirror Interface:
- Modes
- Add Content from web site
- Face Morph
- More Expression
- Comic Effect
- More Comic Effect
- Audio Control
- Settings
- Help
- Preview
Avatar
Selecting an Emotion
You can add emotive animations to your avatar so that you can convey any expression you want during a messenger video conference. With the advanced facial morphing technique, you can control your avatar's lips and expressions to show a wide range of emotions such as happy, sad, and angry, as well as facial movement such as winking, blinking, opening and closing of the mouth, and nose or cheek movement. Moreover, all the emotions are accompanied with sound effects to enhance the expressions.
Use one of the following steps to select the emotion applied to your avatar:
- Select an emotion and your avatar will show the emotion instantly.
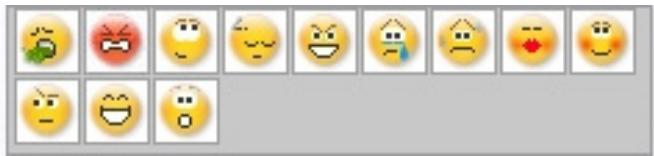
- You can click More to get more emotions.
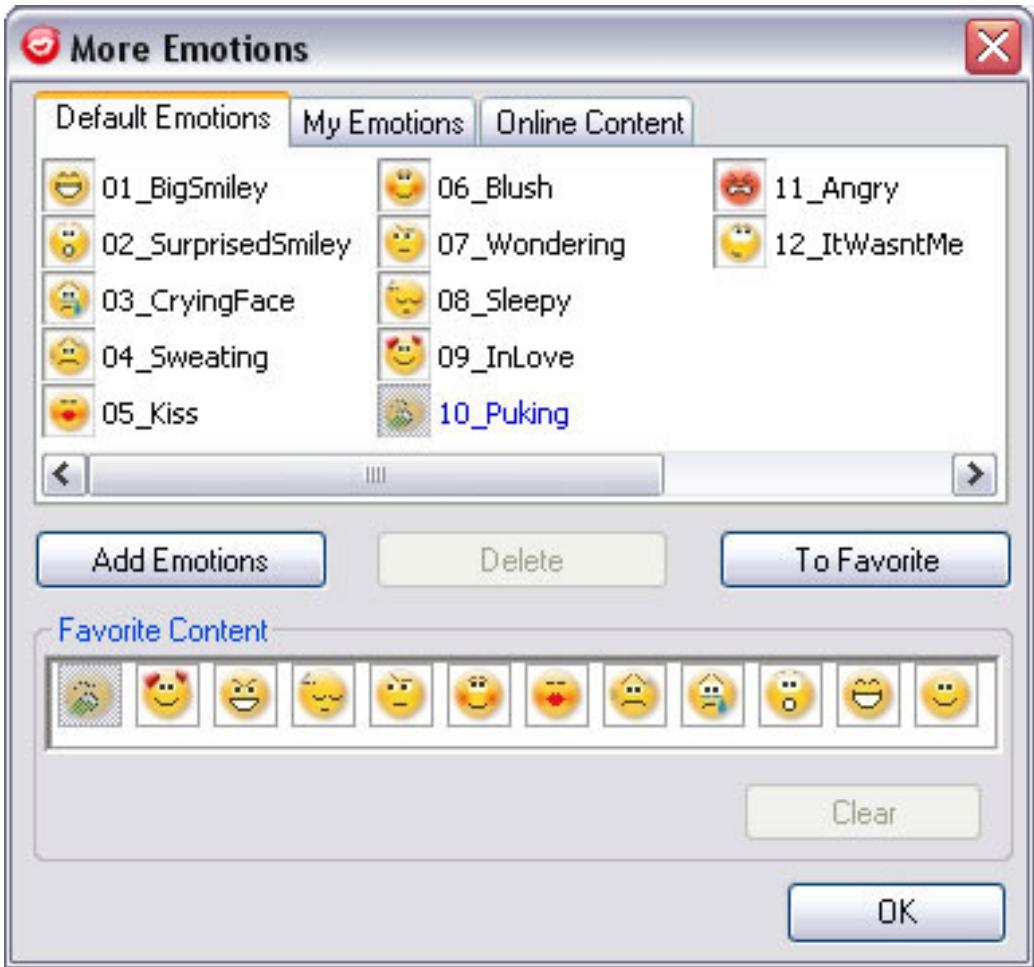
In the dialog, you can see Default Emotions, My Emotions and Online Content. In Default Emotions, you can see the default emotion content provided by CrazyTalk Cam Suite. Click My Emotions and you can see the content which you have purchased from the Reallusion website or create by CrazyTalk Avatar Creator. In Online Content, you can play back and
review the latest avatars with emotions or link to the content store site for purchasing more contents.
Double-click any emotion in the More Emotions dialog, your avatar will show the emotion instantly.
Click Online Content and it will lead you to the content store on the website. You can view and purchase the new, hot and featured content.
If you have installed CrazyTalk Avatar Creator, click Add Emotions to show the CrazyTalk Avatar Creator content data. Please refer to Import an Emotion for details.
To delete an emotion, select the emotion and click Delete.
- Select an emotion and click To Favorite, the emotion will be added to Favorite Content; the Favorite Content will be displayed on the CrazyTalk Cam Suite main interface, which is convenient for you to select afterwards.
○ Select an emotion in Favorite Content and click Clear, and you will remove the emotion from the Favorite Content. Please note: you will not delete the content; instead you remove the content from the Favorite Content section.
Importing an Emotion
CrazyTalk Cam Suite allows you to import customized scripts (.cts) from CrazyTalk Avatar Creator and use them as your emotions. This function expands your emotion library tremendously, as you can choose audio files or record your own voice to create your emotions.
In addition to creating your own emotions, you can download new emotion from the Reallusion website.
To import new emotions:
1. Click
Add Emotions
to display the import options.
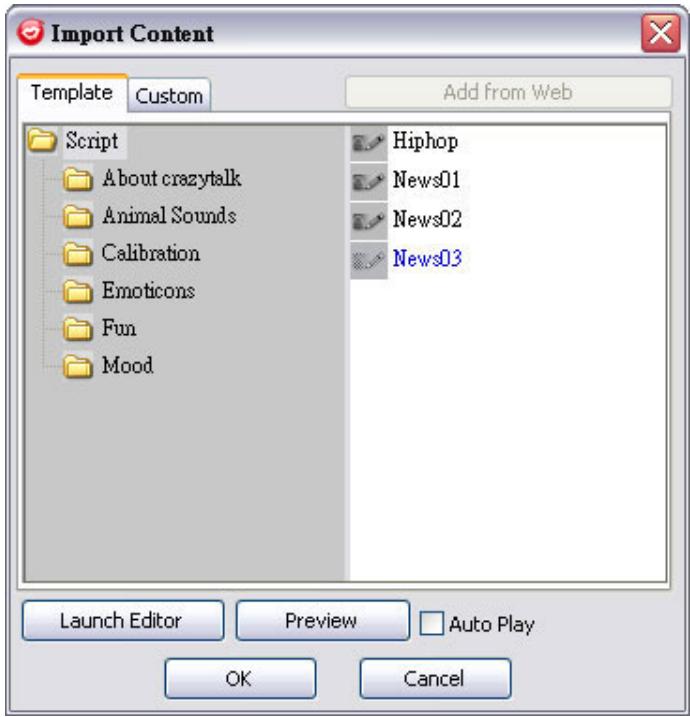
- Click Template and browse through the folders to select a script (.cts) from the CrazyTalk Cam Suite default template scripts. Alternatively, click Custom to browse through the custom-created scripts. Refer to CrazyTalk Cam Suite Online Help to learn how to create custom scripts.
- Select a template or customized script and click Preview to see the script file. If the Auto Play checkbox is checked, it will auto play the script file.
-
Click OK to use it as your CrazyTalk Cam Suite emotion. The emotion is now displayed in My Emotions in More Emotions dialog.
-
To create new emotions using CrazyTalk Avatar Creator, click Launch Editor to start CrazyTalk Avatar Creator. The new emotions are saved under the Custom tab.
- To download emotions from the Reallusion website, click Add from Web. The new emotions are saved under My Emotions.
Selecting an Avatar
CrazyTalk Cam Suite enables you to select a customized image created by CrazyTalk Avatar Creator and use it as your avatar during instant-messaging video calls.
- Select an avatar from the Avatars area. You will see your selected avatar appearing in the preview window. If you are preceding a video conference, you will see the selected avatar displayed on your messenger application.
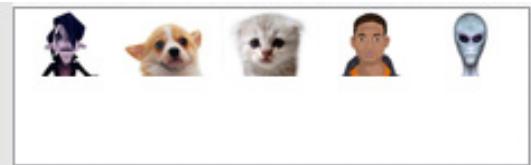
- You can click More to get more avatars:
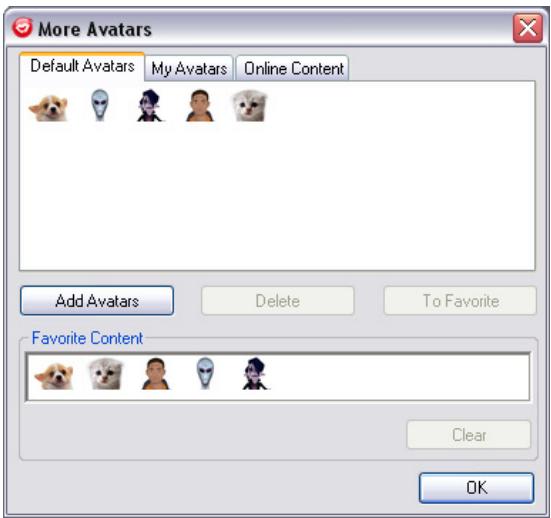
- In the More Avatars dialog, you can see the Default Avatars, My Avatars and Online Content tab. Default Avatars shows the default avatars provided by CrazyTalk Cam Suite. Click My Avatars and you can see the content which you have bought from the Reallusion Content Store or as well as any other imported avatars created using CrazyTalk Avatar Creator. In Online Content, you can play back and preview the latest avatars with emotions or link to the content store site for purchasing more contents.
- Double-click to select an avatar from the More Avatars dialog, and the avatar will be displayed in the preview window. If you are preparing a video conference, your partner will see this avatar and the animation, even if your partner does not have CrazyTalk Cam Suite installed.
-
Online Content will lead you to Reallusion Content Store on the web. You can view and purchase the new, hot and featured avatar content.
-
If you have installed CrazyTalk Avatar Creator, click Add Avatars to show the CrazyTalk Avatar Creator content data. Please refer to Import an Avatar for details.
- To delete an avatar, select the avatar and click the Delete button.
- When you select an avatar and click To Favorites, the avatar will be added to Favorite Content; the avatars in Favorite Content will be directly displayed on the CrazyTalk Cam Suite main interface, which is convenient for you to select afterwards.
- When you select an avatar in Favorite Content and click Clear, you will remove the avatar from Favorite Content. Please note: you will not delete the content in CrazyTalk Cam Suite; instead you remove it from the Favorite Content section.
Importing an Avatar
CrazyTalk Cam Suite allows you to import customized images or photos from CrazyTalk Avatar Creator and use them as your avatars. This function expands your avatar library tremendously, as you can choose any photo of yourself or even your favorite movie star as your avatar.
In addition to creating your own avatars, you can download new avatars from the Reallusion website.
To import new avatars, do the following steps:
1. Click
Add Avatars
to display the import options.
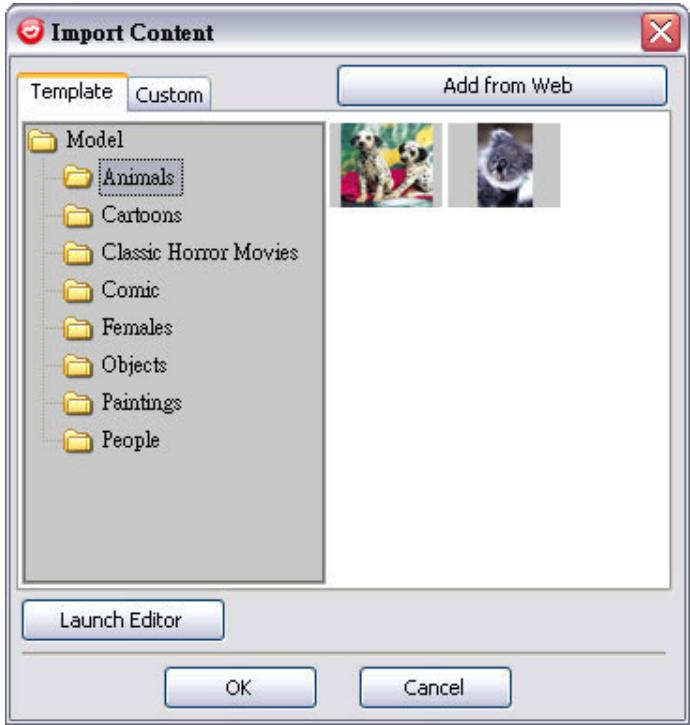
- Click Template and browse through the folders to select a model from the CrazyTalk Cam Suite default template images. Alternatively, click Custom to browse through the custom-created models. Refer to CrazyTalk Cam Suite Online Help to learn how to create custom models.
- Select a template or customized model and click OK to use it as your messenger avatar. The avatar is now displayed in My Avatars.
- To create new avatars using CrazyTalk Avatar Creator, click Launch Editor to start CrazyTalk Avatar Creator. The new avatars are saved under the Custom tab.
- To download avatars from the Reallusion website, click Add from Web. The new avatars are saved under the My Avatars tab.
MagicMirror
Using Face Morph
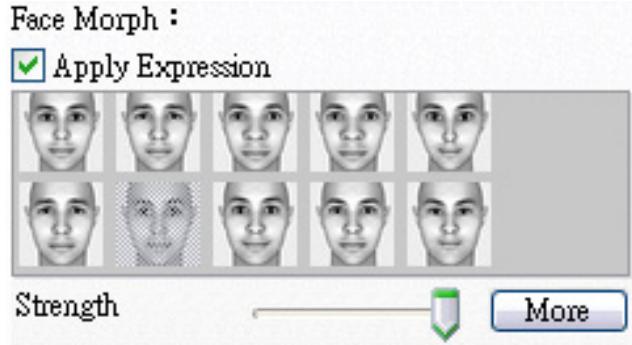
You can add different expressions to enhance your face by means of Face Morph technology. This can enhance your face so that your face looks thinner, younger, or funnier with alien, bull or foxy expressions.
To use the Face Morph features:
- Check up the Apply Expression check box to apply the expression onto your face. Check off the box to discard the expression.
- Click on one of the expression you desire.
- Drag the Strength slider right to strengthen the expression while drag it left to decrease.
- Click on the Preview button to invoke the preview window.
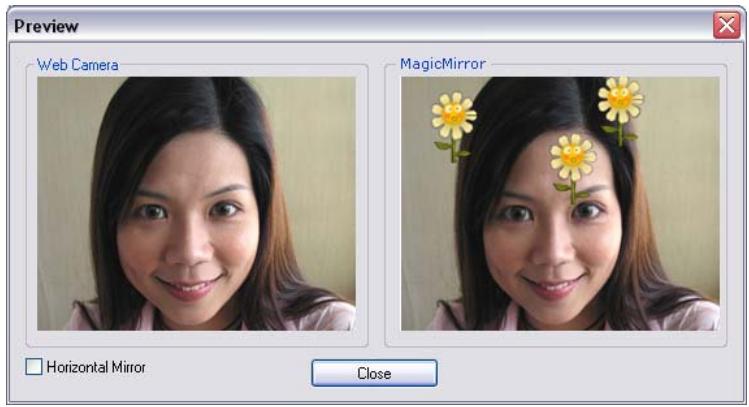
- The left pane, Web Camera, shows the original look of your face.
- The right pane shows the face with the expression applied.
- The MagicMirror pane is able to show Expression and Comic effect simultaneously.
- Check the Horizontal Mirror to flip the images in the two panes horizontally. You can then interact with Cam Suite much more like a mirror.
Getting More Expressions
MagicMirror enables you to adjust the amount of the Expression templates. Besides, you can also add, remove or purchase expressions to modify the contents in the Expression Favorite library.
- Please Click More to get more expressions.
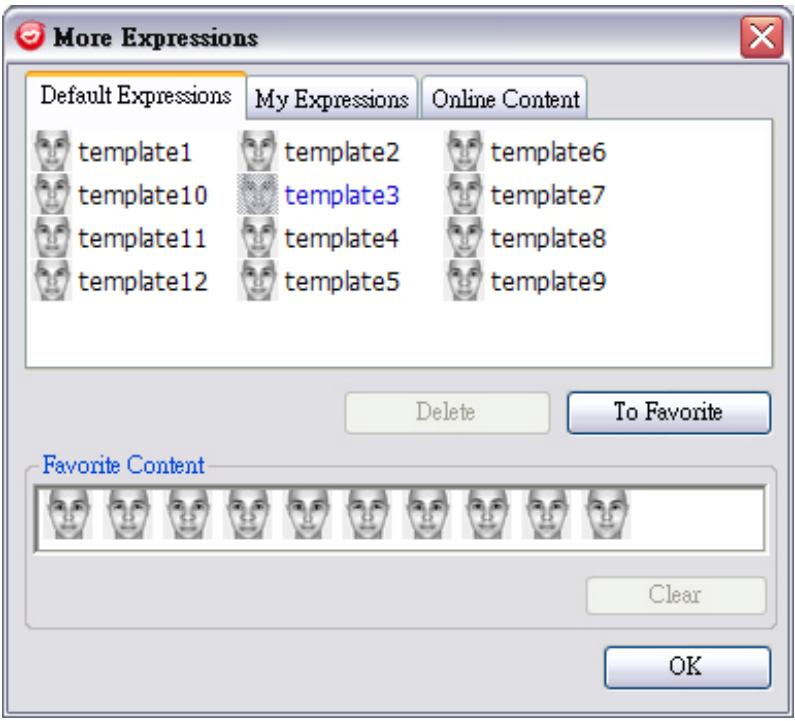
In the dialog, you can see Default Expressions, My Expressions and Online Content. In Default Expressions, you can see the default expression contents provided by CrazyTalk Cam Suite. Click My Expression and you can see the contents which you have purchased from the Reallusion website. In Online Content, you can play back and preview the latest expressions or link to the content store site for purchasing more expressions.
Double-click any expression in the More Expression dialog, your face will show the expression instantly.
Click Online Content and it will lead you to the content store on the website. You can view and purchase the new, hot and featured contents.
To delete an expression, select the expression and click Delete.
- Select an expression and click To Favorite, the expression will be added to Favorite Content; the Favorite Content will be displayed on the CrazyTalk Cam Suite main interface, which is convenient for you to select afterwards.
o Select an expression in Favorite Content and click Clear, and you will remove the expression from the Favorite Content. Please note: you will not delete the content; instead you remove the content from the Favorite Content section.
Selecting a Comic Effect
You can select interesting comic effects to entertain you and your messenger partners. You can use the effect to show your mood, emotions, feelings, or even add some accessories onto your face.
To use the Comic Effect features:
- Check up the Apply Comic check box to apply the comic effect onto your face. Check off the box to discard the effect.
- Click on one of the comic templates you desire.
Comic Effect:

Apply Comic
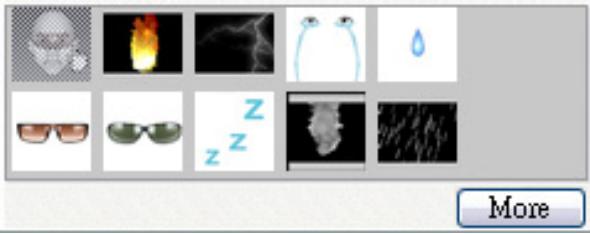
- Click on the Preview button to invoke the preview window.
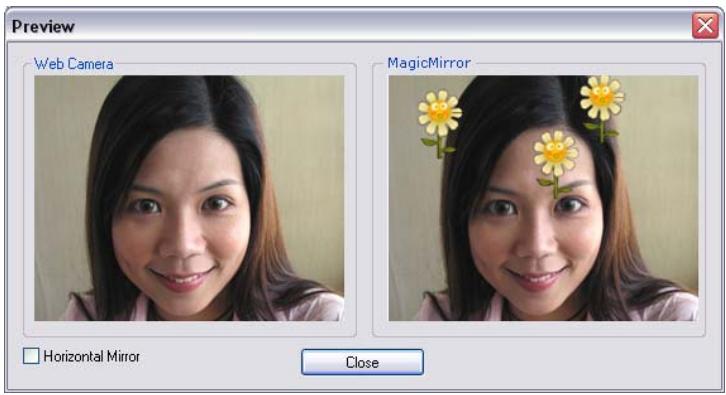
- The left pane, Web Camera, shows the original look of your face.
- The right pane, MagicMirror, shows the face with the comic effect applied.
- The MagicMirror pane is able to show Expression and Comic effect simultaneously.
- Check the Horizontal Mirror to flip the images in the two panes horizontally. You can then interact with Cam Suite much more like a mirror.
Getting More Comic Effects
MagicMirror enables you to adjust the amount of the Comic templates.
Besides, you can also add, remove or purchase comic effects to modify the contents in the Comic Favorite library.
- Please Click More to get more comic effects.
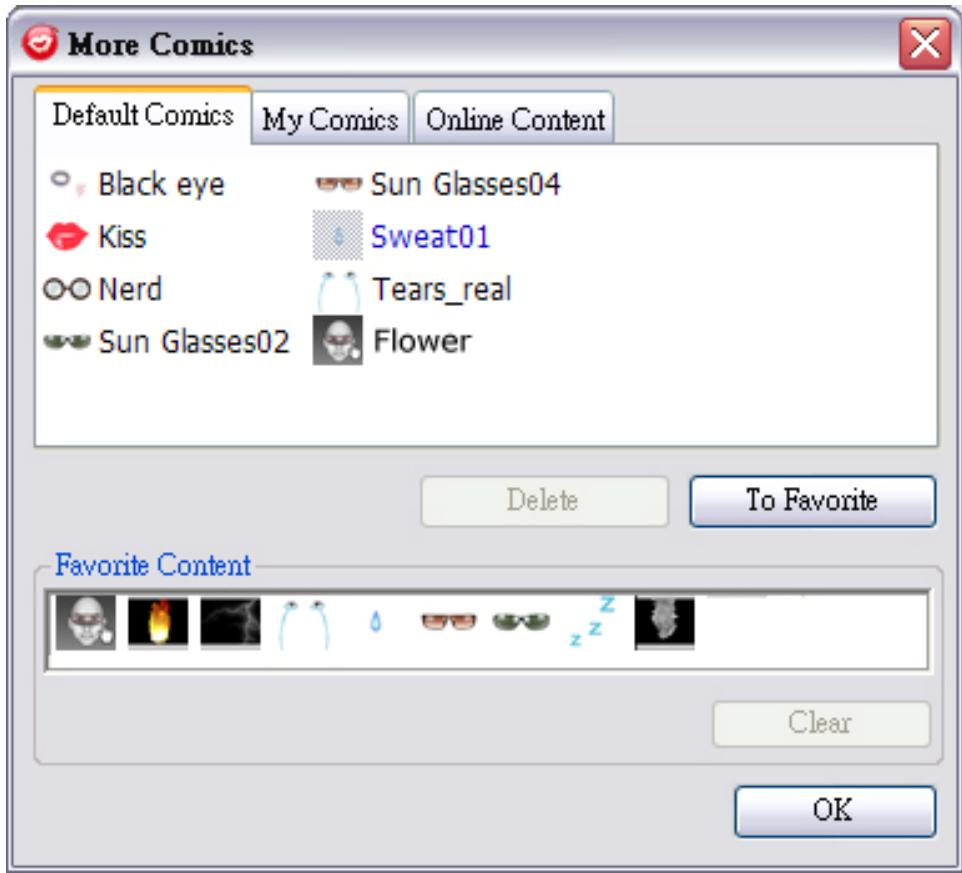
In the dialog, you can see Default Comics, My Comics and Online Content. In Default Comics, you can see the default comic contents provided by CrazyTalk Cam Suite. Click My Comic and you can see the contents which you have purchased
from the Reallusion website. In Online Content, you can play back and preview the latest comics or link to the content store site for purchasing more comic effects.
Double-click any comic in the More Comic dialog, your face will show the comic instantly.
- Click Online Content and it will lead you to the content store on the website. You can view and purchase the new, hot and featured contents.
To delete a comic effect, select the comic effect and click Delete.
○ Select a comic and click To Favorite, the comic effect will be added to Favorite Content; the Favorite Content will be displayed on the CrazyTalk Cam Suite main interface, which is convenient for you to select afterwards.
○ Select a comic effect in Favorite Content and click Clear, and you will remove the comic effect from the Favorite Content. Please note: you will not delete the content; instead you remove the content from the Favorite Content section.
Audio Control
Audio Control allows you to real-time control over the audio while calling.
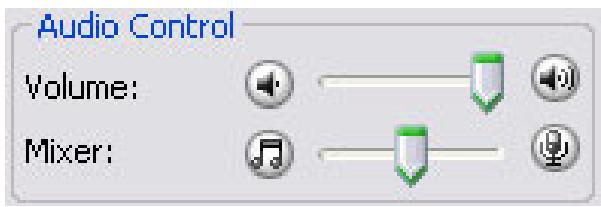
- The Volume slider bar allows you to control the volume while you talk.
- Click to turn all the audio volume down; and click to turn the audio volume up.
- The Mixer controls the audio level between music/sound effect and microphone.
- Click to increase the music/sound effect and decrease the microphone volume.
- Click to decrease the music/sound effect and increase the microphone volume.
Facial Tracking
This section describes items related to facial tracking.
Enable Facial Tracking:
- Switch Enable Facial Tracking tracking feature.

button to turn on/off the facial
- Move your head/mouse to trigger the avatar to track.
Tip: As for the target for tracking, please refer to Setting.
Click Preview button to invoke preview dialog box. You will see the Web Camera and Avatars window panes simultaneously.
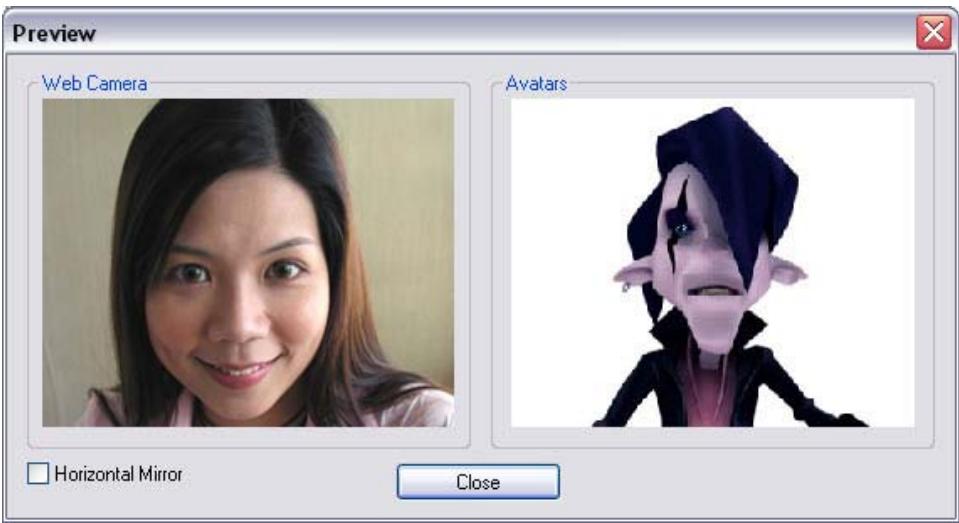
Check the Horizontal Mirror box on so the window pane flips horizontally. Thus you see yourself move toward the same direction as you move.
Settings
CrazyTalk Cam Suite allows you set the default status:
- Click

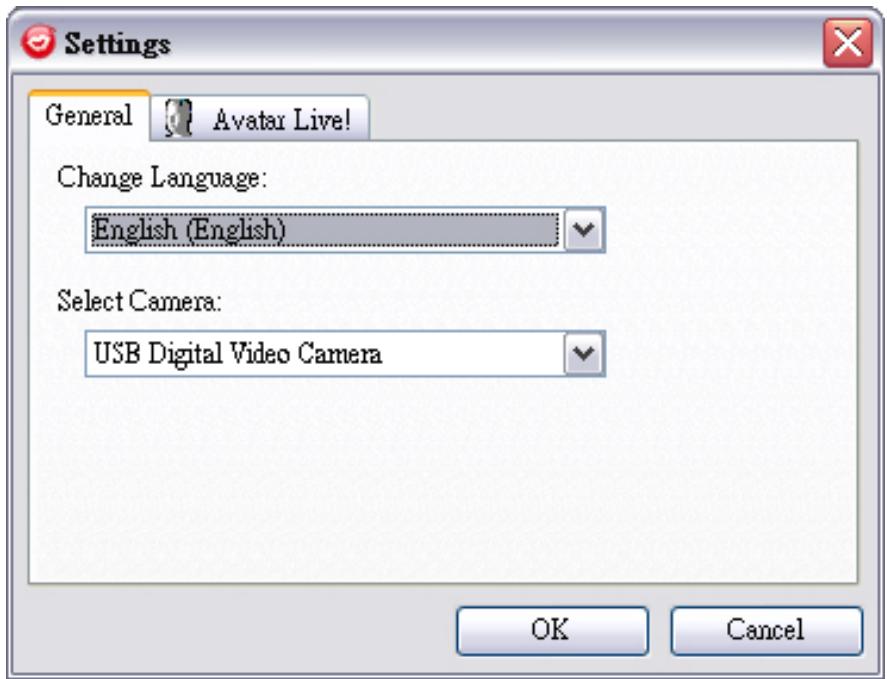
Settings to show the Setting window. You can change the
general settings in this dialog box.
General Settings
- Change Language allows you to change user interface to the selected language.
- If you have instant-messaging application installed on your OS, please manually change the audio/video devices.
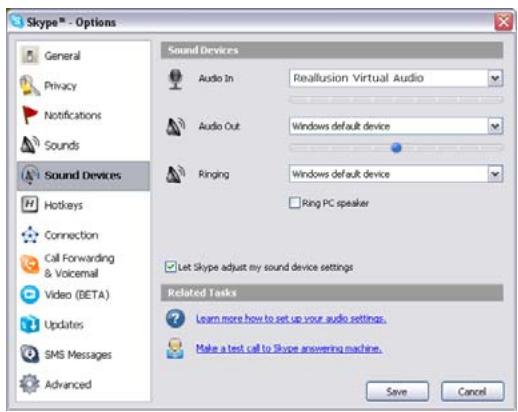
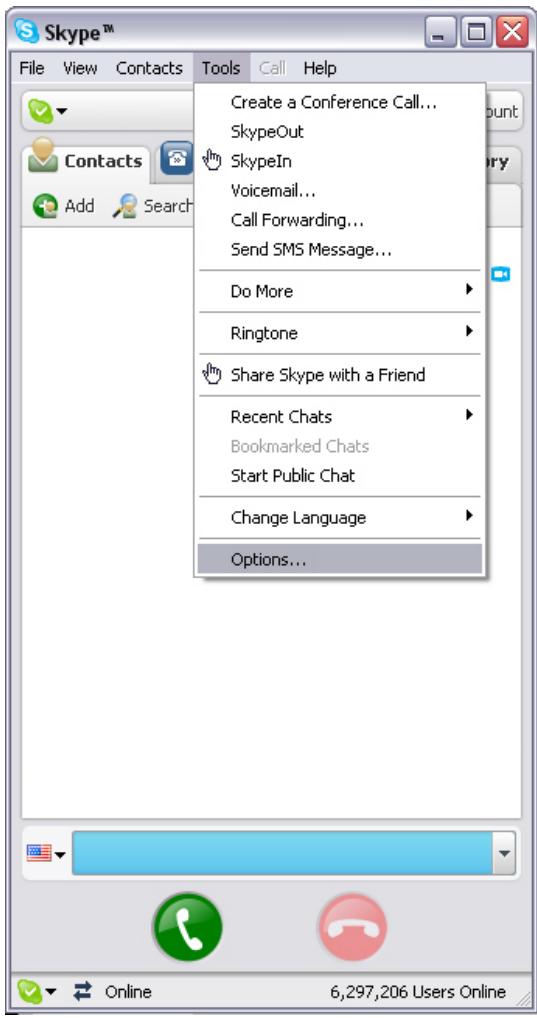
Take Skype 3.0 for instance, please invoke dialog box under Tools/Options. Set both the Audio In and the Video/Select webcam to Reallusion Virtual Audio and Reallusion Virtual Camera.
Facial Tracking
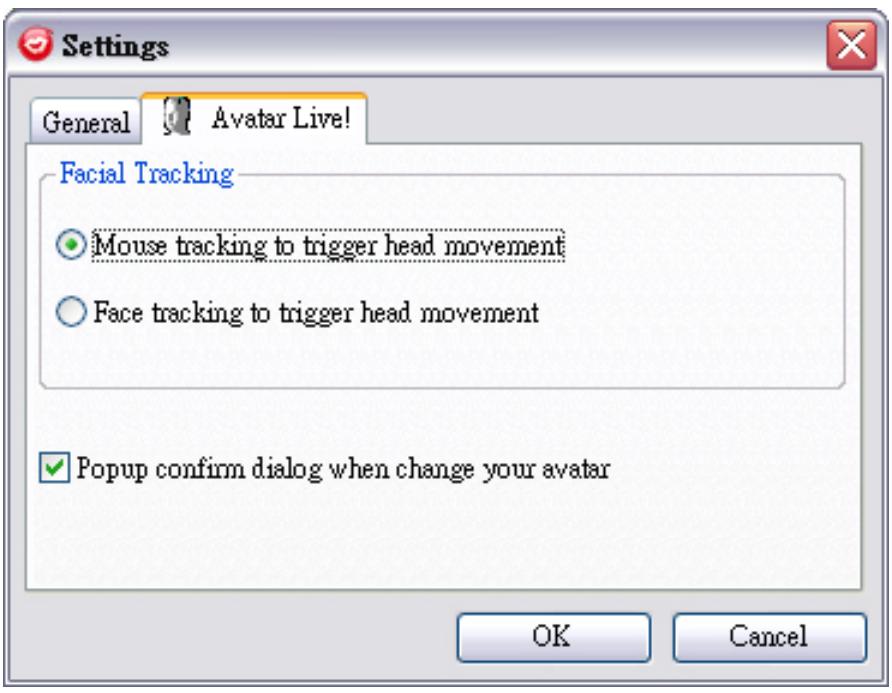
- Check Face/Mouse tracking to trigger head movement radio button so your avatar's head and eyes will track your head or mouse and move.
- Select Camera allows you to select your default camera. If you have multiple cameras installed on your PC, you need to select one of them.
- Check Popup confirm dialog when change your avatar checkbox and the confirm dialog will pop up while you change your avatar.
Set Devices
For connecting your messenger and CrazyTalk Cam Suite, the audio/video devices must be set manually. Take Skype for instance:
- Launch CrazyTalk Cam Suite before using IM applications.
- Make sure that you have already logged onto your instant-messaging application.
- Click Tools/Options... to open the option dialog box.
- Select the Sound Devices and set the Audio In to Reallusion Virtual Audio.
- Select the Video and set the Select webcam to Reallusion Virtual Camera.
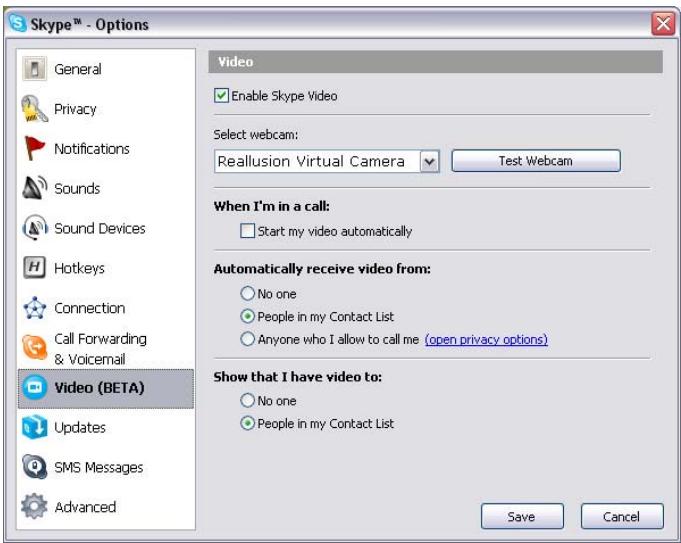
- Click Save button. Your messenger then receives its audio and video sources from CrazyTalk Cam Suite.
Trouble shooting for web camera
Q1: My computer cannot detect the web camera when connect an extended USB cable.
To resolve this problem:
- Connect the web camera directly to a USB port on your computer. Make sure the web camera is connected to the USB port at the back of your computer. Some USB ports at the front of computers may not supply sufficient power for your web camera.
Q2: Insufficient system resources reserved for the USB port, causing the system to be unable to function.
There are too many devices in the system, causing IRQ problems with the system's USB controller.
Do the following:
- Remove some USB devices from the system.
- Restart the system.
The computer reallocates resources.
Q3: The web camera does not light up or the computer restarts for no apparent reason.
You may have USB devices drawing too much power from your computer. This can happen especially when connecting USB devices to a passive or self-powered USB hub. A USB Hub Power Exceeded dialog box appears. Try the following:
- Connect the web camera directly to your computer's USB port.
- Use a USB hub with an external power supply.
- Symbol for Separate Collection in European Countries
- Slim 311R Features
- 1.SnapShot Button
- 2.Lens
- 3.Red-Infrared light
- 4.Microphone
- 5.Swivel and Clipping Base
- Installing the Slim 311R
- NOTE
- About Genius Application-WebCAM Mate
- Main Menu
- -Property page
- Settings
- Effect
- Zoom
- Picture Mode
- Video Mode
- Security Mode
- Using MSN Messenger, Yahoo Messenger, AOL
- MSN Messenger
- Yahoo Messenger
- AOL Instant Messenger
- CrazyTalk Avatar Creator Introduction
- Overview
- Getting Started
- Operating System
- Getting Started-Creating a CrazyTalkAvatar Creator Model
- To create a CrazyTalk Avatar Creator Model:
- Brush Tool:
- Getting Started-Creating a CrazyTalkAvatar Creator Script
- To create a Talking Message:
- Getting Started-Creating a CrazyTalkAvatar Creator Greeting Card
- Getting Started-Exporting Movie Files
- Tips and Suggestions Facial Fitting Tips
- Motion Settings
- - How can I make the eyes look more real?
- - How can I improve the mouth movements for a photo with an open mouth?
- CrazyTalk CamSuite Introduction
- CrazyTalk
- Cam Suite
- About the Interface
- Avatar Interface:
- MagiceMirror Interface:
- Avatar
- Selecting an Emotion
- Use one of the following steps to select the emotion applied to your avatar:
- Importing an Emotion
- To import new emotions:
- Click
- Add Emotions
- Selecting an Avatar
- Importing an Avatar
- To import new avatars, do the following steps:
- MagicMirror
- Using Face Morph
- To use the Face Morph features:
- Getting More Expressions
- Selecting a Comic Effect
- To use the Comic Effect features:
- Getting More Comic Effects
- Audio Control
- Facial Tracking
- Enable Facial Tracking:
- CrazyTalk Cam Suite allows you set the default status:
- - Click
- General Settings
- Set Devices
- Trouble shooting for web camera
- Q1: My computer cannot detect the web camera when connect an extended USB cable.
- Q2: Insufficient system resources reserved for the USB port, causing the system to be unable to function.
- Q3: The web camera does not light up or the computer restarts for no apparent reason.
Brand : GENIUS
Model : SLIM 311R
Category : Webcam